

Page 1
Pilot’s Guide
Manuel de pilotage
Pilotenhandbuch
Pilotenhandboek
Manual del Piloto
40-00-0099 Electrophonic Limited Edition available @ www.line6.com Rev B
Page 2

All product names referred to in this manual
are trademarks of their respective owners,
which are in no way associated or affiliated
with Line 6. These trademarks of other
manufacturers are used solely to identify
the products of those manufacturers whose
tones and sounds were studied during Line
6’s sound model development.
Page 3
You should read these Important Safety Instructions.
Keep these instructions in a safe place.
Before using your Spider III, carefully read the applicable items of these operating instructions and the safety suggestions.
1. Obey all warnings on the amp and in the Spider III Manual.
2. Connect only to AC power outlets rated 100-120V or 200-240V 47-63Hz (depending on voltage range of the unit; refer to back panel).
3. Do not perform service operations beyond those described in the Spider III Manual. Service is required when the apparatus has been
damaged in any way, such as:
• power-supply cord or plug is damaged
• liquid has been spilled or objects have fallen into the apparatus
• the unit has been exposed to rain or moisture
• the unit does not operate normally or changes in performance in a significant way
• the unit is dropped or the enclosure is damaged.
4. The bottom of the metal chassis can get hot during operation. Do not touch during operation or shortly after.
5. Do not place near heat sources, such as radiators, heat registers, or appliances which produce heat. Keep the rear of the unit at least
three inches from walls or other items that might block heat radiation.
6. Do not block any of the ventilation openings or use in an enclosed space.
7. Guard against objects or liquids entering the enclosure. Do not use or place unit near water.
8. Do not step on power cords. Do not place items on top of power cords so that they are pinched or leaned on. Pay particular attention
to the cord at the plug end and the point where it connects to the amp.
9. Unplug the amp when not in use for extended periods of time. Unplug the amp during lightning storms.
10. Clean only with a damp cloth.
11. Do not defeat the safety purpose of the grounding type plug. A grounding type plug has two blades and a third grounding prong.
The third prong is provided for your safety. When the provided plug does not fit into your outlet, consult an electrician for replacement
of the obsolete outlet.
12. Only use attachments/accessories specified by the manufacturer.
13. Prolonged listening at high volume levels may cause irreparable hearing loss and/or damage. Always be sure to practice “safe listening.”
Page 4
Line 6, Spider III, FBV, FBV Shortboard, FBV Express, FBV2 and Vetta are trademarks of Line 6, Inc.
All other product names, trademarks, and artists’ names are the property of their respective owners,
which are in no way associated or affiliated with Line 6. Product names, images, and artists’ names
are used solely to identify the products whose tones and sounds were studied during Line 6’s sound
model development for this product. The use of these products, trademarks, images, and artists’
names does not imply any cooperation or endorsement.
CAUTION: This equipment has been tested and found to comply with the limits for a Class B digital device pursuant to
Part 15 of FCC Rules. Operation is subject to the following two conditions: (1) This device may not cause harmful interference,
and (2) this device must accept any interference received, including interference that may cause undesired operation.
WARNING: To reduce the risk of fire or electric shock, do
not expose this appliance to rain or moisture.
CAUTION: To reduce the risk of fire or electric shock, do
not remove screws. No user-serviceable parts inside. Refer
servicing to qualified service personnel.
Spider III Pilot’s Guide © 2006, Line 6, Inc.
The exclamation point within a triangle means
“caution!” Please read the information next to
all caution signs.
The lightning symbol within a triangle means
“electrical caution!” It indicates the presence of
information about operating voltage and
potential risks of electrical shock.
This symbol within a triangle means “caution!
hot surface!” It is placed in areas that may become
too hot to touch when device is in operation.
Page 5
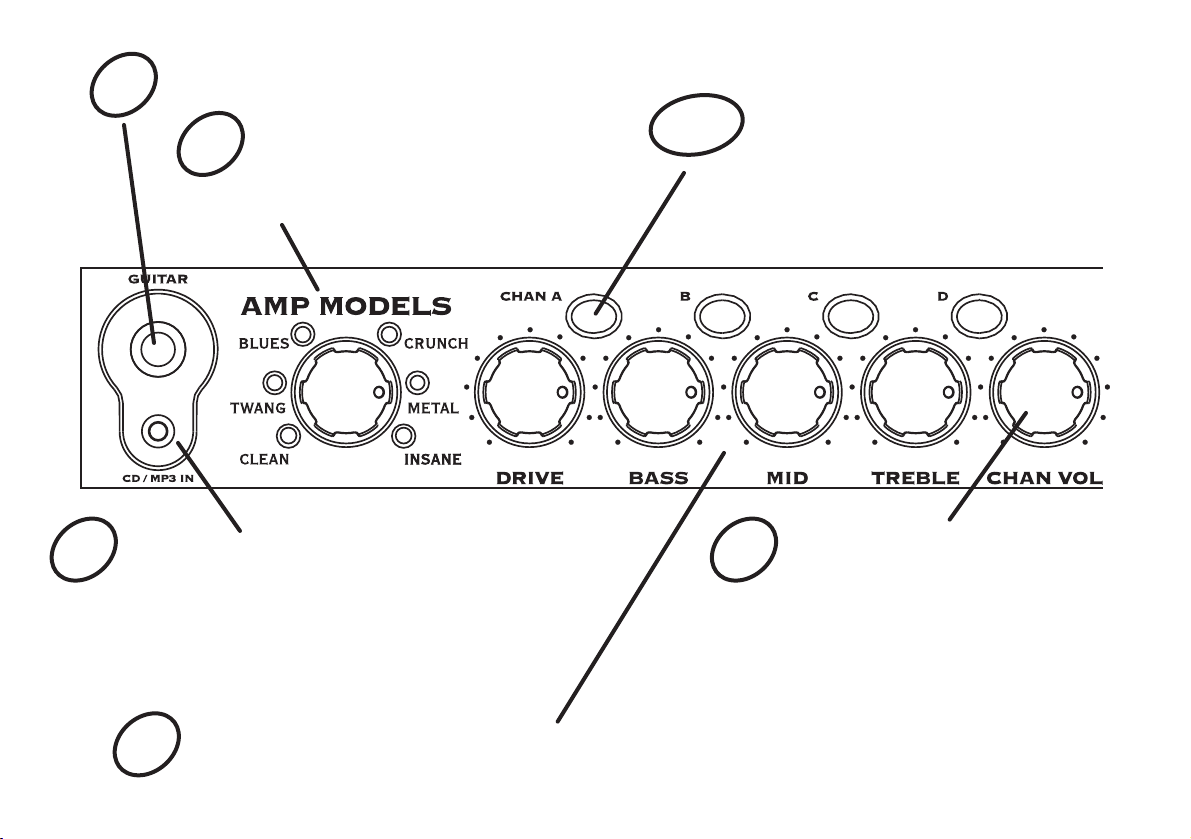
Plug In Here
1
Amp Models
Spin this knob to select one of twelve Amp
2
Models. All the other Spider III controls
will automatically be set to sound great
with that Amp Model, so you can just play!
11
Channel Memories
Four programmable channels come preloaded with great factory presets. These
buttons are also used when saving user
presets. See Saving for more information.
CD/MP3
Plug in any audio source and it feeds directly into the
3
Spider III’s speaker or headphones so you can jam
with your favorite music or drum machine. Use the
device’s output control to adjust its volume. Note:
Start with the volume on your device at it’s lowest
setting and bring it up to the volume you desire.
Tone Controls
Drive is like the volume or gain knob on other amps; controls how much “dirt” you get in your sound.
4
Bass, Mid, and Treble controls are customized for each Amp Model to give you optimal tonal control.
Channel Volume
This control helps you balance the
5
volumes of different amp-and-effect
setups that you store in your Spider
III’s channels. See 10 for the lowdown on channels.
Page 6

Foot Control & Headphone/Line Out
10
TAP: Tap on the TAP button a few times to set the delay time. Also Tap button extra functions.
9
Plug in an FBV2 foot switch to scroll through the 4 channels or connect a Line 6 FBV Shortboard controller
for channel switching, effects on/off control, wah/volume pedals, access to 32 more channel memories, a
chromatic tuner, and tap tempo for delays. Consider the FBV Express for channel switching, tap tempo,
wah/volume control and tuner capabilities. Listen in stereo with headphones, or use this as a direct out
for recording! (If you need a stereo out, use a 1/4” TRS stereo-to-dual mono Y-adaptor cable).
6
A B
Smart Control FX
Spin one of these knobs to get great FX, fast and
easy:
Knob A picks chorus/flange, phaser or tremolo,
with a range of settings – from subtle to
overpowering – for each effect. The LED shows
the active effect.
Knob B picks delay, tape echo or sweep echo, with
a range of mix settings from low to high. The LED
shows the active effect and flashes the delay time.
Tap the TAP button to change the delay time.
Master Volume
8
7
You can choose the
overall volume of
the amplifier,
without affecting
your tone.
Reverb
Dial up more or
less virtual room.
12
Navigator & Channel Display
Navigate up and down to go
through the various banks of
presets (user, artist based, song
based). Navigate left and right to
select from different sounds in each
of those banks. The display will
indicate which preset you have
selected both alphanumerically
(e.g. 01A, 60S) and by name (e.g.
Crunchzilla).
Page 7

Welcome The Spider III...
Thank you for inviting Spider III home with you. This
amp mines the tonal heritage of the past forty years of
guitar amplifier design and matches it up with the kind
of digital signal processing magic that will still be ahead
of its time ten years from now.
Presets
Your new Spider III amplifier comes with a whopping
36 user presets and over 400 artist and song based
presets that can be accessed through the Navigator.
User Presets are loaded with a good variety of great
tones but are ready for you to tweak and leave your
own musical imprint on. See Saving for more
information. User presets are in Banks 1-9. Each bank
contains 4 tones, ABCD on the display and will light
the corresponding ABCD button on the front of the
amp.
The Artist Presets were dialed in by a team of insane
guitar slinging rock stars that cover a great range of
styles. We sent an amp to each of them to create a
bank of inspiring tone. Some chose to capture the tone
of their records, some explored the insane range of
tonal possibility that Spider III offers – whatever the
outcome, their work is at your disposal and is organized
into banks by artist name. It is as if they came to your
home and helped you dial in your amp.
Song Based Presets are based on the top 200 guitar
rock songs of all time. These sounds are organized into
banks by genre.
Page 8

Amp Model Details
Green LED - This Amp Model is based on a number
of vintage tweed amps. We evaluated a ’53 Fender
tweed Deluxe, ’58 Fender tweed Bassman and a ’60
Clean
Red LED - Select this Amp Model and adjust the tone
Gibson Explorer to create a swingin’ Rockabilly tone.
Add some reverb and a slap echo and Be-bop-alu-la!
controls to get crisp, amazing clean tones, great warm
jazz tones, and all the high-end shimmer you’ll need
with a generous amount of bottom end to boot. Then
dial up a little chorus and delay to get the ultimate
clean sound!
Green LED - We developed this Amp Model to emulate
those late 60’s and early 70’s clean tones. It started off
as an Amp Model based on a 1973 Hiwatt custom
100. We extended the tone control range and tightened
up the low end. Hit an open A chord and let that big
sweet tone ring!
Blues
Red LED - What would happen if we based a model
on three helpings of ’65 Marshall JTM-45, one scoop
of ’58 Fender Bassman, a schmeer of ’63 Fender
Vibroverb and a dash of Supro for good measure? The
biggest, fattest down home Blues amp ever heard. This
Amp Model slides between gritty swamp-infected
cleans to syrupy smooth, walloping drive tones. It’s
time to get down and dirty!
Green LED - Ready, steady....GO! This Amp Model
is based on a fawn Vox AC-30 amplifier with an
Twang
Red LED - This Amp Model draws on our analysis of
mid 60’s Fender amps, including the blackface ’65
updated and expanded tone control circuit. We wanted
to capture that early British pop rock tone that the
Beatles and the Stones are so well known for.
Twin Reverb and blackface ’64 Deluxe Reverb. We
wanted an Amp Model that has that classic glassy high
end tone, with some snap and bite for some serious
chick’n pick’n. Things don’t get too crunchy until
reaching the top range of the Drive knob.
*All product names are trademarks of their respective owners, which are in no way associated or affiliated with Line 6.
These product names, descriptions and images are provided for the sole purpose of identifying the specific products that
were studied during Line 6’s sound model development. HIWATT® is a registered trademark of Fernandes Company Ltd.
MARSHALL® is a registered trademark of Marshall Amplification PLC. FENDER®, TWIN REVERB
and BASSMAN are registered trademarks of Fender Musical Instruments Corporation. VOX® is a registered trademark
of Korg Europe Limited.
®
, DELUXE REVERB
®
Page 9

Crunch
Red LED - This sound was crafted during our studies
of the '68 Marshall Plexi 50 Watt. This type of Marshall
amp was used by a number of early metal bands. Check
out albums like British Steel, Number of the Beast and
Black Out. Crunch provides a wider range of tone
control settings than the original Marshall amp had.
This Amp Model will allow you to bump up the mids
even at the highest Drive settings.
Green LED - Plexi On Fire! This Amp Model is based
on a ‘68 Marshall Plexi 100 watt with a few added
extras; The combination of a Variac and the jumpered
input channels creates that infamous brown sound
that will feel like flames are shooting out the input
jack! “Come on Dave… Give me a break!”
Metal
Red LED - This Amp Model is based on the Mesa
Dual Rectifier. For Spider III, we made careful
enhancements to this classic tone. The resulting Amp
Model has a definite modern flavor. This monster
truck of tone delivers a tight bottom end that’s big,
powerful, tight and fast. Use this Amp Model to get
a tight and punchy, high gain Metal sound.
Green LED - This sound was created to be an aggressive
high gain Amp Model with a unique Mid control that
will sweep though an entire spectrum of tone on one
knob. The Mid knob for this Amp Model changes the
character of the distortion. When set to minimum,
the distortion exhibits Fuzz pedal characteristics. When
the Mid is set to noon, it mimics the creamy modern
high gain amp tones. And when the Mid knob is
turned up to max, it’s very much reminiscent of that
Class A sound. Of course, then there are all the places
in-between...
Insane
Red LED - This model is our “dialed in for shredding”
version of the Mesa Dual Rectifier red channel. It
combines the intensity and impact of Metal Red, but
delivers more midrange and teeth for that bonecrushing, brain piercing insane grind.
Green LED - Our goal with Insane was to provide you
with as much input gain distortion as possible short of
complete meltdown. You get an obscene helping of
distortion, while still retaining tonal definition and
character. As a result, you get way more bottom end
and cabinet character than other small amps. Crank
up the Drive control and prepare to dominate!
*All product names are trademarks of their respective owners, which are in no way associated or affiliated with Line 6.
These product names, descriptions and images are provided for the sole purpose of identifying the specific products that
were studied during Line 6’s sound model development. MARSHALL® is a registered trademark of Marshall Amplification
PLC. MESA/BOOGIE® and RECTIFIER® are registered trademarks of Mesa/Boogie, Limited.
Page 10

Smart Control FX:
Great amp tone is only part of a great guitar sound.
Effect processing – whether it’s stomp boxes or rack
gear – is also a big part of the story. Your Spider III
packs the power of several of these tone shapers in its
Smart Control FX section.
The delay knob gives you a trio of delay effect choices:
a standard delay, tape echo, and a sweep echo. The
modulation effect knob lets you choose between
chorus/flange, phaser, and tremolo, and for each of
these effects you can choose anything from a subtle
hint of processing to total tone-mangling overkill.
While turning the knob, Spider III adjusts all the
individual aspects of the effect automatically to give
you the range of sounds you're looking for, without
having to mess with multiple knobs and switches to
get your tone. So you can spend your time making
music instead.
you hold down the Tap Tempo button, you can use
some of Spider III’s knobs to access these extra features.
Tuner Mode
Press and hold the TAP button or TAP footswitch for
2 seconds or more and you get instant digital tuner.
The volume is muted during tuning so you won’t hear
anything coming out of the amp. Press any button to
exit Tuner Mode. If there is no FBV Shortboard
connected, the LCD on the front panel of the Spider
III will work as the tuner display.
IN TUNENOTE
Tap Button “Extra” Functions
The Tap Tempo button, in addition to setting the
speed of your delay effects, also lets you access a few
extra Spider III features: a Tuner, Distortion Boost and
a built-in Noise Gate (the tuner and the boost are also
accessible via the optional FBV Shortboard). When
FLAT SHARP
Page 11

Distortion Boost
Press and hold the Tap button as you turn the Drive
knob up past twelve o’clock. As you do this, Spider
III’s Channel A LED comes on. This gives the kind of
extra ‘dirt’ that you’d expect from a Distortion pedal
with the distortion control set low and the output
control set high. It boosts your guitar signal before it
reaches the Amp Model, so that you hit the model
harder and get a more distorted sound. Enabling this
is the same as kicking on Stomp on the FBV
Shortboard.
Noise Gate
Press and hold Tap as you turn the Reverb knob up
past twelve o’clock, and you turn on a built-in Noise
Gate, which helps to cut down on hiss and noise.
When you do this, the Channel D LED comes on to
indicate that the Gate is on.
Saving
Once you’ve dialed up your own killer sound you’re
probably going to want to save it so you can get to it
another time. To prepare for saving, it’s a good idea
to browse through the various factory-stored user preset
sounds to decide which user preset you can live without.
Make a note of its Bank number and Channel letter
so you can save your new tone there instead.
To save from a User Preset (Banks 1 thru 9) press and
hold the lit channel memory button for 1 second. The
LED will start to blink. You may wish to keep the same
name or you can use the Navigator to name your patch.
Press left and right to select the cursor position and
up and down to select a letter, number or character.
When you have the name you want press left until
the cursor is under the bank number and then press
up or down to select the bank you would like to save
within. To complete a Save operation, press the ABCD
button you wish to save to.
When you select an Artist or Song Based Preset, the
ABCD channel LEDs will turn off to indicate that you
have recalled a factory preset. If you’d like to copy this
preset to a user location (banks 1-9), press and hold
any of the ABCD buttons for 1 second. One of the
LEDs will blink, and then follow the same instructions
as saving from a User Preset.
Page 12

Special Hidden Functions
When you select an Amp Model, Spider III
automatically sets its tone controls and effects to match
that Amp Model. You can disable the auto-FX selection
(but not tone control auto-selection) by powering up
Spider III with the Channel D button held. The autoselection is re-enabled next time you power up.
Want to know where your Spider III's controls are set
in the programmed channels? Hold – and keep holding
– the Tap button. Now, before you do anything else,
turn the Amp Models knob. This activates Spider III's
"Compare" mode. Now turn any knob other than Amp
Model and Master Volume, and the channel lights
will tell you whether you need to turn that knob up
(Channel A lights) or down (Channel D lights) to
match the stored setting. The Channel B & C lights
will be lit at the same time once the knob position
matches the stored setting exactly.
You can reset your Spider III’s programmable channels
to their factory-programmed states by holding down
the Channel A button as you turn on the power.
Warning: This will erase ALL custom sounds you
might have created. Ask yourself, “Do I really want to
do this?” If your answer is yes, then go for it!
Page 13

Using Your Feet
The FBV series of foot controllers includes the original FBV—with its extensive effects controls for the Line 6
Vetta amps—and the more-compact FBV Shortboard, which includes all the controls needed for the Spider III.
Also available are the FBV Express for channel switching and tap and FBV2 for channel scroll. Note that the
Line 6 Floor Board and FB4 foot controllers will not work with Spider III.
FBV footcontrollers come with an included RJ-45 cable. Connect this cable between the front panel of the Spider
III and the side of the FBV. If you ever need a replacement cable, look for a Category 5, 10 Base-T or RJ-45 cable
with male connectors on both ends. These can be found at almost any computer supply retailer.
FBV2
1. The FBV2 functions as a two button channel scroll foot switch. This foot switch allows you to scroll through
the 4 channels (the A,B,C & D buttons) of your Spider III.
Page 14

FBV Express
1. Channel A, B, C & D: Select from the four Channel
Memories. You can also use your active channel to
change your Tap Tempo setting. Just Tap the channel
button twice to the drummer’s beat and presto - you’re
locked in!
2. FBV Pedal: Press the pedal forward to click the
toe-switch, turning the pedal from Volume to Wah.
3. Wah and Volume Lights: These light to show
that a pedal is ready to control Wah or Volume. Note:
Press the pedal fully forward to click the toe-switch,
switching the pedal to control Wah or Volume.
Using your FBV Express Tuner
PRESS & HOLD
UNTIL DISPLAY SHOWS
FLAT SHARPIN TUNE
NOTE
FLAT
DONE TUNING?
PRESS ANY OF THE A,B,C OR D FOOTSWITCHES
Page 15

Page 16

FBV Shortboard
1. Channel A, B, C & D: Select from the four Channel
Memories. Note: On the FBV Express, you can also
use your active channel to change your Tap Tempo
setting. Just Tap the channel button twice to the
drummer’s beat and presto - you’re locked in!
2. Bank Up - Bank Down: The FBV Shortboard
gives you 9 banks of 4 channels each. Bank 1 is the
same 4 memories you get from the Spider III front
panel A,B,C,D buttons when no FBV is connected.
3. STOMP/MOD/DELAY/REVERB: You guessed
it! These switch the Spider III effects MOD, DELAY
and REVERB on and off kinda like they were stomp
boxes on a pedal board. STOMP engages the
DISTORTION BOOST (see Tap Button extra
functions)
4. Tap/Tuner: Tap a couple beats to set the tempo.
Or press and hold this switch until you see the tuner
on the pedal’s display. Press it again to exit tuner mode.
5. Wah and Volume Lights: These light to show
that a pedal is ready to control Wah or Volume. Note:
Pressing the pedal fully forward to click the toe-switch
selects its control between Wah or Volume. If a separate
expression pedal is connected to the Shortboard’s rear
panel 1/4-inch jack, the Shortboard pedal controls
Wah only, with the toe switch toggling the Wah on/off.
6. External Pedal Jack: You can connect an
expression pedal (such as the Line 6 EX-1) to the
Shortboard’s rear panel 1/4-inch jack, and the
connected pedal will control Volume, while the
Shortboard pedal controls Wah only.
7. FBV Pedal: Press the pedal forward to click the
toe-switch, turning the pedal from Volume to Wah.
Saving with FBV Shortboard: To prepare for saving,
it’s a good idea to browse through the various factorystored preset sounds to decide which you can do
without. Make a note of their Bank number and
Channel letter so you can save your own sounds there
instead.
Save: Step on the FX LOOP switch until “NAME
EDIT” is displayed. The Shortboard’s COMP and
MOD switches then select one of the characters of
the channel name so you can edit it. The DELAY and
REVERB switches choose from the available letters,
numbers and symbols. The Bank Up and Bank Down
switches then pick a Bank you’d like to save within.
Complete the Save: Press the A, B, C or D switch
to store to that Channel Memory in the chosen Bank.
The display will show “SAVING”. Congratulations,
you’re all done!
 Loading...