

Page 1

Page 2

Pilot’s Guide
Manuel de pilotage
Pilotenhandbuch
Pilotenhandboek
Manual del Piloto
An in-depth exploration of the technologies and
pulsing tonal pleasures of Floor POD Plus.
®
Electrophonic Limited Edition available @ www.line6.com/manuals
40-00-0116 Rev A
Page 3

Page 4
The serial number can be found on the bottom of your Floor POD Plus. It’s the number that begins
with “(21)”. Please note it here for future reference:
SERIAL NO:
WARNING: To reduce the risk of fire or
electric shock, do not expose this appliance to
rain or moisture.
CAUTION: To reduce the risk of fire or electric shock,
do not remove screws. No user-serviceable parts inside. Refer
servicing to qualified service personnel.
CAUTION: This equipment has been tested and found to comply with the limits for a Class B digital device
pursuant to Part 15 of FCC Rules. Operation is subject to the following two conditions: (1) This device may not cause
harmful interference, and (2) this device must accept any interference received, including interference that may cause
undesired operation.
The lightning symbol within a triangle means
“electrical caution!” It indicates the presence
of information about operating voltage and
potential risks of electrical shock.
The exclamation point within a triangle
means “caution!” Please read the
information next to all caution signs.
You should read these Important Safety Instructions
Keep these instructions in a safe place
Before using your Floor POD Plus, carefully read the applicable items of these operating instructions and
safety suggestions:
1. Obey all warnings on the Floor POD Plus and in this Basic Features Guide.
2. Do not place near heat sources, such as radiators, heat registers, or appliances which produce heat.
3. Guard against objects or liquids entering the enclosure.
4. Connect only to AC power outlets rated 100-120V or 230V 47-63Hz (depending on the voltage range
of the included power supply).
5. Do not step on power cords. Do not place items on top of power cords so that they are pinched or leaned
on. Pay particular attention to the cord at the plug end and the point where it connects to the unit.
6. Unplug your Floor POD Plus when not in use for extended periods of time.
7. Do not perform service operations beyond those described in this Basic Features Guide. In the following
circumstances, repairs should be performed only by qualified service personnel:
• liquid is spilled into the unit
• an object falls into the unit
• the unit does not operate normally or changes in performance in a significant way
• the unit is dropped or the enclosure is damaged
8. Prolonged listening at high volume levels may cause irreparable hearing loss and/or damage. Always be
sure to practice “safe listening.”
Floor POD Plus Pilot’s Guide © 2007, Line 6, Inc.
Page 5

Please Note:
Line 6 and POD are trademarks of Line 6, Inc. All
product names, trademarks, and artist names are the
property of their respective owners, which are in no
way associated or affiliated with Line 6. Product names,
images, and artist names are used solely to identify
the products whose tones and sounds were studied
during Line 6’s sound model development. The use of
these products, trademarks, images and names does
not imply any cooperation or endorsement.
Page 6
Controls & ConneCtions
Controls & Connections
1•1
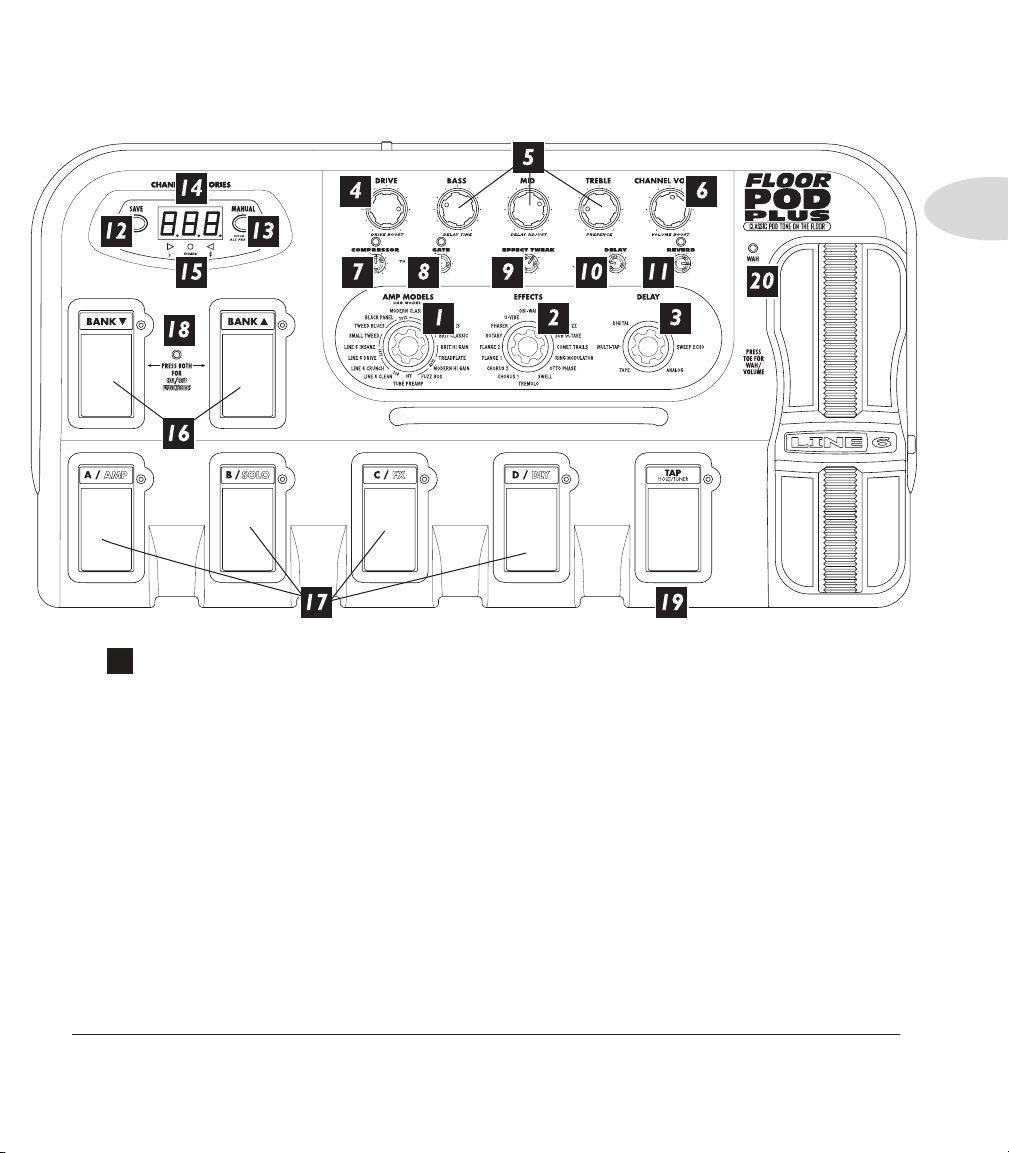
1
Amp Models – This knob selects one of 32 Amp Models originally from the
famous Line 6 POD 2.0. There are two Models for each category silk-screened around the
knob, for example, Black Panel has two Models, one indicated by a Red light and one by
a Green light. Refer to Chapter 2 for a detailed listing of each Model.
When you choose an Amp Model, a Cabinet Model is also loaded automatically. For
example, when you choose the Brit Hi Gain Model (based on* the Marshall® JCM 800),
a Cabinet Model based on* a Marshall® 4x12 will be loaded too. You can mix ’n’ match
different cabs by pressing in the Amp Models knob, holding it down, and spinning it to
select a different cabinet. You can also select a different cabinet by holding the Manual
button and turning the Amp Models knob. Chapter 2 lists cabinet options.
The Amp Models button also acts as a “shift” key – press and hold to access secondary
functions on many controls.
* All product names are trademarks of their respective owners, which are in no way associated or affiliated with Line 6.
These product names, descriptions and images are provided for the sole purpose of identifying the specific products that were
studied during Line 6’s sound model development. MARSHALL® is a registered trademark of Marshall Amplification Plc.
Page 7

Controls & Connections
2
Effects – This knob selects one of 16 different Effect Models. From standard chorus
and flange effects to the more unique Comet Trails and Ring Modulator, you’ll find a
diverse variety to meet your needs. Red lights around the knob show your effects selection.
See Chapter 3 for details.
1•2
3
Delay – The Delay knob selects one of 6 different Delay effects; Tape, Multi-Tap,
Digital, Reverse, Sweep Echo, and Analog. Red lights around the knob show your delay
selection. See Chapter 3 for details.
4
Drive – This knob controls how hard you’re driving the input of a chosen Amp
Model, and just like the input volume control on a non-master volume guitar amp, higher
settings give you more “dirt.”
Drive Boost can be turned on by holding down the Manual button or Amp Models
knob and turning the Drive knob past twelve o’clock. This will give you the kind of extra
“dirt” that you’d expect from a distortion pedal with the distortion control set low and the
output control set high. It boosts your guitar signal before it reaches the Amp Model so
you hit the Model harder and get a dirtier sound.
5
Tone Controls – From left to right we have Bass, Mid, and Treble just
like a regular guitar amp, except that when you change Amp Models, the response and
interactivity of the controls changes too. For example, when you select Black Panel the
tone controls operate like the original amp that Model was based on*, the Fender® Deluxe
Reverb®.
A Presence bump, which brightens your tone, can be switched on and off when you hold
the Manual button or Amp Models knob and turn the Treble knob; fully left and the
Presence is off, while fully right sets the Presence on.
You can adjust Delay Time and Delay Adjust by holding down the Manual button or
Amp Models knob and turning the Bass and Mid knobs, respectively. See Chapter 3 for
details.
6
Channel Volume – This knob controls the relative volume level of the
“channel” you are playing through. Use this to balance levels between the sounds you
store in two different Floor POD Plus Channel Memory locations. In general, you want
to set the Channel Volume as high as possible to ensure you’re getting the best signal-to-
noise ratio.
* All product names are trademarks of their respective owners, which are in no way associated or affiliated with Line 6.
These product names, descriptions and images are provided for the sole purpose of identifying the specific products that were
studied during Line 6’s sound model development. FENDER® and DELUXE REVERB® are registered trademarks of
Fender Musical Instruments Corporation.
Page 8

Controls & Connections
You can access a Volume Boost by holding down the Manual button or Amp Models
knob and turning the Channel Volume knob past twelve o’clock. This boosts volume
without any extra “dirt”. Useful for a lead boost.
7
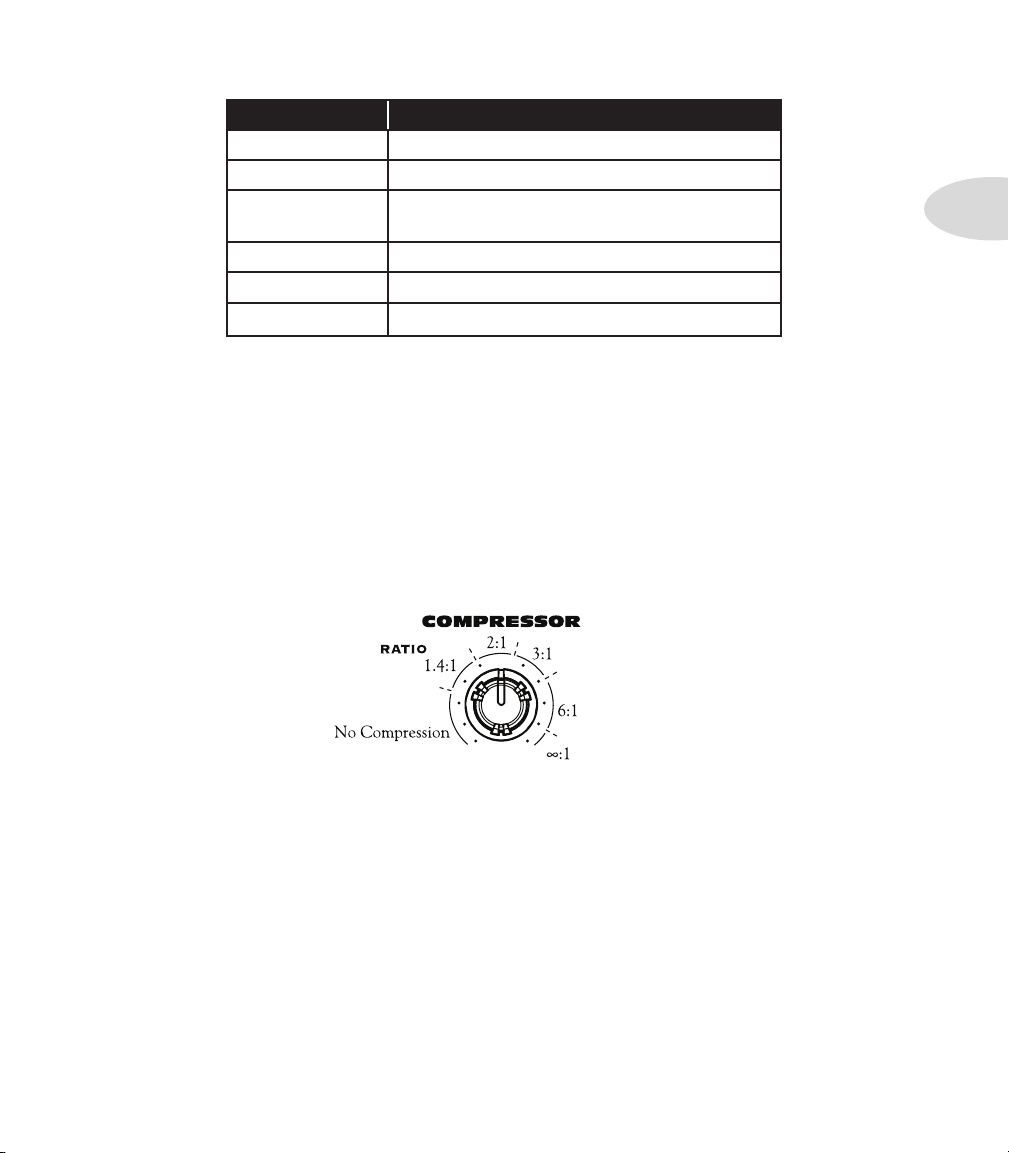
Compressor – This knob is the sole control for the Compressor. Turn it all
the way to the left for “off” (the Compressor light turns off). Turning the knob from left
to right gives you increasing Compression Ratio or amounts of compression. The state
of this knob, for example off or full max, is stored with each Channel Memory when the
Save button is pressed. See Chapter 3 for more info.
8
Gate – This knob controls the Noise Gate. Turn it all the way counterclockwise
for “off” which is indicated when the Gate light turns off. Turning the knob from left to
right gives you increasing amounts of gating. Press and hold the Manual button or Amp
Models knob and turn this knob to adjust Gate Decay. The state of this knob is stored
with each channel memory when the Save button is pressed. See Chapter 3 for more
info.
9
Effect Tweak – This knob selects the Amount of whatever effect is selected; left
for min and right for max. Press and hold the Manual button or Amp Models knob while
turning this knob to Adjust various secondary parameters for each effect. See Chapter 3
for more info.
1•3
10
Delay – This knob sets the mix level of the Delay; left for min and right for max.
Press and hold the Manual button or Amp Models knob while turning this knob to
adjust Delay Feedback. See Chapter 3 for more info.
11
Reverb – This knob controls the reverb; left for off and clockwise for maximum
reverb. The light above the knob is on if the reverb is on. Press and hold the Manual
button or Amp Models knob while turning this knob to adjust Reverb Decay. See
Chapter 3 for more info.
12
Save – When you want to store your own tweaked up sounds, press this button.
More info on how to save can be found in Chapter 4.
13
Manual – Press this button once to enter Manual Mode. In this mode, the sound
of the Floor POD Plus always reflects the knob settings. Move knobs around to change
sounds. This button also acts as a “shift” key – press and hold while turning a knob to
access the secondary functions labeled for many controls.
14
Channel Memories – Displays the selected Channel Memory from 1A-
Page 9

Controls & Connections
31D. Each Channel Memory is a complete preset of the Amp and Effects Model settings.
15
Tuner Lights – The middle light illuminates when the tuner is on (activated by
pressing and holding the Tap footswitch). The note you’re playing is shown in the display
1•4
while the corresponding flat or sharp lights are lit. All three lights will be lit when you are
in tune.
16
Bank Up/Down – These footswitches select banks 1-31. To scroll through
banks quickly, hold a footswitch down until you get to the bank you want. Press both
footswitches together to choose modes as we’re about to describe...
17
Footswitches A-D – There are two footswitch modes; Channel Memory
and On/Off. To toggle between modes press both bank up and down simultaneously.
Channel Memory Mode: In this mode Bank Up and Bank Down selects a bank
•
while Footswitches A-D select a Channel Memory within that bank. In this mode,
the footswitch lights will illuminate Red when the footswitch is pressed.
On/Off Mode: This mode lets you to turn effects or the Amp Model on and off with
•
your feet. Footswitches A-D now turn on and off the Amp Model, Solo boost, FX,
and Delay respectively. In this mode, the footswitch lights will illuminate Green to
indicate the On state of each function.
18
On/Off Functions Light – Lights when On/Off mode is active.
19
Tap/Hold For Tuner – Tap this footswitch a couple of times and the delay
speed will match the speed you tapped. The light will blink at the current delay rate. Even
if delay is off, you can still tap to set the delay rate. When you turn delay back on, the delay
will be ready to rock at the new rate.
Press and hold this footswitch for more than 2 seconds to activate the tuner. Press again to
exit tuner mode. See Chapter 4 for details.
20
Pedal and Wah Light – The onboard pedal can control volume and wah.
When operating the pedal, you can press hard with your toe at the top of the pedal and the
wah – as well as the wah lights to the left of the pedal – will switch on and off.
Note that some Amp Model selections place the volume pedal before the Amp Model
(Pre) while some place the volume pedal after the Amp Model (Post). See Appendix A
for the breakdown.
Page 10
Controls & Connections
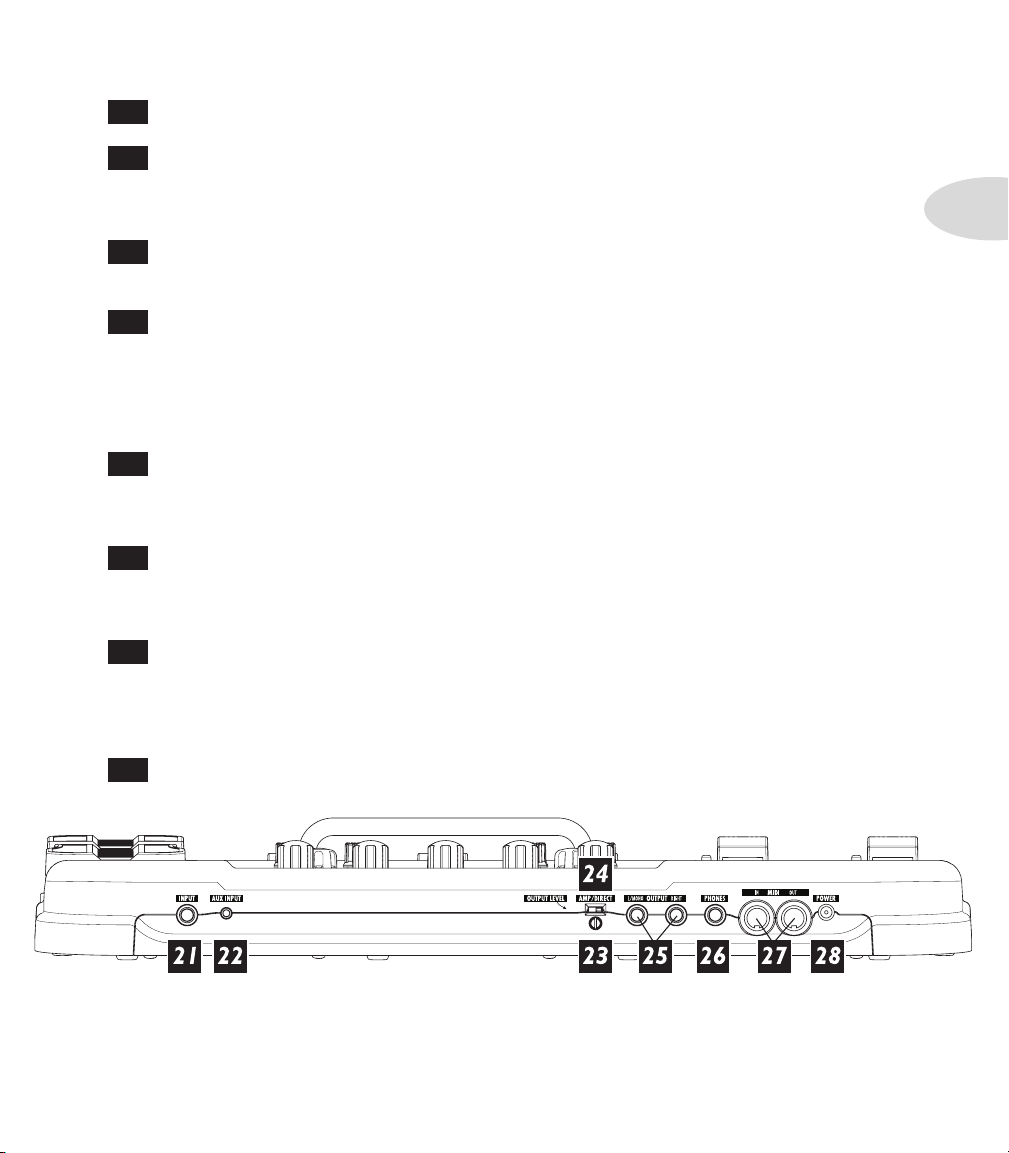
21
Input – Dude, plug in here.
22
Aux Input – This is where you plug the output of your CD or MP3 player into
Floor POD Plus so you can jam along to your favorite tunes. To balance the music with
your guitar you’ll need to adjust the output volume on your CD player or MP3 player.
23
Output Level – Controls the overall level of the Left and Right Output as well
as the level of the headphones.
24
Amp/Direct – Set this switch to Direct when connecting Floor POD Plus
directly to recording equipment, a mixing board, etc. This activates Line 6’s acclaimed
A.I.R. (Acoustically Integrated Recording) technology with advanced speaker-microphone-
room tone simulation. Set this switch to Amp when plugging Floor POD Plus into the
front of your guitar amp. This defeats the A.I.R. processing.
25
Left and Right Outputs – OK, this should be easy. Use the Left Output
for a mono output to your amp or recording device. Use both left and right for your stereo
output to either two amplifiers or a stereo input on your recording device.
26
Phones – This jack was designed for 1/4-inch phones. Make sure you turn the
Output Level down all the way and then slowly turn it up to adjust the listening level of
your headphones. Yes, you can use 1/8-inch phones with an adapter, too.
1•5
27
MIDI In & Out – Connect Floor POD Plus to your MIDI equipment to select
Channel Memories (via Program Change messages), automate settings (via Continuous
Controller messages) and back up your tones (via SysEx). All the details are online at
www.line6.com/manuals, in the downloadable MIDI Reference document.
28
Power – Please only use the Line 6 power supply that came with your unit.
Thanks.
Page 11

Modeled AMps & CAbs
Modeled Amps & Cabs
Which Amps and Cabs Are Modeled?
There are 32 Amp Models living within your Floor POD Plus and 16 Cab Model selections.
The following is a list of all Amp Models and Cabinet Models available, along with a
description of the original equipment that inspired them. See Appendix A for a summary.
Line 6 Clean
RED: “Line 6 Clean”. To create this Amp Model, we essentially grafted the crisp top end
of a solid state amp to a rich, satisfying tube amp-style bottom.
GREEN: “Line 6 Twang”. Glassy high end, plus the snap and bite of a vintage tube amp.
Things don’t really get too crunchy until you get to the top range of the Drive knob.
Line 6 Crunch
RED: “Line 6 Crunch”. Our “boutique” sound. Not too clean, but not too raging. Great for
modern blues or jazz, this sound should be like a fine cognac, smooth and warm going down,
but with a nice kick. The Mid control is located before the Amp Model’s Drive, but the
Bass and Treble controls are placed after the Drive for maximum range.
GREEN: “Line 6 Crunch #2”. Looking for a 50 watt tube head tone with better EQ?
Scoop out the mids even at high drive settings.
Line 6 Drive
RED: “Line 6 Drive”. Our version of the modern, super-saturated, high gain, lead amp;
smooth, yet biting. All the tone controls here are post-Amp Model for maximum control
with minimum muddiness. It’s like playing through a collection of amps simultaneously
– a studio technique that has made possible some of the greatest guitar tones of modern
recordings.
GREEN: “Line 6 Blues”. This tone is based on* the ’65 Marshall® JTM-45 Bluesbreaker
but incorporates wider range tone controls. Once you get into higher Drive settings, this
Amp Model begins to transition into a variant of the Budda Twinmaster (a high end boutique
amp) for sweeter overdrive tonality.
2•1
* All product names are trademarks of their respective owners, which are in no way associated or affiliated with Line 6.
These product names, descriptions and images are provided for the sole purpose of identifying the specific products that were
studied during Line 6’s sound model development. MARSHALL® is a registered trademark of Marshall Amplification,
Plc.
Page 12
Modeled Amps & Cabs
Line 6 Insane
RED: “Line 6 Insane”. Our goal here was to provide you with as much input gain distortion
as possible short of complete meltdown. You get ridiculous, rich tube drive to shame the
distortion of pretty much any amp on the planet while still retaining tonal definition and
2•2
character. As a result, you get lots of bottom end and cabinet character with tons of wideranging tone shaping. Crank up the Drive control and take no prisoners!
GREEN: “Line 6 Layer”. Line 6 Clean meets Line 6 Drive. As we’ve already mentioned,
many guitarists and producers have experimented with running multiple amps simultaneously,
with each amp making a contribution to the overall tone. The Drive knob acts as a blender
control – fully left you’ve got big bottom 21st Century Clean, and fully right you’ve got
paint-peeling ultra-drive. Set it anywhere in between, and you get to have your cake and
smear it all over your audience, too.
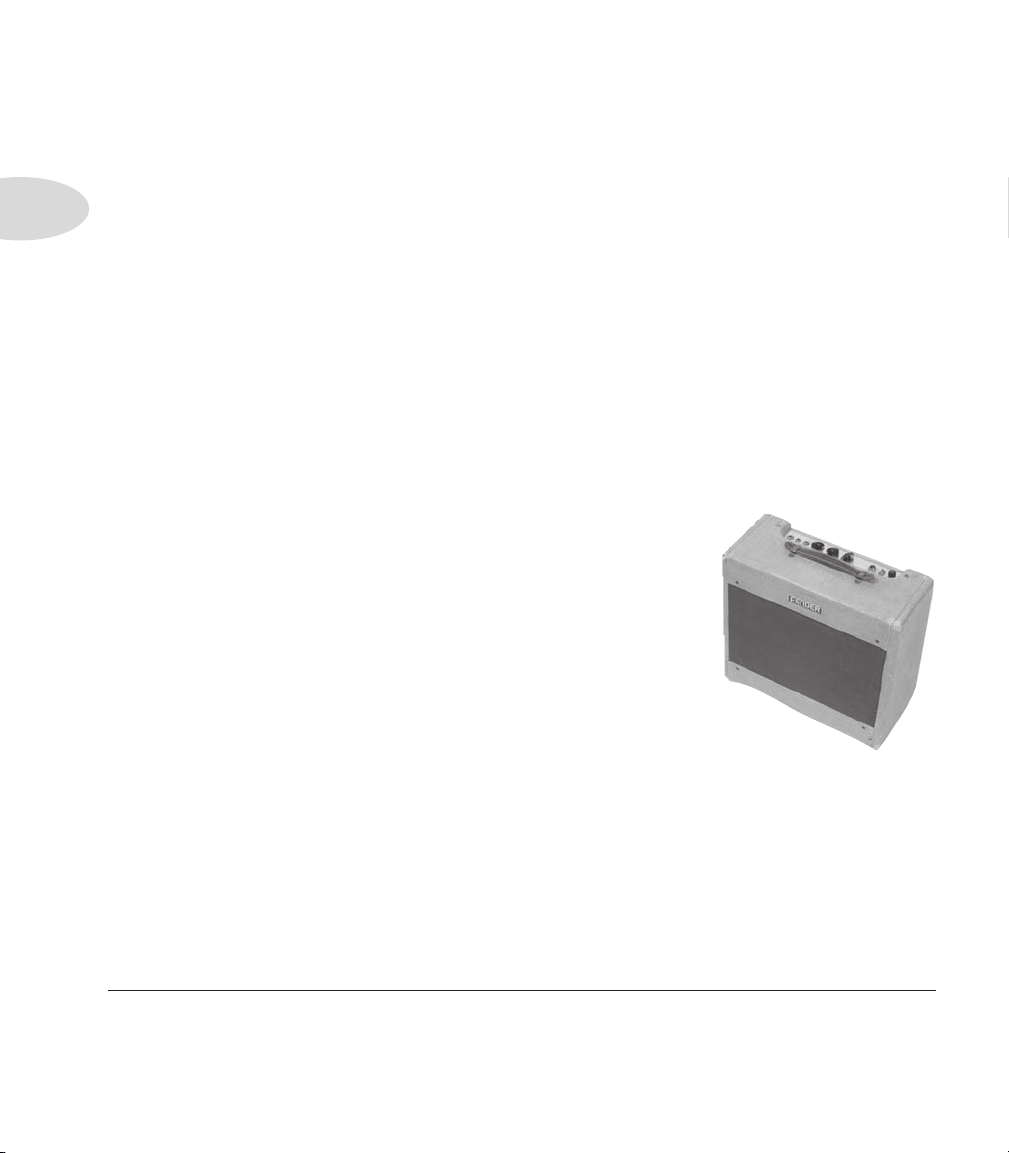
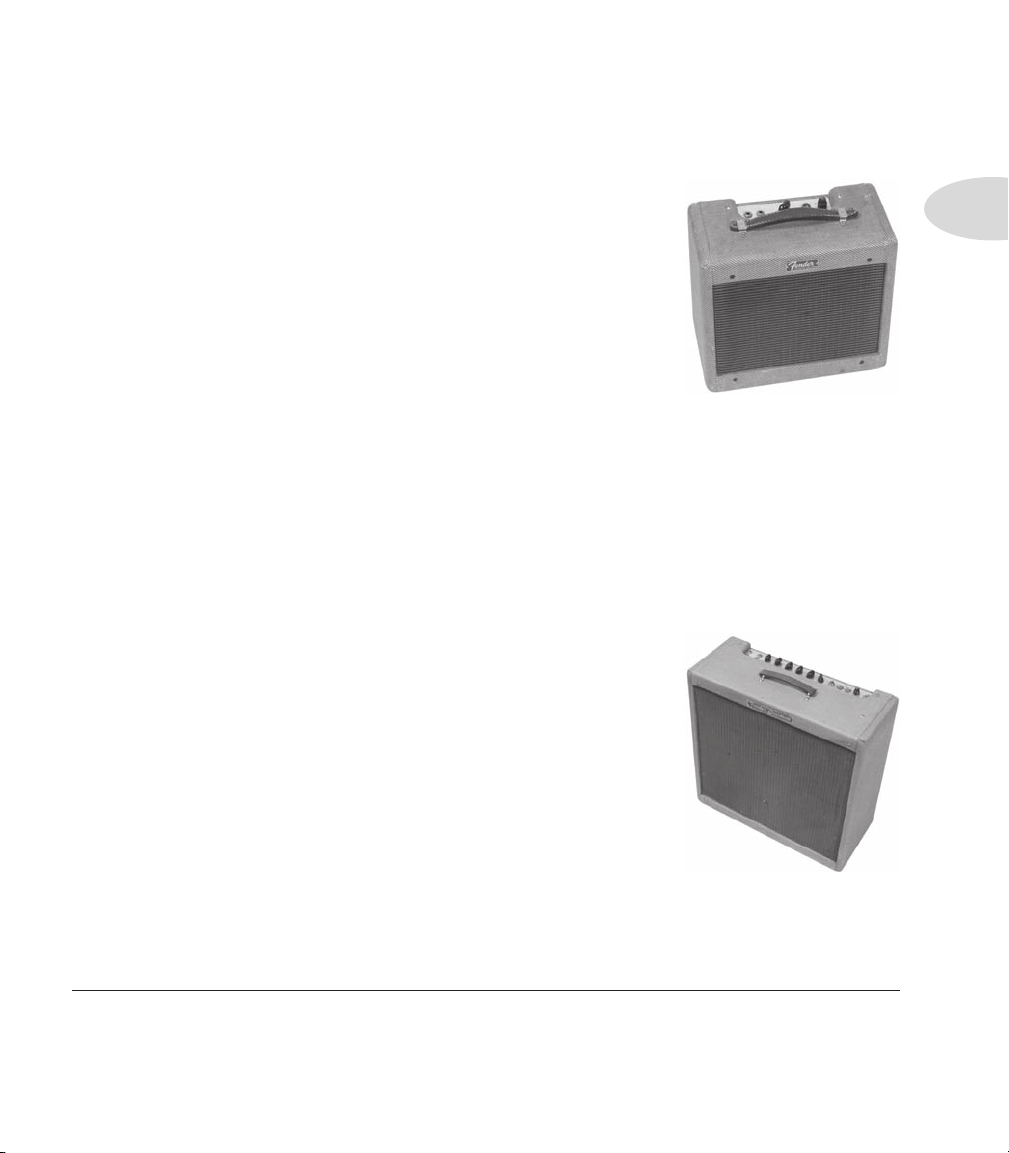
Small Tweed
RED: “Small Tweed”. Based on* a 1952 “wide panel” Fender® Tweed Deluxe Reverb®.
This Amp Model will snarl with the best of them. The original
amp had only a single tone control, essentially a treble roll off.
We set up the Treble knob to give you this treble roll off when
using this Amp Model, which left us with the Bass and Mid knobs
just sitting there. That just didn’t seem right, so we figured out a
way to put those knobs to work without mucking about with the
authenticity of this Amp Model’s treble tone control. We set up
the Bass and Mid as post-Amp Model controls, which essentially
lets you EQ up your tone as you would do on a mixing console after
recording your amp. Set the Bass and Mid knobs at halfway to put
them in “neutral,” and try the Treble knob somewhere above halfway for a classic Tweed
sound.
* All product names are trademarks of their respective owners, which are in no way associated or affiliated with Line 6.
These product names, descriptions and images are provided for the sole purpose of identifying the specific products that were
studied during Line 6’s sound model development. FENDER® and DELUXE REVERB® are registered trademarks of
Fender Musical Instruments Corporation.
Page 13
Modeled Amps & Cabs
GREEN: “Small Tweed #2”. Based on* the 1960 Fender® Tweed Champ®. This is a
great sound when the Drive is cranked (not bad clean, either). These amps were originally
designed to be sold to beginners, but rock and rollers quickly discovered that you could get
a great distorted sound at fairly low volume levels. Many of the
classic guitar solos of the 50’s were recorded through a Champ®.
The Champ® had no tone control, only volume. With your Floor
POD Plus, it’s easy to get a classic Champ® tone. Just leave all
the Bass, Mid, and Treble controls parked at 12 o’clock, which
means they are “flat,” making no contribution to the tone. Still,
we’d hate to waste those things, so we figured out a way to put the
Bass, Mid, and Treble controls to work without mucking about
with the authenticity of this Amp Model. When using this Amp
Model, all these tone controls are applied after the Amp Model processing, which essentially
lets you EQ up your tone as you would do on a mixing console after recording your amp.
Remember, for the authentic emulated sound of the Champ®, set all the tone controls at 12
o’clock.
Tweed Blues
RED: “Tweed Blues”. Based on* the classic ’59 Fender® Bassman® 4x10 combo. The amp
that started it all – instant rock and roll tone. Originally a bass guitar amp, the Bassman®
became a Blues staple for 6-string guitarists. It has the fat bottom
end you’d expect from a bass amp but also has the Fender® twang
on the top. The Bassman® was the “blueprint” for Floor POD
Plus’s Tweed Blues. Incidentally, when Jim Marshall built his
first amps with Ken Bran they were heavily influenced by the early
Bassman®. One of the interesting things about the Bassman® is
just how interactive the Mid and Treble controls are. The Mid
control isn’t a bandpass, as in most tone control setups. Instead,
it’s almost like a second treble control. The two are additive, so if
you’re running the Mid knob higher than halfway up, you’ll find
that the Treble control might give you more bright than you really want. On the other
hand, when you turn the Mid knob down, you’ll probably want to boost the Treble. The
Bassman®, like many of the amps modeled for Floor POD Plus, didn’t have a master volume.
2•3
* All product names are trademarks of their respective owners, which are in no way associated or affiliated with Line 6.
These product names, descriptions and images are provided for the sole purpose of identifying the specific products that were
studied during Line 6’s sound model development. FENDER®, CHAMP® and BASSMAN® are registered trademarks of
Fender Musical Instruments Corporation.
Page 14
Modeled Amps & Cabs
So to get the kind of tone that the Bassman® can deliver at higher gain settings, you had
to crank it up loud enough to do some serious damage to anyone who might be standing
close by. With Floor POD Plus, you can get that kind of tone at a bedroom or studio level
– or through your headphones even! Try a Drive setting of about 4 or 5 – it’s guaranteed to
2•4
dredge up the best R&B licks you know.
GREEN: “Boutique #3”. Based on* a Budda Twinmaster head. The Budda philosophy is
all about power tube distortion. Simplicity is the key. With relatively low front end gain,
highly interactive tone controls, and tube rectifier “sag” it’s great at getting a classic cranked
sound for small gigs and recording. Once again, since the Twinmaster has no mid control,
we’ve added a little bonus in the form of some post-Amp Model mid contouring available via
the Mid control. As usual, set this control to 12 o’clock to get groovy with the unadorned
Budda-style vibe.
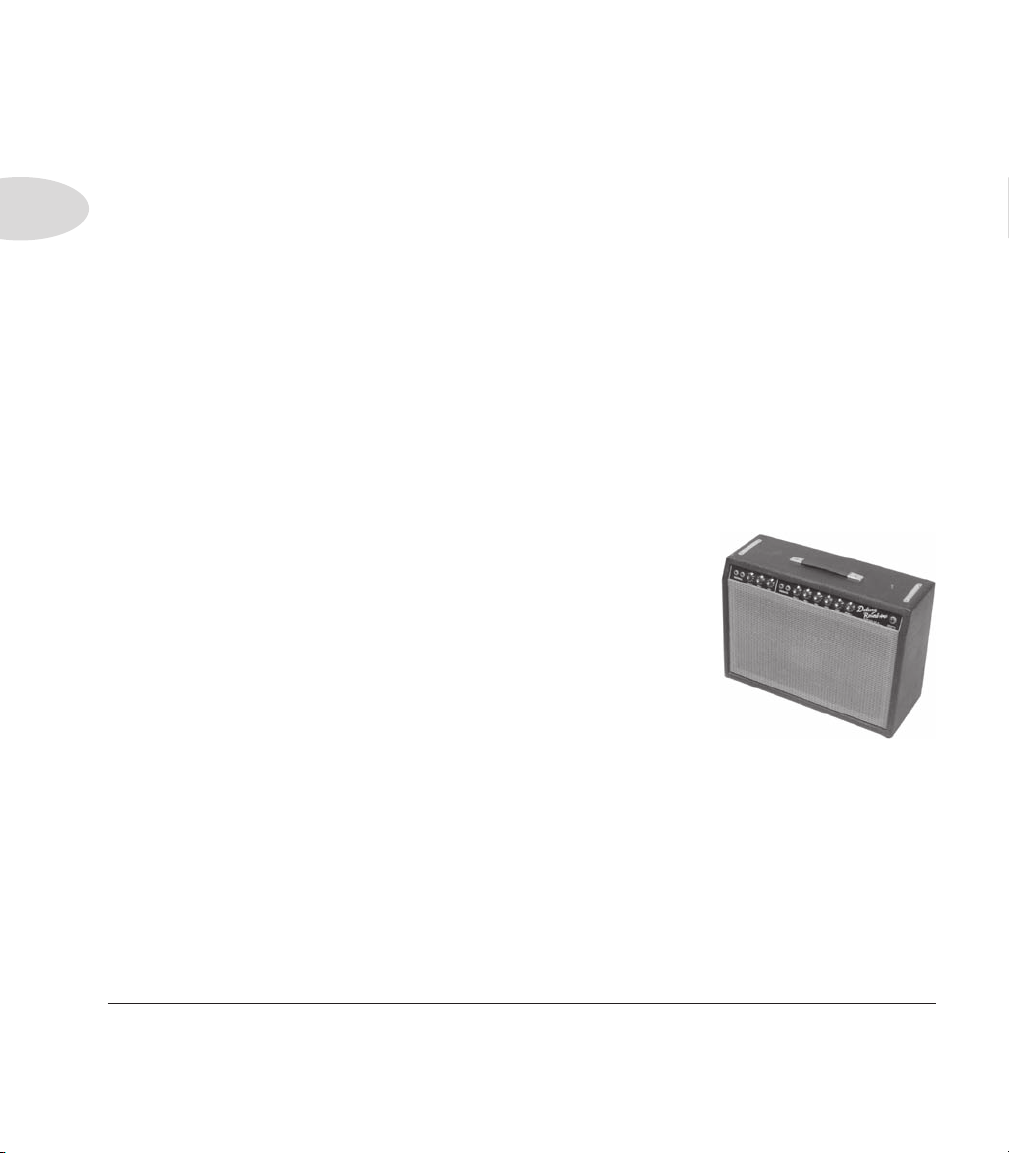
Black Panel
RED: “Black Panel”. Based on* the blackface Fender® Deluxe Reverb®. The Holy
Grail for many blues, country, and “roots” players has been a blackface Fender® Deluxe
Reverb®. After listening to quite a few candidates for modeling,
we stumbled upon an extremely cool amp from 1964. Most players
love a Deluxe Reverb® when it’s turned up to about 7 for a nice
gritty sound that cleans up when you back off your guitar’s volume
knob just a little. Notice how the tone control response changes
as this Amp Model’s Drive is changed; clean settings are crisp
and present, while more driven settings will mellow the high end,
which is similar to the response of an actual amplifier. We’ve set
up the Mid knob for this model, so you can add some post-Amp
Model midrange contouring for a little more flexibility. Once again, set the Mid knob to its
“neutral” 12 o’clock position for the classic sound of a Fender® Deluxe Reverb®.
* All product names are trademarks of their respective owners, which are in no way associated or affiliated with Line 6.
These product names, descriptions and images are provided for the sole purpose of identifying the specific products that were
studied during Line 6’s sound model development. FENDER®, DELUXE REVERB® and BASSMAN® are registered
trademarks of Fender Musical Instruments Corporation.
Page 15
Modeled Amps & Cabs
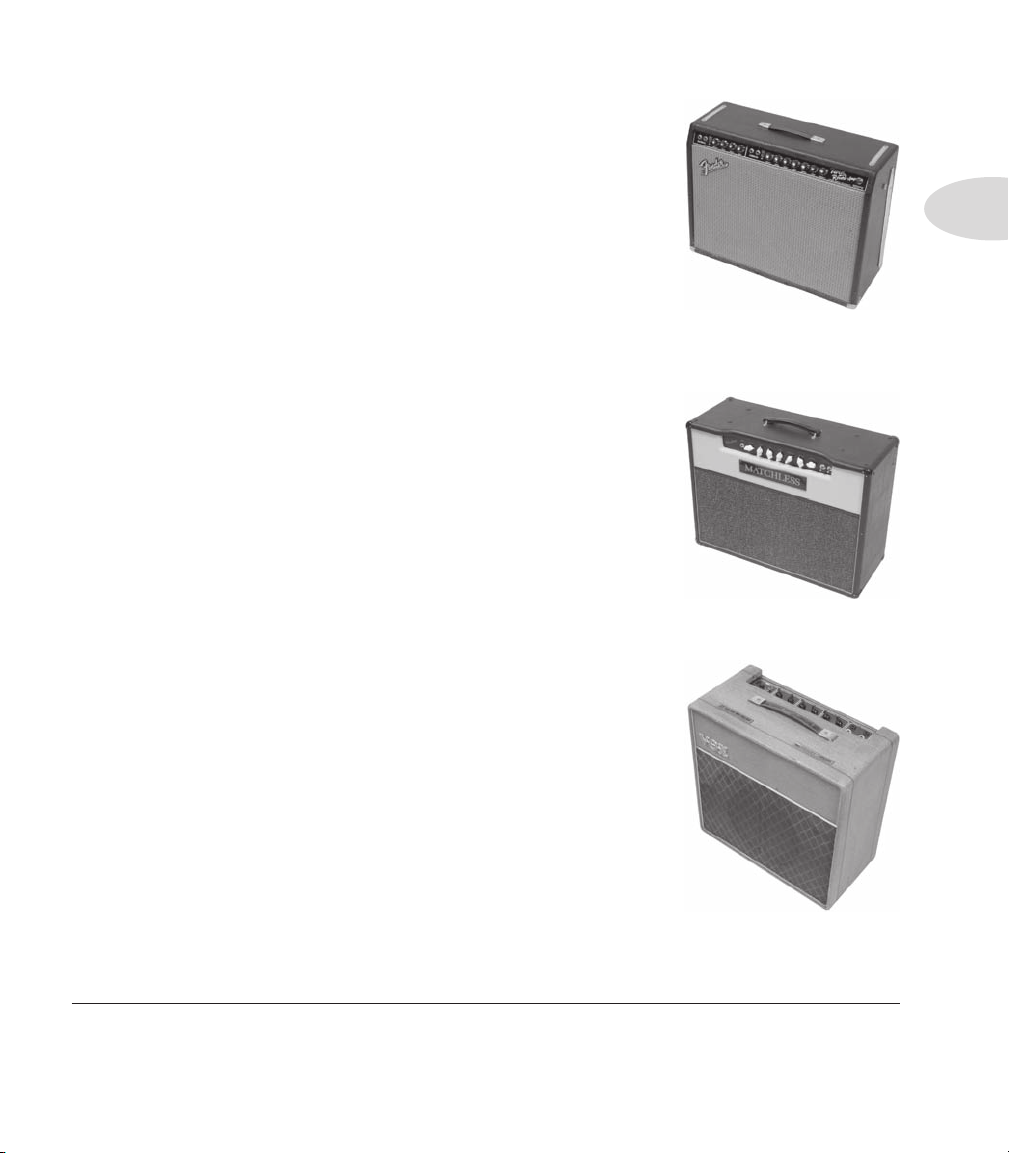
GREEN: “Black Panel #2”. Based on* a 1965 blackface Fender®
Twin Reverb®. A real workhorse, everybody used it, from jazz
and country players to serious rockers. I remember seeing Johnny
Winter at a concert where both he and Rick Derringer – am I
dating myself or what? – were using six Twins stacked in a pyramid
each. We were in the second balcony and it was REALLY loud
even all the way back there. The Twin has a lot of tonal flexibility
and is at home in a great many different situations. It never gets
extremely overdriven and dirty, mostly just louder; a lot louder.
This is the amp for the classic surf sound. Dial up the spring reverb, switch on the tremolo,
crank up the volume, and look out for bikinis.
Modern Class A
RED: “Modern Class A”. Based on* a Matchless Chieftain. The
’96 Matchless Chieftain, which was studied for the Modern Class
A selection, is a very expensive handmade amp. The Matchless has
an EL34-powered “modern class A” design – hence this model’s
name – and a unique tone (largely due to the complicated EQ
scheme). The sound is sort of “future retro.” Its soft clipping is
typical of Class A amplifiers; almost a “hi-fi” sound in a great rock and roll amplifier.
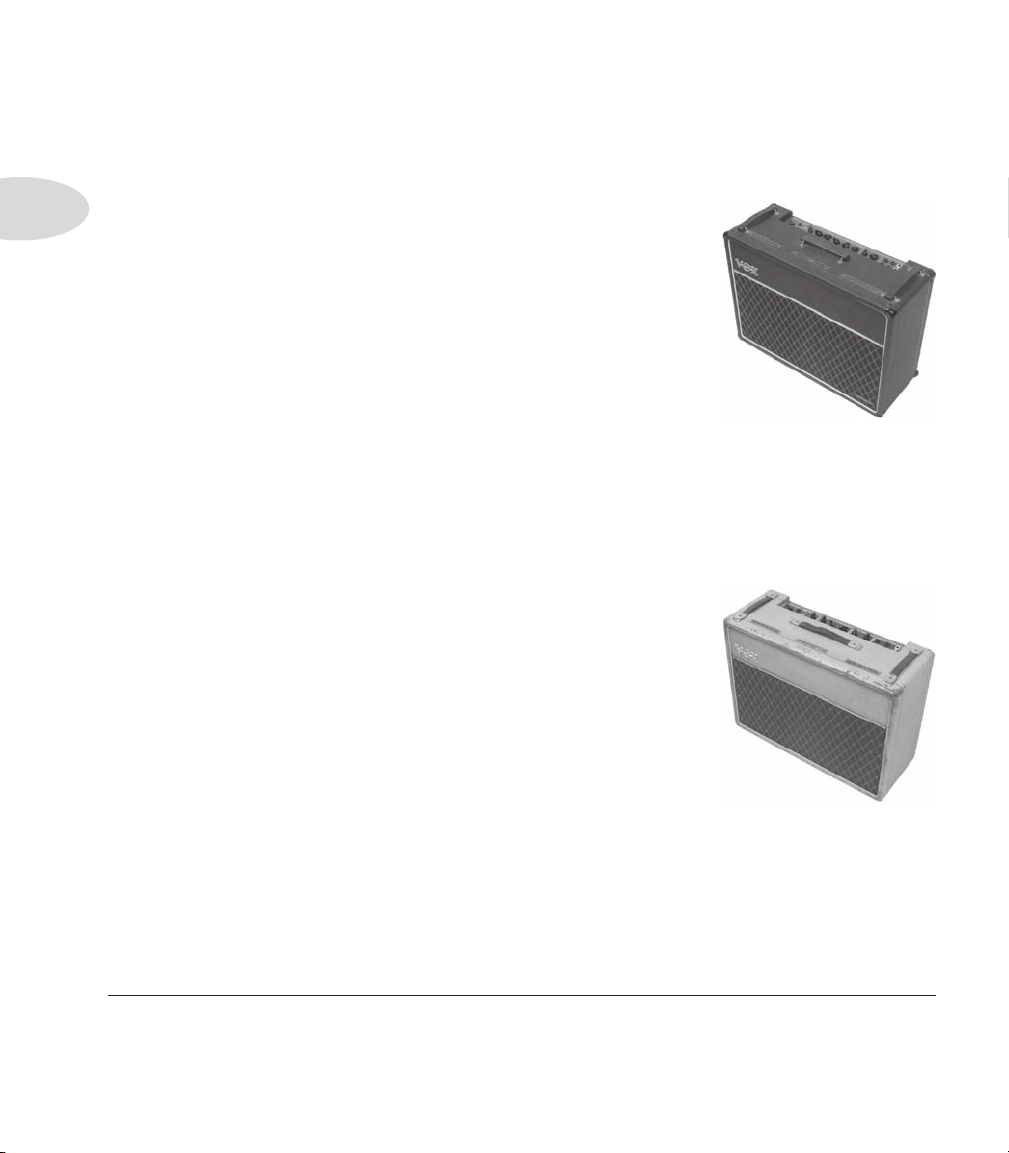
GREEN: “Brit Class A #3”. Based on* Channel 1 of a wonderful 1960 Vox® AC 15.
Here’s another Vox-inspired Amp Model. The sound is similar to
that of the Vox® AC 30s that were studied for Floor POD Plus’s
Brit Class A and Brit Class A #2 Amp Models, but this is a
smaller amp (one, instead of two, 12” speakers) with a warmer,
more “woody” sound. Once again, the original amp had only a
single tone control – a treble cut. We faithfully modeled that and
then slipped in some post-Amp Model bass and mid contouring.
Set the Bass and Mid in neutral (12 o’clock, or halfway up) and
play with the Treble control to get yourself some of those classic
British invasion sounds.
2•5
* All product names are trademarks of their respective owners, which are in no way associated or affiliated with Line 6.
These product names, descriptions and images are provided for the sole purpose of identifying the specific products that were
studied during Line 6’s sound model development. FENDER® and TWIN REVERB® are registered trademarks of Fender
Musical Instruments Corporation. VOX® is a registered trademark of Vox R&D Limited.
Page 16
Modeled Amps & Cabs
Brit Class A
RED: “Brit Class A”. Based on* the Vox® AC 30. Music was changing in the early 60’s
and guitarists were asking for more brilliance & twang. So the Jennings Company, makers
2•6
of Vox® amps, decided to add Treble and Bass controls (and an extra 12AX7 gain stage,
incidentally); this additional circuit became known as Top Boost.
The AC 30 with Top Boost was the amp made famous by many
British invasion bands. Much of the unique character of the Vox®
sound can be attributed to the fact that Class A amps overdrive
in a very different way than Class AB. Brian May of Queen, Mike
Campbell of Tom Petty’s Heartbreakers, and The Edge of U2 have
also used classic AC 30s to make their music. On this Amp Model,
Floor POD Plus’s Mid control acts like the Cut knob on the AC
30. Although usually played fairly clean, a cranked AC 30 has a
great saturated lead tone, a la Brian May on the early Queen albums.
GREEN: “Brit Class A #2”. Based on* the Normal Channel of a Non-Top Boost Vox® AC-
30. As we mentioned, the early Vox® amps were the first designed especially for electric guitar
(Hey, some early amps from other manufacturers have Accordion inputs! Polka, anyone?),
and used Class A power amp designs, rather than the much more common Class AB type.
We were lucky enough to find what we are told was one of Bryan
Adams’ favorite AC 30s for recording. Lenny Kravitz happened
to be using it the week before we began testing. It was one of the
gems in a great collection of vintage amplifiers offered for rental in
Los Angeles, where Line 6 is located. We later bought this amp,
and continued to hone our emulation of it to bring you the Amp
Model it inspired in the Floor POD Plus. This is definitely a good
place to start to get yourself some of those classic British invasion
sounds. Like the AC 15, the AC 30 NTB has only a single treble
control, so POD’s Bass and Mid controls here are set up for boost after the Amp Model
processing to add a little extra flexibility without compromising the accuracy of the model.
The 12 o’clock setting on these controls is flat response.
* All product names are trademarks of their respective owners, which are in no way associated or affiliated with Line 6.
These product names, descriptions and images are provided for the sole purpose of identifying the specific products that were
studied during Line 6’s sound model development. VOX® is a registered trademark of Vox R&D Limited.
Page 17
Brit Blues
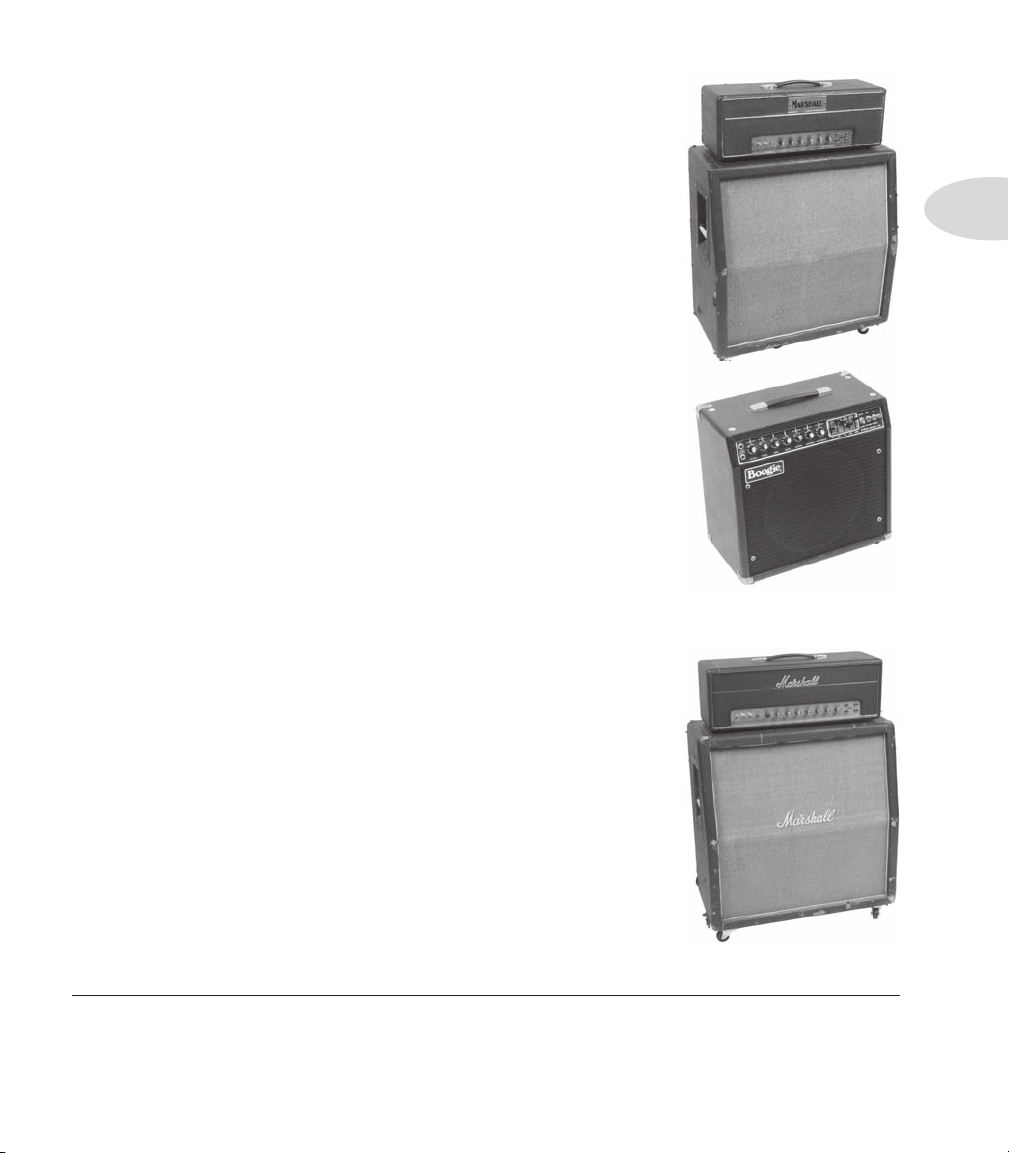
RED: “Brit Blues”. Based on* the Marshall® 1964-65 JTM-45
head. Although the sound normally associated with Marshall®
Plexi amps comes from the 100-watt models of the late 60’s, it is the
50-watt JTM-45 that was the inspiration for the next in Floor POD
Plus’s line up of Amp Models. Complete with block logo (predates
the “scrolled” Marshall® logo) and a gold Plexiglas (Plexi) front
panel, the JTM-45 marked the beginning of Marshall’s transition
from a mellower Fender®-like tone to the distinctive bright
“crunchy” sound of the later Marshalls.
GREEN: “California Crunch #1”. Based on* a Mesa/Boogie®
Mark II-C+. The first of the “boutique” amp makers was probably
Mesa/Boogie®. Boogie made their mark in the late 70’s and early
80’s by adding master volumes and more gain stages to amps with
Fender®-style circuitry. You can hear the Fender® heritage but with
more “punch” in the mids. This model is based on the Clean Channel
of the classic Mesa/Boogie® Mark II-C, with the enhancements of
the “+” version of the Mark II-C circuitry design.
Modeled Amps & Cabs
2•7
Brit Classic
RED: “Brit Classic”. Based on* the infamous Marshall® Plexi.
Coveted by tone connoisseurs the world over. By this time (ca.
1968) Marshall® had completely changed the circuitry away from
the Fender® 6L6 power tube heritage and moved to an EL34 tube;
another major tone difference was due to the necessary output &
power supply transformer changes. (See, we told you we spent some
time looking into all this stuff.) All this mucking about added up
to create a tone forever linked with Rock Guitar. Amps of this era
didn’t have any sort of master volume control, so to get this sound
you’d have to crank your “Mark III Super Amp” to max – just the
thing to help you really make friends with the neighbors. Hendrix
used Marshalls of this era; 20 years later Van Halen’s first two records
* All product names are trademarks of their respective owners, which are in no way associated or affiliated with Line 6.
These product names, descriptions and images are provided for the sole purpose of identifying the specific products that were
studied during Line 6’s sound model development. MARSHALL® is a registered trademark of Marshall Amplification Plc.
MESA/BOOGIE® is a registered trademark of Mesa/Boogie, Ltd. FENDER® is a registered trademark of Fender Musical
Instruments Corporation.
Page 18
Modeled Amps & Cabs
owed their “brown sound” to a 100-watt Plexi. In order to get a crunch sound out of a Plexi
you would likely crank up the input volume and the tone controls (to 10!). You’ll find that
the Brit Classic, in keeping with our basic “make-it-sound-a-whole-lot-like-the-original”
concept, is set up to do pretty darned near the same thing. Max out the Mid and Treble
2•8
knobs and turn Bass to about 9 or 10 o’clock on your Floor POD Plus when using this Plexi-
inspired Amp Model and you can treat those nice neighbors to a tasty slice of fat rock tone.
GREEN: “California Crunch #2”. Based on* the Drive Channel of the Mesa/Boogie®
Mark II-C+. Try your Santana licks here.
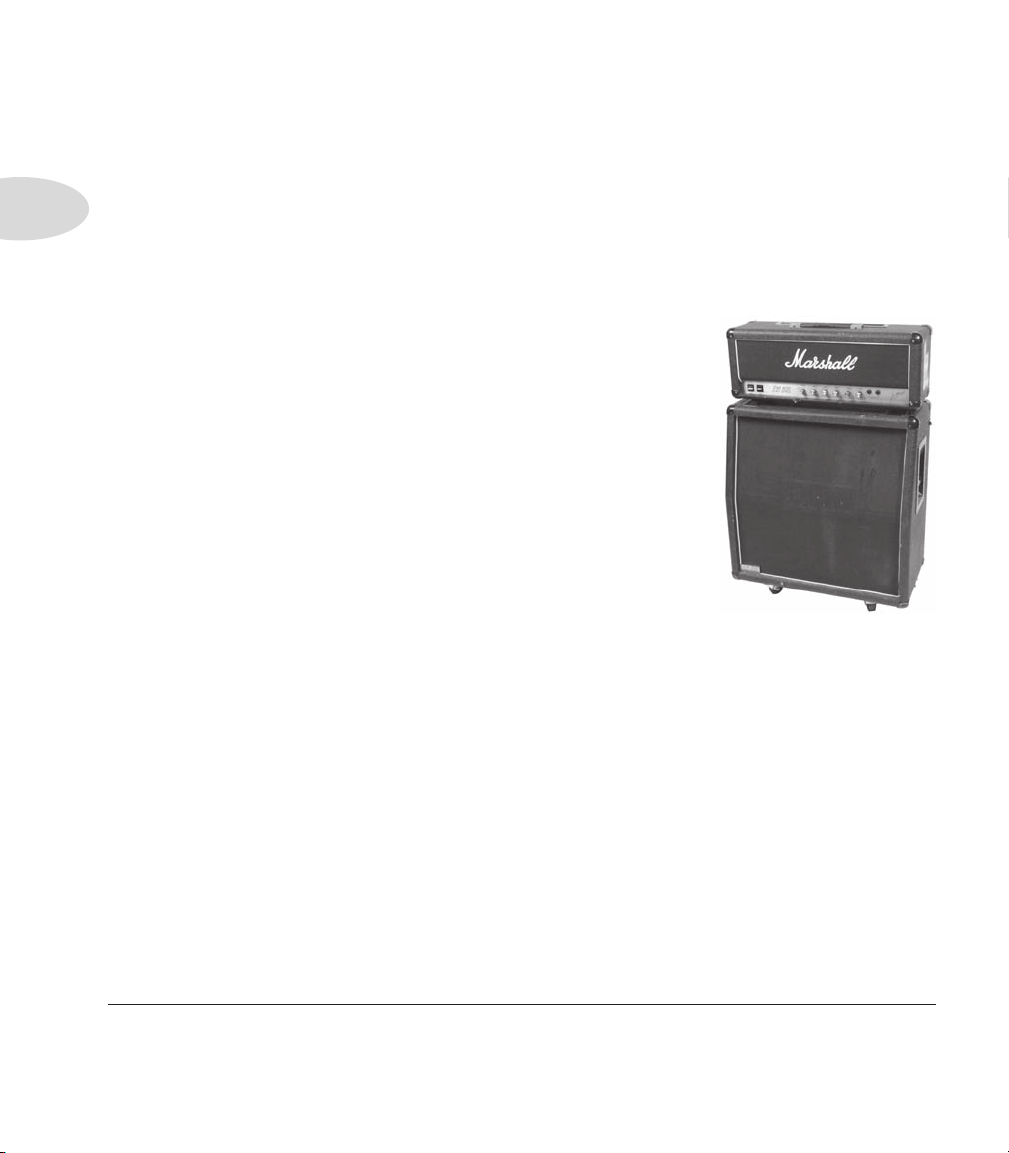
Brit Hi Gain
RED: “Brit Hi Gain”. Based on* the Marshall® JCM 800. Turn
to this Amp Model to conjure up tones of the coveted JCM 800,
one of Marshall’s most universally-acclaimed modern amps. This
updated version of the Plexi continued Marshall’s heritage with
added gain and edge for a new generation of rock guitarists. One
of the biggest differences here is that the tone controls are located
after the preamp tubes. We worked with a 1990 JCM 800 with
Master Volume to develop this model. Incidentally, some versions
of JCM800s get their distortion from clipping a diode. The amp
we modeled uses a tube for distortion. This is the metal sound
Marshall made famous. Although not many people play Marshalls clean, it’s a great tone; so
you should also be sure to check out this model with a low Drive setting, too. Of course, you
can always pump up the drive and rage....
GREEN: “Boutique #1”. Based on* the Clean Channel of the Dumble® Overdrive Special.
The Dumble® Overdrive Special is one of those incredibly expensive, custom amps that
most people never get a chance to actually get close to in this lifetime. Each incarnation
of the Dumble® magic is a little bit different, because each of these amps is hand built for a
specific customer, and voiced to match their playing and desires. With that in mind, we based
this Amp Model on the analysis of several different Dumble® Overdrive Specials. Despite
this tuning to the individual owner, these amplifiers tend to have a number of features in
common; the clean channel is very sensitive to attack and dynamically responsive, and the
drive channel has a thick, liquid, singing sustain that doesn’t lose string definition when
driven hard. Floor POD Plus’s tone controls on this Amp Model are quite subtle, like those
of the Dumble® itself.
* All product names are trademarks of their respective owners, which are in no way associated or affiliated with Line 6.
These product names, descriptions and images are provided for the sole purpose of identifying the specific products that
were studied during Line 6’s sound model development. MESA/BOOGIE® is a registered trademark of Mesa/Boogie, Ltd.
MARSHALL® is a registered trademark of Marshall Amplification Plc. DUMBLE® is a registered trademark of Howard
Alexander Dumble.
Page 19
Modeled Amps & Cabs
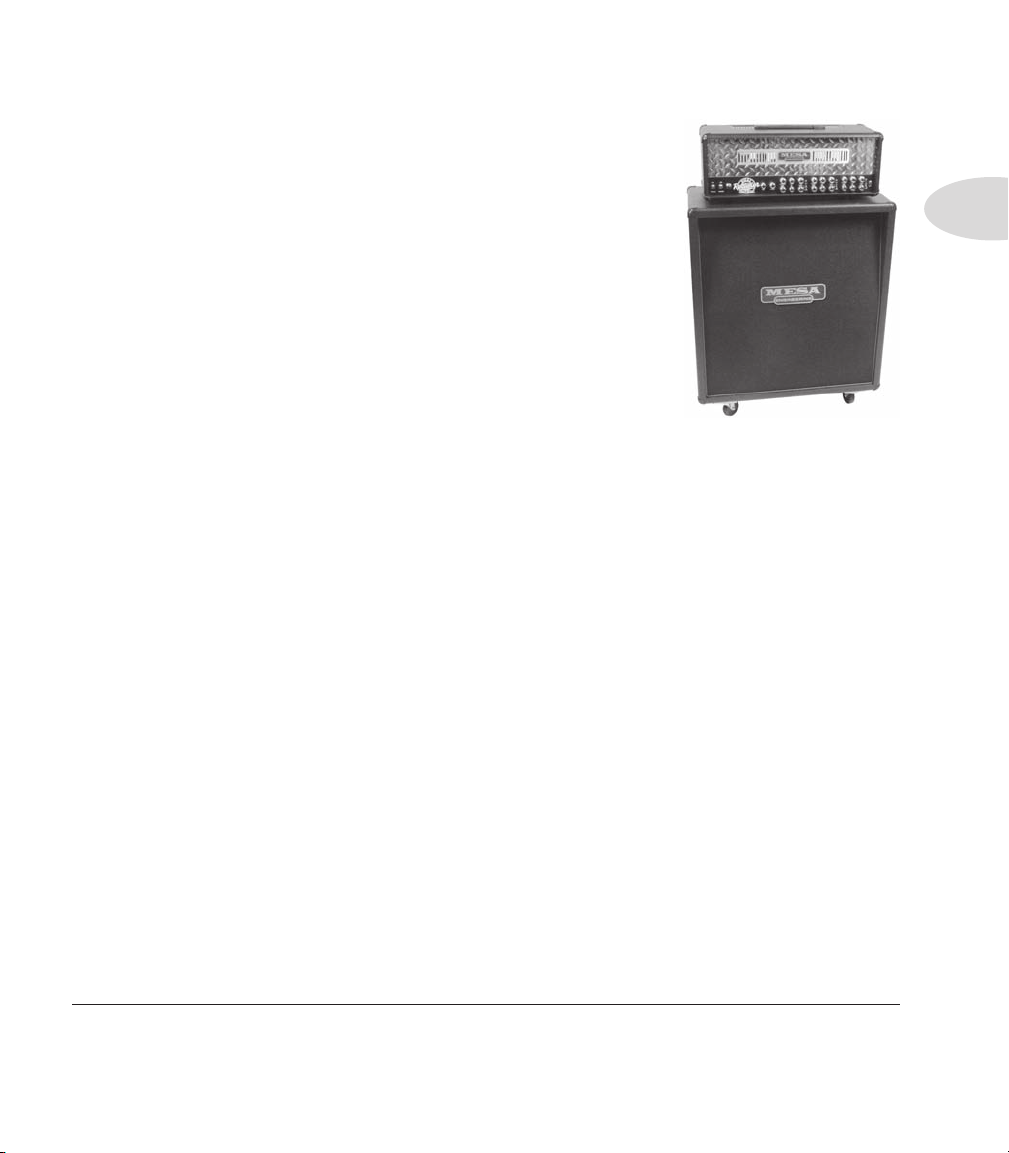
TreadPlate
RED: “TreadPlate”. Based on* a 1994 Mesa/Boogie® Dual
Rectifier® Tremoverb. You can use this Amp Model to get that
tight, high gain sound used by bands like Dream Theater or
Metallica. Mesa/Boogie® made their mark in the late 70’s and early
80’s by adding master volumes and more gain stages to amps with
Fender®-style circuitry. You can hear the Fender® heritage but with
more “punch” in the mids. The Dual Rectifier’s tone controls are
post-distortion and, as with the tone sections of most of the amps
we based our models on, the individual controls interact with each
other and with the Drive. With high drive settings, you can scoop
the mids and crank the bottom end for some great Seattle grunge
sounds.
GREEN: “TreadPlate #2”. Based on* a 1995 Mesa/Boogie® Dual Rectifier® head. As
with the Tremoverb combo that was modeled for the TreadPlate Amp Model, the Dual
Rectifier® was part of Boogie’s more modern, high gain approach for that “big hair” sound.
In contrast to the earlier Boogies, the Dual Rectifier’s tone controls have more influence at
high gain settings, so you can scoop the mids and increase the bottom end.
2•9
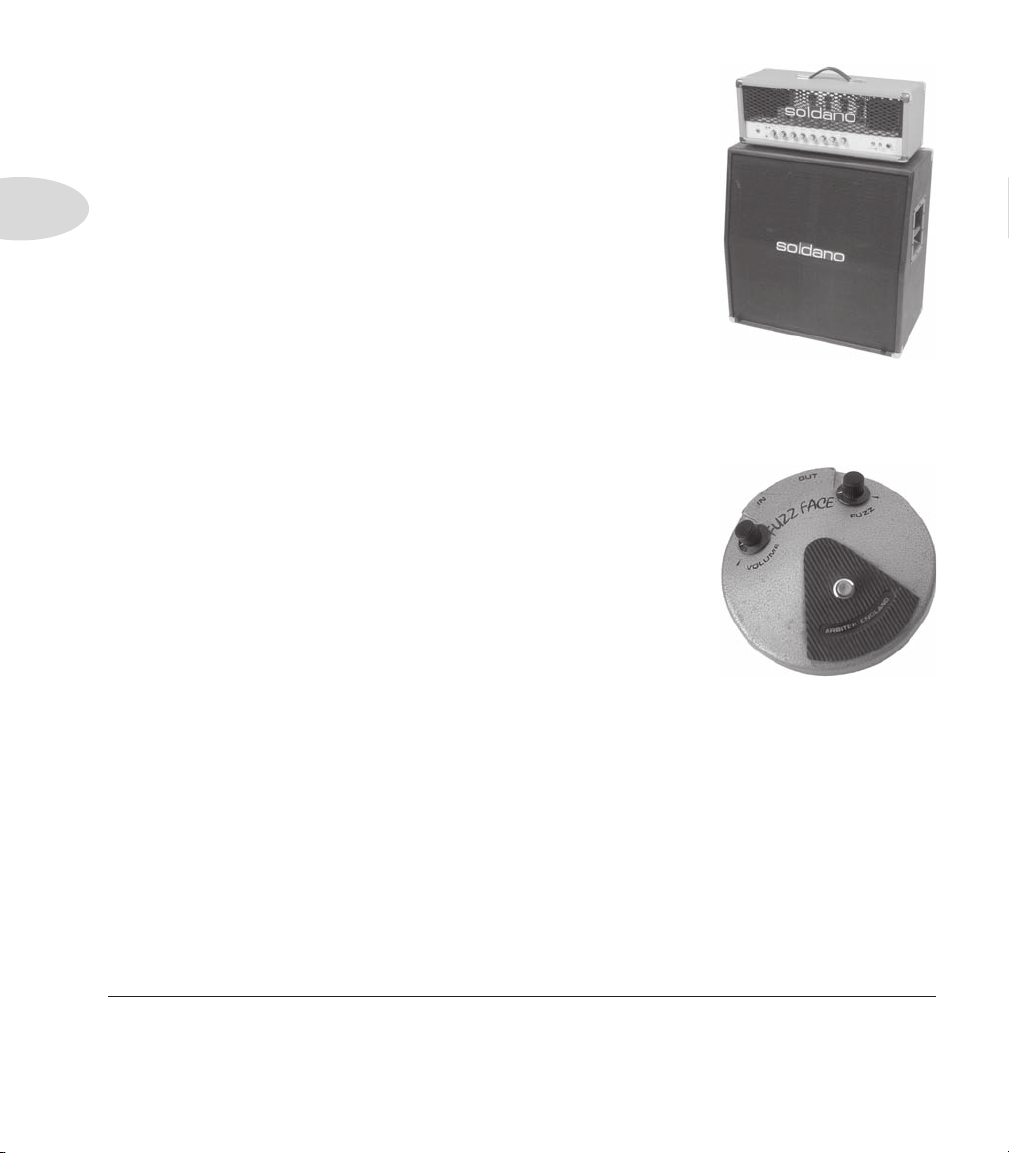
Modern Hi Gain
RED: “Modern Hi Gain”. Based on* the Soldano X88R. The Soldano sound is intensely
overdriven, and also has EQ after the preamp distortion. This oversaturated tone is wellsuited to thrash metal and grunge bands, but has also been used more subtly by artists like
Eric Clapton. This is a good Amp Model to use if you want to get a Van Halen or Joe
Satriani sound. The Floor POD Plus Modern Hi Gain Amp Model is based on one of Mike
Soldano’s rackmount preamps. Talk about high gain preamp tube distortion! The X88R we
studied to create this Amp Model would have been the rage for Los Angeles studio use in
the late ‘80s.
* All product names are trademarks of their respective owners, which are in no way associated or affiliated with Line 6.
These product names, descriptions and images are provided for the sole purpose of identifying the specific products that were
studied during Line 6’s sound model development. MESA/BOOGIE® and RECTIFIER® are registered trademarks of
Mesa/Boogie, Ltd. FENDER® is a registered trademark of Fender Musical Instruments Corporation.
Page 20
Modeled Amps & Cabs
GREEN: “Modern Hi Gain #2”. Based on* a Soldano SLO
– Super Lead Overdrive – head. Unlike the X88R preamp used
for the Floor POD Plus Modern Hi Gain Amp Model, the SLO
includes a presence control, plus other little details that give it a
2•10
bit of a different sound. With the Drive control cranked way up,
you’ll get sustain for days.... Go out’n’ave a bite – when you come
back it’ll still be sustaining!
Fuzzbox
RED: “Fuzzbox”. Based on* the Arbiter® Fuzz Face. Although not technically an amp, we
felt that the unique tonal qualities of the classic 1960’s Arbiter® Fuzz Face earned it a place
among the amps studied to create Floor POD Plus’s Amp Models.
This fuzz box used broad-frequency transistor-based clipping. The
result is a buzzing kind of distortion that has become popular again
with the alternative and grunge set. Jimi Hendrix was among the
first guitarists to popularize the Fuzz Face in the States, but our
Model is considerably dirtier than the tones found on “Are You
Experienced.” Try playing “Satisfaction” by the Stones, or the lead
from “American Woman” by The Guess Who. Liberal use of the
Bass, Mid, and Treble controls will let you go beyond the tones
that the Fuzz Face could deliver, enabling you to discover your own unique recipe for those
elusive fuzz tones in your head. Just a note: when recording “Purple Haze”, Jimi didn’t even
use an amp – he just went straight from a Fuzz Face to an Orange® power amp to a 4x12
cabinet. Which is the same sort of tone you find here....
GREEN: “Boutique #2”. Based on the Dumble® Overdrive Special Drive Channel
(described earlier). If you like the Dumble® sound, you might also want to check out the
Line 6 Crunch model – it was created to deliver a similar kind of tone.
* All product names are trademarks of their respective owners, which are in no way associated or affiliated with Line 6.
These product names, descriptions and images are provided for the sole purpose of identifying the specific products that
were studied during Line 6’s sound model development. ARBITER® is a registered trademark of Arbiter Group, Plc.
ORANGE® is a registered trademark of Orange Personal Communications Services, Limited. DUMBLE® is a registered
trademark of Howard Alexander Dumble.
Page 21
Modeled Amps & Cabs
Tube Preamp
RED: “Tube Preamp”. Not even close to being a guitar amp, but once we got started, we
just couldn’t stop ourselves. The thinking went like this: ‘Once people get this Floor POD
Plus, it’s gonna be so great that they’re gonna wish they could use it for everything – warming
up keyboards, crunching up drums, fuzzing up vocals. We’ve gotta give ’em something to do
that!’ So we did. The Tube Preamp Amp Model lets you warm up any sound source the
way producers and engineers often do in the studio with vintage tube gear. For more “edge”
on vocals, try running your vocal tracks through Floor POD Plus. Or punch up (or munch
up) a synth bass track by sending it through Floor POD Plus and cranking up the Drive and
EQ controls to suit your taste. Although this is not actually a guitar amp model, you can
even get some great guitar tones out of it. Also try using it as a direct box for bass. When you
do this stuff, you want to use the Drive control like a mix knob on a reverb to control how
much processing you want to hear. You generally don’t want to mix the pre-Floor POD Plus
sound with the post-Floor POD Plus sound because of the comb filtering that results. Instead,
jack the sound source right into Floor POD Plus and then only monitor it post-Floor POD
Plus processing. With the tone controls at 12 o’clock, the EQ is “flat.”
GREEN: “Jazz Clean”. Based on* the classic Roland® JC-120.
This transistor amp was known for a strident clean sound and
built-in stereo chorus. When using the Jazz Clean Amp Model,
try cranking up the Treble for a shimmering clean sound that’ll
cut through just about any mix. It’s also perfect for that 80’s “new
wave” sound. Alternatively, try backing off on the Treble and
turn up the Bass and Mid for a darker jazz tone. It’ll give you an
essentially flat response, providing a balanced tone across the fret
board for jazz chord melodies or single-line phrasing.
2•11
* All product names are trademarks of their respective owners, which are in no way associated or affiliated with Line 6.
These product names, descriptions and images are provided for the sole purpose of identifying the specific products that were
studied during Line 6’s sound model development. ROLAND® is a registered trademark of Roland Corporation.
Page 22
Modeled Amps & Cabs
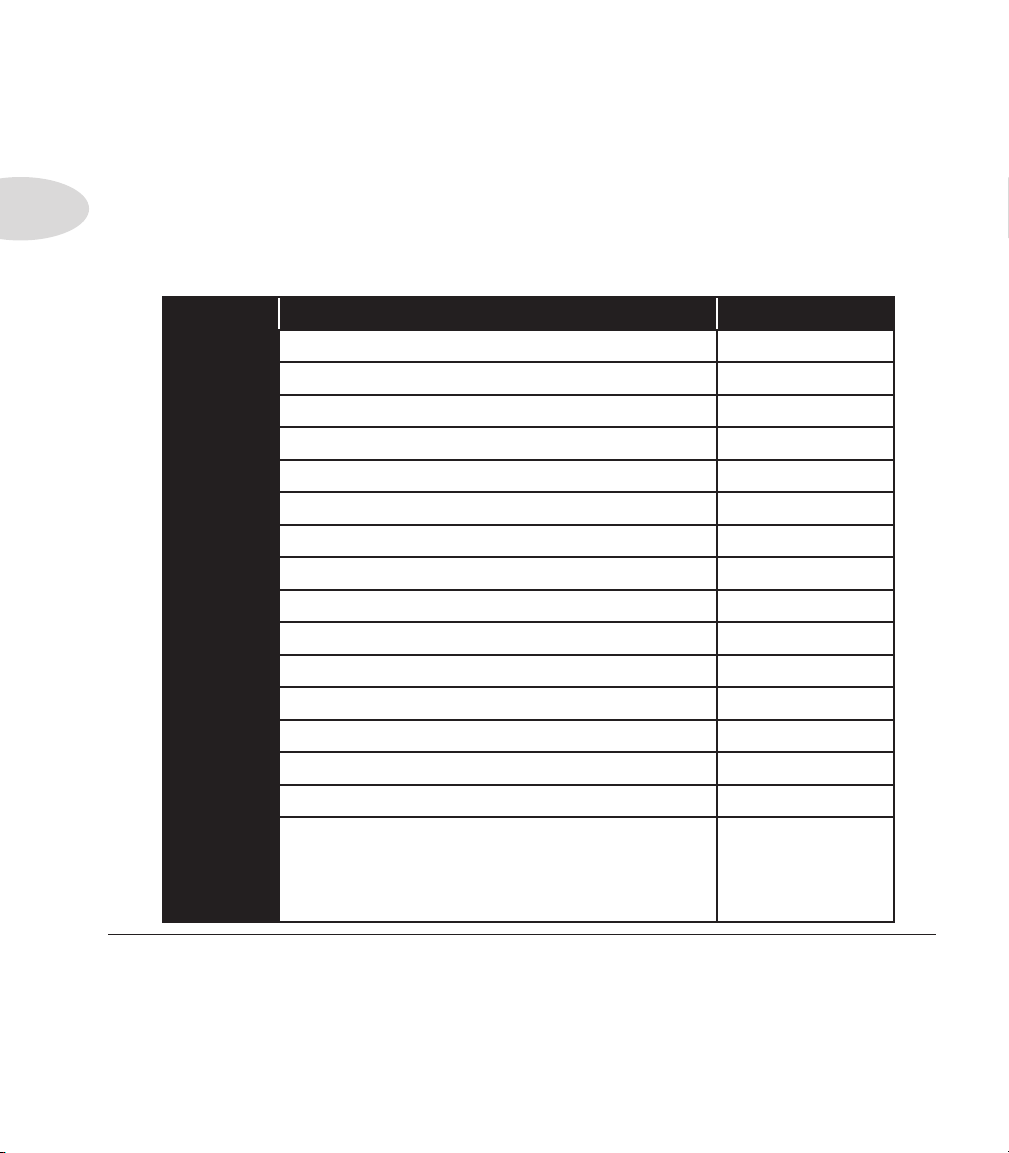
Cabinet Models
The following Cabinet Models are available on Floor POD Plus. When you turn the
Amp Models knob, you select an Amp/Cab combination. You can then mix ’n’ match
2•12
different cabs with the amp by pressing in the Amp Models knob, holding it down, and
spinning it to select a different cabinet. You can also select a different cabinet by holding
the Manual button and turning the Amp Models knob. Amber lights around the knob
will indicate the cabinet selection.
Cab Model Based on* Knob Label
1x8 1960 Fender® Tweed Champ
1x12s 1952 Fender® Tweed Deluxe Reverb
2x12s 1965 Fender® Blackface Twin Reverb
4x10s 1959 Fender® Bassman
4x12s 1996 Marshall® with Vintage 30s Brit Hi Gain
No Cab You will probably want to use this Cabinet
®
®
Line 6 Clean
Line 6 Crunch
1960 Vox® AC-15 Line 6 Drive
1964 Fender® Blackface Deluxe Reverb
®
Line 6 Insane
Line 6 1x12 Small Tweed
®
Tweed Blues
1967 Vox® AC-30 Black Panel
1995 Matchless Chieftain Modern Class A
Line 6 2x12 Brit Class A
®
Brit Blues
Line 6 4x10 Brit Classic
1978 Marshall® with stock 70s TreadPlate
1968 Marshall® Basketweave with Greenbacks Modern Hi Gain
Line 6 4x12 Fuzz Box
Tube Preamp
model with the Tube Preamp model for nonguitar sources. It is selected by default when
you pull up the Tube Preamp Amp Model.
* All product names are trademarks of their respective owners, which are in no way associated or affiliated with Line 6.
These product names, descriptions and images are provided for the sole purpose of identifying the specific products that were
studied during Line 6’s sound model development. FENDER®, CHAMP®, DELUXE REVERB®, TWIN REVERB®,
and BASSMAN® are registered trademarks of Fender Musical Instruments Corporation. VOX® is a registered trademark
of Vox R&D Limited. MARSHALL® is a registered trademark of Marshall Amplification Plc.
Page 23
Modeled Amps & Cabs
Cabinet Tuning Mode
Your Floor POD Plus can be tuned for optimal performance with a variety of systems
when the Amp/Direct switch is set to its Amp position. By default, your Floor POD
Plus expects to be plugged in before an open-backed cabinet. If you want to plug in to
something else, you’ll want to change the Cabinet Tuning Mode. To do this, do the
following:
Press and hold the Save button while plugging in the power supply.
•
After startup, the display will show “Cab” to indicate Cabinet Tuning Mode.
•
The display will show current cabinet bank selection.
•
Press the Bank Up or Bank Down footswitches to change selection as follows:
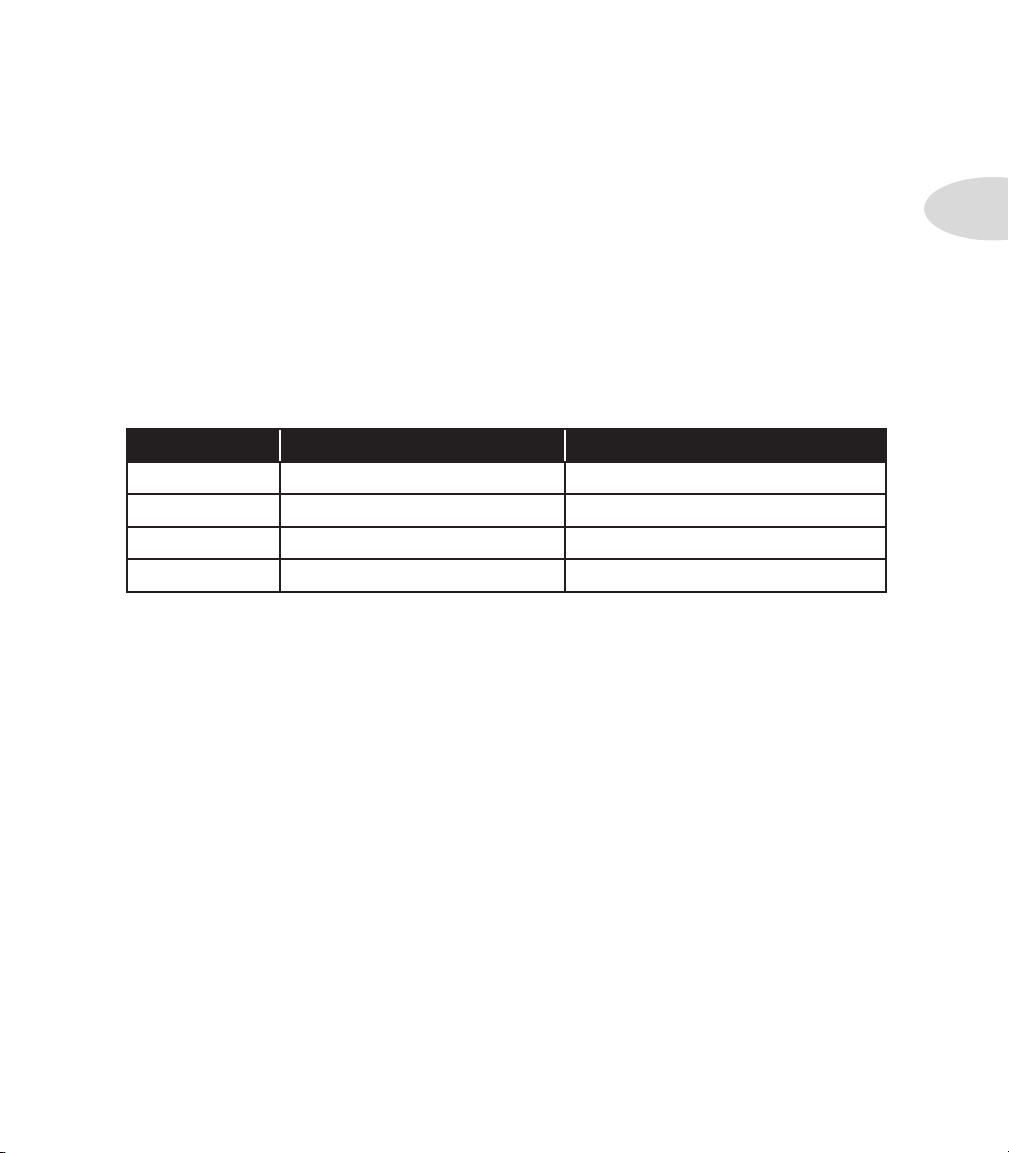
•
Use Mode... when Floor POD Plus is... & your speaker cabs are...
C-a feeding power amp closed back (ideal for 4x12 cab)
C-b feeding power amp open back (ideal for 1x12)
C-c (default) in front of combo/head open back (ideal for 1x12 or 2x12)
C-d in front of combo/head closed back (ideal for 4x12)
2•13
Press Save to store the selection.
•
Page 24
effeCts
In addition to all the great Amp Models built into Floor POD Plus, there are some great
sounding effects. To pick which effect you want to hear, turn the Effects knob. When
you first select the effect you want, your helpful Floor POD Plus will preset the effect’s
parameters so you’re instantly ready to go with a great sound. You can adjust the character
of the effect you’ve chosen by turning the Effect Tweak knob.
Reverb – Reverb is the effect that makes your guitar sound like it is in a room. With
Floor POD Plus, reverb is always available. You can control the Reverb Level with the
Reverb knob. Press and hold the Manual button or Amp Models knob while turning
the Reverb knob, and now you can adjust the Reverb Decay Time. This allows you to
adjust the apparent size of the reverberant space. To turn the reverb off, rotate the knob all
the way to the left. Reverb is on when this control’s light is lit.
There are two basic reverbs, both from the original POD®; a spring reverb Model and a
standard digital room reverb. The reverb type is automatically chosen when you select an
Amp Model and generally speaking, if the amp that inspired a given Amp Model had a
spring reverb, we give you a spring reverb. If the amp did not have a reverb, we’ve given
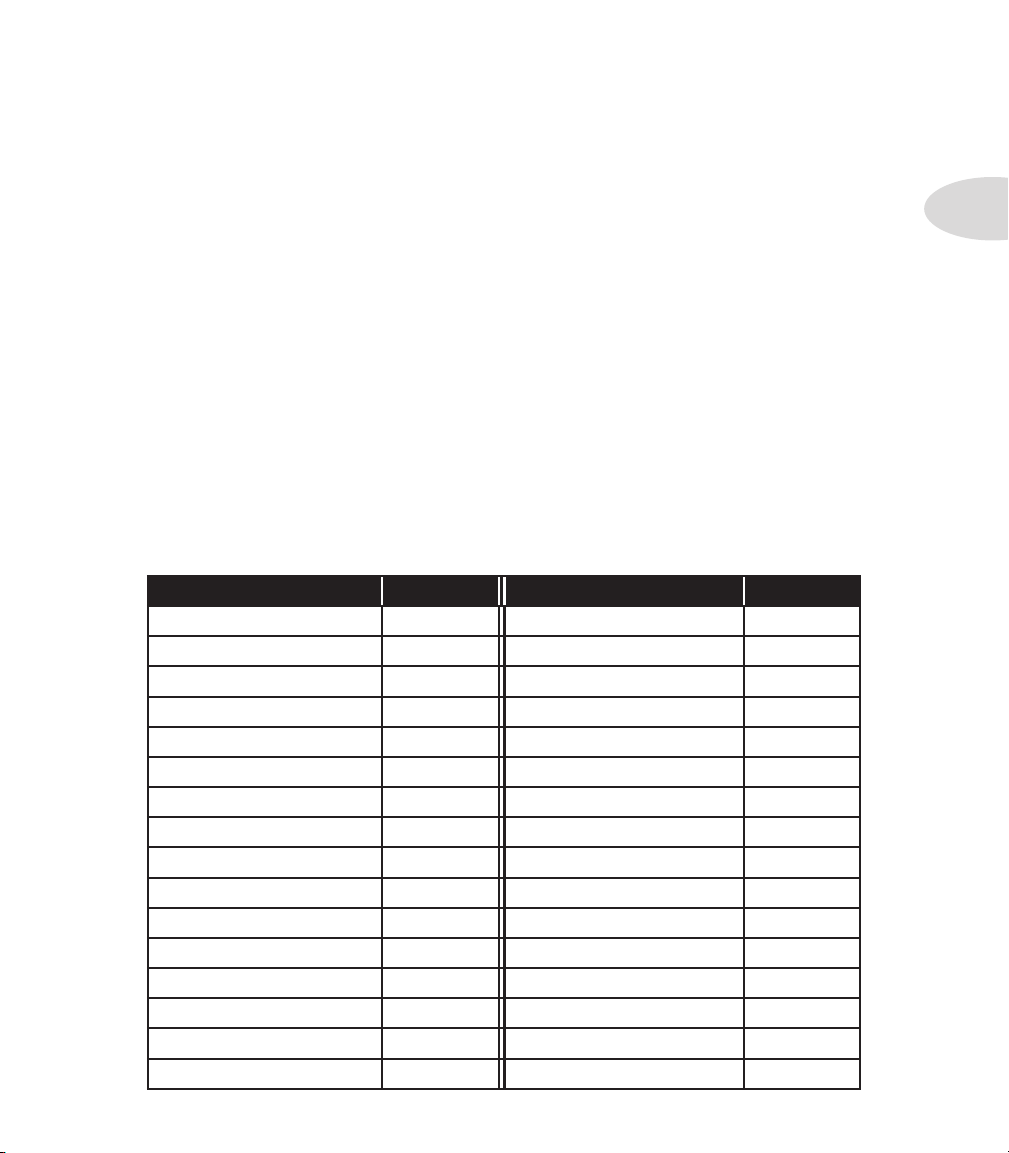
you the room reverb. Below is a list of reverbs that are loaded with each Amp Model:
Knob Label and Light Color Reverb Type Knob Label and Light Color Reverb Type
Line 6 Clean - RED Room Brit Class A - RED Room
Line 6 Clean - GREEN Spring Brit Class A - GREEN Room
Line 6 Crunch - RED Spring Brit Blues - RED Room
Line 6 Crunch - GREEN Room Brit Blues - GREEN Spring
Line 6 Drive - RED Room Brit Classic - RED Room
Line 6 Drive - GREEN Room Brit Classic - GREEN Spring
Line 6 Insane - RED Room Brit Hi Gain - RED Room
Line 6 Insane - GREEN Room Brit Hi Gain - GREEN Room
Small Tweed - RED Room TreadPlate - RED Room
Small Tweed - GREEN Room TreadPlate - GREEN Room
Tweed Blues - RED Spring Modern Hi Gain - RED Room
Tweed Blues - GREEN Room Modern Hi Gain - GREEN Room
Black Panel - RED Spring Fuzz Box - RED Room
Black Panel - GREEN Spring Fuzz Box - GREEN Room
Modern Class A - RED Spring Tube Preamp - RED Room
Modern Class A - GREEN Room Tube Preamp - GREEN Room
Effects
3•1
Page 25

Effects
3•2
Delay – Sometimes referred to as echo or slap back, delay essentially repeats your sound
in interesting and groovy ways. There are six (6) delay Models in the Floor POD Plus:
Tape gives you classic tape echo warmth. The high end will deteriorate with each repeat,
in vintage tape echo style. And you never have to change tapes!
Multi-Tap is voiced similar to Tape, but has a tap pattern based on* the Roland® Space
Echo.
Digital gives you straight up echoes, with crystal clear digital fidelity.
Reverse is a reverse version of Digital.
Sweep Echo is a tape delay emulation with a sweeping filter effect added to the delay
repeats to give you unique new creative possibilities for adjusting the tone of your delays.
Analog is designed to give a vintage analog bucket brigade delay sound, with its darker
distorted tone.
For all delay Models, the Delay knob controls the Delay Level and the Tap footswitch
controls the Delay Time. To use the Tap footswitch, just tap it at the tempo want and the
delays will change to match the tempo that you tapped. You can fine-tune the Delay Time
by pressing and holding the Manual button or Amp Models knob while turning the
Bass knob. When you are using quicker delay times, we cut down the number of repeats
so you can get those rockabilly and surf slap back sounds. Holding down the Manual
button or Amp Models knob while turning the Delay knob allows you adjust the Delay
Feedback. By the way, we let you set the maximum delay level high enough that your
delay’s echoes can actually be louder than your direct signal. You may find this handy for
getting delay effect setups like U2’s The Edge is known for. To turn the delay off, use the
DLY footswitch when in On/Off Mode. See Chapter 1 for more info.
Press and hold the Manual button or Amp Models knob while turning the Mid knob to
adjust various Model-specific parameters, as outlined on the next page:
* All product names are trademarks of their respective owners, which are in no way associated or affiliated with Line 6.
These product names, descriptions and images are provided for the sole purpose of identifying the specific products that were
studied during Line 6’s sound model development. ROLAND® is a registered trademark of Roland Corporation.
Page 26
Delay Model Delay Adjust
Tape Wow and flutter depth
Multi-Tap Modulation depth
Digital Pitch shift in 1/2 steps from -12 to +12 with ring
modulation
Reverse Modulation depth
Sweep Echo LFO speed for sweep
Analog Modulation depth
Compressor – A Compressor “squeezes” your sound so that the softer sounds are
louder and louder sounds won’t jump out at you. In other words, it decreases the dynamic
range. Compression is often expressed in ratios, such as 3:1 or 6:1. The higher the ratio,
the less difference there is between your softest and loudest playing. The Compressor
knob controls compression ratio. There are six settings: off, 1.4:1, 2:1, 3:1, 6:1, and ∞:1.
With the Compressor knob set to max, you get infinite compression, which is similar to
having a limiter. Note that the compressor is pre-Amp Model, so it acts like a compression
pedal. Compression is active when this control’s light is lit.
Effects
3•3
Gate – A Gate is intended to reduce the hiss and noise guitar systems tend to put out
when you’re not playing, especially when using a high gain setting. You can control the
gate threshold with the Gate knob – turn the Gate knob to the right for more gating and
left for off. Press and hold the Manual button or Amp Models knob while turning the
Gate knob, and now you can adjust the Gate Decay Time. The gate is active when this
control’s light is lit.
Page 27

Effects
3•4
Chorus – You’ll find two different chorus effects in Floor POD Plus. Chorus 1 is
modulated by a square wave, so it sounds more like a “rackmount” type chorus. Chorus 2 is
modulated by a sine wave with more feedback, so it has richer harmonic content. Chorus
2 was massaged to closely approximate* the classic tone of an old Roland® CE-1 box. The
Effect Tweak knob controls the Depth and Speed of the chorus.
Flanger – Flanging is that familiar “jet airplane taking off sound” you’ve heard on
countless recordings from the 70’s; just listen to “Barracuda”, by Heart for example.
Originally the effect was rarely used, since engineers had to use finger pressure on one
of the tape reels. This pressure slowed the speed of the tape in tiny increments creating
this effect. The part of the tape reel they pressed on is called the “flange”, so you can see
how the effect got its name. Eventually, the effect could be produced electronically and
when it became available in guitar stomp boxes, it became standard equipment for most
guitarists.
Two flangers are available in Floor POD Plus. Flange 1 is a light flange with no pre-delay,
and is subtler than Flange 2, which is inverted, and has a deeper depth. The Effect Tweak
knob controls the Depth and Speed of the flanging effect.
Rotary – This effect simulates* the effect of a mic’d, rotating high frequency speaker
horn, like on a Leslie®. Rotary speakers have two speeds: slow and fast. We’ve set up Floor
POD Plus’s Rotary Speaker emulation to select a fixed slow speed when the Effect Tweak
knob is in its minimum position, and a fixed fast speed when the Effect Tweak knob is past
the 12 o’clock position. When you switch from one speed to the other, you’ll notice that
the speed doesn’t change immediately, but gradually changes from one speed to the other,
just as a real rotating speaker’s speed would ramp from one setting to the other. The Effect
Tweak knob controls the Speed and Depth of Doppler effect (pitch modulation).
Phaser – The phaser is based on* the MXR
becomes part of the overall tone. This lush, organic, and groovy swirl is heard on countless
albums from the 70’s, 80’s, 90’s, and 2000’s. The Effect Tweak knob controls the Speed
and Depth of the effect.
®
Phase 90, a relatively subtle phaser that
U-Vibe – The legendary Uni-Vibe was put on the map in 1969 by Jimi Hendrix.
Essentially a four-stage phase shifter, the Uni-Vibe is best known for its watery texture and
sultry tones. The Effect Tweak knob controls the Speed and Level of the effect.
* All product names are trademarks of their respective owners, which are in no way associated or affiliated with Line 6.
These product names, descriptions and images are provided for the sole purpose of identifying the specific products that were
studied during Line 6’s sound model development. ROLAND® is a registered trademark of Roland Corporation. LESLIE®
is a registered trademark of Suzuki Musical Instrument Manufacturing Co. Ltd. MXR® is a registered trademark of
Dunlop Manufacturing, Inc.
Page 28

Effects
Obi-Wah – This is a sample and hold filter is based on* the classic Oberheim
Voltage Controlled Filter. It creates changes in tone by rhythmically emphasizing certain
frequencies. The Effect Tweak knob controls the Speed and Q (frequency range) of the
effect.
Tron Up – Part auto-wah, part triggered filter, this effect is based on* the Mu-Tron
III envelope follower and gives you everything you need for that 70’s funk sound. The
Effect Tweak knob controls the Sensitivity and Q of the effect.
®
®
Octave Fuzz – The Octave Fuzz is a Line 6 rendition of a fuzz+octave effect, which
was first used by guitarists such as Jimi Hendrix from the late 60’s. Listen to “Little Sister”
by Queens of the Stone Age to hear a taste of what this effect can do. The Effect Tweak
knob controls the Level and Tone of the effect.
Sub Octave – This Model is an Octave Fuzz with an octave below! It’s just what you
need to give those Moog players fits – deep, fat square wave distortion with enough grind
and glory to shame any analog synth. The Effect Tweak knob controls the Mix and Tone
of the effect.
Comet Trails – A Line 6 original effect from the FM4 Filter Modeler, this one gives
you seven filters, all chasing each other around and looping back and forth across the great
expanse of sonic space. The Effect Tweak knob controls the Speed and Q of the effect.
Ring Modulator – Ring modulators are for those special times when you want
different, weird, distinctive, strange, and otherwise non-traditional guitar sounds. This
effect is very percussive sounding and sounds almost as if you’re changing the signal in a
torturing-the-computer sort of way. The Effect Tweak knob controls the Frequency and
Mix of the effect.
3•5
Otto Phase – Part phaser part vocal box, this effect is an envelope follower that
drives a phaser. Think of it as a phased-up version of Tron Up. The Effect Tweak knob
controls the Sensitivity and Feedback of the effect.
Swell – This effect is like an automatic volume pedal that will give you a very even
volume swell with each note or chord you play. The Effect Tweak knob controls the Rise
Time of the effect.
* All product names are trademarks of their respective owners, which are in no way associated or affiliated with Line 6.
These product names, descriptions and images are provided for the sole purpose of identifying the specific products that were
studied during Line 6’s sound model development. OBERHEIM® is a registered trademark of Gibson Guitar Corp. MUTRON® is a registered trademark of Mark Simonsen.
Page 29
Effects
3•6
Tremolo – Modeled after* the classic Fender
®
tremolo. The Effect Tweak knob
controls Speed and Depth.
Effect Tweak
A summary of the various effect-model-specific parameters that can be adjusted using the
Effect Tweak knob is shown below:
Effect Model Effect Amount Effect Adjust
Tremolo Speed Depth
Chorus 1 Depth Speed
Chorus 2 Depth Speed
Flange 1 Depth Speed
Flange 2 Depth Speed
Rotary Speed Depth
Phaser Speed Depth
U-Vibe Speed Level
Obi-Wah Speed Q
Tron-Up Sensitivity Q
Octave Fuzz Level Tone
Sub Octave Mix Tone
Comet Trails Speed Q
Ring Modulator Frequency Mix
Otto Phase Sensitivity Feedback
Swell Rise Time none
You can tweak the Effect Amount parameter by turning the knob. To tweak the Effect
Adjust parameter, press and hold the Manual button or Amp Models knob while turning
the knob.
To turn the effects off, use the C / FX footswitch when in On/Off Mode. See Chapter 1
for more info.
* All product names are trademarks of their respective owners, which are in no way associated or affiliated with Line 6.
These product names, descriptions and images are provided for the sole purpose of identifying the specific products that were
studied during Line 6’s sound model development. FENDER® is a registered trademark of Fender Musical Instruments
Corporation.
Page 30

Presets, Tuner & Pedal
presets,tuner & pedAl
Recalling Presets
The Floor POD Plus includes 124 presets to cover a wide range of tones and styles.
These presets, or “channels”, store a variety of complete amp-and-effect selections preprogrammed by the tone mavens at Line 6. The channels are arranged in 31 banks of 4
channels each. The four channels are called A, B, C and D.
To recall a channel, make sure you’re in Channel Memory Mode (see Chapter 1), use the
Bank Up/Down footswitches to select a bank, then use Footswitches A-D to select
a channel. When recalling a channel, note that its settings will not be reflected by the
present knob positions – like you may have left the Bass knob at minimum whereas the
just-recalled channel has this control set to max.
To change anything, just grab a knob and tweak.
Saving Presets
You can edit any of the Floor POD Plus presets or create one of your own and store it to
whatever location you want. You’ll notice that when you adjust or change something in
a dot (.) is shown to the right of the channel letter in the display. To save follow these
steps:
4•1
• Press the
• Use the arrow
want to store the new preset.
If you want to save the preset to a different Channel (A, B, C or D) than is currently
•
displayed, press the desired Footswitch to select the channel. Press that Footswitch
again or press the Save button to execute the save.
If you want to save the preset to the same Channel (A, B, C or D) that is currently
•
displayed, press that Footswitch or press the Save button to execute the save.
• All user controls are saved at their current state.
To cancel a save, turn a knob or allow the unit to have 5 seconds of inactivity since the
last press of a footswitch or the Save button.
Save button. The Save light will now flash.
Bank Up/Down footswitches to select the Bank (1-31) where you
Page 31

Presets, Tuner & Pedal
Compare Mode
If you’re curious to find out the knob setting that was saved in a given preset, you can enter
Compare Mode by pressing and holding the Save button for two seconds. Now, while
4•2
turning a knob, the Tuner lights will indicate that control’s current value compared to the
preset value. If the
setting. If the # and Tuner lights are lit, the control position is higher than the preset
setting. If all three tuner lights are lit, the control position is equal to the preset setting.
Press the Save or Tap buttons to exit Compare Mode.
Manual Mode
When presets are recalled, all knob settings come from memory, not from the current knob
positions. If you’d like to hear what all the current knob positions sound like, you can
enter Manual Mode by pressing and releasing the Manual button. The Manual button
light illuminates and the display shows no channel indication. Move the knobs around
to change the sounds. To exit Manual Mode, press and release the Manual button again.
This will reload the last channel that was recalled.
Creating and Saving Custom Setups
As if preset channels weren’t enough, you can pack the Floor POD Plus with your own
custom settings for each Amp Model, effect and delay selection available on the unit.
Here’s the scoop. Turning the Amp Models, Effects and Delay knobs actually sets all
the related parameters to their factory-tweaked settings. However, you can adjust the
parameters to your liking, then store these settings so they live directly on the Amp
Models, Effects and Delay knobs. Here’s how you do it:
b
and Tuner lights are lit, the control position is lower than the preset
Decide whether you want to save an Amp Model, effect or delay custom setup.
•
Tweak the appropriate controls to your liking.
•
Simultaneously press the Amp Models encoder knob and the Save button. The Save
•
and Manual lights will both flash.
The display will show “A”, indicating an Amp Model will be saved. Use the Bank
•
Up/Down footswitches to select the desired custom setup to be saved: “A” = Amp
Model, “E” = Effects, “d” = Delay.
Press the Save button to execute the save or press the Manual or Tap buttons to
•
cancel.
Page 32

Presets, Tuner & Pedal
That’s it. Now, when you turn the Amp Models, Effects or Delay knob to this position,
you’ll instantly get your personal settings, with all the controls set the way you like them.
There’s one thing to note. You’ll notice that you didn’t get to pick a location to save your
custom setup. That’s because Floor POD Plus will only save to the knob position of the
currently selected Amp Model, effect or delay. For example, if you started with the Line
6 Insane Amp Model, saving a custom amp setup will save to the Line 6 Insane knob
position.
Tuner
Press and hold the Tap footswitch for 2 seconds to enter tuner mode. The Tuner light will
light to let you know you’re in tuner mode. Play a note on your guitar and Floor POD Plus
will show you its pitch by displaying the note name in the display. All notes are displayed
as naturals or flats, so you’ll see “Ab” instead of “G#” and so on.
The lights under the display tell you if the note is sharp or flat. If the b light is lit, then
you’re flat. If the # light is lit, now you’re sharp. When all three are lit up, you’re in tune.
To exit tuner mode, press the Save or Manual button or the Tap footswitch.
Tuner Reference Frequency
4•3
When in Tuner Mode, you can change the tuner reference frequency by using the Bank
Up/Down footswitches. By default, the unit has a tuner reference frequency of A440, but
it can be adjusted from A436 to A445. The display will show you the frequency selected.
This setting is automatically saved and will be recalled the next time you enter Tuner
Mode.
Tuner Volume Level/Mute
When in Tuner Mode, you can also select whether you want your sound to be muted or
pass through at a given volume. The pedal Toe Switch toggles tuner volume mute on
and off. When tuner volume mute is off (and the Wah light is lit), you can set the passthrough volume by using the Vol/Wah pedal. This setting is automatically saved and will
be recalled the next time you enter Tuner Mode.
Page 33

Presets, Tuner & Pedal
Complete Factory Reset
If for any reason, or just for the sheer mad joy of it, you decide you need to reset your
Floor POD Plus’s entire memory to its factory-programmed state, then boldly do this:
4•4
Simultaneously press the Bank Up and Bank Down footswitches while plugging in the
power supply. After startup, the display will show “int”, to indicate that the unit has been
re-initialized. Disconnect the power supply then reconnect it. You’re done.
Calibrating the Vol/Wah Pedal
To make sure the pedal on your Floor POD Plus has the most sensitivity and range possible,
do the following:
Unplug the power supply, then press and hold the Toe Switch on the Vol/Wah pedal
•
while reconnecting the power supply. The display will show “ PC” to indicate Pedal
Calibration Mode, then ”000”.
With the pedal in the toe (maximum) position, press Footswitch A. The display will
•
scroll to “100”.
With the pedal in the heel (minimum) position, press Footswitch B. The display will
•
scroll to “100”.
Press Footswitch C. The display will show a numerical value.
•
Press pedal Toe Switch, then move the pedal from heel to toe positions and observe
•
the lights around the Effects encoder. The number of lights should reflect the pedal
position.
Press-and-hold the Tap footswitch for two seconds to save the calibration.
•
Unplug the power then plug it back in. You’re there!
•
Page 34

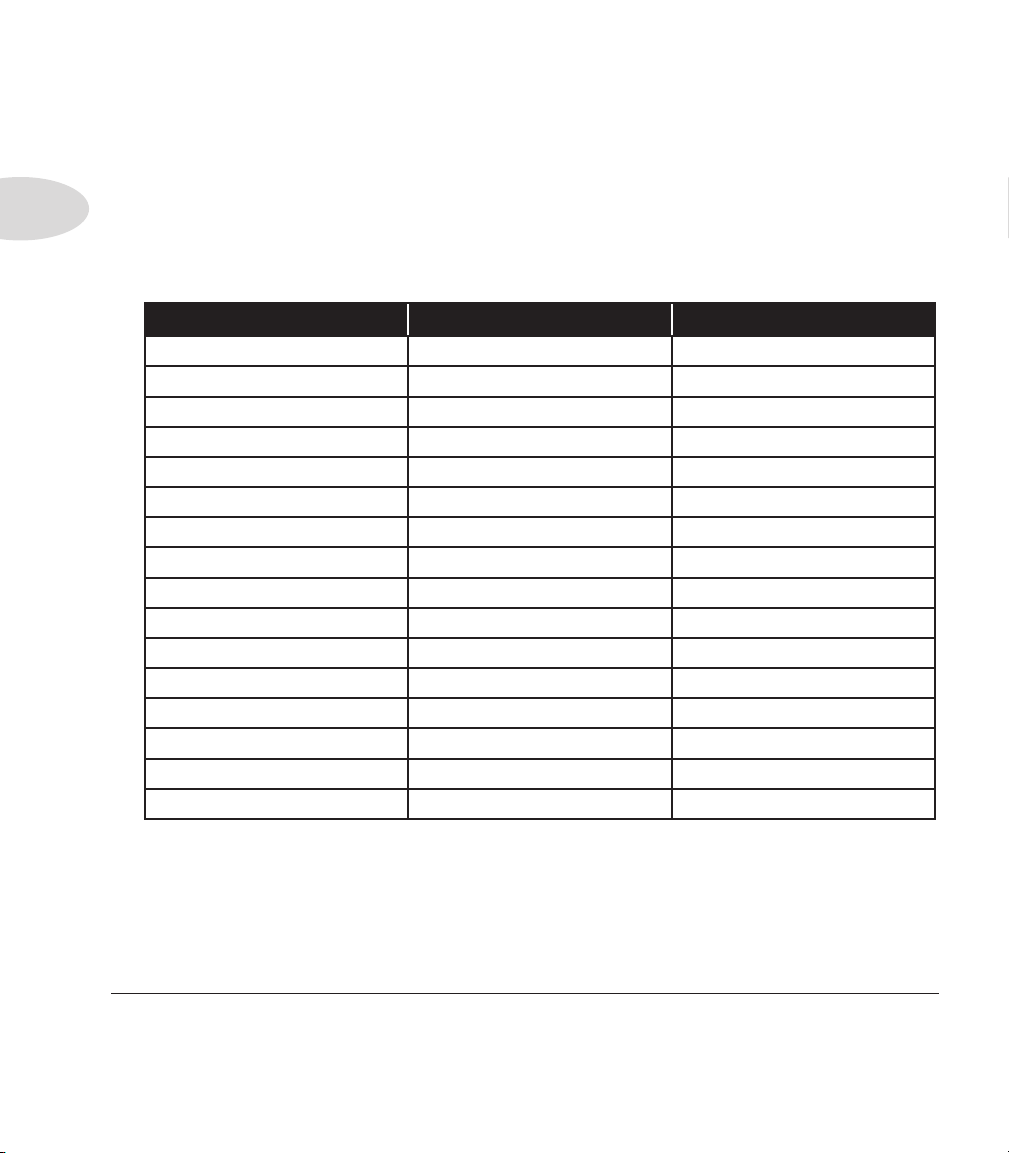
Appendix A: Amp Models
Knob Label & Light
Color
Line 6 Clean – Red Line 6 Clean Pre Room Yes
Line 6 Clean – Green Line 6 Twang Pre Spring No
Line 6 Crunch – Red Line 6 Crunch Pre Spring Yes
Line 6 Crunch – Green Line 6 Crunch #2 Pre Room No
Line 6 Drive – Red Line 6 Drive Post Room Yes
Line 6 Drive – Green Line 6 Blues Pre Room No
Line 6 Insane – Red Line 6 Insane Post Room No
Line 6 Insane – Green Line 6 Layer Post Room Yes
Small Tweed – Red Small Tweed Pre Room No
Small Tweed – Green Small Tweed #2 Pre Room No
Tweed Blues – Red Tweed Blues Pre Spring No
Tweed Blues – Green Boutique #3 Pre Room No
Black Panel – Red Black Panel Pre Spring No
Black Panel – Green Black Panel #2 Pre Spring Yes
Modern Class A – Red Modern Class A Pre Spring No
Modern Class A – Green Brit Class A #3 Pre Room No
Brit Class A – Red Brit Class A Pre Room No
Brit Class A – Green Brit Class A #2 Pre Room No
Brit Blues – Red Brit Blues Pre Room Yes
Brit Blues – Green California Crunch #1 Pre Spring Yes
Brit Classic – Red Brit Classic Pre Room No
Brit Classic – Green California Crunch #2 Post Spring No
Brit Hi Gain – Red Brit Hi Gain Post Room No
Brit Hi Gain – Green Boutique #1 Pre Room No
TreadPlate – Red TreadPlate Post Room No
TreadPlate – Green TreadPlate #2 Post Room No
Modern Hi Gain – Red Modern Hi Gain Post Room No
Modern Hi Gain – Green Modern Hi Gain #2 Post Room No
Fuzz Box – Red Fuzz Box Post Room No
Fuzz Box – Green Boutique #2 Post Room No
Tube Preamp – Red Tube Preamp Post Room No
Tube Preamp – Green Jazz Clean Pre Room Yes
Amp Model Name Volume Pedal
Position
Reverb Type Bright Switch
Page 35

Page 36

®
Manuel de pilotage
Une exploration en profondeur des technologies et des joies sonores du Floor POD Plus.
Disponible en édition électrophonique limitée sur www.line6.com/manuals.
40-00-0116 Version A
Page 37

Page 38

Vous trouverez le numéro de série sous le Floor POD Plus. C’est le numéro qui commence par “(21)”.
Notez-le ici pour toute référence ultérieure:
NUMÉRO DE SÉRIE:
AVERTISSEMENT: Pour éviter tout
risque d’incendie ou d’électrocution, n’exposez
jamais ce produit à la pluie ni à l’humidité.
PRUDENCE: Pour réduire les risques d’incendie et d’élec-
trocution, ne retirez jamais aucune vis. Ce produit ne contient
aucune pièce pouvant être réparée par l’utilisateur. Confiez toute
réparation à un technicien qualifié.
PRUDENCE: Ce produit a fait l’objet de tests et a été déclaré conforme aux normes des appareils numériques de
classe B, conformément à la partie 15 des réglementations FCC. Son fonctionnement est soumis aux deux conditions
suivantes: (1) L’appareil ne peut pas causer d’interférences nocives et (2) doit accepter toute interférence reçue, même
des interférences susceptibles d’entraíner un fonctionnement indésirable.
Le symbole d’éclair dans un triangle signifie
“danger d’électrocution!”. Il attire votre attention
sur des informations relatives à la tension de
fonctionnement et à des risques d’électrocution.
Le point d’exclamation dans un triangle
signifie “Prudence!”. Lisez toujours les
informations précédées de ce symbole.
Lisez attentivement ces informations importantes liées à la sécurité.
Conservez ce manuel dans un lieu sûr pour toute référence ultérieure.
Avant d’utiliser votre Floor POD Plus, lisez attentivement les consignes d’utilisation et de sécurité ci-dessous:
1. Respectez tous les avertissements imprimés sur le Floor POD Plus et dans ce manuel.
2. Evitez les emplacements situés à proximité de sources de chaleur comme des radiateurs, des poêles ou
tout autre appareil produisant de la chaleur.
3. Veillez à ne jamais laisser d’objet ni de liquide pénétrer dans le boítier de l’appareil.
4. Branchez uniquement l’appareil à une prise de courant de 100~120V ou de 230V/47~63Hz (selon la
tension d’utilisation figurant sur l’adaptateur secteur fourni).
5. Ne marchez pas sur le cordon d’alimentation. Évitez de coincer le cordon d’alimentation sous des
objets lourds. Faites particulièrement attention au cordon au niveau de la prise secteur et du point de
connexion au produit.
6. Si vous ne comptez pas utiliser le Floor POD Plus pendant une période prolongée, débranchez-le.
7. N’effectuez aucune opération d’entretien autre que celles préconisées dans ce document. Si vous
rencontrez un des problèmes suivants, faites réparer l’appareil par un technicien qualifié:
• du liquide a pénétré dans l’appareil;
• un objet est tombé dans l’appareil;
• si l’appareil ne fonctionne pas normalement ou ses performances baissent de manière significative
• l’appareil est tombé ou son boítier est endommagé.
8. Une écoute prolongée à volume élevé peut provoquer une perte d’audition et/ou des dommages
irréversibles de l’ouïe. Consommez toujours les décibels avec modération.
Floor POD Plus Manuel de pilotage ©2007, Line 6, Inc.
Page 39

Remarque:
Line 6 et POD sont des marques commerciales de Line
6, Inc. Tous les noms de produits, marques déposées et
noms d’artistes sont la propriété de leurs détenteurs
respectifs. Ceux-ci ne sont nullement associés ou
affiliés à Line 6. Les noms de produit, les images
ainsi que les noms d’artistes servent exclusivement
à décrire certains sons étudiés et modélisés par
Line 6 d’après les sons célèbres de ces produits ou
artistes. L’utilisation de ces produits, images, marques
déposées et noms n’implique aucune coopération ni
sponsorisation.
Page 40

Commandes & Connexions
Commandes & Connexions
1•1
1
Amp Models – Cette commande permet de sélectionner un des 32 modèles
d’amplis tirés du célèbre POD 2.0 de Line 6. Il y a deux modèles pour chaque catégorie
indiquée autour de la commande. Ainsi, “Black Panel”, par exemple, dispose de deux
modèles: l’un est indiqué par un témoin rouge et l’autre par un témoin vert. Vous trouverez
une liste détaillées des modèles dans le chapitre 2.
Quand vous choisissez un modèle d’ampli (“Amp Model”), un modèle d’enceinte (“Cabinet
Model”) est automatiquement chargé. Si, par exemple, vous optez pour le modèle “Brit Hi
Gain” (basé sur* la tête Marshall® JCM 800), il est chargé avec un modèle d’enceinte
basé sur* une Marshall® 4x12. Vous pouvez choisir différentes enceintes en appuyant
sur la commande Amp Models puis en la maintenant enfoncée tout la tournant pour
sélectionner une autre enceinte. Vous pouvez aussi sélectionner une autre enceinte en
maintenant le bouton Manual enfoncé et en tournant la commande Amp Models. Vous
trouverez la liste des enceintes dans le chapitre 2.
Le bouton Amp Models sert aussi de bouton “majuscule”: maintenez-le enfoncé pour
accéder aux fonctions secondaires de nombreuses commandes.
* Tous les noms de produits sont des marques commerciales de leurs détenteurs respectifs. Ceux-ci ne sont nullement associés
ni affiliés à Line 6. Les noms de produits, descriptions et illustrations servent uniquement à faciliter l’identification des
produits étudiés par Line 6 pour élaborer ses modèles. MARSHALL® est une marque déposée de Marshall Amplification
Plc.
Page 41

Commandes & Connexions
2
Effects – Cette commande permet de sélectionner un des 16 modèles d’effets. Des
effets chorus et flanger standard aux étonnants “Comet Trails” et “Ring Modulator”, vous
trouverez tout ce qu’il vous faut. Les témoins rouges entourant la commande indiquent
votre choix. Pour en savoir plus, voyez le chapitre 3.
3
1•2
Delay – La commande Delay sélectionne un des 6 delays disponibles: “Tape”, “Multi-
Tap”, “Digital”, “Reverse”, “Sweep Echo” ou “Analog”. Les témoins rouges entourant la
commande indiquent votre choix. Pour en savoir plus, voyez le chapitre 3.
4
Drive – Cette commande détermine la saturation de l’entrée du modèle d’ampli
choisi: comme avec la commande de volume d’entrée sur un ampli de guitare sans
commande Master, des réglages élevés produisent plus de “crasse”.
Drive Boost peut être activé en maintenant le bouton Manual ou la commande Amp
Models enfoncée et en tournant la commande Drive au-delà de la position “12h”. Le son
est plus saturé – un peu comme sur une pédale de distorsion avec une saturation légère
mais un niveau de sortie élevé. Cette distorsion est produite avant que le signal n’atteigne
le modèle d’ampli qui reçoit un niveau plus élevé et sature donc davantage.
5
Commandes de timbre – De gauche à droite, vous avez Bass, Mid et
Treble comme sur un ampli de guitare, si ce n’est que lorsque vous changez de modèle
d’ampli, la réponse et l’interactivité de ces commandes changent aussi. Si, par exemple,
vous choisissez “Black Panel”, les commandes de timbre fonctionnent comme sur l’ampli
original sur lequel repose* le modèle, en l’occurrence, le Fender® Deluxe Reverb®.
Vous pouvez activer la Presence pour rendre le son plus brillant en maintenant le bouton
Manual ou la commande Amp Models enfoncée et en tournant la commande Treble. A
fond à gauche, la Presence est coupée et à fond à droite, elle est activée.
Vous pouvez régler les paramètres Delay Time et Delay Adjust en maintenant le bouton
Manual ou la commande Amp Models et en tournant respectivement les commandes
Bass et Mid. Pour en savoir plus, voyez le chapitre 3.
6
Channel Volume – Cette commande pilote le niveau de volume relatif de
la mémoire (“Channel”) sélectionnée. Elle permet d’équilibrer les niveaux de sons
sauvegardés dans deux mémoires différentes du Floor POD Plus. En règle générale, il faut
régler la commande Channel Volume aussi haut que possible pour obtenir un rapport
signal/bruit optimum.
Pour activer Volume Boost maintenez le bouton Manual ou la commande Amp Models
enfoncée et tournez la commande Channel Volume au-delà de la position “12h”. Cette
accentuation du volume n’entraíne pas de distorsion supplémentaire et est idéale pour les
solos.
* Tous les noms de produits sont des marques commerciales de leurs détenteurs respectifs. Ceux-ci ne sont nullement
associés ni affiliés à Line 6. Les noms de produits, descriptions et illustrations servent uniquement à faciliter l’identification
des produits étudiés par Line 6 pour élaborer ses modèles. FENDER® et DELUXE REVERB® sont des marques déposées
de Fender Musical Instruments Corporation.
Page 42

Commandes & Connexions
7
Compressor – Cette commande est la seule pour le compresseur. Tournez-la
à fond à gauche pour couper le compresseur (le témoin s’éteint). En la tournant vers la
droite, vous augmentez le taux de compression ou Compression Ratio. Le réglage de
cette commande est sauvegardé en mémoire quand vous appuyez sur le bouton Save. Pour
en savoir plus, voyez le chapitre 3.
8
Gate – Cette commande pilote le noise gate. Tournez-la à fond à gauche pour
couper le gate (le témoin s’éteint). En la tournant vers la droite, vous augmentez le niveau
de noise gate. Maintenez le bouton Manual ou la commande Amp Models enfoncée
et tournez cette commande pour régler le paramètre Gate Decay. Le réglage de cette
commande est sauvegardé en mémoire quand vous appuyez sur le bouton Save. Pour en
savoir plus, voyez le chapitre 3.
9
Effect Tweak – Cette commande sélectionne l’intensité de l’effet sélectionné
(gauche= moins; droite= plus). Maintenez le bouton Manual ou la commande Amp
Models et tournez cette commande pour régler divers paramètres secondaires de chaque
effet. Pour en savoir plus, voyez le chapitre 3.
10
Delay – Cette commande règle la balance du delay: tournez-la vers la gauche pour
diminuer le delay et vers la droite pour l’augmenter. Maintenez le bouton Manual ou la
commande Amp Models enfoncée et tournez cette commande pour régler la réinjection
(feedback) du delay. Pour en savoir plus, voyez le chapitre 3.
11
Reverb – Cette commande pilote la réverbération: elle est coupée à fond à gauche
et au maximum à fond à droite. Le témoin au-dessus de la commande est allumé quand la
réverb est activée. Maintenez le bouton Manual ou la commande Amp Models enfoncée
et tournez cette commande pour régler le paramètre Reverb Decay. Pour en savoir plus,
voyez le chapitre 3.
1•3
12
Save – Pour mémoriser les réglages effectués, appuyez sur ce bouton. Pour en savoir
plus sur la sauvegarde, voyez le chapitre 4.
13
Manual – Appuyez une fois sur ce bouton pour passer en Mode Manuel. En
mode manuel, le son produit par le Floor POD Plus correspond toujours aux réglages des
commandes. Pour changer le son, il suffit d’actionner les commandes. Ce bouton sert aussi
de bouton “majuscule”: maintenez-le enfoncé pour accéder aux fonctions secondaires de
nombreuses commandes.
14
Channel Memories – Affiche la mémoire sélectionnée (1A~31D). Chaque
mémoire contient un ensemble complet de préréglages (presets) de modèles d’ampli et
d’effets.
Page 43

Commandes & Connexions
15
Témoins de l’accordeur – Le témoin central s’allume quand l’accordeur
est activé (en maintenant le commutateur au pied Tap enfoncé). La note jouée est affichée
à l’écran tandis que le témoin bémol ou dièse s’allume. Les trois témoins sont allumés
quand la note est juste.
1•4
16
Bank haut/bas – Ces commutateurs au pied sélectionnent les banques 1~31.
Pour faire défiler les banques rapidement, maintenez le commutateur enfoncé jusqu’à la
banque voulue. Maintenez les deux commutateurs enfoncés pour sélectionner les modes
suivants…
17
Commutateurs au pied A~D – Il y a deux modes pour les commutateurs
au pied: mode de sélection de mémoire et mode on/off. Pour alterner entre ces deux modes,
appuyez simultanément sur les commutateurs Bank haut et bas.
•
Mode de sélection de mémoire: Les commutateurs BANK permettent de
sélectionner une banque et les commutateurs A~D déterminent la mémoire au sein
de la banque choisie. Quand ce mode est choisi, le témoin du commutateur actionné
s’allume en rouge.
•
Mode On/Off: Ce mode vous permet d’activer/de couper les effets ou le modèle d’ampli
avec vos pieds. Les commutateurs au pied A~D activent et coupent respectivement le
modèle d’ampli, l’accentuation du solo, l’effet et le delay. Quand ce mode est choisi, le
témoin du ou des commutateurs dont la fonction est activée s’allume en vert.
18
Témoin du mode On/Off – S’allume quand le mode On/Off est actif.
19
Tap/Hold For Tuner – Tapez deux fois sur ce commutateur pour aligner la
vitesse du delay sur la vitesse de vos frappes. Le témoin clignote à la vitesse choisie. Vous
pouvez régler la vitesse du delay même si ce dernier est coupé. Quand vous activez le delay,
il adopte la vitesse choisie.
Maintenez ce commutateur enfoncé pendant 2 secondes pour activer l’accordeur (Tuner).
Actionnez-le à nouveau pour couper l’accordeur. Pour en savoir plus, voyez le chapitre 4.
20
Pédale et témoin wah – La pédale peut piloter le wah ou le volume. Vous
pouvez enfoncer à fond l’avant de la pédale pour activer/couper le wah (ainsi que le témoin
wah à gauche de la pédale).
Notez que certains modèles d’amplis placent la pédale de volume avant le modèle d’ampli
(Pre) tandis que d’autres la placent après le modèle d’ampli (Post). Voyez l’Appendice
A.
Page 44

Commandes & Connexions
21
Input – Branchez votre instrument ici.
22
Aux Input – Branchez la sortie d’un lecteur CD ou MP3 à cette prise du Floor
POD Plus pour jouer en accompagnant vos morceaux favoris. Pour équilibrer le niveau de
la musique et de la guitare, réglez le niveau de sortie sur le lecteur CD ou MP3.
23
Output Level – Détermine le niveau global des sorties gauche et droite ainsi
que du casque.
24
Amp/Direct – Réglez ce commutateur sur “Direct” quand vous branchez
directement le Floor POD Plus à un enregistreur, une console de mixage etc. Vous
activez ainsi la fameuse technologie Line 6 A.I.R. (Acoustically Integrated Recording)
reproduisant parfaitement l’environnement acoustique de la captation au micro. Réglez ce
commutateur sur “Amp” quand vous branchez le Floor POD Plus à un ampli de guitare.
Cela coupe le traitement A.I.R.
25
L/Mono et Right Outputs – Sorties gauche et droite. Utilisez la sortie
gauche pour envoyer un signal mono à l’ampli ou un enregistreur. Utilisez les sorties gauche
et droite pour envoyer un signal stéréo à deux amplis ou à un enregistreur.
26
Phones – Cette prise accueille un jack 1/4”. Vérifiez que la commande Output
Level est au minimum puis augmentez progressivement son réglage pour ajuster le volume
du casque. Vous pouvez aussi utiliser un mini-jack 1/8” avec adaptateur.
27
MIDI In & Out – Vous pouvez brancher le Floor POD Plus à votre équipement
MIDI pour choisir les mémoires (avec des messages de changements de programme) ou
automatiser certains paramètres (avec des commandes de contrôle) et archiver vos sons
(via SysEx). Vous trouverez tous les détails sur le site www.line6.com/manuals, dans le
document téléchargeable “MIDI Reference”.
1•5
28
Power – Utilisez exclusivement l’adaptateur Line 6 fourni. Merci.
Page 45

Modèles d’amplis et d’enceintes
modèles d’amplis et d’enCeintes
Quels sont les amplis et enceintes modélisés?
Le Floor POD Plus propose 32 modèles d’amplis et 16 modèles d’enceintes. Vous trouverez
ci-dessous tous les modèles d’amplis et d’enceintes proposés ainsi qu’une description du
matériel qui leur a servi de base. Vous trouverez un résumé à l’Appendice A.
Line 6 Clean
ROUGE: “Line 6 Clean”. Pour créer ce modèle, nous avons “greffé” un modèle aux aigus
tranchants et clairs (typiques d’un ampli à transistors) à des graves ayant la chaleur et la
richesse des lampes.
VERT: “Line 6 Twang”. Aigus transparents avec la dynamique et le mordant d’un ampli
à lampe vintage. Le son ne se met vraiment à saturer qu’en fin de course de la commande
Drive.
Line 6 Crunch
ROUGE: “Line 6 Crunch”. Notre création “boutique”. Pas vraiment clean mais pas
exagérément saturé. Idéal pour blues ou jazz moderne, ce son a tout d’un bon cognac: doux
et chaud au premier abord, il stimule agréablement. La commande Mid est placée avant la
commande Drive du modèle d’ampli mais les commandes Bass et Treble viennent après la
commande Drive et ont ainsi un rendement maximum.
VERT: “Line 6 Crunch #2”. Vous recherchez un son de tête à lampe de 50W avec une
égalisation d’enfer? Atténuez le médium même avec un réglage drive élevé.
Line 6 Drive
ROUGE: “Line 6 Drive”. Notre version d’un ampli solo moderne, saturé à mort avec une
accentuation massive de niveau d’entrée. Chaud mais mordant. Toutes les commandes de
tonalité se trouvent après le modèle d’ampli pour un façonnement flexible du son avec une
définition maximale. C’est un peu comme si vous passiez par une série d’amplis différents,
une technique qui a fait ses preuves en studio en générant des sons de guitare légendaires.
VERT: “Line 6 Blues”. Ce modèle est basé sur* un Marshall® JTM-45 Bluesbreaker de
1965 mais propose une plage de réglage de tonalité nettement plus large. Avec des réglages
Drive assez élevés, ce modèle se mue presque en Budda Twinmaster (un ampli d’une grande
finesse dans l’aigu) et offre une saturation plus chaude et plus douce.
2•1
* Tous les noms de produits sont des marques commerciales de leurs détenteurs respectifs. Ceux-ci ne sont nullement associés
ni affiliés à Line 6. Les noms de produits, descriptions et illustrations servent uniquement à faciliter l’identification des
produits étudiés par Line 6 pour élaborer ses modèles. MARSHALL® est une marque déposée de Marshall Amplification,
Plc.
Page 46

Modèles d’amplis et d’enceintes
Line 6 Insane
ROUGE: “Line 6 Insane”. Avec ce modèle, nous voulions augmenter le niveau à un point tel
que la saturation frôle le point de fusion de l’ampli. Ce modèle vous propose un son de saturation
2•2
à lampes d’une richesse à faire mourir de jalousie tous les amplis de la planète, tout en préservant
la définition et le caractère sonore. Le grave est d’une présence inouïe et le timbre d’une flexibilité
étonnante. Drive à droite toute, sans pitié!
VERT: “Line 6 Layer”. Quand “Line 6 Clean” rencontre “Line 6 Drive” Comme nous
venons de l’expliquer, de nombreux guitaristes et producteurs ont utilisé simultanément toute
une série d’amplis, chacun apportant sa contribution au son global. La commande Drive fait
office de commande de mélange: à fond à gauche vous avez un son lourd “21st Century Clean”
tandis qu’à fond à droite, se trouve un “Ultra-drive” décapant. Entre ces deux extrêmes, vous avez
tout ce qu’il faut pour mettre une salle à genoux.
Small Tweed
ROUGE: “Small Tweed”. Basé sur* un Fender
large”. Ce modèle gronde avec les meilleurs de la meute. L’original ne disposait que d’une seule
commande de timbre, servant principalement à diminuer les aigus.
Nous avons affecté cette fonction à la commande Treble pour ce
modèle d’ampli, ce qui nous laisse avec les commandes Bass et Mid
sur les bras. Nous leur avons donc assigné une fonction en veillant à
respecter l’authenticité de la commande treble pour ce modèle. Les
commandes Bass et Mid ont été transformées en commandes (après
le modèle d’ampli) qui se comportent comme l’égalisation d’une
console de mixage, utilisée éventuellement après l’enregistrement
du signal d’ampli. Pour obtenir le son “Tweed” classique, réglez la
commande Treble un peu au-delà du centre et réglez les commandes
Bass et Mid en position centrale (neutre).
®
Tweed Deluxe Reverb® de 1952 à “panneau
* Tous les noms de produits sont des marques commerciales de leurs détenteurs respectifs. Ceux-ci ne sont nullement
associés ni affiliés à Line 6. Les noms de produits, descriptions et illustrations servent uniquement à faciliter l’identification
des produits étudiés par Line 6 pour élaborer ses modèles. FENDER® et DELUXE REVERB® sont des marques déposées
de Fender Musical Instruments Corporation.
Page 47

Modèles d’amplis et d’enceintes
VERT: “Small Tweed #2”. Basé sur* le Fender
®
Tweed Champ® de 1960. Ce modèle délivre
un son optimal avec une bonne dose de Drive (mais se défend aussi très bien dans la catégorie
“clean”). Au départ, cet ampli a été conçu comme modèle d’entrée de gamme. Toutefois, de
nombreux rockeurs ont bien vite découvert qu’il produisait de superbes
sons saturés à niveau relativement bas. D’innombrables solos de guitare
classiques des années 1950 ont ainsi été joués avec un Champ®. Le
Champ® n’était équipé d’aucune commande de tonalité mais seulement
d’un réglage de volume. Vous pouvez facilement recréer le son classique du
Champ® avec votre Floor POD Plus. Laissez simplement les commandes
Bass, Mid et Treble sur “12 heures” (en position “neutre” donc).
L’oisiveté étant mère de tous les vices, nous avons tout de même trouvé
le moyen de mettre les commandes Bass, Mid et Treble au travail sans
compromettre l’authenticité du modèle. Avec ce modèle d’ampli, toutes
les commandes de tonalité interviennent après le traitement par l’ampli, ce qui vous permet
d’égaliser le son comme vous le feriez sur une console de mixage après un enregistrement. Si
vous tenez à une simulation authentique du Champ®, n’oubliez pas de régler vos commandes en
position “midi”.
Tweed Blues
ROUGE: “Tweed Blues”. Basé sur* le combo Fender
tout déclenché: c’est le père du rock’n’roll. Bien que le Bassman® ait été conçu au départ comme
un ampli de basse, il a rapidement été adopté par les guitaristes blues
sur 6 cordes. Il produit les graves épais qu’on attend d’un ampli de
basse mais également ce timbre nasillard typique de Fender® dans les
aigus. Le Bassman® a servi de modèle pour le “Tweed Blues” du
Floor POD Plus. Entre parenthèses: quand Jim Marshall a construit
son premier ampli avec Ken Bran, ils se sont largement inspirés de ce
Bassman®. Le Bassman® est très intéressant par l’interactivité entre
ses commandes Mid et Treble. En effet, la commande Mid n’est pas
conçue comme un passe-bande (comme c’est le cas pour la majorité
des commandes de timbre) mais fonctionne plutôt comme une
seconde commande des aigus. Les deux commandes s’additionnent. Ainsi, quand vous tournez
la commande Mid vers la droite à partir de la position centrale, la commande Treble peut
produire plus d’aigus que vous ne le souhaitez. En revanche, si vous réglez la commande Mid
sur une valeur relativement basse, vous devrez sans doute tourner la commande Treble assez
®
Bassman® 4x10 de 59 Le combo qui a
2•3
* Tous les noms de produits sont des marques commerciales de leurs détenteurs respectifs. Ceux-ci ne sont nullement
associés ni affiliés à Line 6. Les noms de produits, descriptions et illustrations servent uniquement à faciliter l’identification
des produits étudiés par Line 6 pour élaborer ses modèles. FENDER®, CHAMP® et BASSMAN® sont des marques
déposées de Fender Musical Instruments Corporation.
Page 48

Modèles d’amplis et d’enceintes
loin à droite. Comme de nombreux autres amplis ayant servi de base aux modèles du Floor POD
Plus, le Bassman® ne comporte pas de commande Master Volume. Pour obtenir le timbre que le
Bassman® délivre avec des réglages de gain élevés, il fallait le pousser à un point tel qu’il laissait
des séquelles sérieuses chez tous ceux qui se tenaient trop près. Heureusement, le Floor POD Plus
2•4
vous permet d’obtenir ce son à un “niveau studio/chambre à coucher” (et même au casque!).
Réglez Drive sur “4” ou “5”: les meilleurs licks R&B vont vous jaillir des doigts.
VERT: “Boutique #3”. Basé sur* une tête Budda Twinmaster. La philosophie de cet ampli
repose sur la distorsion des lampes de puissance. Sa clé, c’est la simplicité. Le gain de son préampli
est pour le moins décent et ses commandes de tonalité très interactives. En outre, la lampe
redresseuse produit une “dépression”, ce qui donne un son saturé classique idéal pour les petites
salles et les sessions en studio. Comme le Twinmaster original ne dispose pas de commande mid,
nous avons offert un petit bonus à ce modèle en l’équipant d’un réglage du médium après l’ampli
avec la commande Mid. Réglez cette commande sur “midi” si vous vouez un culte de puriste au
Budda.
Black Panel
ROUGE: “Black Panel”. Basé sur* le Blackface Fender
breux artistes blues, country et “roots”, la “gueule noire” Fender® Deluxe Reverb® est un
véritable Graal. Après avoir écouté plusieurs candidats pour la
modélisation, nous sommes tombés sur un superbe ampli de 1964.
La majorité des utilisateurs du Deluxe Reverb® règlent cet ampli sur
“7” car il produit alors un son rocailleux qui s’éclaircit dès que vous
diminuez légèrement le volume de la guitare. Ecoutez le timbre qui,
pour ce modèle, dépend de façon très marquée du réglage Drive:
pour des réglages “clean”, vous obtenez un son clairement défini et
“présent”, tandis que les aigus sont atténués progressivement quand
vous augmentez la valeur Drive. Pour ce modèle, la commande Mid
permet d’accentuer le médium à la sortie de l’ampli et augmente la flexibilité dans cette plage.
Une fois de plus, si la commande Mid se trouve à “midi”, vous obtenez le son classique d’un
Fender® Deluxe Reverb®.
®
Deluxe Reverb®. Pour de nom-
* Tous les noms de produits sont des marques commerciales de leurs détenteurs respectifs. Ceux-ci ne sont nullement
associés ni affiliés à Line 6. Les noms de produits, descriptions et illustrations servent uniquement à faciliter l’identification
des produits étudiés par Line 6 pour élaborer ses modèles. FENDER®, DELUXE REVERB® et BASSMAN® sont des
marques déposées de Fender Musical Instruments Corporation.
Page 49

Modèles d’amplis et d’enceintes
VERT: “Black Panel #2”. Basé sur* un Blackface Fender® Twin
Reverb® de 1965. Tout le monde a joué dessus, des musiciens jazz
et country aux rockeurs purs et durs. Je me souviens encore que
Johnny Winter et Rick Derringer (me ferais-je vieux?) avaient
empilé six Twins en pyramide. Nous étions au deuxième balcon
et même là c'était encore VRAIMENT fort. Le Twin offre une
flexibilité sonore remarquable et s’adapte à d’innombrables
situations différentes. C’est un ampli qui n’est jamais saturé à
l’extrême mais qui, en revanche, est capable de se faire entendre
(à un volume incroyable). C’est l’ampli du classique son surf. Une bonne dose de réverb à
ressorts (Spring), du trémolo, le volume à fond et… cherchez les bikinis.
Modern Class A
ROUGE: “Modern Class A”. Basé sur* un Matchless Chieftain
Le Matchless Chieftain de 1996, l’original du modèle “Modern
Class A”, est un ampli fait main et hors de prix. Le Matchless est un
ampli moderne Class A (d’où son nom) doté de lampes EL34 et au
son unique (en grande partie grâce à son égalisation sophistiquée)
du genre “futur rétro”. La légère distorsion est typique des amplis
Class A: c’est presque de la “hifi” dans un grand ampli rock’n’roll.
VERT: “Brit Class A #3”. Ce modèle est basé* sur le canal 1 du superbe Vox® AC 15 de
1960. Encore un modèle d’ampli inspiré de Vox. Le son ressemble à celui du Vox® AC 30
(que nous avons aussi utilisé pour les modèles “Brit Class A” et
“Brit Class A #2” du Floor POD Plus) mais le boítier est plus
petit (un haut-parleur de 12” au lieu de deux); ce modèle a un
son plus doux, aux accents de “bois”. Cet ampli ne disposait lui
aussi que d’une commande de tonalité qui servait à réduire l’aigu.
Nous l’avons naturellement conservée en plaçant les commandes
bass et mid après le modèle d’ampli, ce qui vous permet de
modifier ces plages de fréquences si nécessaire. Pour obtenir le
son UK original, réglez les commandes Bass et Mid sur “midi”
(en position neutre) et jouez avec la commande Treble.
2•5
* Tous les noms de produits sont des marques commerciales de leurs détenteurs respectifs. Ceux-ci ne sont nullement
associés ni affiliés à Line 6. Les noms de produits, descriptions et illustrations servent uniquement à faciliter l’identification
des produits étudiés par Line 6 pour élaborer ses modèles. FENDER® et TWIN REVERB® sont des marques déposées de
Fender Musical Instruments Corporation. VOX® est une marque déposée de Vox R&D Limited.
Page 50

Modèles d’amplis et d’enceintes
Brit Class A
ROUGE: “Brit Class A”. Basé sur* un Vox® AC 30. Au début des années 1960, le
paysage musical a commencé à changer et les guitaristes se sont mis à réclamer un son plus
2•6
clair et plus brillant. La Jennings Company, fabriquant les amplis Vox®, a donc ajouté des
commandes Treble et Bass (ainsi qu’un étage d’amplification
12AX7 supplémentaire) et a appelé ce nouveau circuit “Top
Boost”. L’AC 30 avec Top Boost a été popularisé par les grands
groupes britanniques de l’époque. Le caractère unique du son
Vox® vient surtout du fait que les amplis “Class A” saturent de
façon complètement différente des modèles “Class AB”. Brian
May (Queen), Mike Campbell (Tom Petty & Heartbreakers) et
The Edge (U2) ont tous joué sur l’AC 30. Avec ce modèle, la
commande Mid du Floor POD Plus reproduit la fonction de la
commande CUT de l’AC 30. Bien qu’il soit généralement utilisé avec un son relativement
clair, l’AC 30 produit une distorsion remarquablement chaleureuse (écoutez donc Brian May
sur les premiers albums de Queen).
VERT: “Brit Class A #2”. Basé sur* le canal Normal d’un Vox® AC-30 sans Top Boost.
Comme nous l’avons déjà dit, les amplis Vox® ont été les premiers à être conçus spécialement
pour guitare électrique (certains amplis d’autres fabricants avaient même des entrées
“Accordion”! Une polka?) et les premiers à être dotés de circuits
Class A pour amplis de puissance plutôt que de circuits Class AB
très répandus à l’époque. Nous avons eu la chance de tomber sur
ce qui semble avoir été un des AC 30 favoris de Bryan Adams pour
l’enregistrement. Lenny Kravitz s’en servait d’ailleurs la semaine
précédant le début des tests. C’est un des bijoux d’une fabuleuse
collection d’amplis vintage mis en location à Los Angeles (où se
trouve le siège de Line 6). Nous avons ensuite acheté cet ampli et
affiné notre modélisation pour vous présenter ce modèle pour Floor
POD Plus. Si vous êtes à la recherche d’un son à l’accent britannique, commencez donc par
celui-ci. Comme l’AC 15 (ci-dessus), l’AC 30 NTB n’a qu’une commande treble, ce qui
laisse les commandes Bass et Mid du Floor POD Plus disponibles pour ajouter (après le
modèle d’ampli) des possibilités de traitement supplémentaires. La position “midi” neutralise
ces commandes.
* Tous les noms de produits sont des marques commerciales de leurs détenteurs respectifs. Ceux-ci ne sont nullement
associés ni affiliés à Line 6. Les noms de produits, descriptions et illustrations servent uniquement à faciliter l’identification
des produits étudiés par Line 6 pour élaborer ses modèles. VOX® est une marque déposée de Vox R&D Limited.
Page 51

Modèles d’amplis et d’enceintes
Brit Blues
ROUGE: “Brit Blues”. Basé sur* une tête Marshall® JTM-45 de
1964~65. Bien que le célèbre son associé avec les amplis Marshall®
Plexi vienne en fait d’une version 100W de la fin des années 1960,
c’est le JTM-45 de 50W qui a servi de base au modèle suivant de
notre Floor POD Plus. Avec son logo carré (précédant le logo
Marshall® en cursive) et sa plaque avant en plexiglas doré, le JTM45 a marqué le passage du son Marshall plus doux de type Fender®
au célèbre son, brillant et “crunchy” des Marshall ultérieurs.
VERT: “California Crunch #1”. Basé sur* un Mesa/Boogie
II-C+. Mesa/Boogie® a probablement été le premier fabricant d’amplis
“boutique”. Boogie se fait remarquer à la fin des années ‘70 et au début
des années ‘80 en ajoutant des commandes Master Volume et des étages
de gain supplémentaires à des amplis dotés de circuits de type Fender®.
Vous distinguez l’héritage Fender® mais avec plus de pêche dans le
médium. Ce modèle est basé sur le canal “Clean” d’un classique Mesa/
Boogie® Mark II-C, pourvu des améliorations apportées par la version
“+” du circuit Mark II-C.
®
Mark
Brit Classic
ROUGE: “Brit Classic”. Basé sur* le fameux Marshall
par les connaisseurs du monde entier. Au moment de la fabrication de
cet ampli (vers 1968), Marshall® avait renoncé aux lampes Fender®
6L6 et n’utilisait plus que des lampes EL34. Autre différence majeure,
les changements incontournables du transformateur d’alimentation et
de sortie(après toutes nos recherches, nous sommes incollables!). Ces
changements sont à l’origine du son qui restera associé à la guitare rock.
Les amplis de cette époque ne disposaient pas encore de commande
Master Volume: il fallait donc pousser le “Mark III Super Amp” à fond
pour obtenir ce son caractéristique (et déclarer la guerre aux voisins).
Hendrix s’est servi de Marshalls de cette période; 20 ans plus tard, les deux
premiers albums de Van Halen doivent leur “Brown Sound” à un Plexi de
100W. Pour produire un son crunch sur un Plexi, il faut régler le niveau
et toutes les commandes de tonalité sur 10! Pour rester aussi fidèle que possible à l’original, c’est
®
Plexi. Recherché
2•7
* Tous les noms de produits sont des marques commerciales de leurs détenteurs respectifs. Ceux-ci ne sont nullement
associés ni affiliés à Line 6. Les noms de produits, descriptions et illustrations servent uniquement à faciliter l’identification
des produits étudiés par Line 6 pour élaborer ses modèles. MARSHALL® est une marque déposée de Marshall Amplification
Plc. MESA/BOOGIE® est une marque déposée de Mesa/Boogie, Ltd. FENDER® est une marque déposée de Fender
Musical Instruments Corporation.
Page 52

Modèles d’amplis et d’enceintes
exactement ce que nous vous invitons à faire avec le “Brit Classic”. Sur le Floor POD Plus, réglez
les commandes Mid et Treble au maximum et la commande Bass sur “9 ou 10 heures” quand
vous utilisez le modèle “Plexi” et vous offrirez une solide dose de rock à tout le voisinage.
VERT: “California Crunch #2”. Basé sur* le canal “Drive” du Mesa/Boogie® Mark II-C+.
2•8
Jouez donc quelques licks de Santana…
Brit Hi Gain
ROUGE: “Brit Hi Gain”. Basé sur* un Marshall JCM 800. Ce
modèle d’ampli vous comblera si vous êtes un inconditionnel
du son du JCM 800, un des amplis Marshall modernes les plus
populaires. Avec cette version actualisée du Plexi, Marshall a
suivi la tendance à la hausse de la préamplification et séduit une
nouvelle génération de guitaristes rock. A la différence des modèles
antérieurs, l’égalisation se trouve derrière les lampes du préampli.
Nous avons travaillé sur un JCM 800 de 1990 avec commande
Master Volume pour créer ce modèle. A propos, savez-vous que
sur certaines versions du JCM800, la distorsion est produite en
saturant une diode? L’ampli que nous avons modélisé utilise une
lampe pour la distorsion. Voici le son metal qui a fait de Marshall
un nom de légende. Bien qu’en règle générale, les guitaristes qui utilisent un Marshall ne
recherchent pas un son clean, ce son vaut le détour: essayez donc une valeur Drive peu
élevée. Si vous êtes rockeur dans l’âme, donnez un bon coup de drive à droite…
VERT: “Boutique #1”. Basé sur* le canal “Clean” du Dumble® Overdrive Special.
Le Dumble® Overdrive Special est un de ces amplis customisés et hors de prix que peu
de guitaristes ont l’occasion d’approcher au cours d’une vie. Chaque ampli Dumble® est
légèrement différent car ils ont été fabriqués pour un client particulier, en fonction de son
type de jeu et de ses goûts. Ce modèle est donc le fruit de l’étude de plusieurs Dumble®
Overdrive Special. En dépit de la personnalisation de chaque ampli, les Dumbles ont toute
une série de traits en commun: le canal Clean est très sensible à l’attaque et d’une dynamique
exemplaire. Le canal Drive propose un sustain épais, fluide et chantant qui conserve sa
définition à travers une forte saturation. Les commandes de tonalité du Floor POD Plus pour
ce modèle d’ampli sont aussi subtiles que celles du Dumble® original.
* Tous les noms de produits sont des marques commerciales de leurs détenteurs respectifs. Ceux-ci ne sont nullement
associés ni affiliés à Line 6. Les noms de produits, descriptions et illustrations servent uniquement à faciliter l’identification
des produits étudiés par Line 6 pour élaborer ses modèles. MESA/BOOGIE® est une marque déposée de Mesa/Boogie,
Ltd. MARSHALL® est une marque déposée de Marshall Amplification Plc. DUMBLE® est une marque déposée de
Howard Alexander Dumble.
Page 53

Modèles d’amplis et d’enceintes
TreadPlate
ROUGE: “TreadPlate”. Basé sur* un Mesa/Boogie® Dual
Rectifier® Tremoverb de 1994. Un modèle d’ampli qui vous
permet de produire ce son serré et “High Gain”, caractéristique
de groupes comme Dream Theater ou Metallica. Mesa/Boogie® se
fait remarquer à la fin des années 1970 et au début des années 1980
en ajoutant des commandes Master Volume et des étages de gain
supplémentaires à des amplis dotés de circuits de type Fender®.
Vous distinguez l’héritage Fender® mais avec plus de pêche dans le
médium. Les commandes de timbre du Dual Rectifier sont placées
après la distorsion et, comme c’est le cas de la section d’égalisation
sur la majorité des amplis que nous avons modélisés, chaque commande de timbre interagit
avec les autres et avec la commande Drive. Avec des réglages drive élevés, vous pouvez
atténuer le médium et accentuer le grave pour obtenir un superbe son grunge de Seattle.
VERT: “TreadPlate #2”. Basé sur* une tête Mesa/Boogie® Dual Rectifier® de 1995. Comme
le combo Tremoverb modélisé avec le “TreadPlate”, le Dual Rectifier® s’inscrit dans une
lignée d’amplis plus modernes, à gain élevé, très prisés par les “chevelus”. Contrairement aux
premiers Boogies, les commandes de tonalité du Dual Rectifier ont une plus grande influence
à niveau élevé, ce qui permet d’atténuer le médium et de booster le grave.
2•9
Modern Hi Gain
ROUGE: “Modern Hi Gain”. Basé sur* un Soldano X88R. Un son Soldano sérieusement
saturé avec égalisation après la distorsion du préampli. Ce son sursaturé est idéal pour des
groupes thrash metal ou grunge mais peut aussi être utilisé plus subtilement par des artistes
comme Eric Clapton. C’est un bon modèle d’ampli si vous recherchez un son actuel à la
Van Halen ou Joe Satriani. Le modèle “Modern Hi Gain” du Floor POD Plus est basé sur
un préampli rack de Mike Soldano. Vous vouliez savoir jusqu’où un préampli à lampes peut
envoyer la sauce? Le X88R que nous avons étudié pour créer ce modèle d’ampli aurait fait
fureur dans les studios de Los Angeles à la fin des années 1980.
* Tous les noms de produits sont des marques commerciales de leurs détenteurs respectifs. Ceux-ci ne sont nullement
associés ni affiliés à Line 6. Les noms de produits, descriptions et illustrations servent uniquement à faciliter l’identification
des produits étudiés par Line 6 pour élaborer ses modèles. MESA/BOOGIE® et RECTIFIER® sont des marques déposées
de Mesa/Boogie, Ltd. FENDER® est une marque déposée de Fender Musical Instruments Corporation.
Page 54

Modèles d’amplis et d’enceintes
VERT: “Modern Hi Gain #2”. Basé sur* une tête Soldano SLO
(Super Lead Overdrive). Contrairement au préampli X88R utilisé
pour le modèle “Modern Hi Gain” du Floor POD Plus, le SLO
dispose d’une commande Presence ainsi que d’autres détails faisant
2•10
toute la différence. Avec une valeur Drive élevée, vous allez
découvrir ce que c’est le sustain: jouez une note et allez manger un
bout – quand vous reviendrez, votre note sera toujours là!
Fuzzbox
ROUGE: “Fuzzbox”. Basé sur* un Arbiter® Fuzz Face. Même si techniquement parlant,
l’Arbiter® Fuzz Face de 1960 n’est pas un ampli, ses caractéristiques inimitables lui valent
bien de figurer parmi les modèles d’ampli du Floor POD Plus. Il s’agit en fait d’une pédale
Fuzz qui produisait une superbe distorsion avec des transistors à
large bande. Ce type de distorsion “bourdonnante” a fait un retour
en force avec la scène alternative et grunge. Jimi Hendrix a été
l’un des premiers guitaristes à populariser la Fuzz Face aux EtatsUnis mais notre modèle propose des sons bien plus saturés que ce
que vous trouverez sur “Are You Experienced”. Essayez donc de
jouer “Satisfaction” des Stones ou le solo du morceau “American
Woman” des Guess Who. Les commandes Bass, Mid et Treble
permettent d’aller bien au-delà des sons proposés par l’effet Fuzz
Face et de générer vos propres sons fuzz. Soit dit en passant: pour enregistrer “Purple Haze”,
Jimi n’a même pas utilisé d’ampli. Il a branché un Fuzz Face directement à un ampli de
puissance Orange® relié à une enceinte 4x12. C’est le genre de son que vous retrouvez
ici…
VERT: “Boutique #2”. Basé sur le canal Drive d’un Dumble® Overdrive Special (décrit
plus haut). Si vous aimez le son Dumble®, essayez le modèle Line 6 Crunch: vous serez en
terrain connu.
* Tous les noms de produits sont des marques commerciales de leurs détenteurs respectifs. Ceux-ci ne sont nullement
associés ni affiliés à Line 6. Les noms de produits, descriptions et illustrations servent uniquement à faciliter l’identification
des produits étudiés par Line 6 pour élaborer ses modèles. ARBITER® est une marque déposée de Arbiter Group, Plc.
ORANGE® est une marque déposée de Orange Personal Communications Services, Limited. DUMBLE® est une marque
déposée de Howard Alexander Dumble.
Page 55

Modèles d’amplis et d’enceintes
Tube Preamp
ROUGE: “Tube Preamp”. Pas vraiment un ampli de guitare mais, une fois lancés, rien
n’a pu nous arrêter. Notre raisonnement a été le suivant: quand les musiciens vont découvrir
le Floor POD Plus, ils vont vouloir l’utiliser pour tout: ajouter une touche de chaleur aux
claviers, une bonne dose de distorsion à la batterie et une once de fuzz au chant. Il faut donc
leur fournir les outils nécessaires. Et voilà le résultat! Grâce à notre modèle “Tube Preamp”,
vous pouvez chauffer n’importe quelle source sonore, comme les producteurs et ingénieurs du
son font souvent en studio avec du matériel vintage à lampes. Pour obtenir un chant encore
plus clair, faites passer vos pistes vocales par le Floor POD Plus. Vous pouvez aussi réveiller
une piste de basse synthé en envoyant son signal au Floor POD Plus et en réglant ad lib les
commandes Drive et EQ de ce dernier. Bien qu’il ne s’agisse pas à proprement parler d’un
modèle d’ampli de guitare, il permet de produire de superbes sons de guitare. Essayez-le aussi
comme boítier d’insertion directe pour basse. Dans ce cas, nous vous conseillons d’utiliser
la commande Drive comme la commande Mix d’un processeur d’effet: vous déterminez
ainsi à quel point le signal est traité. Il vaut généralement mieux éviter de mélanger le son
pré-Floor POD Plus avec le son post-Floor POD Plus car cela produit un effet de filtre en
peigne. Branchez plutôt la source sonore directement au Floor POD Plus et écoutez le signal
après son traitement par le Floor POD Plus. Quand les commandes de tonalité sont sur “12
heures”, l’égalisation est “neutre”.
VERT: “Jazz Clean”. Basé sur* le classique Roland® JC-120. Cet
ampli à transistors est célèbre pour sa sonorité claire et son chorus
stéréo. Quand vous jouez avec le modèle “Jazz Clean”, poussez la
commande Treble: vous obtiendrez un son clean scintillant qui se
distinguera dans tout mixage. Vous retrouverez aussi facilement le
son “New Wave” des années 1980. Par contre, pour produire un son
plus doux et “jazzy”, diminuez réglage de la commande Treble et
augmentez celui des commandes Bass et Mid. C’est la meilleure
façon de produire une réponse neutre et un son bien équilibré sur
toute l’étendue du manche, pour des suites mélodiques d’accords
jazzy ou de simples phrasés.
2•11
* Tous les noms de produits sont des marques commerciales de leurs détenteurs respectifs. Ceux-ci ne sont nullement
associés ni affiliés à Line 6. Les noms de produits, descriptions et illustrations servent uniquement à faciliter l’identification
des produits étudiés par Line 6 pour élaborer ses modèles. ROLAND® est une marque déposée de Roland Corporation.
Page 56

Modèles d’amplis et d’enceintes
Modèles d’enceintes
Le Floor POD Plus propose les modèles d’enceintes suivants. En tournant la commande
Amp Models, vous choisissez une combinaison ampli/enceinte. Vous pouvez choisir
2•12
différentes enceintes à associer avec l’ampli en appuyant sur la commande Amp Models
puis en la maintenant enfoncée tout la tournant pour sélectionner une autre enceinte.
Vous pouvez aussi sélectionner une autre enceinte en maintenant le bouton Manual
enfoncé et en tournant la commande Amp Models. Les témoins jaune entourant la
commande indiquent l’enceinte choisie.
Modèle
1x8
1x12s
2x12
4x10s
4x12
No Cab
Basé sur* Nom
1960 Fender® Tweed Champ
1952 Fender® Tweed Deluxe Reverb
®
®
Line 6 Clean
Line 6 Crunch
1960 Vox® AC-15 Line 6 Drive
1964 Fender® Blackface Deluxe Reverb
®
Line 6 Insane
Line 6 1x12 Small Tweed
1965 Fender® Blackface Twin Reverb
®
Tweed Blues
1967 Vox® AC-30 Black Panel
1995 Matchless Chieftain Modern Class A
Line 6 2x12 Brit Class A
1959 Fender® Bassman
®
Brit Blues
Line 6 4x10 Brit Classic
Marshall® de 1996 avec haut-parleurs 30 vintage Brit Hi Gain
Marshall® de 1978 avec haut-parleurs 70 d’origine TreadPlate
1968 Marshall® Basketweave avec Greenbacks Modern Hi Gain
Line 6 4x12 Fuzz Box
Nous vous conseillons d’utiliser ce modèle d’enceinte avec le modèle
Tube Preamp
Tube Preamp pour des sources autres que la guitare. Il est sélectionné
par défaut quand vous activez le modèle d’ampli Tube Preamp.
* Tous les noms de produits sont des marques commerciales de leurs détenteurs respectifs. Ceux-ci ne sont nullement
associés ni affiliés à Line 6. Les noms de produits, descriptions et illustrations servent uniquement à faciliter l’identification
des produits étudiés par Line 6 pour élaborer ses modèles. FENDER®, CHAMP®, DELUXE REVERB®, TWIN
REVERB® et BASSMAN® sont des marques déposées de Fender Musical Instruments Corporation. VOX® est une
marque déposée de Vox R&D Limited. MARSHALL® est une marque déposée de Marshall Amplification Plc.
Page 57

Modèles d’amplis et d’enceintes
Réglage en fonction des enceintes utilisées
Vous pouvez régler le signal de sortie du Floor POD Plus afin de produire le signal idéal
pour l’installation utilisée quand le commutateur Amp/Direct est réglé sur Amp. Par
défaut, le Floor POD Plus s’attend à être branché à une enceinte à dos ouvert. Si vous
utilisez un autre type d’enceinte, changez le mode de réglage d’enceinte. Pour cela,
procédez comme suit:
Maintenez le bouton Save enfoncé en branchant l’adaptateur.
•
L’écran affiche alors le message “Cab” pour indiquer que vous êtes en mode de réglage
•
d’enceinte.
L’écran affiche la banque d’enceintes sélectionnée.
•
Appuyez sur les commutateurs Bank haut ou bas pour changer la sélection de la façon
•
suivante:
2•13
Mode Connexion du Floor POD
Plus
C-a à un ampli de puissance dos fermé (idéal pour 4x12)
C-b à un ampli de puissance dos ouvert (idéal pour 1x12)
C-c (défaut) à un combo/une tête dos ouvert (idéal pour 1x12 ou
C-d à un combo/une tête dos fermé (idéal pour 4x12)
Appuyez sur Save pour mémoriser votre choix.
•
Enceintes utilisées
2x12)
Page 58

effets
Outre des modèles d’amplis de collection, le Floor POD Plus propose aussi de magnifiques
effets. Pour choisir un effet, tournez la commande Effects. Lorsque vous sélectionnez
un effet, le Floor POD Plus se charge de régler les paramètres de l’effet pour produire
automatiquement un son optimalisé. Vous pouvez changer le caractère de l’effet choisi en
tournant la commande Effect Tweak.
Reverb – L’effet Reverb simule l’acoustique d’une pièce. Avec le Floor POD Plus, l’effet
de réverbération est toujours disponible. Vous pouvez régler le niveau de réverbération
avec la commande Reverb. Maintenez le bouton Manual ou la commande Amp Models
enfoncée et tournez la commande Reverb pour régler le paramètre Reverb Decay
Time. Vous réglez ainsi la taille de la pièce dont l’acoustique est simulée. Pour couper la
réverbération, tournez la commande à fond à gauche. La réverbération est activée quand
le témoin de cette commande est allumé.
II y a deux types de réverbération de base issus du POD®: une réverbération à ressort (spring)
et une simulation numérique de réverbération de salle (room). Le type de réverbération
est automatiquement sélectionné quand vous choisissez un modèle d’ampli. En général,
si l’ampli à l’origine du modèle avait une réverbération à ressort, ce type de réverb lui
est associé. Si l’ampli n’avait pas de réverb, nous proposons une réverbération simulant
l’acoustique d’une pièce. Vous trouverez ci-dessous les types de réverbération associés aux
modèles d’ampli.
Effets
3•1
Nom en façade et couleur du témoin
Line 6 Clean - Rouge Room Brit Class A - Rouge Room
Line 6 Clean - Vert Spring Brit Class A - Vert Room
Line 6 Crunch - Rouge Spring Brit Blues - Rouge Room
Line 6 Crunch - Vert Room Brit Blues - Vert Spring
Line 6 Drive - Rouge Room Brit Classic - Rouge Room
Line 6 Drive - Vert Room Brit Classic - Vert Spring
Line 6 Insane - Rouge Room Brit Hi Gain - Rouge Room
Line 6 Insane - Vert Room Brit Hi Gain - Vert Room
Small Tweed - Rouge Room TreadPlate - Rouge Room
Small Tweed - Vert Room TreadPlate - Vert Room
Tweed Blues - Rouge Spring Modern Hi Gain - Rouge Room
Tweed Blues - Vert Room Modern Hi Gain - Vert Room
Black Panel - Rouge Spring Fuzz Box - Rouge Room
Black Panel - Vert Spring Fuzz Box - Vert Room
Modern Class A - Rouge Spring Tube Preamp - Rouge Room
Modern Class A - Vert Room Tube Preamp - Vert Room
Réverbération
Nom en façade et couleur du témoin
Réverbération
Page 59

Effets
3•2
Delay – Parfois appelé “écho” ou “slap back”, le delay répète le signal de façons diverses
et intéressantes. Le Floor POD Plus propose 6 modèles de delay:
Tape vous offre toute la chaleur d’un écho à bande classique. L’aigu se détériore avec
chaque répétition, dans le plus pur style d’écho à bande. Et vous ne devez jamais changer
les bandes!
Multi-Tap a un son semblable à l’effet Tape mais dispose d’un motif de répétitions basé
sur* le Roland® Space Echo.
Digital propose des échos d’une fidélité numérique cristalline.
Reverse est une version inversée de Digital.
Sweep Echo émule un écho à bande avec effet de filtre à balayage sur les répétitions
offrant des possibilités inédites de réglage de tonalité de ces répétitions.
Analog produit un écho analogique vintage en cascade avec un son saturé plus sombre.
Pour tous les modèles Delay, la commande Delay détermine le niveau des répétitions et
le commutateur au pied Tap détermine le temps de retard. Pour utiliser le commutateur
au pied Tap, il suffit de l’actionner selon le tempo voulu pour que les répétitions
adoptent ce tempo. Vous pouvez affiner le réglage du temps de retard en maintenant le
bouton Manual ou la commande Amp Models enfoncée tout en tournant la commande
Bass. Avec des temps de retard relativement rapides, le nombre de répétitions diminue
pour produire des sons rockabilly et surf. Maintenez le bouton Manual ou la commande
Amp Models enfoncée et tournez la commande Delay pour régler la réinjection
(feedback) du delay. A propos, le niveau maximum du delay permet aux répétitions
d’avoir un volume supérieur à celui du signal original. Cela vous permet d’obtenir des
effets de retard auxquels The Edge (U2) nous a habitués. Pour couper le delay, utilisez le
commutateur DLY en mode On/Off. Pour en savoir plus, voyez le chapitre 1.
Maintenez le bouton Manual ou la commande Amp Models enfoncée et tournez la
commande Mid pour régler divers paramètres spécifiques au modèle choisi, décrits à la
page suivante.
* Tous les noms de produits sont des marques commerciales de leurs détenteurs respectifs. Ceux-ci ne sont nullement
associés ni affiliés à Line 6. Les noms de produits, descriptions et illustrations servent uniquement à faciliter l’identification
des produits étudiés par Line 6 pour élaborer ses modèles. ROLAND® est une marque déposée de Roland Corporation.
Page 60

Modèle de delay Paramètres de delay
Tape Intensité du pleurage et scintillement
Multi-Tap Intensité de la modulation
Digital Transposition par 1/2 tons de –12 à +12 avec
modulation en anneau
Reverse Intensité de la modulation
Sweep Echo Vitesse du LFO pour le balayage
Analog Intensité de la modulation
Compressor – Un compresseur comprime le signal d’entrée afin d’accentuer les
signaux les plus doux et d’atténuer les signaux les plus forts. En d’autres termes, il réduit
la plage de dynamique. La compression s’exprime souvent en taux comme 3:1 ou 6:1.
Plus le taux est élevé (plus le rapport entre les deux valeurs est inégal), moins il y a de
différence entre les signaux les plus forts et les plus doux. La commande Compressor
règle le taux de compression. Elle propose six réglages: coupé, 1.4:1, 2:1, 3:1, 6:1 et ∞:1.
Quand la commande Compressor est au maximum, la compression est infinie et l’effet
se transforme en limiteur. Notez que le compresseur est avant le modèle d’ampli et agit
comme une pédale de compression. La compression est activée quand le témoin de cette
commande est allumé.
Effets
3•3
Gate – Un effet Gate permet d’éliminer le bruit indésirable produit lorsque vous ne
jouez pas, notamment lorsque vous utilisez des réglages de gain élevés. Vous pouvez régler
le seuil de l’effet gate avec la commande Gate. Tournez la commande Gate vers la droite
pour accentuer l’effet ou vers la gauche pour le couper. Maintenez le bouton Manual ou la
commande Amp Models enfoncée et tournez la commande Gate pour régler le temps
de chute de l’effet Gate. Le Gate est activé quand le témoin de cette commande est
allumé.
Page 61

Effets
3•4
Chorus – Le Floor POD Plus propose deux chorus différents. Chorus 1 est modulé
par une onde carrée et évoque plutôt un chorus de type “effet rack”. Chorus 2 est modulé
par une sinusoïde avec plus de réinjection et produit un effet plus riche en harmoniques.
Chorus 2 a été travaillé pour ressembler* à l’effet classique d’une vieille pédale Roland®
CE-1. La commande Effect Tweak détermine l’intensité et la vitesse du chorus.
Flanger – Un flanger recrée l’effet sonore d’un “avion à réaction qui décolle” et a été
utilisé sur d’innombrables morceaux des années 1970. Ecoutez “Barracuda” de Heart par
exemple. A l’origine, cet effet était rarement utilisé car les ingénieurs du son devaient
appuyer sur une des bobines de la bande. Cette pression ralentissait progressivement
la vitesse de la bande et créait cet effet. Comme la partie de la bobine sur laquelle ils
appuyaient est appelée “flange” (joue ou plateau) en anglais, l’effet en a tiré son nom.
Quand l’effet a pu être produit de façon électronique et est devenu disponible sous forme
de pédale, il a rapidement fait partie de l’équipement standard des guitaristes.
Le Floor POD Plus propose deux flangers. Flange 1 est un effet sans pré-delay plus subtil
que Flange 2 qui inverse la phase et est nettement plus intense. La commande Effect
Tweak détermine l’intensité et la vitesse du flanger.
Rotary – Cet effet simule* un haut-parleur haute fréquence rotatif devant lequel
se trouve un microphone, comme sur un Leslie®. Les haut-parleurs rotatifs ont deux
vitesses: lente (Slow) et rapide (Fast). L’effet “Rotary Speaker” du Floor POD Plus adopte
une vitesse lente fixe quand la commande Effect Tweak est au minimum et une vitesse
rapide fixe quand la commande Effect Tweak est au-delà de la position centrale (12h).
Lorsque vous passez d’une vitesse à l’autre, vous remarquerez que le changement n’est pas
immédiat mais progressif, comme avec un haut-parleur réel qui doit accélérer ou freiner
pour adapter sa vitesse. La commande Effect Tweak contrôle la vitesse et l’intensité de
l’effet Doppler (modulation de hauteur).
Phaser – Le phaser est basé sur* le MXR
s’intégrant au son global. Les ondulations chaleureuses, organiques et groovy de cet effet
se retrouvent sur d’innombrables albums des années 70, 80, 90 et 2000. La commande
Effect Tweak détermine l’intensité et la vitesse de l’effet.
®
Phase 90, un phaser relativement subtil
U-Vibe – Le légendaire “Uni-Vibe” fit son apparition en 1969, lorsqu’un certain Jimi
Hendrix se mit à l’utiliser. Il s’agit en fait d’un Phase Shifter à 4 étages, surtout connu et
apprécié pour les sons “perlés” et “mouillés” qu’il produit. La commande Effect Tweak
détermine l’intensité et la vitesse de l’effet.
* Tous les noms de produits sont des marques commerciales de leurs détenteurs respectifs. Ceux-ci ne sont nullement
associés ni affiliés à Line 6. Les noms de produits, descriptions et illustrations servent uniquement à faciliter l’identification
des produits étudiés par Line 6 pour élaborer ses modèles. ROLAND® est une marque déposée de Roland Corporation.
LESLIE® est une marque déposée de Suzuki Musical Instrument Manufacturing Co. Ltd. MXR® est une marque déposée
de Dunlop Manufacturing, Inc.
Page 62

Effets
Obi-Wah – Ce filtre “sample & hold” est basé sur* le classique d’Oberheim
Cet effet crée des changements de timbre en accentuant certaines fréquences de façon
aléatoire. La commande Effect Tweak détermine la vitesse et la largeur de bande de
fréquence (Q) de l’effet.
®
.
Tron Up – Ce croisement entre un auto-wah et un filtre à déclenchement est basé
sur* le suiveur d’enveloppe Mu-Tron® III et vous offre tout ce qu’il faut pour un bon son
funk des années 1970. La commande Effect Tweak détermine la sensibilité et la largeur
de bande (Q) de l’effet.
Octave Fuzz – L’Octave Fuzz est une version Line 6 d’un effet fuzz+octave utilisé
par des guitaristes comme Jimi Hendrix à partir de la fin des années 1960. Ecoutez “Little
Sister” de Queens of the Stone Age pour avoir une idée des possibilités de cet effet. La
commande Effect Tweak détermine le niveau et le timbre de l’effet.
Sub Octave – Ce modèle est un Octave Fuzz d’une octave plus bas! Voilà qui fera
pâlir d’envie les adeptes de Moog: une distorsion d’onde carrée massive avec un grain et
une puissance qui en remontrent aux synthés analogiques. La commande Effect Tweak
détermine la balance et le timbre de l’effet.
Comet Trails – Cet effet original Line 6 tiré du FM4 Filter Modeler propose sept
filtres se pourchassant dans tous les sens pour créer un son monumental. La commande
Effect Tweak détermine la vitesse et la largeur de bande (Q) de l’effet.
Ring Modulator – Les modulateurs en anneau viennent à point quand vous
recherchez des sons de guitare distincts, bizarres, étranges et non conventionnels.
Cet effet a un son très percutant et donne l’impression que vous modifiez le signal en
torturant un ordinateur. La commande Effect Tweak détermine la fréquence et la
balance de l’effet.
3•5
Otto Phase – Combinant phaser et effet vocal, cet effet est un suiveur d’enveloppe
pilotant un phaser. Imaginez une version encore plus intéressante de “Tron Up”. La
commande Effect Tweak détermine la sensibilité et la reinjection de l’effet.
Swell – Cet effet se comporte comme une pédale de volume automatique s’ouvrant
pour chaque note ou accord joué. La commande Effect Tweak détermine le temps de
montée en puissance de l’effet.
* Tous les noms de produits sont des marques commerciales de leurs détenteurs respectifs. Ceux-ci ne sont nullement
associés ni affiliés à Line 6. Les noms de produits, descriptions et illustrations servent uniquement à faciliter l’identification
des produits étudiés par Line 6 pour élaborer ses modèles. OBERHEIM® est une marque déposée de Gibson Guitar Corp.
MU-TRON® est une marque déposée de Mark Simonsen.
Page 63

Effets
3•6
Tremolo – Basé sur* le trémolo classique Fender
®
. La commande Effect Tweak
détermine l’intensité et la vitesse de l’effet.
Effect Tweak
Vous trouverez ci-dessous les paramètres propres aux différents modèles pouvant être réglés
avec la commande Effect Tweak.
Modèle d’effet Paramètre 1 Paramètre 2
Tremolo Vitesse Intensité
Chorus 1 Intensité Vitesse
Chorus 2 Intensité Vitesse
Flange 1 Intensité Vitesse
Flange 2 Intensité Vitesse
Rotary Vitesse Intensité
Phaser Vitesse Intensité
U-Vibe Vitesse Niveau
Obi-Wah Vitesse Q
Tron-Up Sensibilité Q
Octave Fuzz Niveau Timbre
Sub Octave Balance Timbre
Comet Trails Vitesse Q
Ring Modulator Fréquence Balance
Otto Phase Sensibilité Réinjection (Feedback)
Swell Montée en puissance –
Vous pouvez régler le paramètre 1 en tournant la commande. Pour régler le paramètre
2, maintenez le bouton Manual ou la commande Amp Models enfoncée et tournez la
commande.
Pour couper les effets, utilisez le commutateur C / FX en mode On/Off. Pour en savoir
plus, voyez le chapitre 1.
* Tous les noms de produits sont des marques commerciales de leurs détenteurs respectifs. Ceux-ci ne sont nullement associés
ni affiliés à Line 6. Les noms de produits, descriptions et illustrations servent uniquement à faciliter l’identification des
produits étudiés par Line 6 pour élaborer ses modèles. FENDER® est une marque déposée de Fender Musical Instruments
Corporation.
Page 64

Presets, Accordeur & Pédale
presets, aCCordeur & pédale
Sélectionner des presets
Le Floor POD Plus propose 124 presets couvrant un large éventail de sons et de styles.
Ces presets ou mémoires (“channels”) contiennent une grande variété de combinaisons
complètes d’amplis et d’effets préprogrammées par les maniaques du son de Line 6. Les
presets sont répartis dans 31 banques de 4 mémoires. Les quatre mémoires sont appelées
A, B, C et D.
Pour sélectionner un preset, passez en mode de sélection de mémoire (voyez le chapitre 1),
utilisez les commutateurs Bank haut/bas pour choisir une banque puis les commutateurs
A~D pour sélectionner une mémoire. Lors de la sélection d’une mémoire, ses réglages ne
sont pas reflétés par la position des commandes: vous avez peut-être laissé la commande
Bass au minimum, par exemple, alors que, pour la mémoire que vous venez de rappeler, ce
paramètre est au maximum.
Pour changer quoi que ce soit, actionnez simplement la commande.
Sauvegarder des réglages
Vous pouvez modifier n’importe quel preset du Floor POD Plus ou créer vos propres
combinaisons et les sauvegarder dans la mémoire de votre choix. Quand vous changez un
réglage, un point (.) apparaít à droite de la lettre indiquant la mémoire choisie à l’écran.
Pour sauvegarder vos réglages, effectuez les opérations suivantes:
4•1
Appuyez sur le bouton Save. Le témoin Save clignote.
•
Utilisez les commutateurs au pied fléchés Bank haut/bas pour choisir la banque (1~31)
•
de destination de vos réglages.
Pour choisir une autre mémoire de destination (A, B, C ou D) que la mémoire affichée,
•
appuyez sur le commutateur correspondant à la mémoire voulue. Appuyez de nouveau
sur ce commutateur ou appuyez sur le bouton Save pour effectuer la sauvegarde.
Pour sauvegarder vos réglages dans la mémoire (A, B, C ou D) affichée, appuyez sur le
•
commutateur correspondant ou sur le bouton Save pour effectuer la sauvegarde.
Les réglages de toutes les commandes sont mémorisés tels quels.
•
Pour annuler une sauvegarde, actionnez une commande ou laissez l’appareil inactif durant
5 secondes après avoir actionné un commutateur ou le bouton Save.
Page 65

Presets, Accordeur & Pédale
Mode de comparaison
Pour connaítre le réglage d’une commande sauvegardé dans une mémoire donnée, passez
en mode de comparaison en maintenant le bouton Save enfoncé durant deux secondes.
4•2
Dorénavant, lorsque vous tournez une commande, les témoins de l’accordeur comparent
la valeur choisie à la valeur programmée. Si les témoins b et TUNER sont allumés, le
réglage de la commande est inférieur au réglage programmé. Si les témoins # et TUNER
sont allumés, le réglage de la commande est supérieur au réglage programmé. Si les trois
témoins de l’accordeur sont allumés, le réglage de la commande correspond au réglage
programmé. Appuyez sur le bouton Save ou Tap pour quitter le mode de comparaison.
Mode manuel
Quand vous sélectionnez une mémoire, tous les réglages proviennent de la mémoire et non
de la position des commandes. Pour bénéficier des réglages effectifs des commandes, vous
pouvez passer en mode manuel en appuyant sur le bouton Manual. Le bouton Manual
s’allume et l’écran n’indique aucune mémoire. Actionnez les commandes pour changer
le son. Pour quitter le mode manuel, appuyez de nouveau sur le bouton Manual. Vous
retrouvez alors la dernière mémoire sélectionnée.
Créer et sauvegarder des configurations personnelles
Si les presets ne suffisent pas, vous pouvez personnaliser votre Floor POD Plus avec vos
propres réglages pour chaque modèle d’ampli, d’effet et de delay disponible. Attention,
scoop: En actionnant les commandes Amp Models, Effects et Delay, vous ramenez les
paramètres correspondants à leur réglage d’usine. Vous pouvez toutefois régler les paramètres
selon vos goûts puis sauvegarder ces réglages pour les rendre directement accessibles avec
les commandes Amp Models, Effects et Delay. Voici comment faire:
Choisissez le type de configuration à sauvegarder: modèle d’ampli, effet ou delay.
•
Réglez les commandes appropriées.
•
Appuyez simultanément sur la commande Amp Models et le bouton Save. Les té-
•
moins Save et Manual clignotent.
L’écran affiche “A” pour indiquer qu’un modèle d’ampli sera sauvegardé. Utilisez les
•
commutateurs Bank haut/bas pour sélectionner la configuration voulue: “A”= modèle
d’ampli, “E”= effets, “d”= delay.
Appuyez sur le bouton Save pour sauvegarder les réglages ou sur le bouton Manual ou
•
TAP pour annuler l’opération.
C’est tout. Lorsque vous réglez la commande Amp Models, Effects ou Delay sur cette
position, vous obtenez directement votre configuration personnelle: toutes les commandes
sont réglées comme vous le souhaitez.
Page 66

Presets, Accordeur & Pédale
Notez le point suivant. Vous avez peut-être remarqué que vous n’avez pas pu choisir une
position pour votre configuration perso. Le Floor POD Plus sauvegarde automatiquement
votre configuration à la position du modèle d’ampli, de l’effet ou du delay sélectionné. Si,
par exemple, vous êtes parti du modèle d’ampli “Line 6 Insane”, vos réglages d’ampli sont
sauvegardés à la position “Line 6 Insane”.
Accordeur (Tuner)
Maintenez le commutateur Tap enfoncé 2 secondes pour activer l’accordeur. Le témoin
TUNER s’allume quand l’accordeur est activé. Jouez une note sur la guitare: l’écran du
Floor POD Plus indique sa hauteur en affichant le nom de la note. Toutes les notes sont
affichées sous forme de bécarres ou de bémols: vous verrez donc “Ab” au lieu de “G#” etc.
Les témoins sous l’écran indiquent si la note est trop haute ou trop basse. Si “b” s’allume,
la note est trop basse. Si “#” s’allume, la note est trop haute. Quand les trois témoins sont
allumés, la note est juste. Pour couper l’accordeur, appuyez sur le bouton Save ou Manual,
ou sur le commutateur Tap.
Diapason de l’accordeur
Quand l’accordeur est activé, vous pouvez changer sa fréquence de référence (son diapason) avec les commutateurs Bank haut/bas. Par défaut, le diapason de l’accordeur a le
réglage A= 440Hz mais vous pouvez le régler sur une plage de 436 à 445Hz. L’écran affiche
la fréquence choisie. Ce réglage est automatiquement sauvegardé et sera en vigueur la
prochaine fois que vous activez l’accordeur.
4•3
Niveau de l’accordeur/Coupure du son
Quand l’accordeur est activé, vous pouvez couper le son ou le laisser passer à un certain
volume. Le commutateur avant de la pédale active et coupe alternativement le son de
l’accordeur. Quand le son de l’accordeur est activé (le témoin wah est allumé), vous pouvez régler son volume avec la pédale de volume/wah. Ce réglage est automatiquement
sauvegardé et sera en vigueur la prochaine fois que vous activez l’accordeur.
Page 67

Presets, Accordeur & Pédale
Rappel de tous les réglages d’usine
Si, pour une raison ou une autre (ou juste pour le fun), vous décidez d’initialiser
tous les réglages de votre Floor POD Plus, procédez comme suit: Appuyez simul-
4•4
tanément sur les commutateurs Bank haut et bas en branchant l’adaptateur.
Après la mise sous tension, l’écran affiche “int” pour indiquer que tous les réglages ont été initialisés. Débranchez l’adaptateur puis rebranchez-le. Terminé!
Calibrer la pédale Vol/Wah
Pour que la pédale du Floor POD Plus bénéficie de la plus grande sensibilité et de la plus
grande plage possible, effectuez les opérations suivantes:
Débranchez l’adaptateur puis actionnez le commutateur avant de la pédale Vol/Wah
•
tout en rebranchant l’adaptateur. L’écran affiche “PC” pour indiquer que vous êtes en
mode de calibrage de la pédale puis “000”.
Enfoncez la pédale (position maximum) et appuyez sur le commutateur A. L’affichage
•
défile jusqu’à “100”.
Relevez la pédale (position minimum) et appuyez sur le commutateur B. L’affichage
•
défile jusqu’à “100”.
Appuyez sur le commutateur C. L’écran affiche une valeur numérique.
•
Appuyez sur le commutateur avant de la pédale puis faites passer la pédale de la posi-
•
tion minimum à la position maximum et observez les témoins entourant la commande
Effects. Le nombre de témoins allumés devrait correspondre à la position de la pédale.
Maintenez le commutateur Tap enfoncé deux secondes pour sauvegarder le calibrage.
•
Débranchez l’adaptateur puis rebranchez-le. C’est fait!
•
Page 68

Appendice A: Modèles d’amplis
Nom en façade et cou-
leur du témoin
Line 6 Clean – Rouge Line 6 Clean Pre Room Oui
Line 6 Clean – Vert Line 6 Twang Pre Spring Non
Line 6 Crunch – Rouge Line 6 Crunch Pre Spring Oui
Line 6 Crunch – Vert Line 6 Crunch #2 Pre Room Non
Line 6 Drive – Rouge Line 6 Drive Post Room Oui
Line 6 Drive – Vert Line 6 Blues Pre Room Non
Line 6 Insane – Rouge Line 6 Insane Post Room Non
Line 6 Insane – Vert Line 6 Layer Post Room Oui
Small Tweed – Rouge Small Tweed Pre Room No
Small Tweed – Vert Small Tweed #2 Pre Room Non
Tweed Blues – Rouge Tweed Blues Pre Spring Non
Tweed Blues – Vert Boutique #3 Pre Room Non
Black Panel – Rouge Black Panel Pre Spring Non
Black Panel – Vert Black Panel #2 Pre Spring Oui
Modern Class A – Rouge Modern Class A Pre Spring Non
Modern Class A – Vert Brit Class A #3 Pre Room Non
Brit Class A – Rouge Brit Class A Pre Room Non
Brit Class A – Vert Brit Class A #2 Pre Room Non
Brit Blues – Rouge Brit Blues Pre Room Oui
Brit Blues – Vert California Crunch #1 Pre Spring Oui
Brit Classic – Rouge Brit Classic Pre Room Non
Brit Classic – Vert California Crunch #2 Post Spring Non
Brit Hi Gain – Rouge Brit Hi Gain Post Room Non
Brit Hi Gain – Vert Boutique #1 Pre Room Non
TreadPlate – Rouge TreadPlate Post Room Non
TreadPlate – Vert TreadPlate #2 Post Room Non
Modern Hi Gain – Rouge Modern Hi Gain Post Room Non
Modern Hi Gain – Vert Modern Hi Gain #2 Post Room Non
Fuzz Box – Rouge Fuzz Box Post Room Non
Fuzz Box – Vert Boutique #2 Post Room Non
Tube Preamp – Rouge Tube Preamp Post Room Non
Tube Preamp – Vert Jazz Clean Pre Room Oui
Nom du modèle
d’ampli
Position de la
pédale Volume
Réverbération Presence
(BRIGHT)
Page 69

Page 70

®
Pilotenhandbuch
Der definitive Reiseführer durch die technologischen Sound-Freuden des Floor POD Plus.
Limitierte elektrophone Ausgabe verfügbar unter www.line6.com/manuals
40-00-0116 Version A
Page 71

Page 72

Die Seriennummer befindet sich an der Unterseite deines Floor POD Plus. Sie beginnt mit den Ziffern
“(21)”. Bitte trage sie hier ein, weil du sie später vielleicht einmal brauchst:
SERIENNR.:
WARNUNG: Um Brand- und Strom-
schlaggefahr zu vermeiden, dieses Produkt
niemals Regen oder Feuchtigkeit aussetzen.
VORSICHT: Um Brand- und Stromschlaggefahr zu vermeiden,
niemals die Schrauben entfernen. Das Produkt niemals selbst
warten. Überlasse das einem qualifizierten Wartungstechniker.
VORSICHT: Dieses Gerät entspricht den Grenzwerten von “Part 15” der FCC-Bestimmungen für Digital-
Geräte der Klasse B. Die Bedienung unterliegt folgenden beiden Bedingungen: (1) Das Gerät darf keine schädlichen
Interferenzen verursachen; (2) das Gerät muss alle empfangenen Interferenzen akzeptieren, darunter auch Interferenzen,
die Funktionsstörungen verursachen könnten.
Der Blitz in einem Dreieck stellt eine
“elektrische Warnung” bezüglich der
benötigten Stromspannung bzw. einer denkbaren Stromschlaggefahr dar.
Das Ausrufezeichen in einem Dreieck
bedeutet “Vorsicht!” Lies dir alle Informationen neben solchen Symbolen sorgfältig
durch.
Lies dir alle Vorsichtsmaßnahmen durch.
Bewahre diese Anweisungen an einem sicheren Ort auf.
Vor dem Einsatz des Floor POD Plus musst du dir alle zutreffenden Punkte und Sicherheitshinweise
durchlesen:
1. Beachte alle auf dem Floor POD Plus selbst und in dieser Anleitung aufgeführten Warnungen.
2. Stelle das Produkt niemals in die Nähe von Wärmequellen, z.B. Heizkörpern, Öfen oder anderen
Geräten, die starke Hitze erzeugen.
3. Sorge dafür, dass weder Fremdkörper noch Flüssigkeiten in das Geräteinnere gelangen.
4. Verbinde das Gerät nur mit einer 100~120V bzw. 230V/47~63Hz-Steckdose (je nachdem, welche
Spannung dein Modell benötigt; siehe das Typenschild des Netzteils).
5. Laufe niemals auf dem Netzkabel. Stelle keine schweren Gegenstände darauf, damit es nicht gequetscht
oder anderweitig beschädigt wird. Besonders in der Nähe der Steckdose und Anschlussbuchse am Gerät
muss das Kabel mit äußerster Vorsicht behandelt werden.
6. Löse den Netzanschluss, wenn du den Floor POD Plus längere Zeit nicht verwenden möchtest.
7. Führe nur die in dieser Anleitung erwähnten Bedienvorgänge aus. In folgenden Fällen muss das Gerät
bei einer anerkannten Kundendienststelle zur Reparatur eingereicht werden:
• wenn eine Flüssigkeit ins Geräteinnere gelangt ist
• wenn ein Fremdkörper in das Gerät gefallen ist
• wenn sich das Gerät abnormal oder nicht mehr in vollem Umfang erwartungsgemäß verhält
• wenn das Gerät hingefallen ist und das Gehäuse beschädigt wurde
8. Setze dich niemals über längere Zeiträume hohen Schallpegeln aus, weil das zu Gehörverlust führen
kann. Achte immer auf einen auch aus medizinischer Warte “vernünftigen” Pegel.
Floor POD Plus Pilotenhandbuch ©2007, Line 6, Inc.
Page 73

Bitte beachten:
Line 6 und POD sind Warenzeichen der Line 6, Inc.
Alle erwähnten Produktnamen, Warenzeichen
und Künstlernamen gehören den betreffenden
Eigentümern, die in keiner Weise mit Line 6 verbunden
sind. Produktnamen, Bilder und Künstlernamen
werden nur zur Veranschaulichung bestimmter
Modelle verwendet, damit man weiß, anhand welcher
Geräte und Sounds Line 6 seine Modelle erstellt
hat. Die Erwähnung oder Abbildung dieser Namen,
Produktbezeichnungen usw. weist jedoch nicht auf eine
Zusammenarbeit oder gar Empfehlung der jeweiligen
Eigentümer hin.
Page 74

Bedienelemente und Anschlüsse
Bedienelemente und Anschlüsse
1•1
1
Amp Models – Mit diesem Regler wählst du eines der 32 Verstärkermodelle,
die samt und sonders vom POD 2.0 stammen. Pro Kategorie (siehe die Beschriftungen
des Reglers) gibt es übrigens zwei Modelle. Beispiel: Es gibt zwei “Black Panel”-Modelle.
Beim einen leuchtet die Diode rot, beim anderen grün. Eine ausführliche Beschreibung
der Modelle findest du in Kapitel 2.
Bei Anwahl eines Verstärkermodells wird automatisch ein passendes Boxenmodell
aufgerufen. Beispiel: Wenn du das “Brit Hi Gain”-Modell wählst (das auf dem Marshall®
JCM 800-Top beruht*), wird als “Cabinet Model” ein Marshall® 4x12-Sound* gewählt.
Um einem Verstärkermodell eine andere Box zuzuordnen, musst du den Amp Models-
Regler hinein drücken und dann daran drehen. Allerdings kann man auch ein Boxenmodell
wählen, indem man den Manual-Taster gedrückt hält, während man an Amp Models
dreht. Eine Übersicht der Boxenmodelle findest du in Kapitel 2.
Der Amp Models-Taster hat zudem eine “Shift”-Funktion. Halte ihn gedrückt, um Zugriff
zu haben auf die Zweitfunktion vieler Regler.
* Alle Produktnamen sind Warenzeichen der betreffenden Hersteller, die in keiner Weise mit Line 6 verbunden sind.
Die Produktnamen, Beschreibungen und Fotos dienen nur dem Zweck einer leichteren Identifizierung der Geräte, die als
Ausgangspunkt für die Line 6-Modelle verwendet wurden. MARSHALL® ist ein eingetragenes Warenzeichen der Marshall
Amplification Plc.
Page 75

Bedienelemente und Anschlüsse
2
Effects – Mit diesem Regler wählst du eines der 16 Effektmodelle. Vom
herkömmlichen Chorus und Flanger bis zum etwas ausgefalleneren “Comet Trails” und
Ringmodulator, findet sich hier alles, was du brauchst. Der rote Diodenkranz zeigt an,
welcher Effekt gerade gewählt ist. Alles Weitere hierzu findest du in Kapitel 3.
1•2
3
Delay – Mit dem Delay-Regler wählst du einen der folgenden 6 Delay-Effekte:
“Tape”, “Multi-Tap”, “Digital”, “Reverse”, “Sweep Echo” oder “Analog”. Der rote Diodenkranz zeigt an, welcher Effekt gewählt ist. Siehe Kapitel 3.
4
Drive – Hiermit regelst du, wie stark der Eingang des gewählten Verstärkermodells
gefordert wird. Wie bei einem Gitarrenverstärker ohne Master Volume-Regler bestimmst
du hiermit, wie bratig der Sound ist.
“Drive Boost” kann man aktivieren, indem man den Manual-Taster oder Amp Models-
Regler gedrückt hält, während man den Drive-Regler von “12 Uhr” aus weiter nach rechts
dreht. Der Sound wird entsprechend “dreckiger” – etwa wie bei einem Verzerrerpedal,
dessen Distortion-Wert ganz niedrig und dessen Ausgangspegel ganz hoch eingestellt
ist. Diese Pegelanhebung des Gitarrensignals findet vor dem Verstärkermodell statt. Das
Modell wird entsprechend höher ausgesteuert und zerrt also mehr als sonst.
5
Klangregler – Von links nach rechts gibt es hier Bass, Mid und Treble – wie
bei einem regulären Verstärker. Allerdings richtet sich ihr Verhalten nach dem gewählten
Verstärkermodell. Beispiel: Wenn du “Black Panel” wählst, verhält sich die Klangregelung
wie auf dem modellierten* Fender® Deluxe Reverb®.
Es gibt eine “Presence”-Anhebung, die man ein- und ausschalten kann, indem man den
Manual-Taster oder Amp Models-Regler gedrückt hält und den Treble-Regler ganz
nach links (aus) oder rechts (an) dreht.
“Delay Time” und “Delay Adjust” kann man einstellen, indem man den Manual-Taster
oder Amp Models-Regler gedrückt hält, während man am Bass- bzw. Mid-Regler dreht.
Alles Weitere hierzu findest du in Kapitel 3.
6
Channel Volume – Hiermit bestimmst du die relative Lautstärke des “Kanals”
(Speichers), den du zum Spielen verwendest – daher “Chan Vol”. Der Regler erlaubt
eine Pegelangleichung aller gespeicherten Floor POD Plus-Sounds (z.B. für Soli und
Rhythmussachen). In der Regel sollte der Regler so hoch wie möglich eingestellt werden,
um einen optimalen Fremdspannungsabstand zu erzielen.
Eine Pegelanhebung (Boost) ist ebenfalls vorhanden: Halte den Manual-Taster oder
Amp Models-Regler gedrückt, während du Channel Volume von “12 Uhr” aus nach
* Alle Produktnamen sind Warenzeichen der betreffenden Hersteller, die in keiner Weise mit Line 6 verbunden sind.
Die Produktnamen, Beschreibungen und Fotos dienen nur dem Zweck einer leichteren Identifizierung der Geräte, die
als Ausgangspunkt für die Line 6-Modelle verwendet wurden. FENDER® und DELUXE REVERB® sind eingetragene
Warenzeichen der Fender Musical Instruments Corporation.
Page 76

Bedienelemente und Anschlüsse
rechts drehst. Das Signal wird dann ohne zusätzliche Verzerrung lauter. Das ist praktisch
für Soli.
7
Compressor – Hiermit kann der Kompressor eingestellt werden. Drehe den
Regler ganz nach links, um den Kompressor zu deaktivieren (Diode erlischt). Drehe ihn
weiter nach rechts, um den “Compression Ratio”-Wert (d.h. das Kompressionsverhältnis)
zu erhöhen. Die Position dieses Reglers wird bei Drücken des SAVE-Tasters gespeichert.
Alles Weitere hierzu findest du in Kapitel 3.
8
Gate – Hiermit bestimmst du das Verhalten des Noise-Gates. Drehe den Regler
ganz nach links, um das Gate zu deaktivieren (Diode erlischt). Drehe ihn weiter nach
rechts, um die Pegelschwelle immer weiter anzuheben. Halte den Manual-Taster oder
Amp Models-Regler gedrückt, während du an diesem Regler drehst, um den “Gate
Decay”-Parameter einzustellen. Die Position dieses Reglers wird bei Drücken des Save-
Tasters gespeichert. Alles Weitere hierzu findest du in Kapitel 3.
9
Effect Tweak – Mit diesem Regler wählst du die Intensität des momentan
aktiven Effekts. Halte den Manual-Taster oder Amp Models-Regler gedrückt, während
du hieran drehst, um mehrere Parameter (je nach Effekt verschieden) einzustellen. Alles
Weitere hierzu findest du in Kapitel 3.
10
Delay – Mit diesem Regler bestimmst du den Delay-Anteil (links= Minimum,
rechts= Maximum). Halte den MANUAL-Taster oder AMP MODELS-Regler gedrückt,
während du an diesem Regler drehst, um die Rückkopplung einzustellen. Alles Weitere
hierzu findest du in Kapitel 3.
1•3
11
Reverb – Mit diesem Regler wird der Hallanteil eingestellt (links= aus, rechts=
Maximum). Wenn der Effekt aktiv ist, leuchtet die Diode über dem Regler. Halte den
Manual-Taster oder Amp Models-Regler gedrückt, während du an diesem Regler drehst,
um die Halldauer einzustellen. Alles Weitere hierzu findest du in Kapitel 3.
12
Save – Drücke diesen Taster, um die aktuellen Einstellungen zu speichern. In
Kapitel 4 wird erklärt, wie man Sounds speichert.
13
Manual – Drücke diesen Taster ein Mal, um in den “Manual”-Modus zu
wechseln. Dann entsprechen die Einstellungen der Regler exakt dem vom Floor POD Plus
ausgegebenen Sound. Um einen anderen Sound zu verwenden, kannst du an den Reglern
drehen. Dieser Taster hat zudem eine “Shift”-Funktion. Halte ihn gedrückt, um Zugriff zu
haben auf die Zweitfunktion vieler Regler.
14
Channel Memories – Hier wird die Nummer des derzeit gewählten Speichers
angezeigt (1A~31D). Die Speicher enthalten alle Einstellungen für die Verstärker- und
Effektmodelle.
Page 77

Bedienelemente und Anschlüsse
15
Tuner-Dioden – Die mittlere Diode leuchtet, wenn die Stimmfunktion aktiv
ist (hierfür muss der Tap-Fußtaster betätigt werden). Das Display zeigt die jeweils erkannte
Note an (während auch die “b”- oder “#”-Diode leuchtet). Wenn alle drei Dioden leuchten,
ist die Saite richtig gestimmt.
1•4
16
Bank Up/Down – Mit diesen Fußtastern können die Bänke 1~31 gewählt
werden. Du kannst sie gedrückt halten, um schneller zu einer weiter entfernten Bank zu
gehen. Betätige beide Fußtaster gleichzeitig, um einen anderen Modus zu wählen…
17
Fußtaster A~D – Es gibt zwei Fußtastermodi: Speicherwahl und “an/aus”. Um
den jeweils anderen Modus zu wählen, musst du die beiden BANK-Fußtaster gleichzeitig
betätigen.
•
Speicherwahlmodus: In diesem Modus dienen BANK AUF und AB für die Anwahl
der Bänke (mit A~D kann ein Speicher innerhalb jener Bank gewählt werden). Bei
Betätigen eines Fußtasters leuchtet seine Diode rot.
•
“On/Off”-Modus: In diesem Modus können die Effekte oder das Verstärkermodell
ein-/ausgeschaltet werden. Die Fußtaster A~D haben dann folgende An/Aus-
Schaltfunktionen: Amp-Modell, “Solo Boost”, Effekt und Delay. Aktive Funktionen
erkennt man daran, dass die Diode des betreffenden Fußtasters grün leuchtet.
18
‘On/Off Function’-Diode – Leuchtet, wenn der “On/Off”-Modus aktiv
ist.
19
Tap/Hold For Tuner – Betätige diesen Fußtaster wiederholt, um das Tempo
der Delay-Wiederholungen einzustellen. Die Diode blinkt im eingestellten Tempo. Die
Geschwindigkeit kann auch eingestellt werden, wenn der Delay-Effekt aus ist. Aktivierst
du ihn danach wieder, so läuft er sofort im gewünschten Tempo.
Halte den Fußtaster mindestens 2 Sekunden gedrückt, um den Tuner (Stimmfunktion)
zu aktivieren. Drücke ihn noch einmal, um den Tuner-Modus wieder zu verlassen. Alles
Weitere hierzu findest du in Kapitel 4.
20
Pedal und Wah-Diode – Das interne Schwellpedal kann entweder als
Wah- oder Volumenpedal genutzt werden. Wie bei einem “richtigen” WahWah kannst
du den Effekt ein-/ausschalten, indem du mit der Fußspitze fest auf die Oberseite des
durchgedrückten Pedals trittst. Wenn die Diode leuchtet, ist der Wah-Effekt aktiv.
Bei bestimmten Verstärkermodellen befindet sich das Volumenpedal vor dem “Amp”
(Pre), bei anderen hingegen dahinter (Post). Die jeweiligen Routings findest du in
Anhang A.
Page 78

Bedienelemente und Anschlüsse
21
Input – Hier musst du das Instrument anschließen.
22
Aux Input – An diese Buchse kann der Ausgang eines CD- oder MP3-Players
angeschlossen werden, so dass du dich von deinen Helden begleiten lassen kannst. Die
Balance zwischen deiner Gitarre und der Musik musst du mit dem Lautstärkeregler des
CD- oder MP3-Players einstellen.
23
Output Level – Hiermit bestimmst du den Pegel des linken und rechten
Ausgangs sowie den Kopfhörerpegel.
24
Amp/Direct – Stelle diesen Schalter auf “Direct”, wenn der Floor POD Plus
mit einem Aufnahmegerät, Mischpult usw. verbunden ist. Dann wird nämlich die A.I.R.-
Technologie (“Acoustically Integrated Recording”) aktiviert. Sie erzeugt eine Simulation
der Akustik und eines Mikrofons. Wähle “Amp”, wenn du den Floor POD Plus an deinen
Gitarrenverstärker anschließt. Dann ist die A.I.R.-Bearbeitung aus.
25
L/Mono und Right Outputs – Das dürfte klar sein. Verwende die L
Output-Buchse, wenn dein Verstärker mono ist bzw. wenn nur ein Mono-Signal verlangt
wird. Verwende die L- und Right Output-Buchse, wenn du zwei Verstärker besitzt oder in
Stereo aufnehmen möchtest.
26
Phones – An diese Buchse kann ein Kopfhörer mit 1/4”-Klinke angeschlossen
werden. Stelle den Ausgangspegel anfangs auf den Mindestwert und erhöhe die Einstellung
danach allmählich. Bei Verwendung eines entsprechenden Adapters kannst du auch mit
einem Kopfhörer mit 1/8”-Klinke arbeiten.
1•5
27
MIDI In & Out – Wenn du den Floor POD Plus mit einem externen
MIDI-Gerät verbindest, können die Speicheranwahl (über Programmwechsel) und
Parametereinstellungen automatisiert werden. Mit SysEx-Befehlen lassen sich die
Einstellungen zudem archivieren. Weitere Hinweise hierzu findest du im “MIDI Reference”Dokument unter (www.line6.com/manuals).
28
Power – Schließe hier das zum Lieferumfang gehörige Netzteil an. Und bitte nur
das.
Page 79

Die Amp- und Boxenmodelle
die Amp- und Boxenmodelle
Von welchen Amps haben wir Modelle vorbereitet?
Der Floor POD Plus enthält 32 Verstärker- und 16 Boxenmodelle. Im folgenden werden
diese Verstärker- und Boxenmodelle vorgestellt und ausführlich beschrieben. Eine praktische
Übersicht findest du in Anhang A.
Line 6 Clean
ROT: “Line 6 Clean”. Für dieses Modell haben wir den Vorverstärker und die Klangregelung
eines Solidstate-Combos in die Endstufe und den Wandler eines klassischen Röhren-Tops
“implantiert”.
GRÜN: “Line 6 Twang”. “Gläserne” Höhen sowie die Dynamik und der “Biss” eines
Vintage-Röhrenverstärkers. Erst gegen Ende des Drive-Regelwegs fängt der Sound richtig
an zu zerren.
Line 6 Crunch
ROT: “Line 6 Crunch”. Dies ist unser “Boutique-Sound”, nicht zu “clean”, aber auch
nicht übertrieben verzerrt. Er eignet sich für Modern Jazz und Blues und mutet an wie ein
exzellenter Cognac: Sanft und weich, aber eben auch mit dem angenehmen “Brennen”. Der
Mid-Regler befindet sich vor Drive (und also vor dem Verstärkermodell). Bass und Treble
liegen dagegen hinter Drive, weil sie dort am effektivsten sind.
GRÜN: “Line 6 Crunch #2”. Suchst du einen 50W-Top mit besserer Klangregelung?
Schwäche die Mitten bei hoher Drive-Einstellung etwas ab.
2•1
Line 6 Drive
ROT: “Line 6 Drive”. Dies ist unsere Version eines modernen, krankhaft zerrigen Solo-
Verstärkers mit massiver Pegelanhebung. Schön warm, aber eben auch ausgesprochen
zupackend. Alle Klangregler befinden sich hinter dem Verstärkermodell, was eine flexible
Sound-Gestaltung ohne Breineigung zur Folge hat. Es scheint fast, als hättest du die Gitarre
an mehrere Verstärker gleichzeitig angeschlossen – was bekanntlich nur im Studio praktikabel
ist, aber eben tierisch klingt.
GRÜN: “Line 6 Blues”. Dieses Modell beruht auf einem ‘65er Marshall® JTM-45
Bluesbreaker, allerdings mit einer flexibleren Klangregelung. Bei relativ hohen Drive-
Werten erinnert die warme und volle Übersteuerung schon fast an einen Budda Twinmaster
(ein wirklich edler Boutique-Verstärker).
* Alle Produktnamen sind Warenzeichen der betreffenden Hersteller, die in keiner Weise mit Line 6 verbunden sind.
Die Produktnamen, Beschreibungen und Fotos dienen nur dem Zweck einer leichteren Identifizierung der Geräte, die
als Ausgangspunkt für die Line 6-Modelle verwendet wurden. MARSHALL® ist ein eingetragenes Warenzeichen der
Marshall Amplification, Plc.
Page 80

Die Amp- und Boxenmodelle
Line 6 Insane
ROT: “Line 6 Insane”. Hier war unser Ziel, den Pegel so stark anzuheben, dass die Verzerrung
gerade an der Implosion des Amps vorbeischliddert. Das Modell liefert einen so vollen
Röhren-Drive, dass sich alle anderen Amps auf diesem Planeten nur noch ehrfurchtsvoll
2•2
verneigen. Trotzdem bleibt das Signal definiert. Der Bass ist nachhaltig vertreten und die
Klangregelung ist ausgesprochen flexibel. Drehe Drive auf und fahre Ohren und Haare ein
– es pustet!
GRÜN: “Line 6 Layer”. “Line 6 Clean” trifft “Line 6 Drive”. Es war bereits die Rede
davon, dass viele Gitarristen und Produzenten mit der Simultanverwendung mehrerer
Verstärker experimentiert haben, um just “den” Sound zu erzielen. Der Drive-Regler dient
hier zum Mischen. Wenn er sich ganz links befindet, hörst du nur noch den schweren “21st
Century Clean”-Sound. Drehst du ihn ganz nach rechts, so wird gebraten, was das Zeug hält.
Und da vom Mischen die Rede war, fängt der Spaß erst richtig an, wenn man den Regler auf
eine Position zwischen den beiden Extremen stellt.
Small Tweed
ROT: “Small Tweed”. Basierend* auf einem 1952 ‘Wide Panel’ Fender® Tweed Deluxe
Reverb®. Dieses Modell kann kräftig mit den grauen Wölfen heulen. Das Original hatte nur
einen Klangregler, mit dem man die Höhen verringern konnte. Diese Funktion haben wir
dem Treble-Regler unseres Modells zugeordnet. Der Bass- und
Mid-Regler schauten aber gelangweilt aus der Wäsche. Und da wir
das nicht so doll fanden, haben wir sie im Signalweg hinter dem
Amp-Modell angeordnet, damit man fachmännisch eingreifen
kann, wenn einem der Original-Sound noch nicht ganz gefällt.
Folglich haben wir Bass und Mid zu EQ-Reglern umfunktioniert,
die sich ungefähr wie die Klangregelung auf einem Mischpult
verhalten, die man nach der Aufnahme des Amps eventuell
verwendet. Wenn du diese Änderungen nicht brauchst, musst du
den Bass- und Mid-Regler in die Mitte stellen (“neutral”). Dann
ist wieder reiner Tweed angesagt.
* Alle Produktnamen sind Warenzeichen der betreffenden Hersteller, die in keiner Weise mit Line 6 verbunden sind.
Die Produktnamen, Beschreibungen und Fotos dienen nur dem Zweck einer leichteren Identifizierung der Geräte, die
als Ausgangspunkt für die Line 6-Modelle verwendet wurden. FENDER® und DELUXE REVERB® sind eingetragene
Warenzeichen der Fender Musical Instruments Corporation.
Page 81

Die Amp- und Boxenmodelle
GRÜN: “Small Tweed #2”. Basierend* auf dem 1960er Fender® Tweed Champ®. Dieses
Modell liefert einen tollen Sound, wenn man den Drive-Regler auf den Höchstwert stellt
(aber auch “clean” klingt dieser Bursche gut). Dieser Verstärker war zwar als Einsteigermodell
konzipiert, aber viele Rocker entdeckten schon bald, dass man
auch bei relativ niedrigem Pegel schon tolle Brat-Sounds erzielen
kann. Viele klassische Gitarrensoli der 1950er wurden mit einem
Champ® eingespielt. Der Champ® hatte keine Klangregelung
– nur einen Lautstärkeregler. Den klassischen Champ®-Sound
kann man mit dem Floor POD Plus aber mühelos erzielen: Stelle
die Regler Bass, Mid und Treble auf “12 Uhr”, wenn sie keinen
Einfluss auf den Sound haben dürfen. Wir wollten sie aber nicht
tatenlos zusehen lassen. Folglich haben wir Bass, Mid und Treble
hinter dem Amp-Modell angeordnet, damit man doch etwas ändern kann, wenn einem der
Original-Sound noch nicht ganz gefällt. Diese Regler verhalten sich demnach ungefähr wie
die Klangregelung auf einem Mischpult, die man nach der Aufnahme des Amps eventuell
verwendet. Wenn du aber auf den “echten” Champ®-Sound stehst, musst du die Klangregler
auf “12 Uhr” stellen.
Tweed Blues
ROT: “Tweed Blues”. Basierend* auf dem klassischen ‘59er Fender® Bassman® 4x10-
Combo. Dies war der Verstärker, mit dem alles begann – der Urvater des Rock’n’Roll-Sounds
sozusagen. Eigentlich war der Bassman® als Bassverstärker gedacht,
jedoch wurde er auch schnell von Blues-Gitarristen adoptiert.
Er bietet den fetten Bass, den man bei einem Bassverstärker
voraussetzt, aber auch dieses für Fender® typische “Näseln” in den
Höhen. Der Bassman® wurde als “Vorbild” für das “Tweed Blues”-
Modell deines Floor POD Plus verwendet. Übrigens: Als sich Jim
Marshall mit Ken Bran an die ersten Amps machte, ließ er sich
von diesem Bassman® gehörig inspirieren. Besonders interessant
am Bassman® ist die Wechselwirkung zwischen dem Mid- und
Treble-Regler. Der Mid-Regler ist nämlich nicht –wie anderswo–
als Bandpass ausgeführt. Die beiden Regler arbeiten irgendwie
additiv. Wenn du also den Mid-Regler von der Mitte aus etwas weiter nach rechts drehst,
kann es vorkommen, dass der Treble-Regler den Klang plötzlich zu hell macht. Wenn du
* Alle Produktnamen sind Warenzeichen der betreffenden Hersteller, die in keiner Weise mit Line 6 verbunden sind.
Die Produktnamen, Beschreibungen und Fotos dienen nur dem Zweck einer leichteren Identifizierung der Geräte, die als
Ausgangspunkt für die Line 6-Modelle verwendet wurden. FENDER®, CHAMP® und BASSMAN® sind eingetragene
Warenzeichen der Fender Musical Instruments Corporation.
2•3
Page 82

Die Amp- und Boxenmodelle
den Mid-Regler hingegen auf einen relativ kleinen Wert stellst, musst du den Treble-Regler
vermutlich ziemlich weit nach rechts drehen. Wie viele Modelle, die als Ausgangspunkt für
die Floor POD Plus-Sounds herhalten mussten, bietet auch der Bassman® keinen Master
Volume-Regler. Um also den gewünschten Sound zu erzielen, musste man ihn ganz laut
2•4
stellen, was die übrigen Band-Mitglieder gar nicht lustig fanden. Beim Floor POD Plus
kann man diesen Sound zum Glück auch bei Schlafzimmerpegel –und sogar im Kopfhörer–
erzielen! Stelle Drive auf “4” oder “5”: Du wirst sehen, dass sofort deine besten R&B-Licks
aus dir hervorsprudeln.
GRÜN: “Boutique #3”. Basierend* auf einem Budda Twinmaster-Top. Die Philosophie
dieses Amps beruht auf der Verzerrung der Leistungsröhre. Schnörkellosigkeit ist hier trumpf.
Während die Pegelanhebung des Vorverstärkers –gelinde gesagt– dezent bleibt und die
Klangregler besonders interaktiv sind, sorgt der Röhrengleichrichter für eine “Delle”, aus der
sich ein klassischer Sound für kleinere Gigs und Studio-Sessions ergibt. Da das TwinmasterOriginal keinen Middle-Regler hatte, haben wir dieses Modell mit einem kleinen Bonus
ausgestattet und also einen Mittenregler hinter dem Amp implementiert, der über den Mid-
Regler bedient werden kann. Stelle ihn auf “12 Uhr”, wenn du auf Budda-Pur stehst.
Black Panel
ROT: “Black Panel”. Basierend* auf dem ‘Blackface’ Fender® Deluxe Reverb®. Der Hei-
lige Gral vieler Blues-, Country- und “Roots”-Musiker heißt “Fender® Deluxe Reverb®”.
Wir hatten uns schon eine ganze Reihe von Probanden angehört,
als wir auf dieses Prachtexemplar aus 1964 stießen. Die meisten
Deluxe Reverb®-Anwender stellen ihn auf “7”, weil er dann
einen schönen Biss hat, der aber verschwindet, wenn man die
Lautstärke der Gitarre etwas zurücknimmt. Achte besonders auf
die Klangregelung, die sich entscheidend nach der Drive-Einstel-
lung richtet: bei “cleanen” Einstellungen entsteht ein klar definierter und “präsenter” Sound, während die Höhen bei Erhöhen
des Drive-Wertes allmählich gedämpft werden. Der Mid-Regler
erlaubt das Beeinflussen der Mitten am Amp-Ausgang, um in jenem Bereich flexibler zu
sein. Solange sich der Mid-Regler in der “12 Uhr”-Position befindet, hörst du jedoch den
klassischen Fender® Deluxe Reverb®-Sound.
* Alle Produktnamen sind Warenzeichen der betreffenden Hersteller, die in keiner Weise mit Line 6 verbunden sind.
Die Produktnamen, Beschreibungen und Fotos dienen nur dem Zweck einer leichteren Identifizierung der Geräte, die als
Ausgangspunkt für die Line 6-Modelle verwendet wurden. FENDER®, DELUXE REVERB® und BASSMAN® sind
eingetragene Warenzeichen der Fender Musical Instruments Corporation.
Page 83

Die Amp- und Boxenmodelle
GRÜN: “Black Panel #2”. Basierend* auf einem 1965er Blackface Fender® Twin Reverb®.
Alle haben ihn benutzt, in der Jazz- und Country-Szene, aber auch die Rock-Fraktion. Ich
erinnere mich noch, wie Johnny Winter und Rick Derringer –höre
ich mich jetzt alt an?– sechs Twins zu einer Pyramide aufgestapelt
hatten. Wir saßen auf dem zweiten Balkon und selbst dort war es noch
MÄCHTIG laut. Der Twin bietet eine große klangliche Flexibilität
und eignet sich demnach für viele unterschiedliche Situationen. Er
übersteuert jedoch nie extrem und klingt auch nie schmutzig, aber
lauter kann man ihn stellen – eine ganze Ecke lauter. Mit diesem
Modell kann man mühelos den klassischen Surf-Sound erzielen. Rufe
also den Federhall auf, füge einen Tremolo-Effekt hinzu, stelle eine
hohe Lautstärke ein und schüttele dir mal so richtig den Sand aus den Strandsandalen.
Modern Class A
ROT: “Modern Class A”. Basierend* auf einem Matchless Chieftain. Der 1996er
Matchless Chieftain, den wir für unser “Modern Class A”-Modell
studiert haben, ist ein extrem teurer, handgefertigter Verstärker.
Der Matchless enthält EL34-Röhren und wartet mit “Class
A”-Schaltungen auf. Daher der Name. Der Sound ist einfach
einzigartig (was vor allem an den komplexen Schaltungen der
Klangregelung liegt). Der Sound ist irgendwie “futuristisch retro”.
Die sanfte Verzerrung ist typisch für “Class A”-Verstärker – fast
schon HiFi in einem Rock’n’Roll-Umfeld.
GRÜN: “Brit Class A #3”. Basierend* auf Kanal 1 eines
superben 1960er Vox® AC 15. Auch diesen Sound verdanken wir Vox. Vom Sound her
ähnelt er zwar dem Vox® AC 30, der ebenfalls für den Floor POD
Plus modelliert wurde (“Brit Class A” und “Brit Class A #2”),
aber er ist eben kleiner (und enthält statt zwei 12”-Lautsprechern
nur einen). Außerdem ist sein Klang etwas weicher und “hölzerner”.
Dieser Amp hatte nur einen Klangregler, mit dem man die Höhen
abschwächen konnte. Das haben wir natürlich beibehalten und den
Bass- und Mid-Regler hinter das Amp-Modell gelegt, damit du bei
Bedarf jene Frequenzbänder ändern kannst. Um den urigen BritSound zu erzielen, musst du den Bass- und Mid-Regler auf “12 Uhr”
stellen und nur mit dem Treble-Regler spielen.
2•5
* Alle Produktnamen sind Warenzeichen der betreffenden Hersteller, die in keiner Weise mit Line 6 verbunden sind.
Die Produktnamen, Beschreibungen und Fotos dienen nur dem Zweck einer leichteren Identifizierung der Geräte, die als
Ausgangspunkt für die Line 6-Modelle verwendet wurden. FENDER® und TWIN REVERB® sind eingetragene Warenzeichen
der Fender Musical Instruments Corporation. VOX® ist ein eingetragenes Warenzeichen der Vox R&D Limited.
Page 84

Die Amp- und Boxenmodelle
Brit Class A
ROT: “Brit Class A”. Basierend* auf dem Vox® AC 30. Anfang der 1960er tat sich
einiges in der Musikszene, und Gitarristen verlangten einen helleren, brillanteren Klang.
Der Hersteller der Vox®-Verstärker (Jennings Company) versah diesen Amp daher mit
2•6
einem Treble- und Bass-Regler (sowie einer weiteren 12AX7Verstärkerröhre) und nannte diese Schaltung “Top Boost”. Der
AC 30 mit Top Boost fand vor allem im Vereinigten Königreich
großen Anklang. Der Charakter dieses Verstärkers rührt daher,
dass “Class A”-Verstärker ganz anders übersteuern als “Class AB”Modelle. Brian May (Queen), Mike Campbell (Tom Petty &
Heartbreakers) und The Edge (U2) sind die wohl bekanntesten
AC 30-Anwender. Bei diesem Modell übernimmt der Mid-Regler
des Floor POD Plus die Funktion des Cut-Reglers auf dem AC 30.
Obwohl man ihn in der Regel für “cleane” Sachen verwendet, liefert ein übersteuerter AC
30 einen warmen Zerr-Sound. Hör’ dir nur mal ein paar Brian May-Soli der frühen QueenPlatten an.
GRÜN: “Brit Class A #2”. Basierend* auf dem Normal-Kanal eines Vox® AC-30 ohne
“Top Boost”. Wie bereits erwähnt, war Vox® der erste Hersteller, dessen Verstärker speziell
für Gitarre entwickelt wurden (andere Hersteller boten damals u.a.
Eingänge für ein Akkordeon an… Wollen wir tanzen?) Außerdem
kam eine “Class A”-Schaltung statt der damals verbreiteten
“Class AB”-Schaltung zum Einsatz. Wir hatten das Glück, den
AC 30 zu finden, den Bryan Adams angeblich oft und gerne für
Aufnahmen verwendet hat. Lenny Kravitz hat ihn wenige Tage
vor unseren Modellierarbeiten noch benutzt. Das Original gehörte
einem Verleih in Los Angeles, wo ja auch Line 6 ansässig ist. Nach
unserem Studium haben wir den Amp übrigens gekauft, um ihn
immer wieder mit dem unserer Meinung nach gelungenen Modell
in deinem Floor POD Plus vergleichen zu können. Am besten beginnst du mit diesem Sound,
wenn du britisch angehauchte Musik spielen möchtest. Wie der AC 15 besaß der AC 30
NTB nur einen Treble-Regler. Der Bass- und Mid-Regler des Floor POD Plus befinden sich
daher –zwecks erweiterter Flexibilität– hinter dem Verstärkermodell. Stelle sie auf “12 Uhr”,
wenn sie den Sound nicht beeinflussen dürfen.
* Alle Produktnamen sind Warenzeichen der betreffenden Hersteller, die in keiner Weise mit Line 6 verbunden sind.
Die Produktnamen, Beschreibungen und Fotos dienen nur dem Zweck einer leichteren Identifizierung der Geräte, die
als Ausgangspunkt für die Line 6-Modelle verwendet wurden. VOX® ist ein eingetragenes Warenzeichen der Vox R&D
Limited.
Page 85

Die Amp- und Boxenmodelle
Brit Blues
ROT: “Brit Blues”. Basierend* auf einem 1964~65er Marshall® JTM-
45-Top. Obwohl der “typische” Sound eines Marshall® Plexi in der
Regel von einem 100W-Modell der späten 1960er stammt, haben wir
uns für das nächste Floor POD Plus-Modell von einem 50W-Modell
des JTM-45 inspirieren lassen. Wenn dich die Verstärker-Geschichte
interessiert, weißt du wahrscheinlich, dass der JTM-45 (der noch kein
“geschwungenes” Marshall®-Logo besaß) den Übergang von dem
etwas weicheren Fender®-artigen Sound zum unverwechselbar hellen
und “crunchy” Marshall-Sound bedeutete.
GRÜN: “California Crunch #1”. Basierend* auf einem Mesa/
Boogie® Mark II-C+. Mesa/Boogie® war wahrscheinlich der erste
Hersteller von “Boutique”-Verstärkern. Boogie hatte seinen großen
Moment in den 1970ern und frühen ‘80ern, als die Firma noch Verstärker
mit “Fender®-Schaltung” mit einem Master Volume-Regler und
zusätzlichen Gain-Stufen nachrüstete. Man kann die Fender®-Herkunft
noch hören, allerdings mit mehr “Punch” in den Mitten. Dieses Modell
beruht auf dem “Clean”-Kanal eines Mesa/Boogie® Mark II-C und also
den Verbesserungen (“+”) der Mark II-C-Schaltungen.
2•7
Brit Classic
ROT: “Brit Classic”. Basierend* auf dem beliebten Marshall® Plexi.
Diesen Amp lieben Feinschmecker bis auf den heutigen Tag abgöttisch.
In der Zeit, als dieser Amp gebaut wurde (so um 1968), hatte sich
Marshall® vom Fender® 6L6-Röhrenerbe losgesagt und verwendete
fortan nur noch EL34-Röhren. Ein weiterer gewichtiger Unterschied
war, dass die Ausgangs- und Stromversorgungstrafos notgedrungen
geändert werden mussten. (Siehst du, wir haben uns wirklich schlau
gemacht.) Diese Modifikationen bescherten der Welt den Sound, den
man bis heute mit der Rock-Gitarre assoziiert. Die Verstärker jener
Zeit boten noch keinen Master Volume-Regler, so dass man den
Super Lead wirklich voll aufdrehen musste, um den echten “Mark
III Super Amp”-Sound zu erzielen – und dabei die Freundschaft mit
den Nachbarn aufs Spiel setzte. Hendrix spielte auf Marshalls jener Zeit; 20 Jahre später
* Alle Produktnamen sind Warenzeichen der betreffenden Hersteller, die in keiner Weise mit Line 6 verbunden sind.
Die Produktnamen, Beschreibungen und Fotos dienen nur dem Zweck einer leichteren Identifizierung der Geräte, die
als Ausgangspunkt für die Line 6-Modelle verwendet wurden. MARSHALL® ist ein eingetragenes Warenzeichen der
Marshall Amplification Plc. MESA/BOOGIE® ist ein eingetragenes Warenzeichen der Mesa/Boogie, Ltd. FENDER® ist
ein eingetragenes Warenzeichen der Fender Musical Instruments Corporation.
Page 86

Die Amp- und Boxenmodelle
sollte Van Halen mit dem “Brown Sound” der ersten beiden Alben und seinem 100W Plexi
ebenfalls Geschichte schreiben. Um mit einem Plexi einen Crunch-Sound zu erzielen, muss
man den Eingangspegel und alle Klangregler auf “10” stellen. Und um den Original-Touch
wirklich bis ins kleinste Detail zu wahren, musst du bei diesem “Brit Classic”-Modell genau
2•8
dasselbe tun. Stelle Mid und Treble also auf den Höchstwert, regle Bass auf “9~10 Uhr”
(wenn man auf den Floor POD Plus schaut) und piesacke die Nachbarn so lange, bis sie
erschöpft anfangen zu “headbangen”.
GRÜN: “California Crunch #2”. Basierend* auf dem ‘Drive’-Kanal des Mesa/Boogie®
Mark II-C+. Spiele einfach mal ein paar Santana-Licks.
Brit Hi Gain
ROT: “Brit Hi Gain”. Basierend* auf dem Marshall. JCM 800. Dieses
Amp-Modell brauchst du, wenn du auf den Sound des heiß begehrten
JCM 800 stehst, einem der wohl beliebtesten neueren MarshallVerstärker. Diese aktualisierte Version des Plexi war die Fortsetzung
einer höheren Vorverstärkung mit entsprechend mehr Biss und fand
bei einer neuen Gitarristengeneration reißenden Absatz. Im Vergleich
zu den Vorgängermodellen befindet sich die Klangregelung hier hinter
den Vorverstärkerröhren. Wir haben übrigens einen 1990er JCM 800 mit
Master Volume-Regler studiert. Und nur damit du es weißt: bestimmte
JCM800-Versionen organisieren ihre Verzerrung über die Übersteuerung
einer Diode. Der von uns modellierte Amp verwendet jedoch Röhren für
die Verzerrung. Hier findest du den Sound, mit dem Marshall zur Legende
wurde. Und obwohl Marshall-Besitzer in der Regel nicht “clean” spielen, ist auch der Sound fast
genial. Probiere also immer auch einen kleinen
soll, fährst du den
GRÜN: “Boutique #1”. Basierend* auf dem ‘Clean’-Kanal des Dumble® Overdrive Special. Der
Dumble® Overdrive Special ist ein unglaublich teurer und seltener Verstärker, den nur ganz wenige
Leute jemals zu Gesicht bekommen. Außerdem weisen alle Dumble®-Verstärker leichte Unterschiede
auf, weil sie auf Bestellung und von Hand gefertigt werden. Folglich werden sie auch auf die SoundWünsche des Kunden abgestimmt. So etwas wissen wir natürlich, und so haben wir gleich mehrere
Dumble® Overdrive Special-Exemplare studiert. Trotz der individuellen Sound-Abstimmung auf den
Geschmack des Kunden weisen diese Verstärker jedoch zahlreiche Gemeinsamkeiten auf: Der “Clean”Kanal spricht akkurat auf den Anschlag an und ist dementsprechend dynamisch. Der “
Drive
-Wert aus. Und wenn zünftig gerockt werden
Drive
-Regler einfach wieder eine Ecke höher…
Drive
”-Kanal
* Alle Produktnamen sind Warenzeichen der betreffenden Hersteller, die in keiner Weise mit Line 6 verbunden sind.
Die Produktnamen, Beschreibungen und Fotos dienen nur dem Zweck einer leichteren Identifizierung der Geräte, die als
Ausgangspunkt für die Line 6-Modelle verwendet wurden. MESA/BOOGIE® ist ein eingetragenes Warenzeichen der
Mesa/Boogie, Ltd. MARSHALL® ist ein eingetragenes Warenzeichen der Marshall Amplification Plc. DUMBLE® ist ein
eingetragenes Warenzeichen von Howard Alexander Dumble.
Page 87

Die Amp- und Boxenmodelle
erzeugt ein fettes, “fließendes” und singendes Sustain und bleibt selbst bei starker Übersteuerung klar
definiert. Die Klangregler des Floor POD Plus verhalten sich bei diesem Modell genauso subtil wie jene
des Dumble® selbst.
TreadPlate
ROT: “TreadPlate”. Basierend* auf einem 1994er Mesa/Boogie® Dual
Rectifier® Tremoverb. Dieses Model kannst du für den dichten High GainSound von Dream Theater oder Metallica verwenden. Mesa/Boogie® hatte
seinen Einstieg in den 1970ern und frühen ‘80ern, als die Firma noch Verstärker
mit “Fender®-Schaltung” mit einem Master Volume-Regler und zusätzlichen
Gain-Stufen nachrüstete. Man kann die Fender®-Herkunft noch hören,
allerdings mit mehr “Punch” in den Mitten. Die Dual Rectifier-Klangregelung
befindet sich jedoch hinter der Verzerrung. Wie bei der Klangregelung der
meisten Verstärker, auf denen unsere Modelle basieren, arbeiten die einzelnen
Regler auch hier in Abhängigkeit von- und miteinander (und abhängig von
Drive
). Wähle einen hohen
Drive
-Wert, schwäche die Mitten ab und hebe
den Bass an – so klingt purer Grunge aus Seattle.
GRÜN: “TreadPlate #2”. Basierend* auf einem 1995er Mesa/Boogie® Dual Rectifier®-Top. Wie
der Tremoverb-Combo (siehe das “TreadPlate”-Modell) gehörte der Dual Rectifier® zu den BoogieAmps mit starker Pegelanhebung, die vor allem bei der “langhaarigen Zunft” auf großen Zuspruch
stießen. Im Gegensatz zu den ersten Boogies beeinflussen die Klangregler des Dual Rectifier bei
starker Pegelanhebung die Höhenwiedergabe, so dass man ruhig etwas weniger Mitten und mehr Bass
einstellen kann.
Modern Hi Gain
ROT: “Modern Hi Gain”. Basierend* auf dem Soldano X88R. Dieser Soldano-Sound wird schwer
übersteuert und bietet eine Klangregelung hinter der Verzerrung. So viel “Übertreibung” ist natürlich
genau, was man für Thrash Metal und Grunge braucht. Aber Fachleute wie Eric Clapton beherrschen
die Kunst, dezent damit umzugehen. Dieses Modell solltest du wählen, wenn du einen aktuellen Van
Halen- oder Joe Satriani-Sound benötigst. Das “Modern Hi Gain”-Modell des Floor POD Plus beruht
auf einem rackfähigen Vorverstärker von Mike Soldano. Es demonstriert sehr eindrucksvoll, wie weit
ein Röhrenvorverstärker den Pegel hochkitzeln kann. Der X88R, den wir für dieses Modell studiert
haben, wäre Ende der 1980er in der Studioszene von Los Angeles bestimmt –man verzeihe uns den
Ausdruck– ein Knaller gewesen.
2•9
* Alle Produktnamen sind Warenzeichen der betreffenden Hersteller, die in keiner Weise mit Line 6 verbunden sind.
Die Produktnamen, Beschreibungen und Fotos dienen nur dem Zweck einer leichteren Identifizierung der Geräte, die
als Ausgangspunkt für die Line 6-Modelle verwendet wurden. MESA/BOOGIE® und RECTIFIER® sind eingetragene
Warenzeichen der Mesa/Boogie, Ltd. FENDER® ist ein eingetragenes Warenzeichen der Fender Musical Instruments
Corporation.
Page 88

Die Amp- und Boxenmodelle
GRÜN: “Modern Hi Gain #2”. Basierend* auf einem Soldano
SLO (Super Lead Overdrive)-Top. Im Gegensatz zum X88RVorverstärker, der im Floor POD Plus unter dem Namen “
2•10
Hi Gain
und weist auch sonst mehrere Unterschiede auf, die einen nicht
” verewigt wurde, bietet der SLO einen Presence-Regler
unwichtigen Einfluss auf den Sound haben. Drehe Drive voll auf,
wenn du mal hören möchtest, was Sustain überhaupt ist… Spiele
eine Note, geh’ irgendwo gemütlich etwas essen – und wenn du
wieder kommst, ist sie immer noch da!
Fuzzbox
ROT: “Fuzzbox”. Basierend* auf dem Arbiter® Fuzz Face. Selbst wenn man das 1960er
Arbiter® Fuzz Face nicht wirklich einen Verstärker nennen kann, fanden wir seinen
Klangcharakter so interessant, dass wir ihn dir ganz einfach als Floor
POD Plus-Modell anbieten mussten. Dieses Fuzz-Ding deckt ein
breites Frequenzspektrum ab und liefert eine Transistorverzerrung.
Die bewirkte einen knorrigen Sound, auf den man in der
Alternative- und Grunge-Szene steht. Jimi Hendrix war einer der
ersten Fuzz Face-Anwender in den USA. Unser Modell ist aber
noch weitaus dreckiger als die Sounds von “Are You Experienced”.
Spiele doch einfach mal “Satisfaction” der Stones oder den Solopart
von “American Woman” (The Guess Who). Außerdem kannst du
die Grenzen des Original-Fuzz Face sprengen, indem du die Regler Bass und Mid ganz nach
Schnauze einstellst. Damit erzielst du Sound-“Fuzzis”, die es in dieser Form noch nie gab.
Und nur am Rande: Für “Purple Haze” hat Jimi nicht einmal einen Verstärker verwendet:
er hatte sein Fuzz Face direkt mit einer Orange®-Endstufe nebst 4x12”-Box verbunden. Und
genau diesen Sound findest du hier…
GRÜN: “Boutique #2”. Basierend auf dem “Drive”-Kanal eines Dumble® Overdrive
Special (siehe oben). Wenn du auf den Dumble®-Sound stehst, solltest du dir auch einmal das
“
Line 6 Crunch
Modern
”-Modell zu Gemüte führen. Es erzeugt nämlich eine ähnliche Klangfarbe.
* Alle Produktnamen sind Warenzeichen der betreffenden Hersteller, die in keiner Weise mit Line 6 verbunden sind.
Die Produktnamen, Beschreibungen und Fotos dienen nur dem Zweck einer leichteren Identifizierung der Geräte, die als
Ausgangspunkt für die Line 6-Modelle verwendet wurden. ARBITER® ist ein eingetragenes Warenzeichen der Arbiter
Group, Plc. ORANGE® ist ein eingetragenes Warenzeichen der Orange Personal Communications Services, Limited.
DUMBLE® ist ein eingetragenes Warenzeichen von Howard Alexander Dumble.
Page 89

Die Amp- und Boxenmodelle
Tube Preamp
ROT: “Tube Preamp”. Es hat zwar nicht wirklich etwas mit einem Gitarrenverstärker
zu tun, aber irgendwie haben wir an diesem Geschöpf immer weiter herumgebastelt. Der
Gedanke war folgender: Sobald die Menschheit den Floor POD Plus entdeckt, möchte
sie damit alles aufmotzen – zum Aufwärmen der Keyboards, für knackig-bratige Drums
und zum Verrohen von Stimmen. Das müssen wir respektieren. Gesagt, getan. Das “
Preamp
”-Modell dient zum “Verröhren” beliebiger Signale. Schließlich verwenden viele
Produzenten und Toningenieure für so etwas alte Röhrengeräte. Um einen Gesangspart
beispielsweise etwas “kantiger” zu machen, brauchst du ihn nur durch den Floor POD Plus
zu jagen. Oder probier’ doch mal, einen Synth Bass mit dem Floor POD Plus aufzumöbeln
und mit dem Drive- und den Klangreglern wunschgemäß anzuhübschen. Und obwohl dieses
Modell nicht wirklich für Gitarre gedacht ist, kann man damit durchaus brauchbare Sounds
erzielen. DI-Signale eines Basses werden hiermit z.B. richtig lebendig. Mit dem DriveRegler kannst du einstellen, wie stark das Signal verröhrt werden soll, ungefähr wie mit dem
MIX-Regler eines Effektgeräts. Im Allgemeinen raten wir davon ab, den vom Floor POD
Plus nicht bearbeiteten Sound mit der Floor POD Plus-Ausgabe zu mischen, weil dann ein
Kammfiltereffekt entsteht. Schließe die Signalquelle also nur an den Floor POD Plus an und
verwende als Monitorsignal die Ausgabe des Floor POD Plus. Wenn sich die Klangregler auf
“12 Uhr” befinden, ist der EQ neutral.
GRÜN: “Jazz Clean”. Basierend* auf dem ‘klassischen’ Roland® JC-120. Dieser
Transistorverstärker ist wegen seines “cleanen” Sounds und StereoChorus’ beliebt. Bei Verwendung dieses “
Jazz Clean
”-Modells musst
du den Treble-Regler bis zum Anschlag aufdrehen, um jenen hellen
Sound zu erzielen, den man auch in jedem noch so komplexen Mix
immer hört. Außerdem eignet er sich für den “New Wave”-Sound
der 1980er. Einen zünftigen Jazz-Sound erzielst du, indem du den
Treble-Regler zurückfährst und den Bass- sowie den Mid-Regler
anhebst. Dann kommt richtig Club-Atmosphäre auf, weil die
Ansprache relativ neutral ist, so dass sowohl tiefe als auch ganz
hohe Noten gleich gut hörbar bleiben. Das ist besonders für Soli und Einzelnotenpassagen
wichtig.
Tube
2•11
* Alle Produktnamen sind Warenzeichen der betreffenden Hersteller, die in keiner Weise mit Line 6 verbunden sind.
Die Produktnamen, Beschreibungen und Fotos dienen nur dem Zweck einer leichteren Identifizierung der Geräte, die als
Ausgangspunkt für die Line 6-Modelle verwendet wurden. ROLAND® ist ein eingetragenes Warenzeichen der Roland
Corporation.
Page 90

Die Amp- und Boxenmodelle
Boxenmodelle
2•12
Dein Floor POD Plus enthält folgende Boxenmodelle. Bei Verwendung des
dels
-Reglers wird immer eine Verstärker-/Boxenkombination aufgerufen. Um einem Ver-
stärkermodell eine andere Box zuzuordnen, musst du den
Amp Models
Amp Mo-
-Regler drücken
und gleichzeitig daran drehen. Allerdings kann man auch ein Boxenmodell wählen,
indem man den
Manual
-Taster gedrückt hält, während man an
Amp Models
dreht. Eine
gelb leuchtende Diode zeigt an, welche Box gewählt wurde.
Boxenmodell
1x8
1x12s
Beruht* auf… Reglerbezeichnung
1960 Fender® Tweed Champ
1952 Fender® Tweed Deluxe Reverb
®
®
Line 6 Clean
Line 6 Crunch
1960 Vox® AC-15 Line 6 Drive
1964 Fender® Blackface Deluxe Reverb
®
Line 6 Insane
Line 6 1x12 Small Tweed
2x12
1965 Fender® Blackface Twin Reverb
®
Tweed Blues
1967 Vox® AC-30 Black Panel
1995 Matchless Chieftain Modern Class A
Line 6 2x12 Brit Class A
4x10s
1959 Fender® Bassman
®
Brit Blues
Line 6 4x10 Brit Classic
4x12
1996er Marshall® mit Vintage-30ern Brit Hi Gain
1978er Marshall® mit Standard-70ern TreadPlate
1968 Marshall® “Basketweave” mit Greenbacks Modern Hi Gain
Line 6 4x12 Fuzz Box
No Cab
Dieses “Modell” musst du z.B. für “Tube Preamp” wählen, wenn
Tube Preamp
andere Signale als Gitarre bearbeitet werden sollen. Bei Anwahl
von “Tube Preamp” wird dieses Boxenmodell automatisch
aufgerufen.
* Alle Produktnamen sind Warenzeichen der betreffenden Hersteller, die in keiner Weise mit Line 6 verbunden sind.
Die Produktnamen, Beschreibungen und Fotos dienen nur dem Zweck einer leichteren Identifizierung der Geräte, die
als Ausgangspunkt für die Line 6-Modelle verwendet wurden. FENDER®, CHAMP®, DELUXE REVERB®, TWIN
REVERB® und BASSMAN® sind eingetragene Warenzeichen der Fender Musical Instruments Corporation. VOX® ist
ein eingetragenes Warenzeichen der Vox R&D Limited. MARSHALL® ist ein eingetragenes Warenzeichen der Marshall
Amplification Plc.
Page 91

Die Amp- und Boxenmodelle
Sound-Tuning für die verwendeten Boxen
Die Signalausgabe des Floor POD Plus kann man so einstellen, dass bei Anwahl der
Amp
-Position für den Amp/Direct-Schalter exakt der für die verwendete Anlage
benötigte Sound ausgegeben wird. Anfangs geht der Floor POD Plus davon aus, dass eine
hinten offene Box verwendet wird. Wenn du aber andere Boxen verwendest, musst du
den Sound “tunen” (wie bei Autos). Das macht man so:
2•13
Halte den
•
Im Display erscheint dann die Meldung “Cab”, um anzugeben, dass das Boxentuning
•
geändert werden kann.
Die Nummer der momentan gewählten Boxenbank erscheint im Display.
•
Wähle mit den Bank AUF/AB-Fußtastern die gewünschte Einstellung:
•
Empfohlener
Modus
C-a Mit Endstufe Versiegelt (ideal für 4x12”)
C-b Mit Endstufe Hinten offen (ideal für 1x12”)
C-c (Vor-
gabe)
C-d Vor einem Combo/Top Versiegelt (ideal für 4x12)
Drücke den
•
Save
-Taster gedrückt, während du das Netzteil anschließt.
Floor POD Plus-
Verbindung
Vor einem Combo/Top Hinten offen (ideal für 1x12” und
Save
-Taster, um die Einstellung zu speichern.
Verwendete Boxen
2x12”)
Page 92

effekte
Außer den hervorragenden Verstärkermodellen bietet der Floor POD Plus mehrere
hochwertige Effekte. Diese können mit dem Effects-Regler gewählt werden. Bei Aufrufen
eines anderen Effekts stellt der Floor POD Plus die dazugehörigen Parameter automatisch
so ein, dass der Effekt auch wirklich gut klingt. Den Charakter des gewählten Effekts kann
man beeinflussen, indem man am Effect Tweak-Regler dreht.
Reverb – Hall ist der Effekt, der den Eindruck erweckt, dass man in einem Zimmer
oder Saal spielt. Der Reverb-Effekt des Floor POD Plus ist immer verfügbar. Den
Hallpegel kannst du mit dem Reverb-Regler einstellen. Halte den Manual-Taster oder
Amp Models-Regler gedrückt, während du am Reverb-Regler drehst, um die Halldauer
einzustellen. Damit machst du den simulierten Raum größer oder kleiner. Um den Hall zu
deaktivieren, musst du den Regler ganz nach links drehen. Wenn der Halleffekt aktiv ist,
leuchtet die zugehörige Diode.
Es gibt zwei verschiedene Halltypen, die beide vom Ur-POD® übernommen wurden: einen
Federhall und eine digitale Zimmerhallsimulation. Die Regel für diese Anwahl lautet wie
folgt: Wenn das Original, auf dem unser Verstärkermodell beruht, einen Federhall besaß,
wird er für das betreffende Modell gewählt. Wenn das Original keinen Halleffekt hatte,
wird der Zimmerhall aktiviert. Die Hallzuordnung der einzelnen Verstärkermodelle lautet
folgendermaßen:
Effekte
3•1
Reglerbezeichnung und
Diodenfarbe
Line 6 Clean – ROT Room Brit Class A – ROT Room
Line 6 Clean – GRÜN Spring Brit Class A – GRÜN Room
Line 6 Crunch – ROT Spring Brit Blues – ROT Room
Line 6 Crunch – GRÜN Room Brit Blues – GRÜN Spring
Line 6 Drive – ROT Room Brit Classic – ROT Room
Line 6 Drive – GRÜN Room Brit Classic – GRÜN Spring
Line 6 Insane – ROT Room Brit Hi Gain – ROT Room
Line 6 Insane – GRÜN Room Brit Hi Gain – GRÜN Room
Small Tweed – ROT Room TreadPlate – ROT Room
Small Tweed – GRÜN Room TreadPlate – GRÜN Room
Tweed Blues – ROT Spring Modern Hi Gain – ROT Room
Tweed Blues – GRÜN Room Modern Hi Gain – GRÜN Room
Black Panel – ROT Spring Fuzz Box – ROT Room
Black Panel – GRÜN Spring Fuzz Box – GRÜN Room
Modern Class A – ROT Spring Tube Preamp – ROT Room
Modern Class A – GRÜN Room Tube Preamp – GRÜN Room
Halltyp Reglerbezeichnung und Di-
odenfarbe
Halltyp
Page 93

Effekte
Delay – Wird auch oft “Echo” oder “Slap Back” genannt. Dieser Effekt wiederholt das
eingehende Signal und bringt Leben in die Bude. Der Floor POD Plus enthält 6 DelayModelle:
3•2
Tape” liefert den warmen Sound eines Bandechos. Die Signale werden bei jeder
Wiederholung dumpfer – und das Ganze klingt mächtig nach “Vintage”. Das Band braucht
aber nie ausgewechselt zu werden!
Multi-Tap” klingt zwar ähnlich wie Tape, verwendet allerdings ein Wiederholungsmuster
des* Roland® Space Echo.
“Digital” liefert ganz normale Echos in perfekter Digital-Qualität.
Reverse” ist eine rückwärts laufende Version von Digital.
Sweep Echo” ist eine Simulation eines Bandechos mit einem Filter. Hieraus ergibt sich
ein frischer Effekt, mit dem man ganz neue Dinge ausprobieren kann.
Analog” zaubert den Delay-Sound der guten alten Analog-Pedale mit ihren Eimerketten
und leicht zerrenden Wiederholungen.
Bei allen Delay-Modellen stellt man mit dem Delay-Regler den Effektanteil ein.
Die Verzögerungszeit kann mit dem Tap-Fußtaster festgelegt werden. Man braucht
den Tap-Fußtaster nur im Takt des Songs zu betätigen, um ein synchron laufendes
Wiederholungsmuster zu erzielen. Wenn dir das zu ungenau ist, musst du den Manual-
Taster oder Amp Models-Regler gedrückt halten, während du den gewünschten
Wert mit dem Bass-Regler einstellst. Bei schnellen Wiederholungen wird die
Rückkopplung (d.h. die Anzahl der Wiederholungen) automatisch reduziert, weil sich
dann schneller ein Rockabilly- bzw. Surf-Eindruck einstellt. Halte den Manual-Taster
gedrückt, während du am Delay-Regler drehst, um die Rückkopplung einzustellen.
Übrigens haben wir unseren Delay-Effekt so programmiert, dass die Wiederholungen
auch lauter sein können als das Original-Signal. So etwas ist z.B. zum Erzielen von
Effekten praktisch, die man vor allem von The Edge (U2) kennt. Um den Delay-Effekt
auszuschalten, musst du den “On/Off”-Modus wählen und den DLY-Fußtaster betätigen.
Alles Weitere hierzu findest du in Kapitel 1.
Halte den Manual-Taster oder Amp Models-Regler gedrückt, während du am Mid-Regler
drehst, um mehrere modellspezifische Parameter einzustellen (siehe weiter unten).
* Alle Produktnamen sind Warenzeichen der betreffenden Hersteller, die in keiner Weise mit Line 6 verbunden sind.
Die Produktnamen, Beschreibungen und Fotos dienen nur dem Zweck einer leichteren Identifizierung der Geräte, die als
Ausgangspunkt für die Line 6-Modelle verwendet wurden. ROLAND® ist ein eingetragenes Warenzeichen der Roland
Corporation.
Page 94

Delay-Modell Delay-Einstellung
Tape “Wow & Flutter”-Intensität
Multi-Tap Modulationsintensität
Digital Versatz in Halbtönen, von –12~+12, mit Ring-
modulation
Reverse Modulationsintensität
Sweep Echo LFO-Geschwindigkeit des “Wuuschs”
Analog Modulationsintensität
Compressor – Ein Kompressor “drückt das Eingangssignal zusammen” und
sorgt dafür, dass leisere Signale lauter – und lautere Signale etwas leiser ausgegeben
werden. Damit wird also der Dynamikumfang reduziert. Die Komprimierung wird in
der Regel als Verhältniswert (z.B. “3:1” oder “6:1”) ausgedrückt. Je ungleicher das
Verhältnis, desto geringer ist der Unterschied zwischen lauten und leisen Noten. Das
Komprimierungsverhältnis (“Ratio”) kann mit dem Compressor-Regler eingestellt
werden. Es gibt sechs Einstellungsmöglichkeiten: Aus, 1.4:1, 2:1, 3:1, 6:1 und ∞:1.
Wenn du den Compressor-Regler auf den Höchstwert stellst, ist die Komprimierung
unendlich. Das bedeutet, dass es keine Pegelunterschiede mehr gibt (“Limiter”-Effekt).
Der Kompressor befindet sich übrigens vor dem Verstärkermodell und übernimmt
demnach die Rolle eines Kompressorpedals. Wenn der Kompressor aktiv ist, leuchtet die
entsprechende Diode.
Effekte
3•3
Gate – Mit dem Gate-Effekt verhinderst du, dass immer dann, wenn du nicht spielst,
Rauschen und Brummen hörbar ist. Das ist vor allem notwendig, wenn der Eingangspegel
stark angehoben wird. Die Pegelschwelle des Gates muss mit dem Gate-Regler eingestellt
werden. Drehe ihn nach rechts, wenn die Nebengeräusche sehr laut sind – und nach links,
wenn das Gitarrensignal ab und zu ausfällt. Halte den Manual-Taster oder Amp Models-
Regler gedrückt, während du am Gate-Regler drehst, um die Abklingrate des Gates
einzustellen. Wenn das Gate aktiv ist, leuchtet die entsprechende Diode.
Page 95

Effekte
3•4
Chorus – Der Floor POD Plus enthält zwei verschiedene Chorus-Effekte. “Chorus
1” beruht auf einer Rechteckwellenmodulation und klingt also mehr nach “RackEffekt”. “Chorus 2” verwendet hingegen eine Sinuswelle und etwas mehr Rückkopplung. Die Bewegungen fallen daher stärker auf, und der Sound enthält auch mehr
Obertöne. “Chorus 2” wurde so bearbeitet, dass sein Sound stark an jenen des Roland®
CE-1 erinnert*. Mit dem Effect Tweak-Regler bestimmst du die Intensität und
Geschwindigkeit des Effekts.
Flanger – Ein Flanger-Effekt erinnert an aufsteigende und landende Düsenjäger. In
den 1970ern war der Sound mächtig angesagt, Hör’ dir nur mal “Barracuda” der Gruppe
Heart an… Ursprünglich handelte es sich übrigens um einen mechanischen Effekt: Er
wurde durch regelmäßiges Abbremsen der Bandspulen erzeugt. Der Effekt entstand durch
die variierende Bandgeschwindigkeit. Die Stelle, an der gedrückt wurde, nennt man den
“Flansch” (englisch “Flange”) – und so weißt du auch, woher der Name kommt. Irgendwann
fand dann jemand heraus, wie man diesen Effekt auf elektronischem Weg simuliert und
Gitarristen anschmiert.
Der Floor POD Plus enthält zwei Flanger-Effekte. “Flange 1” ist ein dezenter Effekt mit
wenig Verzögerung; “Flange 2” hingegen erzeugt eine Phasendrehung und arbeitet zudem
viel intensiver (hoher Depth-Wert). Mit dem Effect Tweak-Regler bestimmst du die
Intensität und Geschwindigkeit des Effekts.
Rotary – Dieser Effekt simuliert einen sich drehenden Lautsprecher, vor den man ein
Mikrofon gestellt hat – einen Leslie® eben*. Die Drehgeschwindigkeit kann entweder
schnell (“Fast”) oder langsam (“Slow”) sein. Das Rotary Speaker-Modell des Floor POD
Plus funktioniert so: Wenn sich der Effect Tweak-Regler ganz links befindet, läuft der
Effekt langsam. Drehe ihn von “12 Uhr” aus weiter nach rechts, damit er schnell wabert.
Du wirst merken, dass sich die Geschwindigkeit niemals augenblicklich ändert. Ein
Lautsprecher kann sich schließlich nicht sofort schneller drehen bzw. abbremsen. Und
das wird hier sehr realistisch simuliert. Mit dem Effect Tweak-Regler kannst du die
Geschwindigkeit und Intensität des Doppler-Effekts (d.h. der Tonhöhenverschiebung)
einstellen.
Phaser – Dieser Phaser-Effekt beruht* auf dem MXR
dass er Teil des Gesamt-Sounds wird. Das angenehme organische Wirbeln hört man seit
den 1970ern (bis heute) auf unzähligen Aufnahmen. Mit dem Effect Tweak-Regler
bestimmst du die Intensität und Geschwindigkeit des Effekts.
®
Phase 90 und ist so subtil,
U-Vibe – Das mittlerweile legendäre Uni-Vibe wurde 1969 von Jimi Hendrix hof-
fähig gemacht. Eigentlich ist es ein 4-Stufen-“Phase Shifter”, aber vor allem bekannt
und beliebt wegen der “perlenden” und “verwässerten” Sounds. Mit dem Effect Tweak-
Regler bestimmst du die Geschwindigkeit und den Pegel des Effekts.
* Alle Produktnamen sind Warenzeichen der betreffenden Hersteller, die in keiner Weise mit Line 6 verbunden sind.
Die Produktnamen, Beschreibungen und Fotos dienen nur dem Zweck einer leichteren Identifizierung der Geräte, die als
Ausgangspunkt für die Line 6-Modelle verwendet wurden. ROLAND® ist ein eingetragenes Warenzeichen der Roland
Corporation. LESLIE® ist ein eingetragenes Warenzeichen der Suzuki Musical Instrument Manufacturing Co. Ltd.
MXR® ist ein eingetragenes Warenzeichen der Dunlop Manufacturing, Inc.
Page 96

Obi-Wah – Hierbei handelt es sich um eine Simulation* des klassischen
spannungsgesteuerten Oberheim®-Filters. Die Änderungen der Klangfarbe beruhen
auf Anhebungen zufällig gewählter Frequenzbereiche. Mit dem Effect Tweak-Regler
bestimmst du die Geschwindigkeit und Bandbreite (“Q”) des Effekts.
Tron Up – Teils Auto-Wah, teils steuerbares Filter, war der Mu-Tron
kurveneffekt genau, was man in den 1970ern zum amtlichen Funken brauchte. Mit
dem Effect Tweak-Regler bestimmst du die Empfindlichkeit und Bandbreite (“Q”) des
Effekts.
®
III Hüll-
Octave Fuzz – “Octave Fuzz” ist eine Line 6-Kombination eines Fuzz-Effekts mit
einem Oktavierer. Jimi Hendrix gebrauchte so etwas ab den späten 1960ern. Hör’ die
außerdem einmal “Little Sister” der Queens of the Stone Age an, um das Potenzial dieses
Effekts zu entdecken. Mit dem Effect Tweak-Regler bestimmst du den Pegel und die
Klangfarbe des Effekts.
Sub Octave – Dieser Effekt ist ein “Octave Fuzz” mit zusätzlicher tiefer
Oktave! Nicht nur Moog-Anhänger stehen auf diesen Sound – eine tiefe, fette
Rechteckwellenverzerrung, mit der man mühelos jeden Analog-Synthi übertrumpft. Mit
dem Effect Tweak-Regler bestimmst du den Anteil und die Klangfarbe des Effekts.
Comet Trails – Irgendwo in den Eingeweiden des FM4 Filter Modeler von Line
6 (auf dem dieser Effekt beruht) rasen sieben Filter in alle Himmelsrichtungen und
erzeugen einen monumentalen Sound. Mit dem Effect Tweak-Regler bestimmst du die
Geschwindigkeit und Bandbreite (“Q”) des Effekts.
Ring Modulator – Ringmodulatoren erzeugen einen blechernen, ungewohnten
und für eine Gitarre absolut untypischen Sound. Dieser Effekt wirkt ausgesprochen
perkussiv und in gewisser Hinsicht fast außerirdisch. Mit dem Effect Tweak-Regler
bestimmst du die Frequenz und den Anteil des Effekts.
Otto Phase – Teils Phaser, teils Sprechcomputer, beruht dieser Effekt auf einer
Hüllkurve, die einen Phaser steuert. Im Grunde ist dies die umgekehrte Fassung von
“Tron Up”. Mit dem Effect Tweak-Regler bestimmst du die Empfindlichkeit und
Rückkopplung des Effekts.
Swell – Dieser Effekt verhält sich wie ein automatisch bedientes Volumenpedal, das
sich bei jeder gespielten Note erneut öffnet. Mit dem Effect Tweak-Regler bestimmst du
die Anstiegszeit des Effekts.
Effekte
3•5
* Alle Produktnamen sind Warenzeichen der betreffenden Hersteller, die in keiner Weise mit Line 6 verbunden sind.
Die Produktnamen, Beschreibungen und Fotos dienen nur dem Zweck einer leichteren Identifizierung der Geräte, die als
Ausgangspunkt für die Line 6-Modelle verwendet wurden. OBERHEIM® ist ein eingetragenes Warenzeichen der Gibson
Guitar Corp. MU-TRON® ist ein eingetragenes Warenzeichen von Mark Simonsen.
Page 97

Effekte
3•6
Tremolo – Beruht* auf der Tremolo-Schaltung der “klassischen” Fender
®
Verstärker. Mit dem Effect Tweak-Regler bestimmst du die Geschwindigkeit und
Intensität des Effekts.
Effect Tweak
Sehen wir uns noch einmal im Überblick an, welche Funktion der Effect Tweak-Regler
bei den einzelnen Effekten hat:
Effektmodell Effektparameter 1 Effektparameter 2
Tremolo Geschwindigkeit Tiefe
Chorus 1 Tiefe Geschwindigkeit
Chorus 2 Tiefe Geschwindigkeit
Flange 1 Tiefe Geschwindigkeit
Flange 2 Tiefe Geschwindigkeit
Rotary Geschwindigkeit Tiefe
Phaser Geschwindigkeit Tiefe
U-Vibe Geschwindigkeit Pegel
Obi-Wah Geschwindigkeit Q
Tron-Up Empfindlichkeit Q
Octave Fuzz Pegel Klangfarbe
Sub Octave Mischung Klangfarbe
Comet Trails Geschwindigkeit Q
Ring Modulator Frequenz Mischung
Otto Phase Empfindlichkeit Rückkopplung
Swell Anstiegsgeschwindigkeit —
Wenn du “einfach nur” an diesem Regler drehst, ändert sich der Effektanteil. Um die
zugeordneten Effektparameter zu ändern, musst du beim Drehen den Manual-Taster
oder Amp Models-Regler gedrückt halten.
Um den Effekt auszuschalten, musst du den “On/Off”-Modus wählen und den C / FXFußtaster betätigen. Alles Weitere hierzu findest du in Kapitel 1.
* Alle Produktnamen sind Warenzeichen der betreffenden Hersteller, die in keiner Weise mit Line 6 verbunden sind.
Die Produktnamen, Beschreibungen und Fotos dienen nur dem Zweck einer leichteren Identifizierung der Geräte, die als
Ausgangspunkt für die Line 6-Modelle verwendet wurden. FENDER® ist ein eingetragenes Warenzeichen der Fender
Musical Instruments Corporation.
Page 98

Speicher, Tuner und Pedal
speicher, tuner und pedAl
Speicheranwahl
Ab Werk enthält der Floor POD Plus 124 Sounds, die bereits eine breite Stilpalette
abdecken. Diese Speicher (“Channels”) enthalten die geballte Programmierkunst des Line
6-Teams. Die Speicher sind in 31 Bänke zu je 4 Speichern unterteilt. Die vier Speicher
heißen “A”, “B”, “C” und “D”.
Um Speicher wählen zu können, musst du zuerst den gleichnamigen Modus aktivieren
(siehe Kapitel 1) und mit den Bank AUF/AB-Fußtastern eine Bank wählen. Betätige
anschließend einen Fußtaster A~D. Bedenke, dass sich die Reglereinstellungen bei Aufrufen eines anderen Speichers nicht wie von Geisterhand ändern. So ist es durchaus denkbar, dass der neue Speicher viel Bass enthält, obwohl sich der Bass-Regler in der Mindestposition befindet.
Um etwas zu ändern, brauchst du hingegen nur den zugeordneten Taster bzw. Regler zu
verwenden.
Einstellungen speichern
Die im Floor POD Plus gespeicherten Sounds kann man editieren und überschreiben.
Sobald du eine Einstellung änderst, erscheint rechts neben der Speicherbezeichnung im
Display ein Punkt (“.”). Zum Speichern musst du folgendermaßen vorgehen:
4•1
Drücke den Save-Taster. Die Save-Diode blinkt jetzt.
•
Wähle mit den Bank-Fußtastern die benötigte Bank (1~31).
•
Um den Sound in einem anderen Speicher als dem momentan gewählten (A, B,
•
C oder D) zu sichern, musst du den betreffenden Fußtaster betätigen. Drücke den
Fußtaster bzw. Save noch einmal, um deine Absicht zu bestätigen.
Um den Sound im momentan gewählten Speicher zu sichern, musst du den betref-
•
fenden Fußtaster (A, B, C oder D) bzw. Save betätigen.
Die speicherbaren Einstellungen sind jetzt gesichert.
•
Um den Speicherbefehl abzubrechen, musst du an einem beliebigen Regler drehen oder
mindestens 5 Sekunden nach Betätigen des Fußtasters oder Save-Tasters nichts tun.
Page 99

Speicher, Tuner und Pedal
‘Compare’-Modus (Vergleich)
Um in Erfahrung zu bringen, wie ein bestimmter Regler innerhalb eines gespeicherten
Sounds eingestellt war, musst du den “Compare”-Modus aktivieren, indem du den Save-
4•2
Taster mindestens zwei Sekunden gedrückt hältst. Drehe danach an einem Regler und
behalte die TUNER-Dioden im Auge. Wenn die “b”- und “TUNER”-Diode leuchten,
befindet sich die aktuelle Reglerposition unter der gespeicherten Einstellung. Wenn
die “#”- und “TUNER”-Diode leuchten, befindet sich die aktuelle Reglerposition über
dem gespeicherten Wert. Wenn alle drei TUNER-Dioden leuchten, entspricht die
Reglerposition der gespeicherten Einstellung. Drücke den Save- oder Tap-Taster, um den
“Compare”-Modus zu verlassen.
‘Manual’-Modus
Beim Laden eines Speichers werden die gespeicherten Reglerwerte eingestellt und
entsprechen also nicht zwingend den Positionen der physischen Regler. Wenn der Sound
jederzeit den Reglerpositionen entsprechen soll, musst du den Manual-Taster drücken, um
den gleichnamigen Modus aufzurufen. Die “Manual”-Diode leuchtet und das Display zeigt
keine Speichernummer mehr an. Drehe an den Reglern, um eventuelle Klangänderungen
vorzunehmen. Drücke den Manual-Taster erneut, um den “Manual”-Modus wieder zu
verlassen. Dann wird wieder der zuletzt geladene Speicher aufgerufen.
Speichern eigener Vorgaben
Bei Bedarf kannst du die Vorgaben deines Floor POD Plus ändern, die bei Aufrufen eines
Verstärker-, Effekt- oder Delay-Modells geladen werden. Das Prinzip lautet folgendermaßen: Beim Drehen an den Reglern Amp Models, Effects und Delay werden die für
das gewählte Modell gespeicherten Vorgaben geladen. Wenn man diese Vorgaben ändert
und erneut speichert, werden sie beim Drehen an Amp Models, Effects oder Delay au-
tomatisch eingestellt. Das geht so:
Gib an, ob du die Vorgaben eines Verstärker-, Effekt- oder Delay-Modells speichern
•
möchtest.
Stelle die damit zusammenhängenden Bedienelemente wunschgemäß ein.
•
Drücke den Amp Models-Regler und Save-Taster gleichzeitig. Nun blinken die
•
“Save”- und “MANUAL”-Diode.
Die Anzeige “A” bedeutet, dass das Verstärkermodell gespeichert werden kann. Wähle
•
mit den Bank AUF/AB-Fußtastern den Einstellungssatz, den du speichern möchtest:
“A”= Verstärkermodell, “E”= Effekte, “d”= Delay.
Drücke den Save-Taster, um die Einstellungen zu speichern bzw. Manual oder Tap,
•
um den Vorgang abzubrechen.
Page 100

Speicher, Tuner und Pedal
Das war’s auch schon. Wenn du jetzt am Amp Models, Effects- oder Delay-Regler
drehst, werden deine persönlichen Vorgaben für das gewählte Modell aufgerufen.
Beachte aber bitte folgendes. Wahrscheinlich hast du bemerkt, dass du keinen Zielspeicher
für deine Vorgaben wählen kannst. Das rührt daher, dass der Floor POD Plus die eingestellten
Vorgaben automatisch dem aktuell gewählten Verstärker-, Effekt- oder Delay-Modell
zuordnet. Beispiel: Wenn du zuvor das “Line 6 Insane”-Verstärkermodell gewählt hast,
werden die geänderten Vorgaben für “Line 6 Insane” gespeichert.
Stimmfunktion (Tuner)
Um den Tuner zu aktivieren, musst du den Tap-Fußtaster mindestens 2 Sekunden lang ge-
drückt halten. Die “TUNER”-Diode leuchtet, um anzugeben, dass dieser Modus aktiv ist.
Spiele eine Note – der Floor POD Plus zeigt an, wie sie heißt und ob sie richtig gestimmt
ist. Alle Noten werden bei Bedarf einen Halbton tiefer angezeigt (also “Ab” statt “G#”
usw.).
Die Dioden unter dem Display zeigen an, ob die Saite zu tief, zu hoch oder richtig gestimmt ist. Wenn die “b”-Diode leuchtet, ist die Saite zu tief. Wenn die “#”-Diode leuchtet,
ist die Saite zu hoch. Leuchten alle drei Dioden, so ist die Saite richtig gestimmt. Um den
Tuner-Modus wieder zu verlassen, musst du den Save- oder Manual-Taster bzw. den Tap-
Fußtaster betätigen.
Kammertonfrequenz
4•3
Die Kammertonfrequenz (Referenz) des Tuners kann bei Bedarf mit den Bank AUF/ABFußtastern geändert werden. Die Vorgabe lautet zwar –wie allgemein üblich– A= 440Hz,
allerdings kann die Frequenz im Bereich 436~445Hz geändert werden. Das Display zeigt
die gewählte Kammertonfrequenz an. Diese Einstellung wird automatisch gespeichert und
also auch später wieder verwendet.
Lautstärke/Stummschaltung beim Stimmen
Du kannst selbst bestimmen, ob der Pegel bei Verwendung des Tuners reduziert bzw. ob
die Signalausgabe stummgeschaltet werden soll. Mit dem Zehenschalter des Schwellpedals kann die Stummschaltung des Tuners aktiviert bzw. ausgeschaltet werden. Solange
die Stummschaltung aus ist (die WAH-Diode leuchtet), kann der Signalpegel des Tuners
mit dem Wah-/Volumenpedal geändert werden. Diese Einstellung wird automatisch gespeichert und also auch später wieder verwendet.
 Loading...