


T
Corporate Headquarters
10601 West Belmont Avenue
Franklin Park, Illinois 60131
U.S.A.
847.288.3300 • FAX: 847.288.3703 800.735.3867 (Toll-free within the U.S. and Canada)
International Offices
Life Fitness Asia Pacific Ltd |
Life Fitness Austria |
Life Fitness Italia S.R.L. |
12th Floor, Tower 1 |
Vertriebs GmbH |
Via Elvas 92 |
The Gateway |
Hintschiggasse 1 |
39042 Bressanone (BZ) |
25 Canton Road |
1100 Vienna |
ITALY |
Tsimshatsui, Kowloon |
AUSTRIA |
Telephone: 39.472.835 470 |
HONG KONG |
Telephone: 43.1.61 57 198 |
FAX: 39.472.833 150 |
Telephone: 852.2.575.6262 |
FAX: 43.1.61 57 198.20 |
|
FAX: 852.2.575.6001 |
|
|
Life Fitness Atlantic BV |
Life Fitness Benelux NV |
Life Fitness Latin America |
Atlantic Headquarters |
Lambrechtshoekenlaan 309-311 |
10601 West Belmont Avenue |
Columbusstraat 25 |
B-2170 Antwerpen-Merksem |
Franklin Park, Illinois 60131 |
3165 AC Rotterdam |
BELGIUM |
U.S.A. |
NETHERLANDS |
Telephone: 32.3.644.4488 |
Telephone: 847.288.3675 |
Telephone: 31.10.294.5011 |
FAX: 32.3.644.2480 |
FAX: 847.288.3762 |
FAX: 31.10.294.5029 |
Life Fitness Europe GmbH |
Life Fitness UK Ltd |
|
||
|
Siemensstrasse 3 |
Queen Adelaide |
|
85716 Unterschleissheim |
Ely, Cambs CB7 4UB |
|
GERMANY |
UNITED KINGDOM |
|
Telephone: 49.89.31 77 51.0 |
Telephone: 44.1.353.666 017 |
|
FAX: 49.89.31 77 51.99 |
FAX: 44.1.353.666 018 |
M051-00K20-A121 8/98
1

Before using your Lifecycle exercise bike, it is essential that you read this ENTIRE operation manual and ALL instructions.
It will help you set up your Lifecycle exercise bike quickly and give instructions on how to use it correctly.
NOTE: This equipment has been tested and found to comply with the limits for a Class A digital device, pursuant to part 15 of the FCC rules. These limits are designed to provide reasonable protection against harmful interference when the equipment is operated in a commercial environment. This equipment generates, uses and can radiate radio frequency energy, and if not installed and used in accordance with the instruction manual, may cause harmful interference to radio communications. Operation of this equipment in a residential area is likely to cause harmful interference in which case the user will be required to correct the interference at his own expense.
You are cautioned that any changes or modifications to this equipment could void your product warranty!
Any service, other than cleaning or user maintenance, must be performed by an authorized service representative. There are no user serviceable parts.
2

|
TABLE OF CONTENTS |
|
Section |
Description |
Page |
1. |
Getting Started . . . . . . . . . . . . . . . . . . . . . . . . . . . . . . . . . . . . . . . . . . . . . . |
. . 5 |
1.1 |
Important Safety Instructions . . . . . . . . . . . . . . . . . . . . . . . . . . . . . . . . . . |
. 5 |
1.2 |
How to Stabilize the Lifecycle® Exercise Bike . . . . . . . . . . . . . . . . . . . . . |
. 6 |
1.3 |
How to Adjust the Seat . . . . . . . . . . . . . . . . . . . . . . . . . . . . . . . . . . . . . . |
. 7 |
1.4 |
How to Adjust the Footstraps . . . . . . . . . . . . . . . . . . . . . . . . . . . . . . . . . . |
. 8 |
1.5 |
Optional Settings for the Lifecycle Exercise Bike . . . . . . . . . . . . . . . . . . |
. 9 |
2. |
The Display Console . . . . . . . . . . . . . . . . . . . . . . . . . . . . . . . . . . . . . . . . . . |
. 10 |
2.1 |
Display Console Overview . . . . . . . . . . . . . . . . . . . . . . . . . . . . . . . . . . . |
. 10 |
2.2 |
Console Descriptions . . . . . . . . . . . . . . . . . . . . . . . . . . . . . . . . . . . . . . . |
. 10 |
|
Elapsed Time Window |
|
|
Data Entry Window |
|
|
Data Entry Zone |
|
|
Program Profile Window |
|
|
Summary Instructions |
|
|
Speed Window |
|
|
Feedback Window |
|
3. |
Heart Rate Zone Training. . . . . . . . . . . . . . . . . . . . . . . . . . . . . . . . . . . . . . . |
. 13 |
3.1 |
Why Heart Rate Zone Training? . . . . . . . . . . . . . . . . . . . . . . . . . . . . . . . |
. 13 |
3.2 |
Heart Rate Monitoring . . . . . . . . . . . . . . . . . . . . . . . . . . . . . . . . . . . . . . |
. 14 |
|
The Lifepulse® Digital Heart Rate Sensors |
|
|
The Optional Heart Rate Chest Strap |
|
4. |
The Programs . . . . . . . . . . . . . . . . . . . . . . . . . . . . . . . . . . . . . . . . . . . . . . . |
. 15 |
4.1 |
Program Overview . . . . . . . . . . . . . . . . . . . . . . . . . . . . . . . . . . . . . . . . . |
. 15 |
|
The Programs Step by Step |
|
4.2 |
Program Descriptions . . . . . . . . . . . . . . . . . . . . . . . . . . . . . . . . . . . . . . . |
. 17 |
|
To Begin a Lifecycle Exercise Bike Workout |
|
|
Manual |
|
|
Random |
|
|
Hill |
|
|
Fat Burn |
|
|
Cardio |
|
|
Fit Test |
|
4.3 |
How to Maximize Workouts on the Lifecycle Exercise Bike . . . . . . . . . . |
. 26 |
|
Selecting the Correct Intensity Level |
|
4.4 |
Watts / METS Programmability Options . . . . . . . . . . . . . . . . . . . . . . . . . |
. 27 |
4.5 |
Race Option . . . . . . . . . . . . . . . . . . . . . . . . . . . . . . . . . . . . . . . . . . . . . . |
. 27 |
5. |
Service and Technical Data . . . . . . . . . . . . . . . . . . . . . . . . . . . . . . . . . . . . . |
. 28 |
5.1 |
Preventive Maintenance Tips . . . . . . . . . . . . . . . . . . . . . . . . . . . . . . . . . |
. 28 |
5.2 |
How to Solve Basic Operating Problems. . . . . . . . . . . . . . . . . . . . . . . . . |
. 29 |
5.3 |
Troubleshooting the Optional Heart Rate Chest Strap . . . . . . . . . . . . . . . |
. 30 |
5.4 |
How to Obtain Product Service. . . . . . . . . . . . . . . . . . . . . . . . . . . . . . . . |
. 31 |
5.5 |
Lifecycle Exercise Bike Specifications . . . . . . . . . . . . . . . . . . . . . . . . . . |
. 32 |
© 1998 Brunswick Corporation. All rights reserved. The Life Fitness trademark is registered in the U.S. Patent and Trademark Office, Certificate No. 1,400,502, issued July 8, 1986. Life Fitness, Lifecycle and Lifepulse are registered trademarks, and Heart Rate Zone Training is a trademark of Brunswick Corporation. Polar is a registered trademark of Polar. Any use of these trademarks, without the express written consent of Life Fitness or the corresponding companies is forbidden.
3

This Operation Manual describes the functions of the following products:
Lifecycle exercise bikes
8500
8500HR
8500R
See “Specifications” page in this manual for product specific features.
4

1 |
GETTINGI |
STARTED |
|
1.1 Important Safety Instructions
Always follow the console instructions for proper operation.
Close supervision is necessary when used by or near children, invalids or disabled persons.
Never operate a Life Fitness exercise bike if it has been dropped, damaged, or even partially immersed in water. Contact Life Fitness Customer Support Services for assistance.
Never insert objects into any opening in your Lifecycle exercise bike. If an object should drop inside, carefully retrieve it. If you cannot reach the item, contact Life Fitness Customer Support Services.
Never place liquids of any type directly on the unit, except in an accessory tray. Containers with lids are recommended.
Do not use the Lifecycle exercise bike outdoors, near swimming pools or in areas of high humidity.
Do not use the Lifecycle exercise bike in areas where aerosol spray products are being used or where oxygen is being administered. Such substances increase the danger of combustion and explosion.
Keep all loose clothing, shoelaces, and towels away from the Lifecycle exercise bike pedals.
Keep the area around your Lifecycle exercise bike clear of any obstructions, including walls and furniture.
Always be careful and exercise caution when mounting or dismounting your Lifecycle exercise bike. Use the handlebar whenever additional stability is required.
Wear shoes with rubber or high-traction soles. Do not use shoes with heels,leather soles, cleats or spikes. Do not use the bike in your bare feet.
Do not tip the Lifecycle exercise bike on its side during operation.
SAVE THESE INSTRUCTIONS FOR FUTURE REFERENCE
Life Fitness STRONGLY recommends that if you are undertaking an exercise program please see your physician for a complete medical exam, particularly if you have a family history of high blood pressure or heart disease, are over the age of 45, or if you smoke, have high cholesterol, are obese, or have not exercised regularly in the past year.
If, at any time while exercising, you feel faint, dizzy, pain, or shortness of breath, stop immediately.
5
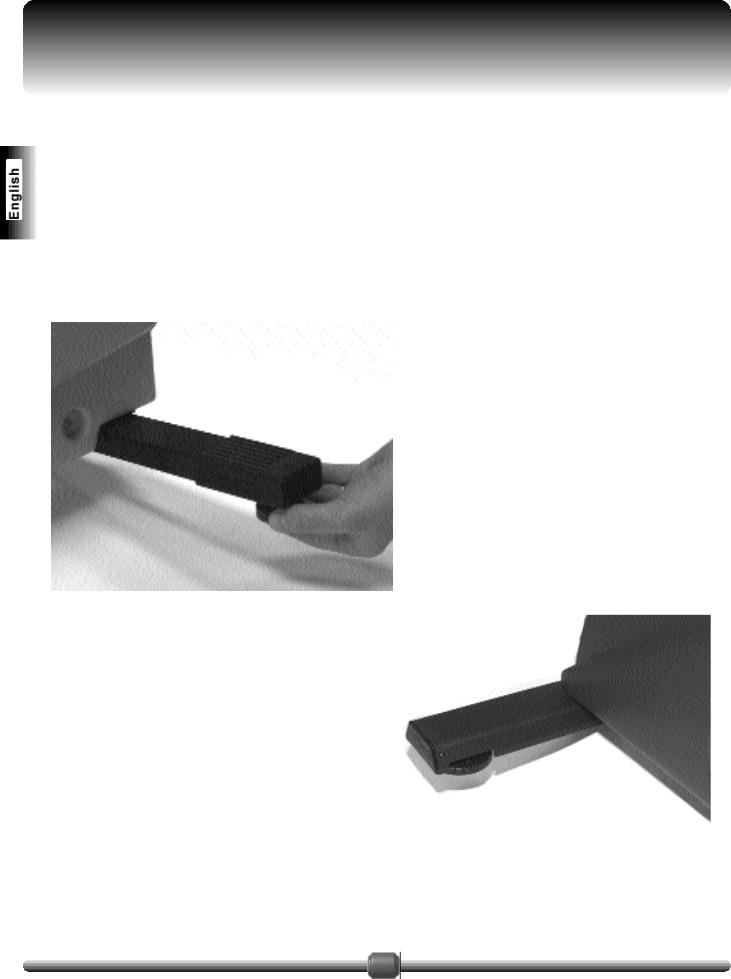
1.2 How to Stabilize the Lifecycle Exercise Bike
Depending on the surface on which the Lifecycle exercise bike is placed, it may need to be stabilized. After you place the bike where you will primarily use it, check the stability of the bike by attempting to rock it back and forth. If it rocks, it is not stable. To stabilize it, rotate the foot on the stabilizer bar that appears to be higher counter-clockwise (as viewed from above) with your finger until the bike is level. Tighten the locknut.
6
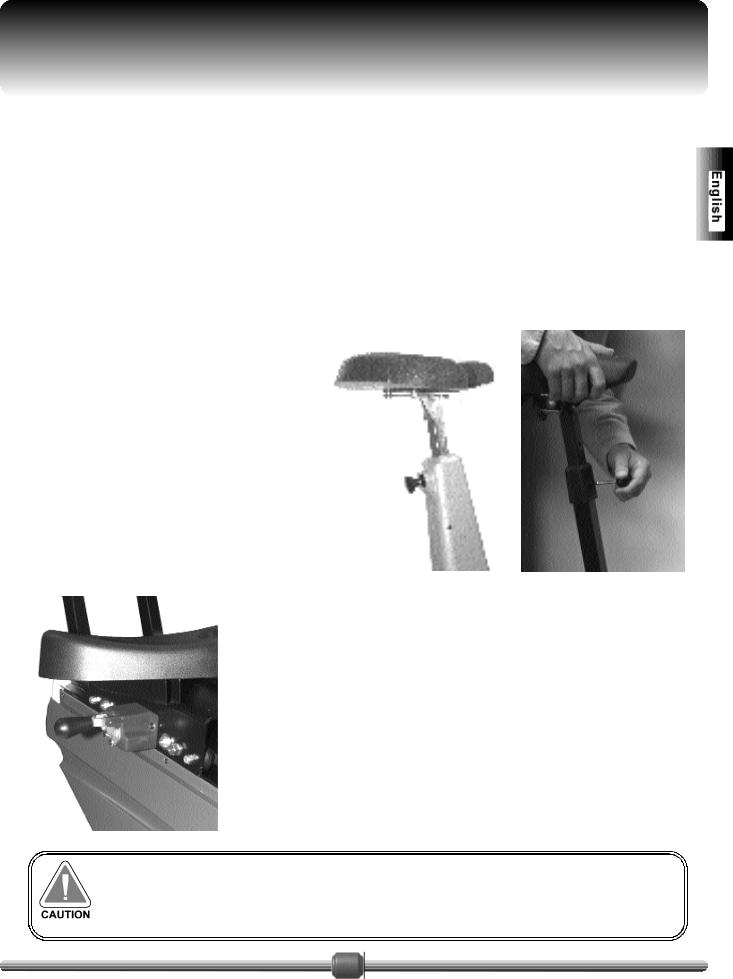
How to Adjust the Seat
A properly adjusted seat is extremely important in any bike-oriented exercise activity and the Lifecycle exercise bike is no exception. If the seat is too close, excessive strain will be placed on the knees and quadriceps muscles; if the seat is too far, the resulting reaching action will irritate the feet, ankles, hips and knees.
Sit on the seat and place the balls of your feet on the pedals. An optimum position will allow you to move through the bottom of the stroke without locking your knees or shifting in the seat (your knees should have a slight bend at the point of fullest leg extension).
Upright Exercise Bikes:
If the seat needs to be adjusted, dismount the bike and pull the springloaded adjusting pin located on the back of the seat post (or pull out the adjusting pin located on the front of the seat post). Slide the seat post up or down as necessary to the proper position and release the pin to complete engagement. Check the seat height again and readjust it if necessary.
Recumbent Exercise Bikes:
If the seat needs to be adjusted, lift the spring-loaded adjusting handle located on the right, front side of the seat. Slide the seat forward or backward as necessary to the proper position and release the pin to complete engagement. Gently slide the seat forward and backward a small distance to ensure it is locked into place. Check the seat distance again and re-adjust it if necessary.
Do not attempt to adjust the seat while you are pedaling the bike. Doing so or failing to insert the seat pin completely may result in an uncomfortable workout or cause injury.
7
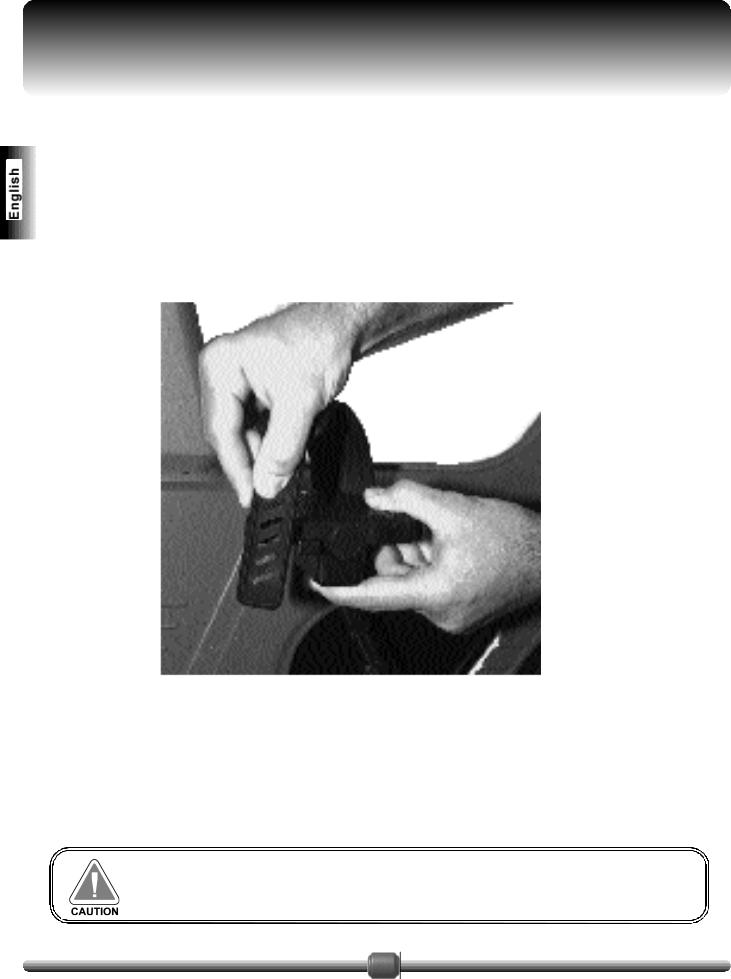
1.4 How to Adjust the Footstraps
The pedals on the Lifecycle exercise bike have footstraps with slits on both the inside and the outside of each strap. To adjust the size of the straps, grasp the outside of the strap and pull down and away from the knob. Once the slotted end is removed, choose a size that will feel the most comfortable while riding, reinsert the knob through the slot and pull the strap up. The knob will click when it locks in place.
Do not attempt to adjust the pedal footstraps while you are pedaling the bike. Doing so may result in an uncomfortable workout or cause injury.
8

1.5 Optional Settings for the Lifecycle Exercise Bike
l
Maximum Program Time
The maximum program time option allows the maximum program time to be changed from the default maximum time limit of 60 minutes to anywhere from 1 to 99 minutes. Altering the maximum program time will affect all programs except the Fit Test. To change the Lifecycle exercise bike’s maximum program time, proceed as follows:
1.Press and hold the 5 key on the numeric keypad.
2.Begin pedaling, then press START.
All LEDs and 7-segment displays will be illuminated when you enter Diagnostic State 1. The maximum program time default settings are located in Diagnostic State 5. Each time you press the ENTER key you will advance one diagnostic state. Continue to advance to Diagnostic State 5.
3.When you reach Diagnostic State 5, the current MAXIMUM PROGRAM TIME setting will be displayed. The factory set default maximum program time is 60 minutes.
4.Use the 1 key to decrease the MAXIMUM PROGRAM TIME or the 3 key to increase the MAXIMUM PROGRAM TIME.
5.To exit the Diagnostic States, press the CLEAR / PAUSE key repeatedly until you return to the user display. The user display is the initial display console you see when you approach the unit for normal operation.
l
English / Metric toggle
Follow steps 1, 2 and 3 as listed above to reach Diagnostic State 5 and continue with Step 4 as listed below.
4.Press the ENTER key two more times to reach Diagnostic State 7. This state indicates the display console default setting of English or Metric units.
When the default is set to English units of measurement, it will read ‘E’ in the upper right window of the display console.
When the default is set to Metric units of measurement, it will read ‘9’ in the upper right window of the display console.
5.To exit the Diagnostic States, press the CLEAR / PAUSE key repeatedly until you return to the SELECT PROGRAM state (all program LED’s will be flashing).
9

2 |
THE DISPLAY CONSOLE |
|
2.1 Display Console Overview
The Lifecycle exercise bike’s display console is easy to use and it allows you to follow progress as you ride. The on-board computer lets you tailor workouts to individual fitness capabilities and goals while providing a unique means of measuring fitness improvement from one workout to the next.
|
A |
G |
B |
|
F 
D 


 C
C
E 


2.2 Console Descriptions
A
Elapsed Time Window
ELAPSED TIME WINDOW: Shows the riding time selected in the Manual, Random, Hill, Fat Burn and Cardio heart rate management programs and the total elapsed time of the workout. When the CLEAR / PAUSE key is pressed, the display functions as a stopwatch (you must continue pedaling). For additional information see Operating Instructions and Program Descriptions.
B
Data Entry Window
DATA ENTRY WINDOW: Displays most data prompts and inputs the effort level chosen (which remains displayed throughout the workout, except in the Fit Test program or when Watts or METS workouts are selected). Your actual and target heart rates also will be displayed here when using the Lifepulse grips or wearing the optional heart rate monitor chest strap (depending on Lifecycle model).
10
C
Data Entry Zone
DATA ENTRY ZONE: Allows information pertinent to the program selected to be entered.
PROGRAM SELECT: This is where to select the workout program. Each time you press the PROGRAM SELECT key, an LED light will move from left to right to the next program option. When the program you want is displayed press ENTER or wait 10 seconds and your choice will be automatically entered.
START: Activates the display console once you begin pedaling and is then inactive for the remainder of the workout.
ENTER: Actually executes the input of any information keyed in. It is not necessary to press ENTER when keying in a new effort level.
RACE ON / OFF: Lets you toggle in and out of the Race mode at any time in the Manual, Random and Hill programs. The Speed / RPM display will toggle between RPMs and MPH / KPH every five seconds. The MPH / KPH will be dependent on the pedal speed and the level chosen. See the Race Option inset later in this manual.
CLEAR / PAUSE: Use this key to clear data before pressing the ENTER key. This key will also put your workout program on hold or restart it. To put a workout on hold, press the key once and continue pedaling (remember, pedaling powers the machine; if you stop pedaling, all power is lost and the display will go blank). Pedal resistance drops to the minimum when the Lifecycle exercise bike is paused and the stopwatch function is activated and the elapsed time window begins counting up from zero. Use this as a brief rest period if you feel fatigued or to take your heart rate. Resume the workout by pressing ENTER once, or end the workout by pressing CLEAR/PAUSE twice.
NUMERIC KEYS: Use these keys to enter riding time, level of difficulty and Heart Rate or Fit Test data. You can select a workout duration of anywhere from 1 to 99† minutes. You also enter a different resistance level than your current level, a different target heart rate for the Fat Burn and Cardio programs, or Fit Test data such as age, gender or weight via the numeric keypad.
WATTS (0) and METS (8): This key allows you to view your workout results in Watts or METS. (For more information on Watts and METS please see Watts / METS Programmability Option.)
†60 minutes is the factory setting for the Maximum Program Duration. To increase or decrease the Maximum Program Duration see the Optional Settings for the Lifecycle exercise bike section.
11
 Loading...