


Washing Machine
OWNER'S MANUAL
MODEL : WD-8050F/8052X
Thank you for purchasing LG Fully Automatic Washer. Please read your owner's manual carefully, it provides instructions on safe installation, use and maintenance. Retain it for future reference.
Record model number and serial number of washing machine.
M
K
P/No.: 3828ER3001M
Product Features
Jumbo Drum
LG's jumbo drum can wash about 40% more per load than conventional washing machine. A bigger drum improves the wash performance.
economical by Fuzzy Logic System
Logic System detects the amount of load and temperature, and then determines the optimum level and washing time to minimize energy and consumption.
-Lock
-Lock system has been developed to prechildren from pressing any button to change the
during operation.
noise speed control system
the amount of load and balance, evenly load to minimize the spinning noise level.
Restart
the washing machine is turned off by a failure, it restarts automatically in its stopped
when power is supplied again.
2
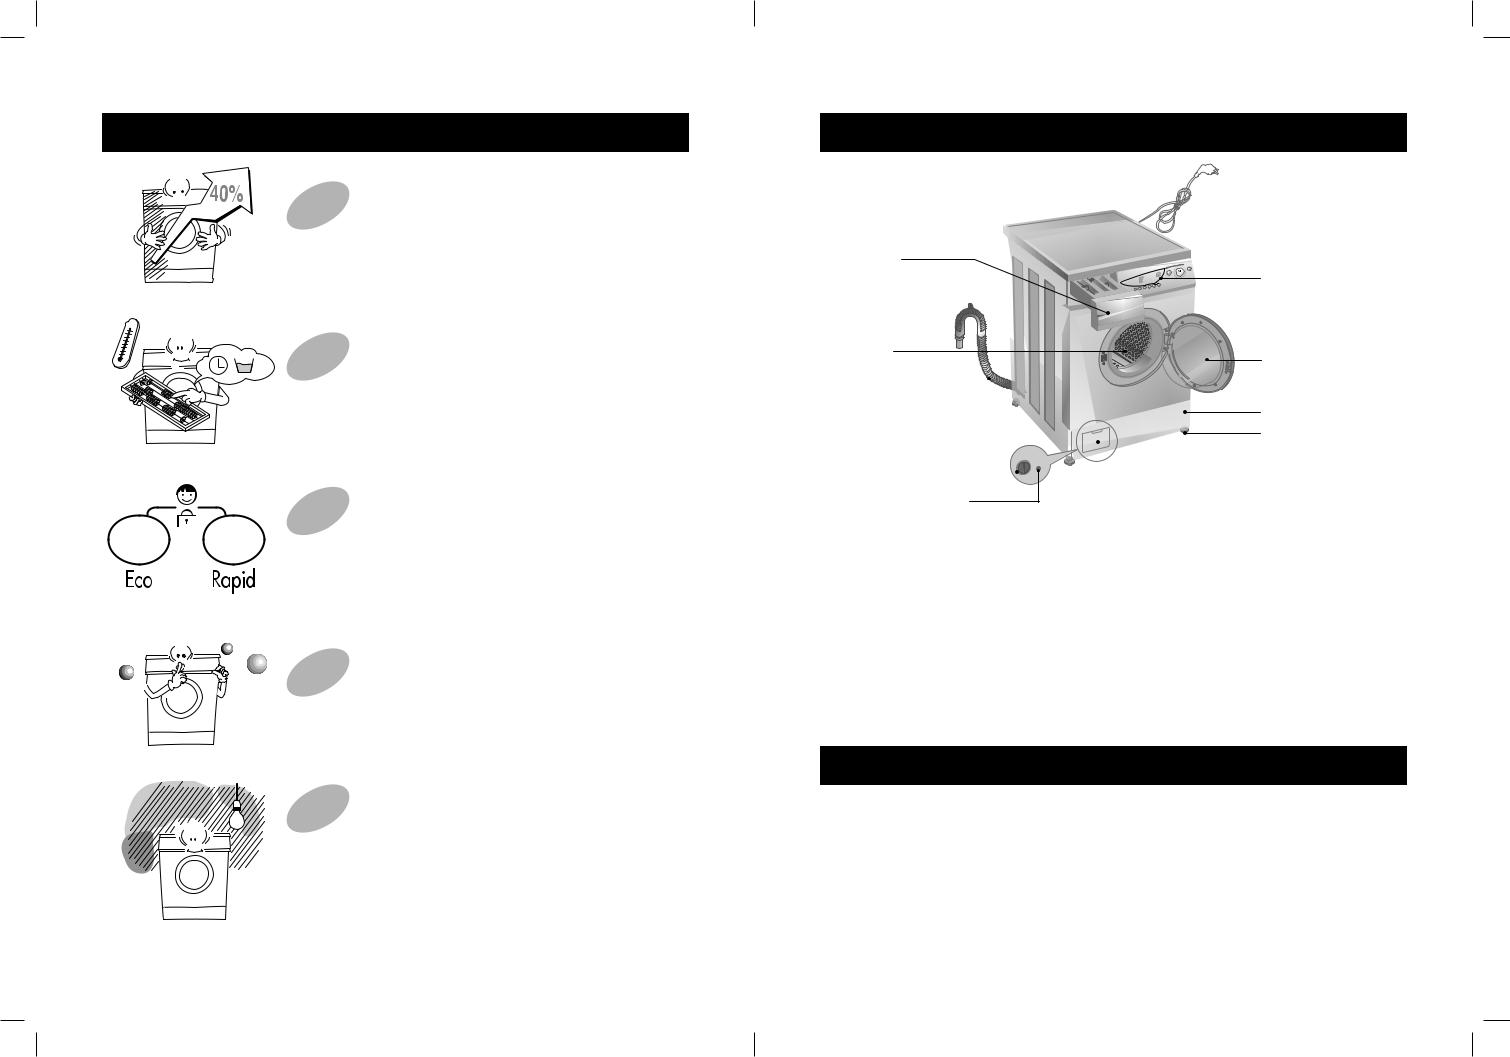
Specification

 Power plug
Drawer
(For detergent and fabric softener)
Drum
Drain hose 
Drain pump filter Drain plug
• If the supply cord is damaged, it must be replaced by the manufacturer or its service agents or similarly qualified person in order to avoid a hazard.
Control panel
Door
Lower Cover
Leveling legs
 Lower cover cap
|
WD-8050F |
|
WD-8052X |
Name |
Front loading washing machine |
||
Power supply |
|
220-240V, 50Hz |
|
Size |
600mm(W) × 600mm(D) × 850mm(H) |
||
Weight |
|
67kg |
|
Wash capacity |
7.0kg |
|
6.0kg |
Heating |
|
2200W |
|
Wash speed |
|
45rpm |
|
Spin speed |
400 / 600 / 800 rpm |
||
Water consumption |
67L(9.6L/kg) |
|
67L(11.2L/kg) |
Permissible water pressure |
0.3-10kgf/cm2 |
(30-1000kPa) |
|
Accessories |
Inlet hose (1EA), Spanner (1EA) |
||
The appearance and specifications may be varied without notice to raise the units quality.
Contents |
|
Product Features .......................................................................................................... |
2 |
Specification ................................................................................................................ |
3 |
Installation.................................................................................................................... |
4 |
Warnings....................................................................................................................... |
6 |
Preparing your laundry / Adding detergent .................................................................. |
7 |
Function of each button ............................................................................................... |
8 |
How to use your washing machine ............................................................................ |
10 |
Maintaining ................................................................................................................ |
12 |
Trouble-shooting guide .............................................................................................. |
14 |
3
P/No.3828ER3001M |
P/No.3828ER3001M |

Installation
■ Removing the transit bolts
•To protect the washer during transportation, the special 4 bolts are locked. Before operating the washer, remove the bolts. (If they are not removed, it may cause heavy vibration, noise and malfunction)
1. Locate the 4 bolts that secure the washer.
2. Unscrew the 4 bolts with a spanner provided. 3. Take out the 4 bolts
4. Keep the transit bolts and spanner for future use.
■ Level adjustment
• If the washer is not levelled, it could cause noise or vibration.
Leveling leg
Higher Lower
Leveling leg 
1. Select a place for installation
•Place it on a firm and even floor.
•Place it more than 2cm away from the wall
2. Check the gap
• Ensure all feet are firmly on the floor.
3. After adjusting the level, check it by shaking the washer. Readjust the level if necessary.
The base opening must not be obstructed by carpeting when the washing machine is installed on a carpeted floor.
Leveling should be done within 1.5 degree angle.
■ Electrical connection
•Do not use an extension cord or double adapter.
•If the supply cord is damaged, it must be replaced by the manufacturer or its service agents or similarly qualified person in order to avoid a hazard.
•Always unplug the machine and turn off the water supply after using.
•Connect the machine to an the exclusive AC 220 – 240V outlet with ground terminal.
•If the appliance is supplied from a cord extension set or electrical portable outlet device, the cord extension set or electrical portable outlet device should be positioned so it is not subject to splashing or ingress of moisture.
•If a stationary appliance is provided with a supply cord and a plug, the instructions shall state that the appliance must be positioned so that plug is accessible.
■ Water drain
• Hook over the edge of a sink using the plastic hose hanger supplied with the machine.
• Make sure there are no kinks in the hose and that it is not crushed. Secure the hose so that it can not be dislodged while the appliance is running.
• The drain hose should not be placed higher than 85cm above the floor.
4
P/No.3828ER3001M
■ Connecting the inlet hose
1. Unscrew the fixing screw to |
2. Push the connector up till the |
3. Push the water supply hose |
|
attach the faucet. |
|
rubber packing is in tight |
vertically upwards so that the |
|
|
contact with the faucet. |
rubber packing within in the |
|
|
Then tighten the 4 screws. |
hose can adhere completely to |
|
|
|
the faucet and then tighten it by |
Upper |
Rubber |
|
screwing it to the |
|
right. |
||
Connector |
packing |
Rubber packing |
|
Upper |
Upper |
Connector |
Connector |
Fixing screw |
Plate |
|
|
|
Water supply |
|
hose |
Used the horizontal faucet
Horizontal faucet
Extension faucet
Square faucet
Hose connector
Rubber seal
• Make sure that the rubber seal |
• Your machine comes with only |
is inside the hose connector. |
cold water connection. |
|
• Make sure that there are no |
|
kinks in the hose and that it is |
|
not crushed. |
■ Connecting the inlet hose (How to connect the hose of screw type.)
• Two rings are supplied with the water inlet hose in the valve connector in order to prevent water leaks.
• Your machine comes with only cold water connection. Connect to cold water using the inlet valve.
• Check water tightness of washing machine connections by turning the tap completely on.
• Periodically check the condition of the hose and replace the hose if necessary.
• Make sure that there are no kinks in the hose and that it is not crushed.
5
P/No.3828ER3001M
 Loading...