


GR-3331W
P/No.: MFL32855806
R
Production inspected
TÜV
Rhelnland
Product Safety
Por favor leia atentamente este manual
antes de ligar este electrodoméstico
Please read this manual carefully and
thoroughly before operating this unit.
Por favor lea este manual cuidadosamente
y completamente antes de operar esta unidad.


CONTENTS
1
ENGLISH
INSTALLATION 2
FEATURE CHART 3
OPERATION 4
Starting
Temperature Control
Ice Making
Bottle Rack Cooling
Chilled Compartment
Defrosting
LAMP REPLACEMENT 6
SUGGESTIONS ON FOOD STORAGE 7
CLEANING 8
GENERAL INFORMATION 8
IMPORTANT WARNINGS 9
BEFORE CALLING FOR SERVICE 10
CIRCUIT DIAGRAM 11
SPECIFICATIONS 12
THIS REFRIGERATOR IS MANUFACTURED WITH GREAT CARE, AND UTILIZES THE
LATEST IN TECHNOLOGY
WE ARE CONFIDENT THAT YOU WILL BE FULLY SATISFIED WITH IT'S PERFORMANCE
AND RELIABILITY
BEFORE YOU START YOUR REFRIGERATOR, PLEASE READ THIS BOOKLET CAREFULLY.
IT PROVIDES EXACT INSTRUCTIONS FOR INSTALLATION, OPERATION AND
MAINTENANCE, AND ALSO SUPPLIES SOME USEFUL HINTS.
.
.
2
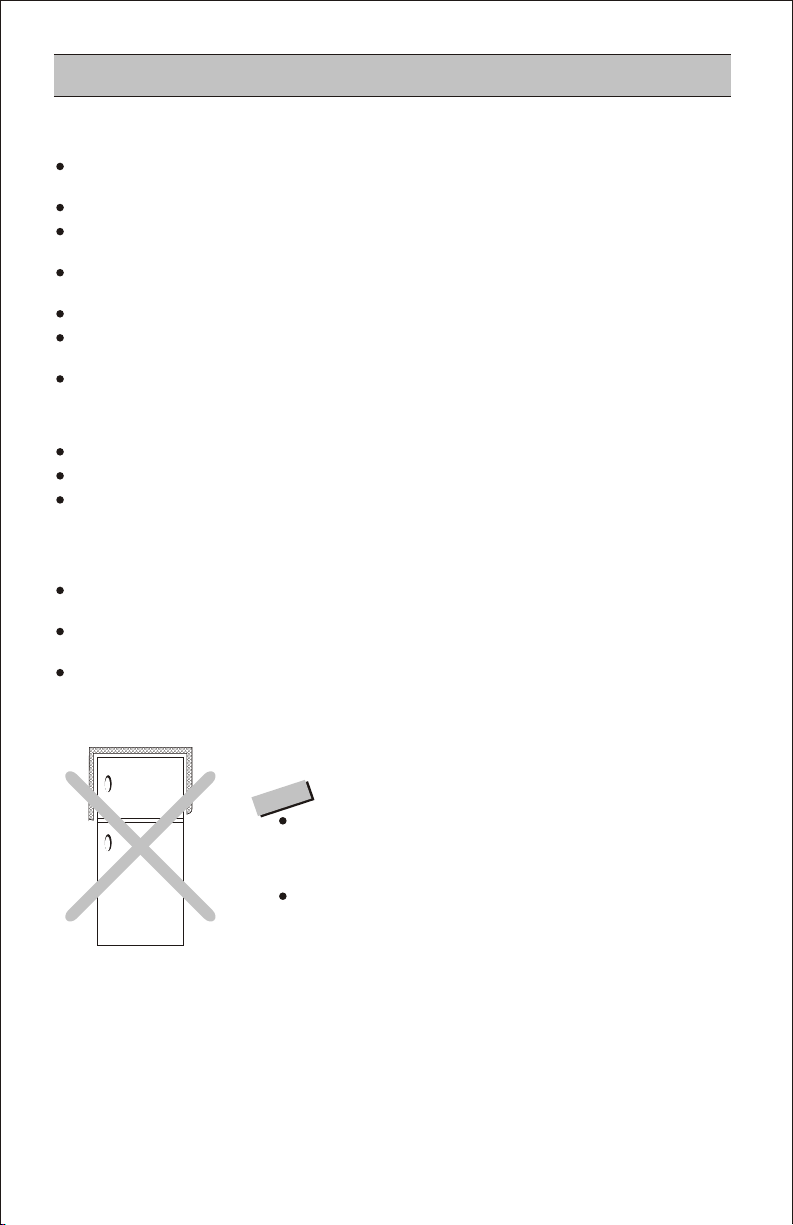
1. Select a good location.
Place your refrigerator where it is easy to use.
2. Avoid placing the unit near heat sources, direct
sunlight or moisture.
4. T avoid vibrations, the unit must be level.o
If required, adjust the leveling screws to
compensate for unevenness of the floor.
The front should be slightly higher than the rear
to aid in door closing.
Leveling screws can be turned easily by tilting
the cabinet slightly.
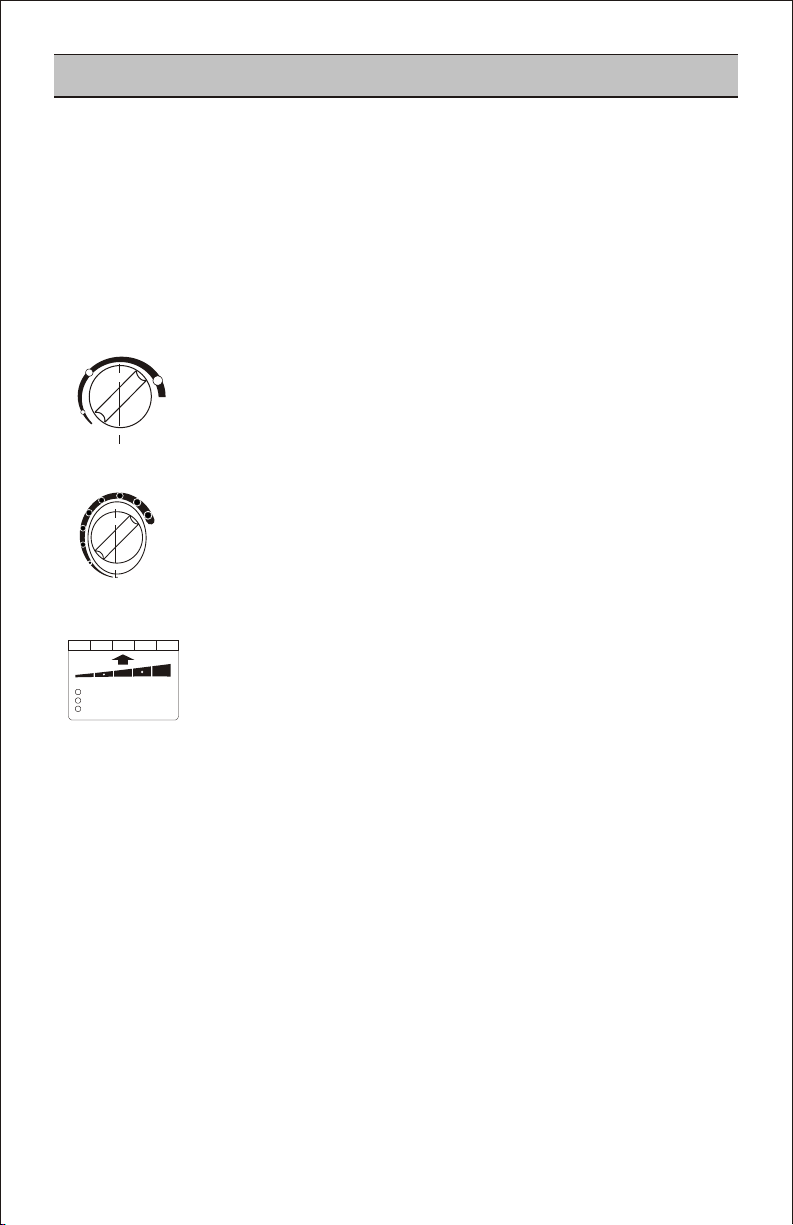
Turn the leveling screws clockwise( ) to raise
the unit, counterclockwise( ) to lower it.
5. Install this appliance between 10°C and 43°C.
If the temperature around the appliance is too
low or high, cooling ability may lessen.
NEXT
1. Clean your refrigerator thoroughly and wipe off
all dust accumulated during shipping.
2. Install accessories such as ice cube box, etc., in
their proper places.They are packed together to
prevent possible damage during shipment.
3. Connect the power supply cord (or plug) to the
outlet. Don't double up with other appliances on
the same outlet.
4. Prior to storing food, leave your refrigerator on
for 2 or 3 hours.
Check the flow of cold air in the freezer
compartment to ensure proper cooling.
Your refrigerator is now ready for use.
INSTALLATION
6. The Refrigerator must be positioned so that the
plug is easily accessible.
The model and serial numbers are found on the inner case back of refrigerator compartment of this unit.
These numbers are unique to this unit and not available to others. You should record requested
information here and retain this guide as a permanent record of your purchase. Staple your
receipt here.
Date of Purchase
Dealer purchased from
Dealer address
Dealer phone no.
Model no.
Serial no.
ENTRY
3. To ensure proper air circulation around the
Refrigerator-Freezer, Please maintain sufficient.
space on both the sides as well as top and maintain
at least 2 inches (5cm) from the rear wall.
The Refrigerator should be elevated 1inch from
the floor, especially if it is carpeted.
:
:
:
:
:
............................................................................................................................
............................................................................................................................
............................................................................................................................
............................................................................................................................
............................................................................................................................

3
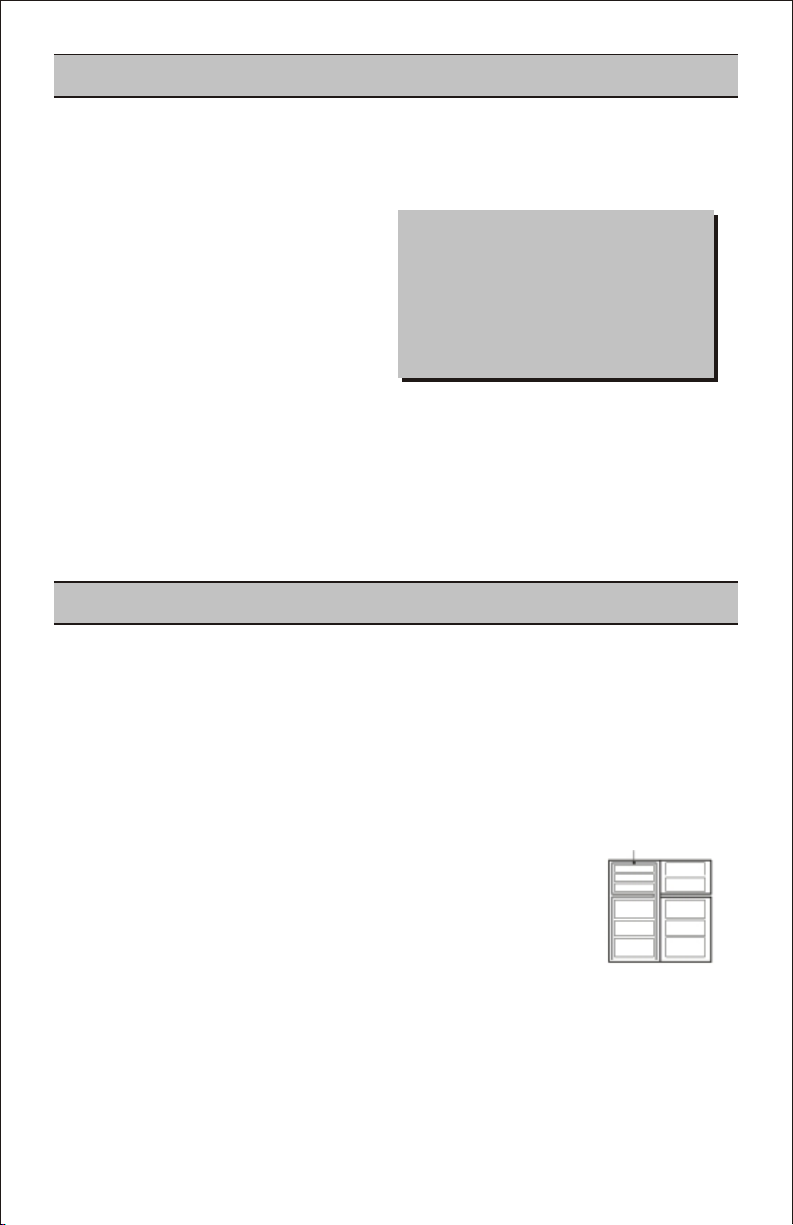
* In view of any policy of continuous improvements, the above technical specifications are subject to change.
FREEZER
COMPARTMENT
Freezer Temperature
Control Knob
Twist Ice Trays/Noramal (Optional)
Twist "N" Serve
(Optional)
Freezer Shelf
(Plastic)
REFRIGERATOR
COMPARTMENT
Fresh Zone
(Crystal)
Temperature
Control Knob
Normal Lamp
Shelves
(Plastic)
Multi Flow Duct
Distributes cold air to
each part of refrigerator
compartment.
Tray Vegetable Used to keep fruits
and vegetables, etc. fresh and crisp.
Freezer
Small Shelf
(Optional)
Leveling Leg
Egg Storage Shelf
Freezer Door Basket
Door Cooling duct
Door Baskets
Deco, Duct Door Cooling (Optional)
Door Cooling helps in Cooling the
refrigerator compartment faster &
maintains uniform temprator inside.
Moisture Controller
Maintains humidity
inside tray vegetable for
lasting freshness of
vegetable and fruits.
Cell, Fresh Cover, T/V
Multi Utility Basket
Multi Utility Basket
FEATURE CHART
4
STARTING
When your refrigerator is first installed, allow it 24 hours to stabilize at normal operating temperatures
prior to filling it with fresh or frozen foods. Then adjust the knobs to get satisfactory results as per instruction
given below.
If operation is interrupted, allow 5 minutes delay before restarting.
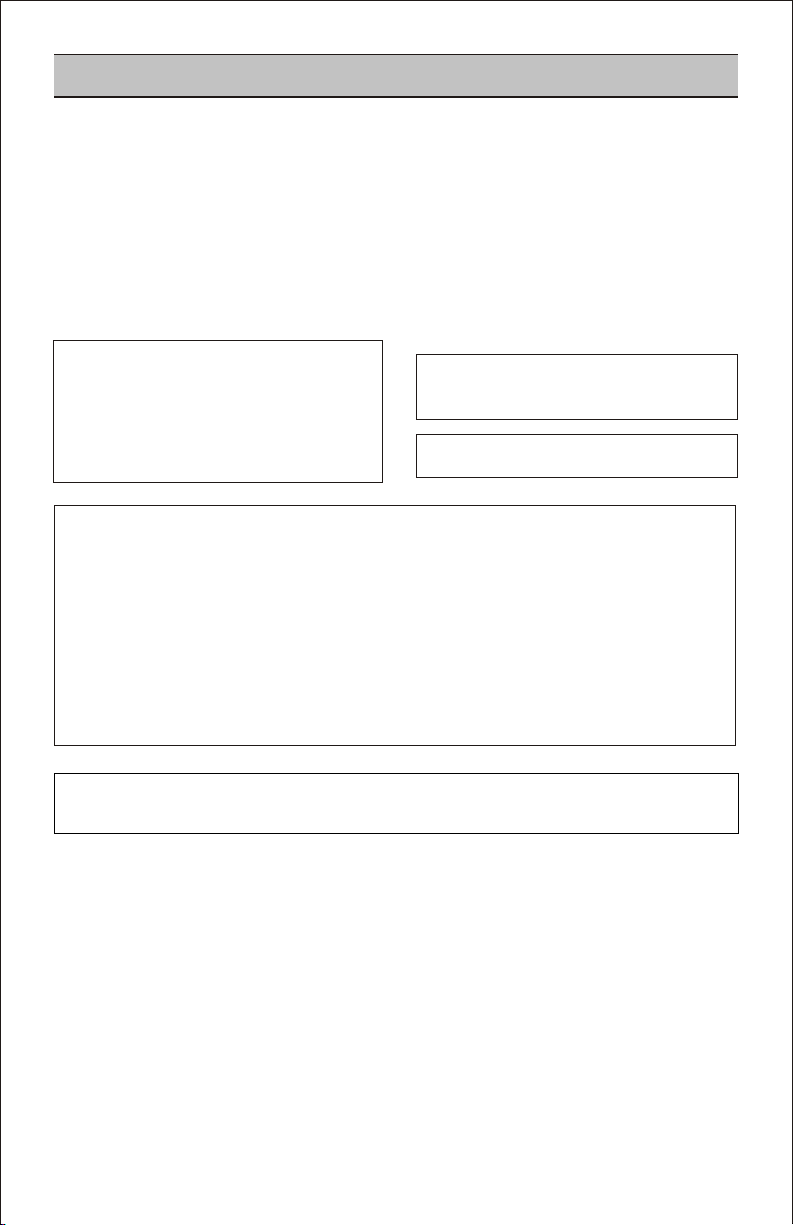
TEMPERATURE CONTROL
r
REFRIGERATOR
• Your refrigerator has two controls that let you regulate the
temperature in the freezer and refrigerator compartments.
• Initially set the REFRIGERATOR TEMP. CONTROL
MED/NORMAL and the FREEZER TEMP. CONTROL at NORMAL
Leave it operating for 24 hours(one day) to stabilize.Then adjust
the compartment temperature according to your desire.
• REFRIGERATOR TEMP. CONTROL (MIN, MED/NORMAL)
• In cold weather the unit operates less and the freezer compartment has a tendency to warm up.
For colder freezer, turn the FREEZER TEMP. CONTROL to "6"~"7".& REFRIGERATOR TEMP. CONTROL to 1 or
• If you keep a lot of foods in the freezer or open its door frequently, its temperature could go
higher In this case, set the FREEZER TEMP. CONTROLdial between 7 and 9 to cool it. Return the FREEZER.
TEMP. CONTROL dial to the original position after usage.
• In hot weather or to put much foods in the refrigerator compartment, the refrigerator compartment has a
tendency to warm up.
For colder refrigeratorturn the FREEZER TEMP. CONTROLto "1"~"3" to direct more cold air into the refrigerator,
compartment, and the REFRIGERATOR TEMP. CONTROL towards max.
Setting at "6"~"7" of the FREEZER TEMP. CONTROL, the refrigerator compartment will not be cold enough.
OPERATION
• FREEZER TEMP. CONTROL- 1, 2, 3, 4, 5, 6, 7, 8, 9
Setting at "9", the freezer compartment becomes coldest..
But the refrigerator compartment becomes warmer because
less cold air flows into the refrigerator compartment.
1, 2, 3, 4, 5, 6, 7
MIN, MED, MAX
The higher the setting, the colder the refrigerator
compartment will become.
MAX
NORMAL
MIN
Med
Min
Max
l
o
r
t
n
o
c
T
e
e
r
m
u
p
t
r
e
a
r
FREEZER
3
4
5
6
7
FREEZER TEMP. CONTROL
FRIDGE MAX.
NORMAL.
FREEZER MAX.
1
5
7
MAX
MIN
minimium. For warmer refrigerator, Please put the FREEZER TEMP. CONTROL to 1~2 and REFRIGERATOR
TEMP. CONTROL TO 1 or minimum.

ICE MAKING
Kindly, Find your appliance is using General type or Twisting ice serve type.
The Ice trays volume is only for ice making.
Normal Type
To make ice cubes, fill the ice tray with water till
the water level mark and place it on the Ice cube box.
Then insert the ice cubes box in the freezer
compartment.
To remove ice cubes, hold the tray at its ends and
twist gently, ice cubes fall automatically.
Twist 'N' Serve Type
To make ice cubes, fill the ice tray with water and
insert in its position.
OPERATION
5
Instruction for Bank Ice
USE BANK ICE ONLY TO STORE ICE CUBES. DO NOT MAKE
ICE IN IT.
Water
Level
Ice Trays
Bank Ice
Ice Tray
To remove ice cubes, hold the knob of the tray and
turn gently. Then, ice cubes drop in the Bank Ice.
6
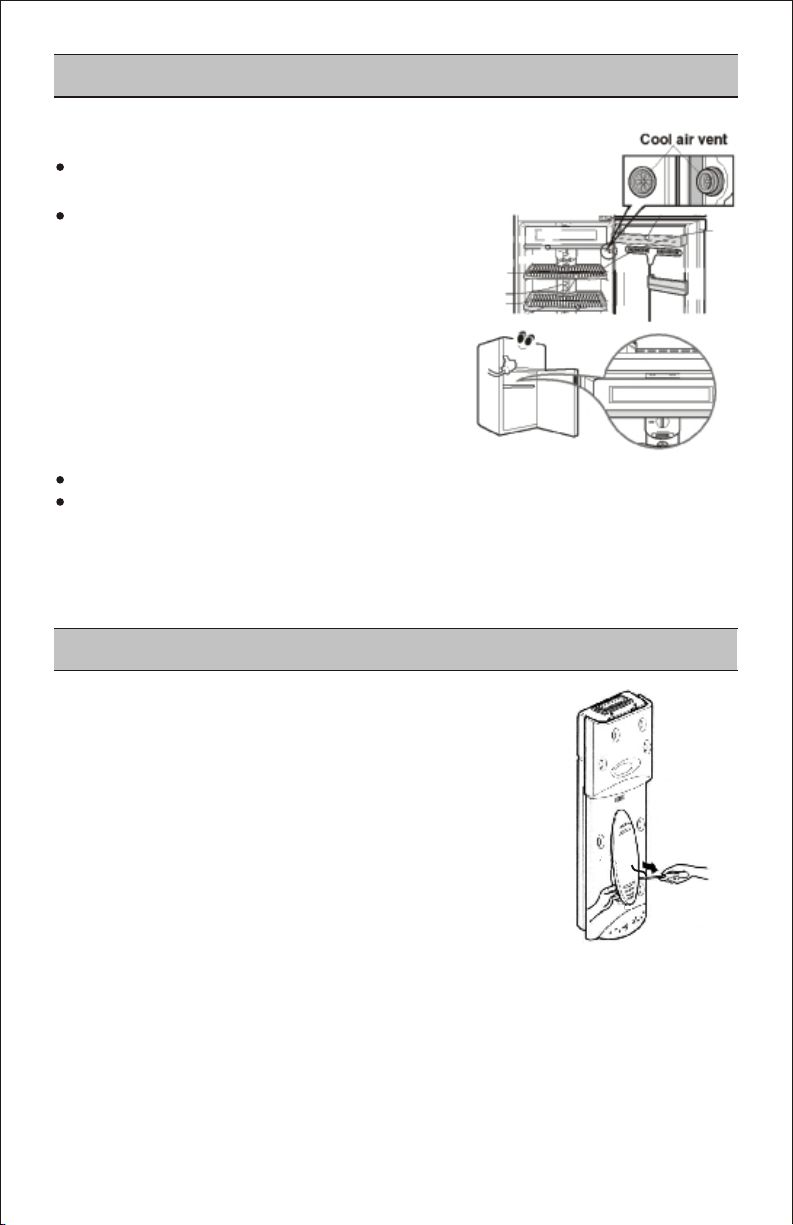
DOOR COOLING
Cool air vent is placed on the refrigerator door to provide Door
Shelves with cool air.
If foreign substances enter the cool air vent while cleaning,
efficiency will be lowered. In addition, if gasket is damaged,
efficiency may be lowered due to the escape of cool air.
So care should be taken during cleaning.
CHILLER COMPARTMENT
DEFROSTING
Defrosting takes place automatically.
The defrosted water flows down to the evaporating tray which is located in the lower back side of the
refrigerator and is evaporated automatically.
When the door is opened, the warmer air doesn't influence the
cooling of chiller compartment. So you can keep food fresher in it.
LAMP REPLACEMENT
Unplug the power cord from the outlet.
Remove refrigerator shelves.
To remove the lamp cover, insert a slotted driver at the one of
under hole of the lamp cover and pull it out forwards.
Turn the lamp counterclockwise.
Assemble in reverse order of disassembly.
Replacement bulb must be the same specification as original
1.
2.
3.
4.
5.
OPERATION
STORING FOOD
Store fresh food in the refrigerator compartment. How food is frozen and defrosted is an important factor
in maintaining freshness and flavor.
Do not store food which goes bad easily at low temperatures, such as bananas, pineapples, and melons.
Allow hot food to cool prior to storing. Placing hot food in the refrigerator could spoil other food, and lead
to high electric bills!
When storing, wrap food in vinyl, or place in a covered container. This prevents moisture from
evaporating, and helps food to keep its taste and nutritional value.
Do not block air vents with food. Smooth circulation of chilled air keeps refrigerator temperatures even.
Do not open the door frequently. Opening the door lets warm air enter the refrigerator, causing
temperatures to rise.
T adjust the temperature control easily, do not store food near the temperature control dial.o
FREEZER COMPARTMENT
Do not store bottles in the freezer compartment - they may break when frozen.
Do not refreeze food that has been defrosted. This causes loss of taste and nutritional value.
When storing frozen food like ice cream for a long period, place it on the freezer shelf, not in the door
Shelf.
REFRIGERATOR COMPARTMENT
Avoid placing moist food on deep interior refrigerator shelves, it could freeze upon direct contact with
chilled air. To avoid this it is better to store food in the covered container.
Always clean food prior to refrigeration. Vegetables and fruits should be washed and wiped, and packed
food should be wiped clean, to prevent adjacent food from spoiling.
When storing eggs in their storage rack, ensure that they are fresh, and always store them in a up-right
position, which keeps them fresh longer.
If you keep the refrigerator in a hot, and humid place, frequently open
its door or put a lot of vegetables in it, dew may form in it, which has no
effect on its performance. Remove the dew with dust cloth free from care.
SUGGESTIONS ON FOOD STORAGE
T
E
NO
Don't use plastic cover. Cloth or any other item to cover your refrigerator
on sides, it will hamper performance of the refrigerator.
7
INTERIOR PARTS - Wash compartment shelves,
door shelves, storage trays and magnetic door seals
etc. with a baking soda solution or a mild detergent
and warm water. Rinse and dry.
WARNING
GENERAL INFORMATION
VACATION TIME
During average length vacations, you will probably
find it best to leave the refrigerator in operation
with REFRIGERATOR TEMP. CONTROL at "MIN"
Position.
Place freezable items in freezer for longer life.
When you plan to be away for an extended period,
remove all food, disconnect the power cord, clean
the interior thoroughly, and don't leave door OPEN.
POWER FAILURE
Most power failures are corrected in an hour or two
and will not affect your refrigerator temperatures.
However, you should minimize the number of door
openings while the power is off. During power
failures of longer duration, place a block of dry ice
on top of your frozen packages.
IF YOU MOVE
Remove or securely fasten down all loose items
inside the refrigerator
.
To avoid damaging the leveling screws, turn them
all the way into the base.
ANTI-CONDENSATION PIPE
CLEANING
8
Anti-Condensation
Pipe
It is important that your refrigerator be kept clean to
prevent undesirable odors. Spilled food should be
wiped up immediately, since it may acidify and stain
plastic surfaces if allowed to settle.
Never use metallic scouring pads, brushes, coarse
abrasive cleaners or strong alkaline solutions on
any surface.
Before you clean, however, remember that damp
objects will stick or adhere to extremely cold
surfaces. Do not touch frozen surfaces with wet or
damp hands.
EXTERIOR - Use a lukewarm solution of mild soap
or detergent to clean the durable finish of your
refrigerator. Wipe with a clean, damp cloth and then
dry.
INTERIOR - Regular cleaning of the interior and
interior parts is recommended. If you have the No
Frost Model which defrosts automatically, leave
both doors open during the entire cleaning process.
Disconnect the power supply, and remove food and
all Compartment Shelves, Storage Trays etc. Wash
all compartments with a baking soda solution. Rinse
and dry.
Always remove power cord from the wall outlet
prior to cleaning in the vicinity of electrical
parts (lamps, switches, controls, etc.). Wipe up
excess moisture with a sponge or cloth to
prevent water or liquid from getting into any
electrical part and causing a electric short
circuit. Do not use flammable or toxic cleaning
liquids.
The outside wall of the
refrigerator cabinet will
always be warm,
especially just after
installation. Don't be
alarmed. This is due to
the anti-condensation
pipe, which pumps hot
refrigerant to prevent
"sweating" on the outer
cabinet wall.
DO NOT USE AN EXTENSION CORD
POWER CORD REPLACEMENT
ABOUT GROUNDING(EARTHING)
This appliance must be grounded(earthed).
DON'T WAIT! DO IT NOW!
VERY DANGEROUS ATTRACTION
NEVER STORE EXPLOSIVES AND CHEMICALS
IMPORTANT WARNINGS
9
VENTILATION
Keep the ventilations openings in the Refrigerator, clear of obstruction.
DEFROSTING
Do not use mechanical devices or other means to accelerate the defrosting process,
other than those recommended by the manufacturer.
APPLIANCES USED INSIDE
Do not use electrical appliances inside the food storage compartments, unless
they are of the type recommended by the manufacturer.
DISPOSAL
Refrigerator not to be disposed by burning as the insulation blowing gas is highly flammable. It can be
handed over to licensed hazardous waste disposal facility for safe disposal.
If possible, connect the refrigerator to its own
individual electrical outlet to prevent it and other
appliances or household lights from causing an
overload and intermittent tripping.
If the supply cord is damaged, it must be replaced
by a special cord or assembly from the
manufacturer or its authorised service agent.
An empty refrigerator can be a dangerous
attraction to children. Remove gaskets, latches,
lids or the entire door from your unused
appliance, or take some other action to make it
harmless. Keep the keys out of reach of children
and not in the vicinity of the refrigerator.
In the event of an electric short circuit, grounding
(earthing) reduces the risk of electric shock by
providing an escape wire for the electric current.
In order to prevent possible electric shock, this
appliance must be grounded.
Improper use of the grounding plug can result in an
electric shock. Consult a qualified electrician or
service person if the grounding instructions are not
completely understood, or if you have doubts on
whether the appliance is properly grounded.
10
BEFORE CALLING FOR SERVICE
SERVICE CALLS CAN OFTEN BE AVOIDED!
IF YOU FEEL YOUR REFRIGERATOR IS NOT OPERATING PROPERLY, CHECK THESE POSSIBLE
CAUSES FIRST :
PROBLEM POSSIBLE CAUSES
REFRIGERATOR DOES Has a house fuse blown or circuit breaker tripped?
NOT OPERATE
Has the power cord plug been removed or loosened
from the electrical wall outlet?
REFRIGERATOR OR FREEZER Temperature control not set on proper position.
COMPARTMENT TEMPERATURE
Appliance is placed close to wall or heat source.
TOO WARM Warm weather-frequent door openings.
Door is not closed entirely.
Door left open for a long time.
Large amount of foods are kept in the refrigerator.
ABNORMAL NOISE(S) Refrigerator is installed in a weak or uneven place
or leveling screw needs adjusting.
Unnecessary objects placed in the back side of the
refrigerator.
REFRIGERATOR Foods with strong odors should be tightly covered
HAS ODOR or wrapped.
Interior needs cleaning.
DEW FORMS ON THE
Not unusual during periods of high humidity.
CABINET SURFACE Door may have been left ajar.
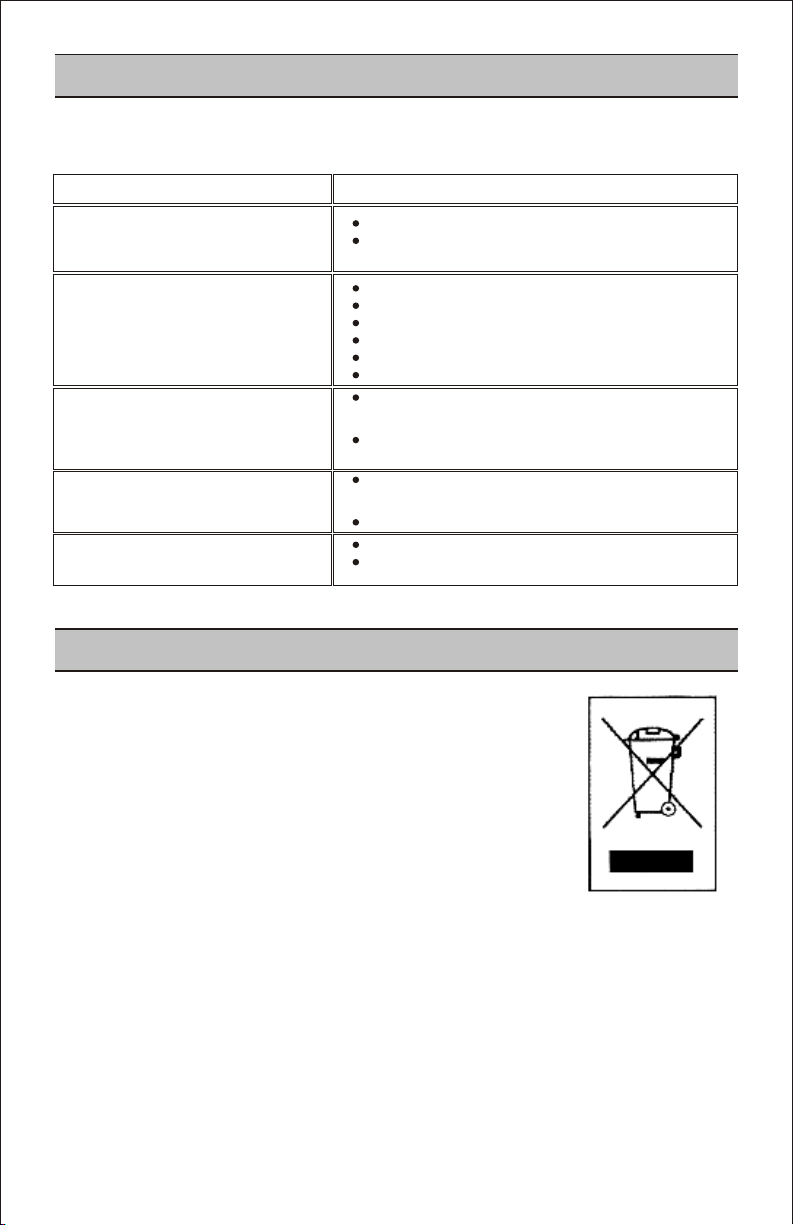
DISPOSAL OF YOUR OLD APPLIANCE
1. When this crossed-out wheeled bin symbol is attached to a product it means
the product is covered by the European Directive 2002/96/EC.
2. All electrical and electronic products should be disposed of separately from
the municipal waste stream via designated collection facilities appointed by
the government of local authorities.
3. The correct disposal of your old appliance will help prevent potential negative
consequences for the environment and human health.
4. For more detailed information about disposal of your old appliance, please
contact your city office, waste disposal service or the shop where you
purchased the product.
5. This product contains fluorinated greenhouse gases covered by the Kyoto
Protocol.
11
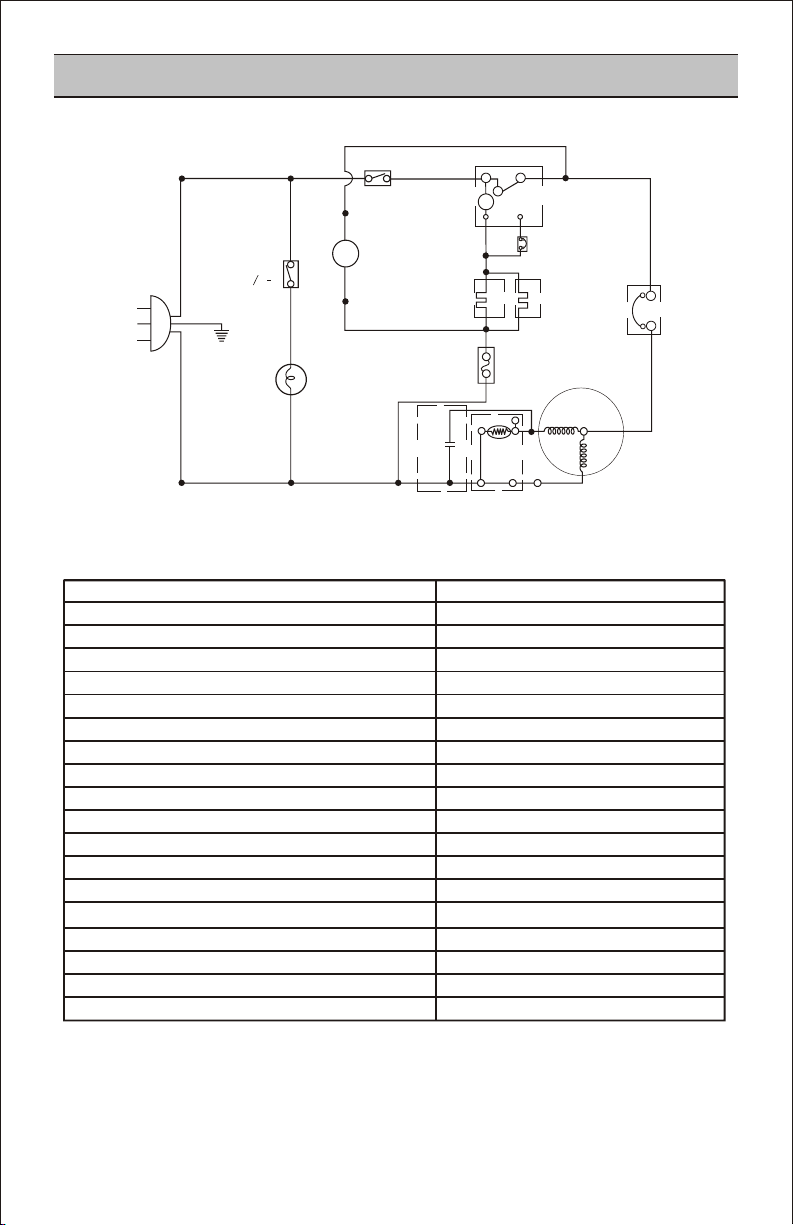
M
YL
LAMP R
PR
GN/YL
POWER SUPPLY
CORD
WH
FAN MOTOR
2
S
C
COMPRESSOR
BK
BL
RD
RD
THERMOSTAT
GY
BN
3
PN
BK
DEFROST TIMER
DEF
THERMO
BK
BN
BL
BL
YL
DOOR
S
W
R
BL BL
M
54
3
6
PTC STARTER
4
1 2
RD
WH
RD
BL
BN
BL
THERMAL
FUSE
HEATER
CORD-L
HEATER
PLATE
OVER LOAD
PROTECTOR
BK
T
BL
RUNNING
CAPACITOR
BL
RD
CIRCUIT DIAGRAM FOR ENERGY 'A' GRADE MODEL
MODEL NUMBER
CLIMATE CLASS
RATED VOLTAGE
RATED FREQUENCY
RATED INPUT
RATED CURRENT
DEFROSTING INPUT :
RATED INPUT OF LAMP R :
REFRIGERANT R 134a
NET VOLUME - TOTAL
FREEZER COMPARTMENT
REFRIGERATOR COMPARTMENT
MANUFACTURER
COUNTRY OF ORIGIN
DIMENSIONS mm :
FREEZING CAPACITY
ENERGY CLASS
NOISE LEVEL dBA
COMPRESSOR
GL-332/GR-332/GL-322/GR-322/GL-333/GR-333
N
15W
0.120Kg
274L
60L
214L
LG ELECTRONICS
MADE IN INDIA
580(W)x675(D)x1680(H)mm
3Kg
'A' Grade (342 kWh per annum)
42
MA57LCJM
220V - 240V
50Hz
108W
0.55A
133W
~
12
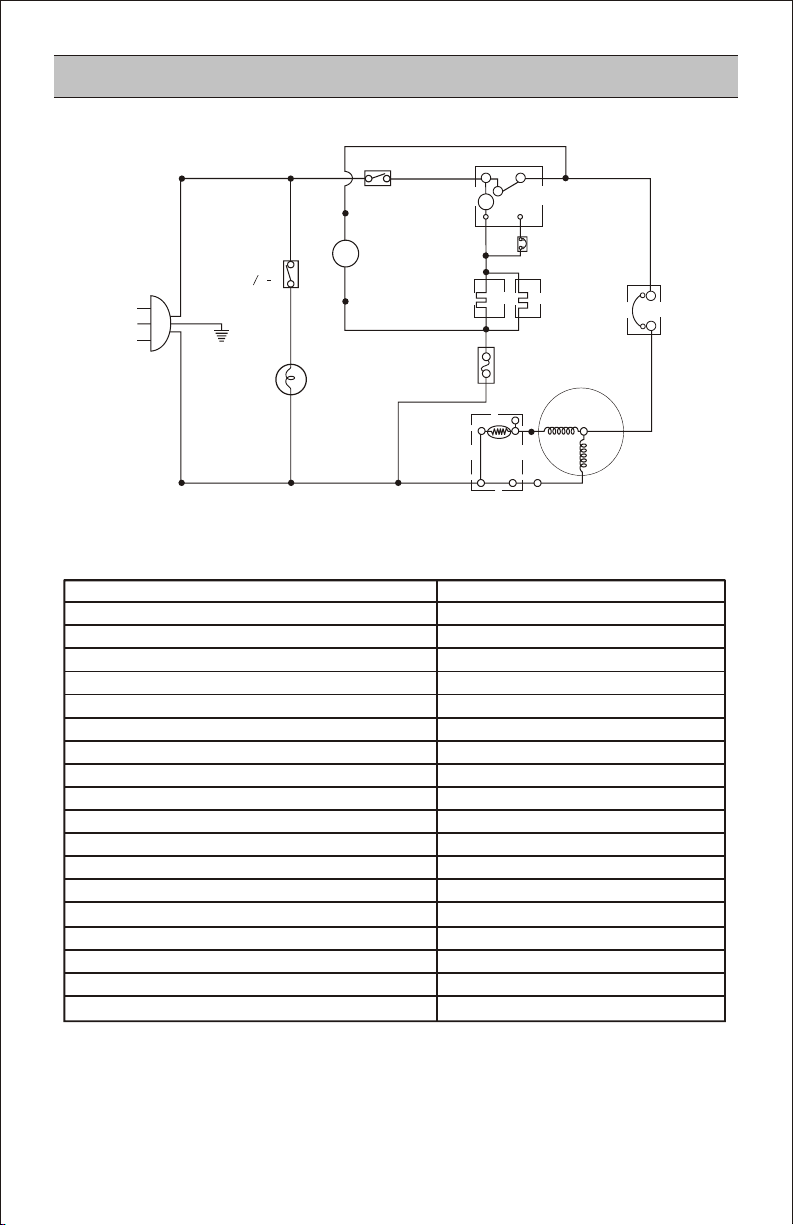
M
YL
LAMP R
PR
GN/YL
POWER SUPPLY
CORD
WH
FAN MOTOR
2
S
C
COMPRESSOR
BK
BL
RD
RD
THERMOSTAT
GY
BN
3
PN
BK
DEFROST TIMER
DEF
THERMO
BK
BN
BL
BL
YL
DOOR
S
W
R
BL BL
M
54
3
6
PTC STARTER
4
1 2
RD
WH
RD
BL
BN
BL
THERMAL
FUSE
HEATER
CORD-L
HEATER
PLATE
OVER LOAD
PROTECTOR
BK
T
BL
MODEL NUMBER
CLIMATE CLASS
RATED VOLTAGE
RATED FREQUENCY
RATED INPUT
RATED CURRENT
DEFROSTING INPUT :
RATED INPUT OF LAMP R :
REFRIGERANT R 134a
NET VOLUME - TOTAL
FREEZER COMPARTMENT
REFRIGERATOR COMPARTMENT
MANUFACTURER
COUNTRY OF ORIGIN
DIMENSIONS mm :
FREEZING CAPACITY
ENERGY CLASS
NOISE LEVEL dBA
COMPRESSOR
GL-332/GR-332/GL-322/GR-322/GL-333/GR-333
N
15W
0.130Kg
274L
60L
214L
LG ELECTRONICS
MADE IN INDIA
580(W)x675(D)x1680(H)mm
3Kg
'B' Grade (464kWh per annum)
42
MA57LBJG
220V - 240V
50Hz
145W
1.22A
133W
~
CIRCUIT DIAGRAM FOR ENERGY 'B' GRADE MODEL
 Loading...