

LG 70LB650V, 60LB870V, 32LB652V, 42LB630V User guide

Printing specification
|
Drawn |
Checked |
Approved |
|
|
|
|
Signature |
Danbi.Park |
Mira.Woo |
Jongok.kim |
|
|
Feb/17/2014 |
|
MMM/DD/YYYY |
Feb/17/2014 |
Feb/17/2014 |
|
|
|
|
|
1. Model Description
Model name |
: |
LB67-Z |
Brand name |
: |
LG |
Part number |
: MFL68027014 |
2nd, 3rd Suffix |
: |
PD |
Product name |
: |
LB670V |
(Revision number) |
(1402-REV00) |
|
|
|
|
|
|
|
|
2. Printing Specification
1. |
Trim size (Format) |
: 148 mm x 210 mm (A5) |
||
2. |
Printing colors |
|
|
|
|
|
• Cover |
: |
1 Color (Black) |
|
|
• Inside |
: |
1 Color (Black) |
3. |
Stock (Paper) |
|
|
|
|
|
• Cover |
: Uncoated, wood-free paper 150 g/ |
|
|
|
• Inside |
: Uncoated, wood-free paper 60 g/ |
|
4. |
Bindery |
: |
Perfect binding |
|
5. |
Language |
: |
ENG/TUR (2) |
|
6. |
Number of pages |
: |
100 |
|
|
|
|
||
|
|
“This part contains Eco-hazardous substances (Pb, Cd, Hg, Cr6+, PBB, PBDE, etc.) within LG standard level, |
||
N |
|
Details should be followed Eco-SCM management standard[LG(56)-A-2524]. |
||
O |
|
Especially, Part should be followed and controlled the following specification. |
||
T |
|
|||
|
|
|
|
|
E |
|
(1) Eco-hazardous substances test report should be submitted when Part certification test and First Mass Production. |
||
|
|
(2) Especially, Don’t use or contain lead(Pb) and cadmium(Cd) in ink. |
||
|
|
|
|
|
3. Origin Notification
LGEAK |
: |
Printed in Kazakhstan |
LGEKR |
: |
Printed in Korea |
LGERS |
: |
Printed in Mexico |
LGEAZ |
: |
Printed in Brazil |
LGEMA |
: |
Printed in Poland |
LGESY |
: |
Printed in China |
LGEEG |
: |
Printed in Egypt |
LGEMX |
: |
Printed in Mexico |
LGETH |
: |
Printed in Thailand |
LGEIL |
: |
Printed in India |
LGEND |
: |
Printed in China |
LGEVN |
: |
Printed in Vietnam |
LGEIN |
: |
Printed in Indonesia |
LGERA |
: |
Printed in Russia |
LGEWR |
: |
Printed in Poland |
LGEAS |
: |
Printed in Algeria |
|
|
|
|
|
|
|
|
|
|
|
|
|
|
|
4. Changes
10
9
8
7
6
5
4
3
2
1
Rev. Number MMM/DD/YYYY Signature |
ECO Number |
Change Contents |
|
Part number |
: |
MFL68027014 |
Pagination sheet |
Total pages |
: |
100 pages |
|
|
|
|
Front |
|
|
|
|
|
|
|
(Eng) |
|
|
|
|
|
|
|
P/No. |
A-2 |
… |
… |
… |
… |
A-23 |
A-24 |
Front (Eng)
2 |
… |
… |
… |
… |
31 |
Blank |
Front
(Tur)
2 |
… |
… |
… |
… |
33 |
Blank |
Back
B-1 |
B-2 |
… |
… |
… |
B-8 Blank |
OWNER’S MANUAL
LED TV*
* LG LED TV applies LCD screen with LED backlights.
Click! User Guide
Please read this manual carefully before operating your set and retain it for future reference.
LB63** LB69** LB87** LB65** LB72**
LB67** LB73**
LB68** LB86**
*MFL68027014*
P/NO : MFL68027014(1402-REV00) |
www.lg.com |
Printed in Korea |
|

A-2 TABLE OF CONTENTS
TABLE OF CONTENTS
A-3 SETTING UP THE TV
A-3 Attaching the stand
A-8 Attaching the Sound Bar Supporter A-9 Tidying cables
A-11 MAKING CONNECTIONS
A-11 Antenna connection A-11 Satellite dish connection A-12 HDMI connection
A-13 - ARC (Audio Return Channel) A-13 DVI to HDMI connection
A-15 Component connection A-16 Composite connection A-17 MHL connection
A-18 Audio connection
A-18 - Digital optical audio connection A-19 USB connection
A-20 CI module connection A-21 Headphone connection A-22 Euro Scart connection
language list
English
Türkçe
B-1 SPECIFICATIONS
COMMON
LANGUAGE
COMMON
SETTING UP THE TV |
A-3 |
|
|
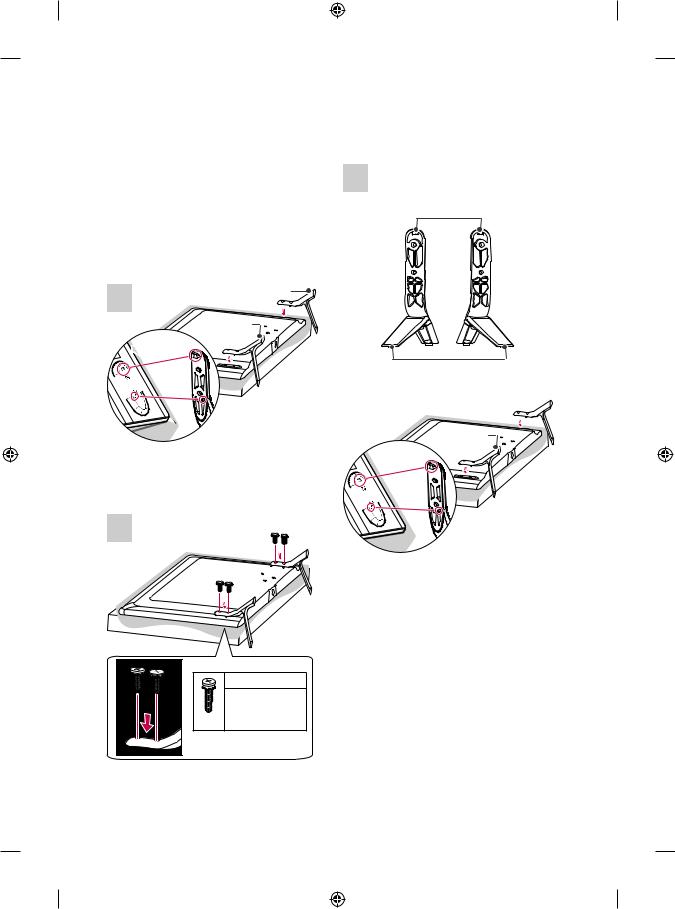
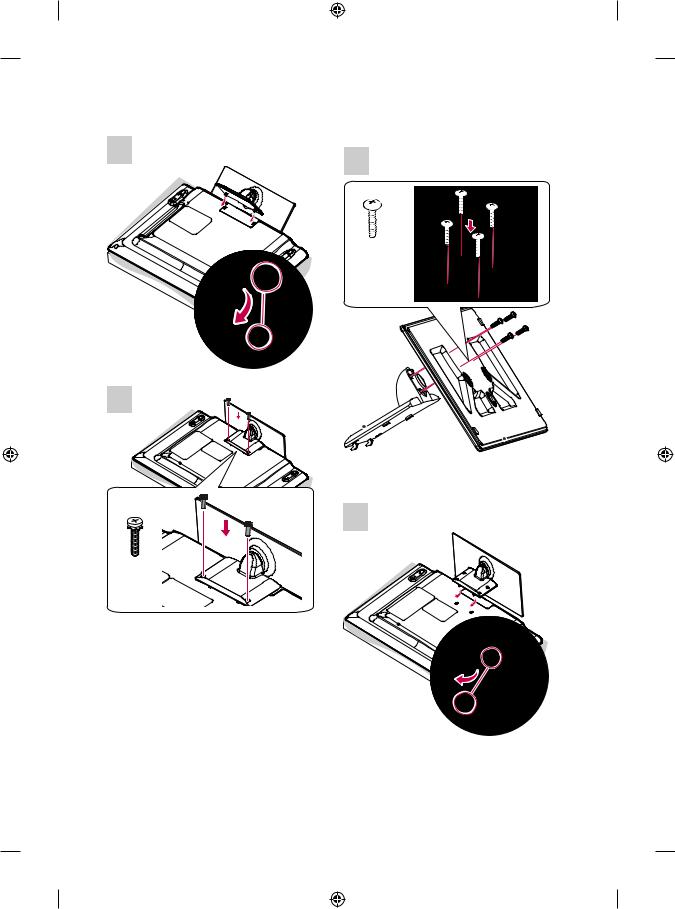
SETTING UP THE TV
Image shown may differ from your TV.
70LB65**-ZA, LB67**, LB68**, LB69**, LB72**, LB73**-ZA
1
Stand Body
Attaching the stand
LB63**-ZA, 32/39/42/47/50/55LB65**-ZA
1 |
A stand base |
|
|
|
B stand base |
 1
1

 2
2
1Attach the stand to the TV using the upper mounting hole on the back of the TV.
2Attach the stand to the TV using the lower connection on the back of the TV.
2
Stand Base
A stand Assy 
B stand Assy
 1
1


 2
2
1Attach the stand to the TV using the upper mounting hole on the back of the TV.
2Attach the stand to the TV using the lower connection on the back of the TV.
|
M4 x L14 |
|
M4 x L20 |
|
(Only 32LB65**- |
4EA |
ZA) |
A-4 SETTING UP THE TV
2 |
2 |
|
4EA M4 x L14
LB63**-ZL, LB65**-ZK
1
A stand base 

B stand base
 1
1

 2
2
1Attach the stand to the TV using the upper mounting hole on the back of the TV.
2Attach the stand to the TV using the lower connection on the back of the TV.
|
M4 x L14 |
|
|
M4 x L20 |
|
|
(Only |
|
4EA |
32LB65**- |
|
ZK) |
||
|
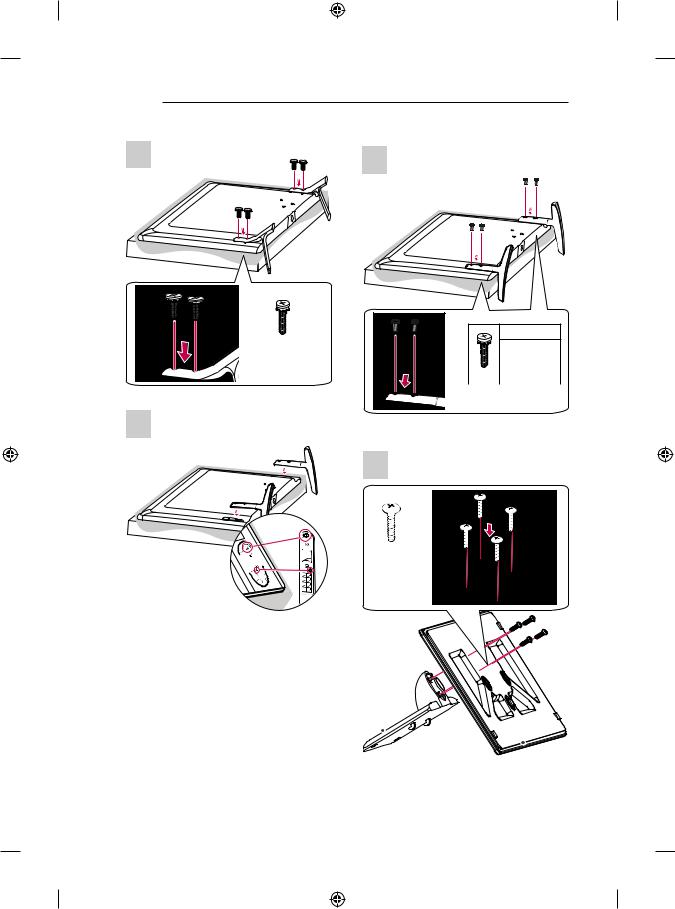
32/39LB65**-ZE/ZN
1
4EA M4 x L20
Stand Body
Stand Base
2
3
2EA M4 x L20
SETTING UP THE TV |
A-5 |
42/47/50/55/60LB65**-ZE/ZN
1
4EA M4 x L20
Stand Body
Stand Base
2
A-6 SETTING UP THE TV
3
4EA M4 x L14
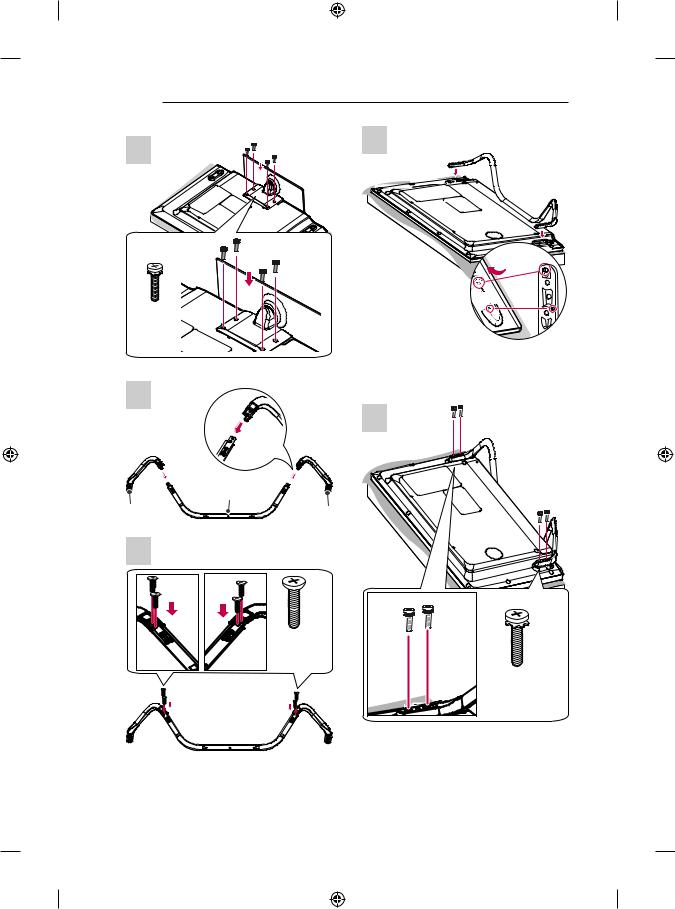
LB73**-ZD/ZE
1
3
 1
1


 2
2
1Attach the stand to the TV using the upper mounting hole on the back of the TV.
2Attach the stand to the TV using the lower connection on the back of the TV.
4
Stand Front
B Stand
Supporter
2 |
A Stand
Supporter
4EA M4 x L10
4EA M4 x L14
SETTING UP THE TV |
A-7 |
|
|
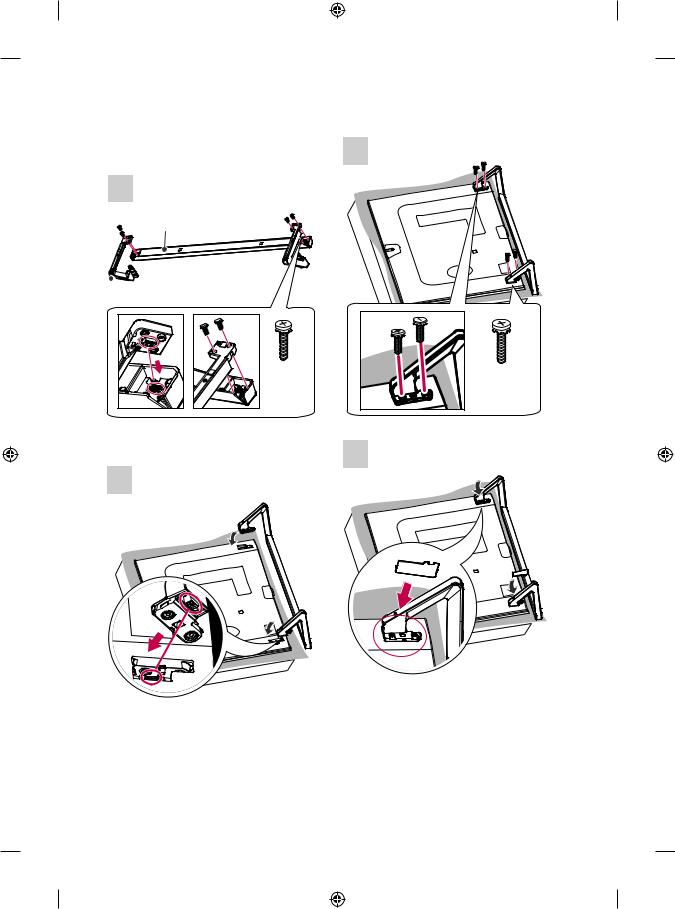
3
LB86**, LB87**
1
Sound Bar
Stand Assy Right 
 Stand Assy Left
4EA |
4EA |
M4 x L14 |
M4 x L14 |
4
2
Screw Cover 

A-8 SETTING UP THE TV
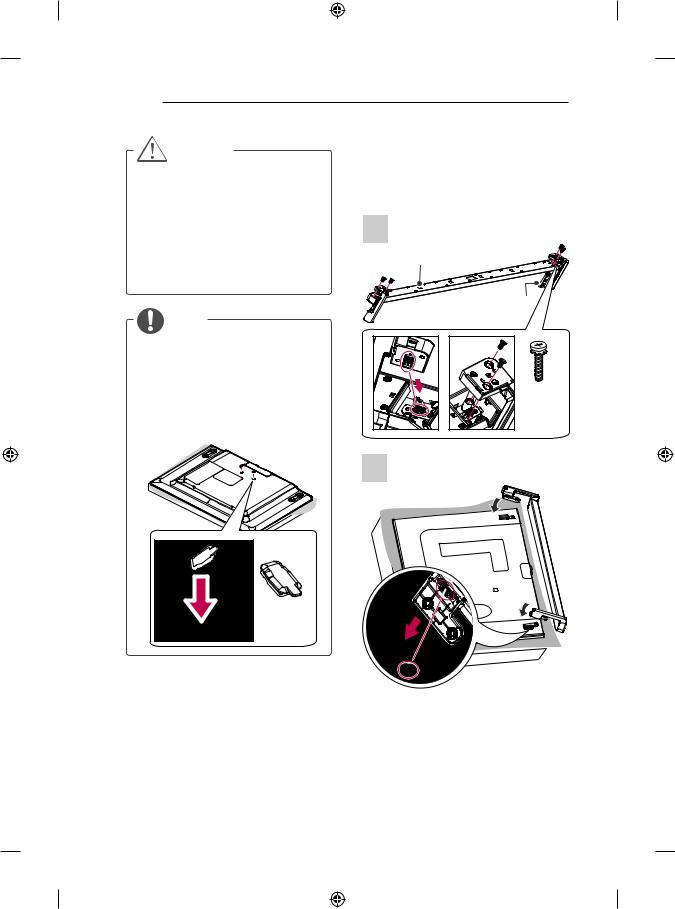
CAUTION
yy When attaching the stand to the TV set, place the screen facing down on a cushioned table or flat surface to protect the screen from scratches.
yy Make sure that the screws are inserted correctly and fastened securely. (If they are not fastened securely enough, the TV may tilt forward after being installed.)
Do not use too much force and over tighten the screws; otherwise screw may be damaged and not tighten correctly.
NOTE
yy Remove the stand before installing the TV on a wall mount by performing the stand attachment in reverse.
yy Screw Cover will protect the opening from accumulating dust and dirty.
yy Rubber will protect the opening from accumulating dust and dirt. When installing the wall mounting bracket, use the Rubber. (Only LB65**-ZE/ZN)
Attaching the Sound Bar
Supporter
(In case of mounting on a wall) LB86**, LB87**
1
Sound Bar
Sound Bar Supporter Right
 Sound Bar Supporter Left
4EA M4 x L14
2
Rubber
SETTING UP THE TV |
A-9 |
|
|
3
4EA M4 x L14
4
Screw Cover 
CAUTION
yy When attaching the sound bar supporter to the TV set, place the screen facing down on a cushioned table or flat surface to protect the screen from scratches.
yy Make sure that the screws are inserted correctly and fastened securely. (If they are not fastened securely enough, the TV may tilt forward after being installed.)
Do not use too much force and over tighten the screws; otherwise screw may be damaged and not tighten correctly.
yy The sound bar supporter only uses for wall mounting.
NOTE
yy Remove the sound bar supporter before installing the stand by performing the stand attachment in reverse.
yy The Screw Cover will protect the opening from accumulating dust and dirty.
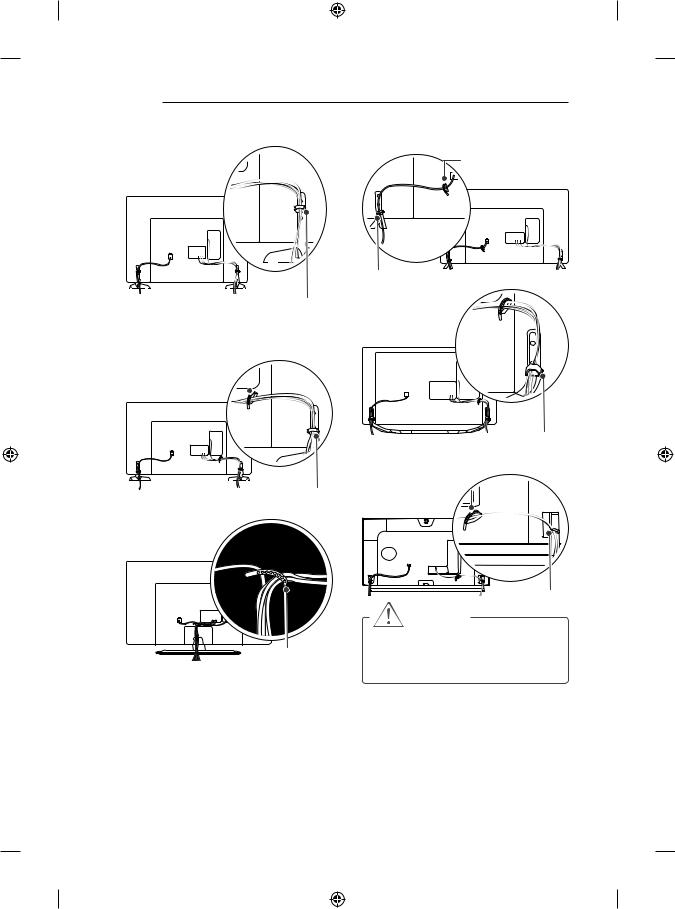
Tidying cables
Image shown may differ from your TV.
1Gather and bind the cables with the cable holder. (Depending on model)
2Fix the Cable Management firmly to the TV.
(Only 32LB65**-ZA)
Cable Management
(Only LB63**-ZA, 39/42/47/50/55/60LB65**-ZA, LB67**, LB68**, LB69**, LB72**, LB73**-ZA)
Cable Holder
Cable Management
A-10 SETTING UP THE TV
(Only 32LB65**-ZK)
Cable Management
(Only LB63**-ZL, 39/42/47/50/55/60/70LB65**- ZK/ZL)
Cable Holder
Cable Management
(Only LB65**-ZE/ZN
Cable Holder
(Only 70LB65**)
Cable Holder
Cable Management
(Only LB73**-ZD/ZE)
Cable Holder
Cable Management
(Only LB86**, LB87**)
Cable Holder 
Cable Management
CAUTION
yy Do not move the TV by holding the cable holders, as the cable holders may break, and injuries and damage to the TV may occur.

MAKING CONNECTIONS A-11
MAKING CONNECTIONS
This section on MAKING CONNECTIONS mainly uses diagrams for the LB67**models.
Türkçe
TV’yi RF kablosu (75 Ω) ile duvar anten soketine bağlayın.
Antenna connection
ANTENNA /
(*Not Provided)
English
Connect the TV to a wall antenna socket with an
RF cable (75 Ω).
NOTE
yy Use a signal splitter to use more than 2 TVs.
yy If the image quality is poor, install a signal amplifier properly to improve the image quality.
yy If the image quality is poor with an antenna connected, try to realign the antenna in the correct direction.
yy An antenna cable and converter are not supplied.
yy Supported DTV Audio: MPEG, Dolby Digital, Dolby Digital Plus, HE-AAC
NOT
yy İkiden fazla TV’de kullanmak için bir sinyal ayırıcısı kullanın.
yy Görüntü kalitesinin kötü olması durumunda görüntü kalitesini artırmak üzere bir sinyal güçlendiricisi kullanın.
yy Anten bağlıyken görüntü kalitesinin kötü olması durumunda anteni doğru yönde yeniden hizalamayı deneyin.
yy Anten kablosu ve dönüştürücü ürünle birlikte verilmemektedir.
yy Desteklenen DTV Ses: MPEG, Dolby Digital, Dolby Digital Plus, HE-AAC
Satellite dish connection
(Only satellite models)
13/18V  Max
Max
LNB
Satellite IN
(*Not Provided)
English
Connect the TV to a satellite dish to a satellite socket with a satellite RF cable (75 Ω).
Türkçe
TV’yi uydu RF kablosu (75 Ω) kullanarak çanak antene ve uydu soketine bağlayın.
A-12 MAKING CONNECTIONS
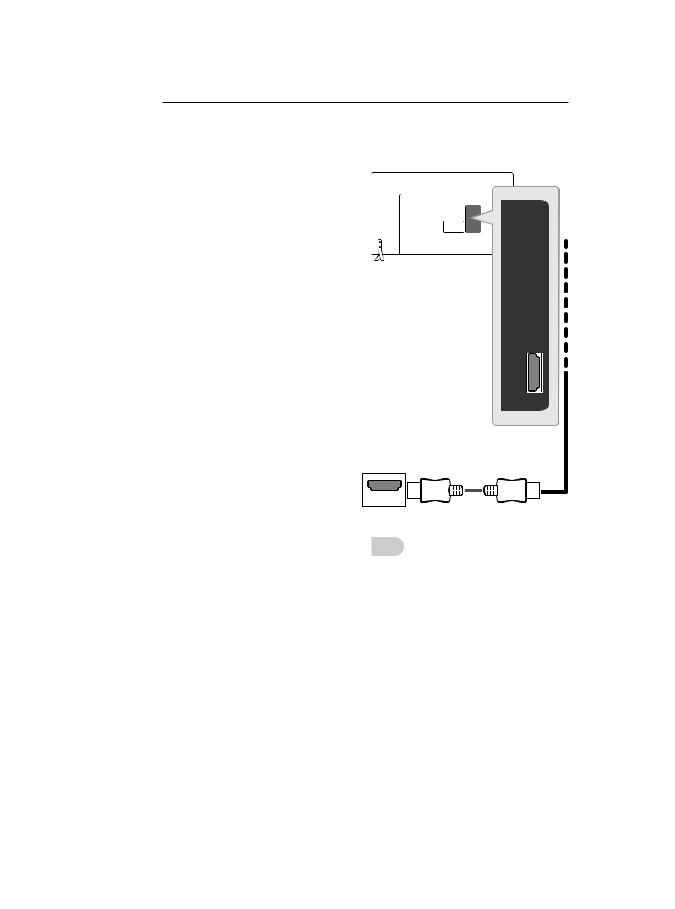
HDMI connection |
|
|
|
|
(Only LB63**, LB65**, LB67**, LB68**, LB69**, |
|||
|
|
|
|
|
|
|||
|
|
|
|
|
|
LB72**, LB73**) |
||
(Only LB86**, LB87**) |
|
|
|
|
|
|
|
|
|
|
|
|
|
|
|
|
|
|
|
|
|
|
|
|
|
|
|
|
|
|
|
|
|
|
|
|
|
|
|
|
|
|
|
|
|
|
|
|
|
|
|
|
|
DVD/ Blu-Ray / HD Cable Box / HD STB / PC
 (*Not Provided)
(*Not Provided)
English
Transmits the digital video and audio signals from an external device to the TV. Connect the
external device and the TV with the HDMI cable
as shown.
Choose any HDMI input port to connect. It does not matter which port you use.
DVD/ Blu-Ray / HD Cable
Box / HD STB / PC
NOTE
yy It is recommended to use the TV with the HDMI connection for the best image quality.
yy Use the latest High Speed HDMI™ Cable with CEC (Customer Electronics Control) function.
yy High Speed HDMI™ Cables are tested to carry an HD signal up to 1080p and higher.
yy Supported HDMI Audio format : Dolby
Digital, DTS, PCM (Up to 192 KHz, 32KH z/44.1KHz/48KHz/88KHz/96KHz/176KHz /192KHz)
Türkçe
Harici cihazdan TV’ye dijital video ve ses sinyalleri gönderir. Harici cihaz ile TV’yi HDMI kablosuyla aşağıdaki şekilde gösterildiği gibi bağlayın.
Bağlanmak için herhangi bir HDMI giriş bağlantı noktasını seçin. Kullandığınız bağlantı noktası
.
NOT
yy En iyi görüntü kalitesi için, TV’nin HDMI bağlantısıyla kullanılması önerilir.
yy CEC (Tüketici Elektronik Kontrolü) fonksiyonlu en son Yüksek Hızlı HDMI™ Kablosunu kullanın.
yy Yüksek Hızlı HDMI™ Kablolarının 1080p ve üzerine kadar HD sinyalini taşıyabildiği test edilmiştir.
yy Desteklenen HDMI Ses biçimi: Dolby Digital, DTS, PCM (En fazla 192 KHz, 32KHz/44.1KHz/48KHz/88KHz/96KHz/17 6KHz/192KHz)
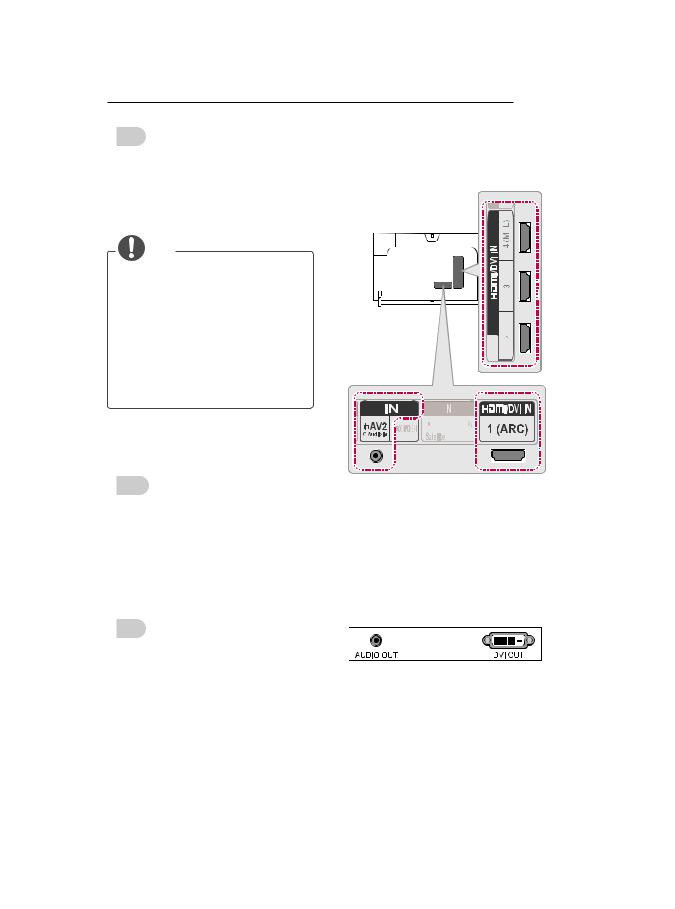
ARC (Audio Return Channel)
English
yyAn external audio device that supports SIMPLINK and ARC must be connected using HDMI IN 1 (ARC) or HDMI/DVI IN 1 (ARC) port.
yyWhen connected with a high-speed HDMI cable, the external audio device that supports ARC outputs optical SPDIF without additional optical audio cable and supports the SIMPLINK function.
Türkçe
yySIMPLINK ve ARC’yi destekleyen hari-
ci ses cihazı HDMI IN 1 (ARC) veyaHDMI/ DVI IN 1 (ARC) bağlantı noktası kullanılarak bağlanmalıdır.
yyARC’yi destekleyen harici ses cihazı, yüksek hızlı bir HDMI kablosuyla bağlandığında ek optik ses kablosu eklemeye gerek kalmadan optik SPDIF çıkışı sağlar ve
SIMPLINK fonksiyonunu destekler.
MAKING CONNECTIONS A-13
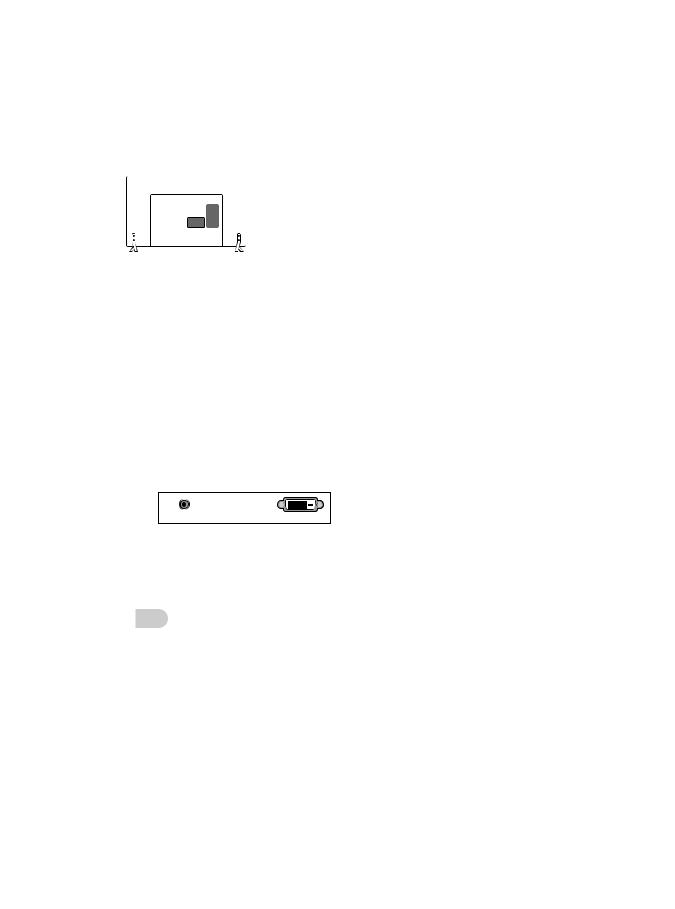
DVI to HDMI connection
(Only LB86**, LB87**)
<![if ! IE]><![endif]>YELLOW
 (*Not Provided)
DVD/ Blu-Ray / HD Cable Box / HD STB / PC
A-14 |
|
MAKING CONNECTIONS |
|
|
|
|
|
(Only |
LB63**, LB65**, LB67**, LB68**, LB69**, |
Türkçe |
|
LB72**, LB73**)
Harici cihazdan TV’ye dijital video sinyali gönderir. Harici cihaz ile TV’yi DVI-HDMI kablosuyla
aşağıdaki şekilde gösterildiği gibi bağlayın. Ses
sinyali göndermek için bir ses kablosu bağlayın.
Bağlanmak için herhangi bir HDMI giriş bağlantı
noktasını seçin. Kullandığınız bağlantı noktası
.
NOT
yy Grafik kartına bağlı olarak, HDMIDVI Kablosu kullanılıyorsa DOS modu çalışmayabilir.
yy HDMI/DVI kablosunu kullanırken yalnızca tek bağlantıya izin verilir.
| <![if ! IE]> <![endif]>WHITE |
<![if ! IE]> <![endif]>RED |
 (*Not Provided)
|
|
|
|
|
|
|
|
|
|
|
|
AUDIO OUT |
DVI OUT |
||||
DVD/ Blu-Ray / HD Cable Box / HD STB / PC
English
Transmits the digital video signal from an external device to the TV. Connect the external device and the TV with the DVI-HDMI cable as shown. To transmit an audio signal, connect an audio cable. Choose any HDMI input port to connect. It does not matter which port you use.
NOTE
yy Depending on the graphics card, DOS mode may not work if a HDMI to DVI Cable is in use.
yy When using the HDMI/DVI cable, only Single link is supported.
Component connection
(Only LB86**, LB87**)
IN
AV2 COMPONENT
VIDEO 
 PR P Y
|
|
|
|
GREEN |
|
|
|
|
|
YELLOW |
|
|||
(Use the composite |
|
(Use the |
||
gender cable |
|
component gender |
||
provided.) |
|
cable provided.) |
||
| <![if ! IE]> <![endif]>YELLOW |
<![if ! IE]> <![endif]>WHITE |
<![if ! IE]> <![endif]>RED |
<![if ! IE]> <![endif]>RED |
<![if ! IE]> <![endif]>BLUE |
<![if ! IE]> <![endif]>GREEN |
|
<![if ! IE]> <![endif]>WHITE |
<![if ! IE]> <![endif]>RED |
<![if ! IE]> <![endif]>RED |
<![if ! IE]> <![endif]>BLUE |
<![if ! IE]> <![endif]>GREEN |
(*Not |
|
|
|
|
|
Provided) |
|
|
|
|
|
|
<![if ! IE]> <![endif]>WHITE |
<![if ! IE]> <![endif]>RED |
<![if ! IE]> <![endif]>RED |
<![if ! IE]> <![endif]>BLUE |
<![if ! IE]> <![endif]>GREEN |
|
L |
R |
|
|
|
|
AUDIO |
|
VIDEO |
|
|
DVD / Blu-Ray / HD Cable Box
MAKING CONNECTIONS A-15
(Only LB63**, LB65**, LB67**, LB68**, LB69**,
LB72**,
| <![if ! IE]> <![endif]>GREEN |
<![if ! IE]> <![endif]>BLUE |
<![if ! IE]> <![endif]>RED |
<![if ! IE]> <![endif]>WHITE |
<![if ! IE]> <![endif]>RED |
|
|
(*Not |
|
|
|
Provided) |
|
|
|
| <![if ! IE]> <![endif]>GREEN |
<![if ! IE]> <![endif]>BLUE |
<![if ! IE]> <![endif]>RED |
<![if ! IE]> <![endif]>WHITE |
<![if ! IE]> <![endif]>RED |
VIDEO AUDIO
DVD / Blu-Ray / HD Cable Box
English
Transmits analog video and audio signals from an external device to the TV. Connect the external device and the TV with a component cable as shown.
 NOTE
NOTE
yy If cables are not installed correctly, it could cause this image to display in black and white or with distorted colours.

A-16 MAKING CONNECTIONS
Türkçe
Harici cihazdan TV’ye analog video ve ses sinyalleri gönderir. Harici cihaz ile TV’yi komponent kablosuyla aşağıdaki şekilde gösterildiği gibi bağlayın.
NOT
yy Kabloların yanlış takılması, görüntünün siyah beyaz veya bozuk renklerle gösterilmesine neden olabilir.
Composite connection
(Only LB86**, LB87**)
IN
AV2 COMPONENT
VIDEO 
 PR P Y
YELLOW  (Use the composite
  gender cable
provided.)
| <![if ! IE]> <![endif]>YELLOW |
<![if ! IE]> <![endif]>WHITE |
<![if ! IE]> <![endif]>RED |
| <![if ! IE]> <![endif]>YELLOW |
<![if ! IE]> <![endif]>WHITE |
<![if ! IE]> <![endif]>RED |
|
|
(*Not |
| <![if ! IE]> <![endif]>YELLOW |
|
Provided) |
| <![if ! IE]> <![endif]>WHITE |
<![if ! IE]> <![endif]>RED |
VIDEO L (MONO) AUDIO R
DVD / Blu-Ray / HD
Cable Box / VCR
MAKING CONNECTIONS A-17
(Only LB63**, LB65**, LB67**, LB68**, LB69**, |
MHL connection |
|
||||
|
|
|
|
|||
LB72**, LB73**) |
|
|
|
|
||
|
|
|
|
|
|
|
|
|
|
|
|
|
|
|
|
|
|
|
|
|
|
|
|
|
|
|
|
|
|
|
|
|
|
|
|
|
|
|
|
|
|
| <![if ! IE]> <![endif]>YELLOW |
|
<![if ! IE]> <![endif]>WHITE |
<![if ! IE]> <![endif]>RED |
|
|
(*Not Provided) |
|
| <![if ! IE]> <![endif]>YELLOW |
<![if ! IE]> <![endif]>WHITE |
<![if ! IE]> <![endif]>RED |
|
VIDEO L (MONO) AUDIO
AUDIO R
R
DVD/ Blu-Ray / HD Cable Box / VCR
English
Transmits analog video and audio signals from an external device to the TV. Connect the external device and the TV with the composite cable as shown.
Türkçe
Harici cihazdan TV’ye analog video ve ses sinyalleri gönderir. Harici cihaz ile TV’yi kompozit kablosuyla aşağıdaki şekilde gösterildiği gibi bağlayın.
MHL passive cable (*Not Provided)
Mobile phone
English
Mobile High-definition Link (MHL) is an interface for transmitting digital audiovisual signals from mobile phones to television sets.
 NOTE
NOTE
yyConnect the mobile phone to the HDMI IN 3 (MHL) or HDMI/DVI IN 4 (MHL) port to view the phone screen on the TV.
yyThe MHL passive cable is needed to connect the TV and a mobile phone. yyThis only works for the MHL-enabled
phone.
yySome applications can be operated by the remote control.
yyFor some mobile phones supporting MHL, you can control with the magic remote control.
yy Remove the MHL passive cable from the TV when:
--the MHL function is disabled
--your mobile device is fully charged in standby mode
A-18 MAKING CONNECTIONS
Türkçe
Mobil Yüksek Tanımlı Bağlantı (MHL) dijital görsel işitsel sinyalleri cep telefonlarından televizyon
iletmek için kullanılan bir arabirimdir.
NOT
yyTelefon ekranını TV’de görüntülemek için cep telefonunu HDMI IN 3 (MHL) veya
HDMI/DVI IN 4 (MHL) bağlantı noktasına bağlayın.
yyTV ile cep telefonunu birbirine bağlamak için MHL pasif kablo gereklidir.
yyBu yalnızca MHL etkin telefonlarda çalışır. yyBazı uygulamalar uzaktan kumanda ile
çalıştırılabilir.
yyMHL desteği olan bazı cep telefonlarını sihirli uzaktan kumanda olarak kullanabilirsiniz.
yyAşağıdaki durumlarda MHL pasif kablosunu TV’den çıkarın:
--MHL işlevi devre dışı bırakıldığında --Mobil cihazınız bekleme modunda
tamamen şarj edildiğinde
Audio connection
 (*Not Provided)
IN
Digital Audio System
English
You may use an optional external audio system instead of the built-in speaker.
Digital optical audio connection
Transmits a digital audio signal from the TV to an external device. Connect the external device and the TV with the optical audio cable as shown.
NOTE
yy Do not look into the optical output port. Looking at the laser beam may damage your vision.
yy Audio with ACP (Audio Copy Protection) function may block digital audio output.
MAKING CONNECTIONS A-19
Türkçe
Dahili hoparlör yerine isteğe bağlı bir harici ses sistemi kullanabilirsiniz.
Dijital optik ses bağlantısı
TV’den harici cihaza dijital ses sinyali gönderir. Harici cihaz ile TV’yi optik ses kablosuyla aşağıdaki şekilde gösterildiği gibi bağlayın.
NOT
yy Optik çıkış bağlantı noktasına doğru bakmayın. Lazer ışınına bakmak gözlerinize zarar verebilir.
yy ACP (Ses Kopyalama Koruması) özelliğine sahip sesler dijital ses çıkışını engelleyebilir.
USB connection
English
Connect a USB storage device such as a USB flash memory, external hard drive, or a USB memory card reader to the TV and access the
SmartShare menu to use various multimedia files.
NOTE
yy Some USB Hubs may not work. If a USB device connected using a USB Hub is not detected, connect it to the USB port on the TV directly.
yy Connect the external power source if your USB is needed.
Türkçe
Çeşitli multimedya dosyalarını kullanmak için TV’ye USB flaş bellek, harici sabit disk ya da USB bellek kartı okuyucu gibi bir USB depolama aygıtı
SmartShare menüsüne gidin.
NOT
yy Bazı USB Hubları çalışmayabilir. USB Hub’ı ile bağlanan bir USB aygıtı çalışmazsa, doğrudan TV üzerindeki USB bağlantı noktasına bağlayın.
yy USB kullanmanız gerekiyorsa harici güç kaynağını bağlayın.
|
|
|
|
|
|
|
|
|
|
|
|
|
|
|
|
|
|
|
|
|
|
|
|
|
|
|
|
|
|
|
|
|
|
|
|
|
|
|
|
|
|
|
|
|
|
|
|
|
|
|
|
|
|
|
|
|
|
|
|
|
|
|
|
|
|
|
|
|
|
|
|
|
|
|
|
|
|
|
|
|
|
|
|
|
|
|
|
|
|
|
|
|
|
|
|
|
|
|
|
|
|
|
|
|
|
|
HUB |
|||||||||
|
|
|||||||||||
HDD |
(*Not Provided) |
|||||||||||
(*Not |
|
|
|
|
|
|
|
|
|
USB |
||
|
|
|
|
|
|
|
|
|
(*Not |
|||
Provided) |
|
|
|
|
|
|
|
|
|
|||
|
|
|
|
|
|
|
Provided) |
|||||
|
|
|
|
|
|
|
|
|
||||
A-20 MAKING CONNECTIONS
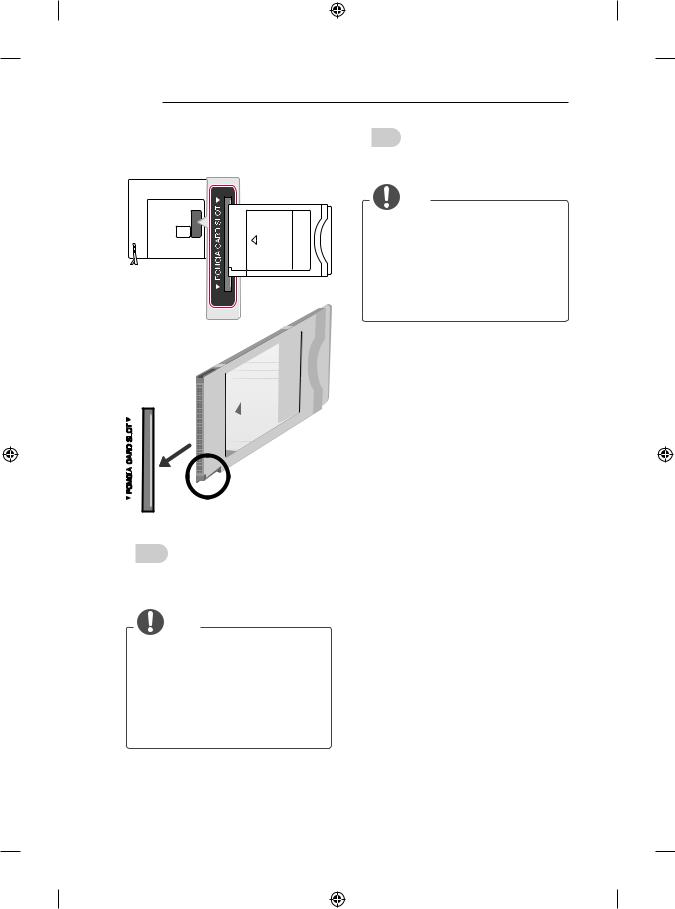
CI module connection Türkçe
(*Not Provided)
English
View the encrypted (pay) services in digital TV mode. This feature is not available in all countries.
NOTE
yy Check if the CI module is inserted into the PCMCIA card slot in the right direction. If the module is not inserted properly, this can cause damage to the TV and the PCMCIA card slot.
yy If the TV does not display any video and audio when CI+ CAM is connected, please contact to the Terrestrial/Cable/ Satellite Service Operator.
Dijital TV modunda şifreli (ücretli) servisleri görüntüler. Bu özellik her ülkede mevcut değildir.
NOT
yy CI modülünün PCMCIA kart yuvasına doğru yönde takıldığından emin olun. Modül doğru takılmadığında, TV’nin ve PCMCIA kart yuvasının zarar görmesine neden olabilir.
yy CI+ CAM bağlandığında TV’de herhangi bir görüntü ve ses yoksa, lütfen Karasal/ Kablo/Uydu Servis Operatörü ile iletişime geçin.
MAKING CONNECTIONS A-21
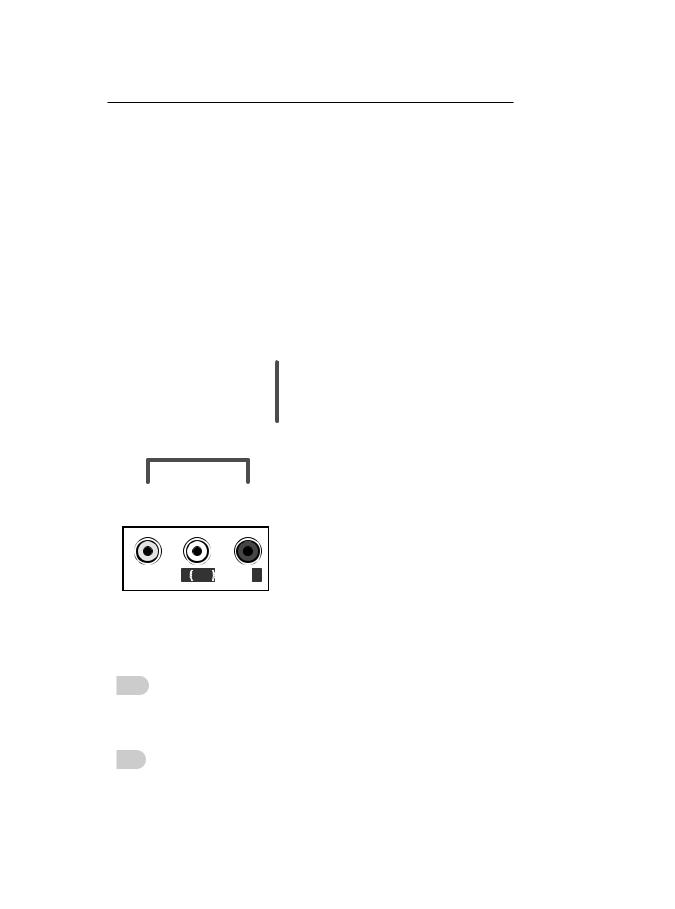
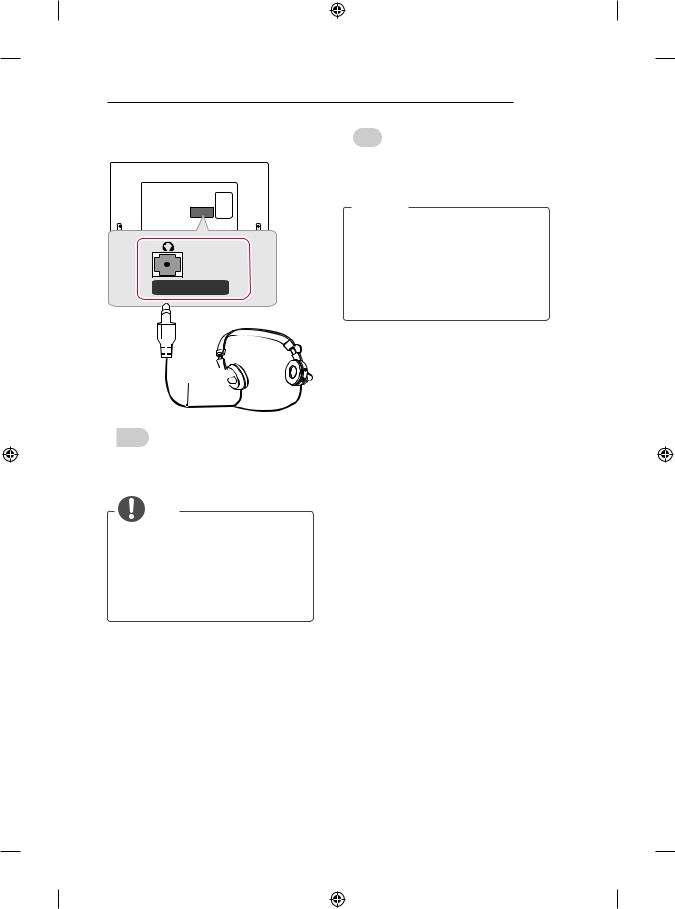
Headphone connection |
Türkçe |
|
Ext.Speaker / H/P OUT
(*Not  Provided)
English
Transmits the headphone signal from the TV to an external device. Connect the external device and the TV with the headphone as shown.
NOTE
yy AUDIO menu items are disabled when connecting a headphone.
yy Optical Digital Audio Out is not available when connecting a headphone.
yy Headphone impedance: 16 Ω
yy Max audio output of headphone: 0.624 mW to 1.04 mW
yy Headphone jack size: 0.35 cm
TV’den harici bir cihaza kulaklık sinyali gönderir. Harici cihaz ile TV’yi kulaklıkla aşağıdaki şekilde gösterildiği gibi bağlayın.
 NOT
NOT
yy Kulaklık bağlandığında SES menüsü öğeleri devre dışı bırakılır.
yy Optik Dijital Ses Çıkışı kulaklık takılı olduğunda kullanılamaz.
yy Kulaklık empedansı: 16 Ω
yy Kulaklığın maks. ses çıkışı: 0,624 mW - 1,04 mW
yy Kulaklık jakı boyutu: 0,35 cm
A-22 MAKING CONNECTIONS
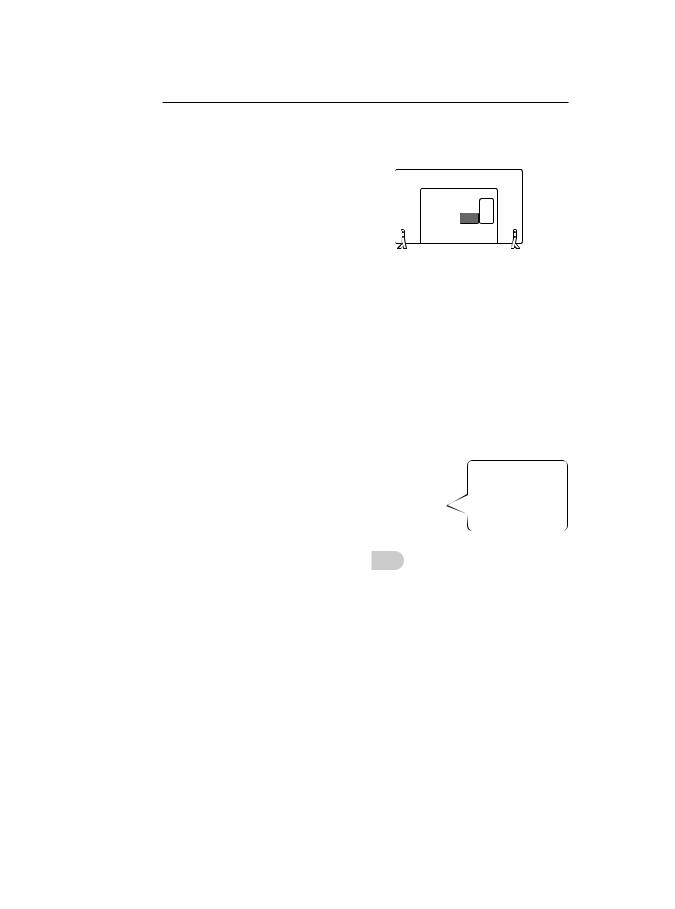
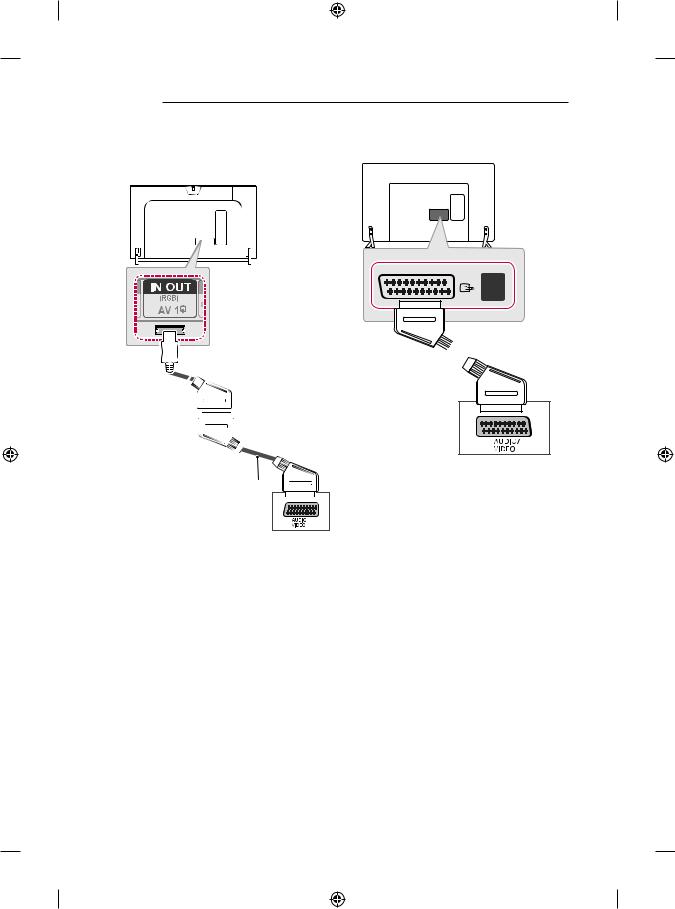
Euro Scart connection |
(Only LB63**, LB65**, LB67**, LB68**, LB69**, |
|
|
|
LB72**, LB73**) |
(Only LB86**, LB87**) |
|
<![endif]>IN/OUT
<![if ! IE]><![endif]>AV1

 (*Not Provided)
(Use the Scart
gender cable
provided.)
(*Not Provided)
MAKING CONNECTIONS A-23
English |
Türkçe |
Transmits the video and audio signals from an external device to the TV set. Connect the external device and the TV set with the euro scart cable as shown.
|
Output |
|
Current |
Type |
AV1 |
|
||
input mode |
|
(TV Out1) |
|
|
|
Digital TV |
|
Digital TV |
|
|
|
Analogue TV, AV |
|
|
|
|
|
Component |
|
Analogue TV |
|
|
|
HDMI |
|
|
|
|
|
1TV Out : Outputs Analogue TV or Digital TV signals.
 NOTE
NOTE
yy Any Euro scart cable used must be signal shielded.
yy When watching digital TV in 3D imaging mode, only 2D out signals can be output through the SCART cable. (Only 3D models)
yy If you set the 3D mode to On while a scheduled recording is performed on digital TV, monitor out signals cannot be output through the SCART cable, and the recording cannot be performed. (Only 3D models)
Harici cihazdan TV setine video ve ses sinyalleri gönderir. Harici cihaz ve TV setini aşağıdaki şekilde gösterildiği gibi Euro Scart kablosuyla bağlayın.
|
Çıkış tipi |
|
Geçerli |
|
AV1 |
giriş modu |
|
(TV Çıkışı1) |
|
|
|
Dijital TV |
|
Dijital TV |
|
|
|
Analog TV, AV |
|
|
|
|
|
Komponent |
|
Analog TV |
|
|
|
HDMI |
|
|
|
|
|
1TV Çıkışı: Analog TV veya Dijital TV sinyal çıkışı sağlar.
NOT
yy Kullanılacak Euro Scart kablosu sinyal korumalı olmalıdır.
yy 3D görüntü modunda dijital TV izlerken, yalnızca 2D çıkış sinyallerinin SCART kablosu aracılığıyla çıkışı sağlanabilir. (Yalnızca 3D modeller)
yy Dijital TV’de planlanmış kayıt yapılırken, 3D modunu Açık olarak ayarladığınızda SCART kablosu aracılığıyla monitör çıkış sinyallerinin çıkışı sağlanamaz ve kayıt yapılamaz. (Yalnızca 3D modeller)
A-24 MAKING CONNECTIONS
English
Connect various external devices to the TV and switch input modes to select an external
device. For more information of external device’s connection, refer to the manual provided with each device.
Available external devices are: HD receivers, DVD players, VCRs, audio systems, USB storage devices, PC, gaming devices, and other external
NOTE
yy The external device connection may differ from the model.
yy Connect external devices to the TV regardless of the order of the TV port.
yy If you record a TV program on a DVD recorder or VCR, make sure to connect the TV signal input cable to the TV through a DVD recorder or VCR. For more information of recording, refer to the manual provided with the connected device.
yy Refer to the external equipment’s manual for operating instructions.
yy If you connect a gaming device to the TV, use the cable supplied with the gaming device.
yy In PC mode, there may be noise associated with the resolution, vertical pattern, contrast or brightness. If noise is present, change the PC output to another resolution, change the refresh rate to another rate or adjust the brightness and contrast on the PICTURE menu until the picture is clear.
yy In PC mode, some resolution settings may not work properly depending on the graphics card.
Türkçe
TV’ye çeşitli harici cihazlar bağlayın ve bir harici cihaz seçmek için giriş modlarına geçin. Harici cihaz bağlantısı hakkında daha fazla bilgi için cihazlarla birlikte verilen kılavuza bakın. Kullanılabilir harici cihazlar şunlardır: HD alıcılar, DVD oynatıcılar, VCR cihazları, ses sistemleri, USB depolama aygıtları, PC, oyun cihazları ve
cihazlar.
NOT
yy Harici cihaz bağlantısı modele göre değişiklik gösterebilir.
yy Harici cihazları TV’ye, TV bağlantı noktalarını dikkate almaksızın bağlayın.
yy DVD kayıt cihazına ya da VCR cihazına bir TV programı kaydederken TV sinyal giriş kablosunun DVD kayıt cihazı ya da VCR üzerinden TV’ye bağlandığından emin olun. Kayıt hakkında daha fazla bilgi için, bağlanan cihazla birlikte verilen kılavuza bakın.
yy Kullanım talimatları için harici cihazın kullanım kılavuzuna başvurun.
yy TV’ye bir oyun cihazı bağlarsanız, oyun cihazıyla birlikte verilen kabloyu kullanın. yy PC modunda, çözünürlük, dikey desen,
kontrast veya parlaklığa bağlı parazit görülebilir. Parazit varsa PC çıkışını başka bir çözünürlüğe ayarlayın, yenileme hızını değiştirin veya net bir görüntü elde edene kadar RESİM menüsünden parlaklık ve kontrast ayarlarını değiştirin.
yy PC modunda bazı çözünürlük ayarları grafik kartına bağlı olarak çalışmayabilir.

OWNER’S MANUAL
LED TV*
* LG LED TV applies LCD screen with LED backlights.
Click! User Guide
Please read this manual carefully before operating your set and retain it for future reference.
www.lg.com
<![endif]>ENGLISH
2 TABLE OF CONTENTS
TABLE OF CONTENTS
3 LICENSES
3OPEN SOURCE SOFTWARE NOTICE
3EXTERNAL CONTROL DEVICE SETUP
4SAFETY INSTRUCTIONS
10 - Viewing 3D Imaging (Only 3D models)
12 INSTALLATION PROCEDURE
12 ASSEMBLING AND PREPARING
12 Unpacking
16Separate purchase
17Parts and buttons
19- Using the Joystick button
20Lifting and moving the TV
21Mounting on a table
22Mounting on a wall
23Using Built-in Camera
24- Preparing Built-in Camera
24- Name of Parts of Built-in Camera
24- Checking the Camera’s Shooting Range
25REMOTE CONTROL
27MAGIC REMOTE FUNCTIONS
28Registering Magic Remote
28How to use Magic Remote
29Precautions to Take when Using the Magic Remote
29USING THE USER GUIDE
30MAINTENANCE
30 Cleaning your TV
30 - Screen, frame, cabinet and stand
30 - Power cord
30TROUBLESHOOTING
31SPECIFICATIONS
WARNING
yy If you ignore the warning message, you may be seriously injured or there is a possibility of accident or death.
CAUTION
yy If you ignore the caution message, you may be slightly injured or the product may be damaged.
 NOTE
NOTE
yy The note helps you understand and use the product safely. Please read the note carefully before using the product.
LICENSES / OPEN SOURCE SOFTWARE NOTICE / EXTERNAL CONTROL DEVICE SETUP |
3 |
|
|
LICENSES
Supported licenses may differ by model. For more information about licenses, visit www.lg.com.
OPEN SOURCE SOFTWARE NOTICE
To obtain the source code under GPL, LGPL, MPL and other open source licenses, that is contained in this product, please visit http://opensource.lge.com .
In addition to the source code, all referred license terms, warranty disclaimers and copyright notices are available for download.
LG Electronics will also provide open source code to you on CD-ROM for a charge covering the cost of performing such distribution (such as the cost of media, shipping and handling) upon email request to opensource@lge.com. This offer is valid for three (3) years from the date on which you purchased the product.
EXTERNAL CONTROL DEVICE SETUP
To obtain the external control device setup information, please visit www.lg.com
<![endif]>ENGLISH
<![endif]>ENGLISH
4 SAFETY INSTRUCTIONS
SAFETY INSTRUCTIONS
Please read these safety precautions carefully before using the product.
 WARNING
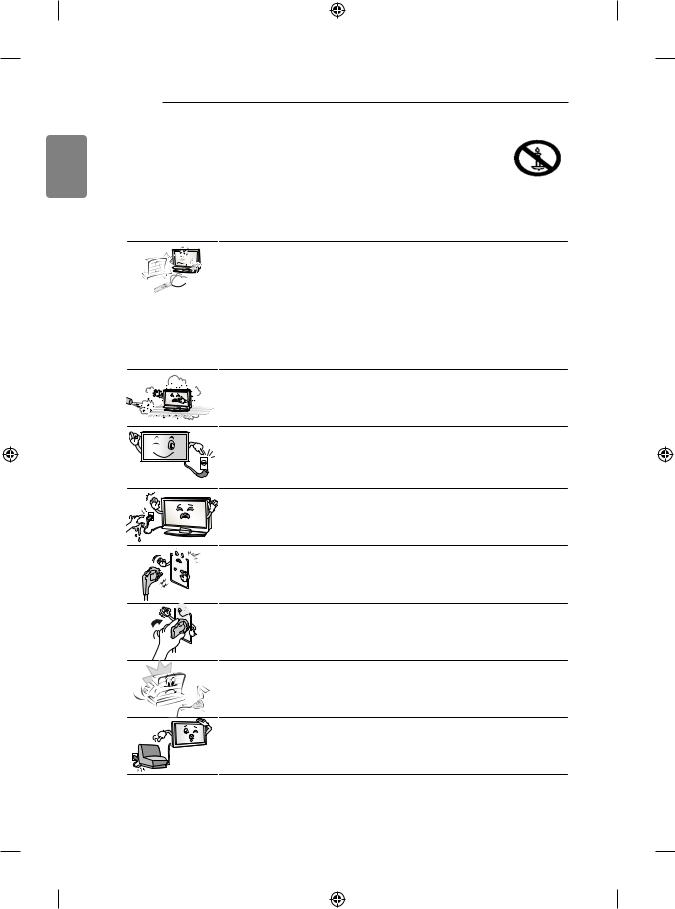
yyDo not place the TV and/or remote control in the following environments:
--A location exposed to direct sunlight
--An area with high humidity such as a bathroom
--Near any heat source such as stoves and other devices that produce
heat
--Near kitchen counters or humidifiers where they can easily be exposed to steam or oil
--An area exposed to rain or wind --Near containers of water such as vases
Otherwise, this may result in fire, electric shock, malfunction or product deformation.
yyDo not place the product where it might be exposed to dust. This may cause a fire hazard.
yyMains Plug is the TV connecting/disconnecting device to AC mains electric supply.This plug must remain readily attached and operable when TV is in use.
yyDo not touch the power plug with wet hands. Additionally, if the cord pin is wet or covered with dust, dry the power plug completely or wipe dust off. You may be electrocuted due to excess moisture.
yyMake sure to connect Mains cable to compliant AC mains socket with Grounded earth pin. (Except for devices which are not grounded on earth.) Otherwise possibility you may be electrocuted or injured.
yyInsert power cable plug completely into wall socket otherwise if not secured completely into socket, fire ignition may break out.
yyEnsure the power cord does not come into contact with hot objects such as a heater.
This may cause a fire or an electric shock hazard.
yyDo not place a heavy object, or the product itself, on power cables. Otherwise, this may result in fire or electric shock.
 Loading...