

Page 1

Owner's Manual
Addendum
MRC V4.0
MIDI
Remote
Controller
Page 2

Copyright ©1992
All Rights Reserved.
Lexicon Part #070-09430
Lexicon Inc.
3 Oak Park
Bedford, MA USA
Telephone 781-280-0300
Fax 781-280-0490
Page 3

Table of Contents
1. Introducing Version 4.0
V. 4.0 Features ......................1-1
V. 4.0 Changes ...................... 1-1
2. Controlling the LXP series of
multi-effects processors
Advantages of MRC control...2-1
One-way and Two-way
Communications.................2-2
Overview of One-way
Features ..........................2-5
Overview of Two-way
Features ..........................2-6
Advanced Two-way
Configurations ................. 2-7
3. Controlling the LXP-15
One-way Connections ........... 3-1
Merging and One-way
Communication ............... 3-2
Establishing One-way
Communication ............... 3-3
One-way Control of
Multiple LXP-15s .............3-5
Two-way Connections ........... 3-6
Merging and Two-way
Communication ............... 3-6
Establishing Two-way
Communication ............... 3-8
Two-way Control of
Multiple LXP-15s ...........3-10
Control Flow.........................3-11
LXP-15 Setups.....................3-12
Selecting an LXP-15
Setup.............................3-12
Communication Problems 3-13
Viewing and Editing LXP-15
Setup Parameters .......3-13
Using the ✳ and ENTER
Keys .............................. 3-14
LXP-15 Display Pages .....3-14
MRC/LXP-15 Presets .......3-18
Storing Setups from
Machine Run Mode ....... 3-20
Editing LXP-15 Setups ..... 3-20
4. Controlling the LXP-5 with
Two-Way Communication
Two-way Connections ........... 4-1
Merging and Two-way
Communication ............... 4-1
Establishing Two-way
Communication ............... 4-3
Two-way Control of
Multiple LXP-5s ............... 4-5
Control Flow...........................4-6
LXP-5 Setups.........................4-7
Selecting an LXP-5
Setup...............................4-7
Communication Problems .. 4-8
Viewing and Editing LXP-5
Setup Parameters .........4-8
Page 4

Using the ✳ and ENTER
Keys ................................ 4-9
Storing Setups from
Machine Run Mode ......... 4-9
MRC/LXP-5 Presets .........4-10
5. Controlling the LXP-1 with
Two-Way Communication
Two-way Connections ........... 5-1
Merging and Two-way
Communication ............... 5-1
Establishing Two-way
Communication ............... 5-3
Two-way Control of
Multiple LXP-1s ............... 5-5
Control Flow...........................5-6
LXP-1 Setups.........................5-7
Selecting an LXP-1
Setup...............................5-7
Communication Problems .. 5-8
Viewing and Editing LXP-1
Setup Parameters .........5-9
Using the ✳ and ENTER
Keys ................................ 5-9
Storing Setups from
Machine Run Mode ......... 5-9
MRC/LXP-1 Presets .........5-10
Changing LXP-1 MIDI
THRU to MIDI OUT ....... 5-11
Page 5

Introducing Version 4.0Owner's Manual Addendum
1. Introducing Version 4.0
Congratulations on your purchase of the MRC V4.0 MIDI Remote Controller.
Version 4.0 adds some significant new features and changes to Version 3.0
of the MRC. These changes and features are based on feedback from
present MRC users.This addendum is not a replacement of the Version 3.0
MRC Owner’s Manual. It describes only the new features and changes
added by Version 4.0. If you are new to the MRC and MIDI control, be sure
to refer to the V3.0 manual for general descriptions of, and operational
guidelines for the MRC. We also suggest that you read
15
in this addendum for the best understanding of MRC control with any LXP
effects processor.
V4.0 Features
The following features have been added to the MRC by Version 4.0:
• The MRC can now control the Lexicon LXP-15 Multi-Effects Processor.
A new machine type for the LXP-15 has been added to the MRC’s
machine definitions.
•
Two-way communication
user registers directly from Lexicon LXP-1, LXP-5, and LXP-15 multieffects processors for parameter display and control.
has been added to allow the MRC to upload
Controlling the LXP-
V4.0 Changes
The following changes have been made by Version 4.0:
• The PCM-70 machine type has been replaced by the LXP-15 machine
type. Although Version 4.0 cannot be used as a dedicated controller for
the PCM-70, you can still control the PCM-70 from a GMIDI machine
type.
• The two-way communication features of Version 4.0 eliminate the need
to hold large banks of LXP-1, LXP-5, and LXP-15 setups in internal
memory. (Each LXP-type machine can access sixteen internal MRC
presets
and
128 external LXP registers.)
1-1
Page 6

Lexicon MRC V4.0/ MIDI Remote Controller
The following table shows the new internal memory configuration of Version
4.0 .
MRC Setup Type Internal Memories
LXP-1 setups 16
LXP-5 setups 16
LXP-15 setups 16
GMIDI setups 20
Global setups 40
1-2
Page 7

Owner's Manual Addendum Controlling the LXP Series of Multi-Effects Processors
2. Controlling the LXP Series of
Multi-Effects Processors
One of the most powerful features of the MRC is its ability to be used as a
dedicated controller for Lexicon’s LXP-1, LXP-5 and LXP-15 multi-effects
processors. For maximum flexibility with your setup, the MRC can control
LXP devices using either one-way or two-way MIDI communication. This
section presents the general issues of MRC/LXP control and communication. The following sections provide specific information for MRC control of
each type of LXP processor.
Advantages of MRC control
As a dedicated LXP controller, the MRC offers functions similar to those
provided by a computer equipped with editor/librarian programs for the three
LXP effects units, as well as a MIDI merger/mapper. The MRC is much
easier to move around than a computer — so it’s a great way to take MIDI
control on the road.
With its 2€×24 character display and its ability to control up to sixteen LXP
processors simultaneously, the MRC becomes the “front end” to your LXP
devices — just put them in your rack and let the MRC take over.
If you’re using a computer with your MIDI system, you can run your favorite
computer-based sequencer and simultaneously use the MRC to edit and
control your LXPs. (The MRC’s GMIDI functions can also be controlling
other MIDI instruments while the sequencer is running)
2-1
Page 8

Lexicon MRC V4.0/ MIDI Remote Controller
The MRC has several advantages as a dedicated remote controller for
Lexicon’s LXP-1, LXP-5, and LXP-15 multi-effects processors. Here are
some of the possibilities:
• Simultaneous editing and display of as many as four parameters
• Access as many as sixteen LXPs from a single MRC
• Route two analog controllers (foot pedals) to multiple LXPs
• Enhances programmability of the LXP-1 (The MRC lets you control
parameters that aren’t accessible from the LXP-1 front panel. Internal
Dynamic MIDI patches are expanded from two to four
• Finer control resolution of LXP-1 and LXP-5 parameters
• Fine and coarse control of LXP-15 delay time parameters speeds up
delay programming
• As many as four
additional
Dynamic MIDI patches per LXP
• Internal storage of sixteen setups each for LXP-1, LXP-5 and LXP-15
machine types
• Record the movements of MRC sliders and external controllers with any
MIDI sequencer, allowing the MRC to function as an
automated
effects
controller
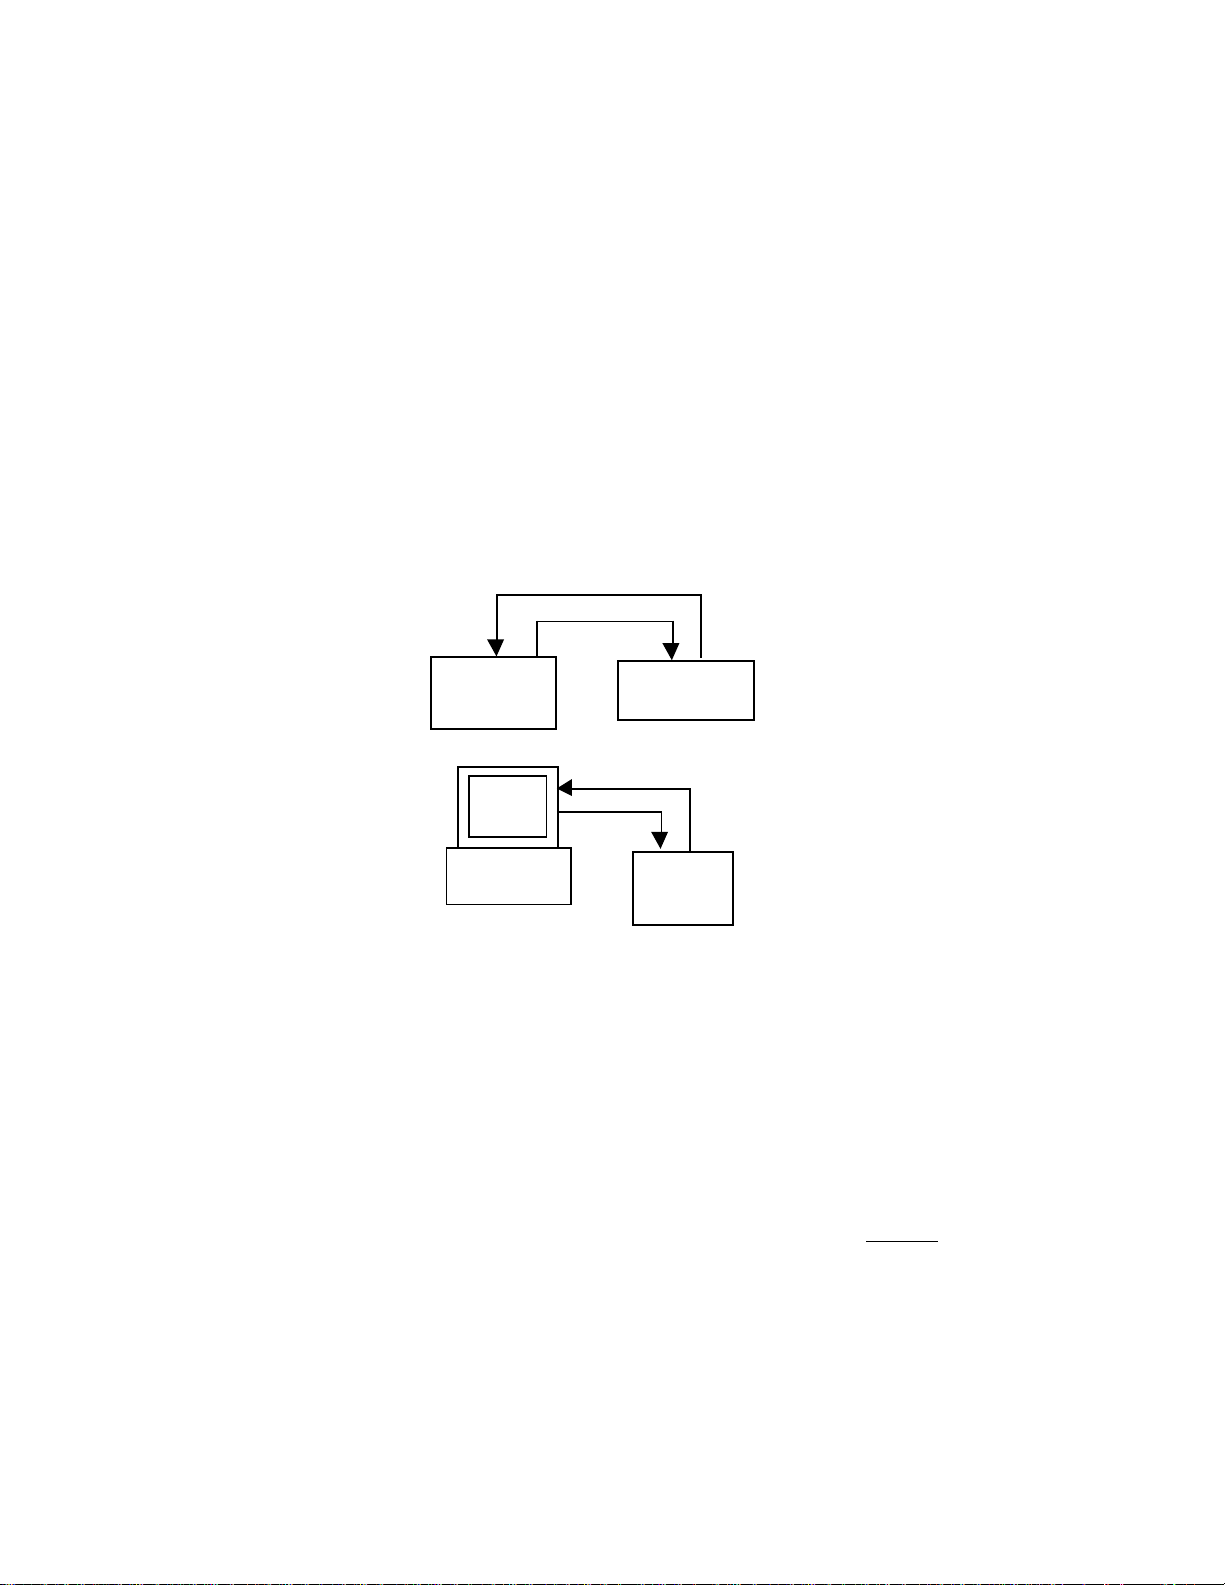
One-way and Two-way Communications
Depending on the application, MIDI systems can be configured for one-way
or two-way communication. For example, when a MIDI keyboard is used to
control a MIDI sound module, one-way communication is usually sufficient.
A single cable is run from MIDI OUT on the keyboard to MIDI IN on the sound
module. This is generally thought of as a master/slave system. Additional
slaves can be controlled by the master via MIDI THRU.
Keyboard Sound
Module
2-2
Page 9
Owner's Manual Addendum Controlling the LXP Series of Multi-Effects Processors
Two-way communication is used for more sophisticated applications. For
instance, in order for a sequencer to record
and
playback MIDI data from a
single synthesizer, they must be set up for two-way communication. Two
cables are required. One is run from the synthesizer’s MIDI OUT to the
sequencer’s MIDI IN. This sends the MIDI data from the synthesizer to the
sequencer where it is recorded. Another cable is run from the sequencer’s
MIDI OUT to the MIDI IN of synthesizer. This sends the recorded MIDI data
back to the synthesizer, where it is played.
Sequencer
Computer Effects
Synthesizer
Device
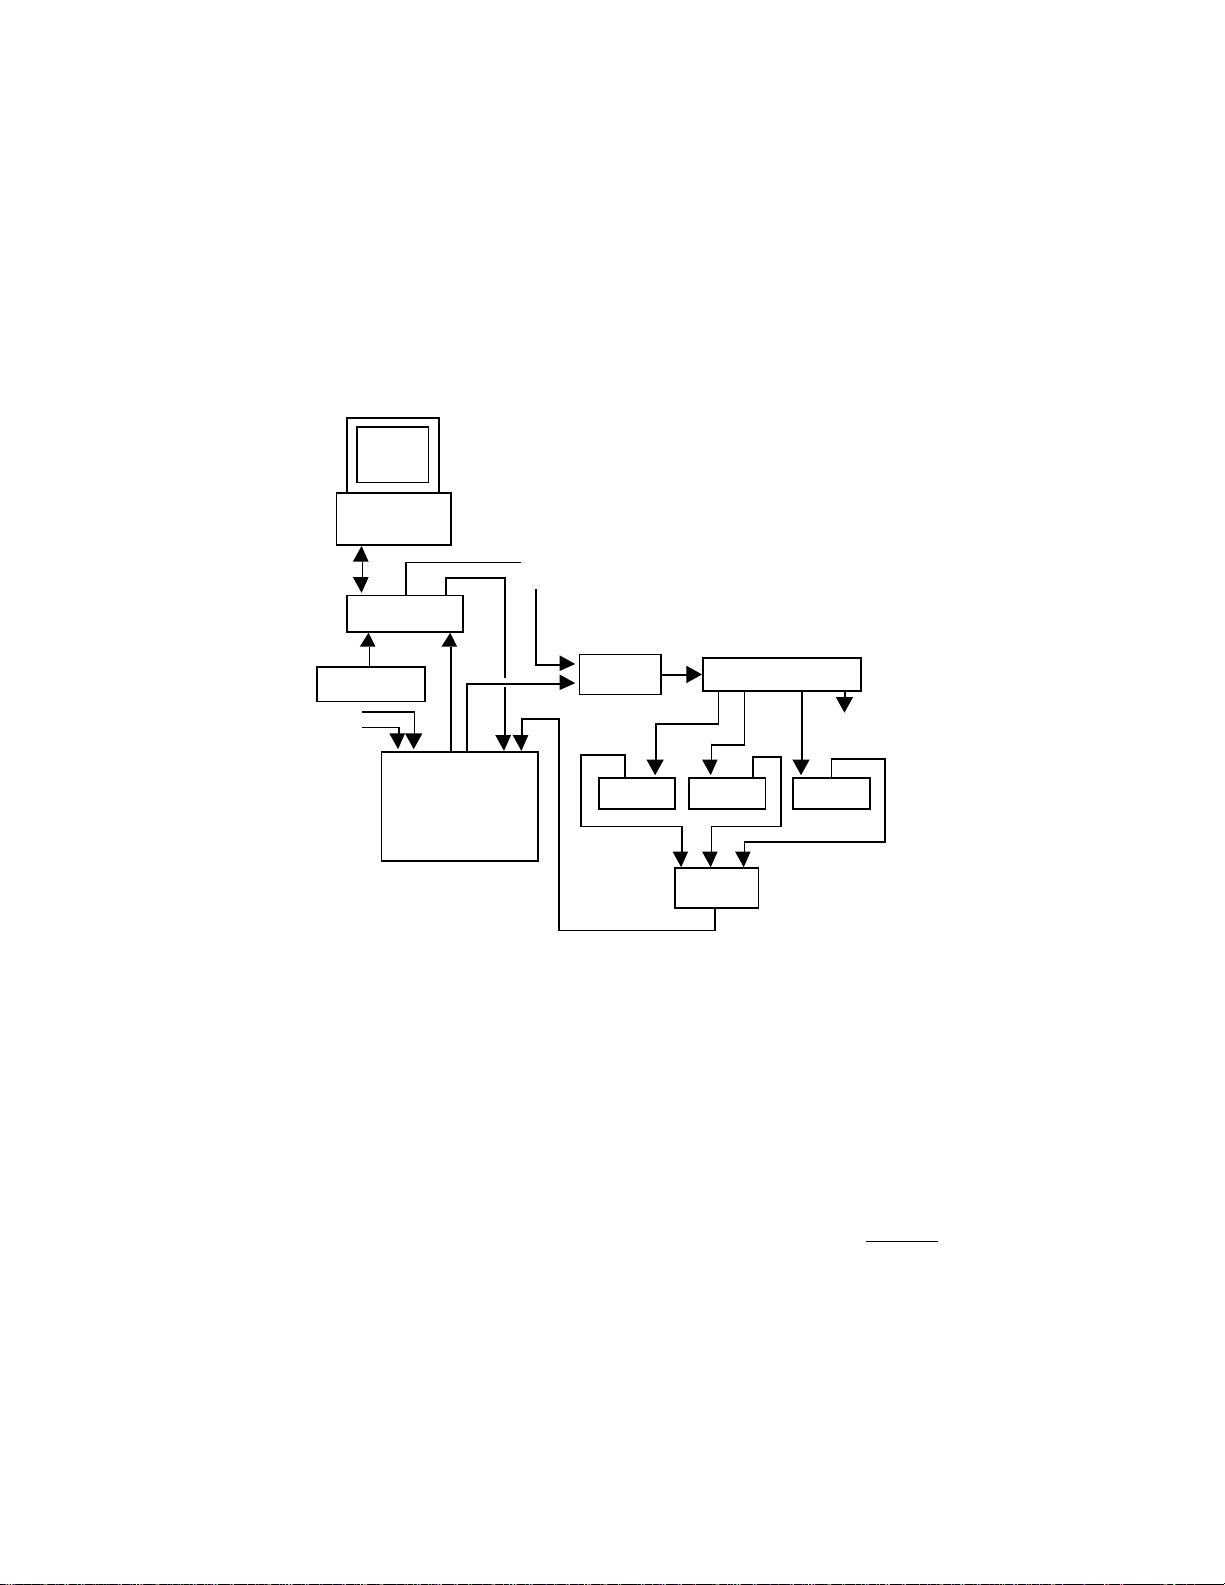
Editor/librarian programs for MIDI effects units are other examples of
applications that require two-way communication to upload parameter
settings from the effects device into the computer, and download them from
the computer back into the effects unit.
2-3
Page 10
Lexicon MRC V4.0/ MIDI Remote Controller
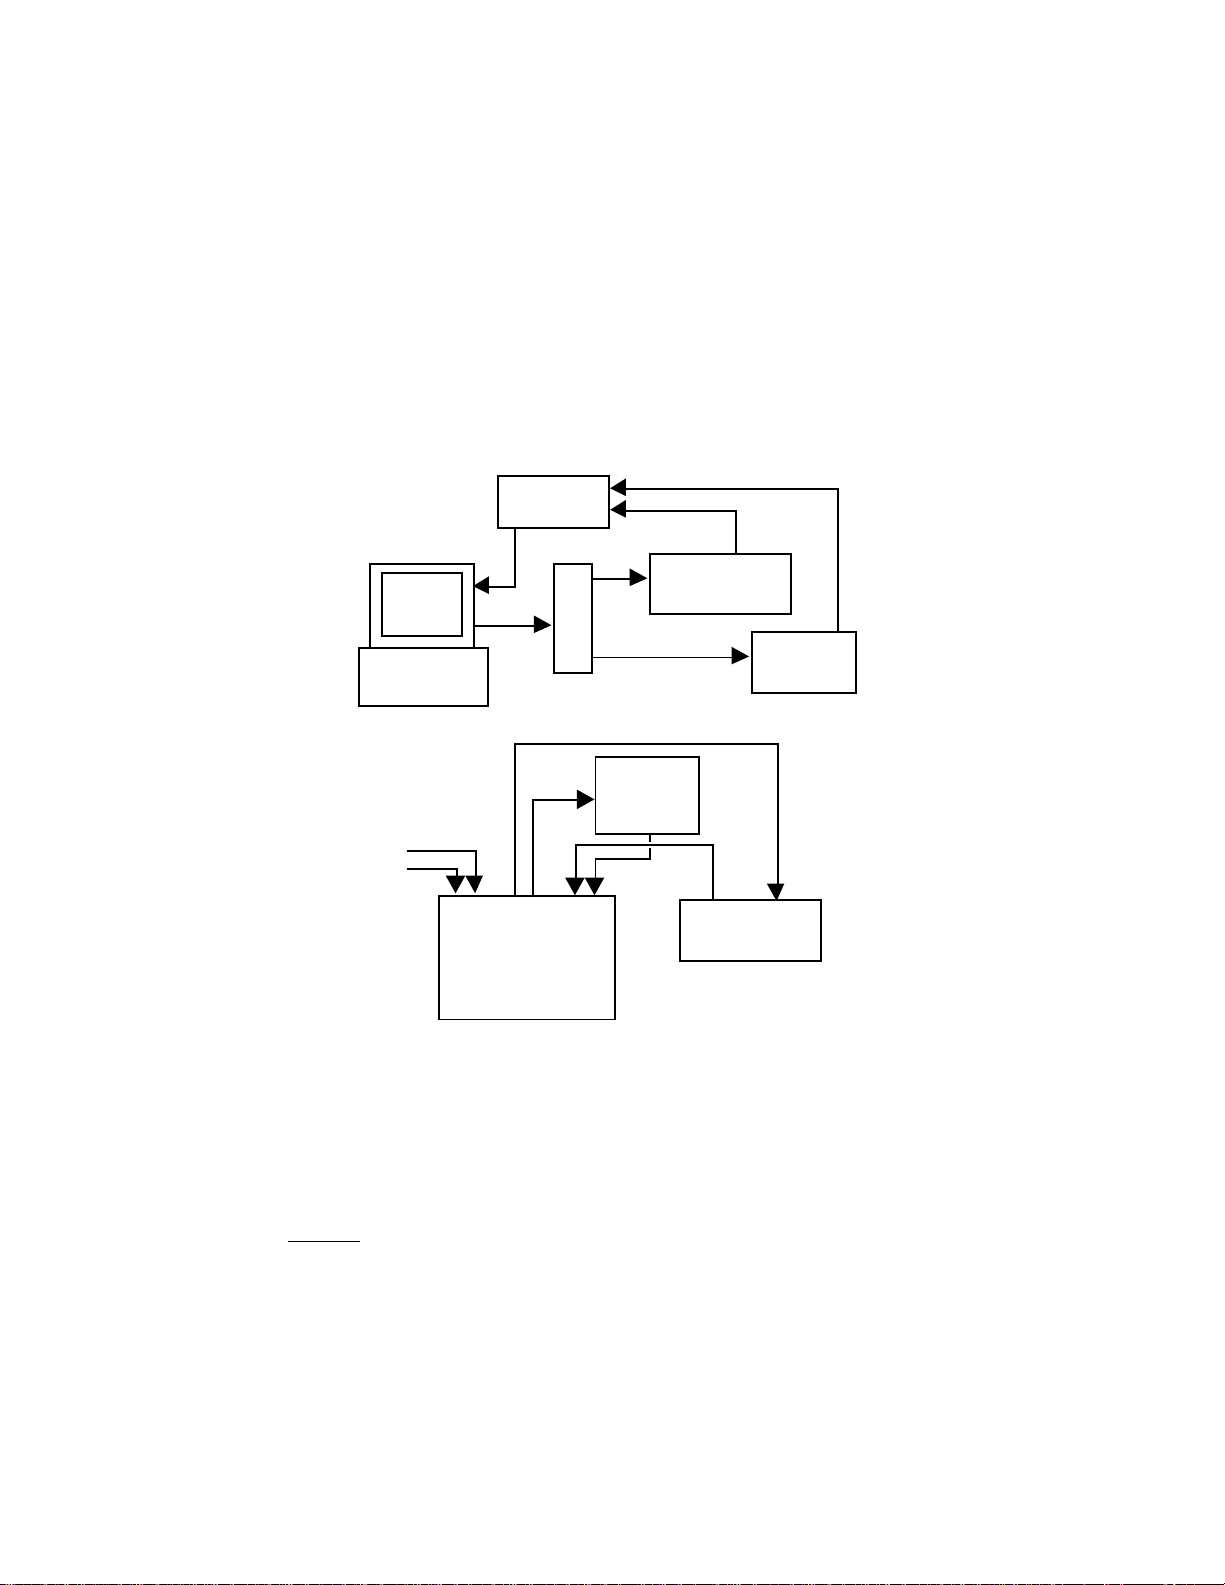
It is important to note that two-way communication creates a closed-loop
between the two MIDI devices. Unlike a one-way configuration, it is not a
simple matter to connect additional devices to a two-way configuration. This
is because MIDI outputs cannot be combined on a single cable without a
MIDI
merger
.
Merger
T
Synthesizer
H
R
U
Computer
Effects
Device
LXP
21
EXT
OUT IN
2121
Synthesizer
MRC
The MRC can be be used in both one-way and two-way configurations.
Since the MRC already “knows” the parameters of the LXP-1, LXP-5 and
LXP-15, it can be used as an editor/librarian in a one-way system. Its dual
in and out ports and built-in merger allow expanded functionality when used
in a two-way configuration. You can, for example, merge selected MIDI
controller messages from MIDI IN 2 with MIDI OUT 1. This makes it possible
to control an LXP from a MIDI keyboard (or other MIDI controller) while the
MRC and LXP are set up for two-way communication.
2-4
Page 11
Owner's Manual Addendum Controlling the LXP Series of Multi-Effects Processors
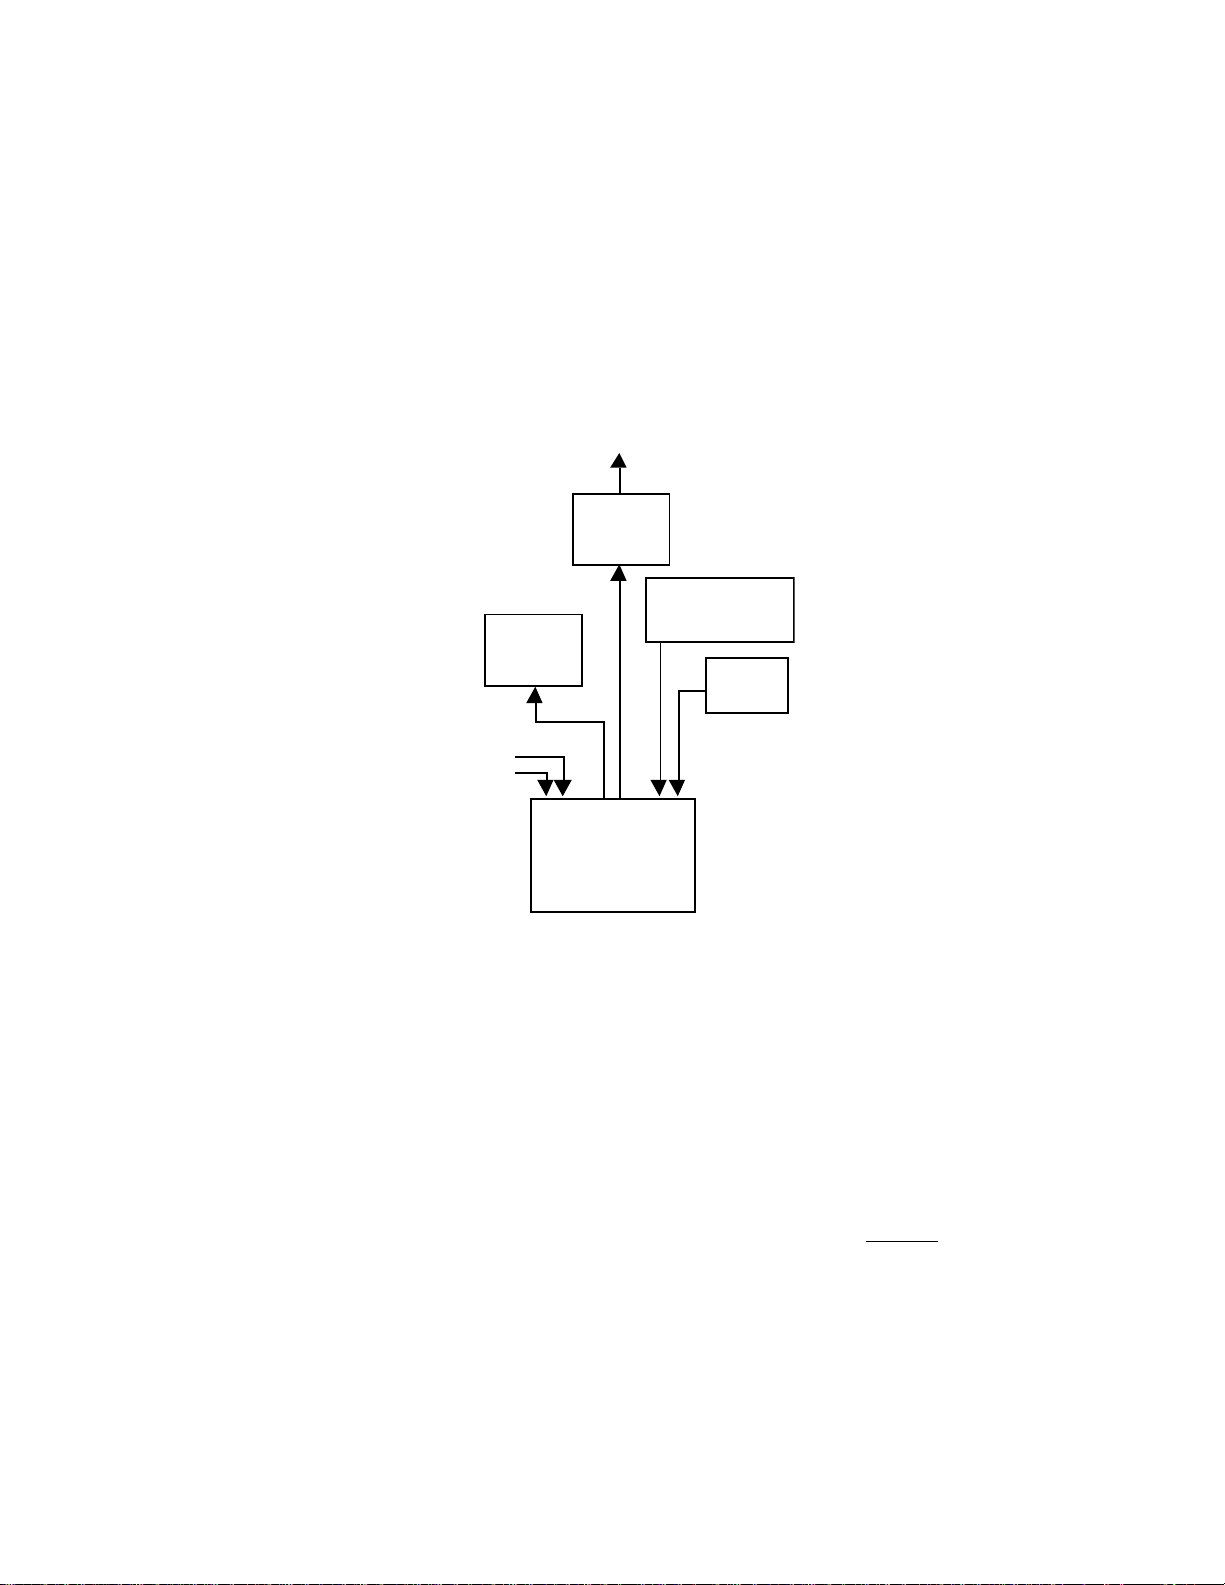
Overview of One-way Features
Additional LXPs
or MIDI devices
THRU
LXP-15
(Tempo
Control)
Sequencer,
Keyboards, etc.
LXP-5
MIDI
Clock
Foot Pedal #1
Foot Pedal #2
EXT21OUT IN
2121
MRC
• Simplified MIDI set up
• MRC editing and display of parameter settings for multiple LXP devices
• Multiple LXPs can be controlled from a single MRC output via the MIDI
THRU ports on the LXPs
• MIDI clock can be routed to LXPs for Tempo patching
• Both MRC inputs can be used to route MIDI controllers to LXP internal
MIDI patches
• Each LXP being controlled can have any four of its parameters controlled
by the MRC’s internal MIDI patches
• MRC’s GMIDI machines can control other MIDI devices while MRC is
actively editing LXP parameters
2-5
Page 12
Lexicon MRC V4.0/ MIDI Remote Controller
• LXPs connected for one-way communication can be controlled simultaneously by MIDI messages received at either IN port, as well as from the
MRC’s sliders, switches and external controllers.
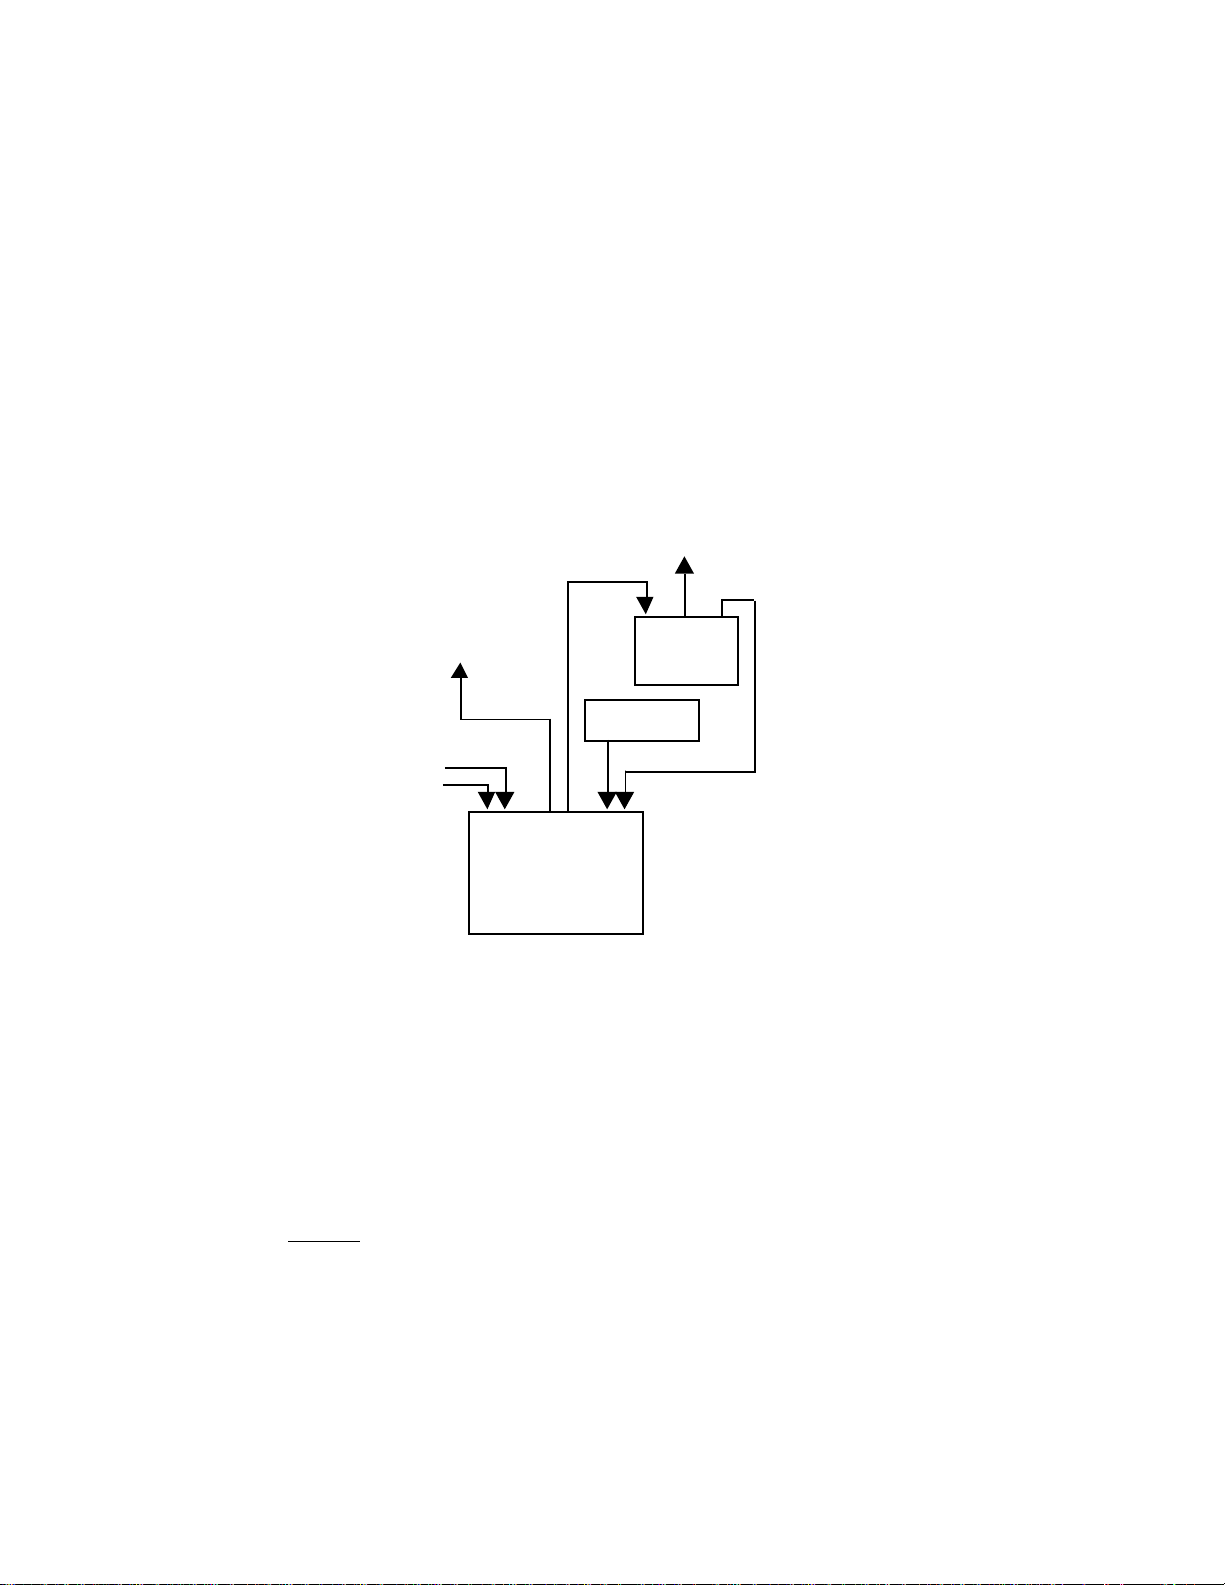
Overview of Two-way Features
to other MIDI devices
(controlled by MRC)
to other MIDI devices
(controlled by MRC
and keyboard)
IN THRU OUT
LXP-15
128 Registers
Keyboard
21
EXT
OUT IN
2121
MRC
• Access to all user registers on the target LXP
• Dual IN/OUT ports make it possible to simultaneously control
two
LXPs
with two-way communication
• Upload and display current settings directly from the target LXP
• An LXP connected for two-way communication can be controlled simul-
taneously by MIDI messages received at the other IN port as well as from
the MRC’s sliders, switches and external controllers.
• Other MIDI devices can be controlled simultaneously by the MRC by
daisy-chaining them to the MIDI OUT used for MRC control. (See
illustration.)
2-6
Page 13
Owner's Manual Addendum Controlling the LXP Series of Multi-Effects Processors
Advanced Two-way Configurations
Computer
MIDI
Clock
Patcher
Keyboard
21
EXT
OUT IN
MRC
Merge
2121
LXP-15 LXP-5 LXP-1
THRU
Additional
MIDI devices
Merge
Two-way communication requires a separate pair of MIDI IN/OUT ports for
each LXP being controlled. The MRC has two sets of MIDI IN/OUT ports, so
you can control two LXPs in two-way at once using two-way communication.
Control of more than two LXPs with two-way communication is possible, but
requires a MIDI merging device that can handle System Exclusive data. In
MIDI systems with additional hardware such as mergers, THRU boxes, or
patching devices, the MRC’s two-way functions can be expanded to allow
control of more than two LXPs and/or merging of MIDI clock for Tempo
patching while maintaining two-way communication.
2-7
Page 14

Owner's Manual Addendum
Controlling the LXP-15
3. Controlling the LXP-15
The MRC can be used as a dedicated remote controller for the LXP-15. All
of the LXP-15 parameters are accessible via the MRC. In addition to being
a full-featured editor, the MRC also extends the programmability of the LXP15 by allowing you to create as many as four additional Dynamic MIDI
patches for each LXP-15 sound via the MRC’s Machine Edit Mode. Each
patch allows you to assign one of a variety of MIDI sources or either of the
MRC’s two external inputs to control any LXP-15 parameter. This makes it
possible to control the LXP-15 from
per LXP-15 setup, and four per LXP-15 machine.
eight
controllers at the same time, four
Be sure to read about MIDI patching in the
V3.0 manual.
The MRC and LXP-15 can be connected for either one-way or two-way
communication, depending on the application.
Dynamic MIDI
section of the MRC
One-way Connections
Some examples of applications that call for one-way communications are:
• to connect more than one LXP-15 to the same MRC OUT port
• to route MIDI clock to the LXP-15 for Tempo patches
The MIDI connections are simple. Connect a single MIDI cable from MIDI
OUT 1 of the MRC to MIDI IN of the LXP-15 as shown. We use OUT 1 as
an example since it is the default. Of course, you can edit an LXP-15
“machine” to transmit on OUT 2 if you wish. (See
MRC V3.0 manual).
Machine Edit Mode
in the
3-1
Page 15

Lexicon MRC V4.0/ MIDI Remote Controller
y
Merging and One-way Communication
to merge MIDI
Clock and
controllers
to merge
controllers onl
LXP-15
EXT21OUT IN
2121
MRC
When connected for one-way communication, you can use the merging
features of the MRC to route MIDI controllers from either MIDI input to the
LXP-15. This is useful when you are using an LXP-15 register that uses MIDI
sources for patching. Merging functions are selected on page 1 of the
SYSTEMS PARAMETERS menu. The different merging options are outlined in the following table:
3-2
Page 16

Owner's Manual Addendum
Merging Options for One-way Communication
IN1 -> OUT1 <ON/OFF> When set to “ON”,
on IN1 is merged with MRC OUT1. Use this
to merge MIDI Clock with MRC output for
Tempo patching on the LXP-15.
Controlling the LXP-15
all
incoming MIDI received
IN1 -> OUT2 <ON/OFF> When set to “ON”, any combination of MIDI
IN 2 -> OUT2 <ON/OFF> When set to “ON”,
IN2 -> OUT1 <ON/OFF> When set to “ON”, any combination of MIDI
controllers, Pitch Bend, Aftertouch, Note
numbers and Program Change messages
received on IN1 can be merged with MIDI
OUT2.
all
on IN2 is merged with MRC OUT2. Use this
to merge MIDI Clock with MRC output for
Tempo patching on the LXP-15.
controllers, Pitch Bend, Aftertouch, Note
numbers and Program Change messages
received on IN2 can be merged with MIDI
OUT1.
incoming MIDI received
Establishing One-way Communication
When configured for one-way communication, the MRC is the master, and
the LXP-15 is the slave. In order to establish communication after the initial
connections are made and both units are turned on, it is necessary to put the
LXP-15 in the same “state” as the MRC. The following procedure describes
how this is done:
1. On the MRC, enter Machine Select Mode by pressing MACH twice.
2. Use the leftmost slider, the MACH button or the keypad to select an LXP-
15 type machine. (Machine #3 is an LXP-15 machine when the MRC is
shipped from the factory.)
3. Confirm that the MIDI cable is connected to the same output as the
displayed “OUT#”.
3-3
Page 17

Lexicon MRC V4.0/ MIDI Remote Controller
4. Confirm that the LXP-15 is set to receive on the same MIDI channel as
the displayed “CH#”.
5. Press ENTER to put the MRC into Machine Run Mode. The MRC
display will change to show the first page of LXP-15 Setup parameters.
6. Press ✱ to send the MRC Setup parameters to the LXP-15. The
parameter values displayed by the LXP-15 will change to match those
displayed by the MRC. (This step only needs to be done the first time
communication is established between the two units.)
7. You can confirm that one-way communication has been established by
moving a parameter slider on any of the six MRC parameter pages. The
LXP-15 display for that parameter should change to match the new
value.
In order to see parameters change on the LXP-15 when MRC sliders are
moved, set the LXP-15 “Update” parameter to “ON”, turn PAGE to the
appropriate parameter page, and press VIEW to display the parameter
values.
With one-way communication, the MRC has no way of “knowing” if the
current LXP-15 setup or parameters have been changed. (This could
happen for example, by sending a Program Change message to the LXP15 or by changing parameters or setups from the LXP-15 front panel.) If you
think the LXP-15 has been changed by some other action, simply press the
✱ key on the MRC to transmit the current MRC values to the LXP-15.
3-4
Page 18
Owner's Manual Addendum
One-way Control of Multiple LXP-15s
Controlling the LXP-15
etc.
THRU
LXP-15
MIDI
Sources
THRU
LXP-15
Additional LXPs
or MIDI devices
21
EXT
OUT IN
2121
MRC
Using one-way communication, you can control as many as sixteen Lexicon
devices at once by defining a separate machine for each device. Multiple
LXP-15 control is very easy to set up since the LXP-15 MIDI THRU port can
be used to “daisy chain” additional units.When two or more LXP-15s are
controlled from the MRC, they (and the MRC machines that control them)
should be set to different MIDI channels, or be connected to different MRC
OUT ports. Different types of LXPs can share the same MIDI channel and/
or MRC OUT ports.
If you want to process multiple audio sources with
identical
LXP effects, you
can daisy chain multiple LXP-15s (or LXP-5s, or LXP-1s) from the same
MRC OUT port and set them all to the same MIDI channel. They can all be
controlled simultaneously from a single MRC machine.
If you want to use a foot pedal or other analog controller as a patch source
for your LXP-15 be aware that you can connect one or two pedals to the MRC
instead of to the LXP-15 rear panel Foot Controller jacks. This allows you to
control
multiple
LXP-15s (or other LXP processors) from the same pedal(s).
3-5
Page 19
Lexicon MRC V4.0/ MIDI Remote Controller
Two-way Connections
Two way communication allows you to access and view parameters stored
in the LXP-15’s 128 internal registers. You can connect one or two LXP-15s
to the MRC for two-way communication. Two MIDI cables are required for
each LXP-15. The LXP-15 MIDI OUT and MIDI IN can be connected to the
MRC IN1 and OUT1 or MRC IN2 and OUT2.
Merging and Two-way Communication
Additional
MIDI devices
Additional
MIDI devices
can be
merged
to OUT1
EXT21OUT IN
THRU
LXP-15
MIDI Sources
(can be merged
to OUT1)
2121
MRC
When connected for two-way communication, the merging function for the
input port connected to the LXP-15 must be set to “OFF” (If it is set to “ON,”
communication will not be possible and the MRC will display “SYNCH
TIMEOUT” )
NOTE: The MRC can’t merge MIDI clock with an LXP device connected
for two way communication. If you want to use Tempo patches and an
LXP, you must set up one-way communication or use an external merger.
(See
Advanced Two-way Communications.
3-6
)
Page 20

Owner's Manual Addendum
Controlling the LXP-15
MIDI data from the input port which is
not connected
to the LXP-15 can be
merged with the data at the output port used for two-way communication.
This is useful when you are using an LXP-15 register that uses MIDI sources
for patching. Merging functions are selected on page 1 of the SYSTEMS
PARAMETERS menu. The different merging options are outlined in the
following table:
Merging Options for Two-way Communication
IN1 -> OUT1 <ON/OFF> Must be set to “OFF” if IN1/OUT1 are being used for
IN1 -> OUT2 <ON/OFF> If IN2/OUT2 are being used for two-way communi-
IN 2 -> OUT2 <ON/OFF> Must be set to “OFF” if IN2/OUT2 are being used for
IN2 -> OUT1 <ON/OFF> If IN1/OUT1 are being used for two-way communi-
two-way communication with the LXP-15.
cation with the LXP-15, any combination of MIDI
controllers, Pitch Bend, Aftertouch, Note numbers
and Program Change messages received on IN1
can be merged with MIDI OUT2 by setting this to
“ON”.
two-way communication with the LXP-15.
cation with the LXP-15, any combination of MIDI
controllers, Pitch Bend, Aftertouch, Note numbers
and Program Change messages received on IN2
can be merged with MIDI OUT1 by setting this to
“ON”.
3-7
Page 21

Lexicon MRC V4.0/ MIDI Remote Controller
Establishing Two-way Communication
When configured for two-way communication, the MRC requests parameter
data from the LXP-15 and displays it for editing. The edited values are sent
back to the LXP-15. This back and forth communication, or
occurs automatically once communication is established between the two
units.
In order to establish communication after the initial connections are made
and both units are turned on, it is necessary to put the LXP-15 and MRC in
the same “state.” With two-way communication you have the option of
setting the LXP-15 to the state of the MRC, or of setting the MRC to the state
of the LXP-15. The following procedure describes both options:
1. On the MRC, enter Machine Select Mode by pressing MACH twice.
2. Move the leftmost slider all the way up to select “SYSTEMS PARAME-
TERS” and press ENTER. Use switches 1, 2 and 3 to set MIDI MERGE
to “OFF” for the IN and OUT connected to the MRC as shown below:
If the LXP-15 is connected to IN/OUT1 . . .
MIDI MERGE
IN1 -> OUT1 <OFF>
hand shaking
,
If the LXP-15 is connected to IN/OUT2 . . .
MIDI MERGE
IN2 -> OUT2 <OFF>
3. Press ENTER to return to Machine Select Mode.
4. Use the leftmost slider, the MACH button or the keypad to select an LXP-
15 type machine. (Machine #3 is an LXP-15 machine when the MRC is
shipped from the factory.)
5. Confirm that the MIDI cables are connected to the same input/output pair
as the displayed “OUT#”.
3-8
Page 22

Owner's Manual Addendum
Controlling the LXP-15
6. Confirm that the LXP-15 is set to receive on the same MIDI channel as
the displayed “CH#”.
7. Press ENTER to put the MRC into Machine Run Mode. The MRC display
will change to show the first page of LXP-15 Setup parameters.
8*.To set the LXP-15 to the same state as the MRC, press ✱ to send the
MRC Setup parameters to the LXP-15. The parameter values displayed
by the LXP-15 will change to match those displayed by the MRC.
OR
To set the MRC to the same state as the LXP-15, press ENTER on the
MRC to send the LXP-15 parameters to the MRC. The parameters
displayed by the MRC will change to show the values received from the
LXP-15.
9. You can confirm that two-way communication has been established by
changing any parameter value from the LXP-15 front panel and then
pressing ENTER on the MRC. The appropriate parameter display on the
MRC will change to show the new value.
* (Step 8 only needs to be done the first time communication is established
between the two units.)
With two-way communication, you can update the MRC values to match
those currently active in the LXP-15. This is particularly useful if you’ve
changed the LXP-15 at the front panel and want to transfer the new settings
to the MRC for further editing. To update the MRC, simply press ENTER at
any time while in Machine Run Mode. This will automatically transfer and
display the active LXP-15 parameters.
3-9
Page 23

Lexicon MRC V4.0/ MIDI Remote Controller
Two-way Control of Multiple LXP-15s
Other MIDI
devices
THRU
LXP-15
can be patched to
LXP machines
controlling both
LXP-15s
EXT21OUT IN
2121
MRC
Using two-way communication you can control two LXP-15s, one for each
input/output pair. If you have a high quality MIDI merger you can control
multiple LXP-15s on the same input/output pair. (Each LXP-15 and its
corresponding MRC machine must be assigned to a different MIDI channel.)
Other MIDI
devices
THRU
LXP-15
To use a foot pedal or other analog controller as a patch source for your LXP15, be aware that you can connect one or two pedals to the MRC instead of
to the LXP-15 rear panel Foot Controller jacks. This allows you to control
multiple
LXP-15s (or other LXP processors) from the same pedal(s).
As long as the LXP-15 MIDI OUT is connected to the appropriate MRC IN,
you can maintain two-way communication, even if other devices are daisy
chained to the MRC OUT. This is useful, for instance, when you want to
control the LXP-15 and one or more sound modules from a sequencer or
keyboard. (See illustration.)
3-10
Page 24

Owner's Manual Addendum
Controlling the LXP-15
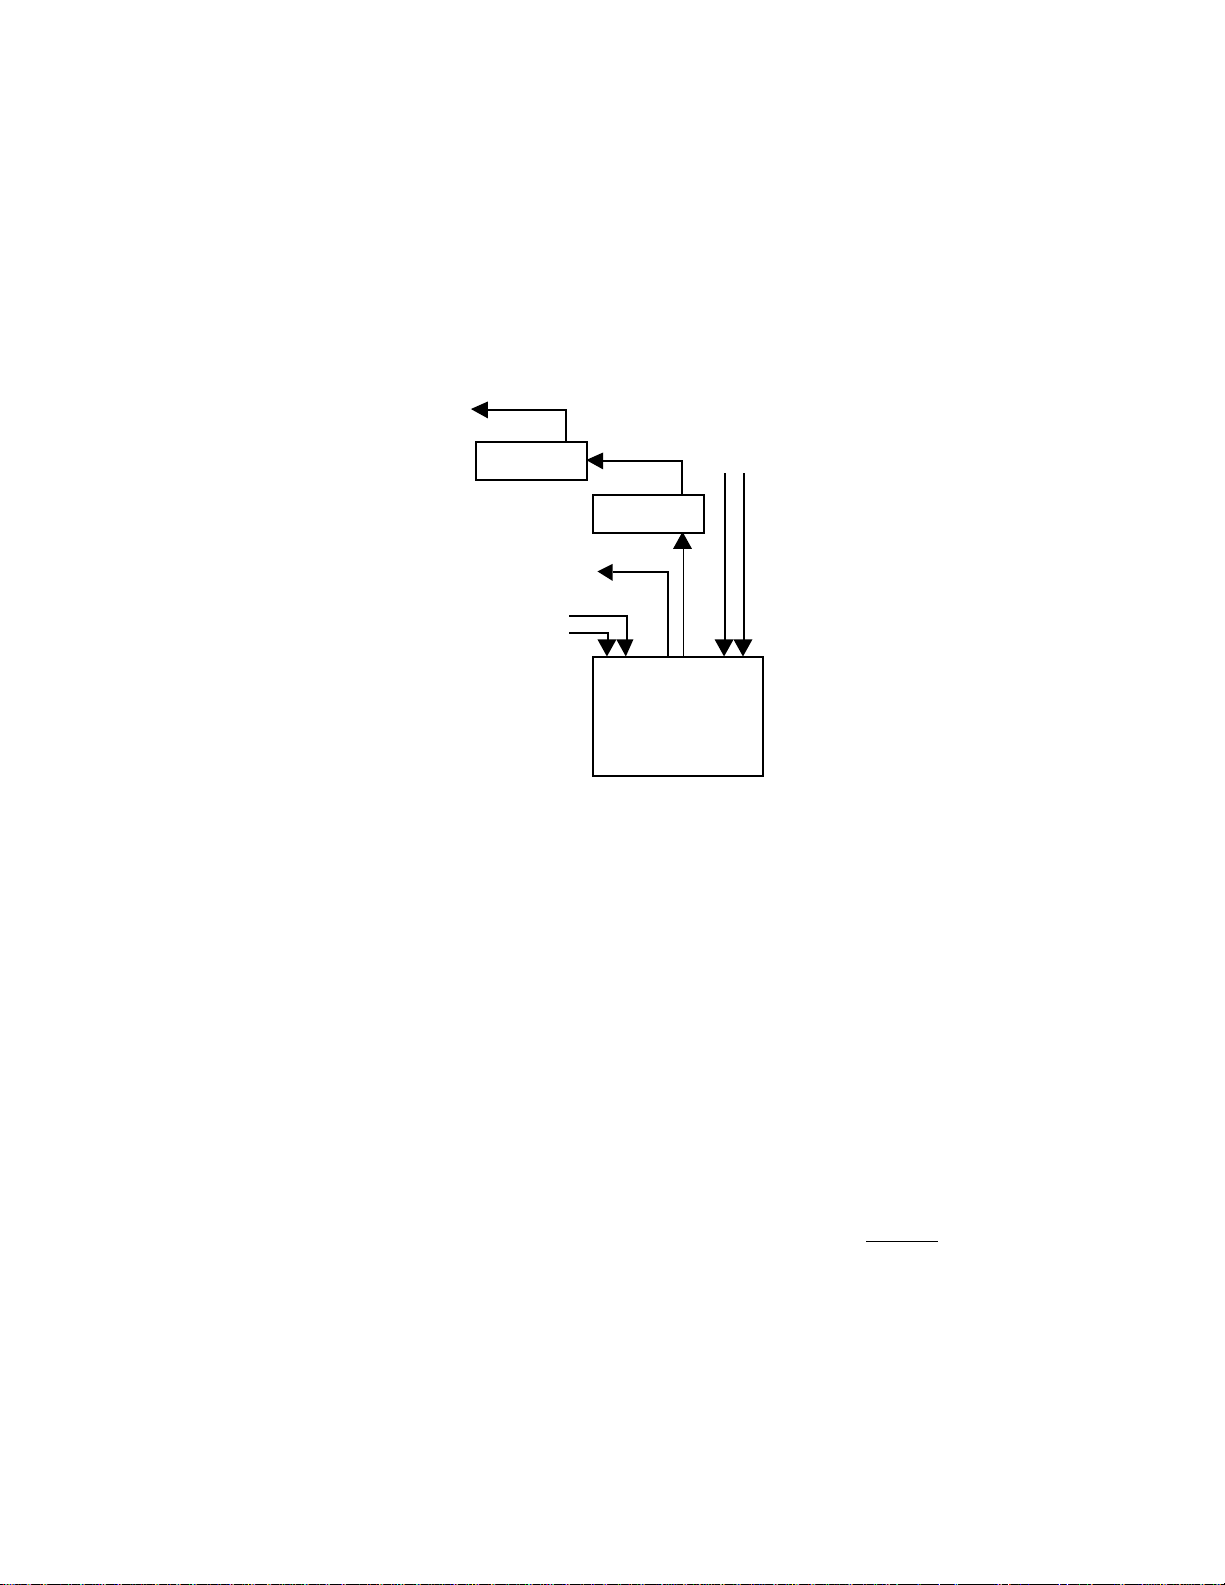
Control Flow
In this diagram, MIDI data from the sequencer and pedal moves from EXT2
(set to NORMAL) can be sent to other MIDI devices via the THRU port of the
LXP-15.
controlled by MRC sliders
when LXP-15 Mach is
displayed; always controlled
by machine patches if they
are turned on
LXP-15
THRU
LXP
THRU
Patch
Normal
Sequencer
EXT21OUT IN
2121
MRC
running an
LXP-15 machine
It is important to realize that all machines defined in the MRC are active even
when they are not being displayed. This means that if you use Machine Edit
Mode to create an LXP-15 machine with MIDI patches (as described in
Dynamic MIDI
in the MRC V3.0 manual), the LXP-15 will be controlled by
those patches no matter what parameters (from any machine type) are
being displayed on the MRC. This feature makes it possible for the MRC to
sumultaneously control as many as sixteen LXPs and other MIDI devices in
any combination.
3-11
Page 25

Lexicon MRC V4.0/ MIDI Remote Controller
8
LXP-15 Setups
LXP-15 machine types have a bank of sixteen user-programmable memories. Each of these memories stores a complete set of LXP-15 parameters
and is referred to in the MRC as an
way communication, you can also upload the parameters from any of the
128 user registers in the LXP-15. These are referred to in the MRC as
External Setups
(abbreviated “EXTRN” in the MRC display).
Internal Setup.
When connected for two-
1
LXP-15
External
LXP-15
16
1
MRC
Internal
LXP-15
NAME
ALGORITHM
PARAMETERS
MIDI PATCHES
12
Selecting an LXP-15 Setup
Once communication has been established between the MRC and the LXP15, different internal and external setups can be selected whenever you are
running an LXP-15 machine. If the MRC is not currently running an LXP-15
machine type, you must first select one, then select the desired setup. Here’s
how :
1. On the MRC, enter Machine Select Mode by pressing MACH twice.
2. Use the leftmost slider, the MACH button or the keypad to select an LXP-
15 type machine. (Machine #3 is an LXP-15 machine when the MRC is
shipped from the factory.)
3. Press ENTER to put the MRC into Machine Run Mode.
3-12
Page 26

Owner's Manual Addendum
Controlling the LXP-15
4. Press SETUP to enter Setup Select Mode.
5. Use the leftmost slider, the SETUP button, or the keypad to select the
desired setup.
Pressing ✱ on the keypad switches the display between “SETUP#” and
“EXTRN#”. While “SETUP#” is displayed, you can use the keypad to
select any internal setup (1–16). While “EXTRN#” is displayed, you can
use the keypad to select any external setup (1–128).
6. Press ENTER to load the setup into the MRC and LXP-15.
Communication Problems
If the MRC is unable to communicate with the LXP-15, it will display one of
two error messages: “No Target,” or “SYNCH TIMEOUT.” The “No Target”
message is displayed if the MRC cannot “find” the LXP-15. This can occur
if the LXP-15 is not connected properly or if it is set to a different MIDI channel
than the MRC. To recover from a “No Target” error, it is necessary to reestablish communication with the LXP-15. To do this, repeat the procedure
in
Establishing Two-way Communication
.
The “SYNCH TIMEOUT” message is displayed if MIDI MERGE for the IN/
OUT ports connected to the LXP-15 is set to “ON,” or when MIDI data is
received faster than it can be processed by the MRC. To recover from a
“SYNCH TIMEOUT” error, simply press ENTER (and confirm that MIDI
MERGE is set to “OFF”).
Viewing and Editing LXP-15 Setup Parameters
LXP-15 setup parameters are viewed and edited on six MRC display
pages.
Pages can be selected by pressing PAGE repeatedly, or by pressing the
desired page number on the keypad.
To edit LXP-15 parameters from the MRC, simply select the desired page
and move the slider of the parameter you want to edit. The new value is
displayed on the MRC and transmitted to the LXP-15. (You can see the
parameter changes on the LXP-15 when MRC sliders are moved, if the LXP15’s “Update” parameter is set to “ON”, PAGE is turned to the appropriate
parameter page, and VIEW is pressed to display the parameter values.)
3-13
Page 27

Lexicon MRC V4.0/ MIDI Remote Controller
Using the ✱ and ENTER Keys
While in Machine Run Mode, the ✱ key transmits the current values of all
parameters to the LXP-15. Use it to reset the LXP-15 to the values displayed
by the MRC. (You would do this, for example, if LXP-15 parameters are
inadvertently changed from its front panel.) If you are using two-way
communication, you can press ENTER to update the MRC to the current
parameter values of the LXP-15. This allows you to transfer new settings to
the MRC after front panel adjustment of the LXP-15.
LXP-15 Display Pages
The LXP-15 has five processing algorithms: Delay/Reverb, Pitch/Delay,
Gate, Plate and Chorus Delay. The following charts show the MRC display
pages for the parameters of each LXP-15 algorithm . (The LXP-15 parameters are shown with their ranges immediately below each MRC label.)
NOTE: There are some slight differences in the labeling and grouping
of parameters on the MRC and LXP-15: The LXP-15 displays five
parameters at a time, the MRC displays four. The LXP-15 and MRC
have different limits as to the number of characters a label can have. The
MRC also provides a fine and coarse control for delay parameters.
Delay/Reverb
Page 1 MIX GLDELY FINE FDBK
Page 2 PDELY FINE - LFO
Page 3 PITCH N/A THIS ALGO
Page 4 HICUT LOCUT TREBLE BASS
Mix Glidely - GldFbk
0-100% 0-638ms - 0-100%
Delay 2 - - LFO Rat
0-179ms - - .03Hz-4.84Hz
-- --
-- --
HiCut LoCut Treble BassMpy
320Hz-11.6kHz, Full, 320Hz-11.6kHz .35x-2.50x
Full 19Hz-1.35kHz Full
3-14
Page 28

Owner's Manual Addendum
Controlling the LXP-15
Page 5 DECAY SIZE DIFFUS RMIX
Page 6 INLVL WPAN DPAN OUTLVL
Decay Size Diffus Rvb Mix
.6-6.1s, 8M-71M 0-100% 0-100%
Infinite
InLevl Wet Pan Dry Pan OutLevl
0-100% 100%L-51%L, 100%R-51%R, 0-100%
Center, Center,
51%R-100%R 51%R-100%R
Pitch/Delay
Page 1 MIX PDELY FINE FDBK
Page 2 DELY L FINE FDBK LFO
Page 3 DELY R FINE INTRVL PFINE
Page 4 HICUT LOCUT TREBLE BASS
Page 5 DECAY SIZE DIFFUS RMIX
Page 6 INLVL WPAN DPAN OUTLVL
Mix Predely - PdlyFbk
0-100% 0-1.04s - 0-100%
Delay L - Feedbak LFO Rat
0-325ms - 0-100% .03Hz-4.84Hz
Delay R - Intervl PchFine
0-325ms - -2oct to +1oct -64 to +63
(in semitones)
HiCut LoCut Treble BassMpy
320Hz-11.6kHz, Full, 320Hz-11.6kHz, .35x-2.50x
Full 19Hz-1.35kHz Full
Decay Size Diffus Rvb Mix
.6-6.1s, 8M-3M 0-100% 0-100%
Infinite
InLevl Wet Pan Dry Pan OutLevl
0-100% 100%L-51%L, 100%R-51%R, 0-100%
Center, Center,
51%R-100%R 51%R-100%R
3-15
Page 29

Lexicon MRC V4.0/ MIDI Remote Controller
Gate
Page 1 MIX PDELY FINE FDBK
Page 2 - - - LFO
Page 3 PITCH N/A THIS ALGO
Page 4 - - TREBLE SLOPE
Page 5 - SIZE DIFFUS -
Page 6 INLVL WPAN DPAN OUTLVL
Mix Predely - PdlyFbk
0-100% 0-262ms - -99% to +99%%
- - - LFO Rat
- - - .03Hz-4.84Hz
-- --
-- --
- - Treble Slope
- - 320Hz-11.6kHz, 0-127
Full
- Size Diffus -
- 8M-39M 0-100% -
InLevl Wet Pan Dry Pan OutLevl
0-100% 100%L-51%L, 100%R-51%R, 0-100%
Center, Center,
51%R-100%R 51%R-100%R
Plate
Page 1 MIX PDELY FINE FDBK
Page 2 - - - LFO
Page 3 PITCH N/A THIS ALGO
Page 4 - - TREBLE BASS
Mix Predely - PdlyFbk
0-100% 0-262ms - -99% to +99%
- - - LFO Rat
- - - .03Hz-4.84Hz
-- --
-- --
- - Treble BassMpy
- - 320Hz-11.6kHz, .35x-2.50x
3-16
Page 30

Owner's Manual Addendum
Full
Page 5 DECAY SIZE DIFFUS -
Decay Size Diffus .6-6.1s 8M-87M 0-100% -
Page 6 INLVL WPAN DPAN OUTLVL
InLevl Wet Pan Dry Pan OutLevl
0-100% 100%L-51%L, 100%R-51%R, 0-100%
Center, Center,
51%R-100%R 51%R-100%R
Controlling the LXP-15
Chorus Delay
Page 1 MIX DELY1 DELY2 CHRAT
Page 2 DELY3 - FDBK3 LFO
Page 3 PITCH N/A THIS ALGO
Page 4 - - TREBLE -
Page 5 - - DIFFUS -
Page 6 INLVL WPAN DPAN OUTLVL
Mix Delay 1 Delay 2 ChorRat
0-100% 0-794ms 0-1.04s 1-16
Delay 3 - Feedbk3 LFO Rat
0-1.04s - -99% to +99% .03Hz-4.84Hz
-- --
-- --
- - Treble -
- - 320Hz-11.6kHz, Full
- - Diffus -
- - 0-100% -
InLevl Wet Pan Dry Pan OutLevl
0-100% 100%L-51%L, 100%R-51%R, 0-100%
Center, Center,
51%R-100%R 51%R-100%R
3-17
Page 31

Lexicon MRC V4.0/ MIDI Remote Controller
MRC/LXP-15 Presets
When shipped from the factory, MRC Version 4.0 has 10 setups loaded into
its internal memory. Six additional memory spaces are left blank. You may
want to use these setups as is, or modify them to your own taste. Be aware
that changes you make will overwrite the factory-loaded setups when you
perform a store operation. Brief descriptions of the 10 presets follow:
#1 Big Hall
This is a preset which emulates a rather large space (67 meters) with a long
decay time (2.1s). This preset will add depth to any sound source. Great
starting point for vocals.
#2 My Room
This preset is a smaller space (31 meters) with a strong reflection added for
wall simulation. The bottom end is rolled off to reduce muddiness. This
preset was originally written with guitar in mind. However, it's a good basic
fill with anything.
#3 Glide Rm
This preset makes use of the gliding delay line which modulates moderately
slowly in combination with a medium size room. If it sounds too strange,
bring the LFO Rate up to 2.12Hz. Experiment also with changing the RMIX
(Reverb Mix) control.
#4 DelyVerb
This preset combines 70ms delay reflection with a small (18 meters) tight
(0.7s) room. Good on anything.
#5 HarmMIDI
This preset makes use of Dynamic MIDI patching where MIDI Note values
are scaled to the coarse pitch parameter. NOTE: In cases where no MIDI
Note data is being transmitted into the LXP-15, the default pitch will be -2
octaves.
3-18
Page 32

Owner's Manual Addendum
Controlling the LXP-15
#6 Eko Roll
This multi-effects preset combines 60ms and 90ms of delay to the left and
right outputs. The pitch shifter is lowered slightly to create a chorusing effect.
The reverb is mixed 50/50 with the delay section. It has a small/tight
character, but with a 30ms pre-delay for additional space separation from
the source.
#7 Gate It
Get it?
#8 V4 Plate
This reverb preset is pretty close to a well-tuned plate. 40ms of pre-delay
is utilized for space. Change the SIZE parameter to suit the application.
#9 V4Chorus
Straight ahead multivoice chorus. Sound sources generally "fatten up" when
put through this preset.
#10 ChorsEko
This preset combines recirculating echoes with a moderate chorusing
effect. Adjust Dely3 to fit the tempo of the sound source. Great effect on lead
or vocal tracks.
3-19
Page 33

Lexicon MRC V4.0/ MIDI Remote Controller
Storing Setups from Machine Run Mode
You can store a setup in any one of the MRC’s sixteen internal setups, or in
any one of the LXP-15’s 128 user registers. Here’s how:
1. On the MRC, press STORE to enter Setup Store Mode.
2. Move slider 2 to select “MRC SETUP” or “LXP-15 RGSTR”
3. Use slider 1, the SETUP key or the keypad to select a setup number.
Valid numbers for MRC setups are 1–16. For LXP-15 registers, valid
numbers are 1–128. The display will blink if you enter an invalid number.
(Simply enter a valid setup number if this occurs.)
4. Press ENTER to store the setup and return to Machine Run Mode
OR
Press MACH to exit Setup Store Mode and return to Machine Run Mode
without
storing the setup.
Editing LXP-15 Setups
An LXP-15 setup also contains settings for the setup name and number,
algorithm name, LXP-15 Dynamic MIDI patches 1-4, as well as setup
parameter values. You can access and change these additional settings
from Setup Edit Mode.
Entering Setup Edit Mode
Setup Edit Mode is entered by pressing EDIT while in Machine Run Mode.
There are seven display pages in Setup Edit Mode. Pages are selected by
repeatedly pressing PAGE.
Storing Options When Exiting the Setup Edit Mode
Changes made to Setup Edit parameters don’t take effect, and are not
stored, until you exit Setup Edit Mode and return to Machine Run mode. You
have three options:
1. Cancel any changes made and revert to the previous settings
2. Transmit the changes to the LXP-15 and store them into the current
MRC Setup
3-20
Page 34

Owner's Manual Addendum
Controlling the LXP-15
3. Transmit the changes to the LXP-15, but don’t store them.
Option 1 is available to you at any time while in etup Edit Mode. Simply press
MACH to cancel any changes and return to Machine Run Mode.
The other options are accessed by pressing either STORE or ENTER. The
display will show the following message:
STORE BEFORE EXITING?
1>Yes 0>No 2>Re-edit
Pressing 1 will store the edited setup into the internal or external setup
location selected on page 2, transmit all parameters to the LXP-15 and
return you to Machine Run Mode.
Pressing 0 will transmit all parameters to the LXP-15 (including changes you
made while in Setup Edit Mode) and return you to Machine Run Mode. Note
that the edited setup is
not
stored in an internal or external register. At this
point, you can store the edited setup into a new location from Machine Run
mode. (See
Storing Setups from Machine Run Mode
)
Pressing 2 returns you to Setup Edit mode. No parameters are stored or
transmitted.(You can also press MACH to return to Machine Run Mode
without storing or transmitting any parameters.)
3-21
Page 35

Lexicon MRC V4.0/ MIDI Remote Controller
Viewing and Editing Setup Edit Parameters
Setup Edit parameters are accessed by repeatedly pressing PAGE to scroll
through different sets of parameters. (Pressing and holding PAGE will show
the number of the page about to be displayed.) The function of each display
page in Setup Edit Mode is shown in the following table:
LXP-15 Setup Edit Display Pages
Page 1 select setup # and algorithm
Page 2 set Patch 1 parameters
Page 3 set Patch 2 parameters
Page 4 set Patch 3 parameters
Page 5 set Patch 4 parameters
Page 6 set name (characters 1–4)
Page 7 set name (characters 5–8)
Changes made to the parameters on these pages don’t take effect until you
return to Machine Run Mode by selecting options 0 or 1 after pressing
ENTER or STORE. Descriptions of how to change parameters on each of
the Setup Edit display pages follow.
Editing the Setup Number and Algorithm
LXP-15 SETUP # Plate
Alg
keypad
SW 4
• Use slider/switch 4 to change the algorithm
• Use the number keys to change the setup number. The display will blink
when the number is changed. This is to remind you that the setup will
be stored in a new location.
3-22
Page 36

Owner's Manual Addendum
Editing LXP-15 Dynamic MIDI Patches
Controlling the LXP-15
SRC1
INLVL
THRS1
1
DEST1
0
RATE
2
SCAL1
100%
3
4
• Use slider/switch 1 to select a patch source. (See LXP-15 Source Table
next page.)
• Use slider/switch 2 to set the threshold.
• Use slider/switch 3 to select a destination. (See LXP-15 Destination
Table next page.)
• Use slider/switch 4 to set the scale amount.
NOTE: The MRC displays all scale values as percentages. The LXP-15
displays scale values in units appropriate for a particular parameter – Mix
scaling in percentage, delay time scaling in milliseconds, etc.
3-23
Page 37

Lexicon MRC V4.0/ MIDI Remote Controller
LXP-15 Patch Sources
MRC Display LXP-15 Display Description
INLVL InLevl Internal controller
FOOT5 Foot 5 rear-panel analog controller
FOOT4 Foot 4 rear-panel analog controller
FOOT3 Foot 3 rear-panel analog controller
FOOT2 Foot 2 rear-panel analog controller
FOOT1 Foot 1 rear-panel analog controller
HINOTE Hi Note highest MIDI note played
LONOTE Low Note lowqest MIDI note played
LFO LFO Out Internal controller
TEMPO Tempo MIDI Clock
PBEND PchBend MIDI pitch bender
AFTCH Aftrtch MIDI channel pressure
VEL Velocty MIDI note on velocity
NOTE LastNot last MIDI note played
96-120 - 95 PhasDep MIDI phaser depth control
94 DetDept MIDI detune control
93 ChorDep MIDI chorus depth control
92 TremDep MIDI tremolo depth control
91 ExtDept MIDI ext effect depth control
70-90 70-90 MIDI controllers 70-90
69 Hold 2 MIDI hold2 ON/OFF
68 68 MIDI controller 68
SOFT Soft MIDI soft pedal
SOSTEN Sosten MIDI sostenuto
PORTSW Portmnto MIDI portamento ON/OFF
SUST Sustain MIDI sustain pedal
32-63 - 12-31 12-31 MIDI controllers 12-31
11 Expresn MIDI expression controller
10 Pan MIDI pan controller
9 9 MIDI controller 9
8 Balance MIDI balance controller
VOLUME Volume MIDI volume controller
D-ENT Data MIDI data controller
PORTA PortTim MIDI portamento time
FOOT Foot MIDI foot controller
CTRL3 3 MIDI controller 3
BREATH Breath MIDI breath controller
MODWH Mod Whl MIDI modulation wheel
CTRL0 0 MIDI controller 0
OFF - -
3-24
Page 38

Owner's Manual Addendum
Controlling the LXP-15
LXP-15 Patch Destinations
MRC Display LXP-15 Display
Dly/Rvb Pch/Dly Gate Plate Cho Dly
DLY1-F Glidely Predely Predely Predely Delay 1
DLY1-C Gldyhi Pdlyhi PredlyHi PredlyHi 2
FDBK1 Gldfbk PdlyFdbk PdlyFdbk PdlyFdbk Feedback 3
DLY2-F Delay 2 Delay L 4 4 Delay 2
DLY2-C Delay2Hi DlyHi 5 5 5
FDBK2 6 Feedbak 6 6 6
DLY3-F 7 Delay R 7 7 Delay 3
DLY3-C 8 DlyRhi 8 8 8
OCTAVE 9 Pitch 9 9 9
PTCH-C 10 Intervl 10 10 10
PTCH-F 11 PchFine 11 11 ChoRat
RTIME Decay Decay Slope Decay 12
TDECAY Treble Treble Treble Treble 13
BASS BassMpy BassMpy 14 BassMpy 14
SIZE Size Size Size Size 15
DIFF Diffus Diffus Diffus Diffus Diffus
HICUT HiCut HiCut 17 17 Treble
LOCUT LoCut LoCut 18 18 18
RMIX Rvb Mix Rvb Mix 19 19 19
WPAN WetPan
DPAN DryPan
MIX Mix
OUTLVL OutLevel
INLVL InLevl
RATE LFORat
NONE Setup + (global patches only)
Algthm (global patches only)
Setup - (global patches only)
3-25
Page 39

Editing the Setup Name
Lexicon MRC V4.0/ MIDI Remote Controller
LXP-15 SETUP
C
1
LXP-15 SETUP
s
1
h
2
E
2
ChorsEko
o
3
ChorsEko
k
3
r
4
o
4
Use the sliders and switches on these two display pages to change the setup
name. Each slider/switch selects one of the eight characters in the name.
NOTE: Setups named from the LXP-15 front panel can have as many as
twelve characters. The MRC can only access the first eight of these. The
“extra” characters will be stored (unchanged) along with the changed name
when the setup is stored in an LXP-15 register from the MRC. They can be
changed or cleared from the LXP-15 front panel (via the NAME page).
3-26
Page 40

Owner's Manual Addendum
Controlling the LXP-5 with Two-Way Communication
4. Controlling the LXP-5 with
Two-Way Communication
Two-way Connections
Two way communication allows you to access and view parameters stored
in the LXP-5’s 128 internal registers. You can connect one or two LXP-5s to
the MRC for two-way communication. Two MIDI cables are required for each
LXP-5. The LXP-5 MIDI OUT and MIDI IN can be connected to the MRC IN1
and OUT1 or MRC IN2 and OUT2.
5 is set to “OUT”
(see illustration).
Merging and Two-way Communication
Additional
controllers
Other MIDI
devices
Be sure the switch on the back of the LXP-
21
EXT
MRC
OUT IN
2121
LXP-5
Rear panel MIDI
switch must be
set to "OUT"
When connected for two-way communication, the merging function for the
input port connected to the LXP-5 must be set to “OFF” (If it is set to “ON,”
communication will not be possible and the MRC will display “SYNCH
TIMEOUT”
NOTE: The MRC can’t merge MIDI clock with an LXP device connected
for two way communication. If you want to use Tempo patches and an
LXP, you must set up one-way communication or use an external merger.
(See
Advanced Two-way Communications.
)
4-1
Page 41

Lexicon MRC V4.0/ MIDI Remote Controller
MIDI data from the input port which is
not connected
to the LXP-5 can be
merged with the data at the output port used for two-way communication.
This is useful when you are using an LXP-5 register that uses MIDI sources
for patching. Merging functions are selected on page 1 of the SYSTEMS
PARAMETERS menu. The different merging options are outlined in the
following table:
Merging Options for Two-way Communication
IN1 -> OUT1 <ON/OFF> Must be set to “OFF” if IN1/OUT1 are being used for
IN1 -> OUT2 <ON/OFF> If IN2/OUT2 are being used for two-way communi-
IN 2 -> OUT2 <ON/OFF> Must be set to “OFF” if IN2/OUT2 are being used for
IN2 -> OUT1 <ON/OFF> If IN1/OUT1 are being used for two-way communi-
two-way communication with the LXP-5.
cation with the LXP-5, any combination of MIDI
controllers, Pitch Bend, Aftertouch, Note numbers
and Program Change messages received on IN1
can be merged with MIDI OUT2 by setting this to
“ON”.
two-way communication with the LXP-5.
cation with the LXP-5, any combination of MIDI
controllers, Pitch Bend, Aftertouch, Note numbers
and Program Change messages received on IN2
can be merged with MIDI OUT1 by setting this to
“ON”.
4-2
Page 42

Owner's Manual Addendum
Controlling the LXP-5 with Two-Way Communication
Establishing Two-way communication
When configured for two-way communication, the MRC requests parameter
data from the LXP-5 and displays it for editing. The edited values are sent
back to the LXP-5. This back and forth communication, or
hand shaking
occurs automatically once communication is established between the two
units.
In order to establish communication after the initial connections are made
and both units are turned on, it is necessary to put the LXP-5 and MRC in
the same “state.” With two-way communication you have the option of
setting the LXP-5 to the state of the MRC, or of setting the MRC to the state
of the LXP-5. The following procedure describes both options:
1. On the MRC, enter Machine Select Mode by pressing MACH twice.
2. Move the leftmost slider all the way up to select “SYSTEMS PARAMETERS” and press ENTER. Use switches 1, 2 and 3 to set MIDI MERGE
to “OFF” for the IN and OUT connected to the MRC as shown below:
If the LXP-5 is connected to IN/OUT1 . . .
MIDI MERGE
IN1 -> OUT1 <OFF>
,
If the LXP-5 is connected to IN/OUT2 . . .
MIDI MERGE
IN2 -> OUT2 <OFF>
3. Press ENTER to return to Machine Select Mode.
4. Use the leftmost slider, the MACH button or the keypad to select an LXP5 type machine. (Machine #2 is an LXP-5 machine when the MRC is
shipped from the factory.)
5. Confirm that the MIDI cables are connected to the same input/output
pair as the displayed “OUT#”.
6. Press ENTER to put the MRC into Machine Run Mode. The MRC
display will change to show the first page of LXP-5 Setup parameters.
4-3
Page 43

Lexicon MRC V4.0/ MIDI Remote Controller
7. Confirm that the LXP-5 and MRC are set to the same MIDI channel by
pressing the LEARN button on the LXP-5 while moving any of the sliders
on the MRC. The LED on the LXP-5 will flicker.
8*. To set the LXP-5 to the same state as the MRC, press ∗ to send the MRC
Setup parameters to the LXP-5. The parameter values displayed by the
LXP-5 will change to match those displayed on the MRC.
OR
To set the MRC to the same state as the LXP-5, press ENTER on the
MRC to send the LXP-5 parameters to the MRC. The parameters
displayed by the MRC will change to show the values received from the
LXP-5
9. You can confirm that two-way communication has been established by
selecting a new register from the LXP-5 front panel and then pressing
ENTER on the MRC. The MRC’s displays will change to the parameter
values of the new register.
* (Step 8 only needs to be done the first time communication is estab-
lished between the two units.)
With two-way communication, you can update the MRC values to match
those currently active in the LXP-5. This is particularly useful if you’ve
changed the LXP-5 from its front panel and want to transfer the new settings
to the MRC for further editing. To update the MRC simply press ENTER at
any time while you are in Machine Run Mode. This will automatically transfer
and display the active LXP-5 parameters.
4-4
Page 44

Owner's Manual Addendum
Controlling the LXP-5 with Two-Way Communication
Two-way Control of Multiple LXP-5s
T
H
Other MIDI
devices
R
U
LXP-5
can be patched to
LXP machines
controlling both
LXP-5s
21
EXT
OUT IN
2121
LXP-5
MRC
Using two-way communication you can control two LXP-5s at once, one for
each input/output pair. If you have a high quality MIDI merger you can control
multiple LXP-5s on the same input/output pair. (Each LXP-5 and its
corresponding MRC machine must be assigned to a different MIDI channel.)
As long as the LXP-5 MIDI OUT is connected to the appropriate MRC IN you
can maintain two-way communication with it, even if other devices are daisy
chained to the MRC OUT. This is useful, for instance, when you want to
control the LXP-5 and one or more sound modules from a sequencer or
keyboard. (See illustration.)
4-5
Page 45

Lexicon MRC V4.0/ MIDI Remote Controller
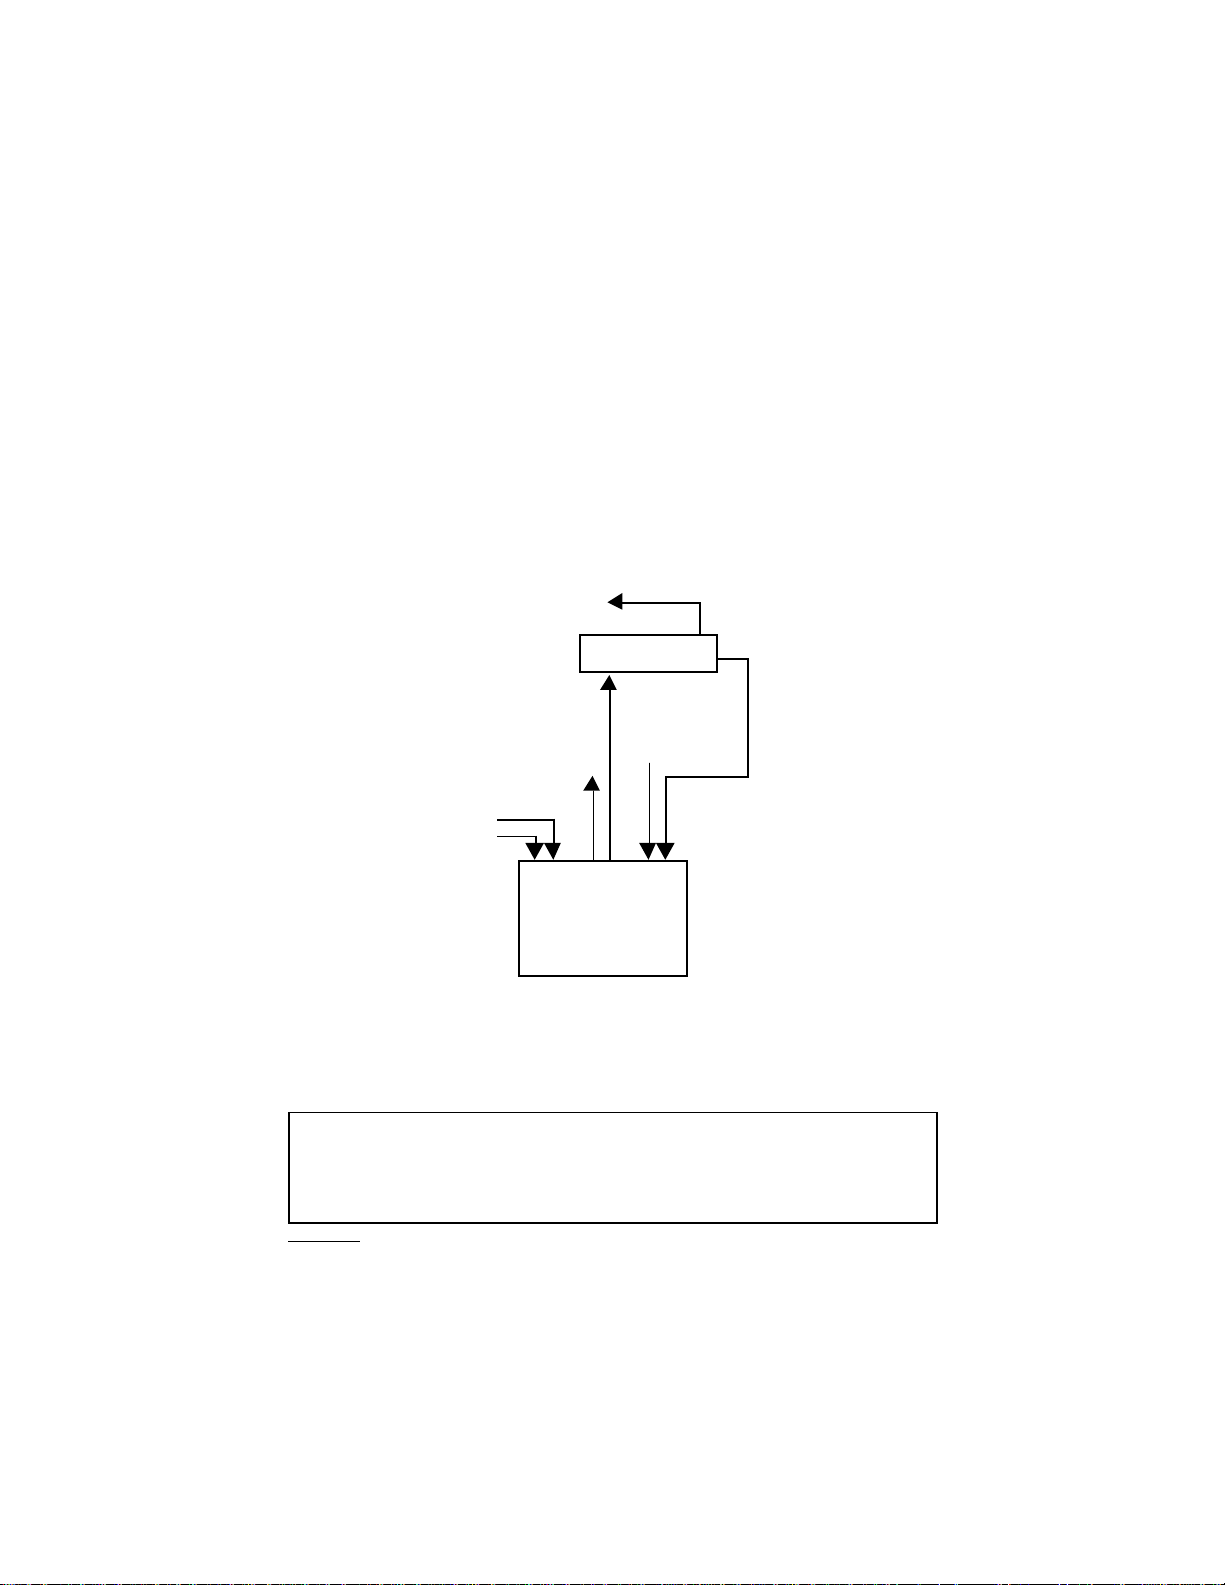
Control Flow
In this diagram, MIDI data from the sequencer and pedal moves from EXT2
(set to NORMAL) can be sent to other MIDI devices via the THRU port of the
LXP-15.
controlled by MRC sliders
when LXP-5 Mach is
displayed; always controlled
by machine patches if they
are turned on
LXP-5
OUT
LXP
THRU
Patch
Normal
EXT21OUT IN
MRC
running an
LXP-5 machine
Sequencer
2121
It is important to realize that all machines defined in the MRC are active even
when they are not being displayed. This means that if you use Machine Edit
Mode to create an LXP-5 machine with MIDI patches (as described in
Dynamic MIDI
in the MRC V3.0 manual), the LXP-5 will be controlled by
those patches no matter what parameters (from any machine type) are
being displayed on the MRC. This feature makes it possible for the MRC to
simultaneously control as many as sixteen LXPs and other MIDI devices in
any combination.
4-6
Page 46

Owner's Manual Addendum
8
Controlling the LXP-5 with Two-Way Communication
LXP-5 Setups
LXP-5 machine types have a bank of sixteen user-programmable memories. Each of these memories stores a complete set of LXP-5 parameters
and is referred to in the MRC as an
way communication, you can also upload the parameters from any of the
128 user registers in the LXP-5. These are referred to in the MRC as
Setups
(abbreviated “EXTRN” in the MRC display).
Internal Setup.
When connected for two-
External
1
LXP-5
External
LXP-5
16
1
MRC
Internal
LXP-5
NAME
ALGORITHM
PARAMETERS
MIDI PATCHES
12
Selecting an LXP-5 Setup
Once communication has been established between the MRC and the LXP5, different internal and external setups can be selected whenever you are
running an LXP-5 machine. If the MRC is not currently running an LXP
machine, you must first select one, then select the desired setup. Here’s how
1. On the MRC, enter Machine Select Mode by pressing MACH twice.
2. Use the leftmost slider, the MACH button or the keypad to select an LXP-
5 type machine. (Machine #2 is an LXP-5 machine when the MRC is
shipped from the factory.)
4-7
Page 47

Lexicon MRC V4.0/ MIDI Remote Controller
3. Press ENTER to put the MRC into Machine Run Mode.
4. Press SETUP to enter Setup Select Mode.
5. Use the leftmost slider, the SETUP button, or the keypad to select the
desired setup.
Pressing ∗ on the keypad switches the display between “SETUP#”
and “EXTRN#”. While “SETUP#” is displayed, you can use the
keypad to select any internal setup (1–16). While “EXTRN#” is
displayed, you can use the keypad to select any external setup (1–
128).
6. Press ENTER to load the setup into the MRC and LXP-5.
Communication Problems
If the MRC is unable to communicate with the LXP-5, it will display one of two
error messages: “No Target,” or “SYNCH TIMEOUT.” The “No Target”
message is displayed if the MRC cannot “find” the LXP-5. This can occur if
the LXP-5 is not connected properly or if it is set to a different MIDI channel
than the MRC. To recover from a “No Target” error, it is necessary to reestablish communication with the LXP-5. To do this, repeat the procedure
in
Establishing Two-way Communication
.
The “SYNCH TIMEOUT” message is displayed if MIDI MERGE for the IN/
OUT ports connected to the LXP-5 is set to “ON,” or when MIDI data is
received faster than it can be processed by the MRC. To recover from a
“SYNCH TIMEOUT” error, simply press ENTER (and confirm that MIDI
MERGE is set to “OFF”).
Viewing and Editing LXP-5 Setup Parameters
LXP-5 setup parameters are viewed and edited on seven MRC display
pages.
Pages can be selected by pressing PAGE repeatedly, or by pressing
the desired page number on the key pad.
To edit LXP-5 parameters from the MRC, simply select the desired page and
move the slider of the parameter you want to edit. The new value is displayed
on the MRC and transmitted to the LXP-5. (You will see the LEARN LED
4-8
Page 48

Owner's Manual Addendum
Controlling the LXP-5 with Two-Way Communication
flicker when sliders are moved on the MRC.) Refer to the
Manual
for a complete description of how to use the MRC to edit LXP-5 setup
MRC V3.0 Owner’s
parameters.
Using the ✱ and ENTER Keys
While in Machine Run Mode, the ✱ key transmits the current values of all
parameters to the LXP-5. Use it to reset the LXP-5 to the values displayed
by the MRC. (You would do this, for example, if LXP-5 parameters are
inadvertently changed from its front panel.) If you are using two-way
communication, you can press ENTER to update the MRC to the current
parameter values of the LXP-5. This allows you to transfer new settings to
the MRC after front panel adjustment of the LXP-5.
Storing Setups from Machine Run Mode
You can store a setup you’ve created in any one of the MRC’s sixteen
internal setups, or in any one of the LXP-5’s 128 user registers. Here’s how:
1. On the MRC, press STORE to enter Setup Store Mode.
2. Move slider 2 to select “MRC SETUP” or “LXP-5 RGSTR”
3. Use slider 1, the SETUP key or the keypad to select a setup number.
Valid numbers for MRC setups are 1–16. For LXP-5 registers, valid
numbers are 1–128. The display will blink if you enter an invalid number.
(Simply enter a valid setup number if this occurs.)
4. Press ENTER to store the setup and return to Machine Run Mode
OR
Press MACH to exit Setup Store Mode and return to Machine Run Mode
without
storing the setup.
4-9
Page 49

Lexicon MRC V4.0/ MIDI Remote Controller
MRC/LXP-5 Presets
When shipped from the factory, MRC Version 4.0 has 10 setups loaded into
its internal memory. Six additional memory spaces are left blank. You may
want to use these setups as is, or modify them to your own taste. Be aware
that changes you make will overwrite the factory-loaded setups when you
perform a store operation. Brief descriptions of the 10 presets follow:
#1 DetunHall
This preset offers a combination of reverb with a slight pitch shift which gives
a smooth chorusing effect. Adjust the RLVL to suit your application. This
preset was originally written with a clean, compressed guitar in mind.
#2 MATdelay
Use MIDI Tempo to automatically set the coarse delay times for Delay 2 and
Delay 3.
#3 SloFlang
Slow Flange is intended to be used totally wet through a pre-fader send for
maximum effect.
#4 SlapDetn
This Pitch/Delay preset combines 155ms master delay with a slight pitch
shift down. A short, bright reverb is mixed 59% into the delay sound. This
preset works well on guitar or smooth background voices.
#5 ChorusUp
This is a Pitch/Delay preset which combines a moderate amount of feedback
(44%) with a 46ms delay line which is pitched up +2 fine steps. The whole
effect is then blended into a reverb module which is moderately sized. This
is a way cool, heavy effect.
#6 E/G Slap
This is a Delay/Reverb preset which uses a filtered (2.49k) delay line set to
90ms with a 22% feedback ratio.
4-10
Page 50

Owner's Manual Addendum
Controlling the LXP-5 with Two-Way Communication
#7 On Stage
This preset combines an early reflection of 24.5ms with a moderately large
space incorporating a 40ms pre-delay. Great for voice or instruments.
#8 Chamber
This preset is a straight ahead reverb with a slight early reflection set to
24ms. The chamber is bright and mid-sized. Really a great sounding preset
for anything.
#9 Linoleum
This preset is kind of like a tiled rest room, only a little duller. The reverb time
is exaggerated in length, but can be easily modified to suit your taste.
#10 Sweep It
This is a Delay/Reverb preset with a slowly swept delay line with a nicely
bloomed reverb effect. You can use this on tracks which are doubled for a
much glitzier final product.
4-11
Page 51

Owner's Manual Addendum Controlling the LXP-1 with Two-Way Communication
5. Controlling the LXP-1 with
Two-Way Communication
Two-way Connections
Two way communication allows you to access and view parameters stored
in the LXP-1’s 128 internal registers. You can connect one or two LXP-1s to
the MRC for two-way communication. Two MIDI cables are required for each
LXP-1. The LXP-1 MIDI OUT and MIDI IN can be connected to the MRC IN1
and OUT1 or MRC IN2 and OUT2.
LXP-1 has been changed to an”OUT” port.
jumper be changed in the LXP-1. Instructions for changing this jumper are
given at the end of this chapter.
Merging and Two-way Communication
21
EXT
OUT IN
2121
Be sure the THRU port on the back of the
This requires that an internal
Internal
jumper must be
set to "OUT"
LXP-1
MRC
When connected for two-way communication, the merging function for the
input port connect to the LXP-1 must be set to “OFF” (If it is set to “ON,”
communication will not be possible and the MRC will display “SYNCH
TIMEOUT” )
5-1
Page 52

Lexicon MRC V4.0/ MIDI Remote Controller
MIDI data from the input port which is
not connected
to the LXP-1 can be
merged with the data on the output port used for two-way communication.
This is useful when you are using an LXP-1 register that uses MIDI sources
for patching. Merging functions are selected on page 1 of the SYSTEMS
PARAMETERS menu. The different merging options are outlined in the
following table:
Merging Options for Two-way Communication
IN1 -> OUT1 <ON/OFF> Must be set to “OFF” if IN1/OUT1 are being used for
IN1 -> OUT2 <ON/OFF> If IN2/OUT2 are being used for two-way communi-
IN 2 -> OUT2 <ON/OFF> Must be set to “OFF” if IN2/OUT2 are being used for
IN2 -> OUT1 <ON/OFF> If IN1/OUT1 are being used for two-way communi-
two-way communication with the LXP-1.
cation with the LXP-1, any combination of MIDI
controllers, Pitch Bend, Aftertouch, Note numbers
and Program Change messages received on IN1
can be merged with MIDI OUT2 by setting this to
“ON”.
two-way communication with the LXP-1.
cation with the LXP-1, any combination of MIDI
controllers, Pitch Bend, Aftertouch, Note numbers
and Program Change messages received on IN2
can be merged with MIDI OUT1 by setting this to
“ON”.
5-2
Page 53

Owner's Manual Addendum Controlling the LXP-1 with Two-Way Communication
Establishing Two-way communication
When configured for two-way communication, the MRC requests parameter
data from the LXP-1 and displays it for editing. The edited values are sent
back to the LXP-1. This back and forth communication, or
hand shaking
occurs automatically once communication is established between the two
units.
In order to establish communication after the initial connections are made
and both units are turned on, it is necessary to put the LXP-1 and MRC in
the same “state.” With two-way communication you have the option of
setting the LXP-1 to the state of the MRC, or of setting the MRC to the state
of the LXP-1. The following procedure describes both options:
1. On the MRC, enter Machine Select Mode by pressing MACH twice.
2. Move the leftmost slider all the way up to select “SYSTEMS PARAME-
TERS” and press ENTER. Use switches 1, 2 and 3 to set MIDI MERGE
to “OFF” for the IN and OUT connected to the MRC as shown below:
If the LXP-1 is connected to IN/OUT1 . . .
MIDI MERGE
IN1 -> OUT1 <OFF>
,
If the LXP-1 is connected to IN/OUT2 . . .
MIDI MERGE
IN2 -> OUT2 <OFF>
3. Press ENTER to return to Machine Select Mode.
4. Use the leftmost slider, the MACH button or the key pad to select an
LXP-1 type machine. Machine #1 is an LXP-1 machine when the MRC
is shipped from the factory.
5. Confirm that the MIDI cables are connected to the same input/output
pair as the displayed “OUT#”.
6. Press ENTER to put the MRC into Machine Run Mode. The MRC
display will change to show the first page of LXP-1 Setup parameters.
5-3
Page 54

Lexicon MRC V4.0/ MIDI Remote Controller
7. Confirm that the LXP-1 and MRC are set to the same MIDI channel by
pressing the MIDI button on the LXP-1 while moving any of the sliders
on the MRC. The MIDI LED on the LXP-1 will flicker.
8*. To set the LXP-1 to the same state as the MRC, press ∗ to send the MRC
Setup parameters to the LXP-1. The parameter values displayed by the
LXP-1 will change to match those displayed by the MRC.
OR
To set the MRC to the same state as the LXP-1, press ENTER to send
the LXP-1 parameters to the MRC. The parameters displayed by the
MRC will change to show the values received from the LXP-1
9. You can confirm that two-way communication has been established by
selecting a new preset from the LXP-1 front panel and then pressing
ENTER on the MRC. The MRC’s displays will change to the parameter
values of the new register.
* (Step 8 only needs to be done the first time communication is estab-
lished between the two units.)
With two-way communication, you can update the MRC values to match
those currently active in the LXP-1. This is particularly useful if you’ve
changed the LXP-1 from its front panel and want to transfer the new settings
to the MRC for further editing. To update the MRC simply press ENTER at
any time while you are in Machine Run Mode. This will automatically transfer
and display the active LXP-1 parameters.
5-4
Page 55

Owner's Manual Addendum Controlling the LXP-1 with Two-Way Communication
Two-way Control of Multiple LXP-1s
T
H
Other MIDI
devices
R
LXP-1
can be patched to
LXP machines
controlling both
LXP-1s
21
EXT
OUT IN
U
LXP-1
2121
MRC
Using two-way communication you can control two LXP-1s at once, one for
each input/output pair. If you have a high quality MIDI merger you can control
multiple LXP-1s on the same input/output pair. (Each LXP-1 and its
corresponding MRC machine must be assigned to a different MIDI channel.)
As long as the LXP-1 MIDI OUT is connected to the appropriate MRC IN you
can maintain two-way communication with it, even if other devices are daisy
chained to the MRC OUT. This is useful, for instance, when you want to
control the LXP-1 and one or more sound modules from a sequencer or
keyboard. (See illustration.)
5-5
Page 56

Lexicon MRC V4.0/ MIDI Remote Controller
Control Flow
In this diagram, MIDI data from the sequencer and pedal moves from EXT2
(set to NORMAL) can be sent to other MIDI devices via the THRU port of the
LXP-1.
controlled by MRC sliders
when LXP-1 Mach is
displayed; always controlled
by machine patches if they
are turned on
LXP-1
OUT
LXP
THRU
Patch
Normal
Sequencer
EXT21OUT IN
2121
MRC
running an
LXP-1 machine
It is important to realize that all machines defined in the MRC are active even
when they are not being displayed. This means that if you use Machine Edit
Mode to create an LXP-1 machine with MIDI patches (as described in
Dynamic MIDI
in the MRC V3.0 manual), the LXP-1 will be controlled by
those patches no matter what parameters (from any machine type) are
being displayed on the MRC. This feature makes it possible for the MRC to
simultaneously control as many as sixteen LXPs and other MIDI devices in
any combination.
5-6
Page 57

Owner's Manual Addendum Controlling the LXP-1 with Two-Way Communication
8
LXP-1 Setups
LXP-1 machine types have a bank of sixteen user-programmable memories. Each of these memories stores a complete set of LXP-1 parameters
and is referred to in the MRC as an
way communication, you can also upload the parameters from any of the
128 user registers in the LXP-1. These are referred to in the MRC as
Setups
(abbreviated “EXTRN” in the MRC display).
Internal Setup.
When connected for two-
External
1
LXP-1
External
LXP-1
16
1
MRC
Internal
LXP-1
NAME
ALGORITHM
PARAMETERS
MIDI PATCHES
12
Selecting an LXP-1 Setup
Once communication has been established between the MRC and the LXP1, different internal and external setups can be selected whenever you are
running an LXP-1 machine. If the MRC is not currently running an LXP
machine, you must forst select one, then select the desired setup. Here’s
how :
1. On the MRC, enter Machine Select Mode by pressing MACH twice.
2. Use the leftmost slider, the MACH button or the keypad to select an LXP-
1 type machine. (Machine #1 is an LXP-1 machine when the MRC is
shipped from the factory.)
5-7
Page 58

Lexicon MRC V4.0/ MIDI Remote Controller
3. Press ENTER to put the MRC into Machine Run Mode.
4. Press SETUP to enter Setup Select Mode.
5. Use the leftmost slider, the SETUP button, or the keypad to select the
desired setup.
Pressing ∗ on the keypad switches the display between “SETUP#” and
“EXTRN#”. While “SETUP#” is displayed, you can use the keypad to
select any internal setup (1–16). While “EXTRN#” is displayed, you can
use the keypad to select any external setup (1–128).NOTE: When
shipped from the factory, there are no parameter values stored in any
of the LXP-1’s 128 user registers. These registers are displayed on the
MRC as “NoName N/A.” If you try to load a “NoName N/A” register into
the MRC, you will see an “INVALID SETUP” message. This simply
means that there are no parameter values assigned to that register (so
there’s nothing to load). You must store parameter values into a user
register before you can load it. (See
Mode
).
Storing Setups from Machine Run
6. Press ENTER to load the setup into the MRC and LXP-1.
Communication Problems
If the MRC is unable to communicate with the LXP-1, it will display one of two
error messages: “No Target,” or “SYNCH TIMEOUT.” The “No Target”
message is displayed if the MRC cannot “find” the LXP-1. This can occur if
the LXP-1 is not connected properly or if it is set to a different MIDI channel
than the MRC. To recover from a “No Target” error, it is necessary to reestablish communication with the LXP-1. To do this, repeat the procedure
in
Establishing Two-way Communication
.
The “SYNCH TIMEOUT” message is displayed if MIDI MERGE for the IN/
OUT ports connected to the LXP-1 is set to “ON,” or when MIDI data is
received faster than it can be processed by the MRC. To recover from a
“SYNCH TIMEOUT” error, simply press ENTER (and confirm the MIDI
MERGE is set to “OFF”).
5-8
Page 59

Owner's Manual Addendum Controlling the LXP-1 with Two-Way Communication
Viewing and Editing LXP-1 Setup Parameters
LXP-1 setup parameters are viewed and edited on two MRC display
pages.
Pages can be selected by pressing PAGE repeatedly, or by pressing the
desired page number on the keypad.
To edit LXP-1 parameters from the MRC, simply select the desired page and
move the slider of the parameter you want to edit. The new value is displayed
on the MRC and transmitted to the LXP-1. (You will see the MIDI LED flicker
when sliders are moved on the MRC.) Refer to the
Manual
for a complete description of how to use the MRC to edit LXP-1 setup
MRC V3.0 Owner’s
parameters.
Using the
✳
and ENTER Keys
While in Machine Run Mode, the ✳ key transmits the current values of all
parameters to the LXP-1. Use it to reset the LXP-1 to the values displayed
by the MRC. (You would do this, for example, if LXP-1 parameters are
inadvertently changed from its front panel.) If you are using two-way
communication, you can press ENTER to update the MRC to the current
parameter values of the LXP-1. This allows you to transfer new settings to
the MRC after front panel adjustment of the LXP-1.
Storing Setups from Machine Run Mode
You can store a setup you’ve created in any one of the MRC’s sixteen
internal setups, or in any one of the LXP-1’s 128 user registers. Here’s how:
1. On the MRC, press STORE to enter Setup Store Mode.
2. Move slider 2 to select “MRC SETUP” or “LXP-1 RGSTR”
3. Use slider 1, the SETUP key or the keypad to select a setup number.
(The display will blink if you enter an invalid number. Valid numbers for
MRC setups are 1–16. For LXP-1 registers valid numbers are 1–128.)
4. Press ENTER to store the setup and return to Machine Run Mode
OR
Press MACH to exit Setup Store Mode and return to Machine Run Mode
without
storing the setup.
5-9
Page 60

Lexicon MRC V4.0/ MIDI Remote Controller
MRC/LXP-1 Presets
When shipped from the factory, MRC Version 4.0 has 10 setups loaded into
its internal memory. Six additional memory spaces are left blank. You may
want to use these setups as is, or modify them to your own taste. Be aware
that changes you make will overwrite the factory-loaded setups when you
perform a store operation. Brief descriptions of the 10 presets follow:
#1 Big Hall
Large lush space. Room size is 67M. Good starting point for any large
reverb. Change PDLY to emulate sounds bouncing off the rear of the hall.
#2 SmalHall
Very tight, moderately bright space with a size of 28M, reverb time of 1.5
secons, and a small amount of feedback (22%).
#3 SmalRoom
Definitely a room — very small characteristics, moderately diffused (61%).
#4 Med Gate
Medioum gate time (258) and steep slope. Great on drums.
#5 GoldPlat
A rich sounding plate, very diffused (100%), with a slight low frequency rolloff
(BASS=0.71x).
#6 SkiSlope
Inside-out room. Good for percussion and other effects.
#7 SizlEkoz
Rolling flange with ping-pong stereo delays (29ms and 57ms.)
#8 Rich Rez
Rich resonant sound with 200ms delay. Nice for acoustic or sampled
material.
5-10
Page 61

Owner's Manual Addendum Controlling the LXP-1 with Two-Way Communication
#9 LongChrs
Delayed effect with feedback (32%) at HICUT filter (4.88kHz).
#10 MultiTap
Offbeat stereo bouncing delays with diffusion (100%) on each recirculating
pass.
Changing LXP-1 MIDI THRU to MIDI OUT
Using a Phillips-head screwdriver, remove the 2 screws from either side of
the LXP-1 front panel. Do
a 9/16" nut driver, or miniature pliers, carefully unscrew the 5 nuts and
washers surrounding the 1/4" jacks labeled DEFEAT, OUTPUTS and
INPUTS.
Holding the unit with both hands, gently separate the outer case from the
front panel. Slide the front panel and its circuit board out of the case. Avoid
touching any of the parts on the board unless you are confident that
both you and your LXP-1 are properly grounded. (The thin rubber
protectors on the sides of the circuit board may come off. These can easily
be replaced prior to reinserting the board and the front panel.)
Locate the single small jumper (usually a small blue plastic piece) at the back
of the circuit board close to the MIDI jacks. Lift the jumper off of the two pins
it is sitting on and place it on the two pins beside it. Your MIDI THRU port is
now a MIDI OUT port.
not
remove the two screws on the rear panel. With
Carefully reinsert the board into the outer case, sliding the rubber protectors
into their grooves. Seat the front and rear panel properly so that the 1/4"
jacks protrude from the proper holes. Replace the 5 washers and nuts
without over-tightening them. Replace the 2 front panel screws. Your LXP1 is now ready to communicate with the Version 4.0 MRC.
After performing this procedure once, you will se that the changeover is very
quick and simple. If you ever want the port to act as a MIDI THRU again, you
can always move the jumper back to its orginal position.
5-11
Page 62

Lexicon Inc.
3 Oak Park
Bedford, MA 01730 USA
781-280-0300
Fax 781-280-0490
Lexicon Part No. 070-09430 Printed in USA
 Loading...