

Page 1

Software Manual
Show/Hide Bookmarks
Card File Handler
L
Page 2

This Manual applies to Card File Handlers as of version 1.0
Show/Hide Bookmarks
Copyright
© 2004 Lenze Drive Systems GmbH. All rights reserved.
Imprint
Lenze Drive Systems GmbH
Postfach 10 13 52, 31763 Hameln, Germany
Phone: ++49 (0)5154 / 82-0
Fax: ++49 (0)5154 / 82-2111
E-mail: Lenze@Lenze.de
Copyright information
All texts, photos and graphics contained in this documentation are subject to
copyright protection. No part of this documentation may be copied or made
available to third parties without the explicit written approval of Lenze Drive
Systems GmbH.
Liability
All information given in this documentation has been selected carefully and
tested for compliance with the described hardware and software. Neverthe
less, discrepancies cannot be ruled out. We do not accept any responsibility or
liability for any damage that may occur. Required corrections will be included
in updates of this documentation.
Trademarks
Microsoft, Windows and Windows NT are either registered trademarks or
trademarks of Microsoft Corporation in the U.S.A. and/or other countries.
Adobe and Reader are either registered trademarks or trademarks of Adobe
Systems Incorporated in the U.S.A. and/or other countries.
All other product names contained in this documentation are trademarks of
the corresponding owners.
2 DMS-Version 1.1 - 07/2004 - TD05/TD11 L
Page 3

Contents
Show/Hide Bookmarks
Card File Handler
Contents
1 About this Manual . . . . . . . . . . . . . . . . . . . . . . . . . . . . . . . . . . . . . . . . . . . . . . . . . . . . . 5
1.1 Conventions used . . . . . . . . . . . . . . . . . . . . . . . . . . . . . . . . . . . . . . . . . . . . . . . . . . . 6
1.2 Definition of icons and signal words used . . . . . . . . . . . . . . . . . . . . . . . . . . . . . 7
2 User interface. . . . . . . . . . . . . . . . . . . . . . . . . . . . . . . . . . . . . . . . . . . . . . . . . . . . . . . . . . 8
2.1 Title bar. . . . . . . . . . . . . . . . . . . . . . . . . . . . . . . . . . . . . . . . . . . . . . . . . . . . . . . . . . . . . 8
2.2 Menu bar . . . . . . . . . . . . . . . . . . . . . . . . . . . . . . . . . . . . . . . . . . . . . . . . . . . . . . . . . . . 9
2.3 Toolbar . . . . . . . . . . . . . . . . . . . . . . . . . . . . . . . . . . . . . . . . . . . . . . . . . . . . . . . . . . . . . 9
2.4 Archive tree . . . . . . . . . . . . . . . . . . . . . . . . . . . . . . . . . . . . . . . . . . . . . . . . . . . . . . . . . 10
2.5 Dialog area. . . . . . . . . . . . . . . . . . . . . . . . . . . . . . . . . . . . . . . . . . . . . . . . . . . . . . . . . . 12
3 Operation . . . . . . . . . . . . . . . . . . . . . . . . . . . . . . . . . . . . . . . . . . . . . . . . . . . . . . . . . . . . . 13
3.1 Organising archives. . . . . . . . . . . . . . . . . . . . . . . . . . . . . . . . . . . . . . . . . . . . . . . . . . 14
3.1.1 Renaming an archive . . . . . . . . . . . . . . . . . . . . . . . . . . . . . . . . . . . . . . . . . 14
3.1.2 Creating a new archive . . . . . . . . . . . . . . . . . . . . . . . . . . . . . . . . . . . . . . . 15
3.1.3 Opening an existing archive . . . . . . . . . . . . . . . . . . . . . . . . . . . . . . . . . . 15
3.1.4 Deleting an archive . . . . . . . . . . . . . . . . . . . . . . . . . . . . . . . . . . . . . . . . . . 16
3.2 Organising cards . . . . . . . . . . . . . . . . . . . . . . . . . . . . . . . . . . . . . . . . . . . . . . . . . . . . 17
3.2.1 Renaming a card . . . . . . . . . . . . . . . . . . . . . . . . . . . . . . . . . . . . . . . . . . . . . 18
3.2.2 Adding another card to an archive . . . . . . . . . . . . . . . . . . . . . . . . . . . . 18
3.2.3 Importing data from a SmartMedia card. . . . . . . . . . . . . . . . . . . . . . . 19
3.2.4 Exporting data to a SmartMedia card . . . . . . . . . . . . . . . . . . . . . . . . . 21
3.2.5 Adding a comment to a card . . . . . . . . . . . . . . . . . . . . . . . . . . . . . . . . . . 22
3.2.6 Removing a card from an archive . . . . . . . . . . . . . . . . . . . . . . . . . . . . . 22
3.2.7 Loading a card from another archive . . . . . . . . . . . . . . . . . . . . . . . . . . 23
3.3 Editing drive sets . . . . . . . . . . . . . . . . . . . . . . . . . . . . . . . . . . . . . . . . . . . . . . . . . . . . 24
3.3.1 Renaming a drive set . . . . . . . . . . . . . . . . . . . . . . . . . . . . . . . . . . . . . . . . . 25
3.3.2 Adding/removing a DDS binary file . . . . . . . . . . . . . . . . . . . . . . . . . . . 26
3.3.3 Adding/removing a GDC parameter set file. . . . . . . . . . . . . . . . . . . . 27
3.3.4 Adding/removing user data . . . . . . . . . . . . . . . . . . . . . . . . . . . . . . . . . . 28
3.3.5 Activating the option "Execute reset (origin) at download" . . . . . 29
3.3.6 Adding a comment to a drive set. . . . . . . . . . . . . . . . . . . . . . . . . . . . . . 29
3.3.7 Deleting a drive set. . . . . . . . . . . . . . . . . . . . . . . . . . . . . . . . . . . . . . . . . . . 30
3.3.8 Loading a drive set from another archive . . . . . . . . . . . . . . . . . . . . . . 30
L 1.1 EN 3
Page 4

Card File Handler
Show/Hide Bookmarks
Contents
4 Appendix. . . . . . . . . . . . . . . . . . . . . . . . . . . . . . . . . . . . . . . . . . . . . . . . . . . . . . . . . . . . . . 31
4.1 File structure . . . . . . . . . . . . . . . . . . . . . . . . . . . . . . . . . . . . . . . . . . . . . . . . . . . . . . . . 31
4.2 Lenze standard folder for program and parameter data. . . . . . . . . . . . . . . . 32
4.3 Installation of program updates . . . . . . . . . . . . . . . . . . . . . . . . . . . . . . . . . . . . . . 33
4.4 Supported SmartMedia card readers. . . . . . . . . . . . . . . . . . . . . . . . . . . . . . . . . . 33
4.5 Supported SmartMedia memory cards . . . . . . . . . . . . . . . . . . . . . . . . . . . . . . . . 33
5 Glossary. . . . . . . . . . . . . . . . . . . . . . . . . . . . . . . . . . . . . . . . . . . . . . . . . . . . . . . . . . . . . . . 34
6 Index . . . . . . . . . . . . . . . . . . . . . . . . . . . . . . . . . . . . . . . . . . . . . . . . . . . . . . . . . . . . . . . . . 36
Your opinion is important to us . . . . . . . . . . . . . . . . . . . . . . . . . . . . . . . . . . . . . . . . . . . . . 37
4 1.1 EN L
Page 5
1 About this Manual
Show/Hide Bookmarks
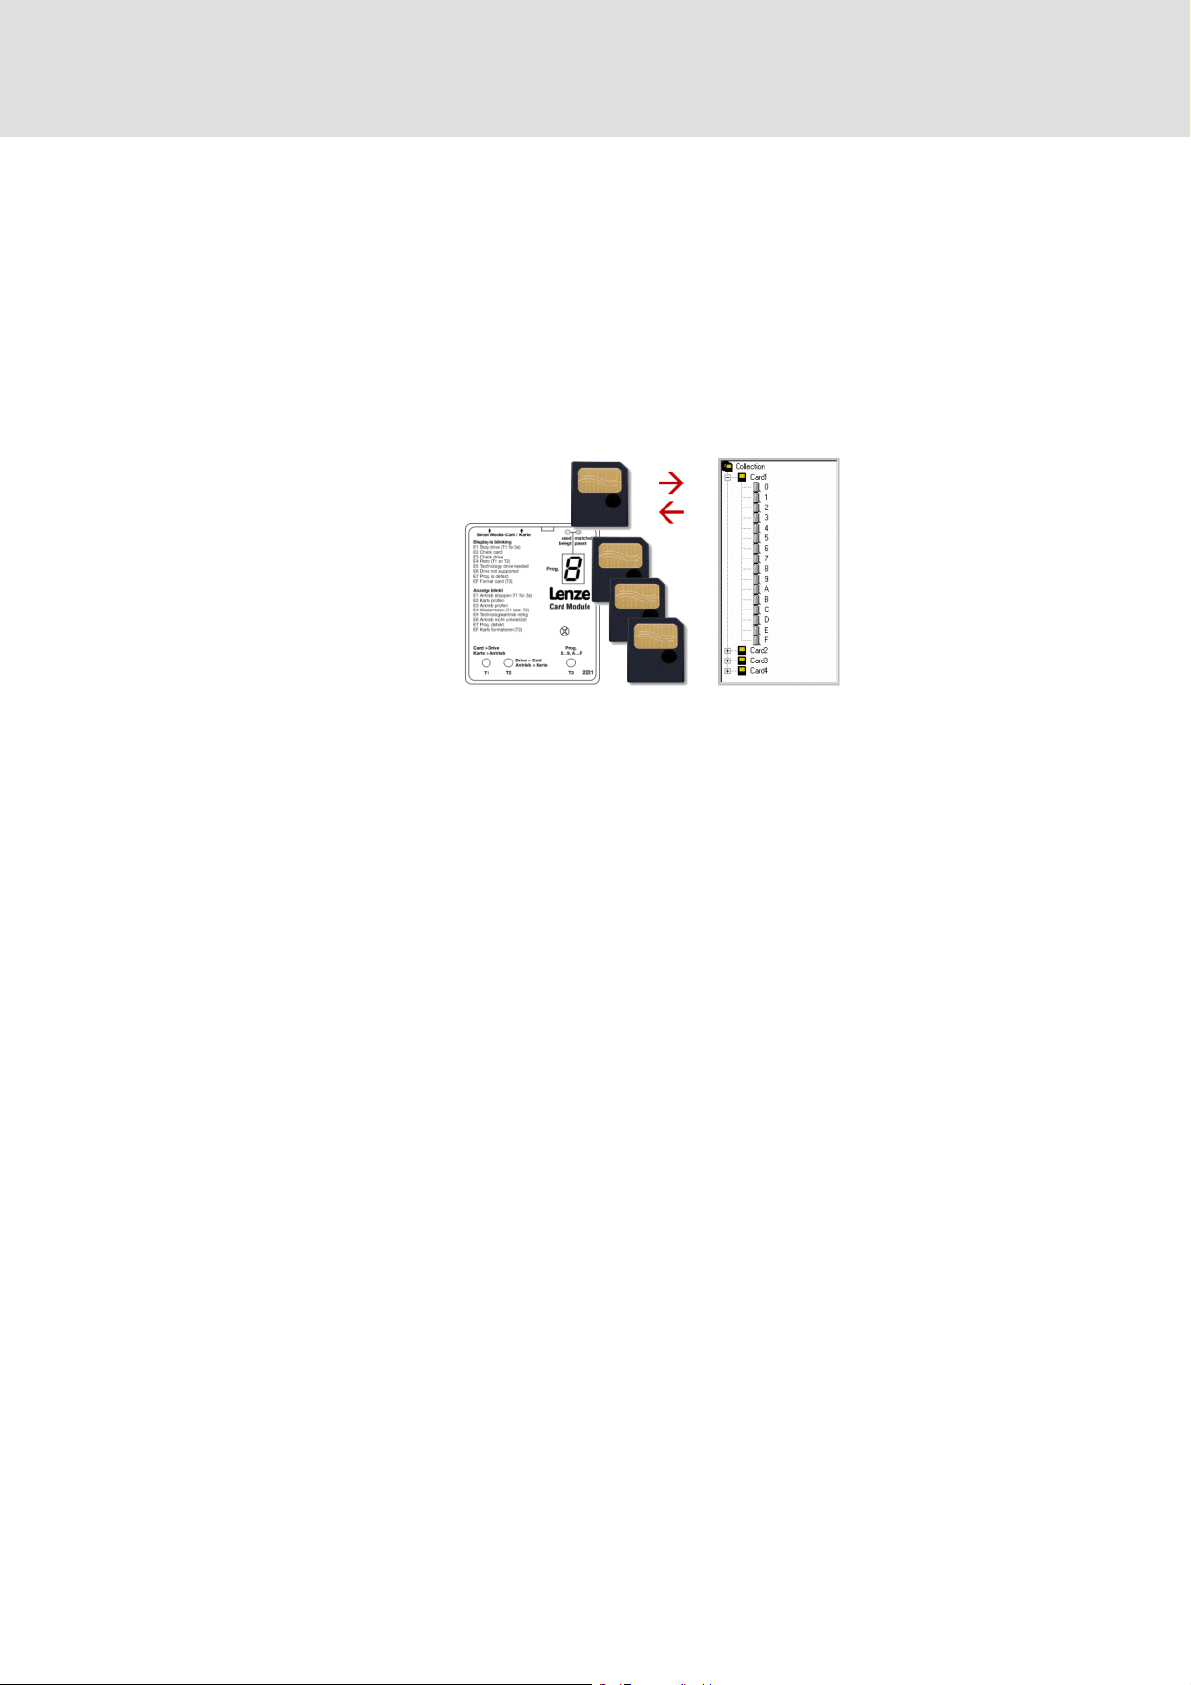
This Manual contains information about the Lenze Card File Handler.
What is a Card File Handler?
The Card File Handler is a tool which can be used to create and organise card archives for
the SmartMedia cards of the Lenze
C When used together with a card reader connected to a PC, it is possible to transfer the
drive sets of a SmartMedia card to "virtual" archive cards and vice versa:
Card File Handler
About this Manual
card module.
C Drive sets consisting of IEC 61131 programs and (optional) parameter and user data
can be easily edited on a PC and afterwards transferred to a SmartMedia card for use
with the card module.
C The archives are listed in a clear folder structure on the file system level. This facilitates
the creation of back-up copies and general data handling.
L 1.1 EN 5
Page 6
Card File Handler
Show/Hide Bookmarks
About this Manual
Conventions used
1.1 Conventions used
This Manual uses the following conventions to distinguish between different types of
information:
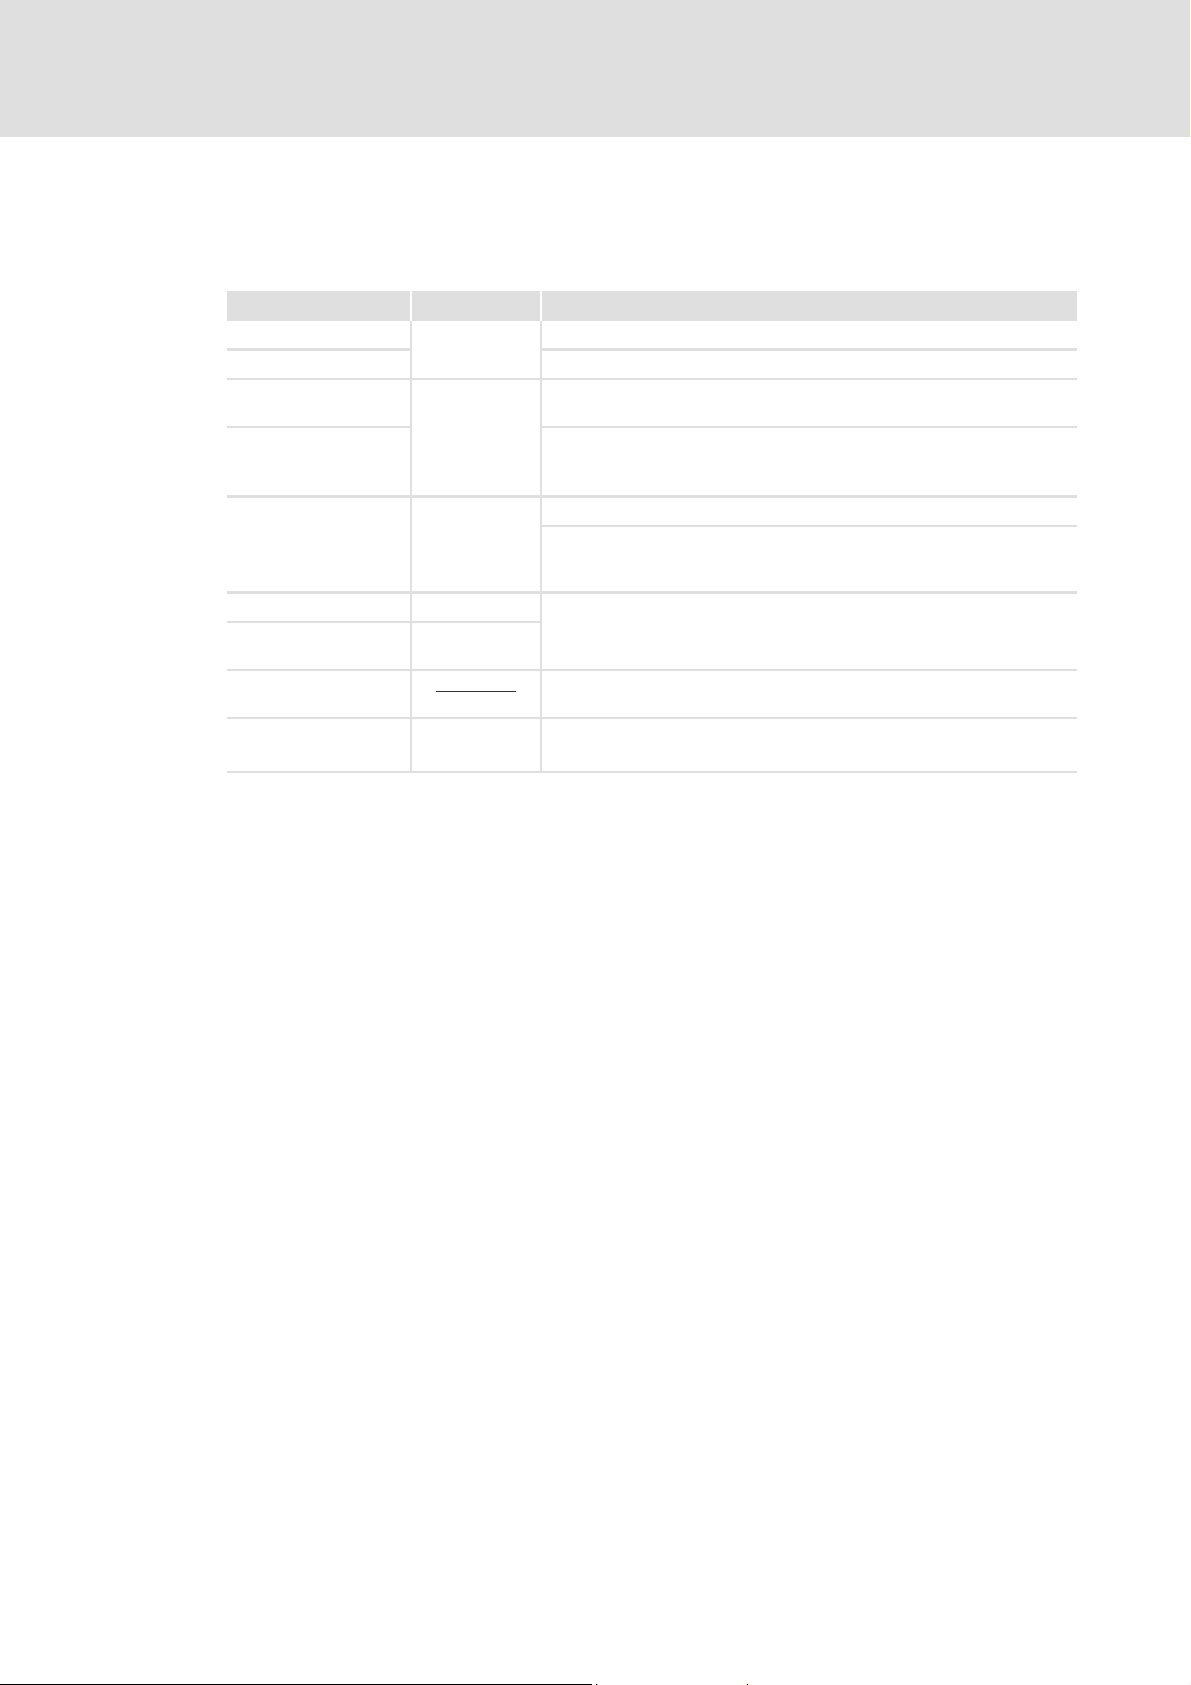
Type of information Marking Examples/notes
Variable name italic Set bEnable to TRUE to...
Window pane The message window... / The Options dialog box...
Control element bold The OK button... / The Copy command... / The Properties tab... / The
Sequence of
menu commands
Keyboard command <bold> Use <F1> to call the Online Help.
Program listings Courier
Keyword Courier
Hyperlink underlined
Step-by-step
instructions
bold
S
Name input field...
If the execution of a function requires several commands, the individual
commands are separated by an arrow: Select the command File
to...
If a command requires a combination of keys, a "+" is placed between
the key symbols:
Use <Shift>+<ESC> to...
IF var1 < var2 THEN
a = a + 1
END IF
Hyperlinks are highlighted references which are activated by means of a
mouse click.
Step-by-step instructions can be recognized by an icon.
Open
6 1.1 EN L
Page 7

1.2 Definition of icons and signal words used
Show/Hide Bookmarks
This documentation uses the following icons and signal words to indicate dangerous
situations and important information:
Safety information
Layout of the safety information:
Icons and signal words
(characterize the type and severity of danger)
Note
(describes the danger and suggests how to avoid the danger)
Icon Signal word Meaning
Danger! Danger to persons due to hazardous electrical voltage
Indicates an impending danger which may lead to death or severe injuries unless
appropriate measures are taken.
Danger! Danger to persons due to a general danger
Indicates an impending danger which may lead to death or severe injuries unless
appropriate measures are taken.
Stop! Danger of damage to material
Indicates a potential danger which may lead to mate rial da mage unle ss ap propri ate
measures are taken.
Card File Handler
About this Manual
Definition of icons and signal words used
Application information
Icon Signal word Meaning
Note! Important note for trouble-free operation
X
Tip! Useful tip for easy handling
L 1.1 EN 7
Page 8
Card File Handler
Show/Hide Bookmarks
User interface
Title bar
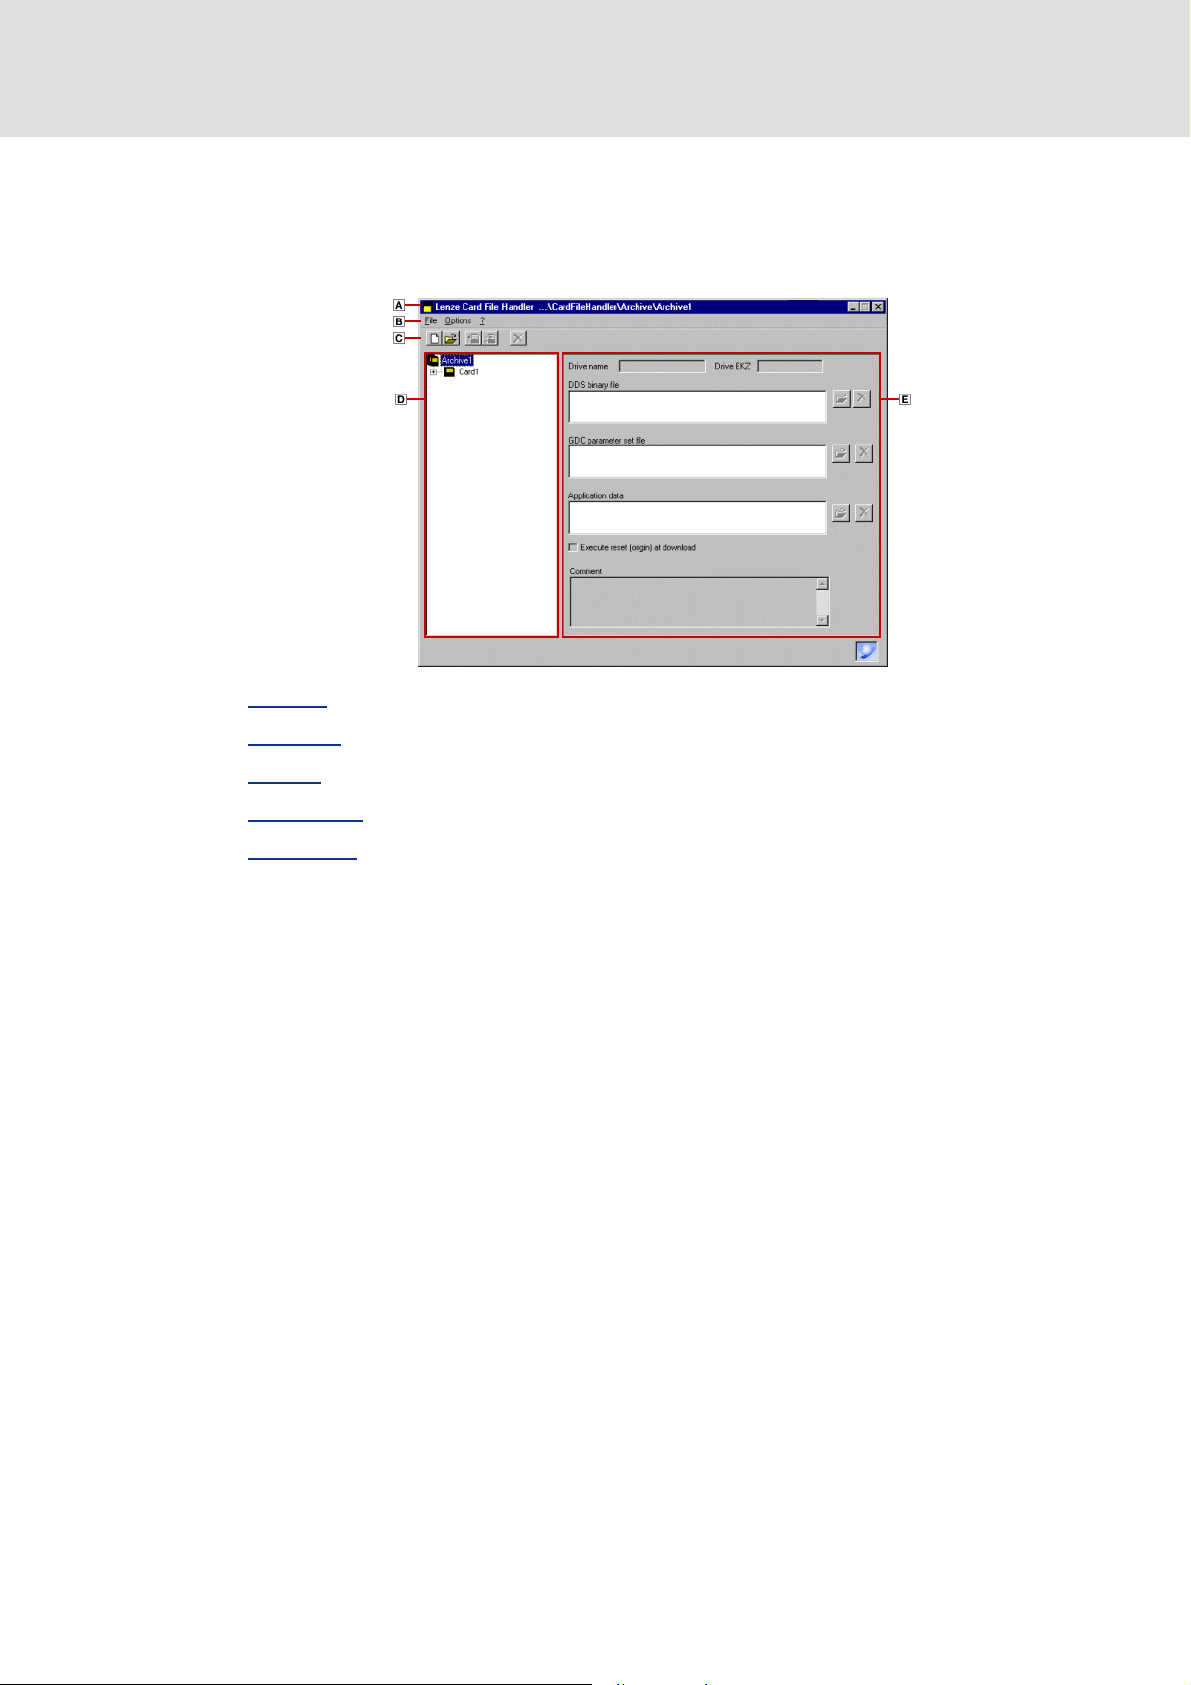
2 User interface
The user interface of the Card File Handler contains the following control and function
elements:
Title bar
Menu bar (E 9)
Toolbar (E 9)
Archive tree (E 10)
Dialog area (E 12)
2.1 Title bar
The title bar at the top of the application window shows the program icon and the program
on the left and the window icons on the right.
name
C A click on the window icon reduces the application window to the icon in the task
bar.
C A click on the program icon opens the system menu which also includes commands for
positioning and changing the size of the application window.
C A click on the window icon U or a double-click on the program icon closes the
Card File Handler.
8 1.1 EN L
Page 9
2.2 Menu bar
Show/Hide Bookmarks
Via the menu bar you can access the menu commands of the Card File Handler.
C A click on an item of the main menu opens the corresponding menu and lists the menu
items contained in it.
C Click a menu item to execute the corresponding function.
– Menu items which are displayed in light gray are currently deactivated because the
execution of the corresponding function would not make any sense in the current
program state.
X Tip!
Card File Handler
User interface
Menu bar
2.3 Toolbar
Via the icons of the toolbar you can directly execute some of the most frequently used
menu commands without making a detour via the
C Simply click an icon to activate the corresponding command.
Note!
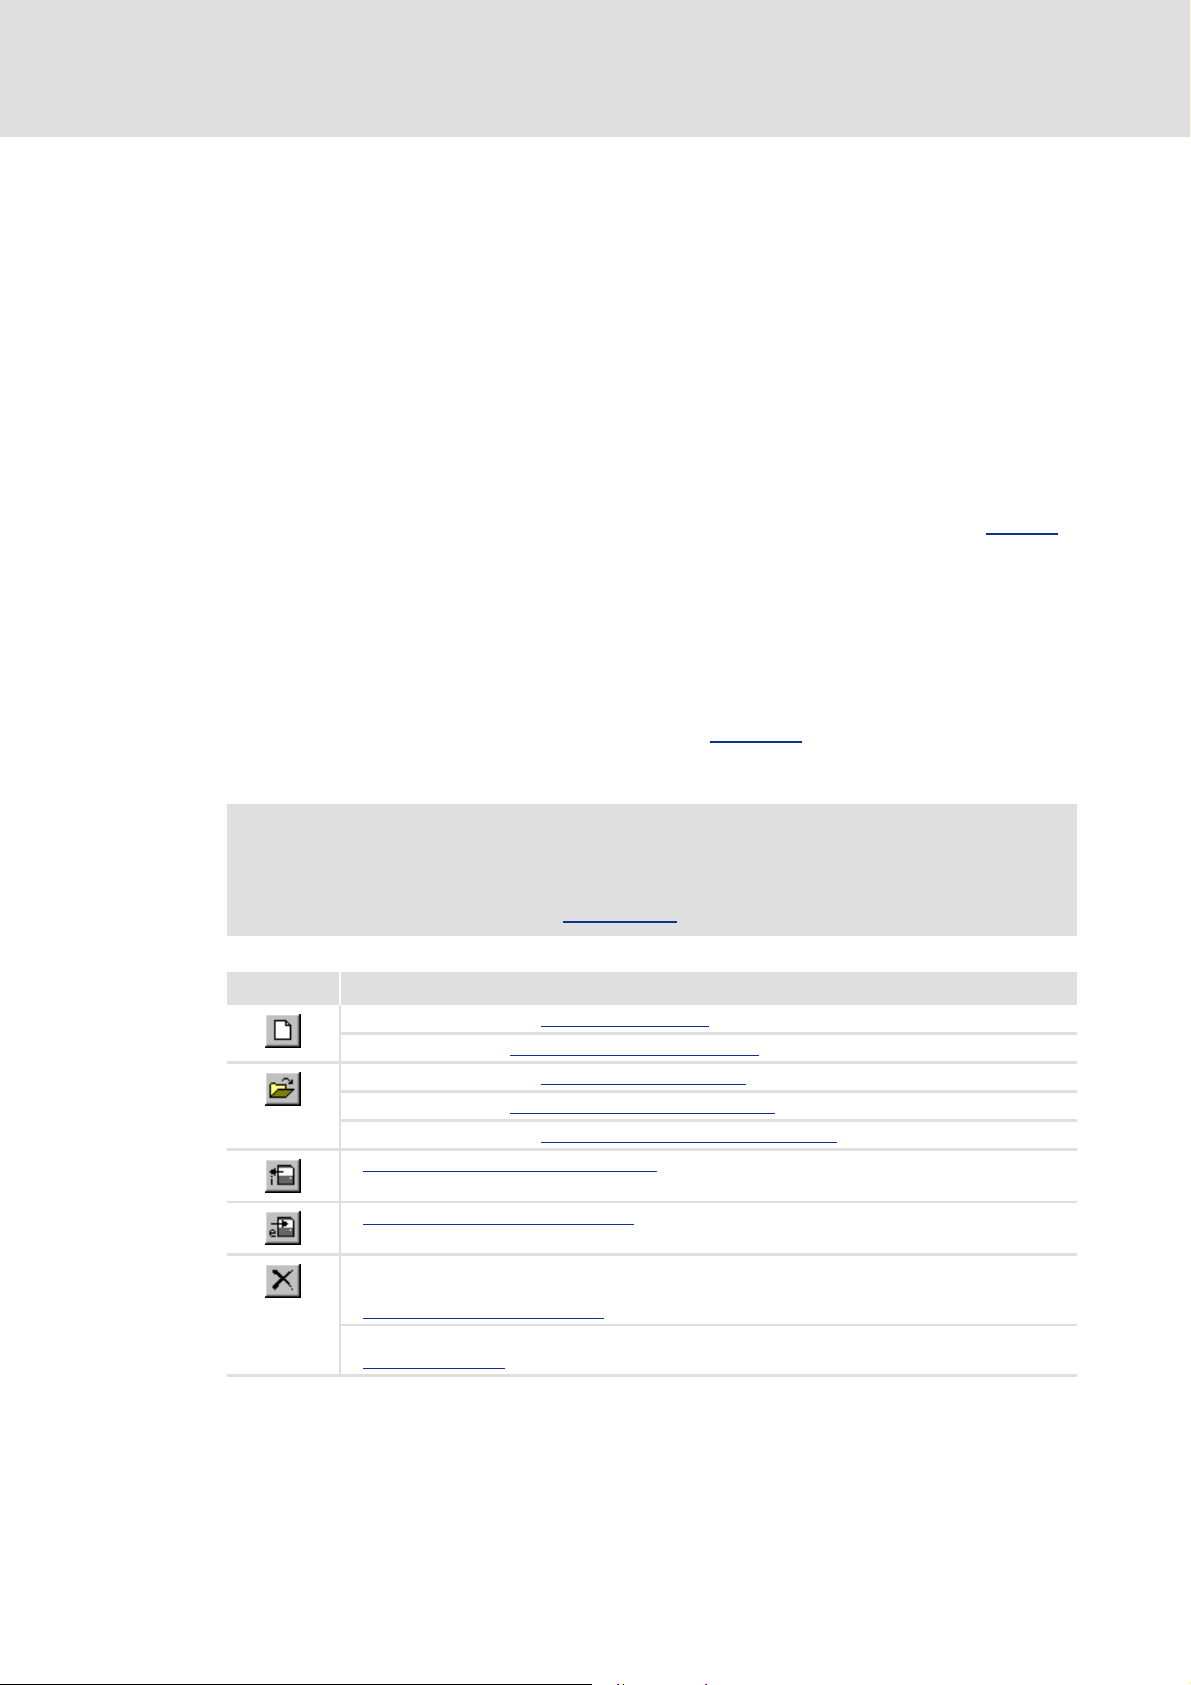
Icon Function
Many frequently used functions can be executed faster by means of the Toolbar
icons.
Menu bar.
Which icons and functions are available in the toolbar depends on the element
currently selected from the Archive tree
If an archive is selected: Creating a new archive (E 15)
If a card is selected: Adding another card to an archive
If an archive is selected: Opening an existing archive
If a card is selected: Loading a card from another archive (E 23)
If a drive set is selected: Loading a drive set from another archive
Importing data from a SmartMedia card
.
(E 18)
(E 15)
(E 30)
(E 19)
L 1.1 EN 9
Exporting data to a SmartMedia card
If a card is selected: Remove selected card from the archive.
• Only possible if the archive contains more than one card.
Removing a card from an archive
If a drive set is selected: Delete all data of the selected drive set.
Deleting a drive set
(E 30)
(E 21)
(E 22)
Page 10
Card File Handler
Show/Hide Bookmarks
User interface
Archive tree
X Tip!
If you position the mouse pointer for a short time over an icon, a "tool tip" will be
indicated with information about the corresponding function.
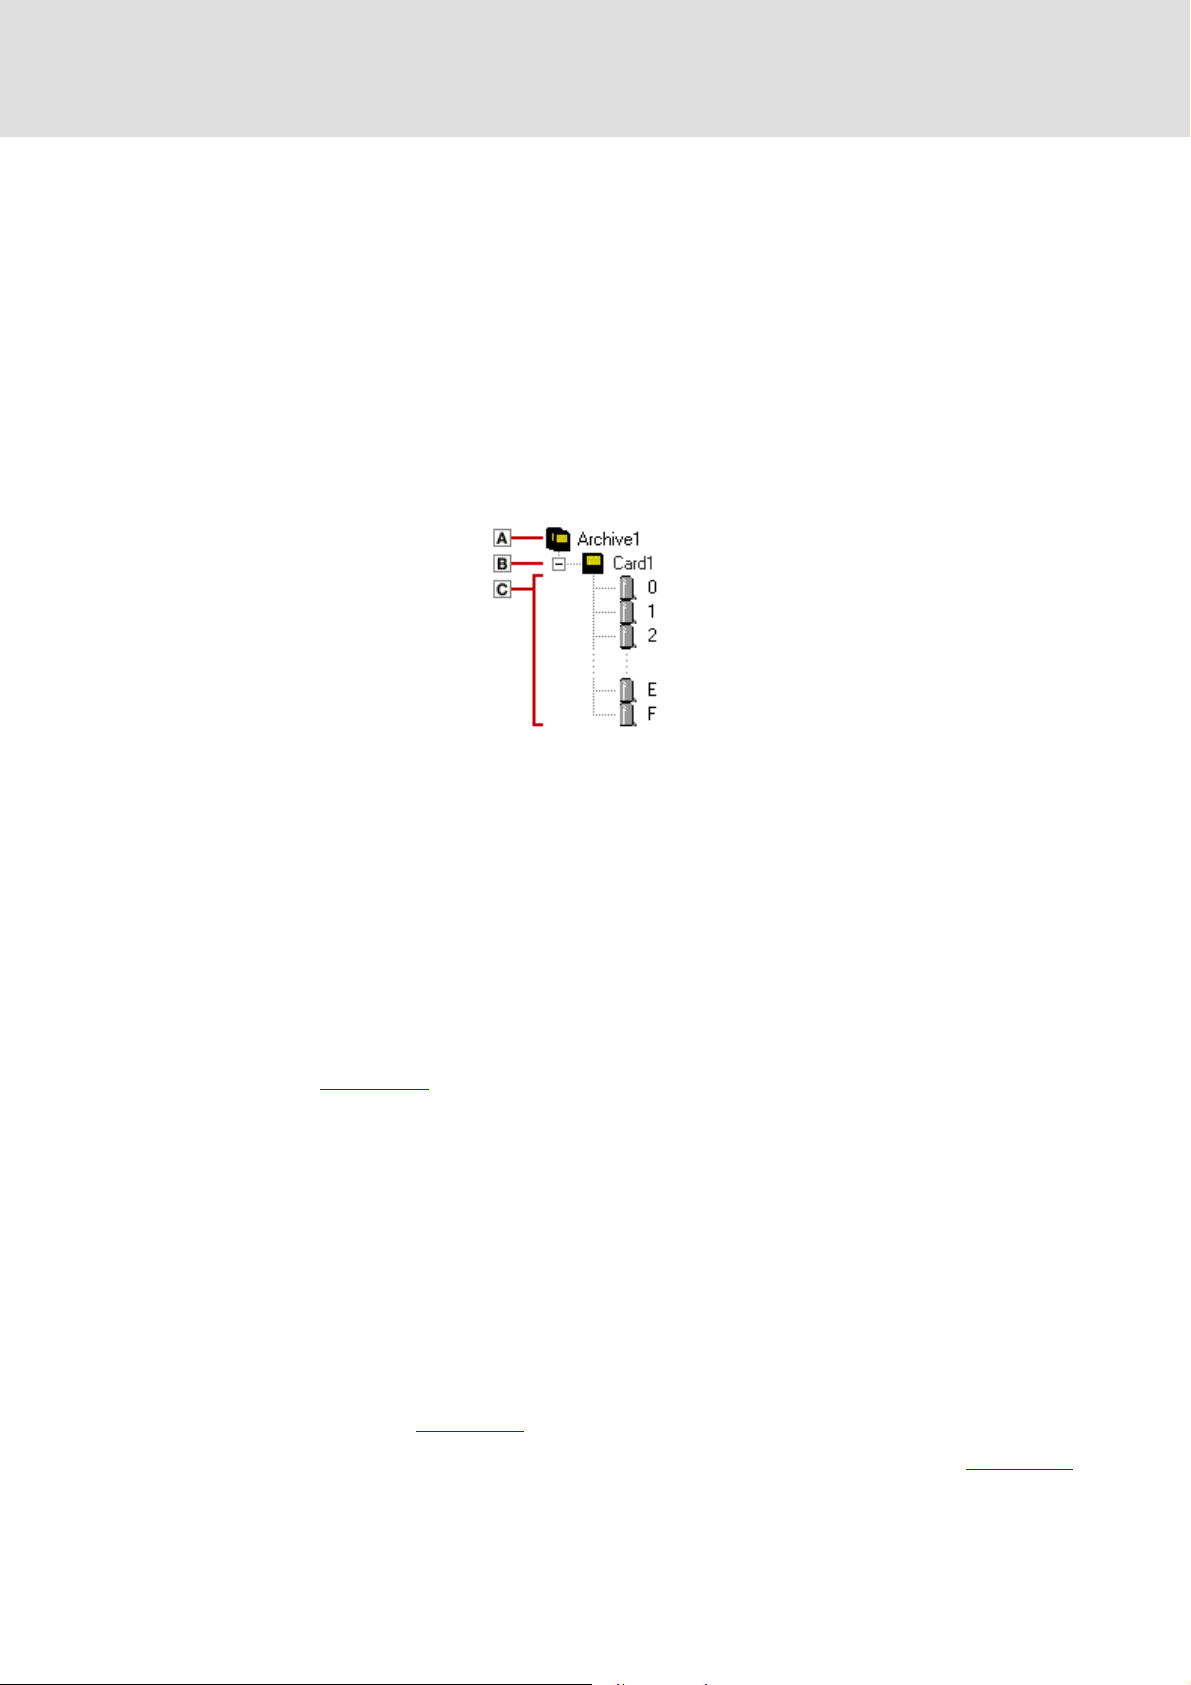
2.4 Archive tree
The archive tree of the Card File Handler contains a hierarchical tree structure similar to the
folders of the
archive:
Archive
Card
Drive sets
Windows Explorer, which allows quick access to all cards and drive sets of an
Archive
C Each archive can contain one or several cards.
C You can create an unlimited number of archives, but always only open one archive in
the Card File Handler.
Card
C Each archive card represents one SmartMedia card and can thus - just like the
SmartMedia card for the Card module - contain 16 drive sets called "0" ... "F" in the
default setting.
C In the Dialog area
C When a Card reader is connected to your PC, you can transfer the drive sets of a
SmartMedia card to an archive card and vice versa:
Drive set
C Each drive set contains all data required by the target system, i.e. the program created
with the Drive PLC Developer Studio, the parameter data generated with Global Drive
Control (option) and additional user data (option).
C In the default setting, the 16 drive sets of each card are called "0" ... "F". As an option,
you can add another name to this designation.
you can enter a comment (option) on the selected card.
C If you select a drive set from the archive tree the corresponding settings will be
C Just like for a card, you can enter a comment on the selected drive set in the Dialog area
10 1.1 EN L
displayed in the Dialog area
(option).
. It is possible to change the settings in the dialog area.
Page 11

Card File Handler
Show/Hide Bookmarks
C The colour of the drive set icon depends on the usage of the drive set:
– Drive set is free.
– Drive set is used.
– Drive set is incomplete or invalid usage.
X Tip!
The operation of the Card File Handler is context-sensitive, i.e. you can only
execute functions that are possible for the element selected from the archive tree.
In the archive tree you can use a context menu with the most frequently used menu
commands. The context menu is activated by a click on the right mouse key.
If a plus sign appears in front of an element in the archive tree this element has
sub-elements.
• A click on the plus sign opens the list of sub-elements.
• A minus sign appears instead of the plus sign. Clicking the minus closes the
list of sub-elements.
User interface
Archive tree
L 1.1 EN 11
Page 12

Card File Handler
Show/Hide Bookmarks
User interface
Dialog area
2.5 Dialog area
The settings of the drive set selected from the Archive tree are indicated in the dialog area.
It is possible to change the settings in the dialog area:
Parameter Info
Name of drive Name of the target system
Product code of drive Product code of the target system
DDS binary file IEC 61131 program (*.bin file) compiled with the Drive PLC Developer Studio
GDC parameter set file Parameter set file (*.gdc file) created with Global Drive Control (GDC)
Application data Optional: Cam profile data or motion profiles (*.lc9 file)
Execute reset (origin) at download If this checkbox is activated the Card module executes a Reset (origin) in the
Comment Optional entry of a comment on the drive set.
(DDS)
corresponding target system before the data is downloaded.
• Reset (origin) resets all variables of the target system, including the
RETAIN and PERSISTENT variables to their initialisation value. The user
program is deleted and the control is reset to its original state.
X Tip!
You can also enter a comment on a card.
12 1.1 EN L
Page 13

3Operation
Show/Hide Bookmarks
After the first start of the Card File Handler, the Archive tree contains one archive including
one card.
C You can edit the (free) drive sets of the card and add more cards to the archive.
C If a Card reader for SmartMedia cards is connected to your PC, you can transfer the drive
sets of your SmartMedia card to the selected archive card and vice versa.
C Of course, you can also create new archives or - if available - open other existing
archives.
What do you want to do?
Editing drive sets (E 24)
Adding another card to an archive (E 18)
Importing data from a SmartMedia card (E 19)
Card File Handler
Operation
Exporting data to a SmartMedia card (E 21)
Creating a new archive (E 15)
Opening an existing archive (E 15)
X Tip!
The operation of the Card File Handler is context-sensitive, i.e. you can only
execute functions that are possible for the element selected from the archive tree.
L 1.1 EN 13
Page 14

Card File Handler
Show/Hide Bookmarks
Operation
Organising archives
3.1 Organising archives
If you want to archive different drive sets it may be useful to store them in different, task
or machine-oriented archives.
C The Card File Handler can be used to create and organise an unlimited number of
archives.
C For each archive a separate archive folder will be created. When creating the archive
folder, you can freely select the memory location within your computer or network
environment.
X Tip!
For a clear data management it is recommended to store all archive folders in a
shared root folder.
• The installation program of the Card File Handler automatically creates the
"Archives" root folder in the program directory of the Card File Handler. The root
folder also includes the archive folder for the archive indicated at the first start
of the Card File Handler.
What do you want to do?
Renaming an archive (E 14)
Creating a new archive (E 15)
Opening an existing archive (E 15)
Deleting an archive (E 16)
3.1.1 Renaming an archive
Note!
If you rename an archive the corresponding archive folder will be renamed
accordingly.
S How to rename an archive:
1. Select the archive from the archive tree.
2. Click the name of the archive once again in the archive tree or select the command
FileArchiveRename archive.
14 1.1 EN L
3. Enter the new name into the Rename archive dialog box and confirm your entry
with OK.
• The name must not include more than 17 characters.
• The following letters, digits and special characters are permissible: A..Z or a..z,
0..9 and $ & # ß % ’ ( ) - @ ^ !
Page 15

3.1.2 Creating a new archive
Show/Hide Bookmarks
S How to create a new archive:
1. Select the archive level (the topmost element) from the archive tree.
Card File Handler
Operation
Organising archives
2. Go to the toolbar and click the
FileArchiveCreate archive.
3. Enter the name for the new archive in the Name of new archive input field.
• The name must not include more than 17 characters.
• The following letters, digits and special characters are permissible: A..Z or a..z,
0..9 and $ & # ß % ’ ( ) - @ ^ !
4. Click Select folder to select the root folder in which the archive folder is to be
created.
5. Click Create archive to create the new archive with the selected settings.
• The new archive including one card will be listed in the archive tree.
3.1.3 Opening an existing archive
If several archives are available you can also open another archive and edit it.
S How to open an existing archive:
1. Select the Archive level from the archive tree.
icon or select the command
2. Go to the toolbar and click the
FileArchiveSelect archive.
3. Go to the Select folder dialog box, select the corresponding archive folder and
confirm your selection with OK.
• You can only click OK if a valid archive folder has been selected.
icon or select the command
L 1.1 EN 15
Page 16

Card File Handler
Show/Hide Bookmarks
Operation
Organising archives
3.1.4 Deleting an archive
Note!
The Windows Explorer is required to delete an archive. Furthermore, the archive
must not be open in the Card File Handler!
When the archive is deleted, all cards and drive sets contained in it will be
deleted as well!
S How to delete an archive:
1. Open the Windows Explorer.
2. Select the archive folder to be deleted in the Windows Explorer.
3. Click the <Del> key to delete the selected archive folder.
16 1.1 EN L
Page 17

3.2 Organising cards
Show/Hide Bookmarks
You can organise an unlimited number of cards in an archive.
C For each card, a separate sub-folder will be created in the corresponding archive folder.
Note!
Each archive contains at least one card.
• When a new archive is created, the archive already includes a card with 16
free drive sets. In the default setting, the hexadecimal numbers "0" to "F" are
used to designate the drive sets.
• It is only possible to remove a card from an archive if the archive contains
more than one card.
What do you want to do?
Card File Handler
Operation
Organising cards
Renaming a card (E 18)
Adding another card to an archive (E 18)
Importing data from a SmartMedia card (E 19)
Exporting data to a SmartMedia card (E 21)
Adding a comment to a card (E 22)
Removing a card from an archive (E 22)
Loading a card from another archive (E 23)
L 1.1 EN 17
Page 18

Card File Handler
Show/Hide Bookmarks
Operation
Organising cards
3.2.1 Renaming a card
Note!
If you rename a card the corresponding sub-folder in the archive folder will be
renamed accordingly.
S How to rename a card:
1. Select the card to be renamed from the archive tree.
2. Click the name of the card once again in the archive tree or select the command
FileCardRename archive card.
3. Enter the new name into the Rename archive card dialog box and confirm your
entry with OK.
• The name must not include more than 11 characters.
• The following letters, digits and special characters are permissible: A..Z or a..z,
0..9 and $ & # ß % ’ ( ) - @ ^ !
3.2.2 Adding another card to an archive
S How to add another card to an archive:
1. Select the Card level from the archive tree.
2. Go to the toolbar and click the
• As an alternative, you can use the command FileArchiveCreate archive card
when you are on the Archive level of the archive tree.
3. Enter a name for the new card in the Create new archive card dialog box and
confirm your entry with OK.
• The name must not include more than 11 characters.
• The following letters, digits and special characters are permissible: A..Z or a..z,
0..9 and $ & # ß % ’ ( ) - @ ^ !
icon.
18 1.1 EN L
Page 19

3.2.3 Importing data from a SmartMedia card
Show/Hide Bookmarks
This function is used to import drive sets from a SmartMedia card of the card module into
an archive card.
C All valid drive sets of the SmartMedia card will be imported into the selected archive
card.
C The drive sets will be automatically marked with the program names.
Note!
• All drive sets of the selected archive card will be overwritten during the data
import!
• This function requires a Card reader for SmartMedia memory cards to be
connected to the USB interface of your PC!
Supported SmartMedia card readers
• Never remove the SmartMedia card during read/write access from the
card reader. This could result in loss of data or damage the SmartMedia card!
Card File Handler
Operation
Organising cards
(E 33)
S How to import data from a SmartMedia card:
1. Insert the SmartMedia card into the card reader connected to your PC.
2. Select the card into which the drive sets of the SmartMedia card are to be imported
from the archive tree.
3. Go to the toolbar and click the
from SmartMedia card.
4. Go to the SmartMedia card --> Archive card X dialog box and select the letter for the
drive to which the card reader has been assigned.
5. Click Load.
icon or select the command FileCardImport
Note!
After the data import, the Card File Handler automatically executes the "eject"
function in the card reader to ensure that the SmartMedia card can be removed
without loss of data from the card reader.
For another read/write access to the SmartMedia card, remove the SmartMedia
card and reinsert it into the card reader. After this, it can be identified by the
Card File Handler.
L 1.1 EN 19
Page 20

Card File Handler
Show/Hide Bookmarks
Operation
Organising cards
If the import has been successful the imported drive sets will be listed with the
corresponding program name below the selected card in the
C The colour of the drive set icon depends on the usage of the drive set:
– Drive set is free.
– Drive set is used.
– Drive set is incomplete or invalid usage.
C In the dialog area, you can find the following information on the drive set:
Text field Information
DDS binary file Comment, project name and compiling date from binary file
GDC parameter set file Comment and standard date of card module
Application data Comment, designation and time stamp of application data
archive tree .
• If the card module was used to write (upload) data from the target system to the
SmartMedia card, the date will not be displayed.
20 1.1 EN L
Page 21

3.2.4 Exporting data to a SmartMedia card
Show/Hide Bookmarks
This function is used to export the drive sets of an archive card to a SmartMedia card for
subsequent use with the card module.
C All drive sets of the card selected from the archive tree will be exported to the
SmartMedia card.
Note!
• All drive sets available on the SmartMedia card will be deleted!
• This function requires a Card reader for SmartMedia memory cards to be
connected to the USB interface of your PC!
Supported SmartMedia card readers
• Ensure that the SmartMedia to be written is not provided with a writeprotect sticker!
• Never remove the SmartMedia card during read/write access from the
card reader. This could result in loss of data or damage the SmartMedia card!
Card File Handler
Operation
Organising cards
(E 33)
S How to export data to a SmartMedia card:
1. Insert the SmartMedia card to be written into the card reader connected to your PC.
2. Select the card the drive sets of which you want to export to the SmartMedia card
from the archive tree.
3. Go to the toolbar and click the icon or select the command FileCardExport
to SmartMedia card.
4. Go to the Archive card X --> SmartMedia card dialog box and select the letter for the
drive to which the card reader has been assigned.
5. If required, change the name of the SmartMedia card by clicking the Change
button.
• Enter the new name into the Rename SmartMedia card dialog box and confirm
your entry with OK.
6. Click Save.
Note!
After the data export, the Card File Handler automatically executes the "eject"
function in the card reader to ensure that the SmartMedia card can be removed
without loss of data from the card reader.
L 1.1 EN 21
For another read/write access to the SmartMedia card, remove the SmartMedia
card and reinsert it into the card reader. After this, it can be identified by the
Card File Handler.
Page 22

Card File Handler
Show/Hide Bookmarks
Operation
Organising cards
3.2.5 Adding a comment to a card
To each card you can add a comment of several lines, e.g. to save additional information
about the machine or drive task.
C When a new card is created, the date will be automatically saved as a comment. When
the Card File Handler is operated under Windows® 2000/XP, the user name will also be
entered as a comment.
S How to add a comment to a card:
1. Select the corresponding card from the archive tree.
2. Go to the Dialog area and enter the desired comment in the Comment input field.
3.2.6 Removing a card from an archive
Note!
Each archive contains at least one card. It is only possible to remove a card from
an archive if the archive contains more than one card!
When the card is removed, all drive sets contained in it will be removed as well!
S How to remove a card from an archive:
1. Select the corresponding card from the archive tree.
2. Go to the toolbar and click the icon or select the command
FileCardRemove archive card.
3. You will be asked if you really want to remove the archive card. Confirm this
question with OK.
22 1.1 EN L
Page 23

3.2.7 Loading a card from another archive
Show/Hide Bookmarks
This function is used to copy an archive card from a freely selectable archive within your
computer environment to the current archive.
Note!
The card selected from the archive tree will be completely overwritten with the
data of the archive card to be loaded!
S How to load a card into an archive:
1. Select the card to be overwritten with the data of the archive card to be loaded
from the archive tree.
2. Go to the toolbar and click the icon or select the command FileCardLoad
archive card.
Card File Handler
Operation
Organising cards
3. Go to the Search folder dialog box, select the archive card to be loaded from your
computer environment and confirm your selection with OK.
• Only valid archive cards can be loaded.
4. You will be asked if you really want to overwrite the card selected from the archive
tree with the data of the archive card selected in the Search folder dialog box.
Confirm this question with OK.
L 1.1 EN 23
Page 24

Card File Handler
Show/Hide Bookmarks
Operation
Editing drive sets
3.3 Editing drive sets
What is a drive set?
A drive set contains all data required for a specific target system, i.e.:
C the DDS binary file (*.bin) including the compiled IEC 61131 program
- and as an option -
C the GDC parameter set file (*.gdc) including the parameter settings (codes) of the
target system,
C additional user data, e.g. cam profiles or motion profiles.
X Tip!
You can add a comment to each drive set and provide that the card module
executes a Reset (origin) before the data is downloaded to the target system.
Reset (origin) resets all variables of the target system, including the RETAIN and
PERSISTENT variables to their initialisation value. The user program is deleted and
the control is reset to its original state.
Organisation of the drive sets
Just like the SmartMedia card of the card module, each archive card may contain up to 16
drive sets called "0" ... "F" in the default setting.
C The colour of the drive set icon depends on the usage of the drive set:
– Drive set is free.
– Drive set is used.
– Drive set is incomplete or invalid usage.
C The settings for a drive set selected from the archive tree can be entered in the Dialog
area.
C Each drive set has a separate sub-folder on the file level in which the files for the target
system are stored.
24 1.1 EN L
Page 25

What do you want to do?
Show/Hide Bookmarks
Renaming a drive set
Adding/removing a DDS binary file (E 26)
Adding/removing a GDC parameter set file (E 27)
Adding/removing user data (E 28)
Activating the option "Execute reset (origin) at download" (E 29)
Adding a comment to a drive set (E 29)
Deleting a drive set (E 30)
Loading a drive set from another archive (E 30)
3.3.1 Renaming a drive set
The hexadecimal numbers "0" ... "F" are used to designate the 16 drive sets of a card.
Card File Handler
Operation
Editing drive sets
C If you assign a DDS binary file to a drive set or import drive sets from a SmartMedia card
the program name will be added to the designation.
Example: 3 - program name
Note!
If you rename a drive set the corresponding sub-folder on the file level will be
renamed accordingly.
The hexadecimal numbers "0" ... "F" are always indicated and cannot be changed.
S How to rename a drive set:
1. Select the drive set to be renamed from the archive tree.
2. Click the name of the drive set once again in the archive tree or select the command
FileDrive setRename drive set.
3. Enter the new name in the Rename drive set dialog box and confirm your entry with
OK.
• The name must not include more than 215 characters.
• The following letters, digits and special characters are permissible: A..Z or a..z,
0..9 and $ & # ß % ’ ( ) - @ ^ !
• The name will be added to the hexadecimal number separated by a hyphen.
L 1.1 EN 25
Page 26

Card File Handler
Show/Hide Bookmarks
Operation
Editing drive sets
3.3.2 Adding/removing a DDS binary file
Adding a DDS binary file
This function is used to load an IEC 61131 program created with the Drive PLC Developer
Studio to the selected drive set.
C For the import into the selected target system, the IEC 61131 program must have been
properly compiled as a binary file (*.bin).
X Tip!
Use the command ProjectBuild to create a DDS binary file in the Drive PLC
Developer Studio.
If you go to ProjectOptions and activate the option Build GDC device description
in the Drive PLC Developer Studio the DDS binary file and a GDC device description
file (*.pdb) will be generated during compiling.
GDC device description files are required if you want to create GDC parameter set
files (*.gdc) with Global Drive Control.
Adding/removing a GDC parameter set file
(E 27)
S How to add a DDS binary file to a drive set:
1. Select the drive set to which you want to add the DDS binary file from the archive
tree.
2. Go to the Dialog area and click the icon to the right of the DDS binary file text
field.
3. Go to the Open DDS binary file dialog box, select the corresponding DDS binary file
(*.bin) and click Open.
Removing a DDS binary file
Note!
If you remove a DDS binary file from a drive set all other data (GDC parameter
set file, application data) will be removed from the drive set as well!
26 1.1 EN L
Page 27

S How to remove a DDS binary file from a drive set:
Show/Hide Bookmarks
1. Select the drive set from which you want to remove the DDS binary file from the
archive tree.
2. Go to the Dialog area and click the icon to the right of the DDS binary file text
field.
3. You will be asked if you really want to remove the DDS binary file. Confirm this
question with OK.
3.3.3 Adding/removing a GDC parameter set file
Adding a GDC parameter set file
After a DDS binary file has been added to the drive set, you can use Global Drive Control to
generate a parameter set file that matches the DDS binary file and add it to the drive set
(option).
Card File Handler
Operation
Editing drive sets
C If the GDC parameter set file is not contained in a drive set the current parameters of
the target system will remain unchanged when the data is downloaded with the card
module.
X Tip!
In Global Drive Control, the creation of a GDC parameter set file is based on a GDC
device description file (*.pdb) for the corresponding target system.
After the required parameters (codes) have been configured, select the GDC
command Drive parameters Write all parameters to file to generate the GDC
parameter set file (*.gdc).
S How to add a GDC parameter set file to a drive set:
1. Select the drive set to which you want to add the GDC parameter set file from the
archive tree.
2. Go to the Dialog area and click the icon to the right of the GDC parameter set
file text field.
• The function can only be activated if you have already added a DDS binary file
to the drive set.
L 1.1 EN 27
3. Go to the Open parameter file dialog box, select the corresponding GDC parameter
set file (*.gdc) and click Open.
• If the GDC parameter set file does not match the DDS binary file a corresponding
message will be displayed and the file will not be loaded.
Page 28

Card File Handler
Show/Hide Bookmarks
Operation
Editing drive sets
Removing a GDC parameter set file
S How to remove a GDC parameter set file from a drive set:
1. Select the drive set from which you want to remove the GDC parameter set file
from the archive tree.
2. Go to the Dialog area and click the icon to the right of the GDC parameter set
file text field.
3. You will be asked if you really want to remove the GDC parameter set file. Confirm
this question with OK.
3.3.4 Adding/removing user data
Adding user data
After a DDS binary file has been added to the drive set, you can add an *.lc9 file including
motion profiles or cam profile data to the drive set (option).
Note!
Ensure that the user data match the program because this will not be checked
automatically.
In the Drive PLC Developer Studio, you can use the CAM Support to add cam
profile data to your project. For detailed information, please read the
documentation for the Drive PLC Developer Studio.
S How to add user data to a drive set:
1. Select the drive set to which you want to add the user data from the archive tree.
2. Go to the Dialog area and click the icon to the right of the User data text field.
• The function can only be activated if you have already added a DDS binary file
to the drive set.
3. Go to the Open user data dialog box, select the corresponding *.lc9 file and click
Open.
28 1.1 EN L
Page 29

Removing user data
Show/Hide Bookmarks
S How to remove user data from a drive set:
1. Select the drive set from which you want to remove the user data from the archive
tree.
2. Go to the Dialog area and click the icon to the right of the User data text field.
3. You will be asked if you really want to remove the user data. Confirm this question
with OK.
3.3.5 Activating the option "Execute reset (origin) at download"
If the Execute reset (origin) at download checkbox is activated for a drive set in the dialog
the card module will execute a reset (origin) in the corresponding target system
area
before the data is downloaded.
Card File Handler
Operation
Editing drive sets
C Reset (origin) resets all variables of the target system, including the RETAIN and
PERSISTENT variables to their initialisation value. The user program is deleted and the
control is reset to its original state.
3.3.6 Adding a comment to a drive set
To each drive set you can add a comment of several lines, e.g. to save additional
information about the machine or drive task.
C When a new card is created, the date will be automatically saved as a comment. When
the Card File Handler is operated under Windows® 2000/XP, the user name will also be
entered as a comment.
C When drive sets are exported to a SmartMedia card, the comment will be saved on the
SmartMedia card and read again when the data is imported.
S How to add a comment to a drive set:
1. Select the corresponding drive set from the archive tree.
2. Go to the Dialog area and enter the desired comment in the Comment input field.
L 1.1 EN 29
Page 30

Card File Handler
Show/Hide Bookmarks
Operation
Editing drive sets
3.3.7 Deleting a drive set
If a drive set is deleted only the data contained in the drive set will be deleted. The drive set
folder will not be deleted.
C If the drive set has been renamed the name of the drive set will be reset to the standard
designation "0" ... "F".
C The function "Delete drive set" corresponds to the function "Remove DDS binary file".
S How to delete a drive set:
1. Select the corresponding drive set from the archive tree.
2. Go to the toolbar and click the icon.
3. You will be asked if you really want to delete the drive set. Confirm this question
with OK.
3.3.8 Loading a drive set from another archive
This function is used to copy a drive set from a freely selectable archive within your
computer environment to an archive card of the current archive.
Note!
The drive set selected from the archive tree will be completely overwritten with
the data of the drive set to be loaded!
S How to load a drive set into an archive:
1. Select the drive set to be overwritten with the data of the drive set to be loaded
from the archive tree.
2. Go to the toolbar and click the icon or select the command FileDrive
setLoad drive set.
3. Go to the Search folder dialog box, select the drive set to be loaded from your
computer environment and confirm your selection with OK.
• Only valid drive sets can be loaded.
4. You will be asked if you really want to overwrite the drive set selected from the
archive tree with the data of the drive set selected in the Search folder dialog box.
Confirm this question with OK.
30 1.1 EN L
Page 31

4 Appendix
Show/Hide Bookmarks
4.1 File structure
The file structure of the archives in the file system corresponds 1:1 to the hierarchical
structure of the archive tree:
Card File Handler
Appendix
File structure
Program directory of the Card File Handler
Root folder
Archive folder
Card folder
Drive set folder
Program directory
By default, "C:\Programs\Lenze\CardFileHandler..." is used as program directory for the
Card
File Handler. This selection can be changed when the Card File Handler is installed.
Root folder
The folder in which the archive folders are stored is called root folder.
X Tip!
The installation program of the Card File Handler automatically creates the
"Archives" root folder in the program directory of the Card File Handler. The root
folder also includes the archive folder for the archive indicated at the first start of
the Card File Handler.
L 1.1 EN 31
Page 32

Card File Handler
Show/Hide Bookmarks
Appendix
Lenze standard folder for program and parameter data
Archive folder
If you create a new archive in the Card File Handler an archive folder will be created in the
file system. The archive folder has the same name as the archive.
X Tip!
For a clear data management it is recommended to store all archive folders in a
shared root folder.
Card folder
If you create a new card in the Card File Handler a card folder will be created in the file
system. The card folder will have the same name as the card in the corresponding archive
folder.
Drive set folder
The card folder contains 16 drive set folders "A"..."F" in which the drive set files are saved.
C The drive set folders are automatically created when a new card is added.
Note!
If you rename an archive, a card or a drive set in the archive tree of the
Card File Handler the corresponding folder in the file system will be renamed
accordingly!
4.2 Lenze standard folder for program and parameter data
If you have installed the Drive PLC Developer Studio and Global Drive Control in the
standard directory provided in the installation program, you will find the corresponding
drive set files (*.bin, *.gdc, *.lc9) which you can assign to a drive set in the Card
in the following sub-folders.
File Handler
32 1.1 EN L
Page 33

4.3 Installation of program updates
Show/Hide Bookmarks
If you have installed an earlier version of the Card File Handler this version should be
uninstalled by using the system control.
Note!
The existing archives will be preserved after the uninstallation/reinstallation!
4.4 Supported SmartMedia card readers
The Card File Handler can be operated together with all commercial card readers (which
can, for instance, be connected to the
Note!
Card File Handler
Appendix
Installation of program updates
USB interface).
Please observe the instructions for the installation of the card reader provided by
the manufacturer!
X Tip!
Write down the letter for the drive the operating system has assigned to the Card
Reader. This information will be needed for the import and export of drive sets.
4.5 Supported SmartMedia memory cards
Just like the card module, the Card File Handler supports all SmartMedia cards with a
memory capacity
≥ 32 MB and a supply voltage of 3.3 V.
L 1.1 EN 33
Page 34

Card File Handler
Show/Hide Bookmarks
Glossary
5Glossary
A
AIF Abbreviation for Automation Interface: Lenze-specific interface on the target
Archive level Topmost level of the archive tree. When selecting the topmost element (ar-
Archive tree Hierarchical representation of the contents of an archive.
C
Card Represents a SmartMedia card in the archive. Just like a SmartMedia card,
Card File Handler Software which can be used to build up, organise and save card archives for
Card level Second level of the archive tree. When selecting a card from the archive tree,
Card module AIF module for the transfer of drive sets between a Lenze PLC and a SmartMe-
Card reader Device used to read data and information from memory cards, e.g. SmartMe-
system for the connection of additional peripherals (AIF modules).
chive) from the archive tree, you will change to the archive level. Here you can
execute all archive functions.
each card can contain up to 16 drive sets.
the SmartMedia memory cards of the Lenze card module.
you will change to the card level. Here you can execute all card functions.
dia card.
dia cards.
D
DDS Abbreviation for Drive PLC Developer Studio.
Device description File with the ending *.pdb, describes all parameters (codes) of the target sys-
Drive PLC Developer Studio Development environment for the creation of IEC 61131 programs for Lenze
Drive set Includes all data required by the target system: DDS binary file, GDC parame-
Drive set level Lowest (third) level of the archive tree. When selecting a drive set from the ar-
tem and is required by Global Drive Control for the creation of a parameter set
file.
PLCs.
ter set file (optional) and user data (optional).
chive tree, you will change to the drive set level. Here you can execute all drive
set functions.
G
GDC Abbreviation for Global Drive Control.
Global Drive Control Software for the commissioning and parameterization of the Lenze 8200 and
9300 drive series.
H
Hyperlink Highlighted reference which is activated by a mouse click.
34 1.1 EN L
Page 35

Card File Handler
Show/Hide Bookmarks
Glossary
P
PLC Abbreviation for Lenze PLC, e.g. Drive PLC or 9300 Servo PLC.
R
Reset (origin) Function which resets all variables, including RETAIN and PERSISTANT varia-
Root folder Parent folder of the archive on the file system level.
S
SmartMedia Memory card family for digital cameras and multi-media devices with a mem-
T
Target system Lenze PLC, e.g. Drive PLC or 9300 Servo PLC.
Title bar Bar at the top of the application window including the program icon and the
bles, in the target system to their initialisation value, deletes the user program
and resets the control to its original state.
ory capacity between 16 and 128 Mbytes (10/2003). SmartMedia cards are
half as big as cheque cards.
program name on the left and the window icons on the right.
U
USB Abbreviation for Universal Serial Bus: Serial bus system representing an easy-
User data Additional data (e.g. cam profile data) required by the IEC 61131 program.
to-use, universal interface for almost any kind of peripheral device.
W
Window icon Button at the right end of the title bar which can be used to change the size of
the window or to close the window.
L 1.1 EN 35
Page 36

Card File Handler
Show/Hide Bookmarks
Index
6Index
A
Adding a card to an archive 18
Adding a comment to a card 22
Adding a comment to a drive set 29
Adding/removing a DDS binary file 26
Adding/removing a GDC parameter set file 27
Adding/removing user data 28
Application information 7
Archive 10
Archive folder 32
Archive tree 10
C
Card 10
Card folder 32
Card reader 33
Conventions used 6
Copyright 2
Copyright information 2
Creating an archive 15
D
Deleting a drive set 30
Deleting an archive 16
Dialog area 12
Drive set 10
Drive set folder 32
Organisation of the drive sets 24
P
Program directory 31
Program updates 33
R
Removing a card from an archive 22
Renaming a card 18
Renaming a drive set 25
Renaming an archive 14
Root folder 31
S
Safety information 7
SmartMedia memory cards 33
T
Title bar 8
Toolbar 9
Trademarks 2
U
User interface 8
W
What is a drive set? 24
E
E-mail to Lenze 37
Execute reset (origin) at download 29
Exporting data to a SmartMedia card 21
F
Feedback to Lenze 37
File structure 31
I
Importing data from a SmartMedia card 19
Imprint 2
L
Layout of the safety information 7
Liability 2
Load archive card 23
Load drive set 30
M
Menu bar 9
O
Opening an archive 15
36 1.1 EN L
Page 37

Your opinion is important to us
)(('%$&.
Show/Hide Bookmarks
These Instructions were created to the best of our knowledge
and belief to give you the best possible support for handling
our product.
If you have suggestions for improvement, please e-mail us to:
feedback-docu@Lenze.de
Thank you for your support.
Your Lenze documentation team
L 37
 Loading...