


 Loading...
Lenovo 100e/300e 2nd Gen User Guide
Read this first
Before using this documentation and the product it supports, ensure that you read and understand the following:
•Appendix A “Important safety information” on page 37
•Safety and Warranty Guide
•Setup Guide
First Edition (January 2020)
© Copyright Lenovo 2020.
LIMITED AND RESTRICTED RIGHTS NOTICE: If data or software is delivered pursuant to a General Services Administration “GSA” contract, use, reproduction, or disclosure is subject to restrictions set forth in Contract No. GS- 35F-05925.

Contents
About this documentation . . . . . . . .iii
Chapter 1. Meet your computer . . . . . 1
Front . . . . . . . . . . . . . . . . . . . . 1
Base |
. . . . |
. . . |
. . . . . |
. . |
. |
. . . . |
. |
2 |
Left |
. . . . |
. . . |
. . . . . |
. . |
. |
. . . . |
. |
3 |
Right . . . . . . . . . . . . . . . . . . . . 5 Bottom . . . . . . . . . . . . . . . . . . . 6
Features and specifications . . . . . . . . . . . 7 Statement on USB transfer rate . . . . . . . . 8
Chapter 2. Get started with your computer . . . . . . . . . . . . . . . . . 9
Get started with Windows 10 . . . . . . . . . |
. |
9 |
Windows account . . . . . . . . . . . . |
. |
9 |
Windows user interface . . . . . . . . . . |
|
10 |
Windows label . . . . . . . . . . . . . |
|
11 |
Connect to networks . . . . . . . . . . . . . |
|
11 |
Use Lenovo Vantage . . . . . . . . . . . . . |
|
12 |
Interact with your computer . . . . . . . . . . |
|
13 |
Hotkeys . . . . . . . . . . . . . . . . |
|
13 |
Use the multi-touch screen (for Lenovo 300e |
|
|
2nd Gen only) . . . . . . . . . . . . . . |
|
14 |
Use multimedia . . . . . . . . . . . . . . . |
|
15 |
Use audio . . . . . . . . . . . . . . . |
|
15 |
Use the camera . . . . . . . . . . . . . |
|
16 |
Connect to an external display . . . . . . . |
|
16 |
Operating modes (for Lenovo 300e 2nd Gen |
|
|
only) . . . . . . . . . . . . . . . . . . . |
|
18 |
Lenovo Integrated Pen (for selected models of |
|
|
Lenovo 300e 2nd Gen) . . . . . . . . . . . . |
|
19 |
Chapter 3. Explore your computer . . |
21 |
Manage power . . . . . . . . . . . . . . . |
21 |
Check the battery status and temperature. . . 21 |
|
Charge the battery . . . . . . . . . . . . |
21 |
Maximize the battery life . . . . . . . . . |
21 |
Set power button functions . . . . . . . . |
21 |
Set the power plan . . . . . . . . . . . . |
22 |
Transfer data . . . . . . . . . . . . . . . . |
22 |
Connect a Bluetooth-enabled device. . . . . |
22 |
Use a MicroSD card . . . . . . . . . . . |
22 |
Airplane mode . . . . . . . . . . . . . . . |
23 |
Chapter 4. Secure your computer |
|
and information . . . . . . . . . . . . |
25 |
Lock the computer . . . . . . . . . . . . . |
25 |
Use passwords . . . . . . . . . . . . . . . |
25 |
Password types . . . . . . . . . . . . . |
25 |
Set administrator password . . . . . . . . |
26 |
Change or remove administrator password . . |
26 |
Set user password . . . . . . . . . . . . |
26 |
Enable power-on password . . . . . . . . |
27 |
Set hard disk password . . . . . . . . . . |
27 |
Change or remove hard disk password . . . . 27 |
|
Use firewalls and antivirus programs. . . . . . . |
28 |
Chapter 5. Configure advanced
settings. . . . . . . . . . . . . . . . . 29
UEFI/BIOS . . . . . . . . . . . . . . . . . |
29 |
What is UEFI/BIOS setup utility . . . . . . . |
29 |
Start the UEFI BIOS setup utility . . . . . . |
29 |
Change the startup sequence . . . . . . . |
29 |
Set the system date and time. . . . . . . . |
29 |
Enable/Disable hotkey mode . . . . . . . . |
29 |
Enable/Disable always-on . . . . . . . . . |
30 |
Update UEFI/BIOS . . . . . . . . . . . . |
30 |
Recovery information . . . . . . . . . . . . |
30 |
Reset your computer . . . . . . . . . . . |
30 |
Use advanced options . . . . . . . . . . |
30 |
Windows automatic recovery. . . . . . . . |
30 |
Create and use a recovery USB device . . . . |
31 |
Chapter 6. Help and support . . . . . |
33 |
Frequently asked questions . . . . . . . . . . |
33 |
Self-help resources . . . . . . . . . . . . . |
34 |
Call Lenovo . . . . . . . . . . . . . . . . |
35 |
Before you contact Lenovo . . . . . . . . |
35 |
Lenovo Customer Support Center . . . . . . |
35 |
Purchase additional services. . . . . . . . . . |
36 |
Appendix A. Important safety information . . . . . . . . . . . . . . . 37
Appendix B. Accessibility and ergonomic information . . . . . . . . 51
Appendix C. Compliance
information . . . . . . . . . . . . . . . 55
Appendix D. Notices and
trademarks . . . . . . . . . . . . . . . 67
© Copyright Lenovo 2020 |
i |
ii Lenovo 100e/300e 2nd Gen User Guide

About this documentation
•Illustrations in this documentation might look different from your product. Please refer to the actual product.
•Depending on the model, some optional accessories, features, and software programs might not be available on your computer.
•Depending on the version of operating systems and programs, some user interface instructions might not be applicable to your computer.
•Documentation content is subject to change without notice. Lenovo makes constant improvements on the
documentation of your computer, including this User Guide To get the latest documentation, go to https:// |
. |
support.lenovo.com. |
|
•Microsoft® makes periodic feature changes to the Windows® operating system through Windows Update. As a result, some information in this documentation might become outdated. Refer to Microsoft resources for the latest information.
© Copyright Lenovo 2020 |
iii |
iv Lenovo 100e/300e 2nd Gen User Guide
Chapter 1. Meet your computer
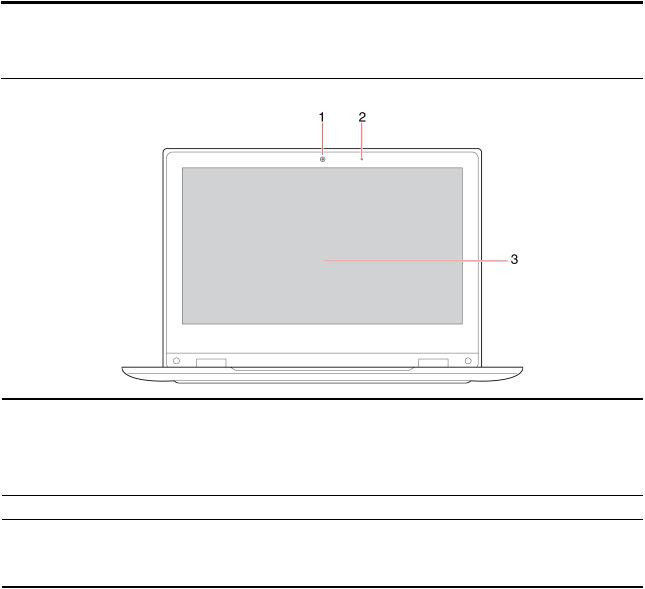
Front
1.Front camera
2.Microphone
3.Screen
Take pictures or record videos by clicking Camera from the Start menu. The indicator next to the camera is on when the camera is in use.
If you use other apps that support photographing, video chatting, and video conference, the camera starts automatically when you enable the camerarequired feature from the app.
Captures or records sound and voice.
Displays text, graphics, and videos.
Select models support multi-touch function. See “Use the multi-touch screen (for Lenovo 300e 2nd Gen only)” on page 14.
© Copyright Lenovo 2020 |
1 |
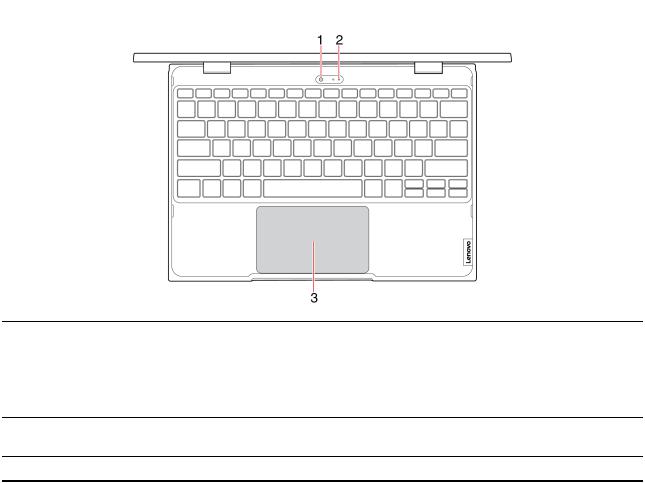
Base
1.World-Facing camera*
2.Microphone*
3.Touchpad
Take pictures or record videos by opening the Start menu and clicking Camera Change camera  .
.
If you use other apps that support photographing, video chatting, and video conference, the camera starts automatically when you enable the camerarequired feature from the app.
Captures or records sound and voice.
Note: This microphone is only available when the World-Facing camera is in use.
Performs finger touch and all the functions of a traditional mouse.
* for selected models of Lenovo 300e 2nd Gen
2 Lenovo 100e/300e 2nd Gen User Guide
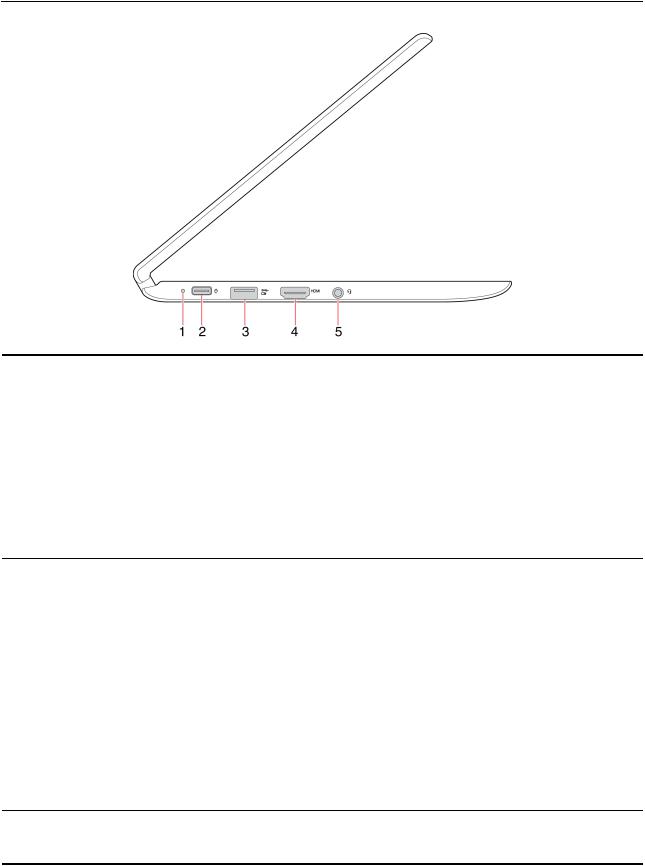
Left
1. Battery/Charging status indicator
2. USB-C connector / Power connector
3. Always On USB 3.1 connector Gen 1
This indicator shows whether the ac power is connected to the computer and the battery power status of the computer.
• Connected to ac power:
– Solid white (battery power 80%–100%)
– Slow blinking white (battery power 20%–80%)
– Slow blinking amber (battery power 1%–20%)
• Not connected to ac power:
– Off (battery power 20%–100%)
– Solid amber (battery power 5%–20%)
– Fast blinking amber (battery power 1%–5%)
• Charges your computer.
• Charges USB-C compatible devices with the output voltage and current of 5 V and 3 A.
• Transfers data at USB 3.1 speed, up to 5 Gbps.
• Connects to an external display.
– USB-C to VGA: 1900 × 1200 pixels, 60 Hz
™
– USB-C to DP: 3840 × 2160 pixels, 60 Hz
•Connects to USB-C accessories to expand computer functionality. To purchase USB-C accessories, go to https://www.lenovo.com/accessories
Note: When the battery power is below 10%, the connected USB-C accessories might not work correctly.
This connector also works as the power connector. Connect the computer to ac power with the shipped USB-C power adapter and power cord.
To charge the USB-compatible devices when your computer is off, in sleep mode, or in hibernation mode, enable the Always On USB feature on your computer. See “Enable/Disable always-on” on page 30.
Chapter 1. Meet your computer 3

4.HDMI connector
5.Audio connector
Connect to a compatible™ digital audio device or video monitor, such as an HDTV.
Connect headphones or a headset with a 3.5-mm (0.14-inch) and 4-pole plug to listen to the sound from the computer.
Note: The audio connector does not support conventional microphones.
4 Lenovo 100e/300e 2nd Gen User Guide
Right
1.Pen slot*
2.Volume up/down button*
3.Power button
4.USB 3.1 connector Gen 1
5.MicroSD card slot
6.Mini security-lock slot
*for Lenovo 300e 2nd Gen only
For Lenovo 300e 2nd Gen, selected models are equipped with Lenovo Integrated Pen (an electronic pen). Use the pen slot to store Lenovo Integrated Pen.
Increase/decrease the volume level.
Press to turn on the computer or put the computer to sleep mode.
To turn off the computer, open the Start menu, click |
Power and then click |
Shut down |
. |
The indicator on the power button shows the system status of your computer.
• |
On The computer is on. : |
|
• |
Off The computer is off or in :hibernation mode. |
|
• |
Blinking The computer is in sleep mode. |
: |
Connect to USB-compatible devices, such as a USB keyboard, USB mouse, USB storage device, or USB printer.
Insert a microSD card for data access or storage.
Lock your computer to a desk, table, or other fixtures through a compatible security cable lock.
Chapter 1. Meet your computer 5
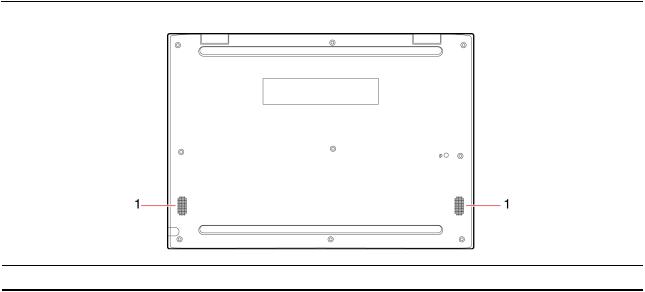
Bottom
1. Speakers |
Produce sound. |
6 Lenovo 100e/300e 2nd Gen User Guide

Features and specifications
Dimensions
Power source (ac power adapter)
Battery
Microprocessor
Memory
Storage device
Display
Keyboard
Connectors and slots
Security features
Wireless features
Others
•Length: 290 mm (11.4 inches)
•Width: 204 mm (8.1 inches)
•Thickness:
–Lenovo 100e 2nd Gen: 19.9 mm (0.78 inches)
–Lenovo 300e 2nd Gen: 20.85 mm (0.82 inches)
•Sine-wave input at 50 Hz to 60 Hz
•Input rating of the ac power adapter: 100 V to 240 V ac, 50 Hz to 60 Hz
•42 Wh
•3 cells
To view the microprocessor information of your computer, right-click the Start button and then click System.
Low Power Double data rate (LPDDR) 4, on-board memory
M.2 solid-state drive or on-board eMMC
•Display size: 294.6 mm (11.6 inches)
•Display resolution: 1366 x 768 pixels
•Multi-touch technology (for Lenovo 300e 2nd Gen only)
•Function keys
•Six-row keyboard
•USB-C connector/Power connector
•Two USB 3.1 connectors Gen 1 (including one Always On USB 3.1 connector Gen 1)
•Audio connector
•HDMI connector
•MicroSD card slot
•Mini security-lock slot
•Pen slot (for selected models of Lenovo 300e 2nd Gen)
•Password
•Mini security-lock slot
•Trusted Platform Module (TPM)
•Bluetooth
•Wireless LAN
•Front camera
•World-Facing camera (for selected models of Lenovo 300e 2nd Gen)
•Microphones
•Speakers
Chapter 1. Meet your computer 7

Note: The battery capacity is the typical or average capacity as measured in a specific test environment. Capacities measured in other environments may differ but are no lower than the rated capacity (see product label).
Statement on USB transfer rate
Depending on many factors such as the processing capability of the host and peripheral devices, file attributes, and other factors related to system configuration and operating environments, the actual transfer rate using the various USB connectors on this device will vary and will be slower than the data rate listed below for each corresponding device.
USB device |
Data rate (Gbit/s) |
3.1 Gen 1 |
5 |
3.1 Gen 2 |
10 |
3.2 |
20 |
8 Lenovo 100e/300e 2nd Gen User Guide

Chapter 2. Get started with your computer
Get started with Windows 10
Learn the basics of Windows 10 and start working with it right away. For more information about Windows 10, see the Windows help information.
Windows account
To use the Windows operating system, a user account is required. It can be either a Windows user account or a Microsoft account.
Windows user account
When you start Windows for the first time, you are prompted to create a Windows user account. This first account you created is of the “Administrator” type. With an Administrator account, you can create additional user accounts or change account types by doing the following:
1.Open the Start menu and select Settings Accounts Family & other people
2.Follow the on-screen instructions.
Microsoft account
You can also sign in to the Windows operating system with a Microsoft account.
To create a Microsoft account, go to the Microsoft sign-up page at https://signup.live.com and follow the onscreen instructions.
With a Microsoft account, you can:
•Enjoy one-time signing in if you are using other Microsoft services, such as OneDrive, Skype, and Outlook. com.
•Sync personalized settings across other Windows-based devices.
© Copyright Lenovo 2020 |
9 |
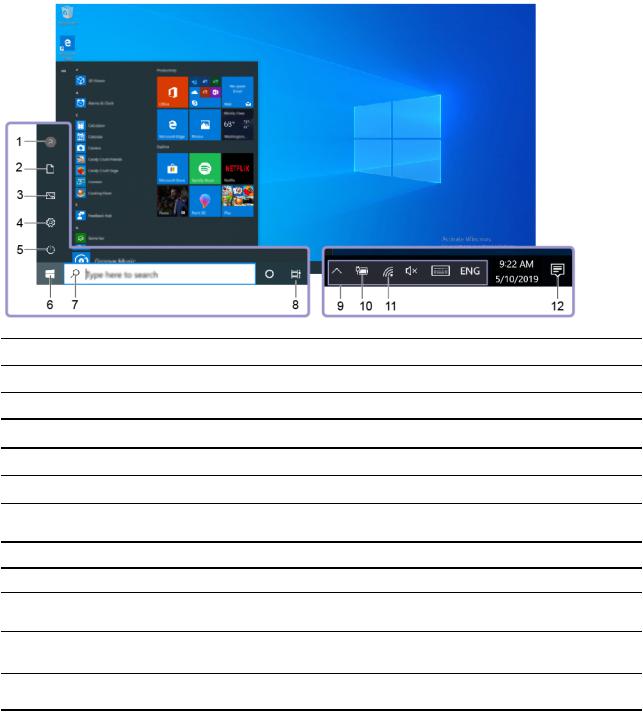
Windows user interface
1.Account 
2.Documents 
3.Pictures 
4.Settings 
5.Power 
6.Start button 
7.Windows Search 
8.Task View 
9.Windows notification area
10.Battery status icon
11.Network icon
12.Action center 
Open the Start menu
Change account settings, lock the computer, or sign out from the current account.
Open the Documents folder, a default folder to save your received files.
Open the Pictures folder, a default folder to save your received pictures.
Launch Settings.
Shut down, restart, or put the computer into sleep mode.
Open the Start menu.
Type what you are looking for in the search box and get search results from your computer and the Web.
Display all opened apps and switch among them.
Display notifications and status of some features.
Display power status and change battery or power settings. When your computer is not connected to ac power, the icon changes to  .
.
Connect to an available wireless network and display the network status. When connected to a wired network, the icon changes to  .
.
Display the latest notifications from apps and provide quick access to some features.
•Click the Start button.
•Press the Windows logo key on the keyboard.
Access Control Panel
• Open the Start menu and click Windows System Control Panel |
. |
10 Lenovo 100e/300e 2nd Gen User Guide

• Use Windows Search.
Launch an app
•Open the Start menu and select the app you want to launch.
•Use Windows Search.
Windows label
Your computer might have a Windows 10 Genuine Microsoft label affixed to its cover depending on the following factors:
•Your geographic location
•Edition of Windows 10 that is preinstalled
Go to https://www.microsoft.com/en-us/howtotell/Hardware.aspx for illustrations of the various types of Genuine Microsoft labels.
•In the People’s Republic of China, the Genuine Microsoft label is required on all computer models preinstalled with any version of Windows 10.
•In other countries and regions, the Genuine Microsoft label is required only on computer models licensed for Windows 10 Pro.
The absence of a Genuine Microsoft label does not indicate that the preinstalled Windows version is not genuine. For details on how to tell whether your preinstalled Windows product is genuine, refer to the information provided by Microsoft at https://www.microsoft.com/en-us/howtotell/default.aspx
There are no external, visual indicators of the Product ID or Windows version for which the computer is licensed. Instead, the Product ID is recorded in the computer firmware. Whenever a Windows 10 product is installed, the installation program checks the computer firmware for a valid, matching Product ID to complete the activation.
In some cases, an earlier Windows version might be preinstalled under the terms of the Windows 10 Pro license downgrade rights.
Connect to networks
Your computer helps you connect to the world through a wireless network.
1.Click the network icon in the Windows notification area. A list of available wireless networks is displayed.
2.Select a network to connect to. Provide required information if needed.
Chapter 2. Get started with your computer 11

Use Lenovo Vantage
The preinstalled Lenovo Vantage is a customized one-stop solution to help you maintain your computer with automated updates and fixes, configure hardware settings, and get personalized support.
Access Lenovo Vantage
Open the Start menu and click Lenovo Vantage You also can type Lenovo Vantage in the search box.
To download the latest version of Lenovo Vantage, go to Microsoft Store and search by the app name.
Key features
Lenovo Vantage enables you to:
•Know the device status easily and customize device settings.
•Download and install UEFI BIOS, firmware, and driver updates to keep your computer up-to-date.
•Monitor your computer health, and secure your computer against outside threats.
•Look up warranty status (online).
•Access User Guide and helpful articles.
Notes:
•The available features vary depending on the computer model.
•Lenovo Vantage makes periodic updates of the features to keep improving your experience with your computer. The description of features might be different from that on your actual user interface.
12 Lenovo 100e/300e 2nd Gen User Guide
Interact with your computer
Your computer provides you various ways to navigate the screen.
Hotkeys
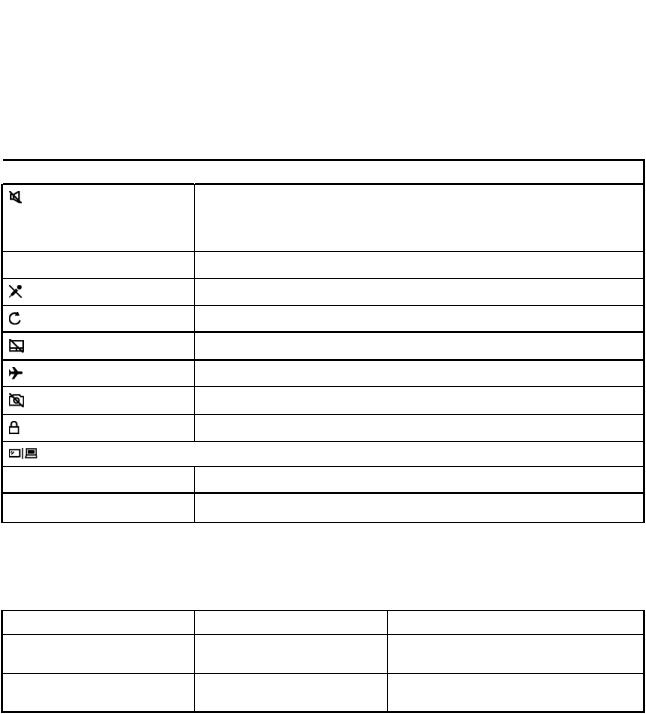
Some keys on the keyboard are printed with icons. These keys are called hotkeys and can be pressed alone or in combination with the Fn key to access certain Windows functions or settings quickly. The functions of hotkeys are symbolized by the icons printed on them.
 Hotkey
 /
/ 
 /
/ 
Fn + 
 Function
Mutes/Unmutes the computer.
If you mute the computer and turn off your computer, the speakers remain muted when you turn on your computer.
Decreases/Increases volume.
Enables/Disables the microphones.
Refreshes the current window.
Enables/Disables the touchpad.
Turns on/off airplane mode.
Enables/Disables the camera.
Locks the current user account.
 Manages external displays.
Decreases/Increases display brightness.
Equal the Home key.
Hotkey mode
Some hotkeys share keys with functions keys (F1 to F12). The hotkey mode is a UEFI/BIOS setting that changes how hotkeys (or function keys) are used.
Hotkey mode setting |
How to use hotkeys |
How to use function keys |
Disabled |
Hold down the Fn key and press |
Press the function keys directly. |
|
one of the hotkeys. |
|
Enabled |
Press the hotkeys directly. |
Hold down the Fn key and press one of the |
|
|
function keys. |
Note: Hotkeys that do not share keys with function keys are not affected by the hotkey mode setting. They should always be used with the Fn key.
Chapter 2. Get started with your computer 13

Use the multi-touch screen (for Lenovo 300e 2nd Gen only)
The display of Lenovo 300e 2nd Gen supports the multi-touch function. You can navigate the screen with simple touch gestures.
Note: Some gestures might not be available depending on the app you use.
Tap once
•From the Start menu: Open an app or item.
•From the desktop: Select an app or item.
•In an open app: Perform an action such as Copy Save and
Delete depending on the app. |
, |
Tap twice quickly
Open an app or item from the desktop.
Tap and hold
Open a shortcut menu.
Slide
Scroll through items, such as lists, pages, and photos.
Drag an item to the location you want
Move an object.
Move two fingers closer together
Zoom out.
14 Lenovo 100e/300e 2nd Gen User Guide
Move two fingers farther apart
Zoom in.
Swipe in from the right edge
Open the action center to see your notifications and quick actions.
Swipe in from the left edge
View all your open windows in task view.
•Swipe downwards shortly from the top edge (for full-screened app or when your computer is in the tablet mode)
Show a hidden title bar.
•Swipe in from the top edge to the bottom edge (when your computer is in the tablet mode)
Close the current app.
Tips
•Turn off the computer before cleaning the multi-touch screen.
•Use a dry, soft, and lint-free cloth or a piece of absorbent cotton to remove fingerprints or dust from the multi-touch screen. Do not apply solvents to the cloth.
•The multi-touch screen is a glass panel covered with a plastic film. Do not apply pressure or place any metallic object on the screen, which might damage the touch panel or cause it to malfunction.
•Do not use fingernails, gloved fingers, or inanimate objects for input on the screen.
•Regularly calibrate the accuracy of the finger input to avoid a discrepancy.
Use multimedia
Use your computer for business or entertainment with the built-in components (camera, speakers, and audio features) or connected external devices (an external projector, monitor, and HDTV).
Use audio
To enhance your listening experience, connect speakers, headphones, or a headset with a 3.5-mm (0.14inch) and 4-pole plug to the audio connector.
Chapter 2. Get started with your computer 15

Change the sound settings
1.Go to Control Panel and view by category.
2.Click Hardware and Sound Sound.
3.Change the settings as you prefer.
Use the camera
Select models are equipped with two cameras, the front camera and World-Facing camera. For the locations of the cameras, see “Front” on page 1 and “Base” on page 2.
Depending on the operating mode of your computer, select your desired camera.
•Front camera:
1.Open the Start menu and click Camera.
2.Click the camera icon  to take photos. Click the video icon
  to record videos.
•World-Facing camera:
1.Open the Start menu and click Camera Change camera  .
.
2.Click the camera icon  to take photos. Click the video icon
  to record videos.
Notes:
•To switch from photo mode to video mode, click Switch to Video mode  .
.
•To use the front camera after you have launched the World-Facing camera, click Change camera  .
.
Connect to an external display
Connect your computer to a projector or a monitor to give presentations or expand your workspace.
Connect a wired display
1.Connect the external display to an appropriate video connector on your computer, such as the HDMI connector.
2.Connect the external display to an electrical outlet.
3.Turn on the external display.
If your computer cannot detect the external display, right-click a blank area on the desktop, and then click
Display settings Detect.
Supported resolution
Your computer supports the following video resolution, if the external display also supports that resolution.
Connect the external display to |
Supported resolution |
the USB-C connector |
Up to 3840 x 2160 pixels / 60 Hz |
the HDMI connector |
Up to 3840 x 2160 pixels / 30 Hz |
Connect a wireless display (for computers and external displays supporting Miracast®)
•Open the Start menu, and then click Settings Devices Bluetooth & other devices Add Bluetooth or other device Wireless display or dock.
16 Lenovo 100e/300e 2nd Gen User Guide

•Click the action center icon  in the Windows notification area and click Connect Select the wireless display and follow the on-screen instructions.
Set the display mode |
|
||
Press |
and then select a display mode as you prefer. |
|
|
• |
PC screen only Displays the video output only on your computer: screen. |
|
|
|
Note: Depending on the situation, you might see Disconnect PC screen only Computer only or |
, |
|
|
Disconnect projector |
. |
|
• |
Duplicate Displays the same video output on both your computer screen and an external display. |
: |
|
•Extend Extends the video output from your computer display to an external: display. You can drag and move items between the two displays.
•Second screen only Displays the video output only on an external: display.
Note: Depending on the situation, you might see Projector only or Second screen only
If you show programs using DirectDraw or Direct3D® in full-screen mode, only the main display shows the video output.
Change display settings
1.Right-click a blank area on the desktop and select Display settings
2.Select the display that you want to configure.
3.Change display settings as you prefer.
You can change the settings for both the computer display and the external display. For example, you can define which one is the main display and which one is the secondary display. You also can change the resolution and orientation.
Note: If you set a higher resolution for the computer display than the external display, only part of the screen can be displayed on the external display.
Chapter 2. Get started with your computer 17
Loading...