


Key to signs used in this manual
Prohibition: Dangerous operations
Danger: Watch out for high risks
Caution: Watch out for medium risks
Attention: Pay attention to low risks
Recommendation: Helpful tips
|
|
|
|
|
|
|
|
|
|
|
|
|
|
|
|
31031422 Greenland UG_EN.indd 1 |
|
2007.8.20 4:58:28 PM |
|
|
|
||
|
|
||||||
|
|
|
|
|
|
|
|
|
|
|
|
|
|
|
|
|
|
|
|
|
|
|
|
31031422 Greenland UG_EN.indd 2 |
|
2007.8.20 4:58:28 PM |
|
|
|
||
|
|
||||||
|
|
|
|
|
|
|
|

Table of contents
Key to signs used in this manual |
|
|
Chapter 1 Instructions for using computer hardware.................... |
1 |
|
1.1 |
Front View of the Chassis................................................................. |
2 |
1.2 |
Rear view of the chassis................................................................... |
4 |
1.3 |
Speaker ........................................................................................... |
7 |
1.4 |
Notes on computer cabling and installation...................................... |
7 |
1.5 |
Keyboard......................................................................................... |
8 |
1.6 |
Power Dial ....................................................................................... |
9 |
Chapter 2 Lenovo Computer Rescue System Operation |
|
|
Instruction....................................................................... |
13 |
|
Note about service partition ................................................................ |
14 |
|
2.1 |
Installing Drivers and Software Shipped with Computer ................. |
14 |
2.2 |
OneKey Recovery ......................................................................... |
15 |
2.3 |
File Management .......................................................................... |
18 |
2.4 |
OneKey Antivirus............................................................................ |
19 |
Chapter 3 Using the software......................................................... |
23 |
|
3.1 |
Power2Go — Burning Discs .......................................................... |
24 |
3.2 |
WinDVD......................................................................................... |
25 |
3.3 |
PC-cillin ......................................................................................... |
26 |
3.4 |
Intel Viiv Media Library (Only for the computer which have the Intel |
|
|
Viiv Media Library).......................................................................... |
27 |
Chapter 4 System maintenance and recovery.............................. |
29 |
|
4.1 |
Restoring the system ..................................................................... |
30 |
4.2 |
Cleaning up the disk ...................................................................... |
30 |
4.3 |
Checking for, and correcting disk errors......................................... |
31 |
|
Table of contents |
1 |
|
|
|
|
|
|
|
|
|
|
|
|
|
|
|
|
31031422 Greenland UG_EN.indd 1 |
|
2007.8.20 4:58:29 PM |
|
|
|
||
|
|
||||||
|
|
|
|
|
|
|
|

4.4 Defragmenting the disk(s)............................................................... |
31 |
|
4.5 |
Performing daily maintenance tasks............................................... |
31 |
Chapter 5 Troubleshooting and Confirming Setup....................... |
33 |
|
5.1 |
Troubleshooting display problems .................................................. |
34 |
5.2 |
Troubleshooting audio problems .................................................... |
34 |
5.3 |
Troubleshooting software problems................................................ |
35 |
5.4 |
Troubleshooting problems with optical drives and hard disks.......... |
36 |
5.5 |
Special considerations for troubleshooting Windows...................... |
37 |
2Table of contents
|
|
|
|
|
|
|
|
|
|
|
|
|
|
|
|
31031422 Greenland UG_EN.indd 2 |
|
2007.8.20 4:58:29 PM |
|
|
|
||
|
|
||||||
|
|
|
|
|
|
|
|

Chapter Instructions for using computer hardware
This chapter is organized under the following topics:
ÿFront view of the chassis (Instruction for the use of buttons and functional keys on the front panel of the chassis)
ÿRear view of the chassis (Instruction for the use of all I/O interfaces on the rear panel of the chassis)
ÿConnection of the speakers
ÿNotes on computer cabling and installation
ÿKeyboard
ÿUsing the Power dial
These topics describe some of the operations commonly performed during routine use of the computer, including the proper connection of components. Please read it carefully.
The description of the TV card in this manual is only used for the machines which have the TV card. It is invalid for those machines which do not have TV card.
 Note: The configuration of your computer model may vary slightly from the illustrations used in this document.
1
2
3
4
5
Lenovo 3000K User Guide |
1 |
|
|
|
|
|
|
|
|
|
|
|
|
|
|
|
|
31031422 Greenland UG_EN.indd 1 |
|
2007.8.20 4:57:57 PM |
|
|
|
||
|
|
||||||
|
|
|
|
|
|
|
|
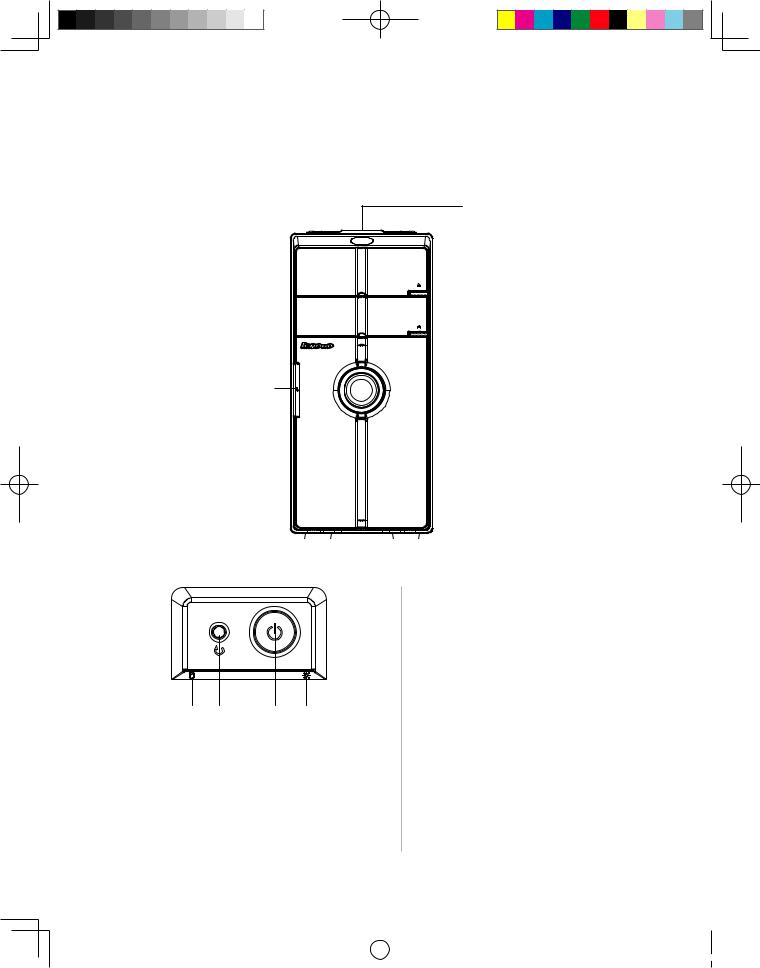
1.1 Front View of the Chassis
Instructions for the use of buttons and functional keys that are located at the front of the computer.
F-1
F-2
F-1 Top Mounted Buttons: Including power switch and reset button.
[1-1] Reset button: Press this button to restart the computer forcibly. Use this button only when absolutely necessary.
[1-2] Power switch: Press this button to turn the computer on or off, or,
if the Power Option in the Control [1-3] [1-1] [1-2] [1-4] Panel has been set to allow it,
to hibernate or wake up the computer.
[1-3] Hard Disk Drive Indicator:
Indicates the read/write operations of the hard disk.
[1-4] Power indicator: Identifies the on/ off power status.
2Lenovo 3000K User Guide
|
|
|
|
|
|
|
|
|
|
|
|
|
|
|
|
31031422 Greenland UG_EN.indd 2 |
|
2007.8.20 4:57:58 PM |
|
|
|
||
|
|
||||||
|
|
|
|
|
|
|
|

F-2 Front Digital Panel: Open the front digital panel. You can now see the front digital connectors such as USB:
CF/MD
SM
[D-1]
Pro MS/MS |
SD/MMC |
[D-2]
[D-5]
[D-4]
[D-2]
[D-3]
D-1 Memory card reader Connector: Able to read/write data from CF, MD, MS Pro, SD, MMC, SM and MS Duo memory cards.
D-2 USB Connectors: To connect USB devices.
D-3 1394 Connector: To connect devices with 1394 connector. (Only some models are equipped with this connector.)
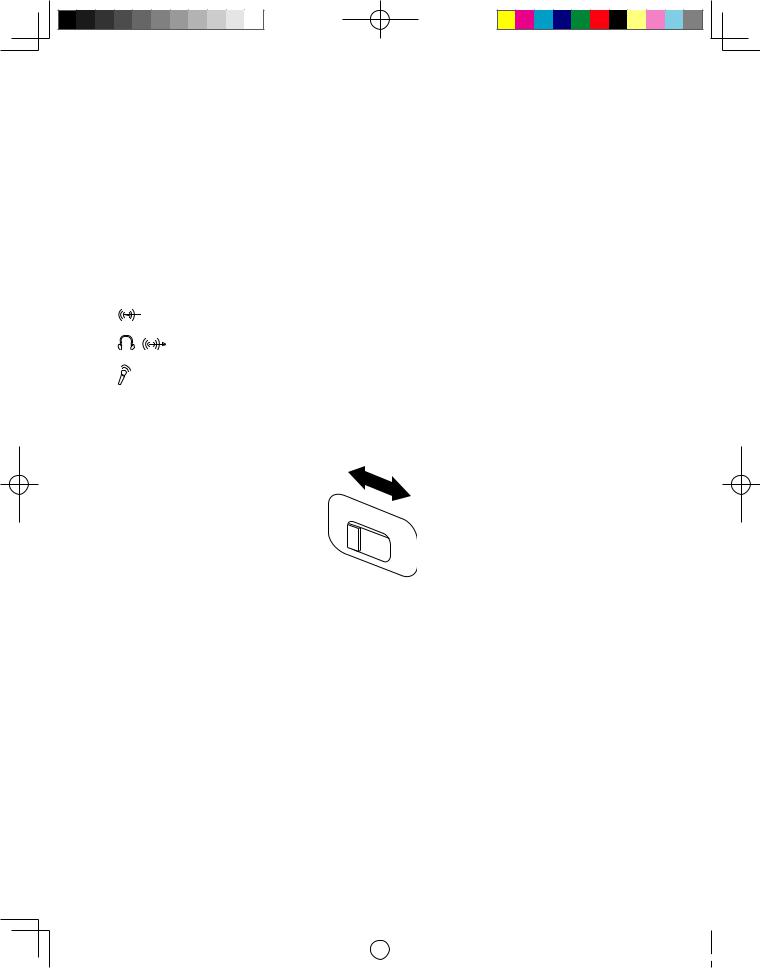
D-4 Speakers/Headphones Connector: To connect speakers or headphones. If it is necessary to connect the headphones, remove the speaker plug and insert the headphones plug.
D-5 Microphone Connector: To connect the microphone and pass the microphone audio input to the computer.
Lenovo 3000K User Guide |
3 |
|
|
|
|
|
|
|
|
|
|
|
|
|
|
|
|
31031422 Greenland UG_EN.indd 3 |
|
2007.8.20 4:57:59 PM |
|
|
|
||
|
|
||||||
|
|
|
|
|
|
|
|
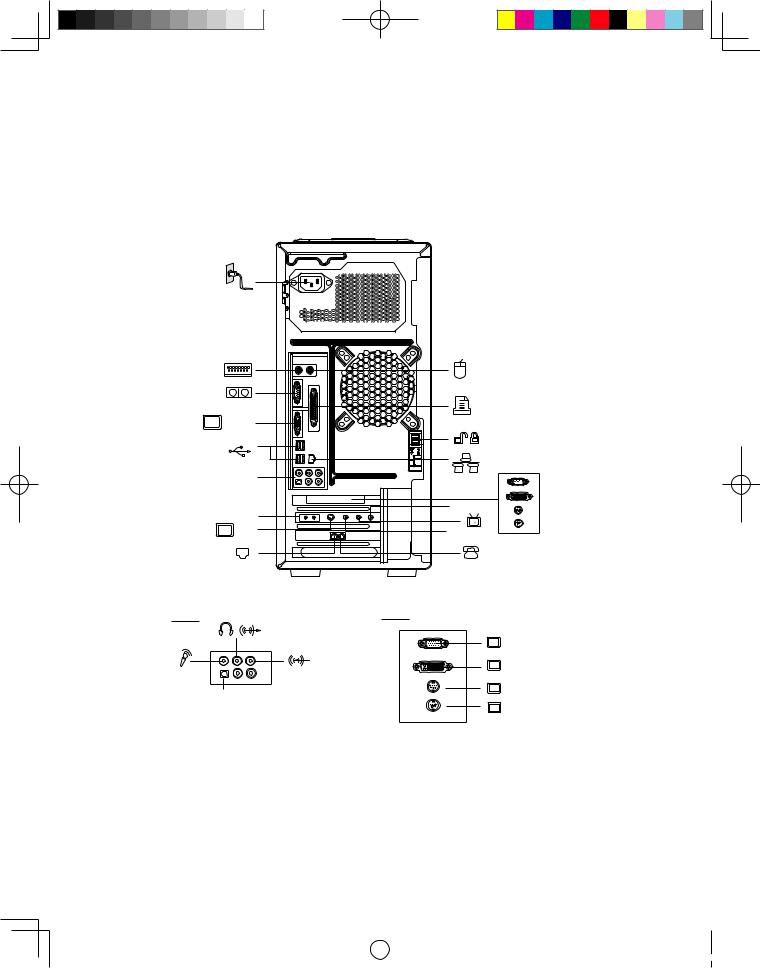
1.2 Rear view of the chassis
Instructions for the use of all I/O interfaces on the rear panel of the computer.
The following illustrations show connections located at the rear of some computer models. The locations of connectors on your computer will be similar to, but possibly not identical to these. Following the illustrations is a key that explains the symbol callouts used in the figures.
VGA-1 |
|
A-2 |
V-2 |
L&R |
FM |
|
|
S-3 |
ANT IN |
A-2 |
|
V-2 |
|
|
X-2 |
|
|
DVI |
|
SPDIF |
S-1 |
|
S-2 |
|
|
|
V-2 ——— The external VGA Card may have some of these connectors, but not have all of them. Use the correct connector according to the monitor you used.
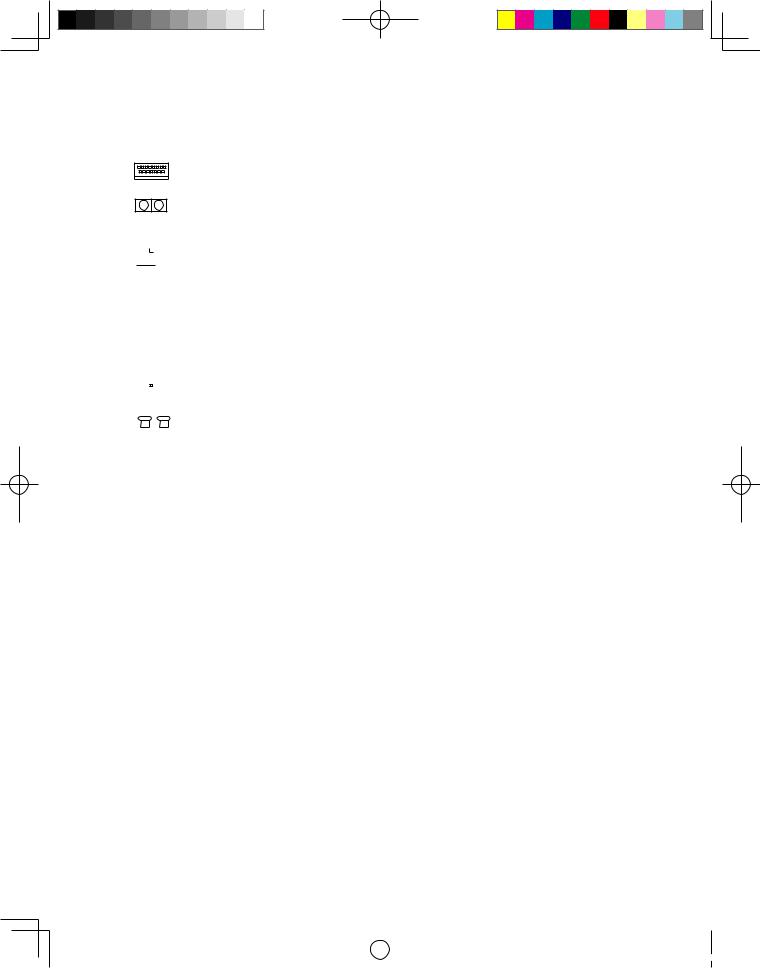
Key to symbols used in the above illustrations of the rear of the chassis:
 ——— Power Connector: To supply power to the computer
4Lenovo 3000K User Guide
|
|
|
|
|
|
|
|
|
|
|
|
|
|
|
|
31031422 Greenland UG_EN.indd 4 |
|
2007.8.20 4:58:00 PM |
|
|
|
||
|
|
||||||
|
|
|
|
|
|
|
|
 ———— PS/2 Mouse Connector: To connect a mouse having a PS/2 connector
—— PS/2 Keyboard Connector: To connect a keyboard having a PS/2 connector
—— Serial Connector: To connect devices requiring a serial connection (COM Connector)
 ——— Parallel Connector: To connect devices requiring a parallel connection
 VGA-1— On-board VGA Card Connector: To connect with the signal cable of a monitor.
On computer models that have an external graphics card, on-board graphics card signals are shielded and there are no VGA signal outputs - some models are equipped with this connector.


 ——— USB Connector: To connect USB devices.
 —— Ethernet Connector: To connect LAN or broadband network devices.
 X-2 —— External VGA Card Connector: To connect with the signal cable of a monitor. It
connects with the data cable of the monitor. (Some models are equipped with this connector.)
 DVI —— External DVI Card Connector: To connect to the data cable of the DVI connector. (Some models are equipped with this connector)
 S-1 —— S Video Connector: To connect the data cable of the S video. (You cannot connect
with the data cable of the S video provided with the computer.) Some models are equipped with this connector.
 S-2 —— S Video Connector: To connect the data cable of the S video. (You cannot connect
with the data cable of the S video provided with the computer.) Some models are equipped with this connector.
 S-3 —— S Video Connector: To connect the data cable of the S video. (You can connect
with the data cable of S video provided in the computer.) Some models are equipped with this connector.
FM———— FM Antenna Connector: To connect an FM antenna provided with the computer. (Some models are equipped with this connector.)
 ———— TV Antenna Connector: To connect the signal input cable for the CATV. (Some
Lenovo 3000K User Guide |
5 |
|
|
|
|
|
|
|
|
|
|
|
|
|
|
|
|
31031422 Greenland UG_EN.indd 5 |
|
2007.8.20 4:58:02 PM |
|
|
|
||
|
|
||||||
|
|
|
|
|
|
|
|
models are equipped with this connector)
— ANT-IN Connector: To connect the digital signal input cable. (Some models are equipped with this connector)
L&R ——— Left and right audio connector: Audio input connector. (Some models are equipped with this connector)
 ——— Chassis Side Lock: After installing the side panel of the chassis, push the lock upward to lock the side panel in place. To remove the side panel, depress the lock first.
——— Audio Line-in Connector: To connect audio input to the computer.
— Audio Line-out Connector: To connect to the speakers or headphones.
———— Microphone Jack: To connect to audio input from a microphone.
SPDIF—— SPDIF Audio Line-out Connector: Output the SPDIF audio signal.
Voltage — selection switch (Some models are equipped with this switch)
 0 1 1
0 1 1
Check the position of the voltage-selection switch on the rear of the computer. Use a ballpoint pen to slide the switch, if necessary.
1.If the voltage supply range is 100-127 V ac, set the switch to 110 V.
2.If the voltage supply range is 200-240 V ac, set the switch to 230 V.
 ———— Used to attach your computer to a telephone line for modem use. (some models equipped with this connector)
 ——— Used to attach a telephone line to your computer for modem use. (some models equipped with this connector)
6Lenovo 3000K User Guide
|
|
|
|
|
|
|
|
|
|
|
|
|
|
|
|
31031422 Greenland UG_EN.indd 6 |
|
2007.8.20 4:58:03 PM |
|
|
|
||
|
|
||||||
|
|
|
|
|
|
|
|
1.3 Speaker
|
|
|
[Y-1] |
[Y-4] |
|
[Y-2] |
[Y-3] [Y-5] |
|
|
Y-1 |
Volume Adjusting Knob |
Y-4 |
Speaker Power Switch |
|
Y-2 |
Primary and secondary speaker cables |
Y-5 |
Speaker DC IN |
|
Y-3 |
Connect to computer speaker/headphone connector |
|
||
1.4 Notes on computer cabling and installation
V-2
C-2
C-1
C-1 Monitor power cord |
C-2 Monitor data cable |
Lenovo 3000K User Guide |
7 |
|
|
|
|
|
|
|
|
|
|
|
|
|
|
|
|
31031422 Greenland UG_EN.indd 7 |
|
2007.8.20 4:58:05 PM |
|
|
|
||
|
|
||||||
|
|
|
|
|
|
|
|

1.Connect the monitor signal cable to the on-board graphics card connector if the model you purchased is not equipped with an external graphics card.
2.If there is an external graphics card, connect the monitor signal cable to the VGA or DVI connector in the external graphics card.
3.If both your computer and monitor have the DVI connector, you can connect the computer to the monitor through your own DVI data cable.
4.If there is only DVI connector in the external graphics card and the monitor only have the VGA connector, connect the monitor data cable and DVI connector by the DVI-VGA converter.
 Notes:
•Keep speakers away from the monitor to avoid magnetic interference.
•Ensure the monitor-to-computer cable connections are secure, with screws tightened.
•Connect the monitor signal cable to the on-board graphics card connector if the model you purchased is not equipped with an external graphics card.
1.5 Keyboard
[B-1] [B-2]
(This picture is only a sketch map for the keyboard, it does not show the detail of the key)
[B-1] — Press this key under Windows system to launch the IE.
[B-2] — LVT key, available for models with the ‘Rescue System’ feature. Press this key to launch ‘Rescue System’ when the “LENOVO” screen appears during booting.
8Lenovo 3000K User Guide
|
|
|
|
|
|
|
|
|
|
|
|
|
|
|
|
31031422 Greenland UG_EN.indd 8 |
|
2007.8.20 4:58:06 PM |
|
|
|
||
|
|
||||||
|
|
|
|
|
|
|
|
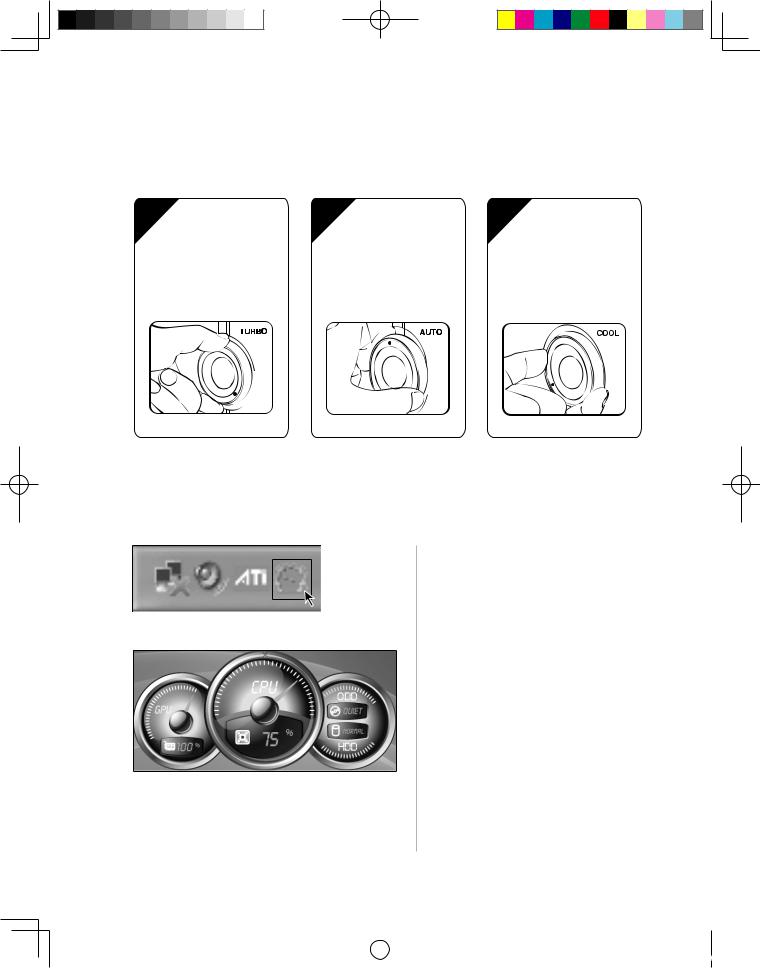
1.6 Power Dial
The Power Dial feature allows your computer to adjust to different modes, thus providing you with varied experiences during operations.
1 Mode one |
2 Mode two |
3 Mode three |
TURBO mode: Breath |
AUTO mode: Breath |
COOL mode: Breath |
light is in red. |
light is in blue. |
light is in green. |
Operation of the Power Dial
The Power Dial function supports three operating modes: the AUTO mode, the TURBO mode and the COOL mode. System resources are optimized by toggling among those three different modes. Different modes are used for different applications.
Display the main screen of software
Double click the Power Dial icon in the Quick Launch bar.
Open the running status for each component under the Mode Switch:
GPU—Show the percentage of the current GPU clock frequency against the nominal maximal GPU clock frequency.
CPU—Show the percentage of the current CPU clock frequency against the nominal maximal CPU clock frequency.
ODD—The status of the optical drive. HDD—The status of the hard disk drive.
Lenovo 3000K User Guide |
9 |
|
|
|
|
|
|
|
|
|
|
|
|
|
|
|
|
31031422 Greenland UG_EN.indd 9 |
|
2007.8.21 11:34:39 AM |
|
|
|
||
|
|
||||||
|
|
|
|
|
|
|
|
 Loading...