


 Loading...
ThinkSmart Hub
User Guide
Read this first
Before using this documentation and the product it supports, ensure that you read and understand the following:
•Appendix A “Important safety information” on page 33
•Documentation in the box
First Edition (August 2020)
© Copyright Lenovo 2020.
LIMITED AND RESTRICTED RIGHTS NOTICE: If data or software is delivered pursuant to a General Services Administration “GSA” contract, use, reproduction, or disclosure is subject to restrictions set forth in Contract No. GS- 35F-05925.

Contents
About this documentation . . . . . . . .iii Chapter 1. Product description . . . . . 1
Main features. |
. . . |
. . . . . |
. . |
. |
. . . . |
. |
1 |
In the box . . |
. . . |
. . . . . |
. . |
. |
. . . . |
. |
1 |
Chapter 2. Set up the Hub . . . . . . . . 3
Hardware requirements. . . . . . . . . . . . . 3
Set up procedure . . . . . . . . . . . . . . . 3
Chapter 3. Get to know the Hub. . . . . 7
Overview . . . . . . . . . . . . . . . . . . 7
Features and specifications . . . . . . . . . . . 9 Statement on USB transfer rate . . . . . . . . 9
Chapter 4. Get started with the
hub . . . . . . . . . . . . . . . . . . . 11
Adjust the screen . . . . . . . . . . . . . . |
11 |
Use the multi-touch screen . . . . . . . . . . |
11 |
Register the hub . . . . . . . . . . . . . . |
12 |
Use conference room system . . . . . . . . . |
12 |
Use ThinkSmart Manager . . . . . . . . . . . |
12 |
Chapter 5. Security . . . . . . . . . . 13
Lock the hub . . . . . . . . . . . . . . . . |
13 |
Use passwords . . . . . . . . . . . . . . . |
13 |
Chapter 6. UEFI BIOS . . . . . . . . . |
15 |
What is UEFI BIOS. . . . . . . . . . . . . . |
15 |
Enter the BIOS menu. . . . . . . . . . . . . |
15 |
Change the display language of UEFI BIOS . . . . 15
Change the display mode of UEFI BIOS . . . . . |
15 |
Change the startup sequence . . . . . . . . . |
15 |
Enable or disable a device. . . . . . . . . . . |
16 |
Enable or disable the configuration change |
|
detection feature . . . . . . . . . . . . . . |
16 |
Enable or disable the automatic power-on |
|
feature . . . . . . . . . . . . . . . . . . |
17 |
Enable or disable the ErP LPS compliance mode . . 17
Change the ICE performance mode . . . . . . . |
17 |
Exit the BIOS menu . . . . . . . . . . . . . |
17 |
Update UEFI BIOS. . . . . . . . . . . . . . |
18 |
Recover from a BIOS update failure . . . . . . . |
18 |
Chapter 7. Troubleshooting, |
|
diagnostics, and recovery . . . . . . . |
19 |
Basic procedure for resolving hub problems. . . . 19
Frequently asked questions . . . . . . . . . . |
19 |
Troubleshooting . . . . . . . . . . . . . . |
19 |
Startup and shutdown problems . . . . . . |
20 |
Microsoft Teams Rooms problems . . . . . |
20 |
Zoom Rooms System problems. . . . . . . |
20 |
Screen problems . . . . . . . . . . . . |
21 |
Audio problems . . . . . . . . . . . . . |
22 |
Storage drive problems . . . . . . . . . . |
22 |
External monitor problems . . . . . . . . . |
23 |
Network problems . . . . . . . . . . . . |
23 |
Performance problems . . . . . . . . . . |
24 |
USB device problems . . . . . . . . . . |
25 |
Diagnostics . . . . . . . . . . . . . . . . |
25 |
Recovery . . . . . . . . . . . . . . . . . |
25 |
Restore system files and settings to an earlier |
|
point . . . . . . . . . . . . . . . . . |
25 |
Restore your files from a backup . . . . . . |
25 |
Reset your hub . . . . . . . . . . . . . |
25 |
Use advanced options . . . . . . . . . . |
26 |
Windows automatic recovery. . . . . . . . |
26 |
Create and use a recovery USB device . . . . 26 |
|
Update the device driver . . . . . . . . . |
27 |
Chapter 8. Help and support . . . . . |
29 |
CRU replacement . . . . . . . . . . . . . . |
29 |
Self-help resources . . . . . . . . . . . . . |
29 |
Call Lenovo . . . . . . . . . . . . . . . . |
31 |
Before you contact Lenovo . . . . . . . . |
31 |
Lenovo Customer Support Center . . . . . . |
31 |
Purchase additional services. . . . . . . . . . |
32 |
Appendix A. Important safety information . . . . . . . . . . . . . . . 33
Appendix B. Accessibility
information . . . . . . . . . . . . . . . 47
Appendix C. Compliance
information . . . . . . . . . . . . . . . 51
Appendix D. Notices and
trademarks . . . . . . . . . . . . . . . 61
© Copyright Lenovo 2020 |
i |
ii ThinkSmart Hub User Guide

About this documentation
•Illustrations in this documentation might look different from your product.
•Documentation content is subject to change without notice. Lenovo makes constant improvements on the
documentation of your product, including this User Guide To get the latest documentation, go to: |
. |
https://smartsupport.lenovo.com/
•Microsoft® makes periodic feature changes to the Windows® operating system through Windows Update. As a result, some information in this documentation might become outdated. Refer to Microsoft resources for the latest information.
© Copyright Lenovo 2020 |
iii |
iv ThinkSmart Hub User Guide
Chapter 1. Product description
ThinkSmart Hub is a Lenovo designed conference room device with all-in-one design and collaborationfocused features. Enhanced scalability across room sizes and flexibility over Microsoft Teams Rooms and Zoom Rooms System make the hub a complete solution for smart conferencing.
Main features
•360° rotatable touch screen
•Auto-on with human proximity motion sensor
•Integrated speaker with surround sound
•Cable management with one cable
•RGB LED for system status
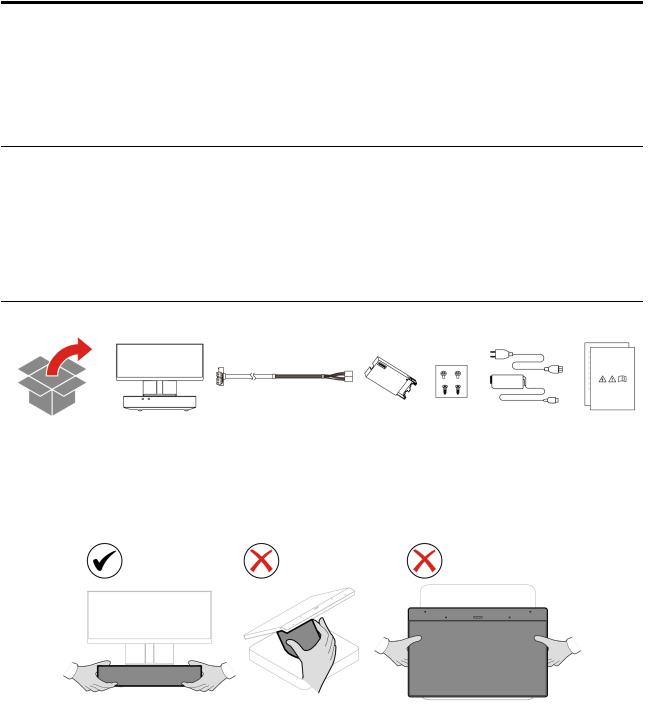
In the box
Contact your place of purchase if any item is missing or damaged. Ensure that you retain your proof of purchase and packing material. They might be required to receive warranty service.
CAUTION:
Hold the base when moving the hub.
© Copyright Lenovo 2020 |
1 |
2 ThinkSmart Hub User Guide
Chapter 2. Set up the Hub
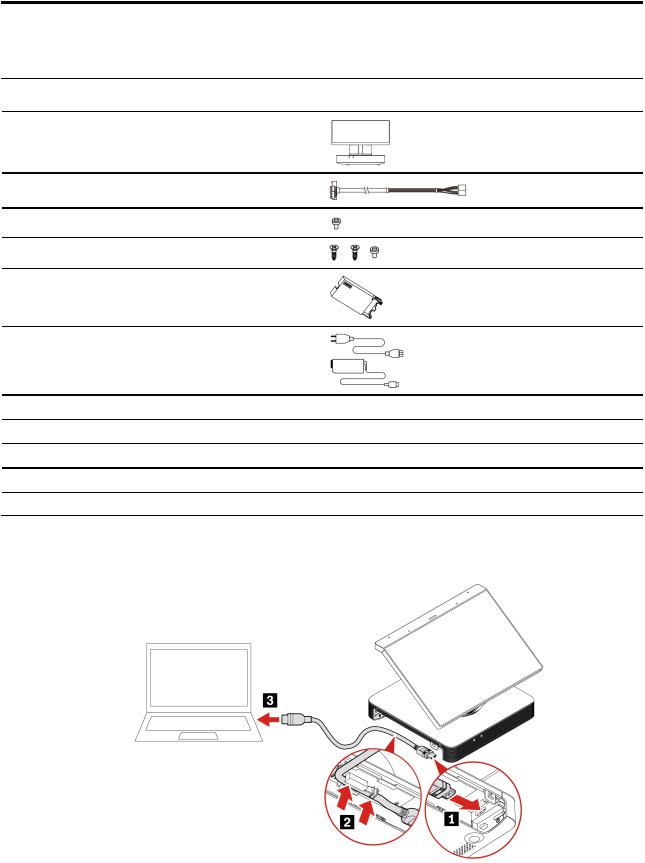
Hardware requirements
ThinkSmart Hub
One cable
Screw for securing the one cable
Screws for securing the cable lock box
Cable lock box
Power adapter and power cord
Three USB-A cables
One USB-C cable
Three HDMI cables
One RJ45 Ethernet cable
Not included in the package Not included in the package Not included in the package Not included in the package
Set up procedure
1. Use an HDMI cable to connect your computer to the hub.
© Copyright Lenovo 2020 |
3 |

2. Connect the one cable to the hub.
3. Secure the one cable.
4 ThinkSmart Hub User Guide
4.Connect desired external devices to the following connectors on the one cable:
•USB 3.2 connectors Gen 1
•USB-C (3.2 Gen 1) connector
•HDMI connectors
•Ethernet connector
•Power connector
5. Secure the one cable to the bottom surface of a wooden table with the cable lock box.
Chapter 2. Set up the Hub 5
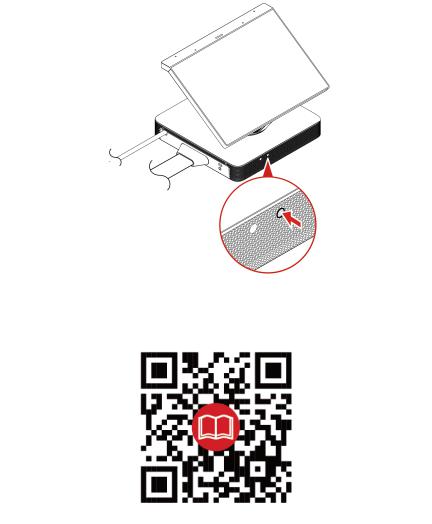
6. Press the power button to turn on the hub.
7.Go to https://support.lenovo.com or scan the following QR code to view the Deployment Guide for initialization instructions.
6 ThinkSmart Hub User Guide
Chapter 3. Get to know the Hub
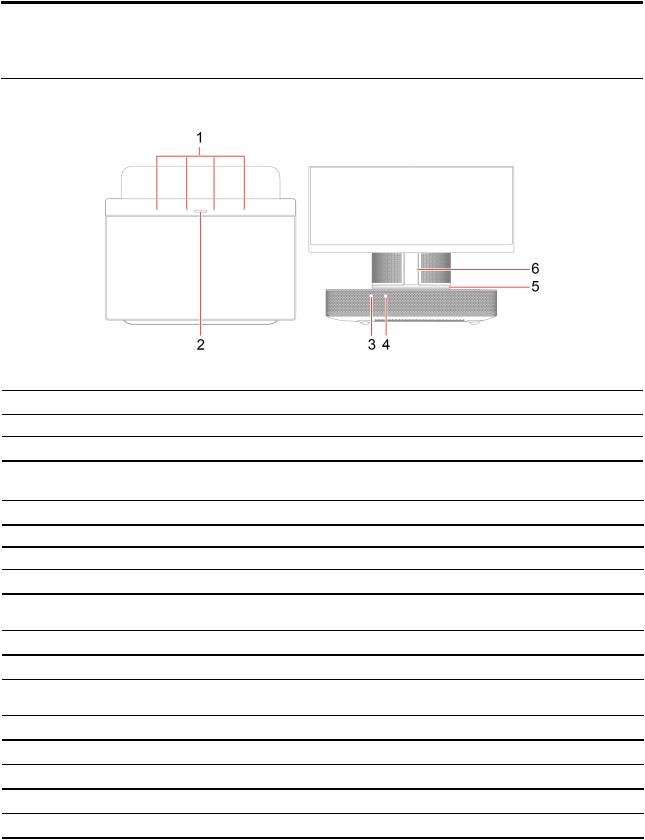
Overview
1. Integrated microphones array
3. Headset connector
5. LED ring
LED bar & LED ring
LED bar status
Solid white
Solid red
Solid green
Solid white
Breathing green
Breathing green
Breathing white for three seconds, then solid
NA
NA
Breathing blue
Breathing red for three times Breathing red
2. LED bar
4. Power button
6. Motion sensor
LED ring status
Solid white
Solid red
Solid green
Spinning white for one cycle, then solid
Spinning green
Blinking green
Spinning white for three cycles, then solid
White ring growing
White ring shrinking
Blinking blue
Blinking red for three times
Blinking red
Description
Power on
Mute
Start a call / meeting
End a call / meeting
Receive a call or dial out Hold a call
Platform loading
Volume up
Volume down
Claiming mode*
Wrong PIN / password Claiming error
* Add your hub to ThinkSmart Manager. For more information, see ThinkSmart Manager User Guide at https://smartsupport.lenovo.com/us/en/downloads/DS542392.
© Copyright Lenovo 2020 |
7 |
Motion sensor
Detect human presentation.
•When the hub is not in a meeting and no one is in the room, the hub will go into standby mode automatically.
•When someone comes in front of the sensor within 3 meters, the hub will automatically wake up from standby mode.
8 ThinkSmart Hub User Guide

Features and specifications
Dimensions
Weight
Hardware configuration
Power supply
Electrical input
Microprocessor
Storage device
Video features
Audio features
Network features
•Width: 240 mm (9.45 inches)
•Height: 185.3 mm (7.30 inches)
•Depth: 200 mm (7.87 inches)
2.47 kg (5.45 lb)
1.Right-click Start to open the Start context menu.
2.Click Device Manager
90-watt automatic voltage-sensing power supply
•Input voltage: From 100 V ac to 240 V ac
•Input frequency: 50/60 Hz
To view the microprocessor information of your hub, right-click Start and then
click System |
. |
M.2 solid-state drive |
|
•Color display with Thin Film Transistor (TFT) and In-Plane Switching (IPS) technology
•Display size: 256.54 mm (10.1 inches)
•Display resolution: 1200 x 1920 pixels
•Multi-touch technology
•Headset connector
•Integrated speaker with surround sound
•Four-microphone array with advanced noise cancellation and acoustic echo cancellation
•Ethernet LAN
•Wireless LAN
Statement on USB transfer rate
Depending on many factors such as the processing capability of the host and peripheral devices, file attributes, and other factors related to system configuration and operating environments, the actual transfer rate using the various USB connectors on this device will vary and will be slower than the data rate listed below for each corresponding device.
USB device |
Data rate (Gbit/s) |
|
3.2 Gen 1 |
/ 3.1 Gen 1 |
5 |
3.2 Gen 2 |
/ 3.1 Gen 2 |
10 |
3.2 Gen 2 |
× 2 |
20 |
Chapter 3. Get to know the Hub 9
10 ThinkSmart Hub User Guide

Chapter 4. Get started with the hub
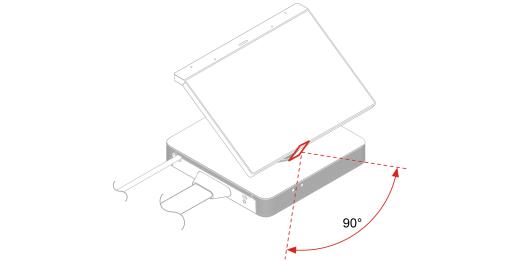
Adjust the screen
Use the multi-touch screen
Tap once to single click. |
Tap twice quickly to double-click. |
Tap and hold to right-click. |
Slide to scroll through items. |
Drag. |
Zoom out. |
© Copyright Lenovo 2020 |
11 |

Zoom in.
Register the hub
To register the hub with Lenovo, ensure that the hub is connected to the Internet. Then, go to http:// www.lenovo.com/register and follow the instructions on the screen to enter the required information into Lenovo database.
The information enables Lenovo to contact you when there is a recall or other severe problem and provide quicker service when you call Lenovo for help. In addition, some locations offer extended privileges and services to registered users.
Use conference room system
Depending on the model, your hub is preinstalled with Microsoft Teams Rooms or Zoom Rooms System.
Microsoft Teams Rooms
Microsoft Teams Rooms brings high-definition video, audio, and content sharing to Teams or Skype for Business calls and meetings. It is intended for use with Microsoft Teams, Skype for Business Online, Skype for Business Server 2019, or Skype for Business Server 2015.
For more information, go to https://docs.microsoft.com/en-us/microsoftteams/rooms/.
Zoom Rooms System
Zoom Rooms System provides an integrated experience for audio conferencing, wireless screen sharing and video conferencing. It allows you to easily share multiple desktops simultaneously in the room and provides a variety of simple, wireless sharing options for guests and people on your network.
For more information, go to https://support.zoom.us.
Use ThinkSmart Manager
ThinkSmart Manager is the official management console for your hub. Administrators can remotely configure, protect, and manage each device.
For more information, see ThinkSmart Manager User Guide at https://smartsupport.lenovo.com/us/en/ downloads/DS542392.
12 ThinkSmart Hub User Guide

Chapter 5. Security
Lock the hub
Lock your hub to a desk, table, or other fixtures through a Kensington-style cable lock.
You are responsible for evaluating, selecting, and implementing the locking device and security feature. Lenovo makes no comments, judgments, or warranties about the function, quality, or performance of the locking device and security feature. You can purchase locks from Lenovo.
Use passwords
Password types
You can set the following passwords in UEFI (Unified Extensible Firmware Interface) BIOS (Basic Input/ Output System) to prevent unauthorized access to your hub. However, you are not prompted to enter any UEFI BIOS password when your hub resumes from sleep mode.
•Supervisor password
Setting a supervisor password deters unauthorized users from changing configuration settings. If you are responsible for maintaining the configuration settings of several hubs, you might want to set a supervisor password.
When a supervisor password is set, you are prompted to enter a valid password each time you try to enter the BIOS menu.
•System management password
You can enable the system management password to have the same authority as the supervisor password to control security related features. To customize the authority of the system management password through the UEFI BIOS menu:
1.Restart the hub. When the logo screen is displayed, press F1 or Fn+F1.
2.Select Security Set System Management Password
3.Follow the on-screen instructions.
© Copyright Lenovo 2020 |
13 |
If you have set both the supervisor password and the system management password, the supervisor password overrides the system management password.
Password considerations
A password can be any combination of up to 128 alphabetic and numeric characters. For security reasons, it is recommended to use a strong password that cannot be easily compromised.
Note: The BIOS passwords are not case sensitive.
To set a strong password, consider the following guidelines:
•Have at least eight characters in length
•Contain at least one alphabetic character and one numeric character
•Not be your name or your user name
•Not be a common word or a common name
•Be significantly different from your previous passwords
Set, change, and remove a password
Before you start, print these instructions.
1. Restart the hub. When the logo screen is displayed, press F1 or Fn+F1.
2. Select Security |
. |
3.Depending on the password type, select Set Supervisor Password or Set System Management Password and press Enter.
4.Follow the on-screen instructions to set, change, or remove a password.
Note: A password can be any combination of up to 128 alphabetic and numeric characters. For more information, see “Password considerations” on page 14.
5.Press F10 or Fn+F10 to save the changes and exit.
14 ThinkSmart Hub User Guide
Chapter 6. UEFI BIOS
This chapter provides information about configuring and updating UEFI BIOS, and clearing CMOS.
What is UEFI BIOS
Note: The operating system settings might override any similar settings in UEFI BIOS.
UEFI BIOS is the first program that the hub runs when the hub is turned on. UEFI BIOS initializes the hardware components and loads the operating system and other programs. Your hub comes with a setup program with which you can change UEFI BIOS settings.
Enter the BIOS menu
Restart the hub. When the logo screen is displayed, press F1 or Fn+F1 to enter the BIOS menu.
Note: If you have set BIOS passwords, enter the correct passwords when prompted. You also can select No or press Esc to skip the password prompt and enter the BIOS menu. However, you cannot change the system configurations that are protected by passwords.
Change the display language of UEFI BIOS
UEFI BIOS supports three or four display languages: English, French, simplified Chinese, and Russian (for selected models).
To change the display language of UEFI BIOS:
1.Select Main Language and press Enter.
2.Set the display language as desired.
Change the display mode of UEFI BIOS
You can use UEFI BIOS in the graphic mode or the text mode according to your needs.
The keys on the keyboard used to perform various tasks are displayed at the bottom of the screen. In addition to the keyboard, you also can use the mouse to make selections.
To change the display mode of UEFI BIOS:
1.Restart the hub. When the logo screen is displayed, press F1 or Fn+F1.
2.Select Main Setup Mode Select and press Enter.
3.Set the display mode as desired.
Change the startup sequence
If the hub does not start up from a device as expected, you can change the startup device sequence permanently or select a temporary startup device.
Change the startup device sequence permanently
1. Depending on the type of the storage device, do one of the following:
© Copyright Lenovo 2020 |
15 |
Loading...