


 Loading...
M630e
User Guide
Read this first
Before using this documentation and the product it supports, ensure that you read and understand the following:
•Appendix A “Important safety information” on page 61
•Safety and Warranty Guide
•Setup Guide
First Edition (March 2019)
© Copyright Lenovo 2019.
LIMITED AND RESTRICTED RIGHTS NOTICE: If data or software is delivered pursuant to a General Services Administration “GSA” contract, use, reproduction, or disclosure is subject to restrictions set forth in Contract No. GS- 35F-05925.

Contents
About this documentation . . . . . . . .iii
Chapter 1. Meet your computer . . . . . 1
Front . . . . . . . . . . . . . . . . . . . . 1 Rear . . . . . . . . . . . . . . . . . . . . 3
System board . . . . . . . . |
. . |
. |
. . . . |
. |
5 |
Features and specifications . . . |
. . |
. |
. . . . |
. |
7 |
Chapter 2. Get started with your computer . . . . . . . . . . . . . . . . . 9
Get started with Windows 10 . . . . . . . . . |
. |
9 |
Windows account . . . . . . . . . . . . |
. |
9 |
Windows user interface . . . . . . . . . . |
|
10 |
Connect to networks . . . . . . . . . . . . . |
|
11 |
Connect to the wired Ethernet . . . . . . . |
|
11 |
Connect to Wi-Fi networks (for selected |
|
|
models) . . . . . . . . . . . . . . . . |
|
11 |
Use Lenovo Vantage . . . . . . . . . . . . . |
|
11 |
Use multimedia . . . . . . . . . . . . . . . |
|
12 |
Use audio . . . . . . . . . . . . . . . |
|
12 |
Chapter 3. Explore your computer . . |
13 |
Manage power . . . . . . . . . . . . . . . |
13 |
Set power button behaviors . . . . . . . . |
13 |
Set the power plan . . . . . . . . . . . . |
13 |
Transfer data . . . . . . . . . . . . . . . . |
13 |
Connect to a Bluetooth-enabled device (for |
|
selected models) . . . . . . . . . . . . |
13 |
Use the optical drive (for selected models) . . |
14 |
Use a media card (for selected models) . . . . 14 |
|
Purchase accessories . . . . . . . . . . . . |
15 |
Chapter 4. Secure your computer |
|
and information . . . . . . . . . . . . |
17 |
Lock the computer . . . . . . . . . . . . . |
17 |
Log in to your computer securely . . . . . . . . |
17 |
Use passwords . . . . . . . . . . . . . |
17 |
Use software security solutions. . . . . . . . . |
18 |
Use firewalls . . . . . . . . . . . . . . |
18 |
Use antivirus programs . . . . . . . . . . |
18 |
Use computrace Agent software embedded in |
|
firmware . . . . . . . . . . . . . . . . |
19 |
Use BIOS security solutions . . . . . . . . . . |
19 |
Erase all storage drive data . . . . . . . . |
19 |
Use Intel BIOS guard . . . . . . . . . . . |
19 |
Use Smart USB Protection. . . . . . . . . |
19 |
Chapter 5. UEFI BIOS . . . . . . . . . |
21 |
What is UEFI BIOS. . . . . . . . . . . . . . |
21 |
Enter the BIOS menu. . . . . . . . . . . . . |
21 |
Navigate in the BIOS interface . . . . . . . . . |
21 |
Change the display language of UEFI BIOS . . . . 21
Set the system date and time . . . . . . . . . |
22 |
Change the startup sequence . . . . . . . . . |
22 |
Enable or disable the configuration change |
|
detection feature . . . . . . . . . . . . . . |
22 |
Enable or disable the smart power-on feature . . . |
23 |
Enable or disable the ErP LPS compliance mode . . 23 Enable or disable the ICE thermal alert feature . . . 24
Change the ICE performance mode . . . . . . . |
24 |
Change BIOS settings before installing a new |
|
operating system . . . . . . . . . . . . . . |
24 |
Update UEFI BIOS. . . . . . . . . . . . . . |
25 |
Recover from a BIOS update failure . . . . . . . |
25 |
Clear CMOS . . . . . . . . . . . . . . . . |
25 |
Chapter 6. Troubleshooting, |
|
diagnostics, and recovery . . . . . . . |
27 |
Basic procedure for resolving computer |
|
problems . . . . . . . . . . . . . . . . . |
27 |
Troubleshooting . . . . . . . . . . . . . . |
27 |
Startup problems . . . . . . . . . . . . |
28 |
Audio problems . . . . . . . . . . . . . |
29 |
Network problems . . . . . . . . . . . . |
30 |
Performance problems . . . . . . . . . . |
32 |
Storage drive problems . . . . . . . . . . |
33 |
CD or DVD problems . . . . . . . . . . . |
33 |
Serial connector problems . . . . . . . . . |
34 |
USB device problems . . . . . . . . . . |
34 |
Software problems . . . . . . . . . . . . |
35 |
Diagnostics . . . . . . . . . . . . . . . . |
35 |
Lenovo diagnostic tools . . . . . . . . . . |
35 |
Lenovo Vantage . . . . . . . . . . . . . |
35 |
Recovery . . . . . . . . . . . . . . . . . |
35 |
Restore system files and settings to an earlier |
|
point . . . . . . . . . . . . . . . . . |
35 |
Restore your files from a backup . . . . . . |
36 |
Reset your computer . . . . . . . . . . . |
36 |
Use advanced options . . . . . . . . . . |
36 |
Windows automatic recovery. . . . . . . . |
36 |
Create and use a recovery USB device . . . . 36 |
|
Update the device driver . . . . . . . . . |
37 |
Chapter 7. CRU replacement . . . . . |
39 |
What are CRUs . . . . . . . . . . . . . . . |
39 |
Replace a CRU . . . . . . . . . . . . . . . |
40 |
© Copyright Lenovo 2019 |
i |
Power adapter and power cord . . . . . . . |
40 |
Vertical stand . . . . . . . . . . . . . . |
41 |
Dust shield . . . . . . . . . . . . . . . |
42 |
Computer cover . . . . . . . . . . . . . |
44 |
Storage drive . . . . . . . . . . . . . . |
45 |
Wi-Fi card . . . . . . . . . . . . . . . |
47 |
System fan . . . . . . . . . . . . . . . |
49 |
Bottom cover . . . . . . . . . . . . . . |
51 |
Memory module . . . . . . . . . . . . . |
51 |
M.2 solid-state drive . . . . . . . . . . . |
53 |
Chapter 8. Help and support . . . . . |
57 |
Self-help resources . . . . . . . . . . . . . |
57 |
Call Lenovo . . . . . . . . . . . . . . . . |
58 |
Before you contact Lenovo . . . . . . . . |
58 |
Lenovo Customer Support Center . . . . . . 58 Purchase additional services. . . . . . . . . . 59
Appendix A. Important safety information . . . . . . . . . . . . . . . 61
Appendix B. Accessibility and ergonomic information . . . . . . . . 75
Appendix C. Compliance
information . . . . . . . . . . . . . . . 79
Appendix D. Notices and
trademarks . . . . . . . . . . . . . . . 91
ii M630e User Guide

About this documentation
•Illustrations in this documentation might look different from your product.
•Depending on the model, some optional accessories, features, and software programs might not be available on your computer.
•Depending on the version of operating systems, some user interface instructions might not be applicable to your computer.
•Documentation content is subject to change without notice. Lenovo makes constant improvements on the
documentation of your computer, including this User Guide To get the latest documentation, go to: |
. |
https://support.lenovo.com
•Microsoft® makes periodic feature changes to the Windows® operating system through Windows Update. As a result, some information in this documentation might become outdated. Refer to Microsoft resources for the latest information.
© Copyright Lenovo 2019 |
iii |
iv M630e User Guide
Chapter 1. Meet your computer
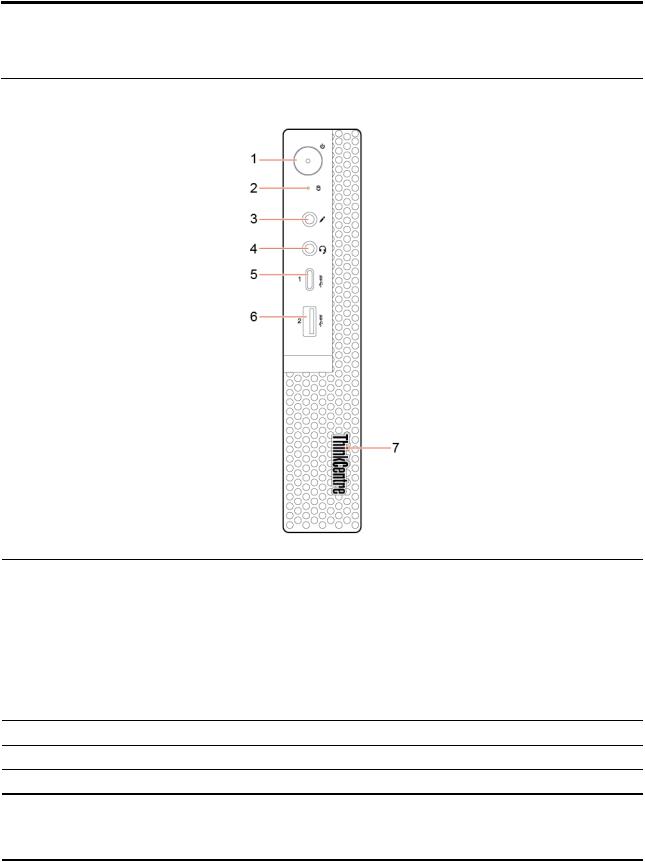
Front
1.Power button
2.Storage drive activity indicator
3.Microphone connector
4.Headset connector
5.USB-C™ connector (USB 3.1 Gen 1)
 Power and then select
.
The indicator in the power button shows the system status of your computer.
•On: The computer is on.
•Off: The computer is off or in hibernation mode.
•Blinking: The computer is in sleep mode.
This indicator is on when the storage drive is in use.
Connect a microphone.
Connect a headset or headphones to your computer.
•Charge USB-C compatible devices with the output voltage and current of 5 V and 3 A.
•Transfer data at USB 3.1 speed, up to 5 Gbps.
© Copyright Lenovo 2019 |
1 |

6. USB 3.1 connector Gen 1 |
Connect USB-compatible devices, such as a USB keyboard, USB mouse, USB |
|
storage device, or USB printer. |
||
|
||
7. ThinkCentre® LED |
This indicator is on when the computer is on. |
2 M630e User Guide
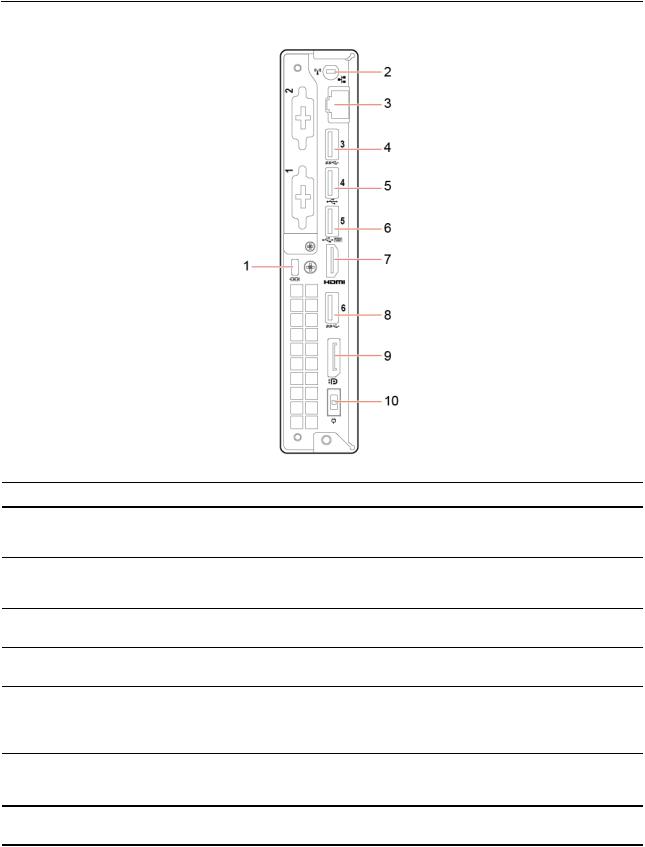
Rear
1.Security-lock slot
2.Wi-Fi antenna slot
3.Ethernet connector
4.USB 3.1 connector Gen 1
5.USB 2.0 connector
6.USB 2.0 connector
7. HDMI 1.4 out connector
8. USB 3.1 connector Gen 1
Secure a Kensington-style cable lock.
Used to install the rear Wi-Fi antenna cable connector that is available only on some models. The rear Wi-Fi antenna is installed on the rear Wi-Fi antenna cable connector.
Connect to a local area network (LAN). When the green indicator is on, the computer is connected to a LAN. When the yellow indicator blinks, data is being transmitted.
Connect USB-compatible devices, such as a USB keyboard, USB mouse, USB storage device, or USB printer.
Connect USB-compatible devices, such as a USB keyboard, USB mouse, USB storage device, or USB printer.
Connect USB-compatible devices, such as a USB keyboard, USB mouse, USB storage device, or USB printer. This connector supports the smart power-on feature. For more information, see “Enable or disable the smart power-on feature” on page 23.
Send audio and video signals from the computer to another audio or video device, such as a high-performance™ monitor. For more information, see https:// www.hdmi.org/manufacturer/hdmi_1_4/index.aspx.
Connect USB-compatible devices, such as a USB keyboard, USB mouse, USB storage device, or USB printer.
Chapter 1. Meet your computer 3

|
Send audio and video signals from the computer to another audio or video device, |
|
9. DisplayPort® 1.2 out connector |
such as a high-performance monitor. For more information, see https:// |
|
www.vesa.org/wp-content/uploads/2010/12/DisplayPort-DevCon-Presentation-DP- |
||
|
||
|
1.2-Dec-2010-rev-2b.pdf. |
|
10. Power adapter connector |
Connect the power adapter to your computer for power supply. |
4 M630e User Guide
System board
1 |
Clear CMOS (Complementary Metal Oxide |
2 |
Microprocessor |
Semiconductor) / Recovery jumper |
|
|
|
3 |
Coin-cell battery |
4 |
Internal speaker connector |
5 |
System fan connector |
6 |
Storage drive connector |
Chapter 1. Meet your computer 5

7 M.2 Wi-Fi card slot |
8 M.2 solid-state drive slot |
9 Memory slot
6 M630e User Guide

Features and specifications
Hardware configuration
Power supply
Electrical input
Microprocessor and memory
Storage device capacity
Video features
Audio features
Expansion
Network features
1.Right-click the Start button to open the Start context menu.
2.Click Device Manager Type the administrator password or provide confirmation if prompted.
•65-watt automatic voltage-sensing power supply
•Input voltage: From 100 V ac to 240 V ac
•Input frequency: 50/60 Hz
1.Click the Start button to open the Start menu.
2. |
Click Settings System About |
. |
Note: The memory shown in the operating system might be inconsistent with the |
|
|
nominal memory of the memory module(s) that are installed in your computer. |
|
|
To know the storage drive capacity: |
|
|
1. |
Right-click the Start button to open the Start context menu. |
|
2. |
Click Disk Management |
|
Note: The storage drive capacity indicated by the system is less than the nominal capacity.
The integrated graphics card supports the following:
•DisplayPort 1.2 out connector
•HDMI 1.4 out connector
The integrated audio card supports the following:
•Headset connector
•Internal speaker
•Microphone connector
•Memory slot
•M.2 solid-state drive slot
•Storage drive slot
•Bluetooth*
•Ethernet LAN
•Wireless LAN*
* for selected models
Chapter 1. Meet your computer 7
8 M630e User Guide

Chapter 2. Get started with your computer
Get started with Windows 10
Learn the basics of Windows 10 and start working with it right away. For more information about Windows 10, see the Windows help information.
Windows account
To use the Windows operating system, a user account is required. It can either be a Windows user account or a Microsoft account.
Windows user account
When you start Windows for the first time, you are prompted to create a Windows user account. This first account you created is of the “Administrator” type. With an Administrator account, you can create additional user accounts or change account types by doing the following:
1.Open the Start menu and select Settings Accounts Other people
2.Follow the on-screen instructions.
Microsoft account
You can also log in to the Windows operating system with a Microsoft account.
To create a Microsoft account, go to the Microsoft sign-up page at https://signup.live.com and follow the onscreen instructions.
With a Microsoft account, you can:
•Enjoy one-time signing in if you are using other Microsoft services, such as OneDrive, Skype, and Outlook. com.
•Sync personalized settings across other Windows-based devices.
© Copyright Lenovo 2019 |
9 |
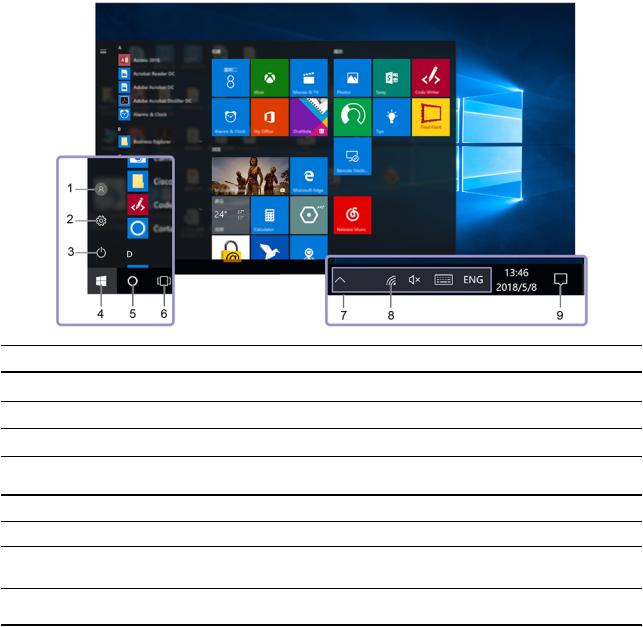
Windows user interface
1.Account 
2.Settings 
3.Power 
4.Start button 
5.Windows Search 
6.Task View 
7.Windows notification area
8.Network icon
9.Action center 
Open the Start menu
• Click the Start button.
Change account settings, lock the computer, or sign out from the current account.
Launch Settings.
Shut down, restart, or put the computer into sleep.
Open the Start menu.
Type what you are looking for in the search box and get search results from your computer and the Web.
Display all opened apps and switch among them.
Display notifications and status of some features.
Connect to an available wireless network and display the network status. When connected to a wired network, the icon changes to  .
.
Display the latest notifications from apps and provide quick access to some features.
• Press the Windows logo key on the keyboard.
Open the Start context menu
Right-click the Start button.
Access Control Panel
• Open the Start menu and click Windows System Control Panel |
. |
• Use Windows Search.
10 M630e User Guide

Launch an app
•Open the Start menu and select the app you want to launch.
•Use Windows Search.
Connect to networks
Your computer helps you connect to the world through a wired or wireless network.
Connect to the wired Ethernet
Connect your computer to a local network through the Ethernet connector on your computer with an Ethernet cable.
Connect to Wi-Fi networks (for selected models)
1.Click the network icon in the Windows notification area. A list of available wireless networks is displayed.
2.Select a network to connect. Provide required information if needed.
Use Lenovo Vantage
The preinstalled Lenovo Vantage is a customized one-stop solution to help you maintain your computer with automated updates and fixes, configure hardware settings, and get personalized support.
Access Lenovo Vantage
Open the Start menu and click Lenovo Vantage You also can type Lenovo Vantage in the search box.
To download the latest version of Lenovo Vantage, go to Microsoft Store and search by the app name.
Key features
Lenovo Vantage makes periodic updates of the features to keep improving your experience with your computer.
Note: The available features vary depending on the computer model.
•System Update
Download and install firmware and driver updates to keep your computer up-to-date. You can configure the options to install updates automatically when available.
•Hardware Settings
Configure intelligent settings of the following hardware to make your computer smarter to use:
–Camera
–Computer display
–Eye Care Mode
The Eye Care Mode tool reduces the blue light emitted from the display and thus creates a less stimulating image and more relaxing vision experience for your eyes. For details, go to: https://www.lenovo.com/blue-light
Chapter 2. Get started with your computer 11

–Keyboard
–Microphone
–Speakers
•Health & Support
Monitor your computer health and get personalized support of your computer. You can:
–Scan the computer hardware and diagnose hardware problems.
–Look up computer warranty status (online).
– Access User Guide |
. |
– Read tips and tricks articles customized for your computer.
•Lenovo Wi-Fi Security
Protect your computer from malicious Wi-Fi networks.
Use multimedia
Use your computer for business or entertainment with the devices (such as a camera, a monitor, or speakers).
Use audio
To enhance the hearing enjoyment, connect speakers, headphones, or a headset to the audio connector.
Adjust the volume
1.Click the volume icon in the Windows notification area on the taskbar.
2.Follow the on-screen instructions to adjust the volume. Click the speaker icon to mute the audio.
Change the sound settings
1. Go to Control Panel and view by category.
2. Click Hardware and Sound Sound |
. |
3. Change the settings as you prefer.
Protect your hearing
Smart audio helps protect against hearing loss. The feature limits the computer’s maximum volume to 130 mV when a headset or headphone is connected. To change the setting:
1.Go to Control Panel and view by large icons or small icons.
2.Click SmartAudio In the window displayed, click the Disable Headphone Limiter icon. Then, follow the on-screen instructions.
12 M630e User Guide

Chapter 3. Explore your computer
Manage power
Use the information in this section to achieve the best balance between performance and power efficiency.
Set power button behaviors
You can define what the power button does according to your preference. For example, by pressing the power button, you can turn off the computer or put the computer to sleep or hibernation mode.
To change what the power button does:
1. Go to Control Panel and view by large icons or small icons.
2. Click Power Options Choose what the power button does |
. |
3. Change the settings as you prefer.
Set the power plan
For ENERGY STAR® compliant computers, the following power plan takes effect when your computers have been idle for a specified duration:
Table 1. Default power plan (when plugged into ac power)
•Turn off the display: After 10 minutes
•Put the computer to sleep: After 25 minutes
To awaken the computer from Sleep mode, press any key on your keyboard.
To reset the power plan to achieve the best balance between performance and power saving:
1. Go to Control Panel and view by large icons or small icons.
2. Click Power Options and then choose or customize a power plan of your preference. |
, |
Transfer data
Quickly share your files using the built-in Bluetooth technology among devices with the same features. You also can install a disc or media card to transfer data.
Connect to a Bluetooth-enabled device (for selected models)
You can connect all types of Bluetooth-enabled device to your computer, such as a keyboard, a mouse, a smartphone, or speakers. The devices must be within a short distance, usually 10 meters (33 feet), from the computer.
1.Turn on Bluetooth on the computer.
a.Open the Start menu, and then click Settings Devices Bluetooth & other devices
b.Turn on the Bluetooth switch.
2.Click Add Bluetooth or other device Bluetooth
3.Select a Bluetooth device, and then follow the on-screen instructions.
© Copyright Lenovo 2019 |
13 |
Your Bluetooth device and computer will automatically connect the next time if the two devices are in range of each other with Bluetooth turned on. You can use Bluetooth for data transfer or remote control and communication.
Use the optical drive (for selected models)
If your computer has an optical drive, read the following information.
Know the type of your optical drive
1. Open the Start context menu.
2. Click Device Manager Type the administrator password or provide confirmation if prompted. |
. |
Install or remove a disc
1.With the computer on, press the eject/close button on the optical drive. The tray slides out of the drive.
2.Insert a disc into the tray or remove a disc from the tray, and then press the eject/close button again to close the tray.
Note: If the tray does not slide out of the drive when you press the eject/close button, turn off the computer. Then, insert a straightened paper clip into the emergency-eject hole adjacent to the eject/close button. Use the emergency eject only in an emergency.
Record a disc
1. |
Insert a recordable disc into the optical drive that supports recording. |
|
2. |
Do one of the following: |
|
|
• Open the Start menu, and then click Settings Devices AutoPlay Select or turn on Use |
|
|
AutoPlay for all media and devices |
. |
|
• Open Windows Media Player. |
|
|
• Double-click the ISO file. |
|
3. |
Follow the on-screen instructions. |
|
Use a media card (for selected models)
If your computer has a SD-card slot, read the following information.
Install a media card
1.Locate the SD-card slot.
2.Ensure that the metal contacts on the card are facing that in the SD-card slot. Insert the card firmly into the SD-card slot until it is secured in place.
Remove a media card
Attention: Before removing a media card, eject the card from the Windows operating system first. Otherwise, data on the card might get corrupted or lost.
1.Click the triangular icon in the Windows notification area to show hidden icons. Then, right-click the
Safely Remove Hardware and Eject Media icon.
2.Select the corresponding item to eject the card from the Windows operating system.
3.Press the card and remove it from your computer. Store the card safely for future use.
14 M630e User Guide
Purchase accessories
Lenovo has a number of hardware accessories and upgrades to help expand the capabilities of your computer. Options include memory modules, storage devices, network cards, power adapters, keyboards, mice, and more.
To shop at Lenovo, go to https://www.lenovo.com/accessories.
Chapter 3. Explore your computer 15
16 M630e User Guide
Chapter 4. Secure your computer and information
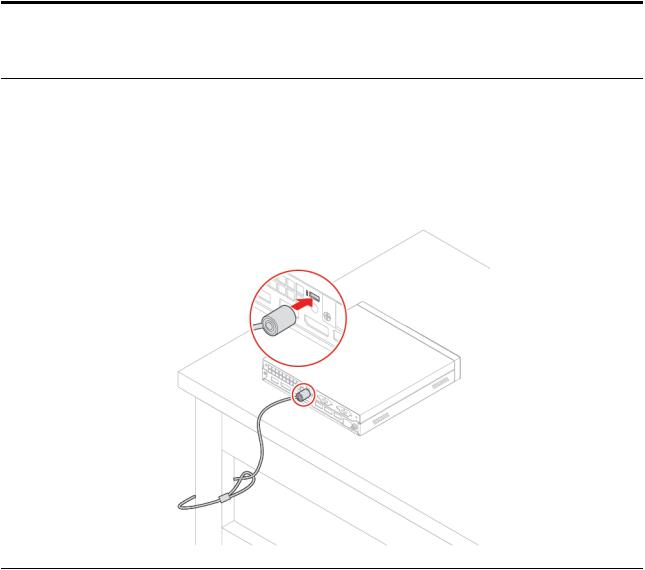
Lock the computer
Note: You are responsible for evaluating, selecting, and implementing the locking device and security feature. Lenovo makes no comments, judgments, or warranties about the function, quality, or performance of the locking device and security feature. You can purchase computer locks from Lenovo.
Kensington-style cable lock
Lock your computer to a desk, table, or other fixtures through a Kensington-style cable lock.
Log in to your computer securely
This section provides secure ways to log in to your computer with a password, a fingerprint, or your face.
Use passwords
Password types
You can set the following passwords in UEFI (Unified Extensible Firmware Interface) BIOS (Basic Input/ Output System) to prevent unauthorized access to your computer. However, you are not prompted to enter any UEFI BIOS password when your computer resumes from sleep mode.
•Power-on password
When a power-on password is set, you are prompted to enter a valid password each time the computer is turned on. The computer cannot be used until the valid password is entered.
•Administrator password
Setting an administrator password deters unauthorized users from changing configuration settings. If you are responsible for maintaining the configuration settings of several computers, you might want to set an administrator password.
© Copyright Lenovo 2019 |
17 |

When an administrator password is set, you are prompted to enter a valid password each time you try to enter the BIOS menu.
If both the power-on password and administrator password are set, you can enter either password. However, you must use your administrator password to change any configuration settings.
•Hard disk password
Setting a hard disk password prevents unauthorized access to the data on the storage drive. When a hard disk password is set, you are prompted to enter a valid password each time you try to access the storage drive.
Notes:
–After you set a hard disk password, your data on the storage drive is protected even if the storage drive is removed from one computer and installed in another.
–If the hard disk password is forgotten, there is no way to reset the password or recover data from the storage drive.
Set, change, and remove a password
Before you start, print these instructions.
1. Restart the computer. When the logo screen is displayed, press F1 or Fn+F1.
2. Select Security |
. |
3.Depending on the password type, select Set Power-On Password Set Administrator Password or Hard Disk Password and press Enter.
4.Follow the on-screen instructions to set, change, or remove a password.
5.Press F10 or Fn+F10 to save the changes and exit.
You might want to record your password and store it in a safe place. Otherwise, if you forget the password, you have to take your computer to a Lenovo reseller or a marketing representative to have the password canceled. However, if you forget the hard disk password, Lenovo cannot reset your passwords or recover data from the storage drive.
Use software security solutions
This section provides software solutions to secure your computer and information.
Use firewalls
A firewall can be hardware, software, or a combination of both depending on the level of security required. Firewalls work on a set of rules to determine which inbound and outbound connections are authorized. If the computer is preinstalled with a firewall program, it helps protect against computer Internet security threats, unauthorized access, intrusions, and Internet attacks. It also protects your privacy. For more information about how to use the firewall program, refer to the help system of your firewall program.
To use firewalls:
1. Go to Control Panel and view by large icons or small icons.
2. Click Windows Defender Firewall and then follow the on-screen instructions. |
, |
Use antivirus programs
The computer is preinstalled with an antivirus program to help you guard against, detect, and eliminate viruses.
18 M630e User Guide

Lenovo provides a full version of antivirus software on the computer with a free 30-day subscription. After 30 days, you must renew the license to continue receiving the antivirus software updates.
Note: Virus definition files must be kept up-to-date to guard against new viruses.
For more information about how to use your antivirus software, refer to the help system of your antivirus software.
Use computrace Agent software embedded in firmware
The Computrace Agent software is an IT asset management and computer theft recovery solution. The software detects if changes have been made on the computer, such as hardware, software, or the computer call-in location. You might have to purchase a subscription to activate the Computrace Agent software.
Use BIOS security solutions
This section provides BIOS solutions to secure your computer and information.
Erase all storage drive data
It is recommended that you erase all storage drive data before recycling a storage drive or the computer.
To erase all storage drive data:
1.Set a hard disk password for the storage drive you will recycle. See “Use passwords” on page 17.
2.Restart the computer. When the logo screen is displayed, press F1 or Fn+F1.
3.Select Security Hard Disk Password Security Erase HDD Data and press Enter.
4.Select the storage drive you will recycle and press Enter.
5.A message is displayed, prompting you to confirm the operation. Select Yes and press Enter. The erasing process begins.
Note: During the erasing process, the power button and the keyboard are disabled.
6.After the erasing process is completed, a message is displayed, prompting you to reset the system.
Select Continue |
. |
Note: Depending on the storage drive capacity, the erasing process will take half an hour to three hours.
7.After the resetting process is completed, one of the following will happen:
•If the data on the system storage drive is erased, you will be prompted that no operating system is available.
•If the data on the non-system storage drive is erased, the computer restarts automatically.
Use Intel BIOS guard
The BIOS guard module cryptographically verifies all the BIOS updates to the system BIOS flash. Therefore, the malware is blocked from attacking the BIOS.
Use Smart USB Protection
The Smart USB Protection function is a security function that helps prevent data from being copied from the computer to USB storage devices connected to the computer. You can set the Smart USB Protection function to one of the following modes:
• Disabled (default setting): You can use the USB storage devices without limitation.
Chapter 4. Secure your computer and information 19
•Read Only You cannot copy data from the computer to: the USB storage devices. However, you can access or modify data on the USB storage devices.
• No Access You cannot access the USB storage devices from the computer. |
: |
To configure the Smart USB Protection function:
1.Restart the computer. When the logo screen is displayed, press F1 or Fn+F1.
2.Select Security Smart USB Protection and press Enter.
3.Select the desired setting and press Enter.
4.Press F10 or Fn+F10 to save the changes and exit.
20 M630e User Guide

Chapter 5. UEFI BIOS
This chapter provides information about configuring and updating UEFI BIOS, and clearing CMOS.
What is UEFI BIOS
Note: The operating system settings might override any similar settings in UEFI BIOS.
UEFI BIOS is the first program that the computer runs when the computer is turned on. UEFI BIOS initializes the hardware components and loads the operating system and other programs. Your computer comes with a setup program with which you can change UEFI BIOS settings.
Enter the BIOS menu
Restart the computer. When the logo screen is displayed, press F1 or Fn+F1 to enter the BIOS menu.
Note: If you have set BIOS passwords, enter the correct passwords when prompted. You also can press Enter to skip the password prompt and enter the BIOS menu. However, you cannot change the system configurations that are protected by passwords.
Navigate in the BIOS interface
Attention: The default configurations are already optimized for you in boldface Improper change of the configurations might cause unexpected results.
Depending on your keyboard, you can navigate in the BIOS interface by pressing the following keys, or combinations of Fn and the following keys:
F1 or Fn+F1 |
Display the General Help screen. |
Esc or Fn+Esc |
Exit the submenu and return to the parent menu. |
↑↓ or Fn+ |
Locate↑↓an item. |
← → or Fn+ → |
Select←a tab. |
+/– or Fn++/– |
Change to a higher or lower value. |
Enter |
Enter the selected tab or submenu. |
F9 or Fn+F9 |
Restore to the default settings. |
F10 or Fn+F10 |
Save your configuration and exit. |
Change the display language of UEFI BIOS
UEFI BIOS supports three display languages: English, French, and simplified Chinese.
To change the display language of UEFI BIOS:
1.Select Main Language and press Enter.
2.Set the display language as desired.
© Copyright Lenovo 2019 |
21 |

Set the system date and time
1.Restart the computer. When the logo screen is displayed, press F1 or Fn+F1.
2.Select Main System Time & Date and press Enter.
3.Set the system date and time as desired.
4.Press F10 or Fn+F10 to save the changes and exit.
Change the startup sequence
If the computer does not start up from a device as expected, you can change the startup device sequence permanently or select a temporary startup device.
Change the startup device sequence permanently
1.Depending on the type of the storage device, do one of the following:
•If the storage device is internal, go to step 2.
•If the storage device is a disc, ensure that the computer is on or turn on the computer. Then, insert the disc into the optical drive.
•If the storage device is an external device other than a disc, connect the storage device to the computer.
2.Restart the computer. When the logo screen is displayed, press F1 or Fn+F1.
3.Select Startup and then follow the on-screen instructions to change the startup sequence,.
4.Press F10 or Fn+F10 to save the changes and exit.
Select a temporary startup device
Note: Not all discs and storage drives are bootable.
1.Depending on the type of the storage device, do one of the following:
•If the storage device is internal, go to step 2.
•If the storage device is a disc, ensure that the computer is on or turn on the computer. Then, insert the disc into the optical drive.
•If the storage device is an external device other than a disc, connect the storage device to the computer.
2.Restart the computer. When the logo screen is displayed, press F12 or Fn+F12.
3.Select the storage device as desired and press Enter.
If you want to change the startup device sequence permanently, select Enter Setup on Startup Device Menu and press Enter to enter the BIOS menu.
Enable or disable the configuration change detection feature
If you enable configuration change detection, when the POST detects configuration changes of some hardware devices (such as storage drives or memory modules), an error message will be displayed when you turn on the computer.
To enable or disable the configuration change detection feature:
1.Restart the computer. When the logo screen is displayed, press F1 or Fn+F1.
2.Select Security Configuration Change Detection and press Enter.
3.Enable or disable the feature as desired.
22 M630e User Guide

4. Press F10 or Fn+F10 to save the changes and exit.
To bypass the error message and log in to the operating system, press F2 or Fn+F2.
Enable or disable the smart power-on feature
Ensure that the keyboard is connected to a USB connector supporting the smart power-on feature. With the smart power-on feature enabled, you can start up or wake up the computer from the hibernation mode by pressing Alt+P.
To enable or disable the smart power-on feature:
1.Restart the computer. When the logo screen is displayed, press F1 or Fn+F1.
2.Select Power Smart Power On and press Enter.
3.Enable or disable the feature as desired.
4.Press F10 or Fn+F10 to save the changes and exit.
Enable or disable the ErP LPS compliance mode
Lenovo computers meet the eco-design requirements of the ErP Lot 3 regulation. For more information, go to:
https://www.lenovo.com/ecodeclaration
You can enable the ErP LPS compliance mode to reduce the consumption of electricity when the computer is off or in sleep mode.
To enable or disable the ErP LPS compliance mode:
1.Restart the computer. When the logo screen is displayed, press F1 or Fn+F1.
2.Select Power Enhanced Power Saving Mode and press Enter.
3.Depending on whether you select Enabled or Disabled do one of the following:
•If you select Enabled press Enter. Then, select Power Automatic Power On and press Enter. , Check whether the Wake on LAN feature is disabled automatically. If no, disable it.
• If you select Disabled press Enter. Then, go to the next step. |
, |
4. Press F10 or Fn+F10 to save the changes and exit. |
|
When the ErP LPS compliance mode is enabled, you can wake up the computer by doing one of the following:
•Press the power button.
•Enable the Wake Up on Alarm feature to make the computer wake up at a set time.
To meet the off mode requirement of ErP compliance, you need to disable the Fast Startup function.
1.Go to Control Panel and view by large icons or small icons.
2.Click Power Options Choose what the power buttons do Change settings that are currently unavailable
3.Clear the Turn on fast startup (recommended) option from the Shutdown settings list.
Chapter 5. UEFI BIOS 23

Enable or disable the ICE thermal alert feature
With the ICE thermal alert feature enabled, an alert log will be written into the Windows system log when a critical thermal situation occurs. The alert log can help you identify thermal problems, such as malfunctioning fans, abnormally high temperature, or poor cooling performances.
To enable or disable the ICE thermal alert feature:
1.Restart the computer. When the logo screen is displayed, press F1 or Fn+F1.
2.Select Power Intelligent Cooling Engine (ICE) and press Enter.
3.Select ICE Thermal Alert and press Enter.
4.Enable or disable the feature as desired.
5.Press F10 or Fn+F10 to save the changes and exit.
Change the ICE performance mode
You can adjust the acoustic and thermal performance of your computer by changing the ICE performance mode. Three choices are available:
•Better Acoustic Performance (default setting): The computer works with less noise at a normal thermal level.
•Better Thermal Performance The computer works at a better thermal level with normal acoustic performance.
• Full Speed All fans in the computer will run at full speed. |
: |
To change the ICE performance mode:
1.Restart the computer. When the logo screen is displayed, press F1 or Fn+F1.
2.Select Power Intelligent Cooling Engine (ICE) and press Enter.
3.Select ICE Performance Mode and press Enter.
4.Set the ICE performance mode as desired.
5.Press F10 or Fn+F10 to save the changes and exit.
Change BIOS settings before installing a new operating system
BIOS settings vary by operating system. Change the BIOS settings before installing a new operating system.
Microsoft constantly makes updates to the Windows 10 operating system. Before installing a particular Windows 10 version, check the compatibility list for the Windows version. For details, go to: https://support.lenovo.com/us/en/solutions/windows-support
To change the BIOS settings:
1.Restart the computer. When the logo screen is displayed, press F1 or Fn+F1.
2.From the main interface, select Exit OS Optimized Defaults and press Enter.
3.Depending on the operating system to be installed, do one of the following:
•To install the Windows 10 (64-bit) operating system, select Enabled and press Enter.
•To install an operating system other than Windows 10 (64-bit), select Disabled and press Enter.
4.Select Yes in the window displayed and press Enter.
5.Press F10 or Fn+F10 to save the changes and exit.
24 M630e User Guide
Loading...