


Not For Resale – Free Download at http://www.joe-chan.com/manuals

Not For Resale – Free Download at http://www.joe-chan.com/manuals
The LEICAFLEX® SL 2 is a modern
single-lens-reflex camera with selective
light metering through the lens.
The large, bright LEICAFLEX viewfinder
gives you all the necessary information.
At the same time it functions as the
control and composing centre for focusing,
spot exposure measurement, assessment
of the pictorial effect, and perspective.
Both the shutter speed set on the dial and
the lens stop can be read at the same time.
All controls are arranged conveniently so
that you will soon carry out the few
operations almost in your sleep.
But please spend a little time on reading
these instructions: you will have even
more fun when you take photographs
with your new LEICAFLEX SL 2.
2

Not For Resale – Free Download at http://www.joe-chan.com/manuals
Contents
Brief description for the reader
in a hurry 4
Inserting and changing the lens 6
Holding the camera correctly 7
The composing and control centre 8
Focusing 10
Exposure meter 12
Setting film speed and -type 13
Use of filters 16
Testing and changing the battery 17
Rapid transport lever, shutter speed
dial, release button 18
The LEICAFLEX lenses 19
Automatic diaphragm 19
Accessories for the LEICAFLEX SL 2
Interchangeable lenses 28
Follow-focus lenses 30
LEICA lenses on the LEICAFLEX 30
Focusing Bellows-R 31
Motor for the LEICAFLEX SL2 MOT 31
Ring combination for the
close-up range 32
ELPRO close-up attachments 32
Cases 34
Enlargers 34
Projectors 35
LEITZ Warranty 36
After-sales service 36
Depth-of-field button 20
Depth-of-field scale 20
Lens hoods 21
LEITZ Information Service 37
"LEICA FOTOGRAFIE" journal 38
Available accessories 39
Series filters 22
Self-timer 22
Flash synchronization, flash table 23
Inserting the film 24
Taking out the film 26
Tips for the care and maintenance of
the LEICAFLEX and its lenses 26
3
Not For Resale – Free Download at http://www.joe-chan.com/manuals
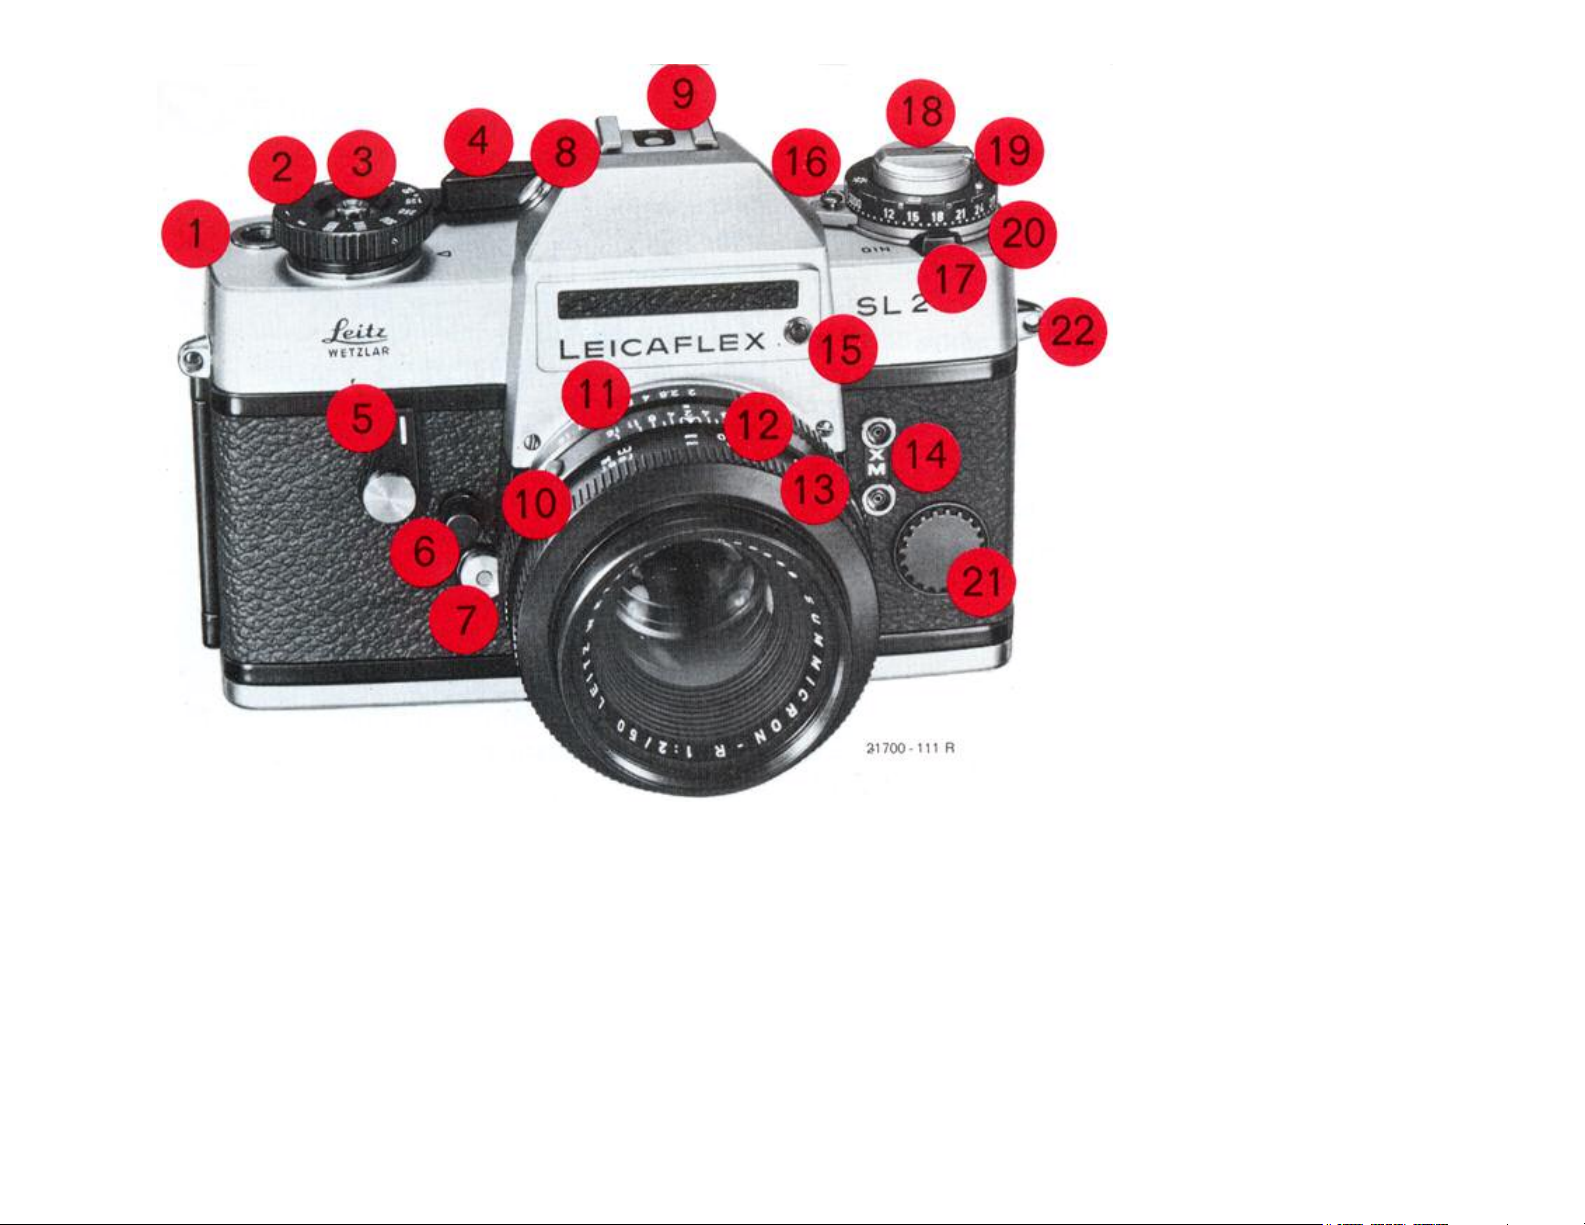
Brief Description for the Reader in a Hurry
1 Automatic film counter (p. 24)
2 Shutter speed dial (p. 18)
3 Release button with thread for cable release
(p. 18)
4 Rapid transport lever for shutter wind and
film transport (p. 18), at the same time
on/off switch of the exposure meter (p. 12)
5 Self-timer (delayed-action mechanism)
(p. 22)
6 Depth-of-field button (p. 20)
7 Bayonet lock for the lens (p. 6)
8 Button for switching on the viewfinder
illumination in poor lighting conditions
(p. 15)
9 Accessory shoe with central contact (p. 23)
10 Red dot mark for lens change (p. 6)
11 Diaphragm pre-setting ring (p. 19)
12 Depth-of-field scale (p. 20)
13 Distance setting ring (p. 10)
4
Not For Resale – Free Download at http://www.joe-chan.com/manuals
14 Contact bushes for flash units (p. 23)
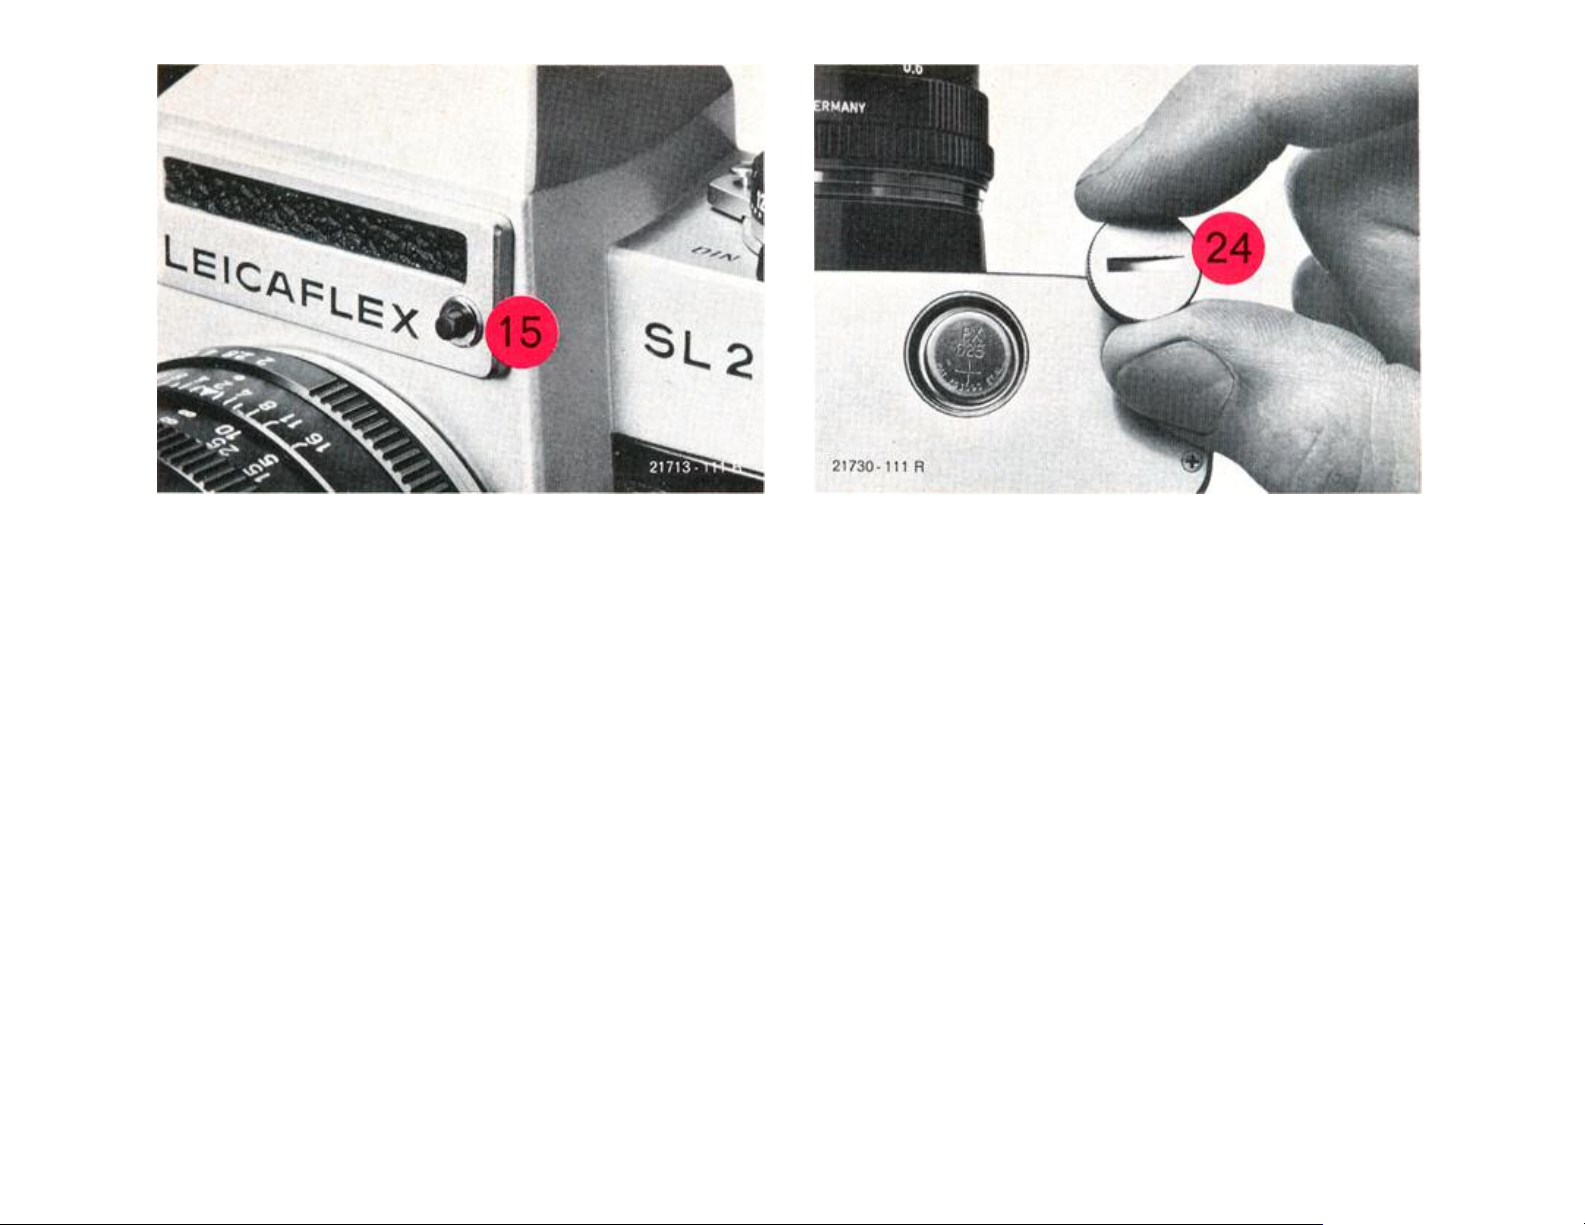
15 Button for testing the exposure meter
battery (p. 17)
16 Locking button for DIN/ASA setting of the
exposure meter (p. 13)
17 Clamp for pulling out the rewind crank to
open the camera back (p. 25)
18 Swing-out rewind crank (p. 25)
19 Disc with film-type symbols (p. 13)
20 DIN scale (p. 13)
21 Cover of the battery for viewfinder
illumination (p. 15)
22 Eyelets for the carrying strap (p. 7)
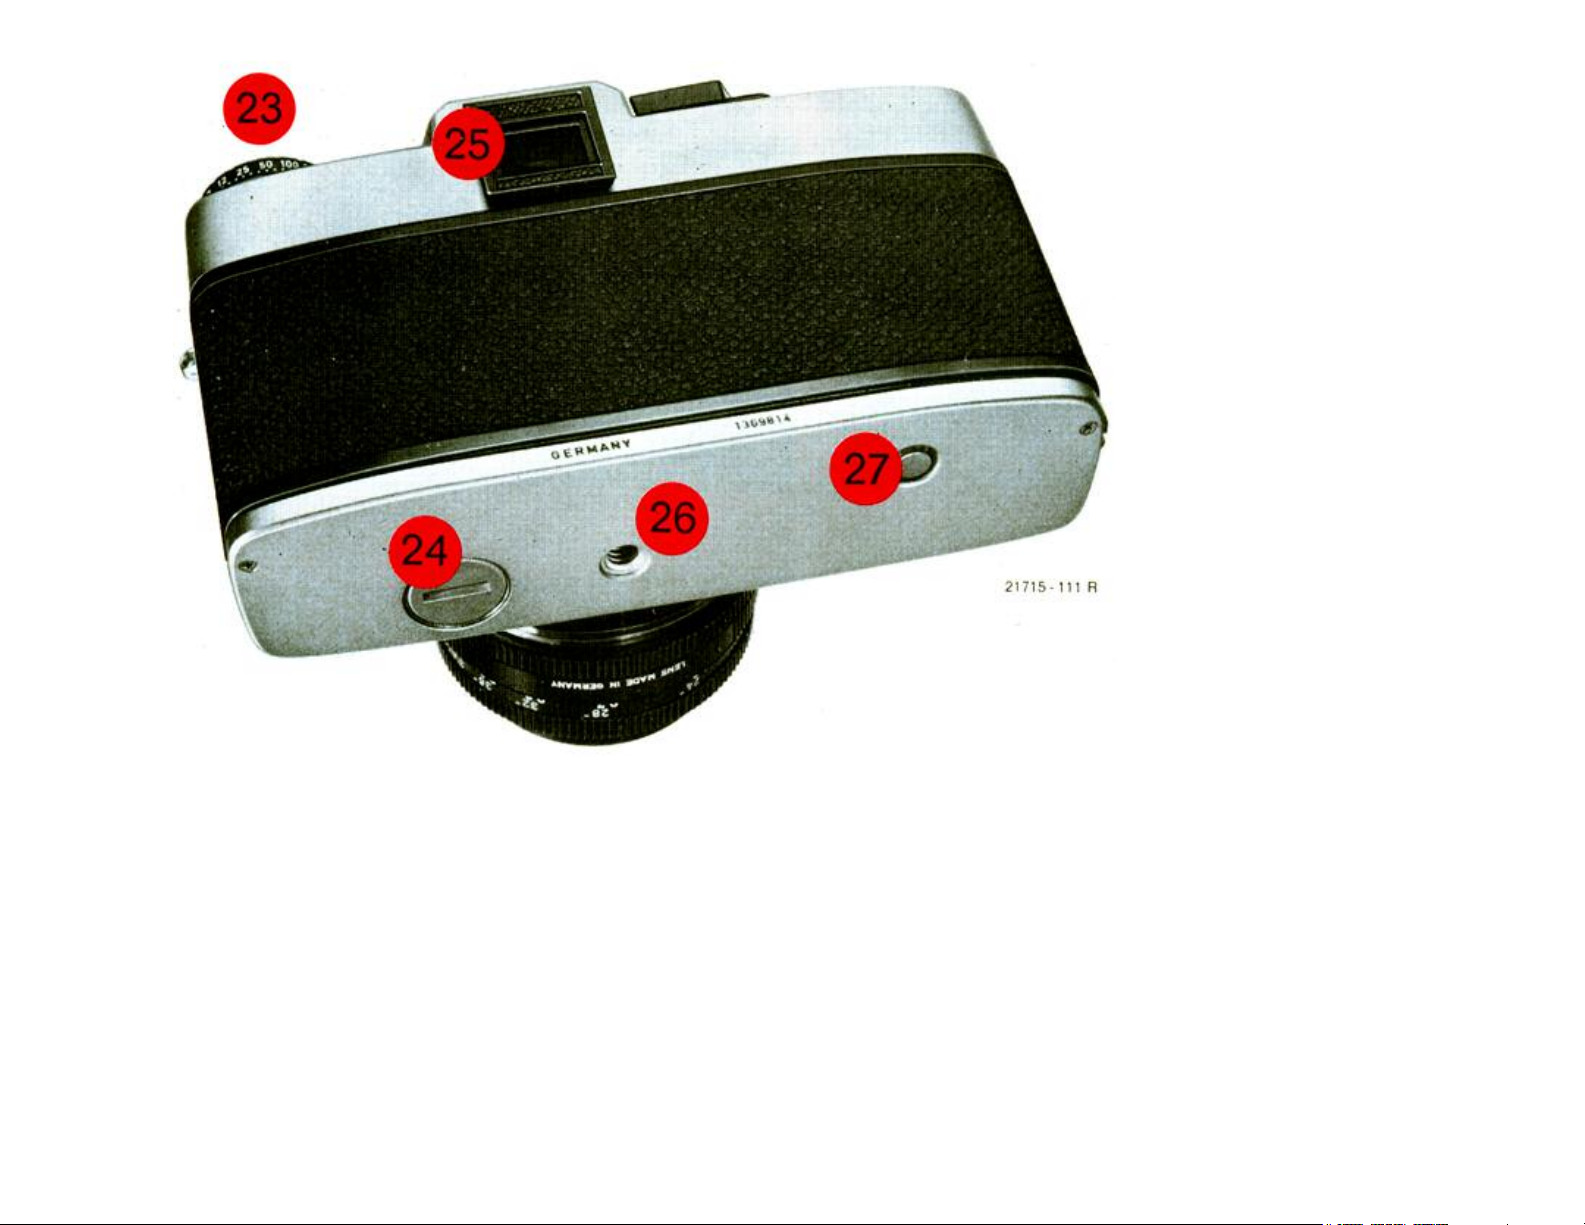
23 ASA scale (p. 13)
24 24 Cover for the exposure meter battery
(p.17)
25 Viewfinder eyelens, accepts mount for
correction lenses (p. 8)
26 ¼ in tripod bush
27 Push-button for rewind release (p. 25)
5
Not For Resale – Free Download at http://www.joe-chan.com/manuals
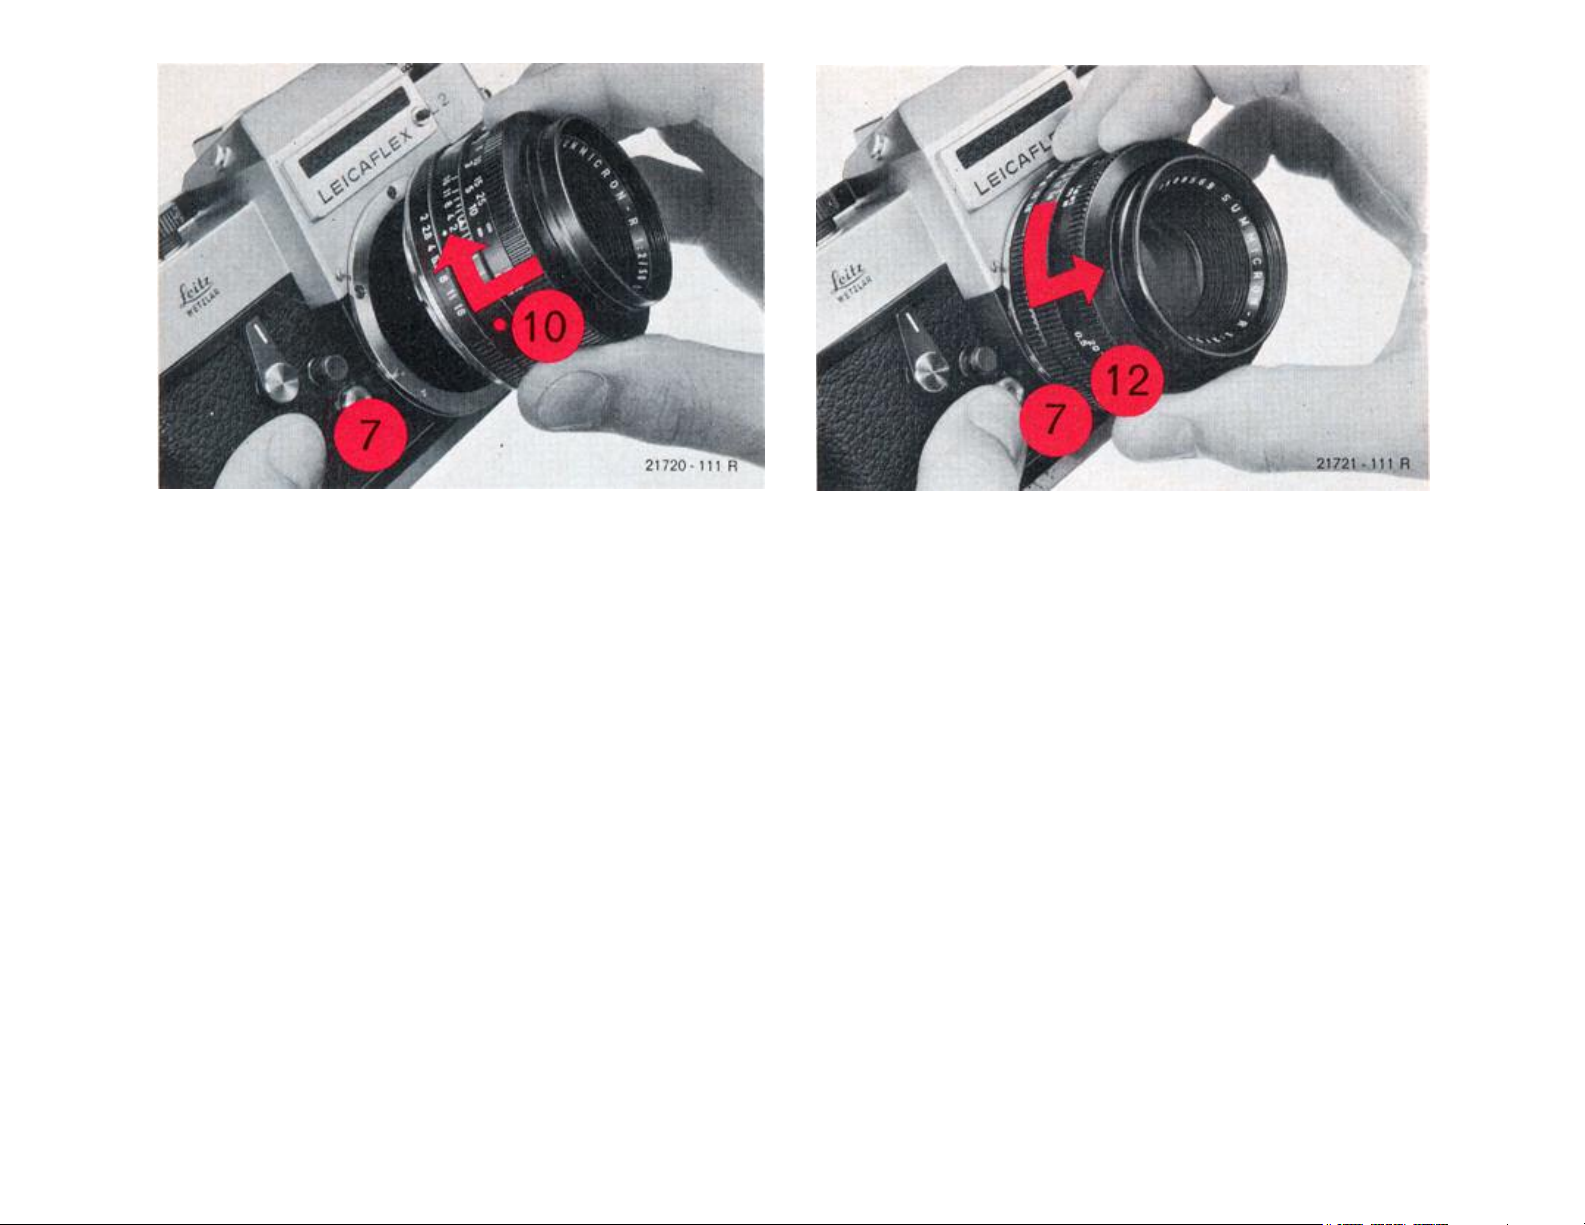
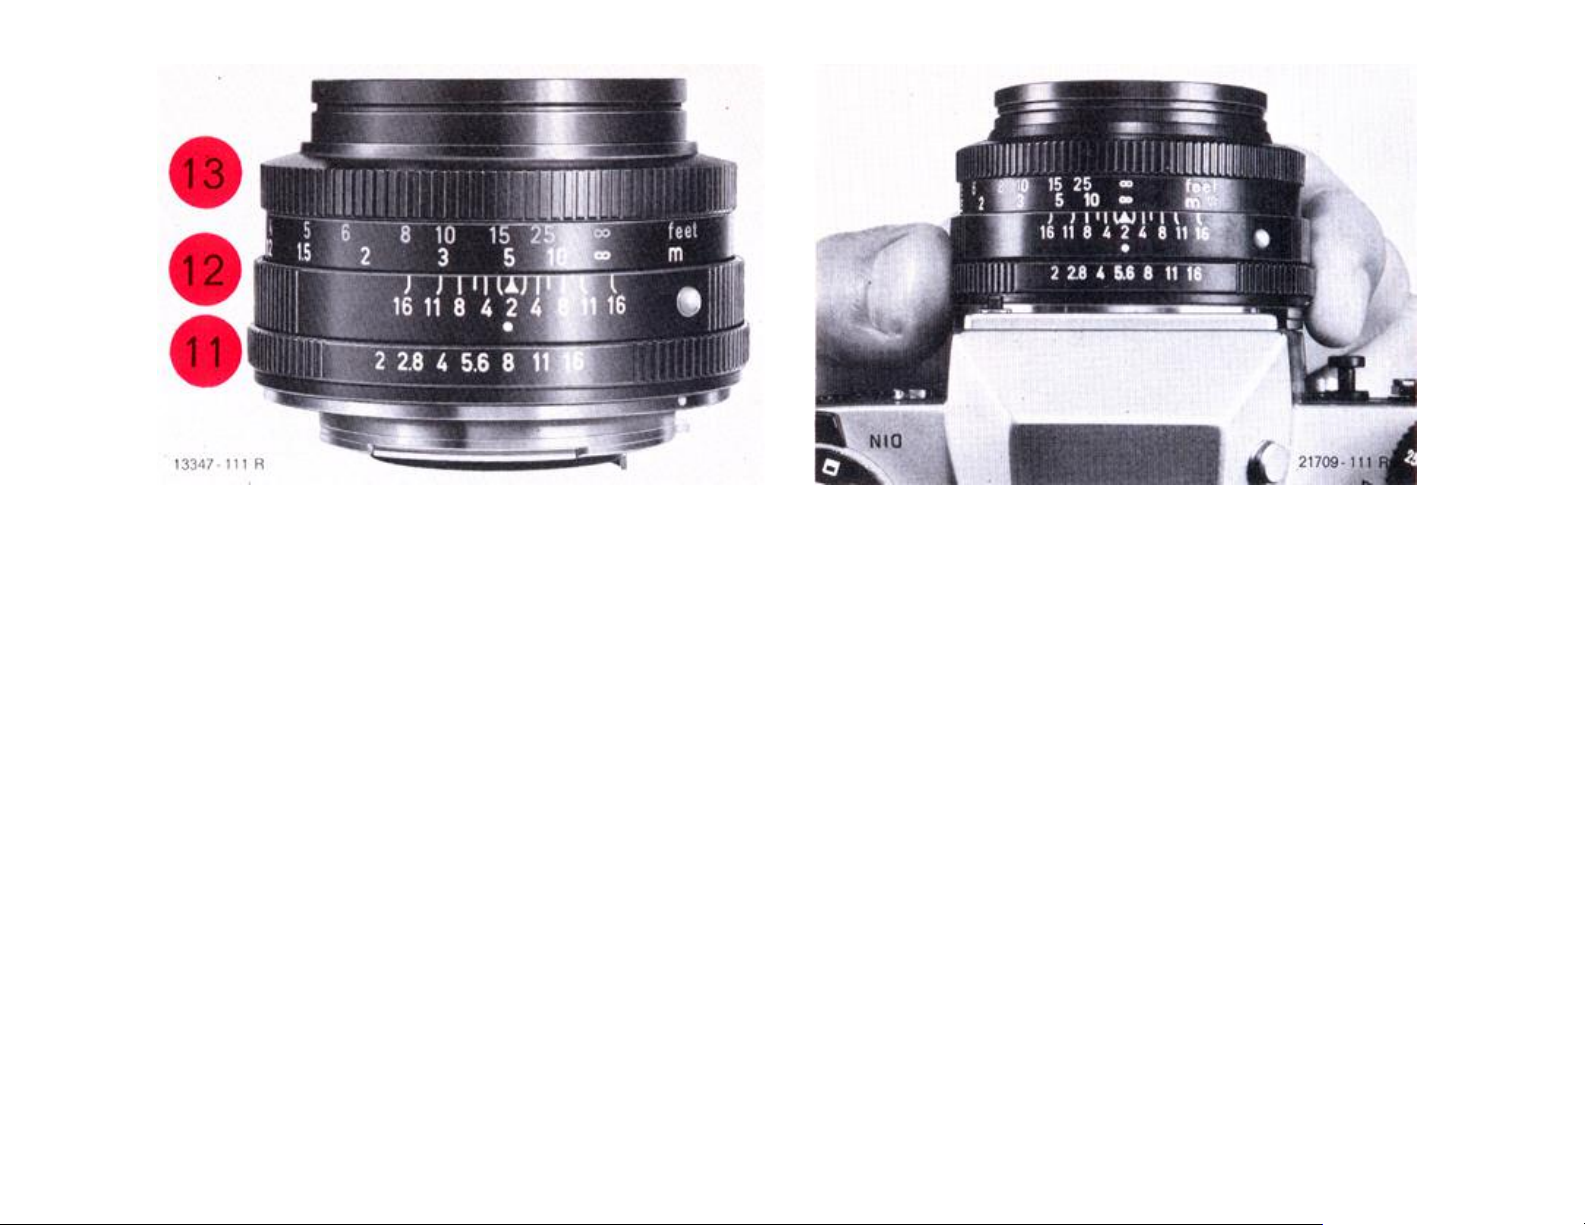
Inserting the lens
For insertion of the lens in the bayonet ring
on the camera body the red dot (10) on the
lens mount must face the bayonet lock (7)
marked in red. After a slight turn to the right
the lens clicks into position.
Change lenses in the shadow of your body.
Taking out the lens
Irrespective of the distance and diaphragm
settings the LEICAFLEX lenses are
changed as follows:
Grip the lens on the fixed ring (12), depress the bayonet lock (7), turn the lens
to the left and take it out.
6
Not For Resale – Free Download at http://www.joe-chan.com/manuals
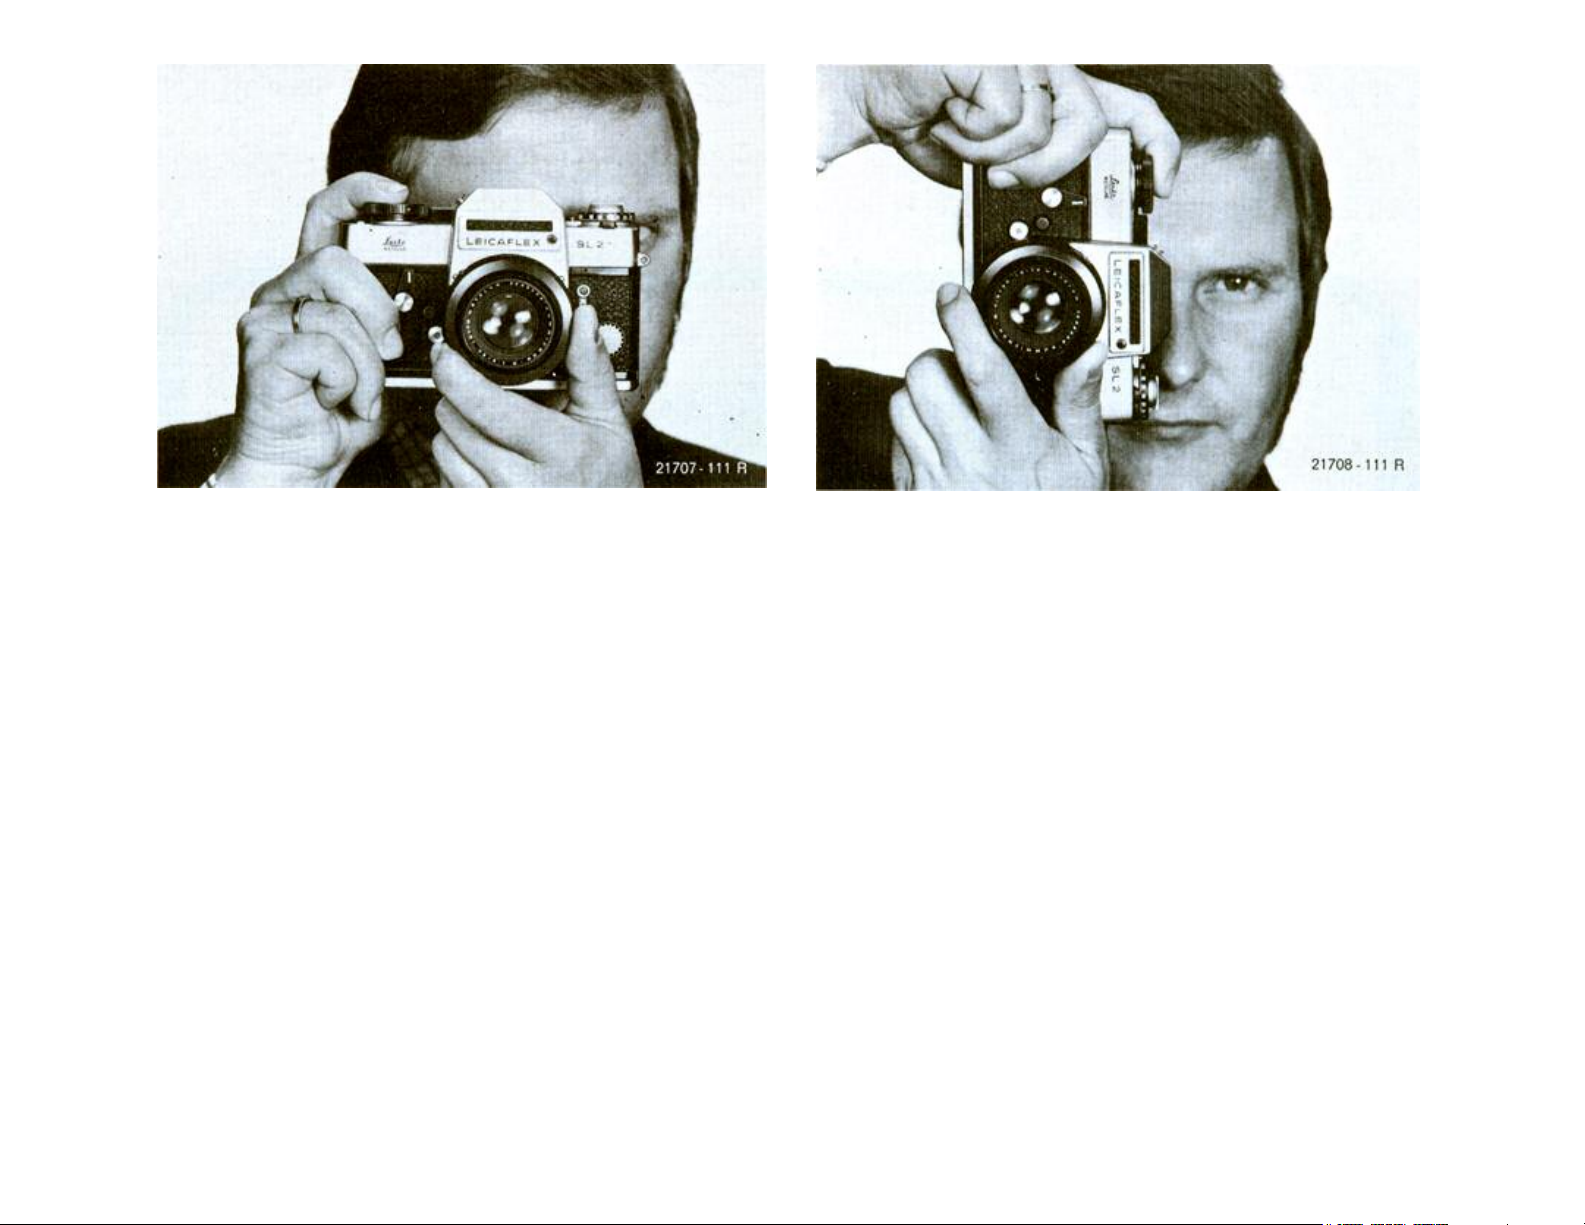
Holding the camera correctly
For the steady 3-point support the right
hand grips the camera. The index finger
rests on the release button, the thumb
against the rapid transport lever. The left
hand supports the lens from below.
When taking pictures in the upright
format, simply turn the LEICAFLEX. The
hands remain in the same position as for
horizontal pictures, ready to wind on the
film and to focus.
7

Not For Resale – Free Download at http://www.joe-chan.com/manuals
8

Not For Resale – Free Download at http://www.joe-chan.com/manuals
The composing and control centre
The viewfinder of the LEICAFLEX SL 2 is
the centre both for pictorial composition
and for control of all important data:
sharpness, picture area and perspective,
measuring field and exposure meter
pointer, shutter speed set on the dial and
lens stop.
Spectacle wearers, too, can normally survey the viewfinder image without
difficulty. In special cases, correction
lenses in a mount can be pushed onto
the eyelens mount.
The viewfinder of the LEICAFLEX SL 2
has been adjusted with micro-precision.
This ensures optimum sharpness as well
as exact agreement of viewfinder image
and picture area on the film.
A scale below the viewfinder field
indicates on the left the shutter speed set
on the dial, and on the right the pre-set
lens stop.
9

Not For Resale – Free Download at http://www.joe-chan.com/manuals
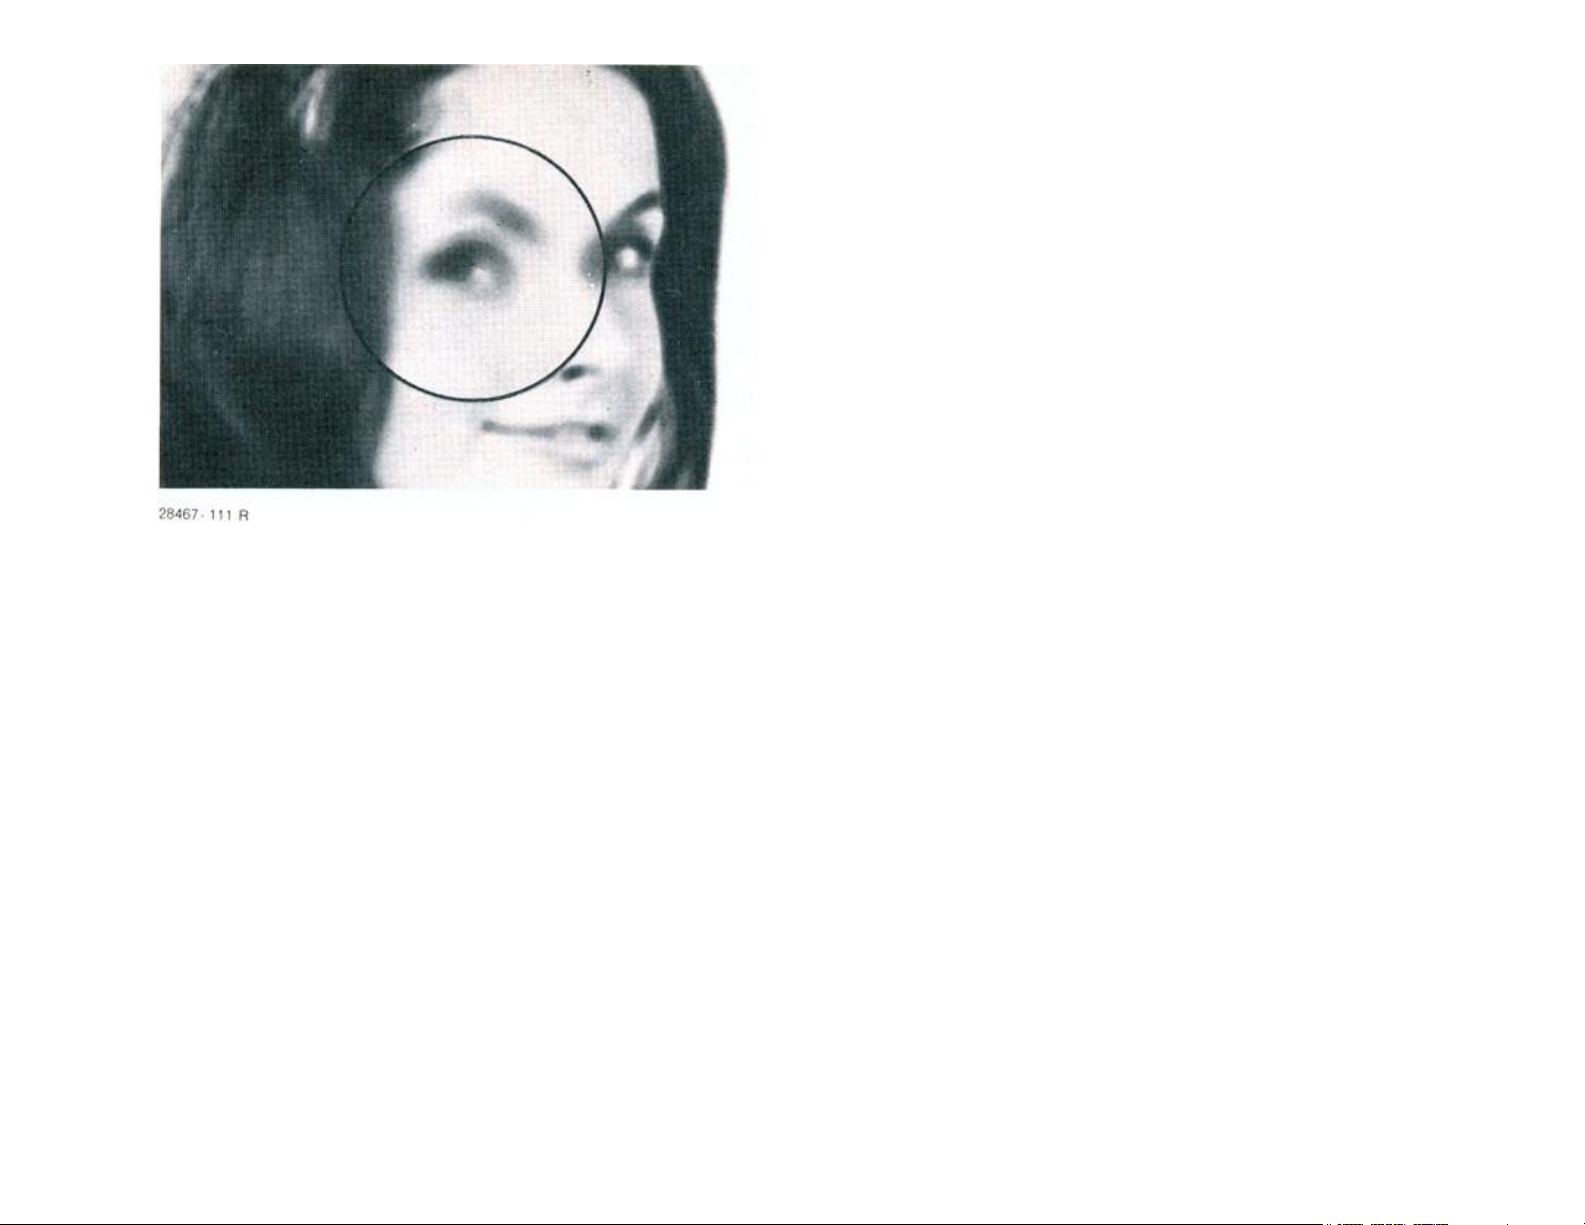
Focusing
According to your predominant photographic work you will have chosen between 3 permanently built-in viewfinder
screens.
The image is focused by rotation of the
distance setting ring (13) on the lens.
a) Screen with split-image wedge
This screen is particularly suitable for
quick focusing with wide-angle and standard lenses. Unless focusing is critical,
edges and lines of the object are mutually displaced in the horizontal split
image.
A ring-shaped quadrangular micro-prism
screen surrounds the central split image.
This serves for the focusing of objects
lacking crisp outlines. Out-of-focus setting is indicated by distinct flickering.
The surrounding field consists of triangular micro-prisms, producing a
ground-glass screen effect. This surrounding field is therefore used mainly for
focusing with longer-focal-length lenses
and in the close-up range.
10
Not For Resale – Free Download at http://www.joe-chan.com/manuals
b) Screen without split-image wedge The
entire central measuring field is occupied
by a quadrangular micro-prism screen.
Distinct flickering indicates that the object
sighted is not critically focused on this
screen.
c) Groundglass screen
The image can be focused within the
entire viewfinder field. The central circle
indicates the measuring field for the exposure meter. This screen is suitable for
close-up and macro-photography as well
as for extreme telephoto work. In these
cases the working stop is usually employed for focusing etc. because a transmission of the automatic diaphragm is no
longer possible. The LEICAFLEX SL 2
MOT special version is supplied with a
ground-glass screen unless otherwise
ordered.
11

Not For Resale – Free Download at http://www.joe-chan.com/manuals
Exposure meter
The exposure meter of the LEICAFLEX
SL 2 measures through the lens at full
aperture. Additional and therefore timeconsuming operations are eliminated.
20% of the light coming from the lens is
directed to the detector of the exposure
meter via a cylindrical deflecting mirror
arranged behind the hinged mirror. The
detector is a CdS photo-resistor built into
the bottom part of the camera and
arranged so that no stray light influences
the measurement. The outline of the
measuring range of the exposure meter
is indicated by the two semicircular
markings top and bottom right on the
edge of the viewfinder image.
The exposure meter is switched on and
off with the rapid transport lever (4). In
the LEICAFLEX SL 2 the exposure meter
is switched off when the rapid transport
lever is parked against the camera body
in the resting position. It is switched on
when the rapid transport lever (4) is
swung into the measuring position (in the
LEICAFLEX SL 2 MOT special model the
exposure meter is constantly switched
on).
The measuring field of the exposure
meter is exactly defined in the viewfinder
by the large central circle. Thus the target
area for the focal length of all the lenses
12

Not For Resale – Free Download at http://www.joe-chan.com/manuals
is outlined clearly and at the same size.
The part of the subject representative of
the exposure can be measured precisely.
Unfavourable influences such as
extremely bright or dark portions of the
subject, open light sources, and other
undesirable features can be eliminated
by the measurement of an undisturbed
area of the object representative of the
total subject. In most cases a rule of
thumb can be used: measure the feature
you are focusing on. Generally do not
measure extremes such as dark shadow
portions, bright clouds, open light
sources, or reflections on the water.
Our special leaflet "Selective Light Measurement" No. 111-77 contains further
details.
Setting the film speed and -type
Correct setting of the film speed is essential to correct exposure measurement.
The setting ring (20) displays the DIN/ASA
values. To set the value for the film in the
camera depress the locking button (16) and
simultaneously turn the ring until the desired
number faces the corresponding index on the
front (DIN) or back (ASA).
The film indicator disc (19) can be set at the
following symbols to denote the type of film in
the camera:
= Black-and-white film
= Daylight colour film
= Artificial-light colour film
= Colour negative film
The locking button (16) serves as index mark
for the setting.
13

Not For Resale – Free Download at http://www.joe-chan.com/manuals
Setting the shutter speed
The pointers of the exposure meter appear on the right of the viewfinder field.
The follow-pointer is coupled with the
diaphragm setting ring (11) of the lens
and the shutter speed dial (2) of the camera. To set the correct exposure the
diaphragm setting ring (11) of the lens
and/or the shutter speed dial (2) are adjusted. It is thus possible to select the desired shutter speed/lens stop combination at will:
The lens stop to vary the depth of field,
the shutter speed to avoid camera shake
or undesired movement blur. The shutter
speed set on the shutter speed dial (left)
and the pre-set lens stop (right) are displayed on the scale below the viewfinder
image. When the exposure is set correctly the follow-pointer exactly brackets
the measuring pointer.
Measurement with working stop
Some accessories, such as extreme telephoto lenses, the ring combination for the
close-up range, and the focusing bellows
R have no automatic diaphragm. The exposure must be measured at the working
stop. The deflection of the measuring
pointer is influenced by a change in the
lens stop. The follow-pointer is made to
14

Not For Resale – Free Download at http://www.joe-chan.com/manuals
coincide with the measuring pointer by
rotation of the shutter speed dial (2) of
the camera. The reading for the lens stop
in the viewfinder will be opposite H in
this case.
Measuring in the limiting ranges
The high sensitivity of the exposure
meter of the LEICAFLEX SL 2 permits
precise exposure measurements even in
very poor lighting conditions. To improve
visibility the adjustment display on the
right-hand margin of the viewfinder image
is illuminated with the push-button (8).
The lamp is supplied with current by a
1.35v mercuric oxide battery.
This is a Mallory PX 625 or an equivalent
make. It is located underneath the cover
(21), which is unscrewed when the
battery has to be changed.
With short switching periods of 3 to 4sec
duration the life of the battery is about 10
hours. Viewfinder illumination should
therefore be switched on only when
necessary.
15

Not For Resale – Free Download at http://www.joe-chan.com/manuals
Use of filters
When light is measured through the lens
the energy reduction owing to filters is
generally allowed for automatically. But
the various films have different sensitivities in the various spectral regions.
Deviations from the measured exposure
value can therefore occur with dense and
extreme filters.
Thus an orange filter, for instance, requires an increase by about 1 stop value,
red filters on average about 2 stop
values. A completely accurate value
cannot be given since the red sensitivity
of black-and-white films varies a great
deal.
with our lenses measurement and
settings can be carried out as with
ordinary filters. With ordinary polarizing
filters without circular effect the longest
exposure is determined by rotation of the
filter and set; now the desired effect is
found and the exposure made.
With circular-polarizing filters as supplied
16
Not For Resale – Free Download at http://www.joe-chan.com/manuals
Testing the battery
The exposure meter has a 1.35v mercuric
oxide battery as current source. The Mallory PX 625 or equivalent brands such as
Varta Pertrix 7002 can be used. These batteries have an average life of 1-2 years
even when the exposure meter remains
switched on for prolonged periods.
The power of the battery can be tested as
follows: hold the camera as for the horizontal format and look through the viewfinder. Depress the test button (15): the
pointer of the exposure meter must be deflected at least as far as the lower semicircular marking of the viewfinder field.
Changing the battery
Unscrew the cover (24) on the underside of
the body with a coin. This exposes the
battery, which can now be exchanged.
When inserting the new battery make sure
that the engraved data are on top.
17

Not For Resale – Free Download at http://www.joe-chan.com/manuals
The rapid transport lever (4) transports
the film through 1 frame with each full lever
movement, winds the shutter and switches
the film counter (1) to the next-higher
number. It engages in a resting position
(exposure meter switched off), in a measuring position, and in a readiness position.
The shutter speed dial
(2) can be set before or after film transport and engages with
a click opposite the engraved speeds.
Intermediate values can be set as required
and are fully operative except between
1
/
8
and 1/4,1/30 and 1/60 sec. At the "B" setting
the shutter remains open as long as the
release button is depressed. Electronic
flash units can be used at the speeds B, 1
to J =
The release button
1
/
sec (see p. 23).
100
(3) has a thread for
cable releases. Pressure on the release
button triggers the following camera functions in sequence:
1. The mirror is swung up.
6. The deflecting mirror of the exposure
meter returns to the measuring position.
7. The lens diaphragm reopens.
2. The deflecting mirror for the exposure
meter folds against the viewfinder mirror.
3. The lens diaphragm closes to the preset value.
4. The shutter operates.
5. The mirror returns into the optical path.
18
Not For Resale – Free Download at http://www.joe-chan.com/manuals
The LEICAFLEX lenses
All LEICAFLEX-R lenses are of the same
external design, i.e. the rotatable diaphragm pre-setting ring (11), the fixed ring
with depth-of-field indication (12), and the
distance setting ring (13) are arranged
identically. The left hand thus becomes very
easily accustomed to rapid and reliable
operation with all focal lengths.
Automatic diaphragm
All LEICAFLEX-R lenses are fitted with an
automatic diaphragm. This means that the
viewfinder image is viewed always — i.e.
before and after exposure — at full aperture and thus maximum viewfinder brightness. Immediately before the exposure or
when the depth-of-field button (6) is depressed the lens diaphragm is closed to the
pre-set value.
19
Not For Resale – Free Download at http://www.joe-chan.com/manuals
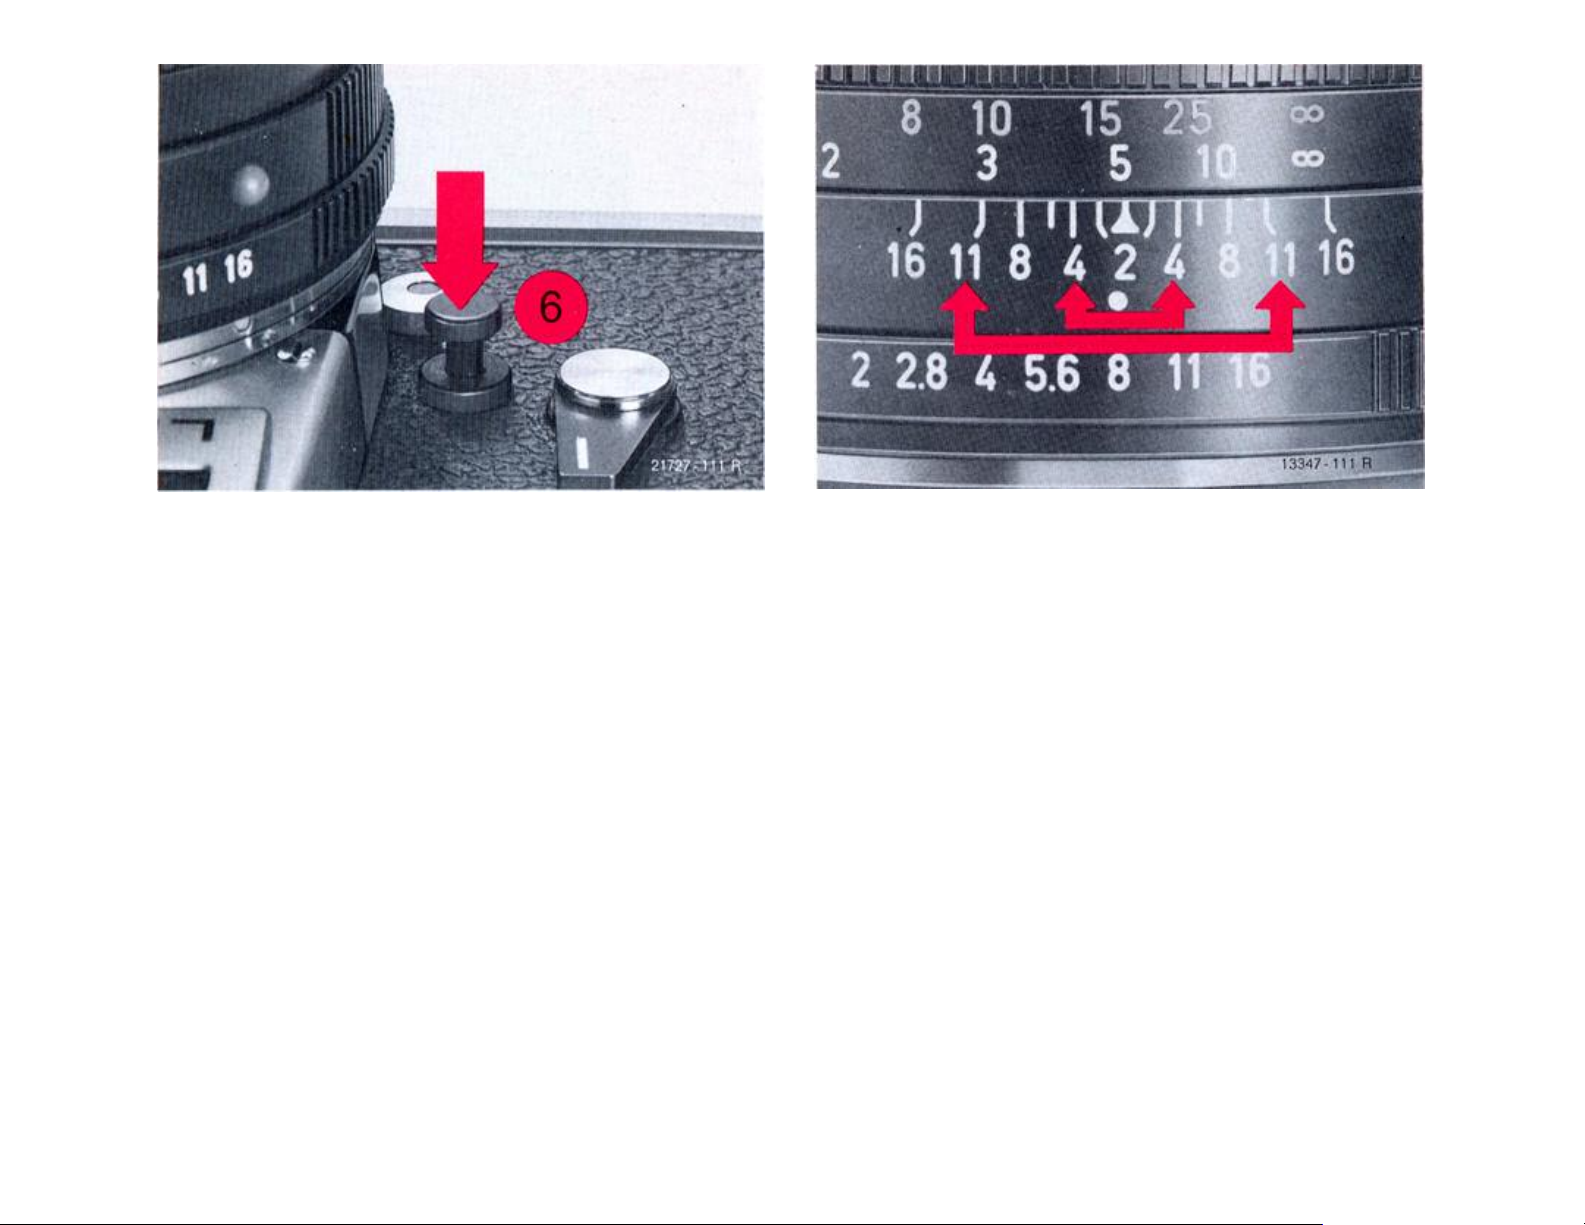
Depth-of-field button
The LEICAFLEX SL 2 measures the exposure at full lens aperture. The depth-offield button permits the assessment in the
viewfinder of the depth of field to be expected with the pre-set stop-down. When
the button (6) is pressed the lens diaphragm is closed to the preset value.
Please note:
During exposure measurement the button
(6) must not be pressed.
Depth-of-field scale
The depth-of-field scale indicates the range
of the depth of field for the object distance
set on the distance setting ring.
If, for instance, you have focused the 50mm
SUMMICRON-R f/2. lens on 5m, the
sharpness will extend from 3m to about
20m when the lens is stopped down to f/11.
If you stop down only to f/4, however,
sharpness will extend from 4m to about 8m.
Detailed information about depth of field
with all focal lengths is contained in our
Depth-of-field Table No. 110-57.
20

Lens hoods
Not For Resale – Free Download at http://www.joe-chan.com/manuals
All LEICAFLEX lenses have their functionally designed lens hood. It should
always be used as a matter of course,
because it effectively protects the lens
against stray light and flare as well as
against raindrops and fingermarks.
On the wide-angle and standard lenses the
lens hood is attached with the white dot
facing white dot and locked by a clockwise
turn. To unlock it, slightly raise the lens
hood and turn it anti-clockwise to remove it.
The lens hood of these lenses also serves
as adapter for series filters.
On long-focal-length lenses the lens hood is
permanently fixed and can be extended like
a telescope.
21
Not For Resale – Free Download at http://www.joe-chan.com/manuals
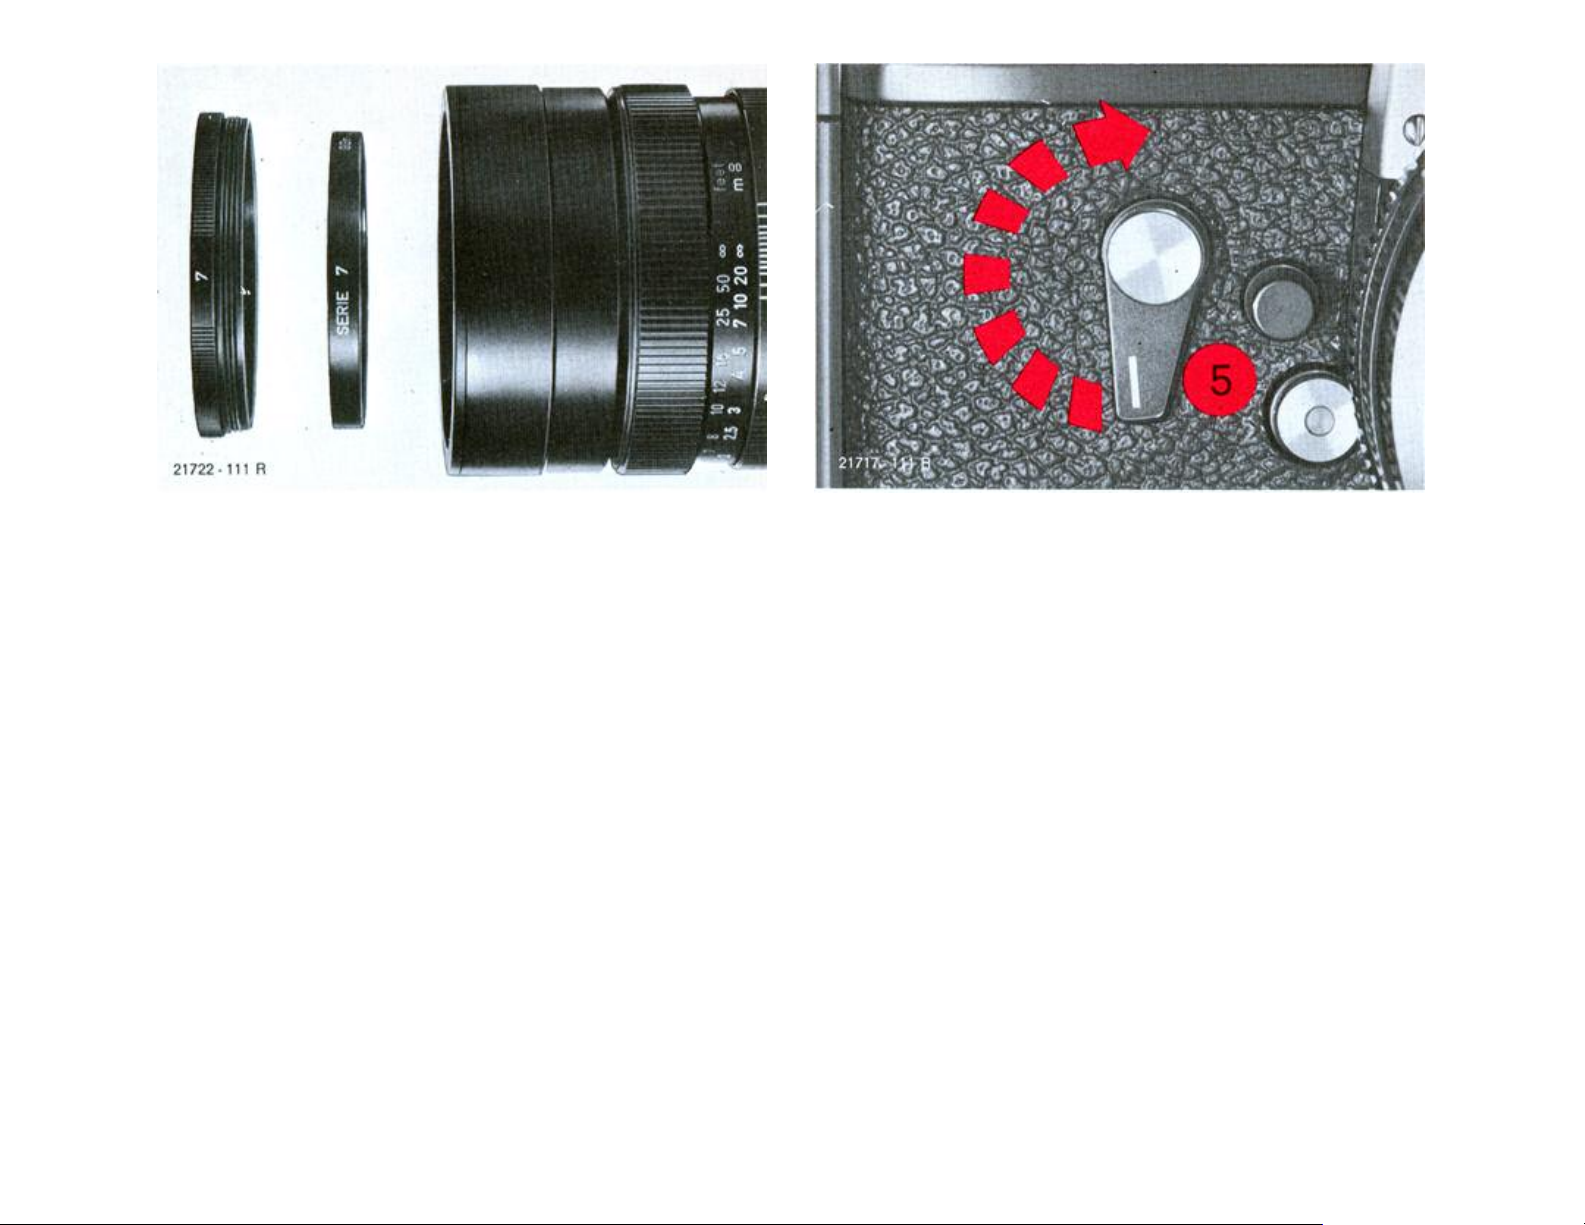
Series filters
With lenses of up to 50mm focal length
inclusive the filters are inserted in the lens
hood.
The lenses with telescoping built-on lens
hood include a screwed-in adapter ring
accommodating series filters. To insert the
filter the adapter ring is unscrewed, the filter
inserted, and the adapter ring replaced to
secure it. The ring can be readily released if
it is gripped only on one side and therefore
"strainfree".
Self-timer*
The self-timer (delayed-action mechanism)
operates with all shutter speeds. First the
shutter is wound with the rapid transport
lever (4). The self-timer is wound by a 180°
turn of the lever (5) and started by means of
the release button (3). Delayed action up to
the exposure is about 10 sec. During this
time the lever (5) returns to its end position.
Shortly before it reaches this position the
shutter is released.
If the lever (5) has been turned only through about
90° for winding, release cannot occur, even if the
lever is turned back manually to its original position.
Remedy: wind the self-timer completely and release
by means of release button (3).
* The LEICAFLEX SL 2 MOT special version does
not include a self-timer.
22
Not For Resale – Free Download at http://www.joe-chan.com/manuals
The table below contains information about
the various possibilities.
Flash Table
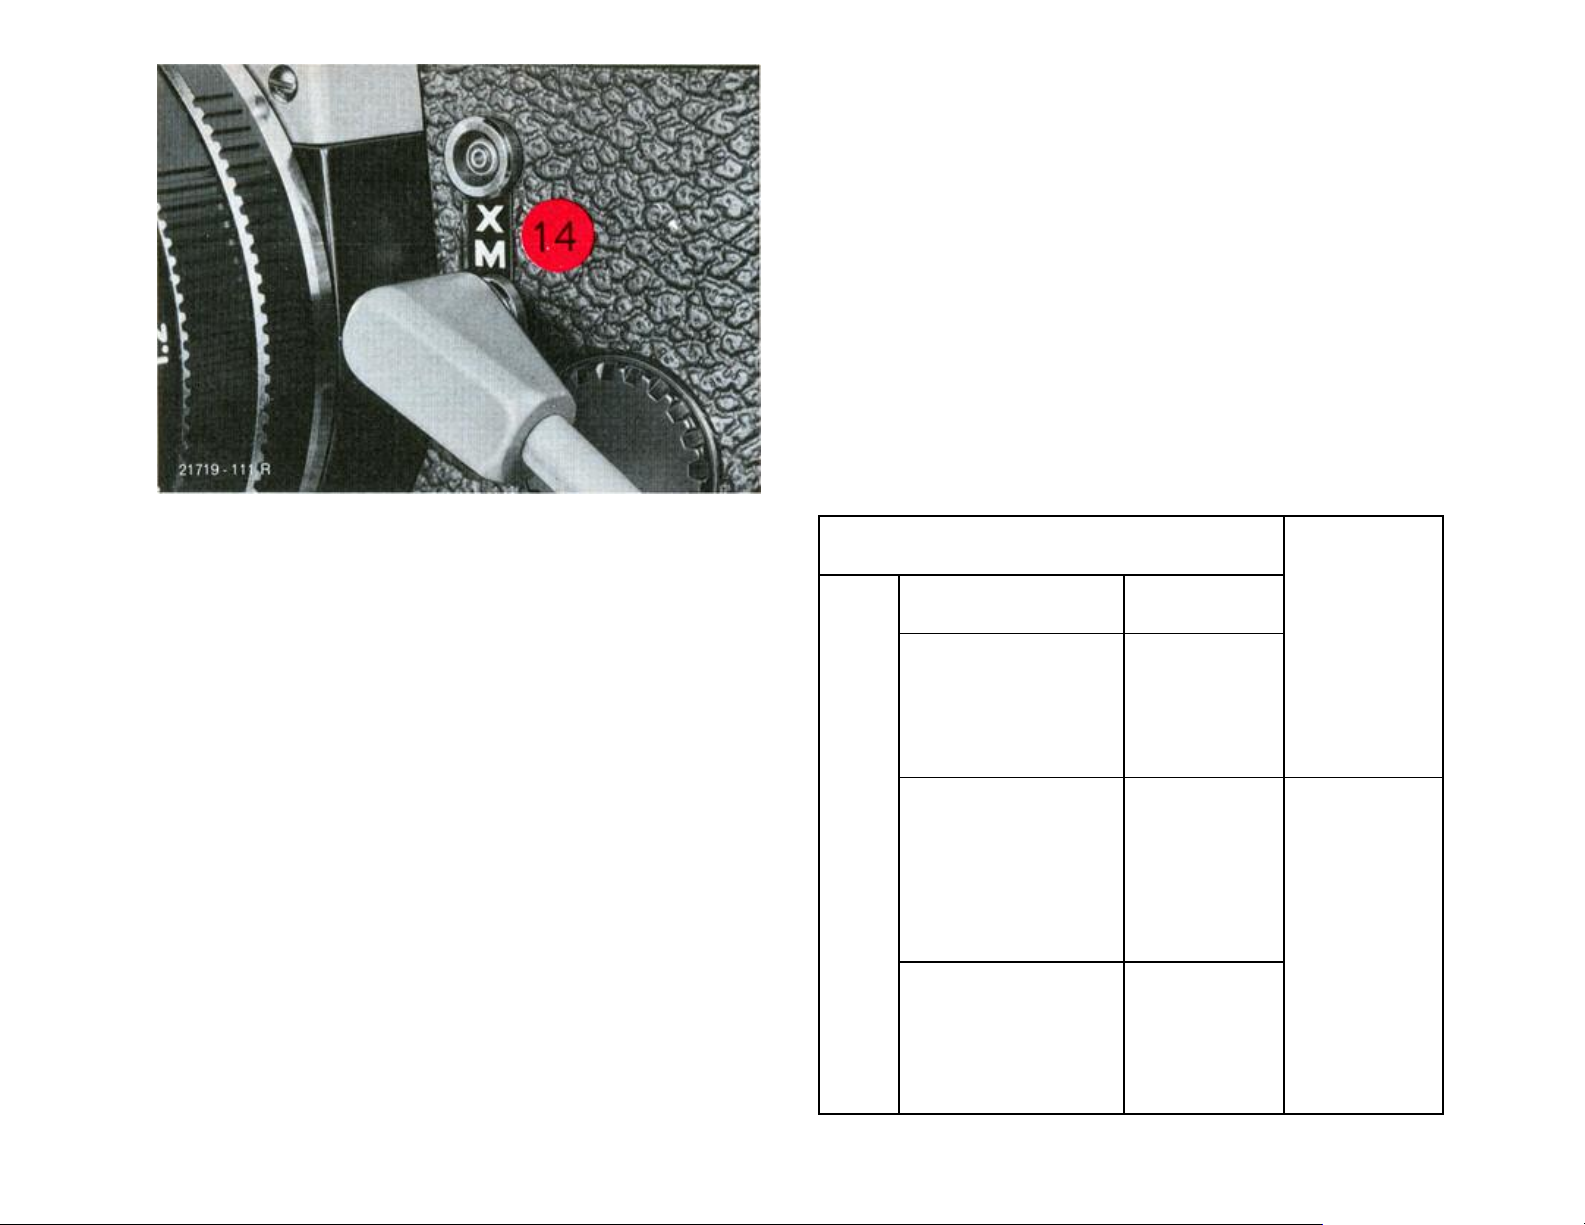
Flash synchronization
All the commercially available flash units
with standardized flash plugs (co-axial
plugs) or with accessory-shoe contact can
be used on the LEICAFLEX SL 2.
The two contact bushes (10) are located in
the front panel of the camera. Electronic
flash units are connected to the upper contact bush marked "X", and expendableflash units to the lower bush marked "M".
Cordless flash units and adapters can be
connected via the flash contact (X) in the
accessory shoe (9).
Both types of flash can be used simultaneously.
Electronic flash BNJ (
M 2 1N1/30
AG 1
AG 3
1N
Flash cubes
XM 1
PF 1
1N
XM 5
PF 5
Expendable-flash units
GE 5
25
1N
M 3
1
/
100
)
Upper
contact
1
/60
Lower
1
/
125
1
/
250
contact
23
Not For Resale – Free Download at http://www.joe-chan.com/manuals
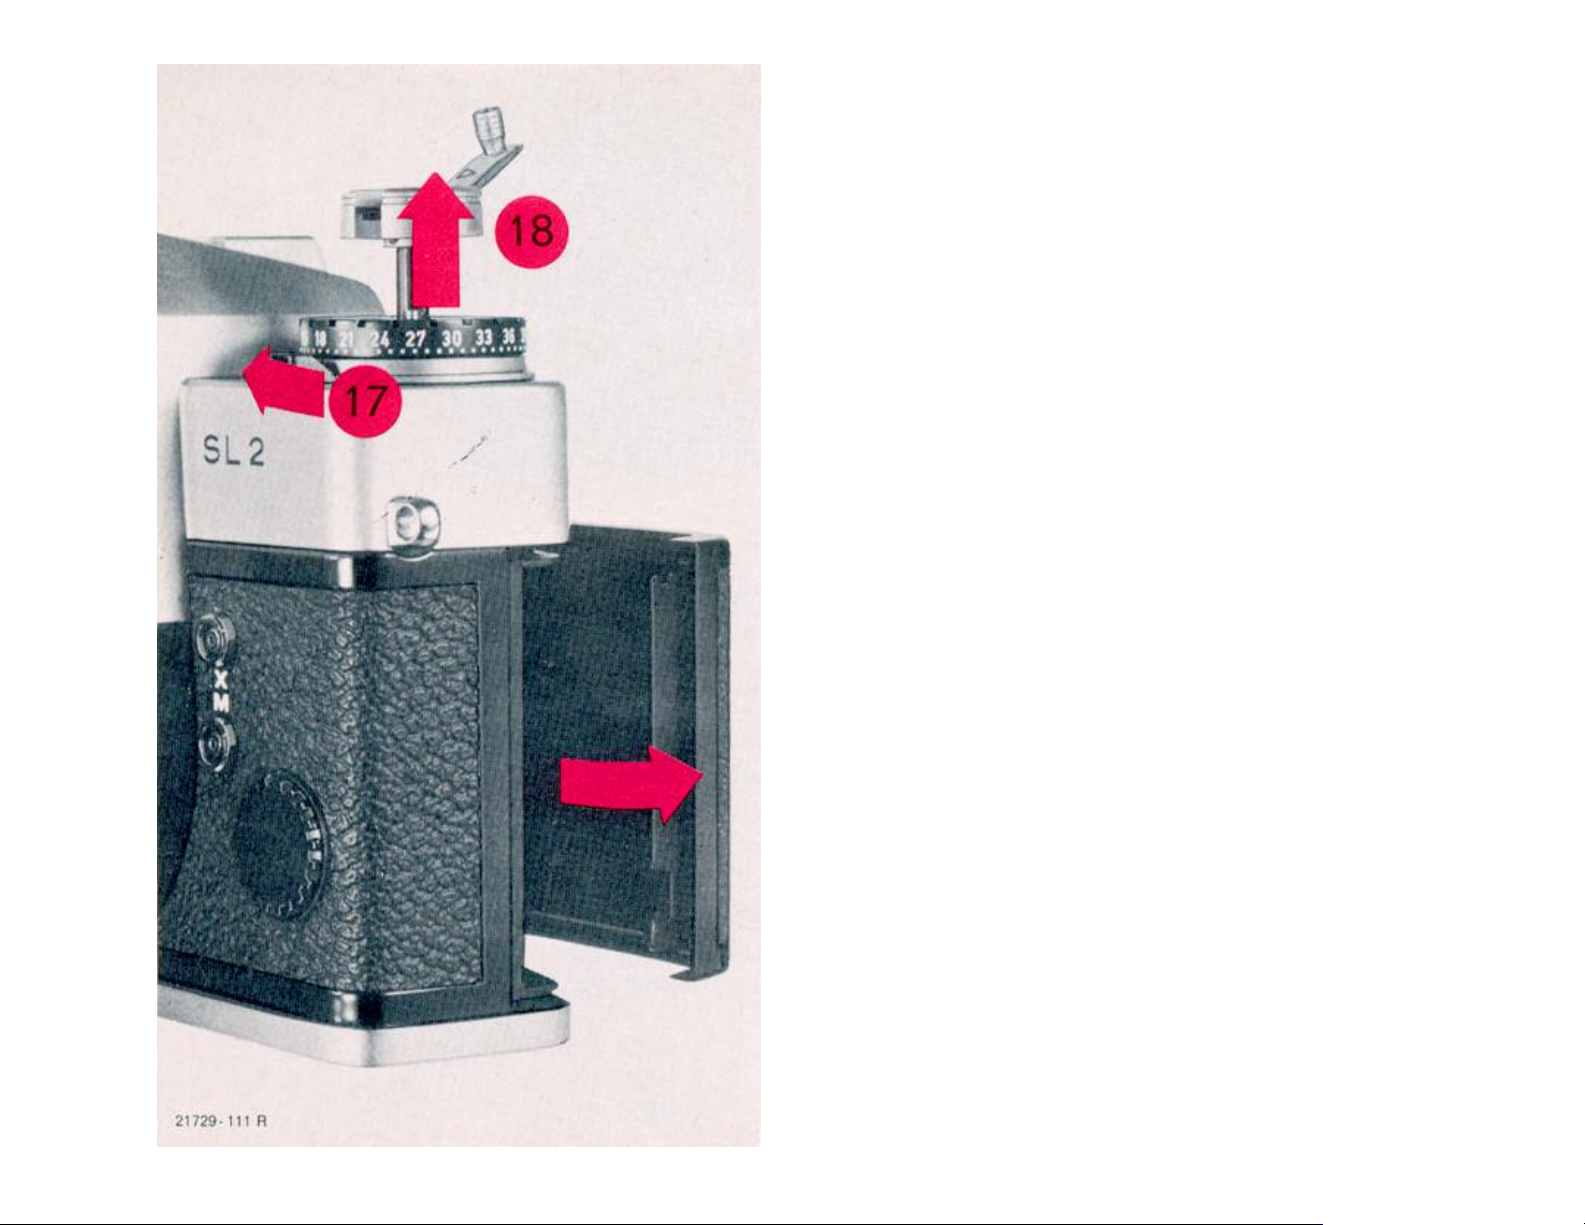
Inserting the film
Open the camera back: push the clamp (17)
in the direction of the arrow, hold it in
position, and at the same time pull out the
rewind crank (18). When the rewind crank is
pulled out further the camera back will open
automatically after overcoming a safety
lock. The film counter (1) returns to "-2".
Wind and release the shutter. Insert the film
leader in one of the slots of the take-up
spool as shown in the illustration. Please
ensure that the film leader is gripped by at
least one holder.
Insert the film cartridge in the empty space
only now. Push in the rewind crank. The
edge of the film must be parallel to the film
guide, and the teeth of the transport
sprocket must engage the perforation holes
of the film during careful operation of the
rapid transport lever.
24

Not For Resale – Free Download at http://www.joe-chan.com/manuals
Close the camera by simply snapping the
back shut; it engages automatically. Transport the film through one frame, release the
shutter, and wind the rewind crank in the
direction of the arrow to pull the film tight
until you feel resistance. Transport
the film again and release the shutter. The
film is correctly inserted and wound if the
rewind crank rotates against the direction of
the arrow during film transport. After the
third transport the camera is ready for the
exposure. The film counter (1) points at 1.
25

Not For Resale – Free Download at http://www.joe-chan.com/manuals
Taking the film out
When the inserted film is completely exposed, increased resistance will be felt on
the rapid transport lever (4). The film must
be rewound into its cartridge as follows:
push the button for the rewind release (27)
on the underside of the camera body, turn
the rewind crank out (18) and in the direction of the arrow until the film, after slight
resistance has been overcome, is wound
back into the cartridge after a further turn.
Pull out the rewind crank (18) after
releasing the clamp (17), open the camera
body and take out the film cartridge. During
rewinding the frame counter (1) moves
backwards.
Hints for the care of the LEICAFLEX and
its lenses
Dust and fluff on the mirror is best removed — carefully — with a soft, dry sable
brush degreased repeatedly in ether before
and during the cleaning operation. The
brush must, however, be absolutely dry
during cleaning. Dust and fluff on the lower
viewfinder screen should be removed only if
the viewfinder image is very badly affected
by it.
For this purpose we recommend a dry
brush repeatedly degreased in ether. Avoid
touching the viewfinder screen with the
mount of the brush. Important::
Never blow
into the mirror space, as this may carry
26

Not For Resale – Free Download at http://www.joe-chan.com/manuals
dust into the interior of the camera.
A lens acts as a burning glass if it is pointed
directly at the sun. Protect the interior of
your camera by covering the lens with the
lens cap, or keeping the camera in a case
or in the shade. Each lens, in addition to its
type, has its own Serial No. engraved on
the front lens mount. Make a note of this as
well as of the Serial No. of the camera,
which you will find on the back of the
baseplate of your LEICAFLEX. This may be
of great importance in case of loss or theft.
A brownish-violet sheen indicates the highquality coating of the LEICAFLEX lenses.
These reflection-reducing layers vastly increase the brightness and brilliance of the
picture.
protect the front element of the lens from
external damage by seawater spray and
sand. Such an additional colourless and
optically flat glass plate, i.e. a filter, may,
however, cause undesirable reflections at
certain angles of light incidence, especially
in centre jour and artificial light. The lens
hood, too, protects the lens against accidental fingermarks and raindrops.
Remove dust from the external surfaces of
your lenses with a soft sable brush or with a
clean, dry, soft piece of linen. Special cloths
used for the cleaning of spectacles are not
recommended; they are chemically
impregnated and may therefore attack the
glass of the lenses (glass used for
spectacles differs in its composition from
the optical glasses of high-quality camera
lenses).
In unfavourable conditions, for instance on
the beach, at sea, in subtropical climate etc.
a colourless U.V. absorbing filter will
27

Not For Resale – Free Download at http://www.joe-chan.com/manuals
28

Not For Resale – Free Download at http://www.joe-chan.com/manuals
Accessories
Interchangeable lenses
In addition to the 50mm standard lenses
you will have the choice of a large number
of interchangeable lenses from 16 to
800mm focal length. The lenses from 16 to
250mm are equipped with automatic
diaphragm. The 16mm fisheye-ELMARIT-R
f/2.8, 24mm ELMARIT-R f/2.8 and 80200mm VARIO-ELMAR-R f/4.5 lenses can
be used on the LEICAFLEX SL 2 only, but
not on earlier models because of their short
intercept distance.
The 60mm MACRO-ELMARIT-R f/2.8 deserves your special interest; it can be used
both as a standard and as a close-up lens,
and, with the special adapter, even down to
the 1:1 reproduction scale. This makes it a
real universal lens.
29

Not For Resale – Free Download at http://www.joe-chan.com/manuals
Follow-focus lenses
The 400mm and 560mm TELYT-R f/6.8
very long-focal-length lenses have a
precision parallel guide for rapid yet critical
focusing, in which the front part of the lens
mount is adjusted. The focusing mechanism can be released for focusing by
means of a push-button and clamped at the
desired setting. An outstanding feature of
these lenses, in addition to their simple
operation, is their light weight. They are
supplied with an adjustable shoulder stock.
LEICA lenses on the LEICAFLEX
®
All the LEICA
®
VISOFLEX
attachment can also be used
lenses suitable for the
on the LEICAFLEX. A special adapter
(Code No. 14167) forms the bridge between
the two LEITZ systems of 35mm photography.
Vignetting of the viewfinder field does not
affect the photographic exposures.
30

Not For Resale – Free Download at http://www.joe-chan.com/manuals
Focusing Bellows-R
In conjunction with the 100mm MACROELMAR f/4 special lens (Code No. 11 230)
the Focusing Bellows-R (Code No. 16860)
for the LEICAFLEX offers a continuous
focusing range from infinity to 1:1. The 50,
60, 90, 135, 180, and 250mm lenses, too,
can be used on the Focusing Bellows-R for
the close-up range.
Motor for the LEICAFLEX SL 2 MOT
The electric LEICAFLEX motor is used in
conjunction with the LEICAFLEX SL 2 MOT
special version. It makes exposure sequences of about 3 to 4 frames per second possible. All shutter speeds from 1 to
1
/
sec can be set. The motor is powered
2000
by 10 NC batteries or 1.5v midget batteries
(size R 6 in Germany, AA in USA).
The list No. 120-46 is available on request.
31

Not For Resale – Free Download at http://www.joe-chan.com/manuals
Ring combination for the close-up range
A three-part ring combination (Code No.
14159), which is used mainly in conjunction with the 50mm SUMMICRON-R f/2
standard lens, makes photography possible
down to 1:1 reproduction scale. The combination can be expanded at will through
the insertion of several middle rings. It can
also be used in combination with 90, 135,
and 180mm lenses.
With the twin-cable release the lens diaphragm can be closed semi-automatically.
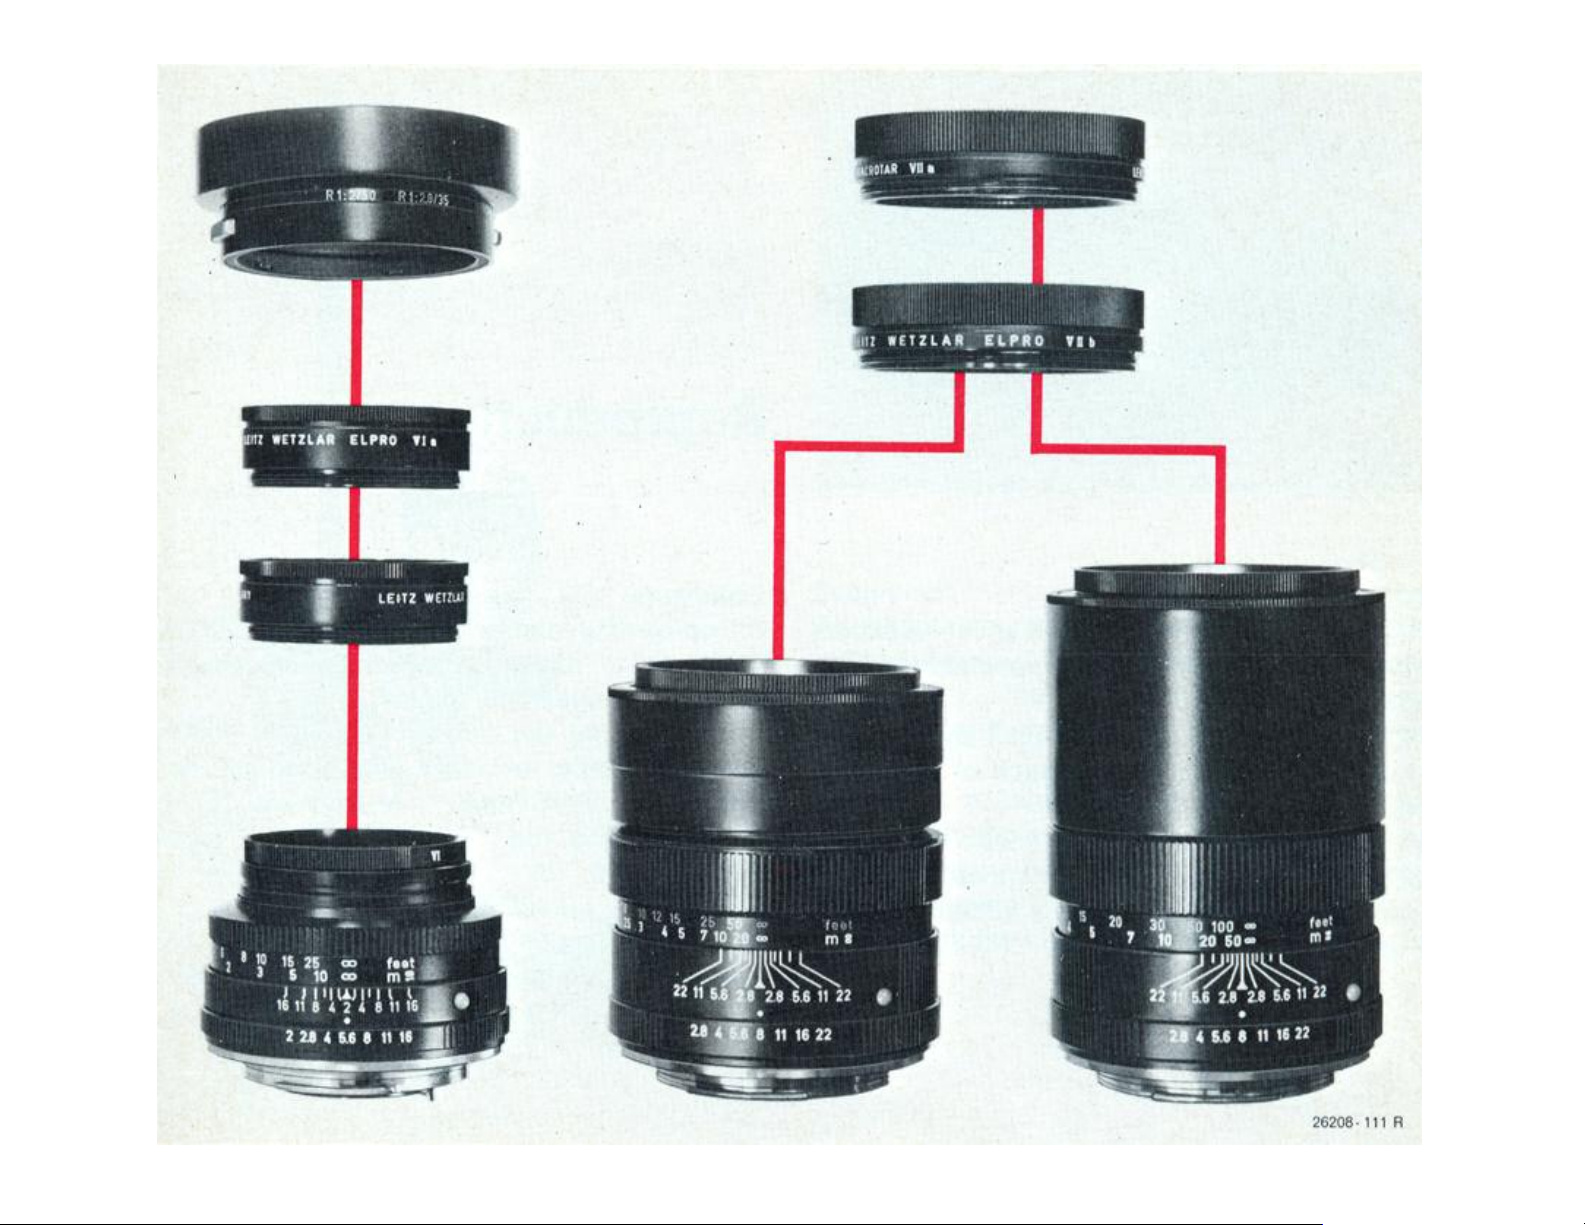
ELPRO close-up attachments
The ELPRO close-up attachments are
achromatic supplementary front lenses
which increase the focusing range and
because of their achromatic correction also
improve the image quality in the close-up
range. Even medium stops produce outstanding sharpness. Exposure technique
including exposure measurement is the
same as in the normal focusing range.
ELPRO close-up attachments are available
for the 50mm SUMMICRON-R f/2, the
90mm lenses and the 135mm ELMARIT-R
f/2.8.
32
Not For Resale – Free Download at http://www.joe-chan.com/manuals
33
Not For Resale – Free Download at http://www.joe-chan.com/manuals
Reproduction
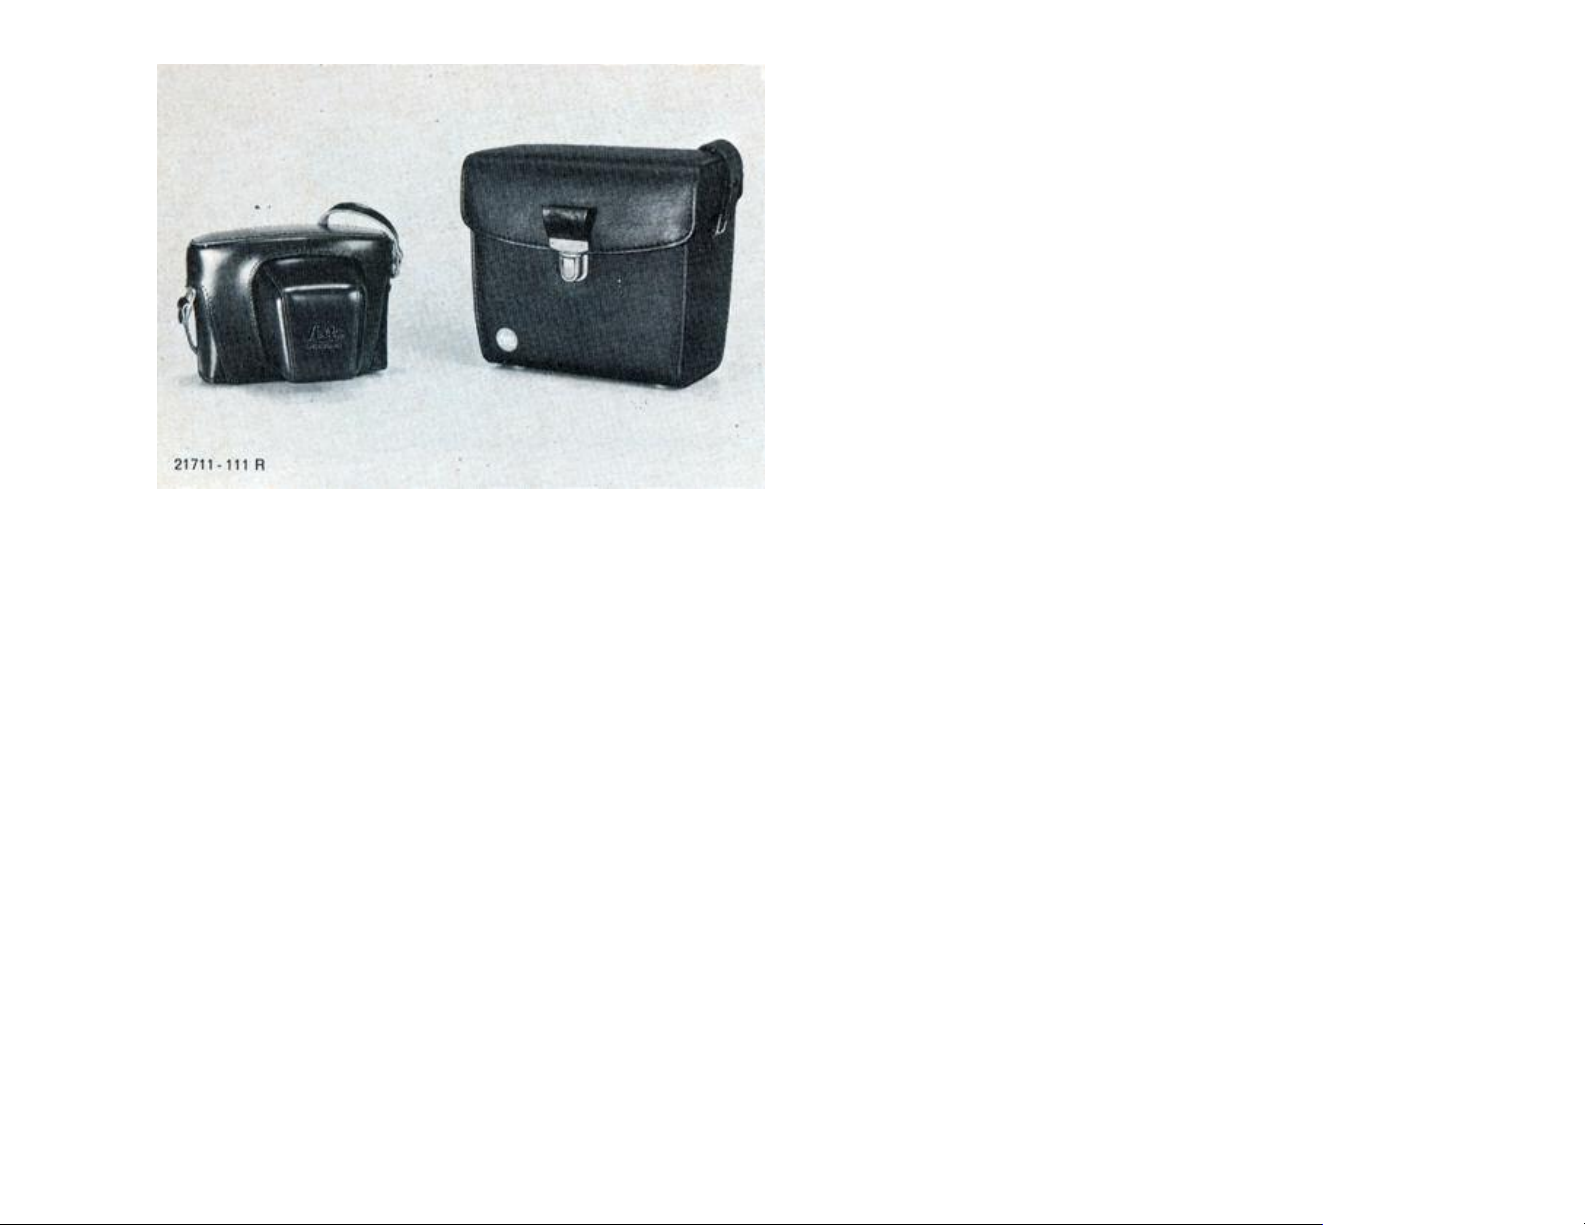
Cases
For the LEICAFLEX SL 2 with standard lens
the ever-ready case (Code No. 14504) is
recommended.
You can detach the front part by pushing up
the press stud in the back of the case for
unlocking.
In addition, combination holdalls are available for extensive camera outfits including
several lenses and various accessories.
Further details: see List No. 120-42.
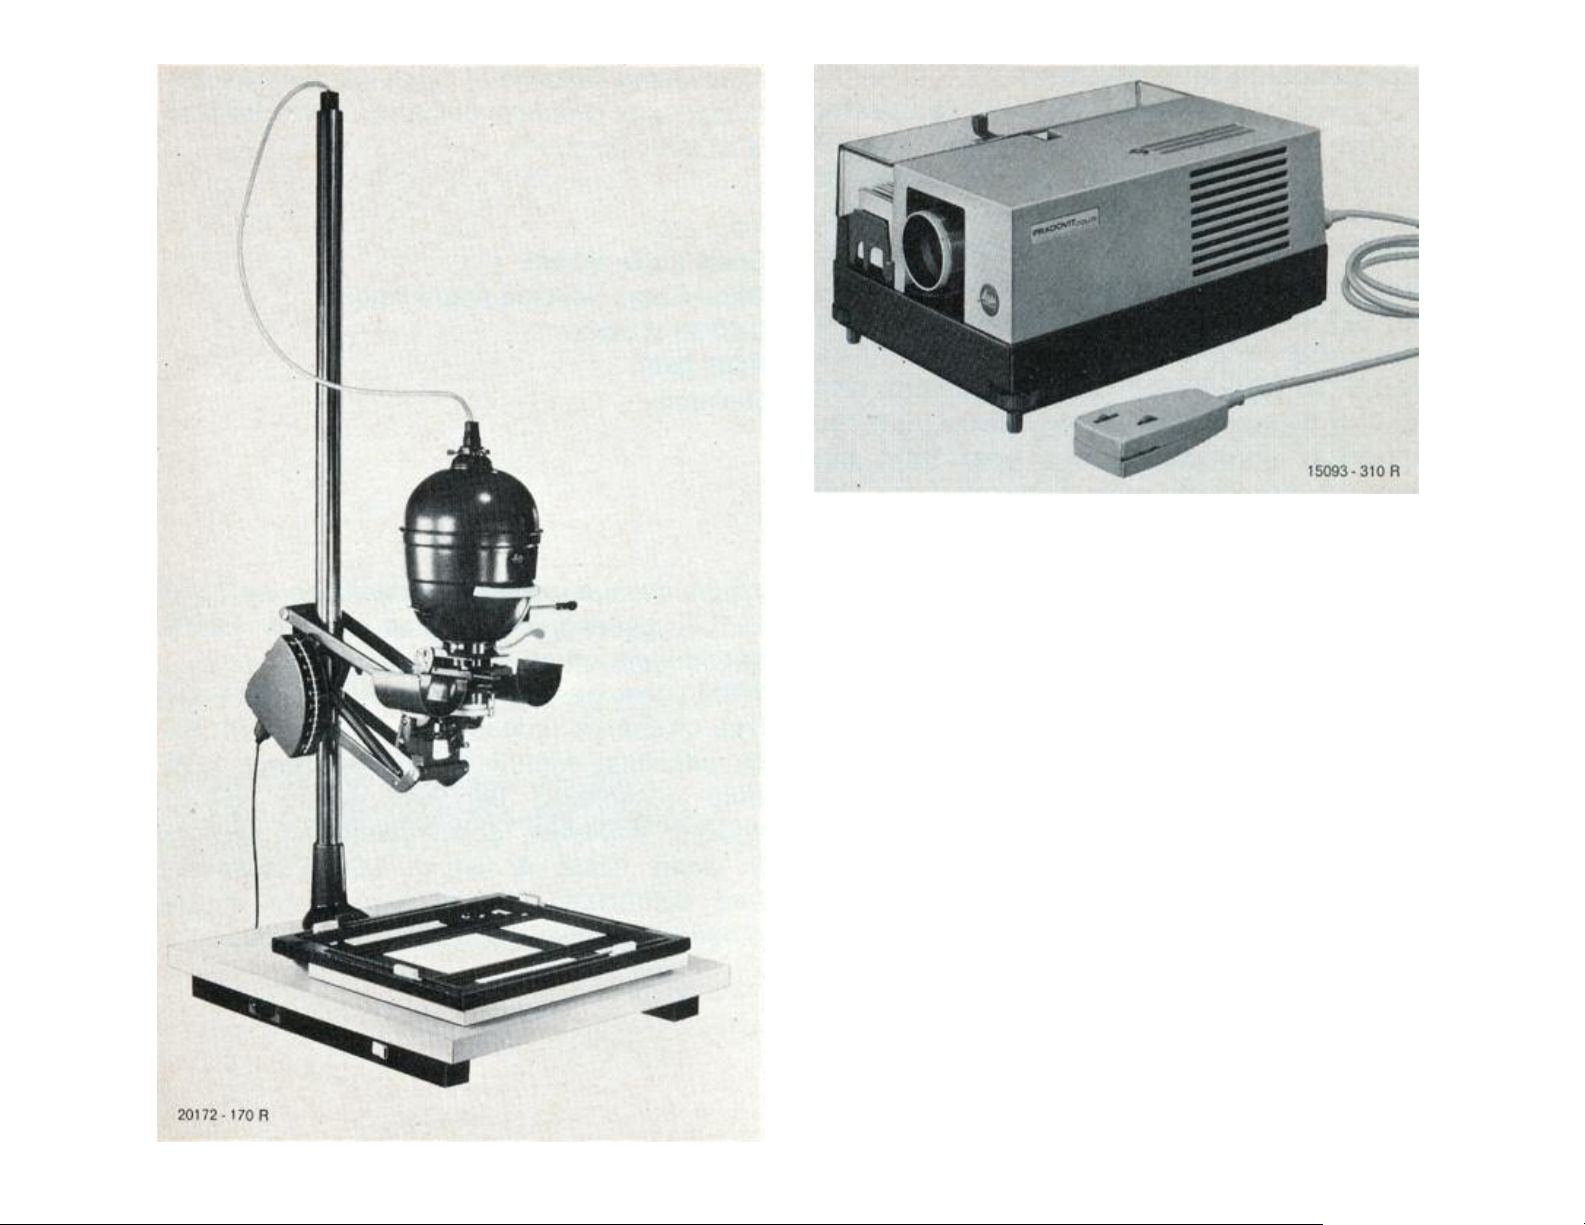
Enlargers
A top-quality camera such as the LEICAFLEX SL 2 requires reproduction equipment of comparable quality.
For enlarging we supply two such outfits
with automatic focusing, well-tried for decades: the FOCOMAT® Ic, a pure 35mm
enlarger, and the FOCOMAT lie, a combined outfit for all film formats up to
6 x 9cm.
Our Lists No.170-2 and 170-15 respectively
contain detailed information.
34
Not For Resale – Free Download at http://www.joe-chan.com/manuals
Projection
An extensive range of projectors is available according to requirements and purpose. They offer maximum operating convenience and versatile possibilities of extension.
The most outstanding common feature of all
LEITZ projectors is optimum optical
performance combined with traditional
LEITZ precision.
Please ask for descriptive literature.
35

Not For Resale – Free Download at http://www.joe-chan.com/manuals
International LEITZ Warranty
Our products are manufactured to special
quality standards and tested by experienced specialists at the various stages of
production. They conform to the International LEITZ Warranty for perfect quality
and expert processing of the material,
careful assembly of all components, and
functional reliability of the design. The
Warranty period for the mechanical and
optical components is two years, for the
electrical components one year from the
date of purchase duly confirmed by the
dealer.
A Warranty Card showing the camera No. is
enclosed with every LEICAFLEX SL 2.
After-Sales Service
In cases of damage our After-Sales Service
is at your disposal.
Address:
Ernst Leitz GmbH
After-Sales Service Department
D-6330 Wetzlar
POB 2027
Germany
When abroad please contact the national
LEITZ agency or the authorized LEITZ
service workshop.
Within the period of warranty repairs are
free of charge unless they are necessitated
by improper handling. The warranty card,
duly completed by your photo dealer,
should, however, accompany the camera in
every case. A list of LEITZ agencies and
authorized service workshops is enclosed
with every LEICAFLEX camera.
36
Not For Resale – Free Download at http://www.joe-chan.com/manuals
Information Service
On request we shall inform you
within the scope of our information
service about new accessories and
send you other important information.
ERNST LEITZ GMBH
After-Sales Service
D-6330 WETZLAR
POB 2020
Please use the appended coupon
and send it to your national agency
or directly to
Germany
after completing it and gluing it to a
postcard.
37
Not For Resale – Free Download at http://www.joe-chan.com/manuals
Journal
Name and Surname
Address
Occupation
I am the owner of LEICAFLEX No.
and the following lenses:
I am the owner of the following LEITZ
cameras:
I have been taking photographs since
"LEICA FOTOGRAFIE"
Each LEICAFLEX SL 2 includes a
coupon for sample copies of
"LEICA FOTOGRAFIE", the topical
journal of 35mm technique.
It is published in German, English, and
French. Please send the completed
coupon directly to:
Umschau-Verlag
D-6000 Frankfurt/Main
Stuttgarter Strasse 18-24
Germany
I use my LEICAFLEX % profession-
ally in the following field(s):
Favourite non-professional subjects:
Reason for purchase:
38

Accessories
Not For Resale – Free Download at http://www.joe-chan.com/manuals
a) Interchangeable lenses Code No.
*16mm FISHEYE-ELMARIT-R f/2.8 11 222
21mm SUPER-ANGULON®-R f/4 11 813
*24mm ELMARIT®-R f/2.8 11 221
28mm ELMARIT-R f/2.8 11 204
35mm SUMMICRON®-R f/2 11 227
35mm ELMARIT-R f/2.8 11 201
35mm PA-CURTAGON®-R f/4 11 202
50mm SUMMILUX®-R f/1.4 11 875
50mm SUMMICRON-R f/2 11 228
60mm MACRO-ELMARIT-R f/2.8 11 203
90mm SUMMICRON-R f/2 11 219
90mm ELMARIT-R f/2.8 11 239
135mm ELMARIT-R f/2.8 11 211
180mm ELMARIT-R f/2.8 11 919
250mm TELYT®-R f/4 11 920
400mm TELYT f/6.8 11 960
b) Close-up focusing devices Code No.
Focusing Bellows-R 16 860
100mm MACRO-ELMAR® f/4 11 230
Ring combination for the
close-up range 14 159
ELPRO 6a for 50mm f/2 lenses 16531
ELPRO 6b for 50mm f/2 lenses 16532
ELPRO 7a for 90 and 135mm lenses 16533
ELPRO 7b for 135mm f/2.8 lens 16534
c) Cases
Ever-ready case 14504
Combination case for camera
with up to 3 lenses 14824
Universal holdall with insert 3 14809
560mm TELYT f/6.8 11 865
45-90mm ANGENIEUX-ZOOM f/2.8
On request
*80-200mm VARIO-ELMAR-R f/4.5 11 224
800mm TELYT-S f/6.3 On request
800mm ROKKOR f/8 Minolta reflecting
lens with LEICAFLEX connection
Available through
Minolta Sales Organization
* Can be used only on the LEICAFLEX SL 2
39

Not For Resale – Free Download at http://www.joe-chan.com/manuals
List of brochures
Depth-of-FieId Table 111-57
Close-up devices for the
LEICAFLEX 160-12
Symbol of Optical Precision
60mm MACRO-ELMARIT-R f/2.8 111-100
800mm TELYT
®
S f/6.3 120-48
Combination cases 120-42
FOCOMAT
®
Ic 170-2
FOCOMAT IIc 170-15
PRADOVIT RC 310-74
®
PRADOVIT
-COLOR 310-49
®
= Registered Trademark
Design subject to alterations without notice.
List
11-94/Engl.
Printed in Germany X/74/FDX/SD
ERNST LEITZ GMBH D-6330WETZLAR
Subsidiary: Ernst Leitz (Canada) Ltd., Midland, Ont
 Loading...