

Page 1

LEICA SL2
QUICK START GUIDE
Download the full scope instruction manual here:
https://en.leica-camera.com/Service-Support/Support/Downloads
Please register via the following link if you would like to receive a printed copy
of the full scope instruction manual:
www.order-instructions.leica-camera.com
Page 2
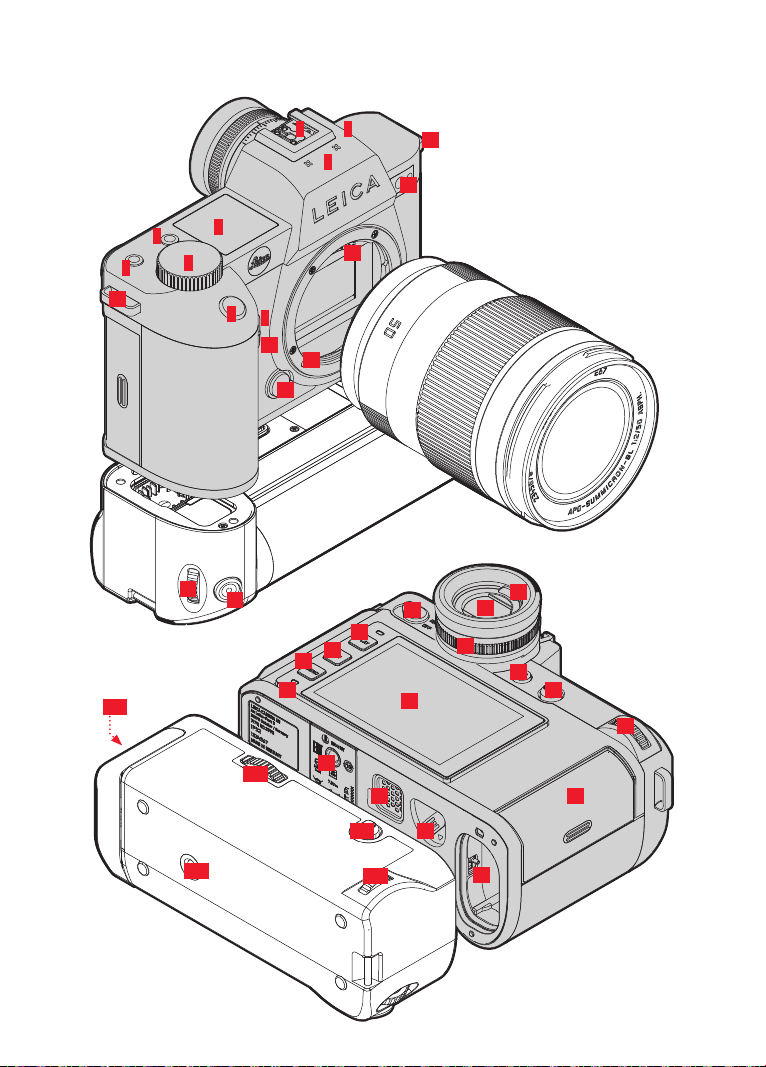
PART DESIGNATIONS
6
8
7
15
14
15
*33
*2
5
26
12
29
25
13
24
30
27
16
18
17
19
20
21
22
28
2
1
9
10
11
*1
23
*34
4
3
*29
*21
*22
31
32
* optional accessory: Multifunction hand grip SL
Page 3
1
Shutter button
12
Leica L bayonet
Tap:
– Autofocusing
– Activating exposure metering and
exposure control
2
3
Press down fully:
– Shutter release
– Video recording Start/Stop
1
1
in standby mode:
– The camera is reactivated
2
Front setting wheel
in the menu:
– Scrolling through the menu screens
in recording mode:
13
Contact strip
14
Self-timer LED / AF Assist Lamp /
Sensor for exposure metering
15
Strap lugs
– depending on exposure mode, confi gurable
(see table under “Wheel assignment”)
in review mode:
– Zooming in/out of the frame
3
FN button**
in recording mode:
– Photo:
– Video: ISOISO (Cine: Exposure IndexExposure Index)
4
FN button**
ISOISO
1
2
in recording mode:
– Mode change photo/video
in review mode:
– Marking/rating a recording
5
Top display
– Set operating mode
– Recording data
– Camera information
6
Accessory shoe
Recommended fl ash units:
Leica SF40, SF64 and SF58
7
Microphone
Sound is recorded in stereo
8
Speaker
9
FN button**
3
16
Main switch
Switching the camera ON/OFF
17
Viewfi nder eyepiece
18
Eye sensor
Available settings: LCD panel only/EVF only/
automatic switchover
19
Diopter setting ring
Setting range: -4/+2diopter
4
in recording mode:
– Photo: Magnifi cation
– Video:
10
FN button**
Microphone GainMicrophone Gain
in recording mode:
– Setting the AF metering method
11
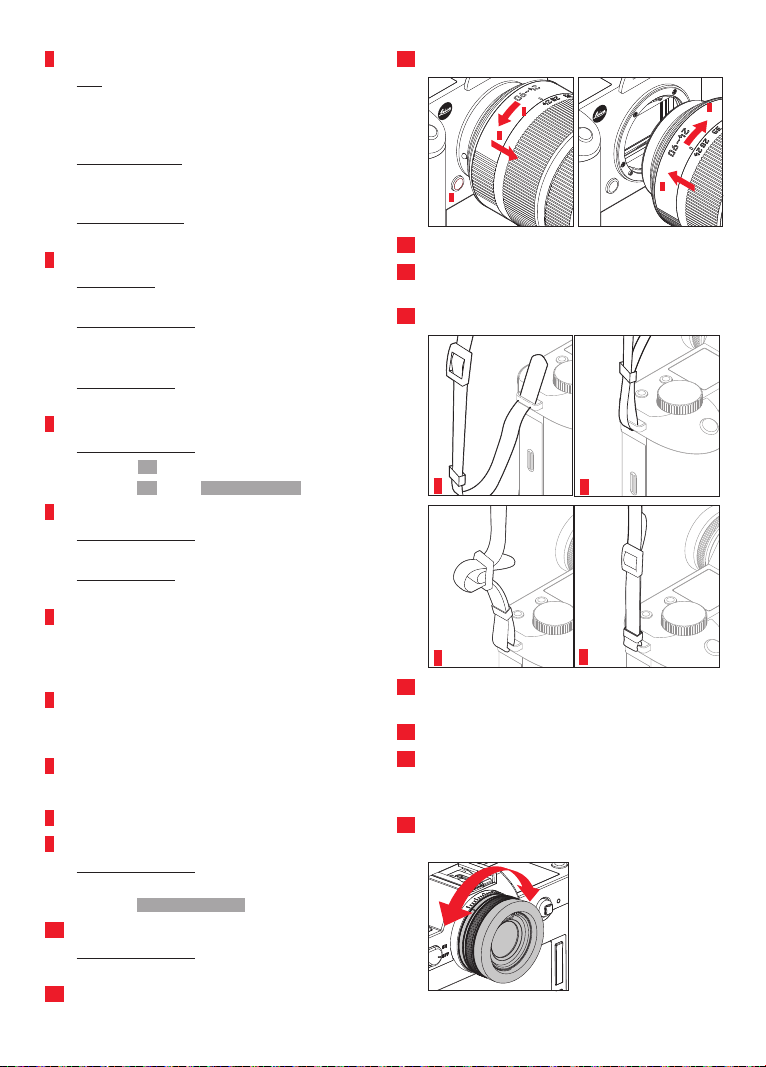
Lens release button
** Factory settings. Press & release: Call-up of assigned function. Press & hold: Modify assignment (drop-down list).
2
Page 4
20
FN button**
EVF/LCD panel switchover
21
Joystick
in the menu:
– Menu control
in recording mode:
– Shifting the AF metering fi eld
– Exposure lock (press and hold)
in review mode:
– Scrolling
– Video playback control
22
Thumbwheel
in the menu:
– Menu control
in recording mode:
– depending on exposure mode, confi gurable
(see table under “Wheel assignment”)
in review mode:
– Scrolling
– Video playback control
23
Status LED
– Memory card access
– Using the WLAN function
– Charging via USB
24
PLAY button
– Switchover between picture and playback/
review mode
– Return to full-screen display
25
FN button**
in Playback/Review mode:
– Toggling info displays
26
MENU button
in the menu:
– Scrolling through the menu screens
in recording mode:
– Accessing the menu
in review mode:
– Accessing the Playback/Review menu
27
LCD panel
28
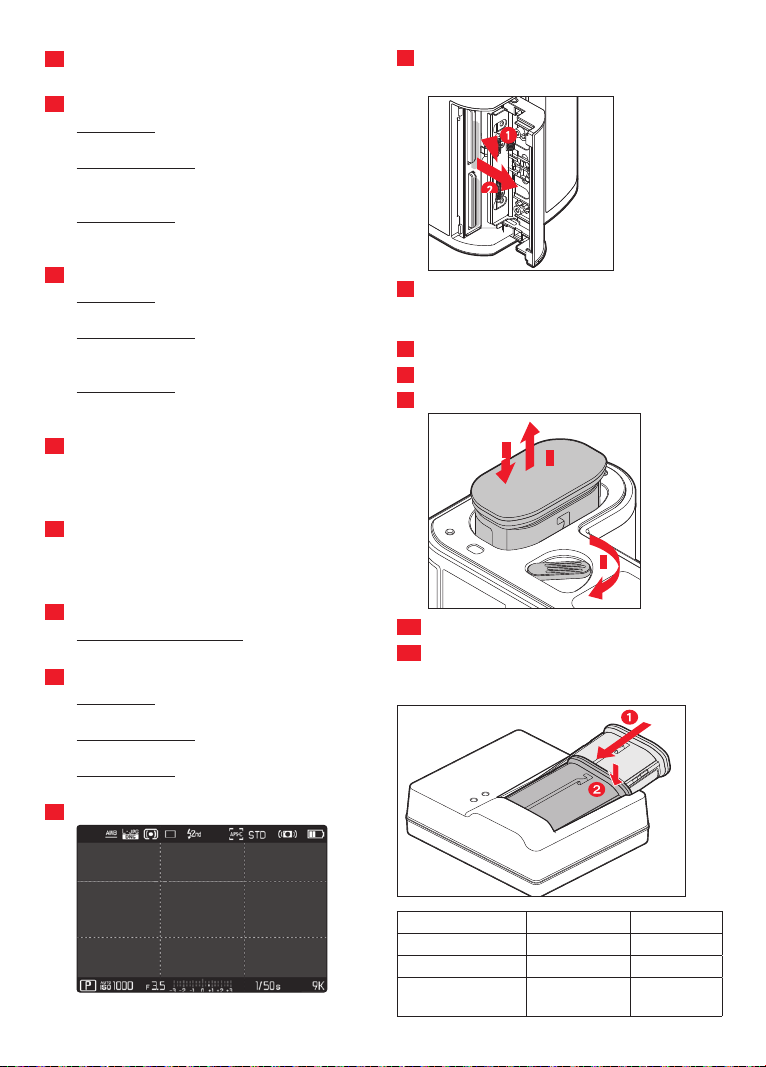
Memory card slot
UHS-II, UHS-I, SD/SDHC/SDXC
29
Tripod thread
A 1⁄4 DIN 4503 (1⁄4”) with stainless steel in
the base
30
Contact for multifunction hand grip
31
Battery release lever
32
Battery compartment
2
3
1
*33
Hand grip-integrated battery compartment
*34
Hand grip lock
CHARGING THE BATTERY
3.2” TFT LCD, 1080 x 720 pixels,
2,332,800dots, touch panel
Display Charge status Charge time*
CHARGE fl ashes green
80% lights up orange
CHARGE continuous
green light
*for a completely discharged battery
battery is charging
80% approx. 2h
100% approx. 3½ h
Page 5

ATTACHING THE MULTIFUNCTION
LOAD USB/DATA TRANSFER
HAND GRIP*
STATUS DISPLAY PHOTO STATUS DISPLAY VIDEO
01
05 06
07
08
09
10 11 12 13
1420152116221723182419
01 Focal length
02 Memory card used
03 Remaining memory capacity
04 Battery capacity
05 Menu section PHOTOPHOTO
06 Menu sections VIDEOVIDEO
07 Light balance
08 Exposure compensation scale
09 Exposure mode
10 Exposure value
11 Shutter speed
12 ISO Sensitivity
13 Exposure compensation VALUE
14 Picture mode (Picture sequencePicture sequence)
15 Autofocus mode
030204
26
25
28 29
16 Autofocus metering method
17 Autofocus settings
18 Exposure metering method
19 White balance mode
20 File format/compression level/resolution
21 Formatting a memory card
22 User profi le
23 Locking/unlocking the setting wheels
24 Leica FOTOS
25 Main menu
26 Microphone recording level
27 Recording time
28 Recording level
29 Headphone volume
27
Page 6

INITIAL START/APP CONNECTION
A B
SWITCHOVER: PHOTO/VIDEO
A B
GESTURE CONTROL
Tap briefl y Tap
twice
Touch and hold,
drag and drop
FN button 4
horizontal/vertical
swipe
Two-fi nger
pinch
Two-fi nger
spread
Page 7

WHEEL ASSIGNMENT (factory settings)
Thumbwheel Front setting wheel
Function assignment optionally for thumbwheel or front setting wheel
Program shift Exposure Compensation
Exposure Compensation Microphone Gain
Exposure Compensation Shutter speed
Aperture
S/
AF lens
A/
P
M/
A
MF lens
M/
The function assignment can be switched between the two wheels.
▸ Select
▸ Select
▸ Select the desired setting
LEICA FOTOS APP
Experience the new Leica FOTOS app. The Leica
FOTOS app is a digital tool with plenty of exciting
options and allows the photographer to get more
out of his Leica camera than ever before. You
can now link all your WLAN-capable Leica
cameras via a single app to transfer images
easily and instantly, capture the essence of
unforgettable moments, manage, optimize and
share your photos – anytime, anywhere.
Direct Access SettingsDirect Access Settings in the main menu
Wheel Assignment (AF Lenses)Wheel Assignment (AF Lenses) / Wheel Assignment (MF Lenses)Wheel Assignment (MF Lenses) in the submenu
Magnifi cation Exposure Compensation
Magnifi cation Exposure Compensation
Magnifi cation Shutter speed
Exposure Compensation
Shutter speed
Page 8

TECHNICAL DATA
VIEWFINDER/LCD PANEL
Viewfinder (EVF)Viewfinder (EVF)
CAMERA
DesignationDesignation
LeicaSL2
Camera typeCamera type
Mirrorless full-frame system camera
Type no.Type no.
2998
Order No.Order No.
10 854 EU/JP/US (black), 10 856 ROW (black)
Buffer memoryBuffer memory
4 GB
DNG™: 78 recordings
JPG: > 100 recordings
Storage mediumStorage medium
UHS-II (recommended), UHS-I, SD/SDHC/SDXC
memory card
MaterialMaterial
Full-metal housing made of aluminum and
magnesium, leatherette cover, splash-water protected in compliance with IEC standard 60529
(protection type IP54).
Lens mountLens mount
Leica L bayonet with contact strip for communication between lens and camera
Operating conditionsOperating conditions
-10 to +40°C
Dimensions (WxHxD)Dimensions (WxHxD)
146x107x42mm
WeightWeight
approx. 835g (without battery)
SENSOR
Sensor sizeSensor size
CMOS sensor, pixel pitch: 4.3 µm
Fullframe (47.3 MP): 8368 x 5584 pixels
APS-C (20.2 MP): 5504 x 3664 pixels
Picture resolutionPicture resolution
DNG™:8368 x 5584pixels (46.7MP)
JPG: 8368 x 5584 pixels (46.7 MP), 6000 x 4000
pixels (24 MP), 4272 x 2848 pixels (12 MP)
Resolution: 5,760,000pixels (dots), 120fps,
magnification: 0.78x, aspect ratio: 4:3, frame
coverage: 100%, exit pupil position: 21mm, setting
range +2/-4diopters, with eye sensor for automatic
switchover between viewfinder and LCD panel, time
delay0.005s
LCD panelLCD panel
3.2" (backlight LED) with anti-fingerprint and
anti-scratch coating, 2,100,000pixels (dots), format
3:2, touch control available
EQUIPMENT
WLANWLAN
The Leica FOTOS app is required to use the WLAN
function. The Leica app is available from the Apple
App Store™ or the Google Play Store™. Complies
with Wi-Fi IEEE802.11b/g/n, 2.4 GHz, channel
1-11 (2412-2462 MHz) and Wi-Fi IEEE802.11ac,
2.4 GHz & 5 GHz, channel 39-48 (5180-5240 MHz),
channel 52-64 (5260-5320 MHz), channel 100-140
(5500-5700 MHz) (standard WLAN protocol),
encryption method: WLAN-compatible WPA™/
WPA2™
BluetoothBluetooth
Bluetooth v4.2 (Bluetooth Low Energy (BLE)), 2402
to 2480 MHz
Menu languagesMenu languages
English, German, French, Italian, Spanish, Russian,
Japanese, Simplified Chinese, Traditional Chinese,
Korean
POWER SUPPLY
Rechargeable battery (Leica BP-SCL4)Rechargeable battery (Leica BP-SCL4)
Lithium-ion rechargeable battery, rated voltage:
7.2V (DC); capacity: 1860mAh (min.), approx. 370
recordings (based on CIPA standard, without EVF);
charging time: approx. 140 min (after deep
discharge); manufacturer: Panasonic Energy (Wuxi)
Co. Ltd., Made in China
Charger (Leica BC-SCL4)Charger (Leica BC-SCL4)
Input: AC 100–240V, 50/60Hz, 0.25 A, automatic
switchover; Output: DC 8.4V 0.85A; Manufacturer:
Salom Electric (Xiamen) Co., Ltd., Made in China
You will find the manufacturing date of your camera on the stickers in the Warranty Card and/or on the packaging. The date format is year/month/day.
Subject to changes in design and production.
93 989 XII/19/D
Page 9

SAFETY REMARKS
GENERAL INFORMATION
• Do not use your camera in the immediate vicinity of devices with powerful magnetic, electrostatic or electromagnetic fields (e.g.
induction ovens, microwave ovens, television sets or computer monitors, video game consoles, cell phones, broadcasting
equipment). Their electromagnetic fields can interfere with recordings.
• Strong magnetic fields, e.g. from speakers or large electric motors can damage the stored picture data or disrupt recording.
• Switch off the camera, remove the battery and switch the camera back on in case of a camera malfunction due to the effects of
electromagnetic fields.
• Do not use the camera in the immediate vicinity of radio transmitters or high-voltage power lines. Their electromagnetic fields may
interfere with recordings.
• Always store small parts e.g. the accessory shoe cover as follows:
– out of the reach of children
– in a safe location, where they will not get lost or stolen
• State-of-the-art electronic components are sensitive to static discharge. Since people can easily pick up charges of several 10,000
volts by walking on synthetic carpets, a discharge can occur when you touch the camera, and especially it is placed on a conductive
surface. A static discharge on the camera housing poses no risk for the electronics. Despite built-in safety circuits, you should avoid
direct contact with external camera contacts like those in the flash shoe.
• Take care not to soil or scratch the sensor for lens detection (6-bit encoding) in the bayonet. You must similarly prevent direct
contact of the bayonet with grains of sand or similar particles, as these could cause irreparable damage. This component must only
be cleaned with a dry cloth (in system cameras).
• Use a cotton or linen cloth instead of a microfiber cloth from an optician’s (synthetic) when cleaning the contacts. Make sure to
discharge any electrostatic charge by deliberately touching a heating or water pipe (conductive, grounded material). Dirt deposits and
oxidation on the contacts can be avoided by storing your camera in a dry location with the lens cap and the flash shoe/viewfinder
cap (in system cameras) attached.
• Only use accessories specified for this model to prevent faults, short circuits or electric shock.
• Do not attempt to remove parts of the housing (covers) yourself. Repairs must be done at authorized service centers only.
• Protect the camera against contact with insect sprays and other aggressive chemicals. Petroleum spirit, thinner and alcohol must not
be used for cleaning. Some chemicals and liquids can damage the camera housing or the surface finish.
• Rubber and plastics are known to expel aggressive chemicals and should therefore not be kept in contact with the camera for
extended periods of time.
• Prevent any sand or dust or water penetration into the camera, e.g. during snowfall or rain or on the beach. Be extra careful when
changing the lens (in system cameras) and when inserting or removing the memory card and rechargeable battery. Sand and dust
can damage the camera, the lens, the memory card and the battery. Moisture can cause malfunctions and irreparable damage to the
camera and memory card.
LENS
• A camera lens can have the effect of a magnifying glass when exposed to direct frontal sunlight. The camera must therefore be
protected against extended exposure to direct sunlight.
• Attaching the lens cap and keeping the camera in the shade or ideally in its camera case, will help prevent damage to the interior of
the camera.
RECHARGEABLE BATTERY
• Improper use of the batteries or the use of unapproved battery types may result in an explosion!
• Do not expose the rechargeable battery to sunlight, heat, humidity or moisture for prolonged periods of time. Likewise, the batteries
must not be placed in a microwave oven or a high-pressure container as this would pose a fire or explosion hazard.
• Do not under any circumstances charge or insert a damp or wet battery into the camera!
• A safety valve in the battery ensures that any excess pressure caused by improper handling is discharged safely. It is nevertheless
important to dispose of a bloated battery immediately. It may pose an explosion hazard!
• Keep the battery contacts clean and easily accessible. Although lithium-ion batteries are secured against short circuits, they should
still be protected against contact with metal objects like paper clips or jewelry. A short-circuited battery can get very hot and cause
severe burns.
• When a battery is accidentally dropped, make sure to check the housing and the contacts immediately for any damage. A damaged
battery can damage the camera.
• The battery must be removed from the camera or charger and must be replaced immediately in case of a strange smell,
discoloration, deformation, overheating or leakage. Continued use of the battery may result in overheating, which can cause fire
and/or explosion!
• Never throw batteries into a fire as they might explode!
• Keep the battery away from sources of heat in case of a leak or a smell of burning. Leaked fluid can catch fire!
Page 10

• The use of other chargers not approved by Leica Camera AG can cause damage to the batteries – and in extreme cases – cause
serious or life-threatening injuries.
• Make sure that the power socket is freely accessible at all times.
• The in-car charging cable must never be connected while the charger is connected to mains electricity.
• Do not attempt to open the battery or the charger. Repairs must only be carried out by authorized service centers.
• Keep batteries out of the reach of children. Batteries can cause suffocation when swallowed.
CHARGER
• Using the charger in the vicinity of broadcasting receivers may interfere with reception. Ensure a distance of at least 1
m (3 ft) between the charger and the receiver.
• When the charger is in use, it may emit a buzzing sound – this is normal and not a malfunction.
• Disconnect the charger from the mains when it is not in use, because it consumes some a very small amount electricity,
even when no battery is inserted.
• Always keep the charger contacts clean, and never short circuit them.
MEMORY CARD
• Never remove the memory card during a datasave or card reading process. The camera must not be switched off or be
subjected to impact or vibrations while working.
• Do not open the compartment or remove the memory card or battery while the status LED is flashing to indicate camera
memory access. Data on the card may otherwise be destroyed and camera malfunctions may occur.
• Do not drop or bend memory cards as this will cause damage and result in the loss of stored data.
• Do not touch the connections on the reverse of the memory card and keep them clean and dry.
• Keep memory cards out of the reach of children. Swallowing a memory card may cause suffocation.
SENSOR
Cosmic radiation (e.g. during flights) may cause pixel defects.
CARRY STRAP
• Once you have attached the carry strap, please make sure that the clips are mounted correctly to prevent the camera
from falling.
• Carry straps are usually made of very robust material. You should therefore keep it out of the reach of children. A carry
strap is not a toy and poses a strangulation risk.
• Use the carry strap only for its intended purpose on a camera or on binoculars. Any other use poses the risk of injury
and may possibly result in damage to the carry strap and is therefore not permitted.
• Carry straps should also not be used for cameras/binoculars during sports activities with a high risk of getting
entangled in the carry strap (e.g. mountain climbing and similar outdoor activities).
TRIPOD
• When using a tripod, make sure it is standing securely and turn the camera only by turning the tripod, not the actual camera.
• Ensure that the tripod screw is hand-tightened only.
• Avoid transporting the camera while the tripod is attached. You might injure yourself or others and the camera could get damaged.
FLASH
The use of incompatible flash units with your LeicaSL2 may result in irreparable damage to the camera and/or the flash unit.
REGULATORY INFORMATION
Specific regional approvals for this device can be found in the camera menu.
▸ Select Camera InformationCamera Information in the main menu
▸ Select Regulatory InformationRegulatory Information from the submenu
Alternating current (AC)
Direct current (DC)
Class II devices (the product has a double-insulated design)
Page 11

DISPOSAL OF ELECTRICAL AND ELECTRONIC EQUIPMENT
(Applies within the EU and for other European countries with active waste separation policies)
This device contains electric and/or electronic components which must not be disposed of in
general household waste. Instead, it should be disposed of at a recycling collection point provided by
your local authority. This service is free of charge. Any standard or rechargeable batteries used in this
device must be removed and disposed of separately in accordance with local regulations. Please
contact your local authorities, waste disposal collection point or the retailer, from whom you
purchased the device for more information on correct waste disposal.
English
Declaration of Conformity (DoC)
Hereby, “Leica Camera AG” declares that this product is in compliance
with the essential requirements and other relevant provisions of Directive
2014/53/EU.
Customers can download a copy of the original DoC to our RE products from
our DoC server:
www.cert.leica-camera.com
In case of further questions, please contact:
Leica Camera AG, Am Leitz-Park 5, 35578 Wetzlar, Germany
Product dependent (see technical data)
Type
WLAN
Bluetooth® Wireless
Technology
Frequency band (central frequency) Maximum power (dBm e.i.r.p.)
2412–2462/5180–5240 MHz/
5260–5320/5500–5700 MHz
2402–2480 MHz 20
20
The CE mark on our products documents
compliance with the fundamental requirements of applicable EU guidelines.
WLAN: 5150 to 5350 Mhz for indoor use only
WARRANTY
In addition to your statutory warranty rights regarding your dealer, you will receive an additional Leica
Camera AG product warranty valid from the date of purchase at an authorized Leica retailer.
Previously, the product warranty was included with the product in the packaging. From now on, the
product warranty will only be available online as a new service. You will be able to review the
warranty conditions for your product at any time, without having to search fr the document. Please
note that this new policy applies only for products that are no longer delivered with a hardcopy
product warranty included in the packaging. Any products still delivered with the warranty document
in the packaging remain governed exclusively by that document. For more information regarding the
warranty scope, services and limitations, please visit: warranty.leica-camera.com
FOR US ONLY:
FCC Note:
This equipment has been tested and found to comply with the limits for a Class B digital device, pursuant to Part
15 of the FCC Rules. These limits are designed to provide reasonable protection against harmful interfer ence in a
residential installation. This equipment generates, uses, and can radiate radio frequency energy and, if not installed
and used in accordance with the instructions, may cause harmful interference to radio communications. However,
there is no guar antee that interference will not occur in a particular installation. If this equipment does cause
harmful interference to radio or television reception, which can be determined by turning the equipment off and
on, the user is encouraged to try to correct the interference by one or more of the following measures:
• Reorient or relocate the receiving antenna.
• Increase the separation between the equipment and receiver.
• Connect the equipment into an outlet on a circuit
• Consult the dealer or an experienced radio/TV technician for help.
different from that to which the receiver is connected.
Page 12

FCC Caution:
To assure continued compliance, follow the attached installation instructions and use only shielded inter face cables with
ferrite core when connecting to com put er or peripheral devices. Any changes or modifications not expressly approved by
the party responsible for compliance could void the user’s authority to operate this equipment.
Trade Name: LEICA
Type No. 2998
Responsible party/
Support contact:
Contains FCC ID: VPYLB1JS955
This transmitter must not be co-located or operated in conjunction with any other antenna or transmitter. This equipment complies with FCC radiation exposure limits set forth for an uncontrolled environment and meets the FCC radio
frequency (RF) Exposure Guidelines. This equipment has very low levels of RF energy that are deemed to comply
without testing of specific absorption ratio (SAR).
Leica Camera Inc.
1 Pearl Count, Unit A, Allendale, New Jersey 07401
Tel.: +1 201 995 0051/ Fax: +1 201 995 1684
technicalinfo@leicacamerausa.com
FOR CANADA ONLY:
CAN ICES-3 (B)/NMB-3(B)
HMN: 2998
Contains IC: 772C-LB1JS955
This device complies with Industry Canada licence-exempt RSS standard(s). Operation is subject to the following
two conditions:
(1) this device may not cause interference, and
(2) this device must accept any interference, including interference that may cause undesired operation of the device.
The available scientific evidence does not show that any health problems are associated with using low power
wireless devices.There is no proof, however, that these low power wireless devices are absolutely safe. Low power
Wireless devices emit low levelsof radio frequency energy (RF) in the microwave range while being used. Whereas
high levels of RF can produce health effects(by heating tissue), exposure of low-level RF that does not produce
heating effects causes no known adverse health effects.Many studies of low-level RF exposures have not found
any biological effects. Some studies have suggested that some biologicaleffects might occur, but such findings
have not been confirmed by additional research. Model 4889 has beentested and found to comply with IC radiation exposure limits set forth for an uncontrolled environment and meets RSS-102 of theIC radio frequency (RF)
Exposure rules.
FOR SINGAPORE ONLY
Complies with
IMDA Standards
DA106734
A recyclable lithium ion/polymer battery powers
this camera. Please call 1-800-8-BATTERY for
information on how to recycle this battery.
FOR UNITED ARAB EMIRATES ONLY:
TRA
REGISTERED No:
ER73893/19
DEALER No: DA0112968/13
 Loading...