


USER´S MANUAL
BEDIENUNGSANLEITUNG
MANUEL D`UTILISATION
MANUAL DE USUARIO
INSTRUKCJA OBSŁUGI
MANUALE D‘ USO
操作说明书
操作說明書
ICOA® SUB
POWERED BASS REFLEX PA SUBWOOFER
LDICOASUB15A / LDICOASUB18A

CONTENTS / INHALTSVERZEICHNIS / CONTENU / CONTENIDO /
TREŚĆ / CONTENUTO / 目录 / 目錄
ENGLISH
SAFETY INFORMATION 3
PROPERTIES 5
CONNECTIONS, CONTROL, AND DISPLAY ELEMENTS 5
CASTOR ASSEMBLY 6
OPERATION 7
CARDIOID SET-UP 9
CABLING/WIRING EXAMPLES 10
OPTIONAL ACCESSORIES 11
TECHNICAL SPECIFICATIONS 11
MANUFACTURER´S DECLARATIONS 12
DEUTSCH
SICHERHEITSHINWEISE 13
EIGENSCHAFTEN 15
ANSCHLÜSSE, BEDIEN- UND ANZEIGEELEMENTE 15
ROLLENMONTAGE 16
BEDIENUNG 17
CARDIOID-SETUP 19
VERKABELUNGSBEISPIELE 20
OPTIONALES ZUBEHÖR 21
TECHNISCHE DATEN 21
HERSTELLERERKLÄRUNGEN 22
FRANCAIS
MESURES PRÉVENTIVES 23
PROPRIÉTÉS 25
ÉLÉMENTS DE CONNEXION, DE CONTRÔLE ET D‘AFFICHAGE 25
MONTAGE DE ROULETTES 26
FONCTIONNEMENT 27
CONFIGURATION CARDIOÏDE 29
EXEMPLES DE CÂBLAGE / RACCORDEMENTS 30
ACCESSOIRES OPTIONNELS 31
SPÉCIFICATIONS TECHNIQUES 31
DECLARATIONS 32
ESPAÑOL
MEDIDAS DE SEGURIDAD 33
PROPIEDADES 35
CONEXIONES, ELEMENTOS DE MANEJO Y VISUALIZACIÓN 35
CONJUNTO DE RUEDAS 36
FUNCIONAMIENTO 37
CONFIGURACIÓN CARDIOIDE 39
EJEMPLOS DE CABLEADO/CONEXIONES 40
ACCESORIOS OPCIONALES 41
ESPECIFICACIONES TÉCNICAS 41
DECLARACIÓN DEL FABRICANTE 42
POLSKI
ŚRODKI OSTROŻNOŚCI 43
WŁAŚCIWOŚCI 45
PRZYŁĄCZA, ELEMENTY OBSŁUGOWE IWSKAŹNIKI 45
MONTAŻ KÓŁEK 46
OBSŁUGA 47
KONFIGURACJA KARDIOIDALNA 49
PRZYKŁADOWE PODŁĄCZENIE PRZEWODÓW 50
AKCESORIA OPCJONALNE 51
DANE TECHNICZNE 51
DEKLARACJE PRODUCENTA 52
ITALIANO
MISURE PRECAUZIONALI 53
PROPRIETÀ 55
COLLEGAMENTI, ELEMENTI DI COMANDO E DISPLAY 55
GRUPPO RUOTE 56
FUNZIONAMENTO 57
CARDIOID SET-UP 59
ESEMPI DI CABLAGGIO 60
ACCESSORI OPZIONALI 61
SPECIFICHE TECNICHE 61
DICHIARAZIONI DEL PRODUTTORE 62
简体中文
安全须知 63
属性 65
连接、控制和显示元件 65
脚轮组件 66
操作 67
CARDIOID SET-UP(心形设置) 69
布线/接线示例 70
可选配件 71
技术规格 71
制造商声明 72
繁體中文
安全注意事項 73
摘要資訊 75
連線、控制和顯示元件 75
腳輪組件 76
操作 77
CARDIOID設定 79
鋪設纜線/配線範例 80
選擇性配件 81
技術規格書 81
製造商聲明 83

ENGLISH
YOU‘ VE MADE THE RI GHT CHOICE!
We have designed this product to operate reliably over many years. LD Systems stands for this with its name and many years of experience as
a manufacturer of high-quality audio products. Please read this User‘s Manual carefully, so that you can begin making optimum use of your LD
Systems product quickly.
You ca n nd more inf ormat ion about L D-SYSTEMS at our I nterne t site W WW.LD-SYSTEMS.COM
SAFETY INFORMATION
1. Please read these instructions carefully.
2. Keep all information and instructions in a safe place.
3. Follow the instructions.
4. Observe all safety warnings. Never remove safety warnings or other information from the equipment.
5. Use the equipment only in the intended manner and for the intended purpose.
6. Use only sufficiently stable and compatible stands and/or mounts (for fixed installations). Make certain that wall mounts are properly installed
and secured. Make certain that the equipment is installed securely and cannot fall down.
7. During installation, observ e the applicable safety regulations for your country.
8. Never install and operate the equipment near radiators, heat registers, ovens or other sources of heat. Make certain that the equipment is
always installed so that is cooled sufficiently and cannot overheat.
9. Never place sources of ignition, e.g., burning candles, on the equipment.
10. Ventilation slits must not be blocked.
11. Keep a minimum distance of 20 cm around and above the device.
12. Do not use this equipment in the immediate vicinity of water (does not apply to special outdoor equipment - in this case, observe the special
instructions noted below. Do not expose this equipment to flammable materials, fluids or gases. Avoid direct sunlight!
13. Make certain that dripping or splashed water cannot enter the equipment. Do not place containers filled with liquids, such as vases or drinking
vessels, on the equipment.
14. Make certain that objects cannot fall into the device.
15. Use this equipment only with the accessories recommended and intended by the manufacturer.
16. Do not open or modify this equipment.
17. After connecting the equipment, check all cables in order to prevent damage or accidents, e.g., due to tripping hazards.
18. During transport, make certain that the equipment cannot fall down and possibly cause property damage and personal injuries.
If your equipment is no longer functioning properly, if fluids or objects have gotten inside the equipment or if it has been damaged in anot her
19.
way, switch it off immediately and unplug it from the mains outlet (if it is a powered device). This equipment may only be repaired by authorized,
qualified personnel.
20. Clean the equipment using a dry cloth.
21. Comply with all applicable disposal laws in your country. During disposal of packaging, please separate plastic and paper/cardboard.
22. Plastic bags must be kept out of reach of children.
23. Please note that changes or modifications not expressly approved by the party responsible for compliance could void the user´s
authority to operate the equipment.
FOR EQU IPMENT THAT C ONNECTS T O THE POWER MA INS
24. CAUTION: If the power cord of the device is equipped with an earthing contact, then it must be connected to an outlet with a protective ground.
Never deactivate the protective ground of a power cord.
25. If the equipment has been exposed to strong fluctuations in temperature (for example, after transport), do not switch it on immediately.
Moisture and condensation could damage the equipment. Do not switch on the equipment until it has reached room temperature.
26. Before connecting the equipment to the power outlet, first verify that the mains voltage and frequency match the values specified on the
equipment. If the equipment has a voltage selection switch, connect the equipment to the power outlet only if the equipment values and the
mains power values match. If the included power cord or power adapter does not fit in your wall outlet, contact your electrician.
27. Do not step on the power cord. Make certain that the power cable does not become kinked, especially at the mains outlet and/or power adapter
and the equipment connector.
When connecting the equipment, make certain that the power cord or power adapter is always freely accessible. Always disconnect the equipment
28.
from the power supply if the equipment is not in use or if you want to clean the equipment. Always unplug the power cord and power adapter from
the power outlet at the plug or adapter and not by pulling on the cord. Never touch the power cord and power adapter with wet hands.
29.
Whenever possible, avoid switching the equipment on and off in quick succession because otherwise this can shorten the useful life of the equipment.
30. IMPORTANT INFORMATION: Replace fuses only with fuses of the same type and rating. If a fuse blows repeatedly, please contact an authorised
service centre.
31. To disconnect the equipment from the power mains completely, unplug the power cord or power adapter from the power outlet.
32. If your device is equipped with a Volex power connector, the mating Volex equipment connector must be unlocked before it can be removed.
However, this also means that the equipment can slide and fall down if the power cable is pulled, which can lead to personal injuries and/or
other damage. For this reason, always be careful when laying cables.
33. Unplug the power cord and power adapter from the power outlet if there is a risk of a lightning strike or before extended periods of disuse.
34. The appliance is not to be used by persons (including children) with reduced physical, sensory or mental capabilities, or lack of experience
and knowledge.
35. Children must be instructed not to play with the device.
36. If the power cord of the device is damaged, do not use the device. The power cord must be replaced by an adequate cable or assembly from an
authorized service center.
ENGLISHFRANCAIS
DEUTSCH
ESPAÑOL
POLSKIITALIANO
简体中文繁體中文
3

CAUTION:
To reduce the risk of electric shock, do not remove cover (or back). There are no user serviceable parts
inside. Maintenance and repairs should be exclusively carried out by qualified service personnel.
The warning triangle with lightning symbol indicates dangerous uninsulated voltage inside the unit, which may cause an
electrical shock.
DEUTSCHENGLISH FRANCAIS
The warning triangle with exclamation mark indicates important operating and maintenance instructions.
Warning! This device is designed for use below 2000 metres in altitude.
Warning! This product is not intended for use in tropical climates.
ESPAÑOL
CAUT ION! HIGH VOLU MES IN AUDIO PR ODUCTS!
This device is meant for professional use. Therefore, commercial use of this equipment is subject to the respectively applicable national accident
prevention rules and regulations. As a manufacturer, Adam Hall is obligated to notify you formally about the existence of potential health risks.
Hearing damage due to high volume and prolonged exposure: When in use, this product is capable of producing high sound-pressure levels (SPL)
that can lead to irreversible hearing damage in performers, employees, and audience members. For this reason, avoid prolonged exposure to
volumes in excess of 90 dB.
NOTE: This equipment has been tested and found to comply with the limits for a Class B digital device, pursuant to Part 15 of the FCC
POLSKI ITALIANO
Rules. These limits are designed to provide reasonable protection against harmful interference in a residential installation. This equipment generates, uses and can radiate radio frequency energy and, if not installed and used in accordance with the instructions, may cause
harmful interference to radio communications. However, there is no guarantee that interference will not occur in a particular installation. If this
equipment does cause harmful interference to radio or television reception, which can be determined by turning the equipment off and on, the
user is encouraged to try to correct the interference by one or more of the following measures:
– Reorient or relocate the receiving antenna.
– Increase the separation between the equipment and receiver.
– Connect the equipment into an outlet on a circuit different from that to which the receiver is connected.
– Consult the dealer or an experienced radio/TV technician for help.
简体中文 繁體中文
4

PROPERTIES
LDICOASUB15A
• 15 inch subwoofer for powerful low-end up to 36 Hz
• 131 dB max. SPL and 1600 Watt peak power through highly efficient digital Class D power amplifier
• Optimized bass reflex ports
• DynX DSP with four application presets (three crossover frequencies, cardioid mode)
• Switchable signal polarity and adjustable delay line for up to 10 meters
• 2 x XLR/TRS “combo jack” inputs and 2 XLR Output
• 18 mm rugged plywood housing and heavy-duty grill
• 4 Aluminum handles with ergonomic rubber surface
• Securely stackable with four stacking-grooves
• M20 thread for distance pole
LDICOASUB18A
• 18 inch subwoofer for powerful low-end up to 29 Hz
• 133 dB max. SPL and 2400 Watt peak power through highly efficient digital Class D power amplifier
• Optimized bass reflex ports
• DynX DSP with four application presets (three crossover frequencies, cardioid mode)
• Switchable signal polarity and adjustable delay line for up to 10 meters
• 2 x XLR/TRS “combo jack” inputs and 2 XLR Output
• 18 mm rugged plywood housing and heavy-duty grill
• 4 Aluminum handles with ergonomic rubber surface
• Securely stackable with four stacking-grooves
• M20 thread for distance pole
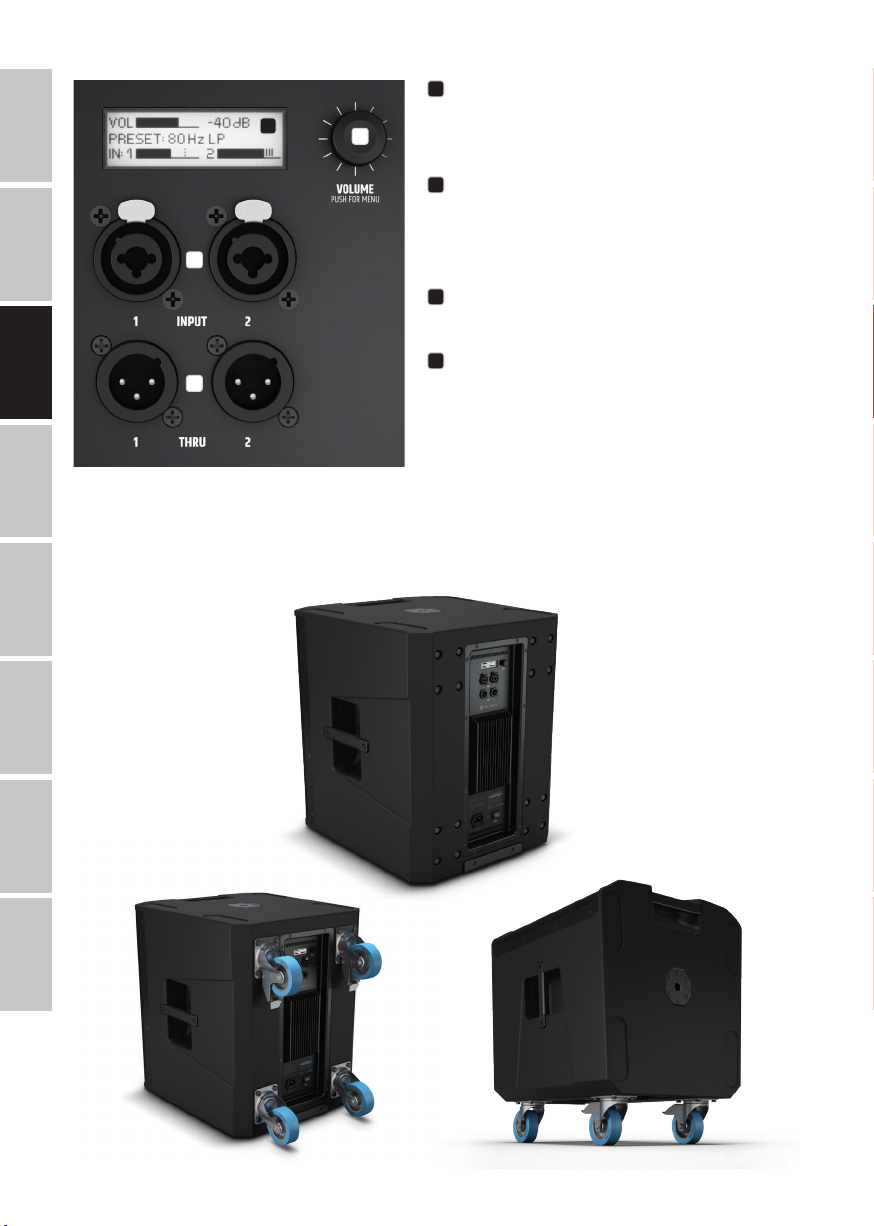
CONNECTIONS, CONTROL, AND DISPLAY ELEMENTS
ENGLISHFRANCAIS
DEUTSCH
ESPAÑOL
POLSKIITALIANO
1 2
1
POWE R SOCKET AN D FUSE HOLDER
IEC power socket with integrated fuse holder. A suitable power cable is included in delivery.
IMPORTANT NOTE: Only replace the fuse with a fuse of the same type and values. Please note the inscription on the housing. If a fuse trips repeatedly, please contact an authorized service center.
2
POWER
On/off switch. The speaker should always be the last device to be switched on in the signal chain, and the first to be switched off.
简体中文繁體中文
5

3
LC DIS PLAY
Multifunctional graphic LC display for displaying the master volume, the DSP
preset and the input level for channels 1 and 2 in the main menu. The menu
items, submenu items, and corresponding editing options are displayed in
the Editing menu.
4
VOLUM E / PUSH FOR MENU
From the main menu, the master volume can be adjusted by turning the
rotary-push encoder. Press the rotary-push encoder to access the Editing
menu. Use the rotary-push encoder to navigate the Editing menu, adjust
system settings, and change values in the respective menu items.
5
INPUT 1–2
Balanced channel 1 and 2 line inputs with XLR/jack combo sockets A connected stereo signal is summed to mono internally.
6
THRU 1–2
Balanced line outputs with male 3-pin XLR sockets for forwarding the line
input signal.
DEUTSCHENGLISH FRANCAIS
3
5
6
4
ESPAÑOL
CASTOR ASSEMBLY
The back of the subwoofer is set up to attach four optionally available transport castors, each equipped with four ex works fastening screws and
recessed. The hole spacing is standardized. A large selection of castors can be found at adamhall.com
POLSKI ITALIANO
简体中文 繁體中文
6

OPERATION
NOTE:
The LD Systems logo briefly appears on the display as soon as the speaker is correctly connected to the power supply and switched on. All settings
(e.g., Preset and Delay) resume the way they were as before the speaker was switched off. The speaker will be ready for use after completion of this
process, which usually takes one second.
MAIN ME NU DISPLAY
The main display is activated during normal operation. It shows the master volume setting, the activated speaker preset, and the input levels of
channels 1 and 2 with peak display (see figure). Reduce the source device’s output level (e.g., mixer) if the peak display shows that the input signal
is too high.
Volume control
Speaker preset
Input level with peak display
channel 1
Level Peak
VOLUME
From the main menu, the volume can be directly adjusted by turning the rotary-push encoder VOLUME / PUSH FOR MENU from -60 to +10 dB. When
the encoder is rotated, the display automatically changes to the corresponding symbol (see figure below). The main menu will automatically
reappear after approx. 20 seconds of inactivity. Pressing the encoder immediately changes the display to the main menu.
AUDIO SETTINGS (AUDIO)
Press the rotary-push encoder to access the main menu and then turn the encoder to select the menu item AUDIO (dark background). Press the
encoder again to access the submenu and then turn the encoder to select the desired submenu item. Confirm the selection by pressing the
encoder.
Input level with peak display
channel 2
ENGLISHFRANCAIS
DEUTSCH
ESPAÑOL
POLSKIITALIANO
Refer to the table below for the submenu items and the relevant setting options.
SETTINGS (Change value or status = turn encoder, conrm value or status change = press encoder)
MAIN MENU Return to main menu
PRESET Selection of the speaker preset 80 Hz Low-Pass Filter at 80 Hz
100 Hz Low-Pass Filter at 100 Hz. Ideal setting in combination with ICOA
loudspeakers in SATELLITE mode.
120 Hz Low-Pass Filter at 120 Hz
CARDIOID Preset for conguring two ICOA subwoofers of the same model as
a cardioid system. Rotate the subwoofer with the cardioid preset
180° and put it next to the main subwoofer. Then select the speaker
preset 100 Hz in the main subwoofer. The delay time, polarity, and
volume for the two subwoofers must all have the same setting.
DELAY Time delay of the audio signal in 0.32 ft steps up to 32 ft (0 ft = OFF, display in meters and feet)
POLARITY Sets the polarity NORMAL Normal polarity
INVERTED Inverted polarity
In the submenu, select MAIN MENU and press the encoder to return to the main menu. In the main menu, select HOME and then press the encoder to confirm this selection and return to the main menu. The main menu will automatically be displayed after approx. 20 seconds of inactivity.
简体中文繁體中文
7

SYSTEM SETTINGS (SETTINGS)
Press the rotary-push encoder to access the main menu and then turn the encoder to select the menu item SETTINGS (dark background). Press the
encoder again to access the submenu and then turn the encoder to select the desired submenu item. Confirm the selection by pressing the
encoder.
DEUTSCHENGLISH FRANCAIS
Refer to the table below for the submenu items and the relevant setting options:
SETTINGS (Change value or status = turn encoder, conrm value or status change or request information = press encoder)
MAIN MENU Return to main menu
LCD DIM Automatic display dimming ON Display is dimmed after approx. 20 seconds of inactivity
ESPAÑOL
BRIGHTNESS Setting the display brightness (0–100%)
CONTRAST Setting the display contrast (0–100%)
INFO Display of model number and software version
FACTORY DEFAULT Reset to factory default
POLSKI ITALIANO
In the submenu, select MAIN MENU and press the encoder to return to the main menu. In the main menu, select HOME and then press the encoder to confirm this selection and return to the main menu. The main menu will automatically be displayed after approx. 20 seconds of inactivity.
(AUDIO + SETTINGS)
OFF Automatic display dimming switched off
CANCEL Cancel reset
RESET SURE? YES Execute reset
CANCEL Cancel reset
简体中文 繁體中文
8

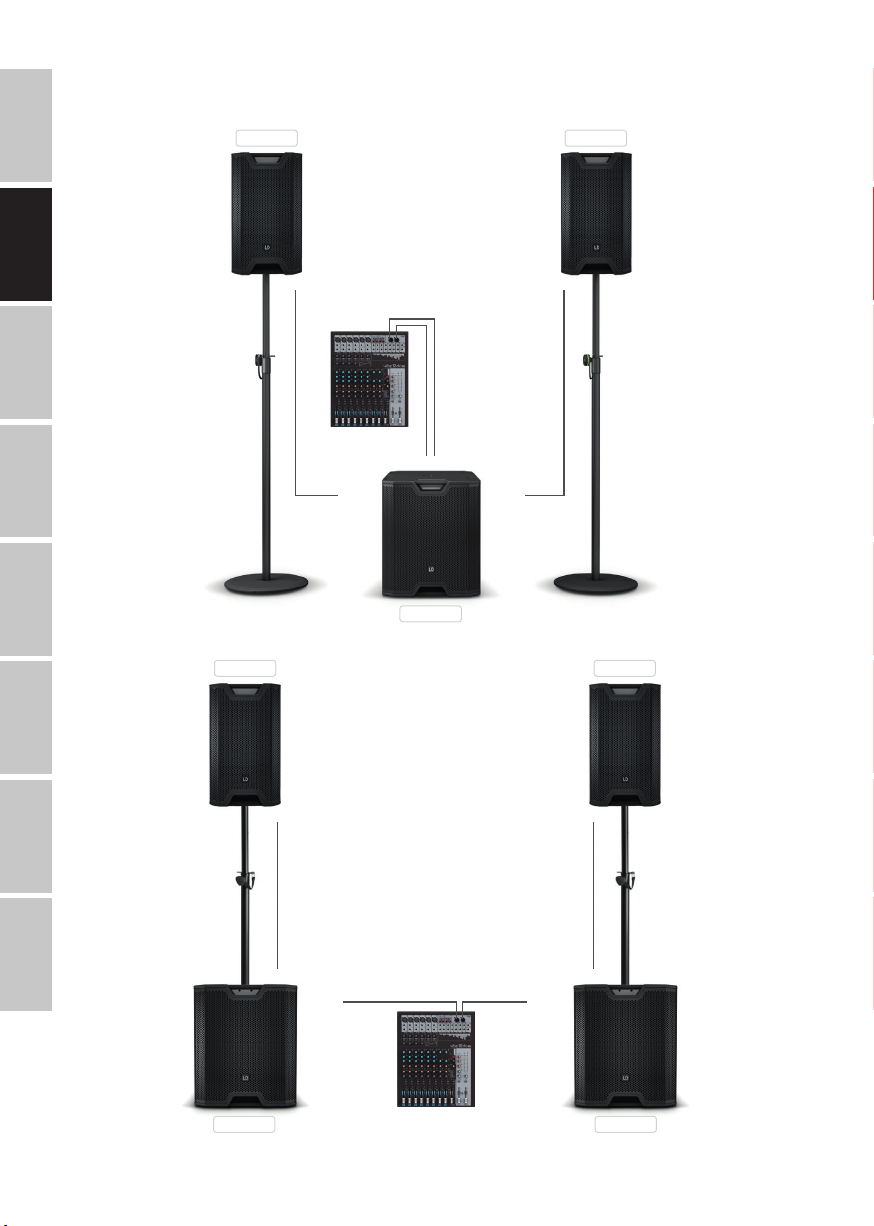
CARDIOID SET-UP
The loudspeaker CARDIOID preset is complex DSP programming that enables a kidney-shaped radiation pattern (cardioid sound radiation) to be
achieved by a combination of two LD ICOA subwoofers of the same model.
In comparison to conventional subwoofer setups, it provides the following advantages:
• Reverse attenuation up to 20 dB
• More precise bass reproduction in the listening area
• Prevention of unwanted reflections from rear walls
• Reduction of diffuse sound in rooms
• Elimination of annoying bass frequencies on stage
• Differentiated sound pattern for stage sound reinforcement (monitoring)
• Reduction of feedback occurring with stage microphones
As illustrated, place two subwoofers beside each other, with the subwoofer with the cardioid preset facing backwards (see figure below). Select the
100 Hz preset for the front-facing main subwoofer and ensure that the delay time, polarity, and volume settings for both subwoofers are the
same.
ENGLISHFRANCAIS
DEUTSCH
PRESET 100 Hz
WHAT DO ES LD SYSTE MS DYNX® DSP ME AN?
DSP is an acronym that stands for digital signal processing. DynX® includes the Limiter, EQ, Compressor, and Low-Pass
Filter. Digital signal processing ensures optimal audio bass reproduction with maximum clarity while protecting the
subwoofer from overloading.
WHAT E XACTLY DOE S DYNX® DSP DO?
The Limiter function protects the speaker and prevents overload-induced distortion. The subwoofer allows the system
to be operated at an overall higher sound pressure since extreme signal peaks are automatically limited so that the
master volume does not have to be reduced. The multi-band EQ handles the entire bass range and optimizes the
subwoofer’s overall sound.
PRESET CARDIOID
Forward-facing
ESPAÑOL
POLSKIITALIANO
简体中文繁體中文
9

CABLING/WIRING EXAMPLES
DEUTSCHENGLISH FRANCAIS
PRESET SAT PRESET SAT
ESPAÑOL
POLSKI ITALIANO
简体中文 繁體中文
INPUT __1
INPUT __1
1__ INPUT __2
THRU __1 THRU __ 2
PRESET 100 Hz
PRESET SATPRESET SAT
INPUT __1INPUT __1
THRU __1THRU __1
INPUT __1 INPUT __1
PRESET 100 Hz PRESET 100 Hz
10
OPTIONAL ACCESSORIES
LDICOASUB15PC – protective cover for ICOA SUB 15 A
LDICOASUB18PC – protective cover for ICOA SUB 18 A
TECHNICAL SPECIFICATIONS
Article number: LDICOASUB15A LDICOASUB18A
Product type: PA subwoofer
Type: Active
Large woofer: 15" 18"
Large woofer: 381 mm 457.2 mm
Woofer magnet: Ferrite
Woofer brand: Custom-made
Woofer voice coil: 3" 4"
Woofer voice coil: 76.5 mm 100 mm
Amplifier: Class D
Power (RMS): 400 W 600 W
Power (Peak): 1600 W 2400 W
Frequency response: 36 Hz – preset dependent 29 Hz – preset dependent
Max. SPL (Peak): 131 dB 133 dB
Protection circuits: Peak Limiter, RMS Limiter, Excursion Limiter, Overheating, Overvoltage, Overcurrent
Input impedance: 18 kOhm
Input sensitivity: 0.3 V
Control elements: On/Off switch, rotary-push encoder
Display elements: Backlit LC display
Line inputs: 2
Line input connections: XLR/6.3mm jack combi sockets (balanced)
Line outputs: 2
Line output connections: XLR
AD/DA converter sampling frequency: 48 kHz
AD/DA converter resolution: 24 bit
Power supply: SMPS
Operating voltage: 100 V–240 V AC 50–60 Hz
Fuse: T6.3AL 250 V T8AL 250 V
Power consumption: 675 W
Ambient temperature (in operation): 0 - 40°C
Relative humidity: <60% (non-condensing)
Housing material: 0.71 inch multiplex
Housing design: Bass reflex
Installation flange for pole extension: M20 internal thread
Dimensions (W × H × D): 510 x 598 x 552 mm 626 x 672 x 637 mm
ENGLISHFRANCAIS
DEUTSCH
ESPAÑOL
POLSKIITALIANO
简体中文繁體中文
11

Weight: 32.5 kg 44.3 kg
Accessories included: Power cable
Additional features:
4 handles - robust front grille - stackable - DSP with 4 presets,
Delay function, and adjustable polarity
DEUTSCHENGLISH FRANCAIS
MANUFACTURER´S DECLARATIONS
MANUFACTURER‘S WARRANTY & LIMITATIONS OF LIABILITY
You can find our current warranty conditions and limitations of liability at: https://cdn-shop.adamhall.com/media/pdf/MANUFACTURERS-DECLARATIONS_
LD_SYSTEMS.pdf To request warranty service for a product, please contact Adam Hall GmbH, Adam-Hall-Str. 1,
61267 Neu Anspach / Email: Info@adamhall.com / +49 (0)6081 / 9419-0.
CORR ECT DISPOS AL OF THIS PRO DUCT
(valid in the European Union and other European countries with a differentiated waste collection system)
This symbol on the product, or on its documents indicates that the device may not be treated as household waste. This is to avoid environmental damage or personal injury due to uncontrolled waste disposal. Please dispose of this product separately from other waste and have it
recycled to promote sustainable economic activity. Household users should contact either the retailer where they purchased this product, or their
local government office, for details on where and how they can recycle this item in an environmentally friendly manner. Business users should
contact their supplier and check the terms and conditions of the purchase contract. This product should not be mixed with other commercial waste
ESPAÑOL
for disposal.
CE COMPLIANCE
Adam Hall GmbH states that this product meets the following guidelines (where applicable):
R&TTE (1999/5/EC) or RED (2014/53/EU) from June 2017
Low voltage directive (2014/35/EU)
EMV directive (2014/30/EU)
RoHS (2011/65/EU)
POLSKI ITALIANO
The complete declaration of conformity can be found at www.adamhall.com.
Furthermore, you may also direct your enquiry to info@adamhall.com.
EU DECLARATION OF CONFORMITY
Hereby, Adam Hall GmbH declares that this radio equipment type is in compliance with Directive 2014/53/EU.
The full text of the EU declaration of conformity is available at the following
internet address: www.adamhall.com/compliance/
简体中文 繁體中文
12

DEUTSCH
SIE HA BEN DIE RICHT IGE WAHL GET ROFFEN!
Dieses Gerät wurde unter hohen Qualitätsanforderungen entwickelt und gefertigt, um viele Jahre einen reibungslosen Betrieb zu gewährleisten.
Dafür steht LD Systems mit seinem Namen und der langjährigen Erfahrung als Hersteller hochwertiger Audioprodukte. Bitte lesen Sie diese Bedienungsanleitung sorgfältig, damit Sie Ihr neues Produkt von LD Systems schnell optimal einsetzen können.
Mehr Informationen zu LD SYSTEMS finden Sie auf unserer Internetseite WWW.LD-SYSTEMS.COM
SICHERHEITSHINWEISE
1. Lesen Sie diese Anleitung bitte sorgfältig durch.
2. Bewahren Sie alle Informationen und Anleitungen an einem sicheren Ort auf.
3. Befolgen Sie die Anweisungen.
4. Beachten Sie alle Warnhinweise. Entfernen Sie keine Sicherheitshinweise oder andere Informationen vom Gerät.
5. Verwenden Sie das Gerät nur in der vorgesehenen Art und Weise.
6. Verwenden Sie ausschließlich stabile und passende Stative bzw. Befestigungen (bei Festinstallationen).
ordnungsgemäß installiert und gesichert sind. Stellen Sie sicher, dass das Gerät sicher installiert ist und nicht herunterfallen kann.
7. Beachten Sie bei der Installation die für Ihr Land geltenden Sicherheitsvorschriften.
8. Installieren und betreiben Sie das Gerät nicht in der Nähe von Heizkörpern, Wärmespeichern, Öfen oder sonstigen Wärmequellen.
Sorgen Sie dafür, dass das Gerät immer so installiert ist, dass es ausreichend gekühlt wird und nicht überhitzen kann.
9. Platzieren Sie keine Zündquellen wie z.B. brennende Kerzen auf dem Gerät.
10. Lüftungsschlitze dürfen nicht blockiert werden.
11. Halten Sie einen Mindestabstand von 20 cm seitlich und oberhalb des Geräts ein.
12. Betreiben Sie das Gerät nicht in unmittelbarer Nähe von Wasser. Bringen Sie das Gerät nicht mit brennbaren Materialien, Flüssigkeiten oder
Gasen in Berührung. Direkte Sonneneinstrahlung vermeiden!
13. Sorgen Sie dafür, dass kein Tropf- oder Spritzwasser in das Gerät eindringen kann. Stellen Sie keine mit Flüssigkeit gefüllten Behältnisse wie
Vasen oder Trinkgefäße auf das Gerät.
14. Sorgen Sie dafür, dass keine Gegenstände in das Gerät fallen können.
15. Betreiben Sie das Gerät nur mit dem vom Hersteller empfohlenen und vorgesehenen Zubehör.
16. Öffnen Sie das Gerät nicht und verändern Sie es nicht.
17. Überprüfen Sie nach dem Anschluss des Geräts alle Kabelwege, um Schäden oder Unfälle, z. B. durch Stolperfallen zu vermeiden.
18. Achten Sie beim Transport darauf, dass das Gerät nicht herunterfallen und dabei möglicherweise Sach- und Personenschäden verursachen kann.
19. Wenn Ihr Gerät nicht mehr ordnungsgemäß funktioniert, Flüssigkeiten oder Gegenstände in das Geräteinnere gelangt sind, oder das Gerät
anderweitig beschädigt wurde, schalten Sie es sofort aus und trennen es von der Netzsteckdose (sofern es sich um ein aktives Gerät handelt).
Dieses Gerät darf nur von autorisiertem Fachpersonal repariert werden.
20. Verwenden Sie zur Reinigung des Geräts ein trockenes Tuch.
21. Beachten Sie alle in Ihrem Land geltenden Entsorgungsgesetze. Trennen Sie bei der Entsorgung der Verpackung bitte Kunststoff und Papier bzw.
Kartonagen voneinander.
22. Kunststoffbeutel müssen außer Reichweite von Kindern aufbewahrt werden.
23. Sämtliche vom Benutzer vorgenommenen Änderungen und Modifikationen, denen die für die Einhaltung der Richtlinien verantwortliche Partei
nicht ausdrücklich zugestimmt hat, können zum Entzug der Betriebserlaubnis für das Gerät führen.
BEI GERÄTEN MIT NETZANSCHLUSS
24. ACHTUNG: Wenn das Netzkabel des Geräts mit einem Schutzkontakt ausgestattet ist, muss es an einer Steckdose mit Schutzleiter angeschlossen
werden. Deaktivieren Sie niemals den Schutzleiter eines Netzkabels.
25. Schalten Sie das Gerät nicht sofort ein, wenn es starken Temperaturschwankungen ausgesetzt war (beispielsweise nach dem Transport).
Feuchtigkeit und Kondensat könnten das Gerät beschädigen. Schalten Sie das Gerät erst ein, wenn es Zimmertemperatur erreicht hat.
26. Bevor Sie das Gerät an die Steckdose anschließen, prüfen Sie zuerst, ob die Spannung und die Frequenz des Stromnetzes mit den auf dem Gerät
angegebenen Werten übereinstimmen. Verfügt das Gerät über einen Spannungswahlschalter, schließen Sie das Gerät nur an die Steckdose an,
wenn die Gerätewerte mit den Werten des Stromnetzes übereinstimmen. Wenn das mitgelieferte Netzkabel bzw. der mitgelieferte Netzadapter
nicht in Ihre Netzsteckdose passt, wenden Sie sich an Ihren Elektriker.
27. Treten Sie nicht auf das Netzkabel. Sorgen Sie dafür, dass spannungsführende Kabel speziell an der Netzbuchse bzw. am Netzadapter und der
Gerätebuchse nicht geknickt werden.
28. Achten Sie bei der Verkabelung des Geräts immer darauf, dass das Netzkabel bzw. der Netzadapter stets frei zugänglich ist. Trennen Sie das Gerät
stets von der Stromzuführung, wenn das Gerät nicht benutzt wird, oder Sie das Gerät reinigen möchten. Ziehen Sie Netzkabel und Netzadapter
immer am Stecker bzw. am Adapter und nicht am Kabel aus der Steckdose. Berühren Sie Netzkabel und Netzadapter niemals mit nassen Händen.
29. Schalten Sie das Gerät möglichst nicht schnell hintereinander ein und aus, da sonst die Lebensdauer des Geräts beeinträchtigt werden könnte.
30. WICHTIGER HINWEIS: Ersetzen Sie Sicherungen ausschließlich durch Sicherungen des gleichen Typs und Wertes. Sollte eine Sicherung wiederholt
auslösen, wenden Sie sich bitte an ein autorisiertes Servicezentrum.
31. Um das Gerät vollständig vom Stromnetz zu trennen, entfernen Sie das Netzkabel bzw. den Netzadapter aus der Steckdose.
32. Wenn Ihr Gerät mit einem verriegelbaren Netzanschluss bestückt ist, muss der passende Gerätestecker entsperrt werden, bevor er entfernt
werden kann. Das bedeutet aber auch, dass das Gerät durch ein Ziehen am Netzkabel verrutschen und herunterfallen kann, wodurch Personen
verletzt werden und/oder andere Schäden auftreten können. Verlegen Sie Ihre Kabel daher immer sorgfältig.
33. Entfernen Sie Netzkabel und Netzadapter aus der Steckdose bei Gefahr eines Blitzschlags oder wenn Sie das Gerät länger nicht verwenden.
34. Das Gerät darf nicht von Personen (einschließlich Kindern) mit eingeschränkten körperlichen, sensorischen oder geistigen Fähigkeiten oder
mangelnder Erfahrung und Kenntnis benutzt werden.
Stellen Sie sicher, dass Wandhalterungen
ENGLISHFRANCAIS
DEUTSCH
ESPAÑOL
POLSKIITALIANO
简体中文繁體中文
13
35. Kinder müssen angewiesen werden, nicht mit dem Gerät zu spielen.
36. Wenn das Netzkabel des Geräts beschädigt ist, darf das Gerät nicht verwendet werden. Das Netzkabel muss durch ein adäquates Kabel oder eine
spezielle Baugruppe von einem autorisierten Service-Center ersetzt werden.
ACHTUNG
Entfernen Sie niemals die Abdeckung, da sonst das Risiko eines elektrischen Schlages besteht. Im Inneren des Geräts befinden sich keine Teile, die vom Bediener repariert oder gewartet werden können.
DEUTSCHENGLISH FRANCAIS
Das gleichseitige Dreieck mit Blitzsymbol warnt vor nichtisolierten, gefährlichen Spannungen im Geräteinneren, die einen elektrischen Schlag verursachen können.
Das gleichseitige Dreieck mit Ausrufungszeichen kennzeichnet wichtige Bedienungs- und Wartungshinweise.
Warnung! Dieses Gerät ist für eine Nutzung bis zu einer Höhe von maximal 2000 Metern über dem Meeresspiegel bestimmt.
Lassen Sie Wartung und Reparaturen ausschließlich von qualifiziertem Servicepersonal durchführen.
ESPAÑOL
ACHTUNG HOHE LAUTSTÄRKEN BEI AUDIOPRODUKTEN!
Dieses Gerät ist für den professionellen Einsatz vorgesehen. Der kommerzielle Betrieb dieses Geräts unterliegt den jeweils gültigen nationalen Vorschriften und Richtlinien zur Unfallverhütung. Als Hersteller ist Adam Hall gesetzlich verpflichtet, Sie ausdrücklich auf mögliche Gesundheitsrisiken
hinzuweisen. Gehörschäden durch hohe Lautstärken und Dauerbelastung: Bei der Verwendung dieses Produkts können hohe Schalldruckpegel (SPL)
POLSKI ITALIANO
erzeugt werden, die bei Künstlern, Mitarbeitern und Zuschauern zu irreparablen Gehörschäden führen können. Vermeiden Sie länger anhaltende
Belastung durch hohe Lautstärken über 90 dB.
Warnung! Dieses Gerät ist nicht für den Einsatz in tropischen Klimazonen bestimmt.
简体中文 繁體中文
14

EIGENSCHAFTEN
LDICOASUB15A
• 15 Zoll Subwoofer für druckvollen Tiefbass bis 36 Hz
• 131 dB max. SPL und 1600 Watt Peak Leistung durch hocheffiziente digitale Class D Endstufe
• Optimierte Bassreflexöffnungen
• DynX DSP mit vier Anwendungs-Presets (drei Übergangsfrequenzen, Cardioid-Modus)
• Umschaltbare Signalpolarität und einstellbares Line Delay für bis zu 10 Meter
• 2 x Combo-Eingang (Klinke/XLR), 2 x XLR-Ausgang
• Stabiles Gehäuse aus 18 mm Schichtholz mit robustem Frontgitter
• Einfaches Handling durch vier ergonomische Aluminiumgriffe mit gummierter Oberfläche
• Sicher stapelbar durch vier Mulden
• M20-Gewinde zur Montage einer Distanzstange
LDICOASUB18A
• 18 Zoll Subwoofer für druckvollen Tiefbass bis 29 Hz
• 133 dB max. SPL und 2400 Watt Peak Leistung durch hocheffiziente digitale Class D Endstufe
• Optimierte Bassreflexöffnungen
• DynX DSP mit vier Anwendungs-Presets (drei Übergangsfrequenzen, Cardioid-Modus)
• Umschaltbare Signalpolarität und einstellbares Line Delay für bis zu 10 Meter
• 2 x Combo-Eingang (Klinke/XLR), 2 x XLR-Ausgang
• Stabiles Gehäuse aus 18 mm Schichtholz mit robustem Frontgitter
• Einfaches Handling durch vier ergonomische Aluminiumgriffe mit gummierter Oberfläche
• Sicher stapelbar durch vier Mulden
• M20-Gewinde zur Montage einer Distanzstange
ANSCHLÜSSE, BEDIEN- UND ANZEIGEELEMENTE
ENGLISHFRANCAIS
DEUTSCH
ESPAÑOL
POLSKIITALIANO
1 2
1
NETZBUCHSE UND SICHERUNGSHALTER
IEC Netzbuchse mit integriertem Sicherungshalter. Ein geeignetes Netzkabel befindet sich im Lieferumfang.
WICHTIGER HINWEIS: Ersetzen Sie die Sicherung ausschließlich durch eine Sicherung des gleichen Typs und mit gleichen Werten. Achten Sie auf den
Aufdruck auf dem Gehäuse. Sollte die Sicherung wiederholt auslösen, wenden Sie sich bitte an ein autorisiertes Servicezentrum.
2
POWER
Ein- und Ausschalter. Schalten Sie den Lautsprecher stets als letztes Gerät in der Signalkette ein und als erstes Gerät wieder aus.
简体中文繁體中文
15

3
LC-DISPLAY
Multifunktionales Grafik-LC-Display für die Anzeige der Gesamtlautstärke,
des DSP-Presets und der Eingangspegel für die Kanäle 1 und 2 in der
Hauptanzeige. Im Bearbeitungsmenü werden die Menüpunkte, die Untermenüpunkte und die entsprechenden Bearbeitungsoptionen angezeigt.
4
VOLUM E / PUSH FOR MENU
Ausgehend von der Hauptanzeige kann die Gesamtlautstärke direkt durch
Drehen des Dreh-Drück-Encoders eingestellt werden. Drücken Sie auf den
Dreh-Drück-Encoder, um ins Bearbeitungsmenü zu gelangen. Navigieren
Sie mit Hilfe des Dreh-Drück-Encoders im Bearbeitungsmenü, passen Systemeinstellungen an und ändern Werte in den entsprechenden Menüpunkten.
5
INPUT 1 - 2
Symmetrische Line-Eingänge der Kanäle 1 und 2 mit XLR/Klinke Kombibuchsen. Ein anliegendes Stereo-Signal wird intern Mono summiert.
6
THRU 1 - 2
Symmetrische Line-Ausgänge mit männlichen 3-Pol XLR-Buchsen zum
Weiterleiten des Line-Eingangssignals.
DEUTSCHENGLISH FRANCAIS
3
5
6
4
ESPAÑOL
ROLLENMONTAGE
Die Rückseite der Subwoofer ist für die Montage von 4 optional erhältlichen Transportrollen vorbereitet, jeweils 4 Befestigungsschrauben sind
bereits ab Werk vorhanden und versenkt angebracht, der Lochabstand ist standardisiert. Eine große Auswahl geeigneter Rollen finden Sie auf
POLSKI ITALIANO
adamhall.com
简体中文 繁體中文
16

BEDIENUNG
HINWEISE
Sobald der Lautsprecher korrekt am Stromnetz angeschlossen und eingeschaltet wird, erscheint das LD Systems Logo für kurze Zeit im Display.
Alle Einstellungen, wie z.B. Preset und Delay werden geladen, so, wie sie vor dem Ausschalten des Lautsprechers eingestellt waren. Nach diesem
Vorgang, der nur etwa eine Sekunde dauert, ist der Lautsprecher betriebsbereit.
DISPLAY HAUPTANZEIGE
Im normalen Betrieb ist die Hauptanzeige aktiviert, dabei werden im Display die eingestellte Gesamtlautstärke angezeigt, das aktivierte
Lautsprecher-Preset und die Eingangspegel der Kanäle 1 und 2 mit Peak-Anzeige (siehe Abbildung). Reduzieren Sie den Ausgangspegel des
Zuspielgeräts (z.B. Mischpult), falls die Peak-Anzeige ein zu hohes Eingangssignal anzeigt.
Lautstärkeeinstellung
Lautsprecher-Preset
Eingangspegel mit Peak-Anzeige
Kanal 1
Pegel Peak
LAU TSTÄRKE (VO LUME)
Ausgehend von der Hauptanzeige kann die Lautstärke direkt durch Drehen des Dreh-Drück-Encoders VOLUME / PUSH FOR MENU von -60 bis +10 dB
eingestellt werden. Die Anzeige im Display wechselt beim Drehen des Encoders automatisch zur entsprechenden Darstellung (siehe Abbildung
unten). Nach circa 20 Sekunden Inaktivität wird automatisch wieder die Hauptanzeige angezeigt, durch Drücken auf den Encoder wechselt die
Anzeige sofort zur Hauptanzeige.
AUDIOEINSTELLUNGEN (AUDIO)
Drücken Sie auf den Dreh-Drück-Encoder, um in das Hauptmenü zu gelangen und wählen dann durch Drehen des Encoders den Menüpunkt AUDIO
aus (dunkel hinterlegt). Drücken Sie wiederum auf den Encoder, um ins Untermenü zu gelangen und wählen den gewünschten Untermenüpunkt
durch Drehen des Encoders aus. Bestätigen Sie durch Drücken auf den Encoder.
Eingangspegel mit Peak-Anzeige
Kanal 2
ENGLISHFRANCAIS
DEUTSCH
ESPAÑOL
POLSKIITALIANO
Entnehmen Sie die Untermenüpunkte und die entsprechenden Einstelloptionen dazu aus nachfolgender Tabelle:
SETTINGS (Wert bzw. Status ändern = Encoder drehen, Wert- bzw. Statusänderung bestätigen = Encoder drücken)
MAIN MENU Zurück zum Hauptmenü
PRESET Auswahl des Lautsprecher-Presets 80Hz Low-Pass Filter bei 80 Hz
100Hz Low-Pass Filter bei 100 Hz. Optimal für die Kombination mit ICOA
120Hz Low-Pass Filter bei 120 Hz
CARDIOID Preset zum Kongurieren von zwei ICOA Subwoofern des gleichen
DELAY Zeitverzögerung des Audiosignals in 0,1 m Schritten bis 10 m (0m = OFF, Anzeige in Meter und Feet)
POLARITY Einstellen der Polarität NORMAL Normale Polarität
INVERTED Invertierte Polarität
Wählen Sie im Untermenü MAIN MENU und drücken auf den Encoder, um zum Hauptmenü zurückzugelangen, wählen Sie im Hauptmenü HOME,
bestätigen durch Drücken auf den Encoder, um dann zur Hauptanzeige zurückzukehren. Nach circa 20 Sekunden Inaktivität wird die Hauptanzeige
automatisch angezeigt.
Lautsprechern im SATELLITE Modus
Modells als Cardioid-System. Subwoofer mit Cardioid-Preset um 180°
gedreht neben den Haupt-Subwoofer stellen und im Haupt-Subwoofer
das Lautsprecher-Preset 100Hz wählen. Delay-Zeit, Polarität und
Lautstärke der beiden Subwoofer müssen identisch eingestellt sein.
简体中文繁體中文
17

SYSTEMEINSTELLUNGEN (SETTINGS)
Drücken Sie auf den Dreh-Drück-Encoder, um in das Hauptmenü zu gelangen und wählen dann durch Drehen des Encoders den Menüpunkt SETTINGS
aus (dunkel hinterlegt). Drücken Sie wiederum auf den Encoder, um ins Untermenü zu gelangen und wählen den gewünschten Untermenüpunkt
durch Drehen des Encoders aus. Bestätigen Sie durch Drücken auf den Encoder.
DEUTSCHENGLISH FRANCAIS
Entnehmen Sie die Untermenüpunkte und die entsprechenden Einstelloptionen dazu aus nachfolgender Tabelle:
SETTINGS (Wert bzw. Status ändern = Encoder drehen, Wert- bzw.Statusänderung bestätigen bzw. Informationen abfragen = Encoder drücken)
MAIN MENU Zurück zum Hauptmenü
LCD DIM Automatische Display-Abdunklung ON Display wird nach ca. 20 Sekunden Inaktivität automatisch abgedunkelt
ESPAÑOL
BRIGHTNESS Einstellen der Display-Helligkeit (0 - 100%)
CONTRAST Einstellen des Display-Kontrasts (0 - 100%)
INFO Anzeige von Modellnummer und Software-Version
FACTORY DEFAULT Zurücksetzen auf Werkseinstellungen
(AUDIO + SETTINGS)
POLSKI ITALIANO
Wählen Sie im Untermenü MAIN MENU und drücken auf den Encoder, um zum Hauptmenü zurückzugelangen, wählen Sie im Hauptmenü HOME,
bestätigen durch Drücken auf den Encoder, um dann zur Hauptanzeige zurückzukehren. Nach circa 20 Sekunden Inaktivität wird die Hauptanzeige
automatisch angezeigt.
OFF Automatische Display-Abdunklung ausgeschaltet
CANCEL Zurücksetzen abbrechen
RESET SURE? YES Zurücksetzen durchführen
CANCEL Zurücksetzen abbrechen
简体中文 繁體中文
18

CARDIOID-SETUP
Bei dem Lautsprecher-Preset CARDIOID handelt es sich um aufwändige DSP-Programmierungen, die es ermöglichen, ein nierenförmig gerichtetes
Abstrahlverhalten (Cardioid-Schallabstrahlung) durch eine Kombination aus 2 LD ICOA Subwoofern des gleichen Modells zu erzielen.
Dadurch egeben sich folgende Vorteile gegenüber konventionellen Subwoofer-Setups:
• eine Rückwärtsdämpfung von bis zu 20 dB
• eine präzisere Bassreproduktion im Zuhörerbereich
• die Vermeidung ungewollter Reflexionen von Rückwänden
• die Verringerung von Diffusschall in Räumen
• der Wegfall störender Bassfrequenzen auf der Bühne
• differenziertes Klangbild für die Bühnenbeschallung (Monitoring)
• Verminderung der Rückkopplungsgefahr beim Einsatz von Bühnenmikrofonen
Stellen Sie 2 Subwoofer wie abgebildet nebeneinander auf, wobei der Subwoofer mit dem Cardioid-Preset nach hinten gerichtet sein muss (siehe
Abbildung unten). Wählen Sie für den nach vorne gerichteten Haupt-Subwoofern das 100Hz Preset und achten darauf, dass Delay-Zeit, Polarität
und Lautstärke bei beiden Subwoofern identisch eingestellt sind.
ENGLISHFRANCAIS
DEUTSCH
PRESET 100Hz
WAS BED EUTET LD SY STEMS DYN X® DSP?
DSP ist die Abkürzung für Digital Signal Processing (Digitale Signalverarbeitung), DynX® beinhaltet die Funktionen Limiter, EQ, Kompressor und Low-Pass Filter. Die digitale Signalverarbeitung gewährleistet eine optimale Basswiedergabe
mit maximaler Klarheit und schützt gleichzeitig den Subwoofer vor Überlastung.
WAS GEN AU BEWIRK T DYNX® DSP?
Die Limiter-Funktion schützt den Lautsprecher und verhindert durch Übersteuerung verursachte Verzerrungen. Der
Subwoofer lässt sich auf diese Weise mit einem insgesamt höheren Schalldruck betreiben, da extreme Signalspitzen
automatisch abgeschwächt werden, sodass die Gesamtlautstärke nicht reduziert werden muss. Der Multiband-EQ
bearbeitet den gesamten Bassbereich und optimiert den Klang des Subwoofers.
PRESET CARDIOID
Abstrahlrichtung
ESPAÑOL
POLSKIITALIANO
简体中文繁體中文
19
VERKABELUNGSBEISPIELE
DEUTSCHENGLISH FRANCAIS
PRESET SAT PRESET SAT
ESPAÑOL
POLSKI ITALIANO
简体中文 繁體中文
INPUT __1
INPUT __1
1__ INPUT __2
THRU __1 THRU __ 2
PRESET 100Hz
PRESET SATPRESET SAT
INPUT __1INPUT __1
20
THRU __1THRU __1
INPUT __1 INPUT __1
PRESET 100Hz PRESET 100Hz

OPTIONALES ZUBEHÖR
LDICOASUB15PC - Schutzhülle für ICOA SUB 15 A
LDICOASUB18PC - Schutzhülle für ICOA SUB 18 A
TECHNISCHE DATEN
Artikelnummer: LDICOASUB15A LDICOASUB18A
Produktart: PA-Subwoofer
Typ: Aktiv
Größe Tieftöner: 15" 18"
Größe Tieftöner: 381 mm 457,2 mm
Magnet Tieftöner: Ferrit
Marke Tieftöner: Custom Made
Schwingspule Tieftöner: 3" 4"
Schwingspule Tieftöner (mm): 76,5 mm 100 mm
Verstärker: Class D
Leistung (RMS): 400 W 600 W
Leistung (Peak): 1600 W 2400 W
Frequenzgang: 36 Hz – Preset abhängig 29 Hz – Preset abhängig
Max. SPL (Peak): 131 dB 133 dB
Schutzschaltungen: Peak Limiter, RMS Limiter, Excursion Limiter, Überhitzung, Überspannung, Überstrom
Eingangsimpedanz: 18 kOhm
Eingangsempfindlichkeit: 0,3 V
Bedienelemente: Ein-/Ausschalter, Dreh-Drück-Encoder
Anzeigeelemente: LC-Display mit Hintergrundbeleuchtung
Line-Eingänge: 2
Line-Eingangsanschlüsse: XLR/6,3mm Klinke Kombibuchsen (symmetrisch)
Line-Ausgänge: 2
Line-Ausgangsanschlüsse: XLR
AD/DA Konverter Samplingfrequenz: 48 kHz
AD/DA Konverter Auflösung: 24 Bit
Stromversorgung: SMPS
Betriebsspannung: 100 V - 240 V AC 50-60 Hz
Sicherung: T6.3AL 250 V T8AL 250 V
Leistungsaufnahme: 675 W
Umgebungstemperatur (in Betrieb): 0 - 40°C
Relative Luftfeuchtigkeit: <60% (nicht kondensierend)
Gehäusematerial: 18 mm Multiplex
ENGLISHFRANCAIS
DEUTSCH
ESPAÑOL
POLSKIITALIANO
简体中文繁體中文
21

Gehäusebauart: Bassreflex
Einbauflansch für Distanzstange: M20 Innengewinde
Abmessungen (B x H x T): 510 x 598 x 552 mm 626 x 672 x 637 mm
Gewicht: 32,5 kg 44,3 kg
Zubehör inklusive: Netzkabel
DEUTSCHENGLISH FRANCAIS
Weitere Eigenschaften:
4 Griffe - robustes Frontgitter - stapelbar - DSP mit 4 Presets,
Delay-Funktion und einstellbarer Polarität
HERSTELLERERKLÄRUNGEN
HERSTELLERGARANTIE & HAFTUNGSBESCHRÄNKUNG
Unsere aktuellen Garantiebedingungen und Haftungsbeschränkung finden Sie unter: https://cdn-shop.adamhall.com/media/pdf/MANUFACTURERSDECLARATIONS_LD_SYSTEMS.pdf. Im Service Fall wenden Sie sich bitte an Adam Hall GmbH, Adam-Hall-Str. 1,
61267 Neu Anspach / E-Mail Info@adamhall.com / +49 (0)6081 / 9419-0.
KORREKTE ENTSORGUNG DIESE S PRODUKTS
ESPAÑOL
POLSKI ITALIANO
(Gültig in der Europäischen Union und anderen europäischen Ländern mit Mülltrennung) Dieses Symbol auf dem Produkt oder dazugehörigen
Dokumenten weist darauf hin, dass das Gerät am Ende der Produktlebenszeit nicht zusammen mit dem normalen Hausmüll entsorgt werden
darf, um Umwelt- oder Personenschäden durch unkontrollierte Abfallentsorgung zu vermeiden. Bitte entsorgen Sie dieses Produkt getrennt von
anderen Abfällen und führen es zur Förderung nachhaltiger Wirtschaftskreisläufe dem Recycling zu. Als Privatkunde erhalten Sie Informationen zu
umweltfreundlichen Entsorgungsmöglichkeiten über den Händler, bei dem das Produkt erworben wurde, oder über die entsprechenden regionalen
Behörden. Als gewerblicher Nutzer kontaktieren Sie bitte Ihren Lieferanten und prüfen die ggf. vertraglich vereinbarten Konditionen zur Entsorgung
der Geräte. Dieses Produkt darf nicht zusammen mit anderen gewerblichen Abfällen entsorgt werden.
CE-KONFORMITÄT
Hiermit erklärt die Adam Hall GmbH, dass dieses Produkt folgenden Richtlinien entspricht (soweit zutreffend):
R&TTE (1999/5/EG) bzw. RED (2014/53/EU) ab Juni 2017
Niederspannungsrichtlinie (2014/35/EU)
EMV-Richtlinie (2014/30/EU)
RoHS (2011/65/EU)
Die vollständige Konformitätserklärung finden Sie unter www.adamhall.com.
Des Weiteren können Sie diese auch unter info@adamhall.com anfragen.
EG-KONFORMITÄTSERK LÄRUNG
Hiermit erklärt die Adam Hall GmbH, dass dieser Funkanlagentyp der Richtlinie 2014/53/EU entspricht.
Der vollständige Text der EU-Konformitätserklärung ist unter der folgenden
Internetadresse verfügbar: www.adamhall.com/compliance/
简体中文 繁體中文
22

FRANCAIS
VOUS AVE Z FAIT LE BON C HOIX!
Cet appareil a été développé et fabriqué en appliquant des exigences de qualité très élevées : il garantit des années de fonctionnement sans
problème. Grâce à de nombreuses années d‘expérience, LD Systems est un nom connu dans le domaine des produits audio haut de gamme. Veuillez
lire attentivement ce Manuel Utilisateur : vous apprendrez rapidement à utiliser votre appareil LD Systems de façon optimale.
Pour plus d‘informations sur LD Systems, visitez notre site Web, WWW.LD-SYSTEMS.COM
MESURES PRÉVENTIVES
1. Veuillez lire attentivement ce manuel.
2. Rangez tous les documents d‘information et d‘instructions en lieu sûr.
3. Veuillez suivre toutes les instructions
4. Observez tous les messages d‘avertissement N‘enlevez pas de l‘appareil les étiquettes de sécurité ou autres informations.
5. N‘utilisez l‘appareil que pour des applications et de la façon appropriées.
6. Utilisez exclusivement des pieds et des dispositifs de fixation stables et adaptés lorsque l‘appareil est utilisé en installation fixe. Assurez-vous
que les fixations murales ont été montées correctement, et qu‘elles sont sécurisées. Vérifiez que l‘appareil est installé en toute sécurité, et qu‘il
ne peut pas tomber.
7. Lors de l‘installation, observez les règlementations de sécurité en vigueur dans votre pays.
8. N‘installez et n‘utilisez pas l‘appareil à proximité de radiateurs, d‘accumulateurs de chaleur, de fours ou de toute autre source de chaleur. Vérifiez
que l‘appareil est installé de façon à bénéficier en permanence d‘un refroidissement efficace et qu‘il ne peut pas chauffer de façon excessive.
9. Ne placez aucune source de flamme sur l‘appareil – par exemple, une bougie allumée.
10. Ne bloquez pas les ouïes d‘aération. Éviter toute exposition directe aux rayons du soleil !
11. Gardez une distance minimale de 20 cm autour et au-dessus de l‘appareil.
12. N‘utilisez pas l‘appareil à proximité immédiate d‘eau (à moins qu‘il ne s‘agisse d‘un appareil conçu pour une utilisation en extérieur – dans
ce cas, respectez les instructions correspondantes ci après) Ne mettez pas l‘appareil en contact avec des matériaux, des liquides ou des gaz
inflammables.
13. Vérifiez qu‘aucune projection ou liquide ne puisse s‘introduire dans l‘appareil. Ne posez sur l‘appareil aucun objet renfermant du liquide : vase,
verre d‘eau...
14. Vérifiez qu‘aucun petit objet ne puisse tomber à l‘intérieur de l‘appareil.
15. N‘utilisez avec cet appareil que des accessoires recommandés et approuvés par le fabricant.
16. N‘ouvrez pas l‘appareil, et n‘essayez pas de le modifier.
17. Lors du branchement de l‘appareil, sécurisez le passage du câble secteur, afin d‘éviter tout dommage ou accident, par exemple quelqu‘un qui
trébuche sur le câble.
18. Lors du transport, vérifiez que l‘appareil ne peut tomber, ce qui pourrait provoquer des dommages matériels et/ou corporels.
19. Si votre appareil ne fonctionne plus correctement, que de l‘eau ou des objets ont pénétré à l‘intérieur, ou qu‘il a été endommagé de quelque
façon que ce soit, éteignez-le immédiatement et débranchez sa prise secteur (s‘il s‘agit d‘un appareil alimenté). Cet appareil ne doit être réparé
que par un personnel autorisé.
20. Pour le nettoyage de l‘appareil, utilisez un chiffon sec.
21. Observez toutes les réglementations en vigueur dans votre pays pour mettre l‘appareil au rebut. Lorsque vous jetez l‘emballage de l‘appareil,
veuillez séparer plastique, papier et carton.
22. Les films plastique doivent être mis hors de portée des enfants.
23. Veuillez noter que les changements ou modifications n‘ayant pas été expressément approuvés par la partie responsable de la conformité
pourraient annuler le droit accordé à l‘utilisateur de faire fonctionner l‘équipement.
APPAREILS RELIÉS AU SECTEUR
24. ATTENTION : Si le câble de l‘appareil est muni d‘un fil de terre, il doit être relié à une prise murale avec terre. Ne désactivez jamais la mise à la
terre d‘un appareil.
25. N‘allumez pas l‘appareil immédiatement s‘il a subi une grande différence de température ambiante (par exemple, lors du transport). L‘humidité
et la condensation pourraient l‘endommager. Ne mettez l‘appareil sous tension que lorsqu‘il est parvenu à la température de la pièce.
26. Avant de relier l‘appareil à la prise murale, vérifiez que la valeur et la fréquence de tension secteur sur laquelle il est réglé correspondent bien à
la valeur et à la fréquence de la tension secteur locale. Si l‘appareil possède un sélecteur de tension, ne le branchez sur la prise murale qu‘après
avoir vérifié que la valeur réglée correspond à la valeur effective de la tension secteur. Si la fiche du cordon secteur ou du bloc adaptateur livré
avec votre appareil ne correspond pas au format de votre prise murale, veuillez consulter un électricien.
27. Ne piétinez pas le câble secteur. Assurez-vous que le câble secteur n‘est pas trop pincé, notamment au niveau de l‘arrière de l‘appareil (ou de
son adaptateur secteur) et de la prise murale.
28. Lors du branchement de l‘appareil, vérifiez que l‘accès au câble secteur ou au bloc adaptateur reste facile. Sortez la fiche secteur de la prise
murale dès que vous n‘utilisez pas l‘appareil pendant un certain temps, ou si vous désirez nettoyer l‘appareil. Pour ce faire, tirez toujours sur la
fiche elle-même, ou sur le bloc secteur lui-même ; ne tirez jamais sur le câble. Ne manipulez jamais le câble secteur ou l‘adaptateur secteur avec
des mains mouillées.
29. N‘éteignez/rallumez pas l‘appareil rapidement plusieurs fois de suite : vosu risquez de réduire la longévité de ses composants internes.
30. CONSEIL IMPORTANT : Ne remplacez le fusible que par un fusible de même type et du même calibre. Si le fusible fond de façon répétée, veuillez
consulter un centre de réparations agréé.
31. Pour séparer complètement l‘appareil du secteur, débranchez le cordon secteur ou l‘adaptateur de la prise murale.
32. Si votre appareil est muni d‘un connecteur secteur verrouillable (Volex), il faut d‘abord déverrouiller le mécanisme avant d‘enlever le cordon
secteur. Attention, lorsque vous retirez le câble secteur, à ne pas faire bouger l‘appareil, ce qui pourrait se traduire par un risque de chute, de
blesser quelqu‘un, ou tout autre dommage. Manipulez toujours le cordon secteur avec soin.
ENGLISHFRANCAIS
DEUTSCH
ESPAÑOL
POLSKIITALIANO
简体中文繁體中文
23

33. Débranchez la fiche secteur ou l‘adaptateur de la prise murale en cas d‘orage, ou si vous n‘utilisez pas l‘appareil pendant une longue période.
34. L’appareil ne peut pas être utilisé par des personnes (y compris des enfants) ayant des capacités physiques, sensorielles ou mentales limitées
ou un manque d’expérience et de connaissances.
35. On doit interdire aux enfants de jouer avec l’appareil.
36. Si le câble d’alimentation de l’appareil est endommagé, l’appareil ne peut pas être utilisé. Le cordon d’alimentation doit être remplacé par un
câble approprié ou un module spécial provenant d’un centre de service agréé.
DEUTSCHENGLISH FRANCAIS
Le pictogramme en forme de triangle équilatéral contenant un éclair terminé d‘une flèche avertit l‘utilisateur de la présence d‘une
tension dangereuse à l‘intérieur de l‘appareil, tension susceptible de provoquer un choc électrique.
Le pictogramme en forme de triangle équilatéral renfermant un point d‘exclamation signale à l‘utilisateur la présence d‘instructions
importantes concernant l‘utilisation ou l‘entretien de l‘appareil.
ESPAÑOL
POLSKI ITALIANO
ATTE NTION ! NIVE AUX SONOR ES ÉLEVÉS S UR LES PRODU ITS AUDIO
Cet appareil a été conçu en vue d‘une utilisation professionnelle. L‘utilisation commerciale de cet appareil est soumise aux réglementations et
directives en vigueur dans votre pays en matière de prévention d‘accident. En tant que fabricant, Adam Hall est tenu de vous avertir formellement
des risques relatifs à la santé. Risques provoqués par une exposition prolongée à des niveaux sonores élevés : Lors de l‘utilisation de ce produit, il
est possible d‘atteindre des niveaux de pression sonore (exprimés en dB SPL) élevés, susceptibles de provoquer des dommages auditifs irréparables chez les artistes, les techniciens et le public. Évitez toute exposition prolongée à des niveaux de pression sonore élevés (supérieurs à 90 dB SPL).
Attention ! Cet appareil est conçu pour une utilisation à une altitude maximale de 2000 m au-dessus du niveau de la mer.
Attention ! Ce produit ne convient pas à une utilisation dans les climats tropicaux.
ATTENTION :
Ne démontez jamais le couvercle de l‘appareil, vous risquez de recevoir un choc électrique. L‘appareil
ne renferme aucune pièce ni composant réparable ou remplaçable par l‘utilisateur. Ne confiez
l‘entretien et la réparation qu‘à un personnel qualifié.
简体中文 繁體中文
24

PROPRIÉTÉS
LDICOASUB15A
• Caisson de basses de 15 pouces pour des basses puissantes jusqu‘à 36 Hz
• 131 dB max. SPL et puissance de crête de 1600 watts grâce à un amplificateur numérique de puissance de classe D très efficace
• Ouvertures bass reflex optimisées
• DynX DSP avec quatre préréglages d‘application (trois fréquences de crossover, mode cardioïde)
• Polarité du signal commutable et retard de ligne réglable jusqu‘à 32,8 pieds (10 mètres)
• 2 × entrée combinée (Jacks/XLR), 2 × sortie XLR
• Boîtier solide en contreplaqué de 0,71 pouce (18 mm) avec une grille frontale robuste
• Quatre poignées en aluminium recouvertes de caoutchouc pour faciliter la manutention
• Quatre rainures pour empilement sûr
• Filetage M20 pour fixation d‘un pied
LDICOASUB18A
• Caisson de basses de 18 pouces pour des basses puissantes jusqu‘à 29 Hz
• 133 dB max. SPL et une puissance de crête de 2400 watts grâce à un amplificateur numérique de puissance de classe D très efficace
• Ouvertures bass reflex optimisées
• DynX DSP avec quatre préréglages d‘application (trois fréquences de crossover, mode cardioïde)
• Polarité du signal commutable et retard de ligne réglable jusqu‘à 32,8 pieds (10 mètres)
• 2 entrées combinées (Jacks/XLR), 2 sorties XLR
• Boîtier solide en contreplaqué de 0,71 pouce (18 mm) avec une grille frontale robuste
• Quatre poignées en aluminium recouvertes de caoutchouc pour faciliter la manutention
• Quatre rainures pour empilement sûr
• Filetage M20 pour fixation d‘un pied
ÉLÉMENTS DE CONNEXION, DE CONTRÔLE ET D‘AFFICHAGE
ENGLISHFRANCAIS
DEUTSCH
ESPAÑOL
POLSKIITALIANO
1 2
1
PRISE D’ALIMENTATION ET PORTE-FUSIBLE
Prise de courant IEC avec porte-fusible intégré. Un câble d‘alimentation adapté est inclus dans la livraison.
REMARQUE IMPORTANTE: Ne remplacez le fusible que par un fusible de mêmes type et valeurs. Veuillez tenir compte de l‘inscription sur le boîtier. Si
le fusible « saute » de manière répétée, veuillez contacter un centre de centre de services autorisé.
2
ALIMENTATION
Interrupteur Marche/Arrêt. Le haut-parleur doit toujours être le dernier appareil à être allumé dans la chaîne de signal, et le premier à être éteint.
简体中文繁體中文
25
3
ÉCRA N LCD
Écran graphique LCD multifonctionnel pour afficher le volume maître,
le préréglage DSP et le niveau d‘entrée des canaux 1 et 2 dans le menu
principal. Les éléments de menu, les éléments de sous-menu et les options
d‘édition correspondantes sont affichés dans le menu Édition.
4
VOLUM E / APPUYER P OUR LE MENU
À partir du menu principal, le volume maître peut être réglé en tournant
l‘encodeur rotatif à bouton poussoir. Appuyez sur l‘encodeur rotatif à
bouton poussoir pour accéder au menu Édition. Utilisez l‘encodeur rotatif à
bouton poussoir pour naviguer dans le menu Édition, régler les paramètres
du système et modifier les valeurs dans les éléments de menu respectifs.
5
INPUT 1–2
Entrées de ligne symétriques canal 1 et 2 avec prises combinées XLR/jack
Un signal stéréo connecté est additionné en interne au mono.
6
THRU 1–2
Sorties ligne symétriques avec prises XLR 3 broches mâles pour le transfert
du signal d‘entrée de ligne.
DEUTSCHENGLISH FRANCAIS
3
5
6
4
ESPAÑOL
MONTAGE DE ROULETTES
L‘arrière du caisson de basses est configuré pour fixer quatre roulettes de transport disponibles en option, chacune équipée de quatre vis de
fixation départ usine et encastrée. L‘espacement des trous est standardisé. Vous trouverez une vaste sélection de roulettes sur le site Internet
POLSKI ITALIANO
adamhall.com
简体中文 繁體中文
26

FONCTIONNEMENT
REMARQUE :
Le logo de LD Systems apparaît brièvement sur l‘écran dès que le haut-parleur est correctement connecté à l‘alimentation électrique et allumé.
Tous les paramètres (par exemple, le préréglage et le retard) sont rétablis comme avant la coupure du haut-parleur. Le haut-parleur sera prêt à
l‘emploi au terme de ce processus, qui, en général, prend une seconde.
AFFICHAGE DU MENU PRINCIPAL
L‘affichage principal est activé pendant le fonctionnement normal. Il indique le réglage du volume maître, le préréglage du haut-parleur activé et
les niveaux d‘entrée des canaux 1 et 2 avec affichage des crêtes (voir figure). Réduisez le niveau de sortie de l‘appareil source (par exemple, le
mélangeur) si l‘affichage de crête montre que le signal d‘entrée est trop élevé.
Contrôle du volume
Préréglage haut-parleur
Niveau d'entrée avec affichage
de crête canal 1
Niveau Crête
VOLUME
À partir du menu principal, le volume peut être réglé directement en tournant l‘encodeur rotatif à bouton poussoir VOLUME / PUSH FOR MENU entre
-60 et +10 dB. Lorsque l‘on tourne l‘ encodeur, l‘affichage passe automatiquement au symbole correspondant (voir figure ci-dessous). Le menu
principal réapparaîtra automatiquement après environ 20 secondes d‘inactivité. Lorsque l‘on appuie sur l‘encodeur, l‘affichage bascule
immédiatement vers le menu principal.
PARAMÈTRES AUDIO (AUDIO)
Appuyez sur l‘encodeur rotatif à bouton poussoir pour accéder au menu principal, puis tournez l‘encodeur pour sélectionner le point de menu AUDIO
(arrière-plan foncé). Appuyez à nouveau sur l‘encodeur pour accéder au sous-menu, puis tournez l‘encodeur pour sélectionner l‘élément de
sous-menu souhaité. Confirmez la sélection en appuyant sur l‘encodeur.
Niveau d'entrée avec affichage
de crête canal 2
ENGLISHFRANCAIS
DEUTSCH
ESPAÑOL
POLSKIITALIANO
Reportez-vous au tableau ci-dessous qui présente les éléments de sous-menu et les options de réglage correspondantes.
PARAMÈTRES (Changer la valeur ou le statut = tourner l'encodeur, conrmer la valeur ou le changement de statut = appuyer sur l'encodeur)
MENU PRINCIPAL
PRÉRÉGLAGES Sélection du préréglage de haut-
RETARD Retard du signal audio par pas de 9,7 cm jusqu'à 32 9,7 m (0 ft = OFF, afchage en mètres et en pieds)
POLARITÉ Dénit la polarité NORMAL Polarité normale
Retour au menu principal
parleur
80 Hz Filtre passe-bas à 80 Hz
100 Hz Filtre passe-bas à 100 Hz. Optimal pour la combinaison avec les
enceintes ICOA en mode SATELLITE
120 Hz Filtre passe-bas à 120 Hz
CARDIOÏDE Préréglage pour la conguration comme système cardioïde de
deux caissons de basses ICOA du même modèle. Faites tourner le
caisson de basses avec le cardioïde préréglé à 180° et placez-le à
côté du caisson de basses principal. Sélectionnez alors le préréglage
haut-parleur 100 Hz dans le caisson de basses principal. Le retard, la
polarité et le volume des deux caissons de basses doivent être réglés
de la même manière.
INVERSÉE Polarité inversée
简体中文繁體中文
27

Dans le sous-menu, sélectionnez MENU PRINCIPAL et appuyez sur l‘encodeur pour retourner au menu principal. Dans le menu principal, sélectionnez ACCUEIL et appuyez alors sur l‘encodeur pour confirmer la sélection et retourner au menu principal. Le menu principal sera automatique-
ment affiché après environ 20 secondes d‘inactivité.
PARAMÈT RES SYSTÈME (SETTINGS)
DEUTSCHENGLISH FRANCAIS
Appuyez sur l‘encodeur rotatif à bouton poussoir pour accéder au menu principal, puis tournez l‘encodeur pour sélectionner l‘élément de menu
RÉGLAGES (arrière-plan foncé). Appuyez à nouveau sur l‘encodeur pour accéder au sous-menu, puis tournez l‘encodeur pour sélectionner l‘élément
de sous-menu souhaité. Confirmez la sélection en appuyant sur l‘encodeur.
Reportez-vous au tableau ci-dessous pour les éléments de sous-menu et les options de réglage correspondantes.
ESPAÑOL
PARAMÈTRES (Changer la valeur ou le statut = tourner l'encodeur, conrmer la valeur ou le changement de statut ou demande d'inrmation =
appuyer sur l'encodeur)
MENU PRINCIPAL
LCD DIM Atténuation automatique de
POLSKI ITALIANO
LUMINOSITÉ Réglage de la luminosité de l'écran (0-100 %)
CONTRASTE Réglage du contraste de l'écran (0-100 %)
INFO Afchage du numéro de modèle et de la version du logiciel
PARAMÈTRES
D'USINE
简体中文 繁體中文
Dans le sous-menu, sélectionnez MENU PRINCIPAL et appuyez sur l‘encodeur pour retourner au menu principal. Dans le menu principal, sélectionnez ACCUEIL et appuyez sur l‘encodeur pour confirmer la sélection et retourner au menu principal. Le menu principal s‘affichera automatiquement après environ 20 secondes d‘inactivité.
Retour au menu principal
l'afchage
Rétablir les paramètres d'usine
(AUDIO + PARAMÈTRES)
AC-
L'afchage est atténué après environ 20 secondes d'inactivité
TIVÉ
DÉ-
L'atténuation automatique de l'afchage est désactivée
SACTIVÉ
ANNULER Annuler la réinitialisation
RÉINITIALISER
CERTAIN ? OUI Exécuter la réinitialisation
ANNULER Annuler la réinitialisation
28

CONFIGURATION CARDIOÏDE
Le préréglage CARDIOÏDE de haut-parleur est une programmation DSP complexe qui permet d‘obtenir un diagramme de rayonnement en forme de
rein (rayonnement sonore cardioïde) en combinant deux caissons de basses LD ICOA du même modèle.
Par rapport aux configurations classiques des caissons de basses, il présente les avantages suivants :
• Atténuation inverse jusqu‘à 20 dB
• Reproduction plus précise des basses dans la zone d‘écoute
• Prévention des réflexions indésirables provenant des murs arrière
• Réduction du son diffus dans les pièces
• Élimination des basses fréquences gênantes sur scène
• Diagramme sonore différencié pour amplification sonore de scène (monitoring)
• Réduction du retour des microphones de scène
Comme illustré, placez deux caissons de basses l‘un à côté de l‘autre, le caisson de basses avec le préréglage cardioïde tourné vers l‘arrière (voir la
figure ci-dessous). Sélectionnez le préréglage de 100 Hz pour le caisson de basses principal orienté vers l‘avant et assurez-vous que les réglages
de retard, de polarité et de volume sont identiques pour les deux caissons de basses.
ENGLISHFRANCAIS
DEUTSCH
PRÉRÉGLAGE 100 Hz
QUE SIG NIFIE DYNX® DS P DE LD SYSTE MS ?
DSP est un acronyme qui signifie traitement numérique des signaux (Digital Signal Processing). DynX® comprend le
limiteur, l‘égaliseur, le compresseur et le filtre passe-bas. Le traitement numérique du signal permet une reproduction
optimale des basses audio avec une clarté maximale tout en protégeant le caisson de basses contre les surcharges.
QUE FAI T EXACT EMENT LE DYN X® DSP ?
La fonction de limiteur protège le haut-parleur et évite les distorsions induites par la surcharge. Le caisson de basses
permet de faire fonctionner le système à une pression sonore globale plus élevée, puisque les pics de signal extrêmes
sont automatiquement limités, de sorte qu‘il n‘est pas nécessaire de réduire le volume principal. L‘égaliseur multi-bandes gère toute la gamme des basses et optimise le son global du caisson de basses.
PRÉRÉGLAGE CARDIOÏDE
Angle de dispersion
ESPAÑOL
POLSKIITALIANO
简体中文繁體中文
29

EXEMPLES DE CÂBLAGE / RACCORDEMENTS
PRÉRÉGLAGE SAT PRÉRÉGLAGE SAT
DEUTSCHENGLISH FRANCAIS
ESPAÑOL
POLSKI ITALIANO
简体中文 繁體中文
INPUT __1
INPUT __1
1__ INPUT __2
THRU __1 THRU __ 2
PRÉRÉGLAGE 100 Hz
PRÉRÉGLAGE SATPRÉRÉGLAGE SAT
INPUT __1INPUT __1
30
THRU __1THRU __1
INPUT __1 INPUT __1
PRÉRÉGLAGE 100 Hz PRÉRÉGLAGE 100 Hz

ACCESSOIRES OPTIONNELS
LDICOASUB15PC - housse de protection pour ICOA SUB 15 A
LDICOASUB18PC - housse de protection pour ICOA SUB 18 A
SPÉCIFICATIONS TECHNIQUES
Numéro d'article: LDICOASUB15A LDICOASUB18A
Type de produit: Caisson de basses PA :
Type: Actif
Grand caisson de basses : 15" 18"
Grand caisson de basses : 381 mm 457,2 mm
Aimant de caisson de basses : Ferrite
Marque du caisson de basses : Sur mesure
Bobine acoustique du caisson de
basses :
Bobine acoustique du caisson de
basses :
Amplificateur : Classe D
Puissance (RMS) : 400 W 600 W
Puissance (crête) : 1600 W 2400 W
Réponse en fréquence: 36 Hz – dépend du préréglage 29 Hz – dépend du préréglage
Max. SPL (crête) : 131 dB 133 dB
Circuits de protection: Écrêteur, limiteur RMS, limiteur d'excursion, surchauffe, surtension, surintensité
Impédance du circuit d'entrée : 18 kohms
Sensibilité d'entrée : 0,3 V
Éléments de commande : Interrupteur marche/arrêt, encodeur rotatif à bouton poussoir
Éléments d'affichage : Écran LCD rétro éclairé
Entrées de ligne: 2
Connexions d'entrée de ligne : Prises combinées XLR/6,3mm jack (symétriques)
Sorties de ligne : 2
Connexions de sortie de ligne : XLR
Fréquence d'échantillonnage du
convertisseur AD/DA:
Résolution du convertisseur AD/DA 24 bit
Alimentation électrique : SMPS
Tension secteur: 100 V–240 V CA 50–60 Hz
Fusible: T6.3AL 250 V T8AL 250 V
Consommation d'énergie : 675 W
Température ambiante (en foncti-
onnement):
Humidité relative: <60% (sans condensation)
Matériau du boîtier : Multiplex de 18 mm
Conception du boîtier : Bass reflex
3" 4"
76,5 mm 100 mm
48kHz
0 - 40°C
ENGLISHFRANCAIS
DEUTSCH
ESPAÑOL
POLSKIITALIANO
简体中文繁體中文
31

Bride d'installation pour pied : Filetage interne M20
Dimensions (L x H x P) 510 x 598 x 552 mm 626 x 672 x 637 mm
Poids: 32,5 kg 44,3 kg
Accessoires inclus : Câble d’alimentation
Caractéristiques supplémentaires: 4 poignées - grille frontale robuste - empilable - DSP avec 4 préréglages,
DEUTSCHENGLISH FRANCAIS
Fonction retard et polarité réglables
DECLARATIONS
GARANTIE FABRICANT & LIMITATION DE RESPONSABILITÉ
Nos conditions actuelles de garantie et de limitation de responsabilité sont disponibles à l‘adresse suivante: https://cdn-shop.adamhall.com/
media/pdf/MANUFACTURERS-DECLARATIONS_LD_SYSTEMS.pdf. Pour les réparations, veuillez contacter Adam Hall GmbH, Adam-Hall-Str. 1, 61267 Neu
Anspach / E-Mail Info@adamhall.com / +49 (0)6081 / 9419-0.
TRI E T MISE AUX DÉCH ETS CORRE CTE DE CE PRO DUIT
(Valid in the European Union and other European countries with waste separation)
(Applicable dans l‘Union Européenne et les autres pays européens pratiquant le tri des déchets) La présence de ce symbole sur le produit
ou sur la documentation correspondante indique qu‘en fin de vie, le produit ne doit pas être jeté avec les déchets normaux, afin d‘éviter tout
ESPAÑOL
dommage à l‘environnement ou aux personnes consécutive à une élimination non contrôlée des déchets. Séparez-le des autres types de déchets
et recyclez-le, afin de promouvoir la réutilisation durable des ressources naturelles. Nous conseillons aux utilisateurs non professionnels de
contacter le revendeur chez qui ils ont acheté le produit, ou un représentant gouvernemental local, pour plus de détails sur le lieu de collecte et la
façon de recycler cet appareil dans le meilleur respect de l‘environnement possible.. Nous invitons les utilisateurs professionnels à contacter leur
fournisseur et à vérifier les termes et conditions de leur contrat d‘achat. Ce produit ne doit pas être mélangé à d‘autres déchets commerciaux lors
de la collecte.
POLSKI ITALIANO
CONFORMITÉ CE
La société Adam Hall GmbH déclare par la présente que ce produit est compatible avec les régulations suivantes (le cas échéant) :
R&TTE (1999/5/EG) et RED (2014/53/EU) à partir de juin 2017
Directive basse tension (2014/35/EU)
Directive CEM (2014/30/EU)
RoHS (2011/65/EU)
La Déclaration de Conformité complète est disponible sur le site Web www.adamhall.com.
Pour toute information complémentaire, contactez-nous : info@adamhall.com.
DÉCLARATION DE CONFORMITÉ CE
Adam Hall GmbH déclare par la présente que ce type d‘équipement radio est conforme à la directive 2014/53/EU.
Le texte intégral de la déclaration de conformité CE est disponible à l‘adresse suivante
Adresse Internet disponible : www.adamhall.com/compliance/
简体中文 繁體中文
32

ESPAÑOL
¡GRAC IAS POR ELE GIR LD-SYS TEMS!
Este equipo está diseñado y fabricado con los estándares de calidad más exigentes, para garantizar un correcto funcionamiento durante muchos
años. Los productos de LD-Systems se caracterizan por su gran calidad, avalada por el prestigio de la marca y una dilatada experiencia como fabricante. Lea atentamente este manual de usuario para poder aprovechar rápidamente toda la funcionalidad de su nuevo producto de LD Systems.
Si desea obtener información sobre LD-SYSTEMS, visite nuestro sitio web WWW.LD-SYSTEMS.COM
MEDIDAS DE SEGURIDAD
1. Lea atentamente las instrucciones de este manual.
2. Guarde toda la información en un lugar seguro para futuras consultas.
3. Siga las instrucciones indicadas.
4. Siga todas las advertencias. No quite las instrucciones de seguridad ni cualquier otra información indicada en el equipo.
5. Utilice el equipo únicamente según la finalidad prevista.
6. Utilice solo soportes y fijaciones que sean robustos y adecuados cuando instale el equipo en instalaciones fijas. Asegúrese de que los soportes
de pared están correctamente instalados y firmemente fijados. Asegúrese de que el equipo está sólidamente instalado y no se puede caer.
7. Al instalar el equipo, respete las normas de seguridad aplicables en su país.
8. Evite instalar el equipo cerca de radiadores, acumuladores de calor, estufas o cualquier otra fuente de calor. Asegúrese de que el equipo esté
instalado en un lugar con ventilación suficiente para evitar cualquier sobrecalentamiento.
9. No coloque sobre el equipo fuentes de llamas sin protección, por ejemplo, velas encendidas.
10. Evite bloquear las rejillas de ventilación. ¡Evite la luz solar directa!
11. Mantenga una distancia mínima de 20 cm alrededor y encima del equipo.
12. No utilice este equipo cerca del agua (excepto los equipos específicamente diseñados para uso en exterior, en cuyo caso tenga en cuenta las
indicaciones mencionadas a continuación). No exponga este equipo a materiales, líquidos o gases inflamables.
13. Evite exponer el equipo a gotas o salpicaduras que puedan caer dentro del mismo. No coloque recipientes llenos de líquido, como floreros o
vasos, sobre el equipo.
14. Asegúrese de no dejar caer ningún objeto dentro del equipo.
15. Emplee el equipo únicamente con los accesorios recomendados por el fabricante.
16. No abra el equipo ni intente modificarlo.
17. Una vez conectado el equipo, compruebe que en toda la longitud del cableado no hay peligro de que provoque una caída, por ejemplo.
18. Durante el transporte, asegúrese de que el equipo no se caiga y pueda causar daños personales o materiales.
19. Si el equipo no funciona correctamente, o si se ha vertido líquido sobre él, o si un objeto ha caído en su interior o si ha sufrido algún desperfecto,
apague inmediatamente el equipo y desenchufe el cable eléctrico (si se trata de un equipo activo). Únicamente un técnico especialista debe
reparar el equipo.
20. Para limpiar el equipo utilice un paño seco.
21. Procure seguir las normas vigentes en su país sobre reciclaje de desechos. Separe los componentes de plástico, papel y cartón del paquete para
reciclarlos en sus contenedores respectivos.
22. No deje las bolsas de plástico al alcance de los niños.
23. Tenga en cuenta que la realización de cambios o modificaciones que no estén expresamente autorizados por el responsable de cumplimiento
normativo podría anular la autoridad del usuario para utilizar el equipo.
PARA L OS EQUIPOS C ON TOMA ELÉ CTRICA
24. ADVERTENCIA: Si el cable eléctrico está provisto de un contacto de protección, debe conectarse a una toma eléctrica con conexión a tierra.
No desactivar nunca esta conexión de protección a tierra del cable eléctrico.
25. Si el equipo ha estado expuesto a un cambio brusco de temperatura (por ejemplo, después del transporte), no lo encienda inmediatamente.
La condensación o la humedad podrían dañar el equipo. Deje que el equipo alcance la temperatura ambiente antes de encenderlo.
Antes de conectar el cable eléctrico a la toma de corriente, compruebe si la tensión y la frecuencia del suministro eléctrico coinciden con las especifi-
26.
caciones de este equipo. Si el equipo dispone de un selector de tensión, antes de enchufarlo a la red eléctrica, asegúrese de que el valor seleccionado
coincide con la tensión de suministro. Si el enchufe o el adaptador de corriente no encajan en la toma eléctrica, consulte a un electricista.
27. Asegúrese de que el cable eléctrico no está pinzado. Evite que el cable resulte pellizcado, sobre todo en los extremos de conexión al equipo y en
la toma eléctrica.
28. Al conectar el equipo, asegúrese de que el cable eléctrico o el adaptador de corriente estén siempre accesibles. Desconecte el equipo de la
toma de corriente cuando no esté en uso o antes de limpiarlo. Para ello, desconecte el cable eléctrico y el adaptador de corriente del conector
del equipo en vez de desenchufar el cable de la toma eléctrica. No tocar el cable eléctrico ni el adaptador de corriente con las manos húmedas.
29. No encienda y apague el equipo en cortos intervalos de tiempo, ya que se reduce así la vida útil del sistema.
30. NOTA IMPORTANTE: Sustituya los fusibles únicamente por otros del mismo tipo y de las mismas características. Si el fusible se funde continua-
mente, póngase en contacto con un servicio técnico autorizado.
Para desconectar completamente el equipo de la tensión eléctrica, desenchufe el cable eléctrico o el adaptador de corriente de la toma eléctrica.
31.
32.
Si el equipo dispone de un enchufe eléctrico Volex, deberá desbloquearse el Volex del equipo para desenchufarlo. Esto implica que un tirón en el
cable eléctrico puede desplazar el equipo y provocar daños personales o materiales. Por tanto, asegúrese de instalar los cables con sumo cuidado.
33. Si es probable que caiga un rayo por una tormenta eléctrica o si no va a emplear el equipo durante mucho tiempo, desenchufe el cable eléctrico
y el adaptador de corriente.
34. El equipo no debe ser utilizado por personas (incluidos niños) con capacidades físicas, sensoriales o mentales reducidas o sin la experiencia y
los conocimientos necesarios.
35. Se debe advertir a los niños que no jueguen con el equipo.
36. Si el cable de alimentación del equipo está dañado, el equipo no debe utilizarse. El cable de alimentación debe ser sustituido por un cable
adecuado o un conjunto de piezas especial en un centro de servicio autorizado
ENGLISHFRANCAIS
DEUTSCH
ESPAÑOL
POLSKIITALIANO
简体中文繁體中文
33
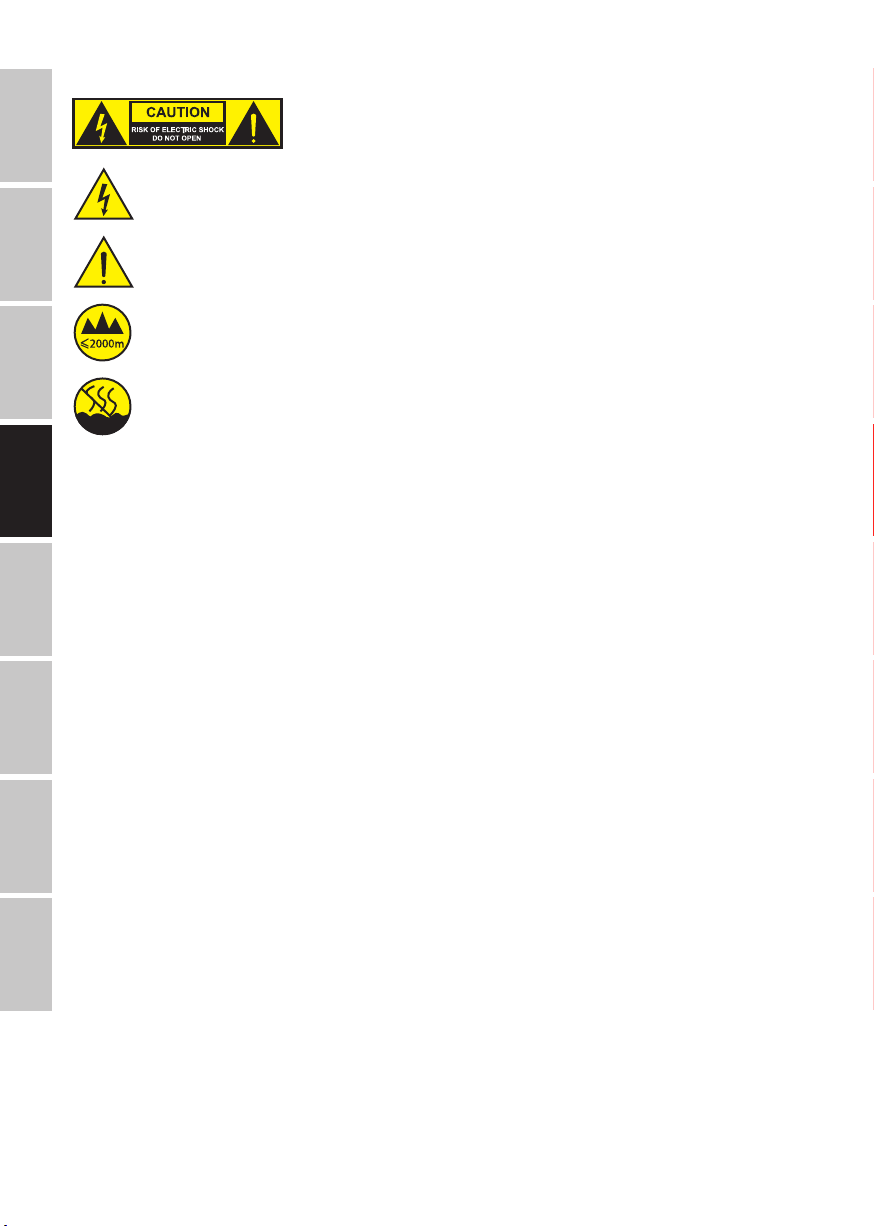
ATENCIÓN:
Para evitar el riesgo de descarga eléctrica, no retire la tapa. El equipo no contiene elementos que el
usuario pueda reparar o sustituir. Para cualquier tarea de mantenimiento o reparación, acuda a un
técnico cualificado.
El símbolo de rayo dentro de un triángulo equilátero advierte al usuario de la presencia de tensiones peligrosas sin aislamiento
DEUTSCHENGLISH FRANCAIS
dentro del equipo que pueden causar una descarga eléctrica.
El símbolo de exclamación dentro de un triángulo equilátero advierte al usuario de la existencia de importantes instrucciones de uso
y mantenimiento.
¡Advertencia! Este equipo está diseñado para ser utilizado a una altura que no supere los 2000metros sobre el nivel del mar.
¡Advertencia! Este equipo no está diseñado para funcionar en climas tropicales.
ESPAÑOL
¡ADVERTENCIA: ALTO VOLUMEN!
Este equipo se destina a un uso profesional. Por consiguiente, si se aplica a un uso comercial, estará sujeto a las normas y reglamentos de la
Asociación para la prevención de accidentes de su sector profesional. Como fabricante, Adam Hall tiene la obligación de informar formalmente a
los usuarios de la existencia de posibles riesgos para la salud. Daños auditivos por exposición prolongada a un nivel SPL alto: este equipo puede
generar fácilmente un nivel de presión sonora (SPL) lo suficientemente elevado como para causar daños auditivos permanentes a los artistas, el
personal de producción y el público. Deben tomarse precauciones para evitar la exposición prolongada a un SPL de más de 90dB.
POLSKI ITALIANO
简体中文 繁體中文
34

PROPIEDADES
LDICOASUB15A
• Subwoofer de 15 pulgadas para graves potentes de baja frecuencia de hasta 36Hz
• SPL máx. de 131dB y 1600vatios de potencia pico gracias al amplificador digital de claseD de gran eficiencia
• Aberturas bass reflex optimizadas
• Procesador digital de señales DynX con cuatro presets de aplicación (tres frecuencias de crossover, modo cardioide)
• Polaridad de señal conmutable y delay de línea ajustable para hasta 10metros
• 2 entradas combo (jacks/XLR); 2 salidas XLR
• Sólida carcasa de contrachapado de 18mm con una robusta rejilla frontal
• Cuatro asas de aluminio recubiertas de goma para facilitar su manejo
• Cuatro ranuras para un apilamiento seguro
• Rosca M20 para fijar una extensión de mástil
LDICOASUB18A
• Subwoofer de 18 pulgadas para graves potentes de baja frecuencia de hasta 29Hz
• SPL máx. de 133dB y 2400vatios de potencia pico gracias al amplificador digital de claseD de gran eficiencia
• Aberturas bass reflex optimizadas
• Procesador digital de señales DynX con cuatro presets de aplicación (tres frecuencias de crossover, modo cardioide)
• Polaridad de señal conmutable y delay de línea ajustable para hasta 10metros
• 2 entradas combo (jacks/XLR); 2 salidas XLR
• Sólida carcasa de contrachapado de 18mm con una robusta rejilla frontal
• Cuatro asas de aluminio recubiertas de goma para facilitar su manejo
• Cuatro ranuras para un apilamiento seguro
• Rosca M20 para fijar una extensión de mástil
CONEXIONES, ELEMENTOS DE MANEJO Y VISUALIZACIÓN
ENGLISHFRANCAIS
DEUTSCH
ESPAÑOL
POLSKIITALIANO
1 2
1
TOMA DE ALIMENTACIÓN Y PORTAFUSIBLE
Toma IEC con portafusible integrado. Se incluye un cable de alimentación adecuado en la entrega.
NOTA IMPORTANTE: Sustituya el fusible únicamente por otro del mismo tipo y características técnicas. Tenga en cuenta el texto inscrito en la carcasa.
Si un fusible salta repetidamente, contacte con un centro de servicio técnico autorizado.
2
POWER
Interruptor de encendido y apagado. El altavoz debe ser siempre el último dispositivo en encenderse en la cadena de señales y el primero en
apagarse.
简体中文繁體中文
35

3
PANTALLA LCD
Pantalla LCD gráfica multifuncional para mostrar el volumen maestro, el
preset DSP y el nivel de entrada para los canales 1 y2 en el menú principal.
Los elementos del menú y de los submenús, y las opciones de edición
correspondientes, se muestran en el menú de edición.
4
VOLUM E / PUSH FOR MENU
En el menú principal, el volumen maestro puede ajustarse girando el mando giratorio y pulsable. Pulse el mando giratorio y pulsable para acceder
al menú de edición. Use este mando para navegar por el menú de edición,
ajustar la configuración del sistema y cambiar valores en las respectivas
opciones del menú.
5
INPUT 1-2
Entradas de línea balanceadas de los canales 1 y2 con conectores combo
XLR/jack. La señal estéreo presente se pasa a mono internamente.
6
THRU 1-2
Salidas de línea balanceadas con conectores de chasis XLR macho de
3pines para retransmitir la señal de entrada de línea.
DEUTSCHENGLISH FRANCAIS
3
5
6
4
ESPAÑOL
CONJUNTO DE RUEDAS
La parte trasera del subwoofer está preparada para instalar cuatro ruedas de transporte, disponibles opcionalmente, cada una de ellas embutida y
equipada de fábrica con cuatro tornillos de fijación. El espacio entre los orificios está estandarizado. Encontrará una amplia selección de ruedas en
POLSKI ITALIANO
adamhall.com
简体中文 繁體中文
36

FUNCIONAMIENTO
NOTA:
El logotipo de LD Systems aparece brevemente en la pantalla tan pronto como el altavoz se conecta correctamente a la fuente de alimentación y
se enciende. Todos los ajustes (por ejemplo, los presets y el delay) se mantienen tal como estaban antes de que se apagara el altavoz. El altavoz
estará listo para usarse una vez finalizado este proceso, que suele tardar un segundo.
PANTALLA DEL MENÚ PRINCIPAL
La pantalla principal se mantiene encendida durante el funcionamiento normal. Muestra el ajuste del volumen maestro, el preset de altavoz
activado y los niveles de entrada de los canales 1 y2 con indicación del pico (ver figura). Reduzca el nivel de salida del dispositivo fuente (por
ejemplo, un mezclador), si la indicación del pico muestra que la señal de entrada es demasiado alta.
Control del volumen
Preset de altavoz
Nivel de entrada con indicación
del pico, canal1
Nivel Pico
VOLUME
En el menú principal, el volumen se puede ajustar directamente girando el mando giratorio y pulsable VOLUME / PUSH FOR MENU de -60 a +10dB. Al
girar este mando, la pantalla cambia automáticamente al símbolo correspondiente (véase la figura a continuación). El menú principal reaparecerá
automáticamente después de unos 20segundos de inactividad. Al pulsar dicho mando, la pantalla cambia inmediatamente al menú principal.
AJUSTES DE AUDIO (AUDIO)
Pulse el mando giratorio y pulsable para acceder al menú principal y luego gire este mando para seleccionar la opción de menú AUDIO (resaltada
con un fondo oscuro). Pulse de nuevo dicho mando para acceder al submenú y luego gírelo para seleccionar la opción deseada del submenú.
Confirme la selección pulsando el mando.
Nivel de entrada con indicación
del pico, canal2
ENGLISHFRANCAIS
DEUTSCH
ESPAÑOL
POLSKIITALIANO
Consulte la tabla siguiente donde se describen los elementos del submenú y las opciones de ajuste pertinentes.
SETTINGS (Cambiar valor o estado = girar el mando; conrmar el cambio de valor o estado = pulsar el mando)
MAIN MENU Volver al menú principal
PRESET Selección del preset del altavoz 80 Hz Filtro de paso bajo a 80Hz
100 Hz Filtro de paso bajo a 100Hz. Óptimo para la combinación con los
altavoces ICOA en modo SATELLITE
120 Hz Filtro de paso bajo a 120Hz
CARDIOID Preset para congurar dos subwoofers ICOA del mismo modelo como
un sistema cardioide. Gire 180° el subwoofer con el preset CARDIOID
y póngalo junto al subwoofer principal. A continuación, seleccione el
preset de altavoz de 100Hz en el subwoofer principal. El tiempo de
delay, la polaridad y el volumen para los dos subwoofers deben tener
los mismos ajustes.
DELAY Tiempo de delay de la señal de audio en pasos de 0,10m hasta 10m (0 ft = OFF, la indicación se da en pies "ft" y en metros)
POLARITY Permite establecer la polaridad NORMAL Polaridad normal
INVERTED Polaridad invertida
En el submenú, seleccione MAIN MENU y pulse el mando para volver al menú principal. En el menú principal, seleccione HOME y seguidamente
pulse el mando para confirmar esta selección y volver al menú principal. El menú principal aparecerá automáticamente después de unos 20segundos de inactividad.
简体中文繁體中文
37

AJUS TES DEL SIST EMA (SETT INGS)
Pulse el mando giratorio y pulsable para acceder al menú principal y luego gire este mando para seleccionar la opción de menú SETTINGS (resaltada
con un fondo oscuro). Pulse de nuevo dicho mando para acceder al submenú y luego gírelo para seleccionar la opción deseada del submenú.
Confirme la selección pulsando el mando.
DEUTSCHENGLISH FRANCAIS
Consulte la tabla siguiente donde se describen los elementos del submenú y las opciones de ajuste pertinentes:
SETTINGS (Cambiar valor o estado = girar el mando; conrmar el cambio de valor o estado o solicitar información = pulsar el mando)
MAIN MENU Volver al menú principal
LCD DIM Oscurecimiento automático de la
pantalla
ESPAÑOL
BRIGHTNESS Ajuste del brillo de la pantalla (0-100%)
CONTRAST Ajuste del contraste de la pantalla (0-100%)
INFO Visualización del número de modelo y la versión del software
FACTORY DEFAULT Restablecimiento a los valores de fábrica
POLSKI ITALIANO
En el submenú, seleccione MAIN MENU y pulse el mando para volver al menú principal. En el menú principal, seleccione HOME y seguidamente
pulse el mando para confirmar esta selección y volver al menú principal. El menú principal aparecerá automáticamente después de unos 20segundos de inactividad.
(AUDIO + AJUSTES)
ON La pantalla se oscurece después de unos 20segundos de inactividad
OFF Se desactiva el oscurecimiento automático de la pantalla
CANCEL Cancelar restablecimiento
RESET SURE? YES Ejecutar restablecimiento
CANCEL Cancelar restablecimiento
简体中文 繁體中文
38

CONFIGURACIÓN CARDIOIDE
El preset CARDIOID del altavoz es una compleja programación de procesamiento digital de señales que permite lograr un patrón de radiación con
forma de riñón (radiación de sonido cardioide) mediante una combinación de dos subwoofers ICOA de LD Systems del mismo modelo.
En comparación con las configuraciones de subwoofer convencionales, proporciona las siguientes ventajas:
• Atenuación inversa hasta 20dB
• Reproducción de graves más precisa en la zona de escucha
• Prevención de reflexiones no deseadas provenientes de las paredes traseras
• Reducción del sonido difuso en las salas
• Eliminación de las molestas frecuencias bajas en el escenario
• Patrón de sonido diferenciado para reforzar el sonido del escenario (monitorización)
• Reducción del acople que se produce con los micrófonos del escenario
Siguiendo la ilustración como guía, coloque dos subwoofers uno al lado del otro, orientando hacia atrás el subwoofer que tiene el preset CARDIOID
(véase la figura a continuación). Seleccione el preset de 100Hz para el subwoofer principal orientado hacia el frente y asegúrese de que los
ajustes de tiempo de delay, polaridad y volumen de ambos subwoofers sean los mismos.
ENGLISHFRANCAIS
DEUTSCH
PRESET 100 Hz
¿QUÉ SIG NIFICA LD SY STEMS DYN X® DSP?
DSP es un acrónimo que significa procesamiento digital de señales. DynX® incluye el limitador, el ecualizador, el
compresor y el filtro de paso bajo. El procesamiento digital de señales asegura una óptima reproducción de los graves
del audio con la máxima claridad, a la vez que protege el subwoofer frente a sobrecargas.
¿QUÉ HACE EXACTAMENTE EL PROCESAMIENTO DIGITAL DE SEÑALES DYNX® DSP?
La función de limitador protege el altavoz y evita la distorsión causada por sobrecarga. El subwoofer permite que
el sistema funcione con una presión acústica más alta en general, ya que los picos de señal extremos se limitan
automáticamente para que no sea necesario reducir el volumen maestro. El ecualizador multibanda abarca todo el
rango de graves y optimiza el sonido general del subwoofer.
PRESET CARDIOID
Ángulo de dispersión
ESPAÑOL
POLSKIITALIANO
简体中文繁體中文
39

EJEMPLOS DE CABLEADO/CONEXIONES
DEUTSCHENGLISH FRANCAIS
PRESET SAT PRESET SAT
ESPAÑOL
POLSKI ITALIANO
简体中文 繁體中文
INPUT __1
INPUT __1
1__ INPUT __2
THRU __1 THRU __ 2
PRESET 100 Hz
PRESET SATPRESET SAT
INPUT __1INPUT __1
40
THRU __1THRU __1
INPUT __1 INPUT __1
PRESET 100 Hz PRESET 100 Hz

ACCESORIOS OPCIONALES
LDICOASUB15PC – funda protectora para subwoofer ICOA SUB 15A
LDICOASUB18PC – funda protectora para subwoofer ICOA SUB 18A
ESPECIFICACIONES TÉCNICAS
Número de artículo: LDICOASUB15A LDICOASUB18A
Clase de producto: Subwoofer de PA
Tipo: Activo
Woofer grande: 15" 18"
Woofer grande: 381 mm 457,2 mm
Imán del woofer: Ferrita
Marca del woofer: Custom made
Bobina de voz del woofer: 3" 4"
Bobina de voz del woofer
(pulgadas):
Amplificador: Clase D
Potencia (RMS): 400 W 600 W
Potencia (pico): 1600 W 2400 W
Respuesta en frecuencia: 36 Hz – dependiente del preset 29 Hz – dependiente del preset
Máx. SPL (pico): 131 dB 133 dB
Circuitos de protección: Limitador de pico, limitador RMS, limitador de excursión, sobrecalentamiento, sobretensión, sobrecorri-
Impedancia de entrada: 18 kOhm
Sensibilidad de entrada: 0,3 V
Elementos de manejo: Interruptor de encendido y apagado, mando giratorio y pulsable
Elementos de visualización: Pantalla LCD retroiluminada
Entradas de línea: 2
Conexiones de entrada de línea: Tomas combo XLR/jack de 6,3 mm (balanceadas)
Salidas de línea: 2
Conexiones de salida de línea: XLR
Frecuencia de muestreo del
conversor AD/DA:
Resolución del conversor AD/DA: 24 bits
Fuente de alimentación: Conmutada (SMPS)
Tensión operativa: 100 V-240 V CA 50-60Hz
Fusible: T6.3AL 250 V T8AL 250 V
Consumo de potencia: 675 W
Temperatura ambiente (en funcionamiento):
Humedad relativa: <60% (sin condensación)
Material de la carcasa: Contrachapado de 18mm
Diseño de la carcasa: Bass reflex
76,5 mm 100 mm
ente
48 kHz
0 °C-40 °C
ENGLISHFRANCAIS
DEUTSCH
ESPAÑOL
POLSKIITALIANO
简体中文繁體中文
41
Brida de instalación para la extensión de mástil:
Dimensiones (anchura × altura ×
profundidad):
Peso: 32,5 kg 44,3 kg
Accesorios incluidos: Cable de alimentación eléctrica
DEUTSCHENGLISH FRANCAIS
Características adicionales: 4 asas - robusta rejilla frontal - apilable - DSP con 4presets,
52,83 × 59,69 × 55,11cm 62,48 × 67,31 × 63,75cm
Rosca interna M20
función de delay y polaridad ajustable
DECLARACIÓN DEL FABRICANTE
GARANTÍA DEL FABRICANTE Y LIMITACIÓN DE RESPONSABILIDAD
Consulte nuestras condiciones de garantía y limitaciones de responsabilidad en: https://cdn-shop.adamhall.com/media/pdf/MANUFACTURERSDECLARATIONS_LD_SYSTEMS.pdf. En caso de necesitar servicio técnico, póngase en contacto con Adam Hall GmbH, Adam-Hall-Str. 1, 61267 Neu Anspach
(Alemania); correo electrónico Info@adamhall.com; +49 (0)6081 / 9419-0.
ELIMI NACIÓN CORR ECTA DE EST E PRODUCTO
ESPAÑOL
POLSKI ITALIANO
(Aplicable en la Unión Europea y en los países europeos que dispongan de un sistema de recogida selectiva) El símbolo que aparece sobre
el producto o en la documentación adjunta indica que al final de la vida útil del equipo, no deberá desecharlo con los demás residuos domésticos, con el fin de evitar posibles efectos negativos en el medio ambiente y en la salud humana debidos al vertido incontrolado de desechos. La
recogida selectiva ayuda a su posterior reciclaje y fomenta la reutilización sostenible de los componentes de este equipo. Si es un particular, póngase en contacto con el distribuidor donde adquirió este producto, o con el ayuntamiento, para informarse sobre el reciclaje adecuado de este equipo.
Si es una empresa, póngase en contacto con su proveedor para informarse sobre los términos y condiciones de su contrato de compra-venta. Este
producto no debe mezclarse con otros residuos industriales.
CONFORMIDAD CE
Adam Hall GmbH declara por la presente que este producto es conforme con las siguientes directivas (según sea aplicable):
R&TTE (1999/5/CE) o RED (2014/53/UE) a partir de junio de 2017
Directiva de baja tensión (2014/35/UE)
Directiva EMC (2014/30/UE)
RoHS (2011/65/UE)
Puede consultar la declaración de conformidad completa en www.adamhall.com.
También puede solicitarla a info@adamhall.com.
DECLARACIÓN CE DE CONFORMIDAD
Adam Hall GmbH declara por la presente que este tipo de equipo de radio cumple con la Directiva 2014/53/UE.
El texto completo de la declaración de conformidad de la UE está disponible en la siguiente dirección
Dirección de Internet disponible: www.adamhall.com/compliance/
简体中文 繁體中文
42

POLSKI
GRATULUJEMY WYBORU!
To urządzenie zostało zaprojektowane i wyprodukowane przy zastosowaniu najwyższych kryteriów jakościowych w celu zapewnienia wieloletniej
bezawaryjnej eksploatacji. Firma LD Systems gwarantuje to swoją marką i wieloletnim doświadczeniem w wytwarzaniu wysokiej jakości produktów
audio. Proszę starannie przeczytać niniejszą instrukcję obsługi, aby móc jak najszybciej zacząć użytkować ten produkt marki LD Systems.
Dalsze informacje na temat firmy LD SYSTEMS dostępne są na naszej stronie internetowej WWW.LD-SYSTEMS.COM
ŚRODKI OSTROŻNOŚCI
1. Należy dokładnie przeczytać niniejszą instrukcję.
2. Wszystkie informacje i instrukcje przechowywać w bezpiecznym miejscu.
3. Należy przestrzegać zaleceń.
4. Należy przestrzegać wszystkich wskazówek ostrzegawczych. Nie wolno usuwać wskazówek bezpieczeństwa ani innych informacji znajdujących
się na urządzeniu.
5. Używać urządzenia wyłącznie w sposób zgodny z jego przeznaczeniem.
6. Stosować wyłącznie stabilne i pasujące statywy, ew. elementy mocujące (w przypadku instalacji stałych). Należy zadbać o prawidłową instalację
uchwytów ściennych i ich odpowiednie zabezpieczenie. Zapewnić bezpieczną instalację urządzenia i upewnić się, że urządzenie nie spadnie.
7. Podczas instalacji przestrzegać obowiązujących w danym kraju przepisów bezpieczeństwa.
8. Urządzenie instalować i eksploatować z dala od grzejników, zasobników ciepła, pieców i innych źródeł ciepła. Zadbać o zainstalowanie urządzenia
w taki sposób, aby zawsze było ono wystarczająco chłodzone i nie mogło ulec przegrzaniu.
9. Nie umieszczać na urządzeniu źródeł zapłonu, takich jak np. palące się świece.
10. Nie wolno blokować szczelin wentylacyjnych. Unikać bezpośredniego działania promieni słonecznych!
11. Zachowaj odległość co najmniej 20 cm wokół i nad urządzeniem.
12. Nie używać urządzenia w bezpośrednim sąsiedztwie wody (nie dotyczy specjalnych urządzeń do stosowania na zewnątrz – w takim przypadku
należy przestrzegać podanych poniżej wskazówek specjalnych). Urządzenie nie może mieć kontaktu z palnymi materiałami, płynami ani gazami.
13. Zabezpieczyć urządzenie przed wniknięciem kapiącej lub pryskającej wody. Nie wolno stawiać na urządzeniu pojemników napełnionych płynami,
takich jak wazony czy naczynia z piciem.
14. Należy zadbać o to, aby do urządzenia nie wpadały żadne przedmioty.
15. Urządzenie można eksploatować tylko przy użyciu akcesoriów zalecanych i przewidzianych przez producenta.
16. Nie otwierać urządzenia ani nie dokonywać w nim zmian.
17. Po podłączeniu urządzenia sprawdzić wszystkie ciągi kablowe, aby zapobiec szkodom lub wypadkom np. w wyniku potknięcia.
18. Podczas transportu zadbać o to, aby urządzenie nie upadło, gdyż może to spowodować uszkodzenie mienia i obrażenia ciała.
19. Jeśli urządzenie nie działa prawidłowo, do jego wnętrza dostały się płyny lub przedmioty lub jeśli urządzenie zostało uszkodzone w inny sposób,
należy je natychmiast wyłączyć i odłączyć od gniazda sieciowego (jeśli urządzenie jest aktywne). Naprawę takiego urządzenia może wykonać
tylko autoryzowany personel specjalistyczny.
20. Do czyszczenia urządzenia stosować suchą ściereczkę.
21. Przestrzegać obowiązujących w danym kraju przepisów dotyczących usuwania odpadów. Podczas utylizacji opakowania oddzielić tworzywo
sztuczne od papieru i tektury.
22. Worki z tworzywa sztucznego należy przechowywać w miejscu niedostępnym dla dzieci.
23. Wszelkie zmiany czy modyfikacje urządzeń, które nie zostały wyraźnie zatwierdzone przez stronę odpowiedzialną za zgodność, mogą spowodo-
wać utratę przez użytkownika prawa do posługiwania się tym sprzętem.
DOT YCZY URZ ĄDZEŃ Z ZA SILANIEM S IECIOWY M
24. UWAGA: jeśli kabel sieciowy urządzenia jest wyposażony w zestyk ochronny, należy go podłączyć do gniazda z przewodem uziemiającym. Nigdy
nie wolno dezaktywować przewodu uziemiającego kabla sieciowego.
25. Nie włączać urządzenia bezpośrednio po narażeniu go na silne wahania temperatury (np. po transporcie). Wilgoć i skropliny mogą uszkodzić
urządzenie. Włączyć urządzenie dopiero wtedy, gdy osiągnie temperaturę pokojową.
26. Przed podłączeniem urządzenia do gniazda elektrycznego należy sprawdzić, czy napięcie i częstotliwość sieci elektrycznej odpowiada wartościom
podanym na urządzeniu. Jeśli urządzenie jest wyposażone w przełącznik napięcia, należy podłączyć je do gniazda tylko wówczas, gdy wartości
urządzenia odpowiadają wartościom sieci elektrycznej. Jeśli dołączony kabel sieciowy lub dołączony adapter sieciowy nie pasuje do gniazda
elektrycznego, należy skontaktować się z elektrykiem.
27. Nie stawać na kablu sieciowym. Należy zadbać o to, aby kable przewodzące napięcie nie były zagięte przy gnieździe sieciowym, przy adapterze
sieciowym ani przy gnieździe urządzenia.
28. Przy podłączaniu urządzenia zawsze należy zadbać o to, aby kabel sieciowy lub adapter sieciowy był zawsze łatwo dostępny. Odłączyć urządzenie
od źródła zasilania, gdy nie jest ono używane lub gdy ma zostać poddane czyszczeniu. Zawsze należy wyjmować kabel sieciowy i adapter sieciowy
z gniazda, chwytając za wtyczkę lub adapter, a nie za kabel. Nigdy nie dotykać kabla sieciowego i adaptera sieciowego mokrymi dłońmi.
29. W miarę możliwości nie włączać i wyłączać urządzenia w krótkich odstępach czasu, gdyż może to mieć negatywny wpływ na jego żywotność.
30. WAŻNA INFORMACJA: bezpieczniki należy wymieniać wyłącznie na bezpieczniki tego samego typu i o takich samych wartościach. Jeśli bezpiecznik
stale się przepala, należy skontaktować się z autoryzowanym centrum serwisowym.
31. Aby całkowicie odłączyć urządzenie od sieci, należy wyjąć kabel sieciowy lub adapter sieciowy z gniazda.
32. Jeśli urządzenie jest wyposażone w przyłącze sieciowe Volex, konieczne jest odblokowanie odpowiedniej wtyczki urządzenia Volex, zanim będzie
możliwe jej odłączenie. Oznacza to także, iż w wyniku pociągnięcia za kabel urządzenie może się przesunąć i spaść, co może spowodować obrażenia ciała i/lub inne szkody, dlatego ważne jest, aby przewody były odpowiednio poprowadzone.
33. W przypadku zagrożenia uderzeniem pioruna lub jeśli urządzenie przez dłuższy czas nie jest używane, należy wyjąć kabel sieciowy i adapter
sieciowy z gniazda.
ENGLISHFRANCAIS
DEUTSCH
ESPAÑOL
POLSKIITALIANO
简体中文繁體中文
43
34. Urządzenie nie może być używane przez osoby (w tym dzieci) o ograniczonych możliwościach fizycznych, sensorycznych lub umysłowych, a także
nieposiadające doświadczenia i wiedzy.
35. Należy poinstruować dzieci, aby nie bawiły się urządzeniem.
36. Jeśli przewód zasilający jest uszkodzony, nie należy używać urządzenia. Przewód zasilający należy wymienić na odpowiedni lub specjalny podze-
spół, który można uzyskać w autoryzowanym centrum serwisowym.
DEUTSCHENGLISH FRANCAIS
Trójkąt równoboczny z symbolem błyskawicy sygnalizuje nieizolowane, niebezpieczne napięcie we wnętrzu urządzenia, które może
spowodować porażenie prądem.
Trójkąt równoboczny z wykrzyknikiem oznacza ważne wskazówki dotyczące obsługi i konserwacji.
ESPAÑOL
POLSKI ITALIANO
UWAG A! WYSOKI P OZIOM GŁO ŚNOŚCI PROD UKTÓW AUD IO!
To urządzenie przewidziane jest do zastosowań profesjonalnych. Komercyjne stosowanie tego urządzenia podlega obowiązującym w danym kraju
przepisom i wytycznym dotyczącym zapobiegania wypadkom. Firma Adam Hall jest jako producent zobowiązana do wyraźnego informowania o
potencjalnym zagrożeniu dla zdrowia. Utrata słuchu w wyniku wysokiego poziomu głośności i długotrwałego narażenia: podczas stosowania tego
produktu może powstać wysoki poziom ciśnienia akustycznego (SPL), który może doprowadzić do nieodwracalnego uszkodzenia słuchu u artystów,
pracowników i widzów. Należy unikać długotrwałego narażenia na wysoki poziom głośności powyżej 90 dB.
Ostrzeżenie! To urządzenie przeznaczone jest do użytku do maksymalnej wysokości 2000 m n.p.m.
Ostrzeżenie! To urządzenie nie jest przewidziane do użytku w tropikalnych strefach klimatycznych.
UWAGA:
Nigdy nie zdejmować pokrywy, gdyż grozi to porażeniem prądem. We wnętrzu urządzenia nie ma
żadnych części, które mogłyby zostać naprawione bądź poddane czynnościom konserwacyjnym przez
użytkownika. Czynności konserwacyjne i naprawy może przeprowadzać wyłącznie wykwalifikowany
personel serwisowy.
简体中文 繁體中文
44

WŁAŚCIWOŚCI
LDICOASUB15A
• 15-calowy subwoofer emitujący mocny, niski bas do 36Hz
• Maks. SPL 131dB i 1600W mocy szczytowej dzięki bardzo wydajnemu cyfrowemu wzmacniaczowi mocy klasyD
• Zoptymalizowane otwory obudowy bass reflex
• Technologia DynX DSP z czterema ustawieniami wstępnymi aplikacji (trzy częstotliwości zwrotnic, tryb kardioidalny)
• Przełączana biegunowość sygnału i regulowane opóźnienie liniowe do 10 metrów (32,8 ft)
• 2 × wejście Combo (jack/XLR), 2 × wyjście XLR
• Solidna obudowa ze sklejki o grubości 18 mm z solidną kratką przednią
• Cztery powlekane gumą aluminiowe uchwyty do łatwego przenoszenia
• Cztery rowki do stabilnego układania wstos
• Gwint M20 do zamocowania rurki dystansowej
LDICOASUB18A
• 18-calowy subwoofer emitujący mocny, niski bas do 29 Hz
• Maks. SPL 133dB i 2400W mocy szczytowej dzięki bardzo wydajnemu cyfrowemu wzmacniaczowi mocy klasyD
• Zoptymalizowane otwory obudowy bass reflex
• Technologia DynX DSP z czterema ustawieniami wstępnymi aplikacji (trzy częstotliwości zwrotnic, tryb kardioidalny)
• Przełączana biegunowość sygnału i regulowane opóźnienie liniowe do 10 metrów
• 2 × wejście Combo (jack/XLR), 2 × wyjście XLR
• Solidna obudowa ze sklejki o grubości 18 mm z solidną kratką przednią
• Cztery powlekane gumą aluminiowe uchwyty do łatwego przenoszenia
• Cztery rowki do stabilnego układania wstos
• Gwint M20 do zamocowania rurki dystansowej
PRZYŁĄCZA, ELEMENTY OBSŁUGOWE IWSKAŹNIKI
ENGLISHFRANCAIS
DEUTSCH
ESPAÑOL
POLSKIITALIANO
1 2
1
GNIAZDO ZAS ILANIA I OPRAWA BEZPIECZNIKOWA
Gniazdo zasilania IEC z wbudowaną oprawą bezpiecznikową. W zestawie znajduje się odpowiedni kabel zasilający.
UWAGA: Bezpiecznik należy wymieniać wyłącznie na bezpiecznik tego samego typu i o tych samych parametrach. Proszę zwrócić uwagę na opis na
korpusie. W przypadku wielokrotnego zadziałania bezpiecznika należy skontaktować się z autoryzowanym centrum serwisowym.
2
POWER
Włącznik/wyłącznik. W łańcuchu sygnału głośnik zawsze powinien być ostatnim urządzeniem włączanym i pierwszym wyłączanym.
简体中文繁體中文
45

3
WYŚ WIETLA CZ LCD
Wielofunkcyjny graficzny wyświetlacz LCD do wskazywania głośności
głównej, ustawień wstępnych DSP i poziomu wejściowego dla kanałów 1 i2
w menu głównym. Pozycje menu, podmenu i odpowiednie opcje edycji są
wyświetlane w menu edycji.
4
VOLUM E / PUSH FOR MENU
Z poziomu menu głównego można regulować głośność główną, obracając
pokrętło enkodera. Naciśnij pokrętło enkodera, aby przejść do menu
edycji. Za pomocą pokrętła enkodera można poruszać się po menu edycji,
dostosowywać ustawienia systemowe i zmieniać wartości w odpowiednich
pozycjach menu.
5
INPUT 1–2
Zbalansowane wejścia liniowe kanałów 1 i2 z gniazdami combo XLR/jack.
Podłączony sygnał stereo jest monosumowany wewnętrznie.
6
THRU 1–2
Zbalansowane wyjścia liniowe z męskimi 3-pinowymi gniazdami XLR do
przekazywania liniowego sygnału wejściowego.
DEUTSCHENGLISH FRANCAIS
3
5
6
4
ESPAÑOL
MONTAŻ KÓŁEK
Z tyłu subwoofera można zamontować cztery opcjonalnie dostępne kółka transportowe. Każde kółko mocuje się czterema śrubami z łbem
wpuszczanym. Rozstaw otworów jest znormalizowany. Duży wybór kółek można znaleźć na stronie adamhall.com
POLSKI ITALIANO
简体中文 繁體中文
46

OBSŁUGA
UWAGA:
Gdy głośnik zostanie prawidłowo podłączony do zasilania i włączony, na wyświetlaczu pojawi się przez chwilę logo LD Systems. Wszystkie ustawienia
(np. Preset i Delay) są przywracane do stanu sprzed wyłączenia głośnika. Głośnik będzie gotowy do użycia po zakończeniu procesu uruchamiania,
który zwykle trwa jedną sekundę.
WYŚWIET LANIE MENU GŁÓWNEGO
Wyświetlacz główny jest włączony podczas normalnej pracy. Pokazuje on ustawienie głośności głównej, aktywowane ustawienie wstępne (preset)
głośnika oraz poziomy wejściowe kanałów 1 i2 ze wskazaniem szczytowym (patrz ilustracja). Zmniejsz poziom sygnału wyjściowego urządzenia
źródłowego (np. miksera), jeśli na wskaźniku wartości szczytowych widać, że sygnał wejściowy jest zbyt wysoki.
Regulacja głośności
Wstępne ustawienie głośnika
Poziom wejściowy ze wskazaniem szczytowym kanału1
Poziom Szczyt
GŁOŚNOŚĆ
W menu głównym można bezpośrednio regulować głośność w zakresie od -60 do +10 dB, obracając pokrętło VOLUME / PUSH FOR MENU. Po obróceniu
pokrętła enkodera wyświetlacz automatycznie wyświetli odpowiedni symbol (patrz ilustracja poniżej). Menu główne wyświetli się automatycznie
ponownie po ok. 20 sekundach braku aktywności. Naciśnięcie pokrętła enkodera spowoduje natychmiastowe przełączenie wyświetlacza do menu
głównego.
USTAWI ENIA DŹWIĘ KU (AUDIO)
Naciśnij pokrętło enkodera, aby przejść do menu głównego, a następnie obróć pokrętło, aby wybrać punkt menu AUDIO (ciemne tło wybranego
podmenu). Ponownie naciśnij pokrętło, aby przejść do podmenu, a następnie obróć pokrętło, aby wybrać żądany element podmenu. Potwierdź
wybór, naciskając pokrętło enkodera.
Poziom wejściowy ze wskazaniem szczytowym kanału2
ENGLISHFRANCAIS
DEUTSCH
ESPAÑOL
POLSKIITALIANO
Pozycje podmenu i odpowiednie opcje ustawień wyszczególniono w poniższej tabeli.
SETTINGS (zmień wartość lub stan = obróć enkoder, potwierdź wartość lub zmianę stanu = naciśnij enkoder)
MAIN MENU Powrót do menu głównego
PRESET Wybór wstępnego ustawienia
głośnika
DELAY Opóźnienie czasowe sygnału audio w krokach co 10 cm (0,32 ft); maks. 10 metrów (32 ft) (0 ft = OFF, wskazanie w metrach
i stopach)
POLARITY Ustawienie polaryzacji NORMAL Normalna polaryzacja
80 Hz Filtr dolnoprzepustowy na poziomie 80Hz
100 Hz Filtr dolnoprzepustowy na poziomie 100 Hz. Optymalne do połączenia
z głośnikami ICOA w trybie SATELLITE
120 Hz Filtr dolnoprzepustowy na poziomie 120 Hz
CARDIOID Wstępne ustawienie do konguracji dwóch subwooferów ICOA tego
samego modelu jako system kardioidalny. Obróć subwoofer ze
wstępnym ustawieniem CARDIOID o 180° i umieść go obok głównego
subwoofera. Następnie w głównym subwooferze wybierz wstępne
ustawienie głośnika „100Hz”. Czas opóźnienia, polaryzacja i głośność
dla dwóch subwooferów muszą mieć takie same ustawienia.
INVERTED Odwrócona polaryzacja
简体中文繁體中文
47

W podmenu wybierz opcję MAIN MENU i naciśnij pokrętło enkodera, aby powrócić do menu głównego. W menu głównym wybierz opcję HOME, a
następnie naciśnij pokrętło enkodera, aby potwierdzić wybór i powrócić do menu głównego. Menu główne wyświetli się automatycznie ponownie po
ok. 20 sekundach braku aktywności.
USTAWIENIA SYSTEMOWE (SETTINGS)
Naciśnij pokrętło enkodera, aby przejść do menu głównego, a następnie obróć pokrętło, aby wybrać punkt menu SETTINGS (ciemne tło wybranego
podmenu). Ponownie naciśnij pokrętło, aby przejść do podmenu, a następnie obróć pokrętło, aby wybrać żądany element podmenu. Potwierdź
wybór, naciskając pokrętło enkodera.
DEUTSCHENGLISH FRANCAIS
Pozycje podmenu i odpowiednie opcje ustawień wyszczególniono w poniższej tabeli:
SETTINGS (zmień wartość lub stan = obróć enkoder, potwierdź wartość lub zmianę stanu lub zażądaj informacji = naciśnij enkoder)
ESPAÑOL
MAIN MENU Powrót do menu głównego
LCD DIM Automatyczne ściemnianie
BRIGHTNESS Ustawianie jasności wyświetlacza (0–100%)
CONTRAST Ustawianie kontrastu wyświetlacza (0–100%)
POLSKI ITALIANO
INFO Wyświetlanie numeru modelu i wersji oprogramowania
FACTORY DEFAULT Przywrócenie domyślnych ustawień
W podmenu wybierz opcję MAIN MENU i naciśnij pokrętło enkodera, aby powrócić do menu głównego. W menu głównym wybierz opcję HOME, a
następnie naciśnij pokrętło enkodera, aby potwierdzić wybór i powrócić do menu głównego. Menu główne wyświetli się automatycznie ponownie po
ok. 20 sekundach braku aktywności.
wyświetlacza
fabrycznych
(AUDIO + SETTINGS)
ON Wyświetlacz jest przyciemniany po ok. 20 sekundach bezczynności
OFF Automatyczne ściemnianie wyświetlacza wyłączone
CANCEL Anuluj resetowanie
RESET SURE? YES Wykonaj resetowanie
CANCEL Anuluj resetowanie
简体中文 繁體中文
48

KONFIGURACJA KARDIOIDALNA
Wstępne ustawienie CARDIOID głośnika jest złożonym programem DSP, który umożliwia uzyskanie nerkowatego (kardioidalnego) wzoru emisji
dźwięku poprzez połączenie dwóch subwooferów LD ICOA tego samego modelu.
W porównaniu z konwencjonalnymi konfiguracjami subwooferów ustawienie kardioidalne zapewnia następujące zalety:
• Tłumienie odwrotne do 20dB
• Bardziej precyzyjne odtwarzanie basów w zakresie słyszalnym
• Zapobieganie niepożądanym odbiciom od tylnych ścian
• Redukcja dźwięku rozproszonego w pomieszczeniach
• Eliminacja irytujących częstotliwości basu na scenie
• Zróżnicowany wzorzec dźwiękowy dla nagłośnienia scenicznego (monitory)
• Redukcja sprzężenia zwrotnego występującego przy użyciu mikrofonów scenicznych
Jak pokazano na ilustracji, należy umieścić dwa subwoofery obok siebie, przy czym subwoofer ze wstępnym ustawieniem kardioidalnym jest
skierowany do tyłu (patrz ilustracja poniżej). Wybierz ustawienie wstępne „100 Hz” dla głównego subwoofera skierowanego do przodu i upewnij
się, że czas opóźnienia, polaryzacja i ustawienia głośności dla obu subwooferów są takie same.
PRESET 100 Hz PRESET CARDIOID
ENGLISHFRANCAIS
DEUTSCH
ESPAÑOL
Kierunek emisji
CO OZN ACZA LOGO L D SYSTEMS D YNX® DSP?
DSP to akronim oznaczający cyfrowe przetwarzanie sygnału (ang. digital signal processing). DynX® zawiera limiter,
korektor, kompresor i filtr dolnoprzepustowy. Cyfrowe przetwarzanie sygnału zapewnia optymalne odtwarzanie basów
z maksymalną czystością, chroniąc jednocześnie subwoofer przed przeciążeniem.
DO CZE GO SŁUŻY D YNX® DSP?
Funkcja limitera chroni głośnik i zapobiega zniekształceniom spowodowanym przeciążeniem. Subwoofer umożliwia
pracę systemu przy ogólnie wyższym ciśnieniu akustycznym, ponieważ ekstremalne wartości szczytowe sygnału są
automatycznie ograniczane, dzięki czemu nie ma potrzeby zmniejszania głośności głównej. Wielopasmowy korektor
obsługuje cały zakres basów i optymalizuje ogólny dźwięk subwoofera.
POLSKIITALIANO
简体中文繁體中文
49

PRZYKŁADOWE PODŁĄCZENIE PRZEWODÓW
PRESET SAT PRESET SAT
DEUTSCHENGLISH FRANCAIS
ESPAÑOL
POLSKI ITALIANO
简体中文 繁體中文
INPUT __1
INPUT __1
1__ INPUT __2
THRU __1 THRU __ 2
PRESET 100 Hz
PRESET SATPRESET SAT
INPUT __1INPUT __1
50
PRESET 100 Hz
THRU __1THRU __1
INPUT __1 INPUT __1
PRESET 100 Hz

AKCESORIA OPCJONALNE
LDICOASUB15PC – osłona zabezpieczająca dla ICOA SUB 15A
LDICOASUB18PC – osłona zabezpieczająca dla ICOA SUB 18A
DANE TECHNICZNE
Numer artykułu: LDICOASUB15A LDICOASUB18A
Rodzaj produktu: Subwoofer PA
Typ: Aktywny
Duży głośnik niskotonowy: 15" 18"
Duży głośnik niskotonowy: 381 mm 457,2 mm
Magnes głośnika niskotonowego: Ferrytowy
Marka głośnika niskotonowego: Wykonane na zamówienie
Cewka głosowa głośnika niskoto-
nowego:
Cewka głosowa głośnika niskotonowego (cale):
Wzmacniacz: Klasa D
Moc (RMS): 400 W 600 W
Moc (szczytowa): 1600 W 2400 W
Pasmo przenoszenia: 36 Hz – zależy od ustawienie wstępnego 29 Hz – zależy od ustawienie wstępnego
Maks. SPL (szczytowy): 131 dB 133 dB
Układy ochronne: Limiter wartości szczytowych, limiter RMS, limiter skoku, przegrzanie, przepięcie, prąd przeciążeniowy
Impedancja wejściowa: 18 kOhm
Czułość wejściowa: 0,3 V
Elementy sterujące: Przełącznik wł./wył., enkoder obrotowy
Elementy wskaźnikowe: Podświetlany wyświetlacz LCD
Wejścia liniowe: 2
Przyłącza wejścia liniowego: Gniazda combo XLR/jack 6,3 mm (zbalansowane)
Wyjścia liniowe: 2
Przyłącza wyjścia liniowego: XLR
Częstotliwość próbkowania przet-
wornika AD/DA:
Rozdzielczość przetwornika AD/DA: 24 bit
Zasilanie: SMPS
Napięcie robocze: 100 V–240 V AC 50–60 Hz
Bezpiecznik: T6.3AL 250 V T8AL 250 V
Pobór mocy: 675 W
Temperatura otoczenia (podczas
pracy):
Wilgotność względna: <60% (bez kondensacji)
Materiał obudowy: Sklejka multiplex, 18mm
Konstrukcja obudowy: Bass reflex
3" 4"
76,5 mm 100 mm
48 kHz
0°C–40°C
ENGLISHFRANCAIS
DEUTSCH
ESPAÑOL
POLSKIITALIANO
简体中文繁體中文
51

Kołnierz instalacyjny do rurki
dystansowej:
Wymiary (szer. × wys. × gł.): 528 × 597 × 551 mm 625 × 673 × 638 mm
Masa: 32,5 kg 44,3 kg
Dołączone akcesoria: Przewód zasilający
DEUTSCHENGLISH FRANCAIS
Dodatkowe funkcje: 4 uchwyty, solidna przednia kratka, możliwość układania w stos, technologia DSP z 4 ustawieniami
Gwint wewnętrzny M20
wstępnymi,
funkcją opóźnienia i regulowaną polaryzacją
DEKLARACJE PRODUCENTA
GWAR ANCJA PROD UCENTA I OGRA NICZENIE OD POWIEDZI ALNOŚCI
Nasze aktualne warunki gwarancji i informacje dotyczące ograniczenia odpowiedzialności znajdą Państwo na stronie: https://cdn-shop.adamhall.
com/media/pdf/MANUFACTURERS-DECLARATIONS_LD_SYSTEMS.pdf. W razie konieczności skorzystania z serwisu proszę skontaktować się z firmą Adam
Hall GmbH, Adam-Hall-Str. 1, 61267 Neu Anspach / e-mail Info@adamhall.com / +49 (0)6081 / 9419-0.
PRAW IDŁOWA UT YLIZAC JA NINIEJS ZEGO PRODUK TU
ESPAÑOL
POLSKI ITALIANO
简体中文 繁體中文
(Obowiązuje w Unii Europejskiej i innych krajach europejskich stosujących system sortowania odpadów) Niniejszy symbol na produkcie lub
związanych z nim dokumentach wskazuje, iż urządzenie po zakończeniu okresu użytkowania nie może być utylizowane razem ze standardowymi odpadami domowymi, aby uniknąć szkód w środowisku lub szkód na osobie powstałych w wyniku niekontrolowanego usuwania odpadów.
Niniejszy produkt należy utylizować oddzielnie od innych odpadów i przekazać do punktu recyklingu w celu ponownego wykorzystania użytych w
nim materiałów w ramach idei zrównoważonego rozwoju. Klienci prywatni otrzymują informacje w zakresie przyjaznych dla środowiska możliwości
usuwania odpadów od sprzedawcy, u którego produkt został zakupiony, lub w odpowiednich placówkach regionalnych. Użytkownicy będący przedsiębiorcami proszeni są o kontakt ze swoimi dostawcami i ewentualne sprawdzenie uzgodnionych umownie warunków utylizacji urządzeń. Niniejszy
produkt nie może być utylizowany razem z innymi odpadami przemysłowymi.
DEKL ARACJA Z GODNOŚCI C E
Firma Adam Hall GmbH niniejszym oświadcza, że produkt ten jest zgodny z następującymi dyrektywami (o ile mają zastosowanie):
dyrektywa w sprawie urządzeń radiowych i końcowych urządzeń telekomunikacyjnych (1999/5/WE) lub dyrektywa w sprawie urządzeń radiowych
(2014/53/UE) od czerwca 2017 r.
dyrektywa niskonapięciowa (2014/35/UE)
dyrektywa w sprawie kompatybilności elektromagnetycznej (2014/30/UE)
dyrektywa w sprawie ograniczenia stosowania niektórych niebezpiecznych substancji w sprzęcie elektrycznym i elektronicznym (2011/65/UE)
Pełna wersja deklaracji zgodności znajduje się na stronie internetowej www.adamhall.com.
Ponadto zapytania w tej sprawie można przesyłać na adres e-mail info@adamhall.com.
DEKL ARACJA Z GODNOŚCI W E
Adam Hall GmbH niniejszym oświadcza, że ten typ sprzętu radiowego jest zgodny z dyrektywą 2014/53/UE.
Pełny tekst deklaracji zgodności UE jest dostępny pod następującym adresem
Dostępny adres internetowy: www.adamhall.com/compliance/
52

ITALIANO
AVETE F ATTO LA SC ELTA GIUSTA!
Quest‘apparecchio è stato sviluppato e prodotto secondo elevati standard qualitativi che garantiscono un funzionamento regolare per molti anni.
Per questo motivo LD Systems, con il suo nome e la pluriennale esperienza, rappresenta un‘azienda produttrice di prodotti audio di qualità. Leggete
attentamente questo manuale d‘uso per utilizzare al meglio il vostro nuovo prodotto LD Systems.
Per maggiori informazioni su LD SYSTEMS, consultate la nostra pagina web WWW.LD-SYSTEMS.COM
MISURE PRECAUZIONALI
1. Leggere attentamente il presente manuale di istruzioni.
2. Conservare tutte le indicazioni e le istruzioni in un luogo sicuro.
3. Seguire le istruzioni.
4. Rispettare tutte le avvertenze. Non rimuovere dal dispositivo le indicazioni sulla sicurezza o altre informazioni.
5. Utilizzare il dispositivo solo nei modi previsti dal manuale.
6. Utilizzare esclusivamente stativi e fissaggi stabili e adatti (per installazioni fisse). Verificare che i supporti a parete siano installati e fissati a
regola d‘arte. Verificare che il dispositivo sia installato in modo stabile e non possa cadere.
7. Durante l‘installazione, osservare le normative sulla sicurezza in vigore nel proprio Paese.
8. Non installare né azionare il dispositivo in prossimità di radiatori, accumulatori termici, stufe o altre fonti di calore. Accertarsi che il dispositivo
sia sempre installato in modo che venga raffreddato a sufficienza e non possa surriscaldarsi.
9. Non appoggiare sul dispositivo fonti di combustione, quali candele accese.
10. Le fessure di areazione non devono essere bloccate. Evitare l‘esposizione diretta ai raggi solari.
11. Mantenere una distanza minima di 20 cm intorno e sopra al dispositivo.
12. Non attivare il dispositivo nelle immediate vicinanze di acqua (questo punto non interessa i dispositivi specifici per l‘esterno, per i quali valgono
le speciali indicazioni riportate di seguito). Non portare mai il dispositivo a contatto con materiali, liquidi o gas infiammabili.
13. Accertarsi che all‘interno del dispositivo non possa penetrare acqua per gocciolamento o spruzzo. Non collocare sul dispositivo oggetti contenenti
liquidi, quali vasi, tazze o bicchieri.
14. Assicurarsi che non sia possibile la caduta di oggetti nel dispositivo.
15. Azionare il dispositivo esclusivamente con gli accessori appositamente consigliati e previsti dal produttore.
16. Non aprire né modificare il dispositivo.
17. Una volta collegato il dispositivo, verificare tutti i cavi per evitare danni o incidenti, ad esempio per inciampo.
18. Durante il trasporto, assicurarsi che il dispositivo non possa cadere e causare possibili danni a cose e/o persone.
19. Se il dispositivo non funzionasse più correttamente, vi fosse caduto sopra del liquido o un oggetto o fosse stato danneggiato in altro modo,
spegnerlo immediatamente e staccare la spina (se si tratta di un dispositivo attivo). La riparazione del dispositivo deve essere affidata
esclusivamente a personale qualificato autorizzato.
20. Per la pulizia del dispositivo utilizzare un panno pulito.
21. Rispettare le leggi sullo smaltimento in vigore nel Paese di installazione. Al momento di smaltire l‘imballo, separare la plastica dalla carta
e dal cartone.
22. I sacchetti di plastica devono essere tenuti lontani dalla portata dei bambini.
23. Notare che eventuali modifiche o alterazioni non espressamente approvate dal responsabile della conformità possono annullare la facoltà
dell‘utente di utilizzare l‘apparecchiatura.
DISPOSITIVI CON ALLACCIAMENTO DI RETE
24. ATTENZIONE: se il cavo di rete è dotato di contatto di protezione, deve essere collegato a una presa di rete con messa a terra. Non disattivare mai
la connessione di messa a terra di un cavo di rete.
25. Non accendere il dispositivo subito dopo essere stato sottoposto a forti variazioni di temperatura (ad esempio dopo il trasporto).
Umidità e condensa potrebbero danneggiare il dispositivo. Accendere il dispositivo solo dopo che ha raggiunto la temperatura ambiente.
26. Prima di collegare il dispositivo alla presa, controllare innanzitutto se la tensione e la frequenza della rete elettrica coincidono con i valori
indicati sul dispositivo stesso. Nel caso di dispositivo munito di selettore di tensione, collegarlo alla presa unicamente se i valori del dispositivo
coincidono con quelli della rete elettrica. Se il cavo di rete o l‘adattatore di rete forniti in dotazione non sono compatibili con la presa, rivolgersi
a un elettricista.
Non calpestare il cavo di rete. Accertarsi che i cavi sotto tensione, in particolare della presa di rete o dell‘adattatore di rete, non vengano pizzicati.
27.
28. Durante il cablaggio del dispositivo, verificare sempre che il cavo di rete e l‘adattatore di rete siano costantemente accessibili. Staccare sempre
il dispositivo dall‘alimentazione di rete quando non è utilizzato o durante la pulizia. Per staccare dalla presa il cavo di rete e l‘adattatore di rete,
tirare sempre dalla spina o dall‘adattatore e non dal cavo. Non toccare mai il cavo di alimentazione e l’alimentatore con le mani umide.
29. Evitare per quanto possibile di accendere e spegnere velocemente il dispositivo per non pregiudicarne la durata.
30. NOTA IMPORTANTE: Sostituire i fusibili esclusivamente con fusibili dello stesso tipo e valore. Se un fusibile continua a saltare, rivolgersi a un
centro di assistenza autorizzato.
31. Per staccare completamente il dispositivo dalla rete elettrica, rimuovere il cavo di rete o l‘adattatore di rete dalla presa.
Per staccare un dispositivo provvisto di presa Volex, è prima necessario sbloccare la relativa spina Volex del dispositivo stesso. Tirando il cavo di
32.
rete, però, il dispositivo potrebbe spostarsi e cadere, provocando danni alle persone o di altro genere. Prestare quindi la più scrupolosa attenzione
durante la posa dei cavi.
33. In caso di pericolo di caduta di fulmine, o se il dispositivo rimane inutilizzato a lungo, staccare sempre il cavo di rete e l‘adattatore di rete
dalla presa.
34. Il dispositivo non deve essere utilizzato da persone (compresi i bambini) con capacità fisiche, sensoriali o mentali limitate o con scarsa
esperienza e conoscenza.
35. I bambini devono essere istruiti a non giocare con il dispositivo.
ENGLISHFRANCAIS
DEUTSCH
ESPAÑOL
POLSKIITALIANO
简体中文繁體中文
53

36. Se il cavo di alimentazione del dispositivo è danneggiato, quest‘ultimo non deve essere utilizzato. Il cavo di alimentazione deve essere sostituito
con un cavo appropriato o un‘unità speciale da un centro di assistenza autorizzato.
ATTENZIONE:
non togliere mai il coperchio di protezione perché sussiste il pericolo di scosse elettriche. L‘interno
del dispositivo non contiene parti che possono essere riparate o sottoposte a manutenzione da parte
DEUTSCHENGLISH FRANCAIS
Il triangolo equilatero con il simbolo del lampo segnala la presenza di tensioni pericolose non isolate all‘interno dell‘apparecchio che
possono causare scosse elettriche.
Il triangolo equilatero con punto esclamativo segnala la presenza di importanti informazioni relative all’uso e alla manutenzione.
Avvertimento! Questo dispositivo è destinato per l’utilizzo a un’altitudine non superiore ai 2.000metri sul livello del mare.
dell‘utente. Per gli interventi di manutenzione e di riparazione rivolgersi esclusivamente a personale
qualificato.
ESPAÑOL
Avvertimento! Questo dispositivo non è destinato all’uso nei climi tropicali.
ATTE NZIONE! PRODO TTI AUDIO C ON LIVELL I SONORI ELE VATI!
Questo dispositivo è destinato a uso professionale. Il suo utilizzo in ambito commerciale è soggetto alle normative e alle direttive nazionali vigenti
in materia di prevenzione di infortuni. In qualità di produttore, Adam Hall è tenuto per legge a informare espressamente gli utenti degli eventuali
POLSKI ITALIANO
rischi per la salute. Danni all‘udito provocati da un’esposizione prolungata a un livello sonoro elevato: l‘utilizzo di questo prodotto può generare
elevati livelli di pressione sonora (SPL) che possono provocare danni irreparabili all‘udito di artisti, collaboratori e spettatori. Evitare l‘esposizione
prolungata a livelli sonori elevati, superiori a 90dB.
简体中文 繁體中文
54

PROPRIETÀ
LDICOASUB15A
• Subwoofer da 15 pollici per bassi potenti fino a 36 Hz
• 131 dB max SPL e potenza di picco da 1600 watt grazie all‘amplificatore di potenza digitale ad alta efficienza in classe D
• Aperture bass reflex ottimizzate
• DynX DSP con quattro preset per applicazioni (tre frequenze crossover, modalità cardioide)
• Polarità del segnale commutabile e ritardo di linea regolabile fino a 32,8 piedi
• 2 ingressi combinati (jack/XLR), 2 uscite XLR
• Solido alloggiamento in compensato da 0,71 pollici, con griglia frontale robusta
• Quattro maniglie in alluminio rivestite in gomma per la massima maneggevolezza
• Quattro scanalature per impilare in sicurezza il prodotto
• Filettature M20 per il collegamento di un‘asta di estensione
LDICOASUB18A
• Subwoofer da 18 pollici per bassi potenti fino a 29 Hz
• 133 dB max SPL e potenza di picco da 2400 watt grazie all‘amplificatore di potenza digitale ad alta efficienza in classe D
• Aperture bass reflex ottimizzate
• DynX DSP con quattro preset per applicazioni (tre frequenze crossover, modalità cardioide)
• Polarità del segnale commutabile e ritardo di linea regolabile fino a 32,8 piedi
• 2 ingressi combinati (jack/XLR), 2 uscite XLR
• Solido alloggiamento in compensato da 0,71 pollici, con griglia frontale robusta
• Quattro maniglie in alluminio rivestite in gomma per la massima maneggevolezza
• Quattro scanalature per impilare in sicurezza il prodotto
• Filettature M20 per il collegamento di un‘asta di estensione
COLLEGAMENTI, ELEMENTI DI COMANDO E DISPLAY
ENGLISHFRANCAIS
DEUTSCH
ESPAÑOL
POLSKIITALIANO
1 2
1
PRESA DI ALIMENTAZI ONE E PORTAFUSIBILI
Presa di alimentazione IEC con portafusibili integrato. È incluso nella dotazione il cavo di alimentazione idoneo.
NOTA IMPORTANTE: sostituire il fusibile esclusivamente con un altro dello stesso tipo e valore. Tenere presente quanto riportato sull’alloggiamento.
Se un fusibile scatta ripetutamente, contattare il centro assistenza autorizzato.
2
ALIMENTAZIONE
Interruttore on/off. Nella catena dei segnali, l’altoparlante deve sempre essere l’ultimo dispositivo che viene acceso e il primo che viene spento.
简体中文繁體中文
55

3
DISPL AY LC
Display LC grafico multifunzione per la visualizzazione del volume master,
del preset DSP e del livello di ingresso dei canali 1 e 2 nel menu principale.
Le voci di menu e sottomenu, nonché le opzioni di modifica corrispondenti
sono visualizzate nel menu di modifica.
4
VOLUM E / PUSH FOR MENU
Dal menu principale è possibile regolare il volume master ruotando l’encoder a rotazione/pressione. Premere l’encoder a rotazione/pressione per
accedere al menu di modifica. Utilizzare l’encoder di rotazione/pressione
per navigare nel menu di modifica, regolare le impostazioni di sistema e
modificare i valori delle voci di menu corrispondenti.
5
INPUT 1–2
Ingressi di linea bilanciati dei canali 1 e 2 con prese combinate XLR/jackIl
segnale stereo collegato viene sommato in mono internamente.
6
THRU 1–2
Uscite di linea bilanciate con prese XLR maschio a 3 pin per l’inoltro del
segnale di ingresso di linea.
DEUTSCHENGLISH FRANCAIS
3
5
6
4
ESPAÑOL
GRUPPO RUOTE
Il retro del subwoofer è impostato per il collegamento di quattro ruote di trasporto disponibili come optional. Ciascuna di esse è incassata e dotata
di quattro viti di fissaggio. La spaziatura dei fori è standard. Su adamhall.com è possibile trovare un’ampia scelta di ruote
POLSKI ITALIANO
简体中文 繁體中文
56

FUNZIONAMENTO
NOTA:
il logo LD Systems appare brevemente sul display non appena l’altoparlante viene collegato correttamente all’alimentazione e acceso. Tutte le
impostazioni (ad es. preset e ritardo) vengono ripristinate nella modalità in cui si trovavano prima di spegnere l’altoparlante. L’altoparlante sarà
pronto per l’uso una volta completato questo processo, che solitamente dura un secondo.
DISPLAY MENU PRINCIPALE
Il display principale viene attivato durante il normale funzionamento. Mostra l’impostazione del volume master, il preset attivo dell’altoparlante e i
livelli di ingresso dei canali 1 e 2 con visualizzazione del picco (v. figura). Ridurre il livello di uscita del dispositivo sorgente (ad es. mixer) se il picco
mostra che il segnale di ingresso è troppo alto.
Controllo volume
Preset altoparlante
Livello di ingresso con visualizzazione di picco canale 1
Livello Picco
VOLUME
Dal menu principale, è possibile regolare il volume agendo direttamente sull’encoder a rotazione/pressione VOLUME / PUSH FOR MENU da -60 a +10
dB. Quando si ruota l’encoder, il display cambia automaticamente passando al simbolo corrispondente (v. figura sotto). Il menu principale riappare
automaticamente dopo circa 20 secondi di inattività. Premendo subito l’encoder il display passa immediatamente al menu principale.
IMPOSTAZIONI AUDIO (AUDIO)
Premere l’encoder a rotazione/pressione per accedere al menu principale, quindi ruotare l’encoder per selezionare la voce di menu AUDIO (sfondo
scuro). Premere nuovamente l’encoder per accedere al sottomenu, quindi ruotare l’encoder per selezionare la voce di sottomenu desiderata.
Confermare la selezione premendo l’encoder.
Livello di ingresso con visualizzazione di picco canale 2
ENGLISHFRANCAIS
DEUTSCH
ESPAÑOL
POLSKIITALIANO
Fare riferimento alla tabella sottostante per le voci di sottomenu e le opzioni delle impostazioni corrispondenti.
IMPOSTAZIONI (Per modicare il valore o lo stato = ruotare l’encoder, per confermare la modica del valore o dello stato = premere l’encoder)
MAIN MENU Tornare al menu principale
PRESET Selezione del preset dell’alto-
parlante
DELAY Ritardo del segnale audio per incrementi di 0,32 ft no a 32 ft (0 ft = OFF, display in metri e piedi)
POLARITY Imposta la polarità NORMAL Polarità normale
Nel sottomenu, selezionare MAIN MENU e premere l’encoder per tornare al menu principale. Nel sottomenu, selezionare HOME e premere
l’encoder per confermare la selezione e tornare al menu principale. Il menu principale viene visualizzato automaticamente dopo circa 20 secondi di
inattività.
80 Hz Filtro passa basso a 80 Hz
100 Hz Filtro passa basso a 100 Hz. Ottimale per la combinazione con gli
altoparlanti ICOA in modalità SATELLITE
120 Hz Filtro passa basso a 120 Hz
CARDIOID Preset per la congurazione di due subwoofer ICOA dello stesso
modello del sistema cardioide. Ruotare il subwoofer con il preset
cardioide di 180° e posizionarlo accanto al subwoofer principale.
Quindi selezionare il preset dell’altoparlante a 100 Hz nel subwoofer
principale. Il tempo del ritardo, la polarità e il volume dei due subwoofer devono tutti essere impostati nello stesso modo.
INVERTED Polarità invertita
简体中文繁體中文
57
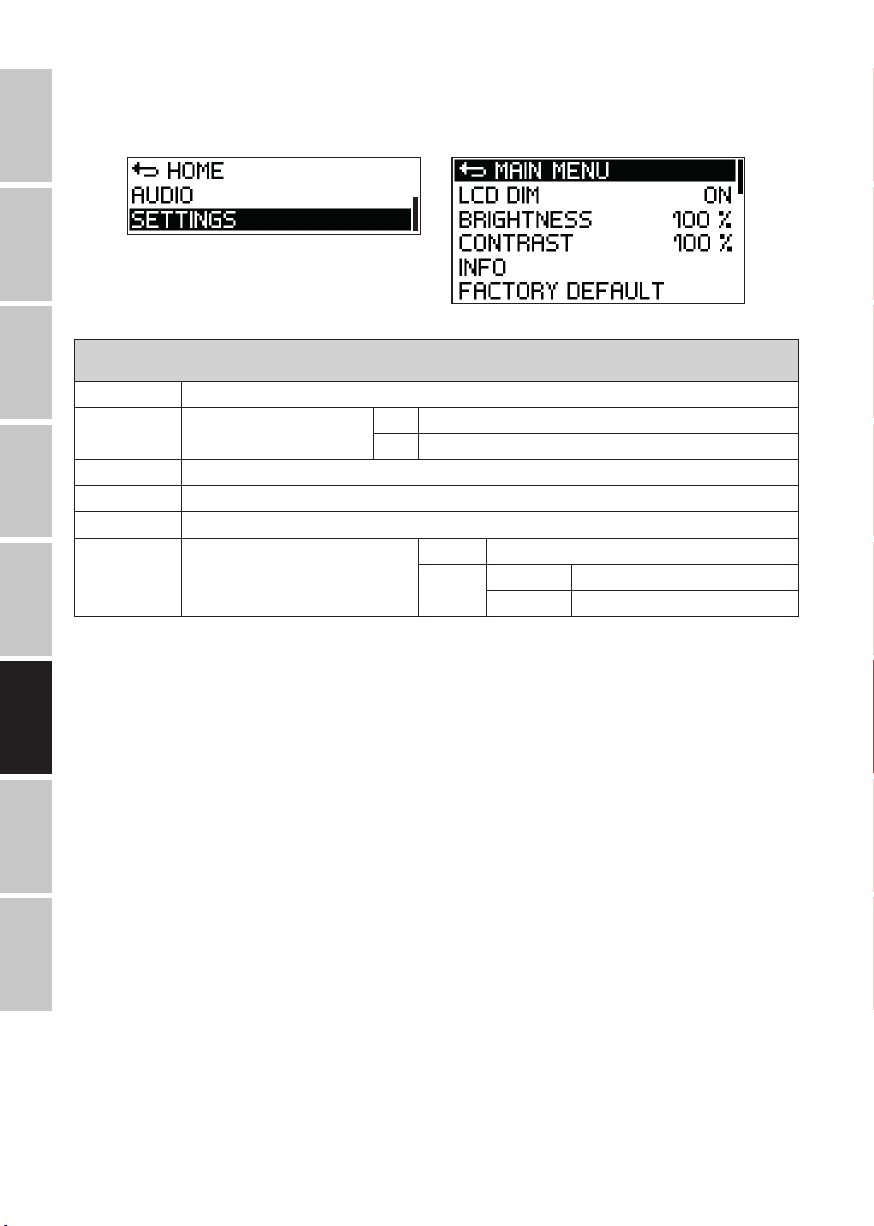
IMPOSTAZIONI DI SISTEMA (SET TINGS)
Premere l’encoder a rotazione/pressione per accedere al menu principale, quindi ruotare l’encoder per selezionare la voce di menu SETTINGS
(sfondo scuro). Premere nuovamente l’encoder per accedere al sottomenu, quindi ruotare l’encoder per selezionare la voce di sottomenu
desiderata. Confermare la selezione premendo l’encoder.
DEUTSCHENGLISH FRANCAIS
Fare riferimento alla tabella sottostante per le voci di sottomenu e le opzioni delle impostazioni corrispondenti:
IMPOSTAZIONI (Per modicare il valore o lo stato = ruotare l’encoder, per confermare la modica del valore o dello stato o richiedere informazi-
oni = premere l’encoder)
MAIN MENU Tornare al menu principale
LCD DIM Regolazione automatica della
ESPAÑOL
BRIGHTNESS Impostare la luminosità del display (0-100%)
CONTRAST Impostare il contrasto del display (0-100%)
INFO Visualizzazione del numero del modello e della versione del software
FACTORY DEFAULT Ripristinare le impostazioni di fabbrica
POLSKI ITALIANO
Nel sottomenu, selezionare MAIN MENU e premere l’encoder per tornare al menu principale. Nel sottomenu, selezionare HOME e premere
l’encoder per confermare la selezione e tornare al menu principale. Il menu principale viene visualizzato automaticamente dopo circa 20 secondi di
inattività.
luminosità del display
(AUDIO + SETTINGS)
ON La luminosità del display viene ridotta dopo circa 20 secondi di inattività
OFF La regolazione automatica della luminosità del display non è attiva
CANCEL Annullare la reimpostazione
REIMPOSTARE
CONFERMI? SÌ Esegui reimpostazione
CANCEL Annullare la reimpostazione
简体中文 繁體中文
58

CARDIOID SET-UP
Il preset CARDIOIDE dell’altoparlante è una programmazione DSP complessa che consente di ottenere un diagramma di direzionalità reniforme
(direzionalità del suono cardioide) combinando due subwoofer LD ICOA dello stesso modello.
Rispetto alle normali impostazioni dei subwoofer, questa configurazione offre i seguenti vantaggi:
• Attenuazione inversa fino a 20 dB
• Riproduzione dei bassi più precisa nell’area di ascolto
• Prevenzione dei riflessi indesiderati dalle pareti posteriori
• Riduzione del suono diffuso negli ambienti
• Eliminazione di fastidiose frequenze dei bassi sul palco
• Pattern sonoro differenziato per la diffusione sonora sul palco (monitoraggio)
• Riduzione del feedback con i microfoni sul palco
Come da illustrazione, posizionare i due subwoofer affiancati. Il subwoofer con il preset cardioide deve essere rivolto all’indietro (v. figura sotto).
Selezionare il preset da 100 Hz per il subwoofer principale rivolto in avanti e assicurarsi che il ritardo, la polarità e il volume siano impostati
nello stesso modo per entrambi i subwoofer.
ENGLISHFRANCAIS
DEUTSCH
PRESET 100 Hz
COSA S IGNIFICA L D SYSTEMS DY NX® DSP?
DSP è l‘acronimo di digital signal processing (elaborazione digitale del segnale). DynX® comprende il limitatore, l’equalizzatore, il compressore e il filtro passa basso. L’elaborazione digitale del suono garantisce la riproduzione ottimale
dei bassi, con la massima chiarezza, e protegge il subwoofer dal sovraccarico.
COSA F A ESATTAMEN TE DYNX® DSP ?
Il limitatore protegge l’altoparlante e previene la distorsione causata dal sovraccarico. Il subwoofer consente al
sistema di funzionare con una pressione sonora generale più elevata, dal momento che i picchi estremi di segnale
vengono limitati in automatico. In questo modo, non c’è bisogno di abbassare il volume master. L’equalizzatore
multibanda gestisce tutta la gamma dei bassi e ottimizza il suono generale del subwoofer.
PRESET CARDIOIDE
Angolo di dispersione
ESPAÑOL
POLSKIITALIANO
简体中文繁體中文
59

ESEMPI DI CABLAGGIO
DEUTSCHENGLISH FRANCAIS
PRESET SAT PRESET SAT
ESPAÑOL
POLSKI ITALIANO
简体中文 繁體中文
INPUT __1
INPUT __1
1__ INPUT __2
THRU __1 THRU __ 2
PRESET 100 Hz
PRESET SATPRESET SAT
INPUT __1INPUT __1
60
PRESET 100 Hz
THRU __1THRU __1
INPUT __1 INPUT __1
PRESET 100 Hz

ACCESSORI OPZIONALI
LDICOASUB15PC – custodia protettiva per ICOA SUB 15 A
LDICOASUB18PC – custodia protettiva per ICOA SUB 18 A
SPECIFICHE TECNICHE
510 x 598 x 552 mm LDICOASUB15A LDICOASUB18A
Tipologia di prodotto: Subwoofer PA
Tipo: attivo
Woofer grande: 15" 18"
Woofer grande: 381 mm 457,2 mm
Magnete del woofer: Ferrite
Marchio woofer: personalizzato
Bobina mobile woofer: 3" 4"
Bobina mobile woofer: 76,5 mm 100 mm
Amplificatore: Classe D
Potenza (RMS): 400 W 600 W
Potenza (picco): 1600 W 2400 W
Risposta in frequenza: 36 Hz – dipendente dal preset 29 Hz – dipendente dal preset
SPL max (picco): 131 dB 133 dB
Circuiti di protezione: limitatore di picco, limitatore RMS, limitatore di escursione, surriscaldamento, sovratensione, sovracor-
Impedenza ingresso: 18 kOhm
Sensibilità ingresso: 0,3 V
Elementi di controllo: interruttore on/off, encoder a rotazione/pressione
Elementi del display: display LC retroilluminato
Ingressi di linea: 2
Connettori ingressi in linea: prese combinate XLR/jack da 6,3mm (bilanciate)
Uscite di linea: 2
Connettori uscita di linea: XLR
Frequenza di campionamento
convertitore AD/DA:
Risoluzione convertitore AD/DA: 24 bit
Alimentazione: SMPS
Tensione di esercizio: 100 V–240 V AC 50–60 Hz
Fusibile: T6.3AL 250 V T8AL 250 V
Consumo energetico: 675 W
Temperatura ambiente (in
esercizio):
Umidità relativa: <60% (senza condensa)
Materiale alloggiamento: multistrato da 18 mm
Design alloggiamento: bass reflex
rente
48 kHz
0 - 40°C
ENGLISHFRANCAIS
DEUTSCH
ESPAÑOL
POLSKIITALIANO
简体中文繁體中文
61
Flangia di installazione per l’asta di
estensione:
Dimensioni (L x H x P): 510 x 598 x 552 mm 626 x 672 x 637 mm
Peso: 32,5 kg 44,3 kg
Accessori inclusi: cavo di alimentazione
DEUTSCHENGLISH FRANCAIS
Caratteristiche aggiuntive: 4 maniglie - griglia frontale robusta - impilabile - DSP con 4 preset,
filettatura interna M20
Funzione di ritardo e polarità regolabile
DICHIARAZIONI DEL PRODUTTORE
GARANZIA DEL PRODUTTORE E LIMITAZIONE DI RESPONSABILITÀ
Le nostre attuali condizioni di garanzia e la limitazione di responsabilità sono consultabili alla pagina: https://cdn-shop.adamhall.com/media/pdf/
MANUFACTURERS-DECLARATIONS_LD_SYSTEMS.pdf. In caso di assistenza, rivolgersi a Adam Hall GmbH, Adam-Hall-Str. 1,
61267 Neu Anspach / E-mail Info@adamhall.com / +49 (0)6081 / 9419-0.
CORRETTO SMALTIMENTO DEL PRODOTTO
(In vigore nell‘Unione Europea e in altri Paesi europei in cui si attui la raccolta differenziata) Questo simbolo apposto sul prodotto o sui relativi
ESPAÑOL
POLSKI ITALIANO
documenti indica che, per evitare danni all‘ambiente e alle persone causati da uno smaltimento incontrollato dei rifiuti, alla fine del suo
ciclo di vita l‘apparecchio non deve essere smaltito insieme ai normali rifiuti domestici. Il prodotto deve quindi essere smaltito separatamente da
altri rifiuti e riciclato nell‘ottica dell‘incentivazione di cicli economici sostenibili. I clienti privati possono richiedere informazioni sulle possibilità di
smaltimento ecosostenibile al rivenditore presso il quale è stato acquistato il prodotto o presso le autorità regionali competenti. I clienti aziendali
devono invece contattare il proprio fornitore e controllare le eventuali condizioni contrattuali inerenti allo smaltimento degli apparecchi. Questo
prodotto non deve essere smaltito assieme ad altri rifiuti industriali.
CONFORMITÀ CE
Con la presente Adam Hall GmbH dichiara che questo prodotto soddisfa le seguenti direttive (ove pertinente):
Direttiva R&TTE (1999/5/CE) e RED (2014/53/UE) da giugno 2017
Direttiva bassa tensione (2014/35/CE)
Direttiva CEM (2014/30/UE)
RoHS (2011/65/UE)
La dichiarazione di conformità completa è reperibile al sito www.adamhall.com.
Per ulteriori informazioni è inoltre possibile scrivere a info@adamhall.com.
DICHIARA ZIONE CE DI CONFORMITÀ
Adam Hall GmbH dichiara che questo tipo di apparecchiature radio è conforme alla direttiva 2014/53/UE.
Il testo integrale della dichiarazione di conformità UE è disponibile al seguente indirizzo
Indirizzo Internet: www.adamhall.com/compliance/
简体中文 繁體中文
62

简体中文
购买我们的产品是您正确的选择!
本产品在极高的质量要求下研发制造,可确保长年平稳运作。LD Systems享誉全球、经验丰富,是一家高品质音频设备制
造商。请仔细阅读这本使用说明书,以便您能尽快以最佳方式使用LD Systems的产品。
关于LD SYSTEMS的更多信息请访问我们的网站WWW.LD-SYSTEMS.COM
安全须知
1.请仔细通读这本使用说明书。
2.请将所有信息和说明妥善保存。
3.请按照说明中的指示进行操作。
4.请注意所有的警告提示。请勿移除设备上的安全提示或其它信息。
5.请按照说明中规定的方法使用本设备。
6.请将设备放置在稳固、合适的三脚架或固定装置上(固定安装方式)。确保墙面支架安装正确,安全牢固。确保本设备安
装牢固,不会滑落。
7.进行安装时请注意本国适用的安全规定。
8.请勿在暖气、储热器、锅炉及其它热源附近安装和运行本设备。确保本设备安装后能够充分散热冷却。
9.请勿将任何火源(如燃烧的蜡烛)放置在本设备上。
10.请勿堵塞通风口。
11. 务请与设备周围和上方至少保持 20 厘米的距离。
12.请勿靠近水源运行本设备。设备不得接触可燃性物质、液体和气体。避免阳光直射!
13.确保不会有水滴入、喷入设备。请勿将盛有液体的容器(如花瓶、水杯等)放置在设备上。
14.确保不会有物体落入设备。
15.仅使用制造商推荐和规定的配件操作本设备。
16.请勿打开、改动设备。
17.设备接线后请检查所有线路,防止诸如因绊倒等引起的损坏或意外事故发生。
18.运输过程中务必确保设备不会掉落,避免造成财物及人身损伤。
19.如果您的设备出现功能故障,液体或物体落入设备内部,或者设备受到其它损坏,请立即关闭设备,并切断电源(若设
备正在运行)。本设备只允许由授权的专业人员进行维修。
20.请使用干布擦拭设备。
21.请遵守本国适用的所有废弃物处理法律。处理包装物时请将塑料与纸张及纸板分类。
22.请勿将塑料袋放置在儿童接触范围内。
23.请注意,在未经合规负责方明确批准的情况下对本设备进行变更或修改,可能导致用户的设备操作权限无效
对于带电源线的设备
24.注意:如果设备的电源线带有接地保护插头,则必须将其连接到接地插座上。禁止使电源线的接地线失效。
25.请勿在温度急剧变化后立即开启设备(如运输后)。湿气和冷凝水会损坏设备。请在设备达到室温后再开启。
26.设备连接电源之前,请先检查电网的电压和频率是否与设备上标明的数值相符。如果设备配有电压选择开关,请仅在
设备参数与电网参数相符的情况下将设备连接电源。如果设备随附的电源线或适配器与您的电源插座不匹配,请联系电
工 。
27.请勿踩踏电源线。特别应确保电源插座、适配器以及设备插孔处的电线不得弯折。
28.设备接线时确保能够容易接触到电源线和适配器。不使用或要清洁设备时,务必断开电源。断电时应握住插头或适配
器拔出插座,而不要拉扯电线。严禁湿手触摸电线和适配器。
29.尽量避免快速连续开关设备,否则可能会影响设备的使用寿命。
30.重要提示:更换保险丝时请使用型号和电流值相同的保险丝。如果保险丝反复被熔断,请联系授权服务中心。
31.为确保设备完全断电,请将电源线或适配器从插座中拔出。
32.如果设备的电源插头带有锁扣,必须在拔出插头之前先解锁。但这也会使设备在电源线被拉扯时可能滑动掉落,由此
导致人身或其它损伤。因此请谨慎敷设电线。
33.存在雷击危险或长时间不使用设备时,请将电源线和适配器拔出插座。
34.身体,感官或精神能力有限或缺乏经验和知识的人(包括儿童)不得使用该装置。
35.必须指示儿童不要使用该设备。
36.如果本机电源线损坏,请勿使用本机。必须使用授权服务中心的适当电缆或组件更换电源线。
ENGLISHFRANCAIS
DEUTSCH
ESPAÑOL
POLSKIITALIANO
简体中文繁體中文
注意
禁止移除盖板,否则存在触电危险。设备内部的部件不得由用户自行修理或维护。仅
允许具备资格的服务人员进行维护修理工作。
带闪电符号的等腰三角形警告设备内部存在未绝缘的危险电压,可能会引起触电。
带感叹号的等腰三角形表示重要的操作和维护说明。
63

警告!本设备可用于最高海拔2000米的高度。
警告!本设备不适用于热带气候地区。
DEUTSCHENGLISH FRANCAIS
注意音频设备的高音量!
本设备适用于专业用途。本设备商用时,应遵守本国适用的事故预防性规定和准则。作为制造商,Adam Hall公司在法律
上有义务明确提醒您可能存在的健康风险。过高的音量和长时间强音负荷会导致听力受损:使用本产品时可能产生很高
的声压级(SPL),会造成音乐人、工作人员和听众受到不可逆转的听力损伤。请避免长时间
受到音量高于90dB的负荷。
ESPAÑOL
POLSKI ITALIANO
简体中文 繁體中文
64

属性
LDICOASUB15A
• 15 英寸低音炮,强效低音可达 36 赫兹,
• 采用高效数字 D 类功率放大器,最大声压级为 131 分贝, 最大功率达 1600 瓦
• 采用优化的低音反射孔
• DynX DSP 具备四个应用预设(三个交叉频率,心形模式)
• 可切换信号极性和可调线路延迟(长达 32.8 英尺)
• 2 × 组合输入(插孔/XLR), 2 × XLR 输出
• 坚固的 0.71 英寸胶合板外壳,带有坚固的前格栅
• 四个橡胶涂层铝制手柄,方便搬运
• 带四个凹槽,方便安全堆叠
• M20 螺栓可用于连接延长杆架
LDICOASUB18A
• 18 英寸低音炮,强效低音可达 29 赫兹
• 采用高效数字 D 类功率放大器,最大声压级为 133 分贝, 最大功率达 2400 瓦
• 采用优化的低音反射孔
• DynX DSP 具备四个应用预设(三个交叉频率,心形模式)
• 可切换信号极性和可调线路延迟(长达 32.8 英尺)
• 2 × 组合输入(插孔/XLR), 2 × XLR 输出
• 坚固的 0.71 英寸胶合板外壳,带有坚固的前格栅
• 四个橡胶涂层铝制手柄,方便搬运
• 带四个凹槽,方便安全堆叠
• M20 螺栓可用于连接延长杆架
连接、控制和显示元件
ENGLISHFRANCAIS
DEUTSCH
ESPAÑOL
POLSKIITALIANO
1 2
1
电源插座和保险丝座
带集成保险丝座的 IEC 电源插座。 交付时包含适用的电源线。
重要说明: 只能用相同类型和相同值的保险丝进行更换。 请注意外壳上的标示内容。 如果保险丝反复跳闸,请联系授权
服务中心。
2
电源
开/关切换。 扬声器应始终是信号链中最后被打开的设备,也应该是第一个被关闭的设备。
简体中文繁體中文
65

3
LC 显示屏
多功能图形 LC 显示屏,用于显示主音量、DSP 预置和主菜单
中通道 1 和通道 2 的输入电平。 “编辑”菜单中会显示菜单项、
子菜单项和相应的编辑选项。
4
音量 / 按压唤醒菜单
在主菜单中,可以通过转动旋转-按压编码器来调节主音量。
按压旋转-按压编码器即可访问“编辑”菜单。 通过旋转-按压
编码器可浏览“编辑”菜单,调整系统设置,并更改相应菜单项
中的值。
5
输入 1–2
带 XLR / 插孔组合插座的平衡通道 1 和 2 线路输入,所连接
的立体声信号在内部汇总为单声道。
6
直通 1–2
带有公头 3 针 XLR 插座的平衡线路输出,用于转发线路输
入信号。
DEUTSCHENGLISH FRANCAIS
3
5
6
4
ESPAÑOL
脚轮组件
低音炮的背面可安装四个运输脚轮(可选件),每个脚轮都配有四个出厂紧固螺钉和凹槽。 孔间距标准化。 可通过
adamhall.com 查看各种可选脚轮
POLSKI ITALIANO
简体中文 繁體中文
66

操作
注意:
将扬声器正确连接到电源并打开后,LD Systems 徽标就会短暂显示在显示屏上。 所有设置(如预设置和延迟)恢复到扬
声器关闭前的状态。 这个过程完成后,扬声器将准备就绪,通常需要一秒钟。
主菜单显 示屏
在常规操作中,主显示屏启用。 它可显示主音量设置,启用的扬声器预设置,通道 1 和通道 2 输入电平的峰值显示(见图)
。 如果峰值显示显示输入信号过高,请降低源设备的输出电平(例如混频器)。
音量控制
扬声器预设置
通道 1 的输入电平(带峰
值显示)
电平 峰值
音量
在主菜单中,可以通过转动旋转-按压编码器(音量/按压菜单)来调节音量,范围是从 -60 分贝到 +10 分贝。 转动编码器
时,显示内容会自动改变为相应的符号(请参见下图)。 闲置状态达约 20 秒后,主菜单将自动重新出现。 按下编码器即可
将显示切换到主菜单。
通道 2 的输入电平(带峰
值显示)
ENGLISHFRANCAIS
DEUTSCH
音频设置 (AUDIO)
按下旋转-按压编码器进入主菜单,然后旋转编码器选择“AUDIO”菜单项(深色背景)。 再次按压编码器访问子菜单,然后
旋转编码器选择所需的子菜单项。 按压编码器确认选择。
有关子菜单项及相关设置选项,请参阅下表。
设置 (更改值或状态 = 转动编码器,确认值或状态更改 = 按压编码器)
MAIN
MENU(主
菜单)
PRESET(预
设置)
DELAY(延迟)
POLARITY
(极性)
在子菜单中选择 MAIN MENU(主菜单),然后按压编码器返回主菜单。 在主菜单中选择 HOME(主页),然后按压
编码器确认选择并返回主菜单。 闲置约 20 秒后,将自动重新显示主菜单。
返回主菜单
扬声器预设置选项 80 Hz 低通滤波器设置值为 80 赫兹
100 Hz 低通滤波器设置值为 100 赫兹. 在 SATELLITE 模
120 Hz 低通滤波器设置值为 120 赫兹
CARDIOID
(心形)
音频信号的时间延迟(0.32 英尺至 32 英尺,0 英尺 = 关闭,显示单位为米和英尺)
设置极性 NORMAL
(正向)
INVERTED(反向)
式下与ICOA扬声器组合的最佳选择
用于将同一型号的两个 ICOA 低音炮预设置为心形
系统。 将预设为心形的低音炮旋转 180°,并将其放在
主低音炮旁边。 然后在主低音炮中选择扬声器预设
置为 100 赫兹。 两个低音炮的延迟时间、极性和音量
设置都必须相同。
正态极性
反向极性
ESPAÑOL
POLSKIITALIANO
简体中文繁體中文
67

系统设置 (SETTINGS)
按下旋转-按压编码器进入主菜单,然后旋转编码器选择“SETTINGS(设置)”菜单项(深色背景)。 再次按压编码器访问子
菜单,然后旋转编码器选择所需的子菜单项。 按压编码器确认选择。
DEUTSCHENGLISH FRANCAIS
有关子菜单项及相关设置选项,请参阅下表:
设置 (更改值或状态 = 转动编码器,确认值或状态更改或请求信息 = 按压编码器)
MAIN
MENU
(主菜单)
LCD DIM
(LCD 变暗)
ESPAÑOL
BRIGHTNESS(亮度)
CONTRAST(
对比度)
INFO(信息)
FACTORY
POLSKI ITALIANO
DE FAULT
(出厂设置)
在子菜单中选择 MAIN MENU(主菜单),然后按压编码器返回主菜单。 在主菜单中选择 HOME(主页),然后按压编
码器确认选择并返回主菜单。 闲置约 20 秒后,将自动重新显示主菜单。
返回主菜单
显示屏自动变暗 ON(开) 闲置约 20 秒后,显示屏自动变暗。
OFF
(关)
设置显示屏亮度 (0-100%)
设置显示屏对比度 (0-100%)
显示型号和软件版本
恢复出厂设置
(AUDIO + SETTINGS)(音频 + 设置)
显示屏自动变暗功能已关闭
CANCEL(
取消)
RESET
(重置)
取消重置
SURE?(
确定吗?
) YES(确
定)
CANCEL(
取消)
执行重置
取消重置
简体中文 繁體中文
68

CARDIOID SET-UP(心形设置)
扬声器心形预设置是复杂的 DSP 设计,通过两个相同型号的 LD ICOA 低音炮组合实现肾形辐射模式(心形声音辐射)。
与传统的低音炮设置相比,它具有以下优点:
• 反向衰减高达 20 分贝
• 在聆听区域中获得更精确的低音再现
• 防止后壁产生不必要的反射
• 减少房间中的漫反射声音
• 消除舞台上恼人的低音频率
• 用于舞台扩声(监控)差异化声音模式
• 减少舞台麦克风产生的反馈
如图所示,将两个低音炮放在一起,将心形预设置的低音炮反向放置(参见下图)。 为主低音炮选择预设置 100 赫兹,确保
两个低音炮的延迟时间、极性和音量设置相同。
ENGLISHFRANCAIS
DEUTSCH
PRESET 100 Hz
(预设置为 100 Hz)
什么是 LD SYSTEMS DYNX® DSP?
DSP 是数字信号处理的英文缩写。 DynX® 包括限制器、均衡器 (EQ)、压缩器和低通滤波器。 采
用数字信号处理可确保最佳的音频低音再现,实现最大清晰度,同时防止低音低音炮过载。
DYNX®DSP 究竟有什么作用?
限制器功能可保护扬声器并防止过载引起的失真。 因为极端信号峰值会自动受到限制,而不必降
低主音量,所以低音炮允许系统在整体较高的声压下运行。 多频段均衡器可处理整个低音范围,
并优化低音炮的整体声音。
PRESET CARDIOID
(预设置为心形)
扩散角度
ESPAÑOL
POLSKIITALIANO
简体中文繁體中文
69

布线/接线示例
DEUTSCHENGLISH FRANCAIS
PRESET SAT
(预设置为 SAT)
PRESET SAT
(预设置为 SAT)
ESPAÑOL
POLSKI ITALIANO
简体中文 繁體中文
PRESET SAT
(预设置为 SAT)
INPUT __1
1__ INPUT __2
THRU __1 THRU __ 2
PRESET 100 Hz
(预设置为 100 Hz)
INPUT __1
PRESET SAT
(预设置为 SAT)
INPUT __1INPUT __1
70
PRESET 100 Hz
(预设置为 100 Hz)
INPUT __1 INPUT __1
THRU __1THRU __1
PRESET 100 Hz
(预设置为 100 Hz)

可选配件
LDICOASUB15PC – ICOA SUB 15 A 防护罩
LDICOASUB18PC – ICOA SUB 18 A 防护罩
技术规格
商品号: LDICOASUB15A LDICOASUB18A
产品类型: PA 低音炮
类型: 现用
大型低音炮: 15" 18"
大型低音炮: 381 mm 457,2 mm
低音炮磁铁: 铁氧体
低音炮商标: 定制式
低音扬声器音圈: 3" 4"
低音扬声器音圈: 76,5 mm 100 mm
放大器: D 类
功率(额定功率): 400 W 600 W
功 率( 峰 值 ): 1600 W 2400 W
频率响应: 36 Hz – 预设置值 29 Hz – 预设置值
最大 声压级(峰值): 131 dB 133 dB
防护电路: 峰值限制器、RMS 限制器、振幅限制器、过热、过电压、过电流
输入阻抗: 18000 欧姆
输入灵敏度: 0.3 V
控制元件: 开/关切换,旋转-按压编码器
显示元件: 背光液晶 LC 显示屏
线路输入: 2
线路输入连接: XLR/6,3 mm 插孔组合式插座(平衡)
线路输出: 2
线路输出连接: XLR
AD/DA 转换器采样频率: 48 kHz
AD/DA 转换器分辨率: 24 比特
电源: SMPS
工作电压: 100 V–240 V AC 50–60 Hz
保险丝: T6.3AL 250 V T8AL 250 V
能量功耗: 675 W
环境温度(运行中): 0 - 40°C
相对湿度: < 60%(无冷凝)
外壳材料: 0.71 英寸多路通信
外壳设计: 低音反射
延长杆的安装法兰: M20 内螺纹
尺寸(宽×高×深): 510 x 598 x 552 mm 626 x 672 x 637 mm
重量: 32,5 kg 44,3 kg
所含配件: 电源线
附加功能: 4 个手柄 - 坚固的前格栅 - 可堆叠 - DSP 具备四个应用预设,
延迟功能,极性可调
ENGLISHFRANCAIS
DEUTSCH
ESPAÑOL
POLSKIITALIANO
简体中文繁體中文
71

制造商声明
制造商质保与责任范围
我们当前适用的质保条款和责任范围请参见:https://cdn-shop.adamhall.com/media/pdf/MANUFACTURERS-DECLARATIONS_LD_SYSTEMS.pdf。 有关售后服务事宜请联系:Adam Hall GmbH,Adam-Hall-Str. 1
,61267 Neu Anspach / 电子邮件:Info@adamhall.com / +49 (0)6081 / 9419-0。
DEUTSCHENGLISH FRANCAIS
ESPAÑOL
POLSKI ITALIANO
废弃处理本产品的正确方法
(适用于欧盟国家以及其他采取垃圾分类的欧洲国家)产品或其附属文件上的这一符号表示,该设备在使用期结束
后不得与普通的生活垃圾一同丢弃,避免在不受控制的废弃物处理过程中造成环境或人身损害。 请将本产品与其它
废弃物分开处理,使其得到回收,促进可持续性经济循环。 作为个人,您可通过出售该产品的经销商或通过相应的当地政
府机构获取环保处理废弃物的相关信息。 作为商业用户,请联系您的供货商,必要时请查看协议中规定的设备废弃处理条
件。 本产品不得与其它商用垃圾一同丢弃。
注意: 本设备已经过测试,符合 FCC 规则第 15 部分对 B 类数字设备的限制。 这些限制旨在提供合理防护,防止居住场所
的有害干扰。 该设备会产生、使用和发射射频能量,如果不按照使用说明进行安装和操作,可能会对无线电通信产生有害干
扰。 但是,不保证特定装置中不会出现干扰。 如本设备确实对无线电或电视机接收信号造成有害干扰(可以通过关闭和打
开设备来确定),建议用户尝试使用以下一种或多种措施来消除干扰:
- 调整接收天线的方向或位置。
- 扩大设备与接收器之间的距离。
- 将设备电源线连接到与接收天线不同的电路插座上。
- 咨询经销商或有经验的无线电/电视机技术人员以获得帮助。
CE符合性声明
Adam Hall GmbH公司在此声明,本产品符合以下指令(如适用):
无线设备指令R&TTE(1999/5/EG),2017年6月起由RED(2014/53/EU)取代
低电压指令(2014/35/EU)
电磁兼容指令(2014/30/EU)
RoHS(2011/65/EU)(在电子电气设备中限制使用某些有害物质指令)
完整的符合性声明请参见www.adamhall.com。
您也可以发送邮件至info@adamhall.com询问信息。
EC符合性声明
Adam Hall GmbH有限公司特此声明,该无线电设备类型符合指令2014/53/EU。
要查看完整的欧盟符合性声明文档,请访问以下
网址:www.adamhall.com/compliance/
简体中文 繁體中文
72

繁體中文
首先祝賀您做出正確的選擇!
本設備依照最高品質標準開發製造,確保長期工作而無故障。LD系統充分體現出我們作為高品質音頻產品製造商所具備
之聲譽和長期的經驗。請仔細閱讀本操作說明書,讓您儘快掌控您新的LD系統之使用。
有關LD系統之更多資訊,請存取我們網站:WWW.LD-SYSTEMS.COM
安全注意事項
1.請仔細閱讀本手冊。
2.請將所有資訊和說明書妥善存放在安全之處。
3.請依照按照說明進行操作。
4.請注意所有警告事項。請勿從設備中去除任何安全說明或其他資料。
5.僅應依照設計用途使用本產品。
6.僅使用穩固、合適之三腳架(固定式安裝時)。確保牆壁式支架正確安裝並固定。確認設備牢固安裝,不會掉落。
7.在安裝期間應遵照您所在國家地區之安全法律規章。
8.請不要在靠近散熱器、電熱器、火爐或其他熱源處安裝或操作設備。確保設備的安裝方式,以便使其充分冷卻,並且不會
過 熱。
9.請不要將任何火源(例如:燃燒蠟燭)放置在設備上。
10.通風孔不得堵塞。
11.在裝置周圍和上方保持至少20公分距離。
12.請不要在水附近操作設備。請勿將本設備使用於接觸易燃材料、液體或氣體之處。應避免陽光直射!
13.確保不會有滴水或濺水進入裝置。請不要在設備上裝有液體的容器(例如:花瓶或飲用器皿)。
14.請確保不會沒有物體可以落入設備。
15.僅使用製造商建議和提供的配件。
16.請勿打開設備,請勿變動設備。
17.設備連接之後,請檢查所有線纜,防止造成損壞或發生事故,例如絆倒。
18.在運輸時,請注意確保設備不會掉落,否則可能造成設備損壞和人身傷害。
19.若您的設備無法正常工作、有液體進入設備或掉入異物,或者設備因為其他原因已經損壞,應立即將其關閉,並從電源
插座上拔下(若為啟用的裝置)。此設備僅應由授權人員進行修理。
20.僅應使用乾布擦拭清潔此設備。
21.應遵守您當地適用的一切處置法規。處理包裝時,請將塑膠和紙或紙板分開。
22.塑膠袋必須存放於孩童無法接觸到之處。
23.請注意,未經負責合規方明確批准的更改或修改可能會導致使用者操作裝置之權利無效。
對於附帶電源連接的設備
24.注意:若設備電源線帶有保護接點,則應將其連接到帶保護接地導體之電源插座。切勿禁用電源線之保護導體。
25.若設備受到嚴重溫度波動之影響(例如:在運輸之後),請勿立即開啟設備。濕氣和冷凝會損壞設備。在已達到室溫之
後,才開啟本設備。
26.在設備連接到電源插座之前,請先檢查電源的電壓和頻率是否與設備上顯示的數值相符。若設備上具有電壓選擇器開
關,僅當設備上的數值與電源值相符合之後,方可將設備連接到插座。若提供的電源線或附帶的電源變壓器不適合您的插
座,請與電子專業人員聯絡。
27.請勿踩踏電源纜線。確保帶電電纜不要扭結,特別是在電源插座和電源變壓器和設備插座之處。
28.設備接線時,應確保總是可以自由接入電源線或電源變壓器。不使用設備時,或者希望清潔設備時,應切斷設備電源。
應從插頭或電源變壓器上拔掉電源線和變壓器,不要從插座上拔下纜線。切勿用濕手觸碰電源線和電源變壓器。
29.如果可能的話,請盡量不要快速接通或切斷設備電源,否則會影響設備壽命。
30.重要提示:僅使用相同類型和額定值的保險絲來更換。若保險絲反覆燒斷,請聯絡授權服務中心。
31.若需將設備完全切斷電源,請將電源線或電源變壓器從牆壁插座上拔下。
32.若設備上配有可鎖定的電源連接器,僅當相應的設備插頭解鎖後,方可將其拔下。但是,在拉動電源線時會導致設備滑
落或傾倒,造成人員傷害或其他損壞之危險。請小心佈放纜線。
33.若存在閃電危險時,或者長時間不使用設備時,應從牆壁上插座斷開電源線和電源變壓器。
34.身體,感官或精神能力有限或缺乏經驗和知識的人(包括兒童)不得使用該裝置。
35.必須指示兒童不要使用該設備。
36.如果本機電源線損壞,請勿使用本機。必須使用授權服務中心的適當電纜或組件更換電源線。
注意
切勿取下蓋板,否則會有觸電危險。設備內沒有可由操作者修理或維護之部件。只有
合格之維修人員方可執行維護和維修作業。
ENGLISHFRANCAIS
DEUTSCH
ESPAÑOL
POLSKIITALIANO
简体中文繁體中文
帶有閃電圖示之等邊三角形警告標誌,表示設備內部具有未經絕緣的危險電壓,可能會導致觸電危險。
帶有驚嘆號之等邊三角形標誌,表明重要的操作和維護說明。
73

警告!本設備僅適合用於海拔高度不超過2000公尺之處。
警告!本設備不適合用於熱帶氣候。
DEUTSCHENGLISH FRANCAIS
注意:本設備為高音量音訊產品!
本設備用於專業用途。將本設備用於商業用途時,務必遵守您所在國家和地區相關事故防範法律法規。作為製造商,Adam
Hall有義務明確告知使用者可能面臨的健康損害風險。高音量及持續收聽可能會損傷聽力:使用本產品過程中,會產生很
高的聲壓,可能對藝術表演者、員工、觀眾之聽力產生不可逆的損傷。避免長時間暴露於90分貝以上的高音量電平環境。
ESPAÑOL
POLSKI ITALIANO
简体中文 繁體中文
74

摘要資訊
LDICOASUB15A
• 可作為強大低音的15吋超低音喇叭,頻率可達36赫茲(Hz)
• 最高聲壓級(SPL)為131分貝(dB)、尖峰功率為1600瓦特(Watt),歸功於高效的數位D類功率放大器
• 最佳化的低音回復孔
• 包含四種應用預設(三種交越頻率、心形模式)的DynX數位訊號處理(DSP)
• 可切換的訊號極性,以及最長可達32.8英尺的可調整線路延遲
• 2×並聯輸入(插口/XLR)、2×XLR輸出
• 結實的0.71吋膠合板外殼,具有堅固耐用的前散熱格柵
• 四個橡膠塗層的鋁材質把手,方便搬運
• 四個凹槽,以便於安全堆放
• 可附加延伸支架的M20螺紋
LDICOASUB18A
• 可作為強大低音的18吋超低音喇叭,頻率可達29赫茲(Hz)
• 最高聲壓級(SPL)為133分貝(dB)、尖峰功率為2400瓦特(Watt),歸功於高效的數位D類功率放大器
• 最佳化的低音回復孔
• 包含四種應用預設(三種交越頻率、心形模式)的DynX數位訊號處理(DSP)
• 可切換的訊號極性,以及最長可達32.8英尺的可調整線路延遲
• 2×並聯輸入(插口/XLR)、2×XLR輸出
• 結實的0.71吋膠合板外殼,具有堅固耐用的前散熱格柵
• 四個橡膠塗層的鋁材質把手,方便搬運
• 四個凹槽,以便於安全堆放
• 可附加延伸支架的M20螺紋
連線、控制和顯示元件
ENGLISHFRANCAIS
DEUTSCH
ESPAÑOL
POLSKIITALIANO
1 2
1
電源插座和保險絲座
符合國際電工委員會(IEC)標準的電源插座,具有整合式保險絲座。內含合適的電源線。
重要注意事項:僅可使用相同類型和數值的保險絲更換。請注意外殼的文字記載。如果保險絲反覆跳開,請與授權服務
中心連絡。
2
電源
開/關切換。喇叭應為訊號鏈中最後開啟的裝置,並為最先關閉的裝置。
简体中文繁體中文
75

3
液晶顯示器
3
4
多功能繪圖型液晶顯示器,可顯示主音量、數位訊號處理
(DSP)預設,以及主功能表聲道1和2的輸入大小。功能表
項目、子功能表項目和對應的編輯選項,顯示於編輯功能表。
4
音量 /按下以叫出 功能表
在主功能表中,轉動旋轉—按壓式編碼器可調整主音量。按下
旋轉—按壓式編碼器可存取編輯功能表。使用旋轉—按壓式
編碼器,可瀏覽編輯功能表、調整系統設定,以及變更各功能
表項目的數值。
5
5
輸入 1–2
平衡的聲道1和2線路輸入,具有XLR/插口並聯插座,已連
線的立體聲訊號在內部被匯集為單聲道。
6
接通 1–2
平衡的線路輸出,具有公3-pinXLR插座,可傳輸線路輸出
訊 號。
6
腳輪組件
重低音喇叭的背面經過設計,可附加四個選擇性搬運腳輪,每個腳輪配備四個工廠出貨的固定螺絲,並可嵌入。孔距已標
準化。可前往adamhall.com查看各種腳輪

操作
備 註:
一旦喇叭正確連接至電源並開啟,LD系統標誌將短暫出現在顯示器上。所有設定(如預設和延遲)將恢復為關閉喇叭之
前的狀態。喇叭在完成此過程之後即可使用,這通常只需一秒鐘。
主功能表 顯示器
主顯示器在正常操作時啟動。它顯示主音量設定、已啟用的喇叭預設,以及具有峰值顯示器的聲道1和2之輸入大小(如
圖)。如果峰值顯示器顯示輸入訊號太高,降低來源裝置的輸出等級(如混音器)
音量控制
喇叭預設
具有峰值顯示器聲道1的
輸入大小
等級 峰值
音量
在主功能表中,將旋轉—按壓式編碼器(功能表的音量/按壓)從-60轉動至+10分貝(dB),可直接調整音量。旋轉編碼
器時,顯示器自動變成對應的符號(如下圖)。主功能表將在閒置約20秒後自動重新出現。立即按下編碼器,將顯示器變
更為主功能表。
具有峰值顯示器聲道2的
輸入大小
ENGLISHFRANCAIS
DEUTSCH
音 訊 設 定( A U D I O )
按下旋轉—按壓式編碼器可存取主功能表,接著轉動編碼器可選取功能表AUDIO項目(深色背景)。再次按下編碼器可存
取子功能表,接著轉動編碼器可選取想要的子功能表項目。按下編碼器以確認選項。
關於子功能表項目和相關設定選項,請參考以下表格。
設定(變更數值或狀態=轉動編碼器,確認數值或狀態變更=按下編碼器)
MAIN
MENU
預設
DELAY
POLARITY
在子功能表中,選取MAINMENU並按下編碼器,以返回主功能表。在主功能表中,選取HOME並按下編碼器,以確
認該選項並返回主功能表。主功能表將在閒置約20秒後自動顯示。
返回主功能表
喇叭預設選項 80Hz 80赫茲(Hz)的低通濾波器
100Hz 100赫茲(Hz)的低通濾波器.在 SATELLITE 模式
下与ICOA扬声器组合的最佳选择
120Hz 120赫茲(Hz)的低通濾波器
CARDIOID 設定兩個相同型號的ICOA重低音喇叭,以預設為
心形系統。將預設為心形的重低音喇叭旋轉180°,
並將其置於主重低音喇叭旁。接著在主重低音喇叭
選取喇叭預設100赫茲(Hz)。兩個重低音喇叭的延
遲時間、極性和音量設定必須相同。
音訊訊號的時間延遲從0.32英尺提高至32英尺(0英尺=關閉,以公尺和英尺顯示)
設定極性 NORMAL 正常極性
INVERTED 反向極性
ESPAÑOL
POLSKIITALIANO
简体中文繁體中文
77
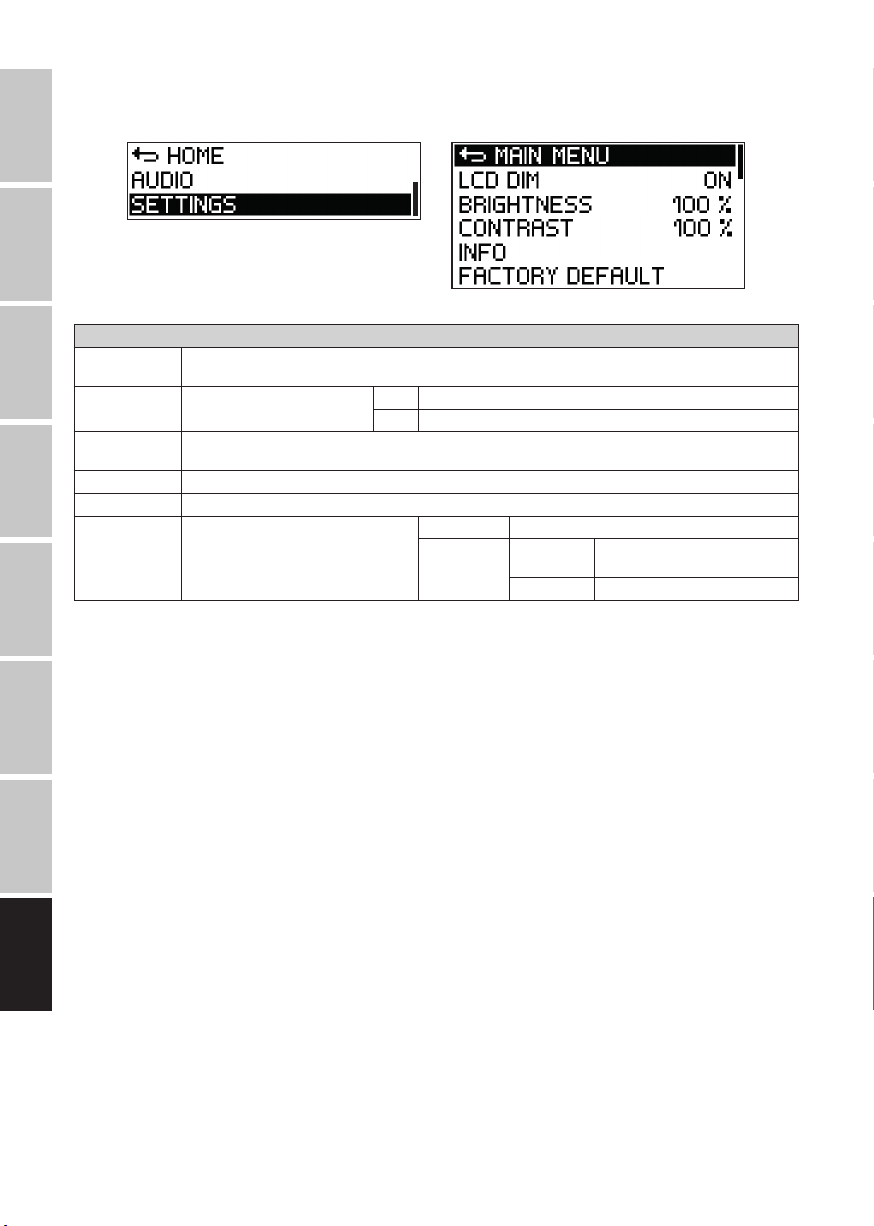
系統設定(SETTINGS)
按下旋轉—按壓式編碼器可存取主功能表,接著轉動編碼器可選取功能表SETTINGS項目(深色背景)。再次按下編碼器
可存取子功能表,接著轉動編碼器可選取想要的子功能表項目。按下編碼器以確認選項。
DEUTSCHENGLISH FRANCAIS
關於子功能表項目和相關設定選項,請參考以下表格:
設定(變更數值或狀態=轉動編碼器,確認數值或狀態變更或要求資訊=按下編碼器)
MAIN
MENU
LCD DIM
BRIGHT-
ESPAÑOL
NESS
CONTRAST
INFO
FACTORY
DE FAULT
POLSKI ITALIANO
在子功能表中,選取MAINMENU並按下編碼器,以返回主功能表。在主功能表中,選取HOME並按下編碼器,以確
認該選項並返回主功能表。主功能表將在閒置約20秒後自動顯示。
返回主功能表
顯示器自動變暗 ON 顯示器在閒置約20秒後變暗
OFF 關閉顯示器自動變暗
設定顯示器亮度(0–100%)
設定顯示器對比(0–100%)
顯示型號和軟體版本
重設為原廠預設值
(AUDIO+SETTINGS)
CANCEL 取消重設
RESET SURE?
YES
CANCEL 取消重設
執行重設
简体中文 繁體中文
78

CARDIOID設定
喇叭心形預設為複雜的數位訊號處理(DSP)程式設計,這讓腎形輻射方向圖(心形聲音輻射)能夠被相同型號的兩個LD
ICOA重低音喇叭組合完成。
相較於傳統的重低音喇叭設定,此設定提供下列優點:
• 反向衰減量高達20分貝(dB)
• 在聆聽區可獲得更精準的低音重現
• 防止來自後牆不想要的反射
• 降低室內的擴散音
• 消除舞台上惱人的低音頻率
• 讓舞台聲音加強(監控)有差異化的聲圖案
• 降低因舞台麥克風所產生的噪聲
如圖所示,將兩個重低音喇叭彼此並排放置,將具有心形預設的重低音喇叭向後(如下圖)。為向前的主重低音喇叭選取
100 赫茲(Hz)預設,並確認兩個重低音喇叭的延遲時間、極性和音量設定相同。
ENGLISHFRANCAIS
DEUTSCH
PRESET
100Hz
何謂 LD 系統 DYN X® DSP?
DSP是數位訊號處理的首字母縮寫。DynX®包括限制器、等化器(EQ)、音量壓縮器和低通濾波
器。數位訊號處理確保最佳音訊低音重現的最大清晰度,同時避免重低音喇叭過載。
DYNX® DSP 究竟有何作用?
限制器功能保護喇叭,並預防因過載所造成的失真。重低音喇叭讓系統可以在整體較高的聲壓時
操作,因為極端訊號峰值被自動限制,所以不必降低主音量。多頻帶等化器(EQ)處理整個低音範
圍,並將重低音喇叭的全音域最佳化。
PRESET
CARDIOID
頻散角度
ESPAÑOL
POLSKIITALIANO
简体中文繁體中文
79

鋪設纜線/配線範例
DEUTSCHENGLISH FRANCAIS
ESPAÑOL
POLSKI ITALIANO
PRESETSAT
PRESETSAT
INPUT __1
PRESETSAT
INPUT __1
1__ INPUT __2
THRU __1 THRU __ 2
PRESET100Hz
PRESETSAT
简体中文 繁體中文
80
INPUT __1INPUT __1
THRU __1THRU __1
INPUT __1 INPUT __1
PRESET100Hz PRESET100Hz

選擇性配件
LDICOASUB15PCICOASUB15A防護罩
LDICOASUB18PCICOASUB18A防護罩
技術規格書
貨 號: LDICOASUB15A LDICOASUB18A
產品類型: 廣播(PA)重低音喇叭
類 型: 使用中
大型低音喇叭: 15吋 18吋
大型低音喇叭: 381mm 457,2mm
低音喇叭磁鐵: 鐵氧磁體
低音喇叭品牌: 客製
低音喇叭音圈: 3吋 4吋
低音喇叭音圈: 76,5mm 100mm
放大器: D類
電源(有效值): 400瓦特(W) 600瓦特(W)
電源(峰值): 1600瓦特(W) 2400瓦特(W)
頻率響應: 36赫茲(Hz)依預設不同 29赫茲(Hz)依預設不同
最大聲壓級(峰值): 131分貝(dB) 133分貝(dB)
防護電路: 峰值限制器、有效值(RMS)限制器、振幅限制器、過熱、過量電壓、過量電流
輸入阻抗: 18千歐姆(kOhm)
輸入靈敏度: 0.3伏特(V)
控制元件: 開/關切換、旋轉—按壓式編碼器
顯示元件: 背光液晶顯示器
線路輸入: 2
線路輸入連線: XLR/0.24吋插口混合插座(平衡)
線路輸出: 2
線路輸出連線: XLR
類比數位/數位類比(AD/
DA)轉換器取樣頻率:
AD/DA轉換器解析度: 24位元
電源供應: 交換式電源(SMPS)
運轉電壓: 100V–240VAC50–60Hz
保險絲: T6.3AL250V T8AL250V
電力消耗: 675瓦特(W)
環境溫度(運作中): 0-40°C
相對溼度: <60%(無凝結)
外殼材質: 0.71吋多路通訊
外殼設計: 低音回復
延伸支架的安裝凸緣: M20內螺紋
尺寸(寬×高×深): 510x598x552mm 626x672x637mm
重 量: 32,5kg 44,3kg
內附配件: 電源線
其他功能: 4個把手—堅固耐用的前散熱格柵—可堆放—包含4種預設的DSP、
48千赫茲(kHz)
延遲功能和可調整的極性
ENGLISHFRANCAIS
DEUTSCH
ESPAÑOL
POLSKIITALIANO
简体中文繁體中文
81

製造商聲明
產品保固和責任限制
我們目前的保護條件和責任限制,請查閱:https://cdn-shop.adamhall.com/media/pdf/MANUFACTURERS-DECLARATIONS_LD_SYSTEMS.pdf。在服務情況下,請聯絡:AdamHallGmbH,Adam-Hall-Str.1,61267Neu
Anspach/電郵:info@adamhall.com/+49(0)6081/9419-0。
DEUTSCHENGLISH FRANCAIS
ESPAÑOL
POLSKI ITALIANO
本產品的之正確處置
(適用於歐盟和其他歐洲國家的垃圾分類系統)產品或相關文件上之此標誌表示此裝置不得在產品壽命結束時與一
般生活垃圾一同處置,應避免由於不受控制的廢棄物造成環境破壞或人身傷害。請將此產品獨立於其他垃圾加以處
置,並重新利用,促進可持續之經濟發展。作為私人客戶,您在購買產品之零售商處,或者透過所在地區地方當局,可獲取
有關保護環境的處置方案之資訊。作為商業使用者,請聯絡您的供應商,並檢查合約協定的裝置處置條件。此產品不得與
其他商業垃圾一起處置。
註:此設備經測試,證明符合FCC規則第15部分中關於B類數位裝置的限制。此類限制旨在針對住宅裝置中的有害干
擾提供合理保護。此設備會產生、使用並散發無線電波能量,若未依照說明進行安裝和使用,對無線電通訊可能會造成有
害干擾。但是,這不能保證在特定安裝設備中不會發生干擾。若此設備確實對無線電或電視接收造成有害干擾(可以透過
開啟和關閉設備來確定),則建議使用者嘗試以下一種或多種措施來糾正干擾:
—重新調整接收天線或變換位置。
—增加設備和接收器之間的距離。
—將設備連接到與接收器不同電路的插座上。
—諮詢經銷商或經驗豐富的廣播/電視技術人員,以尋求支援。
CE 認證
AdamHallGmbH特此聲明此產品符合以下指令(若適用):
R&TTE(1999/5/EC)或2017年6月起RED(2014/53/EU)
低電壓指令(2014/35/EU)
EMC指令(2014/30/EU)
RoHS(2011/65/EU)
完整的合規聲明請查閱:www.adamhall.com。
此外,您也可以經由info@adamhall.com索取。
EC合規聲明
AdamHallGmbH特此聲明,此無線電裝置類型符合2014/53/EU指令。
若需完整版歐盟合規聲明,請登錄以下
互聯網地址:www.adamhall.com/compliance/
简体中文 繁體中文
82


LD-SYSTEMS.COM
Adam Hall GmbH | Adam-Hall-Str. 1 | 61267 Neu-Anspach | Germany
Phone: +49 6081 9419-0 | adamhall.com
REV: 04
 Loading...