


La Crosse Technology WS-8015TWC User Manual
WS-8015TWC
Wireless 433 MHz Weather Station with Sun/Moon Time
Instruction Manual
TABLE OF CONTENTS
Topic |
Page |
Inventory of Contents/ Additional Equipment |
3 |
Quick Set Up Guide |
4 |
About WWVB |
4 |
Detailed Set Up Guide |
5-6 |
Battery Installation |
5 |
Start Up Sequence |
6 |
Explanation of LCD Information |
7 |
Function Key Layout |
7 |
Program Mode |
8-13 |
Time, 12/24 Hour Mode and Date Setting |
8 |
City Location Setting |
8-9 |
U.S. City Codes |
9-11 |
Canada City Codes |
12 |
Mexico City Codes |
12 |
Time Zone Setting |
12 |
Daylight Saving Time (DST) Setting |
|
Weather Measuring Units |
12-13 |
LCD Contrast |
13 |
Overview of Programming Sequence |
13 |
Features and Operation |
14-20 |
Sun Rise/Set and Moon Rise/Set Calculation |
14-15 |
Moon Phase |
15 |
MINIMUM/MAXIMUM TEMPERATURE/HUMIDITY |
15-16 |
MULTIPLE REMOTE TRANSMITTERS |
16 |
REMOTE TEMPERATURE ALARM |
16-17 |
COMFORT INDICATOR |
17 |
WEATHER FORECAST ICON AND PRESSURE TREND |
17-18 |
WEATHER TENDENCY ARROWS |
18 |
STORM WARNING ALARM |
19 |
TWO HOUR AIR PRESSURE TENDENCY CHART |
19 |
BAROMETRIC AIR PRESSURE READING |
19 |
AIR PRESSURE HISTORY BAR CHART |
19-20 |
MOUNTING |
21 |
MAINTENANCE AND CARE |
23 |
TROUBLESHOOTING GUIDE |
23 |
SPECIFICATIONS |
24 |
WARRANTY INFORMATION |
25 |
2
INVENTORY OF CONTENTS
1.WS-8015U—indoor weather station
2.TX4U—remote thermo/hygro
(temperature/humidity) sensor |
Figure 1. |
3. Instruction manual and warranty card |
|
ADDITIONAL EQUIPMENT (not included)
1. Five fresh AA 1.5V alkaline batteries.
2. One wall-mounting screw (optional)
ABOUT WWVB (radio-controlled time)
The NIST (National Institute of Standards and Technology—Time and Frequency Division) radio station, WWVB, is located in Ft. Collins, Colorado and transmits the exact time signal continuously throughout the United States at 60 kHz. The signal can be received up to 2,000 miles away through the internal antenna in the indoor weather station. However, due to the nature of the Earth’s Ionosphere, reception is very limited during daylight hours. The indoor weather station will search for a signal every night when reception is best. The WWVB radio station derives its signal from the NIST Atomic clock in Boulder, Colorado. A team of atomic physicists continually measure every second of every day to an accuracy of ten billionths of a second a day. These physicists have created an international standard, measuring a second as 9,192,631,770 vibrations of a Cesium 133 atom in a vacuum. For more information about WWVB please see the NIST website at http://www.boulder.nist.gov/timefreq/stations/wwvb.htm
3
QUICK SET-UP GUIDE
Hint: Use good quality Alkaline Batteries and avoid rechargeable batteries.
1.Have the indoor weather station and remote thermo/hygro sensor 3 to 5 apart.
2.Batteries should be out of both units for 10 minutes.
3.Place the batteries into the remote thermo/hygro sensor first then into the indoor weather station.
(All remote thermo/hygro sensors must be started before the indoor weather station)
4.DO NOT PRESS ANY BUTTONS FOR 10 MINUTES.
In this time the indoor weather station and remote thermo/hygro sensor will start to talk to each other and the indoor weather station will show both the indoor temperature and humidity and the outdoor temperature and humidity. If the indoor weather station does not display all values after the 10 minutes please retry the set up as stated above. After all values are displayed for 10 minutes you can place your remote thermo/hygro sensor outdoors and set your time.
The remote thermo/hygro sensor should be placed in a dry, shaded area. The remote thermo/hygro sensor has a range of 80 feet. Any walls that the signal will have to pass through will reduce distance. An outdoor wall or window will have 20 to 30 feet of resistance and an interior wall will have 10 to 20 feet of resistance. Your distance plus resistance should not exceed 80 ft. in a straight line.
NOTE: Fog and mist will not harm your remote thermo/hygro sensor but direct rain must be avoided.
To complete the set up of your indoor weather station after the 10 minutes have passed please follow the steps in the Detailed Set Up Guide.
Note: The remote thermo/hygro sensor transmits a signal every 3 minutes; after the batteries have been installed, the indoor weather station will search for the signal for a duration of 5 minutes. If there is no temperature reading in the OUTDOOR LCD after 5 minutes, make sure the units are within range of each other, or repeat the battery installation procedure.
4
DETAILED SET-UP GUIDE
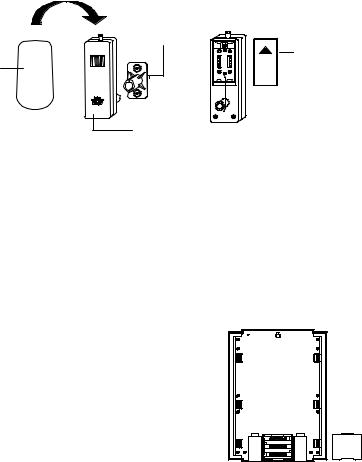
I.Battery Installation
Batteries will fit tightly. To avoid start-up problems, make sure that the batteries do not spring free. Also be sure to insert alkaline batteries into the remote thermo/hygro sensor first, then the indoor weather station. Initial set up should be done with the remote thermo/hygro sensor and indoor weather station in the same room. The units should be permanently mounted only after the signal reception has been verified.
|
Mounting |
|
Bracket/Recept |
|
Battery |
Rain |
Cover |
Cover |
|
Thermo-Hygro
Transmitter
A.Remote Temperature and Humidity Sensor, TX4U
1.Pull the cylindrical rain cover off the transmitter.
2.Remove the battery cover (located on the backside of the transmitter, above the mounting post and bracket). Press the arrow and slide the battery cover off.
3.Observing the correct polarity install 2 Alkaline AA batteries.
4.Replace battery cover, and place rain cover snugly onto the transmitter.
B.Weather Center
1.Remove the battery cover (the cover has white writing on it).
2.Observe the correct polarity, and install three Alkaline AA batteries.
3.Do not press any buttons for at least
ten minutes. If a button is pressed before the Weather Center has received information from the TX4U sensor, no data will be received from that sensor until reset.
4.Replace the battery cover.
5
II.Start Up Sequence
A.Initial Start
1.Immediately after the batteries have been installed, the indoor weather station will sound a “beep”, and the LCD will completely light up for a brief moment.
2.All information will then appear in normal mode, with “12:00” as the default time and “1.1” as the default date (2001 as the year).
3.“DCA” is the default city (Washington, DC, USA), with the sunrise, sunset, moonrise and moonset times displayed for that city at that date.
4.The indoor temperature and humidity, and barometric air pressure (as 29.91 inHg relative RH) will also be displayed.
5.There is a “satellite” icon that appears near the bottom of the LCD, to the right of the “max” remote temperature—this icon informs the user that the indoor weather station is looking for signals from the remote thermo/hygro sensor. Within five minutes the remote temperature and humidity should be displayed—if not, remove batteries from all units and repeat battery installation, the remote temperature sensor first, then the indoor weather station.
B.WWVB Reception
1.Once the batteries are installed in the Weather Center, it will automatically search for the WWVB signal. If it receives a good signal (which is unlikely during daylight hours in most locations), the WWVB reception indicator (looks like a tower icon) will flash. The indoor weather station requires five full minutes of good reception to successfully capture the signal and set to the correct hour, minute, second, month, day and year. If the signal reception is not successful within ten minutes, the signal search will be cancelled and will automatically resume every two hours until the signal is successfully captured.
2.The signal is sent from Ft. Collins, Colorado only and is similar to an AM radio signal. Atmospheric interferences such as storms, sunspots, and even sunlight will cause the signal to not travel as far.
3.To maximize reception, place the indoor weather station in a window facing Colorado, at least six feet from any electrical source (computers, televisions, refrigerators, etc.). Do not move the indoor weather station while it is searching for the signal.
4.The time and date can be manually set. Once the signal is captured, it will override any time and date set to the time zone selected.
6

5.Once the time and date are set, the indoor weather station will conduct a search every night at midnight and correct to the accurate time and date (Daylight Saving Time is automatic). If the signal has been received in the past 24 hours, the reception indicator will be displayed.
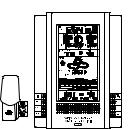
III.Explanation of LCD Information
A. The below picture highlights the LCD features
B.There are many different modes the indoor weather station can be set to. The LCD shown is the normal operating mode, and your actual data shown will be different based on your local settings and conditions.
7
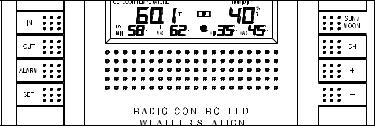
IV. Function Key Layout
A.The below picture shows the eight function keys used in programming and operation of your indoor weather station
V. Program Mode
The program mode is laid out in a manner that allows you to program each function separately, or you can follow the instructions entirely to program the indoor weather center. Complete programming is usually done for the initial set-up, and will require you to skip step 1 and 2 of each programming section. The programming mode can be exited at any time by either pressing the “CH” button, or waiting for the 16-second time-out to take effect.
A. Overview of programming mode sequence
Note: If the country setting is other than USA step 8 is city, step 9 is time zone, etc.
1. |
Hour |
2. |
Minute |
3. |
12/24 hour |
4. |
Year |
5. |
Month |
6. |
Date |
7. |
Country |
8. |
State |
9. |
City |
10. |
Time Zone |
11. |
DST on/off |
12. |
°F/°C |
13. |
inHg/hPa |
14. |
Relative |
15. |
Forecast |
16. |
Storm |
|
|
pressure setting |
sensitivity |
warning setting |
|||
17. |
Storm |
18. |
LCD |
19. |
LI on/off |
|
|
alarm on/off |
contrast |
|
|
|
|
||
8
B. Time, 12/24 Hour Mode and Date Setting
The WWVB signal will override any manual set time and date information. The time will be based on the time zone selected.
1.Press and hold the “SET” button for 1 second.
2.The hour is now flashing.
3.Press and release the “+” or “–“ button to select the current hour.
Note: In 12h mode “PM” will appear to the left of the time during PM hours. If the time is not within the PM hours nothing will be displayed. Be sure to set the time to the correct AM/PM time to ensure automatic reception.
4.Press the “SET” button to advance to the minute
5.The minute is now flashing.
6.Press and release the “+”or “–“ button to select the current minute.
7.Press and release the “SET” button to advance to the 12/24-hour setting.
8.“12” is now flashing.
9.Press and release the “+”or “–“ button to select either 12 (am/pm) or 24 hour (military) time format.
10.Press and release the “SET” button to advance to the year setting.
11.The year is now flashing.
12.Press and release the “+”or “–“ button to select the current year.
13.Press and release the “SET” button to advance to the month setting.
14.The month is now flashing.
15.Press and release the “+”or “–“ button to select the current month.
16.Press and release the “SET” button to advance to the date setting.
17.The date is now flashing.
18.Press and release the “+”or “–“ button to select the current date.
19.Press and release the “SET” button to advance to the location setting (skip steps 1 and 2 in section B if continuing).
9
C. City Location Setting
The list of the cities available is listed after this section.
1.Press and hold the “SET” button for 1 second.
2.Press and release the “SET” button 6 times.
3.The country location will flash (USA default/factory setting).
4.Press and release the “+”or “–“ button to select the country (USA=United States, CAN=Canada, MEX=Mexico).
5.Press and release the “SET” button to advance to the state setting (USA only) or the city location (Canada or Mexico).
Skip to step nine if Mexico or Canada is selected
6.The state is now flashing.
7.Press and release the “+”or “–“ button to select the state.
8.Press and release the “SET” button to advance to the city setting.
9.The city is now flashing.
10.Press and release the “+”or “–“ button to select the city closest to your location (abbreviated by airport code, if applicable).
11.Press and release the “SET” button to advance to the time zone setting (skip steps 1 and 2 in section D if continuing).
Section C lists the available city codes. Section D continues with the setup programming.
10
 Loading...