

Page 1
HDS 3.0/20 C Ea
English 6
Français 21
Español 39
www.kaercher.com/register-and-win
59663300 01/14
Page 2
1
31
30 132292827
33
26
2
3
4
25
5
24
23
4
22
21
20
17
14 15
4
13
16
18
19
9
12
68
10118
2
7
Page 3
34
38
35
MAX
MIN
44
45
36 37
39
40
42
41
43
3
Page 4
2
2.
5
12
354
6
1.
A
3
1.
7
1.
2.
1.
2.
4
8
2.
3.
2.
2.
2.
4
Page 5
9
10
11
6.
7.
9.
4.
5.
8.
5
Page 6

IMPORTANT SAFETY INSTRUCTIONS
몇 WARNING
When using this product basic precautions
should always be followed, including the
following:
1 Read all the instructions before using
the product.
2 High pressure jets can be dangerous if
misused. The jet must not be directed at
persons, animals, electrical devices, or
the unit itself.
3 To reduce the risk of injury, close super-
vision is necessary when a product is
used near children.
4 Know how to stop the product and
bleed pressures quickly. Be thoroughly
familiar with the controls.
5 Stay alert – watch what you are doing.
6 Wear safety goggles.
7 Do not use acids, alkaline, solvents, or
any flammable material in this product.
These products can cause physical in-
juries to the operator and irreversible
damage to the machine.
8 Do not operate the product when fa-
tigued or under the influence of alcohol
or drugs.
9 Do not overreach or stand on unstable
support. Keep good footing and bal-
ance at all times.
10 To reduce the risk of electrocution,
keep all connections dry and off the
ground. Do not touch plug with wet
hands.
11 The Trigger Gun Safety Lock prevents
the trigger from accidentally being en-
gaged. This safety feature DOES NOT
lock trigger in the ON position.
12 Keep operating area clear of all per-
sons.
13 Close cover before operating the ma-
chine.
14 This appliance is intended for commer-
cial use.
15 Follow the maintenance instructions
specified in the manual.
16 This machine has been designed for
use with cleaning chemicals supplied or
recommended by the manufacturer.
The use of other cleaning chemicals
may affect the operation of the machine
and void the warranty.
17 This product is provided with a Ground
Fault Circuit Interrupter built into the
power cord plug. If replacement of the
plug or cord is needed, use only identical replacement parts.
18 Do not use extension cord with this
product.
– Injection hazard: equipment can cause
serious injury if the spray penetrates the
skin. Do not point the gun at anyone or
any part of the body. In case of penetration seek medical aid immediately.
– This system is capable of producing
2000 psi/13.7 MPa.
To avoid rupture and injury, do not op-
erate this pump with components rated
less than 2000 psi/13.7 MPa working
pressure (including but not limited to
spray guns, hose and hose connections).
– Before servicing, cleaning, or removal
of any part, shut off power and relieve
pressure.
– Do not spray electrical apparatus and
wiring.
– High Pressure. Keep clear of nozzle.
– If connection is made to a potable water
system, the system shall be protected
against backflow.
6 EN
Page 7

Owner/User Responsibility
– The owner and/or user must have an
understanding of the manufacturer’s
operating instructions and warnings be-
fore using this pressure washer.
– Warning information should be empha-
sized and understood.
– If the operator is not fluent in English,
the manufacturer’s instructions and
warnings shall be read to and dis-
cussed with the operator in the opera-
tor’s native language by the purchaser/
owner, making sure that the operator
comprehends its contents.
– Owner and/or user must study and
maintain for future reference the manu-
facturers’ instructions.
GROUNDING INSTRUCTIONS
This product must be grounded. If it should
malfunction or breakdown, grounding provides a path of least resistance for electric
current to reduce the risk of electric shock.
This product is equipped with a cord having
an equipment-grounding conductor and a
grounding plug. The plug must be plugged
into an appropriate outlet that is properly installed and grounded in accordance with all
local codes and ordinances.
DANGER
Improper connection of the equipmentgrounding conductor can result in a risk of
electrocution. Check with a qualified electrician or service personnel if you are in doubt
as to whether the outlet is properly grounded. Do not modify the plug provided with
the product - if it will not fit the outlet, have
a proper outlet installed by a qualified electrician. Do not use any type of adapter with
this product.
GROUND FAULT CIRCUIT
INTERRUPTER PROTECTION
This product is supplied with a Ground
Fault Circuit Interrupter (GFCI) built into the
power cord plug. This device provides additional protection from the risk of electric
shock. If power is interrupted in the line, the
GFCI will automatically re-close the circuit
to the load after power is restored. Depending on the GFCI model, it may be necessary to manually operate the reset button to
restore power to the GFCI load circuit. If replacement of the plug or cord is needed use
identical replacement parts.
WATER SUPPLY
몇 CAUTION
When connecting the water inlet to the water supply mains, local regulations of your
water company must be observed. In some
areas the unit must not be connected directly to the public drinking water supply.
This is to ensure that there is no feedback
of chemicals into the water supply. Direct
connection via a receiver tank or backflow
preventer, for example, is permitted.
Dirt in the feed water will damage the unit.
To avoid this risk, we recommend fitting a
water filter.
– Garden hose must be at least 3/4 inch
in diameter.
– Flow rate of water supply must not fall
below 4.0 GPM (gallons per minute).
– Flow rate can be determined by running
the water for one minute into an empty
5-gallon container.
– The water supply temperature must not
exceed 86°F/30°C.
– Never use the pressure washer to draw
in water contaminated with solvents,
e.g. paint thinners, gasoline, oil, etc.
– Always prevent debris from being
drawn into the unit by using a clean water source. Use additional water filter.
SAVE THESE INSTRUCTIONS!
7EN
Page 8
Please read and comply with
these original instructions prior
to the initial operation of your appliance and
store them for later use or subsequent owners.
– Before first start-up it is definitely nec-
essary to read the operating instructions and safety indications Nr. 5.951-
949.0!
– In case of transport damage inform ven-
dor immediately
– Check the contents of the pack before
unpacking. For scope of delivery see illustration 1.
Contents
Environmental protection . . EN . . .1
Symbols in the operating in-
structions . . . . . . . . . . . . . . EN . . .1
Overview . . . . . . . . . . . . . . EN . . .2
Symbols on the machine . . EN . . .2
Proper use . . . . . . . . . . . . . EN . . .2
Safety instructions . . . . . . . EN . . .3
Safety Devices . . . . . . . . . . EN . . .3
Start up. . . . . . . . . . . . . . . . EN . . .4
GFCI INSTRUCTIONS. . . . EN . . .5
Operation . . . . . . . . . . . . . . EN . . .5
Storage. . . . . . . . . . . . . . . . EN . . .8
Transport . . . . . . . . . . . . . . EN . . .8
Maintenance and care . . . . EN . . .8
Troubleshooting . . . . . . . . . EN . . .9
Warranty. . . . . . . . . . . . . . . EN . . 11
Accessories and Spare Parts EN . . 11
Technical specifications . . . EN . .12
Recurring tests . . . . . . . . . . EN . . 13
Environmental protection
The packaging material can be
recycled. Please do not throw
the packaging material into
household waste; please send it
for recycling.
Old appliances contain valuable
materials that can be recycled;
these should be sent for recycling. Batteries, oil, and similar
substances must not enter the
environment. Please dispose of
your old appliances using appropriate collection systems.
Please do not release engine oil, fuel oil,
diesel and petrol into the environment Protect the ground and dispose of used oil in
an environmentally-clean manner.
Notes about the ingredients (REACH)
You will find current information about the
ingredients at:
www.kaercher.com/REACH
Symbols in the operating in-
structions
Danger
Immediate danger that can cause severe
injury or even death.
몇 Warning
Possible hazardous situation that could
lead to severe injury or even death.
Caution
Possible hazardous situation that could
lead to mild injury to persons or damage to
property.
8 EN
– 1
Page 9
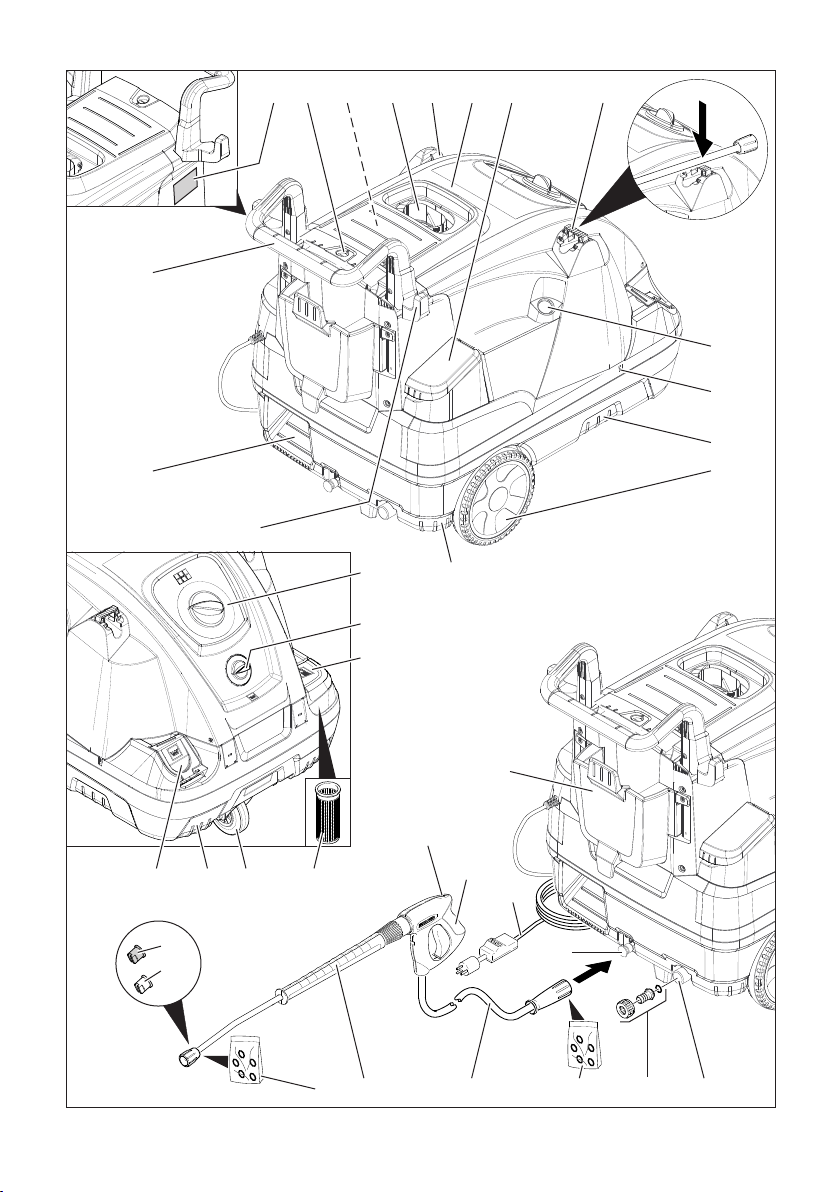
Overview
Device elements
Figure 1
1 Support for spray lance
2 Manometer
3 Recess for detergent suction hose
4 Recessed grip (both sides)
5 Wheel
6 Connection for water supply with filter
7 Water supply set
8 O-ring set (for replacement)
9 High pressure connection
10 High pressure hose
11 Spray lance
12 High-pressure nozzle (stainless steel)
13 Steam nozzle (brass)
14 Pouring vent for detergent
15 Steering roller with fixed position brake
16 Fuel sieve
17 Safety latch of the hand spray gun
18 Hand spray gun
19 Power supply
20 Tool bag
21 Pouring vent for fuel
22 Dosage valve for detergent
23 Operating field
24 Storage for hand spray gun
25 Step depression
26 Handle
27 Nameplate
28 Cover lock
29 Storage compartment for accessories
30 Burner
31 Recess for spray pipe
32 Cover
33 Fill opening for system care RM 110
34 Pressure/quantity regulation of the
pump unit
35 Oil tank
36 Oil drain screw
37 Backflow valve of the detergent infeed
38 Detergent suction hose with filter
39 Fuel filter
40 Fastening clamp
41 Hose (soft damping system) of the wa-
ter shortage safeguard
42 Water shortage safeguard
43 Sieve in the water shortage safeguard
44 Fine filter (water)
45 Float tank
Operating field
Figure 2
A Power switch
1 “Ready for use” indicator lamp
2 Fuel indicator lamp
3 Indicator lamp service
4 Indicator lamp for detergent
5 Indicator lamp system care
Colour coding
– The operating elements for the cleaning
process are yellow.
– The controls for the maintenance and
service are light gray.
Symbols on the machine
High-pressure jets can be dangerous if improperly used. The
jet may not be directed at persons, animals, live electrical equipment or
at the appliance itself.
Risk of electric shock!
Only electricians or authorised
technicians are permitted to
work on parts of the plant.
Risk of burns on account of hot
surfaces!
Risk of poisoning! Do not
breathe in the exhaust fumes.
Proper use
Cleaning of: Machines, Vehicles, Structures, Tools, Facades, Terraces, Gardening tools, etc.
– 2
9EN
Page 10

Danger
Risk of injury! Follow the respective safety
regulations when operating at gas stations
or other dangerous areas.
Please do not let mineral oil contaminated
waste water reach soil, water or the sewage system. Perform engine cleaning and
bottom cleaning therefore only on specified places with an oil trap.
Safety instructions
PROPOSITION 65
WARNING
The burner exhaust from this product contains chemicals known to the State of California to cause cancer, birth defects or
other reproductive harm.
– Please follow the national rules and
regulations for fuel spray jets of the respective country.
– Please follow the national rules and
regulations for accident prevention of
the respective country. Fuel spray jets
must be tested regularly and the results
of these tests must be documented in
writing.
– The heating appliance of the machine is
an ignition plant. All national laws and
regulations about heating systems must
also be followed.
– As per the applicable national guide-
lines, the first time this high-pressure
cleaner must be taken into operation by
a skilled person. KÄRCHER has already performed this initial start-up for
you and has documented it accordingly.
The documentation can be requested at
your KÄRCHER partner. Please have
the part and plant number of the appliance available when enquiring about
the documentation.
– We would like to point out that the appli-
ance must be repeatedly checked by a
skilled person as prescribed by the applicable national regulations. Please
contact your KÄRCHER partner.
Safety Devices
Safety devices serve for the protection of
the user and must not be put out of operation or bypassed with respect to their function.
Overflow valve with two pressure
switches
– While reducing the water supply at the
pump head or with the Servopress regulation the overflow valve opens and
part of the water flows back to the pump
suck side.
– If the hand-spray gun is closed, so that
the whole water flows back to the pump
suck side, the pressure switch at the
overflow valve shuts down the pump.
– If the hand spray gun is opened, the
pressure switch on the cylinder head
turns the pump back on.
The overflow valve is set by the manufacturer and sealed. Setting only by customer
service.
Safety valve
– The safety valve opens, when the over-
flow valve resp. the pressure switch is
broken.
The safety valve is set by the manufacturer
and sealed. Setting only by customer service.
Water shortage safeguard
– The water shortage safeguard prevents
the burner to be turned on when there is
water shortage.
– A sieve prevents the contamination of
the safeguard and must be cleaned regular.
Temperature stop for exhaust gases
– The temperature stop switches off the
machine when the waste gases have
reached very high temperatures.
10 EN
– 3
Page 11

Start up
몇 Warning
Risk of injury! Device, tubes, high pressure
hose and connections must be in faultless
condition. Otherwise, the appliance must
not be used.
Lock parking brake.
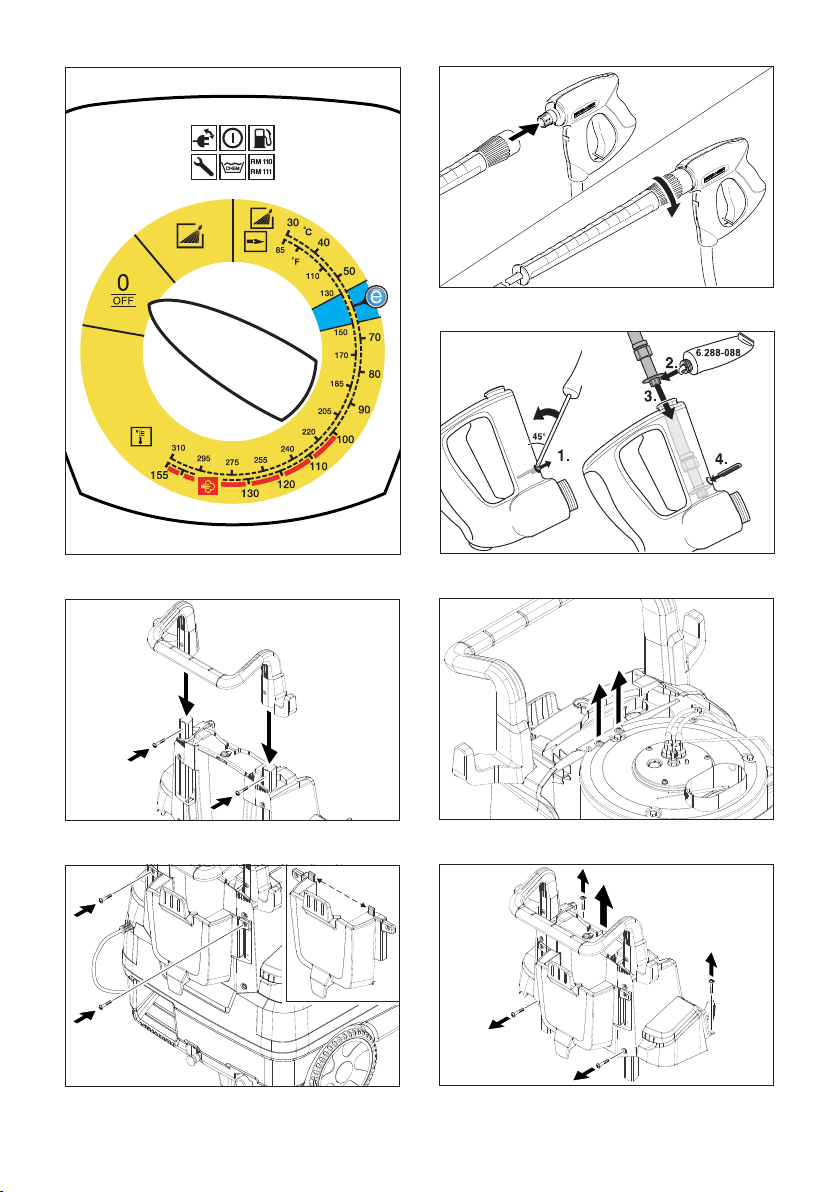
Installing the handle
Figure 3
Screw tightening torque: 6.5-7.0 Nm
Install the tool bag
Figure 4
Hook the tool bag onto the top tabs on
the appliance.
Tilt the tool bag down and lock it into
place.
Fasten the tool bag with 2 screws
(torque: 6.5 - 7.0 Nm).
Install the hand-spray gun, the jet
pipe, the nozzle and the high pres-
sure hose
Figure 5
Connect ray tube with hand spray gun
Tighten the screw connection of the
spray lance finger tight.
Insert high pressure nozzle into cover-
ing nut
Install covering nut and tighten firmly
Connect the high pressure hose to the
high pressure connection point of the
machine.
Installing spare high pressure hose
Figure 6
Refill system care
– The system care prevents the calcifica-
tion of the heating spiral while operating
with calciferous tap water. It is dosed
into the supply in the float container
drop by drop.
– The metering is set to medium water ri-
gidity by the manufacturer
Note: A sample bundle of system care is included.
Refill system care.
Refill fuel
Danger
Risk of explosion! Only refill diesel oil or
light fuel oil. Unsuitable fuels, e.g. petrol,
are not to be used.
Caution
Never operate device with empty fuel tank
The fuel pump will otherwise be destroyed.
Refill fuel.
Close tank lock.
Wipe off spilled fuel.
Refill detergent
Caution
Risk of injury!
– Use Kärcher products only.
– Under no circumstances fill solvents
(petrol, aceton, diluting agent etc.)
– Avoid eye and skin contact.
– Observe safety and handling instruc-
tions by the detergent manufacturer.
Kärcher offers an individual cleaning
and care appliances program.
Your dealer will consult you gladly.
Refill detergent.
Water connection
For connection values refer to technical
specifications
Attach supply hose (minimum length
24.6 ft/7.5 m, minimum diameter 3/4“)
to the water supply set by means of a
hose clamp.
Connect the supply hose to the water
connection point of the machine and at
the water supply point (for e.g. a tap).
Note: The supply hose and the hose clamp
are not included in the scope of delivery.
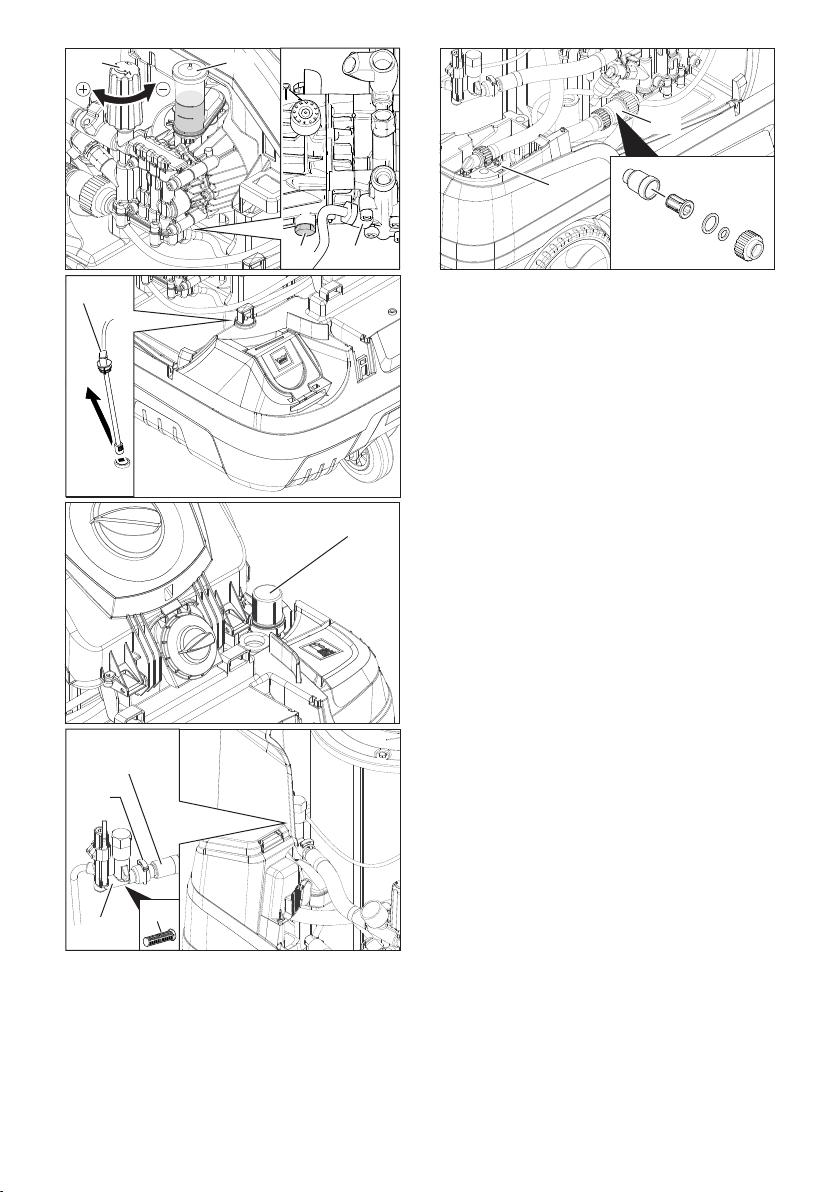
Suck in water from vessel
If you want to suck in water from an external vessel, the following modification is
necessary:
– 4
11EN
Page 12
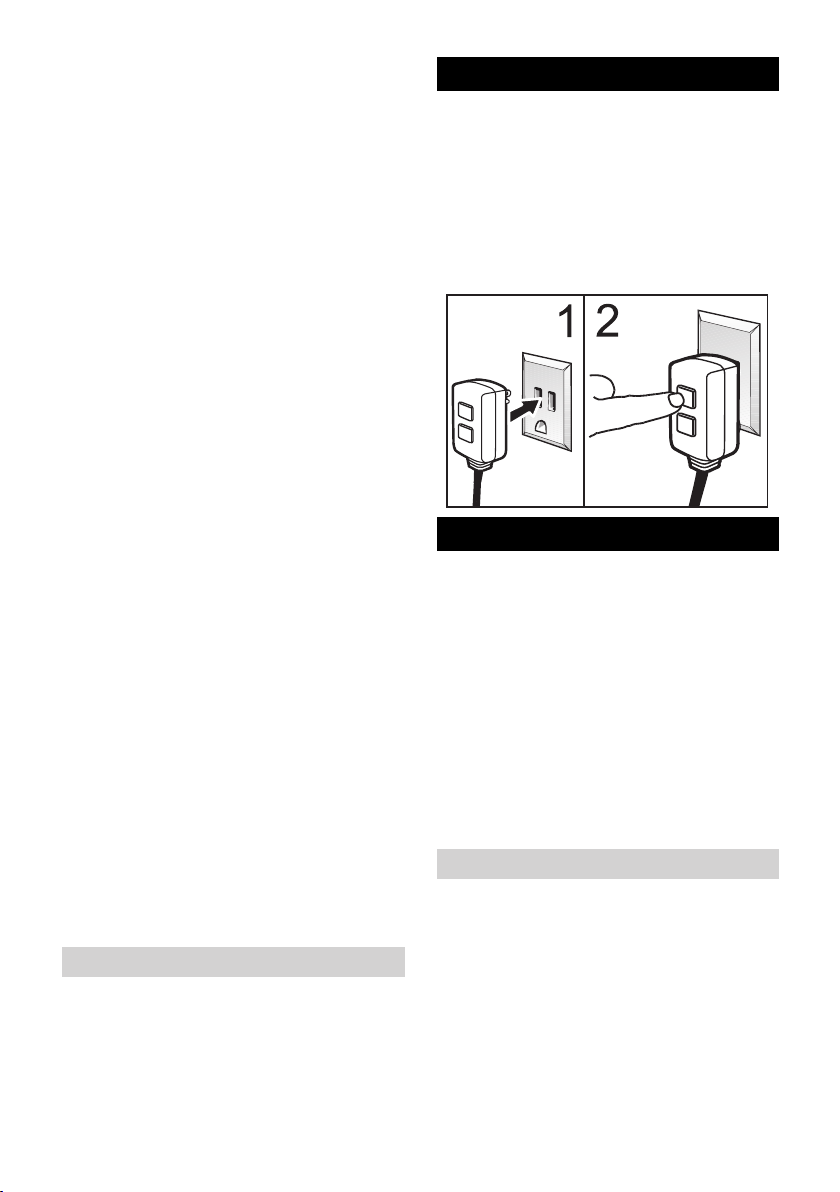
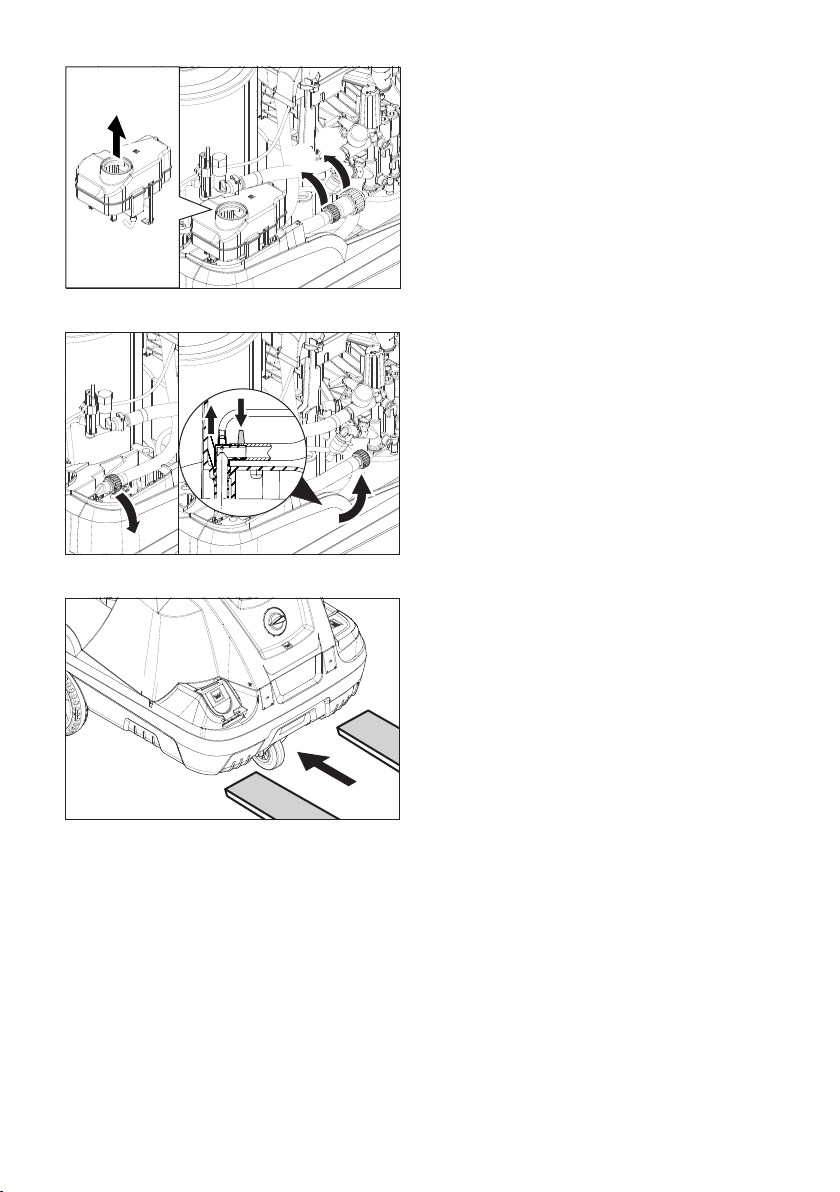
Figure 7
Remove the two screws on the burner
casing.
Figure 8
Unscrew the back wall and remove it.
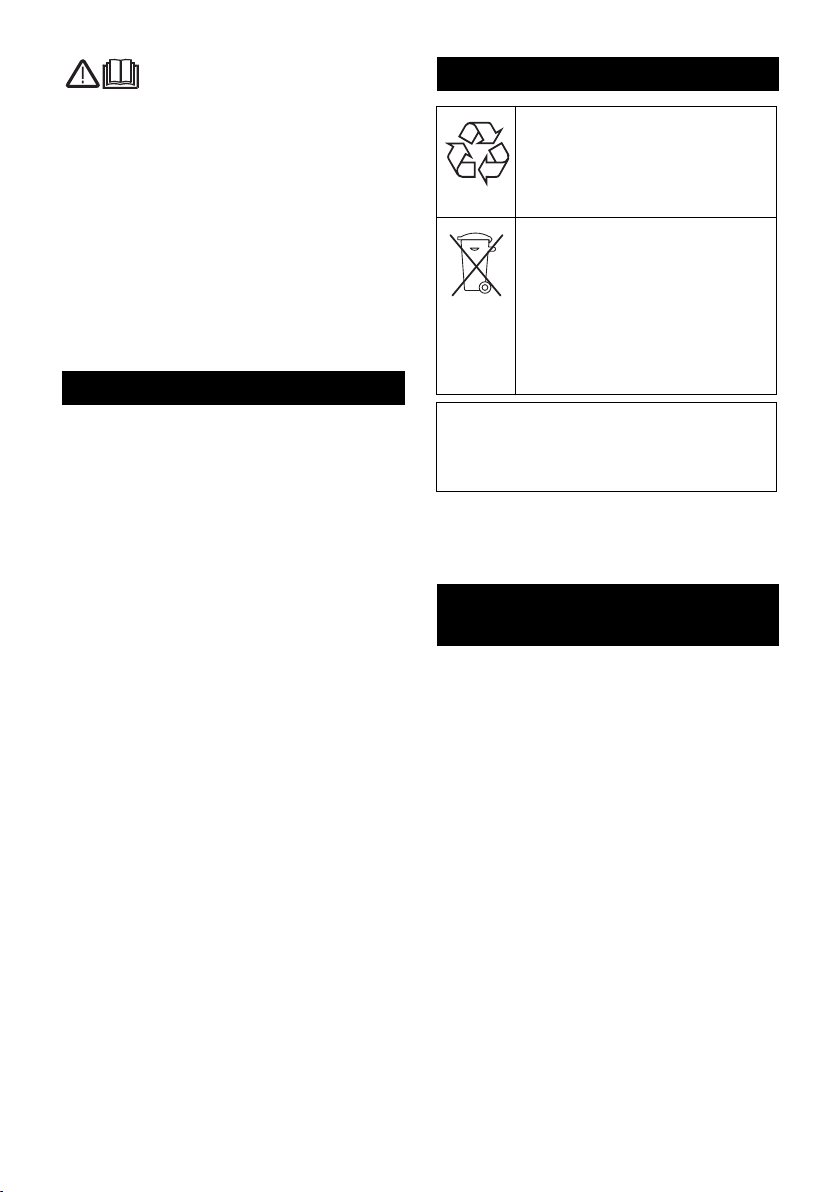
Figure 9
Remove water connection from the fine
filter.
Unscrew the fine filter from the pump
head.
Remove the system care reservoir.
Figure 10
Unscrew the top supply hose to the
swimmer container.
Connect the top supply hose at pump
head.
Replug the rinse line of the detergent
dosing valve to blind plugs.
Connect suction hose (minimum diame-
ter 3/4“) with filter (accessory) to the
water connection point.
– Max. suck height: 1.6 ft (0.5 m)
Until the pump sucked in water, you should:
Set the pressure/quantity regulation at
the pump unit to maximum quantity.
Close the dosing valve for the deter-
gent.
Danger
Never suck in water from a drinking water
container. Never suck in liquids which contain solvents like lacquer thinner, petrol, oil
or unfiltered water. The sealings within the
device are not solvent resistant. The spray
mist of solvents is highly inflammable, explosive and poisonous.
Assembly in reverse order.
Note: Ensure that the solenoid valve cable
on the reservoir of the system care is not
pinched.
Power connection
– For connection values, see technical
data and type plate.
– The electrical connections must be
done by an electrician according to
NEC and local codes.
GFCI INSTRUCTIONS
STEP 1: Plug the Ground Fault Circuit
Interrupter (GFCI) into a working outlet.
STEP 2: Press ’’TEST’’, then press
’’RESET’’ to assure proper connection
to power.
Note: The actual appearance of the
GFCI may be different from this illustration.
Operation
Danger
Risk of explosion!
Do not spray flammable liquids.
Danger
Risk of injury! Never use the appliance
without the spray lance attached. Check
and ensure proper fitting of the spray lance
prior to each use. The screw connection of
the spray lance must be fingertight.
Caution
Never operate device with empty fuel tank
The fuel pump will otherwise be destroyed.
Safety instructions
몇 Warning
Long hours of using the appliance can
cause circulation problems in the hands on
account of vibrations.
It is not possible to specify a generally valid
operation time, since this depends on several factors:
– Proneness to blood circulation deficien-
cies (cold, numb fingers).
12 EN
– 5
Page 13
– Low ambient temperature. Wear warm
gloves to protect hands.
– A firm grip impedes blood circulation.
– Continuous operation is worse than an
operation interrupted by pauses.
In case of regular, long-term operation of
the device and in case of repeated occurrence of the symptoms (e.g. cold, numb fingers) please consult a physician.
Replace the nozzle
Danger
Switch the appliance off prior to replacing
nozzle and activate hand spray gun until
device is pressureless.
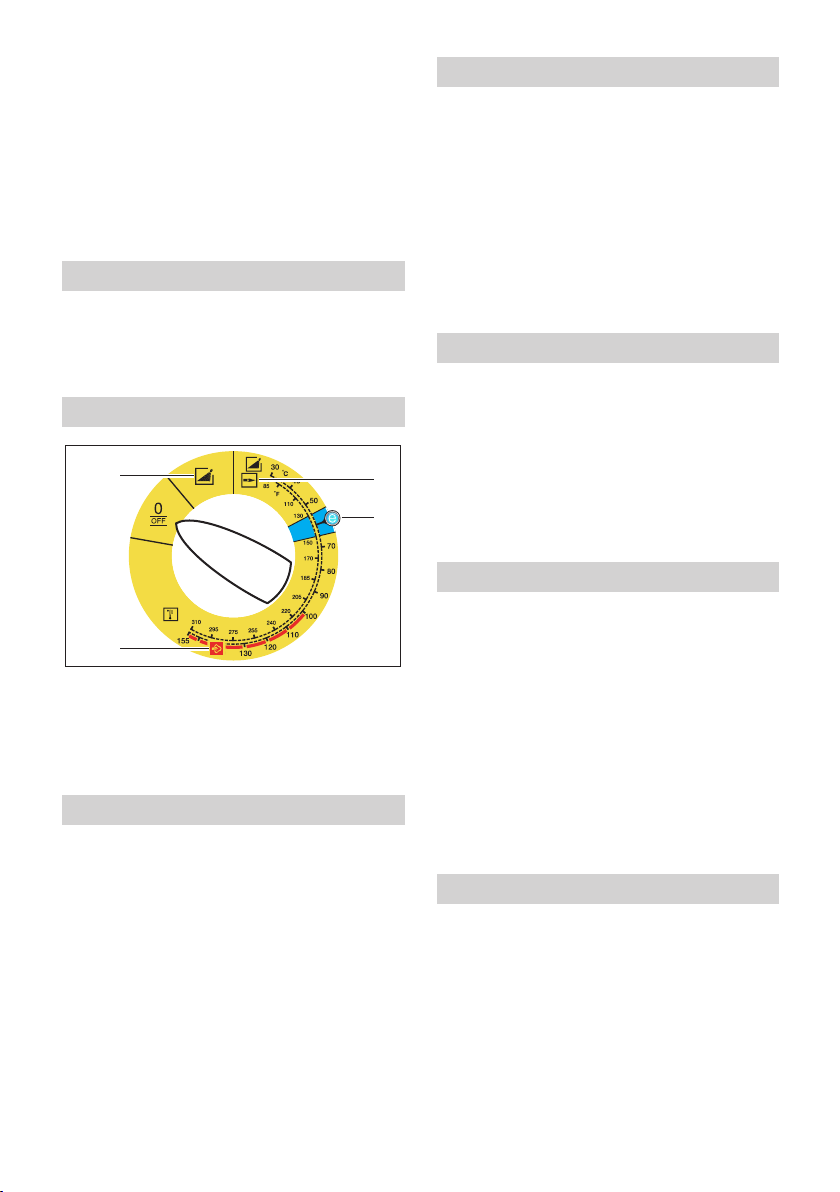
Operating modes
1
2
3
4
0/OFF =Off
1 Operating with cold water
2 Operating with hot water
3 Eco setting (hot water max. 140 °F/60 °C)
4 Operating with steam
Turning on the Appliance
Set appliance switch to desired operat-
ing mode.
Indicator lamp for operational readiness
lights up.
The device starts briefly and turns off, as
soon as the working pressure is reached.
Release the trigger gun.
When activating the hand spray gun the device switches back on.
Note: If no water comes out of the high
pressure nozzle, vent pump. Refer to "Help
with malfunctions - appliance is not building
up pressure".
Adjust cleaning temperature
Set device switch to desired tempera-
ture.
86 °F/30 °C to 208 °F/98 °C:
– Clean with hot water.
212 °F/100 °C to 302 °F/150 °C
– Clean using steam.
Replace the high-pressure nozzle
(stainless steel) with steam nozzle
(brass), (refer to "Using steam").
Set working pressure and flow rate
Pressure/quantity regulation of the
pump unit
Turn the regulation spindle in a clock-
wise direction: Increase working pressure (MAX).
Turn the regulation spindle in an anti-
clockwise direction: Reduce working
pressure (MIN).
Operation with detergent
– For considerate treatment of the envi-
ronment use detergent economically.
– The detergent must be suitable for the
surface to be cleaned.
With support of the detergent dose
valve set detergent concentration as
determined by the manufacturer.
Note: Recommended values at the control
panel at maximum working pressure.
Note: If detergent is be suctioned from an
external container, route the detergent suction hose through the recess to the outside.
Cleaning
Set pressure/temperature and deter-
gent concentration according to the surface to be cleaned.
Note: To prevent damage due to too much
pressure, always position high pressure ray
first from a greater distance towards object
to be cleaned.
– 6
13EN
Page 14

Recommended cleaning method
– Loosen the dirt:
Spray detergent economically and let it
work for 1...5 minutes but do not let it
dry up.
– Remove the dirt:
Spray off loosened dirt with the high
pressure jet.
Operating with cold water
Removal of light contaminations and clear
rinse, i.e.: Gardening tools, terrace, tools,
etc.
Set operating pressure according to
need.
Eco level
The appliance works in the most economical temperature range (max. 140 °F/60 °C).
Operating with hot water/steam
We recommend the following cleaning temperatures:
– Light contaminations
86 °F/30 °C-122 °F/50 °C
– Contaminations containing protein, i.e.
in the food processing industry
max. 140 °F/60 °C
– Vehicle cleaning, machine cleaning
140 °F/60 °C-194 °F/90 °C
– De-preserve, contaminations contain-
ing strong fat contents
212 °F/100 °C-230 °F/110 °C
– De-frosting of surcharge substances,
partially facade cleaning
up to 284 °F/140 °C
Operating with hot water
Danger
Scalding danger!
Set device switch to desired tempera-
ture.
Operating with steam
Danger
Scalding danger!
Therefore the following measures must
definitely be performed:
Replace high pressure nozzle (stain-
less steel) with steam nozzle (brass,
order see specification).
Set the operating pressure on the pump
unit to the minimum value.
Set device switch to min. 212 °F/
100 °C.
After operation with detergent
Set dosing value for detergent to "0".
Set the appliance switch to "1" (opera-
tion with cold water).
Open the hand spray gun and rinse the
appliance for at least 1 minute.
Turn off the appliance
Danger
Danger of scalding by hot water. After the
operation with hot water or steam, the device must be operated with opened gun
with cold water for at least two minutes.
Set the appliance switch to "0/OFF“.
Shut off water supply.
Open the hand spray gun.
Turn on pump shortly (appr. 5 seconds)
with device switch.
Pull main plug out of socket with dry
hands only.
Remove water connection.
Activate hand spray gun until device is
pressure less.
Lock the trigger gun.
Storing the Appliance
Lock in the steel pipe into the holder of
the appliance hood.
Roll up high pressure hose and electri-
cal conduit and hang them into the respective holders.
Note: Do not twist high pressure hose and
electrical conduit.
14 EN
– 7
Page 15

Frost protection
Caution
Frost will destroy the not completely water
drained device.
Store in a frost free area.
If the device is connected to a chimney, the
following must be observed:
Caution
Threat of damage by penetrating cold air
through the chimney.
Disconnect device from chimney when
outside temperature drops below 32 °F/
0 °C.
If it is not possible to store frost free, shut
down device.
Shutdown
For longer work breaks or if a frost free storage is not possible:
Drain water.
Flush device with anti-freeze agent.
Empty detergent tank.
Dump water
Screw off water supply hose and high
pressure hose.
Screw off supply hose at boiler bottom
and drain heating spiral empty.
Operate device for max. 1 minute until
the pump and conduits are empty.
Flush device with anti-freeze agent
Note: Observe handling instructions of the
anti-freeze agent manufacturer.
Fill anti-freeze agent of the trade into
swimmer container.
Switch on appliance (without heater) till
the appliance has been completely
rinsed.
A certain corrosion protection is achieved
with this as well.
Storage
Caution
Risk of injury and damage! Note the weight
of the appliance in case of storage.
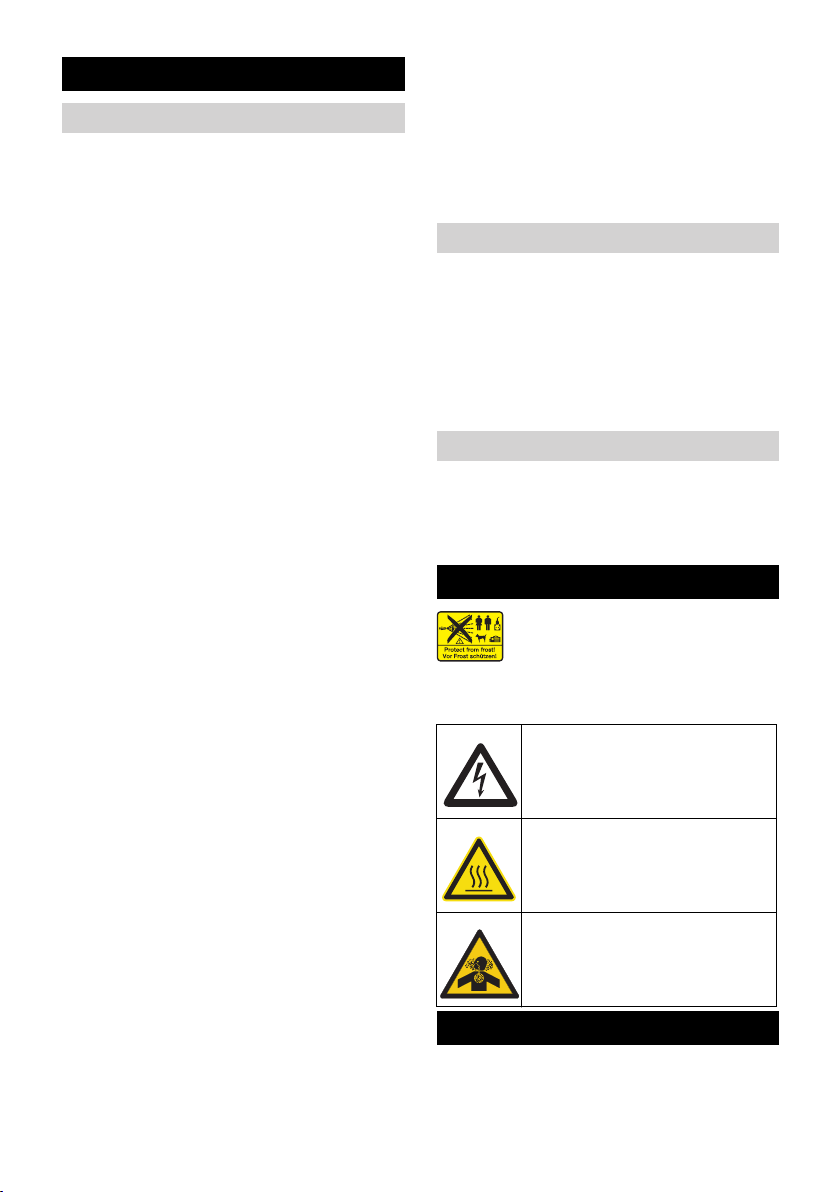
Transport
Figure 11
Caution
Risk of damage! When loading the appliance with a forklift, observe the illustration.
Caution
Risk of injury and damage! Observe the
weight of the appliance when you transport
it.
When transporting in vehicles, secure
the appliance according to the guidelines from slipping and tipping over.
Maintenance and care
Danger
Risk of injury by inadvertent startup of appliance and electrical shock.
First pull out the plug from the mains before
carrying out any tasks on the machine.
Set the appliance switch to "0/OFF“.
Shut off water supply.
Open the hand spray gun.
Turn on pump shortly (appr. 5 seconds)
with device switch.
Pull main plug out of socket with dry
hands only.
Remove water connection.
Activate hand spray gun until device is
pressure less.
Lock the trigger gun.
Allow device to cool down.
Your Kärcher vender will inform you
about the performance of a periodic
safety inspection resp. signing of a
maintenance contract.
Maintenance intervals
Weekly
Clean the sieve in the water connection.
Clean the fine filter.
Clean the fuel sieve.
Check oil level.
Caution
In case of lacteous oil inform Kärcher customer service immediately
– 8
15EN
Page 16

Monthly
Clean sieve in the water shortage safe
guard.
Clean filter at the detergent suck hose.
After 500 operating hours, at least annually
Oil change.
At least every 5 years, recurring
Perform the pressure test as per manu-
facturer's instructions.
Maintenance Works
Clean the sieve in the water connection
Take out sieve.
Clean sieve in water and reinstall.
Cleaning the fine filter
Unpressurize the appliance.
Unscrew the fine filter from the pump
head.
Remove the fine filter and the filter in-
sert.
Clean the filter with clean water or com-
pressed air.
Reinstall in reverse sequence.
Clean the fuel sieve
Knock the dirt off of the fuel sieve. Do
not let the fuel enter the environment.
Clean sieve in the water shortage safe
guard
Remove the fastening clamp and pull
out the hose (soft damping system) of
the lack of water fuse.
Take out sieve.
Note: If necessary turn in screw M8 appr.
0.2 in/5 mm inwards and therewith pull out
sieve.
Clean sieve in water.
Push sieve inwards.
Slide the hose adapter all the way into
the lack of water fuse and secure it with
a fastening clamp.
Clean filter at the detergent suck hose
Take out detergent suck supports.
Clean filter in water and reinstall.
Oil change
Ready a catch bin for appr. 0.26 gal/
1 Liter oil.
Loosen release screw.
Dispose of old oil ecologically or turn in at
a gathering point.
Tighten release screw.
Fill oil slowly up to the MAX marking.
Note: Air pockets must be able to leak out.
For oil type refer to technical specifications.
Troubleshooting
Danger
Risk of injury by inadvertent startup of appliance and electrical shock.
First pull out the plug from the mains before
carrying out any tasks on the machine.
Indicator lamp "Ready for use"
turns off
– No line voltage, see "Appliance is not
running".
Indicator lamp service
Indicator lamp service will be illuminated
– Lack of oil
Replenish oil.
1x blinking
– Water shortage
Check water supply, check connec-
tions.
– Leak in the high pressure system
Check high pressure system and con-
nections for tightness.
2x blinking
– Fault in the voltage supply or current
pickup of the motor too high.
Check main connections and mains
fuse.
Inform Customer Service
16 EN
– 9
Page 17

3x blinking
– Engine overload/overheat
Set the appliance switch to "0/OFF“.
Allow device to cool down.
Turn on the appliance.
– Error occurs repeatedly.
Inform Customer Service
4x blinking
– The exhaust temperature limiter has
been triggered.
Set the appliance switch to "0/OFF“.
Allow device to cool down.
Turn on the appliance.
– Error occurs repeatedly.
Inform Customer Service
5 x blink
– Obstructed reed switch in the lack of
water fuse or magnetic piston stuck.
Inform Customer Service
6 x blink
– The flame sensor turned the burner off.
Inform Customer Service
Fuel indicator lamp glows
– Fuel tank empty.
Refill fuel.
Indicator lamp system care is illumi-
nated
– System care container is empty.
Refill system care.
Indicator lamp for detergent glows
– Detergent tank is empty.
Refill detergent.
Appliance is not running
– No power
Check power connection/conduit.
Device is not building up pressure
– Air within the system
Vent pump:
Set dosing value for detergent to "0".
With open hand spray gun turn device
on and off multiple times with the device
switch.
Open and close the pressure/quantity
regulation at the pump unit with the
hand spray gun open.
Note: By dismantling the high pressure
hose from the high pressure connection the
venting process is accelerated.
If detergent tank is empty, refill.
Check connections and conduits.
– Pressure is set to MIN
Set pressure to MAX.
– Sieve in the water connection is dirty
Clean sieve.
Clean the fine filter; replace it, if neces-
sary.
– Amount of water supply is too low.
Check water supply level (refer to tech-
nical data).
Device leaks, water drips from the
bottom of the device
– Pump leaky
Note: 3 drops/minute are allowed.
With stronger leak, have device
checked by customer service.
Device turns on and off while hand
spray gun is closed
– Leak in the high pressure system
Check high pressure system and con-
nections for tightness.
– 10
17EN
Page 18

Device is not sucking in detergent
Leave device running with open deter-
gent dosage valve and closed water
supply, until the swimmer tank is
sucked empty and the pressure falls to
"0".
Open the water supply again.
If the pump still is not sucking in any deter-
gent, it could be because of the following
reasons:
– Filter in the detergent suck hose dirty
Clean filter.
– Backflow valve stuck
Remove the detergent hose and loosen
the backflow valve using a blunt object.
Burner does not start
– Fuel tank empty.
Refill fuel.
– Water shortage
Check water supply, check connec-
tions.
Clean sieve in the water shortage safe
guard.
– Fuel filter dirty
Change fuel filter.
– No ignition spark
If device is in use and no ignition spark
can be seen through the viewing glass,
have device checked by customer ser-
vice.
Set temperature is not achieved
while using hot water
– Working pressure/flow rate to high
Reduce working pressure/flow quantity
at the pressure/volume regulator in the
pump unit.
– Sooty heating spiral
Have device de-sooted by customer
service.
Customer Service
If malfunction can not be fixed, the device must be checked by customer service.
Warranty
The warranty terms published by our competent sales company are applicable in
each country. We will repair potential failures of the appliance within the warranty
period free of charge, provided that such
failure is caused by faulty material or defects in fabrication.
Accessories and Spare Parts
Note: When connecting the appliance to a
chimney or if the device cannot be accessed visually, we recommend the installation of a flame monitor (option).
– Only use accessories and spare parts
which have been approved by the manufacturer. The exclusive use of original
accessories and original spare parts
ensures that the appliance can be operated safely and trouble free.
– At the end of the operating instructions
you will find a selected list of spare parts
that are often required.
– For additional information about spare
parts, please go to the Service section
at www.kaercher.com.
18 EN
– 11
Page 19

Technical specifications
HDS 3.0/20 C Ea
Main Supply
Voltage V 220-240
Current type Hz 1~ 60
Connected load hp (kW) 5.6 (4.2)
Protection (slow) A 20
Type of protection -- IPX5
Protective class -- I
Water connection
Max. feed temperature °F (°C) 86 (30)
Min. feed volume gpm (l/min) 4.0 (15)
Suck height from open container (68 °F/20 °C) ft (m) 1.6 (0.5)
Max. feed pressure psi (MPa) 145 (1)
Performance data
Water flow rate gpm (l/min) 1.32-2.9 (5-11)
Operating pressure of water (using standard nozzle) psi (MPa) 460-2000 (3.1-13.7)
Max. excess operating pressure (safety valve) psi (MPa) 2460 (17)
Steam flow rate gpm (l/min) 1.32-1.5 (5-5.7)
Max. operating pressure for working with steam (using
steam nozzle)
Part no. of steam nozzle -- 5.130-454.0
Max. operating temperature of hot water °F (°C) 208 (98)
Working temperature steam operation °F (°C) 311 (155)
Detergent suck in gpm (l/min) 0-0.16 (0-0.62)
Burner performance hp (BTU/h) 58 (148,000)
Maximum consumption of heating oil kg/h (gph) 4.15 (1.35)
Max. recoil force of hand spray gun N 25.6
Nozzle size -- 042
Values determined as per EN 60355-2-79
Noise emission
Sound pressure level L
Uncertainty K
pA
Sound power level LWA + Uncertainty K
pA
WA
Hand-arm vibration value
Hand spray gun m/s
Spray lance m/s
Uncertainty K m/s
Fuel
Fuel -- Fuel oil EL or Diesel
Amount of oil gal (l) 0.08 (0.3)
Oil grade -- 0W40
Dimensions and weights
Length x width x height in (mm) 41.7 x 25.6 x 36.2
Typical operating weight lbs (kg) 206.6 (93.7)
Fuel tank gal (l) 4.1 (15.5)
Detergent Tank gal (l) 4.1 (15.5)
psi (MPa) 464 (3.2)
dB(A) 76
dB(A) 3
dB(A) 94
2
2
2
2.7
5.4
0.3
(1060 x 650 x 920)
– 12
19EN
Page 20

Recurring tests
Note: The recommended testing frequencies of the respective statutory regulations of the
country of operation are to be followed.
Testing done by: External testing Internal testing Leak-proof tests
Name Signature of the
authorised person/
date
Name Signature of the
authorised person/
date
Name Signature of the
authorised person/
date
Name Signature of the
authorised person/
date
Signature of the
authorised person/
date
Signature of the
authorised person/
date
Signature of the
authorised person/
date
Signature of the
authorised person/
date
Signature of the
authorised person/
date
Signature of the
authorised person/
date
Signature of the
authorised person/
date
Signature of the
authorised person/
date
Name Signature of the
authorised person/
date
Name Signature of the
authorised person/
date
20 EN
Signature of the
authorised person/
date
Signature of the
authorised person/
date
– 13
Signature of the
authorised person/
date
Signature of the
authorised person/
date
Page 21

CONSIGNES DE SÉCURITÉ IMPORTANTES
몇 AVERTISSEMENT
En utilisant ce produit, toujours observer
une certaine prudence élémentaire, incluant notamment :
1 Lire toutes les instructions de service
avant d'utiliser l'appareil.
2 En cas d'utilisation incorrecte, les jets
haute pression peuvent être dange-
reux. Ne jamais diriger les jets de va-
peur en direction d'individus,
d'animaux, de dispositifs électriques ou
de l'appareil lui-même.
3 Afin de minimiser les risques de bles-
sure, ne jamais laisser l'appareil sans
surveillance lorsque celui-ci est utilisé à
proximité d'enfants.
4 Il est impératif de savoir arrêter et
mettre l'appareil hors pression rapide-
ment. Une connaissance approfondie
des commandes est nécessaire.
5 Rester attentif – se concentrer sur la
tâche en cours.
6 Le port de lunettes de protection est
obligatoire.
7 N'utiliser en aucun cas d'acides, de so-
lutions alcalines, de solvants ou de pro-
duits inflammables dans cet appareil.
Ces produits peuvent être à l'origine de
blessures graves ou d'endommage-
ment irréversible de l'appareil.
8 L'utilisateur ne doit jamais faire usage
de l'appareil lorsqu'il est fatigué ou sous
l'emprise d'alcool ou de drogues.
9 Ne jamais passer ou monter sur des
supports instables. Toujours rester
stable et équilibré.
10 Afin de réduire le risque d'électrocution,
garder toutes les connexions au sec et
ne pas les laisser à terre. Ne pas tou-
cher la fiche avec les mains mouillées.
11 Le dispositif de sécurité de la poignée-
pistolet permet d'éviter tout actionne-
ment accidentel de la gâchette. Ce dis-
positif de sécurité NE verrouille PAS la
gâchette en position marche (ON).
12 Veiller à ce qu'aucun individu ne se
trouve dans la zone de travail.
13 Fermer le couvercle avant d'utiliser la
machine.
14 Cet appareil est prévu pour un usage
commercial.
15 Respecter les consignes d'entretien fi-
gurant dans le manuel.
16 Cette machine a été conçue pour une
utilisation avec des produits chimiques
utilisés pour le nettoyage, fournis ou recommandés par le fabricant. L'utilisation d'autres produits chimiques pour le
nettoyage peut influer sur le fonctionnement de la machine et annuler la garantie.
17 Ce produit est fourni avec un disjonc-
teur différentiel monté dans la fiche du
cordon d'alimentation. Si le remplacement de la fiche ou du cordon d'alimentation s'avère nécessaire, n'utiliser que
des pièces de rechange identiques.
18 Ne pas utiliser que des rallonges.
– Risque d'injection : le produit peut pro-
vo-quer de graves blessures en cas de
péné-tration dans la peau. Ne pas diriger le ca-non vers quelqu'un ou vers
une partie du corps. En cas de pénétration, consulter im-médiatement un médecin.
– Ce système peut produire 2000 psi/
13.7 MPa.
Afin d'éviter une rupture et des bles-
sures, ne pas utiliser cette pompe avec
des composants ayant une puissance
nominale inférieure à une pression de
service de 2000 psi/13.7 MPa (comprend des pistolets pulvérisateurs, des
tuyaux et des raccords de tuyaux).
– Avant d'effectuer l'entretien, le net-
toyage ou le retrait de toute pièce, couper le cou-rant et réduire la pression.
– Ne pas pulvériser sur des appareils ou
des fils électriques.
– Haute pression. Maintenir sans tuyères.
21FR
Page 22

– Si le branchement à un système d'eau
potable est effectué, le système doit
être protégé contre un retour de cou-
rant.
Responsabilité du propriétaire/de
l'utilisateur
– Avant d'utiliser ce nettoyeur pression, le
propriétaire et/ou l'utilisateur doit impé-
rativement avoir pris connaissance des
consignes d'utilisation et mises en
garde du fabricant.
– Il est nécessaire d'insister sur les aver-
tissements et de les comprendre.
– Si l'utilisateur ne parle pas couramment
l'anglais, l'acheteur/le propriétaire doit
lire les consignes et mises en garde du
fabricant avec l'utilisateur dans la
langue maternelle de ce dernier et s'as-
surer qu'il en comprend bien le contenu.
– Le propriétaire et/ou l'utilisateur doit se
familiariser avec les consignes du fabri-
cant et les conserver afin de pouvoir s'y
référer ultérieurement.
INSTRUCTIONS DE MISE À
LA TERRE
Ce produit doit-être mis à la terre. En cas
de mauvais fonctionnement ou de panne,
la mise à la terre établit un chemin de
moindre résistance pour le courant électrique afin de réduire le risque de décharge
électrique. Ce produit est équipé d'un cordon doté d'un conducteur de mise à la terre
de l'équipement et d'une prise de mise à la
terre. La prise doit être branchée dans une
prise appropriée qui est correctement installée et mise à la terre en conformité avec
les codes et ordonnances locaux.
DANGER
Un conducteur de mise à la terre d'équipement incorrectement branché peut entraîner un risque d'électrocution. Vérifier avec
un électricien ou un technicien d'entretien
qualifié en cas de doute sur la mise à terre
correcte de la prise. Ne pas modifier la
fiche fournie avec le produit - si elle ne peut
pas être branchée, faire installer une prise
appropriée par un électricien qualifié. Ne
pas utiliser n'importe quel type d'adaptateur avec ce produit.
PROTECTION PAR
DISJONCTEUR
DIFFÉRENTIEL
Ce produit est fourni avec un disjoncteur
différentiel intégré dans la fiche de cordon
d'alimentation. Ce dispositif fournit une protection supplémentaire contre les risques
de décharges électriques. En cas de coupure de courant, le disjoncteur différentiel
referme automatiquement le circuit lorsque
le courant est rétabli. Selon le modèle de
disjoncteur différentiel, il peut s’avérer nécessaire d’actionner manuellement le bouton de réinitialisation pour rétablir
l’alimentation du circuit de charge. Utiliser
des pièces de rechange identiques en cas
de remplacement du cordon ou de la fiche.
ALIMENTATION EN EAU
몇 ATTENTION
Lors de la connexion de l'entrée d'eau à la
canalisation d'alimentation en eau, les régulations locales de votre compagnie d'eau
doivent être observées. Dans certaines
zones, l'appareil ne doit pas être connecté
directement à l'alimentation en eau potable
publique. Il s'agit de s'assurer qu'il n'y a pas
de retour de produits chimiques dans l'alimentation en eau. Une connexion directe
par l'intermédiaire d'un réservoir de réception ou d'un disconnecteur hydraulique par
exemple est autorisée.
D'éventuelles impuretés dans l'eau d'alimentation endommagent l'appareil. Pour
prévenir ce risque, nous recommandons
d'installer un filtre à eau.
– Le tuyau d'arrosage doit avoir un dia-
mètre minimum de 3/4 pouces.
– Le débit de l'alimentation en eau ne doit
pas être inférieur à 4.0 GPM (gallons
par minute)
22 FR
Page 23

– Pour calculer le débit, faire couler l'eau
pendant une minute dans un récipient
vide d'une contenance de 5 gallons.
– La température de l'eau d'alimentation
ne doit pas excéder 86 °F/30 °C.
– Ne jamais aspirer d'eau contaminée par
des solvants, par exemple des diluants
pour peinture, de l'essence, de l'huile,
etc..
– Toujours utiliser une source d'eau
propre afin d'éviter toute infiltration de
débris dans l'appareil. Utiliser un filtre à
eau supplémentaire.
CONSERVER CES INSTRUCTIONS !
23FR
Page 24

Lire ce manuel d'utilisation origi-
nal avant la première utilisation
de votre appareil, le respecter et le conserver pour une utilisation ultérieure ou pour le
futur propriétaire.
– Avant la première mise en service, vous
devez impérativement avoir lu les
consignes de sécurité N° 5.951-949.0 !
– Contactez immédiatement le revendeur
en cas d'avarie de transport.
– Vérifier le contenu de l'emballage à l'ou-
verture. Étendue de livraison cf. figure 1.
Table des matières
Protection de l’environnement FR . . .1
Symboles utilisés dans le mode
d'emploi . . . . . . . . . . . . . . . FR . . .1
Aperçu général. . . . . . . . . . FR . . . 2
Symboles sur l'appareil . . . FR . . . 2
Utilisation conforme . . . . . . FR . . .3
Consignes de sécurité . . . . FR . . .3
Dispositifs de sécurité . . . . FR . . .3
Mise en service . . . . . . . . . FR . . .4
DISJONCTEUR DIFFEREN-
TIEL . . . . . . . . . . . . . . . . . . FR . . .6
Utilisation . . . . . . . . . . . . . . FR . . .6
Entreposage. . . . . . . . . . . . FR . . . 9
Transport . . . . . . . . . . . . . . FR . . .9
Entretien et maintenance . . FR . . .9
Assistance en cas de panne FR . .10
Garantie . . . . . . . . . . . . . . . FR . .13
Accessoires et pièces de re-
change . . . . . . . . . . . . . . . . FR . .13
Caractéristiques techniques FR . .14
Essais périodiques . . . . . . . FR . .15
Protection de l’environne-
ment
Les matériaux constitutifs de
l’emballage sont recyclables.
Ne pas jeter les emballages
dans les ordures ménagères,
mais les remettre à un système
de recyclage.
Les appareils usés contiennent
des matériaux précieux recyclables lesquels doivent être apportés à un système de
recyclage. Il est interdit de jeter
les batteries, l'huile et les substances similaires dans l'environnement. Pour cette raison,
utiliser des systèmes de collecte
adéquats afin d'éliminer les appareils hors d'usage.
Ne jetez pas l'huile moteur, le fuel, le diesel ou l'essence dans la nature. Protéger
le sol et évacuer l'huile usée de façon favorable à l'environnement.
Instructions relatives aux ingrédients
(REACH)
Les informations actuelles relatives aux ingrédients se trouvent sous :
www.kaercher.com/REACH
Symboles utilisés dans le
mode d'emploi
Danger
Pour un danger immédiat qui peut avoir
pour conséquence la mort ou des blessures corporelles graves.
몇 Avertissement
Pour une situation potentiellement dangereuse qui peut avoir pour conséquence des
blessures corporelles graves ou la mort.
Attention
Pour une situation potentiellement dangereuse qui peut avoir pour conséquence des
blessures légères ou des dommages matériels.
24 FR
– 1
Page 25

Aperçu général
Éléments de l'appareil
Figure 1
1 Dispositif de fixation de la lance
2 Manomètre
3 Évidement pour le flexible d'aspiration
de détergent
4 Poignée encastrée (des deux côtés)
5 Roue
6 Arrivée d'eau avec tamis
7 Kit de raccord d'alimentation en eau
8 Kit joint torique (pour le remplacement)
9 Raccord haute pression
10 Flexible haute pression
11 Lance
12 Buse haute pression (acier inoxydable)
13 Buse de vapeur (laiton)
14 Orifice de remplissage pour détergent
15 Roulettes pivotantes et frein de station-
nement
16 Tamis de combustible
17 Cran de sécurité de la poignée-pistolet
18 Poignée-pistolet
19 Alimentation électrique
20 Trousse à outils
21 Orifice de remplissage pour combus-
tible
22 Vanne de dosage du détergent
23 Pupitre de commande
24 Support pour la poignée pistolet
25 Cavité de marche
26 Poignée
27 Plaque signalétique
28 Fermeture du capot
29 Compartiment de rangement pour ac-
cessoires
30 Brûleur
31 Support pour la lance
32 Capot
33 Orifice de remplissage pour l'entretien
système RM 110
34 Réglage de la pression/ du débit de
l'unité de pompe
35 Réservoir d'huile
36 Bouchon de vidange d'huile
37 Soupape anti-retour de l'aspiration de
détergent
38 Flexible d'aspiration du détergent avec
filtre
39 Filtre de combustible
40 Agrafe de fixation
41 Flexible (système d'amortissage
souple) de la sécurité contre le manque
d'eau
42 Dispositif de sécurité en cas de manque
d'eau
43 Le tamis du dispositif de sécurité en cas
de manque d'eau
44 Filtre fin (eau)
45 Réservoir flottant
Zone de commande
Figure 2
A Interrupteur principal
1 Témoin de contrôle d’état de service
2 Témoin de contrôle Combustible
3 Lampe témoin service
4 Voyant de contrôle Détergent
5 Lampe témoin soin système
Repérage de couleur
– Les éléments de commande pour le
processus de nettoyage sont jaunes.
– Les éléments de commande pour la
maintenance et l'entretien sont en gris
clair.
Symboles sur l'appareil
Une utilisation incorrecte des
jets haute pression peut présen-
ter des dangers. Le jet ne doit
pas être dirigé sur des personnes, animaux, installations électriques actives ni
sur l'appareil lui-même.
Danger lié à la tension
électrique !
Seul les électriciens spécialisés ou le personnel autorisé
sont habilités à réaliser des travaux sur des composants de
l'appareil.
– 2
25FR
Page 26

Risque de brûlure provoqué
par les pièces chaudes de l'installation!
Danger d'intoxication! Ne pas
inspirer les gaz d'échappement.
Utilisation conforme
Nettoyage de : machines, véhicules, bâtiments, outils, façades, terrasses, appareils
de jardinage, etc.
Danger
Risque de blessure ! En cas d'utilisation
dans l'enceinte d'une station service ou
dans d'autres zones à risque, respecter les
consignes de sécurité correspondantes.
Ne pas évacuer les eaux usées contenant
de l'huile minérale dans la terre, les dispositifs pour eaux usées ou les canalisations. Dès lors, effectuer le nettoyage du
moteur ou du bas de caisse uniquement
aux postes de lavage appropriés et équipés d'un séparateur d'huile.
Consignes de sécurité
PROPOSITION 65
AVERTISSEMENT
L'échappement de ce brûleur contient des
produits chimiques connus de l'Etat de
Californie qui provoquent le cancer, des
malformations congénitales et d'autres
dommages de reproduction.
– Respecter les dispositions légales na-
tionales respectives pour les jets de liquide.
– Respecter les dispositions légales na-
tionales respectives pour la prévention
des accidents. Les jets de liquides
doivent être contrôlés régulièrement et
le résultat du contrôle consigné par
écrit.
– Le dispositif de chauffage de l'appareil
est une installation de combustion. Les
installations d'allumage doivent être
contrôlées régulièrement en concordance avec les dispositions légales nationales respectives.
– Selon les dispositions nationales en vi-
gueur, ce nettoyeur haute pression doit
être mis en service la première fois par
une personne compétente en cas d'utilisation professionnelle. KÄRCHER a
déjà exécuté et documenté cette première mise en service pour vous. La documentation à ce sujet vous sera
remise par le biais de votre Partenaire
KÄRCHER sur demande. Veuillez
maintenir le numéro de pièce et le numéro d'usine de l'appareil prêt en cas
demande pour la documentation.
– Nous attirons votre attention sur le fait
que l'appareil doit être contrôlé régulièrement par une personne compétente
selon les dispositions nationales en vigueur. Adressez-vous pour cela à votre
partenaire KÄRCHER.
Dispositifs de sécurité
Les dispositifs de sécurité ont pour but de
protéger l'utilisateur. Par conséquent, ils ne
doivent en aucun cas être désactivés ou
transformés.
Clapet de décharge doté de deux
pressostats
– En cas de réduction du débit d'eau au
niveau de la tête de la pompe ou avec
le réglage de la servopresse, la clapet
de décharge s'ouvre et une partie de
l'eau est évacuée vers le côté aspiration
de la pompe.
– Si la poignée-pistolet est fermés, de
sorte que toute l'eau retourne vers le
côté aspiration de la pompe, le pressostat du clapet de décharge désactive la
pompe.
– Si la poignée-pistolet est de nouveau
ouverte, le pressostat de la culasse
réactive la pompe.
Le clapet de décharge est réglé et plombé
d'usine. Seul le service après-vente est autorisé à effectuer le réglage.
26 FR
– 3
Page 27

Soupape de sûreté
– La soupape de sûreté s'ouvre lorsque le
clapet de décharge ou le pressostat est
défectueux.
La soupape de sûreté est réglée et plombée d'usine. Seul le service après-vente est
autorisé à effectuer le réglage.
Dispositif de sécurité en cas de
manque d'eau
– Le dispositif de sécurité en cas de
manque d'eau permet d'éviter que le
brûleur se mette en marche lorsque la
quantité d'eau est insuffisante.
– Un tamis protège le dispositif de sécuri-
té contre les impuretés. Il doit être nettoyé régulièrement.
Limiteur de la température de tuyère
– Le limiteur de la température de tuyère
arrête l'appareil en attendant une température très haute de tuyère.
Mise en service
몇 Avertissement
Risque de blessure ! L'appareil, les
conduites d'alimentation, les flexibles haute
pression et les raccords ne doivent présenter aucun défaut. Ne pas utiliser l'appareil si
son état n'est pas irréprochable.
Serrer le frein de stationnement.
Monter la poignée
Figure 3
Couple de serrage des vis : 6,5-7,0 Nm
Monter la trousse à outils
Figure 4
Suspendre la trousse à outils à l'ergot
supérieur de l'appareil.
Basculer la trousse à outils vers le bas
et l'encliqueter.
Fixer la trousse à outils à l'aide de 2 vis
(couple de serrage : 6,5-7,0 Nm).
Monter pistolet pulvérisateur à
main, lance, buse et flexible haute
pression
Figure 5
Relier la lance à la poignée-pistolet.
Serrer le raccord vissé de la lance à la
main.
Fixer la buse haute pression dans
l'écrou-raccord.
Installer l'écrou-raccord et le fixer soli-
dement.
Fixer le flexible haute pression au rac-
cord haute pression de l'appareil.
Montage du flexible haute pression
de rechange
Figure 6
Remplir l'entretien système
– L'entretien système enraye l'entartrage
du serpentin de chauffage avec une
forte efficacité en cas d'utilisation d'eau
du robinet calcaire. Il est ajouté goutteà-goutte à l'alimentation dans le réservoir à flotteur.
– Le dosage est effectué d'usine pour ob-
tenir une dureté d'eau moyenne.
Note : Le contenu de la livraison comporte
un premier bidon d'entretien système.
Remplir l'entretien système.
Remplissage du combustible
Danger
Risque d'explosion ! N'utiliser que du carburant diesel ou du fuel léger. Il est interdit
d'utiliser des combustibles non appropriés,
tels que l'essence.
Attention
Ne jamais utiliser l'appareil lorsque le réservoir à combustible est vide sous peine
d'endommager la pompe à combustible.
Remplissage du combustible.
Fermer le couvercle du réservoir.
Essuyer le combustible ayant éventuel-
lement débordé.
– 4
27FR
Page 28

Faire le plein de détergent
Attention
Risque de blessure !
– Utiliser uniquement les produits Kär-
cher.
– N'utiliser en aucun cas de solvant (es-
sence, acétone, diluant, etc.).
– Eviter tout contact avec les yeux ou la
peau.
– Respecter les consignes de sécurité et
d'utilisation fournies par le fabricant du
détergent.
Kärcher propose un assortiment individualisé de produits d'entretien et de nettoyage.
Votre revendeur se fera un plaisir de vous
conseiller.
Faire le plein de détergent.
Arrivée d'eau
Pour les valeurs de raccordement, se reporter à la section Caractéristiques techniques.
Fixer le flexible d'alimentation (longueur
minimale 24.6 ft/7.5 m, diamètre minimal 3/4“) avec collier de flexible au niveau du kit de raccord d'alimentation en
eau.
Raccorder la conduite d'alimentation au
raccord pour l'arrivée d'eau de l'appareil
et à l'alimentation en eau (ex. un robinet).
Remarque : Le flexible d'alimentation et le
collier de flexible ne sont pas contenus
dans l'étendue de livraison.
Aspirer l'eau encore présente dans
les réservoirs
Pour aspirer l'eau des réservoirs externes,
la transformation suivante est requise :
Figure 7
Dévisser 2 vis sur le carter du brûleur.
Figure 8
Dévisser la paroi arrière et la retirer.
Figure 9
Démonter le raccord d'eau sur le filtre
de précision.
Dévisser le filtre de précision sur la tête
de la pompe.
Enlever le réservoir d'entretien du sys-
tème.
Figure 10
Dévisser le flexible d'alimentation supé-
rieur menant au réservoir à flotteur.
Raccorder la conduite sur la tête de la
pompe.
Permuter la conduite de rinçage de la
soupape de dosage de détergent sur
obturateur borgne.
Raccorder le tuyau d'aspiration (dia-
mètre min. de 3/4") et le filtre (accessoire) à l'arrivée d'eau.
– Hauteur d'aspiration max. : 1.6 ft (0.5 m)
Avant que la pompe n'aspire l'eau, il
convient de :
Régler le réglage de pression/de quan-
tité à l'unité de la pompe sur débit maximale.
Fermer la vanne de dosage pour dé-
tergent.
Danger
Ne jamais aspirer de l'eau dans un réservoir d'eau potable. Ne jamais aspirer de liquides contenant des solvants, tels que du
diluant pour peinture, de l'essence, de
l'huile, ou de l'eau non filtrée. Les joints de
l'appareil ne sont pas résistants aux solvants. Le nuage de pulvérisation des solvants est extrêmement inflammable,
explosif et toxique.
Pour le montage, procéder dans l'ordre
inverse.
Remarque :Veiller à ce que le câble d'électrovanne ne soit pas coincé sur le réservoir
d'entretien du système.
Raccordement électrique
– Pour les données de raccordement, se
référer à la section Caractéristiques
techniques et à la plaque signalétique.
– Le raccordement électrique doit être ef-
fectué par un électricien et doit correspondre à la norme NEC et les codes
locaux.
28 FR
– 5
Page 29

DISJONCTEUR DIFFEREN-
TIEL
ETAPE 1 : Brancher le disjoncteur dif-
férentiel dans une prise alimentée.
ETAPE 2 : Appuyer d’abord sur
« TEST », puis sur « RESET » pour assurer le branchement correct au secteur.
Remarque : L’apparence effective du
disjoncteur différentiel peut différer de
l’illustration.
Utilisation
Danger
Risque d'explosion !
Ne pas pulvériser de liquides inflammables.
Danger
Risque de blessure ! Ne jamais utiliser l'appareil si la lance n'est pas montée. Contrôler avant chaque utilisation la bonne
fixation de la lance. Le raccord vissé de la
lance doit être serré à la main.
Attention
Ne jamais utiliser l'appareil lorsque le réservoir à combustible est vide sous peine
d'endommager la pompe à combustible.
Consignes de sécurité
몇 Avertissement
Á cause des vibrations, une durée d'utilisation plus long de l'appareil peut amenée
aux troubles de l'irrigation sanguine dans
les mains.
Il est impossible de définir une durée d'utilisation universelle. Celle-ci dépend en effet
de plusieurs facteurs d'influence :
– Mauvaise circulation sanguine de l'utili-
sateur (doigts souvent froids, sensation
de picotement dans les doigts).
– Température ambiante faible. Porter
des gants chauds pour protéger les
mains.
– Une préhension ferme peut entraver la
circulation sanguine.
– Il est conseiller de ponctuer le travail de
pauses plutôt que d'assurer un service
ininterrompu.
En cas d'utilisation régulière et de longue
durée de l'appareil et en cas d'apparition
répétée des symptômes caractéristiques
(par exemple, une sensation de picotement
dans les doigts, les doigts froids), nous recommandons de consulter un médecin.
Remplacer la buse
Danger
Mettre l'appareil hors service et actionner la
poignée-pistolet jusqu'à ce que l'appareil
soit hors pression avant de procéder au
remplacement de la buse.
Modes de fonctionnement
1
2
3
4
0/OFF =Arrêt
1 Utilisation avec de l'eau froide
2 Utilisation avec de l'eau chaude
3 Niveau Eco (eau chaude maxi 140 °F/
60 °C)
4 Utilisation avec de la vapeur
– 6
29FR
Page 30

Mettre l'appareil en marche
Mettre l'interrupteur principal sur le
mode de fonctionnement souhaité.
Le témoin de contrôle d'état de service
s'allume.
L'appareil se met en marche pendant une
courte durée puis s'arrête dès que la pression de service est atteinte.
Armer la poignée-pistolet.
Dès que la poignée-pistolet est actionnée,
l'appareil se remet en marche.
Remarque :S'il ne sort pas d'eau de la
buse haute pression, purger l'air de la
pompe. Se reporter à la section "Aide en
cas de pannes - L'appareil n'établit aucune
pression".
Régler la température de nettoyage
Régler l'interrupteur principal sur la
température souhaitée.
86 °F/30 °C à 208 °F/98 °C :
– Nettoyer à l'eau chaude.
212 °F/100 °C à 302 °F/150 °C :
– Nettoyer à la vapeur.
Remplacer la buse haute pression
(acier inoxydable) par la buse vapeur
(laiton) (voir "Utilisation avec de la vapeur").
Régler la pression de service et le
débit
Réglage de la pression/ du débit de l'unité de pompe
Tourner la tige de réglage dans le sens
des aiguilles d'une montre : augmentation de la pression de service (MAX).
Tourner la tige de réglage dans le sens
inverse des aiguilles d'une montre : réduction de la pression de service (MIN).
Fonctionnement avec détergent
– Respecter l'environnement en utilisant
le détergent avec parcimonie.
– Le détergent doit être adapté à la sur-
face à nettoyer.
A l'aide de la vanne de dosage du dé-
tergent, régler la concentration du détergent conformément aux
prescriptions du fabricant.
Remarque :Valeurs indicatives sur le pupitre de commande pour la pression de service maximale.
Remarque : Au cas où du détergent serait
aspiré à partir d'un réservoir externe, guider le flexible d'aspiration du détergent vers
l'extérieur, par l'évidement.
Nettoyage
Adapter la pression/la température et la
concentration de détergent en fonction
de la surface à nettoyer.
Remarque :Toujours diriger le jet haute
pression sur l'objet tout d'abord à bonne
distance afin d'éviter tout dommage provoqué par une pression trop élevée.
Méthode de nettoyage conseillée
– Dissoudre la saleté :
Pulvériser le détergent avec parcimonie
puis le laisser agir entre 1 et 5 minutes
sans toutefois le laisser sécher.
– Eliminer la saleté :
Retirer les saletés dissoutes au moyen
du jet haute pression.
Utilisation avec de l'eau froide
Elimination de salissures légères et rinçage
à l'eau claire, ex. : appareils de jardinage,
terrasse, outils, etc.
Régler la pression de service en fonc-
tion des besoins.
Niveau Eco
L'appareil fonctionne dans la plage de température la plus économique (140 °F/60 °C
maxi).
30 FR
– 7
Page 31

Utilisation avec de l'eau chaude/de
la vapeur
Nous recommandons les températures de
nettoyage suivantes :
– Salissures légères
86 °F/30 °C-122 °F/50 °C
– Salissures albuminées, par ex. dans
l'industrie alimentaire
max. 140 °F/60 °C
– Nettoyage de véhicules, de machines
140 °F/60 °C-194 °F/90 °C
– Décirage, salissures à forte teneur en
graisse
212 °F/100 °C-230 °F/110 °C
– Fonte d'adjuvants, nettoyage partiel de
façade
jusqu'à 284 °F/140 °C
Utilisation avec de l'eau chaude
Danger
Risque de brûlure !
Régler l'interrupteur principal sur la
température souhaitée.
Utilisation avec de la vapeur
Danger
Risque de brûlure !
C'est pourquoi il convient d'entreprendre
impérativement les mesures suivantes :
Remplacer la buse haute pression
(acier inoxydable) par la buse de vapeur (étain, No. pièce cf. les caractéristiques techniques).
Régler la pression de travail sur l’unité
de pompe à la valeur minimale.
Régler l'interrupteur de l'appareil sur
212 °F/100 °C min.
Après utilisation avec un détergent
Positionner la vanne de dosage du dé-
tergent sur "0".
Mettre l'interrupteur principal sur le ni-
veau (fonctionnement avec de l'eau
froide).
Rincer l'appareil à l'eau claire pendant 1
minute au minimum en gardant la poignée-pistolet ouverte.
Mise hors service de l'appareil
Danger
Risque de brûlure provoquée par l'eau
chaude ! Après l'utilisation de l'appareil
avec de l'eau chaude ou de la vapeur, ce
dernier doit être actionné, pistolet ouvert,
au minimum deux minutes avec de l'eau
froide afin de le faire refroidir.
Positionner l'interrupteur sur '0/OFF'.
Couper l'alimentation en eau.
Ouvrir le pistolet manuel.
Actionner la pompe un court moment
(environ 5 secondes) au moyen de l'interrupteur principal.
En veillant à avoir les mains bien
sèches, débrancher la fiche secteur.
Déconnecter l'arrivée d'eau.
Actionner la poignée-pistolet jusqu'à ce
que l'appareil soit hors pression.
Sécuriser la poignée-pistolet.
Ranger l’appareil
Enclencher la lance dans le dispositif
de fixation situé sur le capot de l'appareil.
Enrouler le flexible haute pression et le
câble électrique et les placer dans les
dispositifs de fixation prévus à cet effet.
Remarque :Ne pas plier le flexible haute
pression ni le câble électrique.
Protection antigel
Attention
Le gel peut endommager l'appareil si l'eau
n'a pas été intégralement vidée.
Stocker l'appareil dans un lieu à l'abris
du gel.
Si l'appareil est relié à une cheminée, respecter les instructions suivantes :
Attention
Risque d'endommagement provoqué par
une infiltration d'air froid via la cheminée.
– 8
31FR
Page 32

Si la température extérieure descend
en dessous de 32 °F/0 °C, débrancher
l'appareil de la cheminée.
S'il n'est pas possible de le conserver dans
un endroit protégé du gel, remiser l'appareil.
Remisage
En cas d'interruption de longue durée ou s'il
n'est pas possible de conserver l'appareil
dans un lieu protégé du gel :
Purger l'eau.
Rincer l'appareil au moyen de produit
antigel.
Vider le réservoir de détergent.
Purger l'eau
Dévisser le tuyau d'alimentation en eau
et le flexible haute pression.
Dévisser la conduite d'alimentation si-
tuée au fond de la chaudière et faire
fonctionner le serpentin chauffant à
vide.
Faire tourner l'appareil au max. 1 mi-
nute jusqu'à ce que la pompe et les
conduites soient entièrement vides.
Rincer l'appareil au moyen de produit
antigel
Remarque : Respecter les consignes d'uti-
lisation du fabricant du produit antigel.
Introduire un produit antigel disponible
dans le commerce dans le réservoir à
flotteur.
Mettre l'appareil sous tension (sans
brûleur) jusqu'à ce que celui-ci soit intégralement rincé.
Cette opération permet en outre de bénéficier d'une certaine protection anticorrosion.
Entreposage
Attention
Risque de blessure et d'endommagement !
Prendre en compte le poids de l'appareil à
l'entreposage.
Transport
Figure 11
Attention
Risque d'endommagement ! Lors du chargement de l'appareil avec un chariot élévateur, respecter l'illustration.
Attention
Risque de blessure et d'endommagement !
Respecter le poids de l'appareil lors du
transport.
Sécuriser l'appareil contre les glisse-
ments ou les basculements selon les directives en vigueur lors du transport
dans des véhicules.
Entretien et maintenance
Danger
Risque de blessure et de choc électrique
par un démarrage inopiné de l'appareil.
Avant d'effectuer tout type de travaux sur
l'appareil, le mettre hors service et débrancher la fiche électrique.
Positionner l'interrupteur sur '0/OFF'.
Couper l'alimentation en eau.
Ouvrir le pistolet manuel.
Actionner la pompe un court moment
(environ 5 secondes) au moyen de l'interrupteur principal.
En veillant à avoir les mains bien
sèches, débrancher la fiche secteur.
Déconnecter l'arrivée d'eau.
Actionner la poignée-pistolet jusqu'à ce
que l'appareil soit hors pression.
Sécuriser la poignée-pistolet.
Laisser refroidir l'appareil.
Votre commerçant spécialisé Kärcher
vous informe de l'exécution d'une inspection de sécurité régulière ou de la
conclusion d'un contrat de maintenance.
32 FR
– 9
Page 33

Fréquence de maintenance
Hebdomadairement
Nettoyer le tamis de l'arrivée d'eau.
Nettoyer le filtre fin.
Nettoyer le tamis de combustible.
Vérifier le niveau d'huile.
Attention
Si l'huile prend une apparence laiteuse,
contacter immédiatement le service aprèsvente Kärcher.
Mensuellement
Nettoyer le tamis du dispositif de sécu-
rité en cas de manque d'eau.
Nettoyer le filtre situé sur le tuyau d'as-
piration de détergent.
Après 500 heures de service, au moins
annuellement
Remplacer l'huile.
Au plus tard tous les 5 ans
Procéder à un contrôle de la pression
selon les prescriptions du constructeur.
Travaux de maintenance
Nettoyer le tamis de l'arrivée d'eau
Déposer le tamis.
Nettoyer le tamis dans l'eau puis le re-
mettre en place.
Nettoyage du filtre fin
Mettre l'appareil hors pression.
Dévisser le filtre de précision sur la tête
de la pompe.
Démonter le filtre de précision et retirer
la cartouche filtrante.
Nettoyer la cartouche filtrante à l'eau
propre ou à l'air comprimé.
Remonter en suivant les étapes dans
l'ordre inverse.
Nettoyage du le tamis de combustible.
Tapoter le tamis de combustible. Veiller
à ce que le combustible ne s'infiltre pas
dans l'environnement.
Nettoyer le tamis du dispositif de sécurité en cas de manque d'eau
Détacher l'agrafe de fixation et retirer le
flexible (système d'amortissage souple)
de la sécurité contre le manque d'eau
Extraire le tamis.
Remarque : Le cas échéant, tourner la vis
M8 d'environ 0.2 in/5 mm vers l'intérieur de
manière à pouvoir retirer le tamis.
Nettoyer le tamis dans l'eau.
Replacer le tamis.
Enfoncer complètement le nipple de
flexible dans le système de sécurité
contre le manque d'eau et le fixer avec
une agrafe.
Nettoyer le filtre situé sur le tuyau d'aspiration de détergent
Retirer les tubulures d'aspiration de dé-
tergent.
Nettoyer le filtre dans l'eau puis le re-
mettre en place.
Remplacer l'huile
Préparer un récipient de récupération
pouvant contenir environ 0.26 gal/1 litre
d'huile.
Desserrer la visse de vidange.
Eliminer l'huile usagée en respectant l'environnement ou l'apporter à un centre de
collecte.
Revisser la vis de vidange.
Remplir doucement le réservoir d'huile
jusqu'au repère MAX.
Remarque :Les bulles d'air doivent pouvoir
s'échapper.
Pour les types d'huile et les quantités de
remplissage, se reporter à la section Caractéristiques techniques.
Assistance en cas de panne
Danger
Risque de blessure et de choc électrique
par un démarrage inopiné de l'appareil.
Avant d'effectuer tout type de travaux sur
l'appareil, le mettre hors service et débrancher la fiche électrique.
– 10
33FR
Page 34

Le témoin de contrôle d’état de ser-
vice s'éteint
– Absence de tension secteur, voir "L'ap-
pareil ne fonctionne pas".
Lampe témoin service
Le témoin de contrôle service est allumé
– Manque d'huile
Verser l'huile.
1x clignotement
– Manque d'eau
Contrôler le raccord d'eau, contrôler les
conduites d'alimentation
– Présence d'une fuite dans le système
haute pression
Vérifier l'absence de fuite au niveau du
système haute pression et des raccords.
2x clignotement
– Erreur dans l'alimentation en tension ou
consommation de courant trop importante du moteur.
Vérifier l'alimentation électrique et les
fusibles.
Informer le service après-vente.
3x clignotement
– Le moteur est excessivement sollicité/
en surchauffe
Positionner l'interrupteur sur '0/OFF'.
Laisser refroidir l'appareil.
Allumer l’appareil.
– Le défaut se reproduit.
Informer le service après-vente.
4x clignotement
– Le limiteur de gaz résiduaire a été dé-
clenché.
Positionner l'interrupteur sur '0/OFF'.
Laisser refroidir l'appareil.
Allumer l’appareil.
– Le défaut se reproduit.
Informer le service après-vente.
5x clignotement
– Commutateur Reed collé dans la pro-
tection contre le manque d'eau ou piston magnétique coincé.
Informer le service après-vente.
6x clignotement
– Le capteur de flamme a mis le brûleur
hors service.
Informer le service après-vente.
Le témoin de contrôle Combustible
s'allume
– Le réservoir de combustible est vide.
Remplissage du combustible.
La lampe témoin soin système est
allumée
– Le réservoir d'entretien système est
vide.
Remplir l'entretien système.
Témoin de contrôle du détergent
s'allume
– Le réservoir de détergent est vide.
Faire le plein de détergent.
L'appareil ne fonctionne pas
– Pas de tension secteur
Contrôler le raccordement au réseau/le
câble électrique.
L'appareil n'établit aucune pression
– Présence d'air dans le système
Purger la pompe :
Positionner la vanne de dosage du dé-
tergent sur "0".
En gardant la poignée-pistolet ouverte,
mettre plusieurs fois l'appareil hors et
sous tension.
Ouvrir et fermer la régulation de quanti-
té / de pression de l'unité de pompe
avec une poignée-pistolet ouverte.
Remarque :En démontant le flexible haute
pression du raccord haute pression, le processus de purge est accéléré.
Si le réservoir de détergent est vide, le
remplir.
34 FR
– 11
Page 35

Contrôler les raccords et les conduites.
– La pression est réglée sur MIN
Régler la pression sur MAX.
– Le tamis de l'arrivée d'eau est encrassé
Nettoyer le tamis.
Nettoyer le filtre fin, le remplacer si né-
cessaire.
– Le débit de l'alimentation en eau est
trop faible
Contrôler le débit de l'alimentation en
eau (voir la section Caractéristiques
techniques).
L'appareil présente un fuit, de l'eau
s'écoule de l'appareil par le bas
– La pompe fuit.
Remarque :Une fuite de 3 gouttes/minute
est autorisée.
En cas de fuite plus importante, faire
vérifier l'appareil par le service aprèsvente.
Lorsque la poignée-pistolet est fer-
mée, l'appareil ne cesse de se
mettre sous et hors tension
– Présence d'une fuite dans le système
haute pression
Vérifier l'absence de fuite au niveau du
système haute pression et des raccords.
L'appareil n'aspire pas de détergent
Lasser fonctionner l'appareil avec la
vanne de dosage de détergent ouverte
et l'alimentation en eau coupée jusqu'à
ce que le réservoir à flotteur soit vide et
que la pression retombe à "0".
Ouvrir de nouveau l'arrivée d'eau.
Si la pompe n'aspire toujours pas de dé-
tergent, les causes peuvent en être les
suivantes :
– Le filtre du tuyau d'aspiration du dé-
tergent est encrassé
Nettoyer le filtre.
– Le clapet anti-retour est collé
Démonter le tuyau de détergent et dé-
visser le clapet anti-retour à l'aide d'un
objet non contondant.
Le brûleur ne s'allume pas
– Le réservoir de combustible est vide.
Remplissage du combustible.
– Manque d'eau
Contrôler le raccord d'eau, contrôler les
conduites d'alimentation
Nettoyer le tamis du dispositif de sécu-
rité en cas de manque d'eau.
– Le filtre à combustible est encrassé
Remplacer le filtre à combustible.
– Absence d'étincelle d'allumage
Si aucune étincelle d'allumage n'est vi-
sible à travers la vitre transparente
lorsque l'appareil fonctionne, le faire
contrôler par le service après-vente.
Lorsque l'appareil est utilisé avec
de l'eau chaude, il n'atteint pas la
température réglée
– La pression de service/le débit est trop
élevé(e)
Réduire la pression de travail/le débit à
la régulation de la pression / de la quantité de l'unité de pompe.
– Le serpentin de chauffage est encrassé
Faire nettoyer l'appareil par le service
après-vente.
Service après-vente
Si la panne ne peut être réparée, l'appareil doit être contrôlé par le service
après-vente.
– 12
35FR
Page 36

Garantie
Dans chaque pays, les conditions de garantie en vigueur sont celles publiées par
notre société de distribution responsable.
Nous éliminons gratuitement d’éventuelles
pannes sur l’appareil au cours de la durée
de la garantie, dans la mesure où une erreur de matériau ou de fabrication en sont
la cause.
Accessoires et pièces de re-
change
Remarque : Lors du raccordement de l'ap-
pareil à une cheminée ou quand l'appareil
n'est pas visible, nous recommandons le
montage d'une surveillance de flamme (option).
– Utiliser uniquement des accessoires et
des pièces de rechange autorisés par le
fabricant. Des accessoires et des
pièces de rechange d’origine garan-
tissent un fonctionnement sûr et parfait
de l’appareil.
– Une sélection des pièces de rechange
utilisées le plus se trouve à la fin du
mode d'emploi.
– Vous trouverez plus d'informations sur
les pièces de rechange dans le menu
Service du site www.kaercher.com.
36 FR
– 13
Page 37

Caractéristiques techniques
HDS 3.0/20 C Ea
Raccordement au secteur
Tension V 220-240
Type de courant Hz 1~ 60
Puissance de raccordement hp (kW) 5.6 (4.2)
Protection (à action retardée) A 20
Type de protection -- IPX5
Classe de protection -- I
Arrivée d'eau
Température d'alimentation (max.) °F (°C) 86 (30)
Débit d'alimentation (min.) gpm (l/min) 4.0 (15)
Hauteur d'aspiration à partir du réservoir ouvert (68 °F/
20 °C)
Pression d'alimentation (max.) psi (MPa) 145 (1)
Performances
Débit d'eau gpm (l/min) 1.32-2.9 (5-11)
Pression de service de l'eau (avec buse standard) psi (MPa) 460-2000 (3.1-13.7)
Pression maximale de marche (clapet de sécurité) psi (MPa) 2460 (17)
Débit du fonctionnement à vapeur gpm (l/min) 1.32-1.5 (5-5.7)
Pression de service max. du fonctionnement à vapeur (avec
buse vapeur)
N° de pièce de la buse vapeur -- 5.130-454.0
Température de service max de l'eau chaude °F (°C) 208 (98)
Température de service du fonctionnement à vapeur °F (°C) 311 (155)
Aspiration de détergent gpm (l/min) 0-0.16 (0-0.62)
Puissance du brûleur hp (BTU/h) 58 (148,000)
Consommation maximale de fuel: kg/h (gph) 4.15 (1.35)
Force de réaction max. de la poignée-pistolet N 25.6
Taille d'injecteur -- 042
Valeurs déterminées selon EN 60355-2-79
Émission sonore
Niveau de pression sonore L
Incertitude K
pA
Niveau de pression sonore LWA + incertitude K
pA
WA
Valeur de vibrations bras-main
Poignée-pistolet m/s
Lance m/s
Incertitude K m/s
Carburants
Combustible -- Fuel EL ou diesel
Quantité d'huile gal (l) 0.08 (0.3)
Types d'huile -- 0W40
Dimensions et poids
Longueur x largeur x hauteur in (mm) 41.7 x 25.6 x 36.2
Poids de fonctionnement typique lbs (kg) 206.6 (93.7)
Réservoir à combustible gal (l) 4.1 (15.5)
Réservoir de détergent gal (l) 4.1 (15.5)
ft (m) 1.6 (0.5)
psi (MPa) 464 (3.2)
dB(A) 76
dB(A) 3
dB(A) 94
2
2
2
2.7
5.4
0.3
(1060 x 650 x 920)
– 14
37FR
Page 38

Essais périodiques
Indication: Les recommandations d'intervalles de contrôle des exigences nationales res-
pectives du pays d'exploitation doivent être respectées.
Contrôle effectué par : Contrôle exté-
rieure
Contrôle intérieure contrôle de la sta-
bilité
Nom Signature du spé-
cialiste/Date
Nom Signature du spé-
cialiste/Date
Nom Signature du spé-
cialiste/Date
Nom Signature du spé-
cialiste/Date
Signature du spécialiste/Date
Signature du spécialiste/Date
Signature du spécialiste/Date
Signature du spécialiste/Date
Signature du spécialiste/Date
Signature du spécialiste/Date
Signature du spécialiste/Date
Signature du spécialiste/Date
Nom Signature du spé-
cialiste/Date
Nom Signature du spé-
cialiste/Date
38 FR
Signature du spécialiste/Date
Signature du spécialiste/Date
– 15
Signature du spécialiste/Date
Signature du spécialiste/Date
Page 39

INSTRUCCIONES IMPORTANTES DE SEGURIDAD
몇 ADVERTENCIA
Al utilizar este producto, tome siempre las
precauciones básicas, incluidas las siguientes:
1 Lea todas las instrucciones antes de
usar el producto.
2 Los aparatos a alta presión pueden re-
sultar peligrosos si se usan de forma in-
correcta. No se debe dirigir el aparato a
personas, animales, dispositivos eléc-
tricos o la equipo mismo.
3 Para reducir el riesgo de lesiones, es
preciso vigilar atentamente si se usa el
producto cerca de niños.
4 Es necesario saber cómo parar rápida-
mente el producto y parar hemorragias.
Estar familiarizado con los mandos.
5 Estar atento, prestar atención a lo que
se está haciendo.
6 Utilizar gafas de seguridad.
7 No usar ácidos, alcalinos, disolventes,
o cualquier material inflamable con este
producto. Estos productos pueden cau-
sar heridas físicas al operario y daños
irreparables a la máquina.
8 No ponga en funcionamiento el produc-
to si está cansado o está bajo la influen-
cia de alcohol o drogas.
9 No sobrecargar o colocar sobre un so-
porte inestable. Mantener el equilibrio
en todo momento.
10 Para reducir el riesgo de electrocución,
mantenga todas las conexiones secas
y alejadas del suelo. No toque el enchu-
fe con las manos mojadas.
11 El seguro del gatillo de la pistola evita
que el gatillo salte de forma involunta-
ria. El dispositivo de seguridad NO blo-
quea el gatillo en la posición ON
(encendido).
12 Mantenga la zona de trabajo libre de
personas.
13 Cierre la cubierta antes de operar con
la máquina.
14 Este aparato está diseñado para uso
comercial.
15 Seguir las instrucciones de manteni-
miento especificadas en el manual.
16 Esta máquina ha sido diseñada para su
uso con los agentes químicos de limpieza provistos o recomendados por el
fabricante. El uso de otros agentes químicos de limpieza puede afectar al funcionamiento de la máquina y extinguir
la garantía.
17 Este producto se suministra con un in-
terruptor de circuito de avería por puesta a tierra, que está montado en el
enchufe del cable de potencia. Si es necesario reemplazar el enchufe o el cable, utilice sólo piezas de repuesto
idénticas.
18 No se debe usar el cable de extensión
para esta máquina.
– Riesgo de inyección: el equipo puede
causar graves lesiones si el spray penetra en la piel. No dirija la pistola hacia
nadie ni a ninguna parte del cuerpo. En
caso de penetración, busque ayuda
médica de inmediato.
– Este sistema puede rendir 2000 psi/
13.7 MPa.
Para evitar roturas y lesiones no opere
esta bomba con componentes clasificados por debajo de los 2000 psi/
13.7 MPa de presión de trabajo (incluyendo, pero sin limitarse a, pistolas de
spray, mangueras y conexiones de
manguera).
– Antes de usar, limpiar o quitar cualquier
pieza, desconecte el fluido eléctrico y libere presión.
– No pulverice sobre ningún aparato o
cable eléctrico.
– Alta presión. Manténgase lejos de la
boquilla.
– Si la conexión se hace con un sistema
de agua potable, se debe proteger el
sistema contra reflujo.
39ES
Page 40

Responsabilidades del propietario/
usuario
– El propietario y/o el usuario deben com-
prender bien las instrucciones de servi-
cio y advertencias del fabricante antes
de empezar a utilizar este limpiador de
alta presión.
– Debe prestarse especial atención y te-
ner muy claras las advertencias.
– Si el operador no habla bien el español,
el propietario/comprador debe respon-
sabilizarse de leer y comentar las ins-
trucciones y las advertencias en su
lengua natal, y asegurarse de que en-
tienda a la perfección su contenido.
– El propietario y/o el usuario deben leer
y guardar como referencia para el futu-
ro las instrucciones del fabricante.
INSTRUCCIONES DE
PUESTA A TIERRA
Este producto se tiene que poner a tierra.
Si funcionase mal o si se rompiese, la
puesta a tierra proporcionaría una circuito
menos resistente a la energía eléctrica
para reducir el riesgo de electrochoque.
Este producto está equipado con un cable
que tiene un conductor a tierra y un enchufe a tierra para el equipo. El enchufe se tiene que enchufar a un tomacorriente
adecuado, que esté correctamente instalado y puesto a tierra conforme a todas las
normas y reglamentos locales.
PELIGRO
Si la conexión del conductor a tierra del
equipo es incorrecta puede existir riesgo
de electrochoque. En caso de duda, compruebe con ayuda de un electricista cualificado o del personal del servicio técnico que
el tomacorriente está correctamente puesto a tierra. No modifique el enchufe proporcionado con el producto; si no encaja en el
tomacorriente, pida a un electricista cualificado que le instale un tomacorriente adecuado. No utilice ningún tipo de adaptador
con este producto.
PROTECCIÓN MEDIANTE
INTERRUPTOR DE CIRCUITO
DE AVERÍA POR PUESTA A
TIERRA
Este producto se suministra con un interruptor de circuito de avería por puesta a
tierra montado en el enchufe del cable de
potencia. Este aparato proporciona una
protección adicional contra el riesgo de
electrochoque. Si la corriente se interrumpe en la línea, el interruptor de circuito de
avería por puesta a tierra volverá a cerrar,
automáticamente, el circuito a la carga una
vez restablecida la corriente. En función
del modelo de interruptor, puede que sea
necesario tener que poner en funcionamiento el aparato manualmente mediante
el botón de reinicio para restaurar la corriente del circuito de carga del interruptor
de circuito de avería por puesta a tierra. Si
es necesario reemplazar el enchufe o el cable, utilice piezas idénticas.
SUMINISTRO DE AGUA
몇 ATENCIÓN
Al conectar la toma de agua a la red de suministro del agua, es obligatorio respetar la
normativa local establecida por la compañía del agua. En algunas zonas, está prohibido conectar la unidad directamente a la
red pública de suministro de agua potable.
Esto es así para garantizar que no penetren sustancias químicas en la red de suministro del agua. Sí se permite efectuar la
conexión directamente por ejemplo a través de un depósito receptor o un dispositivo antirretorno.
Si el agua de alimentación está sucia, la
unidad sufrirá daños. Para evitar este riesgo, le recomendamos que monte un filtro
de agua.
– La manguera del jardín debe tener al
menos un diámetro de 3/4 pulgadas.
– El índice de flujo de agua no deben ser
inferior a 4.0 GPM (galones por minuto).
40 ES
Page 41

– El índice de flujo se puede determinar si
se deja correr el agua durante un minu-
to en un bidón de 5 galones.
– La temperatura de agua no debe exce-
der los 86°F/30°C.
– No usar la limpiadora de alta presión
para agua contaminada con disolven-
tes, por ejemplo para diluir pintura, ga-
solina, aceite etc.
– Evitar que entren escombros en la uni-
dad, para ello use una fuente de agua
limpia. Use un filtro adicional de agua.
CONSERVE ESTAS INSTRUCCIONES!
41ES
Page 42

Antes del primer uso de su apa-
rato, lea este manual original,
actúe de acuerdo a sus indicaciones y
guárdelo para un uso posterior o para otro
propietario posterior.
– ¡Antes de la primera puesta en marcha
lea sin falta las instrucciones de uso y
las instrucciones de seguridad n.°
5.951-949.0!
– En caso de daños de transporte infor-
me inmediatamente al fabricante.
– Comprobar el contenido del paquete al
desembalar. Consultar el contenido en
la imagen 1.
Índice de contenidos
Protección del medio ambiente ES . . .1
Símbolos del manual de ins-
trucciones. . . . . . . . . . . . . . ES . . . 1
Resumen . . . . . . . . . . . . . . ES . . . 2
Símbolos en el aparato . . . ES . . .2
Uso previsto . . . . . . . . . . . . ES . . .3
Indicaciones de seguridad . ES . . .3
Dispositivos de seguridad . ES . . .3
Puesta en marcha . . . . . . . ES . . .4
Instrucciones del Interruptor de
Circuito de Avería por Puesta a
Tierra . . . . . . . . . . . . . . . . . ES . . .6
Manejo . . . . . . . . . . . . . . . . ES . . .6
Almacenamiento . . . . . . . . ES . . .9
Transporte . . . . . . . . . . . . . ES . . . 9
Cuidados y mantenimiento. ES . . .9
Ayuda en caso de avería . . ES . .10
Garantía . . . . . . . . . . . . . . . ES . .13
Accesorios y piezas de repues-
to . . . . . . . . . . . . . . . . . . . . ES . .13
Datos técnicos . . . . . . . . . . ES . .14
Inspecciones repetitivas. . . ES . . 15
Protección del medio ambien-
te
Los materiales empleados para
el embalaje son reciclables y recuperables. No tire el embalaje
a la basura doméstica y entréguelo en los puntos oficiales de
recogida para su reciclaje o recuperación.
Los aparatos viejos contienen
materiales valiosos reciclables
que deberían ser entregados
para su aprovechamiento posterior. Evite el contacto de baterías, aceites y materias
semejantes con el medio ambiente. Por este motivo, entregue los aparatos usados en los
puntos de recogida previstos
para su reciclaje.
Por favor, no deje que el aceite para motores, el aceite caliente y la gasolina dañen el medio ambiente. Evite que
sustancias nocivas penetren en el suelo y
elimine el aceite usado de forma que no
dañe el medio ambiente.
Indicaciones sobre ingredientes
(REACH)
Encontrará información actual sobre los ingredientes en:
www.kaercher.com/REACH
Símbolos del manual de ins-
trucciones
Peligro
Para un peligro inminente que acarrea lesiones de gravedad o la muerte.
몇 Advertencia
Para una situación que puede ser peligrosa, que puede acarrear lesiones de gravedad o la muerte.
Precaución
Para una situación que puede ser peligrosa, que puede acarrear lesiones leves o
daños materiales.
42 ES
– 1
Page 43

Resumen
Elementos del aparato
Figura 1
1 Soporte para la lanza dosificadora
2 Manómetro
3 Ranura para la manguera de aspiración
de detergente
4 Empuñadura (por ambos lados)
5 Rueda
6 Conexión de agua con filtro
7 Set de toma de agua
8 Set de anillos obturadores (de repues-
to)
9 Conexión de alta presión
10 Manguera de alta presión
11 Lanza dosificadora
12 Boquilla de alta presión (acero)
13 Boquilla de salida de vapor (latón)
14 Abertura de llenado para combustible
15 Rodillo-guía con freno de estaciona-
miento
16 Filtro de combustible
17 Bloque de seguridad de la pistola pul-
verizadora manual
18 Pistola pulverizadora manual
19 Conexión eléctrica
20 Caja de herramientas
21 Abertura de llenado para combustible
22 Válvula dosificadora de detergente
23 Panel de control
24 Soporte para la pistola pulverizadora
manual
25 Peldaño
26 Estribo de manejo
27 Placa de características
28 Cierre del capó
29 Depósito para accesorios
30 Quemador
31 Soporte para la lanza dosificadora
32 Capó del aparato
33 Orificio de relleno para el producto de
mantenimiento del sistema RM 110
34 Regulación de la presión/caudal de la
unidad de bomba.
35 Recipiente de aceite
36 Tornillo purgador de aceite
37 Válvula de retención del sistema de ab-
sorción de detergentes
38 Manguera de detergente con filtro
39 Filtro de combustible
40 Pinza de fijación
41 Manguera (sistema de amortiguación
suave) del dispositivo de seguridad
contra el funcionamiento en seco
42 Dispositivo de seguridad contra el fun-
cionamiento en seco
43 Tamiz en el dispositivo de seguridad
contra el funcionamiento en seco
44 Filtro de depuración fina (agua)
45 Caja de flotador
Panel de control
Figura 2
A Interruptor del aparato
1 Piloto de control de disponibilidad de
servicio
2 Piloto de control de material combusti-
ble
3 Piloto de control revisión
4 Piloto de control detergente
5 Piloto de control producto para cuidado
del sistema
Identificación por colores
– Los elementos de control para el proce-
so de limpieza son amarillos.
– Los elementos de control para el man-
tenimiento y el servicio son de color gris
claro.
Símbolos en el aparato
Los chorros a alta presión pueden ser peligrosos si se usan in-
debidamente. No dirija el chorro
hacia personas, animales o equipamiento
eléctrico activo, ni apunte con él al propio
aparato.
– 2
43ES
Page 44

¡Peligro por descarga eléctrica!
Sólo electricistas cualificados o
personal autorizado pueden
realizar trabajos en los componentes de la instalación.
¡Riesgo de quemaduras por
superficies calientes!
¡Peligro de intoxicación! No se
deben respirar los gases de escape.
Uso previsto
Limpieza de: Máquinas, vehículos, edificios, herramientas, fachadas, terrazas, herramientas de jardín, etc.
Peligro
¡Peligro de lesiones! Cuando se utilice en
gasolineras u otras zonas de peligro deberán tenerse en cuenta las instrucciones de
seguridad.
Las aguas residuales que contengan aceite no deben penetrar en el suelo ni verterse en aguas naturales o en el sistema de
canalización. Por ello, el lavado de motores y el lavado de los bajos sólo debe realizarse en lugares adecuados con un
separador de aceite.
Indicaciones de seguridad
PROPOSITION 65
ADVERTENCIA
Los humos de escape de este quemador
contienen productos químicos que según
el Estado de California pueden causar
cáncer, defectos de nacimiento o reproducción.
– Respetar las normativas vigentes na-
cionales correspondientes para eyectores de líquidos.
– Respetar las normativas vigentes na-
cionales correspondientes de prevención de accidentes. Los eyectores de
líquidos deben ser examinados regularmente y tiene que guardarse una copia
escrita de la revisión.
– El dispositivo calefactor del aparato es
una instalación calefactora. Las instalaciones calefactoras deben revisarse regularmente según las normativas
nacionales correspondientes.
– De acuerdo con las normativas nacio-
nales, esta limpiadora de alta presión
debe ser puesta en funcionamiento industrial por primera vez por una persona cualificada. KÄRCHER ya ha
realizado y documentado para usted
esta primera puesta en marcha. Puede
solicitar la documentación correspondiente a su distribuidor de KÄRCHER.
Para solicitar la documentación, tenga
preparado el número de la pieza y el
número de fábrica del aparato.
– Le informamos de que el aparato, de
acuerdo con las normativas nacionales
vigentes, debe ser inspeccionado de
vez en cuando por una persona cualificada. Consulte a su distribuidor KÄRCHER.
Dispositivos de seguridad
La función de los dispositivos de seguridad
es proteger al usuario y está prohibido ponerlos fuera de servicio y modificar o ignorar su funcionamiento.
Válvula de rebose con dos presós-
tatos
– Al reducir la cantidad de agua en el ca-
bezal de la bomba o con el sistema de
regulación Servopress se abre la válvula de rebose y una parte del agua refluye al lado de succión de la bomba.
– Si se cierra la pistola pulverizadora, de
manera que todo el agua circule de
vuelta al lado de succión de la bomba,
el presóstato en la válvula de rebose
desconecta la bomba.
– Si se vuelve a abrir la pistola pulveriza-
dora manual el presóstato en la culata
conecta de nuevo la bomba.
44 ES
– 3
Page 45

La válvula de rebose ha sido ajustada y
precintada en fábrica. El ajuste lo debe realizar solamente el servicio postventa.
Válvula de seguridad
– La válvula de seguridad se abre cuando
la válvula de rebose o el presóstato están defectuosos.
La válvula de seguridad ha sido ajustada y
precintada en fábrica. El ajuste lo debe realizar solamente el servicio postventa.
Dispositivo de seguridad contra el
funcionamiento en seco
– El dispositivo de seguridad contra el
funcionamiento en seco evita que el
quemador se conecte en caso de falta
de agua.
– Un tamiz evita el ensuciamiento del dis-
positivo de seguridad. Este tamiz se
debe limpiar periódicamente.
Limitador de la temperatura de gas
de escape
– El limitador de la temperatura de gas de
escape apaga el aparato al alcanzar
una temperatura de gas de escape demasiado alta.
Puesta en marcha
몇 Advertencia
Peligro de lesiones El aparato, los tubos de
alimentación, la manguera de alta presión
y las conexiones deben estar en perfecto
estado. Si no está en perfecto estado, no
debe utilizarse.
Active el freno de estacionamiento.
Montar el estribo de manejo
Figura 3
Par de apriete de los tornillos: 6,5-7,0 Nm
Montar la bolsa para herramientas
Figura 4
Colgar la bolsa de herramientas en las
lengüetas superiores de retención del
aparato.
Abatir hacia abajo la bolsa de herra-
mientas y encajar.
Fijar la bolsa de herramientas con 2 tor-
nillos (par de apriete: 6,5-7,0 Nm).
Montar la pistola pulverizadora
manual, lanza dosificadora,
boquilla y manguera de alta presión
Figura 5
Conectar la lanza dosificadora con la
pistola pulverizadora manual.
Apretar con la mano la rosca de la lanza
dosificadora.
Colocar la boquilla de alta presión en la
tuerca de racor.
Montar la tuerca de racor y apretarla
bien.
Montar la manguera de alta presión en
la conexión de alta presión del aparato.
Montaje de la manguera de alta pre-
sión de repuesto
Figura 6
Rellenar producto de mantenimien-
to
– El producto de cuidado del sistema evi-
ta eficazmente la calcificación del serpentín de recalentamiento en el servicio
con agua corriente calcárea. Este, se
dosifica a gotas en la entrada del recipiente del flotador.
– La dosificación ha sido ajustada en fá-
brica a una dureza media del agua.
Nota: En el suministro se incluye un bidón
de prueba de producto de mantenimiento.
Rellenar producto de mantenimiento.
– 4
45ES
Page 46

Llenar de combustible
Peligro
Peligro de explosiones. Llenar sólo con gasóleo o fuel ligero. No deben emplearse
combustibles inadecuados como por ejemplo gasolina.
Precaución
El aparato no debe ponerse en funcionamiento nunca con el depósito de combustible vacío. ya que se estropea la bomba de
combustible.
Llenar de combustible.
Cerrar la tapa del depósito.
Limpiar el combustible que se haya ver-
tido.
Llenar de detergente
Precaución
Peligro de lesiones
– Utilizar sólo productos Kärcher.
– No eche en ningún caso disolvente (ga-
solina, acetona, diluyente, etc.).
– Evite el contacto con los ojos y la piel.
– Tenga en cuenta las instrucciones de
seguridad y uso del fabricante del detergente.
Kärcher ofrece un programa individual
de limpieza y mantenimiento.
Su comercial le asesorará con mucho gusto.
Llenar de detergente.
Conexión de agua
Valores de conexión, ver datos técnicos.
Fijar la manguera de alimentación (lar-
go mínimo 24.6 ft/7.5 m, diámetro mínimo 3/4“) con brida de manguera al set
de la toma de agua.
Conectar la tubería de abastecimiento
a la conexión de agua del aparato y a la
alimentación de agua (como el grifo).
Indicación: La manguera de alimentación
y la brida para mangueras no vienen incluidas.
Aspirar agua del depósito
Si desea aspirar agua de un depósito externo es necesario realizar la siguiente modificación del aparato:
Figura 7
Desenroscar 2 tornillos de la carcasa
del quemador.
Figura 8
Desatornillar y extraer la pared trasera.
Figura 9
Retirar la toma de agua del filtro fino.
Deastornillar el filtro fino del cabezal de
la bomba.
Quitar el recipiente del cuidado del
agua.
Figura 10
Desatornillar la tubería de abasteci-
miento que va hacia el recipiente del
flotador.
Conectar la tubería superior de abaste-
cimiento de agua al cabezal de la bomba.
Cambiar de clavija el conducto de en-
juague de la válvula dosificadora de detergente en el tapón ciego.
Conectar la manguera de aspiración
(diámetro mínimo 3/4" con filtro (accesorios) a la toma de agua.
– Altura máxima de aspiración: 1.6 ft (0.5
m)
Hasta que la bomba haya aspirado el agua,
usted debe:
Regulación de la presión/caudal de la
unidad de bomba al valor máximo.
Cerrar la válvula dosificadora de deter-
gente.
Peligro
No aspire nunca agua de un depósito de
agua potable. No aspire nunca líquidos que
contengan disolventes como diluyente de
laca, gasolina, aceite o agua sin filtrar. Las
juntas en el aparato no son resistentes a
los disolventes. La neblina pulverizada de
los disolventes es altamente inflamable,
explosiva y tóxica.
Montaje en orden inverso.
46 ES
– 5
Page 47

Indicación: Evitar que quede enganchan-
do el cable de la válvula magnética en el recipiente del cuidado del sistema.
Toma de corriente
– Valores de conexión: véase la placa de
características y datos técnicos.
– La conexión eléctrica debe ser realiza-
da por un electricista y cumplir la norma
NEC y los códigos locales.
Instrucciones del Interruptor
de Circuito de Avería por
Puesta a Tierra
PASO 1: Enchufe el interruptor de cir-
cuito de avería por puesta a tierra a un
tomacorriente de servicio.
PASO 2: Presione ’’TEST’’ (PRUEBA) y,
después, presione ’’RESET" (REINICIO)
para asegurarse de que la conexión a la
toma de energía eléctrica es correcta.
Nota: El aspecto actual del interruptor
de circuito de avería por puesta a tierra
puede ser distinto al de la ilustración.
Precaución
El aparato no debe ponerse en funcionamiento nunca con el depósito de combustible vacío. ya que se estropea la bomba de
combustible.
Instrucciones de seguridad
몇 Advertencia
Si se utiliza el aparato durante un período
de tiempo largo, se pueden producir problemas de circulación en las manos provocados por las vibraciones.
No se puede establecer una duración general válida para el uso porque este depende de varios factores:
– Factor personal debido a una mala cir-
culación de la sangre (dedos fríos frecuentemente, sensación de
hormigueo).
– Temperatura ambiente baja. Lleve
guantes calientes para proteger las manos.
– Apretar fuertemente impide la circula-
ción de la sangre.
– El funcionamiento ininterrumpido es
peor que el funcionamiento interrumpido por pausas.
Si se utiliza durante mucho tiempo y con regularidad el aparato y se aparecen síntomas repetidas veces (como por ejemplo
hormigueo en los dedos, dedos fríos) recomendamos hacerse una revisión médica.
Cambiar las boquillas
Manejo
Peligro
Peligro de explosiones
No pulverizar ningun líquido inflamable.
Peligro
Peligro de lesiones No utilizar el aparato
nunca sin la lanza dosificadora sin montar.
Comprobar que la lanza dosificadora está
bien colocada antes de cada uso. La rosca
de la lanza dosificadora debe estar bien
apretada con la mano.
Peligro
Desconectar el aparato antes de cambiar
la boquilla y accionar la pistola pulverizadora manual hasta que el aparato se quede
sin presión.
– 6
47ES
Page 48

Tipos de servicio
Ajustar la presión de trabajo y el
caudal
1
2
3
4
0/OFF =OFF
1 Servicio con agua fría
2 Servicio con agua caliente
3 Nivel Eco (agua caliente máx. 140 °F/
60 °C)
4 Funcionamiento con vapor
Conexión del aparato
Ajustar el interruptor del aparato al
modo de servicio deseado.
El piloto de control de disposición de
servicio se enciende.
El aparato se pone en marcha brevemente
y se desconecta en cuanto se ha alcanzado la presión de trabajo.
Desbloquear la pistola pulverizadora
manual.
Al accionar la pistola pulverizadora manual
se vuelve a encender el aparato.
Nota: Si no sale agua de la boquilla de alta
presión, purgue el aire de la bomba. Véase
ayuda en el apartado "El aparato no genera
presión" en Averías.
Regular la temperatura de limpieza
Ajustar el interruptor del aparato a la
temperatura deseada.
de 86 °F/30 °C a 208 °F/98 °C:
– Limpiar con agua caliente.
212 °F/100 °C a 302 °F/150 °C:
– Limpiar con vapor.
Sustituir la boquilla de alta presión (ace-
ro) por una boquilla de vapor (latón)
(véase "Funcionamiento con vapor").
Regulación de la presión/caudal de la
unidad de bomba
Gire el husillo regulador en el sentido
de las agujas del reloj: Aumentar la presión de trabajo (MAX).
Gire el husillo regulador en el sentido
contrario a las agujas del reloj: Reducir
la presión de trabajo (MIN).
Funcionamiento con detergente
– Utilice los detergentes con moderación
para no perjudicar el medio ambiente.
– El detergente debe ser apropiado para
la superficie que se ha de limpiar.
Ajustar la concentración de detergente
con ayuda de la válvula dosificadora de
detergente según las indicaciones del
fabricante.
Nota: Valores indicativos en el panel de
control a la máxima presión de trabajo.
Indicación: Si se aspira detergente desde
un recipiente externo, introducir la manguera de detergente por la ranura hacia
fuera.
Limpieza
Ajustar la presión/temperatura y con-
centración de detergente en función de
la superficie a limpiar.
Nota: Dirigir pimero el chorro a alta presión
desde una mayor distancia hacia el objeto
a limpiar, con el fin de evitar causar daños
por una presión demasiado alta.
Método de limpieza recomendado
– disolución de la suciedad
Rociar con detergente con moderación
y dejar actuar 1...5 minutos pero sin dejar secar.
– eliminación de la suciedad
Aplicar el chorro de agua a alta presión
sobre la suciedad disuelta para eliminarla.
48 ES
– 7
Page 49

Servicio con agua fría
Eliminación de suciedades ligeras y enjuague de, por ejemplo: aparejos de jardín, terrazas, herramientas, etc.
Ajustar la presión de trabajo según sea
necesario.
Nivel Eco
El aparato trabaja en el rango de temperatura máx. económico (máx. 140 °F/60 °C).
Servicio con agua caliente/vapor
Recomendamos las siguientes temperaturas de limpieza:
– Suciedades ligeras
86 °F/30 °C-122 °F/50 °C
– Suciedades de albúmina, por ejemplo
en la industria alimentaria
max. 140 °F/60 °C
– Limpieza de coches, de máquinas
140 °F/60 °C-194 °F/90 °C
– Desconservar, suciedades resistentes
que contienen grasa
212 °F/100 °C-230 °F/110 °C
– Descongelación de agregados, limpie-
za parcial de fachadas
hasta 284 °F/140 °C
Servicio con agua caliente
Peligro
Existe peligro de escaldamiento.
Ajustar el interruptor del aparato a la
temperatura deseada.
Funcionamiento con vapor
Peligro
Existe peligro de escaldamiento.
Por ello se deben llevar a cabo sin falta las
siguientes medidas:
Sustituir las boquillas de alta pre-
sión (acero inoxidable) por boquillas
de salida de vapor (latón, N° de pieza, ver Datos Técnicos).
Ajustar la presión de trabajo de la uni-
dad de bomba a valor mínimo.
Ajustar el interruptor del aparato a
212 °F/100 ºC como mínimo.
Después del funcionamiento con
detergente
Poner la válvula dosificadora en la posi-
ción "0".
Ajustar el interruptor del aparato en el
nivel 1 (funcionamiento con agua fría).
Enjuagar el aparato con la pistola pul-
verizadora abierta durante al menos 1
minuto.
Desconexión del aparato
Peligro
Peligro de escaldamiento por agua caliente
Después del servicio con agua caliente o
vapor el aparato debe ser enfriado al menos dos minutos con agua fría con la pistola abierta.
Ponga el interruptor del aparato en "0/
OFF".
Cerrar el abastecimiento de agua.
Abrir la pistola pulverizadora manual.
Conectar la bomba mediante el inte-
rruptor principal brevemente (unos 5
segundos).
Sacar el enchufe de la toma de corrien-
te sólo con las manos secas.
Retirar la conexión de agua.
Poner en funcionamiento la pistola pul-
verizadora manual hasta que no quede
presión en el aparato.
Asegurar la pistola pulverizadora ma-
nual.
Almacenamiento del aparato
Encajar la lanza dosificadora en el so-
porte del capó del aparato.
Enrollar la manguera a alta presión y el
cable eléctrico y colocarlos en soportes.
Nota: No doble la manguera a alta presión
y el cable eléctrico.
– 8
49ES
Page 50

Protección antiheladas
Precaución
El hielo deteriora el aparato si éste no se ha
vaciado por completo de agua.
Coloque el aparato en un lugar a salvo
de las heladas.
Si el aparato está conectado a una chimenea deberá tenerse en cuenta lo siguiente:
Precaución
Peligro de sufrir daños a causa del aire frío
que penetre a través de la chimenea.
Mantener el aparato a salvo de las tem-
peraturas exteriores por debajo de
32 °F/0 °C.
Si no es posible el almacenamiento libre de
heladas, pare el aparato.
Parada
En largos periodos de inactividad o cuando
no sea posible el almacenamiento a salvo
del hielo:
Dejar salir agua.
Enjuagar el aparato con anticongelan-
te.
Vaciar el depósito de detergente.
Dejar salir agua
Desatornillar la manguera de abasteci-
miento de agua y la manguera a alta
presión.
Desatornillar el tubo de abastecimiento
en el fondo de la caldera y hacer marchar en vacío el serpentín de recalentamiento.
Dejar en marcha el aparato durante 1
minuto como máximo hasta que la
bomba y los conductos estén vacíos.
Enjuagar el aparato con anticongelante.
Nota: Tener en cuenta las instrucciones de
uso del fabricante del anticongelante.
Añadir a la caja de flotador un anticon-
gelante de los habituales en el mercado.
Encender el aparato (sin quemador),
hasta que está totalmente enjuagado.
De este modo se conseguirá una protección segura contra la corrosión.
50 ES
Almacenamiento
Precaución
¡Peligro de lesiones y daños! Respetar el
peso del aparato en el almacenamiento.
Transporte
Figura 11
Precaución
¡Peligro de daños en la instalación! Al cargar el aparato con una carretilla elevadora,
tener en cuenta la ilustración.
Precaución
¡Peligro de lesiones y daños! Respetar el
peso del aparato para el transporte.
Al transportar en vehículos, asegurar el
aparato para evitar que resbale y vuelque conforme a las directrices vigentes.
Cuidados y mantenimiento
Peligro
Peligro de lesiones causadas por un aparato que se arranque involuntariamente y
descarga eléctrica.
Antes de efectuar cualquier trabajo en el
aparato, hay que desconectar de la red
eléctrica.
Ponga el interruptor del aparato en "0/
OFF".
Cerrar el abastecimiento de agua.
Abrir la pistola pulverizadora manual.
Conectar la bomba mediante el inte-
rruptor principal brevemente (unos 5
segundos).
Sacar el enchufe de la toma de corrien-
te sólo con las manos secas.
Retirar la conexión de agua.
Poner en funcionamiento la pistola pul-
verizadora manual hasta que no quede
presión en el aparato.
Asegurar la pistola pulverizadora manual.
Deje enfriar el aparato.
Un comercial de Kärcher especializado
le informará sobre la realización de una
inspección de seguridad regular o el
cierre de un contrato de mantenimiento.
– 9
Page 51

Intervalos de mantenimiento
Todas las semanas
Limpie el tamiz en la conexión del agua.
Limpiar el filtro de depuración fina.
Limpiar el filtro de combustible.
Controle el nivel de aceite.
Precaución
En caso de aceite lechoso informar inmediatamente al servicio postventa Kärcher.
mensualmente
Limpie el tamiz en el dispositivo de se-
guridad contra el funcionamiento en seco.
Limpie el filtro en la manguera de aspi-
ración de detergente.
Después de 500 horas de servicio, al menos cada año
ha de cambiar el aceite.
Realizar como muy tarde cada 5 años
Realizar la comprobación de presión de
acuerdo con las indicaciones del fabricante.
Trabajos de mantenimiento
Limpie el tamiz en la conexión del agua
Retire el tamiz.
Limpie el tamiz en agua y vuelva a co-
locarlo.
Limpiar el filtro de depuración fina.
Despresurizar el sistema de alta pre-
sión.
Deastornillar el filtro fino del cabezal de
la bomba.
Desmontar el filtro fino y sacar el filtro.
Limpiar el filtro con agua limpia o aire
comprimido.
Montar siguiendo los pasos a la inver-
sa.
Limpiar el filtro de combustible
Sacudir el filtro de combustible. El com-
bustible no debe entrar en contacto con
el medio ambiente.
Limpie el tamiz en el dispositivo de seguridad contra el funcionamiento en seco
Hacer palaca para extraer la pinza de fi-
jación y extraer la manguera (sistema
de amortiguación suave) del dispositivo
de seguridad contra el funcionamiento
en seco
Saque el tamiz.
Nota: En caso necesario gire el tornillo M8
unos 0.2 in/5 mm hacia adentro y saque
así el tamiz.
Limpie el tamiz en agua.
Meta el tamiz.
Desplazar el racor de la manguera to-
talmente en el dispositivo de seguridad
contra el funcionamiento en seco y asegurar con la pinza de fijación.
Limpie el filtro en la manguera de aspiración de detergente.
Saque la tubuladura de aspiración de
detergente.
Limpie el filtro en agua y vuelva a colo-
carlo.
Cambie el aceite.
Prepare un recipiente colector para
aprox. 0.26 gal/1 litro de aceite.
Suelte el tornillo de purga.
Elimine el aceite viejo sin dañar el medio
ambiente o entregarlo en un punto de recogida de residuos.
Vuelva a apretar el tornillo de purga.
Introducir aceite poco a poco hasta la
marca MAX.
Nota: Las burbujas de aire deben poder
desaparecer.
Tipo de aceite y cantidad de llenado, ver
datos técnicos.
Ayuda en caso de avería
Peligro
Peligro de lesiones causadas por un aparato que se arranque involuntariamente y
descarga eléctrica.
Antes de efectuar cualquier trabajo en el
aparato, hay que desconectar de la red
eléctrica.
– 10
51ES
Page 52

El piloto de control de disposición
de servicio se apaga
– No hay tensión de red, véase "El apara-
to no se pone en marcha".
Piloto de control revisión
El piloto de control de mantenimiento se
ilumina
– Falta de aceite
Rellene con aceite.
1 parpadeo
– Falta de agua
Comprobar la conexión de agua y las
tuberías.
– Fuga en el sistema de alta presión
Verificar la estanqueidad del sistema
de alta presión y las conexiones.
2 parpadeos
– Error en el suministro de tensión o ab-
sorción de corriente del motor demasiado grande.
Comprobar el cable de conexión y los
fusibles de red.
Avisar al servicio técnico.
3 parpadeos
– Motor sobrecargado/sobrecalentado
Ponga el interruptor del aparato en "0/
OFF".
Deje enfriar el aparato.
Conexión del aparato
– El error se repite varias veces.
Avisar al servicio técnico.
4 parpadeos
– El limitador de temperatura de gases de
escape se ha activado.
Ponga el interruptor del aparato en "0/
OFF".
Deje enfriar el aparato.
Conexión del aparato
– El error se repite varias veces.
Avisar al servicio técnico.
Parpadear 5 veces
– El interruptor de láminas flexibles está
pegado al dispositivo de seguridad contra el funcionamiento en seco o el émbolo magnético está enganchado.
Avisar al servicio técnico.
Parpadear 6 veces
– El detector de llamas ha apagado el
quemador.
Avisar al servicio técnico.
El piloto de control de combustible
está encendido
– Depósito de combustible vacío.
Llenar de combustible.
El piloto de control del producto de
cuidado del sistema se enciende
– El recipiente de producto de manteni-
miento del sistema está vacío.
Rellenar producto de mantenimiento.
El piloto de control del detergente
está iluminado
– El depósito de detergente está vacío.
Llenar de detergente.
El aparato no funciona
– No hay tensión de red
Verificar conexión de red/cable.
El aparato no genera presión
– Aire en el sistema
Purgar el aire de la bomba:
Poner la válvula dosificadora en la posi-
ción "0".
Cuando la pistola pulverizadora está
abierta conecte y desconecte el aparato varias veces con el interruptor principal.
Abrir/cerrar la regulación de la presión/
caudal de la unidad de bomba con la
pistola pulverizadora manual.
Nota: Al desmontar la manguera de alta
presión de la conexión a alta presión se
acelera el proceso de purga de aire.
52 ES
– 11
Page 53

Si el depósito de detergente está vacío,
llénelo.
Verifique las conexiones y tuberías.
– La presión está ajustada a MIN.
Ajuste la presión a MAX.
– Limpie el tamiz en la conexión del agua.
Limpie el tamiz.
Limpiar el filtro de depuración fina, si es
necesario cambiar.
– La cantidad de abastecimiento de agua
es escasa
Verifique la cantidad de abastecimiento
de agua (ver datos técnicos).
El aparato tiene fugas, el agua gotea
del aparato por abajo
– La bomba no es estanca
Nota: Lo permitido es 3 gotas por minuto.
En caso de fuga de mayor envergadura
deje que el servicio técnico revise el
aparato.
El aparato se enciende y se apaga
continuamente cuando la pistola
está cerrada
– Fuga en el sistema de alta presión
Verificar la estanqueidad del sistema
de alta presión y las conexiones.
El aparato no succiona detergente
Deje en marcha el aparato con la válvu-
la dosificadora de detergente abierta y
el suministro de agua cerrado hasta
que la caja de flotador se haya vaciado
y la presión baje hasta "0".
Abrir de nuevo el suministro de agua.
Si la bomba sigue sin aspirar detergente
puede ser debido a lo siguiente:
– El filtro en la manguera de aspiración
de detergente está sucio
Limpiar el filtro.
– La válvula de retención se pega
Desmontar la manguera de detergente
y soltar la válvula de retención con un
objeto obtuso.
El quemador no se enciende
– Depósito de combustible vacío.
Llenar de combustible.
– Falta de agua
Comprobar la conexión de agua y las
tuberías.
Limpie el tamiz en el dispositivo de se-
guridad contra el funcionamiento en seco.
– El filtro de combustible está sucio
Cambie el filtro de combustible.
– No hay chispa de encendido
Si durante el servicio no se ve ninguna
chispa de encendido a través de la mirilla, lleve el aparato al servicio técnico
para revisarlo.
La temperatura regulada no se al-
canza durante el servicio con agua
caliente
– La presión de trabajo/caudal son dema-
siado altos
Reducir la presión de trabajo y el cau-
dal del regulador de presión/caudal de
la unidad de bomba.
– El serpentín de recalentamiento ha al-
macenado hollín
El aparato deberá deshollinarlo el servi-
cio técnico.
Servicio de atención al cliente
Si la avería no se puede solucionar el
aparato debe ser revisado por el servicio técnico.
– 12
53ES
Page 54

Garantía
En cada país rigen las condiciones de garantía establecidas por el distribuidor oficial
autorizado. Reparamos gratuitamente las
averías que se produzcan durante el plazo
de garantía, siempre y cuando hayan sido
ocasionadas por fallos materiales o de fabricación.
Accesorios y piezas de re-
puesto
Nota: Al conectar el aparato a una chime-
nea o cuando no se vea el aparato, recomendamos integrar un detector de llamas
(opcional).
– Sólo deben emplearse accesorios y
piezas de repuesto originales o autori-
zados por el fabricante. Los accesorios
y piezas de repuesto originales garanti-
zan el funcionamiento seguro y sin ave-
rías del aparato.
– Podrá encontrar una selección de las
piezas de repuesto usadas con más
frecuencia al final de las instrucciones
de uso.
– En el área de servicios de www.kaer-
cher.com encontrará más información
sobre piezas de repuesto.
54 ES
– 13
Page 55

Datos técnicos
HDS 3.0/20 C Ea
Conexión de red
Tensión V 220-240
Tipo de corriente Hz 1~ 60
Potencia conectada hp (kW) 5.6 (4.2)
Fusible de red (inerte) A 20
Categoria de protección -- IPX5
Clase de protección -- I
Conexión de agua
Temperatura de entrada (máx.) °F (°C) 86 (30)
Velocidad de alimentación (mín.) gpm (l/min) 4.0 (15)
Altura de aspiración desde el depósito abierto (68 °F/20 °C) ft (m) 1.6 (0.5)
Presión de entrada (máx.) psi (MPa) 145 (1)
Potencia y rendimiento
Caudal, agua gpm (l/min) 1.32-2.9 (5-11)
Presión de trabajo agua (con boquilla estándar) psi (MPa) 460-2000 (3.1-13.7)
Sobrepresión de servicio máxima (válvula de seguridad) psi (MPa) 2460 (17)
Caudal, accionamiento por vapor gpm (l/min) 1.32-1.5 (5-5.7)
Presión de trabajo máx accionamiento por vapor (con boquilla de salida de vapor)
No. de pieza boquilla de salida de vapor -- 5.130-454.0
Temperatura de trabajo máx. agua caliente °F (°C) 208 (98)
Temperatura de trabajo, accionamiento por vapor °F (°C) 311 (155)
Aspiración de detergente gpm (l/min) 0-0.16 (0-0.62)
Potencia del quemador hp (BTU/h) 58 (148,000)
Consumo máximo de fuel kg/h (gph) 4.15 (1.35)
Fuerza de retroceso de la pistola pulverizadora manual
(máx.)
Tamaño de la boquilla -- 042
Valores calculados conforme a la norma EN 60355-2-79
Emisión sonora
Nivel de presión acústica L
Inseguridad K
pA
Nivel de potencia acústica LWA + inseguridad K
pA
WA
Valor de vibración mano-brazo
Pistola pulverizadora manual m/s
Lanza dosificadora m/s
Inseguridad K m/s
Combustibles
Material combustible -- Aceite combustible EL
Cantidad de aceite gal (l) 0.08 (0.3)
Tipo de aceite -- 0W40
Medidas y pesos
Longitud x anchura x altura in (mm) 41.7 x 25.6 x 36.2
Peso de funcionamiento típico lbs (kg) 206.6 (93.7)
Depósito de carburante gal (l) 4.1 (15.5)
Depósito de detergente gal (l) 4.1 (15.5)
– 14
psi (MPa) 464 (3.2)
N 25.6
dB(A) 76
dB(A) 3
dB(A) 94
2
2
2
2.7
5.4
0.3
o Diesel
(1060 x 650 x 920)
55ES
Page 56

Inspecciones repetitivas
Nota: Se deben respetar las recomendaciones de intervalos de inspección de los requisi-
tos nacionales correspondientes del país donde está operativo el aparato.
Inspección llevada a
cabo por:
Inspección exterior
Inspección interior Inspección de re-
sistencia
Nombre Firma de la perso-
na cualificada/fecha
Nombre Firma de la perso-
na cualificada/fecha
Nombre Firma de la perso-
na cualificada/fecha
Nombre Firma de la perso-
na cualificada/fecha
Firma de la persona cualificada/fecha
Firma de la persona cualificada/fecha
Firma de la persona cualificada/fecha
Firma de la persona cualificada/fecha
Firma de la persona cualificada/fecha
Firma de la persona cualificada/fecha
Firma de la persona cualificada/fecha
Firma de la persona cualificada/fecha
Nombre Firma de la perso-
na cualificada/fecha
Nombre Firma de la perso-
na cualificada/fecha
56 ES
Firma de la persona cualificada/fecha
Firma de la persona cualificada/fecha
– 15
Firma de la persona cualificada/fecha
Firma de la persona cualificada/fecha
Page 57

Page 58

Page 59

Page 60

http://www.kaercher.com/dealersearch
 Loading...