

Page 1
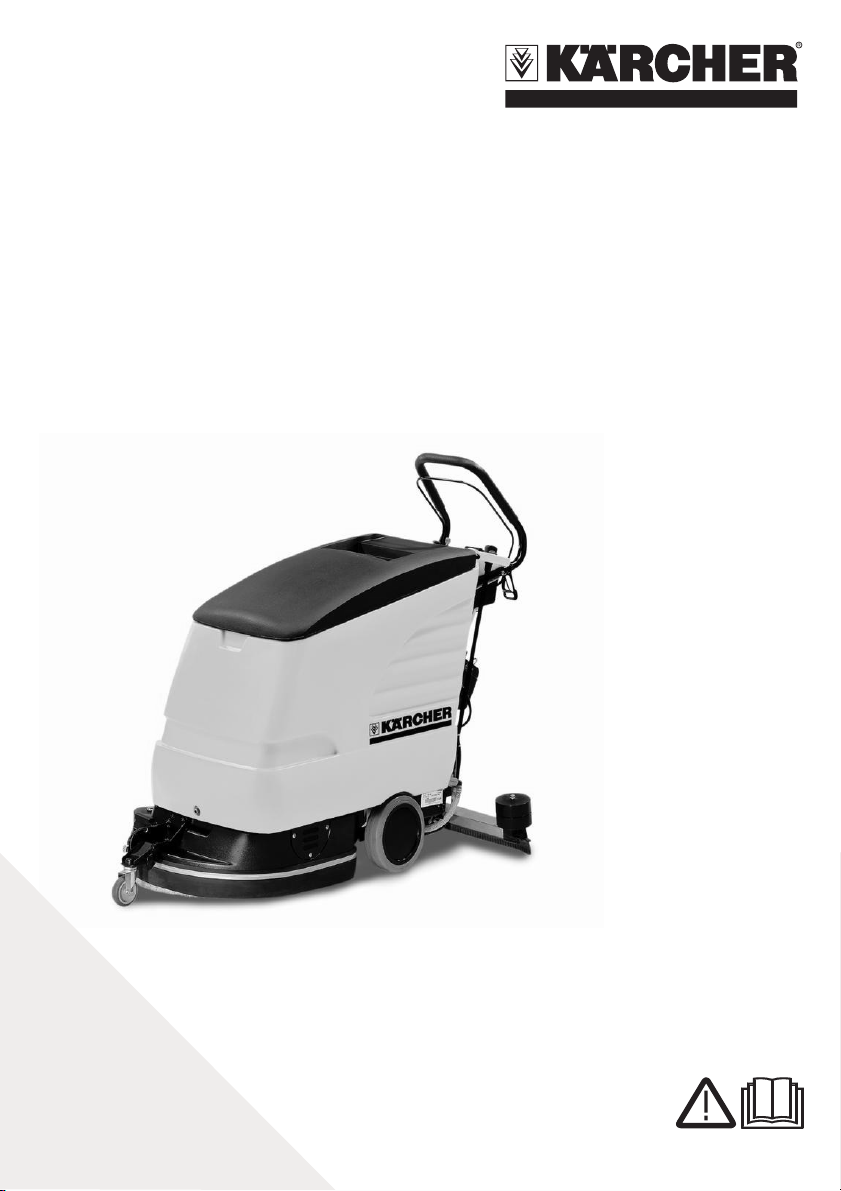
BD 530 Bp Classic
Register and win!
www
.kaercher
.com!
FOR U. S. USE ONLY
English 3
Español 19
Français 37
5.963-660.0 03/10
Page 2

2
Page 3

IMPORTANT SAFETY IN-
STRUCTIONS
READ ALL INSTRUCTIONS
BEFORE USING.
WARNING
To reduce the risk of fire, electric shock,
or injury:
– Do not leave the unit when plugged
in. Unplug from outlet when not in
use and before servicing.
and anything that may reduce air
flow.
– Keep hair, loose clothing, fingers,
and all parts of body away from
openings and moving parts.
– Turn off all controls before unplug-
ging.
– Do not use to pick up flammable or
combustible liquids, such as gasoline, or use in areas where they may
be present.
SAVE THESE INSTRUCTIONS
WARNING
– TO REDUCE THE RISK OF ELEC-
TRIC SHOCK-USE INDOORS
ONLY
– Do not allow to be used as a toy.
Close attention is necessary when
used near children.
– Use only as discribed in this manual.
Use only manufacturer’s recommended attachments.
– Do not use with damaged cord or
plug. If the unit is not working as it
should, has been dropped, damaged, left outdoors, or dropped into
water, return it to a service center.
– Do not pull or carry by cord, use cord
as a handle, close a door on cord, or
pull cord around sharp edges or corners. Do not run the unit over cord.
Keep cord away from heated surfaces.
– Do not unplug by pulling on cord. To
unplug, grasp the plug, not the cord.
– Do not handle plug or appliance with
wet hands.
– Do not put any object into openings.
Do not use with any opening
blocked; keep free of dust, lint, hair,
OPERATING SAFETY RULES
AND PRACTICES
Operator Responsibility
Save operation is in the responsibility of
the operator.
The operator shall be familiar with the
operation and function of all controls
and instruments before undertaking to
operate the unit.
Before operating the unit, operators
shall have read and be familiar with the
operator’s manual for the particular unit
being operated and they shall also
abide by the safety rules and practices
in the following paragraphs.
Before operating any unit, the operator
shall be familiar with unusual operating
conditions which may require additional
safety precautions or special operating
instructions.
General
Before starting to operate the unit be in
operating position.
Do not start or operate the unit, any of
its functions or attachments, from any
place other than from the designated
operators position.
Before leaving the operator’s position:
English 3
Page 4

A bring the unit to a complete stop;
B if the unit must be on an incline,
block the wheels.
Do not add to, or modify the unit.
Do not block access to fire aisles, stairways or fire equipment.
Travelling
Yield the right of way to pedestrians and
emergency vehicles such as ambulances and fire trucks.
Cross railroad tracks at an angle wherever possible. Do not park closer than 6
ft (1800 mm) to the nearest rail of a railroad track.
Keep a clear view of the path of travel
and observe for other traffic, personnel,
and safe clearances.
Under all travel conditions, operate the
unit at a speed that will permit it to be
brought to a stop in a safe manner.
Do not indulge in stunt driving or horseplay.
Slow down for wet and slippery floors.
Before driving over a dockboard or
bridge plate, be sure that it is properly
secured. Drive carefully and slowly
across the dockboard or bridge plate,
and never exceed its rated capacity.
When negotiating turns, reduce speed
to a safe level consistent with the operating environment. Make the turns
smoothly.
Operator care of the unit
If the unit is found to be in need of repair
or in any way unsafe, or contributes to
an unsafe condition, the matter shall be
reported immediately to the user’s designated authority, and the unit shall not
be operated until it has been restored to
safe operating condition.
If during operation the unit becomes unsafe in any way, the matter shall be re-
ported immediately to the user’s
designated authority, and the unit shall
not be operated until it has been restored to safe operating condition.
Do not make repairs or adjustments unless specifically authorized to do so.
Do not use open flames when checking
electrolyte level in storage batteries.
MAINTENANCE AND RE-
BUILD PRACTICES
Operation of the unit may be hazardous
if maintenance is neglected or repairs,
rebuilds, or adjustments are not performed in accordance with the manufacturer’s design criteria. Therefore,
maintenance facilities (on or off premises), trained personnel, and detailed
procedures shall be provided.
Maintenance and inspection of the unit
shall be performed in conformance with
the following practices:
A a schedules planned maintenance,
lubrication, and inspection system
shall be followed; consult the manufacturer’s recommendations.
B only tranined and authorized person-
nel shall be permitted to maintain,
repair, adjust, and inspect the unit,
and in accordance with manufactur-
er’s specifications.
Avoid fire hazards and have fire protection equipment present in the work area.
Do not use an open flame to check the
level of any fluid, especially battery
electrolyte. Do not use open pans of fuel
or flammable cleaning fluids for cleaning parts.
FIRE SAFETY STANDARD
Any unit not in safe operating condition
shall be removed from service.
Repairs shall not be made in Class I,
Class II, and Class III locations.
4 English
Page 5

Fire Prevention.The unit shall be kept
in a clean condition and reasonably free
of lint, excess oil, and grease. Noncombustible agents are preferred for cleaning the unit. Flammable liquids [those
having flash points at or above 100°F
(37,8°C)] are not allowed. Precautions
regarding toxicity, ventilation, and fire
hazard shall be appropriate for the
agent or solvent used.
Nameplate Visibility. The unit type
designations as shown on the nameplate and the type markers shall not be
covered over with paint so that their
identification information is obscured.
The unit shall not be used in classified
areas.
Please read and comply with
these original instructions prior to the initial operation of your appliance and store them for later use or
subsequent owners.
Contents
Safety instructions 5
Function 6
Proper use 6
Environmental protection 6
Control elements 7
Before Startup 8
Operation 11
Maintenance and care 14
Faults 15
Technical specifications 18
Warranty 18
Spare parts 18
Safety instructions
Before using the appliance for the first
time, read and observe these operating
instructions and the accompanying brochure: Safety information for brush
cleaning units and spray-extraction
units, 5.956-251.
The machine has been approved for
use on surfaces with gradients of up to
2%.
The appliance may only be operated
when the container and all lids are
closed.
Symbols
The following symbols are used in this
operating manual:
Danger
Indicates an immediate threat of danger. Failure to observe the instruction
may result in death or serious injuries.
English 5
Page 6
몇 Warning
Indicates a possibly dangerous situation. Failure to observe the instruction
may result in light injuries or damage to
property.
Note
Indicates useful tips and important information about the product.
Function
The appliance is used for the wet cleaning of level floors. It can be easily adjusted to the cleaning task by setting the
water quantity and the dirt water suction.
A working width of 460 mm and a capacity of 40 l each of the fresh and dirt
water reservoirs enable an effective
cleaning even when the machine is
used for long duration.
Proper use
Use this appliance only as directed in
these operating instructions.
– The appliance should only be used
for cleaning level floors that are not
affected by moisture.
– The appliance is not suited for the
cleaning of frozen grounds (e.g. in
cold stores).
– The appliance may only be equipped
with original accessories and spare
parts.
Environmental protection
The packaging material can
be recycled. Please do not
place the packaging into the
ordinary refuse for disposal,
but arrange for the proper recycling.
Old appliances contain valuable materials that can be recycled. Please arrange for
the proper recycling of old
appliances. Batteries, oil,
and similar substances must
not enter the environment.
Please dispose of your old
appliances using appropriate
collection systems.
Notes about the ingredients
(REACH)
You will find current information about
the ingredients at:
http://www.karcher.de/de/unternehmen/
umweltschutz/REACH.htm
6 English
Page 7
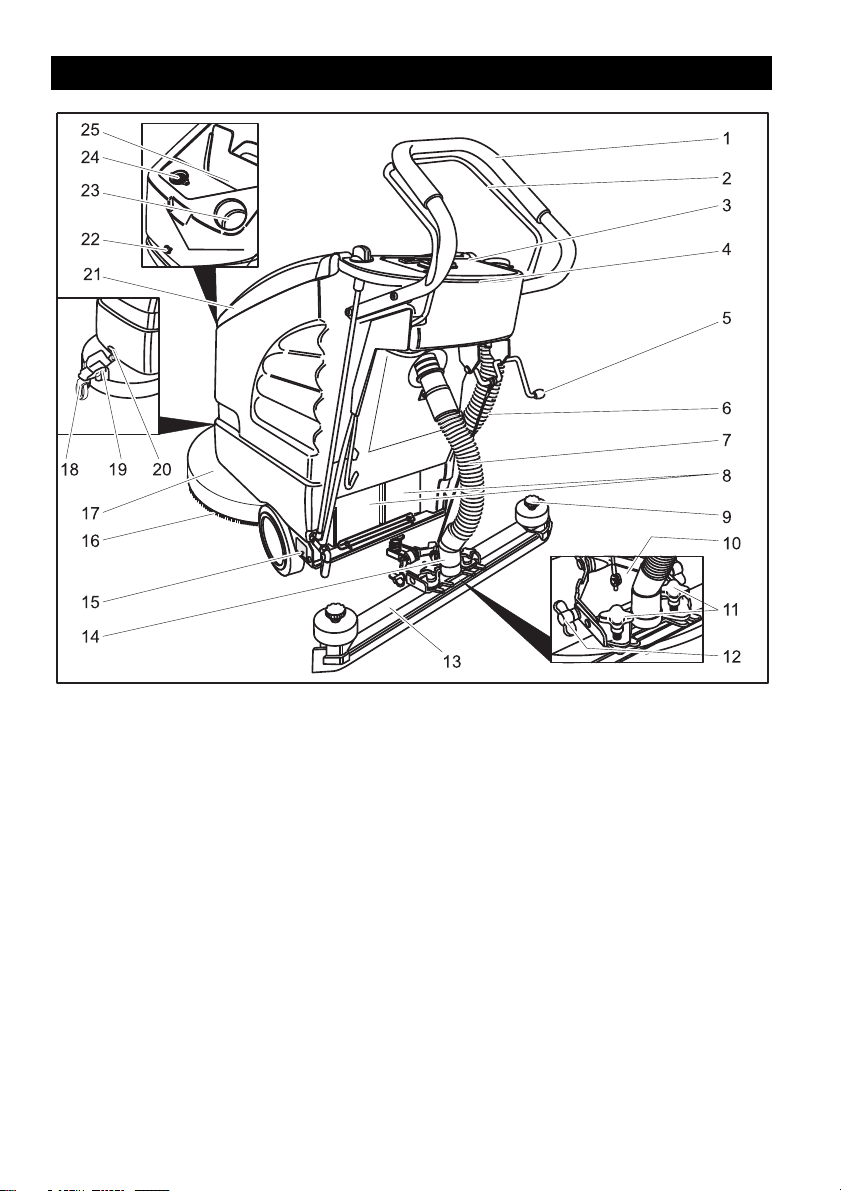
Control elements
1 Push handle
2 Control handle
3 Operator console
4 Electronics and fuses
(under the operations panel)
5 Vacuum bar lowering lever
6 Dirt water discharge hose
7 Suction hose
8 Battery (BD 530 Bp only)
9 Star grips to exchange the vacuum
lips
10 Vacuum bar suspension
11 Cross handles for fastening and
slanting the vacuum bar
12 Wing nuts for tilting the vacuum bar
13 Vacuum bar (not included in the de-
livery)
14 Connecting the suction hose to the
suction turbine
15 Nameplate
16 Disc brush
17 Cleaning head
18 Chassis
19 Locking
20 Handle
21 Cover dirt water reservoir
22 Screw for locking the container; in
the container. Batteries *
Under the lid of the dirt water tank:
23 Fresh water reservoir filler neck
24 Lint sieve (suction)
25 Dirt water reservoir
English 7
Page 8
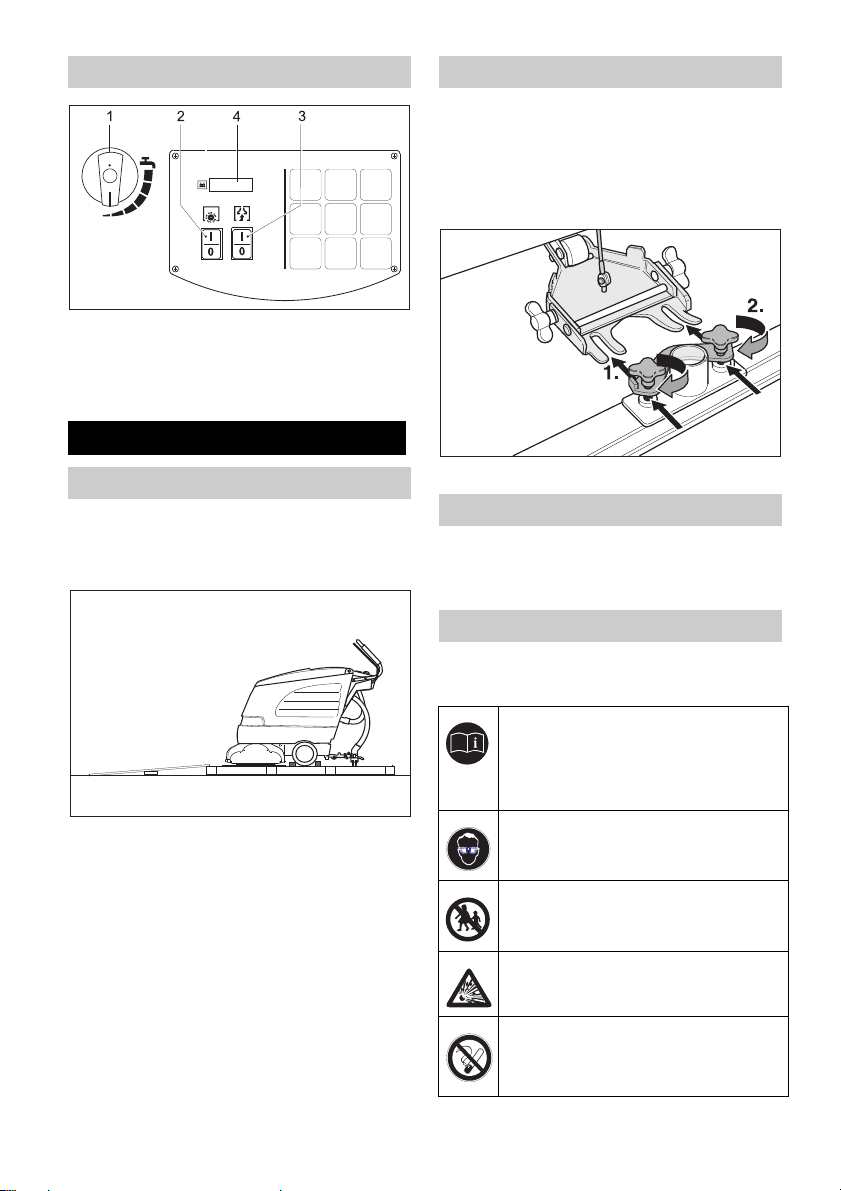
Operator console
1 Water quantity regulator
2 Switch for brush operations
3 Switch of suction turbine
4 Display
Before Startup
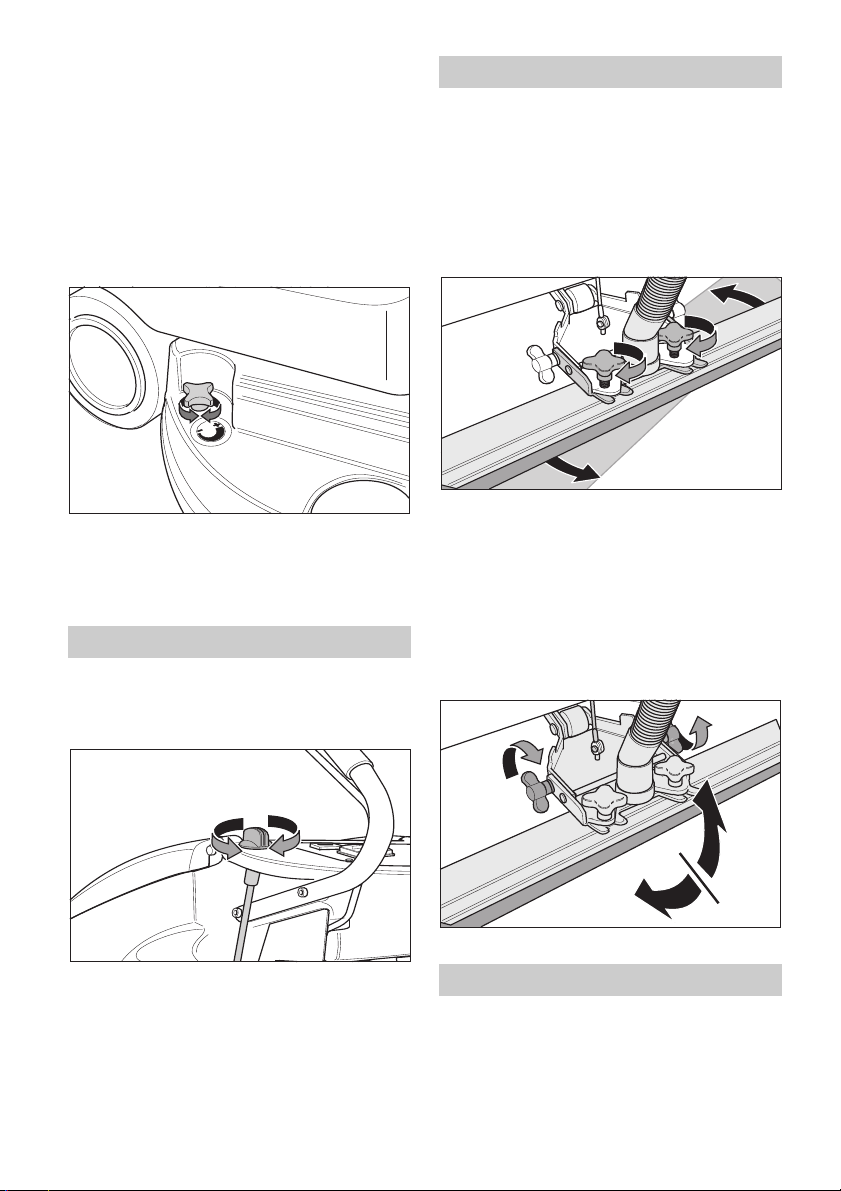
Installing the Vacuum Bar
Î Insert the vacuum bar into the vacu-
um bar suspension in such a manner
that the profiled sheet is positioned
above the suspension.
Î Tighten the cross-handles.
Unloading
Î Fasten the pushing handle using the
four screws that have been delivered
and fit the protective caps.
Î
Place long lateral boards of the packaging as a ramp next to the pallet.
Î Fix the ramp on the pallet with nails.
Î Place short boards as a support un-
derneath the ramp.
Î Remove the wooden bars in front of
the wheels.
Î Raise the cleaning head and remove
the cartonage.
Î Push down the appliance through
the ramp from the pallet.
Î Insert the suction hose.
Install the brush
The disc brush must be installed before
the initial operation (see "Maintenance
work").
Batteries
Please observe the following warning
notes when handling batteries:
Observe the directions on the
battery, in the instructions for
use and in the vehicle operating instructions
Wear eye protection
Keep children away from acid
and batteries
Danger of explosion
Fire, sparks, naked flames and
smoking must be strictly avoided
8 English
Page 9
Danger of chemical burns
First aid
Warning note
Disposal
Do not throw the battery into
the regular waste
Danger
Danger of explosion. Do not put tools or
similar on the battery, i.e. on the terminal poles and cell connectors.
Risk of injury. Ensure that wounds never come into contact with lead. Always
clean your hands after having worked
with batteries.
Insert batteries and connect
Î Release the lock screw for the con-
tainer and open the container.
Î Place the batteries facing the clean-
ing head closely in the trough.
Î Lubricate the battery pole with pole
grease.
Î Connect pole using the enclosed
connecting cable.
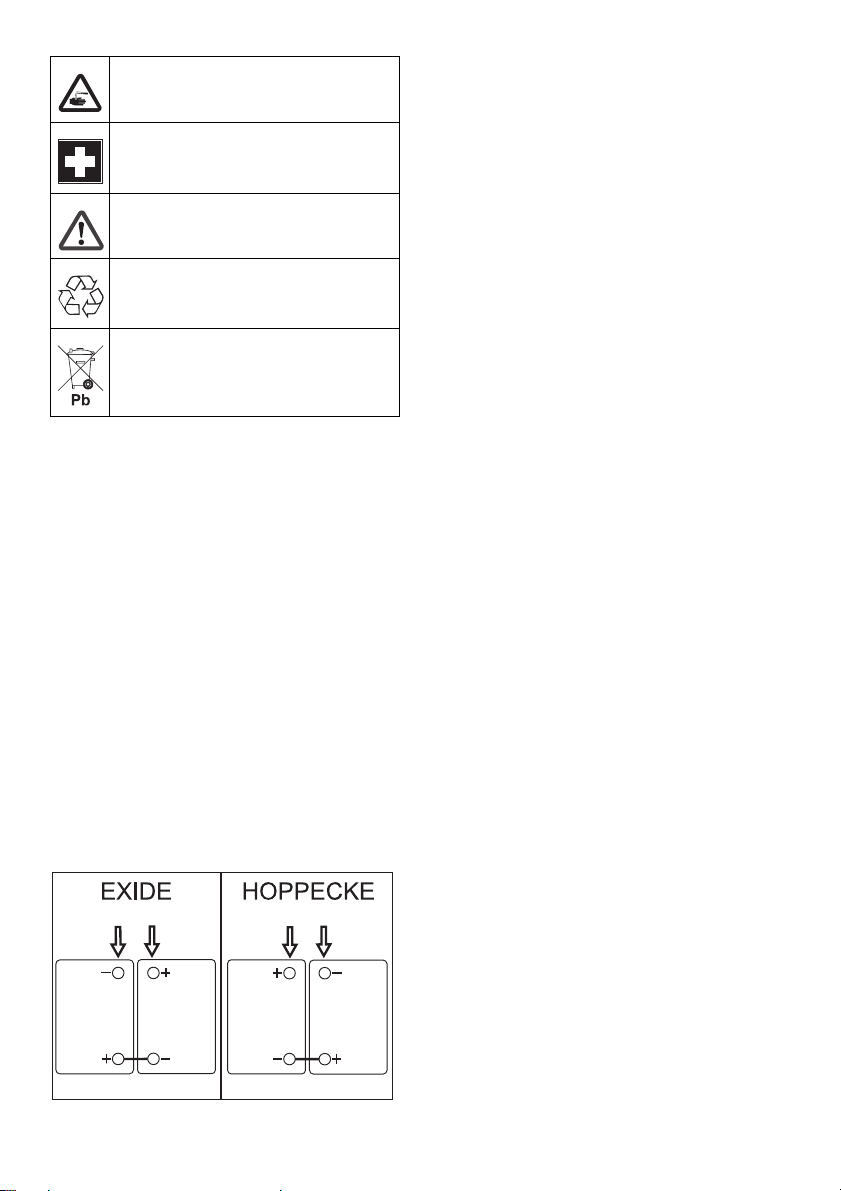
Caution
Risk of damage during repoling the connecting cable. Connect the red cable to
the plus pole and the black cable to the
minus pole of the battery. The battery
model can easily be recognised by the
casing color of the batteries: EXIDE:
grey, HOPPECKE: green.
Î Connect the connection cable to the
free battery poles (+) and (-).
Î Close the container and tighten the
screw.
Î Screw in the the lock screw for the
container and tighten it.
몇 Warning
Charge the battery before commissioning the machine.
Charging battery
Danger
Danger of explosion. Wet batteries can
only be charged with opened battery
cover.
Note
The device is equipped with a safety
mechanism to prevent total discharge,
i.e. when the permissible minimum capacity is reached, then the brush motor
and the turbine are switched off. The
message "LOW BAT“ is displayed on
the operations panel.
Note
Average charging time is approx. 10 -15
hours.
The recommended chargers (matching
the batteries used) are regulated electronically and will automatically switch
off the charging process.
All functions of the machine are automatically interrupted during the charging process.
English 9
Page 10

Î
Move the machine directly to the
charging station.
Recommended batteries
Charging process
Î Pull out the suction hose from the
vacuum bar.
Î Release the lock screw for the con-
tainer and open the container.
Î Remove battery plug and join it to
the charging cable.
Î Connect the charger to the mains
and turn it on.
Low maintenance batteries (wet
batteries)
Î Add distilled water one hour before
the charging process comes to an
end; follow the correct acid level.
There are corresponding indicators
on the battery.
Danger
Danger of causticization!
– Adding water to the battery in its dis-
charged state can cause the acid to
leak.
– Use safety glasses while handling
battery acid and follow the safety instructions to avoid personal injury or
damage to clothes.
– Should the acid spray on to the skin
or clothes, rinse immediately with
lots of water.
몇 Warning
Risk of damage!
– Use only distilled or desalinated wa-
ter (EN 50272-T3) for filling the battery.
– Do not add any substances (so-
called performance improving
agents), else warranty claims will not
be entertained.
Manufactur-
Description
er, Kärcher
order no.
EXIDE
6.654-097.0
12 V, 80 Ah, low main-
tenance
Recommended chargers
Manufactur-
Description
er, Kärcher
order no.
KÄRCHER
6.654-179.0
Separate charger for
battery 6.654-097.0
Batteries and chargers are available in
specialised stores.
Battery control display
The charging status of the battery is
shown in the display on the operations
panel:
– After switching on the button for
brush operations or suction turbine,
the operating hours are displayed for
5 seconds.
– A bar diagram is then displayed to
show the charging status of the battery.
10 English
Page 11
Operation
몇
Warning!
Risk of damage. Raise the vacuum bar
before reversing.
Note
The appliance is designed and built in
such a way that the brush head is projecting towards the right. This enables
working in a comfortable way close to
the edges.
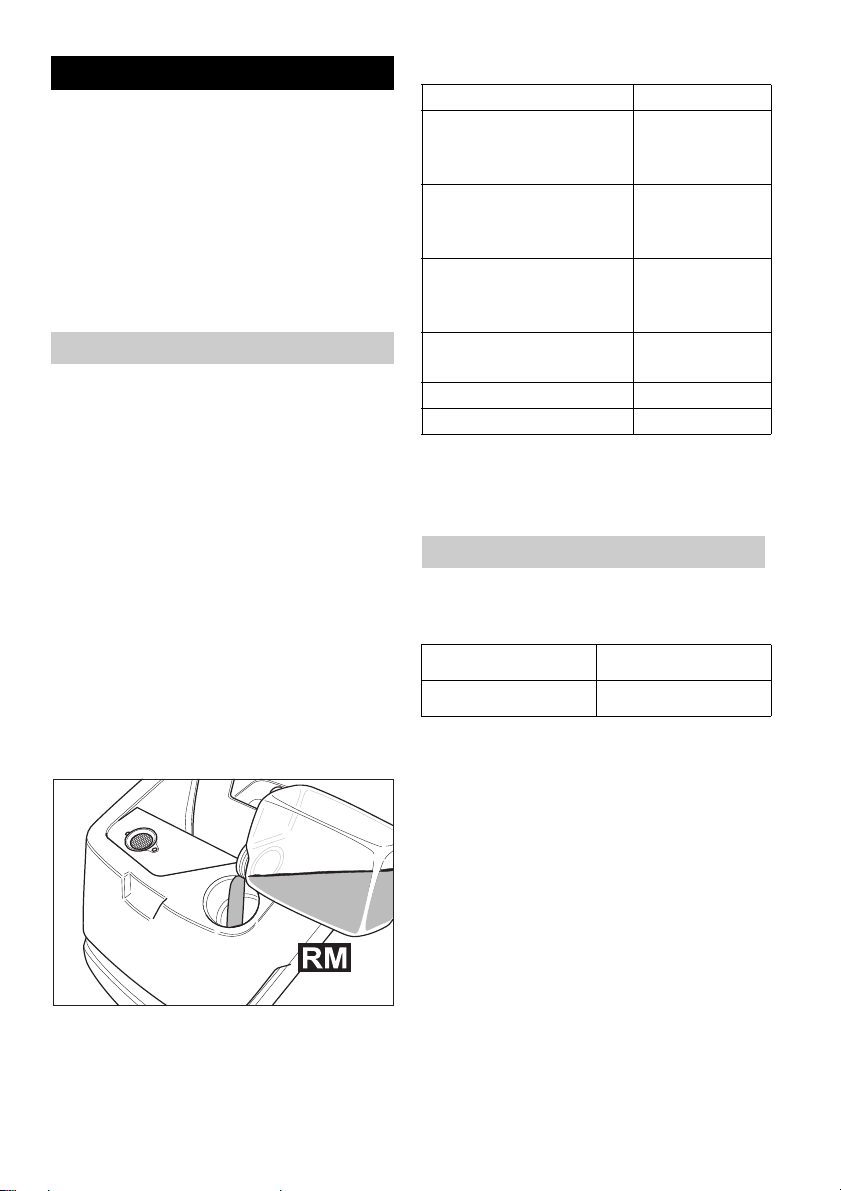
Filling in detergents
몇 Warning
Risk of damage. Only use the recommended detergents. With respect to different detergents the operator bears the
increased risk regarding the operational
safety and danger of accident. Only use
detergents that are free from solvents,
hydrochloric acid and hydrofluoric acid.
Note
Do not use highly foaming detergents.
Observe the dosing notes.
Î Open the cover of the fresh water
reservoir.
Î Fill in fresh water (maximum 60 °C).
Î Add detergent. Follow dosing in-
structions for detergent.
Recommended detergents:
Application Detergent
Regular cleaning
(even for floors sensi-
RM 745
RM 746
tive to alkalies)
Cleaning dirt from
grease
RM 69 ES
ASF
RM 69 ASF
Basic cleaning (strip-
RM 752
ping) of alkali-resistant hard coatings
Basic cleaning (strip-
RM 754
ping) linoleum
Sanitary cleaning RM 25 ASF
Disinfection cleaning RM 732
Detergents are available in specialised
stores.
Î Close the cover of the dirt water res-
ervoir.
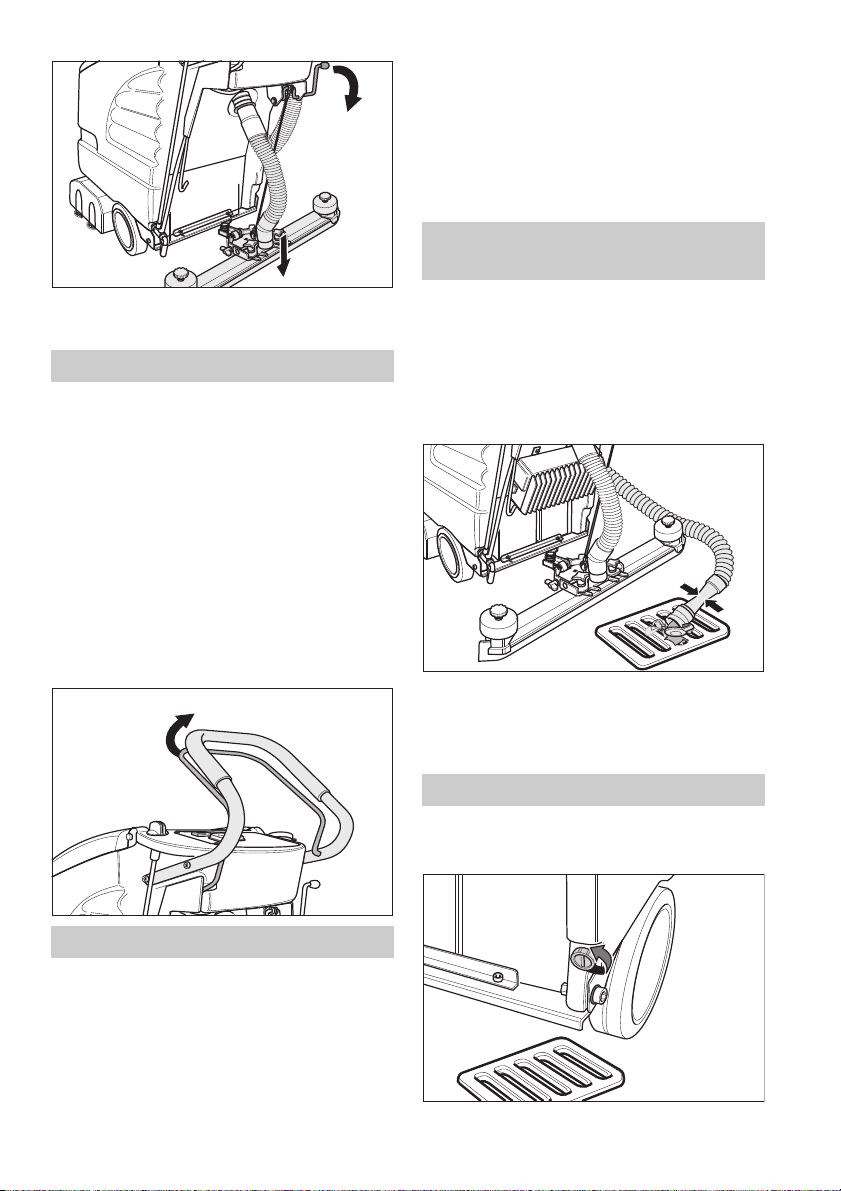
Cleaning
Chassis
Down Transport
Up Cleaning
Î Raise the device slightly at the han-
dle.
Î Pull out the lock.
Î Tilt the chassis to the desired posi-
tion.
Î Put the lock.
Driving to the Place of Use
Î
Tilt the chassis downward and lock it.
Î Push the machine to the place
where it is to be used.
Cleaning
Î Tilt the chassis upward and lock it.
Î Switch on the button for brush oper-
ations and suction turbine
English 11
Page 12
Î
Press control switch.
Note
If the brush motor does not run when
switched on, then brush motor is to be
released by pulling the machine backward.
Î Perform the cleaning operation.
Setting the advance speed
Î Reducing the speed: Turn the button
in "–" direction.
Î Increasing the speed: Turn the but-
ton in "+" direction.
Setting the water quantity
Î Set the water quantity at the regula-
tion knob according to the dirt level
and the type of flooring.
Setting the Vacuum Bar
Oblique position
To improve the vacuuming result on
tiled floors the vacuum bar can be
turned to an oblique position of up to 5°.
Î Loosen cross-handles.
Î Turn the vacuum bar.
Î Tighten the cross-handles.
Inclination
If the vacuum result is unsatisfactory the
inclination of the straight vacuum bar
can be modified.
Î Release the wing nuts.
Î Tilt the vacuum bar.
Note
Carry out initial cleaning attempts with
low quantity of water. Slowly increase
the water quantity till the desired cleaning result is achieved.
12 English
Î Tighten the wing nuts.
Lower the vacuum bar
Î Turn the lever downwards; the vacu-
um bar is lowered.
Page 13
Î Raise the vacuum bar.
Î
Tilt the chassis downward and lock it.
몇 Warning!
Danger of deformation of the brush(es).
When shutting down the appliance relieve the brush(es) by lowering the running gear.
Emptying the Dirt Water Reser-
voir
Î Switch on the suction turbine using
the switch.
Switching on the cleaning head
몇 Warning!
Risk of damage to the floor covering. Do
not operate the appliance on the spot.
Î Switch on the button for brush oper-
ations.
Î Activate the control handle; the
brush motor starts up.
Note
First turn on the switch for brush operation, then use the control handle. If you
do this in reverse order, there will an error message on the display.
몇 Warning
Please observe the local provisions regarding the wastewater treatment.
Î Take the dirt water discharge hose
from the support and lower above a
suited collection device.
Î Let off water by opening the dosage
device at the discharge hose.
Î The rinse the dirt water reservoir
with clear water.
Emptying the Fresh Water Tank
Î Open the lock of the fresh water tank
using a suitable tool (such as a coin).
Shutting Down the Appliance
Î Close the water quantity regulator.
Î
Drive the appliance forward for another 1-2 m to draw off residual water.
Î Release the control handle.
Î Switch off the button for brush oper-
ations and suction turbine
English 13
Page 14
Maintenance and care
Danger
Risk of injury!
Before carrying out any tasks on the device, switch off the button for brush operations and suction turbine and pull out
the charger plug.
몇 Warning
Risk of damage to the appliance on account of water leakage. Drain out dirt
water and the remaining free water before wokring at the machine.
Maintenance schedule
After the work
몇 Warning
Risk of damage. Do not wash down the
appliance with water and do not use aggressive detergents.
Î Drain off dirt water.
Î Rinse the dirt water reservoir with
clear water.
Î Clean the outside of the appliance
with a damp cloth which has been
soaked in mild detergent.
Î Check the fluff filter, clean if required
Î Clean the vacuum lips and the wip-
ing lips, check for wear and replace
if required.
Î Check the brushes for wear, replace
if required.
Î Charge battery if required.
Monthly
Î Check the condition of the seals be-
tween dirt water reservoir and cover,
replace if required.
Î Check battery pole for oxidation;
brush it if required and lubricate it using pole grease. Ensure that the connection cable sits firmly.
Î Check the acid density of the cells if
the batteries are not maintenancefree batteries.
Yearly
Î Have the prescribed inspection car-
ried out by the customer service.
Maintenance Works
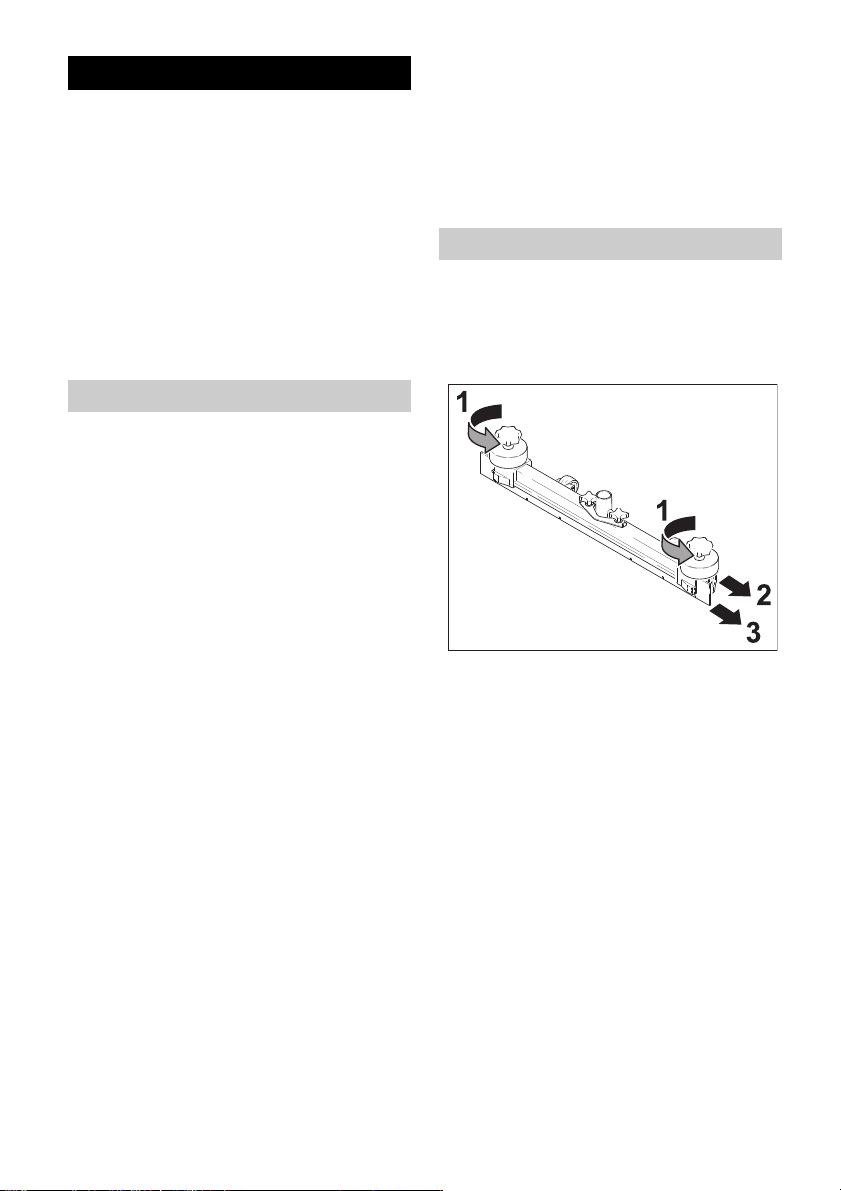
Turn or replace vacuum lips
Î Remove the vacuum bar.
Î Unscrew the star grips.
Î Remove the plastic parts.
Î Remove the vacuum lips.
Î Turn the vacuum lips or insert new
ones.
Î Insert the plastic parts.
Î Screw in and tighten the star grips.
Replacing the disk brushes
Î Turn the button for the setting of the
advance speed in "– " direction.
Î Raise the disk brush.
Î Turn the disk brush by approx. 45° in
anti-clock-wise direction.
Î Remove the disk brush at the bot-
tom.
Î Insert new disk brush in reverse se-
quence.
Î Set the advance speed.
14 English
Page 15
Maintenance contract
To ensure a reliable operation of the appliance maintenance contracts can be
concluded with the competent Kärcher
sales office.
Frost protection
In case of danger of frost:
Î Empty the fresh and dirt water reser-
voirs.
Î Store the appliance in a frost-pro-
tected room.
Transport
Î Remove brushes to avoid damage to
the brushes.
Î If you want to transport the machine
on a vehicle secure it from slipping
using belts/ ropes.
Faults
Danger
Risk of injury!
Before carrying out any tasks on the device, switch off the button for brush operations and suction turbine and pull out
the charger plug.
몇 Warning
Risk of damage to the appliance on account of water leakage. Drain out dirt
water and the remaining free water before wokring at the machine.
Faults with display
Display Remedy
ERR B Check if foreign matters block the brushes; remove for-
eign matter if required.
ERR T Call customer service.
LOW BAT Charging battery
ERR TEMP Allow device to cool down.
Reduce brush contact pressure, if necessary.
HandsOff Release the control handle and wait until the operating
hours or the battery status is shown in the display. After
that, activate the control handle again.
ERR REL Turn off the switch for brush operation, turn off the switch
for the vacuum turbine, release the control handle, wait 3
seconds and turn back on.
If the event recurs, call Customer Service.
English 15
Page 16
Faults without display on the console
Fault Remedy
Appliance cannot be start-edPress control switch.
Check battery; replace, if needed.
Check if the mains plug is connected.
Insufficient water quantity Check fresh water level, refill tank if necessary.
Check hoses for blockages; clean if required.
Insufficient vacuum performance
Insufficient cleaning result Check the brushes for wear, replace if required.
Brushes do not turn Press control switch.
Clean the seals between dirt water reservoir and
cover and check for tightness, replace if required.
Clean the fluff filter.
Clean the vacuum lips on the vacuum bar, turn or
replace if required
Check if the suction hose and vacuum bar are
chocked, clean if required
Check the suction hose for tightness; replace if required.
Check if the cover on the dirt water discharge hose
is closed
Check the setting of the vacuum bar.
Check if foreign matters block the brushes; remove
foreign matter if required.
16 English
Page 17

Accessories
The appliance can be equipped with
various accessories depending on the
cleaning task. Please request our cata-
Description
Disk brush, natural
(white)
Disk brush, red (medium, standard)
Disk brush, black
(hard)
Driver plate 6.906-332.0 For intake of pads. 1 1
Disc pad, red (medium)
Part no.:
BD 530
6.906-056.0 For polishing floors. 1 1
6.906-054.0 For cleaning slightly dirtied
6.906-055.0 For cleaning heavily dirtied
6.369-024.0 For cleaning slightly dirtied
logue or visit us on the Internet at
www.kaercher.com.
Description
or sensitive floors.
floors.
floors.
Each/packaging
11
11
51
Machine requires piece
Disc pad, green
(hard)
Disc pad, black
(very hard)
Vacuum bar,
straight
Vacuum bar, bent 4.777-054.0 Standard 1 1
Rubber lip, blue 6.273-204.0 Standard 1 1
Rubber lip, brown 6.273-207.0 oil-resistant 1 1
6.369-023.0 For cleaning normal dirtied
floors.
6.369-022.0 For cleaning heavily dirtied
floors.
4.777-047.0 Standard 1 1
51
51
English 17
Page 18

Technical specifications
BD 530 Bp
Power
Nominal voltage V 24
Battery capacity Ah (5h) 75
Average power consumption W 1200
Suction engine output W 500
Brush engine output W 600
Vacuuming
Cleaning power, air quantity l/s (gpm) 30 (475)
Cleaning power, negative pressure kPa (psi) 14 (2)
Cleaning brushes
Working width mm (in) 460 (18,1)
Brush diameter mm (in) 460 (18,1)
Brush speed 1/min 140
Dimensions and weights
Theoretical surface cleaning performance m
Fresh/dirt water reservoir volume l (gal) 40/40 (10,5/
Total weight kg (lbs) 115 (253,5)
Noise emission
Sound pressure level (EN 60704-1) dB(A) 70
Machine vibrations
Vibration total value (ISO 5349) m/s² 0,4
2
/h (ft2/h) 1840 (19800)
10,5)
Warranty Spare parts
The warranty terms published by our
competent sales company are applicable in each country. We will repair potential failures of your accessory within
the warranty period free of charge, provided that such failure is caused by
faulty material or defects in fabrication.
In the event of a warranty claim please
contact your dealer or the nearest authorized Customer Service center.
Please submit the proof of purchase.
18 English
– Only use accessories and spare
parts which have been approved by
the manufacturer. The exclusive use
of original accessories and original
spare parts ensures that the appliance can be operated safely and
troublefree.
– At the end of the operating instruc-
tions you will find a selected list of
spare parts that are often required.
– For additional information about
spare parts, please go to the Service
section at www.kaercher.com.
Page 19

CONSIGNES DE SÉCURITÉ
IMPORTANTES
LIRE L'INTÉGRALITÉ DES
INSTRUCTIONS AVANT
L'UTILISATION.
AVERTISSEMENT
Afin de réduire les risques d'incendie,
d'électrocution et de blessures, prendre
les précautions suivantes :
– Ne pas laisser l'appareil sans sur-
veillance lorsqu'il est branché. Débrancher l'appareil lorsqu'il n'est pas
utilisé et avant de procéder à l'entretien.
AVERTISSEMENT
– UTILISER L'APPAREIL EXCLUSI-
VEMENT À L'INTÉRIEUR POUR
RÉDUIRE LES RISQUES D'ÉLECTROCUTION
– Cet appareil n'est pas un jouet. Ne
jamais le laisser sans surveillance
lorsqu'il est utilisé à proximité d'enfants.
– Respecter impérativement les consi-
gnes d'utilisation de ce manuel. Utiliser uniquement les accessoires
recommandés par le fabricant.
– Ne pas mettre l'appareil en service
en cas d'endommagement du cordon ou de la prise. Si l'appareil ne
fonctionne pas correctement, s'il est
tombé, s’il a été endommagé, s’il est
resté à l’extérieur ou est tombé dans
l’eau, le retourner à un centre de service.
– Ne pas tirer ou transporter l’appareil
par le cordon électrique ou se servir
de ce dernier comme d’une poignée.
Veiller à ne pas coincer le cordon
dans une porte et éviter de le tirer
sur des bords ou des coins tranchants. Ne pas rouler sur le cordon
électrique. Tenir le cordon à l'écart
des surfaces chaudes.
– Ne pas tirer sur le cordon électrique
pour débrancher l'appareil. Tirer au
niveau de la fiche pour déconnecter
l'appareil du secteur.
– Ne pas manipuler l’appareil ou la fi-
che électrique avec les mains
mouillées.
– Ne rien introduire dans les orifices.
Ne pas utiliser l’appareil si l’un des
orifices est obstrué. Protéger les orifices de la poussière, des peluches,
des cheveux et autres matières susceptibles de réduire le débit d'air.
– Veiller à ne pas approcher les che-
veux, vêtements larges, doigts ou
toute autre partie du corps des orifices et composants mobiles de l’appareil.
– Désactiver toutes les commandes
avant de débrancher l'appareil.
– Ne pas aspirer de liquides inflamma-
bles ou combustibles, tels que de
l’essence avec l'appareil. Ne pas utiliser ce dernier dans des zones susceptibles de contenir de tels
produits.
CONSERVER CES CONSI-
GNES
REGLES DE SECURITE ET
PRATIQUES RELATIVES A
L'UTILISATION
Responsabilité de l'utilisateur
L'utilisateur est responsable de l'utilisation en toute sécurité de l'appareil.
Français 19
Page 20

Avant d'utiliser l'appareil, l'utilisateur devra avoir acquis une connaissance approfondie des fonctions et du
fonctionnement de toutes les commandes et de tous les instruments.
Avant d'utiliser l'appareil, l'utilisateur devra avoir lu et s'être familiarisé avec le
manuel d'utilisation de l'appareil en
question. Il devra par ailleurs se conformer aux règles de sécurité et pratiques
décrites dans les paragraphes suivants.
Avant d'utiliser quelque appareil que ce
soit, l'utilisateur doit être conscient des
éventuelles conditions d'utilisation inhabituelles pouvant nécessiter des précautions de sécurité supplémentaires
ou la mise en œuvre d'instructions d'utilisation particulières.
Généralités
Avant de commencer à faire fonctionner
l'unité, soyez dans une position d'opération.
Ne pas démarrer ou utiliser l'appareil, ni
aucune de ses fonctions ou accessoires, à partir d'un autre endroit que celui
réservé à l'utilisateur.
Avant de quitter le poste de l'utilisateur :
A arrêter l'appareil ;
B si l'appareil doit stationner sur une
pente, caler les roues.
Ne pas ajouter d''accessoires à l'appareil ni le modifier de quelque manière
que ce soit.
Ne pas stationner à un endroit où l'appareil risque d'entraver les issues de
secours, les cages d'escaliers ou les
équipements de lutte contre l’incendie.
Conduite
Céder la priorité aux piétons ainsi
qu'aux véhicules d'urgence comme les
ambulances et les camions de pompiers.
Traverser les voies ferrées à angle droit
lorsque c'est possible. Ne pas garer
l'appareil à moins de 1,8 m de la voie
ferrée ou du rail le plus proche.
Veiller à conserver une vue bien dégagée du trajet à emprunter et être attentif
à la circulation des autres véhicules,
aux déplacements des membres du
personnel, ainsi qu'aux espaces de dégagement.
Quelles que soient les conditions de circulation, conserver une vitesse permettant d'arrêter l'appareil en toute
sécurité.
Ne jamais adopter de conduite dangereuse (cascades, acrobaties etc.)
Ralentir sur les sols mouillés et glissants.
Avant de déplacer l'appareil sur un pont
de chargement ou un pont de laison,
s'assurer que celui-ci est correctement
sécurisé. Avancer prudemment et lentement sur le pont de chargement ou
pont de liaison. Ne jamais dépasser la
charge maximale autorisée.
Dans les virages, ralentir et adopter une
vitesse de sécurité adaptée à l'environnement d'utilisation. Les virages doivent
être abordés sans à-coups.
Entretien de l'appareil par l'utili-
sateur
Si le véhicule a besoin d'être réparé ou
présente un risque quelconque, l'utilisateur doit le signaler immédiatement à
son responsable et ne pas utiliser l'appareil avant résolution du problème.
Si, en cours d'utilisation, le véhicule
s'avère dangereux de quelque façon
que ce soit, signaler immédiatement le
problème au responsable concerné et
cesser l'utilisation de l'appareil avant résolution du problème.
20 Français
Page 21

Ne pas effectuer de réparations ou réglages à moins d'y être expressément
autorisé.
Ne pas éclairer les batteries à l'aide
d'un flamme vive pour vérifier le niveau
d'électrolyte.
PROCEDURES D'ENTRETIEN
ET DE REMISE EN ETAT
L'utilisation de l'appareil peut devenir
dangereuse si l'entretien est négligé ou
si la remise en état ou les réglages nécessaires ne sont pas effectués en conformité avec les recommandations du
fabricant. Par conséquent, il est nécessaire de prévoir des ateliers de maintenance, à l'intérieur ou l'extérieur des
bâtiments, avec du personnel dûment
formé, ainsi que d'établir des procédures détaillées.
La maintenance et l'inspection de l'appareil doivent être effectuées conformément aux procédures suivantes :
A Les intervalles prescrits pour la
maintenance, la lubrification et le
contrôle du système doivent être
respectés; se reporter aux instructions du fabricant.
B La maintenance, les réparations, les
réglages et l'inspection de l'appareil
doivent être confiés exclusivement à
des personnes formées et habilitées
et effectués conformément aux recommandations du fabricant.
Eviter les risques d'incendie et s'assurer
que les locaux sont dotés des équipements nécessaires pour la lutte contre
l'incendie. Ne jamais éclairer les batteries à l'aide d'une flamme vive pour vérifier le niveau des liquides, en
particulier celui de l'électrolyte. Ne jamais utiliser de bacs ouverts contenant
du carburant ou des produits de nettoyage inflammables pour nettoyer les
composants de l'autolaveuse motorisée.
NORMES DE SECURITE IN-
CENDIE
Tout appareil dont le fonctionnement représente un risque doit être mis hors
service.
Les réparations ne doivent pas être effectuées dans les zones de classe I, II
et III.
Prévention des
incendies :L'autolaveuse motorisée
doit être tenue propre et dans la mesure
du possible, protégée des peluches,
des déversements d'huile et de la graisse. L'utilisation de produits non inflammables est recommandée pour le
nettoyage de l'autolaveuse motorisée.
Les liquides inflammables dont le point
d'ignition est égal ou supérieur à
37,8 °C (100 °F) ne sont pas autorisés.
Prendre les mesures appropriées concernant la toxicité, l'aération, et les risques d'incendie selon le produit ou
solvant utilisé.
Visibilité de la plaque signalétique :
Les données techniques figurant sur la
plaque signalétique de l'appareil ne doivent pas être recouvertes de peinture et
les informations d'identification doivent
rester visibles.
L'autolaveuse motorisée ne doit pas
être utilisée dans les zones classées.
Français 21
Page 22

Lire ces notice originale avant
la première utilisation de votre
appareil, se comporter selon ce qu'elles
requièrent et les conserver pour une utilisation ultérieure ou pour le propriétaire
futur.
Table des matières
Consignes de sécurité 22
Fonction 22
Utilisation conforme 22
Protection de l’environnement 23
Eléments de commande 24
Avant la mise en service 25
Fonctionnement 28
Entretien et maintenance 31
Pannes 33
Caractéristiques techniques 36
Garantie 36
Pièces de rechange 36
Consignes de sécurité
Lire la présente notice d'instructions
ainsi que la brochure ci-jointe Consignes de sécurité pour les nettoyeurs à
brosses n° 5.956-251 avant d'utiliser
l'appareil et respecter les instructions.
à la mort ou entraîner de graves blessures.
몇 Avertissement
Signalise une situation éventuellement
dangereuse. Un non respect de cette
consigne peut entraîner de légères
blessures ou encore des dégâts matériels.
Remarque
Donne des conseils pour l'utilisation et
d'importantes informations relatives au
produit.
Fonction
L’appareil est mis en oeuvre pour nettoyer des sols plans par voie humide. Il
peut être aisément adapté à l'application respective en ajustant la quantité
d'eau et l'aspiration pour évacuer l'eau
sale.
Une largeur de travail de 460 mm et une
capacité de 40 l pour le réservoir d'eau
fraiche et le réservoir d'eau sale assurent un nettoyage efficace, même si la
machine est utilisée pendant une période prolongée.
Utilisation conforme
Cette balayeuse doit être utilisée uniquement sur des surfaces qui présentent une pente maximale de 2%.
L'appareil peut être seulement exploité, lorsque le réservoir et tous les
couvercles sont fermés.
Symboles
Les symboles suivants sont utilisés
dans ces instructions de service :
Danger
Signalise un danger imminent. Un non
respect de cette consigne peut conduire
22 Français
L'utilisation de l'appareil doit être faite
en conformité avec les consignes figurant dans les instructions de service.
– L'apareil peut être urilizé que pour le
polissage des sols plats qui ne sont
pas sensibles à l'humidité.
– L'appareil n'est pas approprié pour
nettoyer des sols gelés (par exemple
dans des entrepôts frigorifiques)
– L'appareil doit uniquement être équi-
pé d'accessoires et de pièces de rechange d'origine.
Page 23

Protection de l’environne-
ment
Les matériaux constitutifs de
l’emballage sont recyclables.
Ne pas jeter les emballages
dans les ordures ménagères,
mais les remettre à un système de recyclage.
Les appareils usés contiennent des matériaux précieux
recyclables lesquels doivent
être apportés à un système
de recyclage. Il est interdit de
jeter les batteries, l'huile et
les substances similaires
dans l'environnement. Pour
cette raison, utiliser des systèmes de collecte adéquats
afin d'éliminer les appareils
usés.
Instructions relatives aux ingrédients (REACH)
Les informations actuelles relatives aux
ingrédients se trouvent sous :
http://www.karcher.de/de/unternehmen/
umweltschutz/REACH.htm
Français 23
Page 24

Eléments de commande
1 Guidon de poussée
2 Etrier de commande
3 Pupitre de commande
4 Électronique et fusibles
(sous le pupitre de commande)
5 Levier pour abaisser la barre d'aspi-
ration
6 Flexible de vidange pour eau sale
7 Flexible d’aspiration
8 Batterie (BD 530 Bp seulement)
9 Bouton cannelé pour le remplace-
ment des lèvres d'aspiration
10 Suspension de la barre d'aspiration
11
Écrous à croisillon pour fixer et points
diagonaux de la barre d'aspiration.
12 Ecrous-papillon pour incliner la barre
d'aspiration
13 Barre d'aspiration (non fournie)
24 Français
14 Raccordement flexible d'aspiration -
turbine
15 Plaque signalétique
16 Disque-brosse
17 Tête de nettoyage
18 Train de roulement
19 Verrouillage
20 Poignée
21 Couvercle du réservoir d'eau sale
22 Vis pour le verrouillage du réservoir,
dans le réservoir : Batteries *
Sous le couvercle du réservoir d'eau
sale :
23 Orifice de remplissage pour réser-
voir d'eau propre
24 Filtre pour des bouloches de dé-
chets (aspiration)
25 Réservoir d'eau sale
Page 25

Pupitre de commande
1 Bouton de régulation pour la quanti-
té d'eau
2 Sélecteur mode brosse
3 Sélecteur turbine
4Ecran
Avant la mise en service
Î Descendre l'appareil de la palette en
le poussant sur la rampe.
Montage de la barre d'aspiration
Î Poser les barres d'aspiration dans la
suspension de la barre d'aspiration
que la tôle profilée se trouve au-dessous de la suspension.
Î Visser les écrous à croisillon.
Déchargement de la machine
Î Fixer le guidon de poussée avec les
quatre vis fournies et enficher les
bouchons de protection.
Î Poser les longues planches latérales
d'emballage sur la palette pour qu'el-
les servent de rampe de descente.
Î Clouer la rampe sur la palette.
Î Poser les planches courtes sous la
rampe pour qu'elles servent d'appui.
Î Retirer les listeaux en bois figurant
devant les roues.
Î Soulever la tête de nettoyage et reti-
rer les cartons.
Î Emmancher le flexible d'aspiration.
Mettre la brosse en place
La brosse rotative doit être mise en place avant la première opération (voir
« Maintenance »).
Batteries
Respecter impérativement ces consignes en cas de manipulation des
batteries :
Respecter les consignes situées sur la batterie, dans les
instructions de service et dans
le mode d'emploi du véhicule
Porter des lunettes de protection
Tenir les enfants à l'écart des
acides et des batteries
Risque d'explosion
Français 25
Page 26

Toute flamme, matière incandescente, étincelle ou cigarette
est interdite à proximité de la
batterie.
Risque de brûlure
Premiers soins
Attention
Mise au rebut
Ne pas mettre la batterie au rebut dans le vide-ordures
Danger
Risque d'explosion. Ne jamais déposer
d'outils ou d'objets similaires sur les
bornes et les barrettes de connexion de
la batterie.
Risque de blessure. Ne jamais mettre
en contact des plaies avec le plomb.
Prendre soin de toujours se laver les
mains après avoir manipulé la batterie.
Montage et branchement de la batterie
Î Desserrer la vis pour le verrouillage
du récipient et relever le récipient.
Î Mettre en place les batteries dans la
cuve en les alignant par rapport à la
tête de nettoyage.
Î Graisser les bornes de batterie avec
graisse de borne.
Î Connecter les bornes avec le câble
de raccordement ci-joint.
Attention
Risque d'endommagement en cas d'inversion des pôles du câble de raccordement. Connecter le câble rouge au pôle
plus et le câble noir au pôle moins. La
version de la batterie peut être facilement identifiée au moyen de la couleur
du corps de la batterie : EXIDE : gris,
HOPPECKE : vert.
Î Brancher le câble de raccordement
ci-joint aux bornes de batterie encore libres (+) et (-).
Î Fermer le réservoir et serrer la vis.
Î Visser la vis pour le verrouillage du
récipient et la serrer.
몇 Avertissement
Charger la batterie avant de mettre l'appareil en service.
Chargement de la batterie
Danger
Risque d'explosion. Le chargement des
batteries humides est seulement permis
avec réservoir ouvert.
Remarque
L'appareil dispose d'un dispositif de protection anti-décharge, c'est-à-dire se le
minimum admissible de capacité est attendu, le moteur des brosses et la turbine sont arrêtés. L'affichage "LOW VAT"
apparaît dans l'écran sur le pupitre de
commande.
26 Français
Page 27

Remarque
Le temps de charge s'élève en moyenne à environ 10-15 heures.
Les chargeurs recommandés (adaptables à toutes les batteries) disposent
d'une réglage électronique et mettent
fin automatiquement à la procédure de
charge.
Lors de la procédure de charge, toutes
les fonctions de l'appareil sont automatiquement interrompues.
Î Pousser directement l'appareil jus-
qu'à la station de charge.
Processus de charge
Î Retirer le tuyau d'aspiration de la
bare d'aspiration.
Î Desserrer la vis pour le verrouillage
du récipient et relever le récipient.
Î Débrancher le connecteur de batte-
rie et le raccorder au câble du char-
geur.
Î Brancher le chargeur au réseau et le
mettre en marche.
Batteries pour service à maintenance réduite (batteries humides)
sures et l'endommagement des vêtements.
– En cas de projection d'acide sur la
peau ou les vêtements, rincer immédiatement et abondamment à l'eau.
몇 Avertissement
Risque d'endommagement!
– Pour remplir la batterie, utiliser uni-
quement de l'eau distillée ou dessalée (EN 50272-T3).
– N'employer aucun additif (produit dit
d'amélioration) sous peine d'annulation de toute garantie.
Batteries recommandées
Fabricant,
N° de commande de
Kärcher
EXIDE
6.654-097.0
Chargeurs recommandés
Description
12 V, 80 Ah, quasiment
exempte de maintenance
Î Ajouter de l'eau distillée une heure
avant la fin de la procédure de char-
ge. Respecter le niveau d'acidité ap-
proprié. Les mentions
correspondantes figurent sur la bat-
terie.
Danger
Risque de brûlure!
– Des fuites d'acide peuvent survenir
lors du remplissage de la batterie
déchargée.
– Porter impérativement des lunettes
de protection lors de toute manipula-
tion d'acide de batterie et respecter
les consignes afin d'éviter les bles-
Fabricant,
Description
N° de commande de
Kärcher
KÄRCHER
6.654-179.0
Chargeur séparé pour
la batterie 6.654-097.0
Les batteries et chargeurs sont disponibles dans le commerce.
Témoin de contrôle de la batterie
L'état de charge de la batterie est affiché dans l'écran sur le pupitre de commande :
– Après la mise en service du sélec-
teur mode brosse ou turbine, les
Français 27
Page 28

heures de service sont affichées
pendant 5 secondes.
– Ensuite, un affichage à barre appa-
raît pour le niveau de charge de la
batterie.
Fonctionnement
몇 Avertissement !
Risque d'endommagement. Toujours
soulever la barre d'aspiration avant de
rouler en marche arrière.
Remarque
Lorsque la tête de brosse dépasse à la
côté droite, l'appareil est bien installé.
Ce-ci permet un travail clair et prêt de la
bord.
Remplissage de carburant
몇 Avertissement
Risque d'endommagement. Utiliser uniquement les détergents recommandés.
Pour tout autre détergent, l'exploitant
prend des risques plus élevés quant à la
sécurité du travail et au risque d'accident. Utiliser uniquement des détergents exempts de solvants, d'acide
chlorhydrique et fluorhydrique.
Remarque
Ne jamais utiliser de détergents extrêmement moussants. Tenir compte des
consignes de dosage.
Î Ouvrir le couvercle du réservoir
d'eau sale.
Î Remplir d'eau fraîche (maximum 60°
C)
Î Ajouter de détergent. Observer les
consignes pour le dosage.
Détergents recommandés :
Application Produit dé-
tergent
Nettoyge d'entretien
(y compris pour les
sols sensibles aux alcalins)
Nettoyages des salissures graisseuses
Nettoyage minutieux
(stripage) des revêtements durs résistants
aux alcalins
Nettoyage de base
(stripage) du linoléum
Détergent sanitaire RM 25 ASF
Détergent désinfectant
Les détergents sont disponibles dans le
commerce spécialisé.
Î Fermer le couvercle du réservoir
d'eau sale.
RM 745
RM 746
RM 69 ES
ASF
RM 69 ASF
RM 752
RM 754
RM 732
28 Français
Page 29

Nettoyage
Train de roulement
en bas Transport
en haut Nettoyage
Î Soulever légèrement l'appareil au ni-
veau de la poignée.
Î Retirer le verrouillage.
Î Pivoter le train de roulement dans la
position désirée.
Î Enclencher le verrouillage.
Déplacement vers le lieu d'utilisation
Î Le faire ensuite pivoter vers le bas et
le retirer.
Î Pousser l'appareil jusqu'au site de
mise en oeuvre.
Nettoyage
Î Faire pivoter le train de roulement
vers le haut et le verrouiller.
Î Mettre en service les sélecteurs
mode brosse et turbine.
Î Actionner le guidon à poussée.
Remarque
Lorsque le moteur de brosses ne démarre pas à la mise en service, soulager la contrainte du moteur de brosses
en tirant l'appareil en arrière.
Î Procéder au nettoyage.
Réglage de la vitesse d'avance
Î Pour réduire la vitesse : tourner le
bouton dans le sens "–".
Î Pour augmenter la vitesse : tourner
le bouton dans le sens "+".
Réglage de la quantité d'eau
Î Régler la quantité d'eau correspon-
dant à la salissure et l'espèce du sol
au bouton de réglage.
Remarque
Effectuer des premières essaies de nettoyage avec une faible quantité d'eau.
Augmenter peu à peu la quantité d'eau
jusqu'à atteindre le résultat souhaité du
nettoyage.
Réglage de la barre d'aspiration
Position inclinée
Pour améliorer le résultat de l'aspiration
sur des revêtements carrelés, il est possible de tourner la barre d'aspiration jusqu'à une position inclinée de 5°.
Î Deserrer les écrous à croisillon.
Î Tourner la barre d'aspiration.
Î Visser les écrous à croisillon.
Français 29
Page 30

Inclinaison
Si le résultat de l'aspiration n'est pas
suffisant, il est possible de modifier le
degré d'inclinaison de la barre d'aspiration.
Î Desserrer les écrous-papillons.
Î Incliner la barre d'aspiration.
Î Actionner l'étrier de commande, le
moteur de brosse démarre.
Remarque
Enclencher en premier le commutateur
de fonctionnement des brosses puis actionner l'étrier de commande. Un message de défaut est affiché dans l'écran
dans l'ordre inverse.
Î Serrer à fond les écrous-papillons.
Abaisser la barre d'aspiration
Î Pousser le levier vers le bas, la barre
d'aspiration est abaissée.
Î Mettre la turbine en service avec le
sélecteur.
Mettre en marche la tête de net-
toyage
몇 Avertissement !
Risque d'endommagement pour le revêtement de sol. Ne pas exploiter l'appareil sur place.
Î Activer l'interrupteur mode brosse.
Arrêt et mise hors marche de
l'appareil
Î Fermer le bouton de régulation pour
la quantité d'eau.
Î Encore avancer l'appareil de 1 à 2 m
pour aspirer toute l'eau restante.
Î Relâcjer la poignée de commande.
Î Désactiver les sélecteurs mode
brosse et turbine.
Î Soulever la barre d'aspiration.
Î Le faire ensuite pivoter vers le bas et
le retirer.
몇 Avertissement !
Risque de déformer la/les brosse/s.
Lors de la mise hors marche/stationnement de l'appareil, soulager la/les brosse/s en abaissant le train de roulement
vers l'avant
Vidange du réservoir d'eau sale
몇 Avertissement
Tenir compte des prescriptions locales
pour le traitement des eaux usées.
30 Français
Page 31

Î Sortir le flexible de vidange pour
l'eau sale du dispositif de maintien et
l'abaisser au-dessus d'un collecteur
approprié.
Î Vider l'eau en ouvrant le dispositif de
dosage sur le flexible de vidange.
Î Puis rincer le réservoir d'eau sale à
l'eau propre.
Vidange du réservoir d'eau propre
Î Ouvrir le bouchon du réservoir d'eau
fraîche avec un outil approprié (par
ex. une pièce).
propre résiduaire avant comencer les
travaux à l'appareil.
Plan de maintenance
Après le travail
몇 Avertissement
Risque d'endommagement. Ne pas laver l'appareil au jet d'eau et ne jamais
utiliser de détergents agressifs.
Î Vider l'eau sale.
Î Rincer le réservoir d'eau sale à l'eau
propre.
Î Nettoyer l'extérieur de l'appareil
avec un chiffon humide et imbibé de
détergent doux.
Î Contrôler le tamis à peluches et le
cas échéant, le nettoyer.
Î Nettoyer les lèvres d'aspiration et les
lèvres d'enlèvement, puis contrôler
leur degré d'usure et le cas échéant,
les nettoyer.
Î Vérifier si les brosses sont usées,
les remplacer si nécessaire.
Î Charger la batterie, en cas de be-
soin.
Mensuellement
Entretien et maintenance
Danger
Risque de blessure !
Avant d'effectuer des opérations sur
l'appareil, mettre le bouton d'enclenchement de la brosse et de l'aspiration hors
circuit et débrancher la fiche.
몇 Avertissement
Risque de dommage pour l'appareil par
eau que fuit. Vider l'eau sale et l'eau
Î Contrôler les joints entre le réservoir
d'eau sale et le couvercle ; le cas
échéant, les remplacer.
Î Contrôler les bornes de la batterie,
en cas de besoin brosser et graisser
avec graisse de borne. Faire attention que les câbles de raccordement
sont bien branché.
Î Contrôler en cas de batteries avec
maintenance la concentration de
l'acide des celulles.
Tous les ans
Î L'inspection prescrite doit être effec-
tuée par le service après-vente.
Français 31
Page 32

Travaux de maintenance
Contrat de maintenance
Changer ou tourner les lèvres d'aspiration.
Retirer la brosse d'aspiration.
Î
Î Dévisser le bouton cannelé.
Î Retirer les pièces plastiques.
Î Retirer les lèvres d'aspiration.
Î Tourner les lèvres d'aspiration ou
mettre des nouvelles lèvres d'aspiration.
Î Mettre en place des pièces plasti-
ques.
Î Visser et serrer les boutons can-
nelés.
Afin de pouvoir garantir un fonctionnement fiable de l'appareil, il est possible
de conclure des contrats de maintenance avec le bureau de ventes Kärcher
responsable.
Protection antigel
En cas de risque de gel :
Î Vider le réservoir d'eau propre et le
réservoir d'eau sale.
Î Déposer l'appareil dans une pièce à
l'abri du gel.
Transport
Î Retirer les brosses pour éviter qu'el-
les ne soient endommagées.
Î Pour le transport sur un véhicule,
bloquer l'appareil avec des sangles
pour tendre/cordes pour l'empêcher
de glisser.
Échanger les disques-brosses
Î Tourner le bouton de régulation de la
vitesse de traction avant dans le
sens "–".
Î Soulever le disque-brosse.
Î Tourner le disque-brosse d'environ
45° dans le sens anti-horaire.
Î Retirer le disque-brosse par le bas.
Î Mettre en place le nouveau disque-
brosse dans l'ordre inverse.
Î Régler la vitesse de traction avant.
32 Français
Page 33

Pannes
Danger
Risque de blessure !
Avant d'effectuer des opérations sur
l'appareil, mettre le bouton d'enclenchement de la brosse et de l'aspiration hors
circuit et débrancher la fiche.
몇 Avertissement
Risque de dommage pour l'appareil par
eau que fuit. Vider l'eau sale et l'eau
propre résiduaire avant comencer les
travaux à l'appareil.
En cas de pannes ne pouvant pas être
résolues grâce aux instructions de ce
tableau, appeler le service après-vente.
Défauts qui s'affichent à l'écran
Affichage de l'écran Remède
ERR B Vérifier si des corps étrangers bloquent les brosses et le
cas échéant, éliminer les corps étrangers.
ERR T Contacter le service après-vente
LOW BAT Chargement de la batterie
ERR TEMP Laisser refroidir l'appareil.
Réduire éventuellement la pression d'appui des brosses.
HandsOff Relâcher l'étrier de commande et attendre jusqu'à ce que
les heures de service ou l'état de la batterie soient affichés dans l'écran. Actionner ensuite de nouveau l'étrier
de commande.
ERR REL Mettre l'interrupteur de fonctionnement de brosse hors
service, mettre l'interrupteur de turbine d'aspiration, relâcher l'étrier de commande, attendre 3 secondes, remettre
en service.
Si cela se renouvelle, appeler le service après-vente.
Français 33
Page 34

Défauts qui ne s'affichent pas à l'écran
Panne Remède
Il est impossible de mettre
l'appareil en marche
Quantité d'eau insuffisante Contrôler le niveau d'eau propre et en cas de be-
Puissance d'aspiration insuffisante
Actionner le guidon à poussée.
Vérifier la batterie, la remplacer si nécessaire.
Vérifier si la fiche secteur est branchée.
soin, remplir le réservoir
Contrôler si les flexibles sont bouchés, en cas de
besoin nettoyer.
Nettoyer les joints entre le réservoir d'eau sale et le
couvercle et vérifier s'ils sont étanches, en cas de
besoin remplacer.
Nettoyer le tamis à peluches.
Nettoyer les lèvres d'aspiration sur la barre d'aspiration et en cas de besoin tourner ou remplacer.
Vérifiier si le flexible d'aspiration et la barre d'aspiration sont colmatés et le cas échéant, éliminer le
colmatage
Contrôler si les flexibles d'aspiration sont étanches
et en cas de besoin remplacer.
Vérifier si le couvercle sur le flexible de vidange
d'eau sale est fermé.
Résultat de nettoyage insuffisant
Les brosses ne se tournent
pas
34 Français
Vérifier le réglage de la barre d'aspiration.
Vérifier si les brosses sont usées, les remplacer si
nécessaire.
Actionner le guidon à poussée.
Vérifier si des corps étrangers bloquent les brosses
et le cas échéant, éliminer les corps étrangers.
Page 35

Accessoires
L'appareil peut être équipé de différents
accessoires en fonction de l'application
respective. De plus amples détails figu-
Désignation
Disque-brosse, nature (douce)
Disque-brosse, rouge (moyenne, standard)
Disque-brosse, noire (dure)
Plateau de propulsion
Disc-Pad, rouge
(moyen)
Disc-Pad, vert (dur) 6.369-023.0 Pour le nettoyage des sols
Disc-Pad, noir (très
dur)
Barre d'aspiration,
droit
Barre d'aspiration,
courbée
Lèvre en caoutchouc, bleu
Lèvre en caoutchouch, marron
Référence
BD 530
6.906-056.0 Pour le polissage des sols. 1 1
6.906-054.0 Pour le nettoyage des sols
6.906-055.0 Pour le nettoyage des sols
6.906-332.0 Pour la réception de pads. 1 1
6.369-024.0 Pour le nettoyage des sols
6.369-022.0 Pour le nettoyage des sols
4.777-047.0 Standard 1 1
4.777-054.0 Standard 1 1
6.273-204.0 Standard 1 1
6.273-207.0 résistante à l'huile 1 1
rent dans notre catalogue ou sur notre
site Internet www.kaercher.com.
Description
pas trop sales ou sensibles.
très sales.
pas trop sales.
normalement sales.
très sales.
Pièce/emballage
L'appareil besoin la pièce
11
11
51
51
51
Français 35
Page 36

Caractéristiques techniques
BD 530 Bp
Performances
Tension nominale V 24
Capacité de la batterie Ah (5h) 75
Puissance absorbée moyenne W 1200
Puissance du moteur d'aspiration W 500
Puissance de moteur de brosses W 600
Aspiration
Puissance d'aspiration, débit d'air l/s (gpm) 30 (475)
Puissance d'aspiration, dépression kPa (psi) 14 (2)
Brosses de nettoyage
Largeur de travail mm (pouce) 460 (18,1)
Diamètre des brosses mm (pouce) 460 (18,1)
Vitesse des brosses t/min 140
Dimensions et poids
Surface théoriquement nettoyable m
Volume du réservoir d'eau propre/réservoir
d'eau sale
Poids total kg (lbs) 115 (253,5)
Emissions sonores
Niveau de pression acoustique (EN 60704-1) dB(A) 70
Vibrations de l'appareil
Valeur globale de vibrations (ISO 5349) m/s² 0,4
2
/h (ft2/h) 1840 (19800)
l (gal) 40/40 (10,5/
10,5)
Garantie Pièces de rechange
Dans chaque pays, les conditions de
garantie en vigueur sont celles publiées
par notre société de distribution responsable. Les éventuelles pannes sur les
accessoires sont réparées gratuitement
dans le délai de validité de la garantie,
dans la mesure où celles-ci relèvent
d'un défaut matériel ou d'un vice de fabrication. En cas de recours en garantie, adressez-vous à votre revendeur ou
au service après-vente agréé le plus
proche munis de votre preuve d'achat.
36 Français
– Utiliser uniquement des accessoires
et des pièces de rechange autorisés
par le fabricant. Des accessoires et
des pièces de rechange d’origine
garantissent un fonctionnement sûr
et parfait de l’appareil.
– Une sélection des pièces de rechan-
ge utilisées le plus se trouve à la fin
du mode d'emploi.
– Plus information sur les pièces de
rechange vous les trouverez sous
www.kaercher.com sous le menu
Service.
Page 37

INSTRUCCIONES IMPOR-
TANTES DE SEGURIDAD
LEER TODAS LAS INSTRUC-
CIONES ANTES DE USAR.
ADVERTENCIA
Para reducir el riesgo de fuegos, descarga eléctrico o lesiones:
– no abandonar la unidad mientras
esté enchufada. Desenchufar cuando no esté en uso y antes de revisar.
ADVERTENCIA
– PARA REDUCIR EL RIESGO DE
DESCARGA ELÉCTRICA, USAR
SOLO EN INTERIORES
– No permita que se use como jugue-
te. Prestar mucha atención cuando
se use cerca de niños.
– Usar exclusivamente como se des-
cribe en este manual. Usar solamente con los complementos
recomendados por el fabricante.
– No usar con el cable o la clavija da-
ñados. Si el aparato no funciona
como debería, se ha caído al suelo,
dañado, dejado al aire libre, o caído
al agua, devuélvalo a servicio de
atención al cliente.
– No tirar del cable ni transportar el
aparato cogido por el cable, no cerrar una puerta sobre el cable, ni pasar el cable por bordes o esquinas
afiladas. No pasar el aparato por encima del cable. Mantener el cable
alejado de superficies calientes.
– No tirar del cable para desenchufar
el aparato. Para desechufar, tire de
la clavija no del cable.
– No manipular la clavija ni el aparato
con las manos mojadas.
– No introducir objetos en los orificios.
No usar con cualquiera de los orificios bloqueados; mantener sin polvo, pelusa, pelo y cualquier otra
cosa que pueda reducir el flujo de aire.
– Mantener el cabello, la ropa floja, los
dedos y todas las partes del cuerpo
alejadas de los orificios y partes móviles.
– Apagar los mandos de control antes
de desenchufar.
– No usar para recoger líquidos infla-
mables o combustible, como gasolina, ni utilizar el aparato en áreas
donde puedan estar presentes.
CONSERVE ESTAS INS-
TRUCCIONES
NORMAS Y PRÁCTICAS DE
SEGURIDAD PARA EL FUN-
CIONAMIENTO
Responsabilidad del operario
El operario es responsable de un funcionamiento seguro.
El operario estará familiarizado con el
trabajo y funcionamiento de todos los
controles e instrumentos antes de poner en funcionamiento el equipo.
Antes de poner el funcionamiento el
aparato, los operarios tendrán que leer
y estar familiarizados con el manual del
operario de la unidad en concreto y
también cumplirán con las normas y
prácticas de seguridad indicadas en los
siguientes párrafos.
Antes de poner en funcionamiento cualqueir unidad, el operario se familiarizarán con las condiciones inusuales de
funcionamiento que puedan requerir
precauciones de seguridad adicionales
Español 37
Page 38

o instrucciones de funcionamiento especiales.
Generalidades
Antes de poner en funcionamiento la
unidad, ésta deberá encontrarse en la
posición de servicio.
No arrancar ni poner en funcionamiento
la unidad, cualquiera de sus funciones o
complementos, en otro sitio que no sea
la posición designada de operario.
Antes de dejar la posición del operario:
A parar completamente el equipo;
B si el equipo tiene que estar en una
inclinación, bloquear las ruedas.
No realice modificaciones ni añadidos
al equipo.
No bloquear el acceso a las salidas de
emergencias de incendios, escaleras o
equipo antiincendios.
Conducción
Ceder el paso a peatones y vehículos
de emergencias como ambulancias o
camiones de bomberos.
Cruce vías de tren en ángulo siempre
que sea posible. No aparcar a menos
de 1800 mm de la vía del tren.
Mantener una buena vista del camino
por el que conduce y preste atención al
tráfico, personal y seguridad.
Operar el equipo siempre a una velocidad que permita parar de manera segura.
No permita realizar escenas peligrosas
ni juguetear con el equipo.
Reducir la velocidad en suelos húmedos y resbaladizos.
Antes de conducir sobre un muelle o
puente, asegúrese de que esté bien seguro. Conducta con cuidado y lentamente por el muelle o puente, y no
exceda nunca la capacidad indicada.
Al sortear curvas, reduzca la velocidad
a un nivel seguro de acuerdo con el ambiente de funcionamiento. Sortear las
curvas con cuidado.
Cuidados del equipo realizados
por el operario
Si el equipo necesita ser reparado o es
inseguro, o favorece una situación insegura, se deberá informar del problema
inmediatamente al encargado designado por el usuario, y no se pondrá en funcionamiento el equipo hasta que se
recupere el estado de funcionamiento
seguro.
Si el equipo se vuelve inseguro de cualquier modo durante su funcionamiento,
se deberá informar del problema inmediatamente al encargado designado por
el usuario, y no se pondrá en funcionamiento el equipo hasta que se recupere
el estado de funcionamiento seguro.
No realizar reparaciones o ajustes a no
ser que se autorizado específicamente.
No usar llamas directas cuando se comprueba el nivel de electrolitos en las baterías de almacén.
MANTENIMIENTO Y PRÁCTI-
CAS DE RECONSTRUCCIÓN
El funcionamiento del equipo puede resultar peligros si no realiza el mantenimiento o se llevan a cabo reparaciones,
reconstrucciones o ajustes que no correspondan con los criterios de diseño
del fabricante. Por lo tanto, se deben
poner a disposición lugares de mantenimiento (en el mismo local o en otro lugar), personal cualificado, y
procedimientos detallados.
El mantenimiento e inspección de la
unidad se realizará de acuerdo con las
siguientes prácticas:
38 Español
Page 39

A a un mantenimiento planificado, le
seguirán lubricación e inspección
del sistema: consulte las recomendaciones del fabricante.
B sólo se permitirá realizar manteni-
miento, reparaciones, ajustes e inspecciones del equipo a personal
formado y autorizado y de acuerdo
con las especificaciones del fabricante.
Evitar los riesgos de incendios y tener
equipo de protección de incendios en el
área de trabajo. No usar llama directa
para comprobar el nivel que cualquier
fluido, especialmente electrolitos de la
batería. No usar recipientes abiertos de
fuel o líquidos inflamables de limpieza
para las limpiar las piezas.
NORMA DE SEGURIDAD
CONTRA INCENDIOS
Cualquier unidad que no esté en un estado de funcionamiento seguro será retirada de servicio.
No se realizarán reparaaciones en ubicaciones de clase I, clase II y clase III.
Prevención de incendios.Se mantendrá el equipo limpio y sin pelusas, exceso de aceite y grasa en la medida de lo
posible. Es preferible utilizar productos
no combustibles para limpiar el equipo.
No está permitido utilizar líquidos inflamables [aquellos que tengan puntos de
inflamación de o superior a 37,8ºC
(100ºF)]. Se deberá tomar precauciones ante la toxicidad, ventilación e incendios con el producto o disolvente
usado.
Visibilidad de la placa identificadora.
Las denominaciones de tipo de equipo
se indican en la placa identificadora y
no se deben cubrir las marcas de tipo
con pintura para que no se vea la información de identificación.
No se usará la unidad en áreas clasificadas.
Antes del primer uso de su
aparato, lea este manual original, actúe de acuerdo a sus indicaciones y guárdelo para un uso posterior o
para otro propietario posterior.
Índice de contenidos
Indicaciones de seguridad 39
Función 40
Uso previsto 40
Protección del medio ambiente 40
Elementos de mando 41
Antes de la puesta en marcha 42
Funcionamiento 44
Cuidados y mantenimiento 48
Averías 49
Datos técnicos 53
Garantía 53
Piezas de repuesto 53
Indicaciones de seguridad
Antes de utilizar por primera vez el aparato, lea y tenga en cuenta el presente
manual de instrucciones y el folleto adjunto relativo a las indicaciones de seguridad para aparatos de limpieza con
cepillos y aparatos pulverizadores,
5.956-251.
El equipo está diseñado para funcionar
en superficies con una pendiente de
hasta 2%.
El aparato sólo se puede poner en
funcionamiento cuando el depósito y
todas las tapas estén cerradas.
Símbolos
En este manual de instrucciones se emplean los siguientes símbolos:
Peligro
Indica la existencia de un peligro inminente. El incumplimiento de la indica-
Español 39
Page 40

ción puede acarrear la muerte o
lesiones de suma gravedad.
몇 Advertencia
Hace alusión a una situación potencialmente peligrosa. El incumplimiento de
la indicación puede provocar lesiones
leves o daños materiales.
Nota
Identifica consejos de manejo e información importante sobre el producto.
Función
El aparato sirve para efectuar la limpieza en húmedo de pisos llanos. Se puede adaptar fácilmente a la tarea de
limpieza que corresponda ajustando el
caudal de agua y la aspiración de agua
sucia.
Un ancho de trabajo de 460 mm y una
capacidad de 40 l de agua fresca y
agua sucia permiten realizar una limpieza eficaz incluso cuando la máquina se
usa durante un período largo.
Uso previsto
Utilice el aparato únicamente de conformidad con las indicaciones del presente
manual de instrucciones.
– El aparato sólo se puede utilizar
para limpiar suelos lisos resistentes
a la humedad.
– El aparato no es apto para la limpie-
za de pisos congelados (p. ej., en almacenes frigoríficos).
– Sólo está permitido dotar al aparato
de accesorios y piezas de repuesto
originales.
Protección del medio ambiente
Los materiales de embalaje
son reciclables. Po favor, no
tire el embalaje a la basura
doméstica; en vez de ello,
entréguelo en los puntos oficiales de recogida para su
reciclaje o recuperación.
Los aparatos viejos contienen materiales valiosos reciclables que deberían ser
entregados para su aprovechamiento posterior. Evite el
contacto de baterías, aceites
y materias semejantes con el
medioambiente. Por este
motivo, entregue los aparatos usados en los puntos de
recogida previstos para su
reciclaje.
Indicaciones sobre ingredientes (REACH)
Encontrará información actual sobre los
ingredientes en:
http://www.karcher.de/de/unternehmen/
umweltschutz/REACH.htm
40 Español
Page 41

Elementos de mando
1 estribo de empuje
2 Estribo de conexión
3 Pupitre de mando
4 Sistema electrónico y fusibles
(bajo el pupitre de mando)
5 Palanca de bajada de la barra de as-
piración
6 Manguera de salida de agua sucia
7 manguera de aspiración
8 Batería (sólo la BD 530 Bp)
9 Mangos en estrella para cambiar los
labios de aspiración
10 Soporte para barra de aspiración
11 Mango en cruz para fijar e inclinar la
barra de aspiración.
12 Tuercas de mariposa para inclinar la
barra de aspiración
13 Barra de aspiración (no incluida en
el suministro)
14 Conexión de la turbina de aspiración
con la manguera de aspiración
15 placa de características
16 cepillo en forma de disco
17 Cabezal limpiador
18 Tren de desplazamiento
19 dispositivo de bloqueo
20 Mango
21 Tapa del depósito de agua sucia
22 Tornillo para bloquear el depósito;
en el depósito: Baterías *
Debajo de la tapa del depósito de
agua sucia:
23 Orificio de llenado del depósito de
agua limpia
24 Filtro de pelusas (aspiración)
25 depósito de agua sucia
Español 41
Page 42

Pupitre de mando
1 Botón regulador del caudal de agua
2 Interruptor modo de cepillo
3 Interruptor turbina de aspiración
4 anuncio
Montaje de la barra de aspiración
Î Coloque la barra de aspiración en su
soporte de modo que la chapa perfilada quede por encima del soporte.
Î Ajustar bien los mangos en cruz.
Antes de la puesta en marcha
Descarga
Î Fijar el estribo con los cuatro torni-
llos suministrados e insertar la tapa
protectora.
Î
Coloque las tablas largas laterales del
embalaje como rampa en el palet.
Î Fije la rampa al palet con clavos.
Î Coloque las tablas cortas debajo de
la rampa a modo de soporte.
Î Retire los listones de madera de de-
lante de las ruedas.
Î Levantar el cabezal de limpieza y re-
tirar el cartón.
Î Baje el aparato del palet por la ram-
pa.
Î Coloque la manguera de aspiración.
Montar los cepillos
Antes de la puesta en servicio, se tienen que montar la escobilla de disco
(véase "Trabajos de mantenimiento").
Baterías
Al manipular baterías, tenga siempre en
cuenta las siguientes advertencias:
Tenga en cuenta las indicaciones presentes en la batería, en
las instrucciones de uso y en el
manual del vehículo.
Use protección para los ojos
Mantenga a los niños alejados
del ácido y las baterías
Peligro de explosiones
Prohibido hacer fuego, producir
chispas, aplicar una llama directa y fumar
Peligro de causticación
42 Español
Page 43

Primeros auxilios
Nota de advertencia
Eliminación de desechos
No tire la batería al cubo de la
basura
Peligro
Peligro de explosiones. No coloque herramientas u otros objetos similares sobre la batería, es decir, sobre los
terminales y el conector de elementos.
Peligro de lesiones. No deje nunca que
el plomo entre en contacto con las heridas. Luego de trabajar con las baterías,
límpiese siempre las manos.
Colocar la batería y cerrar
Î Afloje el tornillo de bloqueo del de-
pósito y abra el depósito.
Î Insertar las baterías alineadas res-
pecto al cabezal limpiador en la cubeta.
Î Lubricar los polos de la batería con
lubricante para polos
Î Conectar los polos con el cable de
conexión que viene incluido.
Precaución
Riesgo de daños por inversión de la polaridad del cable de conexión. Enganchar el cable rojo en el polo positivo y el
cable negro en el polo negativo. La variante de batería puede reconocerse fácilmente por el color de la carcadas de
la batería: EXIDE: gris, HOPPECKE:
verde.
Î Enganchar el cable de conexión su-
ministrado al polo de batería libre (+)
y (-).
Î Cerrar el depósito y apretar el torni-
llo.
Î Atornillar el tornillo de bloqueo del
depósito y apretarlo.
몇 Advertencia
Cargar la batería antes de poner el aparato en funcionamiento.
Carga de batería
Peligro
Peligro de explosiones. Sólo está permitido cargar baterías húmedas con el
depósito abierto.
Nota
El aparato dispone de una protección
contra descarga total, es decir, si se alcanza la medida mínima permitida de
capacidad, se apaga el motor de los cepillos y la turbina. En la pantalla del pupitre de mando aparece el texto "LOW
BAT".
Nota
El tiempo de carga dura aproximadamente 10-15 horas.
Los cargadores recomendados (adaptados a las baterías que se usen) se regulan electrónicamente y finalizan el
proceso de carga automáticamente.
Español 43
Page 44

Todas las funciones del aparato se interrumpen automáticamente durante el
proceso de carga.
Î Desplazar el aparato directamente a
la estación de carga.
Baterías recomendadas
Fabricante,
Descripción
ref. Kärcher
Proceso de carga
Î Sacar la manguera de absorción de
la barra.
Î Afloje el tornillo de bloqueo del de-
pósito y abra el depósito.
Î Extraer el enchufe de la batería y co-
nectarlo con el cable de carga.
Î Conecte el cargador a la red y en-
ciéndalo.
Baterías que no requieren mantenimiento (baterías húmedas)
Î Una hora antes de que se acabe el
proceso de carga, añadir agua destilada, tener en cuenta el nivel de
ácido correcto. La batería está marcada de la forma correspondiente.
Peligro
¡Peligro de causticación!
– Rellenar con agua cuando la batería
está descargada puede provocar
una salida de ácido.
– Cuando trate con ácido de baterías,
lleve siempre unas gafas de seguridad y respetar las normas, para evitar lesiones y daños a la ropa.
– Lavar inmediatamente con mucha
agua las posibles salpicaduras de
ácido sobre la piel o la ropa.
몇 Advertencia
¡Peligro de daños en la instalación!
– Utilizar únicamente agua destilada o
desalada (EN 50272-T3) para rellenar las baterías.
– No utilizar más sustancias (los lla-
mados agentes de mejora), de lo
contrario desaparecerá la garantía.
EXIDE
6.654-097.0
12 V, 80 Ah, bajo mantenimiento
Cargadores recomendados
Fabricante,
Descripción
ref. Kärcher
KÄRCHER
6.654-179.0
Cargador por separado
para batería 6.654-
097.0
Las baterías y cargadores se pueden
adquirir en comercios especializados.
Indicador de control de batería
El estado de carga de la batería se
muestra en la pantalla del pupitre de
mando:
– Tras conectar el interruptor de modo
de cepillos o turbina de aspiración
se muestran las horas de servicio
durante 5 segundos.
– A continuación aparece una barra
que indica el estado de carga de la
batería.
Funcionamiento
몇 Advertencia
Peligro de daños en la instalación. Antes de la circulación marcha atrás, levante la barra de aspiración.
Nota
El aparato se debe montar de forma
que el cabezal del cepillo sobresalga
por la derecha. Esto permite trabajar de
forma clara y junto al borde.
44 Español
Page 45

Adición de combustibles
몇 Advertencia
Peligro de daños en la instalación. Utilice únicamente el detergente recomendado. En caso de usar otros
detergentes, el propietario-usuario asume unos mayores riesgos en lo que a la
seguridad durante el funcionamiento y
al peligro de sufrir accidentes se refiere.
Utilice únicamente detergentes que no
contengan disolventes, ácidos clorhídricos ni ácidos hidrofluóricos.
Nota
No utilice detergentes altamente espumosos. Respete las indicaciones de dosificación.
Î Abra la tapa del depósito de agua
sucia.
Î Rellenar con agua fresca (máximo
60 ºC).
Î Añadir detergente. Observar las in-
dicaciones de dosificación.
Limpieza básica (mar-
RM 752
ca) de pavimentos duros resistentes al
álcali
Limpieza básica (mar-
RM 754
ca) de linóleo
Limpiador de sanita-
RM 25 ASF
rios
Desinfectante RM 732
Detergente disponible en comercios especializados.
Î Cierre la tapa del depósito de agua
sucia.
Limpieza
Tren de desplazamiento
abajo Transporte
arriba Limpieza
Î Elevar ligeramente el aparato por el
asa.
Î Extraer el bloqueo.
Î Girar el chasis en la posición desea-
da.
Î Encajar el bloqueo.
Conducción hasta el lugar de empleo
Detergente recomendado:
Empleo Detergente
Limpieza de mantenimiento
RM 745
RM 746
(también en suelos
sensibles al álcali)
Limpieza de manchas
de grasa
RM 69 ES
ASF
RM 69 ASF
Î Girar hacia abajo y bloquear el cha-
sis.
Î Desplazar el aparato hacia el lugar
de uso.
Limpieza
Î Girar hacia arriba y bloquear el cha-
sis.
Î Conectar el interruptor modo de ce-
pillos y turbina de aspiración.
Î Pulsar el estribo de conexión.
Español 45
Page 46

Nota
Si el motor de cepillos no arranca al conectar, descargar el motor tirando hacia
atrás del aparato.
Î Llevar a cabo la limpieza.
Ajuste de la velocidad de avance
Î Para reducir la velocidad: gire el bo-
tón hacia –.
Î Para aumentar la velocidad: gire el
botón hacia "+".
Ajuste del caudal de agua
Î Ajustar el caudal de agua con el bo-
tón regulador de acuerdo con la suciedad y el tipo del pavimento del
suelo.
Ajuste de la barra de aspiración
Posición en diagonal
Para mejorar el resultado de la aspiración en pavimentos alicatados, se puede girar la barra de aspiración hasta
una posición en diagonal de 5°.
Î Soltar los mangos en cruz.
Î Gire la barra de aspiración.
Î Ajustar bien los mangos en cruz.
Inclinación
Si el resultado de la aspiración no resulta satisfactorio, se puede modificar la
inclinación de la barra de aspiración
recta.
Î Suelte las tuercas de mariposa.
Î Incline la barra de aspiración.
Nota
Llevar a cabo los primeros intentos con
menos caudal de agua. Aumentar el
caudal de agua poco a poco, hasta alcanzar el resultado de limpieza deseado.
46 Español
Î Apriete las tuercas de mariposa.
Baje la barra de aspiración
Î Pulsar la palanca hacia abajo, la ba-
rra de aspiración se baja.
Page 47

Î Conectar la turbina de aspiración
con el interruptor.
Encender el cabezal limpiador
몇 Advertencia
Peligro de daños para el revestimiento del
suelo. No utilice el aparato en esa zona.
Î Conexión del interruptor del modo
de cepillos.
Î Accionar el estribo, el motor de cepi-
llos arranca.
Nota
Primero conectar interruptor de funcionamiento de cepillo, después accionar
estribo de conexión. Si se efectúa en orden inverso aparece un aviso de avería
en la pantalla.
Î Suelte el estribo de conexión.
Î Desconectar el interruptor modo de
cepillos y turbina de aspiración.
Î Levante la barra de aspiración.
Î Girar hacia abajo y bloquear el cha-
sis.
몇 Advertencia
Peligro de deformación del/de los cepillo/s. Al apagar el aparato, descargue
los cepillos haciendo avanzar el tren de
desplazamiento
Vaciado del depósito de agua
sucia
몇 Advertencia
Respete la normativa local vigente en
materia de tratamiento de aguas residuales.
Î Retire del soporte la manguera de
salida de agua sucia y bájela mediante un mecanismo recogedor
adecuado.
Detención y apagado
Î Cierre el botón regulador del caudal
de agua.
Î
Conduzca el aparato entre 1-2 m hacia
delante para aspirar el agua restante.
Î Purgue el agua a través del orificio
del dosificador situado en la manguera de salida.
Î A continuación, aclare el depósito de
agua sucia con agua limpia.
Vaciado del depósito de agua
limpia
Î Abrir el cierre del depósito de agua
limpia con una herramienta adecuada (p.ej. moneda).
Español 47
Page 48

Cuidados y mantenimiento
Peligro
Peligro de lesiones
Antes de llevar a cabo cualquier tipo de
tarea en el dispositivo, desenchufe el
botón de funcionamiento de los cepillos
y turbina de succión y también la clavija
de carga.
몇 Advertencia
Si se sale agua se puede dañar el aparato. Purgar el agua sucia y el resto de
agua limpia antes de trabajar en el aparato.
Plan de mantenimiento
sentan desgaste y, en caso necesario, cámbielos.
Î Compruebe si los cepillos presentan
desgaste y, en caso necesario, cámbielos.
Î Si es necesario recargar la batería.
Mensualmente
Î Compruebe el estado de las juntas
situadas entre el depósito de agua
sucia y la tapa y, en caso necesario,
cámbielas.
Î Comprobar si los polos de la batería
están oxidados, si es necesario cepillar y lubricar con lubricante para
polos. Cerciorarse del asiento firme
y correcto del cable de conexión.
Î En el caso de baterías que requieran
mantenimiento, comprobar la estanqueidad al ácido de los elementos.
Anualmente
Î Encargue al servicio técnico la revi-
sión anual obligatoria.
Trabajos de mantenimiento
Después del trabajo
몇 Advertencia
Peligro de daños en la instalación. No
salpique al aparato con agua ni utilice
detergentes agresivos.
Î Purgue el agua sucia.
Î Aclare el depósito de agua sucia con
agua limpia.
Î Limpie el aparato por fuera con un
trapo húmedo ligeramente empapado en una solución jabonosa suave.
Î Compruebe el filtro de pelusas; en
caso necesario, límpielo.
Î Limpie los labios de aspiración y los
labios de secado; compruebe si pre-
48 Español
Cambiar o girar los labios de aspiración
Î Retire la barra de aspiración.
Î Desatornille los mangos en estrella.
Î Retire las piezas de plástico.
Page 49

Î Retire los labios de aspiración.
Î Girar los labios de aspiración o intro-
ducir unos nuevos.
Î Coloque las piezas de plástico.
Î Atornille y apriete los mangos en es-
trella.
Cambiar el cepillo de disco
Î Gire el botón de ajuste de la veloci-
dad de avance hacia –.
Î Elevar el cepillo de disco.
Î Girar el cepillo de disco aprox. 45º
en el sentido contrario a las agujas
del reloj.
Î Retire la escobilla de disco por de-
bajo.
Î Insertar un nuevo cepillo de disco si-
guiendo los mismos pasos en el orden inverso.
Î Ajuste la velocidad de avance.
Contrato de mantenimiento
Para garantizar el funcionamiento seguro del aparato, es posible firmar contratos de mantenimiento con el
departamento comercial correspondiente de Kärcher.
Protección antiheladas
Averías
Peligro
Peligro de lesiones
Antes de llevar a cabo cualquier tipo de
tarea en el dispositivo, desenchufe el
botón de funcionamiento de los cepillos
y turbina de succión y también la clavija
de carga.
몇 Advertencia
Si se sale agua se puede dañar el aparato. Purgar el agua sucia y el resto de
agua limpia antes de trabajar en el aparato.
Cuando las averías no se puedan solucionar con ayuda de la tabla que aparece a continuación, acuda al servicio
técnico.
En caso de peligro de heladas:
Î Vacíe el depósito de agua limpia y el
depósito de agua sucia.
Î Guarde el aparato en un lugar prote-
gido de las heladas.
Transporte
Î Extraer cepillos para evitar que se
dañen.
Î Para el transporte sobre un vehícu-
lo, fije el aparato para impedir que
resbale con cinturones de sujeción/
cuerdas.
Español 49
Page 50

Averías con indicación en pantalla
Indicador de pantalla
ERR B Compruebe si hay cuerpos extraños bloqueando los ce-
ERR T Acuda al servicio técnico
LOW BAT Cargue la batería
ERR TEMP Deje enfriar el aparato.
HandsOff Soltar el estribo de conexión y esperar hasta que se
ERR REL
Modo de subsanarla
pillos y, de ser así, elimínelos.
Si es necesario reducir la presión de apriete de los cepillos.
muestren en la pantalla horas de servicio o estado de la
batería. A continuación volver a accionar el estribo de
conexión.
Desconectar el interruptor de funcionamiento de cepillo,
desconectar interruptor de turbina de aspiración, soltar estribo de conexión, esperar 3 segundos, volver a conectar.
Si se repite, llamar al servicio técnico
50 Español
Page 51

Averías sin indicación en pantalla
Avería Modo de subsanarla
No se puede poner en marcha el aparato
Caudal de agua insuficien-teCompruebe el nivel de agua limpia y, de ser nece-
Potencia de aspiración insuficiente
Resultados de limpieza insuficientes
Los cepillos no giran Pulsar el estribo de conexión.
Pulsar el estribo de conexión.
Comprobar la batería; sustituir si es necesario.
Compruebe si está enchufada la clavija de red
sario, llene el depósito.
Comprobar si los tubos están atascados, si es ne-
cesario limpiar.
Limpie las juntas situadas entre el depósito de
agua sucia y la tapa; compruebe su estanqueidad
y, en caso necesario, cámbielas
Limpiar el filtro de pelusas.
Limpie los labios de aspiración de la barra de aspi-
ración y, en caso necesario, girar o cambiar
Compruebe si la manguera y la barra de aspiración
está obstruida y, de ser necesario, desatásquela
Compruebe si el tubo de aspiración está hermética
y, en caso necesario, cámbielo.
Compruebe si está cerrada la tapa de la manguera
de salida de agua sucia.
Compruebe el ajuste de la barra de aspiración.
Compruebe si los cepillos presentan desgaste y,
en caso necesario, cámbielos.
Compruebe si hay cuerpos extraños bloqueando
los cepillos y, de ser así, elimínelos.
Español 51
Page 52

Accesorios
En función de la tarea de limpieza de
que se desee realizar, es posible dotar
al aparato de distintos accesorios. Soli-
denominación
Escobilla de disco,
natural (suave)
Escobilla de disco,
rojo (medio, estándar)
Cepillo de disco, negro (duro)
platillo motriz 6.906-
No. de pieza
BD 530
6.906-
056.0
6.906-
054.0
6.906-
055.0
332.0
Descripción
Para pulir pavimentos. 1 1
Para limpiar pavimentos de
poca suciedad o delicados.
Para limpiar pavimentos muy
sucios.
Para alojamiento del pad. 1 1
cite nuestro catálogo o visítenos en la
página de internet www.kaercher.com.
unidad/paquete
Aparato necesita pieza
11
11
Pad del disco, rojo
(medio)
Pad del disco, verde
(duro)
Pad del disco, negro
(muy duro)
Barra de aspiración,
recta
Barra de aspiración,
doblado
Borde de goma,
azul
Borde de goma, marrón
52 Español
6.369-
024.0
6.369-
023.0
6.369-
022.0
4.777-
047.0
4.777-
054.0
6.273-
204.0
6.273-
207.0
Para limpiar pavimentos ligeramente sucios.
Para limpiar pavimentos de suciedad normal.
Para limpiar pavimentos muy
sucios.
Estándar 1 1
Estándar 1 1
Estándar 1 1
resistente al aceite 1 1
51
51
51
Page 53

Datos técnicos
BD 530 Bp
Potencia
Tensión nominal V 24
Capacidad de batería Ah (5h) 75
Consumo medio de potencia W 1200
Potencia del motor de aspiración W 500
Potencia del motor de barrido W 600
Aspirar
Potencia de aspiración, caudal de aire l/s (gpm) 30 (475)
Potencia de aspiración, depresión kPa (psi) 14 (2)
Cepillos de limpieza
Anchura de trabajo mm (in) 460 (18,1)
Diámetro cepillos mm (in) 460 (18,1)
Nº de rotaciones de los cepillos 1/min 140
Medidas y pesos
Potencia teórica por metro cuadrado m
Volumen de los depósitos de agua limpia y agua
sucia
Peso total kg (lbs) 115 (253,5)
Emisión sonora
Nivel de presión acústica (EN 60704-1) dB(A) 70
Vibraciones del aparato
Valor total de la vibración (ISO 5349) m/s² 0,4
2
/h (ft2/h) 1840 (19800)
l (gal) 40/40 (10,5/
10,5)
Garantía Piezas de repuesto
En todos los países rigen las condiciones de garantía establecidas por nuestra empresa distribuidora. Las averías
del accesorio serán subsanadas gratuitamente dentro del periodo de garantía,
siempre que se deban a defectos de
material o de fabricación. En un caso de
garantía, le rogamos que se dirija con el
comprobante de compra al distribuidor
donde adquirió el aparato o al servicio
al cliente autorizado más próximo a su
domicilio.
–
Sólo deben emplearse accesorios y
piezas de repuesto originales o autorizados por el fabricante. Los accesorios y piezas de repuesto originales
garantizan el funcionamiento seguro y
sin averías del aparato.
– Podrá encontrar una selección de
las piezas de repuesto usadas con
más frecuencia al final de las instrucciones de uso.
–
En el área de servicios de www.kaercher.com encontrará más información
sobre piezas de repuesto.
Español 53
Page 54

Page 55

Page 56

AE Karcher FZE, P.O. Box 17416, Jebel Ali Free Zone (South),
Dubai, United Arab Emirates,
+971 4 886-1177, www.kaercher.com
AR Kärcher S.A., Uruguay 2887 (1646) San Fernando, Pcia. de
Buenos Aires
+54-11 4506 3343, www.karcher.com.ar
AT Alfred Kärcher Ges.m.b.H., Lichtblaustraße 7, 1220 Wien,
+43-1-25060-0, www.kaercher.at
AU Kärcher Pty. Ltd., 40 Koornang Road, Scoresby VIC 3179,
Victoria,
+61-3-9765-2300, www.karcher.com.au
BE Kärcher N.V., Industrieweg 12, 2320 Hoogstraten,
+32-3-340 07 11, www.karcher.be
BR Kärcher Indústria e Comércio Ltda., Av. Professor
Benedicto Montenegro no 419, Betel, Paulínia - Estado de Sao
Paulo, CEP 13.140-000
+55-19-3884-9100, www.karcher.com.br
CA Kärcher Canada Inc., 6535 Millcreek Road, Unit 67,
Mississauga, ON, L5N 2M2,
+1-905-672-8233, www.karcher.ca
CH Kärcher AG, Industriestrasse, 8108 Dällikon, Kärcher SA,
Croix du Péage, 1029 Villars-Ste-Croix,
0844 850 864, www.kaercher.ch
CN Kärcher (Shanghai) Cleaning Systems, Co., Ltd., Part F,
2nd Floor, Building 17, No. 33, XI YA Road, Waigaogiao Fre e
Trade, Pudong, Shanghai, 200131
+86-21 5076 8018, www.karcher.cn
CZ Kärcher spol. s r.o., Modletice c.p. 141, CZ-251 01 Ricany,
+420/323/606 014, www.kaercher.cz
DE Alfred Kärcher Vertriebs-GmbH, Friedrich-List-Straße 4,
71364 Winnenden,
+49-7195/903-0, www.kaercher.de
DK Kärcher Rengøringssystemer A/S, Helge Nielsens Allë 7 A,
8723 Løsning,
+45-70206667, www.karcher.dk
ES Kärcher, S.A., Pol. Industrial Font del Radium, Calle Josep
Trueta, 6-7, 08403 Granoll ers (Barcelona),
+34-902 17 00 68, www.karcher.es
F Kärcher S.A.S., 5, avenue des Coquelicots, Z.A. des Petits
Carreaux, 94865 Bonneuil-sur-Marne,
+33-1-4399-6770, www.karcher.fr
FI Kärcher OY, Yrittäjäntie 17, 01800 Klaukkala,
+358-207 413 600, www.karcher.fi
GB Kärcher (U.K.) Ltd., Kärcher House, Beaumont Road,
Banbury, Oxon OX16 1TB,
+44-1295-752-000, www.karcher.co.uk
GR Kärcher Cleaning Systems A.E., 31-33, Nikitara str. &
Konstantinoupoleos str., 13 6 71 Aharnes,
+30-210-2316-153, www.karcher.gr
HK Kärcher Limited, Unit 10, 17/F., Apec Plaza, 49 Hoi Yuen
Road, Kwun Tong, Kowloon,
++(852)-2357-5863, www.karcher.com.hk
HU Kärcher Hungaria KFT, Tormásrét ut 2 ., (Vendelpark), 2051
Biatorbagy,
+36-23-530-64-0, www.kaercher.hu
I Kärcher S.p.A., Via A. Vespucci 19, 21013 Gallarate (VA),
+39-848-998877, www.karcher.it
IE Kärcher Limited (Ireland), 12 Willow Business Park, Nangor
Road, Dublin 12,
(01) 409 7777, www.kaercher.ie
JP Kärcher (Japan) Co., Ltd., Irene Kärcher Building, No. 2,
Matsusaka-Daira 3-chome, Taiwa-cho, Kurokawa-gun, Miyagi
981-3408,
+81-22-344-3140, www.karcher.co.jp
KR Karcher Co. Ltd. (South Korea), 2nd Floor , Youngjae
Building, 50-1, 51-1, Sansoo-don g, Mapo-ku, Seoul 121-060,
+82-2-322 6598, www.karcher.co.kr
MX Karcher México, SA de CV, Av. Gustavo Baz Sur No. 29-C,
Col. Naucalpan Centro, Naucalpan, Edo. de México, C.P. 53000
México,
+52-55-5357-04-28, www.karcher.com.mx
MY Karcher Cleaning Systems Sdn. Bhd., 71 & 73 Jalan TPK 2/
8, Taman Perindustrian Kinrara, Seksyen 2, 47100 Puchong,
Selangor Darul Ehsan, Malaysia,
+603 8073 3000, www.karcher.com.my
NL Kärcher B.V., Postbus 474, 4870 AL Etten-Leur,
0900-33 666 33, www.karcher.nl
NO Kärcher AS, Stanseveien 31, 0976 Oslo, Norway,
+47 815 20 600, www.karcher.no
NZ Karcher Limited, 12 Ron Driver Place, East Tamaki,
Auckland, New Zealand,
+64 (9) 274-4603, www.karcher.co.nz
PL Kärcher Sp. z o.o., Ul. Stawowa 140, 31-346 Kraków,
+48-12-6397-222, www.karcher.pl
RO Karcher Romania srl, Sos. Odaii 439, Sector 1, RO-013606
BUKAREST,
+40 37 2709001, www.kaercher.ro
RU Karcher Ltd. Service Center, Leningradsky avenue, 68,
Building 2, Moscow, 125315
+7-495 789 90 76, www.karcher.ru
SE Kärcher AB, Tagenevägen 31, 42502 Hisings-Kärra,
+46 (0)31-577 300, www.karcher.se
SGP Karcher South East Asia Pte. Ltd., 5 Toh Guan Road East,
#01-00 Freight Links Express Distripark, Singapore 608831,
+65-6897-1811, www.karcher.com.sg
SK Kärcher Slovakia, s.r.o., Beniakova 2, SK-94901 NITRA,
+421 37 6555 798, www.kaercher.sk
TR Kärcher Servis Ticaret A.S., 9 Eylül Mahallesi, 307 Sokak
No. 6, Gaziemir / Izmir,
+90-232-252-0708, +90-232-251-3578, www.karcher.com.tr
TW Karcher Limited, 7/F, No. 66, Jhongijheng Rd., Sinjhuang
City, Taipei County 24243, Taiwan,
+886-2-2991-5533, +886-800-666-825, www.karcher.com.tw
UA Kärcher TOV, Kilzeva doroga, 9, 03191 Kiew,
+380 44 594 7576, www.karcher.com.ua
USA To locate your local dealer please visit our web site at
http://www.karchercommercial.com or call us at 888.805.9852
ZA Kärcher (Pty) Ltd., 144 Kuschke Street, Meadowdale,
Edenvale, 1614,
+27-11-574-5360, www.karcher.co.za
02/10
 Loading...