


pdQ™ Applications Handbook
QUALCOMM Incorporated, 6455 Lusk Boulevard, San Diego,
California 92121-2779 U.S.A.
http://www.qualcomm.com

Software changes may have occurred after this printing. QUALCOMM reserves the right to make changes in technical and product specifications without prior notice. The products and equipment described in this documentation are manufactured under one or more of the following U.S. Patents:
4,901,307 |
5,056,109 |
5,099,204 |
5,101,501 |
5,103,459 |
5,107,225 |
5,109,390 |
5,193,094 |
5,228,054 |
5,257,283 |
5,265,119 |
5,267,261 |
5,267,262 |
5,280,472 |
5,283,536 |
5,289,527 |
5,307,405 |
5,309,474 |
5,337,338 |
5,339,046 |
5,341,456 |
5,383,219 |
5,392,287 |
5,396,516 |
D356,560 |
5,408,697 |
5,414,728 |
5,414,796 |
5,416,797 |
5,426,392 |
5,437,055 |
D361,065 |
5,442,322 |
5,442,627 |
5,452,473 |
5,461,639 |
5,469,115 |
5,469,471 |
5,471,497 |
5,475,870 |
5,479,475 |
5,483,696 |
5,485,486 |
5,487,175 |
5,490,165 |
5,497,395 |
5,499,280 |
5,504,773 |
5,506,865 |
5,509,015 |
5,509,035 |
5,511,067 |
5,511,073 |
5,513,176 |
5,515,177 |
5,517,323 |
5,519,761 |
5,528,593 |
5,530,928 |
5,533,011 |
5,535,239 |
5,539,531 |
5,544,196 |
5,544,223 |
5,546,459 |
5,548,812 |
5,559,881 |
5,559,865 |
5,561,618 |
5,564,083 |
5,566,000 |
5,566,206 |
5,566,357 |
5,568,483 |
5,574,773 |
5,574,987 |
D375,740 |
5,576,662 |
5,577,022 |
5,577,265 |
D375,937 |
5,588,043 |
D376,804 |
5,589,756 |
5,590,069 |
5,590,406 |
5,590,408 |
5,592,548 |
5,594,718 |
5,596,570 |
5,600,754 |
5,602,834 |
5,602,833 |
5,603,096 |
5,604,459 |
5,604,730 |
5,608,722 |
5,614,806 |
5,617,060 |
5,621,752 |
5,621,784 |
5,621,853 |
5,625,876 |
5,627,857 |
5,629,955 |
5,629,975 |
5,638,412 |
5,640,414 |
5,642,398 |
5,644,591 |
5,644,596 |
5,646,991 |
5,652,814 |
5,654,979 |
5,655,220 |
5,657,420 |
5,659,569 |
5,663,807 |
5,666,122 |
5,673,259 |
5,675,581 |
5,675,644 |
5,680,395 |
5,687,229 |
D386,186 |
5,689,557 |
5,691,974 |
5,692,006 |
5,696,468 |
5,697,055 |
5,703,902 |
5,704,001 |
5,708,448 |
5,710,521 |
5,710,758 |
5,710,768 |
5,710,784 |
5,715,236 |
5,715,526 |
5,722,044 |
5,722,053 |
5,722,061 |
5,722,063 |
5,724,385 |
5,727,123 |
5,729,540 |
5,732,134 |
5,732,341 |
5,734,716 |
5,737,687 |
5,737,708 |
5,742,734 |
D393,856 |
5,748,104 |
5,751,725 |
5,751,761 |
5,751,901 |
5,754,533 |
5,754,542 |
5,754,733 |
5,757,767 |
5,757,858 |
5,758,266 |
5,761,204 |
5,764,687 |
5,774,496 |
5,777,990 |
5,778,024 |
5,778,338 |
5,781,543 |
5,781,856 |
5,781,867 |
5,784,406 |
5,784,532 |
5,790,589 |
5,790,632 |
5,793,338 |
D397,110 |
5,799,005 |
5,799,254 |
5,802,105 |
5,805,648 |
5,805,843 |
5,812,036 |
5,812,094 |
5,812,097 |
5,812,538 |
5,812,607 |
5,812,651 |
5,812,938 |
5,818,871 |
5,822,318 |
5,825,253 |
5,828,348 |
5,828,661 |
5,835,065 |
5,835,847 |
5,839,052 |
5,841,806 |
5,842,124 |
5,844,784 |
5,844,885 |
5,844,899 |
5,844,985 |
5,848,063 |
5,848,099 |
5,850,612 |
5,852,421 |
5,854,565 |
5,854,786 |
5,857,147 |
5,859,612 |
5,859,838 |
5,859,840 |
5,861,844 |
5,862,471 |
5,862,474 |
5,864,760 |
5,864,763 |
5,867,527 |
5,867,763 |
5,870,427 |
5,870,431 |
5,870,674 |
5,872,481 |
5,872,774 |
5,872,775 |
5,872,823 |
5,877,942 |
5,878,036 |
5,870,631 |
5,881,053 |
5,881,368 |
5,884,157 |
5,884,193 |
5,884,196 |
Other patents pending. |
|
|
|
FCC/IC Notice
This computer peripheral complies with part 15 of the FCC Rules. Operation is subject to the following two conditions: (1) This device may not cause harmful interference, and (2) this device must accept any interference received, including interference that may cause undesired operation. This receiver complies with part 15 of the FCC Rules. Operation is subject to the condition that this device does not cause harmful interference.
Caution
The user is cautioned that changes or modifications not expressly approved by the party responsible for compliance could void the warranty and user’s authority to operate the equipment.
Warning
Use only QUALCOMM-approved accessories with QUALCOMM phones. Use of any unauthorized accessories may be dangerous and will invalidate the phone warranty if said accessories cause damage or a defect to the phone. The use of any other type will invalidate the warranty and may be dangerous.
Customer Service
Your service provider’s customer support department should be able to answer all of your questions. If they are unable to assist you, then please call (800) 349-4478 toll free (United States and Canada) or (619) 651-4028 (worldwide).
QUALCOMM is a registered trademark and registered service mark, Eudora is a registered trademark, and pdQ, pdQsuite, pdQalert, pdQbrowser, Smart Keys, and pdQmail are trademarks of QUALCOMM Incorporated. 3Com, the 3Com logo, Palm Computing, Graffiti, and HotSync are registered trademarks, and PalmPilot, Palm III, Palm OS, Palm, the Palm Computing platform logo, the PalmPilot logo, and the Palm III logo are trademarks of Palm Computing Inc., 3Com Corporation, or its subsidiaries. Microsoft, Windows, Windows NT, and other Microsoft products referenced herein are either trademarks or registered trademarks of Microsoft Corporation. Other product and brand names may be trademarks or registered trademarks of their respective owners.
Copyright © 1999 QUALCOMM Incorporated. All rights reserved. Portions of this document are Copyright © 1998 3Com Corporation or its subsidiaries. Reprinted with permission. Printed in the United States of America.
80-68789-1 Rev. A

Contents
Chapter 1 Address Book . . . . . . . . . . . . . . . . . . . . . . . . . . . . . . . . . . . . . . . . . . .1
Creating Address Book Entries . . . . . . . . . . . . . . . . . . . . . . . . . . . . . . . . . 2 Working with Address Book Entries . . . . . . . . . . . . . . . . . . . . . . . . . . . . . 5 Using the Address Book Menus . . . . . . . . . . . . . . . . . . . . . . . . . . . . . . . . 11
Chapter 2 Calculator. . . . . . . . . . . . . . . . . . . . . . . . . . . . . . . . . . . . . . . . . . . . . .13
Using the Calculator. . . . . . . . . . . . . . . . . . . . . . . . . . . . . . . . . . . . . . . . . . 14
Using the Calculator Menus . . . . . . . . . . . . . . . . . . . . . . . . . . . . . . . . . . . 15
Chapter 3 Call History . . . . . . . . . . . . . . . . . . . . . . . . . . . . . . . . . . . . . . . . . . . .17
Opening Call History . . . . . . . . . . . . . . . . . . . . . . . . . . . . . . . . . . . . . . . . . 18 Making a Call from Call History . . . . . . . . . . . . . . . . . . . . . . . . . . . . . . . 18 Tracking Your Calls . . . . . . . . . . . . . . . . . . . . . . . . . . . . . . . . . . . . . . . . . . 18 Creating an Expense Record . . . . . . . . . . . . . . . . . . . . . . . . . . . . . . . . . . . 21 Using the Menus in Call History . . . . . . . . . . . . . . . . . . . . . . . . . . . . . . . 23
Chapter 4 Date Book . . . . . . . . . . . . . . . . . . . . . . . . . . . . . . . . . . . . . . . . . . . . .25
Scheduling Events in the Date Book . . . . . . . . . . . . . . . . . . . . . . . . . . . . 26
Scheduling Repeating Events . . . . . . . . . . . . . . . . . . . . . . . . . . . . . . . . . . 30
Deleting an Event . . . . . . . . . . . . . . . . . . . . . . . . . . . . . . . . . . . . . . . . . . . . 31
Changing the Date Book View . . . . . . . . . . . . . . . . . . . . . . . . . . . . . . . . . 31
Using the Date Book Menus . . . . . . . . . . . . . . . . . . . . . . . . . . . . . . . . . . . 34
Chapter 5 Dialer . . . . . . . . . . . . . . . . . . . . . . . . . . . . . . . . . . . . . . . . . . . . . . . . .37
Making Calls from the Dialer . . . . . . . . . . . . . . . . . . . . . . . . . . . . . . . . . . 38
Chapter 6 Expense . . . . . . . . . . . . . . . . . . . . . . . . . . . . . . . . . . . . . . . . . . . . . . .39
Creating an Expense Item . . . . . . . . . . . . . . . . . . . . . . . . . . . . . . . . . . . . . 40 Entering Receipt Details . . . . . . . . . . . . . . . . . . . . . . . . . . . . . . . . . . . . . . 41 Transferring Your Data to Microsoft Excel. . . . . . . . . . . . . . . . . . . . . . . 45 Using the Expense Menus . . . . . . . . . . . . . . . . . . . . . . . . . . . . . . . . . . . . . 48
Chapter 7 HotSync Technology . . . . . . . . . . . . . . . . . . . . . . . . . . . . . . . . . . . .49
HotSync Technology and the HotSync Manager. . . . . . . . . . . . . . . . . . 50
Setting Up Your First HotSync Operation . . . . . . . . . . . . . . . . . . . . . . . 50
Performing a Local HotSync Operation . . . . . . . . . . . . . . . . . . . . . . . . . 51
Selecting HotSync Setup Options. . . . . . . . . . . . . . . . . . . . . . . . . . . . . . . 52
Customizing HotSync Operations . . . . . . . . . . . . . . . . . . . . . . . . . . . . . . 53
Chapter 8 Memo Pad . . . . . . . . . . . . . . . . . . . . . . . . . . . . . . . . . . . . . . . . . . . . .57
Creating Memos . . . . . . . . . . . . . . . . . . . . . . . . . . . . . . . . . . . . . . . . . . . . . 58
Reviewing and Editing Memos . . . . . . . . . . . . . . . . . . . . . . . . . . . . . . . . 58
Beaming a Memo . . . . . . . . . . . . . . . . . . . . . . . . . . . . . . . . . . . . . . . . . . . . 60
Deleting a Memo. . . . . . . . . . . . . . . . . . . . . . . . . . . . . . . . . . . . . . . . . . . . . 60
Using Memo Pad Menus . . . . . . . . . . . . . . . . . . . . . . . . . . . . . . . . . . . . . . 61
Contents |
iii |

Contents
Chapter 9 Modem Emulation. . . . . . . . . . . . . . . . . . . . . . . . . . . . . . . . . . . . . . . 63
Setting Up Modem Emulation . . . . . . . . . . . . . . . . . . . . . . . . . . . . . . . . . 64
Opening Modem Emulation . . . . . . . . . . . . . . . . . . . . . . . . . . . . . . . . . . . 65
Exiting Modem Emulation . . . . . . . . . . . . . . . . . . . . . . . . . . . . . . . . . . . . 66
Tips and Troubleshooting . . . . . . . . . . . . . . . . . . . . . . . . . . . . . . . . . . . . . 66
Chapter 10 Palm Mail . . . . . . . . . . . . . . . . . . . . . . . . . . . . . . . . . . . . . . . . . . . . . . 67
Deciding Which E-mail Application to Use . . . . . . . . . . . . . . . . . . . . . . 68 Setting Up Palm Mail. . . . . . . . . . . . . . . . . . . . . . . . . . . . . . . . . . . . . . . . . 68 Viewing Messages . . . . . . . . . . . . . . . . . . . . . . . . . . . . . . . . . . . . . . . . . . . 70 Creating Messages . . . . . . . . . . . . . . . . . . . . . . . . . . . . . . . . . . . . . . . . . . . 71 Sending Messages. . . . . . . . . . . . . . . . . . . . . . . . . . . . . . . . . . . . . . . . . . . . 76 Deleting Messages . . . . . . . . . . . . . . . . . . . . . . . . . . . . . . . . . . . . . . . . . . . 78 Managing the Message List. . . . . . . . . . . . . . . . . . . . . . . . . . . . . . . . . . . . 79 Setting HotSync Options . . . . . . . . . . . . . . . . . . . . . . . . . . . . . . . . . . . . . . 81 Working with Filters . . . . . . . . . . . . . . . . . . . . . . . . . . . . . . . . . . . . . . . . . 82 Using the Mail Menu Commands . . . . . . . . . . . . . . . . . . . . . . . . . . . . . . 86
Chapter 11 pdQalert . . . . . . . . . . . . . . . . . . . . . . . . . . . . . . . . . . . . . . . . . . . . . . . 87
Setting Up pdQalert . . . . . . . . . . . . . . . . . . . . . . . . . . . . . . . . . . . . . . . . . . 88 Receiving pdQalert Messages. . . . . . . . . . . . . . . . . . . . . . . . . . . . . . . . . . 88 Responding to pdQalert Messages . . . . . . . . . . . . . . . . . . . . . . . . . . . . . 89 Checking Messages with the Keypad Closed . . . . . . . . . . . . . . . . . . . . 90
Chapter 12 pdQbrowser. . . . . . . . . . . . . . . . . . . . . . . . . . . . . . . . . . . . . . . . . . . . 91
Getting Started with pdQbrowser . . . . . . . . . . . . . . . . . . . . . . . . . . . . . . 92 Maintaining pdQbrowser Preferences . . . . . . . . . . . . . . . . . . . . . . . . . . 93 Connecting to the Internet. . . . . . . . . . . . . . . . . . . . . . . . . . . . . . . . . . . . . 95 Working with Bookmarks . . . . . . . . . . . . . . . . . . . . . . . . . . . . . . . . . . . . . 96 Copying Text from a Web Site to Applications . . . . . . . . . . . . . . . . . . . 98 Disconnecting from the Internet . . . . . . . . . . . . . . . . . . . . . . . . . . . . . . . 99
Chapter 13 pdQmail . . . . . . . . . . . . . . . . . . . . . . . . . . . . . . . . . . . . . . . . . . . . . . 101
Deciding Which E-Mail Application to Use . . . . . . . . . . . . . . . . . . . . . 102 Setting Up pdQmail . . . . . . . . . . . . . . . . . . . . . . . . . . . . . . . . . . . . . . . . 102 Opening pdQmail. . . . . . . . . . . . . . . . . . . . . . . . . . . . . . . . . . . . . . . . . . . 108 Checking Your Incoming E-mail Messages . . . . . . . . . . . . . . . . . . . . . 108 Creating and Sending E-mail Messages . . . . . . . . . . . . . . . . . . . . . . . . 110 Working with Mailboxes . . . . . . . . . . . . . . . . . . . . . . . . . . . . . . . . . . . . . 115 Organizing Your Incoming Messages Using Filters . . . . . . . . . . . . . . 119 Setting or Adjusting pdQmail Preferences . . . . . . . . . . . . . . . . . . . . . . 124 Changing Your Password . . . . . . . . . . . . . . . . . . . . . . . . . . . . . . . . . . . . 129 Disconnecting from the Server . . . . . . . . . . . . . . . . . . . . . . . . . . . . . . . . 130
Chapter 14 Preferences . . . . . . . . . . . . . . . . . . . . . . . . . . . . . . . . . . . . . . . . . . . 131
About Preferences . . . . . . . . . . . . . . . . . . . . . . . . . . . . . . . . . . . . . . . . . . 132
Selecting Alerts . . . . . . . . . . . . . . . . . . . . . . . . . . . . . . . . . . . . . . . . . . . . . 133
Changing Button Preferences . . . . . . . . . . . . . . . . . . . . . . . . . . . . . . . . . 134
Using the Digitizer . . . . . . . . . . . . . . . . . . . . . . . . . . . . . . . . . . . . . . . . . . 136
Selecting Formats . . . . . . . . . . . . . . . . . . . . . . . . . . . . . . . . . . . . . . . . . . . 137
iv |
pdQ Applications Handbook |

Contents
Setting General Preferences . . . . . . . . . . . . . . . . . . . . . . . . . . . . . . . . . . 138
Setting Modem Preferences. . . . . . . . . . . . . . . . . . . . . . . . . . . . . . . . . . . 139
Setting Network Preferences. . . . . . . . . . . . . . . . . . . . . . . . . . . . . . . . . . 140
Recording Owner Preferences . . . . . . . . . . . . . . . . . . . . . . . . . . . . . . . . 142
Setting Phone Preferences . . . . . . . . . . . . . . . . . . . . . . . . . . . . . . . . . . . . 143
Setting Registry Preferences . . . . . . . . . . . . . . . . . . . . . . . . . . . . . . . . . . 147
Creating ShortCuts . . . . . . . . . . . . . . . . . . . . . . . . . . . . . . . . . . . . . . . . . . 148
Changing the SideStrip Icons . . . . . . . . . . . . . . . . . . . . . . . . . . . . . . . . . 149
Chapter 15 Security . . . . . . . . . . . . . . . . . . . . . . . . . . . . . . . . . . . . . . . . . . . . . .151
Setting Up Passwords . . . . . . . . . . . . . . . . . . . . . . . . . . . . . . . . . . . . . . . 152 Showing or Hiding Private Entries . . . . . . . . . . . . . . . . . . . . . . . . . . . . 154 Locking the pdQ Smartphone. . . . . . . . . . . . . . . . . . . . . . . . . . . . . . . . . 155 Restricting the pdQ Smartphone . . . . . . . . . . . . . . . . . . . . . . . . . . . . . . 156
Chapter 16 Speed Dial . . . . . . . . . . . . . . . . . . . . . . . . . . . . . . . . . . . . . . . . . . . .157
Adding Phone Numbers to the Speed Dial List. . . . . . . . . . . . . . . . . . 158 Making Calls Using Speed Dial . . . . . . . . . . . . . . . . . . . . . . . . . . . . . . . 159 Modifying Entries in the Speed Dial List . . . . . . . . . . . . . . . . . . . . . . . 160 Removing Entries from the Speed Dial List . . . . . . . . . . . . . . . . . . . . . 161
Chapter 17 To Do List. . . . . . . . . . . . . . . . . . . . . . . . . . . . . . . . . . . . . . . . . . . . .163
Creating To Do Items . . . . . . . . . . . . . . . . . . . . . . . . . . . . . . . . . . . . . . . . 164
Setting Item Details . . . . . . . . . . . . . . . . . . . . . . . . . . . . . . . . . . . . . . . . . 165
Displaying Your To Do List . . . . . . . . . . . . . . . . . . . . . . . . . . . . . . . . . . 167
Using the To Do List Menus . . . . . . . . . . . . . . . . . . . . . . . . . . . . . . . . . . 168
Appendix A Expense Reports. . . . . . . . . . . . . . . . . . . . . . . . . . . . . . . . . . . . . . .169
Customizing the Expense Reports . . . . . . . . . . . . . . . . . . . . . . . . . . . . . 173
Appendix B Non-ASCII Characters for Login Scripts. . . . . . . . . . . . . . . . . . . .179
About Non-ASCII Characters . . . . . . . . . . . . . . . . . . . . . . . . . . . . . . . . . 179 Use of ^ char . . . . . . . . . . . . . . . . . . . . . . . . . . . . . . . . . . . . . . . . . . . . . . . 179 Carriage Return and Line Feed. . . . . . . . . . . . . . . . . . . . . . . . . . . . . . . . 179 Literal Characters . . . . . . . . . . . . . . . . . . . . . . . . . . . . . . . . . . . . . . . . . . . 180
Index . . . . . . . . . . . . . . . . . . . . . . . . . . . . . . . . . . . . . . . . . . . . . . . . . . . . . . . . . . . .181
Contents |
v |

Chapter 1
Address Book
Using the Palm™ Address Book, you can easily keep track of names, addresses, phone numbers, e-mail addresses, URLs, and other information about your personal and business contacts.
With the Palm Address Book, you can...
Make a phone call, send e-mail, or open web sites directly from the Address List.
Enter up to five phone numbers, e-mail addresses, or web addresses (URLs) for each contact. Select which of these numbers appears in the Address List.
Attach a note to an Address Book entry for additional information.
Assign categories to your Address Book entries, so you can quickly sort and view your entries in logical groups.
Define the contacts to include in the Speed Dial list.
In this chapter, you’ll find...
|
Creating Address Book Entries |
page 2 |
|
||
|
Working with Address Book Entries |
page 5 |
|
||
|
Using the Address Book Menus |
page 11 |
|

Creating Address Book Entries
Creating Address Book Entries
An Address Book entry is the name, address, and phone information you are keeping for a person or business. You can create these entries on the pdQ smartphone, or you can use the Palm™ Desktop software to create them on your computer and download them to your pdQ smartphone during a HotSync® operation. For procedures, see “Chapter 7—HotSync Technology.”
Note: Palm Desktop software also has data import capabilities that allow you to load database files into the Address Book. Refer to the online documentation supplied with the Palm Desktop for details.
To create a new Address Book entry:
1.Press the  button to open the Address List.
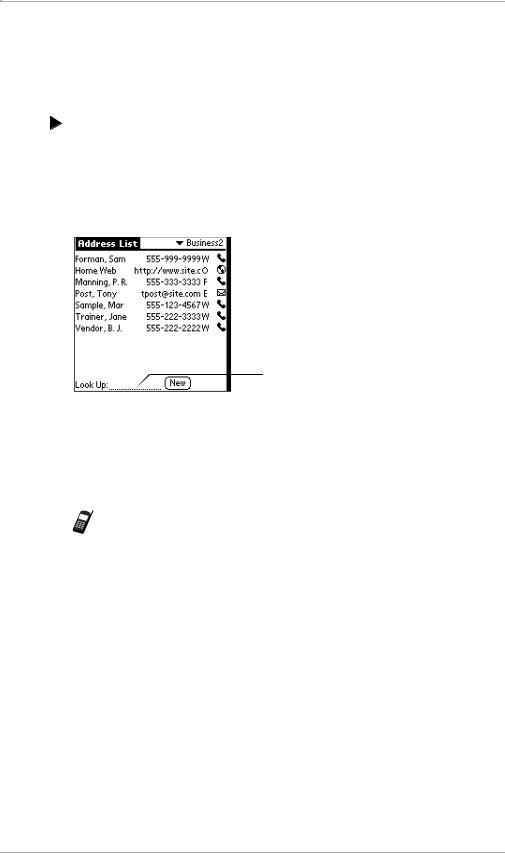
2.From the Address List, tap New to display the Address Edit screen.
Tap New.
3.Enter the last name of a person you want to add to your Address Book.
You can write with the stylus or use the on-screen keyboard. The first letter is capitalized automatically (except for numeric and e-mail information). For details about entering text, see the pdQ Basics Handbook.
4. Move to the next line either by tapping it or by writing , the Next Field Graffiti stroke.
5.Enter the person's first name on the First Name line.
6.Enter the rest of the information for this person or business.
Notice that you can enter e-mail addresses or web addresses (URLs) in any of the five phone number fields. To add pauses, see “Entering Pauses” on page 5.
7.Tap  to move to the next page.
8.When you have finished, tap Done to return to the Address List screen.
Adding an Address Book Entry to the Speed Dial List
If you want the entry you are creating to appear in the Speed Dial list, follow these steps. Contacts are always added to the Speed Dial list from the Address Book so you only have to maintain the phone numbers in one place.
2 |
pdQ Applications Handbook |
Creating Address Book Entries
To add a phone number to the Speed Dial list:
1. |
In the Address List, locate the person or business you want to add to the |
Address |
||
|
||||
|
Speed Dial list. Tap the name in the left column. |
|
||
|
Note: Be sure to tap the name in the left column, not the number in the |
Book |
||
|
right column. Tapping the name opens the Address View screen |
|||
|
for editing information; tapping the number starts a phone call. |
|
||
2. |
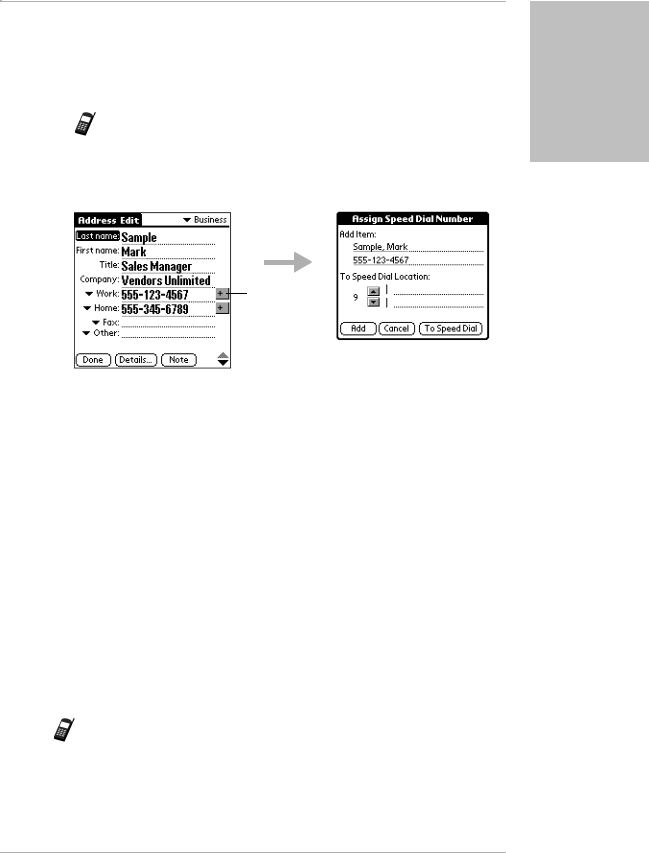
Tap Edit to display the Address Edit screen. |
|
||
|
A plus sign (+) appears to the right of numbers that have not been added |
|
||
|
to the Speed Dial list. |
|
||
|
|
|
|
|
|
|
|
|
|
Tap the plus sign.
3.Tap the plus sign beside the number you want to add. The Assign Speed Dial Number dialog appears.
4.Tap the up arrow or the down arrow to select a specific Speed Dial number. Tap Add.
5.In the confirmation dialog, tap Yes to add the number.
6.Tap Done.
7.If you want to verify that the number has been added to the Speed Dial list,
tap  to open the Applications Launcher.
8. Tap  to open Speed Dial. Your new entry is in the Speed Dial list.
Making a Call from the Address Book
After you create an Address Book entry, you can make a call from it directly. If you have entered e-mail addresses or URLs in the Address Book, you can also make direct connections to them if your service provider supports over-the-air data.
Note: You cannot initiate conference calls from the Address Book. If your service provider supports conference calls, you can initiate a three-way call by entering the numbers directly on the keypad or the Dialer.
Chapter 1 Address Book |
3 |

Creating Address Book Entries
To make a phone call from the Address Book:
1. If the pdQ smartphone is not already on, tap  to turn it on.
Tap the icon to call this number directly.
 Tap the phone number to see all of the available numbers, including e-mail addresses or URLs, for this person or business.
2.If the number you want to call appears in the list, do the following: a. Tap the phone icon beside the number you want to call.
b.In the confirmation dialog, tap Dial. To eliminate the confirmation dialog when you make future calls from the Address Book, tap Do not ask me again.
3.To choose a different phone number for a person or business in your Address List, do the following:
a.Locate the entry and tap the number.
Be sure to tap the number, not the name or icon. A dialog shows all of the numbers for that person or business.
If you select an e-mail address or a URL, the Dial button changes to Email or Browse.
b.Tap the number you want to call and tap Dial.
If you select an e-mail address or URL, the pdQ smartphone recognizes these addresses and makes the appropriate connection.
4.When you have finished your call, tap End to hang up.
4 |
pdQ Applications Handbook |
Working with Address Book Entries
Working with Address Book Entries
In the Address Book, you can locate your entries quickly, edit them, display them by name or company name, and group them by category. You can also choose the type of information you want your entries to include and exchange Address Book information with other pdQ smartphones or Palm organizers.
Editing an Address Book Entry
To edit an Address Book entry:
1.In the Address List, tap the name of the entry you want to change.
Tap the name in the left column, not the phone number in the right column. Tapping the phone number initiates a call.
2.Tap Edit. The Address Edit screen appears.
3.Tap any line (such as Address or City). Enter or change the information.
4.When you have finished, tap Done.
Entering Pauses
When you call automated systems, you often have to dial a series of numbers with pauses between them (for example, when sending a page or entering a password). You can place these pauses in the Address Book.
To enter pauses in a phone number:
1.Open the Address Edit screen for the appropriate person or business.
2.In the phone number, enter a percent sign (%) for a hard pause or a comma
(,) for a timed pause wherever necessary.
Hard Pause |
When you call this number, the pdQ smartphone pauses at |
(%) |
this point. It does not continue with the next set of numbers |
|
until you tap Resume. |
Timed Pause |
When you call this number, the pdQ smartphone pauses for |
(,) |
two seconds before continuing with the next set of numbers. |
|
You can enter as many commas as necessary to extend the |
|
length of the pause. |
|
|
Book Address
Chapter 1 Address Book |
5 |
Working with Address Book Entries
Looking Up an Address Book Entry
You can find entries in your Address Book quickly either by scrolling through it or by using the Look Up line in the Address List screen.
To scroll through the Address Book:
Press the up and down buttons on the front panel of the pdQ smartphone.
In the Address List screen, you move up or down by a screen of entries. In the Address View screen, you move to the previous or next entry.
To look up an Address Book entry:
1. In the Address List, enter the first letter of the name you want to find.
Write the first letter or two in the Look Up line.
The list scrolls to the first entry beginning with that letter. If you write a second letter, the list scrolls to the first entry beginning with those two letters.
2.Tap any entry to view its contents.
Note: You can also look up entries in your Address Book with the pdQ smartphone’s keypad closed. See “Chapter 3—Using Phone and Messaging Features” in the pdQ Basics Handbook.
Choosing and Displaying Phone Numbers
In your Address Book, you can keep up to five phone numbers, e-mail addresses, or URLs for each entry. You can select the labels for these numbers individually. For example, you might want to keep a fax number for one person and a pager number for another. You can also choose which of these numbers you want to see in the Address List for each entry.
To choose other types of phone numbers in an Address Book entry:
1.In the Address List, tap the name of the entry you want to change.
Tap the name in the left column, not the phone number in the right column.
2.Tap Edit to display the Address Edit screen.
6 |
pdQ Applications Handbook |

Working with Address Book Entries
3. Tap the  beside the phone number you want to change.
Book Address
Tap the arrow to open the pick list.
4.From the list, tap the label (for example, Fax or Pager) you want to use.
5.If you want to select which phone number appears in the Address List, tap
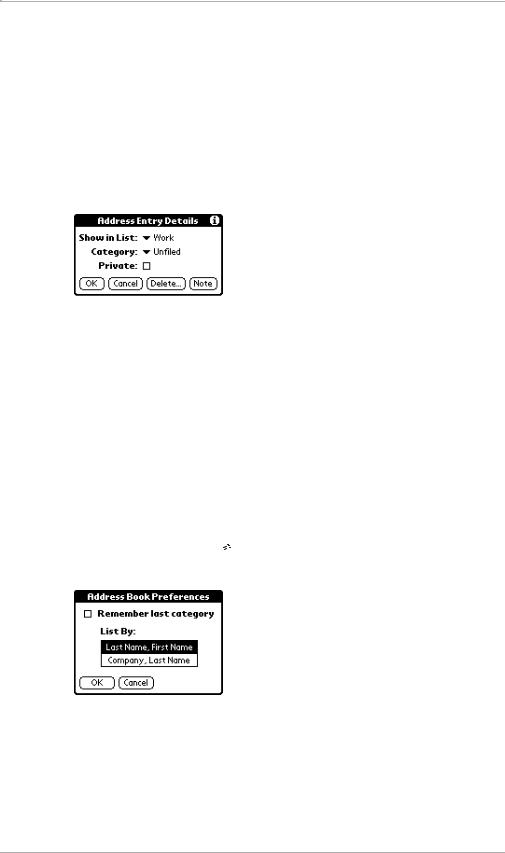
Details to display the Address Entry Details dialog. If you don’t want to change this setting, skip to step 8.
6. Tap the  beside Show in List. Select a label to identify which phone number appears in the Address List.
7.Tap OK.
8.Tap Done.
Assigning Address Categories
Categories can help you file your Address Book entries into groups for easy review. For more information about creating and using categories, see “Using Categories” in the pdQ Basics Handbook.
To assign a category to an Address Book entry:
1.In the Address List, tap the name you want to assign to a category.
Tap the name in the left column, not the phone number in the right column.
2.Tap Edit in the Address View screen to display the Address Edit screen.
3.In the Address Edit screen, tap the pick list in the upper-right corner. From the list, tap the category you want to assign to this entry.
4.Tap Done.
Chapter 1 Address Book |
7 |
Working with Address Book Entries
Marking an Address Book Entry as Private
You can mark any entry as private. When the security features are turned on, private entries are not visible. You must enter a password to see them.
To mark an entry as private:
1.In the Address List, tap the name you want to mark as private.
Tap the name in the left column, not the phone number in the right column.
2.Tap Edit to display the Address Edit screen.
3.Tap Details to open the Address Entry Details dialog.
4.Tap the Private check box.
5.Tap OK.
6.In the confirmation dialog, tap OK.
7.Tap Done.
Sorting the Address List by Name or Company
You can sort the entries in the Address List screen by Company and Last Name, rather than by Last Name and First Name. These settings do not change your Address Book data in any way; they merely change the view.
To sort the entries in the Address List screen:
1.In the Address List, tap  to open the Address Book menus.
2.Tap Options. In the Options menu, tap Preferences.
3.Tap the setting that you want for the Address List screen.
4.Tap OK.
The Address List is resorted based on your choice. Entries with no company name are always sorted by last name.
8 |
pdQ Applications Handbook |

Working with Address Book Entries
Beaming Address Book Entries to Other pdQ Smartphones
Using the infrared (IR) port, you can beam Address Book entries to other pdQ smartphones or Palm organizers.
Note: To conserve power, your pdQ smartphone is delivered with the beam feature turned off. To turn it on, see “Setting General Preferences” in the pdQ Basics Handbook.
Once the beam feature is turned on, you can beam any of the following:
■Your business card—The business card is a specially designated entry containing information you want to exchange with business contacts. You can send your business card quickly with one-touch beaming.
■An address entry—You can select and beam any entry in your Address Book.
■A category of address entries—You can beam all of the entries in a category. For example, you can share a list of restaurants with a friend.
For more information on the IR port, see “Beaming Information to Other pdQ Smartphones” in the pdQ Basics Handbook.
To create a business card:
1.In the Address List, tap New. Create an Address Book entry containing the information you want on your business card.
2. Tap  to open the Address Book menus.
3.Tap Select Business Card from the Record menu. Tap Yes to accept this entry as your business card.
4.Tap Done. Notice that in the Address View, the 

 icon identifies this record as your business card.
To beam a business card:
1.In the Address List, tap the name of your business card entry to display the Address View screen.
Tap the name in the left column, not the phone number in the right column.
2.Tap  to open the Address Book menus.
3.Tap Beam Business Card from the Record menu to beam your card. You can also press  for about two seconds to beam your card.
To beam the current entry:
1.In the Address List, tap the name of an entry you want to beam.
Tap the name in the left column, not the phone number in the right column.
2. Tap  to open the Address Book menus.
3.Tap Beam Address from the Record menu to beam the current entry.
If you beam entries often, you can set the full-screen pen stroke to beam the current entry. See “Pen Preferences” on page 135.
Book Address
Chapter 1 Address Book |
9 |

Working with Address Book Entries
To beam the current category:
1.In the Address List, tap the pick list in the upper-right corner. From the list, select the category you want to beam.
2.Tap  to open the Address Book menus.
3.Tap Beam Category from the Record menu.
Removing an Address Book Entry from the Speed Dial List
You can remove a phone number from the Speed Dial list without deleting the entry entirely from the Address Book.
To remove an Address Book entry from the Speed Dial list:
1.In the Address List, tap the name of the entry you want to remove.
Tap the name in the left column, not the phone number in the right column.
2.Tap Edit to display the Address Edit screen.
3.Tap the Speed Dial number.
Tap Remove.
4.Tap Remove.
5.In the confirmation dialog, tap Yes to remove this number from the Speed Dial list or No to keep it.
6.Tap Done.
Deleting an Address Book Entry
To delete an entry in the Address Book:
1.In the Address List, tap the name of the entry you want to delete.
Tap the name in the left column, not the phone number in the right column.
2.Tap Edit to display the Address Edit screen.
3.Tap Details.
4.Tap Delete. Tap OK. The entry is removed from both the Address Book and the Speed Dial list.
10 |
pdQ Applications Handbook |

Using the Address Book Menus
Using the Address Book Menus
This section outlines menu commands specific to the Address Book. See
“Using Menus” in the pdQ Basics Handbook for information about menu commands common to all applications.
Record Menu
The commands in the Record menu vary depending on which screen is open.
If Address List is open |
If Address View is open |
Book Address
Delete Address |
Remove an Address Book entry. In the alert dialog, tap OK to |
|
delete the entry. The entry is removed from the Address Book, but |
|
a copy is sent to an archive file on your computer during your next |
|
HotSync operation. To delete the entry completely, remove the |
|
check mark from the Save archive copy on PC check box. |
Attach Note |
Create a note for the current entry. |
Delete Note |
Remove a note attached to an Address Book entry. In the alert |
|
dialog, tap OK to delete the note or Cancel to keep the note. |
Beam Address |
Beam the current Address Book entry to another pdQ smartphone |
|
through the IR port. |
Beam Category |
Beam all Address Book entries in the current category to another |
|
pdQ smartphone through the IR port. |
Select |
Select the current Address Book entry as your business card. To |
Business Card |
beam your business card, use the Beam Business Card command. |
Beam |
Send the current business card to another pdQ smartphone |
Business Card |
through the IR port. You can also beam your business card by |
|
holding down the Address Book button for at least two seconds. |
|
|
Chapter 1 Address Book |
11 |

Using the Address Book Menus
Options Menu
The commands on the Option menu vary depending on which screen is open.
If Address List is open |
If Address View is open |
Font |
Choose a different font (text) style for your entries. |
Preferences Set how you want the Address Book to list information.
|
Remember last category—If you select this check box, the Address |
|
Book shows the last category you used when you return to it from |
|
another application. If you clear it, the Address Book shows the |
|
entries for all categories. |
|
List By—Sort address entries by last name or by company. |
Rename |
Create your own names for the four custom fields. Your changes |
Custom Fields |
apply to all of your Address Book entries. |
About |
Show version information for the Address Book application. |
Address Book |
|
|
|
12 |
pdQ Applications Handbook |

Chapter 2
Calculator
Using the Calculator, you can quickly perform basic calculations. The Calculator is designed to perform addition, subtraction, multiplication, and division operations.
You can also store and retrieve values in the Calculator’s memory.
In this chapter, you’ll find...
|
Using the Calculator |
page 14 |
|
||
|
Using the Calculator Menus |
page 15 |
|

Using the Calculator
Using the Calculator
To open and use the Calculator:
1.Open the keypad. Tap  to open the Applications Launcher.
2.Tap  to display the Calculator.
3. Use your fingers or the stylus to tap the Calculator buttons on the screen.
Using the Calculator Functions
Use the Calculator function keys to perform the following calculations.
Clears the last number you entered. Use this button if you make a mistake while entering a number in the middle of a calculation. When you tap this button, you can re-enter a number without starting over.
Clears the entire calculation and allows you to begin a fresh calculation.
Toggles the current number between a negative value and a positive value. If you want to enter a negative number, enter the number first and then press the +/- button.
Places the current number into Memory. Each new number you enter with the M+ button is added to the total already stored in memory. The number that you add can be either a calculated value or any number you enter by pressing the number buttons. Pressing this button has no effect on the current calculation (or series of calculations); it merely places the value into memory until it is recalled.
Recalls the stored value from memory and inserts it in the current calculation.
Removes any value that is stored in the Calculator memory.
14 |
pdQ Applications Handbook |
Using the Calculator Menus
Using the Calculator Menus
The Calculator supports the Copy and Paste commands. You can use these commands to copy a value from the Calculator and paste it into another application on the pdQ smartphone. Similarly, you can copy values from other applications on the pdQ smartphone, such as Expense, and paste the values into the Calculator. For additional information on the Copy and Paste commands, see “Using Menus” in the pdQ Basics Handbook.
Recent Calculations
The Recent Calculations command enables you to review the last series of calculations. It is particularly useful for confirming a series of “chain” calculations.
To display the last series of calculations:
1.Tap  to open the Calculator menu.
2.From the Options menu, tap Recent Calculations to display the Recent Calculations screen.
3.After you finish reviewing the dialog, tap OK to close the Recent Calculations dialog and return to the Calculator.
Calculator
Chapter 2 Calculator |
15 |

Chapter 3
Call History
Call History maintains a list of your incoming, outgoing, and missed calls. By default, the pdQ smartphone is set to keep 99 calls in Call History, but you can adjust this number as high as 999 if you choose. The pdQ smartphone automatically replaces older entries with new entries.
Using Call History, you can see exactly when someone called you and return the call directly. You can also track data about your calls and export it to the Expense application.
With Call History, you can...
Return a call directly.
View and sort calls in three categories: Incoming, Outgoing, and Missed.
In this chapter, you’ll find...
|
Opening Call History |
page 18 |
|
||
|
Making a Call from Call History |
page 18 |
|
||
|
Tracking Your Calls |
page 18 |
|
||
|
Creating an Expense Record |
page 21 |
|
||
|
Using the Menus in Call History |
page 23 |
|

Opening Call History
Opening Call History
To open Call History:
Open the keypad. Tap  to open the Call History list.
The icons show what type of call was made:
Incoming call
Outgoing call
Data call (for example, a call to a web site)
The screen shows the calls you have made or received, including the date, time, and length. If the phone number is in your Address Book, the pdQ smartphone displays the associated name in the Who column. Otherwise, it displays the phone number. If you haven’t made or received any calls yet, the Call History screen is empty.
If you synchronize more than one pdQ smartphone with the same user name, the Call History screen displays calls from all of them. (Notice, however, that synchronizing more than one device with the same user name is not recommended.)
Making a Call from Call History
You can quickly return a phone call directly from the Call History list.
To make a call from the Call History list:
1.Open the keypad. Tap  to turn on the phone.
You can view or edit the calls in Call History with your pdQ smartphone turned off, but it must be turned on to make a call.
2.Tap  to open the Call History list.
3.Tap the entry you want to call.
4.Tap Dial.
Tracking Your Calls
Call History is a valuable tool for keeping track of your incoming and outgoing calls. You can sort the Call History list, copy information from it into the Address Book or the Clipboard, and delete entries.
18 |
pdQ Applications Handbook |

Tracking Your Calls
Copying Information from Call History
You can copy the name and phone number of any caller into your Address
Book or onto the Clipboard so it can be pasted into other applications.
To copy information from Call History to the Address Book:
1.Tap the entry you want to add to (or modify) in the Address Book. The Call Detail dialog appears.
2. |
Do one of the following: |
|
|
|
|||
|
■ To add a new entry, tap Create Address Book Entry. Tap OK in the |
|
|
|
confirmation dialog. The pdQ smartphone opens the Address Edit |
|
|
|
screen where you can verify or change the entry. |
Call |
|
|
■ To change an existing entry, tap Update Address Book Entry. In the |
||
|
History |
||
|
Address Book where you can verify or change the entry. |
||
|
confirmation message, tap OK. The pdQ smartphone opens the |
|
|
To copy information from Call History to the Clipboard: |
|
||
1. |
Tap the entry you want to copy. |
|
|
|
|||
2. |
Tap |
to open the Call History menus. |
|
3. |
Tap Copy Number to Clipboard from the Record menu. |
|
|
Sorting the Call History List
With a single click, you can sort the Call History list by the name or phone number of the caller, by date and time, or by length of call. No matter which sequence you choose, new calls automatically appear at the top of the list.
To sort by name or phone number:
1.Tap Who in the column heading. Calls are listed by phone number first, then by name in alphabetical order.
2.Tap Who again to resort the list by name first.
Chapter 3 Call History |
19 |

Tracking Your Calls
To sort by the date or time the call was received:
1.Tap Date in the column heading. Calls are listed by date, with all the calls on a single day listed by time. For calls received or made during the current day, only the time is displayed, not the date.
2.Tap Date again to resort the list based on the most recent time.
To sort by length of call:
1.Tap Length in the column heading. Calls are listed from longest to shortest.
2.Tap Length again to resort the list from shortest call to longest call.
Deleting Calls
To delete one entry from the Call History list:
1.Tap the entry you want to delete.
2.Tap Delete. The call is removed from the list.
To delete all entries from the Call History List:
1.From the Call History list, tap  to open the menus.
2.Tap Delete All Calls from the Record menu. All the calls are removed from your Call History list.
Tracking Call Length
Your pdQ smartphone keeps statistics on the number and length of calls (in minutes) made or received on the phone.
Notice that these statistics may not match the number of calls on the Call History screen if you have synchronized more than one pdQ smartphone with the same user name. That is, the Call History screen shows the calls one user made or received on several devices, while the Call Statistics screen shows the calls made or received on one device.
Notice also that the durations of call-waiting and conference calls are not logged, since the pdQ smartphone cannot distinguish between the first and second conversations.
To track call statistics:
1. From the Call History list, tap  to open the menus.
20 |
pdQ Applications Handbook |

Creating an Expense Record
2. Tap Recent Calls from the Statistics menu.
The screen shows the total calls and total minutes for both Home and Roaming calls.
3.To reset either of these counters, tap the appropriate Reset button.
4.To view all the minutes of calls in the lifetime of your pdQ smartphone, tap Lifetime Calls from the Statistics menu. You cannot reset the Lifetime Calls number.
Setting Up Your Call History Preferences
To define Call History preferences:
1.In the Call History application, tap  .
.
2.Tap Preferences from the Options menu.
3.If you don’t want caller names to appear in the Who column even if this information is available, tap Don’t show name in summary.
4.To delete calls after a specific number of days, tap Delete calls after ___
days. Enter the number of days on the line.
5.To set the maximum number of calls to be listed in Call History, enter a number between 1 and 999 on the Maximum # of Calls line.
6.Tap OK when you have finished.
Creating an Expense Record
If you need to keep a financial record of your calls for billing or expense reports, you can generate an expense record from Call History. The calls you select are copied to the Expense application where you can edit them, place them in categories, and export them to Microsoft® Excel.
History Call
Chapter 3 Call History |
21 |
Creating an Expense Record
To create an expense record:
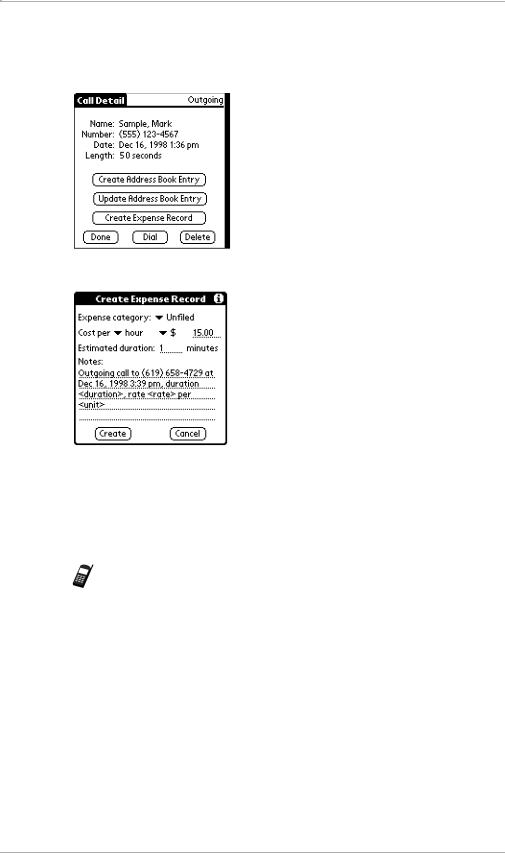
1.In the Call History list, tap a call you want to track on your expense record. The Call Detail screen appears.
2. Tap Create Expense Record.
3.Tap the Expense category pick list and select the appropriate category for this call.
4.Tap the Cost pick list and select hour or minute. Select the unit of currency. Enter the amount to be charged per hour or minute.
Note: You can change the default settings in the category and cost fields using the Options menu. See “Options Menu” on page 24.
5.If necessary, change the estimated duration of the call (for example, if you spent billable time before or after the call that you want to include).
6.Enter any additional information you want to record (for example, the purpose or subject of the call) in the Notes area. The text you write here will appear as a Note in the Expense record of this call.
7.Tap Create.
8.Tap Done.
Information about this call is moved to the Expense application where you can edit it and export it to Microsoft Excel. For details, see
“Chapter 6—Expense.”
22 |
pdQ Applications Handbook |
Using the Menus in Call History
Using the Menus in Call History
This section outlines menu commands specific to Call History. See “Using Menus” in the pdQ Basics Handbook for information about menu commands common to all applications.
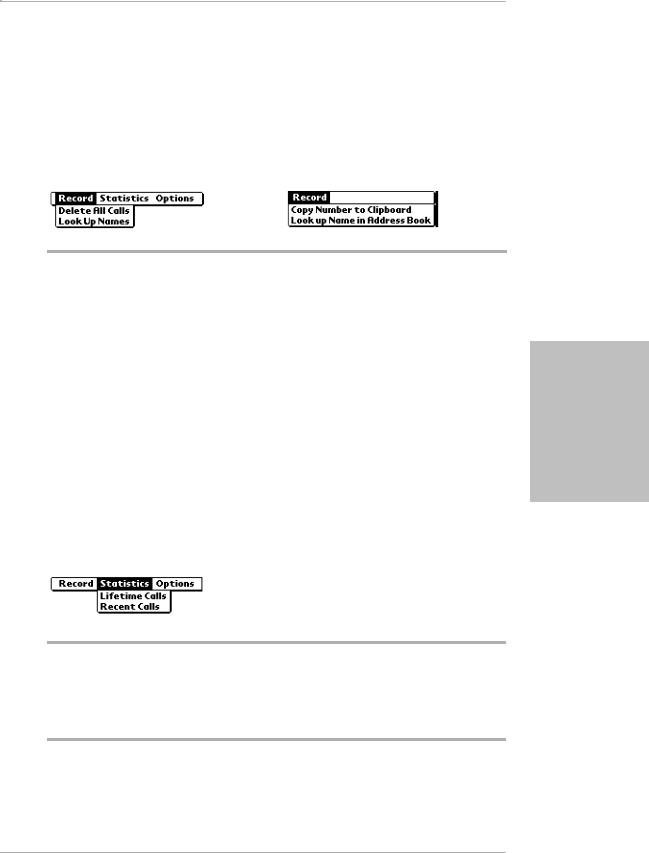
Record Menu
The commands on the Record menu vary depending on which screen is open.
From Call History |
From Call Details |
Delete All Calls |
Remove all records from the Call History List. |
Look Up Names |
From the Call History screen, scan the Address Book to update |
|
the information in Call History. If you have made a number of |
|
changes to your Address Book, you can select this menu option |
|
to refresh the information in Call History. |
|
Note that if you have 250 or more names in the Address Book, |
|
you may want to turn off this feature to increase the |
|
performance speed of Call History. |
Copy Number |
From the Call Details screen, copy information from a call to |
to Clipboard |
your Address Book. |
Look up Name |
From the Call Details screen, scan the Address Book for an entry |
in Address Book |
that matches this number. The pdQ smartphone makes this scan |
|
automatically after each call. However, if you have made a |
|
number of changes to your Address Book, you can select this |
|
menu option to update information in Call History. |
|
|
Statistics Menu
Lifetime Calls View the total minutes for all calls received during the lifetime of your pdQ smartphone. You cannot reset this number.
Recent Calls View the total number of calls and minutes since you last reset the pdQ smartphone. Calls are divided into Home and Roam areas. You can reset either or both of these numbers.
These statistics may not match the calls on the Call History screen if you have synchronized more than one pdQ smartphone with the same user name. The Statistics count the calls on one pdQ smartphone. The Call History screen shows the calls made by one user on all devices synchronized under the same name.
History Call
Chapter 3 Call History |
23 |
Using the Menus in Call History
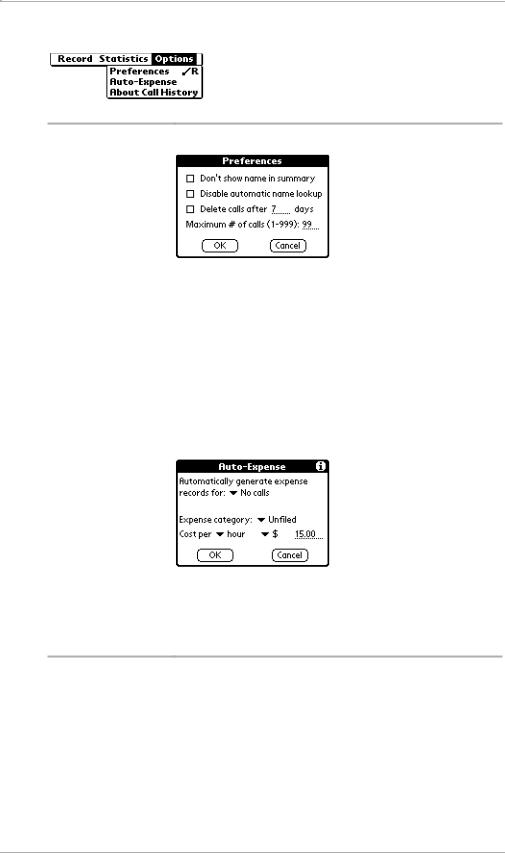
Options Menu
Preferences |
Manage the way calls are handled by Call History. |
■ Display phone numbers only, without names.
■ Disable the lookup feature that updates Call History
|
with names from the Address Book. If you have more |
|
than 250 names in the Address Book, it is recommended |
|
that you disable automatic lookup to improve phone |
|
performance. |
|
■ Delete calls after X days. |
|
■ Set the maximum number of calls to be kept in Call |
|
History. |
Auto-Expense |
Automatically generate expense reports based on your |
|
incoming or outgoing calls. |
■Generate reports for all calls or for calls in a category.
■Enter your cost per minute or hour in any currency you have set up.
About Call History View version information for the Call History application.
24 |
pdQ Applications Handbook |
 Loading...