

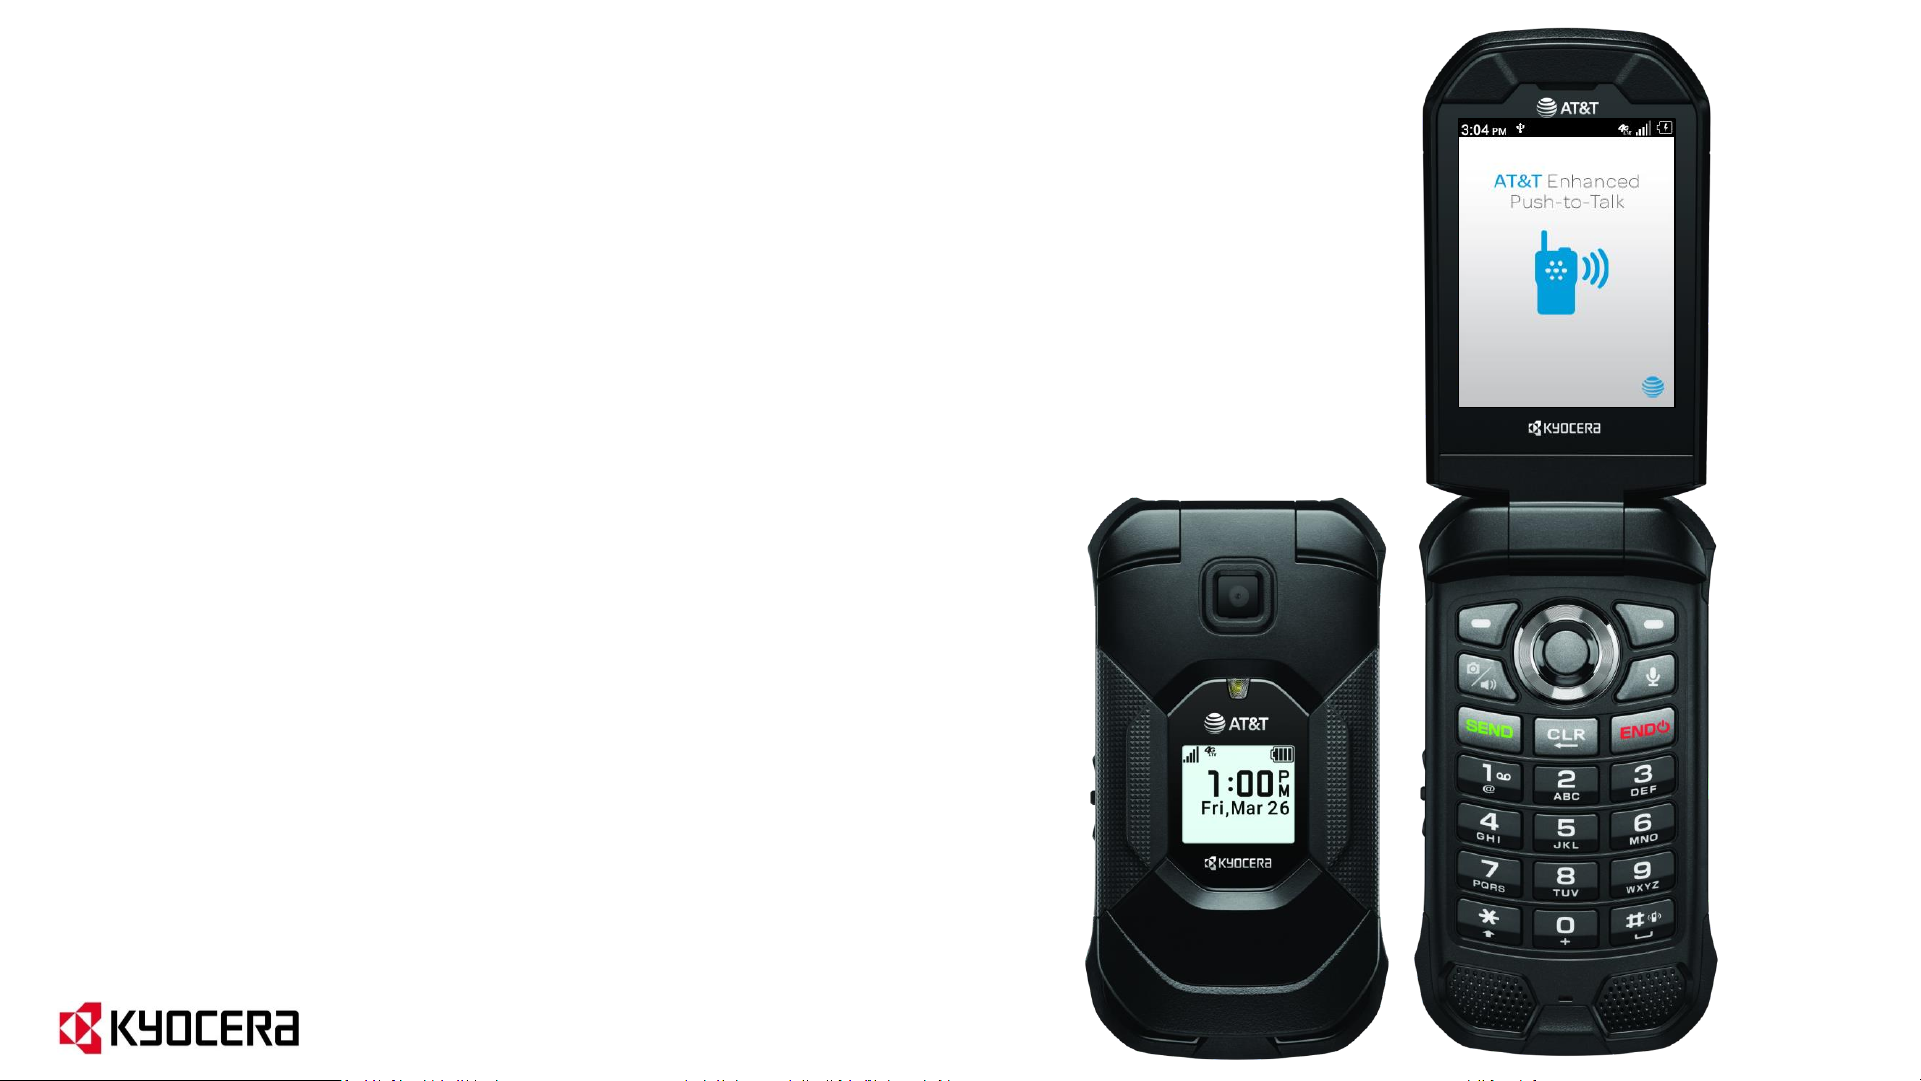
Kyocera DuraXE Epic
AT&T Enhanced Push-to-Talk (EPTT)
“How To” Guide

Table of Contents:
1. DuraXE Epic Phone
• Overview ------------------------------------------------------------------------------------- 6
• Keyguard ------------------------------------------------------------------------------------ 10
• Customizing your Home Screen ------------------------------------------------------- 11
• Customizing your Main Menu ---------------------------------------------------------- 12
2. EPTT Activation -------------------------------------------------------------------------- 13
3. How to Assign PTT key and SOS key to EPTT App ----------------------- 16
4. General EPTT Settings
• How to Access the EPTT App Settings ------------------------------------------------ 19
• Important Settings
• EPTT Alert Tones ------------------------------------------------------------------------- 20
• EPTT Speed Dial ------------------------------------------------------------------------- 21
• Call from Lock Screen -------------------------------------------------------------------- 22
• Call History ------------------------------------------------------------------------------- 23
• Sharing Text, Location and Media with your EPTT contacts/groups ----------- 24
• How to switch EPTT Call Audio from Speaker to Earpiece and vice versa ---- 27
2

Table of Contents:
5. EPTT Basic User Interface
• EPTT Menu Icons -------------------------------------------------------------------------- 30
• One Touch Action -------------------------------------------------------------------------- 31
• Status Indicator ---------------------------------------------------------------------------- 32
• How to Add Contacts ------------------------------------------------------------------- 33
• How to Add Personal Groups -------------------------------------------------------- 34
• How to Make 1-to-1 EPTT Calls (Flip Open) ------------------------------------- 35
• How to Make 1-to-1 EPTT Calls (Flip Closed) ----------------------------------- 36
• How to Make EPTT Group Calls (Flip Open) ------------------------------------ 37
• How to Make EPTT Group Calls (Flip Closed) ---------------------------------- 38
• Emergency Calling and Alerting ------------------------------------------------------ 39
• How to Make an Emergency Call ------------------------------------------------------ 40
• Receiving an Emergency Call ----------------------------------------------------------- 42
• How to Cancel an Emergency Call ------------------------------------------------------ 43
3

Table of Contents:
6. EPTT Radio User Interface
• Overview ------------------------------------------------------------------------------------ 45
• Zones and Channels -------------------------------------------------------------------- 46
• Scanning On/Off ------------------------------------------------------------------------ 47
• Changing Channels (Flip Open) ---------------------------------------------------- 48
• Changing Channels (Flip Closed) --------------------------------------------------- 49
• How to assign External Keys to EPTT Channel Up/Down ----------------- 50
• EPTT Channel Announcement ------------------------------------------------------ 51
• How to Make EPTT Calls (Flip Open) --------------------------------------------- 52
• How to Make EPTT Calls (Flip Closed) ------------------------------------------- 53
• How to Make 1-to-1 EPTT Calls ----------------------------------------------------- 54
• Emergency Calling and Alerting ----------------------------------------------------- 55
• How to Make an Emergency Call ----------------------------------------------------- 56
• Receiving an Emergency Call ---------------------------------------------------------- 58
• How to Cancel an Emergency Call ---------------------------------------------------- 59
4

Table of Contents:
7. Kyocera Business Tools
• Device Control
• Overview ---------------------------------------------------------------------------------- 61
• How to create a Device Control Policy ------------------------------------------------ 64
• Device Control and Potential Impact on EPTT Functionality ----------------------- 67
• Car Kit Power ON/OFF ------------------------------------------------------------------- 68
8. PTT Accessories -------------------------------------------------------------------------- 69
9. Kyocera Sales and Support Team -------------------------------------------- 72
5
DuraXE Epic Phone Overview
Model Numbers:
• E4830 (camera version)
• E4830NC (non-camera version)
6
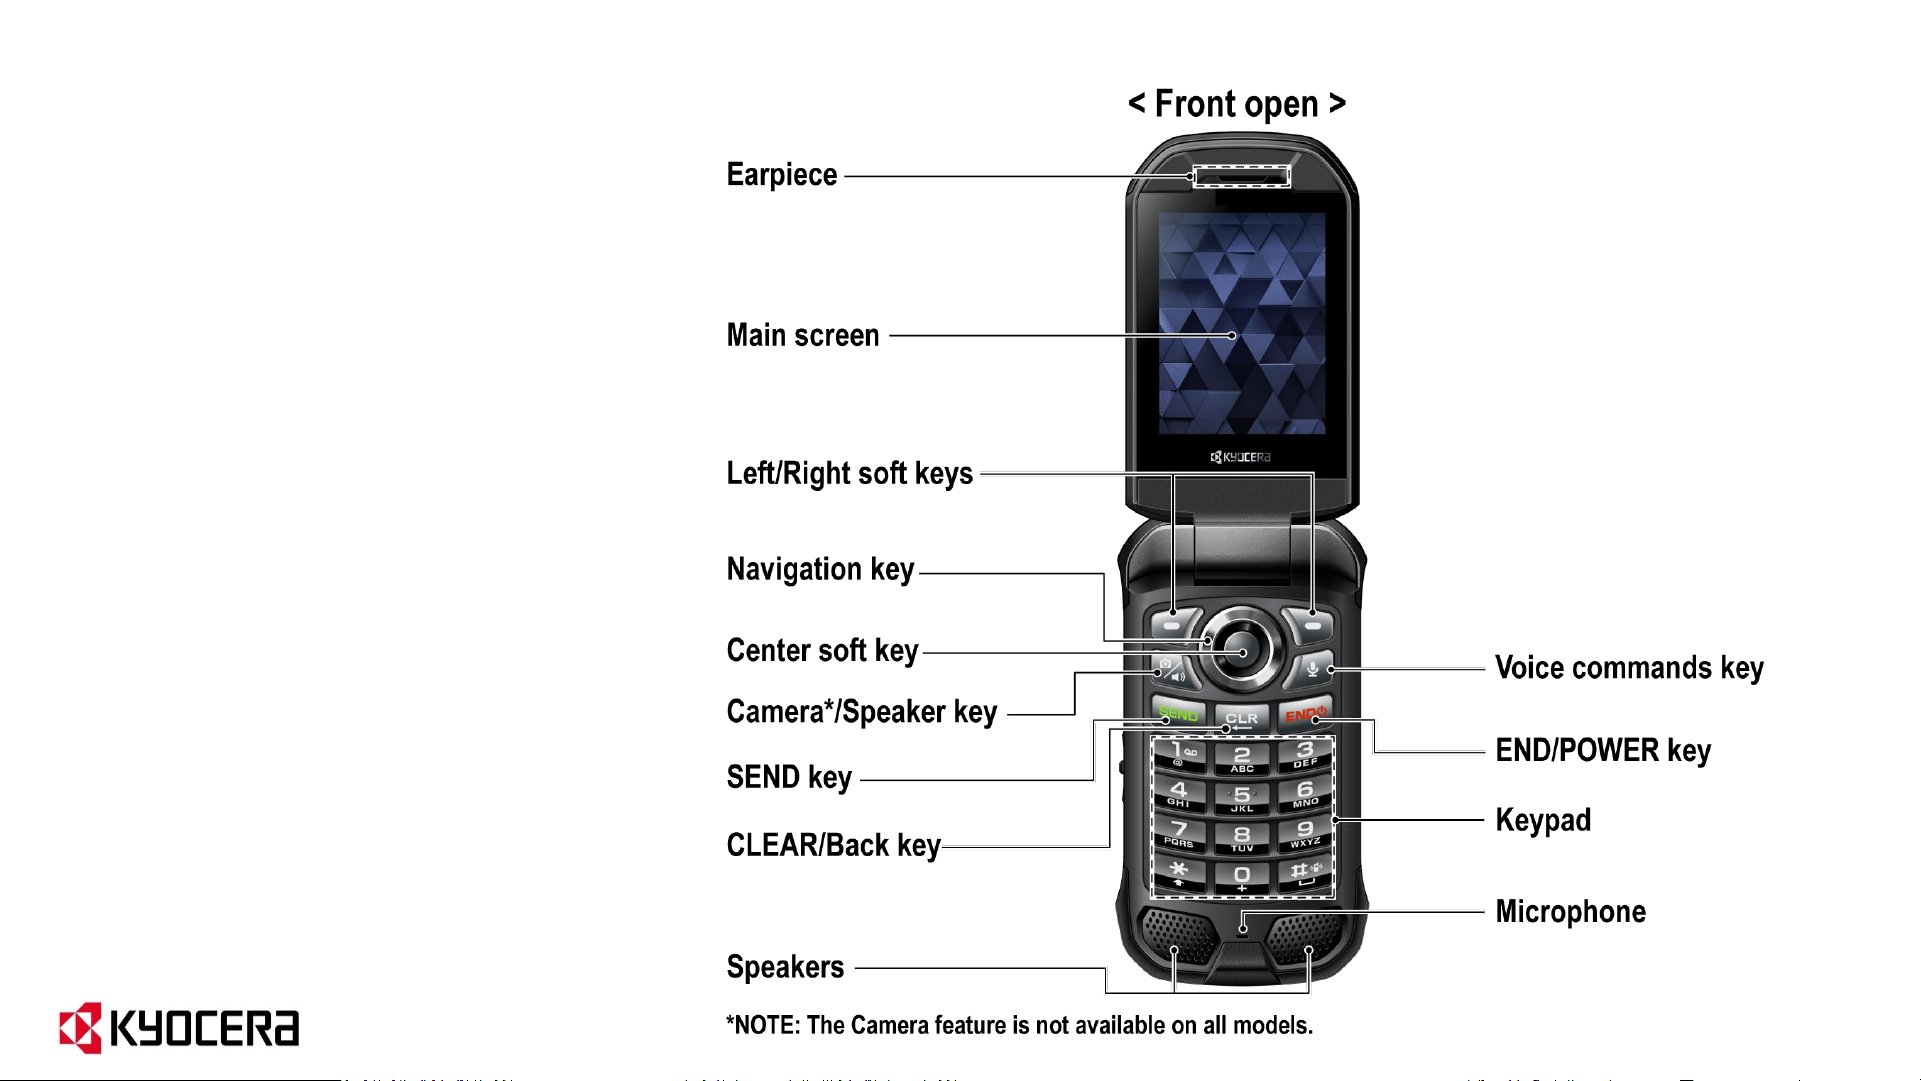
DuraXE Epic Phone Overview (cont.)
7
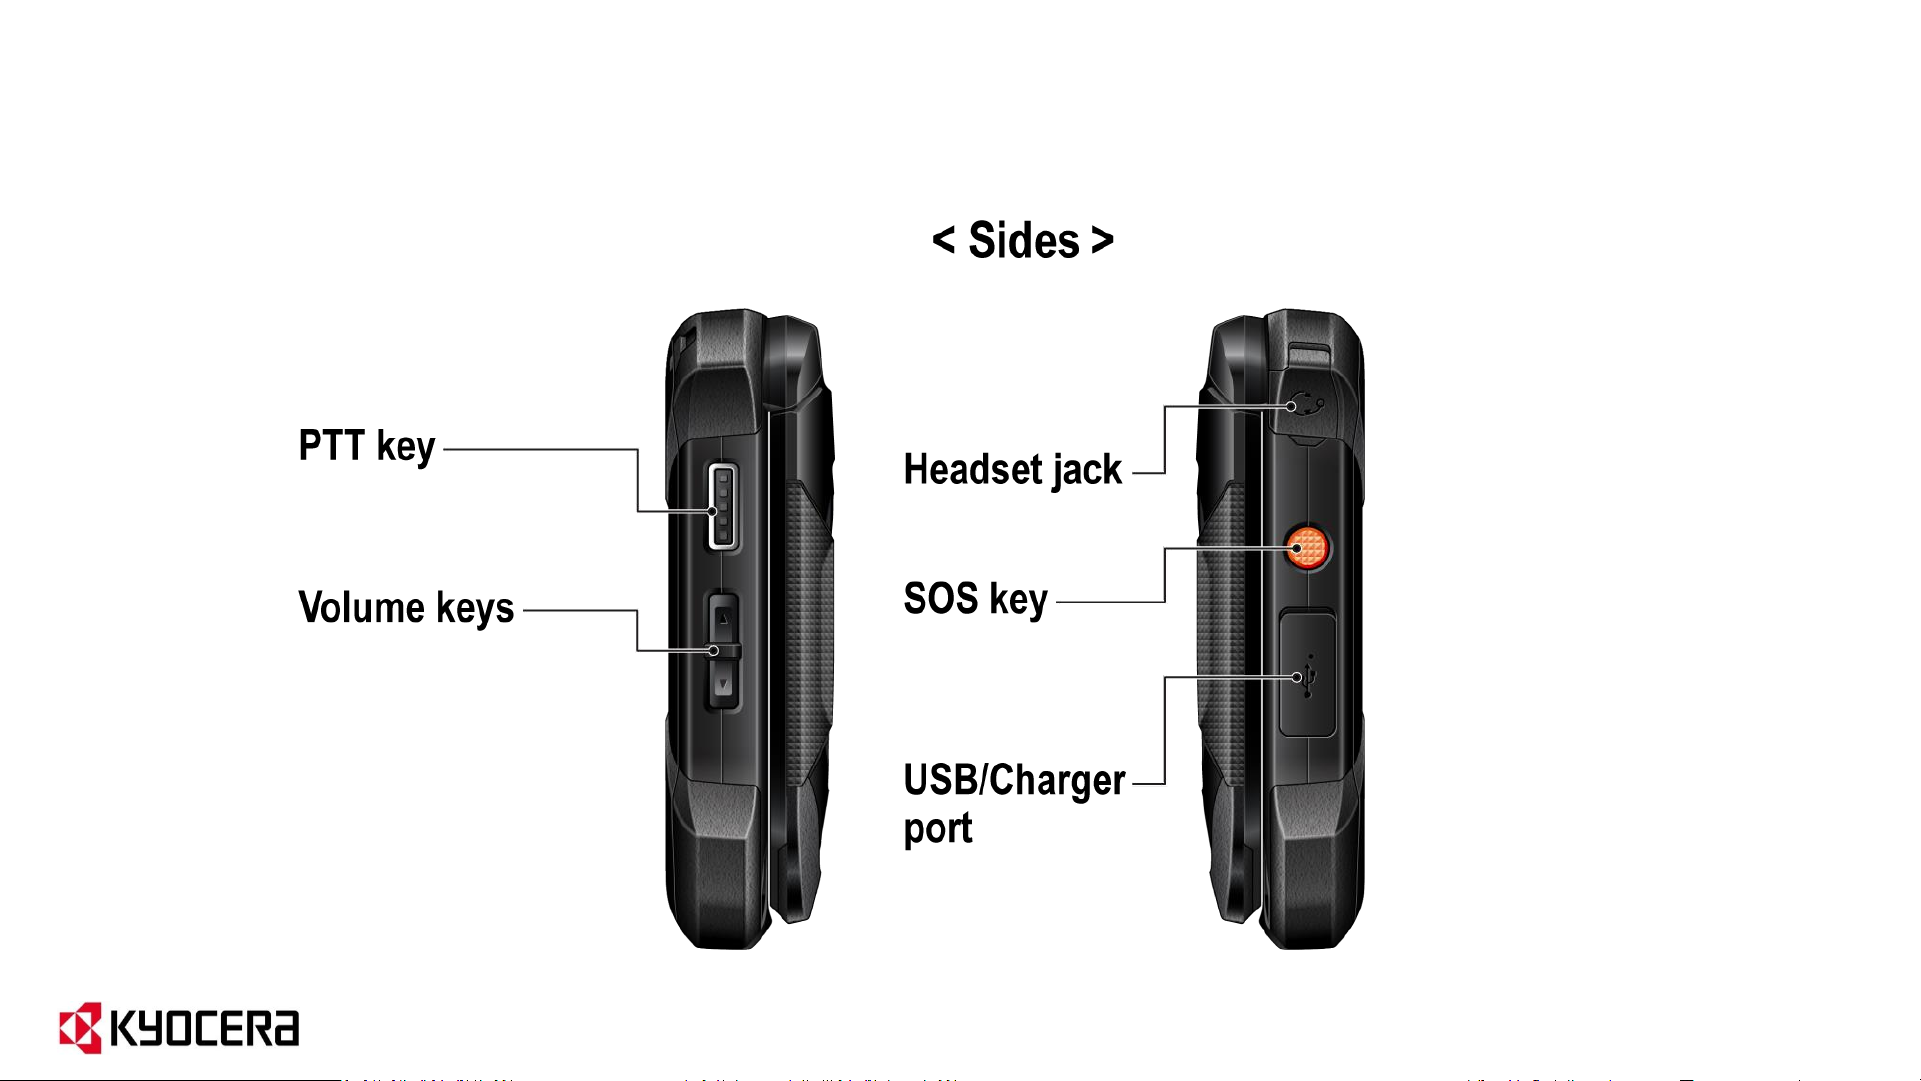
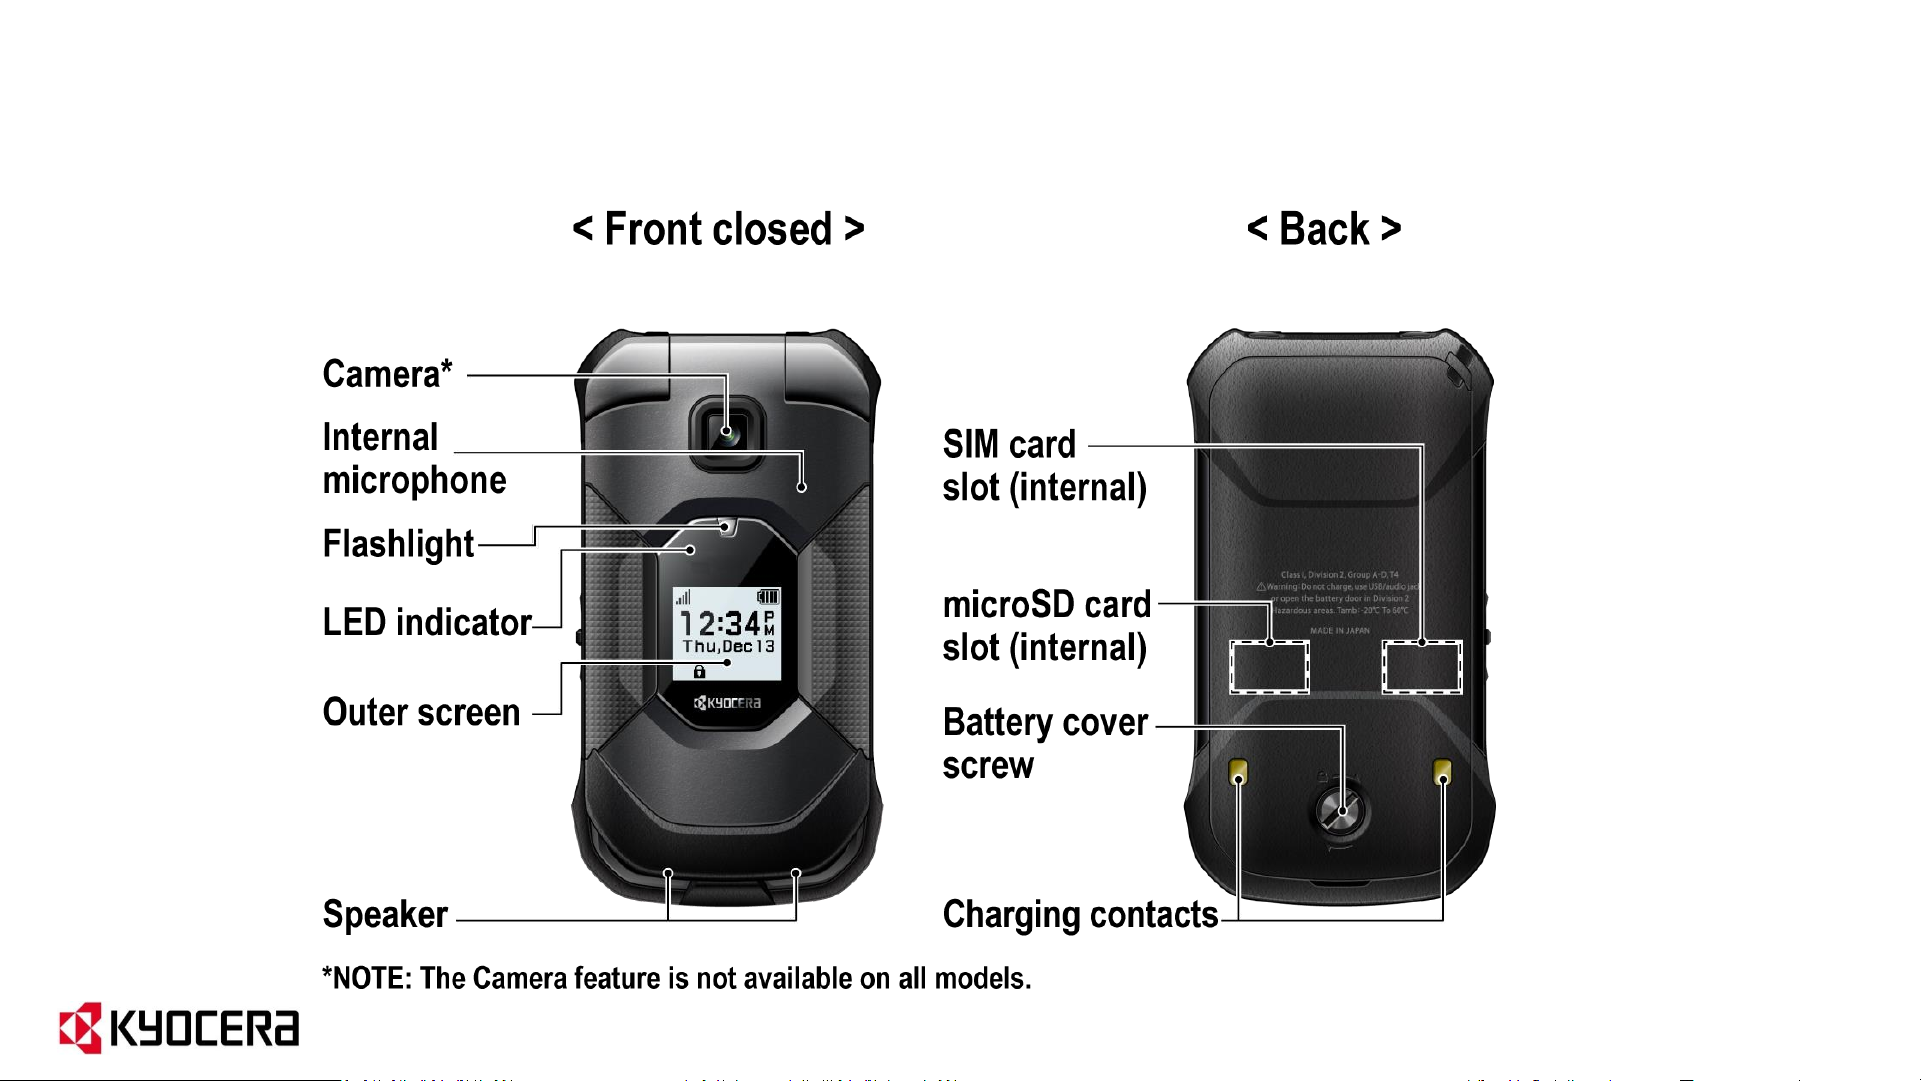
DuraXE Epic Phone Overview (cont.)
8
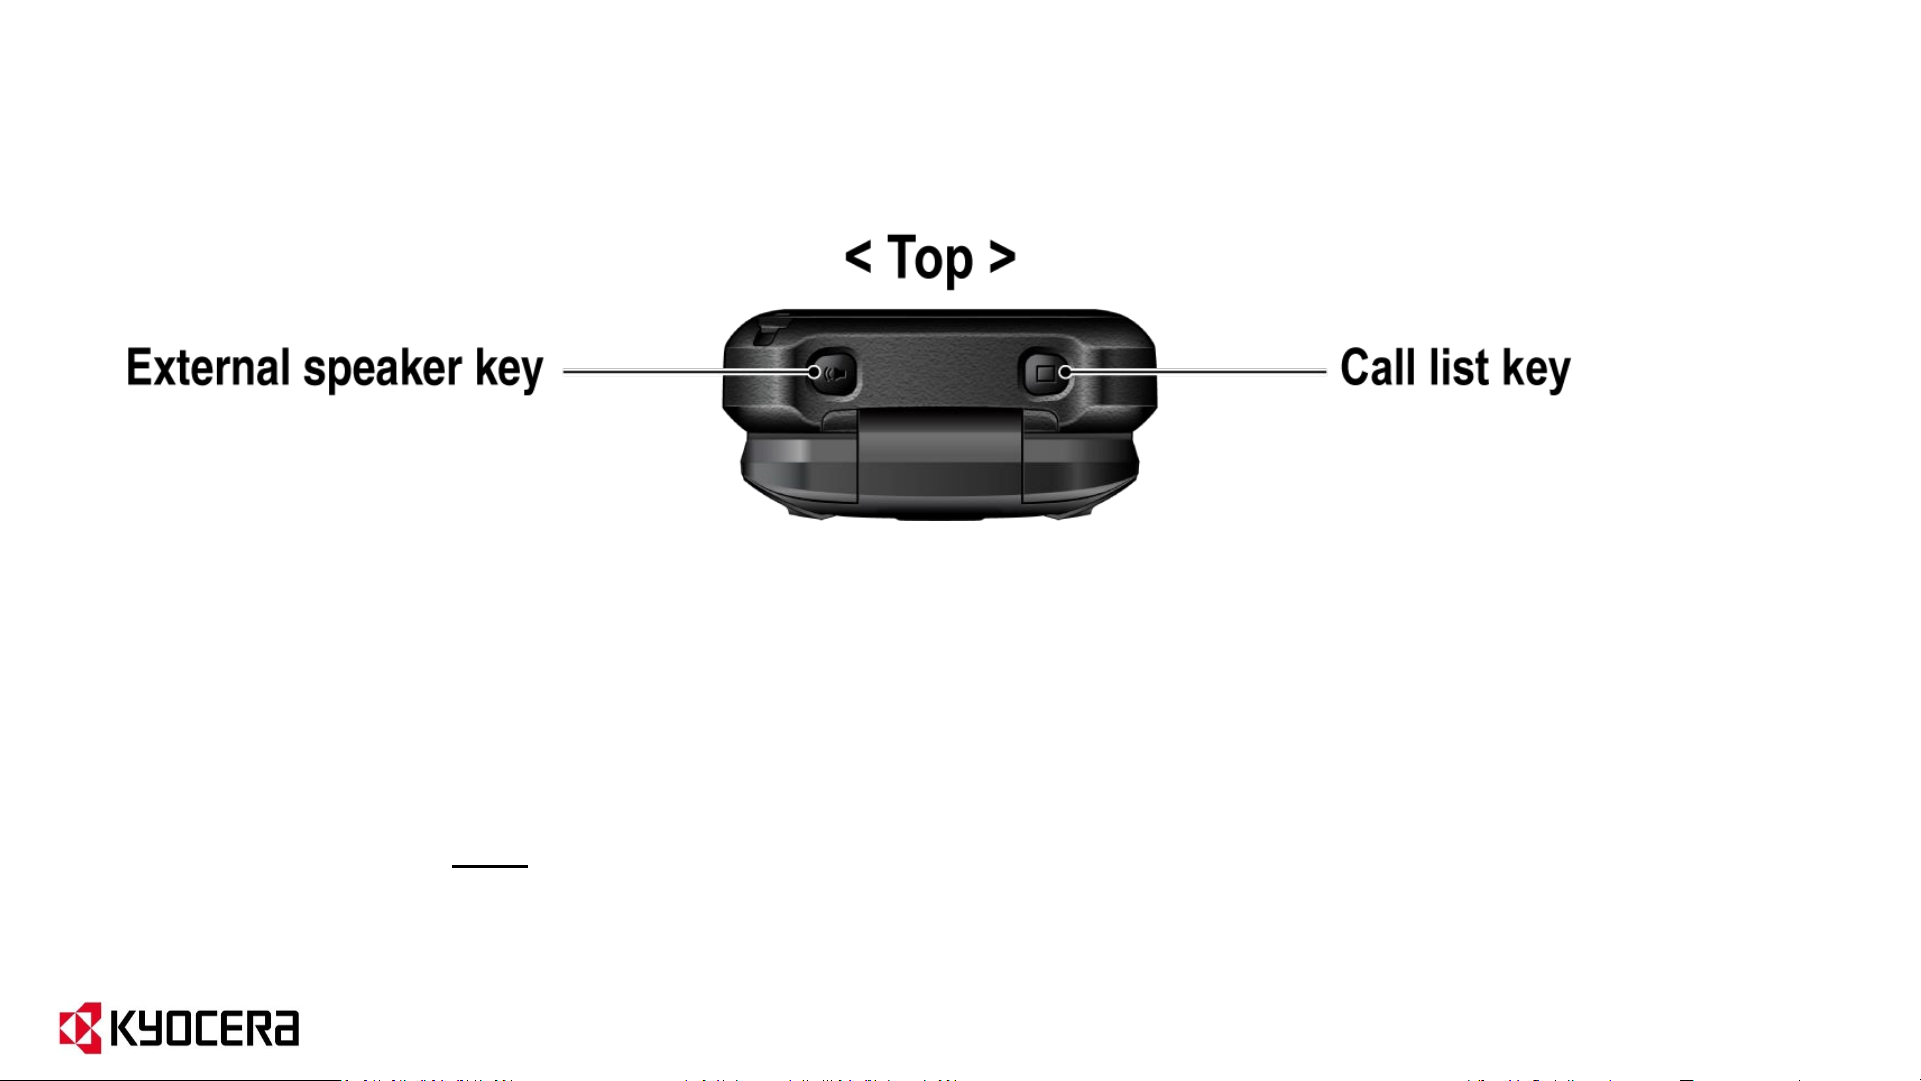
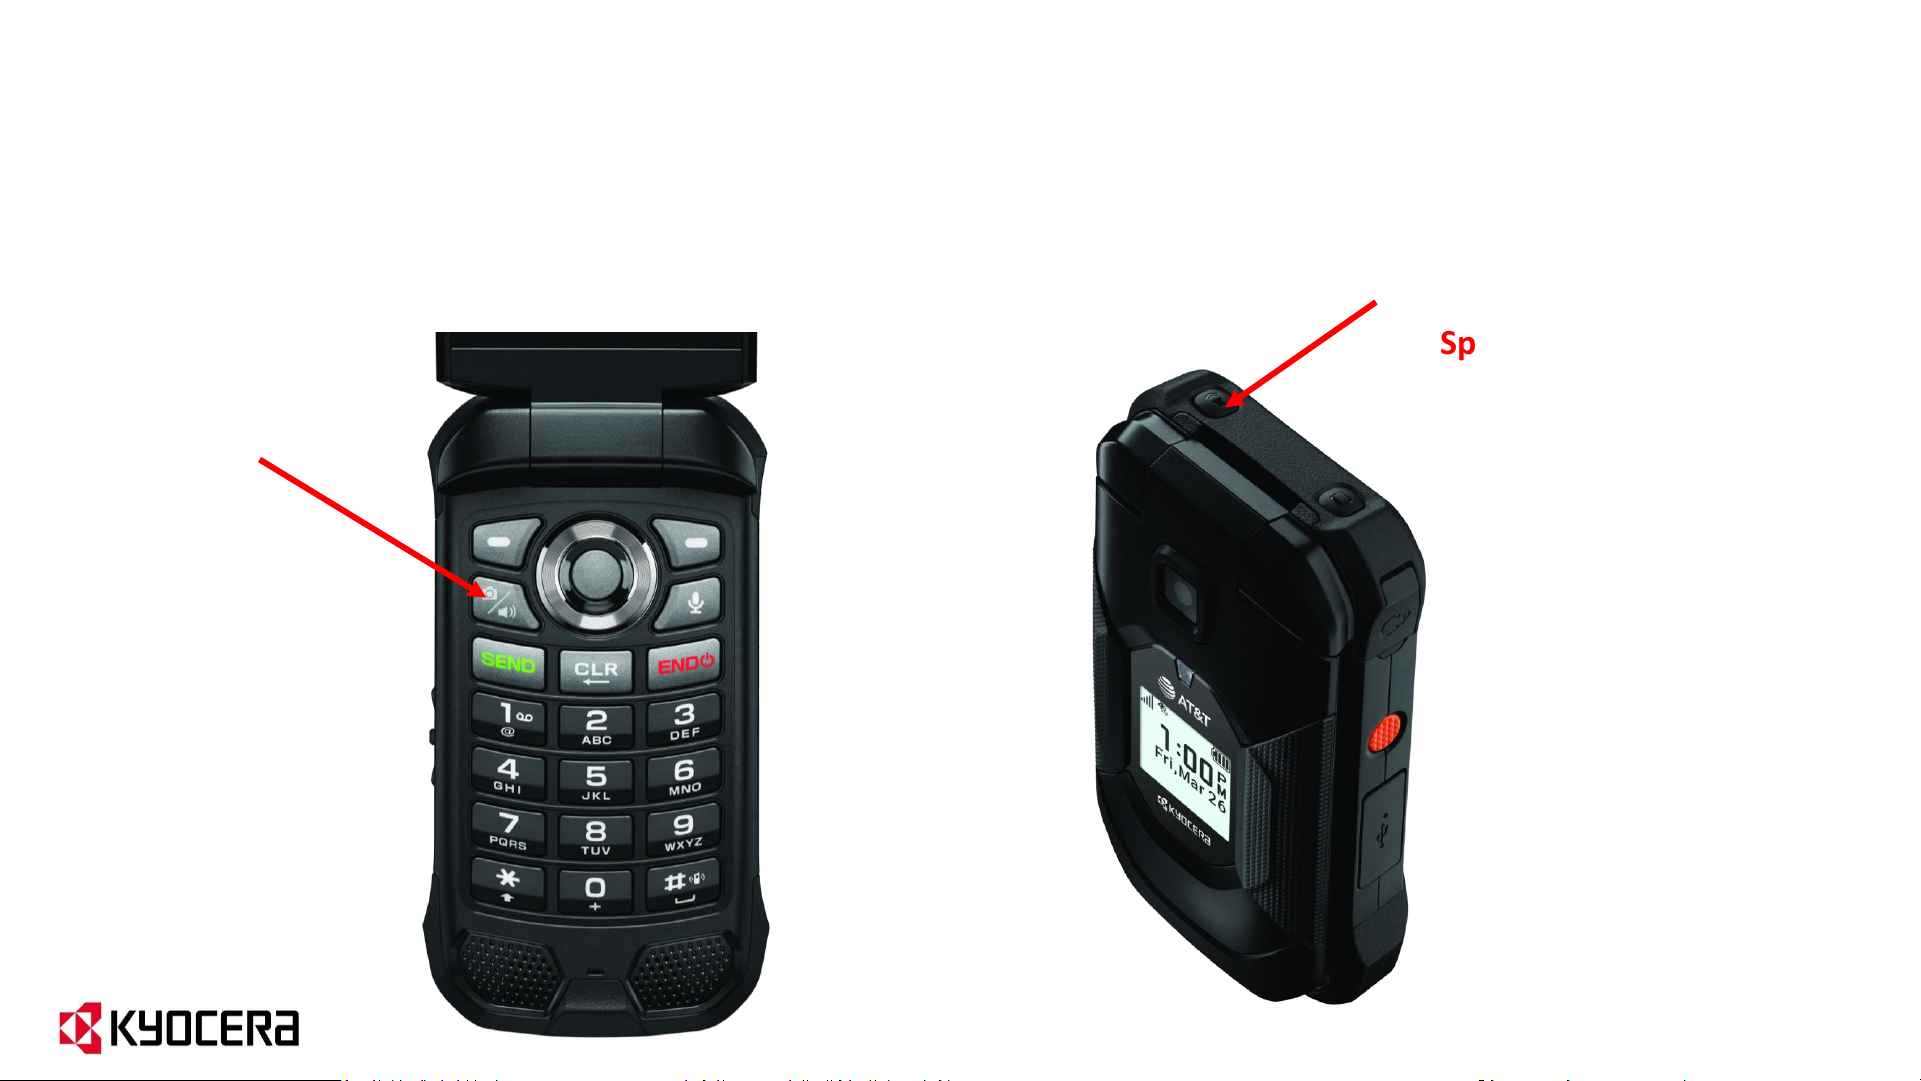
Lets you place or receive calls in
speakerphone mode (with the phone
closed), turn the speakerphone on
and off during a call, or unlock the
keyguard (if configured).
Note: These programmable keys can be assigned to the EPTT App
to change channels (see EPTT Radio UI section).
Lets you display the recent call history (with
the phone closed), ignore an incoming call,
end the ongoing call, or unlock the
keyguard (if configured). You can select a
name or number from the call list and place
the call with the phone closed by using the
external speaker key.
DuraXE Epic Phone Overview (cont.)
9
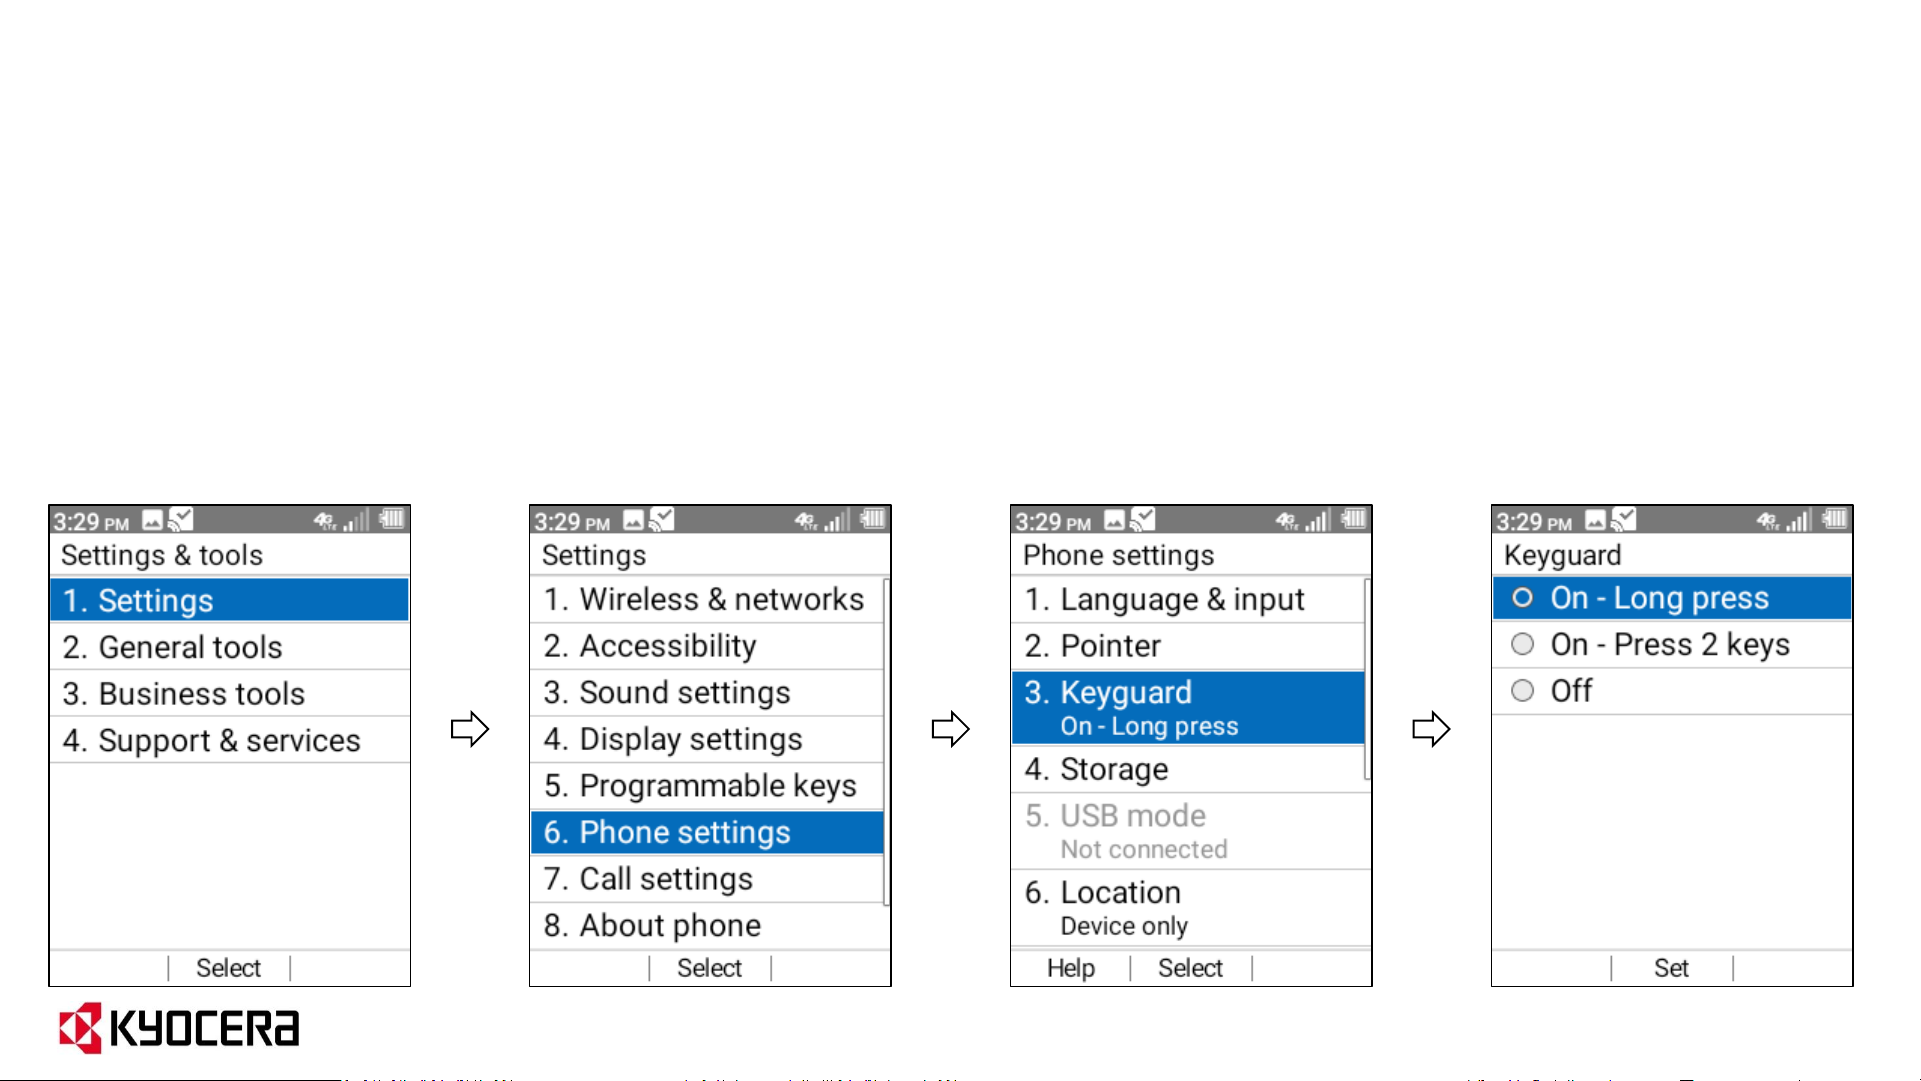
DuraXE Epic: Keyguard
Use this feature to lock the external keys while the phone is closed to prevent accidental key presses.
Select one of the following options:
• On - Long press to temporarily disable the keyguard by pressing and holding the External speaker
key while the phone is closed.
• On - Press 2 keys to temporarily disable the keyguard by pressing the Call list key and the Volume
down key sequentially while the phone is closed.
• Off to disable the keyguard.
10
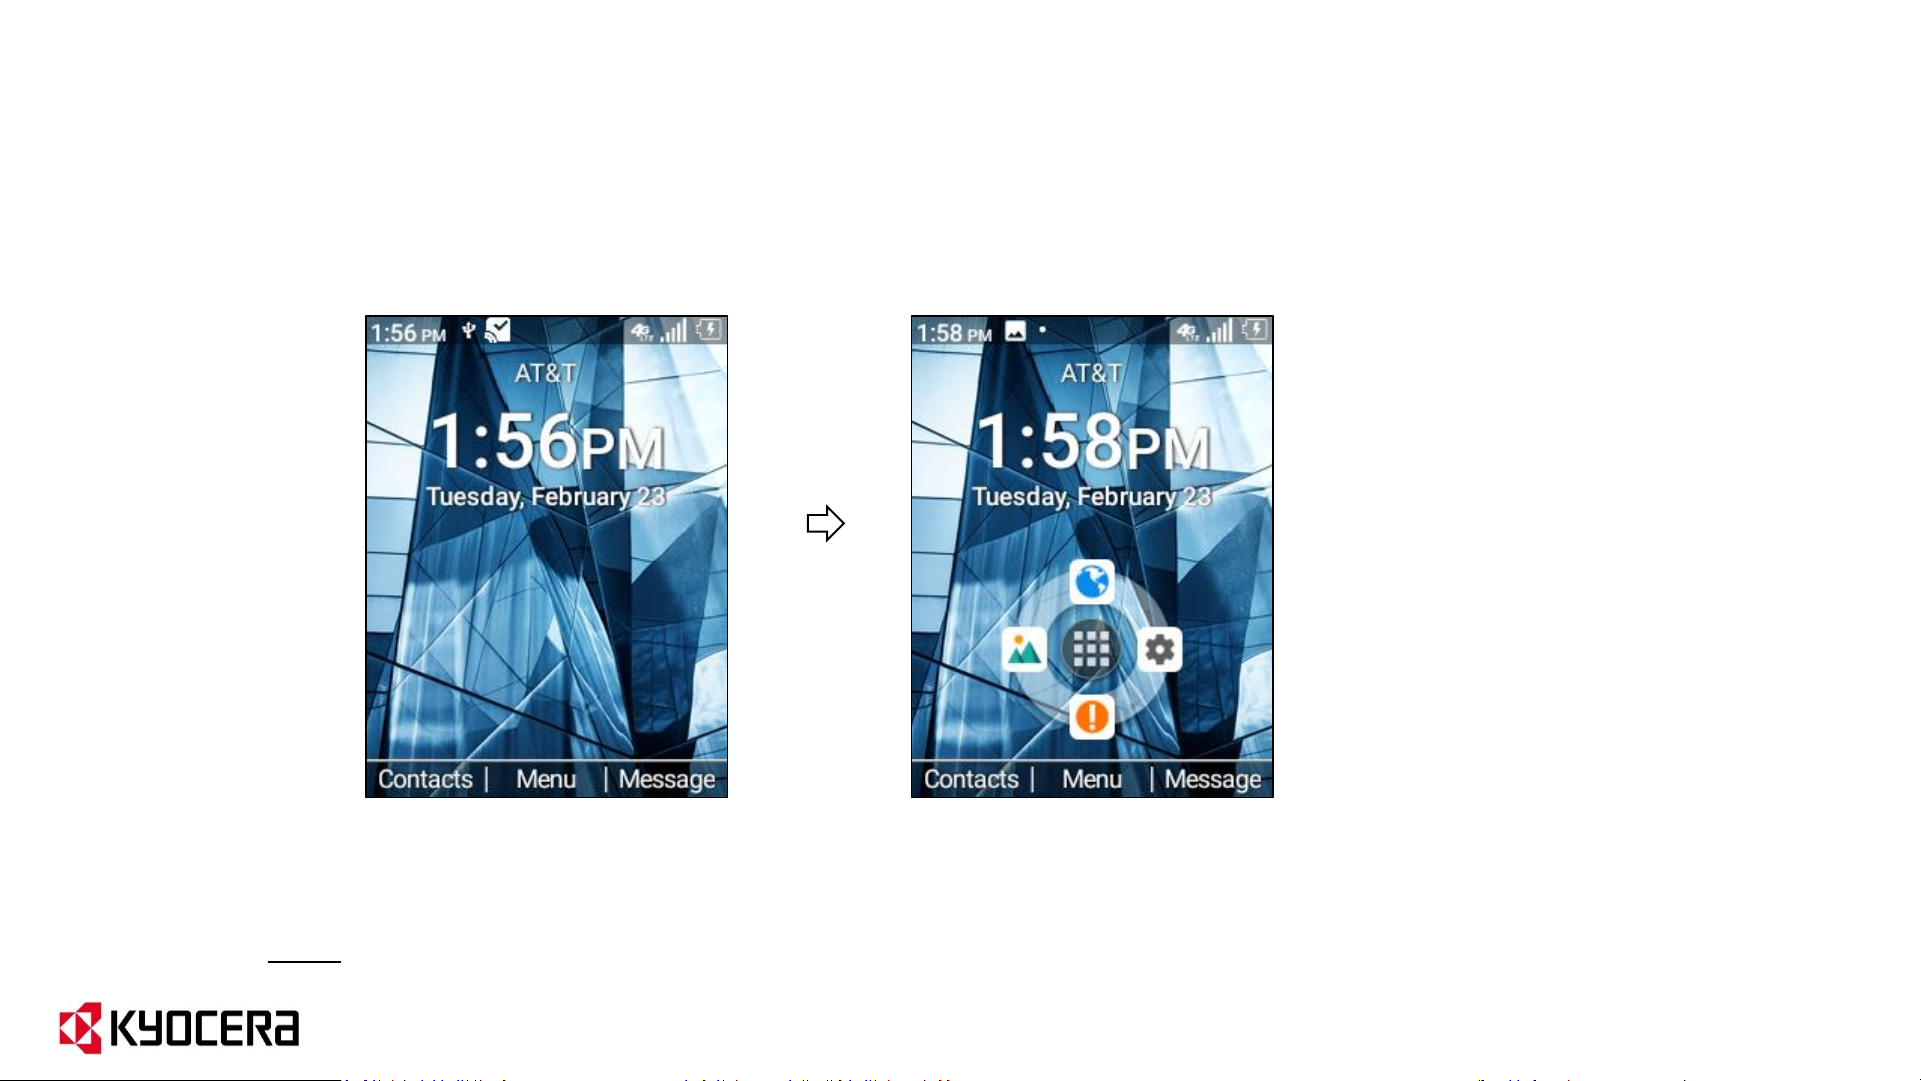
DuraXE Epic: Customizing your Home Screen
To add the Navigation Key Guide to your home screen, go to:
Settings & tools→ Settings→ Display settings→ Navi key guide and select ON (default is OFF)
Default Home Screen Custom Home Screen
Note: The Navigation keys (up, down, left, right) can be reprogrammed by going to:
Settings & tools
→
Settings
→
Programmable keys
→
Navigation keys
11
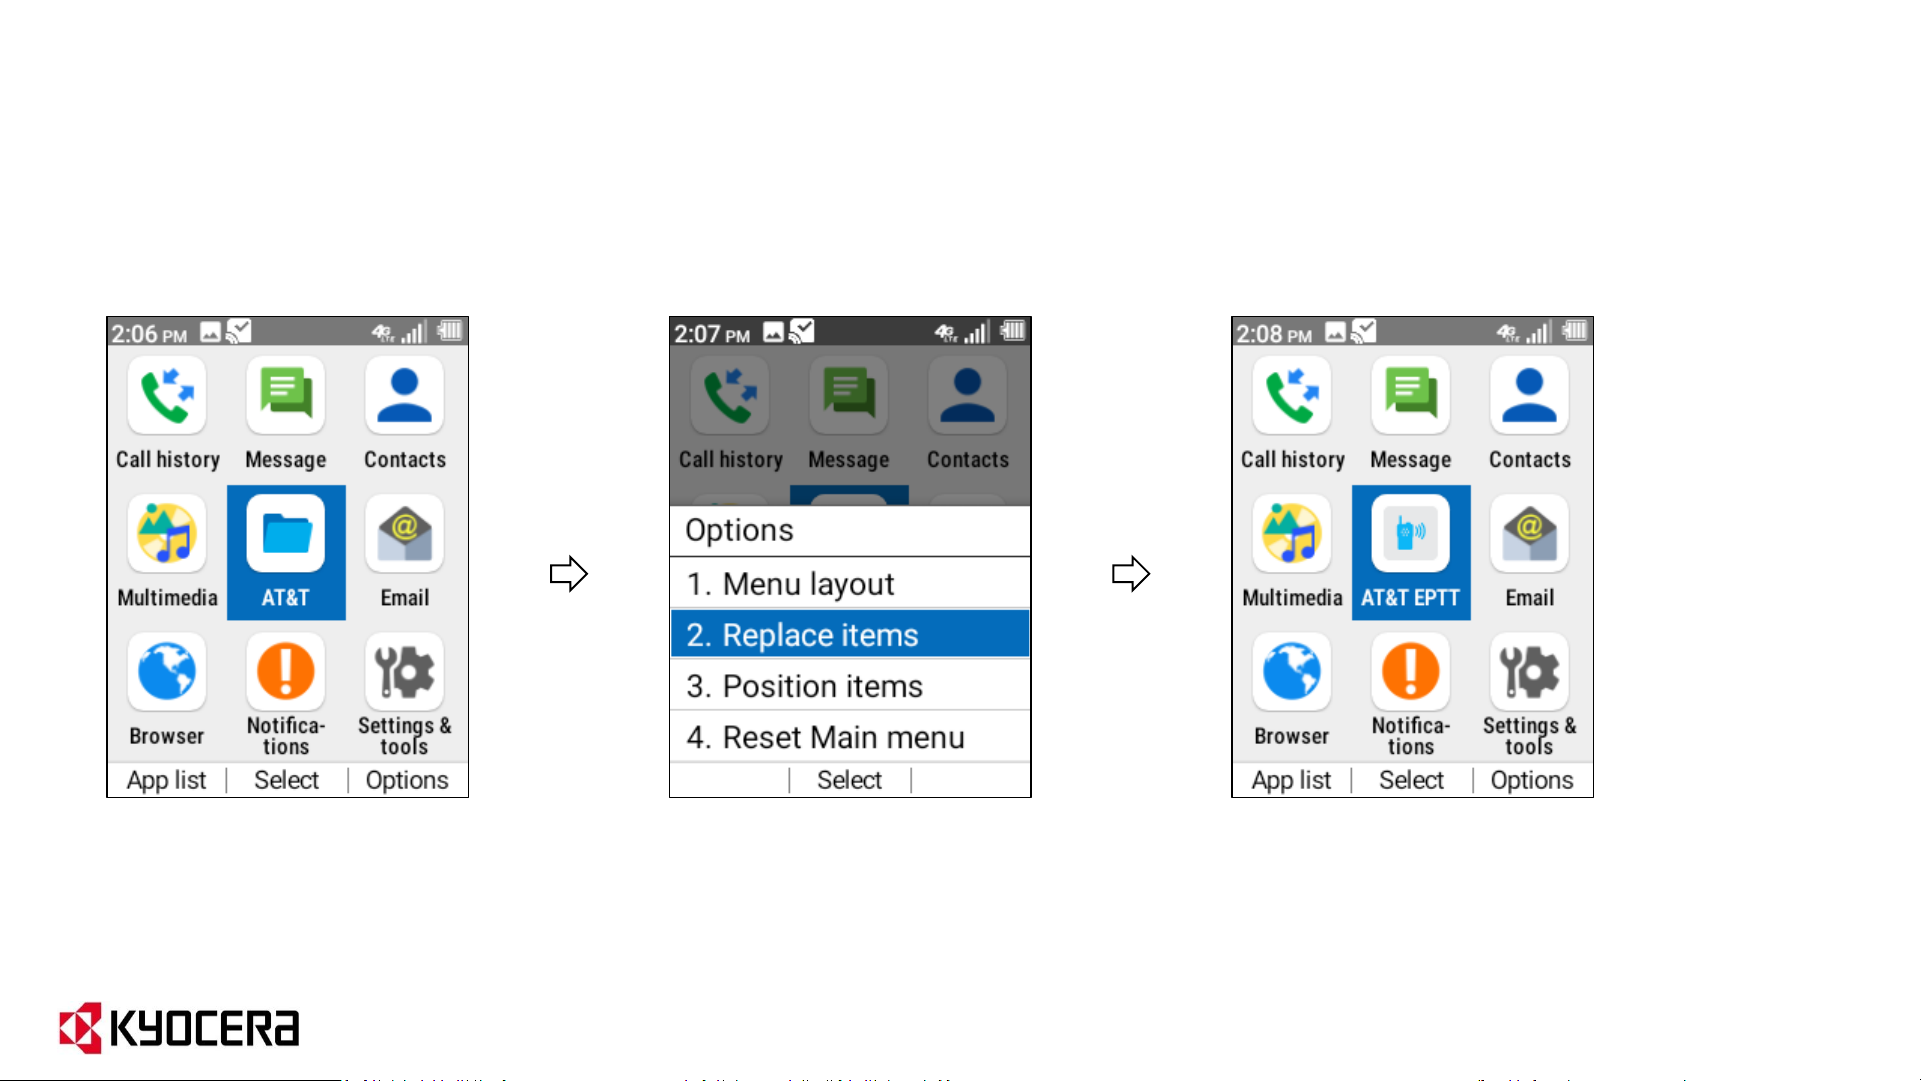
DuraXE Epic: Customizing your Main Menu
To replace a Main Menu icon, press right soft key “Options” and select replace items.
Default Main Menu
Custom Main Menu
In the above example, AT&T Folder has been replaced with AT&T EPTT icon.
12

EPTT Activation
1. Select AT&T Folder from main menu then select AT&T EPTT to launch the app.
2. EPTT App will contact the server and show a confirmation screen. Use the Navigation key to highlight “Yes”
and press the center softkey to select.
3. Contacting server screen will appear.
13
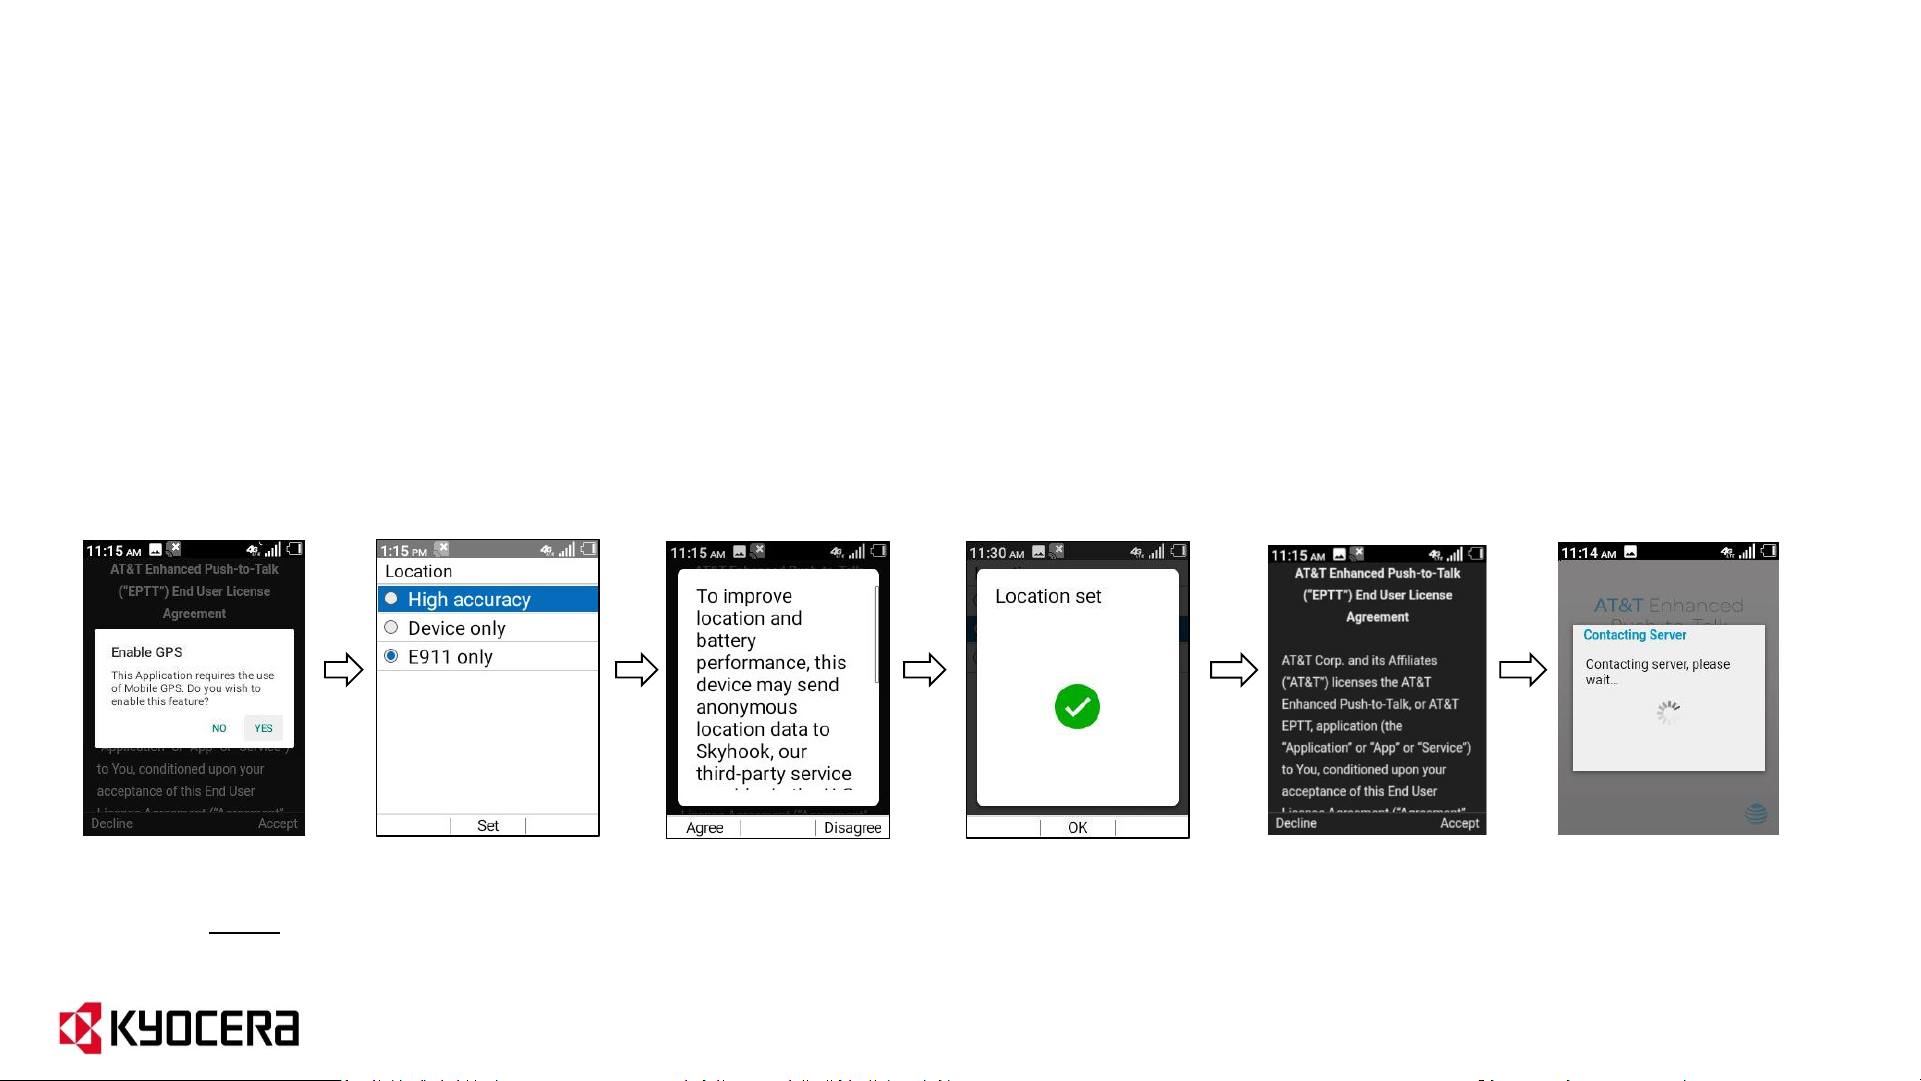
EPTT Activation (cont.)
5. User agreement will appear on screen. On top of EULA: Enable GPS: This application requires the use of
Mobile GPS. Do you wish to enable this feature? Select YES.
6. Location screen will appear, Select either “High Accuracy” or “Device only” and press center key to set the
location. (Location feature must be set to use EPTT app)
7. User agreement will appear, press the right soft key to “Accept”. Acceptance of user agreement is only
required once during initial activation.
8. Contacting server screen will appear again.
Note: “High Accuracy” setting under Location is recommended; when selected it will give the 3
rd
pop-up above.
With “Device only”, the 3rdpop-up will not be available.
14
EPTT Activation (cont.)
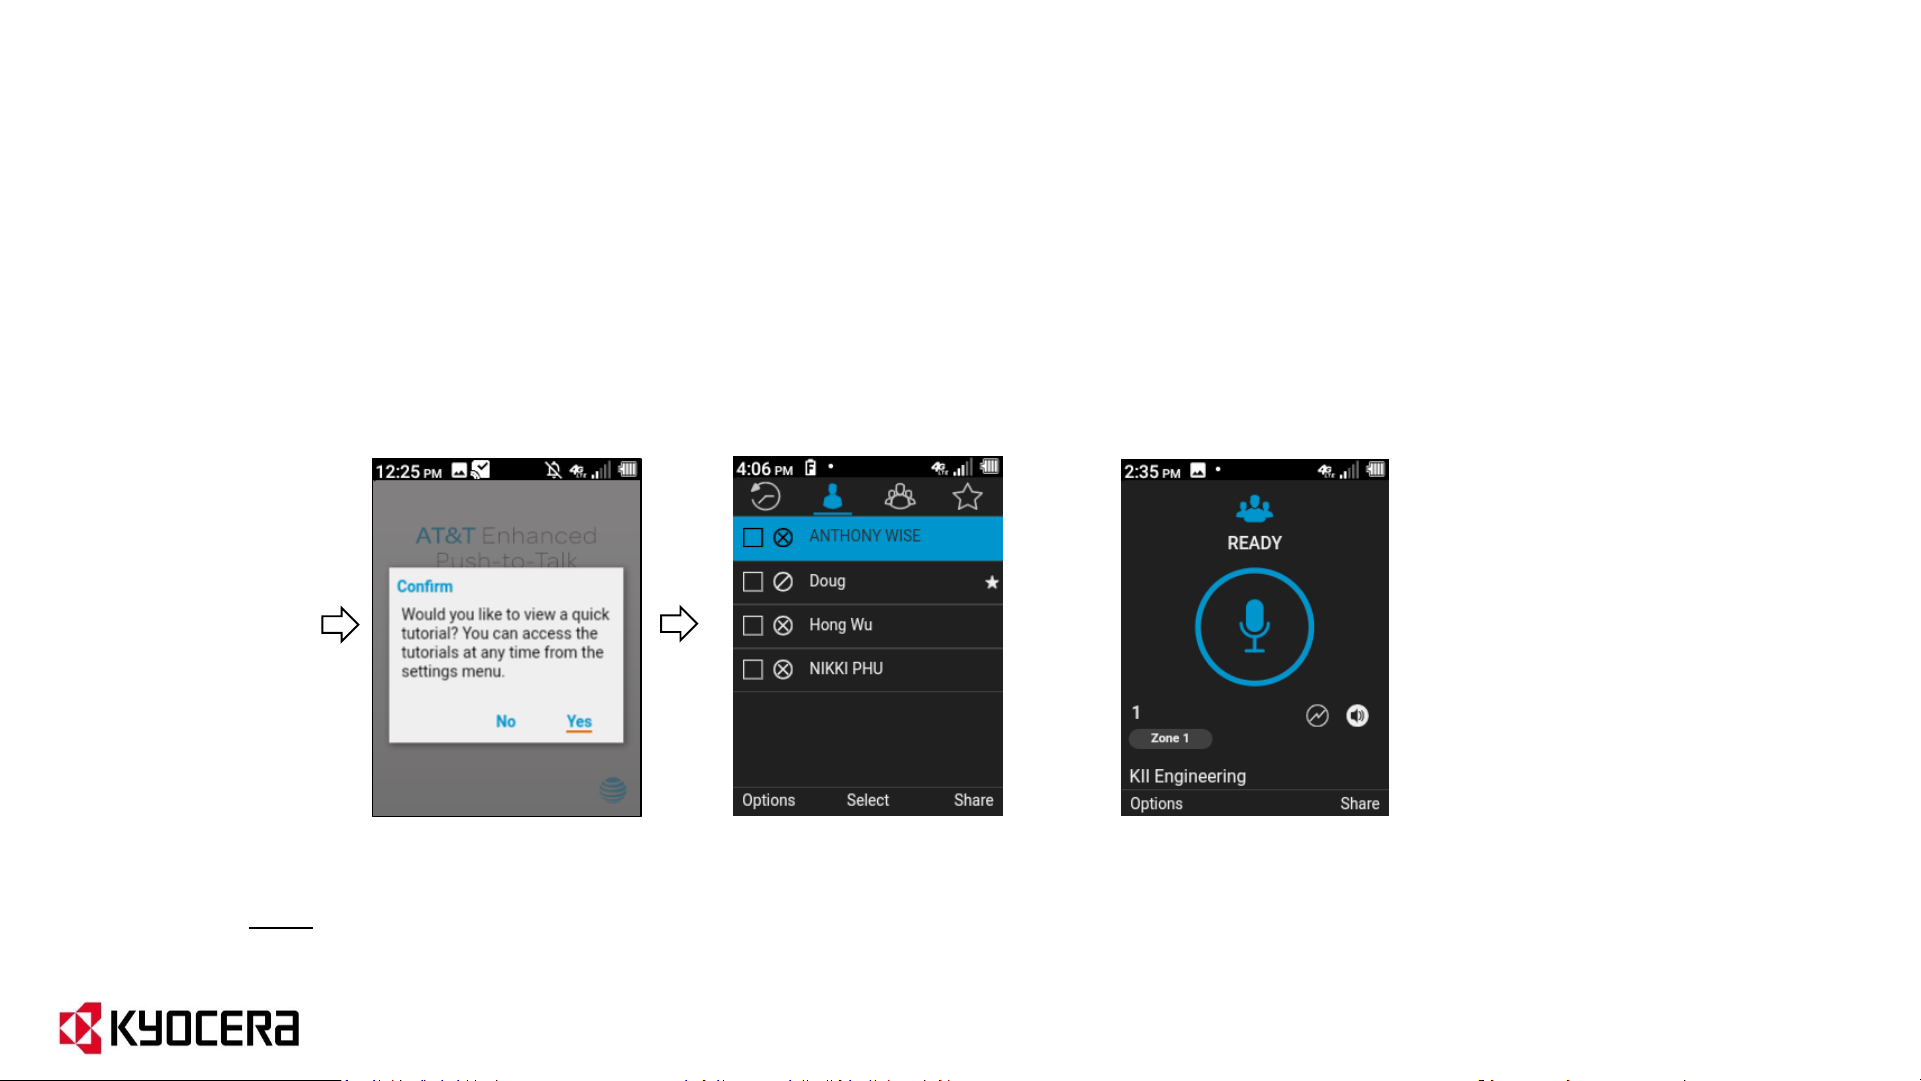
9. After setting location accuracy preference, select “Yes” or “No” to view or skip EPTT tutorial.
10. After tutorial, the application will open and show either the Basic UI contacts screen or the LMR Radio UI.
Note: The Kyocera DuraXE Epic supports both the Basic User Interface (UI) and the Radio User Interface.
The default interface is Basic UI. User Interfaces can be configured via the EPTT Corporate Admin Tool.
or
Basic UI Radio UI
15

How to assign the PTT key to EPTT Application
1. Press and hold PTT key until pop-up appears on LCD screen.
2. “Would you like to select the function for this key now?” Select Yes.
3. In PTT Key menu, select AT&T EPTT.
PTT Key
Note: As an alternate method, PTT Key can be assigned manually by navigating to the below path:
Settings & tools→Settings→Programmable keys, then under PTT Key menu, Select "AT&T EPTT“.
16
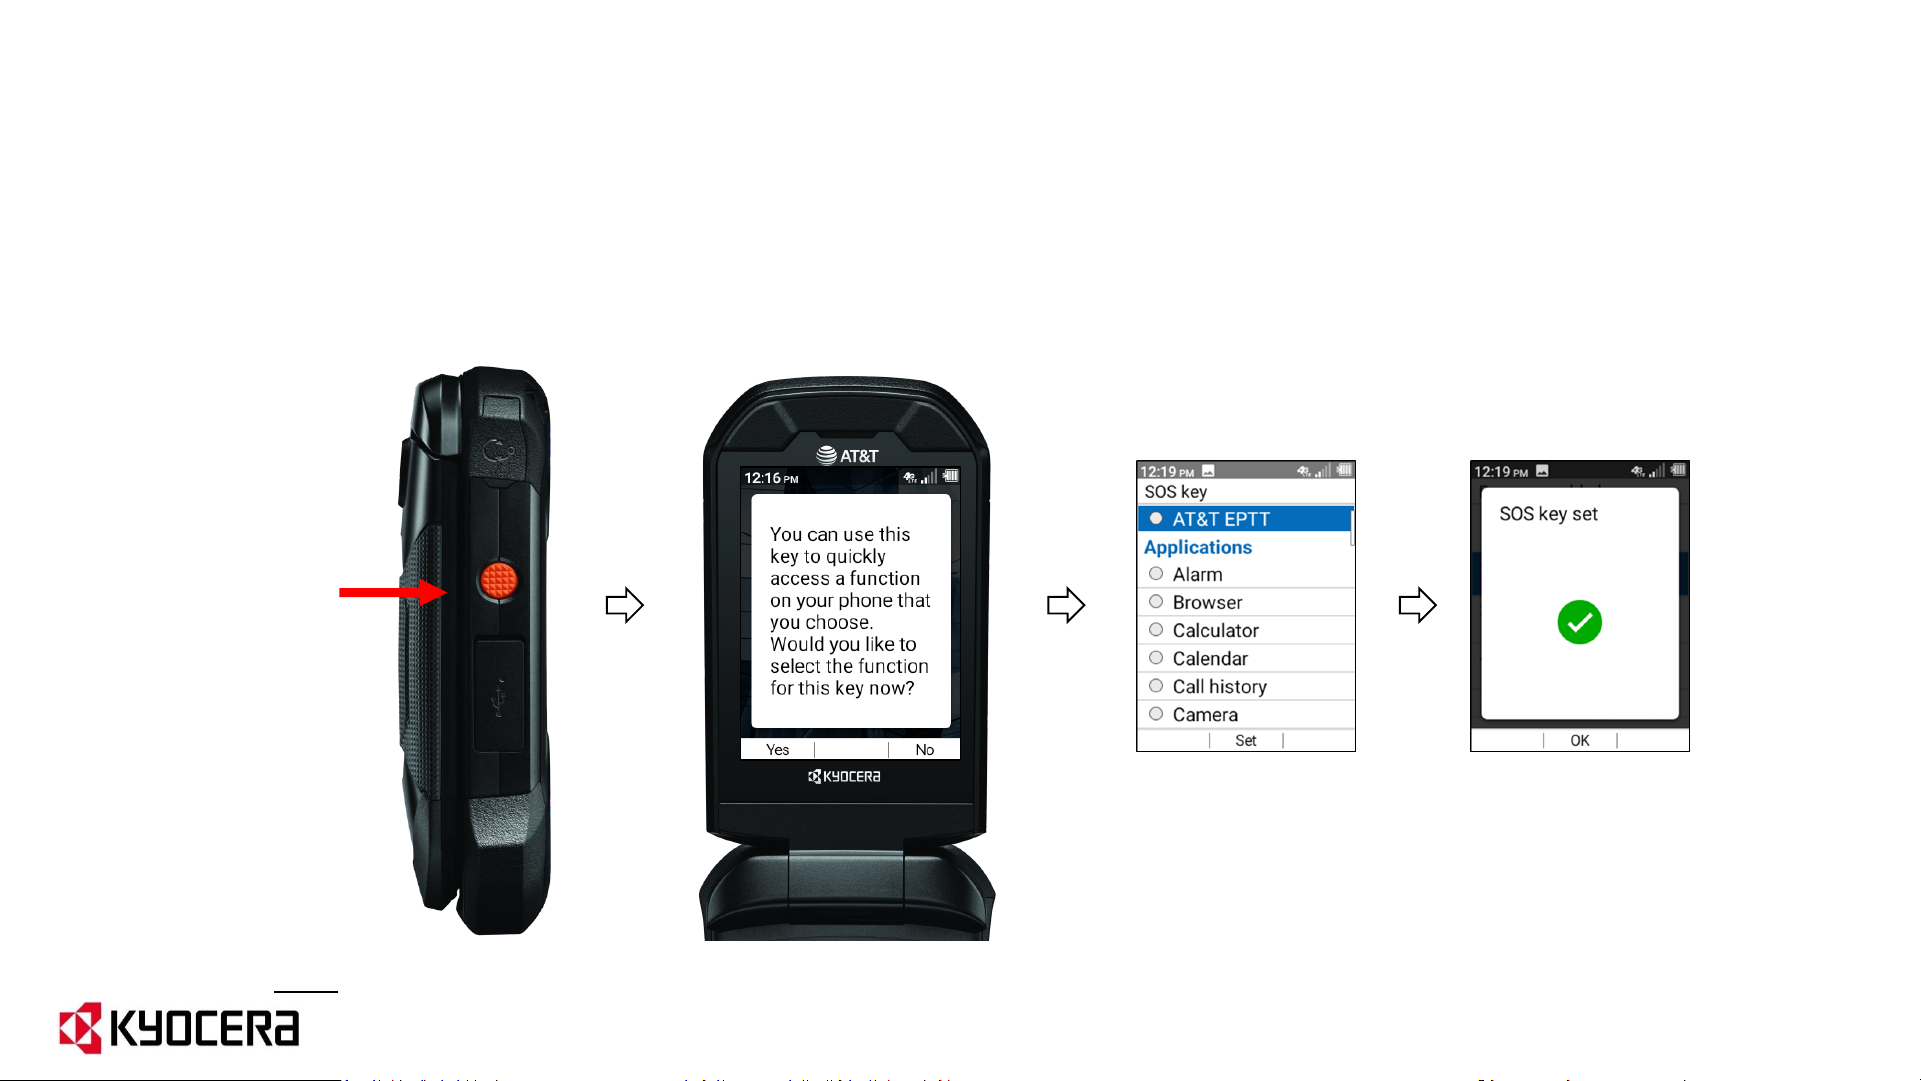
How to assign the SOS key to EPTT Application
Once assigned to the EPTT App, the SOS Key can be used to initiate Emergency PTT calls
(requires “EPTT Advanced” service plan).
1. Press and hold SOS key until pop-up appears on LCD screen.
2. “Would you like to select the function for this key now?” Select Yes.
3. In SOS Key menu, select AT&T EPTT.
SOS Key
Note: As an alternate method, SOS Key can be assigned manually by navigating to the below path:
Settings & tools→Settings→Programmable keys, then under SOS Key menu, Select "AT&T EPTT“.
17

General EPTT Settings
(applies to both Basic UI and Radio UI)
18

How to Access the EPTT App Settings
1. Select “Options” (left soft key).
2. Scroll down to Settings using the navigation down key and press the center soft key.
Radio User
Interface
Basic User
Interface
19
Important Settings
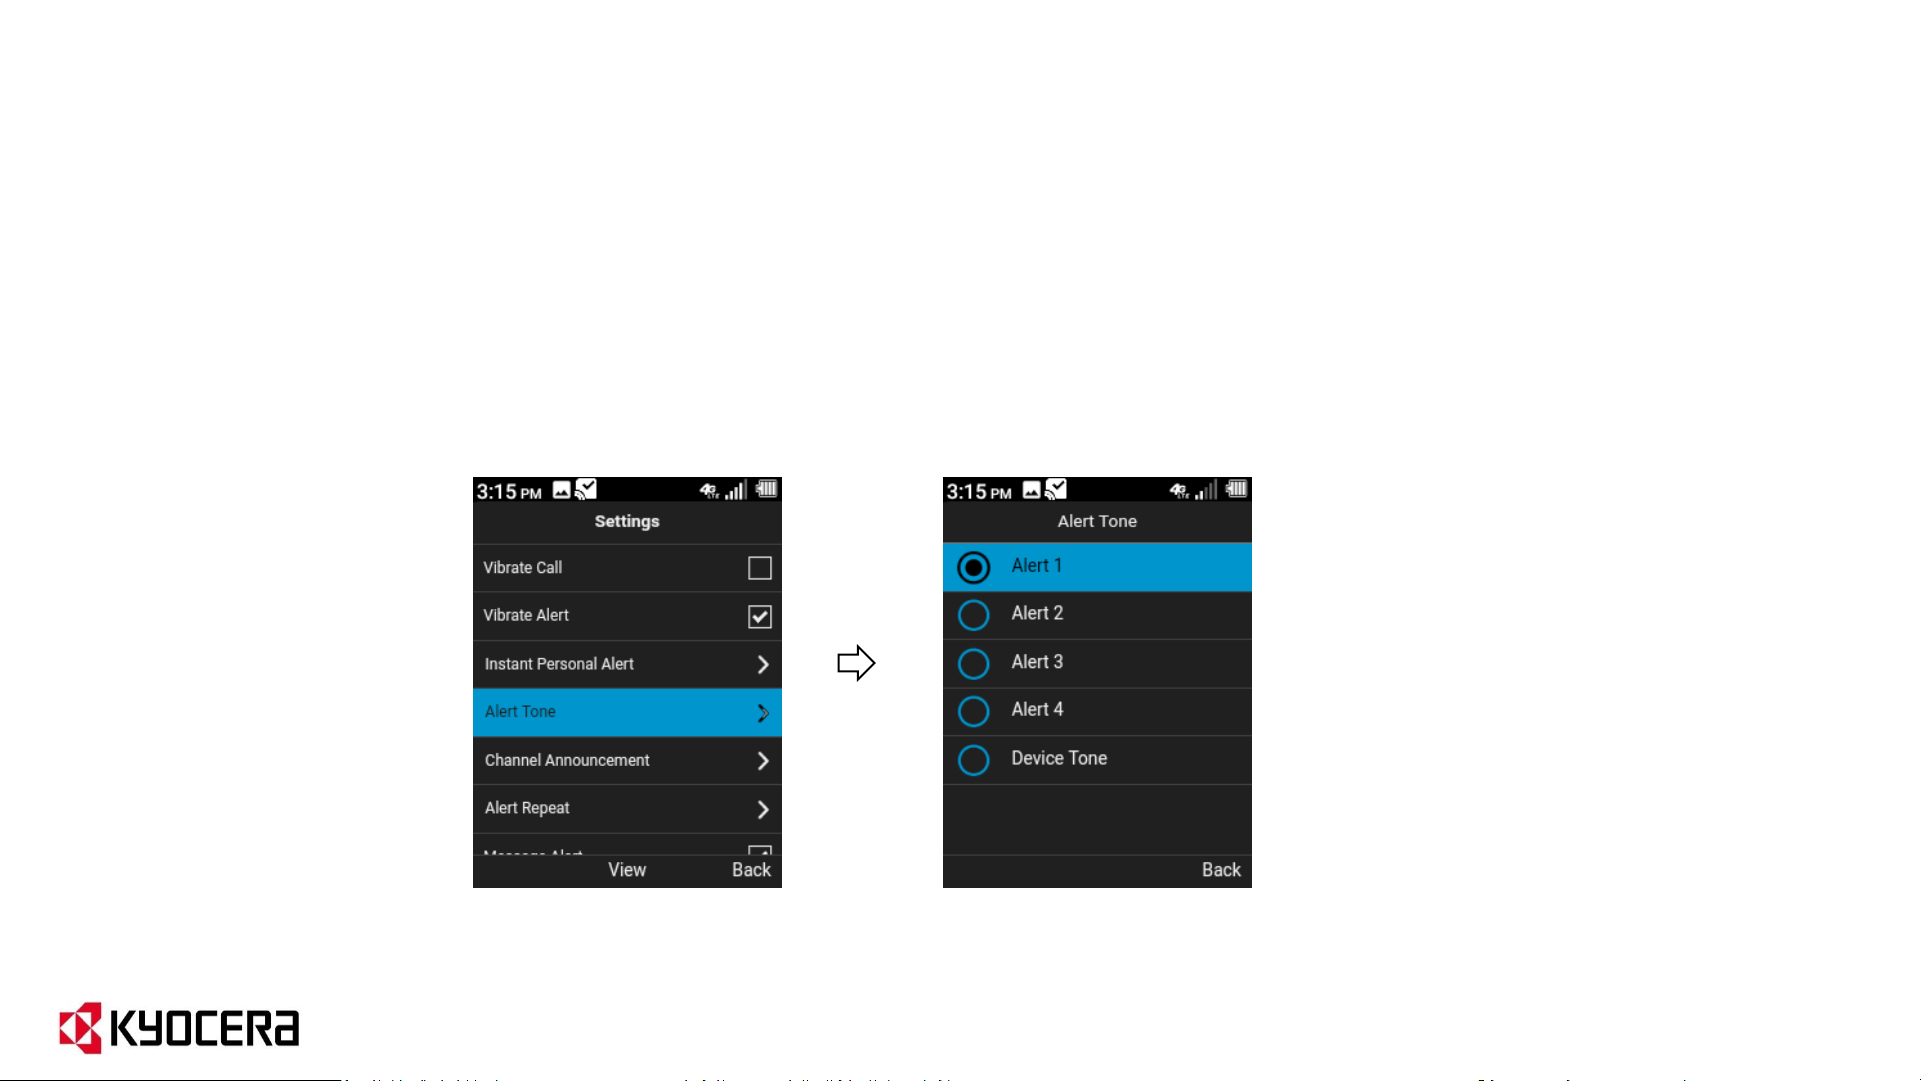
EPTT Alert Tones
In Settings, scroll
down to select
“Alert Tone”.
Scroll down and select
desired Alert Tone.
20
Important Settings
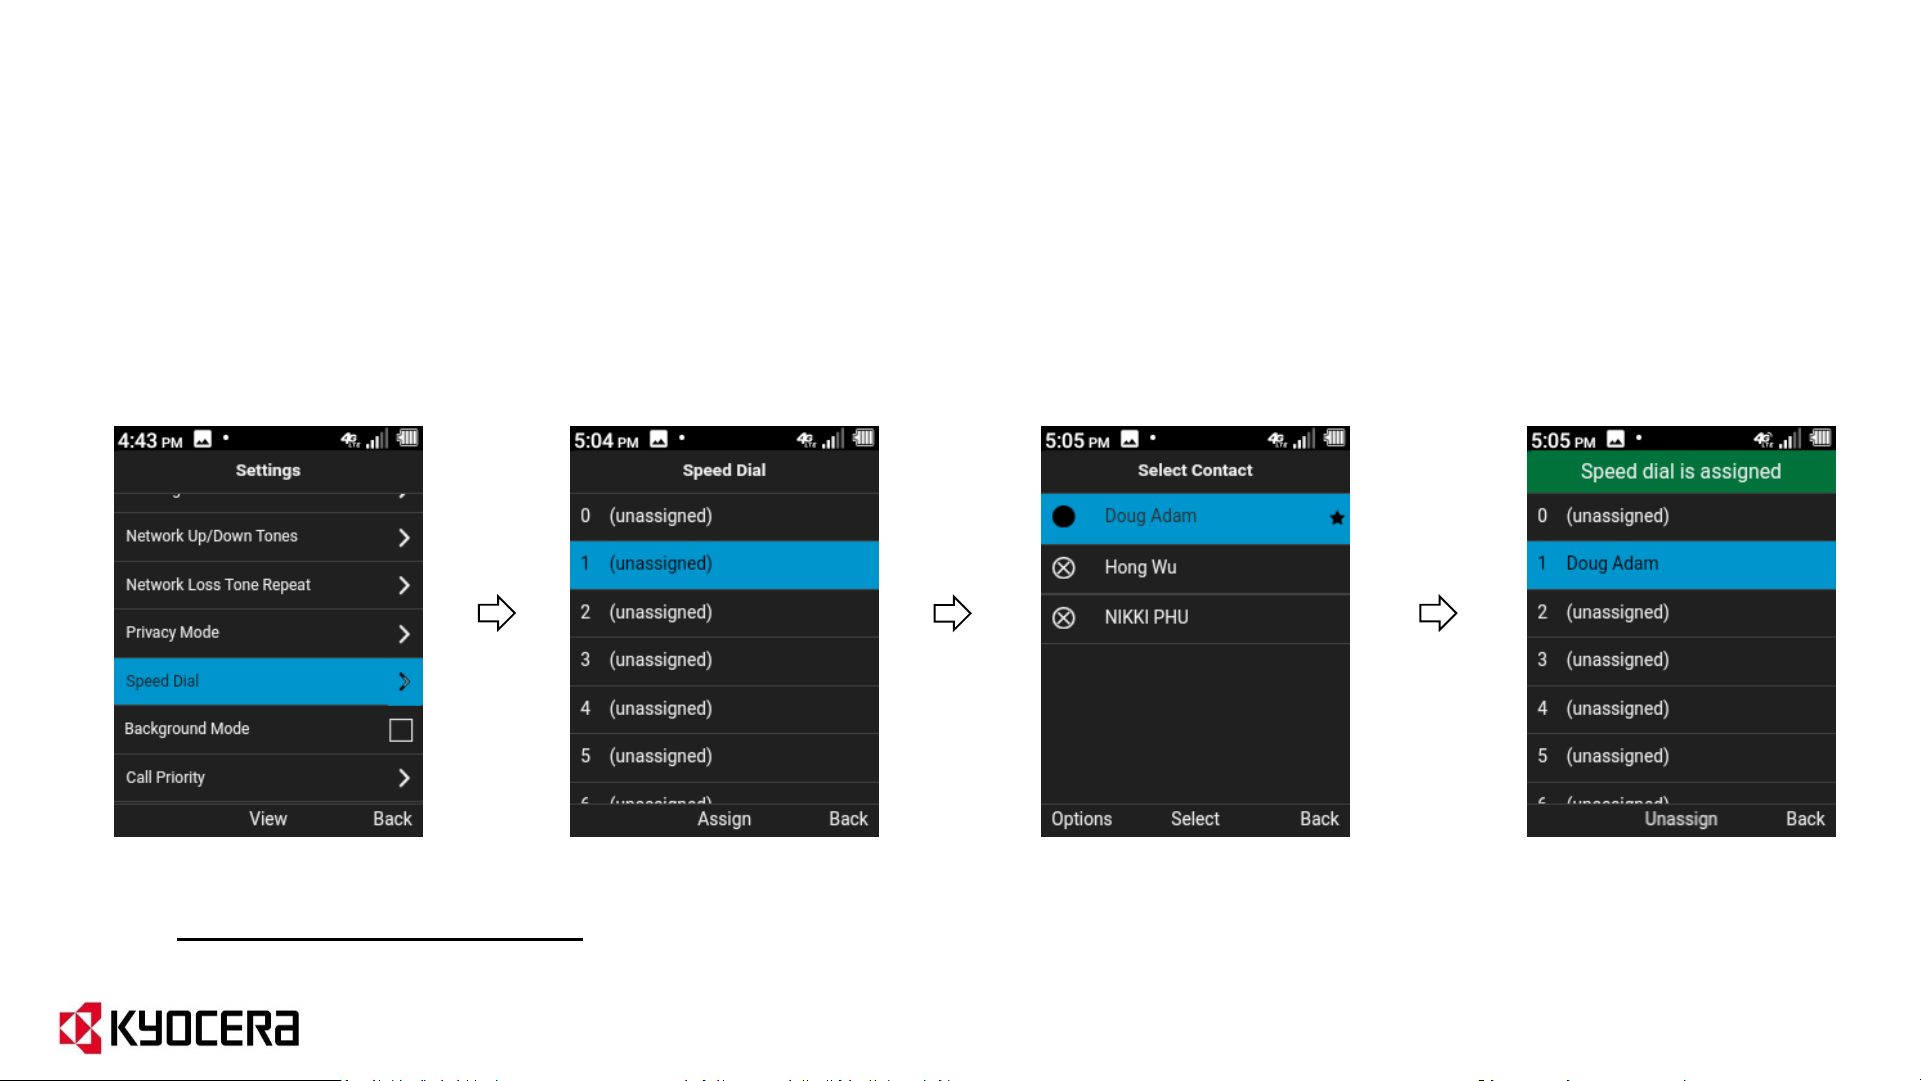
EPTT Speed Dial
In Settings, scroll
down to select
“Speed Dial”.
Scroll down and select
unassigned spot.
After Speed Dial is set up:
To make a Speed Dial call, press the speed dial # on the keypad and then press the PTT button.
Select desired
contact.
Contact is now added
to Speed Dial list.
21
Important Settings
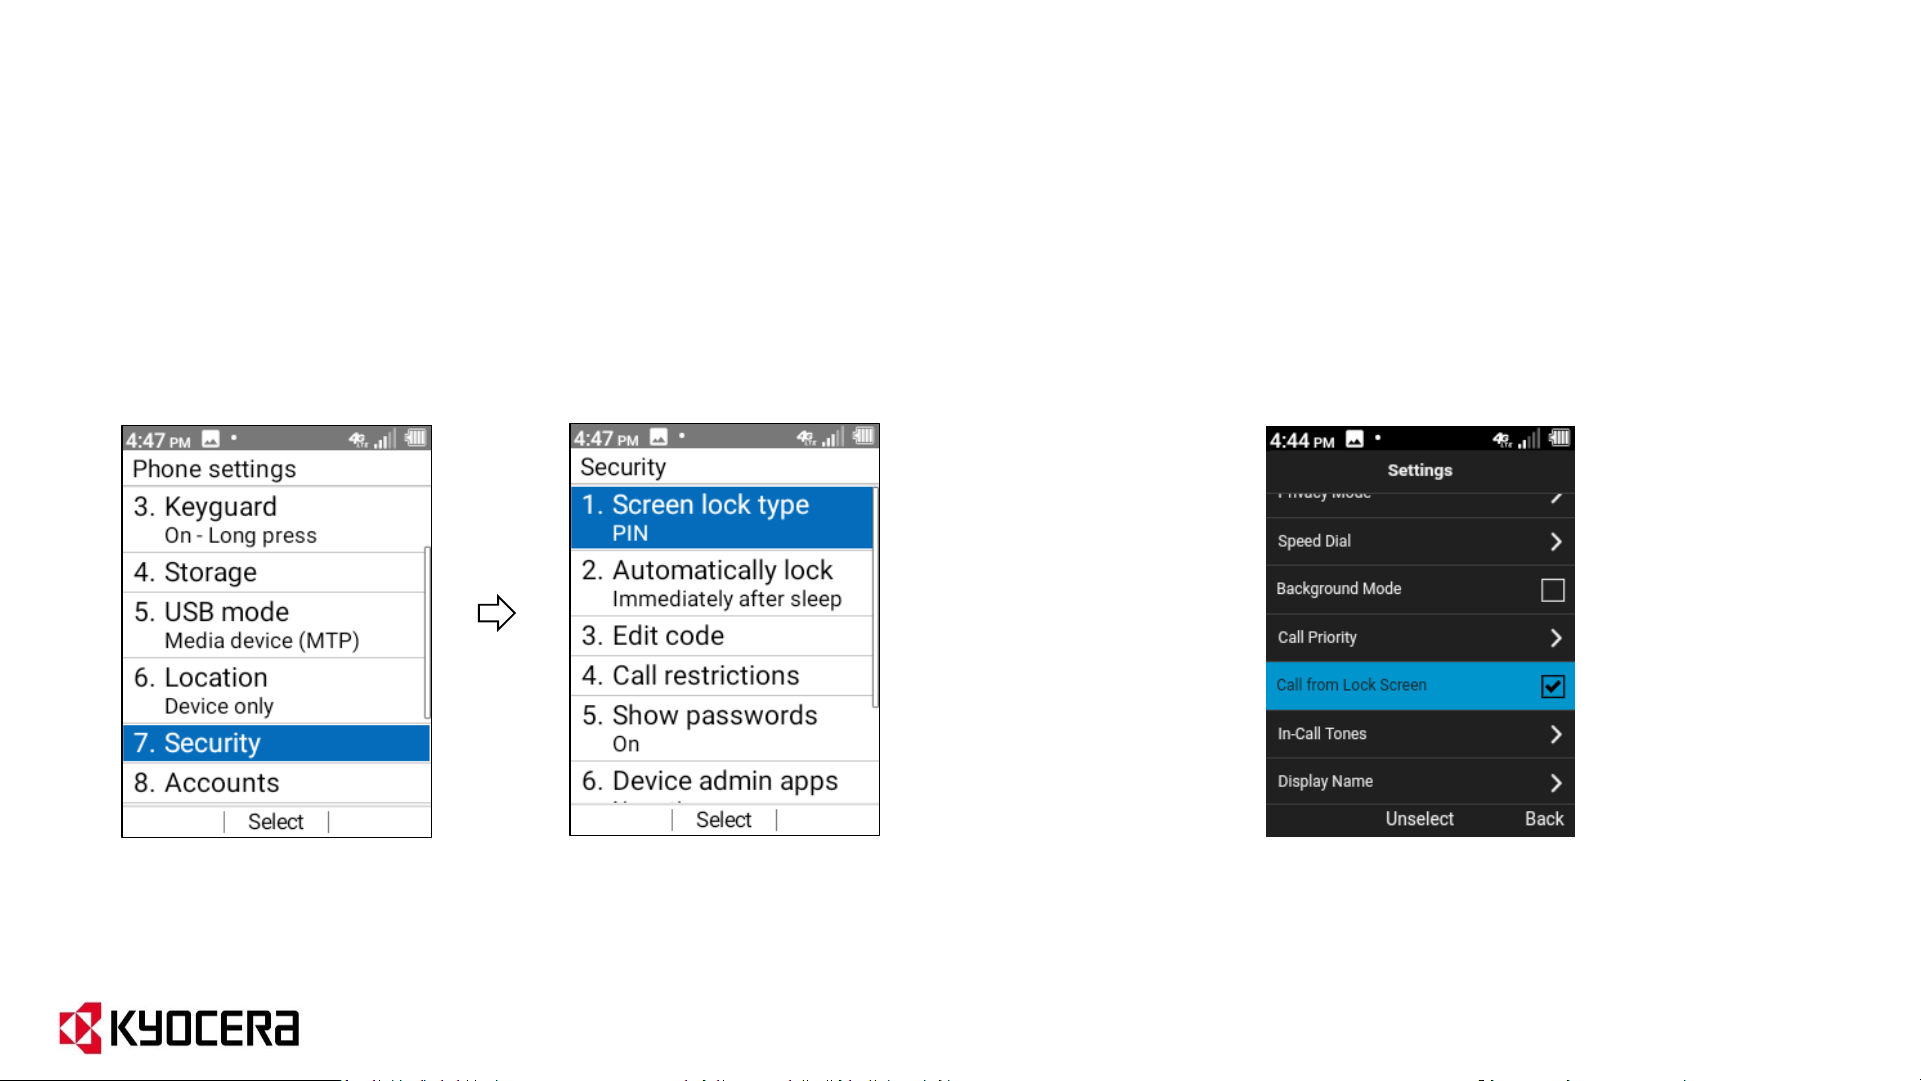
Call from Lock Screen
To set up Lock screen,
go to Phone settings and
select “Security”.
Then select Screen lock
type and finish set up.
Once this is set up, you can make EPTT calls by pressing PTT key even though phone is locked.
In EPTT App, go to
Settings and select
“Call from Lock Screen”.
22
Call History
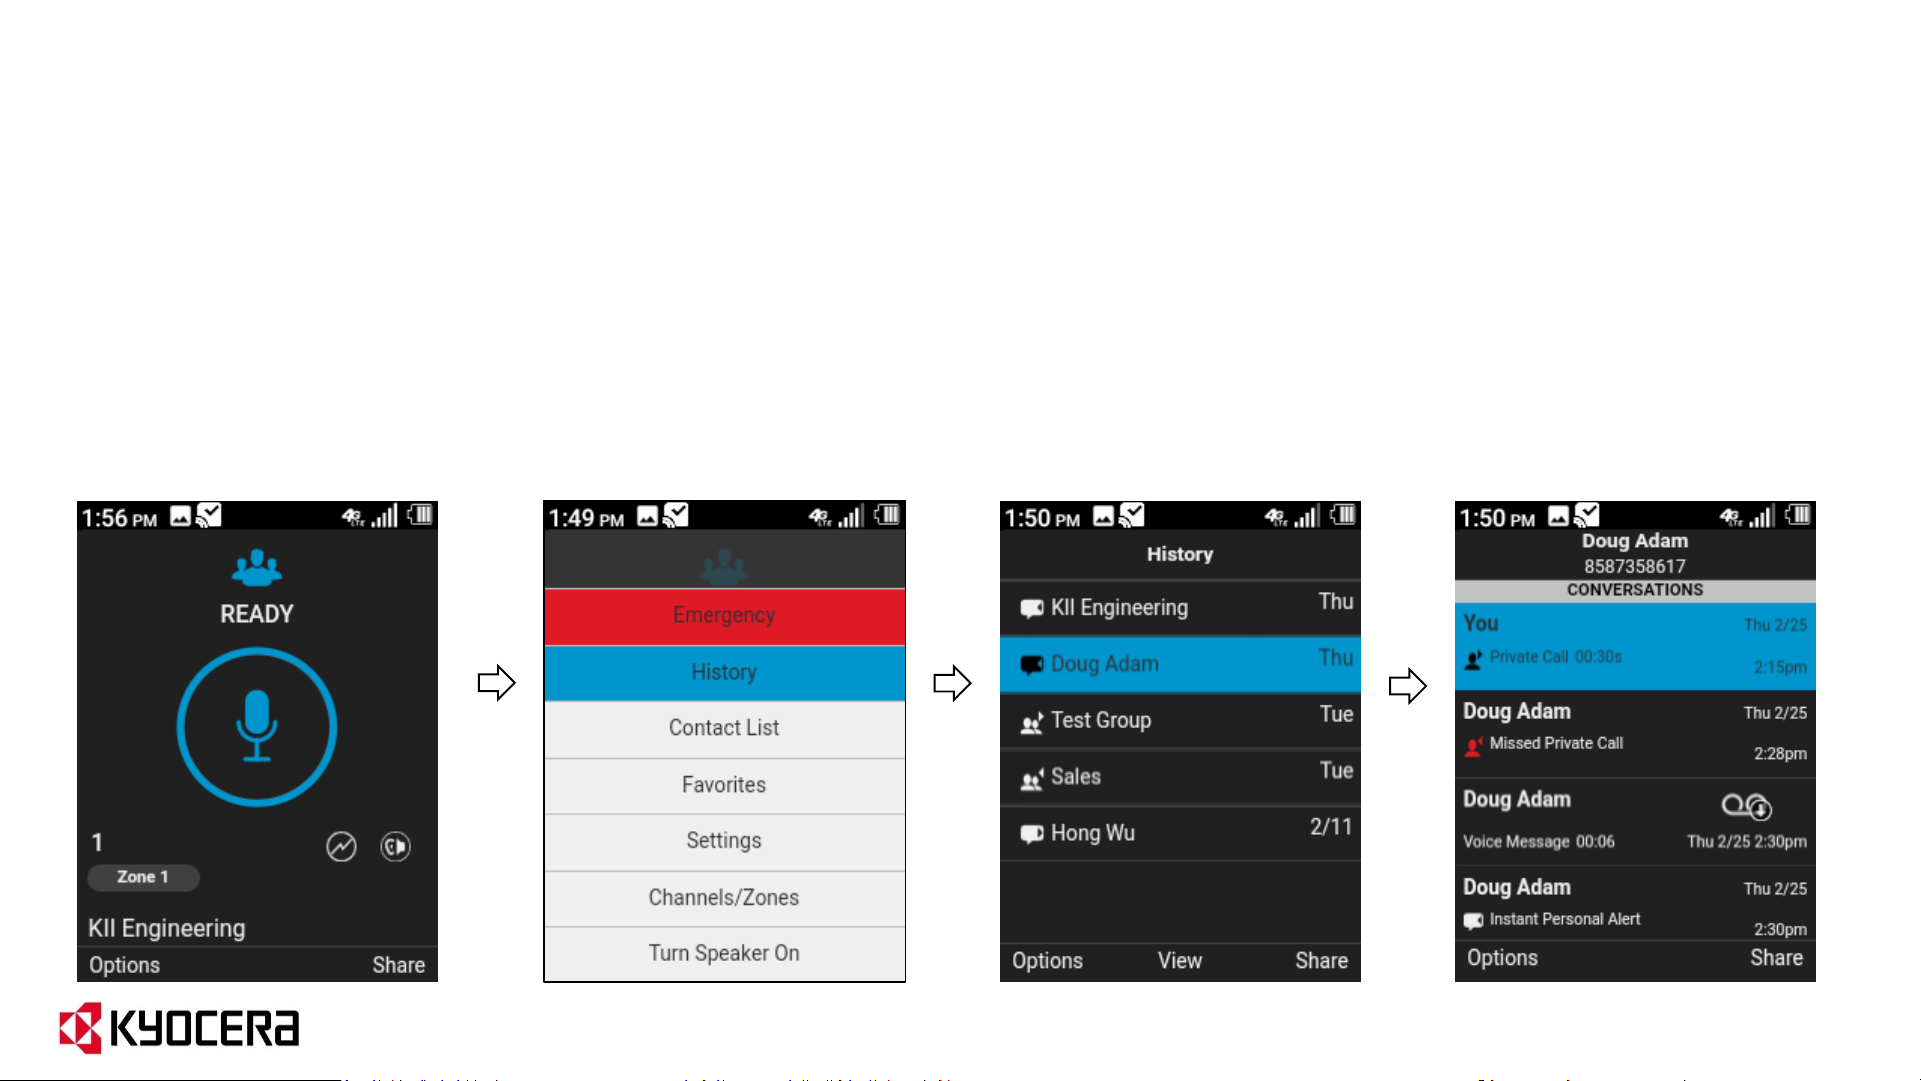
Press left soft key
“Options”.
Select “History”.
History is shown;
Select an individual or
group for more detail.
Detailed record of calls
and alerts is shown.
To see a record of call history – with the newest at the bottom.
23

Sharing Texts, Location, and Media with your EPTT Contacts/Groups
Press right soft key
“Share”.
Scroll down and select
item you want to share.
Using Share feature, you can send text messages, your location,
images, videos, voice messages and files.
24
Send a Text Messages to your EPTT contacts/groups
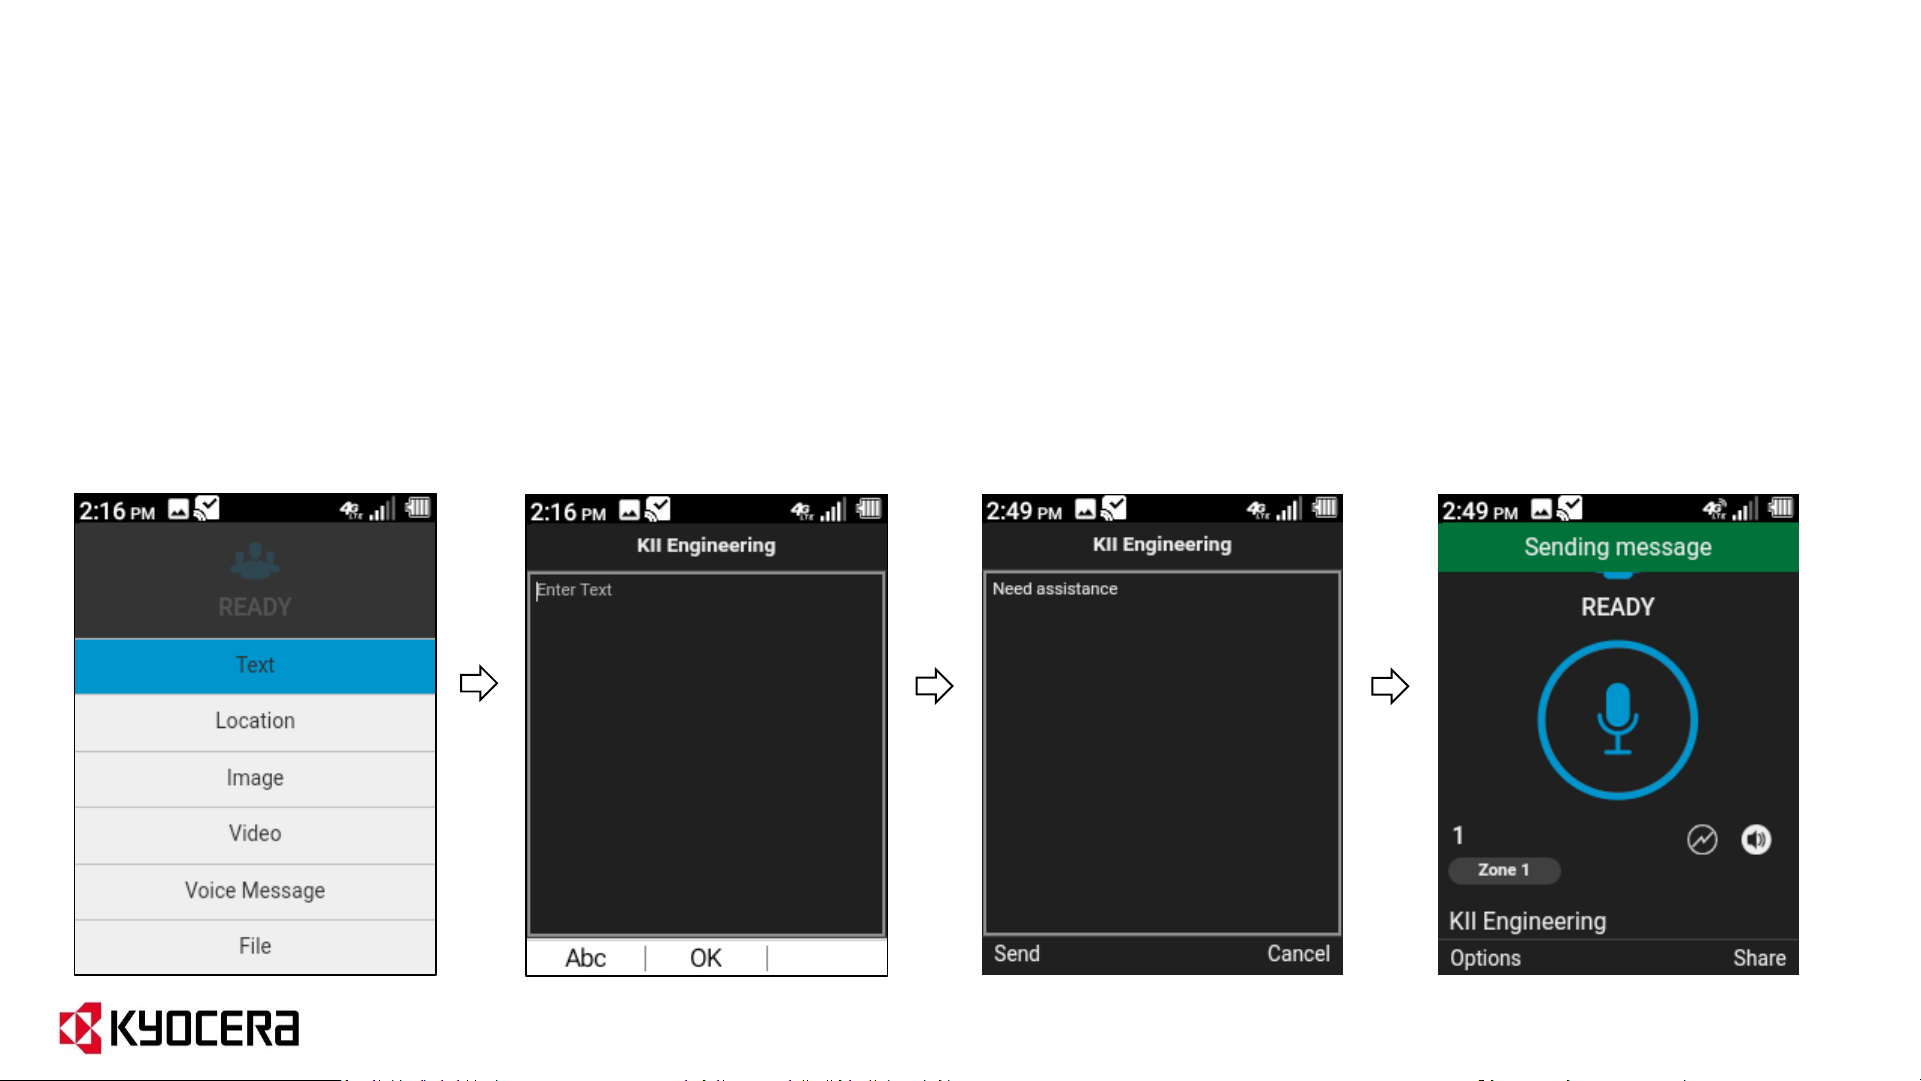
From Share menu, select
“Text”.
To change Text Entry
mode, press left soft key
“Abc”.
Enter message, press
down Nav key, then left
soft key to “Send”.
Compose a text message and send it to your current contact or group.
25

From Share menu, select
“Location”.
Press 1 or 3 key to
zoom in/out. Press Nav
keys to move left, right,
up or down.
Press right soft key to
“Send” the location.
Send your current location or pan to a different location, then
send location to your current contact or group.
Send Your Location to your EPTT contacts/groups*
26
* Sharing location via EPTT messaging is not available on services provisioned
with EPTT only plan. Contact your representative for more information.

How to switch EPTT Call Audio from Speaker to Earpiece and vice versa
1. By default, the DuraXE Epic EPTT call audio is set to Speakerphone.
2. To change the audio to Earpiece, prior to or during an EPTT call, press left soft
key “Options” and select “Turn Speaker Off“.
3. Received EPTT call audio will now be heard from Earpiece until Speaker is
turned ON.
4. To change the audio to back to Speaker, prior to or during an EPTT call, press left
soft key “Options” and select “Turn Speaker On“.
Earpiece
icon
Speaker
icon
27
Other ways to change EPTT Audio from Speaker to Earpiece
External
Speaker key
Camera/
Speaker key
1. Long Press Camera/Speaker key on main keypad or
2. Press External Speaker key (with Default Settings under External
Speaker Key menu in Programmable Keys).
28

EPTT Basic
User Interface
29

Basic UI: EPTT menu icons
Call History:
Displays your EPTT
conversation history.
You can also change your
presence status here.
Contacts:
Displays your EPTT
contacts and allows you
to create/edit/delete a
contact or initiate an EPTT
call and send an alert.
(See below note.)
Groups:
Displays your EPTT
groups and allows you
to created/edit/delete a group
or initiate a group call.
(See below note.)
Favorites:
Displays your favorite
contacts and groups.
Allows you to easily initiate
EPTT calls/IPA/PTX to your
favorites.
Note: Create/edit/delete options are only available to subscribers with
necessary permissions set by the EPTT Corporate Admin Tool.
30

Basic UI: One Touch Action
1. In Settings list, scroll down to select One Touch Action. This setting allows you to
configure what pressing the PTT key will do.
2. You can choose the following actions to happen when PTT key is pressed:
A. call the most recent caller
B. call a specific contact
C. call a specific group
D. navigate to a specific landing page (Call History, Contacts, Groups or Favorites)
E. None – no action is performed when PTT key is pressed
31
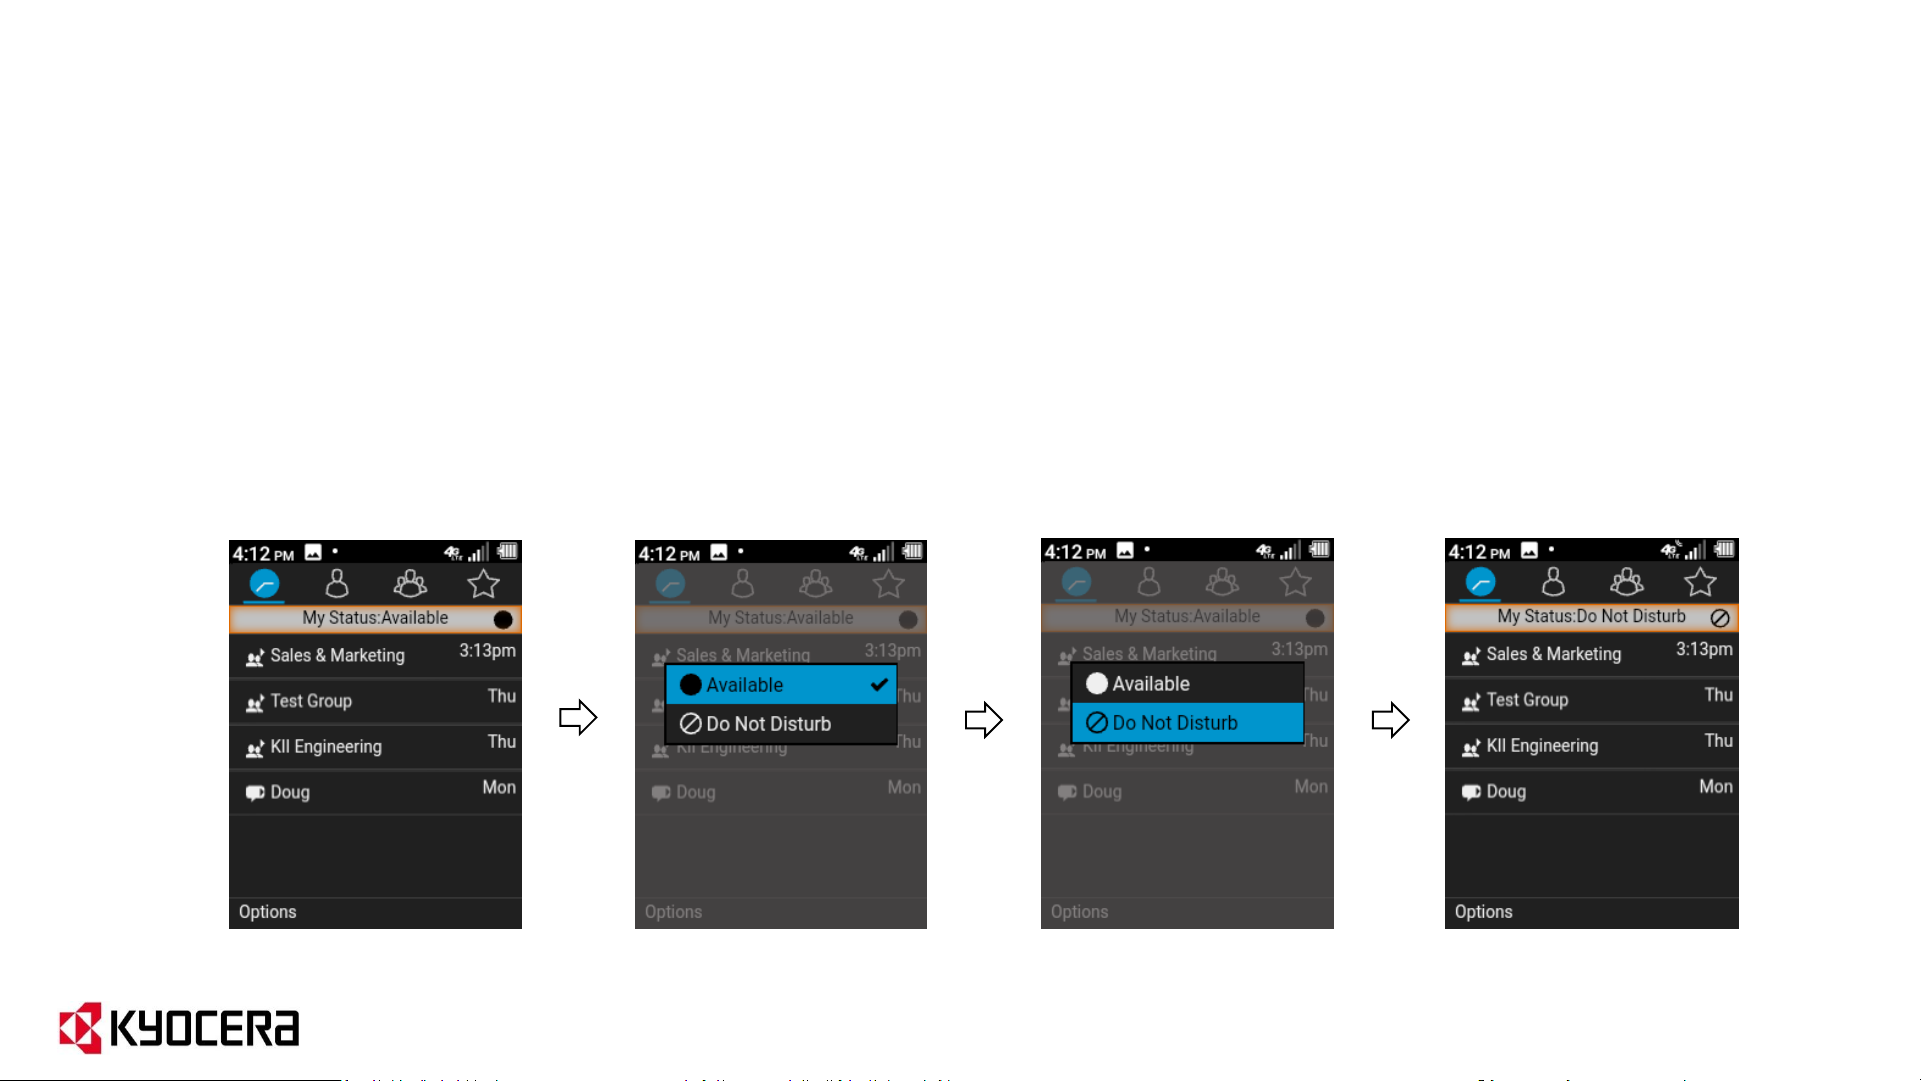
Basic UI: Status indicator
In the EPTT App, under History – select “My Status” using the navigation keys (up/down arrows) and the
Center key.
Available: You are available to accept calls and alerts.
Do Not Disturb: Prevents incoming calls.
To change status, use the navigation keys to highlight the item and then hit the center key to select it.
32
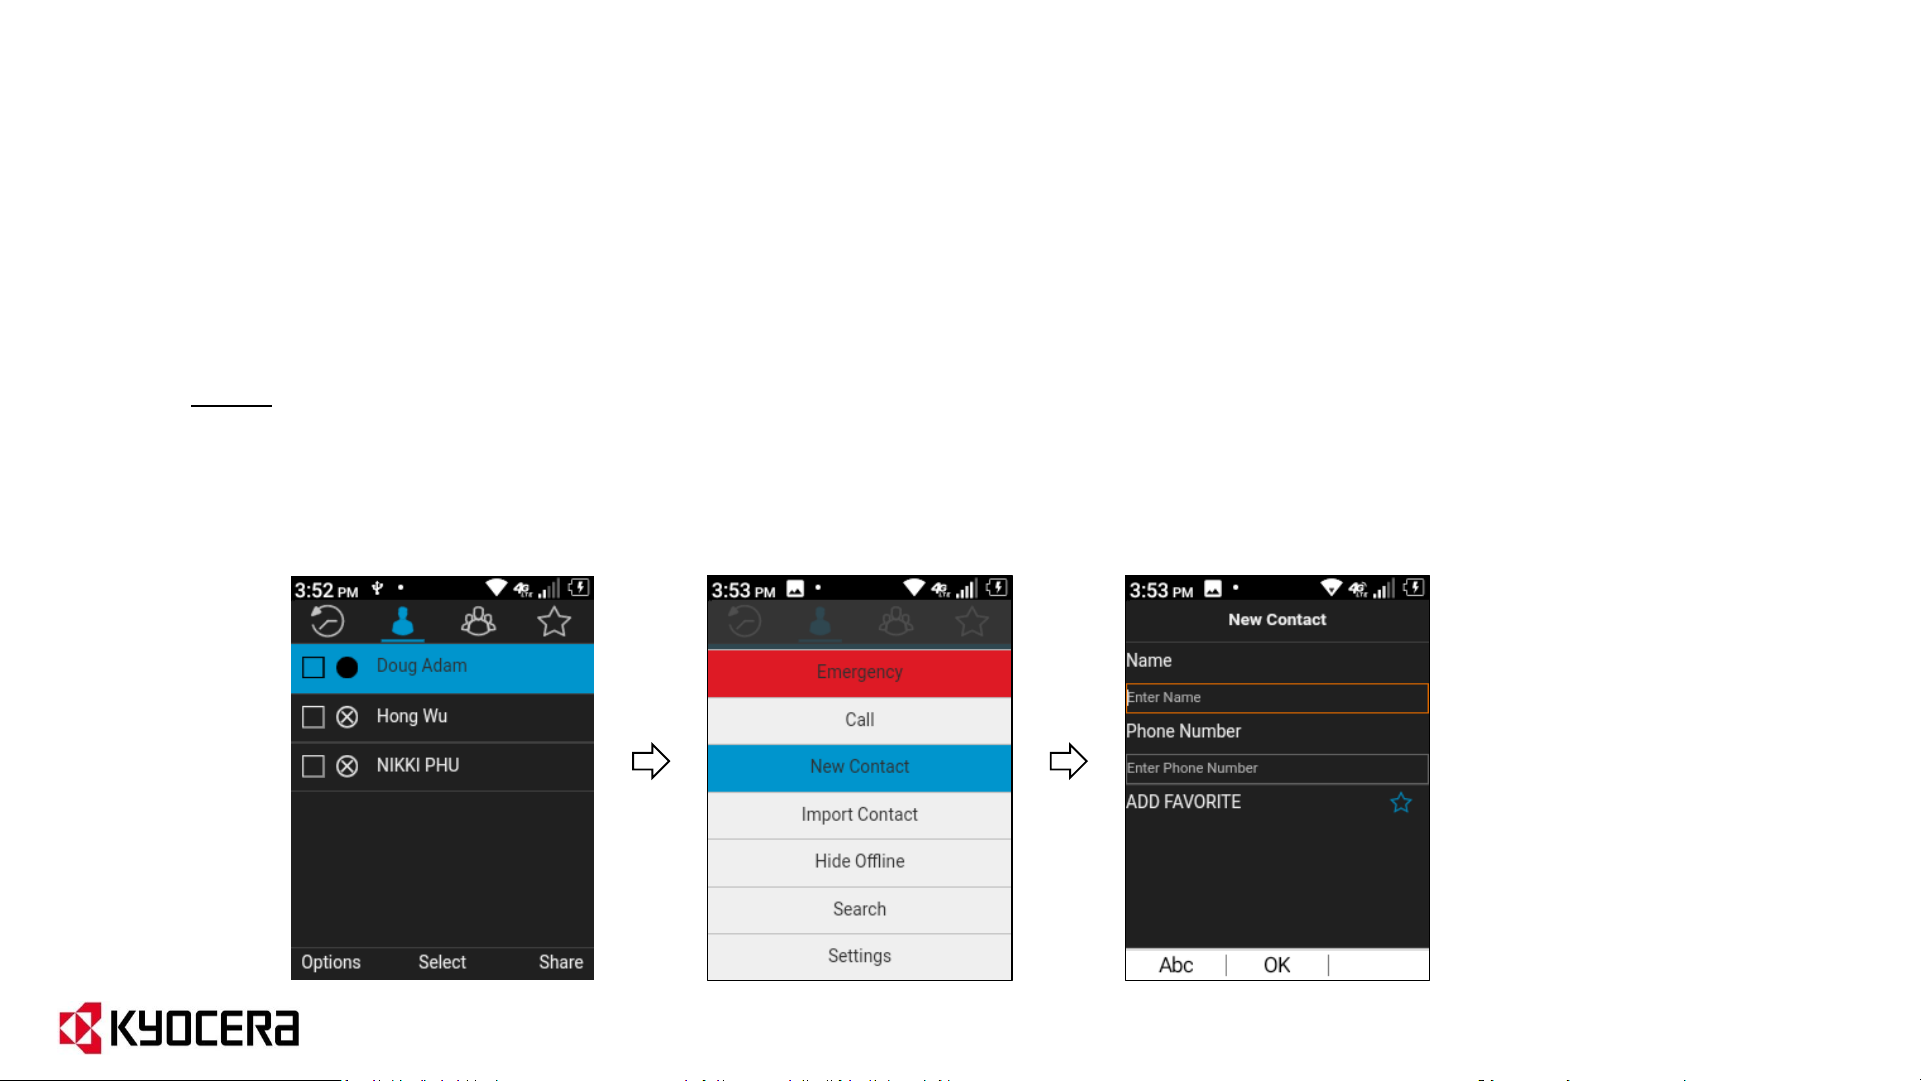
Basic UI: How to Add Contacts
1. Open the EPTT app, select Contacts tab and click the Options button.
2. Select New Contact to manually add a contact or if you have already entered contacts into
your device phonebook, select import contact to import from your phonebook.
Note: Only Subscribers with permission in the Corporate Administrator Tool have this
option. The preferred method is to add contacts via the Corporate Administrator Tool.
33
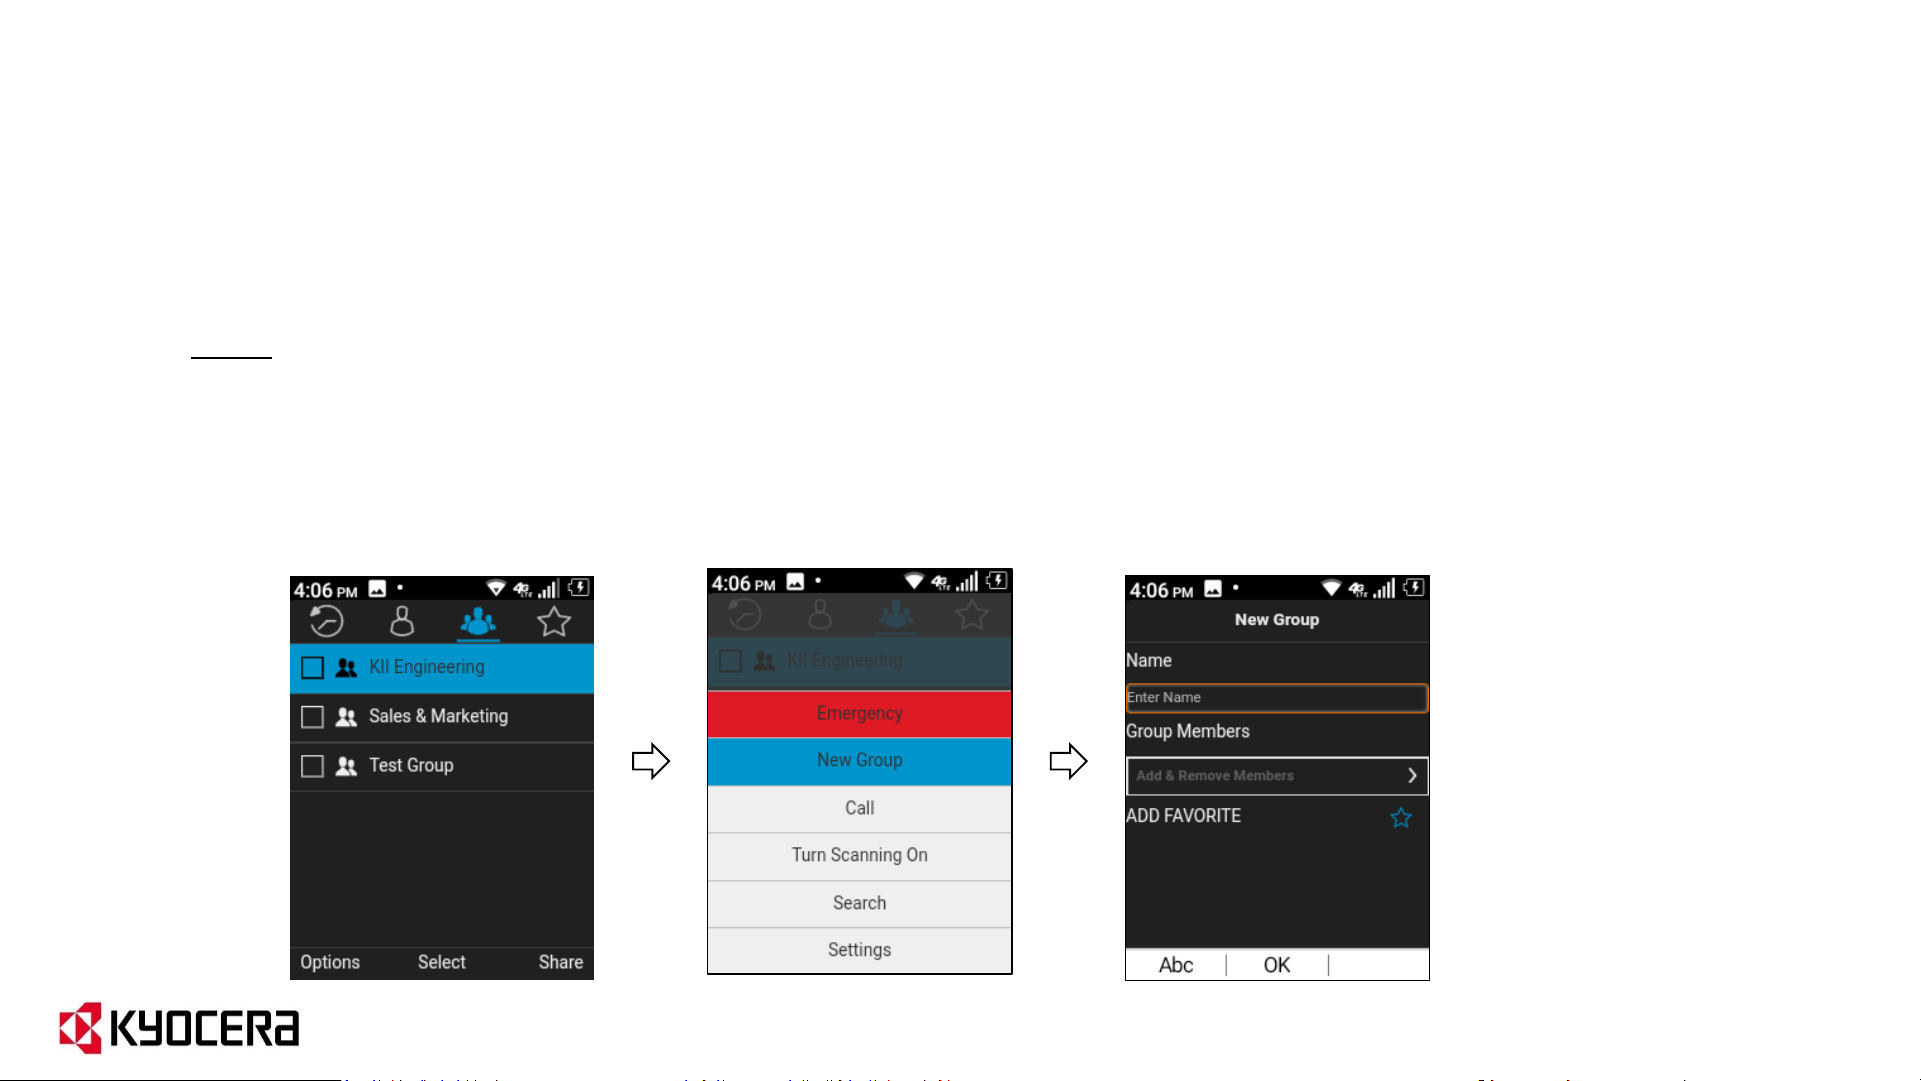
Basic UI: How to Add Personal Groups
1. Open the EPTT app, select Groups tab and click the Options button.
2. Select New Group to manually create a talkgroup.
Note: Only Subscribers with permission in the Corporate Administrator Tool have this
option. The preferred method is to add groups via the Corporate Administrator Tool.
34
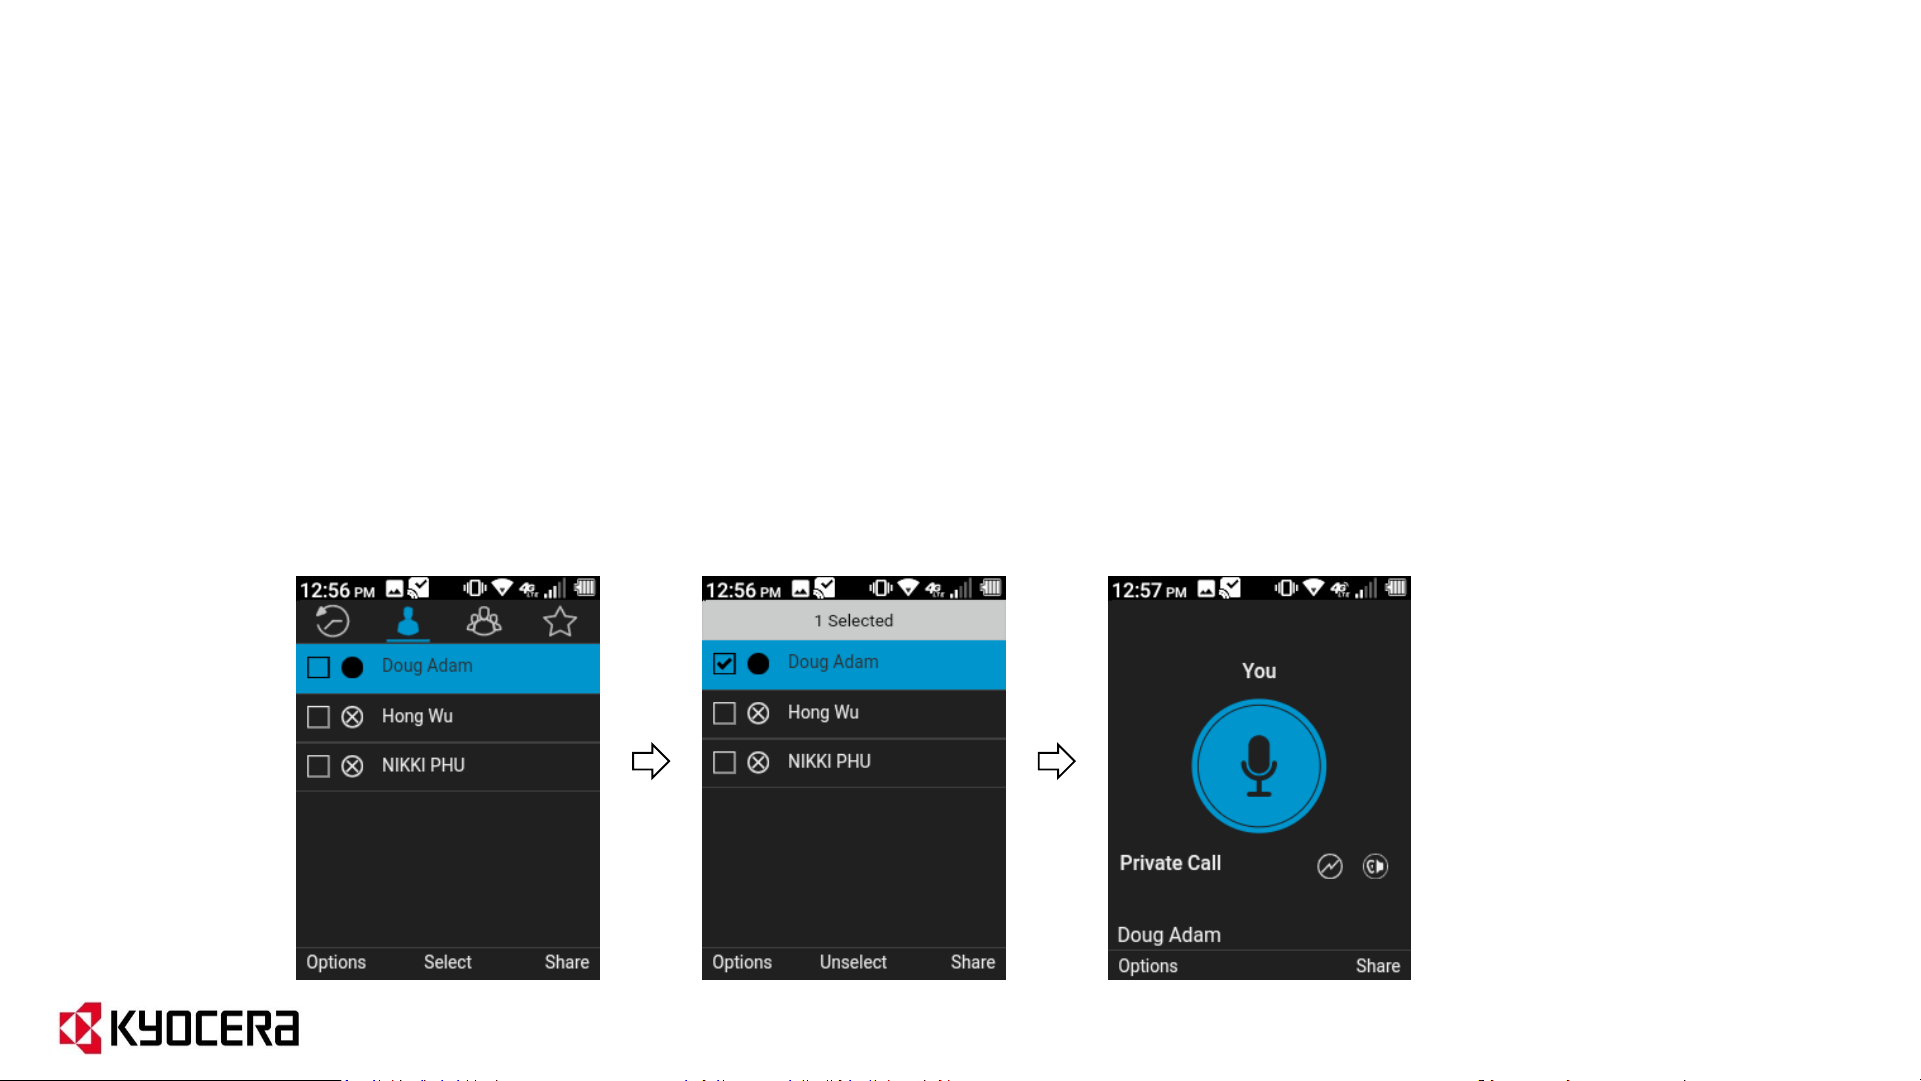
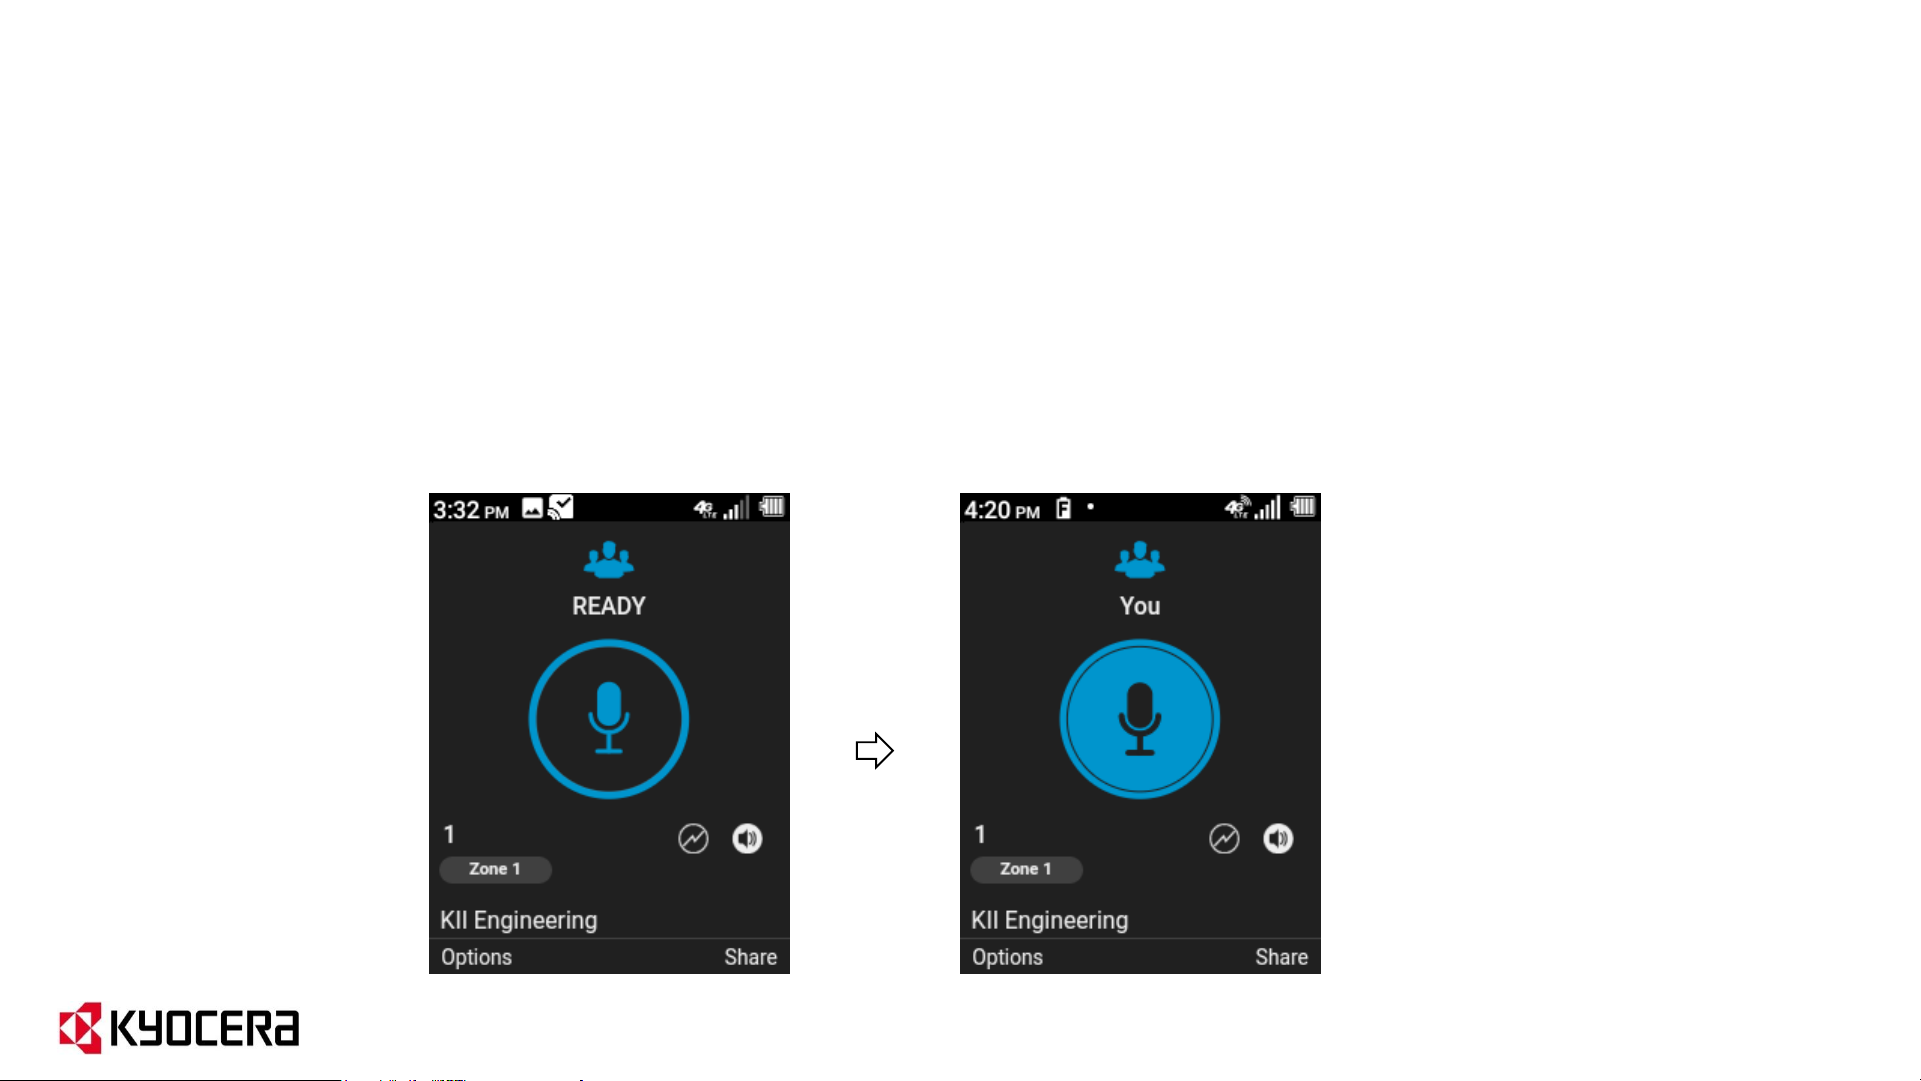
Basic UI: How to make 1-to-1 EPTT calls (Flip Open)
1. Open the EPTT application, go to Contacts tab.
2. Scroll to the person you want to call, press the center key to select the contact and
press the PTT key to connect.
3. The call-ready screen will show who is speaking.
If the person has an X next to their name, it means they are not available. If you try and
call them, it will send a Voice Message to them.
35
When One Touch Action is set to Landing Page / Contacts:
1. Press PTT key; EPTT Contacts List appears.
2. Scroll to the person you want to call using the volume keys.
3. Press PTT key again to initiate the call.
When One Touch Action is set to Call a Specific Contact:
1. Press PTT key to initiate the call.
Basic UI: How to make 1-to-1 EPTT calls (Flip Closed)
36

Basic UI: How to make EPTT group calls (Flip Open)
1. Open the EPTT application, go to Groups tab.
2. Scroll to the group you want to call, press the center key to select the group and
press the PTT key to connect.
3. The call-ready screen will show who is speaking.
37

Basic UI: How to make EPTT group calls (Flip Closed)
When One Touch Action is set to Landing Page / Talkgroup:
1. Press PTT key; EPTT Talkgroup List appears.
2. Scroll to the group you want to call using the volume keys.
3. Press PTT key again to initiate the call.
When One Touch Action is set to Call a Specific Group:
1. Press PTT key to initiate the call.
38

Basic UI: Emergency Calling and Alerting
• Emergency Calling and Alerting makes it possible for those in immediate danger to
quickly communicate with an individual or groups who can provide assistance.
• When EPTT users declare an emergency all PTT communication is immediately routed,
with the highest priority, to the designated individual or group.
Note: This Feature is available only to "EPTT Advanced Package“ subscribers.
39
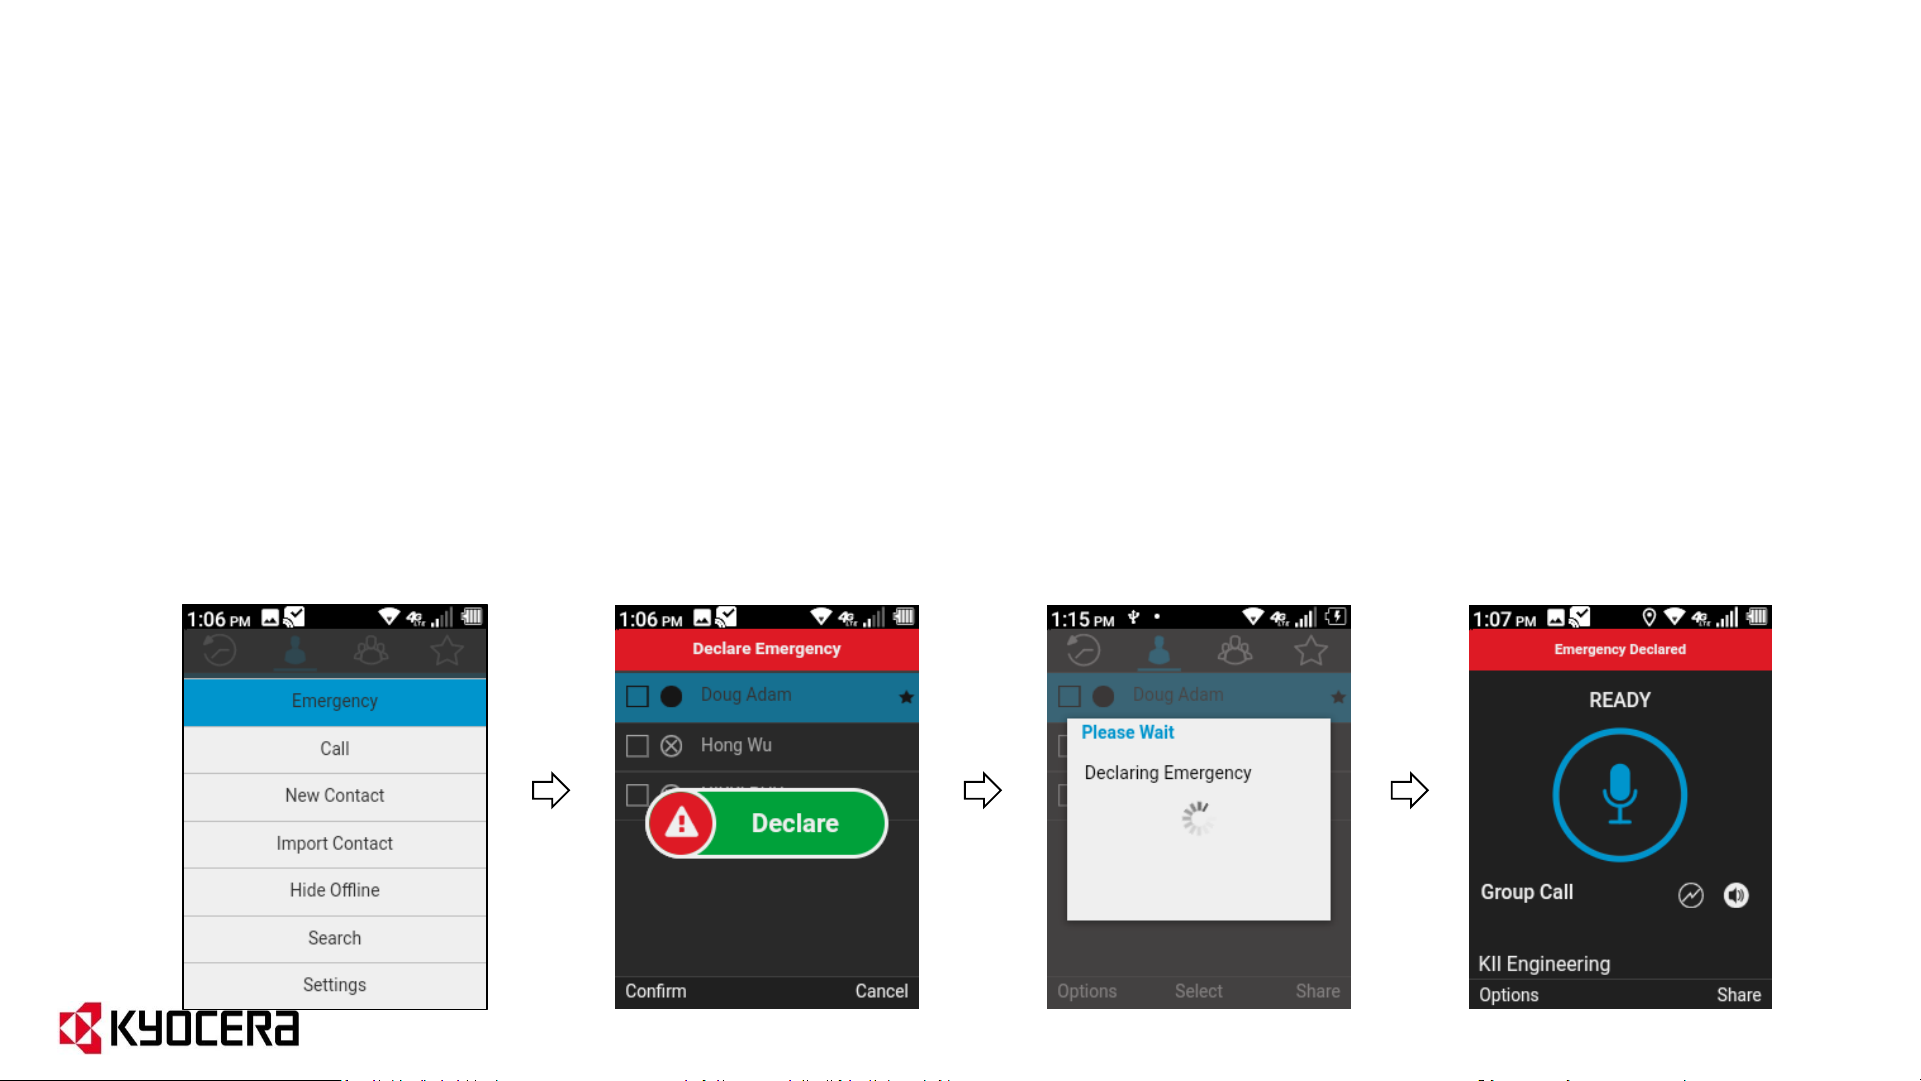
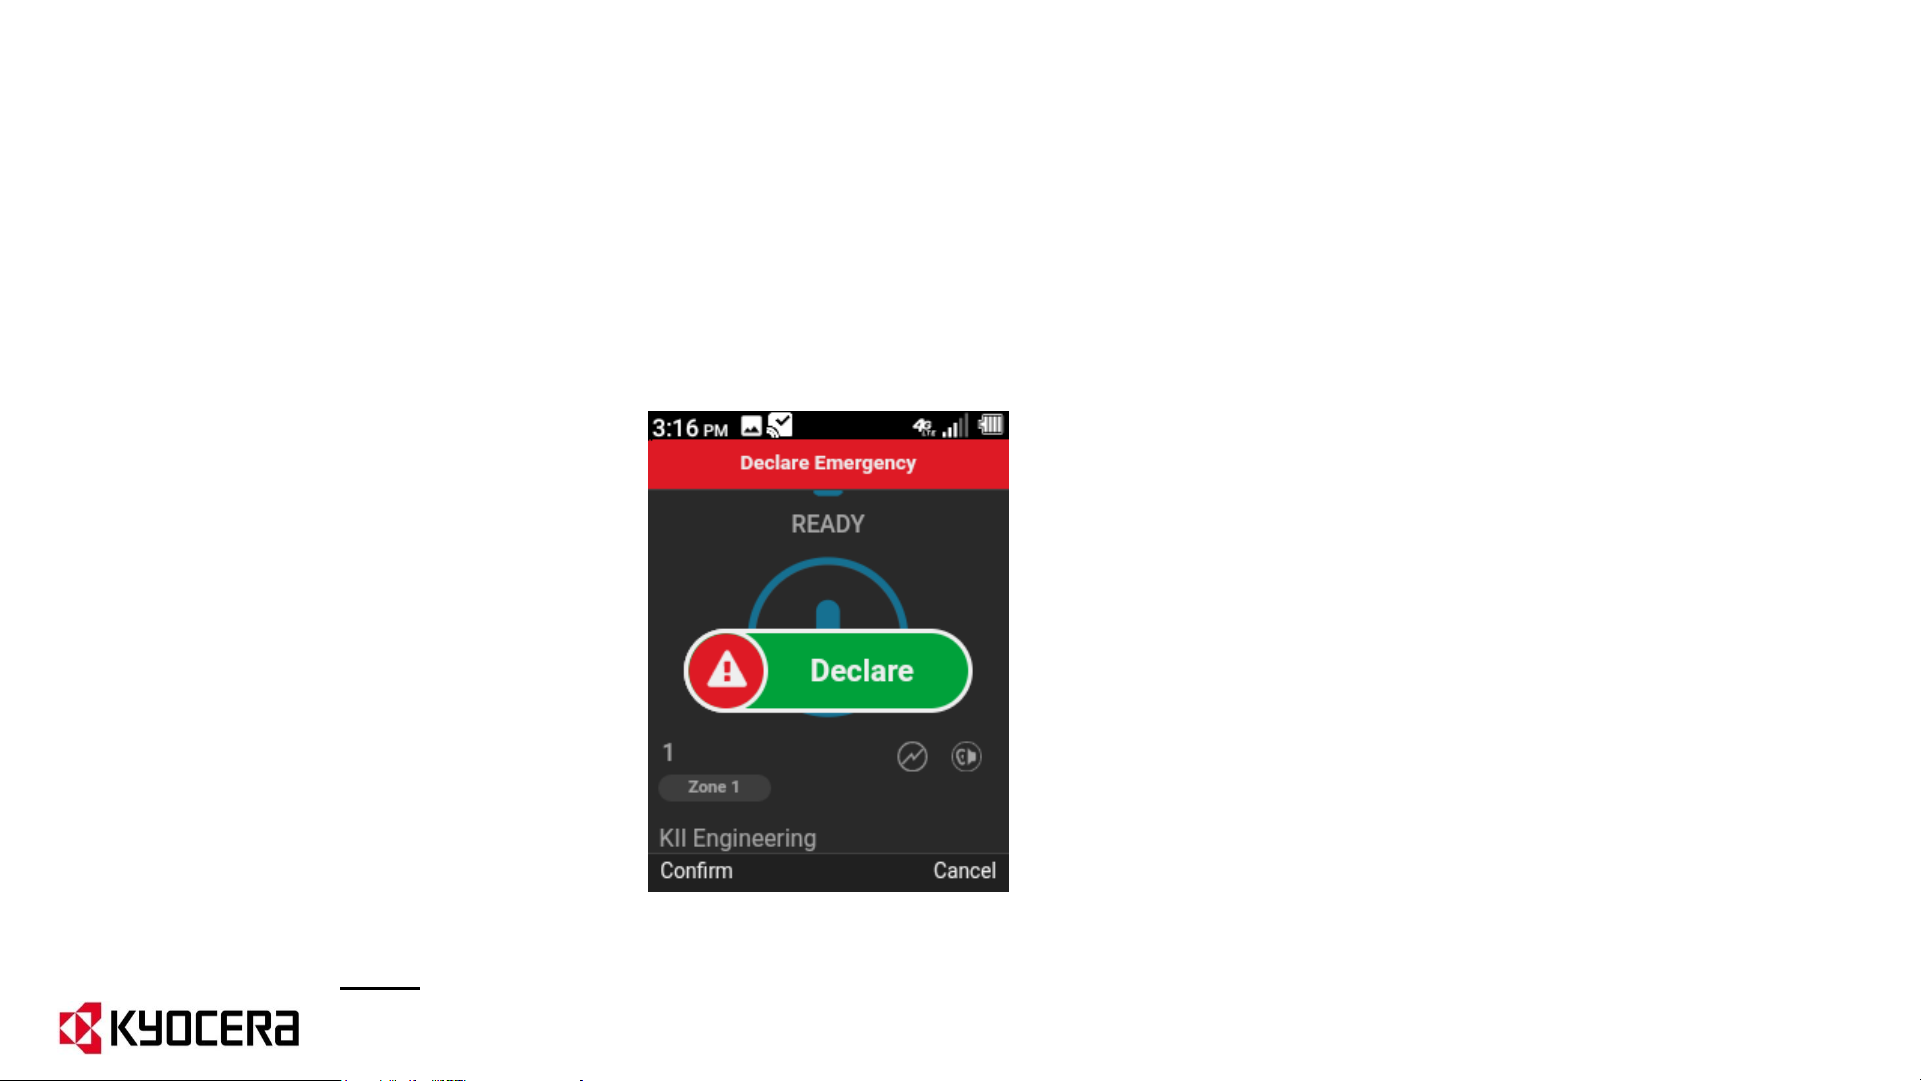
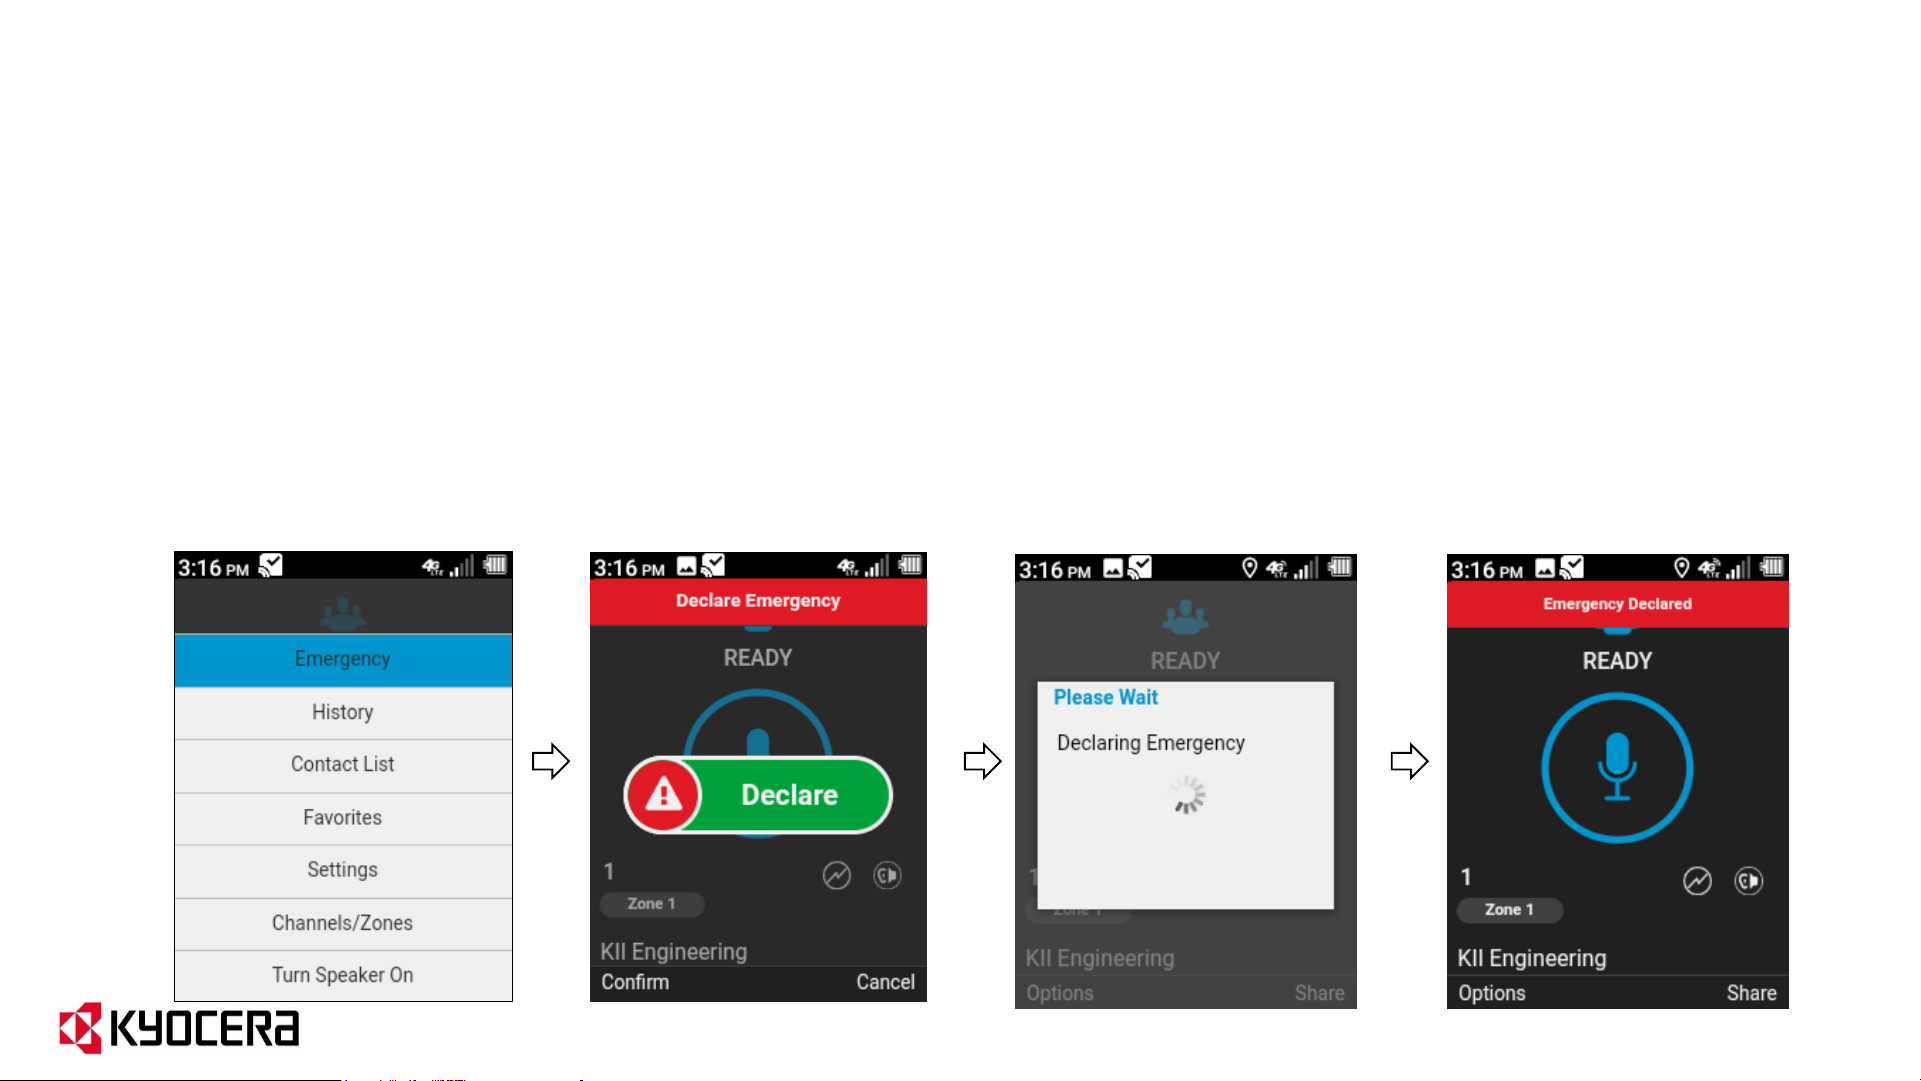
Basic UI: How to Make an Emergency Call
1. Open the app, press the Options key, scroll up to Emergency and select it.
2. An emergency “Declare” icon will appear on your screen.
3. Select “Confirm” to declare an emergency. When an Emergency Call is initiated, it is
to a destination - Contact or Group. The destination is assigned via the Corporate
Admin Tool. If the subscriber is already in a call with the assigned destination Contact or Group, the call will be upgraded to an Emergency Call.
4. Once the Emergency Call is initiated, if the floor is not taken for 10 sec the call shall
end. Your mic will be live for the first 10 sec of the call or until the call is ended.
40
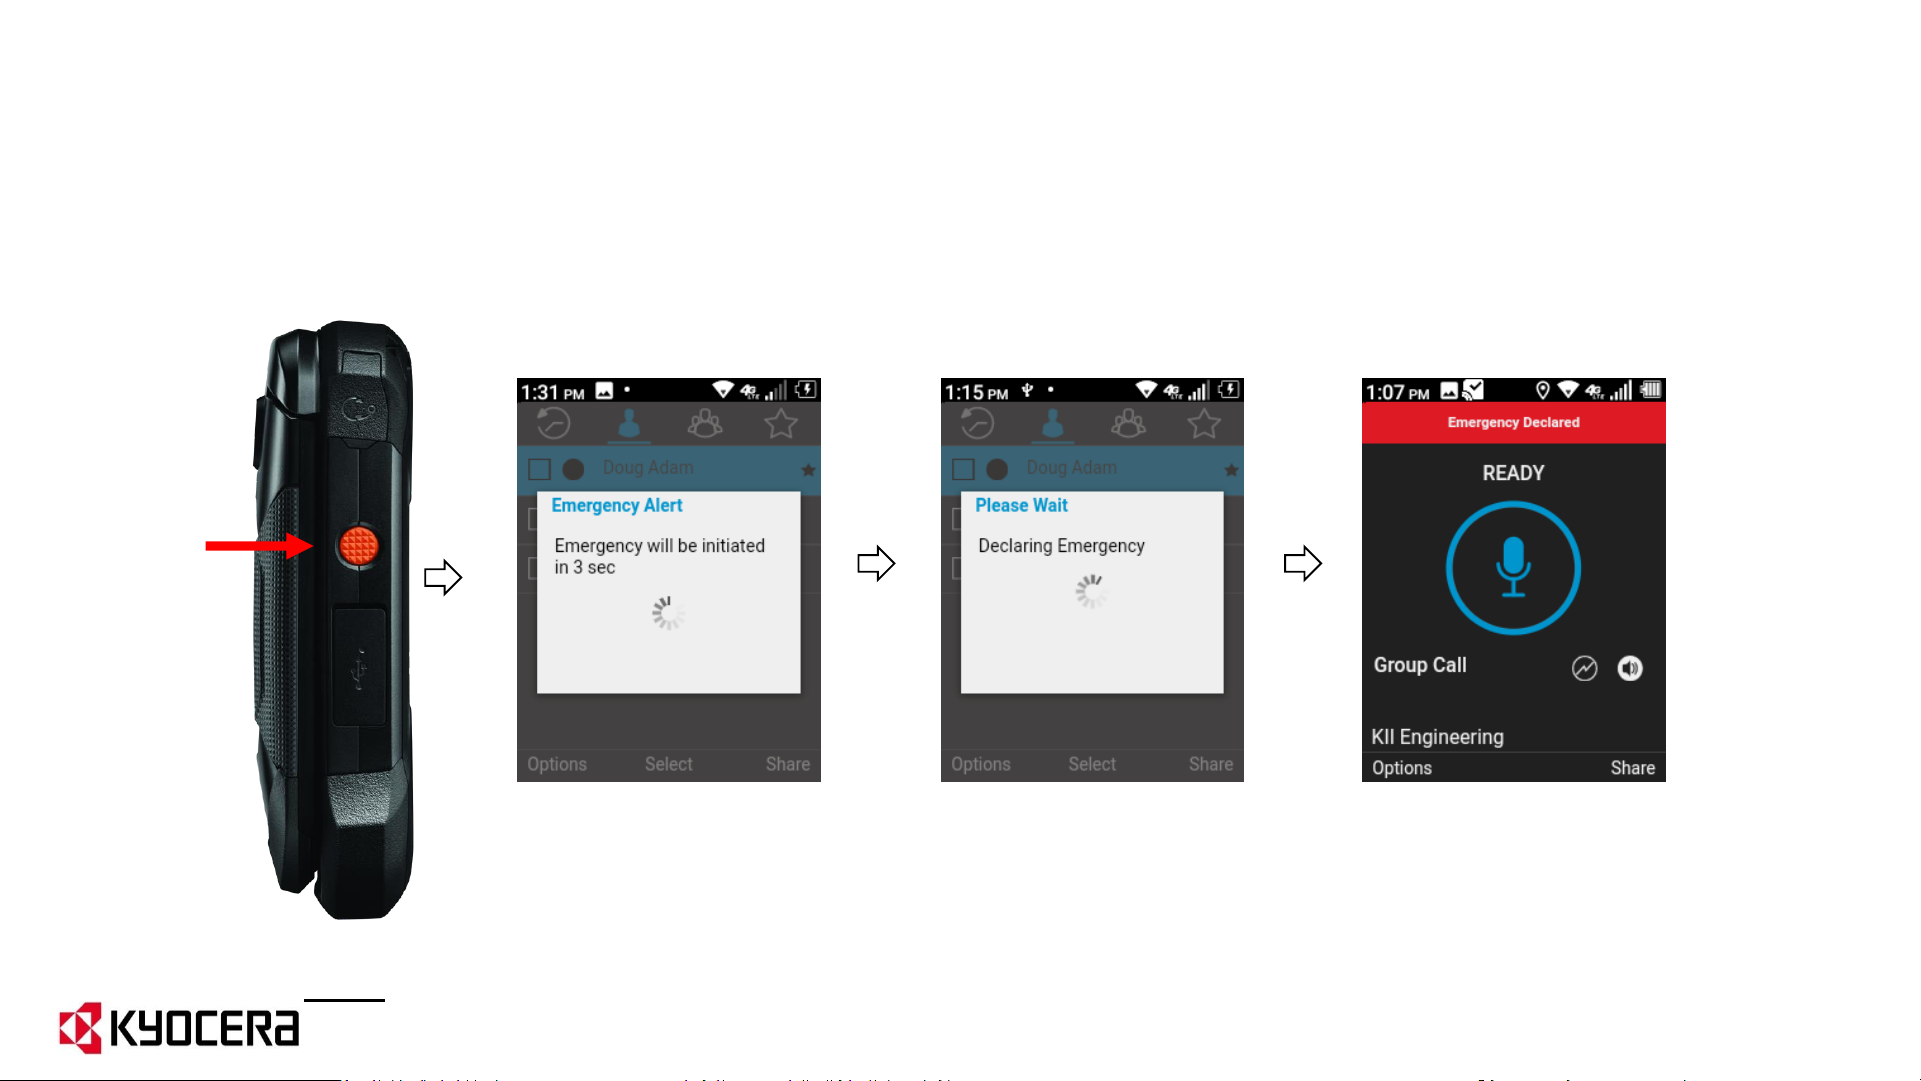
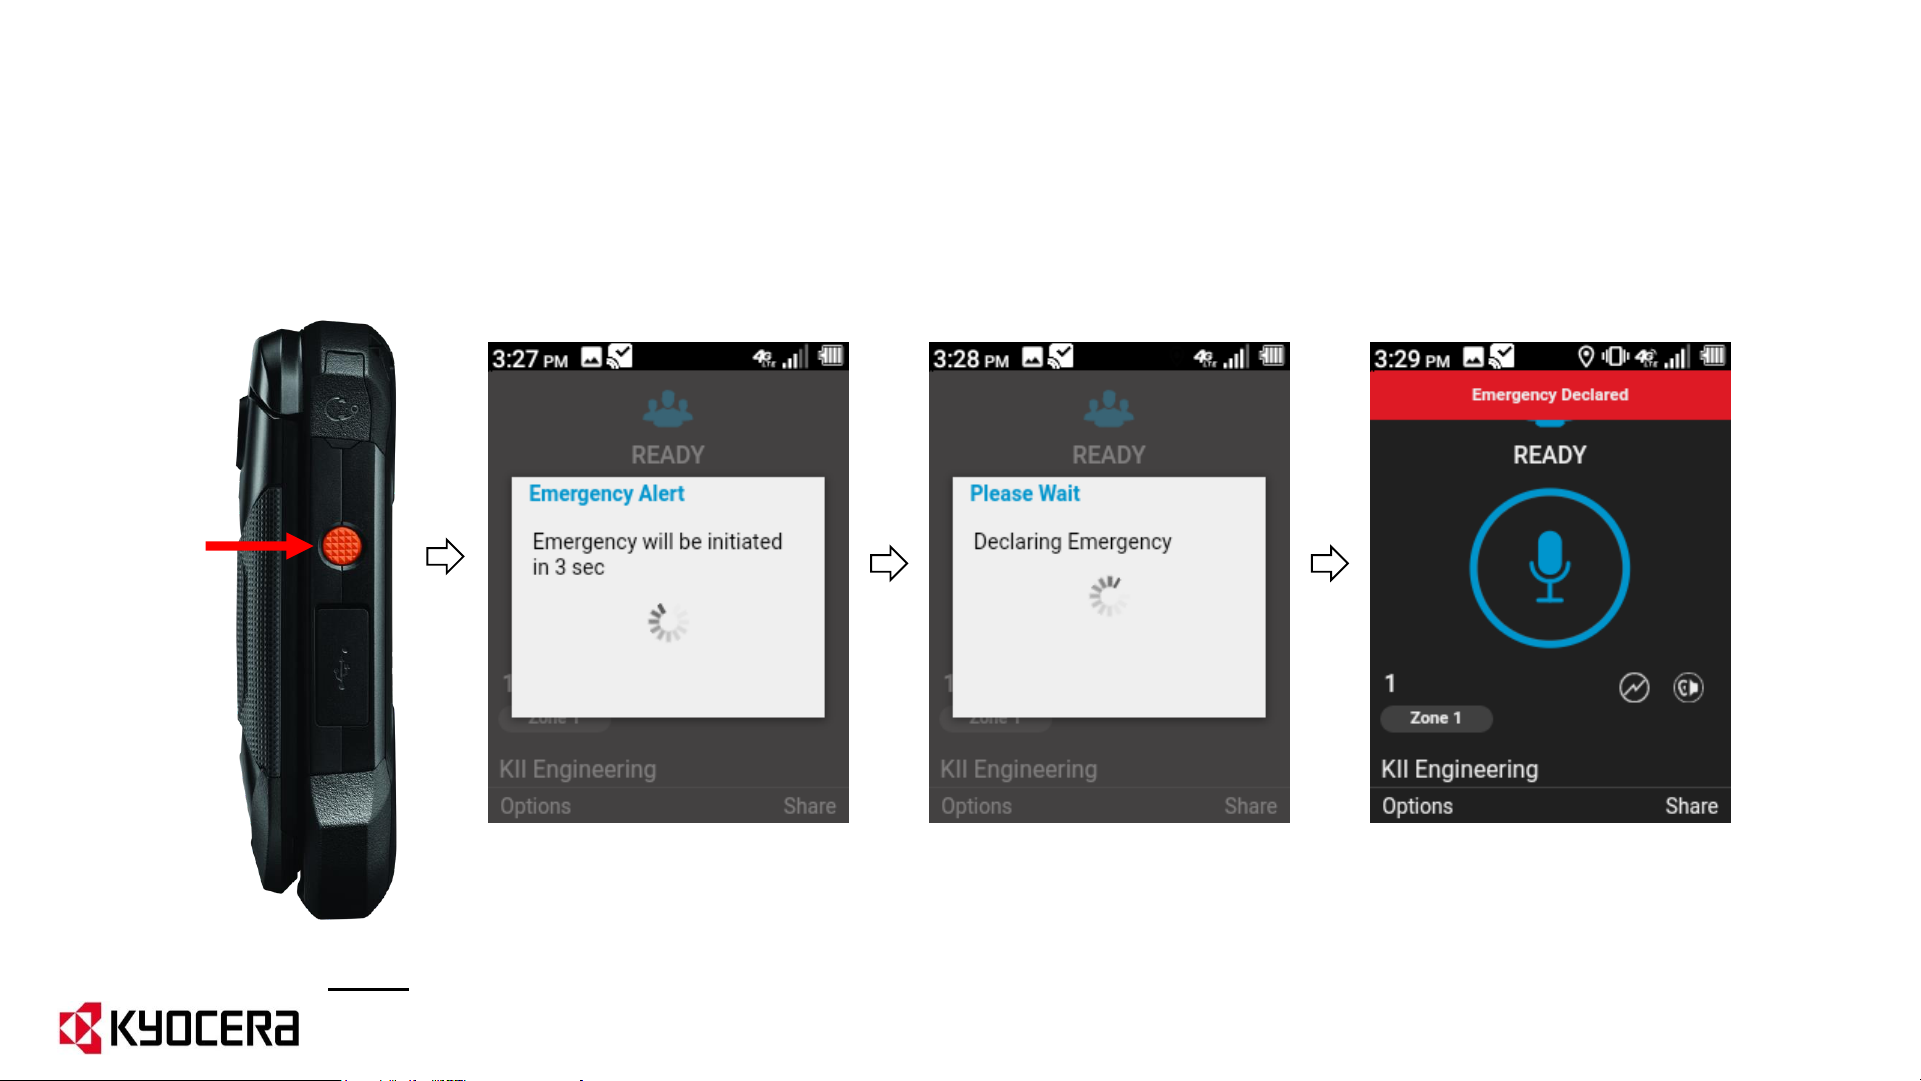
Basic UI: How to Make an Emergency Call (using SOS key)
1. Press and hold SOS key for 3 seconds.
2. Emergency is declared.
SOS Key
Note: You can make an Emergency Call using SOS Key with Flip open or Flip closed.
41

Basic UI: Receiving an Emergency Call
Once the subscriber declares an Emergency, the emergency destination group or contact
will receive the emergency notification. When the subscriber in emergency initiates call
from his or her call ready screen, you as a member of the emergency destination group or
emergency contact will receive the Emergency call.
Once the emergency is cancelled, you will receive an emergency cancellation notification.
42

Basic UI: How to Cancel an Emergency Call
1. Press the Options key, scroll up to Cancel Emergency and select.
2. An emergency “Cancel” icon will appear on your screen.
3. Select “Confirm” to cancel the emergency.
4. Select either “Real emergency” or “False alarm” as appropriate.
5. Emergency is cancelled and all contacts that are part of the assigned emergency
destination are notified of the cancellation.
Note: You can also Cancel an Emergency Call by pressing and holding the SOS Key for 3 seconds.
43

EPTT Radio
User Interface
44
Radio UI: Overview
The EPTT Radio User Interface is designed to emulate a land mobile radio on your
phone. Allowing the users to communicate with groups or contacts using traditional
push to talk like a land mobile radio.
“Home” screen is always
a channel (talkgroup or
individual) call ready
screen; it displays the
Zone and Channel
selected by the user.
EPTT Radio UI uses
concept of Zones and
Channels – similar to LMR.
Channels can be easily
changed with the left/right
navigation keys.
Can also make 1:1 calls
from the Radio UI.
Note: User interface type is configured by the EPTT Admin through the CAT tool.
45

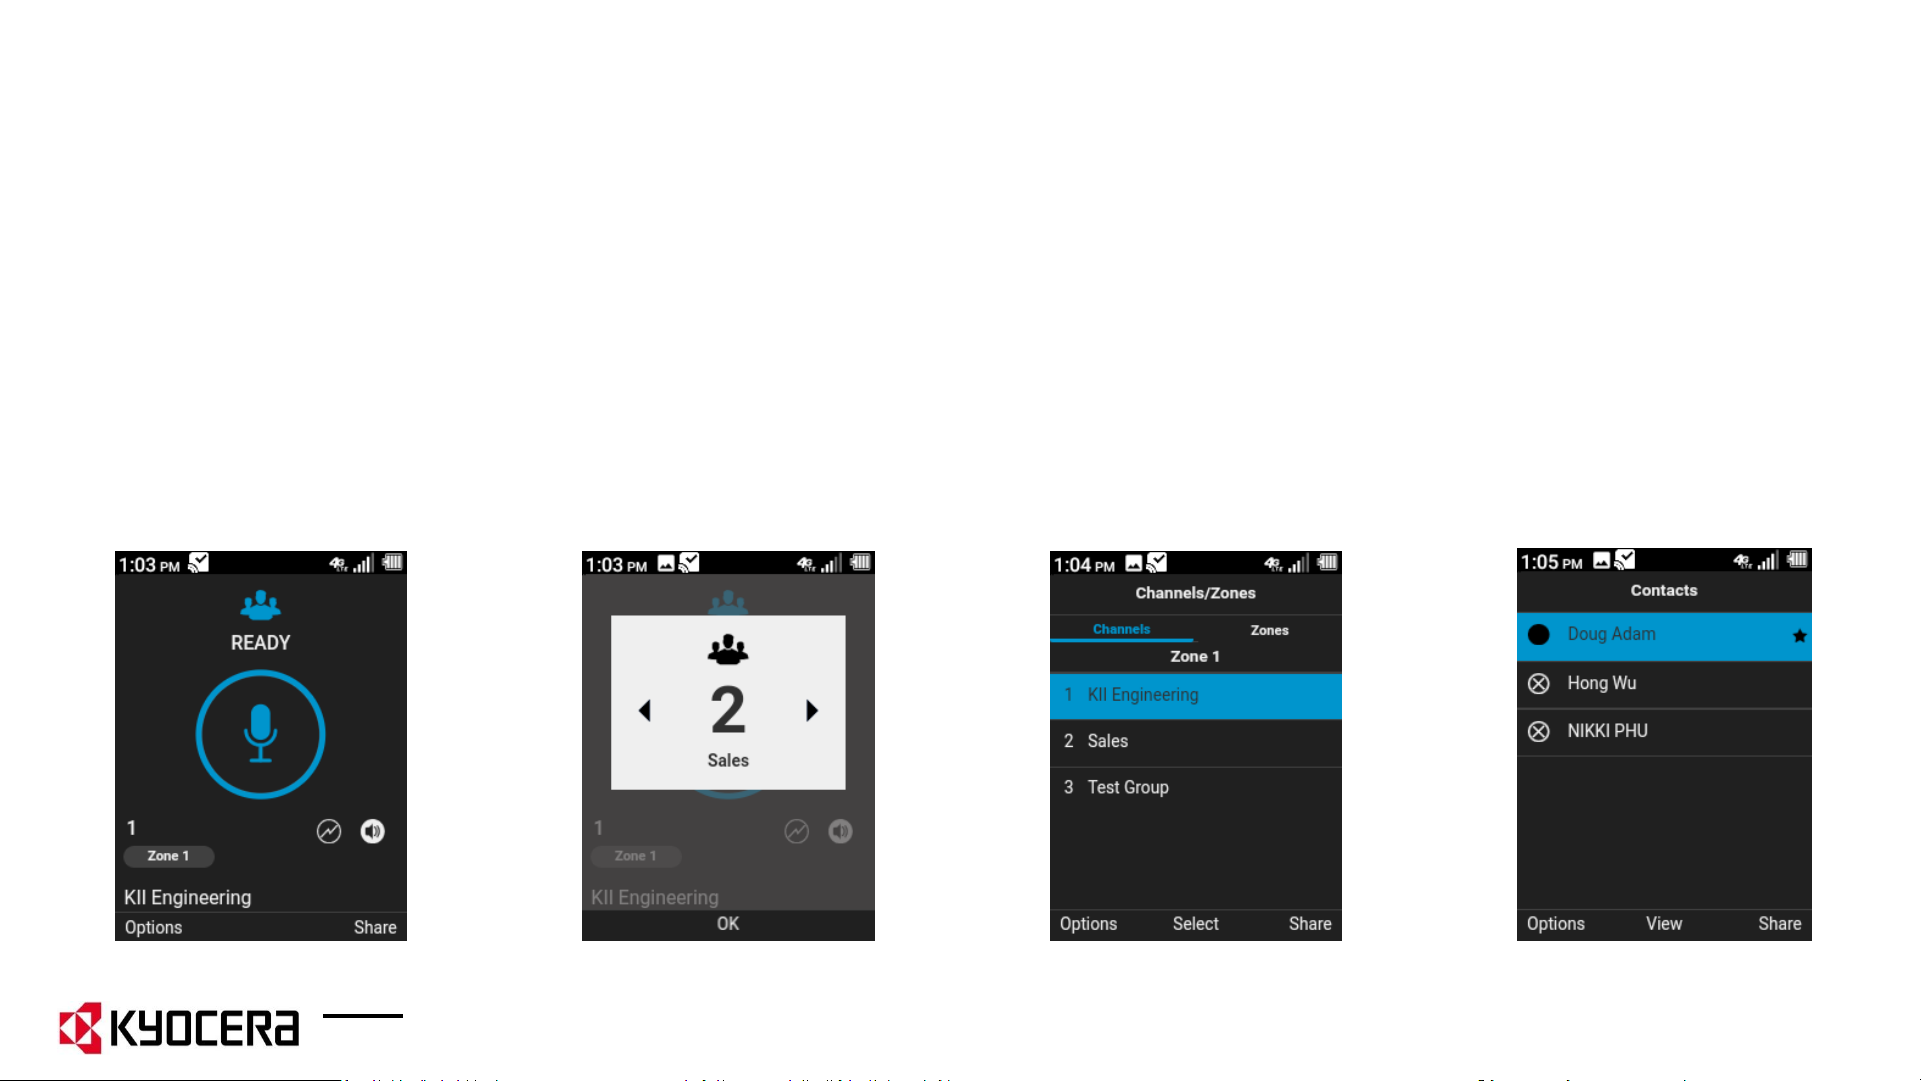
Radio UI: Zones and Channels
The EPTT Radio UI uses the concept of zones that segment channels into logical
talkgroups similar to LMR radios. The EPTT Admin can create up to 6 zones per user,
each of which can contain up to 16 talkgroups (96 total).
Press left soft key
“Options”.
View list of Channels
in Zone 1.
Scroll down to select
“Channels/Zones”.
Use Nav key (right
arrow) to view Zones.
To go to a particular talkgroup, navigate to the desired Zone and Channel, scroll to it then select it.
46

Radio UI: Scanning On/Off
• When scanning is OFF (camping), you will only receive calls for the Zone/Channel displayed on
the screen.
• When scanning is ON, you will receive calls from any Zone/Channel with channel scanning
priority assigned by the EPTT Admin using the CAT tool.
Press left soft key
“Options”.
Scroll down and select
“Turn Scanning On”.
Scanning
ON
47

Radio UI: Changing Channels (Flip Open)
With the EPTT Radio UI, you’ll always be in one of up to 6 zones. Each zone can have 1 to
16 channels (controlled by the EPTT Admin).
To change channels within a zone, use the right and left navigation keys to choose your
active EPTT channel.
48

Radio UI: Changing Channels (Flip Closed)
To change channels while the flip is closed, you must first assign the External Speaker key
and Call List key to the EPTT App. (Please refer to the next page for detailed instructions.)
Channel
UP
Channel
DOWN
Note: When the channel is
changed, the Kyocera DuraXE Epic
will audibly announce the name
and/or channel number of the
newly set channel.
External
Speaker key
Call List
key
49

Radio UI: How to assign External Keys to EPTT Channel Up/Down
1. For Channel UP: Settings→Programmable keys→External speaker key→ Set to EPTT (plus) channel
2. For Channel DOWN: Settings→Programmable keys→Call list key→ Set to EPTT (minus) channel
Note: Once you assign the external keys to EPTT Channel Up/Down, you will no
longer be able to use the left/right Nav keys to change channels.
50

Radio UI: EPTT Channel Announcement
In EPTT Settings, scroll
down to select “Channel
Announcement”.
After you have assigned external keys to EPTT Channel Up/Down, then go the
EPTT App and select your Channel Announcement preference.
Note: “Channel Announcement” will not appear in the EPTT Settings menu until you have
assigned your external keys to EPTT Channel Up/Down.
Select desired type
of “Channel
Announcement”.
51
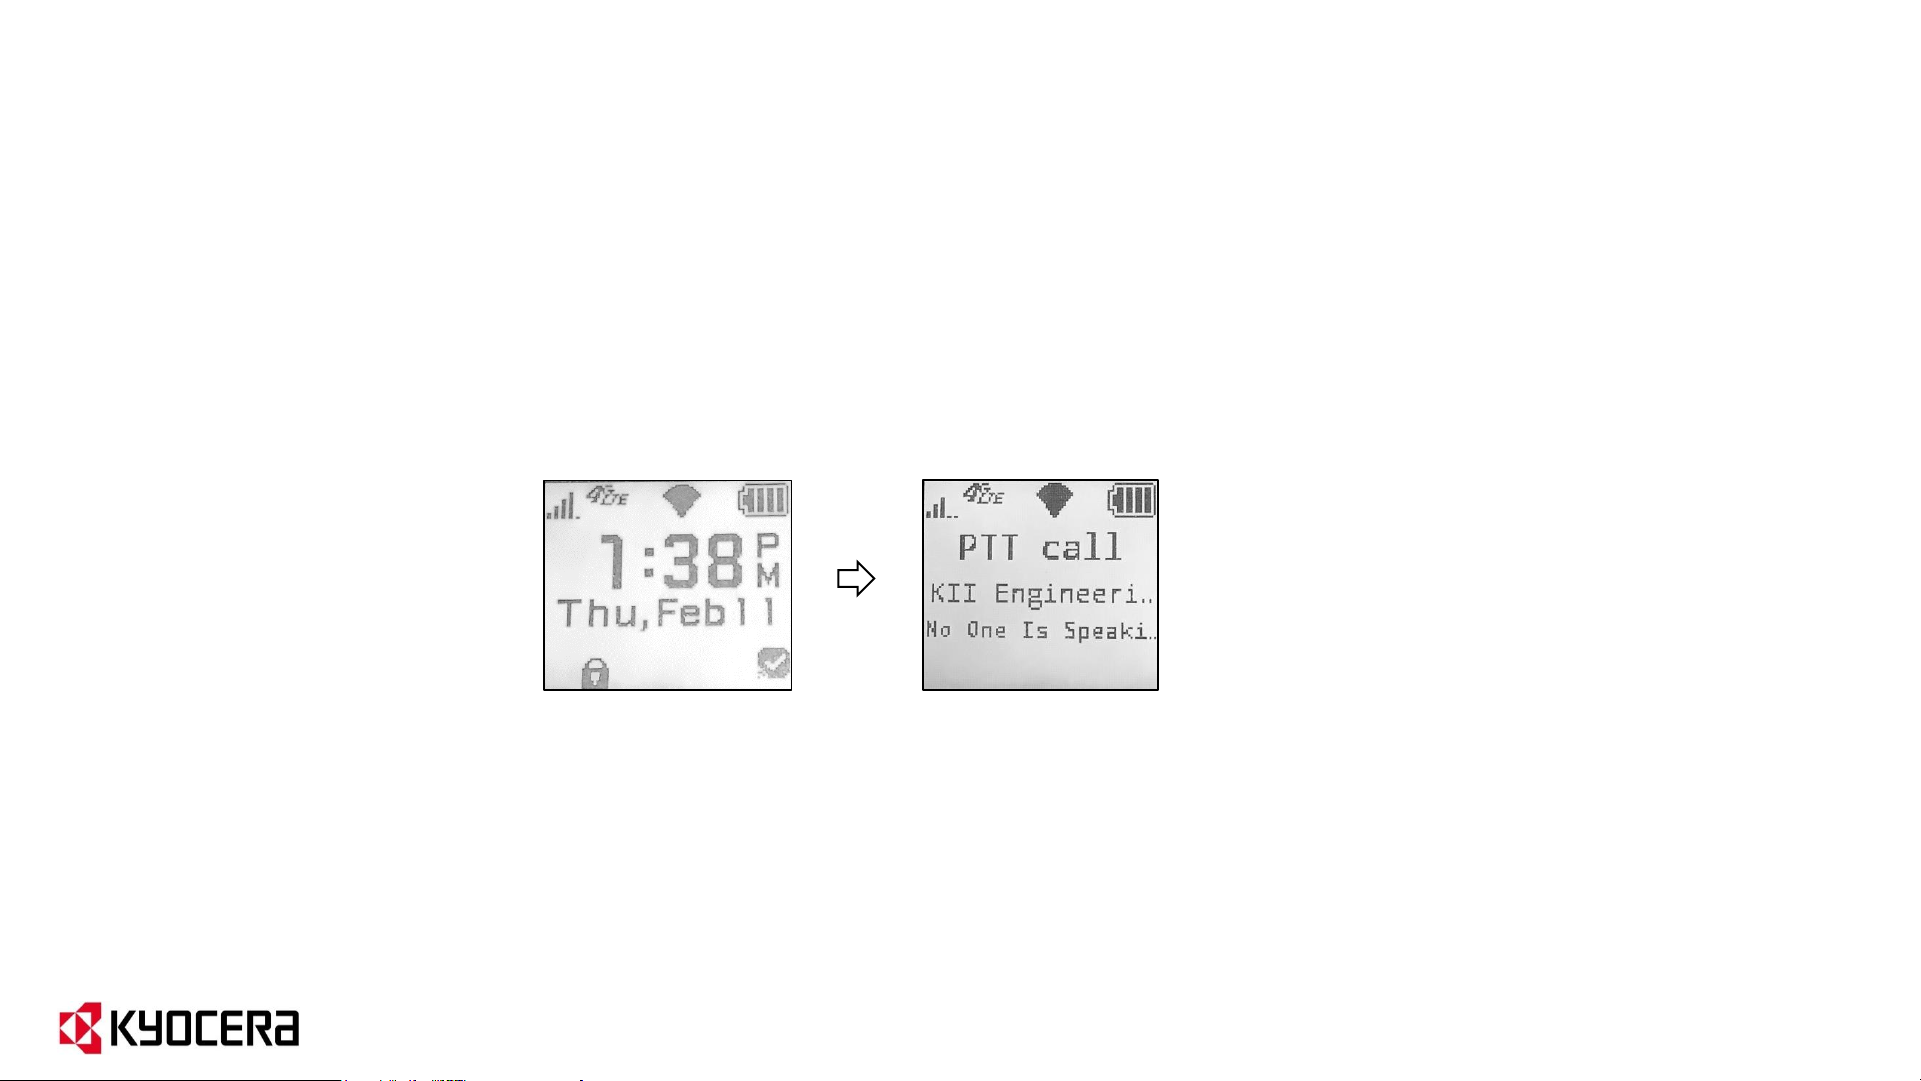
Radio UI: How to make EPTT calls (Flip Open)
1. Press PTT key to initiate call. (Call will be made on current channel.)
2. The screen will show who is speaking.
52
Radio UI: How to make EPTT calls (Flip Closed)
1. Press PTT key to initiate call. (Call will be made on current channel.)
2. The screen will show who is speaking.
53

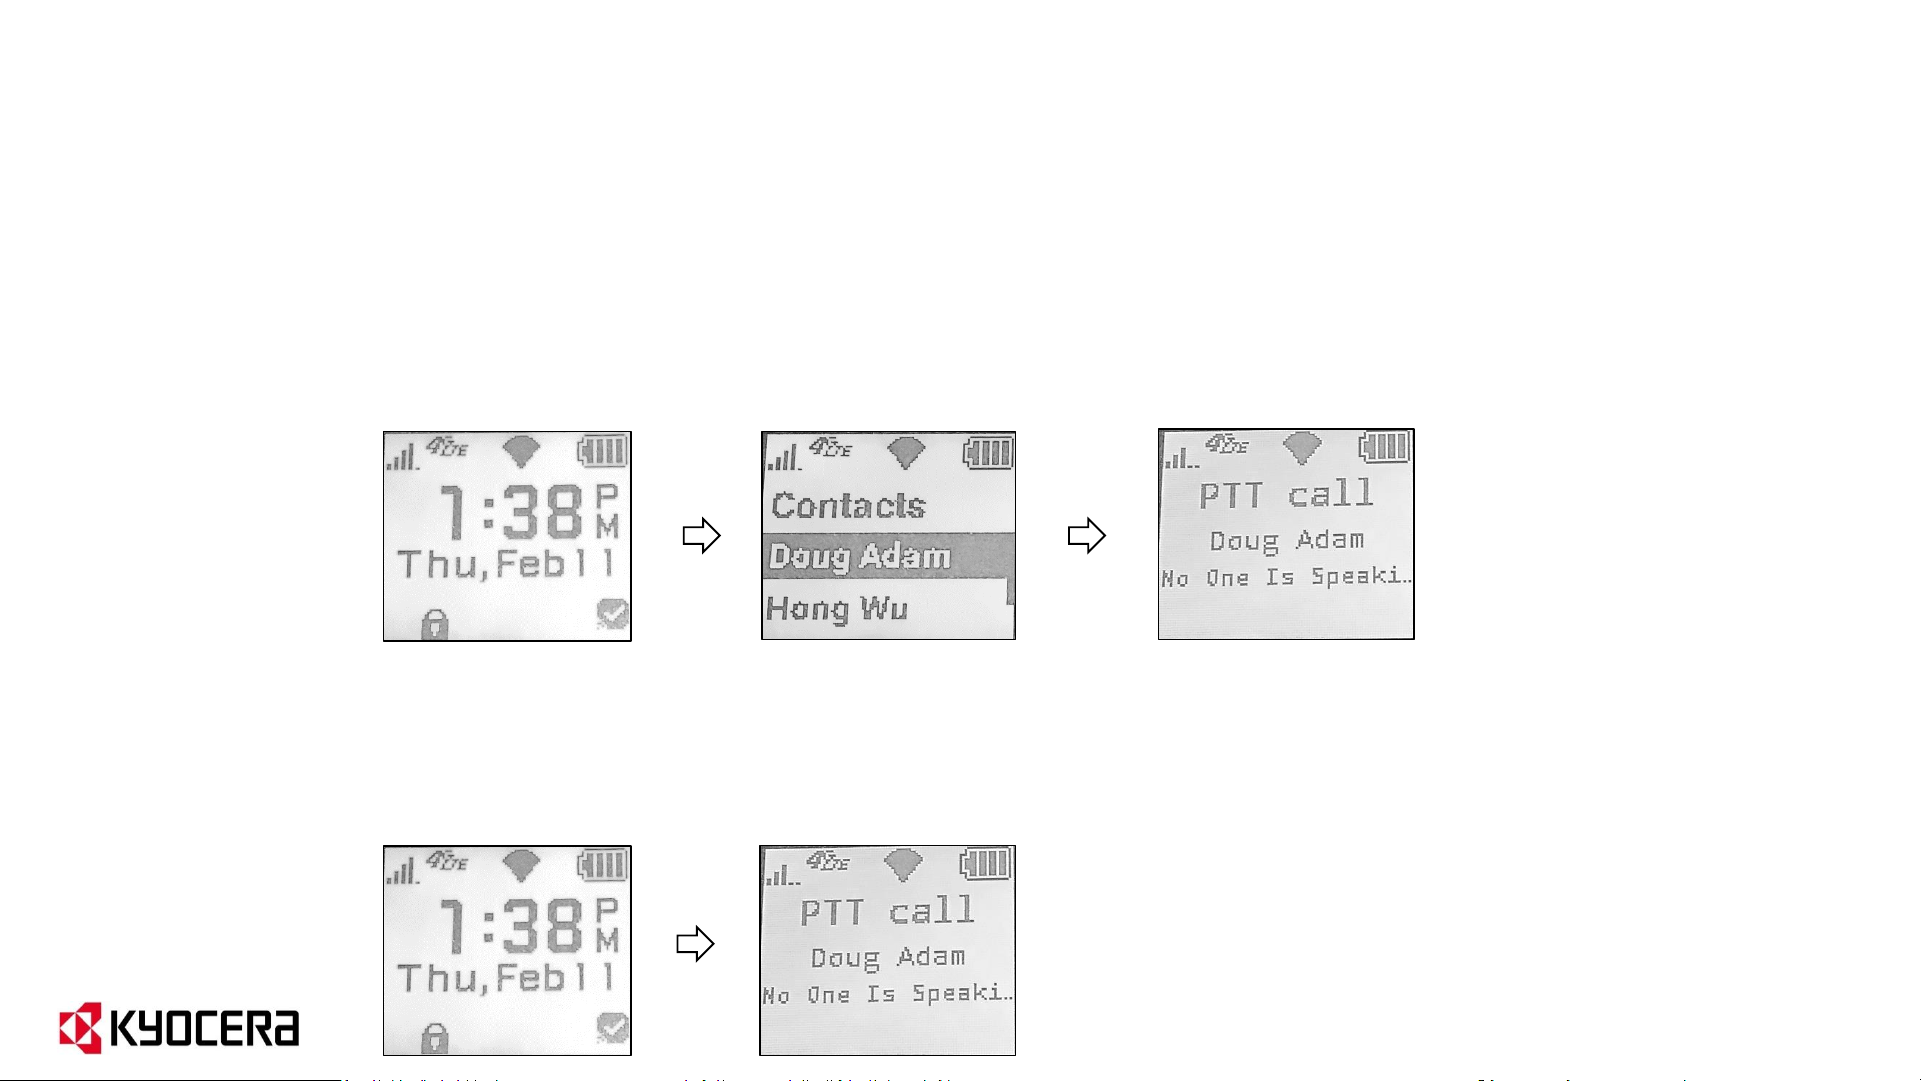
Radio UI: How to make 1-to-1 EPTT calls
1. From “Ready” screen, press left soft key (Options).
2. Scroll to “Contacts List” and select.
3. Scroll to the contact you want to call and press PTT key.
If the person has an X next to their name, it means they are not available. If you try and
call them, it will send a Voice Message to them.
54
Radio UI: Emergency Calling and Alerting
• Emergency Calling and Alerting makes it possible for those in immediate danger to
quickly communicate with an individual or groups who can provide assistance.
• When EPTT users declare an emergency all PTT communication is immediately routed,
with the highest priority, to the designated individual or group.
Note: This Feature is available only to "EPTT Advanced Package“ subscribers.
55
Radio UI: How to Make an Emergency Call
1. Open the app, press the Options key, scroll up to Emergency and select it.
2. An emergency “Declare” icon will appear on your screen.
3. Select “Confirm” to declare an emergency. When an Emergency Call is initiated, it is
to a destination - Contact or Group. The destination is assigned via the Corporate
Admin Tool. If the subscriber is already in a call with the assigned destination Contact or Group, the call will be upgraded to an Emergency Call.
4. Once the Emergency Call is initiated, if the floor is not taken for 10 sec the call shall
end. Your mic will be live for the first 10 sec of the call or until the call is ended.
56
Radio UI: How to Make an Emergency Call (using SOS key)
1. Press and hold SOS key for 3 seconds.
2. Emergency is declared.
SOS Key
Note: You can make an Emergency Call using SOS Key with Flip open or Flip closed.
57

Radio UI: Receiving an Emergency Call
Once the subscriber declares an Emergency, the emergency destination group or contact
will receive the emergency notification. When the subscriber in emergency initiates call
from his or her call ready screen, you as a member of the emergency destination group or
emergency contact will receive the Emergency call.
Once the emergency is cancelled, you will receive an emergency cancellation notification.
58

Radio UI: How to Cancel an Emergency Call
Note: You can also Cancel an Emergency Call by pressing and holding the SOS Key for 3 seconds.
1. Press the Options key, scroll up to Cancel Emergency and select.
2. An emergency “Cancel” icon will appear on your screen.
3. Select “Confirm” to cancel the emergency.
4. Select either “Real emergency” or “False alarm” as appropriate.
5. Emergency is cancelled and all contacts that are part of the assigned emergency
destination are notified of the cancellation.
59

Business tools:
• Device Control
• Carkit power on/off
60

Device Control Overview
61

Device Control Overview (cont.)
62

Device Control is preloaded on DuraXE Epic for basic options. For advanced configurations,
please contact Kyocera Business Select.
Device Control Overview (cont.)
63

This app is preloaded on DuraXE Epic and has to be enabled during the initial device setup. (Note: Users
who have already completed the initial device set-up will need to reset the device to perform this
procedure.)
Set-up procedure:
1. Immediately after initial power up, language selection screen appears.
2. Enter secret code *#*#*# to initiate Device Control set up.
3. After making language selection, go to Settings & Tools/Business Tools/Device Control.
4. Enter default password (000000) and press center soft key to sign into Device Control.
5. Set the desired restrictions (see next page for an example).
Enter:
*#*#*#
How to create a Device Control Policy
64
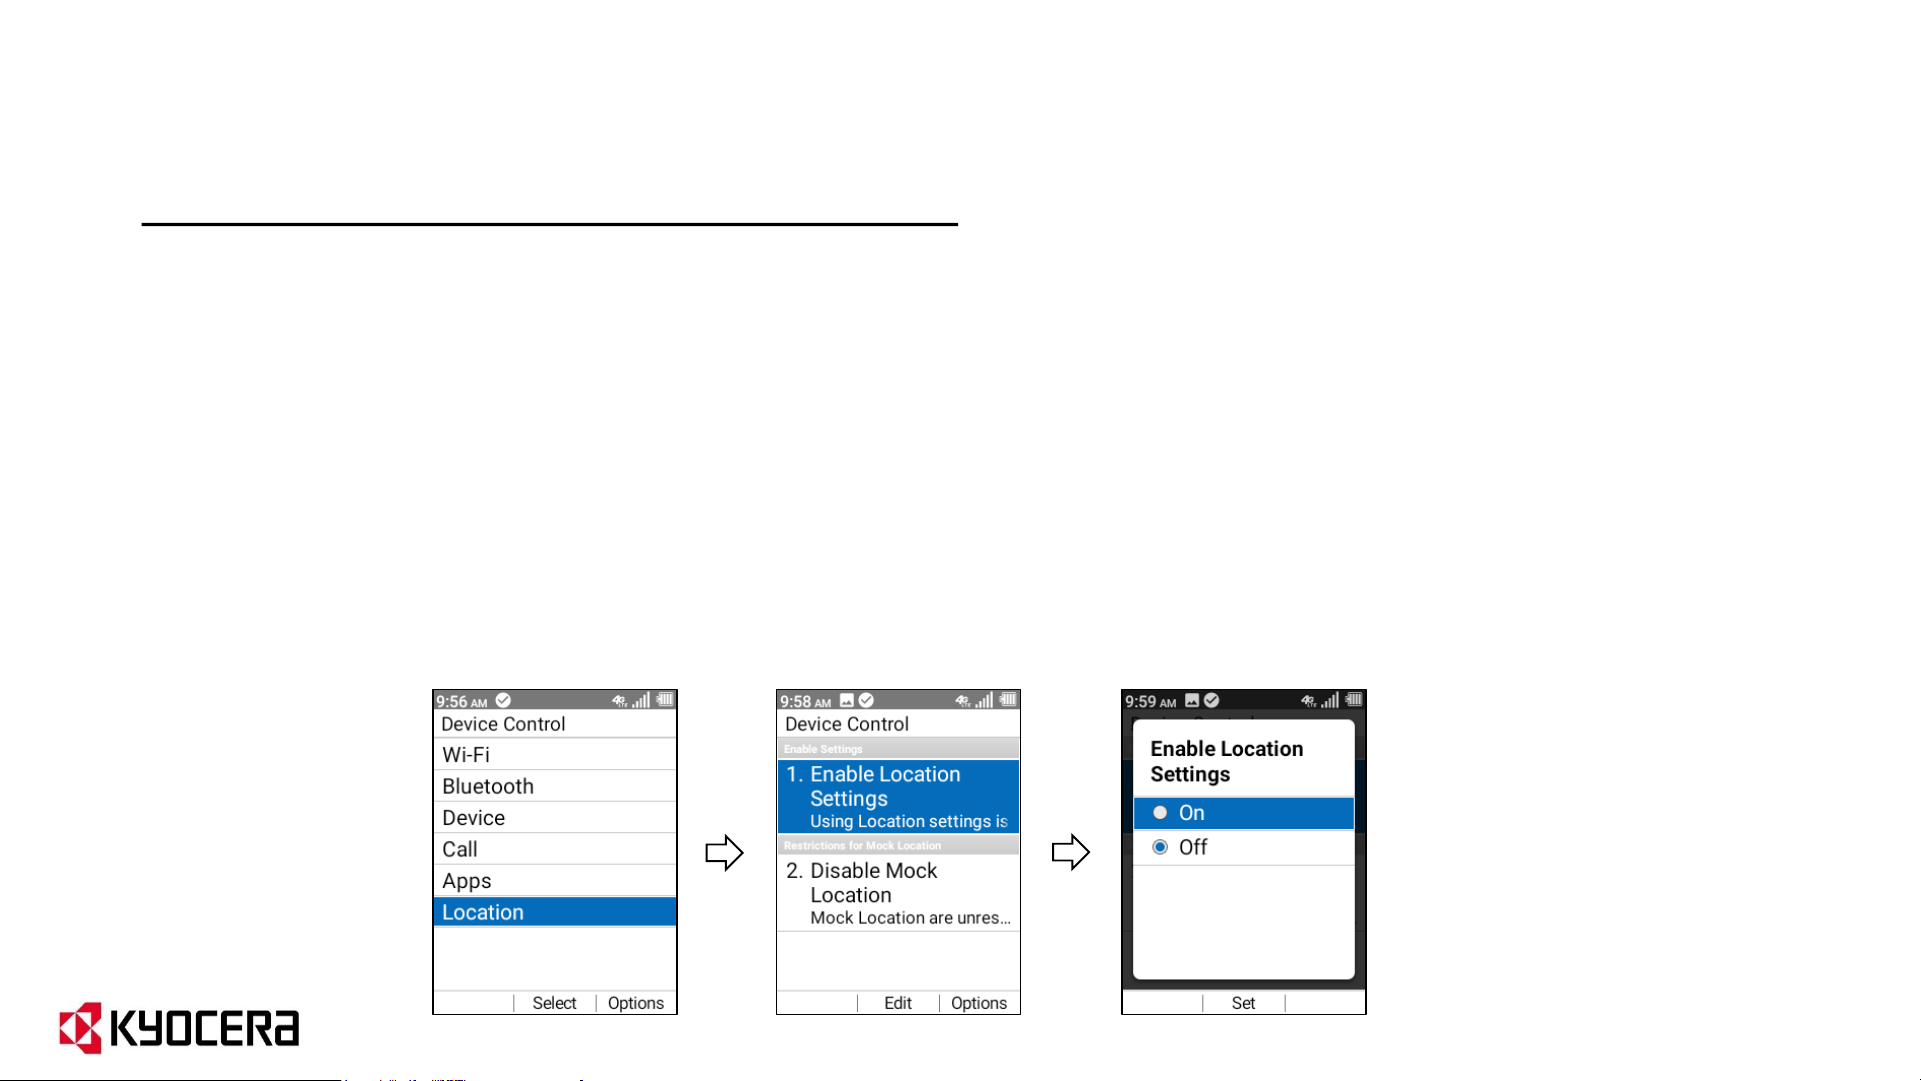
Example: How to restrict Location settings:
If you want to restrict the user’s ability to disable location services follow these steps:
1. In Device Control menu, select Location.
2. Select “Enable Location Settings”.
3. Change “Enable Location Settings” from Off to On.
4. When “On” is selected, Location will be set to “High Accuracy” and user will not be
able to change it. (If user were to change Location to “E911 Only”, location sharing
feature of EPTT App would not work.)
How to create a Device Control Policy (cont.)
65
Using Device Control and EPTT together:
Care must be taken when setting up Device Control on phones that use EPTT App.
The table on the next page shows Device Control settings to avoid when using EPTT.
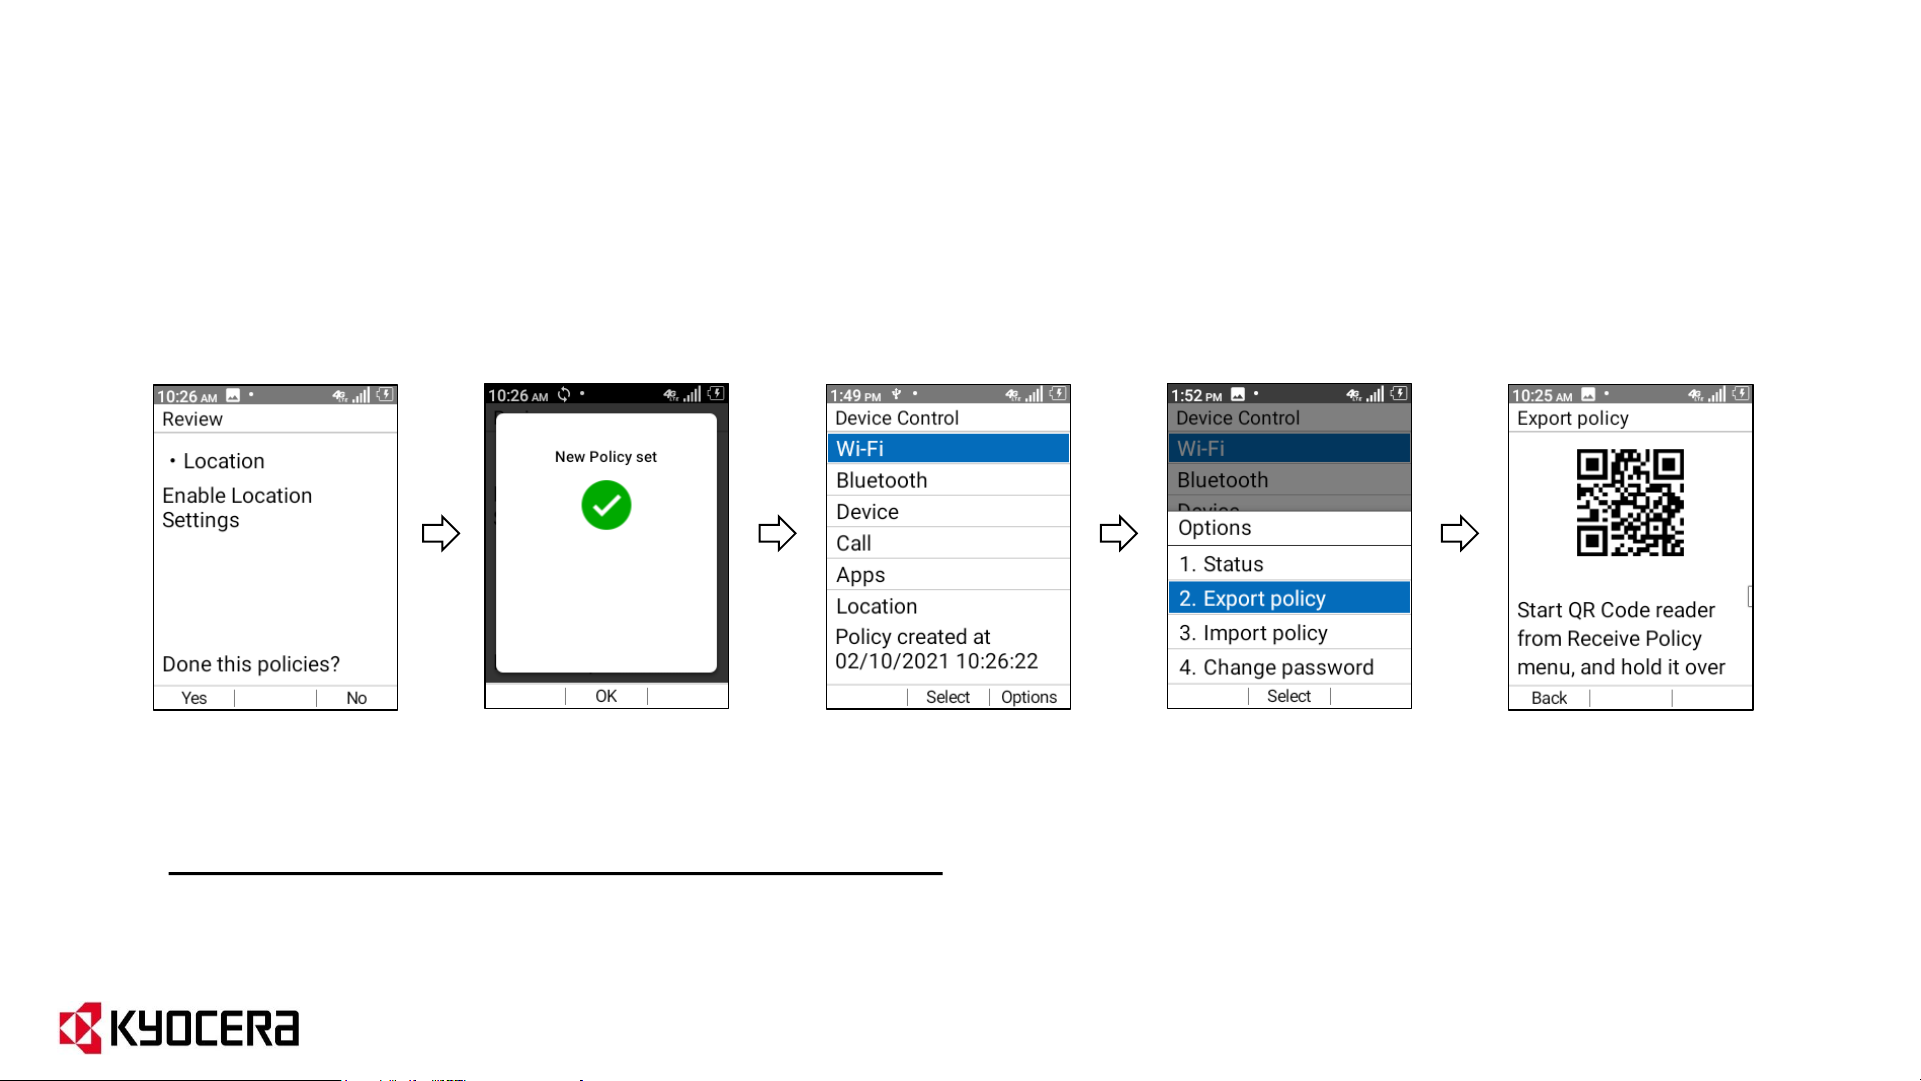
After you are done configuring your various restrictions, you can copy the
saved Device Control policy to another device by using the QR code and Wi-Fi
functions. Press the right soft key [Options] > Export Policy (sending device).
How to create a Device Control Policy (cont.)
66

Device Control and Potential Impact on EPTT Functionality
Category
Restriction
Impact
EPTT?
Impact on EPTT Functionality
Wi
-Fi
Disable Wi
-Fi Yes
EPTT will not work over Wi
-Fi.
Bluetooth
Disable Bluetooth
Yes
EPTT will not work with Bluetooth devices.
Device
Disable SMS
Yes
Disabling SMS blocks EPTT activation.
Disable FOTA
No
Disable Camera
Yes
Prevents user from taking photos or recording
videos within the EPTT App.
Disallow Unknown Sources
No
Disable SD card
Yes
User will not be able attach files from SD card.
Call
Disable Voice Roaming
No
Disable Data Roaming
Yes
EPTT service cannot be used while roaming.
Disable Data
Yes
EPTT service cannot be used over cellular.
Restrict Contact List
No
Restrict Incoming Calls
No
Restrict Outgoing Calls
No
Apps
Hidden Applications
Yes
EPTT app can be hidden.
Location
Enable Location Settings
No
Disable Mock Location
No
67
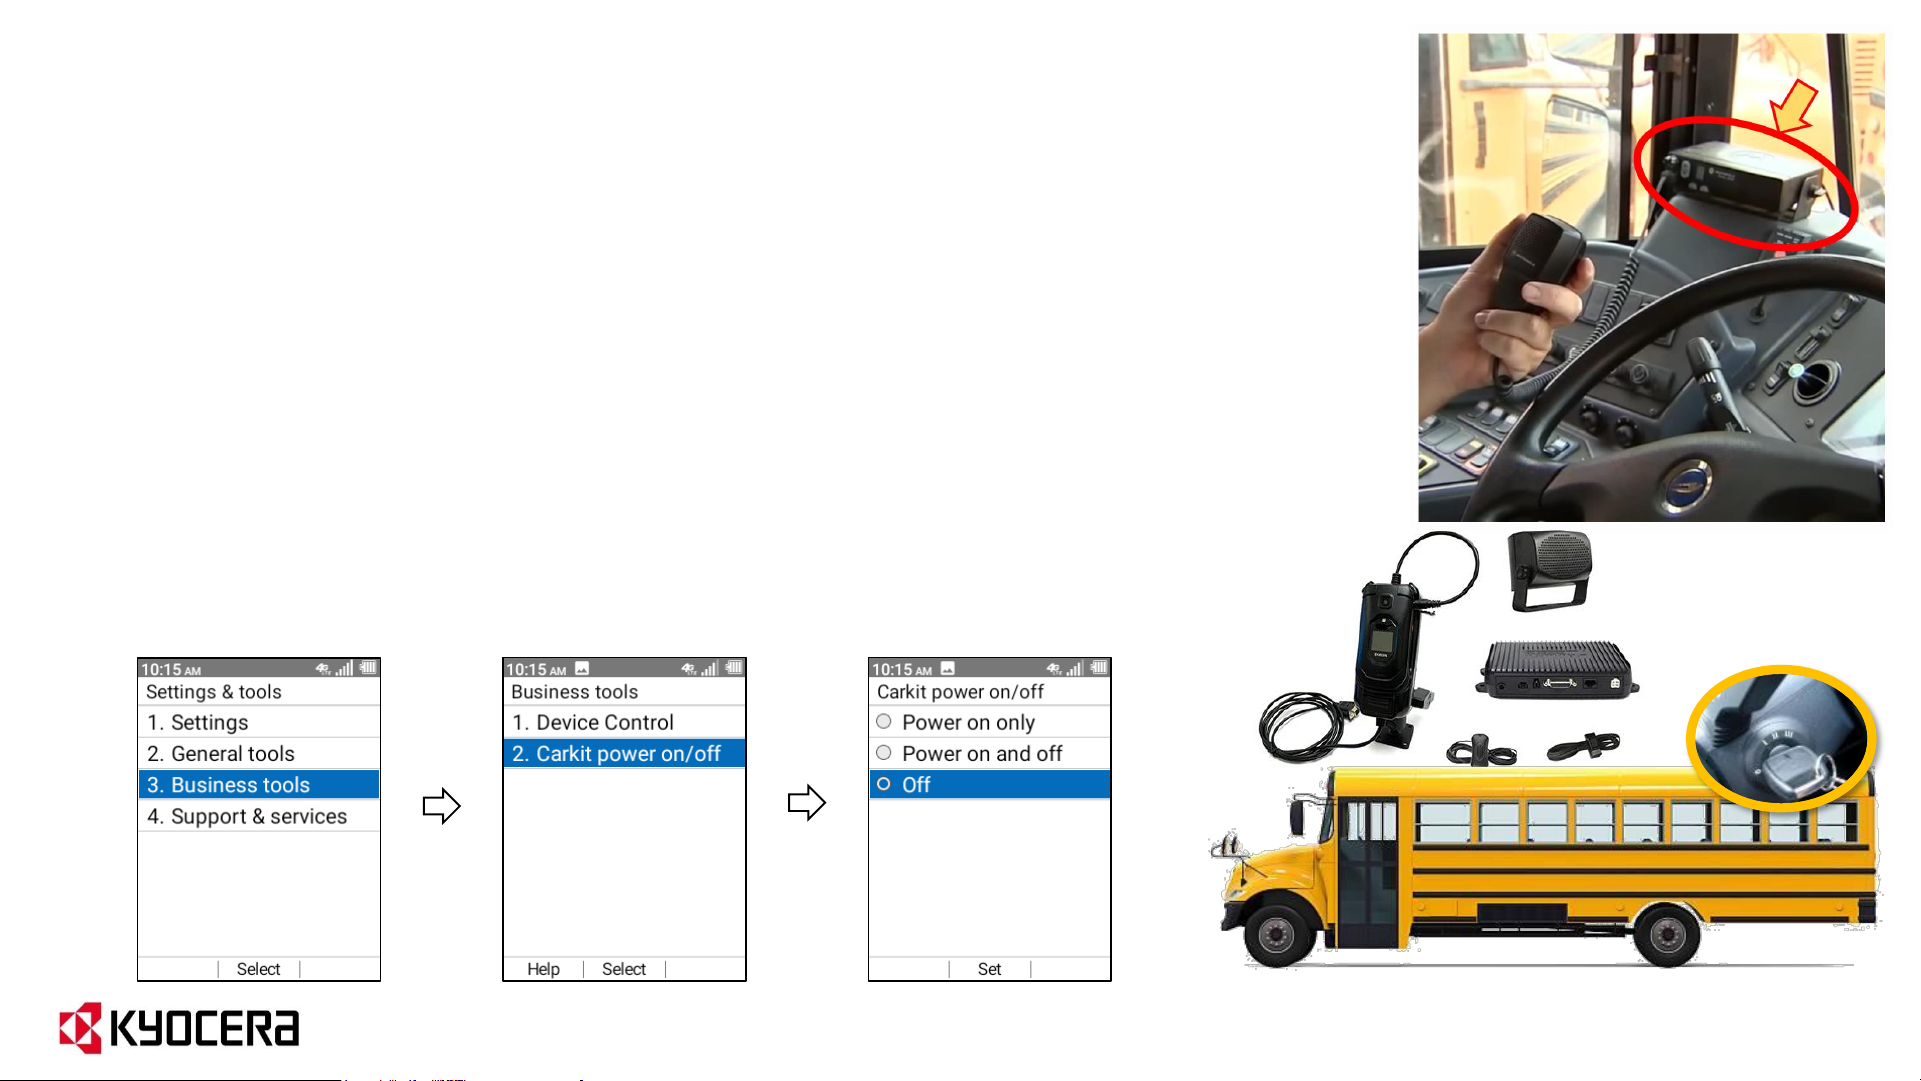
Business Tools: Car Kit Power on/off
The main use cases for the Car Kit power on/off are for school bus drivers or
delivery truck drivers who use EPTT and external Car Kit.
When the driver turns on the engine, the phone gets automatically powered
on. When the driver finishes the job and turns off the engine, the phone is
automatically powered off.
The car kit detects the ignition signal and supplies power to the phone
through the rear charging pads. This feature is enabled from the Settings
menu.
68
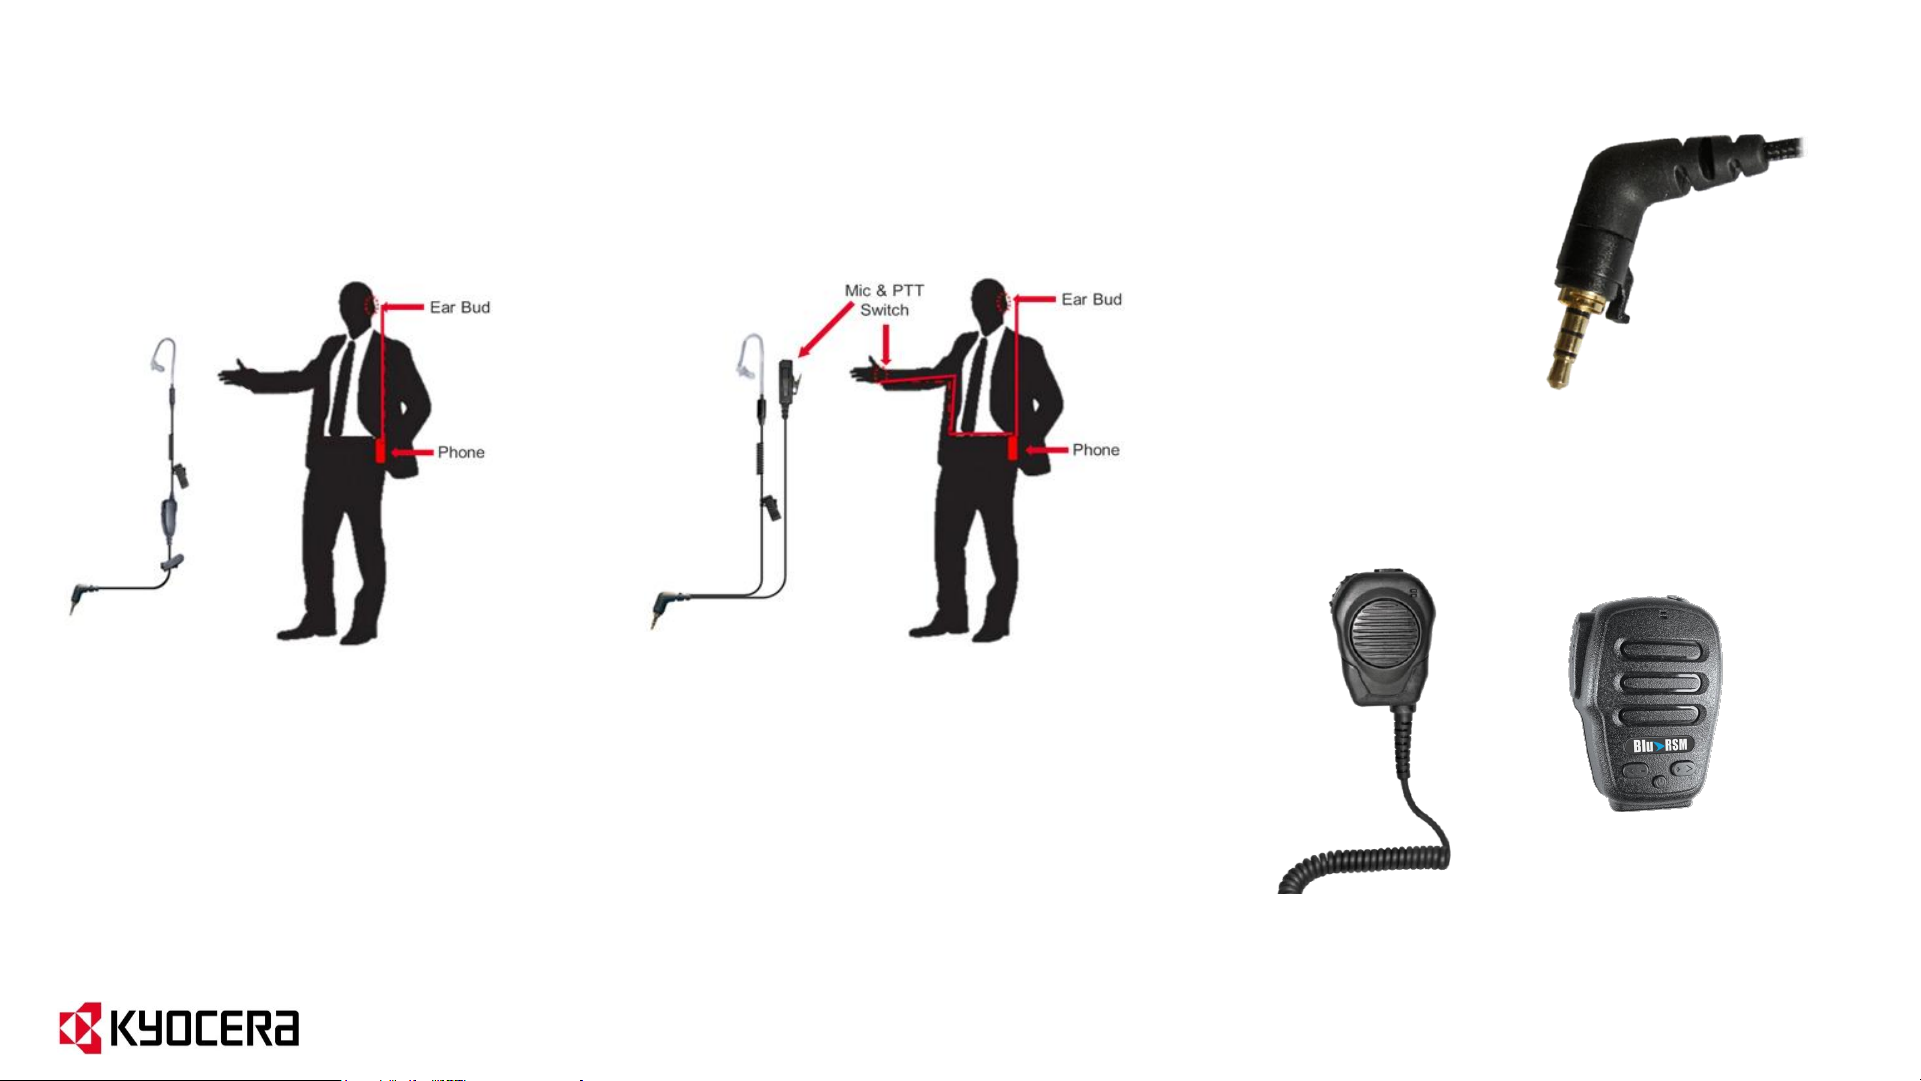
DuraXE Epic PTT Accessories
AUDIO SOLUTIONS
Wired RSM Bluetooth RSM
DuraXE Epic supports Cam Lock.
Available on all Klein
Wired Headsets and RSMs
The 5-Pole connector allows the device
to have a Dedicated PTT circuit
Headsets can be worn in ear, over the ear or behind the ear.
1-Wire Standard Headset
Verticals used in:
Hospitality, Constructions, Public Safety,
Warehousing, Manufacturing, Retail, and
Restaurants
2-Wire Surveillance Headset
Verticals used in:
Public Safety, Security
69

DuraXE Epic PTT Accessories (cont.)
70

Device Charging Holster
Replaceable 2940mAh
Other items
• ProCLIP Vehicle Non-Charging Mount
• Advanced Communicator
• Single Device Charger
• Single Bay Battery Charger
DuraXE Epic PTT Accessories (cont.)
71
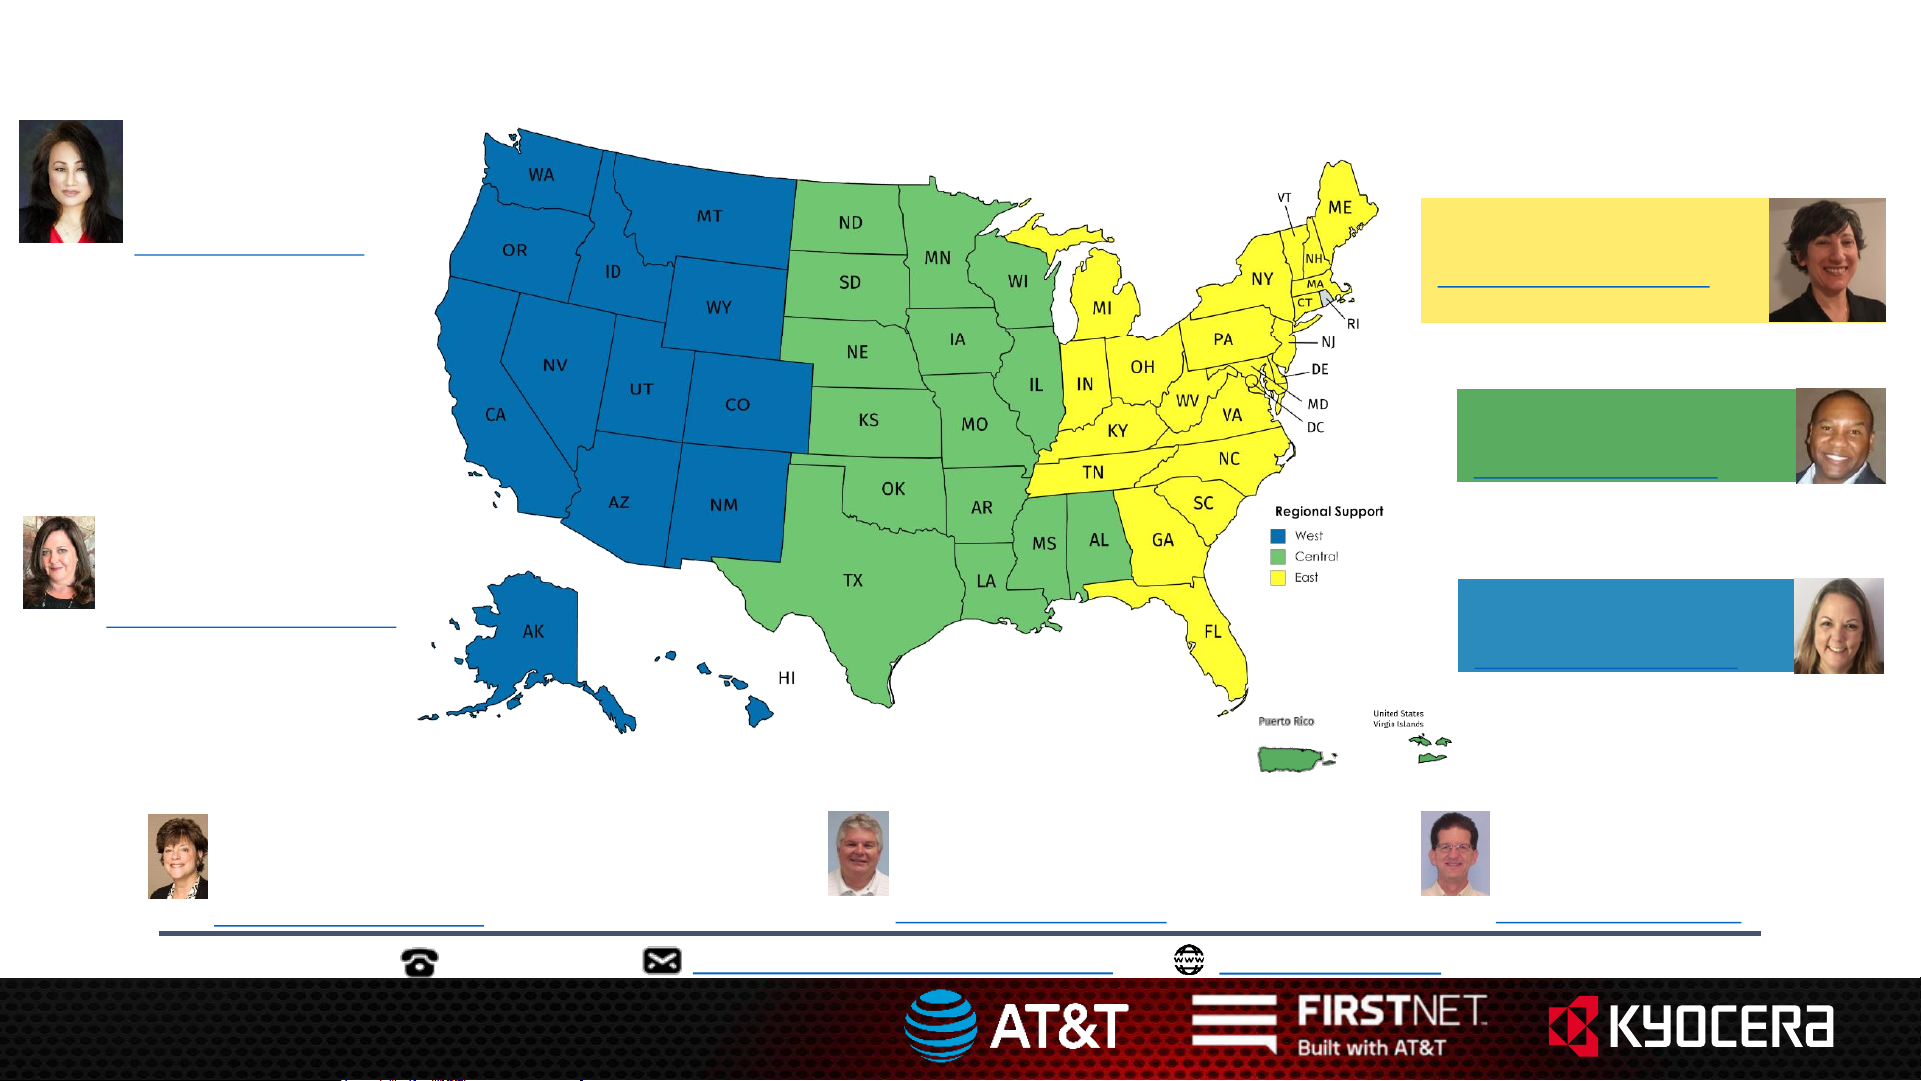
Nikki Phu - 858.204.0673
DGM, Sales
KII-CEG HQ, San Diego, CA
Nikki.Phu@kyocera.com
Lynn Robertson - 858.285.8988
AT&T Channel Marketing Mgr
San Diego, CA
Lynn.Robertson@kyocera.com
Kyocera AT&T Sales Team
Business Select: 866.844.7525 BusinessSelectSupport@Kyocera.com
Angela Spain- 865.274.2049
AT&T Sales Account Mgr (West)
Angela.Spain@kyocera.com
Chuck Phillips - 858.204.0155
Business Development, Accessories
San Diego, CA
Chuck.Phillips@kyocera.com
Greg Eager - 619.890.2655
Quality Assurance
Overland Park, KS
Greg.Eager@kyocera.com
Kirk Nobles– 972.358.6513
AT&T Sales Account Mgr (Central)
kirk.nobles@kyocera.com
Laurie Rogers – 619.990.4316
DGM, Channel Mktg/Business Solutions
San Diego, CA
Laurie.Rogers@kyocera.com
Sarah Estrella – 828.301.8647
AT&T National Sales Lead (& East)
Sarah.Estrella@Kyocera.com
KyoceraMobile.com
 Loading...