

Page 1
Thank you for purchasing the Korg PitchCrow-G Clip- on Tuner.
2 semitones
lower
3 semitones
higher
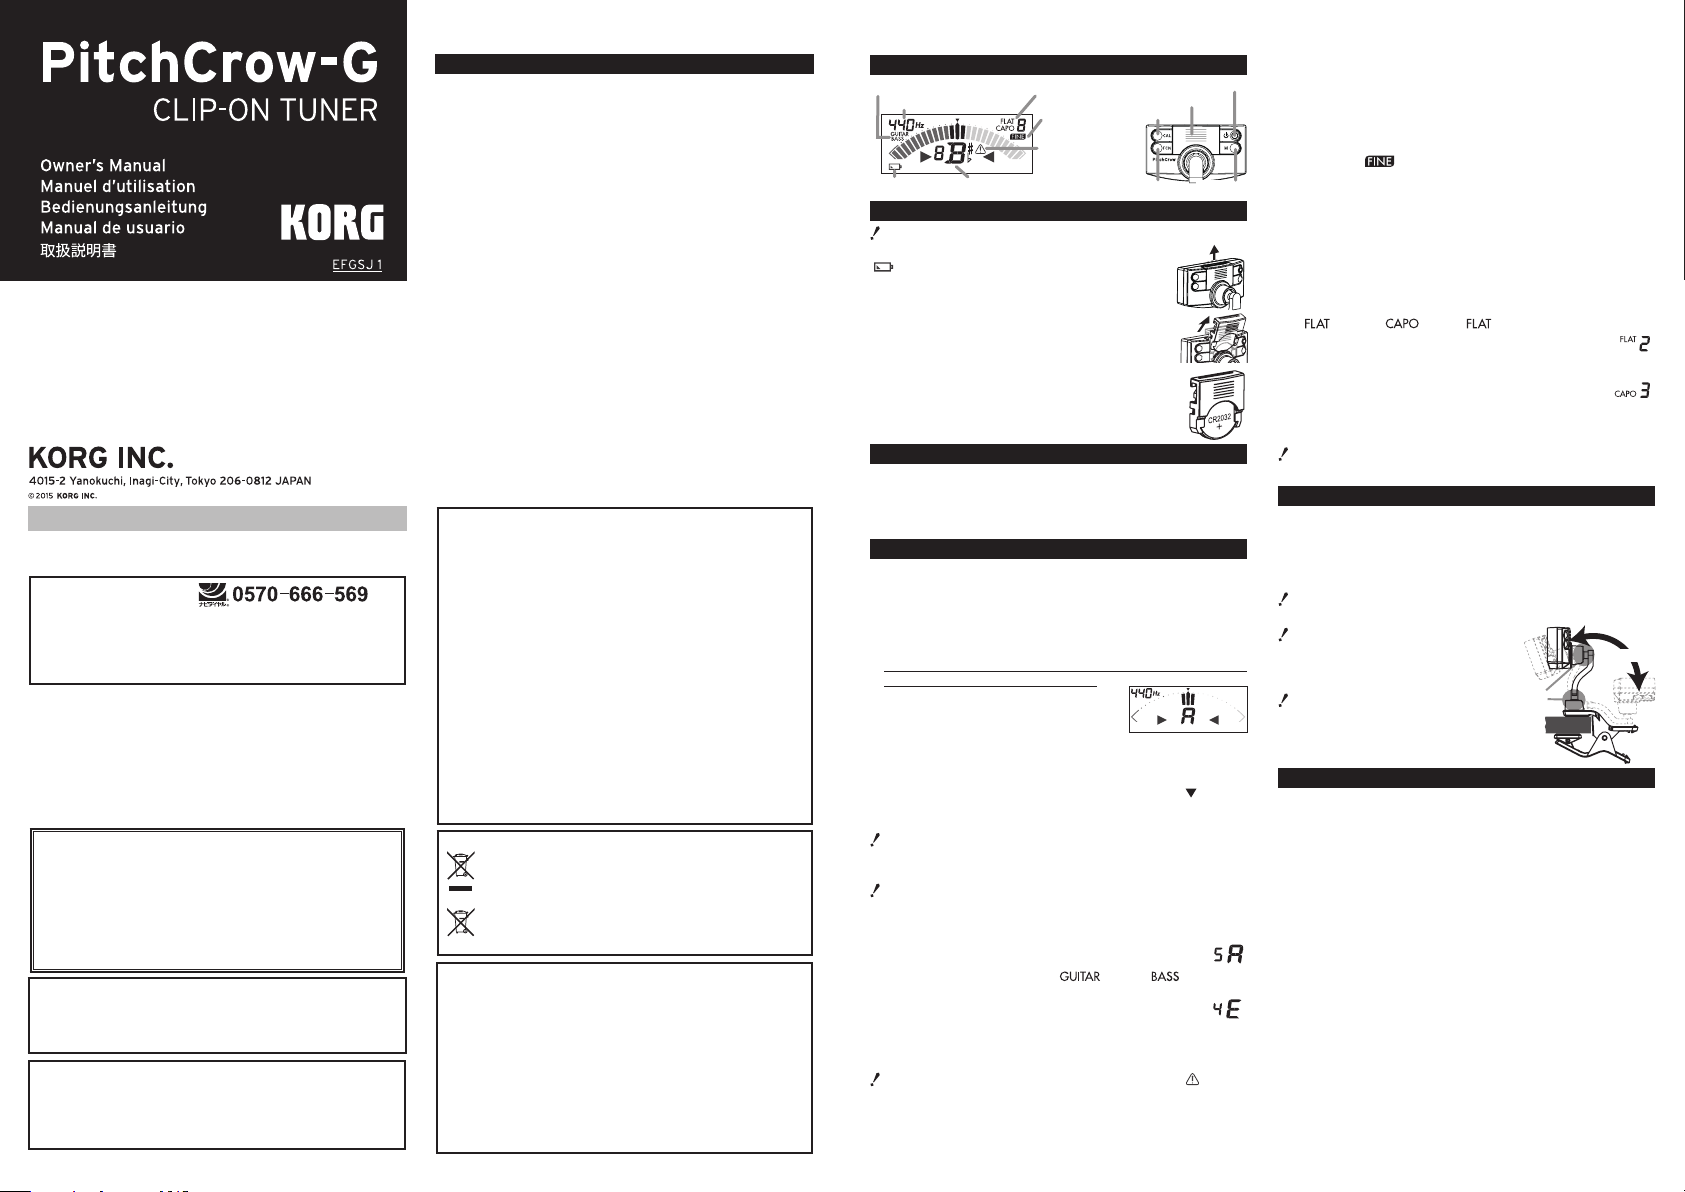
Power button
FLAT/
Mode indicator
Battery indicator
Note name indicator
FCN button
M button
A
Meter indicator
when correctly tuned
5th guitar
string
4th bass
string
Merci d’avoir choisi l’accordeur PitchCrow-G Clip- on Tuner de Korg.
Vielen Dank, dass Sie sich für das Clip-on Stimmgerät Pitch-
Crow-G von Korg entschieden haben.
Gracias por comprar el anador PitchCrow-G Clip-on de Korg.
このたびは、コルグ Clip-on Tuner PitchCrow-Gをお買い上
げいただきまして、まことにありがとうございます
。
アフターサービス
修理および
様相談窓口へお問い合わせください。
PHS等一部の電話ではご利用できません。固定電話また
は携帯電話からおかけください。
受付時間 月曜~金曜 10:00 ~ 17:00
●サービス・センター :
■お願い
1.
2.
コルグ PitchCrow-G
本保証書は、上記の保証規定により無償修理をお約束するものです。
お買い上げ日 年 月 日
販売店名
This Perchlora te warning applie s only to pr imar y CR (Manganese
Dioxid e) Lithium coin c ells sold or dis tributed ON LY in Calif ornia USA.
“Perchlorate Material–special handling may apply, See www.dtsc.
ca.gov/hazardouswaste/perchlorate.”
This devi ce com plies wi th Part 15 of t he FCC Rule s.
Operation is subject to t he follo wing tw o condit ions: (1) This device
may not ca use harmful in terferenc e, and (2) this devic e must accept
any interference received, including interference that may cause
undesired operation.
CAN ICES-3 B / NMB-3 B.
商品のお取り扱いについてのご質問、ご相談は、お客
お客様相談窓口
(祝祭日、窓口休業日を除く)
〒168-0073 東京都杉並区下高井戸1-15-12
保証書に販売年月日等の記入がない場合は無効となります。記入でき
ないときは、お買い上げ年月日を証明できる領収書等と一緒に保管し
てください。
保証書は再発行致しませんので、紛失しないように大切に保管してく
ださい。
保証書
CALIFORNIA USA ONLY
Precautions
Location
Using th e unit in the following locations c an resul t in a malfu nction.
• In direc t sunlight.
• Locations of extreme tem peratu re or humi dity.
• Exces sively du sty or dir ty lo catio ns.
• Locations of exce ssive vi bratio n.
• Close to m agnetic elds.
Power supply
Be sure to turn the po wer switc h to OFF whe n the unit i s not in use.
Remove the batter y in orde r to prevent i t from leaking wh en the unit is
not in use for extend ed peri ods.
Interference with other electrical devices
Radios and televisions placed nearby may experience reception
inter ferenc e. Operate this unit at a suita ble dist ance fr om radio s and
televisions.
Handling
To avoid breaka ge, do not ap ply exces sive force to the sw itches o r
controls.
Care
If the ext erior b ecome s dirt y, wipe it wit h a clean, dry cloth. Do not us e
liquid c leaner s such as b enzene or t hinner, or c leanin g compo unds or
ammable polishes.
Keep this manual
After reading this manual, please keep it for later reference.
Keeping foreign matter out of your equipment
Never set any c ontainer wi th liquid in it ne ar this equipm ent. If liquid g ets
into the equipment, it could cause a breakdown, re, or electri cal shock.
Be careful not to let metal objects get into the equipmen t.
THE FCC REGULATION WARNING (for USA)
NOTE: Thi s equipment has bee n tested an d found to c omply w ith
the limi ts for a Class B dig ital device, p ursuant to Par t 15 of the FCC
Rules. T hese limits are d esigned to provi de reasonabl e protection
against harmful interference in a residential installation. This equipment generates, uses, and can radiate radio frequency energy and,
if not inst alled and used in ac cordance wit h the inst ructions, may
cause harmful interference to radio communications. However,
there is n o guarantee tha t interferen ce will not occ ur in a partic ular
instal lation. If this equ ipment d oes caus e harmf ul inter ference to
radio or televisi on rece ption, w hich ca n be deter mined by turning
the equi pment of f and on, the user is encoura ged to tr y to cor rect
the inter ference by one or more of the followin g measur es:
• Reorient or relo cate th e receiving antenna.
• Increase the separation between the equipment and receiver.
• Connect the equ ipment into an outl et on a circ uit dif ferent f rom
that to which the re ceiver i s conne cted.
• Consul t the dealer or a n experienc ed radio/ TV technic ian for help.
If items su ch as cables are i ncluded with t his equipment , you must
use those included items.
Unauth orized changes or mo dica tion to this sys tem can void th e
user’s au thority to operate this e quipme nt.
Notice regarding disposal (EU only)
If this symbol is sh own on the p roduct, manual , batter y, or
packag e, you must dispo se of it in the cor rect manner to av oid
harm to hu man health or da mage to the envir onment. Cont act
your loc al admin istrat ive body fo r detail s on the co rrect d is
posal me thod. If the bat tery contai ns heavy metal s in excess
the regu lated amo unt, a che mical sy mbol is di splayed
of
below th e symbol o n the battery or b atter y package.
This p roduct has been man ufac ture d acco rdin g to str ict sp eci ca tions an d voltag e requir ements t hat are app licab le in the c ountr y
in w
purcha sed this p roduct via the int ernet, t hrough mail order, and/or
via a tele phone sa le, you must verify that this p roduc t is intend ed
to be used i n the country in w hich you r eside.
WARNIN G: Use of this product in any country ot her than that for
which it is intended could b e danger ous and c ould inval idate the
manufacturer’s or distributor’s warranty.
Please a lso retain your r eceipt as proo f of purchase oth erwise you r
produc t may be disqu alied f rom the manu factur er’s or distribu
tor’s warranty.
IMPORTANT NOTICE TO CONSUMERS
hich it is i ntended that this p roduc t should b e used. If yo u have
-
-
Parts of the PitchCrow- G
Reference pitch indicator
CAPO indicator
FINE
indicator
1st string
overtightening
warning indicator
Battery holder
CAL button
Installing the battery
Make sure to turn the power o before you install or replace the baery.
When the baery begins to run low, the baery indicator
) will light up.
(
When the baery indicator lights up,the PitchCrow-G
will become less accurate. Replace the baery as soon as
possible to ensure accurate tuning.
1. Unlock part “A” of t he battery holder, and then
slightly pul l out the holder.
2. Tilt the baery holder, and then pull it up to remove
it.
3. Insert the baery into the baery holder, making
sure to observe the cor rect polar ity.
4. Retur n the baery holder to its or iginal position.
Backlight
The backlight will illuminate brightly when sound is detected or when
a buon is pres sed. Whe n there has bee n no sou nd detected for app roximately three seconds, the backlight will dim slightly in order to prevent
e baery from being depleted.
th
Tuning
1. Press the power buon. The power will tu rn on/o each time you
press t his buon.
If the power is left on for approximately 3 minutes without any user
input, it will turn o automatically.
2. If necessary, change the tuner mode, c alibration (reference pitch),
ne tu ning and at /capo seings.
The proc edu re wit h the tu ner mod e set to chrom ati c (f act ory de fa ult ;
no mode indicator) is descr ibed below.
3. Play a sing le note on your instrument.
The display will show the name of the note
that’s closest to the pitch detected. Tune your
instrument to the correct pitch so that the
desired note name appears.
On ce aga in pl ay a sing le not e on you r ins tru ment, and adjus t the tun-
4.
ing so that the center segment of t he meter (indicated by
An indicator toward the right will light up if the pitch is too high,
and an indicator toward the left will light up if the pitch is too low.
Even if the pitch is within the range of detection, it may not be possible to detect
the pitch of an instrumental sound that contains large numbers of ove rtone s
or a sound that has a rapid decay.
Th e meter may res pond to vib rat ions it pic ks up fr om the envi ronme nt; how -
ever, this will not aect tuning of the instrument.
Setting the tuner mode (*M)
Each time you press the M buon, the tuner mode changes,
with the current mode shown by the mode indicator.
Chromatic (no indicator) → Guitar (
→ Chromatic...
Additionally, when in the guitar and bass modes, the string
number closest to the detected pitch appears to the left of
the note name indicator.
) → Bass ( )
Note name indicators for guit ar mode: 7B, 6E, 5A, 4D, 3G, 2B, 1E
In guitar mode, the 1st string overtightening warning indicator ( ) will light
to help prevent the 1st string from breaking as a result of overtightening.
Note name indicators for bass mode: LB, 4E, 3A, 2D, 1G, HC
(LB stands for low B, and HC stands for high C.)
) is lit up.
Calibration (reference pitch) settings (*M)
Each time you press the CAL buon, the calibration value (reference pitch) increases in 1 Hz steps. Hold down the buon for at
ast one second to reset the calibration to 440 Hz.
le
Setting ne tuning (*M)
With the PitchCrow-G in chromatic mode, press the FCN buon. The
FINE indicator (
indicator, allowing the instrument to be tuned more accurately. When
the pitch is high, the strobe indicators in the meter will light up, running from left to right. When the pitch is low, the indicators in the meter
ll light up, running from right to left. Tune the instrument until the
wi
in dic ators stop running. To ca nce l ne tu ning , pre ss th e FCN buon . The
FINE indicator will turn o.
Specifying at/capo settings (*M)
Each time you hold down the FCN buon, the seing changes between at
and capo, with the current seing shown by the FLAT/CAPO indicator.
) → Capo ( ) → Flat ( )...
Flat (
To change the at se ing , press the FCN buon while
the FLAT indicator is lit up.
To ch ange th e cap o se ing, pr ess th e FC N bu on wh i le
the CAPO indicator is lit.
When the at or capo seing is set to 0, the FLAT/CAPO
indicator turns o after a few seconds, and the default
seing (no at or capo tuning) is applied.
Both at and capo tuning can be set in guitar mode, but only at tuning can be
se t in bas s mode, and neithe r at nor cap o tuni ng can be se t in chroma ti c mode.
) will light up. The meter will change to a strobe
Attaching to the instrument and range of motion
The PitchCrow-G tunes by picking up the vibrations of the instrument.
For the most accurate tuning, be sure to aach the PitchCrow-G to the
head stock of your instrument.
In addition, the joints marked A in the diagram below can be freely
moved so that the display is easy to read.
The PitchCrow-G may be damaged if you apply excessive force within its
range of motion, or attempt to move it beyond its intended range of motion.
Pl eas e ca ref ully a ach the Pit chCro w- G to you r
in st rum ent. Le avi ng the Pitc hCrow -G aac hed
fo r a long ti me ma y dam ag e or ma rk the in st rument's surface.
Depending on various factors such as age-
related change or the surface nish, there is a
possibility that your instrument may be damaged by aaching this product.
A
100°
Specications
Scale: 12-note equal temperament
Range (sine wave): Chromatic A0 (27.50 Hz)–C8 (4186 Hz)
Guitar B1 at5 (46.25 Hz)–E4 capo7 (493.88 Hz)
Bass B0 at5 (23.12 Hz)–C3 (130.81 Hz)
Precision: +/-0.1 cent (ne tuning)
Reference pitch:436–445 Hz (1 Hz steps)
Flat tuning: 1–5 semitones (in semitone steps)
Capo tuning: 1–7 semitones (in semitone steps)
Dimensions: 63 mm(W) X 56 mm(D) X 25 mm(H)
2.48’’ (W) X 2.20’’ (D) X 0.98 ’’ (H)
Weig ht: 21 g/0.74 oz. (including baery)
Baery life: approximately 24 hours
(tuner continuously operating, A4 input)
Included items: CR2032 lithium baery (3V)
*M Seings are remembered even when the power is o. However,
seings will be initialized when you replace the baery (default,
Tuner mode: Chromatic, calibration: 440 Hz, Fine tuning: normal,
FLAT/CAPO: normal)
• Specications and appearance are subject to change without notice for
improvement.
Page 2

安全上のご注意
火災・感電・人身傷害の危険を防止するには以下の指示を守ってください
この注意事項を無視した取り扱いをすると、
警告
・ 次のような場合には、直ちに電池をぬく。
○異物が内部に入ったとき ○製品に異常や故障が生じたとき
修理が必要なときは、コルグお客様相談窓口へ修理を依頼してください。
・ 本製品を分解したり改造したりしない。
・ 修理/部品の交換などで、取扱説明書に書かれている以外のことは絶対
にしない。
・ 本製品を医療機器へ近づけない。磁石が心臓ペースメーカーや医療用
電気機器に影響を与える恐れがあります。
・ 本製品に異物(燃えやすいもの、硬貨、針金など)を入れない。
・ 温度が極端に高い場所(直射日光の当たる場所、暖房機器の近く、発熱
する機器の上など)での使用や保管はしない。
・ 振動の多い場所で使用や保管はしない。
・ホコリの多い場所で使用や保管はしない。
・ 風呂場、シャワー室で使用や保管はしない。
・ 雨天時の野外などのような湿気の多い場所で、使用や保管はしない。
・ 本製品の上に液体の入ったもの(水や薬品等)を置かない。
・ 本製品に液体をこぼさない。
・ 濡れた手で本製品を使用しない。
注意
・ 正常な通気が妨げられない所に設置して使用する。
・ ラジオ、テレビ、電子機器などから十分に離して使用する。ラジオやテ
レビ等に接近して使用すると、本製品が雑音を受けて誤動作する場合が
あります。また、ラジオ、テレビ等に雑音が入ることがあります。
・ 外装のお手入れは、乾いた柔らかい布を使って軽く拭く。
・ 長時間使用しないときは、電池の液漏れを防ぐために電池を抜く。
・ 電池や本体は幼児の手の届かないところに保管する。
・ 電池を過度の熱源(日光、火など)にさらさない。
・ ボタンやツマミに必要以上の力を加えない。故障の原因になります。
・ 外装のお手入れに、ベンジンやシンナー系の液体、コンパウンド質、強
燃性のポリッシャーは使用しない。
・ 不安定な場所に置かない。
保証規定(必ずお読みください)
本保証書は、保証期間中に本製品を保証するもので、付属品類(ヘッドホンなど)
は保証の対象になりません。保証期間内に本製品が故障した場合は、保証規定
によって無償修理いたします。
1. 本保証書の有効期間はお買い上げ日より1ケ年です。
2. 次の修理等は保証期間内であっても有償修理となります。
・ 消耗部品(電池など)の交換。 ・お取扱い方法が不適当のために生じた故障。
・ 天災(火災、浸水等)によって生じた故障。
・ 故障の原因が本製品以外の他の機器にある場合。
・ 不当な改造、調整、部品交換などにより生じた故障または損傷。
・ 保証書にお買い上げ日、販売店名が未記入の場合、または字句が書き替えら
れている場合。
本保証書の提示がない場合。尚、当社が修理した部分が再度故障した場合
・
は、保証期間外であっても、修理した日より3ケ月以内に限り無償修理いた
します。
3. 本保証書は日本国内においてのみ有効です。
This warranty is valid only in Japan.
4. お客様が保証期間中に移転された場合でも、保証は引き続きお使いいただけ
ます。詳しくは、お客様相談窓口までお問い合わせください。
5. 修理、運送費用が製品の価格より高くなることもありますので、あらかじめ
お客様相談窓口へご相談ください。発送にかかる費用は、お客様の負担とさ
せていただきます。
6. 修理中の代替品、商品の貸し出し等は、いかなる場合においても一切行って
おりません。
本製品の故障、または使用上生じたお客様の直接、間接の損害につきましては、
弊社は一切の責任を負いかねますのでご了承ください。本保証書は、保証規定
により無償修理をお約束するためのもので、これによりお客様の法律上の権利
を制限するものではありません。
死亡や重傷を負う可能性が予想されます
この注意事項を無視した取り扱いをすると、傷害を負う
可能性、または物理的損害が発生する可能性があります
Précautions
Emplacement
L'utilisation d e cet instrument dans les endroits suivants peut
en entraîner le mauvais fonctionnement.
• En plein soleil.
• Endroit s très chauds ou trè s humides.
• Endroits sales ou fort poussiéreux.
• Endroit s soumis à de forte s vibrations.
• A proximité de champs magnétiques.
Alimentation
Lorsqu e vous n’utilisez pas l ’appare il, n’oubliez pas de le m ettre
hors ten sion. Retirez le s piles pour évite r toute fuite lor sque l’appareil ne sera pas utilisé pendant de longues périodes de temps.
Interférences avec d'autres appareils électriques
Les poste s de radio et de télévision situés à proximité peuvent
par conséquent souffrir d'interférences à la réception. Veuillez
dès lors faire fonctionner cet appareil à une distance raiso nnable de postes de radio et de télévision.
Maniement
Pour éviter de les endommager, manipulez les commandes et
les boutons de cet instrument avec soin.
Entretien
Lorsqu e l'instrume nt se salit, nettoy ez-le avec un chif fon propre
et sec. Ne vous servez pas d'agents de net toyage liquides tels
qu e du ben z ène ou du di lua n t, vo i re de s pro dui t s in amm a ble s .
Conservez ce manuel
Après avo ir lu ce manuel, veu illez le conser ver soigneusement
pour toute référence ultérieure.
Evitez toute intrusion d'objets ou de liquide
Ne placez jamais de récipient contenant du liquide près de
l'instrument . Si le liquide se renverse ou coule, il risque de
provoqu er des dommage s, un court- circuit ou une é lectrocut ion.
Veillez à ne pas laisser tomber des objets m étalliques dans le
boîtier (trombones, par ex.).
Note concernant les dispositions (Seulement EU)
Si ce symbole apparait sur le produit, le manuel, les piles ou
les packs de piles, cela signi e que vous devez le recyc ler
d’une manière correcte an de prévenir les do mmages pour
la santé humaine et les dommage s potenti els pour l ’environ
nement. Contac tez votre administration locale pour de plus
amp
les renseignements concernant la bonne méthode de
recyclage. Si la pile contient des mét aux lourds au-delà du
seuil réglementé, un symbole c himique est afché en dessous du
symbole de la poube lle barrée d’une cr oix sur la pile ou le pac k de
piles.
REMARQ UE IMPORTANTE POUR LES CLIENTS
Ce produit a été fabriqué suivant des spéc ications sévères et des
besoins en tensio n applic ables dans le pays où c e produit doit être
utilisé. Si vous avez ac heté ce produit via l’internet, par vente par
correspondance ou/et vente par télé phone, vous devez vér ier que
ce produit est bie n utilisable dans l e pays où vous résidez.
ATTENTIO N: L’uti lisation de ce pr oduit dans un pays aut re que celui
pour leq uel il a été conçu pe ut être dangereuse et annule ra la garan
tie du fab ricant ou du dist ributeur. Conse rvez bien votre r écépissé qui
s
t la preuve d e votre achat, faute de quoi votr e produit ne risq ue de
e
ne plus êtr e couver t par la garantie du fabric ant ou du distributeur.
Vorsichtsmaßnahmen
Aufstellungsort
Vermeiden Sie das Aufstellen des Geräts an Or ten, an denen
• es direkter Sonneneinstrahlung ausgesetzt ist;
• hohe Feuchtigkeit oder Extremtemperaturen auftreten können;
• Staub oder Schmutz in großen Mengen vorha nden sind;
• das Gerät Erschütterungen ausgesetzt sein kann.
• in der Nähe eines Magnetfe ldes.
Stromversorgung
Stellen Sie den Net zschalter auf OFF, wenn das Gerät ni cht benutzt
wird. Wenn S ie das Gerät über einen längeren Zeit raum nicht benut zen,
nehmen Sie die Bat terien heraus, damit sie ni cht auslaufen.
Störeinüsse auf andere Elektrogeräte
Dieser kann bei in der Nähe aufgestellten Rund-funkempfänger n oder
Fernsehgeräten Empfangsstörungen hervorrufen. Betreiben Sie solche
Geräte nur in einem geeigneten Abstand von diesem Erzeugnis.
Bedienung
Vermeiden Sie bei der Bedienung von Schaltern und Reglern unangemessenen Kraftaufwand.
Reinigung
Bei auftretender Verschmutzung können Sie das Gehäuse mit einem
trockenen, sauberen Tuch abwischen. Verwenden Sie keinerlei Flüssigreiniger wie beispielsweise Reinigungsbenzin, Verdünnungs- oder
ülmittel. Verwenden Sie niemals brennbare Reiniger.
Sp
Bedienungsanleitung
Bewahren Sie diese Bedienungsanleitung gut auf, falls S ie sie später
noch einmal benötigen.
Flüssigkeiten und Fremdkörper
Stelle n Sie niemals Behä ltnisse mit Flüs sigkeiten in der N ähe des Geräts
auf. Wenn Flüs sigkeit in das Gerät gelangt, können Beschädigung des
Geräts , Feuer oder ein ele k-trischer S chlag die Folge se in. Beachten Sie,
daß keinerlei Fremdkörper in das Gerät gelangen.
Hinweis zur Entsorgung (Nur EU)
Wenn Sie das Symbol mit der „dur chgekreuzten Mülltonne“ auf
Ihrem Produkt, der dazugehörigen Bedienungsanleitung, der
Batter ie oder der Verpackung sehen, müssen Sie das Produkt
in der vorg eschrieben en Art und Weise e ntsorgen um Sch äden
an der men schlichen Ge sundheit und der U mwelt zu vermeid en.
-
Batter ien oder Akkus, die Schadstoffe enthalten, sind auc h mit
dem Symbol einer durchgekreuzten Mülltonne gekennzeichnet. In der
Nähe zum Mülltonnensymbol bendet sich die chemische Bezeichnung
des Schadstoffes.
Ubicación
El uso de la unidad en las siguientes ubicaciones puede dar
como resultado un mal funcionamiento:
• Expuesto a la luz dir ecta del sol.
• Zonas de ex tremad a temperatura o humedad.
• Zonas con exceso de suciedad o polvo.
• Zonas con excesiva vibración.
• Cercano a campos magnéticos.
Fuente de alimentación
Apague la unidad cuando no la use la batería. Retire las baterías si no va a usar la unida d durante un tiempo largo.
Interferencias con otros aparatos
Las radios y televisores situados c erca pueden experiment ar
interferencias en la rec epción. Opere este dispositivo a una
distancia prudencial de radios y televiso res.
Manejo
Para evitar una rotura, no apli que excesiva fuer za a los conmutadores o controles.
Cuidado
Si exter ior se ensucia, límp iese co n un trapo s eco. No us e líqui-
dos limpiadores como dis olvente, ni compue stos inamables.
Guarde este manual
Después de leer este manual, guárdelo para futuras consultas.
Mantenga los elementos externos alejados del
equipo
Nunca c oloque ningún recipiente con líquido cerc a de este
equipo, podría causar un cortocircuito, fuero o descarga
eléctrica. Cuide de que no caiga ningún objeto metálico dentro
del equipo.
Nota respecto a residuos y deshechos (solo UE)
Si apare ce el símbolo del c ubo de basura tach ado sobre
un producto, su manu al de usuar io, la bate ría, o el em-
balaje de cualquier a de éstos, signica que cuando tire
dichos a rtículos a la basura, ha de hacerlo en acuerdo
con la normativa v igente de la Unión Europea par a
prevenir daños a la salud pública y al medioambiente.
Le rogamos que se ponga en contacto con su ocina o
ministerio de medioambi ente para m ás detalles. Si la batería
contiene metales pesados por encima del límite permitido,
habrá un símbolo de un material químico, debajo del símbolo
del cubo de basura tachado.
Precauciones
WICHTIGER HINWEIS FÜR KUNDEN
Dieses Produkt wurde unter strenger Beacht ung von Spezikationen
und Spannungsanforderungen hergestellt, die im Bestimmungsland
gelten. Wenn Sie dieses Produkt über das Intern et, per Postversand
und/oder mit telefonischer Bestellung gekauft haben, müssen Sie
bestätigen, das s dieses Produkt für Ihr Wohngebiet ausgelegt ist.
WARNUNG: Verwendung dieses Produkts in einem anderen Land als
dem, für d as es bestimmt ist , verwendet wi rd, kann gefährl ich sein und
die Garantie des Herstellers ode r Impor teurs hinfällig lassen werden.
Bitte bewahren Sie diese Quittung als Kauf beleg auf, da ander nfalls
-
das Produkt von der G arantie des Hersteller s oder Imp orteurs aus
geschlossen werden kann.
-
NOTA IMPORTANTE PARA EL CONSUMIDOR
Este producto ha sido fabricado de acuerdo a estrictas espe -
cicacione s y requeri mientos de voltaje aplicabl es en el país
para el cual está de stinado. Si ha comprado este producto
por inter net, a través de cor reo, y/o venta telefónica, debe
usted ver icar que el uso de este producto e stá destinado al
país en el cua l reside. AVISO: El uso de este producto en un
país distinto al cual está destinado podría resultar peli groso
y podría invalidar la garantía del fabricante o distribuidor. Por
favor guar de su recibo como prueba de compra ya que de
otro modo el produ cto puede verse pr ivado de la g arantía de l
fabricante o distribuidor.
Page 3

Parties du PitchCrow-G
Indicateur de la
Interrupteur d’alimentation
Indicateur du mode
nom de la note
Indicateur
M
A
Indications à l'écran
quand l'accord est correct
5e corde
de guitare
de basse
2 demi-tons
plus ba
3 demi-tons
plus haut
Netzschalter
Modus-Anzeige
Batterieanzeige
M-Taste
FLAT/CAPO-Anzeige
A
Meteranzeige bei
korrekter Stimmung
4. Basssaite
5. Gitarrensaite
2 Halbtöne
tiefer
3 Halbtöne
höher
note de référence
Indicateur de pile
de la FLAT/CAPO
Indicateur
de la FINE
Avertissement
de surtension
de la 1re corde
Indicateur du
Compartiment de pile
Bouton CAL
Bouton FCN
Mise en place de la pile
Coupez toujours l’alimentation avant de changer la pile.
Quand la pile commence à s’épuiser, l’indicateur de pile (
L’PitchCrow-G continue à fonctionner un certain temps
mais l’accordage devient moins précis. Remplacez la pile
aussi vite que possible.
1. Déverrouillez la partie “A” du compartiment de la
pile, puis tirez légèrement sur le compa rti ment.
2. Inclinez le compar timent de la pile, puis tirez-le vers
le haut pour l’extraire.
3. Insérez la pile dans son compa rtiment en veill ant à
respecter les indications de polarité.
4. Replacez le compartiment de la pile dans sa posit ion
initiale.
Rétroéclairage
Le rétroéclairage s’allume de façon vive quand un signal arrive ou
quand vous actionnez un bouton. Si aucun signal ne parvient à l’accordeur pendant environ 3 secondes, il diminue légèrement l’intensité du
troéclairage pour économiser l’énergie de la pile.
ré
1. Appuyez sur l’interrupteur d’alimentation. L’appareil se mera
sous/hors tension à c haque pression sur l’interr upteu r.
Si vous laissez l’appareil allumé pendant environ 3 minutes sans
capter aucun son, il s’éteindra automatiquement.
2. Si nécessa ire, changez le mode de l’accordeur, le calibrage (diapa
so n), le ré gla ge d’a cco rd n a in si q ue les ré glag es bé mol (Fla t)/ca po.
La procédure ci-dessous décrit le mode d’accordeur chromatique
(réglage par défaut, pas d’indicateur de mode).
3. Jouez une note isolée sur l’instrument.
L’écran ache le nom de la note la plus proche de la hauteur détectée.
Accordez grossièrement votre instrument de sorte à faire apparaître
la note voulue.
4. Jo uez à nou ve au un e no te is olé e su r l’i nstr um ent et ac cor dez -
la jusqu’à ce que le segment central de l’indicateur (repéré
) s’allume.
par
Le témoin côté droit s’allume si la note est
trop haute et le témoin côté gauche s’allume
si la note est trop basse.
Même si la note se trouve à l’intérieur de la plage
de détection, elle peut ne pas être détectée si le son de l’instrument de musique
contient un grand nombre d’harmoniques ou un temps de descente rapide.
Il se pourrait que l’accordeur réagisse à des vibrations ambiantes qu’il capte;
cela n’aecte toutefois pas l’accord de l’instrument.
Réglage du mode d’accordeur (*M)
Chaque pression du bouton M change de mode d’accordeur;
l’indicateur de mode signale le mode actif.
Mode chromatique (pas d’indicateur) → Guitare ( )
→ Basse (
En outre, en modes guitare et basse, l’écran affiche le
numéro de la corde la plus proche de la hauteur détectée à
gauche de l’indicateur du nom de note.
Indicateur s du nom de note e n mode guitare:
7B (Si), 6E (Mi), 5A (La), 4D (Ré), 3G (Sol), 2B (Si), 1E (Mi)
En mode guitare, l’avertissement de surtension de la 1re corde ( ) s’allume
pour prévenir une rupture de la corde causée par une tension trop forte.
Indicateur s du nom de note e n mode basse:
LB (Si grave), 4E (Mi), 3A (La), 2D (Ré), 1G (Sol), HC (Do aigu)
) → Chromatique...
Accordage
Bouton
) s’allume.
4e corde
Réglages de calibrage (diapason) (*M)
Chaque pression sur le bouton CAL augmente la valeur de calibrage
(diapason) par pas de 1 Hz. Vous pouvez initialiser le diapason à 440
Hz e n mai nte nant le bouto n enf onc é penda nt au moi ns une se conde .
Réglage de l’accord n (*M)
Vérifiez que l’accordeur PitchCrow-G est en mode chromatique, puis
appuyez sur le bouton FCN. L’indicateur FINE (
cateurs lumineux apparaissent alors sur l’achage, permeant d’accorder
instrument avec une plus grande précision. Quand la hauteur est trop
l’
élevée, les indicateurs lumineux s’allument de gauche à droite sur l’achage.
Quand la hauteur est trop basse, les indicateurs lumineux s’allument de
droite à gauche sur l’achage. Accordez votre instrument de sorte que les
indicateurs ne s’allument plus. Pour annuler l’accord n, appuyez sur le
bouton FCN. L’indicateur FINE s’éteint.
Réglages bémol (Flat)/capo (*M)
Chaque fois que vous maintenez enfoncé le bouton FCN, le réglage alterne
entre le mode bémol (Flat) et capo, et l’écran ache le statut avec l’indicateur FLAT/CAPO.
Bé
Pour modier le rég lage d’accord en bémol, appuyez sur le
bouton FCN quand l’indicateur F LAT est al lumé.
Pour mod ier le réglage d’accord avec capo, appuyez sur le
bouton FCN quand l’indicateur C APO est allumé.
Quand le paramètre bémol (Flat) ou capo est réglé sur 0,
l’indicateur FLAT/CAPO s’éteint après quelques secondes et le réglage par
défaut (accord sans bémol ni capo) est activé.
) → Capo ( ) → Bémol ( )...
mol (
Les réglages d’accords en bémol et avec capo peuvent être eectués en mode
guitare, mais en mode basse, seul le réglage d’accord en bémol est disponible. Le
mode chromatique ne permet pas les réglages bémol/capo.
) s’allume. Des indi-
Fixation sur l’instrument et plage de manœuvre de l’accordeur
L’PitchCrow-G détermine l’accordage en captant les vibrations de l’instrument. Veillez donc à xer l’PitchCrow-G sur la tête de votre instrument
ur garantir un accordage able. En outre, les raccords indiqués par la
po
lere A sur l’illustration ci-dessous peuvent être retirés pour une lisibilité
-
supérieure de l’écran.
Vous risquez d'endommager l'PitchCrow-G si vous le
manipulez avec une force excessive ou si vous tentez
de le manipuler en dehors de sa plage de manœuvre.
S’il vous plait, aachez soigneusement l’PitchCrow-G
à vo tre ins tru me nt. Le lai sse r aa ché pend ant un long
moment, peut rayer la surface de votre instrument.
Dépendant de plusieurs facteurs comme le change-
ment dû à l’âge de l’instrument ou la nition de la structure, il y a une possibilité
e votre instrument soit endommagé par le système d’aache par pince.
qu
A
Spécications
Gamme: 12 notes tempérament égal
Plage de détect ion (onde sinus):
chromatique A0 (27,50 Hz)–C8 (4186 Hz)
guitare B1 at5 (46,25 Hz)–E4 capo7 (493,88 Hz)
basse B0 at5 (23,12 Hz)–C3 (130,81 Hz)
Précision: +/-0,1 centième (
Note de référence: 436 à 445 Hz (paliers de 1 Hz)
Accord en bémol (Flat): 1–5 demi-tons (par pas de demi-ton)
Accord avec capo: 1–7 demi-tons (par pas de demi-ton)
Dimensions: 63 mm (L) x 56 mm (P) x 25 mm (H)
Poids: 21 g (pile comprise)
Autonomie de la pile
Accessoires fournis: Pile au lithium CR2032 (3 V)
*M
Les réglages sont conservés même quand l’appareil est mis hors tension.
Néanmoins, les réglages seront réinitialisés si vous remplacez la pile
(réglages par défaut, mode d’accordeur: chromatique, calibrage: 440
Hz, accord n: normal, FLAT/CAPO: normal).
• Les caractéristiques et l’aspect du produit sont susceptibles d’être modiés
sans avis préalable en vue d’une amélioration.
: Environ 24 heures (utilisation continue de
l’accordeur, entrée de la note A4)
accord n)
100°
Teile des PitchCrow-G
Bezugstonhö henanzeige
Notennamen-Anzeige
FINE-Anzeige
Warnanzeige bei zu
fest angezogener
1. Saite
Batteriefachdeckel
CLB-Taste
FCN-Taste
Einsetzen der Batterie
Dea kti vie ren Sie den Ne sc halte r, bev or Sie di e Ba er ie ei nl egen od er ausw ech seln.
Wenn die Baerie fast erschöpft ist, leuchtet die Baeriean-
) auf.
zeige (
Der PitchCrow-G funktioniert dann zwar noch eine Weile,
allerdings lässt seine Genauigkeit dann ebenfalls nach.
Wechseln Sie die Baerie also so schnell wie möglich aus.
1. Das Baeriefach im Bereich “A” entriegeln und dan n
behutsam emporziehen.
2. Das Ba eriefach neigen und dann abziehen.
s
3. Die Baerie polgerec ht in das Baer iefach einse en.
4. Das Baeriefach in seine ursprü ngliche Lage zurück
bringen.
-
Hintergrundbeleuchtung
Die Hintergrundbeleuchtung wird aktiviert, wenn ein Eingangssignal
empfangen wird bzw. wenn Sie einen Taster drücken.
Drei Sekunden nach dem leten Bedienvorgang lässt die Helligkeit der
Hintergrundbeleuchtung etwas nach, um die Baerie zu schonen.
Tuning
1. Drücken Sie die Neschalter. Bei jedem Drücken dieser Taste schaltet
das Gerät ein /aus.
Wenn das Gerät ca. 3 Minuten lang eingeschaltet bleibt, ohne dass Ton
angelegt wird, schaltet es automatisch aus.
2. Nach Bedarf die Einstellungen für Stimm-Modus, Kalibr ieru ng (Refe
renzton), Feinabstimmung und Flat/Capo änder n.
Di
e Vor geh ens wei se mi t dem ch rom atis che n Sti mm -Mo du s (We rks ein -
stellu ng, keine Modus-Anzeige) wird unten stehend beschrieben.
Spielen Sie eine Einzelnote auf dem Inst rument.
3.
Das Display zeigt den Namen der Note an, die der gespielten Note am
nächsten kommt. Stimmen Sie Ihr Instrument so, dass der Name der
gewünschten Note angezeigt wird.
4. Spielen Sie erneut eine Einzelnote auf
Ihrem Instr ument und sti mmen Sie so
lange, bis d as milere Metersegment
angezeigt) leuchtet.
(durch
Eine Anzeige rechts davon leuchtet, wenn der Ton zu hoch ist, und einen
Anzeige links davon leuchtet, wenn der Ton zu tief ist.
Auch we nn die Ton höh e inner hal b des Erk ennungs ber eic hs ist, ka nn es unm ög li ch
se in, die Tonhö he ei nes Ins tru me nte nkl angs z u erk enn en, wenn die ser eine n hoh en
Anteil an Obertönen oder sehr schnelles Abklingen aufweist.
Das Meter k ann auf Schwingungen aus der Umgebung reagieren. Dies beein-
trächtigt allerdings nicht den Stimmvorgang des Instruments.
Einstellen des Stimm-Modus (*M)
Mit jedem Drücken des M-Tasters ändert sich der Stimm-Modus, wobei der
momentane Modus in der Modus-Anzeige folgendermaßen erscheint:
Chromatisch (keine Anzeige) → Gitarre (
) → Chrom atisc h …
Bass (
Außerdem erscheint im Gitarren- und Bass-Modus links
neben der Notennamen-Anzeige die Saitennummer, die
der erkannten Tonhöhe am ähnlichsten ist.
Notennamen-Anzeige für Gitarren-Modus: 7B, 6E, 5A, 4D, 3G, 2B, 1E
Im Gitarren-Modus erscheint die Warnanzeige bei zu fest angezogener 1. Saite
), um eine Beschädigung der 1. Saite durch zu festes Anziehen zu verhindern.
(
Notennamen-Anzeige für Bass -Modus: LB, 4E, 3A, 2D, 1G, HC
(LB steht für ein tiefes B und HC steht für ein hohes C)
) →
Kalibrierungseinstellungen (Referenzton) (*M)
Mit jedem Drücken des CAL-Tasters erhöht sich der Kalibrierungswert
(Referenzton) in Schrien von 1 Hz. Halten Sie den Taster mindestens 1
Sekunde lang gedrückt, um die Kalibrierung auf 440 Hz zurückzuseen.
Einstellen der Feinabstimmung (*M)
Im chromatischen Stimm-Modus des PitchCrow-G die FCN-Taste drücken.
Di e FI NE-An zeige (
kopa nzei ge über, um ei ne Feina bst immu ng des In stru men ts zu e rmö gliche n.
nn der Ton zu hoch ist, laufen die Stroboskopanzeigen von links nach
We
rechts. Wenn der Ton zu niedrig ist, laufen die Stroboskopanzeigen von
rechts nach links. Stimmen Sie das Instrument, bis die Anzeigen stehen
bleiben Drücken Sie zum Abbrechen der Feinabstimmung die FCN-Taste.
Die FINE-Anzeige erlischt.
Festlegen der Flat-/Capo-Einstellungen (*M)
Bei jedem Drücken des FCN-Tasters wird zwischen „Flat“ und „Capo“ umgeschaltet, wobei die momentane Einstellung auf der FLAT/CAPO-Anzeige
lgendermaßen erscheint:
fo
) → Capo ( ) → Flat ( ) …
Flat (
Um die Einstellung für „Flat“ zu ändern, drüc ken Sie den
FCN-Taster, wä hrend die FLAT-Anzeige leuchtet.
Um die Einstellung für „Capo“ zu ändern, dr ücken Sie den
FCN-Taster, wä hrend die CAPO-A nzeige leuchtet.
Wenn die Flat- oder Capo-Einstellung auf 0 geändert wird, schaltet sich
di e FLAT/CAPO-A nze ige nac h wen ige n Sek und en aus, u nd di e Sta nda rdeinstellung (kein Flat und kein Capo) wird aktiviert.
Sowohl Flat- als auch Capo -Stimmung können im Gitarren-Modus eingestellt
werden, während im Bass-Modus nur die Flat-Stimmung und im chromatischen
Modus weder Flat- noch Capo-Stimmung eingestellt werden können.
) leuchtet auf. Das Display wechselt auf die Strobos-
Anbringen an das Instrument und Bewegungsspielraum
Das PitchCrow-G stimmt Ihr Instrument, indem
es dessen Schwingungen aufnimmt. Aus diesem
Grund sollte das PitchCrow-G zum Stimmen an die
Kopfplae Ihres Instruments angebracht werden.
Außerdem ist das Display über die Gelenke “A”
-
n
der unteren Abbildung zum Verbessern der
i
Lesbarkeit beliebig einstellbar.
Das Pi tc hCro w-G ka nn bes ch ädig t we rden, wen n in -
nerhalb des Bewegungsspielraums übermäßige Kraft
das Gerät ausgeübt wird bzw. wenn versucht wird, es über den Bewegungs-
auf
spielraum hinaus zu bewegen.
Bie befestigen sie das PitchCrow-G vorsichtig an ihrem Instrument. Wenn sie
das PitchCrow- G für längere Zeit an ihrem Instrument befestigt lassen, kann dies
zu Veränderungen an der Oberäche des Instruments f ühren.
Abhängig von verschiedenen Faktoren wie z. B. altersbedingte Veränderungen der
La cki eru ng/O ber äc he Ih res Ins tru men te s, ka nn e s vor kom me n das s ein Anb rin gen dieses Produkts zu einer Beschädigung führt.
A
Technische Daten
Skala: 12 Noten gleichschwebende Stimmung
Bereic h (Sinuswelle): chromatisch A0 (27,50 Hz)–C8 (4186 Hz)
Gitarre B1 at5 (46,25 Hz)–E4 capo7 (493,88 Hz)
Bass B0 at5 (23,12 Hz)–C3 (130,81 Hz)
Präzision: +/-0,1 Cent (Feinabstimmung)
Bezugstonhöhe: 436–445 Hz (in Schrien von 1 Hz)
Flat-Stimmung: 1-5 Halbtöne (in Halbtonschrien)
Capo-Stimmung: 1-7 Halbtöne (in Halbtonschrien)
Abmessu ngen: 63 mm (B) x 56 mm (T) x 25 mm (H)
Gewicht: 21 g (mit Baerie)
Baerielebensdauer: ca. 24 Stunden (kontinuierlicher Betrieb mit einge
Lie
ferumfang: CR2032 Lithiumbaerie (Knopfzelle, 3 V)
*M
Die Einstellungen bleiben gespeichert, wenn das Gerät ausgeschaltet
wird. Die Einstellungen werden zurückgeset, wenn Sie die Baerie
erseen (Werkseinstellung, Stimm-Modus: chromatisch, Kalibrierung:
440 Hz, Feinabstimmung: normal, FLAT/CAPO: normal).
• Änderungen der technischen Daten und des Designs ohne vorherige
Ankündigung vorbehalten.
schaltetem Stimmgerät, A4-Eingang)
100°
-
Page 4

音
上げ
モー
音名表示
Mボタン
A
チュ
状態のメーター表示
ギタ
5弦
ス
4弦
Partes del PitchCrow-G
Botón de alimentación
Indicador de mod
Indicador de batería
Indicador de nombre de nota
Botón M
Botón FCN
A
Indicaciones de
medidor si se ha
afinado correctamente
5ª cuerda
de guitarra
de bajo
2 semitonos
más bajo
3 semitonos
más alto.
Indicador FLAT/CAPO
Indicado de tono de referencia
o
Soporte de la batería
Indicador
FINE
Indicador de
advertencia de
apriete excesivo
de la 1ª cuerda
Botón CAL
Instalación de la Batería
Apague la unidad antes de instalar o reemplazar la batería.
Cuando la batería comience a agotarse, se iluminará el indicador de batería (
El Pit chC row- G seg uirá f unci ona ndo un tie mpo, p ero será menos exacto. Reemplace la Batería tan pronto como sea posible.
1. Desbloquee la pa rte “A” del soporte de la batería y
después t ire del soporte con suavidad.
2. Incline el soporte de la batería y después tire de él hacia
arr iba para extraerlo.
3. Inserte la batería en el soporte y asegúrese de tener en
cuenta la polaridad correcta.
4. Vuelva a colocar el sopor te de la batería en su posic ión original.
).
Retroiluminación
La retroiluminación se hace más brillante cuando hay sonido de entrada o
cuando se pulsa un botón. Si el usuario no realiza ninguna acción durante
aproximadamente tres segundos, la retroiluminación se atenuará ligeramente para evitar que la batería se agote.
Anación
1. Pulse el botón de alimentación. La unidad se enciende o se apaga cada
vez que Pulse este botón.
Si la alimentación se deja durante unos 3 minutos sin ningún sonido de
entrada, seapagará de forma Automática.
2. En caso necesario, ca mbie el modo de anador, la calibración (tono de
referencia), la an ación precisa y los ajustes de bemol /cejilla.
El procedimiento con el modo de anador establec ido en cromático
(valor de fábrica; sin ind icador de modo) se describe a continuación.
3. Toque una sola not a en su in strumento.
La pantalla mostrará el nombre de la nota más cercana al tono detectado.
Ane su instrumento con el tono correcto para que aparezca el nombre
de la nota deseada.
4. De nuevo, toque una nota en su instrumento y ajuste la an ación de forma que se ilumine el seg mento central del medidor
ndicado por
(i
El indicador de la derecha se iluminará si el tono es demasiado agudo, y
el indicador de la izquierda se iluminará si es demasiado grave.
Aunque el tono esté dentro del rango de detección,
pu ede que n o se a pos ible de tecta r el tono de un soni do
qu e conte nga gr an cant ida d de a rmó nicos o que t enga
una rápida caída.
El medidor puede responder a las vibraciones que
recoge del entorno; sin embargo, eso no afectará a
la anación del instrumento.
Ajuste del modo de anador (*M)
Cada vez que pulsa el botón M, el modo de anador cambia; el indicador de modo muestra el modo actual.
Cromático (sin indicador) → Guitarra ( ) → Bajo ( ) →
Cromático...
Además, en los modos de bajo y guitarra, el número de cuerda más cercano
al tono detectado aparece a la izquierda del indicador de nombre de nota.
Indicadores de nombre de nota para el modo de guitarra:
7B, 6E, 5A, 4D, 3G, 2B, 1E
En el modo de guitarra, el indicador de advertencia de apriete
excesivo de la 1ª cuerda (
que la 1ª cuerda se rompa debido al apriete excesivo.
Indicadores de nombre de nota para el modo de bajo:
LB, 4E, 3A, 2D, 1G, HC (LB indica B baja, y HC indica C alta).
).
) se iluminará para ayudarle a evitar
4ª cuerda
Ajustes de la calibración (tono de referencia) (*M)
Cada vez que pulsa el botón CAL, el valor de calibración (tono de
referenc ia) aume nta en pasos de 1 Hz. Ma ntenga pulsado el botón
du rante a l men os un segun do para reaj ust ar la calibra ció n a 44 0 Hz.
Ajuste de la anación precisa (*M)
Con el anador PitchCrow-G en modo cromático, pulse el botón FCN. El
in dic ador F INE (
estroboscópico, que permite anar el instrumento con mayor precisión.
Cuando el tono sea alto, los indicadores estroboscópicos en el medidor
se iluminarán, de izquierda a derecha. Cuando el tono sea bajo, los indicadores en el medidor se iluminarán, de derecha a izquierda. Ane el
n
st rume nto hast a que los i ndicad ores de jen d e ilu mina rse . Para ca nce lar
i
la anación precisa, pulse el botón FCN. El indicador FINE se apagará.
Especicación de ajustes de bemol/cejilla (*M)
Cada vez que mantiene pulsado el botón FCN, el ajuste cambia entre
be mol y cej ill a, con el a jus te actua l mos trado por el ind ica dor FL AT/CA PO.
Bemol (
Para ca mbiar el ajuste de bemol, pulse el botón FCN
con el ind icador FLAT iluminado.
Para ca mbiar el ajuste de cejil la, pu lse el botón FC N
con el ind icador CAPO iluminado.
Cuando el ajuste de bemol o cejilla se cambia a 0, el
indicador FLAT/CAPO se desactiva unos segundos después, y se aplica
el ajuste por defecto (sin anación de bemol ni de cejilla).
La anación de bemol y cejilla se puede establecer en el modo de guitarra, pero
únicamente la anación de bemol se puede establecer en el modo de bajo; en el
modo cromático no es posible ajustar ninguna de las dos anaciones.
) se i lum inar á. El med idor ca mbi ará a un ind ica dor
) → Cejilla ( ) → Bemol ( )
Colocación en el instrumento e intervalo de movimiento
El sistema PitchCrow-G realiza la afinación recogiendo las vibraciones del instrumento. Por ello, asegúrese de colocar el PitchCrow-G en el cabezal del instrumento para poder anarlo.
Además, las uniones marcadas con A en el diagrama siguiente se pueden
splazar con libertad para facilitar la lectura de la pantalla.
de
El PitchCrow-G puede resultar dañado si ejerce una fuerza excesiva en su
intervalo de movimiento, o si intenta desplazarlo
más allá de su inte rvalo de movimiento previsto.
Por favor sujete con cuidado e PitchCrow -G a su
instr umento. Si deja el Pitch Crow -G sujeto al instrumento durante un largo periodo, puede dañar la
percie del instrumento.
su
Dependiendo de varios factores, como el envejeci-
miento del acabado de la supercie, existe la posibilidad de que su instrumento pueda dañarse por la colocación del anador.
A
Especicaciones
Escala: 12-notas, temperamento igual
Rango (onda sinusoidal):
chromatique A0 (27,50 Hz)–C8 (4186 Hz)
guitare B1 at5 (46,25 Hz)–E4 capo7 (493,88 Hz)
basse B0 at5 (23,12 Hz)–C3 (130,81 Hz)
Precisión: +/-0,1 centésima (anación precisa)
Tono de Referencia: 436–445 Hz (en pasos de 1 Hz)
Anación de bemol: 1-5 semitonos (en pasos de semitono)
Anación de cejilla: 1-7 semitonos (en pasos de semitono)
Dimensiones: 63 mm(Anch.) x 56 mm (Prof.) x 25 mm (Alt.)
Peso: 21 g (incluyendo batería)
Vida de la Batería : aproximadamente 24 horas
El
ementos incluidos: Batería de litio CR2032 (3V)
*M
Los Ajustes son recordados al apagar la unidad. No obstante, los
Ajustes serán inicializados a reemplazar la batería (valor por defecto,
modo de anador: cromático, calibración: 440 Hz, anación precisa:
normal, FLAT/CAPO: normal).
• Las especicaciones y el aspecto están sujetas a cambios sin previo
aviso por mejora.
(anador funcionando continuamente, entrada A4)
100°
各部の名称
ド表示
基準ピッチ表示
電池表示
FLAT/
CAPO表示
FINE表示
1弦巻き過ぎ
警告表示
CALボタン
FCNボタン
電池ホルダー
電源ボタン
電池の入れ方
電池を入れるときや交換するときは、本機の電源を切って行ってく
ださい。付属の電池は機能チェック用ですので、寿命の短い場合が
あります。
電池が消耗してくると、電池表示( )が点灯します。
しばらくの間は動作しますが、チューニングが正確に
できなくなります。速やかに新しい電池と交換して
ください。
1. 電池ホルダーのA部分のロックを外して、少し引
き上げます。
2. 電池ホルダーをななめ上方向へ引き上げて取り外
します。
3. 極性に注意して電池ホルダーに電池を入れます。
4. 電池ホルダーを元に戻します。
バックライト
音を入力したときと、ボタン操作時にバックライトが明るく点灯しま
す。約3秒間、音の入力が無くボタン操作もしないと、電池消耗を防ぐ
ため、低輝度の点灯になります。
チューニング
1. 電源ボタンを押します。押すたびに電源が入る、切れるを繰り返し
ます。
電源が入ったまま音の入力がない状態が約3分続くと、自動的に電
源が切れます。
2. 必要に応じてチューナー・モード、キャリブレーション(基準ピッ
チ)、ファイン・チューニング、フラット/カポの設定をします。
以下は、チューナー・モードがクロマチック(工場出荷時:モード
表示なし)の場合の説明になります。
3. 楽器を単音で鳴らします。認識した音に一番近い音名が表示され
ます。
合わせたい音名が表示されるように、楽器をおおまかにチューニ
ングしてください。
楽器を単音で鳴らして、メーターの中央(▼)の位置が点灯する
4.
ようにチューニングします。
測定範囲内の音程でも、倍音を多く含ん
だ楽器音や減衰の早い楽器音については、
測定できない場合があります。
周囲の環境によっては振動を拾いメー
ターが反応する場合がありますが、楽器
のチューニングには影響ありません。
チューナー・モードの設定
Mボタンを押すたびにチューナー・モードが切り替わり、モード表示
に現在のモードが表示されます。
クロマチック(表示なし)→ギター(
ベース(
なお、ギターとベース・モードのときは、音名表示の左横に認識した
音に一番近い弦番号が表示されます。
ギター・モード時の音名表示:7B、6E、5A、4D、3G、2B、1E
)→クロマチック...
(*M)
ギター・モードでは、1弦は巻き過ぎによって弦が切れるのを防ぐ
ため、1弦巻き過ぎ警告表示(
ベース・モード時の音名表示:LB、4E、3A、2D、1G、HC
(LBはLow B、HCはHigh Cになります。)
)が点灯します。
)→
ーニングが合った
ベー
ー
キャリブレーション(基準ピッチ)の設定
CALボタンを押すたびにキャリブレーションの値(基準ピッチ)を
1Hz単位で上げることができます。長押しした場合は約1秒後に
440Hzにリセットされます。
ファイン・チューニングの設定
クロマチック・モードのときに、FCNボタンを押すと、FINE表示
)が点灯します。このときメーターがファイン・チューニング
(
のできるストロボ表示になり、より正確なチューニングができま
す。メーターの点灯はピッチが高いときは左から右へ、低いときは右
から左へ流れるので、流れが止まるように楽器をチューニングしま
す。ファイン・チューニングを解除するときはFC Nボタンを押して、
FINE表示を消灯します。
フラット/カポの設定
FC Nボタンを長押しするたびに、フラット設定とカポタスト設定が
切り替わり、FLAT/CAPO表示に設定が表示されます。
フラット(
フラットの設定をするときは、FLAT表示のときにFCNボ
タンを押します。
カポの設定をするときは、CAPO表示のときにFCNボタン
を押します。
フラットまたはカポの設定を0にすると、FLA T/CAPO表
示が数秒後に消灯し、標準設定(フラット、カポ設定なし)
になります。
(*M)
)→カポタスト( )→フラット( )...
(*M)
(*M)
2半
下げ
3半 音
ギター・モードではフラット、カポタストの設定ができますが、
ベース・モードではフラット設定のみ、クロマチック・モードでは
フラット、カポタストの設定はできません。
楽器への取り付けと可動範囲
本機は楽器本体の振動を拾ってチューニングを行います。そのため、
必ずご使用になる楽器のヘッド部分に取り付けて、チューニングを
行ってください。また、本機は下図のAの接続箇所を自由に動かすこと
によって、表示を見やすいように調節することができます。
可動範囲内であっても、過度な力で無理に向きを変えると破損す
る恐れがあります。
楽器への取り付け、取り外しはていね
いに行ってください。また、長時間取り
100°
付けたままにすると、取り付け跡が残
る場合があります。
A
楽器の経年変化や塗装などの状態に
よっては、本機の装着により損傷を与
える恐れがあります。
仕様
音 律: 12平均律
測定精度: ±0.1セント以内(ファイン・チューニング)
測定範囲(サイン波):
基準ピッチ範囲: 436 ~ 445Hz(1Hz単位)
フラット・チューニング: 1 ~ 5半音(半音ステップ)
カポタスト対応: 1 ~ 7半音(半音ステップ)
外形寸法: 63mm(W)X 56mm(D)X 25mm(H)
質量: 21g (電池含む)
電池寿命: 約24時間(チューナー動作、A4入力 連続動作時)
付属品: 動作確認用CR2032型リチウム電池(3V) 1個
*M
・ 仕様および外観は、改良のため予告なく変更する場合があります。
クロマチック A0(27.50Hz)~ C8(4186Hz)
ギター B1 at5(46.25Hz)~ E4 capo7(493.88Hz)
ベース B0 at5(23.12Hz)~ C3(130.81Hz)
各設定は、電源を切っても記憶しています。ただし、電池を交換
した場合は、設定が初期化されます(チューナー・モード:クロマ
チック、キャリブレーション:440Hz、ファイン・チューニング:
設定なし、フラット/カポ:設定なし)。
 Loading...