

Page 1

Owner’s manual
Manuel d’utilisation
Advanced Pedal Tuner
Pedalier Accordeur Evolue
Vielseitiges Pedalstimmgerät
Pedal Afinador Avanzado
F
E
Bedienungsanleitung
Manual de usuario
S
G
1
Page 2

Precautions
Location
Using the unit in the following locations can result in
a malfunction.
• In direct sunlight
• Locations of extreme temperature or humidity
• Excessively dusty or dirty locations
• Locations of excessive vibration
• Close to magnetic fields
Power supply
Please connect the designated AC adapter to an AC
outlet of the correct voltage. Do not connect it to an
AC outlet of voltage other than that for which your
unit is intended.
Interference with other electrical devices
Radios and televisions placed nearby may experience reception interference. Operate this unit at a
suitable distance from radios and televisions.
Handling
To av oid breakage, do not apply excessive force to
the switches or controls.
2
Care
If the exterior becomes dirty, wipe it with a clean, dry
cloth. Do not use liquid cleaners such as benzene or
thinner, or cleaning compounds or flammable polishes.
Keep this manual
After reading this manual, please keep it for later reference.
Keeping foreign matter out of your equipment
Never set any container with liquid in it near this equipment. If liquid gets into the equipment, it could cause
a breakdown, fire, or electrical shock.
Be careful not to let metal objects get into the equipment. If something does slip into the equipment, unplug the AC adapter from the wall outlet. Then contact your nearest Korg dealer or the store where the
equipment was purchased.
Page 3
THE FCC REGULATION WARNING (for USA)
This equipment has been tested and found to comply
with the limits for a Class B digital device, pursuant to
Part 15 of the FCC Rules. These limits are designed to
provide reasonable protection against harmful interference in a residential installation. This equipment generates, uses, and can radiate radio frequency energy
and, if not installed and used in accordance with the
instructions, may cause harmful interference to radio
communications. However, there is no guarantee that
interference will not occur in a particular installation. If
this equipment does cause harmful interference to radio or television reception, which can be determined
by turning the equipment off and on, the user is encouraged to try to correct the interference by one or
more of the following measures:
•Reorient or relocate the receiving antenna.
• Increase the separation between the equipment and
receiver.
•Connect the equipment into an outlet on a circuit
different from that to which the receiver is connected.
• Consult the dealer or an experienced radio/TV technician for help.
Unauthorized changes or modification to this system
can void the user’s authority to operate this equipment.
Notice regarding disposal (for EU)
If this “crossed-out trash can” symbol is shown
on the product or in the operating manual, you
must dispose of the product in an appropriate
way. Do not dispose of this product along with
your household trash. By disposing of this product correctly, you can avoid environmental harm
or health risk. The correct method of disposal
will depend on your locality, so please contact
the appropriate local authorities for details.
*All product names and company names are the
trademarks or registered trademarks of their
respective owners.
3
Page 4

Table of Contents
Precautions .......................................... 2
Main features ...................................... 4
Parts of the pitchblack+ ....................... 6
Installing the battery ............................7
Restoring the factory settings ............... 7
Connections ......................................... 8
Tuning ............................................... 11
Setting the Calibration ....................... 13
Setting the Tuning Mode ..................... 14
Creating your own Tuning .................. 16
Flat Tuning ......................................... 18
Setting the Display Mode ................... 20
Troubleshooting ................................. 22
Specifications..................................... 23
4
Thank you for purchasing the Korg
pitchblack+ advanced pedal tuner. In order
to take full advantage of your pitchblack+,
please read this owner’s manual carefully
and use it as directed. Keep this owner’s
manual for future reference.
Main features
Precision Tuning
The pitchblack+ uses two LED meters to
allow extremely accurate tuning with a
precision of better than ±0.1 cents.
Tuning modes
The pitchblack+ supports a variety of tunings
including chromatic, guitar and bass, as well as
five open tunings for guitar.
In addition to equal temperament, you can
specify your own temperaments, such as the
tunings of ethnic instruments or stretched
tuning. A temperament you create can be saved
as a temperament program in one of five
internal memories.
Page 5

Flat tuning
You can tune your instrument down to seven
semitone steps below the note name shown in
the display.
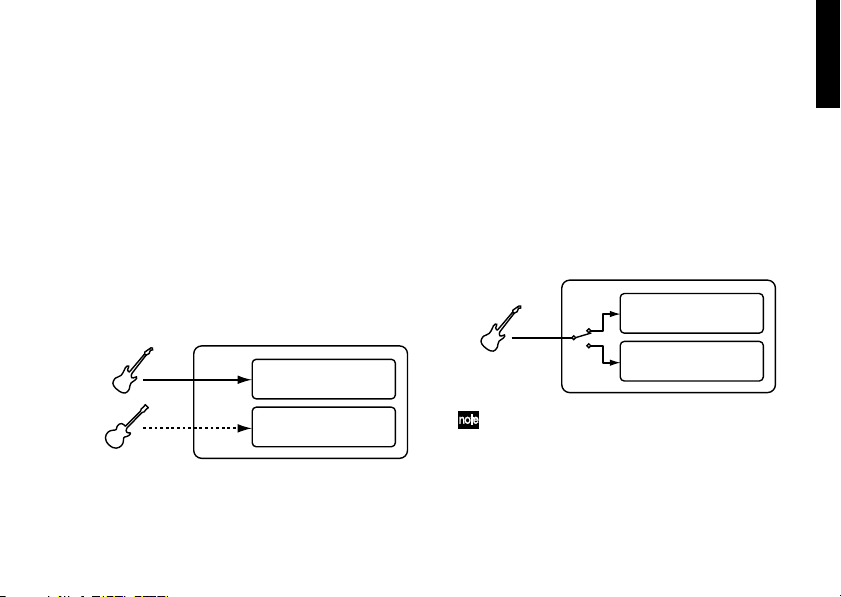
Input jacks
The pitchblack+ provides two input jacks,
INPUT A and INPUT B. You can specify
calibration, tuning mode, flat tuning, and
display mode individually for each input jack.
If you’ve connected an instrument to only one
of these jacks, you’ll be able to choose from two
sets of settings for your instrument.
Display mode
You can choose from six types of display
patterns for the LED meter. A variety of
illumination patterns are provided, including a
Meter that lights in the center when you're in
tune, a Strobe type meter that stops the flow of
illumination when the tuning is correct, and
Focus that uses dual LED meters to allow even
higher precision tuning.
BYPASS jack
When the tuner is off, the bypass output
delivers true bypass, in which the output signal
is completely unaffected by the internal
circuitry. The bypass output is muted when the
tuner is on.
DC 9V OUT jack
If you’re using the optional AC adapter (9V
), you can use the included DC cable to
supply
power for effect pedals that use
9V ( ). (A maximum of 200 mA can be
supplied.)
5
Page 6
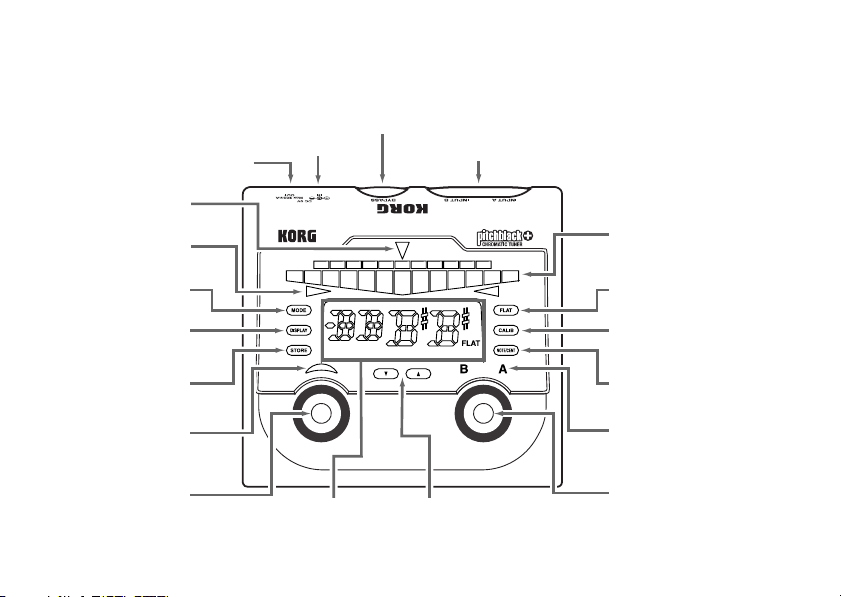
Parts of the pitchblack+
DC 9V IN jack
DC 9V OUT jack
Center indicator
guide
Pitch guide LEDs
BYPASS jack (mono)
INPUT A, INPUT B jacks (mono)
LED meters
6
MODE button
DISPLAY button
STORE button
TUNER ON/OFF
indicator
TUNER ON/OFF
switch
FLAT button
CALIB button
NOTE/CENT button
INPUT SELECT
indicators
INPUT SELECT
UP/DOWN buttonsDisplay
switch
Page 7
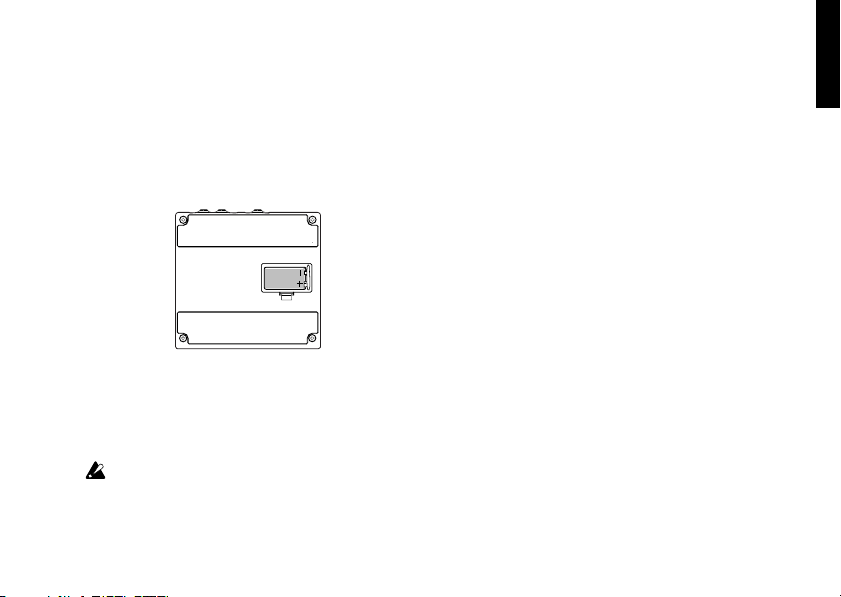
Installing the battery
1 Open the lid of the battery compartment
located on the bottom of the unit.
2 Attach a battery to the battery connector.
Make sure that the battery is oriented in the
correct polarity.
3 Fit the battery into the battery compartment
and close the lid.
When the battery nears the end of its life, the
TUNER ON/OFF indicator will blink. Please
install a new battery as soon as possible.
The included battery is provided so that
you can verify that the unit is operating
correctly; its lifespan may be shorter than
normal.
Restoring the factory settings
Here’s how to return the pitchblack+ to the
factory settings.
1 Connect a cable to the INPUT A or INPUT B
jack; the pitchblack+ will be powered-on.
2 While holding down the UP button and
DOWN button, press the TUNER ON/OFF
switch.
The tuner will turn off, and the following
settings will return to their factory-set state.
Calibration: 440 Hz (40)
Tuning mode: Chromatic (CH)
Flat tuning: 0
Display mode: Focus (F1)
Temperament program: 0 cent for all notes
7
Page 8
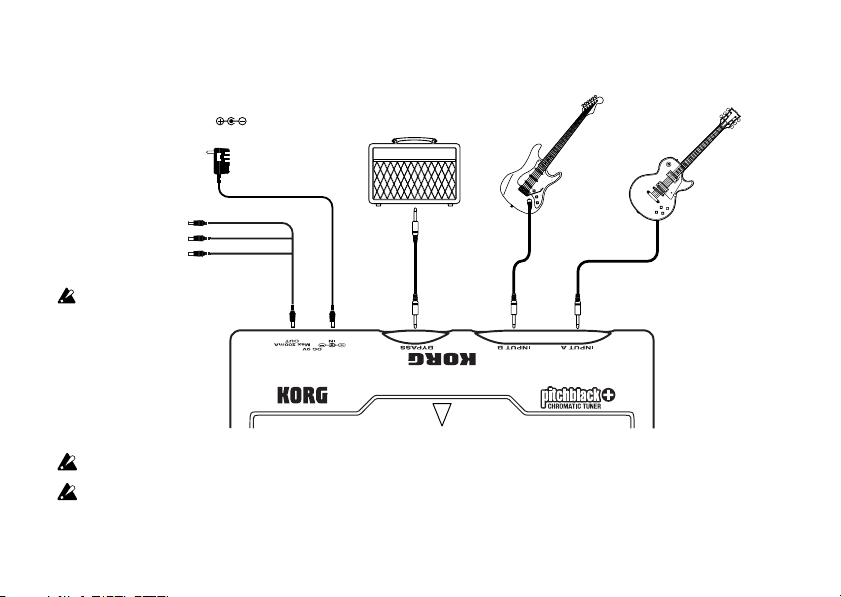
Connections
AC adapter (9V, , 600 milliamps
or greater, sold separately)
To AC outlet
DC cable (included)
To your effect pedals
Maximum 200
amps
DO NOT let the unused plugs touch metal objects. Doing so
can damage the AC
adapter. Be sure the
unused plugs are protected
milli-
DC 9V OUT
Connect to your amp
or effect pedal, etc.
DC 9V IN
BYPASS
Power-off all equipment before making connections.
The INPUT A, INPUT B, and BYPASS jacks are mono-only. Stereo cables cannot be used.
8
Guitar or bass
INPUT AINPUT B
Page 9
INPUT A & INPUT B jacks
Connect the instrument(s) to be tuned to these
jacks.
If your instruments are connected to both
INPUT A and INPUT B, use the INPUT SELECT
switch to choose the instrument you want to
tune. The INPUT SELECT indicator shows the
instrument whose input jack is selected.
You can specify the calibration, tuning mode,
flat tuning, and display mode independently
for each input jack. For example you can
specify regular tuning for the instrument
connected to INPUT A, and “open A” tuning
for the instrument connected to INPUT B.
Instrument 1
INPUT A
Instrument 2
INPUT B
A
Calibration, Tuning mode,
Flat tuning, Display mode
B
Calibration, Tuning mode,
Flat tuning, Display mode
If you connect just one instrument to either
INPUT A or INPUT B (not both), you can use
the INPUT SELECT switch to choose either A or
B settings (calibration, tuning mode, flat tuning,
display mode). The INPUT SELECT indicator
shows the settings you’ve selected.
For example if you’ve specified regular tuning
for A and flat tuning at a semitone lower for B,
you can use the setting A to perform in regular
tuning, and then switch to setting B and
perform in flat tuning.
Instrument
INPUT A
INPUT SELECT
switch
A
Calibration, Tuning mode,
Flat tuning, Display mode
B
Calibration, Tuning mode,
Flat tuning, Display mode
If instruments are connected to both INPUT
A and INPUT B, and you disconnect the
cable from the input jack currently selected
by the INPUT SELECT switch, the input
selection will automatically switch to the
other input jack.
9
Page 10
BYPASS jack
Connect this jack to your effect pedal or amp, etc.
When the tuner is on, the sound from the
instrument connected to the INPUT A or INPUT
B jack will be muted. When the tuner is off, the
sound from the instrument connected to the
input jack will be audible. Since this is “true
bypass,” the output sound is unaffected by the
internal circuit. If instruments are connected to
both INPUT A and INPUT B jacks, use the
INPUT SELECT switch to choose the instrument
that will be audible from the BYPASS jack. The
INPUT SELECT indicator shows the input jack
that is selected. If an instrument is connected
only to the INPUT A or INPUT B jack (not both),
the sound of the connected instrument will
always be audible from the BYPASS jack,
regardless of the INPUT SELECT switch.
10
DC 9V IN jack
If you want to use an AC adapter to supply
power to the pitchblack+, you can use the
optional AC adapter (9V 600 milliamps).
Using any other AC adapter may cause
malfunctions.
DC 9V OUT jack
By using the included DC cable with the
optional AC adapter, you can supply power to
up to three effect pedals or other devices that
use 9V power ( ).
Make sure that the total current consumption of the connected effect pedals does not
exceed 200 mA. You must also check the
polarity of the connected effect pedals.
Do not connect an AC adapter to the DC 9V
OUT jack. This may cause malfunctions.
If the pitchblack+ is operating on battery
power, power cannot be supplied from the
DC 9V OUT jack.
Page 11
Tuning
1 Use a cable to connect the instrument you
want to tune to the INPUT A jack or INPUT
B jack.
The pitchblack+ will power-on.
The power will turn on when you connect a
cable to the INPUT A or INPUT B jack, but
the tuner will be off. The tuner will turn on
when you press the TUNER ON/OFF
switch.
2 If instruments are connected to both INPUT
A and INPUT B jacks, use the INPUT
SELECT switch to choose the instrument
that you want to tune. If an instrument is
connected only to the INPUT A or INPUT B
jack (not both), use the INPUT SELECT
switch to choose setting A or setting B.
The INPUT SELECT indicator shows the
input jack or setting that’s selected.
When the power is on, the input jack to
which you first connected a cable will be
selected automatically.
3 Press the TUNER ON/OFF switch to turn
the tuner on.
The TUNER ON/OFF indicator will light.
When you turn the tuner on, the signal being
input from the INPUT A or INPUT B jack will
not be output from the BYPASS jack.
The tuner can be turned on if the instrument to be tuned is connected to the
INPUT A or INPUT B jack.
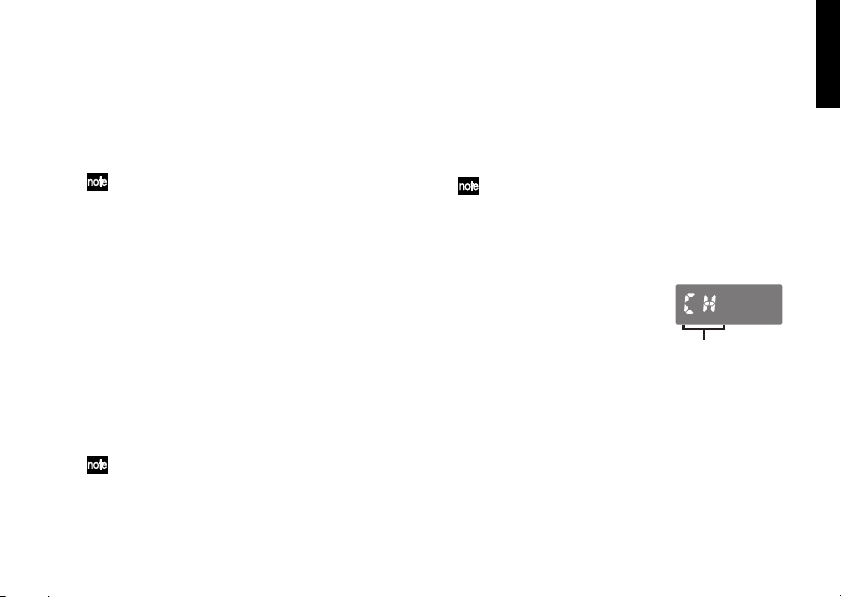
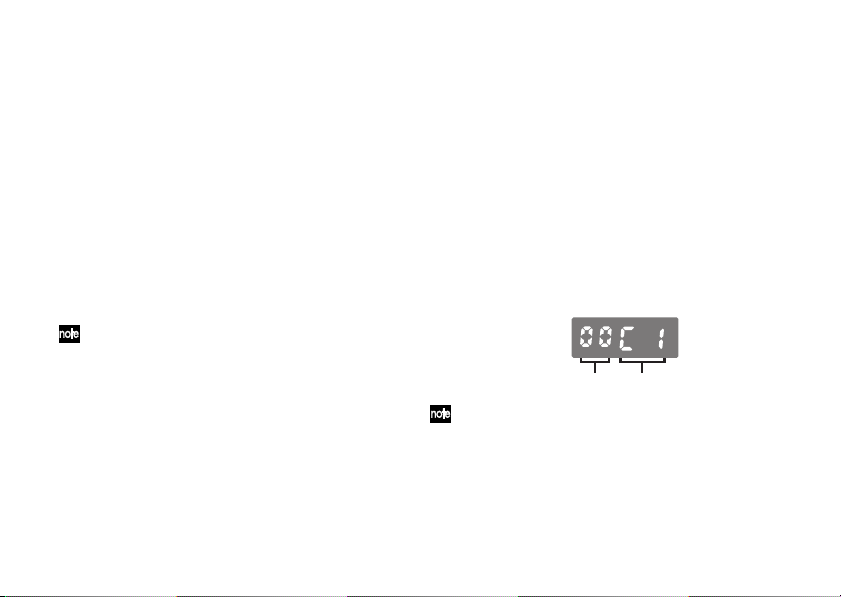
The display will show the tuning mode
setting for approximately one second.
Tuning mode
With the factory settings, the tuning mode is
set to CH: chromatic.
4
As desired, adjust the calibration, tuning
mode, flat tuning, and display mode settings.
☞p.13 “Setting the Calibration”
☞p.14 “Setting the Tuning Mode”
☞p.18 “Flat Tuning”
☞p.20 “Setting the Display Mode”
11
Page 12

You can make these settings independently
for the INPUT A and INPUT B input jacks.
When you use the INPUT SELECT switch
to change inputs, these settings will also
change automatically. If an instrument is
connected only to the INPUT A or INPUT B
jack (not both), you can use the INPUT
SELECT switch to select setting A or setting
B for the instrument that is connected.
These settings are stored in internal
memory. Even if you remove the battery or
disconnect the AC adapter, the pitch-
will start up with the settings
black+
stored in internal memory the next time
you turn the power on.
5 Play a single note on your instrument and
tune it so that the desired note name is
shown in the display.
The display shows the note name that is
closest to the pitch you played.
12
Note name
6 Use the LED meter to tune your instrument.
The way in which the LED meter indicates the
pitch deviation will depend on the display
mode you’ve selected. With the factory
settings, this is set to the F1: Focus1.
☞p.20 “Setting the Display Mode”
7
When you’ve finished tuning, press the TUNER
ON/OFF switch to turn the tuner off.
The TUNER ON/OFF indicator will go dark.
The sound of the instrument connected to the
input jack will be audible from the BYPASS
jack. If instruments are connected to both the
INPUT A and INPUT B jacks, you can use the
INPUT SELECT switch to choose the
instrument that is audible from the BYPASS
jack even if the tuner is off. The INPUT
SELECT indicator shows the input jack that’s
selected. If an instrument is connected only to
the INPUT A or INPUT B jack (not both), the
connected instrument will always be audible,
regardless of the INPUT SELECT switch.
Page 13

Setting the Calibration
Here’s how to set the calibration (the reference
pitch used for tuning, expressed as the pitch of
the middle A note (A4) on a piano).
You can set the calibration independently
for the INPUT A and INPUT B input jacks.
When you use the INPUT SELECT switch
to change inputs, the setting will also
change automatically.
The calibration settings are stored in
internal memory. Even if you remove the
battery or disconnect the AC adapter, the
pitchblack+ will recall the settings stored
in internal memory the next time you turn
the power on.
1 Press the CALIB button.
The display will indicate the current setting.
When the pitchblack+ is shipped from the
factory this is set at 40: 440 Hz.
2 Use the UP button or DOWN button to
specify the calibration.
40: 440 Hz 41: 441 Hz 42: 442 Hz
43: 443 Hz 44: 444 Hz 45: 445 Hz
36: 436 Hz 37: 437 Hz 38: 438 Hz
39: 439 Hz
If you decide to cancel the change you
made, press the TUNER ON/OFF switch or
press the INPUT SELECT switch to change
between A or B.
3 Press the STORE button.
The INPUT SELECT indicator will blink. If
the A and B settings are identical, the A and B
indicators will blink. If the A and B settings
differ, the indicator selected by the INPUT
SELECT switch will blink.
4 Use the UP button, DOWN button, or
INPUT SELECT switch to select the internal
memory in which you want to store the
setting.
5 Press the STORE button once again.
The calibration setting will be stored in the
internal memory you specified, and the
pitchblack+ will return to tuning mode.
13
Page 14
When you press the STORE button, the
calibration, tuning mode, flat tuning, and
display mode settings will all be saved at
the same time. For example if you select
“A,” change the tuning mode, and save to
“B,” settings other than the tuning mode
will also change to the setting of “A.”
Similarly, if you change the tuning mode of
“A” and then change the display mode and
save to “A,” the tuning mode and display
mode will be rewritten with the edited
values.
14
Setting the Tuning Mode
Here’s how to specify the tuning mode as
appropriate for your instrument or the
particular tuning you’re using. In addition to
the regular tuning mode for a guitar or bass,
the pitchblack+ supports various tunings
including five open tunings for guitar, as well
as original tunings you’ve created.
You can set the tuning mode independently
for the INPUT A and INPUT B input jacks.
When you use the INPUT SELECT switch
to change inputs, the setting will also
change automatically.
The tuning mode settings are stored in
internal memory. Even if you remove the
battery or disconnect the AC adapter, the
pitchblack+ will start up with the settings
stored in internal memory the next time
you turn the power on.
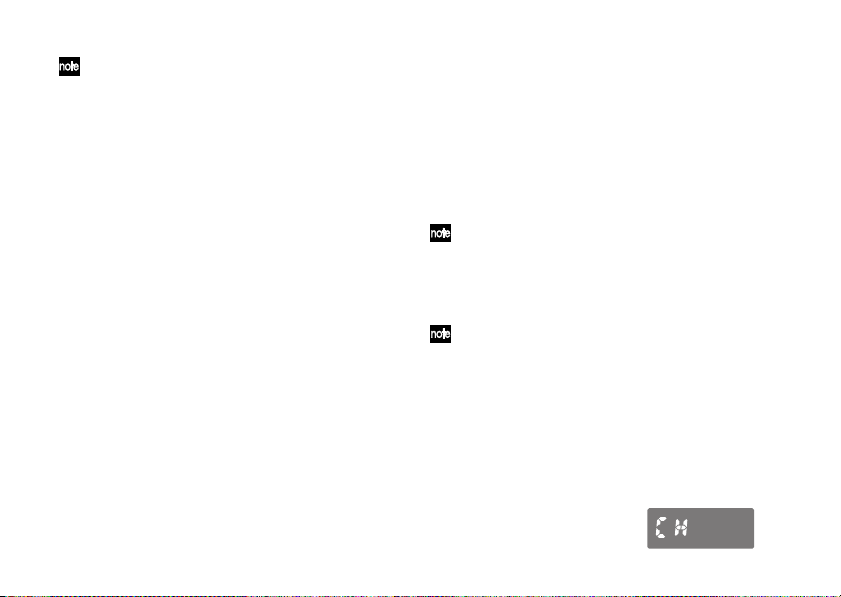
1 Press the MODE button.
The display will indicate the current tuning
mode.
Page 15

When shipped from the factory, the tuning
mode is set to CH: chromatic.
2 Use the UP or DOWN button to select the
desired tuning mode.
CH: Chromatic. The note names are shown at
semitone (half step) intervals.
GT: Standard tuning for a guitar
(7B, 6E, 5A, 4D, 3G, 2B, 1E).
BS: Standard tuning for a bass
(LB, 4E, 3A, 2D, 1G, HC).
OD: Open D tuning for a guitar
(6D, 5A, 4D, 3F#, 2A, 1D).
OE: Open E tuning for a guitar
(6E, 5B, 4E, 3G#, 2B, 1E).
OG: Open G tuning for a guitar
(6D, 5G, 4D, 3G, 2B, 1D).
OA: Open A tuning for a guitar
(6E, 5A, 4E, 3A, 2C#, 1E).
DA: DADGAD tuning for a guitar
(6D, 5A, 4D, 3G, 2A, 1D).
P1–P5: Tuning programs you’ve created. You
can create up to five tuning programs. (☞p.16
“Creating a Tuning Program”).
If you decide to cancel your choice, press
the TUNER ON/OFF switch or press the
INPUT SELECT switch to change between
A and B.
3 Press the STORE button.
The INPUT SELECT indicator will blink. If
the A and B settings are identical, the A and B
indicators will blink. If the A and B settings
differ, the indicator selected by the INPUT
SELECT switch will blink.
4 Use the UP button, DOWN button, or
INPUT SELECT switch to select the internal
memory in which you want to store the
setting.
5 Press the STORE button once again.
The tuning mode setting will be stored in the
internal memory you specified, and the
pitchblack+ will return to the tuning state.
When you press the STORE button, the
calibration, tuning mode, flat tuning, and
display mode settings will all be saved at
the same time (☞p.14).
15
Page 16
Creating your own Tuning
Cent value
Note name and octave
In addition to equal temperament, the
pitchblack+ lets you store and use any desired
temperament. You can also specify ethnic
tunings or stretched tuning.
You can create a tuning program in either of
two ways: by specifying the pitch individually
for every one of the eighty-eight notes A0–C8
(All Note), or by specifying the pitch for each
note in an octave that will be applied across the
entire pitch range (Octave Link).
The tuning you create can be saved as one of
five tuning programs.
Tuning programs you create are saved in
internal memory. Even if you remove the
battery or disconnect the AC adapter, the
pitchblack+ will remember the settings
stored in internal memory the next time
you turn the power on.
16
Specifying the pitch for every note (All Note)
Here’s how to individually specify the pitch for
every one of the eighty-eight notes A0–C8.
1 In Tuning mode, select P1–P5 (PROGRAM
1–PROGRAM 5), and press the STORE
button to store the setting.
☞p.14 “Setting the Tuning Mode”
2 Press the NOTE/CENT button.
You will enter Tuning Program Edit mode.
The display will indicate the note name, the
octave, and the cent value; the note name and
octave will blink.
If the octave is not shown, the display is
showing the Octave Link edit screen (☞p.17
“Specifying the pitch for each note in the
octave”). If so, hold down the NOTE/CENT
button for approximately one second to
select the All Note edit screen.
Page 17

3 Use the UP or DOWN button to select the
note name and octave whose cent value you
will specify.
4 Press the NOTE/CENT button to make the
cents value blink, and use the UP or DOWN
buttons to specify the cents value relative to
equal temperament.
You can edit the cents value in a range of -50–
+50 cents.
5To continue editing, press the NOTE/CENT
button and repeat steps 3 and 4.
6 When you’ve finished editing, press the
STORE button.
The display will indicate a program number.
7 Use the UP button or DOWN button to
select the program number (P1–P5) in which
you want to store the tuning program you
created.
8 Press the STORE button once again.
Your tuning program will be stored, and the
pitchblack+
will return to tuning mode.
Specifying the pitch for each note in the
octave (Octave Link)
Here’s how to specify the pitch for each note of
an octave.
1 In Tuning mode, select P1–P5 (PROGRAM
1–PROGRAM 5), and press the STORE
button to store the setting.
☞p.14 “Setting the Tuning Mode”
2 Press the NOTE/CENT button.
You will enter the Tuning Program Edit mode.
☞p.16 “Specifying the pitch for every note
(All Note)”
3 Hold down the NOTE/CENT button for
approximately one second.
The display will show the Octave Link edit
screen. The note name and cent value will be
displayed, and the note name will blink.
Cent value
Note name
17
Page 18

Each time you hold down the NOTE/
CENT button for approximately one
second, you will alternate between the All
Note and Octave Link edit screens.
4
Use the UP or DOWN buttons and the
NOTE/CENT button to specify the cent value
for each note in the one-octave range C–B.
The procedure and the range for the cent
value are the same as for All Note.
☞p.16 “Specifying the pitch for every note
(All Note)”
5 When you’ve finished editing, press the
STORE button.
The display will indicate a program number.
6 Use the UP or DOWN button to select the
program number (P1–P5) in which you want
to store the tuning program you created.
7 Press the STORE button once again.
Your tuning program will be stored, and the
pitchblack+
will return to tuning mode.
18
Flat Tuning
Flat Tuning lets you tune a number of semitones lower than the note names shown in the
display. You can tune down a maximum of
seven semitones (half steps).
Flat Tuning is available when the Tuning
Mode is set to Guitar, Bass, Open D–Open
A open tuning, or DADGAD.
You can specify Flat Tuning independently
for the INPUT A and INPUT B input jacks.
When you use the INPUT SELECT switch
to change inputs, the setting will also
change automatically.
The Flat Tuning settings are stored in internal
memory. Even if you remove the battery or
disconnect the AC adapter, the pitchblack+ will
start up with the settings stored in internal
memory the next time you turn the power on.
Page 19
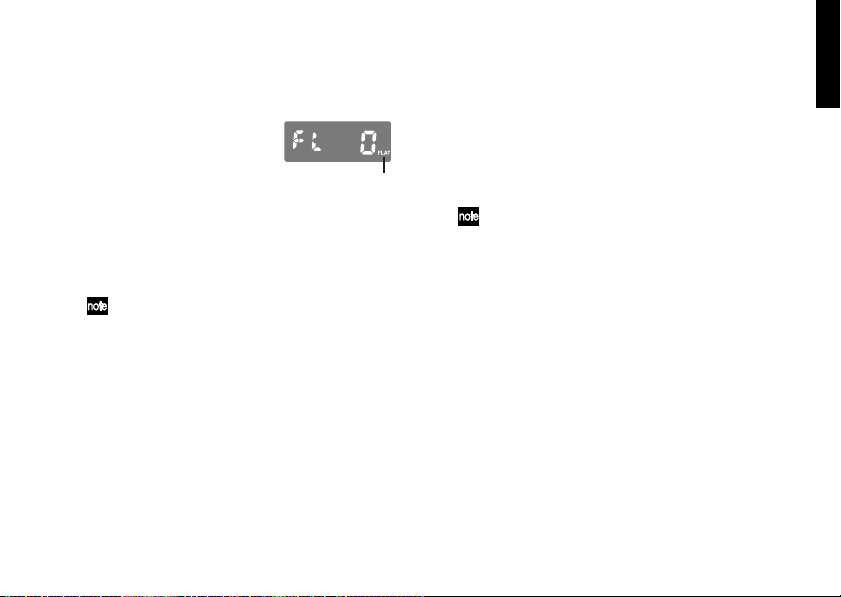
1 Press the FLAT button.
The Flat Tuning indicator will blink, and the
display will show the current number of flats.
Flat tunning indicater
2 Use the UP or DOWN buttons to specify the
number of flats.
You can specify a number of flats in the range
of 0–7. If you specify a setting other than 0,
the Flat Tuning indicator will light.
If you decide to cancel the change you
made, press the TUNER ON/OFF switch or
press the INPUT SELECT switch to change
between A or B.
3 Press the STORE button.
The INPUT SELECT indicator will blink. If
the A and B settings are identical, the A and B
indicators will blink. If the A and B settings
differ, the indicator selected by the INPUT
SELECT switch will blink.
4
Use the UP button, DOWN button, or INPUT
SELECT switch to select the internal memory
in which you want to store the setting.
5 Press the STORE button once again.
The selected flat tuning setting will be stored
in the internal memory you specified, and the
pitchblack+ will return to tuning mode.
When you press the STORE button, the
calibration, tuning mode, flat tuning, and
display mode settings will all be saved at
the same time (☞p.14).
19
Page 20
Setting the Display Mode
Here’s how to specify the display mode of the
LED meter. You can choose from six types of
display modes.
The Display Mode settings are stored in
internal memory. Even if you remove the
battery or disconnect the AC adapter, the
pitchblack+ will start up with the settings
stored in internal memory the next time
you turn the power on.
1 Press the DISPLAY button.
The display will indicate the current setting.
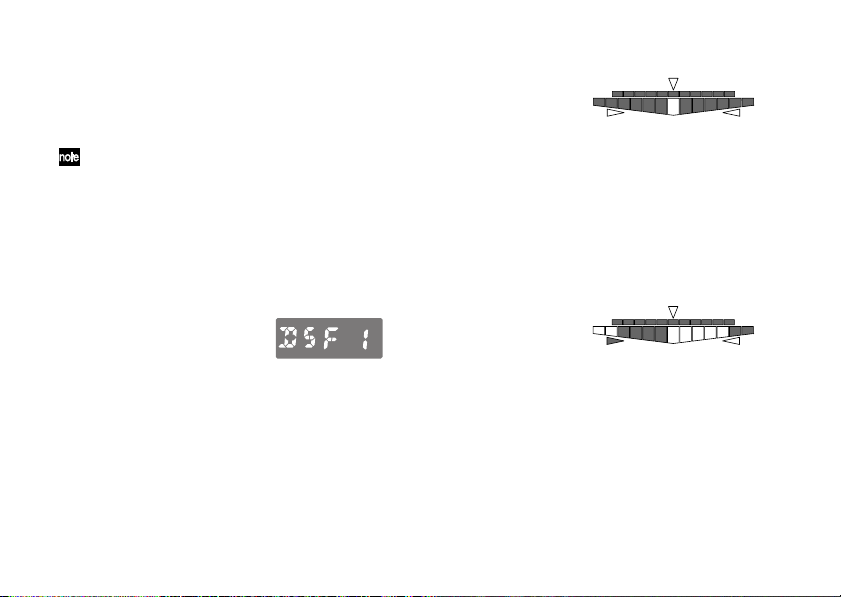
S1: Meter
Tune your instrument so that the center LED
of the LED meter is lit. An LED to the right of
center will light if your instrument is sharp,
and an LED to the left of center will light if
your instrument is flat. The w pitch guide
LED will light if your instrument is sharp,
and the s LED will light if your instrument
is flat.
S2: Full Strobe
When the pitchblack+ is shipped from the
factory this is set to F1: Focus1.
2 Use the UP button or DOWN button to
select a display pattern.
20
Tune your instrument so that the LED meter
illumination stops moving. The LED meter
illumination will flow from left to right if your
instrument is sharp, or from right to left if
your instrument is flat. The w pitch guide
LED will light if your instrument is sharp, and
the s LED will light if your instrument is flat.
Page 21
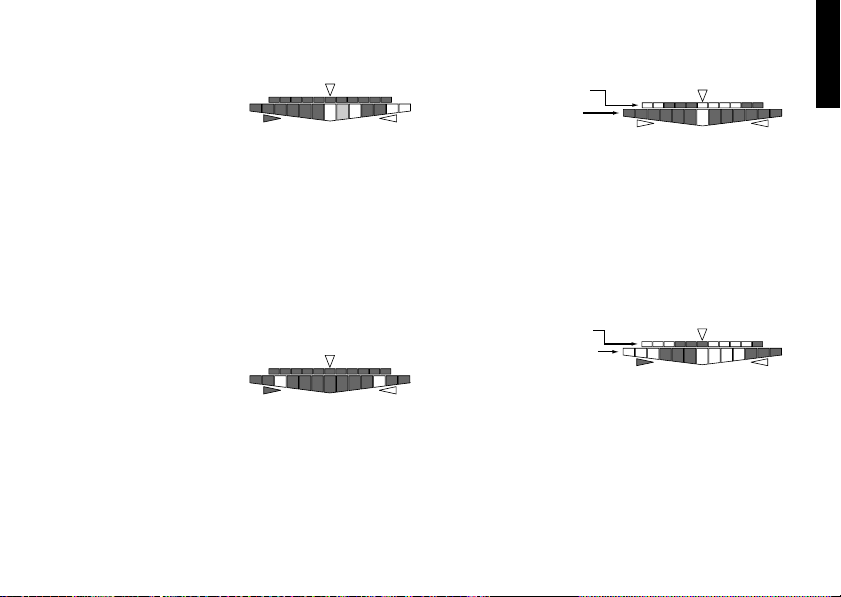
S3: Half Strobe
Tune your instrument so that the LED meter
illumination stops flowing. The strobe illumination will appear in the right side of the LED
meter if your instrument is sharp, and in the left
side if your instrument is flat. When your
instrument is tuned correctly, only the center
LED will be lit. The pitch guide LEDs indicate
whether your instrument is sharp or flat. The w
LED will light if your instrument is sharp, and
the s LED will light if your instrument is flat.
S4: Mirror
Tune your instrument so that the two
illuminated LEDs in the left and right side of
the LED meter coincide in the center. The
farther your instrument is from the correct
pitch, the farther apart the illuminated LEDs
will be. The pitch guide w LED will light if
your instrument is sharp, and the s LED will
light if your instrument is flat.
F1: Focus1
Sub meter: Full Strobe
Main meter: Meter
The main meter will operate as described in
S1: Meter, and the sub-meter will operate as
described in S2: Full Strobe. Since the submeter has higher precision, it allows you to
tune with greater accuracy. The pitch guide
w LED will light if your instrument is sharp,
and the s LED will light if your instrument
is flat.
F2: Focus2
Sub meter: Full Strobe
Main meter: Full Strobe
The main meter and sub meter will operate as
described in S2: Full Strobe. Since the submeter has higher precision, it allows you to
tune with greater accuracy. The pitch guide
w LED will light if your instrument is sharp,
and the s LED will light if your instrument
is flat.
21
Page 22

If you decide to cancel the change you
made, press the TUNER ON/OFF switch or
press the INPUT SELECT switch to change
between A or B.
3 Press the STORE button.
The INPUT SELECT indicator will blink. If
the A and B settings are identical, the A and B
indicators will blink. If the A and B settings
differ, the indicator selected by the INPUT
SELECT switch will blink.
4 Use the UP button, DOWN button, or
INPUT SELECT switch to select the internal
memory in which you want to store the
setting.
5 Press the STORE button once again.
The display mode setting will be stored in the
internal memory you specified, and the
pitchblack+ will return to the tuning state.
When you press the STORE button, the
calibration, tuning mode, flat tuning, and
display mode settings will all be saved at
the same time (☞p.14).
22
Troubleshooting
Can’t tune.
• Could the tuner be off?
Press the TUNER ON/OFF switch to turn the
tuner on.
• If instruments are connected to both INPUT A
and INPUT B jacks, have you used the INPUT
SELECT switch to select the correct input for
the instrument you’re tuning?
• Have you selected the appropriate tuning
mode for the instrument you’re tuning?
For example if you’re tuning a guitar, the note
names might not be displayed if the Tuning
Mode is set to BS (Bass).
Sound is not audible from the BYPASS jack.
• Could the tuner be on?
If the tuner is on, sound will not be audible
from the BYPASS jack. Press the TUNER ON/
OFF switch to turn the tuner off.
Power is not supplied from the DC 9V OUT jack.
• Could the pitchblack+ be operating on
battery power?
Power cannot be supplied from the DC 9V
OUT jack if the pitchblack+ is operating on
battery power.
Page 23

Specifications
• Tuning: 12-note equal temperament,
programs (88-note)
• Detection range: E0 (20.60 Hz) – C8 (4186
Hz)(for sine wave input)
• Calibration range: A4=436–445 Hz (1 Hz
steps)
• Detection accuracy: within ±0.1 cent
• Flat tuning: 1–7 semitones
• Connectors:
INPUT A, INPUT B jacks (1/4" mono
phone jacks)
BYPASS jack (1/4" mono phone jack)
DC 9V IN jack
DC 9V OUT jack
• Input impedance: 1M (when tuner is on)
• Power supply: S-006P/6F22/6LR61 (9V
battery) or AC adapter (9V 600
milliamps or greater, sold separately)
• Battery life: approximately 5 hours of
continuous operation when tuner is on
(continuous A4 input, display mode: Forcus1,
using 6F22 type zinc-carbon battery)
• Current consumption: maximum 50 mA
• Dimensions (W x H x D): 128 mm x 120 mm
x 47 mm/5.04" x 4.72" x 1.85" (including
rubber feet)
• Weight: 492 g/1.08 lbs. (including battery)
• Included items: one 6F22 type zinc-carbon
battery for verifying operation, one DC cable
• Options: AC adapter (9V 600 milliamps)
Specifications and appearance are subject to
change without notice for improvement.
23
Page 24

Précautions
Emplacement
L’utilisation de cet instrument dans les endroits
suivants peut en entraîner le mauvais fonctionnement.
• En plein soleil
• Endroits très chauds ou très humides
• Endroits sales ou fort poussiéreux
• Endroits soumis à de fortes vibrations
• A proximité de champs magnétiques
Alimentation
Branchez l’adaptateur secteur fourni à une prise secteur de
tension appropriée. Evitez de brancher l’adaptateur à une
prise de courant dont la tension ne correspond pas à celle
pour laquelle l’appareil est conçu.
Interférences avec d’autres appareils électriques
Les postes de radio et de télévision situés à proximité
peuvent par conséquent souffrir d’interférences à la
réception. Veuillez dès lors faire fonctionner cet
appareil à une distance raisonnable de postes de
radio et de télévision.
24
Maniement
Pour éviter de les endommager, manipulez les
commandes et les boutons de cet instrument avec
soin.
Entretien
Lorsque l’instrument se salit, nettoyez-le avec un
chiffon propre et sec. Ne vous servez pas d’agents de
nettoyage liquides tels que du benzène ou du
diluant, voire des produits inflammables.
Conservez ce manuel
Après avoir lu ce manuel, veuillez le conserver
soigneusement pour toute référence ultérieure.
Evitez toute intrusion d’objets ou de liquide
Ne placez jamais de récipient contenant du liquide
près de l’instrument. Si le liquide se renverse ou coule,
il risque de provoquer des dommages, un court-circuit
ou une électrocution.
Veillez à ne pas laisser tomber des objets métalliques
dans le boîtier (trombones, par ex.). Si cela se produit,
débranchez l’alimentation de la prise de courant et
contactez votre revendeur korg le plus proche ou la
surface où vous avez acheté l’instrument.
Page 25
Notice concernant l’élimination du produit
(UE seulement)
Si ce symbole “Poubelle barrée” est
imprimé sur le produit ou dans le manuel
de l’utilisateur, vous devez vous débarrasser du produit de la manière appropriée.
Ne jetez pas ce produit avec vos ordures
ménagères. En vous débarrassant
correctement du produit, vous préviendrez
les dommages environnementaux et les
risques sanitaires. La méthode correcte
d'élimination dépendra de votre lieu
d’habitation, aussi veuillez contacter les
autorités locales concernées pour les
détails.
*Tous les noms de produits et de sociétés sont des
marques commerciales ou déposées de leur détenteur
respectif.
25
Page 26

Table des matiére
Précautions ........................................ 24
Caractéristiques principales ............... 26
Description du pitchblack+ ................. 28
Installation de la pile ......................... 29
Rétablir les réglages d’usine .............. 29
Connexions ....................................... 30
Accordage ......................................... 33
Régler le diapason ............................. 35
Sélectionner le mode d’accordage ...... 36
Créer vos propres accordages ............ 38
Accordage bémol............................... 40
Sélectionner le mode d’affichage ....... 42
Dépannage ........................................ 44
Fiche technique .................................. 45
26
Nous vous remercions d’avoir opté pour
l’accordeur avancé en pédale Korg pitchblack+.
Afin de pouvoir profiter au mieux de votre
pitchblack+, veuillez lire attentivement ce
mode d’emploi et suivre ses consignes.
Conservez ce manuel pour toute référence
ultérieure.
Caractéristiques principales
Accordage précis
Le pitchblack+ utilise deux affichages à diodes
pour permettre un accordage extrêmement fin
d’une précision supérieure à ±0,1 cents.
Modes d’accordage
Le pitchblack+ propose divers modes
d’accordage: chromatique, guitare, basse et cinq
accordages ouverts pour guitare.
Outre le tempérament égal, vous pouvez
choisir vos propres accordages comme ceux
d’instruments ethniques ou l’accordage élargi
(“stretched tuning”). Les accordages de votre
cru peuvent être sauvegardés dans cinq
mémoires internes.
Page 27

Accordage bémol
Vous pouvez opter pour un accordage bémol de
votre instrument allant jusqu’à sept demi-tons
plus bas que la note affichée à l’écran.
Entrées
Le pitchblack+ dispose de deux entrées:
INPUT A et INPUT B. Vous pouvez déterminer
le diapason (calibrage), le mode d’accordage,
l’accordage bémol et le mode d’affichage pour
chaque entrée. Si vous avez branché un
instrument à une seule de ces entrées, vous
avez le choix entre deux jeux de réglages pour
l’instrument.
Mode d’affichage
Vous avez en outre le choix parmi six types
d’affichage pour l’indicateur à diodes.
Différents motifs indicatifs sont disponibles:
une échelle dont la diode centrale s’allume
quand la note est juste, un stroboscope dont le
mouvement s’arrête quand la note est juste et
un motif de focalisation qui se sert de deux
indicateurs à diodes pour affiner encore
l’accordage.
Prise BYPASS
Quand l’accordeur est éteint, la sortie BYPASS
constitue un véritable contournement: le signal
de sortie n’est absolument pas affecté par les
circuits internes. La sortie BYPASS est coupée
lorsque l’accordeur est activé.
Prise DC 9V OUT
Si vous utilisez l’adaptateur (9V )
disponible en option, vous pouvez vous servir
du câble DC pour alimenter les pédales d’effets
d’une tension de 9V ( ). (La capacité
maximum d’alimentation est de 200mA.)
27
Page 28

Description du pitchblack+
Prise DC 9V IN
Prise DC 9V OUT
Guidage centrale
Diodes de guidage
Prise BYPASS (mono)
Prises INPUT A, INPUT B (mono)
Indicateurs
à diode
Bouton DISPLAY
Interrupteur de
28
Bouton MODE
Bouton STORE
Témoin
d’activation
de l’accordeur
l’accordeur
Bouton FLAT
Bouton CALIB
Bouton NOTE/CENT
Témoins de
sélection d’entrée
Sélecteur d’entrée
Boutons HAUT/BASEcran
Page 29

Installation de la pile
1 Ouvrez le couvercle du compartiment à pile
situé sur la face inférieure du produit.
2 Attachez une pile au connecteur à pile.
Orientez la pile correctement en respectant
la polarité.
3 Insérez la pile dans le compartiment à pile
et fermez le couvercle.
Quand la pile est pratiquement épuisée, le
témoin d’activation de l’accordeur clignote.
Remplacez la pile aussi vite que possible.
La pile fournie permet de vérifier que le
produit fonctionne correctement. Sa durée
de vie peut être plus brève que d’habitude.
Rétablir les réglages d’usine
Vous pouvez toujours rétablir les réglages
d’usine du pitchblack+.
1 Branchez un câble à la prise INPUT A ou
INPUT B. Le pitchblack+ est sous tension.
2 Maintenez les boutons HAUT et BAS
enfoncés et appuyez sur l’interrupteur de
l’accordeur.
L’accordeur s’éteint et les paramètres
suivants retrouvent leur réglage d’usine.
Diapason: 440Hz (40)
Mode d’accordage: Chromatique (CH)
Accordage bémol: 0
Mode d’affichage: Focalisation1 (F1)
Programme d’accordage: 0 cent pour toutes
les notes
29
Page 30

Connexions
Adaptateur (9V,
ou plus, disponible en option)
Vers une prise de courant
Câble DC (fourni)
Vers vos pédales d’effet
Maximum 200mA
Ne laissez pas les prises
inutilisées toucher des objets
métalliques, ceci peut
endommager l’adaptateur
secteur. Vérifiez que les prises
sont protégées.
Coupez l’alimentation de tous les éléments avant d’effectuer les connexions.
Les prises INPUT A, INPUT B et BYPASS sont mono. Les câbles stéréo ne peuvent pas être utilisés.
30
,
600mA
DC 9V OUT
Branchez votre ampli,
pédale d’effet etc.
DC 9V IN
BYPASS
INPUT B
Guitare ou basse
INPUT A
Page 31

Prises INPUT A & INPUT B
Branchez le ou les instrument(s) à accorder à
ces prises.
Si vous branchez des instruments aux prises
INPUT A et INPUT B, sélectionnez l’instrument
à accorder avec le sélecteur d’entrée. Le témoin
de sélection indique l’instrument dont l’entrée
est sélectionnée.
Vous pouvez déterminer le diapason (“calibrage”), le mode d’accordage, l’accordage bémol et
le mode d’affichage pour chaque entrée. Vous
pouvez, par exemple, sélectionner l’accordage
standard pour l’instrument branché à INPUT A
et un accordage ouvert de La (“open A”) pour
l’instrument branché à INPUT B.
Instrument 1
INPUT A
Instrument 2
INPUT B
A
Régler le diapason, Mode d’accordage,
Accordage bémol, Mode d’affichage
B
Régler le diapason, Mode d’accordage,
Accordage bémol, Mode d’affichage
Si vous ne branchez qu’un seul instrument à
INPUT A ou INPUT B, vous pouvez utiliser le
sélecteur d’entrée pour sélectionner la série de
réglages A ou B (diapason, mode d’accordage,
accordage bémol, mode d’affichage). Le témoin
de sélection d’entrée indique les réglages
sélectionnés.
Si, par exemple, vous avez sélectionné
l’accordage standard pour A et un accordage
bémol d’un demi-ton pour B, vous pouvez
utiliser les réglages A pour jouer avec l’accordage standard puis sélectionner les réglages B
pour passer à l’accordage bémol.
Sélecteur
Instrument
INPUT A
A
d’entrée
Régler le diapason, Mode d’accordage,
Accordage bémol, Mode d’affichage
B
Régler le diapason, Mode d’accordage,
Accordage bémol, Mode d’affichage
Si, quand deux instruments sont branchés
aux prises INPUT A et INPUT B, vous
débranchez le câble de l’entrée sélectionnée
par le sélecteur, l’entrée alternative est
automatiquement sélectionnée.
31
Page 32

Prise BYPASS
Branchez cette prise à une pédale d’effet, un
ampli etc. Quand l’accordeur est activé, le
signal de l’instrument branché à la prise INPUT
A ou INPUT B est coupé. Quand l’accordeur est
coupé, le signal de l’instrument branché à
l’entrée est audible. Comme il s’agit d’un
véritable “contournement”, le signal de sortie
n’est pas affecté par le circuit interne. Si vous
branchez des instruments aux prises INPUT A
et INPUT B, sélectionnez l’instrument qui sera
audible avec le sélecteur d’entrée. Le témoin de
sélection indique l’entrée choisie. Si vous
n’avez branché qu’un instrument à la prise
INPUT A ou INPUT B, le signal de l’instrument
branché est toujours envoyé à la prise BYPASS,
quel que soit le réglage du sélecteur d’entrée.
32
Prise DC 9V IN
Pour alimenter le pitchblack+ avec un
adaptateur secteur, utilisez l’adaptateur
disponible en option (9V 600mA).
L’utilisation de tout autre adaptateur peut
provoquer des dysfonctionnements.
Prise DC 9V OUT
En utilisant le câble DC fourni avec l’adaptateur secteur optionnel, vous pouvez alimenter
jusqu’à trois pédales d’effet ou autres dispositifs d’une tension de 9V ( ).
Veillez à ce que la demande totale des
pédales branchées n’excède pas 200mA.
Vérifiez également la polarité des pédales
d’effet branchées.
Ne branchez pas un adaptateur secteur à la
prise DC 9V OUT. Cela entraînerait des
dysfonctionnements.
Si le pitchblack+ fonctionne sur pile, il ne
peut pas fournir d’alimentation via la prise
DC 9V OUT.
Page 33

Accordage
1 Branchez l’instrument à accorder à la prise
INPUT A ou INPUT B.
Le pitchblack+ se met sous tension.
La mise sous tension a lieu quand vous
branchez un câble à la prise INPUT A ou
INPUT B mais l’accordeur est désactivé.
Pour activer l’accordeur, appuyez sur
l’interrupteur de l’accordeur.
2 Si vous branchez des instruments aux prises
INPUT A et INPUT B, sélectionnez
l’instrument à accorder avec le sélecteur
d’entrée. Si vous n’avez branché qu’un seul
instrument (à la prise INPUT A ou INPUT
B), le sélecteur d’entrée permet de choisir la
série de réglages A ou B.
Le témoin de sélection indique l’entrée ou la
série de réglages sélectionnée.
Lors de la mise sous tension, la première
entrée à laquelle vous avez branché un
câble est automatiquement sélectionnée.
3 Appuyez sur l’interrupteur de l’accordeur
pour l’activer.
Le témoin d’activation de l’accordeur s’allume.
Quand vous activez l’accordeur, le signal de
l’entrée INPUT A ou INPUT B n’est pas
envoyé à la sortie BYPASS.
Pour activer l’accordeur, il faut que
l’instrument à accorder soit branché à la
prise INPUT A ou INPUT B.
L’écran affiche le mode d’accordage durant
environ une seconde.
Mode d’accordage
Avec les réglages d’usine, le mode d’accordage est “CH” (chromatique).
4Vous pouvez régler le diapason (calibrage),
le mode d’accordage, l’accordage bémol et le
mode d’affichage.
☞p.35 “Régler le diapason”
☞p.36 “Sélectionner le mode d’accordage”
☞p.40 “Accordage bémol”
☞p.42 “Sélectionner le mode d’affichage”
33
Page 34

Vous pouvez effectuer ces réglages
indépendamment pour les entrées INPUT
A et INPUT B. Lorsque vous changez
d’entrée avec le sélecteur, ces réglages
changent automatiquement. Si vous n’avez
branché qu’un seul instrument (à la prise
INPUT A ou INPUT B), le sélecteur
d’entrée permet de choisir la série de
réglages A ou B pour l’instrument branché.
Ces réglages sont sauvegardés en mémoire
interne. Même si vous retirez la pile ou
débranchez l’adaptateur secteur, le
pitchblack+ démarre avec les réglages
sauvegardés en mémoire interne lorsque
vous le mettez sous tension.
5 Jouez une note sur l’instrument et accordez-
la jusqu’à ce que le nom de note voulu
apparaisse à l’écran.
L’écran affiche le nom de la note dont la
hauteur se rapproche le plus de celle de la
note jouée.
6 Utilisez l’affichage à diodes pour accorder
votre instrument.
La façon dont l’affichage à diodes indique la
correction à faire dépend du mode d’affichage choisi. Par défaut, ce paramètre est réglé
sur “F1” (Focalisation1).
☞p.42 “Sélectionner le mode d’affichage”
7 Quand vous avez terminé, appuyez sur
l’interrupteur pour désactiver l’accordeur.
Le témoin d’activation de l’accordeur s’éteint.
Le signal de l’instrument branché à l’entrée
est audible à la sortie BYPASS. Si vous
branchez des instruments aux prises INPUT
A et INPUT B, vous pouvez sélectionner
l’instrument qui sera audible avec le sélecteur
d’entrée même si l’accordeur est désactivé. Le
témoin de sélection indique l’entrée sélectionnée. Si vous n’avez branché qu’un instrument
à la prise INPUT A ou INPUT B, le signal de
l’instrument branché est toujours audible,
quel que soit le réglage du sélecteur d’entrée.
34
Nom de la note
Page 35

Régler le diapason
Vous pouvez régler le diapason (“calibrage”),
c.-à-d. la hauteur de référence pour l’accordage
correspondant à la hauteur du La central (A4)
sur un piano.
Vous pouvez régler le diapason indépendamment pour les entrées INPUT A et
INPUT B. Lorsque vous changez d’entrée
avec le sélecteur, ce réglage change
automatiquement.
Les réglages de diapason sont sauvegardés
en mémoire interne. Même si vous retirez la
pile ou débranchez l’adaptateur secteur, le
pitchblack+ démarre avec les réglages
sauvegardés en mémoire interne lorsque
vous le mettez sous tension.
1 Appuyez sur le bouton CALIB.
L’écran affiche le réglage en vigueur.
A la sortie d’usine du pitchblack+, ce
paramètre est réglé sur “40” (440Hz).
2 Réglez le diapason avec le bouton HAUT ou
BAS.
40: 440Hz 41: 441Hz 42: 442Hz
43: 443Hz 44: 444Hz 45: 445Hz
36: 436Hz 37: 437Hz 38: 438Hz
39: 439Hz
Pour annuler le changement que vous avez
effectué, appuyez sur l’interrupteur de
l’accordeur ou sur le sélecteur d’entrée
pour passer de A à B (ou vice versa).
3 Appuyez sur le bouton STORE.
Le témoin de sélection clignote. Si les
réglages A et B sont identiques, les témoins A
et B clignotent. Si les réglages A et B diffèrent,
le témoin sélectionné par le sélecteur d’entrée
clignote.
4 Utilisez le bouton HAUT, BAS ou le
sélecteur d’entrée pour sélectionner la
mémoire de destination du réglage.
5 Appuyez à nouveau sur le bouton STORE.
Le réglage du diapason est sauvegardé dans
la mémoire interne choisie et le pitchblack+
repasse en mode d’accordage.
35
Page 36

Quand vous appuyez sur le bouton STORE,
les réglages de diapason, de mode
d’accordage, d’accordage bémol et de mode
d’affichage sont sauvegardés simultanément. Si, par exemple, vous sélectionnez
“A”, puis changez le mode d’accordage et
sauvegardez le résultat dans “B”, les autres
paramètres adoptent également les réglages
de “A”. Si, par contre, vous changez le
mode d’accordage puis le mode d’affichage
de “A” et sauvegardez ensuite les réglages
dans “A”, les anciens réglages des mode
d’accordage et d’affichage sont remplacés
par les nouveaux.
36
Sélectionner le mode d’accordage
Vous pouvez sélectionner un mode d’accordage pour
un instrument particulier ou correspondant à
l’accordage souhaité. En plus des accordages
standard pour guitare et basse, le pitchblack+
propose cinq accordages ouverts pour guitare et
mémorise des accordages de votre cru.
Vous pouvez régler le mode d’accordage
indépendamment pour les entrées INPUT A et
INPUT B. Lorsque vous changez d’entrée avec le
sélecteur, ce réglage change automatiquement.
Les réglages de mode d’accordage sont
sauvegardés en mémoire interne. Même si vous
retirez la pile ou débranchez l’adaptateur
secteur, le pitchblack+ démarre avec les
réglages sauvegardés en mémoire interne
lorsque vous le mettez sous tension.
1 Appuyez sur le bouton MODE.
L’écran affiche le mode d’accordage en vigueur.
A la sortie d’usine, ce paramètre est réglé sur
“CH” (chromatique).
Page 37

2 Utilisez le bouton HAUT ou BAS pour
choisir un mode d’accordage.
CH: Chromatique. Les noms de note sont
affichés à intervalles de demi-tons.
GT: Accordage standard pour guitare
(7B, 6E, 5A, 4D, 3G, 2B, 1E).
BS: Accordage standard pour basse
(LB, 4E, 3A, 2D, 1G, HC).
OD: Accordage ouvert de ré (Open D) pour guitare
(6D, 5A, 4D, 3F#, 2A, 1D).
OE: Accordage ouvert de mi (Open E) pour guitare
(6E, 5B, 4E, 3G#, 2B, 1E).
OG: Accordage ouvert de sol (Open G) pour guitare
(6D, 5G, 4D, 3G, 2B, 1D).
OA: Accordage ouvert de la (Open A) pour guitare
(6E, 5A, 4E, 3A, 2C#, 1E).
DA: Accordage DADGAD pour guitare
(6D, 5A, 4D, 3G, 2A, 1D).
P1~P5: Programmes d’accordage personnels.
Vous pouvez créer jusqu’à cinq accordages
(☞p.38 “Créer votre propre accordage”).
Pour annuler votre sélection, appuyez sur
l’interrupteur de l’accordeur ou sur le
sélecteur d’entrée pour passer de A à B (ou
vice versa).
3 Appuyez sur le bouton STORE.
Le témoin de sélection clignote. Si les
réglages A et B sont identiques, les témoins A
et B clignotent. Si les réglages A et B diffèrent,
le témoin sélectionné par le sélecteur d’entrée
clignote.
4 Utilisez le bouton HAUT, BAS ou le
sélecteur d’entrée pour sélectionner la
mémoire interne où sauvegarder le réglage.
5 Appuyez à nouveau sur le bouton STORE.
Le mode d’accordage est sauvegardé dans la
mémoire interne choisie et le pitchblack+
redevient accordeur.
Quand vous appuyez sur le bouton STORE,
les réglages de diapason, de mode
d’accordage, d’accordage bémol et de mode
d’affichage sont sauvegardés simultanément (☞p.36).
37
Page 38

Créer vos propres accordages
Outre le tempérament égal, le pitchblack+
vous permet de sauvegarder et d’utiliser un
autre accordage. Vous pouvez également
choisir des gammes venues d’ailleurs ou un
accordage étiré.
Il y a deux façons de créer un accordage: en
spécifiant la hauteur individuelle des 88 notes
A0~C8 (toutes les notes) ou en réglant la
hauteur des notes d’une octave et en appliquant ces réglages aux autres octaves de la
plage.
Vous pouvez sauvegarder jusqu’à cinq
programmes d’accordage.
Vos accordages personnels sont sauvegardés en mémoire interne. Même si vous
retirez la pile ou débranchez l’adaptateur
secteur, le pitchblack+ démarre avec les
réglages sauvegardés en mémoire interne
lorsque vous le mettez sous tension.
38
Spécifier la hauteur de chaque note
(toutes les notes)
Voici comment spécifier la hauteur de chaque
note de la plage A0~C8.
1
En mode d’accordage, sélectionnez P1~P5
(PROGRAM 1~PROGRAM 5) et appuyez sur le
bouton STORE pour sauvegarder le réglage.
☞p.36 “Sélectionner le mode d’accordage”
2 Appuyez sur le bouton NOTE/CENT.
Vous passez en mode d’édition de programme d’accordage.
L’écran affiche le nom de la note, l’octave et
la valeur en “cents” (centièmes de demi-ton).
La note et l’octave clignotent.
Val eur en “cents”
Si l’octave n’est pas affichée, vous êtes en mode
d’édition par octave (☞p.39 “Spécifier la
hauteur de chaque note d’une octave”). Dans ce
cas, maintenez le bouton NOTE/CENT enfoncé
durant environ une seconde pour sélectionner le
mode d’édition de toutes les notes.
Nom de la note et l’octave
Page 39

Valeur en “cents”
Nom de la note
3 Sélectionnez la note et l’octave dont vous
allez spécifier la valeur en cents avec les
boutons HAUT et BAS.
4 Appuyez sur le bouton NOTE/CENT pour
faire clignoter la valeur en cents et utilisez
le bouton HAUT ou BAS pour régler cette
valeur sur base du tempérament égal.
Vous pouvez modifier la valeur sur une plage
de –50~+50 cents.
5 Pour poursuivre l’édition, appuyez sur le
bouton NOTE/CENT et recommencez les
opérations 3 et 4.
6 Quand vous avez terminé, appuyez sur le
bouton STORE.
L’écran affiche un numéro de programme.
7 Utilisez le bouton HAUT ou BAS pour
sélectionner le programme (P1~P5) devant
contenir votre accordage.
8 Appuyez à nouveau sur le bouton STORE.
Le programme d’accordage est sauvegardé et
le pitchblack+ repasse en mode d’accordeur.
Spécifier la hauteur de chaque note
d’une octave
Vous pouvez spécifier la hauteur de chaque
note d’une octave.
1
En mode d’accordage, sélectionnez P1~P5
(PROGRAM 1~PROGRAM 5) et appuyez sur
le bouton STORE pour sauvegarder le réglage.
☞p.36 “Sélectionner le mode d’accordage”
2 Appuyez sur le bouton NOTE/CENT.
Vous passez en mode d’édition de programme d’accordage.
☞p.38 “Spécifier la hauteur de chaque note
(toutes les notes)”
3 Maintenez le bouton NOTE/CENT enfoncé
durant environ une seconde.
L’écran affiche la page d’édition par octave.
Le nom de la note et la valeur en cents
apparaissent. Le nom de la note clignote.
39
Page 40

En maintenant le bouton NOTE/CENT
enfoncé durant environ une seconde, vous
alternez entre la page d’édition de toutes
les notes et la page d’édition par octave.
4 Utilisez les boutons HAUT, BAS et NOTE/
CENT pour entrer la valeur en cents pour
chaque note de la plage d’une octave C~B.
La procédure et la plage de réglage de la
valeur en cents sont les mêmes que pour
l’édition de toutes les notes.
☞p.38 “Spécifier la hauteur de chaque note
(toutes les notes)”
5 Quand vous avez terminé, appuyez sur le
bouton STORE.
L’écran affiche un numéro de programme.
6 Utilisez le bouton HAUT ou BAS pour
sélectionner le programme (P1~P5) devant
contenir votre accordage.
7 Appuyez à nouveau sur le bouton STORE.
Le programme d’accordage est sauvegardé et
le pitchblack+ repasse en mode d’accordeur.
40
Accordage bémol
L’accordage bémol vous permet de baisser les
notes affichées à l’écran de plusieurs demi-tons.
L’accordage bémol peut aller jusqu’à sept demi-tons.
L’accordage bémol est disponible quand le
mode d’accordage est réglé sur guitare,
basse, accord ouvert de Ré~La (Open D~A)
ou DADGAD.
Vous pouvez régler l’accordage bémol
indépendamment pour les entrées INPUT
A et INPUT B. Lorsque vous changez
d’entrée avec le sélecteur, ce réglage change
automatiquement.
L’accordage bémol est sauvegardé en
mémoire interne. Même si vous retirez la
pile ou débranchez l’adaptateur secteur, le
pitchblack+ démarre avec les réglages
sauvegardés en mémoire interne lorsque
vous le mettez sous tension.
Page 41

1 Appuyez sur le bouton FLAT.
Le témoin d’accordage bémol (“Flat”)
clignote et l’écran affiche le nombre de
bémols.
Témoin d’accordage bémol
2 Utilisez le bouton HAUT ou BAS pour
régler le nombre de bémols.
Vous pouvez spécifier le nombre de bémols
sur la plage 0~7. Avec un réglage autre que
“0”, le témoin d’accordage bémol s’allume.
Pour annuler le changement que vous avez
effectué, appuyez sur l’interrupteur de
l’accordeur ou sur le sélecteur d’entrée
pour passer de A à B (ou vice versa).
3 Appuyez sur le bouton STORE.
Le témoin de sélection clignote. Si les
réglages A et B sont identiques, les témoins A
et B clignotent. Si les réglages A et B diffèrent,
le témoin sélectionné par le sélecteur d’entrée
clignote.
4 Utilisez le bouton HAUT, BAS ou le
sélecteur d’entrée pour sélectionner la
mémoire interne où sauvegarder le réglage.
5 Appuyez à nouveau sur le bouton STORE.
L’accordage bémol est sauvegardé dans la
mémoire interne choisie et le pitchblack+
repasse en mode d’accordeur.
Quand vous appuyez sur le bouton STORE,
les réglages de diapason, de mode
d’accordage, d’accordage bémol et de mode
d’affichage sont sauvegardés simultanément (☞p.36).
41
Page 42

Sélectionner le mode d’affichage
Vous pouvez choisir le mode d’affichage de
l’afficheur à diodes. Vous avez le choix parmi
six modes d’affichage.
Le mode d’affichage est sauvegardé en
mémoire interne. Même si vous retirez la
pile ou débranchez l’adaptateur secteur, le
pitchblack+ démarre avec les réglages
sauvegardés en mémoire interne lorsque
vous le mettez sous tension.
1 Appuyez sur le bouton DISPLAY.
L’écran affiche le réglage en vigueur.
S1: Echelle
L’ instrument est accordé quand la diode
centrale de l’afficheur est allumée. Si la note
est trop haute, une diode à droite de la diode
centrale s’allume. Si la note est trop basse,
une diode à gauche de la diode centrale
s’allume. La diode de guidage w s’allume si
la note est trop haute et la diode de guidage
s s’allume si la note est trop basse.
S2: Stroboscope
A la sortie d’usine du pitchblack+, ce
paramètre est réglé sur “F1” (Focalisation1).
2 Sélectionnez le mode d’affichage avec le
bouton HAUT ou BAS.
42
Accordez l’instrument jusqu’à ce que
l’éclairage des diodes cesse de bouger. Si la
note est trop haute, l’éclairage des diodes se
déplace de gauche à droite et si la note est
trop basse, il se déplace de droite à gauche.
La diode de guidage w s’allume si la note est
trop haute et la diode de guidage s s’allume
si la note est trop basse.
Page 43

S3: Demi-stroboscope
Accordez l’instrument jusqu’à ce que
l’éclairage des diodes cesse de bouger. Si la
note est trop haute, l’éclairage stroboscopique
des diodes a lieu du côté droit si la note est
trop basse, il a lieu du côté gauche. Quand
l’instrument est accordé, seule la diode
centrale est allumée. Les diodes de guidage
indiquent si la note est trop haute ou trop
basse. La diode de guidage w s’allume si la
note est trop haute et la diode de guidage s
s’allume si la note est trop basse.
S4: Miroir
Accordez votre instrument pour que les deux
diodes de gauche et de droite se retrouvent
au centre. Plus votre instrument est éloigné
de la bonne hauteur, plus les diodes sont
écartées. La diode de guidage w s’allume si
la note est trop haute et la diode de guidage
s s’allume si la note est trop basse.
F1: Focalisation1
Secondaire onctionne:
Stroboscope
Principal fonctionne:
Echelle
L’afficheur principal fonctionne de la façon
décrite sous S1 (Echelle) et l’afficheur secondaire fonctionne de la façon décrite sous S2
(Stroboscope). Comme l’afficheur secondaire est
d’une plus grande précision, il permet d’obtenir
un accordage plus fin. La diode de guidage w
s’allume si la note est trop haute et la diode de
guidage s s’allume si la note est trop basse.
F2: Focalisation2
Secondaire onctionne:
Stroboscope
Principal fonctionne:
Stroboscope
Les afficheurs principal et secondaire
fonctionnent de la façon décrite sous S2
(Stroboscope). Comme l’afficheur secondaire
est d’une plus grande précision, il permet
d’obtenir un accordage plus fin. La diode de
guidage w s’allume si la note est trop haute
et la diode de guidage s s’allume si la note
est trop basse.
43
Page 44

Pour annuler le changement que vous avez
effectué, appuyez sur l’interrupteur de
l’accordeur ou sur le sélecteur d’entrée
pour passer de A à B (ou vice versa).
3 Appuyez sur le bouton STORE.
Le témoin de sélection clignote. Si les réglages
A et B sont identiques, les témoins A et B
clignotent. Si les réglages A et B diffèrent, le
témoin sélectionné par le sélecteur d’entrée
clignote.
4 Utilisez le bouton HAUT, BAS ou le
sélecteur d’entrée pour sélectionner la
mémoire interne où sauvegarder le réglage.
5 Appuyez à nouveau sur le bouton STORE.
Le mode d’affichage est sauvegardé dans la
mémoire interne choisie et le pitchblack+
repasse en mode d’accordeur.
Quand vous appuyez sur le bouton STORE,
les réglages de diapason, de mode
d’accordage, d’accordage bémol et de mode
d’affichage sont sauvegardés simultanément (☞p.36).
44
Dépannage
Impossible d’accorder.
•L’accordeur est-il désactivé?
Appuyez sur l’interrupteur de l’accordeur
pour l’activer.
• Si vous branchez des instruments aux prises
INPUT A et INPUT B, avez-vous sélectionné
le bon instrument à accorder avec le sélecteur
d’entrée?
•Avez-vous choisi le mode d’accordage
approprié pour l’instrument?
Si, par exemple, vous accordez une guitare, les
noms de note peuvent ne pas être affichés si le
mode d’accordage est réglé sur “BS” (basse).
Aucun signal ne sort de la prise BYPASS.
•L’accordeur est-il activé?
Si l’accordeur est activé, aucun son audible
n’est produit par la prise BYPASS. Appuyez sur
l’interrupteur de l’accordeur pour le couper.
La prise DC 9V OUT ne fournit pas d’alimentation.
• Le pitchblack+ fonctionne-t-il sur piles?
La prise DC 9V OUT ne fournit pas d’alimentation si le pitchblack+ fonctionne sur piles.
Page 45

Fiche technique
• Accordage: Tempérament égal à 12 notes,
programmes (88 notes)
•
Plage de détection:
(pour une forme d’onde sinusoïdale)
•
Plage du diapason (calibrage):
(par pas d’1Hz)
•
Précision de la détection: moins de ±0,1 cents
• Accordage bémol: 1~7 demi-tons
• Prises:
Prises INPUT A, INPUT B (jacks 1/4" mono)
Prise BYPASS (jack 1/4" mono)
Prise DC 9V IN
Prise DC 9V OUT
• Impédance d’entrée: 1M (quand l’accor -
deur est activé)
• Alimentation: S-006P/6F22/6LR61 (pile 9V)
ou adaptateur secteur (9V 600mA ou plus,
vendu séparément)
E0 (20,60Hz)~C8 (4186Hz)
A4= 436~445Hz
• Autonomie des piles: environ 5 heures de
fonctionnement continu quand l’accordeur
est activé (entrée continue d’un La4 (A4),
mode d’affichage= “ Focalisation1” avec une
pile de type 6F22 zinc-carbone)
• Consommation électrique: Maximum 50 mA
• Dimensions (L x H x P): 128 mm x 120 mm x
47 mm (pieds en caoutchouc compris)
• Poids: 492 g (pile comprise)
• Accessoires fournis: Une pile 6F22 zinc-
carbone pour vérifier le fonctionnement, un
câble DC
• Options: Adaptateur secteur (9V
600mA)
Les caractéristiques et l’aspect du produit sont
susceptibles d’être modifiés sans avis préalable
en vue d’une amélioration.
45
Page 46

Vorsichtsmaßnahmen
Aufstellungsort
Vermeiden Sie das Aufstellen des Geräts an Orten,
an denen
• es direkter Sonneneinstrahlung ausgesetzt ist;
• hohe Feuchtigkeit oder Extremtemperaturen
auftreten können;
• Staub oder Schmutz in großen Mengen
vorhanden sind;
• das Gerät Erschütterungen ausgesetzt sein kann.
• in der Nähe eines Magnetfeldes.
Stromversorgung
Schließen Sie das beiliegende Netzteil nur an eine
geeignete Steckdose an. Verbinden Sie es niemals
mit einer Steckdose einer anderen Spannung.
Störeinflüsse auf andere Elektrogeräte
Dieser kann bei in der Nähe aufgestellten Rundfunkempfängern oder Fernsehgeräten Empfangsstörungen hervorrufen. Betreiben Sie solche Geräte
nur in einem geeigneten Abstand von diesem
Erzeugnis.
46
Bedienung
Vermeiden Sie bei der Bedienung von Schaltern
und Reglern unangemessenen Kraftaufwand.
Reinigung
Bei auftretender Verschmutzung können Sie das
Gehäuse mit einem trockenen, sauberen Tuch
abwischen. Verwenden Sie keinerlei Flüssigreiniger wie beispielsweise Reinigungsbenzin,
Ve rdünnungs- oder Spülmittel. Verwenden Sie
niemals brennbare Reiniger.
Bedienungsanleitung
Bewahren Sie diese Bedienungsanleitung gut auf,
falls Sie sie später noch einmal benötigen.
Flüssigkeiten und Fremdkörper
Stellen Sie niemals Behältnisse mit Flüssigkeiten in
der Nähe des Geräts auf. Wenn Flüssigkeit in das
Gerät gelangt, können Beschädigung des Geräts,
Feuer oder ein elek-trischer Schlag die Folge sein.
Beachten Sie, daß keinerlei Fremdkörper in das
Gerät gelangen. Sollte ein Fremdkörper in das
Gerät gelangt sein, so trennen Sie es sofort vom
Netz. Wenden Sie sich dann an Ihren KORGFachhändler
Page 47

Hinweis zur Entsorgung (nur EU)
Wenn dieses „durchgestrichener Müllkübel“
Symbol auf dem Produkt oder in der
Bedienungsanleitung erscheint, müssen Sie
dieses Produkt sachgemäß als Sondermüll
entsorgen. Entsorgen Sie dieses Produkt
nicht im Haushaltsmüll. Durch richtige
Entsorgung verhindern Sie Umwelt- oder
Gesundheitsgefahren. Die geltenden
Vorschriften für richtige Entsorgung sind je
nach Bestimmungsland unterschiedlich.
Bitte informieren Sie sich bei der zuständigen Behörde über die bei Ihnen geltenden
Vorschriften zur Entsorgung.
*Alle Firmen-, Produkt- und Formatnamen usw. sind
War enzeichen oder eingetragene Warenzeichen der
betreffenden Eigentümer.
47
Page 48

Inhalt
Vorsichtsmaßnahmen ......................... 46
Die wichtigsten Funktionen................. 48
Bestückung des pitchblack+ ............... 50
Einlegen der Batterie .......................... 51
Laden der Werksvorgaben ................. 51
Anschlüsse ......................................... 52
Stimmung .......................................... 55
Wahl der Kammertonfrequenz ...........57
Wahl des Stimm-Modus’ .................... 58
Programmieren Ihrer eigenen
Stimmungssysteme............................. 60
Mollstimmung (‘Flat’) ......................... 62
Wahl des Anzeigemodus’................... 64
Fehlersuche ....................................... 66
Technische Daten ............................... 67
48
Vielen Dank für Ihre Entscheidung zu einem
Korg pitchblack+ Pedalstimmgerät. Um
alle Funktionen des pitchblack+ kennen
zu lernen, sollten Sie sich diese Bedienungsanleitung vollständig durchlesen. Bitte legen
Sie diese Bedienungsanleitung an einen Ort,
an dem Sie sie bei Bedarf auch wieder
finden.
Die wichtigsten Funktionen
Exakte Stimmung
Der pitchblack+ enthält zwei LED-Anzeigen,
die eine höchst Exakte Stimmung (bis auf ±0,1
Cent genau) ermöglichen.
Stimm-Modi
Der pitchblack+ unterstützt eine Vielzahl von
Stimmungen, darunter chromatisch, Gitarre,
Bass sowie fünf offene Stimmungen für Gitarre.
Außer der gleichschwebenden Stimmung
können Sie auch eigene Stimmungssysteme, so
z.B. ethnische Stimmungen oder die gedehnte
Klavierstimmung, verwenden. Selbst erstellte
Page 49

Stimmungen können in einem der fünf Speicher
abgelegt und bei Bedarf wieder gewählt
werden.
Mollstimmung (‘Flat’)
Bei Bedarf können Sie Ihr Instrument bis zu
sieben Halbtöne tiefer als die angezeigten
Notennamen stimmen.
Eingänge
Der pitchblack+ bietet zwei Eingangsbuchsen:
INPUT A und INPUT B. Die Kammertonfrequenz, der Stimm-Modus, das „Flat“-Intervall
und der Anzeigemodus können für beide
Buchsen separat eingestellt werden. Wenn Sie
nur an eine Buchse ein Instrument anschließen,
können Sie bei Bedarf auch die Einstellungen
der anderen Buchse wählen und verwenden.
Anzeigemodus
Das LED-Display bietet sechs verschiedene Modi,
von denen jeweils einer gewählt werden kann. Es
stehen mehrere Leuchtmuster zur Wahl, darunter
eine Anzeige, die bei richtiger Stimmung in der
Mitte leuchtet, eine „Strobe“-Anzeige, die bei
richtiger Stimmung konstant leuchtet und ein
„Focus“-Modus, in dem zwei LED-Anzeigen
gleichzeitig verwendet werden, um eine noch
genauere Stimmung zu ermöglichen.
BYPASS-Buchse
Solange der Tuner ausgeschaltet ist, wird das
Eingangssignal unverändert und ohne jegliche
Färbung wieder ausgegeben. Wenn Sie den
Tuner aktivieren, wird diese Buchse jedoch
stummgeschaltet.
DC 9V OUT-Buchse
Bei Verwendung eines optionalen AC-Netzteils
(9V ) können Sie das beiliegende DCKabel für die Stromversorgung weiterer Pedale
anschließen, die ebenfalls eine Spannung von
9V ( ) benötigen. (Allerdings darf die
Gesamtaufnahme nie mehr als 200mA
betragen.)
49
Page 50

Bestückung des pitchblack+
BYPASS-Buchse (mono)
DC 9V IN-Buchse
DC 9V OUT-Buchse
Mittenanzeige
Stimmungshilfen
INPUT A-, INPUT B-Buchse (mono)
LED-Anzeige
DISPLAY-Taster
STORE-Taster
TUNER-Diode
TUNER-Schalter
50
MODE-Taster
FLAT-Taster
CALIB-Taster
NOTE/CENT-Taster
Eingangswahlanzeige
Eingangswahltaster
AUF/AB-TasterDisplay
Page 51

Einlegen der Batterie
1Öffnen Sie den Deckel des Batteriefachs an
der Geräteunterseite.
2Verbinden Sie eine Batterie mit der
Anschlussleiste. Achten Sie auf eine der
Polarität entsprechenden Orientierung der
Batterie.
3 Schieben Sie die Batterie in das Batteriefach
und bringen Sie den Deckel wieder an.
Wenn die Batterie fast erschöpft ist, beginnt die
TUNER-Diode zu blinken. Legen Sie dann so
schnell wie möglich eine andere Batterie ein.
Die beiliegende Batterie ist ausschließlich
für Testzwecke gedacht. Daher hat sie eine
kürzere Lebensdauer als andere Batterien.
Laden der Werksvorgaben
Um wieder die Werksvorgaben des pitchblack+ zu laden, müssen Sie folgendermaßen
vorgehen.
1 Schließen Sie an die INPUT A- oder INPUT
B-Buchse ein Klinke an, um den pitch-
black+ einzuschalten.
2 Halten Sie den AUF- und AB-Taster
gedrückt, während Sie den TUNER-Schalter
betätigen.
Der Tuner wird ausgeschaltet und folgende
Einstellungen werden auf die Werksvorgaben
zurückgestellt.
Kammertonfrequenz: 440Hz (40)
Stimm-Modus: Chromatischer Modus (CH)
Mollstimmung: 0
Anzeigemodus: Focus1 (F1)
Stimmungssystem: 0 Cent für alle Noten
51
Page 52

Anschlüsse
Optionales AC-Netzteil (9V,
600mA oder mehr)
Zu einer
Steckdose
DC-Kabel (liegt bei)
Zu Ihren Effektpedalen
Maximal 200mA
Stellen Sie sicher, dass
ungenutzte Stecker
metallische Teile NICHT
berühren. Bei Nichtbeachtung
könnte Ihr Netzadapter
beschädigt werden.
Vergewissern Sie sich, dass
unbenutzte Stecker
abgeschirmt sind.
,
DC 9V OUT
Hier den Verstärker,
ein Effektpedal usw. anschließen.
DC 9V IN
BYPASS
INPUT B
Gitarre oder Bass
INPUT A
Schalten Sie vor Herstellen der Verbindungen alle Geräte aus.
Die Buchsen INPUT A, INPUT B und BYPASS sind mono. Es können keine Stereokabel verwendet
werden.
52
Page 53

INPUT A- & INPUT B-Buchse
Schließen Sie hier die Instrumente an, die Sie
stimmen möchten.
Wenn Sie sowohl an INPUT A als auch INPUT
B ein Instrument anschließen, müssen Sie mit
dem EINGANGSWAHLSCHALTER das zu
stimmende Instrument wählen. Die EINGANGSWAHLDIODE informiert Sie über die
momentan gewählte Buchse.
Die Kammertonfrequenz, der Stimm-Modus,
das „Flat“-Intervall und der Anzeigemodus
können für beide Buchsen separat eingestellt
werden. So könnten Sie z.B. für INPUT A die
normale Stimmung wählen und für INPUT B
die „Open A“-Stimmung aktivieren.
Instrumente 1
Instrumente
INPUT A
2
INPUT B
A
Kammertonfrequenz, Stimm-Modus,
Mollstimmung, Anzeigemodus
B
Kammertonfrequenz, Stimm-Modus,
Mollstimmung, Anzeigemodus
Wenn Sie nur ein Instrument besitzen, können
Sie es entweder an INPUT A oder INPUT B
(aber nicht beide) anschließen. Allerdings
können Sie mit dem EINGANGSWAHLSCHALTER dann abwechselnd Einstellungssatz „A“
oder „B“ wählen (Kammertonfrequenz, StimmModus, „Flat“-Intervall und Anzeigemodus).
Die EINGANGSWAHLDIODE informiert Sie
über die momentan gewählten Einstellungen.
Wenn Sie für „A“ z.B. die reguläre Stimmung
und für „B“ eine „Flat-Stimmung (1 Halbton)
wählen, können Sie Ihr Instrument ganz schnell
anders Stimmen.
Instrumente
Eingangswahltaster
INPUT A
A
Kammertonfrequenz, Stimm-Modus,
Mollstimmung, Anzeigemodus
B
Kammertonfrequenz, Stimm-Modus,
Mollstimmung, Anzeigemodus
Wenn Sie sowohl an INPUT A als auch an
INPUT B ein Instrument anschließen und
danach die Verbindung mit dem momentan
gewählten Anschluss lösen, aktiviert der
EINGANGSWAHLSCHALTER automatisch den anderen Eingang.
53
Page 54

BYPASS-Buchse
Schließen Sie hier Ihren Gitarrenverstärker, ein
Effektpedal usw. an. Wenn Sie die Stimmfunktion aktivieren, wird die an die INPUT A- oder
INPUT B-Buchse angeschlossene Signalquelle
stummgeschaltet. Sobald Sie die Stimmfunktion
deaktivieren, wird das Signal des gewählten
Eingangs wieder ausgegeben. Hierbei handelt
es sich übrigens um eine „echte“ BypassSchaltung, die also keinerlei Klangfärbung
bewirkt. Wenn Sie sowohl an INPUT A als auch
an INPUT B ein Instrument anschließen,
müssen Sie mit dem EINGANGSWAHLSCHALTER das Instrument wählen, dessen
Signal an der BYPASS-Buchse anliegen soll. Die
EINGANGSWAHLDIODE informiert Sie über
den momentan gewählten Eingang. Wenn Sie
nur die INPUT A- oder INPUT B-Buchse (aber
nicht beide) verwenden, wird das dort
anliegende Signal immer zur BYPASS-Buchse
übertragen (die Einstellung des EINGANGSWAHLSCHALTERS hat darauf keinen
Einfluss).
54
DC 9V IN-Buchse
Wenn Sie den pitchblack+ lieber nicht mit
einer Batterie verwenden möchten, können Sie
sich für ein optionales AC-Netzteil (9V
600mA) entscheiden.
Die Verwendung anderer Netzteile könnte
zu Schäden führen.
DC 9V OUT-Buchse
Wenn Sie hier das beiliegende DC-Kabel
anschließen, können Sie –bei Verwendung eines
optionalen AC-Netzteils– bis zu drei 9VEffektpedale mit Strom versorgen ( ).
Achten Sie darauf, dass der Stromverbrauch der angeschlossenen Effektpedale
niemals mehr als 200mA beträgt. Überprüfen Sie außerdem die Polarität der
angeschlossenen Effektpedale.
Schließen Sie niemals ein Netzteil an die
DC 9V OUT-Buchse an. Das könnte
nämlich zu Schäden führen.
Wenn Sie den pitchblack+ mit einer
Batterie betreiben, kann die DC 9V OUTBuchse nicht verwendet werden.
Page 55

Stimmung
1 Schließen Sie Ihr Instrument mit Hilfe
eines Klinkenkabels an die INPUT A- oder
INPUT B-Buchse an.
Dadurch schalten Sie den pitchblack+ außerdem ein.
Beim Anschließen eines Klinkensteckers an die
INPUT A- oder INPUT B-Buchse wird zwar das
Gerät aktiviert, nicht aber die Stimmfunktion.
Um die Stimmfunktion zu verwenden, müssen
Sie den TUNER-Schalter betätigen.
2
Wenn Sie sowohl an INPUT A als auch an
INPUT B ein Instrument angeschlossen haben,
wählen Sie mit dem EINGANGSWAHLSCHALTER das zu stimmende Instrument. Wenn Sie
nur an INPUT A oder INPUT B (aber nicht
beide) ein Instrument angeschlossen haben,
dient der EINGAGSWAHLSCHALTER zum
Wählen des gewünschten Einstellungssatzes.
Die EINGANGSWAHLDIODE informiert Sie über
die momentan gewählte Buchse bzw. den
Einstellungssatz.
Beim Einschalten wird automatisch der
Eingang gewählt, an den Sie zuerst ein
Instrument anschließen.
3 Drücken Sie den TUNER-Schalter, um die
Stimmfunktion zu aktivieren.
Die TUNER-Diode leuchtet.
Solange die Stimmfunktion aktiv ist wird das
an INPUT A oder INPUT B anliegende Signal
nicht zur BYPASS-Buchse übertragen.
Die Stimmfunktion kann nur aktiviert
werden, wenn Sie an die INPUT A- oder
INPUT B-Buchse ein Instrument anschließen.
Das Display zeigt jetzt etwa eine Sekunde
lang den gewählten Stimm-Modus an.
Stimm-Modus
Laut Vorgabe wird der „CH“-Modus
verwendet (chromatisch).
4Wählen Sie bei Bedarf eine andere Kammer-
tonfrequenz, den richtigen Stimm-Modus,
ein „Flat“-Intervall und den Anzeigemodus.
☞S. 57 „Wahl der Kammertonfrequenz“
☞S. 58 „Wahl des Stimm-Modus’“
☞S. 62 „Mollstimmung (‘Flat’)“
☞S. 64 „Wahl des Anzeigemodus’“
55
Page 56

Diese Einstellungen können für die INPUT Aund INPUT B-Buchse separat vorgenommen
werden. Wenn Sie mit dem EINGANGSWAHLSCHALTER den jeweils anderen Eingang
wählen, werden auch die zugehörigen
Einstellungen geladen. Wenn Sie nur an INPUT
A oder INPUT B (aber nicht beide) ein
Instrument angeschlossen haben, dient der
EINGANGSWAHLSCHALTER zum Wählen des
gewünschten Einstellungssatzes („A“ oder „B“),
die also beide verwendet werden können.
Diese Einstellungen werden intern gespeichert.
Der pitchblack+ merkt sich die intern
gespeicherten Einstellungen selbst, nachdem Sie
die Batterie entnommen haben und längere Zeit
kein Netzteil anschließen.
5 Spielen Sie eine Einzelnote auf Ihrem
Instrument und stimmen Sie sie so, dass der
richtige Notenname im Display erscheint.
Das Display zeigt immer den Namen jener Note
an, die der gespielten Note am nächsten kommt.
56
Notenname
6 Behalten Sie die LED-Anzeige im Auge,
während Sie Ihr Instrument stimmen.
Wie genau eventuelle Stimmungsabweichungen angezeigt werden, richtet sich nach dem
gewählten Anzeigemodus. Laut Vorgabe wird
die „F1“-Einstellung (Focus1) verwendet.
☞S. 64 „Wahl des Anzeigemodus’“
7 Betätigen Sie den TUNER-Schalter nach
dem Stimmen erneut, um die Stimmfunktion wieder auszuschalten.
Die TUNER-Diode erlischt.
Das Signal des gewählten Eingangs wird jetzt
wieder zur BYPASS-Buchse übertragen. Wenn Sie
sowohl an INPUT A als auch an INPUT B ein
Instrument anschließen, können Sie bei deaktivierter Stimmfunktion mit dem EINGANGSWAHLSCHALTER das Instrument wählen,
dessen Signal an der BYPASS-Buchse anliegen
soll. Die EINGANGSWAHLDIODE informiert Sie
über die momentan gewählte Buchse. Wenn Sie
nur an die INPUT A- oder INPUT B-Buchse (aber
nicht beide) ein Instrument angeschlossen haben,
wird sein Signal automatisch ausgegeben (die
Einstellung des EINGANGSWAHLSCHALTERS
hat darauf keinen Einfluss).
Page 57

Wahl der Kammertonfrequenz
Die Kammertonfrequenz (d.h. die Frequenz der
Note „A4“, die auch „Kammerton“ genannt
wird) kann folgendermaßen eingestellt werden.
Diese Einstellung kann für die INPUT Aund INPUT B-Buchse separat vorgenommen werden. Wenn Sie mit dem EINGANGSWAHLSCHALTER den jeweils
anderen Eingang wählen, werden auch die
zugehörigen Einstellungen geladen.
Die Wahl der Kammertonfrequenz wird
intern gespeichert. Der pitchblack+ merkt
sich die intern gespeicherten Einstellungen
selbst, nachdem Sie die Batterie entnommen haben und längere Zeit kein Netzteil
anschließen.
1 Drücken Sie den CALIB-Taster.
Das Display zeigt jetzt die aktuell verwendete Einstellung an.
Ab Werk lautet diese Einstellung des
pitchblack+ „40“ (440Hz).
2Wählen Sie mit dem AUF- oder AB-Taster
die gewünschte Kammertonfrequenz.
40: 440Hz 41: 441Hz 42: 442Hz
43: 443Hz 44: 444Hz 45: 445Hz
36: 436Hz 37: 437Hz 38: 438Hz
39: 439Hz
Wenn Sie die gewählte Einstellung nicht
übernehmen möchten, müssen Sie den
TUNER-Schalter drücken oder mit dem
EINGANGSWAHLSCHALTER den
„anderen“ Eingang („A“ oder „B“) wählen.
3 Drücken Sie den STORE-Taster.
Die EINGANGSWAHLDIODE blinkt. Wenn
„A“ und „B“ dieselbe Einstellung verwenden,
blinken beide Dioden. Wenn „A“ und „B“
unterschiedliche Einstellungen verwenden,
blinkt nur der Buchstabe des gewählten
Eingangs.
4Wählen Sie mit dem AUF- oder AB-Taster
bzw. dem EINGANGSWAHLSCHALTER
den Speicher, in dem die Einstellung
gesichert werden soll.
57
Page 58

5 Drücken Sie den STORE-Taster noch
einmal.
Die Kammertonfrequenz wird am gewünschten Ort gespeichert und der pitchblack+
wechselt wieder in den Normalbetrieb.
Mit dem STORE-Taster werden jeweils alle
folgenden Einstellungen gespeichert:
Kammertonfrequenz, Stimm-Modus,
„Flat“-Intervall und Anzeigemodus.
Beispiel: Wenn Sie „A“ wählen, einen
anderen Stimm-Modus selektieren und in
Speicher „B“ sichern, enthält dieser
hinterher auch die übrigen Einstellungen
von Speicher „A“. Wenn Sie einen anderen
Stimm-Modus für „A“ wählen, dann den
Anzeigemodus ändern und diese Einstellung in Speicher „A“ sichern, ändert sich
auch die ursprünglich dort gespeicherte
Stimm-Moduseinstellung.
58
Wahl des Stimm-Modus’
Dieses Gerät unterstützt mehrere Stimm-Modi, die
den verwendeten Instrumenten entsprechend
gewählt werden können. Außer den herkömmlichen
Stimm-Modi für Gitarre und Bass bietet der
pitchblack+ fünf „offene“ Gitarrenstimmungen und
erlaubt sogar die Erstellung eigener Stimmungen.
Der Stimm-Modus kann für die INPUT Aund INPUT B-Buchse separat gewählt
werden. Wenn Sie mit dem EINGANGSWAHLSCHALTER den jeweils anderen
Eingang wählen, werden auch die
zugehörigen Einstellungen geladen.
Die Wahl des Stimm-Modus’ wird intern
gespeichert. Der
intern gespeicherten Einstellungen selbst,
nachdem Sie Batterie entnommen haben
und längere Zeit kein Netzteil anschließen.
1 Drücken Sie den MODE-Taster.
Das Display zeigt jetzt den aktuell verwendeten Stimm-Modus an.
pitchblack+
merkt sich die
Page 59

Ab Werk ist der „CH“-Modus (chromatisch)
gewählt.
2Wählen Sie mit dem AUF- oder AB-Taster
den gewünschten Stimm-Modus.
CH: Chromatisch. Die Notennamen werden in
(den gebräuchlichen) Halbtonschritten angezeigt.
GT: Gebräuchliche Gitarrenstimmung
(7B, 6E, 5A, 4D, 3G, 2B, 1E).
BS: Gebräuchliche Bass-Stimmung
(LB, 4E, 3A, 2D, 1G, HC).
OD: Offene „D“-Stimmung für Gitarre
(6D, 5A, 4D, 3F#, 2A, 1D).
OE: Offene „E“-Stimmung für Gitarre
(6E, 5B, 4E, 3G#, 2B, 1E).
OG: Offene „G“-Stimmung für Gitarre
(6D, 5G, 4D, 3G, 2B, 1D).
OA: Offene „A“-Stimmung für Gitarre
(6E, 5A, 4E, 3A, 2C#, 1E).
DA: DADGAD-Gitarrenstimmung
(6D, 5A, 4D, 3G, 2A, 1D).
P1–P5: Ihre selbst erstellten Stimmungsprogramme. Sie können bis zu fünf eigene
Stimmungsprogramme anlegen. (☞S. 60
„Programmieren Ihrer eigenen Stimmungssysteme“).
Wenn Sie die gewählte Einstellung nicht
übernehmen möchten, müssen Sie den
TUNER-Schalter drücken oder mit dem
EINGANGSWAHLSCHALTER den
„anderen“ Eingang („A“ oder „B“) wählen.
3 Drücken Sie den STORE-Taster.
Die EINGANGSWAHLDIODE blinkt. Wenn „A“
und „B“ dieselbe Einstellung verwenden, blinken
beide Dioden. Wenn „A“ und „B“ unterschiedliche Einstellungen verwenden, blinkt nur der
Buchstabe des gewählten Eingangs.
4Wählen Sie mit dem AUF- oder AB-Taster
bzw. dem EINGANGSWAHLSCHALTER
den Speicher, in dem die Einstellung
gesichert werden soll.
5
Drücken Sie den STORE-Taster noch einmal.
Die Wahl des Stimm-Modus’ wird am gewünschten Ort gespeichert und der pitch-
black+ wechselt wieder in den Normalbetrieb.
Mit dem STORE-Taster werden jeweils alle
folgenden Einstellungen gespeichert:
Kammertonfrequenz, Stimm-Modus, „Flat“Intervall und Anzeigemodus (☞S .58).
59
Page 60

Programmieren Ihrer eigenen
Cent-Wert
Notennamen und Oktave
Stimmungssysteme
Der pitchblack+ braucht nicht unbedingt die
gleichschwebende Stimmung zu verwenden.
Sie können vielmehr auch eigene programmieren. Somit könnten Sie bei Bedarf mit einer
ethnischen oder der gedehnten Klavierstimmung arbeiten.
Für die Erstellung eines Stimmungssystems
gibt es zwei Verfahren: Sie können entweder
alle 88 Klaviernoten (A0–C8= Tonumfang)
wunschgemäß Stimmen oder sich eine Referenz
für eine Oktave vorbereiten, die dann auch von
den übrigen Oktaven übernommen wird
(Oktavumfang).
Ihr Stimmungssystem kann in einem der fünf
Speicher gesichert werden.
Ihre Stimmungssysteme werden intern
gespeichert. Der pitchblack+ merkt sich
die intern gespeicherten Einstellungen
selbst, nachdem Sie die Batterie entnommen haben und längere Zeit kein Netzteil
anschließen.
60
Stimmung aller Noten (Tonumfang)
Zum separaten Festlegen der Stimmung aller 88
Noten (A0–C8) müssen Sie folgendermaßen
vorgehen.
1Wählen Sie im Stimm-Modus P1–P5
(PROGRAM 1–PROGRAM 5) und drücken
Sie den STORE-Taster, um die Einstellung
zu speichern.
☞S. 58 „Wahl des Stimm-Modus’“
2 Drücken Sie den NOTE/CENT-Taster.
Damit rufen Sie den Stimm-Editiermodus auf.
Das Display zeigt den Notennamen, die
Oktave und den Cent-Wert an. Der Notenname und die Oktavangabe blinken.
Wenn die Oktavangabe fehlt, befindet sich
das Gerät im Oktavmodus (☞S.61 „Stimmen der Noten einer einzigen Oktave“).
Halten Sie den NOTE/CENT-Taster dann
ungefähr eine Sekunde gedrückt, um den
Tonumfangsmodus zu wählen.
Page 61

3Wählen Sie mit dem AUF- und AB-Taster
den Buchstaben und die Oktavnummer der
Note, deren Stimmung Sie ändern möchten.
4
Drücken Sie den NOTE/CENT-Taster, um den
Cent-Wert zu wählen (er blinkt) und stellen Sie
mit AUF und AB die Abweichung gegenüber
der gleichschwebenden Stimmung ein.
Der Cent-Wert lässt sich im Bereich –50–+50
ändern.
5 Um noch weitere Noten zu ändern, müssen
Sie den NOTE/CENT-Taster erneut drücken
und die Schritte 3 und 4 wiederholen.
6 Drücken Sie den STORE-Taster, wenn Sie
fertig sind.
Das Display zeigt jetzt die Programmnummer an.
7Wählen Sie mit dem AUF- und AB-Taster
den Speicher (P1–P5), in dem Sie Ihr
Stimmungssystem sichern möchten.
8
Drücken Sie den STORE-Taster noch einmal.
Das Stimmungssystem wird gespeichert und
der pitchblack+ wechselt wieder in den
Normalbetrieb.
Stimmen der Noten einer einzigen
Oktave (Oktavumfang)
Um sich schneller ein anderes Stimmungssystem zurechtzulegen, können Sie die gewünschten Abweichungen auf eine Oktave beschränken.
1Wählen Sie im Stimm-Modus P1–P5
(PROGRAM 1–PROGRAM 5) und drücken
Sie den STORE-Taster, um die Einstellung
zu speichern.
☞S. 58 „Wahl des Stimm-Modus’“
2 Drücken Sie den NOTE/CENT-Taster.
Damit rufen Sie den Stimm-Editiermodus auf.
☞S. 60 „Stimmung aller Noten (Tonumfang)“
3 Halten Sie den NOTE/CENT-Taster ca. eine
Sekunde gedrückt.
Das Display zeigt die Angaben des Oktavmodus’ an. Es werden der Notenname und der
Cent-Wert angezeigt. Der Notenname blinkt.
Cent-Wert
Notenname
61
Page 62

Wenn Sie den NOTE/CENT-Taster
wiederholt ungefähr eine Sekunde
gedrückt halten, werden abwechselnd der
Tonumfangs- und der Oktavmodus
gewählt.
4 Stellen Sie mit den Tastern AUF, AB und
NOTE/CENT die Cent-Abweichung für die
Noten der verfügbaren Oktave (C–B) ein.
Die Arbeitsweise und der Einstellbereich der
Cent-Abweichung entsprechen jenen des
Oktavumfangs.
☞S. 60 „Stimmung aller Noten (Tonumfang)“
5 Drücken Sie den STORE-Taster, wenn Sie
fertig sind.
Das Display zeigt jetzt die Programmnummer an.
6Wählen Sie mit dem AUF- und AB-Taster
den Speicher (P1–P5), in dem Sie Ihr
Stimmungssystem speichern möchten.
7
Drücken Sie den STORE-Taster noch einmal.
Das Stimmungssystem wird gespeichert und
der pitchblack+ wechselt wieder in den
Normalbetrieb.
62
Mollstimmung (‘Flat’)
Mit „Mollstimmung“ („Flat Tuning“) ist
gemeint, dass die Gitarrensaiten um einen oder
mehrere Halbtöne tiefer gestimmt werden als
sonst. Bei Bedarf kann die Gitarre um bis zu
sieben Halbtöne tiefer gestimmt werden.
Die Mollstimmung kann im Gitarren-, Bass-,
offenen D–offenen A- und DADGADModus aktiviert werden.
Bei Bedarf können Sie für die INPUT Aund INPUT B-Buchse unterschiedliche
„Flat“-Intervalle wählen. Wenn Sie mit dem
EINGANGSWAHLSCHALTER den jeweils
anderen Eingang wählen, werden auch die
zugehörigen Einstellungen geladen.
Die Wahl der Mollstimmung wird intern
gespeichert. Der pitchblack+ merkt sich
die intern gespeicherten Einstellungen
selbst, nachdem Sie Batterie entnommen
haben und längere Zeit kein Netzteil
anschließen.
Page 63

1 Drücken Sie den FLAT-Taster.
Die „FLAT“-Anzeige im Display blinkt und
Wert gibt an, um wie viele Halbtöne die
Stimmung abgesenkt wird.
„FLAT“-Anzeige
2 Stellen Sie mit den Tastern AUF und AB
den gewünschten Halbtonversatz ein.
Der Einstellbereich lautet 0–7 Halbtöne.
Wenn Sie einen anderen Wert als „0“ wählen,
erscheint wieder die Mollanzeige.
Wenn Sie die gewählte Einstellung nicht
übernehmen möchten, müssen Sie den
TUNER-Schalter drücken oder mit dem
EINGANGSWAHLSCHALTER den
„anderen“ Eingang („A“ oder „B“) wählen.
3 Drücken Sie den STORE-Taster.
Die EINGANGSWAHLDIODE blinkt. Wenn „A“
und „B“ dieselbe Einstellung verwenden, blinken
beide Dioden. Wenn „A“ und „B“ unterschiedliche Einstellungen verwenden, blinkt nur der
Buchstabe des gewählten Eingangs.
4Wählen Sie mit dem AUF- oder AB-Taster
bzw. dem EINGANGSWAHLSCHALTER
den Speicher, in dem die Einstellung
gesichert werden soll.
5 Drücken Sie den STORE-Taster noch
einmal.
Die Wahl des Halbtonintervalls wird am
gewünschten Ort gespeichert und der
pitchblack+ wechselt wieder in den
Normalbetrieb.
Mit dem STORE-Taster werden jeweils alle
folgenden Einstellungen gespeichert:
Kammertonfrequenz, Stimm-Modus, „Flat“Intervall und Anzeigemodus (☞S. 58).
63
Page 64

Wahl des Anzeigemodus’
Zur Wahl eines anderen Anzeigemodus’
müssen Sie folgendermaßen verfahren. Es
stehen sechs verschiedene Anzeigemodi zur
Verfügung.
Die Wahl des Anzeigemodus’ wird intern
gespeichert. Der pitchblack+ merkt sich
die intern gespeicherten Einstellungen
selbst, nachdem Sie Batterie entnommen
haben und längere Zeit kein Netzteil
anschließen.
1 Drücken Sie den DISPLAY-Taster.
Das Display zeigt jetzt die aktuell verwendete Einstellung an.
Ab Werk lautet diese Einstellung des
pitchblack+ „F1“ (Focus1).
2Wählen Sie mit dem AUF- oder AB-Taster
das gewünschte Anzeigemuster.
64
S1: Taktart
Stimmen Sie Ihr Instrument so, dass die
Diode in der Mitte leuchtet. Wenn eine Diode
rechts der Mitte leuchtet, ist die Note zu
hoch. Leuchtet eine Diode links der Mitte, so
ist die Note zu tief gestimmt. Wenn die Note
zu hoch ist, leuchtet außerdem die „w“Diode. Ist die Note zu tief gestimmt, so
leuchtet die „s“-Diode.
S2: Komplett-Impulsanzeige
Stimmen Sie Ihr Instrument so, dass die LEDBeleuchtung anhält. Wenn die Dioden von
links nach rechts pulsieren, ist die Note zu
hoch gestimmt. Rollen sie von rechts nach
links, so ist die Note zu tief. Wenn die Note
zu hoch ist, leuchtet außerdem die „w“Diode. Ist die Note zu tief gestimmt, so
leuchtet die „s“-Diode.
Page 65

S3: Halbe Impulsanzeige
Stimmen Sie Ihr Instrument so, dass die LEDBeleuchtung anhält. Wenn die Dioden in der
rechten Hälfte pulsieren, ist die Note zu hoch
gestimmt. Pulsieren sie in der linken Hälfte,
so ist die Note zu tief. Wenn die Note richtig
gestimmt ist, leuchtet nur die Diode in der
Mitte. Auch die Pfeile zeigen an, wie die Note
gestimmt ist. Wenn die Note zu hoch ist,
leuchtet die „w“-Diode. Ist die Note zu tief
gestimmt, so leuchtet die „s“-Diode.
S4: Spiegel
Stimmen Sie das Instrument so, dass sich die
beiden Dioden (links und rechts) in der Mitte
treffen. Je weiter die Note vom Sollwert
entfernt ist, desto weiter liegen auch die
beiden Dioden auseinander. Wenn die Note
zu hoch ist, leuchtet außerdem die „w“Diode. Ist die Note zu tief gestimmt, so
leuchtet die „s“-Diode.
F1: Focus1
Nebenanzeige:
Komplett-Impulsanzeige
Hauptanzeige: Taktart
Die Hauptanzeige verwendet den „S1“Modus und die Nebenanzeige den „S2“Modus. Dank der hohen Auflösung der
Nebenanzeige können die Noten viel exakter
gestimmt werden. Wenn die Note zu hoch ist,
leuchtet außerdem die „w“-Diode. Ist die
Note zu tief gestimmt, so leuchtet die „s“Diode.
F2: Focus2
Nebenanzeige:
Komplett-Impulsanzeige
Hauptanzeige:
Komplett-Impulsanzeige
Die Hauptanzeige verwendet den „S2“Modus. Dank der hohen Auflösung der
Nebenanzeige können die Noten viel exakter
gestimmt werden. Wenn die Note zu hoch ist,
leuchtet außerdem die „w“-Diode. Ist die
Note zu tief gestimmt, so leuchtet die „s“Diode.
65
Page 66

Wenn Sie die gewählte Einstellung nicht
übernehmen möchten, müssen Sie den
TUNER-Schalter drücken oder mit dem
EINGANGSWAHLSCHALTER den
„anderen“ Eingang („A“ oder „B“) wählen.
3 Drücken Sie den STORE-Taster.
Die EINGANGSWAHLDIODE blinkt. Wenn „A“
und „B“ dieselbe Einstellung verwenden, blinken
beide Dioden. Wenn „A“ und „B“ unterschiedliche Einstellungen verwenden, blinkt nur der
Buchstabe des gewählten Eingangs.
4Wählen Sie mit dem AUF- oder AB-Taster
bzw. dem EINGANGSWAHLSCHALTER
den Speicher, in dem die Einstellung
gesichert werden soll.
5
Drücken Sie den STORE-Taster noch einmal.
Die Wahl des Anzeigemodus’ wird am
gewünschten Ort gespeichert und der pitch-
black+ wechselt wieder in den Normalbetrieb.
Mit dem STORE-Taster werden jeweils alle
folgenden Einstellungen gespeichert:
Kammertonfrequenz, Stimm-Modus, „Flat“Intervall und Anzeigemodus (☞S. 58).
66
Fehlersuche
Die Noten können nicht gestimmt werden.
• Ist die Stimmfunktion ausgeschaltet?
Drücken Sie den TUNER-Schalter, um die
Stimmfunktion zu aktivieren.
• Haben Sie sowohl an INPUT A als auch an
INPUT B ein Instrument angeschlossen und mit
dem EINGANGSWAHLSCHALTER den
momentan falschen Eingang gewählt?
• Haben Sie einen für das zu stimmende
Instrument geeigneten Modus gewählt?
Wenn Sie z.B. eine Gitarre stimmen möchten,
während der „BS“-Modus gewählt ist, werden
die Notennamen eventuell nicht angezeigt.
Die BYPASS-Buchse gibt kein Signal aus.
•
Ist die Stimmfunktion aktiv?
Solange die Stimmfunktion aktiv ist, gibt die BYPASSBuchse kein Signal aus. Drücken Sie den TUNERSchalter, um die Stimmfunktion auszuschalten.
Die DC 9V OUT-Buchse führt keinen Strom.
• Betreiben Sie den pitchblack+ gerade mit
einer Batterie?
Die DC 9V OUT-Buchse ist nicht belegt, wenn Sie
den pitchblack+ mit einer Batterie betreiben.
Page 67

Technische Daten
• Stimmfunktionen: 12 Noten (gleichschwe-
bende Stimmung), Programme (88 Noten)
• Erkennungsbereich: E0 (20,60Hz)–C8
(4186Hz) (bei Empfang einer Sinuswelle)
• Kammertonfrequenz: A4= 436–445Hz (1Hz-
Schritte)
• Genauigkeit: bis auf ±0,1 Cent genau
• Mollstimmung: 1–7 Halbtöne
• Anschlüsse:
INPUT A-, INPUT B-Buchse (1/4"-MonoKlinkenbuchsen)
BYPASS-Buchse (1/4"-Mono-Klinkenbuchse)
DC 9V IN-Buchse
DC 9V OUT-Buchse
• Eingangsimpedanz: 1M (bei aktiver
Stimmfunktion)
• Stromversorgung: S-006P/6F22/6LR61 (9V-
Batterie) oder optionales AC-Netzteil (9V
600mA oder besser)
•
Lebensdauer der Batterie: Ca. 5 Stunden im
Dauerbetrieb, bei eingeschalteter Stimmfunktion (Dauereingabe der Note A4, Anzeigemodus= Meter, mit 6F22 Zink-Kohlenstoffbatterie)
•Leistungsaufnahme: Maximal 50 mA
• Abmessungen (B x H x T): 128 mm x 120
mm x 47 mm (inklusive Gummifüße)
• Gewicht: 492 g (inklusive Batterie)
• Lieferumfang: Eine 6F22 Zink-Kohlenstoff-
batterie für Testzwecke, ein DC-Kabel
• Sonderzubehör: AC-Netzteil (9V
600mA)
Änderungen der technischen Daten und des
Designs ohne vorherige Ankündigung
vorbehalten.
67
Page 68

Precauciones
Ubicación
El uso de la unidad en las siguientes ubicaciones
puede dar como resultado un mal funcionamiento:
• Expuesto a la luz directa del sol
• Zonas de extremada temperatura o humedad
• Zonas con exceso de suciedad o polvo
• Zonas con excesiva vibración
• Cercano a campos magnéticos
Fuente de alimentación
Por favor, conecte el adaptador de corriente
designado a una toma de corriente con el voltaje
adecuado. No lo conecte a una toma de corriente
con voltaje diferente al indicado.
Interferencias con otros aparatos
Las radios y televisores situados cerca pueden
experimentar interferencias en la recepción. Opere
este dispositivo a una distancia prudencial de
radios y televisores.
Manejo
Para evitar una rotura, no aplique excesiva fuerza
a los conmutadores o controles.
68
Cuidado
Si exterior se ensucia, límpiese con un trapo seco.
No use líquidos limpiadores como disolvente, ni
compuestos inflamables.
Guarde este manual
Después de leer este manual, guárdelo para
futuras consultas.
Mantenga los elementos externos alejados
del equipo
Nunca coloque ningún recipiente con líquido cerca
de este equipo, podría causar un cortocircuito,
fuero o descarga eléctrica. Cuide de que no caiga
ningún objeto metálico dentro del equipo.
Page 69

Aviso sobre desechos (solo para UE)
Si el simbolo del cubo de basura tachado
se muestra en el producto o en el manual
de instrucciones, debe desechar el
producto de una forma adecuada. No
deseche este producto con el resto de
residuos domesticos. El desecho
apropiado de este producto ayuda a
reducir el impacto medioambiental. El
metodo correcto de desecho puede
variar dependiendo de la localidad, por
favor consulte a la agencia de medio
ambiente para obtener mas detalles.
* Los nombres de empresas, nombres de productos y
nombres de formatos, etc., son marcas registradas
de sus respectivos propietarios.
69
Page 70

Índice de materias
Precauciones ...................................... 68
Características principales.................. 70
Partes de pitchblack+ ........................ 72
Instalación de la pila ......................... 73
Restaurar los ajustes de fábrica ......... 73
Conexiones........................................ 74
Afinación ........................................... 77
Ajuste de la Calibración ..................... 79
Ajuste del Modo de Afinación ............ 80
Crear su propia Afinación .................. 82
Afinación Flat .................................... 84
Ajuste del Modo de Visualización ...... 86
Solución de problemas....................... 88
Especificaciones .................................89
70
Gracias por comprar el pedal afinador
avanzado Korg pitchblack+. Con el
objetivo de aprovechar completamente su
pitchblack+, por favor este manual de
usuario cuidadosamente y úselo como se le
sugiere. Mantenga a buen recaudo este
manual de usuario para futuras referencias.
Características principales
Afinación alta precisión
pitchblack+ usa dos medidores LED para
permitir una afinación extremadamente precisa,
con una precisión mejor que ±0,1 centésimas.
Modos de afinación
pitchblack+ soporta una amplia variedad de
afinaciones, incluyendo cromática, de guitarra y bajo,
así como cinco afinaciones abiertas para la guitarra.
Demás de la afinación estándar, usted puede
especificar sus propias afinaciones, como afinaciones
para instrumentos étnicos o afinaciones extendidas.
Las afinaciones creadas por usted pueden ser
guardadas como un programa de afinación en una
de cinco memorias internas.
Page 71

Afinación Flat
Usted puede afinar su instrumento hasta siete
pasos de semitono por debajo del nombre de la
nota mostrada en la pantalla.
Jacks de entrada
pitchblack+ le ofrece dos jacks de entrada,
INPUT A e INPUT B. Usted puede especificar la
calibración, modo de afinación, afinación Flat
(Fat), y el modo visualización individualmente
para cada jack de entrada. Si ha unido conectado
un único instrumento a estos jacks, podrá entre
de dos juegos de ajustes para su instrumento.
Modo de visualización
Usted puede elegir de seis tipos de modos de
visualización para medidor de LEDs. Se
proporciona una amplia variedad de modos de
iluminación, incluyendo un medidor que se
ilumina por el centro cuando usted está en el
tono (Meter), un medidor de tipo estroboscopio
que detiene el flujo de iluminación cuando la
afinación es correcta (Strobe), y Focus que usa
medidores LED duales para permitir una
afinación incluso más precisa.
Jack de Bypass
Cuando el afinador está desconectado, la salida
en bypass se comporta como un verdadero
bypass, en el que la señal saliente se mantiene
completamente inalterada por la circuitería
interna. La salida de carretera de circunvalación
es silenciada cuando el afinador es conectado.
Jack de salida DC 9V
Si usted usa el adaptador de corriente alterna
opcional (9V ), usted puede usar el cable
de corriente continua incluido para suministrar
la potencia necesaria para pedales de efectos de
9V ( ). (Un máximo de 200 mA puede ser
suministrado.)
71
Page 72

Partes de pitchblack+
Jack de entrada de DC 9V
Jack de salida de DC 9V
Guía indicadora
de centro
LEDs guía
de tono
Botón MODE
(Modo)
Botón DISPLAY
(Pantalla)
Jack BYPASS (mono)
Jacks INPUT A e INPUT B (mono)
Medidores LED
Botón FLAT
Botón CALIB
Botón Store
Indicador de conexión
del AFINADOR
Conmutador de
conexión del AFINADOR
72
Pantalla
Botones UP/DOWN
(Arriba / Abajo)
Botón NOTE/CENT
Indicadores
INPUT SELECT
Conmutador
INPUT SELECT
(Selección de entrada)
Page 73

Instalación de la pila
1 Abra la tapa del compartimiento de las pilas
localizado en la parte inferior de la unidad.
2 Conecte una pila al conector de baterías.
Asegúrese que la batería esté orientada en la
polaridad correcta.
3 Encaje la pila en el compartimiento de las
pilas y cierre la tapa.
Cuando la pila se acerque al final de su vida,
el indicador de TUNER ON/OFF parpadeará.
Por favor, instale una nueva pila lo antes
posible. La pila incluida se proporciona
para que usted pueda verificar que la
unidad funciona correctamente; su vida útil
puede ser más corta de lo normal.
Restaurar los ajustes de fábrica
Aquí tiene cómo devolver los ajustes de fábrica
de pitchblack+.
1 Conecte un cable al jack INPUT A o INPUT
B; pitchblack+ se conectará.
2 Mientras presiona los botones UP y DOWN,
presione el conmutador TUNER ON/OFF.
El afinador de apagará, y los siguientes
ajustes volverán a su estado de fábrica.
Calibración: 440 Hz (40)
Modo de afinación: Cromático (CH)
Afinación Flat: 0
Modo de visualización: Focus (F1)
Programa de afinación: 0 centésimas para
todas las notas
73
Page 74

Conexiones
Conecte un adaptador de AC
(9V, 600 miliamperios o superior, vendido opcionalmente, a
la toma de AC.
Cable DC (incluido).
Para sus pedales de
efectos, máximo 200
miliamperios.
No deje que los
conectores toquen
objetos metálicos. Dicho
contacto podría
estropear el adaptador
de corriente. Asegúrese
de que los conectores
están bien protegidos.
DC 9V OUT
Conecte su amplificador
o pedal de efectos, etc.
DC 9V IN
BYPASS
INPUT B
Apague todos los equipos antes de realizar las conexiones
Los jacks INPUT A, INPUT B y BYPASS son sólo mono. No puede usar cables estéreo.
74
Guitarra o bajo
INPUT A
Page 75

Jacks INPUT A e INPUT B
Conecte el/los instrumento(s) que quiera afinar
a estos jacks. Si sus instrumentos están
conectados tanto a la entrada INPUT A como a
la entrada INPUT B, use el conmutador INPUT
SELECT para elegir el instrumento que desea
afinar. El indicador INPUT SELECT muestra el
instrumento cuyo jack ha sido seleccionado.
Usted puede especificar la calibración, modo de
afinación, la afinación Flat, y el modo de
visualización independientemente para cada
jack de entrada. Por ejemplo, usted puede
especificar que una afinación regular para el
instrumento conectado a INPUT A, y una
afinación “abierta” (Open A) para el instrumento conectado a la entrada INPUT B.
Instrumento 1
INPUT A
Instrumento 2
INPUT B
A
calibración, modo de afinación, afinación
planta (Flat) y modo de visualización
B
calibración, modo de afinación, afinación
planta (Flat) y modo de visualización
Si usted conecta un único instrumento tanto a
INPUT A como en INPUT B (no ambos), puede usar
el conmutador INPUT SELECT para elegir entre los
ajustes A o B (calibración, modo de afinación,
afinación Flat-Flat, el modo de visualización). El
indicador INPUT SELECT muestra los ajustes que
usted ha seleccionado. Por ejemplo si ha especificado
una afinación regular para A y una afinación Flat en
un semitono más abajo para B, usted puede usar el
ajuste A para interpretar con una afinación regular, y
luego cambiar al ajuste B e interpretar con una
afinación Flat.
Conmutador
A
INPUT A
INPUT SELECT
calibración, modo de afinación, afinación
planta (Flat) y modo de visualización
B
calibración, modo de afinación, afinación
planta (Flat) y modo de visualización
Instrumento
Si los instrumentos están conectados tanto en la
entrada INPUT A como en INPUT B, y usted
desconecta el cable del jack de entrada
actualmente seleccionado por el conmutador
INPUT SELECT, la selección de entrada
cambiará automáticamente al otro jack de
entrada.
75
Page 76

Jack BYPASS
Conecte este jack a su pedal de efectos o
amplificador, etc. Cuando el afinador está
conectado, el sonido del instrumento conectado
a la entrada INPUT A o INPUT B, será
enmudecido. Cuando el afinador está desconectado, el sonido del instrumento conectado al
jack de entrada será audible. Como actúa como
un “bypass verdadero”, el sonido de salida no
será afectado por los circuitos internos. Si los
instrumentos están conectados tanto a la
entrada INPUT A como en INPUT B, use el
conmutador INPUT SELECT para elegir el
instrumento que será audible desde el jack
BYPASS. El indicador INPUT SELECT muestra
el jack de entrada actualmente seleccionado. Si
el instrumento está conectado sólo a la entrada
INPUT A o INPUT B (no ambos), el sonido del
instrumento conectado siempre será audible
desde el jack BYPASS, sin tener en cuenta el
conmutador INPUT SELECT.
76
Jack DC 9V IN
Si usted quiere usar un adaptador de corriente
alterna para suministrar alimentación a pitch-
black+, puede usar el adaptador de corriente
alterna opcional (9V 600 miliamperios).
Usar cualquier otro adaptador de corriente
alterna puede provocar un funcionamiento
defectuoso.
Jack DC 9V OUT
Usando el cable DC incluido con el adaptador
de corriente alterna opcional, usted podrá
suministrar potencia a hasta tres pedales de
efectos u otros dispositivos que usen una
alimentación de 9V ( ).
Asegúrese que el consumo total actual de los
pedales de efectos conectados no exceda los 200
mA. Usted también debe comprobar la
polaridad de los pedales de efectos conectados.
No conecte un adaptador de corriente
alterna al jack DC 9V OUT. Podría provocar
un funcionamiento defectuoso.
Si pitchblack+ está funcionando con la
pila, no será posible suministrar potencia
desde el jack DC 9V OUT.
Page 77

Afinación
Modo de Afinación
1 Use un cable para conectar el instrumento
2 Si los instrumentos están conectados tanto
que usted desea afinar al jack INPUT A o
INPUT B.
pitchblack+ se conectará.
La alimentación se conectará al conectar un
cable al jack INPUT A o INPUT B, pero el
afinador estará desconectado. El afinador
se conecta al presionar el conmutador
TUNER ON/OFF.
al jack INPUT A como al jack INPUT B, use
el conmutador INPUT SELECT para elegir
el instrumento que desea afinar. Si un único
instrumento está conectado al jack INPUT A
o INPUT B (no ambos), use el conmutador
INPUT SELECT para elegir entre el ajuste A
o el ajuste B. El indicador INPUT SELECT
muestra el jack de entrada o ajuste seleccionado.
Cuando la alimentación se conecta, el jack
de entrada en el cual primero conectó el
cable será seleccionado automáticamente.
3 Presione el conmutador TUNER ON/OFF
para habilitar el afinador.
El indicador TUNER ON/OFF se iluminará.
Al habilitar el afinador, la señal introducida
desde la entrada INPUT A o INPUT B será
encaminada al jack BYPASS.
El afinador puede ser habilitado si el
instrumento que desea afinar está conectado al jack de entrada INPUT A o INPUT B.
La pantalla mostrará el modo de afinación
durante aproximadamente un segundo.
Con los ajustes de fábrica, el modo de
afinación está ajustado a CH: cromático.
4 Ajuste la calibración, modo de afinación, la
afinación Flat, y el modo de visualización
como desee.
☞p.79 “Ajuste de la Calibración”
☞p.80 “Ajuste del Modo de Afinación”
☞p.84 “Afinación Flat”
☞p.86 “Ajuste del Modo de Visualización”
77
Page 78

Usted puede realizar estos ajustes independientemente para los jacks INPUT A e INPUT B.
Cuando usted usa el conmutador INPUT
SELECT para cambiar entre las entradas, estos
ajustes también cambiarán automáticamente. Si
un único instrumento está relacionado al jack
INPUT A o INPUT B (no ambos), puede usar el
conmutador INPUT SELECT para seleccionar
entre el ajuste A o el ajuste B para el instrumento que está conectado.
Estos ajustes son almacenados en la
memoria interna. Incluso si usted retira la
pila o desconecta el adaptador de corriente
alterna, pitchblack+ se iniciará con los
ajustes almacenados en la memoria interna
la próxima vez que conecte la unidad.
5Toque una única nota en su instrumento y
afínelo de modo que el nombre de la nota
deseada sea mostrada en la pantalla.
La pantalla muestra el nombre de la nota que
es más cercana al tono tocado por usted.
Nombre de la nota
78
6
Usan el medidor LED para afinar su instrumento.
El modo en el que el medidor LED indica la
desviación de tono dependerá del modo de
visualización que usted ha seleccionado. Con
los ajustes de fábrica, está ajustado a F1: Focus1.
☞p.86 “Ajuste del Modo de Visualización”
7 Cuando haya terminado de afinar, presione
el conmutador TUNER ON/OFF para apagar
el afinador.
El indicador TUNER ON/OFF se oscurecerá.
El sonido del instrumento conectado al jack
de entrada será audible desde el jack
BYPASS. Si los instrumentos están conectados
a ambos jacks INPUT A e INPUT B, usted
puede usar el conmutador INPUT SELECT
para elegir el instrumento que debe ser
audible desde el gato BYPASS, incluso si el
afinador es desconectado. El indicador
INPUT SELECT muestra qué jack de entrada
está seleccionado. Si ha conectado un
instrumento sólo a la entrada INPUT A o
INPUT B (no ambos), el instrumento
conectado siempre será audible, sin tener en
cuenta el conmutador INPUT SELECT.
Page 79

Ajuste de la Calibración
Aquí se expone cómo ajustare la calibración (el
tono de referencia usado para la afinación,
expresada como el tono de la nota central (A4)
en un piano).
Usted puede ajustar la calibración independientemente para el jack de entrada INPUT
A o INPUT B. Cuando use el conmutador
INPUT SELECT para cambiar las entradas, el
ajuste también cambiará automáticamente.
Los ajustes de calibración son almacenados
en la memoria interna. Incluso si usted
retira la pila o si desconecta el adaptador de
corriente alterna, pitchblack+ recordará
los ajustes almacenados en la memoria
interna la próxima vez que usted conecte la
unidad.
1 Presione el botón CALIB.
La visualización indicará el ajuste actual.
Cuando pitchblack+ se envía de fábrica este
ajuste está en 40: 440 Hz.
2 Use el botón UP o DOWN para especificar
la calibración.
40: 440 Hz 41: 441 Hz 42: 442 Hz
43: 443 Hz 44: 444 Hz 45: 445 Hz
36: 436 Hz 37: 437 Hz 38: 438 Hz
39: 439 Hz
Si usted decide anular el cambio realizado,
presione el conmutador TUNER ON/OFF o
pulse el conmutador INPUT SELECT para
cambiar entre A o B.
3 Presione el botón STORE.
El indicador INPUT SELECT parpadeará. Si
los ajustes A y B son idénticos, los indicadores A y B parpadearán. Si los ajustes A y B se
diferencian, el indicador seleccionado por el
conmutador INPUT SELECT parpadeará.
4 Use el botón UP, DOWN o el conmutador
INPUT SELECT para seleccionar la memoria
interna en la cual usted desea almacenar el
ajuste.
5 Presione el botón STORE de nuevo.
El ajuste de calibración será almacenado en la
memoria interna que usted especificó, y
pitchblack+ volverá al modo de afinación.
79
Page 80

Al presionar el botón STORE, la calibración, el modo de afinación, la afinación Flat
y los ajustes de modo de visualización
serán todos guardados simultáneamente.
Por ejemplo, si usted selecciona “A”,
cambia el modo de afinación, y guarda
todo a “B”, los ajustes además del modo de
afinación también cambiarán al ajuste “A”.
Del mismo modo, si usted cambia el modo
de afinación “A” y luego cambia el modo
de visualización y guarda a “A”, el modo
de afinación y el modo de visualización
serán reescritos con los valores editados.
80
Ajuste del Modo de Afinación
Aquí tiene cómo especificar el modo de afinación
apropiado para su instrumento, o la afinación
particular que usted use. Además del modo de
afinación regular para guitarras o bajos, pitch-
black+ soporta varias afinaciones incluyendo
cinco afinaciones “Open” para guitarra, así como
las afinaciones originales que usted ha creado.
Usted puede ajustar el modo de afinación
independientemente para el jack INPUT A e
INPUT B. Cuando usted usa el conmutador
INPUT SELECT para cambiar entre las entradas,
el ajuste también cambiará automáticamente.
Los ajustes del modo de afinación son
almacenados en la memoria interna. Incluso si
usted retira la pila o si desconecta el adaptador
de corriente alterna, pitchblack+ se iniciará
con los ajustes almacenados en la memoria
interna la próxima vez conecte la unidad.
1 Presione el botón MODE.
La pantalla indicará el modo de afinación actual.
Page 81

Cuando la unida viene de fábrica, el modo de
afinación está ajustado a CH: cromático.
2 Use el botón UP o DOWN para seleccionar
el modo de afinación deseado.
CH: Cromático. Los nombres de nota son
mostrados en semitonos.
GT: Estándar, afinación estándar para
guitarras
(7B, 6E, 5A, 4D, 3G, 2B, 1E)
BS: afinación estándar para bajos
(LB, 4E, 3A, 2D, 1G, HC)
OD: Open D, afinación para guitarras
(6D, 5A, 4D, 3F#, 2A, 1D)
OE: Open E, afinación para guitarras
(6E, 5B, 4E, 3G#, 2B, 1E)
OG: Open G, afinación para guitarras
(6D, 5G, 4D, 3G, 2B, 1D)
OA: Open A, afinación para guitarras
(6E, 5A, 4E, 3A, 2C#, 1E)
DA: DADGAD, afinación para guitarras
(6D, 5A, 4D, 3G, 2A, 1D)
P1–P5: El progama de afinación que usted ha
creado. Usted puede crear hasta cinco
programas de afinación (☞p.82, “Crear su
propia Afinación”).
Si usted decide anular su elección, presione
el conmutador TUNER ON/OFF o pulse el
conmutador INPUT SELECT para cambiar
entre A y B.
3 Presionan el botón STORE.
El indicador INPUT SELECT parpadeará. Si
los ajustes A y B son idénticos, los indicadores A y B parpadearán. Si los ajustes A y B son
distintos, el indicador seleccionado mediante
el conmutador INPUT SELECT parpadeará.
4 Use el botón UP o DOWN, o el conmutador
INPUT SELECT para seleccionar la memoria
interna en la que desea almacenar el ajuste.
5 Presione el botón STORE otra vez.
El ajuste del modo de afinación será
almacenado en la memoria interna que usted
especificó, y pitchblack+ volverá al estado
de afinación.
Cuándo pulse el botón STORE, la calibración, el modo de afinación, la afinación
Flat, y los ajustes de modo de visualización
serán todos guardados simultáneamente
(☞p.80).
81
Page 82

Crear su propia Afinación
Además de la afinación estándar, pitchblack+
le permite almacenar y usar cualquier afinación
deseada. Usted también puede especificar
afinaciones étnicas o afinación extendidas.
Usted puede crear un programa de afinación de
dos formas distintas: especificando el tono
individualmente para cada una de las ochenta y
ocho notas, de A0 a C8 (All Note), o especificando el tono para cada nota en una octava, y
aplicándolas a través de todo el rango de tonos
entero (Octave Link).
La afinación creada por usted puede ser
guardada como uno de los cinco programas de
afinación.
Los programas de afinación creados por
usted son guardados en la memoria
interna. Incluso si usted retira la pila o si
desconecta el adaptador de corriente
alterna, pitchblack+ recordará los ajustes
almacenados en la memoria interna la
próxima vez que usted habilite la unidad.
82
Especificando el tono para cada nota (All Note)
Aquí tiene cómo especificar individualmente el tono
para cada una de las ochenta y ocho notas A0–C8.
1 En el modo de afinación seleccione P1–P5
(programas 1–5) y presione la tecla STORE
para guardar el ajuste.
☞p.80 “Ajuste del Modo de Afinación”
2 Presione el botón NOTE/CENT.
Ahora accederá al modo de Edición de Programas de Afinación. La pantalla indicará el nombre
de nota, la octava y el valor en centésimas. El
nombre de nota y la octava parpadearán.
Valor en centésimas
Si la octava no se muestra, significa que la
pantalla muestra el modo de edición Octave
Link (
☞p.83
cada nota en la octava”). De ser así, pulse y
mantenga pulsado el botón NOTE/CENT
durante aproximadamente un segundo para
seleccionar la pantalla de edición All Note.
“Especificando el tono para
Nombre de nota y octava
Page 83

3 Use el botón UP o DOWN para seleccionar
los nombres de las notas y la octava cuyos
valores de centésima desea especificar.
4 Presione el botón de NOTE/CENT para
hacer que el valor de centésimas parpadee, y
use los botones UP o DOWN para especificar el valor de centésimas con relación a al
afinación estándar.
Usted puede editar el valor de las centésimas
en un rango de -50–+50 centésimas.
5 Para seguir editando, presione el botón de
NOTE/CENT y repita los pasos 3 y 4.
6 Cuando haya terminado de editar, presione
el botón STORE.
La pantalla indicará un número de programa.
7 Use el botón UP o DOWN para seleccionar
el número de programa (P1-P5) en el cual
usted desea almacenar el programa de
afinación creado.
8 Presione el botón de STORE de nuevo.
Su programa de afinación será almacenado, y
pitchblack+ volverá al modo de afinación.
Especificando el tono para cada nota en
la octava (Octave Link)
Aquí tiene cómo especificar el tono para cada
nota de una octava.
1 En el modo de afinación seleccione P1-P5
(programas 1–5) y presione la tecla STORE
para guardar el ajuste.
☞p.80 “Ajuste del Modo de Afinación”
2 Presione el botón de NOTE/CENT. Accederá
el modo de Edición de Programa de
Afinación.
☞p.82 “Especificando el tono para cada nota
(All Note)”
3 Pulse y mantenga pulsado el botón de
NOTE/CENT durante aproximadamente un
segundo.
La pantalla mostrará el modo de edición
Octave Link. El nombre de la nota y el valor
en centésimas serán ambos mostrados, y el
nombre de la nota parpadeará.
Valor en centésimas
Nombre de la nota
83
Page 84

Cada vez usted pulse durante un segundo el
botón NOTE/CENT, alternará entre las
pantallas de edición Octave Link y All Note.
4 Use los botones UP o DOWN, y el botón de
NOTE/CENT para especificar el valor de
centésimas para cada nota del rango de un
octava C–B.
El procedimiento y el rango del valor de las
centésimas son los mismos que en el modo de
edición All Note.
☞ p.82 “Especificando el tono para cada nota
(All Note)”
5 Cuando haya finalizado la edición, presione
el botón STORE.
La pantalla indicará un número de programa.
6 Use los botones UP/DOWN para seleccionar
el número de programa (P1–P5) en el cual
usted desea almacenar el programa de
afinación creado.
7 Presionan el botón de TIENDA(DEPÓSITO)
otra vez.
Su programa de afinación será almacenado, y
el negro como boca de lobo + volverá al
modo que sintoniza.
84
Afinación Flat
La Afinación Flat le permite afinar varios
semitonos más abajo que los nombres de nota
mostrados en la pantalla. Usted afinar abajo en
un máximo de siete semitonos.
La Afinación Flat está disponible cuando el
Modo de Afinación está ajustado a
afinaciones Guitar, Bass, D–Open A o
DADGAD.
Usted puede especificar la Afinación Flat
Piso independientemente para la entrada
INPUT A e INPUT B. Cuando pulse el
conmutador INPUT SELECT para cambiar
entre las entradas, el ajuste también
cambiará automáticamente.
Los ajustes de Afinación Flat son almacenados en la memoria interna. Incluso si usted
retira la pila o si desconecta el adaptador
de corriente alterna, pitchblack+ se
iniciará con los ajustes almacenados en la
memoria interna la próxima vez que usted
habilite la unidad.
Page 85

1 Pulse el botón FLAT.
El indicador de Afinación Flat parpadeará, y
la pantalla mostrará el número actual de
pasos (flats)
Indicador de Afinación Flat
2 Use los botones UP o DOWN para especifi-
car el número de pasos.
Usted puede especificar varios pasos entre un
rango de 0–7. Si usted especifica un ajuste
distinto a 0, el indicador de Afinación Flat se
iluminará.
Si usted decide anular el cambio realizado,
pulse el conmutador TUNE ON/OFN o
presione el conmutador INPUT SELECT
para cambiar entre A o B.
3 Presionan el botón STORE.
El indicador INPUT SELECT parpadeará. Si
los ajustes A y B son idénticos, los indicadores A y B parpadearán. Si los ajustes A y B son
distintos, el indicador seleccionado con el
conmutador INPUT SELECT parpadeará.
4 Use el botón UP, DOWN o el conmutador
INPUT SELECT para seleccionar la memoria
interna en la cual usted desea almacenar el
ajuste.
5 Pulse de nuevo el botón STORE.
El ajuste de afinación Flat seleccionado será
almacenado en la memoria interna que usted
especificó, y pitchblack+ volverá al modo
de afinación.
Cuando usted presione el botón STORE, la
calibración, el modo de afinación, la
afinación Flat y el modo de visualización
serán todos guardados simultáneamente
(☞p.80).
85
Page 86

Ajuste del Modo de Visualización
Aquí tiene cómo especificar el modo de
visualización del medidor LED. Usted puede
elegir entre seis tipos de modos de visualización.
Los ajustes de Modo de Visualización son
almacenados en la memoria interna.
Incluso si usted retira la pila o si desconecta
el adaptador de corriente alterna, pitch-
black+ se iniciará con los ajustes almacenados en la memoria interna la próxima
vez que usted habilite la alimentación.
1 Presione el botón DISPLAY.
La pantalla indicará el ajuste actual.
S1: Meter
Afine su instrumento de modo que el LED
central del medidor LED se ilumine. El LED de
la derecha del centro se iluminará si su
instrumento está afinado alto, y el LED de la
izquierda del centro se iluminará si su
instrumento está afinado por debajo. El LED de
guía de tono w se iluminará si el instrumento
está por encima y el LED de guía de tono s se
iluminará si su instrumento está por debajo.
S2: Full Strobe
pitchblack+ se envía de fábrica con el ajuste
F1: Focus1.
2 Use los botones UP o DOWN para seleccio-
nar el modo de visualización.
86
Afine su instrumento de modo que la
iluminación del medidor LED deje de
moverse. La iluminación del medidor LED
fluirá de izquierda a derecha si su instrumento está por encima, o de derecha a izquierda
si está por debajo. El LED de guía de tonos
se iluminará si su instrumento está por
encima, y el LED de guía de tonos s se
iluminará si su instrumento está por debajo.
w
Page 87

S3: Half Strobe
Afine su instrumento de modo que la iluminación
del medidor LED deje de fluir. La iluminación
estroboscópica aparecerá en la derecha del medidor
LED si su instrumento está por encima, y a la
izquierda si su instrumento está por debajo.
Cuando su instrumento esté afinado correctamente,
sólo se iluminará el LED central. El LED de guía de
tono indican si su instrumento está por encima o
por debajo. El LED de guía de tono w se iluminará
si su instrumento está por encima, y el LED s se
iluminará si su instrumento está por debajo.
S4: Mirror
F1: Focus1
Medidor secundario: Full Strobe
Medidor principal: Medición
El medidor principal funcionará como se
describe en S1: Meter, y el medidor secundario funcionará como se describe en S2: Full
Strobe. Como el submedidor es de mayor
precisión, permite una afinación de más
exacta. El LED de guía de tono w se
iluminará si su instrumento está por encima,
y el LED s se iluminará si su instrumento
está por debajo.
F2: Focus2
Medidor secundario: Full Strobe
Medidor principal: Full Strobe
Afine su instrumento de modo que los dos LED
iluminados en la izquierda y en la derecha del
medidor coincidan en el centro. Cuanto más
lejos esté su instrumento del tono correcto, más
lejos estarán los LED entre sí. El LED de guía
de tono w se iluminará si su instrumento está
por encima agudo, y el LED de guía de tono s
se iluminará si su instrumento está por debajo.
El metro principal y el medidor secundario
funcionarán como se describe en S2: Full
Strobe. Como el submedidor es de mayor
precisión, permite una afinación de más
exacta. El LED de guía de tono w se
iluminará si su instrumento está por encima,
y el LED s se iluminará si su instrumento
está por debajo.
87
Page 88

Si usted decide anular el cambio realizado
pulse el botón TUNER ON/OFF, o pulse el
conmutador INPUT SELECT para cambiar
entre A o B.
3 Presione el botón STORE.
El indicador INPUT SELECT parpadeará. Si
los ajustes A y B son idénticos, los indicadores A y B parpadearán. Si los ajustes A y B son
distintos, el indicador seleccionado por el
conmutador INPUT SELECT parpadeará.
4 Use los botones UP y DOWN, o el conmuta-
dor INPUT SELECT para seleccionar la
memoria interna en la cual usted desea
almacenar el ajuste.
5 Presione el botón STORE de nuevo.
El ajuste de modo de visualización será
almacenado en la memoria interna que usted
especificó, y pitchblack+ volverá al modo
de afinación.
Cuándo presione el botón STORE, la
calibración, el modo de afinación, la afinación
Flat y el modo de visualización serán todos
guardados simultáneamente (☞p.80).
88
Solución de problemas
No puedo afinar sintonizar.
• ¿Podría ocurrir que el afinador estuviera
deshabilitado?
Pulse el conmutador TUNER ON/OFF para
habilitar el afinador.
• Si los instrumentos están conectados tanto a la
entrada INPUT A como en la entrada INPUT B,
¿ha usado el conmutador INPUT SELECT para
seleccionar la entrada correcta para el instrumento que usted desea afinar?
• ¿Ha seleccionado el modo de afinación
apropiado para el instrumento que desea afinar?
Por ejemplo si usted afina una guitarra, los
nombres de nota podrían no ser mostrados si el
Modo de afinación está ajustado a BS (BASS).
El sonido no es audible en el jack BYPASS.
•
¿Podría ocurrir que el afinador estuviera conectado?
Si el afinador está conectado, el sonido no será
audible desde el jack BYPASS Pulse el conmutador TUNER ON/OFF para apagar el afinador.
No se suministra potencia desde el jack DC 9V OUT.
• ¿Pudiera ser que su pitchblack+ estuviera
operando con la pila?
No es posible suministrar alimentación desde el jack
DC 9VC OUT si pitchblack+ funciona usando la pila.
Page 89

Especificaciones
• Afinación: afinación estándar de 12 notas,
programas (88 notas)
• Rango de detección: E0 (20,60 Hz)–C8 (4186
Hz) (para entrada de onda sinusoidal)
• Rango de calibración: A4=436–445 Hz (pasos
de 1 Hz)
• Precisión de la detección: dentro de ±0,1
centésima
• Afinación Flat: 1–7 semitonos
• Conexiones:
Jacks INPUT A, INPUT B (jacks 1/4" mono)
Jack BYPASS (jack 1/4" mono)
Jack DC 9V IN
Jack DC 9V OUT
• Impedancia de entrada: 1M (cuando el
afinador está conectado)
• Suministro de energía: S-006P/6F22/6LR61
(batería 9V) o adaptador de corriente alterna
(9V 600 miliamperios o mayor, vendido por
separado)
• Duración de la pila: aproximadamente 5
horas de operación continua cuando el
afinador se conecta (entrada continua de A4,
modo de visualización: Meter, usando una
pila 6F22.
• Consumo: máximo 50 mA
• Dimensiones (Ancho x Alto x Profundo):
128 mm x 120 mm x 47 mm (incluyendo los
pies de goma)
• Peso: 492 g (incluyendo la pila)
• Artículos incluidos: pila 6F22 para la
verificación del funcionamiento, un cable DC.
• Opciones: adaptador de corriente alterna (9V
600 miliamperios)
Las especificaciones y el aspecto están sujetas a
cambios sin previo aviso por mejora.
89
Page 90

This product has been manufactured according to strict specifications and voltage requirements that are applicable in the country in which it is intended that this product
should be used. If you have purchased this product via the internet, through mail order, and/or via a telephone sale, you must verify that this product is intended to be
used in the country in which you reside.
WARNING: Use of this product in any country other than that for which it is intended could be dangerous and could invalidate the manufacturer’s or distributor’s warranty. Please also retain your receipt as proof of purchase otherwise your product may be disqualified from the manufacturer’s or distributor’s warranty.
Ce produit a été fabriqué suivant des spécifications sévères et des besoins en tension applicables dans le pays où ce produit doit être utilisé. Si vous avez acheté ce
produit via l’internet, par vente par correspondance ou/et vente par téléphone, vous devez vérifier que ce produit est bien utilisable dans le pays où vous résidez.
ATTENTION: L’utilisation de ce produit dans un pays autre que celui pour lequel il a été conçu peut être dangereuse et annulera la garantie du fabricant ou du distributeur. Conservez bien votre récépissé qui est la preuve de votre achat, faute de quoi votre produit ne risque de ne plus être couvert par la garantie du fabricant ou du
distributeur.
Dieses Produkt wurde unter strenger Beachtung von Spezifikationen und Spannungsanforderungen hergestellt, die im Bestimmungsland gelten. Wenn Sie dieses Produkt
über das Internet, per Postversand und/oder mit telefonischer Bestellung gekauft haben, müssen Sie bestätigen, dass dieses Produkt für Ihr Wohngebiet ausgelegt ist.
WARNUNG: Verwendung dieses Produkts in einem anderen Land als dem, für das es bestimmt ist, verwendet wird, kann gefährlich sein und die Garantie des Herstellers
oder Importeurs hinfällig lassen werden. Bitte bewahren Sie diese Quittung als Kaufbeleg auf, da andernfalls das Produkt von der Garantie des Herstellers oder Importeurs
ausgeschlossen werden kann.
Este producto ha sido fabricado de acuerdo a estrictas especificaciones y requerimientos de voltaje aplicables en el país para el cual está destinado. Si ha comprado
este producto por internet, a través de correo, y/o venta telefónica, debe usted verificar que el uso de este producto está destinado al país en el cual reside.
AVISO: El uso de este producto en un país distinto al cual está destinado podría resultar peligroso y podría invalidar la garantía del fabricante o distribuidor.
Por favor guarde su recibo como prueba de compra ya que de otro modo el producto puede verse privado de la garantía del fabricante o distribuidor.
IMPORTANT NOTICE TO CONSUMERS
REMARQUE IMPORTANTE POUR LES CLIENTS
WICHTIGER HINWEIS FÜR KUNDEN
NOTA IMPORTANTE PARA EL CONSUMIDOR
4015-2 Yanokuchi, Inagi-city, Tokyo 206-0812 Japan
© 2008 KORG INC.
 Loading...