

Page 1
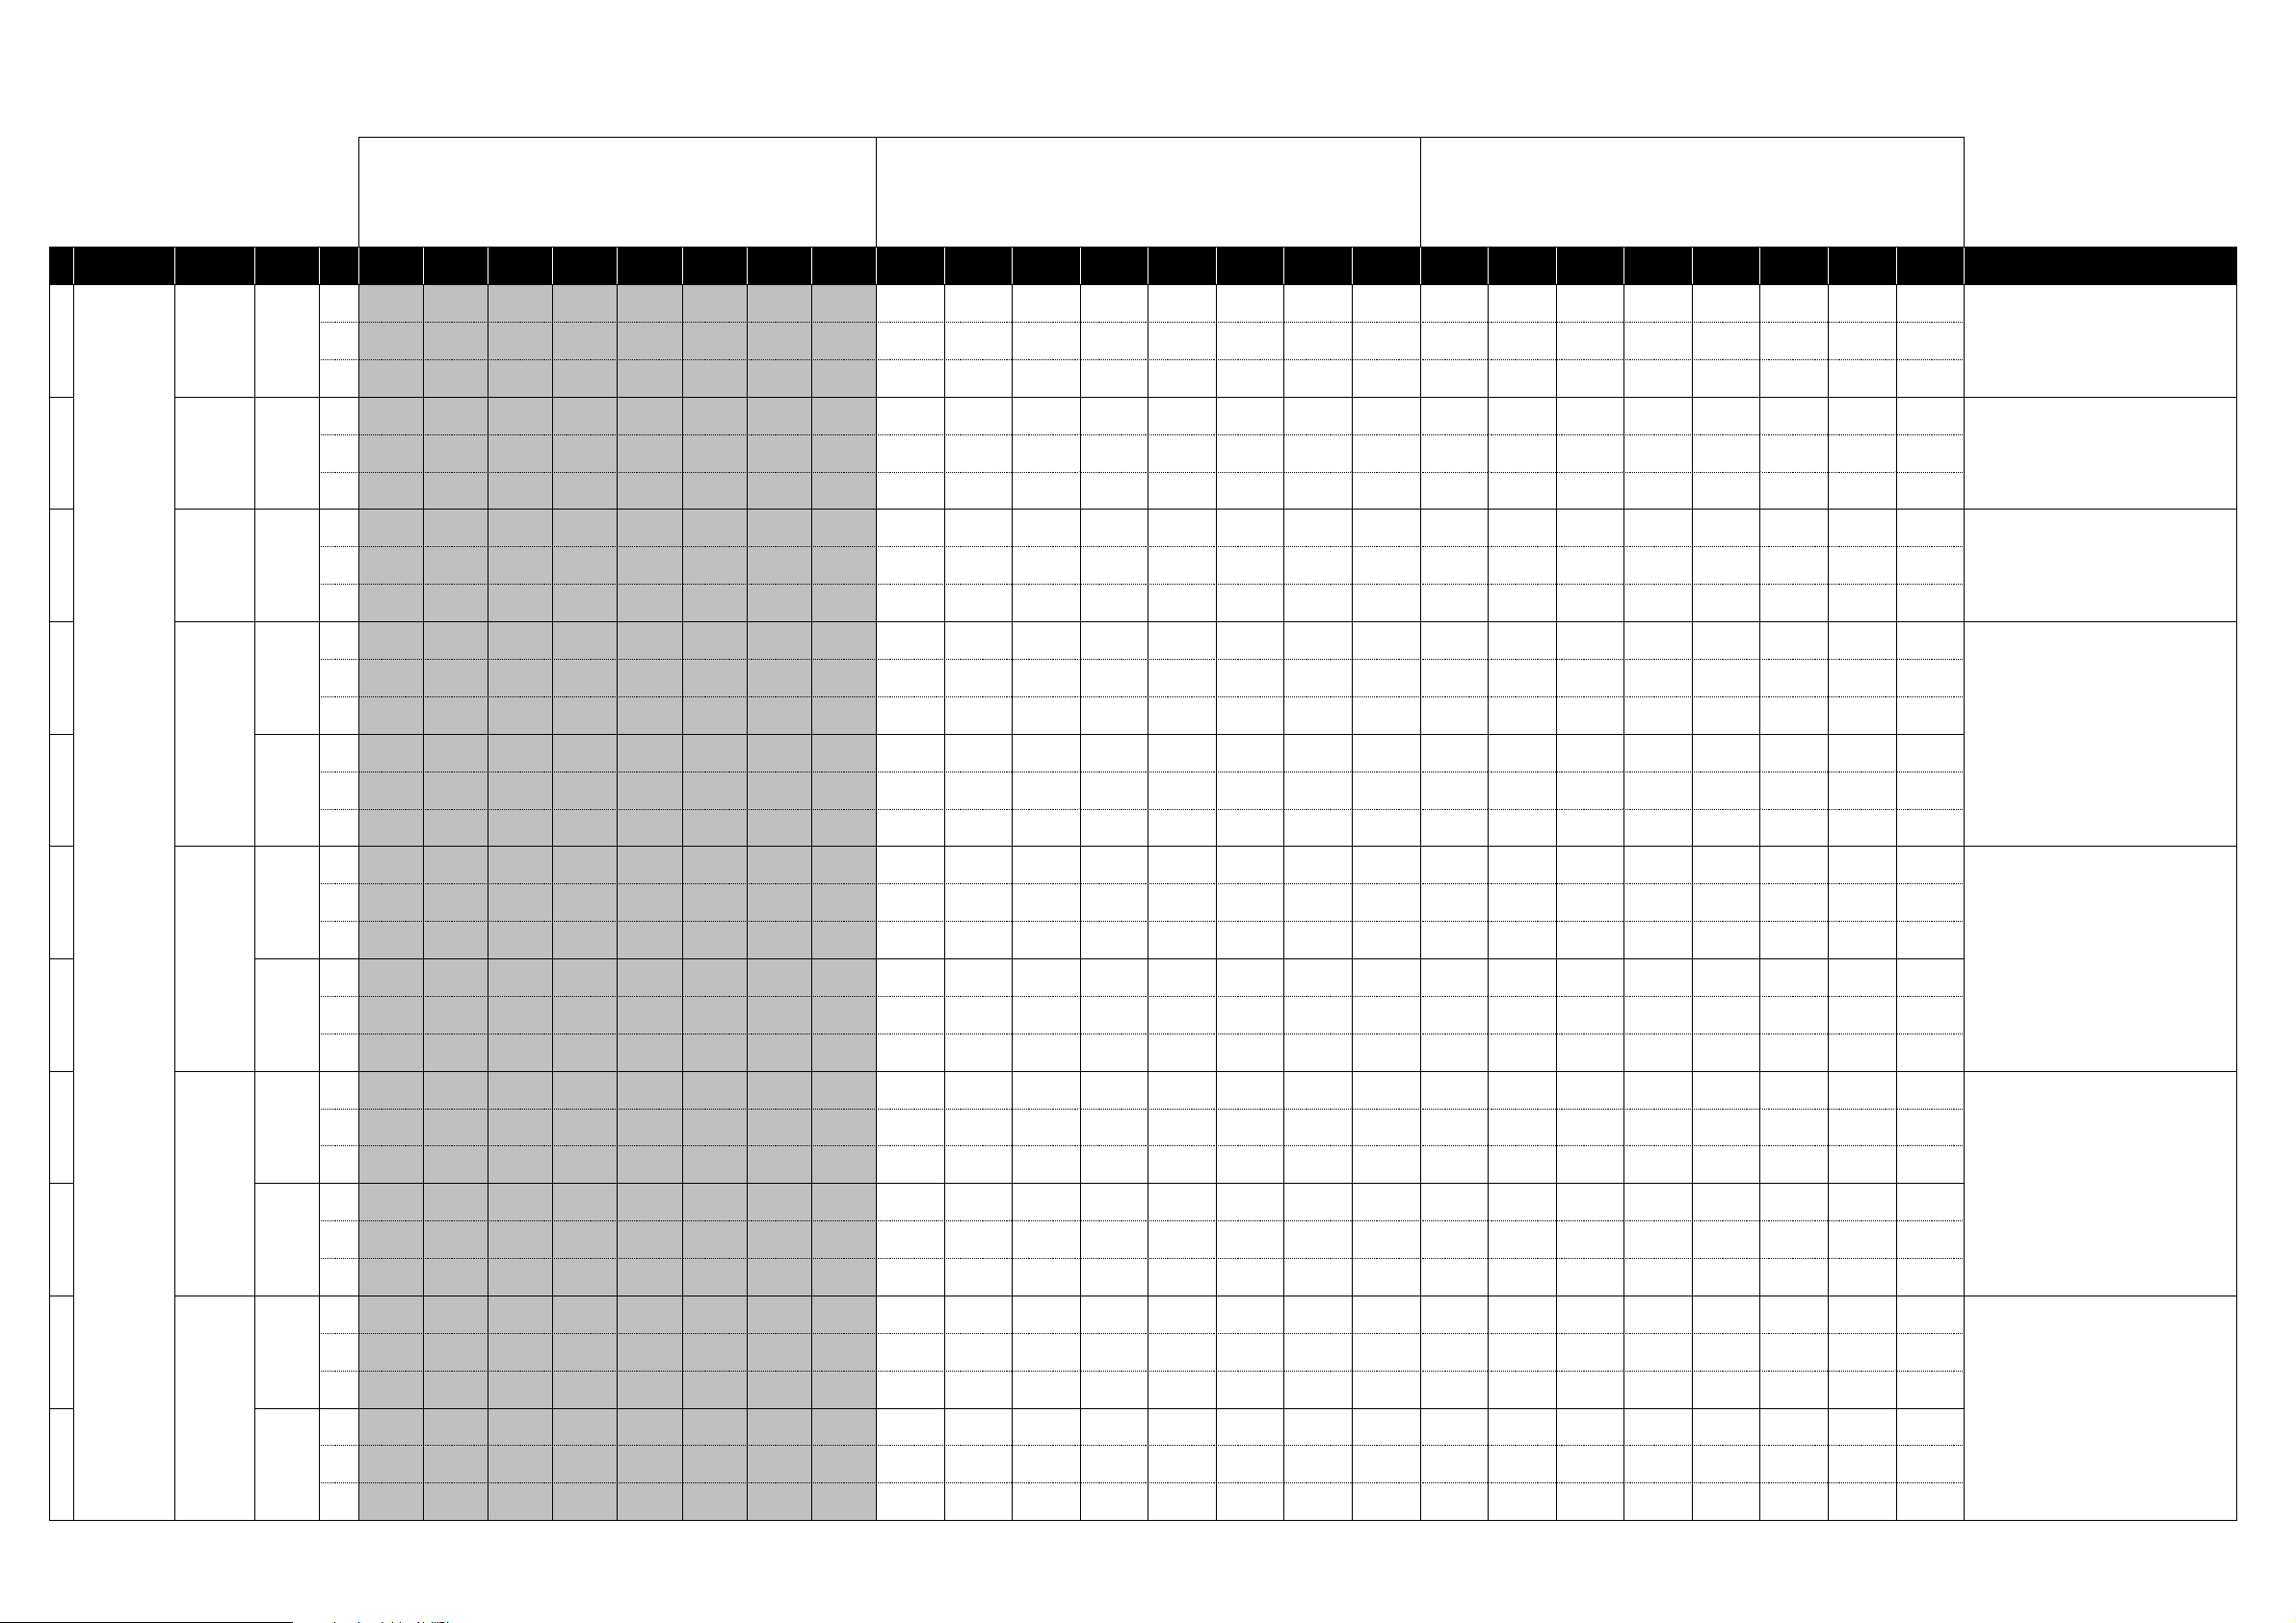
M3 External Setups
Manufacturers
0 KLC M1
1
2
3
4[B]
KORG
5
Product
Name
KLC M1 Le
KLC
WAVESTATION
KLC MS-20
KLC Polysix
Scene
Variation
[A]
[A]
[B]6
12345678 1234567812345678 HINT
Name Free Free Free Free Free Free Free Free OSC BAL RESO CUTOFF EG INT ATTACk DECAY RELEASE IFX BAL Note Note Note Note Note Note Note Note
Ch Ch:01G Ch:01G Ch:01G Ch:01G Ch:01G Ch:01G Ch:01G Ch:01G Ch:01G Ch:01G Ch:01G Ch:01G Ch:01G Ch:01G Ch:01G Ch:01G Ch:01G Ch:01G Ch:01G Ch:01G Ch:01G Ch:01G Ch:01G Ch:01G
CC#/
Off Off Off Off Off Off Off Off CC#8 CC#71 CC#74 CC#79 CC#73 CC#75 CC#72 CC#91 C4 D4 E4 F4 G4 A4 B4 C5
Note
Name Free Free Free Free Free Free Free Free OSC BAL Free CUTOFF EG INT ATTACK DECAY RELEASE Volume Note Note Note Note Note Note Note Note
Ch Ch:01G Ch:01G Ch:01G Ch:01G Ch:01G Ch:01G Ch:01G Ch:01G Ch:01G Ch:01G Ch:01G Ch:01G Ch:01G Ch:01G Ch:01G Ch:01G Ch:01G Ch:01G Ch:01G Ch:01G Ch:01G Ch:01G Ch:01G Ch:01G
CC#/
Off Off Off Off Off Off Off Off CC#8 off CC#74 CC#79 CC#73 CC#75 CC#72 CC#7 C4 D4 E4 F4 G4 A4 B4 C5
Note
Name Free Free Free Free Free Free Free Free Vector X Vector Y Free Free Free Free Free Volume Note Note Note Note Note Note Note Note
Ch Ch:01G Ch:01G Ch:01G Ch:01G Ch:01G Ch:01G Ch:01G Ch:01G Ch:01G Ch:01G Ch:01G Ch:01G Ch:01G Ch:01G Ch:01G Ch:01G Ch:01G Ch:01G Ch:01G Ch:01G Ch:01G Ch:01G Ch:01G Ch:01G
CC#/
Off Off Off Off Off Off Off Off CC#16 CC#17 off off off off off CC#7 C4 D4 E4 F4 G4 A4 B4 C5
Note
Name Free Free Free Free Free Free Free Free
Ch Ch:01G Ch:01G Ch:01G Ch:01G Ch:01G Ch:01G Ch:01G Ch:01G Ch:01G Ch:01G Ch:01G Ch:01G Ch:01G Ch:01G Ch:01G Ch:01G Ch:01G Ch:01G Ch:01G Ch:01G Ch:01G Ch:01G Ch:01G Ch:01G
CC#/
Off Off Off Off Off Off Off Off CC#77 CC#82 CC#28 CC#74 CC#24 CC#23 CC#26 Ch.1 CC#7 C4 D4 E4 F4 G4 A4 B4 C5
Note
Name Free Free Free Free Free Free Free Free
Ch Ch:01G Ch:01G Ch:01G Ch:01G Ch:01G Ch:01G Ch:01G Ch:01G Ch:01G Ch:01G Ch:01G Ch:01G Ch:01G Ch:01G Ch:01G Ch:01G Ch:01G Ch:01G Ch:01G Ch:01G Ch:01G Ch:01G Ch:01G Ch:01G
CC#/
Off Off Off Off Off Off Off Off CC#20 CC#21 CC#29 CC#71 CC#73 CC#75 CC#70 CC#72 C4 D4 E4 F4 G4 A4 B4 C5
Note
Name Free Free Free Free Free Free Free Free
Ch Ch:01G Ch:01G Ch:01G Ch:01G Ch:01G Ch:01G Ch:01G Ch:01G Ch:01G Ch:01G Ch:01G Ch:01G Ch:01G Ch:01G Ch:01G Ch:01G Ch:01G Ch:01G Ch:01G Ch:01G Ch:01G Ch:01G Ch:01G Ch:01G
CC#/
Off Off Off Off Off Off Off Off CC#77 CC#14 CC#74 CC#71 CC#12 CC#93 CC#10 CC#7 C4 D4 E4 F4 G4 A4 B4 C5
Note
Name Free Free Free Free Free Free Free Free
Ch Ch:01G Ch:01G Ch:01G Ch:01G Ch:01G Ch:01G Ch:01G Ch:01G Ch:01G Ch:01G Ch:01G Ch:01G Ch:01G Ch:01G Ch:01G Ch:01G Ch:01G Ch:01G Ch:01G Ch:01G Ch:01G Ch:01G Ch:01G Ch:01G
CC#/
Off Off Off Off Off Off Off Off CC#27 CC#24 CC#76 CC#73 CC#75 CC#70 CC#72 CC#7 C4 D4 E4 F4 G4 A4 B4 C5
Note
Name Free Free Free Free Free Free Free Free Encoder 1 Encoder 2 Encoder 3 Encoder 4 Encoder 5 Encoder 6 Encoder 7 Encoder 8 Note Note Note Note Note Note Note Note
Switches Sliders Pads
VCO 1 WAVE
VCO WAVE
FREQUENCY
FORM
VCO 1
LEVEL
FORM
MG
VCO 2 WAVE
FORM
VCO 2
LEVEL
VCO PWM
ADJUST
MG DELAY
TIME
HPF CUTOFF LPF CUTOFF EG 1 DELAY
HPF PEAK LPF PEAK
VCF CUTOFF
MG LEVEL EG ATTACK EG DECAY EG SUSTAIN
VCF
RESONANCE
EG 2
ATTACK
FX MODE FX SPEED PAN VOLUME Note Note Note Note Note Note Note Note
EG 1
ATTACK
EG 2 DECAY
EG 1
RELEASE
EG 2
SUSTAIN
EG
RELEASE
VOLUME Note Note Note Note Note Note Note Note
EG 2
RELEASE
VOLUME Note Note Note Note Note Note Note Note
Note Note Note Note Note Note Note Note
1 : These operations will overwrite the previous MIDI
Control settings. If necessary, back up the previous
controlMidi file.
2 : When the MIDI channel settings of the host application
and the plug-in software are the same, proper control may
not be available. Please change the MIDI channel setting
on either the host application or the plug-in software.
Please refer to the application's manual for the correct
setting.
Click the "KORG" logo. Select "Load Controller Map..." from
the displayed KORG logo menu. Load the controller
settings file "M1.cmap" from the "Presets" folder inside the
folder where the KORG Legacy Collection is installed.
Click the "KORG" logo. Select "Load Controller Map..." from
the displayed KORG logo menu. Load the controller
settings file "M1 Le.cmap" from the "Presets" folder inside
the folder where the KORG Legacy Collection is installed.
Click the "KORG" logo. Select "Load Controller Map..." from
the displayed KORG logo menu. Load the controller
settings file "MS-20.cmap" from the "Presets" folder inside
the folder where the KORG Legacy Collection is installed.
Click the "KORG" logo. Select "Load Controller Map..." from
the displayed KORG logo menu. Load the controller setting
file "Polysix.cmap" from the "Presets" folder inside the
folder where the KORG Legacy Collection is installed.
7
KLC LegacyCell
8[Slider]
9
KLC Mono/Poly
[Encoder]
[A]
[B]10
Ch Ch:01G Ch:01G Ch:01G Ch:01G Ch:01G Ch:01G Ch:01G Ch:01G Ch:01G Ch:01G Ch:01G Ch:01G Ch:01G Ch:01G Ch:01G Ch:01G Ch:01G Ch:01G Ch:01G Ch:01G Ch:01G Ch:01G Ch:01G Ch:01G
CC#/
Off Off Off Off Off Off Off Off CC#28 CC#29 CC#30 CC#31 CC#74 CC#71 CC#85 CC#79 C4 D4 E4 F4 G4 A4 B4 C5
Note
Name Free Free Free Free Free Free Free Free Slider 1 Slider 2 Slider 3 Slider 4 Slider 5 Slider 6 Slider 7 Slider 8 Note Note Note Note Note Note Note Note
Ch Ch:01G Ch:01G Ch:01G Ch:01G Ch:01G Ch:01G Ch:01G Ch:01G Ch:01G Ch:01G Ch:01G Ch:01G Ch:01G Ch:01G Ch:01G Ch:01G Ch:01G Ch:01G Ch:01G Ch:01G Ch:01G Ch:01G Ch:01G Ch:01G
CC#/
Off Off Off Off Off Off Off Off CC#77 CC#15 CC#5 CC#20 CC#82 CC#22 CC#18 CC#21 C4 D4 E4 F4 G4 A4 B4 C5
Note
Name Free Free Free Free Free Free Free Free XMOD INT FREQ MOD PWM INT VCF Cut VCF Reso VCF int Pan Volume Note Note Note Note Note Note Note Note
Ch Ch:01G Ch:01G Ch:01G Ch:01G Ch:01G Ch:01G Ch:01G Ch:01G Ch:01G Ch:01G Ch:01G Ch:01G Ch:01G Ch:01G Ch:01G Ch:01G Ch:01G Ch:01G Ch:01G Ch:01G Ch:01G Ch:01G Ch:01G Ch:01G
CC#/
Off Off Off Off Off Off Off Off CC#12 #CC13 #CC15 #CC74 #CC71 #CC79 #CC10 #CC7 C4 D4 E4 F4 G4 A4 B4 C5
Note
Name Free Free Free Free Free Free Free Free
Ch Ch:01G Ch:01G Ch:01G Ch:01G Ch:01G Ch:01G Ch:01G Ch:01G Ch:01G Ch:01G Ch:01G Ch:01G Ch:01G Ch:01G Ch:01G Ch:01G Ch:01G Ch:01G Ch:01G Ch:01G Ch:01G Ch:01G Ch:01G Ch:01G
CC#/
Off Off Off Off Off Off Off Off #CC28 #CC29 #CC30 #CC31 #CC73 #CC75 #CC70 #CC72 C4 D4 E4 F4 G4 A4 B4 C5
Note
VCF EG
ATTACK
VCF EG
DECAY
VCF EG
SUSTAIN
VCF EG
RELEASE
EG ATTACK EG DECAY EG SUSTAIN
EG
RELEASE
Note Note Note Note Note Note Note Note
Click the controller logo on the "PERFORMANCE" page.
Select "Load Controller Map..." from the displayed
controller menu. Load the controller setting file
"LegacyCell.cmap" from the "Presets" folder inside the
folder where the KORG Legacy Collection is installed.
Click the "FILE" button at the bottom of the screen. Click
the "LOAD" button in the display and make the popup menu
appear. Choose "Controller Map ..." from the popup menu.
Load the controller setting file "MonoPoly.cmap" from the "
Presets" folder inside the folder where the KORG Legacy
Collection is installed.
Page 2
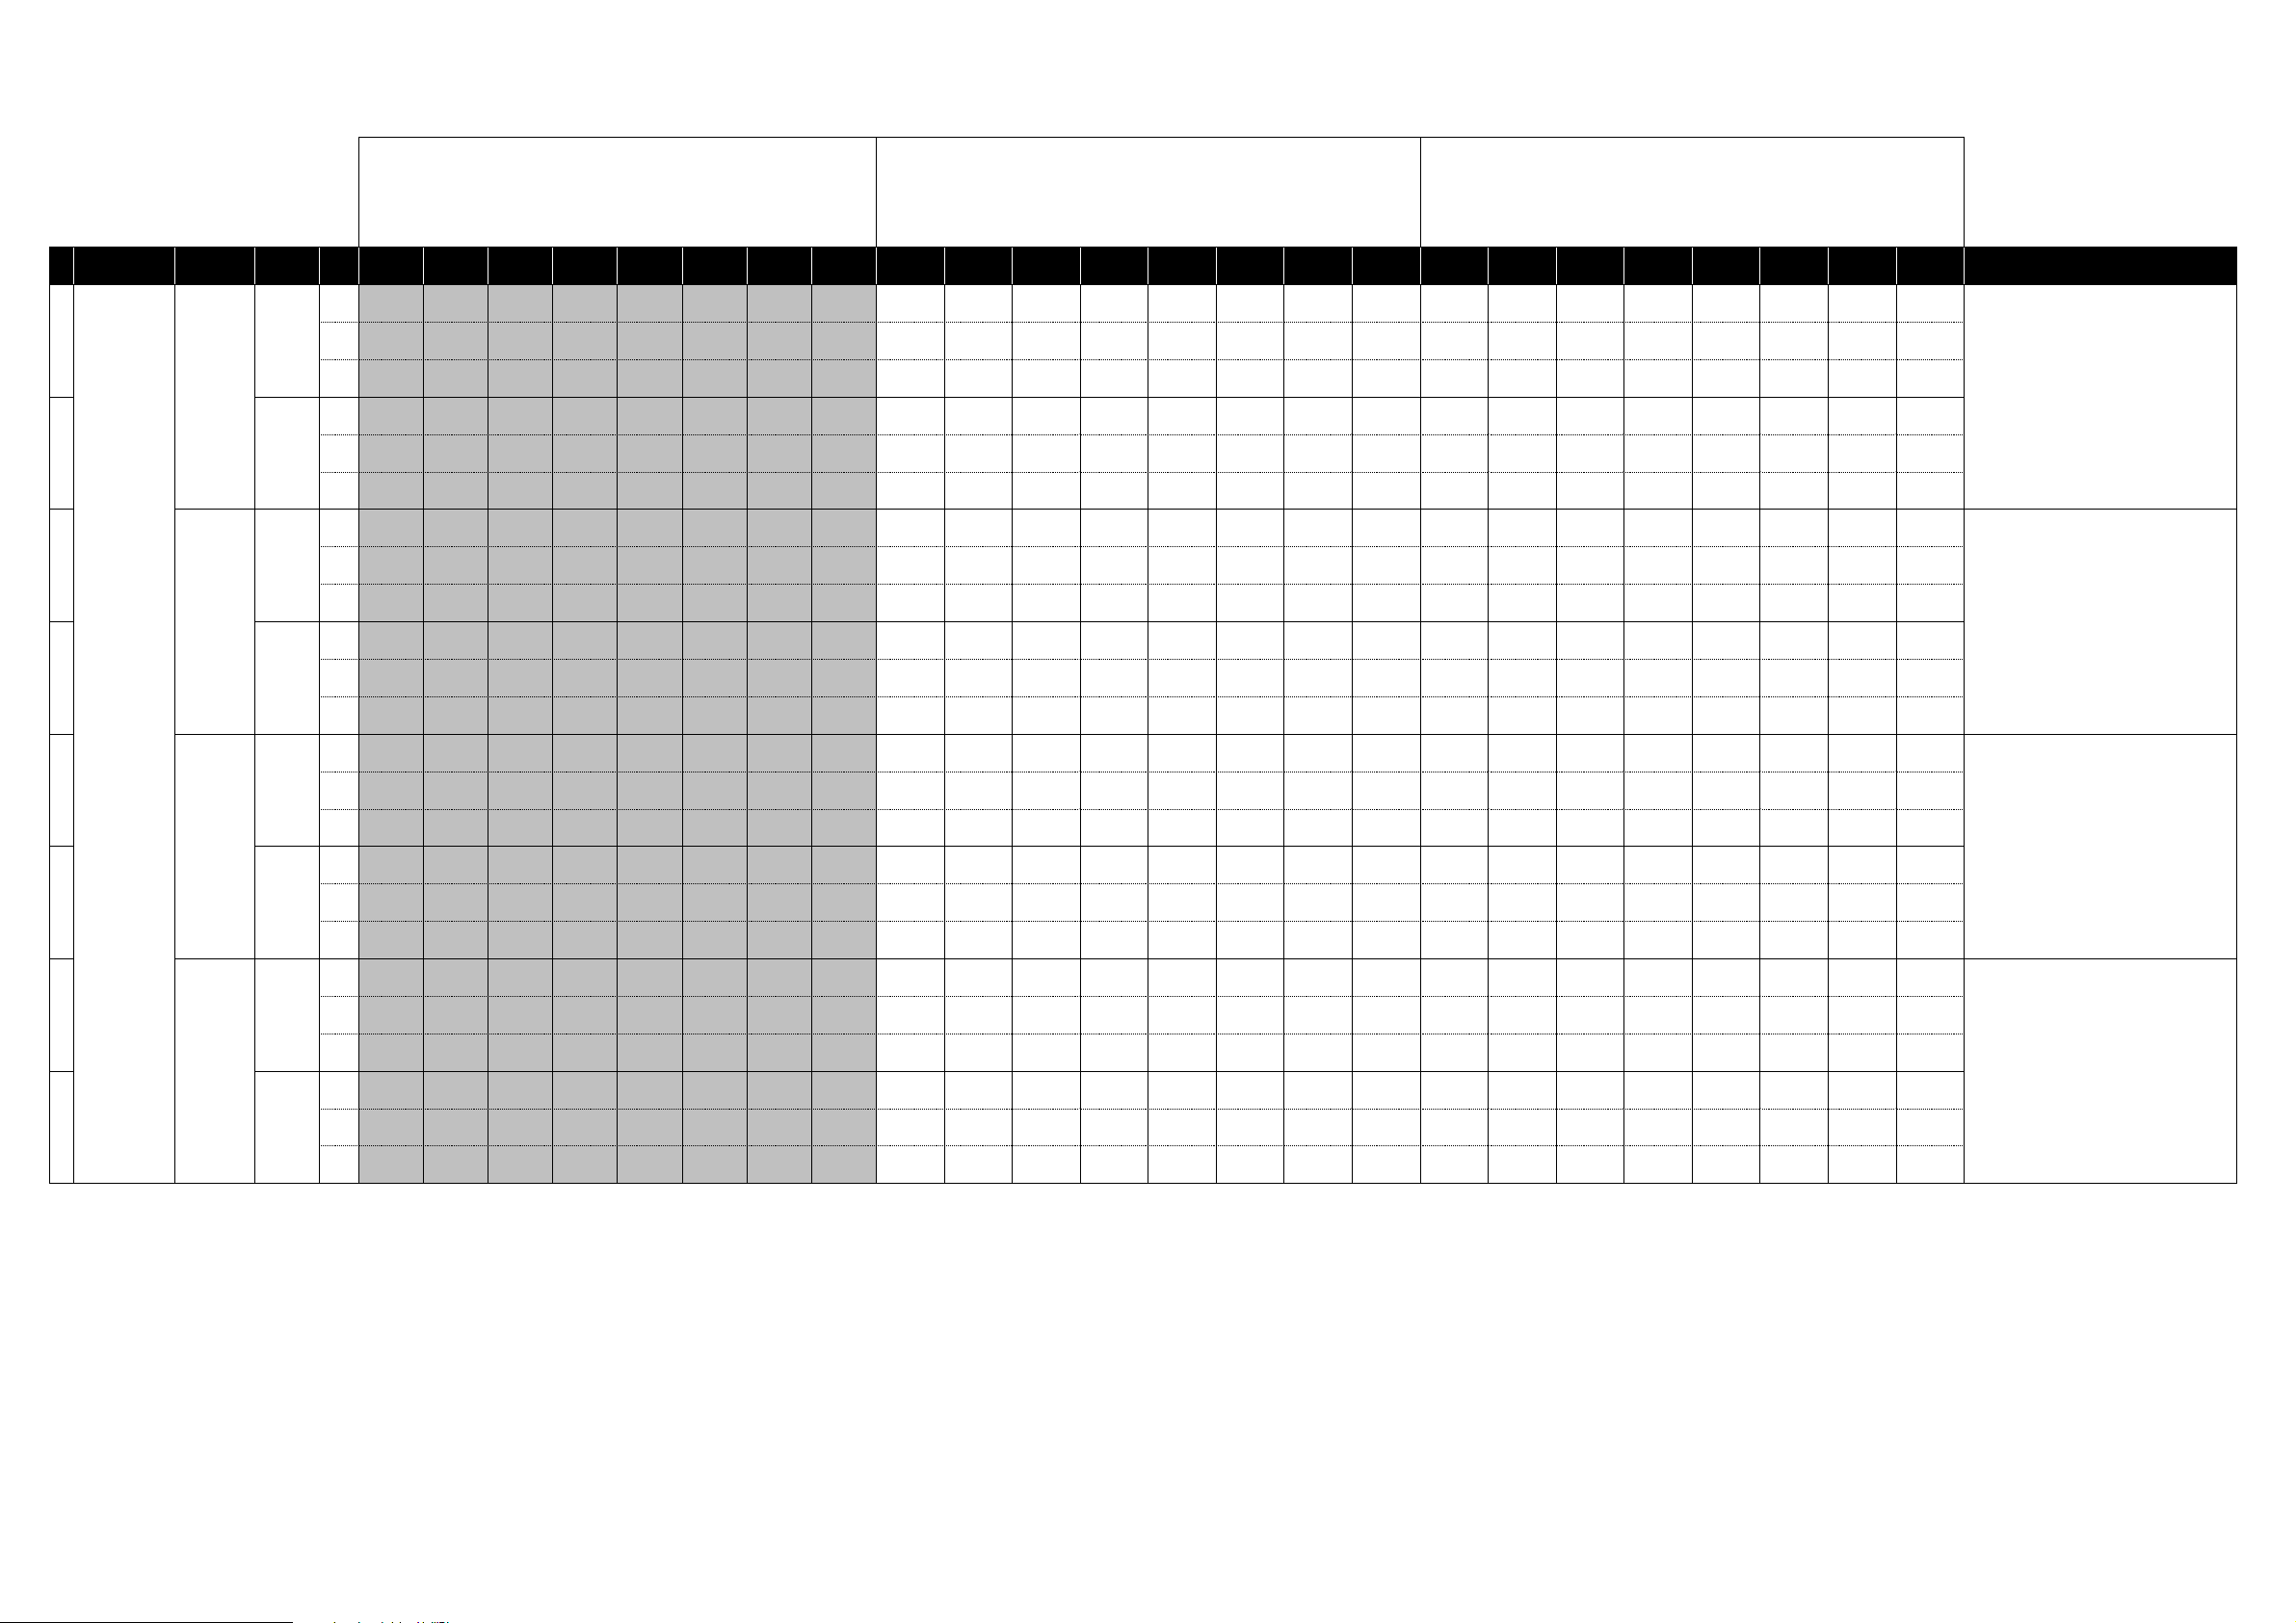
M3 External Setups
Manufacturers
11
12 [B]
13
KORG
15
16 [B]
17
18
Product
Name
microKORG
MS2000/R
RADIAS
R3
Scene
Variation
Switches Sliders Pads
12345678 1234567812345678 HINT
Filter
Name Free Free Free Free Free Free Free Free OSC 1 Wave Filter Cutoff
[A]
Ch Ch:01G Ch:01G Ch:01G Ch:01G Ch:01G Ch:01G Ch:01G Ch:01G Ch:01G Ch:01G Ch:01G Ch:01G Ch:01G Ch:01G Ch:01G Ch:01G Ch:01G Ch:01G Ch:01G Ch:01G Ch:01G Ch:01G Ch:01G Ch:01G
CC#/
Off Off Off Off Off Off Off Off CC#77 CC#74 CC#71 CC#79 CC#23 CC#24 CC#25 CC#27 C4 D4 E4 F4 G4 A4 B4 C5
Note
OSC 1
Name Free Free Free Free Free Free Free Free
Ch Ch:01G Ch:01G Ch:01G Ch:01G Ch:01G Ch:01G Ch:01G Ch:01G Ch:01G Ch:01G Ch:01G Ch:01G Ch:01G Ch:01G Ch:01G Ch:01G Ch:01G Ch:01G Ch:01G Ch:01G Ch:01G Ch:01G Ch:01G Ch:01G
CC#/
Off Off Off Off Off Off Off Off CC#15 CC#19 CC#20 CC#21 CC#73 CC#75 CC#70 CC#72 C4 D4 E4 F4 G4 A4 B4 C5
Note
Name Free Free Free Free Free Free Free Free OSC 1 Wave Filter Cutoff
[A]
Ch Ch:01G Ch:01G Ch:01G Ch:01G Ch:01G Ch:01G Ch:01G Ch:01G Ch:01G Ch:01G Ch:01G Ch:01G Ch:01G Ch:01G Ch:01G Ch:01G Ch:01G Ch:01G Ch:01G Ch:01G Ch:01G Ch:01G Ch:01G Ch:01G
CC#/
Off Off Off Off Off Off Off Off CC#77 CC#74 CC#71 CC#79 CC#23 CC#24 CC#25 CC#27 C4 D4 E4 F4 G4 A4 B4 C5
Note
Name Free Free Free Free Free Free Free Free
[B]14
Ch Ch:01G Ch:01G Ch:01G Ch:01G Ch:01G Ch:01G Ch:01G Ch:01G Ch:01G Ch:01G Ch:01G Ch:01G Ch:01G Ch:01G Ch:01G Ch:01G Ch:01G Ch:01G Ch:01G Ch:01G Ch:01G Ch:01G Ch:01G Ch:01G
CC#/
Off Off Off Off Off Off Off Off CC#15 CC#19 CC#20 CC#21 CC#73 CC#75 CC#70 CC#72 C4 D4 E4 F4 G4 A4 B4 C5
Note
Name Free Free Free Free Free Free Free Free OSC1 Wave Filter 1 Cut
[A]
Ch Ch:01G Ch:01G Ch:01G Ch:01G Ch:01G Ch:01G Ch:01G Ch:01G Ch:01G Ch:01G Ch:01G Ch:01G Ch:01G Ch:01G Ch:01G Ch:01G Ch:01G Ch:01G Ch:01G Ch:01G Ch:01G Ch:01G Ch:01G Ch:01G
CC#/
Off Off Off Off Off Off Off Off CC#8 CC#74 CC#71 CC#27 CC#79 CC#85 CC#86 CC#87 C4 D4 E4 F4 G4 A4 B4 C5
Note
Name Free Free Free Free Free Free Free Free
Ch Ch:01G Ch:01G Ch:01G Ch:01G Ch:01G Ch:01G Ch:01G Ch:01G Ch:01G Ch:01G Ch:01G Ch:01G Ch:01G Ch:01G Ch:01G Ch:01G Ch:01G Ch:01G Ch:01G Ch:01G Ch:01G Ch:01G Ch:01G Ch:01G
CC#/
Off Off Off Off Off Off Off Off CC#17 CC#90 CC#21 CC#7 CC#73 CC#75 CC#70 CC#72 C4 D4 E4 F4 G4 A4 B4 C5
Note
Name Free Free Free Free Free Free Free Free OSC1 Wave Filter 1 Cut
[A]
Ch Ch:01G Ch:01G Ch:01G Ch:01G Ch:01G Ch:01G Ch:01G Ch:01G Ch:01G Ch:01G Ch:01G Ch:01G Ch:01G Ch:01G Ch:01G Ch:01G Ch:01G Ch:01G Ch:01G Ch:01G Ch:01G Ch:01G Ch:01G Ch:01G
CC#/
Off Off Off Off Off Off Off Off CC#8 CC#74 CC#71 CC#27 CC#79 CC#85 CC#86 CC#87 C4 D4 E4 F4 G4 A4 B4 C5
Note
Name Free Free Free Free Free Free Free Free
[B]
Ch Ch:01G Ch:01G Ch:01G Ch:01G Ch:01G Ch:01G Ch:01G Ch:01G Ch:01G Ch:01G Ch:01G Ch:01G Ch:01G Ch:01G Ch:01G Ch:01G Ch:01G Ch:01G Ch:01G Ch:01G Ch:01G Ch:01G Ch:01G Ch:01G
CC#/
Off Off Off Off Off Off Off Off CC#17 CC#90 CC#21 CC#7 CC#73 CC#75 CC#70 CC#72 C4 D4 E4 F4 G4 A4 B4 C5
Note
Control2
Control2
Control2
Control2
OSC 2 Tune OSC 1 Level OSC 2 Level A.EG Attack A.EG Decay A.EG Sustain
OSC 1
OSC 2 Tune OSC 1 Level OSC 2 Level EG 2 Attack EG 2 Decay EG 2 Sustain EG 2 Release Note Note Note Note Note Note Note Note
OSC 1
Frequency
OSC 1
Frequency
Resonance
Resonance
Resonance
LFO 1
OSC 2 Tune Amp Level EG 2 Attack EG 2 Decay EG 2 Sustain EG 2 Release Note Note Note Note Note Note Note Note
Resonance
LFO 1
OSC 2 Tune Amp Level EG 2 Attack EG 2 Decay EG 2 Sustain EG 2 Release Note Note Note Note Note Note Note Note
Filter EG Int F.EG Attack F.EG Decay F.EG Sustain
Filter
Filter EG 1 Int EG 1 Attack EG 1 Decay EG 1 Sustain
Filter 1
Filter 1
Filter 1
Balance
Filter 1
Balance
EG 1 Int EG 1 Attack EG 1 Decay EG 1 Sustain Note Note Note Note Note Note Note Note
EG 1 Int EG 1 Attack EG 1 Decay EG 1 Sustain Note Note Note Note Note Note Note Note
LFO 1
Frequency
A.EG
Release
LFO 1
Frequency
Note Note Note Note Note Note Note Note
Note Note Note Note Note Note Note Note
Note Note Note Note Note Note Note Note
1 : These operations will overwrite the previous MIDI
Control settings. If necessary, back up the previous
controlMidi file.
2 : When the MIDI channel settings of the host application
and the plug-in software are the same, proper control may
not be available. Please change the MIDI channel setting
on either the host application or the plug-in software.
Please refer to the application's manual for the correct
setting.
1 ; Connect the M3's MIDI OUT jack to the microKORG's
MIDI IN jack with a MIDI cable.
2 ; Set the microKORG's EDIT SELECT 2 knob to "MIDI".
Move Knob 1 to set the MIDI CH to "1". Move Knob 3 to set
the CLOCK to "Ext".
3 ; Set the EDIT SELECT 2 knob to "GLOBAL". Move Knob
4 to set the POSITION to "PrE" (Pre TG).
4 ; Press the 4 key while holding the SHIFT key to enter
MIDI Filter settings. Move Knob 1 to select "P-E"
(PROGRAM CHANGE Enabled). Move Knob 2 to select
"C-E" (CONTROL CHANGE Enabled). Move Knob 3 to
select "b-E" (PITCH BEND Enabled).
1 ; Connect the M3's MIDI OUT jack to the MS2000/R's
MIDI IN jack with a MIDI cable.
2; Press the [GLOBAL] key to enter Global mode. Set
"Position" on the "GLOBAL" page to "Pre TG".
3; Press the [PAGE] key to move to the "MIDI" page. Set
"MIDI Ch" to "01" and "Clock" to "External".
4; Press the [PAGE] key to move to the "MIDI FILTER"
page. Set "ProgChg" to "ENA", "CtrlChg" to "ENA",
"P.Bend" to "ENA", "NoteRcv" to "ALL", and
"TimbreSelect" to "CC#95".
1 ; Connect the M3's MIDI OUT jack to the RADIAS' MIDI
IN jack with a MIDI cable.
2 ; Press the [GLOBAL] key to enter Global mode. Set
"Position" on the "GLOBAL" page to "Pre TG".
3 ; Press the [PAGE] key to move to the "MIDI" page. Set
"MIDI Ch" to "01" and "Clock" to "Ext-MIDI".
4 ; Press the [PAGE] key to move to the "MIDI FILTER"
page. Set "ProgChg" to "o", "CtrlChg" to "o", "P.Bend" to
"o".
1: Connect the M3's MIDI OUT jack to the R3's MIDI IN jack
with a MIDI cable.
2: Turn [PAGE SELECT] dial to move to "EDIT-P40 GlobalA" page and set [KNOB4]'s "Position" to "Pre TG."
3: Turn [PAGE SELECT] dial to move to "EDIT-P42 MIDI"
page and set [KNOB1]'s "MIDI Ch" to "01", [KNOB4]'s
"Clock" to "Ext-MIDI."
4: Turn [PAGE SELECT] dial to move to "EDIT-P43
MIDIFilt" page and set [KNOB1]'s "PROG Chg" to "Enable,"
[KNOB2]'s "Ctrl Chg" to "Enable", [KNOB3]'s "PitchBend" to
"Enable."
Page 3
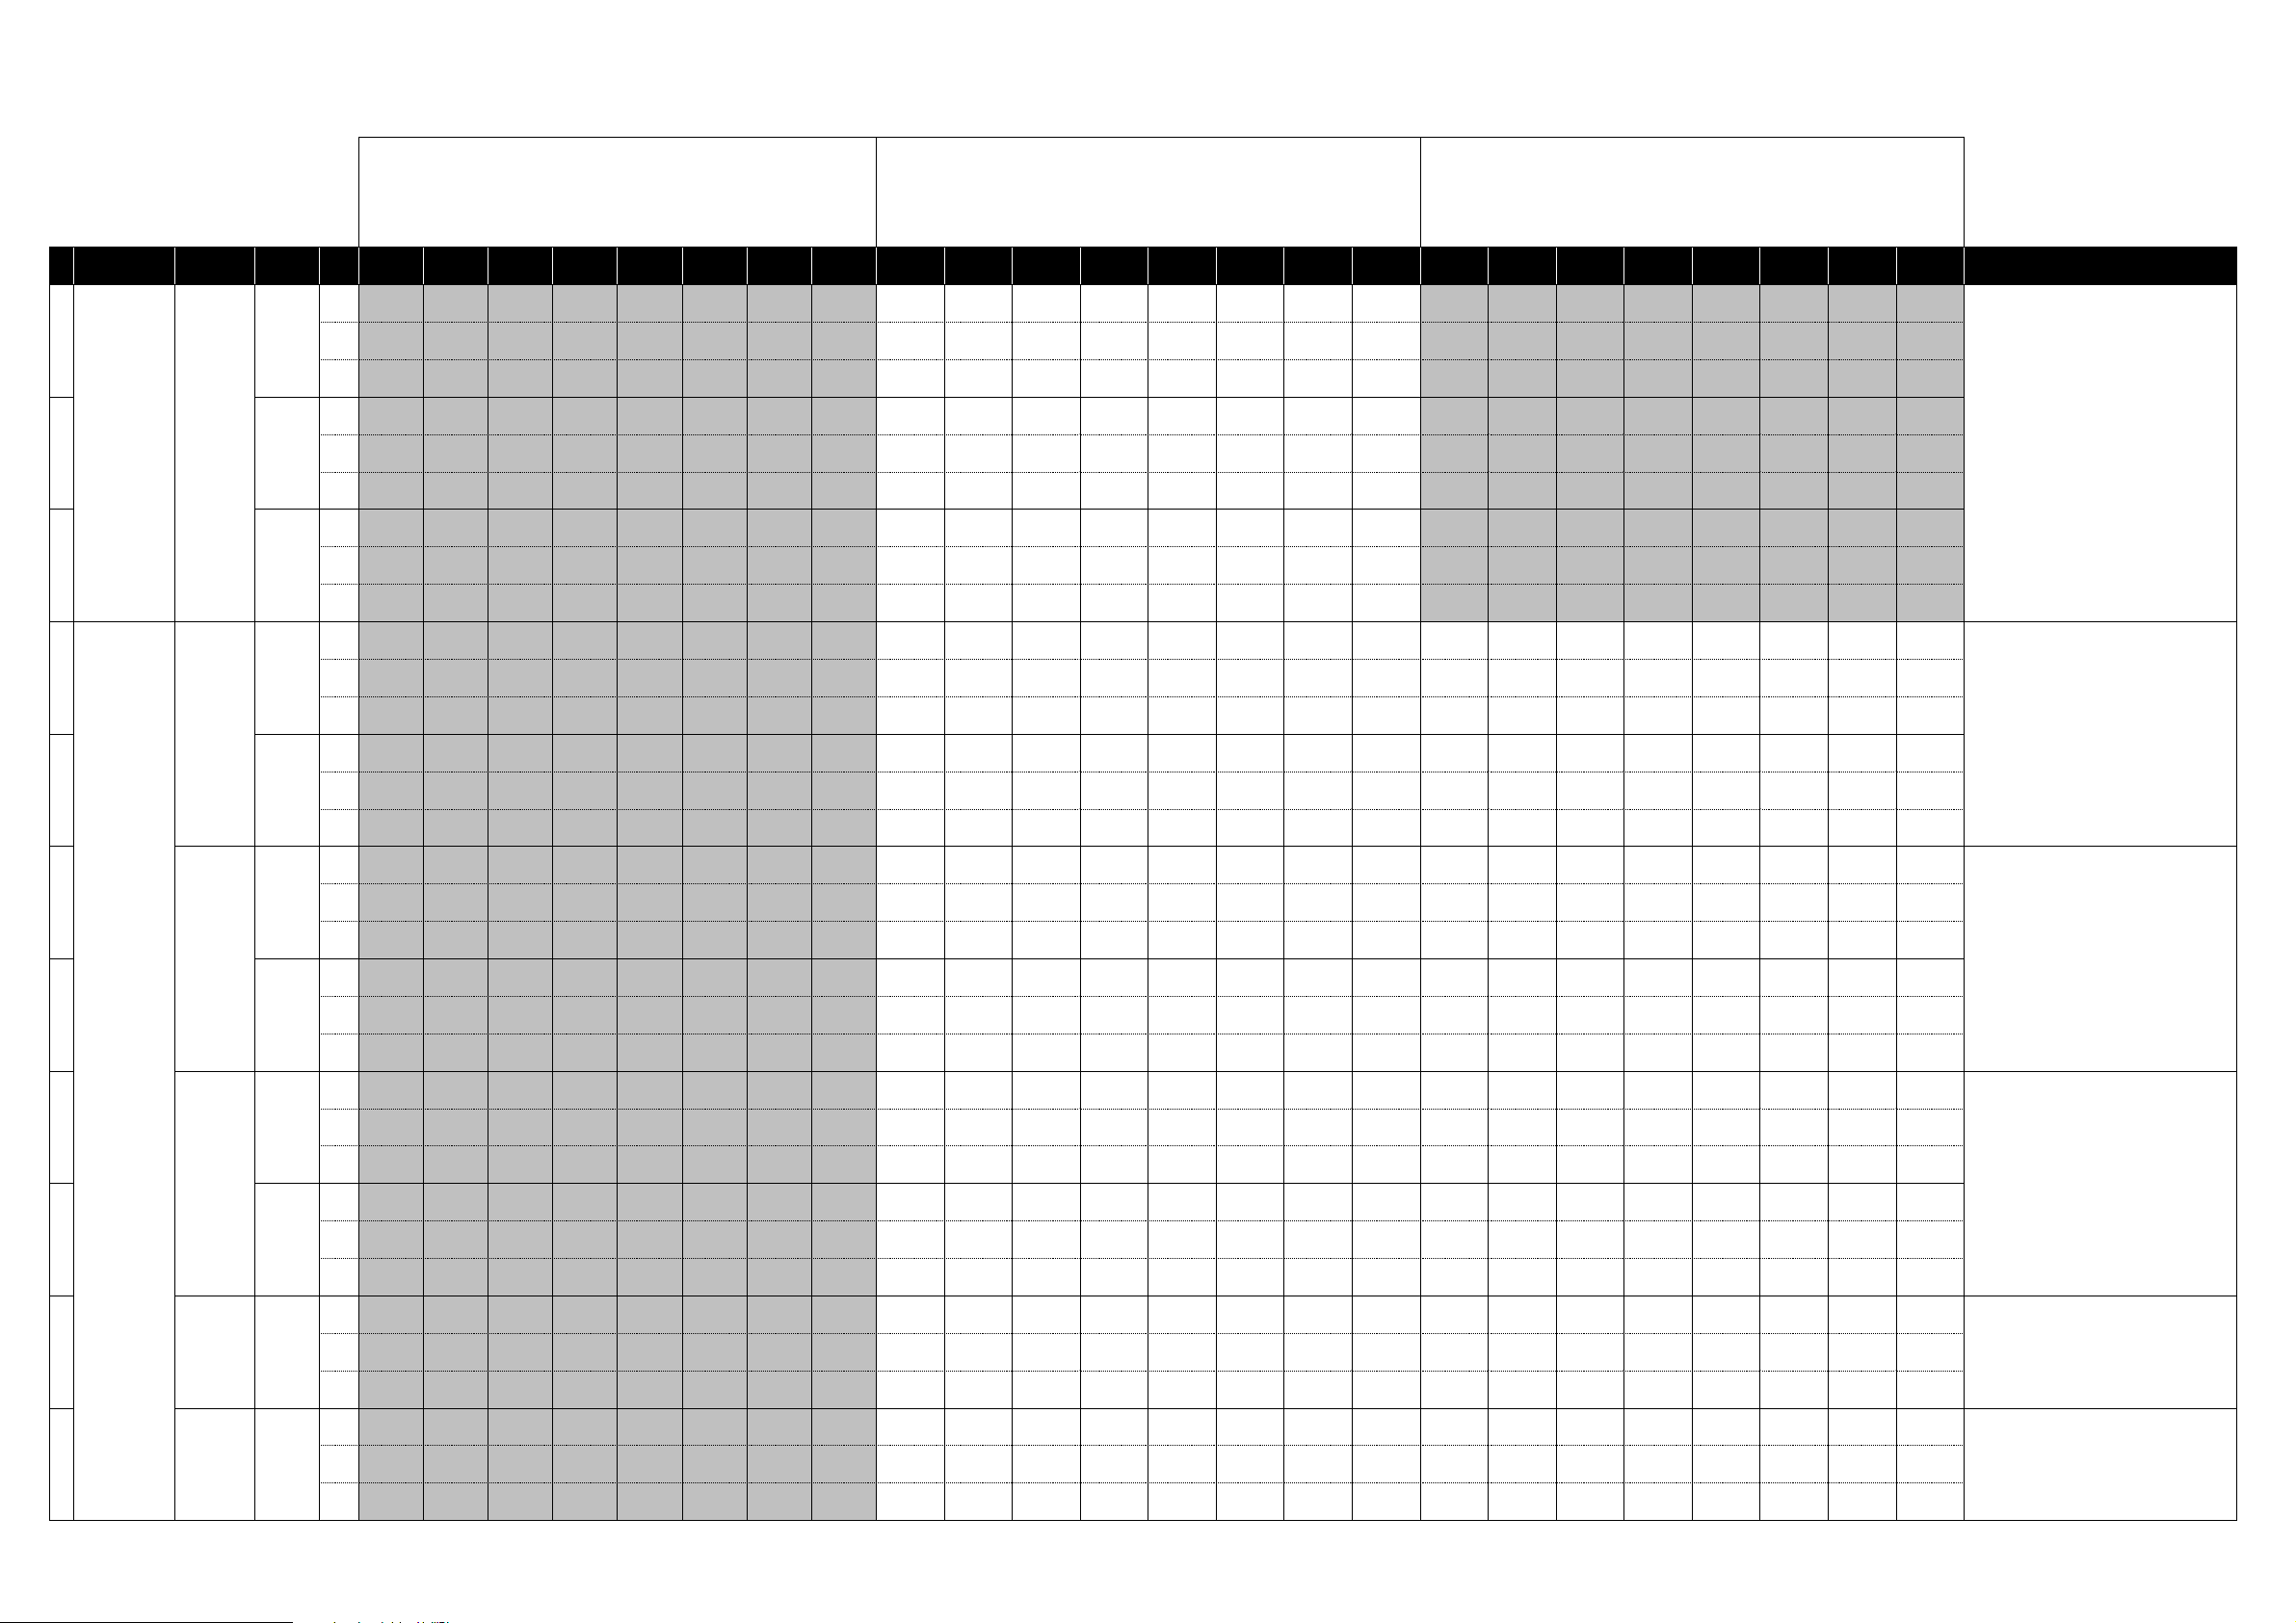
M3 External Setups
Manufacturers
Product
Name
Scene
Variation
Switches Sliders Pads
12345678 1234567812345678 HINT
Name Free Free Free Free Free Free Free Free Track 1 Send Track 2 Send Track 3 Send Track 4 Send Track 5 Send Track 6 Send Track 7 Send Track 8 Send Free Free Free Free Free Free Free Free
1 : These operations will overwrite the previous MIDI
Control settings. If necessary, back up the previous
controlMidi file.
2 : When the MIDI channel settings of the host application
and the plug-in software are the same, proper control may
not be available. Please change the MIDI channel setting
on either the host application or the plug-in software.
Please refer to the application's manual for the correct
setting.
19
Ableton Live
20 [Pan]
21
Lounge Lizard EP-3
23 [B]
24
Ultra Analog VA
25
Applied Acoustics Systems
26
String Studio VS
27
28
29
Lounge Lizard Session
Ultra Analog Session
[Send]
[Volume]
[A]22
[A]
[B]
[A]
[B]
Ch Ch:01G Ch:01G Ch:01G Ch:01G Ch:01G Ch:01G Ch:01G Ch:01G Ch:01G Ch:02 Ch:03 Ch:04 Ch:05 Ch:06 Ch:07 Ch:08 Ch:01G Ch:01G Ch:01G Ch:01G Ch:01G Ch:01G Ch:01G Ch:01G
CC#/
Off Off Off Off Off Off Off Off CC#18 CC#18 CC#18 CC#18 CC#18 CC#18 CC#18 CC#18 Off Off Off Off Off Off Off Off
Note
Name Free Free Free Free Free Free Free Free Track 1 Pan Track 2 Pan Track 3 Pan Track 4 Pan Track 5 Pan Track 6 Pan Track 7 Pan Track 8 Pan FreeFree Free Free Free Free Free Free
Ch Ch:01G Ch:01G Ch:01G Ch:01G Ch:01G Ch:01G Ch:01G Ch:01G Ch:01G Ch:02 Ch:03 Ch:04 Ch:05 Ch:06 Ch:07 Ch:08 Ch:01G Ch:01G Ch:01G Ch:01G Ch:01G Ch:01G Ch:01G Ch:01G
CC#/
Off Off Off Off Off Off Off Off CC#10 CC#10 CC#10 CC#10 CC#10 CC#10 CC#10 CC#10 Off Off Off Off Off Off Off Off
Note
Name Free Free Free Free Free Free Free Free
Ch Ch:01G Ch:01G Ch:01G Ch:01G Ch:01G Ch:01G Ch:01G Ch:01G Ch:01G Ch:02 Ch:03 Ch:04 Ch:05 Ch:06 Ch:07 Ch:08 Ch:01G Ch:01G Ch:01G Ch:01G Ch:01G Ch:01G Ch:01G Ch:01G
CC#/
Off Off Off Off Off Off Off Off CC#7 CC#7 CC#7 CC#7 CC#7 CC#7 CC#7 CC#7 Off Off Off Off Off Off Off Off
Note
Name Free Free Free Free Free Free Free Free
Ch Ch:01G Ch:01G Ch:01G Ch:01G Ch:01G Ch:01G Ch:01G Ch:01G Ch:01G Ch:01G Ch:01G Ch:01G Ch:01G Ch:01G Ch:01G Ch:01G Ch:01G Ch:01G Ch:01G Ch:01G Ch:01G Ch:01G Ch:01G Ch:01G
CC#/
Off Off Off Off Off Off Off Off CC#44 CC#45 CC#46 CC#47 CC#48 CC#49 CC#50 CC#51 C4 D4 E4 F4 G4 A4 B4 C5
Note
Name Free Free Free Free Free Free Free Free
Ch Ch:01G Ch:01G Ch:01G Ch:01G Ch:01G Ch:01G Ch:01G Ch:01G Ch:01G Ch:01G Ch:01G Ch:01G Ch:01G Ch:01G Ch:01G Ch:01G Ch:01G Ch:01G Ch:01G Ch:01G Ch:01G Ch:01G Ch:01G Ch:01G
CC#/
Off Off Off Off Off Off Off Off CC#52 CC#53 CC#54 CC#55 CC#56 CC#57 CC#58 CC#7 C4 D4 E4 F4 G4 A4 B4 C5
Note
Name Free Free Free Free Free Free Free Free OSC1 Detune OSC1 PW
Ch Ch:01G Ch:01G Ch:01G Ch:01G Ch:01G Ch:01G Ch:01G Ch:01G Ch:01G Ch:01G Ch:01G Ch:01G Ch:01G Ch:01G Ch:01G Ch:01G Ch:01G Ch:01G Ch:01G Ch:01G Ch:01G Ch:01G Ch:01G Ch:01G
CC#/
Off Off Off Off Off Off Off Off CC#44 CC#45 CC#46 CC#47 CC#48 CC#49 CC#50 CC#51 C4 D4 E4 F4 G4 A4 B4 C5
Note
Name Free Free Free Free Free Free Free Free
Ch Ch:01G Ch:01G Ch:01G Ch:01G Ch:01G Ch:01G Ch:01G Ch:01G Ch:01G Ch:01G Ch:01G Ch:01G Ch:01G Ch:01G Ch:01G Ch:01G Ch:01G Ch:01G Ch:01G Ch:01G Ch:01G Ch:01G Ch:01G Ch:01G
CC#/
Off Off Off Off Off Off Off Off CC#52 CC#53 CC#54 CC#55 CC#56 CC#57 CC#58 CC#59 C4 D4 E4 F4 G4 A4 B4 C5
Note
Name Free Free Free Free Free Free Free Free Chorus Mix Chorus Depth Chorus Rate Delay Mix Delay Depth Delay Rate Reverb Mix
Ch Ch:01G Ch:01G Ch:01G Ch:01G Ch:01G Ch:01G Ch:01G Ch:01G Ch:01G Ch:01G Ch:01G Ch:01G Ch:01G Ch:01G Ch:01G Ch:01G Ch:01G Ch:01G Ch:01G Ch:01G Ch:01G Ch:01G Ch:01G Ch:01G
CC#/
Off Off Off Off Off Off Off Off CC#44 CC#45 CC#46 CC#47 CC#48 CC#49 CC#50 CC#51 C4 D4 E4 F4 G4 A4 B4 C5
Note
Name Free Free Free Free Free Free Free Free
Ch Ch:01G Ch:01G Ch:01G Ch:01G Ch:01G Ch:01G Ch:01G Ch:01G Ch:01G Ch:01G Ch:01G Ch:01G Ch:01G Ch:01G Ch:01G Ch:01G Ch:01G Ch:01G Ch:01G Ch:01G Ch:01G Ch:01G Ch:01G Ch:01G
CC#/
Off Off Off Off Off Off Off Off CC#102 CC#103 CC#104 CC#105 CC#106 CC#107 CC#108 CC#109 C4 D4 E4 F4 G4 A4 B4 C5
Note
Name Free Free Free Free Free Free Free Free Piano Tune
Ch Ch:01G Ch:01G Ch:01G Ch:01G Ch:01G Ch:01G Ch:01G Ch:01G Ch:01G Ch:01G Ch:01G Ch:01G Ch:01G Ch:01G Ch:01G Ch:01G Ch:01G Ch:01G Ch:01G Ch:01G Ch:01G Ch:01G Ch:01G Ch:01G
CC#/
Off Off Off Off Off Off Off Off CC#71 CC#70 CC#92 CC#79 CC#16 CC#12 CC#91 CC#19 C4 D4 E4 F4 G4 A4 B4 C5
Note
Name Free Free Free Free Free Free Free Free
Ch Ch:01G Ch:01G Ch:01G Ch:01G Ch:01G Ch:01G Ch:01G Ch:01G Ch:01G Ch:01G Ch:01G Ch:01G Ch:01G Ch:01G Ch:01G Ch:01G Ch:01G Ch:01G Ch:01G Ch:01G Ch:01G Ch:01G Ch:01G Ch:01G
CC#/
Off Off Off Off Off Off Off Off CC#5 CC#74 CC#71 CC#85 CC#79 CC#73 CC#72 CC#7 C4 D4 E4 F4 G4 A4 B4 C5
Note
Track 1
Volume
Mallet
Stiffness
soft/hard
Pickup
Geometry
Symmetry
FILTER1
ENV1 A
Excitator Prot
(Force, Mass)
Keyboard
Glide
Track 2
Volume
Mallet Force
strength
Pickup
Geometry
Distance
FILTER1
ENV1 D
Excitator Stiff
(Friction)
Filter Cutoff Filter Q
Track 3
Volume
Mallet Noise
pitch
Pickup
Volume Input
FILTER1
Cutoff
FILTER1
ENV1 S
Excitator
Velocity
Tremoro
Depth
Track 4
Volume
Mallet Noise
decay
Pickup
Volume
Output
FILTER1 Q AMP1 Level AMP1 Pan LFO1 Rate LFO1 Delay Note Note Note Note Note Note Note Note
FILTER1
ENV1 R
Filter Cutoff Filter Q EQ Low Gain EQ Mid Gain EQ High Gain Note Note Note Note Note Note Note Note
Tremolo
Speed
Filter Env
Attack
Track 5
Volume
Fork Tine
Decay
EQ Low Gain EQ Mid Gain EQ High Gain Volume Note Note Note Note Note Note Note Note
AMP ENV1 A AMP ENV1 D AMP ENV1 S AMP ENV1 R Note Note Note Note Note Note Note Note
Drive amount Effect Depth Reverb mix Volume Note Note Note Note Note Note Note Note
Filter Env
Amount
Track 6
Volume
Fork Tine
volume
AMP Attack AMP Release AMP Level Note Note Note Note Note Note Note Note
Track 7
Volume
Fork Tone
Decay
Track 8
Volume
Fork Tone
Volume
Reverb
Decay
Free Free Free Free Free Free Free Free
Note Note Note Note Note Note Note Note
Note Note Note Note Note Note Note Note
Load the "KORG M3 template.als" file.
Select "Preferences..." in the "Options" menu (or select
"Preferences..." from the "Live" menu on the Mac) to open
the "Preferences" dialog. Set "Input" of "Remote Control"
to "M3(KEYBOARD)".
Select "Import..." from the "File" menu and load the setting
file "KORG Midi Links.lx3".
Select "Import..." from the "File" menu and load the setting
file "KORG Midi Links.axf" file.
Select "Import..." from the "File" menu and load the setting
file "KORG Midi Links.sxf" file
Select "Import..." from the "File" menu and load the setting
file "KORG Midi Links.lls" file
Select "Import..." from the "File" menu and load the setting
file "KORG Midi Links.uas" file
Page 4
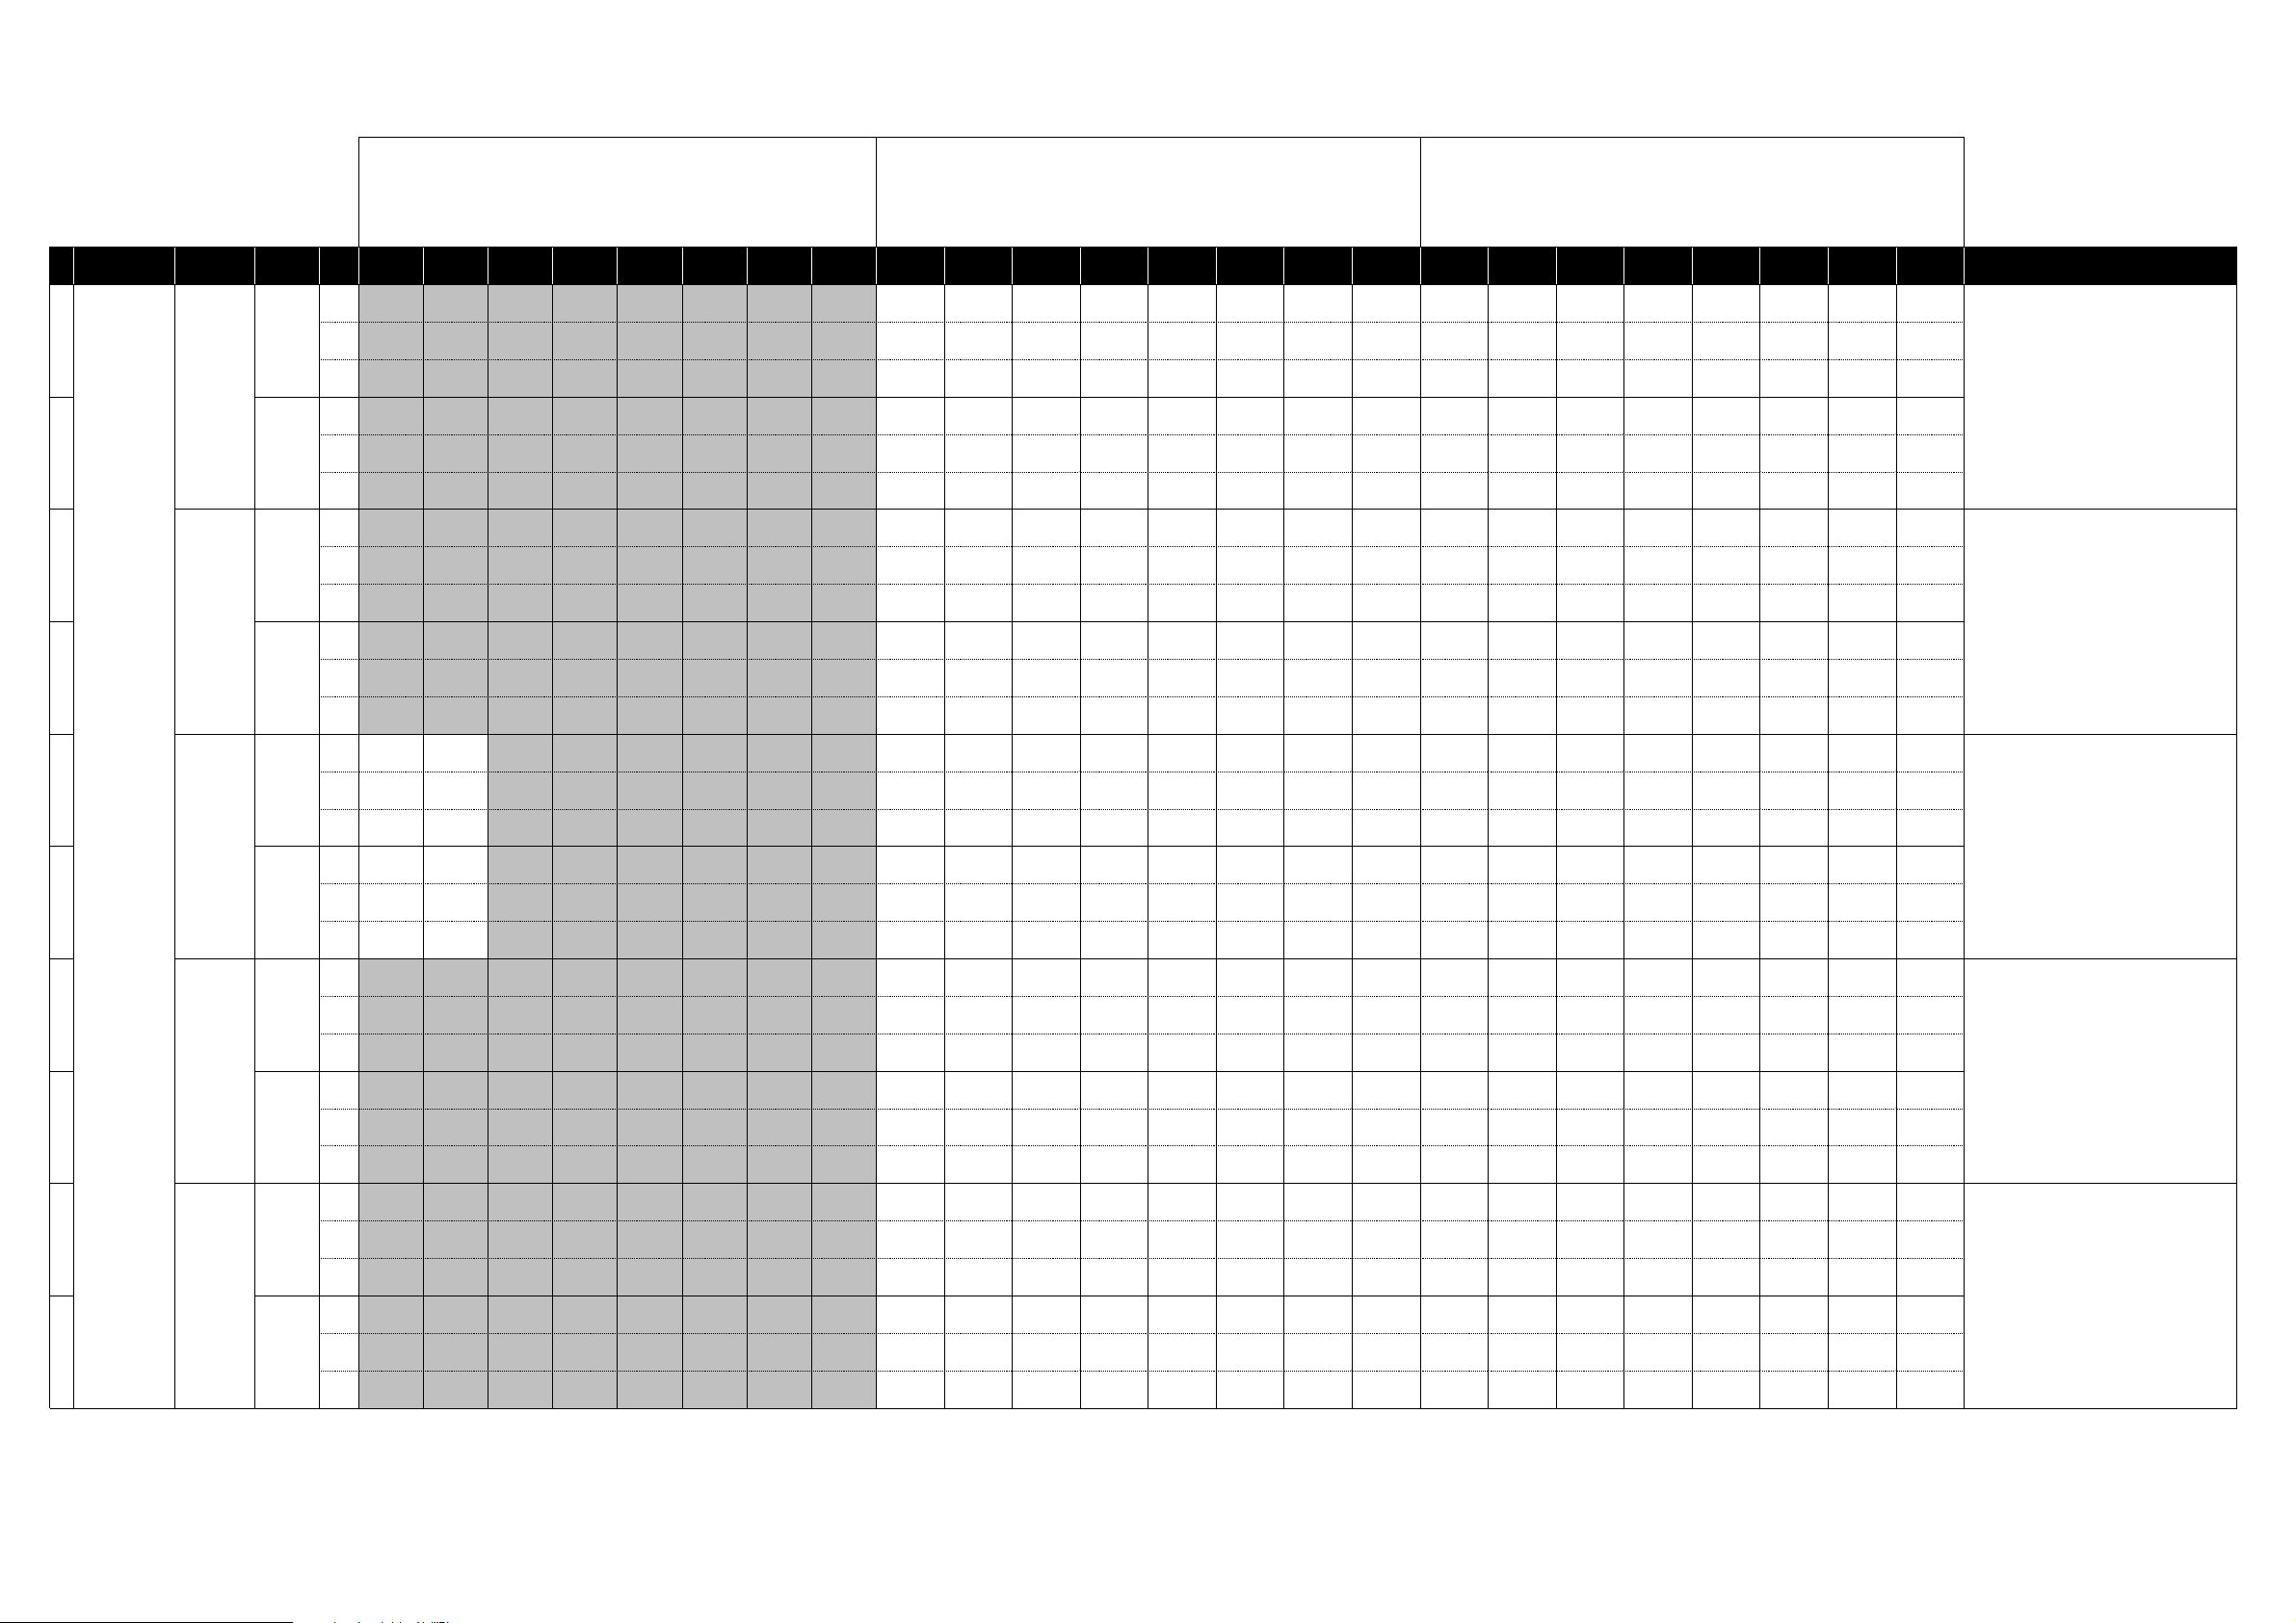
M3 External Setups
Manufacturers
Product
Name
Scene
Variation
Switches Sliders Pads
12345678 1234567812345678 HINT
Name Free Free Free Free Free Free Free Free Wave Osc 1 Wave Osc 2 Wave Osc 3 Cutoff Emphasis VCF Attack VCF Decay VCF Sustain Note Note Note Note Note Note Note Note
1 : These operations will overwrite the previous MIDI
Control settings. If necessary, back up the previous
controlMidi file.
2 : When the MIDI channel settings of the host application
and the plug-in software are the same, proper control may
not be available. Please change the MIDI channel setting
on either the host application or the plug-in software.
Please refer to the application's manual for the correct
setting.
30
minimoog V
31
CS-80V
33 [B]
34
Arturia
35 [B]
36
37 [B]
38
39 [VS]
moog modular V
ARP2600 V
Prophet V
[A]
[B]
[A]32
[A]
[A]
[V]
Ch Ch:01G Ch:01G Ch:01G Ch:01G Ch:01G Ch:01G Ch:01G Ch:01G Ch:01G Ch:01G Ch:01G Ch:01G Ch:01G Ch:01G Ch:01G Ch:01G Ch:01G Ch:01G Ch:01G Ch:01G Ch:01G Ch:01G Ch:01G Ch:01G
CC#/
Off Off Off Off Off Off Off Off CC#16 CC#17 CC#18 CC#74 CC#71 CC#49 CC#50 CC#51 C4 D4 E4 F4 G4 A4 B4 C5
Note
Name Free Free Free Free Free Free Free Free Level Osc 1 Level Osc 2 Level Osc 3 Level Ext Amount VCA Attack VCA Decay VCA Sustain Note Note Note Note Note Note Note Note
Ch Ch:01G Ch:01G Ch:01G Ch:01G Ch:01G Ch:01G Ch:01G Ch:01G Ch:01G Ch:01G Ch:01G Ch:01G Ch:01G Ch:01G Ch:01G Ch:01G Ch:01G Ch:01G Ch:01G Ch:01G Ch:01G Ch:01G Ch:01G Ch:01G
CC#/
Off Off Off Off Off Off Off Off CC#80 CC#81 CC#82 CC#83 CC#87 CC#88 CC#89 CC#90 C4 D4 E4 F4 G4 A4 B4 C5
Note
Name Free Free Free Free Free Free Free Free
Ch Ch:01G Ch:01G Ch:01G Ch:01G Ch:01G Ch:01G Ch:01G Ch:01G Ch:01G Ch:01G Ch:01G Ch:01G Ch:01G Ch:01G Ch:01G Ch:01G Ch:01G Ch:01G Ch:01G Ch:01G Ch:01G Ch:01G Ch:01G Ch:01G
CC#/
Off Off Off Off Off Off Off Off CC#92 CC#94 CC#95 CC#96 CC#97 CC#98 CC#99 CC#100 C4 D4 E4 F4 G4 A4 B4 C5
Note
Name Free Free Free Free Free Free Free Free
Ch Ch:01G Ch:01G Ch:01G Ch:01G Ch:01G Ch:01G Ch:01G Ch:01G Ch:01G Ch:01G Ch:01G Ch:01G Ch:01G Ch:01G Ch:01G Ch:01G Ch:01G Ch:01G Ch:01G Ch:01G Ch:01G Ch:01G Ch:01G Ch:01G
CC#/
Off Off Off Off Off Off Off Off CC#65 CC#66 CC#67 CC#68 CC#69 CC#70 CC#72 CC#73 C4 D4 E4 F4 G4 A4 B4 C5
Note
VCA 1 Filter
Name
Ch Ch:01G Ch:01G Ch:01G Ch:01G Ch:01G Ch:01G Ch:01G Ch:01G Ch:01G Ch:01G Ch:01G Ch:01G Ch:01G Ch:01G Ch:01G Ch:01G Ch:01G Ch:01G Ch:01G Ch:01G Ch:01G Ch:01G Ch:01G Ch:01G
CC#/
Note
VCA 1 Filter
Name
Ch Ch:01G Ch:01G Ch:01G Ch:01G Ch:01G Ch:01G Ch:01G Ch:01G Ch:01G Ch:01G Ch:01G Ch:01G Ch:01G Ch:01G Ch:01G Ch:01G Ch:01G Ch:01G Ch:01G Ch:01G Ch:01G Ch:01G Ch:01G Ch:01G
CC#/
Note
Name Free Free Free Free Free Free Free Free
Ch Ch:01G Ch:01G Ch:01G Ch:01G Ch:01G Ch:01G Ch:01G Ch:01G Ch:01G Ch:01G Ch:01G Ch:01G Ch:01G Ch:01G Ch:01G Ch:01G Ch:01G Ch:01G Ch:01G Ch:01G Ch:01G Ch:01G Ch:01G Ch:01G
CC#/
Note
Name Free Free Free Free Free Free Free Free
Ch Ch:01G Ch:01G Ch:01G Ch:01G Ch:01G Ch:01G Ch:01G Ch:01G Ch:01G Ch:01G Ch:01G Ch:01G Ch:01G Ch:01G Ch:01G Ch:01G Ch:01G Ch:01G Ch:01G Ch:01G Ch:01G Ch:01G Ch:01G Ch:01G
CC#/
Note
Name Free Free Free Free Free Free Free Free Osc A PW Filter Cutoff
Ch Ch:01G Ch:01G Ch:01G Ch:01G Ch:01G Ch:01G Ch:01G Ch:01G Ch:01G Ch:01G Ch:01G Ch:01G Ch:01G Ch:01G Ch:01G Ch:01G Ch:01G Ch:01G Ch:01G Ch:01G Ch:01G Ch:01G Ch:01G Ch:01G
CC#/
Note
Name Free Free Free Free Free Free Free Free
Ch Ch:01G Ch:01G Ch:01G Ch:01G Ch:01G Ch:01G Ch:01G Ch:01G Ch:01G Ch:01G Ch:01G Ch:01G Ch:01G Ch:01G Ch:01G Ch:01G Ch:01G Ch:01G Ch:01G Ch:01G Ch:01G Ch:01G Ch:01G Ch:01G
CC#/
Note
VCA 2 Filter
On/Off
CC#104 CC#105 Off Off Off Off Off Off CC#80 CC#16 CC#81 CC#17 CC#82 CC#18 CC#89 CC#90 C4 D4 E4 F4 G4 A4 B4 C5
On/Off
CC#104 CC#105 Off Off Off Off Off Off CC#106 CC#107 CC#108 CC#109 CC#110 CC#111 CC#112 CC#113 C4 D4 E4 F4 G4 A4 B4 C5
On/Off
VCA 2 Filter
On/Off
Off Off Off Off Off Off Off Off CC#44 CC#45 CC#46 CC#47 CC#48 CC#49 CC#50 CC#51 C4 D4 E4 F4 G4 A4 B4 C5
Off Off Off Off Off Off Off Off CC#52 CC#53 CC#54 CC#55 CC#56 CC#57 CC#58 CC#59 C4 D4 E4 F4 G4 A4 B4 C5
Off Off Off Off Off Off Off Off CC#20 CC#74 CC#71 CC#79 CC#73 CC#75 CC#70 CC#72 C4 D4 E4 F4 G4 A4 B4 C5
Off Off Off Off Off Off Off Off CC#69 CC#30 CC#68 CC#83 CC#90 CC#76 CC#16 CC#17 C4 D4 E4 F4 G4 A4 B4 C5
Free Free Free Free Free Free
Free Free Free Free Free Free
Attack Time
HighPass 1
Filter 1 Cutoff
Frequency
125Hz Band
POLTAMENTO
INT.FIRTER
FREQUENCY
Filter Env
Vca 1
Cutoff
Gain
TIME
Amount
Decay Time
Vca 1
HighPass 1
Resonance
Filter 1
Resonance
350Hz Band
Gain
DELAY
Dry/Wet
RESONANCE
Filter Cutoff
Sustain Level
Vca 1
LowPass 1
Cutoff
Filter 2 Cutoff
Frequency
1000Hz Band
Gain
DELAY
time L
ADSR
Filter
Resonace
Filter
Resonace
Release Time
LowPass 1
Resonance
Resonance
2800Hz Band
DELAY
FILTER
Filter Env
Amount
Volume LFO1 Rate LFO2 Rate pad X Pad Y Note Note Note Note Note Note Note Note
Attack Time
Vca 1
HighPass 2
Filter 2
Filter 3 Cutoff
Frequency
175Hz Band
Gain
AUDIO VCO1 AUDIO VCO2 AUDIO VCO3
time R
TYPE
Amp Env A Amp Env D Amp Env S Amp Env R Note Note Note Note Note Note Note Note
Decay Time
Vca 2
HighPass 2
Cutoff
Resonance
Resonance
500Hz Band
Gain
ADSRNoteNote Note Note Note Note Note Note
Vca 2
Filter 3
Gain
Sustain Level
Vca 2
LowPass 2
Cutoff
VCA
Envelope 1
Gain
1400Hz Band
Gain
Release Time
Vca 2
LowPass 2
Resonance
VCA
Envelope 2
Gain
4000Hz Band
Gain
Encoder 8
AUDIO
NOISE
Note Note Note Note Note Note Note Note
Note Note Note Note Note Note Note Note
Note Note Note Note Note Note Note Note
Note Note Note Note Note Note Note Note
Note Note Note Note Note Note Note Note
Copy the setting file "controlMidi" into the following folder:
Windows : The "save" folder inside the folder where
minimoog V is installed. (e.g. C:Program
Files/Arturia/minimoog V/save)
Mac: /Library/Preferences/minimoog V/save folder This
operation will overwrite the previous MIDI Control settings.
If necessary, back up the previous controlMidi file.
Copy the setting file "controlMidi" into the following folder:
Windows : The "save" folder inside the folder where CS80V is installed. (e.g. C:/Program Files/Arturia/CS80V/save)
Mac : /Library/Preferences/Cs80V/save folder. This
operation will overwrite the previous MIDI Control settings.
If necessary, back up the previous controlMidi file.
Copy the setting file "controlMidi" into the following folder:
Windows : The "save" folder inside the folder where Moog
Modular V is installed. (e.g. C:/Program Files/Arturia/Moog
Modular V/save),
Mac:/Library/Preferences/MoogModularV/save folder This
operation will overwrite the previous MIDI Control settings.
If necessary, back up the previous controlMidi file.
Copy the setting file "controlMidi" into the following folder:
Windows : The "save" folder inside the folder where
ARP2600 V is installed. (e.g. C:/Program
Files/Arturia/ARP2600V/save)
Mac : /Library/Preferences/arp2600v/save folder This
operation will overwrite the previous MIDI Control settings.
If necessary, back up the previous controlMidi file.
Copy the setting file "controlMidi" into the following folder:
Windows : The "save" folder inside the folder where
Prophet V is installed. (e.g. C:/Program
Files/Arturia/ProphetV/save)
Mac : /Library/Preferences/prophetv/save folder This
operation will overwrite the previous MIDI Control settings.
If necessary, back up the previous controlMidi file.
Page 5

M3 External Setups
Manufacturers
Product
Name
Scene
Variation
Switches Sliders Pads
12345678 1234567812345678 HINT
Name Free Free Free Free Free Free Free Free Level Cut Off Resonance LFO Rate LFO Amt Chorus Delay Free Note Note Note Note Note Note Note Note
1 : These operations will overwrite the previous MIDI
Control settings. If necessary, back up the previous
controlMidi file.
2 : When the MIDI channel settings of the host application
and the plug-in software are the same, proper control may
not be available. Please change the MIDI channel setting
on either the host application or the plug-in software.
Please refer to the application's manual for the correct
setting.
40
Arturia
41 [B]
42 Apple GarageBand
43
Fxpansion BFD
44 [trim]
Analog Factory
[A]
[master]
Ch Ch:01G Ch:01G Ch:01G Ch:01G Ch:01G Ch:01G Ch:01G Ch:01G Ch:01G Ch:01G Ch:01G Ch:01G Ch:01G Ch:01G Ch:01G Ch:01G Ch:01G Ch:01G Ch:01G Ch:01G Ch:01G Ch:01G Ch:01G Ch:01G
CC#/
Off Off Off Off Off Off Off Off CC#7 CC#74 CC#71 CC#90 CC#89 CC#93 CC#91 Off C4 D4 E4 F4 G4 A4 B4 C5
Note
Name Free Free Free Free Free Free Free Free Param 1 Param 2 Param 3 Param 4 Amp Env A Amp Env D Amp Env S Amp Env R Note Note Note Note Note Note Note Note
Ch Ch:01G Ch:01G Ch:01G Ch:01G Ch:01G Ch:01G Ch:01G Ch:01G Ch:01G Ch:01G Ch:01G Ch:01G Ch:01G Ch:01G Ch:01G Ch:01G Ch:01G Ch:01G Ch:01G Ch:01G Ch:01G Ch:01G Ch:01G Ch:01G
CC#/
Off Off Off Off Off Off Off Off CC#18 CC#19 CC#16 CC#17 CC#73 CC#75 CC#70 CC#72 C4 D4 E4 F4 G4 A4 B4 C5
Note
Name Free Free Free Free Free Free Free Free Pan Volume Free Free Free Free Free Free Note Note Note Note Note Note Note Note
Ch Ch:01G Ch:01G Ch:01G Ch:01G Ch:01G Ch:01G Ch:01G Ch:01G Ch:01G Ch:01G Ch:01G Ch:01G Ch:01G Ch:01G Ch:01G Ch:01G Ch:01G Ch:01G Ch:01G Ch:01G Ch:01G Ch:01G Ch:01G Ch:01G
CC#/
Off Off Off Off Off Off Off Off CC#10 CC#7 off off off off off off C4 D4 E4 F4 G4 A4 B4 C5
Note
Name Free Free Free Free Free Free Free Free
Ch Ch:01G Ch:01G Ch:01G Ch:01G Ch:01G Ch:01G Ch:01G Ch:01G Ch:01G Ch:01G Ch:01G Ch:01G Ch:01G Ch:01G Ch:01G Ch:01G Ch:01G Ch:01G Ch:01G Ch:01G Ch:01G Ch:01G Ch:01G Ch:01G
CC#/
Off Off Off Off Off Off Off Off CC#16 CC#17 CC#18 CC#19 CC#11 CC#7 off off B1 D2 F#2 A#2 B2 A2 G2 C#3
Note
Name Free Free Free Free Free Free Free Free Kick Trim Snr Trim HiH Trim F Tom Trim M Tom Trim H Tom Trim Cym 1 Trim Cym 2 Trim Note Note Note Note Note Note Note Note
Ch Ch:01G Ch:01G Ch:01G Ch:01G Ch:01G Ch:01G Ch:01G Ch:01G Ch:01G Ch:01G Ch:01G Ch:01G Ch:01G Ch:01G Ch:01G Ch:01G Ch:01G Ch:01G Ch:01G Ch:01G Ch:01G Ch:01G Ch:01G Ch:01G
CC#/
Off Off Off Off Off Off Off Off CC#52 CC#53 CC#54 CC#55 CC#56 CC#57 CC#58 CC#59 B1 D2 F#2 A#2 B2 A2 G2 C#3
Note
Name Free Free Free Free Free Free Free Free Kick Tune Snr Tune HiH Tune F Tom Tune M Tom Tune H Tom Tune Cym 1 Tune Cym 2 Tune Note Note Note Note Note Note Note Note
Direct Master
Level
Overhead
Level
Room Level PZM Level
Master
Dynamics
Master Level Free Free Note Note Note Note Note Note Note Note
Copy the setting file "midi.prefs" into the following folder:
Windows : The "save" folder inside the folder where Analog
Factory is installed. (e.g. C:/Program Files/Arturia/Analog
Factory/save)
Mac : /Library/Preferences/AnalogFactory/save folder This
operation will overwrite the previous MIDI Control settings.
If necessary, back up the previous controlMidi file.
Click the "Load" icon (located in the upper right corner of
the BFD window) to load the "BFD_KORG.bfd" file.
45 [tune]
46
47 M-Tron
GMEDIA
48 Oddity
49 minimonsta
impOSCar
Ch Ch:01G Ch:01G Ch:01G Ch:01G Ch:01G Ch:01G Ch:01G Ch:01G Ch:01G Ch:01G Ch:01G Ch:01G Ch:01G Ch:01G Ch:01G Ch:01G Ch:01G Ch:01G Ch:01G Ch:01G Ch:01G Ch:01G Ch:01G Ch:01G
CC#/N
Name Free Free Free Free Free Free Free Free
Name Free Free Free Free Free Free Free Free Volume Tone Pitch
Name Free Free Free Free Free Free Free Free
Name Free Free Free Free Free Free Free Free
Off Off Off Off Off Off Off Off CC#44 CC#45 CC#46 CC#47 CC#48 CC#49 CC#50 CC#51 B1 D2 F#2 A#2 B2 A2 G2 C#3
ote
Filter
Frequency
Ch Ch:01G Ch:01G Ch:01G Ch:01G Ch:01G Ch:01G Ch:01G Ch:01G Ch:01G Ch:01G Ch:01G Ch:01G Ch:01G Ch:01G Ch:01G Ch:01G Ch:01G Ch:01G Ch:01G Ch:01G Ch:01G Ch:01G Ch:01G Ch:01G
CC#/
Off Off Off Off Off Off Off Off CC"74 CC#71 CC#73 CC#52 CC#36 CC#37 CC#38 CC#39 C4 D4 E4 F4 G4 A4 B4 C5
Note
Ch Ch:01G Ch:01G Ch:01G Ch:01G Ch:01G Ch:01G Ch:01G Ch:01G Ch:01G Ch:01G Ch:01G Ch:01G Ch:01G Ch:01G Ch:01G Ch:01G Ch:01G Ch:01G Ch:01G Ch:01G Ch:01G Ch:01G Ch:01G Ch:01G
CC#/
Off Off Off Off Off Off Off Off CC#7 CC#74 CC#95 CC#73 CC#72 off off off C4 D4 E4 F4 G4 A4 B4 C5
Note
VCF Cutoff
Frequency
Ch Ch:01G Ch:01G Ch:01G Ch:01G Ch:01G Ch:01G Ch:01G Ch:01G Ch:01G Ch:01G Ch:01G Ch:01G Ch:01G Ch:01G Ch:01G Ch:01G Ch:01G Ch:01G Ch:01G Ch:01G Ch:01G Ch:01G Ch:01G Ch:01G
CC#/
Off Off Off Off Off Off Off Off CC#74 CC#71 CC#9 CC#8 CC#75 CC#76 CC#77 CC#78 C4 D4 E4 F4 G4 A4 B4 C5
Note
Filter
Emphasis
Ch Ch:01G Ch:01G Ch:01G Ch:01G Ch:01G Ch:01G Ch:01G Ch:01G Ch:01G Ch:01G Ch:01G Ch:01G Ch:01G Ch:01G Ch:01G Ch:01G Ch:01G Ch:01G Ch:01G Ch:01G Ch:01G Ch:01G Ch:01G Ch:01G
CC#/
Off Off Off Off Off Off Off Off CC#71 CC#74 CC#70 CC#20 CC#21 CC#73 CC#72 CC#7 C4 D4 E4 F4 G4 A4 B4 C5
Note
Filter Q
VCF
Resonance
Filter Cutoff Filter Contour VCF Attack VCF Decay VCA Attack VCA Decay Volume Note Note Note Note Note Note Note Note
Filter
Separation
HPF Cutoff
Freq Q
Filter Amount Vel Attack Vel Release Vel Drive Vel Env2 Note Note Note Note Note Note Note Note
Amp Env
Attack
LFO Freq Q ADSR Attack ADSR Decay
Amp Env
Relese
Free Free Free Note Note Note Note Note Note Note Note
ADSR
Sustain
ADSR
Release
Note Note Note Note Note Note Note Note
For stand-alone operation Windows: Click the “SET UP”
button in the lower right part of the “minimonsta” window to
open the menu. Click on “Input device” and select “M3
KEYBOARD”. Mac: Click the “SET UP” in the lower right
part of the “minimonsta” window to open the menu. Click on
“Input device” and select “CoreMIDI”.
Page 6

M3 External Setups
Manufacturers
Product
Name
Scene
Variation
Switches Sliders Pads
12345678 1234567812345678 HINT
Name Free Free Free Free Free Free Free Free Master Pan FX1 Pan FX2 Pan FX3 Pan FX4 Pan FX5 Pan FX6 Pan FX7 Pan Note Note Note Note Note Note Note Note
1 : These operations will overwrite the previous MIDI
Control settings. If necessary, back up the previous
controlMidi file.
2 : When the MIDI channel settings of the host application
and the plug-in software are the same, proper control may
not be available. Please change the MIDI channel setting
on either the host application or the plug-in software.
Please refer to the application's manual for the correct
setting.
50
Image-Line Software
51 [Volume]
52
MOTU
53
54 [Level]
55
56 [B]
Native Instruments
57
58 [B]
FL Studio
MachFive
Digital Performer
B4
B4 Organ II
[Pan]
[Pan]
[A]
[A]
Ch Ch:01G Ch:01G Ch:01G Ch:01G Ch:01G Ch:01G Ch:01G Ch:01G Ch:01G Ch:01G Ch:01G Ch:01G Ch:01G Ch:01G Ch:01G Ch:01G Ch:01G Ch:01G Ch:01G Ch:01G Ch:01G Ch:01G Ch:01G Ch:01G
CC#/
Off Off Off Off Off Off Off Off CC#16 CC#17 CC#18 CC#19 CC#48 CC#49 CC#50 CC#51 C5 C#5 D5 D#5 E5 F5 F#5 G5
Note
Master
Name Free Free Free Free Free Free Free Free
Ch Ch:01G Ch:01G Ch:01G Ch:01G Ch:01G Ch:01G Ch:01G Ch:01G Ch:01G Ch:01G Ch:01G Ch:01G Ch:01G Ch:01G Ch:01G Ch:01G Ch:01G Ch:01G Ch:01G Ch:01G Ch:01G Ch:01G Ch:01G Ch:01G
CC#/
Off Off Off Off Off Off Off Off CC#80 CC#81 CC#82 CC#83 CC#87 CC#88 CC#89 CC#90 C5 C#5 D5 D#5 E5 F5 F#5 G5
Note
Name Free Free Free Free Free Free Free Free Filter Cutoff
Ch Ch:01G Ch:01G Ch:01G Ch:01G Ch:01G Ch:01G Ch:01G Ch:01G Ch:01G Ch:01G Ch:01G Ch:01G Ch:01G Ch:01G Ch:01G Ch:01G Ch:01G Ch:01G Ch:01G Ch:01G Ch:01G Ch:01G Ch:01G Ch:01G
CC#/
Off Off Off Off Off Off Off Off CC#74 CC#71 CC#75 CC#76 CC#77 CC#96 CC#97 CC#10 C2 C#2 D2 D#2 E2 F2 F#2 G2
Note
Name Free Free Free Free Free Free Free Free Track 1 Pan Track 2 Pan Track 3 Pan Track 4 Pan Track 5 Pan Track 6 Pan Track 7 Pan Track 8 Pan FreeFree Free Free Free Free Free Free
Ch Ch:01G Ch:01G Ch:01G Ch:01G Ch:01G Ch:01G Ch:01G Ch:01G Ch:01G Ch:02 Ch:03 Ch:04 Ch:05 Ch:06 Ch:07 Ch:08 Ch:01G Ch:01G Ch:01G Ch:01G Ch:01G Ch:01G Ch:01G Ch:01G
CC#/
Off Off Off Off Off Off Off Off CC#10 CC#10 CC#10 CC#10 CC#10 CC#10 CC#10 CC#10 Off Off Off Off Off Off Off Off
Note
Name Free Free Free Free Free Free Free Free Track 1 Level Track 2 Level Track 3 Level Track 4 Level Track 5 Level Track 6 Level Track 7 Level Track 8 Level Free Free Free Free Free Free Free Free
Ch Ch:01G Ch:01G Ch:01G Ch:01G Ch:01G Ch:01G Ch:01G Ch:01G Ch:01G Ch:02 Ch:03 Ch:04 Ch:05 Ch:06 Ch:07 Ch:08 Ch:01G Ch:01G Ch:01G Ch:01G Ch:01G Ch:01G Ch:01G Ch:01G
CC#/
Off Off Off Off Off Off Off Off CC#7 CC#7 CC#7 CC#7 CC#7 CC#7 CC#7 CC#7 Off Off Off Off Off Off Off Off
Note
VIBRATO
Name
LOWER
Ch Ch:01G Ch:01G Ch:01G Ch:01G Ch:01G Ch:01G Ch:01G Ch:01G Ch:01G Ch:01G Ch:01G Ch:01G Ch:01G Ch:01G Ch:01G Ch:01G Ch:01G Ch:01G Ch:01G Ch:01G Ch:01G Ch:01G Ch:01G Ch:01G
CC#/
Note
VIBRATO
Name
LOWER
Ch Ch:01G Ch:01G Ch:01G Ch:01G Ch:01G Ch:01G Ch:01G Ch:01G Ch:01G Ch:01G Ch:01G Ch:01G Ch:01G Ch:01G Ch:01G Ch:01G Ch:01G Ch:01G Ch:01G Ch:01G Ch:01G Ch:01G Ch:01G Ch:01G
CC#/
Note
VIBRATO
Name
LOWER
Ch Ch:01G Ch:01G Ch:01G Ch:01G Ch:01G Ch:01G Ch:01G Ch:01G Ch:01G Ch:01G Ch:01G Ch:01G Ch:01G Ch:01G Ch:01G Ch:01G Ch:01G Ch:01G Ch:01G Ch:01G Ch:01G Ch:01G Ch:01G Ch:01G
CC#/
Note
VIBRATO
Name
LOWER
Ch Ch:01G Ch:01G Ch:01G Ch:01G Ch:01G Ch:01G Ch:01G Ch:01G Ch:01G Ch:01G Ch:01G Ch:01G Ch:01G Ch:01G Ch:01G Ch:01G Ch:01G Ch:01G Ch:01G Ch:01G Ch:01G Ch:01G Ch:01G Ch:01G
CC#/
Note
VIBRATO
ON/OF
CC#30 CC#31 CC#66 CC#67 CC#68 CC#69 Off Off CC#70 CC#71 CC#73 CC#74 CC#76 CC#78 CC#80 CC#90 C4 D4 E4 F4 G4 A4 B4 C5
ON/OF
CC#30 CC#31 CC#66 CC#67 CC#68 CC#69 Off Off CC#12 CC#13 CC#14 CC#15 CC#16 CC#17 CC#18 CC#20 C4 D4 E4 F4 G4 A4 B4 C5
ON/OF
CC#30 CC#31 CC#66 CC#70 CC#71 CC#72 CC#85 CC#67 CC#70 CC#71 CC#73 CC#74 CC#1 CC#2 C#84 CC#76 C4 D4 E4 F4 G4 A4 B4 C5
ON/OF
CC#30 CC#31 CC#66 CC#70 CC#71 CC#72 CC#85 CC#67 CC#12 CC#13 CC#14 CC#15 CC#16 CC#17 CC#19 CC#20 C4 D4 E4 F4 G4 A4 B4 C5
UPPER
ON/OFF
VIBRATO
UPPER
ON/OFF
VIBRATO
UPPER
ON/OFF
VIBRATO
UPPER
ON/OFF
PERC.
ON/OFF
PERC.
ON/OFF
PERC.
ON/OFF
PERC.
ON/OFF
DRIVE
ON/OFF
DRIVE
ON/OFF
PERC.
Volume
Soft/Normal
PERC.
Volume
Soft/Normal
ROTATOR
ON/OFF
ROTATOR
ON/OFF
PERC.
Decay
Fast/Slow
PERC.
Decay
Fast/Slow
VELOCITY
ON/OFF
VELOCITY
ON/OFF
PERC.
Harmon
Third/Second
PERC.
Harmon
Third/Second
Free Free
Free Free
Reveb Type
Studio/Spring
Reveb Type
Studio/Spring
Rotaor
Dual/ single
Rotaor
Dual/ single
PERCUSSION
VOLUME
MANUAL 16'
PERCUSSION
VOLUME
Drawbar 16'
FX1 Volume FX2 Volume FX3 Volume FX4 Volume FX5 Volume FX6 Volume FX7 Volume Note Note Note Note Note Note Note Note
Volume
UPPER
Upper
Filter
Resonance
PERCUSSION
DECAY
UPPER
MANUAL 5
1/3'
PERCUSSION
DECAY
Upper
Drawbar
5 1/3'
Drive Transpose Fine Tune LFO 1 Rate LFO 2 Rate Part Pan Note Note Note Note Note Note Note Note
VIBRATO
MIX
UPPER
MANUAL 8'
VIBRATO
MIX
Upper
Drawbar
8'
VIBRATO
DEPTH
UPPER
MANUAL 4'
VIBRATO
DEPTH
Upper
Drawbar
4'
TUBE AMP
DRIVE
UPPER
MANUAL 2
2/3'
Rotator
Slow/Fast
Upper
Drawbar
2 2/3'
TUBE AMP
BODY
UPPER
MANUAL 2'
Rotaor Run Reverb DRIVE Note Note Note Note Note Note Note Note
Upper
Drawbar
TREBLE
ROTOR
TONE
UPPER
MANUAL 1
2/3'
Upper
Drawbar
2'
1 1/3'
BASS
ROTOR
TONE
UPPER
MANUAL 1'
Upper
Drawbar1'Note Note Note Note Note Note Note Note
Note Note Note Note Note Note Note Note
Note Note Note Note Note Note Note Note
For stand-alone and plug-in synthesizer operationSelect
"MIDI settings" (located in the "OPTIONS" menu in the
upper left corner of FL STUDIO window), and select "M3 1
KEYBOARD". Select "Open" from the "FILE" menu, and
load the "KORG M3.flp" file.
Select "Open..." from the "File" menu and open the song
file "DP_M3" .
Page 7

M3 External Setups
p
Manufacturers
Product
Name
59 Battery
60 Elektrik Piano
61
FM7
62 [B]
Native Instruments
63
FM8
64 [B]
65 Massive
66 PRO-53
Scene
Variation
Switches Sliders Pads
12345678 1234567812345678 HINT
Name Free Free Free Free Free Free Free Free Controller A Controller B Controller C Controller D Controller E Controller F Controller G Controller H Note Note Note Note Note Note Note Note
Ch Ch:01G Ch:01G Ch:01G Ch:01G Ch:01G Ch:01G Ch:01G Ch:01G Ch:01G Ch:01G Ch:01G Ch:01G Ch:01G Ch:01G Ch:01G Ch:01G Ch:01G Ch:01G Ch:01G Ch:01G Ch:01G Ch:01G Ch:01G Ch:01G
CC#/
Off Off Off Off Off Off Off Off CC#0 CC#1 CC#2 CC#3 CC#4 CC#5 CC#6 CC#7 C2 C#2 D2 D#2 E2 F2 F#2 G2
Note
Name Free Free Free Free Free Free Free Free
Sound
Control Knob
Ch Ch:01G Ch:01G Ch:01G Ch:01G Ch:01G Ch:01G Ch:01G Ch:01G Ch:01G Ch:01G Ch:01G Ch:01G Ch:01G Ch:01G Ch:01G Ch:01G Ch:01G Ch:01G Ch:01G Ch:01G Ch:01G Ch:01G Ch:01G Ch:01G
CC#/N
Name Free Free Free Free Free Free Free Free
[A]
Off Off Off Off Off Off Off Off CC#20 CC#21 CC#22 CC#23 CC#10 CC#7 off off C4 D4 E4 F4 G4 A4 B4 C5
ote
Easy Edit
Timbre
Brightness
Ch Ch:01G Ch:01G Ch:01G Ch:01G Ch:01G Ch:01G Ch:01G Ch:01G Ch:01G Ch:01G Ch:01G Ch:01G Ch:01G Ch:01G Ch:01G Ch:01G Ch:01G Ch:01G Ch:01G Ch:01G Ch:01G Ch:01G Ch:01G Ch:01G
CC#/
Off Off Off Off Off Off Off Off CC#102 CC#103 CC#104 CC#105 CC#106 CC#107 CC#108 CC#109 C4 D4 E4 F4 G4 A4 B4 C5
Note
Name Free Free Free Free Free Free Free Free Filter Cutoff
Ch Ch:01G Ch:01G Ch:01G Ch:01G Ch:01G Ch:01G Ch:01G Ch:01G Ch:01G Ch:01G Ch:01G Ch:01G Ch:01G Ch:01G Ch:01G Ch:01G Ch:01G Ch:01G Ch:01G Ch:01G Ch:01G Ch:01G Ch:01G Ch:01G
CC#/N
Name Free Free Free Free Free Free Free Free
[A]
Off Off Off Off Off Off Off Off CC#111 CC#112 CC#113 CC#110 CC#114 CC#115 CC#116 CC#117 C4 D4 E4 F4 G4 A4 B4 C5
ote
Timbre
Harmonic
Ch Ch:01G Ch:01G Ch:01G Ch:01G Ch:01G Ch:01G Ch:01G Ch:01G Ch:01G Ch:01G Ch:01G Ch:01G Ch:01G Ch:01G Ch:01G Ch:01G Ch:01G Ch:01G Ch:01G Ch:01G Ch:01G Ch:01G Ch:01G Ch:01G
CC#/
Off Off Off Off Off Off Off Off CC#83 CC#20 CC#74 CC#79 CC#85 CC#86 CC#87 CC#7 C4 D4 E4 F4 G4 A4 B4 C5
Note
Name Free Free Free Free Free Free Free Free LFO Rate LFO Vibrato LFO Timbre LFO Tremolo
Ch Ch:01G Ch:01G Ch:01G Ch:01G Ch:01G Ch:01G Ch:01G Ch:01G Ch:01G Ch:01G Ch:01G Ch:01G Ch:01G Ch:01G Ch:01G Ch:01G Ch:01G Ch:01G Ch:01G Ch:01G Ch:01G Ch:01G Ch:01G Ch:01G
CC#/
Off Off Off Off Off Off Off Off CC#90 CC#103 CC#104 CC#105 CC#73 CC#75 CC#70 CC#72 C4 D4 E4 F4 G4 A4 B4 C5
Note
Name Free Free Free Free Free Free Free Free Filter 1 Cutoff
Ch Ch:01G Ch:01G Ch:01G Ch:01G Ch:01G Ch:01G Ch:01G Ch:01G Ch:01G Ch:01G Ch:01G Ch:01G Ch:01G Ch:01G Ch:01G Ch:01G Ch:01G Ch:01G Ch:01G Ch:01G Ch:01G Ch:01G Ch:01G Ch:01G
CC#/
Off Off Off Off Off Off Off Off CC#74 CC#71 CC#30 CC#68 CC#73 CC#75 CC#70 CC#72 C4 D4 E4 F4 G4 A4 B4 C5
Note
Name Free Free Free Free Free Free Free Free
Oscillator A
Pulse Width
Ch Ch:01G Ch:01G Ch:01G Ch:01G Ch:01G Ch:01G Ch:01G Ch:01G Ch:01G Ch:01G Ch:01G Ch:01G Ch:01G Ch:01G Ch:01G Ch:01G Ch:01G Ch:01G Ch:01G Ch:01G Ch:01G Ch:01G Ch:01G Ch:01G
CC#/
Off Off Off Off Off Off Off Off CC#43 CC#55 CC#70 CC#71 CC#80 CC#81 CC#82 CC#83 C4 D4 E4 F4 G4 A4 B4 C5
Note
1
Sound
Control Knob
2
Easy Edit
Timbre
Harmonic
Filter 1
Resonance
Timbre
Detune
Filter 1
Resonance
Oscillator B
Pulse Width
Sound
Control Knob
3
Easy Edit
Timbre
Detune
Filter
Envelope
Amount
Timbre
Brightness
Filter 2 Cutoff
Filter Cutoff
Sound
Control Knob4Pan Volume Free Free Note Note Note Note Note Note Note Note
Easy Edit
Timbre Env
Amount
Filter 1 Mode
Timbre Env
Amount
Filter 2
Resonance
Filter
Resonance
Easy Edit Timbre
Envelope Attack
Easy Edit
Volume
Envelope Attack
Timbre Env
Attack
Volume Env
Attack
Env 4 Attack
Time
Amplifier
Attack
Easy Edit Timbre
Envelope Decay
Envelope Decay
Timbre Env
Volume Env
Env 4 Decay
Easy Edit
Volume
Decay
Decay
Time
Amplifier
Decay
Easy Edit Timbre
Enve-lope
Sustain
Easy Edit
Volume Enve-
lope Sustain
Timbre Env
Sustain
Volume Env
Sustain
Env 4 Decay
Level
Amplifier
Sustain
Easy Edit Timbre
Enve-lope
Release
Easy Edit
Volume Enve-
lope Release
Master
Volume
Volume Env
Release
Env 4
Release Time
Amplifier
Release
Note Note Note Note Note Note Note Note
Note Note Note Note Note Note Note Note
Note Note Note Note Note Note Note Note
Note Note Note Note Note Note Note Note
Note Note Note Note Note Note Note Note
Note Note Note Note Note Note Note Note
1 : These operations will overwrite the previous MIDI
Control settings. If necessary, back up the previous
controlMidi file.
2 : When the MIDI channel settings of the host application
and the plug-in software are the same, proper control may
not be available. Please change the MIDI channel setting
on either the host application or the plug-in software.
Please refer to the application's manual for the correct
setting.
Press the "OPTIONS" button and open the Preference
dialog. Set the MIDI controllers as below.
A:CC#0, B:CC#1, C:CC#2, D;CC#3, E:CC#4, F:CC#5,
G:CC#6, H:CC#7
Press the "OPTIONS" button to open the "Settings" dialog.
Confirm that "USE STD. CC#7 / CC#10 VOLUME & PAN"
is active. In case it is not active, click it.
On the "MASTER" page, locate the "CONTROLLER
DEFINE" parameters then press the "LOAD" button for
"CONTROLLER ASSIGN" to load the setup file "KORG
M3.f7c".
On the "MASTER" page, locate the "MIDI Controller
Assignment" parameters then press the "LOAD" button for
"CONTROLLER ASSIGN" to load the setup file "KORG
MIDI Assignment.f8c".
1 : Copy the setting file "KORG MIDI Setup.mca" into the
following folder.
Windows: "mca" folder in the folder where the Massive is
installed.
(e.g. C:/Program Files/Native Instruments/Massive/mca)
Mac: /Library/Application Support/Native
Instruments/Massive/mca
2 : Select "Preference..."in "Massive" menu to open
"Massive Options". Double-Click "KORG MIDI Setup" in the
"Midi Setu
s" of "Midi" page to turn it "on".
Click the "NI" logo. Select "Load Controllermap" in the
displayed menu and load "DefaultMap.txt" from the
"Presets"-"Controller maps" folder inside the folder where
PRO-53 is installed.
Page 8

M3 External Setups
Manufacturers
67
68 [Volume]
69 Dr.Rex
70
71 NN 19Propellerhead
72 NN-XT
Product
Name
Reason Mixer
Malstrom
Scene
Variation
[Pan]
Switches Sliders Pads
12345678 1234567812345678 HINT
Name Free Free Free Free Free Free Free Free
Ch Ch:01G Ch:01G Ch:01G Ch:01G Ch:01G Ch:01G Ch:01G Ch:01G Ch:01G Ch:01G Ch:01G Ch:01G Ch:01G Ch:01G Ch:01G Ch:01G Ch:01G Ch:01G Ch:01G Ch:01G Ch:01G Ch:01G Ch:01G Ch:01G
CC#/
Off Off Off Off Off Off Off Off CC#23 CC#24 CC#25 CC#26 CC#27 CC#28 CC#29 CC#30 Off Off Off Off Off Off Off Off
Note
Name Free Free Free Free Free Free Free Free
Ch Ch:01G Ch:01G Ch:01G Ch:01G Ch:01G Ch:01G Ch:01G Ch:01G Ch:01G Ch:01G Ch:01G Ch:01G Ch:01G Ch:01G Ch:01G Ch:01G Ch:01G Ch:01G Ch:01G Ch:01G Ch:01G Ch:01G Ch:01G Ch:01G
CC#/
Off Off Off Off Off Off Off Off CC#8 CC#9 CC#10 CC#12 CC#13 CC#14 CC#15 CC#16 Off Off Off Off Off Off Off Off
Note
Name Free Free Free Free Free Free Free Free Filter Freq Filter Res Filter Mode
Ch Ch:01G Ch:01G Ch:01G Ch:01G Ch:01G Ch:01G Ch:01G Ch:01G Ch:01G Ch:01G Ch:01G Ch:01G Ch:01G Ch:01G Ch:01G Ch:01G Ch:01G Ch:01G Ch:01G Ch:01G Ch:01G Ch:01G Ch:01G Ch:01G
CC#/
Off Off Off Off Off Off Off Off CC#74 CC#71 CC#76 CC#18 CC#73 CC#9 CC#12 CC#72 C4 D4 E4 F4 G4 A4 B4 C5
Note
Name OSC A on/off
Ch Ch:01G Ch:01G Ch:01G Ch:01G Ch:01G Ch:01G Ch:01G Ch:01G Ch:01G Ch:01G Ch:01G Ch:01G Ch:01G Ch:01G Ch:01G Ch:01G Ch:01G Ch:01G Ch:01G Ch:01G Ch:01G Ch:01G Ch:01G Ch:01G
CC#/
Note
Name Filter on/off Free Free Free Free Free Free Free Filter Freq Filter Res Filter Mode
Ch Ch:01G Ch:01G Ch:01G Ch:01G Ch:01G Ch:01G Ch:01G Ch:01G Ch:01G Ch:01G Ch:01G Ch:01G Ch:01G Ch:01G Ch:01G Ch:01G Ch:01G Ch:01G Ch:01G Ch:01G Ch:01G Ch:01G Ch:01G Ch:01G
CC#/
Note
Name Free Free Free Free Free Free Free Free Filter Freq Filter Res
Ch Ch:01G Ch:01G Ch:01G Ch:01G Ch:01G Ch:01G Ch:01G Ch:01G Ch:01G Ch:01G Ch:01G Ch:01G Ch:01G Ch:01G Ch:01G Ch:01G Ch:01G Ch:01G Ch:01G Ch:01G Ch:01G Ch:01G Ch:01G Ch:01G
CC#/
Note
Name Free Free Free Free Free Free Free Free Drum 1 Pan Drum 2 Pan Drum 3 Pan Drum 4 Pan Drum 5 Pan Drum 6 Pan Drum 7 Pan Drum 8 Pan Note Note Note Note Note Note Note Note
OSC A to
Shaper
on/off
CC#95 CC#61 CC#56 CC#54 CC#41 CC#60 CC#59 CC#75 CC#92 CC#86 CC#78 CC#79 CC#43 CC#44 CC#71 CC#74 C4 D4 E4 F4 G4 A4 B4 C5
CC#75 Off Off Off Off Off Off Off CC#74 CC#71 CC#76 CC#14 CC#15 CC#18 CC#73 CC#9 C4 D4 E4 F4 G4 A4 B4 C5
Off Off Off Off Off Off Off Off CC#74 CC#71 CC#73 CC#9 CC#72 CC#15 CC#7 off C4 D4 E4 F4 G4 A4 B4 C5
Shaper
Filter A on/off OSC B on/off
on/off
OSC A to
Filter B on/off
OSC B to
Filter B on/off
Filter B on/off
Channel 1
Channel 1
OSC A
motion
Channel 2
Pan
Level
Pan
Channel 2
Level
OSC A shift Filter A res Filter A Freq
Channel 3
Pan
Channel 3
Level
Amp Env
Attack
Channel 4
Pan
Channel 4
Level
Filter Env
Amount
Filter Env
Attack
Amp Env
Decay
Channel 5
Pan
Channel 5
Level
Amp Env
Attack
OSC B
motion
Filter Env
Decay
Amp Env
Release
Channel 6
Channel 6
Amp Env
Decay
OSC B shift Filter B res Filter B Freq Note Note Note Note Note Note Note Note
Filter Env
Amount
Mod Env
Decay
Pan
Level
Channel 7
Pan
Channel 7
Level
Amp Env
Sustain
mp Env
Attack
Master
Volume
Channel 8
Pan
Channel 8
Level
Amp Env
Release
Amp Env
Decay
Free Note Note Note Note Note Note Note Note
Free Free Free Free Free Free Free Free
Free Free Free Free Free Free Free Free
Note Note Note Note Note Note Note Note
Note Note Note Note Note Note Note Note
1 : These operations will overwrite the previous MIDI
Control settings. If necessary, back up the previous
controlMidi file.
2 : When the MIDI channel settings of the host application
and the plug-in software are the same, proper control may
not be available. Please change the MIDI channel setting
on either the host application or the plug-in software.
Please refer to the application's manual for the correct
setting.
73
74 [Level]
75 [Pitch]
ReDrum
[Pan]
Ch Ch:01G Ch:01G Ch:01G Ch:01G Ch:01G Ch:01G Ch:01G Ch:01G Ch:01G Ch:01G Ch:01G Ch:01G Ch:01G Ch:01G Ch:01G Ch:01G Ch:01G Ch:01G Ch:01G Ch:01G Ch:01G Ch:01G Ch:01G Ch:01G
CC#/
Off Off Off Off Off Off Off Off CC#19 CC#20 CC#21 CC#22 CC#23 CC#24 CC#25 CC#26 C2 C#2 D2 D#2 E2 F2 F#2 G2
Note
Name Free Free Free Free Free Free Free Free Drum 1 Level Drum 2 Level Drum 3 Level Drum 4 Level Drum 5 Level Drum 6 Level Drum 7 Level Drum 8 Level Note Note Note Note Note Note Note Note
Ch Ch:01G Ch:01G Ch:01G Ch:01G Ch:01G Ch:01G Ch:01G Ch:01G Ch:01G Ch:01G Ch:01G Ch:01G Ch:01G Ch:01G Ch:01G Ch:01G Ch:01G Ch:01G Ch:01G Ch:01G Ch:01G Ch:01G Ch:01G Ch:01G
CC#/
Off Off Off Off Off Off Off Off CC#8 CC#9 CC#10 CC#12 CC#13 CC#14 CC#15 CC#16 C2 C#2 D2 D#2 E2 F2 F#2 G2
Note
Name Free Free Free Free Free Free Free Free Drum 1 Pitch Drum 2 Pitch Drum 3 Pitch Drum 4 Pitch Drum 5 Pitch Drum 6 Pitch Drum 7 Pitch Drum 8 Pitch Note Note Note Note Note Note Note Note
Ch Ch:01G Ch:01G Ch:01G Ch:01G Ch:01G Ch:01G Ch:01G Ch:01G Ch:01G Ch:01G Ch:01G Ch:01G Ch:01G Ch:01G Ch:01G Ch:01G Ch:01G Ch:01G Ch:01G Ch:01G Ch:01G Ch:01G Ch:01G Ch:01G
CC#/
Off Off Off Off Off Off Off Off CC#51 CC#52 CC#53 CC#54 CC#55 CC#56 CC#57 CC#58 C2 C#2 D2 D#2 E2 F2 F#2 G2
Note
Page 9

M3 External Setups
Manufacturers
76 SubtractorPropellerhead
77
78
Spectrasonics
79
80
Product
Name
Atmosphere
Stylus RMX
Trilogy
Scene
Variation
Switches Sliders Pads
12345678 1234567812345678 HINT
Name OSC 2 on/off
Ch Ch:01G Ch:01G Ch:01G Ch:01G Ch:01G Ch:01G Ch:01G Ch:01G Ch:01G Ch:01G Ch:01G Ch:01G Ch:01G Ch:01G Ch:01G Ch:01G Ch:01G Ch:01G Ch:01G Ch:01G Ch:01G Ch:01G Ch:01G Ch:01G
CC#/
Note
Name
Selection
Ch Ch:01G Ch:01G Ch:01G Ch:01G Ch:01G Ch:01G Ch:01G Ch:01G Ch:01G Ch:01G Ch:01G Ch:01G Ch:01G Ch:01G Ch:01G Ch:01G Ch:01G Ch:01G Ch:01G Ch:01G Ch:01G Ch:01G Ch:01G Ch:01G
CC#/
CC#108 CC#109 CC#106 CC#107 CC#110 Off Off Off CC#83 CC#81 CC#84 CC#82 CC#77 CC#78 CC#74 CC#71 C4 D4 E4 F4 G4 A4 B4 C5
Note
Name 24dB Solo Mute
[A]
Ch Ch:01G Ch:01G Ch:01G Ch:01G Ch:01G Ch:01G Ch:01G Ch:01G Ch:01G Ch:01G Ch:01G Ch:01G Ch:01G Ch:01G Ch:01G Ch:01G Ch:01G Ch:01G Ch:01G Ch:01G Ch:01G Ch:01G Ch:01G Ch:01G
CC#/
Note
Name 24dB Solo Mute
[B]
Ch Ch:01G Ch:01G Ch:01G Ch:01G Ch:01G Ch:01G Ch:01G Ch:01G Ch:01G Ch:01G Ch:01G Ch:01G Ch:01G Ch:01G Ch:01G Ch:01G Ch:01G Ch:01G Ch:01G Ch:01G Ch:01G Ch:01G Ch:01G Ch:01G
CC#/
Note
Name
Selection
Ch Ch:01G Ch:01G Ch:01G Ch:01G Ch:01G Ch:01G Ch:01G Ch:01G Ch:01G Ch:01G Ch:01G Ch:01G Ch:01G Ch:01G Ch:01G Ch:01G Ch:01G Ch:01G Ch:01G Ch:01G Ch:01G Ch:01G Ch:01G Ch:01G
CC#/
CC#108 CC#109 CC#106 CC#107 CC#110 Off Off Off CC#83 CC#81 CC#84 CC#82 CC#77 CC#78 CC#74 CC#71 C4 D4 E4 F4 G4 A4 B4 C5
Note
Name Free Free Free Free Free Free Free Free Audio Pan1 Audio Pan2 Audio Pan3 Audio Pan4 Audio Pan5 Audio Pan6 Audio Pan7 Audio Pan8 Free Free FreeFree Free Free Free Free
Ring mod
CC#94 CC#109 CC#81 CC#80 CC#75 CC#30 Off Off CC#93 CC#106 CC#108 CC#107 CC#74 CC#71 CC#79 CC#78 C4 D4 E4 F4 G4 A4 B4 C5
Layer
Layer Link
A/B
CC#43 CC#36 CC#37 CC#38 CC#85 Off Off Off CC#16 CC#17 CC#18 CC#19 CC#48 CC#49 CC#50 CC#51 C4 D4 E4 F4 G4 A4 B4 C5
CC#43 CC#36 CC#37 CC#38 CC#85 Off Off Off CC#80 CC#81 CC#82 CC#83 CC#87 CC#88 CC#89 CC#90 C4 D4 E4 F4 G4 A4 B4 C5
Layer
Layer Link
A/B
Noise on/off
on/off
Layer A Mute Layer B Mute Solo Free Free Free Layer A Pan Layer A Level Layer B Pan Layer B Level Cutoff Resonance Master Filter
On/Off
Layer A Mute Layer B Mute Solo Free Free Free Layer A Pan Layer A Level Layer B Pan Layer B Level Cutoff Resonance Master Filter
On/Off
Filter 1 Link
on/off
START/
STOP
START/
STOP
Filter 2 on/off LFO 1 on/off Free Free OSC 1 Phase OSC 2 Phase FM MIX Filter 1 Freq
REVERSE Free Free Free
REVERSE Free Free Free
FILTER
LFOS RATE
CHAOS
PATERN
FILTER
LFOS DEPTH
CHAOS
REPEAT
FILTER
LFOS WAVE
CHAOS
REVERSE
CHAOS
DOWN/UP
SAMPLE
START
CHAOS
RANGE
CHAOS
PITCH
Filter 1
Resonace
POWER
FILTER
MODE
POWER
FILTER
CUTOFF
Filter 2 Freq
POWER
FILTER
DRIVE
POWER
FILTER
RESO
Filter 2
Resonace
Master
Resonance
POWER
FILTER GAIN
POWER
FILTER
WIDTH
Master
Resonance
Note Note Note Note Note Note Note Note
Note Note Note Note Note Note Note Note
Note Note Note Note Note Note Note Note
Note Note Note Note Note Note Note Note
Note Note Note Note Note Note Note Note
1 : These operations will overwrite the previous MIDI
Control settings. If necessary, back up the previous
controlMidi file.
2 : When the MIDI channel settings of the host application
and the plug-in software are the same, proper control may
not be available. Please change the MIDI channel setting
on either the host application or the plug-in software.
Please refer to the application's manual for the correct
setting.
Load the "StylusRMX_KORG.mlt_rmx" as the MIDI Learn
set file.
81
82 [Audio Level]
Steinberg
83 [MIDI Pan]
84 [MIDI Level]
Cubase
[Audio Pan]
Ch Ch:01G Ch:01G Ch:01G Ch:01G Ch:01G Ch:01G Ch:01G Ch:01G Ch:01G Ch:02 Ch:03 Ch:04 Ch:05 Ch:06 Ch:07 Ch:08 Ch:01G Ch:01G Ch:01G Ch:01G Ch:01G Ch:01G Ch:01G Ch:01G
CC#/
Off Off Off Off Off Off Off Off CC#10 CC#10 CC#10 CC#10 CC#10 CC#10 CC#10 CC#10 Off Off Off Off Off Off Off Off
Note
Name Free Free Free Free Free Free Free Free Audio Level 1 Audio Level 2 Audio Level 3 Audio Level 4 Audio Level 5 Audio Level 6 Audio Level 7 Audio Level 8 Free Free Free Free Free Free Free Free
Ch Ch:01G Ch:01G Ch:01G Ch:01G Ch:01G Ch:01G Ch:01G Ch:01G Ch:01G Ch:02 Ch:03 Ch:04 Ch:05 Ch:06 Ch:07 Ch:08 Ch:01G Ch:01G Ch:01G Ch:01G Ch:01G Ch:01G Ch:01G Ch:01G
CC#/
Off Off Off Off Off Off Off Off CC#7 CC#7 CC#7 CC#7 CC#7 CC#7 CC#7 CC#7 Off Off Off Off Off Off Off Off
Note
Name Free Free Free Free Free Free Free Free MIDI Pan1 MIDI Pan2 MIDI Pan3 MIDI Pan4 MIDI Pan5 MIDI Pan6 MIDI Pan7 MIDI Pan8 Free Free Free Free Free Free Free Free
Ch Ch:01G Ch:01G Ch:01G Ch:01G Ch:01G Ch:01G Ch:01G Ch:01G Ch:01G Ch:02 Ch:03 Ch:04 Ch:05 Ch:06 Ch:07 Ch:08 Ch:01G Ch:01G Ch:01G Ch:01G Ch:01G Ch:01G Ch:01G Ch:01G
CC#/
Off Off Off Off Off Off Off Off CC#41 CC#41 CC#41 CC#41 CC#41 CC#41 CC#41 CC#41 Off Off Off Off Off Off Off Off
Note
Name Free Free Free Free Free Free Free Free MIDI Level 1 MIDI Level 2 MIDI Level 3 MIDI Level 4 MIDI Level 5 MIDI Level 6 MIDI Level 7 MIDI Level 8 Free Free Free Free Free Free Free Free
Ch Ch:01G Ch:01G Ch:01G Ch:01G Ch:01G Ch:01G Ch:01G Ch:01G Ch:01G Ch:02 Ch:03 Ch:04 Ch:05 Ch:06 Ch:07 Ch:08 Ch:01G Ch:01G Ch:01G Ch:01G Ch:01G Ch:01G Ch:01G Ch:01G
CC#/
Off Off Off Off Off Off Off Off CC#35 CC#35 CC#35 CC#35 CC#35 CC#35 CC#35 CC#35 Off Off Off Off Off Off Off Off
Note
First, you need to install the KORG USB/MIDI driver.
1; Select "Device Setup..." from the "Devices" menu and
open the "Device setup" dialog. Select "Generic Remote"
from the "Devices" list in the left column. Select "keyboard"
for the "MIDI input" and press the "Import" button. Load
"Cubase_KORG.xmll". (If you do not find "Generic
Remote" in the left column, please add it using the
"Add/Remove" function.)
2; Press the "Apply" button.
Page 10

M3 External Setups
Manufacturers
85 A1
86 Monologue
87 Tonic
88 Embracer
Steinberg
89 Groove Agent
90 HALion
91
Product
Name
Hypersonic
Scene
Variation
Switches Sliders Pads
12345678 1234567812345678 HINT
Name Free Free Free Free Free Free Free Free
Ch Ch:01G Ch:01G Ch:01G Ch:01G Ch:01G Ch:01G Ch:01G Ch:01G Ch:01G Ch:01G Ch:01G Ch:01G Ch:01G Ch:01G Ch:01G Ch:01G Ch:01G Ch:01G Ch:01G Ch:01G Ch:01G Ch:01G Ch:01G Ch:01G
CC#/
Off Off Off Off Off Off Off Off CC#77 CC#74 CC#71 CC#29 CC#37 CC#38 CC#24 CC#25 C4 D4 E4 F4 G4 A4 B4 C5
Note
Name Free Free Free Free Free Free Free Free
Ch Ch:01G Ch:01G Ch:01G Ch:01G Ch:01G Ch:01G Ch:01G Ch:01G Ch:01G Ch:01G Ch:01G Ch:01G Ch:01G Ch:01G Ch:01G Ch:01G Ch:01G Ch:01G Ch:01G Ch:01G Ch:01G Ch:01G Ch:01G Ch:01G
CC#/
Off Off Off Off Off Off Off Off CC#103 CC#19 CC#105 CC#70 CC#15 CC#93 CC#12 CC#91 C4 D4 E4 F4 G4 A4 B4 C5
Note
Name Free Free Free Free Free Free Free Free
Ch Ch:01G Ch:01G Ch:01G Ch:01G Ch:01G Ch:01G Ch:01G Ch:01G Ch:01G Ch:01G Ch:01G Ch:01G Ch:01G Ch:01G Ch:01G Ch:01G Ch:01G Ch:01G Ch:01G Ch:01G Ch:01G Ch:01G Ch:01G Ch:01G
CC#/
Off Off Off Off Off Off Off Off CC#73 CC#72 CC#71 CC#74 CC#70 CC#77 CC#76 CC#82 C4 D4 E4 F4 G4 A4 B4 C5
Note
Name Free Free Free Free Free Free Free Free OSC1 WAVE OSC1 TONE OSC1 WIDTH OSC2 WAVE OSC1 TONE
Ch Ch:01G Ch:01G Ch:01G Ch:01G Ch:01G Ch:01G Ch:01G Ch:01G Ch:01G Ch:01G Ch:01G Ch:01G Ch:01G Ch:01G Ch:01G Ch:01G Ch:01G Ch:01G Ch:01G Ch:01G Ch:01G Ch:01G Ch:01G Ch:01G
CC#/
Off Off Off Off Off Off Off Off CC#9 CC#74 CC#16 CC#14 CC#76 CC#83 CC#18 CC#72 C4 D4 E4 F4 G4 A4 B4 C5
Note
Name Kik Mute Snare Mute Tom Mute Hi-Hat Mute Ride Mute Crash Mute Perc 1 Mute Perc 2 Mute Kik Volume
Ch Ch:01G Ch:02 Ch:03 Ch:04 Ch:05 Ch:06 Ch:07 Ch:08 Ch:01G Ch:02 Ch:03 Ch:04 Ch:05 Ch:06 Ch:07 Ch:08 Ch:01G Ch:01G Ch:01G Ch:01G Ch:01G Ch:01G Ch:01G Ch:01G
CC#/
CC#69 CC#69 CC#69 CC#69 CC#69 CC#69 CC#69 CC#69 CC#73 CC#73 CC#73 CC#73 CC#73 CC#73 CC#73 CC#73 Off Off Off Off Off Off Off Off
Note
Name Free Free Free Free Free Free Free Free
Ch Ch:01G Ch:01G Ch:01G Ch:01G Ch:01G Ch:01G Ch:01G Ch:01G Ch:01G Ch:01G Ch:01G Ch:01G Ch:01G Ch:01G Ch:01G Ch:01G Ch:01G Ch:01G Ch:01G Ch:01G Ch:01G Ch:01G Ch:01G Ch:01G
CC#/
Off Off Off Off Off Off Off Off CC#74 CC#71 CC#15 CC#80 CC#83 CC#89 CC#70 CC#7 Off Off Off Off Off Off Off Off
Note
Name Free Free Free Free Free Free Free Free
Ch Ch:01G Ch:01G Ch:01G Ch:01G Ch:01G Ch:01G Ch:01G Ch:01G Ch:01G Ch:01G Ch:01G Ch:01G Ch:01G Ch:01G Ch:01G Ch:01G Ch:01G Ch:01G Ch:01G Ch:01G Ch:01G Ch:01G Ch:01G Ch:01G
CC#/
Off Off Off Off Off Off Off Off CC#74 CC#71 CC#77 CC#78 CC#73 CC#75 CC#72 CC#7 Off Off Off Off Off Off Off Off
Note
Name Free Free Free Free Free Free Free Free Shuffle Dynamics Timing Decay Stereo Width Presence Low Cut Mic Position Free Free Free Free Free Free Free Free
Oscillator 1
DEPTH
ENV MOD
ATTACK
CUTOFF
GM Edit:
FM
OSC1
DCF
cutoff
Filter Cutoff
OSC2 PWM
ENV MOD
RELEASE
Snare
Volume
DCF
RESONANCE
GM Edit:
resonance
Filter
Resonance
DEPTH
Tom Volume
VELOCITY
GM Edit: filt
env att
Filter Drive
OSC2
FX OVER
DRIVE
RES CUTOFF DRIVE
Hi-Hat
Volume
DCF
DCF ENV.
AMOUNT
GM Edit: filt
env dec+rel
Fitler Env
Attack
FX DEPTH FX MIX DELAY FBK DELAY MIX Note Note Note Note Note Note Note Note
Ride Volume
Envelope1 A
GM Edit: amp
env att
DCF
Filter Env
Decay
LFO MOD
DEPTH
OSC1
COARSE
Crash
Volume
DCF
Envelope1 D
GM Edit: amp
env dec
Amp Env
Attack
LFO MOD
RATE
OSC1 WIDTH
Perc 1
Volume
DCA ENV.
AMOUNT
GM Edit: amp
env rel
Amp Env
Decay
LFO MOD
STEPS
MASTER
RELEASE
Perc 2
Volume
VOLUME Free Free Free Free Free Free Free Free
Volume Free Free Free Free Free Free Free Free
Note Note Note Note Note Note Note Note
Note Note Note Note Note Note Note Note
Note Note Note Note Note Note Note Note
Free Free Free Free Free Free Free Free
1 : These operations will overwrite the previous MIDI
Control settings. If necessary, back up the previous
controlMidi file.
2 : When the MIDI channel settings of the host application
and the plug-in software are the same, proper control may
not be available. Please change the MIDI channel setting
on either the host application or the plug-in software.
Please refer to the application's manual for the correct
setting.
In the host application, change the MIDI output channel for
the MIDI track you want to use "Groove Agent" on to "ANY"
or other multi-channel outputs.
Enable "RECEIVE MIDI CONTROLLER" in
"KEY/CONTROL OPTION" of the "OPTIONS" page.
92 Virtual Guitarist
93 Attack
Waldorf
94 PPG Wave 2.V
Ch Ch:01G Ch:01G Ch:01G Ch:01G Ch:01G Ch:01G Ch:01G Ch:01G Ch:01G Ch:01G Ch:01G Ch:01G Ch:01G Ch:01G Ch:01G Ch:01G Ch:01G Ch:01G Ch:01G Ch:01G Ch:01G Ch:01G Ch:01G Ch:01G
CC#/
Off Off Off Off Off Off Off Off CC#76 CC#79 CC#78 CC#75 CC#74 CC#81 CC#80 CC#82 Off Off Off Off Off Off Off Off
Note
Name Free Free Free Free Free Free Free Free Osc 1 Pitch Osc 1 Level Osc 2 Pitch Osc 2 Level Osc 1 P Env Osc 2 P Env Cutoff Resonance Note Note Note Note Note Note Note Note
Ch Ch:01G Ch:01G Ch:01G Ch:01G Ch:01G Ch:01G Ch:01G Ch:01G Ch:01G Ch:01G Ch:01G Ch:01G Ch:01G Ch:01G Ch:01G Ch:01G Ch:01G Ch:01G Ch:01G Ch:01G Ch:01G Ch:01G Ch:01G Ch:01G
CC#/
Off Off Off Off Off Off Off Off CC#13 CC#28 CC#22 CC#30 CC#14 CC#23 CC#37 CC#38 C4 D4 E4 F4 G4 A4 B4 C5
Note
Name Free Free Free Free Free Free Free Free BASIS
Ch Ch:01G Ch:01G Ch:01G Ch:01G Ch:01G Ch:01G Ch:01G Ch:01G Ch:01G Ch:01G Ch:01G Ch:01G Ch:01G Ch:01G Ch:01G Ch:01G Ch:01G Ch:01G Ch:01G Ch:01G Ch:01G Ch:01G Ch:01G Ch:01G
CC#/
Off Off Off Off Off Off Off Off CC#8 CC#74 CC#71 CC#28 CC#26 CC#27 CC#30 CC#7 C4 D4 E4 F4 G4 A4 B4 C5
Note
VCF-
CUTOFF
VCF-
EMPHASIS
ENV1>VCF WAVES-OSC WAVES-SUB
ENV1>WAVES
VOLUME Note Note Note Note Note Note Note Note
In the host application, change the MIDI output channel for
the MIDI track on which "Attack" is used for each of the
sounds that you want to remote-control such as kick, snare,
drum, etc.
Page 11

M3 External Setups
Manufacturers
Product
Name
Scene
Variation
Switches Sliders Pads
12345678 1234567812345678 HINT
Name Free Free Free Free Free Free Free Free Free Free Free Free Free Free Free Free Bass Drum Snare Drum Open HH Closed HH Tom2 Tom3 Crach Cymbal Ride Cymbal
1 : These operations will overwrite the previous MIDI
Control settings. If necessary, back up the previous
controlMidi file.
2 : When the MIDI channel settings of the host application
and the plug-in software are the same, proper control may
not be available. Please change the MIDI channel setting
on either the host application or the plug-in software.
Please refer to the application's manual for the correct
setting.
95
ToonTrack
96
97
98 [Volume]
99 Charlie
UltimateSoundBank
100 Ultra Focus
101 X-treme FX
dfh
EZ Drummer
PLUGSOUND PRO
[Pan]
Ch Ch:01G Ch:01G Ch:01G Ch:01G Ch:01G Ch:01G Ch:01G Ch:01G Ch:01G Ch:01G Ch:01G Ch:01G Ch:01G Ch:01G Ch:01G Ch:01G Ch:01G Ch:01G Ch:01G Ch:01G Ch:01G Ch:01G Ch:01G Ch:01G
CC#/
Off Off Off Off Off Off Off Off Off Off Off Off Off Off Off Off C2 G#1 F#4 C4 E2 G2 G5 F7
Note
Name Free Free Free Free Free Free Free Free Free Free Free Free Free Free Free Free Bass Drum Snare Drum Open HH Closed HH Hi Mid Tom Low Mid Tom Crach Cymbal Ride Cymbal
Ch Ch:01G Ch:01G Ch:01G Ch:01G Ch:01G Ch:01G Ch:01G Ch:01G Ch:01G Ch:01G Ch:01G Ch:01G Ch:01G Ch:01G Ch:01G Ch:01G Ch:01G Ch:01G Ch:01G Ch:01G Ch:01G Ch:01G Ch:01G Ch:01G
CC#/
Off Off Off Off Off Off Off Off Off Off Off Off Off Off Off Off B1 E2 A#2 F#2 C3 B2 C#3 D#3
Note
Name Free Free Free Free Free Free Free Free Timbre 1 Pan Timbre 2 Pan Timbre 3 Pan Timbre 4 Pan Timbre 5 Pan Timbre 6 Pan Timbre 7 Pan Timbre 8 Pan Note Note Note Note Note Note Note Note
Ch Ch:01G Ch:01G Ch:01G Ch:01G Ch:01G Ch:01G Ch:01G Ch:01G Ch:01G Ch:02 Ch:03 Ch:04 Ch:05 Ch:06 Ch:07 Ch:08 Ch:01G Ch:01G Ch:01G Ch:01G Ch:01G Ch:01G Ch:01G Ch:01G
CC#/
Off Off Off Off Off Off Off Off CC#10 CC#10 CC#10 CC#10 CC#10 CC#10 CC#10 CC#10 C4 D4 E4 F4 G4 A4 B4 C5
Note
Name Free Free Free Free Free Free Free Free
Ch Ch:01G Ch:01G Ch:01G Ch:01G Ch:01G Ch:01G Ch:01G Ch:01G Ch:01G Ch:02 Ch:03 Ch:04 Ch:05 Ch:06 Ch:07 Ch:08 Ch:01G Ch:01G Ch:01G Ch:01G Ch:01G Ch:01G Ch:01G Ch:01G
CC#/
Off Off Off Off Off Off Off Off CC#7 CC#7 CC#7 CC#7 CC#7 CC#7 CC#7 CC#7 C4 D4 E4 F4 G4 A4 B4 C5
Note
Name Free Free Free Free Free Free Free Free Filter Cutoff
Ch Ch:01G Ch:01G Ch:01G Ch:01G Ch:01G Ch:01G Ch:01G Ch:01G Ch:01G Ch:01G Ch:01G Ch:01G Ch:01G Ch:01G Ch:01G Ch:01G Ch:01G Ch:01G Ch:01G Ch:01G Ch:01G Ch:01G Ch:01G Ch:01G
CC#/
Off Off Off Off Off Off Off Off CC#77 CC#78 CC#74 CC#71 CC#81 CC#82 CC#73 CC#75 C4 D4 E4 F4 G4 A4 B4 C5
Note
Timbre 1
Volume
Timbre 2
Volume
Filter
Resonance
Filter
Resonance
Filter
Resonance
Timbre 3
Volume
Master filter
cutoff
Master filter
cut frequency
Master filter
cut frequency
Timbre 4
Volume
Master filter
resonance
Master filter
resonance
Master filter
resonance
Timbre 5
Volume
Layer one
level
Layer A Level Layer B Leve
Layer A Level Layer B Leve
Timbre 6
Volume
Layer two
level
Timbre 7
Volume
Amp
Envelope
Attack
Amp
Envelope
Attack
Amp
Envelope
Attack
Timbre 8
Volume
Amp
Envelope
Decay
Amp
Envelope
Decay
Amp
Envelope
Decay
Note Note Note Note Note Note Note Note
Note Note Note Note Note Note Note Note
Note Note Note Note Note Note Note Note
Note Note Note Note Note Note Note Note
Manufacturer Name
• KORG These product names are the trademark or a registered trademarks of KORG Inc.
• Ableton This product name is a trademark or a registered trademark of Ableton AG.
• Applied Acoustics Systems These product names are the trademark or a registered trademarks of Applied Acoustics Systems DVM Inc.
• Arturia These product names are the trademark or a registered trademarks of Arturia SA.
• Apple This product name is a trademark or a registered trademark of Apple Computer, Inc.
• Fxpansion This product name is a trademark or a registered trademark of FXpansion Audio UK Ltd.
• GMEDIA These product names are the trademark or a registered trademarks of GMEDIA Music.
• Image-Line Software This product name is a trademark or a registered trademark of Image-Line Software.
• MOTU These product names are the trademark or a registered trademarks of Mark of the Unicorn, Inc.
• Native Instruments These product names are the trademark or a registered trademarks of Native Instruments Software Synthesis GmbH.
• Propellerhead These product names are the trademark or a registered trademarks of Propellerhead Software AB.
• Spectrasonics These product names are the trademark or a registered trademarks of Spectrasonics.
• Steinberg These product names are the trademark or a registered trademarks of Steinberg Media Technologies GmbH
• Waldorf and the Waldorf Logo are registered trademarks of Waldorf Music GmbH Germany.
• ToonTrack These product names are the trademark or a registered trademarks of Toontrack Music.
• UltimateSoundBank These product names are the trademark or a registered trademarks of Univers Sons, SA.
 Loading...