

Page 1

PageScope
My Panel Manager Ver. 3.0
User’s Guide
My Panel Manager
Page 2

Contents
1 General
1.1 What is My Panel Manager?..............................................................1-1
1.2 General setup operation.................................................................... 1-2
Device Manager settings................................................................ 1-2
1.2.1 My Panel Manager setting .............................................................. 1-2
2 Logging on
2.1 Logging on to Enterprise Suite ......................................................... 2-1
2.2 Basic Operations................................................................................2-2
2.2.1 Main Menu ...................................................................................... 2-2
2.2.2 Pages for the functions ..................................................................2-3
3 My Panel Manager operations
3.1 Available operations in the My Address page .................................3-1
3.2 Using an address book......................................................................3-3
3.2.1 Viewing the address book list ......................................................... 3-3
3.2.2 Registering an address book ..........................................................3-4
When "E-mail" is selected.............................................................. 3-5
When "Fax" is selected .................................................................. 3-7
When "WebDAV" is selected.......................................................... 3-9
When "PC (SMB)" is selected ...................................................... 3-11
When "FTP" is selected................................................................ 3-13
When "IP Address Fax" is selected.............................................. 3-16
When "Internet Fax" is selected ................................................... 3-18
3.2.3 Editing an address book ............................................................... 3-20
3.2.4 Deleting an address book .............................................................3-22
3.3 Using a group ................................................................................... 3-23
3.3.1 Viewing the group list ................................................................... 3-23
3.3.2 Registering a group ......................................................................3-24
3.3.3 Editing Group ...............................................................................3-25
3.3.4 Deleting a group ...........................................................................3-26
3.4 Using expansion functions.............................................................. 3-27
3.4.1 Selecting the expansion function ................................................. 3-27
My Panel Manager i
Page 3

3.4.2 Importing My Address .................................................................. 3-27
3.4.3 Viewing import results ..................................................................3-28
3.4.4 Exporting My Address .................................................................. 3-30
Export file formats ........................................................................ 3-31
Export file items (Address Book) .................................................. 3-31
Export file items (Group)............................................................... 3-37
3.5 Available operations in the My Panel page.................................... 3-38
3.6 Customizing My Panel.....................................................................3-40
3.6.1 Specifying the My Panel environment .......................................... 3-40
Screen example............................................................................ 3-41
3.6.2 Setting up the main menu ............................................................3-42
Screen example............................................................................ 3-43
3.6.3 Setting up the Copy screen .......................................................... 3-44
Shortcut keys in the Copy screen ................................................ 3-45
3.6.4 Setting up the Fax/Scan screen ...................................................3-46
Fax/Scan screen example............................................................ 3-47
Types of the Fax/Scan screen...................................................... 3-48
3.6.5 Setting up the User Box screen ...................................................3-51
User Box screen example ............................................................ 3-51
Types of the User Box screen ...................................................... 3-52
3.7 Specifying expansion functions......................................................3-54
3.7.1 Selecting the expansion function ................................................. 3-54
3.7.2 Importing My Panel ......................................................................3-54
3.7.3 Viewing import results ..................................................................3-55
3.7.4 Exporting My Panel ...................................................................... 3-56
Export file formats ........................................................................ 3-57
Export file items............................................................................ 3-57
3.8 Customizing Browser Data .............................................................3-62
3.8.1 Browser Setting ............................................................................3-62
4 Managing My Panel Manager
4.1 My Panel Manager administrative setting .......................................4-1
4.2 Specifying administrators of My Panel Manager ............................ 4-3
4.2.1 Viewing the administrator of My Panel Manager list ......................4-3
4.2.2 Adding an administrator ................................................................. 4-4
4.2.3 Canceling the administrator privileges ...........................................4-5
4.3 Specifying a device to be managed ................................................. 4-6
My Panel Manager ii
Page 4

4.3.1 Selecting a device .......................................................................... 4-6
4.3.2 Specifying device management information ..................................4-8
4.3.3 Displaying the device setting results .............................................. 4-9
4.4 Specifying the operating environment ...........................................4-10
4.5 Editing the address book of each user .......................................... 4-11
4.5.1 Displaying My Address users list ..................................................4-11
4.5.2 Editing an address book ............................................................... 4-13
4.5.3 Editing Group ...............................................................................4-14
4.5.4 Deleting My Address .................................................................... 4-14
4.6 Editing the panel settings for each user........................................ 4-15
4.6.1 Displaying a list of My Panel users ............................................... 4-15
4.6.2 Editing the System Settings ......................................................... 4-18
4.6.3 Editing the Select items to display in main menu ......................... 4-18
4.6.4 Editing the Main Menu Settings ................................................... 4-19
4.6.5 Editing Copy Setting ..................................................................... 4-21
4.6.6 Editing Fax/Scan Settings ............................................................ 4-22
4.6.7 Editing Box Settings ..................................................................... 4-23
4.6.8 Deleting My Panel .........................................................................4-23
4.6.9 Editing Browser Settings .............................................................. 4-24
4.7 Address Batch Setting..................................................................... 4-25
4.7.1 Selecting an import file .................................................................4-25
4.7.2 Selecting a target user ..................................................................4-26
4.7.3 Displaying batch setting result .....................................................4-27
4.7.4 Displaying an import file error ....................................................... 4-28
4.8 Specifying the panel batch setting ................................................. 4-29
4.8.1 Selecting an import file .................................................................4-29
4.8.2 Selecting a target user ..................................................................4-30
4.8.3 Displaying batch setting result .....................................................4-31
4.8.4 Displaying an import file error ....................................................... 4-32
4.9 Displaying the error history............................................................. 4-33
4.10 Specifying functions of My Panel Manager...................................4-34
4.11 Specifying the default value of My Address/My Panel .................4-37
4.12 Displaying the version information................................................. 4-39
4.13 ImageConverter................................................................................4-40
My Panel Manager iii
Page 5

4.13.1 Installation ....................................................................................4-40
4.13.2 Uninstallation ................................................................................4-41
4.13.3 Using ImageConverter .................................................................. 4-41
4.14 AddressImporter ..............................................................................4-43
4.14.1 Installation ....................................................................................4-43
4.14.2 Uninstallation ................................................................................4-44
4.14.3 Using AddressImporter ................................................................4-44
Select import method................................................................... 4-45
System Settings ........................................................................... 4-48
Select/register address book data ............................................... 4-49
Import Result ................................................................................ 4-50
5 Setting by purpose
5.1 I want to display the registered personal screen on the device....5-1
How to display the personal screen............................................... 5-1
5.2 I want to use the registered personal address book on
the device............................................................................................5-2
How to display the personal address book.................................... 5-2
5.3 I want to send scanned images to my E-mail address...................5-3
6 Troubleshooting
6.1 Problems on Administrative Setting................................................. 6-1
My Panel Manager iv
Page 6

About this product
My Panel Manager is network-based software used for managing personal
address books and panels used on MFPs and other devices. By using My
Panel Manager, the address information and panel settings of each user can
be managed easily in a Web browser.
My Panel Manager is an application that runs on Device Manager. Device
Manager must be installed in order to install My Panel Manager.
My Panel Manager v
Page 7

Abbreviation of product names
This manual describes product names using the following abbreviations.
Product name Abbrev.
KONICA MINOLTA PageScope Enterprise Suite Enterprise Suite
KONICA MINOLTA PageScope Net Care Device
Manager
KONICA MINOLTA PageScope Account Manager Account Manager
KONICA MINOLTA PageScope My Panel Manager My Panel Manager
KONICA MINOLTA ImageConverter ImageConverter
KONICA MINOLTA AddressImporter AddressImporter
Device Manager
My Panel Manager vi
Page 8

Trademarks and registered trademarks
Trademark acknowledgements
KONICA MINOLTA and KONICA MINOLTA logo are registered trademarks or
trademarks of KONICA MINOLTA HOLDINGS, INC.
PageScope is a registered trademark or trademark of KONICA MINOLTA
BUSINESS TECHNOLOGIES, INC.
Microsoft, Active Directory and Windows are either registered trademarks or
trademarks of Microsoft Corporation in the United States and/or other
countries.
All other company and product names are either trademarks or registered
trademarks of their respective companies.
Dialog boxes
The dialog boxes shown in this manual are those that appear in Windows XP.
!
Detail
The dialog boxes that appear in this document may differ from those that
appear on your computer, depending on the installed devices and
specified settings.
Note
Unauthorized reproduction, translation or duplication of this document,
whether in its entirety or in part, is strictly prohibited.
The content of this document is subject to change without notice.
Copyright © 2007 KONICA MINOLTA BUSINESS TECHNOLOGIES, INC. All
rights reserved.
My Panel Manager vii
Page 9

General
1 General
1.1 What is My Panel Manager?
My Panel Manager provides the following functions.
- My Address
Edits a personal address book (My Address) managed by the server
using a Web application. This is a function for general users.
- My Panel
Edits personal panel settings (My Panel) managed by the server using a
Web application. This is a function for general users.
- Administrative Setting
Specifies settings for devices managed by My Panel Manager or edits an
address book or panel settings for each user managed by My Panel
Manager using a Web application. This is a function for administrators.
1
My Panel Manager 1-1
Page 10

General
1.2 General setup operation
In order to use My Panel Manager, configure settings in the following order.
Device Manager settings
Log on to Device Manager as a system administrator, and then specify
settings for the following.
Function Description
Device List Refer to the Device Manager User's Guide.
User List
Server Settings
1.2.1 My Panel Manager setting
Log on to My Panel Manager as a system administrator, and then specify
settings for the following. The following settings are required to enable My
Panel Manager for general users.
- Device Management
Specifies devices for which My Address and My Panel are managed by
My Panel Manager. (p. 4-6)
- Operating environment settings
Specifies settings for the operating environment of My Panel Manager.
(p. 4-10)
1
My Panel Manager 1-2
Page 11

Logging on
2 Logging on
This chapter provides details on logging on to My Panel Manager.
2.1 Logging on to Enterprise Suite
For details on logging on to the Enterprise Suite server, refer to the Device
Manager User's Guide.
2
My Panel Manager 2-1
Page 12
Logging on
2.2 Basic Operations
The basic operation of My Panel Manager is described below.
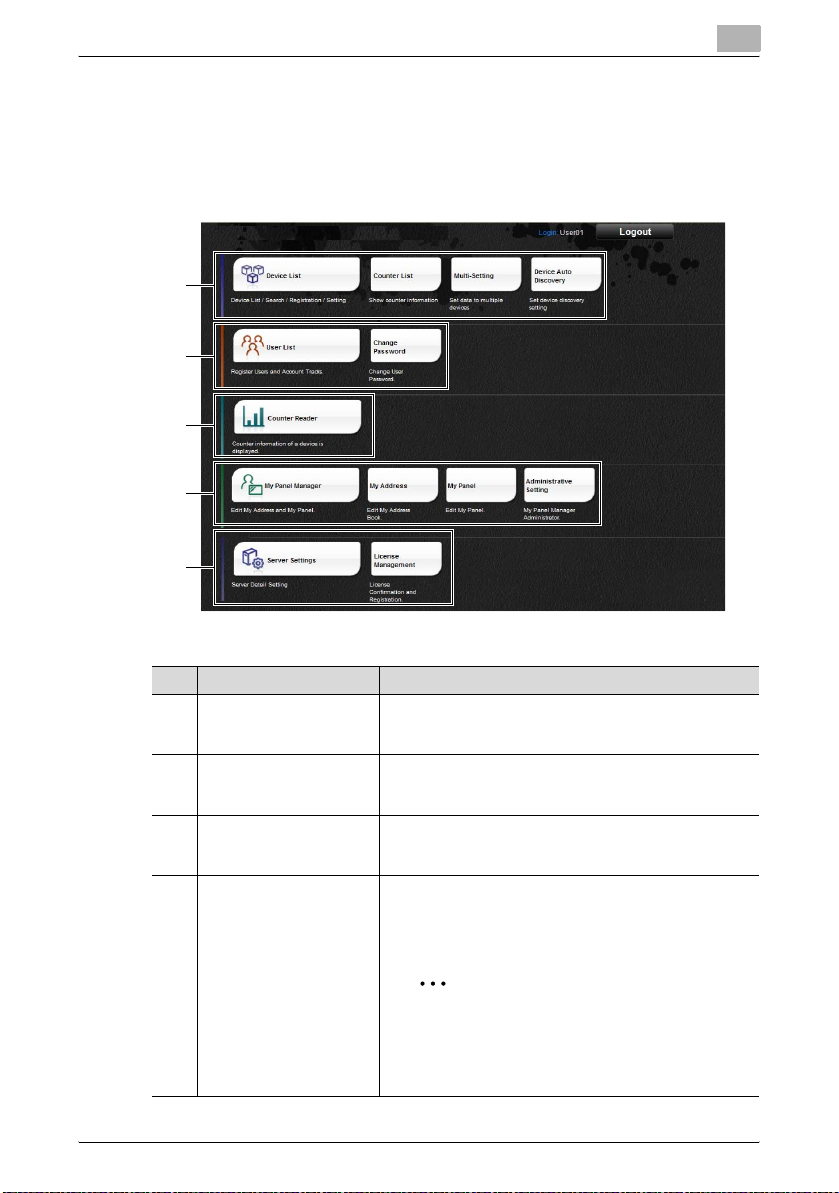
2.2.1 Main Menu
1
2
3
4
5
2
No. Function Description
1 Device List Registers and manages devices. For details, refer to the
2 User List Registers and manages users. For details, refer to the
3 Counter Reader Checks the device usage status. For details, refer to the
4 My Panel Manager Specifies panel settings and manages an address book for
chapter related to Device List in the Device Manager User's
Guide.
chapter related to User List in the Device Manager User's
Guide.
chapter related to Counter Reader in the Device Manager
User's Guide.
the each user. It also specifies administrator settings for My
Panel Manager. For details, refer to "3 My Panel Manager
operations" and "4 Managing My Panel Manager".
2
Reminder
When logged on as a general user (except for
My Panel Manager administrator), only the address book and panel settings registered for
that user's account can be edited.
My Panel Manager 2-2
Page 13
Logging on
No. Function Description
5 Server Settings Sets up the Enterprise Suite server. For details, refer to the
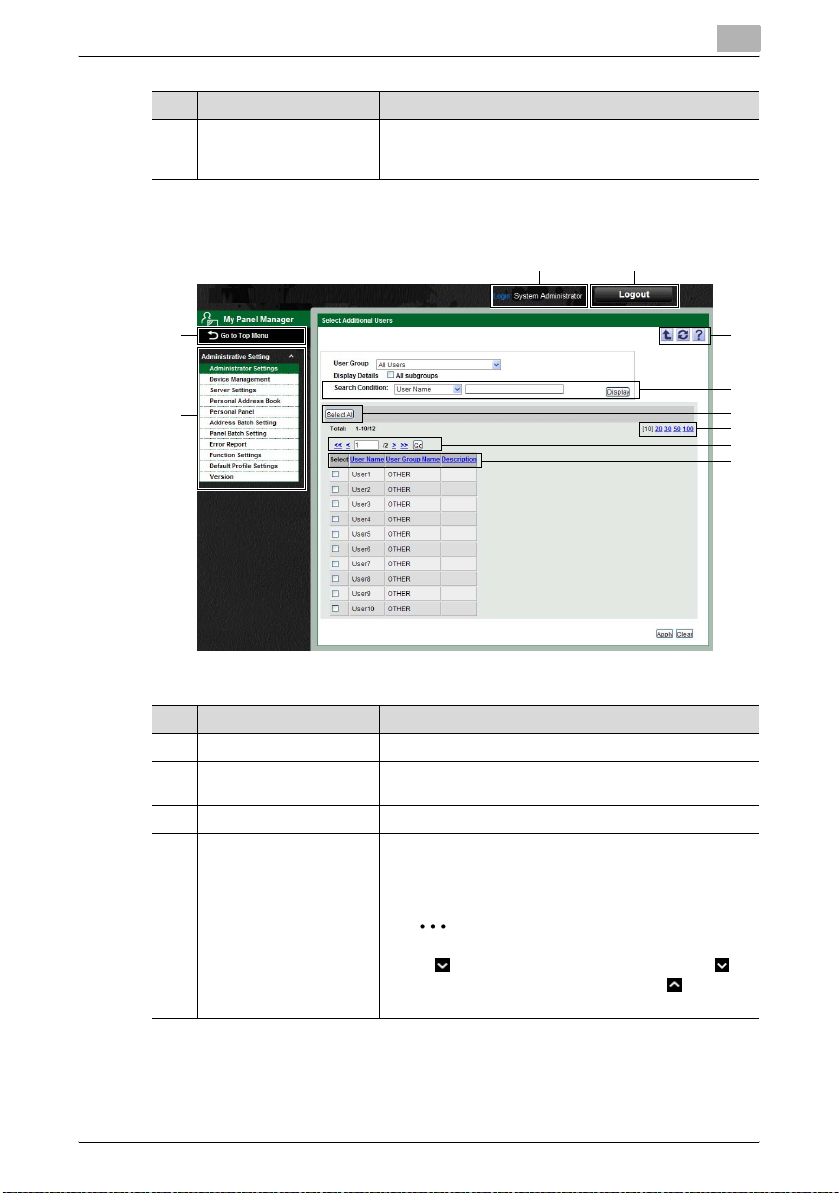
2.2.2 Pages for the functions
2
chapter related to Server Settings in the Device Manager
User's Guide.
12
3
4
No. Function Description
1 Login user name Displays the name of the user who is logged in.
2 [Logout] button Click this button to log off of My Panel Manager and display
3 [Go to Top Menu] button Click this button to move to the Top Menu page.
4 Menu The menu items are displayed.
the Login page.
Click a menu item to display details on the right side of the
page.
5
6
7
8
9
10
2
Note
If appears beside the menu title, click to
display the collapsed menu. Click to close
the menu.
My Panel Manager 2-3
Page 14
Logging on
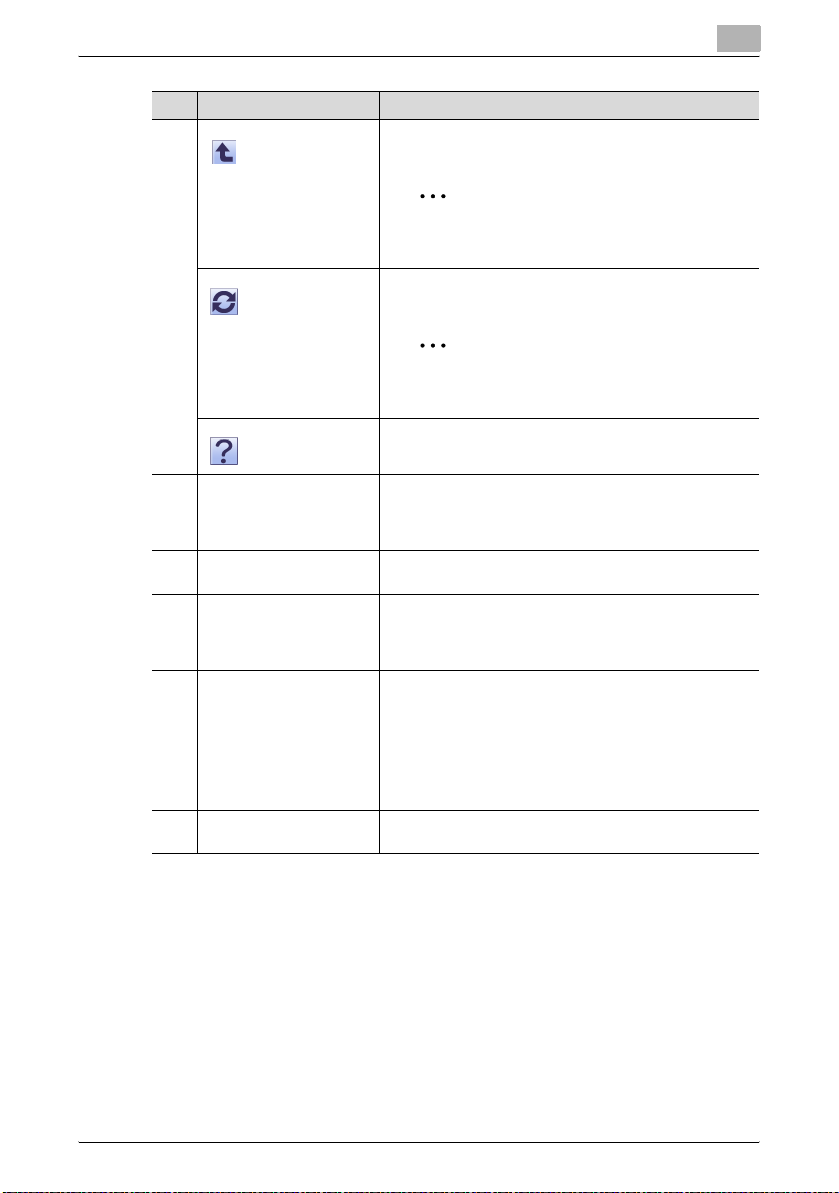
No. Function Description
5 Click this button to display the page for the item one level
higher in the menu.
2
Note
The "Back" button of the Web browser cannot
be used.
Click this button to update the information in the current
page.
2
Note
The "Refresh" button of the Web browser cannot be used.
Click this button to display the Help information for the current page.
2
6 Search Condition When a list is displayed in the page, the listed items can be
7 [Select All/Uncheck all]
button
8 Maximum number of dis-
played lines
9 Page selection These buttons appear when the list displayed in the page
10 Sort When a list is displayed in the page, click an item name in
narrowed.
Select a column to search from the drop-down list, and
then type in the text to be searched for in the text box.
When a list is displayed in the page, all items can be selected or cleared.
When a list is displayed in the page, select the number of
data items displayed in the list.
For example, if "10" is clicked, ten data items are displayed
in the current page.
extends over multiple pages.
• Click the [<] button to display the previous page.
• Click the [>] button to display the next page.
• Click the [<<] button to display the first page.
• Click the [>>] button to display the last page.
• Type the desired page number in the text box, and then
click the [Go] button to display the specified page.
the list to sort the entire list using the item as a sort key.
My Panel Manager 2-4
Page 15
My Panel Manager operations
3 My Panel Manager operations
3.1 Available operations in the My Address page
My Address is a personal address book managed in a server. Because only
the registered destinations of the user are displayed in My Address, it is easy
to select the destination.
Every user can edit My Address using a Web application and use My
Address within a range of devices selected in Administrative Setting. A
general user can edit the following items using a Web application.
2
Note
To use an address book edited by My Panel Manager on each device, the
relevant device must be specified as a device to be managed by My
Address Book function in Administrative Setting.
3
My Panel Manager 3-1
Page 16

My Panel Manager operations
Function Details
Address Book Registers a new address book, or edits or deletes the ex-
Group Registers a new group, or edits or deletes the existing data.
Expansion Function Imports or exports My Address data.
2
Reminder
My Address can be edited from the panel of the target device. For details,
refer to chapters on My Address in the User's Guide (for expansion
functions) that comes with your device.
2
Reminder
Some of the functions specified here may not be available on some
devices. For details on device functions, refer to the user's guide that
comes with your device.
2
Note
If editing is disabled for a particular user in Administrative Setting, the
user cannot edit the personal My Address. Even if an edit-disabled user
attempts to edit from the panel on the target device, the setting is not
reflected in My Panel Manager. (p. 4-11)
3
isting data.
My Panel Manager 3-2
Page 17
My Panel Manager operations
3.2 Using an address book
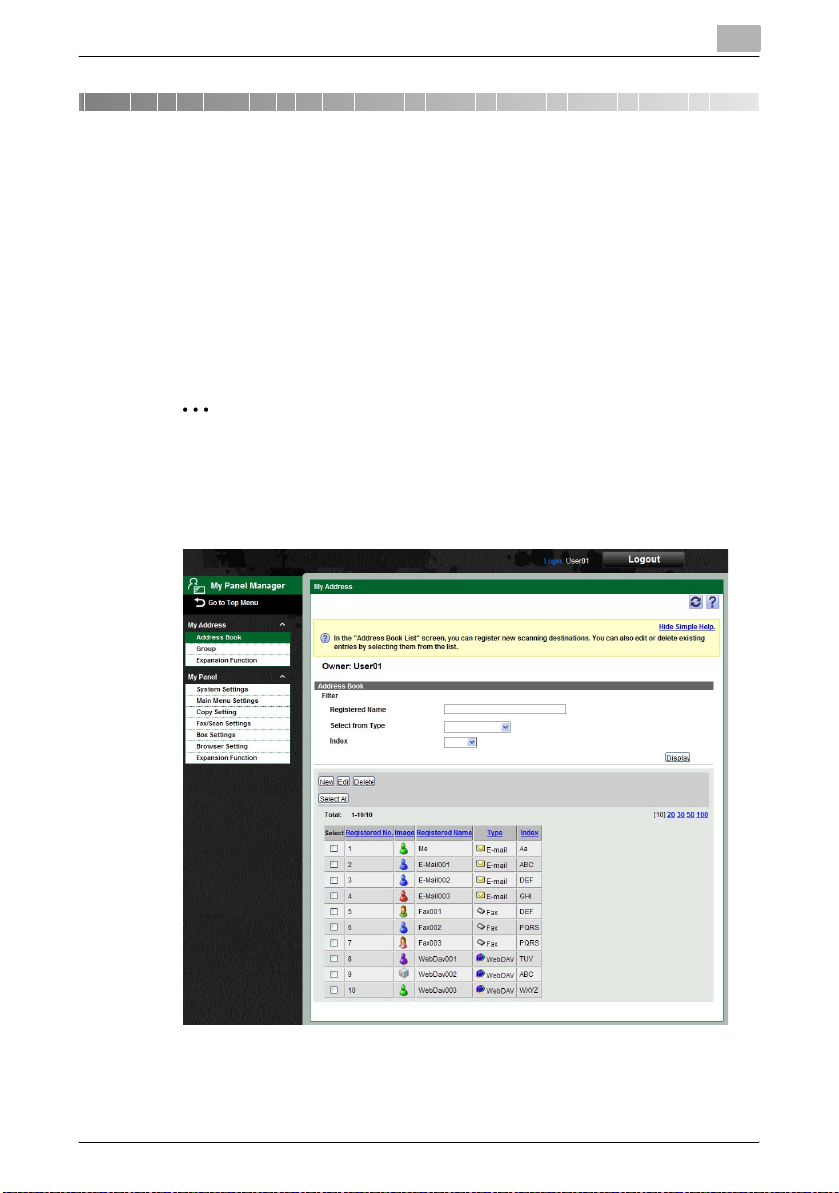
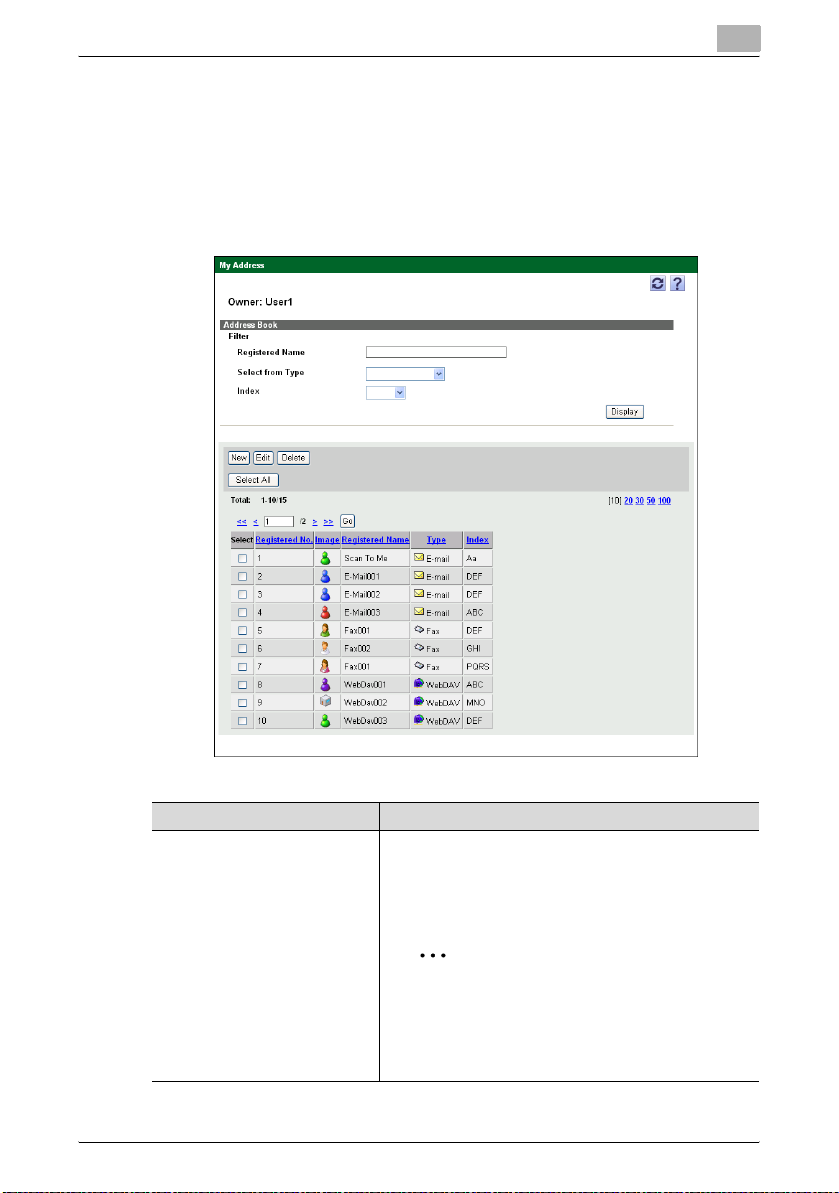
3.2.1 Viewing the address book list
Clicking [Address Book] on the "My Address" menu displays the Address
Book page. On this page, the following operations can be executed for
desired purposes.
3
Function Details
Filter
(Registered Name/Select from
Type/Index)
Specify the address book search conditions.
Registered Name: Type in the keyword to search for registered name.
Select from Type: Select the type.
Index: Select a letter.
2
Reminder
When searching by registered name, address
books including the entered keyword are listed.
If multiple conditions are specified, address
books matching all conditions are listed.
My Panel Manager 3-3
Page 18

My Panel Manager operations
Function Details
[Display] button Displays address books matching the specified search
[New] button Registers a new address book. For details, refer to "Regis-
[Edit] button Edits the address book selected in the Address Book List.
conditions.
tering an address book" on page 3-4.
For details, refer to "Editing an address book" on
page 3-20.
2
Reminder
Multiple address books cannot be edited at the
same time.
[Delete] button Deletes the address book selected in the Address Book
[Select All/Uncheck all] button Selects all address books displayed in the Address Book
Address Book List Displays a list of address books registered in My Address.
3.2.2 Registering an address book
Clicking the [New] button on the Address Book page displays the New
Address Book page. On this page, a new address book can be registered in
My Address. Select the type according to the purpose of the address book
to be registered. The settings to be displayed differ depending on the
selected type.
List. For details, refer to "Deleting an address book" on
page 3-22.
List. Clicking this button again cancels all selections.
Select the check box, and then select the address book to
be edited or deleted.
3
2
Reminder
Up to 100 address books can be registered for each user.
To select the type, select one of the following from the drop-down list, and
then click the [Change Type] button.
Function Details
E-mail Registers an address book for sending E-mails. For details,
Fax Registers an address book for Fax. For details, refer to
WebDAV Registers an address book for WebDAV. For details, refer
PC (SMB) Registers an address book for PC (SMB). For details, refer
My Panel Manager 3-4
refer to "When "E-mail" is selected" on page 3-5.
"When "Fax" is selected" on page 3-7.
to "When "WebDAV" is selected" on page 3-9.
to "When "PC (SMB)" is selected" on page 3-11.
Page 19
My Panel Manager operations
Function Details
FTP Registers an address book for FTP. For details, refer to
IP Address Fax Registers an address book for IP Address Fax. For details,
Internet Fax Registers an address book for Internet Fax. For details, re-
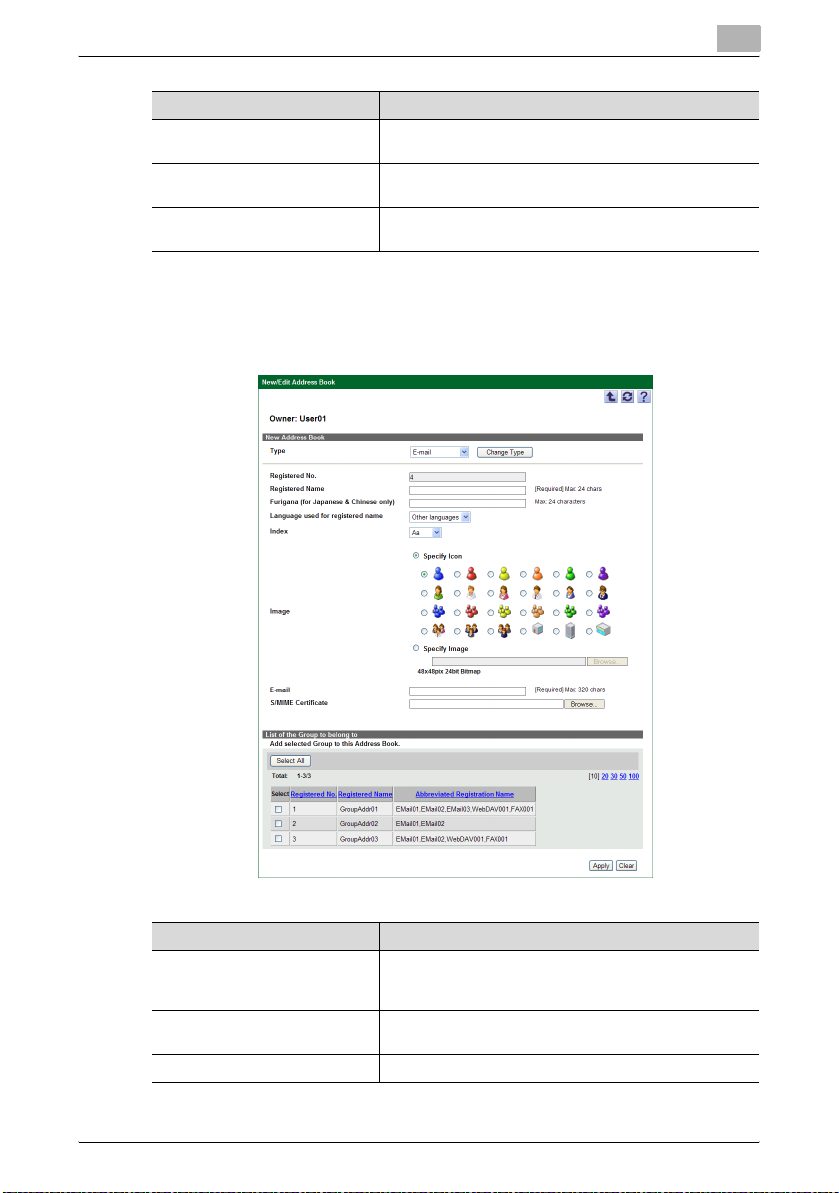
When "E-mail" is selected
When "E-mail" is selected in "Type", the following items appear on the page.
Specify the settings according to the desired purpose.
3
"When "FTP" is selected" on page 3-13.
refer to "When "IP Address Fax" is selected" on page 3-16.
fer to "When "Internet Fax" is selected" on page 3-18.
Function Details
Type Select the type of address book to be registered. Click the
Registered No. Displays the registered number assigned automatically
Registered Name Type in the name of the address book.
[Change Type] button to change the items (settings) on the
page.
(cannot be changed).
My Panel Manager 3-5
Page 20

My Panel Manager operations
Function Details
Furigana (for Japanese & Chinese
only)
Language used for registered
name
Index Select an index letter. The selected letter is used as an ad-
Image Select an image. To use a supplied icon, select [Specify
E-mail Type in the destination of E-mail.
S/MIME Certificate Click the [Browse] button to specify the S/MIME Certificate
[Select All/Uncheck all] button Selects all groups displayed in the Group List. Clicking this
Group List Displays a list of groups registered in My Address. Select
[Apply] button Registers the address book with the specified settings.
[Clear] button Clears the specified settings and reverts to the initial set-
Enter the same name as that used for the registered name.
Addresses can be sorted by registered name.
Select whether or not the language used for registered
names is Chinese or a language other than Chinese.
dress book search condition.
Icon], and then select an icon. To use any other image, select [Specify Image], and then click the [Browse] button to
specify the image file (24-bit BMP (Bitmap) file of 48 x 48
pixels).
2
Reminder
To change the image registered in the address
book, select [Edit], and then specify the image
file.
file. The destination specified in the S/MIME certificate and
the e-mail destination must be the same.
2
Reminder
To change the S/MIME Certificate registered for
the address book, select [Edit], and then specify
the S/MIME Certificate file.
button again cancels all selections.
the check box, and then select the group where the address book currently specified is registered.
tings.
3
My Panel Manager 3-6
Page 21
My Panel Manager operations
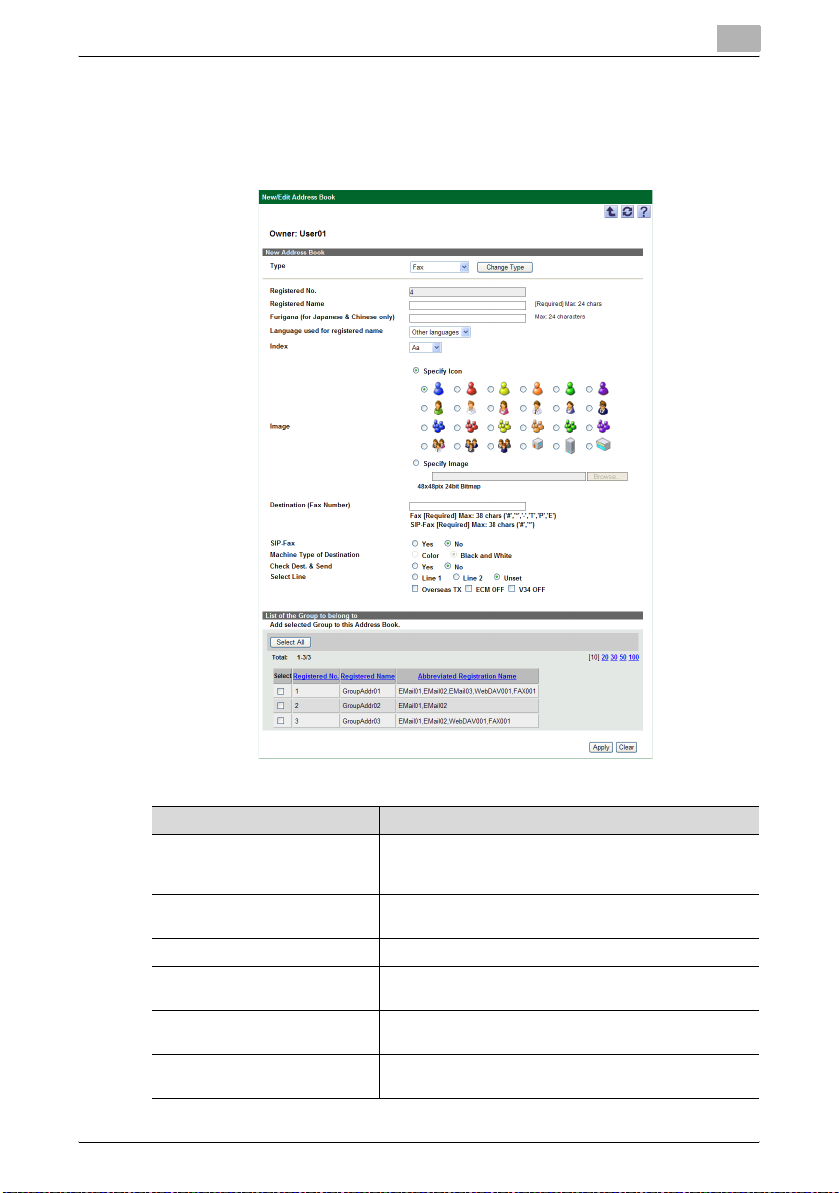
When "Fax" is selected
When "Fax" is selected in "Type", the following appear on the page. Specify
the settings according to the desired purpose.
3
Function Details
Type Select the type of address book to be registered. Click the
Registered No. Displays the registered number assigned automatically
Registered Name Type in the name of the address book.
Furigana (for Japanese & Chinese
only)
Language used for registered
name
Index Select an index letter. The selected letter is used as an ad-
[Change Type] button to change the items (settings) on the
page.
(cannot be changed).
Enter the same name as that used for the registered name.
Addresses can be sorted by registered name.
Select whether or not the language used for registered
names is Chinese or a language other than Chinese.
dress book search condition.
My Panel Manager 3-7
Page 22

My Panel Manager operations
Function Details
Image Select an image. To use a supplied icon, select [Specify
Destination (Fax Number) Type in the destination of a fax (fax number).
SIP-Fax Select to enable or disable SIP-Fax Transmission.
Machine Type of Destination Select [Color] when the destination is a color device, or se-
Check Dest. & Send Select to enable or disable Check Dest. & Send.
Select Line Select the line to be used. Selecting [Overseas TX] enables
[Select All/Uncheck all] button Selects all groups displayed in the Group List. Clicking this
Group List Displays a list of groups registered in My Address. Select
[Apply] button Registers the address book with the specified settings.
[Clear] button Clears the specified settings and reverts to the initial set-
Icon], and then select an icon. To use any other image, select [Specify Image], and then click the [Browse] button to
specify the image file (24-bit BMP (Bitmap) file of 48 x 48
pixels).
2
Reminder
To change the image registered in the address
book, select [Edit], and then specify the image
file.
lect [Black and White] when the destination is a black-andwhite device.
2
Reminder
This function can only be set when SIP-Fax
Transmission is enabled.
2
Reminder
This function can only be set when SIP-Fax
Transmission is disabled.
the Overseas TX mode. Selecting [ECM OFF] disables the
ECM mode. Selecting [V34 OFF] disables the V34 mode.
2
Reminder
This function can only be set when SIP-Fax
Transmission is disabled.
The ECM and V34 modes cannot be disabled at
the same time.
button again cancels all selections.
the check box, and then select the group where the address book currently specified is registered.
tings.
3
My Panel Manager 3-8
Page 23
My Panel Manager operations
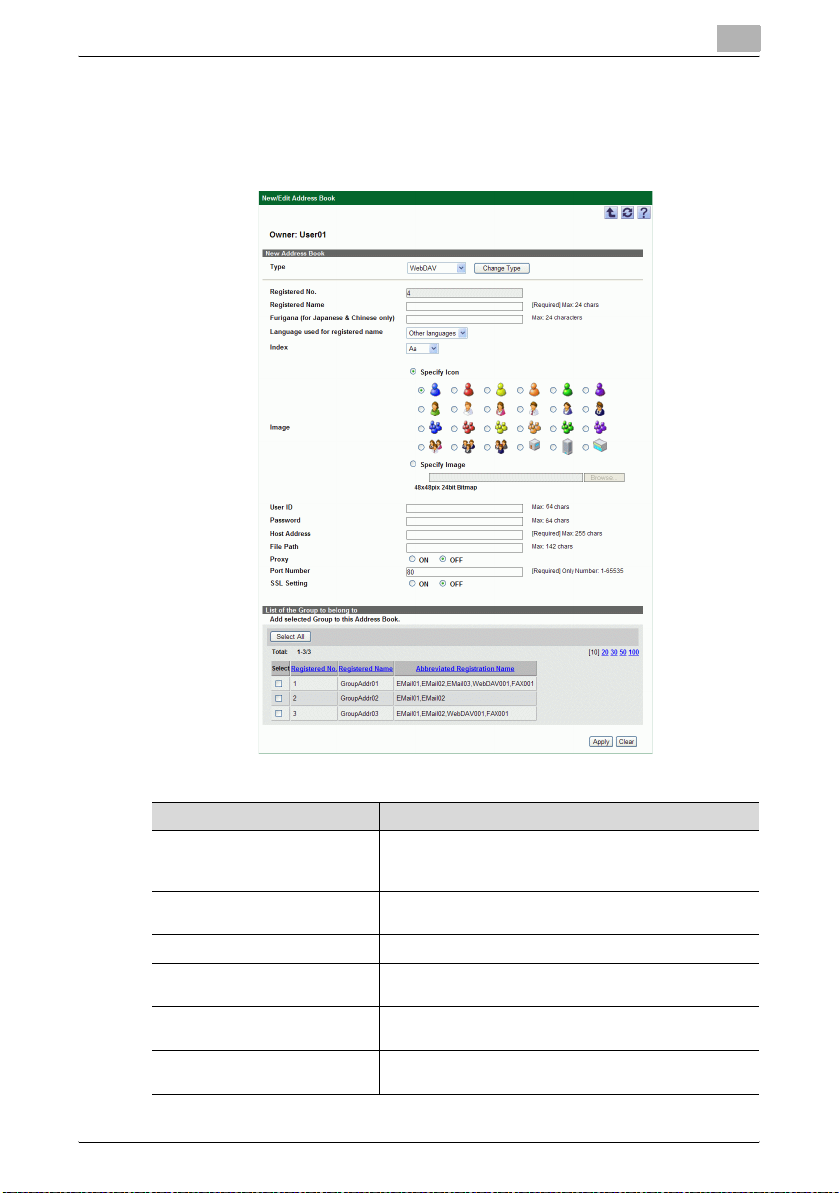
When "WebDAV" is selected
When "WebDAV" is selected in "Type", the following appear on the page.
Specify the settings according to the desired purpose.
3
Function Details
Type Select the type of address book to be registered. Click the
Registered No. Displays the registered number assigned automatically
Registered Name Type in the name of the address book.
Furigana (for Japanese & Chinese
only)
Language used for registered
name
Index Select an index letter. The selected letter is used as an ad-
[Change Type] button to change the items (settings) on the
page.
(cannot be changed).
Enter the same name as that used for the registered name.
Addresses can be sorted by registered name.
Select whether or not the language used for registered
names is Chinese or a language other than Chinese.
dress book search condition.
My Panel Manager 3-9
Page 24

My Panel Manager operations
Function Details
Image Select an image. To use a supplied icon, select [Specify
User ID Type in the user ID to connect to the WebDAV server.
Password Type in the password to connect to the WebDAV server.
Icon], and then select an icon. To use any other image, select [Specify Image], and then click the [Browse] button to
specify the image file (24-bit BMP (Bitmap) file of 48 x 48
pixels).
2
Reminder
To change the image registered in the address
book, select [Edit], and then specify the image
file.
2
Note
The maximum number of characters allowed
varies depending on the device. Note that a
one-touch destination whose name contains a
number of characters that exceeds the maximum is not sent to the device.
2
Reminder
To change the password registered for the address book, select [Edit], and then type in the
new password.
3
2
Note
The maximum number of characters allowed
varies depending on the device. Note that a
one-touch destination whose name contains a
number of characters that exceeds the maximum is not sent to the device.
Host Address Type in the host address of the WebDAV server.
2
Note
The maximum number of characters allowed
varies depending on the device. Note that a
one-touch destination whose name contains a
number of characters that exceeds the maximum is not sent to the device.
File Path Type in the file path.
Proxy Select to enable or disable the proxy.
My Panel Manager 3-10
Page 25

My Panel Manager operations
Function Details
Port Number Type in the port number.
SSL Setting Select to enable or disable the SSL setting.
[Select All/Uncheck all] button Selects all groups displayed in the Group List. Clicking this
Group List Displays a list of groups registered in My Address. Select
[Apply] button Registers the address book with the specified settings.
[Clear] button Clears the specified settings and reverts to the initial set-
When "PC (SMB)" is selected
When "PC (SMB)" is selected in "Type", the following appear on the page.
Specify the settings according to the desired purpose.
button again cancels all selections.
the check box, and then select the group where the address book currently specified is registered.
tings.
3
My Panel Manager 3-11
Page 26

My Panel Manager operations
Function Details
Type Select the type of address book to be registered. Click the
Registered No. Displays the registered number assigned automatically
Registered Name Type in the name of the address book.
Furigana (for Japanese & Chinese
only)
Language used for registered
name
Index Select an index letter. The selected letter is used as an ad-
Image Select an image. To use a supplied icon, select [Specify
User ID Type in the user ID to connect to the SMB server.
Password Type in the password to connect to the SMB server.
Host Address Type in the host address of the SMB server.
File Path Type in the file path.
[Select All/Uncheck all] button Selects all groups displayed in the Group List. Clicking this
[Change Type] button to change the items (settings) on the
page.
(cannot be changed).
Enter the same name as that used for the registered name.
Addresses can be sorted by registered name.
Select whether or not the language used for registered
names is Chinese or a language other than Chinese.
dress book search condition.
Icon], and then select an icon. To use any other image, select [Specify Image], and then click the [Browse] button to
specify the image file (24-bit BMP (Bitmap) file of 48 x 48
pixels).
2
Reminder
To change the image registered in the address
book, select [Edit], and then specify the image
file.
2
Reminder
To change the password registered for the address book, select [Edit], and then type in the
new password.
2
Note
The maximum number of characters allowed
varies depending on the device. Note that a
one-touch destination whose name contains a
number of characters that exceeds the maximum is not sent to the device.
button again cancels all selections.
3
My Panel Manager 3-12
Page 27
My Panel Manager operations
Function Details
Group List Displays a list of groups registered in My Address. Select
[Apply] button Registers the address book with the specified settings.
[Clear] button Clears the specified settings and reverts to the initial set-
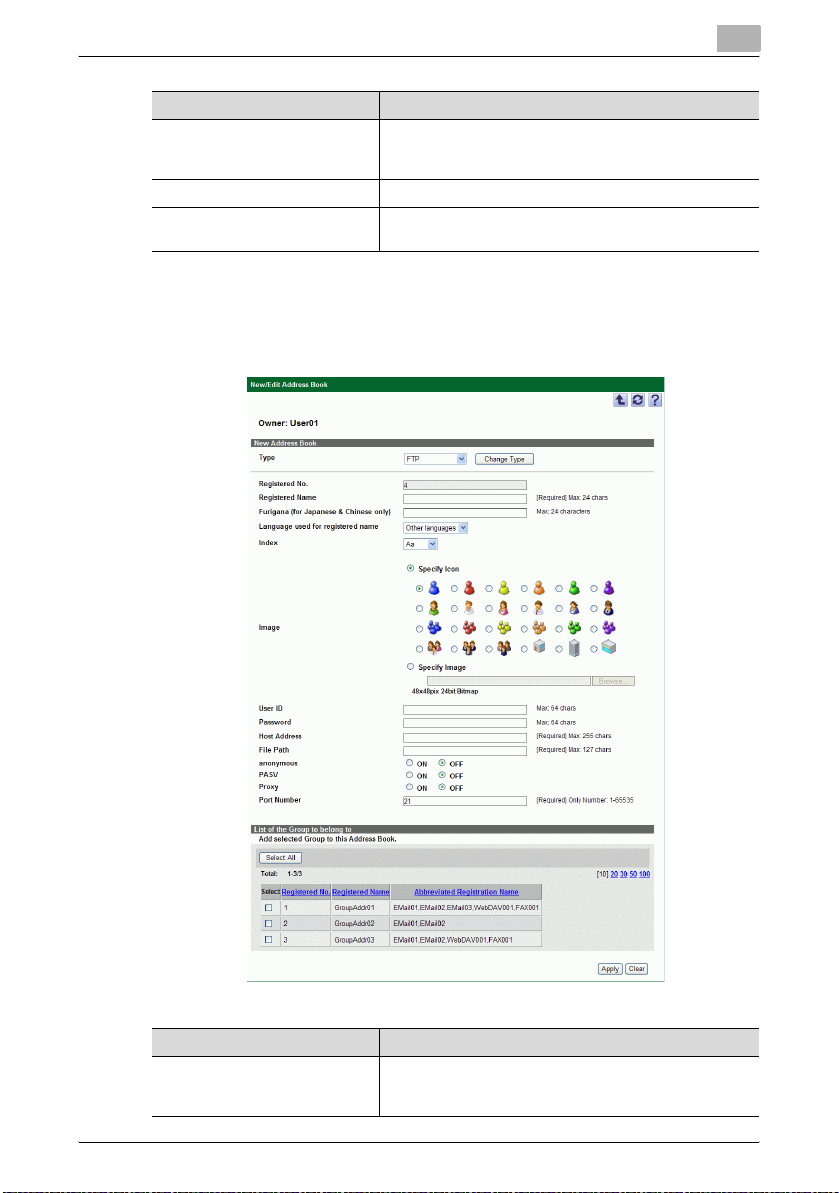
When "FTP" is selected
When "FTP" is selected in "Type", the following appear on the page. Specify
the settings according to the desired purpose.
3
the check box, and then select the group where the address book currently specified is registered.
tings.
Function Details
Type Select the type of address book to be registered. Click the
[Change Type] button to change the items (settings) on the
page.
My Panel Manager 3-13
Page 28

My Panel Manager operations
Function Details
Registered No. Displays the registered number assigned automatically
Registered Name Type in the name of the address book.
Furigana (for Japanese & Chinese
only)
Language used for registered
name
Index Select an index letter. The selected letter is used as an ad-
Image Select an image. To use a supplied icon, select [Specify
User ID Type in the user ID to connect to the FTP server.
Password Type in the password to connect to the FTP server.
(cannot be changed).
Enter the same name as that used for the registered name.
Addresses can be sorted by registered name.
Select whether or not the language used for registered
names is Chinese or a language other than Chinese.
dress book search condition.
Icon], and then select an icon. To use any other image, select [Specify Image], and then click the [Browse] button to
specify the image file (24-bit BMP (Bitmap) file of 48 x 48
pixels).
2
Reminder
To change the image registered in the address
book, select [Edit], and then specify the image
file.
2
Note
The maximum number of characters allowed
varies depending on the device. Note that a
one-touch destination whose name contains a
number of characters that exceeds the maximum is not sent to the device.
2
Reminder
To change the password registered for the address book, select [Edit], and then type in the
new password.
3
2
Note
The maximum number of characters allowed
varies depending on the device. Note that a
one-touch destination whose name contains a
number of characters that exceeds the maximum is not sent to the device.
My Panel Manager 3-14
Page 29

My Panel Manager operations
Function Details
Host Address Type in the host address of the FTP server.
File Path Type in the file path.
anonymous Select to enable or disable anonymous.
PASV Select to enable or disable PASV.
Proxy Select to enable or disable the proxy.
Port Number Type in the port number.
[Select All/Uncheck all] button Selects all groups displayed in the Group List. Clicking this
Group List Displays a list of groups registered in My Address. Select
[Apply] button Registers the address book with the specified settings.
[Clear] button Clears the specified settings and reverts to the initial set-
3
2
Note
The maximum number of characters allowed
varies depending on the device. Note that a
one-touch destination whose name contains a
number of characters that exceeds the maximum is not sent to the device.
button again cancels all selections.
the check box, and then select the group where the address book currently specified is registered.
tings.
My Panel Manager 3-15
Page 30
My Panel Manager operations
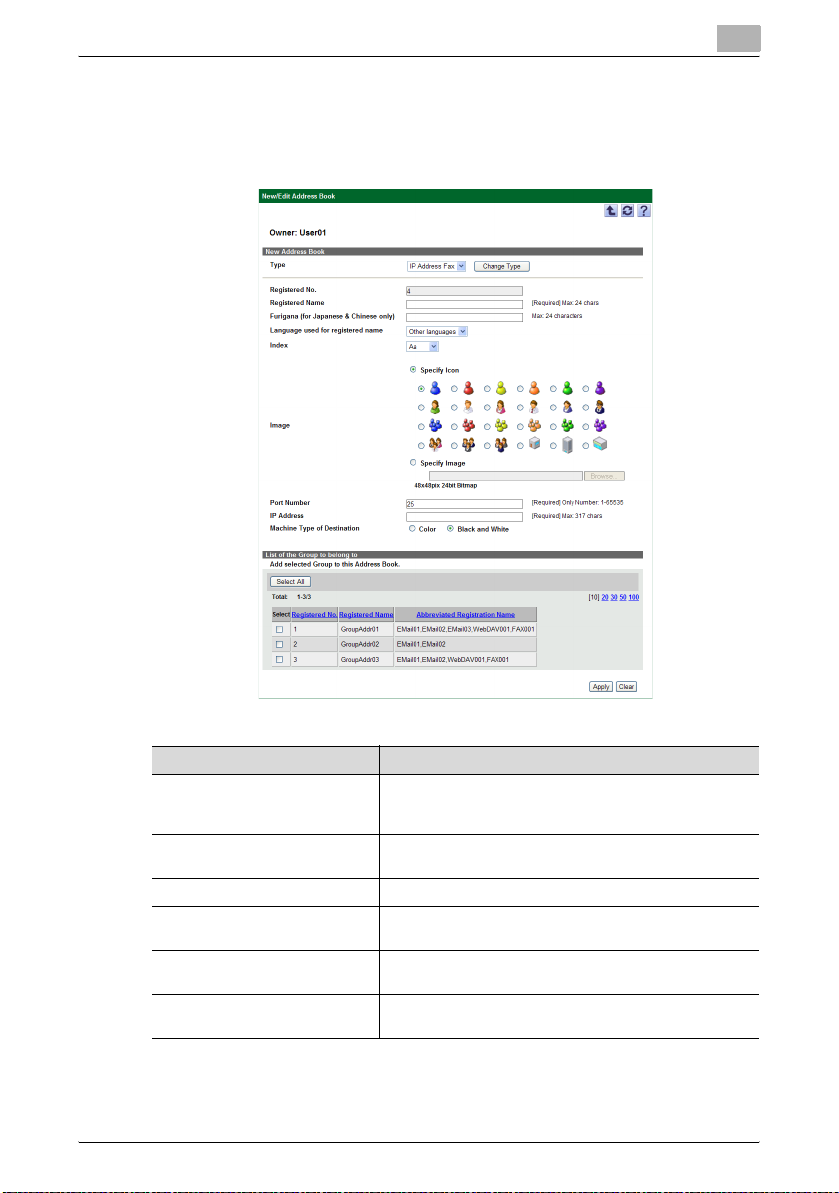
When "IP Address Fax" is selected
When "IP Address Fax" is selected in "Type", the following appear on the
page. Specify the settings according to the desired purpose.
3
Function Details
Type Select the type of address book to be registered. Click the
Registered No. Displays the registered number assigned automatically
Registered Name Type in the name of the address book.
Furigana (for Japanese & Chinese
only)
Language used for registered
name
Index Select an index letter. The selected letter is used as an ad-
[Change Type] button to change the items (settings) on the
page.
(cannot be changed).
Enter the same name as that used for the registered name.
Addresses can be sorted by registered name.
Select whether or not the language used for registered
names is Chinese or a language other than Chinese.
dress book search condition.
My Panel Manager 3-16
Page 31

My Panel Manager operations
Function Details
Image Select an image. To use a supplied icon, select [Specify
Port Number Type in the port number.
IP Address Type in the destination of a fax (IP address or DNS name).
Machine Type of Destination Select [Color] when the destination is a color device, or se-
[Select All/Uncheck all] button Selects all groups displayed in the Group List. Clicking this
Group List Displays a list of groups registered in My Address. Select
[Apply] button Registers the address book with the specified settings.
[Clear] button Clears the specified settings and reverts to the initial set-
Icon], and then select an icon. To use any other image, select [Specify Image], and then click the [Browse] button to
specify the image file (24-bit BMP (Bitmap) file of 48 x 48
pixels).
2
Reminder
To change the image registered in the address
book, select [Edit], and then specify the image
file.
lect [Black and White] when the destination is a black-andwhite device.
button again cancels all selections.
the check box, and then select the group where the address book currently specified is registered.
tings.
3
My Panel Manager 3-17
Page 32

My Panel Manager operations
When "Internet Fax" is selected
When "Internet Fax" is selected in "Type", the following appear on the page.
Specify the settings according to the desired purpose.
3
Function Details
Type Select the type of address book to be registered. Click the
Registered No. Displays the registered number assigned automatically
Registered Name Type in the name of the address book.
Furigana (for Japanese & Chinese
only)
Language used for registered
name
Index Select an index letter. The selected letter is used as an ad-
[Change Type] button to change the items (settings) on the
page.
(cannot be changed).
Enter the same name as that used for the registered name.
Addresses can be sorted by registered name.
Select whether or not the language used for registered
names is Chinese or a language other than Chinese.
dress book search condition.
My Panel Manager 3-18
Page 33

My Panel Manager operations
Function Details
Image Select an image. To use a supplied icon, select [Specify
E-mail Type in the destination of E-mail.
Compression Type Select the compression type (enable or disable [MR],
Paper Size Select the paper size (enable or disable [B4] or [A3]).
Resolution Select the resolution (enable or disable [400x400dpi(Super
[Select All/Uncheck all] button Selects all groups displayed in the Group List. Clicking this
Group List Displays a list of groups registered in My Address. Select
[Apply] button Registers the address book with the specified settings.
[Clear] button Clears the specified settings and reverts to the initial set-
Icon], and then select an icon. To use any other image, select [Specify Image], and then click the [Browse] button to
specify the image file (24-bit BMP (Bitmap) file of 48 x 48
pixels).
2
Reminder
To change the image registered in the address
book, select [Edit], and then specify the image
file.
[MMR], [Color], or [Gray Scale]).
2
Reminder
[MH] is always enabled. It cannot be disabled.
2
Reminder
[A4] is always enabled. It cannot be disabled.
Fine)] or [600x600dpi(Ultra Fine)]).
2
Reminder
[200x100dpi(Standard)] and [200x200dpi(Fine)]
are always enabled. It cannot be disabled.
button again cancels all selections.
the check box, and then select the group where the address book currently specified is registered.
tings.
3
My Panel Manager 3-19
Page 34

My Panel Manager operations
3.2.3 Editing an address book
Edit an address book registered in My Address.
1 Select the address book you want to edit from the Address Book List
on the Address Book page (p. 3-3).
2 Click [Edit].
– The settings for the selected address book are displayed on the
Edit Address Book page.
– When the selected address book is specified as a group, the
confirmation page appears.
3
My Panel Manager 3-20
Page 35

My Panel Manager operations
3 Change the settings as desired.
– The settings differ depending on the type of the address book to be
edited. For details, refer to the description of each type provided in
"Registering an address book" on page 3-4.
2
Reminder
Multiple address books cannot be edited at the same time.
2
Note
The type of registered address books cannot be changed.
2
Note
A Scan To Me or Scan To Home address book cannot be edited.
3
My Panel Manager 3-21
Page 36

My Panel Manager operations
3.2.4 Deleting an address book
Delete an address book registered in My Address.
1 Select the address book you want to delete from the Address Book List
on the Address Book page (p. 3-3).
– To select all address books, click the [Select All] button.
2 Click the [Delete] button.
The confirmation page appears.
3 Click the [OK] button.
The selected address book is deleted from My Address.
2
Reminder
If the E-mail address of the user is registered to User List, and "Scan To
Me" is set to "Yes" in Administrative Setting, the Scan To Me address
cannot be deleted. For details on Scan To Me, refer to "Specifying
functions of My Panel Manager" on page 4-34.
2
3
Note
If the following conditions are satisfied, a Scan To Home address book
cannot be deleted.
- Authentication Manager is installed.
- The user's home address is registered in User List.
- [Scan To Home] is set to [Yes] in the Function Settings page of the
Administrative Setting menu.
- Account information with access rights for the user's home address is
specified in [Authentication Settings for Scan To Home] on the Function
Settings page of the Administrative Setting menu.
For details on Scan To Home, refer to "Specifying functions of My Panel
Manager" on page 4-34.
My Panel Manager 3-22
Page 37

My Panel Manager operations
3.3 Using a group
3.3.1 Viewing the group list
Clicking [Group] on the "My Address" menu displays the Group page. On this
page, the following operations can be executed for the desired purpose.
Function Details
[New] button A new group is registered. For details, refer to "Registering
[Edit] button Edits the group selected in the Group List. For details, refer
[Delete] button The group selected in the Group List is deleted. For details,
[Select All/Uncheck all] button Selects all groups displayed in the Group List. Clicking this
Group List Displays a list of groups registered in My Address. Select
a group" on page 3-24.
to "Editing Group" on page 3-25.
2
Reminder
Multiple groups cannot be edited at the same
time.
refer to "Deleting a group" on page 3-26.
button again cancels all selections.
the check box, and then select the group to be edited or
deleted.
3
My Panel Manager 3-23
Page 38

My Panel Manager operations
3.3.2 Registering a group
Clicking the [New] button on the Group page displays the Register Group
page. On this page, a group can be registered in My Address. Specify the
following settings according to the desired purpose.
2
Reminder
Up to 10 groups can be registered for each user. Up to 100 address
books can be registered for each group (however, one user can register
up to 100 address books for all groups in total).
3
Function Details
Registered No. Displays the registered number assigned automatically
Registered Name Type in the name of the group.
Furigana (for Japanese & Chinese
only)
Language used for registered
name
(cannot be changed).
Enter the same name as that used for the registered name.
Addresses can be sorted by registered name.
Select whether or not the language used for registered
names is Chinese or a language other than Chinese.
My Panel Manager 3-24
Page 39

My Panel Manager operations
Function Details
Index Select an index letter. The selected letter is used as an ad-
Image Select an icon.
Search Condition Select a column to search from the drop-down list, type in
[Select All/Uncheck all] button Selects all address books displayed in the Address Book
Address Book List Displays a list of address books registered in My Address.
[Apply] button Registers the group with the specified settings.
[Clear] button Clears the specified settings and reverts to the initial set-
3.3.3 Editing Group
Edit a group registered in My Address.
1 Select the group you want to edit from the Group List on the Group
page (p. 3-23).
2 Click [Edit].
The settings for the selected group are displayed on the Edit Group
page.
dress book search condition.
the text to be searched for in the text box, and then click
the [Display] button to narrow the data to be displayed.
List. Clicking this button again cancels all selections.
Select the check box, and then select the address book to
be added to the group currently specified.
tings.
3
My Panel Manager 3-25
Page 40

My Panel Manager operations
3 Change the settings as desired.
– For details on the settings, refer to "Registering a group" on
page 3-24.
3.3.4 Deleting a group
Delete a group registered in My Address.
1 Select the group you want to delete from the Group List on the Group
page (p. 3-23).
– To select all groups, click the [Select All] button.
2 Click the [Delete] button.
The confirmation page appears.
3 Click the [OK] button.
The selected group is deleted from My Address.
3
My Panel Manager 3-26
Page 41

My Panel Manager operations
3.4 Using expansion functions
3.4.1 Selecting the expansion function
Clicking [Expansion Function] on the "My Address" menu displays the
Expansion Function page. On this page, the following operations can be
executed for the desired purpose.
Function Details
My Address Import Imports address books or groups using a text file (tab-de-
My Address Export Exports address books or groups managed in My Address
[Next] button Proceeds to the next page.
limited) exported with My Address Export. For details, refer
to "Importing My Address" on page 3-27.
to a text file (tab-delimited). For details, refer to "Exporting
My Address" on page 3-30.
3
3.4.2 Importing My Address
Selecting [My Address Import] on the Expansion Function page and clicking
the [Next] button displays the My Address Import page. On this page,
address books or groups can be imported using a text file (tab-delimited)
exported with My Address Export. Use this file to import My Address of
another user or to restore My Address exported in the past.
My Panel Manager 3-27
Page 42

My Panel Manager operations
Function Details
Destination To import address books, select [Address Book]. To import
Import File Path Type in the full path to the My Address data file to be im-
File Character Code Select the file character code.
Operation for duplication of Registration Number
Encryption Password Type in the password used for file encryption.
Re-enter Encryption Password Type in the above encryption password again.
[Start Import] button Starts import of My Address. When the import operation
[Clear] button Clears the specified settings and reverts to the initial set-
3.4.3 Viewing import results
When import of address books or groups finishes, the Import Result page
appears. On this page, you can confirm whether each address has been
correctly imported.
2
3
groups, select [Group].
ported. Alternatively, click the [Browse] button to display
the Select File dialog box, and then specify the file.
Specify whether to overwrite the existing data if it has the
same registration number as the data to be imported.
finishes, the Import Result page (p. 3-28) appears.
tings.
Note
When the message "There is no data." appears, the file path may be
incorrect, an unsupported file may be selected, or there may be no data
in the selected file Select the correct file on the My Address Import page.
My Panel Manager 3-28
Page 43

My Panel Manager operations
Function Details
Result Displays the result of the import operation.
Contents Displays the cause of error that has occurred.
Registered No. Displays the registered number of the imported destination.
Registered Name Displays the registered name of the imported destination.
Type Displays the type of the imported destination.
[OK] button Ends the Import Result page, and then returns to the My
3
2
Reminder
This item is displayed only when address books
are imported.
Address Import page.
My Panel Manager 3-29
Page 44

My Panel Manager operations
3.4.4 Exporting My Address
Selecting [My Address Export] on the Expansion Function page and clicking
the [Next] button displays the My Address Export page. On this page,
address books or groups managed in My Address can be exported to a text
file (tab-delimited). Use this file to import My Address when you restore the
current My Address later, another user uses it, or the administrator of My
Panel Manager specifies the address books of multiple users collectively.
Function Details
Destination To export address books, select [Address Book]. To export
File Character Code Select the file character code.
Encryption Password Type in the password used for file encryption.
Re-enter Encryption Password Type in the above encryption password again.
[Start Export] button Starts export of My Address. Click the [Save] button on the
[Clear] button Clears the specified settings and reverts to the initial set-
groups, select [Group].
Download File dialog box, and then specify the file name
and save location on the Save As dialog box.
tings.
3
My Panel Manager 3-30
Page 45

My Panel Manager operations
Export file formats
The My Address data can be exported to a text file (tab-delimited) as shown
below. The contents of the file can be viewed using a text editor or browser.
Export file items (Address Book)
When an address book is exported, the following items are exported to a text
file. Depending on the type of the address book, information to be exported
(item marked with "o") varies.
3
2
Reminder
With My Panel Manager, registering or editing address books of the Box
type is not available. However, because such address book may be
registered on the device side, the Box type exists as an item for export
files. When address book is being imported with My Panel Manager,
address books of the Box type are skipped without being imported. (In
the Import Result page, a message "This line was skipped." appears.)
2
Reminder
If the SIP-Fax is enabled when registering or editing an address book of
the "Fax" type, it is recognized as the SIP type in the exported file.
My Panel Manager 3-31
Page 46

My Panel Manager operations
3
Function Description Input value
AbbrNo Registered
Name Registered
SearchKey Index [Aa, Ka, Sa, Ta,
WellUse - Always [No] ooooooooo
SendMode Type [Fax, Email, Ftp,
IconID Icon ID 1-24 ooooooooo
UseRefer Licence
ReferGroup No- Always blank ooooooooo
ReferPossible Level
MailAddress E-mail 1 to 320 charac-
FTPServer
Address
No.
Name
- Always blank ooooooooo
- Always [0] ooooooooo
Host Address (FTP)
1-100 ooooooooo
1 to 12 characters
(2-byte)
1 to 24 characters
(ASCII)
Na, Ha, Ma, Ya,
RaWa, Abc, Def,
Ghi, Jkl, Mno,
Pqrs, Tuv, Wxyz,
Other] (Hiragana
is enabled only
when they are
typed in Japanese.)
Smb, WebDav,
Box, Sip, IP, Ifax]
ters (1-byte alphanumeric
characters, symbols)
1 to 63 characters
(1-byte alphanumeric characters,
symbols)
Type of address book
E-mail FTP SMB Web
ooooooooo
ooooooooo
ooooooooo
oo
o
Box Fax SIP IP I-Fax
Dav
My Panel Manager 3-32
Page 47

My Panel Manager operations
3
Function Description Input value
FTPServer
Folder
FTPLogin
Anonymous
FTPLogin
User
FTPLogin
Password
FTPPassive
Send
FTPProxy Proxy [Yes, No] o
FTPPortNo Port
File Path
(FTP)
anonymous [Yes, No] o
User ID
(FTP)
Password
(FTP)
PASV [Yes, No] o
Number
1 to 127 characters (Character
code: 9 languages (Japanese,
English, German,
French, Italian,
Spanish, Korean,
Chinese, Taiwanese), numeric values, and
symbols), (Korean
and Taiwanese
are not supported.)
1 to 63 characters
(Character code:
9 languages (Japanese, English,
German, French,
Italian, Spanish,
Korean, Chinese,
Taiwanese), numeric values, and
symbols), (Korean
and Taiwanese
are not supported.) (When "anonymous" is set to
[Yes], it is not necessary to specify
this item.)
1 to 63 characters
(1-byte alphanumeric characters,
symbols, and
range of ISO
8859-1), or encrypted data (at
export), (0 character is also acceptable if
"anonymous" is
set to [Yes])
1 to 65535 (1-byte
numeric value)
Type of address book
E-mail FTP SMB Web
Box Fax SIP IP I-Fax
Dav
o
o
o
o
My Panel Manager 3-33
Page 48

My Panel Manager operations
3
Function Description Input value
SMBAddress
SMBFolder File Path
SMBLogin
User
SMBLogin
Password
WebDAV
Server Address
Host Address
(SMB)
(SMB)
User ID
(SMB)
Password
(SMB)
Host Address
(WebDAV)
1 to 255 characters (1-byte alphanumeric
characters, symbols)
1 to 255 characters (Character
code: 9 languages (Japanese,
English, German,
French, Italian,
Spanish, Korean,
Chinese, Taiwanese), numeric values, and
symbols), (Korean
and Taiwanese
are not supported.)
0 to 127 characters (Character
code: 9 languages (Japanese,
English, German,
French, Italian,
Spanish, Korean,
Chinese, Taiwanese), numeric values, and
symbols), (Korean
and Taiwanese
are not supported.)
0 to 127 characters (1-byte alphanumeric
characters, symbols, and range of
ISO8859-1), or
encrypted data (at
export)
1 to 255 characters (1-byte alphanumeric
characters, symbols)
Type of address book
E-mail FTP SMB Web
Dav
o
o
o
o
o
Box Fax SIP IP I-Fax
My Panel Manager 3-34
Page 49

My Panel Manager operations
3
Function Description Input value
WebDAV
Collection
WebDAV
LoginUser
WebDAVLogin Password
WebDAVSSL
WebDAVProxy
WebDAVPort No
BoxID Ignored 1-999999999 o
Model Machine
File Path
(WebDAV)
User ID
(WebDAV)
Password
(WebDAV)
SSL Setting
Proxy [Yes, No] o
Port
Number
(WebDAV)
Type of
Destination
0 to 142 characters (Character
code: 9 languages (Japanese,
English, German,
French, Italian,
Spanish, Korean,
Chinese, Taiwanese), numeric values, and
symbols), (Korean
and Taiwanese
are not supported.)
0 to 63 characters
(Character code:
9 languages (Japanese, English,
German, French,
Italian, Spanish,
Korean, Chinese,
Taiwanese), numeric values, and
symbols), (Korean
and Taiwanese
are not supported.)
0 to 63 characters
(1-byte alphanumeric characters,
symbols, and
range of
ISO8859-1), or
encrypted data (at
export)
[Yes, No] o
1-65535 o
[Color, Mono] oo
Type of address book
E-mail FTP SMB Web
Dav
o
o
o
Box Fax SIP IP I-Fax
My Panel Manager 3-35
Page 50

My Panel Manager operations
3
Function Description Input value
FaxPhoneNo
FaxCapabili-ty- Always [Yes] o
FaxV34Off V34OFF [Yes, No] o
FaxECMOff ECMOFF [Yes, No] o
FaxOversea Overseas TX[Yes, No] o
FaxLine Select Line [None, Line1,
CheckDest Check
Host IP Address 1 to 317 charac-
PortNo Port
IfaxResolution
Destination (Fax
Number)
Dest. &
Send
Number (IP
Fax)
Resolution [200x100,
1 to 38 characters
(1-byte numeric
characters and
"#", "*", "-", T, P,
E)
1 to 38 characters
(1-byte alphanumeric characters,
"#", "*")
Always [No] o
Line2]
[Yes, No] o
ters (For IP address, in
***.***.***.*** format), (For DNS
name, 1-byte alphanumeric characters, symbols)
1-65535 o
200x200,
400x400,
600x600]
(Multiple selections are available
by delimiting with
comma. Required if
[200x100] or
[200x200] is selected.)
Type of address book
E-mail FTP SMB Web
Dav
Box Fax SIP IP I-Fax
o
o
o
o
o
My Panel Manager 3-36
Page 51

My Panel Manager operations
3
Function Description Input value
IfaxSize Paper Size [A4, B4, A3]
Ifax Compression
RubyName Furigana
LangKind Language
Compression Type
(for Japanese & Chinese only)
used for
registered
name
(Multiple selections are available
by delimiting with
comma. Required if [A4] is selected.)
[MH, MR, MMR,
JpegColor,
JpegGray]
(Multiple selections are available
by delimiting with
comma. Required if [MH] is
selected.)
1 to 12 characters
(2-byte)
1 to 24 characters
(ASCII)
[0,1]
(0: Other languages, 1: Chinese)
Type of address book
E-mail FTP SMB Web
oooo o oo
oooo o oo
Box Fax SIP IP I-Fax
Dav
Export file items (Group)
When a group is exported, the following items are exported in a text file.
o
o
Function Description Input value
GroupNo Registered No. 1-10
Name Registered Name 1 to 12 characters (2-byte)
SendGroup - Always "Send"
IconID Icon ID 1-24
UseReferLicence - Always blank
ReferGroupNo - Always [0]
ReferPossibleLevel - Always [0]
Model - Always [0]
AbbrNoList Address Book List Specify numbers registered in address book,
1 to 24 characters (ASCII)
delimiting with colons (:).
My Panel Manager 3-37
Page 52

My Panel Manager operations
3.5 Available operations in the My Panel page
My Panel is personal panel settings (an operation panel environment)
managed in a server. My Panel makes the panel operation more convenient.
The display language or screen setting can be changed and the frequentlyused functions can be displayed with higher priority.
Every user can edit My Panel using a Web application and use My Panel
within a range of devices selected in Administrative Setting. A general user
can edit the following items using a Web application.
2
Note
To use a panel edited by My Panel Manager on each device, the relevant
device must be specified as a device to be managed by My Panel
function in Administrative Setting.
3
Function Details
System Settings The language, unit, and color to be applied to the device
Main Menu Settings Specify main menu keys displayed on the main menu.
Copy Setting Specify shortcut keys for the copy function and default tab
Fax/Scan Settings Specify shortcut keys for the fax/scan functions and default
Box Settings Specify shortcut keys for the User Box functions and de-
Browser Setting In this screen, you can edit data managed by the web
Expansion Function Imports or exports My Panel data.
panel, and the screen to be displayed after login are specified.
settings.
tab settings.
fault tab settings.
browser on the device.
My Panel Manager 3-38
Page 53

My Panel Manager operations
2
Reminder
My Panel can be edited from the panel of the target device. For details,
refer to chapters on My Panel in the User's Guide (for expansion
functions) that comes with your device.
2
Reminder
Some of the functions specified here may not be available on some
devices. For details on device functions, refer to the user's guide that
comes with your device.
2
Reminder
If editing is disabled for a particular user in Administrative Setting, the
user cannot edit the personal My Panel. Even if an edit-disabled user
attempts to edit from the panel on the target device, the setting is not
reflected in My Panel Manager.(p. 4-11)
3
My Panel Manager 3-39
Page 54

My Panel Manager operations
3.6 Customizing My Panel
3.6.1 Specifying the My Panel environment
Clicking [System Settings] on the "My Panel" menu displays the System
Settings page. On this page, settings to be applied to the device panel can
be changed.
Function Details
Language Selection Select the language used on the panel.
2
Reminder
The language selected on the Function Settings
page is displayed. For details, refer to "Specifying functions of My Panel Manager" on
page 4-34. When the device does not support
the selected language, the setting is not reflected.
Measurement Unit Settings Select the unit used on the panel.
Color Selection Settings Select the panel color.
Screen to be displayed after login Select the screen to be displayed after user authentication.
[Apply] button Accepts the specified settings.
[Clear] button Clears the specified settings and reverts to the initial set-
tings.
3
My Panel Manager 3-40
Page 55

My Panel Manager operations
Screen example
The panel display example when color setting is changed is as follows.
3
My Panel Manager 3-41
Page 56

My Panel Manager operations
3.6.2 Setting up the main menu
Clicking [Main Menu Settings] on the "My Panel" menu displays the Main
Menu Settings page. On this page, functions can be assigned to the main
menu keys displayed on the main menu.
3
Function Details
Main menu key (1 to 23)/Short cut
key (1 to 12)
Check which model supports it. Displays a list of devices on which the keys marked with an
[Apply] button Accepts the specified settings.
[Clear] button Clears the specified settings and reverts to the initial set-
Select the functions to be assigned to the main menu keys
displayed on the main menu.
asterisk "*" can be assigned to shortcut keys.
tings.
My Panel Manager 3-42
Page 57

My Panel Manager operations
2
Note
Shortcut key names or functions that can be assigned to shortcut keys
vary depending on the device.
2
Reminder
The functions available for each user vary depending on administrator
settings.
Screen example
The panel display example when the shortcut key setting is changed is as
follows.
3
My Panel Manager 3-43
Page 58

My Panel Manager operations
3.6.3 Setting up the Copy screen
Clicking [Copy Setting] on the "My Panel" menu displays the Copy Setting
page. On this page, the display of the Copy screen and shortcut keys are
specified.
3
Function Details
Default Tab To use the normal Copy screen, select [Basic]. To display
Function key (1 to 14)/Shortcut
key (1, 2)
Quick setting (1, 2)/One-touch key
(1 to 4)
Copy Program (1 to 4) Select Copy Program to apply to the One Touch Key(s)
Default Tab Density Settings In order to display the key for density control on the copy
Check which model supports it. Displays a list of devices on which the keys marked with an
[Apply] button Accepts the specified settings.
[Clear] button Clears the specified settings and reverts to the initial set-
all settings on one screen, select [Quick Copy].
Select the functions to be assigned to the shortcut keys
displayed on the Copy screen.
Select functions to apply to the One Touch Key(s) which
appears in the Copy screen.
which appears in the Copy screen.
screen, select [ON]. If you want to hide the density control
key select [OFF].
asterisk "*" can be assigned to shortcut keys.
tings.
My Panel Manager 3-44
Page 59

My Panel Manager operations
2
Note
Shortcut key names or functions that can be assigned to shortcut keys
vary depending on the device.
Shortcut keys in the Copy screen
3
1
My Panel Manager 3-45
2
Page 60

My Panel Manager operations
3.6.4 Setting up the Fax/Scan screen
Clicking [Fax/Scan Settings] on the "My Panel" menu displays the Fax/Scan
Settings page. On this page, the display of the Fax/Scan screen and shortcut
keys are specified.
3
Function Details
Function key (1 to 7)/Shortcut key
(1, 2)
Default Tab Used to specify the Default tab (initial display) of the
Default value for sorting Address-esSelect whether to sort addresses by registered number or
Address display method Select whether to display addresses using a box-type key
Select the functions to be assigned to the shortcut keys
displayed on the Fax/Scan screen.
Fax/Scan screen. For details on panel displays, refer to
"Types of the Fax/Scan screen" on page 3-48.
Job History: The Job History screen is specified as the default tab.
Direct Input: The Direct Input screen is specified as the default tab.
Address Search: The Address Search screen is specified
as the default tab.
Address Book: The Address Book screen is specified as
the default tab. Select [Index] or [Destination Type]. When
you have selected [Index], specify [My Address Book] or index. When you have selected [Destination Type], specify
the initial display for selecting the destination.
registered name.
or in the list view.
My Panel Manager 3-46
Page 61

My Panel Manager operations
Function Details
Check which model supports it. Displays a list of devices on which the keys marked with an
[Apply] button Accepts the specified settings.
[Clear] button Clears the specified settings and reverts to the initial set-
2
Note
Shortcut key names or functions that can be assigned to shortcut keys
vary depending on the device.
Fax/Scan screen example
The panel display example when the shortcut key setting is changed is as
follows.
3
asterisk "*" can be assigned to shortcut keys.
tings.
1
My Panel Manager 3-47
2
Page 62

My Panel Manager operations
Types of the Fax/Scan screen
In Default Tab, the Default tab (initial display) of the Fax/Scan screen can be
specified. The panel display examples are as follows.
Job History screen
Direct Input screen
3
My Panel Manager 3-48
Page 63

My Panel Manager operations
Address Search screen
Address Book (Index) screen
3
My Panel Manager 3-49
Page 64

My Panel Manager operations
Address Book (Destination Type) screen
3
My Panel Manager 3-50
Page 65

My Panel Manager operations
3.6.5 Setting up the User Box screen
Clicking [Box Settings] on the "My Panel" menu displays the Box Settings
page. On this page, the display of the User Box screen and settings for
shortcut keys are specified.
Function Details
Default Tab Used to specify the Default tab (initial display) of the User
Shortcut Key (1 and 2) Select the functions to be assigned to the shortcut keys
[Apply] button Accepts the specified settings.
[Clear] button Clears the specified settings and reverts to the initial set-
Box screen. For details on panel displays, refer to "Types
of the User Box screen" on page 3-52.
displayed on the User Box screen.
tings.
3
User Box screen example
The panel display example when the shortcut key setting is changed is as
follows.
1
2
My Panel Manager 3-51
Page 66

My Panel Manager operations
Types of the User Box screen
In Default Tab, the Default tab (initial display) of the User Box screen can be
specified. The panel display examples are as follows.
Public screen
Personal screen
3
System screen
My Panel Manager 3-52
Page 67

My Panel Manager operations
Group screen
3
My Panel Manager 3-53
Page 68

My Panel Manager operations
3.7 Specifying expansion functions
3.7.1 Selecting the expansion function
Clicking [Expansion Function] on the "My Panel" menu displays the
Expansion Function page. On this page, the following operations can be
executed for desired purposes.
Function Details
My Panel Import Imports the panel settings using a text file (tab-delimited)
My Panel Export Exports the panel settings managed in My Panel to a text
[Next] button Proceeds to the next page.
exported with My Panel Export. For details, refer to "Importing My Panel" on page 3-54.
file (tab-delimited). For details, refer to "Exporting My Panel" on page 3-56.
3
3.7.2 Importing My Panel
Selecting [My Panel Import] on the Expansion Function page and clicking the
[Next] button displays the My Panel Import page. On this page, the panel
settings can be imported using a text file (tab-delimited) exported with My
Panel Export. Use this file to import My Panel of another user or to restore
My Panel exported in the past.
My Panel Manager 3-54
Page 69

My Panel Manager operations
Function Details
Import File Path Type in the full path to the My Panel data file to be import-
File Character Code Select the file character code.
Encryption Password Type in the password used for file encryption.
Re-enter Encryption Password Type in the above encryption password again.
[Start Import] button Starts import of My Panel. When the import operation fin-
[Clear] button Clears the specified settings and reverts to the initial set-
3.7.3 Viewing import results
When the import of panel settings finishes, the Import Result page appears.
On this page, you can confirm whether each address has been correctly
imported.
2
Note
When the message "There is no data." appears, the file path may be
incorrect, an unsupported file may be selected, or there may be no data
in the selected file. Select the correct file on the My Panel Import page.
ed. Alternatively, click the [Browse] button to display the
Select File dialog box, and then specify the file.
ishes, the Import Result page (p. 3-55) appears.
tings.
3
Function Details
Result Displays the result of the import operation.
Contents Displays the cause of error that has occurred.
[OK] button Ends the Import Result page, and then returns to the My
Panel Import page.
My Panel Manager 3-55
Page 70

My Panel Manager operations
3.7.4 Exporting My Panel
Selecting [My Panel Export] on the Expansion Function page and clicking the
[Next] button displays the My Panel Export page. On this page, the settings
managed in My Panel can be exported to a text file (tab-delimited). Use this
file to import My Panel when you restore the current My Panel later, another
user uses it, or the administrator of My Panel Manager specifies the panels
of multiple users collectively.
Function Details
File Character Code Select the file character code.
Encryption Password Type in the password used for file encryption.
Re-enter Encryption Password Type in the above encryption password again.
[Start Export] button Starts export of My Panel. Click the [Save] button on the
[Clear] button Clears the specified settings and reverts to the initial set-
Download File dialog box, and then specify the file name
and save location on the Save As dialog box.
tings.
3
My Panel Manager 3-56
Page 71

My Panel Manager operations
Export file formats
The My Panel data can be exported to a text file (tab-delimited) as shown
below. The contents of the file can be viewed using a text editor or browser.
3
Export file items
When the My Panel data is exported, the following items are exported to a
text file.
Function Description Input value
#Basic Basic information
InfoTubeID InfoTubeID (None)
DeviceID DeviceID (None)
IgcUserID IgcUserID [1]
LanguageKind Display language [Japanese, American English, German,
UnitSystem Measurement unit
settings
French, Italian, Danish, Dutch, Portuguese,
Swedish, Spanish, Norwegian, Finnish,
Czech, Hungarian, Greek, Turkish, Cantonese, Chinese, Korean, Russian, Croatian,
Ukrainian, Romanian, Slovak, Arabic, Thai,
Malay, Polish]
[mm(Integer), inch(Integer), inch(Fraction)]
My Panel Manager 3-57
Page 72

My Panel Manager operations
Function Description Input value
SelectButtonColorKind Color Selection Set-
InitialScreenKind Initial screen set-
CopyMainDisplay Copy Default Tab [Basic, QuickCopy]
FaxMainDisplay Fax/Scan Default
ProgramPageNo Program index [Off, On]
CharDisplayMode Address book initial
InitialDisplayOfAddress Default display from
BoxMainDisplay User Box Default
DefaultAddrKind Address Book de-
AddressOrderType Default value for
AddressDisplayType Address display
#FaxScan Fax/Scan shortcut
ShortCut Shortcut [Off, Simplex/Duplex, Resolution, Color, File
tings
tings
Tab
display
Address Book
Tab
fault display for destination type
selection
sorting Addresses
method
[Green, Blue, Yellow, Orange]
[MainMenu, Copy, Fax/Scan, UserBox, ImagePanel, Browser]
[AddressBook, DirectInput, History, LDAP]
[MyAddressBook, Aa, Ka, Sa, Ta, Na, Ha,
Ma, Ya, RaWa, ABC, DEF, GHI, JKL, MNO,
PQRS, TUV, WXYZ, etc, Group]
[Index, DestinationType]
[Public, Personal, System, Group]
[Group, Fax, Email, Box, Ifax, Ipfax, Smb,
Ftp, WebDAV]
[0,1] (0: Sort by registered number, 1: Sort by
registered name)
[0,1] (0: Box, 1: List)
Type, Scan Size, E-mail Setting, Original Setting, Book Original, Separate Scan, Original
Direction, Original Page Margin, Total # of
Pages, Original Type, Text/Photo, Photo,
Density, Quality Adjustment, Background
Removal, Stamp/Composition, Date/Time,
Page Number, Stamp, Header/Footer, TX
Stamp, Frame Erase, Sharpness, Annotation, Send and print, URL Notification Setting, E-mail encryption, Digital Signatures,
Fax Header Settings, Line Settings, Quick
Memory TX, Polling TX, Polling RX, Timer TX,
Password TX, F-Code TX, Doc Name/ Subject /Other, Book Copy, Application, TX and
RX Method Setting]
3
My Panel Manager 3-58
Page 73

My Panel Manager operations
Function Description Input value
#TopMenu Main Menu shortcut
ShortCutIcon Icon ID [Off, Copy, Fax/Scan, User Box, Image Pan-
Type Shortcut type [Off, MajorFunction, CopySetting,
Function Shortcut function When Off is selected as shortcut type: [Off]
DeviceID Device ID Always blank
el, Browser, OpenAPI Application, Color
Mode, Paper Setting, Zoom Setting, Duplex/Combine, Finishing, Density Settings,
Original Image Quality Settings, Scan Settings, Original Settings, Communication Settings, One side/Both sides, Resolution
Settings, Color Settings, File Format Settings, Scan Size, E-mail Settings, Security
Document, Compulsion Memory Reception,
Authentication & Print, Bulletin Board, Polling Transmission, Filing Number, Retransmission, Password Encryption PDF,
Extrinsic Memory, Cellular Phone/PDA]
Fax/ScanSetting, SystemBoxFunction,
CopyMemory, Scan/FaxMemory]
When MajorFunction is selected as shortcut
type: [Copy, Fax/Scan, User Box, Image
Panel, Browser, App]
When CopySetting is selected as shortcut
type: [Color Mode, Paper Setting, Zoom Setting, Duplex/Combine, Finishing, Density
Settings, Original Image Quality Settings]
When Fax/ScanSetting is selected as shortcut type: [One side/Both sides, Resolution
Settings, Color Settings, File Format Settings, Scan Size, Document name/Subject/Other, Original Settings,
Communication Settings, Scan Settings]
When Off is selected as shortcut type: [Security Document, Compulsion Memory Reception, Authentication & Print, Bulletin Board,
Polling Transmission, Filing Number, Retransmission, Password Encryption PDF, Extrinsic Memory, Cellular Phone/PDA]
When CopyMemory is selected as shortcut
type: [Off]
When Scan/FaxMemory is selected as shortcut type: [Off]
3
My Panel Manager 3-59
Page 74

My Panel Manager operations
Function Description Input value
#Copy Copy shortcut
Function Shortcut function [Off, Color, Density, Original Image Type, Pa-
#OneTouchKey One Touch Key
OneTouchKeyType One Touch Key type [Off, Auto Color, Full color, Black+Red,
ProgramKeyId ProgramID [0-255]
per, Zoom, Duplex/Combine, Finishing,
Text/Photo, Photo, Original Setting, Book
Original, Booklet Pagination, Index Original,
Separate Scan, Auto Image Rotation, Original Page Margin, Original Direction, Zoom,
Scan Size, Background Removal, Text Enhancement, Glossy, Edit Color, Neg./Pos.
Reverse, Background Color, Color Adjust,
Brightness, Contrast, Saturation, Red,
Green, Blue, Hue, Copy Density, Sharpness,
Color Balance, Booklet, Page Margin, Image
Shift, Mirror Image, Book Copy/Repeat,
Book Copy, Image Repeat, Poster Mode,
Booklet Original, Image Adjust, Sheet/Cover/Chapter Insert, OHP Interleave, Cover
Sheet, Insert Sheet, Insert Image, Chapters,
Date/Time, Page Number, Stamp, Stamp
Repeat, Header/Footer, Watermark, Overlay,
Registered Overlay, Copy Protect, Copy
Guard, Password Copy, Frame Erase, NonImage Area Erase, Save In User Box, Program Job, Card Shot]
Black+Blue, Black+Green, Black+Yellow,
Black+Cyan, Black+Magenta, Black, Red,
Blue, Green, Yellow, Cyan, Magenta, Sepia
1, Sepia 2, Emerald, Orange, Vermilion, Violet, Yellow Green, Purple, Camel, Moss
Green, Wine Red, Brown, Marine Blue, Pink,
Copper Red, Text, Text+Photo-Photo Paper,
Text+Photo-Printed Photo, Photo-Photo Paper, Photo-Printed Photo, Map, Dot Matrix
Original, Copied Paper, Auto, Full Size,
Small, Fixed Magnification1, Fixed
Magnification2, Fixed Magnification3, Fixed
Magnification4, Fixed Magnification5, Fixed
Magnification6, Fixed Magnification7, Fixed
Magnification8, Set Zoom Ratio1, Set Zoom
Ratio2, Set Zoom Ratio3, 1-Sided > 1-Sided,
1-Sided > 2-Sided, 2-Sided > 1-Sided, 2Sided > 2-Sided, 2-in-1, 4-in-1Horizontal, 4in-1Vertical, 8-in-1Horizontal, 8-in-1Vertical,
Mixed Original, Same Width Mixed, Varied
Width Mixed, Thin Paper Original, Z-Folded
Original, Blank Sheet Original Adj, Despeckle, Separate Scan, Auto Image Rotation,
Booklet Original, Glossy Mode, Job Program]
3
My Panel Manager 3-60
Page 75

My Panel Manager operations
Function Description Input value
#MainDisplayDensity Default Tab Density Settings
MainDisplayDensity Default Tab Density
#Box User Box shortcut
Function Shortcut function [Off, BoardBox, PolingBox, SecurityDocu-
#IconID Icon ID information
Id Icon ID [0]
#ImageDealer Image dealer information
Type Shortcut type [0]
Function Function ID [0]
DeviceID Device ID [0]
Settings
[On, Off]
mentBox, ForceMemoryBox, FilingNumberBox, ResendBox, EncryptedPDFBox,
TouchPrintBox, ExternalMemory]
3
My Panel Manager 3-61
Page 76

My Panel Manager operations
3.8 Customizing Browser Data
3.8.1 Browser Setting
When you click on [Browser Setting] in the "My Panel" menu, the "Browser
Setting" screen appears. In this screen, you can edit data managed by the
web browser on the device.
3
Function Details
Home Page Setting Set the top page for the web browser.
Bookmark Setting Set bookmarks for the web browser. You can register up to
20 bookmarks.
2
Reminder
If you register bookmarks which have a long
URL, it may not be able to register 20 bookmarks.
My Panel Manager 3-62
Page 77

My Panel Manager operations
Function Details
[Add] button It adds the bookmark you entered to the list.
Edit Edit the bookmark you selected.
[Delete] button It deletes the bookmark you selected.
Display History It shows the display history of the web browser.
Address Input History It shows the URL input history of the web browser.
[Apply] button Accepts the specified settings.
[Clear] button Clears the specified settings and reverts to the initial set-
3
2
Reminder
After adding the inserted bookmark, please
click [Apply] at the bottom of the screen, to accept.
2
Reminder
After clicking on the [Edit] button, modify bookmarks as you wish, then click on the [Setting]
button. If you want to cancel the modifications
you have done, click on the [Cancel] button.
tings.
My Panel Manager 3-63
Page 78

Managing My Panel Manager
4 Managing My Panel Manager
4.1 My Panel Manager administrative setting
An administrator can specify system settings for My Panel Manager, and edit
an address book and a panel for each user managed by My Panel Manager.
The administrator can use the following items using a Web application.
2
Note
To use the administrative setting function, the device must be logged on
using an administrator account. For details, refer to the Device Manager
User's Guide. Only administrators of My Panel Manager can use all of My
Panel Manager functions.
4
My Panel Manager 4-1
Page 79

Managing My Panel Manager
Function Details
Administrator Settings Adds or deletes administrators of My Panel Manager.
Device Management Specifies device managements for My Panel Manager.
Server Settings Specifies the operating environment for My Panel Manager.
Personal Address Book Edits the personal address book of the individually users.
Personal Panel Edits the panel settings for the individually users.
Address Batch Setting Collectively specifies address books of multiple users.
Panel Batch Setting Collectively specifies panel settings of multiple users.
Error Report Displays the error history page.
Function Settings Specifies the various settings for My Panel Manager.
Default Profile Settings Specifies the default value of My Address/My Panel that is
Version Displays the version information.
4
2
Reminder
To use an address book or panel edited by My
Panel Manager on each device, the relevant device must be specified as a device to be managed.
automatically applied to newly registered users.
2
Reminder
Some of the functions specified here may not be available on some
devices. For details on device functions, refer to the user's guide that
comes with your device.
My Panel Manager 4-2
Page 80

Managing My Panel Manager
4.2 Specifying administrators of My Panel Manager
4.2.1 Viewing the administrator of My Panel Manager list
Clicking [Administrator Settings] on the "Administrative Setting" menu
displays the Administrator Settings page. On this page, the following
operations can be executed for desired purposes.
4
Function Details
Search Condition Select a row to be searched for from the drop-down list,
[Add] button Adds administrators of My Panel Manager. For details, refer
[Cancel] button Cancels the administrator privileges of the user selected in
[Select All/Uncheck all] button Selects all users displayed in the administrator settings.
Admin. List Displays a list of users registered as administrators of My
type in the text to be searched for in the text box, and then
click [Display] to filter the data to be displayed.
to "Adding an administrator" on page 4-4.
the administrator settings. For details, refer to "Canceling
the administrator privileges" on page 4-5.
Clicking this button again cancels all selections.
Panel Manager. Select the check box, and then select the
user for whom administrator privileges are to be canceled.
My Panel Manager 4-3
Page 81

Managing My Panel Manager
4.2.2 Adding an administrator
Clicking the [Add] button on the Administrator Settings page displays the
Select Additional Users page. On this page, additional administrators of My
Panel Manager can be registered.
2
Reminder
Administrators of My Panel Manager can use all of My Panel Manager
functions.
4
My Panel Manager 4-4
Page 82

Managing My Panel Manager
Function Details
User Group Selects the user group to be displayed in the user list. Click
the [Display] button to change the user list display.
2
Reminder
Selecting the [All subgroups] check box displays users, including those registered in the
subgroup of the selected user group. Clearing
the check box displays only users registered
immediately under the selected user group.
Search Condition Select a row to be searched for from the drop-down list,
[Select All/Uncheck all] button Selects all users displayed in the user list. Clicking this but-
User List Displays a list of users registered in User List (except for
[Apply] button Adds an administrator of My Panel Manager.
[Clear] button Clears all selections and reverts to the initial settings.
4.2.3 Canceling the administrator privileges
The administrator privileges of users registered as an administrator of My
Panel Manager can be canceled.
type in the text to be searched for in the text box, and then
click [Display] to filter the data to be displayed.
ton again cancels all selections.
administrators of My Panel Manager). Select the check
box, and then select the user to whom administrator privileges are to be given.
4
1 Select the user you want to cancel the administrator privileges in the
Administrator Settings on the Administrator Settings page (p. 4-3).
– To select all users, click the [Select All] button.
2 Click the [Cancel] button.
The confirmation page appears.
3 Click the [OK] button.
The administrator privileges of the selected user are canceled.
My Panel Manager 4-5
Page 83

Managing My Panel Manager
4.3 Specifying a device to be managed
Specifies device managements for My Panel Manager. To use an address
book or panel edited by My Panel Manager on each device, the relevant
device must be specified as a device to be managed.
2
Note
If the server address is changed, settings for all the devices to be
managed must be specified again from the beginning.
4.3.1 Selecting a device
Clicking [Device Management] on the "Administrative Setting" menu
displays the Device Management page. On this page, the number of device
licenses for My Panel Manager can be checked and a device to be managed
by the My Panel Manager can be selected.
2
Reminder
For details on licence management, refer to the chapter related to
Licence in the Device Manager User's Guide.
4
Function Details
Total Licence Count Displays the number of acquired My Panel Manager licens-
My Panel Manager 4-6
es.
Page 84

Managing My Panel Manager
Function Details
Unused Licence Count Displays the number of unused licenses among the ac-
Device Group Selection Selects a device group to be displayed in the device list.
[Select All/Uncheck all] button Selects all devices displayed in the device list. Clicking this
Device List Displays a list of devices registered in Device List. Select
[Manage] button Makes the device selected on the device list to be man-
[Do not manage] button Makes the device selected on the device list not to be man-
[Clear] button Clears all selections and reverts to the initial settings.
quired My Panel Manager licenses.
Click the [Display] button to change the device list display.
2
Reminder
Selecting the [All subgroups] check box displays devices including ones registered in the
subgroup of the selected device group. Clearing the check box displays only the devices registered immediately under the selected device
group.
button again cancels all selections.
the check box, and then select whether to manage the device or not by My Panel Manager.
2
Reminder
It is not allowed to select multiple devices beyond the pages.
aged. Click [Manage] to proceed to the Device Management Information Setting page (p. 4-8).
aged. Click [Do not manage] to proceed to the Device Management Information Setting page (p. 4-8).
4
2
Reminder
If the device is registered for management, appears in the [Manage]
field of the device list.
My Panel Manager 4-7
Page 85

Managing My Panel Manager
4.3.2 Specifying device management information
Clicking the [Manage]/[Do not manage] button on the Device Management
page (p. 4-6) displays the Device Management Information Setting page. On
this page, the device administrator password and other information required
for managing the device can be entered.
2
Reminder
If authentication information is already specified in Device List, the input
control of the authentication information displayed in the Device
Management Information Setting page is disabled.
4
Function Details
Device Administrator Password Type in the administrator password for the device.
OpenAPI Account Type in the OpenAPI account name.
OpenAPI Password Type in the OpenAPI password.
The settings will overwrite the "My
Panel Manager" settings
Force deletion from the managed
target.
[Apply] button Specifies the device to be managed. When the specifica-
[Clear] button Clears the specified settings and reverts to the initial set-
When this check box is selected, the settings on this page
overrides other settings even if the device is already managed by a different My Panel Manager. When this check
box is cleared, the existing settings overrides the settings
on this page.
When this check box is selected, the devices selected in
the Device Management page are forcibly excluded from
the devices to be managed.
tion process finishes, the Device Management Result page
(p. 4-9) appears automatically.
tings.
My Panel Manager 4-8
Page 86

Managing My Panel Manager
4.3.3 Displaying the device setting results
When the device management has been specified, the Device Management
Result page appears automatically. On this page, you can check whether or
not the selected device has been correctly specified as a device to be
managed by My Panel Manager.
4
Function Details
Result Displays the result of the specification process for each de-
Device Name Displays the model name of the device.
Registered Name Displays the registered name of the device.
Contents Displays the cause of error that has occurred.
[OK] button Ends the Device Management Result page, and returns to
vice.
the Device Management page.
2
Note
If either My Address or My Panel setting is failed, specify the devices to
be managed again.
My Panel Manager 4-9
Page 87

Managing My Panel Manager
4.4 Specifying the operating environment
Clicking [Server Settings] on the "Administrative Setting" menu displays the
Server Settings page. On this page, the operating environment of My Panel
Manager can be specified.
2
Note
If the port number or application identifier is changed, settings for all the
devices to be managed must be specified again from the beginning.
2
Note
If the port number is changed, the server must be restarted. For details
on restarting the server, refer to the chapter related to Admin Console in
the Device Manager User's Guide.
4
Function Details
Port Number Type in the port number to be used for My Panel Manager.
Application Identifier Type in the extension to be used for My Panel Manager.
[Apply] button Accepts the specified settings.
[Clear] button Clears the specified settings and reverts to the initial set-
My Panel Manager 4-10
tings.
Page 88

Managing My Panel Manager
4.5 Editing the address book of each user
My Address (a personal address book for individual users) managed by My
Panel Manager can be edited.
Multiple users can be selected at the same time. Also, the address book can
be managed to enable/disable editing of personal My Address by each user.
2
Reminder
If you want to consolidate My Address of users in the same group, the
settings for address books of multiple users can be collectively specified
by reading address information from a file. For details, refer to "Address
Batch Setting" on page 4-25.
4.5.1 Displaying My Address users list
Clicking [Personal Address Book] on the "Administrative Setting" menu
displays the Personal Address Book page. On this page, the following
operations can be executed for desired purposes.
4
My Panel Manager 4-11
Page 89

Managing My Panel Manager
Function Details
User Group Selects the user group to be displayed in the user list. Click
Search Condition Select a row to be searched for from the drop-down list,
Select Address Type To Be Edited Select the type of address (address book/group) to be ed-
Edit Edits My Address of the user(s) selected in the user list.
Allow Profile Editing To allow a particular user to edit personal My Address, se-
Disallow Profile Editing To not to allow a particular user to edit personal My Ad-
[Delete] button Deletes My Address of the user selected in the user list. For
[Select All/Uncheck all] button Selects all users displayed in the user list. Clicking this but-
User List Displays a list of users registered in User List. Select the
the [Display] button to change the user list display.
2
Reminder
Selecting the [All subgroups] check box displays users, including those registered in the
subgroup of the selected user group. Clearing
the check box displays only users registered
immediately under the selected user group.
type in the text to be searched for in the text box, and then
click [Display] to filter the data to be displayed.
ited.
• if Address Book is selected: Edits the address book of
the selected user. For details, refer to "Editing an address book" on page 4-13.
• if Group is selected: Edits the group of the selected user.
For details, refer to "Editing Group" on page 4-14.
lect a user (or users) in the user list, and click [Allow Profile
Editing].
dress, select a user (or users) in the user list, and click [Disallow Profile Editing].
2
Reminder
Even if the edit-disabled user attempts to edit
My Address from the panel of the target device,
the setting is not reflected in My Panel Manager.
details, refer to "Deleting My Address" on page 4-14.
ton again cancels all selections.
check box, and then select the user.
4
My Panel Manager 4-12
Page 90

Managing My Panel Manager
4.5.2 Editing an address book
The address book of the selected user can be edited.
1 Click [Edit] button of the [Address Book] item for the user for whom
address book is to be edited on the user list of the Personal Address
Book page (p. 4-11).
The address book list of the selected user is displayed on the Address
Book page.
4
2 Edit Address Book as desired.
– For details on operating the Address Book page, refer to "Viewing
the address book list" on page 3-3.
My Panel Manager 4-13
Page 91

Managing My Panel Manager
4.5.3 Editing Group
The group of the selected user can be edited.
1 Click [Edit] button of the [Group] item for the user for whom address
book is to be edited on the user list of the Personal Address Book page
(p. 4-11).
The group list of the selected user is displayed on the Group page.
2 Edit a group as desired.
– For details on operating the Group page, refer to "Viewing the
group list" on page 3-23.
4
4.5.4 Deleting My Address
My Address of the selected user can be deleted.
1 Select the user for whom My Address is to be deleted on the user (or
users) list of the Personal Address Book page (p. 4-11).
– To select all users, click the [Select All] button.
2 Click the [Delete] button.
The confirmation page appears.
3 Click the [OK] button.
My Address of the selected user is deleted.
My Panel Manager 4-14
Page 92

Managing My Panel Manager
4.6 Editing the panel settings for each user
My Panel (personal panel settings for individual users) managed by My Panel
Manager can be edited.
Multiple users can be selected at the same time. Also, the address book can
be managed to enable/disable editing of personal My Panel by each user.
2
Reminder
If you want to consolidate My Panel of users in the same group, the
settings for panel of multiple users can be collectively specified by
reading panel information from a file. For details, refer to "Specifying the
panel batch setting" on page 4-29.
4.6.1 Displaying a list of My Panel users
Clicking [Personal Panel] on the "Administrative Setting" menu displays the
Personal Panel page. On this page, the following operations can be executed
for desired purposes.
4
My Panel Manager 4-15
Page 93

Managing My Panel Manager
Function Details
User Group Selects the user group to be displayed in the user list. Click
Search Condition Select a row to be searched for from the drop-down list,
Select Panel Information To Be
Edited
Edit Edits My Panel of the user(s) selected in the user list.
Allow Profile Editing To allow a particular user to edit personal My Panel, select
the [Display] button to change the user list display.
2
Reminder
Selecting the [All subgroups] check box displays users, including those registered in the
subgroup of the selected user group. Clearing
the check box displays only users registered
immediately under the selected user group.
type in the text to be searched for in the text box, and then
click [Display] to filter the data to be displayed.
Select the panel information (system settings, main menu
function permission settings, main menu settings, copy
setting, fax/scan settings, user box settings, and browser
setting) to be edited.
• When System Settings is selected: Edits the system settings of the selected user. For details, refer to "Editing
the System Settings" on page 4-18.
• When Select items to display in main menu is selected:
Allows the administrator to restrict functions the target
user can assign to shortcut keys in the main menu. For
details, refer to "Editing the Select items to display in
main menu" on page 4-18.
• When Main Menu Settings is selected: Edits the main
menu settings of the selected user. For details, refer to
"Editing the Main Menu Settings" on page 4-19.
• When Copy Setting is selected: Edits the copy settings
of the selected user. For details, refer to "Editing Copy
Setting" on page 4-21.
• When Fax/Scan Settings is selected: Edits the fax/scan
settings of the selected user. For details, refer to "Editing
Fax/Scan Settings" on page 4-22.
• When Box Settings is selected: Edits the box settings of
the selected user. For details, refer to "Editing Box Settings" on page 4-23.
• When Browser Setting is selected: Edits the browser
setting of the selected user. For details, refer to "Editing
Browser Settings" on page 4-24.
a user (or users) in the user list, and click [Allow Profile Editing].
4
My Panel Manager 4-16
Page 94

Managing My Panel Manager
Function Details
Disallow Profile Editing To not to allow a particular user to edit personal My Panel,
[Delete] button Deletes My Panel of the user selected in the user list. For
[Select All/Uncheck all] button Selects all users displayed in the user list. Clicking this but-
User List Displays a list of users registered in User List. Select the
4
select a user (or users) in the user list, and click [Disallow
Profile Editing].
2
Reminder
Even if the edit-disabled user attempts to edit
My Panel from the panel of the target device,
the setting is not reflected in My Panel Manager.
details, refer to "Deleting My Panel" on page 4-23.
ton again cancels all selections.
check box, and then select the user.
My Panel Manager 4-17
Page 95

Managing My Panel Manager
4.6.2 Editing the System Settings
My Panel system settings for the selected user can be edited.
1 Click [Edit] button of the [System Settings] item for the user for whom
address book is to be edited on the user list of the Personal Panel page
(p. 4-15).
My Panel system settings for the selected user are displayed on the
System Settings page.
2 Edit System Settings as desired.
– For details on operating the System Settings page, refer to
"Specifying the My Panel environment" on page 3-40.
4
4.6.3 Editing the Select items to display in main menu
The administrator can restrict functions the selected user can assign to
shortcut keys (Main menu key/Short cut key) in the main menu.
1 Click the [Edit] button of [Main Menu Function Permission Settings] for
the user to be edited in the user list of the Personal Panel page
(p. 4-15).
My Panel Manager 4-18
Page 96

Managing My Panel Manager
This displays the functions that can be assigned to shortcut keys in the
main menu.
4
2 Select the check boxes of the functions the selected user can assign
to My Panel, and restrict the functions that are available to the user.
– Clicking [Check which model supports it.] allows you to check
devices on which the functions marked with an asterisk "*" can be
assigned to shortcut keys.
3 Click the [Apply] button.
2
Note
Shortcut key names or functions that can be assigned to shortcut keys
vary depending on the device.
4.6.4 Editing the Main Menu Settings
The Main Menu Settings for the selected user can be edited.
1 Click [Edit] button of the [Main Menu Settings] item for the user for
whom address book is to be edited on the user list of the Personal
Panel page (p. 4-15).
My Panel Manager 4-19
Page 97

Managing My Panel Manager
My Panel Main Menu Settings for the selected user are displayed on
the Main Menu Settings page.
4
2 Select a target device for "Display Panel Template", and click the
[Display] button.
The display switches corresponding to the selected device.
3 Edit Main Menu Settings as desired.
– For details on operating the Main Menu Settings page, refer to
"Setting up the main menu" on page 3-42.
My Panel Manager 4-20
Page 98

Managing My Panel Manager
4.6.5 Editing Copy Setting
The copy setting for the selected user can be edited.
1 Click [Edit] button of the [Copy Setting] item for the user for whom
address book is to be edited on the user list of the Personal Panel page
(p. 4-15).
My Panel copy setting for the selected user are displayed on the Copy
Setting page.
4
2 For "Customize Function Template", select a function template to be
displayed in the Copy screen.
3 Edit copy setting as desired.
– For details on operating the Copy Setting page, refer to "Setting up
the Copy screen" on page 3-44.
My Panel Manager 4-21
Page 99

Managing My Panel Manager
4.6.6 Editing Fax/Scan Settings
The fax/scan settings for the selected user can be edited.
1 Click the [Edit] button of the [Fax/Scan Settings] item for the user for
whom address book is to be edited on the user list of the Personal
Panel page (p. 4-15).
My Panel fax/scan settings for the selected user are displayed on the
Fax/Scan Settings page.
4
2 For "Customize Function Template", select a function template to be
displayed in the Fax/Scan screen.
3 Edit fax/scan settings as desired.
– For details on operating the Fax/Scan Settings page, refer to
"Setting up the Fax/Scan screen" on page 3-46.
My Panel Manager 4-22
Page 100

Managing My Panel Manager
4.6.7 Editing Box Settings
The Box Settings for the selected user can be edited.
1 Click [Edit] button of the [Box Settings] item for the user for whom
address book is to be edited on the user list of the Personal Panel page
(p. 4-15).
My Panel Box Settings for the selected user are displayed on the Box
Settings page.
2 Edit box settings as desired.
– For details on operating the Box Settings page, refer to "Setting up
the User Box screen" on page 3-51.
4
4.6.8 Deleting My Panel
My Panel of the selected user can be deleted.
1 Select the user (or users) for whom My Panel is to be deleted on the
user list of the Personal Panel page (p. 4-15).
– To select all users, click the [Select All] button.
2 Click the [Delete] button.
The confirmation page appears.
3 Click the [OK] button.
– My Panel of the selected user is deleted.
My Panel Manager 4-23
 Loading...