

Page 1

PageScope
Address Book Utility Ver. 1.4
User Manual
Address Book Utility
Ver. 1.4
Page 2

Contents
Contents
1 Getting Started
1.1 System Requirements ..................................................................1-1
1.2 Supported Models.........................................................................1-2
1.3 Overview of Functions..................................................................1-3
2 Software Installation
2.1 How to Install the PageScope Address Book Utility .................2-1
2.2 How to Uninstall the PageScope Address Book Utility.............2-2
3 Using the PageScope Address Book Utility
3.1 To Start...........................................................................................3-1
3.2 To Exit ............................................................................................3-1
3.3 Screen Layout ...............................................................................3-2
3.4 Specify the Range of the Device Search.....................................3-5
3.5 Add Devices...................................................................................3-6
3.6 Specify Default Settings for Devices...........................................3-8
3.7 Creating an Address List............................................................3-10
3.8 Importing Address Lists using CSV Files.................................3-12
3.9 Import Address Configurations registered in Devices............3-14
3.10 Editing an Address List..............................................................3-15
3.11 Transfer an Address Book to a Device .....................................3-29
3.12 Using LDAP Server Data ............................................................3-32
3.13 Saving the Address Book...........................................................3-37
4 APPENDIX
4.1 Can I import Lotus Notes Structured Text Format? ..................4-1
4.2 Transferring Data Between Devices of Different Types............4-4
4.3 What do I do if this message is displayed?................................4-7
4.4 Restrictions for each Model.......................................................4-10
4.5 Device Connection Methods......................................................4-12
PageScope Address Book Utility i
Page 3

About this Product
PageScope Address Book Utility is an administration tool with which email addresses and fax numbers that are registered in the control panel of
supported devices (multifunctional OA equipment) can be edited and
changed from other computers on the network.
After importing and editing address lists from devices, it can be used to
then export these lists to devices.
PageScope Address Book Utility can import address lists in CSV, TAB,
LDIF, Lotus Notes Structured Text, and other formats.
The LDAP protocol can be used to both search and browse destination
data on directory servers such as Active Directory, and to import these
addresses.
Trademarks
KONICA MINOLTA and the KONICA MINOLTA logo are trademarks of
KONICA MINOLTA HOLDINGS, INC.
PageScope is a trademark of KONICA MINOLTA BUSINESS
TECHNOLOGIES, INC.
Active Directory, Microsoft and Windows are either registered trademarks
or trademarks of Microsoft Corporation in the United States and/or other
countries.
Domino, Lotus Notes and Lotus are trademarks of IBM Corporation in the
United States, or other countries, or both.
NDS and Novell Directory Services are registered trademarks of Novell,
Inc., in the United States and other countries. eDirectory is a trademark of
Novell, Inc.
Intel and Pentium are trademarks or registered trademarks of Intel
Corporation or its subsidiaries in the United States and other countries.
All other product names are trademarks or registered trademarks of their
respective companies.
Contents
ii PageScope Address Book Utility
Page 4

Getting Started
1 Getting Started
1.1 System Requirements
Systems must have the following specifications in order to use this software.
G Operating System
Windows 2000 Professional
Windows XP Professional Edition
G Computer
PC/AT compatible, with Pentium II 300MHz CPU or better
G Memory (RAM)
64 MB or above
G Unused hard drive capacity
150 MB or more
G Display
1024 × 768 pixel, 16 bit color or better
G Network
TCP/IP protocol
G Applications
Microsoft Internet Explorer 5.0 (SP2) or later
1
PageScope Address Book Utility 1-1
Page 5
1
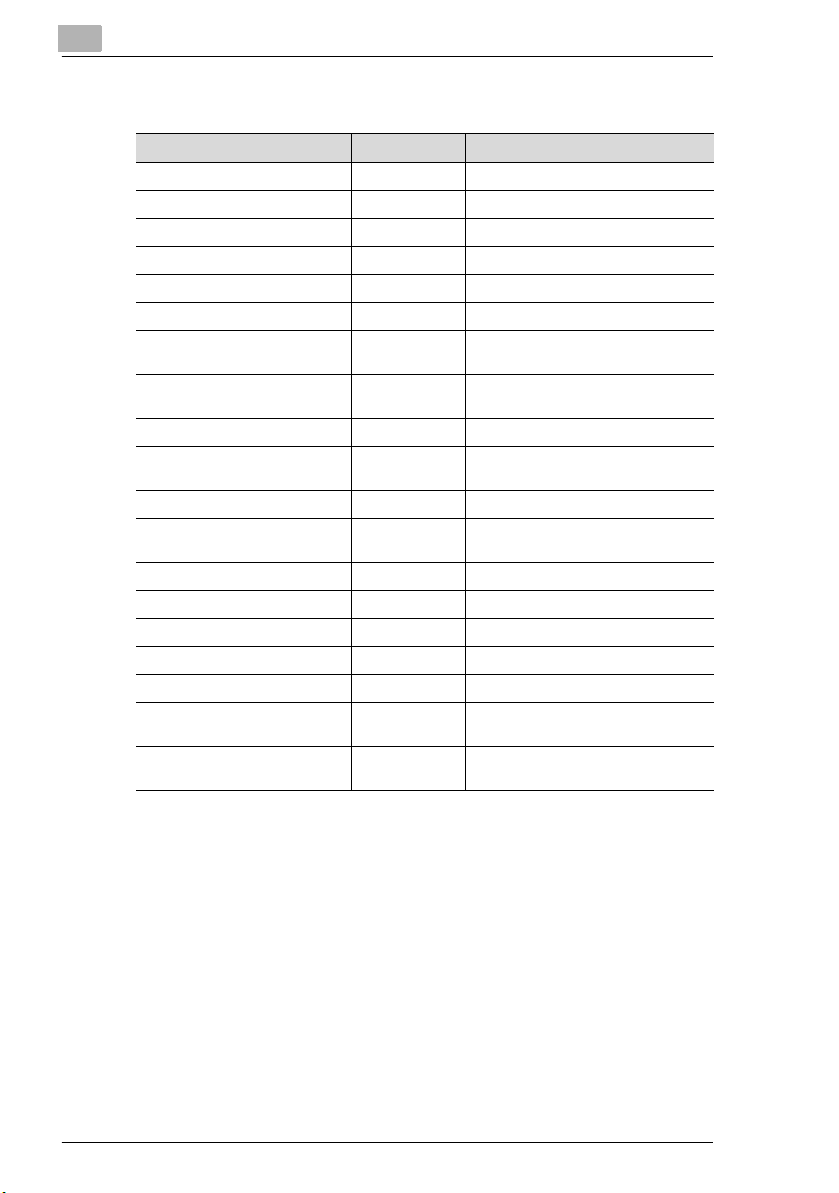
1.2 Supported Models
Model Names Controller Firmware Version
Di200/Di251/Di351 Pi3502 Controller: 2.05aS or later
Di200f/Di251f/Di351f Pi3502 (Fax) Controller: 2.05aS or later
Di551 Copier, 7155 Copier Copier Image Control (I1): 50 or later
Di650 Copier, 7165 Copier Copier Image Control (I1): 50 or later
Di850 Copier, 7085 Copier Copier Image Control (I1): 30 or later
CF3102/CF2002 CN3101e Controller: 4334-3FG0-06-00
C350 Standard
CF3102/CF2002 CN3102e Controller: 1.2
C350 IC-401
CF3102 CN3102Pro Controller: 2.0
Di3510/Di3010/Di2510/Di2010 Pi3505e
Di3510f/Di3010f/Di2510f/
Di2010f
7145 Copier System Control: 20 or later
7222, 7228, 7235
8050, CF5001 Copier Image Control (I1): 40 or later
7272, Di7210 Copier Image Control (I1): 10 or later
7255, Di5510 Copier Image Control (I1): 10 or later
D1610f, Di1610fp
7416MFG, 7416MFP
Di1611, Di1811, Di2011
7216, 7218, 7220
Please contact your Service Representative for details of the firmware
version.
*1: Requires a Network Interface Card (Option).
*2: Requires a Fax Unit (Option) and a Network Interface Card (Option).
Getting Started
Controller
Patch: GimletTarFile030822.ps
Patch: 1-AZPW.PS
Pi3505e
*1
*2
1-2 PageScope Address Book Utility
Page 6

Getting Started
1.3 Overview of Functions
G Detecting supported models on the network
Di351/Di251/Di200, Di351f/Di251f/Di200f,
Di3510/Di3010/Di2510/Di2010,
Di3510f/Di3010f/Di2510f/Di2010f,
CF3102/CF2002, C350
7145, 7222, 7228, 7235
Di1610f/Di1610fp, 7416MFG/7416MFP
Di1611/Di1811/Di2011, 7216/7218/7220
G Importing of address book files (CSV, Tab Delimited Text, Structured
Text, LDIF formats)
G Display and editing of destination data
G Import of destination data from multifunctional OA equipment
G Export of destination data to multifunctional OA equipment
G Reference and searching of destination data on LDAP servers
Supported LDAP Servers
G Lotus Domino Server 5.08
G Microsoft Active Directory (Windows 2000)
G Novell NDS eDirectory 8.7
1
PageScope Address Book Utility 1-3
Page 7

1
Getting Started
1-4 PageScope Address Book Utility
Page 8

Software Installation
2
2 Software Installation
2.1 How to Install the PageScope Address Book Utility
Install the PageScope Address Book Utility (below: “Address Book Utility”)
as follows:
1 Open the Address Book Utility folder.
❍ Confirm the location to where you copied the Address Book Utility.
2 Double-click Setup.exe.
The installer starts.
3 Proceed with the install as indicated on the screen.
4 When the InstallShield Wizard Complete screen is displayed, click
Finish.
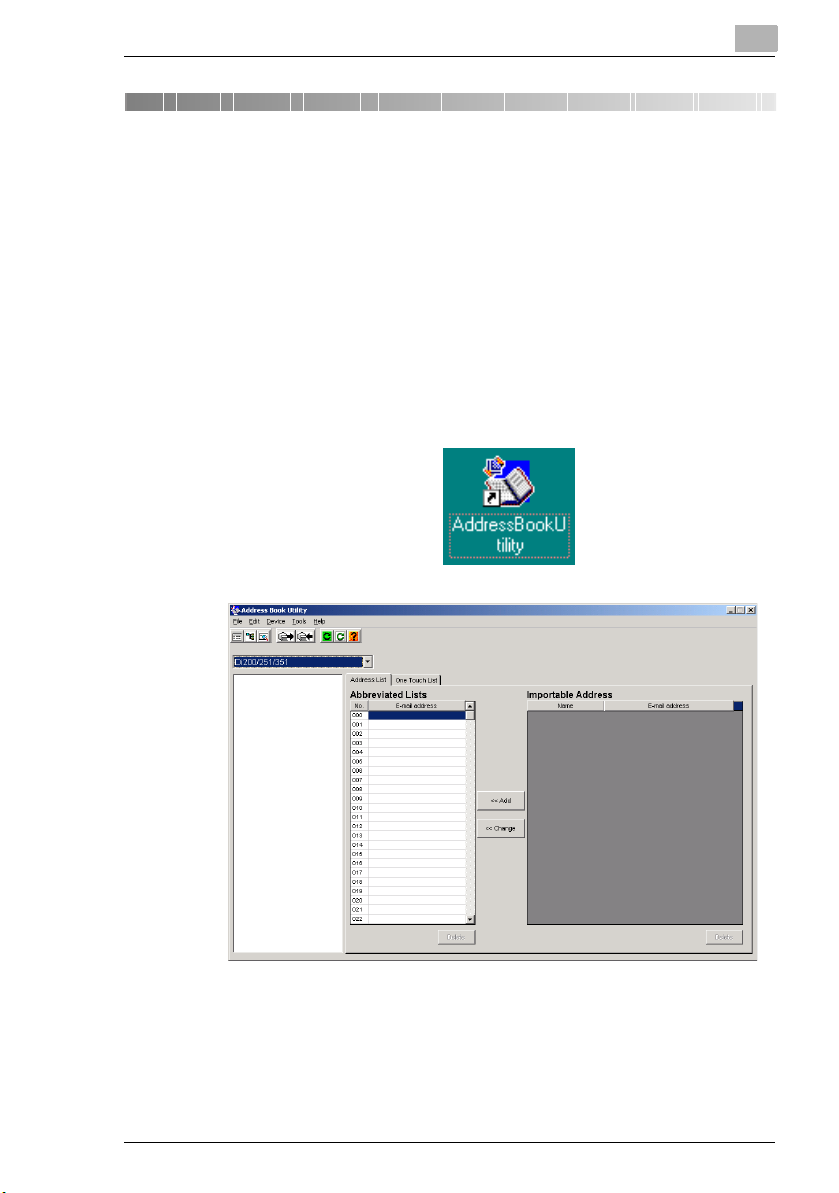
Confirm that the Address Book Utility icon is displayed on the desktop.
PageScope Address Book Utility 2-1
Page 9

2
Software Installation
2.2 How to Uninstall the PageScope Address Book Utility
Uninstall the Address Book Utility as follows:
1 From the Taskbar, click Start, then Settings—Control Panel, to open
the Control Panel.
2 Double-click Add/Remove Programs.
3 In the Currently installed programs field, select Address Book Util-
ity, and click Change/Remove.
4 When the Confirm Uninstall screen is displayed, click OK.
Uninstall commences.
5 When the Maintenance Complete screen is displayed, click Finish.
2-2 PageScope Address Book Utility
Page 10
Using the PageScope Address Book Utility
3 Using the PageScope Address Book
Utility
3.1 To Start
Start the Address Book Utility as follows:
➜ Double-click the Address Book Utility icon on the desktop.
or
From the Taskbar, click Start, then Programs—KONICA
MINOLTA—Address Book Utility—AddressBookUtility.
The Address Book Utility screen is displayed.
3
3.2 To Exit
Exit the Address Book Utility as follows:
➜ From the File menu, select Exit.
PageScope Address Book Utility 3-1
Page 11
3
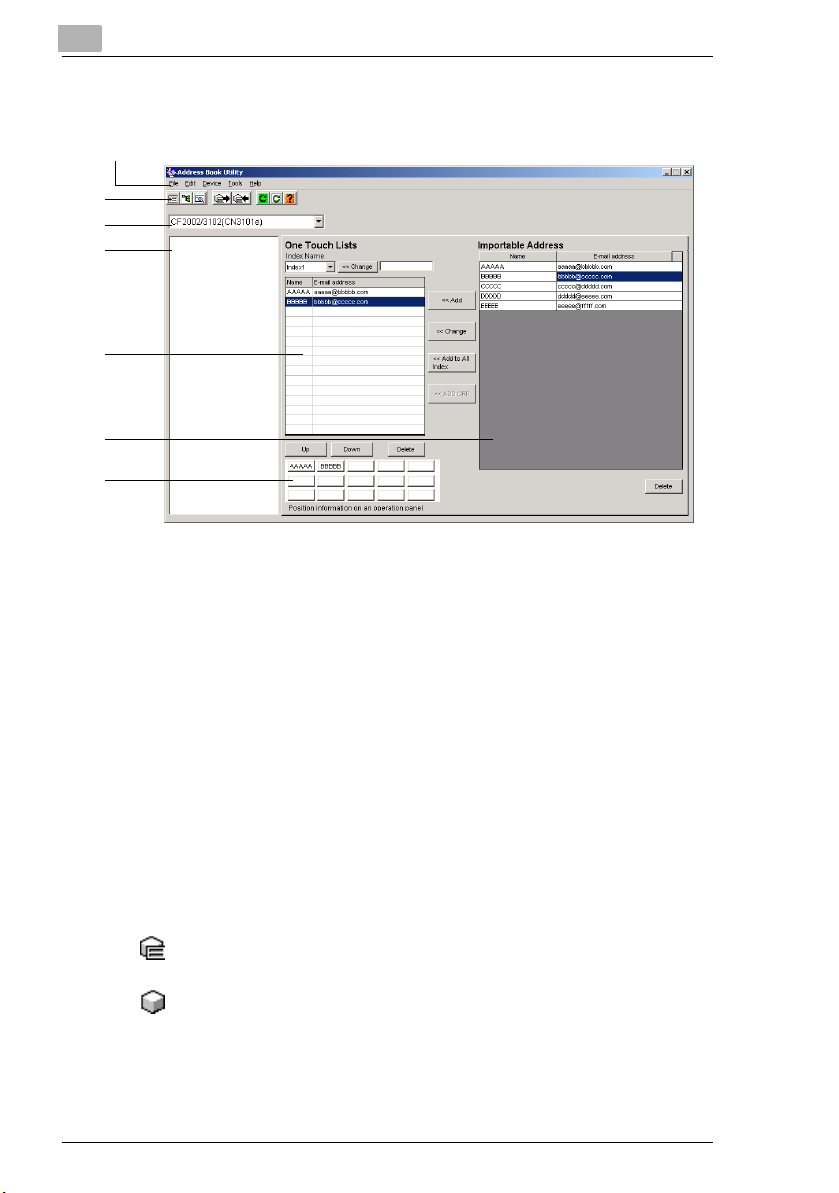
3.3 Screen Layout
(1)
(2)
(3)
(4)
(5)
(6)
(7)
1. Menu bar
2. Tool bar
3. Device Type
4. Device list
5. Address book (the displayed screen may differ, depending on the
selected device)
6. Importable Address: Displays files in CSV and other formats, and
address data that has been imported from LDAP servers. Click
“Name” or “E-mail address” to change the order of each parameter.
7. One Touch Button: A One Touch Name is displayed on the button.
(Not including Di200/251/351 and Di200f/251f/351f device types).
Additionally, clicking a button will highlight the corresponding address
in the table above.
Using the PageScope Address Book Utility
Icons displayed in the device list
:Indicates that Address data from this device is been imported into
the Address Book Utility, and is currently being edited.
:Indicates that Address data is not being imported from the device.
3-2 PageScope Address Book Utility
Page 12
Using the PageScope Address Book Utility
Menu Bar
3
Menu Description
File Refresh Device List Refreshes the device list.
Display Device List
(only Add Device)
Open Address List File Opens an existing address list file. page 3-12
Open Address Book
Utility File
Save Address Book
Utility File
Exit Exits the Address Book Utility. page 3-1
Edit Address edit Displays the edit screen for a
Find Searches for mail addresses,
Select All Selects all destination data in the
Device Search Configuration Specifies the extent of the network
Add Device Manually adds devices to the
Default Setting
Configuration
Import from Device Imports destination data
Export to Device Transfers currently opened
Re-detects and displays
supported models connected to
the network.
Displays the device list of devices
added using the Add Device dialog
only.
Opens an Address Book Utility
format file.
Saves an edited address book file. page 3-37
destination selected in the
“Address List” or “One Touch
Lists”.
names, and fax numbers from a
currently opened address book
file.
Available in the Importable
Address list.
currently opened address book
file.
Available in the Importable
Address list.
to search for devices when the
Address Book Utility is started.
This utility can not search Di551,
Di650, Di850, 7155, 7165, 7085,
8050, CF5001, 7272, 7255,
Di7210 or Di5510.
device list.
Specifies default destination
settings for each device.
registered in devices into the
Address Book Utility.
address book file data to devices.
Details
(Refer page)
page 3-5
page 3-7
page 3-10
page 3-5
page 3-6
page 3-8
page 3-14
page 3-29
PageScope Address Book Utility 3-3
Page 13
3
Using the PageScope Address Book Utility
Menu Description
Tools LDAP Configuration Carries out initial configuration in
LDAP Search Specifies the directory on the
LDAP Browsing Refers to the directory server in a
Help Topics Opens the Address Book Utility
About Displays application version
order to access addresses on
directory servers (LDAP Server).
directory server, and searches
address data.
tree view.
You can add necessar y data to the
address book.
help.
information.
Details
(Refer page)
page 3-32
page 3-35
page 3-36
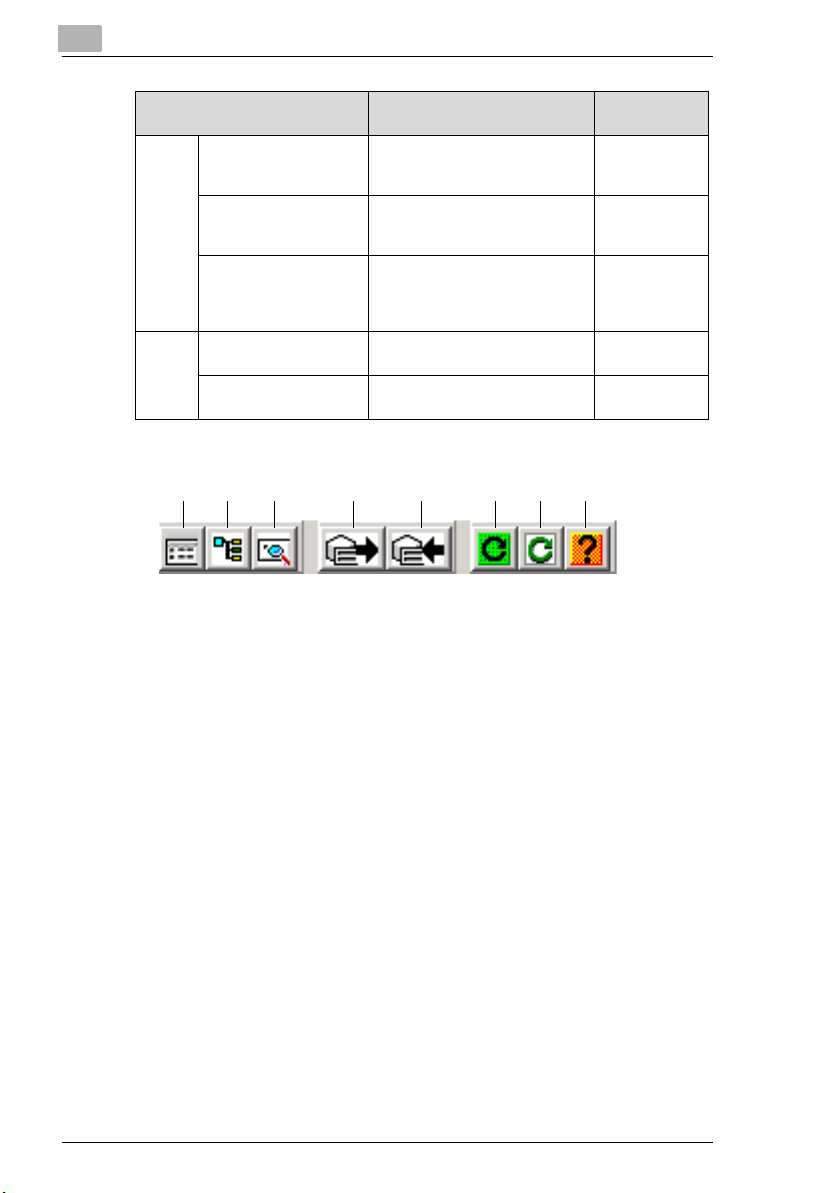
Tool bar
(1) (2) (3) (4) (5) (6) (7) (8)
1. Open Address Book File icon: Opens an existing address book file.
2. LDAP Browsing icon: Refers to the directory server in a tree view.
3. LDAP Search icon: Specifies the directory on the directory server,
and searches address data.
4. Import from Device icon: Imports destination data registered in
devices into the Address Book Utility.
5. Export to Device icon: Transfers address book file data to devices.
6. Refresh Device List icon: Re-detects and displays supported models
connected to the network.
7. Display Device (only Add Device) List icon: Displays the device list
of devices added using the Add Device dialog only.
8. Topics icon: Opens help.
3-4 PageScope Address Book Utility
Page 14
Using the PageScope Address Book Utility
3.4 Specify the Range of the Device Search
✎
Note
This utility can not search Di551, Di650, Di850, 7155, 7165, 7085,
8050, CF5001, 7272, Di7210, 7255 or Di5510, therefore add devices
using the “Add Device” function. (page 3-6)
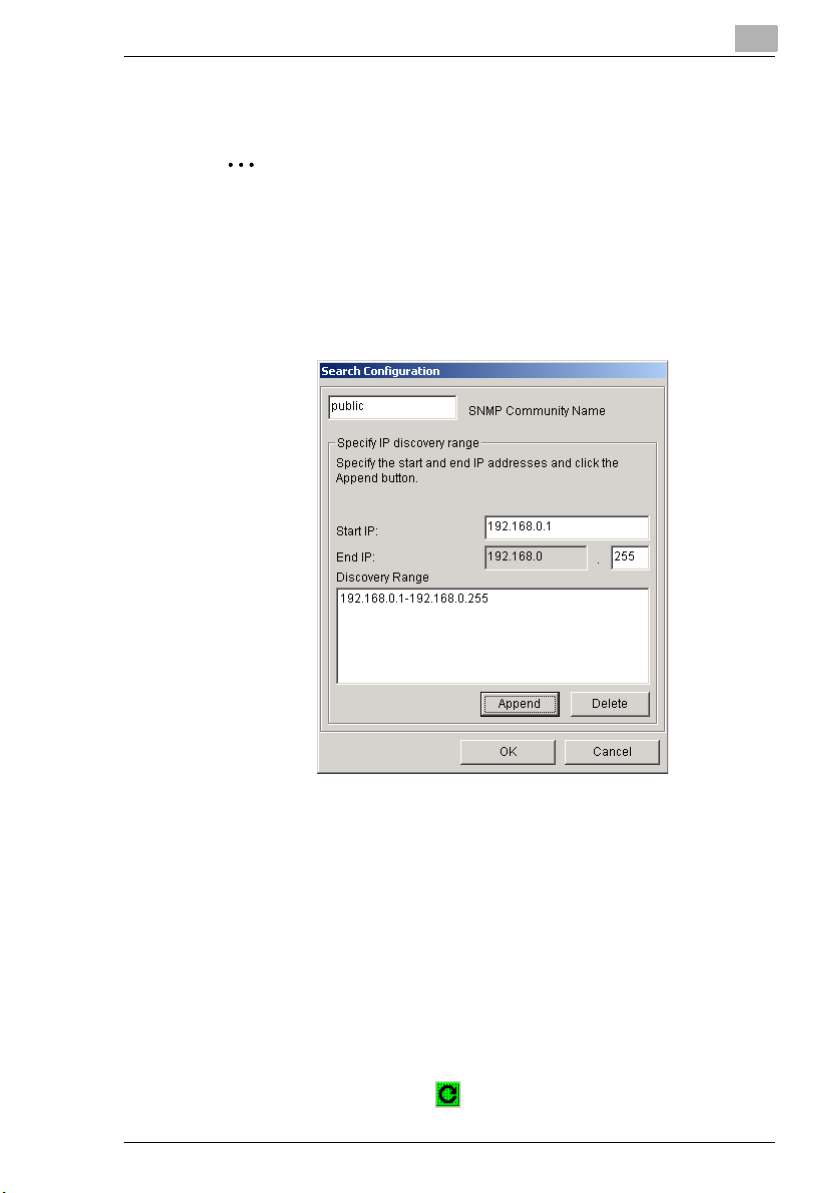
1 From the Device menu, select Search Configuration.
This displays the Search Configuration dialog.
3
2 Specify the SNMP Community Name. (The default value is Public)
3 Input the Start IP and End IP.
4 Click Append.
5 The search range is displayed in the Discovery Range box.
6 Click OK to close the Search Configuration dialog.
7 From the File menu, select Re-Fresh Device List to re-display the
device list.
❍ You can also click the button on the tool bar to re-display the
device list.
PageScope Address Book Utility 3-5
Page 15
3
3.5 Add Devices
✎
Note
Before use...
When selecting the 7085/7165/7155, Di551/650/850, 7145, 8050,
CF5001, 7272/7255, Di7210/Di5510, confirm that a Network Cable is
connected to the copier main body. Additionally, confirm the IP
address on the copier control panel. (page 4-12) This value is required
in the Add Device dialog.
1 From the drop down list in the box at the top of the device list, select
the Device type you wish to register in the address book.
Device Device Type
Di200, Di251, Di351 Di200/251/351
Di200f, Di251f, Di351f Di200f/251f/351f
Di551, Di650, Di850, 7155, 7165,
7085
CF3102 with CN3101e
CF2002 with CN3101e
CF3102 with CN3102Pro
CF3102 with CN3102e
CF2002 with CN3102e
C350 with IC-401
Di3510, Di3010, Di2510, Di2010 Di3510/3010/2510/2010
Di3510f, Di3010f, Di2510f, D i2010f Di3510f/3010f/2051f/2010f
C350 C350
7145, 7222, 7228, 7235 7145/7222/7228/7235
8050, CF5001 8050/CF5001
7272, 5252, Di7210, Di5510 7272/7255, Di7210/5510
Di1610f, Di1610fp
7416MFG, 7416MFP
Di1611, Di1811, Di2011
7216, 7218, 7220
Using the PageScope Address Book Utility
7085/7165/7155, Di551/650/850
CF2002/3102 (CN3101e)
CF2002/3102 (CN3102Pro/e), C350 (IC-401)
Di1610f/fp, 7416MFG/MFP
Di1611/1811/2011, 7210/7218/7220
3-6 PageScope Address Book Utility
Page 16
Using the PageScope Address Book Utility
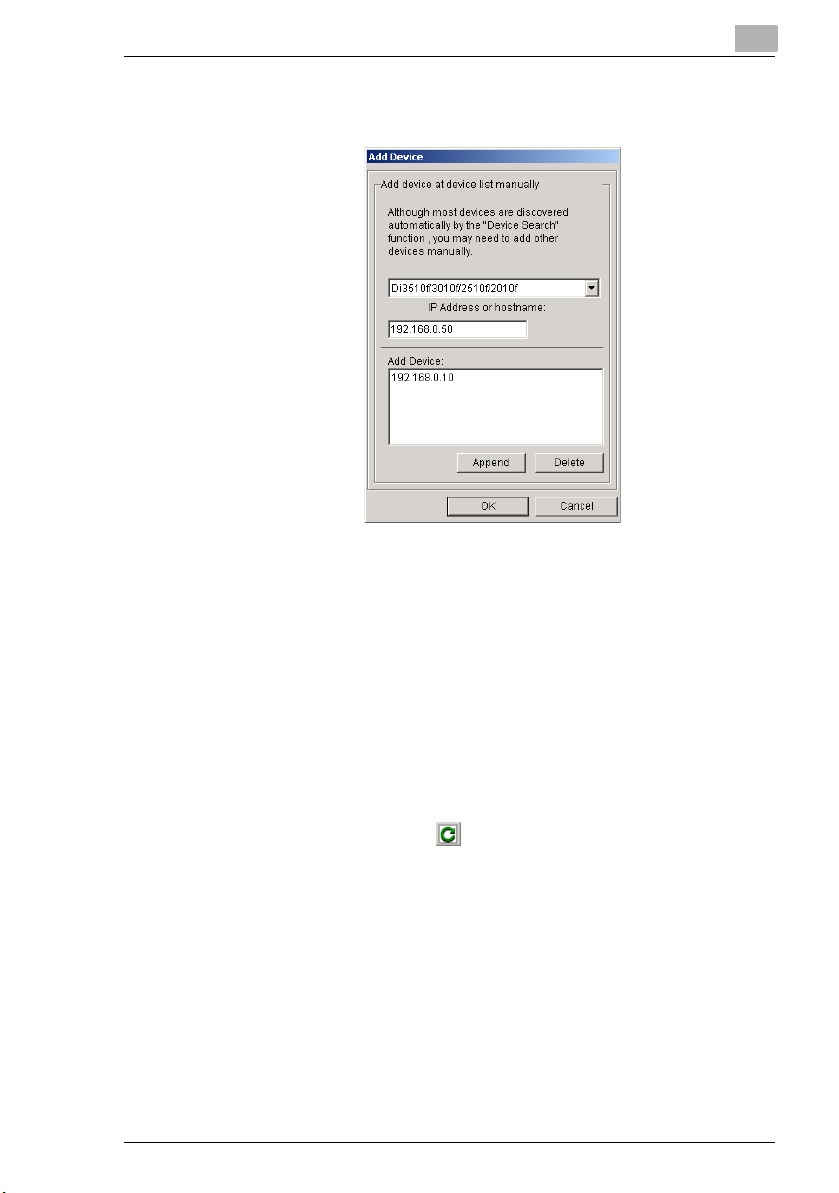
2 From the Device menu, select Add Device.
This displays the Add Device dialog.
3 From the drop down list in the box at the top of the dialog, select the
device type you wish to add.
3
4 In the IP Address or hostname: box, input the IP address or domain
name of the device you wish to add.
5 Click Append, to add to the Add Device box.
6 Click OK to close the Add Device dialog.
7 From the File menu, select Display Device List to re-display the
device list.
❍ You can also click the button on the tool bar to re-display the
device list.
Confirm that the selected device is displayed in the device list.
PageScope Address Book Utility 3-7
Page 17

3
Using the PageScope Address Book Utility
3.6 Specify Default Settings for Devices
All configuration for importing into the Address Book Utility from CSV and
other files is carried out here, and these are then registered in devices. If
you wish to change individual settings, from the Abbreviated List click
Destination, change these individual settings, and transmit to the device.
This function can only be used with the following 6 device types.
Di200/251/351
Di200f/251f/351f
Di3510/3010/2510/2010
Di3510f/3010f/2510f/2010f
Di1610f/fp, 7416MFG/MFP
Di1611/1811/2011, 7216/7218/7220
Values that can be specified differ between devices. Here, examples
using Di3510f/3010f/2510f/2010f device types are shown.
1 From the Device menu, select Default Setting Configuration.
This displays the Default Setting Configuration dialog.
1
2
1 Settings for E-mail
2 Settings for FAX transmission
2 Click the tab of the device that you wish to configure.
✎
Note
Displayed parameters may vary depending on the device.
3-8 PageScope Address Book Utility
Page 18

Using the PageScope Address Book Utility
3 Specify the file format for when sending scanned data.
❍ In File Format, select either PDF or TIFF.
4 Specify the compression scheme to be used in transmission.
❍ Select from MH, MMR.
5 Specify overseas transmission.
❍ Select either Yes or No for overseas.
6 Specify the transmission speed.
❍ Select from the Speed drop down list.
7 Configure when using F-Code fax transmission.
❍ Input the F-Code into the F Code (SUB) box.
❍ Input the selective polling code into the F Code (SEP) box.
❍ Input the password into the F Code Password box.
✎
Note
“F-Code” can hold a text string up to 20 alphanumeric characters
long, including 1-9, *, and #.
3
8 Click OK to close the Default Setting Configuration dialog.
PageScope Address Book Utility 3-9
Page 19
3
Using the PageScope Address Book Utility
3.7 Creating an Address List
You can specify recipients in the Address Book Utility Address List.
Register and edit recipients as follows:
✎
Note
Displayed parameters may vary depending on the device.
Here, examples using Di200f/251f/351f device types are shown.
Input New E-mail Addresses
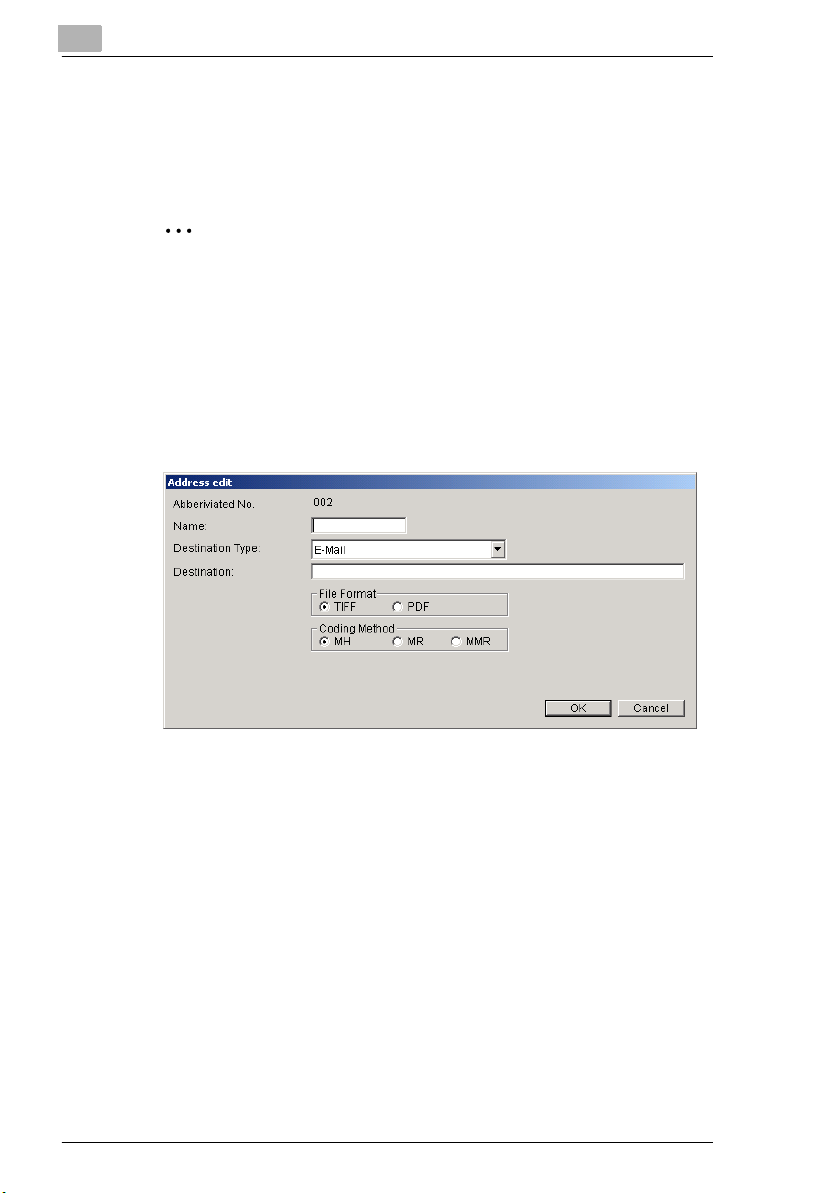
1 In the Address List screen, double-click the border of the number you
wish to register from Abbreviated Lists.
This displays the Address Edit dialog.
2 Input the destination (Name).
3 From the drop down list in the Destination Type box, select E-mail.
4 Specify the recipient.
❍ Input the e-mail address in the Destination box.
❍ In File Format, select either PDF or TIFF.
❍ For compression, select from MH, MR, or MMR.
5 Click OK to close the Address Edit dialog.
The input recipient address will be displayed in Abbreviated Lists.
6 In order to input more recipients, repeat steps 1 to 5.
3-10 PageScope Address Book Utility
Page 20

Using the PageScope Address Book Utility
Input New Fax Destination
1 In the Address List screen, double-click the border of the number you
wish to register from Abbreviated Lists.
This displays the Address Edit dialog.
2 Input the destination (Name).
3 From the drop down list in the Destination Type box, select Fax.
3
4 Specify the recipient.
❍ Input the Fax number into the Destination box.
❍ Input the F-Code into the F Code (SUB) box.
❍ Input the selective polling code into the F Code (SEP) box.
❍ Input the password into the F Code Password box.
❍ Select either Yes or No for overseas transmission.
❍ Select from the Speed drop down list to specify the transmission
speed.
5 Click OK to close the Address Edit dialog.
The input fax destination is displayed in Abbreviated Lists.
6 In order to input more recipients, repeat steps 1 to 5.
PageScope Address Book Utility 3-11
Page 21

3
Using the PageScope Address Book Utility
3.8 Importing Address Lists using CSV Files
1 In the Address List screen, from the File menu, select Open Address
List File.
❍ You can also click the button on the tool bar to import an
address list.
This displays the File Selection dialog.
2 Select the CSV file you wish to import, and click OK.
This displays the Open Address List File dialog.
3 Enter the User Name (surname, name) column number, e-mail
address column number, and fax number column number. If
parameters will not be imported, input a “0” or a “space” into the field.
4 Click OK.
Imported information is displayed in the Importable Addresses list.
5 Select recipients you wish to add to the address list from the
Importable Addresses list, and click << Add.
The selected recipients will be added to Abbreviated Lists,
Registration list or One Touch Lists.
3-12 PageScope Address Book Utility
Page 22

Using the PageScope Address Book Utility
✎
Tip
You can select multiple recipients from the Importable Addresses
list, and add them at the same time.
From the Edit menu, select Select All to select all recipients in the
Importable Addresses list.
From the Edit menu, select Find to search recipients in the
Importable Addresses list.
3
6 In order to add more recipients, repeat step 5.
PageScope Address Book Utility 3-13
Page 23

3
Using the PageScope Address Book Utility
3.9 Import Address Configurations registered in Devices
You can import into the Address Book Utility and edit address information
that is already registered in devices.
➜ In the Address List screen, from the Device menu, select Import from
Device.
❍ You can also click the button on the tool bar to import an
address list.
Imported information is displayed in the Abbreviated Lists,
Registration list or the One Touch Lists.
✎
Note
When importing address data from “Di200/251/351, Di200f/251f/351f”
type devices, Change (Overwrite) and Delete functions will not be
available for addresses that include multi-destination lists, FTP, and
URL information.
When importing address data from “Di1610f/Di1610fp,7416MFG/
7416MFP” and “Di1611/1811/2011,7216/7218/7220” type devices,
“Program Dial” will not be imported.
Import of address lists may take 2-3 minutes for “CF2002/3102
(CN3102Pro/e), C350 (IC-401)” device types.
3-14 PageScope Address Book Utility
Page 24

Using the PageScope Address Book Utility
3.10 Editing an Address List
Methods of editing the address list differ between device types.
For Di200/251/351, Di200f/251f/351f
This device type comprises 2 tabs; Address List and One Touch List.
3
G To add an address from Importable Address to Abbreviated Lists,
select the number registered in Abbreviated Lists, select the address
to register in Importable Address, and click << Add.
If you have selected the number for an address that is already
registered in Abbreviated Lists, add it below.
G If you have clicked << Change, then instead of being added, the
address will overwrite the existing number.
G To edit an address in Abbreviated Lists, double click the address to
edit.
G To create a new address in Abbreviated Lists, double click an
address that has no information registered.
PageScope Address Book Utility 3-15
Page 25

3
Using the PageScope Address Book Utility
G To delete an address from Abbreviated Lists, select the address to
delete, and click “Delete”.
G To add an address from Abbreviated Lists to One Touch Lists,
select the Index and Number to register in One Touch Lists, select
the address to register in the Importable Address, and click << Add.
If you have selected the number for an address that is already
registered in Abbreviated Lists, add it below.
G If you have clicked << Change, then instead of being added, the
address will overwrite the existing number.
G If you have clicked << Add to All Index, then the address will be
added to multiple indexes.
G To delete an address from One Touch Lists, select the address to
delete, and click “Delete”.
G With this device type, addresses can not be edited in One Touch
Lists. Click the Address List tab, and edit in Abbreviated Lists.
3-16 PageScope Address Book Utility
Page 26

Using the PageScope Address Book Utility
For 7085/7165/7155, Di551/651/850
G To add an address from Importable Address to Registration list,
select the number registered in Registration list, select the address
to register in Importable Address, and click << Add.
If you have selected the number for an address that is already
registered in Registration list, add it below.
G If you have clicked << Change, then instead of being added, the
address will overwrite the existing number.
G To edit an address in Registration list, double click the address to
edit.
G To create a new address in Registration list, double click an address
that has no information registered.
G To change the order in Registration list, select the item to move, and
click “Up” and “Down”.
G To delete an address from Registration list, select the address to
delete, and click “Delete”.
G In Registration list, click “Name” or “E-mail address” to change the
order of each parameter.
3
PageScope Address Book Utility 3-17
Page 27

3
Using the PageScope Address Book Utility
For CF2002/3102 (CN3101e)
G To add an address from Importable Address to One Touch Lists,
select the Index and Location to register in One Touch Lists, select
the address to register in Importable Address, and click << Add.
If you have selected the number for an address that is already
registered in One Touch Lists, add it below.
G If you have clicked << Change, then instead of being added, the
address will overwrite the existing number.
G If you have clicked << Add to All Index, then the address will be
added to multiple indexes.
G To register a group, click << Add GRP. Select another address in
Importable Address, and click << Add GRP to add addresses to the
group.
G To edit an address in One Touch Lists, double click the address to
edit.
G To create a new address in One Touch Lists, double click an address
that has no information registered.
G To change the order in One Touch Lists, select the item to move, and
click “Up” and “Down”.
G To delete an address from One Touch Lists, select the address to
delete, and click “Delete”.
3-18 PageScope Address Book Utility
Page 28

Using the PageScope Address Book Utility
G To change the Index name, select the Index to change, and input a
new Index name in an empty field. Click << Change to change the
Index. (Index name can have a maximum of 10 characters)
For CF2002/3102 (CN3102Pro/e), C350 (IC-401)
3
G To add an address from Importable Address to One Touch Lists,
select the Index and Location to register in One Touch Lists, select
the address to register in Importable Address, and click << Add.
If you have selected the number for an address that is already
registered in One Touch Lists, add it below.
G If you have clicked << Change, then instead of being added, the
address will overwrite the existing number.
G If you have clicked << Add to All Index, then the address will be
added to multiple indexes.
G To register a group, select index8, and click << Add GRP. Select
another address in Importable Address, and click << Add GRP to
add addresses to the group. Registering of groups can only be carried
out in Index8.
G To edit an address in One Touch Lists, double click the address to
edit.
G To create a new address in One Touch Lists, double click an address
that has no information registered.
PageScope Address Book Utility 3-19
Page 29

3
Using the PageScope Address Book Utility
G To change the order in One Touch Lists, select the item to move, and
click “Up” and “Down”.
G To delete an address from One Touch Lists, select the address to
delete, and click “Delete”.
G To change the Index name, select the Index to change, and input a
new Index name in an empty field. Click << Change to change the
Index. (Index name can have a maximum of 10 characters)
For Di3510/3010/2510/2010, Di3510f/3010f/2510f/2010f
G To add an address from Importable Address to One Touch Lists,
select the Index and Location to register in One Touch Lists, select
the address to register in Importable Address, and click << Add.
If you have selected the number for an address that is already
registered in One Touch Lists, add it below.
G If you have clicked << Change, then instead of being added, the
address will overwrite the existing number.
G If you have clicked << Add to All Index, then the address will be
added to multiple indexes.
G To edit an address in One Touch Lists, double click the address to
edit.
G To create a new address in One Touch Lists, double click an address
that has no information registered.
3-20 PageScope Address Book Utility
Page 30

Using the PageScope Address Book Utility
G To change the order in One Touch Lists, select the item to move, and
click “Up” and “Down”.
G To delete an address from One Touch Lists, select the address to
delete, and click “Delete”.
G To change the Index name, select the Index to change, and input a
new Index name in an empty field. Click << Change to change the
Index. (Index name can have a maximum of 8 characters)
For C350
3
G To add an address from Importable Address to One Touch Lists, do
the following:
1. Select an Index (Index1 to Index17).
2. Select a Sub Index (Sub1 to Sub8).
3. Select the location to register in One Touch Lists.
4. Select the address to register in Importable Address.
5. Click << Add.
If you have selected the number for an address that is already
registered in One Touch Lists, add it below.
G If you have clicked << Change, then instead of being added, the
address will overwrite the existing number.
G If you have clicked << Add to All Index, then the address will be added
to multiple indexes.
PageScope Address Book Utility 3-21
Page 31

3
Using the PageScope Address Book Utility
G To register a group, do the following:
1. Select the Group check box.
2. Select an Index (Index1 to Index17).
3. Select the location to register in One Touch Lists.
4. Select the addresses (multiple) to register in Importable Address.
5. Click << ADD GRP.
G To edit an address in One Touch Lists, double click the address to
edit.
G To create a new address in One Touch Lists, double click an address
that has no information registered.
G To change the order in One Touch Lists, select the item to move, and
click “Up” and “Down”.
G To delete an address from One Touch Lists, select the address to
delete, and click “Delete”.
For 7145/7222/7228/7235
G To add an address from Importable Address to the Address List, do
the following:
1. Select the Destination Type.
2. Import an address into Importable Address (page 3-12,
page 3-32).
Import either e-mail addresses or fax numbers depending on the
destination type.
3. Select the location to register in the Address List.
4. Select the address to register in Importable Address.
3-22 PageScope Address Book Utility
Page 32

Using the PageScope Address Book Utility
5. Click << Add.
If you have selected the number for an address that is already
registered in the Address List, add it below.
G If you have clicked << Change, then instead of being added, the
address will overwrite the existing number.
G To edit an address in the Address List, double click the address to edit.
G To create a new address in the Address List, double click an address
that has no information registered.
G To change the order in the Address List, select the item to move, and
click “Up” and “Down”.
G To delete an address from the Address List, select the address to
delete, and click “Delete”.
✎
NOTE
For the 7145 with a firmware version of either “20” or “25”, SMB
addresses can not be sent to the device. For the 7145 with a firmware
version of “30”, and for the 7222/7228/7235, SMB addresses can be
sent to the device.
For 8050/CF5001
3
G To add an address from Importable Address to the Registration list,
select the number registered in the Registration list, select the
address to register in Importable Address, and click << Add.
PageScope Address Book Utility 3-23
Page 33

3
Using the PageScope Address Book Utility
G If you have clicked << Change, then instead of being added, the
address will overwrite the existing number.
G To edit an address in the Registration list, double click the address
to edit.
G To create a new address in the Registration list, double click an
address that has no information registered.
G To change the order in the Registration list, select the item to move,
and click “Up” and “Down”.
G To delete an address from the Registration list, select the address to
delete, and click “Delete”.
G In Registration list, click “Name” or “E-mail address” to change the
order of each parameter.
For Di1610f/fp, 7416MFG/MFP
With this device type, the following two tabs appear: One Touch List and
Speed Dial List.
3-24 PageScope Address Book Utility
Page 34

Using the PageScope Address Book Utility
G To add an address from Importable Address to One Touch Lists,
select the number registered in One Touch Lists, select the address
to register in Importable Address, and click <<Add.
If you have selected the number for an address that is already
registered in One Touch Lists, add it below.
3
G To add an address from Importable Address to the Speed Dial List,
select the number registered in the Speed Dial List, select the
address to register in Importable Address, and click <<Add.
If you have selected the number for an address that is already
registered in the Speed Dial List, add it below.
G If you have clicked << Change, then instead of being added, the
address will overwrite the existing number.
G To edit an address in One Touch Lists or the Speed Dial List, double
click the address to edit.
G To create a new address in One Touch Lists or the Speed Dial List,
double click an address that has no information registered.
G To change the order in One Touch Lists or the Speed Dial List,
select the item to move, and click “Up” and “Down”.
G To delete an address One Touch Lists or the Speed Dial List, select
the address to delete, and click “Delete”.
PageScope Address Book Utility 3-25
Page 35

3
Using the PageScope Address Book Utility
For 7272/7255, Di7210/5510
G To add an address from Importable Address to the Registration list,
select the number registered in the Registration list, select the
address to register in Importable Address, and click << Add.
G If you have clicked << Change, then instead of being added, the
address will overwrite the existing number.
G To edit an address in the Registration list, double click the address
to edit.
G To create a new address in the Registration list, double click an
address that has no information registered.
G To change the order in the Registration list, select the item to move,
and click “Up” and “Down”.
G To delete an address from the Registration list, select the address to
delete, and click “Delete”.
3-26 PageScope Address Book Utility
Page 36

Using the PageScope Address Book Utility
For Di1611/1811/2011, 7216/7218/7220
With this device type, the following two tabs appear: One Touch List and
Speed Dial List.
G To add an address from Importable Address to One Touch Lists,
select the number registered in One Touch Lists, select the address
to register in Importable Address, and click <<Add.
If you have selected the number for an address that is already
registered in One Touch Lists, add it below.
3
PageScope Address Book Utility 3-27
Page 37

3
Using the PageScope Address Book Utility
G To add an address from Importable Address to the Speed Dial List,
select the number registered in the Speed Dial List, select the
address to register in Importable Address, and click <<Add.
If you have selected the number for an address that is already
registered in the Speed Dial List, add it below.
G If you have clicked << Change, then instead of being added, the
address will overwrite the existing number.
G To edit an address in One Touch Lists or the Speed Dial List, double
click the address to edit.
G To create a new address in One Touch Lists or the Speed Dial List,
double click an address that has no information registered.
G To change the order in One Touch Lists or the Speed Dial List,
select the item to move, and click “Up” and “Down”.
G To delete an address One Touch Lists or the Speed Dial List, select
the address to delete, and click “Delete”.
3-28 PageScope Address Book Utility
Page 38

Using the PageScope Address Book Utility
3.11 Transfer an Address Book to a Device
When you have completed registration and editing of the address book,
transfer the address book to devices as follows:
✎
Note
When exporting address book data to “Di200/Di251/Di351, Di200f/
Di251f/Di351f” device type devices, if exporting data other than
address book data that has been imported from a device (new data or
data imported from CSV data), then One-Touch Index names, multi
destination, and file destination data that is currently registered in the
device will be deleted.
When exporting address book data that has been imported from one
device to a different device, all configuration of the One-Touch Index
names, multi destination, and file destination data from the imported
address book will be copied.
For device types CF2002/3102 (CN3101e), when exporting address
data to a device other than that from which it was imported, then the
data will be deleted from the HDD or FTP destination before
transmission.
For device types “CF2002/3102 (CN3102Pro/e), C350 (IC-401)” when
exporting address data to a device other than that from which it was
imported, then the data will be deleted from the HDD destination
before transmission.
3
When exporting address data to “Di1610f/Di1610fp,7416MFG/
7416MFP” and “Di1611/1811/2011,7216/7218/7220” type devices, if
“Program Dial” is registered in the destination device, address data
can not be overwritten.
“Program Defind (OT-13, OT-14),” etc. will be displayed in the Status
column.
If this happens, delete “Program Dial” from the device before exporting
address data.
PageScope Address Book Utility 3-29
Page 39

3
Using the PageScope Address Book Utility
1 From the device list, select the check boxes corresponding to devices
to which you wish to transfer the address book information.
2 From the Device menu, select Export to Device.
❍ You can also click the button on the tool bar to carry out this
action.
This displays the Write to Device dialog.
3 Select the device, and enter the Administrator Password.
❍ For Di200/Di251/Di351/Di200f/Di251f/Di351f/CF3102/CF2002/
C350/Di3510/Di3010/Di2510/Di2010/Di3510f/Di3010f/Di2510f/
Di2010f/Di1610f/Di1610fp/7416MFG/7416MFP/Di1611/Di1811/
Di2011/7216/7218/7220, enter the Administrator Password in the
password box.
❍ The Administrator Password is the same one used in PageScope
Web Connection (or PageScope Light).
Click Modify Password to register the password.
❍ For 7155/7165/7085/Di551/Di650/Di850/8050/CF5001/7272/
7255/Di7210/Di5510, enter the Copier’s Web Page Administrator
ID and password into the pop up dialog that is displayed when
selecting the device. (Default user name: “ekc”. Default password:
“00000000”)
❍ For 7145/7222/7228/7235, enter the Web Key Operator
Password. (Default password: “0000”)
3-30 PageScope Address Book Utility
Page 40

Using the PageScope Address Book Utility
✎
Note
After entering the Administrator Password, be sure to click Modify
Password.
To save the password, select “Save password (all device)”
4 Click Send to Device.
During transfer, the device status will display Processing.
✎
Note
Data transfer will take approximately 3 minutes (Di200/Di251/
Di351 or Di200f/Di251f/Di351f). Please do not close the Address
Book Utility during data transfer. Forcing the Address Book Utility
to close before processing is complete will mean the Address Book
data will not be correctly transferred, and this may cause Address
data corruption on the device.
Please do not start PageScope Web Connection (or PageScope
Light) while sending data from the Address Book Utility to a device.
Doing so could result in the destination data not being copied
correctly.
3
5 When data transfer has completed, click Exit to close the Write to
Device dialog.
PageScope Address Book Utility 3-31
Page 41

3
Using the PageScope Address Book Utility
3.12 Using LDAP Server Data
Settings in order to Access an LDAP Server
LDAP Servers settings can have up to 99 items registered. You can
change and delete registered details.
1 From the Tools menu, select LDAP Configuration.
This displays the LDAP Configuration dialog.
2 To register new details, click New.
To change already registered details, click Edit.
To delete already registered details, click Delete.
3-32 PageScope Address Book Utility
Page 42

Using the PageScope Address Book Utility
This displays the LDAP Server Configuration dialog.
3 After you have completed input or changes, click OK to close the
LDAP Server Configuration dialog.
The LDAP Server Configuration dialog.
G Directory Name:
Input a name for the current details.
G Server Name:
Input either the directory server IP address or its DNS server name.
Input the DNS name when using SSL.
G Search Root:
Input the search base. (Up to 512 characters)
(E.g.)ou=sales division ,dc=ABCDEFG ,dc=com
Consult with the LDAP administrator about search bases to input.
G Port Number:
Specify the port number to be used when accessing LDAP servers.
G SSL:
Select when using SSL for LDAP communications.
It is recommended that you use SSL for secure transmission. Not
using SSL means that LDAP data will be transmitted over the network
in unsafe ASCII format.
G Maximum number of hits:
Specify the maximum number of items to show when searching.
(1-9999)
G Timeout:
Specify the transmission timeout for the LDAP server. (1-120 sec)
3
PageScope Address Book Utility 3-33
Page 43

3
Using the PageScope Address Book Utility
G Authentication (Anonymous, Simple, NTLM)
Select the BIND type for the LDAP server.
Select NTLM when connecting to an Active Directory.
G Domain Name
Input the domain name.
Input Domain Name when connecting to an Active Directory.
G User Name
This field can be entered when authentication is not set to
Anonymous. (Up to 255 characters)
G Password
This field can be entered when authentication is not set to
Anonymous. (Up to 164 characters)
G Confirm Password
Re-input password for confirmation.
3-34 PageScope Address Book Utility
Page 44
Using the PageScope Address Book Utility
Searching LDAP Server Data
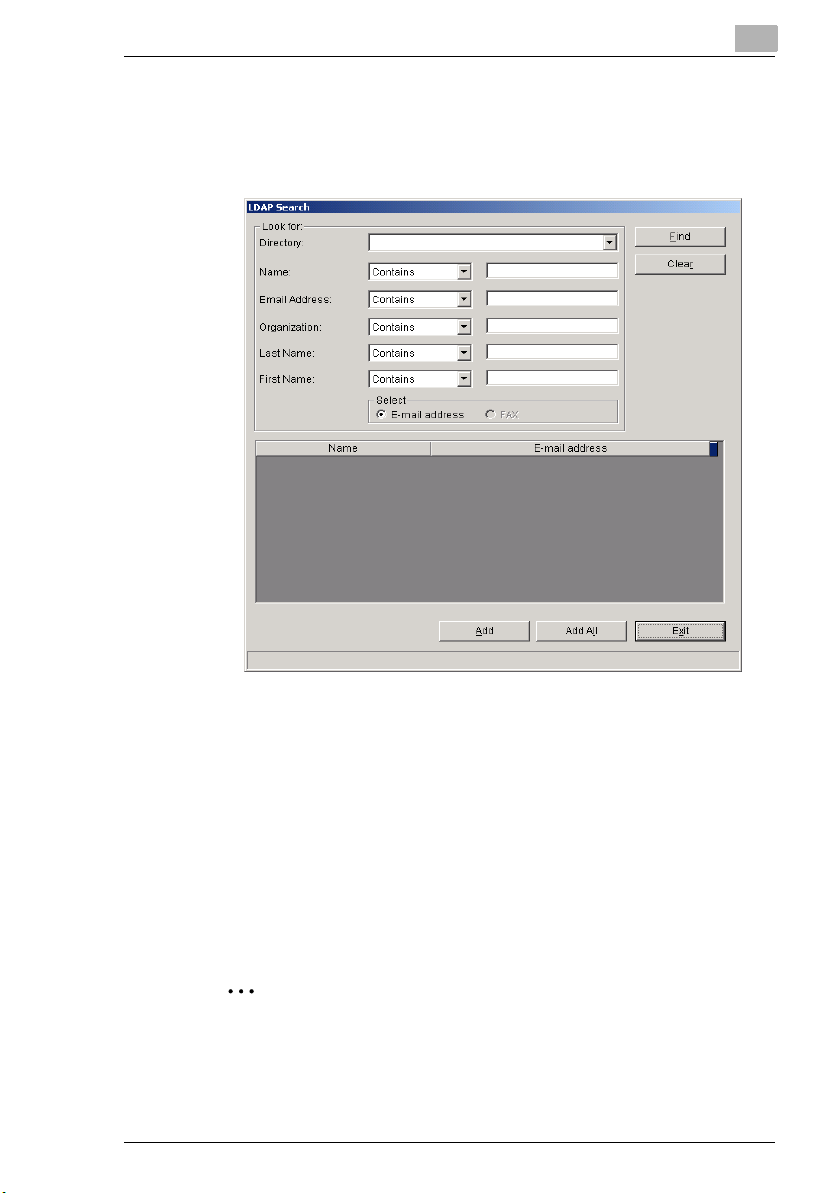
1 From the Tools menu, select LDAP Search.
This displays the LDAP Search dialog.
3
2 Select the directory to search in the Directory box.
3 Input search parameters, and click Find.
❍ To delete all search parameters, click Clear.
❍ To exit the LDAP Search dialog, click Exit.
Data that matches the search parameters is displayed in a list.
4 From the search results list, select the information you wish to import
into the address book, and click Add.
❍ To import all search results into the Address Book, click Add All.
✎
Tip
When importing information that has been retrieved using LDAP Search,
only information that includes both “Name” and “Destination” data may
be imported. When creating data for use in LDAP, it is recommended that
data you register includes both the name and the e-mail address.
PageScope Address Book Utility 3-35
Page 45

3
Using the PageScope Address Book Utility
The LDAP Search dialog
From the search parameter drop down lists, select from Contains, Start,
or End, and input the parameters in the boxes at right. (Search
parameters can be up to 128 characters long.)
G Directory: Input the directory to search.
G Name: Input the name.
G Email Address: Input the e-mail address.
G Organization: Input affiliation (organization name).
G Last Name: Input the last name.
G First name: Input the first name.
Referring to LDAP Server Data
1 From the Tools menu, select LDAP Browse.
This displays the LDAP Browsing dialog.
2 From the Directories Box drop down list, specify the directory to which
you wish to search, and click Refresh.
3 From the list, select the information you wish to add to the address
book, and click Add.
❍ To import all information in the directory into the Address Book,
click Add All.
4 Click Exit to close the LDAP Browsing dialog.
3-36 PageScope Address Book Utility
Page 46

Using the PageScope Address Book Utility
3.13 Saving the Address Book
You can save address book data in the following way:
1 From the File menu, select Save.
This displays the Save Address Book Utility File dialog.
2 Specify the save location and file name for the address book data, and
click Save.
✎
Note
When saving to device types “Di200/251/351” and “Di200f/251f/351f”,
select the device from the Device List area before saving. Additionally,
when using data saved on the Di200f/251f/351f in this utility, first
select the device type Di200f/251f/351f before importing. (Additionally,
because data is reacquired from devices when saving, do not close
the application while saving is taking place.)
3
PageScope Address Book Utility 3-37
Page 47

3
Using the PageScope Address Book Utility
3-38 PageScope Address Book Utility
Page 48

APPENDIX
4 APPENDIX
4.1 Can I import Lotus Notes Structured Text Format?
Address book utility supports Lotus Notes Structured Text format files.
1 Open the Address Book Database on the Lotus Notes Client.
2 Please check addresses that you want to import to the device.
3 From the File menu, select Export.
4
4 In the following dialog, input the file name as “***” and as Save as
type, select Structured Text. Then, click Export.
PageScope Address Book Utility 4-1
Page 49

4
APPENDIX
5 In the following dialog, select the Export type and make sure that the
Character code (for Inter-document delimiters) is set to 12.
Then, click OK.
The database is exported as a file.
6 Using a text editor such as WordPad, open the file.
7 Check the tag name applied to the Internet E-mail Address.
8 Open the PageScope Address Book Utility.
From the File menu, select Open Address Book File.
This displays Open Address Book File dialog.
9 Select LotusNotesStructuredText (*) from the Files of type drop
down list. Then, select the desired file.
4-2 PageScope Address Book Utility
Page 50

APPENDIX
10 Click Open.
11 Enter 12 in the Break Point Code box.
12 Click OK to import the structured text to the Address Book Utility.
4
This displays Import Structured Text dialog.
In the E-mail Address Tag Name box, type the E-mail Address tag
name that you checked in step 7.
PageScope Address Book Utility 4-3
Page 51

4
APPENDIX
4.2 Transferring Data Between Devices of Different Types
By using the Address Book Utility, you can transfer address data between
devices of different types. However, the following may occur due to
differences in specifications of the devices.
G Group destinations cannot be transferred.
G FTP destinations cannot be transferred.
G Data for functions not available on the other device cannot be
transferred.
G The index cannot be transferred.
G Not all destinations can be transferred due to differences in the
maximum number of destinations.
G The Destination Name may be cut due to differences in the number of
characters that can be registered.
G Data may not be transferred due to differences in the number or type
of characters that can be registered.
Example: To transfer data from CF3102 (CN3101e) to C350
1 Import the address data from CF3102 (CN3101e) into the Address
Book Utility.
4-4 PageScope Address Book Utility
Page 52

APPENDIX
2 From the File menu, select Save Address Book Utility File, and then
3 Change the device type to C350.
4
save the file.
4 From the File menu, select Open Address Book Utility File, and then
open the file saved in step 2.
PageScope Address Book Utility 4-5
Page 53
4
APPENDIX
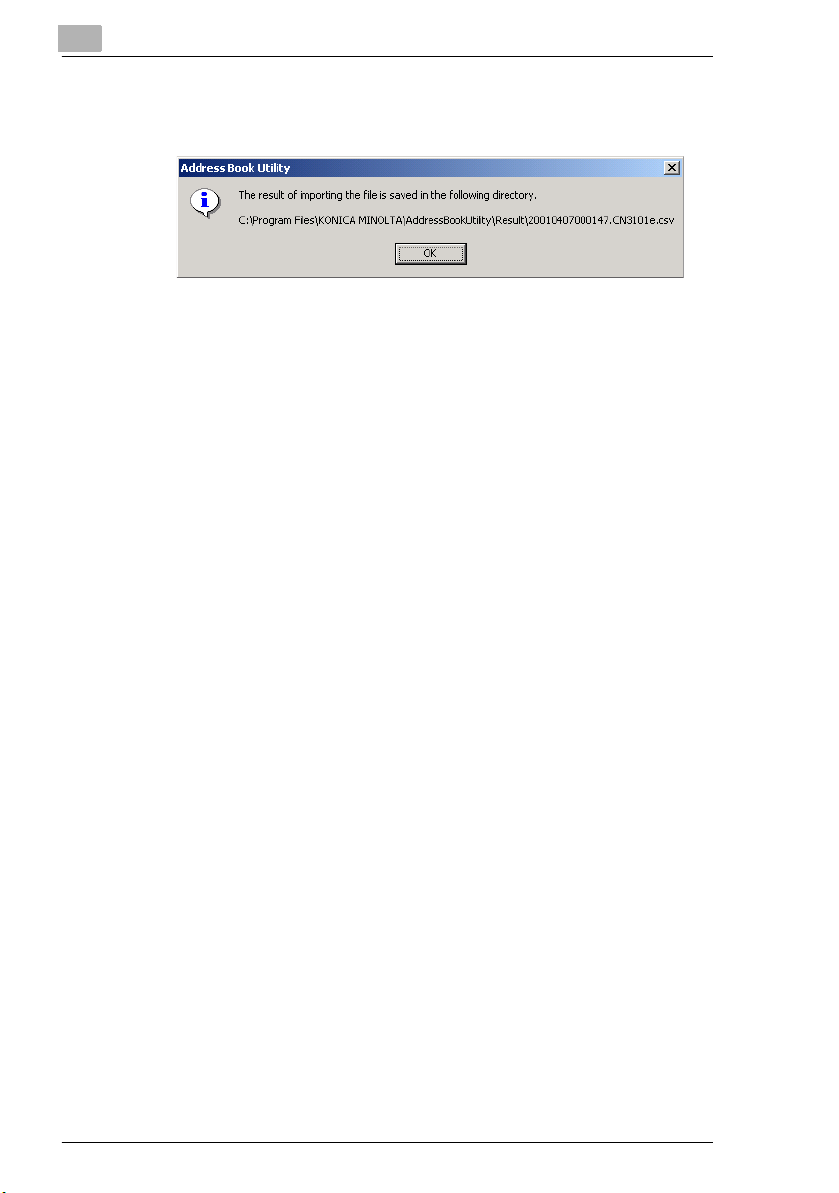
5 The following dialog box appears, therefore make a note of the
displayed file directory.
6 Click OK.
7 Open the file of which you made a note in Step 5. (If Microsoft Excel is
installed, then Excel will start. If Excel is not installed, then open the
file in a text editor or similar.)
8 Confirm the contents of the file. Items that have “OK” displayed at the
far left of the row can be imported into the One Touch List. Items that
do not have “OK” displayed can not be imported.
9 After confirming these items, close the file.
10 Check the data imported into the One Touch List, and then edit the
data if necessary.
11 Export the address data to C350.
4-6 PageScope Address Book Utility
Page 54

APPENDIX
4.3 What do I do if this message is displayed?
Message Details of Error
exception error An unexpected error has occurred. Restart the
input file error You can only input CSV (*.csv), TAB (*.txt), LDIF (*.ldif),
select item error Select a device in the “Device Display List”.
If you select another device type,
your changed data will be lost.
Continue?
size limit over You have exceeded the permissible amount of data.
Input error Non-specified input error. Input the data again with the
Input error, Please input User or
Email.
Input Error, Please input
the Tag name of user name
the Tag name of email address
Data is empty. The data is empty.
SNMP error SNMP setup has failed. Check that the program is
Searched to the last line. Searching has reached the last line.
SNMP error : open- SNMP setup has failed. Check that the program is
SNMP error : creation- SNMP setup has failed. Check that the program is
SNMP error : object- SNMP setup has failed. Check that the program is
SNMP error : add- SNMP setup has failed. Check that the program is
SNMP error : request- SNMP setup has failed. Check that the program is
Please input a password. Specify a password.
incorrect password Passwords do not match.
indispensable password Required input.
data length error! Data received from the device is not supported. Confirm
Please input a numeric value. Input a numerical value.
value range error. Value range error.
The object is not chosen. A object is not selected.
application, confirm that the program is configured
correctly, and try again.
and Lotus Notes Structured Text (*.*) files. Recheck the
file extension and try again.
If you change device types while editing recipient data,
the recipient data that you are currently editing will be
lost.
Reduce the amount of data and try again.
correct values.
Input error. Specify the line corresponding to the user
name or e-mail address.
Input error. Input the tag name corresponding to th e user
name or e-mail address.
installed correctly, or that it is supported by the OS.
installed correctly, or that it is supported by the OS.
installed correctly, or that it is supported by the OS.
installed correctly, or that it is supported by the OS.
installed correctly, or that it is supported by the OS.
installed correctly, or that it is supported by the OS.
the device firmware is supported, and try again.
4
PageScope Address Book Utility 4-7
Page 55

4
APPENDIX
Message Details of Error
Do you want to delete? Do you really want to delete this?
Do you want to save? Do you really want to save this?
Time out from device. Please try
again.
This device does not support
scanning function.
This file does not supported. This file is not supported.
The destination No. in red can
not be sent to the device,
because it has the same
destination name. Please
change the destination name or
delete the addresses.
This function is not available on
this Tab until opening an
Address Book file.
Table does not exist Can not connect to the LDAP Server. Or, login could not
The number of destinations for
person is Overflow (Max 100)
The number of destinations for
group is Overflow (Max 15)
The table of contents of a help
cannot be displayed. The help
file related with this project does
not exist.
Export error Export error.
get wrong parameter Acquired invalid parameter.
The following file already exists.
Do you want to replace it?
The following directory does not
exist.
Windows Sockets for 32 bit
Windows environments is not
successfully responding.
This device does not support
scanning function.
Failed to log in the device. Failure logging in to the device.
making binary data error Failure creating binary data.
delete data error Data could not be deleted.
A request to the device timed out. Try again.
• Shown when the device is not supported. Confirm that
the IP address that was input when the device was
added is correct.
• The device does not support scanning functions.
• The device is currently carrying out other processing
(copying, etc.) (for Di850)
When sending to the Di850, recipients can not be
registered with the same name. Change the recipient
names in red.
Select “All” and “Search” in the “Edit” menu are only
available on the right side of the screen. This function
can only be used when recipients are opened from CSV
files, etc.
take place. Confirm the LDAP configuration is correct.
Individual registered destinations overflow (max 100)
Group registered destinations overflow (max 15)
The help table of contents can not be displayed.
There is no help file associated with this project.
The following file already exists.
Overwrite?
The following directory does not exist.
Windows Sockets setup failure. Check that the program
is installed correctly, or that it is supported by the OS.
This device does not support scanning functions.
4-8 PageScope Address Book Utility
Page 56

APPENDIX
Message Details of Error
Send(post) binary data to target
device Error
Is it all right that the following
number of addresses are not
added?
Is it all right that the following
number of addresses are not
changed?
Do you want to end this
program?
Do you want to overwrite the
addresses?
Please set up with Device-Add
menu.
An administrator number is not
right.
(Administrator Login) Invalid
Password. Or another
administrator already login.
(Administrator Login) Returned
Web page is not expect page.
(Confirm Dialog) Returned Web
page is not expect page.
Send(post) binary data to target
device Error
Can’t log off from administrator
mode
The following data can not be
edited.
The following characters can not
be used.
The names in red contains the
word which is not supported by
the device. The unsupported
words are to be deleted.
This data can not be edited. This data can not be edited.
Are you sure that the space
characters is changed into an
under-bar characters in the case
of sending to the following
device?
Following destination types are
not sent to the devices, except
the imported device.
The address types which the
device does not support are not
sent to the device.
Data could not be transmitted.
The following number of addresses will not be added?
Proceed.
This will be changed. The following number of addresses
will not be changed? Proceed.
Do you want to end the program?
Do you want to overwrite the addresses?
Add a device from the “Add Device” dialog.
Administrator login failure.
(Login error) invalid password. Or, another Administrator
is logged in.
(Login error) The device failed to return the expected
HTML data. Try again.
Login confirmation error. Recheck settings and try again.
Data transmission error. Attempt retransmission.
Unable to log off from Administrator mode.
The following data can not be edited.
The following data can not be used.
Lines in red contain characters that are not supported by
the device. Unsupported characters will be deleted in
data transfer.
When transmitting to the following device, space
characters in destinations will be converted to
underscores. Proceed?
The following destination types can not be send to the
any device except that from which it is imported.
Corresponding addresses can not be sent to devices
without the following address types.
4
PageScope Address Book Utility 4-9
Page 57

4
Message Details of Error
Are you sure that the device’s all
registered addresses are
overwritten? The destination
type which the device does not
support will not be exported. Are
you sure?
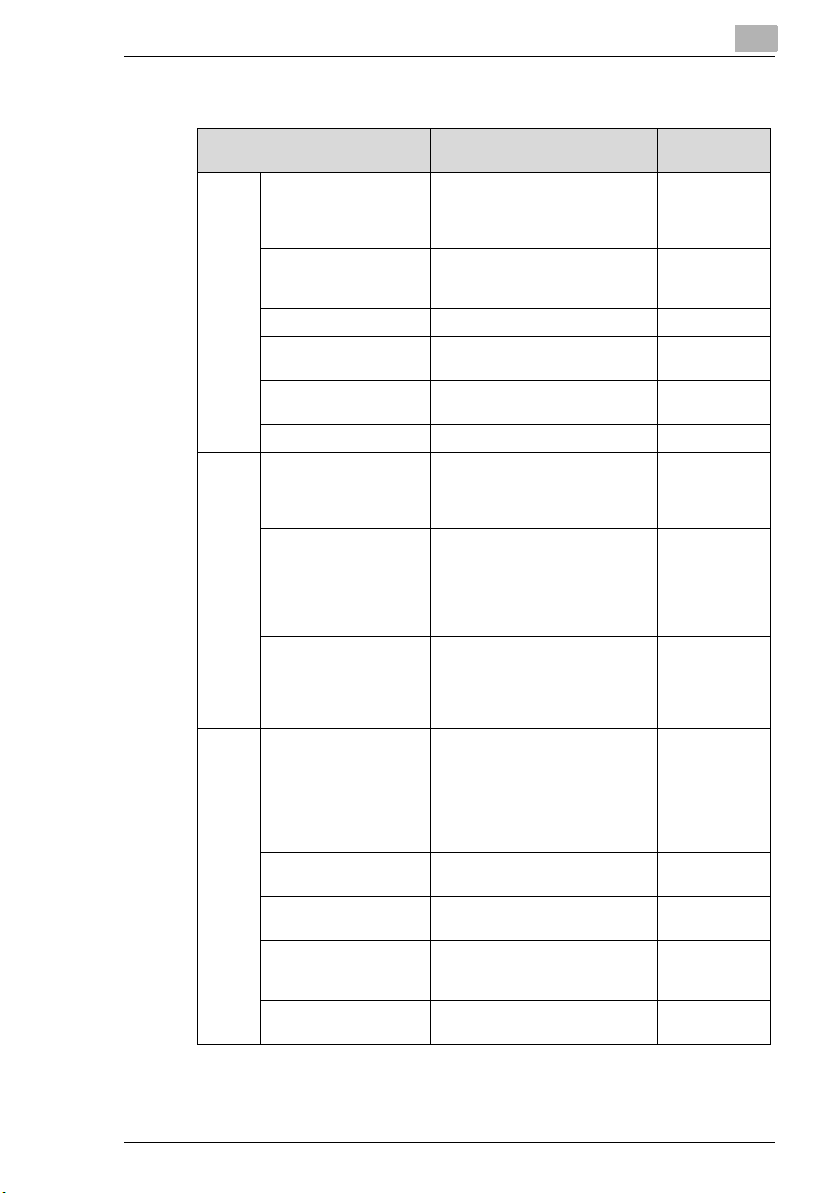
4.4 Restrictions for each Model
Copiers have the following restrictions as to the number of items that can
be registered, and their character codes. The address data transfer tool
will generate an error if restrictions for each copier are exceeded. If an
error occurs, amend the data to within the restricted values, and register
again.
Restrictions for each copier are as follows:
Model Name 7155/7165 7085
Image control ROM
version (*1)
Maximum number of
items that can be
registered
[Register
ed name]
Restrictio
ns on
contents
[E-mail
address]
Restrictio
ns on
contents
Maximum
number of
characters
registered
Figure
within
parenthese
s are for
doublebyte
characters
Register
spaces
between
characters
Maximum
number of
characters
registered
(alphanum
eric
characters
and
symbols
only)
When sending data, all data will be overwritten, or,
depending on option settings, some data may not be
sent. Proceed?
50 52 and
96 96 96 96 96
18
characters
(9 characters)
YYYNY
60
characters
later
18
characters
(9 characters)
60
characters
APPENDIX
30 40 41 and
18
characters
(9 characters)
60
characters
18
characters
(9 characters)
60
characters
later
18
characters
(9 characters)
60
characters
4-10 PageScope Address Book Utility
Page 58

APPENDIX
(*1) Please contact your service management store to confirm the ROM
version.
Model Name 8050
Image control ROM
version (*1)
Maximum number of
items that can be
registered
[Register
ed name]
Restrictio
ns on
contents
[E-mail
address]
Restrictio
ns on
contents
Maximum
number of
characters
registered
Figure
within
parenthese
s are for
doublebyte
characters
Register
spaces
between
characters
Maximum
number of
characters
registered
(alphanum
eric
characters
and
symbols
only)
10
450
18
characters
(9 characters)
Y
64
characters
4
PageScope Address Book Utility 4-11
Page 59
4
4.5 Device Connection Methods
In order to use the Address Book Utility, the device must be connected to
the network. Connection methods differ depending on the device.
G Devices that connect using the printer controller
The following devices connect to the network using the printer
controller. If these are used as network printers, these do not need to
be specially reconnected.
Di200/Di251/Di351/Di200f/Di251f/Di351f/CF3102/CF2002/Di3510/
Di3010/Di2510/Di2010/Di3510f/Di3010f/Di2510f/Di2010f/C350/
Di1610f/Di1610fp/7416MFG/7416MFP/Di1611/Di1811/Di2011/7216/
7218/7220
G Devices that connect directly to the main body
The following devices connect directly to the network port on the back
of the main body. Separate network connection with the printer
controller is not required.
Di850/Di650/Di551/7085/7165/7155/7145/7222/7228/7235/8050/
CF5001/7272/7255/Di7210/Di5510
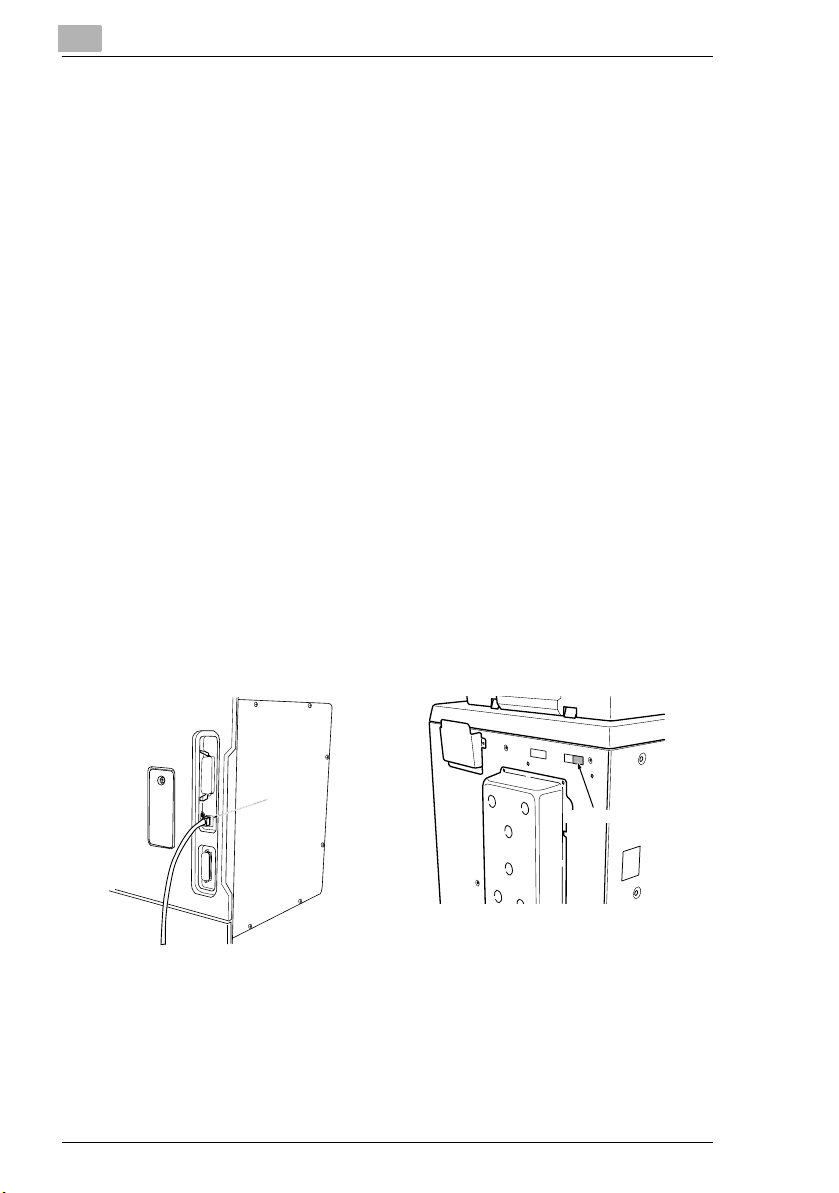
Connection examples for the Di850/Di650/Di551 are shown below.
1 Remove the cover sticker on the right of the rear side of the main body,
then connect the straight twisted-pair category 5 (100BASE-TX) cable
to the main body.
APPENDIX
2 Connect the straight cable from the main body to the hub.
Straight cable
Cover sticker
Di850
Di551/650
3 Touch to select “1. System Initial setting” on the Key Operator Mode
screen.
4-12 PageScope Address Book Utility
Page 60

APPENDIX
4 Touch to select “3. IP address setting” on the System Initial Setting
5 Set the appropriate IP address / subnet mask / gateway address and
✎
4
Menu screen.
other items according to your network administrator’s instructions.
TIP
In the same way, 7085/7165/7155/7145/7222/7228/7235/8050/
CF5001/7272/7255/Di7210/Di5510 also use network ports on the rear
of the main body.
PageScope Address Book Utility 4-13
Page 61

4
APPENDIX
4-14 PageScope Address Book Utility
Page 62

2003
http://konicaminolta.com/
Copyright
2004. 64343-PS035-05
 Loading...