


™
PagePro
9100
Repacking Guide
1760522-001A

Trademarks
KONICA MINOLTA and the KONICA MINOLTA logo are trademarks or registered
trademarks of KONICA MINOLTA HOLDINGS, INC. PagePro is a trademark or
registered trademark of KONICA MINOLTA BUSINESS TECHNOLOGIES, INC. Crown
and CrownView are trademarks or registered trademarks of KONICA MINOLTA
PRINTING SOLUTIONS U.S.A., INC. All other trademarks are the property of their
respective owners.
Proprietary Statement
The digitally encoded software included with your printer is Copyright © 2003
KONICA MINOLTA BUSINESS TECHNOLOGIES, INC. All Rights Reserved. This
software may not be reproduced, modified, displayed, transferred, or copied in any
form or in any manner or on any media, in whole or in part, without the express
written permission of KONICA MINOLTA BUSINESS TECHNOLOGIES, INC.
Copyright Notice
Copyright © 2004 KONICA MINOLTA BUSINESS TECHNOLOGIES, INC., Marunouchi
Center Building, 1-6-1 Marunouchi, Chiyoda-ku, Tokyo, 100-0005, Japan. All Rights
Reserved. This document may not be copied, in whole or part, nor transferred to any
other media or language, without written permission of KONICA MINOLTA BUSINESS
TECHNOLOGIES, INC.
Manual Notice
KONICA MINOLTA BUSINESS TECHNOLOGIES, INC. reserves the right to make
changes to this manual and to the equipment described herein without notice.
Considerable effort has been made to ensure that this manual is free of inaccuracies
and omissions. However, KONICA MINOLTA BUSINESS TECHNOLOGIES, INC.
makes no warranty of any kind including, but not limited to, any implied warranties of
merchantability and fitness for a particular purpose with regard to this manual.
KONICA MINOLTA BUSINESS TECHNOLOGIES, INC. assumes no responsibility for,
or liability for, errors contained in this manual or for incidental, special, or
consequential damages arising out of the furnishing of this manual, or the use of this
manual in operating the equipment, or in connection with the performance of the
equipment when so operated.
Introduction
Storing the Printer
“What do I do when storing the printer for an extended period?” page 1
“How do I care for media?” page 2
Deinstalling Accessories
“How do I remove a duplexer?” page 2
“How do I remove a 4-bin mailbox?” page 2
“How do I remove an optional media tray?” page 4
Relocating the Printer
“How do I relocate my printer?” page 6
Repacking the Printer
“What's involved in repacking?” page 7
Shipping the Printer
“How do I ship the printer?” page 11
“Where can I get more information?” page 11
Attention
Failure to follow instructions as outlined in this chapter could result in
voiding your warranty.
Storing the Printer
What do I do when storing the printer for an extended period?
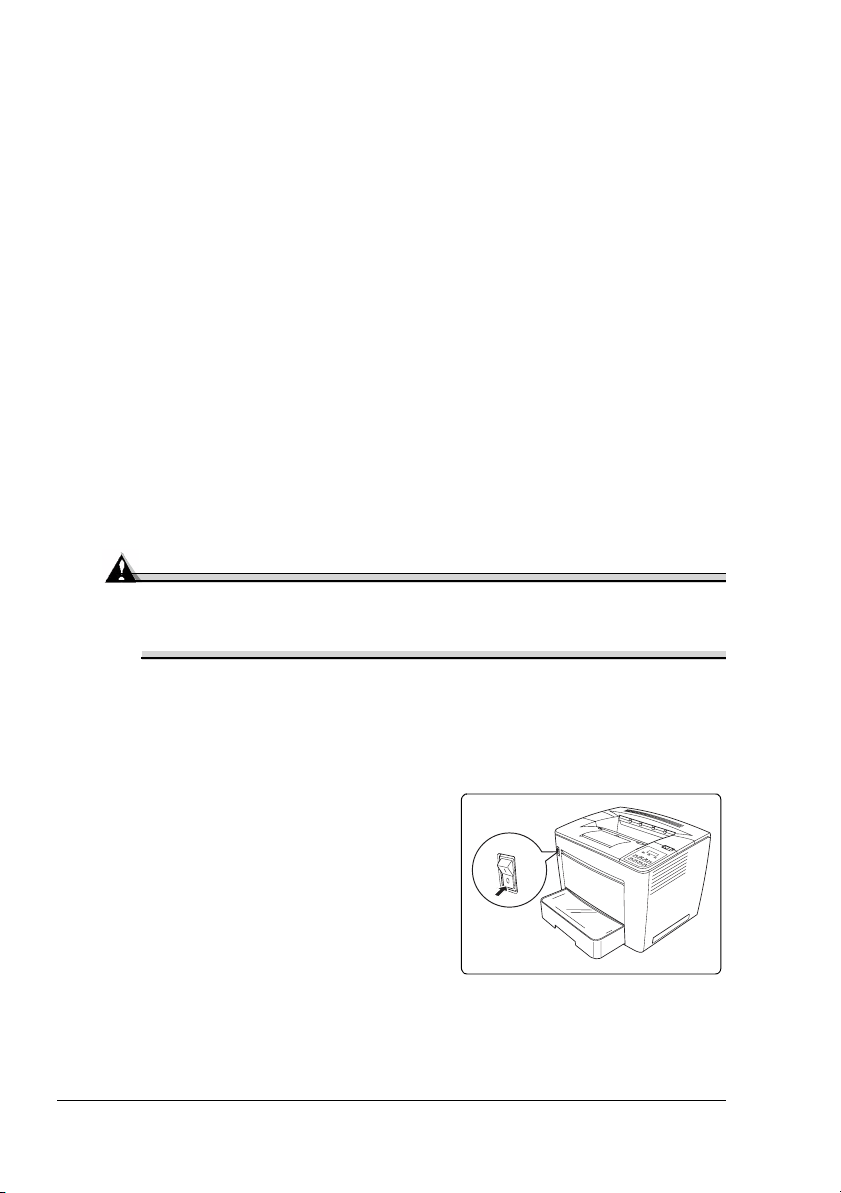
1 Turn off the printer.
2 Unplug the printer’s power cords and interface cables.
3 Remove the toner cartridge from the printer and return it to its original
packaging. If the original packaging is not available, protect the toner
cartridge from light and from spilling toner.
4 Remove the media from all media tray(s).
Introduction
1
How do I care for media?
If media has been removed from its wrapper, place it in its original packaging
and store in a cool, dark place.
When storing media, avoid
! Moisture, excess humidity
Keep media between 30% to 65% relative humidity. Toner does not
adhere well to moist or wet paper
On the other hand, media that has been stored for a long time without
staying in its packaging may dry up too much and also cause jamming.
! Direct sunlight
! Excess heat (up to 86° F/30° C)
! Dust
! Leaning against other objects or placed in an upright position
Store the media in a dust-free area protected from humidity.
Deinstalling Accessories
Attention
Before transporting the printer, remove the toner cartridge, put the
cartridge in its original package or in a plastic bag, and then
transport it without subjecting it to strong impacts.
How do I remove a duplexer?
"# If both the optional duplexer and the 4-bin mailbox are to be removed,
remove the duplexer first.
1 Turn off the printer, and unplug the
power supply cord and interface
cable.
The illustration shows the printer without a 4-bin mailbox. Follow the same
instructions if a 4-bin mailbox is
installed.
Deinstalling Accessories2

2 Detach the duplexer from the printer.
Attention
If the duplexer is released too
quickly, it may fall and break.
Be sure to keep the duplexer
supported until the screws are
loosened.
a Using the wrench supplied with
the duplexer, loosen the two
screws on the duplexer.
The two screws are attached to the duplexer and cannot be removed.
"# After using the wrench, keep it in a safe place for future use.
b Unhook the two tabs at the bottom
of the duplexer from the notches
on the back of the printer.
c Store the duplexer in its original
packaging.
3 Replace the cover on the back of the
printer.
Use the wrench supplied with the
duplexer to tighten it.
4 Replace the exhaust filter.
Deinstalling Accessories
3

How do I remove a 4-bin mailbox?
1 Turn off the printer.
2 Unplug the power supply cord and interface cable.
3 Remove the four mailbins (trays) from the 4-bin mailbox.
4 Disconnect the 4-bin mailbox cable
from the connector on the printer.
a Press $.
b Unplug the connector %.
5 Press in the two buttons $ (one on
each side) at the back of the 4-bin
mailbox, and then lift the sorter up off
the transport unit %.
6 Remove the two screws securing the
transport unit, and then remove the
transport unit from the printer.
7 Return the stopper to its original
position.
1
1
8 Install the two brackets, the back
section of the top cover, and the
connector cover, removed during
installation of the 4-bin mailbox.
9 If you are going to use the printer without the 4-bin mailbox, reconnect the
printer’s power supply cord and interface cable.
1
2
2
How do I remove an optional media tray?
1 Turn off the printer, and unplug the
power supply cord and interface
cable.
2 Remove the upper media tray.
Deinstalling Accessories4

3 Detach the mounting brackets from
the two locations on the back of the
printer.
4 Loosen and remove the screws in
front. (Use a coin to loosen the
screws.)
When deinstalling multiple optional
media trays, remove each using the
same procedure.
5 After loosening the screws, lift the
printer away from the optional media
tray(s).
WARNING!
Your printer weighs approximately 61.7 lbs (28 kg) without
consumables. Be sure to have help when lifting and moving it.
6 Replace any tape and packing
material.
7 If you are going to use the printer without the optional media tray(s),
reconnect the printer’s interface cables.
8 Reconnect the power cord, and turn
on the printer.
"# In compliance with UL guide-
lines, “The appliance inlet is
considered to be the main
disconnect device.”
Deinstalling Accessories
5

Relocating the Printer
How do I relocate my printer?
Occasionally, you may have to move your printer to a different location, either
nearby or to a distant location.
To avoid damage to your printer, we advise you to follow the next instructions
very carefully.
1 Turn off the printer.
2 If the printer has accessories, such as a 4-bin mailbox, remove them.
3 If you are moving to a distant location, follow the instructions for repacking
the printer on
page 7.
4 Relocate the printer.
WARNING!
Your printer weighs approximately 61.7 lbs (28 kg) without
consumables. Be sure to have help when lifting and moving it.
5 Set up the printer in its new location.
6 Reinstall the accessories you removed in step 2.
Relocating the Printer6

Repacking the Printer
Attention
KONICA MINOLTA BUSINESS TECHNOLOGIES, INC. cannot be held
responsible for damage to your printer during shipment that results
from the improper packaging of your printer. You must use the
instructions given in this section before repacking the printer in its
original shipping carton with the original packing materials. If you do
not have your original packaging, in the Americas call the Spares
departmevbnt at (251) 633-4300 extension 2530 and request the
PagePro 9100 Repacking Kit 2600713-100. For locations outside the
Americas, refer to
If you have been instructed to return the printer to KONICA MINOLTA
PRINTING SOLUTIONS U.S.A., INC. by a customer support
representative in the Americas, be sure to write the RMA (Return
Merchandise Authorization) number you receive on the outside of the
carton before calling the shipper for pickup. If the RMA number is not
prominently visible on the outside of the return inventory, we will not
accept receipt.
You can also have a KONICA MINOLTA authorized service provider
uninstall and repack your printer, or you can upgrade to on-site service.
For prices and availability, call 1 (877) 778–2687 in the Americas or see
printer.konicaminolta.com worldwide.
printer.konicaminolta.com.
What's involved in repacking the printer?
1 Turn off the printer.
2 Unplug the printer’s power cords and interface cables.
3 Remove the toner cartridge and store it in its original packaging.
4 Remove all media.
5 Deinstall the duplexer, 4-bin mailbox, and optional media trays (if
attached).
"# If you’re returning the printer for service, you don’t need to return
the accessories unless instructed to do so.
Repacking the Printer
7

6 With another person’s help, put the printer into the plastic bag.
WARNING!
Your printer weighs approximately 61.7 lbs
(28 kg) without consumables. Be sure to
have help when lifting and moving it.
Do not tilt it more than 1° in any direction at
any time.
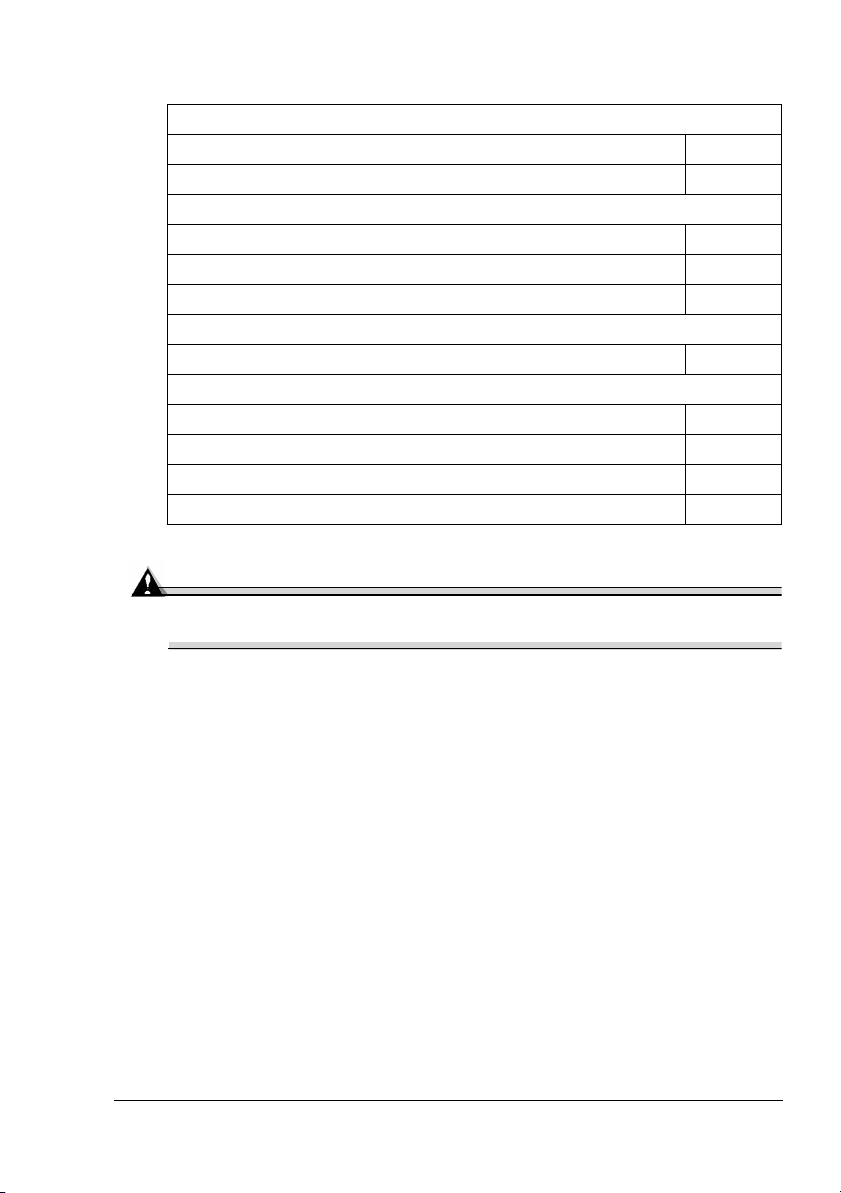
7 Verify that the actions in the following checklist have been completed.
"# If you’re returning the printer for service, you don’t need to return
the accessories, toner cartridges, imaging unit, documentation, or
power and interface cables.
Item Should be... Additional
&
RMA number Received and placed
prominently on the
outside of the
carton.
Replacement Packaging Kit
part number 2600713-100
Power cord and cables Removed page 7
Toner cartridge Removed page 7
Duplexer Removed page 2
4-bin mailbox Removed page 4
Optional media tray(s) Removed page 4
Printer Bagged page 8
Acquired, if necessary page 5
information
page 7
Repacking the Printer8

8 Pack the printer for shipment
as shown in the illustration.
"# Ensure the shipping
carton rests squarely on
top of the base tray.
9 If you’re also shipping the
power cord and any manuals
with the printer, place them in
the shipping carton.
"# Don’t ship these items if
you’re returning the
printer for service.
10 Ensure that the top of the
carton is securely taped.
11 Secure the shipping carton
using proper strapping and
buckling.
If you ordered the repacking kit,
2 lengths of strapping precut to
the appropriate length and 2
buckles to secure the strap
ping are included.
-
Otherwise, contact your local
dealer for strapping and buck
ling supplies.
Attention
If the printer is not securely strapped, we will not accept receipt.
Repacking the Printer
-
9

12 Thread one end of the strapping beneath the
carton.
13 Pull the two ends of the strapping together at
the top of the carton.
14 Thread both ends up through the
center of the buckle.
15 Weave the slack of one
end through the buckle.
16 Pull the slack on that end
so that the strapping is
taut in the buckle.
17 Weave the slack of the
other end through the
buckle.
18 Pull all of the
remaining slack
of the strapping
through this side
of the buckle,
until the buckle is
taut against the carton.
19 Pull the buckle against the carton as tightly as possible.
Some slack may still exist.
Repacking the Printer10

20 Repeat this procedure again, spacing the
straps across the carton.
21 Place the RMA number prominently on the
carton.
Shipping the Printer
How do I ship the printer?
If you need to ship your printer after installation, you must follow the
procedures in this document to prevent damage to the printer and to keep
your warranty valid.
"# We strongly suggest that you save the packaging materials in case
you ever need to move or ship the printer. If you’re returning the
printer for service, you don’t need to return the accessories,
documentation, interface cables, media tray(s), power cable, or
toner cartridge.
Where can I get more information?
Refer to the Service & Support Guide or, for the most up-to-date contact
information worldwide, go to
If you have specific questions about your printer, go to
printer.konicaminolta.com/support, and then click on the Answer Base.
printer.konicaminolta.com.
#
A
M
R
Shipping the Printer
11

 Loading...