


+ Documentation ++ Documentation ++ Documentation ++ Documentation ++ Documentation ++
User Manual
PagePro 4100GN

Contents
1 Introduction
1.1 Welcome to Minolta/QMS .............................................................1-1
1.2 Roadmap of this manual ..............................................................1-2
Where to find what in this User’s Manual........................................1-2
Brief explanatio n of special type style s and method of
presentation ....................................................................................1-3
1.3 Working safely with your laser print er..... .......... .......... .......... .....1-4
Notes on your safety and operating safety......................................1-4
Laser safety.....................................................................................1-6
Intern a l la se r rad i at io n.. ............ .......................................................1-6
CDRH regulations...........................................................................1-7
Laser safety label............................. ........................... .. ..................1-8
Laser caution label..........................................................................1-9
2 Unpacking, installing and setting up the printer
2.1 Unpacking the laser printer..........................................................2-1
2.2 Overview of the printer.................................................................2-3
External printer parts.......................................................................2-3
Intern a l pr in te r pa rt s.. ......................................................................2-4
Optional printer parts.......................................................................2-5
Printer control panel........................................................................2-6
2.3 Installing your laser printer..........................................................2-7
Place of installation .........................................................................2-7
Stora g e of co n s umables and acc e ss o ries .......... .. ..........................2-7
Ambient conditions..........................................................................2-8
Space required................................................................................2-9
Space required (when equipped with optional paper cassette
unit) ...............................................................................................2-10
2.4 S e tting up your la se r pr in te r........... ...........................................2-1 1
Fitting the paper output tray and paper feed tray 1.......................2-11
Connecting the power cable................ .. .......... .......... .......... .. ........2-12
Switching the printer on and off.....................................................2-13
Printi ng a configuration p ag e ... .. ... ................................................2-14
Connecting the printer to a computer (parallel port)............ ..........2-15
Connecting the printer to a network (network interface)...............2-16
PagePro 4100GN TOC-1

3 Installing the PCL printer driver
3.1 Sy s te m re q u ir ements .......... ... ...................................................... 3-1
3.2 No t es o n ins ta l ling the prin t er dr iv e r....... ... ................................ 3-1
General information on the printer driver........................................3-2
Information on installation using Plug-and-Play ............................. 3-2
Information on installation using the Add Printer Wizard................3-2
Information on installing a network printer......................................3-2
3.3 CD-ROM installation for Win 95/98 or Win NT4.0 ...................... 3-3
3.4 CD - R OM in s ta ll a tion for Wind ows 3.1 x . ..................................... 3-5
3.5 CD - R OM in s ta ll a tion for MS-D O S... ... ..........................................3 -7
3.6 Uninstalling the Windows printer driver ....... .. ...................... .....3-8
Deinstallation for Windows 95/98 and Windows NT4.0..................3-8
Deinstallation for Windows 3.1x.....................................................3-9
4 Working with the PCL printer driver
4.1 Displaying printer driver settings ............................................... 4-1
Displaying setti ngs in Windows 95/98................. .................... .......4-1
Displaying settings in Windows NT 4.0 .................... .......... .. ..........4-3
Displaying the settings in Windows 3.1x ........................................ 4-4
4.2 Pa p e r in de x ca rd...... .. ............................................................. ...... 4-5
Selecting a paper format ................................................................ 4-6
Creating a custom paper for ma t..... .......... ..................... .......... .......4-7
Adjusting the print -out to fit the paper........................ .....................4-8
Specifying the number of copies .................................................... 4-8
Specifying the orientation of the print paper................ .......... .........4-8
Switching on/off t he pri nter’s sorting function.................................4-9
Specifying the paper source......................................................... 4-10
Recalling the original setings [DEFAULT] ....................................4-10
4.3 Page layout index card ..............................................................4-11
Printing multiple document pages per print page (N-up)..............4-12
Printi ng w a te rma rks..... ... ..............................................................4 -1 3
Creating watermarks .................................................................... 4-14
Scaling the printed document....................................................... 4-15
Duplex function............................................................................. 4-15
4.4 Qu a l ity in d e x c a rd ... .. ... ..............................................................4 -1 6
Optimizing data exchange with the printer (All raster) ..................4-17
Switching Toner Save function on and off....................................4-17
Specifying the graphics mode ...... .. ................... .. .........................4-18
Optimizing the print quality of text and graphics (Fine-ART)..... ...4-18
Specifying TrueType mode........................................................... 4-19
Deter min in g th e res o lu tion... .. ............ ...........................................4-19
TOC-2 PagePro 4100GN

Specifying the emulation mode.....................................................4-19
Optimizing the presentation of graphics in the print-out
(Detail of quality...)........................................................................4-20
4.5 Font index card...........................................................................4-21
Adding fonts..................................................................................4-22
Deleting fonts................................................................................4-22
Setting the ID ................................................................................4-22
4.6 Device option index card............................................................4-23
Activating the optional duplex unit.. .......... .......... ........... .......... .. ....4-24
Activating opti onal paper feed tray 2 or 3. .......... ........... .......... .. ....4-24
5 Working with the Windows PCL printer tools
5.1 C a lling up the St a tu s Di splay....... ... .............................................5-2
Calling up the Status Display in Windows 95/98, Windows NT4. 0.5-2
Calling up the Status Display in Windows 3.1x...............................5-3
Altering the size of the Sta tus Display window.. .......... .. ..................5-4
5.2 C a lling up the Co n t ro l P a n el........... .. ...........................................5-5
5.3 P a p e r in d e x card ........ ...................................................................5-6
Defining the response in the case of a lack of suitabl e paper.........5-7
Specifying a paper format for paper feed tray 1..............................5-7
5.4 P r in ter setting in d e x car d... ... .......................................................5 -8
Switching on/off the Power Save mode ..........................................5-9
Switching on/off th e paper format error detecti on...........................5-9
Detecting paper misfeeds – Jam Recov e ry ....................................5-9
Switching preheat on/off... .. .......... ..................... .......... .. .......... ........5-9
Specifying the print language.................. .......... .......... ..................5-10
5.5 T e s t p ri nt in d ex card.... ......................................... ......................5-1 1
The various test prints...................................................................5-11
5.6 Counter index card........................... .. .......... .......... .. .......... ........5-12
Checking the status of a counter.... .......... ................... .. .......... ......5-13
Resetting a counter.......................................................................5-13
5.7 Configuration index card............................................................5-14
6 Working with the DOS PCL printer tools
6.1 Using the Status Display..............................................................6-1
Calling up the Status Display ..........................................................6-1
Switching on/off popup messages (Setup menu) .......... .......... .. ......6-2
Changing the hotkey command for the Status Display
(Setup menu)................ ............................. .....................................6-2
Defining popup messages (Setup menu)........................................6-2
PagePro 4100GN TOC-3

6.2 Us i ng th e DOS Co n trol Panel ......... ... .......................................... 6-3
Calling up the Control Panel........................................................... 6-3
6.3 Pa p e r p ane l ........................................... ........................................ 6-4
Selecting a paper format ................................................................ 6-5
Specifying the paper source........................................................... 6-6
Specifying the number of lines printed per page ............................ 6-6
Specifying the number of copies .................................................... 6-6
Specifying the orientation of the print ing paper................ .. .......... ..6-7
Defining the response to format errors ........................................... 6-7
Specifying a paper format for paper feed tray 1.............................6-8
6.4 Font panel.....................................................................................6-9
6.5 Output Quality panel .................................................................. 6-10
Switching on/off t he Toner Save function........ .......... .. .......... .......6-11
Fine- A R T fea tu re..... ............ ......................................................... 6-11
Print language..............................................................................6-11
6.6 Counter panel ...... .................... .. .......... .. .......... .. .......... ............ ...6-12
Checking the status of a counter................... ........... .......... ..........6-13
Rese tt in g a coun t e r ...................................................................... 6-13
6.7 Configuration panel.................................................................... 6-14
6.8 Printer Setting panel .................................................................. 6-15
Switching on/off the Power Save mode........................................ 6-16
Switching on/off t he paper format error detecti on... .. .......... ..........6-16
Pre-H e a t fe a tu re ...... .. .. .................................................................6-16
Switching on/off t he automatic continuation function............... .....6-16
Detecting paper misfeeds – Jam Recov e ry. .................................6-17
Specifying the input/output timeout .............. .......... ................... ...6-17
7 Installing the PostScript printer driver
7.1 Sy s te m re q u ir ements .......... ... ...................................................... 7-1
Wind ows 95 / 98 ........ .. ............................................................. ........ 7-1
Wind ows N T 4. 0 .... ... .......................................................................7-1
Wind ows 3. 1 x ..... ............................................................................ 7-2
MacOS............................................................................................ 7-2
7.2 No t es o n ins ta l ling the prin t er dr iv e r....... ... ................................ 7-2
General information on the printer driver........................................7-3
Information on installing a network printer......................................7-3
7.3 CD - R OM in s ta ll a tion for Win9 5/98 or Win NT 4. 0 ..... ... ............... 7-4
Printer Test page (Sample )..... .. .. .......... .. .......... .. .......... ...............7-10
7.4 CD - R OM in s ta ll a tion for Win 3.1x ..... .. ...................................... 7-11
TOC-4 PagePro 4100GN

7.5 C D - R O M in s ta llation for Ma c OS .. ..............................................7-14
Insta llin g Sc r e en Fon ts .......... ........................................................7 -1 8
8 Working with the PostScript printer driver
8.1 The Windows 95/98 PostScript printer pr operties dialogue.....8-2
The "Minolta/QMS PagePro 4100 -PS Properties" dialogue........ .. .8-2
8.2 The Windows NT4.0 PostScript printer properties dialogues..8-4
Displaying the "Printers" dialogue................. ..................... .......... .. .8-4
The "Minolta/QMS PagePro 4100 -PS Def ault Document Properties"
dialogue...........................................................................................8-5
The "Minolta/QMS PagePro 4100 -PS Properties" dialogue........ .. .8-6
8.3 The Windows 3.1x PostScript printer prop ert ies dialogue.......8-7
The "Minolta/QMS PagePro 4100 -PS Properties" dialogue........ .. .8-7
8.4 The MacOS PostScript printer setup dialogue..... .. .. ............ ......8-9
The "Printer Specific Options" dialogue ........................................8-10
Resolution.....................................................................................8-10
Jam Recovery ...............................................................................8-10
Idiom Recognition .........................................................................8-11
9 Working with the printer
9.1 Please note the following points:................................................9-1
What should I watch out for when loading paper?........... .. .......... .. .9-1
What should I watch out for when loading envelopes?.............. .. ...9-1
Which sizes of paper can I use?...... ........ .. ................... ..................9-2
What type s of p ap e r c an I us e ? .... .. ................................................9-3
Printa b le ar e a....... ... ................................................... .....................9-3
9.2 U s ing the contr o l b ut to n .. .. ..........................................................9-4
Cance l th e cur re n t jo b.. .. .................................................................9-5
Printing out the configuration page.................................................9-5
Continuing a print job after an error message.................................9-5
9.3 Loading paper ...............................................................................9-6
Loading paper into pap er fe ed tray 1................ .......... .......... ..........9-6
Loading paper into the manual feed unit............................ .............9-7
Loading paper into pap er fe ed tray 2/3 .............................. ........... .9-8
9.4 Monitoring print jobs with the Status Display..........................9-10
10 Installing optional accessories
10.1 Installing paper feed tray 2/3......................................................10-1
10.2 Insta ll in g the d uplex unit ......................................... ...................10-3
10.3 Installing a SIMM memory module............ ................................10-5
PagePro 4100GN TOC-5

11 Caring for and maintaining your printer
11.1 Cl e an i n g th e pr inter... .................................................... ............. 11-2
Cleaning the case......................................................................... 11-2
Cleaning the paper feed roller ......................................................11-2
11.2 Replacing the imaging cartridge............................................... 11-5
12 Troubleshooting
12.1 Cl e ar in g pa p e r misf e e ds............. .. ............................................. 12-2
Clearing paper misfeeds at the imaging cartr idge................ ........12-2
Clearing a paper misfeed at the fusing unit..................................12-4
Clearing a paper misfeed at the output tray ...... .......... .......... .......12-6
Clearing a paper misfeed at paper feed tray 1............... .. .......... ..12-7
Clearing a paper misfeed at the manual feed unit................. .......12-8
Clearing a paper misfeed at paper feed tray 2/3 (optional)..........12-9
Clearing paper misfeeds at the duplex unit – top (optional) ....... 12-10
Clearing paper misfeeds at the duplex unit – bottom (optional). 12-11
12.2 Problems with print quality ..................................................... 12-12
12.3 General printing problems....................................................... 12-15
12.4 Printer messages...................................................................... 12-16
Lamp functions........................................................................... 12-16
Status messages........................................................................12-17
User messages...........................................................................12-18
Servi ce me ss a g es ... .. ................................................................. 12-20
13 Appendix
13.1 Pe r fo r m a n ce fe a tures... .. ................................................... ......... 13-1
Hardware...................................................................................... 13-1
Software ....................................................................................... 13-1
Operating system ......................................................................... 13-1
13.2 Technical specification..............................................................13-2
PagePro 4100GN printer........ .......... .. ........................................ ..13-2
500-sheet paper fee d tray (option)............... .......... ................... ...13-3
Duplex unit (option) ...................................................................... 13-4
SDRAM-SIMM memory module (option)...................................... 13-4
Paral le l in te rfaces. ........................................................................13-4
Network interfaces........................................................................ 13-4
13.3 Minolta/QMS’s concern for environmental protecti on ...... .. ...13-5
What does the energy star mean?... ................... .......... ...............13-5
13.4 Index ............................................................................................ 13-6
TOC-6 PagePro 4100GN

Introduction
1 Introduction
1.1 Welcome to Minolta/QMS
Thank you for purchasing a M inolta/QMS PagePro 4100GN laser printer.
To achieve the best possi ble results and to use your laser printer
effectively, this User’s Manual provides you with information on the
follow ing top ics:
G installing the printer driver,
G working with the printer drivers and tools,
G working with the printer,
G caring for and maintaining your printer,
G troubleshooting.
Read this User’s Manual careful ly before o perating your prin ter for the first
time, and always keep the manual within easy reach.
We reserve the right to make changes to the content s of th is manual.
Trademarks
PCL is a registered tradema rk of the Hewl ett -Packard Company.
Centronics is a registered trademark of Centronics, Inc.
MS-DOS, Microsoft, Windows and Windows NT are registered
trademarks of Micr osoft Corporation.
IBM is a registered trademark of the International Business Mach ines
Corporation.
Apple, Macintosh and TrueType are registered trademarks of Apple
Computer, Inc.
PagePro is a registered trademark of Minolta.
Adobe and PostScript are tr adem arks of Adobe Systems, Inc.
Fine-ART and Fine Micro Toning are trademarks of Minolta Co. Ltd.
QMS and the QMS logo are registered trademarks of QMS, Inc.
All other names of products and brand-names are trademarks or
registered trademarks of their respective proprietors.
1
PagePro 4100GN 1-1

1
1.2 Roadmap of this manual
Where to find what in this User’s Manual
You don’t know exactly where to find the information you need? The
following table is designed to help you.
Alternatively, to find informati on on a specific problem qui ckly and
precisely, please refer to the index at the end of the User’s Manual.
No. Title of chapter Content of chapter
Contents A complete list of all the chapters and sub-chapters in
1 Introduction Introductory remarks and information on how to use
2 Unpacking, installing and
setting up the printer
3 Installing the PCL printer
driver
4 Working with the PCL printer
drivers
5 Working with the Windows
PCL printer tools
6 Working with the DOS PCL
printer tools
7 Installing the PostScript
printer driver
8 Working with the PostScript
printer driver
9 Working with the printer Getting to know how your printer works. For example,
10 Installing optional
accessories
11 Caring for and maintaining
your printer
12 Troubleshooting Help with analysing and rectifying faults.
13 Appendix A collection of helpful additional information, e.g.:
this User’s Manual.
this manual as well as notes on the safe use of the
printer.
|nformation on how to set up the printer as well as an
introduction to the various features.
A step-by-step explanation of the routine for installing
the PCL printer driver.
Details of how to control the printer via the PCL
printer driver. This helps you learn how to use the
printer’s functions effectively .
Details of how you can use the supplementary
Windows programs most effectively.
Details of how you can use the supplementary DOS
programs most effectively.
A step-by-step explanation of the routine for installing
the PostScript printer driver.
Details of how to control the printer via the PostScript
printer driver.
information on:
• loading paper
• monitoring print jobs
• cancelling print jobs
Details of how to install optional accessories
correctly, e.g.:
• 500-sheet paper feed tray
• Expansion memory
Details of how to look after your printer and how you
can easily replace cerain parts yourself.
• technical specification
• index of keywords
Introduction
1-2 PagePro 4100GN

Introduction
Brief explanation of special type styles and method of presentation
Special type styles and methods of presentation are used in this User’s
Manual to highlight var ious circumst ances. The following exampl es will
help you to recognize and deal with the most important of these.
CAUTION
This is a warning!
A warning alerts you to danger to life and limb or to damage that could
result to the machine by tr eating it improper ly.
➜ The arrow refers yo u to saf ety measures that must be taken to pr event
[MENU] Key on the control panel / button on the printer driver with
➜ Single action to be performed (there are no other steps)
1
the hazard.
the description “Menu“
1 Step 1 of a series of actions
2 Step 2 of a series of actions, etc.
Help is available here .
?
➜ The approach that i s suggested
here is sure to get you to your
desired result.
Here you can see what has to be done.
✎
This is a hel p fu l tip
Text passages th at are iden tified in this manner provide you with trick s
and handy tips to make it even easier to work with the print er.
PagePro 4100GN 1-3

1
1.3 Working safely with your laser printer
Notes on your safety and operating saf ety
Working improperly wit h the printer can resul t in health hazards, elect ric
shocks and even fires. Before you unpack the laser printer, you should
make yourself fami li ar with this information on your safety and operating
safety.
CAUTION
Observe the following information:
➜ Make sure that the power cable is correct ly plugged into the socket
and that the socket is at al l ti m es visible and readil y accessible.
➜ Do not pull the cabl e of t he po wer plug as thi s may da mage t he cable.
The result could be an electric shock or a fire.
➜ Remove the power plug from the socket if the machi ne will not be use d
for an extended period of t ime.
➜ Do not remove the power cab le from the socket wit h wet hands as this
may result in an electric shock.
➜ Do not mov e the unit u nless the power cable has been removed from
the socket. Ot herwise you may d amage the cabl e. The r esult co uld be
a short-circuit or a fi re.
➜ Do not place any hea vy objects on t he power cable. Do not pull or kink
the cable as this can result in damage to the cable. The result could
be an electric shock or a fi re.
➜ Make sure that the machine is not standing on a cable connected to
another machine as this can resu lt i n d amage t o that cabl e. The resu lt
could be a fire or improper functioning of the unit i n question.
➜ Make sure that the power supply to the unit has the correct voltage.
Otherwise the result could be a fire or an electric shock.
➜ Switch off the unit immediately and unpl ug the power cable if the
power supply cable is damaged. Failur e to do so could result in a fire
or an electric shock. Contact your customer support service centre.
➜ Use only ext ens ion cab les t hat are des igned f or at le ast t he maxim um
power rating of the machine. Extension cables with lower ratings can
result in overheating and can even cause a fire.
Introduction
1-4 PagePro 4100GN

Introduction
➜ Perform only t he procedures th at are describ ed in this manual. Using
➜ Do not place any heavy objects on the machine.
➜ Do not open any covers on the machine while printing is in progress.
➜ Do not switch off the unit while printing is in progress.
➜ Do not place any magnetic object near the machine.
➜ Do not use any flammable sp rays, liqui ds or gases in the vicinity of the
➜ Do not remove any safet y devices and do not alter the const ruct ion of
➜ Do not insert any paper cl ips, staple s or other smal l meta l objec ts into
➜ Do not place coffee cups, drin ks bottles or other conta iners with liquids
➜ If the machine becomes unusually hot, or if you not ice smoke or an
1
the machine improperly can result in a fire or an electric shock.
machine.
the machine. The unit is equipped with high-voltage components.
Using the machine improperly can result in a fire or an electric shock.
openings on the machine. The result could be an electric shock or a
fire. If metal pieces are fed i nto th e machi ne, swi tch it of f imm ediate ly,
disconnect the power cable and contact your customer support
service centre .
in them on the machine. If li quid enters the machine the result could
be an electric sho ck or a f ire. If l iquid does g et into the ma chine, swit ch
it off immediately , di sconnect the power cabl e and contact your
customer support ser vice centre.
unusual odour coming fr om the machine, swi tch it off immedia tely and
remove the power cable from the socket. Contact your customer
support technical specialist.
PagePro 4100GN 1-5

1
Introduction
Laser safety
This printer is equipped with a laser unit. If the pri nter is used in
accordance wit h the instructions in the User’s M anual, the laser presents
no danger.
The radiation emitt ed is complet ely absorbed and attenuated by the case.
The laser radi ation c annot esc ape at any t im e during the pri ntin g process .
This laser printer is categorized as a Class 1 printer. This classification
means that the printer does not produce any hazardous laser radiation.
This printer is certi fied as a Class I Laser produc t under the US
Department of Health and Human Service s (DHHS) Radiation
Performance Standard according to the Radiati on Control for Heal th and
Safety Act of 1968. This means t hat the printer does not produce
hazardous laser ra diation.
Internal laser radiation
Average radiation output:
1.03 mW at the laser aperture of the laser unit.
Wavelength: 770-810 nm
This device works with a laser diode of class 3b with invis ible laser
radiation. The las er diode and the polygon mirro r for sampling are
integrated into t he laser unit.
The laser unit is NOT AN ITEM TO BE MAINTAINED ON SITE. You
should therefore not open it under any circumstance.
CAUTION
Dangerous laser radiation!
Using the printer in a manne r other than as indicat ed in t his manual may
result in exposure to dangerous radiati on.
➜ Use the printe r only according to the in structions con tai ned in the
User’s Manual.
1-6 PagePro 4100GN

Introduction
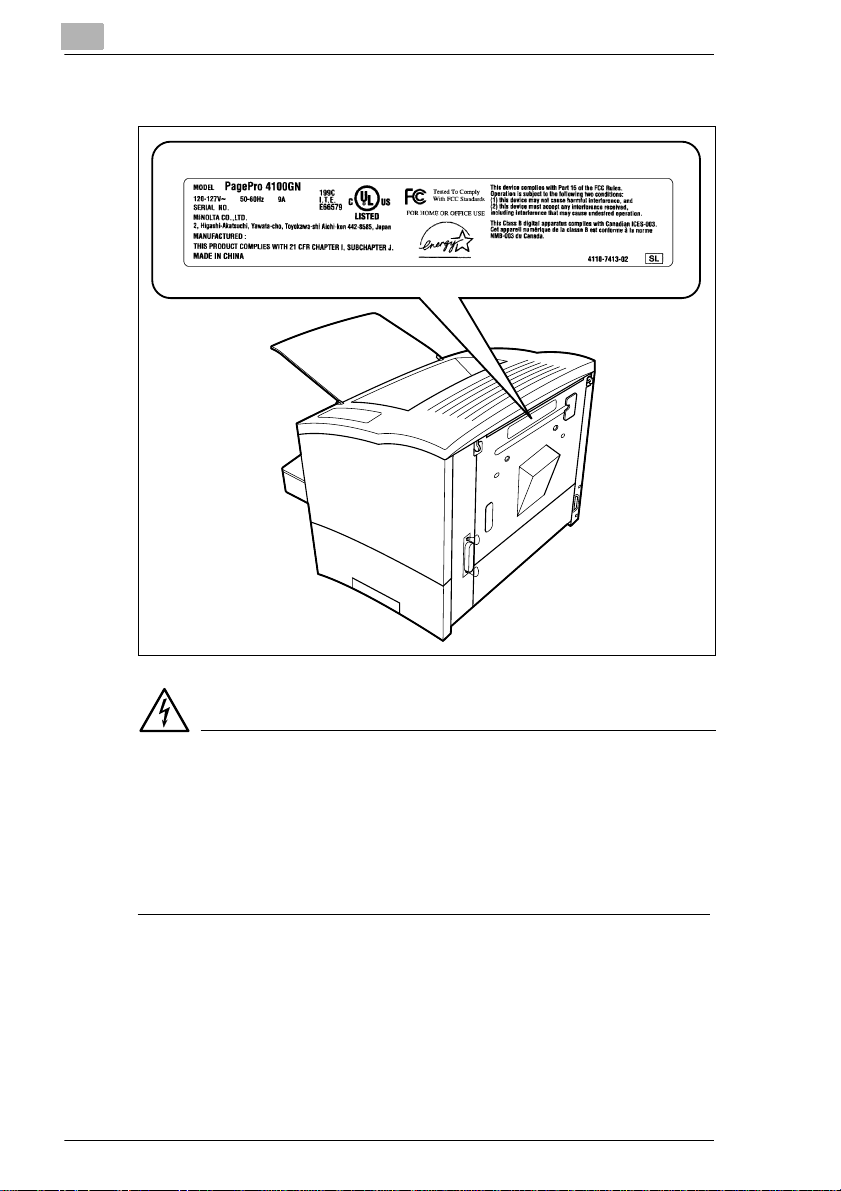
CDRH regulations
On 2 August 1976 the Center for Devices and Radiological Health
(CDRH), part of the US Food and Drug Administration, introduced
specifications for all products that operate with laser beam s. Products
which are to be sold or used i n the USA must compl y with th ese stat utory
requirements without exception. The safety label shown here confirms
compliance with the CDRH re gulations . This l abel must be attac hed to al l
products sold or used in th e USA.
1
PagePro 4100GN 1-7
1
Introduction
Laser safety label
DANGER
Use the printer only as described in this manual!
Using the controls, adjusting the printer or performing procedures other
than as specifie d in th is manual may result in exposure to hazardous
radiation.
➜ Use the printe r only according to the in structions con tai ned in the
User’s Manual.
1-8 PagePro 4100GN
Introduction
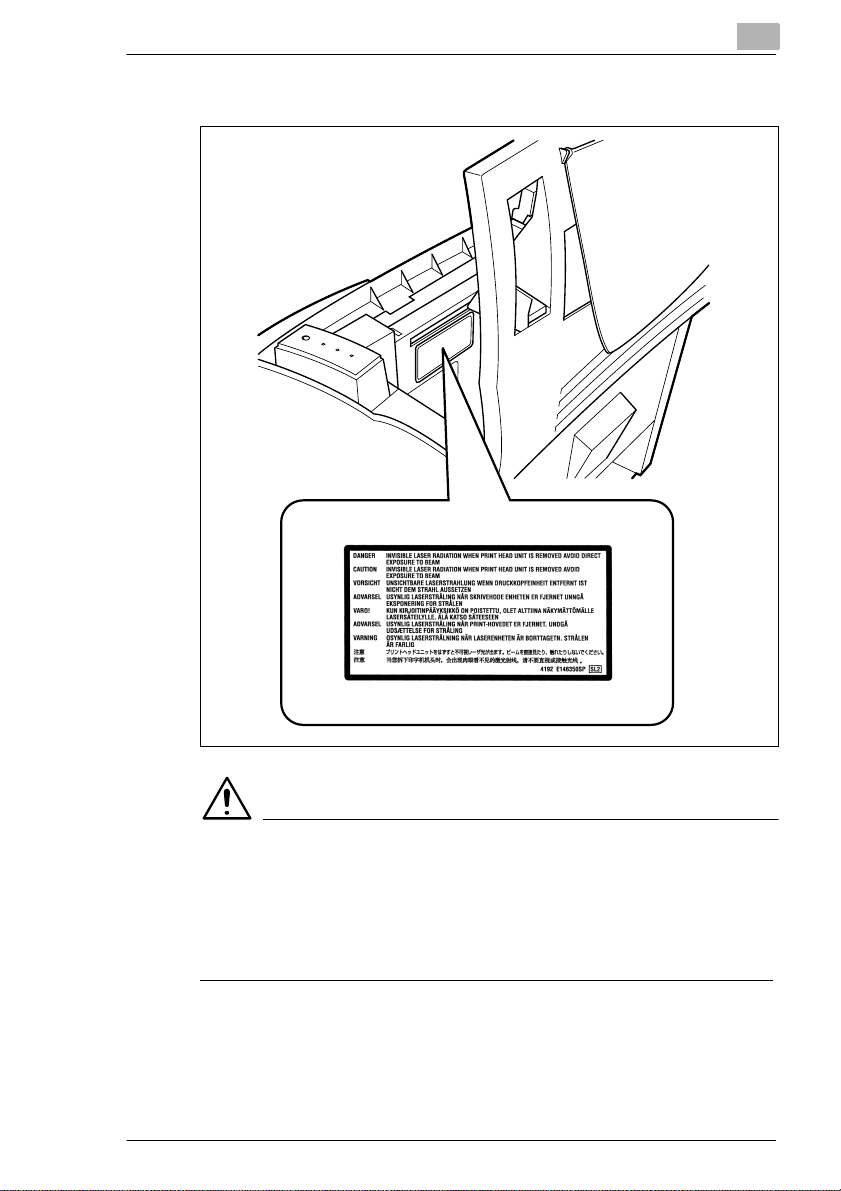
Laser caution label
1
CAUTION
Dangerous laser radiatio n!
This is a semiconduct or l aser. The maximum power of the laser diode is
5 mW and the wavelength is 770–810 nm.
➜ Use the printer only according to the instructions contained in the
User's Manual.
PagePro 4100GN 1-9

1
Introduction
1-10 PagePro 4100GN
Unpacking, in stalling and setting up the printer
2 Unpacking, installing and setting up
the printer
2.1 Unpacking the laser printer
CAUTION
Danger for children from packaging materials made of plasti c!
➜ After unpacking, keep the pa ckaging mater ials out of r each of chi ldren.
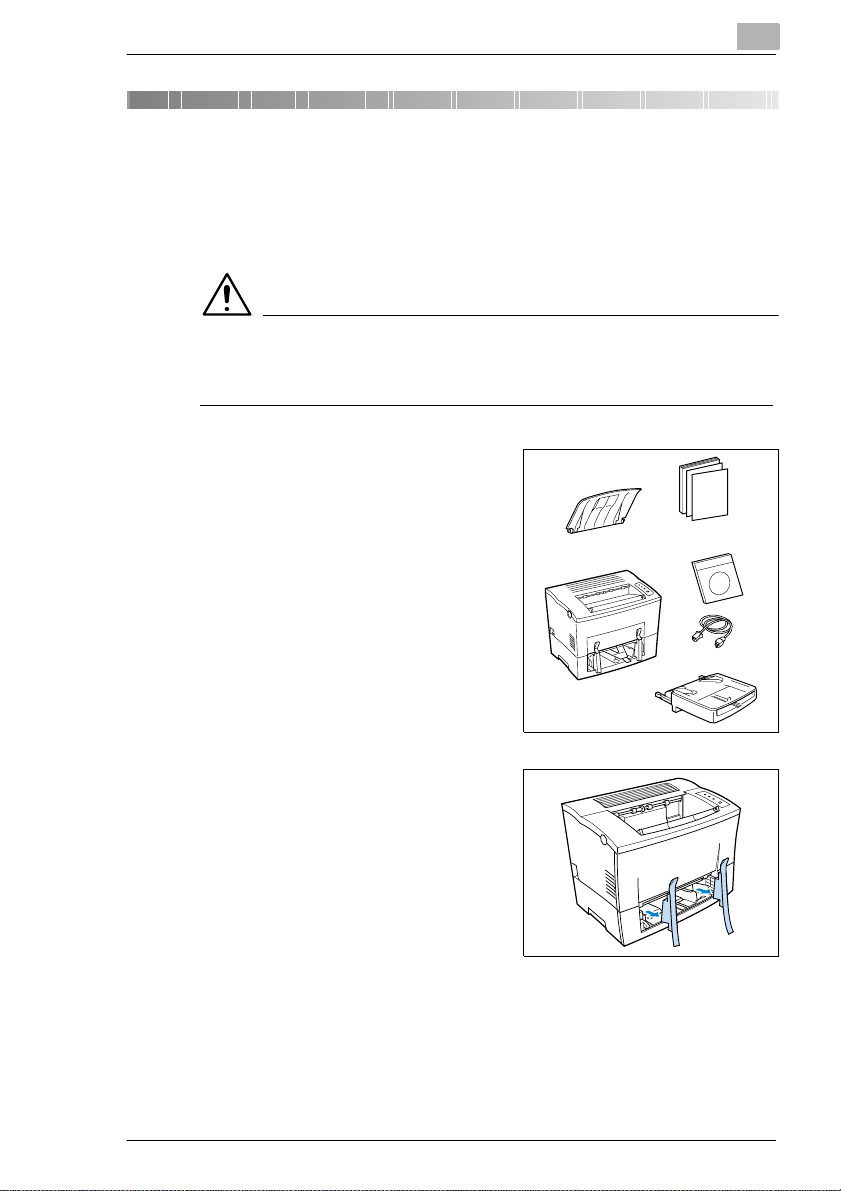
1 Remove the printer parts and
accessories fr om the box.
❍ Paper output tray
❍ Printer
❍ Inst a llation Guide
❍ CD-ROM
❍ Power cable
❍ Paper feed tray.
2
2 Remove the pac k aging material
from the printer.
3 Remove the transport retainers
from the printer.
PagePro 4100GN 2-1
2
Unpacking, installing and setting up the printer
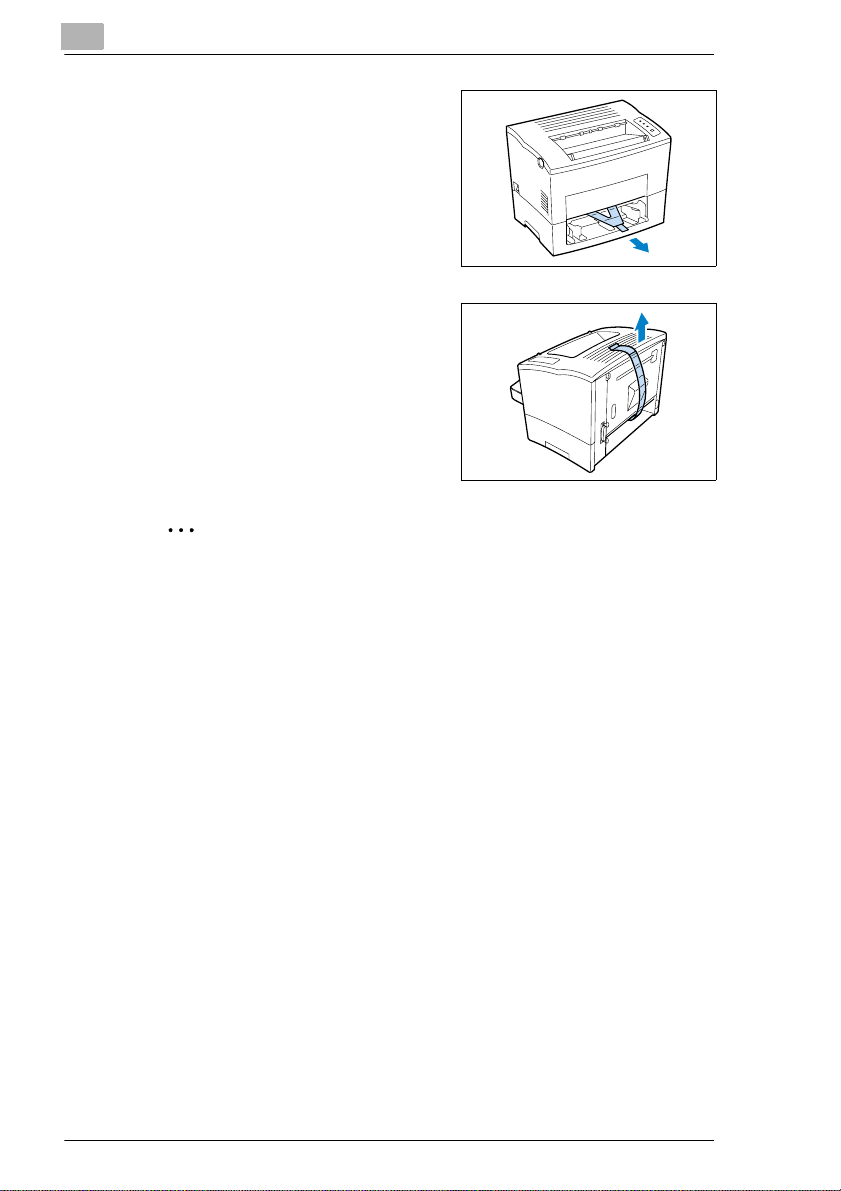
4 Pull the plastic strips out of the
printer.
5 Remove the plastic strips from the
rear of the printer.
✎
Why save packaging materi als?
If you need to move the printer , you can use the packaging again. In
this way you can be certain that your printer is corr ectly packed.
2-2 PagePro 4100GN
Unpacking, in stalling and setting up the printer
2.2 Overview of the printe r
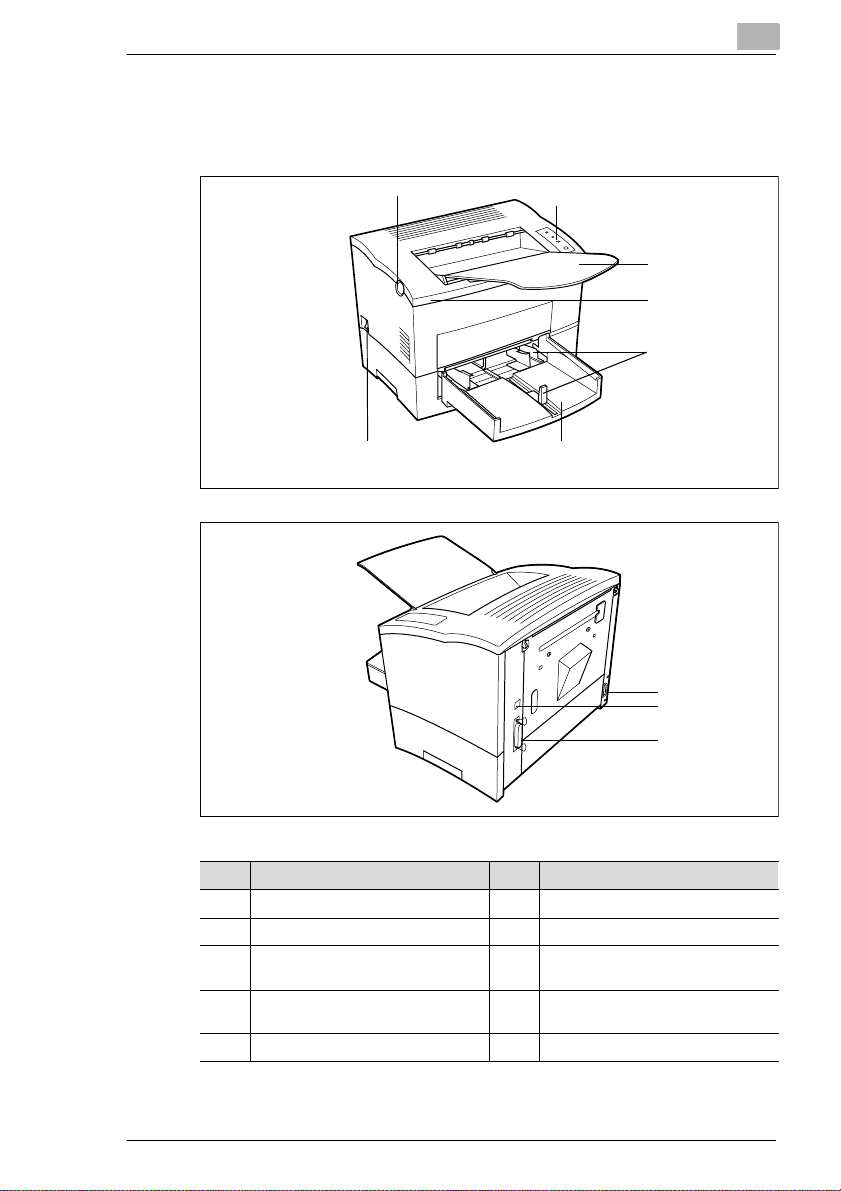
External p rinter parts
2
1
2
3
4
5
67
8
9
10
No. Description No. Description
1 Release button for top cover 6 Paper feed tray 1 (multipurpose tray)
2 Contr ol panel 7 Power Switch (ON/O FF)
3 Paper output tray
(face down)
4 Top Cover 9 Ethernet interface connector
5 Paper guides 10 Parallel port
8 Socket for power cable
(10BaseT/100 BaseTX)
PagePro 4100GN 2-3
2
Unpacking, installing and setting up the printer
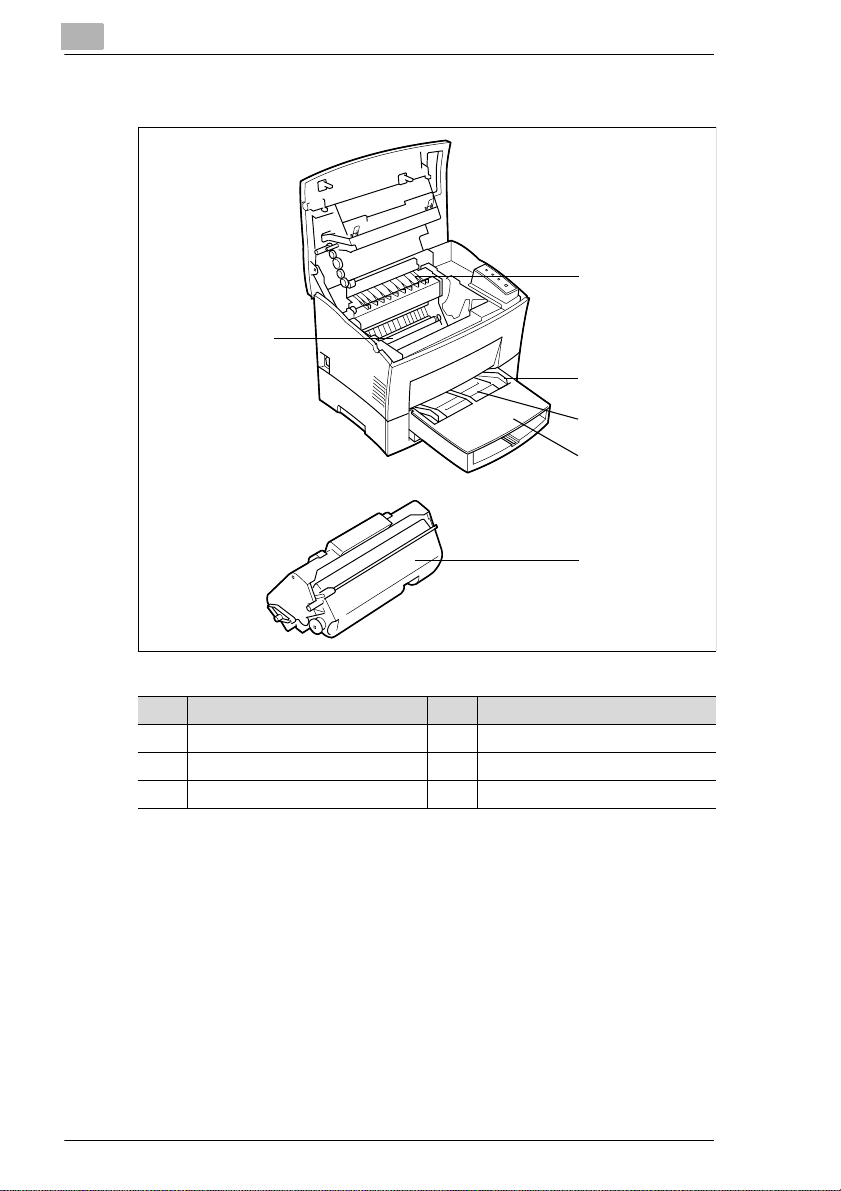
Internal printer parts
1
5
2
3
4
6
No. Description No. Description
1 Fusing unit 4 Cover to paper feed tray 2
2 Paper guide 5 Image transfer roller
3 Manual paper feed unit 6 Imaging cartridge
2-4 PagePro 4100GN
Unpacking, in stalling and setting up the printer
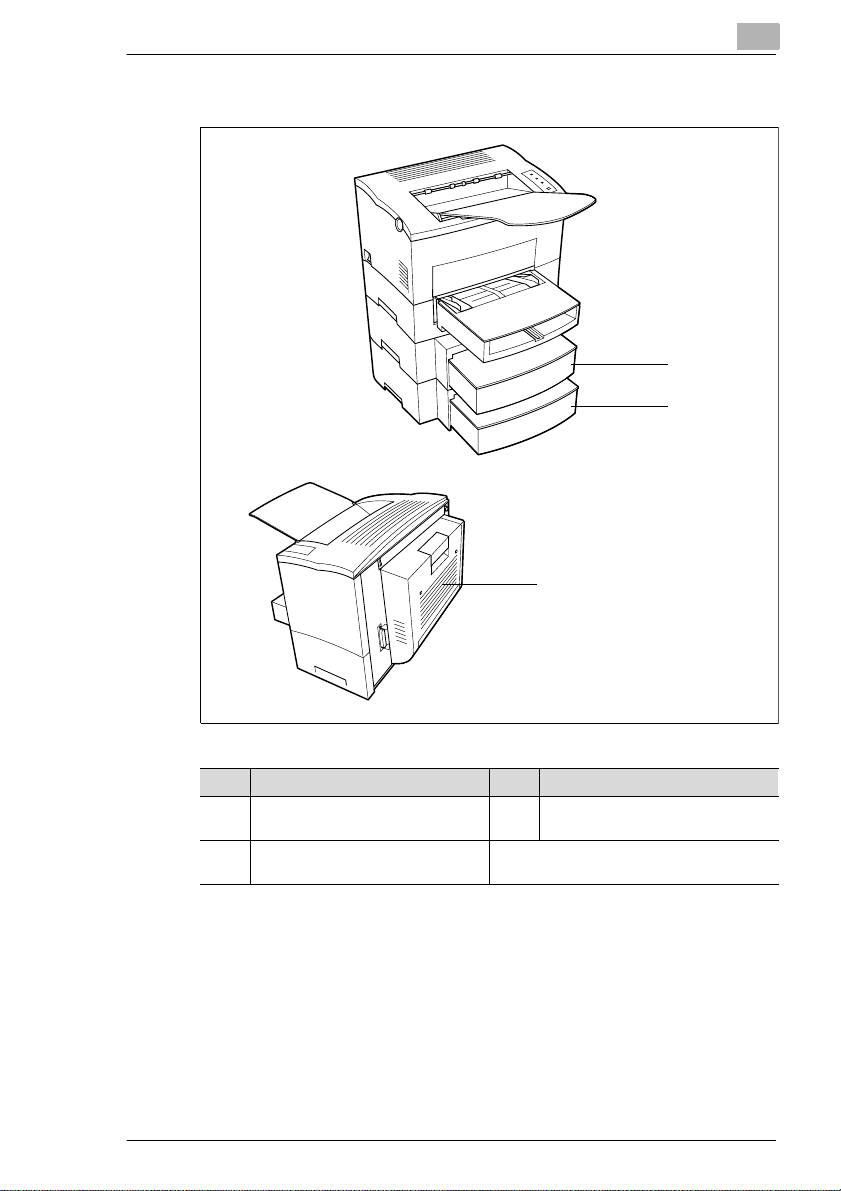
Optio n a l pr in t e r pa r ts
2
1
2
3
No. Description No. Description
1 Paper feed tray 2
(500-sheet cassette)
2 Paper feed tray 3
(500-sheet cassette)
3 Duplex Unit
PagePro 4100GN 2-5
2
Unpacking, installing and setting up the printer
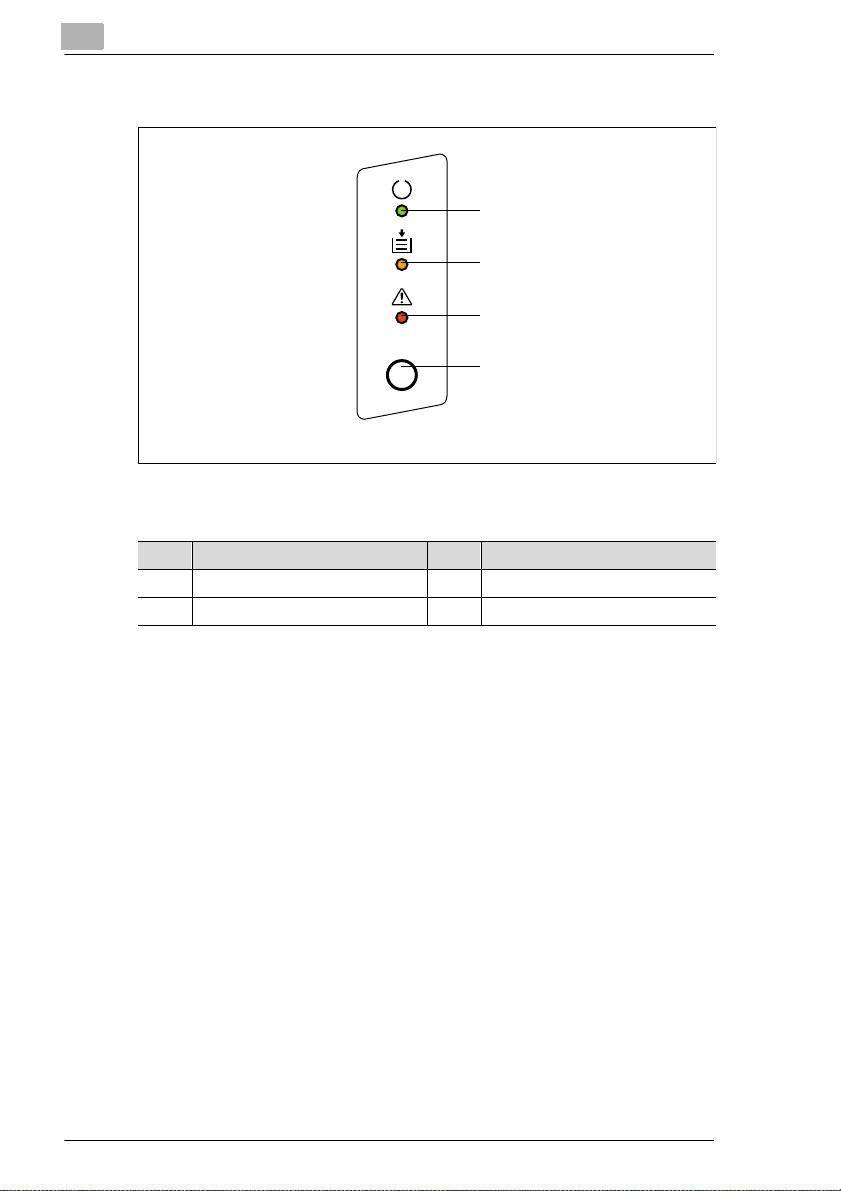
Printer control panel
1
2
3
4
The control panel has three lamps and one button.
No. Description No . Description
1 Stand-by lamp (green) 3 Fault (red)
2 Paper empty (orange) 4 Control button
2-6 PagePro 4100GN

Unpacking, in stalling and setting up the printer
2.3 Installing your laser printer
Place of installation
The printer should be set up in a place which is:
G dry and free from dust,
G on a stable surf ace,
G well ventilated,
G away of highly flamm able items, e.g. cur tains,
G away of objects which mi ght obstruct the prin ter ’s ventilation slits,
G near to an easily accessible power socket.
The printer must be positioned in a way that it cannot be adversely
affected by the following:
G splashing l iquids,
G organic gases, e.g. ammonia,
G direct sunlight,
G severe temp erature fluctuat ions,
G exhaust-air from heating, ve ntilation or air-conditioning systems.
Storage of consumables and accessories
Printing consumables and accessories should be kept:
G sealed in their original packagings,
G protected against direct sun li ght or heat,
G protected against fluorescent light,
G in a cool, dry and dust-free place,
G out of reach of children.
2
CAUTION
Toner poses a health hazard!
Toner is harmful if swallowed.
➜ If you swallow toner, con sult a doctor immediate ly.
➜ If you get ton er on your han ds, wash them i mmediately with cold water
and soap.
PagePro 4100GN 2-7

2
Unpacking, installing and setting up the printer
Ambient conditions
The optimum ambient conditions for your print er are as follows:
G Temper ature range 50°F to 95°F / 10°C to 35°C
(maximum variati on of 18°F / 10°C per hour);
G Relati ve hum idity of 15% to 85%
(maximum variati on of 20% per hour).
2-8 PagePro 4100GN
Unpacking, in stalling and setting up the printer
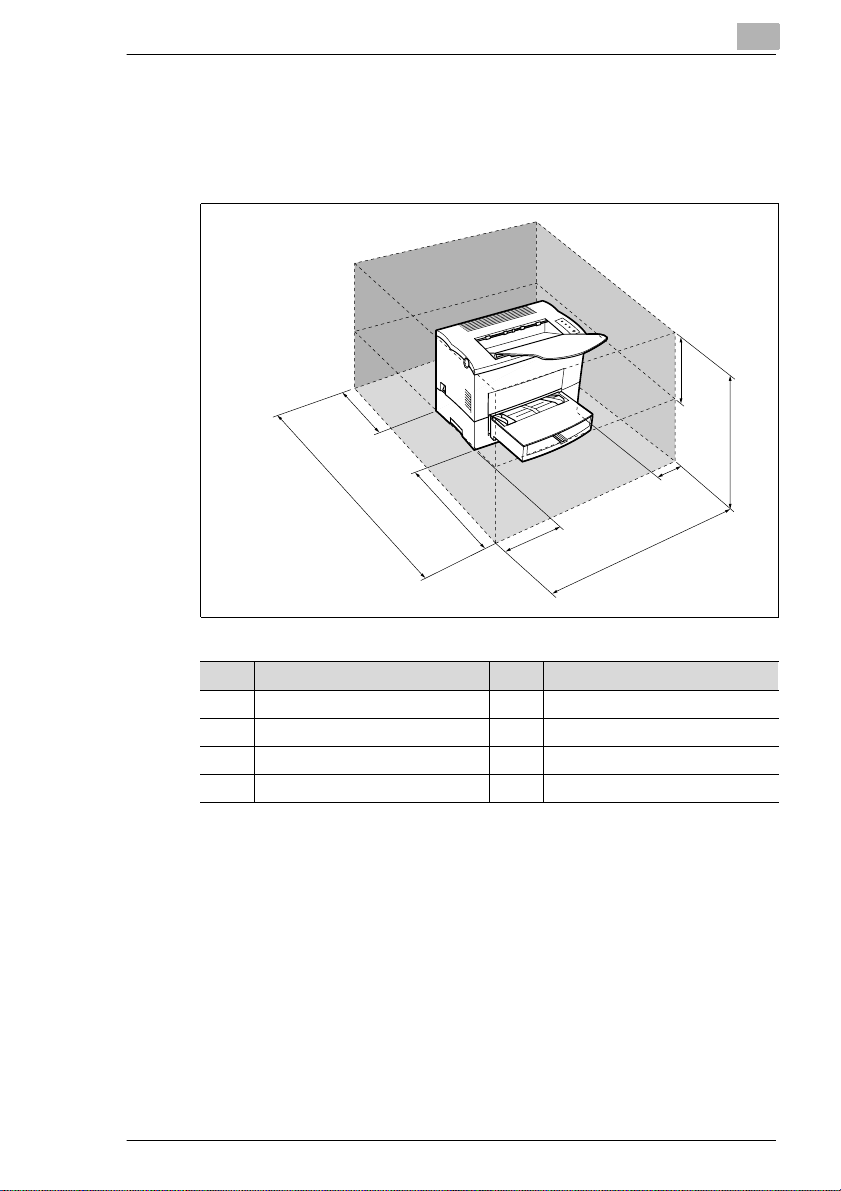
Space required
Make certain t hat th ere is enou gh space a vai labl e around the print er (s ee
figure). This will faci litate operation, reloading paper and toner, and
maintenance of the pr int er.
D
A
E
2
H
C
G
F
B
No. Dimension No. Dimension
A 40-1/2 in. / 1030 mm E 23-1/2 in. / 600 mm
B 33 in. / 840 mm F 11-3/4 in. / 300 mm
C 24-3/4 in. / 630 mm G 4 in. / 100 mm
D 6 in. / 150 mm H 11-3/4 in. / 300 mm
PagePro 4100GN 2-9
2
Unpacking, installing and setting up the printer
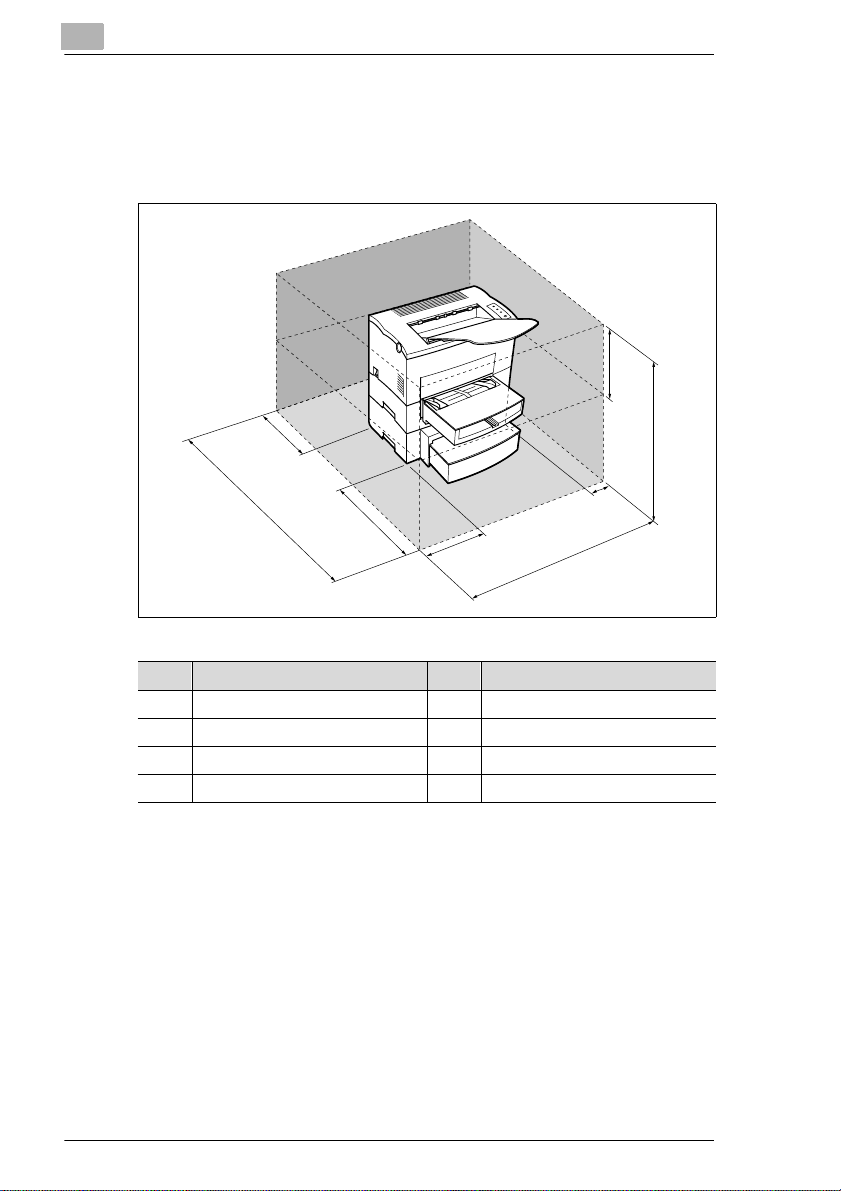
Space required (when equipped with optional paper cassette unit)
Make certain t hat t here is enou gh space avai labl e around the printer (s ee
figure). This will faci litate operation, reloading paper and toner, and
maintenance of the pr int er.
H
D
A
No. Dimension No. Dimension
A 40-1/2 in. / 1030 mm E 23-1/2 in. / 600 mm
B 33 in. / 840 mm F 11-3/4 in. / 300 mm
C 29-1/2 in. / 750mm G 4 in. / 100 mm
D 6 in. / 150 mm H 11-3/4 in. /300 mm
E
F
B
C
G
2-10 PagePro 4100GN
Unpacking, in stalling and setting up the printer
2.4 Setting up your laser printer
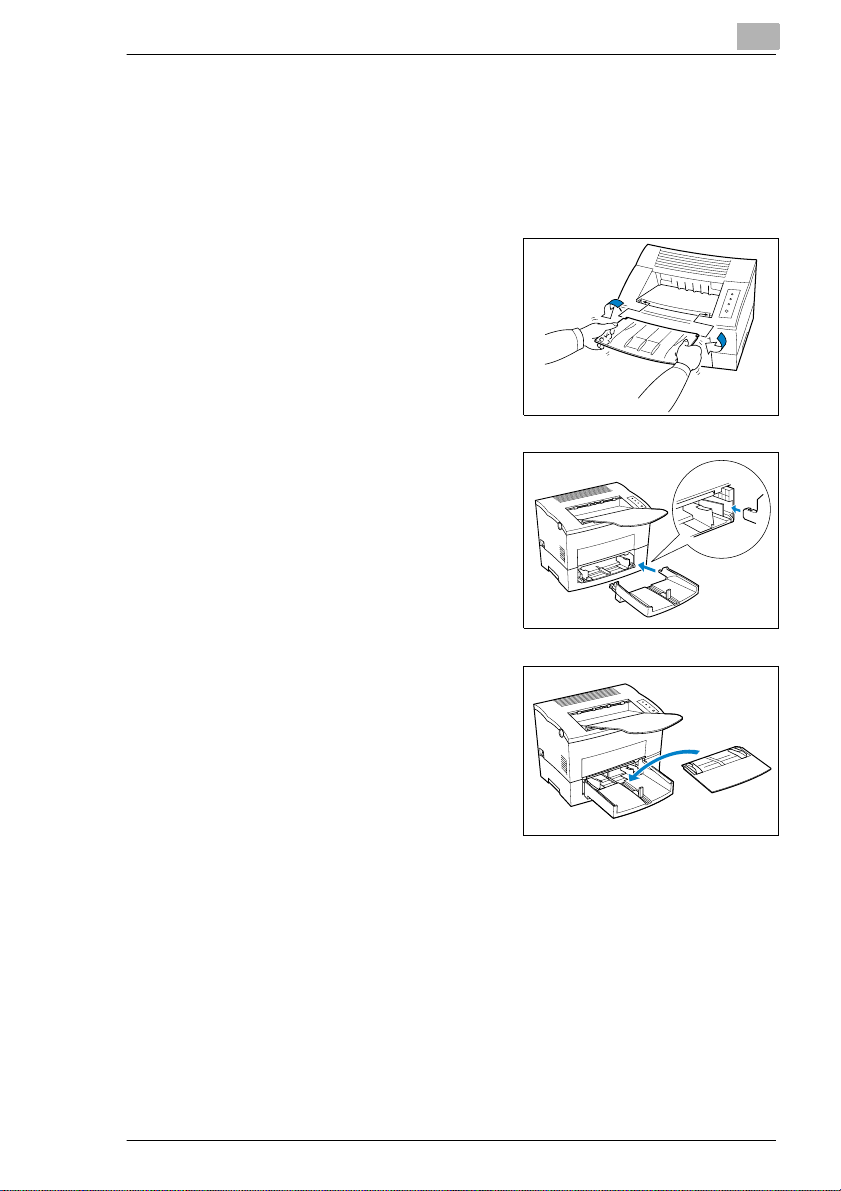
Fitting the paper output tray and paper feed tray 1
Set the guides of the paper feed tray to match the size of paper you wis h
to use.
1 Attach the paper output tray to the
printer as shown here.
2 Slide the lower part of the paper
feed tr a y in to the pr inter.
2
3 Fit the cover of paper feed
tray 1.
PagePro 4100GN 2-11
2
Unpacking, installing and setting up the printer
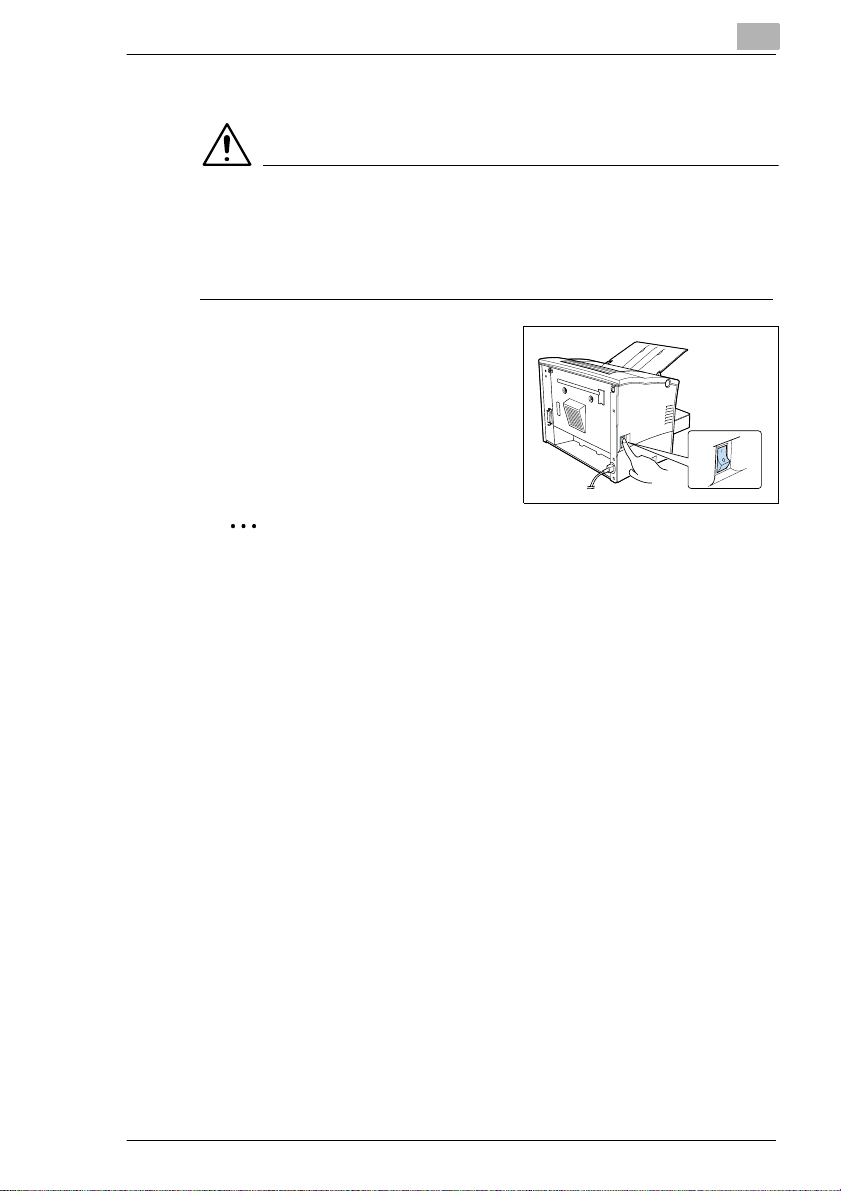
Connecting the power cable
Only use the power cable suppli ed with the printer!
The laser printer req uires a power supply with minimal voltage and
frequency fluc tuation. If necessary, ask an electrician for advice.
✔ Power supply: 120-127 V at 50-60 Hz / 220-240 V at 50-60 Hz
✔ Voltage fluctuation: 120 V -10%, 127 V +6% / 220-240 V ± 10%
✔ Frequency fluctuation: Within 3 Hz
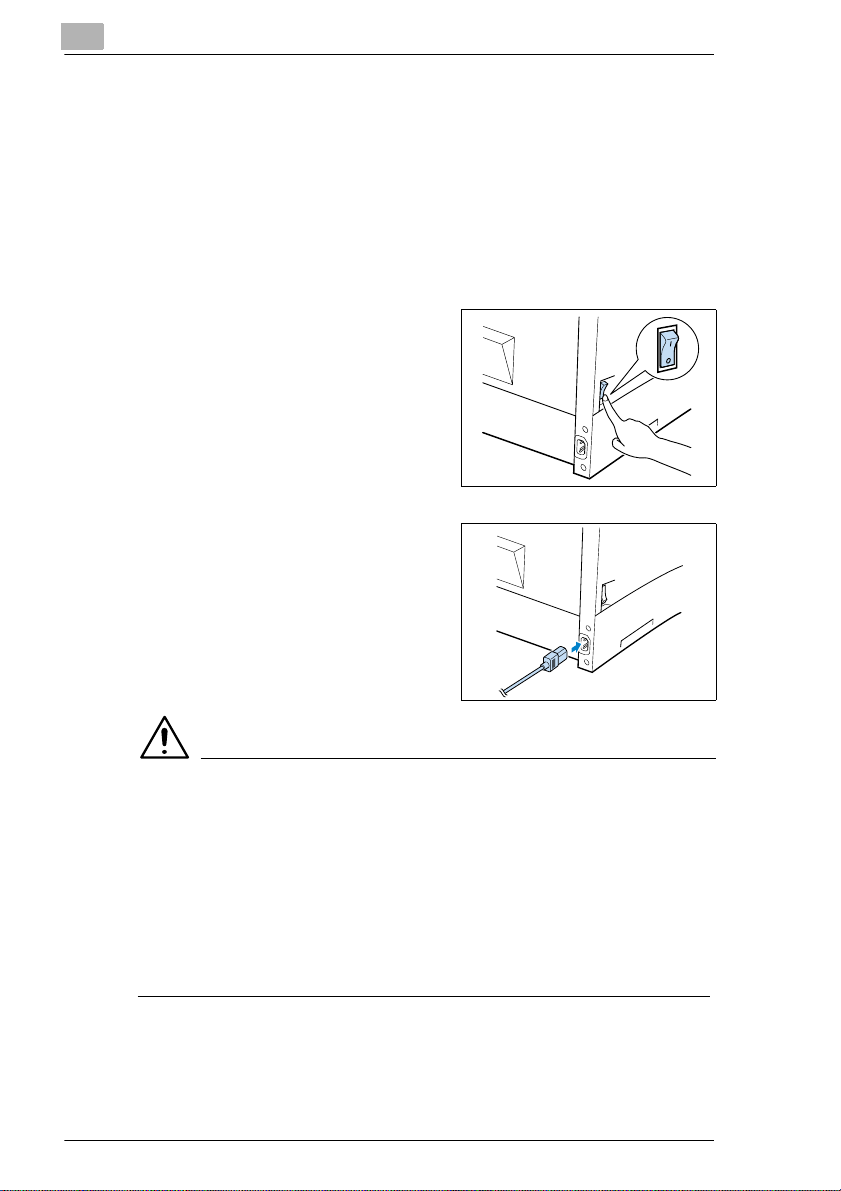
1 Make sure that the printer’s power
switch is in the "0" (OFF) position.
2 Insert the plug on the end of the
power cable (supplied) into the
power socket of the print er.
3 Insert the other end of the power
cable into a power socket.
CAUTION
Using the wrong power cable may lead to a short-circuit situation!
The use of a power cable of inadequate cross-section can lead to overheating of the cable.
➜ Only use an extensi on cable which has a hi gher rat ing than the c urrent
consumption of the printer.
➜ Only use cables wi th a ground connection .
➜ Always observe the relevant local regulations regarding the
connection of electrical equipment to the mains network.
2-12 PagePro 4100GN
Unpacking, in stalling and setting up the printer
Switching the printer on and off
CAUTION
Improper handling may result in damge to the printer!
➜ Never switch off the printer while a print job is in progress, the printer
is receiving data fr om the computer (flashing “Stand-by“ lamp on the
control panel) or the printer is being reset.
➜ Switch the power swit ch to "I" (“On“)
in order to activate the printer.
The printer is ready for use after
approx. 23 seconds.
➜ Switch the power switch to
"0" (“Off“) in order t o deactivate the
printer.
✎
Saving energy makes sense!
After the printer has not received a print com mand for a certain amount
of time, it automatically switches to the POWER SAVE mode. This
time interval can be adj usted via the printer tool s, see page 5-9.
If the printer receives a new pri nt j ob whil e it is in POWER SAVE
mode, or if the side cover is openend or if the [ON LINE] key is
pressed, the printer automaticall y starts its warm-up phas e.
2
PagePro 4100GN 2-13
 Loading...