

Page 1

TM
PagePro 1350EN
Reference Guide
4136-9563-00A
1800814-001A
Page 2

Copyright Notice
The digitally encoded software and publication included with your printer are
Copyrighted © 2006 by KONICA MINOLTA BUSINESS TECHNOLOGIES, INC.,
Marunouchi Center Building, 1-6-1 Marunouchi, Chiyoda-ku, Tokyo, 100-0005,
Japan. All Rights Reserved.
Trademarks
KONICA MINOLTA and the KONICA MINOLTA logo are trademarks or registered
trademarks of KONICA MINOLTA HOLDINGS, INC.
PagePro and PageScope are trademarks or registered trademarks of KONICA
MINOLTA BUSINESS TECHNOLOGIES, INC.
All other trademarks and registered trademarks are the property of their respective
owners.
Notice
KONICA MINOLTA BUSINESS TECHNOLOGIES, INC. reserves the right to make
changes to this guide and to the equipment described herein without notice. Considerable effort has been made to ensure that this manual is free of inaccuracies and
omissions. However, KONICA MINOLTA BUSINESS TECHNOLOGIES, INC. makes
no warranty of any kind including, but not limited to, any implied warranties of merchantability and fitness for a particular purpose with regard to this manual.
KONICA MINOLTA BUSINESS TECHNOLOGIES, INC. assumes no responsibility
for, or liability for, errors contained in this manual or for incidental, special, or consequential damages arising out of the furnishing of this manual, or the use of this manual in operating the equipment, or in connection with the performance of the
equipment when so operated.
Page 3

SOFTWARE LICENSE AGREEMENT
This package contains the following materials provided by Konica Minolta Business Technologies, Inc. (KMBT): software included as part of the printing system, the digitally-encoded
machine-readable outline data encoded in the special format and in the encrypted form (“Font
Programs”), other software which runs on a computer system for use in conjunction with the
Printing Software (“Host Software”), and related explanatory written materials (“Documentation”). The term “Software” shall be used to describe Printing Software, Font Programs and/or
Host Software and also include any upgrades, modified versions, additions, and copies of the
Software.
The Software is being licensed to you under the terms of this Agreement.
KMBT grants to you a non-exclusive sublicense to use the Software and Documentation, provided that you agree to the following:
1. You may use the Printing Software and accompanying Font Programs for imaging to the
licensed output device(s), solely for your own internal business purposes.
2. In addition to the license for Font Programs set forth in Section 1 (“Printing Software”)
above, you may use Roman Font Programs to reproduce weights, styles, and versions of
letters, numerals, characters and symbols (“Typefaces”) on the display or monitor for your
own internal business purposes.
3. You may make one backup copy of the Host Software, provided your backup copy is not
installed or used on any computer. Notwithstanding the above restrictions, you may install
the Host Software on any number of computers solely for use with one or more printing systems running the Printing Software.
4. You may assign its rights under this Agreement to an assignee of all of Licensee’s right and
interest to such Software and Documentation (“Assignee”) provided you transfer to
Assignee all copies of such Software and Documentation Assignee agrees to be bound by
all of the terms and conditions of this Agreement.
5. You agree not to modify, adapt or translate the Software and Documentation.
6. You agree that you will not attempt to alter, disassemble, decrypt, reverse engineer or
decompile the Software.
7. Title to and ownership of the Software and Documentation and any reproductions thereof
shall remain with KMBT and its Licensor.
8. Trademarks shall be used in accordance with accepted trademark practice, including identification of the trademark owner’s name. Trademarks can only be used to identify printed
output produced by the Software. Such use of any trademark does not give you any rights
of ownership in that trademark.
9. You may not rent, lease, sublicense, lend or transfer versions or copies of the Software that
the Licensee does not use, or Software contained on any unused media, except as part of
the permanent transfer of all Software and Documentation as described above.
10. In no event will KMBT or its licensor be liable to you for any consequential, incidental INDIRECT, PUNITIVE or special damages, including any lost profits or lost saving, even if
KMBT has been advised of the possibility of such damages, or for any claim by any third
party. KMBT or its licensor disclaims all warranties with regard to the software, express or
implied, including, without limitation implied warranties of merchantability, fitness for a particular purpose, title and non-infringement of third party rights. Some states or jurisdictions
do not allow the exclusion or limitation of incidental, consequential or special damages, so
the above limitations may not apply to you.
Page 4

11. Notice to Government End Users: The Software is a “commercial item,” as that term is
defined at 48 C.F.R.2.101, consisting of “commercial computer software” and “commercial
computer software documentation,” as such terms are used in 48 C.F.R. 12.212. Consistent with 48 C.F.R. 12.212 and 48 C.F.R. 227.7202-1 through 227.7202-4, all U.S. Government End Users acquire the Software with only those rights set forth herein.
12. You agree that you will not export the Software in any form in violation of any applicable
laws and regulations regarding export control of any countries.
Page 5

Contents
1 Network Printing ...............................................................................................2
Network Printing 3
BOOTP 3
DHCP 3
HTTP 4
IPP 4
IPX/SPX 4
LPD/LPR 4
SNMP 4
Port 9100 4
Network Connection 5
Theory 5
Making the Connection 5
Ethernet Interface 5
Using DHCP/BOOTP 6
Using the PCL6 Driver Setup 7
Using the New Printer Wizard 7
Using PageScope Web Connection 10
Using PageScope Network Setup 11
Installing the PCL6 Driver for a network printer 16
Contents
i
Page 6

Installing missing network components 25
Installing Internet Explorer 6.0 or above for Windows 9X, Windows NT4.0, or
Windows Server 2003/XP/2000 25
Installing TCP/IP for Windows 9X 25
Installing Crown Print Monitor+ for Windows 9X 27
Installing the TCP/IP Protocol for Windows NT 4.0 27
Installing the Microsoft TCP/IP Printing for Windows NT 4.0 29
Printing via IPP (Internet Printing Protocol) – Windows Server 2003/XP/
2000 32
Adding an IPP Port using Add Printer Wizard 32
Resetting the printer to factory defaults 34
Troubleshooting 35
2 Using PageScope Web Connection ...............................................................36
About PageScope Web Connection 37
Display Language 37
Requirements 37
Setting Up the Printer Web Page 38
Determining the Printer Name 38
Setting Up Your Browser Software 38
Internet Explorer (version 6.0 for Windows) 39
Netscape Navigator (version 7.1) 40
Understanding the PageScope Web Connection Window 41
Navigation 41
Current Status 42
User Mode 42
Administrator Mode 42
Viewing Printer Status 44
System Page 44
Summary (shown previous) 45
Device Information 46
Detail 47
Counter 53
Online Assistance 54
Job Page 55
Active Job List (shown above) 55
Done Job List 56
Done Job List (Detail) 57
Print Page 58
Default Settings 58
PCL Font List 62
Report Types 63
Configuring the Printer 64
System Page 64
Date/Time 64
Admin Password 66
Contentsii
Page 7

Device Information 67
ROM Version 70
Online Assistance 71
Maintenance 73
Print Page 75
Interfaces 75
Default Settings 76
PCL Font List 84
Network Page 85
TCP/IP(shown above) 85
NetWare 87
IPP 90
FTP Server 94
SNMP 95
A Appendix .......................................................................................................... 96
Font Information 97
Contents
iii
Page 8

Page 9

Network Printing
Page 10

Network Printing
Network printing terms are described below.
BOOTP
DHCP
HTTP
IPP
IPX/SPX
LPD/LPR
SNMP
Port9100
This chapter contains descriptions on the network printing terms and the IPP
printing methods.
BOOTP
BOOTP (Bootstrap Protocol) is an Internet protocol that enables a diskless
workstation to discover (1) its own IP address, (2) the IP address of a BOOTP
server on the network, and (3) a file that can be loaded into memory to boot
the workstation. This enables the workstation to boot without requiring a hard
or floppy disk drive.
DHCP
DHCP (Dynamic Host Configuration Protocol) is a protocol for assigning
dynamic IP addresses to devices on a network. With dynamic addressing, a
device can have a different IP address every time it connects to the network.
In some systems, the device's IP address can even change while it is still
connected. DHCP also supports a mix of static and dynamic IP addresses.
Dynamic addressing simplifies network administration because the software
keeps track of IP addresses rather than requiring an administrator to manage
the task. This means that a new computer can be added to a network without
the hassle of manually assigning it a unique IP address.
Network Printing3
Page 11

HTTP
HTTP (HyperText Transfer Protocol) is the underlying protocol used by the
World Wide Web. It defines how messages are formatted and transmitted,
and what actions web servers and browsers should take in response to various commands. For example, when you enter a URL in your browser, this
actually sends an HTTP command to the Web server directing it to fetch and
transmit the requested web page.
IPP
IPP (Internet Printing Protocol) is a protocol for end users’ most common
printing situations over the Internet. It allows users to find out about a printer’s
capabilities, submit print jobs to a printer, determine the status of the printer
or print job, and cancel a previously submitted print job.
For more information on using IPP, See “Printing via IPP (Internet Printing
Protocol) – Windows Server 2003/XP/2000” on page 32.
IPX/SPX
IPX/SPX (Internetwork Packet Exchange/Sequenced Packet Exchange) is a
networking protocol developed by Novell. It was used mainly in Netware environments as the general LAN protocol, where TCP/IP has become
wide-spread.
LPD/LPR
LPD/LPR (Line Printer Daemon/Line Printer Request) is a platform-independent printing protocol that runs over TCP/IP. Originally implemented for BSD
UNIX, its use has spread into the desktop world and is now an industry standard.
SNMP
SNMP (Simple Network Management Protocol) is actually a set of protocols
for managing complex networks. SNMP works by sending messages to different parts of a network. SNMP-compliant devices, called agents, store data
about themselves in Management Information Bases (MIBs) and return this
data to the SNMP requesters.
Port 9100
When printing through a network, TCP/IP port number 9100 can be used to
send raw data.
Network Printing
4
Page 12
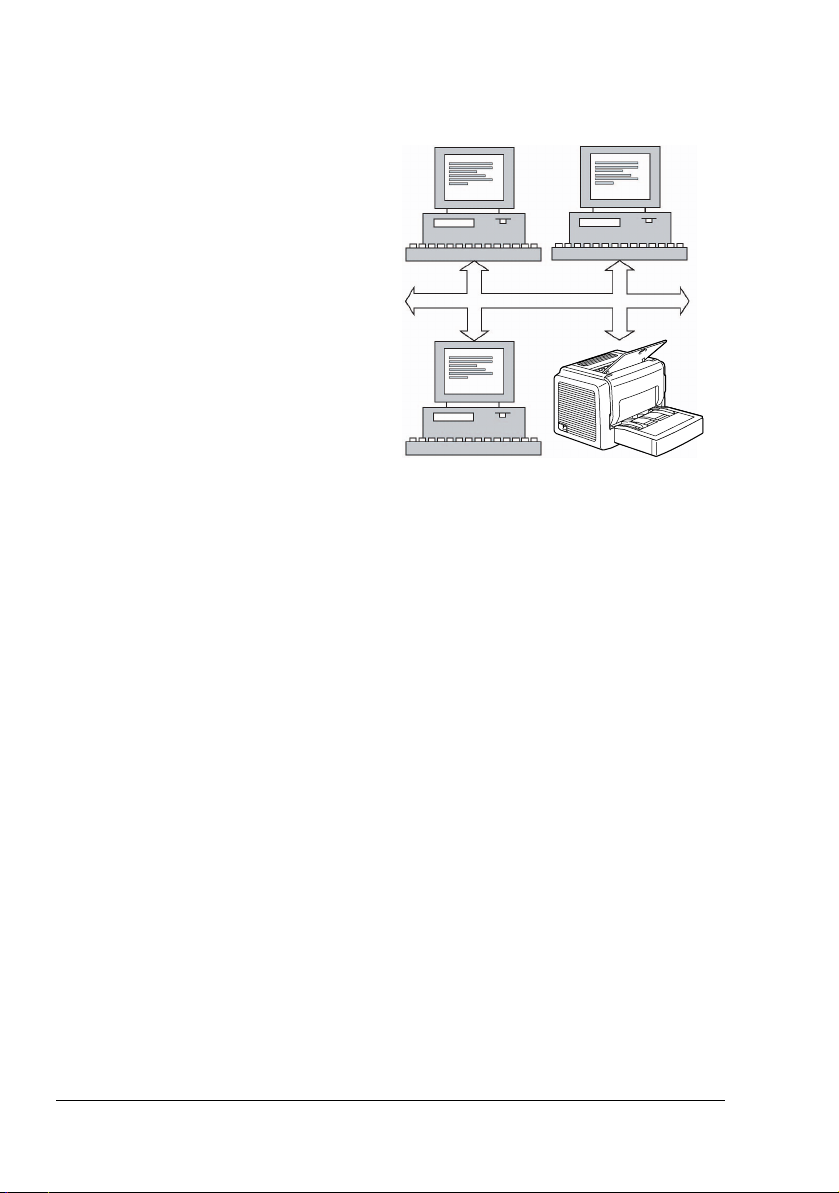
Network Connection
Theory
To connect your printer in a
TCP/IP network environment, you
must make sure that the internal
network addresses in the printer
have been set. This chapter
explains how to setup the network connection to your printer.
" In many cases, you have
to enter only a unique IP
address. However, you
may also have to enter a
subnet mask and/or a
gateway (router) address,
depending on your
network configuration requirements.
Making the Connection
Ethernet Interface
An RJ45 connector can be used as the Ethernet interface for this printer.
When connecting your printer to an Ethernet network, the tasks you perform
depend on how you plan to set the printer's IP (Internet Protocol) address,
Subnet Mask and Gateway:
IP Address—A unique identifier for each device on a TCP/IP network.
Subnet Mask—A filter used to determine what subnet an IP address
belongs to.
Gateway—A node on a network that serves as an entrance to another
network.
Printers are shipped with DHCP/BOOTP enabled in order to insure easy
automatic connection in most network environments. However for printing,
the use of a static IP address is preferred and you will need to change the
automatically assigned IP address for a static IP address. You can do this by
several different ways. Each is explained in detail in the following sections.
Using DHCP/BOOTP
Using the PCL6 Driver Setup
Using the New Printer Wizard
Network Connection5
Page 13

Using PageScope Web Connection
Using PageScope Network Setup
CAUTION
You should always notify your network's administrator before changing
the printer's IP address. Since the IP address for each PC and printer on
your network must be unique, you need to make sure it doesn't conflict
with any other IP address or your network or any attached network.
Using DHCP/BOOTP
If your network supports DHCP (Dynamic Host Configuration Protocol) or
BOOTP (Bootstrap Protocol), the printer's IP address will be automatically
assigned by the DHCP or BOOTP server when you turn on the printer. (Refer
to “Network Printing” on page 3 for a description of DHCP and BOOTP.)
" If your printer is not automatically assigned an IP address, verify that
DHCP is enabled on the printer.
1 Connect your printer to the network.
When using an Ethernet cable, plug the RJ45 connector into the Ethernet
interface port of the printer.
2 Put paper on the input tray.
3 Turn on your PC and printer.
When the green “Ready” indicator is on, print a configuration page to verify that the IP address is set.
4 Make sure that
– the orange “Error” indicator is off.
– the green “Ready” indicator is on (but not blinking).
5 Briefly press the cancel button.
6 Press the cancel button two more times.
– A configuration page is printed.
7 Check the INTERFACE section of the Configuration Page and make sure
of the following:
– DHCP/BOOTP is On
– IP Address is different from the default 192.168.1.2
Network Connection
6
Page 14

" If the configuration page was printed immediately after the green
“Ready” indicator lit, the updated IP address information may not be
applied and all IP Address, Subnet Mask and Default Router will show
“Initializing…”. In such a case, please wait a few minutes and print a
new configuration page.
" If DHCP/BOOTP is On, but IP Address shows 192.168.1.2, this
means that your printer is not connected correctly to the network, or
that there is no DHCP or BOOTP server available to assign an IP
address to your printer. In such a case, please use any of the other
methods described in the following sections to assign a valid static IP
address to your printer before installing the printer driver.
" If DHCP/BOOTP is Off, this probably mean that your printer has
already been assigned a static IP address and if this address is correct, you can proceed directly with the PCL6 Driver Setup. If this is not
the case, and you cannot communicate with the printer, please reset
the printer to factory default as explained in “Resetting the printer to
factory defaults” on page 34.
Using the PCL6 Driver Setup
During the PCL6 Driver Setup the New Printer Wizard will be run automatically. For more information, see “Installing the PCL6 Driver for a network
printer” on page 16.
Using the New Printer Wizard
A utility called “New Printer Wizard” is provided on your CD-ROM. This utility
allows you to locate your printer on the network, and configure its network
settings, as follows:
1 Connect your printer to the network.
When using an Ethernet cable, plug the RJ45 connector into the Ethernet
interface port of the printer.
2 Turn on your PC and printer.
Wait until the green “Ready” indicator is on.
Network Connection7
Page 15

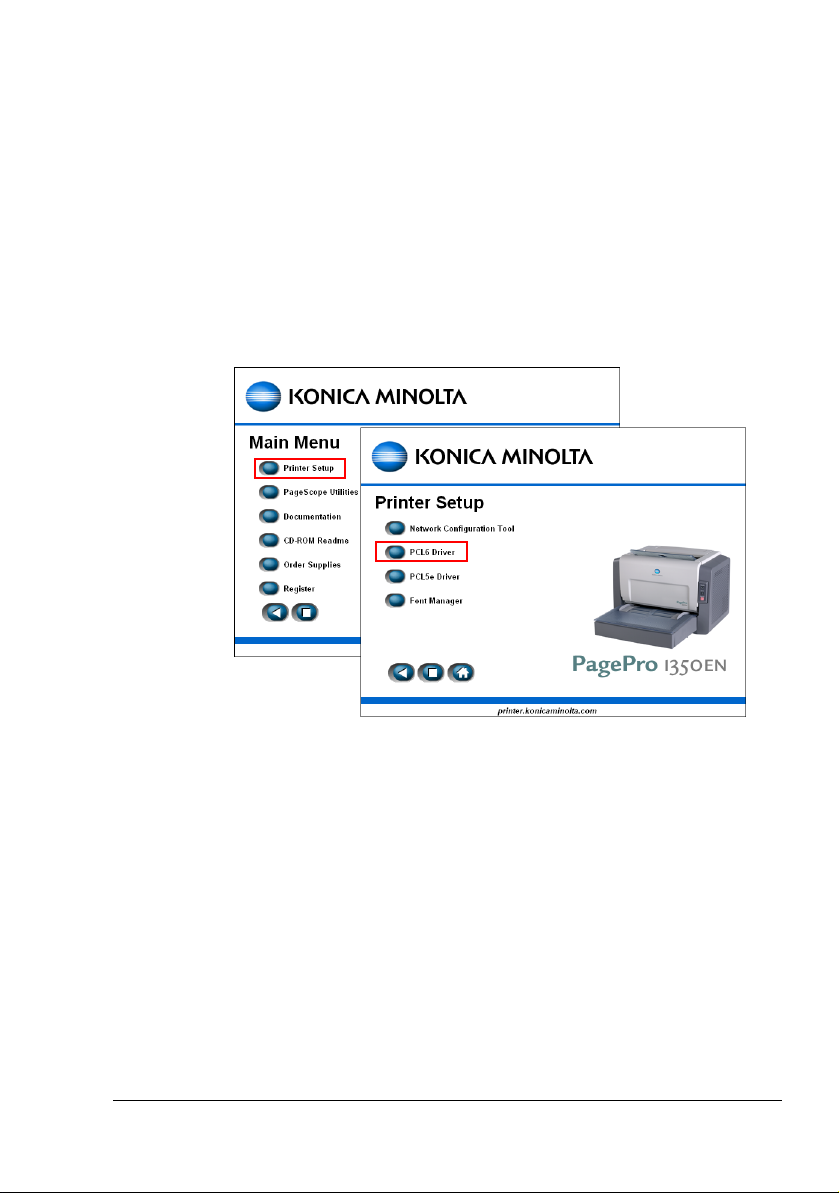
3 Insert the CD-ROM that shipped with your printer and from the CD-ROM
menus, select Printer Setup then Network Configuration Tool.
" During installation of the PCL6 Driver, New Printer Setup Wizard will
be run automatically by the PCL6 Setup program.
" If needed, you may also start New Printer Setup Wizard manually from
the CD-ROM directory \Install\English and run KMNPW.EXE.
4 Select a search method then choose Next.
Network Connection
8
Page 16
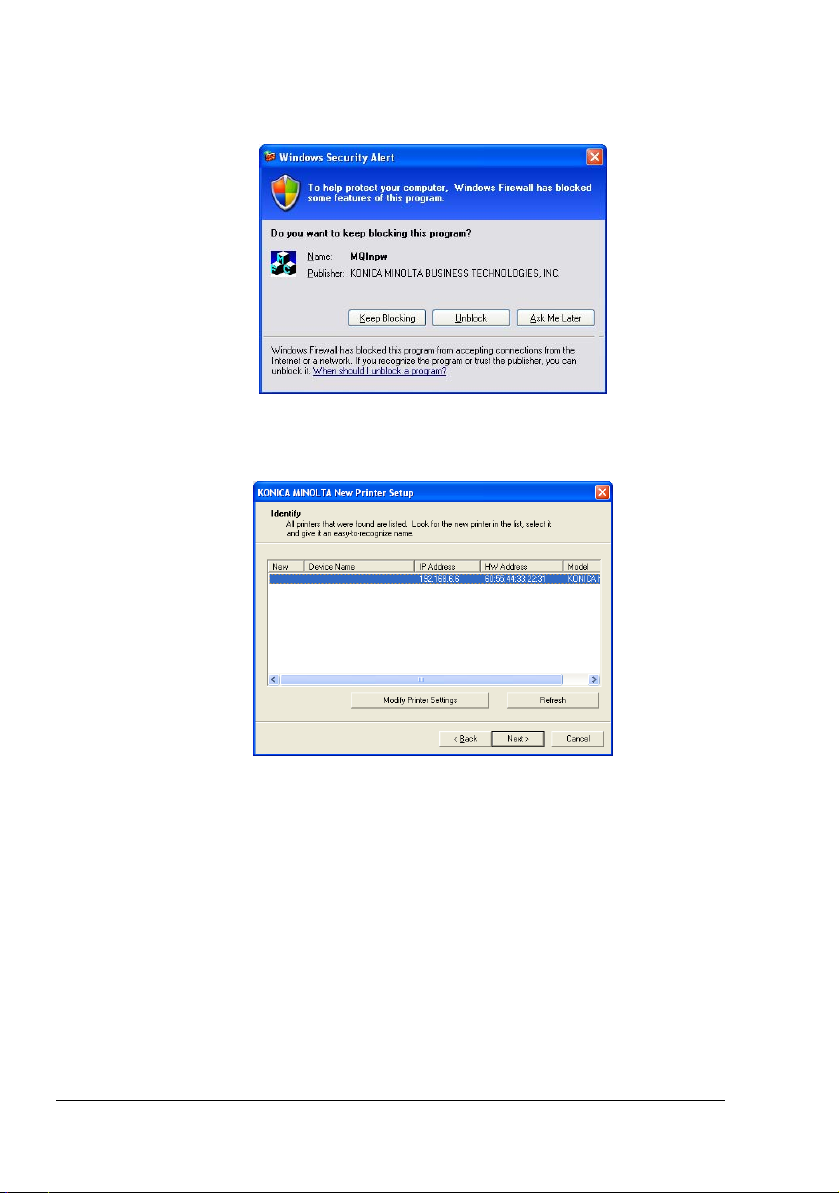
5 Windows XP Service Pack 2 only:
If a Windows Security Alert pops up, choose Unblock to allow the program to run.
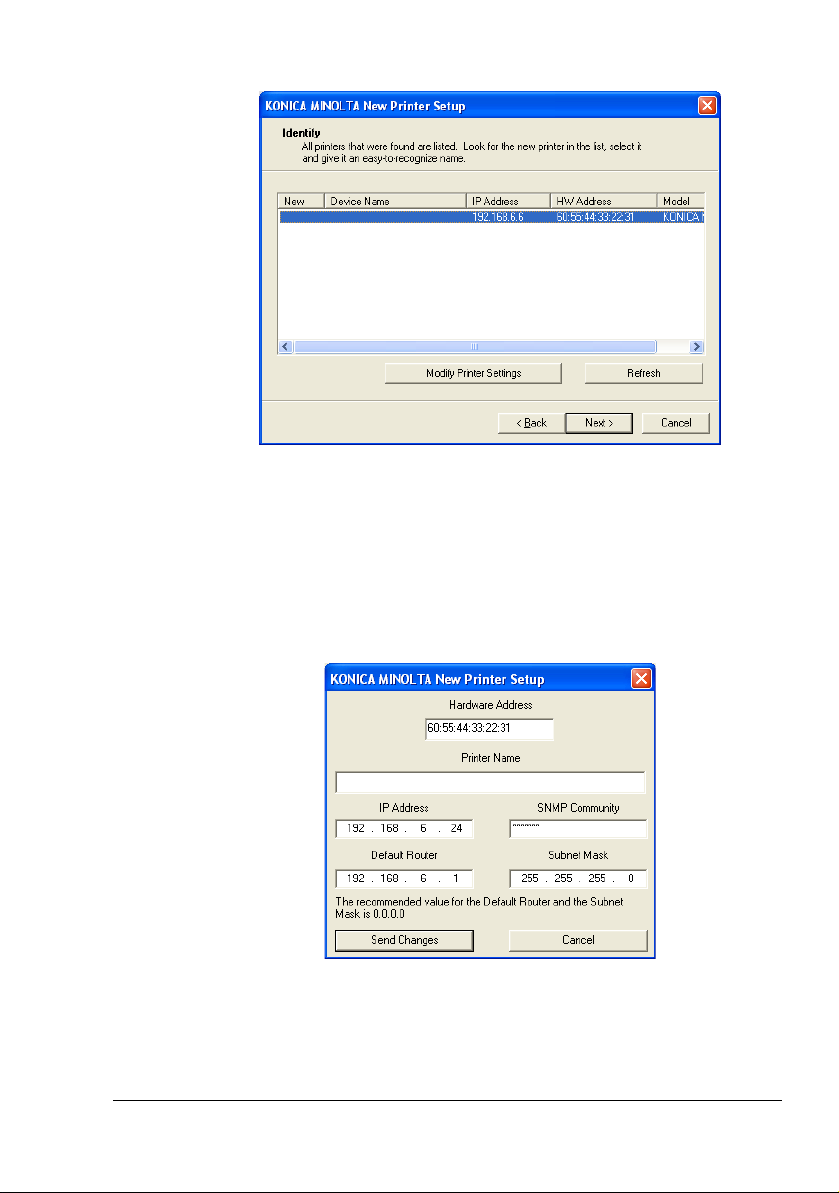
6 From the list of available KONICA MINOLTA printers, select your printer
then choose Modify Printer Settings.
Network Connection9
Page 17
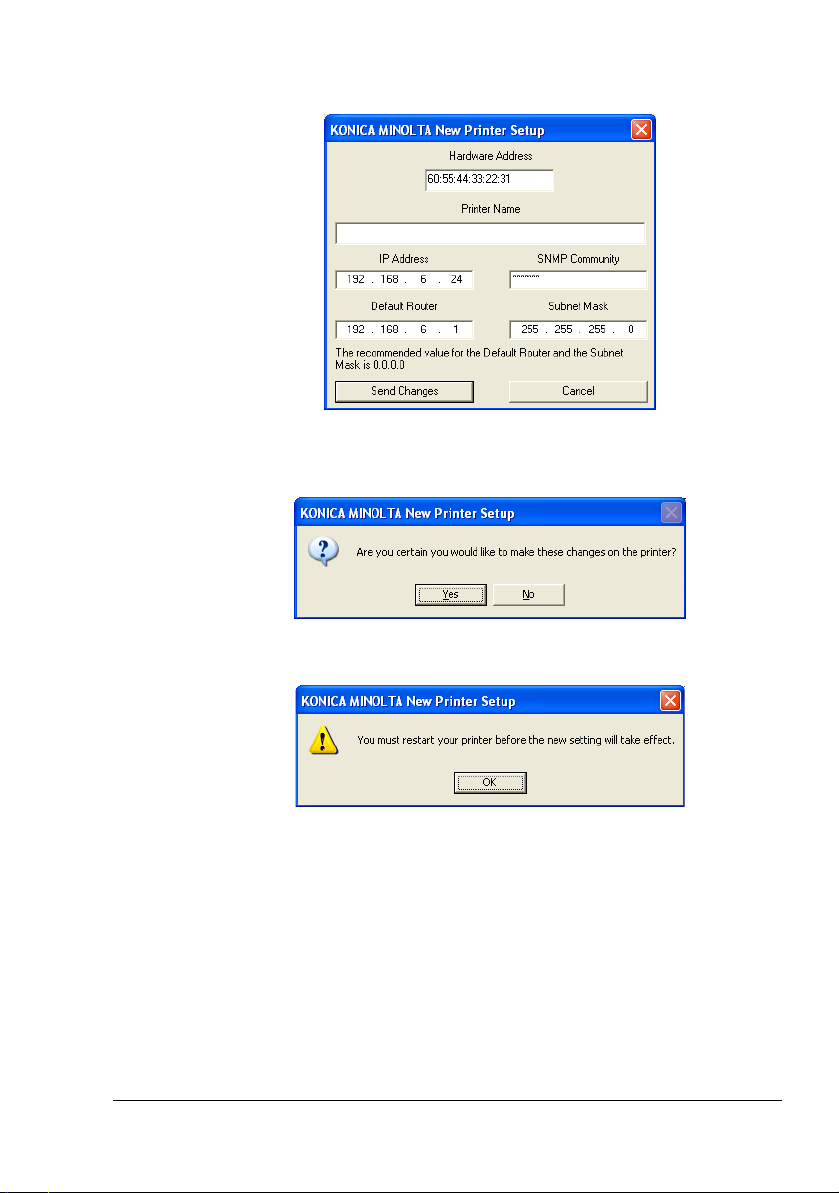
7 In the modify screen, enter the desired IP Address, Default Router and
Subnet Mask then choose Send Changes.
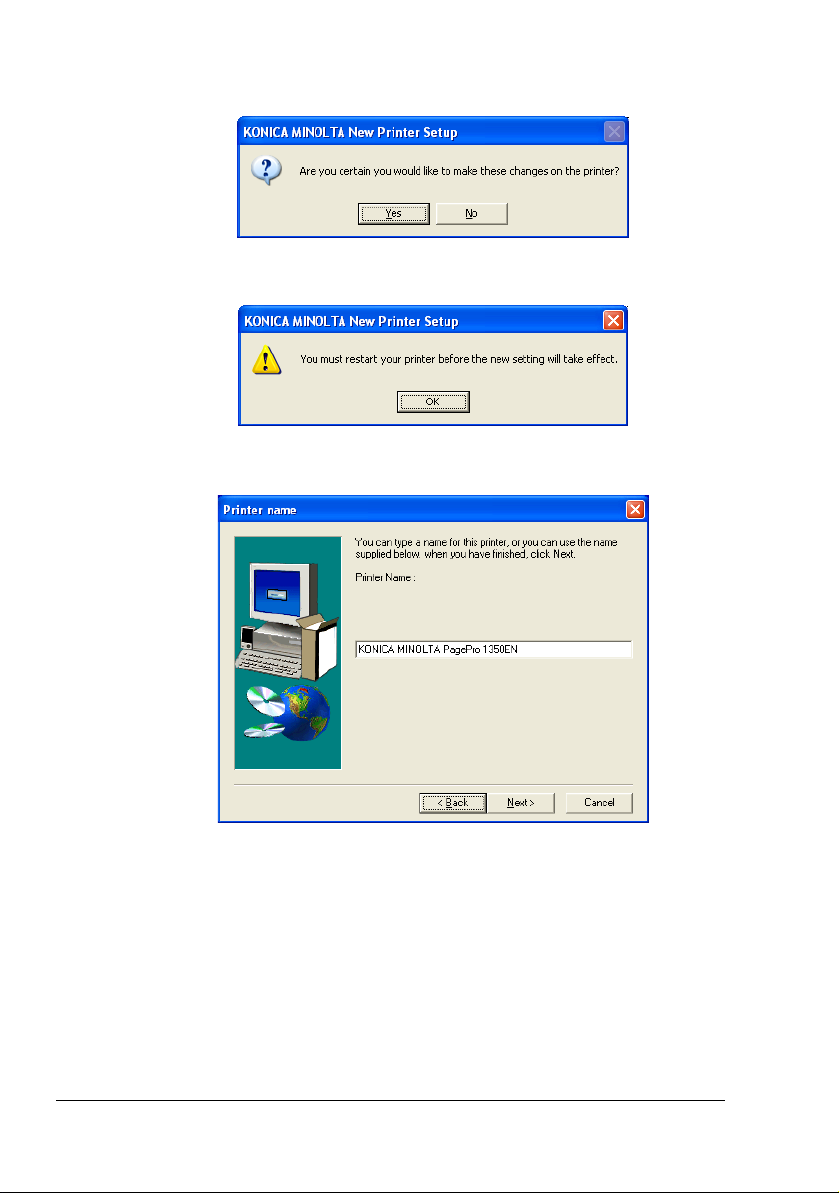
8 Confirm that you want to make these changes to the printer by choosing
Yes.
9 Make sure you restart your printer before continuing and choosing OK.
Using PageScope Web Connection
You may also manually change the printer's IP address, subnet mask, and
gateway by using PageScope Web Connection (See chapter 2, “Using PageScope Web Connection” for more information.)
Network Connection
10
Page 18
Using PageScope Network Setup
You may also manually change the printer's IP address, subnet mask, and
gateway by using PageScope Network Setup.
1 Connect your printer to the network.
When using an Ethernet cable, plug the RJ45 connector into the Ethernet
interface port of the printer.
2 Turn on your PC and printer.
Wait until the green “Ready” indicator is on.
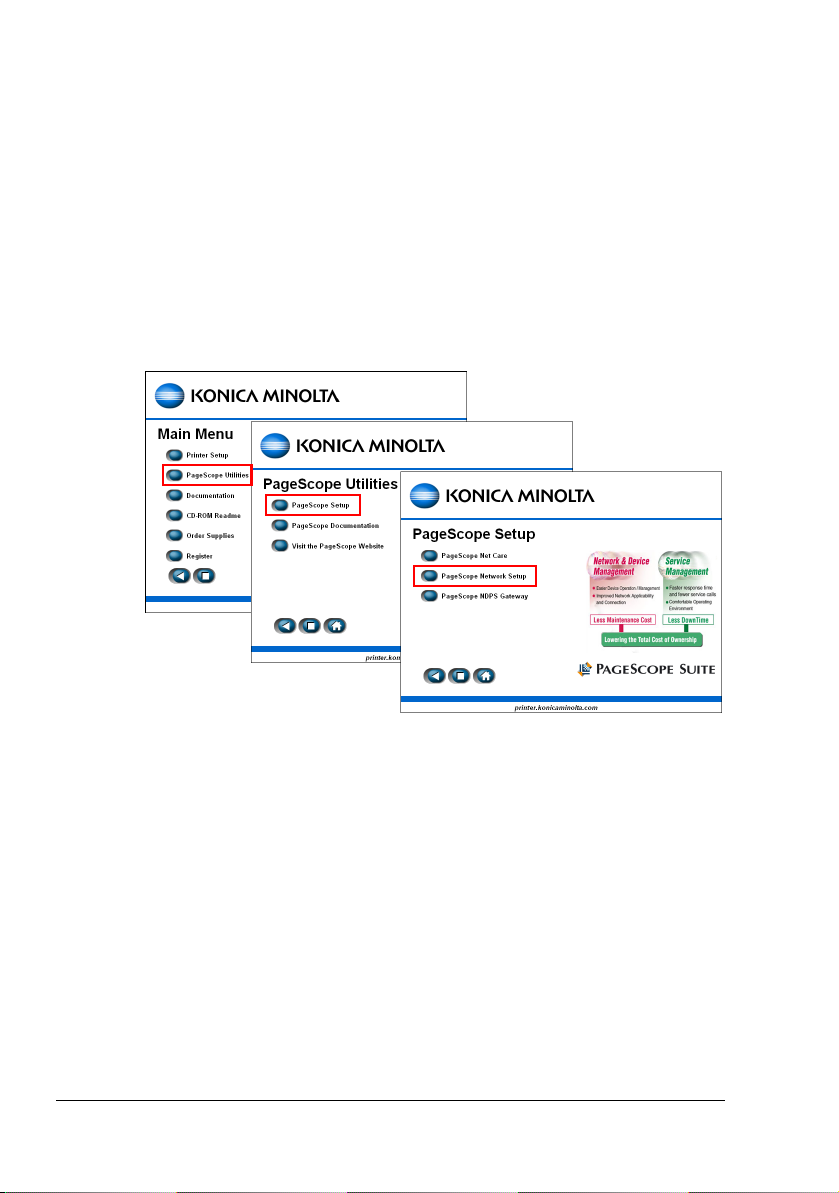
3 Insert the CD-ROM that shipped with your printer and install PageScope
Network Setup from the CD-ROM menus, by selecting PageScope Utili-
ties, PageScope Setup then PageScope Network Setup.
4 Once installed, start the PageScope Network Setup utility. (Click start,
select Program, KONICA MINOLTA, PageScope Network Setup then
PageScope Network Setup)
Network Connection11
Page 19
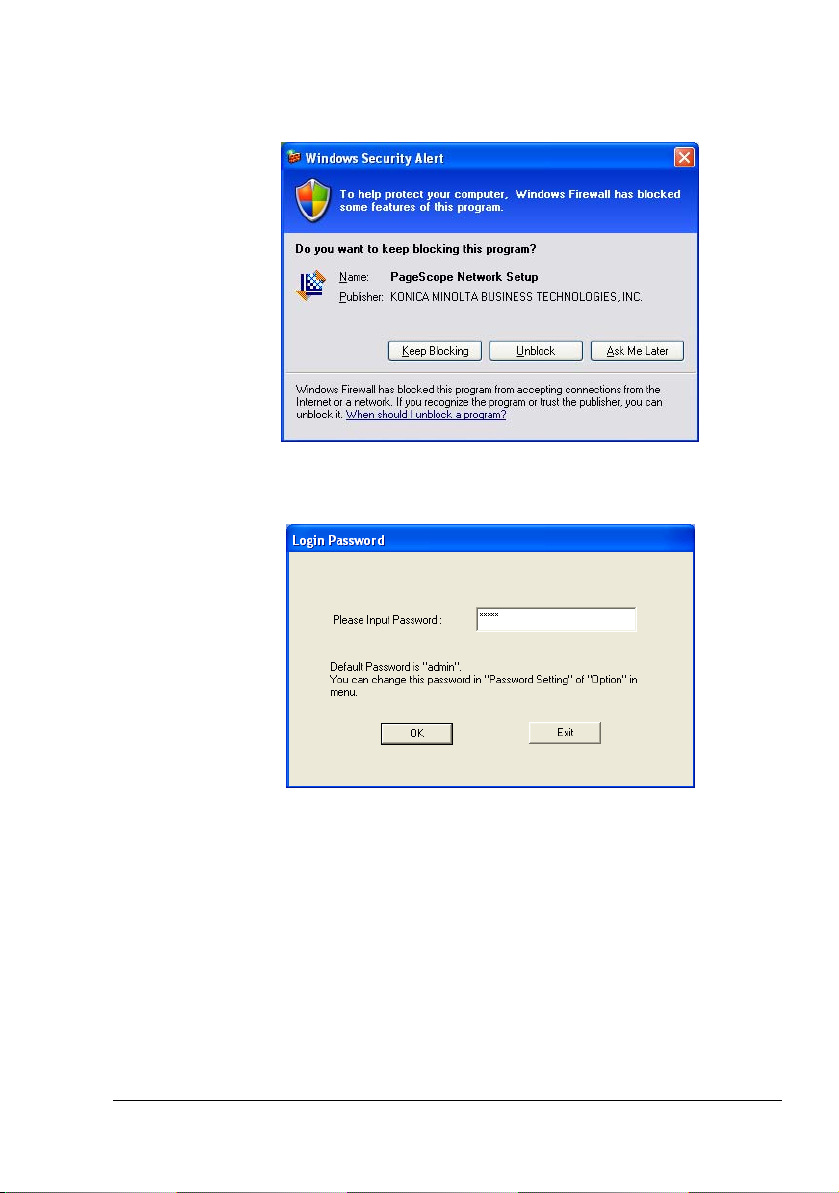
5 Windows XP Service Pack 2 only:
If a Windows Security Alert pops up, choose Unblock to allow the program to run.
6 The PageScope Network Setup Utility is password protected. Enter the
default password: admin then choose OK.
Network Connection
12
Page 20
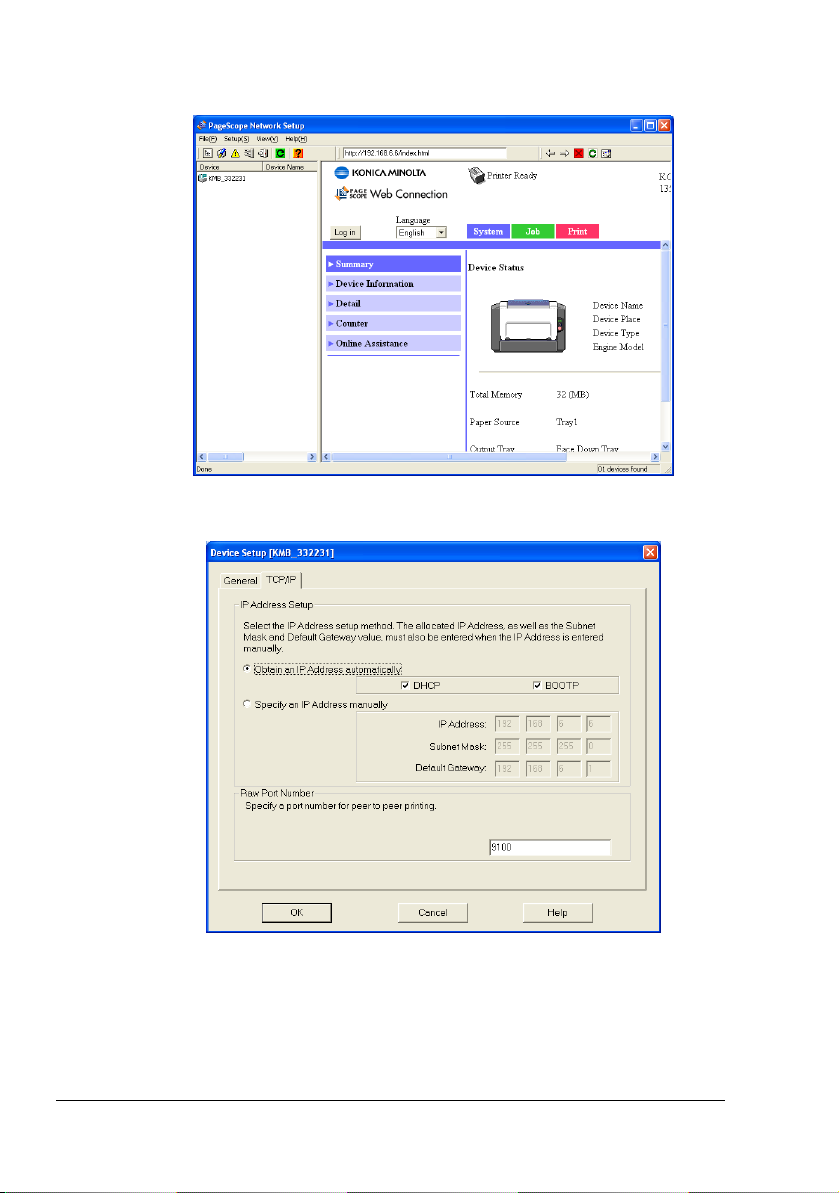
7 The PageScope Network Setup Utility will find and display all KONICA
MINOLTA printers on your network. Double-Click on your printer.
8 In the Device Setup screen, select the TCP/IP tab.
Network Connection13
Page 21
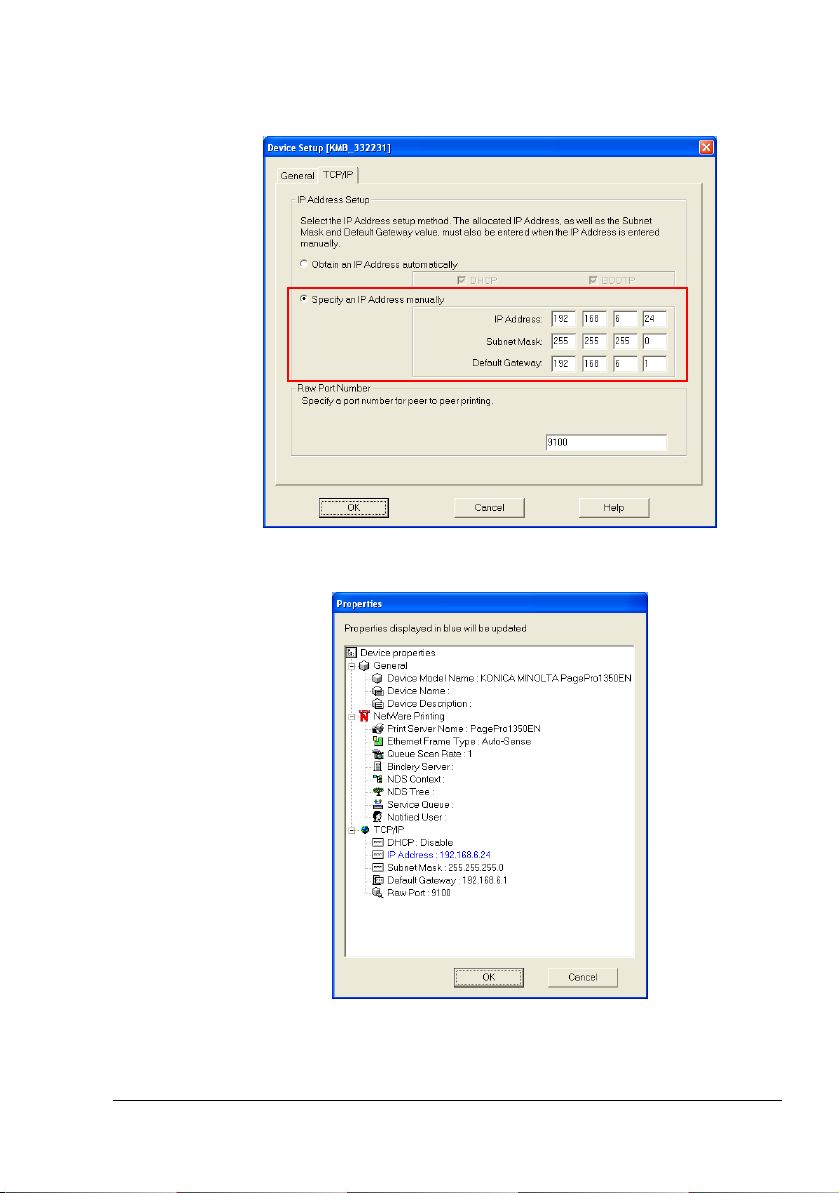
9 Select Specify an IP Address manually, enter the IP Address, Subnet
Mask and Default Gateway you wish to assign to the printer, then choose
OK.
10 Verify that the settings are correct then choose OK again.
Network Connection
14
Page 22
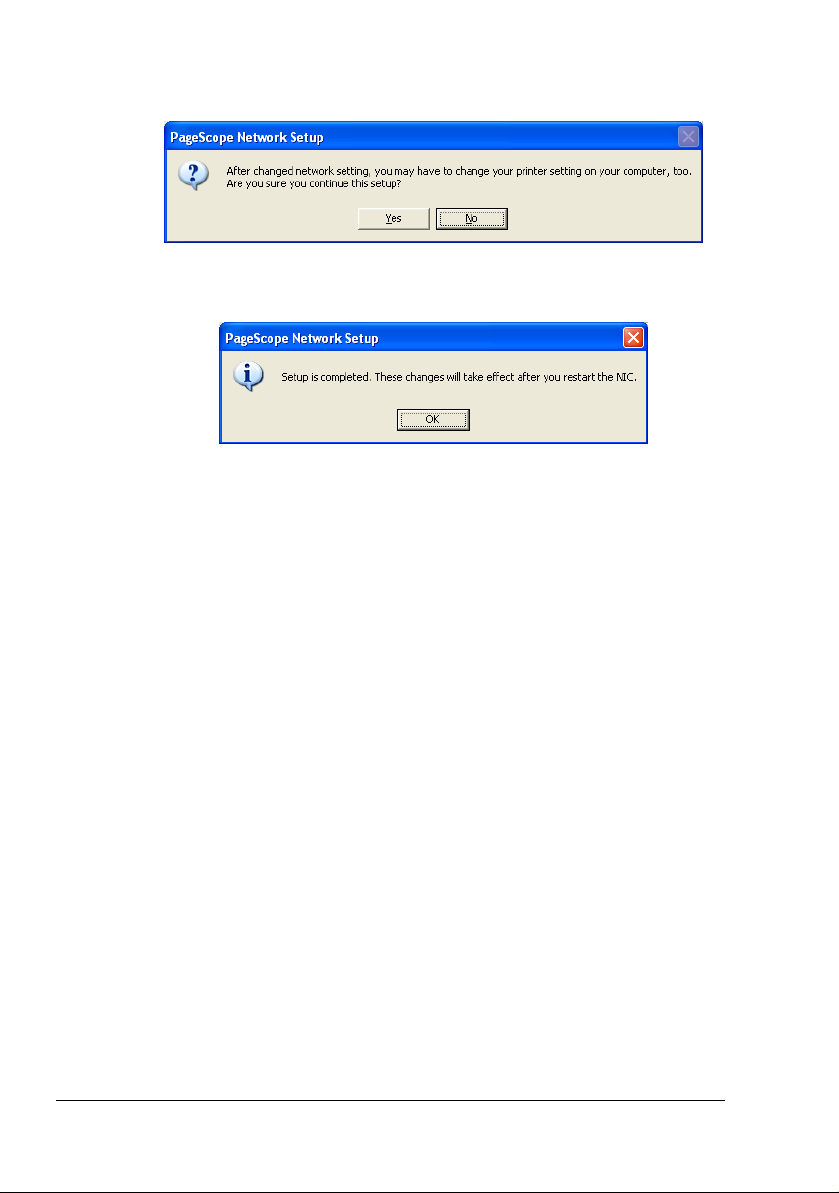
11 Confirm that you want to make these changes to the printer by choosing
Yes.
12 Make sure to restart your printer before continuing and choosing OK.
Network Connection15
Page 23
Installing the PCL6 Driver for a network printer
To install the PCL6 driver for your network printer, please follow these steps:
1 Connect your printer to the network.
When using an Ethernet cable, plug the RJ45 connector into the Ethernet
interface port of the printer.
2 Turn on your PC and printer.
Wait until the green “Ready” indicator is on.
3 Insert the CD-ROM that shipped with your printer and from the CD-ROM
menus, select Printer Setup then PCL6 Driver.
Installing the PCL6 Driver for a network printer
16
Page 24
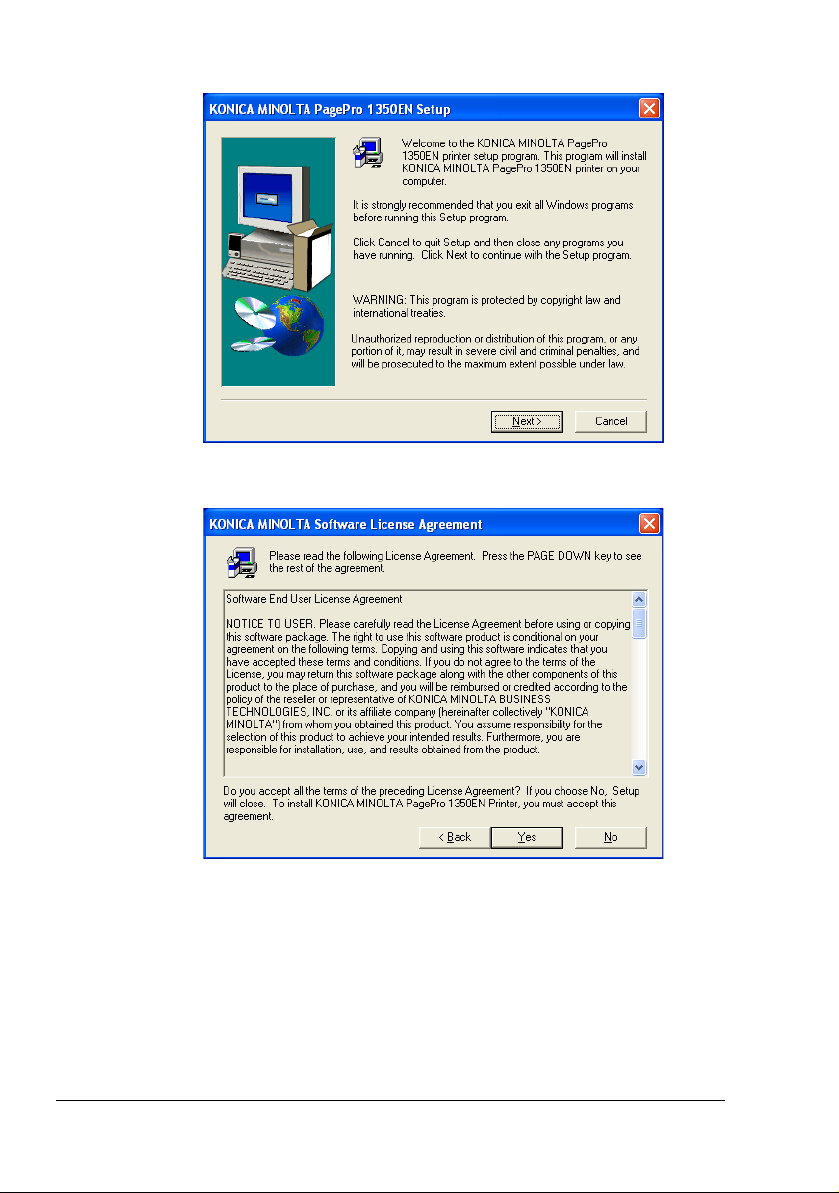
4 Choose Next on the Welcome screen.
5 Check the License Agreement then choose Yes to accept.
Installing the PCL6 Driver for a network printer17
Page 25
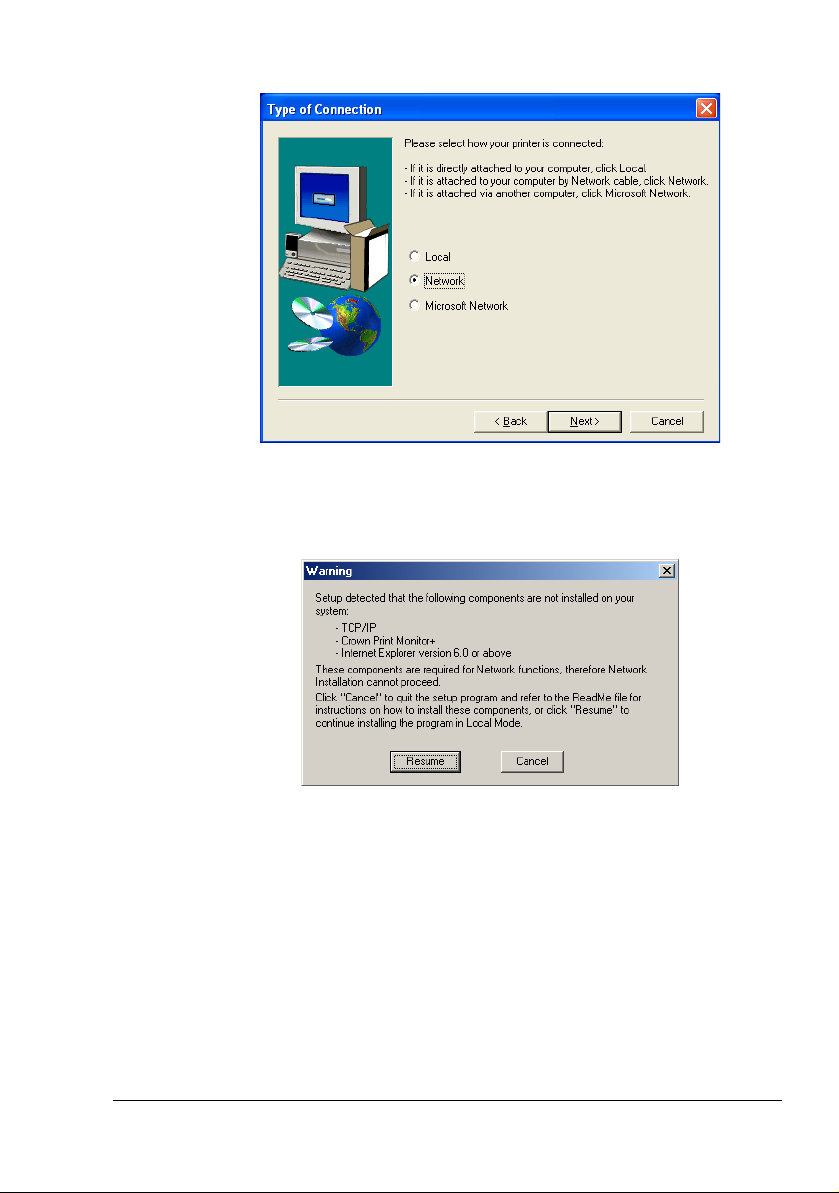
6 Select Network type of connection then choose Next.
" Before proceeding, Setup will check that all necessary network com-
ponents are installed on your computer. If it was not the case, you
would receive a warning message such as following:
In such a case, cancel the current installation and refer to the corresponding chapter in the “Installing missing network components” section. Once the missing component has been installed, you can resume
the PCL6 Driver Setup.
Installing the PCL6 Driver for a network printer
18
Page 26
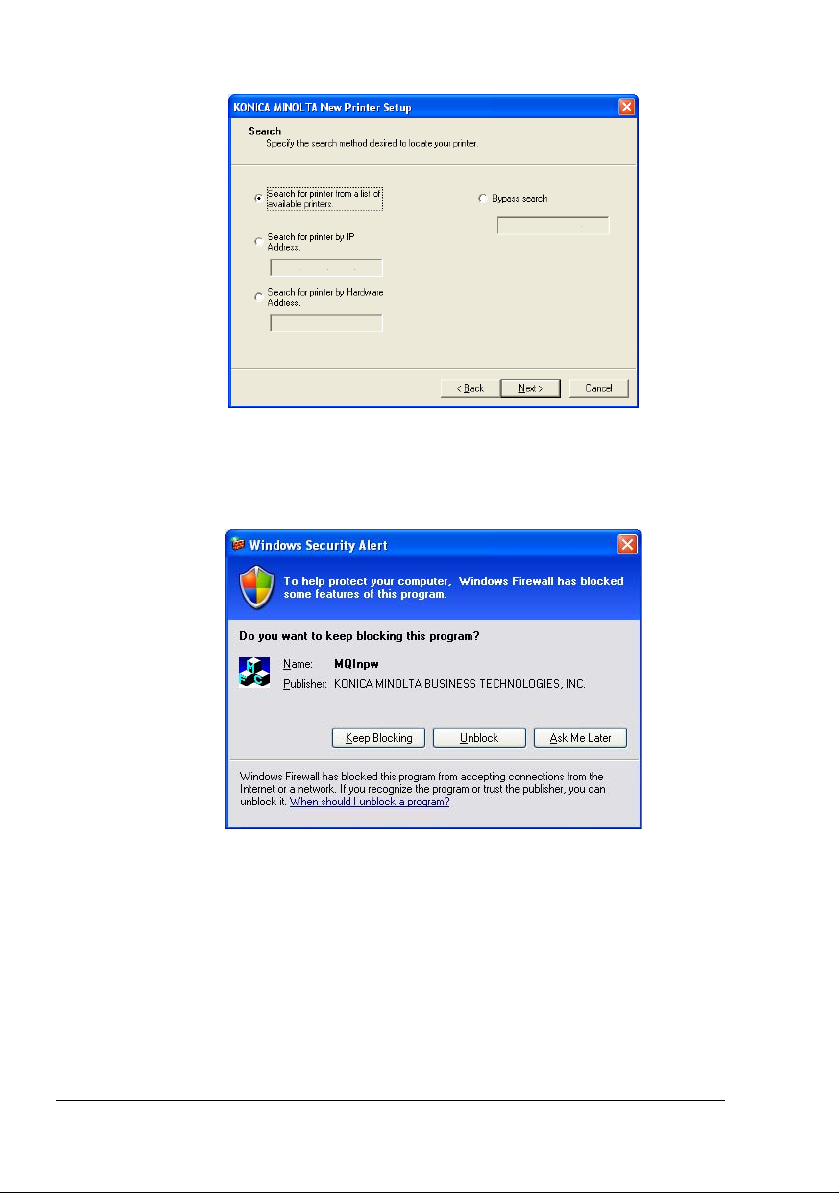
7 Select a search method then choose Next.
8 Windows XP Service Pack 2 only:
If a Windows Security Alert pops up, choose Unblock to allow the program to run.
Installing the PCL6 Driver for a network printer19
Page 27
9 Find your printer in the list of available KONICA MINOLTA printers.
10 Select your printer then check the IP address shown:
– If the IP address is already correct, choose Next and proceed directly
to step 14.
– If the IP address needs to be modified, choose Modify Printer Set-
tings and continue to step 11.
11 In the modify screen, enter the desired IP Address, Default Router and
Subnet Mask then choose Send Changes.
Installing the PCL6 Driver for a network printer
20
Page 28
12 Confirm that you want to make these changes to the printer by choosing
Yes.
13 Make sure you restart your printer before continuing and choosing OK.
14 Rename the printer if needed then choose Next.
Installing the PCL6 Driver for a network printer21
Page 29
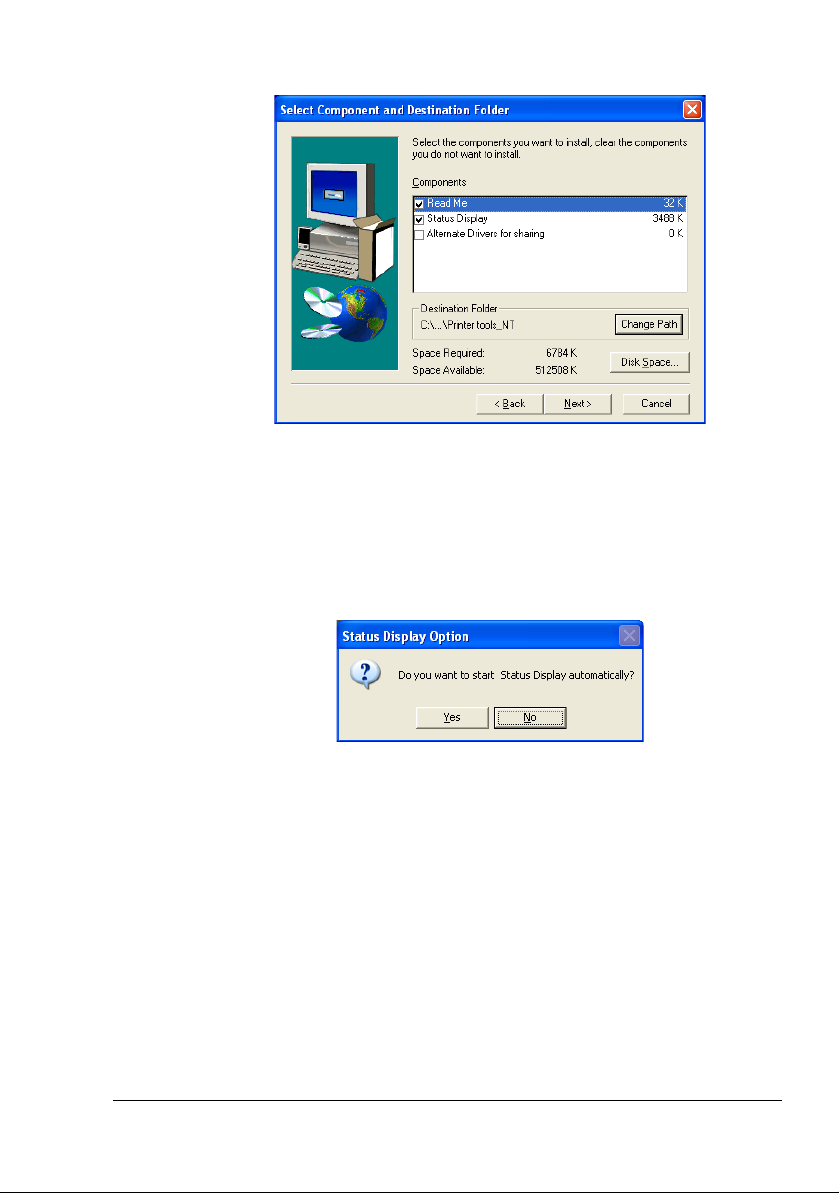
15 Choose which components you wish to install then choose Next.
" In case this printer driver will be shared with other users using a differ-
ent Operating system than yours, select Alternate Driver for sharing.
16 If you want the printer Status Display (utility monitoring the printer status)
to be started up automatically when you start up your PC, choose Yes in
the screen below. Otherwise choose No if you prefer to start up the Status
Display manually.
Installing the PCL6 Driver for a network printer
22
Page 30
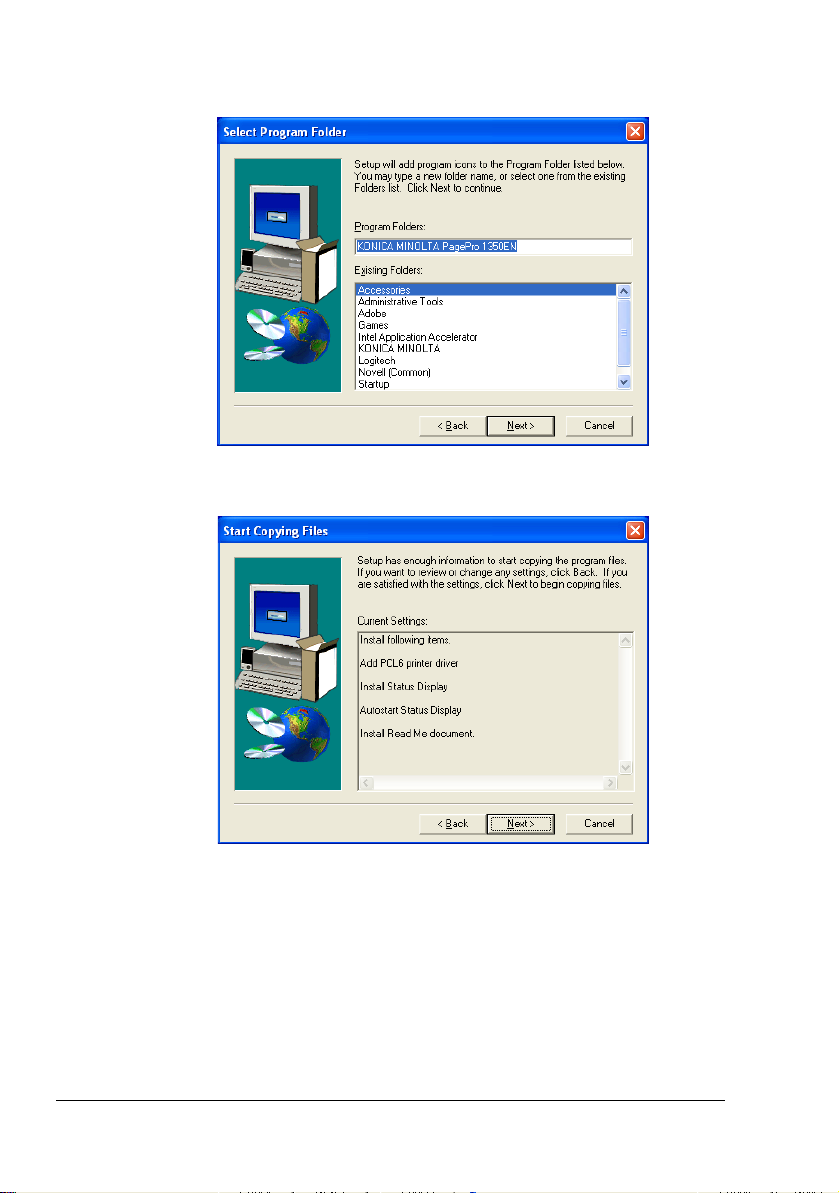
17 Choose in which Program Folder you want Setup to add the program
icons then choose Next.
18 Confirm the PCL6 driver Setup settings then choose Next.
Installing the PCL6 Driver for a network printer23
Page 31

19 Once installed, you must restart your computer.
Installing the PCL6 Driver for a network printer
24
Page 32

Installing missing network components
During installation the PCL6 Driver Setup will check that that all necessary
network components are installed on your computer. If it was not the case,
you would receive a warning message such as following:
In such a case, cancel the current installation and check the following sections for instructions on how to install the missing component. Once the missing component has been installed, you can resume the PCL6 Driver Setup.
Installing Internet Explorer 6.0 or above for Windows 9X, Windows NT4.0, or Windows Server 2003/XP/2000
If you receive a warning that Internet Explorer version 6.0 or above is not
installed while attempting a Network Installation of the printer, please first
install the latest version of Microsoft Internet Explorer as follows:
1 Cancel the PCL6 Driver Setup program.
2 Exit the CD-ROM Installer.
3 Download the latest version of Microsoft Internet Explorer from Microsoft
Website and install on your computer.
4 Once completed, resume the PCL6 Driver Setup.
" Please refer to Microsoft documentation for full instructions on how to
install Internet Explorer on your computer.
Installing TCP/IP for Windows 9X
If you receive a warning that TCP/IP is not installed while attempting a Network Installation of the printer, please first install TCP/IP as follows:
1 Cancel the PCL6 Driver Setup program.
2 Exit the CD-ROM Installer.
3 Insert Your Microsoft Windows 98/ME in your CD-ROM Station.
Installing missing network components25
Page 33

4 Click start, select Settings, then click Control Panel.
5 Select Network, then Configuration Tab.
6 Add TCP/IP with Add - Protocol - Microsoft - TCP/IP.
7 Once completed, resume the PCL6 Driver Setup.
" Please refer to Microsoft documentation for full instructions on how to
install TCP/IP on your computer.
Installing missing network components
26
Page 34

Installing Crown Print Monitor+ for Windows 9X
If you receive a warning that Crown Print Monitor+ is not installed while
attempting a Network Installation of the printer, please first install Crown Print
Monitor+ as follows:
1 Cancel the PCL6 Driver Setup program.
2 Exit the CD-ROM Installer.
3 Browse to the \Utilities\Crown Print Monitor directory of your CD-ROM
and run SETUP.EXE to proceed with the Crown Print Monitor+ installation.
4 You only need to install Crown Print Monitor+ and can cancel the Port cre-
ation, since this will be done by the PCL6 driver Setup.
5 Once completed, resume the PCL6 Driver Setup.
" Please refer to the Crown Print Monitor+ Administrator's Guide
located in the \manuals\english directory of your CD-ROM as printmon.pdf for full instructions on how to install Crown Print Monitor+ on
your computer.
Installing the TCP/IP Protocol for Windows NT 4.0
If you receive a warning that TCP/IP Protocol is not installed while attempting
a Network Installation of the printer, please first install TCP/IP Protocol as follows:
1 Cancel the PCL6 Driver Setup program.
2 Exit the CD-ROM Installer.
3 Insert your Microsoft Windows NT4 CD-ROM in your CD-ROM Station.
Installing missing network components27
Page 35

4 Right Click the Network Neighborhood on your desktop, select properties,
and click the Protocols tab.
5 Select the Add button, highlight TCP/IP Protocol and choose OK.
Installing missing network components
28
Page 36

6 If prompted by the system, specify the path to the I386 directory on your
Microsoft Windows NT4 CD-ROM and choose Continue.
7 If requested, restart your computer.
8 After your computer is restarted, resume the PCL6 Driver Setup.
" Please refer to Microsoft documentation for full instructions on how to
install TCP/IP protocol on your computer.
Installing the Microsoft TCP/IP Printing for Windows NT
4.0
If you receive a warning that Microsoft TCP/IP Printing is not installed while
attempting a Network Installation of the printer, please first install Microsoft
TCP/IP Printing as follows:
1 Cancel the PCL6 Driver Setup program.
2 Exit the CD-ROM Installer.
3 Insert your Microsoft Windows NT4 CD-ROM in your CD-ROM Station.
Installing missing network components29
Page 37

4 Right Click the Network Neighborhood on your desktop, select properties,
and click the Services tab.
5 Select the Add button, highlight Microsoft TCP/IP Printing and choose
OK.
Installing missing network components
30
Page 38

6 If prompted by the system, specify the path to the I386 directory on your
Microsoft Windows NT4 CD-ROM and choose Continue.
7 Once installation is completed, verify that the Microsoft TCP/IP Printing
service has been added in the list of installed services.
8 If requested, restart your computer.
9 After your computer is restarted, resume the PCL6 Driver Setup.
" Please refer to Microsoft documentation for full instructions on how to
install TCP/IP Printing on your computer.
Installing missing network components31
Page 39

Printing via IPP (Internet Printing Protocol) – Windows
Server 2003/XP/2000
Adding an IPP Port using Add Printer Wizard
For Windows Server 2003/XP: Click start, select Printers and Faxes,
and then click Add a Printer.
For Windows 2000: Click Start, point to Settings, click Printers, and then
click Add Printer.
1 In the second dialog box select the Network Printer (for Windows Server
2003/XP: A network printer, or a printer attached to another com-
puter) radio button and then choose Next.
Windows Server 2003/XP
Windows 2000
2 In the URL field in the next dialog box enter the printer’s network path-
name in one of the following formats and then choose Next:
http://ipaddress/ipp
http://ipaddress:80/ipp
http://ipaddress:631/ipp
" Port 631 is not supported by Windows 2000.
Windows Server 2003/XP
Windows 2000
Installing missing network components
32
Page 40

Windows Server 2003/XP—“Windows cannot connect to the printer.
Either the printer name was typed incorrectly, or the specified printer
has lost its connection to the server. For more information, click Help.”
Windows 2000—“Could not connect to the printer. You either entered
a printer name that was incorrect or the specified printer is no longer
connected to the server. Click Help for more information.”
3 Windows Server 2003/XP—Go to step 4.
Windows 2000—If you entered a valid path in the previous step, the following message displays: “The server on which the KONICA MINOLTA
PagePro 1350EN printer resides does not have the correct printer driver
installed. If you want to install the driver on your local computer, click OK.”
The reason for this is that you do not yet have a printer driver installed.
Choose OK.
4 Choose Have Disk, locate the directory
on the CD-ROM where the printer driver
files are located (for example, Drivers\W2K-XP\PCL6\PNP\english), and
then choose OK.
5 Finish installing the printer driver.
Installing missing network components33
Page 41

Resetting the printer to factory defaults
If the printer was manually configured to an invalid IP address, or moved to a
different network, and communication cannot be established anymore, you
might have to reset it to factory settings to re-enable DHCP/BOOTP automatic protocols. In such a case, please follow these steps:
1 Turn on your printer.
When the green “Ready” indicator is on, reset the printer to factory
default.
2 Make sure that
– the orange “Error” indicator is off.
– the green “Ready” indicator is on (but not blinking).
3 Press the cancel button for more than 20 seconds, until:
– the orange “Error” indicator and the green “Ready” indicator are slowly
blinking alternately (about 1 blink per second).
4 Press the cancel button one more time.
– the green “Ready” indicator blinks for a few seconds, then stops blink-
ing and remains on.
5 Restart the printer to use the new (factory) settings.
Resetting the printer to factory defaults
34
Page 42

Troubleshooting
Symptom Action
The printer cannot be
located on the network
PCL6 Driver Setup shows
a warning that some network components are
missing
“Network” option is disabled (Grayed-out) in the
Type of Connection screen
of the PCL6 Driver Setup.
Some client functions are
not available with the Point
and Print feature when the
server is running Windows
XP/Server 2003/2000 and
the client computer is running Windows NT 4.0.
Check the DHCP settings, as described in
“Using DHCP/BOOTP section”
Install the missing component(s), as
described in the “Install missing network components” section.
Go back one step in the PCL6 Driver Setup,
then Next again, and check carefully the
Warning screen that appears. If you choose
to resume without installing the missing network components, the PCL6 Driver Setup will
continue in Local mode only.
Install the printer driver directly on the client
computer.
Troubleshooting35
Page 43

Using PageScope
Web Connection
Page 44

About PageScope Web Connection
This chapter provides information on
PageScope Web Connection, an
HTTP (HyperText Transfer Protocol)-based web page that resides in
your printer and that you can access
using your Web browser.
This page gives you instant access to
printer status and the most frequently
used printer configuration options.
Anyone on your network can access
the printer using their web browser
software. In addition, with the proper
password, you can change the configuration of the printer.
" Users who are not given passwords by the administrator can still view
the configuration settings and options but are not able to save or apply
changes.
Display Language
The language can be selected from the Language drop-down list in PageScope Web Connection.
Requirements
To use PageScope Web Connection, the following is required:
Windows Server 2003/XP/2000/Me/98SE/NT4.0
Microsoft Internet Explorer version 5.5 or later
Netscape Navigator version 7.1 or later
" You do not need an Internet connection.
TCP/IP communication software (used by PageScope Web Connection)
installed on your PC
A network, to which both your PC and the printer are connected
" You cannot access PageScope Web Connection using a local
(USB or Parallel) connection. If your PC and printer are connected
via a USB or a Parallel cable, use the Status Display.
About PageScope Web Connection37
Page 45

Setting Up the Printer Web Page
Setting up the printer web page to run on your network involves two basic
steps:
Determining the name or address of your printer
Setting up the “no proxy” preferences in your browser software
Determining the Printer Name
The printer web page can be accessed in two ways:
" The printer names can also be determined via WINS if the network
supports it.
Through the assigned name of the printer—This name comes from the IP
host table (the filename is hosts) on the computer system and is usually
assigned by the system administrator (for example, PagePro 1350EN). It
may be more convenient for you to use the printer name than the IP
address.
Location of the Host Table on the PC
z Windows Server 2003/XP \windows\system32\drivers\etc\hosts
z Windows Me/98SE \windows\hosts
z Windows 2000/NT4.0 \winnt\system32\drivers\etc\hosts
Through the printer’s IP address—The IP address of your printer is a
unique number and, therefore, may be the preferred identification to enter,
especially if you have more printers active in your network. The printer’s
IP address is listed on the configuration page.
For deatails on ptinting a configuration page, refer to “Using DHCP/
BOOTP” on page 6.
Setting Up Your Browser Software
Since your printer resides on your intranet and is not accessible beyond the
firewall of your network, you must set up the proper “preferences” in your
browser software. Your printer name or IP address must be added to the “no
proxy” list in the preferences dialog box of the browser.
" You need to do this procedure only once.
The sample screens below may be different from yours depending on software versions and operating systems in use.
Setting Up the Printer Web Page
38
Page 46

" Our examples represent the IP address of the printer with:
xxx.xxx.xxx.xxx. Always enter your printer's IP address without leading zeros. For example, 192.168.001.002 should be entered as
192.168.1.2.
Internet Explorer (version 6.0 for Windows)
1 Start Internet Explorer.
2 From the Tool s menu
choose Internet Options.
3 Select the Connections tab
on the dialog box.
4 Choose the LAN Settings
button to display the Local
Area Network (LAN) Settings dialog box.
5 Select Advanced in Proxy
server to open the Proxy Settings dialog box.
6 In the Exceptions text box,
type a comma after the last
entry and then type the
printer name or the IP
address of your printer.
7 Choose OK three times to return to the main browser window.
8 Enter the printer’s IP address in the URL Address box to access the
printer home page.
Setting Up the Printer Web Page39
Page 47

Netscape Navigator (version 7.1)
1 Start Netscape Navigator.
2 From the Edit menu choose
Preferences.
3 Select the
Advanced/Proxies
directory from the left pane
of the dialog box.
4 Select the Manual Proxy
Configuration radio
button.
5 In the No Proxy for: text
box, type a comma after the
last entry, and then type the printer name or the IP address of your printer.
6 Choose OK to return to the main browser window.
7 Enter the printer name or IP address in the URL Location box to access
the printer home page.
http://192.168.1.2/
Setting Up the Printer Web Page
40
Page 48

Understanding the PageScope Web
V
Connection Window
The illustration below identifies the navigation and configuration areas of the
windows that you see in PageScope Web Connection windows.
Link to
KONICA MINOLTA
web site
ersion information
Access to
Administrator
Mode
Display
language list
Links to subtopics
Current status
Links to main
topics
Printer name
Configuration area
Navigation
Selecting the main topic and subtopic displays the configuration area for the
printer options (parameters) associated with your selections.
To change a current setting, click on the current setting and then select from
the available choices or enter the new value.
" In order to apply or save any changes made to the configuration set-
tings, PageScope Web Connection must be logged in from Administrator Mode. (For details, refer to “Administrator Mode” on page 42.)
Understanding the PageScope Web Connection41
Page 49

Current Status
The current status of the printer is displayed at the top of all PageScope Web
Connection windows. The icon displays the type of status being displayed.
Icon Status Description Examples
Ready The printer is online
and either ready to
print or printing.
Ready
Warming up
Printing
Warning The printer needs
attention, but
printing continues.
Error The printer needs
attention before
printing can resume.
Fatal The printer must be
rebooted. If that
doesn’t fix the error,
service is required.
Power Save
Cover Open
Fatal Error XX
User Mode
You automatically enter User Mode whenever you enter PageScope Web
Connection. In User Mode you can view configuration settings but not change
them.
Administrator Mode
In order to change any configuration settings through PageScope Web Connection, you must first enter Administrator Mode:
1 Choose the Log in button.
Understanding the PageScope Web Connection Window
42
Page 50

2 Type the password in the Admin Password text box.
" Default password isn’t set; however, once you have logged on in
Administrator Mode, the password can be specified in the System/
Admin Password window.
3 Choose the Log in button.
If you type an incorrect password, the following message displays:
“Invalid Password Please check your input and try again !” Retype the
password.
43
Understanding the PageScope Web Connection Window
Page 51

Viewing Printer Status
System Page
The System page is the starting point for all access to the printer’s internal
web pages. On this page you find printer status and current configuration settings, printer identification, and links to all other web pages.
Printer status
Printer name
" All of the information displayed on the System page is read only.
Viewing Printer Status
44
Page 52

Summary (shown previous)
The System/Summary window provides the following information.
Item Description
Printer name/status Shows the name assigned to your printer, and dis-
plays the current status of the printer—just as it’s
displayed on the printer’s Status Display message
window.
" The “Status Display” application allows you to
remotely identify possible printer problems,
such as out of paper and out of toner.
Device Status (Product
image)
Total Memory Displays the amount of memory installed in the
Paper Source Identifies the media tray.
Output Tray Identifies the output tray.
Network Lists the installed printer interface (Ethernet 10
Identifies the type of printer that you are browsing.
The printer is pictured in the illustration.
printer.
BaseT/100Base TX).
Viewing Printer Status45
Page 53

Device Information
The System/Device Information window provides the following information.
Item Description
Controller Firmware Identifies the controller firmware version.
Printer
Language
Country Identifies the country specifications of the printer.
Administrator Name Identifies the name of the administrator of the
Identifies the display language for the PageScope
Web Connection and Internal Pages.
printer.
Viewing Printer Status
46
Page 54

Detail
Paper Source
The System/Detail/Paper Source window provides the following information.
Item Description
Paper Source Identifies Tray1 and the manual feed tray embedded
in the printer.
Paper Size Indicates the size of media loaded in a specific tray.
Media Type Indicates the type of media loaded in a specific tray.
Paper Indicates the status (“Ready” or “Empty”) for each
tray.
Detail button Displays detailed information about the media trays.
Viewing Printer Status47
Page 55

Paper Source (Detail)
The System/Detail/Paper Source/Detail window provides the following
information.
Item Description
Paper Source Displays the names of the media trays.
Setting Displays the setting of the media tray.
Paper Size Displays the media sizes.
Media Type Displays the media types.
Capacity Displays the maximum capacity for each media tray.
Paper Displays the amount of media remaining.
Back button Returns to the previous screen.
Viewing Printer Status
48
Page 56

Output Tray
The System/Detail/Output Tray window provides the following information.
Item Description
Tray Displays the names of the output tray.
Viewing Printer Status49
Page 57

Interface Information
The System/Detail/Interface Information window provides the following
information.
Item Description
Protocol
Information
TCP/IP Displays the setting of TCP/IP.
IPP If Enable is displayed, IPP is enabled.
If Disable is selected, IPP is disabled.
NetWare If Enable is displayed, NetWare is
enabled.
If Disable is selected, NetWare is disabled.
SNMP If Enable is displayed, SNMP is enabled.
If Disabled is selected, SNMP is disabled.
FTP If Enable is displayed, FTP is enabled.
If Disable is selected, FTP is disabled.
Viewing Printer Status
50
Page 58

Item Description
Network
Information
Type Identifies the type of network interface
installed on the printer (Ethernet
10Base-T/100Base-TX/1000Base-T).
Ethernet Speed Indicates the transmission speed for the
network and the transmission method for
bi-directional transmission.
IP Address Identifies the IP (Internet Protocol)
address of the Ethernet interface.
MAC Address Identifies the Media Access Control
(MAC) address of the Ethernet interface.
Host Name Identifies the host name for the printer.
Print Server
Name (NetWare)
Identifies the Print Server Name for the
NetWare.
Viewing Printer Status51
Page 59

Consumables
The System/Details/Consumables window provides the following information:
Item Description
Consumables Identifies the type of consumable that is being moni-
tored.
Status Indicates the remaining life of the consumables.
Capacity Displays the maximum capacity of the consum-
Viewing Printer Status
Toner Cartridge: Percentage
ables.
52
Page 60

Counter
The System/Counter window provides the following information:
Item Description
Total Counter This counter indicates the number of pages that
have been printed throughout the entire lifetime of
the printer.
Tray 1 Counter This counter indicates the number of pages that
have been fed from Tray1.
Manual Feed Counter This counter indicates the number of pages that
have been fed manually.
Toner Counter This counter indicates the number of pages that
have been printed using the currently installed toner
cartridge.
Viewing Printer Status53
Page 61

Online Assistance
The System/Online Assistance window provides the following information:
Item Description
Contact Displays the organization that provides assistance
with the printer.
Contact Information Displays the web address for assistance.
Product Help URL Displays the web address for assistance.
Corporate URL Displays the KONICA MINOLTA web address.
Supplies and
Accessories
Contact Phone
Number
Contact Address Displays the e-mail address for support.
Contact Utility Link Displays a link to the Printer Management Utilities.
Displays the web address where you can order
printer supplies and accessories.
Displays the telephone number of the printer
administrator.
Viewing Printer Status
54
Page 62

Job Page
This page allows you to view the status of current print jobs.
Active Job List (shown above)
The Job/Active Job List window provides the following information of the
current job:
Item Description
Job Number Displays the print job identification number. Each
print job that the printer receives is assigned a
unique identification number.
User Name If known, displays the owner of the print job.
File Name Displays the name of the print file.
Job Status Displays the current status of the print job (Printing,
Cancel).
Create Time Displays the time that the job was queued.
Delete button Deletes the print job(s) whose check boxes the left
end are checked.
Viewing Printer Status55
Page 63

Done Job List
The Job/Done Job List window provides the following information for up to
49 print jobs:
Item Description
Job Number Displays the print job identification number. Each
print job that the printer receives is assigned a
Number unique identification number.
User Name If known, displays the owner of the print job.
File Name Displays the name of the print file.
End Time Displays the time that printing finished.
Result Displays the result of the print job (OK, Error, or
Cancelled).
Detail button Displays a screen containing details.
Viewing Printer Status
56
Page 64

Done Job List (Detail)
The Job/Done Job List/Detail window provides the following information for
the selected job:
Item Description
Job Number Displays the print job identification number. Each
print job that the printer receives is assigned a Number unique identification number.
User Name If known, displays the owner of the print job.
File Name Displays the name of the print file.
Delivery Type Displays the delivery method for the job.
Create Time Displays the time that the job was queued.
End Time Displays the time that printing finished.
Result Displays the result of the print job (OK, Error, or
Cancelled).
Back button Returns to the previous screen.
Viewing Printer Status57
Page 65

Print Page
This page allows you to check the settings for printing when there is no driver
used and default setting of the printer are used.
Default Settings
General Settings (shown above)
The Print/Default Settings/General Settings window provides the following
information.
Item Description
Personality Indicates default printer language to be selected.
Paper Source The media tray that is normally used is indicated.
Output Tray Displays the name of the output tray.
Copies Indicates the default setting for number of copies to
Paper Size Indicates the default setting for the size of paper.
Media Type Indicates the default setting for the type of paper.
Unit The units for specifying the size of custom paper is
Viewing Printer Status
be printed.
indicated between inches and millimeters.
58
Page 66

Paper Source Settings
The Print/Default Settings/Paper Source Settings window provides the following information.
Item Description
Tray1 Paper Size Indicates the setting for the size of paper
loaded into media tray. The Width and
Length settings appear if Paper Size is
set to CUSTOM.
Media Type Indicates the setting for the type of media
loaded into Tray.
General Paper Time
Out
Detect Size
Error
If Proceed is indicated, the printer will
proceed with the job using paper from the
specified source.
If Clear is indicated, the printer will cancel
the current print job.
If None is indicated, the printer will do
nothing and will wait until paper is fed
manually or until it receives a command to
cancel the current print job. Printing
resumes when the Cancel Button on the
printer’s control panel is pressed.
If On is indicated, the printer will detect
size errors.
If Off is indicated, paper size error detection is turned off.
Viewing Printer Status59
Page 67

PCL Settings
The Print/Default Settings/PCL Settings window provides the following
information.
Item Description
Font Index Displays the default font in the PCL language.
Symbol Set Displays the symbol set used with the PCL lan-
guage.
Line/Page Indicates how many lines are in a page in PCL lan-
guage.
Font Point Size Displays the font size in the PCL language.
Font Pitch Size Displays the font pitch in the PCL language.
CR/LF Mapping Indicates CR/LF code definition in PCL language.
Courier Type Displays the Courier type.
Viewing Printer Status
60
Page 68

Print Quality Settings
The Print/Default Settings/Print Quality Settings window provides the following information.
Item Description
Resolution Displays the printing resolution.
Fine-Art If Off is indicated, the Fine Art option, which can enhance
the print quality of images that include halftoning and
screen patterns, is turned off.
If Light is indicated, the edges of line art and text appear
smoother because fewer dots are used.
Medium is the default setting, which should be suitable for
most printing needs. Select a different setting only if text
and graphics appear too dark or too light when Medium is
selected.
If Dark is selected, the edges of line art and text appear
smoother because more dots are used.
Toner Save With this option, the printer conserves toner while printing.
This will prolong the life of the toner cartridge.
Less toner is consumed when Toner Save is set to On;
however, image quality is reduced.
If Off is indicated, the Toner Save function is turned off.
If On is indicated, the Toner Save function is turned on.
Toner Density Displays the setting for the toner density during printing.
With a darker setting, toner can be used up relatively
quickly.
Viewing Printer Status61
Page 69

PCL Font List
The Print/PCL Font List page allows you to check the list of PCL fonts that
the printer manages.
Item Description
Font Index Displays the control number of the font.
Typeface Displays the name of the fonts.
Viewing Printer Status
62
Page 70

Report Types
The Print/Report Types window provides the following information.
Item Description
Configuration Page Prints the printer configuration page.
Demo Page Prints the printer demo page.
Operator Panel Status
Sheet
PCL Font Page Prints the PCL font lists.
Print button Sends the page to the printer.
Clear button Cancels the selected settings.
Prints the Operator Panel Status Sheet.
Viewing Printer Status63
Page 71

Configuring the Printer
In order to make any configuration changes through PageScope Web Connection, you must first enter Administrator Mode. See “Administrator Mode”
on page 42 for instructions on logging into Administrator Mode.
System Page
This page allows you to configure several user- and printer-specific items.
Date/Time
Manual Settings (shown above)
The System/Date/Time/Manual Settings window allows you to configure the
following items:
Item Description
Year Specifies the year for the printer.
Month Specifies the month for the printer.
Day Specifies the day for the printer.
Hour Specifies the hour for the printer.
Minute Specifies the minute for the printer.
Apply button Applies the configuration settings for this window.
Clear button Resets all configuration settings to previous values.
Configuring the Printer
64
Page 72

Item Description
Log out button Logs out of Administrator Mode and returns to User
Mode.
Configuring the Printer65
Page 73

Admin Password
The System/Admin Password window allows you to configure the following
items:
Item Description
Current Password Type in the current password.
New Password Sets a new password to enter Administrator Mode.
Default: [Blank]
Retype New Password Verifies the new password typed in the New Pass-
Apply button Applies the configuration settings for this window.
Clear button Resets all configuration settings to previous values.
Log out button Logs out of Administrator Mode and returns to User
Configuring the Printer
" Passwords can be set to any string of
numbers and letters (uppercase and
lowercase) up to 16 characters in length.
word text box.
" If the password typed in three text boxes
doesn’t match, the following message
displays when you choose the Apply button:
“Please retype the correct password.” Click
OK button, and then retype the passwords in
both text boxes.
Mode.
66
Page 74

Device Information
The System/Device Information window allows you to configure the following items:
Item Description
Administrator Name Specifies the name of the administrator for the
printer.
Range: Up to 127 characters
Default: [Blank]
Device Name Specifies the name of the printer.
Range: Up to 127 characters
Default: [Blank]
Device Place Specifies the setup location for the printer.
Range: Up to 127 characters
Default: [Blank]
Do Startup Page Selects whether or not a startup page is printed
when the printer is turned on.
Choices: On, Off
Default: Off
Configuring the Printer67
Page 75

Item Description
Auto Continue Selects whether or not printing continues if the size
or type of paper in the selected paper tray is different from the size or type of paper for the print job.
Choices: On, Off
Default: Off
Power Save If On is selected, the machine will enter Power Save
mode.
If Off is selected, the machine will not enter Power
Save mode.
Choices: Off, On
Default: On
Power Save Time Specifies the length of time until the machine enters
Power Save mode.
This menu item appears only when Power Save is
set to On.
Choices: 15 minutes, 30 minutes, 1 Hours, 3 Hours
Default: 15 minutes
Midnight Mode The Midnight Mode function allows you to reduce
printer noise while printing by reducing the print
speed.
Settings: Not used, Always used, Used for the
specified time
Default: Not used
Start Time Specify the starting time for the Midnight Mode func-
tion. This parameter is available only when Used for
the specified time is selected from the Midnight
Mode drop-down list.
End Time Specify the ending time for the Midnight Mode func-
tion. This parameter is available only when Used for
the specified time is selected from the Midnight
Mode drop-down list.
Menu Timeout Specifies the length of time until the status screen is
displayed when no operation is performed while a
menu or help screen is displayed in the message
window.
Apply button Applies the configuration settings for this window.
Configuring the Printer
Choices: 1 minute, 2 minutes, 5 minutes
Default: 2 minutes
68
Page 76

Item Description
Clear button Resets all configuration settings to previous values.
Log out button Logs out of Administrator Mode and returns to User
Mode.
Configuring the Printer69
Page 77

ROM Version
The System/ROM Version window provides the following information.
Item Description
Engine Firmware Version
Controller Firmware
Version
Boot Firmware Version Displays the Firmware version of the Boot ROM.
Displays the Firmware version of the printer engine.
Displays the Firmware version of the printer controller.
Configuring the Printer
70
Page 78

Online Assistance
The System/Online Assistance window allows you to configure the following items:
Item Description
Contact Name Sets the name of the person or organization respon-
sible for providing assistance with the printer.
Range: Up to 63 characters
Default: KONICA MINOLTA Customer Support
Contact
Information
Product Help URL Sets the help web site address for printer assis-
Sets the support contact URL for printer assistance.
Range: Up to 71 characters
Default: http://printer.konicaminolta.com
tance.
Range: Up to 71 characters
Default: http://printer.konicaminolta.com
Corporate URL Sets the KONICA MINOLTA corporate web site
address.
Range: Up to 71 characters
Default: http://printer.konicaminolta.com
Configuring the Printer71
Page 79

Item Description
Supplies and Accessories
Contact Phone
Number
Contact Address Specifies the e-mail address of the printer adminis-
Contact Utility Link Specifies the link to the Printer Management Utili-
Apply button Applies the configuration settings for this window.
Clear button Resets all configuration settings to previous values.
Log out button Logs out of Administrator Mode and returns to User
Sets the web address where you can purchase
printer supplies and accessories.
Range: Up to 71 characters
Default: http://www.q-shop.com/
Specifies the telephone number of the printer
administrator.
Range: Up to 31 characters
Default: [Blank]
trator.
Range: Up to 63 characters
Default: [Blank]
ties.
Range: Up to 71 characters
Default: http://www.pagescope.com/
Mode.
Configuring the Printer
72
Page 80

Maintenance
Clear Settings
The System/Maintenance/Clear Settings page allows you to reset the
printer settings to its factory defaults.
Item Description
Printer Settings
Network Settings
All Settings
Clear button When clicked, the message “Is it OK to restore Fac-
Log out button Logs out of Administrator Mode and returns to User
Resets the printer settings to their defaults.
Resets the network settings to their defaults.
Resets all settings to their defaults.
tory Defaults?” appears. Click OK to automatically
restart the printer and return the settings to their
default values.
Mode.
Configuring the Printer73
Page 81

Reset Printer
The System/Maintenance/Reset Printer page allows you to reset the printer
controller.
Item Description
Reset button When clicked, the message “Is it OK to reset the
Printer?” appears. Click OK to restart the printer
and return the settings to their default values.
Log out button Logs out of Administrator Mode and returns to User
Mode.
Configuring the Printer
74
Page 82

Print Page
The Print page allows more detailed printer settings to be specified.
Interfaces
The Print/Interfaces window allows you to configure the following items:
Item Description
USB I/O Timeout Specifies the reception timeout for USB (in sec-
onds).
Range: 10-300
Default: 15
LPT I/O Timeout Specifies the LPT reception timeout (in seconds).
Range: 10-300
Default: 15
NET I/O Timeout Specifies the NET reception timeout (in seconds).
Range: 15-300
Default: 30
Apply button Applies the configuration settings for this window.
Clear button Resets all configuration settings to previous values.
Log out button Logs out of Administrator Mode and returns to User
Mode.
Configuring the Printer75
Page 83

Default Settings
General Settings
The Print/Default Settings/General Settings window allows you to configure the following items:
Item Description
Personality Selects default Printer language to be selected.
Paper Source The paper tray that is normally used can be speci-
Output Tray Displays the name of the output tray.
Copies Specifies the default setting for number of copies to
Paper Size Specifies the default setting for the size of media.
Configuring the Printer
Choices: Auto, PCL
Default: Auto
fied.
Choices: Automatic, Tray 1
Default: Automatic
be printed.
Range: 1-999
Default: 1
76
Page 84

Item Description
Width Specifies the paper width when Paper Size is set to
Custom.
Range: 2.99 - 8.50 (inch) / 76 - 216 (mm)
Height Specifies the paper length when Paper Size is set to
Custom.
Range: 5.00 - 14.00 (inch) / 127- 356(mm)
Media Type Specifies the default setting for the type of paper.
Choices: Plain Paper, Envelope,Transparency,
Thick Paper, Postcard
Default: Plain Paper
Unit The unit for specifying the size of custom paper can
be specified between inches and millimeters.
Choices: Inches, Millimeters
Default: Millimeters (European model), Inches
(U.S. model)
Apply button Applies the configuration settings for this window.
Clear button Resets all configuration settings to previous values.
Log out button Logs out of Administrator Mode and returns to User
Mode.
Configuring the Printer77
Page 85

Paper Source Setting
The Print/Default Settings/Paper Source Setting window allows you to
configure the following items:
Item Description
Tray 1 Paper Size Specifies the setting for the size of media
loaded into the tray.
Default: A4 (European model), Letter
(U.S. model)
Width Specifies the paper width when Paper
Size is set to Custom.
Range: 2.99 - 8.50 (inch) /
76 - 216 (mm)
Height Specifies the paper length when Paper
Size is set to Custom.
Range: 5.00 - 14.00 (inch) /
127 - 356 (mm)
Media Type Specifies the setting for the type of media
loaded into the tray.
Configuring the Printer
78
Page 86

Item Description
General Paper Time
Out
Detect Size
Error
Apply button Applies the configuration settings for this
Clear button Resets all configuration settings to previ-
Log out button Logs out of Administrator Mode and
The printer automatically enters a “paper
timeout” standby state when the paper
specified for a specific tray from the driver
does not match the paper loaded in the
tray. Use this setting to specify what the
printer should do after it enters the paper
timeout state.
If Proceed is selected, the printer will proceed with the job using paper from the
specified source.
If Clear is selected, the printer will cancel
the current print job.
If None is selected, the printer will do
nothing and will wait until paper is fed
manually or until it receives a command to
cancel the current print job. Printing
resumes when the Cancel Button on the
printer’s control panel is pressed.
A size error occurs when the actual paper
size is different from the paper size specified from the printer driver.
If On is selected, the printer will detect
size errors.
If Off is selected, paper size error detection is turned off.
window.
ous values.
returns to User Mode.
Configuring the Printer79
Page 87

PCL Settings
The Print/Default Settings/PCL Settings window allows you to configure
the following items:
Item Description
Font Index Sets the default font in the PCL language.
Range: 0 - 58
Default: 0
Symbol Set Selects the symbol set used with the PCL language.
Line/Page Selects how many lines are in a page in PCL lan-
Font Point Size Sets the font size in the PCL language.
Configuring the Printer
" The range is 0 - 58 if no fonts are
downloaded, but the range is larger if fonts
are downloaded.
Default: PC-8
guage.
Range: 5 - 128
Default: 64
Range: 4.00 - 999.75
Default: 12.00
80
Page 88

Item Description
Font Pitch Size Sets the font pitch in the PCL language.
Range: 0.44 - 99.99
Default: 10.00
CR/LF Mapping Selects CR/LF code definition in PCL language.
Choices: CR=CR LF=LF, CR=CRLF LF=LF,
CR=CR LF=LFCR, CR=CRLF LF=LFCR
Default: CR=CR LF=LF
Courier Type Select the Courier type.
Settings: Regular, Dark
Default: Regular
Apply button Applies the configuration settings for this window.
Clear button Resets all configuration settings to previous values.
Log out button Logs out of Administrator Mode and returns to User
Mode.
Configuring the Printer81
Page 89

Print Quality Settings
The Print/Default Settings/Print Quality Settings window allows you to
configure the following items:
Item Description
Resolution Specify the printing resolution.
Settings: 600 x 600dpi, 1200 x 600dpi or 1200 x 1200dpi
Default: 1200 x 600dpi
Fine-Art If Off is selected, the Fine Art option, which can enhance
the print quality of images that include halftoning and
screen patterns, is turned off.
If Light is indicated, the edges of line art and text appear
smoother because fewer dots are used.
Selecting Medium should be suitable for most printing
needs. Select a different setting only if text and graphics
appear too dark or too light when Medium is selected.
If Dark is selected, the edges of line art and text appear
smoother because more dots are used.
Settings: Off, Light, Medium, Dark
Default: Medium
Configuring the Printer
82
Page 90

Item Description
Toner Save With this option, the printer conserves toner while printing.
This will prolong the life of the toner cartridge.
Less toner is consumed when Toner Save is set to On;
however, image quality is reduced.
If Off is selected, the Toner Save function is turned off.
If On is selected, the Toner Save function is turned on.
Settings: Off, On
Default: Off
Toner Density Use this option to make fine adjustments in the density of
the toner during printing. With a darker setting, toner can
be used up relatively quickly.
Settings: Extra Dark, Dark, Medium Dark, Medium, Light,
Medium Light, Extra Light
Default: Medium
Apply button Applies the configuration settings for this window.
Clear button Resets all configuration settings to previous values.
Log out button Logs out of Administrator Mode and returns to User Mode.
Configuring the Printer83
Page 91

PCL Font List
The Print/PCL Font List window allow you to configure the following items:
Item Description
Check box Select the check box of the font to be deleted, and then
click Delete to delete the selected font from the printer.
" This checkbox is available only for Downloaded
Font Index Displays the control number of the font.
Typeface Displays the name of the font.
Log out button Logs out of Administrator Mode and returns to User Mode.
Configuring the Printer
Fonts.
84
Page 92

Network Page
The Network page allows you to configure network settings. For more information on these protocols, see chapter 1, “Network Printing.”
TCP/IP(shown above)
The Network/TCP/IP window allows you to configure the following items. For
more information on these TCP/IP, see chapter 1, “Network Printing.”
Item Description
TCP/IP TCP/IP is always enabled.
Speed Specifies the operating mode and speed for Ethernet.
Choices: Auto,10Base-T(Full), 10Base-T(Half),
100Base-TX(Full), 100Base-TX(Half),
Default: Auto
Auto IP Specifies the automatic assigning method for the printer
IP address.
Choices: DHCP/BOOTP
Default: Checked
Configuring the Printer85
Page 93

Item Description
IP Address* Sets the printer’s IP address.
Range: 0–255 for each xxx triplet
Default: 192.168.1.2
" If the specified IP address is outside of the
allowable range, the value is not changed, even
after the Apply button is clicked. The setting
returns to the previous value.
Subnet Mask* Sets the printer’s subnet mask address.
Range: 0–255 for each xxx triplet
Default: 255.255.255.0
" If the specified subnet mask address is outside of
the allowable range, the value is not changed, even
after the Apply button is clicked. The setting
returns to the previous value.
Default Router* If a router is used on the network, sets the router’s
address.
Range: 0–255 for each xxx triplet
Default: 192.168.1.2
" If the specified router address is outside of the
allowable range, the value is not changed, even
after the Apply button is clicked. The setting
returns to the previous value.
RAW Port
Number
Host Name Specifies the host name.
Apply button Applies the configuration settings for this window.
Clear button Resets all configuration settings to previous values.
Log out button Logs out of Administrator Mode and returns to User
* Always enter these addresses without leading zeros. For example,
131.011.010.001 should be entered as 131.11.10.1.
Identifies the number of the printer’s RAW port.
Choices: 1 - 65535
Default: 9100
Range: Up to 31 characters
Default: PagePro 1350EN
Mode.
Configuring the Printer
86
Page 94

NetWare
Configuring the Printer87
Page 95

The Network/NetWare window allows you to configure the following items:
Item Description
NetWare NetWare Print Enables or Disables the NetWare print
option.
Choices: Enable, Disable
Default: Enable
Frame Type Specifies the Frame Type.
Choices: Auto, Ethernet802.2, Ethernet
802.3, Ethernet II, Ethernet
SNAP
Default: Auto
Mode Specifies the NetWare Configuration
mode.
Choices: PServer, NPrinter/RPrinter
Default: Pserver
PServer Print Server
Name
Print Server
Password
Retype Password
Print Queue
Scan Rate
Sets the Print Server Name for the printer.
Range: Up to 47 characters
Default: [Blank]
Sets the Print Server password.
Range: Up to 31 characters
Default: [Blank]
Verifies the new password typed in the
Print Server Password text box.
Range: Up to 31 characters
Default: [Blank]
Sets the number of the queue scan interval.
Range: 1-65535 (Seconds)
Default: 1
Configuring the Printer
88
Page 96

Item Description
Bindery/NDS Specifies the bindery options.
Choices: NDS, Bindery/NDS, Bindery
Default: NDS
Preferred File
Server
Preferred NDS
Context Name
Preferred NDS
Tree Name
NPrinter/
RPrinter
Apply button Applies the configuration settings for this
Clear button Resets all configuration settings to previ-
Log out button Logs out of Administrator Mode and
Printer Name Sets the printer’s name.
Printer Number Sets the Printer Number.
Sets the Preferred File Server for the
printer.
Range: Up to 47 characters
Default: [Blank]
Sets the Preferred NDS Context for the
printer.
Range: Up to 127 characters
Default: [Blank]
Sets the Preferred NDS Tree for the
printer.
Range: Up to 32 characters
Default: [Blank]
Range: Up to 47 characters
Default: PagePro1350EN
Range: 0 - 255
Default: 255
window.
ous values.
returns to User Mode.
Configuring the Printer89
Page 97

IPP
The Network/IPP window allows you to configure the following items. For
details on IPP, refer to chapter 1, “Network Printing.” In order to apply the settings, the printer must be turned off, then on again after the setting is specified.
Item Description
IPP Print Sets whether or not to use IPP.
Choices: Enable, Disable
Default: Enable
Accept IPP Job Sets whether or not to accept IPP Job.
Choices: Enable, Disable
Default: Enable
" This item is automatically set to
Enable or Disable depending on
IPP print settings.
Configuring the Printer
90
Page 98

Item Description
Printer Name Sets the printer’s name.
Range: Up to 127 characters
Default: [Blank]
Printer Location Sets the printer’s location.
Range: Up to 127 characters
Default: [Blank]
Printer Information Specifies the printer information.
Range: Up to 71 characters
Default: http://printer.konicaminolta.com
Printer URI Specifies the printer’s Uniform Resource
Identifier (URI), authentication, and
security.
Range: Non-configurable
Defaults:
http://192.168.1.2/ipp
RequestingUserName None
http://192.168.1.2:80/ipp
RequestingUserName None
ipp://192.168.1.2:80/ipp
RequestingUserName None
http://192.168.1.2:631/ipp
RequestingUserName None
ipp://192.168.1.2/ipp
RequestingUserName None
ipp://192.168.1.2:631/ipp
RequestingUserName None
Configuring the Printer91
Page 99

Item Description
Operational
Support
Print Job If this check box is selected, Print Job is
enabled.
Default: Checked
" This item is automatically set to
Enable or Disable depending on
IPP print settings.
Validate Job If this check box is selected, Validate Job
is enabled.
Default: Checked
" This item is automatically set to
Enable or Disable depending on
IPP print settings.
Cancel Job If this check box is selected, Cancel Job
is enabled.
Default: Checked
" This item is automatically set to
Enable or Disable depending on
IPP print settings.
Get Job
Attributes
If this check box is selected, Get Job
Attribute is enabled.
Default: Checked
Configuring the Printer
" This item is automatically set to
Enable or Disable depending on
IPP print settings.
92
Page 100

Item Description
Get Jobs If this check box is selected, Cancel Job
is enabled.
Default: Checked
" This item is automatically set to
Enable or Disable depending on
IPP print settings.
Get Print
Attributes
If this check box is selected, Get Printer
Attribute is enabled.
Default: Checked
" This item is automatically set to
Enable or Disable depending on
IPP print settings.
Apply button Applies the configuration settings for this
window.
Clear button Resets all configuration settings to
previous values.
Log out button Logs out of Administrator Mode and
returns to User Mode.
Configuring the Printer93
 Loading...