


PagePro 1200W
®
User’s Guide
1800691-001B

Trademarks
The following are registered trademarks of MINOLTA-QMS, Inc.: QMS and the
MINOLTA-QMS logo . Minolta, Fin e-ART, and PagePro are trademarks of Minolt a
Co., Ltd. Other produ ct names ment ioned in this guid e may also b e trademarks o r
registered trademarks of their respective owners.
Proprietary Statement
The digitally encode d software inc luded with yo ur printer is C opyrighted © 2002
by MINOLTA-QMS , Inc . All Rig hts Re se rved . This sof tware m ay n ot b e rep roduc ed,
modified, displaye d, transferr ed, or copi ed in any form or in any mann er or on
any media, in whole or in par t, without the e xpress writt en permission of MINOLTAQMS, Inc.
Copyright Notice
This manual is Copyrighted © 2002 by MINOLTA-QMS, Inc., One Magnum Pass,
Mobile, AL 36618. All Rights Res erv ed. This docu ment may no t be co pie d, in whol e
or part, nor transferre d to any other m edia or langua ge, without w ritten permis sion
of MINOLTA-QMS, Inc.
Manual Notice
MINOLTA-QMS, Inc. reserves the right to make changes to this manual and to the
equipment described h erein withou t notice. Cons iderable effort ha s been ma de to
ensure that this ma nual is free of inaccuraci es and omissio ns. Howev er, MINOLTAQMS, Inc. makes no warranty of any kind including, but not limited to, any implied
warranties of merch anta bility and fitness for a particular purpose with regard to th is
manual. MINOLTA-QMS, Inc. assum es no responsibility for, or liability for, errors
contained in this ma nual or for in cidental, sp ecial, or cons equential d amages
arising out of the furnishin g of this man ual, or the use of this manual in operating
the equipment, or in conn ection with the performanc e of the equipme nt when so
operated.
ii

Contents
Contents
1 Introduction
1.1 Welcome........................................................................................1-1
1.2 Roadmap of this manual ..............................................................1-2
Brief explanation of special type styles and method of
presentation....................................................................................1-3
2 Installing and setting up the printer
2.1 Overview of the printer.................................................................2-1
External features.............................................................................2-1
Inside the printer.............................................................................2-2
Optional accessories.......................................................................2-3
Printer control panel........................................................................2-4
2.2 Installing your laser printer..........................................................2-5
Place of installation .........................................................................2-5
Storage of consumables and accessories ......................................2-5
Ambient conditions..........................................................................2-5
Space requirements........................................................................2-6
2.3 Setting up your laser printer........................................................2-7
Turning the printer on and off............................................. ...........2-11
Connecting the printer to a computer............................................2-12
3 Installing the printer driver
3.1 Minimum system requirements...................................................3-1
3.2 Notes on installing the printer driver..........................................3-1
General information on the printer driver ........................................3-1
Information on installation using “Add Printer” ...............................3-2
3.3 Installing the USB device drive r and printer driver under
Windows XP...................................................................................3-2
3.4 Installing the USB device drive r and printer driver under
Windows Me................................................................................3-11
3.5 Installing the USB device drive r and printer driver under
Windows 2000.............................................................................3-15
iii

3.6 Installing the USB device driver and printer driver under
Windows 98................................................................................. 3-21
3.7 Installing the printer driver under Windows 95.......................3-26
3.8 Installing the printer driver under Windows NT 4.0 ................3-29
3.9 Uninstalling the printer driver and USB device drive r............3-31
4 Working with the printer driver
4.1 Displaying printer driver settings...............................................4-1
4.2 Setup tab.......................................................................................4-4
4.3 Paper tab....................................................................................... 4-5
4.4 Quality tab.....................................................................................4-6
4.5 Device Options Setting tab.......................................................... 4-7
5 Working with the Status Display
5.1 Environment.................................................................................. 5-1
5.2 Opening the Status Display.........................................................5-2
5.3 Using the Status Display ............................................................. 5-4
5.4 Closing the Status Display ..........................................................5-5
Contents
6 Working with the printer
6.1 Please note the following points: ............................................... 6-1
What should I watch out for when loading paper?..........................6-1
What should I watch out for when loading envelopes?..................6-1
Which sizes of paper can I use?.....................................................6-2
What types of paper can I use?...................................................... 6-3
Printable area.................................................................................6-3
6.2 Using the panel button................................................................. 6-4
6.3 Loading media.............................................................................. 6-5
6.4 Determining the direction printed sheets ..................................6-7
7 Installing printer options
7.1 Installing the lower feeder unit (Tray 2) .....................................7-1
7.2 Installing the face-up tray ........................................................... 7-3
8 Maintaining the printer
8.1 Replacing the toner cartridge......................................................8-2
8.2 Replacing the drum cartridge .....................................................8-6
8.3 Cleaning the printer....................................................................8-10
iv

Contents
9 Troubleshooting
9.1 Clearing media jams .....................................................................9-1
9.2 General printing problem s...........................................................9-8
9.3 Print quality problems ..................................................................9-8
9.4 Printer messages ........................................................................ 9-11
Indicator functions.........................................................................9-11
Status message............................................................................9-12
Error messages.............................................................................9-12
Service message...........................................................................9-13
10 Appendix
10.1 Safety specifications..................................................................10-1
10.2 Technical specifications.............................................................10-1
Printer............................................................................................10-1
Lower feeder unit (option) .............................................................10-3
Parallel interface connecto rs and cable........................................10-3
USB interface connectors and cable.............................................10-3
10.3 Our concern for environmental protection...............................10-4
What is an ENERGY STAR product? ...........................................10-4
10.4 CE Marking (Declaration of Conformity)...................................10-4
For European users......................................................................10-4
10.5 CISPR 22 and local rules........................................... ...... ...........10-4
10.6 Acoustic Noise............................................................................10-4
10.7 Safety Information.......................................................................10-5
Warning and precaution symbols..................................................10-5
Meaning of symbols......................................................................10-5
10.8 Working safely with your laser printer......................................10-8
Notes on your safety and operating safety....................................10-8
Laser safety.................................................................................10-10
Internal laser radiation.................................................................10-10
Laser caution label......................................................................10-10
Laser safety label........................................................................ 10-11
For United States users..............................................................10-11
For users in all countries.............................................................10-12
For Denmark users.....................................................................10-12
For Norway users........................................................................10-12
For Finland, Sweden ssers.........................................................10-12
Ozone release.............................................................................10-13
Dégagement d’ozone..................................................................10-13
11 Index
v


Introduction
1 Introduction
1.1 Welcome
Thank you for purchasing a PagePro 1200W.
So you can use your new laser printer effectively and achieve the best
possible results, this manual provides you with information on the following topics:
G Installing the printer driver
G Wo rki ng w ith the printer driv er and Status Disp lay
G Wo rki ng with the printer
G Caring for and maintaining the printer
G Troubleshooting
Read this manual carefull y before op erating your prin ter for the firs t time,
and always keep the manual within easy reach.
1
1-1

1
1.2 Roadmap of this manual
The following tab le is des igned to he lp y ou fin d the inform ation you need.
Alternatively, to find in formation on a spec ific problem quick ly and precisely, refer to the index at the end of this manual.
No. Title of chapter Content of chapter
1 Introduction Overview of this manual.
2 Setting up the printer Information on how to set up the printer as well as an
3 Installing a printer driver A step-by-step explanation of the procedure for
4 Working with the printer
driver
5 Working with the Status
Display
6 Working with the printer General information on how to use your printer,
7 Installing printer options Detailed instructions on installing printer options:
8 Maintaining the printer Information on how to replace consumables and
9 Troubleshooting Information on identifying and solving printer
10 Specifications Technical specifications, safety information, and
Index Index of the contents of this manual.
introduction to its features.
installing a printer driver.
Overview of the Windows printer drivers.
Details of how to use the Status Display.
including supported media sizes and types, loading
media, monitoring print jobs, and canceling print jobs.
lower feeder unit and face-up tray.
clean the printer.
problems.
regulatory information.
Introduction
1-2
Introduction
Brief explanation of special type styles and method of presentation
Special type styles and methods of presentation are used in this manual
to highlight various circumstances. The following examples will help you
recognize and deal with the most im porta nt of thes e.
CAUTION OR WARNING
This is a caution or warning!
A caution alerts you to damage that could result to the printer by treating
it improperly while a warning alerts you to the potential for bodily harm.
➜ The arrow refers you t o safety measures that must be taken to prevent
[MENU] button on the printer driver with the description “Menu”
➜ Single action to be performed (there are no other steps)
1 Step 1 of a series of actions
1
the hazard.
If you’re using the Acrobat PDF version of this guide, click this icon
to play a QuickTime video clip of the procedure described in
the text. Acrobat Reader and a download link to QuickTime
are provided on the Utilities and Documentation CD-ROM.
2
Step 2 of a series of actions.
Help is available here.
?
➜ The approach that is sugges ted
here is sure to get you to your
desired result.
Here you can see what has to be done.
✎
This is a helpful tip
Text passages that are identified in this manner provide you with tips
and tricks that make it even easier to work with the printer.
1-3


Installing and setting up the printer
2 Installing and setting up the printer
2.1 Overview of the printer
External features
4
5
1
6
2
2
3
9
10
No. Description No. Description
1 Top cover release button 7 Paper guides for manual feed tray
2 Manual feed tray 8 Tray1 (multipurpose tray)
3 Power switch (ON/OFF) 9 USB interface connector
4 Face-down tray (printed si de down ) 10 Parallel interface connector
5 Control panel 11 Face-up/face-down selection switch
(printed side up/down)
6 Top cover 12 Power cord socket
7
8
11
12
2-1
2
Installing and setting up the printer
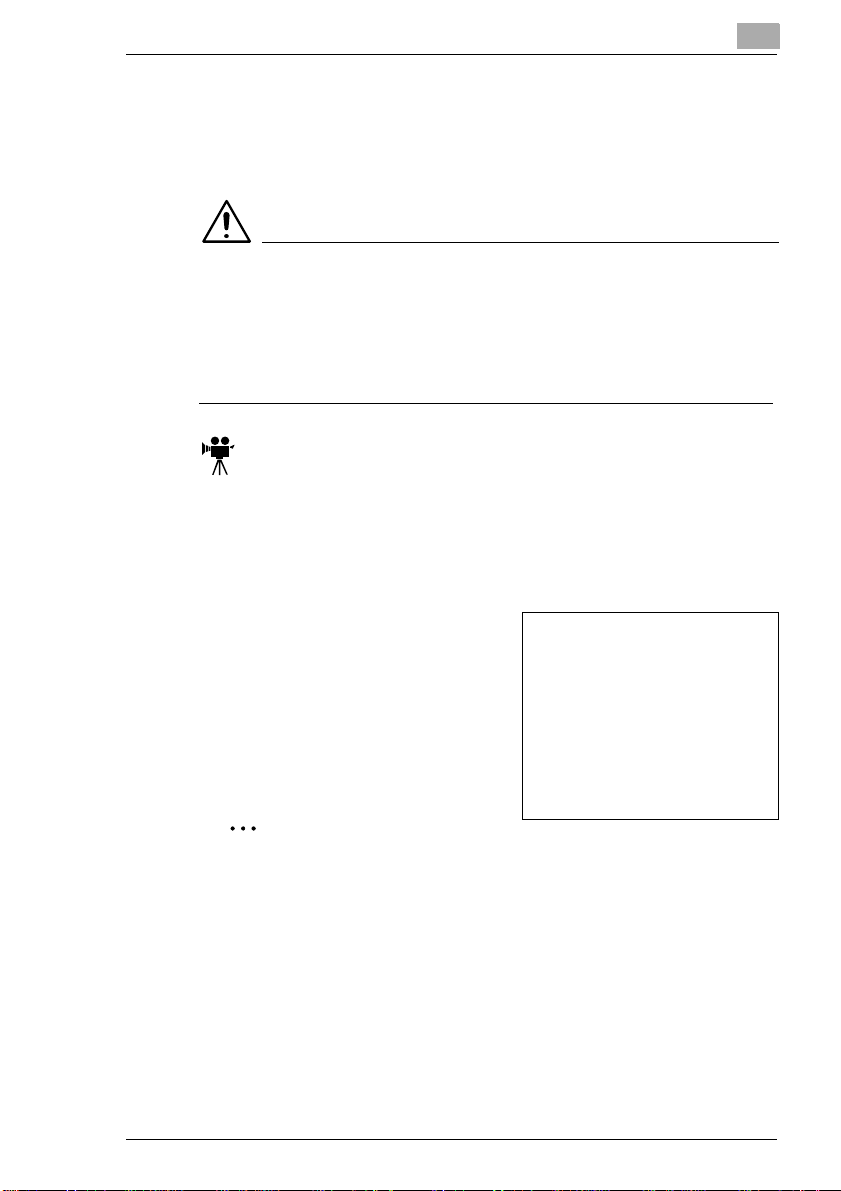
Inside the printer
1
23
2-2
No. Description No. Description
1 Fusing unit 3 Drum cartridge
2 Toner cartridge
Installing and setting up the printer
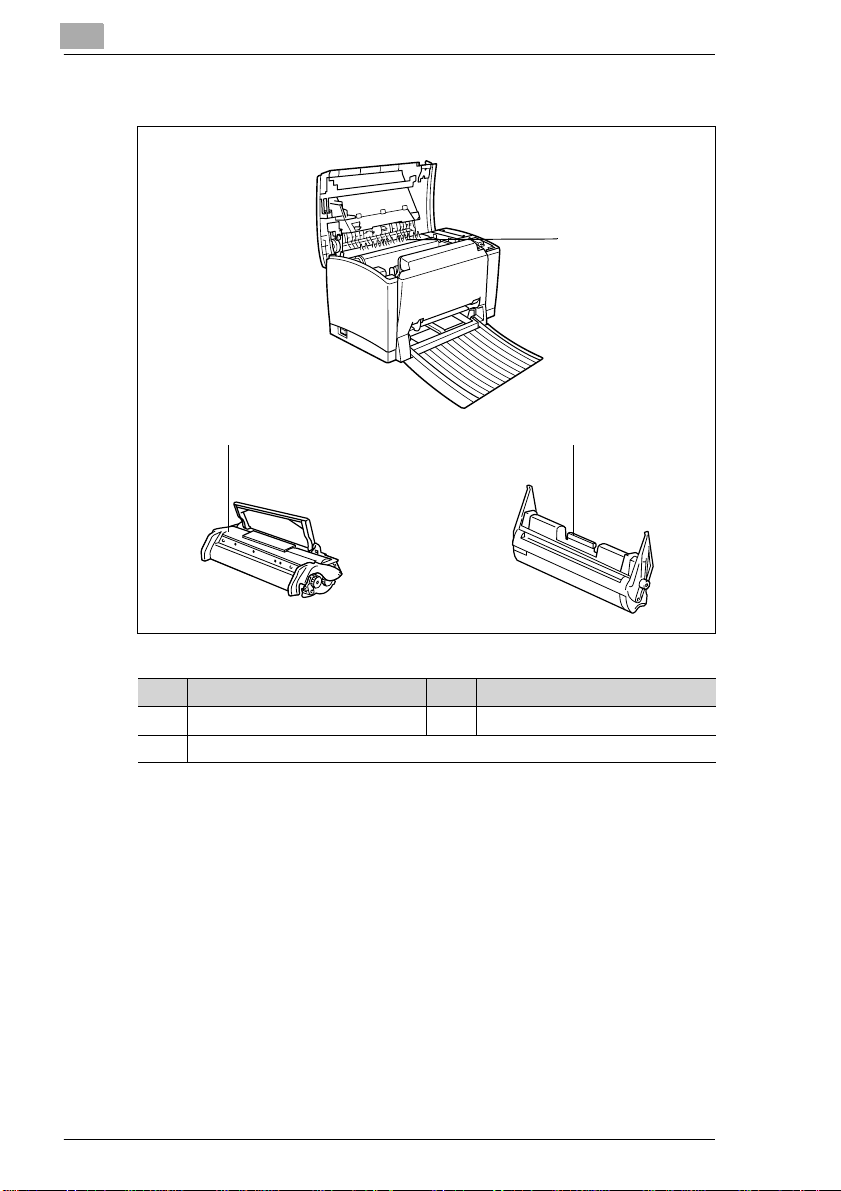
Optional accessories
2
1
2
No. Description No. Description
1 Face-up tray
(printed side up)
2 Lower feeder unit (Tray 2)
(500-sheet capacity)
2-3
2
Installing and setting up the printer
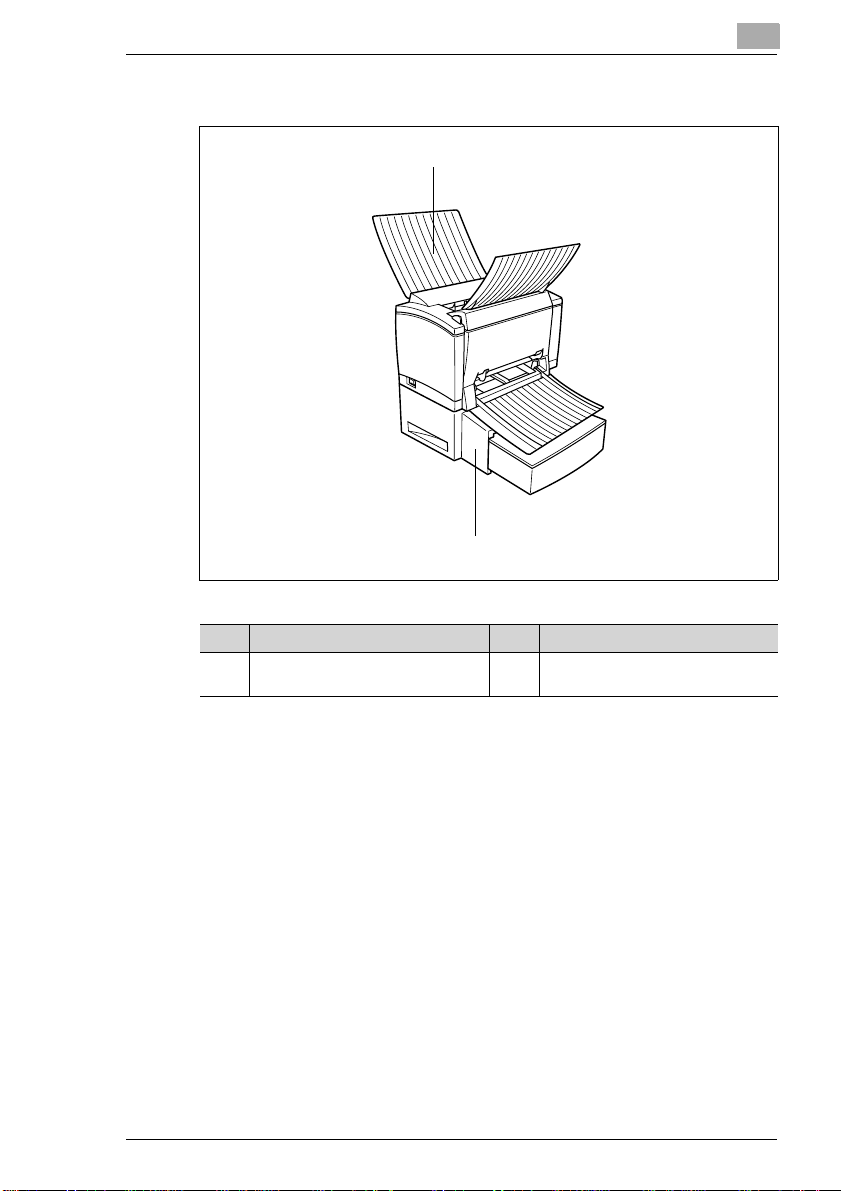
Printer control panel
1
2
3
The control panel has two indicators and one button.
No. Description
1 Error indicator (orange)
2 Ready indicator (green)
3 Panel button
2-4
For further information on the control panel, see chapter 6.

Installing and setting up the printer
2.2 Installing your laser printer
Place of installation
Set up the printer in a place that is
G dry and free from dust
G on a stable surface
G well ventilated
G near an easily accessible power socket
G away from objects which might obstruct the printer’s ventilation grille
G away from highly flammable items (such as curtains)
G away from splashing liquids
G away from organic gases (such as ammonia)
G away from direct sunlight
G away from severe temperature fluctuations
G away from exhaust-air from heating, ventilation, and air-conditioning
systems
Storage of consumables and accessor ies
Printing consumables and accessories should be kept
G s eal ed in thei r origi nal pack agi ng
G protected from direct sunlight or heat
G protected from fluorescent light
G in a cool, dry, and dust-free place
G out of reach of children
2
WARNING
Toner poses a health hazard!
Toner is harmful if swallowed.
➜ If you swallow toner, consult a doctor immediately.
➜ If you get toner on your hands, wash them immediately with cold wate r
and soap.
Ambient conditions
The optimum ambient conditions for your printer are as follows:
G Te mp erature range: 50°F–95°F/10°C–35°C with maximum fluctua-
tions of 18°F/10°C per hour
G H umidi ty range: 15%–85% with maximum fluctuations of 20% per hour
2-5
2
Installing and setting up the printer
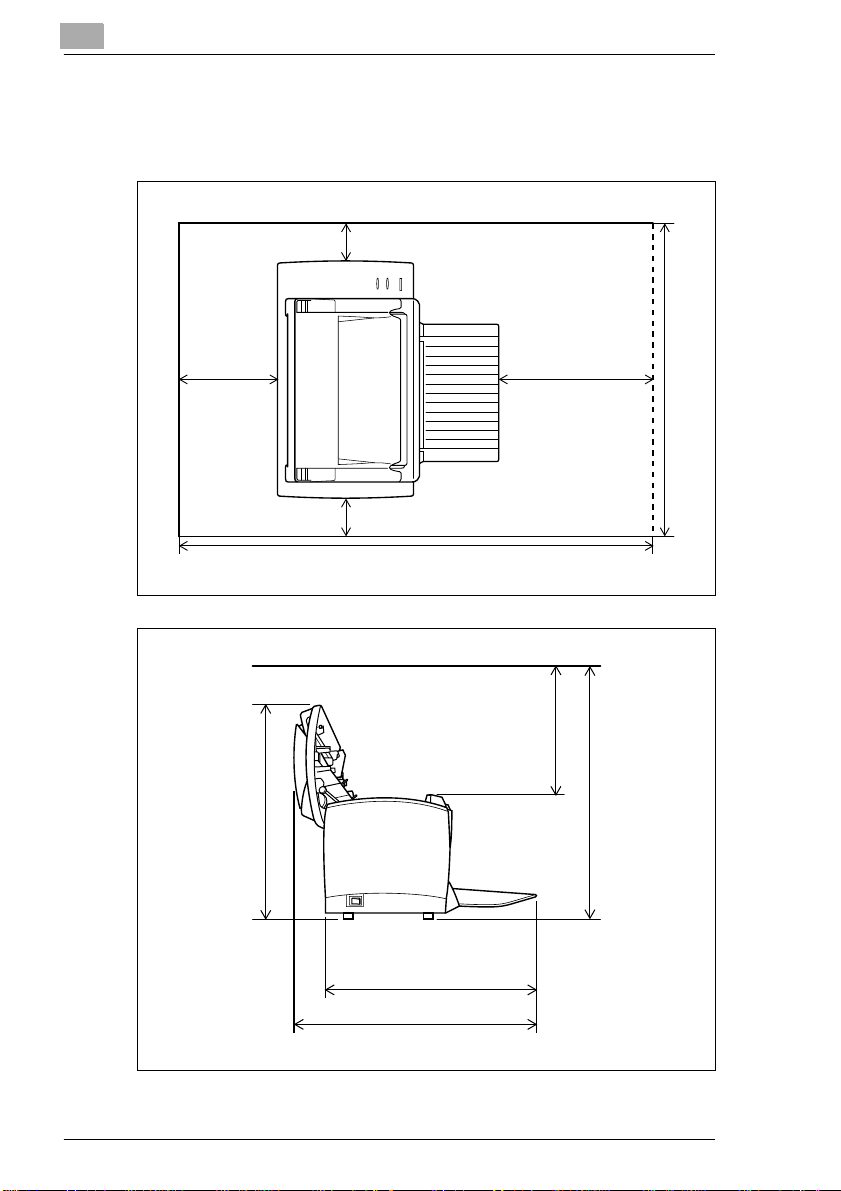
Space requirements
Be sure to provide enough space around the printer to ensure easy printer
operation, paper and toner replacement, and maintenance.
3.9" (100 mm)
(150 mm) (300 mm)
11.8"5.9"
3.9" (100 mm)
35.1 in. (891 mm)
11.2" (285 mm )
15.6" (395 mm)
23.2 in. (589 mm)
21.7" (550 mm)
2-6
16.1 in. (410 mm)
18.7 in. (475 mm)
Installing and setting up the printer
2.3 Setting up your laser printer
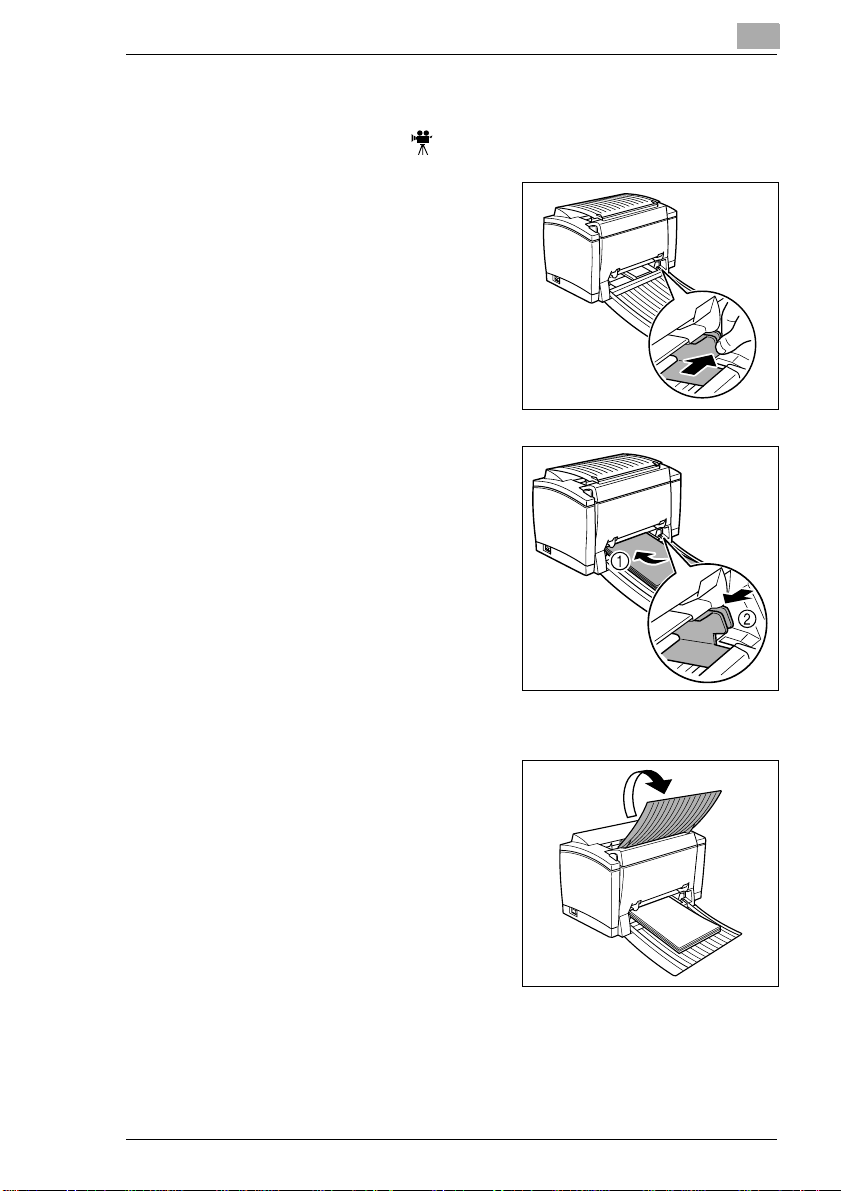
Loading paper in Tray 1
1 Lay Tray1 down flat.
2
Squeeze the right pap er guide and
open the media guides.
3
Place a stack of paper in the tray.
How many sheets may I pl ace in
?
the tray?
➜ Tray 1 has a capacity of 150
sheets of plain pap er. The stack
of paper should not rise above
the media limit mark.
2
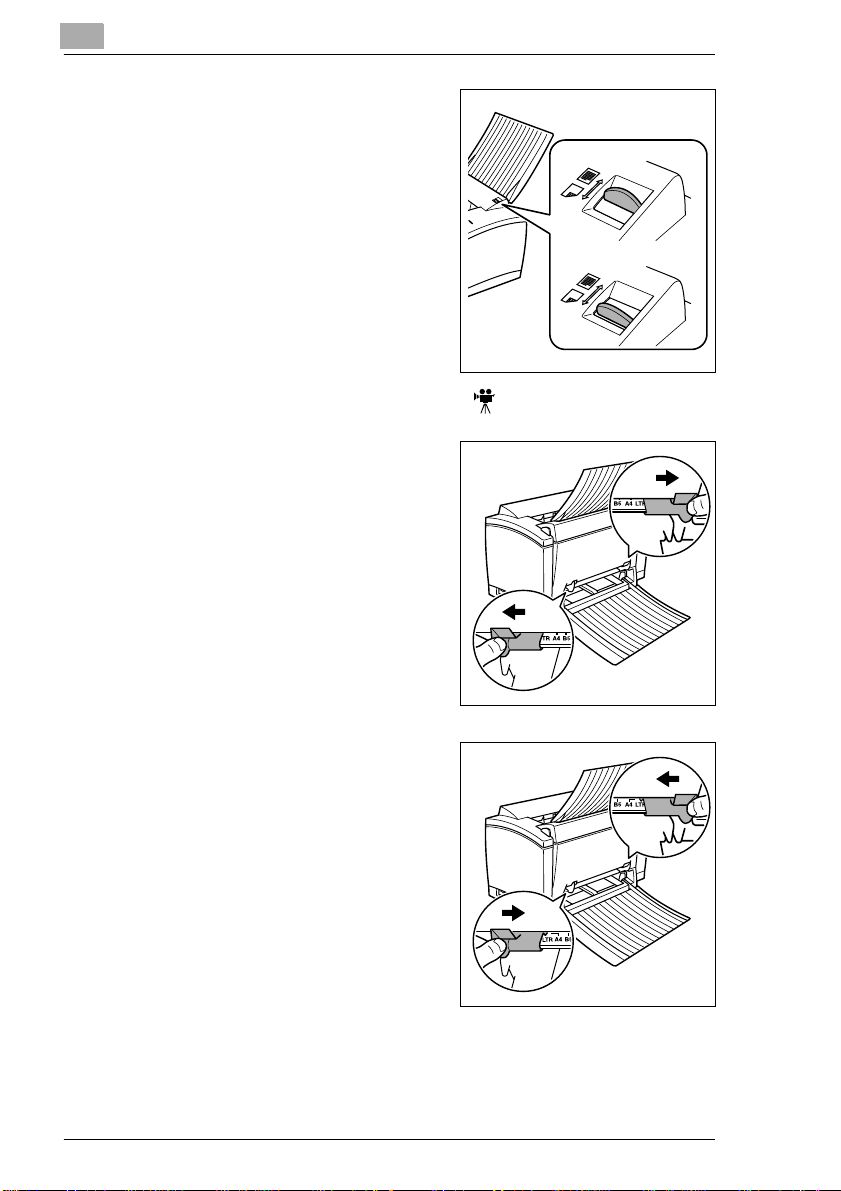
4 Squeeze the right paper guide and
adjust the media gui des so that both
the left and right sides of the paper
stack are secure.
5
Open the face-down tray.
2-7
2
Installing and setting up the printer
❍ If you installed an optional face-
up tray and you want the sheets
to come out face up, then open
the face-up tray instead of the
face-down tray, and set the
face-up/face-down selection
switch as shown.
Loading media in the manual feed tray
1
Open the media guides.
Face-up output
Face-down output
2-8
2 Move each media guide to the mark
identifying the size of the media to
be loaded. The illustration shows
the media guide positions for lettersize media.

Installing and setting up the printer
3
Insert a sheet of media as far as
possible into the manual feed tray
with the side to be printed facin g up.
How many sheets may I pl ace in
?
the tray?
➜ Load only one sheet of media at
a time.
2
2-9
2
Installing and setting up the printer
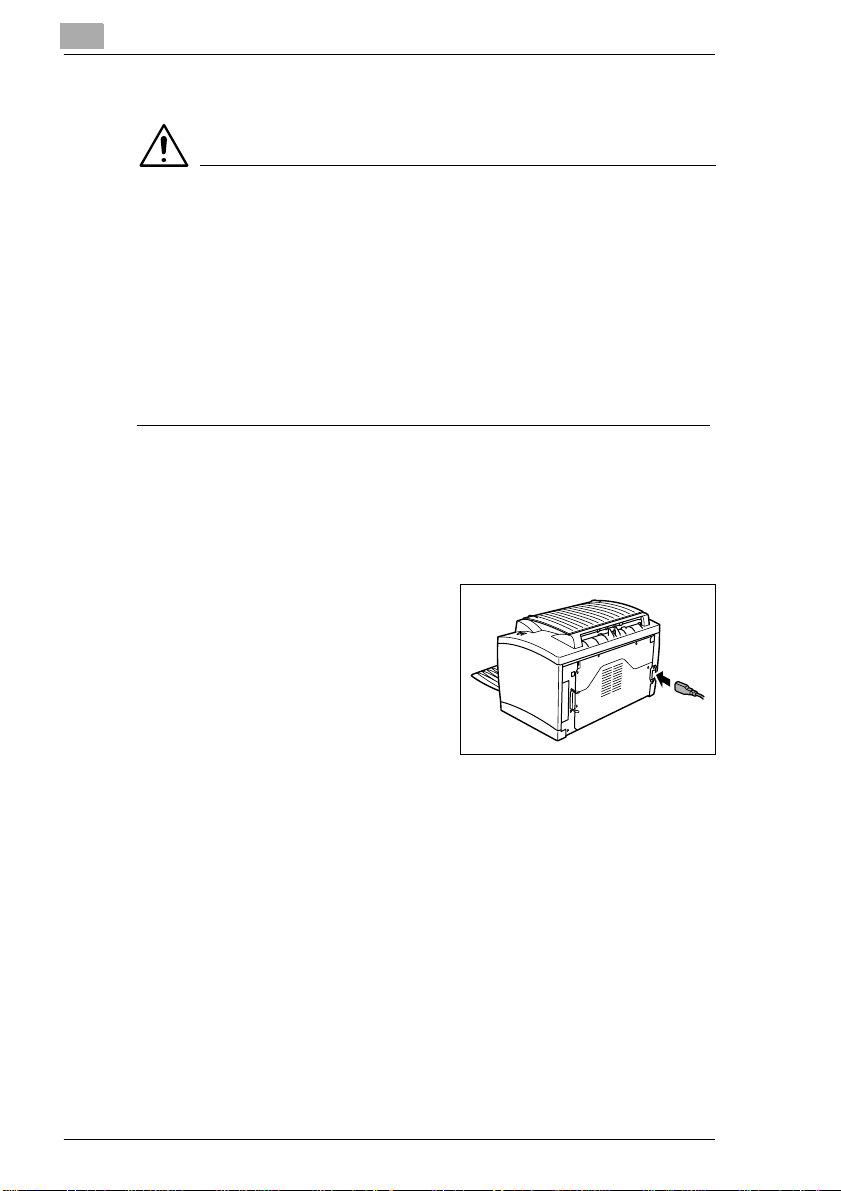
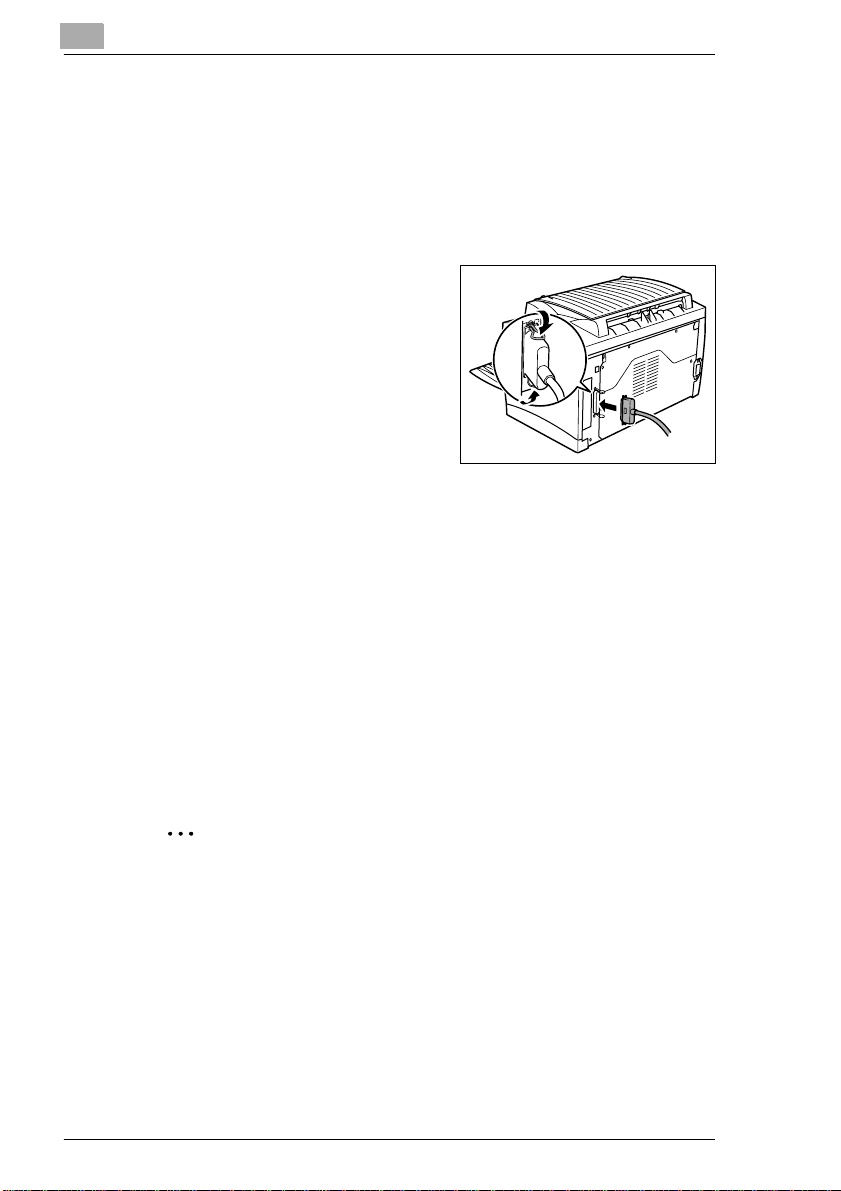
Connecting the power cord
WARNING
Use only the power cord shipped with the printer. Using the wrong
power cord may lead to a short-circuit!
The use of a power cord of inadequate cross-section can lead to a shortcircuit.
➜ Only use an ex tension cable which has a higher rating t han the curr ent
consumption of the printer.
➜ Only use grounded cords.
➜ Always observe the relevant local regulations r egarding the connec-
tion of electrical equipment to the main network.
The laser printer requires a non-fluctuating power supply. If necessary,
ask an electrician for advice.
✔ Voltage: 110V - 10%, 127V + 6%, or 220-240V ± 10%
✔ Frequency: 50-60Hz ± 3Hz
1
Make sure that the printer’s power
switch is in the “O” (OFF) position.
2-10
2
Connect one end of the power cord
to the power cord socket on the
back of the printer, and plug the
other end into a power outlet.
Installing and setting up the printer
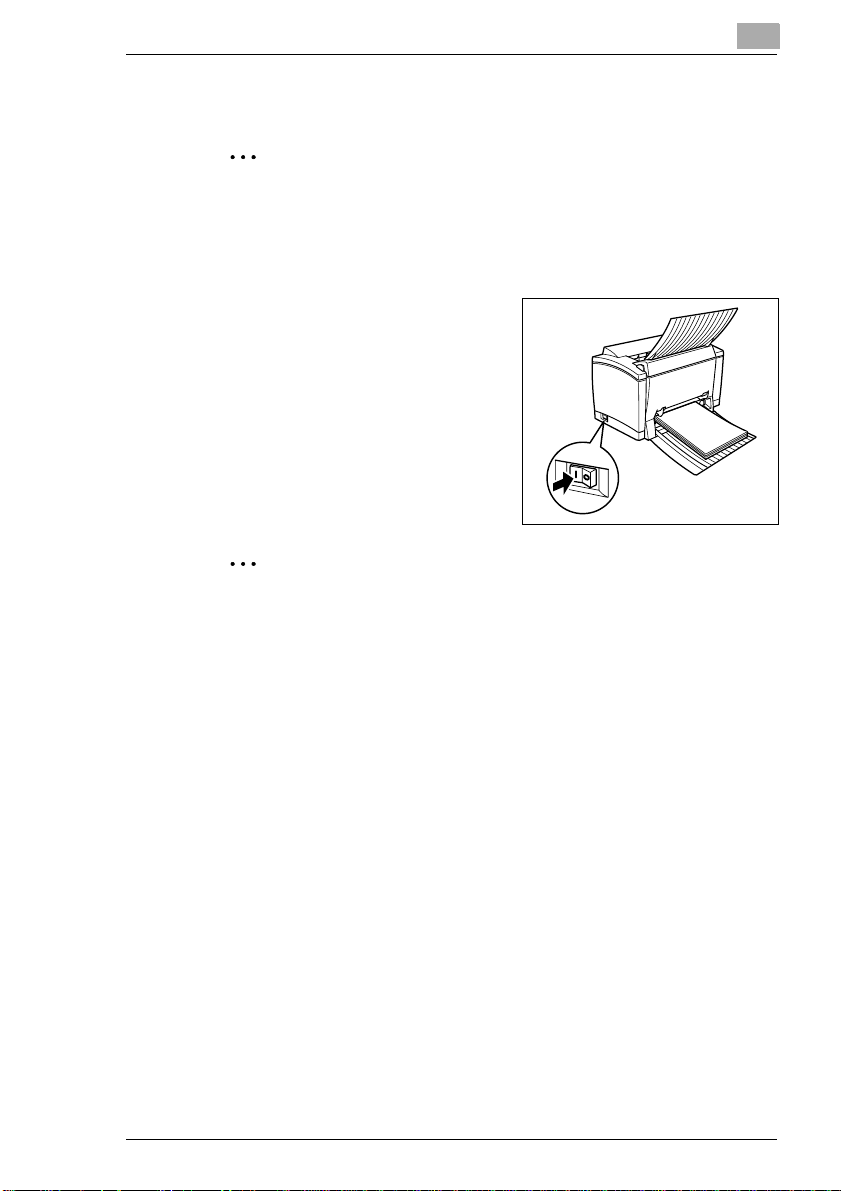
Turning the printer on and off
✎
Note
Improper handling may damage the printer!
- Never turn off the pri nter while a print job is in progress, the printe r is
receiving data f rom the c omputer (blin king green “Read y” indic ator on
control panel), or the printer is being reset.
➜ Set the power switch to the “I” (ON)
position to turn on the printer.
The printer is ready to use in ap-
proximately 20 sec onds. T he gre en
“Ready” indicator should be on (bu t
not blinking) and the orange “Error”
indicator off.
➜ Set the power switch to the
“O” (OFF) position to turn off the
printer.
✎
Saving energy is sensible!
When the printer has been inactive for 15 minutes, it automatically
switches to the POWER SAVE mode . When the printer recei ves a new
print job while i n POWER SAVE mode , it automa tically switc hes to the
warmup phase and is ready to print within approximately 7 seconds.
2
2-11
2
Installing and setting up the printer
Connecting the printer to a computer
Parallel interface
1
Turn off both the printer and the PC.
2
Connect one end of the interface cable to the parallel port on the PC.
3
Connect the other end of the
interface cable to the parallel
interface connector on the back of
the printer. Secure the interface
cable using the two clips.
4
Turn on the printer and then, when
it’s ready, turn on the PC.
Does the Windows operating
?
system detect the new device?
➜ If you are using Windows XP/Me/2000/98, plug-and-play printer
driver installation should start automatically. Follow the instructions on the screen. See chapter 3 for more information.
➜ If you’re using Windows XP/Me /20 00/9 8 an d plu g-an d-play driver
installation doesn ’t start automatically, leave the printer on, unplug
both ends of the interface cable , and the reconnect the cable. If this
does not work, use the instructio ns in chapter 3 to install the pri nter
driver manually.
➜ If you’re using Windows 95/NT 4.0, use the instructions in chapter
3 to install the printer driver manually.
2-12
For technical specifications of the cable, see chapter 10.
✎
Note
Using the wrong type of cable can damage the socket on the
printer.
- Use only an IEEE 1284 type B shielded interface cable.

Installing and setting up the printer
USB interface
✎
Note
Windows 95/NT4.0 do not support USB connections.
1
Turn off both the PC and the printer.
2
Turn on the PC.
3
Turn on the printer.
4
When Windows and the pr inter are both ready, c onnect one end of the
interface cable to the PC’s USB port .
5
Connect the other end of the
interface cable to the USB int erface
connector on the back of the printer.
Does the Windows operating
?
system detect the new device?
➜ Plug-and-play driver installation
should start automatically. Follow the ins tructions on the
screen. See chapter 3 for more
information.
➜ If plug-and-play driver in stallation doesn’t sta rt automatically, leav e
the printer on, unplug both end s of the inte rfac e ca ble , and th e reconnect the cable. If this does not work, use the instructions in
chapter 3 to install the printer driver manually.
For technical specifications of the cable, see chapter 10.
2
✎
Note
Using the wrong type of cable can damage the socket on the
printer.
- Use only a USB Revision 1.1 compliant cable for connecting the
printer to your computer.
2-13


Installing the printer driver
3 Installing the printer driver
3.1 Minimum system requirements
G IBM-compatible PC with a Pentium/Celeron series, AMD K6/Athron/
Duron family or compatible 200 MHz processor (300 MHz
recommended)
G Windows XP/Me/2000/98/95/NT 4.0
G 16 MB RAM (Windows 98/95/NT 4.0), 32 MB RAM (Windows Me), 64
MB RAM (Windows 2000), or 128 MB RAM (Windows XP)
G 36 MB free hard disk space (20 MB for printer driver and status
display, 16 MB for image processing)
G IEEE 1284 Type B parallel port or USB Revision 1.1 port
G CD-ROM drive
3.2 Notes on installing the printer driver
The installation prog ram is design ed so that even peo ple not accust omed
to working with com puters can easil y install a printe r driver. You will be led
step-by-step throug h th e in sta lla tion process. All you need to do is foll ow
the installation program.
Before you begin the installation, you should know the following
information:
G What operating system is running on your computer (for example,
Windows XP)?
G What is the letter of your CD-ROM drive (for example, D)?
G Wh ich optiona l access ories are inst alled on your pri nter (for exampl e,
a lower feeder unit)?
G Is yo ur prin ter c onn ec ted dire ctl y to y ou r compu ter v ia a p aral lel inte r-
face cable or a USB cable?
3
General information on the printer driver
The printer driver is delivered on a CD-ROM along with the printer.
✎
No CD-ROM drive?
You can download the p rinter driver fro m the Internet. You can find the
latest version of the printer driver at http://www.minolta-qms.com
(choose "Online Help & Drivers").
3-1

3
Information on installation using “Add Printer”
We strongly recommend that you install the printer driver using the
Installer (“setup.exe” file). If you install the printer driver using the Add
Printer wizard, note the following points:
G The dialog box for installing options is not displayed. Adjust the
additional options after you have completed the installation in the
printer driver.
G The Status Display and printer uninstaller utility will not be installed.
G A folder for storing the form overlay data is not created.
Installing the printer driver
3.3 Installing the USB device driver and printer driver under Windows XP
When connecting t he printe r to your PC with a USB cable, install the USB
device driver according to the following instructions before installing the
printer driver.
If you have conne cte d th e printer to your PC with a parallel c abl e, s k ip t o
the following section, “To install the printe r driver u sing the Installe r under
Windows XP,” on page 3-6.
To install the USB Device Driver under Windows XP
3-2
1
Turn on your PC.
2 Turn on the printer.
3
When Windows and the printer are both ready, insert the CD-ROM
that came with your printer into your PC’s CD-ROM drive.
Installing the printer driver
4
Connect the printer to the PC with the USB cable (see chapter 2) to
display the Found New Hardware Wizard dialog box.
5
Choose [Can cel] to close the Found New Hardware Wizard dialog
box.
3
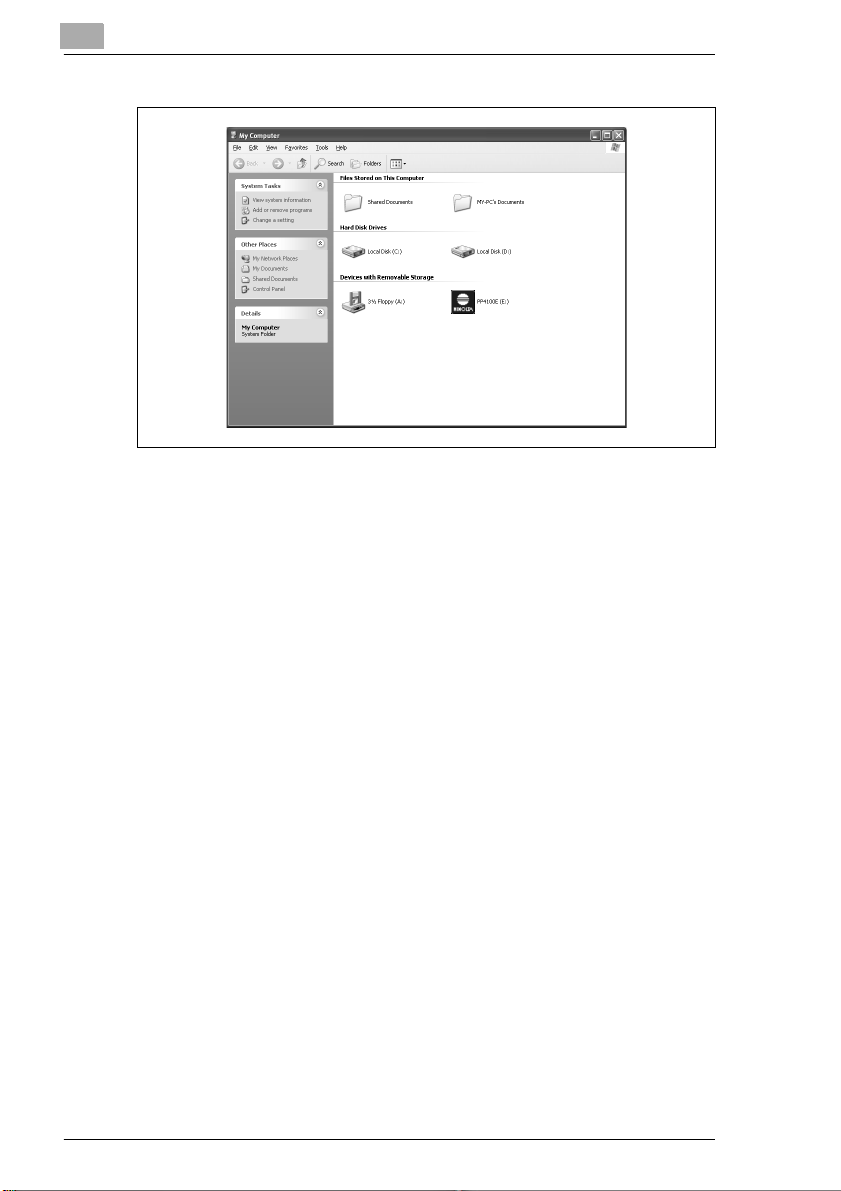
6
Choose [start], and then choose “My Computer.”
3-3
3
Installing the printer driver
7
In the System Tasks list choose “View system information.”
8
Choose the “Hardware” tab of the System Properties dial og, and then
choose the [Device Manager...] button.
9
Under “Universal Serial Bus controllers” double-click “USB Printing
Support.” The USB Printing Support Properties dialog box displays.
3-4

Installing the printer driver
10
Choose the “Driver” tab of the USB Printing Support Prop erties dialog
box, and then choose [Update Driver...].
3
11
Choose the “Install from a list or specific location (Advanced)” option
button, and then choose [Next].
3-5
3
Installing the printer driver
12
When the next dialog box appears, check the “Don’t search. I will
choose the driver to install” box, and then choose [Next].
13
Choose [Have Disk...].
14
Choose [Browse...].
15
Browse the CD-ROM and naviga te to “\Drivers\language\Win98USB.”
Then, choose [Open].
16
Choose [OK], and then choose [Next].
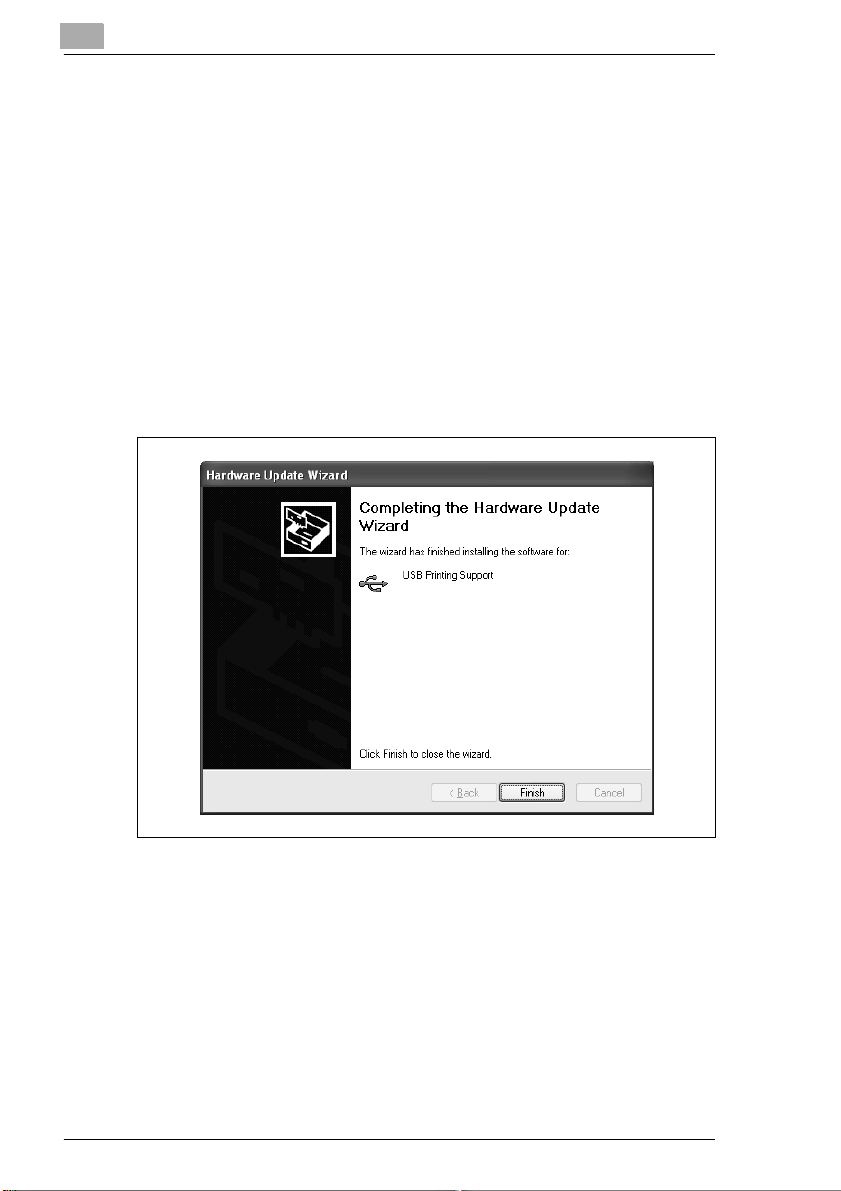
17Follow the instructions on the screen to complete the installation.
18
When the following dialog box displays, choose [Finish] to finish the
installation.
3-6
This completes the installation of the USB device driver for the
PagePro 1200W printer. Now go on to the following section to install
the printer driver.
To install the printer driver using the Installer under Windows XP
The CD-ROM that cam e wi th y our p r in ter s tart s au tom ati ca ll y after being
loaded into the CD-ROM drive of your PC. You are guided step-by-step
through the installation procedure.

Installing the printer driver
1
With Windows running, insert the CD-ROM in the CD-ROM drive of
your PC.
The installation program starts automatically.
What if the installation program does not start up automatically?
?
➜ Browse to the CD-ROM directo ry. Then double-cli ck “setup.exe” to
start the installation program.
2
Follow the instructions for the installation program.
Once the printer driver has been successfully installed, the
“MINOLTA-QMS PagePro 1200W” p rinter icon displ ays in the Printers
dialog box.
3 Remove the CD-ROM from your PC’s CD-ROM drive. This complete s
the installation of the printer driver.
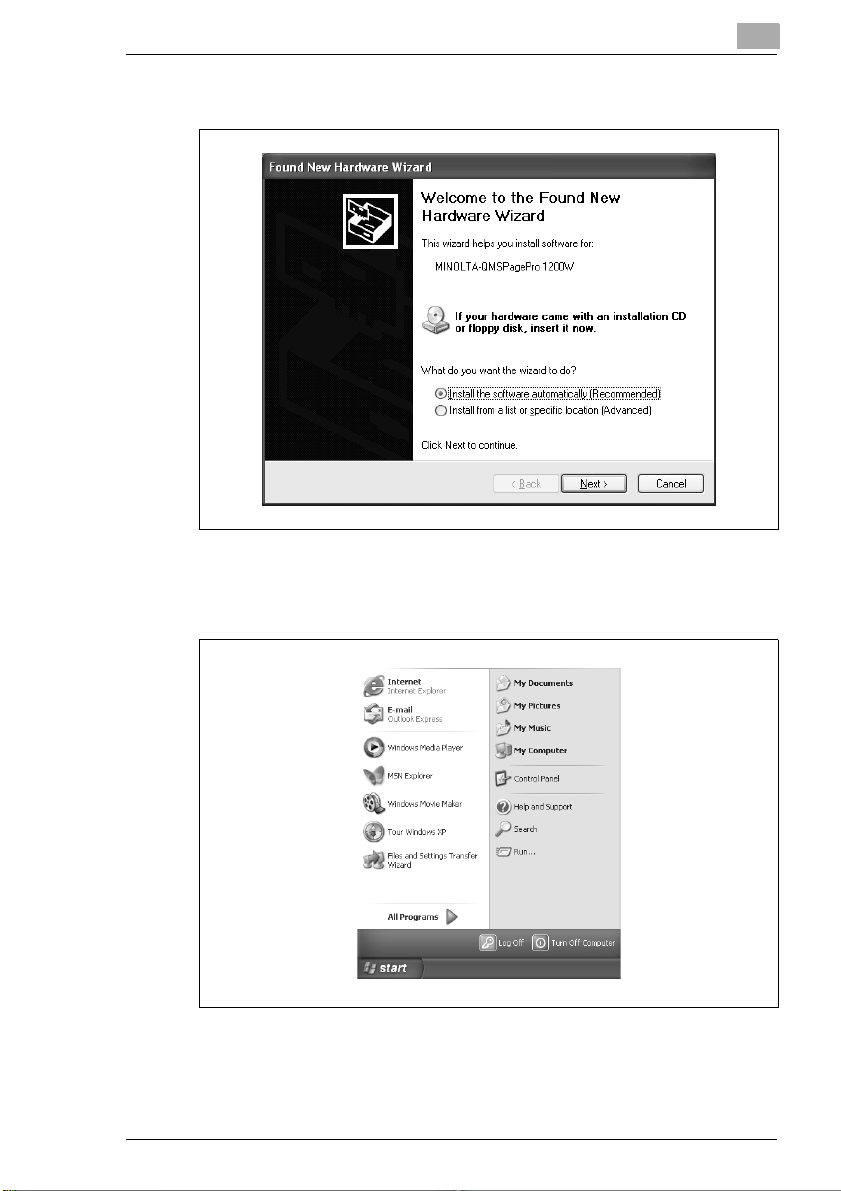
To install the printer driver using Plug-and-Play under Windows XP
For a simple way of installing the print er driver, we recommend us ing the
Installer (see the previous section). However, there are other ways of
installing the printer driver without using the installer. This section
describes Plug-and-Play installation.
Parallel USB
1
After connecting the printer to
your PC with the parallel cable,
turn on the printer.
1
Turn on the PC, and then turn on
the printer.
3
2
Turn on the PC. After Windows
starts, the Found New Hard ware
Wizard dialog displays.
3
Insert the CD-ROM that came with your printer into your PC’s CDROM drive, and then choose [Next].Check the “Install from a list or
specific location (Advanced ) ” option button, and then click [Next].
2
When Windows and the printer
are both ready, connect the
printer to the PC with the USB
cable (see chapter 2). The
Found New Hardware Wizard
dialog box displays.
3-7

3
Installing the printer driver
4
Check the “Don’t search, I will choose the driver to install” option
button, and then choose [Next].
5
Select “Printers” in the Common hardware t ypes li st, and t hen choo se
[Next].
6
Choose [Have Disk], and then choose [Browse].
7
Browse the CD-ROM and navigate to “\Drivers\language\Win2000.”
8
Choose [Open].
9 Choose [OK], and then choose [Next].
10
Follow the instructions on the screen to complete the installation.
11
Check that the “MINOLTA-QMS PagePro 1200W” printer icon is displayed in the Printers dialog box.
12
Remove the CD-ROM from your PC’s CD-ROM drive. This completes
the installation of the printer driver.
To install the printer driver using the Add Printer Wizard under
Windows XP
3-8
1
Turn on the PC.
2
After Windows starts, insert the CD-ROM that came with your printer
into your PC’s CD-ROM drive.

Installing the printer driver
3
Choose [start], and then choose “Control Panel.”
4
In “Pick a category” choose “Printers and Other Hardware.”
3
3-9

3
Installing the printer driver
5
In “Pick a task” choose [Add a printer].
6
Choose [Next].
7
Select “Local printer attached to this computer.”
❍ Do not check the “Automatically detect and install my Plug and
Play printer” box.
3-10
8
Choose [Next].
9
Choose the “Use the following port:” button, select the port you want
to use, and then choose [Next].
If you are using a parallel connection, select “LPTx:” (x=1, 2, etc.).
If you are using a USB connection, select “USB001.”
10
Choose [Have Disk], and then choose [Browse].
11
Browse the CD-ROM and navigate to “\Drivers\language\Win2000.”
12
Choose [Open].
13
Choose [OK], and then choose [Next].
14
Follow the instructions on the screen to complete the installation.
15
Check that the “MINOLTA-QMS PagePro 1200W” printer icon is displayed in the Printers dialog box.

Installing the printer driver
16
Remove the CD-ROM from your PC’s CD-ROM drive. This compl etes
the installation of the printer driver.
3.4 Installing the USB device driver and printer driver under Windows Me
When connecting t he printer to your PC with a USB cabl e, insta ll the USB
device driver according to the following instructions before installing the
printer driver.
If you have conne cte d th e p r int er to yo ur PC wit h a parallel cable, skip to
the following sec tion, “To install the printe r drive r using the Insta ller under
Windows Me,” on page 3-12.
To install the USB device driver under Windows Me
1
Turn on your PC.
2
Turn on the printer.
3
When Windows and the printer are both ready, insert the CD-ROM
that came with your printer into your PC’s CD-ROM drive.
4
Connect the printer to the PC with the USB cable (see chapter 2) to
display the Add New Hardware Wizard dialog box.
3
5
Check the “Specify the location of the driver (Advanced)” option
button, and then choose [Next].
3-11

3
Installing the printer driver
6
Check the “Search for the best driver for your device.
(Recommended).” option button, check the “Specify a location” box,
and then choose [Browse...].
7
Browse the CD-ROM and naviga te to “\Drivers\language\Win98USB.”
8
Choose [OK].
9
Follow the instructions that appear on the screen to complete the
installation.
10
When the following dialog box displays, choose [Finish] to finish the
installation.
3-12
11
This completes the installation of the USB device driver for the
MINOLTA-QMS PagePro 1200W printer. Now go to the followi ng
section to install the printer driver.
To install the printer driver using the Installer under Windows Me
The CD-ROM that cam e wi th y our p r in ter s tart s au tom ati ca ll y after being
loaded into the CD-ROM drive of your PC. You are guided step-by-step
through the installation procedure.
1
With Windows runni ng, insert the CD -ROM that came w ith your printe r
into your PC’s CD-ROM drive.
The installation program starts automatically.
What if the installation program does not start up automatically?
?
➜ Browse the CD-ROM and double-click “setup.exe” to start the
installation program.

Installing the printer driver
2
Follow the instructions for the installation program.
Once the printer driver has been successfully installed, the
“MINOLTA-QMS PagePro 1200W” p rinter icon displ ays in the Printers
dialog box.
3
Remove the CD-ROM from your PC’s CD-ROM drive. This compl etes
the installation of the printer driver.
To install the printer driver using Plug-and-Play under Windows Me
For a simple way of installing the print er driver, we recommend us ing the
Installer (see the previous section). However, there are other ways of
installing the printer driver without using the installer.
This section describes Plug-and-Play installation with a parallel
connection.
1
After connecting the printer to your PC with the pa rallel c able, tur n on
the printer.
2
Turn on the PC. After Windows sta rts, the Add New Hardware Wizard
dialog displays.
3
3
Insert the CD-ROM that came with your printer into your PC’s CDROM drive, click the “Specify the location of the driver (Advanced)”
button, and then choose [Next].
4
Choose the “Search for the best driver for your device.
(Recommended).” option button, check the “Specify a location:” box,
and then choose [Browse].
3-13

3
Installing the printer driver
5
Browse the CD-ROM and navigate to “\Drivers\language\Win9x.”
6
Choose [OK], and then choose [Next] twice.
7
Follow the instructions on the screen to complete the installation.
8
Check that the “MINOLTA-QMS PagePro 1200W” printer icon is
displayed in the Printers dialog box.
9
Remove the CD-ROM from your PC’s CD-ROM drive. This completes
the installation of the printer driver.
To install the printer driver using the Add Printer Wizard under
Windows Me
1
Turn on the PC.
2
After Windows starts, insert the CD-ROM that came with your printer
into your PC’s CD-ROM drive.
3
Choose[Start], point to “Settings,” and then choose “Printers.”
4
Double-click the “Add Printer” icon.
3-14
5
Choose [Next].
6 Select “Local Printer.”
7 Choose [Next].
8 Choose [Have Disk], and then choose [Browse].

Installing the printer driver
9
Browse the CD-ROM and navigate to “\Drivers\language\Win9x.”
10
Choose [OK].
11
Choose [OK], and then choose [Next].
12
Select the appropriate port, and then choose Next.
If you are using a parallel connection, select “LPTx:” (x=1, 2, etc.).
If you are using a USB connection, select “USB001:”
13
Follow the instructions on the screen to complete the installation.
14Check that the “MINOLTA-QMS PagePro 1200W” printer icon is
displayed in the Printe rs dialog box.
3
15
Remove the CD-ROM from your PC’s CD-ROM drive. This compl etes
the installation of the printer driver.
3.5 Installing the USB device driver and printer driver under Windows 2000
When connecting t he printer to your PC with a USB cabl e, insta ll the USB
device driver according to the following instructions before installing the
printer driver.
If you have conne cte d th e p r int er to yo ur PC wit h a parallel cable, skip to
the following sec tion, “To install the printe r drive r using the Insta ller under
Windows 2000,” on page 3-18.
To install the USB device driver under Windows 2000
If the printer is connected to the computer using a USB cable, USB
3-15

3
Installing the printer driver
Printing Support may automatically be incorporated, depending on the
operating system. In order to activate al l functions of the Pa gePro 1200W,
the USB device driver for PagePro 1200W must be installed.
Install the USB device driver for PagePro 1200W according to the
following procedure.
1
Turn on your PC.
2
Turn on the printer.
3 When Windows and the printer are both ready, insert the CD-ROM
that came with your printer into your PC’s CD-ROM drive.
4 Connect the printer to the PC with the USB cable (see chapter 2) to
display the Found New Hardware Wizard dialog box.
3-16
5
Choose [Cancel] to close the Found New Hardware Wizard dialog
box.
6
Right-click the “My Computer” icon on the desktop, and then choose
“Properties” in the sho rtcut menu that appears . The System Properti es
dialog box displays.
7
Choose the “Hardware” tab of the System Properties dial og, and then
choose the [Device Manager...] button.
8
Under “Universal Serial Bus controllers” double-click “USB Printing
Support.” The USB Printing Support Properties dialog box displays.

Installing the printer driver
9
Chose the “Driver” tab of the USB Printing Support Properties dialog
box, and then choose [Update Driver...].
10
Choose [Next] to display the next dialog box.
3
11
Check the “Search a suitable driver for my device (recommended)”
option button, and then choose [Next].
3-17

3
Installing the printer driver
12
When the next dia log box dis plays, check the “Specify a location” box,
and then choose [Next].
13
Choose [Browse...].
14
Browse the CD-ROM and naviga te to “\Drivers\language\Win98USB.”
15
Choose [Open].
16
Choose [OK], and then choose [Next].
17
Follow the instructions on the screen to complete the installation.
18
When the following dialog box displays, choose [Finish] to finish the
installation.
3-18
This completes the installation of the USB device driver for the
PagePro 1200W printer. Now go on to the following section to install
the printer driver.
To install the printer driver using the Installer under Windows 2000
The CD-ROM that cam e wi th y our p r in ter s tart s au tom ati ca ll y after being
loaded into the CD-ROM drive of your PC. You are guided step-by-step
through the installation procedure.
1
With Windows runni ng, insert the CD -ROM that came w ith your printe r
into your PC’s CD-ROM drive.
The installation program starts automatically.

Installing the printer driver
What if the installation program does not start up automatically?
?
➜ Browse to the CD-ROM directo ry. Then double-cli ck “setup.exe” to
start the installation program.
2 Follow the instructions for the installation program.
Once the printer driver has been successfully installed, the
“MINOLTA-QMS PagePro 1200W” p rinter icon displ ays in the Printers
dialog box.
3
Remove the CD-ROM from your PC’s CD-ROM drive. This compl etes
the installation of the printer driver.
To install the printer driver us ing Plug-and-Play unde r Windows 2000
For a simple way of installing the print er driver, we recommend us ing the
Installer (see the previous section). However, there are other ways of
installing the printer driver without using the installer. This section
describes Plug-and-Play installation.
Parallel USB
1
After connecting the printer to
your PC with the parallel cable,
turn on the printer.
1
Turn on the PC, and then turn on
the printer.
3
2
Turn on the PC. After Windows
starts, the Found New Hard ware
Wizard dialog displays.
3
Insert the CD-ROM that came with your printer into your PC’s CDROM drive, and then choose [Next].
4
Check the “Display a list of the known drivers for this device so tha t I
can choose a specific driver” option button, and then choose [Next].
2
When Windows and the printer
are both ready, connect the
printer to the PC with the USB
cable (see chapter 2). The
Found New Hardware Wizard
dialog box displays.
3-19

3
Installing the printer driver
5
Choose “Printers,” and then choose [Next].
6
Choose [Have Disk...], and then choose [Browse...].
7
Browse theCD-ROM and navigate to “\Drivers\language\Win2000.”
8
Choose [Open].
9
Choose [OK], and then choose [Next].
10
Follow the instructions on the screen to complete the installation.
11Check that the “MINOLTA-QMS PagePro 1200W” printer icon is dis-
played in the Printers dialog box.
12
Remove the CD-ROM from your PC’s CD-ROM drive. This completes
the installation of the printer driver.
To install the printer driver using the Add Printer Wizard under
Windows 2000
1
Turn on the PC
2 After Windows starts, insert the CD-ROM that came with your printer
into your PC’s CD-ROM drive.
3-20
3 Choose [Start], point to “Settings,” and then choose “Printers.”
4
Double-click the “Add Printer” icon.
5 Click [Next].

Installing the printer driver
6
Select “Local Printer.”
❍ Do not check the “Automatically detect and install my Plug and
Play printer” box.
7
Choose [Next].
8
Choose the “Use the following port:” button, select the port you want
to use, and then choose [Next].
If you are using a parallel connection, select “LPTx:” (x=1, 2, etc.).
If you are using a USB connection, select “USB001.”
9
Choose [Have Disk], and then choose [Browse].
10Browse the CD-ROM and navigate to “\Drivers\language\Win2000.”
11
Choose [Open].
12
Choose [OK], and then choose [Next].
13
Follow the instructions on the screen to complete the installation.
14
Check that the “MINOLTA-QMS PagePro 1200W” printer icon is displayed in the Printers dialog box.
3
15
Remove the CD-ROM from your PC’s CD-ROM drive. This compl etes
the installation of the printer driver.
3.6 Installing the USB device driver and printer driver under Windows 98
When connecting t he printer to your PC with a USB cabl e, insta ll the USB
device driver according to the following instructions before installing the
printer driver.
If you have conne cte d th e p r int er to yo ur PC wit h a parallel cable, skip to
the following sec tion, “To install the printe r drive r using the Insta ller under
Windows 98,” on page 3-23.
To install the USB device driver under Windows 98
1
Turn on your PC.
2 Turn on the printer.
3
When Windows and the printer are both ready, insert the CD-ROM
that came with your printer into your PC’s CD-ROM drive.
3-21

3
Installing the printer driver
4
Connect the printer to the PC with the USB cable (see chapter 2) to
display the Add New Hardware Wizard dialog box.
5
Choose [Next] to display the next dialog box.
6
Check the “Search for the best driver for your device.
(Recommended).” option button, and then choose [Next].
3-22
7 When the next dialog box a ppears, check the “Specify a location” box,
and then choose [Browse...].
8 Browse the CD-ROM and navigate to “\Drivers\language\Win98USB.”
9
Choose [OK].
10
Follow the instructions on the screen to complete the installation.

Installing the printer driver
11
When the following dialog box displays, choose [Finish] to finish the
installation.
12
This completes the installation of the USB device driver for the
PagePro 1200W printer. Now go to th e fol lowi ng s ec tio n to in sta ll the
printer driver.
To install the printer driver using the Installer under Windows 98
The CD-ROM that came w i th y our p rin ter s tarts au tom ati ca lly after being
loaded into the CD-ROM drive of your PC. You are guided step-by-step
through the installation procedure.
3
1
With Windows running, insert the CD-ROM in the CD-ROM drive of
your PC.
The installation program starts automatically.
What if the installation program does not start up automatically?
?
➜ In Windows Explorer browse to the CD-ROM directory. Then
double-click “setup.exe” to start the installation program.
2
Follow the instructions for the installation program.
Once the printer driver has been successfully installed, the
“MINOLTA-QMS PagePro 1200W” p rinter icon displ ays in the Printers
dialog box.
3
Remove the CD-ROM from your PC’s CD-ROM drive. This compl etes
the installation of the printer driver.
3-23

3
Installing the printer driver
To install the printer driver using Plug-and-Play under Windows 98
For a simple wa y of in sta lli ng the printer driver, we recommend us in g the
Installer (see the previous section). However, there are other ways of
installing the printer driver without using the Installer.
This section describes Plug-and-Play installation with a parallel
connection.
1
After connecting the prin ter to your PC with the parall el cabl e, turn on
the printer.
2
Turn on the PC. After Windows st arts, the Add New Hardware Wi zard
dialog box displays.
3-24
3
Insert the CD-ROM that came with your printer into your PC’s CDROM drive, and then choose [Next].
4 Choose the “Search for the best driver for your device.
(Recommended).” button, and then choose [Next].
5
Check the “Specify a location:” box, and then choose [Brow s e... ].
6 Browse the CD-ROM and navigat e to “\Drivers\language\Win9x.”
7
Choose [OK], and then choose [Next] twice.
8
Follow the instructions on the screen to complete the installation.

Installing the printer driver
9
Check that the “MINOLTA-QMS PagePro 1200W” printer icon is displayed in the Printers dialog box. To display the Printers dialog box,
choose [Start], point to [Settings], and then choose [Printers].
10
Remove the CD-ROM from your PC’s CD-ROM drive. This compl etes
the installation of the printer driver.
To install the printer driver using the Add Printer Wizard under
Windows 98
1
Turn on the PC
2 After Windows starts, insert the CD-ROM that came with your printer
into your PC’s CD-ROM drive.
3
Choose [Start], point to “Settings,” and then choose “Printers.”
4
Double-click the “Add Printer” icon.
3
5
Click [Next].
6
Select “Local Printer.”
7 Choose [Next].
8
Choose [Have Disk], and then choose [Browse].
9
Browse the CD-ROM and navigate to “\Drivers\language\Win9x.”
10Choose [OK].
3-25

3
Installing the printer driver
11
Choose [OK], and then choose [Next].
12
Select the appropriate port, and then choose [OK].
If you are using a parallel connection, select “LPTx:” (x=1, 2, etc.).
If you are using a USB connection, select “USB001.”
13
Follow the instructions on the screen to complete the installation.
14
Check that the “MINOLTA-QMS PagePro 1200W” printer icon is displayed in the Printers dialog box.
15Remove the CD-ROM from your PC’s CD-ROM drive. This complete s
the installation of the printer driver.
3.7 Installing the printer driver under Windows 95
To install the printer driver using the Installer under Windows 95
The CD-ROM that cam e wi th y our p r in ter s tart s au tom ati ca ll y after being
loaded into the CD-ROM drive of your PC. You are guided step-by-step
through the installation procedure.
1
With Windows running, insert the CD-ROM in the CD-ROM drive of
your PC.
The installation program starts automatically.
What if the installation program does not start up automatically?
?
➜ In Windows Explorer browse to the CD-ROM directory. Then
double-click “setup.exe” to start the installation program.
3-26

Installing the printer driver
2
Follow the instructions for the installation program.
Once the printer driver has been successfully installed, the
“MINOLTA-QMS PagePro 1200W” p rinter icon displ ays in the Printers
dialog box.
3
Remove the CD-ROM from your PC’s CD-ROM drive. This compl etes
the installation of the printer driver.
To install the printer driver using Plug-and-Play under Windows 95
For a simple way of installing the print er driver, we recommend us ing the
Installer (see the previous section). However, there are other ways of
installing the printer driver without using the Installer.
This section describes Plug-and-Play installation with a parallel
connection. Windows 95 does not support USB connections.
1
After connecting the printer to your PC with the pa rallel c able, tur n on
the printer.
2
Turn on the PC. After Windows starts, the Update Device Driver
Wizard dialog box displays.
3
3
Insert the CD-ROM that came with your printer into your PC’s CDROM drive, and then choose [Next].
4
Choose [Other Locations], and then choose [Browse].
5
Browse the CD-ROM and navigate to “\Drivers\language\Win9x.”
6 Choose [OK].
7 Follow the instructions on the screen to complete the installation.
3-27

3
Installing the printer driver
8
Check that the “MINOLTA-QMS PagePro 1200W” printer icon is
displayed in the Printers dialog box.
9
Remove the CD-ROM from your PC’s CD-ROM drive. This completes
the installation of the printer driver.
To install the printer driver using the Add Printer Wizard under
Windows 95
1
Turn on the PC.
2
After Windows starts, insert the CD-ROM that came with your printer
into your PC’s CD-ROM drive.
3
Choose [Start], point to “Settings,” and then choose “Printers.”
4
Double-click the “Add Printer” icon.
3-28
5
Choose [Next].
6
Select “Local Printer.”
7 Choose [Next].
8
Choose [Have Disk], and then choose [Browse].
9
Browse the CD-ROM and navigate to “\Drivers\language\Win9x.”
10
Choose [OK] twice, and then choose [Next].
11
Follow the instructions on the screen to complete the installation

Installing the printer driver
12
Check that the “MINOLTA-QMS PagePro 1200W” printer icon is
displayed in the Printe rs dialog box.
13
Remove the CD-ROM from your PC’s CD-ROM drive. This compl etes
the installation of the printer driver.
3.8 Installing the printer driver under Windows NT 4.0
To install the printer driver us ing the Installe r under Window s NT 4. 0
The CD-ROM that came w i th y our p rin ter s tarts au tom ati ca lly after being
loaded into the CD-ROM drive of your PC. You are guided step-by-step
through the installation procedure.
1
With Windows running, insert the CD-ROM in the CD-ROM drive of
your PC.
The installation program starts automatically.
What if the installation program does not start up automatically?
?
➜ In Windows Explorer browse to the CD-ROM directory. Then
double-click “setup.exe” to start the installation program.
2
Follow the instructions for the installation program.
Once the printer driver has been successfully installed, the
“MINOLTA-QMS PagePro 1200W” p rinter icon displ ays in the Printers
dialog box.
3
3
Remove the CD-ROM from your PC’s CD-ROM drive. This compl etes
the installation of the printer driver.
To install the printer driver using the Add Printer Wizard under
Windows NT 4.0
For a simple way of installing the print er driver, we recommend us ing the
Installer (see the previous section). However, there are other ways of
installing the printer driver without using the Installer.
This section describes Plug-and-Play installation with a parallel
connection. Windows NT 4.0 does not support USB connections.
1
Turn on the PC.
2 After Windows starts, insert the CD-ROM that came with your printer
into your PC’s CD-ROM drive.
3 Choose [Start], point to “Settings,” and then choose “Printers.”
3-29

3
Installing the printer driver
4
Double-click the “Add Printer” icon.
5
Select “My Computer.”
6
Choose [Next].
7
Select the appropriate port and then choose[Next].
8
Choose [Have Disk...], and then choose [Browse...].
9
Browse the CD-ROM and navigate to “\Drivers\language\WinNT4.”
3-30
10Choose [Open].
11
Choose [OK], and then choose [Next].
12
Follow the instructions on the screen to complete the installation.
13Check that the “MINOLTA-QMS PagePro 1200W” printer icon is
displayed in the Printers dialog box.
14Remove the CD-ROM from your PC’s CD-ROM drive. This complete s
the installation of the printer driver.

Installing the printer driver
3.9 Uninstalling the printer driver and USB device driver
This section describes how to uninstal l the PagePro 1200W pr inter driver
when necessary.
✎
Note
If the uninstallation program is used to remove the printer driver, the
USB device driver is also removed.
✎
Note
If you used Add Printer to install the printer driver, there is no
uninstaller utility. To remove the printer, select it and delete it in the
Printers folder.
✎
Note
The screen images that appear in this section show the examples of
uninstallation under Windows 98. Your screen m ay differ slightly.
3
To uninstall the printer driver under Windows XP
1
Choose the [Start] button, and then choose “Control Panel.”
3-31

3
Installing the printer driver
2
In “Pick a category” choose “Add or remove Programs” to open the
Add or Remove Programs dialog box.
3 Select “MINOLTA-QMS PagePro 1200W,” and then choose [Change/
Remove] to uninstall the printer driver.
3-32

Installing the printer driver
4
Select “MINOLTA-QMS PagePro 1200W” in the Uninstall dialog box.
5
Choose [Uninstall] to proceed with the uninstallation or [Cancel] to
abort.
6 When the following dialog box displays, c hoose [Yes] to r estart the PC.
3
✎
Note
If is recommended that you restart your computer after uninstallation.
To uninstall the printer driver under Windows Me/2000/98/95/NT 4.0
1
Choose the [Start] button, po int to [Settings], and then choo se [Control
Panel].
3-33

3
Installing the printer driver
2
Double-click the “Add/ Remove Pr ograms” ico n in the Control Pan el dialog box to open the Add/Remove Programs Properties dialog box.
3-34

Installing the printer driver
3
For Windows Me/98/95/NT 4.0, select “MINOLTA-QMS PagePro
1200W,” and then c hoose [Add /Remove] to uninst all the pri nter driver .
3
For Windows 2000, select “MINOLTA-QMS PagePro 1200W,” and
then choose [Change/Remove] to uninstall the printer driver.
3-35

3
Installing the printer driver
4
Select “MINOLTA-QMS PagePro 1200W” in the Unin sta ll dialog .
5
Choose [Uninstall] to proceed with the uninstallation or [Cancel] to
abort.
6
After the PagePro 1200W printer driver has been removed, choose
[OK].
3-36
7
Choose [Yes] to close the window.
✎
Note
It is recommended that you restart your computer after uninstallation.

Working with the printer driver
4 Working with the printer driver
4.1 Displaying printer driver settings
Displaying settings under Windows XP
1
From the Start menu, choose Control Panel.
2 In Pick a Category choose Printers and Other Hardware.
3
In Pick a task choose View installed printers or fax printers.
4
In the Printers and Faxes dialog box, select the MINOLTA-QMS
PagePro 1200W printer icon.
5
To display the printer driver settings, from the File menu choose
Printing Preferences... The following dialog box displays.
4
Displaying settings in Windows Me/98/95
1
From the Start menu, choos e Settings and th en Printers to displa y the
Printers directory.
2
Select the MINOLTA-QMS PagePro 1200W printer icon.
4-1

4
Working with the printer driver
3
Display the printer driver settings:
G
Windows Me/98/95—From the File menu choose Properties, and
then choose the --> 32-bit Driver Setup tab.
4-2
✎
The operating system also uses tabs!
The “General” and “Details” tabs are automatically determ in ed by the
operating system and are therefore not described in this manual.

Working with the printer driver
G
Windows 2000—From the File m enu choose Printing P references.
The following window displays.
G
Windows NT 4.0—From the File menu choose Document De-
faults. A window similar to the Windows 2000 window shown
above displays.
4
4-3

4
4.2 Setup tab
The Setup tab allows you to
G Print several pages of a document on the same page (n-up printing)
G Provide a watermark on printed documents
G Design custom watermarks
G Specify manual duplex printing
G Specify paper feed from different trays
G Define the type of paper/media
G Print using a form over lay
G Create/edit a form overlay
Refer to the printer driver’s online help for information on all of these
functions.
Working with the printer driver
4-4

Working with the printer driver
4.3 Paper tab
The Paper tab allows you to
G Specify the size of the original document
G Define custom media sizes
G Fit printed documents to a specified media size
G Select the output media size
G Scale (enlarge/reduce) documents
G Specify the number of copies
G Turn on/off the printer’s sorting function
G Turn on/off the Proof Print function
G Specify the orientation of the media
Refer to the printer driver’s online help for information on all of these
functions.
4
4-5

4
4.4 Quality tab
The Quality tab allows you to
G Specify the resolution
G Adjust the contrast and brightness of the printed document
G Turn on/off Toner Save mode
Refer to the printer driver’s online help for information on all of these
functions.
Working with the printer driver
4-6

Working with the printer driver
4.5 Device Options Setting tab
The Device Options Setting tab allows you to
G Activate the optional lower feeder unit (Tray 2)
G View information about the printer driver.
Refer to the printer driver’s online help for information on all of these
functions.
4
4-7


Working with the Status Display
5 Working with the Status Display
If you used the CD-ROM Installer to install the printer driver, the Status
Display was also installed. It was not installed, however, if you used Add
Printer to install the printer driver.
5.1 Environment
The Status Monitor and Printer Con trol Panel can be used with the following operating systems and interfaces.
IEEE 1284 Parallel USB
Windows XP 22
Windows Me 22
Windows 2000 22
Windows 98 SE 22
Windows 98 2 —
Windows 95 2 —
Windows NT 4.0 2 —
5
5-1

5
5.2 Opening the Status Display
Use one of the following steps to open the Status Monitor.
➜
Windows Me2000//98/95/NT 4.0—From the Start menu, choose
Programs, then MINOLTA-QMS PagePro 1200W Utilities, and then
MINOLTA-QMS PagePro 1200W Status.
➜
Windows XP—Choose Start, choose All Programs, then MINOLTA-
QMS PagePro 1200W Utilities, and then MINOLTA-QMS PagePro
1200W Status.
Working with the Status Display
5-2

Working with the Status Display
Altering the size of the Status Display window
➜ From the Display m enu choose Status (Redu ce)” to decrease the size
of the window.
➜ From the Display menu choose Status (Expand) to increase the size
of the window.
5
5-3

5
5.3 Using the Stat us Display
G When the background of the printer graphic is green, the printer is in
Stand-by mode or a job is printing normally.
G When the background to the printer graphic is red, there is an error
and the job has been interrupted. The status of the printer and the
error message are shown in the dialog boxes on the left.
Working with the Status Display
5-4
Refer to the Status Display’s online help for information on all of its
functions.

Working with the Status Display
5.4 Closing the Status Display
➜ To close the Status Display from the File menu choose Exit.
✎
Note
If you choose [X] button in the upper-rig ht corner of the Status Displa y
window to close the window, the Status Display remains available at
the bottom right end of the taskbar.
5
5-5


Working with the printer
6 Working with the printer
6.1 Please note the following points:
What should I watch out for when loading paper?
To avoid paper misfeeds, observe the following points:
G Do not use any paper with the following features:
❍ Paper that has already been used in a thermal or ink-jet printer.
❍ Creased or wavy paper.
❍ Paper with a surface that is too smooth, too rough or irregular.
❍ Specially coated paper such as carbon paper or paper with an
adhesive surface.
❍ Paper that is not cut at right-angles.
❍ Paper that is held together by glue, adhesive or clips.
❍ Paper with labels that detach easily.
❍ Warped or curled postcards.
G D o not all ow th e s tac k of p ape r in th e paper tray to exceed the media
limit mark.
What should I watch out for when loading envelopes?
To avoid envelope misfeeds in the laser printer, please observe the
following points:
G Do not use self-adhesive envelopes or those with a tear-off strip, clo-
sures, or a window.
G Pl ace the envelop es in the tray with the flap down and fac ing to the left.
G Make sure that the flaps are neatly folded back.
6
✎
Test envelopes before buying large quantities!
Some types of envelopes crease easily when they are run through a
printer. Test a type of envelope before purchasing large quantities.
6-1

6
Working with the printer
Which sizes of paper can I use?
This printer is designed for use only with these media sizes.
Media size
Standard sizes
Letter
8.5" x 11.0"
Legal
8.5" x 14.0"
Executive
7.25" x 10.5"
Half Letter
5.5" x 8.5"
A4
210 x 297 mm
A5
148 x 210 mm
B5 JIS
182 x 257 mm
Chinese 16K
185 x 260 mm
Chinese 32K
130 x 185 mm
Envelopes, postcar d and cus tom siz es
Envelope Monarch
3.875" x 7.5"
Envelope COM10
4.125" x 9.5"
Envelope DL
110 x 220 mm
Envelope C5
162 x 229 mm
Envelope C6
114 x 162 mm
Envelope B5
176 x 250 mm
Choukei-3Gou
120 x 235 mm
Choukei-4Gou
90 x 205 mm
Postcard
100 x 148 mm
Custom
3.0"–8.5" x 5.0"–14.0"
(76–216 mm x 127–356mm)
* The optional lower feeder unit (Tray 2 is shipped with either a letter or A4 tray. Legal and
executive/B5 JIS trays are available as optional accessories.
Media source
Tray 1 Tray 2*(optional) Manual feed tray
Yes Yes Yes
Yes Yes Yes
Yes Yes Yes
Yes No Yes
Yes Yes Yes
Yes No Yes
Yes Yes Yes
Yes No Yes
Yes No Yes
Yes No Yes
Yes No Yes
Yes No Yes
Yes No Yes
Yes No Yes
Yes No Yes
Yes No Yes
Yes No Yes
Yes No Yes
Yes No Yes
6-2

Working with the printer
What types of paper can I use?
This printer is designed for use with the following media types.
6
Media type
Plain paper
16–24 lbs (60–90 g/m
Thick paper/Labels
24–43.25 lbs (90–163 g/m
Envelopes Yes No Yes
Letterhead Yes No Yes
Postcard Yes No Yes
Transparencies Yes No Yes
2
)
Media source
Tray 1 Tray 2 (optional) Manual feed tray
Yes Yes Yes
Yes No Yes
2
)
Printable area
0.2" (4 mm)0.2" (4 mm)
0.2" (4 mm)
Printable area
0.2" (4 mm)
6-3

6
6.2 Using the panel button
1
2
3
The control panel has two indicators and one button.
No. Description No. Description
1 Error indicator (orange) 3 Panel button
2 Ready indicator (green)
The panel button allows you to
G Continue a print job after an error message
G Cancel a print job
Continuing a print job after an error message
You can continue the print job after corr ecting the follow ing types of errors :
✔ When the print job is too complex and the memory capacity of the
printer is inadequate
✔ When there is no more paper in the trays
✔ When paper of a different format than that set in the printer driver w as
fed into the printer
Working with the printer
6-4
Check that one of the above errors has occurred.
1
Press the panel button to operate the media feed.
2
The print job continues.
✎
Check your printed document!
If you have continued a print job after an error message, be sure to
check your printed document. Not all pages may have printed.

Working with the printer
Cancelling a print job
You can cancel a print job that is currently being processed.
While data is being proces sed or p rinted (th e green “Ready” indicator
1
is blinking), hold down the panel button for more than 5 seconds.
Release the panel button after both indi ca tors light up.
2
The current print job has now been cancelled.
6.3 Loading media
Loading media into Tray 1
Note the following points:
✔ Refill the tray only when it is completely empty.
✔ Refer to the advice on loading media on page 6-1.
Fold Tray 1 down flat.
1
Squeeze the right media gui de a nd
2
open the media guides.
6
Place the media in the tray.
3
How many sheets may I place
?
on the tray?
➜ Tray 1 has a capacity of 150
sheets of plain pap er. The stack
of paper should not rise above
the media limit mark.
How is letterhead fed in?
?
➜ Load letterhead with the side to
be printed facing up and the
preprinted letterhead at the top (facing the printer).
6-5

6
Working with the printer
Squeeze the right media guide and adjust the media guides so that
4
both the left and right sides of the media are secure.
Loading media in the manual feed tray
Open the media guides.
1
Insert the piece of media as far as
2
possible into the manual feed tray
(with the side to be printed facing
up).
How many pieces of media can
?
be fed at one time?
➜ Insert only one sheet of paper or
type of media at a time.
How are envelopes fed in?
?
➜ Place the envelope in the tray with the side to be pri nted facing up .
The flap of the envelope should be facing down and to the left.
How is letterhead fed in?
?
➜ Load letterhead with the side to be printed facing up and the pre-
printed letterhead at the top (facing the printer).
6-6
Loading media in the lower feeder unit (Tray 2)
Note the following points:
✔ The optional lower feeder unit (Tray 2 ) is shippe d with either a letter or
A4 tray. Legal and exec utive/B5 JIS tra ys are als o availabl e as optio nal accessories.
✔ Refill the tray only when it is completely empty.
✔ Paper must be loaded short edge first.
✔ Refer to the advice on loading media on page 6-1.
Remove Tray 2 from the lower feed
1
unit by pulling it out as far as it will
go, gently raising up the front, and
sliding it the rest of the way out.

Working with the printer
Remove the cover from the tray.
2
Press down on the paper lifting
3
plate until it locks into place.
Place a stack of pa per in to t he tray.
4
Make sure that the paper fits under
under the triangular clips.
How many shee ts of paper may
?
I place in the tray?
➜ Tray 2 has a capacity of 500
sheets of plain pap er. The stack
of paper should not rise above
the media limit mark.
How is letterhead fed in?
?
➜ Load letterhead with the side to be printed facing up and the
preprinted letterhead at the top (facing the printer).
Replace the tray cover and insert
5
the tray into the lower feeder unit.
6
6.4 Determining the direction printed sheets
Printed sheets can be output in two ways:
G Face down
G Face up
The printer is fitted with a tray for face-down output. A tray for face-up
output is available as an option. This tray is especially suitable for thick
paper and envelopes because the path through the printer is straighter.
6-7

6
Working with the printer
The face-down output tray can hold up to 100 sheets while the optional
face-up output tray holds 20 sheets.
Note the following points:
✔ Do not change the output direction while a print job is in progress.
✔ Make sure that the output selector switch is in the correct position
when the optional output tray is not installed.
1
1
2
3
4
5
6-8
No. Description No. Description
1 Face-down output tray 4 Output switch location for face-up output
2 Face-up output tray 5 Output switch location for face-down output
3 Output switch

Installing printer options
7 Installing printer options
The following options are available for your printer:
G Lower feeder unit (Tray 2, 500-sheet capacity)
G Legal and executive/B5 JIS trays for the lower feeder unit
G Fa ce -up tray
7.1 Installing the lower feeder unit (Tray 2)
The lower feeder unit can hold up to 500 sheets of plain paper. It is supplied with either a letter (US) or A4 (Europe) tray (Tray 2).
Remove the lower feeder unit from its carton, and then remove the
1
plastic bag and all packing materials.
Make sure that yo u rem ove a ll of the p ackin g ma teri als ins ide th e uni t.
Turn the printer off, and then disconn ect the power cord and interface
2
cable from the printer.
Place the printer onto the lower
3
feeder unit.
❍ Make sure to align the holes on
the bottom of the pr inter with the
coupling pins on the lower
feeder unit.
7
Fill the tray with paper. (For details see chapter 6.)
4
How many sheets of paper may I place in the tray?
?
➜ Tray 2 has a capacity of 500 sheets of plain paper. The stack of
paper should not rise above the media limit mark.
7-1

7
Installing printer options
Replace the tray cover.
5
Insert the tray into the lower feeder
6
unit.
❍ Be sure to use both hands
whenever you are inserting the
tray into or removing it from the
lower feeder unit.
Reconnect the pow er cord and interface cable, and turn on the printe r.
7
7-2

Installing printer options
7.2 Installing the face-up tray
The printer is fitted wi th a tray f or face-down ou tput. A tray for face-up output is available as an opti on. This tray is es peci ally u seful for thic k pape r,
envelopes, label s, and transp arencies bec ause the path through the prin ter is straighter. The face-up tray can hold up to 20 sheets.
Before installing the face-up tray:
Remove the face-up output tray from its carton.
1
Attach the face-up output tray by in-
2
serting the pins into the holes on the
printer, one side at a time. Do not
force both sides in at the same time.
❍ The face-up tray must be bent
slightly to insert it.
7
✎
Face-up or face-down output?
You can set the outp ut direction with
the output switch. (For details see
chapter 6.)
No. Description
1 Output switch location for face-up
output
2 Output switch location for face-down
output
1
2
7-3


Maintaining the printer
8 Maintaining the printer
CAUTION
You could damage the unit by using incorr ect accessories and parts!
If you use accessories and parts from manufacturers other than
MINOLTA-QMS, we cannot guarantee that the laser printer will operate
properly.
➜ Use only MINOLTA-QMS accessories and parts unless specified
otherwise.
WARNING
Toner poses a health hazard!
Toner is harmful if swallowed.
➜ If you swallow toner, consult a doctor immediately.
➜ If you get toner on your hands, wash them immediately with cold wate r
and soap.
8
8-1

8
8.1 Replacing the toner cartridge
Replace the toner cartridge when it is empty or when the printed documents are too light.
Two toner cartridges are available:
G The regular toner cartridge has a capacity of about 3000 letter/A4
pages at about 5% toner coverage.
G The high-capacity toner cartridge has a capacity of about 6000 letter/
A4 pages at about 5% toner coverage.
✎
Note:
The toner cartridge that comes w ith the printe r has a capa city of abou t
1500 letter/A4 pages at about 5% toner coverage.
WARNING
The fusing unit can become very hot!
The fusing unit, which is loca ted benea th the top cover, can become very
hot when the printer is in operation.
➜ To prevent injuries, avoid contact with this area.
Maintaining the printer
8-2
Fusing unit

Maintaining the printer
✎
What precautions should I take
when handling the toner
cartridge?
Never touch the developing roller
under the flap; otherwise, pri nt quality may decline.
Turn off the printer and disconnect the power cord from the printer.
1
Close the face-down tray.
2
Press the top cover release button
3
and open the top cover.
8
Remove the old toner cartridge.
4
8-3

8
Press in the marked positi ons of the
5
handle to fold down the handle.
❍ Disp ose of the used toner car-
tridge properly.
Remove the new toner cartridge
6
from its package.
Holding it firmly with both hands,
7
rock the toner cartridge left and
right, forward and backward, to
distribute the toner evenly.
Completely remove the protective
8
seal from the toner cartridge, and
then raise up the handle.
Maintaining the printer
8-4
Holding the handle, l ower th e to ner
9
cartridge into the printer, aligning
the four pins (two on each side) fit
into the grooves inside the printer.
❍ Color coordinat ed “2” labels
have been affixed to the toner
cartridge and to the inside of the
printer. Install the to ner cartridge
by aligning these labels.

Maintaining the printer
❍ The toner cartridge clicks into
place when it is completely
installed.
Close the top cover and press it
10
down gently but firmly until it locks
into place.
8
Resetting the counter for the toner cartridge
After you have replaced the toner cartridge, reset the co unter for the toner
cartridge.
Turn off the printer.
1
While holding down the panel button, turn on the printer.
2
The green “Ready” indicator begins to blink.
Continue holding down the panel button, and the green “Ready” indi-
3
cator starts to blink.
8-5

8
After the green “Ready” indicator has blinked for about 5 sec on ds , re-
4
lease the panel button.
Both indicators begin to blink.
After confirming that both indicato rs are blinki ng, press an d hold down
5
the panel button again for at least 5 seconds.
Both indicators light up fo r abou t 5 seconds, and then both indicators
begin to blink again.
The counter for the toner cartridge has now been reset.
Turn the printer off and then on again.
6
Once the green “Ready” indicator remains on, the printer is again in
Stand-by mode.
8.2 Replacing the drum cartridge
Change the drum cartridge when the printed documents become faint or
blurred.
The drum cartridge has a capacity of about 16,000 (one-page jobs) to
20,000 (continuous pr inti ng) let ter/A4 pag es (at a n avera ge of 5% or less
coverage).
Maintaining the printer
8-6
WARNING
The fusing unit can become very hot!
The fusing unit, which is loca ted benea th the top cover, can become very
hot when the printer is in operation.
➜ To prevent injuries, avoid contact with this area.
Fusing unit

Maintaining the printer
✎
What precautions should I take
when handling the drum
cartridge?
Never touch the drum under the
flap; otherwise, print quality may
decline.
Turn off the printer and disconnect the power cord from the printer.
1
Close the face-down tray.
2
Press the top cover release button
3
and open the top cover.
8
8-7

8
Remove the toner cartrid ge and the
4
old drum cartridge.
Maintaining the printer
8-8
Remove the new drum cartridge from its carton.
5
Install the drum cartridge in the
6
printer, aligning the guides of the
cartridge with the grooves inside the
printer.
❍ Color coordinat ed “1” labels
have been affixed to the drum
cartridge and to the inside of the
printer. Install the d rum cartridge
by aligning these labels.

Maintaining the printer
Place the toner cartridge back into
7
the printer, aligning the four pins
(two on each side) wi th the groo ves
inside the printer.
❍ Color coordinated “2” labels
have been affixed to the toner
cartridge and to the inside of the
printer. Install the toner c artridge
by aligning these labels.
❍ The cartridge will click into place
when it is completely installed.
8
Close the top cover and press it
8
down gently but firmly until it locks
into place.
8-9

8
Maintaining the printer
Resetting the counter for the drum cartridge
After you have replaced the drum cartridge, reset the drum cartridge
counter.
Turn off the printer.
1
While holding down the panel button, turn on the printer.
2
The green “Ready” indicator begins to blink.
Continue holding down the panel button, and the green “Ready” indi-
3
cator starts to blink.
After the green “Ready” indicator has blinked for about 5 sec on ds , re-
4
lease the panel button.
Both indicators begin to blink.
After confirming that both indicators are blinking, briefly press the
5
panel button.
Both indicators light up fo r abou t 5 seconds, and then both indicators
begin to blink.
The counter for the drum cartridge has now been reset.
Turn the printer off and then on again.
6
Once the green “Ready” indicator remains on, the printer is again in
Stand-by mode.
8.3 Cleaning the printer
Clean the printer at regular intervals to prevent dust, dirt, and paper residue from accumulating in and on the printer.
Cleaning the outside of the printer
Turn off the printer and disconnect the power cord from the printer.
1
Wipe the outside of the printer with a soft cloth. You may moisten th e
2
cloth with a little neutral household cleaner if you wish.
8-10

Maintaining the printer
Cleaning the paper feed roller
Clean the paper feed roller if paper feed problems occur frequently.
WARNING
The fusing unit can become very hot!
The fusing unit , which is locat ed benea th the top c over, can become very
hot when the printer is in operation.
➜ To prevent injuries, avoid contact with this area.
➜ After turning off th e printer, wait at least 10 minutes before cleaning the
inside of the printer.
8
Fusing unit
Turn off the printer and disconnect the power cord from the printer.
1
Close the face-down tray.
2
Press the top cover release button
3
and open the top cover.
8-11

8
Remove the toner cartrid ge and the
4
drum cartridge.
Wrap the drum cartridge wit h a cloth
to protect it from exposure to light.
Wipe the paper feed roller with a
5
soft, dry cloth.
Maintaining the printer
8-12

Maintaining the printer
Reinstall the drum cart ridge and the
6
toner cartridge.
8
Close the top cover and press it
7
down gently but firmly until it locks
into place.
8-13

 Loading...