

Page 1
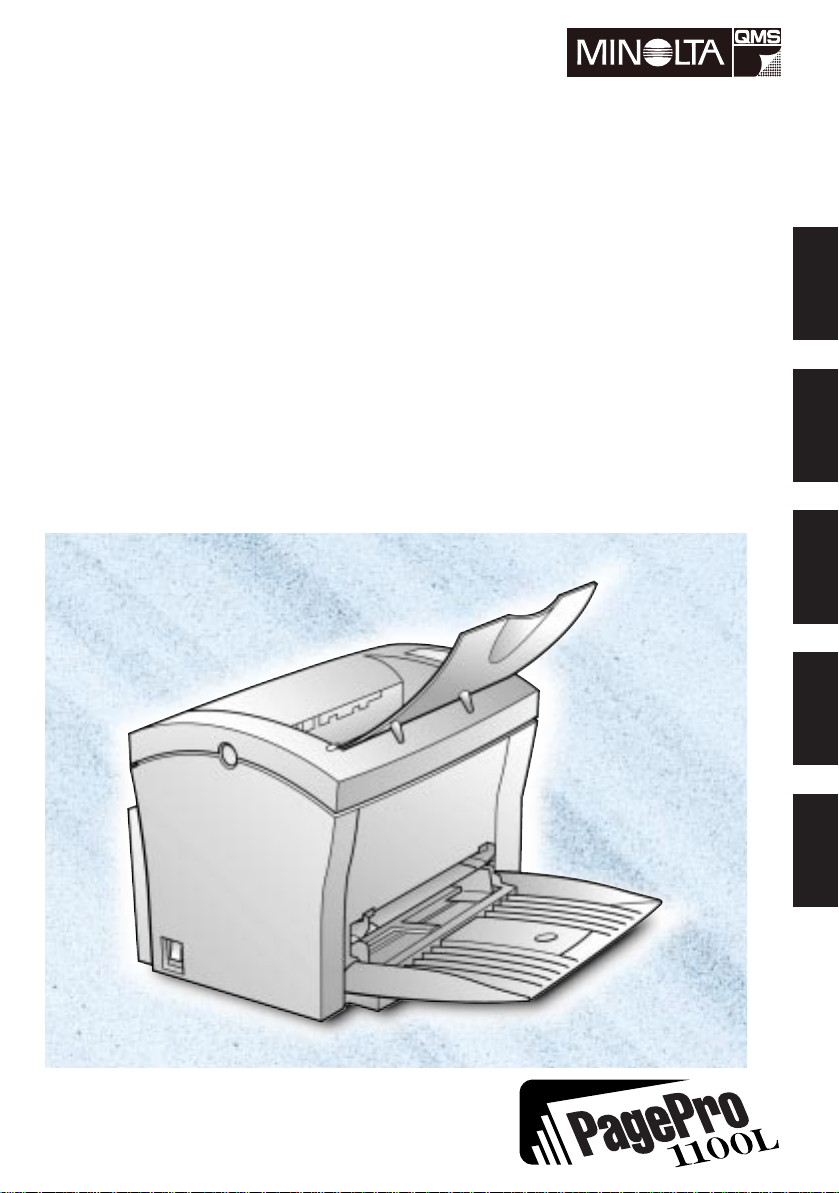
PagePro 1100L
User’s Guide
Bedienungsanleitung
Guide d’utilisation
Guía del usuario
Manuale d’uso
EnglishDeutschFrançaisEspañolItaliano
Page 2

As an ENERGY STAR Partner, we have determined that this
machine meets the
efficienc y.
E
NERGY STAR Guidelines for energy
What is an
E
NERGY STAR product has a special feature that al lows it to automati cally switch to a
“low-power mode” after a period of inactivity. An
more efficie ntl y, saves you money on util ity bills and helps prot ect the enviro nment.
Als
S
TAR-Richtlinien f ür den Ener giewirkungs grad erfüllt .
Was ist ein
Ein
spanne der Inaktivität automatisch in einen “Energiesparmodus” wechseln kann. Ein
E
NERGY STAR Produkt verwendet Energie effektiver, spart bei der Stromrechnung für
Sie Geld und hilft, die Umwelt zu schützen.
En tant que partenaire
aux Directives
Qu’entend-on par produit
Les produits
passer automati quem ent en “mode à fai ble consommation” au terme d’une période d’inact ivité. Un pro duit
factures d’électricit é et de contribuer à la protection de l’environnement.
Como socios de
mas
¿Qué es un producto
Los productos
máticamente a un “modo de ahorro de energía” después de un peri odo de inactividad. Los
productos
mantenimiento y ayudan a protege r el medio ambiente.
E
NERGY STAR product?
E
NERGY STAR product uses energy
E
NERGY STAR Partner haben wir besti mmt , daß di eses Gerät den ENERGY
E
NERGY STAR Produkt?
E
NERGY STAR Produkt hat eine besond ere Funktion, durch die es nach einer Zeit-
E
NERGY STAR, nous avons vérifié que cet appareil est c onforme
E
NERGY STAR sur l’efficacité énergétique.
E
NERGY STAR ?
E
NERGY STAR bénéficient d’une fonctionnalité spéciale qui leur permet de
E
NERGY STAR fait u n usag e plus ef fic ace de l’ énergi e , afin de rédu ire l es
E
NERGY STAR, hemos determinado que esta máquina cumple las nor-
E
NERGY STAR de ahorro de energía.
E
NERGY STAR?
E
NERGY STAR tienen una funci ón especial que les permite cambiar auto-
E
NERGY STAR utilizan l a energí a de f orma m ás efic iente , ahor ran di nero en e l
In qualità di associati alla
soddisfa le direttiv e di
Cos’è un prodotto
E
E
NERGY STAR ?
E
NERGY STAR , stabiliamo che la presente apparecchiatura
NERGY STAR in materia di efficienza energetica.
Page 3

Un prodotto
zione automati ca in modo “risparmio energia” dopo un period o di inattività. Un prodotto
E
NERGY STAR utilizza l’ene rgi a in modo più efficient e, consente risparmi sulle utenze
elettriche e contribuisce alla salvaguardia dell’ambiente.
E
NERGY STAR è dotato di una particolare funzione che attiva la commuta-
Page 4

END USER LI CENSE AGREEME N T
PLEASE READ CAREFULLY THE LICENSE AGRE EMENT BELO W BE FORE OPENING THI S
PACKAGED SOFTWARE. OPENING THIS PA CKAGE INDICATES YOUR ACCEPTANCE OF
THE TERMS AND CONDITIONS BELOW. IF YOU DO NOT AGREE WITH THEM, Y OU
SHOULD PROMPTLY RETURN THE PACKAGE UNUSED.
1. SOFTWARE
“Software” means the computer program contained in this package (whi ch may include digitall y
encoded, machine readable, scalable outline font data as encoded in a special format), together with
all codes, techniques, software tools, format, design, concepts, methods and ideas associated with the
computer program and all documentation rela ted thereto.
2. LICENSE AGREEMENT
This is a license agreement and not an agreement for sale. Minolta owns, or has been licensed from
other owners, copyrights in the Software. Except as stated in this Agreement, you are n ot gran ted any
rights to patents, copyrights, trade names, trademarks (whether regis tered or unregister ed), or any
other rights, franchises or licenses i n respect of the Software. Title to the Sof tw are and an y copy
made from it is retained by Minolta or such other owne rs.
3. LICENSE
Minolta , hereby grant to you, and yo u agree to accept a non-exclusiv e, non-transferable and limit ed
license and you may:
(1) insta ll an d us e th e S oftware on a sing le computer an d on e associated printer.
(2) use the Software only for your own customary business or personal purposes.
(3) make a copy of the Software for backup or installation purposes only in support of the normal and
intended use of the Software.
(4) transfer p ossession of copies of the Software to another party by transferr ing a copy of this
Agreement and all other documentation along with at least one com plete unalt ered copy of the
Software, provided that ( i) you must, at the same time, either transfer to such other party or
destro y all your other copies of the Software. (ii) such transfer of possession terminates your
license from Minolt a, and (iii) such other party shall accept and be bound by these license ter ms
by its initial use of the Software.
4. RESTRICTIONS
(1) You shall not without the written consent of Minolta:
(i) use, copy, modify, merge or transfer copies of the Software except as provided herein. (ii)
rev erse assem ble or reverse compile the Software except as permitted by law; or (iii) Sublicense ,
rent, lease or distribute the Softwa re or any copy there o f.
(2) You shall not expo rt or re-export the Software in any form under violation of export restri ctions
by the government of your country.
5. LIMITED WARRANTY
Minolta warrants the media on which the Software is recorded to be free from defects in materials
and workmanship under normal use. Warranty details and limitations for the Software are described
in the Statement of Limited W arran ty which was su pplied with the hardware. Wi th the exception of
the fore going express warranties applicable to hardw are and media only, the Software is not warranted and is provided.
English
En-1
Page 5

SUCH WARRANTIES ARE IN LIEU OF ALL OTHER WARRANTIES, EXPRESS OR IMPLIED,
INCLUDING, BUT NOT LIMITED TO, THE IMPLIED WARRANTIES OF MERCHANTABILITY AND FITNESS FOR A PARTICULAR PURPOSE.
6. LIMITATION OF REMEDIES
IN NO EVENT WILL MINOLTA BE LIABLE FOR ANY LOST PR OFI TS, LOST DATA, OR ANY
OTHER INCIDENTAL OR CONSEQUENTIAL DAMAGES THAT RESULT FROM USE OR
INABILITY T O USE THE SOFTWARE, EVEN IF MINOL TA OR ITS AUTHORISED REMARKETERS HAVE BEEN ADVISED OF THE POSSIBILITY OF SUCH DAMAGES OR FOR ANY
CLAIM BY YOU BASED ON A THIRD PARTY CLAIM.
7. TERMINATION
You may terminate your license at any time by destroying the Software and all your copies of it or as
English
otherwi se described in these terms. Minolta may termi n ate your license if you f ail to comply w ith
these terms. Upon such termination, you agree to destroy all your copies of the Software.
8. GOVERNING LAW
This Agreement sha ll be gov erned by the laws of the countr y w here the delivery is made to the original customer.
9. GOVERNMENT END USERS
If you are acquiring the Software on b ehalf of any uni t or agency of the United St ates Gov ernment,
the followin g provisions apply. Use, duplication or disclosure by the Governm ent is subject t o restric tions as set forth in the Rights in Technical Data and Computer Software clause at FAR 252.2 277013, subd ivision (b)(3)(ii) or subparagraph (c)(1)(ii), as appropr iate.
Further use, duplication or disclosure is subject to restrict ions applicable to restricted right s softwar e
as set forth in FAR 52.227-19(c)(2).
YOU ACKNOWLEDGE THAT YOU HAVE READ THIS AGREEMENT , UNDERSTAND IT, AND A GREE TO BE BOUND BY ITS TERMS AND CONDITIONS. NEITHER PARTY SHALL BE BOUND BY ANY STAT EMENT OR REPRESENTATION
NOT CONTAINED IN THIS AGREEMENT. NO CHANGE IN THIS AGREEMENT IS
EFFECTIVE UNLESS WRITTEN AND SIGNED BY PROPERLY AUTHORISED REPRESENTATIVES OF EA C H PARTY. BY O PENING THE PACKAGE, YOU AGREE TO
ACCEPT THE TE RMS OF THI S AGREE M EN T.
En-2
Page 6

Contents
END USER LICENSE AGREEMENT ...................... ................En-1
Forewor d................................. ........................................... .........En-4
Safety Information ....................................................................En-4
Printer Parts and Accessories ................................................En-10
Control Panel........... ...................... ...........................................En-11
Installation Precautions.................................. .........................En-13
Selecting a Location for the Printer........................................E n-13
Power Source.........................................................................En-13
Grounding..............................................................................En-14
Space Requirements .................. ...................... .....................En-15
Operational Precautions..........................................................En-16
Operating Environment........ ................................ ..................En-16
Printer............ ...................... ........................................... ....... En-16
Printer Supplies .....................................................................En-18
Step 1: Unpacking the Printer.................................................En-19
Step 2: Connecting the Power Cord .......................................En-21
Step 3: Loading Paper..............................................................En-22
Step 4: Connecting to a Computer .........................................En-23
Step 5: Turning On the Printer.................................................En-24
Step 6: Installing the Printer Driver........................................En-25
Step 7: Testing the Printer.......................................................En-33
Installing Options.....................................................................En-35
Second Paper Cassette Unit..................................................En-35
Face-Up Tray..........................................................................En-39
Replacing the Cartridges........................................... ..............En-41
Cleaning the Printer.................................................................En-45
Clearing a Paper Misfeed.........................................................En-47
English
En-3
Page 7

Foreword
Safety Information
Laser S afet y
This is a page printer which operates by means of a laser. There is no possibility of
danger from the laser, provided the printer is operated according to the instructions
in this manual.
English
Since radiation emitted by the laser is completely confined within protective housing, the laser beam cannot escape from the machine during any phase of user
operation.
Internal Laser Radiation
Maximum Radiation Power:
0.6 mW at laser aperture of the print head unit
Wavelength:
770–810 nm
This product employs Class
Laser Diode and Scanning Polygon Mirror are incorporated in the print head unit.
The print head unit is not a field service item.
Therefore, the print head unit should not be opened under any circumstance.
III
b Laser Diode that emits an invisible laser beam.
Laser Safety
This printer is certified as a Class I Laser product under the
Health and Human Services (DHHS)
to the Radiation Control for Health and Safety Act of 1968. This means that the
printer does not produce hazardous laser radiation.
Radiation Performance Standard according
En-4
U.S. Department of
Page 8
CDRH Regulations
The
Center for Devices and Radiological Health (CDRH)
Drug Administration implemented regulations for laser products on August 2, 1976.
Compliance is mandatory for products marketed in the United States. The label
shown below indicates compliance with the CDRH regulations and must be
attached to laser products marketed in the United States.
of the U.S. Food and
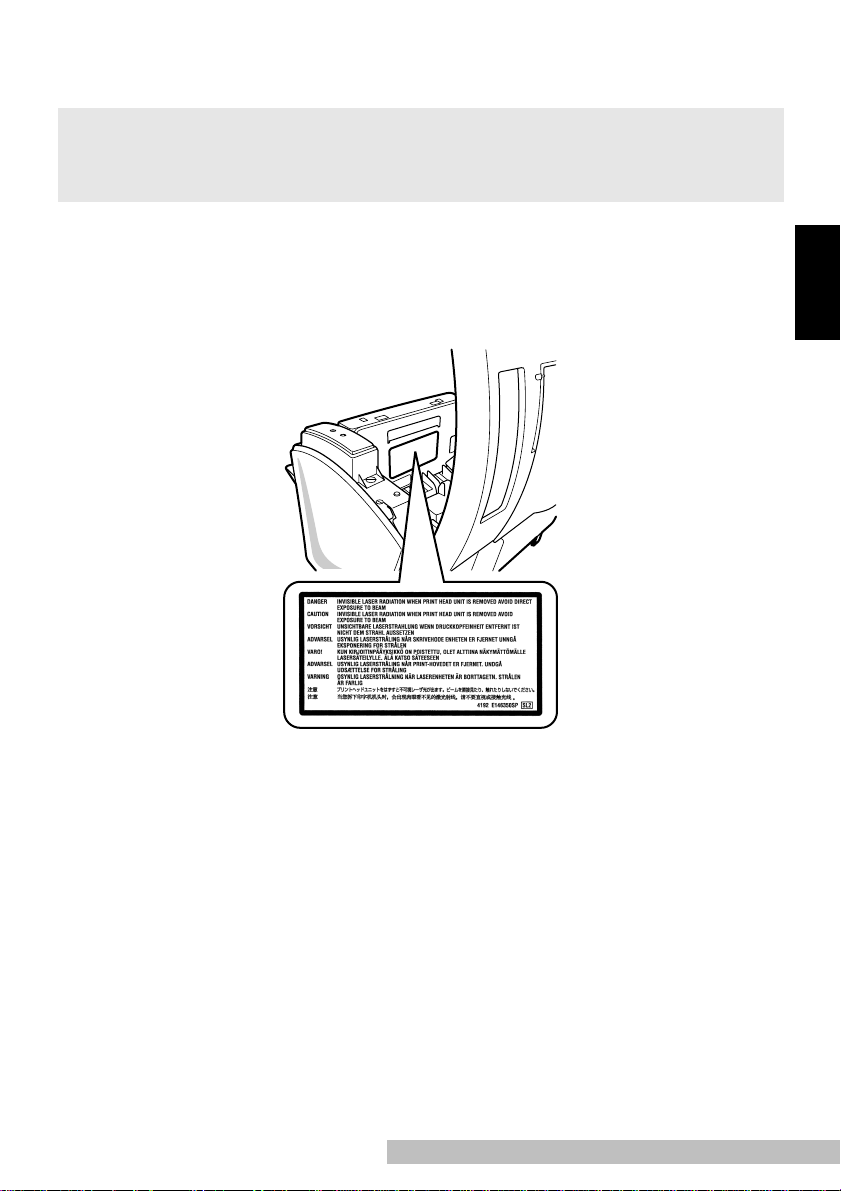
Laser Safety Label
English
Caution
• Use of controls , adjustments or performance of procedures other than those specified
in this manual may result in hazar dous radiation exposure.
Caution
• This is a semiconductor laser. The maximum power of the laser diode is 5 mW and the
wav elength is 770–810 nm.
En-5
Page 9

For Denmark Users
ADVARSEL
• Usynlig laser str åling ved åbni ng, når sikkerhedsafbrydere er ude af funktion. Undgå
udsættelse for stråling.
Klasse 1 laser produ kt der opfylder IEC60825 sikkerheds kra vene.
Dansk: Dette er en halvlederlaser. Laserdiodens højeste styrke er 5 mW og bølgelængden er 770–810 nm.
English
For Finland, Sweden Users
LUOKAN 1 LASERLAI TE
KLASS 1 LASER APPARAT
VAROITUS!
• Laitteen käyt täminen muulla kuin tässä käyttöohjeessa mainitulla tavalla saattaa altistaa käyttäjän turvallisuusluokan 1 ylittävälle näkymättömälle lasersäteilylle.
Tämä on puolijohdelaser. Laserdiodin suurin teho on 5 mW ja aallonpituus on
770–810 nm.
VARNING
• Om apparaten används på annat sätt än i denna bruksanvisning specificerats, kan
användar en utsättas för osynlig laserstrålning, som överskrider gränsen för l aserklass
1.
Det här är en halvledarlaser. Den maximala effekten för laserdioden är 5 mW och
våglängden är 770–810 nm.
VARO
• Avattaessa ja suojalukitus ohitettaessa olet alttiina näkymättömälle lasersäteilylle. Älä
katso säteeseen.
VARNING
• Osynlig laserstrålning när denna del är öppnad och spärren är urkopplad. Betrakta ej
strålen.
En-6
Page 10
For Norw ay Users
ADVARSEL
• Dersom apparatet brukes på annen måte enn spesifisert i denne bruksanvisning, kan
brukeren utsettes for unsynlig laserstråling som overskrider grensen for laser klass 1.
Dette en halvleder laser. Maksimal effekt till laserdiode er 5 mW og bølgelengde er
770–810 nm.
Laser Caution Label
User Instru cti on s
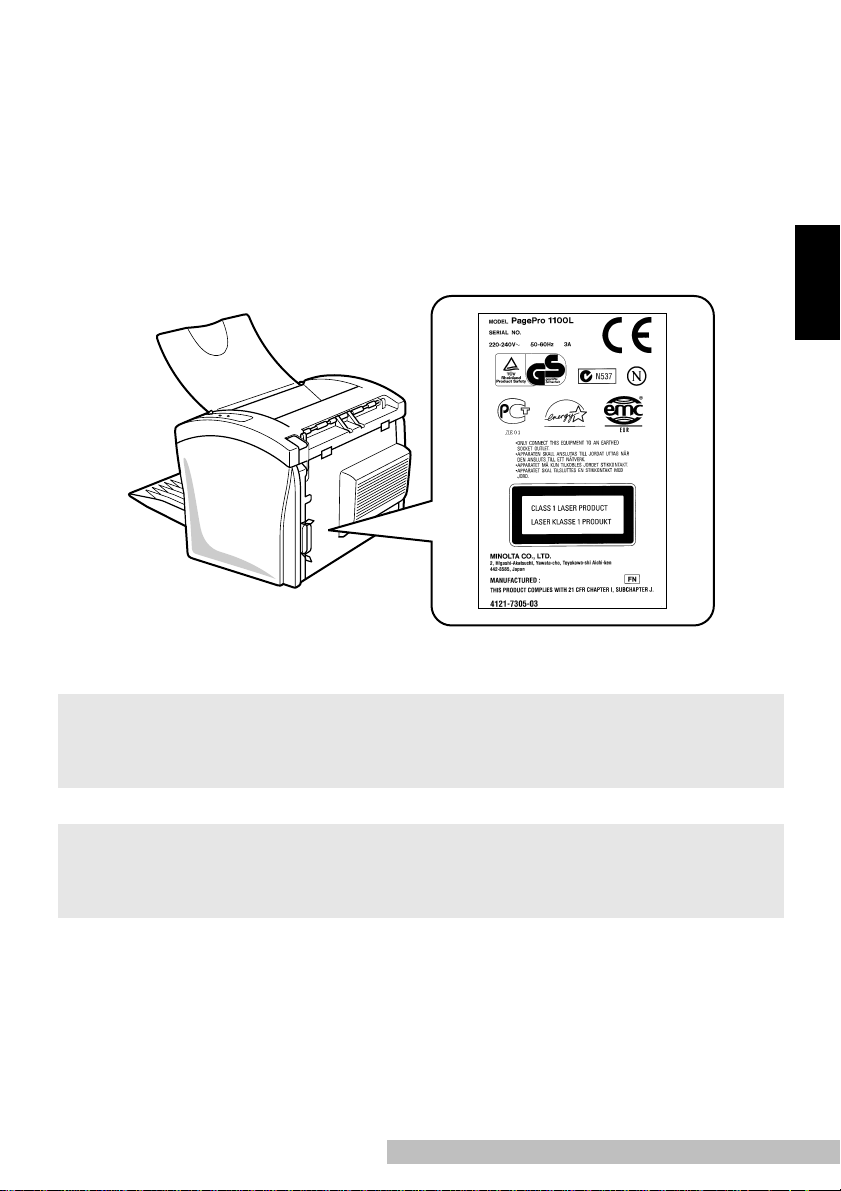
CE Marking (Declaration of Conformity)
We declare under our sole responsibility that the printer and options to which this
declaration relates are in conformity with the specifications below.
This declaration is valid for the area of the European Union (EU) only.
English
En-7
Page 11

Product Type Laser Beam Printer
Product Name PagePro 1100L
Options Second Paper Cassette Unit (4148-611)
Face-Up Tray (4121-0633)
English
Standard
Safety: EN60 950/ 1992 with Amendme nts 1, 2, 3, 4, A11
Safety of informat i on technology equipm ent , including electr i cal business
equipment
EN60825-1/1994 with Amendment A11
Radiation s afet y of l aser products, equipm ent classificatio n , requirements
and user’s guide
EMC: EN55 022 (
Limits and method for measurement of radio disturbance characteristic of
information technology equipment (ITE)
EN61000-3-2 (
Electromagnetic compatibility (EMC)
Part 3: Limits Section 2: Limits for harmonic current emissions (equipment
input curr ent ≤ 16A per phase)
EN61000-3-3/1995
Electromagnetic compatibility (EMC)
Part 3: Limits Section 3: Limitati on of voltage fluctuations and flicker in lowvoltage suppl y s ystems for equipment with rated current ≤ 16A
EN55024/1 998
Information technology equipme nt – imm unity characterist i cs – Limits and
methods of m eas urement
EN61000–4–2/1995
Electromagnetic compatibility (EMC)
Part 4: Testing and measurement techniques
Section 2: El ectrostatic disch arge immunity test
EN61000–4–3/1995
Electromagnetic compatibility (EMC)
Part 4: Testing and measurement techniques
Section 3: R adiated, radio-freq uency electromagnetic field immunity te st
EN61000–4–4/1995
Electromagnetic compatibility (EMC)
Part 4: Testing and measurement techniques
Section 4: El ectrical fast transien t/ burst immunity test
EN61000–4–5/1995
Electromagnetic compatibility (EMC)
Part 4: Testing and measurement techniques
Section 5: Surge immunity test
EN61000–4–6/1996
Electromagnetic compatibility (EMC)
Part 4: Testing and measurement techniques
Section 6: Conducted disturba nces inducted by radio-frequency fields –
Immunity test
Class B
Class A
)/1998
)/1995 (A13)
En-8
Page 12

EN61000–4–8/1993
Electromagnetic compatibility (EMC)
Part 4: Testing and measurement techniques
Section 8: Power-frequency magnetic field immunity test
EN61000–4–11/1994
Electromagnetic compatibility (EMC)
Part 4: Testing and measurement techniques
Section 11: Voltage dips, short interruptions and voltage variations immunity
test
EC Directive Safety: 73/23/EEC
EMC: 89/ 336/ EEC and 93/68/EEC
• This device must be used with shielded inter face (Parallel) cable.
The use of non-shielded cab le is likely to result in interfe rence with radio communications and is prohibited under 89/336/ EEC rule s.
Ozone R elease
During printer operation, a small quantity of ozone is released. This amount is not
large enough to harm anyone adversely. However, be sure the room where the
machine is being used has adequate ventilation, especially if you are printing a
high volume of materials, or if the machine is being used continuously over a long
period.
English
En-9
Page 13
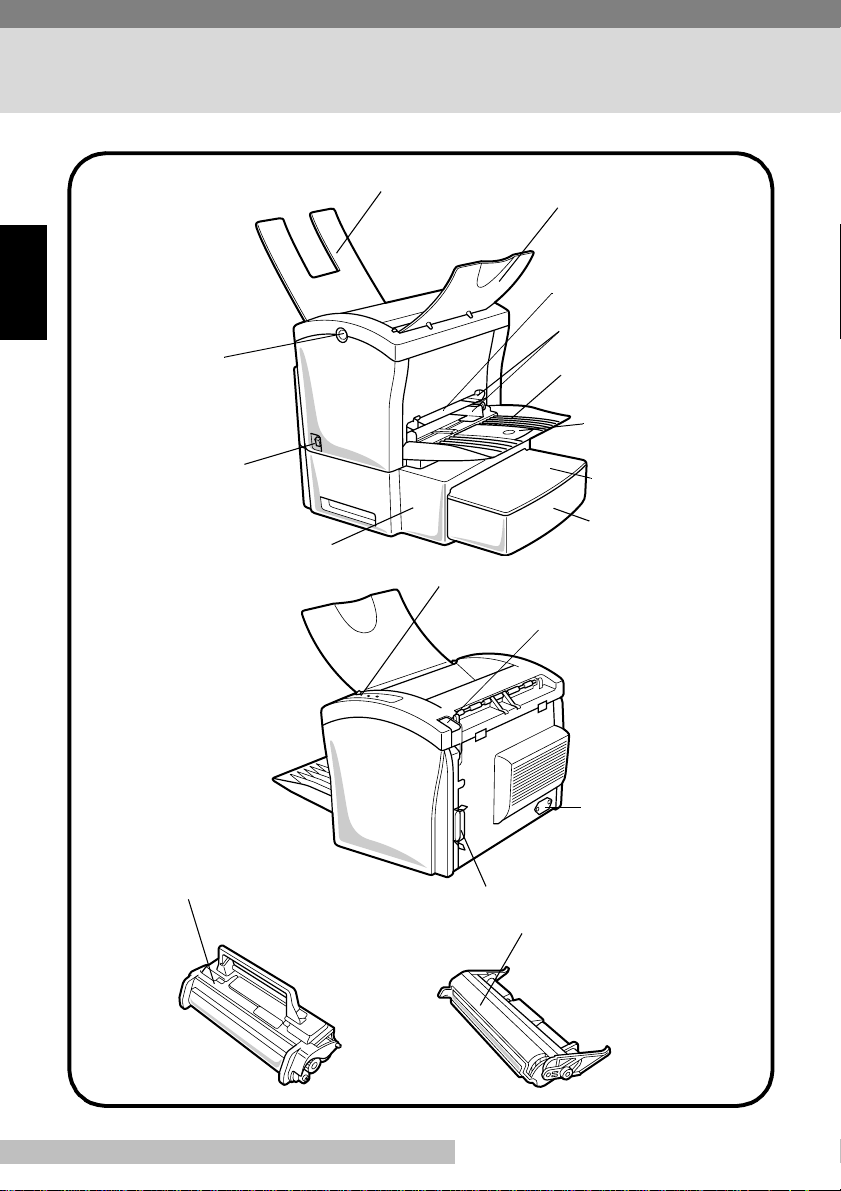
Printer Parts and Accessories
Fac e-u p tra y
(option)
English
Top cover
release button
Fac e-down tray
Manual feed tray
Paper guide
Tra y 1
(Multipurpose tray)
Paper support
Power switch
Second paper cassett e
unit (option)
Toner cartridge
Cassette cover
Tray2 (500-sheet
second cassette)
Control panel
Face-up/Face-down
selection switch
Power cord
socket
Prallel interface connector
Drum cartridge
En-10
Page 14
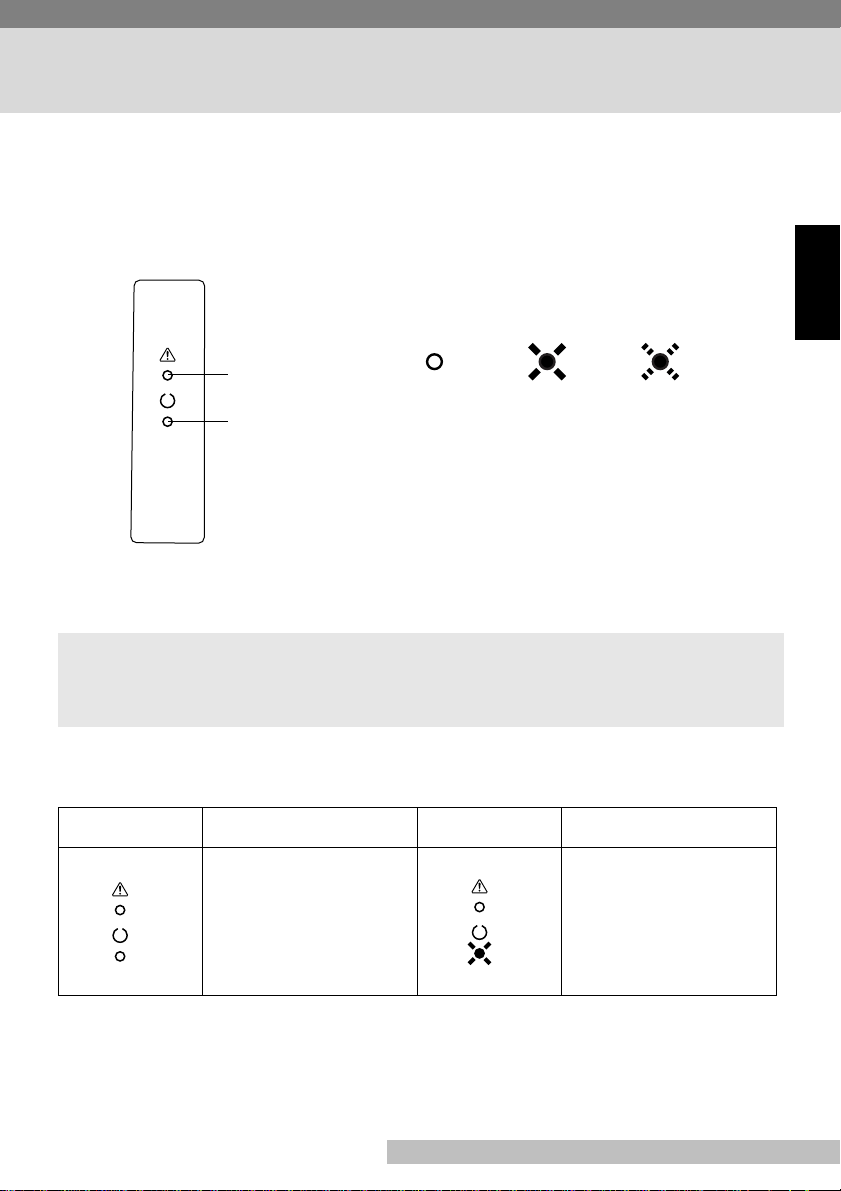
Control Panel
The two indicators on the printer’s control panel turn on, off, or blink in fixed patterns to let you know the current status of the printer. Refer to t he following section
for the description of each indicator light pattern and the action you need to take
when it occurs.
Error (a mber)
indic a tor
Ready (green)
indicator
Off On Blinking
English
Note
• You can find out details of the printer’s status by checking the information that
appears on your computer screen.
Indicator Lights (Printer Messages)
Indicators Description Indicators Description
Power is off. Printer is ready.
Warming up.
En-11
Page 15

Indicators Description Indicators Description
Power on initial setting.
(Slow blinking) P ower
Save Mode.
English
The wrong size of
paper were fed into
the printer during
printing.
Load the appropriate
size of paper onto the
paper feed tray.
Receiving data.
Processing data .
Printing.
Top cover is open.
Close the top cover .
Paper misfeed.
Clear the misfeed
and continue printing.
Out of paper.
Load paper onto the
paper feed tray.
Engine communication error.
Engine error.
Turn off the printer
and contact your
dealer.
En-12
Page 16

Installation Precautions
Note the following important precautions when selecting a location for the printer
and when connecting it to a power source.
Selecting a Location for the Printer
A proper location helps to ensure that your printer provides you with the long service life for which it is designed. Double-check to make sure that the location you
select has the following characteristics.
• Choose a location that is well -ventilated.
• Make sure there is no chance of ammonia or other organic gasses bei ng gen erated in the area.
• The power outlet you plan to connect to for power sho uld be nearby and unobstructed.
• Make sure that the print er is not exposed to dire ct sunl ight.
• Avoid areas in the direct airflow of air condit ioners, heaters, or ventilators, and
areas subjected to t emp erature and humidity ex tremes.
• Choose a sturdy, level surface where the printer will not be exposed to strong
vibration.
• Keep the printer aw ay from any objects that might bloc k its heat vents.
• Do not locate the printer near curtains or other combustible objects.
• Choose an area where there is no possibility of the printer being splashed with
water or other liquids.
• Make sure that the surrounding area is clean, dry, and free of dust.
English
Power Source
The following are the power source requirements for this printer.
Power supply:
220–240 V at 50–60 Hz
Voltage fluctuation:
220–240 V ±10%
Frequency fluctuation:
Within ±3 Hz
En-13
Page 17

Note
• Use a power source wit h minimal voltage and frequency fluctu ati on.
• Only use an outlet that is rated for the voltage capacity specified for this printer.
• Be sure to plug the power cord all the way into t he outlet. The outlet should be located
near the printer and be easily accessible so you can unplug the power cord immediately should any problem occur.
• Make sure the outlet you use is visi ble, and not hidden behind the printer or any other
object.
• If any other electrical equipment is plugged into the same outlet , make sure that the
English
capacity of the outlet is not exceeded.
• If you use an extension cord, make sure its capacity is greater than the power con-
sumption of the prin ter. Using an extensi on cord with a lower capacity creates the danger of fire.
• Never use a multiple soc ket to connect other appliances or machines to the same out-
let being used to power the printer.
Grounding
Always ground the printer to guard against the danger of electrical shock. To
ground the printer, connect the grounding wire to the ground terminal of the electrical outlet you are plugging in to or to a grounding contact that complies with local
electrical standards in your area.
Note
• Neve r connect the grounding wire to a gas pip e, the gro unding wire for a telephone, or
to a water pipe.
En-14
Page 18
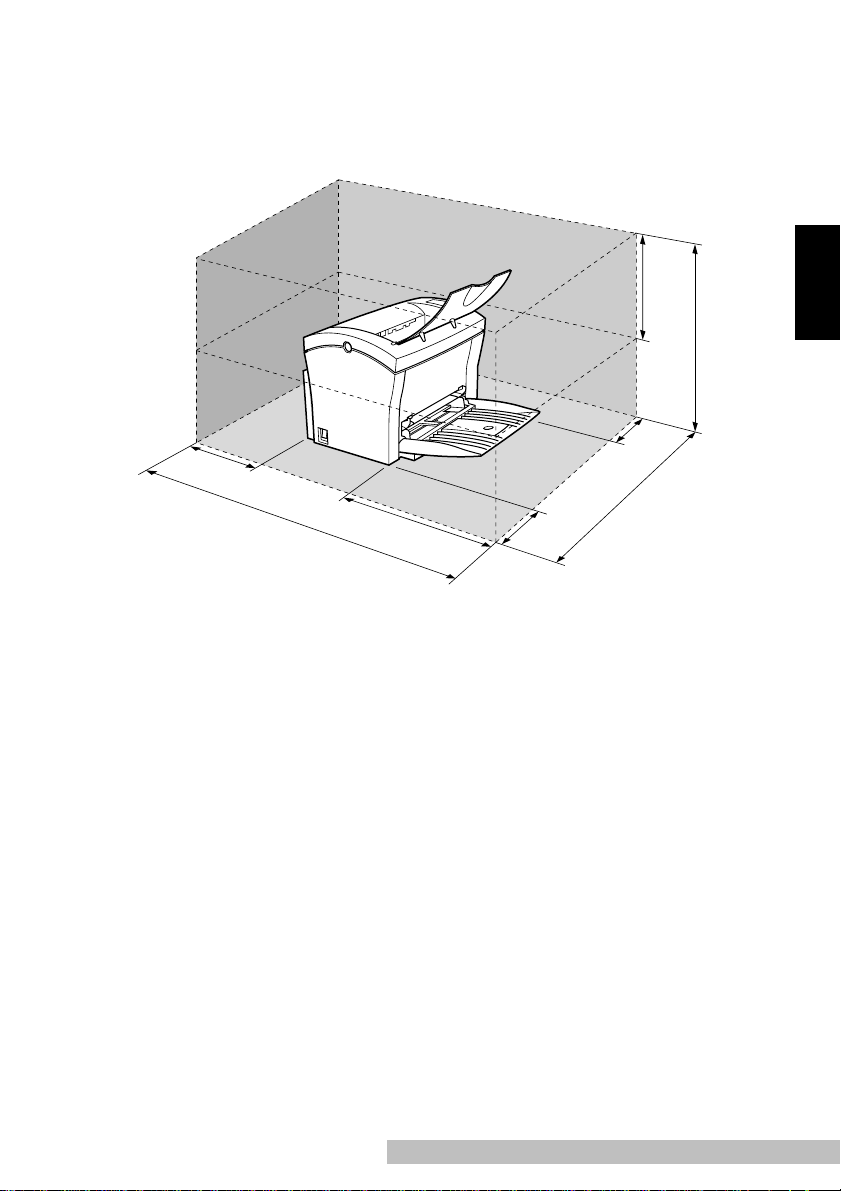
Space Requirements
Be sure to provide space around the printer as indicated below , to ensure easier
printer operation, paper and toner replacement, and maintenance.
250mm
150mm
(6 in.)
672mm
(26-1/2 in.)
300mm
(11- 3/ 4 in.)
200mm
(7-3/4 in.)
(9-3/4 in.)
507mm
(20 in.)
100mm
(4 in.)
660mm
(26 in.)
English
En-15
Page 19

Operational Precautions
Note the following important precautions whenever using the printer.
Operating Envir onment
The following describes the operating environment required when using the
printer.
Temperature:
English
10°C to 35°C (50°F to 95°F) with fluctuation of 10°C (18°F) per hour
Humidity:
15% to 85% with fluctuation of 20% per hour
Printer
The following describes precaut ions f or using the printer.
• Never turn the printer off or open any of it s covers during a pri nt operation.
• Never place flammable gasses, liquids or objects that generate magnetic forces
near the printer.
• When unplugging the power cord, always grasp the plug and never pull on the
cord. A damaged cord creates the danger of fire or electrical shock.
• Never touch the power cord when y our hands are wet. Doing so creates the danger of electrical shock.
• Always unplug the power cord before moving the printer. Failure to do so can
damage the power cor d, creating the danger of fire or electrical shock.
• Always unplug the power cord if you do not pla n to use the printer f or a long time.
• Never try to remove any secured panel or cover. The interior of the printer contains high-voltage circuitry which crea tes the danger of electrical sh ock when
exposed.
• Never try to modify the print er. Doing so creates the danger of fire or electrical
shock.
• Never place any heavy objects on the power cord, pull on it or bend it. Doing so
creates the danger of fire or electrical shock.
• Always make sure the pri nter is not pl aced on the electr ical cord or the communications cables of any other electrical equipment. Also make sure that cords and
cables do not get into the printer’s mechanism. Any of these condit ions create
the danger of malfunction and fi re.
En-16
Page 20

• Always take care so that paper clips, staples, or other small pieces of metal do
not get into the printer through its vents or other openings. Such objects create
the danger of fire or electrical shock.
• Do not allow water or other l iquids to spill on or near the printer. Fire or electrical
shock can occur should wate r or liquid come into contact with the print er.
• Should liquid or any piece of metal accidentl y get insi de the printer, immediately
turn it off, unplug the power cord, and contact your dealer. Failure to take this
immediate action creates the danger of fire or electrical shock.
• Whenever the printer emits unusually high amounts of heat, smoke, an unusual
odor , or noise, immediatel y turn i t off, unplug it, and contact y our dealer . Failure
to take this immediat e action creates the danger of fir e or electrical shock.
Caution
• Be sure to locate the printer in a well-ventilated location. A minim al amount of ozone is
generated duri ng normal operation of this printer. Because of this, an unpleasant odor
may result when the printer is used for extensive printing in a poorly ventilated area .
For co mfortable, healthy, and safe operati on, be sure to locate the printer in a well-ventilated area.
English
En-17
Page 21

Printer Su pplies
Note the following precautions when handling printer supplies such as the toner
cartridge, the drum cartridge, and paper.
• Avoid storing printer supplies in the following locations.
• Areas subjected to direc t sunlight . Additional ly, the drum cartridge must be protected
from fluorescent light.
• Areas exp osed to open flame.
• Areas subjected to high humidity.
English
• Areas subjected to large amounts of dust.
• Keep paper that has been rem oved from its wrap per, but not yet loaded onto the
printer tray, in a sealed plastic bag and store it in a cool , dark location.
• Use only the toner cartridge that is expressly specified for this printer.
• Keep supplies out of the reach of children .
• Should your hands becom e soiled with toner, immediately wash them with soap
and water.
Caution
• Whenever you remov e the drum cartridge from the printer, immediately wra p it wit h a
cloth to protect i t agai nst overexposure to light.
En-18
Page 22
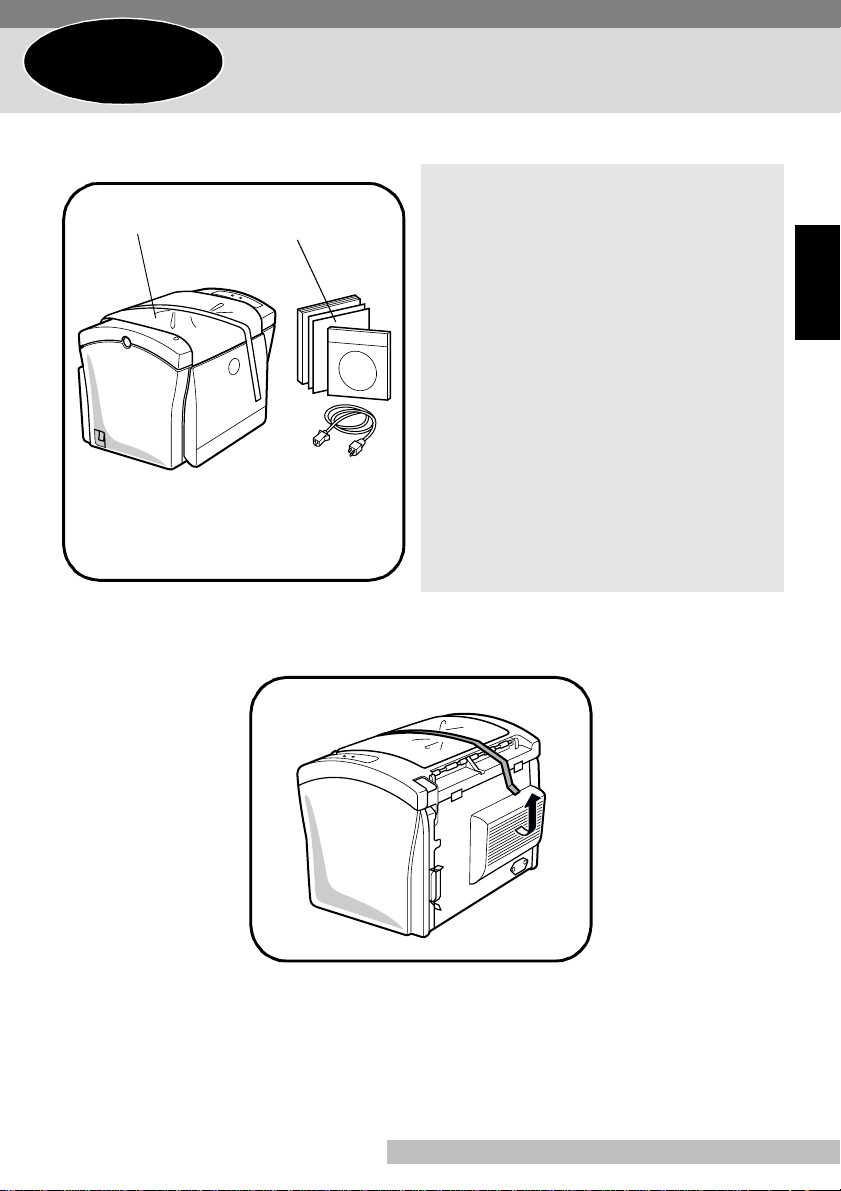
Step 1
T ake the items and accessories show n below out of the carton.
1
1
Unpacking the Printer
1. Printer
2
2. Accessories
User’s Guide
CD-ROM
Power cord
Warrant y bookle t
Registrat ion card
Power Cord Instructions
Caution
• After unpacking, keep all packing materials out of the reach of chil dren.
Remove the plastic bag and peel off the shipping tape from the back of the
2
printer .
English
En-19
Page 23
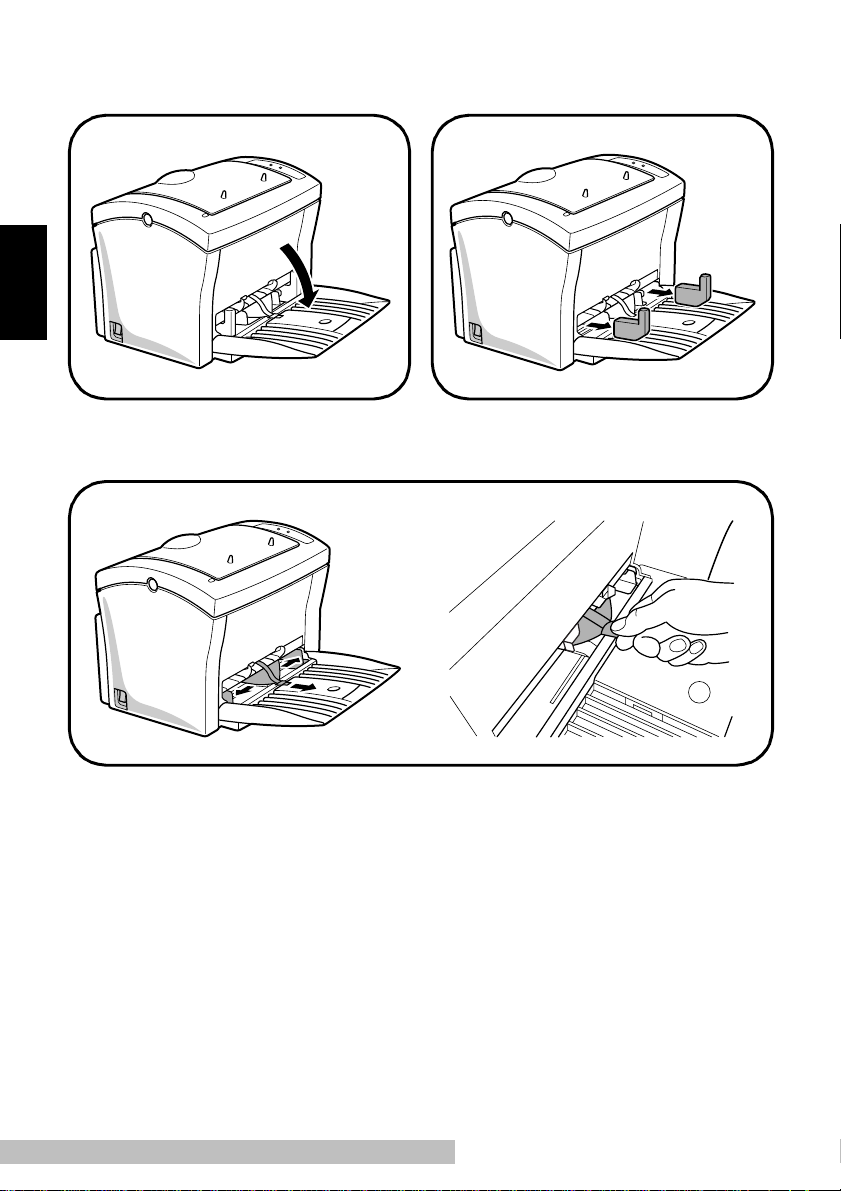
Pull the Tray1 from the printer with
3
both hands and lie it down flat.
English
Squeeze the right paper size gui de and open the paper size guides. Pull out the
5
plastic-lead stri p from the paper feed inl et.
Pull out the two cushions from the
4
paper feed inlet.
En-20
Page 24
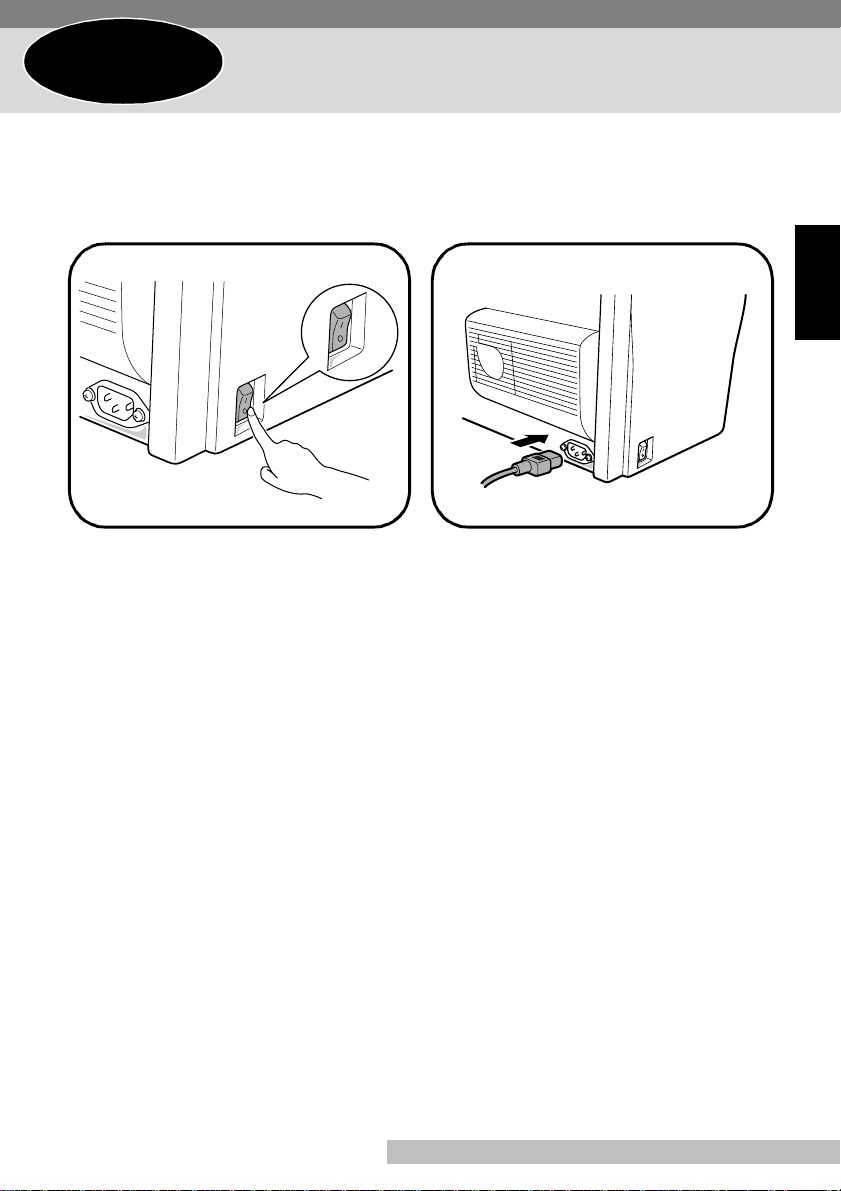
Step 2
Connecting the Power Cord
Make sure that the power sw it ch is
1
in the
(Off) position.
❍
Connect one end of the power cord
2
that comes with the printer to the
power cord socket. Plug the other
end into a power outlet.
English
En-21
Page 25
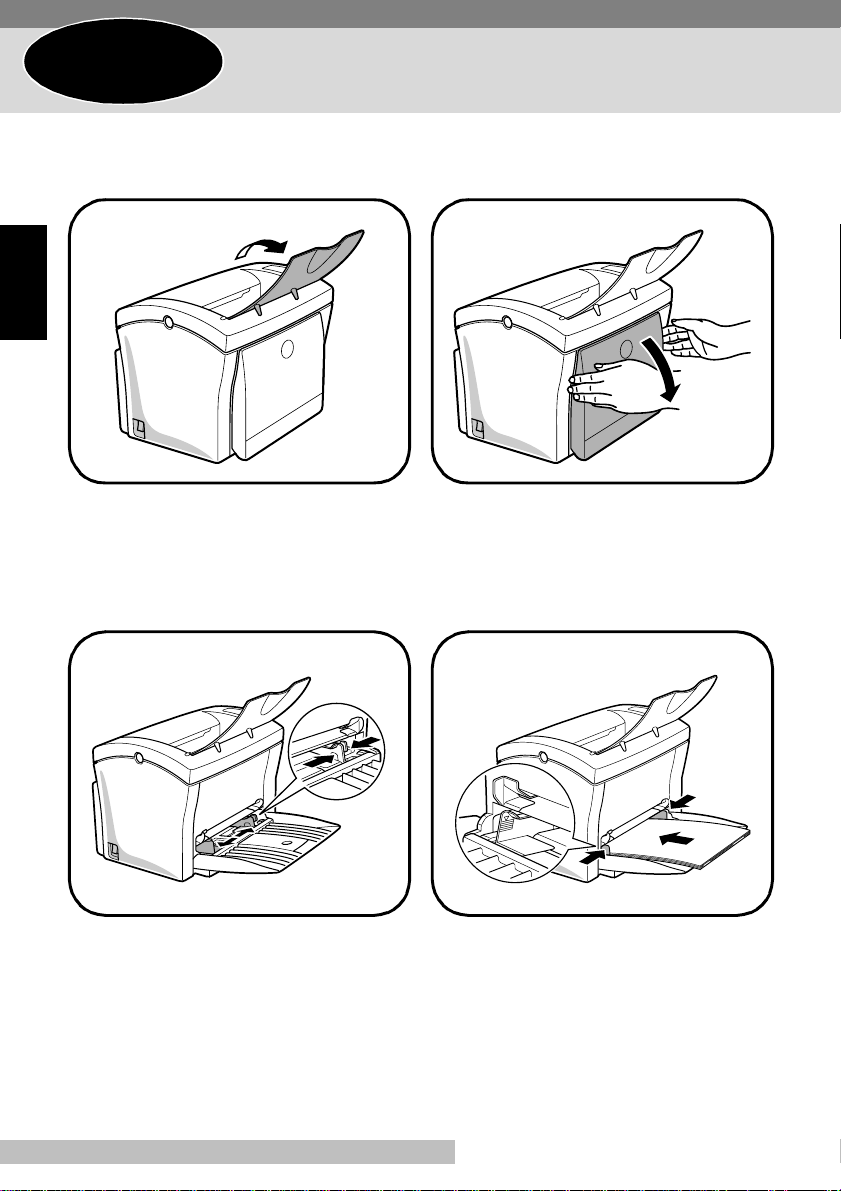
Step 3
Loading Paper
Open the face-down tray.
1
English
Squeeze the right paper guide and
3
open the paper guides.
Pull Tray1 fr om the printer with both
2
hands and lie it down flat.
Place a stack of paper in the center
4
of Tray1. Squeeze the right pape r
guide and adjust the paper guides
so that both the left and right sides
of the paper stack are secure.
En-22
Page 26

Step 4
Connecting to a Computer
Caution
• Alway s use a shielded interface cable. Use of an unshielded cable can result in radio
interference with data.
Note
• You must purchase an IEEE 128 4 type-B cab le for connection between th e pri nter and
a computer. For more details, ref er to “Specifications” in t he
• Minolta does not warrant the use of any particular cable. The user assumes all responsibility as to the quality and performance of the cable.
Make sure that the printer and t he comp uter you are connecting it to are bot h
1
turned o ff.
Connect one end of the interface cable to the parallel port of the computer.
2
Connect the other end of the i nterf ace c able to the pa ralle l inte rface con nect or on
3
the back of the prin ter. Secure the interface cable using the two c l ips on the paral lel interface connector.
User’s Manual (CD-RO M )
English
.
En-23
Page 27
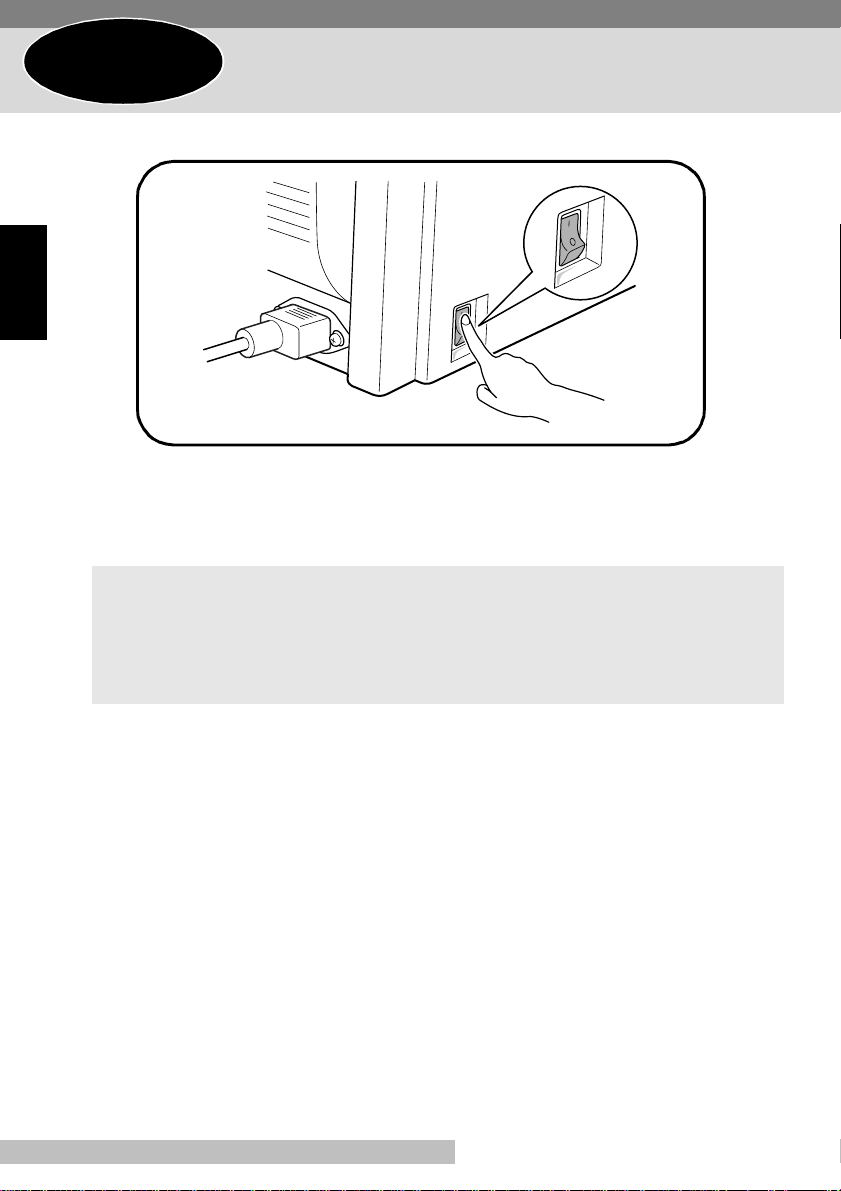
Step 5
After connecting the printer to a power outle t, press the power swi tch to turn it on.
■
English
When the printer is turned on, both ind icators on the control panel to light up, and then
the Error indicat or goes off while the Ready indicator stays on. After about 23 seconds,
the printer is finished warming up and is ready to begin print ing.
Turning On the Printer
Note
• The printer automatical ly ent ers a power saving mode after about 15 minutes in
which it does not recei ve a print command from the computer. Whenever the
printer receives a print command while in the power saving mode, it will automatically start to warm up befor e prin ting.
En-24
Page 28

Step 6
The Minolta PagePro 1100L Printer Driver was specially developed to provide true
Windows-based printing for users of the Minolta/QMS PagePro 1100L printer. The
PagePro 1100L Printer Driver consists of three programs: the Minolta PagePro
Printer Driver, the Printer Console and the Printer Status Display.
Installing the Printer Driver
System Requirements
The following describes the minimum system requirements that are necessary to
correctly run the Minolta PagePro 1100L Printer Driver.
Operating System: Microsoft Windows 95, Windows 98 or Windows NT 4.0
Personal Computer: IBM-compatible PC with at least a 386DX 16MHz CPU (Pen-
tium processor recommended)
CD-ROM drive
I/O Interface: IEEE 1284 parallel
Memory: At least 16MB of PC RAM
Free Disk Space: Approximately 20MB for files
English
En-25
Page 29

Installing the PagePro 1100L Printer Driver
Under Windows 95/Windows 98/Windows NT
4.0
This section provides information on installing the PagePro 1100L Printer Driver
under Windows 95, Windows 98 or Windows NT 4.0.
You can use the following methods to install the PagePro 1100L Printer Driver.
English
Using the auto-run Installer on
the CD-ROM.
Plug-and-Play installation.
Using the Add Printer Wizard
❍
: Available —: Not available
Windows 95 Windows 98
❍❍❍
❍
❍❍
——
Windows
NT 4.0
To Install the PagePro 1100L Printer Driver Using the
Instal ler (Auto Run)
Turn on your c omp uter and start up W indows 95, Windo ws 98 or Windows NT 4.0.
1
Note
• Under Windows 95 or W indows 98 when the Update Device Driv er Wizard or Add
New Hardware Wizard dialog appears on the display, click
Insert the CD-ROM labeled Minolta/QMS PagePro 1100L Printer Drivers into your
2
computer’ s CD-ROM drive.
The opening screen is automatically displayed.
3
Note
• The configuration of some com puters may prevent the opening screen from
appearing automati cally. If the screen does not appear, double-click
from the CD-ROM.
Cancel
.
Minolta.exe
—
En-26
Page 30
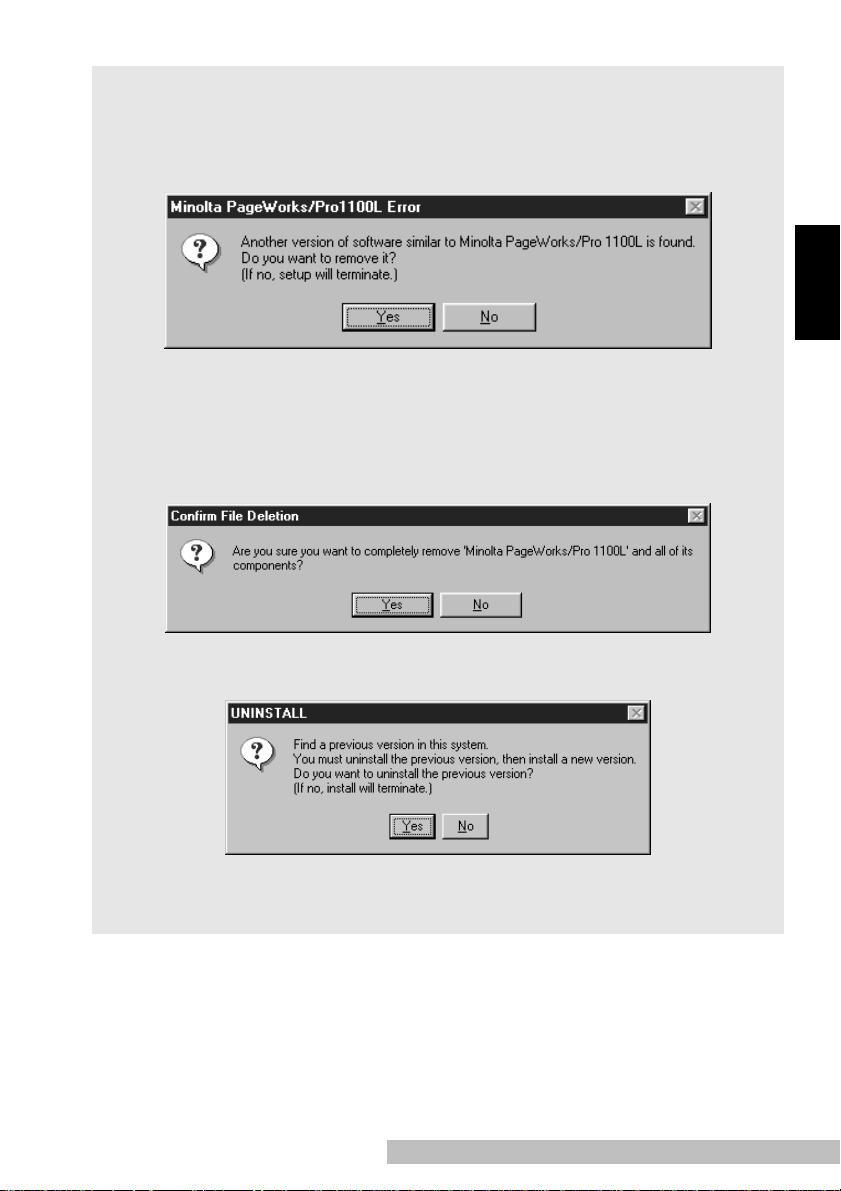
Note
• If you have ol der version of the PagePro 1100L printer driver already installed on
your computer, the following dialog appears.
Under Windows 95/Windows 98
Click Yes to delete the old printer driver. (To quit the set up program, click
1
No.)
When the fol lowing dialog appears, click Yes to start uninstalling the old
2
printer driver.
English
Under Windows NT 4.0
Click Yes to delete the old printer driver. (To quit the set up program, click
1
No.)
En-27
Page 31

Follow the instructions that appear on your computer screen to complete the
4
installation.
English
When the fol lowing dialog appears, select the port you want to use and click
5
Next.
En-28
Page 32

Caution
• If you intend to access the printer from a server running Windows 95, first install
the printer’s driver from the server using the Installer. The installer can be
accessed though either the autorun program (minolta.exe) or the setup.exe of
each language version. You will find the English setup.exe under the following
path: ...\Driv er s\PP1100L\ WinXX\Gb\ Gdi\Drv\s etup .e x e (where “ winXX” sho uld be
replaced by the version of the operating system being used).
• If you find that your printer is unable to print documents in a network en vironment,
set the data-spool format of the client to RAW.
When the following dialog appears, check the Tray2 box if the optional second
6
paper cassette unit is in stalled onto your pri nter. Then, click Next to display the
next step.
English
En-29
Page 33

After the installation is completed, the following dialog appears.
7
Click Finish to close the setup program window.
English
Note
• It is recommended that you restart your computer after installation.
En-30
Page 34

8
After restarting the computer, the following dialog appears on the desktop of the computer.
Check that the Minol ta PageWorks/Pro 1100L printer icon is displayed in the
9
Printers dialog. To display the Printers dialog, click Start, point to Settings, and
then click Printers.
English
Eject the CD-ROM labeled Minol ta/QMS PagePro 1100L Printer Drivers from your
10
computer’ s CD-ROM drive.
This completes t he installation of Minol ta PagePro 1100L printer driver.
En-31
Page 35

To Display the PagePro 1100L Printer Driver Setup Dialog
Click Start, poi nt t o Settings and then click Printer s to display the Pri nters dialog.
1
In the Printers dial og, clic k the Minol ta PagePro 1100L printer icon.
2
Select Properties from the File menu.
3
The following window appears.
English
Note
• The screen image below shows the printer driver ope rating in a Windows 95 environment.
En-32
Page 36

Step 7
Use the following procedure to print a test page and see if the printer is working
correctly. You can also pri nt a sheet that shows the current printer settings.
Note
• The screen images that appear in this section show the Printer Console in a Windows 95 environment.
Click the Start button, point to Program s, th en to Minol ta PageWorks_Pro 1100L,
1
and then click Printer Console.
Testing the Printer
English
Select the Printing Test from the Run menu. The Printin g Test dialog box appears.
2
En-33
Page 37

Check the item(s) which you want to print, then click OK.
3
Before clicking OK, make sure that the printer is ready to print.
English
Note
• If a test page cannot be printed with the print er connected directl y to the parallel
port of a computer running Windows 95 or Wind ows 98, the problem ma y caused
by the Drvwppqt.vxd f ile i n the f ol der C:\Windo ws\Sys tem\lo subsy s. Ei ther rem ov e
the file from its folder or change the file’s name (for example, to “Drvwppqt.old”).
However, if a tape backup device is connect ed to th e parallel port, do not perf orm
the operation mentioned above.
En-34
Page 38

Installing Options
This section describes the optional items that are available for this printer.
Second Paper Cassette Unit
The second paper cassette unit comes
Legal
Executive
A4
Letter
equipped with a cassette that can hold
up to 500 sheets of A4 size paper
called Tray2.
The same unit can accommodate a
variety of other paper trays as well
(Legal, Executive, Letter and B5). Contact your dealer to find out how you can
add these trays to increase the capabilities of your printer.
English
B5
En-35
Page 39

Space Requirements
English
250mm
(9-3/4 in.)
626mm
(24-3/4 in.)
150mm
(6 in.)
972mm
(38- 1/ 4 in .)
600mm
(23-1/2 in.)
200mm
(7-3/4 in.)
100mm
(4 in.)
660mm
(26 in.)
En-36
Page 40

Installing the Second Paper Cassette Unit
Remove the second paper cassette
1
unit and Tray2 from their packaging,
including t he pr ote ctive tape used to
hold the various component s in
place.
Note
• Before installing the second paper cassette unit, be sure to re move the protective tape and the paper padding
from the unit as shown in the ill ustrati on
below .
English
Place the printer on top of the base
2
unit. Make sure to a li gn the coupli ng
pins of the base unit with the holes
located underneath the print er.
3
En-37
Remove the cover from Tray2
Page 41

Press down on t he paper l ifti ng pla te
4
located inside of Tray2 until it locks.
Place a stack of up to 500 sheets of
5
paper into Tray2 so that the side that
was facing up when the paper was
unwrapped is still facing up.
English
Replace the cassette co ver and
6
insert Tray2 into the second paper
cassette unit.
Note
• Be sure to use both hands whenever
Tray2 is removed from or inserted into
the second paper cassette unit.
En-38
Page 42

Face-Up Tray
This face-up tray receives printed pages, printed side up, as they are output from
the printer. Printed pages are not rolled during the printer’s output sequence when
this tray is used. For this reason, the face-up tray is recommended for thick paper
or envelopes to avoid curling during the feeding process.
The maximum capacity of the face-up tray is 20 sheets.
Space Requirements
300mm
(11-3/4 in.)
557mm
(22 in.)
100mm
250mm
(9-3/4 in.)
772mm
(30-1/2 in.)
300mm
(11-3/4 in.)
200mm
(7-3/4 in.)
(4 in.)
660mm
(26 in.)
English
En-39
Page 43

Installing the Face-Up Tray
Remove the face-up tray from its carton.
1
Gently bend the outp ut tra y inwar ds,
2
toward the printer, with both hands.
Align the insertion pins of the tray
with the pin holders of the printer.
English
Note
• Whenever the face-up tray is not
installed on the printer, check to make
sure the set to switch for out put t o the
face-down tray (see above illustration).
• Never lay the face-up tray towards the
front of the pri nter o r a pply e x cessive to
it.
Use the switch which is locat ed on
3
the right-rear side of the printer and
select the output direct ion.
a: Fa ce-down tray
b: Fa ce-up tray
a
b
a
b
En-40
Page 44

Replacing the Cartridges
ATTENTION
fusing unit
• The
the area to avoid injury.
inside the printer can become v ery hot during operat ion. Do not touch
Fusing unit
Follow the instructions as the steps shown below to replace the toner cartridge or
drum cartridge.
To replace the ton er cartridge: 1 ➧ 2 ➧ 3 ➧ 4 ➧ 7 ➧ 8 ➧ 9
T o replace the drum cartridge: 1
T urn off the printer and disconnect the power cord from the printer.
1
Close the fa ce-down tray.
2
2 ➧ 3 ➧ 4 ➧ 5 ➧ 6 ➧ 8 ➧ 9
➧
Press the top cover rel ease button
3
and open the top cover.
English
En-41
2
1
Page 45

Remove the old toner cartridge.
4
Remove the old drum cartridge.
5
English
Install the drum cartridge into the
6
printer , aligning the guides of the
cartridge with the gr oo ves i nsi de the
printer .
Note
• Color coordina ted “1” labels have been
affixed to the drum cartridge and to the
inside of the printer. Install the drum
cartridge by aligning these labels.
• Make sure the drum cartridge is
inserted inside the printer as far as it
will go.
En-42
Page 46

Remove the toner cartridge from the box it comes packed in. Holding it f irmly with
7
both hands, rock it in the directions indicated by the arrows in the illustration.
Holding onto the toner cartridge’s
8
handle, lower it into the printer.
Make sure that the four pins (two on
each side) fit int o the groov es inside the
printer .
Note
• Color coordina ted “2” labels have been
affixed to the toner cartridge and to the
inside of the printer. Install the toner
cartridge by aligning these labels.
English
En-43
Page 47

The cartridge will click into place when it is completely installed.
1
2
English
Close the top cover and press it
9
down gently but firmly until it locks
into place.
En-44
Page 48

Cleaning the Printer
Dust, dirt, and paper debris on the outer surfaces and inside the printer can interfere with printer performance. Clean the printer regularly.
ATTENTION
fusing unit
• The
the area to avoid injury.
Note
• Use a soft cloth to clean the printer. Never use abrasives or corrosive detergents.
• Wait for at least 10 minut es after the printer has been turned of f and make sure that
fusing unit
the
Cleaning the Outside of the Printer
Wipe the outside of the printer with a soft c loth moistened with a neutral, hous e-
■
hold detergent.
inside the printer can become v ery hot during operat ion. Do not touch
has cooled before cleaning the interior of the printer.
English
En-45
Page 49

Cleaning the Paper Feed Roller
T urn off the printer and unplug the power cord.
1
Close the fa ce-down tray.
2
Press the top cover rel ease button and open the top cover.
3
Remove the toner cartridge and the drum cartridge.
4
English
Pull back on the cover that protects
5
the paper feed roll er located at the
bottom of the printer chamber.
Fusing unit
fusing unit
•The
the area to avoid injury.
inside the printer can become v e ry hot d uring operation. Do not touch
Use a so ft cloth to w ipe the pa pe r
6
feed roller.
ATTENTION
Reinstall the drum cartridge and toner cartridge. See “Replacing the Car-
7
tridges” on page En-41.
Close the top cover and press it down gently but firmly until it locks into place.
8
En-46
Page 50

Clearing a Paper Misfeed
Inside the Printer
ATTENTION
fusing unit
• The
the area to avoid injury.
Close the fa ce-down tray.
1
Press the top cover rel ease button and open the top cover.
2
Remove the toner cartridge and the drum cartridge.
3
Clear the paper misfeed usi ng one of the f ollo wing pr ocedur es dependin g upon
4
the location of the paper misf eed.
inside the printer can become v ery hot during operat ion. Do not touch
English
In the Vicinity of the Drum
Cartridge
At the Fusing Unit
En-47
Page 51

Between the Drum Cartridge and the Fusing Unit
1
English
Note
• Do not touch the image tra nsfer roller.
Reinstall the drum cartridge and toner cartridge. See “Replacing the Car-
5
tridges” on page En-41.
Close the top cover and press it down gently but firmly until it locks into place.
6
2
En-48
Page 52

Pull the misfed paper straight out of the printer.
After removing a misfed paper, be sure to open the top cover, then close it again
to reset the printer.
Face-Down Tray Face-Up Tray (option)
Tray1 Manual Feed Tray
English
Second Paper Cassette Unit (option)
En-49
Page 53

English
En-50
Page 54

ENDVERBRAUCHER-LIZENZVERTRAG
Vor der Benutzung des beigefügten Produktes sind die nachstehenden Bedingungen sorgfältig zu
lesen. Mit der Benutzung des Produkt es erkennen Sie als Liz enznehmer die Bedingungen dieses Vertrages an. Wenn Sie mit den Bedingungen nicht einverstanden sind, senden Sie die ungeöffnete Pakkung umgehend zurück. Bei diesem Vertrag handelt es sich um einen Lizenzvertrag und nicht um
einen Kauf vertrag. MINOLTA ist Inhaberin der Urhe-b errechte an dem Microcod e, den Computerprogrammen und codiert en Schriften ein-schließlich der Bitmap-Schriften und Konturschriften
(nachfo lgend insgesamt als “S oftware” bezeichnet), die sich in diesem Druc ker, den Druckerzubehörteilen oder Fontprodukten befinden, oder MINOLTA besitzt die Lizenzen an den entsprechenden
Urheberrechten anderer Inhaber. Der Lizenznehmer erwirbt keine Rechte an der Software.
MINOLTA oder die genannten anderen Inhaber bleiben Inhaber der Rechte an der in der Packung
enthal tenen Kopie der Softwa re u nd jedwe der v on i hr ange fe rt igte n K op ie . Die Verantw or tung fü r di e
Wahl zur Erzi elung der gewünschten Ergebnisse, Inst allation, Benutzung und die mit der Soft w are
erzielten Ergebni sse liegt allein be i Ihnen als Lizenznehmer.
LIZENZ
Ihnen als Lizenznehmer i st es gestattet:
1. die Sof tware auf einem Computer und einem angesc hlossenen Drucker zu installie ren und zu
benutzen; 2. auss chlie ßl ic h zu Siche ru ngs - oder I nst al lat ion szwe cken e ine K opi e der So ft war e f ür d ie
normale und beabsicht igte Erstellung zu benu tzen. In diesem Fall is t der Lizenznehmer verpflichtet,
auf der Kopie die sich auf der Software befindenden Vermerke über Urheberrecht und Warenzeichen
entsprechend anzubringen; 3. das Eigentuman Kopien der Software an Dritte zu übertragen durch
Überlassung dieser Vertragsausferti gung und des son stigen dazugehörigen sc hriftlichen Materials
sowie mindestens einer vollstä ndigen, unver än d erten Kopie der S oftware, wen n folgende Be dingungen erfüllt sind: (i) Wenn gleichzeitig al le anderen Kopien der Software des Erstli zenznehmer s dem
Dritten überlassen oder diese Kopien vernichtet werden, (ii) wenn mit der Übertragung des Eigentums der Liz enzvertrag des Erstlizenznehmers mit MIN O LTA gekündigt wird und (iii) wenn der
Dritte diese Lizenzbe dingungen mi t der erstmaligen Benutz ung der Software annimmt und die entspreche nden vertraglichen Verpflichtungen eingeht; 4. die auf der Software vorhandenen Warenzeichen un d den en tsprechenden Vermerk über den Namen des Warenzeicheninhaber s ausschließlich im
Rahmen der anerkannten Praxis im Umgang mi t Warenzeichen zu verwenden.
Dem Lizenzn ehmer ist nur mit schrift licher Zus timmung von MINOLTA erlaub t:
1. Kopien der S oftware zu an d er en als den hie r au sdrückli ch genannten Zwecken zu verwenden,
anzufer tigen, zu verändern, mit anderer Software zu mischen oder zu übertragen, 2. die Software zu
entassem blie re n od er ent k ompi lier en, vo rbe halt li ch and ers la utend er geset zl icher Be stim mung en ode r
3.die Software oder eine Kopie davon zu verm ieten, zu verleasen, zu übert ragen oder eine Unterl izenz zu erteilen.
HAFTUNGSBESCHRÄNKUNGEN
MINOLTA gewährt bei sachgerech ter Benutzung eine Garantie auf Material und Verarbeitung der
Hardware, die die Software beinhaltet. D ie Haftungsbedingungen und beschränkungen bezüglich der
Hardware, die die Software beinhaltet, sind in den Gew ährleist ungsbedingungen aufgeführt, die mit
der Hardware ausgeliefert wurden. Ne ben dieser Gewährleistung auf Hardware und Medien wird
keine weitere Haftung für die Software übernom men. Die Software wird in dem Zus tand geliefert,in
dem sie sich bei der Übergabe befindet. Diese Gewähr leistungen gelten anstelle etwaiger anderer ausdrücklich er ode r st il lschwe ig end er G ew ährl ei stunge n e insch li eßli ch - j edoch ni cht besc hrä nkt hi er auf
- der gesetzlich vermuteten Gewährleistung bezüglich der Nut zung und Eignung der Software für
einen bestimmten Zweck .
De-1
Deutsch
Page 55

BESCHRÄNKUNG VON GEWÄHRLEISTUNGSANSPRÜCHEN
IN KEINEM FALL HAFTET MINOL TA FÜR ENTGANGENEN GEWINN ODER VERLORENE
EINSPARUNGSMöGLICHKEIT ODER GELEGENTLICH WEGEN DES GEBRAUCHS ENTSTANDENE ODER ANDERER FOLGESCHÄDEN, SELBST WENN MINOLTA ODER DIE
AUT O RISIER TEN HÄNDLER ÜBER MöGLICHE SCHÄDEN DIESER ART UNTERRICHTET
WURDEN. MINOLTA HAFTET AUCH NICHT FÜR ANSPRÜCHE DES LIZENZNEHMERS
AUFGRUND EINES ANSPRUCHS EINES DRITTEN.
ALLGEMEINE BESTIMMUNGEN
Der Lizenz nehmer kann den Lizenzvertrag je derzeit beenden, indem er sämtliche Kopien der Software ver nichtet oder ent sprechen d anderwei tiger Bes timmunge n diese s Vertrages handel t. MINOLT A
kann den Lizenzvertrag mit dem Lizenznehmer beenden, wenn dieser diese Bed ingungen nicht einhält. In diesem Fall erklärt sich der Lizenznehmer damit ein verstanden, alle Kopien der Software zu
vernichten.Jedweder Versuch, eine Kopie der Software zu anderen als den hier ausdrücklich genannten Zwecken zu vermieten, z u verleasen, zu über tragen ode r eine Unterlizenz hiervon zu erteilen, ist
nichtig. Der Liz enzneh mer e rk enn t hier mit an, da ß er für di e si ch a us die sem Vertra g etw a er ge bend en
persönlichen Steuern haftet. R echte aus diesem Vertrag können von den Parteien unabhängig von der
Art der Ansprüche nur innerhalb von zwei Jahren nach Entstehen des Anspruchs ge ltend gemach t
werden. Bei Verstößen gegen die Bestimmungen im Abschnitt unter der Überschrift “Lizenz” gilt
Deutsch
eine Frist von 4 Jahren.Für diesen Vertrag gilt im übrigen das Recht des Landes, indem dieses Produkt erworben worden ist.
LIZENZNEHMER REGIERUNG
Handelt der Lizenznehm er für eine ode r im Au ftrage ein er Einricht ung der Amerika nischen Regierung, gelten die folge nden Bestimmungen: Nutzu ng, Vervielfältigung oder Offenlegung durch die
Regierung unterli egt den Rights in Technical Data and Computer Software clause at FAR 252.2277013, subd ivision (b)(3)(ii) oder su bparagra ph (c)(1)(ii).
Eine Nutzu ng, Vervielfältigung oder Offenlegung darüberhinaus unterlieg t den Bestimmungen der
Restricted Rights Sof tware in FAR 52.227-19(c)(2).
SIE ALS LIZENZNEHMER ERKLÄREN, DIESEN LIZENZVERTRAG GELESEN
UND VERSTA NDEN ZU HABEN. SIE ERKENNEN DIE LIZENZBEDINGUNGEN
AN.
WEDER SIE NOCH MINOLTA FÜHLEN SICH AN BEDINGUNGEN GEBUNDEN,
DIE NICHT IN DIESEM VERTRAG ENTHALTEN SIND. ETW AIGE ERGÄNZUNGEN ODER ÄNDERUNGEN ZU DIESEM VERTRAG SIND NUR RECHTSGÜLT IG,
WENN SIE SCHRIFTLICH NIEDERGEL EGT UND UNTERSCHRIEBEN SIND VON
AUTORISIERTEN VERTRETERN BEID ER PARTEIEN .
MIT DEM öFFNEN DER VERPACKUNG ERKENNEN SIE SÄMTLICHE PUNKTE
DIESES VERTRAGES AN.
De-2
Page 56

Inhaltsverzeichnis
ENDVERBRAUCHER-LIZENZVERTRAG...............................De-1
Vorwort ........................................................................................De-4
Informationen zur Sicherheit.................................... ................De-4
Druckerteile und Zubehör................................... .....................De-10
Bedienfeld................ ................................. ... ........... ..................De-11
Vorsichtsmaßnahmen bei der Installation..............................De-13
Installationsort........................................................................De-13
Netzanschluß.........................................................................De-13
Erdung ...................................................................................De-14
Platzbedarf.............................................................................De-15
Allgemeine Sicherheitshinweise................ .............................De-16
Betriebsumgebung........... ........... ...........................................De-16
Drucker ................. ...................... ...........................................De-16
Druckerzubehör............... ...................... ................................De-18
Schritt 1: Drucker auspacken..................................................De-19
Schritt 2: Netzkabel anschließen ............................................De-21
Schritt 3: Papier laden..............................................................De-22
Schritt 4: Drucker an einen Computer anschließen..............De-23
Schritt 5: Drucker einschalten .................................................De-24
Schritt 6: Druckertreiber installieren ......................................De-25
Schritt 7: Drucker testen ..........................................................De-33
Installationsoptionen ...............................................................De-35
2. Papiereinzugsfach..............................................................De-35
Face-Up-Papierausgabefach ................................................ De-39
Ver brauchs t ei le austausc hen.................. ................................De-41
Drucker reinigen.......................................................................De-45
Papierstau beseitigen...............................................................De-47
Deutsch
De-3
Page 57

Vorwort
Informationen zur Sicherheit
Sicherheit des Lasers
Dieses Gerät ist ein Seitendrucker, der einen Laser verwendet. Vom Lase r gehen
keinerlei mögliche Gefahren aus, solange der Drucker entsprechend den Anweisungen in diesem Handbuch verwendet wird.
Da die vom Laser ausgesandte Strahlung vollständig in einem schützenden
Gehäuse eingeschlossen ist, kann der Laserstrahl zu keinem Zeitpunkt des
Betriebs aus dem Gerät entweichen.
Interne Laserstrahlu ng
Maximale S t rahl ungsleistung:
Deutsch
0,6 mW an der Laseraustrittsöffnung des Druckkopfes
Wellenlänge:
770–810 nm
Dieses Produkt verwendet eine Laserdiode der Klasse
Laserstrahl aussendet.
Laserdiode und r otierender P olygonspiegel sind im Druckko pf integ r i ert.
Der Druckkopf kann nicht vom Service vor Ort gewartet werden.
Daher sollte der Druckkopf unter gar keinen Umständen geöffnet werden.
III
b, die einen unsichtbaren
Sicherheit des Lasers
Dieser Drucker ist als Laserprodukt der Klasse I nach dem Strahlungsleistungsstandard des
chend dem “Radiation Control for Health and Safety Act of 1968”, zertifiziert. Das
bedeutet, daß der Drucker keine gefährliche Laserstrahlung erzeugt.
U.S. Department of Health and Human Services (DHHS),
De-4
entspre-
Page 58

CDRH-Vorschriften
Das
Center for Devices and Radiological Health (CDRH)
Drug Administration hat am 2. August 1976 Vorschriften für Laserprodukte erlassen. Die Erfüllung dieser Vorschriften ist für Produkte, die in den USA vermarktet
werden, zwingend vorgeschrieben. Das unten gezeigte Etikett weist auf die Erfüllung der CDRH-Vorschriften hin und muß auf Laserprodukten, die in den USA vermarktet werden, angebracht sein.
der U.S. Food and
Lasersicherheitsetikett
Deutsch
Vorsicht
• Verwendung v on Bedienungselementen, Einstellungen oder Verfahren auf andere Art
und Weise , al s in di esem Handbuch angege ben, kann zur Einwirkung gef ährlicher
Strahlung führen.
Vorsicht
• Dies ist ein Halbl eiterlaser. Die maximale Leist ung der Laserdiode beträgt 5 mW , und
die Wellenlänge ist 770–810 nm.
De-5
Page 59

Für Anwender in Dänemark
ADVARSEL
• Usynlig laser str åling ved åbni ng, når sikkerhedsafbrydere er ude af funktion. Undgå
udsættelse for stråling.
Klasse 1 laser produ kt der opfylder IEC60825 sikkerheds kra vene.
Dansk: Dette er en halvlederlaser. Laserdiodens højeste styrke er 5 mW og bølgelængden er 770–810 nm.
Für Anwender in Finnland und Schweden
LUOKAN 1 LASERLAI TE
KLASS 1 LASER APPARAT
Deutsch
VAROITUS!
• Laitteen käyt täminen muulla kuin tässä käyttöohjeessa mainitulla tavalla saattaa altistaa käyttäjä n turvallisuusl uokan 1 ylittäväll e näkym ättömälle lasersäteilylle.
Tämä on puolijohdelaser. Laserdiodin suurin teho on 5 mW ja aallonpituus on
770–810 nm.
VARNING
• Om apparaten används på annat sätt än i denna bruksanvisning specificerats, kan
användar en utsättas för osynlig laserstrålning, som överskrider gränsen för l aserklass
1.
Det här är en halvledarlaser. Den maximala effekten för laserdioden är 5 mW och
våglängden är 770–810 nm.
VARO
• Avattaessa ja suojalukitus ohitettaessa olet alttiina näkymättömälle lasersäteilylle. Älä
katso säteeseen.
VARNING
• Osynlig laserstrålning när denna del är öppnad och spärren är urkopplad. Betrakta ej
strålen.
De-6
Page 60

Für Anwender in Norwegen
ADVARSEL
• Dersom apparatet brukes på annen måte enn spesifisert i denne bruksanvisning, kan
brukeren utsettes for unsynlig laserstråling som overskrider grensen for laser klass 1.
Dette en halvleder laser. Maksimal effekt till laserdiode er 5 mW og bølgelengde er
770–810 nm.
Laserwarnetikett
Deutsch
Benutzeranweisungen
CE-Zeichen (Konformitätserklärung)
Unter unserer alleinigen Verantwortung erklären wir, daß der Drucker und die
Optionen, auf die diese Erklärung Bez ug nimmt , konform mit den unten aufgeführten Spezifikationen sind.
Diese Erklärung gilt nur für den Bereich der europäischen Union (EU).
De-7
Page 61

Produkttyp Laserstrahldrucker
Produktname PagePro 1100L
Optionen Zweites P apiereingabef ach (4148-611)
Face-Up-Papierausgabefach (4121-0633)
Deutsch
Standard
Sicherhei t: EN60 950/1992 mit den Änderungen 1, 2, 3, 4, A11
Sicherheit informationstechnischer Einrichtungen einschließlich elektrischer
Bürogeräte.
EN60825-1/ 1994 mit Änderung A11
Strahlungssicherheit für Laserprodukte, Geräteklassifikation, Anforderungen und Bedienungsanleitung
EMV: EN55 022 (
Grenzwerte und Meßverfahren für Funkstörungen von informationstechnischen Einrichtungen (ITE)
EN61000-3-2 (
Elektromagnetische Verträglichkeit (EMV)
Teil 3: Grenzwerte Abschnitt 2: Gr enzwerte für ha rmonische Stromemissionen (Geräte-Eingangsstrom ≤ 16 A pro Phase)
EN61000-3-3 /1995
Elektromagnetische Verträglichkeit (EMV)
Teil 3: Grenzwerte Abschnitt 3: Begrenzung von Spannungsschwankungen
und Flackern in Niederspannun gs-Versorgungssyst e m en mit Nennstrom ≤
16 A
EN55024/1 998
Informationstechnische Einrichtungen – Störfestigkeit – Grenzwer te und
Meßverfahren
EN61000–4–2/1995
Elektromagnetische Verträglichkeit (EMV)
Teil 4: Test- und Meßverfahren
Abschnitt 2: Prüfung der Störfest ig keit gegen die Entladun g st at i scher Elektrizität
EN61000–4–3/1995
Elektromagnetische Verträglichkeit (EMV)
Teil 4: Test- und Meßverfahren
Abschnitt 3: Prüfung der Störfesti gkei t gegen ein ausgestrahltes elektromagnetisches Hochfrequenzfeld.
EN61000–4–4/1995
Elektromagnetische Verträglichkeit (EMV)
Teil 4: Test- und Meßverfahren
Abschnitt 4: Prüfung der Störfestigkeit gegen schnelle transiente elektrische
Störgrößen (B urst)
EN61000–4–5/1995
Elektromagnetische Verträglichkeit (EMV)
Teil 4: Test- und Meßverfahren
Abschnitt 5: Prüfung der Störfesti gkei t gegen Überspannung
EN61000–4–6/1996
Elektromagnetische Verträglichkeit (EMV)
Teil 4: Test- und Meßverfahren
Abschnitt 6: Lei tungsgeführ t e, durch Hochfrequenzfelder induzier te Störgröße – Prüfung der Störfestigkeit
Klasse B
Klasse A
)/1998
)/1995 (A13)
De-8
Page 62

EN61000–4–8/1993
Elektromagnetische Verträglichkeit (EMV)
Teil 4: Test- und Meßverfahren
Abschnitt 8: Prüfung der Störfest ig keit gegen Magnetfelder mit energietechnischen Frequen zen
EN61000–4–11/1994
Elektromagnetische Verträglichkeit (EMV)
Teil 4: Test- und Meßverfahren
Abschnitt 11: Prüfung der Störfesti gkeit gegen Spannung seinbrüche, kurze
Unterbrechungen und Spannungsänderungen
EU-Direktive Sicherheit: 73/23/EEC
EMV: 89/ 336/ EEC und 93/68/EEC
• Das Gerät muß mit abgeschirmtem Schnittstellenkabel (Parallel) verwendet wer-
den.
Die Verwendung von nicht abgeschirmtem Kabel kann zu Störungen des Funkverkehrs führen und ist nach 89/336/EEC verboten.
Ozonfreisetzung
Während des Druckbetriebs wird eine kleine Menge Ozon freigesetzt. Diese Mengen sind nicht groß genug, um bei Personen negative Effekte hervorzurufen. Trotzdem sollten Sie, falls Sie größere Mengen drucken, oder falls das Gerät über einen
längeren Zeitraum andauernd verwendet wird, sicherstellen, daß der Raum, in
dem das Gerät verwendet wird, ausreichend belüftet ist.
Der Schalldruckpegel
Der arbeitsplatzbezogene Schalldruckpegel nach DIN 45 635 beträgt 70dB (A)
oder weniger.
Deutsch
De-9
Page 63

Druckerteile und Zubehör
Fac e-Up-Papierausgabefach (optional)
Face-Down-Papierausgabefach
Manueller Papierei nzugsschacht
Papierführungen
Entriegelungsknop f für
die obere Druck erabdeckun g
Deutsch
Netzschalter
Tonerkartusc he
Socke l fü r 2. Papiereinzugsf ach (opti onal)
Bedienfel d
Parallelschnittstelle
Fotoleitertrommel
1. Papiereinzugsfach
(Universalfach)
Papierauflage
Papierfachabdeckung
2. Pa piereinzugsfach
(500 Blatt, opti onal)
Face-U p-/F ac e-Do wnWahlsc halter
Netzkabelanschluß
De-10
Page 64

Bedienfeld
Die beiden Kontrolleuchten sind ein- oder ausgeschaltet oder blinken in bestimmten Kombinationen und zeigen dem Anwender den aktuellen Druckerstatus an. Im
folgenden Abschnitt werden die einzelnen Kombinationen beschrieben, in denen
die Kontrolleuchten aktiviert werden, und die Maßnahmen, die Sie dann jeweils
ergreifen müssen.
Fehler-Kontrollleuchte (orange)
Bereitschafts-Kontrolleuchte (grün)
Aus Ein Blinkend
Deutsch
Hinweis
• Eine detaillierte Erklärung des Druckerstatus kann auf Ihrem PC-Bil dschirm aufgerufen werden.
Kontrolleuchten (Druckermeldungen)
Kontrollleuchten
Beschreibung Kontroll-
leuchten
Netzspannung ausgeschaltet.
De-11
Beschreibung
Drucker bereit.
Aufwärmphase
Page 65

Kontrollleuchten
Beschreibung Kontroll-
leuchten
Beschreibung
Drucker eingeschaltet und initialisiert.
(langsam blinkend)
Stromsparmodus
Deutsch
Falsches Papierformat bei Ausführung
des Druckauftrags
Richtiges Papierformat in das Einzugsfach legen.
Datenempfang
Datenverarbeitung
Druckvorgang
Aufwärmphase
Obere Druckerabdekkung offen.
Obere Druckerabdekkung schließen.
Papierstau
Papierstau beseitigen, um mit dem
Ausdruck fortzufahren.
Kein Papier.
Papier in das Einzugsfach legen.
Druckwerk-Kommunikationsfehler
Druckwerkfehler
Drucker ausschalten
und Fachhändler aufsuchen.
De-12
Page 66

Vorsichtsmaßnahmen bei der
Installation
Bitte beachten Sie die folgenden wichtigen Vorsichtsmaßnahmen, wenn Sie einen
Standort für den Drucker suchen und ihn an eine Spannungsversorgung anschließen.
Installationsort
Um Ihrem Drucker eine lange Betriebsdauer zu gewährleisten, ist es sehr wichtig,
einen geeigneten Installationsort auszuwählen. Wählen Sie sehr sorgfältig einen
Ort, der fol gende Bedingungen erfüllt.
• Gute Belüftung muß gewährleistet sein.
• Am Aufstell ungsort dürf en weder Ammoniak no ch and ere orga nis che Stof fe oder
Gase freigesetzt werden.
• In der Nähe einer Steckdose, die frei zugänglich ist, damit bei Druckerproblemen
schnell der Netzstecker gezogen werden kann.
• Der Aufstellungsort sollte nicht direktem Sonnenlicht ausgesetzt sein.
• Vermeiden Sie Bereiche im direktem Luftzug einer Klimaanlage, einer Wärmequelle oder eines Ventilators und Bereiche, an denen extrem hohe oder niedrige
T em peraturen oder eine hohe Luftf euchtigkeit herrschen.
• Wählen Sie einen stabilen und ebenen Untergrund, der nic ht übermäßigen
Erschütter ungen ausgesetzt ist.
• Halten Sie Objekte vom Druc ker f ern, di e die Lüftun gsschli tze ver dec ken könn en.
• Der Aufstellungsort sollte sic h a usreichend entf ernt von leicht entflammbaren
Gardinen oder anderen brennbaren Objekten befinden.
• Wählen Sie einen Installationsort, an dem es ausgeschlossen ist, daß der Drukker Wasserspritzer n oder anderen Flüssigkeiten ausgesetzt ist.
• Stellen Sie sicher, daß die Umgebung des Druckers saube r, trocken und staubfrei
ist.
Deutsch
Netzanschluß
Der Drucker arbeitet mit folgenden Spannungs- und Frequenzwerten:
Spannungsversorgung:
220–240 V bei 50–60 Hz
Spannungsschwankun ge n:
220–240 V ±10%
Frequenzschwankungen:
Innerhalb eines Bereichs von ±3 Hz
De-13
Page 67

Hinweis
• Benutzen Sie ei nen Netzanschluß mit geringe n Netzspannungs- und Frequenz-
schwankun gen.
• Benutzen Sie ei nen Netzanschluß mit der für dies en Drucker geeigneten Spannung.
• Prüfen Sie, ob der Stecker vollständig in die Steckdose eingesteckt ist. Die Steckdose
sollte nahe beim Drucker und frei zugängl ich sein, damit bei Druckerproblemen
schnell der Stecker gezogen werden kann.
• Die Steckdose, die Sie benutzen, soll gut sichtbar sein und nicht durch den Drucker
selbst oder ander e Geg enstände verst ellt sein.
• Wenn der Drucker mit mehreren elektrischen Geräten an dieselbe Steckdose ange-
schlossen wird, darf die Stromkapazität der Steckdose nicht überschritten werden .
• Wenn Sie ein Verlängerungskabel benutzen, muß es ein Kabel mit einer höheren
Kapazität sein, al s es der Stromverbrauch vom Drucker ist. Ein Verlängerungskabel
mit einer geringeren Kapaz ität kann sich erhitzen und einen Brand aus lösen.
• Schließen Sie niemals den Drucker mit anderen Geräten oder Maschinen an einen
Deutsch
Mehrfachstecker an.
Erdung
Der Drucker muß zum Schutz vor elektrischen Schlägen immer geerdet sein.
Schließen Sie zur Erdung des Druckers das Netzkabel an eine Steckdose an, die
mit einem Schutzkontakt versehen ist, der den örtlichen Vorschriften entspricht.
Hinweis
• Verbinden Sie ein Erdungskabel niemals mit ei ner Gasleitung, dem Erdungskabel
eines Telefons oder einer Wasserleitung.
De-14
Page 68

Platzbedarf
Bitte stellen Sie den benötigten Platzbedarf für den Drucker sicher, wie in der
Abbildung unten dargestellt wird. Sie erreichen damit eine einfachere Bedienung
und Wartung des Druckers sowie einen leichteren Papier- und Toneraustausch.
250mm
(9-3/4")
507mm
(20")
150mm
(6")
672mm
(26-1/2")
300mm
(11-3/4")
200mm
(7-3/4")
100mm
(4")
660mm
(26")
Deutsch
De-15
Page 69

Allgemeine Sicherheitshinweise
Beachten Sie die fo lgenden Sicherheitshinweise, wenn Sie den Drucker benutzen.
Betriebsum gebung
Die Betriebsumgebung des Druckers sollte folgenden Anforderungen genügen.
Temperatur:
10 °C bis 35 °C (50 °F bis 95 °F) mit Schwankungen von höchstens 10 °C
(18°F) in der Stunde
Luftfeuchtigkeit:
Zwischen 15% und 85% mit einer Schwankung von höchstens 20% in der
Stunde
Deutsch
Drucker
Die nachfolgenden Sicherheitshinweise sollen beim Betrieb des Druckers eingehalten werden.
• Schalten Sie niemals während eines Druckvorgangs den Drucker aus, oder öffnen Sie dabei eine Abdeck ung oder Kla ppe.
• Halten Sie entflammba re G ase, Fl üssigkeiten oder Objek te, die magnetische
Kräfte erzeugen, vom Drucker fern.
• Wenn Sie das Net zkabel aus der Stec kdose zi ehen, fa ssen Sie imm er den Stec ker
an, statt direkt am Kabel selbst zu ziehen. Ein beschädigtes Kabel kann einen
Brand verursachen, und es besteht die Gefahr, einen Stromschlag zu erleiden.
• Ziehen Sie niemals den Stecker mit feuchten Händen aus der St eckdose. Es
besteht die Gefahr, einen Stromschlag zu erleiden.
• Ziehen Sie das Netzkabel imme r aus der Steckdose, wenn Sie den Druc ker bewegen. Das Netzkabel könnte sonst beim Umstellen beschädigt werden. Ein beschädigtes Kabel kann einen Brand verursachen, und es besteht die Gefahr, einen
Stro mschlag zu erl e iden.
• Ziehen Sie das Netzkabel imme r aus der Steckdose, wenn der Druc ker längere
Zeit nicht benutzt wird.
• Entfernen Si e niemals verschraubte Verk lei dungen oder Abdeckungen vom Drukker. Der Drucker enthält Hochspannungskomponenten, die einen Stromschlag
verursachen können.
• Modifizieren Sie das Gerät auf kei nen Fall. Die Folge könnten Brand oder Stromschlag sein.
De-16
Page 70

• Achten Sie darauf , kei ne schweren Gegenstände auf das Netzkabel zu st ellen,
daran zu ziehen oder es zu knicken. Die Folge könnten Brand oder Strom schlag
sein.
• Stellen Sie immer sic her, daß der Drucker nicht auf dem Netzkabel oder anderen
Anschlußkabeln elektrischer Geräte steht. Stellen Sie außerdem immer sicher,
daß kein Kabel in den Druckermechanismus eingeklemmt wird. Die Folge könnten Fehlfunktionen oder gar ein Brand sein.
• Lassen Sie niemals Büroklammern, Heftklamm ern oder andere kleine Metallteile
durch die Lüftungsschlitze oder andere Öffnungen in den Drucker fallen. Die
Folge könnten Brand oder Stromschlag sein.
• Ver me iden Sie, daß Wasser oder andere Flüssigkeiten in den Drucke r oder in die
Nähe des Druckers gelangen. Sollte der Drucker in Kontakt mit Wasser oder
anderen Flüssigkeiten kom m en, besteht die Gefahr von Stromschlag oder Brand.
• Falls trotz aller Vorsichtsmaßnahmen ein kleines Stück Metall oder eine Flüssigkeit ins I nnere des Dr uc kers gelangen sollt e, schal ten Si e sofo rt den Drucker aus,
ziehen Sie das Netzkabel aus der Steckdose, und wenden Sie sich an lhren Fachhändler. Wird diese Maßn ahm e nicht sofort ergriff en, besteht die Gefahr eines
Brandes oder eines Stromschlags.
• Sollte der Drucker außergewöhnliche Hitze, Rauch, einen unnormalen Geruch
oder ungewöhnliche Geräusche erzeugen, schalt en Sie den Drucker sofort aus,
ziehen Sie das Netzkabel aus der Steckdose, und wenden Sie sich an lhren Fachhändler. Wird diese Maßn ahm e nicht sofort ergriff en, besteht die Gefahr eines
Brandes oder eines Stromschlags.
Deutsch
Warnung
• Stellen Sie sicher, daß der Druck er in einem gut belüfteten Raum aufgestellt wird.
Während des normalen Druckvorgangs tritt eine geringfügige Menge von Ozon aus.
Es kann so während umfangreicher Druckaufträge in schlecht belüfteten Räumen ein
unangenehmer Geruch auftreten. Um einen komfortablen, gesunden und sicheren
Betrieb zu gewährleis ten, em pfehlen wir Ihnen, den Drucker in einem gut belüf teten
Raum aufzustelle n.
De-17
Page 71

Druckerzubehör
Beachten Sie die fo lgenden Vorsichts maßnahmen, wenn Sie mit Drucke rz ubehör
wie z. B. Tonerkartusche, Fotoleitertrommel und Papier hantieren.
• Vermeiden Sie die Lagerung von Druckerzubehör an fol genden Orten:
• einen Ort mit direkter Sonneneinstrahlung – Zusätzlich muß die Fotoleitertrommel
vor fluor eszierendem Licht g eschützt werden.
• in der Nähe einer Wärmequelle oder gar einer offenen Fl amme
• Bereiche mit hoher Luftfeuchtigkeit
• staubige Bereiche
• Lagern Sie Papier, das zwar aus der Originalverpac kung entnommen, aber noch
nicht in ein P apiereingabefac h gelegt wu rde, in einer geschlossenen Plastiktüte
an einem kühlen und dunklen Ort.
• Ver w enden Sie nur Tonerkartuschen, die ausdrücklich für diesen Drucker freigegeben sind.
Deutsch
• Bewahren Sie das Zubehör außerhalb der Reichweite von Kindern auf.
• Sollten I hre Hände mi t Toner beschmutzt werden, waschen Sie sie sof ort mit Wasser und Seife.
Warnung
• Immer wenn die Fotoleitertrommel aus dem Drucker genommen wird, muß sie sofort
mit einem Tuch oder ähnlichem abgedeckt wer den, um sie vor Lich tei nfall zu schützen.
De-18
Page 72

Schritt 1
Nehmen Sie die unten gezeigten Gegenstände und Zubehörteile aus dem Kar-
1
ton.
1
Drucker auspacken
1. Drucker
2
2. Zubehör:
Bedienungsanleitung
CD-ROM
Netzkabel
Garantiebroschüre
Registrierkarte
Power Cord Instructions
Warnung
• Lagern Sie nach dem Auspacken das
gesamte Verpackungsmateria l an
einem sicheren Ort, außerhalb der
Reichweite von Kindern.
Entfernen Sie den Plastikb eutel, und lösen Sie das Versandklebeb and von der
2
Druckerrüc kseite ab.
Deutsch
De-19
Page 73

Klappen Sie das 1. Papiereinzugs-
3
fach mit beiden Händen auf.
Drücken Sie die rechte Papierführun g nach außen, um beide Papier führ ungen
5
Deutsch
auseinanderzuschieben. Ziehen Sie den Plasti kstreifen aus dem manuellen
Papiereinzugsschach t heraus.
Ziehen Sie die beiden Schutzpolster
4
aus dem Papiereinzugsschacht heraus.
De-20
Page 74

Schritt 2
Netzkabel anschließen
Stellen Sie sicher, daß der Netz-
1
schalter in der Position
steht.
❍
(Aus)
Schließen Sie das eine Ende des
2
mitgelieferen Netzkabels am Netzkabelanschluß des Druc kers an. Stekken Sie das andere Ende in eine
Steckdose.
Deutsch
De-21
Page 75

Schritt 3
Papier laden
Klappen Sie die Face-Down-Papier-
1
ausgabefach auf.
Deutsch
Drücken Sie die rechte Papierfüh-
3
rung nach außen, um beide Papierführungen auseinanderzus chieben.
Klappen Sie das 1. Papiereinzugs-
2
fach mit beiden Händen auf.
Legen Sie einen Papier stapel in die
4
Mitte des 1. Papie reinzugsfachs.
Drücken Sie die rechte Papierf ührung nach innen, bis der Papierstapel bündig an beiden
Papierführungen anliegt.
De-22
Page 76

Schritt 4
Drucker an einen Computer
anschließen
Warnung
• Benutzen Sie immer ei n abgesch irmtes Schni ttst ell enkab el. Bei Verwendung von nicht
abgeschirmten Kabeln kön nen Funkstörungen Daten beeinträchtigen.
Hinweis
• Sie benötigten für die V erbindung von Drucker und Com puter ein Kabel entspr echend
IEEE 1284 Typ B. Detaillierte technische Daten zum Schnittstellenkabel finden Sie in
“Specifications” (Technische Daten) in der
der CD-ROM.
• Minolta kann verständliche rweise nicht garant ieren, daß der Drucker mit allen der im
Handel befindlichen Kabel korrekt funktioniert. Die Auswahl eines geeigneten Kabels
liegt in der Verantwortung des Anwenders.
Stellen Sie sicher, daß sowohl der Dr ucker als auch der Computer, an den Sie ihn
1
anschließen, ausgeschaltet sind.
Schließen Sie ein Ende des Schnittstellenkabels am Parallelanschluß des Com-
2
puters an.
Bedienungsanleitung “User’s Manual”
auf
Deutsch
Schließen Sie das ander e Ende des Schnittstellenk abels am Parallelanschluß an
3
der Rückseite des Druckers an. Sichern Sie das Kabel, indem Sie die beiden
Klammern des Parallelanschlusses am Stecker einrasten lassen.
De-23
Page 77

Schritt 5
Nachdem Sie den Drucker an die Spannungsversor gung angeschlossen haben,
■
drücken Sie den Netzsc halter , um den Drucker einzusch alten.
Drucker einschalten
Deutsch
Bei Einschalten des Druckers leuchten beide Kontrolleuchten auf dem Bedi enfeld auf,
dann erlischt die Fehler-Kontrolleuchte, während die Bereitschafts-Kontrolleuchte weiterhin leuchtet. Nach etwa 23 Sekunden ist die Aufwärmphase beendet, und der Drukker ist bereit.
Hinweis
• Wenn 15 Minuten lang kein Signal vom Computer an den Drucker gesendet
wurde, schaltet der Drucker automatisch in den Energies parmodus. Sobald ein
neues Signal vom Computer empfangen wird, benöt igt der Drucker ein kurze Zeit,
um sich auf Betriebstemperatur zu erwärmen, bevor der Druckvorgang beginnt.
De-24
Page 78

Schritt 6
Der Minolta PagePro 1100L-Druckertreiber wurde speziell entwickelt, um den
Anwendern des Minolta/QMS PagePro 1100L-Druckers sowohl wirklich Windowsbasiertes Drucken als auch Drucken unter DOS zu bieten. Der PagePro 1100LDruckertreiber besteht aus drei Programmen: dem Minolta PagePro-Druckertreiber, der Druckerkonsole und der Druckerstatusanzeige.
Druckertreiber installieren
Systemanforderungen
Nachfolgend werden die Minimalanforderungen an Ihr System beschrieben, die
notwendig sind, um einwandfrei mit dem Minolta PagePro 1100L-Druckertreiber
arbeiten zu können.
Betriebssystem: Microsoft Windows 95, Windows 98 oder Windows NT 4.0
Personal Computer: IBM-kompatibler PC mit mindestens einer 386 DX 16 MHz
CPU (empfohlen wird ein Pentium-Prozessor).
CD-ROM-Laufwerk
E/A-Schnittstelle: IEEE 1284 Parallel
Arbeitsspeicherpla tz: minde stens 16 MB
Freier Festplattenspeicherplatz: ungefähr 20 MB für Dateien
Deutsch
De-25
Page 79

PagePr o 1100L-Druckertreiber unter Windows
95/98/NT 4.0 installieren
In diesem Abschnitt wird beschrieben, wie der PagePro 1100L-Druckertreiber
unter Windows 95, Windows 98 oder Windows NT 4.0 installiert wird.
Sie können unter folgenden Methoden zur Installation des PagePro 1100L-Drukkertreibers wählen.
Windows NT
4.0
—
Autorun-Installationsprogramm auf der CD- ROM
Plug & Play-Installation
Deutsch
Assistent für die Druckerinstallation
❍
: Verfügbar —: Nicht verfüg bar
Windows 95 Windows 98
❍❍❍
❍
——
❍❍
PagePro 1100L-Druckertreiber mit dem Autorun-Installationsprogramm installieren
Schalten Sie Ihren Computer ein, und starten Sie Windows 95, Windows 98 oder
1
Windows NT 4.0.
Hinweis
• Falls unter Windo ws 95 oder Windows 98 der Assistent für G erätetreiber-Updates
oder der Hardwareassistent auf dem Bildschirm erscheint, klicken Sie auf
Abbrechen
“
Legen Sie die CD-ROM mit der Be schr iftung “M inolta/ QMS Pa gePr o 1100L Pri nter
2
Drivers” in das CD-RO M-Laufwerk Ihres Computers ein.
”.
Das Startfenster wird automatisch angezei gt.
3
Hinweis
• Einige Computer sind so k onfiguriert, daß der Startbildschirm nicht automatisch
erscheint. Falls dies bei Ihnen der Fall ist, klicke n Sie doppelt auf
der CD-ROM.
De-26
Minolta.exe
auf
Page 80

Hinweis
• Wenn Sie bereits eine ältere Version des PagePro1100L-Drucker treibers auf
Ihrem Computer installiert haben, erscheint das folgende Dialogfenster.
Unter Windows 95/Windo ws 98
Klicken Sie zum Löschen des alten Drucke rtrei bers auf “Ja”. (Zum Been-
1
den des Setup-Progr am ms können Sie auf “Nein” klicken.)
Wenn das folgende Dialogfenster erscheint, klicken Si e zum Start der Dein-
2
stallation des alten Druckertreibers auf “Ja”.
Deutsch
Unter Windows NT4.0
Klicken Sie zum Löschen des alten Drucke rtrei bers auf “Ja”. (Zum Been-
1
den des Setup-Progr am ms können Sie auf “Nein” klicken.)
De-27
Page 81

Folgen Sie zur Vervollständigung der Installatio n den Anweisungen, die auf dem
4
Bildschirm Ihres Com puters erscheinen.
Deutsch
Wenn das folgende Dialogfenster erscheint, wählen Sie den gewünschten
5
Anschluß, und klicken Si e auf “Weiter”.
De-28
Page 82

Warnung
• Wenn Sie auf den Drucker über einen unter Windows 95 betriebenen Server
zugreif en wol len, inst alli eren Si e zunäch st den Druc k ertreiber v om Se rver mi t Hilfe
des Installationsprogramms. Auf das Installationsprogramm kann entweder über
das sich selbstausführende Programm (Minolta.exe) oder über das Programm
Setup.exe der ei nzelnen Sprach versionen zuge gri ffen werden. Sie finden das
deutsche Setup.ex e in folgendem Pfad:
...\Drivers\PP1100L\WinXX\D\Gdi \Drv\ setup.e xe (wobei “winXX” durch die Version
des jeweils verwendeten Betriebssystems ersetzt werden soll).
• Wenn Sie feststellen, daß Ihr Drucker in einer Netzwerkumgebung keine Dokumente ausgeben kann, wählen Sie beim Client “RAW” als Datenformat zum Zwi schenspeichern.
Wenn das folgende Dialogfenster erscheint, aktivieren Sie das Kontrollkästchen
6
“Kassette 2”, falls die optionale Zweite Papierkasse tten-Einheit in Ihrem Dru cker
installiert ist. Klicken Sie dann auf “Weiter”, um den nächsten Schritt anzuzeigen.
Deutsch
De-29
Page 83

Nach Beendigung der Installation erscheint das folgende Dialogfenster.
7
Klicken Sie zum Schließen des Setup-Programmfensters auf “Beenden”.
Deutsch
Hinweis
• Es wird empfohlen, Ihren Computer nach der Instal lation neu zu starten.
8
Nach dem Neustart des Computers erscheint das folgende Fenster auf
dem Desktop des Computers.
De-30
Page 84

Prüfen Sie, ob das Druckersymbol für den Minolta PageWorks/Pro 1100L im Dia-
9
logfenster “Drucker” angezeigt wird. Klicken Sie zur Anzeige des Dia logfenster s
“Drucker” auf “Start”, zeigen Sie auf “Einstellungen”, und klicken Sie dort auf
“Drucker”.
Nehmen Sie die CD-ROM mit der Beschriftung “Mino lta/QMS PagePro 1100L Prin-
10
ter Drivers” aus dem CD-ROM-Laufwerk Ihr es Comp uters.
Damit ist die Insta ll ation des Minolta PagePro 1100L-Druc kertreibers abgeschlossen.
Deutsch
De-31
Page 85

Dialogfenster “PagePro 1100L-Druckertreiber einrichten” anze ig e n
Klicken Sie auf “Start”, gehen Sie auf “Einstellungen”, und klicken Sie dort zur
1
Anzeige des Dialogfens ters “Drucker” auf “Drucker” .
Klicken Sie i m Dialogfenster “Dru cker” auf das Druckersymbol des Minol ta Page-
2
Pro 1100L.
Wählen Sie “Eigenschaften” aus dem Menü “Datei”.
3
Das folgende Fenster erscheint.
Hinweis
• Die folgende Grafik zeigt den Druckertreiber unter Windows 95.
Deutsch
De-32
Page 86

Schritt 7
Führen Sie die folgenden Schritte durch, um eine Testseite zu drucken und um zu
überprüfen, ob der Drucker einwandfrei arbeitet. Sie können außerdem eine Seite
mit den aktuellen Einstellungen des Druckers ausdrucken lassen.
Drucker testen
Hinweis
• Die Grafiken in dieser Abschnitt zeigen die Druckerk onsole unter Windows 95.
Klicken Sie auf die Schaltfläche “Start”, zeigen Sie auf “Programme”, dann auf
1
“Minolta PageWorks_Pro 1100L”, und klicken Sie dann auf “Druckerkonsole”.
Deutsch
Wählen Sie “Druckertest” aus dem Menü “Ausführen”. Das Dialogfeld “Dr ucker-
2
test” erscheint.
De-33
Page 87

Aktivieren Sie das (die ) Ele men t(e), die gedruckt werden sollen, und klicke n Sie
3
dann auf “OK”.
Prüfen Sie , bevor Sie auf “OK” klicken, ob der Drucker betriebsbereit ist.
Hinweis
• Wenn die Testseite nicht mit einem Compu ter unt er Windo ws 95 oder Wind ows 98
ausgegeben we rden kann, an den der Drucker direkt über di e Parallelschnittstelle
Deutsch
angeschlossen ist, kann die Ursache des Problems die Datei Drvwppqt.vxd im
Ordner C:\Windo ws\System\Iosubsys sein. Entfernen Si e entweder diese Datei
aus dem Ordner , oder ändern Sie den Dateinamen (beispielsweise zu “Drvwppqt.old”). W enn aller dings ei n Bandlauf werk für die Datensi cherung an den parallelen Anschluß angeschlossen is t, unterlassen Sie die oben erwähnte
Maßnahme.
De-34
Page 88

Installationsoptionen
Dieser Abschnitt beschreibt das zur Verfügung stehende optionale Zubehör, für
diesen Drucker.
2. Papiereinzugsfach
Der Sockel des 2. Papiereinzugsfachs
Legal
Executiv e
A4
wird mit einem Einzugsfach geliefert,
das bis zu 500 Blatt im Format A4 aufnehmen kann.
In denselben Sockel können auch
andere Einzugsfäc her für weitere
Papierformate (Legal, Executive, Letter
und B5) eingesetzt werden. Wenden
Sie sich an Ihren Fachhändler, um festzustellen, wie Sie diese Einzugsfächer
beziehen können, um somit die Fähigkeiten Ihres Druckers erweitern zu können.
Deutsch
Letter
B5
De-35
Page 89

Platzbedarf
250mm
(9-3/4")
626mm
(24-3/4")
150mm
(6")
Deutsch
972mm
(38-1/4")
600mm
(23-1/2")
200mm
(7-3/4")
100mm
(4")
660mm
(26")
De-36
Page 90

2. Papiereinzugsf ach insta llie ren
Entnehmen Sie den Sockel und das
1
2. Papiereinzugsfach aus der Verpackung. Entfer nen Sie auch das
Schutzklebeband, das die verschiedenen Einzelteile an ihrem Ort
sichert.
Hinweis
• Vor dem Einsetzen der zweiten Pa pierkassette immer das Schutzband nd die
Papierpolst erung aus dem Gerät entfernen, wie in der Abbildung unten
gezeigt.
Deutsch
De-37
Page 91

Stellen Sie den Drucker auf den Sok-
2
kel des Papiereinzugsfachs. Stellen
Sie sicher, daß die Paßstifte am Sokkel in die entsprechen d en Aufnahmen an der Druckerunterseite
eingesetzt werd e n .
Entfernen Sie die Papierfachabdek-
3
kung.
Deutsch
Drücken Sie das Bodenblech im
4
Inneren des 2. Papiereinzugsfachs
nach unten, bis es einrastet.
Setzen Sie die Abdeckung wieder
6
auf, und schieben Sie das 2. Papiereinzugsfach wieder in den Sockel
ein.
Legen Sie einen Stapel Papier von
5
bis zu 500 Blatt in das 2. Papiereinzugsfach. Die Papierseite, dieschon
beim Auspacken nach oben zeigte,
soll auch im Papiere inzugsfach oben
liegen.
Hinweis
• Verwenden Sie zum Her ausnehmen
und Einsetzen des 2. Papiereinzugsfachs immer beide Hände.
De-38
Page 92

Face-Up-Papierausgabefach
In diesem Papierausgabefach werden die gedruckten Seiten mit dem Ausdruck
nach oben (Face-Up) abgelegt, so wie sie vom Drucker ausgeworfen werden. Wird
dieses Papierausgabefach benutzt, werden die bedruckten Seiten während der
Auswurfsequenz des Druckers nicht gerollt oder v erbogen. Aus diesem Grund wird
das Face-Up-Papierausgabefach empfohlen, wenn Sie Karton oder Umschläge
bedrucken, da damit ein Verbi egen des Druckm ediu ms während des Auswerfens
vermieden wird.
Die maximale Kapazität des Face-Up-Papierausgabefachs beträgt 20 Blatt.
Platzbed arf
300mm
(11-3/4")
557mm
(22")
100mm
250mm
(9-3/4")
772mm
(30-1/2")
300mm
(11-3/4")
200mm
(7-3/4")
(4")
660mm
(26")
Deutsch
De-39
Page 93

Face-Up-Papierau sg ab ef ach insta llie re n
Nehmen Sie das Face-Up-Papierausgabefach aus der Verpackung.
1
Biegen Sie das Papierausgabefach
2
vorsichtig mit beiden Händen leicht
nach innen. Setzen Sie die Stifte am
Papierau sgabefach in die entsprechenden Aufna hme n am Drucker
ein.
Deutsch
Hinweis
• Wenn das F ace-Up-P apieraus gabefach
nicht installiert ist, sollte der Face-Up-/
Face- Down-W ah ls chalte r auf das F aceDown-Pa pierausgabefach gestell t sei n
(siehe obige Abbildung).
• Klappen Sie niemals das Face-UpPapierausgabefach in Richtung Drukkervorderseit e oder üben g roßen Druck
darauf aus.
Wählen Sie die gewünschte Papier-
3
ausgaberichtung mit dem F ace-Up-/
Face-Down-Wahlschalter rechts an
der Druckerr ückseite.
a: Face-Down
b: F ace-Up
a
b
a
b
De-40
Page 94

Verbrauchsteile austauschen
ACHTUNG
Fixiereinheit
•Die
Berühren Sie daher diesen Bereich nicht, um Verletzungen vorzubeugen.
Gehen Sie wie im folgenden beschrieben vor, wenn Sie Tonerkartusche oder Fotoleitertrommel austauschen möchten.
Austausc h der Tonerkartusche: 1 ➧ 2 ➧ 3 ➧ 4 ➧ 7 ➧ 8 ➧ 9
Austausc h der Fotoleitertrommel:1
im Drucker kann während des Druckbetriebs sehr heiß werden.
Fixiereinheit
2 ➧ 3 ➧ 4 ➧ 5 ➧ 6 ➧ 8 ➧ 9
➧
Deutsch
Schalten Sie den Drucker aus, und ziehen Sie den Netzstecker aus der Steckdose.
1
Klappen Sie das Face-Down- Papier-
2
ausgabefach zu.
De-41
Drücken Sie den Entriegelungs-
3
knopf für die obere Druckerabdeckung, und klappen Si e die
Druckerabdeckung auf.
2
1
Page 95

Entfernen Sie die alte Tonerkartu-
4
sche.
Setzen Sie die neue Fotoleitertrom-
6
Deutsch
mel in den Drucker ein, indem Sie
die Führungsnasen an der Trommel
in die entsprechenden Aufnahmen
im Drucker leiten.
Entfernen Sie die alte Fotolei ter-
5
trommel.
Hinweis
• Sowohl die Fotoleitertrommel als auch
die entsprechenden Einbaustellen im
Drucker si nd m it farblich abge sti m m ten
und mit “1” beschrifteten Aufklebern
versehen. Richten Sie zum Installieren
der Fotoleitertrommel die entsprechenden Aufkleber aufeinander aus.
• St e l len Sie sic her, daß die Fot o leitertrommel so weit wie möglich in den
Drucker eingeschoben wurde.
De-42
Page 96

Nehmen Sie die neue Tonerkartusche aus der Verpackung. Halten Sie die Kartu-
7
sche mit beiden Händen fest, und schütteln Sie sie in Pfeilrichtung, wie in der
Abbildung gezeigt.
Halten Sie die Tonerkartusche an
8
ihrem Handgriff fest, und lassen Sie
sie in den Drucker gleiten.
Stellen Sie sicher, daß die vier Stifte an
der Kartusche (zwei auf jeder Seit e) in
die entsprechenden Aufnahmen im
Drucker einges etzt sind.
Hinweis
• Sowohl die Tonerkartusche als auch
die entsprechenden Einbaustellen im
Drucker si nd m it farblich abge sti m m ten
und mit “2” beschrifteten Aufklebern
versehen. Richten Sie zum Installieren
der Tonerkartusche die entsprechenden Aufkleber aufeinander aus.
Deutsch
De-43
Page 97

Wenn richtig ei ngesetzt, rastet die Kartusche hörbar ein.
1
Klappen Sie die obere Druckerab-
9
deckung vor sichtig zu, bis sie einr a-
Deutsch
stet.
2
De-44
Page 98

Drucker reinigen
Staub, Schmutz und Papierrückstände am Druckergehäuse und auch im Inneren
des Druckers können die Leistung des Druckers negativ beeinflussen. Reinigen
Sie daher den Drucker regelmäßig.
ACHTUNG
Fixiereinheit
•Die
Berühren Sie daher diesen Bereich nicht, um Verletzungen vorzubeugen.
Hinweis
• Benutzen Sie zur Reinigung des Druckers ein weiches Tuch. Benutzen Sie niemals
scharfe oder korrosive Reinigungs mittel.
• Warten Sie mindestens 10 Minuten, nachdem Sie den Drucker ausgeschaltet haben,
und stellen Sie sicher, daß die
der Reinigung des Druckerinnenraums beginnen.
Druckergehäuse reinigen
im Drucker kann während des Druckbetriebs sehr heiß werden.
Fixiereinheit
ausreichend abgekühlt ist, bevor Sie mit
Deutsch
Wischen Sie das Gehäus e des Dr uc kers mi t einem wei che n Tuch ab, das leicht mi t
■
einem neutralen Haushaltsreiniger befeuchtet ist.
De-45
Page 99

Papiere in z ugswalze r e in igen
Schalten Sie den Drucker aus, und ziehen Sie den Netzstecker aus der Steck-
1
dose.
Klappen Sie das Face-Down- Papierausgabefach zu.
2
Drücken Sie den Entriegelungsknopf für die obere Druckerabdeckung, und
3
klappen Sie sie Druckerabdeckung auf.
Entfernen Sie die Tonerkartusche und die Fotoleitertrommel aus dem Drucker.
4
Deutsch
Klappen Sie die Papiereinzugswal-
5
zen-Abdeckung am Boden der Drukkerkammer auf.
Fixiereinheit
Benutzen Sie ein weiches Tuch zur
6
Reinigung der Papiereinzugswalze.
ACHTUNG
Fixiereinheit
•Die
Berühren Sie daher diesen Bereich nicht, um Verletzungen vorzubeugen.
im Drucker kann währ end des Druckbetriebs sehr heiß werden.
Installieren Sie die Fo tol eitertrommel und die Tonerkartusche. Siehe dazu “Ver-
7
brauchsteile austauschen” auf Seite De-41.
Klappen Sie die obere Druckerabdeckung vorsichtig zu, bis sie ei nrastet.
8
De-46
Page 100

Papierstau beseitigen
Innerhalb de s Druckers
ACHTUNG
Fixiereinhe it
•Die
Berühren Sie daher diesen Bereich nicht, um Verletzungen vorzubeugen.
Klappen Sie das Face-Down- Papierausgabefach zu.
1
Drücken Sie den Entriegelungsknopf für die obere Druckerabdeckung, und
2
klappen Sie sie die Druckerabdeckung auf.
Entfernen Sie die Tonerkartusche und die Fotoleitertrommel aus dem Drucker.
3
Um einen Papierstau zu beseitigen, gehen Sie wie unten beschrieben vor, ent-
4
sprechend der P o sition im Drucke r, an der der Papierstau auf getreten ist.
im Drucker kann während des Druckbetriebs sehr heiß werden.
Deutsch
Im Bereich der Fotoleitertrommel
Im Bereich der Fixiereinheit
De-47
 Loading...