

Page 1
User’s Guide: Maintenance/Troubleshooting
Page 2

Table of contents
1 Cleaning This Machine
1.1 Before getting started .................................................................................................................... 1-2
1.2 Cleaning ........................................................................................................................................... 1-4
1.2.1 Cleaning the outside of this machine..................................................................................................1-4
1.2.2 Cleaning the Paper Feed Rollers ........................................................................................................1-5
1.2.3 Cleaning the laser lenses....................................................................................................................1-8
2 Checking and Replacing Consumables
Control Panel ......................................................................................................................................1-4
Exhaust Air Duct .................................................................................................................................1-4
Outer Covers.......................................................................................................................................1-4
Original Glass......................................................................................................................................1-5
Original Cover Pad..............................................................................................................................1-5
Cleaning the Paper Feed Rollers of the Manual Feed Tray ................................................................1-5
Cleaning the Paper Feed Unit of Tray 1/2/3 .......................................................................................1-6
Cleaning the Transport Roller of Tray 2/3 ...........................................................................................1-6
Cleaning the Paper Feed Roller of the ADF ........................................................................................1-7
2.1 Checking the status of consumables............................................................................................ 2-2
2.2 Replacing consumables................................................................................................................. 2-3
2.2.1 Replacing a Toner Cartridge...............................................................................................................2-3
2.2.2 Replacing an Imaging Unit..................................................................................................................2-6
2.2.3 Replacing a Waste Toner Bottle .......................................................................................................2-12
2.2.4 Replacing the Transfer Roller............................................................................................................2-14
2.2.5 Replacing the Transfer Belt Unit .......................................................................................................2-16
2.2.6 Replacing a Toner Filter....................................................................................................................2-22
2.2.7 Replacing a Fusing Unit....................................................................................................................2-23
2.2.8 Replacing a Staple Kit SK-602 .........................................................................................................2-27
2.2.9 Replacing a Staple Kit SK-501 .........................................................................................................2-30
Consumables replacement messages................................................................................................2-2
Checking the consumable level ..........................................................................................................2-2
Handling a Toner Cartridge.................................................................................................................2-3
Storing Toner Cartridges.....................................................................................................................2-3
Replacement procedure .....................................................................................................................2-4
3 Clearing Paper Jam and Staple Jam
3.1 To prevent a paper jam .................................................................................................................. 3-2
3.2 When a paper jam has occurred ................................................................................................... 3-3
3.2.1 Paper jam message screen.................................................................................................................3-3
3.2.2 Clearing a paper jam in the Manual Feed Tray or Transfer Roller ......................................................3-3
Clear procedure ..................................................................................................................................3-4
3.2.3 Clearing a paper jam in Tray 1 ............................................................................................................3-5
3.2.4 Clearing a paper jam in Tray 2/3 .........................................................................................................3-7
3.2.5 Clearing a paper jam in the ADF .........................................................................................................3-8
3.2.6 Clearing a paper jam in the Duplex Option.......................................................................................3-10
3.2.7 Clearing a paper jam in the Fusing Unit............................................................................................3-11
3.2.8 Clearing a paper jam in the Finisher (bizhub C3850FS only) ............................................................3-14
3.3 Troubleshooting for paper jam.................................................................................................... 3-15
3.4 Clearing a staple jam.................................................................................................................... 3-17
3.4.1 Clearing a staple jam in the Staple Kit SK-501.................................................................................3-17
Clear procedure ..................................................................................................................................3-5
Clear procedure ................................................................................................................................3-11
[Maintenance/Troubleshooting] Contents-1
Page 3

3.4.2 Clearing a staple jam in the Staple Kit SK-602.................................................................................3-19
4 Troubleshooting
4.1 The power is not turned on............................................................................................................ 4-2
4.2 The Touch Panel is not displayed.................................................................................................. 4-3
4.3 Cannot print..................................................................................................................................... 4-4
4.3.1 Cannot print ........................................................................................................................................4-4
4.3.2 Problems on print quality....................................................................................................................4-7
4.3.3 When the bit count does not match between the server and the client .............................................4-8
4.4 Cannot perform network scanning ............................................................................................. 4-10
4.5 Cannot perform fax/internet fax.................................................................................................. 4-11
4.5.1 Cannot perform Fax TX.....................................................................................................................4-11
4.5.2 Cannot perform Fax RX ....................................................................................................................4-12
4.6 Cannot perform copy.................................................................................................................... 4-13
4.7 Trouble in use of Finisher FS-P03 ............................................................................................... 4-15
4.8 Trouble in use of Finisher (bizhub C3850FS) .............................................................................. 4-16
4.9 Major messages and actions....................................................................................................... 4-17
Warning messages............................................................................................................................4-17
Error messages.................................................................................................................................4-18
Service call........................................................................................................................................4-21
5 Checking Counters
5.1 Checking the counter ..................................................................................................................... 5-2
6Index
[Maintenance/Troubleshooting] Contents-2
Page 4

1
Cleaning This Machine
Page 5

1.1 Before getting started
1 Cleaning This Machine
NOTICE
Thoroughly read all the precautions and warning labels, and be sure to follow their instructions. These labels
are provided inside the door of this machine or inside the machine.
1.1 Before getting started
Carefully handle this machine so that you can use it for an extended period of time. A failure caused by incorrect use or rough handling is not covered by the warranty
If dust or slips of paper are left inside or outside this machine, it may reduce printing quality. We recommend
that you periodically clean this machine. Follow the guideline shown below.
- When cleaning the inside of this machine or clearing a paper jam, exercise care not to touch around the
Fusing Unit because internal components such as the Fusing Unit may be hot.
- Do not place any objects on this machine.
- To clean this machine, use a soft cloth.
- Do not spray detergent directly on the surface of this machine. If detergent gets into this machine
through holes, slots, etc., it may damage internal circuits.
- Do not use abrading or corrosive agents, including solvents such as alcohol, benzene, or thinner, to
clean this machine.
- When using detergent such as neutral detergent, try it on an obscure part of this machine to check its
effectiveness.
- To clean this machine, do not use a sharp or textured object such as a wire, plastic cleaning pad, or
brush.
- When you close the door of this machine, do it carefully. Do not do anything that might make this ma-
chine oscillate.
- Do not cover this machine directly after using it. Turn the power off, then wait until this machine be-
comes cool.
- Do not leave the door of this machine open for a long period of time. Especially, in bright light, Imaging
Unit may be damaged.
- Do not open any door of this machine during printing.
- Do not align sheets of paper at the top of this machine.
- Do not grease or disassemble this machine.
- Do not set this machine on an incline.
- Do not touch the electric wiring, gears, or laser beam unit. Doing so may lead to a machine failure or
reduce printing quality.
- Do not load an excessive number of sheets of paper in the output tray. Doing so may cause a paper
jam or paper curling.
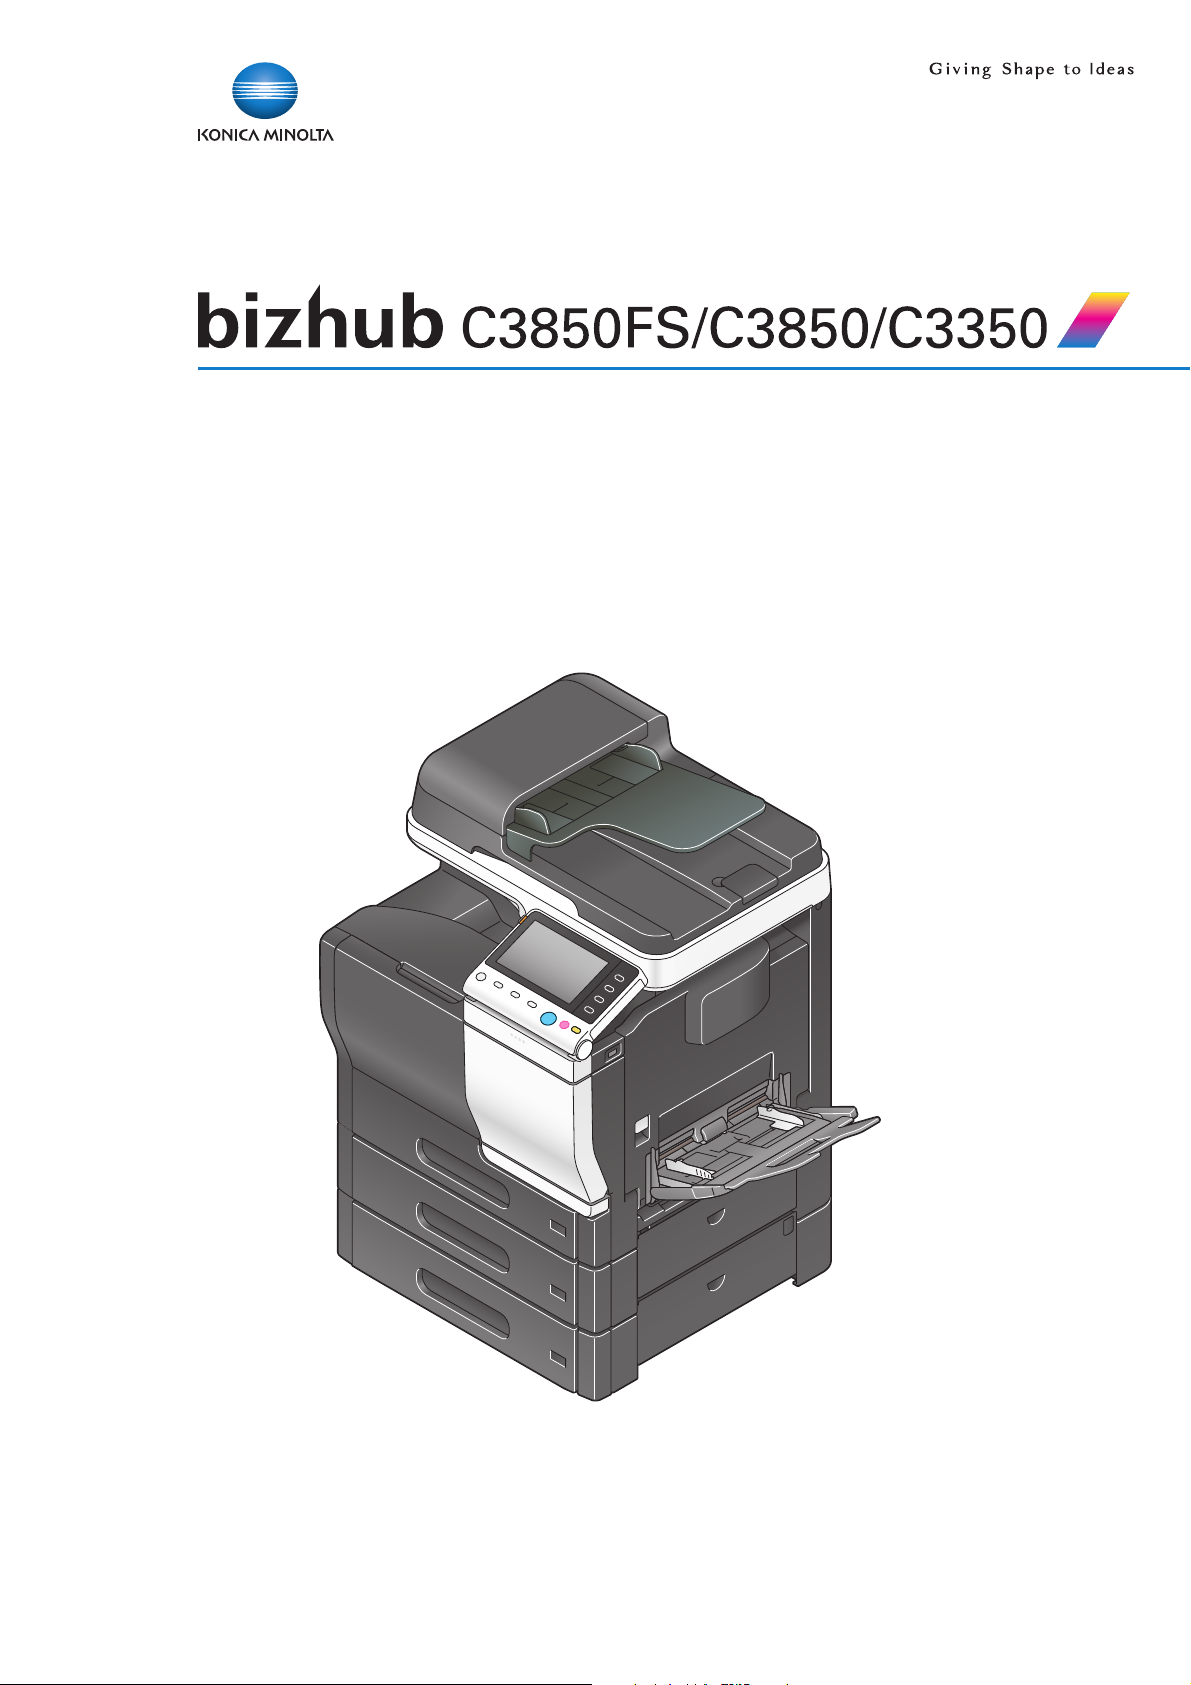
- When moving this machine, at least two people are required to do so. To prevent toner from spilling,
keep this machine horizontal when carrying it.
1
[Maintenance/Troubleshooting] 1-2
Page 6
1.1 Before getting started
bizhub C3850FS
bizhub C3850/bizhub C3350
- When carrying this machine, be sure to fold the Manual Feed Tray and hold the parts shown below.
53 kg
117 lbs
1
- When the optional Paper Feed Unit is installed, be sure to carry it separately from this machine. Also,
- Before connecting the power cable of this machine to the power outlet, check that internal components
- If your hand is stained by toner, wash it with cool water and neutral detergent.
7WARNING
- Before cleaning this machine, turn the power off, then disconnect the power cable and interface cable.
48 kg
105 lbs
do not hold handles (drawers) of the Paper Feed Unit or Right Door. Doing so may damage the Paper
Feed Unit.
removed at the time of cleaning have been installed to their original positions.
Exercise care not to spill water or detergent inside this machine. Doing so may cause a damage of this
machine or an electric shock.
7CAUTION
- If any toner enters your eyes, immediately wash them with cool water, then contact your doctor.
- The Fusing Unit is heated. The temperature of the Fusing Unit slowly reduces (wait for 1 hour).
[Maintenance/Troubleshooting] 1-3
Page 7
1.2 Cleaning
1.2 Cleaning
7WARNING
- Before cleaning this machine, turn the power off, then disconnect the power cable and interface cable.
Exercise care not to spill water or detergent inside this machine. Doing so may cause a damage of this
machine or an electric shock.
1.2.1 Cleaning the outside of this machine
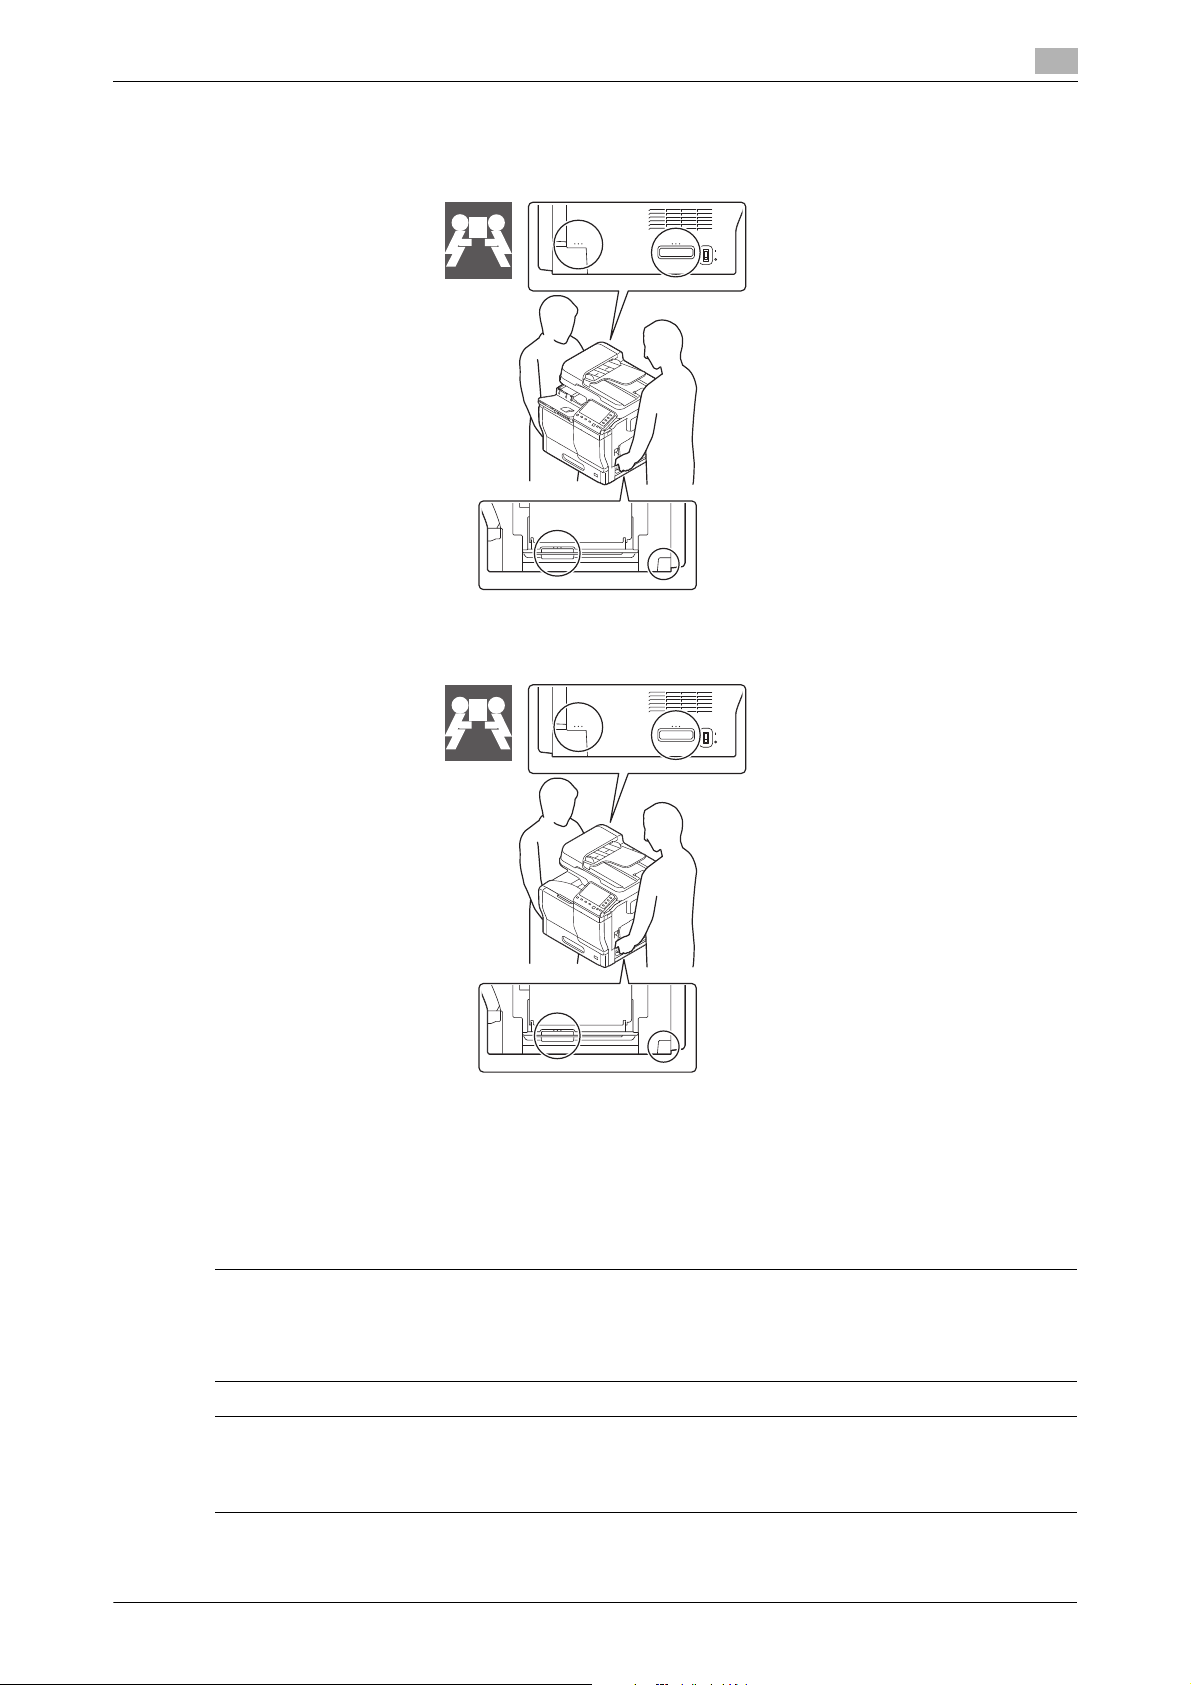
Control Panel
1
Exhaust Air Duct
Outer Covers
[Maintenance/Troubleshooting] 1-4
Page 8

1.2 Cleaning
Original Glass
Original Cover Pad
1
1.2.2 Cleaning the Paper Feed Rollers
If the Paper Feed Rollers have been stained with paper powders or dust, a paper feeding failure may occur.
Cleaning the Paper Feed Rollers of the Manual Feed Tray
1 Open the Manual Feed Tray.
2 Press up the center of the flip-top plate until the lock latches (white) at the right and left are locked.
[Maintenance/Troubleshooting] 1-5
Page 9

1.2 Cleaning
3 Wipe off the Paper Feed Rollers with a soft and dry cloth.
4 Close the Manual Feed Tray.
Cleaning the Paper Feed Unit of Tray 1/2/3
0 Tray 2/3 is available when the optional Paper Feed Unit is installed.
1 Open the tray.
1
2 Wipe off the Paper Feed Rollers with a soft and dry cloth.
3 Close the Tray.
Cleaning the Transport Roller of Tray 2/3
0 Tray 2/3 is available when the optional Paper Feed Unit is installed.
1 Open the Right Door of Tray 2/3.
% When opening the Right Door of Tray 2/3, be sure to fold the Manual Feed Tray in advance.
[Maintenance/Troubleshooting] 1-6
Page 10
1.2 Cleaning
2 Wipe off the Transport Roller with a soft and dry cloth.
3 Close the Right Door of Tray 2/3.
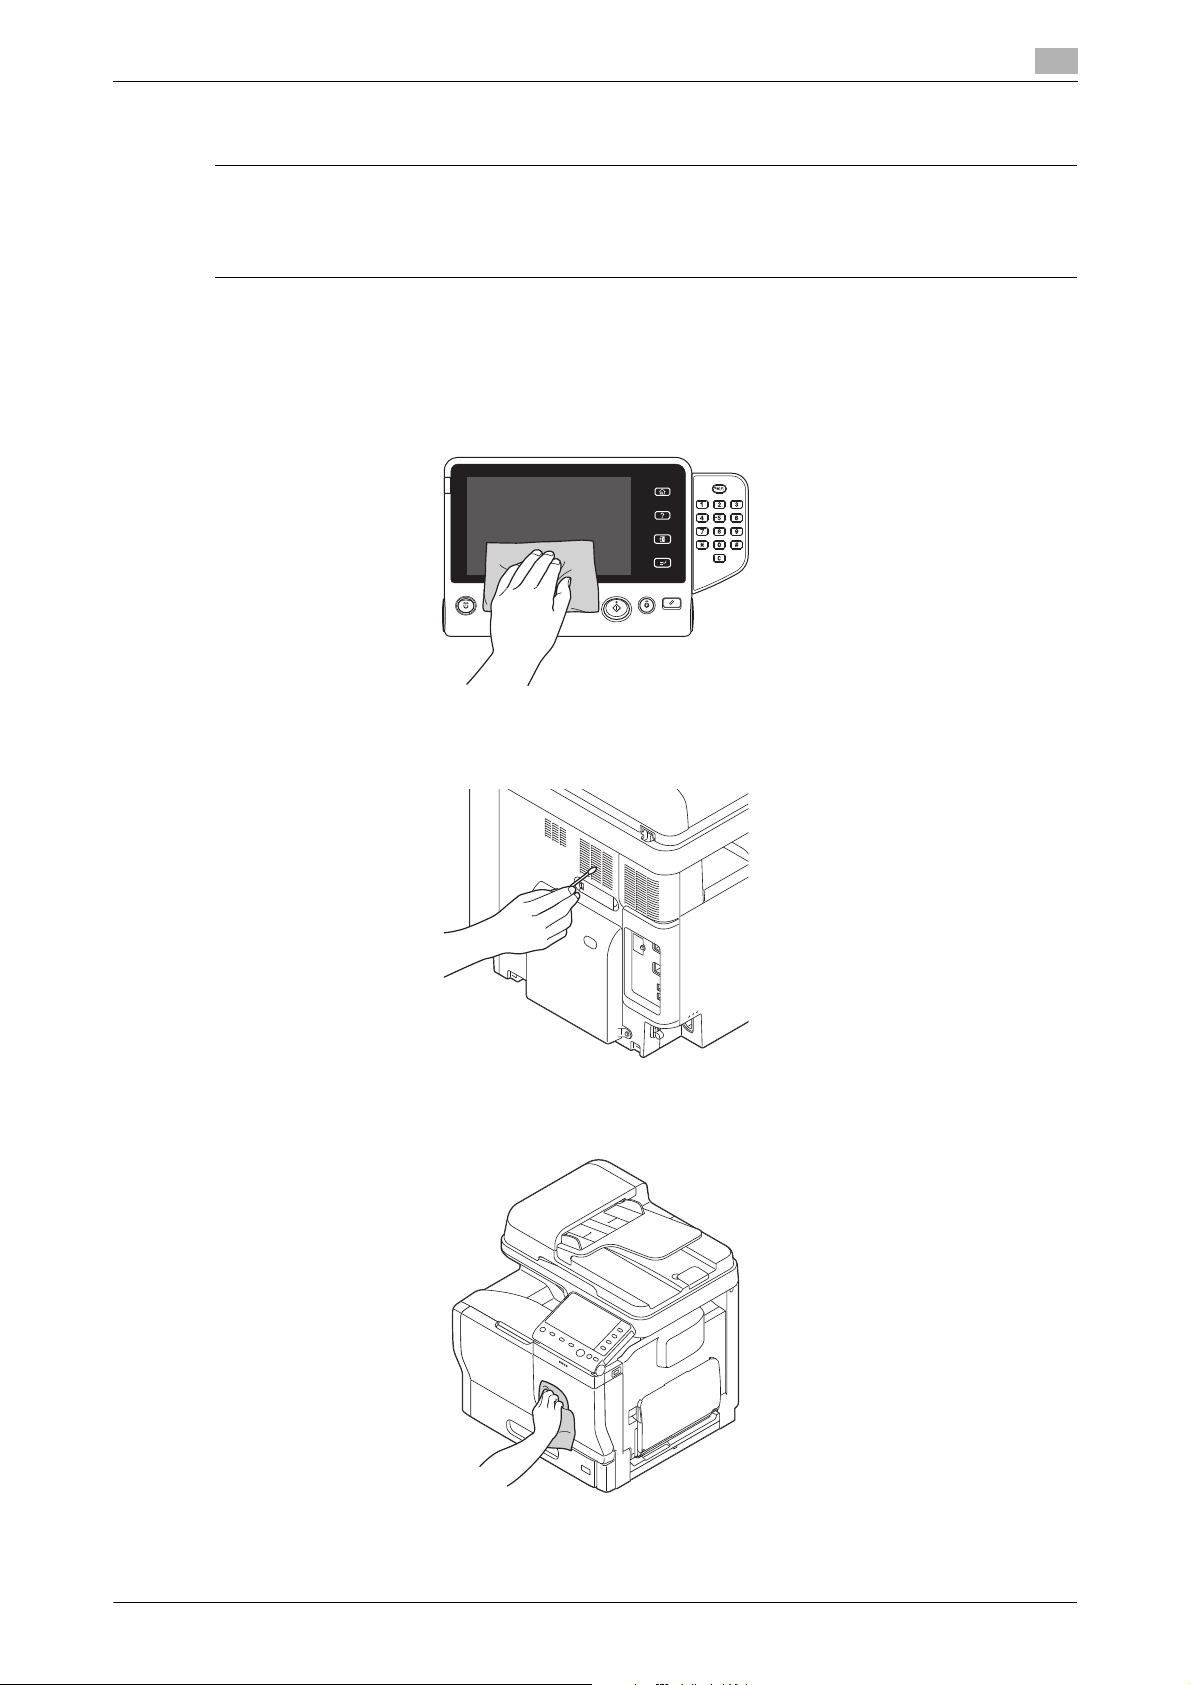
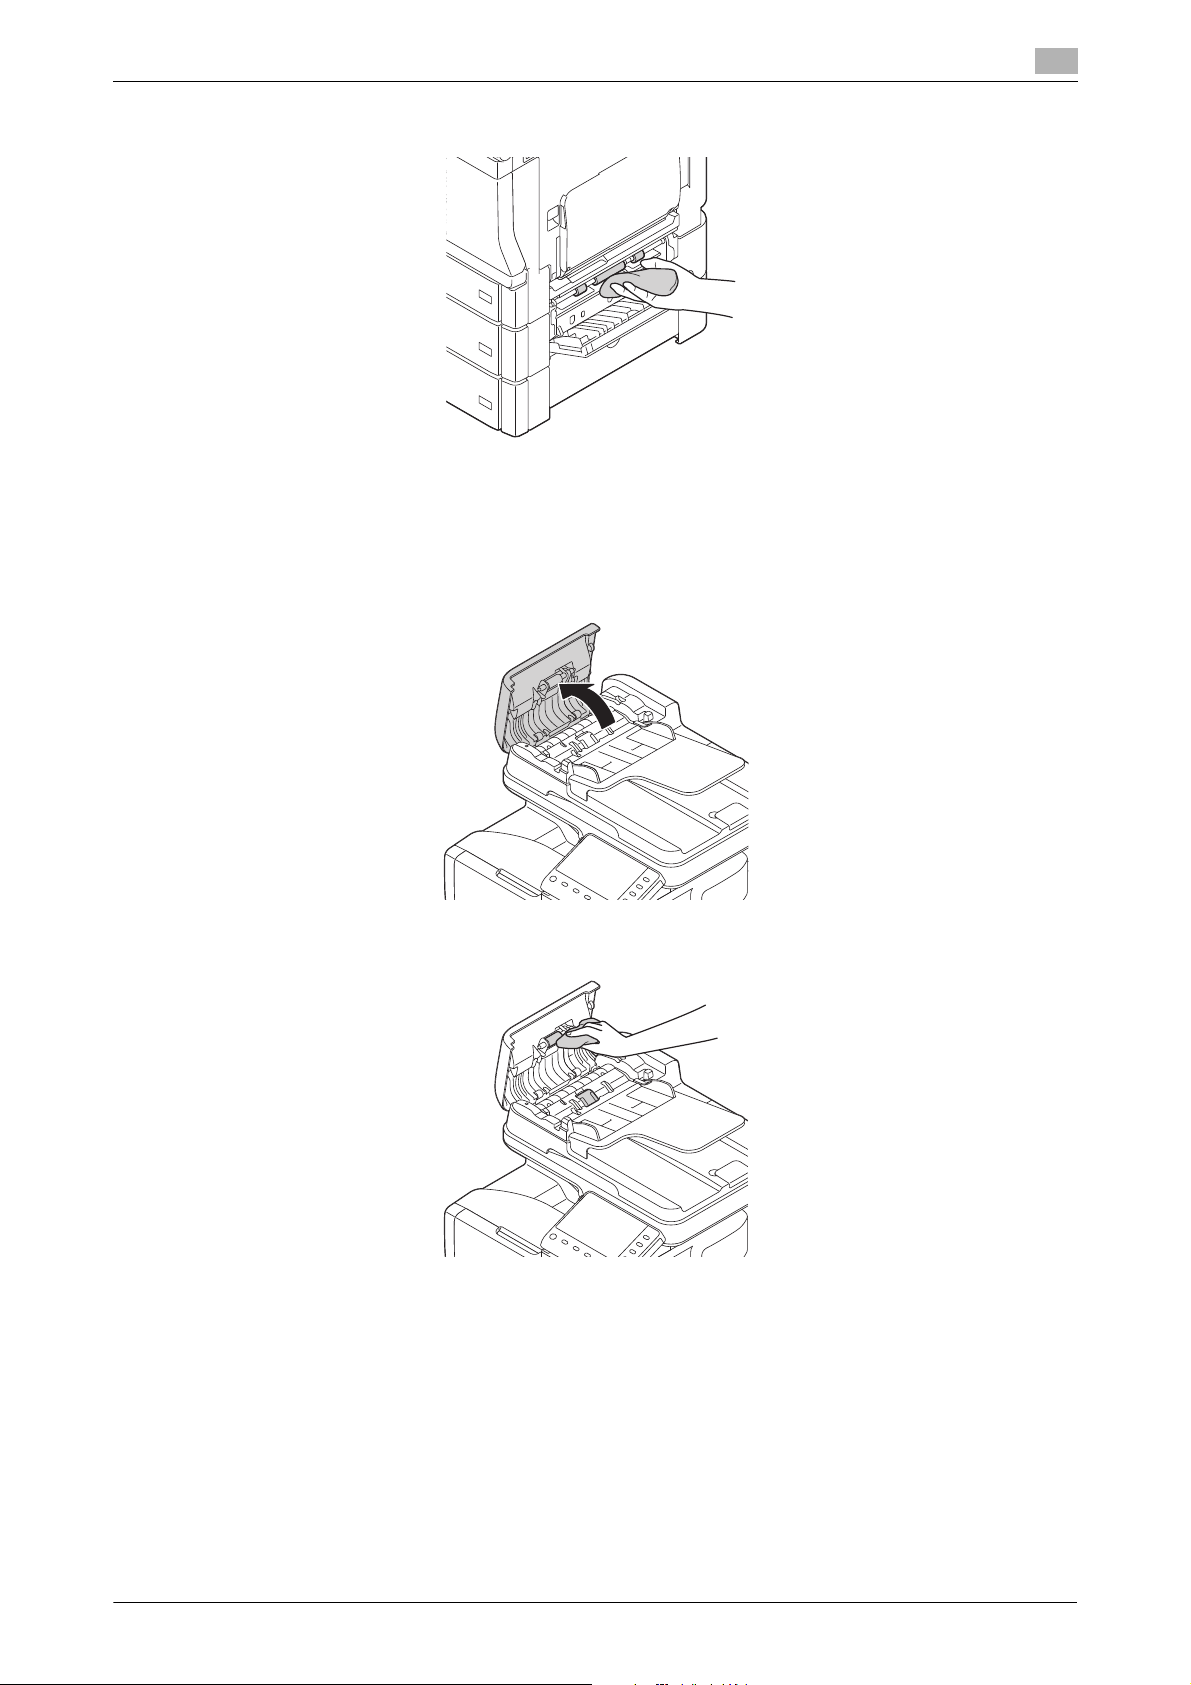
Cleaning the Paper Feed Roller of the ADF
1 Open the ADF Cover.
1
2 Wipe off the Paper Feed Roller at the rear side of the cover with a soft and dry cloth.
3 Close the ADF Cover.
[Maintenance/Troubleshooting] 1-7
Page 11
1.2 Cleaning
1.2.3 Cleaning the laser lenses
This machine has four laser lenses. Follow the steps shown below to clean all the laser lenses.
0 The Laser Lens Cleaning Tool is stored in the Front Cover.
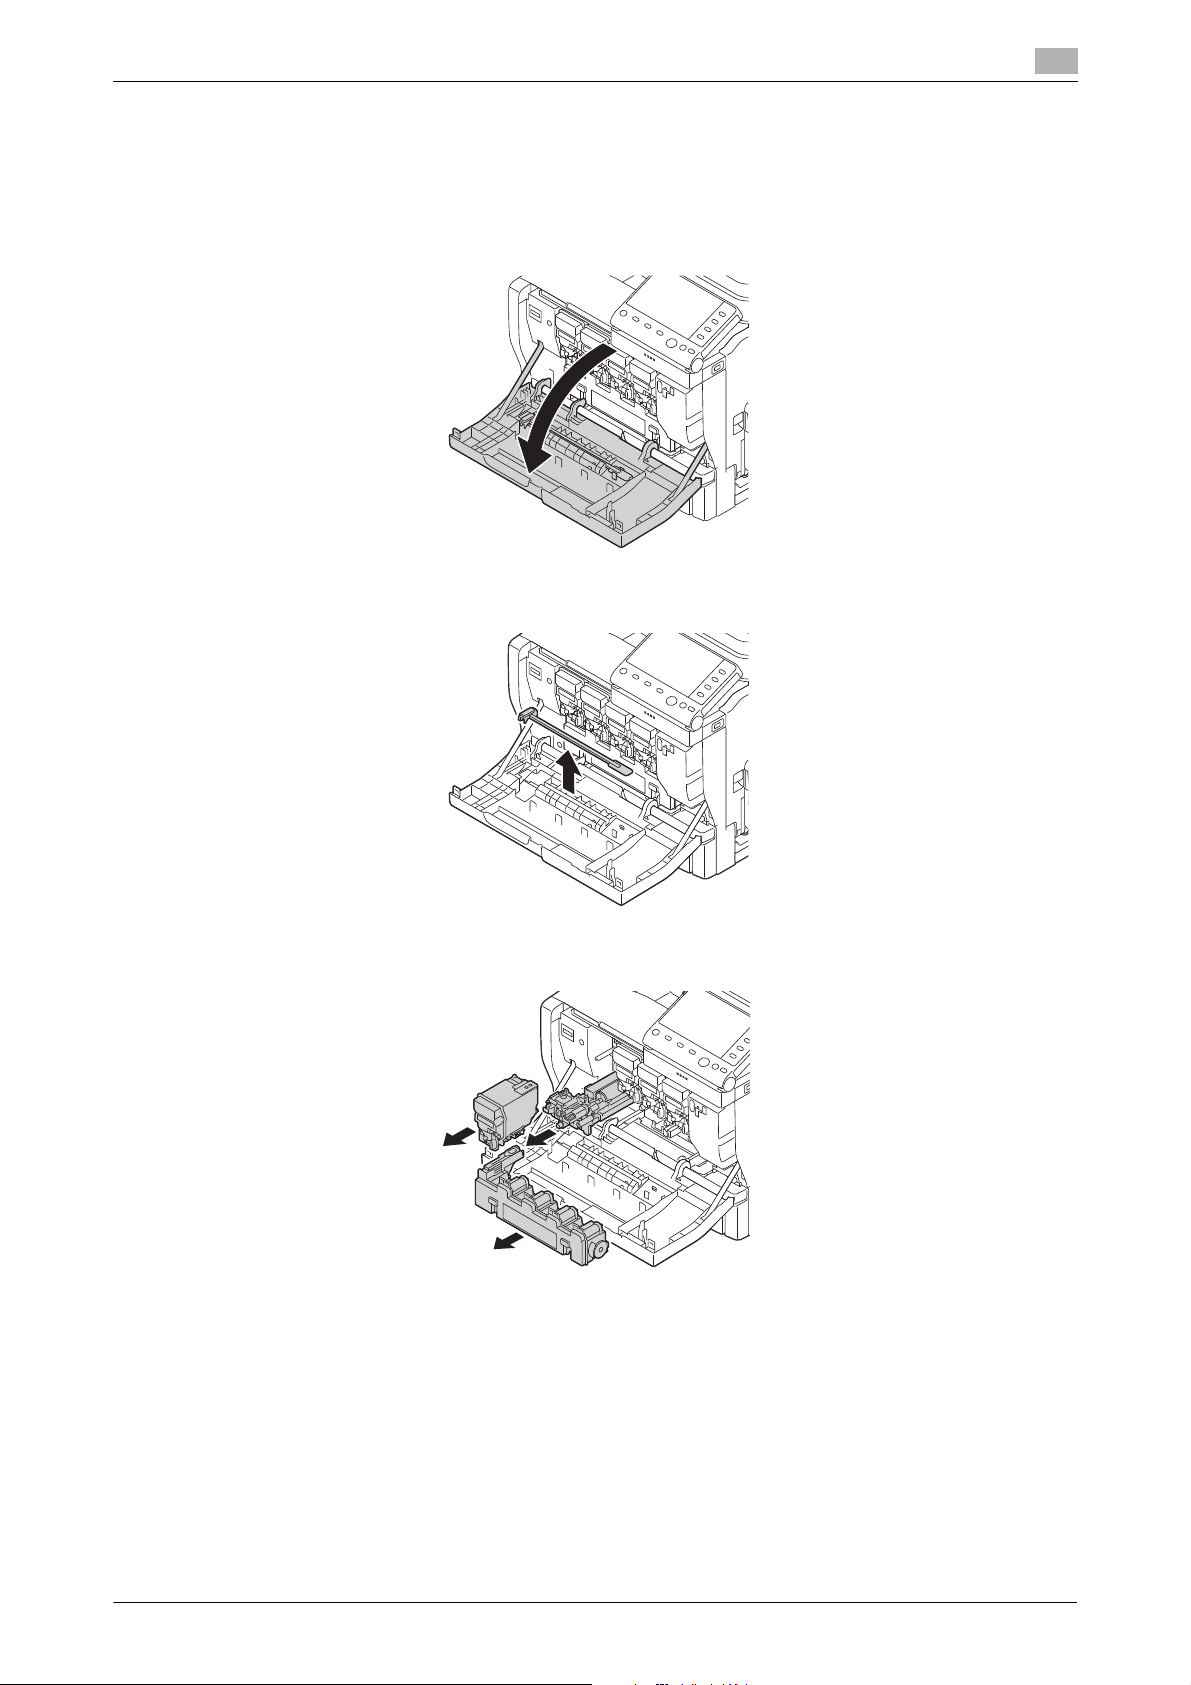
1 Open the Front Cover.
2 Take out the Laser Lens Cleaning Tool.
1
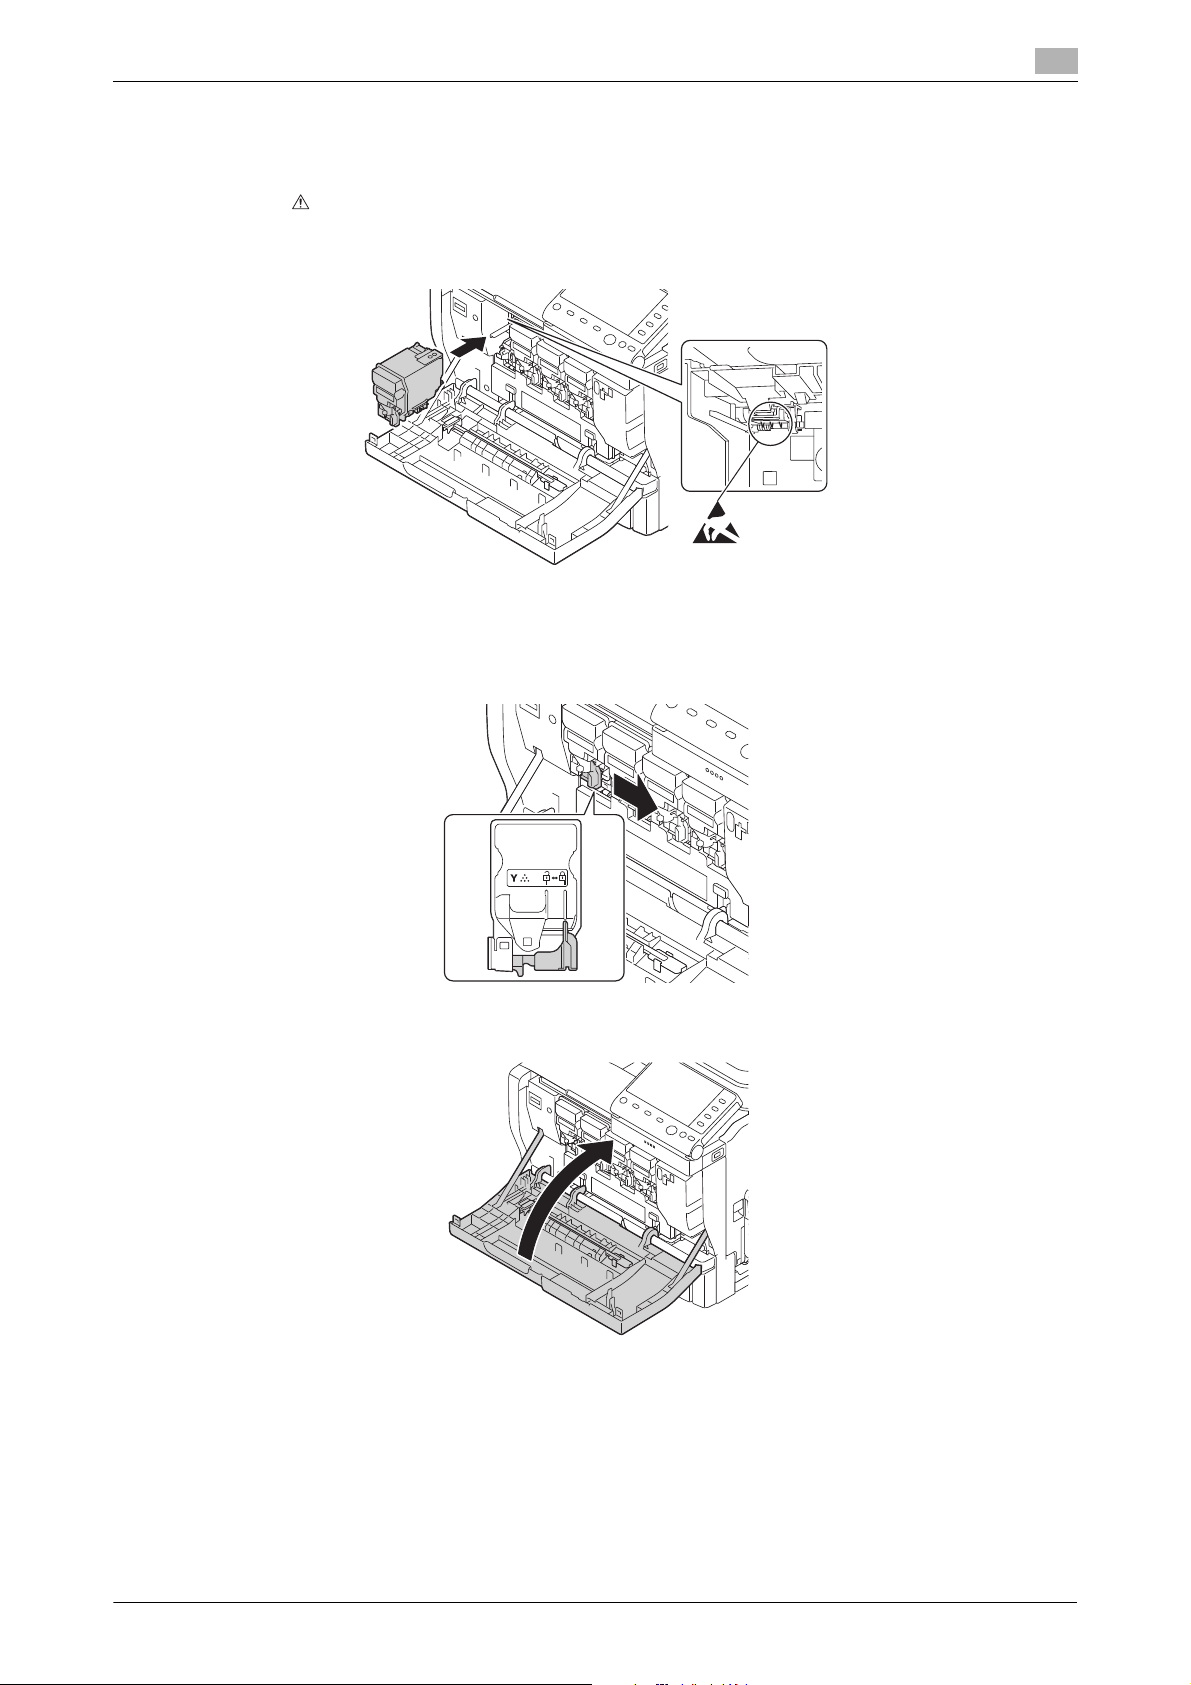
3 Pull out the Waste Toner Bottle as well as the Toner Cartridge and Imaging Unit of the target color.
% For information on how to remove a Toner Cartridge, refer to page 2-3. Inclining the Toner Car-
tridge may cause toner to spill.
% For information on how to remove a Waste Toner Bottle, refer to page 2-12. Inclining the Waste
Toner Bottle may cause toner to spill.
% For information on how to remove an Imaging Unit, refer to page 2-6. Cover the removed Imaging
Unit with a cloth to keep from being affected by light.
[Maintenance/Troubleshooting] 1-8
Page 12
1.2 Cleaning
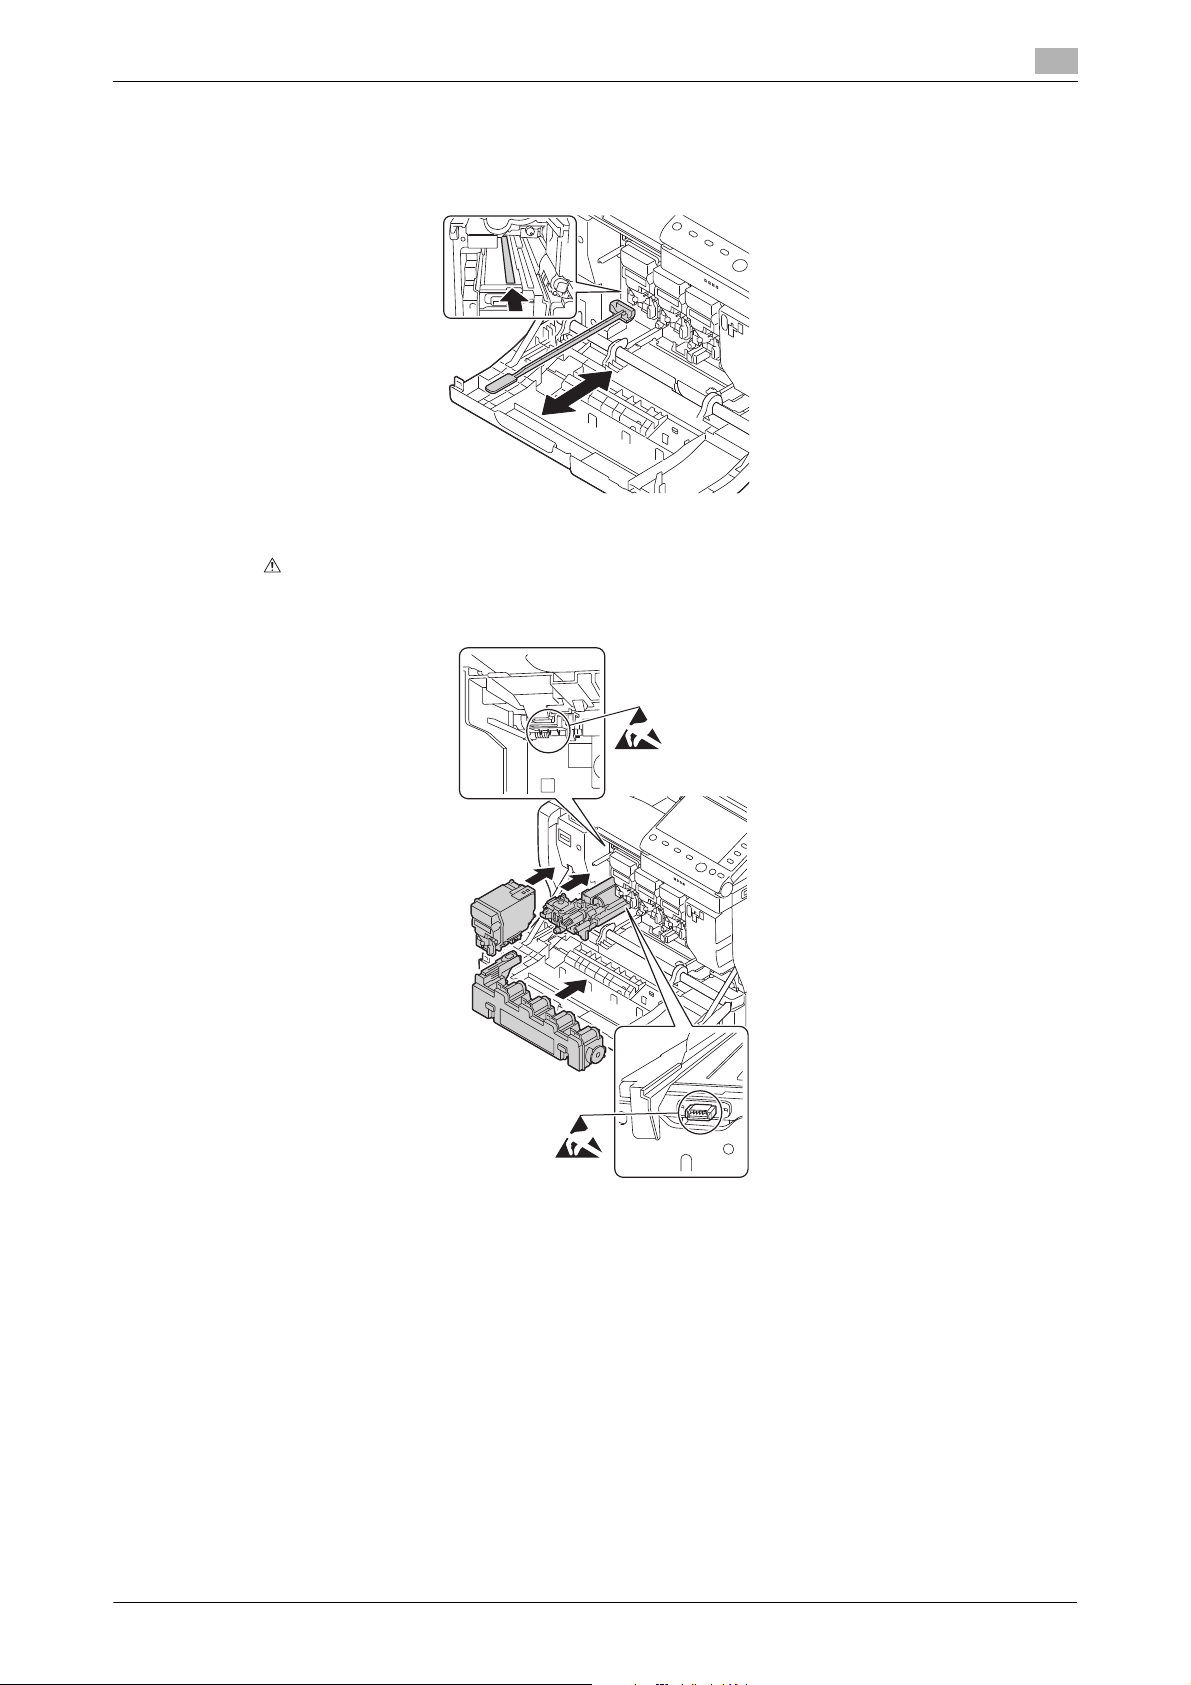
4 Align to the Print Head Glass, then insert the Laser Lens Cleaning Tool inside with the sponge side
5 Install all of Toner Cartridge, Waste Toner Bottle, and Imaging Unit.
1
facing downward, then move it back and forth several times.
% Repeat this operation for all the Print Head Glass.
CAUTION
Do not touch the copper terminals of the Toner Cartridge and Imaging Unit. Doing so may cause static electricity to damage the product.
% For information on how to install a Toner Cartridge, refer to page 2-3.
% For information on how to install a Waste Toner Bottle, refer to page 2-12.
% For information on how to install an Imaging Unit, refer to page 2-6.
6 Return the Laser Lens Cleaning Tool to the holder.
% The Laser Lens Cleaning Tool is an accessory of this machine. Return the Laser Lens Cleaner to
the laser lens cleaner holder so that you do not lose it.
[Maintenance/Troubleshooting] 1-9
Page 13
1.2 Cleaning
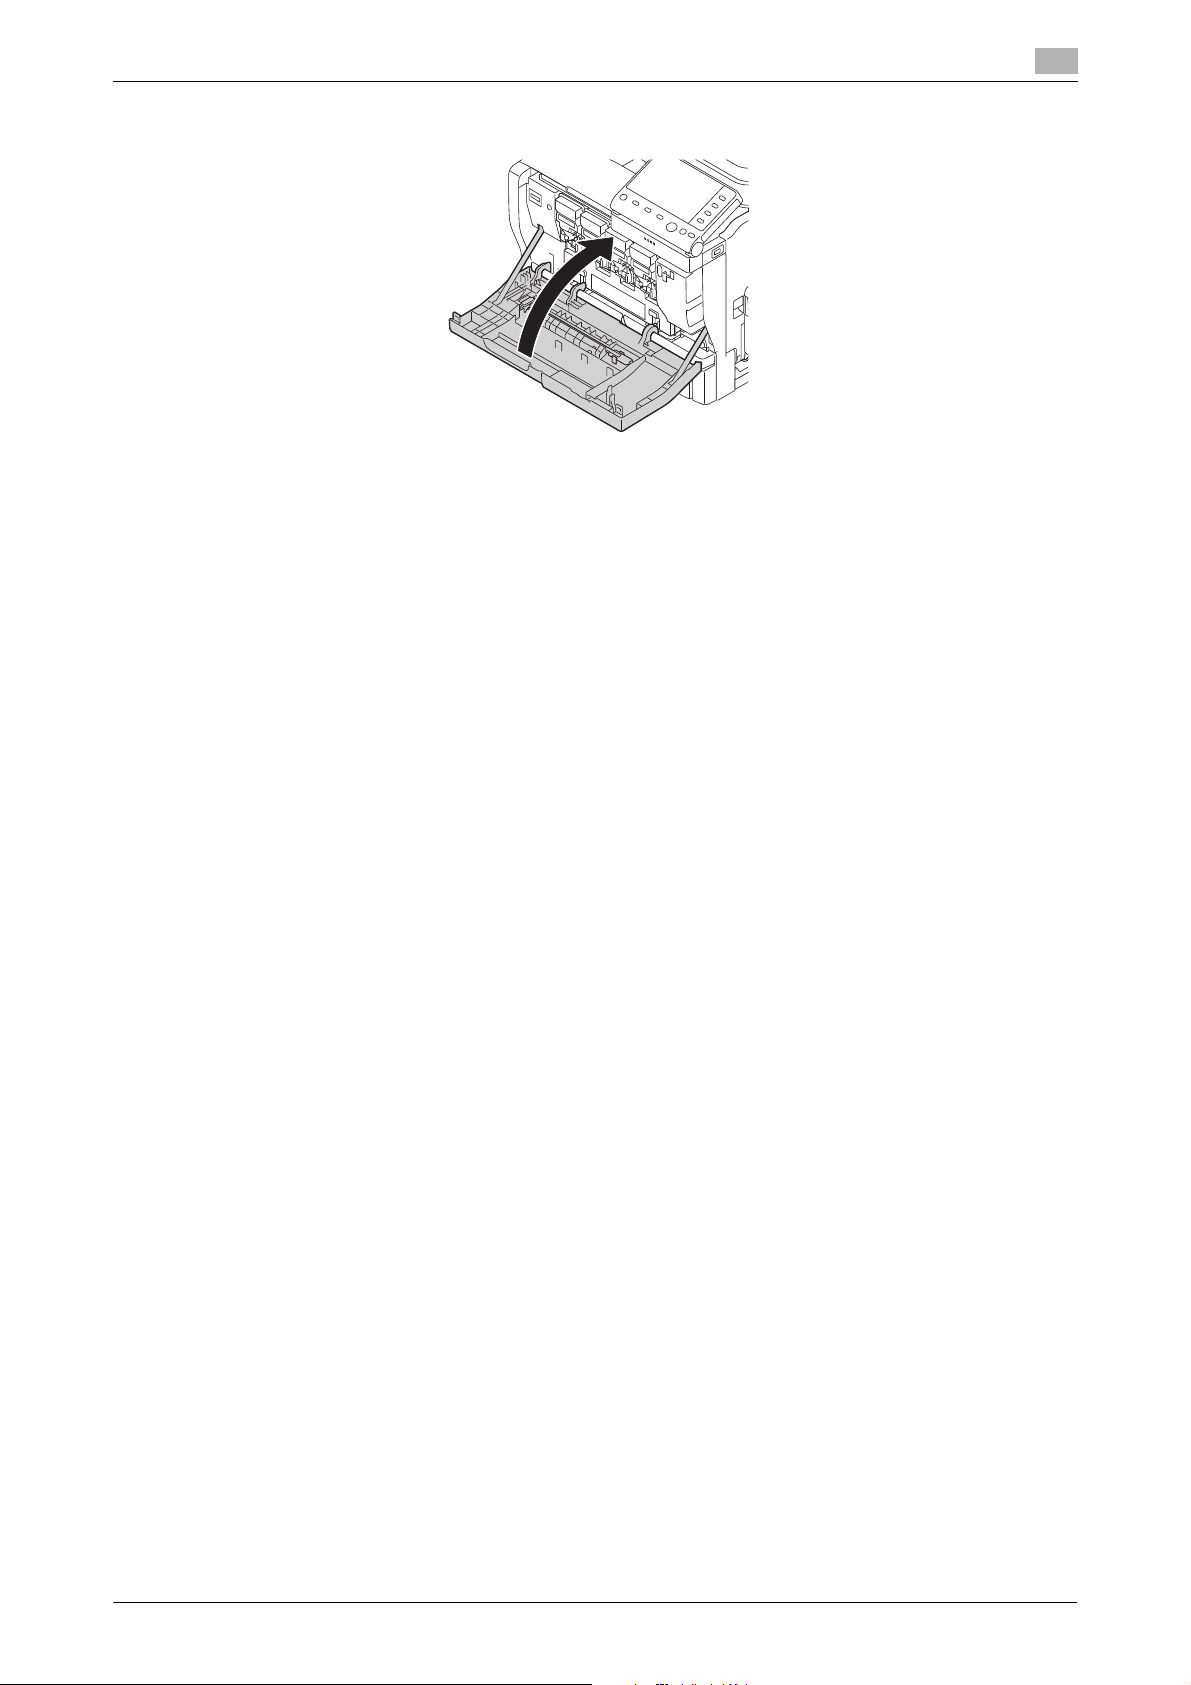
7 Close the Front Cover.
1
[Maintenance/Troubleshooting] 1-10
Page 14

2
Checking and Replacing
Consumables
Page 15

2.1 Checking the status of consumables
2 Checking and Replacing Consumables
2.1 Checking the status of consumables
Consumables replacement messages
Users will be informed of the time to replace consumables via a message displayed on the screen.
Message Description Reference
[Toner is low.] The toner is about to run out.
Prepare the specified Toner Cartridge.
[Replace toner] Toner is depleted. Replace the Toner Cartridge.page2-3
[Imaging Unit will require replacement soon.]
[Image Transfer Belt Unit will
require replacement soon.]
[Toner Filter will require replacement soon.]
[Fusing Unit will require replacement soon.]
[Waste Toner Box will require
replacement soon.]
[Waste Toner Box Full] The Waste Toner Bottle will become full soon.
[Transfer Roller Unit will require replacement soon.]
[Replace Staples] The staples in the Finisher have run out.
The operating life of the Imaging Unit has expired.
Replace the Imaging Unit.
The operating life of the Transfer Belt Unit has expired. Printing is possible, but the printing quality is not
assured.
Replace the Transfer Belt Unit.
The operating life of the Toner Filter has expired.
Replace the Toner Filter.
The operating life of the Fusing Unit has expired.
Printing is possible, but the printing quality is not assured.
Replace the Fusing Unit.
The Waste Toner Bottle will become full soon.
Prepare a new Waste Toner Bottle.
Replace the Waste Toner Bottle.
The operating life of the Transfer Roller has expired.
Printing is possible, but the printing quality is not assured.
Replace the Transfer Roller.
Replace the Staple Cartridge.
2
-
page 2-6
page 2-16
page 2-22
page 2-23
-
page 2-12
page 2-14
page 2-27
Checking the consumable level
Check the status of consumables (consumption level) using the Touch Panel. If necessary, each level can
be printed in list form.
1 Tap [Utility] - [Check Consumable Life].
2 Check the status of consumables.
% To print a consumption level list, tap [Print], select [Print], then tap [OK].
dReference
If a warning such as for toner replacement or a paper jam occurs on this machine, it can be sent to a registered
E-mail address. For information on the setting procedure, refer to Chapter 1 "Using Web Connection" in [User's Guide: Applied Functions].
[Maintenance/Troubleshooting] 2-2
Page 16

2.2 Replacing consumables
Tips
2.2 Replacing consumables
NOTICE
A failure, which was caused because you did not follow the procedures described in this user's guide, is not
included in the warranty.
2.2.1 Replacing a Toner Cartridge
Handling a Toner Cartridge
When handling a Toner Cartridge, be careful of the following.
- This machine supports four Toner Cartridges: black, yellow, magenta, and cyan. When handling a
Toner Cartridge, take care not to spill toner on this machine or your hand.
- Replace a Toner Cartridge with an unused product. If a toner cartridge is replaced with a used one,
the message window may not to be cleared or the toner level may not be displayed accurately.
- Do not forcibly open the Toner Cartridge. If toner has leaked, avoid toner inhaling or skin contact as
much as possible.
- If your clothes or hand has been stained with toner, wash it off with soap and water.
- If you have inhaled toner, move to a fresh air place, then gargle well with a large amount of water. If you
have had a symptom such as a cough, see your doctor.
- If any toner enters your eyes, immediately wash them with running water for 15 minutes or more. If pain
persists, see your doctor.
- If you have drunk toner, wash your mouth out well, then drink one or two glasses of water. See your
doctor, if necessary.
- Keep Toner Cartridge out of reach of babies and children.
- When handling a Toner Cartridge, do not touch the printed circuit board installed on the Toner Car-
tridge.
- When replacing a Toner Cartridge, do not touch the spring contact of the main unit.
- Do not touch the copper terminal of the Toner Cartridge. Doing so may cause static electricity
damaging the product.
2
Storing Toner Cartridges
Store Toner Cartridge as shown below.
- Do not open the protection bag before installing a Toner Cartridge.
- Store Toner Cartridges in a cold dark place, away from direct sunlight.
- Store Toner Cartridges in a place in which the temperature is 95 °F (35 °C) or less and the humidity is
85% or less with no dew condensation. If a Toner Cartridge is moved from a cold place to a warm
place with high humidity, a dew may form. which may affect printing quality. Before using a Toner Car-
tridge, leave it for approximately one hour to adjust to the ambient environment.
- Keep Toner Cartridges horizontal. Do not place a Toner Cartridge in the reverse direction from that
specified. Doing so may cause toner in a Toner Cartridge to become hard or uneven.
- Do not touch salty air or corrosive gases such as aerosol.
Guidance for recovering used Toner Cartridge
- Put the used Toner Cartridge in a bag, place the bag in the box in which the Toner Cartridge was in-
cluded at the time of purchase, then send the box to us. Securely seal the bag and box with tape, being
careful of the toner in the Toner Cartridge. The recovered Toner Cartridge and Imaging Unit are recycled.
[Maintenance/Troubleshooting] 2-3
Page 17
2.2 Replacing consumables
Y
M C K
Replacement procedure
The following example shows how to replace a Yellow Toner Cartridge.
NOTICE
Do not use a recycle Toner Cartridge other than our genuine product. A failure or problem that affects printing
quality and that was caused due to use of a recycled Toner Cartridge is not covered by the warranty. Such a
failure or problem is not subject to technical support.
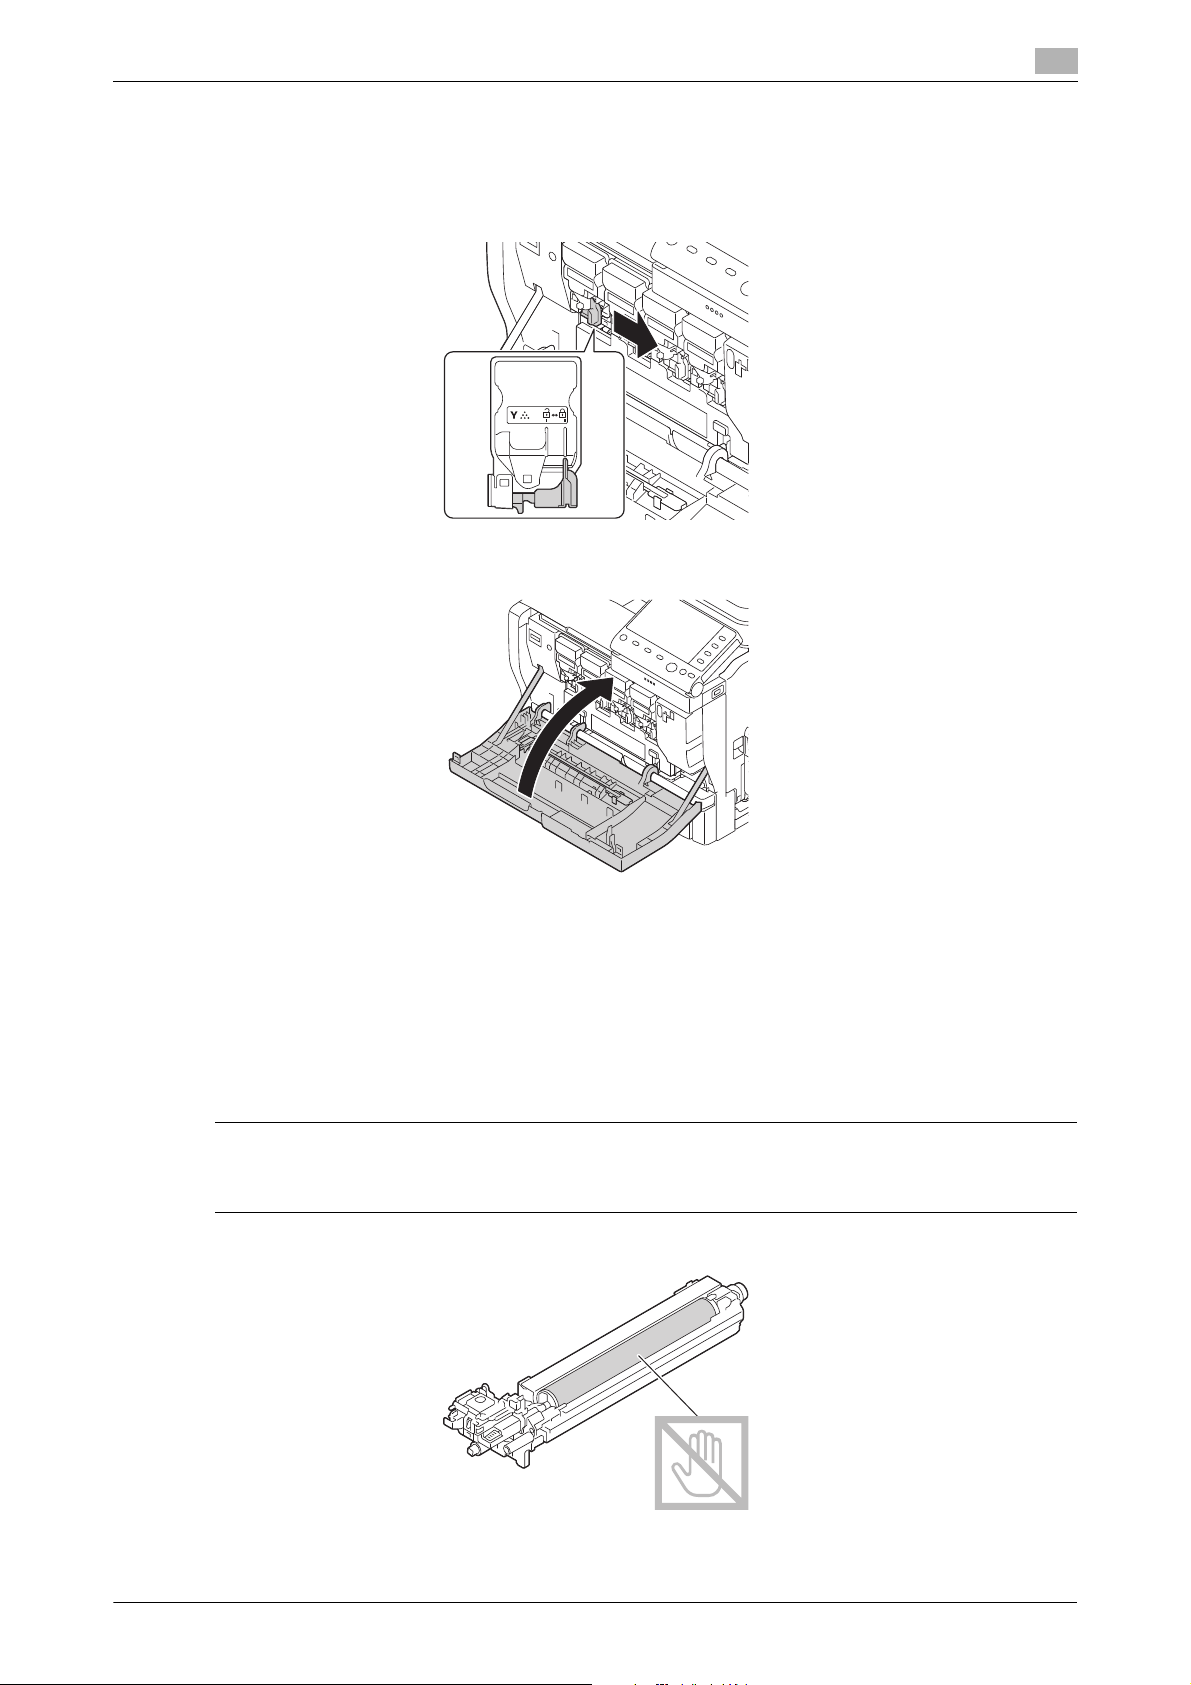
1 Check the color of the exhausted toner in the message window of the Control Panel.
2 Open the Front Cover.
3 Pull the lever at the front left.
2
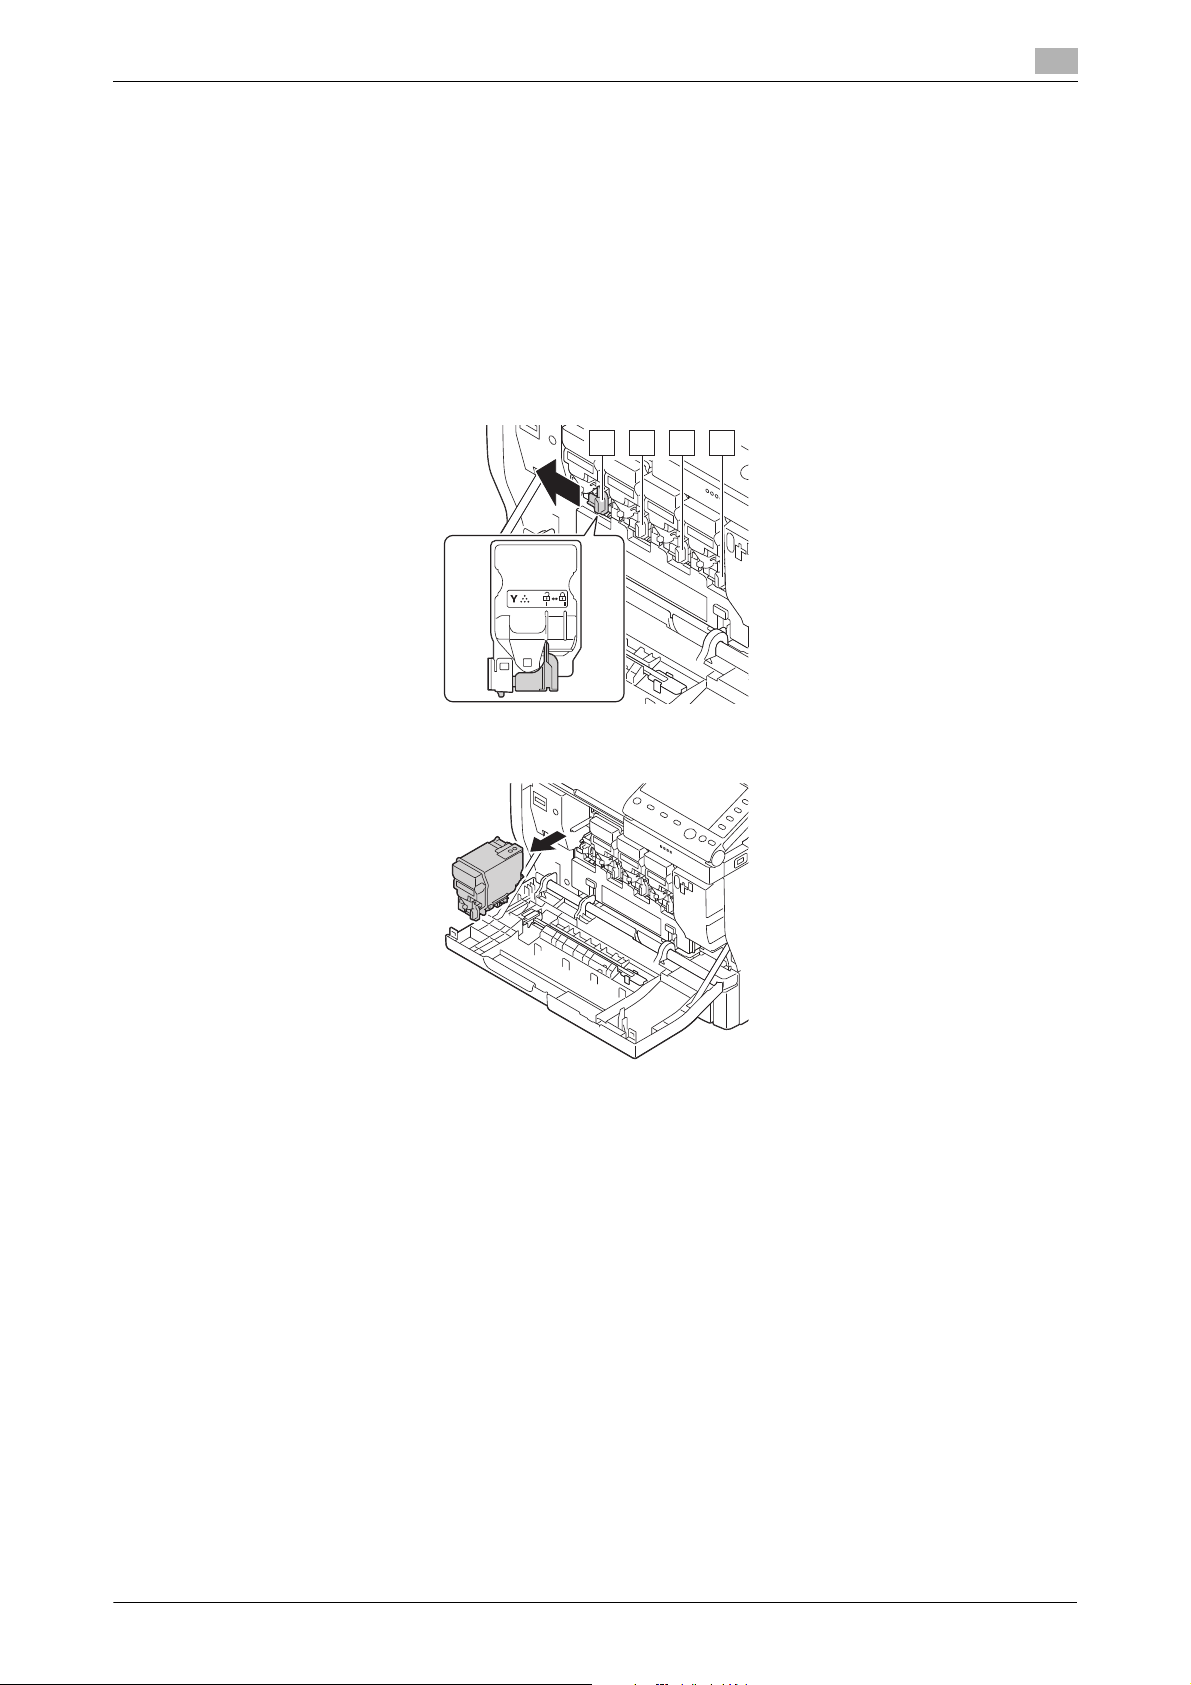
4 Hold the handle of the Toner Cartridge to be replaced, then pull out it.
NOTICE
When replacing the Toner Cartridge, be careful not to spill any toner. If toner has spilled, immediately
wipe it off using a soft and dry cloth.
5 Check the color of the new Toner Cartridge.
% To prevent toner from spilling, do not take the Toner Cartridge out of the bag until Step 4 is exe-
cuted.
[Maintenance/Troubleshooting] 2-4
Page 18

2.2 Replacing consumables
6 Take the Toner Cartridge out of the bag.
7 Hold a new Toner Cartridge upside down in your hands, then shake it several times in each of the ver-
tical, horizontal, and longitudinal directions.
2
8 Check that the color of the Toner Cartridge matches that of the insertion slot in the main unit, then
push the Toner Cartridge to the back.
CAUTION
Do not touch the copper terminal of the Toner Cartridge. Doing so may cause static electricity to damage the product.
[Maintenance/Troubleshooting] 2-5
Page 19
2.2 Replacing consumables
9 Pull the lever to the right to lock it.
% Carefully return the lever at the front to its original position. If the lever is not returned to its original
position, the Front Cover is not closed.
% If it is difficult to operate the lever, push the lever unit to the back.
10 Close the Front Cover.
2
2.2.2 Replacing an Imaging Unit
The following example shows how to replace a yellow Imaging Unit.
Be sure to replace an Imaging Unit with an unused product. If an Imaging Unit is replaced with a used one,
the message window may not be cleared.
NOTICE
Do not touch the surface of the OPC drum. Doing so may reduce printing quality.
7CAUTION
- Do not touch the copper terminal of the Imaging Unit. Doing so may lead to static electricity damaging
the product.
1 Check the color of the Imaging Unit to be replaced in the message window of the Control Panel.
[Maintenance/Troubleshooting] 2-6
Page 20
2.2 Replacing consumables
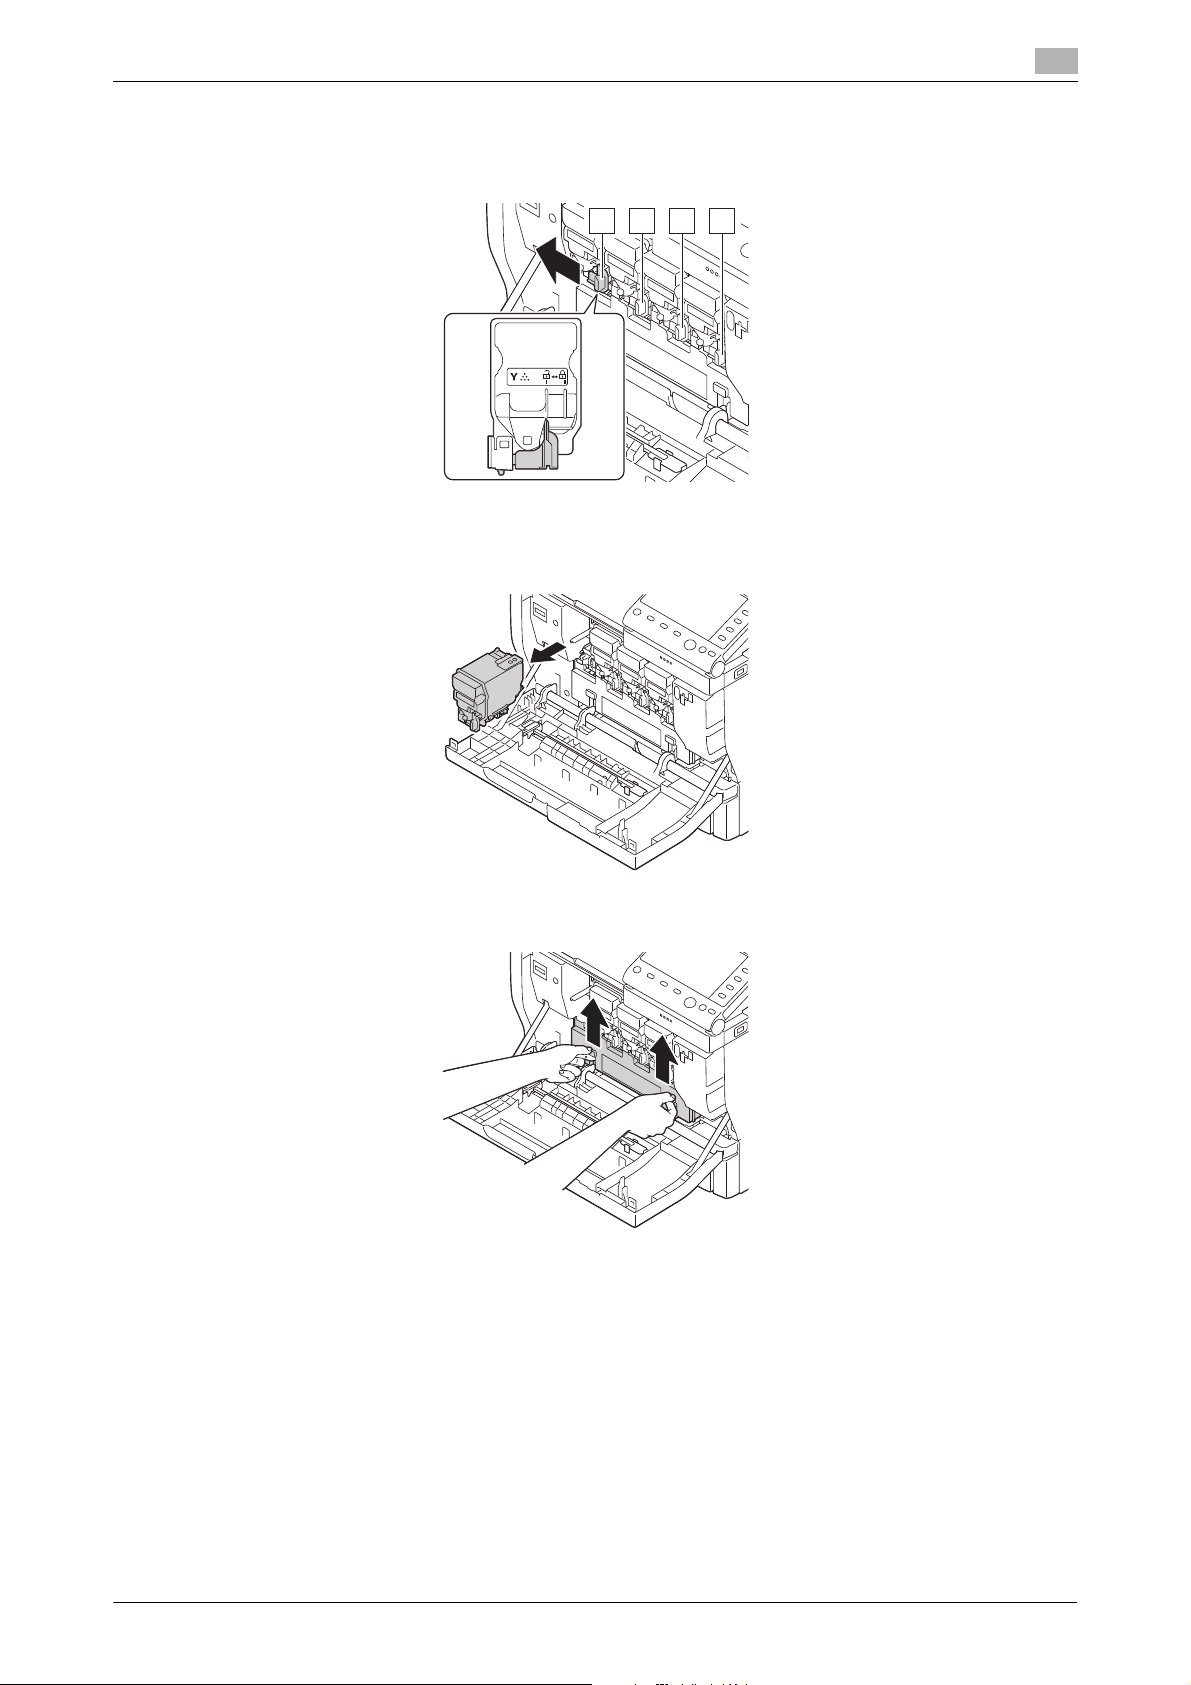
Y
M C K
2 Open the Front Cover.
3 Pull the lever at the front of the Toner Cartridge to the left.
4 Hold the handle of the Toner Cartridge, then pull out it.
% Inclining the Toner Cartridge may cause toner to spill.
2
5 Press up the Waste Toner Bottle to unlock.
[Maintenance/Troubleshooting] 2-7
Page 21
2.2 Replacing consumables
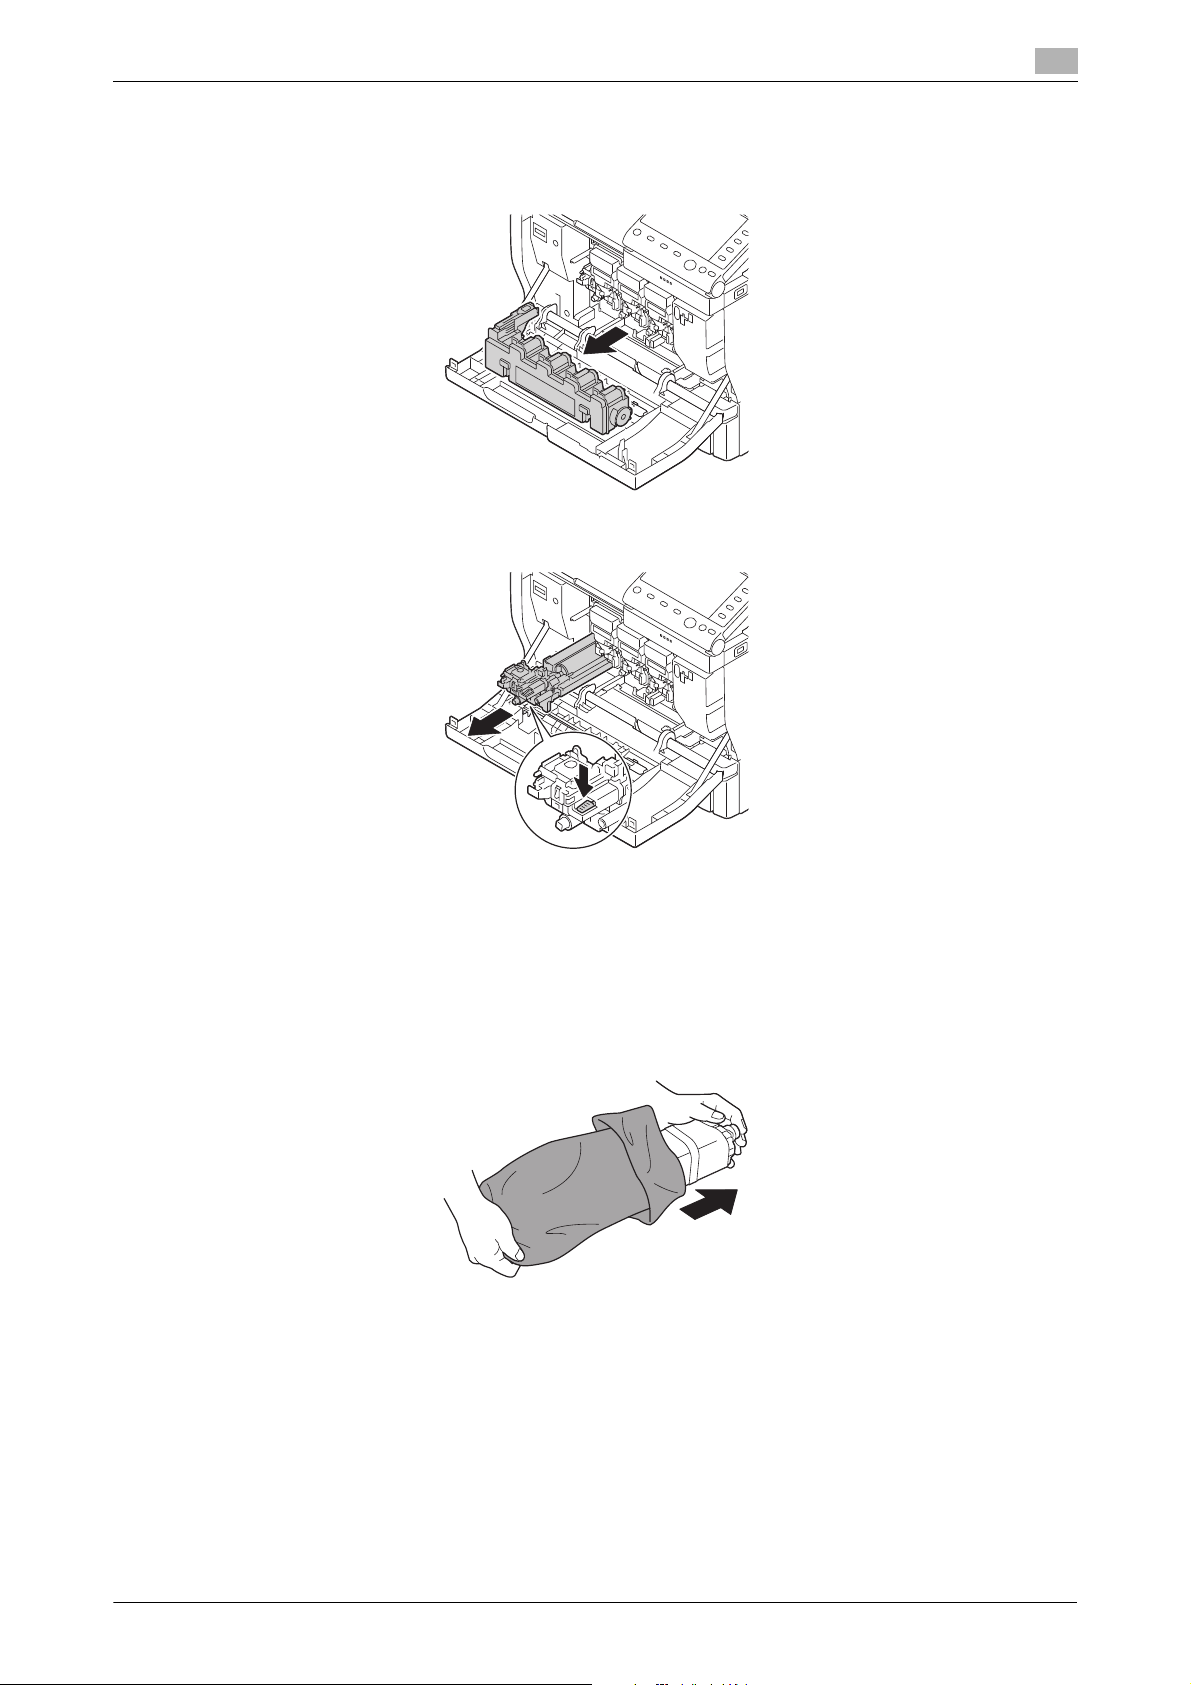
6 Hold the handles at the right and left of the Waste Toner Bottle, then carefully pull out the Waste Toner
Bottle.
% Inclining the Waste Toner Bottle may cause toner to spill.
7 While holding down the tab of the Imaging Unit to be replaced, pull out the Imaging Unit.
2
% To dispose of the used Imaging Unit, use the recovery service or follow the regulations for your re-
gion.
8 Check the color of the new Imaging Unit.
9 Take the Imaging Unit out of the bag.
[Maintenance/Troubleshooting] 2-8
Page 22

2.2 Replacing consumables
10 Hold a new Imaging Unit with both your hands, then shake it several times as shown in the figure.
% Do not touch the bottom of the Imaging Unit. Doing so may damage it and subsequently reduce
printing quality.
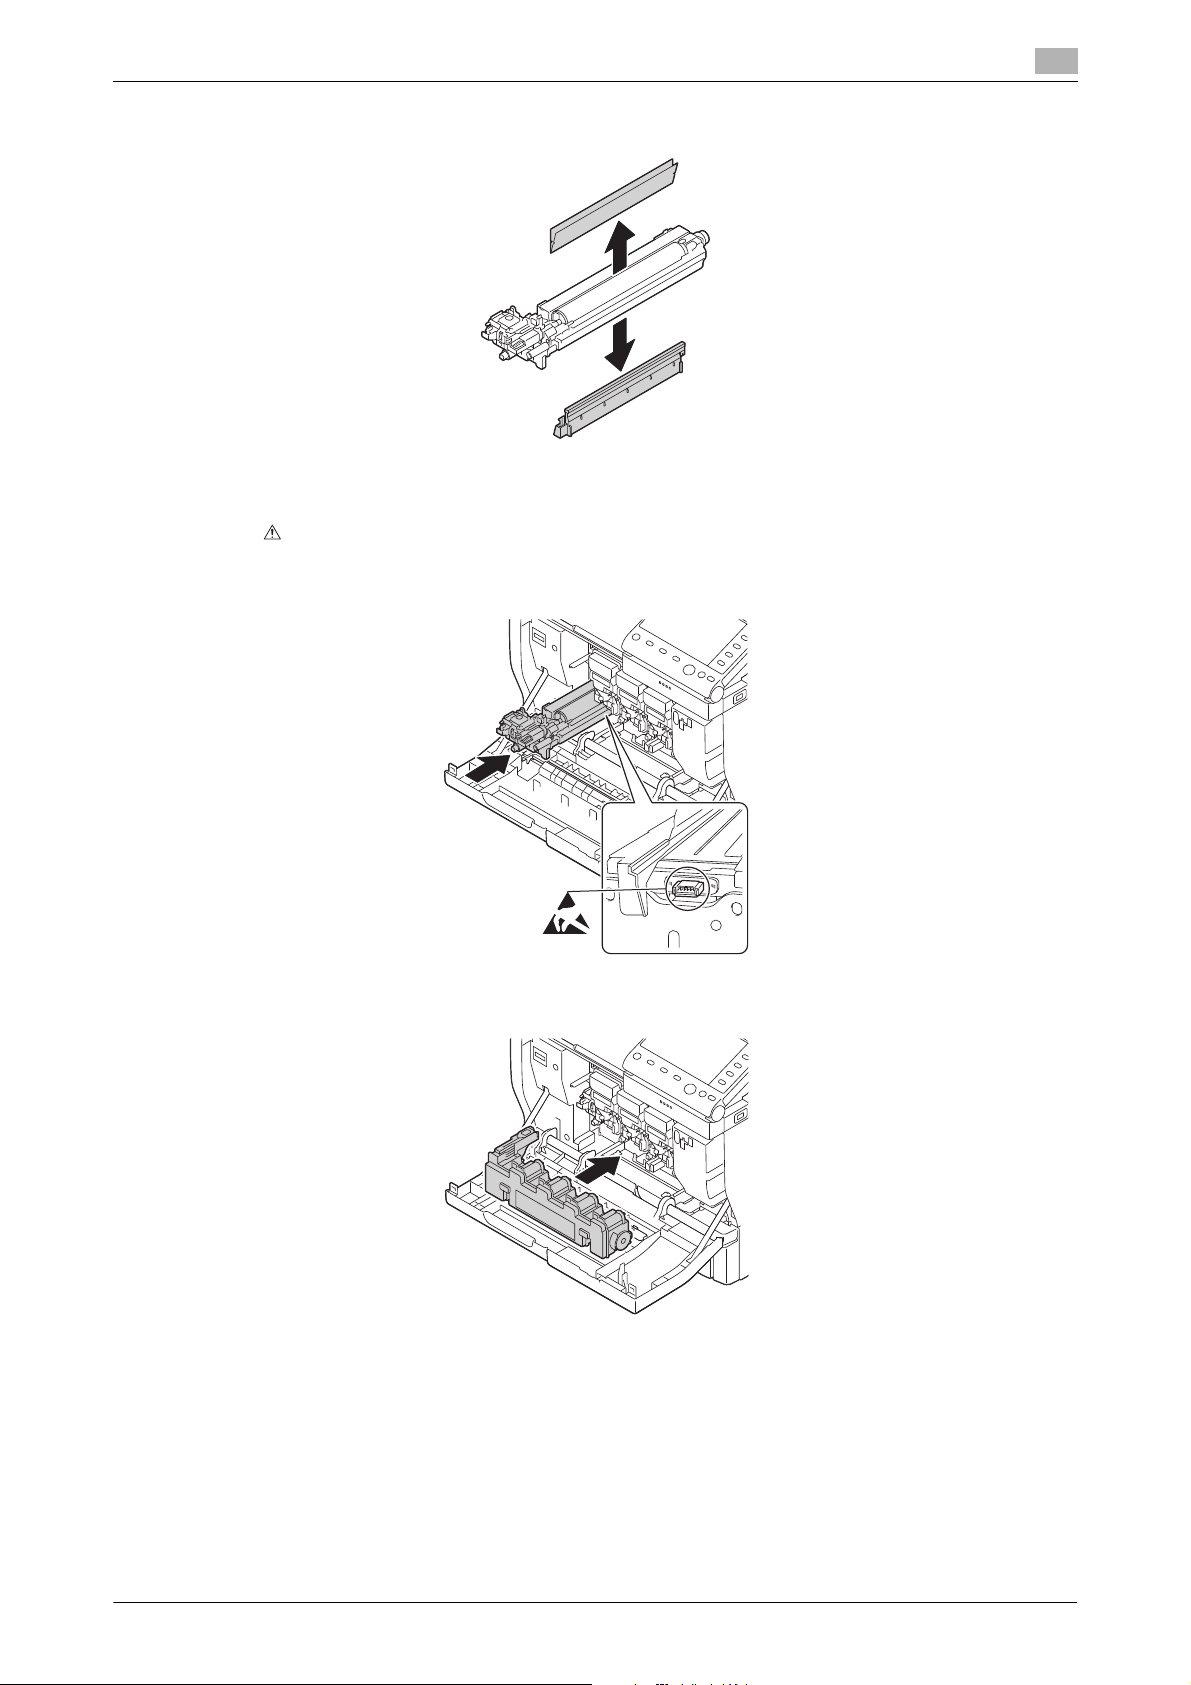
11 Remove the protection tape from the Imaging Unit, then take off the protection paper (black).
2
12 Remove the protection tape from the Imaging Unit, then take off the protection paper.
[Maintenance/Troubleshooting] 2-9
Page 23
2.2 Replacing consumables
13 Remove the holding sheet and protection materials from the Imaging Unit.
14 Check that the color of the new Imaging Unit matches that of the insertion slot in the main unit, then
push the Imaging Unit to the back.
CAUTION
Do not touch the copper terminal of the Imaging Unit. Doing so may cause static electricity to damage
the product.
2
15 Push the Waste Toner Bottle to the back to lock it.
[Maintenance/Troubleshooting] 2-10
Page 24
2.2 Replacing consumables
16 Check that the color of the Toner Cartridge matches that of the insertion slot in the main unit, then
push the Toner Cartridge to the back.
% Push the Toner Cartridge to the back.
% CAUTION
Do not touch the copper terminal of the Toner Cartridge. Doing so may cause static electricity to
damage the product.
17 Pull the lever to the right to lock it.
% Carefully return the lever at the front to its original position. If the lever is not returned to its original
position, the Front Cover is not closed.
2
18 Close the Front Cover.
[Maintenance/Troubleshooting] 2-11
Page 25
2.2 Replacing consumables
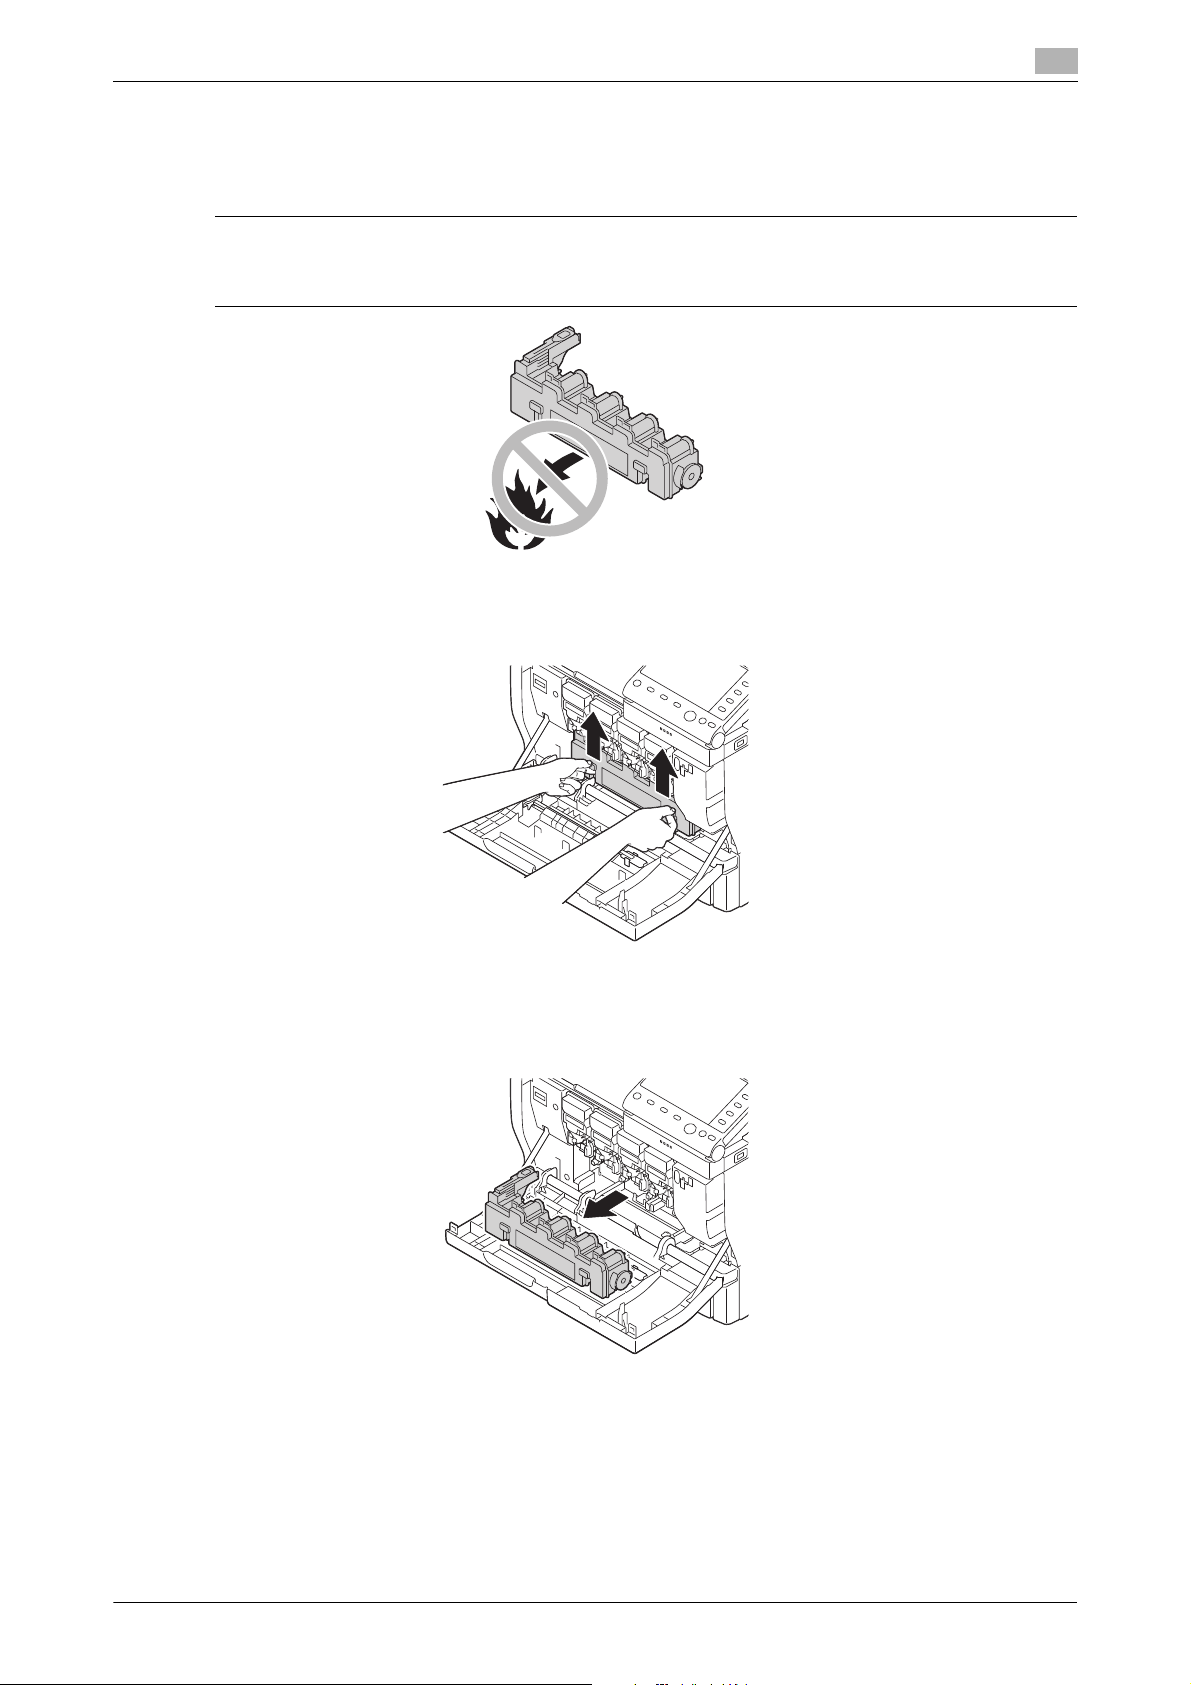
2.2.3 Replacing a Waste Toner Bottle
If the Waste Toner Bottle becomes full, this machine stops printing, and restarts printing after the Waste
Toner Bottle is replaced.
7WARNING
- Do not throw a toner container such as a toner bottle into a fire. Doing so may cause hot toner to spray
in all directions, which may cause burn injuries.
1 Open the Front Cover.
2 Press up the Waste Toner Bottle to unlock.
2
3 Hold the handles at the right and left of the Waste Toner Bottle, then carefully pull out the Waste Toner
Bottle.
% Inclining the Waste Toner Bottle may cause toner to spill.
4 Take a new Waste Toner Bottle out of the package box.
% Put the used Waste Toner Bottle in the plastic bag included in the package, then store it in the
package box.
% To dispose of the used Waste Toner Bottle, use the recovery service or follow the regulations in
your region.
[Maintenance/Troubleshooting] 2-12
Page 26

2.2 Replacing consumables
5 Push the Waste Toner Bottle to the back to lock it.
6 Close the Front Cover.
2
[Maintenance/Troubleshooting] 2-13
Page 27
2.2 Replacing consumables
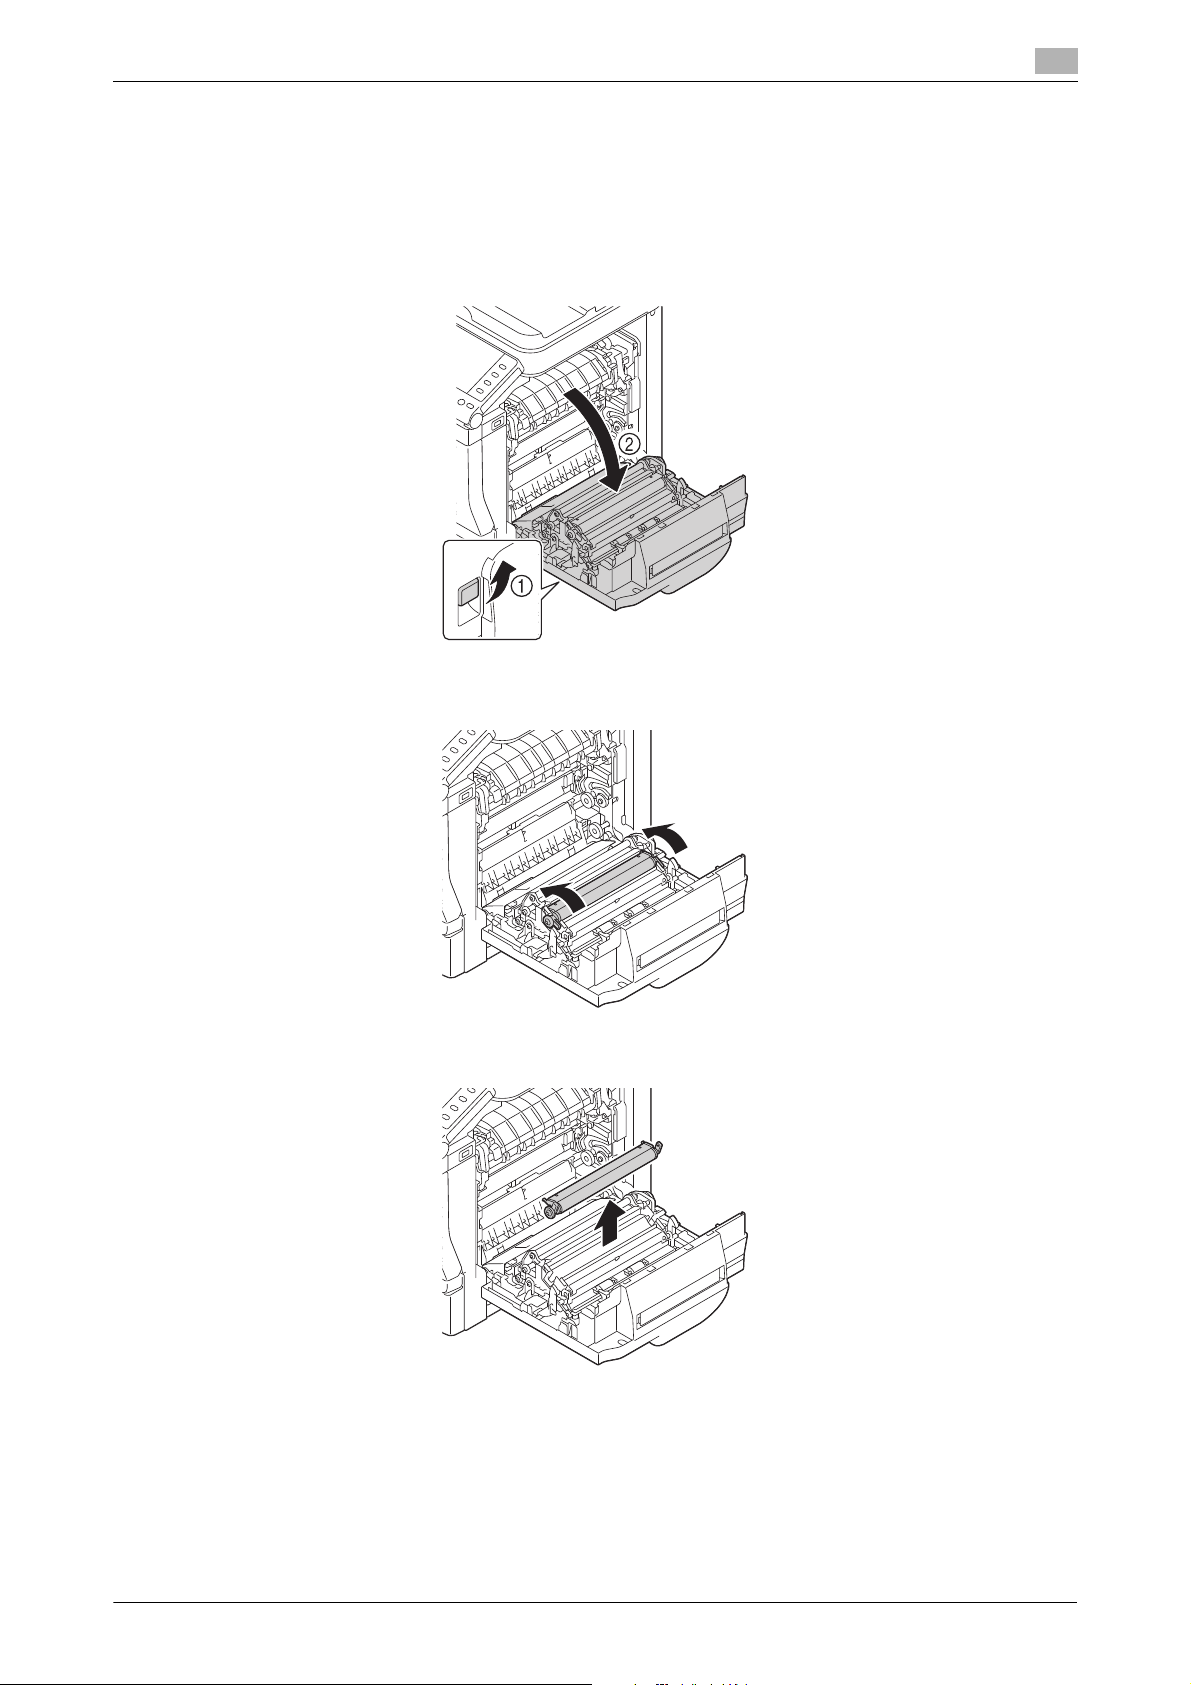
2.2.4 Replacing the Transfer Roller
After the Transfer Roller replacement message has appeared, printing is possible, but the printing quality
reduces. Immediately replace the Transfer Roller.
1 Pull the lever (1), then open the Right Door (2).
% When opening the Right Door, be sure to fold the Manual Feed Tray in advance.
2
2 Press two tabs at the right and left of the Transfer Roller up to unlock.
3 Remove the Transfer Roller.
4 Take a new Transfer Roller out of the package box.
[Maintenance/Troubleshooting] 2-14
Page 28

2.2 Replacing consumables
5 Insert the shaft of the Transfer Roller into the bearing in the machine.
6 Press down two tabs at the right and left of the Transfer Roller to lock it.
2
7 While holding down the roller, press it inward until it clicks.
8 Close the Right Door.
9 Select [Utility] - [Administrator Settings] - [System Settings] - [Expert Adjustment] - [Life] - [New Release]
- [Transfer Roller Unit], then reset the counter.
[Maintenance/Troubleshooting] 2-15
Page 29

2.2 Replacing consumables
2.2.5 Replacing the Transfer Belt Unit
After the Transfer Belt Unit replacement message has appeared, printing is possible, but the printing quality
reduces. Immediately replace the Transfer Belt.
1 Turn the power of this machine off, then disconnect the power cable and interface cable.
2 Open the Front Cover.
3 Remove all of Toner Cartridge, Waste Toner Bottle, and Imaging Unit.
2
% For information on how to remove a Toner Cartridge, refer to page 2-3. Inclining the Toner Car-
tridge may cause toner to spill.
% For information on how to remove a Waste Toner Bottle, refer to page 2-12. Inclining the Waste
Toner Bottle may cause toner to spill.
% For information on how to remove an Imaging Unit, refer to page 2-6. Cover the removed Imaging
Unit with a cloth to keep from being affected by light.
4 Pull the lever (1), then open the Right Door (2).
% When opening the Right Door, be sure to fold the Manual Feed Tray in advance.
[Maintenance/Troubleshooting] 2-16
Page 30

2.2 Replacing consumables
5 Insert the protection sheet under the Transfer Belt Unit.
% Insert the protection sheet until it stops.
6 Lower the Transfer Belt Unit guide.
2
[Maintenance/Troubleshooting] 2-17
Page 31

2.2 Replacing consumables
7 Hold the handles at the right and left, then carefully pull out the Transfer Belt Unit.
% Pull out the Transfer Belt Unit horizontally. Not doing so may damage the surface.
% After pulling out the Transfer Belt Unit halfway, draw out it while holding the handles on the right
and left sides.
2
8 Take a new Transfer Belt Unit out of the package box.
9 Remove protection paper.
% Do not touch the surface of the Transfer Belt Unit. Also, do not remove the blue lever.
[Maintenance/Troubleshooting] 2-18
Page 32

2.2 Replacing consumables
10 Remove the protection materials of the new Transfer Belt Unit.
11 Carefully insert the new Transfer Belt Unit along the guides at the right and left.
% Insert the Transfer Belt Unit horizontally. Not doing so may damage the surface.
% Insert the Transfer Belt to the back.
2
12 Lift the Transfer Belt Unit guide.
[Maintenance/Troubleshooting] 2-19
Page 33

2.2 Replacing consumables
13 Pull out the protection sheet.
14 Close the Right Door.
2
[Maintenance/Troubleshooting] 2-20
Page 34

2.2 Replacing consumables
15 Install all of Toner Cartridge, Waste Toner Bottle, and Imaging Unit.
CAUTION
Do not touch the copper terminals of the Toner Cartridge and Imaging Unit. Doing so may cause static electricity to damage the product.
2
% For information on how to install a Toner Cartridge, refer to page 2-3.
% For information on how to install a Waste Toner Bottle, refer to page 2-12.
% For information on how to install an Imaging Unit, refer to page 2-6.
16 Close the Front Cover.
17 Connect the power cable, then turn the power of this machine on.
18 Select [Utility] - [Administrator Settings] - [System Settings] - [Expert Adjustment] - [Life] - [New Release]
- [Image Transfer Belt Unit], then reset the counter.
[Maintenance/Troubleshooting] 2-21
Page 35

2.2 Replacing consumables
2.2.6 Replacing a Toner Filter
0 The Toner Filter is in the Transfer Belt package.
1 Pull the filter case out from the main unit.
2 Push the Toner Filter from the bottom up, then take it out of the case.
2
3 Take a new Toner Filter out of the plastic bag.
% Put the used Toner Filter in the plastic bag that contained the new Toner Filter was contained.
4 Insert a new Toner Filter into the case.
[Maintenance/Troubleshooting] 2-22
Page 36

2.2 Replacing consumables
5 Install the filter case in the main unit.
6 Select [Utility] - [Administrator Settings] - [System Settings] - [Expert Adjustment] - [Life] - [New Release]
- [Toner Filter], then reset the counter.
2.2.7 Replacing a Fusing Unit
After the Fusing Unit replacement message has appeared, printing is possible, but the printing quality re-
duces. Immediately replace the Fusing Unit.
2
7CAUTION
- The Fusing Unit is too hot. It may cause a burn injury; therefore, leave the Fusing Unit out for 20 minutes
or more until it reaches room temperature after turning the power off. Then, replace the Fusing Unit.
1 Turn off the power of this machine.
2 Pull the lever (1), then open the Right Door (2).
% When opening the Right Door, be sure to fold the Manual Feed Tray in advance.
[Maintenance/Troubleshooting] 2-23
Page 37

2.2 Replacing consumables
3 Open the Fusing Cover.
4 Lower the levers at the right and left.
2
5 Remove the Fusing Unit.
[Maintenance/Troubleshooting] 2-24
Page 38

2.2 Replacing consumables
6 Take a new Fusing Unit out of the package box.
% Do not touch the surface of the Fusing Roller.
7 Lift the levers at the right and left.
2
8 Remove protection materials.
9 Lower the levers at the right and left.
[Maintenance/Troubleshooting] 2-25
Page 39

2.2 Replacing consumables
10 Lower the lever at the bottom.
11 Insert a new Fusing Unit to the back until it is fixed.
2
12 Lift the lever at the bottom.
[Maintenance/Troubleshooting] 2-26
Page 40

2.2 Replacing consumables
13 Close the Fusing Cover.
14 Close the Right Door.
% If the Right Door is not closed, check that the Fusing Unit is installed correctly.
2
15 Select [Utility] - [Administrator Settings] - [System Settings] - [Expert Adjustment] - [Life] - [New Release]
- [Fusing Unit], then reset the counter.
2.2.8 Replacing a Staple Kit SK-602
1 Open the Left Cover.
[Maintenance/Troubleshooting] 2-27
Page 41

2.2 Replacing consumables
2 Pull the tab.
3 Pull out the Staple Cartridge.
2
4 Lift an empty Staple Case while holding its both edges, then pull out it from the Staple Cartridge.
5 Mount a new Staple Case in the Staple Cartridge.
[Maintenance/Troubleshooting] 2-28
Page 42

2.2 Replacing consumables
6 Insert the Staple Cartridge until it clicks.
7 Return the tab to the original position.
2
8 Close the Left Cover.
[Maintenance/Troubleshooting] 2-29
Page 43

2.2 Replacing consumables
2.2.9 Replacing a Staple Kit SK-501
1 Rotate the Finisher FS-P03 90 degrees.
2 Open the cover of the Finisher FS-P03.
2
3 Take the Staple Cartridge out of the Finisher FS-P03.
4 Lift an empty Staple Case while holding its both edges, then pull out it from the Staple Cartridge.
[Maintenance/Troubleshooting] 2-30
Page 44

2.2 Replacing consumables
5 Mount a new Staple Case in the Staple Cartridge.
6 Insert the Staple Cartridge until it clicks.
2
7 Close the cover of the Finisher FS-P03.
8 Rotate the Finisher FS-P03 90 degrees to return it to its original position.
[Maintenance/Troubleshooting] 2-31
Page 45

3
Clearing Paper Jam and
Staple Jam
Page 46

3.1 To prevent a paper jam
3 Clearing Paper Jam and Staple Jam
3.1 To prevent a paper jam
To prevent a paper jam, check the following points.
- Do the paper match the specifications of this machine?
- Is the paper (in particular, the feeding side) even?
- Is this machine installed on a stable and horizontal location that has a hard and even surface?
- Is the paper kept away from humid conditions?
- Do you always align the paper guide to the paper size after loading paper into a tray? (If the paper guide
is not aligned to the paper size, it may reduce printing quality, cause a paper jam, or damage the machine.)
- Is the paper loaded into a tray with the required side facing upward? (The arrow indicating the print side
of paper may be shown on the packing label of paper.)
To prevent a paper jam, avoid the following actions.
- Do not load paper that is folded, creased, embossed, or bent into a tray.
- Do not load jammed paper into a tray more than once.
- Do not load a stack of paper into a tray. (When a stack of paper is fed, remove it from the tray once,
then flip through the paper to separate sheets.)
- Do not load paper of different types, sizes, or weights together into a tray.
- Do not load a quantity of paper that exceeds the maximum capacity of the paper tray in the tray.
- Do not leave a quantity of paper that exceeds the maximum capacity of the paper tray. (Up to 250
sheets can be output from the output tray. If 250 or more sheets are left in the tray, it will cause a paper
jam.)
3
[Maintenance/Troubleshooting] 3-2
Page 47

3.2 When a paper jam has occurred
Tips
3.2 When a paper jam has occurred
To prevent a failure, carefully remove jammed paper so that it does not tear. Even if only a large or small slip
of paper is left in this machine, it will cause a paper feed failure, resulting in a paper jam.
7CAUTION
- A print image is not fused before it is processed in the fusing unit. If you touch the print side, your hand
may become stained with toner. When removing jammed paper, be careful not to touch the print side.
Also, do not spill toner inside this machine.
- Toner that is not fused may stain your hand or clothes. If your clothes become stained with toner, try
to clean off as much as you can. If a stains remain on your clothes, wash with cool water, not hot water.
If your skin is stained with toner, wash with water or neutral detergent.
- If any toner enters your eyes, immediately wash them with cool water, then contact your doctor.
3.2.1 Paper jam message screen
If a paper jam occurs on this machine, a message notifying that a paper jam has occurred will be displayed
on the Touch Panel.
If a paper jam message remains displayed after a paper jam has been cleared, open and close the door of
this machine.
3
3.2.2 Clearing a paper jam in the Manual Feed Tray or Transfer Roller
7CAUTION
- The area around the fusing unit is hot. To avoid a burn injury, be careful not to touch any parts except
for the specified knob and dial. In case your hand or any other part of your body comes in contact with
the heated section, immediately run it under cold water and seek medical assistance.
[Maintenance/Troubleshooting] 3-3
Page 48

3.2 When a paper jam has occurred
Clear procedure
1 Pull the lever (1), then open the Right Door (2).
% When opening the Right Door, be sure to fold the Manual Feed Tray in advance.
2 Carefully pull out the jammed paper.
3
NOTICE
If you touch the surface of the Transfer Belt Unit or Transfer Roller, it may reduce printing quality. Be
careful not to touch the surface of the Transfer Belt Unit or Transfer Roller.
[Maintenance/Troubleshooting] 3-4
Page 49

3.2 When a paper jam has occurred
3 Close the Right Door.
3.2.3 Clearing a paper jam in Tray 1
7CAUTION
- The area around the fusing unit is hot. To avoid a burn injury, be careful not to touch any parts except
for the specified knob and dial. In case your hand or any other part of your body comes in contact with
the heated section, immediately run it under cold water and seek medical assistance.
3
Clear procedure
1 Pull the lever (1), then open the Right Door (2).
% When opening the Right Door, be sure to fold the Manual Feed Tray in advance.
[Maintenance/Troubleshooting] 3-5
Page 50

3.2 When a paper jam has occurred
2 Carefully pull out the jammed paper.
NOTICE
If you touch the surface of the Transfer Belt Unit or Transfer Roller, it may reduce printing quality. Be
careful not to touch the surface of the Transfer Belt Unit or Transfer Roller.
3
3 Close the Right Door.
4 Pull out Tray 1, then remove any paper left in the tray.
[Maintenance/Troubleshooting] 3-6
Page 51

3.2 When a paper jam has occurred
5 Flip through the removed paper, the align the edges.
6 Load paper into Tray 1, then close the tray.
3.2.4 Clearing a paper jam in Tray 2/3
0 Tray 2/3 is available when the optional Paper Feed Unit is installed.
1 Open the Right Door of Tray 2/3.
% When opening the Right Door of Tray 2/3, be sure to fold the Manual Feed Tray in advance.
3
2 Carefully pull out the jammed paper.
3 Close the Right Door of Tray 2/3.
4 Pull out Tray 2/3, then remove any paper left in the tray.
[Maintenance/Troubleshooting] 3-7
Page 52

3.2 When a paper jam has occurred
5 Flip through the removed paper, the align the edges.
6 Load paper into Tray 2/3, then close the tray.
3.2.5 Clearing a paper jam in the ADF
1 Open the ADF Cover.
3
2 Remove the remaining original from the Document Feed Tray.
[Maintenance/Troubleshooting] 3-8
Page 53

3.2 When a paper jam has occurred
3 Open the ADF.
4 Remove the jammed original.
3
5 Close the ADF.
6 Close the ADF Cover.
[Maintenance/Troubleshooting] 3-9
Page 54

3.2 When a paper jam has occurred
3.2.6 Clearing a paper jam in the Duplex Option
1 Pull the lever (1), then open the Right Door (2).
% When opening the Right Door, be sure to fold the Manual Feed Tray in advance.
2 Carefully pull out the jammed paper.
3
3 Close the Right Door.
[Maintenance/Troubleshooting] 3-10
Page 55

3.2 When a paper jam has occurred
3.2.7 Clearing a paper jam in the Fusing Unit
7CAUTION
- The area around the fusing unit is hot. To avoid a burn injury, be careful not to touch any parts except
for the specified knob and dial. In case your hand or any other part of your body comes in contact with
the heated section, immediately run it under cold water and seek medical assistance.
3
Clear procedure
1 Pull the lever (1), then open the Right Door (2).
% When opening the Right Door, be sure to fold the Manual Feed Tray in advance.
2 Press up the levers (2 places).
[Maintenance/Troubleshooting] 3-11
Page 56

3.2 When a paper jam has occurred
3 Open the Fusing Cover.
4 Carefully pull out the jammed paper.
3
% If you cannot remove the paper downward, remove it from the upper side of the Fusing Unit.
NOTICE
If you touch the surface of the Transfer Belt Unit or Transfer Roller, it may reduce printing quality. Be
careful not to touch the surface of the Transfer Belt Unit or Transfer Roller.
[Maintenance/Troubleshooting] 3-12
Page 57

3.2 When a paper jam has occurred
5 Close the Fusing Cover.
6 Press down the levers (2 places).
3
7 Close the Right Door.
[Maintenance/Troubleshooting] 3-13
Page 58

3.2 When a paper jam has occurred
3.2.8 Clearing a paper jam in the Finisher (bizhub C3850FS only)
1 Pull the lever (1), then open the Right Door (2).
% When opening the Right Door, be sure to fold the Manual Feed Tray in advance.
2 Check the Processing Tray of the Finisher, then carefully pull out the jammed paper from the outlet.
3
3 Close the Right Door.
[Maintenance/Troubleshooting] 3-14
Page 59

3.3 Troubleshooting for paper jam
3.3 Troubleshooting for paper jam
Symptom Cause Action
Multiple sheets are fed out as a
stack of paper.
A paper jam message persists. This machine must be reset. Open and close the Right Door
A paper jam has occurred during
2-sided printing.
A paper jam has occurred in the
ADF.
Sheet edges are not aligned. Remove sheets, align their edg-
Paper is damp. Remove the damp paper, then
A jammed paper or slip of paper
remains inside this machine.
Invalid paper (paper of an invalid
size, thickness, or type) is used.
A paper jam has not yet cleared. Recheck the paper path, then
An invalid original is used. Use an original that matches this
The number of original pages exceeds the maximum capacity.
The width of the lateral guide is
not adjusted to the size of the
original.
es, then load them into a tray
again.
replace it with new dry paper.
of this machine to reset.
Recheck the paper path, then
check that all paper jams are
cleared.
Use our recommended paper.
For information on the available
paper, refer to Chapter 6 "Loading Paper" in [User's Guide: Introduction].
2-sided printing is available for
plain paper (recycled paper) of
15-15/16 to 23-15/16 lb (60 to 90
2
), thick paper of 24-3/16 to
g/m
55-7/8 lb (91 to 210 g/m2), or
special paper of 15-15/16 to 2315/16 lb (60 to 90 g/m
the correct paper type using the
printer driver.
For information on the available
paper, refer to Chapter 6 "Loading Paper" in [User's Guide: Introduction].
Do not load sheets of different
types together.
Do not use an envelope, label
sheet, postcard, glossy paper, or
single side only paper for 2-sided
printing.
check that all paper jams are
cleared.
machine.
For information on the available
original size, refer to Chapter 5
"Loading the Original" in [User's
Guide: Introduction].
Remove excessive original pages on the ADF, then load them
again.
Adjust the lateral guide of the
ADF to the size of the original.
2
). Specify
3
[Maintenance/Troubleshooting] 3-15
Page 60

3.3 Troubleshooting for paper jam
Tips
Symptom Cause Action
A paper jam has occurred in the
paper tray.
A paper jam has occurred in the
Finisher.
Paper is not loaded in the correct
position in the paper tray.
The number of sheets in the paper tray exceeds the maximum
capacity.
The width of the paper guide has
not adjusted to the paper size.
Bent or creased paper has been
loaded into the paper tray.
Paper is damp. Remove damp paper, then load
Envelopes are loaded in Tray
2/3.
Thick paper, label sheets, postcards, glossy paper, or letterheads are loaded in Tray 2/3.
Label sheets are loaded in an incorrect orientation.
Envelopes are loaded in an incorrect orientation.
Invalid paper (paper of an invalid
size, thickness, or type) is used.
The Paper Feed Rollers are dirty. Clean the Paper Feed Rollers.
Invalid paper (paper of an invalid
size, thickness, or type) is used.
Remove the jammed paper, then
correctly load paper into the paper tray.
Remove excessive sheets in the
paper tray, then re-load paper
into the paper tray.
Adjust the paper guide in the paper tray to the paper size.
Remove the bent or creased paper, then load new paper into the
paper tray.
new dry paper into the paper
tray.
Load envelopes into Tray 1 or
the Manual Feed Tray.
Load thick paper, label sheets,
postcards, glossy paper, or letterheads into Tray 1 or the Man-
ual Feed Tray.
Correct the orientation of label
sheets.
Place an envelope with the flap
facing upward.
When the flap is in the long side
of an envelope, load it in the machine side.
Use our recommended paper.
For information on the available
paper, refer to Chapter 6 "Loading Paper" in [User's Guide: Introduction].
For details, refer to page 1-5.
Use the paper available with the
Finisher.
For information on the available
paper, refer to Chapter 10
"Specifications" in [User's
Guide: Introduction].
3
If a paper jam frequently occurs in a specific place, carry out checks, repairs, or cleaning focusing on the
location of the jam.
[Maintenance/Troubleshooting] 3-16
Page 61

3.4 Clearing a staple jam
3.4 Clearing a staple jam
3.4.1 Clearing a staple jam in the Staple Kit SK-501
1 Rotate the Finisher FS-P03 90 degrees.
2 Open the cover of the Finisher FS-P03.
3
3 Take the Staple Cartridge out of the Finisher FS-P03.
4 Lift the Face Plate, then remove jammed or spilled staples.
[Maintenance/Troubleshooting] 3-17
Page 62

3.4 Clearing a staple jam
Tips
5 Return the Face Plate until it clicks.
6 Insert the Staple Cartridge until it clicks.
3
7 Close the cover of the Finisher FS-P03.
8 Rotate the Finisher FS-P03 90 degrees to return it to its original position.
After clearing a staple jam, conduct idle stapling twice.
[Maintenance/Troubleshooting] 3-18
Page 63

3.4 Clearing a staple jam
3.4.2 Clearing a staple jam in the Staple Kit SK-602
1 Open the Left Cover.
2 Pull the tab.
3
3 Pull out the Staple Cartridge.
4 Lift the Face Plate, then remove one staple sheet.
[Maintenance/Troubleshooting] 3-19
Page 64

3.4 Clearing a staple jam
Tips
5 Return the Face Plate until it clicks.
6 Insert the Staple Cartridge until it clicks.
3
7 Return the tab to the original position.
8 Close the Left Cover.
After a staple jam is cleared, idle stapling is conducted one to nine times depending on the conditions.
[Maintenance/Troubleshooting] 3-20
Page 65

4
Troubleshooting
Page 66

4.1 The power is not turned on
4 Troubleshooting
4.1 The power is not turned on
Check the Power Switch for the status.
- Check whether the power plug of this machine is firmly plugged into the power outlet. Also check that
the breaker has not tripped.
- Check that the Power Switch is turned ON.
4
[Maintenance/Troubleshooting] 4-2
Page 67

4.2 The Touch Panel is not displayed
4.2 The Touch Panel is not displayed
If a certain length of time has elapsed without any operations being carried out on this machine, the Touch
Panel may turn off.
Check the following items:
- Select [Utility] - [Accessibility] - [Brightness Adjustment], then adjust the contrast (brightness) of the
Touch Panel.
- Touch the Touch Panel. In Power Save (Low Power/Sleep) mode, this machine returns from the Power
Save mode when the Touch Panel is touched or a key on the Control Panel is pressed, and the Touch
Panel appears normally.
- On the Control Panel, press the Power key. If the Weekly Timer setting has put the machine in Erp
Auto Power Off mode, press the Power key to display the Touch Panel. To use it outside the preset
operating hours, follow the on-screen instructions.
- Check that the Power Switch is turned ON.
4
[Maintenance/Troubleshooting] 4-3
Page 68

4.3 Cannot print
4.3 Cannot print
4.3.1 Cannot print
Description of problem Check points Remedy
A message saying
"Printer is not connected" or "Print Error" appears on the computer
screen.
A postscript error appears on the computer
screen.
Is the power turned on? Check the Power Switch of this machine.
Has the machine been
placed in ErP Auto Power Off mode?
Is another printer specified?
Is the network or USB
cable disconnected?
Has an error occurred on
the machine?
Is there sufficient computer memory available?
Is there sufficient computer memory available?
There may be an error in
the application software
settings.
Are the file printing settings correct?
If a hub is used, also check the hub power.
If the machine is placed in ErP Auto Power Off
mode, it cannot receive any jobs. Press the Pow-
er key to release the ErP Auto Power Off mode.
Check the specified printer name.
Make sure that the cables are correctly connected.
If a hub is used, also check the connection with
the hub.
Check the Control Panel of this machine.
Perform a test printing to check whether printing
is possible.
If test printing is successful, this indicates there
are no problems on this machine or with the
printer driver. In this case, remove the cause of
memory shortage.
If test printing fails, resolve any problems that
may be occurring in the machine or with the
printer driver.
Refer to the user's manual of the application software to check the settings.
Change the settings and try to print again.
4
[Maintenance/Troubleshooting] 4-4
Page 69

4.3 Cannot print
Description of problem Check points Remedy
Print processing on the
computer has finished,
but printing does not
start.
Cannot print in Secured
Job
A file saved on the HDD
has disappeared from a
computer.
Is another printer specified?
Is the network or USB
cable disconnected?
Is the machine in the Sub
Power Off mode?
Has an error occurred on
the machine?
Are unprocessed jobs
queued on the machine?
Did you specify [Store
Job] when executing the
print job?
Did you specify [Secured
Job] when executing the
print job?
If account track is enabled, are the account
name and password
correct?
If user authentication is
enabled, are the user
name and password
correct?
Is there sufficient computer memory available?
If network connection is
in place, is the printer
controller connected to
the network?
Is the machine in enhanced security mode?
Is [Password Rules] set
to [ON] on this machine?
Is the setting for deleting
files on the HDD configured on the machine?
4
Check the specified printer name.
Make sure that the cables are correctly connected.
If a hub is used, also check the connection with
the hub.
If the machine is in the Sub Power Off mode,
printing cannot be executed. Press Power key to
release the Sub Power Off mode.
Check the Control Panel of this machine.
Tap [Job List] to check the job sequence.
Check whether or not the target file is saved on
the HDD.
Check whether or not the target file is saved on
the HDD.
Enter the correct account name and password.
Enter the correct user name or password.
Perform a test printing to check whether printing
is possible.
If test printing is successful, this indicates there
are no problems on this machine or with the
printer driver. In this case, remove the cause of
memory shortage.
If test printing fails, resolve any problems that
may be occurring in the machine or with the
printer driver.
Check with the network administrator.
Configure authentication settings in enhanced
security mode.
For information on the authentication settings in
enhanced security mode, refer to [User's Guide:
Description of Utility Keys] - Chapter 5 "Administrator Settings" - [Enhanced Security Mode].
If [Password Rules] is set to [ON], set a password
that satisfies the password rules. For details, refer to [User's Guide: Description of Utility Keys] Chapter 5 "Administrator Settings" - [Security
Details]-[Password Rules].
Check the HDD settings for the machine. For information on the setting use to delete files on the
HDD, refer to [User's Guide: Description of Utility
Keys] - Chapter 5 "Administrator Settings" [Folder Settings].
[Maintenance/Troubleshooting] 4-5
Page 70

4.3 Cannot print
Description of problem Check points Remedy
Printing in user authentication or account track
mode is not available.
Printing is not available
when you have selected
[Public User] in user authentication.
Selection of items failed
in the printer driver.
A "conflict" message
saying "unable to configure" or "function will be
canceled" appears.
Cannot print according
to the settings you have
configured.
Images are not printed
correctly.
Paper is not fed from the
specified paper tray.
Are the user name or account name, and password correct?
Is the user authentication or account track enabled in the printer
driver?
Is the entered user name
or account name authorized?
Is printing by public users permitted on the machine?
Selection may not be enabled for certain combinations of functions.
Have you set up functions that cannot be
used in combination?
The settings may not be
configured correctly.
Even though a combination of functions may be
enabled in the printer
driver, that combination
may not be available on
this machine.
The paper size or paper
orientation specified in
the application may take
precedence over the
settings in the printer
driver when printing.
Is there sufficient computer memory available?
Does the specified paper
tray contain paper of the
correct size/orientation?
4
Enter the correct user name, account name and
password.
Enable user authentication or account track on
the printer driver.
Check that printing of the current user name/account name is permitted?
Check whether printing by public users is permitted. If not, grant printing permission to public users.
Grayed out items cannot be configured.
Check what functions are enabled and redo the
selection of functions.
Check the setting of each item of the printer driver.
Correct the settings in the application.
Simplify the images to reduce the data size.
Load paper of the appropriate size and orientation into the paper tray.
[Maintenance/Troubleshooting] 4-6
Page 71

4.3 Cannot print
4.3.2 Problems on print quality
Description of problem Cause Remedy
No data is printed. A Toner Cartridge is
Printed in jet black or all
over in color.
A print is faint. The laser lens is dirty. Clean the laser lens.
A print is dark. A Toner Cartridge is
damaged.
One or more Imaging
Unit are damaged.
Paper is damp. Adjust the humidity of the paper storage place.
The paper setting of the
printer driver does not
match the paper that is
actually loaded on this
machine.
The power supply does
not match the specification of this machine.
Multiple sheets are fed
out simultaneously.
Paper is not correctly
loaded into the paper
tray.
A Toner Cartridge is
damaged.
One or more Imaging
Unit are damaged.
Paper is damp. Remove the damp paper, then replace it with
Toner is running out in
the Toner Cartridge.
A Toner Cartridge is
damaged.
One or more Imaging
Unit are damaged.
The correct paper type is
not specified.
damaged.
One or more Imaging
Unit are damaged.
The original does not
stick fast to the Original
Glass.
The specified copy density is too high.
4
Remove the Toner Cartridge, then check it for
damage. If the Toner Cartridge is damaged, replace it.
Remove Imaging Unit, then check them for
damage. If necessary, replace Imaging Unit.
Remove the damp paper, then replace it with
new dry paper.
Load the correct paper in this machine.
Use the power supply that matches the specification.
Remove paper from the paper tray, then check it
for static electricity. Flip through the paper, then
return it into the paper tray.
Remove paper, align its edges, return it into the
paper tray, then adjust the paper guide.
Remove the Toner Cartridge, then check it for
damage. If the Toner Cartridge is damaged, replace it.
Remove Imaging Unit, then check them for
damage. If necessary, replace Imaging Unit.
new dry paper.
Replace the Toner Cartridge.
Remove the Toner Cartridge, then check it for
damage. If the Toner Cartridge is damaged, replace it.
Remove Imaging Unit, then check them for
damage. If necessary, replace Imaging Unit.
When printing on thick paper, envelope, label
sheet, postcard, glossy paper, single side only
paper, special paper, or letterhead, specify the
paper type using the printer driver.
Remove the Toner Cartridge, then check it for
damage. If the Toner Cartridge is damaged, replace it.
Remove Imaging Unit, then check them for
damage. If necessary, replace Imaging Unit.
Position the original so that it is pressed closely
against the Original Glass.
Set the copy density to a lower level.
[Maintenance/Troubleshooting] 4-7
Page 72

4.3 Cannot print
Tips
Description of problem Cause Remedy
Image colors run.
The background is dirty.
The degree of gloss is
uneven.
The density is uneven. A Toner Cartridge is
A Toner Cartridge is
damaged.
One or more Imaging
Unit are damaged.
The Original Cover Pad
is dirty.
The Original Glass is
dirty.
damaged.
Toner is running out in
one or more Toner Car-
tridge, or any Toner Cartridge is damaged.
This machine has not
been placed on a level
location.
4
Remove the Toner Cartridge, then check it for
damage. If the Toner Cartridge is damaged, replace it.
Remove Imaging Unit, then check them for
damage. If necessary, replace Imaging Unit.
Clean the Original Cover Pad.
Clean the Original Glass.
Remove the Toner Cartridge, then check it for
damage. If the Toner Cartridge is damaged, replace it.
Replace the Toner Cartridge.
Place this machine on a flat, hard, stable, and
horizontal surface (inclination within +/-1 degree).
4.3.3 When the bit count does not match between the server and the client
If the print server is Windows Server 2008/Server 2008 R2/Server 2012/Server 2012 R2 and its OS bit count
does not match that of the client computer, an additional driver may not be able to be installed normally on
the print server.
To solve this problem, specify the setup information file (ntprint.inf) of the operating system with a different
bit number when installing the additional driver on the print server.
The following describes how to install the additional driver by specifying a setup information file on a different
computer from that of the print server.
- Before starting this procedure, prepare to configure a different client computer from that of the print
server and install the operating system that has a bit number different from that of the print server.
- On the print server side, the system drive of the client computer is assigned as the network drive. Con-
figure the setting to share the drive to be assigned in advance.
This example shows the operation when installing Windows Server 2008 (32-bit version) on the print server
and Windows Vista (64-bit version) on the client computer.
1 Configure the setting to share the drive (ordinarily, drive C) where the client computer's operating sys-
tem is installed.
2 On the print server, assign the drive (example: "C") of the client computer, which is shared in Step 1,
as the network drive (example: "z").
3 Install the 32-bit operating system driver on the print server.
4 Open the Properties screen in the driver installed.
5 Select the [Sharing] tab, and select the [Share this printer] check box.
6 Click [Additional Drivers].
The Additional Drivers page appears.
7 Select the [x64] check box in the [Processor] column, and click [OK].
8 Specify the folder that contains the 64-bit operating system driver.
This displays a page to request a setup information file.
[Maintenance/Troubleshooting] 4-8
Page 73

4.3 Cannot print
9 Click [Browse], and specify the setup information file [ntprint.inf] on the client computer to which the
network drive is assigned.
% Specify the following file.
% The setup information file may be stored at a different location depending on your client computer.
10 Click [Open].
Installation starts.
11 When the installation is complete, click [Close].
Additional installation of the 64-bit operating system driver is then completed.
4
[z:\Windows\System32\DriverStore\FileRepository\ntprint.inf_xxx]
In the path above, "z" represents the assigned network drive. "_xxx" at the end of this path varies
depending on the driver version.
If folder [amd64] resides in the same hierarchy as that of [ntprint.inf], specify a setup information file
for 64-bit operating system under that folder. To additionally install a 32-bit operating system driver,
specify a setup information file under folder [i386] that is in the same hierarchy as that of [ntprint.inf].
[Maintenance/Troubleshooting] 4-9
Page 74

4.4 Cannot perform network scanning
4.4 Cannot perform network scanning
Description of problem Check points Remedy
Cannot send data. Is the volume per E-mail to
be sent exceeding the maximum receiving capacity of
the SMTP server?
Was the transmission procedure carried out correctly?
Are the network settings and
connection correct?
Is the correct E-mail address
set for this machine?
Are cables connected correctly?
Scanned data cannot be sent
(by SMB TX) to a specified
computer.
When sending scanned data
(by SMB TX) to a specified
computer, operations take
place slowly.
When sending scanned data
(by SMB TX) to a specified
computer, a "Server connection error" occurs.
When sending scanned data
(by SMB TX) to a specified
computer, a "login error" occurs.
Is the folder correctly specified?
Are you using the correct authentication method?
Have you specified a folder
name using more than 13
characters?
Is [LLMNR] enabled? Disable [LLMNR] using Web Connec-
Is the network cable connected?
Do packets from this machine reach the destination?
Is the [File Path] set correctly
for the destination?
Are you operating as a domain user?
4
If the volume of one E-mail message exceeds the maximum capacity of the
SMTP server for reception, an error occurs which will prevent transmission.
Check the transmission procedure, then
resend the fax.
Check the network settings and connection.
Check the E-mail address of the machine and configure it.
Make sure that the network cable is correctly connected.
If the path for the destination folder is
delimited by "/ (slash)", the folder cannot be specified. Use "\" to specify the
path for the destination folder.
When sending data to a destination PC
running operating software earlier than
Mac OS X 10.3.x, use the NTLMv1 authentication. To a destination PC running operating system later than Mac
OS X 10.4.x, send data using the
NTLMv2 authentication.
When sending data to a folder on a PC
running Mac OS X, specify a folder
name using up to 12 characters.
tion.
Make sure that the network cable is correctly connected.
Check that packets from this machine
reach the destination.
If not, take/check the action indicated
below:
• Replace the network cable with a
new one.
• Check if the wireless settings are
correct if wireless connection is
used. Or replace it with a wired connection.
• If no packets are sent out from this
machine, check the IP settings on
this machine.
• Check that the IP address of the
destination is correctly registered.
Check that the [File Path] of the destination is correctly registered.
If you are operating as a domain user,
create a domain user name that is different from the local user name. If your domain user name is the same as the local
user name, use the same password for
both.
[Maintenance/Troubleshooting] 4-10
Page 75

4.5 Cannot perform fax/internet fax
4.5 Cannot perform fax/internet fax
4.5.1 Cannot perform Fax TX
Description of problem Check points Remedy
Cannot send data. Was the transmission proce-
dure carried out correctly?
Is the fax number you entered for the destination correct?
Were the address book destination and program destination registered correctly?
Is the telephone line setting
correct?
Is the modular cable connected correctly?
Is there a problem with the
receiving machine?
If it is a password TX job,
have you sent the correct
password?
Was the sender's fax number
correctly registered with
"Check Dest. & Send"?
Is [PBX Connection Settings]
set correctly when you are
using this machine in the
PBX environment?
4
Check the transmission procedure, then
resend the fax.
If you are using a destination in the Address Book or Program, the registered
fax number may be incorrect.
Print the Speed Dial list to check whether the numbers are registered correctly.
Does the setting in [Dialing Method]
match the telephone line being used?
Check the setting and correct it if an error is found.
Is the modular cable connected?
Check the modular cable connection
and, if unplugged, plug it in securely.
Are TEL and LINE connected inversely?
Check the modular cable connection
and, if unplugged, plug it in securely.
Is the power of the receiving facsimile
turned off, is it out of paper or is there
another problem?
Call the recipient to determine whether
there is a problem.
Check the recipient's password then
resend the fax using a correct password.
Check that the fax number registered
with the recipient is correct.
Or set Check Dest. & Send to Disable,
then send a fax.
When setting [PBX Connection Settings]
to [ON] and dialing the recipient for
which [E] is registered at the head of a
fax number, check that the outside line
number is correctly registered in [PBX
Connection Settings].
When setting [PBX Connection Settings]
to [OFF], you can enter "P" (pause) and
the recipient fax number following the
outside line number to call the outside
line.
[Maintenance/Troubleshooting] 4-11
Page 76

4.5 Cannot perform fax/internet fax
4.5.2 Cannot perform Fax RX
Description of problem Check points Remedy
Cannot receive faxes. Is the power turned on? Check the Power Switch of this ma-
No printout produced. Is PC-Fax RX enabled? When PC-Fax RX is enabled, print the
chine.
If a hub is used, also check the hub
power.
Has the machine been
placed in ErP Auto Power Off
mode?
Is the Receive Mode set to
Manual RX?
Is the modular cable connected correctly?
Is [Closed Network RX] enabled?
Has a wrong SUB been sent
in F-code from the sender
side?
Is TSI Distribution enabled? Check forwarding destinations for TSI
Is Memory RX enabled? If Memory RX is enabled, print the fax
Is paper in the machine? Add paper.
Is paper jammed in the machine?
Is the machine out of toner? No fax can be received if the toner is ex-
If the machine is placed in ErP Auto
Power Off mode, it cannot receive any
jobs. Press the Power key to release the
ErP Auto Power Off mode.
Change the [RX Mode ]to [Auto RX].
When [RX Mode ]is set to [Manual RX],
receive faxes manually.
Is the modular cable connected?
Check the modular cable connection
and, if unplugged, plug it in securely.
If [Closed Network RX] is enabled, the
machine accepts faxes sent from specific recipients. For details, contact your
administrator.
If a wrong sub-address is received with
the Confidential User Box set, a communication error may occur, causing
failed reception. Check the sender side
to see if the sub-address is set.
fax from the Memory RX User Box.
Distribution.
from the Memory RX User Box.
Clear the jammed paper.
hausted. Replace the Toner Cartridge.
4
[Maintenance/Troubleshooting] 4-12
Page 77

4.6 Cannot perform copy
4.6 Cannot perform copy
Description of problem Check points Remedy
Copying does not start. Are the doors of the machine
securely closed?
Has paper of the correct size
for the original been loaded
into the paper tray?
The original does not feed. Is the ADF slightly open? Securely close the ADF.
Is the original one that does
not meet the specifications?
Has the original been positioned correctly?
The image is light. Is [Light] specified for the
The image is dark. Is [Dark] specified for the
The image is partially obscured or blurry.
The entire area of a copy gets
smudged.
Images are tipped. Is the original positioned cor-
density setting?
Is the paper damp? Replace with new/dry paper.
density setting?
Was the original not pressed
close enough against the
Original Glass?
Is the paper damp? Replace with new/dry paper.
Was the original not pressed
close enough against the
Original Glass?
Is the Original Glass dirty? Wipe the Original Glass with a soft, dry
Is the Original Cover Pad
dirty?
Was the original printed on
highly translucent material,
such as diazo photosensitive
paper or OHP transparencies?
Is a 2-sided original being
copied?
rectly?
Is the original incorrectly positioned in the ADF?
Is the lateral guide of the paper tray correctly aligned
with the paper?
Has curled paper been loaded into the paper tray?
4
Close the doors of the machine securely.
Load paper of the appropriate size into
the paper tray.
Check that the original is one that can
be loaded into the ADF.
Position the original correctly.
Tap [Density] on the copy main screen
to adjust density.
Tap [Density] on the copy main screen
to adjust density.
Position the original so that it is pressed
closely against the Original Glass.
Position the original so that it is pressed
closely against the Original Glass.
cloth.
Clean the Original Cover Pad with a
soft cloth dampened with a mild detergent.
Place a blank sheet of paper on top of
the original.
If a thin 2-sided original is being copied,
the print on the back side may be reproduced on the front side of the copy. On
the Background Removal screen, select
a lighter background density.
Correctly position the original against
the Original Scale.
Load the original into the ADF, and slide
the adjustable Document Guide to fit
the size of the original.
If the original cannot be fed correctly
through the ADF, make copies by positioning the original on the Original
Glass.
Align the Document Guide with the
edges of the paper.
Manually flatten the paper and re-load it
into the paper tray.
[Maintenance/Troubleshooting] 4-13
Page 78

4.6 Cannot perform copy
Description of problem Check points Remedy
An output copy is curled. Curls may appear depending
The area around an image
gets smudged.
Cannot switch to the 2-Sided
> 1-Sided or 2-Sided > 2Sided function.
on the paper type (recycled
paper, for example).
Is the Original Cover Pad
dirty?
Is the paper selected of a size
larger than the original size?
(When copying at full size or
100.0% zoom ratio)
Is the size or orientation of
the original different from
that of the paper?
(When copying at full size or
100.0% zoom ratio)
Have you selected the zoom
ratio for reduced copying
that is suited for the paper
size?
(When the reduced copying
zoom ratio has been selected
manually)
Have settings been selected
that cannot be combined?
4
Remove the paper from the paper tray,
turn it over, then load it again.
Replace with new dry paper.
Paper curls can be reduced by enabling
[Paper Curl Adjustment]. [Paper Curl
Adjustment] adjusts paper curls and enables smoother ejection of paper into
the processing tray.
For details, refer to Chapter 5 "Administrator Settings" in [User's Guide: Description of Utility Keys]. (This function is
only available when bizhub C3850FS is
used.)
Clean the Original Cover Pad with a
soft cloth dampened with a mild detergent.
Select a paper size that is the same as
the original.
Otherwise, tap [Zoom] on the copy main
screen to select [Auto], and perform enlarged copying at a zoom ratio matching
the paper.
Select a paper size that is the same as
the original.
Otherwise, re-load paper in the same
orientation as the original.
Select the zoom ratio that matches the
paper size.
Otherwise, tap [Zoom] on the copy main
screen to select [Auto], and perform reduced copying at a zoom ratio matching
the paper.
Check the combinations of the selected
settings.
[Maintenance/Troubleshooting] 4-14
Page 79

4.7 Trouble in use of Finisher FS-P03
4.7 Trouble in use of Finisher FS-P03
Description of problem Check points Remedy
The Finisher FS-P03
does not function.
- Turn the power of this machine off and on to re-
Have you loaded paper
on which an image without margins has been
printed?
4
set the Finisher FS-P03.
Paper on which an image without margins has
been printed will not be stapled because the sensor cannot detect it. Do not load paper on which
an image without margins is printed.
[Maintenance/Troubleshooting] 4-15
Page 80

4.8 Trouble in use of Finisher (bizhub C3850FS)
4.8 Trouble in use of Finisher (bizhub C3850FS)
Description of problem Check points Remedy
The device cannot be
used due to a Finisher
failure.
- Use of the device can be continued by temporarily isolating the Finisher from the device.
Select [Utility] - [Administrator Settings] - [System Settings] - [Expert Adjustment] - [Problem
Unit Isolation Set.] to isolate the Finisher, then
turn the device off and on.
4
[Maintenance/Troubleshooting] 4-16
Page 81

4.9 Major messages and actions
4.9 Major messages and actions
Check the displayed message, then take the appropriate action. If messages other than those listed below
have been displayed, follow them to perform processing.
Warning messages
Message Description Remedy
[Memory Overflow] Not enough memory to print on a
copy basis.
[HDD is low on disk space.] The HDD free space is insuffi-
[Paper Empty] No paper is loaded in the tray. Add paper.
[Toner is low.] The toner is about to run out. Prepare the specified Toner Car-
[Replace toner] Toner is depleted. Replace the Toner Cartridge.
[Imaging Unit will require replacement soon.]
[Image Transfer Belt Unit will
require replacement soon.]
[Fusing Unit will require replacement soon.]
[Toner Filter will require replacement soon.]
[Waste Toner Box will require
replacement soon.]
[Transfer Roller Unit will require replacement soon.]
[No more staples.] Staples have run out. Replace the Staple Cartridge.
[USB hub is not supported.] A hub has been connected to the
[The USB device is invalid.] An incompatible USB device has
[IEEE 802.1x Authentication
failure.]
[IEEE802.1x Authenticating] IEEE802.1X authentication is
[Fax Memory Low] The fax data storage area is in-
[No HDD is installed.] The HDD is not installed. Install the HDD.
[Fax RX Job Max Over] The number of registered fax RX
[Offset and Staple are currently not available.]
[Staple cannot be used.] Finisher is specified to be sepa-
cient.
The operating life of the Imaging
Unit has expired.
The operating life of the Transfer
Belt Unit has expired. Printing is
possible, but the printing quality
is not assured.
The operating life of the Fusing
Unit has expired. Printing is possible, but the printing quality is
not assured.
The operating life of the Toner
Filter has expired.
The Waste Toner Bottle will become full soon.
The operating life of the Transfer
Roller has expired. Printing is
possible, but the printing quality
is not assured.
USB port.
been connected to the USB port.
IEEE802.1x authentication has
not been executed normally,
causing a timeout.
currently executed.
sufficient.
jobs has reached the upper limit.
Finisher is specified to be separated in Administrator Settings or
service mode.
rated in Administrator Settings or
service mode.
4
Print only the first page.
Delete data saved on the HDD, if
necessary.
tridge.
For details, refer to page 2-3.
Replace the Imaging Unit.
For details, refer to page 2-6.
Replace the Transfer Belt Unit.
For details, refer to page 2-16.
Replace the Fusing Unit.
For details, refer to page 2-23.
Replace the Toner Filter.
For details, refer to page 2-22.
Prepare a new Waste Toner Bottle.
Replace the Transfer Roller.
For details, refer to page 2-14.
For details, refer to page 2-27.
Remove the USB hub.
Disconnect the USB device.
Restart this machine.
Wait until authentication is completed.
Check fax jobs. Delete fax jobs, if
necessary.
Print or cancel fax RX jobs.
Cancel the Finisher to be separated.
Cancel the Finisher to be separated.
[Maintenance/Troubleshooting] 4-17
Page 82

4.9 Major messages and actions
Message Description Remedy
[Setting an administrator
password is required in order
to improve security.]
[Setting Password Rules are
required in order to improve
security.]
[Setting an administrator
password/Password Rules
are required in order to improve security.]
Error messages
Message Description Remedy
[Configuration of options has
been changed.]
[There is an open component.]
[Paper Jam] A paper jam has occurred. Check a paper jam location, then re-
[Staple Jam] A staple jam has occurred. Open the Left Cover, then remove
[Imaging Unit Installation Error]
[Incorrect Imaging Unit] An incorrect Imaging Unit has
[Processing Tray Paper Left] Paper is left on the Processing
[New Imaging Unit Detection
Error]
[Fusing Unit Installation Error]
[Install toner cartridge.] The Toner Cartridge is not in-
[New Toner Cartridge Detection Error]
[Waste Toner Box Full] The Waste Toner Bottle has be-
[Imaging Unit needs to be replaced.]
[Replace Toner] Toner is depleted. Replace the Toner Cartridge.
The default administrator password remains unchanged in
[Quick Security Setting].
Password Rules is disabled in
[Quick Security Setting].
The default administrator password remains unchanged in
[Quick Security Setting]. Also,
Password Rules is disabled.
The option configuration was
changed while the power was
turned on.
The cover is opened. Close the cover.
The Imaging Unit is not installed
correctly.
been installed.
Tray.
The usage status of the new Im-
aging Unit is not detected.
The Fusing Unit is not installed
correctly.
stalled correctly.
The usage status of the new
Toner Cartridge is not detected.
come full.
The operating life of the Imaging
has expired.
Unit
Change the administrator password
from the default to any password.
A warning is released one minute after it has occurred.
Enable Password Rules.
A warning is released one minute after it has occurred.
Change the administrator password
from the default to any password,
then enable Password Rules.
A warning is released one minute after it has occurred.
Restart this machine.
move the jammed paper.
the jammed staples.
For details, refer to page 3-19.
Install the Imaging Unit correctly.
Install an Imaging Unit which is our
genuine product with the correct
color and correct marketing area.
Remove paper from the Processing
Tray, then reset the error on the
Control Panel.
Remove and insert the Imaging
Unit, then close all the doors.
For details, refer to page 2-6.
Install the Fusing Unit, then close all
doors.
Correctly install the Toner Car-
tridge, and close all doors.
For details, refer to page 2-3.
Remove and insert the Toner Car-
tridge, then close all the doors.
For details, refer to page 2-3.
Replace the Waste Toner Bottle.
For details, refer to page 2-12.
[Contact your service representative.] If appears, contact your service
representative.
Replace the Imaging unit. For details, refer to page 2-6.
[Contact your service representative.] If appears, contact your service
representative.
For details, refer to page 2-3.
4
[Maintenance/Troubleshooting] 4-18
Page 83

4.9 Major messages and actions
Message Description Remedy
[Paper Size Mismatch] Paper of the specified size is not
[Paper Empty] A print job was executed by
[Paper Size/Type Mismatch] The size and type of the paper
[Output Tray Full] The amount of paper output to
[Memory Overflow] Data has been received over the
[No more staples.] Staples have run out. Replace the Staple Cartridge.
[Stored Job Error] The option configuration is dif-
[HDD Capacity Over] The HDD capacity has become
[Document Registration
Overload]
[Memory Full (FAX)] The fax data storage area has
[ADF Initialize Error] The ADF cover is not set secure-
[Check Scanner Lock Lever] The Scanner Lock Lever is
[Job Registration Limit Over] The number of registered jobs
[Connection Failed] Failed to connect to the FTP
[Writing Error] An error has occurred while sav-
[Matching paper size not
available.]
loaded into a tray.
specifying the Manual Feed
Tray from the printer driver, but
no paper was loaded in the Man-
ual Feed Tray.
A print job was executed by
specifying Tray X from the printer
driver, but no paper was loaded
in Tray X.
loaded in the tray specified from
the printer driver are different
from those of the paper loaded in
the tray on the main unit.
The size and type of the paper in
the tray that are specified on the
Control Panel do not match
those of the paper actually loaded in the tray.
the Output Tray has reached the
maximum.
maximum memory size.
All the available space in memory has been used up by document scanning.
ferent from that specified when a
job was saved.
full.
The number of files on the HDD
has reached the upper limit.
become full.
ly.
locked.
has reached the upper limit.
server.
ing data onto a USB memory device.
Paper appropriate for a print job
is not loaded in the tray.
4
Load the correct paper into the displayed tray.
Load paper into the Manual Feed
Tray.
Load paper into Tray X.
Load the paper of the appropriate
size and type into the tray, then
specify the correct size and type for
the loaded paper on the Control
Panel.
Load the paper of the appropriate
size and type into the tray, then
specify the correct size and type for
the loaded paper on the Control
Panel.
Remove the paper from the Output
Tray.
Cancel the job to reduce the amount
of data, then execute the job again.
Reduce the amount of original data.
For details, refer to page 2-27.
Return to the option configuration
specified when a job was saved.
Delete data saved on the HDD, if
necessary.
Delete data saved on the HDD, if
necessary.
When sending fax data, send only
the scanned original, or manually
send it again.
When receiving fax data, print or delete data saved in memory.
Open the ADF cover once, then
close it again.
Cancel the job, then release the
Scanner Lock Lever.
Wait until a job has been completed,
or delete a current job.
Check that the destination has been
registered correctly.
Cancel the job, then check that the
USB memory is in the write enable
state.
Load the appropriate paper in the
tray, then specify the correct size
and type for the loaded paper on the
Control Panel.
[Maintenance/Troubleshooting] 4-19
Page 84

4.9 Major messages and actions
Message Description Remedy
[Out of the Range of Auto
Zoom]
[Place Original on Glass] The original of an invalid size is
[Place Original on ADF] No original is loaded on the ADF. Load the original on the ADF.
[Duplex Copy Disabled] The size of the loaded paper is
[Scan TX Failed] Scan transmission has failed. After a while, cancel the job.
[Off-Hook] The handset remains picked up
[Fax TX Failed] Fax transmission has failed. This error is remedied automatically.
[Fax RX Failed] Fax receiving has failed. This error is remedied automatically.
[I-Fax TX Failed] An error occurred while sending
[I-Fax RX Failed] An error occurred while receiving
[I-Fax RX Data Error] The received Internet fax data is
[E-mail forwarding failed.] An error occurred while forward-
[PC-FAX Restricted] PC-Fax TX is prohibited. Enable PC-Fax TX.
[PC-Fax TX Error] An error occurred when PC-Fax
[Polling RX Error] Multiple destinations have been
[Counter has reached its
maximum allowance.]
[Job Log Error] The job log storage area on the
[Card Authentication Registration Error]
[USB Connection Error] The same type of USB device is
[Expiration Error] The enhanced server authentica-
[The number of pages that
can be stapled has been exceeded.]
[Extended Authentication
disabled]
[Unable to staple with the selected paper.]
[Unable to staple with the
current binding position.]
The auto zoom ratio setting exceeds the allowable range.
loaded on the ADF.
not available for 2-sided copy.
after a manual transmission.
an Internet fax, and the job was
not ended normally.
an Internet fax, and the job was
not ended normally.
destroyed, or it was not configured in the TIFF format.
ing the received fax by E-mail,
and the job was ended normally.
TX data was received on this machine.
specified for Polling RX.
The counter has reached the upper limit.
HDD is full.
Failed to scan the IC card at the
time of registration.
connected.
tion application has expired.
You tried to print more pages
than can be stapled.
The enhanced server authentication application cannot be used.
A paper size that cannot be stapled was selected.
An incorrect binding position
was selected.
4
Specify the zoom ratio between 25
and 400%.
Scan the original from the Original
Glass.
Scan the original of different sizes
from the ADF.
Cancel 2-sided copy, or change the
paper size.
Replace the handset.
This error is remedied automatically.
This error is remedied automatically.
This error is remedied automatically.
This error is remedied automatically.
This error is remedied automatically.
Multiple destinations cannot be
specified for Polling RX. Specify only
one destination.
Delete jobs.
Delete job logs.
This error is remedied automatically.
Disconnect the USB device.
Change to the authentication method other than the enhanced server
authentication.
Cancel the job or the staple setting.
Change to the authentication method other than the enhanced server
authentication.
This error is remedied automatically.
This error is remedied automatically.
[Maintenance/Troubleshooting] 4-20
Page 85

4.9 Major messages and actions
Message Description Remedy
[Exceeds number of pages
for stapling in Group setting.]
[Mixed original cannot be set
with Staple.]
Service call
If a service call has appeared, restart this machine.
If the problem is not resolved after this machine has been restarted, check the displayed trouble code number, then contact your service representative.
You tried to print more pages
than can be stapled.
During stapling, different paper
sizes were detected.
4
This error is remedied automatically.
Cancel the job or the staple setting.
[Maintenance/Troubleshooting] 4-21
Page 86

5
Checking Counters
Page 87

5.1 Checking the counter
5 Checking Counters
5.1 Checking the counter
The counter indicates the total number of pages printed on this machine on a function or color basis. This
information will help you gain an understanding of the usage status of this machine.
1 Tap [Counter].
5
2 Check the total number of pages printed after the count starting date.
Item Description
[Total] Check the total number of pages printed on this machine.
[Copy] Allows you to check the total number of pages copied.
[Print] Check the total number of pages printed through a computer.
[Scan] Check the total number of pages scanned in Scan to E-mail and Scan to Folder
[Fax] Check the total number of pages scanned in Fax mode, total number of pages
modes.
printed in a file received by fax, and total number of pages received by fax.
dReference
Counter information of this machine can be sent to a specified E-mail address. Arrange a notification schedule, for example, weekly or monthly, around your system environment. For details on how to configure settings, refer to Chapter 1 "Using Web Connection" in [User's Guide: Applied Functions].
[Maintenance/Troubleshooting] 5-2
Page 88

6
Index
Page 89

6Index
6
C
Cleaning
........................................................................1-7
ADF
Control Panel
Exhaust Air Duct
Laser Lenses
Manual Feed Tray
Original Cover Pad
Original Glass
Outer Covers
Paper Feed Unit
Tray 1
Consumables
Check
Replace
Counter
........................................................................5-2
.........................................................1-4
.................................................... 1-4
.........................................................1-8
..................................................1-5
................................................1-5
........................................................1-5
.........................................................1-4
.....................................................1-6
.....................................................................1-6
....................................................................2-2
..................................................................2-3
F
Fusing Unit
Replace
................................................................2-23
I
Imaging Unit
Replace
..................................................................2-6
M
Messages ..................................................................4-17
Consumables Replacement
.....................................................................4-18
Error
Warning
...............................................................4-17
..................................2-2
Transfer Roller
Replace
Troubleshooting
Copy
Fax RX
Fax TX
Internet Fax RX
Internet Fax TX
Network Scan
Paper Jam
Power Supply
Print
Print Quality
Touch Panel
............................................................... 2-14
.................................................................... 4-13
................................................................. 4-12
................................................................. 4-11
...........................................................3-15
....................................................................... 4-4
........................................................... 4-7
..........................................................4-3
W
Waste Toner Bottle
Replace
............................................................... 2-12
....................................................4-12
.................................................... 4-11
...................................................... 4-10
........................................................4-2
P
Paper Jam
ADF
........................................................................3-8
Duplex Option
Finisher
Fusing Unit
Manual Feed Tray
Paper Feed Unit
Transfer Roller
.....................................................................3-5
Tray 1
......................................................3-10
................................................................3-14
...........................................................3-11
..................................................3-3
.....................................................3-7
.......................................................3-3
S
Service Call ...............................................................4-21
Staple Jam
Staple Kit
Replace
......................................................3-17, 3-19
......................................................2-27, 2-30
T
Toner Cartridge ...........................................................2-3
...................................................................2-3
Handle
Replace
Store
Toner Filer
Replace
Transfer Belt
Replace
..................................................................2-4
......................................................................2-3
................................................................2-22
................................................................2-16
[Maintenance/Troubleshooting] 6-2
Page 90

http://konicaminolta.com
A3GN-9567-33A 2015. 2
© 2013
 Loading...