

Page 1

KODAK
DC265 Zoom Digital Camera
User’s Guide
for the camera and Kodak software
Visit Kodak on the World Wide Web at www.kodak.com
Page 2

Kodak, and FlashPix are trademarks of Eastman Kodak Company.
Digita is a trademark of FlashPoint Technology, Incorporated.
The FlashPix format is defined in a specification and test suite developed and published by
Kodak in collaboration with Microsoft, Hewlett-Packard, and Live Picture. Only products that
meet the specification and pass the test suite may use the FlashPix name and logo.
Page 3

Table of
Contents
Page
Getting started. . . . . . . . . . . . . . . . . . . . . . . . . . . . . . . . . . . . . . . . . . 1-1
Introduction . . . . . . . . . . . . . . . . . . . . . . . . . . . . . . . . . . . . . . . . . . . . . . .1-1
Camera features . . . . . . . . . . . . . . . . . . . . . . . . . . . . . . . . . . . . . . . . . . . .1-1
Software . . . . . . . . . . . . . . . . . . . . . . . . . . . . . . . . . . . . . . . . . . . . . . . . . .1-2
PC . . . . . . . . . . . . . . . . . . . . . . . . . . . . . . . . . . . . . . . . . . . . . . . . . . . .1-2
System requirements . . . . . . . . . . . . . . . . . . . . . . . . . . . . . . . . . . .1-2
Installing software . . . . . . . . . . . . . . . . . . . . . . . . . . . . . . . . . . . . .1-3
MACINTOSH . . . . . . . . . . . . . . . . . . . . . . . . . . . . . . . . . . . . . . . . . . .1-3
System requirements . . . . . . . . . . . . . . . . . . . . . . . . . . . . . . . . . . .1-3
Installing software . . . . . . . . . . . . . . . . . . . . . . . . . . . . . . . . . . . . .1-4
Your camera. . . . . . . . . . . . . . . . . . . . . . . . . . . . . . . . . . . . . . . . . . . . 2-1
Four digital camera . . . . . . . . . . . . . . . . . . . . . . . . . . . . . . . . . . . . . . . . . .2-1
Softkeys . . . . . . . . . . . . . . . . . . . . . . . . . . . . . . . . . . . . . . . . . . . . . . . . . .2-3
Mode dial . . . . . . . . . . . . . . . . . . . . . . . . . . . . . . . . . . . . . . . . . . . . . . . . .2-3
Four-way controller . . . . . . . . . . . . . . . . . . . . . . . . . . . . . . . . . . . . . . . . .2-3
Your status LCD . . . . . . . . . . . . . . . . . . . . . . . . . . . . . . . . . . . . . . . . . . . .2-4
Flash . . . . . . . . . . . . . . . . . . . . . . . . . . . . . . . . . . . . . . . . . . . . . . . . .2-4
Exposure compensation . . . . . . . . . . . . . . . . . . . . . . . . . . . . . . . . . . .2-5
Picture type . . . . . . . . . . . . . . . . . . . . . . . . . . . . . . . . . . . . . . . . . . . .2-5
Quality . . . . . . . . . . . . . . . . . . . . . . . . . . . . . . . . . . . . . . . . . . . . . . . .2-6
Understanding quality and resolution . . . . . . . . . . . . . . . . . . . . . .2-7
Self-timer . . . . . . . . . . . . . . . . . . . . . . . . . . . . . . . . . . . . . . . . . . .2-7
Batteries . . . . . . . . . . . . . . . . . . . . . . . . . . . . . . . . . . . . . . . . . . . . . . .2-8
Pictures remaining . . . . . . . . . . . . . . . . . . . . . . . . . . . . . . . . . . . . . . .2-8
Manual mode . . . . . . . . . . . . . . . . . . . . . . . . . . . . . . . . . . . . . . . . . . .2-9
IrDA (Infrared) communication . . . . . . . . . . . . . . . . . . . . . . . . . . . . .2-9
Removable memory card . . . . . . . . . . . . . . . . . . . . . . . . . . . . . . . . . . . .2-10
Removing and inserting the memory card . . . . . . . . . . . . . . . . . . . .2-11
Table of Contents
i
Page 4

Power management . . . . . . . . . . . . . . . . . . . . . . . . . . . . . . . . . . . . . . . .2-12
Sleep mode . . . . . . . . . . . . . . . . . . . . . . . . . . . . . . . . . . . . . . . . . . . .2-12
Using the AC adapter . . . . . . . . . . . . . . . . . . . . . . . . . . . . . . . . . . . .2-12
Using the battery charger . . . . . . . . . . . . . . . . . . . . . . . . . . . . . . . . .2-13
Using your batteries . . . . . . . . . . . . . . . . . . . . . . . . . . . . . . . . . . . . .2-14
Installing the batteries . . . . . . . . . . . . . . . . . . . . . . . . . . . . . . . . . . .2-16
Taking pictures. . . . . . . . . . . . . . . . . . . . . . . . . . . . . . . . . . . . . . . . . . 3-1
Turning the camera on or off . . . . . . . . . . . . . . . . . . . . . . . . . . . . . . . . . .3-1
Setting the camera to Capture mode . . . . . . . . . . . . . . . . . . . . . . . . . . . . .3-2
Defining the settings . . . . . . . . . . . . . . . . . . . . . . . . . . . . . . . . . . . . . . . . .3-3
Defining settings using the Capture mode menus . . . . . . . . . . . . . . .3-3
Displaying Capture mode settings . . . . . . . . . . . . . . . . . . . . . . . .3-4
Picture type settings . . . . . . . . . . . . . . . . . . . . . . . . . . . . . . . . . . .3-5
Album settings . . . . . . . . . . . . . . . . . . . . . . . . . . . . . . . . . . . . . . .3-6
White balance settings . . . . . . . . . . . . . . . . . . . . . . . . . . . . . . . . .3-7
Watermark settings . . . . . . . . . . . . . . . . . . . . . . . . . . . . . . . . . . . .3-8
Advanced exposure modes settings . . . . . . . . . . . . . . . . . . . . . . .3-9
Advanced focus mode settings . . . . . . . . . . . . . . . . . . . . . . . . . .3-10
Preferences settings . . . . . . . . . . . . . . . . . . . . . . . . . . . . . . . . . . .3-11
Script settings . . . . . . . . . . . . . . . . . . . . . . . . . . . . . . . . . . . . . . .3-14
Defining settings using the Scroll and Select buttons . . . . . . . . . . .3-17
Setting flash, exposure, picture type, and quality . . . . . . . . . . . .3-17
Setting the self-timer . . . . . . . . . . . . . . . . . . . . . . . . . . . . . . . . .3-17
Taking pictures . . . . . . . . . . . . . . . . . . . . . . . . . . . . . . . . . . . . . . . . . . . .3-18
Viewing the memory gauge . . . . . . . . . . . . . . . . . . . . . . . . . . . . . . .3-19
Adding sound to a picture in Quickview . . . . . . . . . . . . . . . . . . . . .3-20
Zooming . . . . . . . . . . . . . . . . . . . . . . . . . . . . . . . . . . . . . . . . . . . . . . . . .3-21
Optical zooming . . . . . . . . . . . . . . . . . . . . . . . . . . . . . . . . . . . . . . . .3-21
Digital zooming . . . . . . . . . . . . . . . . . . . . . . . . . . . . . . . . . . . . . . . .3-22
Reviewing your pictures . . . . . . . . . . . . . . . . . . . . . . . . . . . . . . . . . . 4-1
Setting the Camera to the Review mode . . . . . . . . . . . . . . . . . . . . . . . . .4-2
Setting Review mode preferences . . . . . . . . . . . . . . . . . . . . . . . . . . . . . .4-3
Overlay preferences . . . . . . . . . . . . . . . . . . . . . . . . . . . . . . . . . . . . . .4-4
Slide show preferences . . . . . . . . . . . . . . . . . . . . . . . . . . . . . . . . . . . .4-4
Video preferences . . . . . . . . . . . . . . . . . . . . . . . . . . . . . . . . . . . . . . . .4-5
Playback preferences . . . . . . . . . . . . . . . . . . . . . . . . . . . . . . . . . . . . .4-5
Format card preferences . . . . . . . . . . . . . . . . . . . . . . . . . . . . . . . . . . .4-6
ii
Page 5

Viewing pictures . . . . . . . . . . . . . . . . . . . . . . . . . . . . . . . . . . . . . . . . . . . .4-7
Viewing the remaining memory . . . . . . . . . . . . . . . . . . . . . . . . . . . . . . . .4-8
Marking pictures for an action . . . . . . . . . . . . . . . . . . . . . . . . . . . . . . . . .4-8
Placing marked pictures in an album . . . . . . . . . . . . . . . . . . . . . . . . .4-9
Copying marked pictures from camera to camera . . . . . . . . . . . . . .4-10
Protecting your pictures . . . . . . . . . . . . . . . . . . . . . . . . . . . . . . . . . .4-11
Opening albums . . . . . . . . . . . . . . . . . . . . . . . . . . . . . . . . . . . . . . . . . . .4-12
Expanding and collapsing pictures . . . . . . . . . . . . . . . . . . . . . . . . . . . . .4-13
Adding sound to pictures . . . . . . . . . . . . . . . . . . . . . . . . . . . . . . . . . . . .4-14
Deleting pictures . . . . . . . . . . . . . . . . . . . . . . . . . . . . . . . . . . . . . . . . . . .4-15
Playing sound, bursts, and time-lapse sequences . . . . . . . . . . . . . . . . . .4-16
Magnifying pictures . . . . . . . . . . . . . . . . . . . . . . . . . . . . . . . . . . . . . . . .4-17
Viewing pictures on your television . . . . . . . . . . . . . . . . . . . . . . . . . . . .4-18
Connecting your camera to your computer . . . . . . . . . . . . . . . . . . 5-1
Which connection? . . . . . . . . . . . . . . . . . . . . . . . . . . . . . . . . . . . . . . . . . .5-2
Determining which connections are available . . . . . . . . . . . . . . . . . .5-2
WINDOWS 95 . . . . . . . . . . . . . . . . . . . . . . . . . . . . . . . . . . . . . . .5-2
WINDOWS NT 4.0 . . . . . . . . . . . . . . . . . . . . . . . . . . . . . . . . . . .5-3
WINDOWS 98 . . . . . . . . . . . . . . . . . . . . . . . . . . . . . . . . . . . . . . .5-3
MACINTOSH Computers . . . . . . . . . . . . . . . . . . . . . . . . . . . . . .5-3
Determining what your computer supports . . . . . . . . . . . . . . . . . . . .5-4
Checking for USB support . . . . . . . . . . . . . . . . . . . . . . . . . . . . . .5-4
Checking for RS-232 serial support . . . . . . . . . . . . . . . . . . . . . . .5-5
Checking for IrDA transceiver support . . . . . . . . . . . . . . . . . . . . .5-6
Making the connection . . . . . . . . . . . . . . . . . . . . . . . . . . . . . . . . . . . .5-7
Using a serial cable to connect . . . . . . . . . . . . . . . . . . . . . . . . . . .5-7
Using a USB cable to connect . . . . . . . . . . . . . . . . . . . . . . . . . . .5-8
Using an infrared transceiver to connect . . . . . . . . . . . . . . . . . . .5-8
Table of Contents
Setting camera properties . . . . . . . . . . . . . . . . . . . . . . . . . . . . . . . . 6-1
You’ve got to connect first . . . . . . . . . . . . . . . . . . . . . . . . . . . . . . . . . . . .6-1
Finding camera properties software . . . . . . . . . . . . . . . . . . . . . . . . . . . . .6-2
Specifying general settings . . . . . . . . . . . . . . . . . . . . . . . . . . . . . . . . . . . .6-2
Specifying camera settings . . . . . . . . . . . . . . . . . . . . . . . . . . . . . . . . . . .6-4
Specifying picture type settings . . . . . . . . . . . . . . . . . . . . . . . . . . . . . . .6-6
Specifying albums settings . . . . . . . . . . . . . . . . . . . . . . . . . . . . . . . . . . .6-7
iii
Page 6

Accessing your pictures through your computer. . . . . . . . . . . . . . 7-1
Using Mounter Software . . . . . . . . . . . . . . . . . . . . . . . . . . . . . . . . . . . . .7-1
Mounter Software overview . . . . . . . . . . . . . . . . . . . . . . . . . . . . . . . .7-2
You’ve got to connect first . . . . . . . . . . . . . . . . . . . . . . . . . . . . . . . . .7-3
Viewing your pictures . . . . . . . . . . . . . . . . . . . . . . . . . . . . . . . . . . . . .7-3
Copying pictures to your computer . . . . . . . . . . . . . . . . . . . . . . . . . .7-4
Transferring pictures and scripts to your camera . . . . . . . . . . . . . . . .7-5
Opening picture files in other software programs . . . . . . . . . . . . . . .7-7
Saving sound . . . . . . . . . . . . . . . . . . . . . . . . . . . . . . . . . . . . . . . . . . . .7-7
Setting preferences . . . . . . . . . . . . . . . . . . . . . . . . . . . . . . . . . . . . . . .7-8
Placing the memory card in your computer . . . . . . . . . . . . . . . . . . . . . . .7-8
Picture Card adapter . . . . . . . . . . . . . . . . . . . . . . . . . . . . . . . . . . . . . .7-9
Does my computer support a PCMCIA card? . . . . . . . . . . . . . . . . .7-10
Memory card reader . . . . . . . . . . . . . . . . . . . . . . . . . . . . . . . . . . . . .7-10
Using Digital Access (TWAIN Acquire) Software . . . . . . . . . . . . . . 8-1
Connecting the camera to your computer . . . . . . . . . . . . . . . . . . . . . . . . .8-1
Starting the Digital Access software . . . . . . . . . . . . . . . . . . . . . . . . . . . .8-2
Selecting the source of your pictures . . . . . . . . . . . . . . . . . . . . . . . . . . . .8-3
Selecting the camera contents . . . . . . . . . . . . . . . . . . . . . . . . . . . . . .8-3
Taking a picture . . . . . . . . . . . . . . . . . . . . . . . . . . . . . . . . . . . . . . . . .8-3
Selecting pictures on your computer . . . . . . . . . . . . . . . . . . . . . . . . .8-4
Previewing your pictures . . . . . . . . . . . . . . . . . . . . . . . . . . . . . . . . . . . . .8-5
Playing an attached sound file . . . . . . . . . . . . . . . . . . . . . . . . . . . . . .8-5
Expanding and collapsing groups of pictures . . . . . . . . . . . . . . . . . . .8-6
Displaying picture information . . . . . . . . . . . . . . . . . . . . . . . . . . . . . .8-6
Transferring pictures . . . . . . . . . . . . . . . . . . . . . . . . . . . . . . . . . . . . . . . .8-7
Saving a sound file . . . . . . . . . . . . . . . . . . . . . . . . . . . . . . . . . . . . . . .8-7
MACINTOSH Software . . . . . . . . . . . . . . . . . . . . . . . . . . . . . . . . . . . . 9-1
Connecting the card reader . . . . . . . . . . . . . . . . . . . . . . . . . . . . . . . . . . . .9-2
Digital Access application window . . . . . . . . . . . . . . . . . . . . . . . . . . . . .9-2
Displaying pictures . . . . . . . . . . . . . . . . . . . . . . . . . . . . . . . . . . . . . . . . . .9-4
Displaying pictures from the memory card . . . . . . . . . . . . . . . . . . . .9-4
Displaying pictures from your computer . . . . . . . . . . . . . . . . . . . . . .9-5
Selecting pictures . . . . . . . . . . . . . . . . . . . . . . . . . . . . . . . . . . . . . . . . . . .9-5
Change thumbnail and picture display size . . . . . . . . . . . . . . . . . . . . . . .9-6
Contact sheet . . . . . . . . . . . . . . . . . . . . . . . . . . . . . . . . . . . . . . . . . . . .9-6
Preview view . . . . . . . . . . . . . . . . . . . . . . . . . . . . . . . . . . . . . . . . . . .9-6
iv
Page 7

Viewing a high-resolution picture . . . . . . . . . . . . . . . . . . . . . . . . . . . . . .9-7
Viewing burst and time-lapse pictures . . . . . . . . . . . . . . . . . . . . . . . . . . .9-8
Contact sheet . . . . . . . . . . . . . . . . . . . . . . . . . . . . . . . . . . . . . . . . . . . .9-8
Preview view . . . . . . . . . . . . . . . . . . . . . . . . . . . . . . . . . . . . . . . . . . .9-9
Slide show . . . . . . . . . . . . . . . . . . . . . . . . . . . . . . . . . . . . . . . . . . . . . .9-9
Playing the audio attached to a picture . . . . . . . . . . . . . . . . . . . . . . . . . .9-10
Rotating pictures . . . . . . . . . . . . . . . . . . . . . . . . . . . . . . . . . . . . . . . . . . .9-10
Deleting pictures . . . . . . . . . . . . . . . . . . . . . . . . . . . . . . . . . . . . . . . . . . .9-10
Viewing picture information . . . . . . . . . . . . . . . . . . . . . . . . . . . . . . . . .9-11
Transferring pictures to the host application . . . . . . . . . . . . . . . . . . . . .9-12
Transferring individual pictures . . . . . . . . . . . . . . . . . . . . . . . . . . . .9-12
Transferring thumbnails on a contact sheet . . . . . . . . . . . . . . . . . . . . . .9-13
Saving pictures to your computer . . . . . . . . . . . . . . . . . . . . . . . . . . . . . .9-14
Saving individual pictures . . . . . . . . . . . . . . . . . . . . . . . . . . . . . . . .9-14
Saving the audio attached to a picture . . . . . . . . . . . . . . . . . . . . . . .9-14
Exporting an APPLE QUICKTIME Movie . . . . . . . . . . . . . . . . . . .9-15
Setting preferences . . . . . . . . . . . . . . . . . . . . . . . . . . . . . . . . . . . . . . . . .9-16
Tips and troubleshooting . . . . . . . . . . . . . . . . . . . . . . . . . . . . . . . . 10-1
General maintenance and safety . . . . . . . . . . . . . . . . . . . . . . . . . . . . . . .10-1
Connecting with your computer . . . . . . . . . . . . . . . . . . . . . . . . . . . . . . .10-2
Communicating with the computer . . . . . . . . . . . . . . . . . . . . . . . . . . . .10-2
Monitor adjustment . . . . . . . . . . . . . . . . . . . . . . . . . . . . . . . . . . . . . . . .10-2
Tips for printing . . . . . . . . . . . . . . . . . . . . . . . . . . . . . . . . . . . . . . . . . . .10-3
Troubleshooting . . . . . . . . . . . . . . . . . . . . . . . . . . . . . . . . . . . . . . . . . . .10-4
Conditional problems . . . . . . . . . . . . . . . . . . . . . . . . . . . . . . . . . . . .10-5
LCD Messages . . . . . . . . . . . . . . . . . . . . . . . . . . . . . . . . . . . . . . . .10-11
Table of Contents
Getting help . . . . . . . . . . . . . . . . . . . . . . . . . . . . . . . . . . . . . . . . . . . 11-1
Software help . . . . . . . . . . . . . . . . . . . . . . . . . . . . . . . . . . . . . . . . . . . . .11-1
Online services . . . . . . . . . . . . . . . . . . . . . . . . . . . . . . . . . . . . . . . . . . . .11-1
Faxed information . . . . . . . . . . . . . . . . . . . . . . . . . . . . . . . . . . . . . . . . .11-1
Customer support . . . . . . . . . . . . . . . . . . . . . . . . . . . . . . . . . . . . . . . . . .11-2
Warranty and regulatory information
Warranty time period . . . . . . . . . . . . . . . . . . . . . . . . . . . . . . . . . . . . . . .W-1
Warranty repair coverage . . . . . . . . . . . . . . . . . . . . . . . . . . . . . . . . . . . .W-1
Limitations . . . . . . . . . . . . . . . . . . . . . . . . . . . . . . . . . . . . . . . . . . . . . . .W-2
Application support . . . . . . . . . . . . . . . . . . . . . . . . . . . . . . . . . . . . . . . .W-3
How to obtain service . . . . . . . . . . . . . . . . . . . . . . . . . . . . . . . . . . . . . . .W-3
Regulatory information . . . . . . . . . . . . . . . . . . . . . . . . . . . . . . . . . . . . .W-4
v
Page 8

Page 9

1
1Getting started
Introduction
The KODAK DC265 Zoom Digital Camera takes great pictures without using
film. Here are some of the things that you can do:
✔ take pictures and immediately view them on the color camera display,
your TV, or your computer
✔ take burst (quickly in succession) and time-lapse (a series of shots over an
extended period of time) pictures
✔ add sound to a picture
✔ organize your pictures in electronic photo albums on the camera
✔ transfer your pictures to your computer and then e-mail them to family
and friends
Camera features
1
Getting st arted
The camera features are:
✔ built-in flash with red-eye reduction
✔ an easy-to-use status display of camera settings
✔ removable and reusable memory card
✔ fast picture transfer to your USB-compatible computer
✔ a 3X zoom lens (38 to 115mm) to zoom in on subjects
✔ a mode dial to activate one of four functions:
Capture—takes, previews, and adjusts the exposure of pictures
Review—reviews, plays, or deletes pictures
Connect—lets the camera communicate with your computer
Info—displays information about the camera
1-1
Page 10

Software
Included with your camera is a CD containing software that will help you use
your digital pictures
✔ PC—KODAK DC265 Camera Properties Software allows you to set up
your digital camera through a graphical interface on your computer.
✔ PC—KODAK DC265 Zoom Camera Mounter Software allows you to
transfer pictures back and forth between your camera and your computer
✔ PC—KODAK DC265 Digital Access (TWAIN Acquire) Software allows
you to retrieve pictures from your camera and transfer them directly into
many popular programs on your computer
✔ PC—KODAK Picture Easy Software allows you to organize, enhance,
share, and print your digital pictures. For instructions see the publication
enclosed with your camera
✔ MACINTOSH—KODAK DC265 Digital Access Software (Plug-In
Acquire) allows you to use a
application to access your pictures
✔ MACINTOSH—DIGITA Desktop Acquire. For instructions, use the
online documentation
PC
PCMCIA-compatible card reader and a host
System requirements
✔ PC with 486/66MHz microprocessor or PENTIUM Processor
✔ 16 MB or more of RAM (WINDOWS 95 and WINDOWS 98), 32 MB
RAM (WINDOWS NT 4.0)
✔ 50 MB hard disk space available
✔ available serial port, IrDA connection, USB po rt, or PC MCIA card reader
(supporting hardware and software required)
✔ WINDOWS 95, WINDOWS 98, or WINDOWS NT 4.0
✔ USB requires WINDOWS 98 and supporting hardware
✔ IrDA requires WINDOWS 95 or WINDOWS 98 and supporting hardware
✔ CD-ROM drive
✔ 256 colors (thousands of colors recommended)
✔ System Administrator privileges to install on WINDOWS NT 4.0
1-2
Page 11

Installing software
1 Close all other software programs incl uding backgr ound applicatio ns and task
bar items.
2 Place the DC265 disc into your CD-ROM drive and follow the online
instructions.
If the installation does not automatically begin:
✔ Click Start and click Run.
The Run dialog box appears.
✔ T ype: D:\setup (or use the letter for the drive you have the DC265 disc in)
then click Ok.
3 Select the language you want to use.
The CD Browser menu appears.
4 Click INSTALL DC265 SOFTWARE.
5 Follow the instructions on your comp uter screen to complete the installation.
You are now ready to run the newly installed software. For more detailed
information on:
✔ KODAK DC265 Camera Properties Software, see Chapter 6
✔ KODAK DC265 Mounter Software, see Chapter 7
1
1
Getting st ar t ed
Getting started
✔ KODAK DC265 Digital Access (TWAIN Acquire) Software, see
Chapter 8
☞Instructions for other provided software are included in the camera
package or online.
MACINTOSH
System requirements
✔ APPLE POWER MACINTOSH, PowerPC-equipped POWERBOOK,
PowerPC-equipped MACINTOSH-compatible Computer, or iMac, and a
CD-ROM drive
✔ Display monitor with a minimum resolution of 640 by 400 (1024 by 768
preferred) and 8-bit color (16-bit or 24-bit preferred)
✔ 32MB free disk space
1-3
Page 12

✔ 32 MB random access memory (RAM)
✔ available serial port, USB port, or PCMCIA card reader (supporting hardware and
software required)
✔ MacOS 7.6 or later (USB requires MacOS 8.5 or later)
✔ ADOBE PHOTOSHOP version 4.0 or later, or ADOBE PHOTODELUXE
version 2.0 or later
Installing software
1 Close any applications that are running.
2 Place the software installation disc into the
CD-ROM drive.
3 Double-click the
The Install dialog box appears.
4 Select the KODAK DC265 Digital Access Software (Plug-In Acquire), the
DIGITA Desktop Acquire (Plug-In), or both.
5 Follow the on -screen instructions to complete the installation.
KODAK Plug-In Installer icon.
☞ In the select Folder dialog box, navigate to one of the following
application folders where you want to install the software:
✔ PHOTOSHOP 4.0 or later Plug-Ins folder Import/Export folder
✔ PHOTODELUXE version 2.0 Plug-Ins folder Acquire/Export folder
If you do not have
message notifies you that you need to install it. The APPLE
QUICKTIME version 3.0 installer is located on the installation disc.
6 When the software has been installed successfully, a message appears
prompting you to restart your computer. Click Restart.
Digital Access software is installed in the folder KODAK DC265 Acquire in
the selected folder. To also use Digital Access software with another
supported application, Option-click the KODAK DC265 Acquire folder and
then drag it to the Plug-ins folder for the application you want to use.
APPLE QUICKTIME installed on your system, a
You are now ready to run the newly installed software. For more detailed
information on Digital Access Software (Plug-In Acquire), see Chapter 9.
1-4
Page 13
2
2Your camera
This chapter presents an overview of the camera buttons, displays, and hardware
features.
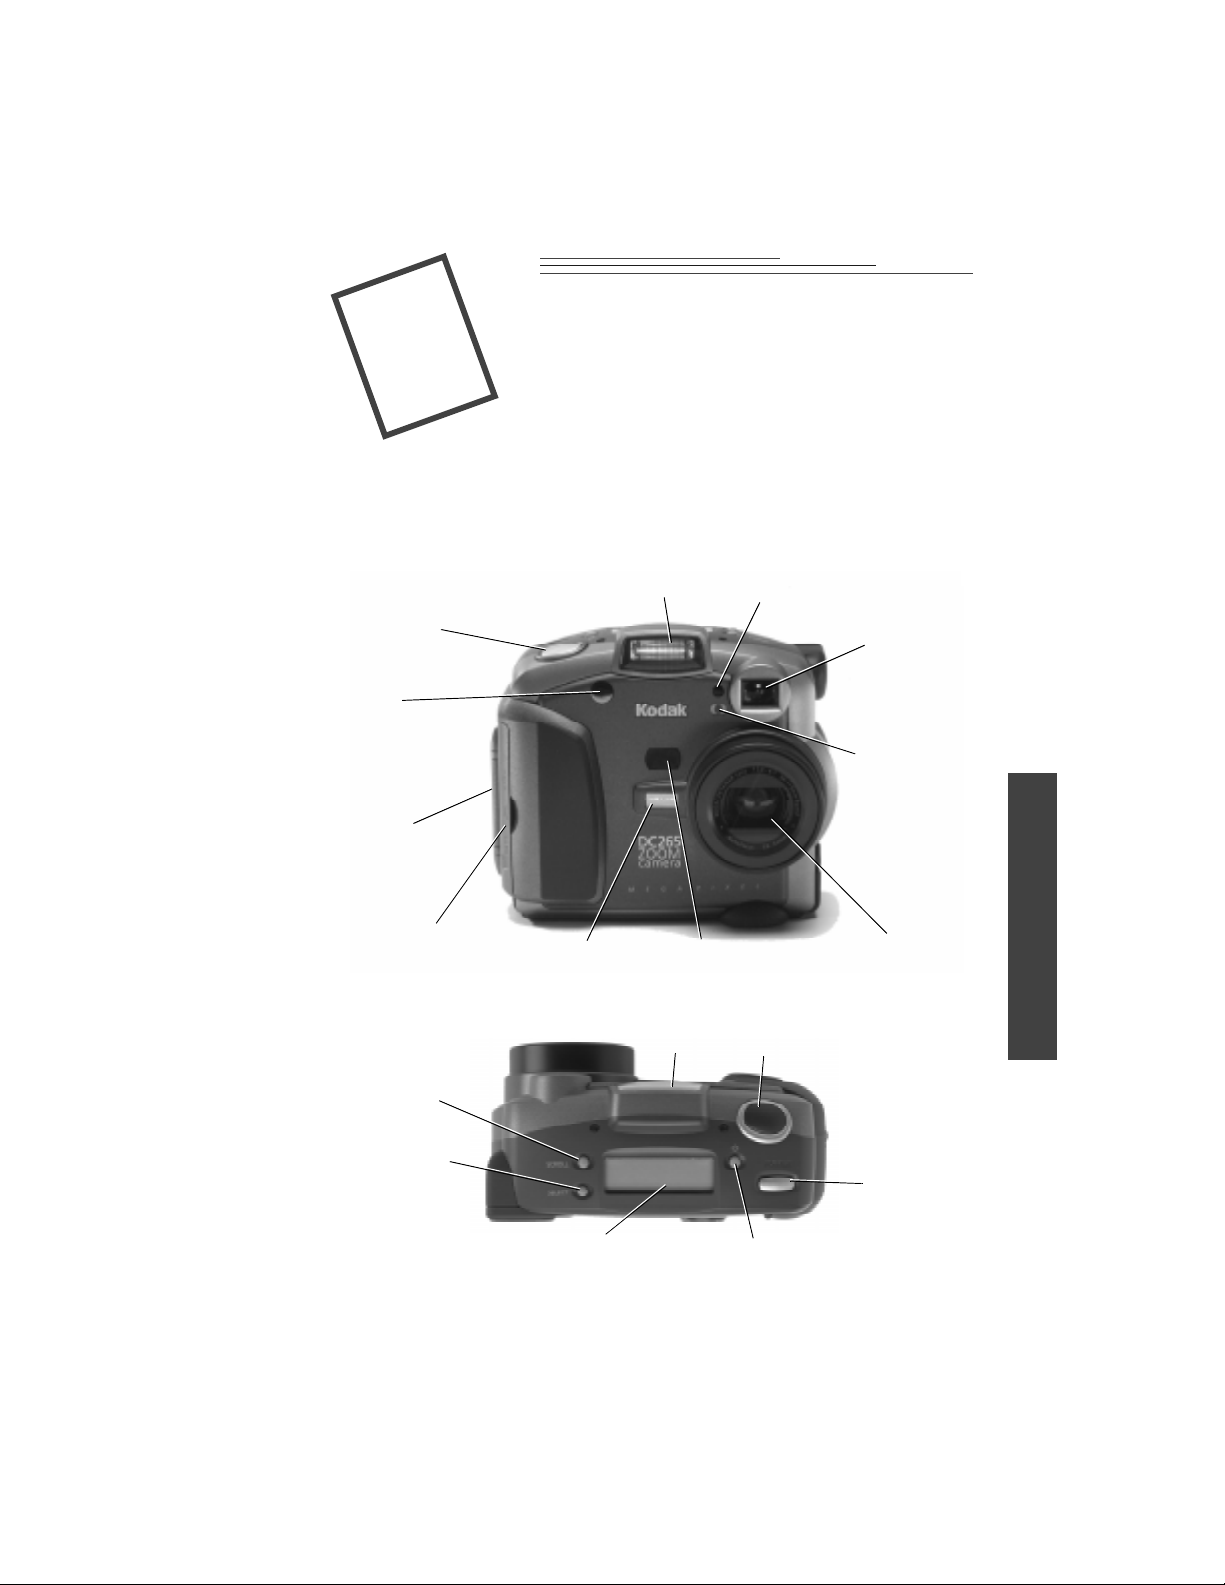
Four digital camera
Flash
Shutter
Self-timer
light
Battery door
Light sensor
Viewfinder
Flash sensor
2
Your camera
Memory card
door
Scroll
button
Select
button
Auto Focus
sensor
Status LCD
IrDA (Infrared)
transceiver (IR port)
Flash
Shutter
Self-timer
Lens
Power
2-1
Page 14
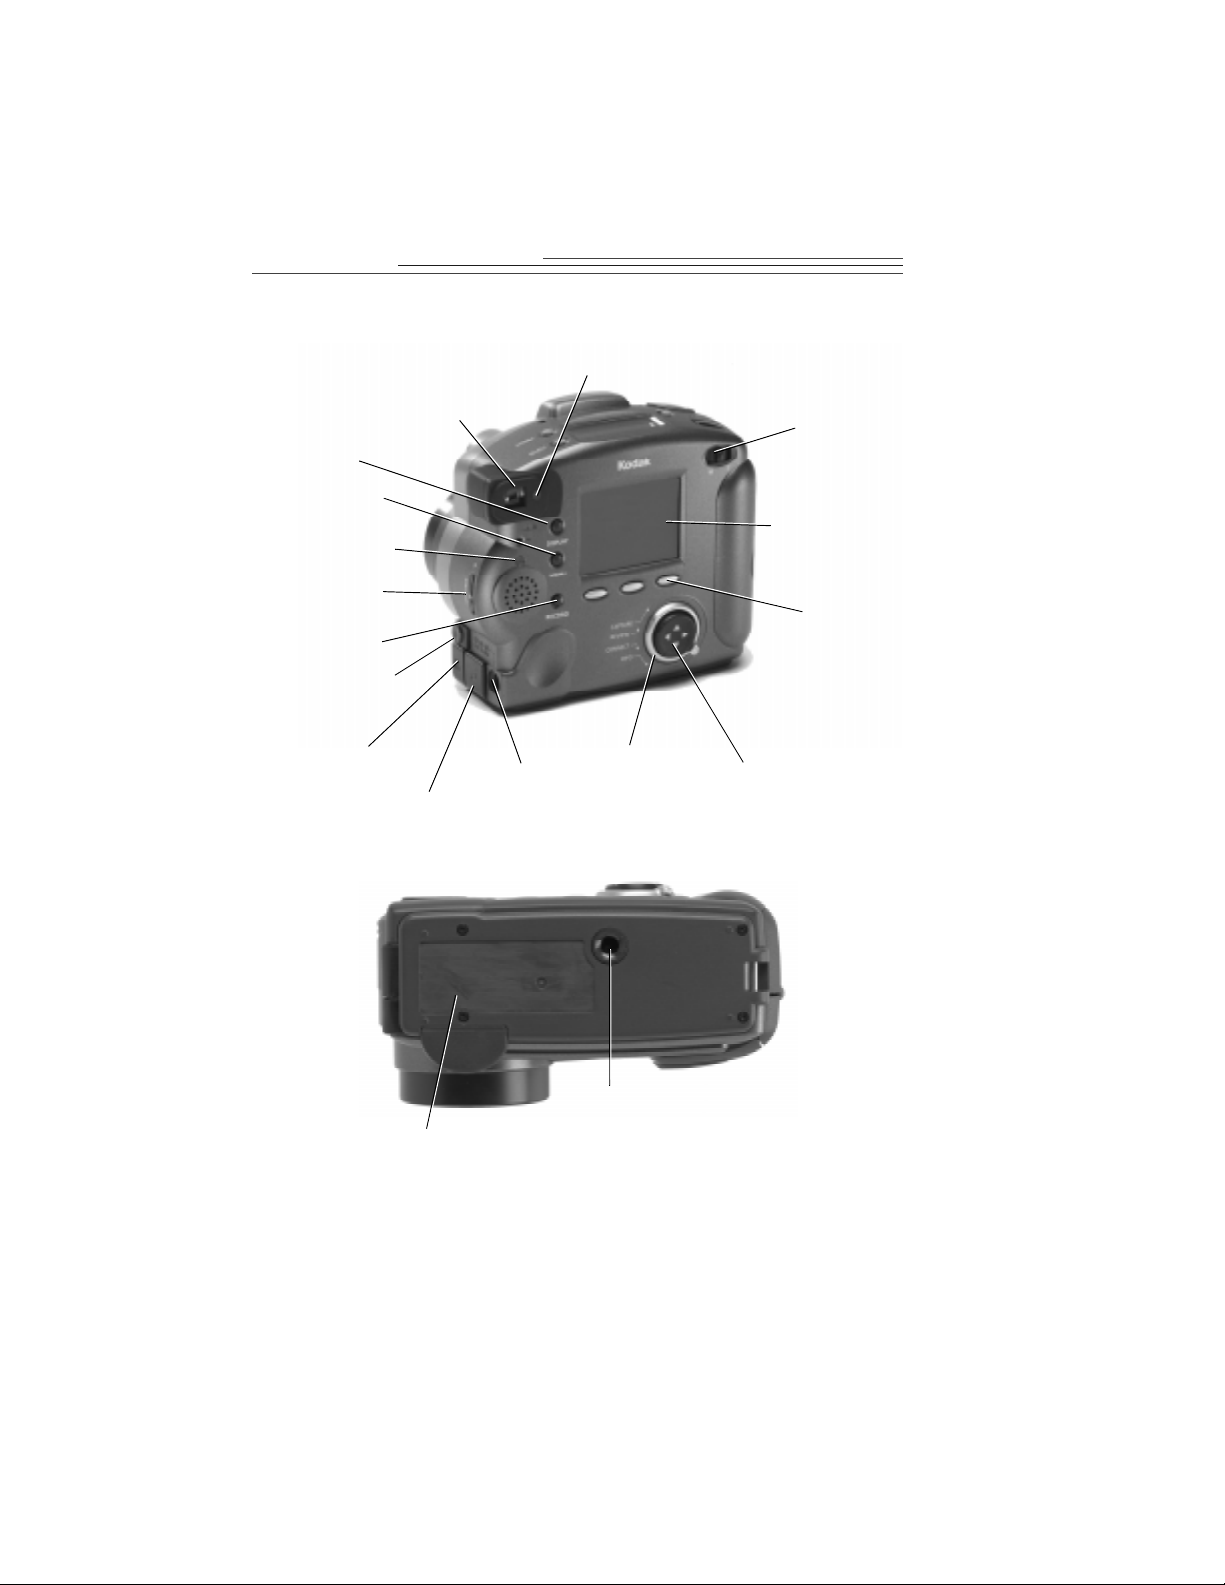
Ready light
Display button
Menu button
Audio LED
Audio volume
Audio Record
External flash
Video and
Audio Out
Viewfinder
Serial/USB
AC adapter
Mode dial
Zoom
Color
LCD screen
Softkeys
Four-way controller
2-2
Tripod socket
Product information
data plate
Page 15

Softkeys
Your camera has three “softkeys.” A softkey is a button whose function changes
according to what is displayed above it. For example, in the Capture mode, the
following screen can be displayed:
Softkeys
In this case, pressing the left softkey enters the Capture Preferences. When
presented with a different screen display, pressing this softkey can perform an
entirely different function.
2
Mode dial
The camera mode dial allows you to choose from four camera modes:
✔ Capture—to take beautiful digital pictures
✔ Review—to view, edit, and organize your pictures
✔ Connect—to connect your camera to your computer
✔ Info—to display information about your camera firmware
Four-way controller
The four-way controller up, down, left, and right arrows allow you to move
through the camera menus and icons, and to scroll through your pictures.
Your camera
2-3
Page 16
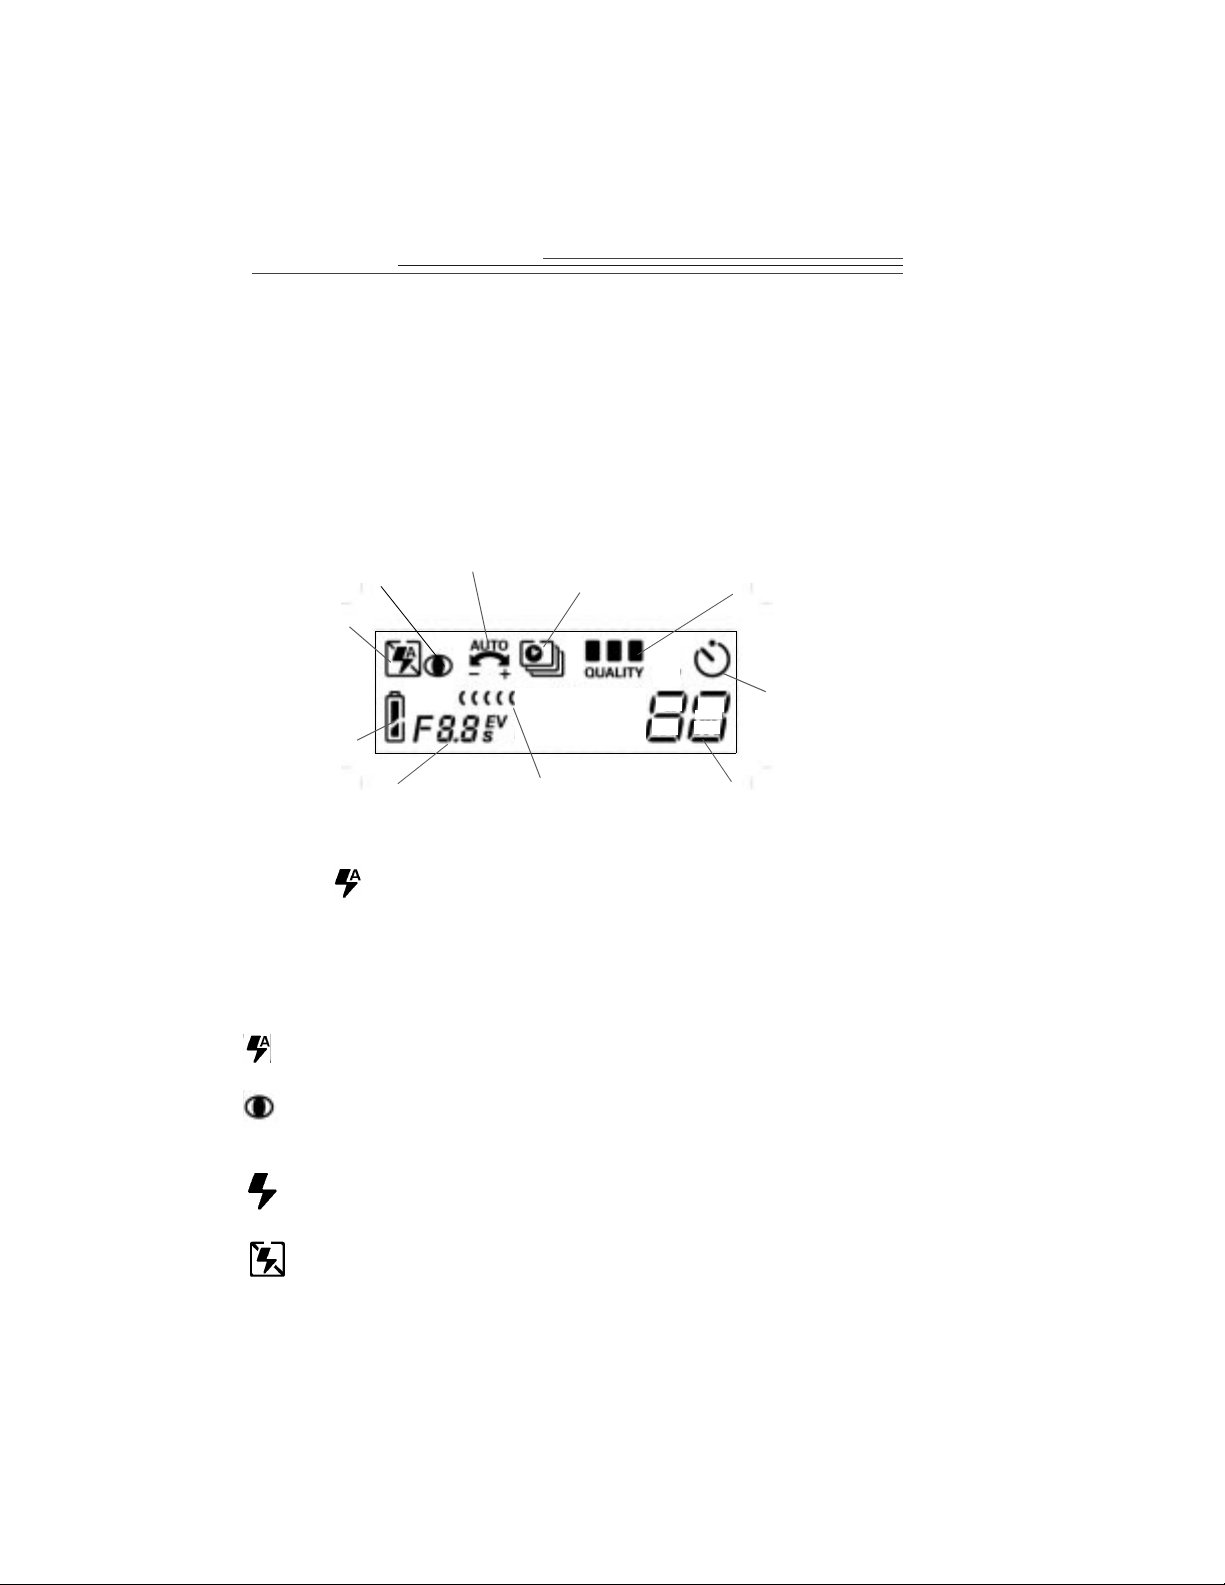
Your status LCD
A display on the top of the camera shows the current settings. The following
subsections briefly describe each entry . For in formation on how to d efine settings
through the Capture mode menus or the Scroll and Select buttons, refer to
Chapter 3.
☞ The camera must be turned on and in the Capture mode to view and in teract
with this display.
Red-eye
reduction
indicator
Flash
Battery
status
Manual mode
Exposure
compensation
IrDA (Infrared)
communication
Picture type
Quality
Pictures
remaining
Self-timer
Flash
Your camera is equipped with a built-in flash that offers a red-eye reduction
feature. The flash has an effective range of approximately 1.6 to 9.8 ft
(0.68 to 3 m). There are four Flash settings:
Auto—fires the flash automatically when you press the Shutter button and
the camera determines that there is not enough light .
Red-eye—determines that there is not enough light , and fires the flash once
when you press the Shutter button to reduce the chance of red eye, and then
flashes a second time 600 milliseconds later when the picture is tak e n.
Fill—fires the flash every time you press the Shutter button. Use this
setting when the lighting is poor or when y our subject is lit from behind.
Off—turns off the flash. The next time you turn the camera on, the camera
defaults to the Auto flash setting.
2-4
Page 17

Exposure compensation
☞ In very large rooms, under low light, you may achieve better results by
turning the flash off entirely, or by utilizing the flash sync capability with an
external flash unit.
While in Capture mode, the camera exposure can be adjusted from -2.0 to +2.0
exposure value (EV) in 0.5 EV increments.
If your pictures are:
✔ correctly exposed—maintain the AUTO default setting, which will
automatically choose the correct exposure for the lighting conditions.
✔ too dark—increase (+) the exposure compensation setting.
✔ too light—decrease (-) the exposure compensation setting.
Picture type
The Picture Type icon changes to indicate the type of picture you are taking.
There are three picture types:
Still—(the default) takes a single still picture. Whenever you turn the
camera on, this is the selected picture type.
Burst—takes a series of pictures in quick succession.
Time-lapse—takes a series of pictures with a time delay between
each picture. You can set the time delay through the Picture Type
screen.
☞ Refer to Chapter 6, “Setting camera properties” for mo re in form ation abou t
each picture type and their settings.
2-5
2
Your camera
Page 18

Quality
You can set your camera to take pictures with a Good, Bett er, or Best Quality
setting. The Quality setting indicates how much the picture is compressed to save
space on the memory card. For advanced users, a Super quality is also available.
When taking pictures, you can switch freely among the three se ttings. The
number of pictures the camera is able to store will vary accordingly. The quality
and resolutions settings combine to dictate how many pictures you can store on
your memory card remaining space.
The three quality settings are:
Best—which should be used when imag e qua lity is very important
especially for larger sized prints.
Better—which should be used for standard quality picture taking and
to store a large number of pictures.
Good—which should be used to store the greatest number of pictures
on the memory card and for images you plan to use online.
☞ To get even more pictures on a memory card, consider setting a lower
resolution (number of pixels), see page 6-6.
For advanced users who require a Super quality , refer to “Script settings” on
page 3-14.
2-6
Page 19

Understanding quality a nd reso luti on
Keep in mind that with your camera you’re generally going to get beautiful
digital pictures. But based on two factors, resolution and compression, some
pictures will be of a higher quality than others.
Instead of film, the camera places your pictures on a memory card. These
pictures are made up of pixels. The more pixels you have (or the better the
resolution) the more space you use on the memory card.
To save space, you can compress each picture. When a picture is compressed,
some color and detail information is discarded. More compression means a lower
quality picture. Less compression means a better quality picture.
T ogether, compression (or quality) and resolution dictate how many pictures you
can fit on your memory card.
✔ If the quality of your pictures is most important, use the Best qu a lity
setting, which results in little compres sion, and high resolution. You may
want to do this if you are printing your pictures on a high-quality printer.
✔ If space on your memory card is most important, use the Good or Better
quality setting (which results in more compression ) and standard
resolution. You may want to do this if you are using your pictures in a
Web page.
Remember that resolution and quality are two different things. Resolution is the
number of pixels in the picture. Quality is how much you com press them.
2
Your camera
Self-timer
Activating the Self-timer option creates a 10-second delay between the time you
press the Shutter button and when the picture is taken. This allows enough time
for you to include yourself in the picture.
2-7
Page 20

Batteries
The battery power icon changes automatically. It is a display-only icon, you
cannot select or change it.
Full—indicates the batteries are fully charged.
Low—indicates the batteries need to be replaced.
Blinking—indicates the batteries are insufficient to run th e camera and
need to be replaced.
☞ Battery life is rapidly reduced when Preview or Review modes are in use.
Pictures stored on the memory card are not lost if the b atteries are d epleted.
Your camera uses four AA batteries for power. For your convenience, two sets of
batteries are included with your camera; four alkaline batteries, and four Ni-MH
rechargeable batteries with a battery charger. The alkaline batteries are provided
so you can start using your camera immediately. The rechargeable batteries need
to be charged before using them in the camera. Although both types of batteries
work in your camera, do not mix different types of batteries in the camera.
Pictures remaining
The Pictures Remaining icon changes automatically to in dicate the remaining
number of pictures that can be stored at the current quality and resolution setting.
This is a display-only icon. You cannot select or change it.
The pictures remaining number does not always change when a picture is taken if
the picture content is easily compressed.
When the card memory is full, the status display indicates Full. You must delete
existing pictures or change the memory card to take additional pictures. For more
information on how to delete pictures, refer to “Deleting pictures” on page 4-15.
2-8
Page 21

Manual mode
The camera supports two advanced Capture modes, the external flash and the
long-time modes.
External flash mode—disables the built-in flash and uses the external
flash sync to provide flash. You can set the camera aperture setting
(or f/stop). The default aperture setting is 5.6.
Long-time mode—disables the flash since a long exposure time is
necessary to obtain a proper exposure within the current ambient
lighting environment. You set the exposure time between 0.5 and 16
seconds in 0.5-second increments.
IrDA (Infrared) communication
In a camera-to-camera connection in the Review mode, two cameras can
communicate with each other through an IrDA connection. The IrDA
Communication icon appears and changes to indicate the state of the
communication with its IrDA partner camera.
2
Blinking
Blinking
Initiating communication—indicates IrDA communication has been
initiated.
Searching for communication partner—indicates the camera is
looking for an IrDA communicatio n partner.
Communicating—indicates the camera is communicating with its
IrDA partner. The alph anumeric display also indicates the number of
pictures that have yet to be transmitted.
Communication timed out—indicates a problem has occurred that
caused the communication to time-out. The icon continues to blink
until you respond to the LCD dialog or turn off the camera.
2-9
Your camera
Page 22

Removable memory card
The DC265 camera uses a removable memory card, also referred to as a
CompactFlash or KODAK Picture card, for storing your pictures. You can erase
the picture data on the card and then reuse it. To reformat a memory card, see
“Format card preferences” on page 4-6.
The removable memory card contains no m ovi n g parts . It s to res in for mat i on an d
retains it when the card is removed from your camera or until you either delete it
or reformat the card. Normal magnetic interference and airport x-rays do not
harm the stored information.
☞ The KODAK Picture Card is furnished with your camera. Additional
removable memory cards can be obtained from a variety of sources. Visit
http://www.kodak.com/go/accessories for ordering directly from Kodak, or
visit the retail store where you purchased your camera. Any standard
CompactFlash card that is “CF” certified will function properly.
2-10
Page 23

Removing and inserting the me mory card
Although your camera can’t take pictures without the memory card, you can
remove the card to use in another camera or to place in your computer.
To remove the memory card:
1 Open the memory card door.
2 Flip the memory card Release button so it
protrudes out from the side of the camera.
WAR NING: Do not press the Release button if
the red LED under the button is on
or blinking. Ejecting the card
while this LED is on can result in
the loss of all data on the card.
3 Press Release to release the memory card from
the camera.
4 Pull the memory card out of the camera.
To insert the memory card:
1 Open the memory card door.
2 Insert the memory card so that the:
✔ pin-connector edge of the card enters the camera first
✔ small lip on the memory card is toward the front of the camera
3 Close the door.
☞ For a more information on the memory card, refer to “Placing the
memory card in your computer” on page 7-8.
2
Your camera
2-11
Page 24

Power management
Y ou can use batteries or an AC adapter to power your camera. To conserve power
usage, the camera has a sleep mode.
Sleep mode
After a specified period of inactivity , the camera enters sleep mode b y turning the
color LCD off. You use the Capture Preferences menu to set the amount of time
before entering sleep mode. Refer to setting the Sleep Time-out preference on
page 3-11. After 10 minutes of inactivity, the camera turns itself off.
To reactivate your camera from the sleep mode:
✔ In the Review mode, press Display.
✔ In the Capture mode, use the Zoom or Shutter as you normally would to
take a picture.
Using the AC adapter
The AC adapter, which is an optional accessory, allows you to connect your
camera to a standard electrical outlet. This is especially useful when you are
transferring pictures to your computer or using video out mode. The adapter
powers the camera, but does not charge the batteries.
WARNING: Only use the AC adapter designed for the camera. Use of any
other adapter can void the warranty and can cause camera
failure, fire, electric shock, or injury.
1 Insert the AC adapter into the AC power adapter
connection on the side of your camera.
2 Connect the other end of the adapter into a power
outlet.
3 Tu rn on the camera.
☞ The Battery icon does not appear on the Status
Display when an AC adapter is used.
2-12
Page 25

Using the battery charger
To ensure that you have a constant supply of freshly charged batteries, a battery
charger and four AA Ni-MH rechargeable batteries are provided with some
cameras. These batteries need to be charged before using and take up to eight
hours to fully charge. So you are always p repar ed to take pictures, it is g ood idea
to have one set of rechargeable batteries in the camera, and an extra set charged,
ready for use. You can purchase additional KODAK Ni-MH Rechargeable
Batteries as an accessory . For details about available accessories, ask your Kodak
dealer, or visit our Website at http://www.kodak.com/go/accessories.
1 V erify that you are loading NiMH rechargeable
batteries. If they are any ot her type, do not lo ad
them into the charger.
This charger is for charging NiCd or NiMH
batteries only, with a maximum of 4 cells, and
a maximum charge of 1450mAH.
Do not attempt to charge nonrechargeable
batteries.
2 Align the positive and nega tive ends of the
batteries with the positive and negative contact
points in the charger, respectively.
3 Insert the batteries into the charger until the
batteries snap in place.
2
Your camera
4 Plug the charger into a power outlet.
Depending on where you live, some battery
chargers are supplied with power plugs that
are not at tached to the ch ar ger. If you have that
type of char g e r, use the plug that ma tches your
power outlet.
5 V er ify that the charge indicator lights on the
charger turns on. If the lights do not turn on,
verify that the batteries are inserted correctly.
Batteries are fully charged when the charge
indicator lights on the charger turn off, or after
8 hours of charging.
6 Unplug the charger and remove the batteries
when charging is complete.
2-13
Page 26

Using your batteries
✔ Kodak recommends KODAK Photolife AA Alkaline Batteries, or
KODAK Photolife AA Ni-MH Rechargeable Batteries for use in the
DC265 camera.
✔ Remove the batteries when the camera is stored for extended periods
of time.
✔ Always follow your battery manufacturer’s directions fully. Do not
attempt to disassemble, short circuit, or subject the battery to high
temperature or fire.
✔ Your camera has been designed to operate correctly using a variety of
AA-size batteries currently available. These include 1.5-volt alkaline and
rechargeable 1.2-volt Nickel Metal Hydride (Ni-MH).
✔ Replace all batteries of a set at the same time. New batteries should not be
mixed with used ones. Do not mix rechargeable and nonrechargeable
batteries. Do not mix alkaline or Ni-MH ty pes of batteries. Do not mix
different grades or brands of batteries. Failure to observe this precaution
may result in some batteries in a set being driven beyond their normal
exhaust point and increase their possibility of leak age.
✔ NOT ALL BATTERIES ARE CREATED EQUAL! Battery life depends
significantly on age, usage conditions, type, brand, and camera. Digital
camera requirements are very demanding on batteries. Not all batteries
perform well under these challenging conditions. In Kodak lab tests, NiMH rechargeable batteries delivered the best results in a variety of
conditions. Ni-MH batteries are designed for high-demand devices, such
as digital cameras, and do not exhibit the “memory” effects seen with
other rechargeable technologies.
✔ If you elect to use alkaline batteries in your camera, you will obtain better
performance from “photo-flash grade” alkaline batteries, such as
KODAK PHOTOLIFE Alkaline Batteries. These types of batteries last
more than twice as long in digital cameras as ordinary alkalin e batteries.
Alkaline batteries are not rechargeable, do not attempt to recharge th em in
the battery charger.
✔ When using your camera on battery power, we recommend you limit
continuous LCD Previ ew or Review t o less than 20 -minutes per session. If
you are using the camera for longer periods, it is recommended that you
do so with the camera powered by the AC adapter.
2-14
Page 27

✔ When disposing of batteries, follow the manufacturer’s instructions.
Battery Charger Tips
Kodak suggests customers take advantage of any community battery
recycling programs that may exist in your area. Contact your local waste
remover or recycler for details.
Caution Hot Surface
✔ When removing batteries, allow to cool before touching, since the
batteries may be hot.
For charging Ni-Cd or Ni-MH batteries only, with a maximum
of 4 cells, and a maximum charge of 1450mAH.
2
Your camera
Do not charge nonrechargeable batteries.
Endast för att ladda Ni-Cd eller Ni-MH batterier, med maximalt
4 celler och en maximal laddning av 1450mAH.
Återladda inte batterier som inte är laddningsbara.
2-15
Page 28

Installing the batteries
1 Open the battery door.
2 Slide the inside battery cover toward the back of
the camera and then lift it away from the
camera.
3 Insert the batteries as indicated on the battery
cover.
4 Close and lock the inside battery cover and
close the battery door.
Remove the batteries if the camera will not be used for an extended period of
time. This will extend the battery life and prevent camera damage from battery
leaks or corrosion. If the batteries are removed from the camera for more than a
few days, the date and time will be deleted and must be reset.
WARNING: When using batteries, limit the continuous operation of the color
LCD for previewing pictures to less than 20 minutes. This is
particularly true with Lithium batteries. Previewing pictur es
requires a significant electrical current, which over time could
cause your batteries to heat up sig nificantly. Should your camera
become too hot inside, it is designed with protective circuitry to
turn itself off. You should allow sufficient time for the camera to
cool before turning it on again. Consider using an AC adapter
when using Preview mode for extended periods.
2-16
Always follow your battery manufacturer directions fully.
Page 29

3
3Taking pictures
This chapter provides information to help you take great pictures. Y ou can simply
turn on the camera, position the Mode dial to Capture, and start taking pictures.
However, you may want to change some of the default settings. This chapter also
provides the instructions for defining these settings.
Tu rning th e camera on or off
Ready light
1 Press Power to turn on the camera.
The green Ready light on the back of the
camera blinks for approximately 6 seconds
until the camera is ready to take pictures.
2 Press Power and hold for at least one full
second to turn off the camera.
This built-in delay prevents accidentally
turning off the camera.
If the camera is turned off while a picture is
being processed, the camera retracts the
lens immediately and finishes processing
the picture before turning off. Your camera
automatically turns off if it is idle fo r the
time period you set in the Camera
Properties Time-out Settings, see page 6-3.
3
Taking pictures
3-1
Page 30
Setting the camera to Capture mode
Turn the Mode dial to Capture.
The lens extends to the default picture-taking
position.
☞ You cannot take pictures without a
memory card in the camera. If you enter
the Capture mode without a memory card
in the camera, the status LCD flashes the
message “NO CARD.”
If the camera goes into sleep mode to
conserve power, the word “CARD”
remains on the status LCD.
To use the default settings and begin taking pictures, refer to “Taking pictures”
on page 3-18.
3-2
Page 31

Defining the settings
You can use the default settings or you can define settings using the Capture
mode menus and the Scroll and Select buttons on the top of the camera. Capture
mode settings affect only future pictures, they cannot be used to alter pictures you
have already taken.
Defining settings using the Capture mode menus
The Capture mode preferences are divided into the following categories:
Picture Type
Album
White Balance
Watermark
Advanced Exposure Modes
Advanced Focus Mode
Preferences
Scripts
☞ The script icon appears only when a script is present on
your current memory card. It is possible for multiple
script icons to appear.
3-3
3
3
Taking pictures
Page 32

Displaying Capture mode settings
As a first step in adjusting the Capture mode settings through the menus, you
need to display the Capture mode settings screen on the color LCD:
1 Press the Menu button.
The Capture mode settings screen appears
Menu button
with the Picture Type icon selected.
2 Press to highlight the icon
representing the settings to adjust.
Some icons do not appear on the initial
screen.
3 Adjust the appropr iate s etting s. Refe r to the
following subsections for information
about each setting.
4 When you are satisfied with all your
settings, press Done.
/
☞ The following subsections assume that you have turned on the camera,
entered the Capture mode, and pressed Menu to display the Capture mode
settings on the color LCD.
3-4
Page 33

Picture type settings
There are three picture type settings which allow yo u to select the typ e of pictur e
and then define the picture characteristics, including resolution.
✔ Still pictures are your normal digital photographs.
✔ Burst pictures are a series of photographs taken in quick succession.
☞In Burst m ode, medium and standard resolutions can appear less
sharp than in a still picture mode.
✔ Time-lapse pictures are a series of photographs taken with a time delay
between each picture.
1 Press to highlight the type of picture
you want to select and define.
A checkmark appears to indicate the
selected picture type
2 Press Enter.
The settings for the picture type appear.
3 Highlight the particular setting you want to
specify .
4 Press
for each setting.
to scroll through the options
/
☞ More informatio n about Picture type
settings can be found on page 6-6.
3-5
3
3
Taking pictures
Page 34

Album settings
Album settings let you specify the album in which pictures will be stored on the
camera memory card. All future pictures are stored in the selected album un til
you change the setting or turn the camera off.
1 Press to select one of the following:
✔ No Album—does not store your
pictures in an album.
✔ New Album—allows you to create a
new album. The New Album Name
screen appears. Press to select a
character. Press to add the selected
character to the name. Add additional
characters until you have spelled the
name you want using a maximum of 8
characters. When you are satisfied with
the name, press Done to return to the
Album Settings screen.
/
✔ An existing album name—stores your
pictures in the album you select.
2 Press Select, then Done.
3-6
☞ To remove an album, highlight it and
then press Dissolve. The album is
removed, but its pictures are retained
outside the album.
When you turn the camera off, the
setting returns to No Album.
Page 35

White balance settings
White balance adjusts the color balance to remove the color cast that th e current
lighting conditions add.
1 Press to highlight the type of white
balance you want to use.
✔ Automatic—takes pictures under a
variety of lighting conditions. This is
the default.
✔ Daylight—takes pictures outdoors.
✔ Fluorescent—takes pictures under
fluorescent light.
✔ Tungsten—t akes pi ct ur es u nder normal
incandescent light.
✔ Off—applies no white balance
adjustment.
2 Press Select.
3-7
3
3
Taking pictures
Page 36

Watermark settings
Watermark settings allow you to place a date, time, text, or logo watermark on
the pictures you take. Watermarks will only appear on future pictures, and you
can see them on pictures in the Review mode when the full resolution picture
appears. You cannot see watermarks on thumbnail pictures.
1 Press to select the type of watermark
you want.
2 Press Select.
✔ None—no watermark appears.
✔ Date and Time—the Date & Time
Stamp screen appears. You can specify
to use the date, the time, or both.
✔ Text—the Text Stamp screen appears.
Select the text stamp and then Edit to
change the text.
✔ Logo—the Logo Stamp screen a ppear s.
Select the logo stamp and press Edit to
change the logo. If a file (.lgo) exceeds
512 KB, it does not appear as an option
on the Logo Stamp screen.
3-8
3 Press to set each of the fields:
/
✔ Left offset—the distance in from the
left side of the color LCD to place the
watermark.
✔ T op of fset—the di stance down fr om the
top of the LCD to place the watermark.
✔ Transparency—the level of
transparency for the watermark.
✔ Text color—the color of the text in the
watermark.
✔ Background color—the color of the
watermark background.
4 When you are satisfied with the settings,
press Done.
Page 37

Advanced exposure modes settings
The Advanced Exposure Mod e s set ti ngs all ow y ou to select one of the following
modes:
✔ Programmed AE—uses the programmed automatic exposure setting
which selects the appropriate flash and aperture settin g. This is the
default.
✔ Long-Time Exposure—the flash is disabled as it is assumed that the long-
time exposure is necessary to obtain a proper exposure within the current
ambient lighting environment. You set the exposure time between 0.5 and
16 seconds in 0.5 second increments.
✔ External Flash—disables the flash and uses the external flash sync to
provide the flash. You can set the camera aperture (or f/stop). The default
aperture setting is 5.6.
To select an Advanced Exposure mode:
1 Press to cho ose the exposure mode you
want to use.
2 Press Select.
✔ Programmed AE—the programmed
automatic exposure setting is used. This
is the default.
✔ External Flash—the External Flash
Setup screen appears. Press
the aperture.
/
✔ Long-Time Exposure—the Long-Time
Setup screen appears. Press
the exposure time.
3 Press Done.
If you set a new aperture or exposure time,
it appears on the status LCD on top of the
camera.
/
to set
to set
3-9
3
3
Taking pictures
Page 38

Advanced focus mode settings
The Advanced Focus Mode settings allow you to select one of the following:
✔ Multi-Spot Auto Focus
✔ Single-Spot Auto Focus
✔ Manual Focus
To select the focus mode:
1 Press to choose the focus mode you
want to use.
2 Press Select.
✔ Multi-Spot Auto Focus—the camera
uses a multi-spot focus algorithm which
determines the focus position using
three positions in the field of view.
✔ Single-Spot Auto Focus—the camera
uses a single-spot focus algorithm
which determines the focus position
using the subject in the center of the
field of view.
✔ Manual Focus—the Manual Focus
Setup screen appears which allows you
to specify the focus position. Press
to set the focus distance.
/
3 Press Done.
3-10
Page 39

Preferences settings
The Preferences settings are Capture, Date and Time, and Camera Name.
Capture
1 Press to select the particular setting you
want to change.
✔ File Type—the format in which the
pictures are saved, either FlashPix
(FPX) or JPEG (JPG).
✔ Quickview—displays the picture just
taken for a duration of 0.5 - 30 seconds.
✔ Auto Rotate—rotates pictures
automatically in response to a sensor
that determines the orientation of the
camera and rotates pictures to a vertical
plane. If you are above the subject with
the lens perpendicular to the floor the
Auto Rotate should be Off.
✔ System sounds—plays shutter sounds
when a picture is taken and alert sounds
when an error occurs.
✔ Sleep Time-out—the number of
minutes the camera sits inactive with
the color LCD on before it goes into a
power conservation mode. In the sleep
mode, the color LCD turns off, the
Status Display on the top of the camera
remains on, and you can take a picture.
2 Press to change each setting.
3 When you are satisfied with the settings,
press Done.
/
3
3
Taking pictures
☞ Pressing Default res tores the default
Capture Preference values.
3-11
Page 40

Date and time
1 Press Format.
The Date and Time Format screen appears.
2 Press to select the date and time format
you want to use.
3 Press Select.
The Date and Time screen appears again.
3-12
4 Press to select a value for the
highlighted field.
5 Press to move from one field to
another.
6 When you are satisfied with the settings,
press Done.
/
/
Page 41

Camera name
When you name your camera, the name is included in the header of each
picture file.
To name your camera:
1 Press the left softkey to select the type of
character set you want to choose from:
✔ capital letters
✔ lower case letters
✔ numbers
✔ symbols
2 Press to select a character.
3 Press to add the selected character to the
name.
4 Add additional characters until you have
spelled the name you want using a
maximum of 32 characters. Press to
backspace and press the center softkey to
add a space to the name.
5 When you are satisfied with the name,
press Done.
/
3
3
Taking pictures
3-13
Page 42

Script settings
Scripts are electronic files on the camera memory card that automate routine
camera operations and extend camera functions. When a memory card containing
a script is placed in your camera, the script appears as an option in either the
Capture or Review modes. The Scripts option is not displayed unless a script is
on the memory card.
There are several sample script files available either preloaded on the memory
card or on the CD-ROM that comes with your camera. Scripts on the CD-ROM
are located in the Extras/English/Camera Scripts directory. Additional scripts and
information can be found at www.kodak.com/go/dc265. The DC265 camera
supports DIGITA Scripts.
If you’re familiar with spreadsheet macro language or software programming,
you’ll find scripts eas y t o writ e. You can create your own scrip ts us i ng th e Script
Developer Kit that is available from the Kodak Developer Relations Group at
www.kodak.com/go/drg.
Also, for advanced users, the Super quality setting is available using a script
located on the memory card and the Kodak software CD.
To load scripts onto a picture memory card:
Scripts must be loaded into the System folder of your memory card to be
accessible. You should copy the scripts to all the cards you plan to use in the
DC265 camera.
WARNING: If you reformat a card, everyth ing is deleted, including th e scripts
and protected pictures.
To load scripts for:
✔ WINDOWS users—use a KODAK Mounter Software to drag and drop, or
use the card reader
✔ MACINTOSH—use a card reader to copy scripts
The following is an example of a script included on the CD:
Name Filename Purpose
Exposure Bracket EXPBRCK.CSM Prompts you to take 3 captures of the same
subject at different exposure values to get the
best picture under difficult lighting conditions.
3-14
Page 43

Choosing a script on the camera
1 Press to choose the script you want to
execute.
2 Press Start.
Any steps that follow depend on the chosen
script. The chosen script can begi n runni ng
or a screen containing subscripts can
appear.
3 Stop an active script by pressing Exit.
☞ When you let the script run to
completion or abort the scri pt by
pressing Stop Script or Exit, the
camera is reset to the original settings.
3-15
3
3
Taking pictures
Page 44

Setting your camera for Super quality
There are several important things to remember:
✔ The Super quality setting only appears in the script menu if it resides on
the memory card that is currently in the camera.
✔ You can only set your camera for Super quality through the Scripts menu.
The status LCD quality settings are Good, Better, and Best.
✔ Setting your camera to Super quality sign ificantly reduces the amount of
memory on your card and is recommended for advanced users only.
✔ Once set, the Super quality mode persists for all pictures until changed,
even after the camera is turned off and on.
✔ The status LCD quality setting does not display the Super qu ality mode.
To determine if you are in the Super quality mode, you must check it
through the Scripts menu.
To set your camera to Super quality:
1 With the Mode dial set to Capture, press
Menu.
2 Press
highlighted.
3 Press until a script is highlighted.
4 Select Super Quality Mode.
5 Highlight On and press Select.
A checkmark appears next to the selection
and a confirmation screen indicates the
changed quality level.
until the Kodak Script menu is
☞ If you press Stop Script, the quality
level reverts to the previous setting.
6 Press Exit from the confirmation screen.
To exit the Super quality mode:
✔ Select Good, Better, or Best from the status LCD display, or
✔ use the Super Quality Mode script to deselect the Super quality option.
3-16
Page 45

Defining settings using the Scroll and Select buttons
It’s likely that you’ll change these settings much more often than the settings that
you define through the settings menus. The settings can change from picture to
picture depending on the conditions that exist at th e time.
☞ You must be in the Capture mode to change these settings.
Setting flash, exposure, picture type, and quality
To change the Flash, Exposure, Picture Type, and Quality Capture mode
settings:
1 Press Scroll to scro ll through the first four
functions on the Status display: Flash,
Exposure, Picture Type, and Quality.
2 When the function you want to change is
flashing, press Select to toggle through the
choices for the active function.
The new selection takes affect if you press
Scroll agai n to move to anot her funct ion or
if you do not press a button for 5 seconds.
Setting the self-timer
Press Timer once to activate the self-timer.
The self-timer is deactivated after the picture is
taken.
3-17
3
3
Taking pictures
Page 46

Taking pictures
Taking any kind of picture, still, burst, or time-lapse is basically the same. The
only difference is the amount of time you hold down the Shutter button. For the
fastest response when tak in g a pict ur e, p ress an d hold the Shutter button halfway
down until the green Ready light illumin a tes. Then, press the Shutter button the
rest of the way. You do not need to hold the camera still while the green Ready
light is blinking. You are not able to take another picture until it stops blinking.
To take a picture:
1 Place the subject in the viewfinder.
☞ To view the subject in the color LCD
as well as the viewfinder, press
Display.
2 Press the Shutter button.
If you have the Quickview setting turned
on, the camera displays the picture on the
color LCD and saves it to the memory card.
✔ For still pictures, press and release the Shutter button.
✔ For burst pictures, hold do wn the Shutter button for as long as you want
the camera to fire.
The camera stops firing when the available memory is used or when you
release the Shutter button. The resolution and quality of your pictures,
set in the burst picture settings, dictate how quickly the memory is
consumed. Refer to page 3-5 for mo re information.
✔ For time-lapse pictures, press and release the Shutter button.
The camera fires at the interval set in the time-lapse picture settings. It
continues to fire until you press the Shutter button again, press Stop, or
until the maximum number of pictures, set in the time-lapse picture
settings, is taken. Refer to page 3-5 for more information. If you set a
long interval between time-lapse pictures, the camera appears to turn
itself off to save batteries. It turns itself back on to take the next picture.
☞If you are taking burst or time-lapse pictures, the color LCD
displays the picture after the last picture in the series is taken. You
can only record sound when the picture sequence is complete and
the last picture is displayed.
3-18
Page 47

Viewing the memory gauge
In the Capture mode, the Overlay bar displays a memory gauge that gives the
status of working memory (DRAM) and memory on the memory card.
Memory card
Working memory
Working memory is the memory the camera uses to process pictures. The
working memory gauge fluctuates as the camera processes pictures. When the
camera has completely processed all pictures, by either saving them to the
memory card or deleting them, the working memory gauge will be clear.
The memory card gauge shows space used on the memory card in red and space
available as white. As the camera processes pictures and saves them to the
memory card, more of the memory card gauge fills with red.
3-19
3
3
Taking pictures
Page 48

Adding sound to a picture in Quickview
After taking a picture with Quickview turned on, you can attach sound to the
picture. Once the picture disappears from Quickv iew, you must enter the Review
mode to record sound.
☞ You can also attach sound to a picture in the Review mode.
1 While the color LCD displays the picture
you have taken, press and hold Record.
The flashing microphone icon appears in
the top overlay bar along with a timer
indicating how long you have been
recording sound.
☞ If you lift your finger from the Record
button before you have finished
recording sound, delete the sound clip
and record a new one.
2 When you are done recording, release the
Record button.
Delete, Overlay, and Play appear on the
bottom of the screen.
3-20
☞ If you press Record a second time,
you are given the option to delete the
existing sound and record new sound
for the picture.
3 Press one of the following.
✔ Delete—gives the option of deleting
both the picture and sound, or just the
sound.
✔ Overlay—turns off the Overlay.
✔ Play—plays the recorded sound.
Page 49

Zooming
There are two types of zooming. Optical zooming uses the lens to produce
quality pictures. Digital zooming continues the zooming process but reduces the
quality of the pi cture.
Optical zooming
The camera is equipped with a 3X zoom lens that lets you zoom in from Wide
Angle (38mm) to TelePhoto (115mm).
To activate the optical zoom:
Move the Zoom button to adjust the lens.
✔ Move the button to the right (toward
Telephoto) to z oom in on your
subject.
✔ Move it to the left (toward Wide
angle) to zoom away from your
subject.
The default lens position is Wide Angle. All other lens positions are considered
Telephoto settings.
3-21
3
3
Taking pictures
Page 50

Digital zooming
Digital zooming allows you to zoom in on a subject beyond the range provided
by the optical zoom lens. Digital zooming crops the digital picture and resizes the
new cropped picture to the size of the selected resolution.
The viewfinder cannot accurately depict a subject that is digitally zoomed. You
must use the color LCD to preview the subject.
To use digital zoom:
1 Turn on the camera and set the Mode dial
to Capture.
In this mode, you can access the full
optical zoom range plus the additional
digital zoom range.
2 Press Display to turn on the color LCD.
3 Move and hold the Zoom switch all the
way to the right (toward T) to zoom to
the maximum optical range.
4 Release the Zoom switch and then press
and hold it again.
5 View the subject through color LCD.
3-22
The color LCD displays an icon
indicating that digital zoom is in effect.
☞ Digital zoom is disabled when you
turn off the color LCD.
6 Press the Shutter button to take th e
picture.
Page 51

4
4Reviewing your
4
4
pictures
Did you have your thumb over the lens? Did someone have their eyes closed?
Should you take one more picture before you let your kids take those ties off?
With film, you’ll know as soon as you get your pictures processed. With the
camera in the Review mode, you’ll know instantly.
Review mode allows you to:
✔ view pictures as thumbnails on a portion of the color LCD.
✔ view the amount of unused memory on the memory card
✔ delete one or all pictures from the memory card
✔ view pictures from the camera on your television
✔ protect pictures from accidental deletion
✔ view and magnify pictures on the full color LCD
✔ play back sound, bursts, and time-lapse sequences
✔ reformat your memory card
Reviewing
4-1
Page 52

Setting the Camera to the Review mode
Turn the Mode dial to Review.
The last picture taken appears on the color
LCD in a full screen view.
Pressing Display toggles between the
thumbnail and full screen views.
Highlighted picture
Filmstrip of
pictures stored on
memory card
Memory bar displaying
space left on card and
current picture position.
from filmstrip
Picture information
4-2
Overlay
Album name
(if present)
Page 53

Setting Review mode preferences
The Review mode preferences allow you to set global parameters for this mode.
Review mode preferences include:
✔ overlay
✔ slide show
✔ video
✔ playback
✔ format card
1 Press M e nu.
The Review Mode Settings screen appears.
4
4
Reviewing
2 Press to highlight the Re view
Preference icon.
3 Press to highlight the preference
category you want to set.
4 Press Enter.
5 Refer to the following su bsections for
information about each preference
category.
6 Press Done to save your settings.
The color LCD returns to the thumbnail or
full screen.
4-3
Page 54

Overlay preferences
Use the Overlay preferences to turn the overlay on or off. The overlay appears on
the color LCD and displays the softkey labels.
1 Press
2 Press Done to save your settings.
Press Cancel to exit without saving the
changes.
to choose between On and Off.
/
Slide show preferences
A slide show displays each selected picture for a specified interval. Through the
Slide show preferences you can specify the duration each picture is displayed,
turn sound on or off, and choose to continuously loop the pictures in the
slide show.
1 Press
setting.
2 Press Start to begin the slide show.
3 Press Display, Menu, or Stop to stop the
slide show.
to select a choice for each
/
4-4
4 Press Done to save your settings.
Press Cancel to exit without saving the
changes.
Page 55

Video preferences
Use Video preferences to specify the type of video connection needed for a
television.
1 Press
NTSC.
NTSC is generally used in the United States
and Japan, PAL in Europe.
2 Press Done to save your settings.
Press Cancel to exit without saving the
changes.
to choose between PAL and
/
Playback preferences
Use Playback preferences to specify how quickly burst, time-lapse, and album
pictures are displayed during full-screen playback.
1 Press
setting.
2 Press Done to save your settings.
Press Cancel to exit without saving the
changes.
to select a choice for each
/
4
4
Reviewing
4-5
Page 56

Format card prefer ences
If your camera does not recognize the format of the memory card, or for some
other reason you want to reformat a memory card, you can do so from this
camera menu option.
WARNING: All files, including image, script, protected, and text files, are
deleted from the memory card during reformatting. This deleted
information cannot be recovered.
1 Press Format to erase all files and reformat
the memory card.
Press Cancel to exit without saving the
changes.
2 Press Done when the Format Complete
confirmation screen appears.
4-6
Page 57

Viewing pictures
You can view your pictures one at a time on a full screen, or you can view them
one at a time, in a continuous scroll, or in a fast scroll on a filmstrip screen.
To review pictures on a full screen:
1 Set the Mode dial to Review.
4
4
Reviewing
2 Press and release .
Display button
To review pictures on a filmstrip screen:
1 Set the Mode dial to R e view.
2 Press Display to obtain the filmstrip screen.
3 To review your pictures:
✔ one at a time—press and release .
✔ in a continuous scroll—press and hold .
✔ in a fast scroll—press and hold and after several pictures have
scrolled by and the left softkey is labelled F ASTER, hold the left softkey
while still holding down the arrow butto n.
/
/
/
Once you release the buttons, the selected
picture on the filmstrip is highlighted and is
displayed as a thumbnail.
/
4-7
Page 58

Viewing the remaining memory
The Review screen displays a reminder of the amount of memory remaining on
the memory card.
Memory Filled Status
The memory bar gives two different indications about memory. The Memory
Filled Status indicator shows the amount of used memory (in blue) and the
amount of available memory (in white).
As you scroll through your pictures, the Picture Location Indicator moves to
represent the position of the current picture in the list of pictures already on the
memory card. For example, if the selected picture is the first of 20 pictures on the
memory card, the indicator is all the way to the left. As you scroll through the
pictures, the indicator moves to the right with each new picture. At picture 10, the
indicator is in the middle of the blue portion of the Memory Filled Status
indicator. At picture 20, the indicator is all the way to the right of the blue area.
Picture Location Indicator
Available memory
Marking pictures for an action
When you want to select a number of pictures and carry out an action on them,
you must first mark each picture. Marked pictures can be deleted, copied from
camera to camera, protected, or transferred from album to album.
To mark a picture:
4-8
1 Scroll to find the picture you want to select.
2 Press Mark.
The selected picture is marked, denoted by
the notched lower right co rn er, and remai ns
marked until you carry out an action on it.
☞ When you have marked a picture, the
softkey changes to Unmark.
3 To mark the entire contents of the memory
card, hold down Mark for 2 seconds.
Page 59

Placing marked pictures in an album
You can place marked pictures in an existing album or a new one.
4
4
To create a new album:
1 Press Menu.
2 Press to highlight the Album icon.
3 Press to select an existing album or New
Album.
Refer to the next subsection for information
about creating a new album.
4 Press Move to move the pictures to the
selected album.
1 Display the Album screen as described in
the “Placing marked pictures in an album”
section above.
2 Press to select New Album.
3 Press Move .
The New Album Name screen appears.
4 Press the left softkey to select the type of
character set you want. You can select either
capital letters or numbers.
Reviewing
5 Press to select a character.
6 Press to add the selected character to the
name. Press backspace.
7 Add additional charact ers until you have
spelled the name you want using a
maximum of 8 characters.
8 Press Done to save your settings.
The marked pictur es ar e moved to the album
you created and the Album screen appears.
/
4-9
Page 60

Copying marked pictures from camera to camera
You can send marked pictures to or receive mark ed pictures fr om another camera
in the Review mode.
1 Place the two cameras facing each other,
aligning their IrDA transceivers.
During Camera-to-Camera communication,
the cameras communicate using the IrDA
port.
2 Make sure both cameras are in the Review
mode.
3 Press Menu on the receiving camera.
4 Press to highlight Receive.
5 Press Menu on the sending camera.
6 Press to highlight Send.
7 Press Send.
8 The marked pictures are copied from one
camera to the other.
4-10
Page 61

Protecting your pictures
Y o u can safeguar d your pictures from being deleted accidentally from the camera
memory card. This feature is very useful if the cam era and memo ry card ar e used
by more than one person.
To protect and undo the protection of your pictures:
1 Set the Mode dial to R e view.
2 Mark the pictures to be protected. If
necessary, refer to page 4-8.
4
4
Reviewing
3 Press
icon.
4 Press to highlight Protect.
5 Press Select.
6 Press Done when the confirmation screen
appears.
The picture appears on the color LCD with
the Protect icon in the upper-left corner.
7 To undo the protection, use the same
procedure and highlight Undo Protection.
You are prompted with a screen indicating
pictures are protected if you attempt to
delete a protected picture.
to highlight the Picture Protect
/
/
4-11
Page 62

Opening albums
The Review screen shows you when pictures are grouped in an albu m and allows
you to open the album to view the p ictures. If the high lighted picture resid es in an
album, an album icon appears and the left softkey is labelled Open. The album
name is displayed next to the picture number.
To open an album:
1 Scroll to view the picture you want to select.
Use any of the three methods described in
the “Viewing pictures” section on page 4-7.
2 Press Open.
The screen opens the album containing the
selected picture and displays the other
pictures that are stored in the album. The
related pictures are linked by a colored
background.
When you have opened an album, the Open
softkey changes to Close.
3 Press Close to close the album.
4-12
Page 63

Expanding and collapsing pictures
It is important to note that your camera treats burst and time-lapse pictures as
folders containing a series of individual pictures, but displays them as a single
picture until you press Expand. In the Review mode, you can expand the
displayed burst or time-lapse picture to view all the pictures in the series.
If the highlighted picture is a burst or time-lapse picture, the appropriate icon
appears and the left softkey is labelled Expand.
To expand a burst or time-lapse picture:
1 Scroll to view the picture you want to select.
Use any of the three methods described in
the “Viewing pictur es ” s ect i on o n pa ge 4- 7.
2 Press Expand.
The screen expands the selected burst or
time-lapse picture and displays its
individual pictures on the filmstrip. The
related pictures are linked by a colored
dotted line.
When you have expanded a picture, Expand
changes to Collapse.
4
4
Reviewing
3 Press Collapse to collapse the picture back
to its original form.
4-13
Page 64

Adding sound to pictures
You can attach sound to a selected picture at any time while reviewing your
pictures from either the filmstrip or full screens.
☞ You can only add sound to or play sound associated with burst and time-
lapse pictures when the series is collapsed. If the camera volume control is
turned down, you will not be able to hear the sound you have recorded. The
volume control adjusts the volume of sound clips attached to pictures only.
1 Scroll to view the picture you want to select.
Use any of the three methods described in
the “Viewing pictures” section on page 4-7.
2 Press and hold the Record button.
The microphone icon appears on the scr een,
along with how long you have been
recording.
☞ Each picture can have only one
attached sound clip.
3 Speak into the microphone on the back of
the camera.
4 Release the Record button.
4-14
A sound icon appears indicating the picture
now has attached sound. If a picture has
attached sound, pressing Delete lets you
delete the sound alone or both the picture
and sound.
5 Press one of the following softkeys:
✔ Delete—deletes the picture and any
attached sound.
✔ Save—saves the sound.
✔ Play—plays the sound
☞Refer to “Playing sound, bursts,
and time-lapse sequences” on page
4-16 for information on sound that
has not been recently recorded.
Page 65

Deleting pictures
To delete one picture:
4
4
To delete multiple pictures:
1 Scroll until the picture you want to delete is
highlighted in the center of the filmstrip.
2 Press Delete.
3 Press one of the following softkeys:
✔ Delete—deletes the picture and any
attached sound.
✔ Sound Only—deletes only the attached
sound. (This softkey appears only if the
picture contains an attached sound clip.)
✔ Cancel—cancels the delete operation.
1 Mark the pictures you want to delete.
If necessary, refer to the “Marking pictures
for an action” section on page 4-8.
2 Press Delete.
Reviewing
Press and hold Delete for 2 seconds to
delete all the pictures on the memory card. It
is not necessary to mark pictures if you want
to delete all of your pictures.
A confirmation screen appears asking if you
want to delete all the marked pictures and
attached sound.
3 Press one of the following softkeys:
✔ Delete—deletes the pictures and any
attached sound.
✔ Cancel—cancels the delete operation.
4-15
Page 66

Playing sound, bursts, and time-lapse
sequences
To play sound, burst, and time-lapse sequences you have to be viewing the
picture on a full screen.
1 Scroll to highlight the picture sequence you
want to play.
You can scroll through your pictures while
viewing them as thumbnails or on a full
screen. If you scroll to the picture as a
thumbnail, press Display to view it on a full
screen.
2 Press Play.
If the highlighted picture is a still picture
with sound, the camera plays the sound.
If the highlighted picture is a burst or timelapse picture, the camera plays back the
sequence of pictures at the rate specified in
the Review mode preferences.
3 To stop playing the sequence, press Stop.
4-16
Page 67

Magnifying pictures
To magnify a picture while viewing it on a full screen:
4
4
1 Scroll to view the picture you want to
magnify.
Use any of the three methods described in
the “Viewing pictur es ” s ect i on o n pa ge 4- 7.
2 Press Magnify.
The screen displays a magnified view of the
selected picture.
☞ Use the arrow keys to scroll to
different parts of the picture. If you use
the arrow keys to move to different
parts of the magnified picture, the
Reduce softkey label disappear s.
However, you can still press the middle
softkey to reduce the picture to its
normal view.
3 To return to a normal view, press Reduce.
Reviewing
4-17
Page 68

Viewing pictures on your television
The camera video out feature lets you show the pictures from the memory card
on your television.
☞ The color LCD is disabled when the camera is attached to the
video cable.
1 Turn off your television and camera.
2 Insert the video output cable into the video out
connection on the side of your camera.
3 Connect the other end of the cable to the video in
connection on your television.
☞ To play sound on your television, use a
cable that has two connectors on the
television end. Connect the yellow
connector to the video in connection and
the white connector to the audio in
connection.
4 Turn on the camera and television.
5 Set the Mode dial to Review.
6 Set the television to the correct chan nel for
viewing video.
4-18
The pictures that are stored on the memory card
appear on the television screen.
7 Scroll through your pictures using any of the
three methods described in the “Viewing
pictures” section on page 4-7.
☞ If pictures do not appear on the television,
you may need try a different channel or
adjust the Video preference on the camera.
Refer to page 4-5.
Page 69

5
5Connecting
your camera to
your computer
A first step to using your digital pictures on your computer is to connect your
camera to your computer. The camera can communicate with your computer
using:
✔ an RS-232 serial connection
✔ a Universal Serial Bus (USB) connection
✔ an IrDA (infrared) transceiver
While in Connect mode, the camera is controlled by the computer . E xcept for the
Mode dial, Power, Shutter, and Zoom buttons, all other camera buttons are
disabled. The Ready light indicates when the camera is on.
Once software is installed and the camera is connected to a computer, you are
ready to transfer the pictures.
5
Connecting
☞ Use the AC adapter when connecting to your computer to conserve
battery power.
5-1
Page 70

Which connection?
The connection you u se depends o n seve ral variabl es. You need to determine whi ch
connections are available with your Operating System, which of these connections
are physically supported by your computer, and then you can make the connection.
☞ After making the connections, if you experience problems, refer to the
troubleshooting guide located on the CD.
Determining which connections are available
This section guides you through what connections are available with yo ur operating
system.
WINDOWS 95
If your computer uses a WINDOWS 95 Operating System, you need to determine
which version.
To check for the WINDOWS 95 version:
1 Click Start ➔ Settings ➔ Control Panel.
2 Double-click the System icon.
3 Click the General tab and note the installed Operating System:
✔ 4.00.950 indicates WINDOWS 95 (basic)
✔ 4.00.950a indicates WINDOWS 95a
✔ 4.00.950B indicates WINDOWS 95B
The two types of connections available with WINDOWS 95 and 95a are:
✔ Serial—see “Checking for RS-232 serial suppo rt” o n page 5-5, then “Using
a serial cable to connect” on page 5-7.
✔ IrDA (infrared) transceiver—see “Checking for IrDA transceiver support”
on page 5-6, and then see “Using an infrared transceiver to connect” on
page 5-8.
☞WINDOWS 95 and WINDOWS 95a require an IrDA Software Patch
that is available from the Microsoft Web site. Go to http://
www.microsoft.com and then search for “irda.” (Please read and
understand all the instructions provided by Microsoft before
proceeding.)
5-2
Page 71

The two types of connections available with WINDOWS 95B are:
✔ Serial—see “Checking for RS-232 serial support” on page 5-5, then see
“Using a serial cable to connect” on page 5-7.
✔ IrDA (infrared)—see “Checking for IrDA transceiver support” on page 5-
6, and then “Using an infrared transceiver to connect” on page 5-8.
☞The IrDA driver for WINDOWS 95B is either preloaded on your
system or available on your original diskettes or CD.
USB is not fully supported on WINDOWS 95. If you use USB on
WINDOWS 95 and experience problems, please upgrade to
WINDOWS 98.
WINDOWS NT 4.0
WINDOWS NT 4.0 supports only a serial connection, see the procedure,
“Checking for RS-232 serial support” on page 5-5, then “Using a serial cable to
connect” on page 5-7.
WINDOWS 98
The three types of connections available for WINDOWS 98 are:
✔ Serial—see “Checking for RS-232 serial support” on page 5-5, then see
“Using a serial cable to connect” on page 5-7.
5
Connecting
✔ USB—see “Checking for USB support” on page 5-4, and then “Using a
USB cable to connect” on page 5-8.
✔ IrDA (infrared)—see “Checking for IrDA transceiver support” on page 5-
6, and then “Using an infrared transceiver to connect” on page 5-8.
MACINTOSH Computers
A serial or USB connection is available using the DIGITA Desktop Acquire
(Plug-in). Refer to the online information provided wi th the software.
5-3
Page 72

Determining what your computer supports
Checking for USB support
The Universal Serial Bus (USB) is a relatively new method for your camera to
communicate with the PC. A USB connection is faster than an RS-232 serial
connection, increasing the maximum data transfer rate to 12 Mb/sec.
USB requires special computer hardware and software features, including a USB
enabled motherboard, USB connections, and WINDOWS 98. Most computers
manufactured prior to January 1997 do not meet these requirements.
To determine if your computer supports a USB connection:
1 Verify that a USB connector is present.
This connector is normally on the back of the computer.
2 Right-click the My Computer icon.
3 Click on Properties in the pop-up menu.
4 Verify the operating system is WINDOWS 98.
5 Click the Device Manager tab.
6 Verify that the Universal Serial Bus Controller is presen t without any yellow
or red indicators.
7 Click on Universal Serial Bus Controller.
8 Verify that a controller and USB Root hub are listed.
9 Double-click on USB Root hub.
10 Verify that device status is “The device is working properly.”
If all of the above conditions are met, your computer supports a USB
connection.
5-4
Page 73

Checking for RS-232 serial support
Although not as fast (maximum data transfer rate of 115 kb per second), an RS232 serial connection is supported by the vast majority of computers. The serial
port option is available on WINDOWS 95, WINDOWS 98, and WINDOWS NT
4.0 Operating Systems.
RS-232 connectors are the standard ports located on the back of the computer.
They are usually labeled A and B.
To determine if your computer supports an RS-232 serial connection
(WINDOWS 95, WINDOWS 98):
1 Right-click the My Computer icon.
2 Click on Properties in the pop-up menu.
3 Click the Device Manager tab.
4 Double-click on the Ports dev ice in the displayed list.
5 Verify that there is at least one Communication Port.
If at least one Communications Port is present, your computer supports an
RS-232 Serial connection.
To determine if your computer supports an RS-232 serial connection
(WINDOWS NT 4.0):
5
Connecting
1 Click Sta rt ➔ Settings ➔ Control Panel
2 Click on Ports.
3 Click the Device Manager tab.
4 Verify that there is at least one Communication Port.
If at least one Communication Port is present, your computer supports an
RS-232 Serial connection.
5-5
Page 74

Checking for
Infrared is invisible light that the camera uses to transfer pictures without cables
or wires. Like your television remote, the camera requires a clear line of sight
between its IrDA transceiver and the IrDA port on the computer.
IrDA (Infrared Data Association) compliant devices use both a transmitting mode
and a receiving mode which allows these devices to acknowledge the information
was received, generate responses, and even automatically detect the presence of
another IrDA device.
IrDA 1.1 has a maximum data trans fer rate o f 4 Mb second, abou t 40 times faster
than a standard serial port.
IrDA
transceiver support
☞ Remember that IrDA communication usually requires system resources that
are used by the serial port. On some computers, you will have to disable the
serial port and enable the infrared port for infrared communication to work,
and reverse these settings if you wish to use your serial port again.
To determine if your computer supports an infrared connection:
1 Right-click the My Computer icon.
2 Click on Properties in the pop-up menu.
3 Click the Device Manager tab.
4 Verify that an “Infrared” entry exists.
5 Double click on the “Infrared” devices.
6 Verify that the “Infrared port on laptops or desktop” is present.
7 On your computer, click Start ➔ Settings ➔ Control Panel.
8 Verify that the Infrared icon is present.
9 Double-click the Infrared icon.
10 Click the Options tab.
11 Verify that the “Enable infrared communication on Com X” and “Search for
and provide status for device in range” checkboxes are selected.
12 Make a note of the COM port and LPT port.
You will need this information w hen setting up you software to
communication with the camera. These are identified in the phrase
“Providing Application Support on COM “X” and LPT “Y”.
5-6
Page 75

13 Verify that you have an internal or external IrDA transceiver connected to
your computer. Check your computer hardware manual for information on
the IrDA transceiver location.
☞ If you are using the infrared transceiver to connect to the computer and
the camera automatically turns off because of inactivity, you need to
press Power to turn the camera back on.
For more information, go to www/irda.org and select “Using IrDA.”
Making the connection
Using a serial cable to connect
The camera can connect to a computer using the serial cable included in your
camera package.
To connect to your computer with a serial cable:
1 Plug one end of the serial cable into a
Communication port on the back of your
computer.
☞ If your computer has a 25-pin port, you
need to use a 9-pin adapter and attach it to
the port before attaching the serial cable to
the computer. Do not use a Null-Modem
adapter.
2 Open the serial/USB port on the side of your
camera.
3 Plug the other end of the serial cable into the
serial port.
4 Set the Mode dial to Connect.
5 Turn on the camera.
5
Connecting
If you get a message on your computer stating
that you are not connected, refer to the
Serial.PDF, or for MACINTOSH Computers,
Connect.PDF, document or the online help for
troubleshooting information.
5-7
Page 76

Using a USB cable to connect
The camera can connect to a computer using the USB cable included in your
camera package.
To connect to your computer with a USB cable:
1 Plug one end of the USB cable into the USB
port.
2 Open the serial/USB port on the side of your
camera.
3 Plug the other end of the US B cable into the
serial port.
4 Set the Mode dial to Connect.
5 Turn on the camera.
If you get a message on your computer stating
that you are not connected, refer to the
USB.PDF, or for MACINTOSH Computers,
Connect.PDF, document o r th e online help for
troubles hooting information.
Using an infrared transceiver to connect
Your camera automatically detects when a compatible IrDA device is present.
Place the camera facing the computer IrDA
transceiver.
When the two IrDA ports establish contact, the
computer emits a beep.
☞ While in the Review mode, you can
transfer pictures from one camera to
another using an IrDA connection. Refer
to “Copying marked pictures from
camera to camera” on page 4-10.
5-8
Page 77

6
6Setting camera
properties
Camera properties software lets you program your digital camera through a
graphical interface on your computer.
You can set these properties before you use your camera to take pictures, or you
can use the camera default properties. To use the default for each setting, click
the Defaults button on the Camera Properties screen.
You can set camera properties for these categories:
✔ General
✔ Camera
✔ Picture Type
✔ Albums
You’ve got to connect first
Before you can set the camera properties from your computer, you first have to
connect your camera to your computer. Refer to Chapter 5 for instructions.
6-1
6
Setting camera
Page 78

Finding camera properties software
You can get to the Camera Properties software in a number of ways:
✔ Double-click the DC265 Camera Properties icon on your desktop
✔ Select Properties from the Mounter Software screen
✔ Select Camera Properties from the Digital Access (TWAIN Acquire)
software application window
✔ Select Tools from the KODAK Picture Easy Software 3.1 screen
✔ Select DC265 Camera Properties from Start→Programs
The remaining sections of this chapter assume that you have started Camera
Properties software and are viewing the General settings tab.
Specifying general settings
The General settings tab is selected by default.
1 Specify the settings.
Refer to the following list for a bri e f
description of each setting.
2 Click Apply to apply the settings
3 If you want to see more settings, click
Advanced.
6-2
Additional settings appear.
☞ To revert to the default settings, click
Defaults.
Page 79

✔ Communications Method—defines the type of connection you want to
use between the camera and your computer.
✔ Baud Rate—defines the rate at which the camera and the computer
communicate. This field is grayed out if USB or IrDA is selected as the
communication method.
✔ Camera Name—lets you assign a unique name to your camera that is
included in every picture file.
✔ Firmware Version—is a read-only field that displays the camera’s
firmware version number . You can also view the camera firmware version
on the color LCD by turning the Mode Dial to Info.
✔ File Type—is the file format in which the camera stores all future
pictures. You can choose JPEG (.jpg), which can be used by many
software programs, or FLASHPIX (.fpx). FLASHPIX offers great
benefits such as speed in displaying your pictures and the ability to undo
and redo edits in software programs such as Picture Easy.
✔ Camera Date and Time—is the date and time assigned to each picture that
you take. You can set it to the same date and time as on your computer by
clicking the Set to Computer Date and Time checkbox.
✔ Computer Date and T ime—is a read-only display of the ti me and date as it
is set on the computer to which the camera is connected.
6
Setting camera
☞The remaining General Property settings are available only after you
click Advanced.
✔ Power status—displays an AC Power icon when you are using the AC
Adapter or an icon indicating the level of the camera’s battery charge.
✔ Time-out Settings—includes:
✔ AC Power Off After— turns the camera off after a period o f inactivity
when using AC power.
✔ Battery Power Off After—turns the camera off after a period of
inactivity when using battery power.
✔ Quick View Display Off After — defines how long a newly captured
picture is displayed before the color LCD turns off.
6-3
Page 80

Specifying camera settings
1 Click the Camera settings ta b.
2 Specify the settings.
Refer to the following list for a bri e f
description of each setting.
3 To apply these settings to the camera, click the
Apply button.
✔ Picture type—lets you select Still, Burst, or Time-lapse. This field
defaults to Still when you turn off the camera.
✔ White balance—examines your pictures and tries to adjust the color
balance to remove the color casts that the current lighting conditions add.
Use Automatic when taking pictures under a variety of lighting
conditions. Use Daylight when taking pictures outdoors. Use Fluorescent
when taking pictures under fluorescent light. Use Tungsten when taking
pictures under normal incandescent light. Off makes no white balance
adjustment.
✔ Flash mode—is the mode in which you want the camera’s flash to
operate. Auto causes the flash to fire only when there is not enough light.
Fill causes the flash to fire for every picture. Red-Eye Reduction cause s
the flash to fire twice Once 600 milliseconds before the picture is taken to
constrict the subject’ s pupils, and once when the pictur e is taken. Of f turns
the flash off.
✔ Focus—provides three settings:
✔ Single spot determines the focus position using the subject in the
center of the field of view.
✔ Multi-spot determines the focus position using three lens positions in
the field of view.
✔ Manual allows you to select the focus position from the pull-down
menus.
6-4
Page 81

✔ Advanced capture mode—provides three settings:
✔ Programmed AE automatically determines the appropriate shutter
speed and aperture settings but lets you choose an exposure
compensation value from a drop down list.
✔ Long-time exposur e allows you to se lect the shutter s peed setting from
a drop down list.
✔ External flash lets you select the aperture value from a drop down list.
✔ Zoom—The position of the zoom lens. The DC265 camera ranges from
38mm to 115mm in six steps.
6
Setting camera
6-5
Page 82

Specifying picture type settings
1 Click the Picture Type Settings tab.
2 Specify the settings.
Refer to the following list for a bri e f
description of each setting.
3 To apply these settings to the camera, click
Apply.
✔ Picture capture state—lets you select Still, Burst, or Time-lapse. The other
fields on the screen change depending on the type of picture.
✔ Picture q uality—has four settings:
✔ Super compresses a picture the least and has the highest quality. Super
can be viewed, if set in the camera. It can only be selected from the
Super quality script. For more information, see page 3-16 .
✔ Best compresses a picture a small amount and has high quality.
✔ Better compresses a picture more and has a lower quality.
✔ Good compresses a picture the most and has the lowest quality.
✔ Resolution—is the number of pixels in each picture, either High (1536 x
1024 pixels), Medium (1152 x 768 pixels), or Standard (768 x 512 p ixels).
✔ Approximate picture size (Still)—is the approximate size of each picture
based on your picture quality and resolution selections. The actual picture
size can vary, depending on the content of the picture.
✔ Burst/Capture rate—is the rate, in frames per second, to take pictures.
✔ Approximate picture size (Burst)—is the approximate size of the burst
picture series, based on the picture quality, resolution, and burst/capture
rate. The actual burst size varies depending on the picture content.
✔ Interval (time-lapse)—is the time between pictures. The minimum time
between pictures is 60 seconds. The maximum is 24 hours.
✔ Number of pictures (time-lapse)—is the number of pictures to capture.
✔ Approximate time-lapse size—is the approximate size of the time-lapse
picture series, based on the picture quality, resolution, interval, and
number of pictures. The actual time-lapse size can vary depending on the
content of the picture.
✔ Storage status—is the number of pictures you have stored on your
memory card and the number of pictures that can still be stored.
6-6
Page 83

Specifying albums settings
1 Click the Albums Se ttings tab.
2 Specify the settings.
Refer to the following list for a brief
description of each Albums setting.
3 To apply these settings to the camera, click
Apply.
✔ Camera Folder—is the list of camera folders on the memory card.
Multiple names exist if the memory card in question has pictures on it that
were taken with different cameras.
✔ Albums—is a display of the albums in the selected camera folder. You can
create new albums, rename albums, or delete existing albums.
6
Setting camera
6-7
Page 84

Page 85

7
7Accessing your
pictures through
your computer
Now that you’ve taken some pictures with your digital camera, how do you get
to them?
✔ By connecting your camera to your computer and using KODAK Moun ter
Software. This is an easy way to view, transfer, or delete pictures stored
on the memory card using your computer and WINDOWS Software.
✔ By placing your memory card in a PCMCIA card adapter and placing it in
your computer card reader.
Using Mounter Software
When using Mounter Software, the DC265 camera icon appears in the My
Computer window, dialog boxes, and file browsers included in many software
applications.
Using Mounter Software to transfer your pictures assures that all the cameraspecific information and original picture quality are maintained.
Mounter Software presents the camera contents as though it were an extension o f
your hard drive. For more detailed information on working with WINDOWS,
refer to your WINDOWS Software User’s Guide.
7-1
7
Accessing pictures
Page 86

Mounter Software overview
With Mounter Software you can:
✔ View pictures on the camera
✔ Transfer pictures from the camera to your computer
✔ Transfer pictures and scripts to the camera
✔ Save the audio portion of a picture file as a .wav file
✔ Set Mounter preferences
Mounter Software uses the following icons:
camera—represents the DC265 camera.
album—represents an album on your memory card.
camera folders—represent both the Camera Folder and the System
folder. The Camera Folder holds your pictures or albums. The
System folder holds scripts and camera firmware files.
burst—represents burst pictures with and without attached sound.
7-2
time-lapse—represents time-lapse pictures with and without
attached sound.
picture file—represents picture files (with and without attached
sound) with FLASHPIX (FPX) or JPEG (JPG) extensions when
appropriate viewing option is selected. If the picture file has been
registered by another application this icon can be different.
Page 87

You’ve got to connect first
To use Mounter Software to access your pictures, the camera needs to be
connected to your computer and turned on. Refer to Chapter 5 for detailed
information.
When the camera is correctly connected to and
communicating with your computer, the camera
Status Display is replaced with the following
screen.
If the connection times out, the Status Display
returns.
Viewing your pictures
Mounter Software lets you view your pictures as picture files or as thumbnails.
T o view your pi ctures as thumbnails, select View ➔ Thumbnail View. It will take
longer to display pictures as thumbnails than as picture files.
To view your pictures:
1 Double-click the My Computer icon.
The My Computer window appears.
2 Double-click the Camera icon.
The Camera and System folder icons appear.
3 Double-click the Camera Folder icon .
A window appears listing pictures and albums,
if any.
4 To delete a picture, select it and press Delete.
7-3
7
Accessing pictures
Page 88

Copying pictu r es to your computer
Mounter Software allows you to copy pi ctures from the c amera to your computer.
To copy pictures:
1 Double-click the My Computer icon.
The My Computer window appears.
2 Double-click the Camera icon.
The Camera and System folder icons appear.
3 Double-click the Camera Folder icon.
A window appears listi ng pict ures and albums,
if any.
4 Open the folder on your computer into which
you’ll be placing the pictures.
5 Select the pictures to be copied and while
holding the mouse button down, drag the
pictures to the new folder.
☞ To select mul tiple pictur es, hold do wn the
shift key and click to select adjacent
pictures or hold the control key and click
to select non-adjacent pictures.
A copy of the pictures appear in the new
location.
7-4
Page 89

Transferring pictures and scripts to your camera
Mounter Software allows you to drag and drop pictures and scripts from your
computer to your camera.
A predefined script can promp t you for cert ain actio ns and def ine the beh avior of
the camera. For example, a script can set the camera to take burst pictures at a
certain rate. The script can then prompt you, using text on the LCD, to take a
picture and the camera waits for you to press the Shutter button.
☞ You can view transferred pictures on your camera only if they are in a
FLASHPIX (.fpx) or JPEG (.jpg) formats supported by the camera.
To transfer pictures and scripts to the camera:
1 Double-click the My Com puter icon.
The My Computer window appears.
2 Double-click the folder containing the pictures
or scripts you want to write.
3 Double-click the Camera icon.
The Camera and System folder icons appear.
4 Double-click the System folder o r the
appropriate Camera folder.
To transfer pictures to a specific album,
double-click the desired album.
5 Click on the picture or scr ipt t o highl ight it and
while holding the left mouse button down, drag
the file onto the appropriate open folder.
✔ Drag picture files to the open Camera
folder or album.
✔ Drag script files to the open System folder.
7-5
7
Accessing pictures
Page 90

To create, rename, or delete albums:
1 Double-click the Camera icon.
The Camera and System folder icons appear.
2 Double-click the Camera Folder icon.
A window appears listi ng pict ures and albums,
if any.
3 Perform one of the following operations:
✔ To create an album select File ➔ Create
New Album.
✔ To rename an existing album, select the
album, press the right mouse button, and
select Rename Album
☞You should not rename the System or
Camera folders because the camera
looks for these names to locate
pictures, scripts, and logo files.
Names are limited to eight characters
and they cannot begin with “TL” or
“BR”.
7-6
4 To delete an album, select it and press Delete.
Page 91

Opening picture files in other software programs
Mounter Software allows you to open picture files into a registered software
program.
1 Double-click the Camera icon.
The Camera and System folder icons appear.
2 Double-click the Camera folder icon.
A window appears listing pictures and albums,
if any.
3 If necessary, open the album.
4 Double-click the picture file to open it into a
registered software program.
Saving sound
When you transfer pictures containing sound, Mounter Software extracts the
sound portion of the file. Through preferences, Mounter Software can:
✔ Prompt you to save audio for each picture under the same filename as the
picture with a .wav extension
✔ Save the sound under the same filename as the picture with a .wav
extension
✔ Save no sound
7-7
7
Accessing pictures
Page 92

Setting preferences
Mounter Software allows you to set preferences that determine how Mounter
Software notifies and prompts you for audio options.
To set Mounter preferences:
1 Right-click the My Comp uter icon.
The My Computer window appears.
2 Right click the Camera icon.
3 Select Mounter Preferences from the pop-up
menu.
4 Specify how you want to be prompted when
saving audio attached to a picture.
5 Click Ok to apply the settings.
Placing the memory card in your computer
As an alternative to connecting your camera to your computer, you can also
access the pictures on the memory card by placing the card in a PCMCIA-ATA
Card Adapter. You can then place the Adapter Card in a PCMCIA drive if your
computer is so equipped or into a memory card reader.
PCMCIA is an acronym for Personal Computer Memory Card International
Association. Using a PCMCIA card eliminates the need to have your camera
tethered to your PC and provides a fast picture data transfer rate.
☞ While using a PCMCIA card to access your pictures is generally faster than
accessing the camera in the Connect mode, you lose some functionality. For
example, when using MICROSOFT EXPLORER and a PCMCIA card, you
cannot extract and save audio from pictures that have attached sound. To
access both from the PCMCIA card, use KODAK TWAIN Software or
KODAK Picture Easy Software 3.1.
7-8
Page 93

Picture Card adapter
The DC265 camera uses a removable KODAK Picture Card that complies with
the CompactFlash standard. Due to the size of the CompactFlash card, most
PCMCIA card readers do not accept the card as is, bu t req uire a n adapter card. A
KODAK Picture Card adapter is available for your memory card to adapt the
50-pin Kodak Pic ture card for use with 68 -pin PCMCIA-ATA compatible
devices.
☞ For information on ordering a Picture Card adapter, see the Accessories
pamphlet, included with your camera.
To transfer pictures through the PCMCIA card:
1 Remove the KODAK Picture Card from the
camera.
Refer to “Removing and inserting the
memory card” on page 2-11.
2 Insert the memory card into the memory card
adapter.
3 Insert the memory card adapter into your
computer.
The memory card appears as a drive on your
computer.
7-9
7
Accessing pictures
Page 94

Does my computer support a PCMCIA card?
To determine if your computer supports a PCMCIA connection
(WINDOWS 95, WINDOWS 98):
1 Right-click the My Computer icon.
2 Click Properties in the pop-up menu.
3 Click the Device Manager tab.
4 Verify that a “PCMCIA Socket” entry exists.
5 Double-click the PCMCIA socket.
6 Verify that the “PCIC or compatible PCMCIA controller” is present.
7 Double-click “PCIC or compatible PCMCIA controller.”
8 Verify that device status is “The device is working properly.”
If the above conditions are met and you have a PCMCIA card for your
camera (KODAK Picture Card with Picture Card Adapter), you can use a
PCMCIA connection. A picture card adapter is an optional accessory for the
DC265 camera.
To determine if your computer supports a PCMCIA connection
(WINDOWS NT 4.0):
1 Click Start ➔ Settings ➔ Control Panel.
2 Click PC Card (PCMCIA).
Memory card reader
7-10
A memory card reader allows you to transfer
pictures faster from a KODAK Picture Card or full
size PCMCIA Flash Memory ATA card to your
computer than with a cable connection.
Several models of memory card readers are
available from computer dealers.
Page 95

8
8Using Digital
Access (TWAIN
Acquire)
Software
You’ve used your digital camera to photograph your real estate agency’s newest
listings for the company’s Web page. Now you need to open your pictures in an
image editing software program to touch up some peeling paint, add some text,
and insert an asking price.
KODAK Digital Access (TWAIN Acqui re) Software for WINDOWS is special
industry-standard software that allows you to transfer pictures from your digital
camera directly to TWAIN-compliant software, such as ADOBE
PHOTODELUXE.
8
Digital Access
Connecting the camera to your computer
To use Digital Access software to transfer your pictures, the camera needs to be
connected to your computer and turned on. Refer to Chapter 5 for detailed
information.
When the camera is correctly connected to and
communicating with your computer, the camera
Status LCD is replaced with the following screen.
If the connection times out, the Status LCD
returns.
8-1
Page 96

Starting the Digital Access software
s
1 Open a TWAIN-compliant software (for example, ADOBE
PHOTODELUXE).
2 Select KODAK DC265 ZOOM ACQUIRE as the source.
3 Select TWAIN ACQUIRE from the compliant software.
The Digital Access software main window appears.
Select appropriate button to
retrieve pictures from your
camera or computer, or to
take a picture
Picture viewing area
8-2
Select Transfer
to transfer pictures
into the software
Select Camera
Properties to change
camera settings
Select Preference
to specify audio
options
Page 97

Selecting the source of your pictures
Digital Access Software allows you to transfer:
✔ a picture that you take while your camera is connected to the computer
✔ pictures stored on your computer or your picture card
Selecting the camera contents
1 Click Camera Contents on the Digital Access
screen.
The pictures stored on the picture card are
displayed. Only pictures stored using
supported file formats are displayed.
☞ If your camera contains albums, the
screen displays album icons. Click on an
album to display its contents.
2 Select the pictures for transfer.
See “Previewing your pictures ” on page 8-5.
Taking a picture
1 Frame the subject of your picture in the
viewfinder.
8
Digital Access
2 Click Take Picture on the Digital Access
window.
☞ You cannot take burst or time-lapse
pictures using Digital Access Software.
The picture is displayed in a full view. See
“Previewing your pictures” on page 8-5.
8-3
Page 98

Selecting pictures on your computer
You can select pictures that you have transferred to your computer or pictures
that reside on your picture card that is in your computer.
To select a picture:
1 Click My Computer on the Digital Access
application window.
The standard WINDOWS Open window is
displayed.
2 Navigate to the pictures that you want to open.
3 Select the pictures you want and click Open.
The pictures are displayed in either the list or
thumbnail view. Only pictures stored using
supported file f ormats are displayed.
Refer to the next section, ”Previewing your
pictures.”
8-4
Page 99

Previewing your pictures
While previewing your pictures using Digital Access software, you can view
your pictures as files or as thumbnails, which are smaller versions of your
pictures.
☞ To view your pictures as thumbnails, click the Show as Thumbnails
checkbox. Viewing pictures as thumbnails is slower than viewing pictures
as files.
Refer to the following subsections for more information about each
Preview function.
8
Digital Access
Plays an attached
sound file
Expands and
collapses burst and
time-lapse pictures
Opens any selected
pictures in a full
view.
Displays information
about a single
selected picture.
Playing an attached sound fi le
Pictures that have attached sound show a sound icon beneath the picture.
8-5
Page 100

Expanding and collapsing groups of pictures
Burst pictures are a series of pictures taken in rapid succession. Time-lapse
pictures are a series of pictures taken at a specified interval. Digital Access
software displays both as a singl e thumb nail w ith an icon i ndicating if the picture
is a burst or a time-lapse picture.
☞ When you have expanded a selected picture, Expand changes to a Collapse.
Displaying picture information
The Picture Information window displays information about the picture and
camera settings when the picture was taken. You can not select or change any
settings on the window.
The Picture Information window displays:
✔ Name of the picture file
✔ Number of pictures (burst and time-lapse
only)
✔ Quality setting
✔ Resolution setting
✔ Size (in bytes)
☞ To play an attached
sound file, click Play.
8-6
✔ Date and time picture was taken
✔ Name of the album in which the picture is
stored
✔ Aperture information
✔ Exposure Time, in seconds
✔ Flash information
✔ Audio attachment
 Loading...