

Page 1

KODAK DIGITAL SCIENCE ª
DC220 and DC260 Zoom Cameras
UserÕs Guide
for the cameras, KODAK Installation Software,
KODAK Camera Properties Software, KODAK Mounter
Software, and KODAK Acquire/TWAIN Software
Visit Kodak on the World Wide Web at www.kodak.com
Page 2

Kodak, Digital Science, FlashPix, and the ds monogram are trademarks of Eastman Kodak
Company.
Digita is a trademark of FlashPoint Technology, Incorporated.
The FlashPix format is defined in a specification and test suite developed and published by
Kodak in collaboration with Microsoft, Hewlett-Packard, and Live Picture. Only products that
meet the specification and pass the test suite may use the FlashPix name and logo.
Page 3

Table of
Contents
Page
1 Getting started . . . . . . . . . . . . . . . . . . . . . . . . . . . . . . . . . . . . . . . . . 1-1
So where is the film? . . . . . . . . . . . . . . . . . . . . . . . . . . . . . . . . . . . . . . . .1-1
Camera features . . . . . . . . . . . . . . . . . . . . . . . . . . . . . . . . . . . . . . . . . . . .1-1
Typical uses for your camera . . . . . . . . . . . . . . . . . . . . . . . . . . . . . . . . . .1-2
DC220 and DC260 software . . . . . . . . . . . . . . . . . . . . . . . . . . . . . . . . . .1-3
System Requirements . . . . . . . . . . . . . . . . . . . . . . . . . . . . . . . . . . . . .1-3
Installing software . . . . . . . . . . . . . . . . . . . . . . . . . . . . . . . . . . . . . . .1-4
Accessories . . . . . . . . . . . . . . . . . . . . . . . . . . . . . . . . . . . . . . . . . . . . . . . .1-4
2 Meet your camera . . . . . . . . . . . . . . . . . . . . . . . . . . . . . . . . . . . . . . . 2-1
Your Digital Camera . . . . . . . . . . . . . . . . . . . . . . . . . . . . . . . . . . . . . . . .2-1
Softkeys . . . . . . . . . . . . . . . . . . . . . . . . . . . . . . . . . . . . . . . . . . . . . . . . . .2-3
Mode dial . . . . . . . . . . . . . . . . . . . . . . . . . . . . . . . . . . . . . . . . . . . . . . . . .2-3
Four-way controller . . . . . . . . . . . . . . . . . . . . . . . . . . . . . . . . . . . . . . . . .2-3
Your camera display . . . . . . . . . . . . . . . . . . . . . . . . . . . . . . . . . . . . . . . . .2-4
Removable memory card . . . . . . . . . . . . . . . . . . . . . . . . . . . . . . . . . . . .2-10
Reformatting the memory card . . . . . . . . . . . . . . . . . . . . . . . . . . . . .2-10
Removing the memory card. . . . . . . . . . . . . . . . . . . . . . . . . . . . . . . 2-11
Power management . . . . . . . . . . . . . . . . . . . . . . . . . . . . . . . . . . . . . . . .2-11
Installing batteries . . . . . . . . . . . . . . . . . . . . . . . . . . . . . . . . . . . . . . .2-12
Using the AC adapter . . . . . . . . . . . . . . . . . . . . . . . . . . . . . . . . . . . .2-13
Table of Contents
3 Taking pictures . . . . . . . . . . . . . . . . . . . . . . . . . . . . . . . . . . . . . . . . 3-1
Turning the camera on . . . . . . . . . . . . . . . . . . . . . . . . . . . . . . . . . . . . . . .3-2
Entering the Capture mode . . . . . . . . . . . . . . . . . . . . . . . . . . . . . . . . . . . .3-2
Defining settings . . . . . . . . . . . . . . . . . . . . . . . . . . . . . . . . . . . . . . . . . . . .3-3
Defining settings via the Capture mode menus . . . . . . . . . . . . . . . . .3-3
iii
Page 4

Defining settings via the SCROLL and SELECT buttons . . . . . . . .3-13
Taking pictures . . . . . . . . . . . . . . . . . . . . . . . . . . . . . . . . . . . . . . . . . . . .3-14
Viewing the memory gauge . . . . . . . . . . . . . . . . . . . . . . . . . . . . . . .3-15
Adding sound to a picture . . . . . . . . . . . . . . . . . . . . . . . . . . . . . . . . .3-15
Zooming . . . . . . . . . . . . . . . . . . . . . . . . . . . . . . . . . . . . . . . . . . . . . . . . .3-17
Digital zooming . . . . . . . . . . . . . . . . . . . . . . . . . . . . . . . . . . . . . . . .3-17
4 Reviewing your pictures . . . . . . . . . . . . . . . . . . . . . . . . . . . . . . . . 4-1
Entering the Review mode . . . . . . . . . . . . . . . . . . . . . . . . . . . . . . . . . . . .4-1
Setting Review mode preferences . . . . . . . . . . . . . . . . . . . . . . . . . . . . . .4-2
Viewing pictures . . . . . . . . . . . . . . . . . . . . . . . . . . . . . . . . . . . . . . . . . . . .4-5
Viewing the remaining memory . . . . . . . . . . . . . . . . . . . . . . . . . . . . . . . .4-6
Marking pictures for an action . . . . . . . . . . . . . . . . . . . . . . . . . . . . . . . . .4-6
Placing marked pictures in an album (DC260 only) . . . . . . . . . . . . .4-7
Copying marked pictures from camera to camera . . . . . . . . . . . . . . .4-8
Opening albums . . . . . . . . . . . . . . . . . . . . . . . . . . . . . . . . . . . . . . . . . . . .4-9
Expanding and collapsing pictures . . . . . . . . . . . . . . . . . . . . . . . . . . . . .4-10
Adding sound to pictures . . . . . . . . . . . . . . . . . . . . . . . . . . . . . . . . . . . .4-11
Deleting one picture . . . . . . . . . . . . . . . . . . . . . . . . . . . . . . . . . . . . . . . .4-12
Deleting multiple or all pictures . . . . . . . . . . . . . . . . . . . . . . . . . . . . . . .4-13
Playing sound, bursts, and timelapse sequences . . . . . . . . . . . . . . . . . . 4-14
Magnifying pictures . . . . . . . . . . . . . . . . . . . . . . . . . . . . . . . . . . . . .4-15
Viewing pictures on your TV . . . . . . . . . . . . . . . . . . . . . . . . . . . . . . . . .4-16
5 Setting camera properties . . . . . . . . . . . . . . . . . . . . . . . . . . . . . . . 5-1
You’ve got to connect first . . . . . . . . . . . . . . . . . . . . . . . . . . . . . . . . . . . .5-1
Finding the Properties software . . . . . . . . . . . . . . . . . . . . . . . . . . . . . . . .5-1
Specifying General settings . . . . . . . . . . . . . . . . . . . . . . . . . . . . . . . . . . .5-2
Specifying Camera settings . . . . . . . . . . . . . . . . . . . . . . . . . . . . . . . . . . .5-4
Specifying Picture Type settings . . . . . . . . . . . . . . . . . . . . . . . . . . . . . . .5-5
Specifying Albums settings (DC260 only) . . . . . . . . . . . . . . . . . . . . . . . .5-7
6 Connecting your camera to your computer . . . . . . . . . . . . . . . . 6-1
Entering the Connect mode . . . . . . . . . . . . . . . . . . . . . . . . . . . . . . . . . . .6-1
iv
Page 5

Which connection? . . . . . . . . . . . . . . . . . . . . . . . . . . . . . . . . . . . . . . . . . .6-2
RS-232 Serial. . . . . . . . . . . . . . . . . . . . . . . . . . . . . . . . . . . . . . . . . . . . . . 6-2
Connecting via a serial cable . . . . . . . . . . . . . . . . . . . . . . . . . . . . . . .6-3
USB . . . . . . . . . . . . . . . . . . . . . . . . . . . . . . . . . . . . . . . . . . . . . . . . . . . . .6-4
Connecting via a USB cable . . . . . . . . . . . . . . . . . . . . . . . . . . . . . . . .6-5
Infrared transceiver . . . . . . . . . . . . . . . . . . . . . . . . . . . . . . . . . . . . . . . . . .6-5
Connecting via an infrared transceiver . . . . . . . . . . . . . . . . . . . . . . . .6-7
Potential connection problems . . . . . . . . . . . . . . . . . . . . . . . . . . . . . . . . .6-8
7 Accessing your pictures via computer . . . . . . . . . . . . . . . . . . . . .7-1
Using the Mounter software . . . . . . . . . . . . . . . . . . . . . . . . . . . . . . . . . . .7-1
Installing Mounter software . . . . . . . . . . . . . . . . . . . . . . . . . . . . . . . .7-1
Mounter software overview . . . . . . . . . . . . . . . . . . . . . . . . . . . . . . . .7-2
You’ve got to connect first . . . . . . . . . . . . . . . . . . . . . . . . . . . . . . . . .7-2
Viewing your pictures . . . . . . . . . . . . . . . . . . . . . . . . . . . . . . . . . . . . .7-3
Transferring pictures to your computer . . . . . . . . . . . . . . . . . . . . . . .7-4
Transferring pictures and scripts to your camera . . . . . . . . . . . . . . . .7-4
Opening picture files in other software programs . . . . . . . . . . . . . . .7-6
Saving sound . . . . . . . . . . . . . . . . . . . . . . . . . . . . . . . . . . . . . . . . . . . .7-6
Setting preferences . . . . . . . . . . . . . . . . . . . . . . . . . . . . . . . . . . . . . . .7-7
Exiting Mounter software . . . . . . . . . . . . . . . . . . . . . . . . . . . . . . . . . .7-7
Placing the memory card in your computer . . . . . . . . . . . . . . . . . . . . . . .7-7
Picture Card Adapter . . . . . . . . . . . . . . . . . . . . . . . . . . . . . . . . . . . . .7-8
Memory Card Reader . . . . . . . . . . . . . . . . . . . . . . . . . . . . . . . . . . . . .7-9
Table of Contents
8 Transferring pictures via TWAIN software . . . . . . . . . . . . . . . . . .8-1
Installing TWAIN software. . . . . . . . . . . . . . . . . . . . . . . . . . . . . . . . . . . 8-1
TWAIN software workflow . . . . . . . . . . . . . . . . . . . . . . . . . . . . . . . . . . .8-2
Connecting the camera to your computer . . . . . . . . . . . . . . . . . . . . . . . . .8-2
Starting the TWAIN Software . . . . . . . . . . . . . . . . . . . . . . . . . . . . . . . . .8-3
Selecting the source of your pictures . . . . . . . . . . . . . . . . . . . . . . . . . . . .8-4
Selecting the camera’s contents . . . . . . . . . . . . . . . . . . . . . . . . . . . . .8-4
Taking a picture . . . . . . . . . . . . . . . . . . . . . . . . . . . . . . . . . . . . . . . . .8-4
v
Page 6

Selecting pictures on your computer . . . . . . . . . . . . . . . . . . . . . . . . .8-5
Previewing your pictures . . . . . . . . . . . . . . . . . . . . . . . . . . . . . . . . . . . . .8-5
Play a picture’s attached sound . . . . . . . . . . . . . . . . . . . . . . . . . . . . . .8-6
Expanding and collapsing pictures . . . . . . . . . . . . . . . . . . . . . . . . . . .8-6
Opening a picture in full view . . . . . . . . . . . . . . . . . . . . . . . . . . . . . .8-6
Displaying picture information . . . . . . . . . . . . . . . . . . . . . . . . . . . . . .8-7
Transferring pictures . . . . . . . . . . . . . . . . . . . . . . . . . . . . . . . . . . . . . . . . 8-7
Saving sound . . . . . . . . . . . . . . . . . . . . . . . . . . . . . . . . . . . . . . . . . . . .8-8
9 Tips and troubleshooting . . . . . . . . . . . . . . . . . . . . . . . . . . . . . . . . 9-1
General maintenance and safety . . . . . . . . . . . . . . . . . . . . . . . . . . . . . . . .9-1
Communicating with the computer . . . . . . . . . . . . . . . . . . . . . . . . . . . . .9-2
Monitor adjustment . . . . . . . . . . . . . . . . . . . . . . . . . . . . . . . . . . . . . . . . .9-2
Printing . . . . . . . . . . . . . . . . . . . . . . . . . . . . . . . . . . . . . . . . . . . . . . . . . . .9-3
Troubleshooting. . . . . . . . . . . . . . . . . . . . . . . . . . . . . . . . . . . . . . . . . . . . 9-4
10 Getting help . . . . . . . . . . . . . . . . . . . . . . . . . . . . . . . . . . . . . . . . 10-1
Software help . . . . . . . . . . . . . . . . . . . . . . . . . . . . . . . . . . . . . . . . . . . . .10-1
Online services . . . . . . . . . . . . . . . . . . . . . . . . . . . . . . . . . . . . . . . . . . . 10-1
Faxed information . . . . . . . . . . . . . . . . . . . . . . . . . . . . . . . . . . . . . . . . .10-1
Customer support . . . . . . . . . . . . . . . . . . . . . . . . . . . . . . . . . . . . . . . . . .10-2
A KODAK Digital Access Software Plug-In Acquire . . . . . . . . . . . A-1
System and Software Requirements . . . . . . . . . . . . . . . . . . . . . . . . . . . . A-1
Installing Digital Access Software . . . . . . . . . . . . . . . . . . . . . . . . . . . . . A-2
Connecting the Card Reader . . . . . . . . . . . . . . . . . . . . . . . . . . . . . . . . . . A-2
Digital Access Application Window . . . . . . . . . . . . . . . . . . . . . . . . . . . A-3
Getting Pictures from the Camera Memory Card . . . . . . . . . . . . . . . . . . A-5
Select Pictures . . . . . . . . . . . . . . . . . . . . . . . . . . . . . . . . . . . . . . . . . . A-7
Change Thumbnail and Picture Display Size . . . . . . . . . . . . . . . . . . A-7
View a High-resolution Picture . . . . . . . . . . . . . . . . . . . . . . . . . . . . A-8
View Burst and Time-lapse Pictures . . . . . . . . . . . . . . . . . . . . . . . . A-9
Play the Audio Attached to a Picture . . . . . . . . . . . . . . . . . . . . . . . A-11
Rotate Pictures . . . . . . . . . . . . . . . . . . . . . . . . . . . . . . . . . . . . . . . . A-11
vi
Page 7

Delete Pictures . . . . . . . . . . . . . . . . . . . . . . . . . . . . . . . . . . . . . . . . A-11
View Picture Information . . . . . . . . . . . . . . . . . . . . . . . . . . . . . . . . A-12
Getting Pictures from Your Computer . . . . . . . . . . . . . . . . . . . . . . . . . A-12
Transferring Pictures . . . . . . . . . . . . . . . . . . . . . . . . . . . . . . . . . . . . . . A-13
Transfer Individual Pictures . . . . . . . . . . . . . . . . . . . . . . . . . . . . . . A-13
Transfer Thumbnails on a Contact Sheet . . . . . . . . . . . . . . . . . . . . A-13
Saving Pictures to Your Computer . . . . . . . . . . . . . . . . . . . . . . . . . . . . A-14
Save Individual Pictures . . . . . . . . . . . . . . . . . . . . . . . . . . . . . . . . . A-15
Save the Audio Attached to a Picture . . . . . . . . . . . . . . . . . . . . . . . A-15
Export an APPLE QuickTime Movie . . . . . . . . . . . . . . . . . . . . . . . A-16
Setting Preferences . . . . . . . . . . . . . . . . . . . . . . . . . . . . . . . . . . . . . . . . A-17
Table of Contents
Warranty & Regulatory Information
Index
vii
Page 8

1
Getting started
So where is the Þlm?
Of course there is no film, but you knew that already. The KODAK DIGITAL
SCIENCE™ DC260 Zoom Camera (DC260) and the KODAK DIGITAL
SCIENCE™ DC220 Zoom Camera (DC220) take great pictures without using
film. Here are some of the things that you can do:
✔
take pictures and immediately view them on the color camera display, on
your TV, or on your computer
1
Getting started
take burst and timelapse pictures
✔
✔
add sound to a picture
✔
organize your pictures in electronic photo albums (DC260 only)
transfer your pictures to your computer and do things like e-mail them to
✔
family and friends
Camera features
The DC220/DC260 Camera features:
✔
built-in flash with red-eye reduction
an easy to use status display of camera settings
✔
✔
removable memory card
✔
infrared remote connection to compatible devices
a 2X zoom lens (29 to 58mm) on the DC220 and a 3X zoom lens (38.4 to
✔
115.2mm) on the DC260 to zoom in on subjects
✔
a close up option to set the focus at 8 in. (20 cm) (DC220 only)
✔
a mode dial to activate one of four functions on the camera:
Capture —takes, previews, and adjusts the exposure of pictures
Review —reviews, plays, or deletes pictures
Connect —the camera communicates with your computer
Info —displays information about the camera
1-1
Page 9

Typical uses for your camera
So you bought this great new digital camera and now you want to know what to
do with it. Here is a typical scenario:
1. Turn on your camera and
put it in the Capture mode.
2. Take a picture and instantly
review it.
3. Add sound to your picture.
4. Put the camera in the
Review mode.
5. Scroll through your
pictures.
6. Play back the pictureÕs
sound.
7. Magnify the picture on the
LCD to see its detail.
A push of a button and a turn of the
dial. See page 3-2.
With your digital camera you can take
single, burst, or timelapse pictures. See
page 3-14.
Record a reminder to mail your
insurance premium and attach it to the
picture of your latest fender-bender. See
page 3-16.
The Review mode lets you vie w, edit, and
organize your pictures. See page 4-1.
One at a time, in a continuous scroll, or
in a fast scroll. See page 4-5.
You can also play a series of burst or
timelapse pictures. See page 4-14.
Get a close up view of your
subject. See page 4-15.
8. Connect your camera to
your computer.
9. Transfer the pictures to
your computer.
Now the skyÕs the limit.
With various software programs you can e-mail pictures to friends,
place pictures in your documents and letters, manipulate your
picture in image editing software...you name it. Try Picture Easy—it
offers great ways to use your digital pictures.
1-2
You can use a serial, USB, or infrared
connection. See page 6-1.
Choose from Mounter, TWAIN, or
KODAK DIGITAL SCIENCE Picture
Easy Software 3.0. See Chapters 7 and
8 in this Guide and the Picture Easy
User’s Guide.
Page 10

DC220 and DC260 software
Included with your camera is a CD-ROM containing software that will help you
use your digital pictures:
✔
Camera Properties which allows you to setup your digital camera through
a graphical interface on your computer
Mounter and TWAIN which allow you to move pictures from the camera
✔
to your computer
✔
Picture Easy which allows you to organize, enhance, share, and print your
digital pictures
☞
This User’s Guide describes the DC220/DC260 Camera operation and the
operation of software for use on WINDOWS PC computer systems. For
information about the Macintosh plug-in software, please refer to Appendix
A.
1
1
Getting started
Getting started
System Requirements
PC with 486/66MHz microprocessor or PENTIUM Processor
✔
16 MB or more of RAM (WINDOWS 95), 32 MB RAM (WINDO WS NT
✔
4.0)
✔
50 MB hard disk space available
✔
available serial port, IrDA connection, USB port or PC Card reader
USB requires WINDOWS 95 4.00.950B and supporting hardware
✔
✔
IrDA requires WINDOWS 95 and supporting hardware
✔
CD-ROM drive
256 colors (thousands of colors recommended)
✔
✔
System Administrator privileges to install on a WINDOWS NT 4.0
system
1-3
Page 11

Installing software
To install the software:
1
Close all other software programs before starting the DC220/DC260
software installation.
2
Place the DC220 or DC260 CD into your CD-ROM drive.
3
Select the language in which you want to view menus and install the
software.
The CD Browser menu appears.
4
Click the INSTALL DC220/DC260 SOFTWARE button.
5
Follow the instructions on your computer screen to complete the
installation.
You are now ready to run the newly installed software. Detailed information on
Camera Properties Software (Chapter 5), KODAK Mounter Software (Chapter
7), and TWAIN Software (Chapter 8) are included in this user manual.
Instruction manuals for the additional software packages that were installed are
included in the camera package.
Accessories
The following accessories for the DC220 and DC260 Cameras can be purchased
from your local Kodak dealer or computer dealer.
Camera Accessories Item Number
KODAK DIGITAL SCIENCE Premium Accessory
Kit for DC200 Series Digital Camera
KODAK DC200 Series Premium Camera Bag 809 2710
Lens Cap for DC220/DC260 Zoom Camera 139 5185
KODAK DIGITAL SCIENCE AC Adapter for
DC200 Cameras
KODAK Ni-MH/Ni-Cd Battery Charger with 4AA
NiMH Batteries
190 6130 (US/Canada)
188 0459 (International)
122 0557 (US/Canada)
190 9282 (International)
974 2933 (Australia/NZ)
807 6341
1-4
Page 12

Camera Accessories Item Number
Serial Interface Cable for DC220/DC260 Zoom
Cameras and WINDOWS platforms
USB Interface Cable for DC220/DC260 and
WINDOWS
Video/Audio Cable for DC220/DC260 Zoom
Cameras
COMPACTFLASH Card
10 MB Card 863 3828 32 20
10 MB Card With Adapter 849 2399 32 20
20 MB Card 146 8628 65 40
20 MB Card With Adapter 824 2026 65 40
32 MB Card 180 6900 100 65
32 MB Card With Adapter 196 4840 100 65
Card Adapter only 156 1596 N/A N/A
*
These figures are based on the best quality and highest resolution in a Still
Picture JPEG format. These are approximate numbers because the actual
numbers are determined by the detail in the scene of each picture.
Item
Number
804 4745
811 2690
812 6344
Number of
Pictures
220 260
1
1
*
Getting started
Getting started
.
KODAK DIGITAL SCIENCE Inkjet Quality
Products
Snapshot Paper, 36 sheet, 4x6in. 145 6979
Photographic Quality paper, Photo Weight, 15 sheet, 8.5x11in. 158 5199
Photo Paper, Photo Weight, 50 sheet, 8.5x14in. 121 5904
Photo Paper, Photo Weight, 50 sheet, 11x17in. 877 0356
Photographic Quality Paper, Photo Weight, 15 sheet, 210x297mm 134 2013
Photo Paper, Photo Weight, 50 sheet, 297x420mm 829 5370
Photographic Quality Paper, Letter Weight, 15 sheet, 8.5x11in. 815 0443
Item
Numbe
r
1-5
Page 13

KODAK DIGITAL SCIENCE Inkjet Quality
Products
Photographic Quality Paper, Photo Weight, 15 sheet, 210 x 297mm 197 5937
Photo Paper, Perforated 2 up 5"x7", 15 sheet with Picture Easy
Software CD, 8.5x11in.
Photo Paper, Perforated 2 up 127x177mm, 15 sheet with Picture
Easy Software CD, 210x297 mm
Photo Paper, Perforated 6 up 2.25" x 3.5", 15 sheet with Picture
Easy Software CD, 8.5x11in.
Photo Paper, Perforated 6 up 57.1 x 88.9mm, 15 sheet with Picture
Easy Software CD, 210x297 mm
Photo Paper, Perforated 10 up 2" x 3.5", 20 sheet, 8.5 x 11in. 877 8151
Photo Paper, Perforated 10 up 50 x 90mm, 20 sheet, 210x297 mm 863 9064
Photo Stickers, Pre cut 6 up 3.75" x 3.25", 15 sheet with Picture
Easy Software CD, 8.5 x 11 in.
Photo Stickers, Pre cut 6 up 95.25 x 82.55mm, 15 sheet with Picture
Easy Software CD, 210x297 mm
Photo Stickers, Full Page, 15 sheet, 8.5x11in. 847 2177
Photo Greeting Card Paper, 1/2 Fold, 20 sheet with 20 envelopes,
28.5x11in.
Photo Greeting Card Paper, 1/2 Fold, 20 sheet with 20 envelopes,
210x297 mm
Premium Transparency Film, 15 sheet, 8.5x11in. 182 0445
Premium Transparency Film, 15 sheet, 210 x 297mm 149 8369
Item
Numbe
r
864 5491
888 5139
870 2870
802 1172
167 4647
114 2470
106 2330
103 6540
Additional information on accessories is available from:
✔ the W orld W ide Web—http://www.kodak.com/go/accessories
✔ in the U.S., shop on-line at http://www.kodak.com/go/shop
✔ your computer or Kodak dealer
☞Not all accessories are available in all countries.
1-6
Page 14
2
Meet your
camera
To take full advantage of your camera, it’s important to familiarize yourself with
your KODAK DIGITAL SCIENCE™ DC220 or DC260 Zoom Camera’s buttons,
displays, and hardware features.
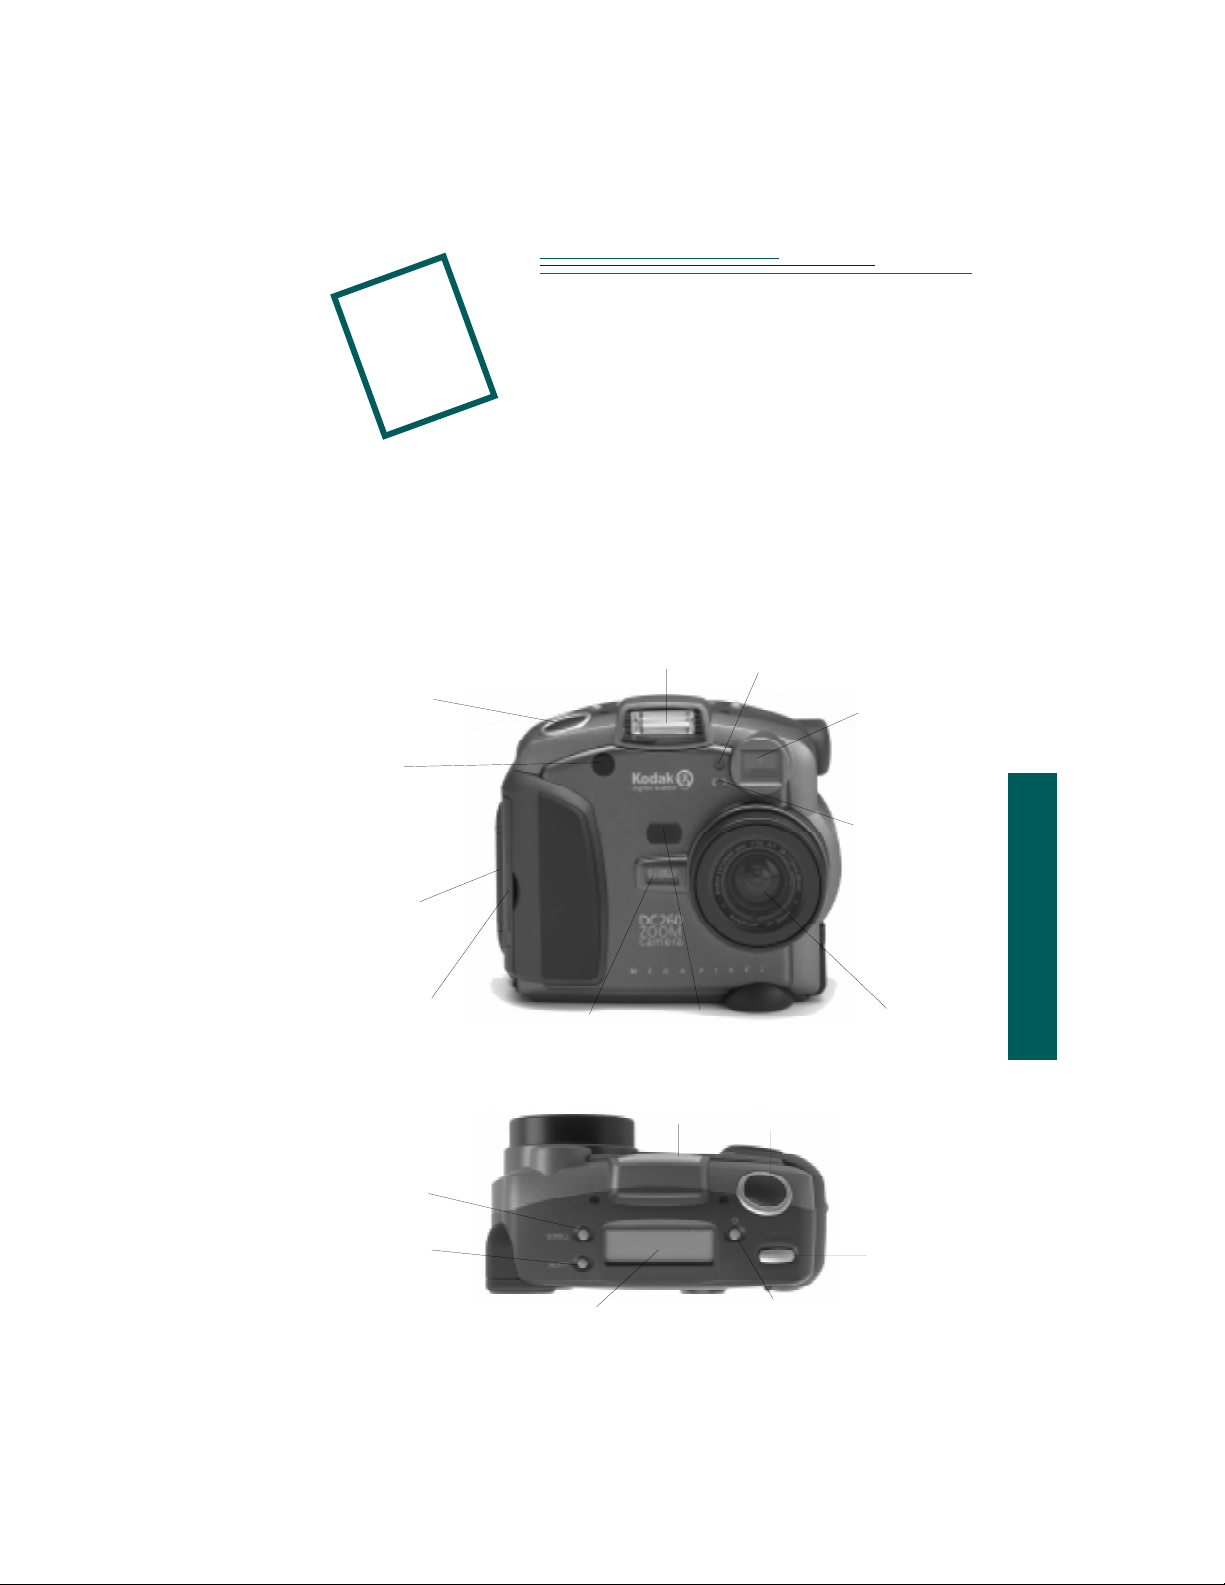
Your Digital Camera
Flash
Shutter
Self-timer
light
Light sensor
Viewfinder
Battery door
Memory card
door
SCROLL
button
SELECT
button
Auto Focus
sensor (DC260 only)
Status display
Flash sensor
Infrared
transceiver (IR port)
Flash
Self-timer & Close up (DC220 only)
Shutter
Lens
Power
2
Your camera
2-1
Page 15

Ready light
Display button
Menu button
Audio LED
Audio volume
Audio
Record button
External flash
(DC260 only)
Video & audio
Out
Viewfinder
Serial/USB
AC adapter
Mode dial
Zoom
LCD screen
Softkeys
Four-way controller
Tripod socket
☞ The camera shown is a DC260. In cases where the features differ from the
camera shown, the User’s Guide will note it.
2-2
Page 16

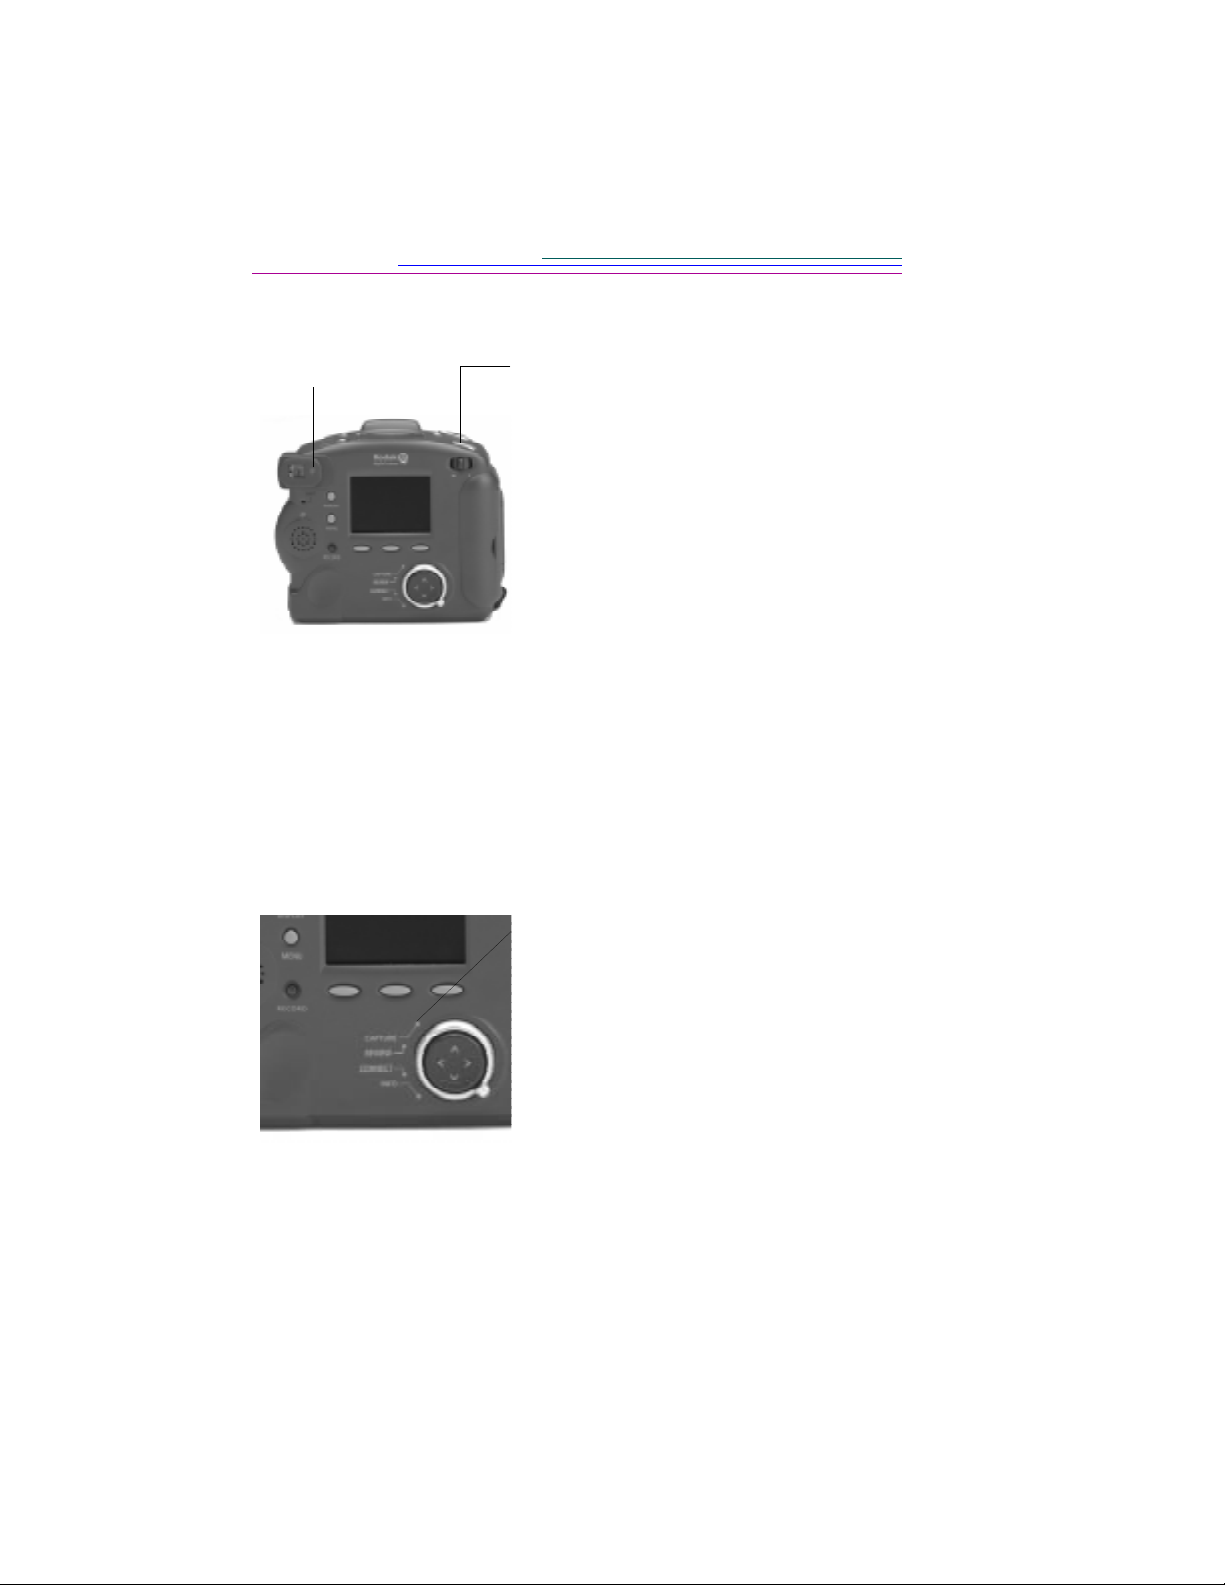
Softkeys
Your camera has three “softkeys.” A softkey is a button whose function changes
according to what is displayed above it. For example, in the Capture mode, the
following screen can be displayed:
In this case, pressing the left softkey enters the Capture Preferences. When
presented with a different screen display, pressing this softkey may perform an
entirely different function.
2
Mode dial
The camera’s mode dial allows you to choose from four camera modes:
✔ Capture—the mode you’ll use to take beautiful digital pictures
✔ Review—this mode allows you to view, edit, and organize your pictures
✔ Connect—the mode you’ll use to connect your camera to your computer.
Once connected you can use Mounter, TWAIN, or KODAK DIGITAL
SCIENCE Picture Easy Software to move your pictures from your camera
to your computer.
✔ Info—this mode displays information about your camera’s firmware.
You can change modes without turning your camera off.
Four-way controller
The four-way controller’s up, down, right, and left arrows allow you to move
through the Camera’s menus and icons and to scroll through your pictures.
Your camera
2-3
Page 17

Your camera display
On the top of the camera a display shows the current settings. Take a minute to
become familiar with the various entries on the display. The following
subsections briefly describe each entry.
☞ The camera must be turned on to view the Status Display. You must also be
in the Capture mode to view and interact with this display.
Flash
Set using the
hardware buttons
or Capture
Mode menus
Exposure
compensation
Set using the
SCROLL and
SELECT buttons
hardware buttons
or Capture Mode
Picture
Set using the
type
menus
Quality
Set using the
hardware buttons
or Capture
Mode menus
Close up (DC220
only)
Set using the
SCROLL and
SELECT buttons
Self-timer
Set using the
SCROLL and
SELECT buttons
Battery
status
Manual mode
Set using the
Capture Mode
menus
InfraRed
communication
A read only display
Pictures
remaining
A read only displayA read only display
☞ For information on how to define settings through the Capture Mode menus
and through the SCROLL and SELECT buttons, refer to Chapter 3.
Flash
Your camera is equipped with a built-in flash that offers a red-eye reduction
feature. The flash has an effecti ve range of approximately 1.6 to 9.8 ft. (0.68 to 3
m). There are four Flash settings:
2-4
Auto— the flash fires automatically when you press the SHUTTER
button and the camera determines that there is not enough light.
Red-eye— if the camera determines that there is not enough light,
the flash fires once when you press the SHUTTER button to reduce
the chance of red-eye and then flashes a second time, 600
milliseconds later, when the picture is taken.
Page 18

Fill— the flash fires every time you press the SHUTTER button.
Use this setting when the lighting is poor or when your subject is lit
from behind.
Off— the flash is turned off and will not fire. If you turn the flash
off, the next time you turn the camera on, the camera defaults to the
Auto flash setting.
Exposure Compensation
The camera’s e xposure can be adjusted from -2.0 to +2.0 exposure value (EV) in
0.5 EV increments while in Capture mode.
If your pictures are:
✔ correctly exposed —maintain the AUTO default setting which will
automatically choose the correct exposure for the lighting conditions.
✔ too dark— increase (+) the exposure compensation setting
✔ too light— decrease (-) the exposure compensation setting
2
Picture Type
The Picture Type icon changes to indicate the type of picture you are taking.
There are three picture types:
Still— a single still picture is taken. The Still picture type is the
default; whenever you turn the camera on, Still pictures is the
selected picture type.
Burst— a series of pictures are taken in quick succession.
Timelapse— a series of pictures are taken with a time delay
between each picture. You can set the time delay through Capture
Preferences.
☞ Refer to Chapter 5, “Setting camera properties” for more information about
each picture type and their preference settings.
2-5
Your camera
Page 19

Quality
You may set your camera to take pictures with a Good, Better, or Best Quality
setting. The Quality setting indicates how much the picture is compressed to sav e
space on the memory card.
A brief detour to discuss quality and resolution...
Keep in mind that with your DC220 and DC260 Cameras you’ re generally going
to get beautiful digital pictures. But based on two factors, resolution and
compression , some pictures will be of a higher quality than others.
It’s basically quality versus quantity when it comes to pictures.
Instead of film, a digital camera places your pictures on a memory card. The
pictures are made up of pixels. Stand really close to your TV—so close that your
mother would yell at you if she saw you. Those little dots that make up the
picture are pixels. It’s the more the merrier when it comes to pixels and the
quality of your digital pictures. But everything has its price. The more pix els you
have (or the better the resolution in other words) the more space you use on
the camera memory card.
To save space, you can compress each picture. When a picture is compressed,
some color and detail information is discarded. More compression means a lower
quality picture. Less compression means a better quality picture.
Together, compression (or quality ) and resolution dictate how many pictures
you can fit on your memory card.
✔ If the quality of your pictures is most important, use high quality (which
results in little compression) and high resolution. You may want to do this
if you will be printing your pictures on a high quality printer.
✔ If space on your memory card is most important, use a lower quality
(which results in more compression) and standard resolution. You may
want to do this if you will be using your pictures in a Web page.
☞ Remember that Resolution and Quality are two different things. Resolution
is the number of pixels in the picture. Quality is how much you compress
them.
2-6
Page 20

We now return to our Quality discussion....
You may switch freely between the three settings when taking pictures. The
number of pictures the camera is able to store will vary accordingly. The Quality
and Resolutions settings combine to dictate how many pictures you can store on
your memory card. Higher Quality and Resolution settings mean you save more
picture information, making for higher quality pictures, but use more space of
your memory card.
The three Quality setting icons are:
Best— use this setting when image quality is very important for
maximum picture quality, especially for larger sized or zoom prints.
Better— use this setting for general picture taking, good quality
pictures, and to store a large number of pictures.
Good— use this setting to store the greatest number of pictures.
Self-Timer
Activating the Self-T imer option creates a 10-second delay between the time you
press the SHUTTER button and when the picture is taken. This allows enough
time for you to include yourself in the picture.
Close Up (DC220 only)
The camera offers a Close Up setting which allows you to focus as close as 8 in.
(20 cm).
☞ The viewfinder does not accurately display the subject in close up mode. T o
accurately capture the picture close up, the Preview option automatically
starts when the CLOSE UP button is pressed.
2-7
2
Your camera
Page 21

Batteries
☞ This is a display icon only. You cannot select or change this icon.
The camera comes equipped with four AA batteries. You can use standard 1.5V
alkaline, 1.7V lithium, rechargeable 1.2 NiMH, or rechargeable 1.2V NiCad
batteries. NiMH tend to give the best overall performance of rechargeable
batteries.
☞ Battery life will be reduced when Preview , Revie w, or Close-up Mode are in
use.
The battery power icon changes automatically.
Full— batteries are fully charged.
Low— batteries need to be replaced.
Blinking— batteries are insufficient to run the camera and need to be
replaced.
☞ Pictures stored in the card’s memory are not lost if the batteries
are depleted.
Pictures Remaining
☞ This is a display icon only. You cannot select or change this icon.
The Pictures Remaining icon changes automatically to indicate the remaining
number of pictures that can be stored at the current quality and resolution setting.
You may not select or change the Pictures Remaining icon.
☞ The Pictures Remaining number does not always change when a picture is
taken if the picture content is easily compressed.
When the card’s memory is full, the Status Display indicates Full. You must
delete existing pictures or change the memory card to take additional pictures.
For more information on how to delete pictures, refer to the “Deleting pictures”
section on page 4-13.
2-8
Page 22

Manual Mode
The DC260 Camera supports two advanced capture modes—the external flash
mode and the long time mode. The DC220 Camera supports only the long time
mode.
The two manual mode icons are:
External flash mode— the DC260 camera’s built-in flash is
disabled and the external flash sync is used to provide flash. You set
the camera aperture setting (or f/stop). Choose from 1.8, 2.4, 4, 5.6,
8, 11, 16, or 22. The default value is 5.6 and pro vides an appropriate
depth of field for many identification or portraiture applications.
Long time mode— The camera’ s flash is disabled as it is assumed
that a long exposure time is necessary to obtain a proper exposure
within the current ambient lighting environment. You set the
exposure time between 0.5 and 4 seconds in 0.5 second increments.
Infrared Communication
In a camera to camera connection in the Review mode, two cameras can
communicate with each other through an infrared connection. The Infrared
Communication icon appears and changes to indicate the state of the camera’s
communication with its infrared partner camera.
2
Your camera
The infrared communication icons are:
Initiating communication— Infrared communication has been
initiated.
Searching for communication partner— The camera is
looking for an infrared communication partner.
Blinking
Communicating— The camera is communicating with its
infrared partner. The alphanumeric display also indicates the number
of pictures that have yet to be transmitted.
Communication timed out— A problem has occurred that has
caused the communication to time out. The icon continues to blink
until you respond to the LCD dialog or turn the camera off.
Blinking
2-9
Page 23

Removable memory card
The DC220 and DC260 cameras use a removable KODAK DIGITAL SCIENCE
Picture Card, also referred to as a CompactFlash or memory card, for storing
your pictures. A memory card can be thought of as a roll of film. But unlike a roll
of film, the picture data on the card can be erased and the card can be reused.
☞ The KODAK DIGITAL SCIENCE Picture Card is furnished with your
camera. Additional remo vable memory cards can be obtained from a v ariety
of sources. Visit http://www.kodak.com/go/accessories for
ordering directly from Kodak, or visit the retail store where you purchased
your camera. The memory cards can also be purchased at any computer
store. Any standard CompactFlash card that is “CF” certified will function
properly. A CF certified card will have the CF logo on its label.
The removable memory card contains no moving parts. It stores information in
and maintains that data when removed from your camera. The memory card
retains information until you either delete the data or re-format the card. Normal
magnetic interference and airport x-rays will not harm the stored data.
Reformatting the memory card
In order to communicate with the camera and the PC, the removable memory
card requires the same standard DOS format that is used by floppy diskettes. The
DC220 and DC260 offer you the format option if the camera doesn’t recognize
the format of the card when it is inserted into the camera.
If you suspect that the card requires formatting and the camera does not
automatically provide you the option, you can format the card by placing it into a
PCMCIA card adapter and placing the card adapter in your computer or in a card
reader attached to a PC. (Refer to “Placing the memory card in your computer”
on page 7-7 for more information.)
Follow the same procedures as you would for formatting a floppy diskette:
1 Double-click on the My Computer icon.
The My Computer window appears.
2 With the removable memory card inserted into your computer or card reader,
highlight the icon representing the memory card.
3 Click the right mouse button and select FORMAT from the pop-up menu.
2-10
Page 24
☞ Reformatting a removable memory card deletes all information on the card.
This deleted information cannot be recovered.
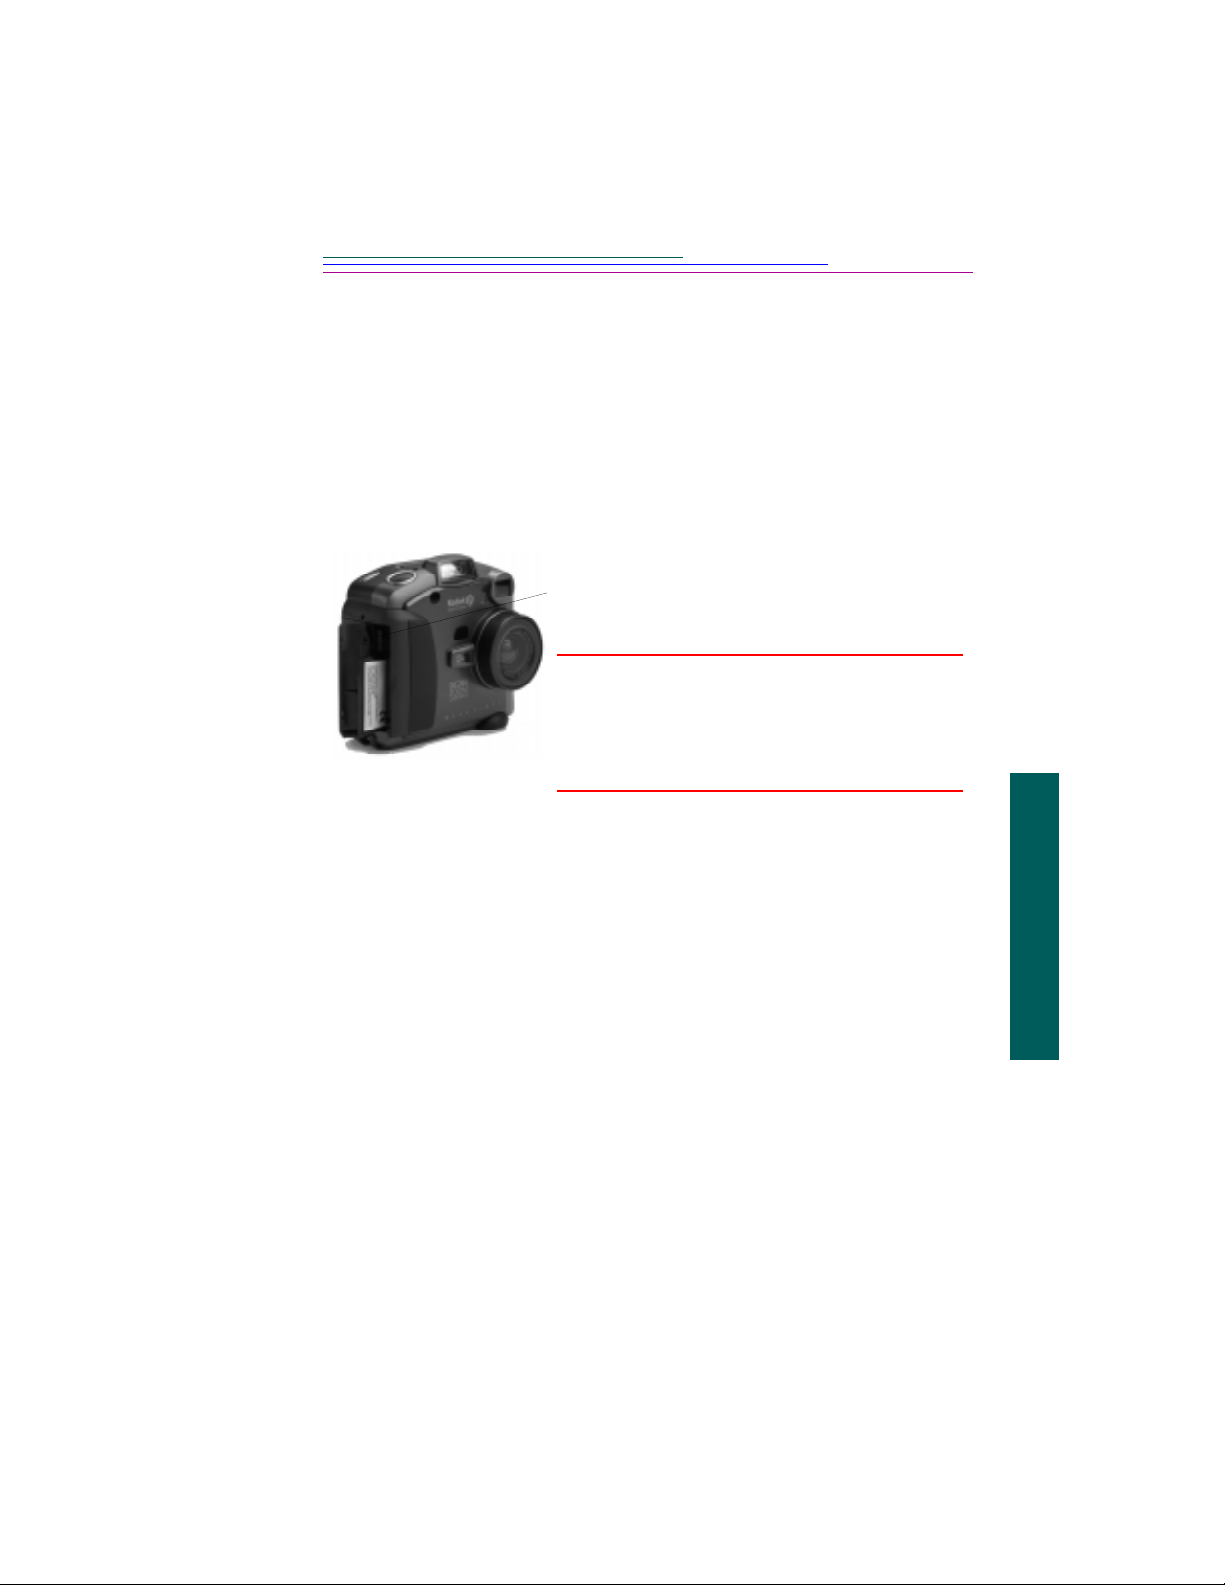
Removing the memory card
Although your camera can’t take pictures without the memory card, you may
want to remove the card to use in another camera or to place in your computer.
To remove the memory card:
1 Open the memory card door.
2 Flip the memory card release button so it
protrudes out from the side of the camera.
WARNING: Do not depress the release button
if the red LED under the button is
on or blinking. Ejecting the card
while this LED is on may result in
the loss of all data on the card.
3 Depress the release button to release the
memory card from the camera.
4 Pull the memory card out of the camera.
☞ For a more detailed discussion of the memory card, the PCMCIA card, and
the K OD AK DIGITAL SCIENCE Picture Card Adapter , refer to “Placing the
memory card in your computer” on page 7-7.
Power management
You can use batteries or an AC adapter to power your camera. Refer to the
following subsections for information about battery and AC adapter use.
To conserve power usage, the camera has a sleep mode. After a specified period
of inactivity, the camera enters sleep mode by turning the LCD off. You can set
the amount of time before entering sleep mode through the Capture menu
settings. Refer to setting the Sleep Timeout preference on page 3-10. After 10
minutes of inactivity, the camera turns itself off.
2-11
2
Your camera
Page 25
To reactivate your camera from the sleep mode:
✔ In the Review mode, press the DISPLAY button.
✔ In the Capture mode, use the ZOOM or SHUTTER as you normally
would to take a picture.
Installing batteries
To install the batteries:
1 Open the battery door.
2 Slide the inside battery cover toward the back
of the camera and then lift it away from the
camera.
3 Insert the batteries as indicated on the battery
cover.
4 Close and lock the inside battery cover and
close the battery door.
WARNING: When using batteries, limit the continuous operation of the LCD
for previewing pictures to less than 30 minutes. This is
particularly true with Lithium batteries. Previewing pictures
requires a significant electrical current, which over time could
cause your batteries to heat up significantly. Should your camera
become too hot inside, it is designed with protective circuitry to
turn itself off. You should allo w sufficient time for the camera to
cool before turning it on again. Consider using an AC adapter
when using preview mode for extended periods.
Always follow your battery manufacturer's directions fully.
2-12
Page 26

☞ Remove the batteries if the camera will not be used for an extended period
of time. This extends the battery life and prevents camera damage from
battery leaks or corrosion. If the batteries are removed from the camera for
more than a few days, the date and time will be deleted and must be reset.
Using the AC adapter
The AC adapter allows you to connect your camera to a standard electrical outlet.
This is especially useful when you are transferring pictures into your computer.
The adapter powers the camera, but does not charge the batteries.
WARNING: Only use the AC adapter designed for the DC220 or DC260. Use
of any other adapter may void the warranty and can cause camera
failure, fire, electric shock, or injury.
1 Insert the AC adapter into the AC power adapter
connection on the side of your camera.
2 Connect the other end of the adapter into a power
outlet.
3 Turn the camera on.
2
☞ The Battery icon does not appear on the Status
Display when an AC adapter is used.
2-13
Your camera
Page 27

3
Taking pictures
Here is a summary of the steps you’ll likely follow to take pictures with your
DC220 or DC260 Camera:
It doesn’t work very well if you don’t. Refer to
Turn the
camera on
Enter the
Capture mode
Define settings
the “Turning the camera on” section on
page 3-2.
Make sure the Mode dial is pointing to
CAPTURE. Refer to the “Entering the Capture
mode” section on page 3-2.
Settings can be defined either through using the
SCROLL and SELECT buttons or through the
settings menus on the LCD. Refer to the
“Defining settings” section on page 3-3.
Take a picture
You can take still, burst, or timelapse pictures.
Refer to the “Taking pictures” section on
page 3-14.
3
Taking pictures
3-1
Page 28
Turning the camera on
Ready light
1 Press the POWER button.
The green Ready light on the back of the
camera blinks for approximately 10 seconds
until the camera is ready to take pictures and
the Status Display on the top of the camera
turns on.
To turn the camera off, press the POWER
button again.
☞ If the camera is turned off while a picture
is being processed, the camera will finish
processing the picture before turning off.
If your camera is idle for the time period you set in the Camera Properties Timeout Settings, it automatically turns off. To turn the camera on again, press the
POWER button.
Entering the Capture mode
You will use the Capture Mode to take pictures. To place the camera in the
Capture Mode:
1 Turn the Mode dial to the CAPTURE
setting.
3-2
The camera moves the lens to a point away
from the camera.
☞ You cannot take pictures without a
memory card in the camera. If you enter
the Capture mode without a memory
card, the Status LCD flashes the message
“NO CARD.”
If the camera goes into sleep mode to
conserve power, the word “CARD”
remains on the Status LCD.
Page 29
DeÞning settings
You can define settings via the Capture mode menus and through the SCROLL
and SELECT buttons on the top of the camera.
☞ Capture mode settings affect only future pictures—they cannot be used to
alter pictures you have already taken.
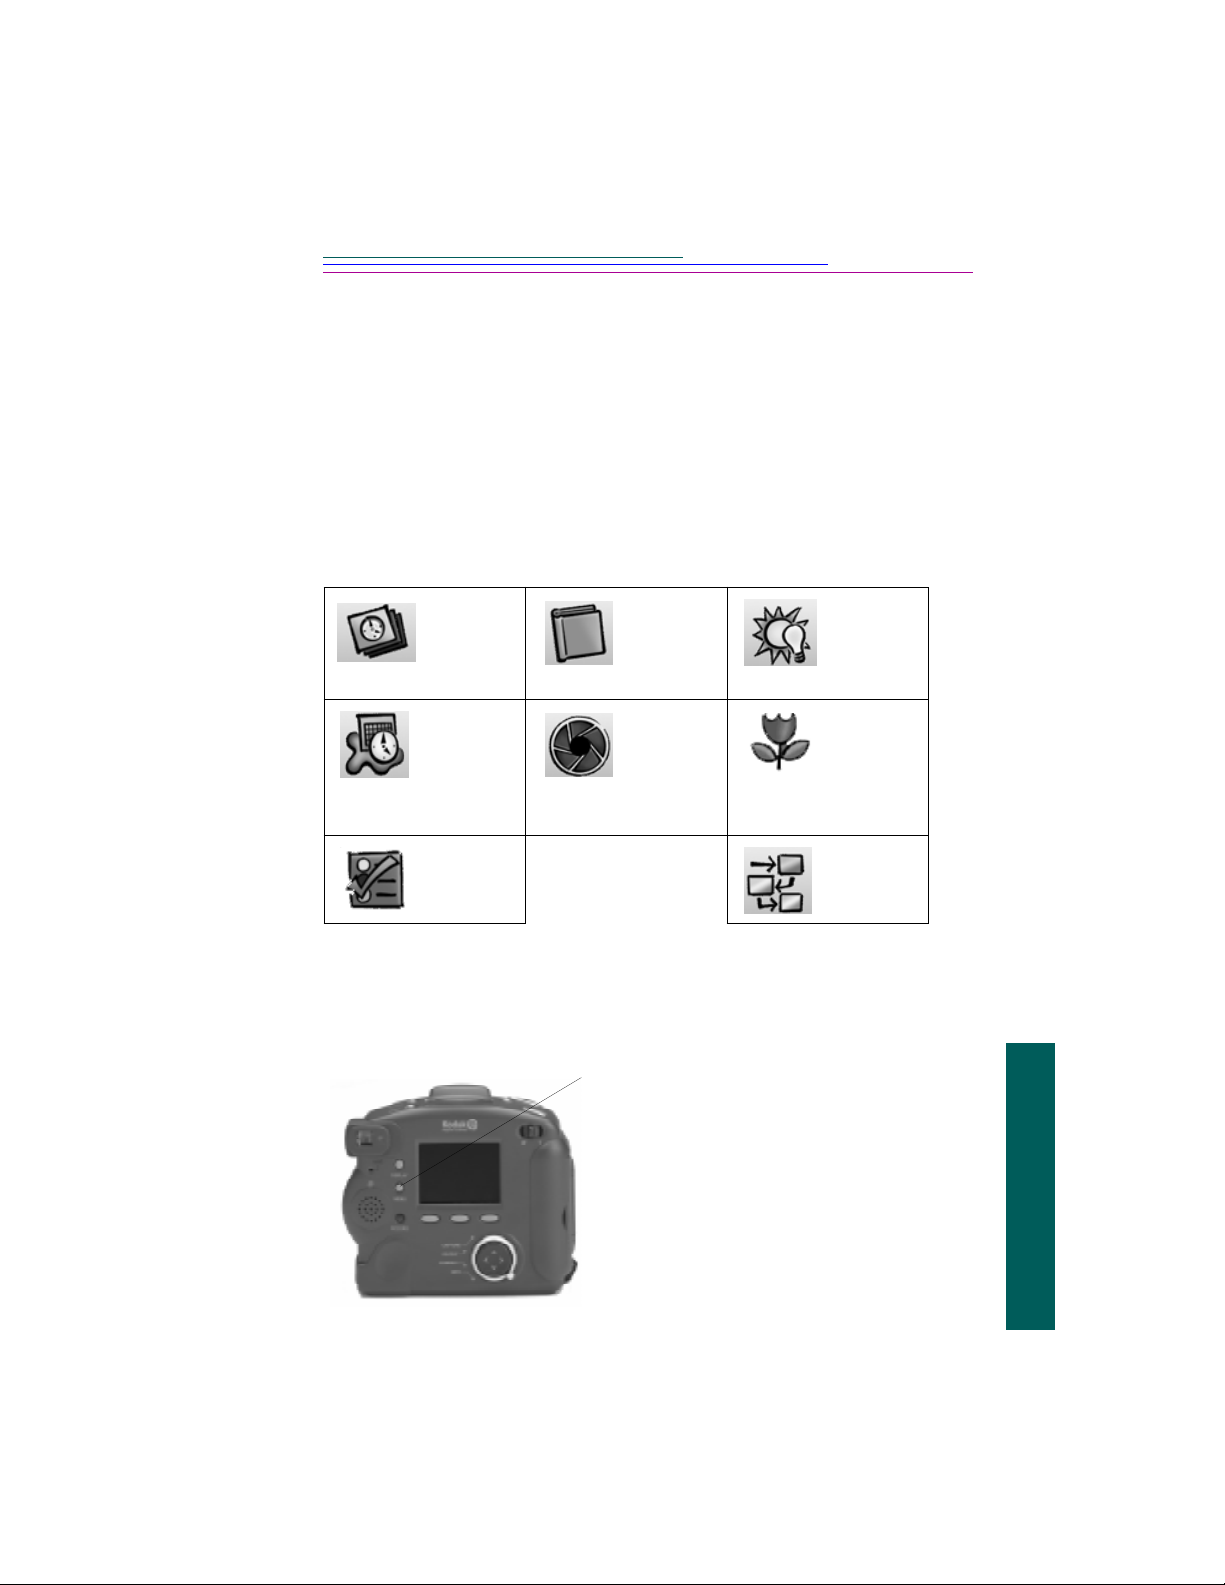
DeÞning settings via the Capture mode menus
The Capture mode preferences are divided into the following categories:
Picture
Type
Watermark Advanced
Preferences Script
Album
(DC260
only)
Exposure
Modes
(DC260 only)
White
Balance
Advanced
Focus
Mode
☞ The Script icon only appears when a script is present on your camera. It is
possible for multiple script icons to appear in your menus.
As a first step in adjusting the Capture mode settings via the menus, you need to
display the Capture Mode Settings screen on the LCD:
1 Press the MENU button.
The Capture Mode Settings scr een appear s
with the Picture Type icon selected.
3
Taking pictures
3-3
Page 30
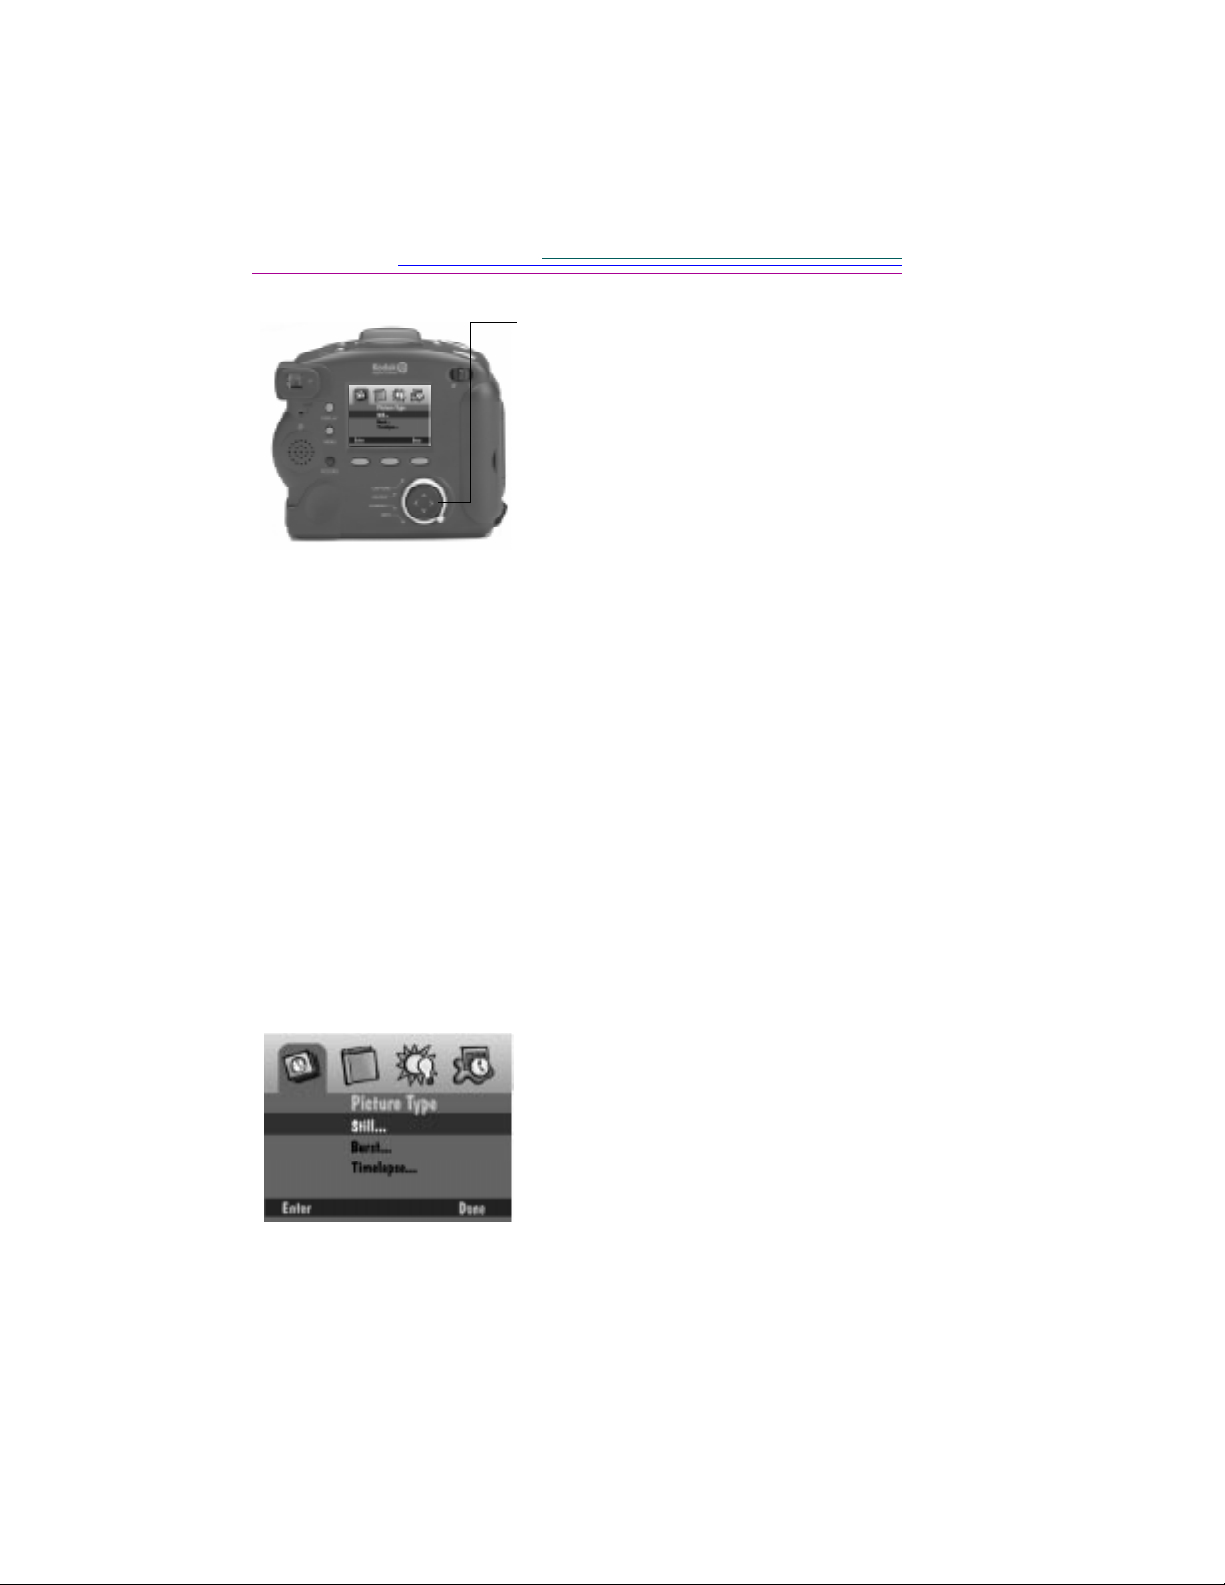
2 Press the left and right arrows to highlight
the icon representing the settings you want
to adjust.
Some icons do not appear on the initial
screen; continue to pr ess the right arrow to
display these additional icons.
3 Refer to the following subsections for
information about each setting category.
4 When you are satisfied with all your
settings, press the DONE softkey.
☞ The following subsections assume that you have turned the camera on,
entered the Capture mode, and pressed the MENU button to display the
Capture Mode Settings on the LCD.
Picture Type settings
Picture Type settings define the characteristics, including resolution, of your still,
burst, and timelapse pictures.
✔ Still pictures are your normal digital photographs.
✔ Burst pictures are a series of photographs taken in quick succession.
☞ In Burst mode, Medium and Standard resolutions may appear less sharp
than in a Still picture mode.
✔ Timelapse pictures are a series of photographs taken with a time delay
between each picture.
1 Press the down arrow to highlight the type
of picture you want to define.
2 Press the ENTER softkey.
The settings for the selected picture type
appear.
3 Use the up and down arrow keys to
highlight the particular setting you want to
specify.
☞ More information about
Picture Type settings can
be found in Chapter 5.
3-4
4 Use the left and right arrow keys to scroll
through the options for each individual
setting.
Page 31

Album settings (DC260 only)
Album settings specify the album into which pictures will be stored. All future
pictures are stored in the selected album until you change the album setting.
1 Press the down arrow to select one of the
following selections:
✔ No Album—your pictures are not
stored in an album.
✔ New Album—allows you to create a
new album. The New Album Name
screen appears.
Press the up and down arrows to select
☞ To remove an album,
highlight it and then
press the DISSOLVE
softkey. The album is
removed, but its pictures
are retained outside the
album.
a character. Press the right arrow to add
the selected character to the name. Add
additional characters until you have
spelled the name you want using a
maximum of 8 characters. When you
are satisfied with the name, press the
DONE softkey to return to the Album
Settings screen. Press the down arrow
to select the new album.
✔ An existing album name—your pictures
are stored in the album you select.
2 Press the SELECT softkey.
3 Press the DONE softkey.
Script setting
The Script setting allows you to run a predefined script that’ s been do wnloaded to
the System folder on the camera’s memory card. Scripts can be created to appear
on any screen, not only the Script setting screen.
A script can prompt you for certain actions and define the behavior of the camera
and its settings. For example, a script can set the camera to take burst pictures at a
certain rate. The script can then prompt you, using text on the LCD, to take a
picture and the camera waits for you to press the SHUTTER button.
☞ The DC220 and DC260 can run DIGITA-compatible scripts. These scripts
add new selections to existing menus or can create new menus and choices
3-5
3
Taking pictures
Page 32

to automate and extend camera operations. Visit http://
www.kodak.com for information on how to obtain scripts for your
camera.
To choose and run a script that has been placed on the camera:
1 Press the down arrow to choose the script
you want to execute.
2 Press the START softkey.
Any steps that follow depend on the chosen
script. The chosen script may begin
running or a screen containing subscripts
may appear.
☞ To stop a script that is running, press
the EXIT softkey which appears after
you push the START softkey.
White Balance settings
White Balance examines your pictures and tries to adjust the color balance to
remove the color cast that the current lighting conditions add.
1 Press the down arrow to highlight the type
of White Balance you want to use.
3-6
✔ Automatic—Use this setting when
taking pictures under a variety of
lighting conditions. This is the default.
✔ Daylight—Use this setting when taking
pictures outdoors.
✔ Fluorescent—Use this setting when
taking pictures under fluorescent light.
✔ Tungsten—Use this setting when taking
pictures under normal incandescent
light.
✔ Off—No White Balance adjustment is
made.
2 Press the SELECT softkey to select the
highlighted choice.
Page 33

Watermark settings
You can choose to place a date, time, text, or logo watermark on the pictures you
take. (Logo watermarks are available only on the DC260.)
1 Press the down arrow to select the type of
watermark you want.
2 Press the SELECT softkey.
✔ None—No watermark appears.
✔ Date and Time—The Date & Time
Stamp screen appears. In the Date &
Time Stamp screen, you can specify to
use the date, the time, or both.
☞ If you do not want a
watermark, select None.
☞ If a logo watermark file
(.lgo) exceeds 512 Kb, it
will not appear as an
option on the Logo
Stamp screen.
✔ Text—The Text Stamp screen appears.
When you select the text stamp, you
can select the EDIT softkey to change
the text.
✔ Logo—The Logo Stamp screen
appears. When you select the logo
stamp, you can select the EDIT softkey
to change the logo.
3 Press the left and right arrows to set each of
the following fields:
☞ Remember that
watermarks will only
appear on future pictures.
☞ You can see watermarks
on pictures in the Review
mode when the full
resolution picture
appears. You cannot see
watermarks on thumbnail
pictures.
✔ Left offset—The distance in from the
left side of the LCD to place the
watermark.
✔ Top offset—The distance down from
the top of the LCD to place the
watermark.
✔ Transparency—The level of
transparency for the watermark.
✔ Text color—The color of the text in the
watermark.
✔ Background color—The color of the
watermark’s background.
4 When you are satisfied with the settings,
press the DONE softkey.
3
Taking pictures
3-7
Page 34

Advanced Exposure Modes settings
The Advanced Exposure Modes settings allow you to select one of the following
modes:
✔ Programmed AE—the camera uses the programmed automatic exposure
setting which selects the appropriate flash and aperture setting. This is the
default.
✔ Long Time Exposure—the camera’s flash is disabled as it is assumed that
the long time exposure is necessary to obtain a proper exposure within the
current ambient lighting environment. You set the exposure time between
0.5 and 4 seconds in 0.5 second increments.
✔ External Flash (DC260 only)—the camera’s built in flash is disabled and
the external flash sync is used to provide flash. You set the camera
aperture (or f/stop). Choose from 3, 4, 5.6, 8, 11, 16, or 22. The default
value is 5.6 which provides an appropriate depth of field for many
identification or portraiture applications.
To select an Advanced Exposure mode:
1 Press the down arrow to choose the
exposure mode you want to use.
2 Press the SELECT softkey.
✔ Programmed AE—the programmed
automatic exposure setting is used. This
is the default.
3-8
✔ External Flash—the External Flash
Setup screen appears. Use the left and
right arrows to set the aperture.
✔ Long Time Exposure—the Long Time
Setup screen appears. Use the left and
right arrows to set the exposure time.
3 Press the DONE softkey.
If you set a new aperture or exposure time,
it appears on the Status LCD on top of the
camera.
Page 35

Advanced Focus Mode settings (DC260 only)
The Advanced Focus Mode settings allow you to select one of the following
modes:
✔ Multi-Spot Auto Focus
✔ Single-Spot Auto Focus
✔ Manual Focus
To select the focus mode:
1 Press the down arrow to choose the focus
mode you want to use.
2 Press the SELECT softkey.
✔ Multi-Spot Auto Focus—the camera
uses a multi-spot focus algorithm which
determines the focus position using
three positions on the lens.
✔ Single-Spot Auto Focus—the camera
uses a single-spot focus algorithm
which determines the focus position
using the subject in the center of the
lens.
Preferences settings
The Preferences settings include:
✔ Capture
✔ Date and Time
✔ Camera Name
✔ Manual Focus—the Manual Focus
Setup screen appears which allows you
to specify the focus position. Use the
left and right arrows to set the focus
distance.
3 Press the DONE softkey.
3
Taking pictures
3-9
Page 36

Capture
☞ Pressing the DEFAULT
softkey restores the
default Capture
Preference values.
1 Press the down arrow to select the
particular setting you want to change.
✔ File T ype—the format in which pictures
are saved, either FlashPix (FPX) or
JPEG (JPG).
✔ Quickview—displays the picture just
taken for a duration between 0.5 and 30
seconds.
✔ Auto Rotate—rotates pictures
automatically in response to a sensor
that senses the orientation of the camera
and rotates pictures to a vertical plane.
The Auto Rotate sensor does not
function well when you are above the
subject with the lens perpendicular to
the floor. In such cases, Auto Rotate
should be OFF.
✔ System sounds—plays shutter sounds
when a picture is taken and alert sounds
when an error occurs.
3-10
✔ Sleep Timeout—the number of minutes
the camera will sit inactive with the
LCD on before it goes into the low
power mode. In the “sleep” mode, the
LCD turns off, the Status Display on
the top of the camera remains on, and
you can take a picture.
2 Press the left and right arrows to change
each setting.
3 When you are satisfied with the settings,
press the DONE softkey.
Page 37

Date and Time
1 Press the FORMAT softkey.
The Format screen appears.
2 Press the down arrow to select the date and
time format you want to use.
3 Press the SELECT softkey.
The Date and Time screen appears again.
4 Press the up and down arrows to select a
value for the highlighted field.
5 Press the left and right arrows to move
from one field to another.
6 When you are satisfied with the settings,
press the DONE softkey.
3-11
3
Taking pictures
Page 38

Camera Name
When you name a camera, the name is included in the header of each picture file.
1 Press the left softkey to select the type of
character set you want to choose from:
✔ capital letters
✔ lower case letters
✔ numbers
✔ symbols
2 Press the up and down arrows to select a
character.
3 Press the right arrow to add the selected
character to the name.
☞ Press the left arrow to backspace and
press the center softkey to add a space
to the name.
4 Add additional characters until you have
spelled the name you want using a
maximum of 32 characters.
3-12
5 When you are satisfied with the name,
press the DONE softkey.
Page 39

DeÞning settings via the SCROLL and SELECT buttons
Its likely that you’ll change these settings much more often than the settings that
you define through the settings menus. The settings can change from picture to
picture depending on the conditions that exist at the time.
☞ You must be in the Capture mode to change these settings.
Setting Flash, Exposure, Picture Type, and Quality
T o change the Flash, Exposure, Picture T ype, and Quality Capture mode settings:
1 Press the SCROLL button to scroll through
the first four functions on the Status
display: Flash, Exposure, Picture T ype, and
Quality.
2 When the function you want to change is
flashing, press the SELECT button to
toggle through the choices for the active
function.
The new selection takes affect if you press
the SCROLL button again to move to
another function or if you do not press a
button for 5 seconds.
Setting the Self-Timer and Close-up settings (DC220 only)
To activate the Self-Timer and Close-up settings:
1 Press the TIMER button:
✔ once to activate the self-timer
✔ twice to activate the close-up setting
✔ three times to activate both settings
✔ four times to turn both settings off again
☞ On the DC260, activate the self-timer
by pressing the TIMER button.
3-13
3
Taking pictures
Page 40

Taking pictures
Taking any kind of picture, still, burst, or timelapse is basically the same. The
only difference is the amount of time you have to hold down the SHUTTER
button.
☞ For best results when taking a picture, press and hold the SHUTTER button
halfway down until the green Ready light illuminates. Then press the
SHUTTER button the rest of the way.
To take a picture:
1 Place the subject in the viewfinder.
☞ To view the subject in the LCD as
well as the viewfinder, press the
DISPLAY button.
2 Press the SHUTTER button.
✔ If you are taking a still picture, press
and release the SHUTTER button.
✔ If you are taking burst pictures, hold
☞ You do not need to hold
the camera still while the
green Ready light is
blinking, but you will not
be able to take another
picture until it stops
blinking.
☞ If you set a long interval
between timelapse
pictures, the camera may
appear to turn itself off to
save batteries. It will turn
itself back on to take the
next picture.
3-14
down the SHUTTER button for as long
as you want the camera to fire. The
camera stops firing when the available
camera memory is used or when you
release the SHUTTER button. The
resolution and quality of your pictures,
set in the burst picture settings, dictates
how quickly camera memory is
consumed. Refer to page 3-4 for more
information on burst picture settings.
✔ If you are taking timelapse pictures,
press and release the SHUTTER button.
The camera fires at the interval set in
the timelapse picture settings. The
camera continues to fire until you press
the SHUTTER button again, press the
STOP softkey, or until the maximum
number of pictures, set in the timelapse
picture settings, is taken. Refer to
page 3-4 for more information on
timelapse picture settings.
Page 41

If you have the Quickview setting turned
on, the camera displays the picture on the
LCD and saves it to the memory card.
☞ If you are taking burst or timelapse
pictures, the LCD displays the picture
after the last picture in the series is taken.
You can only record sound when the
picture sequence is complete and the last
picture is displayed.
Viewing the memory gauge
In the Capture mode, the Overlay bar displays a memory gauge that gives the
status of working memory (DRAM) and memory on the memory card.
Memory card
Working memory
Working memory is the memory the camera uses to process pictures. The
working memory gauge fluctuates as the camera processes pictures. When the
camera has completely processed all pictures (by either saving them to the
memory card or deleting them) the working memory gauge will be clear.
The memory card gauge shows used space on the memory card in red and
available space as white. As the camera processes pictures and saves them to the
memory card, more of the memory card gauge fills with red.
Adding sound to a picture
After taking a picture with Quickview turned on, you can attach sound to the
picture. Once the picture disappears from Quickview, you must enter the Review
mode to record sound.
☞ You can switch to Review mode and attach sound to a picture at any time.
1 When the LCD displays the picture you
have taken, press and hold the RECORD
button.
The flashing microphone icon appears in
the top overlay bar along with a timer
indicating how long you have been
recording sound.
3-15
3
Taking pictures
Page 42

☞ If you lift your finger
from the RECORD
button before you have
finished recording sound,
delete the sound clip and
record a new one.
2 When you are done recording, release the
RECORD button.
Delete, Overlay, and Play softkeys appear
on the bottom of the screen.
☞ If you press the RECORD button a
second time, you are given the option
to delete the existing sound and
record new sound for the picture.
3 Press a softkey.
✔ Delete—Gives the option of deleting
the picture and sound or just the sound.
✔ Overlay—Turns the Overlay off.
✔ Play—Plays the recorded sound.
3-16
Page 43

Zooming
The DC220 comes equipped with a 2X zoom lens that allows you to zoom in on
your subject from W ide Angle (29mm) to TelePhoto (58mm). The DC260 comes
equipped with a 3X zoom lens that allows you to zoom in from Wide Angle
(38mm) to TelePhoto (115mm).
To activate the zoom:
1 Move the ZOOM button to adjust the
lens.
✔ Move the button to the right (toward
Telephoto) to zoom in on your
subject.
✔ Move it to the left (toward Wide
angle) to zoom away from your
subject.
The camera’s default lens position is Wide Angle. All other lens positions are
considered T elePhoto settings.
Digital zooming
Digital zooming allows you to zoom in on a subject beyond the range provided
by the optical zoom lens. Digital zooming crops the center of the digital picture
and resizes the new cropped picture to the size of the selected resolution.
☞ You may see some pixel interpolation effects with digital zooming.
The camera’s viewfinder cannot accurately depict a subject that is digitally
zoomed. You must use the LCD to preview the subject.
3-17
3
Taking pictures
Page 44

To use digital zoom:
1 Turn the camera on in CAPTURE mode.
In this mode, you can access the full
optical zoom range plus the additional
digital zoom range.
2 Press the DISPLAY button to turn on the
LCD.
3 Move and hold the ZOOM switch all the
way to the right (toward T) to zoom to
the camera’s maximum range.
4 View the subject through camera LCD.
The LCD displays an icon indicating that
digital zoom is in effect.
☞ Digital zoom is disabled when you turn
the LCD off.
5 Press the SHUTTER button to take the
picture.
3-18
Page 45

4
Reviewing your
4
pictures
Did you have your thumb over the lens? Did someone have their eyes closed?
Should you take one more picture before you let your kids take those ties off?
With film, you’ll know as soon as you get your pictures processed. With the
DC220 and DC260 Cameras in the Review mode, you’ll know instantly.
Entering the Review mode
1 Set the Mode dial to Review.
The last picture taken appears on the LCD
in a full screen view.
Pressing the DISPLAY button toggles
between the thumbnail and full screen
views.
Highlighted picture
Filmstrip of
pictures stored on
memory card
from filmstrip
Reviewing
Memory bar displays
space left on card and
current picture position.
Picture information
Overlay
4-1
Page 46

Reviewing allows you to:
✔ view pictures as thumbnails on a portion of the Camera LCD screen.
✔ view the amount of unused memory on the memory card
✔ delete one or all pictures from the memory card
✔ view pictures from the camera on your TV
✔ view and magnify pictures on the full LCD
✔ play back sound, bursts, and timelapse sequences
Setting Review mode preferences
The Review mode preferences allow you to set global parameters for this mode.
Review mode preferences include:
✔ overlay
✔ slideshow
✔ video
✔ play
As a first step in adjusting the Review mode settings, you need to display the
Review Mode Settings screen on the LCD:
4-2
1 Press the MENU button.
The Review Mode Settings screen appears.
Page 47

2 Press the right arrow to highlight the
Review Preference icon.
3 Press the down arrow to highlight the
preference category you want to set.
4 Press the ENTER softkey to enter the
selected preference category.
5 Refer to the following sections for
information about each preference
category.
6 When you are satisfied with all your
settings, press the DONE softkey.
The LCD returns to the thumbnail or full
screen.
Overlay preferences
Through the Overlay preferences you can turn the overlay on or off. The overlay
appears on the LCD and displays the softkey labels.
1 Use the left and right arrows to choose
between ON and OFF.
2 Press the DONE softkey to save your
settings.
CANCEL takes you out of the menu without
saving the changes you have made.
4
Reviewing
Slideshow preferences
A slideshow displays each selected picture for a specified interval. Through the
Slideshow preferences you can specify the duration each picture is displayed,
turn sound on or off, and choose to continuously loop the pictures in the
4-3
Page 48

slideshow.
1 Use the left and right arrows to select a
choice for each setting.
2 Press the START softkey to start the
slideshow.
Press the DISPLA Y or MENU b utton or the
STOP softkey to stop the slideshow.
☞ Pressing the DONE softkey saves
your settings and takes you back to
the Review Preferences menu.
Video preferences
Through the Video preferences you can specify the type of video connection for
connecting to a TV.
1 Use the left and right arrows to choose
between PAL and NTSC.
NTSC is generally used in the United States
and Japan, PAL in Europe.
2 Press the DONE softkey to save your
settings.
CANCEL takes you out of the menu without
saving the changes you have made.
Playback preferences
Through the Playback preferences you can specify how quickly burst, timelapse,
and album pictures are displayed during full screen playback.
1 Use the left and right arrows to select a
choice for each setting.
2 Press the DONE softkey to save your
settings.
CANCEL takes you out of the menu without
saving the changes you have made.
4-4
Page 49

Viewing pictures
You can view your pictures in three ways on the Filmstrip screen:
4
✔ one picture at a time
✔ in a continuous scroll
✔ in a fast scroll
To review pictures:
Reviewing
1 Use one of the following methods to view
your pictures:
✔ To review the pictures one at a time
press and release the right or left arrow.
✔ To review the pictures in a continuous
scroll, press and hold the right or left
arrow.
The filmstrip scrolls until you release
the arrow button.
✔ To review the pictures in a fast scroll,
press and hold the right or left arrow.
After several pictures have scrolled by
and the left softkey is labelled
FASTER, hold the left softkey while
still holding the arrow.
The filmstrip scrolls until you release
the arrow button.
The selected picture on the filmstrip is
highlighted and is displayed as a
thumbnail.
4-5
Page 50

Viewing the remaining memory
The Review screen displays a reminder of the amount of memory remaining on
the memory card.
Memory Filled Status
The memory bar gives two different indications about your camera’s memory.
The Memory Filled Status indicator shows the amount of used memory (in blue)
and the amount of available memory (in white).
As you scroll through your pictures, the Picture Location Indicator moves to
represent the position of the current picture in the list of pictures already on the
camera. For example, if the selected picture is the first of 20 pictures on the
camera, the indicator is all the way to the left. As you scroll through the pictures,
the indicator moves to the right with each new picture. At picture 10, the
indicator will be in the middle of the blue portion of the Memory Filled Status
indicator. At picture 20, the indicator will be all the way to the right of the blue
area.
Picture Location Indicator
Available memory
Marking pictures for an action
When you want to select a number of pictures and carry out an action on them,
you must first mark each picture. Marked pictures can be deleted, copied from
camera to camera, or moved from album to album (DC260 only).
To mark a picture:
1 Scroll to find the picture you want to select.
Use any of the three methods described in the
“Viewing pictures” section.
2 Press the MARK softkey.
The selected picture is marked, denoted by
the notched lower right corner. It remains
marked until you carry out an action on it.
☞ When you have marked a
picture, the softkey
changes to UNMARK.
4-6
☞ To mark the entire contents of the
memory card, hold down the MARK
softkey for 2 seconds.
Page 51

Placing marked pictures in an album (DC260 only)
You can place marked pictures in an existing or new album.
4
Creating a new album
To create a new album:
1 Press the MENU button.
2 Press the right arrow to highlight the Album
icon.
3 Press the down arrow to select an existing
album or New Album.
Refer to the next subsection for information
about creating a new album.
4 Press the MOVE softkey.
The marked pictures are moved to the
selected album.
1 Display the Album screen as described in the
“Placing marked pictures in an album”
section above.
2 Press the down arrow to select New Album.
3 Press the MOVE softkey.
The New Album Name screen appears.
Reviewing
4 Press the left softkey to select the type of
character set you want to choose from:
✔ capital letters
✔ numbers
5 Press the up and down arrows to select a
character.
4-7
Page 52

6 Press the right arrow to add the selected
character to the name.
☞ Press the left arrow to backspace.
7 Add additional characters until you have
spelled the name you want using a maximum
of 8 characters.
8 When you are satisfied with the name, press
the DONE softkey.
The marked pictures are moved to the album
you created and the Album screen appears.
Copying marked pictures from camera to camera
You can send marked pictures to or receive marked pictures from another camera
in the Review mode:
1 Place the two cameras facing each other
aligning their infrared transceivers.
During Camera to Camera communication,
the cameras communicate via infrared port.
4-8
2 Make sure both cameras are in the Review
mode.
3 Press the MENU button on the receiving
camera.
4 Press the down arrow key to highlight
RECEIVE.
5 Press the MENU button on the sending
camera.
6 Press the down arrow key to highlight SEND.
7 Press the SEND softkey.
The marked pictures are copied from one
camera to the other.
Page 53

Opening albums
The Review screen sho ws you when pictures are grouped in an alb um and allo ws
you to open the album to view the pictures. If the highlighted picture resides in an
album, an album icon appears and the left softkey is labelled OPEN.
To open an album:
1 Scroll to view the picture you want to select.
Use any of the three methods described in the
“Viewing pictures” section on page 4-5.
2 Press the OPEN softkey.
The screen opens the album containing the
selected picture and displays the other
pictures that are stored in the album. The
related pictures are linked by a colored
background.
☞ When you have opened an album, the
OPEN softkey changes to CLOSE. Press
this softkey to close the album.
4
Reviewing
4-9
Page 54

Expanding and collapsing pictures
It is important to note that your camera treats burst and timelapse pictures as
folders containing a series of individual pictures but displays them as a single
picture until you press the EXPAND softkey. In the Review mode, you can
expand the displayed burst or timelapse picture to view all the pictures in the
series.
If the highlighted picture is a burst or timelapse picture, the appropriate icon
appears and the left softkey is labelled EXPAND.
To expand a burst or timelapse picture:
1 Scroll to view the picture you want to select.
Use any of the three methods described in the
“Viewing pictures” section on page 4-5.
2 Press the EXPAND softkey.
The screen expands the selected burst or
timelapse picture and displays its individual
pictures on the filmstrip. The related pictures
are linked by a colored dotted line.
☞ When you have expanded a picture, the
EXPAND softkey changes to COLLAPSE.
Press this softkey to collapse the picture
back to its original form.
4-10
Page 55

Adding sound to pictures
You can attach sound to a selected picture at any time while reviewing your
pictures from either the filmstrip or full screens.
☞ You can only add sound to or play sound associated with burst and
timelapse pictures when the series is collapsed.
1 Scroll to view the picture you want to select.
Use any of the three methods described in the
“Viewing pictures” section on page 4-5.
2 Press and hold the RECORD button.
The microphone icon appears on the screen
along with how long you have been
recording.
☞ Each picture can have only one attached
sound clip. If you attempt to attach a
second sound clip to a picture, a
message appears allowing you to delete
the existing sound.
3 Speak into the microphone on the back of the
camera.
4
Reviewing
☞ If the camera’s volume
control is turned down,
you will not be able to
hear the sound you have
recorded.
☞ The volume control
adjusts the volume of
sound clips attached to
pictures only. You can
turn off System Sounds
through Capture
Preferences on
page 3-10.
4 Release the RECORD button.
A sound icon appears indicating the picture
now has attached sound. If a picture has
attached sound, pressing the DELETE
softkey allows you to delete the sound alone
or both the picture and sound.
5 Press the softkey of your choice.
✔ DELETE—Deletes the sound.
✔ SAVE—Saves the sound.
✔ PLAY—Plays the sound. Refer to
“Playing sound, bursts, and timelapse
sequences” on page 4-14 for information
on playing sound that has not been newly
recorded.
4-11
Page 56

Deleting one picture
To delete a picture:
1 Scroll until the picture you want to delete is
highlighted in the center of the filmstrip.
2 Press the DELETE softkey.
Delete, Sound Only, and Cancel softkeys
appear.
3 Press the softkey of your choice.
✔ DELETE—Deletes the picture and any
attached sound.
✔ SOUND ONLY—Deletes only the
attached sound. (This softkey appears
only if the picture contains an attached
sound clip.)
✔ CANCEL—Cancels the delete operation.
4-12
Page 57

Deleting multiple or all pictures
You can delete multiple pictures from your memory card:
4
1 Mark any pictures you want to delete.
Refer to the “Marking pictures for an action”
section on page 4-6 for information on how
to mark pictures.
2 Press the DELETE softkey.
☞ Pressing and holding the DELETE
softkey for 2 seconds will delete all the
pictures on the memory card. It is not
necessary to mark pictures if you want
to delete all your pictures.
A confirmation screen appears asking if you
want to delete all the marked pictures.
3 Press the softkey of your choice.
✔ DELETE—Deletes the pictures and any
attached sound.
✔ CANCEL—Cancels the delete operation.
Reviewing
4-13
Page 58

Playing sound, bursts, and timelapse sequences
T o play sound, b urst, and timelapse sequences you ha ve to be viewing the picture
on a full screen.
1 Scroll to highlight the picture sequence you
want to play.
You can scroll through your pictures while
viewing them as thumbnails or on a full
screen. If you scroll to the picture as a
thumbnail, press the DISPLAY button to
view it on a full screen.
2 Press the PLAY softkey.
If the highlighted picture is a still picture
with sound, the camera plays the sound.
☞ The softkeys remain DELETE,
MAGNIFY, and PLA Y when you play
a sound clip.
If the highlighted picture is a burst or
timelapse picture, the camera plays back
the sequence of pictures at the rate
specified in the Review Mode preferences.
4-14
☞ To stop playing the sequence, press
the STOP softkey.
Page 59

Magnifying pictures
You can magnify a picture while viewing it on a full screen:
4
1 Scroll to view the picture you want to
magnify.
Use any of the three methods described in the
“Viewing pictures” section on page 4-5.
2 Press the MAGNIFY softkey.
The screen displays a magnified view of the
selected picture.
☞ Use the arrow keys to scroll to different
parts of the picture.
3 To return to a normal view, press the
REDUCE softkey.
☞ If you use the arrow keys to move to
different parts of the magnified picture, the
REDUCE softkey label disappears.
However, you can still press the middle
softkey to reduce the picture to its normal
view.
Reviewing
4-15
Page 60

Viewing pictures on your TV
The video out feature on the camera allows you to show the pictures from the
memory card on your TV.
☞ The camera’s LCD is disabled when the camera is attached to the video
cable.
To view pictures on a TV:
1 Turn your TV and the camera off.
2 Insert the video output cable into the video out
connection on the side of your camera.
3 Connect the other end of the cable to the video in
connection on your TV.
☞ To play sound on your TV, use a cable that has
two connectors on the TV end. Connect the
yellow connector to the video in connection
and the white connector to the audio in
connection.
4 Turn on the camera and TV.
5 Set the Mode dial to Review.
4-16
6 Set the TV to the correct channel for viewing
video.
The pictures that are stored on the memory card
appear on the TV screen as they appear on the
LCD.
7 Scroll through your pictures using any of the
three methods described in the “Viewing
pictures” section on page 4-5.
☞ If pictures do not appear on the TV, you
may need try a different channel or adjust
the Video preference on the camera. Refer
to page 4-4.
Page 61

5
Setting camera
properties
Camera Properties allow you to program your digital camera through a graphical
interface on your computer.
You may want to set these properties before you use your camera to take pictures.
Or you may want to use the default properties that are already set on your
camera. To use the default for each setting, click the Defaults button on the
Camera Properties screen. To return to the previous settings, click Cancel.
We’ll identify any properties that can also be set from the camera itself.
You can set camera properties for these categories:
✔ General
✔ Camera
✔ Picture T ype
✔ Albums (DC260 only)
5
Camera properties
YouÕve got to connect Þrst
Because you set the camera properties on your computer, you first have to
connect your camera to your computer.
Refer to Chapter 6, “Connecting your camera to your computer” for instructions.
Finding the Properties software
You can get to the Camera Properties software in a number of ways:
✔ Double-click the DC220 or DC260 Camera Properties icon on your
desktop
✔ Select the Camera Properties menu item from the Mounter Software
screen
5-1
Page 62

✔ Select the Camera Properties button from the camera’s TWAIN Software
screen
✔ Select the Properties button from the K OD AK DIGIT AL SCIENCE Picture
Easy Software 3.0 screen
✔ Select DC220 or DC260 Camera Properties from the Start Programs
menu.
The remaining sections of this chapter assume that you have started the Camera
Properties software and are viewing the first tab, General settings.
Specifying General settings
The GENERAL settings tab is
selected by default.
1 Specify the settings.
Refer to the following
subsections for a brief
description of each setting.
2 If you want to see more
settings, click the
ADVANCED button.
Additional settings appear.
3 To apply these settings to the
camera, click the APPLY
button.
☞ To revert to a screen’s
default settings, click
the DEFAULTS button.
Communications Method—Defines the type of connection you want to use
between the camera and your computer.
Baud Rate—Defines the rate at which the camera and the computer
communicate. This field is greyed out if USB or IrDA is selected as the
communication method.
5-2
Page 63

Camera Name—Why would you want to give a camera a name? Because
it’s so impersonal calling it “Hey, camera.” Also, the camera name is
included in every picture file. You can also set this setting through the
Capture mode settings on the camera.
Firmware Version—A read-only field that displays the camera’s firmware
version number . You can also view the camer a firmwar e version on the LCD
by turning the Mode Dial to INFO.
File T ype—The file format in which the camera will store all future
pictures. You can choose JPEG (.jpg), which can be used by many software
programs, or FLASHPIX (.fpx). FLASHPIX offers great benefits such as
speed in displaying your pictures and the ability to undo and redo edits in
software programs such as Picture Easy. You can also set this setting
through the Capture settings on the camera.
Camera Date and Time—This date and time are assigned to each picture
that you take. You can set it to the same date and time as on your computer
by clicking the Set to Computer Date and Time checkbox. You can
also set this setting through the Capture mode settings on the camera.
Computer Date and Time—A read-only display of the time and date as it is
set on the computer to which the camera is connected.
☞ The remaining General Property settings are available only after you
click the ADVANCED button.
5
2
Camera properties
Your camera
Power status—The current power status. This field displays an AC Power
icon when you are using the AC Adapter or an icon indicating the level of
the camera’s battery charge.
Time-out Settings—AC Power Off After turns the camera off after a
period of inactivity when using AC power. Battery Power Off After
turns the camera off after a period of inactivity when using battery power.
Quick View Display Off After defines how long a newly captured
picture is displayed before the LCD turns off.
5-3
Page 64

Specifying Camera settings
1 Click the CAMERA
SETTINGS tab.
2 Specify the settings.
Refer to the following
subsections for a brief
description of each setting.
3 To apply these settings to the
camera, click the APPLY
button.
Picture type—Choose the type of picture—Still , Burst , or
Timelapse —that you want to take. This field defaults to Still when you
turn the camera off. You can also set this setting through the Capture mode
settings on the camera.
White Balance—White Balance examines your pictures and tries to adjust
the color balance to remove the color casts that the current lighting
conditions add. Use Automatic when taking pictures under a variety of
lighting conditions. Use Daylight when taking pictures outdoors. Use
Fluorescent when taking pictures under fluorescent light. Use
Tungsten when taking pictures under normal incandescent light. Off
makes no white balance adjustment. You can also set this setting through the
Capture mode settings on the camera.
Flash mode—The mode in which you want the camera’s flash to operate.
Auto causes the flash to fire only when there is not enough light. Fill
causes the flash to fire for every picture. Red-eye Reduction causes the
flash to fire twice—once 600 milliseconds before the picture is taken to
constrict the subject’s pupils, and once when the picture is taken. Off turns
the flash off. You can also set this setting through the Capture mode settings
and through the SCROLL and SELECT buttons on the camera.
Focus (DC260 only)—Single spot determines the focus position using
the subject in the center of the lens. Multi-spot determines the focus
position using three positions on the lens. Manual allows you to specify
the focus position from the pull down menus. You can also set this setting
through the Capture mode settings on the camera.
Macro (DC220 only)—On disables the zoom control and places the lens in
5-4
Page 65

the macro position. Off enables the zoom control and sets the lens position
to 28mm. This is also known as Close-up mode. You can also set this setting
through the SCROLL and SELECT buttons on the camera.
Advanced capture mode—Programmed AE automatically determines
the appropriate shutter speed and aperture settings but allows you to choose
an exposure compensation value from a drop down list. Long time
exposure allows you to select the shutter speed setting from a drop down
list. External flash (DC260 only) allows you select the aperture setting
from a drop down list. You can also set this setting through the Capture
mode settings on the camera.
Zoom—The position of the zoom lens. The DC220 ranges from 28mm to
58mm in four steps. The DC260 ranges from 38mm to 115mm in six steps.
Specifying Picture Type settings
1 Click the PICTURE TYPE
SETTINGS tab.
2 Specify the settings.
Refer to the following
subsections for a brief
description of each setting.
3 To apply these settings to the
camera, click the APPLY
button.
Picture Capture State—Choose the type of picture—Still , Burst , or
Timelapse —for which you want to set Picture Type settings. The other
fields on the screen change depending on the type of picture.
Picture quality—Best compresses a picture the least and has the highest
image quality. Better compresses a picture more and has a lower image
quality. Good compresses a picture the most and has the lowest image
quality. You can also set this setting through the Capture mode settings and
through the SCROLL and SELECT buttons on the camera.
5
2
Camera properties
Your camera
Resolution—The number of pixels that make up each picture, either High
(1152 x 864 pixels DC220, 1536 x 1024 pixels DC260), Medium (1152 x
768 pixels DC260 only), or Standard (640 x 480 pixels DC220, 768 x
512 pixels DC260). The more the merrier when it comes to pixels and the
quality of your pictures. You can also set this setting through the Capture
5-5
Page 66

mode settings on the camera.
Approximate Picture Size (Still)—The approximate size of each picture
based on your Picture quality and Resolution selections. The actual
picture size can vary depending on the content of the picture.
Burst/Capture rate—The rate, in frames per second, at which pictures will
be taken. You can also set this setting through the Capture mode settings on
the camera.
Approximate Picture Size (Burst)—Based on the Picture Quality ,
Resolution , and Burst/Capture rate , the approximate size of the
burst picture series. The actual burst size can v ary depending on the content
of the picture.
Interval (Timelapse)—The time between pictures, in hours and minutes.
The minimum time between pictures is 60 seconds for both the DC220 and
DC260. The maximum time between pictures is 1550 minutes for both
cameras. You can also set this setting through the Capture mode settings on
the camera.
Number of Pictures (Timelapse)—The total number of pictures to capture.
Approximate timelapse size—Based on the Picture Quality ,
Resolution , Interval , and Number of Pictures, the number of
pictures that can be taken and the total size of the timelapse picture series.
The actual timelapse size can vary depending on the content of the picture.
Storage status—Based on your current Picture Type settings, the number of
pictures you have stored on your memory card and the number of pictures
that can still be stored.
5-6
Page 67

Specifying Albums settings (DC260 only)
1 Click the ALBUMS
SETTINGS tab.
2 Specify the settings.
Refer to the following
subsections for a brief
description of each Albums
setting.
3 To apply these settings to the
camera, click the APPLY
button.
Camera Folder—The list of camera folders on the memory card. Multiple
names exist if the memory card in question has pictures on it that were
taken with 2 or more different DC260 Cameras.
Albums—A display of the albums on the memory card. Y ou can create new
albums, or rename or delete existing albums.
5
2
Camera properties
Your camera
5-7
Page 68

6
Connecting
your camera to
your computer
A first step to using your digital pictures on your computer is to connect your
camera to your computer. The camera can communicate with your computer
using:
✔ an RS232 serial connection
✔ a Universal Serial Bus (USB) connection
✔ an infrared transceiver
☞ It is a good idea to use the AC Adapter when connecting to your computer
to conserve battery power.
While in Connect mode the camera is controlled by the computer. Except for the
Mode dial, POWER, SHUTTER, and ZOOM buttons, all other camera buttons
are disabled. The Ready light indicates when the camera is on.
Once software is installed and the camera is connected to a computer, you are
ready to transfer the pictures. Refer to the appropriate chapters of this User’s
Guide, or the software’s quick setup guides, for more information on the softw are
programs.
Entering the Connect mode
To enter the Connect mode:
1 Set the Mode dial to Connect.
6-1
6
Connecting
Page 69

Which connection?
Which connection should you use to transfer pictures between your camera and
computer? That depends on which connections your computer supports. The
following sections will help you determine the connections that your PC
supports.
You specify the type of connection you are using through the Camera Properties
software. For information on how to choose a connection method, refer to
Chapter 5, “Setting camera properties.”
Operating System Connection Option
WINDOWS 95
Serial, IrDA
WINDOWS 95a
WINDOWS 95B (also known as OSR2)
Serial, IrDA, USB
WINDOWS NT 4.0 Serial
1
WINDOWS 95 and WINDOWS 95a require an IrDA Software Patch that is available
from MICROSOFT’s Web site. Go to http://www.microsoft.com and then search
for “irda.” (Please read and understand all the instructions provided by MICROSOFT
before proceeding.)
2
WINDOWS 95B requires the MICR OSOFT USB Supplement. Contact your PC vendor
or manufacturer for the Supplement.
1
2
The IrDA driver for WINDOWS 95B is either preloaded on your system or available on
your original diskettes or CD-ROM.
To determine which version of WINDOWS 95 is installed on your PC:
1. Click Start -> Settings -> Control Panel .
2. Double-click the System icon.
3. View the top right of the General tab which indicates the installed operating system:
4.00.950 indicates WINDOWS 95 (basic)
4.00.950a indicates WINDOWS 95a
4.00.950B indicates WINDOWS 95B
RS-232 Serial
Although not fast (maximum data transfer rate of 115 kb/sec), an RS-232 serial
connection is supported by the vast majority of PC computers. The serial port
option is available on both the WINDO WS 95 and WINDO WS NT 4.0 Operating
Systems.
6-2
Page 70

RS-232 connectors are the standard ports located on the back of the PC. They are
usually labeled A and B. The typical computer user should use this method of
communicating with the camera.
To determine if your computer supports an RS232 connection:
1 Click the right mouse button on the My Computer icon on your computer’s
desktop.
2 Click on Properties in the pop-up menu.
3 Click the Device Manager tab.
4 Double-click on the Ports device in the displayed list.
5 Verify that there is at least one Communication Port.
If at least one Communications Port is present, your computer supports an
RS-232 Serial connection.
Connecting via a serial cable
The camera can connect to a computer using the serial cable included in your
camera package.
6
To connect to your computer with a serial cable:
1 Plug one end of the serial cable into a COM port
on the back of your PC.
☞ If your computer has a 25-pin port, you need
to use a 9-pin adapter and attach it to the
port before attaching the serial cable to the
computer.
2 Open the serial port on the side of your camera.
3 Plug the other end of the serial cable into the
camera’s serial port.
4 Turn on the camera.
Connecting
6-3
Page 71

USB
The Universal Serial Bus (USB) is a relatively new method for your camera to
communicate with the PC. A USB connection is faster than an RS-232 serial
connection increasing the maximum data transfer rate to 12 Mb/sec.
USB requires special computer hardware and software features including a USB
enabled motherboard, USB connections, and a version of WINDOWS 95 (called
Win95B or OSR2). Most computers manufactured prior to January 1997 do not
meet these requirements, but most computers manufactured since then often meet
these requirements.
☞ USB is not currently supported in the WINDOWS NT 4.0 environment.
This method should only be used by the advanced computer user.
To determine if your computer supports a USB connection:
1 Verify that a USB connector is present.
This connector is normally on the back of the computer.
2 Click the right mouse button on the My Computer icon on your computer’s
desktop.
3 Click on Properties in the pop-up menu.
4 Verify the operating system is 4.00.950b or greater.
5 Click the Device Manager tab.
6 Verify that the Universal Serial Bus Controller is present, without any yellow
or red indicators.
7 Click on Universal Serial Bus Controller.
8 Verify that a controller and USB Root hub are listed.
9 Double-click on USB Root hub.
10Verify that device status is “The device is working properly.”
11 On your desktop, click Start ➔ Settings ➔ Control Panel .
12Click the Add/Remove Programs entry.
13Verify that USB Supplement to OSR2 is present.
If all of the above conditions are met, your computer supports a USB
6-4
Page 72

connection.
If your computer meets all the conditions except that no USB Supplement to
OSR2 is present, refer to the README file for instructions on installing the
USB Supplement.
Connecting via a USB cable
The camera can connect to a computer using the USB cable included in your
camera package.
To connect to your computer with a USB cable:
1 Plug one end of the USB cable into the USB port
on the back of your PC.
2 Open the serial port on the side of your camera.
3 Plug the other end of the USB cable into the
camera’s serial port.
4 Turn on the camera.
Infrared transceiver
Infrared is invisible light that the camera uses to transfer pictures through the air
without cables or wires. Like your television remote, the camera requires a clear
line of sight between its infrared transceiver and the infrared port on the
computer.
IrDA (Infrared Data Association) compliant de vices use both a transmitting mode
and a receiving mode which allows these de vices to acknowledge the information
was received, generate responses, and even automatically detect the presence of
another infrared device.
6-5
6
Connecting
Page 73

IrDA 1.0 has the same maximum data transfer rate of the serial port, 115 Kb per
second.
☞ Remember that infrared communication usually requires system resources
that are used by the serial port. On most computers you will have to disable
the serial port and enable the infrared port for infrared communication to
work and reverse these settings if you wish to use your serial port again.
☞ IrDA is not currently supported in the WINDOWS NT 4.0 environment.
To determine if your computer supports an infrared connection:
1 Click the right mouse button on the My Computer icon on your computer’s
desktop.
2 Click on Properties in the pop-up menu.
3 Click the Device Manager tab.
4 Verify that an “Infrared Devices” entry exists.
5 Double click on Infrared Devices.
6 Verify that the “Infrared port on laptops or desktop” is present.
7 On your computer, click Start ➔ Settings ➔ Control Panel .
8 Verify that the Infrared icon is present.
9 Double-click the Infrared icon.
10Click the Options tab.
11 Verify that the “Enable infrared communication on Com X” and “Search for
and provide status for device in range” checkboxes are selected.
12Verify that you have an internal or external IrDA transceiver connected to
your computer. Check your computer hardware manual for information on
the IrDA transceiver location.
☞ If you are using the camera’s infrared transceiver to connect to the
computer, and the camera automatically turns off because of inactivity, you
need to press the camera’s POWER button to turn the camera back on.
6-6
Page 74

Connecting via an infrared transceiver
Your camera automatically detects when a compatible infrared device is present.
1 Place the camera facing the computer’s infrared
transceiver.
When the two infrared ports establish contact, the
PC emits a beep.
☞ While in the Review mode, you can transfer
pictures from one camera to another using an
infrared connection. Refer to “Copying marked
pictures from camera to camera” on page 4-8.
6
Connecting
6-7
Page 75

Potential connection problems
Here are some issues that might come up when attempting to connect your
camera to your computer and some ways to correct them:
Windows/DC220 DC260 Camera Communications
Problem Cause Solution
Computer cannot
communicate with the camera.
Camera power is off. Turn the camera on.
The Mode dial is not
set to Connect.
Conflict with another
serial device, such as a
modem.
Some Advanced
Power Management
utilities on laptops can
turn off ports to save
battery life.
Camera is not
connected to serial
cable or cable is not
connected to the
computer’s COM port.
Infrared port is not
responding.
The BIOS has a
different port assigned
as the infrared port.
Set the camera’s Mode
dial to Connect.
Refer to the serial
communication or
corresponding section
of your computer’s
modem, and/or
operating system’s
user’s guide.
See the Power
Management section
of your laptop’s user
guide to disable this
feature.
Connect serial cable to
camera and COM
port. See “Connecting
via a serial cable” on
page 6-3.
Check the computer’s
infrared connection.
Be sure that the
camera is on.
Change the port
setting in Camera
Properties to reflect
the port value assigned
in the BIOS.
6-8
Page 76

7
Accessing your
pictures via
computer
Now that you’ ve tak en some pictures with your digital camera, ho w do you get to
them?
✔ By connecting your camera to your computer and using KOD AK Mounter
Software. Mounter software is an easy way to view, transfer, or delete
pictures stored on the memory card using your PC and WINDOWS
software.
✔ By placing your memory card in a PCMCIA card adapter and placing it in
your computer or a memory card reader.
Using the Mounter software
Using Mounter software, the DC220 or DC260 camera icon appears in the My
Computer window, dialog boxes, and file browsers included in many software
applications.
Mounter software presents the camera contents as though it were an extension of
your hard drive. For more detailed information on working with WINDOWS,
refer to your WINDOWS Software User’s Guide.
Installing Mounter software
If you have not installed the DC220/DC260 software, refer to the “Installing
software” section on page 1-4.
7-1
7
Accessing pictures
Page 77

Mounter software overview
With Mounter software you can:
✔ View pictures on the camera
✔ Transfer pictures from the camera to your computer
✔ Transfer pictures and scripts to the camera
✔ Save the audio portion of a picture file as a .wav file
✔ Set Mounter preferences
Mounter software uses the following icons:
camera— represent the DC220 and DC260 cameras.
album— represents an album on your memory card. (DC260
only)
camera folders— represents both the Camera Folder and the
System folder. The Camera Folder holds your pictures or albums.
The System folder holds scripts and camera firmware files.
burst— represents burst pictures with and without attached
sound.
timelapse— represents timelapse pictures with and without
attached sound.
picture file— represents picture files (with and without attached
sound) with FLASHPIX (FPX) or JPEG (JPG) extensions when
appropriate viewing option is selected.
If the picture file has been registered by another application this
icon may be different.
YouÕve got to connect Þrst
To use Mounter software to access your pictures, the camera needs to be
7-2
Page 78

connected to your computer and turned on. Refer to Chapter 6, “Connecting your
camera to your computer” for detailed information.
When the camera is correctly connected
to and communicating with your
computer, the camera’s Status Display
is replaced with the following screen.
If the connection times out, the Status
Display returns.
Viewing your pictures
Mounter software allows you to view your pictures as picture files or as
thumbnails.
☞ To view your pictures as thumbnails, select View -> Thumbnail View. It will
take longer to display pictures as thumbnails than as picture files.
To view your pictures:
1 Double-click on the My Computer icon.
The My Computer window appears.
2 Double-click on the Camera icon.
The Camera Folder icon appears.
3 Double-click on the Camera Folder
icon.
A window appears showing the
individual picture files or thumbnails.
☞ To delete pictures from your memory
card, either move them to the Recycle
Bin or press the DELETE key.
7-3
7
Accessing pictures
Page 79

Transferring pictures to your computer
Mounter software allows you to drag and drop pictures from the camera to your
computer.
☞ When you drag pictures from one place to another using Mounter software,
the pictures are copied, not moved. To move pictures, you must hold down
the SHIFT key while dragging and dropping.
Select multiple pictures by holding down the shift key and clicking to select
adjacent pictures or the control key and clicking to select nonadjacent
pictures.
To transfer pictures:
1 Double-click on the My Computer icon.
The My Computer window appears.
2 Double-click on the Camera icon.
The Camera Name and System folder
icons appear.
3 Double-click on the Camera Folder
icon.
A window appears listing individual
pictures.
4 Double-click on the folder into which you’ll be placing pictures.
5 Click on the pictures and while holding the mouse button down, drag the
pictures to the folder.
The pictures appear in the new location.
Transferring pictures and scripts to your camera
Mounter software allows you to drag and drop pictures and scripts from your
computer to your camera.
7-4
Page 80

A predefined script can prompt you for certain actions and define the behavior of
the camera and its settings. For example, a script can set the camera to take burst
pictures at a certain rate. The script can then prompt you, using text on the LCD,
to take a picture and the camera waits for you to press the SHUTTER button.
☞ You can view transferred pictures on your camera only if they are
FLASHPIX (.fpx) or JPEG (.jpg) formats in a resolution supported by the
camera. Refer to page 5-5 for resolution information.
To transfer pictures and scripts to the camera:
1 Double-click on the My Computer icon.
The My Computer window appears.
2 Double-click on the folder containing the pictures or scripts you want to
write.
3 Double-click on the Camera icon.
The Camera Name and System folder
icons appear.
4 Click on the picture or script to highlight it and while holding the left mouse
button down, drag the file onto the appropriate folder icon:
✔ Drag picture files onto the Camera Folder icon. If you want to transfer
pictures to a specific album on the camera, double-click the Camera
Folder to open it and find the desired album.
✔ Drag script files onto the System folder icon.
Creating albums on the camera (DC260 only)
You can create, rename and delete albums on your DC260 camera. Because your
computer treats the camera like another drive, you can create, rename, and delete
7-5
7
Accessing pictures
Page 81

albums just like you would create, rename, and delete folders on any other drive.
1 Double-click on the Camera Folder
icon.
A window appears listing individual
pictures.
2 Perform one of the following operations:
✔ To create a folder select File -> New -> Folder or position the cursor in
the folder window and click the right mouse button.
✔ To rename an existing folder click on the name beneath the folder to
highlight it. Type a new name and press Enter.
☞ You should not rename the System, DC260_01, or DC220_01 folders
because the camera looks for these names to locate pictures, scripts, and
logo files.
✔ To delete a folder click on the folder to highlight it. Either move it to the
Recycle Bin or press the DELETE key.
Opening picture Þles in other software programs
Mounter software allows you to open picture files into a registered software
program. Simply double-click on the Camera icon and then double-click on the
Camera Folder icon to view the picture files. Double-click on a picture file to
open it into a registered software program.
☞ You can also save FLASHPIX and JPEG pictures from other software
programs to the Camera Folder.
Saving sound
When you transfer pictures containing sound, Mounter software extracts the
sound portion of the file. Through preferences, Mounter software can:
✔ Prompt you for a filename for each sound file
✔ Save the sound under the same filename as the picture with a .wav
extension
✔ Save no sound
7-6
Page 82

Setting preferences
Mounter software allows you to set preferences that govern how Mounter
software notifies and prompts you for audio options.
To set Mounter preferences:
1 Click the right mouse button on the Camera icon.
2 Select MOUNTER PREFERENCES from the pop-up menu.
The Mounter Preferences screen appears.
3 Specify the settings which include:
✔ How you want to be prompted when
saving a picture’s attached audio
✔ If you want to show the progress of
the Mounter connection operations.
4 Click the OK button to apply the
settings.
Exiting Mounter software
To exit the Mounter software, select Close from the File menu. The Mounter
Camera icon remains in the My Computer folder even when the camera is not
accessed.
Placing the memory card in your computer
As an alternative to connecting your camera to your computer, you can also
access the pictures on the memory card by placing the card in a PCMCIA-ATA
Card Adapter. You can then place the Adapter Card in a PCMCIA drive if your
computer is so equipped or into a memory card reader.
PCMCIA is an acronym for Personal Computer Memory Card International
Association. Using a PCMCIA card eliminates the need to have your camera
tethered to your PC and provides a fast picture data transfer rate.
7-7
7
Accessing pictures
Page 83

☞ While using a PCMCIA card to access your pictures is generally faster than
accessing the camera in the Connect mode, you lose some of the
functionality you would have through the Mounter software. For example,
when using MICROSOFT EXPLORER software and a PCMCIA card, you
cannot extract and save audio from pictures that have attached sound. To
access both a picture and its attached sound from the PCMCIA card, you
must use KODAK TWAIN software or KODAK DIGITAL SCIENCE
Picture Easy Software 3.0.
Picture Card Adapter
The DC220 and DC260 use a removable memory card that complies with the
CompactFlash standard. Due to the size of the CompactFlash card, most
PCMCIA card readers do not accept the card as is, but require an adapter card. A
KODAK DIGITAL SCIENCE Picture Card Adapter is available for your memory
card to adapt the 50-pin Picture Card for use with 68-pin PCMCIA-ATA
compatible devices.
☞ For information on ordering a Picture Card Adapter, refer to the
“Accessories” section on page 1-4.
To transfer pictures via the PCMCIA card:
1 Remove the memory card from the camera.
7-8
.........................
.........................
.........................
.........................
Refer to “Removing the memory card” on
page 2-10.
2 Insert the memory card into the Picture Card
Adapter.
3 Insert the Picture Card Adapter into your
computer.
The Picture Card appears as a drive on your
computer.
Page 84

Does my computer support a PCMCIA card?
To determine if your computer supports a PCMCIA connection:
1 Click the right mouse button on the My Computer icon on your computer’s
desktop.
2 Click on Properties in the pop-up menu.
3 Click the Device Manager tab.
4 Verify that a “PCMCIA Socket” entry exists.
5 Double click on the PCMCIA socket.
6 Verify that the “PCIC or compatible PCMCIA controller” is present.
7 Double click on “PCIC or compatible PCMCIA controller.”
8 Verify that device status is “The device is working properly.”
If the above conditions are met and you have a PCMCIA card for your
camera, you can use a PCMCIA connection. A PCMCIA card is an optional
accessory for the DC220/DC260 camera.
Memory Card Reader
A memory card reader allows you to transfer
pictures faster from a CompactFlash or full size
.........................
.........................
PCMCIA Flash Memory ATA card to your PC
computer than with a cable connection.
Several models of memory card readers are av ailable
from computer dealers.
7-9
7
Accessing pictures
Page 85

8
Transferring
pictures via
TWAIN software
You’ve used your digital camera to photograph your real estate agency’s newest
listings for the company Web page. Now you need to open your pictures in an
image editing software program to touch up some peeling paint, add some text,
and insert an asking price.
Using KOD AK Access TWAIN Acquire Softw are (TWAIN) for WINDOWS, you
can do just that. TWAIN is special industry-standard software that allows you to
transfer pictures from your digital camera directly to TWAIN-compliant
software, such as ADOBE PHOTODELUXE.
Installing TWAIN software
If you have not installed the DC220/DC260 software, refer to the “Installing
software” section on page 1-4.
8
Using TWAIN
8-1
Page 86

TWAIN software workßow
Connect the
camera to your
computer
Start the
TWAIN
software
Select the
source of your
pictures
Preview the
picture
Refer to page 8-2.
Refer to page 8-3.
Refer to page 8-4.
Refer to page 8-5.
Transfer the
picture
Refer to page 8-7.
Connecting the camera to your computer
To use TWAIN software to transfer your pictures, the camera needs to be
connected to your computer and turned on. Refer to Chapter 6, “Connecting your
8-2
Page 87

camera to your computer” for detailed information.
When the camera is correctly connected
to and communicating with your
computer, the camera’s Status Display
is replaced with the following screen.
If the connection times out, the Status
Display returns.
Starting the TWAIN Software
1 Open a TWAIN-compliant software (for example, ADOBE
PHOTODELUXE).
2 Select KODAK DC220/DC260 ZOOM ACQUIRE as the TWAIN source.
3 Select TWAIN ACQUIRE from the compliant software.
The TWAIN software main window appears.
The following screen is the main window of TWAIN software. More detailed
information is offered in the following sections.
Select appropriate button to
retrieve pictures from your
camera or computer
Picture viewing area
8
Using TWAIN
Select Tr ansfer
to transfer pictures
into the software
Select Camera
Properties to change
camera settings
Select Preferences
to specify audio
options
8-3
Page 88

Selecting the source of your pictures
TWAIN software allows you to transfer:
✔ the contents of the camera’s memory card
✔ a picture that you take while your camera is connected to the computer
✔ pictures stored on your computer or your memory card
Selecting the cameraÕs contents
1 Click the CAMERA CONTENTS
button on the TWAIN screen.
The TWAIN software displays the
pictures stored on the camera’s
memory card.
☞ If your DC260 Camera
contains albums, the screen
displays album icons. Click
on an album to display its
contents.
2 Click on the pictures you want to
select for transfer.
Refer to “Previewing your
pictures” on page 8-5.
Taking a picture
8-4
1 Frame the subject of your picture
in the camera’s viewfinder.
2 Click the TAKE PICTURE button
on the TWAIN screen.
☞ You can only take still pictures
through the TWAIN software.
The TWAIN software displays the
picture in a full view.
Refer to “Previewing your
pictures” on page 8-5.
Page 89

Selecting pictures on your computer
To select a picture that is stored on your computer or a picture that resides on a
memory card that is in your computer:
1 Click the MY COMPUTER button
on the TWAIN screen.
The TWAIN software displays a
standard WINDO WS Open
window .
2 Navigate to find the pictures that
you want to open.
3 Click on the pictures you want and
click OPEN.
The TWAIN software displays the
picture in either the list or
thumbnail mode.
Refer to the next section,
”Previewing your pictures.”
Previewing your pictures
8
Using TWAIN
While previewing your pictures using TWAIN software, you can view your
pictures as files or as thumbnails which are smaller versions of your pictures.
☞ To view your pictures as thumbnails, click on the SHOW AS
THUMBNAILS checkbox. Viewing pictures as thumbnails will be slower
than viewing pictures as files.
8-5
Page 90

Refer to the following subsections for more information about each Preview
function.
Plays a picture’s
attached sound.
Expands and
collapses burst and
timelapse pictures.
Opens any selected
pictures in a full
view.
Displays information
about a single
selected picture.
Play a pictureÕs attached sound
Pictures that have attached sound show a sound icon beneath the picture.
Expanding and collapsing pictures
Burst pictures are a series of pictures taken in rapid succession. Timelapse
pictures are a series of pictures taken at a specified interval. TWAIN software
displays both as single thumbnails with an icon indicating if the picture is a burst
or a timelapse picture.
☞ When you have expanded a selected picture, the EXPAND button changes
to a COLLAPSE button.
Opening a picture in full view
You can also double-click a picture to open it.
8-6
Page 91

Displaying picture information
The Picture Information window displays information about the picture and
camera settings when the picture was taken. You may not select or change any
settings on the window.
The Picture Information window displays:
✔ Name of the picture file
✔ Number of pictures (burst and
timelapse only)
✔ Quality setting
✔ Resolution setting
✔ Size (in bytes)
✔ Date and time picture was taken
✔ Name of the album in which the
picture is stored (DC260 only)
☞ To play the picture’s attached
sound, click the PLAY icon.
✔ Aperture information
✔ Exposure Time, in seconds
✔ Flash information
✔ Audio attachment
8
Using TWAIN
Transferring pictures
When you have previewed your pictures and determined which ones you want to
transfer:
1 Click on the pictures you want to
transfer.
2 Click the TRANSFER button.
The picture is displayed in the
previously opened TWAINcompliant software window.
8-7
Page 92

Saving sound
When you transfer pictures containing sound, TWAIN software extracts the
sound portion of the file. Through Preferences, TWAIN software can:
✔ Prompt you for a filename for each sound file
✔ Save the sound under the same filename as the picture with a .wav
extension
✔ Save no sound
1 Click the PREFERENCES button on
the TWAIN screen.
The Preferences screen appears.
2 Specify how you want to save a
picture’s attached audio.
3 Click the OK button to apply the
settings.
8-8
Page 93

9
Tips and
troubleshooting
General maintenance and safety
✔ To keep from damaging your camera, avoid exposing it to moisture and
extreme temperatures.
✔ Clean the outside of the camera by wiping with a clean, dry cloth. Never
use harsh or abrasive cleaners or organic solv ents on the camera or an y of
its parts.
✔ Never disassemble or touch the inside of the camera. This could result in
electrical shock.
✔ If you notice smoke or a strange smell coming from the camera,
immediately turn the camera off, wait a few minutes until the camera
cools, and then remove the batteries.
✔ Cleaning the lens:
1 Blow gently on the lens to remove dust and dirt.
2 Moisten the lens by breathing lightly on it.
3 Wipe the lens gently with a soft, lint-free cloth or an untreated lens-
cleaning tissue.
☞ Do not use cleaning solutions unless they are designed
specifically for camera lenses. Do not wipe the camera lens
with chemically treated eyeglass lens tissue as it may scratch
the lens.
9
Troubleshooting
9-1
Page 94

Communicating with the computer
If your computer cannot communicate with the camera you may need to adjust
the serial port speed setting. Adjust the settings using the Camera Properties
(Chapter 5), or follow the instructions on the Kodak Web site at
http://www.kodak.com
Monitor adjustment
To get the best view of your pictures, you should optimize your monitor display.
You can view the pictures on a monitor using 256 color and a 640 x 480 display
setting, but these settings will not give a true representation of the pictures.
1 Double-click on the My Computer icon.
2 Double-click on the Control Panel icon.
3 Double-click on the Display icon and click on the Settings tab.
4 Make note of the settings for the Color Palette and Desktop areas.
5 From the Color Palette field, select the highest available setting {256, High
(16-bit), or True (24-bit or 32-bit) color} and click the OK button.
6 From the Desktop Area, select 800 x 600 pixels.
☞ Changing these values may cause your monitor display to be offset. Consult
your monitor’s User’s Guide for information on repositioning the display.
☞ If changing your settings makes your display unusable, shutdown your PC,
reboot in the Safe mode and reset the settings to those recorded in Step 4. T o
boot up in Safe mode, press the F5 key when “Starting WINDOWS 95...”
appears on the monitor.
9-2
Page 95

Printing
You may notice that the colors on your computer screen do not always match
those in your documents or prints. This is because monitors and printers use
different color systems.
You may be able to achieve more predictable results in your printed
documents by:
✔ improving the quality of your paper . Copier paper may not offer the same
results as coated paper or paper made especially for ink jet printers.
✔ adjusting your printer software settings.
✔ using fresh ink cartridges. Do not use ink cartridges beyond their life
expectancy.
☞ If you need extreme precision in matching printed output to your computer
screen, you may want to consider purchasing a calibration system. The aim
of a calibration system is to match, as closely as possible, the printed image
to the image on your computer screen. Please consult your local computer
dealer for more information.
Remember these few tips when it comes time to print your document:
✔ color printing takes more time. Increased complexity in your document
increases the printing and drying time.
✔ color printing is more memory intensive than black and white. If your
computer gives you an insufficient memory message, you may need to
close some applications, change some settings, or add additional memory.
✔ color prints may not photocopy as clearly as black and white. If you plan
to photocopy documents, you may consider printing the document in gray
scale. This setting is usually changed from the Print menu.
✔ resizing the picture to a smaller size or printing the picture on glossy
paper may increase the quality of the print.
9
Troubleshooting
To improve the quality of your prints, you may want to print your pictures on
KODAK DIGITAL SCIENCE Inkjet Paper. InkJet Paper is made to work with
most inkjet printers to give you clearer , crisper , and more detailed images on your
prints.
9-3
Page 96

Troubleshooting
If you are experiencing difficulties with your camera, check the following table
for possible solutions. If the difficulties persist, refer to Chapter 10 - Getting
Help.
☞ Additional technical information is available in the ReadMe file located in
the KODAK DC220/DC260 folder.
Computer Monitor
Problem Cause Solution
The image on your monitor is
jagged or inappropriately
colored.
Memory Card
Problem Cause Solution
The camera does not recognize
your memory card.
Monitor is not set
correctly.
The memory card may
not be ATA
compatible or
CompactFlash CF
certified.
Adjust your monitor
display settings. See
“Monitor adjustment”
on page 9-2.
Memory cards must be
ATA compatible and
CompactFlash
certified to work with
the camera.
9-4
Page 97

Camera
Problem Cause Solution
Ready light does not turn on
and the camera does not work.
Ready light is red. No memory card in
Shutter button does not work. Camera is not turned
Camera does not turn on. Batteries are not
Batteries are low or
empty.
Camera is not turned
on.
camera or the memory
card is full.
on.
Mode dial is not set to
Capture.
Ready light is
blinking. Camera is
processing picture.
The Status Display
reads Full . The
memory card is full.
properly installed.
Batteries are weak or
dead.
Replace the batteries
or use the A C Adapter.
Pictures remain in the
camera’s memory
when the battery is
removed.
Turn the camera on
and verify that the
green Ready light
turns on.
Insert a new memory
card.
Turn the camera on
and verify that the
green Ready light
turns on.
Set the Mode dial to
Capture.
Wait until Ready light
stops blinking before
attempting to take
another picture.
Transfer pictures to
your computer or
insert a memory card
that has available
memory.
Remove the batteries
and install them
according to the
directions on the
inside of the battery
door.
Install new batteries or
use the AC Adapter.
9
Troubleshooting
9-5
Page 98

Camera
Problem Cause Solution
Part of the picture is missing. Something was
blocking the lens
when the picture was
taken.
Y our e ye or the picture
was not centered
correctly in the
viewfinder.
Picture is too dark. Flash is not on or did
not go off.
The subject is too far
away for the flash to
have an effect.
The subject is in front
of a bright light.
Picture is too light. The flash is not
needed.
The subject is too
close when the flash
was used.
The light sensor is
covered.
Stored pictures are damaged. The memory card was
removed when the
Ready light was
blinking.
Pictures remaining number
does not decrease.
The image resolution
does not take up
sufficient space to
decrease the picture
remaining number.
Keep hands, fingers,
or other objects away
from the lens when
taking pictures.
Leave space around
subject when
centering picture in
viewfinder.
Turn on the flash. See
“Flash” on page 2-4.
Move so there is no
more than 10 feet
(3 m) between the
camera and the
subject.
Change your position
so the light is not
behind the subject.
Change to automatic
flash. See “Flash” on
page 2-4.
Move so there is at
least 1.6 ft. (0.5 m)
between the camera
and the subject.
Hold the camera so
your hands or other
objects do not cover
the light sensor.
Make sure the Ready
light is not blinking
before removing the
memory card.
The camera is
operating normally.
Continue taking
pictures.
9-6
Page 99

Camera
Problem Cause Solution
Picture is not clear. The lens is dirty. Clean the lens. See
“General maintenance
and safety” on page 9-
1.
Subject too close
when taking picture
Subject or the camera
moved while the
picture was taken.
The subject is too far
away for the flash to
be effective.
LCD Messages
Message Cause Solution
Memory Card is Full. Memory card is full
and cannot hold
additional pictures
No Memory Card. There is no memory
card inserted in the
camera.
Cannot read memory card. Memory card is
corrupted.
Camera did not establish
connection.
Camera needs service. The camera is
The receiving camera does not
have enough memory to
receive the pictures.
The camera cannot
communicate with the
computer.
malfunctioning.
In a camera to camera
communication, the
receiving camera’s
memory card is full.
Stand at least 8 in. (20
cm.) away when
taking pictures using
Close-up.
Hold camera steady
until the picture is
taken.
Move so the subject is
less than 10 ft. (3 m)
away.
Transfer pictures to
your computer or
insert a memory card
that has available
memory.
Insert a memory card
into the camera.
Insert a new or
reformat the memory
card.
See “Potential
connection problems”
on page 6-8.
Have the camera
serviced.
Transfer pictures to
your computer or
insert a memory card
that has available
memory.
9
Troubleshooting
9-7
Page 100

LCD Messages
Problem Cause Solution
Unable to receive picture. An error has occurred
while receiving
pictures in a camera to
camera transfer.
Transfer of pictures was
interrupted. Not all pictures
were sent.
Not enough memory There is not enough
An error has occurred
before all pictures
were transferred.
memory on the card to
store the selected
timelapse picture
sequence.
Try the camera to
camera transfer again.
Try the transfer again.
Transfer pictures to
your computer or
insert a memory card
that has available
memory. You can also
change the timelapse
sequence to one that
requires less memory.
9-8
 Loading...