


Users' Guide
How To Operate And Enjoy Your
VR-5900
Di
g
i
t
a
l
Audio/ V i
d
e
o
R e c e i v
e r
B60-5016-00 00 CH (K,P) OC 0011

Using Your New Kenwood Audio-Video
Receiver
Welcome to the Users’ Guide for your new Kenwood Audio-Video Receiver.
The VR-5900 connects all your current audio and video components. It allows you to control them all with Kenwood’s remarkable PowerTouch touch screen remote—a graphical user interface without having to use your TV!
The VR-5900 adds dual-zone/dual-source operation, letting you play two different A/V sources independently in two different rooms! For a match made in “dual-zone heaven,” add Kenwood’s dual-transport CD-2280M, or CD-3280M 200-Disc CD Changer to the VR-5900.
NetFront® by Access Co., Ltd. is adopted for this product. Copyright© 1996, 1997 Access Co., Ltd.
NetFront® is registered trademark of Access Co.,Ltd. in Japan.
Table of Contents |
|
Chapter One: Moving Around ................................. |
1 |
What’s on the Front Panel of Your Kenwood Audio - Video |
|
Receiver? ................................................................................... |
2 |
What’s on PowerTouch? ........................................................... |
3 |
What’s on PowerTouch’s Screen? ............................................ |
4 |
The Quick Access Menu: ........................................................... |
5 |
How is PowerTouch Powered? ................................................. |
5 |
How Do I Use PowerTouch? ..................................................... |
6 |
How Do I Move Around? ........................................................ |
7 |
How Do I Enter Text? ............................................................... |
8 |
Chapter Two: Using PowerTouch ............................ |
9 |
How Do I Adjust the Sound? ................................................. |
10 |
Turning the Speakers On ........................................................ |
10 |
Adjusting the Volume ............................................................. |
11 |
Adjusting the Loudness (Only in STEREO mode with THX |
|
mode Off) ........................................................................... |
11 |
Adjusting the Tone (Only in STEREO mode with THX |
|
mode Off) .......................................................................... |
12 |
Adjusting Speaker Levels ................................................... |
13 |
Muting Sound .................................................................... |
15 |
Midnight Theater Function (Dolby Digital, DTS and DTS- |
|
ES only) .............................................................................. |
16 |
i
To balance volume extremes ................................................. |
16 |
How Do I Adjust the Surround modes? ................................. |
17 |
What are THX? ....................................................................... |
17 |
What are Listen Modes? ......................................................... |
18 |
To check the Surround Play status ......................................... |
21 |
Input Modes ........................................................................... |
22 |
To Set the Input Mode manually .......................................... |
23 |
To Set the THX mode ............................................................. |
24 |
To Set the Listen Mode manually ......................................... |
26 |
Selectable Listen modes ........................................................ |
27 |
Selecting the Pro Logic mode with PowerTouch ................. |
28 |
Description of Dolby Pro Logic II: Music modes ................ |
29 |
Applying Digital Signal Processor (DSP) Effects ................. |
30 |
HDCD® and D.R.I.V.E. Effects (THX Off mode only )........ |
33 |
Headphone Operation .......................................................... |
34 |
How Do I Operate Devices? ................................................... |
35 |
Operating PowerTouch without Sending Commands to the |
|
Receiver (Operations using the SHIFT key): .................... |
36 |
HOME1, HOME2 Devices ..................................................... |
37 |
Playback of the device connected to the CD2/TAPE2 |
|
MONITOR .......................................................................... |
39 |
CD player ................................................................................ |
40 |
Kenwood System Connected 200-Disc CD Changer .......... |
40 |
To play KENWOOD 200-Disc CD Changer (without system |
|
connection) using PowerTouch: ....................................... |
46 |
SingleCD or Carrousel CD Player .......................................... |
51 |
CD-R Recorder ....................................................................... |
52 |
MD Recorder .......................................................................... |
53 |
ii
Tape Deck ............................................................................... |
55 |
Turntable ................................................................................ |
56 |
Tuner ....................................................................................... |
57 |
TV ........................................................................................... |
62 |
VCR/PVR ................................................................................. |
66 |
DVD Player ............................................................................. |
67 |
Laser Disc Player .................................................................... |
68 |
Operation on the More menu .............................................. |
69 |
How Do I Record (Edit Mode)? ............................................ |
59 |
Digital to Digital Recording: .................................................. |
61 |
Digital to Analog Recording: .................................................. |
61 |
How Do I Record (Edit Mode)? ............................................. |
70 |
How Do I Adjust PowerTouch’s Display? ............................... |
73 |
How Do I See PowerTouch’s Screen More Clearly? ............. |
74 |
How Do I Turn the Beeping On or Off?............................... |
74 |
Using PowerTouch to Dim or Brighten the Receiver’s Front |
|
Panel ................................................................................... |
75 |
How Do I Perform Several Actions at Once? ......................... |
76 |
Creating Macros ..................................................................... |
77 |
Modifying a macro ................................................................ |
78 |
Using Macros .......................................................................... |
80 |
How Do I Control Home Automation Equipment? (for U.K. |
|
only) ....................................................................................... |
82 |
To switch on or switch off the RELAY CONTROL output |
|
using PowerTouch ............................................................. |
82 |
X-10 Home Automation ........................................................ |
83 |
Lutron ..................................................................................... |
85 |
iii
Makita ................................................................................. |
86 |
Accessories Control ............................................................ |
88 |
Chapter Three: Using PowerTouch in Multiple Zones |
|
............................................................................ |
90 |
How Do I Switch Control Modes? .................................... |
91 |
Why Don’t I See All My Devices? ...................................... |
92 |
How Do I Operate Devices? .............................................. |
93 |
Operating Devices in Zone A ............................................ |
93 |
Operating Devices in Zone B ............................................ |
93 |
Chapter Four: Troubleshooting ............................. |
94 |
Sound...................................................................................... |
96 |
I don’t hear any sound at all ................................................. |
96 |
Audio is not output only when a 96k fs compatible disc is |
|
played. ................................................................................ |
96 |
I can’t hear sound from one or more of the speakers, or the |
|
sound is abnormally low .................................................. |
96 |
The 96k fs indicator does not light while a 96k fs compatible |
|
disc is being played. .......................................................... |
97 |
I can’t hear sound from my surround or center speakers ... |
97 |
I can hear sound only from the center speaker when Dolby |
|
Pro Logic is selected .......................................................... |
97 |
A DTS-ES encoded source is played but it is not decoded in |
|
DTS-ES. ............................................................................... |
97 |
ADolby Digital Surround EX-encoded source is played with THX Surround EX set to “Auto”, but the source is not
reproduced in 6.1-channel audio. .................................... |
98 |
Sound from one (or more) of my devices is abnormally loud |
|
or soft. ................................................................................ |
98 |
iv
I can’t hear any sound in Zone B .......................................... |
99 |
I can’t hear sound from some of my laser discs .................. |
99 |
There wasn’t any sound recorded on tapes made on my |
|
VCR or tape deck ............................................................... |
99 |
The initial sound is intermittent or non-existent when I start |
|
to play from a Dolby Digital, DTS, DTS-ES or MPEG |
|
source ................................................................................ |
100 |
With a Dolby Digital program or DTS program, the loud |
|
sounds aren’t very loud and the quiet sounds aren’t very |
|
quiet................................................................................... |
100 |
All I hear is loud static when I play DTS discs .................... |
100 |
I hear a hum when I select the PHONO input ................... |
100 |
Audio is not output only when a 96 kfs compatible disc is |
|
played. ............................................................................... |
100 |
Sound is intermittent ............................................................ |
100 |
Video ...................................................................................... |
101 |
I can’t see the program I’m playing on the TV |
|
There wasn’t any video output to my VCR when I recorded |
|
............................................................................................ |
101 |
PowerTouch ........................................................................... |
101 |
I don’t see icons for all my devices ...................................... |
101 |
I don’t see icons for all the devices I set up ........................ |
101 |
When I select a device icon, I don’t see any commands .... |
101 |
My PowerTouch is slow to respond—sometimes I have to |
|
press buttons or select commands several times ........... |
101 |
My PowerTouch is not responding ...................................... |
102 |
My PowerTouch is beeping. What does that mean? ........... |
102 |
PowerTouch does not "learn" new commands or functions |
|
............................................................................................ |
102 |
v
I want to clear all the items in PowerTouch and make it to |
|
the factory-set default condition. .................................... |
102 |
Receiver/Tuner ....................................................................... |
103 |
My receiver won’t turn on and the STANDBY indicator is |
|
flashing .............................................................................. |
103 |
The sound is distorted, and the CLIP indicator on the |
|
receiver’s front panel flashes red continually, or stays red |
|
for more than 1 second at a time .................................... |
104 |
I can’t access any RDS (Radio Data System) functions (for |
|
U.K. only) .......................................................................... |
105 |
I can’t receive a radio station ............................................... |
105 |
I’m getting a lot of static/interference ................................. |
105 |
When I press a key to tune to a preset station, the receiver |
|
does not respond .............................................................. |
105 |
Macro is not running as I programmed. ............................. |
106 |
vi

Chapter One: Moving Around
Welcome to the Kenwood VR-5900 Users’ Guide. This chapter explains the buttons and functions you can find on the front of the receiver and on the PowerTouch. The chapter also includes an explanation of how to navigate the convenient graphical display on your new PowerTouch.
It includes the following sections:
What’s on the Front Panel of Your Kenwood Audio - Video Receiver? page 2
What’s on PowerTouch? |
page 3 |
How is PowerTouch Powered? |
page 5 |
How Do I Use PowerTouch? |
page 6 |
Around Moving
1

What’s on the Front Panel of Your Kenwood Audio-Video Receiver?
2 |
1 |
24 |
23 |
22 |
21 |
20 |
19 |
|
|
|
|
|
DTS-ES |
|
|
SURROUND |
CD 2 / TAPE 2 |
CLIP |
|
|
|
|
|
DISCRETE 6.1 |
MATRIX 6.1 NEO : 6 |
PRO LOGIC |
|
BACK |
96kfs MONITOR |
INDICATOR |
|
|
|
|
|
|
THX |
DOLBY DIGITAL |
|
VOLUME CONTROL |
|
18 |
|
|
STANDBY |
|
|
DTS |
|
MPEG |
|
|
|
|
|
|
|
|
|
|
|
|
|
|
|
|
REMOTE POWER |
|
|
D.R.I.V.E. |
HDCD |
|
|
|
17 |
|
|
|
|
|
|
|
¤ INPUT SELECTOR |
‹ |
|
||
|
ON/STANDBY |
|
|
|
|
|
|
DOOR |
|
|
|
|
|
|
|
|
|
OPEN/CLOSE |
|
|
|
|
|
|
|
|
|
|
|
DOWN |
UP |
16 |
|
|
|
|
|
|
|
|
|
|
|
|
|
AV - AUX |
|
PHONES |
S VIDEO |
VIDEO |
L - AUDIO - R |
Buttons be- |
A SPEAKERS B |
INPUT |
CD 2/TAPE 2 LISTEN |
|
MULTI |
|
|
|
|
||
hind |
the |
MODE |
MONITOR |
MODE |
THX |
SOUND fi CONTROL % |
fi P.CALL % |
MEMORY AUTO |
BAND |
|
|
|
ON/OFF |
RF BAND |
DISPLAY |
|
SET UP |
|
|
|
|
||
|
|
|
RF |
|
|
|
|
|
|||
door |
|
|
|
|
|
|
|
|
|
|
|
3 |
|
4 |
6 |
8 |
|
10 |
11 |
12 |
14 |
15 |
|
|
|
5 |
|
7 |
9 |
|
|
13 |
|
||
1. |
STANDBY indicator |
7. |
LISTEN MODE button/DISPLAY button |
2. |
REMOTE POWER ON/STANDBY button |
8. |
THX button |
3. |
PHONES jack |
9. |
SOUND button/SET UP button |
4. |
SPEAKERS A/B buttons |
10. |
MULTI CONTROL (Up/Down) buttons |
5. |
INPUT MODE button / |
11. |
P. CALL (Up/Down) buttons |
|
RF ON/OFF button |
12. |
MEMORY button |
6. |
CD 2/TAPE 2 MONITOR button / |
13. |
AUTO button |
|
RF BAND button |
14. |
BAND button |
15.AV-AUX input jacks
16.DOOR OPEN/CLOSE button
17.VOLUME CONTROL knob
18.INPUT SELECTOR buttons
19.Indicators
SURROUND BACK 96 k fs
CD2/TAPE2 MONITOR
CLIP INDICATOR
20. Indicators THX DTS
D. R. I. V. E.
DOLBY DIGITAL
MPEG
HDCD
21.Display
22.2-way communication indicator
23.Indicators
DTS-ES DISCRETE 6.1
DTS-ES MATRIX 6.1
NEO : 6
PRO LOGIC
24. Infrared remote transmitter
Buttons 4 to 14 are located behind the door.
Standby mode
While the standby indicator of the unit is lit, a small amount of current is flowing into the unit’s internal circuitry to back up the memory. This condition is referred to as the standby mode of the unit. While the unit is in the standby mode, it can be turned ON from the remote control unit.
2
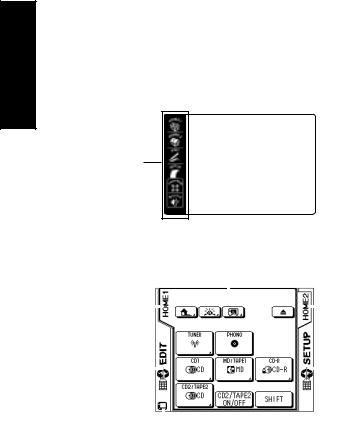
What’s on PowerTouch?
What’s on PowerTouch?
8 9
10
1
|
|
ENTER |
|||
2 |
CONFIRM |
|
|
|
UP |
|
|
|
|
|
E |
|
|
|
|
|
M |
|
|
|
O |
L |
U |
|
|
V |
|
|
|
3
MUTE
DOWN
4
CONTRAST |
SYS.POWER |
BACKLIGHT |
5 |
|
6 |
|
7 |
1.Joystick (see page 7)
2.CONFIRM button
3.MUTE button (see page 15)
4.VOLUME UP/DOWN button (see page 11)
5.CONTRAST button
6.SYS. POWER button
7.BACKLIGHT button (see page 73)
8.Quick Access menu
9.Touch screen display
10.Stylus (stored on top edge)
Around Moving
3
Moving Around
What’s on PowerTouch?
What’s on PowerTouch’s Screen?
PowerTouch’s LCD display screen is divided into two sections: the Quick Access Menu and the Device Control/Menu Section. Use the stylus to touch the buttons in each area.
Device
Control/Menu
Quick Access Section
Menu
An example of HOME 1 menu
|
|
|
|
Device control buttons |
|||
HOME 1 button |
|
|
|
|
|
|
HOME 2 button |
|
|
|
|
|
|
||
|
|
|
|||||
EDIT button |
|
|
|
|
|
|
SETUP button |
|
|
|
|
|
|
||
|
|
|
|||||
|
|
|
|
|
|||
|
Customize button, communication indicator etc. |
||||||
The Quick Access Menu:
The buttons in the Quick Access Menu are always available, regardless of what else is displayed on the touch screen. Touch these buttons for instant access to:
•Home1, Home2 : Music and movie device controls such as CD players, the radio tuner or VCRs.
•Editing features
•Setup features
•Listen modes such as stereo, Dolby Digital or DTS
•Sound controls, such as loudness or “Midnight” mode
4
How is PowerTouch Powered ?
The Device Control/Menu Section: The device control section provides the same kinds of access as the Quick Access menu, but with more structure. Use the Main menu to navigate through the feature menus to exactly the feature or device you want to use.
Using these features, your Kenwood PowerTouch can store and display a large number of tasks, making it easier for you to access features. You get all the advantage of on-screen graphical display, without having to use a TV screen!
For more information on using these icons, see “How Do I Use PowerTouch?” on page 6.
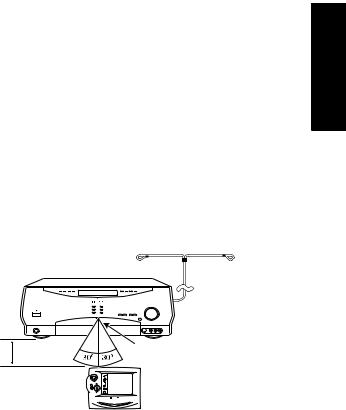
How is PowerTouch Powered ?
Your new PowerTouch uses four C (LR14) alkaline batteries and operates in the following range:
RF Remote
Antenna
Around Moving
20 ft |
IR Transmitter |
|
(6m) |
||
|
If you use PowerTouch outside of this range, PowerTouch’s display may show incorrect information, or may not operate.
The remote control signal received by the main unit is only the RF signal.
The control distance of the RF remote signal is about 10 meters provided there is no obstacle.
5

Moving Around
How Do I Use PowerTouch?
As you use PowerTouch, be aware of the following:
•When PowerTouch’s operating range gets shorter or PowerTouch displays a low battery alarm, replace all 6 batteries. (see “Installing the Batteries” on page 34 of the Connections and Setup Guide.)
•Do not install the receiver where direct sunlight or high-frequency fluorescent lighting can shine directly into the infrared remote sensor. This can limit PowerTouch’s operating range.
How Do I Use PowerTouch?
Use your new PowerTouch to control your new receiver and most devices attached to it. PowerTouch appears and functions a little differently from traditional remotes. Because it can control so many different devices, it displays a separate set of controls for each device on an LCD screen.
Only devices you have identified and connected to the receiver appear as buttons on the touch screen. If you are “missing” a device’s icon on the Home1 or Home2 screen, make sure you have identified the device to the PowerTouch. For more information on identifying devices to the PowerTouch, see “Chapter Two: Setting Up PowerTouch” in the Connections and Setup Guide.
6

How Do I Use PowerTouch?
Do not block the IR transmitter on the front panel of the receiver or on PowerTouch. Even a brief blockage while it is transmitting (such as someone walking by) can cause the communication and feedback to become erratic temporarily. If this happens, press CONFIRM and PowerTouch will resume normal operation (you might need to reenter the interrupted command).
How Do I Move Around?
1.Press any button or touch the screen to activate PowerTouch’s display.
2.Use the stylus to touch the menu or control button you want to use.
Operations using the joystick
The joystick makes the following operations possible.
1.Customization of the PowerTouch screen: The buttons on the screen of PowerTouch can be moved or resized. (Refer to "To Customize the PowerTouch Screen" on page 43 of the Connection and Setup Guide.
2.Contrast adjustment of the PowerTouch screen: For details, see "To adjust the contrast" on page 74.
Also use the joystick when using the OSD (On-Screen Display) of the DVD or LD player. (Certain functions may be restricted with some devices.)
•Display a menu containing the OSD function.
•Press the OSD button or Menu. The menu is displayed on the TV monitor screen.
•Select an item by tilting the joystick up/down or to the left/right.
•Press the joystick’s ENTER button to enter the selected item.
(With certain models, the selected item may also be established with the other buttons.)
Around Moving
7

Moving Around
How Do I Use PowerTouch?
How Do I Enter Text?
Many of the control menus allow you to assign your own names to list items (such as radio stations, CD titles, etc.).
To enter text for names:
1.Access the control screen with the item name you want to change.
You have accessed the appropriate screen if  ,
,  ,
,  or
or  appears on the screen.
2.Touch  ,
,  ,
,  or
or  :
:
•Use the stylus to select characters from the keyboard.
•Touch  to access to lowercase characters. Touch it again to access special characters (such as @, !, &, etc.). Touch it a third time to return to uppercase characters.
•Touch  or
or  to move back and forth between the characters.
•Touch  to clear the last character you entered. Touch
  to delete all the characters in the line.
8

How Do I Adjust the Sound?
Chapter Two: Using PowerTouch
Your new receiver comes with the easiest—and most innovative— remote you’ve ever seen. Its palm-sized illuminated screen displays clear icons and menus. Because PowerTouch maintains two-way communication with your receiver, it shows the result of your action right on its screen.
PowerTouch is a universal remote that can control hundreds of devices, and is the first of its kind to offer infra-red compatibility with X-10, Lutron lighting, and Makita drapery control systems, making it perfect for controlling even the most elaborate home theater system. (for U.K. only)
This chapter contains the following sections: |
|
How Do I Adjust the Sound? |
page 10 |
How Do I Adjust the Surround modes? |
page 17 |
How Do I Operate Devices? |
page 35 |
HOME1, HOME2 Devices |
page 37 |
How Do I Record? (Edit Mode) |
page 70 |
How Do I Adjust PowerTouch’s Display? |
page 73 |
How Do I Perform Several Actions at Once? |
page 76 |
How Do I Control Home Automation Equipment? |
page 82 |
PowerTouch Using
9

Using PowerTouch
How Do I Adjust the Sound?
How Do I Adjust the Sound?
You can control and adjust a variety of sound settings using the receiver’s front panel or PowerTouch.
Turning the Speakers On
To turn on the speakers A, press the DOOR OPEN/CLOSE button to open the door and press the SPEAKERS A button inside the door.
To turn on the speakers B, press the SPEAKERS B button located in the door of the receiver’s front panel. (Å or ı displayed)
If you select SPEAKERS B (Zone B) while listening to a surround mode in Zone A, the sound in Zone A will automatically revert to stereo. While SPEAKERS B is on, surround mode cannot be selected.
If you use speakers connected to amplifiers via the PRE OUT jacks, choose
SPEAKERS A.
10
SLS |
p |
P |
e |
a |
E |
k |
e A |

How Do I Adjust the Sound?
Adjusting the Volume
Use one of the following methods to adjust the volume.
•Turn the volume knob on the front panel of the receiver.
UP
|
|
|
ME |
|
O |
L |
U |
V |
|
|
|
|
|
|
•Press in the appropriate direction on PowerTouch.
DOWN
Adjusting the Loudness (Only in STEREO mode with THX mode Off)
The Loudness control increases the bass and treble at low volume control settings. This adjusts to the way the human ear hears sound at quiet volumes, retaining music’s fullness and sparkle.
1. Touch  (sound) on the Quick Access menu to open the Sound menu.
If the opened menu is not the Sound menu, touch  .
.
2. Touch  to turn the loudness setting on or off.
3. Touch  to return to the previous menu or touch one of the Quick Access menu buttons to proceed to the next operation.
Operation on the receiver:
1.Press the SOUND button inside the door repeatedly until LOUDNESS OFF or ON is displayed.
2.Press the MULTI CONTROL (%/fi) button to select LOUDNESS ON (or OFF), then press the SOUND button repeatedly until “SOUND FIXED” is displayed.
PowerTouch Using
11

How Do I Adjust the Sound?
Adjusting the Tone (Only in STEREO mode with THX mode Off)
Use the Sound menu to adjust the bass or treble tone of your front left and right speakers manually. In addition to setting bass and treble tone adjustment values, you can completely bypass the tone control circuitry for a purer sound.
1.Touch  (sound) on the Quick Access menu to open the Sound menu:
Using PowerTouch
2. Touch  to open the Tone menu:
3. Touch  to turn the tone settings on or off.
4. If you selected “on” in the above, touch the left  or right
  arrow next to a tone setting (Treble or Bass) to adjust it. A readout
 between the arrows shows the current setting.
12
How Do I Adjust the Sound?
5.Touch  to return to the previous menu or touch any Quick Access menu button to access that menu.
Operation on the receiver: |
|
|
1. |
Press the SOUND button in the door repeatedly until TONE OFF or |
|
|
ON is displayed. |
|
2. |
Press the MULTI CONTROL (%/fi) button to display TONE ON (or |
|
|
OFF if desired so). |
|
3. |
When ON is selected above and the SOUND button is pressed again, |
|
|
the BASS setting menu appears. |
|
|
When OFF is selected above, the LOUDNESS setting menu appears. |
Using |
4. |
Adjust BASS level using the MULTI CONTROL (%/fi) button. |
|
5. |
Press the SOUND button. |
PowerTouch |
|
||
6. |
When the TREBLE setting menu appears, adjust the treble in the same |
|
|
way as above. To exit from setting, press the SOUND button repeatedly |
|
|
until “SOUND FIXED” is displayed. |
|
Adjusting Speaker Levels
You can use the Sound menu to temporarily adjust the speaker levels of your center speaker, surround speakers, surround back speakers and subwoofer. For example, if a particular movie has dialog that’s hard to understand, you can temporarily increase the center channel volume just for that movie. For more information on adjusting speaker levels permanently, see Chapter Two: Setting Up PowerTouch in the Connections and Setup Guide.
1. Touch  (sound) on the Quick Access menu to open the Sound menu:
13

Using PowerTouch
How Do I Adjust the Sound?
2. Touch  to open the Speaker Level menu:
Although icons for the front speakers appear here, notice that they do not have buttons. They’re here for a visual reference; you cannot change their level.
3.Select a speaker by touching its button. You have selected a speaker when its button darkens.
The two surround speakers (SL and SR) or the two surround back speakers (SBL and SBR)cannot be adjusted independently between each other.
4.Touch the up  or down arrow
  to adjust the volume of the speaker(s) you chose.
5.Touch  to return to the previous menu or touch any Quick Access menu button to access that menu.
The subwoofer level can be adjusted between +10 dB and -20 dB, and other speaker level can be adjusted between +10 dB and -10 dB.
14

How Do I Adjust the Sound?
Operation on the receiver:
1.Press the SOUND button inside the door repeatedly until the name of the speaker(s) to be adjusted is displayed.
C : center speaker
S : surround speakers
SB : surround back speakers
SW : subwoofer
2.Press the MULTI CONTROL (%/fi) button to select the desired volume level, then press the SOUND button repeatedly until “SOUND FIXED” is displayed.
These settings automatically return to the level you adjust on Chapter Two of Connection and Setup Guide whenever you select a different source device or turn the receiver’s power off.
Muting Sound
Use following method to temporarily mute the sound:
•Press MUTE button on PowerTouch.
A “Mute On” message appears on the LCD screen for 3 seconds, then disappears. The MUTE indicator on the receiver panel blinks during muting.
Use one of the following methods to cancel muting:
•Press either Mute button again.
•Adjust the volume control on either the receiver or PowerTouch. The MUTE indicator on the receiver panel goes off.
PowerTouch Using
15

How Do I Adjust the Sound?
Midnight Theater Function (Dolby Digital, DTS and DTS-ES only)
Any time you don’t want to experience the loud and soft volume extremes of recorded sound (for example, late at night), use midnight Theater function to reduce volume extremes. This feature keeps loud, dramatic sound from being too loud (perhaps disturbing family members or neighbors) while ensuring that you can still hear whispered dialog or other soft sounds.
Midnight theater function only works if you are listening to a Dolby Digital, DTS or DTS-ES program that has been encoded with special compression data.
|
To balance volume extremes |
|
||
PowerTouchUsing |
|
|||
1. Touch |
(sound) on the Quick Access menu to open the Sound menu: |
|||
|
||||
|
If the opened menu is not the Sound menu, touch |
. |
||
|
|
|
|
|
2. Touch  until the balancing sounds right to you:
•OFF for normal balancing
•1 for quieter balancing
•2 for quietest balancing (the least difference between the loudest and quietest sound)
3. Touch  to return to the previous menu or touch one of the Quick Access menu buttons to proceed to the next operation.
Operation on the receiver:
1.Press the SOUND button in the panel door repeatedly until MIDNIGHT OFF, 1 or 2 is displayed.
2.Press the MULTI CONTROL (%/fi) button to select 1, 2 or OFF, then press the SOUND button repeatedly until returning to the previous menu.
16

How Do I Adjust the Surround?
How Do I Adjust the Surround modes?
You can experience true home-theater sound with your Kenwood AudioVideo Receiver. This receiver incorporates several listen modes to let you enjoy surround sound with a wide variety of program sources. Each produces multiple channels of surround-sound, but each does it differently.
What are THX? |
|
|
• THX: Movie soundtracks are mixed in special movie theaters called |
|
|
dubbing stages and are designed to be played back in movie theaters |
|
|
with similar equipment and conditions. The soundtrack created for |
|
|
movie theaters is then transferred directly onto Laserdisc, VHS tape, |
|
|
DVD, etc., and is not changed for playback in a small home theater |
Using |
|
environment. |
||
|
||
THX engineers developed patented technologies to accurately trans- |
PowerTouch |
|
late the sound from the movie theater environment into the home, |
||
|
||
correcting the tonal and spatial errors that occur. On the VR-5900, |
|
|
when the THX mode is on, the THX technologies are automatically |
|
|
added after the decoded signal. |
|
|
Movies which have been encoded in Dolby Digital, DTS, MPEG, Dolby |
|
|
Pro Logic, Stereo and Mono can all benefit from activating the THX |
|
|
technologies. THX should be activated only when watching movies |
|
|
which were mixed for playback in large movie theater environments. |
|
|
THX need not be activated for music, movies that were made espe- |
|
|
cially for television or shows such as sports programming, talk shows, |
|
|
etc. This is because they were mixed in a small room environment. |
|
|
• THX Surround EX: Lucas Film and Dolby Laboratories jointly devel- |
|
|
oped the Dolby Digital Surround EX system, which is a cinema sur- |
|
|
round sound system featuring improved special representation and |
|
|
acoustic imaging of surround channels. |
|
|
To allow the home theater environment to reproduce this surround |
|
|
sound by translating the above technology, the VR-5900 incorporates |
|
|
a THX Surround EX decoder. |
|
|
This circuit features merges the matrix decoding technology with the |
|
|
Lucas Film's proprietary THX processor technology and adds the sur- |
|
|
round back (SB) channels to offer clearer acoustic positioning on the |
|
|
rear, spatial expression and the feeling of movement between the front |
|
|
and rear. |
|
17
|
How Do I Adjust the Surround? |
|
|
The surround back (SB) signals are encoded in the surround channels |
|
|
(SL, SR) and decoded to the SL, SR and SB channels during playback. |
|
|
The THX processor then corrects these signals to match the home the- |
|
|
ater reproduction and outputs them in the 6.1-channel signals. |
|
|
What are Listen Modes? |
|
|
• Dolby Digital: Dolby Digital uses an encode/decode process based |
|
|
on its theatrical digital surround sound technology. The five main |
|
|
channels are full-frequency and independent, so sound can completely |
|
|
envelop you or soar anywhere in the room, just like at the movies. |
|
|
Compared with Dolby Pro Logic, Dolby Digital has more clarity, |
|
PowerTouch |
||
greater surround envelopment, and more realistic sound movement |
||
|
||
|
between channels. |
|
|
Although a full set of speakers (front left and right, center, surround |
|
|
left and right, and a subwoofer) is required for true Dolby Digital |
|
Using |
surround sound, this receiver lets you enjoy Dolby Digital program |
|
• DTS : DTS has five full-frequency channels that create effects nearly |
||
|
sources, even if you connect fewer speakers. |
|
|
identical to those in a theater. Sounds seem to zoom from one place |
|
|
to another or entirely surround you. Like Dolby Digital, DTS has much- |
|
|
improved clarity, surround and sound movement capability compared |
|
|
with Dolby Pro Logic. This listen mode is available on CD, LD, and |
|
|
DVD media. DTS is a strictly digital format that can be supplied only |
|
|
by a CD, LD, or DVD player that supports DTS sound. If you attempt |
|
|
to listen to DTS encoded media through the analog connections to |
|
|
your new receiver, you will experience digital noise (loud static). |
|
|
• DTS-ES Discrete 6.1, DTS-EX Matrix 6.1: Both DTS-ES Discrete 6.1 |
|
|
and DTS-ES Matrix 6.1 add the surround back channel audio to the |
|
|
DTS 5.1-channel format to improve the acoustic positioning and |
|
|
makes acoustic image movement more natural with the 6.1-channel |
|
|
reproduction. This receiver incorporates a DTS-ES decoder, which can |
|
|
handle DTS-ES Discrete-encoded and DTS-ES Matrix-encoded program |
|
|
sources from DVD, etc. |
|
|
DTS-ES Discrete 6.1 features digital discrete recording of all channels |
|
|
including the surround back channels and higher quality of audio |
|
|
reproduction. |
18

How Do I Adjust the Surround? |
|
DTS-ES Matrix 6.1 features matrix encoding of surround back (SB) |
|
signals in the SL/SR signals and decoding of the matrix into the SL, |
|
SR and SB signals during playback. |
|
• MPEG: MPEG, which stands for “Moving Pictures Experts Group”, is |
|
an international standard of digital video and audio compression and |
|
decompression in media. It is the most efficient encoding method |
|
for compressed multi-channel audio which provides the highest sound |
|
quality to deliver the best movie theater sound into the home. |
|
• Dolby Pro Logic/Dolby Pro Logic II: Dolby Pro Logic reproduces a |
|
surround sound like in a movie theater from Dolby Surround-encoded |
|
program source (videotape or LaserDisc software carrying the Dolby |
Using |
Surround logo), and features excellent sound movement on the front |
|
and a surrounding atmosphere of movie theaters. Meanwhile, Dolby |
|
Pro Logic II decodes a signal encoded in 2 channels into 4-channel |
PowerTouch |
used with Dolby Pro Logic. It inputs 2-channel signals from a Dolby |
|
signals composed of the left/right front signals, center signal and |
|
surround signal. |
|
Dolby Pro Logic II is an advanced version of the decoding technology |
|
Surround-encoded source and reproduces 5.1-channel signals in |
|
which the surround channel is divided into independent channels |
|
for the left and right. Dolby Pro Logic II has the MOVIE mode and |
|
MUSIC mode, and the MUSIC mode enables independent adjustment |
|
of three parameters including Panorama mode, Dimension and Center |
|
Width. See page 29 for the Dolby Pro Logic II parameters. |
|
To allow the users enjoy multichannel playback also from the analog |
|
audio of currently available Dolby Surround home video software, |
|
the VR-5900 incorporates a Dolby Pro Logic II surround decoder. |
|
• DTS NEO:6: This is a new technology which decodes 2-channel sig- |
|
nals into 6-channel signals using high-accuracy digital matrix tech- |
|
nology. The DTS NEO:6 decoder has near-discrete properties in the |
|
frequency characteristics of the channels as well as in channel separa- |
|
tion. According to the signals to be played back, DTS NEO:6 uses |
|
either the NEO:CINEMA mode optimized for movie playback or the |
|
NEO:MUSIC mode optimized for music playback. |
|
19

|
How Do I Adjust the Surround? |
|
|
• DSP (Digital Signal Processing): DSP allows you to create your |
|
|
own custom surround sound environments and use them with any |
|
|
source (except Dolby Digital, MPEG, DTS and DTS-ES). You can se- |
|
|
lect the ambience of an Arena, Jazz Club, Stadium, Cathedral or The- |
|
|
ater, and then modify the parameters to ‘fine-tune’ the environment |
|
|
to your taste. (See “Applying Digital Signal Processor (DSP) Effects” |
|
|
on page 30 for details about making DSP adjustments.) |
|
|
• Multi ch Music (Multichannel music): All speakers are used to real- |
|
|
ize a stereo sound with a wide listening range. |
|
|
• Stereo: Stereo listen mode provides standard stereo sound to the front |
|
PowerTouch |
left and right speakers. |
|
You cannot select the Input Analog mode if you are playing DTS-encoded |
||
Using |
||
media. |
||
|
||
|
You cannot listen to DTS-encoded media in Zone B. |
|
|
When playing DTS-encoded media, wait until “DTS” appears on the |
|
|
||
|
receiver display before proceeding. |
|
|
The listen mode is fixed to Stereo during playback of 96k fs signals. |
20
How Do I Adjust the Surround?
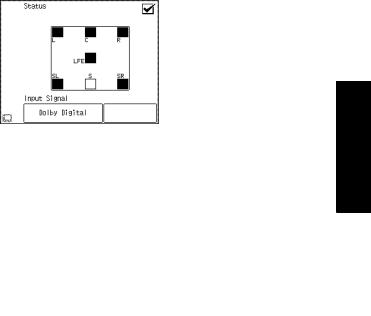
To check the Surround Play status
1.Touch  (listen mode) on the Quick Access menu to open the Listen Mode menu:
|
|
Using |
2. Touch |
. This displays the Input Signal Status screen, which shows |
PowerTouch |
|
the signal being displayed:
During playback of Dolby Digital, MPEG or DTS signal, the surround identification signal in the input is identified and displayed by means of the L, C, R, SR, SB, SL and LFE icons.
L : Left front channel |
C : Center channel |
|
R : Right channel |
SR : Surround right channel |
|
SL : Surround left channel |
SB : Surround back channel |
|
LFE : Low frequency effect channel |
S : Surround channel |
|
3. Touch  to return to the previous menu or touch one of the Quick Access menu buttons to proceed to the next operation.
21

Using PowerTouch
How Do I Adjust the Surround?
Input Modes
The input mode should usually be set to Full Auto. However, the input mode can also be set manually when you want to fix the inputs as analog signals, etc.
Full Auto |
: The receiver detects the input signal format and |
|
selects the Listen mode automatically according to |
|
the speaker setup. |
Digital Manual |
: The inputs are fixed at digital signals and the listen |
|
modes should be switched manually by the user. |
|
The Digital Manual mode is switched automati- |
|
cally to the Full Auto mode when an input is |
|
switched or the receiver is set to OFF. |
Analog |
: The inputs are fixed at the analog 2-channel inputs. |
6ch Input |
: The inputs are fixed at the analog 6-channel inputs. |
|
This mode can be selected only when the DVD in- |
|
put is selected with the input selector. |
•When you use Full Auto mode with certain DVD and LD players, performing operations such as “Skip” or “Stop” may momentarily interrupt the output. This could switch the “Listen Mode” automatically to the surround mode intended for the input signal if you have manually selected a different listen mode.
22
 Loading...