

Page 1
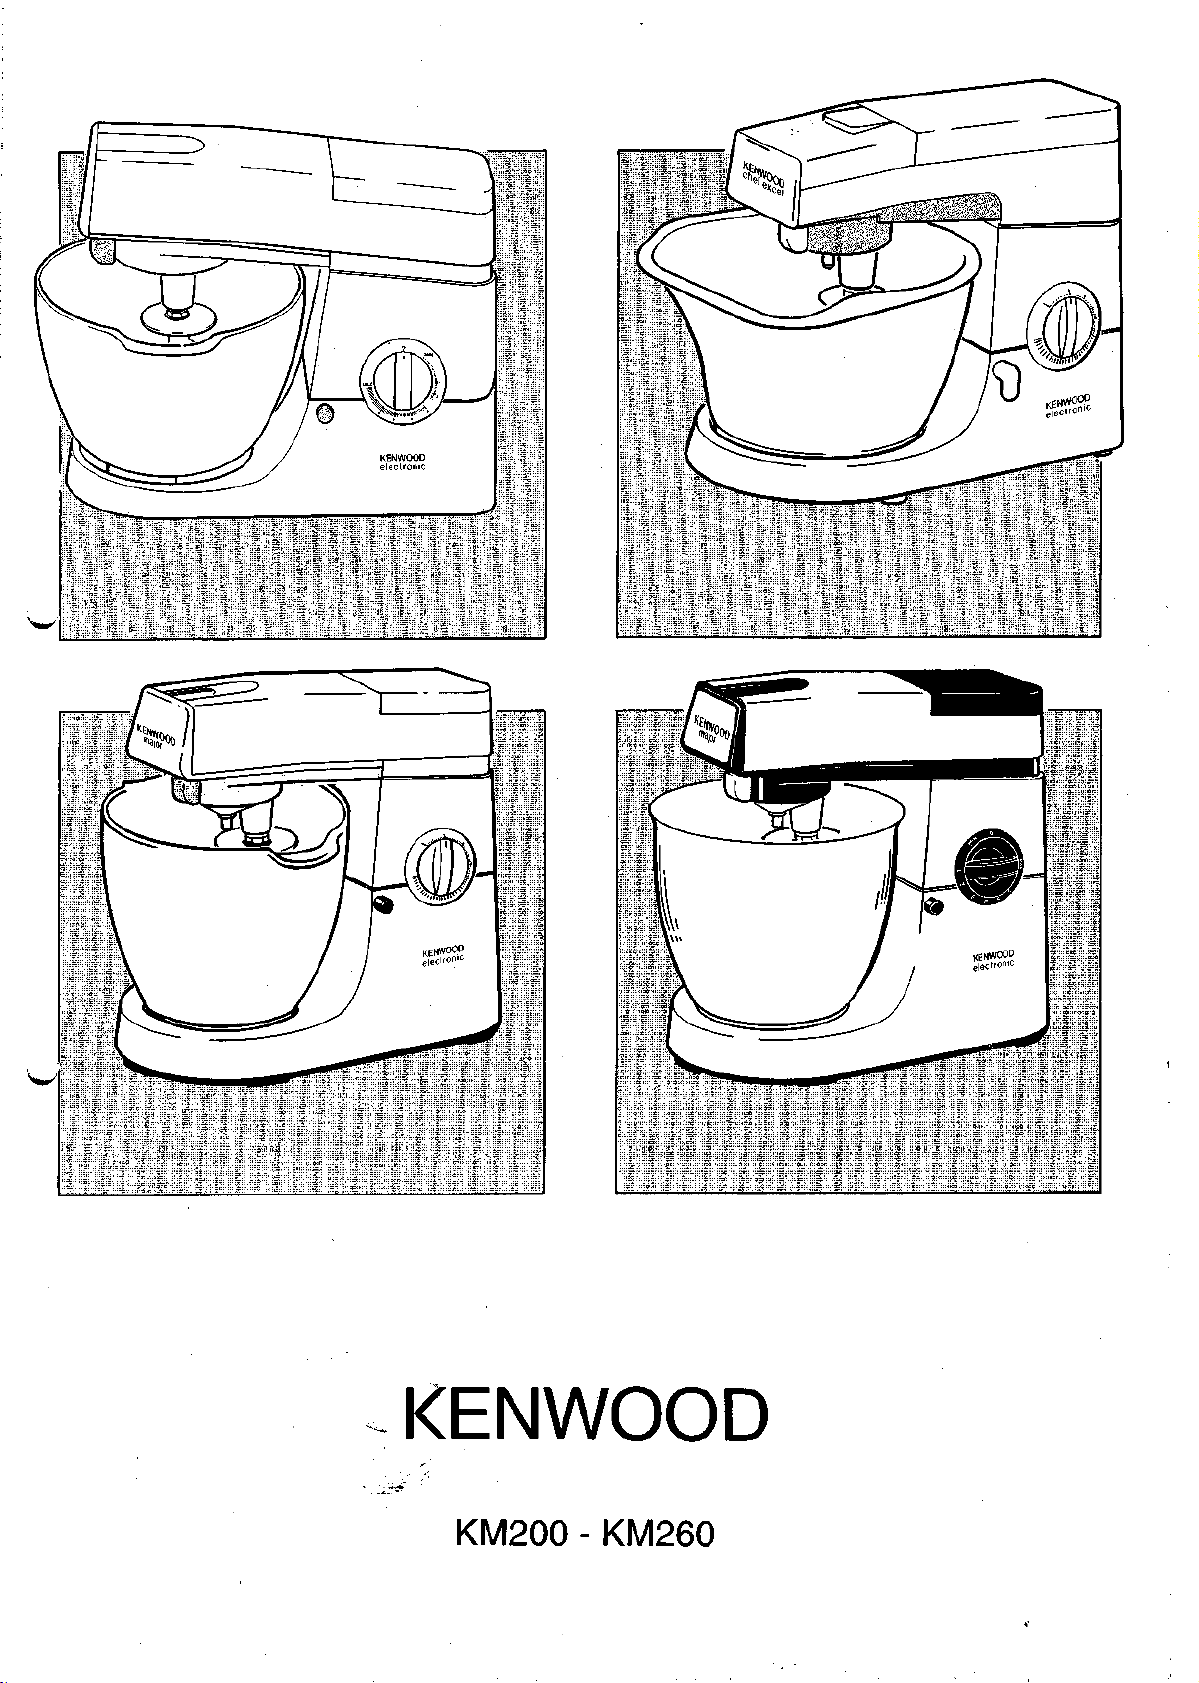
KENWOOD
KM200 - KM260
Page 2
Your new Kenwood Food Mixer will make food preparation a simple and enjoyable task. To reap maximum
benefit from your mixer keep it ready to use on a convenient worktop for whenever you need it. A large
range of attachments is available which will enable you to explore further culinary delights. (Please note
some attachments are for special international markets only.)
Connecting
Before switching on make sure that the voltage of your electricity supply is the same as
that indicated on the rating plate.
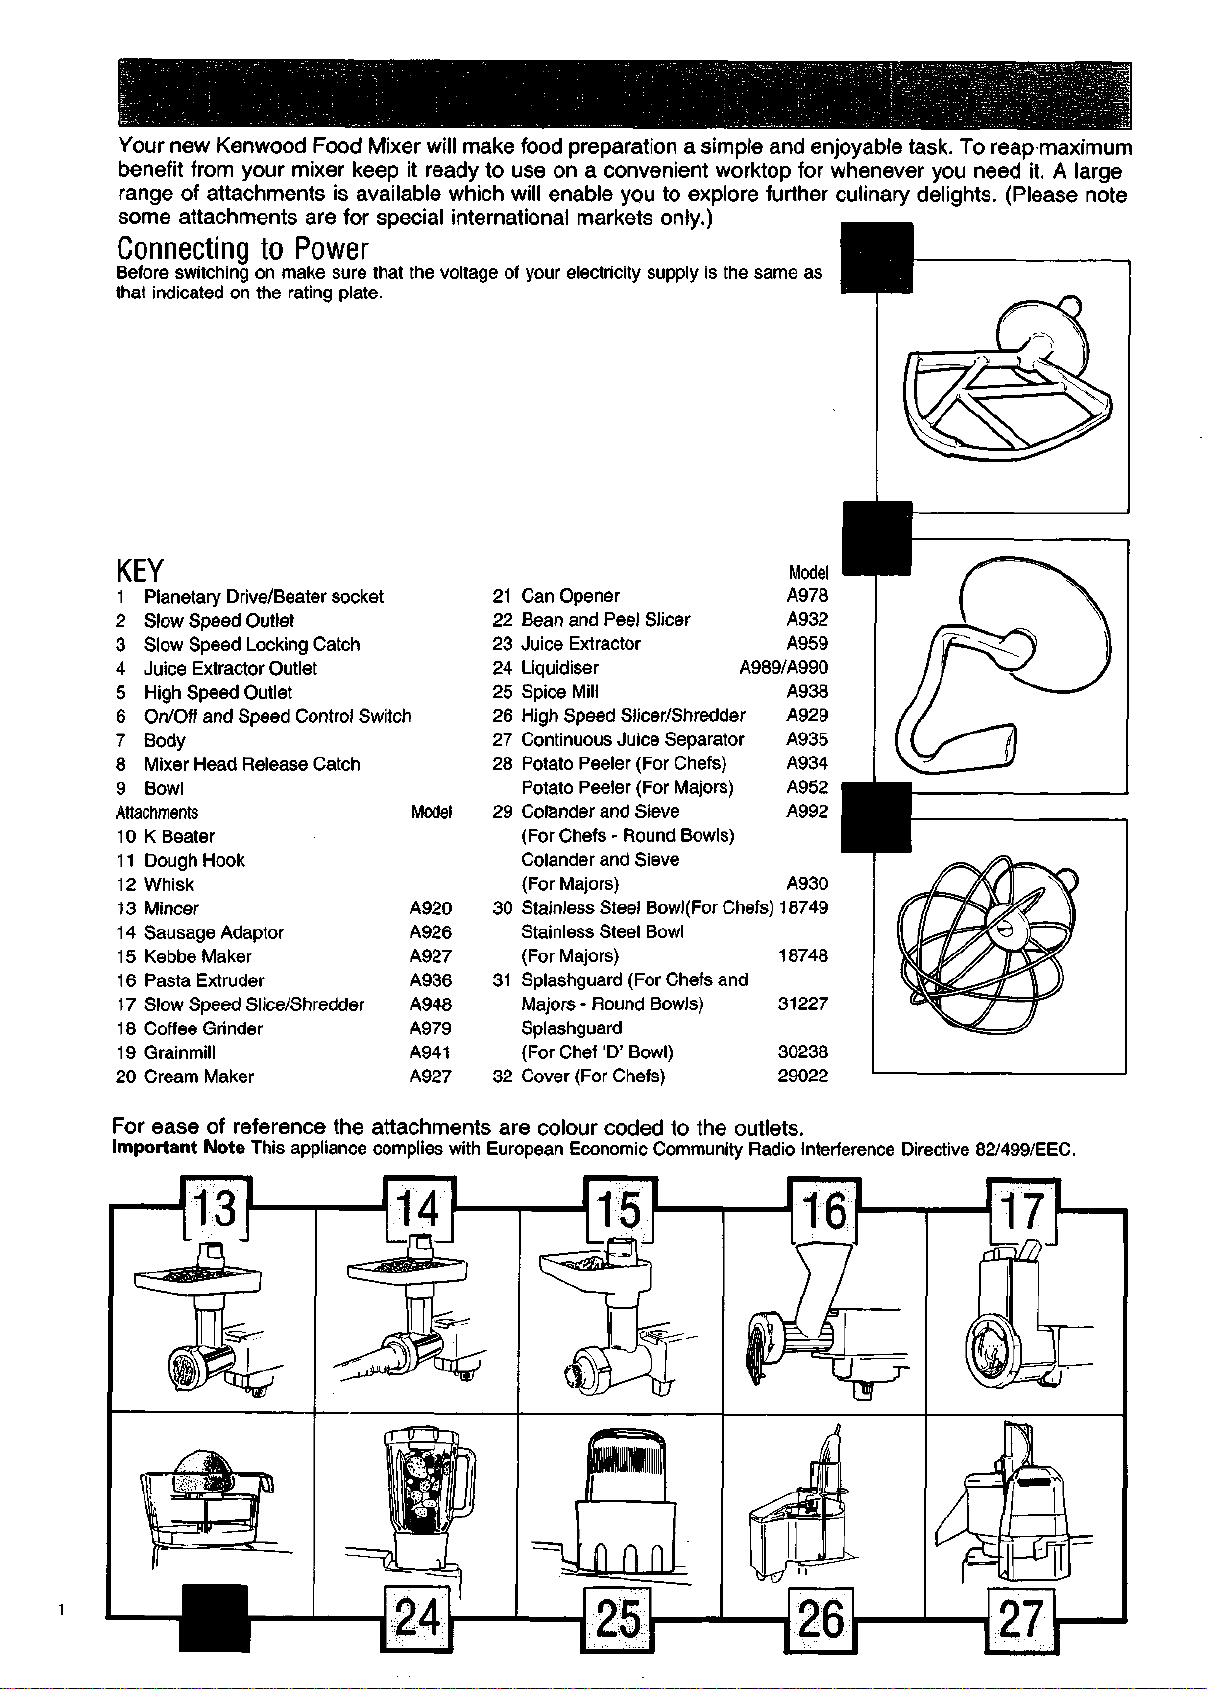
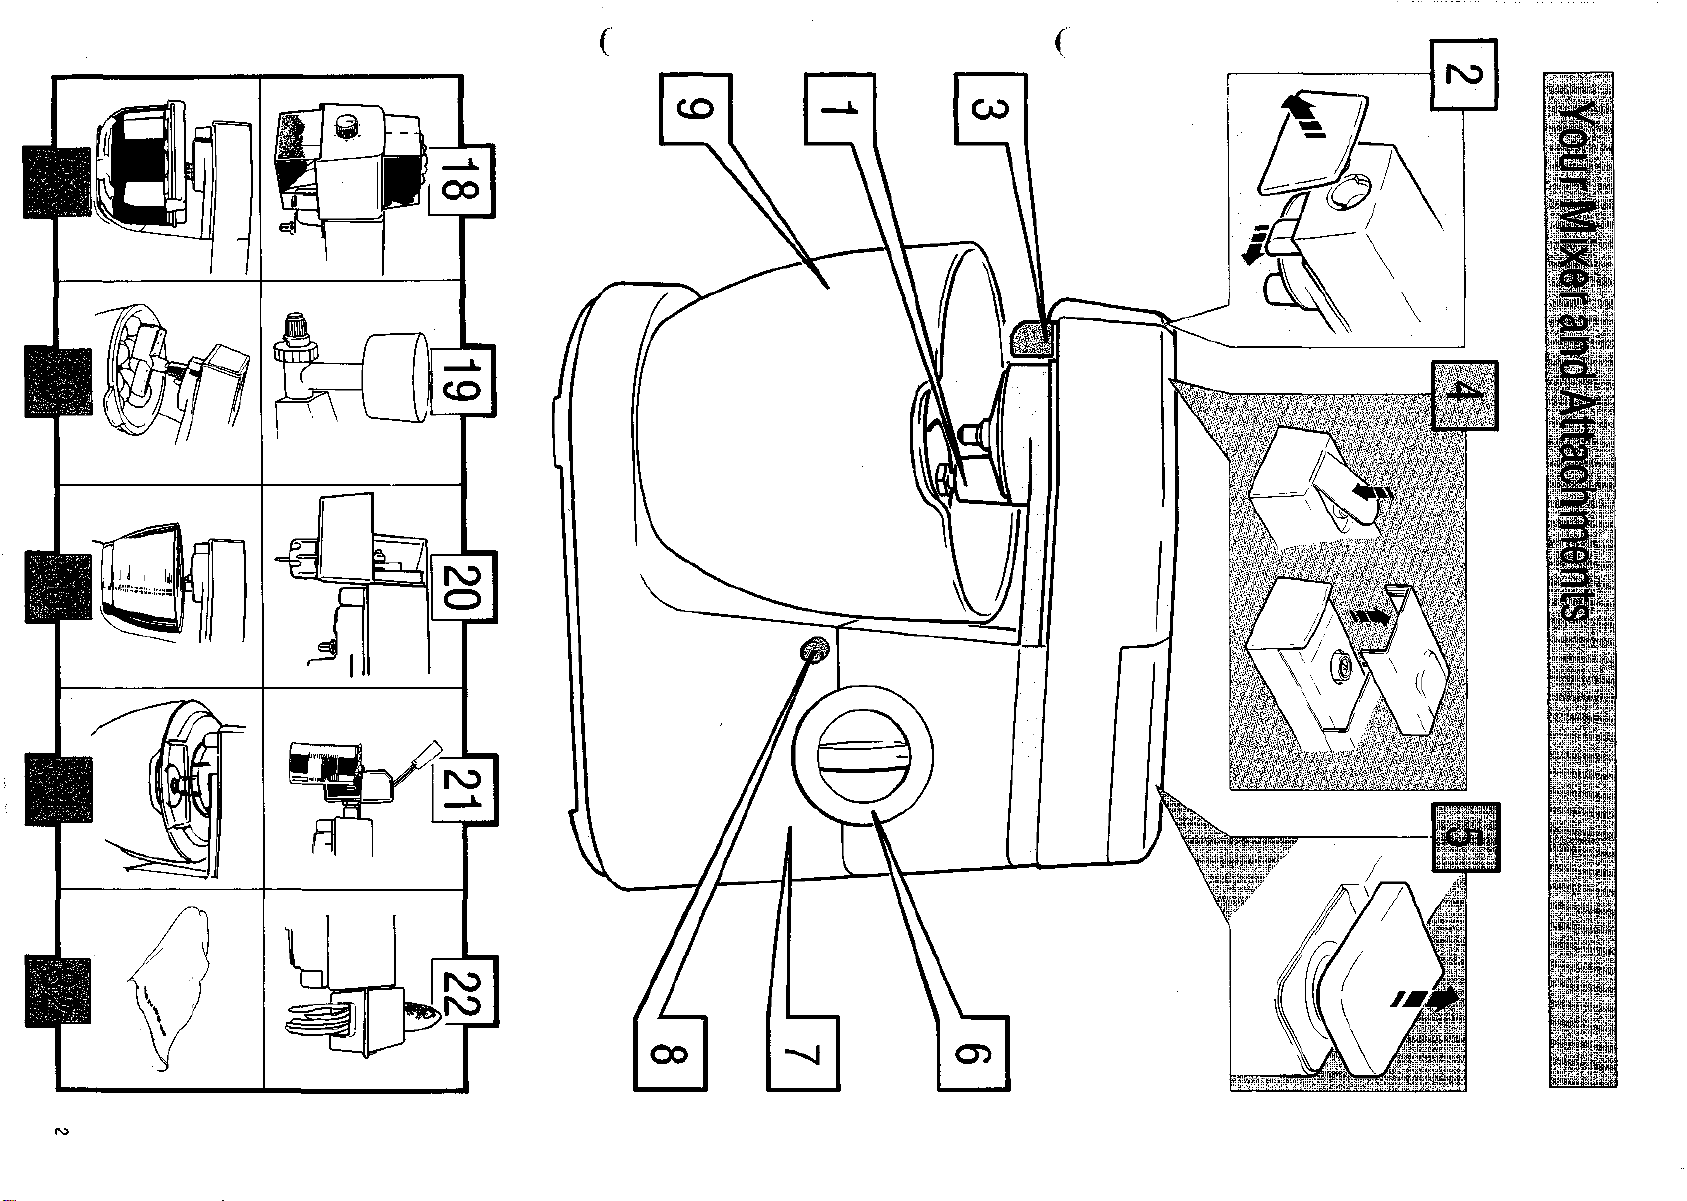
KEY
1 Planetary Drive/Beater socket
2 Slow Speed Outlet
3 Slow Speed Locking Catch
4 Juice Extractor Outlet
5 High Speed Outlet
6 On/Off and Speed Control Switch
7 Body
8 Mixer Head Release Catch
9 Bowl
Attachments Model
10 K Beater
11 Dough Hook
12 Whisk
13 Mincer A920
14 Sausage Adaptor A926
15 Kebbe Maker A927
16 Pasta Extruder A936
17 Slow Speed Slice/Shredder A948
18 Coffee Grinder A979
19 Grainmill
20 Cream Maker A927
to
Power
A941
Model
21
Can
Opener A978
22 Bean
23 Juice Extractor A959
24 Liquidiser A989/A990
25 Spice Mill A938
26 High Speed Slicer/Shredder A929
27 Continuous Juice Separator A935
28 Potato Peeler
29 Cofender
30 Stainless Steel Bowl(For Chefs) 18749
31 Splashguard
32 Cover
and
Peel Slicer A932
(For
Chefs) A934
Potato Peeler
(For Chefs - Round Bowls)
Colander
(For Majors) A930
Stainless Steel Bowl
(For Majors) 18748
Majors - Round Bowls) 31227
Splashguard
(For Chef
(For
(For
Majors) A952
and
Sieve A992
and
Sieve
(For
Chefs
and
'D'
Bowl) 30238
Chefs) 29022
For ease of reference the attachments are colour coded to the outlets.
Important Note This appliance complies with European Economic Community Radio Interference Directive 82/499/EEC.
Page 3
o
CD
!
&
13
CD
CO
Page 4
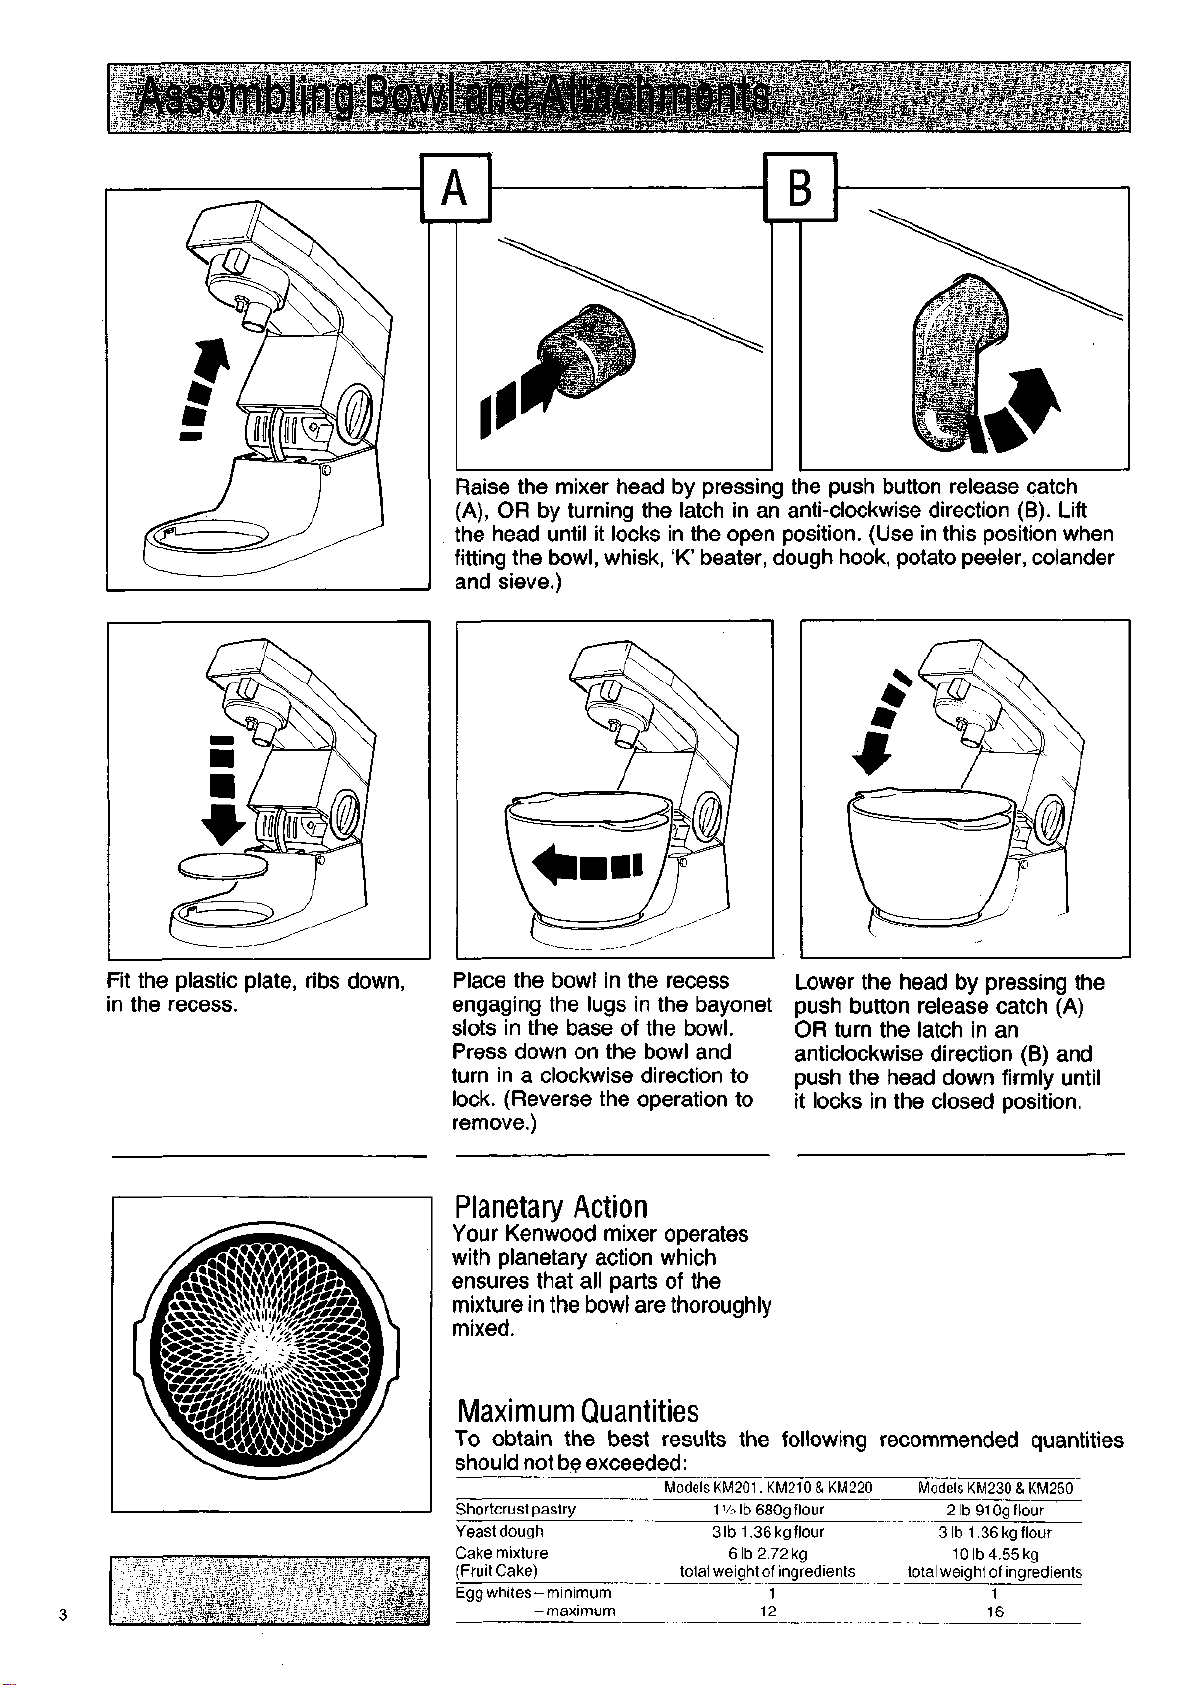
Assembling
Bowl and Attachments
A
Raise the mixer head by pressing the push button release catch
(A),
OR by turning the latch in an anti-clockwise direction (B). Lift
the head until it locks in the open position. (Use in this position when
fitting the bowl, whisk, 'K' beater, dough hook, potato peeler, colander
and sieve.)
B
Fit the plastic plate, ribs down,
in the recess.
Place the bowl in the recess
engaging the lugs in the bayonet
slots in the base of the bowl.
Press down on the bowl and
turn in a clockwise direction to
lock. (Reverse the operation to
remove.)
Lower the head by pressing the
push button release catch (A)
OR turn the latch in an
anticlockwise direction (B) and
push the head down firmly until
it locks in the closed position.
Planetary Action
Your Kenwood mixer operates
with planetary action which
ensures that all parts of the
mixture in the bowl are thoroughly
mixed.
Maximum Quantities
To obtain the best results the following recommended quantities
should not be exceeded:
Shortcrust pastry
Yeast dough
Cake mixture
(Fruitcake)
Egg whites - minimum
-maximum
Models KM201.KM210&KM220
1'/Plb68Og
3 Ib 1.36 kg flour
6 Ib 2.72 kg
total weight of ingredients
flour
1
12
Models KM230 & KM250
2lb910gflour
3 Ib 1.36 kg flour
10lb4.55kg
total weight of ingredients
1
16
Page 5
Assembling Bowl and Attachments Cont...
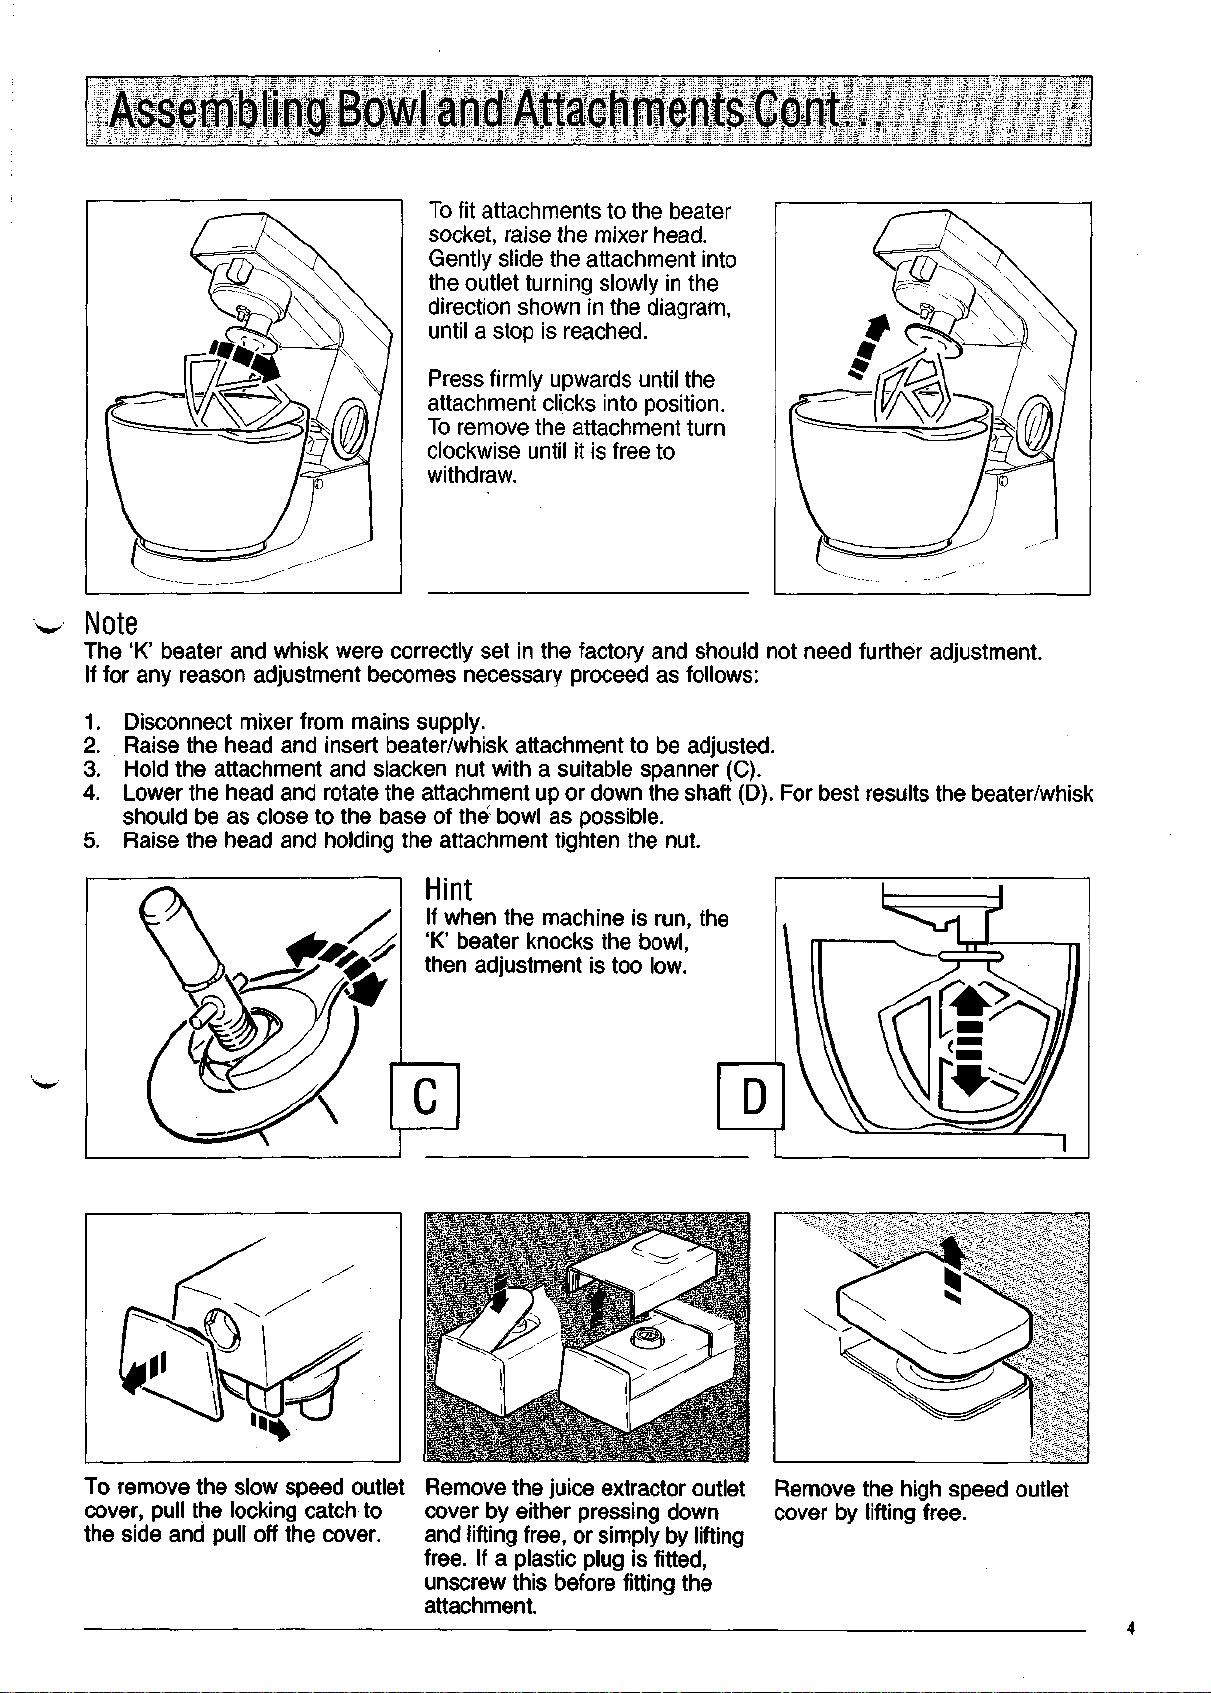
To fit attachments to the beater
socket, raise the mixer head.
Gently slide the attachment into
the outlet turning slowly in the
direction shown in the diagram,
until a stop is reached.
Press firmly upwards until the
attachment clicks into position.
To remove the attachment turn
clockwise until it is free to
withdraw.
Note
The 'K' beater and whisk were correctly set in the factory and should not need further adjustment.
If for any reason adjustment becomes necessary proceed as follows:
1.
Disconnect mixer from mains supply.
2.
Raise the head and insert beater/whisk attachment to be adjusted.
3. Hold the attachment and slacken nut with a suitable spanner (C).
4.
Lower the head and rotate the attachment up or down the shaft (D). For best results the beater/whisk
should be as close to the base of the bowl as possible.
5. Raise the head and holding the attachment tighten the nut.
Hint
If when the machine is run, the
'K' beater knocks the bowl,
then adjustment is too low.
To remove the slow speed outlet
cover, pull the locking catch to
the side and pull off the cover.
Remove the juice extractor outlet
cover by either pressing down
and lifting free, or simply by lifting
free.
If a plastic plug is fitted,
unscrew this before fitting the
attachment.
Remove the high speed outlet
cover by lifting free.
Page 6
Mixer Controls
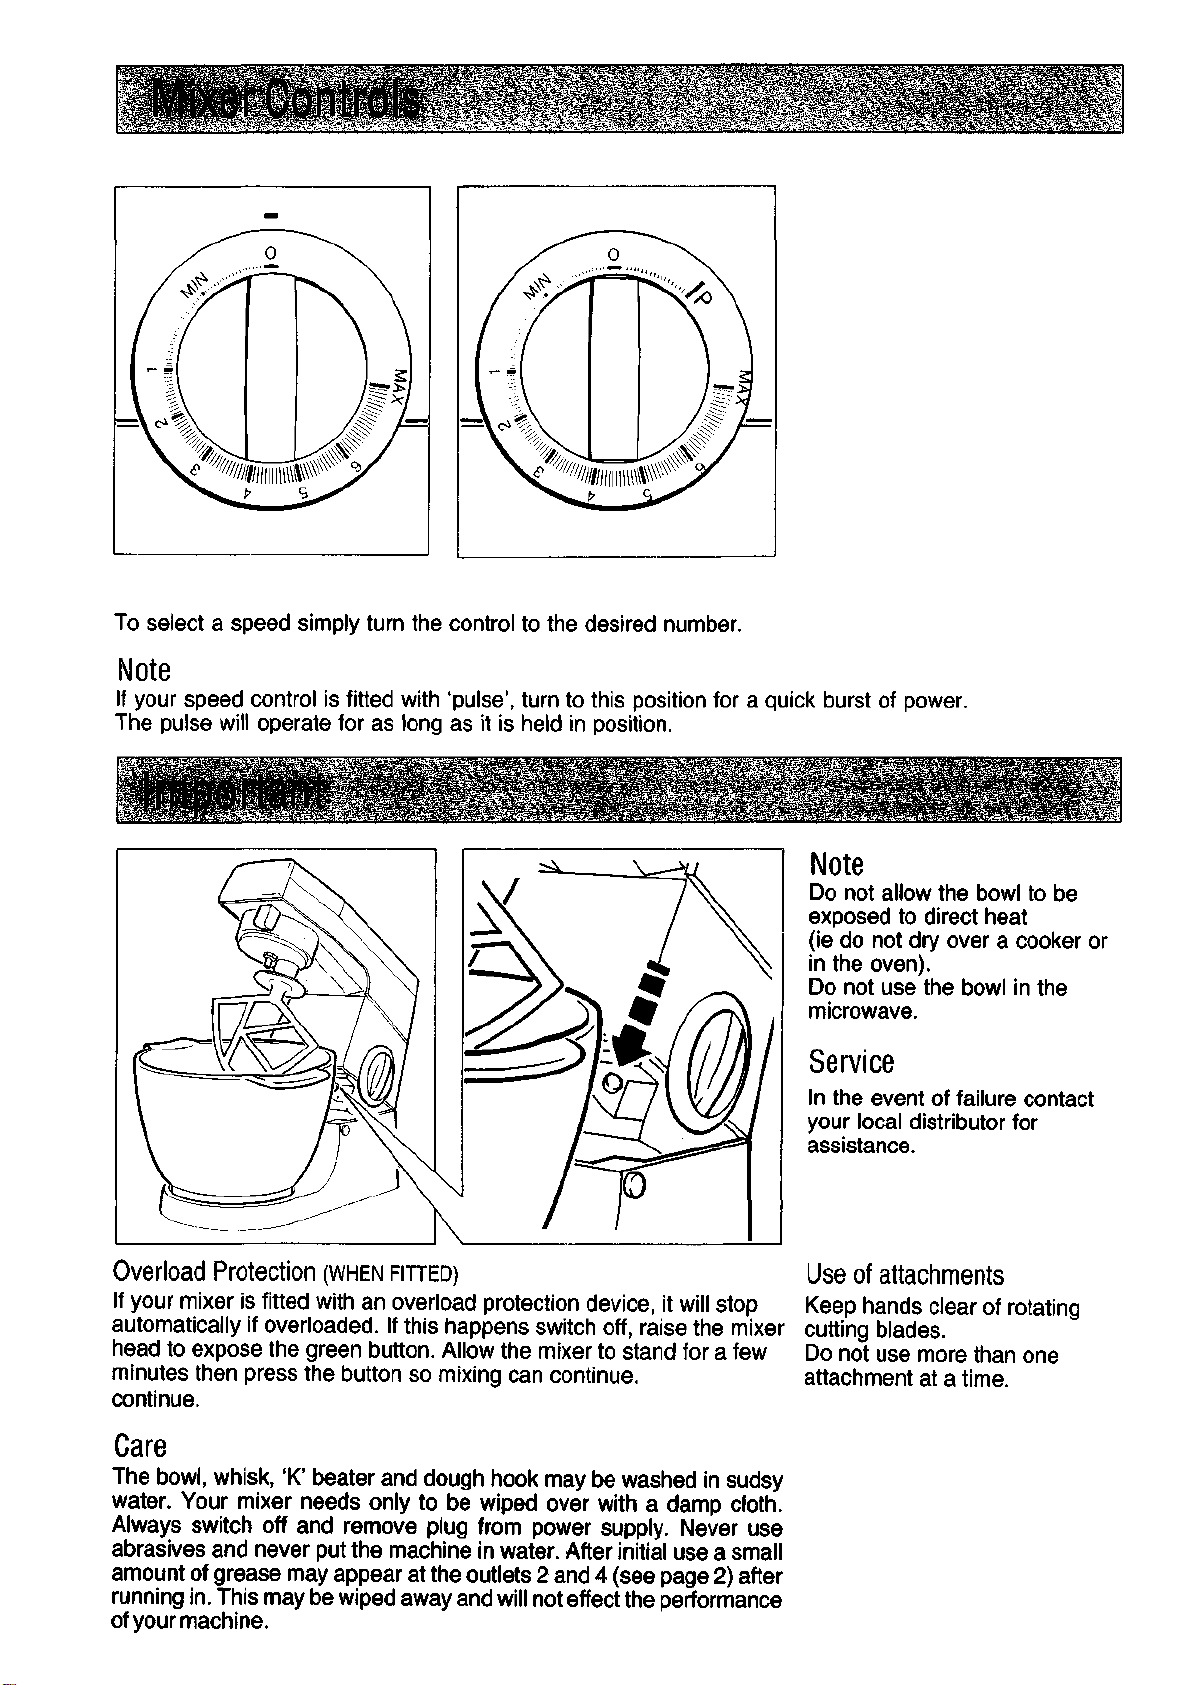
To select a speed simply turn the control to the desired number.
Note
If your speed control is fitted with 'pulse', turn to this position for a quick burst of power.
The pulse will operate for as long as it is held in position.
Important
Overload Protection (WHEN FITTED)
If your mixer is fitted with an overload protection device, it will stop
automatically if overloaded. If this happens switch off, raise the mixer
head to expose the green button. Allow the mixer to stand for a few
minutes then press the button so mixing can continue.
continue.
Note
Do not allow the bowl to be
exposed to direct heat
(ie do not dry over a cooker or
in the oven).
Do not use the bowl in the
microwave.
Service
In the event of failure contact
your local distributor for
assistance.
Use
of
attachments
Keep hands clear of rotating
cutting blades.
Do not use more than one
attachment at a time.
Care
The bowl, whisk, 'K' beater and dough hook may be washed in sudsy
water. Your mixer needs only to be wiped over with a damp cloth.
Always switch off and remove plug from power supply. Never use
abrasives and never put the machine in water. After initial use a small
amount of grease may appear at the outlets 2 and 4 (see page 2) after
running in. This may be wiped away and will not effect the performance
of your machine.
Page 7
General Information
Use the whisk for eggs, cream, batters, fatless sponges, meringues, cheesecakes, mousses, souffles etc.
Use the 'K' beater for cakes, biscuits, pastry, icing, fillings, mashing potatoes, gateaux, eclairs.
Use the dough hook for yeasted mixtures.
The speed control gives a completely variable range of speeds and these should be selected according to
type of ingredients and quantities used. Generally, the following speeds are recommended:
Whisk Gradually turn up to maximum speed. If mixture shows signs of splashing keep speed lower.
'K' Beater Cream fat and sugar on low speed, increasing gradually to medium. For very small quantities
keep to a lower speed. Beat fat, sugar and eggs on medium to fast speed. Fold in flour, fruit
etc on low speed. Do not overmix at this stage.
Mix biscuits on medium speed.
Rub fat into flour on low speed.
Dough Hook Commence on speed 1, gradually increasing to 2.
Recipes
...... _.. J
White Bread
3 lb/1350g strong plain flour
3 level tsp/15 ml salt
1 oz/25g fresh yeast or
1
/2 oz/15g or 20 ml dried yeast
1 tsp/5ml sugar
11/2 pts/750 ml warm water
1 oz/25g lard
Dried yeast
Sprinkle the dried yeast into the warm water,
add the sugar and allow to stand for
approximately 10 minutes or until the mixture
is frothy.
Fresh yeast
Crumble the yeast into the flour and add the
sugar.
Ensure that all the liquid is in the bowl add
the
lard,
flour and salt.
Knead for approximately 45 seconds to 1
minute on speed 1 then increase to 2 until a
dough is formed, adding a little more flour if
necessary.
Knead for a further 2 minutes approximately
on speed 2 until the dough is smooth and
elastic and leaves the sides of the bowl
clean.
Place the dough in a greased polythene bag
and leave somewhere warm to double in
bulk about 1-1
and knead again for 2 minutes on speed 1.
Fit into 4 x 1 Ib (450g) greased tins (which
should be half full). Cover and prove until
doubled in bulk.
Cook at 450°F/230°C/Gas Mark 8 for 30-35
minutes. When cooked the loaves should
sound hollow when rapped on the bottom.
3
Vfe
hours. Return to the bowl
Hints
• Best results are obtained by using 'strong'
flour, but plain flour may be used if it is
not available.
• It is not necessary to warm utensils or to
rise dough in a warm place, but this
speeds up the growth of the yeast.
Brown Bread
Follow the recipe for white bread using 2 Ib/
900g wholemeal flour and 1 lb/450g white
flour.
Important
Different batches of flour vary considerably
in the quantities of liquid required and the
stickiness of the dough can have a marked
effect upon the load imposed on the machine.
You are strongly advised, therefore, to
adhere exactly to the quantity stated and to
keep the machine under observation whilst
the dough is being mixed. The operation
should take no longer than 31/2 minutes.
Pizza Napoletana .Oil
Base
1 oz/25g fresh yeast or 4 tsp/20 ml dried
yeast plus 1 tsp/5 ml caster sugar
1
/2 pt/250 ml warm water
1 oz/25g lard
2 tsp/10 ml salt
1 lb/400g strong plain flour
Topping
1 lb/400g onions, skinned and chopped
011
for frying
2 lb/800g tomatoes, skinned and sliced
2-3 tsp/10-15 ml oregano
salt and pepper
12 oz/300g Mozzarella cheese
4 oz/100g anchovy fillets
Black olives
Make the bread dough, following the method
for white bread. After the first rising, re-knead
the dough and roll out to form two 12 in/30 cm
circles. Place onto suitable baking trays.
Lightly fry the onions in the oil and then
spread over the pizza base to within 1 in/2.5 cm
of the edge. Place the sliced tomato over
the onion and sprinkle with oregano and
seasoning.
Slice the cheese using the thin slice of the
High Speed Slicer and Shredder, and spread
over the tomato. Decorate with anchovies
and olives. Allow to prove for 30 minutes,
then bake in a pre-heated oven 425°F/220°C/
Gas Mark 7 for approximately 20-25 minutes
or until cooked.
3
Rich Fruit Cake.
8 oz/200g butter
8 oz/200g moist brown sugar
1 tbsp/20 ml black treacle
grated rind of an orange or lemon
4 eggs
10 oz/250g plain flour
VA.
tsp/1.2 ml nutmeg
V* tsp/1.2 ml cinnamon
Vi tsp/1.2 ml mixed spice
VA
tsp/1.2 ml salt
2 tbsp/40 ml brandy, rum or sherry
11/2 lb/600g mixed dried fruit
2 oz/50g almonds (chopped)
Place the butter, sugar, treacle and grated
rind in the bowl and beat on speed 3-4
increasing to a higher speed as the ingredients
combine. Beat until light and fluffy, then
scrape down the bowl and beater. Add the
eggs,
one at a time, beating to a smooth
consistency between each addition.
Mix in the flour on minimum speed then add
the fruit and nuts.
Place in a 81/2"/22 cm round cake tin, greased
and lined with a double thickness of
greaseproof paper. Cook for the first hour at
150°C/300°F/Mk 2 then at 140°C/275°F/Gas
Mark 1 for a further 2Vi hours.
When the cake is
upside down, pierce with a skewer in several
places and pour on the brandy, rum or
sherry. When this has soaked in, wrap in
greaseproof paper or foil and place in an
airtight tin. Use as desired.
cold,
<t
remove from tin, turn
Hints
• Use the spatula provided to scrape
ingredients away from the sides of the
bowl.
• Use the butter at room temperature, or
warm the bowl by filling with hot water
and stand the 'K' beater in it whilst weighing
out the ingredients. Dry thoroughly before
using.
e Start the creaming on a low speed while
the ingredients combine, then increase to
a higher speed but not so high that the
mixture is thrown up the sides of the bowl
and not mixed properly. A higher speed
can be used with larger quantities.
• Use a low speed to incorporate flour and
fruit into the mixture.
Page 8
Victoria
6 oz/150g margarine
6 oz/150g caster sugar
3 eggs
6oz/150g SR flour
Jam
Icing sugar
Cream the margarine and sugar on speed 3-
4 until combined and then on a higher speed
until light and fluffy. Scrape the mixture from
the sides of the bowl and beater, and add
the eggs one at a time on maximum speed
beating to a smooth consistency between
each addition. Add the flour on minimum
speed,
incorporate.
Bake in 2 x 7718 cm sandwich tins, greased
and lined for 20-30 minutes at 190°C/375°F/
Gas Mark 5 until golden and springs back
when lightly touched. Turn onto a wire rack
and allow to
jam and dust with icing sugar.
Sandwich.
mixing just long enough to
cool.
Sandwich together with
Hints
•
Use soft tub margarine straight from the
refrigerator for 'all in one' cakes, and
block margarine at room temperature for
creamed cakes.
•
When creaming, if the margarine is
warm the bowl by filling with hot water
and stand the 'K' beater in it for a few
minutes. Empty and dry thoroughly before
mixing.
•
If the beater is not mixing to the bottom of
the bowl, check adjustment of the beater
(see page 4).
•
Start the creaming on a low speed whilst
the ingredients combine then increase to
a higher speed, but not so high that the
mixture is thrown up the sides of the bowl
and not properly mixed. A higher speed
can be used with larger quantities.
•
It may be necessary to stop the machine
and scrape the bowJ down ocassionally
with the spatula provided.
Short Crust Pastry
1 lb/400g flour sieved
1 tsp/5 ml salt together
8 oz/200g fat (a mixture of lard and margarine
straight from the refrigerator)
4 tbsp/80 ml water (approx)
Cut the fat up roughly and add to the flour in
the bowl. Mix on speed 1, increasing to
speed 4-5 until the mixture resembles
breadcrumbs, but switch off before it becomes
greasy in appearance.
Add the water and mix on the lowest speed
just long enough to incorporate.
Pastry is normally cooked at 200°C/400°F/Gas
Mark 6, but this will depend on the filling.
Use as desired.
Hints
•
Use the fat straight from the refrigerator.
•
Take care not to overmix the ingredients.
firm,
<fe
Choux
2 oz/50 g butter
1
/4pt/125 ml water
3 oz/75g plain flour
pinch of salt
2 eggs
Melt the butter in the water then bring to
boiling point. Remove from heat, add sieved
flour and salt, then beat for a few minutes
over a very gentle heat with a wooden
spoon until the paste forms a ball and the
sides of the saucepan are clean. Allow this
to cool slightly, then place in the mixing
bowl.
beater add the eggs a little at a time.
Once the egg has been added, increase to
maximum speed and beat for 30-60
seconds.
Use as desired (eg eclairs, profiteroles).
Pastry_
Switch to speed 2 and using the 'K'
Strawberry Apricot Gateau
Sponge fi
3 eggs ''IF
3 oz/75g caster sugar
3 oz/75g plain flour
Filling and Decoration
VA
pt/125 ml double cream
sugar to taste
8 oz/200g strawberries
8 oz/200g apricots
Halve the apricots and remove the stones.
Cook gently in a very little water with sugar
to taste until soft. Clean and halve
strawberries.
Make the sponge by whisking the eggs and
sugar on maximum speed until very pale
and thick. Remove the bowl from the machine
and carefully fold in the flour using the whisk
in one's hand. Transfer the mixture to two
7 in/18 cm greased and lined sandwich tins.
Cook for approximately 20 minutes at 350°F/
180°C/Gas Mark 4 until the cake springs
back when lightly touched. Remove from tins
and cool on a wire rack. Use the whisk
attachment to whip the cream on a high
speed until stiff, add sugar to taste. Roughly
chop the apricots and a third of the
strawberries and carefully fold into half the
cream.
Sandwich the two cakes together
with this mixture. Spread the remaining
cream on top of the cake and decorate the
top with the remaining strawberry halves.
Hint
•
Take care when adding the flour to ensure
a light and airy result.
Chilled Lemon Cheesecake
Biscuit Base- [Tni A
8 oz/200g digestive biscuits ^J W
4oz/100g butter
Filling
1 tbsp/20 ml gelatine
VA.
pt/125 ml water
4 eggs, separated
4-6 oz/100-150g caster sugar (depending
upon taste)
3 large lemons
10 oz/250g curd cheese or fromage frais,
sieved
Fruit and cream to decorate (optional)
Using the liquidiser attachment, drop pieces
of biscuits onto the revolving blades on
maximum speed to form biscuit crumbs. This
should be carried out in two or three batches.
Melt the butter in a saucepan, add the biscuit
crumbs, stir well then press lightly into an
8V2 in/21 cm spring clip tin. Leave to chill
whilst preparing the filling.
Dissolve the gelatine in the water, in a bowl
over a saucepan of hot water.
Whisk the egg yolks and sugar on maximum
speed using the whisk attachment until the
mixture is pale and creamy. Add the curd
cheese or fromage frais to the egg mixture
and continue whisking until smooth. Reduce
to speed 5, add the lemon
gelatine mixture and whisk until all ingredients
are incorporated. Transfer the mixture to
another bowl and chill until the point of
setting is reached.
Whisk the egg whites on maximum speed
until stiff, and carefully fold into the cheeseckae
mixture using a metal spoon. Pour the mixture
onto the biscuit base and chill until set.
Remove the sides of the springclip tin and
decorated with fruit and whipped cream as
desired.
gues
4 egg whites
9 oz/225g icing sugar (sieved)
Line baking trays with non-stick baking
parchment. Place the egg whites and icing
sugar in the bowl and whisk on maximum
speed until it stands in peaks (about 10
minutes).
Fit a large piping bag with 172.5 cm Star
nozzle and half fill with meringue mixture.
Pipe shapes on to the prepared trays. Bake
the meringues in a very slow oven 110°C/
225°F/Gas Mark V4 until they are firm and
crisp (approximately 4-5 hours)
Hints
•
Meringues should be stored in an airtight
tin.
•
If the meringues start to brown, prop open
the oven door a little.
rind,
juice and
A
Page 9
KENWOOD
KM200 - KM260
Page 10
Gebruiksaanwijzing
Uw nieuwe KENWOOD keukenrobot zal van het koken een eenvoudige en
aangename taak maken.
Bewaar het toestel op een handig aanrecht, niet in de kast, zodat het met een
draai aan de knop klaar staat om iedere taak groot of klein voor u te verrichten.
Een brede gamma hulpstukken staat te uwer beschikking, die u zullen helpen
de culinaire kunst beter te beheersen.
Alvorens het toestel aan te sluiten, nazien of het aantal volts van uw elektrische
installatie overeenkomt met het aantal volts aangeduid op het apparaat.
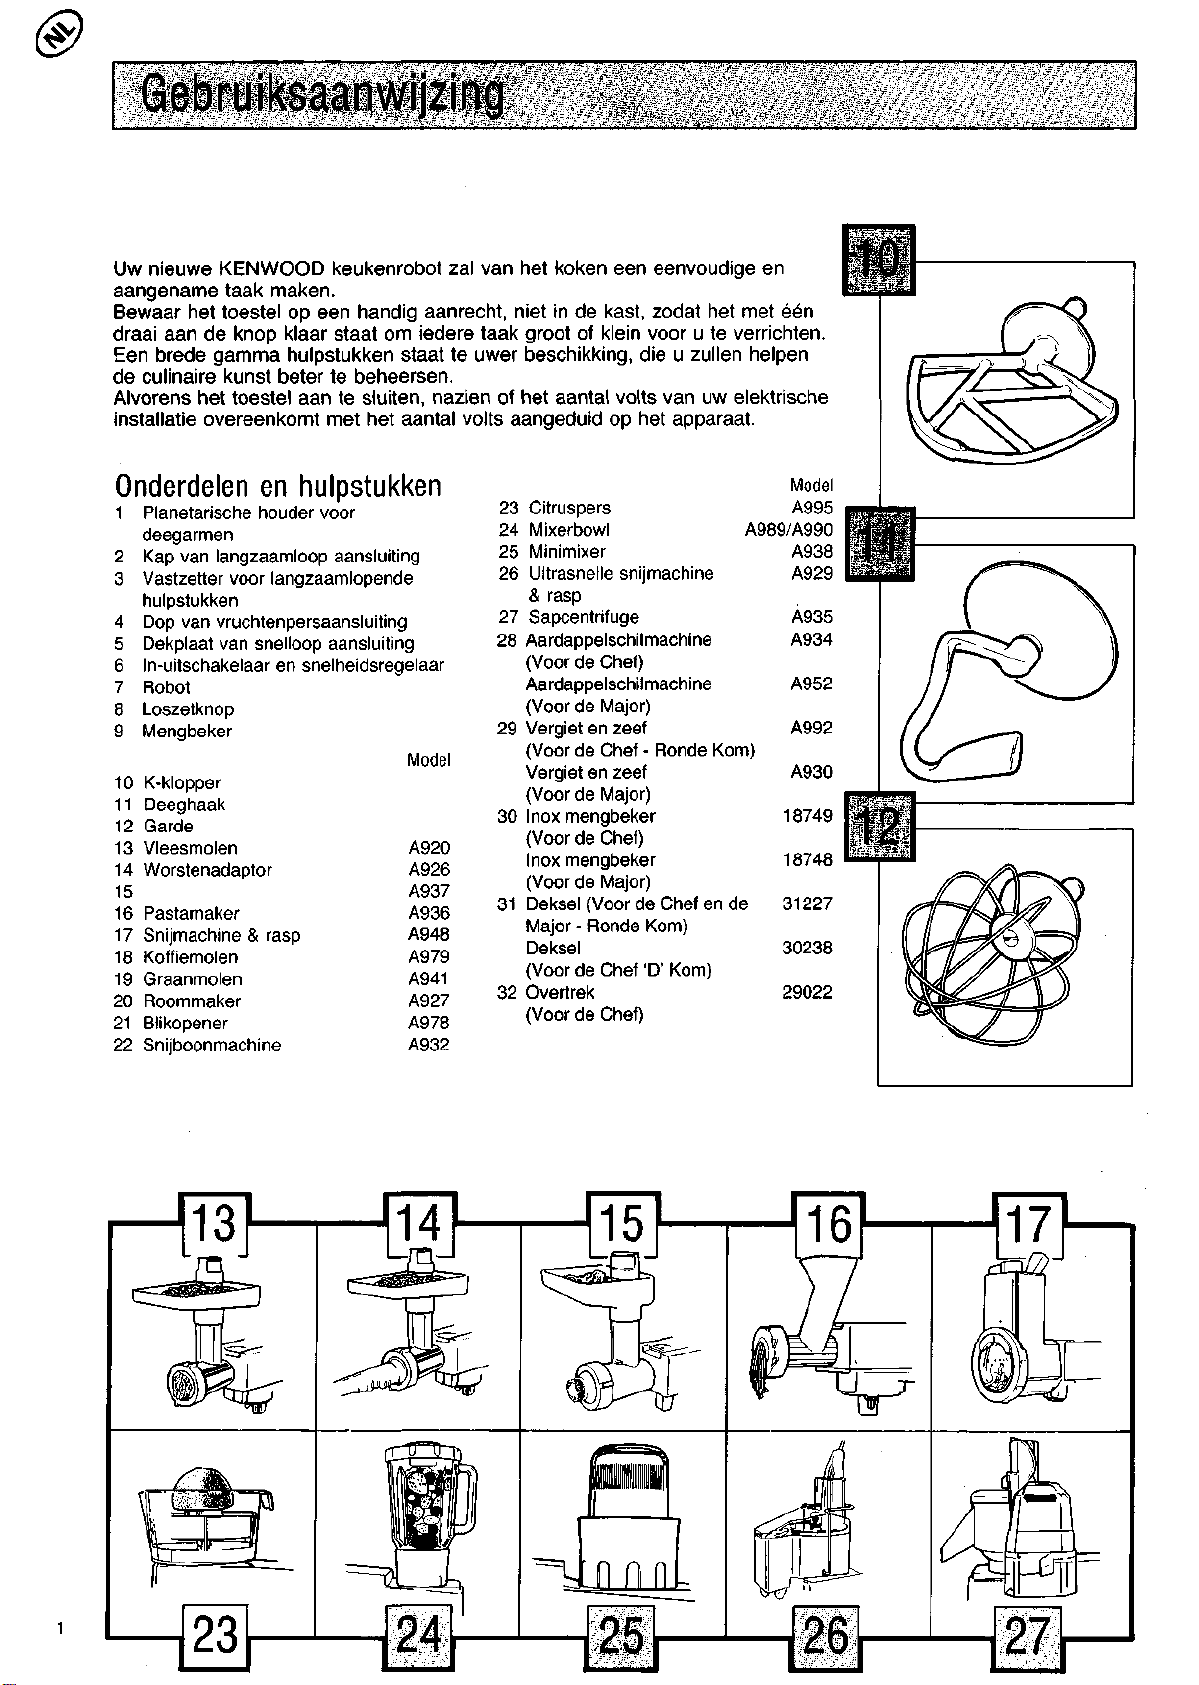
Onderdelen
1
Planetansche houder voor
deegarmen
2
Kap
van
Vastzetter voor langzaamlopende
3
hulpstukken
4
Dop
van
5
Dekplaat
6
In-uitschakelaar
7
Robot
8
Loszetknop
9
Mengbeker
K-klopper
10
11
Deeghaak
12
Garde
13
Vleesmolen
14
Worstenadaptor
15
Pastamaker
16
17
Snijmachine & rasp
Koffiemolen
18
Graanmolen
19
Roommaker
20
21
Blikopener
22
Snijboonmachine
en
hulpstukken
langzaamloop
vruchtenpersaansluiting
van
snelloop aansluiting
en
aansluitlng
snelheidsregelaar
Model
A920
A926
A937
A936
A948
A979
A941
A927
A978
A932
Model
23 Citruspers A995
24 Mixerbowl A989/A990
25 Minimixer A938
26 Ultrasnelle snijmachine A929
& rasp
27 Sapcentrifuge A935
28 Aardappelschilmachine A934
(Voor
de
Chef)
Aardappelschilmachine A952
(Voor
de
Major)
29 Vergiet
30 Inox mengbeker 18749
31 Deksel (Voor
32 Overtrek 29022
en
zeef A992
(Voor
de
Chef - Ronde
Vergiet
en
zeef A930
(Voor
de
Major)
(Voor
de
Chef)
Inox mengbeker 18748
(Voor
de
Major)
de
Major - Ronde
Deksel 30238
(Voor
de
(Voor
de
Chef
Chef)
Kom)
'D' Kom)
Chef
Kom)
en de
31227
Page 11
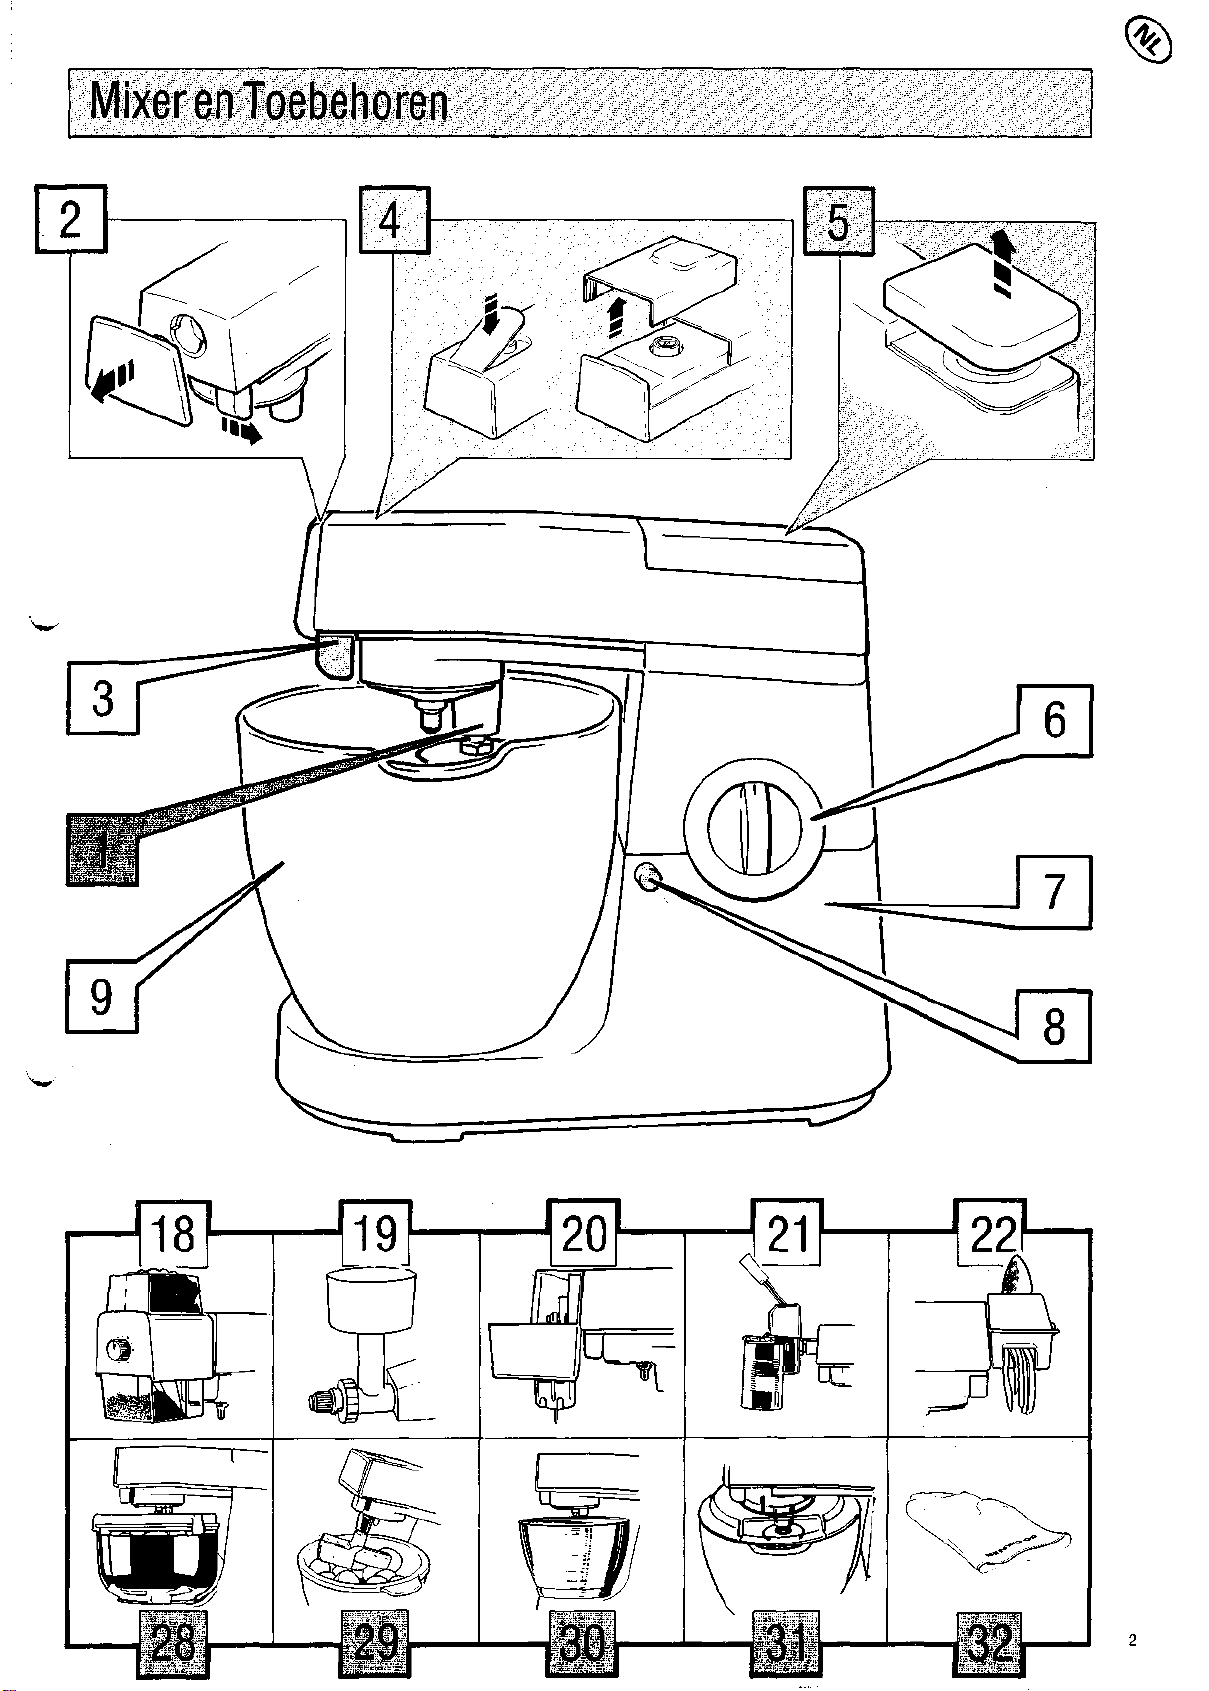
Mixer en Toebehoren
Page 12
Gebruik van
de
robot en aanbrengen van
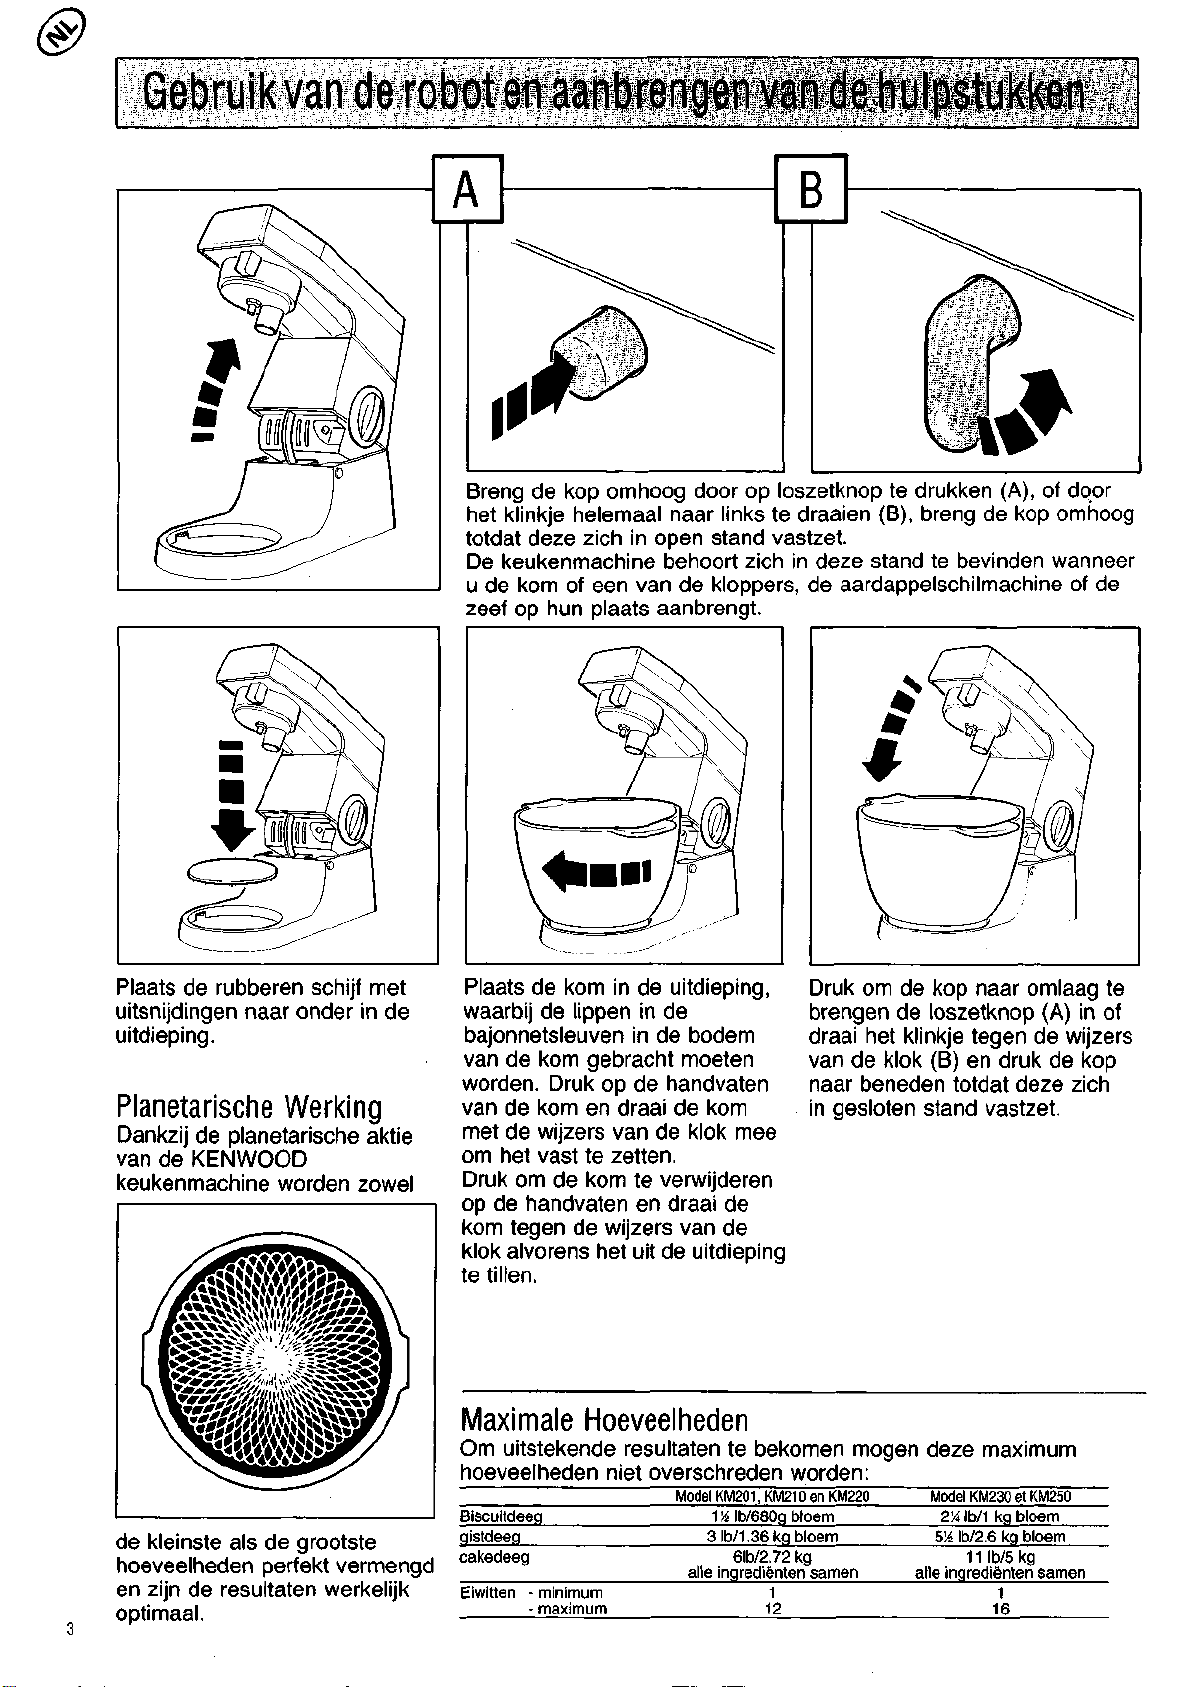
Breng de kop omhoog door op loszetknop te drukken (A), of door
het klinkje helemaal naar links te draaien (B), breng de kop omhoog
totdat deze zich in open stand vastzet.
De keukenmachine behoort zich in deze stand te bevinden wanneer
u de kom of een van de kloppers, de aardappelschilmachine of de
zeef op hun plaats aanbrengt.
de
B
hulpstukken
Plaats de rubberen schijf met
uitsnijdingen naar onder in de
uitdieping.
Planetarische Werking
Dankzij de planetarische aktie
van de KENWOOD
keukenmachine worden zowel
de kleinste als de grootste
hoeveelheden perfekt vermengd
en zijn de resultaten werkelijk
optimaal.
Plaats de kom in de uitdieping,
waarbij de lippen in de
bajonnetsleuven in de bodem
van de kom gebracht moeten
worden.
van de kom en draai de kom
met de wijzers van de klok mee
om het vast te zetten.
Druk om de kom te verwijderen
op de handvaten en draai de
kom tegen de wijzers van de
klok alvorens het uit de uitdieping
te tillen.
Druk op de handvaten
Druk om de kop naar omlaag te
brengen de loszetknop (A) in of
draai het klinkje tegen de wijzers
van de klok (B) en druk de kop
naar beneden totdat deze zich
in gesloten stand vastzet.
Maximale Hoeveelheden
Om uitstekende resultaten te bekomen mogen deze maximum
hoeveelheden niet overschreden worden:
Biscuitdeeg
gistdeeg
cakedeeg
Eiwitten - minimum
-
maximum
Model KM201.KM210
11^lb/680gbloem
3
lb/1.36
6lb/2.72
alle ingredienten samen
kg
1
12
en
KM220 Model KM230
bloem
kg
alle ingredienten samen
2%
5'A
lb/1 kg
lb/2.6
11
lb/5 kg
kg
1
16
e1
KM250
bloem
bloem
Page 13

Gebruikvan
Opmerking
De K-klopper
te werk gaan:
en
garde werden
de
robot en aanbrengen van
De hulpstukken aansluiten op de
klopper door de mengkop omhoog
te bewegen. Het hulpstuk
vervolgens voorzichtig naar
binnen schuiven en langzaam zo
ver mogelijk omdraaien in de
aangegeven richting (zie schema)
Draai om de klopper of garde te
verwijderen, deze naar links totdat
u het vrijelijk uit de houder kunt
trekken.
op de
fabriek juist afgesteld. Indien
er
toch
de
hulpstukken
een
aanpassing nodig blijkt
als
volgt
1.
Nazien
2.
De kop
3.
Hou het
4.
Breng
men wanneer
5. Breng
dat de
naar omhoog brengen
de kop
de kop
keukenrobot niet meer aangesloten
hulpstuk vast
naar beneden
de
terug omhoog
en
K-klopper/garde
draai
en
en
en de
K-klopper
de
moer
draai
het
zo
weinig mogelijk
terwiji
u het
los met een
hulpstuk naar boven
stuk vasthoudt draait
Opmerking
Als
de
machine
klopper slaagt tegen
de mengkom, werd
laag aangebracht.
is.
of
eiwitklopper
aangepaste sleutel.
van de
in
werking
de
randen
de
K-klopper
die
moeten aangepast worden aanbrengen.
of
naar beneden.
bodem
is en de
van de
u de
van
te
moer weer vast
De
beste resultaten bekomt
mengbeker verwijderd
is.
Om
de kap van de
langzaamloopaansluiting
verwijderen,
zijwaarts trekken.
de
vastzetknop
te
De
dop van de
citruspers verwijderen door ofwel
eerst
in te
heffen
of
uitang voor
drukken
door enkel
de
en dan op te
op te
heffen.
De dekplaat
snelloopaansluiting verwijderen
door
het op te
van de
heffen.
Page 14

Snelheidsregelaar
Om een snelheid te selecteren de snelheidsregelaar op de gewenste stand brengen.
Opmerking
Indien uw snelheidsregelaar tevens over een 'Pulse' stand beschikt, kunt u deze positie gebruiken voor een snelle
en korte werking, zolang u de snelheidsregelaar op 'P' houdt zal het toestel blijven draaien.
Belangrijk
Beveiliging Tegen Overbelasting (INDIEN AANWEZIG)
Indien uw mixer voorzien is van zo'n beveiliging, zal het apparaat bij
overbelasting automatisch stoppen. Mocht dit gebeuren, schakel de
mixer dan uit en zet de kop omhoog, zodat de groene knop vrijkomt.
Laat het apparaat zo enkele minuten staan en druk vervolgens op de
knop.
Hierna kunt u weer doorgaan met mixen.
Onderhoud
De mengbeker, eiwitklopper, K-klopper en deeghaak kunnen in een warme
sop afgewassen worden. De keukenmachine zelf hoeft u maar met een
vochtige doek proper te maken en met een zachte doek op te drogen.
Na gebruik uw machine nooit aangesloten laten. Gebruik nooit bijtende
produkten en het machine niet onder water dompelen.
In het begin kan er op de langzaamloopaansluiting en op de
vruchtenpersaansluiting een weinig vet te voorschijn komen. Dit mag
verwijderd worden en zal de werking van uw keukenmachine niet
beinvloeden.
Opmerking
De mengbeker nooit in contact
brengen met rechtstreekse
warmte (nooit laten drogen boven
een fornuis of in een oven).
Gebruik de mengbeker niet in
een microgolf oven.
Gebruik van accessoires
Voorkom kontakt met
bewegende onderdelen.
Gebruik niet meer dan een
accessoire per handeling.
Page 15

Algemene informatie
Gebruik de garde voor het kloppen van eieren, room, pannekoekdeeg, luchte koekdeeg, kaastaarten, meringues,
mousse, souffles,...
GebruikdeK-klopper voor cakes, koekjes,taartdeeg,glazuur, aardappelpuree, soesendeeg,...
Gebruik de deeghaak voor mengsels met gist.
De snelheidsregelaar biedt u een brede keuze snelheidmogelijkheden welke aangepast dienen te worden aan het soort
ingredienten en de gebruikte hoeveelheden. Over't algemeen worden volgende snelheden aangeraden:
Voor de garde: Langzaam tot op de maximale snelheid regelen. Indien het mengsel zou kunnen spatten de
de K-klopper snelheid laag houden. Klop boter en suiker op lage tot gemiddelde snelheid. Voor heel kleine
hoeveelheden de snelheid laag houden. Klop boter, suiker en eieren op gemiddelde tot hoge
snelheid.
Bloem en fruit mengen op lage snelheid, koekjesdeeg op middelmatige snelheid, boter
en bloem op lage snelheid.
Voor de deeghaak: Begin op snelheid 1 omdaarnaop2overtegaan.
r
Recepten
Wit Brood
W 3 lb/1350g bloem
3 koffielepels zout
1 oz/25g verse bakkersgist
of 15g, gedroogde gist
1 koffielepel suiker
1 tsp/750ml warm water
1 oz/25g reuzel
Met gedroogde gist:
los de suiker op in een kopje warm water
(van de totale hoeveelheid afgenomen).
Sprenkel de gedroogde gist erboven op en
laat het geheel staan totdat het schuimt, +7
-10 min.
Met verse bakkersgist:
Meng de gist met de bloem en voeg de
suiker bij.
Giet het water in de mengbeker, voeg daarbij
de bloem, de reuzel en het zout. Ongeveer
45 sec kneden op snelheid 1, verhoog dan
tot 2 totdat alle ingredienten een geheel
vormen en indien nodig wat bloem
toevoegen.
s^ Nog 2 min kneden totdat het deeg elastisch
is en van de zijkanten van de mengbeker
loskomt. Het deeg op een tamelijke warme
plaats 1-1/2 uur laten rijzen. Opnieuw
kneden gedurende 2 min, op snelheid 1.
Deel het deeg over 4 ingesmeerde bakblikken
(van +/— 450g), welke halfvol dienen te
Afdekken en het deeg opnieuw laten rijzen
totdat de massa gedubbeld heeft, 30-35 min
in de oven (230°) laten bakken. De broden
zullen klaar zijn als ze hoi klinken wanneer u
op hun bodem klopt.
3
zijn.
Tips
• Men verkrijgt de beste resultaten door
glutenrijk meel te gebruiken, maar wanneer
dit niet te verkrijgen is kan men ook
gewoon tarwemeel gebruiken.
• Het is niet volstrekt noodzakelijk het
gereedschap voor te verwarmen of het
rijzen op een warme plaats te laten
gebeuren,
gist wel versnellen.
maar dit zal de groei van de
Bruin Brood
Volg het recept van wit brood maar gebruik
900g volkorenbloem en 450g gewone
bloem.
Belangrijk:
De aard van de bloem kan wat de benodigde
hoeveelheid vloeistof betreft aanzienlijk
varieren en de mate van de kleverigheid van
het deeg kan een merkbare invloed hebben
op de belasting van de machine. Het verdient
dus aanbeveling om zich precies aan de
opgegeven hoeveelheden te houden en op
de machine toe te zien terwijl het deeg
vermengd wordt; dit proces behoort niet
meer dan 3 1/2 min, te duren.
Pizza Napolitana
Deeg:
25g verse bakkersgist of 4
koffielepels gedroogde gist
250ml warm water
25g boter of margarine
2 koffielepels zout
400g bloem
Vulling:
400g ajuinen in stukjes gesneden
olie voor het bruinen
800g,
tomaten, gepeld en in schijfjes
gesneden
2 a 3 koffielepels origano
zout en peper
300g mozarella kaas
100g anjovisfilets
zwarte olijven
Bereidt het deeg op dezelfde wijze als
brooddeeg. Na dat het reeds eenmaal gerust
en gerezen heeft het deeg opnieuw kneden
en uitrollen in 2 cirkels van 30cm en breng
het deeg in hiervoor voorziene taartvormen.
De ajuinen lichtjes laten bruineren in de olie
en vervolgens over de pizza verspreiden tot
+/- 2,5cm van de
Plaats hierop de schijfjes tomaat en bestrooi
met origano, peper en zout.
Maak gebruik van de ultrasnelle snijmachine
en rasp om uw kaas te raspen en verspreidt
over de tomaten, versieren met anjovis en
olijven.
Laat een dertigtal min, rusten en bak
vervolgens in een voorverwarmde oven
(220°C) gedurende 20-25 minuten.
rand.
JJ $
Vruchtencake
200g boter of margarine
200g bruine suiker
20ml zwarte melasse
geraspte sinaasappel of citroenschil
250g bloem
een snuifje muskaatnoot, kaneelpoeder,
gemengde kruiden, zout
40ml brandy, rhum of sherry
600g mengeling van gedroogde vruchten
50g geschaafde amandelen
Breng boter, suiker, melasse en de geraspte
schillen in de mengbeker. Op stand 3-4
laten doorkloppen, schakel over op hogere
snelheid wanneer de ingredienten een geheel
vormen.
Blijven kloppen totdat u een luchtig
mengsel bekomt, daarna voegt u de eieren
een per een toe. Zet vervolgens op de
laagste snelheid en voeg voorzichtig de
bloem
erbij,
en de kruiden. Het mengsel in een ronde
springvorm brengen (22cm), op vo.orhand
ingesmeerd en ingelegd met boterhampapier.
Eerst 1 uur bakken in een oven aan 150°C
vervolgens 2 1/2 uur aan 140°C.
Als de cake afgekoeld is uit de bakvorm
nemen,
plaatsen met een mes doorprikken en begieten
met de brandy rhum of sherry.
Wanneer het vloeistof werd opgenomen de
cake in boterhampapier inpakken en bewaren
in een luchtdicht metalen doos.
Verbruiken wanneer u hef wenst.
TIPS
• Gebruik de meegeleverde spate! om het
deeg van de zijkanten van de mengbeker
te schrabben.
• Gebruik boter op kamertemperatuur of
verwarm de mengbeker door het met
warm water te vullen en breng ook de Kklopper erin terwijl u de ingredienten
weegt. Goed afdrogen alvorens het te
gebruiken.
• Het mengen starten op een lage snelheid
totdat de ingredienten een geheel vormen,
vervolgens kunt u overschakelen naar
een hogere snelheid maar niet zo hoog
dat het deeg de zijkanten van de mengbeker
zou bedekken.
Een hoge snelheid wordt aangeraden
voor grote hoeveelheden.
daarna de gedroogde vruchten
omdraaien en op verschillende
Page 16

Victoria Sandwich
150g boter of margarine
150g bloemsuiker
3 eieren
150g bloem
confituur
suiker glazuur
Meng boter en suiker op snelheid 3-4 totdat
het een homogeen mengsel vormt en schakel
dan over op een hogere snelheid totdat u
een luchtig mengsel bekomt.
Schrab het mengsel van de zijkanten van de
mengbeker en voeg er vervolgens een voor
een de eieren toe op maximum snelheid.
Vervolgens de bloem bijvoegen en goed
mengen op minimum snelheid totdat de
bloem er volledig in vermengd is.
Bakken in twee bakblikken van elk 18cm op
voorhand ingesmeerd voor 20 a 30 min aan
190°C totdat ze goudkleurig zijn en lichtjes
terugspringen als u erop drukt. Omdraaien
en laten afkoelen alvorens u het met confituur
naar smaak insmeert en suikerglazuur op
brengt.
Tips
• Indien de boter uit de koelkast genomen
wordt dient u best de mengbeker eerst
met warm water te vullen en de K-klopper
erin te dompelen. Goed afdrogen voor dat
u het apparaat in werking brengt.
• Indien de K-klopper niet tot bij de bodem
van de mengbeker komt, dient u deze
aan te passen. (zie hiervoor p4).
• Start het proces op lage snelheid totdat
de ingredienten goed vermengd zijn en
schakel dan over op een hogere snelheid
er op lettend dat het mengsel niet tegen
de zijkanten van de mengbeker zou
worden gedrukt.
Een hoge snelheid wordt aangeraden bij
grote hoeveelheden.
Biscuitdeeg
400g bloem
1 koffielepel zout
200g boter of margarine
+/-80ml water
Meng de boter met de bloem op snelheid 1,
schakel over op 4-5 totdat het mengsel op
broodkruimels lijkt en schakel het apparaat
uit.
Voeg het water toe en mengen op de laagste
snelheid totdat u een homogeen mengsel
bekomt. Het deeg wordt normaal gezien
gebakken aan 200°C, maar dit zal van de
vulling afhangen.
Tips
• Gebruik boter of margarine dat rechtstreeks
uit de koelkast komt.
• Let op dat u de ingredienten niet overmix.
^
Soesendeeg
50g boter
125ml water
75g bloem
een snuifje zout
2 eieren
Laat de boter in het water smelten en breng
aan de kook. Haal van het vuur en giet er in
een keer al de bloem en het zout bij. Terug
op een zacht vuurtje zetten en roeren met
een houten lepel totdat het mengsel een
geheel vormt en van de zijkanten van de
kookpot loskomt. Laat even afkoelen en
breng alles in de mengbeker. Op snelheid 2
en gebruikmakend van de K-klopper voegt u
er een voor een de eieren toe.
Eenmaal dat de eieren volledig opgenomen
werden kunt u de snelheid verhogen tot het
maximum gedurende 30 a 60 sec.
Maak er gebruik van zoals u wenst: soesjes,
eclairs,...
Aardbei
en
Abrikozen
Gebak
Koek
3 eieren
75g bloemsuiker
75g bloem
Vulling en decoratie
125 ml verse room
suiker
200g aardbeien
200g abrikozen
Snij de abrikozen in twee en haal er de
steen uit. Laat ze op een zacht vuurtje met
wat suiker en water zacht worden.
De aardbeien onder water spoelen en in
twee snijden.
Voor de koek mengt u eerst de suiker en de
eieren op maximum snelheid totdat u een
dik, schuimachtig en wit mengsel bekomt.
Verwijder de mengbeker en voeg voorzichtig
de bloem toe met behulp van een
handklopper.
Breng dit mengsel in twee reeds ingesmeerde
bakblikken van +/-18cm.
In de oven bakken op 180°C gedurende 20
min.
De cake is klaar als het terugspringt als
u er zachtjes op drukt. Haal uit de bakblikken
en op een rooster laten afkoelen.
De room op hoge snelheid opkloppen en
suiker toevoegen. De in stukjes gesneden
abrikozen en 1/3 van uw aardbeien voorzichtig
in de helft van uw room mengen. De twee
cakes insmeren met dit mengsel en boven
op elkaar brengen. De cake insmeren met
de resterende room en versieren met de
aardbeienhalfjes.
Tips
• Wees zeer voorzichtig bij het toevoegen
van de bloem om een luchtig resultaat te
bekomen.
Citroen Kaastaart
Koekjes Basis
200g digestive koekjes
100g boter of margarine
Vulling
20 ml gelatine
125 ml water
4 eieren
100-150g bloemsuiker (naar gelang uw
smaak)
3 grote citroenen
250g kwark
fruit en verse room om te versieren
Gebruik het mixer hulpstuk, breng daarin de
koekjes reetis in stukjes gebroken en maak
er kruimels van op maximum snelheid.
Laat de boter op een zacht vuurtje smelten
en voeg er dan de koekjeskruimels bij, goed
mengen en in een 21cm springvorm brengen,
goed drukken. Laten rusten in de ijskast
terwijl u de vulling voorbereidt.
Los de gelatine op in water, en op een heel
zacht vuurtje laten smelten. Klop de
eierdooiers en de suiker op maximum snelheid
totdat u een romig mengsel bekomt, voeg er
vervolgens de kwark bij en verlaag de snelheid
tot 5, voeg de geraspte citroenschil, de
citroensap en de gelatine erbij en blijven
doorkloppen totdat alle ingredienten goed
vermengd
schotel en laat rusten in de koelkast totdat
het vast geworden is.
Klop de eiwitten stijf op maximum snelheid
en ze dan voorzichtig in het kaasmengsel
mengen.
en laat in de koelkast opnieuw stevig
worden.
Haal uit de springvorm en versier met fruit
en opgeklopte room naar believe.
zijn.
Giet het mengsel in een
Giet alles op het koekjesmengsel
Meringues.
4 eiwitten
225g bloemsuiker
Breng de eiwitten en de suiker in de
mengbeker en op maximum snelheid
opkloppen totdat de eiwitten kopjes vormen
(+/-
10 min). Vul een versierspuit met het
mengsel en spuit kleine vormpjes op een
ingesmeerde bakplaat.
De meringues bakken in een heel zachte
oven (110°C) totdat ze hard en krokant zijn
(+/-
4 a 5 uren).
Tips
• Meringues kunnen bewaard worden in
een luchtdichte metalen doos.
• Indien de meringues in de oven te gekleurd
worden,
de ovendeur op een kiertje
zetten.
Page 17

KENWOOD
KM200 - KM260
Page 18

Bienvenue dans I'univers Kenwood
Votre nouveau robot Kenwood fera des preparations culinaires un vrai plaisir. Pour tirer parti au maximum
de votre robot, laissez-le en permanence sur le plan de travail.
Une vaste gamme d'accessoires vous est offerte pour completer votre appareil.
(nota : certains accessoires sont reserves a des marches etrangers)
Alimentation Electrique
Le Kenwood Chef est prevu pour fonctionner en 220V. Avant de brancher I'appareil,
assurez-vous que le voltage de votre compteur electrique est bien le meme que celui
inscrit sur la plaque fixee sous le corps de votre robot Kenwood.
IMPORTANT Les fils du cordon electrique sont de couleurs, conformement au code
suivant:
BLEU NEUTRE
MARRON PHASE
La couleurs des fils du cordon electrique de votre appareil peut differer des reperes
couleurs identifiant les broches de votre prise ; si c'est le cas, procedez comme suit :
Le fil de couleur bleue sera raccorde a la broche portant la lettre 'N' ou celle coloree en
noir. Le fil de couleur marron sera raccorde a la broche portant la lettre 'L' ou celle coloree
en rouge.
Dans le cas d'une prise a 3 broches, aucun fil ne doit etre raccorde a la broche de terre.
Les Differentes Parties
de votre Robot Kenwood
1 Moyeu planetaire
2 Orifice de branchement des
accessoires a rotation lente
3 Cliquet de blocage des accessoires a
rotation lente
4 Orifice de branchement du pressefruits
5 Orifice de branchement des
accessoires a rotation rapide
6 Bouton de mise en marche et
regulateur de Vitesse
7 Corps de
8 Bouton de deblocage
9 Bol
Accessoires Modele
10 KBatteur
11 Crochet
12 Fouet
13 Hachoir A920
14 Remplisseur de saucisses A926
15 Appareil a kebbe A937
16 Appareil a pates A936
17 Eminceur et rape A948
18 Moulin a cafe A979
19 Moulin a cereales A941
20 Appareil a creme A927
NOTE IMPORTANTI cet appareil est conforme aux normes europeennes de parasitage definies par la directive 82/499/EEC.
I'appareil
21 Ouvre-boites A978
22 Eminceur de haricots etdezestes
23 Presse-fruits A995
24 Mixer A989/A990
25 Moulin a epices A938
26 Eminceur rape rapide A929
27 Centrifugeuse A935
28 Eplucheuse de pommes de terre A934
(Poor appareils Chef)
Eplucheuse de pommes de terre A952
(Poor appareils Major)
29 Passoire et tamis A992
(Poor appareils Chef - Bols ronds)
Passoire et tamis A930
(Poor appareils Major)
30 Bol inox (Poor appareils Chef) 18749
Bol inox (Poor appareils Major) 18748
31 Protection anti-eclaboussures 31227
(Poor appareils Chef et MajorBols ronds)
Protection anti-eclaboussures 30238
(Bol 'D' pour appareil Chef)
32 Housse 29022
(Poor appareils Chef)
Modele
A932
Page 19

Votre Robot et Ses Accessoires
Page 20

Mise
en
Place
du bol et
A B
Pour redresser la tete de I'appareil, appuyez sur le bouton de
deblocage (A) ou tournez le taquet vers la droite (B). Soulevez la
tete jusqu'a ce qu'elle se bloque en position ouverte. (le chef doit
toujours etre dans cette position lorsque vous mettez en place le
bol ou I'un des batteurs, I'eplucheuse de pommes de terre ou la
passoire et le tamis).
des
Accessoires
Placez le coussinet de mousse
nervures en dessous dans
I'evidement du socle.
Placez le bol sur le socle en
engageant les tenons dans les
fentes de la base du bol. Appuyez
sur le bol puis tournez vers la
gauche, (faire I'operation inverse
pour degager le bol).
Abaissez la tete du robot en
appuyant sur le bouton de
deblocage (A) ou en tournant le
tacquet vers la droite jusqu'a ce
qu'elle se bloque dans la position
fermee.
Mouvement Planetaire
Votre robot KENWOOD est muni
du mouvement planetaire qui
assure un mixage parfait de
tous les ingredients.
Quantites Maximum
Pour obtenir de meilleurs resultats, respectez les quantites ci-dessous
qui ne doivent pas etre depassees
pate brisee
pate a levain
pate a cake
blancs en neige - minimum
•maximum
KM201,KM210etKM220
680gdefarine
1,30kgdefarine
2,70kg (tous
les ingredients)
1
12
KM230etKM250
910gdefarine
1,30kgdefarine
2,70kg (tous
les ingredients)
1
16
Page 21

n;
Mise
NOTE
Le batteur "K" et le fouet sont ajustes a
un ajustement s'averait necessaire, procedez comme suit:
en
Place
du
Bol
Pour fixer des accessoires dans
la douille du petrisseur, relevez la
tete du mixeur, introduisez sans
forcer I'accessoire dans le douille
en le faisant tourner lentement
dans le sens indique sur le
schema, jusqu'a ce qu'il atteigne
une butee
et
I'usine
des Accessoires (suite)
et il
n'est
pas utile de les regler par la suite. Si toutefois
1.
debranchez I'appareil.
2.
levez la tete et inserez le batteur ou le fouet a ajuster.
3. a
I'aide
4.
abaissez la tete et tournez I'accessoire vers le haut ou vers le bas de la hampe (D). Pour de rneilleurs
resultats le fouet ou le batteur doit effleurer le
5. redressez la tete du CHEF et serrez a
d'une cle, desserrez
I'ecrou
situe immediatement au-dessus du batteur (ou du fouet) (C).
fond.
I'aide
de la cle.
Conseil
si,
pendant le fonctionnement, le
batteur "K" frotte le fond du bol,
c'est qu'il est regie trop bas.
Pour Fixer les Accessoires
Pour enlever le cache de
de branchement basse vitesse
lente,
tirez le cliquet de blocage
sur le cote.
I'orifice
Enlevez le cache de
d'entrainement du presse-fruits
soit en appuyant soit en soulevant
la plaque. Si un bouchon
plastique est visible, devissez-le
avant d'inserer I'accessoire.
I'orifice
Enlevez le cache de
branchement grande vitesse en
le soulevant.
I'orifice
de
Page 22

Boutons
Pour selectionner une Vitesse, il suffit de tourner le bouton de controle sur le numero desire.
de
Commande
Nota:
si votre bouton de commande est muni d'un pulsateur, tournez le dans cette position lorsque vous
voulez travailler par impulsion. Le pulsateur fonctionne aussi longtemps que le bouton est dans cette
position.
Important
Dispositif antisurcharge
Les mixeurs comportant un dispositif antisurcharge sont congus pour
s'arreter automatiquement en cas de surcharge. Dans cette
eventualite, mettez
superieure pour faire apparaitre le bouton vert. Laissez le mixeur
hors tension quelques minutes puis appuyez de nouveau sur le
bouton pour la remise en route.
Nettoyage
Le bol, le fouet, le batteur "K", le crochet peuvent etre nettoyes a
I'eau
savonneuse. L'appareil lui-meme doit etre nettoye avec un
chiffon humide puis essuye. Toujours debrancher l'appareil avant
de le nettoyer. Ne jamais utiliser de poudres abrasives et ne jamais
plonger l'appareil dans I'eau. Apres la premiere utilisation, un peu
de graisse peut apparaTtre par les orifices 2 et 4 (voir p. 2) apres
usage il suffit de
affecte.
I'essuyer,
(OPTION)
I'appareil
hors tension puis soulevez-en la partie
le fonctionnement n'en est aucunement
Nota:
n'exposez jamais le bol a une
source de chaleur.
N'utilisez pas le bol dans un
four a micro-ondes.
Service apres Vente
En cas de non fontionnement,
consultez votre revendeur.
Si le cordon d'alimentation est
endommage, seul un reparateur
Kenwood agree doit le
remplacer, cette intervention
necessitant des outils speciaux.
POUR DECOUVRIR L'ENSEMBLE DE NOTRE
COLLECTION AVEC SES NOUVEAUTES
OFFRES SPECIALES
POUR CONNAITRE LES CONDITIONS
D'ADHESION AU CLUB KENWOOD CHEF
(CADEAUX, RECETTES, JEUX) ET LES
ADRESSES DES STATIONS - SERVICES
TAPEZ 3615 KENWOOD SUR VOTRE MINITEL
Utilisation
N'approchez pas vos mains
des lames coupantes en
rotation.
N'utilisez qu'un accessoire a la
fois.
des
accessoires
ET
Page 23

Information Generale
Utilisez le fouet pour les oeufs, la creme, les pates lisses, les pates molles, les meringues, les gateaux a base de fromage blanc,
les mousses, les souffles...
Utilisez le batteur "K" pour les gateaux, les biscuits, les patisseries, les glaces, la puree de pommes de terre, la pate a chou.
Utilisez le crochet pour les pates lourdes a base de levurex.
Le bouton de commande off
Fouet augmentez la Vitesse graduellement jusqu'a position maximum. Si le melange eclabousse, diminuez la vitesse
Batteur K melangez la matiere grasse et le sucre a vitesse lente, I'augmentez progressivement jusqu'a une position
moyenne. Pour de tres petites quantites, gardez la vitesse lente. Battez la matiere grasse, le sucre et les oeufs
a vitesse moyenne ou rapide. Incorporez la farine et les fruits, et... a vitesse lente. Ne pas melanger trop longtemps
acestade.
Melangez la pate a biscuit a vitesse moyenne.
Incorporez la matiere grasse a la farine a vitesse lente.
Crochet a pate commencez a la vitesse 1 et augmentez progressivement jusqu'a 2.
re
un large choix de vitesses que vous selectionnerez selon les ingredients et les quantites a travailler.
Recettes
Pain Blanc
1350
g de
15
g de sel
25
g de
levure fraiche
20
g de
levure seche
2 cuillerees a cafe
750
ml
d'eau chaude
25
g de
matiere grasse
Levure seche
Mettez
la
ajoutez
le
environ jusqu'a
mousseux.
Levure fraiche
Emiettez
le sucre. Versez tout
ajoutez
Petrissez
vitesse 1 puis augmentez
une boule. Ajoutez un- peu
necessaire.
Petrissez a nouveau 2 minutes
2 jusqu'a
et
Placez
dans
a 1 heure
volume. Remettez-la alors dans
petrissez 2 minutes
Mettez
a moitie. Couvrez
de volume.
Laissez cuire
(230°).
creux
couteau.
la
la
de 45
ce que la
se
detache
la
pate dans
un
endroit chaud pour environ 1 heure
la
pate dans 4 moules beurres remplis
Le
si on
5
farine
ou
de
sucre
levure seche dans
sucre
et
laissez reposer
ce que le
levure dans
matiere grasse,
secondes
des
Vz,
jusqu'a
30 a 35
pain
est
heurte
melange devienne
la
le
liquide dans
la
a 1
a 2
pate soit lisse, elastique
bords
du bol.
un sac
ce
qu'elle double
a la
vitesse
et
laissez
minutes thermostat
cuit quand
le
dessous avec
I'eau
farine
de
plastique beurre
la
Conseils:
Vous obtiendrez
une farine complete mais
vous
en
ordinaire.
II
n'est
pas
ustensiles utilises
dans
un
cependant
rapidement.
Pain
Bis
Suivez
la
900
g de
blanche.
de
meilleurs resultats avec
si
procurer, utilisez
indispensable
endroit chaud, mais cela permet
et de
a la
levure
recette
du
farine complete
vous
une
de
faire lever
de
monter plus
pain blanc
et 450 g de
chaude,
10
minutes
et
ajoutez
le bol,
farine
et le sel.
minute
a la
jusqu'a former
farine
si
a la
vitesse
de
le bol et
1.
pate doubler
il
emet
un son
un
ne
pouvez
bonne farine
chauffer
les
la
pate
en
utilisant
farine
Important
II peut y avoir
dans
la
des farines utilisees,
pourra imposer
grand a votre appareil. Nous vous conseillons
done vivement
les quantites indiquees,
constamment
pate - cette operation
de 3 minutes
des
quantite
I'appareil
et
differences considerables
de
liquide requise
et une
un
effort beaucoup plus
de
respecter scrupuleusement
et de
pendant qu'il petrit
ne
demi.
durera guere plus
Pizza Napolitaine .QH
Pate:
25
g de
levure fraiche
seche
+ 5 g de
250
ml
d'eau chaude
25
g de
matiere grasse
10
g de sel
400
g de
Garniture:
400 g d'oignons epluches
frits dans
800
10
sel,
300
100
olives noires
Faites
blanc. Apres
premiere fois, petrissez-la
travaillez
Placez-les
Faites revenir
8
les
Placez
et parsemez d'origan. Assaisonnez. Rapez
le fromage avec
sur
et
puis cuisez dans
pour environ
farine
I'huile
g de
tomates epluchees
a 15 g
d'origan,
poivre
g de
mozzarella
g de
filets d'anchois
la
pate
en
que la
la
pour obtenir 2 cercles
sur des
sur la
les
les
les
pate jusqu'a
les
tomates
tomates. Decorez avec
olives. Laissez reposer
20 a 25
ou 20 ml de
sucre
en
poudre
et
suivant
la
recette
pate
ait
de
plaques
oignons
en
la
le
de
dan
2,5 cm du
quartier
rape rapide
four prechauffe a 220°C
minutes.
en
surveiller
emincees
du
une
nouveau
de 30 cm.
cuisson.
I'huile
bord.
sur les
et
versez-le
les
anchois
30
minutes
fonction
levure
pain
et
versez-
oignons
pate collante
eminces
et
monte
Cake
aux
200
g de
200
g de
20
ml de
1 zeste d'orange
4 oeufs
250
g de
1,2 ml de
la
1,2 ml de
1,2 ml
d'epices
1,2 ml de sel
40
ml de
600
5
g de
50 g d'amandes
Mettez
le
zestes dans
en augmentant
ingredients soient bien melanges
deviennent legers
Raclez
le bol et le
un
par un.
lisse entre chaque oeuf. Ajoutez
la vitesse minimum puis
Placez
la
de
22
cm graisse
Cuire
a 150° la
pendant 2 heures
Quand
le
le retournant. Transpercez-le
endroits a I'aide
brandy,
le
absorbe, enveloppez
sulfurise
et
etanche.
NOTE:
Utilisez
ingredients
Utilisez
le
rechauffez
laissez
le
vous pesez
soigneusement avant utilisation.
Commencez
puis augmentez raisonnablement
en evitant
bords
du bol. Si les
importantes,
Utilisez
une
farine
et les
Fruits
beurre
sucre roux
melasse
ou de
farine
muscade
cannelle
brandy,
de
fruits confits
en
beurre,
le
le bol et
la
vitesse jusqu'a
et
batteur. Ajoutez
Battez jusqu'a
preparation dans
et
tapisse
premiere heure, puis
'A.
gateau
est
d'une brochette
rhum
ou le
placez
le
la
spatule pour racier
sur les
parois
beurre a temperature ambiante
le bol
avec
batteur K dedans pendant
les
ingredients. Essuyez
le
melange a basse vitesse,
que le
melange n'eclabousse
la
vitesse peut Stre augmentee.
vitesse lente pour incorporer
fruits dans
citron
rhum
ou de
sherry
poudre
sucre,
la
melasse
battez
a la
vitesse
ce que les
mousseux.
les
refroidi, demoulez-le
sherry. Quand
le
dans
dans
de
quantites sont plus
le
et
une
consistance
la
fruits
et
un
moule rond
de
papier sulfurise.
en
plusieurs
et
un
papier
un
recipient
du bol.
I'eau
chaude
la
melange.
les
farine
noisettes.
a 140°
versez
il a
les
que
vitesse
et les
3-4
oeufs
a
en
le
tout
ou
et
les
la
Page 24

9
Recettes
Sandwich
150 g de beurre
150 g de sucre en poudre
3 oeufs
150 g de farine additionnee de
levure chimique
Confiture
sucre glace
Fouettez le beurre et le sucre a la vitesse 34 jusqu'a I'obtention d'un melange cremeux
et mousseux. Eventuellement, augmentez la
vitesse en cours de fonctionnement. Raclez
le bol et le batteur et ajoutez les oeufs un a
un en utilisant la vitesse maximum jusqu'a
obtention d'une pate lisse. Ajoutez la farine
a vitesse minimum, melangez juste le temps
necessaire a I'incorporation. Versez le
melange dans 2 moules a manque de 18 cm
de diametre prealablement beurres et mettre
au four prechauffe a 190° pendant 25 a 30
minutes. Retournez sur une grille et laissez
refroidir. Formez un sandwich en intercalant
une couche de confiture et saupoudrez de
sucre glace.
Victoria.
Conseils
Le beurre doit etre a temperature ambiante
pour la preparation des gateaux.
Si la matiere grassee est trop ferme mettez
de
I'eau
chaude dans le bol, trempez-y le
batteur K quelques minutes, et essuyez
soigneusement avant usage.
Si le batteur ne va pas jusqu'au fond du bol,
procedez a son ajustement (voir p. 4).
Pour incorporer les ingredients, demarrez a
petite vitesse, puis augmentez la vitesse
petit a petit. Pour de plus grandes quantites,
vous pouvez utiliser une vitesse plus
importante.
II peut etre necessaire de stopper
pour racier le bol a
Pate Brisee
400 g de farine tamisee
5 g de sel
200 g de matiere grasse
80 ml d'eau environ
Coupez grossierement le beurre et ajoutez
la farine dans le bol. Melangez a vitesse 1,
puis augmentez a 4-5 jusqu'a ce que le
melange s'emiette, arretez avant qu'il ne
devienne graisseux.
Ajoutez
I'eau
jusqu'a obtention d'un melange homogene.
En principe la pate cuit a 200°, mais cela
depend de la garniture.
I'aide
de la spatule.
^
et melangez a vitesse lente
I'appareil
Conseils
Utilisez la matiere grasse sortant directement
du refrigerateur.
Ne pas trop melanger les ingredients.
Pate a Chou.
50 g de beurre
125 ml d'eau
75 g de farine
1 pincee de sel
2 oeufs
Mettez le beurre dans
ebullition.
sel.
doux a
ce que la pate forme une boule qui se detache
des parois de la casserole. Laissez refroidir
puis versez dans le bol. Mettre a la vitesse 2
et utilisez le batteur K pour incorporer les
oeufs un a un.
Augmentez alors la puissance au maximum
pendant 30 a 60 secondes. Disposez sur
une plaque beurree et farinee, en forme
ronde pour les choux, en longueur pour les
eclairs.
Gateau
Abricots
Biscuit
3 oeufs
75 g de sucre semoule
75 g de farine
Garniture et decoration
125 ml de creme fraiche
200 g de fraises
200 g d'abricots
Sucre a volonte
Coupez les abricots en 2 et les denoyauter.
Laissez cuire a feu doux dans tres peu
d'eau avec le sucre jusqu'a ce qu'ils soient
moelleux. Lavez et coupez les fraises en 2.
Preparez la genoise en melangeant les
oeufs et le sucre a vitesse maximum jusqu'a
ce que le melange blanchisse. Otez le bol et
versez delicatement la farine en utilisant le
fouet d'une main. Versez le melange dans 2
moules a manque de 18 cm prealablement
beurres. Laissez cuire a 180° environ pendant
20 minutes, jusqu'a ce que le gateau
rebondisse quand on le touche legerement.
Le sortir du moule et le laisser refroidir sur
une plaque. Utilisez le fouet pour fouetter la
creme a grande vitesse pour
ajoutez le sucre selon votre gout. Hachez
grossierement les abricots avec Vi des
fraises et incorporez delicatement a la moitie
de la creme. Etalez cette preparation entre
les 2 biscuits. Etendez le reste de la creme
au-dessus du gateau et decorez avec les Vz
fraises restantes.
Hors du feu, ajoutez la farine et le
Melangez quelques minutes a feu tres
I'aide
d'une cuillere en bois jusqu'a
aux
£
I'eau
et portez a
Fraises
I'epaissir,
et aux
Gateau
200 g de gateaux sees ijr r; /;_
100 g de beurre ^ ii:
Garniture:
20 ml de gelatine
125 ml d'eau
4 oeufs
100/150 g de sucre en poudre
3 gros citrons
250 g de fromage frais egoutte
Des fruits et de la creme
Utilisez le mixer. Lachez. les morceaux de
gateaux sees sur les lames a vitesse maximum
pour les emietter completement. Repetez
I'operatian 2 ou 3 fois. Faites fondre le
beurre dans une casserole, ajoutez les
gateaux sees emiettes, remuez et pressez
legerement dans un moule de 21 cm a •
bords amovibles. Laissez refroidir pendant
que vous preparez la garniture.
Faites fondre la gelatine au bain-marie.
Melangez les jaunes d'oeufs et le sucre a
vitesse maximum a
ce que le melange blanchisse. Ajoutez le
formage frais et continuez a melanger pour
obtenir une pate lisse. Reduisez la vitesse a
5, ajoutez le zeste des citrons, le jus et la
gelatine et melangez jusqu'a ce que tous les
ingredients soient incorpores. Versez dans
un recipient et laissez refroidir.
Battez les blancs a vitesse maximum et
incorporez-les delicatement a la preparation.
Versez le melange dans le moule sur le
biscuit et laissez refroidir.
Enlevez le tour du moule et decorez avec
des fruits ou de la creme fouettee, selon
votre gout.
Meringues
4 blancs d'oeuf
225 g de sucre glace
Recouvrez la plaque de cuisson de papier
sulfurise.
Mettez les blancs et le sucre glace dans le
bol et melangez a vitesse maximum jusqu'a
ce qu'ils soient bien fermes (environ 10
minutes). Remplissez une poche a douille
avec le melange et repartissez sur la plaque
de cuisson.
Laissez cuire les meringues a four tres
doux, 110° jusqu'a ce qu'elles deviennent
fermes et craquantes (environ 4 a 5 heures).
Glace
au
I'aide
du fouet jusqu'a
Citron
2
Conseils
Les meringues peuvent etre conservees
dans une boite en fer.
Si les meringues se colorent, ouvrez
immediatement la porte du four pour quelques
instants.
Page 25

.__ ~
KENWOOD
KM200 - KM260
Page 26

Willkommen
bei der
Kuchenarbeit
mit
Kenwood
Mit Ihrer neuen Kenwood Kuchenmaschine wird
angenehm. Besten Nutzen
von
Ihrem Mixer haben
geeigneten Arbeitsflache immer bereit haben.
lieferbaren Werkzeugen
Genusse
zum
Ausprobieren geboten.
und
Zubehor-Aufsatzen sind Ihnen weitere kulinarische
(NB:
Einige Zubehor-Aufsatze sind
besondere Modelle vorgesehen.)
Die Bildnumerierung
1 Planetengetriebe/Werkzeugaufnahme
2 Langsame Abtriebswelle
3 Verriegelung
Abtriebswelle
Abntriebswelle
4
Schnelle Abntriebswelle
5
An/Aus
6
Motorgehause
7
8
Freigabeknopf
9
Schussel
Werkzeuge/Aufsatze Modell
10 K-Ruhrwerkzeug
11 Knethaken
12 Schneebesen
13 Fleischwolf A920
14 Wurstaufsatz
15 Kebbe-Werkzeug
16 Pasta Aufsatz A936
17 Trommel-Schneider/Raspel A948
18 Mahlwerkskaffeemuhle A979
19 Getreidemuhle
20 Sahneaufsatz A927
der
langsamen
fur
Entsafter
und
Geschwindigkeitsregelung
fur das
zum
Oberteil
Fleischwolf A926
zum
Fleischwolf A937
A941
21 Dosenoffner A978
22 Bohnen23 Entsafter A995
24 Mixbecher A989/A990
25 Gewiirzmuhle A938
26 Schnitzelwerk A929
27 Entsafter A935
28 Kartoffelschaler A934
29 Passiergerat
30 Edelstahlschussel 18749
31 Spritzschultz
32 Abdeckhaube 29022
die
Kuchenarbeit einfach
Sie,
wenn
Mit der
reichhaltigen Auswahl
Sie ihn auf
und
einer
an
nur fur
Modell
und
Schalwerkzeug A932
(Fur Chef-Kuchenmaschinen)
Kartoffelschaler A952
(Filr Major-Kuchenmaschinen)
(Fur
Chef- A992
Kuchenmaschinen: Rundschiisseln)
Passiergerat A930
(Fur Major-Kuchenmaschinen)
(Fur Chef-Kuchenmaschinen)
Edelstahlschussel 18748
(Fur Major-Kiichenmaschinen)
(Fur
Chef-und 31227
Major-Kuchenmaschinen: Rundschusseln)
Spritzschultz ('D'-Schussel
die Chef-Kilchenmaschine)
(Fur Chef-Kuchenmaschinen)
fur
30238
Die Zuordnung der Werkzeuge zu den Abtriebswellen wird durch entsprechenden Farbencode
erleichtern.
Wichtig:
Das
Gerat erfullt hinsichtlich
der
Funkentstorung
die
Bestimmung 82/499/EEC
der
Europaischen Gemeinschaft.
Page 27

Ihr Mixer mit den Werkzeugen
Page 28

Montage
der
S^hussei
Das Oberteil laBt sich nach Betatigung des Freigabeknoptes (A)
heben,
dem Uhrzeigersinn. (B). Das Oberteil nach oben klappen, bis es
einrastet. (Diese hochgeklappte Stellung ermoglicht das Einsetzen
von Schussel, Schneebesen, 'K'-Ruhrwerkzeug, Knethaken,
Kartoffelschaler, Passiergerat)
ODER durch Drehen des Verriegelungshebels entgegen
und
Werkzeuge
Stecken sie die Plastikscheibe
mit der Rippung nach unten in
die runde Aussparung.
Stellen Sie die Schussel in die
runde Aussparung. Durch
Drehung im Uhrzeigersinn und
Druck von oben gleiten die
Rastnasen in die Halterillen im
Boden der Schussel, die so festen
Sitz erhalt. (Vorgang umkehren
zum Losen der Schussel).
Das Uberteii laiit sich nacn
Betatigung des Freigabeknopfes
(A) senken, ODER durch Drehen
des Verriegelungshebels
entgegen dem Uhrzeigersinn.
(B).
Das Oberteil nach unten
klappen,
bis es einrastet.
Planetengetriebe
Ihr Kenwood Mixer mischt
stemformig, so daB alle Teile
des Mischguts in der Schussel
griindlich durchgemischt
werden.
Hdchstmengen
Zur Erzielung bester Ergebnisse sollten Sie die folgend angegebenen
Mengen nicht uberschreiten:
Murbegeback
Hefeteig
Teigmischung
(Fruchtkuchen)
EiweiB-mind
-hochstens
TypKM201,KM210undKM220
11/2 lb/680g Mehl
3lb/1.36kgMehl
6lb/2.72kg
insgesamt
1
12
TypKM230undKM250
2lb/910gMehl
3lb/1.36kgMehl
10lb/4.55kg
insgesamt
1
16
Page 29

Montage
der
Schussel
Zum Einsetzen der Vorsatzgerate
in die Aufnahme wird der
Ruhrarm angehoben.
Vorsatzgerat vorsichtig in die
Buchse schieben, wahrend man
es langsam in der im Bild
dargestellten Richtung bis zum
Anschlag dreht.
Drucken Sie das Werkzeug test
nach oben, bis es einrastet. Zum
Herausnehmen des Werkzeugs
drehen Sie es im Uhrzeigersinn, bis
es freigegeben ist.
und
Werkzeuge
Bemerkung
Das 'K'-Werkzeug und der Schneebesen wurden im Werk eingerichtet, so dal3 sich weitere Eingriffe erubrigen.
Sollten solche aus irgendeinem Grund dennoch erforderlich
sein,
gehen sie wie folgt vor:
1.
Trennen Sie den Mixer vom Netz.
2.
Klappen Sie das Oberteil hoch und setzen Sie das einzurichtende Werkzeug - 'K' oder Schneebesen - ein.
3. Halten Sie das Werkzeug und lockern Sie die Mutter mit einem geeineten Schlussel (C).
4.
Senken Sie das Oberteil und drehen Sie das Werkzeug nach oben oder unten auf der Welle (D). Das 'K'-Werkzeug
wie der Schneebesen sollten am besten moglichst nahe zum Schusselboden sitzen.
5. Klappen Sie das Oberteil hoch und ziehen Sie die Mutter test, wahrend Sie das Werkzeug festhalten.
Hinweis
Wenn das K'-Werkzeug bei
laufendem Motor gegen die Schussel
schlagt, dann ist es zu tief
eingerichtet.
Zum Abheben des Deckels auf der
Niedriggeschwindigkeitswelle ist der
Rasthebel zur Seite zu drucken und
der Deckel wegzuziehen.
Der Deckels uber der Abtriebswelle
fur den Entsafter ist durch
Niederdrucken oder einfaches
Abheben zu entfemen. Wenn ein
PlastikverschluB aufsitzt, ist dieser
abzuschrauben, bevor das
Werkzeug eingesctzt werden kann.
Der Deckel uber der Hochgeschwindigkeitswelle laBt sich einfach
abheben.
Page 30

Geschwindigkeitskontrolle
Zur Wahl einer Drehgeschwindigkeit den Regler auf die gewCinschte Zahl drehen.
Bemerkung
Wenn Ihr Geschwindigkeitsregler die Funktion 'Pulse' (Momentstufe) aufweist, dann konnen Sie in dieser
Reglerstellung den Motor kurz stoBweise betreiben, oder solange Sie den Regler in dieser Stellung festhalten.
Wichtig
Uberlastungsschutz (SOFERN IHR GERAT DAMIT AUSGESTATTET IST)
Wenn Ihre Kuchenmaschine mit einem Uberlastungsschutz
ausgestattet ist, stellt sich das Gerat automatisch aus, wenn es
uberladen wurde. Sollte dies der Fall
der Kuchenmaschine an, um den grunen Knopf freizulegen. Lassen
Sie die Kuchenmaschine einige Minuten stehen, und drucken Sie
dann den Knopf, um mit dem Mixen fortzufahren.
Wartung
Die Schiissel, der Schneebesen, das 'K'-Werkzeug und der Knethaken
konnen in warmer Lauge gewaschen werden. Das Gehause braucht nur
mit einem feuchten Tuch abgewischt zu werden. Schalten Sie immer nach
Betrieb aus und ziehen Sie den Netzstecker. Verwenden Sie nie
Scheuermittel und halten Sie das Gerat nie unter Wasser. Nach dem ersten
Betrieb und Einlaufen kann an den Abtriebswellen 2 und 4 (vgl. S. 2)
Schmiermittel austreten, das Sie abwischen konnen. Der
Schmiermittelaustritt ist fur das Funktionieren Ihres Gerats ohne
Bedeutung
sein,
heben Sie das Oberteil
Bemerkung
Setzen Sie die Schtissel nie direkter
Hitze aus (d.h. nie uber oder im
Herd trocknen.) Die Schussel
niemals im Mikrowellenherd
verwenden.
Wartung
Wenn das Kabel dieses Gerats
beschadigt ist, sollte es nur von
einem zugelassenen KENWOOD
Reparaturbetrieb ersetzt werden,
da dazu Spezialwerkzeuge
erforderlich
Bitte wenden Sie sich an den
Handler, bei dem Sie das Gerat
gekauft haben.
sind.
Gebrauch der Zubehorteile
Hande von den sich drehenden
Messerschneiden fernhalten.
Nicht mehr als ein Zubehorteil
zur Zeit verwenden.
Page 31

Allgemeine Hinweise
L .
Verwenden Sie
- den Schneebesen fur Eier, Schlagsahne, Eierteig, Schaumgeback, Baisers, Kasekuchen, Mousees, Souffles usw.
- das'K'-WerkzeugfurKuchen, Biskuitteig , Murbegeback, Zuckerglasur, Fiillungen, Kartoffelbrei,Tortenteig, Eclairs.
- den Knethaken fur Hefeteige.
Mit dem Stufenregler stehen alle Geschwindigkeitsstufen zur Verfugung, die fur verschiedene Zutaten und Mengen
benotigt werden. Im allgemeinen werdenfolgende Geschwindigkeiten empfohlen:
Schneebesen: Schrittweise bis zur hochsten Stufe schalten. Sollte der Inhalt uberspritzen, die Geschwindigkeit
reduzieren.
'K'-Werkzeug: Fett und Zucker auf niedriger Stufe cremig ruhren und schrittweise auf mittlere Geschwindigkeit
erhohen.
Eier benotigen mittlere bis hohe Geschwindigkeiten, Mehl, Fruchte usw. Auf niedriger Stufe in den Teig
arbeiten.
Buiskuitteig benotigt mittlere Geschwindigkeit, Fett sollte dagegen langsam in Mehl geknetet werden.
Knethaken: Mit Stufe 1 beginnen und langsam auf Stufe 2 erhohen.
WICHTIG
• Um optimale Ergebnisse zu erzielen, sollte das Wasser eine Temperatur von 43°C haben. Dies kann mit Hilfe eines Thermometers kontrolliert
werden oder laBt sich erreichen, indem 2 Teile kaltes Wasser mit einem Teil kochendem Wasser gemischt werden.
• Sollte das Gerat beim Kneten eines festen Teiges anfangen muhsam zu arbeiten, empfehlen wir, den Teig in zwei Halften zu teilen und diese
nacheinander zu verarbeiten.
0 Verschiedene Teigarten konnen sehr unterschiedliche Mengen an Wasser benotigen, und die Klebrigkeit des Teiges hat erheblichen EinfluB
darauf, wieviel Kraft die Maschine aufwenden muB. Wir raten Ihnen daher dringend, sich an die vorgegebenen Mengenangaben zu halten und das
Gerat wahrend der Teigverarbeitung nicht unbeobachtet zu lassen.
Bei sehr kleinen Mengen empfiehlt es
sich,
auf niedriger Stufe zu bleiben. Fett, Zucker und
Der Teig sollte dabei nicht ubermaBig geruhrt werden.
Rezepte
Sonnenblumenbrot
Zutaten
4 Wurfel Hefe
:
A I lauwarmes Wasser
1 I warmes Wasser
20 dag Topfen (20%)
8 gestrichene Teeloffel Salz
2 gestrichene Teeloffel Koriander gemahlen
1,5 kg Roggenmehl
V2 kg Roggenvollkomschrot
8 EBI. Sonnenblumenkerne geschalt
Zubereitung:
Die Hefe, V4 lauwarmes Wasser in der Schussel
glattruhren. Topfen und 1 I warmes Wasser
dazugeben und verruhren.
Salz, Koriander, Roggenmehl, Roggenvollkomschrot
und Sonnenblumenkerne dazugeben und
abschlagen bis sich der Teigballen von der Schussel
lost.
Den Teig zugedeckt ca 90 Min. an warmen Ort
ruhen lassen. Danach nochmals durchkneten und
zwei runde Laibe daraus formen.
Auf ein mit Backpapier ausgelegtes Backblech
setzen und zugedeckt nochmals 1 Stunde gehen
lassen.
Den Ofen auf 200°C vorheizen, den Teiglaib einige
Male mit einer Gabel einstechen; das Backblech
auf der Mittelschiene einschieben und 1 Tasse
Wasser auf den Ofenboden gieBen; die Tur sofort
schlieBen.
Nach 30 min. I Schale kochendes Wasser auf den
Herdboden stellen und noch 45 Min. fertigbacken.
WeiBrot
3 lb/1350g WeiB-Mehl
3 gstr. TL salz
1 oz/25g frische Hefe Oder
V2 oz/15g or 20 ml getrocknete Hefe
1 tsp/5ml Zucker
1 Vi pts/750 ml warmes Wasser
1 oz/25g Schweineschmalz
Trockenhefe:
Trockenhefe in warmes Wasser streuen, Zucker
hinzufugen und ca.10 Minuten stehen lassen, bis
die Mischung schaumig ist.
Frische hefe:
Hefe in das Mehl Krumeln und Zucker hinzufugen.
Fur den Teig Schweineschmalz, Mehl und Salz mit
der Flussigkeit ca.45 bis 60 sek. Auf Stufe 1
kneten,
danach auf Stufe 2 erhohen, bis sich die
Zutaten gut vermischt haben. Gegebenenfalls
etwas Mehl hinzufugen.
Weitere 2 Minuten auf Stufe 2 kneten, bis der Teig
weich und elastisch ist und sich vom Schiisselrand
lost.
Der Teig muB an einem warmen Platz etwa 1 bis
1/2 Stunden gehen. Danach weitere 2 Minuten auf
Stufe 1 kneten. In eine gefettete Backform fiillen
(ausreichend fur 450g - die Form sollte nur zur
Halfte gefullt sein), mit einem Tuch bedecken und
nochmals solange gehen lassen, bis der Teig sich
verdoppelt hat.
Backzeit bei 230 Grad ca. 30-35 Minuten.
Das Brot ist gut durchgebacken, wenn es beim
Abklopfen der Unterseite hohl klingt.
Hinweise
• Beste Ergebnisse lassen sich mit Spezialmehl
erzielen,
wenngleich auch einfaches verwendbar
ist, falls nur dieses vorhanden ist.
• Ein Anwarmen des Geschirrs oder das
Gehenlassen des Teigs an warmem Ort ist zwar
nicht notwendig, beschleunig aber das Aufgehen
der Hefe.
Vollkombrot
Rezept wie fur WeiBbrot; jedoch 450g Weifi-mehl
mit 900g Vollkornmehl mischen.
Festlicher Fruchtekuchen_w
8 oz/200g Butter
8 oz/200g brauner Zucker
1 tbsp/20 ml schwarzer Sirup
geriebene Schale einer Zitrone oder Orange
4 Eir
250g WeiBmehl
Vi TL MuskatnuB
V* TL Zimt
1
A TL Kuchen-Gewurzmischung
V* TL Salz
2 EL Branntwein, Rum Oder Sherry
1V2 lb/600g Trockenfriichte (gemischt)
2 oz/50g gehackte Mandeln
Butter, Zucker, Sirup und geriebene Zitronen-oder
Orangenschale in der Schussel bei Stufe 3-4
verruhren;
sich die Zutaten gut vermischt haben und weiter
ruhren,
Die Masse vom Knethaken und Schiisselrand in
die Mitte der Schussel schaben und die Eier
einzeln hineinruhren - darauf achten, daB jedes Ei
sich mit dem Teig verbunden hat, bevor das
nachste hinzugefugt
Auf niedrigster Stufe das Mehl in die Mischung
ruhren,
Den Teig in eine gefettete, mit Papier ausgelegte,
runde Kuchenform fiillen und eine 'Stunde bei 150
Grad backen; danach die Hitze auf 140 Grand
reduzieren und den Kuchen weitere 2 1/4 Stunden
backen.
Nachdem der Kuchen abgekuhlt ist, aus der Form
nehmen und mit der Unterseite nach oben auf eine
Platte legen. Mit einer Stricknadel Locher in den
Kuchen stechen und mit dem Alkohol betraufeln.
Sobald dieser eingezogen ist, den Kuchen in
Backpapier oder Plastikfolie wickeln und luftdicht
aufbewahren.
die Geschwindigkeit erhohen, sobald
bis die Mischung locker und schaumig ist.
wird.
danach Fruchte und Mandeln zugeben.
Hinweise;
• Benutzen Sie den beigefugt Teigschaber, um
die Zutaten vom Schusseirand zu schaben.
• Falls die Butter keine Raumtemperatur hat, in
die Ruhrschiissel heiBes Wasser fullen und das
'K'-Werkzeug wahrend der vobereitenden
Arbeiten darin stehen lassen. Vor Gebrauch
griindlich trocknen.
• Beginnen Sie den Ruhrvorgang auf niedriger
Stufe - bis sich die Zutaten vermischt haben.
Erhohen Sie dann die Geschwindigkeit, achten
Sie aber darauf, daB die Mischung nicht zu sehr
an den Schusseirand geworfen
den Mischvorgang beeintrachtigen wurde.
GroBere Mengen erlauben hohere
Geschwindigkeiten.
• Mehl und Fruchte langsam in den Teig
wird,
da dies
riih'
Page 32

Viktoria
6 oz/150g Margarine
6 oz/150g sehr feiner Zucker #jfik
3 Eier ^^
6oz/150g WeiGmehl
Marmelade
Puderzucker
Fett und Zucker auf Stufe 3-4 cremig riihren,
danach die Geschwindigkeit erhohen, bis die
Mischung schaumig
Knethaken und Schusselrand in die Mitte
der Schussel schaben und die Eier auf
hochster Stufe einzeln hineinriihren. Darauf
achten,
verbunden hat, bevor das nachste hinzugefiigt
wird.
Stufe unterriihren.
Den Teig auf 2 eingefettete, mit Papier ausgelegte flache Backformen (Durchmesser 18
cm) streichen und bei 190 Grad 20-30 Minuten
goldgelb backen. Der Kuchen ist gar, wenn
er bei Auflegen der flachen Hand leicht
federt. Zum Auskuhlen auf einen Kuchenrost
legen,
bestreichen, den anderen daruber legen und
den fertigen Kuchen mit Puderzucker
bestauben.
Sandwich
wird.
daB jedes Ei sich mit dem Teig
Das Mehl vorsichtig bei niedrigster
einen der Boden mit Marmelade
Kuchen
Die Masse vom
Hinweise:
• Fur alle Teige, bei denen alle Zutaten
zusammen geruhrt werden, weiche
Margarine aus dem Kuhlschrank
verwenden, hingegen Blockmargarine mit
Raumtemperatur fur alle schaumig zu
ruhrenden Teige.
• Falls die Margarine zu test ist, urn sich
gut verarbeiten zu lassen, heiBes Wasser
in die Ruhrschiissel fuller) und den 'K'Werkzeug einige Minuten darin stehen
lassen.
• Wenn das Ruhrwerkzeug nicht fast bis
• Den Ruhrvorgang auf niedriger Stufe
• Gelegentlich kann es notwendig
Vor Gebrauch grundlich trocknen.
zum Boden der Schussel reicht, ist die
Einrichtung des Werkzeugs zu iiberprufen
(Siehe 2.4).
beginnen,
haben.
Achten Sie darauf, da6 die Mischung
nicht zu sehr an den Schusselrand
geworfen
beeintrachtigen wiirde. GroGere Mengen
erlauben hohere Geschwindigkeiten.
Ruhrvorgang zu unterbrechen und den
Teig mit dem Schaber vom Rand in die
Schusselmitte zu schaben.
bis sich die Zutaten vermischt
Dann die Geschwindigkeit erhohen.
wird,
da dies den Mischvorgang
sein,
den
Pasteten-Murbteig.
1 lb/400g Mehl, gesiebt
ITLSalz mit
8 oz/200g kaltes (Margarine und
Schweineschmalz gemischt)
4TL/80mlWasser
Fett in grobe Stiicke schneiden und zum Mehl
geben.
Beides beginnend mit Stufe 1
untereinander kneten, die Geschwindigkeit
schrittweise erhohen, bis die Mischung
Krumen bildet. Sollte der Teig Anzeichen von
Verschmierung zeigen, die Geschwindigkeit
reduzieren.
Wasser hinzufugen und bei niedrigster Stufe
vorsichtig unterruhren.
Backtemperatur: ca. 200 Grad. Sie ist
abhangig von der verwendeten Fullung.
Wahlen Sie die Fullung nach Wunsch.
Hinweise
• Das Fett sollte gut gekuhltsien.
• Zugig arbeiten und die Zutaten nicht zu
stark verruhren.
Brandteig i
2 oz/50g Butter
V* pt/125 ml Wasser
3 oz/75g WeiGmehl
etwas Salz
2 Eier
Butter und Wasser zum Kochen bringen,
den Topf vom Herd nehmen und das gesiebte
Mehl sowie Salz hinzufugen. Bei leichter
Hitze einige Minuten gut riiren, bis die
Mischung sich vom Topfboden lost und eine
Art Ball formt. Leicht abkiihlen lassen und
den Teig dann in die Ruhrschussel geben.
Mit dem 'K'-Werkzeug auf Stufe 2 die Eier
portionsweise unterruhren. Danach den Teig
nochmals auf hochster Stufe 30-60 Minuten
schlagen.
Bedarf (Fettgebackenes, Eclairs, Windbeutel
etc).
Erdbeer
Biskuit Boden:
3 Eier
3 oz/75g sehr feiner Zucker
3 oz/75g WeiBmehl
Fullung und Dekoration:
Vt pt/125 ml Schlagrahm
Zucker nach Wunsch
8 oz/200g Erdbeeren
8 oz/200g Aprikosen
Aprikosen halbieren und Steine entfernen.
Mit sehr wenig Wasser und etwas Zucker
vorsichtig weichkochen. Erdbeeren waschen
und halbieren.
Fur den Biskuit Boden Eier und Zucker auf
hochster Stufe solange schlagen, bis eine
helle,
Schussel von der Maschine nehmen und
vorsichtig mit dem Hand-Schneebesen das
Mehl unterheben. Die Mischung in zwei
eingefettete, mit Papier ausgelegte flache
Backformen (18 cm) geben und bei 180
Grad ca. 20 Minuten backen. Der Kuchen ist
gar, wenn er bei Auflegen der flachen Hand
leicht federt.
Aus der Backform nehmen und auf einem
Kuchenrost auskuhlen lassen.
Schlagsahne auf hochster Stufe steif
schlagen,
hinzufiigen. Aprikosen in grobe Stucke
schneiden und zusammen mit einem Drittel
der Erdbeeren unter die Halfte der
Schlagsahne heben. Diese Mischung auf
einen der Boden streichen und den anderen
darauf legen. Die restliche Schlagsahne auf
den Kuchen streichen und mit Erdbeerhalften
dekorieren.
Verwenden sie den Teig nach
Aprikosen
creme-artige Masse enstanden ist. Die
Zucker nach Geschmack
Torte_
v
Hinweise:
• Urn einen lockeren, luftigen Biskuitboden
zu erzielen, mul3 das Mehl sehr vorsichtig
unter das Butter-Zucker-Gemisch gehoben
werden.
Gekuhlter ZitronenKasekucheri—
Biskuit-Boden:
8 oz/200g fertige Biskuits
n
4oz/100g Butter
s
' Fullung
1 EL Gelatine
1
/4 pt/125 ml Wasser
4 Eier, getrennt nach Eigelb und EiweiB
4-6 oz/100-150g sehr feiner Zucker (Menge
nach Geschmack)
3 groBe Zitronen
10 oz/250g Schichtkase Oder Quark
Dekoration mit Friichten und Schlagsahne
nach
Wunsch
Zum Herstellen von Biskuit-Krumen die
Biskuits stCickweise in den Mixer geben und
bei hochster Stufe zerkleinern. Die
Gesamtmenge dabei auf 3 Arbeitsgange
verteilen.
die Biskuit-Krumen hinzufugen und gut
durchruhren. Die Masse in eine runde
Springform geben und leicht andriicken.
Kuhl stellen.
ji
Eigelb und Zucker mit dem Schneebesen
auf hochster Stufe solange schlagen, bis
eine cremig-helle Masse entsteht. Den durch
ein Sieb gestrichenen Schichtkase Oder
Quark hinzugeben und den Teig ruhren, bis
er glatt ist. Auf Stufe 5 zuriickschalten, Safl
und geriebene Schale der Zitronen sowie die
aufgeloste Gelatine hinzugeben und nochmals
gut durchruhren. Den Teig in eine andere
Schussel geben und solange kalt stellen, bis
er sich gesetzt hat.
EiweiB auf hochster Stufe steif schlagen und
mit einer Gabel vorsichtig unter die
Kasekuchen-Mischung heben. Auf den
Biskuit-Boden geben und kuhl stellen.
Wenn der Teig sich gesetzt hat, den fertigen
Kuchen aus der Form nehmen und nach
Wunsch mit Fruchten und Schlagsahne
verzieren.
Baisers
4 EiweiB
9 oz/225g gesiebter Puderzucker
EiweiB und Puderzucker auf hochster Stufe
solange schlagen, bis die Masse sehr steif
ist (ca. 10 Minuten). Einen Spritzbeutel mit
sternformiger Tulle etwa zur Halfte mit BaiserMasse fiillen. Die Baisers auf das vorbereitete
Backblech spritzen und sehr langsam bei
110 Grad fest werden lassen (ca. 4-5
Stunden).
Hinweise
• Baisers in luftdichter Dose aufbewahren.
• Sollten die Baisers braun zu werden
Butter in einem Stieltopf schmelzen,
beginnen,
die Ofentiir leicht offen halten.
Page 33

KENWOOD
KM200 - KM260
Page 34

hjj>
iiUI
jd^
yjll ol^VI oljLil
SjUlu/VI Jjiaj Ja.Vj .Jj^ii
(J^J.
j>) iJJji ol i> jSlil) u^ ,lkiUJI Jl 5ji^
Uukll jlicl ijL«c J*ajl .JjtfJjS 3£>i IflViVi
^ill
.SjjdsJI
j
Jjt.Wll
l.lh".. SljVl
»i»
Jjlki
Page 35

3S.lt I cJ
Page 36

o>&xi £V>J.I
JJJJIJ
ji ,(1
yi la* Jm'niil)
(J^ ' *
*J SU
j;V>
^k UuAlL U.MUI
AJjl AJ
I,
ji ,(1)
^WJ)
<tU*JI
^Ijlol ^nirii iiJ^jS 4$j=kj 4i>liS ikiLL JjuC
uajJJ ill
Itill jjjlill jjl
Yo.
f.
J
YY.
ilft*^1 <>
Cfrai
UtfJUa.VllJi>ll
\
^^
^SY
J,Y.
(
i£
\
\Y
(aJ i .gjLu)l
\ r J :jl>
\
,VY
L
-•"alii d
lj ..f* AI
y^jl Ja..
oill 4-JuJ
Sjj^aJ
I
3'.
.-.»•
Ili^Ja.
Page 37

xi) 4a-.ni
^
JtVI
J^i
oLtjJ JSaJll SljVl
o
Jt
ki.,Al
IJLllI
^jic 6'jJ
o
<iiiJ.I/tjj*AJ.I ,jjSj jl
>
if"
All
Jti^>1 Ijlj
LOJ
,gjlllll J^Aii 3ji->"ilj .(j)
.^ji
J
V
LLAJ
. I Atl jji JS I-.. ^
I
U_i. A
^'ic^l.l
V
I uij
j j SljVl
yj-.HI SljVl jjjji jkSj ik^LiJI ^uij ^Aiil . I
jjjl - X
dlni.a| . V
SljVl
el-kill
Lol
<j
-
-j~"•••_•
ij Jl 4jjc L- • Xll.
<dUJI
<tJXJJI
rJl>^lI ^-*^
f1 l-kt
IMU
Page 38

f
0
imwB
Ij]
li* ^i
ki
Ijl
CULS jl)
aj j-u <JL5JJI
Ljitj
.
V ^1) Sjitil \n Sjl_jaJ
c»l_>iuill
i;,i,l....II
I.IU
S.US.-...II
iiUI
j
Page 39

.-•1
. XII tj* i
U t <f •!„ Ic
JaliaJI
*""
jjl (
9
LuL
^flji
*
jJ
I-'-
(jlj .
<Lkij 4ljJaj
<
j
MA.
Jj" ' 'I-
jjJ AJ
LJJI
<LoLc
t1
jj
CJ
LajJ t A
llifl^.
gJ^ll
JtJa^aj
5jl (N jli
J1 fAl J
jl
^1
(f jU
tS-jHj;
i i _ V 4
J^l ^
^^xji^ul
l .jjiull JUSI
J»JJ
|
4AAC
ljul
jl
4JJJ«
Sj^
fk Xo
V •
jl *i
No
LU^J
U S jaj
jj~ l-~
^jAii]
i J
Ui^J.1
Sj^iii
jUl
l
UJJSJ
ijjl-Sj j-i^J JL=JI sjjfc
J»J
£.
A-
-
SjjSill
4SJ^LJI
£_Uit j^iJ' C^r^
5|J
>
(A>
uljJi
Jl
luall jJaSI
^
4A_JJ
Jl
laj.nn
tjA
..in
(X)*
(i
3').~»)l
j^i
<£._^o SjUj (_ric
^-i
*1 -C
_
V.
& 1 .* * ^ ^ OJ ^T *
.
^jji'
SJ
JI
rt
1^
Ul~iJ
jit
JlikJI Uj-JI fAil—l
X..
,j»-».
(J-KII)
LM
^o
^ahJ. 1 I
Ciblii
'
* •
I -t" . 1-. >. i^.
V^ I .
K
LfliLla.1 • a^-^"'
it
Page 40

I C ^^^^ij J *^t
*&
Iji] U
JjAI ^niltIj *"•;•••
II
Jlifl-^l I <( * •
ll ^ J
"f)) a j '
\\ 1 r>
l^Q
LJ J ^
'^
*a 6 ) i " * "i
j
JJ^
ul
fj
X.
jLlill
Ujj Jl
Sjl^JI jjjl
I
r^-al
j»J
ftil-'j
I
olli
JJJ£
Vjl
^
'-ii'-iAJ'j
J.IJJ-I^JIj
ijjjiillI
(•
LaJ g->j-o
el_a
-i
k>*->^ ^-^-'"1
AJ
'
^^4
I I ^ 1
^ l
1 11 A j
i^^^^^J^ I ^ ^ 1
JJ I
*j
l^^^^ I •
J*^
I ^ ^ A .
^
IS
..
• ••
cl«il I
JJ
jj 1 ^
-J--II S»-A>'il I
UIJ I -it I ^
Ij^ *Jj I
Ljjjii
<<a
f=
Lilc U C/-=>-^JI
jM U
''a 1 V • ftji
M
jj
«_>JjJ.
i^aijl
T
,7.
"-^ .a. ^.
j;>i.1
fi
u°—'' I
i>^JJI ijiAj jUJI
A • iLall J >.«';. .,1 .
^
^j
p^j"''! • •^•••J
I ••<
Ul ,uu^ A I ^ j '"»
ill <-a5l£.) * \
.«JJJQVLJ •< • -it ^ic.
j <Jjl_jiJI iJjj ,j^.a.itiU ^ ji
.U.I
J
£
VJ
IUJLJ
*\ • _ V . A .".aI
JiS
jliilo \ X
. jJI
_i
J^
jl*a • ^"•'• U 1 ^j
A-
Sjlj^
"LJlio
i^l
Jt ^jjH
<<SaA I I
^JJ L*^
^1
l-l!iLc
t
* ljj^.1 U.^Jt I , li£.'jj (iiii. g-i^i I -"oi lj^J.A.i , ^,i
,11 . a. X sj ,. , .. XI
•Ltjj-j jJJL->
^j-a
/j*
,
ft
A~s.
• V|
jLitl iij^U:) f.W . Sjlj^.
J
' I ^ * I i~ ( J
**^
k^ J '-
j^ • .i
JJJJ LXJJ^'
0
'y#a ><>.c^^ili^I!^j , &J
I
<JLJ I i\c
'Lv. ioli.1
i
jl
» 'I-
UAJ
O^1 •"'-*J'
i)
-k < .i
^
/\ ^^^£
A
.^ m g
* . ^
il I A
J|
J'I L U
1
vs ^ ^i"
-i J--
"'
Jt
l J j • • •
•
I j
/"-*
|j yj I i-> d V. i -^
t** F
ii.jJ ^ oliiij V . _ X
'. * || | J n A ^J
"I l'*'l ^-°
ia (j
|^_
. df • , ,i ^j
^[jilal
Hj i" j 11 AI^JIJI
I ^
^ ^ r
.LJ^
4_^,,\
U|l . -'-Ij---
0* *" ^^1 • ,ii
•
JJJII ^ .jL^V
^ j
^
[-^
.
"- r | .T i d
'j^'1 I
~j]
* "- I ,
j}
, . i
s-* I J
-j -j | A '^^LAA>
jj
|-'''iflll jl^C.1
J-11 J1 ^
AJ£
-i I 'i'ii
n^j] f to i *x [ a
_tU
(AUJQ
'**-
ifl j j«>
j—J I J j
a
j
^
J^J
C_y^
/ c 1 J
3^^*-*
J_>JJ I j f
S^JI
*ii . (_5
If
-IGLLN-I, I i-i • I ^ M
iajilll SiJJj
TC_J J»
I
•*
i
L**
I
. Sji • ^"'iI""j
-'J r ^1-
Jl
iLx^ilL,
c- l_4_j ' jl * I
*AJ;i
ijl
yj
'I
11
"f Jj" • ••!
•;'j-JI ^
,*'.
..I LJI ^jjlj
-I
i^"--l jS-
j
i^UJ)
^l
ol j 6
jj
"f
^^^^^a j • > 111 <i
^)
yM*
J-iiJ
^'
T
l
^
Q
,1U!
Jjill VL giil
ii Ijl
KENWOOD LIMITED
New Lane • Havant • Hampshire • PO9 2NH
PRINTED IN BRITAIN
.ijjljijl
,_
ftl
i^i'ii
4\iy
iaijl
jjj
a^
iJx£JI <-aS 1Jc
: < •' A w
mil
gj^ll
jjt.
^
c^-aJaJI
^1
<J*i
[U^U
jl ,
i^i^^i^i
j*i
UUJ
JA*J!
^a2
<,^JJJ,^L^IC>^ULII
;j
JSJJC\
jliili.51.)
r.. Sjl^^jjjijUSjJaill y^
f
.ijijll.
^^i SjJaiJI
^jx
J^.-...l
jjj
laljiVI
^.^...11
iJ
Jt
.->.
83056/20
ENGLISH
DUTCH
FRENCH
GERMAN
ARABIC
 Loading...