


Kenwood KCA-HF521 Manual
KCA-HF521
GSM HANDS FREE UNIT 3 page 2 - 15
INSTRUCTION MANUAL
UNITE MAINS LIBRES POUR GSM 3 page 16 - 29
MODE D’EMPLOI
GSM-FREISPRECHGERÄT 3 Seite 30 - 43
BEDIENUNGSANLEITUNG
HANDSFREE UNIT VOOR GSM 3 blz 44 - 57
GEBRUIKSAANWIJZING
© PRINTED IN JAPAN B64-2252-00/01 (E)(DT)
Before Use
Safety Precaution
2WARNING
To prevent injury and/or fire, take the following precautions:
•Ensure that the unit is securely installed. Otherwise it may fly out of place during collisions and other jolts.
•To prevent short circuits, never put or leave any metallic objects (e.g., coins or metal tools) inside the unit.
•If the unit starts to emit smoke or strange smells, turn off the power immediately and consult your Kenwood dealer
2CAUTION
To prevent damage to the machine, take the following precautions:
•Do not open the covers of the unit.
•Do not install the unit in a spot exposed to direct sunlight or excessive heat or humidity. Also avoid places with too much dust or the possibility of water splashing.
•Do not use any screws except for the ones provided. The use of improper screws might result in damage to the main unit.
NOTE
If you experience problems during installation, consult your Kenwood dealer.
GSM model available for this unit
The GSM models that can be used with KCAHF521 are as follows: (As of December/2001)
Brand Name |
Model Name |
GSM Connection Cable (Option) |
|
|
|
Nokia |
6110/ 6210 |
CAW-NK 511 |
|
|
|
Ericsson |
R320/ T28/ A2618 |
CAW-ES 511 |
|
|
|
Siemens |
S35/ M35 |
CAW-SM 511 |
|
|
|
CAUTION
Restriction on GSM Telephone connections
•It is necessary to set the "GSM MODEL SELECT SWITCH", found on the back of the control unit, to the correct GSM model setting. See "GSM MODEL SELECT SWITCH" setting in the <Installation> pages for details of setting.
•In Ericsson Models, you cannot use “@” for any entry into Phone Book or SMS. If the mark is used, it is replaced with a space. However, the “@” mark is displayed at browsing.
•It is not possible to dial a number that includes either of the characters '#' or '*'.
•The correct operation of the unit with Siemens models requires that the supplied charging adapter is plugged into the vehicles cigar lighter socket.
•If the generation of call lists is disabled on the GSM phone, then the redial functionality offered by the KCA-HF521 will be adversely affected.
•You can use the GSM telephone connection to start the automatic downloading.
The downloading will be completed in several minutes. It may take more than 10 minutes to finish the downloading, depending on GSM telephone models to be connected.
2

Kenwood Receivers available for this unit
The receiver units that can be used with KCA-HF521 are as follows:
(As of December /2001)
CD Receiver/ Cassette Receiver
KDC-PSW9521/ KDC-M9021/ KDC-8021/ Z838W/ Z738/ Z638/ KDC-MV6521/ KDC-M6021/ KDC-M6021G/ KDC-6021/ X838
Monitor Receiver
KVT-M700
About the KCA-RC420 (Remote controller with [  ] button)
The KCA-RC420 is optional depending on the types of receiver units.
About the disc changer/ CD player/ CA-C1AX to be connected:
•No O-N switch disc changer and CA-C1AX cannot be connected directly. (Except after 2002 models)
•Two disc changer or player cannot be connected (During KCA-210A is connected).
Restriction on Receivers connected and conditions of operation
A : During memory download from GSM |
D : While driving (when parking brake |
|
||||||||||
|
Telephone |
signal is undetected) |
|
|
|
|
|
|||||
B : Normal conditions |
Y : Function available |
|
|
|
|
|
|
|||||
C : During a call |
N : Function not available |
|
|
|
|
|
||||||
|
|
|
|
|
|
|
|
|
|
|
|
|
|
|
|
|
|
|
|
|
|
|
|
|
|
|
|
|
CD/Cassette |
|
|
|
|
|
|
|||
|
|
|
Receiver |
|
|
KVT-M700 |
|
|||||
|
Function |
|
A |
B |
|
C |
A |
|
B |
C |
|
D |
|
Call from Phone Book |
|
N |
Y |
|
N |
N |
|
Y |
N |
|
Y |
|
|
|
|
|
|
|
|
|
|
|
|
|
|
Redialling |
|
N |
Y |
|
N |
N |
|
Y |
N |
|
Y |
|
|
|
|
|
|
|
|
|
|
|
|
|
|
Manual outgoing call |
|
N |
Y |
|
N |
N |
|
Y |
N |
|
N |
|
|
|
|
|
|
|
|
|
|
|
|
|
|
Automatic incoming call with GSM |
|
Y* |
Y |
|
N |
Y* |
|
Y |
N |
|
Y |
|
|
|
|
|
|
|
|
|
|
|
|
|
|
Automatic incoming call with hands-free unit |
|
Y* |
Y |
|
N |
Y* |
|
Y |
N |
|
Y |
|
|
|
|
|
|
|
|
|
|
|
|
|
|
Manual memory download |
|
N |
Y |
|
N |
N |
|
Y |
Y |
|
Y |
|
|
|
|
|
|
|
|
|
|
|
|
|
|
Phone Book data entry |
|
N |
N |
|
N |
N |
|
Y |
N |
|
N |
|
|
|
|
|
|
|
|
|
|
|
|
|
|
Phone Book data update |
|
N |
N |
|
N |
N |
|
Y |
N |
|
N |
|
|
|
|
|
|
|
|
|
|
|
|
|
|
Phone Book data deletion |
|
N |
N |
|
N |
N |
|
Y |
N |
|
Y |
|
|
|
|
|
|
|
|
|
|
|
|
|
|
Notification of new message (SMS) |
|
Y |
Y |
|
Y |
Y |
|
Y |
Y |
|
Y |
|
|
|
|
|
|
|
|
|
|
|
|
|
|
Message (SMS) browsing |
|
N |
Y |
|
N |
N |
|
Y |
N |
|
N |
|
|
|
|
|
|
|
|
|
|
|
|
|
|
Message (SMS) deletion |
|
N |
N |
|
N |
N |
|
Y |
N |
|
N |
|
|
|
|
|
|
|
|
|
|
|
|
|
|
Message (SMS) sending |
|
N |
N |
|
N |
N |
|
Y |
N |
|
N |
|
|
|
|
|
|
|
|
|
|
|
|
|
 *: Only the caller's phone number will be displayed.
3
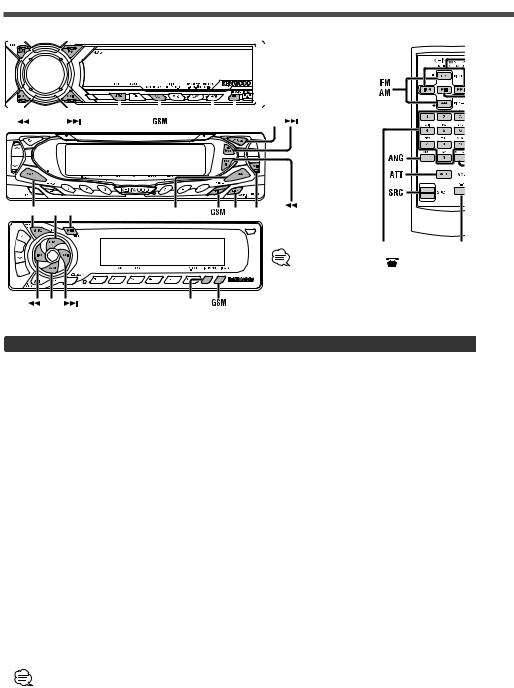
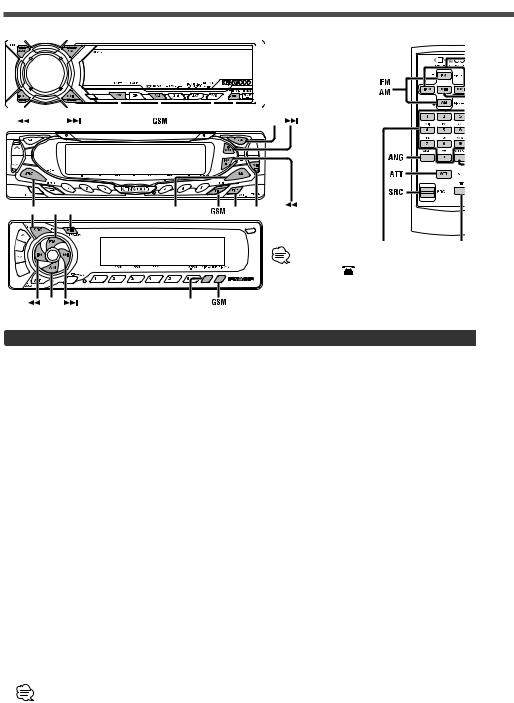
Operation <For CD/ Cassette Receiver Unit>
AM |
FM |
|
KCA-RC420 |
|||||||||||||||||||||||||||
|
|
|
|
|
|
|
|
|
|
|
|
|
|
|
|
|
|
|
|
|
|
|
|
|
|
|
|
|
|
|
|
|
|
|
|
|
|
|
|
|
|
|
|
|
|
|
|
|
|
|
|
|
|
|
|
|
|
|
|
|
|
|
|
|
|
|
|
|
|
|
|
|
|
|
|
|
|
|
|
|
|
|
|
|
|
|
|
|
|
|
|
|
|
|
|
|
|
|
|
|
|
|
|
|
|
|
|
|
|
|
|
|
|
|
|
|
|
|
|
|
|
|
|
|
|
|
|
|
|
|
|
|
|
|
|
|
|
|
|
|
|
|
|
|
|
|
|
|
|
|
|
|
|
|
|
|
|
|
|
|
|
|
|
|
|
|
|
|
|
|
|
|
|
|
|
|
|
|
|
|
|
|
|
|
|
|
|
|
|
|
|
|
|
|
|
|
|
|
|
|
|
|
|
|
|
|
|
|
|
|
|
|
|
|
|
|
|
|
|
|
|
|
|
|
|
|
|
|
|
|
|
|
|
|
|
|
|
|
|
|
|
|
|
|
|
|
|
|
|
|
|
|
|
|
|
|
|
|
|
|
|
|
|
|
|
|
|
|
|
|
|
|
|
|
|
|
|
|
SRC |
MENU DISP |
FM |
SRC FM MENU |
AM |
DISP MENU |
|
|
About the KCA-RC420 (Remote |
|
|
controller with [ ] button) |
|
|
The KCA-RC420 is optional |
|
|
depending on the types of receiver |
AM |
DISP |
units.receiver units. |
|
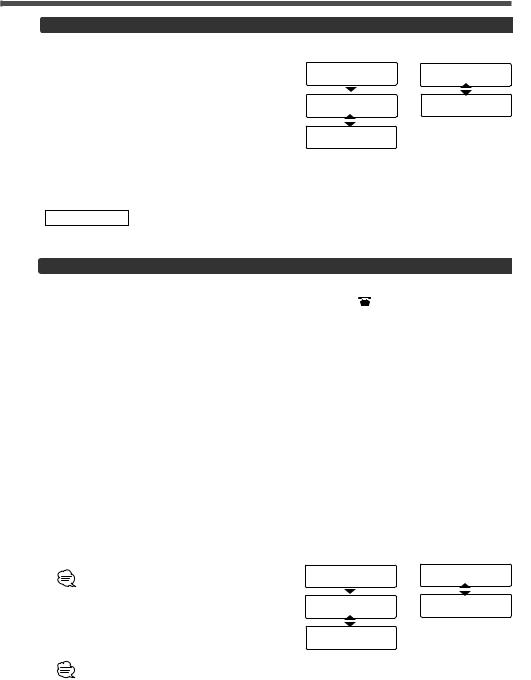
Setting the Menu
Refer to the centre unit (receiver) instruction manual for Menu features.
Display |
Adjustment Item |
Setting |
|
|
|
|
|
“HF WT“/ |
Auto Response time |
“OFF”/”Off” |
Auto response function is off |
“HF Wait Time“/ |
Adjust |
|
|
“Wait Time“ |
|
“01“-“30“ |
Adjust 1 to 30 seconds |
|
|
|
|
“HF MIC“/ |
Microphone sensitivity |
“00“-“31“ |
Adjust level from 0 to 31 |
“MIC ADJ“/ |
adjust |
|
|
“HF MIC ADJ” |
|
|
|
|
|
|
|
“HFSP“/ |
Phone voice speaker |
“ALL”/“All” |
Phone voice sent to |
“HFSpeaker“/ |
setting |
|
the front and rear speaker. |
“SP SEL“ |
|
|
|
|
“FL”/ |
Phone voice sent to the front |
|
|
|
||
|
|
“Front-Left”/ |
left speaker. |
|
|
“F-Left” |
|
|
|
|
|
|
|
“FR”/ |
Phone voice send to the front |
|
|
“Front-Right/ |
right speaker. |
|
|
“F-Right” |
|
|
|
|
|
“GSM SYNC“/ |
Phone Book/ Message |
If you have updated GSM telephone after you |
|
“GSM Memory |
(SMS) data synchronize |
connected this unit to GSM telephone and |
|
SYNC” |
|
synchronized the data, select [SYNC] to |
|
|
|
synchronize again. |
|
|
|
|
|
Auto response time adjust:
If the time set in the GSM telephone is shorter than that set in the unit, the former will be used.
4
Hands Free Function
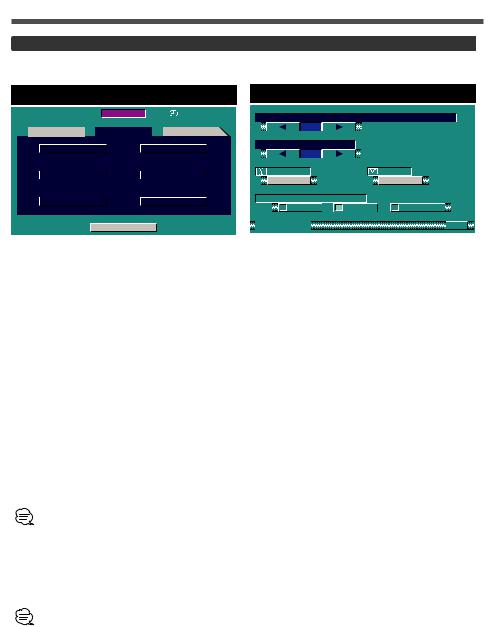
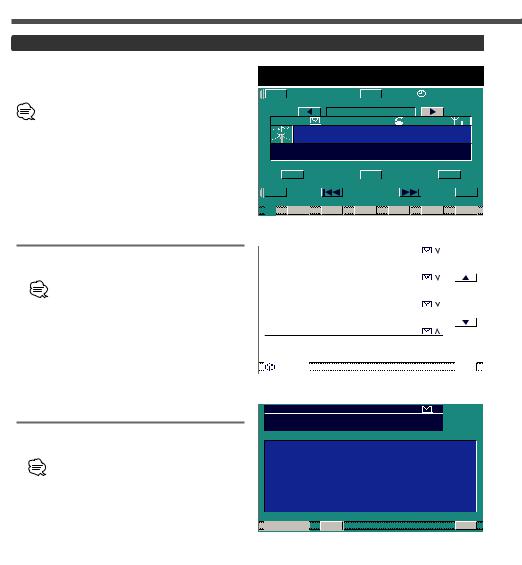
When a Call is Received
"HF CALL" / "CALL" will be displayed.
1Accept a call
Press any button.
(Except SRC, ATT, volume, DISP and 0 buttons)
Switching between the Name and Telephone Number
Press the [DISP] button.
2 Hang up
Press the [GSM] button for at least 1 second or Press the [SRC] button.
CAUTION
Display Ex, -1 |
Display Ex, -2 |
|
HF CALL |
CALL |
|
|
KENWOOD |
|
KENWOOD |
CALL |
|
123456789012 |
||
|
||
12345678 |
|
Inserting a CD or cassette tape while a call is in progress will cause the telephone to be hung up.
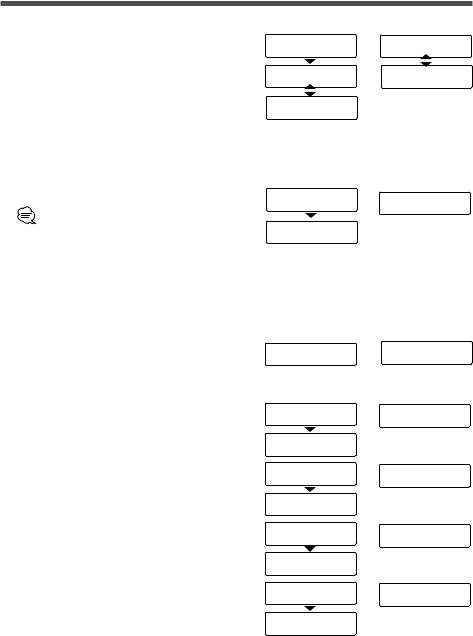
GSM Mode
GSM Mode item |
Display |
|
|
1 Phone Book Search Mode |
“Initial“/“Initial Select“ |
|
|
2 Redial Mode |
“Redial“ |
|
|
3 Direct Dial Mode <Function of Remote (KCA-RC420) > |
“Dial“/ “Number Dial“ |
|
|
4 SMS Mode (SMS: Short Message Service) |
“SMS Mode“ |
|
|
Exit GSM Mode |
|
|
|
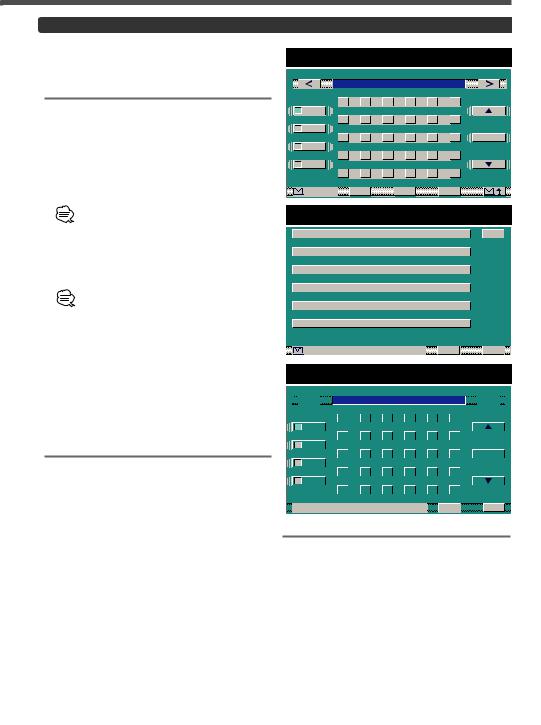
1 |
Select the Initial Group |
Display Ex, -1 |
|
Press the [FM] or [AM] button. |
|
|
|
|
|
Initials including no corresponding name will not |
I n i t i a l |
|
be displayed. |
|
2 |
Select the Name |
KENWOOD |
Press the [4] or [¢] button.
Switching between the Name and Telephone
Number 1 2 3 4 5 6 7 8
Press the [DISP] button.
•Not available if the name has not been stored.
•Not applicable if the text scroll function has been set to Auto (in menu).
Display Ex, -2
Initial Select
KENWOOD
Initial Select 1 2 3 4 5 6 7 8
Dial a selected number
Press the [GSM] button for at least 1 second or press the [  ] button on the remote. 5
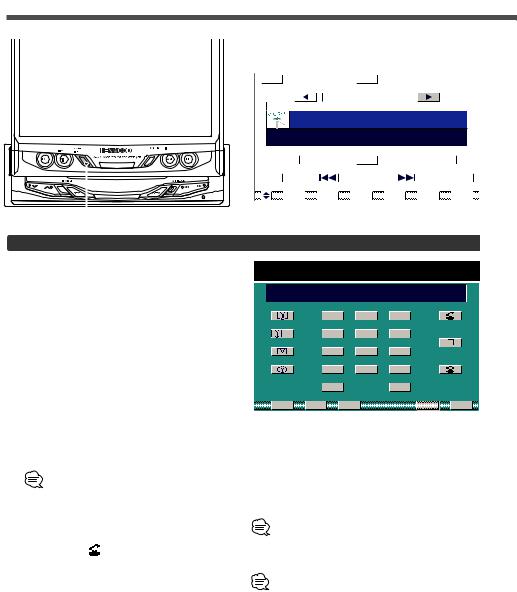
Operation <For CD/ Cassette Receiver Unit>
2 Redial Mode
1Switching between the Name and Telephone Number
Press the [DISP] button.
2 Dialling
Press the [GSM] button for at least 1 second or press the [ ] button on the remote.
Display Ex, -1
Redial
KENWOOD
1 2 3 4 5 6 7 8
3 Direct Dial Mode
1 Enter the telephone number
Press the number [#], [*] and [+](ANG) buttons on the remote.
•You can input max 32 digits
•If an incorrect digit is entered, pressing the [4] button will clear it.
2 Dialling
Press the [GSM] button for at least 1 second or press the [  ] button on the remote.
Display Ex, -1
D i a l
0 1 2 3 4 5 6 7
4 SMS (Short Message Service) Mode
When New Message is Received
“NEW MSG”/ ”New Message” will be displayed.
1 Select the Message
Press the [FM] or [AM] button.
2 Switch the Display
Press the [4] or [¢] button.
<When Text scroll function is set to auto (in menu)>
Name/Number j Date j Message (Scrolling text) j Name/Number
<When Text scroll function is set to manual (in menu)>
Name/Number j Date j Message (1st line) j Message (2nd line) jjj Message (End line) j Name/Number
Switching between the Name and Telephone Number.
Press the [DISP] button.
Display Ex, -1
NEW MSG
Display Ex, -1
Name
RICHARD
Number
0 1 2 3 4 5 6 7
Date
1 5 / 0 1 / 02
Message
KENWOOD
Display Ex, -2
Redial
KENWOOD
Redial
1 2 3 4 5 6 7 8
Display Ex,-2
Number Dial 0 1 2 3 4 5 6 7
Display Ex, -2
New Message
Display Ex, 2
SMS Mode
RICHARD
SMS Mode 0 1 2 3 4 5 6 7
SMS Mode 1 5 / 0 1 / 02
SMS Mode
KENWOOD
6
Phone Setup
for menu screen features.
Setup Menu Screen
M E N U |
1 |
 S O U N D
 S E T U P
 T U N
T U N
|
|
|
T O U C H |
|
|
|
A V I / |
|
|
|
|
|
|
|
|
|
|
|
|
|
C L O C K |
|
|
|
S Y S T E |
|
|
|
|
|
|
|
|
|
|
|
|
|
C O D E |
|
|
|
P H O N |
|


 S O U R C E


Phone Setup Screen
A U T O R E S P O N S E T I M E
|
|
|
3 |
0 |
|
|
|
|
|
|
|
|
|
|
|
|
|
|
|
|||||
|
M I C S |
E N S E |
|
|||||||||||||||||||||
|
|
|
3 |
1 |
|
|
|
|
|
|
|
|
|
|
|
|
|
|
|
|||||
|
|
|
|
|
|
|
|
|
|
|
|
|
|
|
|
|
|
|
|
|
|
|||
|
|
|
B O O K |
|
|
|
|
|
|
|
|
S M S |
C |
|
||||||||||
|
|
|
S Y N C |
|
|
|
|
|
|
|
|
S Y N |
|
|
|
|||||||||
|
|
|
|
|
|
|
|
|
|
|
|
|
|
|
|
|
|
|
|
|
|
|
|
|
|
P H O N E |
V O I C E |
|
|||||||||||||||||||||
|
|
|
|
|
F |
L |
|
F |
R |
|
U S E R |
|
|
|
|
|||||||||
|
|
|
|
|
|
|
|
|
|
|
|
|
|
|
|
|
|
|
|
|
|
|
|
|
|
P H O N E |
|
|
|
|
|
|
|
|
|
|
|
|
|
RTN |
|
||||||||
Select the Phone Setup Screen
Touch the [PHONE] button in the Setup menu screen.
Display |
Adjustment Item |
Setting |
|
|
|
|
|
|
|
“AUTO |
Auto Response time |
“OFF” |
Auto response function is off |
|
RESPONSE TIME“ |
adjust |
|
|
|
“01“-“30“ |
Adjust 1 to 30 seconds |
|||
|
|
|||
|
|
|
|
|
“MIC SENSE“ |
Microphone sensitivity |
“00“-“31“ |
Adjust level from 0 to 31 |
|
|
adjust |
|
|
|
|
|
|
|
|
“PHONEVOICE“ |
Phone voice speaker |
“FL” |
Phone voice sent to the front |
|
|
setting |
|
left speaker. |
|
|
|
|
|
|
|
|
“FR” |
Phone voice sent to the front |
|
|
|
right speaker. |
||
|
|
|
||
|
|
|
|
|
|
|
“USER” |
Phone voice sent to the |
|
|
|
Balance/ Fader set. |
||
|
|
|
||
|
|
|
|
Auto response time adjust:
If the time set in the GSM telephone is shorter than that set in the unit, the former will be used.
Synchronize the Phone Book data [BOOK]
Touch the [SYNC] button.
Synchronize the Message data [SMS]
Touch the [SYNC] button.
If you have updated GSM telephone after you connected this unit to GSM telephone and synchronized the data, select [SYNC] to synchronize again.
7
Operation <For KVT-M700>
AUTO Indicator
Auto answer function |
Signal Strength |
enabled |
Indicator |
|
|
|
|
|
|
|
|
|
|
|
|
|
|
|
|
|
|
|
|
|
|
|
|
|
|
|
|
|
|
|
|
|
|
|
|
|
|
|
|
|
|
|
|
|
|
|
|
|
|
|
|
|
|
|
|
|
|
|
|
|
|
|
|
|
|
|
|
|
|
|
|
|
|
|
|
|
|
|
|
|
|
|
|
|
|
|
|
|
|
|
|
|
|
|
|
|
|
|
|
|
|
|
|
|
|
|
|
|
|
|
|
|
|
|
|
|
|
|
|
|
|
|
|
|
|
|
|
|
|
|
|
|
|
|
|
|
|
|
|
|
|
|
|
|
|
|
|
|
|
|
|
|
|
|
|
|
|
|
|
|
|
|
|
|
|
|
|
|
|
|
|
|
|
|
|
|
|
|
|
|
|
|
|
|
|
|
|
|
|
|
|
|
|
|
|
|
|
|
|
|
|
|
|
|
|
|
|
|
|
|
|
|
|
|
|
|
|
|
|
|
|
|
|
|
|
|
|
|
|
|
|
|
|
|
|
|
|
|
|
|
|
|
|
|
|
|
|
|
|
|
|
|
|
|
|
|
|
|
|
|
|
|
|
|
|
|
|
|
|
|
|
|
TEL |
|
|
|
|
Source Control Screen |
|||||||||||||||
|
|
|
|
|
|
|
|
|
|
|
|
|
|
|
|
|
|
|
|
|
Phone Control Screen
When a Call is Received
Phone control screen is displayed automatically.
Switch to the Phone Control Screen
Press the [TEL] button for at least 1 second.
Accept a call
Touch the [  ] Button.
Hang up
Touch the [  ] Button.
Redialling
Touch the [  ] Button.
Direct Dialling
1 Input the Telephone number
Touch the [0] - [9] , [#], [*] and [+] button.
• You can input max 32 digits
• If an incorrect digit is entered, touching the [CLR] button will delete it. If the [CLR] button is pressed for at least 1 second then the whole telephone number will be deleted.
2 Dialling |
|
Touch the [ |
] Button. |
Telephone number presets
Up to three preset telephone numbers can be stored.
To store the currently displayed number press the [P1] — [P3] button for at least 1 second.
Preset Call
1Touch the [P1] — [P3] button.
2Touch the [  ] Button.
Phone Control Screen
K E N WO O D
0 1 2 3 4 5 6 7 8
|
|
|
|
|
|
|
|
|
|
|
|
1 |
2 |
3 |
|
|
|
|
|
|
|
|
|
|
|
|
|
+ |
|
|
4 |
5 |
6 |
|
|
|
|
|
|
||
|
|
|
|
|
|
|
|
|
|
|
|
|||||||||
|
|
|
|
|
|
|
|
|
|
|
|
7 |
8 |
9 |
|
|
|
|
|
|
|
|
|
|
|
|
|
|
|
|
|
|
|
|
|
|
|
|
|||
|
|
|
|
|
|
|
|
|
|
|
|
* |
0 |
# |
|
|
|
|
|
|
|
|
|
|
|
|
|
|
|
|
|
|
|
|
|
|
|
|
|||
|
|
|
|
|
|
|
|
|
|
|
|
|
|
|
|
|
|
|||
|
|
|
|
|
|
|
|
|
|
|
|
+ |
|
CLR |
||||||
|
|
|
|
|
|
|
|
|
|
|
|
|
|
|
|
|
|
|
|
|
|
|
|
|
|
|
|
P 1 |
P 2 |
P 3 |
|
|
MENU |
|
RTN |
||||||
3Switch to the Phone Setup
Touch the [MENU] button.( Page 7)
3Switch to the Initial Search Screen
Touch the [  ] button.( Page 9)
3Switch to the Device Select Screen
Touch the [ + ] button.( Page 10)
A telephone number must be entered before this function becomes available.
3Switch to the SMS Edit Screens
Touch the [  ] button.( Page 13)
A telephone number must be entered before this function becomes available.
3Switch to the SMS Box Screen
Touch the [ ] button.( Page 12)
8
Phone Book Search
Exit the Initial Search Screen
Touch the [RTN] button.
Return to the Phone control screen.
Phone book List Screen
4Page up/down for the name list
Touch the [∞] or [5] button.
• When all list of initial are displayed on  the name list, [∞] and [5] do not appear.
•Initials including no corresponding name will not be displayed.
5Select a name
Touch the Name list.
6Enter the name
Touch the [OK] button.
Switch to the Phone control screen.
Phone Book data deletion
1Select the name
Touch the Name list.
2Data deletion
Touch the [CLR] button for at least 1 second.
Edit the Phone Book
Touch the [EDIT] button.
Switch to the Telephone number edit screen. ( Page 11)
Exit the Phone book list screen
Touch the [RTN] button.
Return to the Phone control screen.
## # # # # # # # # # # # # # # # # #
## # # # # # # # # # # # # # # # # #
## # # # # # # # # # # # # # # # # #
N A M E # # # # # # # # # # # # |
|
EDIT |
|
|
N A M E # # # # # # # # # # # # |
|
|
|
|
|
|
|
||
N A M E # # # # # # # # # # # # |
|
|
|
|
|
|
|
||
N A M E # # # # # # # # # # # # |
|
|
|
|
|
CLR |
|
||
|
|
|
|
|
P H O N E B O O K |
RTN |
|
O K |
|
9
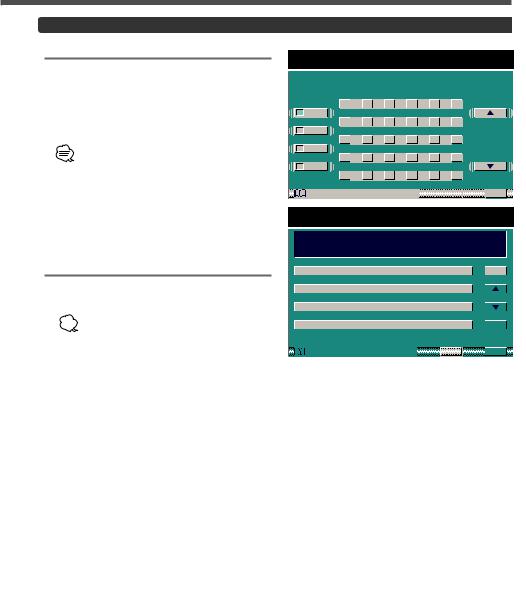
Phone Book Data Entry
1Input the Telephone number and press the [  + ] button in the Phone control screen.
Device select screen is displayed.
Device Select Screen
Choose whether to add Phone Book data to be edited to SIM Card or to Memory built in GSM.
2 Select the Device
To SIM Card:
Touch the [SIM CARD] button.
Switch to the Name edit screen.
To Memory built in GSM:
Touch the [IN MEMORY] button.
Switch to the Name edit screen.
Cancel the Device Select Screen
Touch the [RTN] button.
Return to the Phone control screen
Name Edit Screen
3Move the cursor to the required position.
Touch the [<] or [>] button.
4 Select the character type
Touch the [AB], [ab], [12] or [Ää] button.
5Select the character list
Touch the [∞] or [5] button.
When all characters are displayed on the character list, [∞] and [5] do not appear.
6Select the character
Touch a character.
7Repeat steps 3 through 6 and enter the name.
• The number of characters whose names  can be stored will differ depending on
the device that is connected. Please see your GSM telephone manual for details.
• To enter a space, touch the [SPC] button.
8 Enter the name
Touch the [OK] button.
Return to the Phone control screen.
Cancel the Name Edit Screen
Touch the [RTN] button.
Return to the Device select screen
Device Select Screen
S E L E C T D E V I C E
S I M C A R D
I N M E M O R Y 


 P H O N E B O O K

 RTN
RTN


 K E N WO O D # # # # #


|
|
|
|
|
|
|
A |
|
|
B |
|
C |
|
D |
E |
|
F |
|
|
|
|
|
|
|
A B |
|
|
|
|
|
|
|
|
|
|
|
|
|
|
|
|
|
|
|
|
|
|
|
|
|
G |
|
|
H |
|
I |
|
J |
K |
|
L |
|
|
|
|
|
|
|
a b |
|
|
|
|
|
|
|
|
|
|
|
|
|
|
|
|
|
|
|
|
|
|
|
|
|
M |
|
|
N |
|
O |
|
P |
Q |
|
R |
|
|
|
S P C |
|
|
|
1 2 |
|
|
|
|
|
|
|
|
|
|
|
|
|
|
|
|
|
|
|
|
|
|
|
|
|
S |
|
|
T |
|
U |
|
V |
W |
|
X |
|
|
|
|
|
|
|
Ä ä |
|
|
|
|
|
|
|
|
|
|
|
|
|
|
|
|
|
|
|
|
|
|
|
|
|
Y |
|
|
Z |
|
, |
|
. |
? |
|
! |
|
|
|
|
 P H O N E B O O K
 RTN
RTN O K
O K
10
Edit Phone Book
Telephone Number Edit Screen
1 Input the Telephone number
Touch the [0] - [9] , [#], [*] and [+] button.
• You can input max 32 digits
 • If an incorrect digit is entered, touching the [CLR] button will delete it. If the [CLR] button is pressed for at least 1 second then the whole telephone number will be deleted.
Cancel the Telephone Number Edit
Screen
Touch the [RTN] button.
Return to the Phone control screen.
2Edit the Telephone number
Touch the [OK] button.
Switch to Name edit screen.
Name Edit Screen
3Move the cursor to the required position.
Touch the [<] or [>] button.
4 Select the character type
Touch the [AB], [ab], [12] or [Ää]
5Select the character list
Touch the [∞] or [5] button.
When all characters are displayed on the character list, [∞] and [5] do not appear.
6Select the character
Touch a character.
7Repeat steps 3 through 6 and enter the name.
• The number of characters whose names  can be stored will differ depending on
the device that is connected. Please see your GSM telephone manual for details.
• To enter a space, touch the [SPC] button.
8 Enter the name
Touch the [OK] button.
Return to the Phone control screen.
Cancel the Name Edit Screen
Touch the [RTN] button.
Return to the Phone control screen.
Telephone Number Edit Screen
0 1 2 3 4 5 6 7 8 # # # # # # # # #
# # # # # # # # # # # # # # # # # #
1 |
2 |
3 |
4 |
5 |
6 |
7 |
8 |
9 |
* 0 #
+CLR
 P H O N E B O O K
 RTN
RTN O K
O K


 K E N WO O D # # # # #


A B C D E F


 A B
A B 


|
|
|
G |
|
H |
|
I |
|
J |
|
K |
|
L |
|
|
|
a b |
|
|
|
|
|
|
|
|
|
|
|
|
|
|
|
|
|
|
|
M |
|
N |
|
O |
|
P |
|
Q |
|
R |
|
|
S P C |
1 2 |
|
|
|
|
|
|
|
|
|
|
|
|
|
|
|
|
S T U V W X


 Ä ä
Ä ä 


Y Z , . ? !
 P H O N E B O O K
 RTN
RTN O K
O K
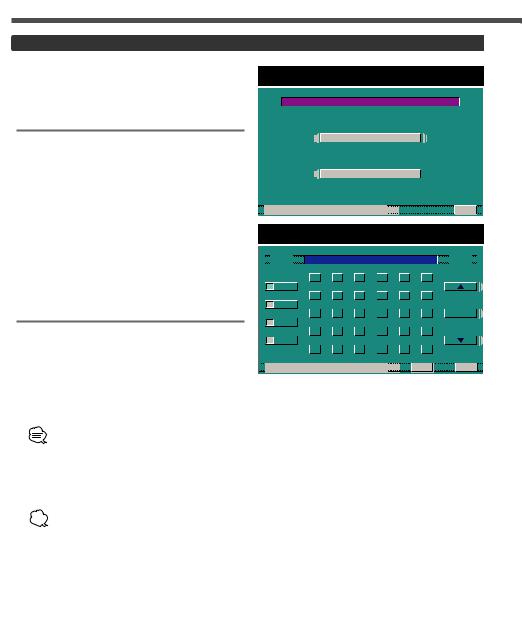
Browse Messages (SMS)
When New Message is Received
“NEW MESSAGE” will be displayed in the source control screen.
The “  FULL” indicator lights up to show that the memory is full of incoming messages.
1Switch to the Phone Control Screen
Press the [TEL] button for at least 1 second in the monitor panel.
2Select the Message List
Touch the [  ] button in the phone control screen.
Message list screen is displayed.
Message List Screen
3Page up/down for the list
Touch the [∞] or [5] button.
•When all lists are displayed on message list, [∞] and [5] do
•[ 
 ]: Message in inbox
[ 
 ]: Message in outbox
4Select a message
Touch the list
Message screen is displayed.
Exit the Message List Screen
Touch the [RTN] button.
Return to the Phone control screen.
Message Screen
5Page up/down for the message
Touch the [∞] or [5] button.
When all messages are displayed on the message screen, [∞] and [5] do not appear.
Delete the Message
Touch the [CLR] button for at least 1 second.
Exit the Message Screen
Touch the [RTN] button.
Return to the Message list screen.
Source Control Screen
T I |
|
|
|
|
|
|
|
|
|
|
M E N U |
|
|
|
|
|
1 2 : 0 0 |
|
||||||||||||||||||
|
|
|
|
|
|
|
|
|
|
|
|
|
|
|
|
|
|
|
|
|
|
|
|
|
|
|
|
|
|
|
|
|
|
|
|
|
|
|
|
|
|
|
|
|
|
|
|
|
|
|
T U N E R |
|
|
|
|
|
|
|
|
|
|
|
|
||||||||||
|
|
|
|
|
|
|
|
|
|
|
F U L L |
|
|
AUTO |
|
|
|
|||||||||||||||||||
|
|
|
|
|
|
F M 3 P 1 |
9 2 . 5 M Hz |
|
|
|||||||||||||||||||||||||||
|
|
|
|
|
|
F M - I N F O |
|
|
|
|
|
|
|
|
|
|
|
|
|
|
|
|||||||||||||||
|
MANU |
|
|
|
|
|
|
|
|
|
|
|
|
|
|
|
|
|
|
|
|
|
|
|
|
|
|
|
ST |
|
||||||
|
|
|
|
|
|
|
|
|
|
|
|
|
|
|
|
|
|
|
|
|
|
|
|
|
|
|
|
|
|
|
|
|
|
|||
|
|
|
|
|
|
|
|
|
|
|
|
|
|
|
|
|
|
|
|
|
|
|
|
|
|
|
|
|
|
|
|
|
|
|
|
|
|
|
|
A M |
|
|
|
|
|
|
|
|
|
|
|
LIST |
|
|
|
|
|
|
|
|
|
|
|
F M |
|
|
|
|
|||||
|
|
|
|
|
|
|
|
|
|
|
|
|
|
|
|
|
|
|
|
|
|
|
|
|
|
|
|
|
|
|
|
|
||||
INFO |
|
|
|
|
|
|
|
|
|
|
|
|
|
|
|
|
|
|
|
|
|
|
|
|
|
|
PTY |
|
||||||||

 P 1
P 1 P 2
P 2 P 3
P 3 P 4
P 4 P 5
P 5 P 6
P 6
|
|
|
|
|
|
|
|
|
|
|
|
|
|
|
|
|
|
|
|
|
|
|
|
|
|
|
|
|
|
|
|
|
|
|
|
|
|
|
|
|
|
|
|
|
|
|
|
|
|
|
|
|
|
|
|
|
|
|
|
|
|
|
|
|
|
|
|
|
|
|
|
|
|
|
|
|
|
|
|
|
|
|
|
|
|
|
|
|
|
|
|
|
|
|
|
|
|
|
|
|
|
|
|
|
|
|
|
|
|
|
|
|
|
|
|
|
|
|
|
|
|
|
|
|
|
|
|
|
|
|
|
|
|
|
|
|
|
|
|
|
|
|
|
|
|
|
|
|
|
|
|
|
|
|
|
|
|
|
|
|
|
|
|
|
|
|
|
|
|
|
|
|
|
|
|
|
|
|
|
|
|
|
|
|
|
|
3 1 / 0 1 / 0 2 2 3 : 5 5 |
^ |
|
|
|
||||||
|
|
|
|
|
||||||
T I T L E # # # # # # # # # # #
# # # # # # # # # # # # # # # #
M E S S A G E # # # # # # # # # # # #
## # # # # # # # # # # # # # # # # #
## # # # # # # # # # # # # # # # # #
## # # # # # # # # # # # # # # # # #
## # # # # # # # # # # # # # # # # #
## # # # # # # # # # # # # # # # # #
## # # # # # # # # # # # # # # # # #
## # # # # # # # # # # # # # # # # #

 B O X
B O X CLR
CLR


 RTN
RTN
12
Create Message (SMS)
1Input the Telephone number and press the [  ] button in the Phone control screen.
SMS Message Input Screen
2Move the cursor to the required position.
Touch the [<] or [>] button.
3 Select the character type
Touch the [AB], [ab], [12] or [Ää]
4Select the character list
Touch the [∞] or [5] button.
When all characters are displayed on the character list, [∞] and [5] do not appear.
5Select character
Touch a character.
6Repeat steps 2 through 5 and enter the message.
• You can enter up to 160 characters for each message.
•To enter a space, touch the [SPC] button.
•Touching the [CLR] button briefly will delete the last entered character. If the [CLR] button is touched for at least 1 second then all the entered text will be deleted.
7Send the message
Touch the [ 
 ] button .
Using the SMS Library Text
Touch the [LB] button.
SMS library text screen is displayed.
SMS Library Text Screen
1Select the Library Text
Touch a library list item.
2Enter the Library Text
Touch the [OK] button.
Return to the message input screen.
Cancel the Library Text screen
Touch the [RTN] button.
Return to the message input screen.
Library Text Edit
1Select the Library Text
Touch a library list item.
2Switch to the SMS Library Edit Screen
Touch the [EDIT] button.
SMS library edit screen is displayed.
SMS Message Input Screen
SMS Library Text Screen
SMS Library Edit Screen


 T E X T # # # # # # # #


|
|
|
|
A |
|
|
B |
|
C |
|
D |
|
E |
|
F |
|
|
|
|
|
A B |
|
|
|
|
|
|
|
|
|
|
|
|
|
|
|
|
|
|
|
|
|
|
|
|
G |
|
|
H |
|
I |
|
J |
|
K |
|
L |
|
|
|
|
|
a b |
|
|
|
|
|
|
|
|
|
|
|
|
|
|
|
|
|
|
|
|
|
|
|
|
M |
|
|
N |
|
O |
|
P |
|
Q |
|
R |
|
|
|
S P C |
|
1 2 |
|
|
|
|
|
|
|
|
|
|
|
|
|
|
|
|
|
|
|
|
|
|
|
|
S |
|
|
T |
|
U |
|
V |
|
W |
|
X |
|
|
|
|
|
Ä ä |
|
|
|
|
|
|
|
|
|
|
|
|
|
|
|
|
|
|
|
|
|
|
|
|
Y |
|
|
Z |
|
, |
|
. |
|
• |
|
- |
|
|
|
|
|
 S M S L I B R A R Y
 CLR
CLR RTN
RTN
SMS Library Edit Screen
1Perform the operation from steps 2 to 5 of Input message to edit.
2Entry the Library Text
Touch the [RTN] button.
Return to the SMS library text screen.

Installation
Accessories
A


 B
B  C
C 


 D
D 
The use of any accessories except for those provided might result in damage to the unit. Make sure only to use the accessories shipped with the unit, as shown above.
Installation the Control Unit
■ Securing to audio board ■ Securing to pile carpet
Accessory C
Accessory D
2CAUTION
Please do not install the unit near the dashboard, the rear tray, or other important components. Doing so could lead to injury or accident should the unit come off due to a shock and strike a person or an important component. Tapping screws should be used for mounting. (Attachment with velcro strips, although easy, can come off with a shock.)
Installation the Microphone Unit <Accessory A>
Peel the release coated paper of double-face adhesive tape to fix on the place shown in the left-hand example.
Fix a cable with a commercial item of clamper
Adjust the direction of the microphone to the driver.
14
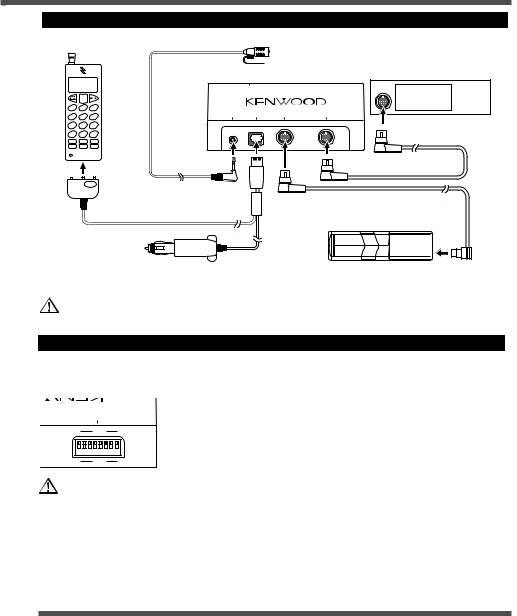
Connection
GSM Telephone
Accessory A
|
|
|
Control Unit |
Receiver Unit |
|
|
|
GSM MODEL SELECT SWITCH |
|
1 |
2 |
3 |
|
|
4 |
5 |
6 |
TO MICROPHONE TO GSM TO CHANGER |
TO HEAD UNIT |
|
|
|||
7 |
8 |
9 |
|
|
|
0 |
# |
|
Accessory B |
GSM connection cable (Option)
To the cigar lighter socket ( + 12 V)
If you want to connect KCA-S210A
Connection cable (Provided with the disc changer or disc player)
Disc Changer/ Disc Player
• Two disc Changer or Player cannot be connected.
• Connect the KCA-HF521 to the terminal labelled TO CHANGER 2.
• Set the PROTOCOL selection switch to "N" position.
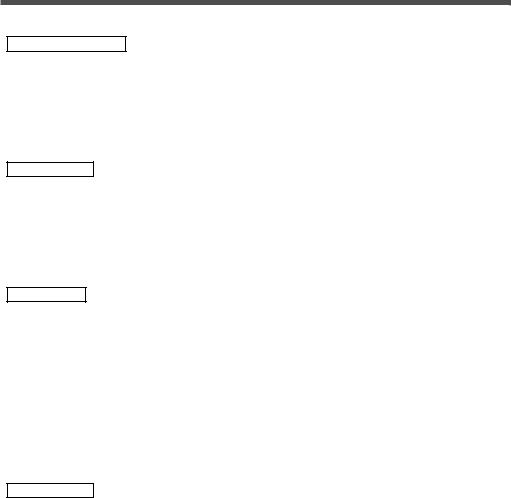
“GSM MODEL SELECT SWITCH” Setting
Set the switch on the back of the control unit depending on the GSM model to be connected as shown below.
GSMMODELSELECTSWITCH
OFF
1 2 3 4 5 6 7 8
ON
Ensure that the power is off before setting the switch.
|
|
|
|
|
|
|
|
|
|
|
|
|
|
|
|
|
|
|
|
|
6110 |
|
|
|
|
|
|
|
|
|
|
|
|
|
|
|
|
|
|
|
6210 |
|
|
|
|
|
|
|
|
|
|
|
|
|
|
|
|
|
|
Ericsson |
R320 |
OFF |
OFF |
OFF |
OFF |
ON |
OFF |
OFF |
OFF |
|
|
|
|
|
|
|
|
|
|
|
T28 |
ON |
OFF |
OFF |
OFF |
ON |
OFF |
OFF |
OFF |
|
|
|
|
|
|
|
|
|
|
|
A2618 |
ON |
ON |
OFF |
OFF |
ON |
OFF |
OFF |
OFF |
|
|
|
|
|
|
|
|
|
|
|
S35 |
OFF |
OFF |
OFF |
OFF |
OFF |
ON |
OFF |
OFF |
|
|
|
|
|
|
|
|
|
|
Siemens |
M35 |
ON |
OFF |
OFF |
OFF |
OFF |
ON |
OFF |
OFF |
|
|
|
|
|
|
|
|
|
|
Specifications
Specifications subject to change without notice.
Operating voltage |
..............................................................................14.4 V DC (11 to 16 V) |
Size ............................................................................................ |
196(W) x 96(H) x 30(D) mm |
Mass ............................................................................................................................ |
528 g |
15
Avant l’utilisation
Précautions de sécurité
2AVERTISSEMENT
Pour éviter toute blessure et/ou incendie, veuillez prendre les précautions suivantes :
•Assurez-vous que l’appareil soit corectement installé. Sinon il risquerait d’être déplacé en cas de collisions ou de cahots.
•Pour éviter les court-circuits, ne jamais mettre ou laisser d’objets métalliques (comme une pièce de monnaie ou un outil ) à l’intérieur de l’appareil.
•Si l’appareil émet de la fumée ou une odeur bizarre, mettez immédiatement l’appareil hors tension et consultez un revendeur Kenwood.
2ATTENTION
Pour éviter tout dommage à l’appareil, veuillez prendre les précautions suivantes :
•N’ouvrez pas le couvercle de l’appareil.
•N’installez pas l’appareil dans un endroit exposé directement à la lumière du soleil, à une chaleur excessive ou à l’humidité. Evitez aussi les endroits trop poussiéreux et où l’appareil risque d’être éclaboussé.
•Pendant l’installation, n’utilisez aucunes autres vis que celles fournies. L’utilisation de vis incorrectes pourrait endommager l’appareil.
REMARQUE
Si vous rencontrez des problèmes pendant l’installation, consultez votre revendeur Kenwood.
Modèle GSM disponible pour cette unité
Les modèles GSM pouvant être utilisés avec le KCAHF521 sont les suivants : (A compter de décembre 2001)
Marque |
Modèle |
Câble de connexion GSM (Option) |
|
|
|
Nokia |
6110/ 6210 |
CAW-NK 511 |
|
|
|
Ericsson |
R320/ T28/ A2618 |
CAW-ES 511 |
|
|
|
Siemens |
S35/ M35 |
CAW-SM 511 |
|
|
|
ATTENTION
Restrictions concernant les connexions aux GSM
•Il est nécessaire d’installer le "GSM MODEL SELECT SWITCH", situé à l’arrière de l’unité de contrôle, pour la bonne configuration de modèle GSM. Pour plus de détails concernant le réglage du "COMMUTATEUR DE SELECTION DU MODELE GSM", cf. pages <Installation>.
•Les Modèles Ericsson ne permettent pas d’utiliser le signe “@” pour saisir l’Annuaire ou les SMS. Si le signe est tapé, il est automatiquement remplacé par un espace. Toutefois, le signe “@” s’affiche lors de la navigation.
•Il est impossible de composer un numéro comprenant les caractères '#' or '*'.
•Le bon fonctionnement de l’unité avec des modèles Siemens exige que l’adaptateur de charge d’alimentation soit branché sur l’allume-cigare du véhicule.
•Si l’activation des listes d’appel est défaillante sur le téléphone GSM, alors la fonction de rappel offerte par le KCA-HF521 sera irrémédiablement touchée.
•Il est possible d’utiliser la connexion GSM pour démarrer le chargement automatique.
Le chargement se fait en quelques minutes. Il est possible que le chargement prenne plus de 10 minutes selon le modèle de GSM à connecter.
16
Récepteurs Kenwood disponibles pour cette unité
Les récepteurs pouvant être utilisés avec le KCA-HF521 sont les suivants:
(A compter de décembre /2001)
Ampli-Tuner CD / Ampli-Tuner Cassette
KDC-PSW9521/ KDC-M9021/ KDC-8021/ Z838W/ Z738/ Z638/ KDC-MV6521/ KDC-M6021/ KDC-M6021G/ KDC-6021/ X838
Ampli-Tuner Moniteur
KVT-M700
En ce qui concerne la KCA-RC420 (Télécommande disposant de la touche [  ])
])
La KCA-RC420 est en option en fonction des types d’unités Ampli-Tuners.
A propos du chargeur / lecteur CD /CA-C1AX devant être connecté :
•Tous les chargeurs CD O-N et CA-C1AX peuvent être connectés directement. (Sauf modèles après 2002)
•Deux chargeurs ou lecteurs CD ne peuvent être connectés (pendant que le KCA-210A est connecté).
Restrictions concernant les Récepteurs connectés et conditions de fonctionnement
A : Pendant le chargement de la mémoire du GSM
B : Conditions normales C : Pendant un appel
D : Pendant que vous conduisez (lorsque vous vous garez, l’appel aux freins n’est pas détecté)
Y : Fonction disponible
N : Fonction non disponible
|
|
Ampli-Tuner |
|
|
|
|
|
||
|
|
CD/Cassette |
|
KVT-M700 |
|
||||
Fonction |
A |
B |
C |
A |
|
B |
C |
D |
|
Appel à partir de l’Annuaire |
N |
Y |
N |
N |
|
Y |
N |
Y |
|
|
|
|
|
|
|
|
|
|
|
Recomposition |
N |
Y |
N |
N |
|
Y |
N |
Y |
|
|
|
|
|
|
|
|
|
|
|
Appel manuel sortant |
N |
Y |
N |
N |
|
Y |
N |
N |
|
|
|
|
|
|
|
|
|
|
|
Appel automatique entrant sur le GSM |
Y* |
Y |
N |
Y* |
|
Y |
N |
Y |
|
|
|
|
|
|
|
|
|
|
|
Appel automatique entrant sur l’unité mains libres |
Y* |
Y |
N |
Y* |
|
Y |
N |
Y |
|
|
|
|
|
|
|
|
|
|
|
Chargement manuel de la mémoire |
N |
Y |
N |
N |
|
Y |
Y |
Y |
|
|
|
|
|
|
|
|
|
|
|
Saisie des données Annuaire |
N |
N |
N |
N |
|
Y |
N |
N |
|
|
|
|
|
|
|
|
|
|
|
Mise à jour des données Annuaire |
N |
N |
N |
N |
|
Y |
N |
N |
|
|
|
|
|
|
|
|
|
|
|
Suppression des données Annuaire |
N |
N |
N |
N |
|
Y |
N |
Y |
|
|
|
|
|
|
|
|
|
|
|
Notification d’un nouveau message (SMS) |
Y |
Y |
Y |
Y |
|
Y |
Y |
Y |
|
|
|
|
|
|
|
|
|
|
|
Navigation à l’intérieur du message (SMS) |
N |
Y |
N |
N |
|
Y |
N |
N |
|
|
|
|
|
|
|
|
|
|
|
Suppression du message (SMS) |
N |
N |
N |
N |
|
Y |
N |
N |
|
|
|
|
|
|
|
|
|
|
|
Envoyer du message (SMS) |
N |
N |
N |
N |
|
Y |
N |
N |
|
|
|
|
|
|
|
|
|
|
|
 *:Seul le N° de téléphone de l’appel sera affiché.
17
Fonctionnement <Du Ampli-Tuner CD/ Cassette>
AM |
FM |
|
|
KCA-RC420 |
|||||||||||||||||||||||||||
|
|
|
|
|
|
|
|
|
|
|
|
|
|
|
|
|
|
|
|
|
|
|
|
|
|
|
|
|
|
|
|
|
|
|
|
|
|
|
|
|
|
|
|
|
|
|
|
|
|
|
|
|
|
|
|
|
|
|
|
|
|
|
|
|
|
|
|
|
|
|
|
|
|
|
|
|
|
|
|
|
|
|
|
|
|
|
|
|
|
|
|
|
|
|
|
|
|
|
|
|
|
|
|
|
|
|
|
|
|
|
|
|
|
|
|
|
|
|
|
|
|
|
|
|
|
|
|
|
|
|
|
|
|
|
|
|
|
|
|
|
|
|
|
|
|
|
|
|
|
|
|
|
|
|
|
|
|
|
|
|
|
|
|
|
|
|
|
|
|
|
|
|
|
|
|
|
|
|
|
|
|
|
|
|
|
|
|
|
|
|
|
|
|
|
|
|
|
|
|
|
|
|
|
|
|
|
|
|
|
|
|
|
|
|
|
|
|
|
|
|
|
|
|
|
|
|
|
|
|
|
|
|
|
|
|
|
|
|
|
|
|
|
|
|
|
|
|
|
|
|
|
|
|
|
|
|
|
|
|
|
|
|
|
|
|
|
|
|
|
|
|
|
|
|
|
|
|
|
|
|
|
|
|
|
|
|
|
SRC |
MENU DISP |
FM |
SRC FM MENU |
AM |
DISP MENU |
|
|
En ce qui concerne la KCA-RC420 |
|
|
|
(Télécommande disposant de la |
|
|
|
touche [ ]) |
|
|
|
La KCA-RC420 est en option en |
|
AM |
DISP |
fonction des types d’unités Ampli- |
|
Tuners. |
|||
|
|
Réglage du Menu
En ce qui concerne les caractéristiques du Menu, se référer aux instructions de l’unité principale (Ampli-Tuner).
Affichage |
Rubriques de réglage |
Réglage |
|
|
|
|
|
“HF WT“/ |
Réglage du temps de |
“OFF”/”Off” |
La fonction réponse auto est |
“HF Wait Time“/ |
réponse auto |
|
désactivée |
“Wait Time“ |
|
|
|
|
“01“-“30“ |
Ajuster de 1 à 30 secondes |
|
|
|
||
|
|
|
|
“HF MIC“/ |
Réglage de la sensibilité |
“00“-“31“ |
Ajuster le niveau de 0 à 31 |
“MIC ADJ“/ |
du micro |
|
|
“HF MIC ADJ” |
|
|
|
“HFSP“/ |
Réglage du haut-parleur |
“ALL”/“All” |
Le son téléphone est envoyé sur |
“HFSpeaker“/ |
téléphone |
|
les haut-parleurs avant et arrière. |
“SP SEL“ |
|
|
|
|
“FL”/ |
Le son téléphone est envoyé |
|
|
|
||
|
|
“Front-Left”/ |
sur le haut-parleur avant gauche. |
|
|
“F-Left” |
|
|
|
|
|
|
|
“FR”/ |
Le son téléphone est envoyé |
|
|
“Front-Right/ |
sur le haut-parleur avant droit. |
|
|
“F-Right” |
|
|
|
|
|
“GSM SYNC“/ |
Annuaire/ Synchronisation |
Si vous avez effectué la mise à jour du GSM |
|
“GSM Memory |
des données message |
après l’avoir connecté à cette unité et avoir |
|
SYNC” |
(SMS) |
synchronisé les données, sélectionner [SYNC] |
|
|
|
pour charger à nouveau. |
|
Réglage du Temps de Réponse Auto:
Si le temps installé dans le téléphone GSM est plus court que celui installé dans l’unité, c’est
le premier cité qui sera utilisé.
18
 Loading...