


DPX-5100BT
DUAL DIN SIZED CD RECEIVER
INSTRUCTION MANUAL
DUALER DIN-GENORMTER CD-RECEIVER
BEDIENUNGSANLEITUNG
SINTOLETTORE CD DI DIMENSIONI DUE DIN
ISTRUZIONI PER L’USO
CD-РЕСИВЕР РАЗМЕРА 2DIN
ИHCTPУKЦИЯ ПO ЭKCПЛУATAЦИИ
ПРИЙМАЧ CD ПОДВІЙНОГО DIN-РОЗМІРУ
ІНСТРУКЦІЯ З ЕКСПЛУАТАЦІЇ
DPX-M3100BT
DUAL DIN SIZED DIGITAL MEDIA RECEIVER
INSTRUCTION MANUAL
DUALER DIN-GENORMTER DIGITALER MEDIEN-RECEIVER
BEDIENUNGSANLEITUNG
SINTOLETTORE DIGITALE DI DIMENSIONI DUE DIN
ISTRUZIONI PER L’USO
ЦИФРОВОЙ МЕДИА-РЕСИВЕР РАЗМЕРА 2DIN
ИHCTPУKЦИЯ ПO ЭKCПЛУATAЦИИ
ЦИФРОВИЙ МЕДІА-РЕСІВЕР ПОДВІЙНОГО DIN-РОЗМІРУ
ІНСТРУКЦІЯ З ЕКСПЛУАТАЦІЇ
B5A-2110-00 (EN)© 2017 JVC KENWOOD Corporation
Information on Disposal of Old Electrical and Electronic Equipment and Batteries (applicable
for countries that have adopted separate waste collection systems)
Products and batteries with the symbol (crossed-out wheeled bin) cannot be disposed as household waste.
Old electrical and electronic equipment and batteries should be recycled at a facility capable of handling
these items and their waste byproducts.
Contact your local authority for details in locating a recycle facility nearest to you. Proper recycling and
waste disposal will help conserve resources whilst preventing detrimental effects on our health and the
environment.
Notice: The sign “Pb” below the symbol for batteries indicates that this battery contains lead.
Entsorgung von gebrauchten elektrischen und elektronischen Geräten und Batterien
(anzuwenden in Ländern mit einem separaten Sammelsystem für solche Geräte)
Das Symbol (durchgestrichene Mülltonne) auf dem Produkt oder seiner Verpackung weist darauf hin, dass
dieses Produkt nicht als normaler Haushaltsabfall behandelt werden darf, sondern an einer Annahmestelle
für das Recycling von elektrischen und elektronischen Geräten und batterien abgegeben werden muss.
Durch Ihren Beitrag zur korrekten Entsorgung dieses Produktes schützen Sie die Umwelt und die
Gesundheit Ihrer Mitmenschen.
Unsachgemässe oder falsche Entsorgung gefährden Umwelt und Gesundheit. Weitere Informationen
über das Recycling dieses Produktes erhalten Sie von Ihrer Gemeinde oder den kommunalen
Entsorgungsbetrieben.
Achtung: Das Zeichen „Pb“ unter dem Symbol fur Batterien zeigt an, dass diese Batterie Blei enthalt.
Informazioni sullo smaltimento delle vecchie apparecchiature elettriche ed elettroniche e
delle batterie (valide per i paesi che hanno adottato sistemi di raccolta differenziata)
I prodotti e le batterie recanti il simbolo di un cassonetto della spazzatura su ruote barrato non possono
essere smaltiti insieme ai normali rifiuti di casa.
I vecchi prodotti elettrici ed elettronici e le batterie devono essere riciclati presso un’apposita struttura in
grado di trattare questi prodotti e di smaltirne i loro componenti.
Per conoscere dove e come recapitare tali prodotti nel luogo a voi più vicino, contattare l’apposito ufficio
comunale. Un appropriato riciclo e smaltimento aiuta a conservare la natura e a prevenire effetti nocivi alla
salute e all’ambiente.
Nota: Il simbolo “Pb” sotto al simbolo delle batterie indica che questa batteria contiene piombo.
For Israel
For Turkey
Bu ürün 28300 sayılı Resmi Gazete’de yayımlanan Atik Elektrikli ve Elektronik Eşyalarin Kontrolü
Yönetmeliğe uygun olarak üretilmiştir.
Eski Elektrik ve Elektronik Ekipmanların İmha Edilmesi Hakkında Bilgi (atık yan ürün toplama
sistemlerini kullanan ülkeleri için uygulanabilir)
Sembollü (üzerinde çarpı işareti olan çöp kutusu) ürünler ev atıkları olarak atılamaz.
Eski elektrik ve elektronik ekipmanlar, bu ürünleri ve ürün atıklarını geri
dönüştürebilecek bir tesiste değerlendirilmelidir. Yaşadığınız bölgeye en yakın geri
dönüşüm tesisinin yerini öğrenmek için yerel makamlara müracaat edin. Uygun geri
dönüşüm ve atık imha yöntemi sağlığımız ve çevremiz üzerindeki zararlı etkileri
önlerken kaynakların korunmasına da yardımcı olacaktır.
i
Дата изготовления (месяц/год) находится на этикетке устройства.
В соответствии с Законом Российской Федерации “О защите прав потребителей” срок службы
(годности) данного товара “по истечении которого он может представлять опасность для жизни,
здоровья потребителя, причинять вред его имуществу или окружающей среде” составляет семь (7)
лет со дня производства.
Дополнительные косметические материалы к данному товару, поставляемые вместе с ним, могут
храниться в течение двух (2) лет со дня его производства.
Срок службы (годности), кроме срока хранения дополнительных косметических материалов,
упомянутых в предыдущих двух пунктах, не затрагивает никаких других прав потребителя, в
частности, гарантийного обслуживания KENWOOD, которое он может получить в соответствии с
законом о правах потребителя или других законов, связанных с ним.
Условия хранения:
Температура : от -30°C до +85°C
Влажность : от 0% до 90%
Декларація про Відповідність Вимогам Технічного Регламенту Обмеження Використання
деяких Небезпечних Речовин в електричному та електронному обладнанні
(затвердженого Постановою №1057 Кабінету Міністрів України)
Виріб відповідає вимогам Технічного Регламенту Обмеження Використання деяких Небезпечних
Речовин в електричному та електронному обладнанні (ТР ОВНР).
Вміст небезпечних речовин у випадках, не обумовлених в Додатку №2 ТР ОВНР:
1. свинець(Pb) – не перевищує 0.1 % ваги речовини або в концентрації до 1000 частин на
мільйон;
2. кадмій (Cd)– не перевищує 0.01 % ваги речовини або в концентрації до 100 частин на мільйон;
3. ртуть(Hg) – не перевищує 0.1 % ваги речовини або в концентрації до 1000 частин на мільйон;
4. шестивалентний хром (Cr 6+) – не перевищує 0.1 % ваги речовини або в концентрації до 1000
частин на мільйон;
5. полібромбіфеноли (PBB) – не перевищує 0.1% ваги речовини або в концентрації до 1000 частин
на мільйон;
6. полібромдефенілові ефіри (PBDE) – не перевищує 0.1 % ваги речовини або в концентрації до
1000 частин на мільйон.
Declaration of Conformity with regard to the RE Directive 2014/53/EU
Declaration of Conformity with regard to the RoHS Directive 2011/65/EU
Manufacturer:
JVC KENWOOD Corporation
3-12, Moriya-cho, Kanagawa-ku, Yokohama-shi, Kanagawa, 221-0022, JAPAN
EU Representative:
JVCKENWOOD Europe B.V.
Amsterdamseweg 37, 1422 AC UITHOORN, THE NETHERLANDS
Konformitätserklärung in Bezug auf die RE-Vorschrift 2014/53/EU
Konformitätserklärung in Bezug auf die RoHS-Vorschrift 2011/65/EU
Hersteller:
JVC KENWOOD Corporation
3-12, Moriya-cho, Kanagawa-ku, Yokohama-shi, Kanagawa, 221-0022, JAPAN
EU-Vertreter:
JVCKENWOOD Europe B.V.
Amsterdamseweg 37, 1422 AC UITHOORN, Niederlande
Dichiarazione di conformità alla Direttiva RE 2014/53/EU
Dichiarazione di conformità relativa alla direttiva RoHS 2011/65/EU
Produttore:
JVC KENWOOD Corporation
3-12, Moriya-cho, Kanagawa-ku, Yokohama-shi, Kanagawa, 221-0022, JAPAN
Rappresentante UE:
JVCKENWOOD Europe B.V.
Amsterdamseweg 37, 1422 AC UITHOORN, THE NETHERLANDS
ii

Декларация соответствия относительно Директивы RE 2014/53/EU
Декларация соответствия относительно Директивы RoHS 2011/65/EU
Производитель:
JVC KENWOOD Corporation
3-12, Moriya-cho, Kanagawa-ku, Yokohama-shi, Kanagawa, 221-0022, ЯПОНИЯ
Представительство в EC:
JVCKENWOOD Europe B.V.
Amsterdamseweg 37, 1422 AC UITHOORN, НИДЕРЛАНДЫ
Декларація про відповідність вимогам Директиви RE 2014/53/EU
Декларація про відповідність вимогам Директиви RoHS 2011/65/EU
Виробник:
JVC KENWOOD Corporation
3-12 Moriya-cho, Kanagawa-ku, Yokohama-shi, Kanagawa, 221-0022, JAPAN
Представник у ЕС:
JVCKENWOOD Europe B.V.
Amsterdamseweg 37, 1422 AC UITHOORN, THE NETHERLANDS
English
Hereby, JVCKENWOOD declares that the radio equipment
“DPX-5100BT/DPX-M3100BT” is in compliance with
Directive 2014/53/EU.
The full text of the EU declaration of conformity is available
at the following internet address:
http://www.kenwood.com/cs/ce/eudoc/
Français
Par la présente, JVCKENWOOD déclare que l’équipement
radio « DPX-5100BT/DPX-M3100BT » est conforme à la
directive 2014/53/UE.
L’intégralité de la déclaration de conformité UE est
disponible à l’adresse Internet suivante :
http://www.kenwood.com/cs/ce/eudoc/
Deutsch
Hiermit erklärt JVCKENWOOD, dass das Funkgerät
“DPX-5100BT/DPX-M3100BT” der Richtlinie 2014/53/EU
entspricht.
Der volle Text der EU-Konformitätserklärung steht unter
der folgenden Internetadresse zur Verfügung:
http://www.kenwood.com/cs/ce/eudoc/
Nederlands
Hierbij verklaart JVCKENWOOD dat de radioapparatuur
“DPX-5100BT/DPX-M3100BT” in overeenstemming is met
Richtlijn 2014/53/EU.
De volledige tekst van de EU-verklaring van
overeenstemming is te vinden op het volgende
internetadres:
http://www.kenwood.com/cs/ce/eudoc/
Italiano
Con la presente, JVCKENWOOD dichiara che l΄apparecchio
radio “DPX-5100BT/DPX-M3100BT” è conforme alla
Direttiva 2014/53/UE.
Il testo integrale della dichiarazione di conformità UE è
disponibile al seguente indirizzo internet:
http://www.kenwood.com/cs/ce/eudoc/
Español
Por la presente, JVCKENWOOD declara que el equipo de
radio “DPX-5100BT/DPX-M3100BT” cumple la Directiva
2014/53/EU.
El texto completo de la declaración de conformidad con la
UE está disponible en la siguiente dirección de internet:
http://www.kenwood.com/cs/ce/eudoc/
Português
Deste modo, a JVCKENWOOD declara que o equipamento de
rádio “DPX-5100BT/DPX-M3100BT” está em conformidade
com a Diretiva 2014/53/UE.
O texto integral da declaração de conformidade da UE está
disponível no seguinte endereço de internet:
http://www.kenwood.com/cs/ce/eudoc/
Polska
Niniejszym, JVCKENWOOD deklaruje, że sprzęt radiowy
“DPX-5100BT/DPX-M3100BT” jest zgodny z dyrektywą
2014/53/UE.
Pełny tekst deklaracji zgodności EU jest dostępny pod
adresem:
http://www.kenwood.com/cs/ce/eudoc/
Český
Společnost JVCKENWOOD tímto prohlašuje, že rádiové
zařízení “DPX-5100BT/DPX-M3100BT” splňuje podmínky
směrnice 2014/53/EU.
Plný text EU prohlášení o shodě je dostupný na následující
internetové adrese:
http://www.kenwood.com/cs/ce/eudoc/
Magyar
JVCKENWOOD ezennel kijelenti, hogy a „DPX-5100BT/
DPX-M3100BT“ rádióberendezés megfelel a 2014/53/EU
irányelvnek.
Az EU konformitási nyilatkozat teljes szövege az alábbi
weboldalon érhető el:
http://www.kenwood.com/cs/ce/eudoc/
iii

Svenska
Härmed försäkrar JVCKENWOOD att
radioutrustningen “DPX-5100BT/DPX-M3100BT”
är i enlighet med direktiv 2014/53/EU.
Den fullständiga texten av EU-försäkran
om överensstämmelse finns på följande
Internetadress:
http://www.kenwood.com/cs/ce/eudoc/
Suomi
JVCKENWOOD julistaa täten, että radiolaite
“DPX-5100BT/DPX-M3100BT” on direktiivin
2014/53/EU mukainen.
EU-vaatimustenmukaisuusvakuutusvaatimus
löytyy kokonaisuudessaan seuraavasta internetosoitteesta:
http://www.kenwood.com/cs/ce/eudoc/
Slovensko
S tem JVCKENWOOD izjavlja, da je radijska oprema
»DPX-5100BT/DPX-M3100BT« v skladu z Direktivo
2014/53/EU.
Celotno besedilo direktive EU o skladnosti je
dostopno na tem spletnem naslovu:
http://www.kenwood.com/cs/ce/eudoc/
Slovensky
Spoločnosť JVCKENWOOD týmto vyhlasuje, že
rádiové zariadenie „DPX-5100BT/DPX-M3100BT“
vyhovuje smernici 2014/53/EÚ.
Celý text EÚ vyhlásenia o zhode nájdete na
nasledovnej internetovej adrese:
http://www.kenwood.com/cs/ce/eudoc/
Dansk
Herved erklærer JVCKENWOOD, at
radioudstyret “DPX-5100BT/DPX-M3100BT” er i
overensstemmelse med Direktiv 2014/53/EU.
EU-overensstemmelseserklæringens fulde ordlyd
er tilgængelig på følgende internetadresse:
http://www.kenwood.com/cs/ce/eudoc/
Ελληνικά
Με το παρόν, η JVCKENWOOD δηλώνει ότι ο
ραδιοεξοπλισμός «DPX-5100BT/DPX-M3100BT»
συμμορφώνεται με την Οδηγία 2014/53/ΕΕ.
Το πλήρες κείμενο της δήλωσης συμμόρφωσης
της ΕΕ είναι διαθέσιμο στην ακόλουθη διεύθυνση
στο διαδίκτυο:
http://www.kenwood.com/cs/ce/eudoc/
Eesti
Käesolevaga JVCKENWOOD kinnitab, et
„DPX-5100BT/DPX-M3100BT“ raadiovarustus on
vastavuses direktiiviga 2014/53/EL.
ELi vastavusdeklaratsiooni terviktekst on
kättesaadav järgmisel internetiaadressil:
http://www.kenwood.com/cs/ce/eudoc/
Latviešu
JVCKENWOOD ar šo deklarē, ka radio aparatūra
„DPX-5100BT/DPX-M3100BT” atbilst direktīvas
2014/53/ES prasībām.
Pilns ES atbilstības deklarācijas teksts ir pieejams
šādā tīmekļa adresē:
http://www.kenwood.com/cs/ce/eudoc/
Lietuviškai
Šiuo JVCKENWOOD pažymi, kad radijo įranga
„DPX-5100BT/DPX-M3100BT“ atitinka 2014/53/EB
direktyvos reikalavimus.
Visą EB direktyvos atitikties deklaracijos tekstą
galite rasti šiuo internetiniu adresu:
http://www.kenwood.com/cs/ce/eudoc/
Malti
B’dan, JVCKENWOOD jiddikjara li t-tagħmir
tar-radju “DPX-5100BT/DPX-M3100BT” huwa
konformi mad-Direttiva 2014/53/UE.
It-test kollu tad-dikjarazzjoni ta’ konformità huwa
disponibbli fl-indirizz intranet li ġej:
http://www.kenwood.com/cs/ce/eudoc/
HRVATSKI / SRPSKI JEZIK
JVCKENWOOD ovim izjavljuje da je radio oprema
“DPX-5100BT/DPX-M3100BT” u skladu s
Direktivom 2014/53/EU.
Cjeloviti tekst deklaracije Europske unije o
usklađenosti dostupan je na sljedećoj internet
adresi:
http://www.kenwood.com/cs/ce/eudoc/
ROMÂNĂ
Prin prezenta, JVCKENWOOD declară că
echipamentul radio “DPX-5100BT/DPX-M3100BT”
este în conformitate cu Directiva 2014/53/UE.
Textul integral al declarației de conformitate UE
este disponibil la urmatoarea adresă de internet:
http://www.kenwood.com/cs/ce/eudoc/
БЪЛГАРСКИ
С настоящото JVCKENWOOD декларира,
че радиооборудването на “DPX-5100BT/
DPX-M3100BT” е в съответствие с Директива
2014/53/ЕС.
Пълният текст на ЕС декларацията за
съответствие е достъпен на следния интернет
адрес:
http://www.kenwood.com/cs/ce/eudoc/
Turkish
Burada, JVCKENWOOD “DPX-5100BT/
DPX-M3100BT” radyo ekipmanının 2014/53/AB
Direktifine uygun olduğunu bildirir.
AB uyumluluk deklarasyonunun tam metni
aşağıdaki internet adresinde mevcuttur.
http://www.kenwood.com/cs/ce/eudoc/
Русский
JVCKENWOOD настоящим заявляет, что
радиооборудование «DPX-5100BT/
DPX-M3100BT» соответствует Директиве
2014/53/EU.
Полный текст декларации соответствия
ЕС доступен по следующему адресу в сети
Интернет:
http://www.kenwood.com/cs/ce/eudoc/
Українська
Таким чином, компанія JVCKENWOOD заявляє,
що радіообладнання «DPX-5100BT/
DPX-M3100BT» відповідає Директиві
2014/53/EU.
Повний текст декларації про відповідність ЄС
можна знайти в Інтернеті за такою адресою:
http://www.kenwood.com/cs/ce/eudoc/
iv
CONTENTS
BEFORE USE 2
BASICS 3
GETTING STARTED 4
1 Select the display language
and cancel the demonstration
2 Set the clock and date
3 Set the initial settings
RADIO 6
CD/USB/iPod/ANDROID 8
AUX 11
Spotify 11
BLUETOOTH® 12
AUDIO SETTINGS 20
DISPLAY SETTINGS 23
TROUBLESHOOTING 24
REFERENCES 27
Maintenance
More information
SPECIFICATIONS 29
INSTALLATION/
CONNECTION 31
BEFORE USE
IMPORTANT
•
To ensure proper use, please read through this manual before using this product. It is especially important that you read and observe
Warning and Caution in this manual.
•
Please keep the manual in a safe and accessible place for future reference.
WARNING
• Do not operate any function that takes your attention away from safe driving.
Caution
Volume setting:
•
Adjust the volume so that you can hear sounds outside the car to prevent accidents.
•
Lower the volume before playing digital sources to avoid damaging the speakers by the sudden increase of the output level.
General:
•
Avoid using the external device if it might hinder safe driving.
•
Make sure all important data has been backed up. We shall bear no responsibility for any loss of recorded data.
•
Never put or leave any metallic objects (such as coins or metal tools) inside the unit to prevent a short circuit.
•
For : If a disc error occurs due to condensation on the laser lens, eject the disc and wait for the moisture to evaporate.
•
Depending on the types of cars, the antenna will automatically extend when you turn on the unit with the antenna control wire connected
( 34)
. Turn off the unit or change the source to STANDBY when parking at a low ceiling area.
How to read this manual
•
Operations are explained mainly using buttons on the faceplate of .
•
English indications are used for the purpose of explanation. You can select the display language from the
• [XX]
indicates the selected items.
• ( XX)
indicates references are available on the stated page.
[FUNCTION]
menu.
( 5)
2
ENGLISH
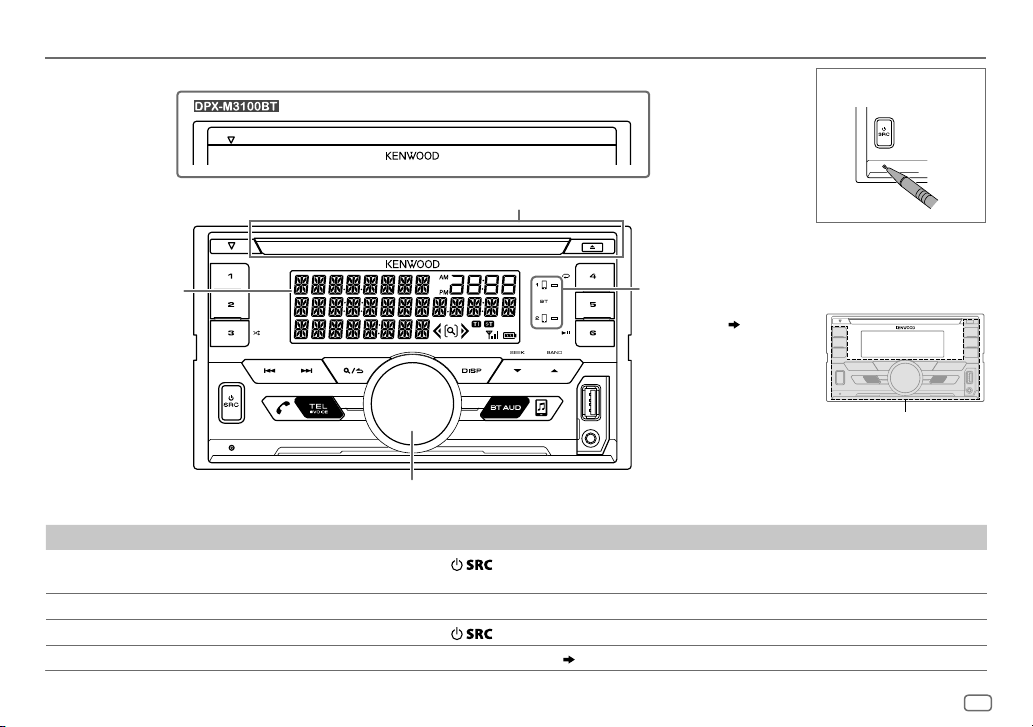
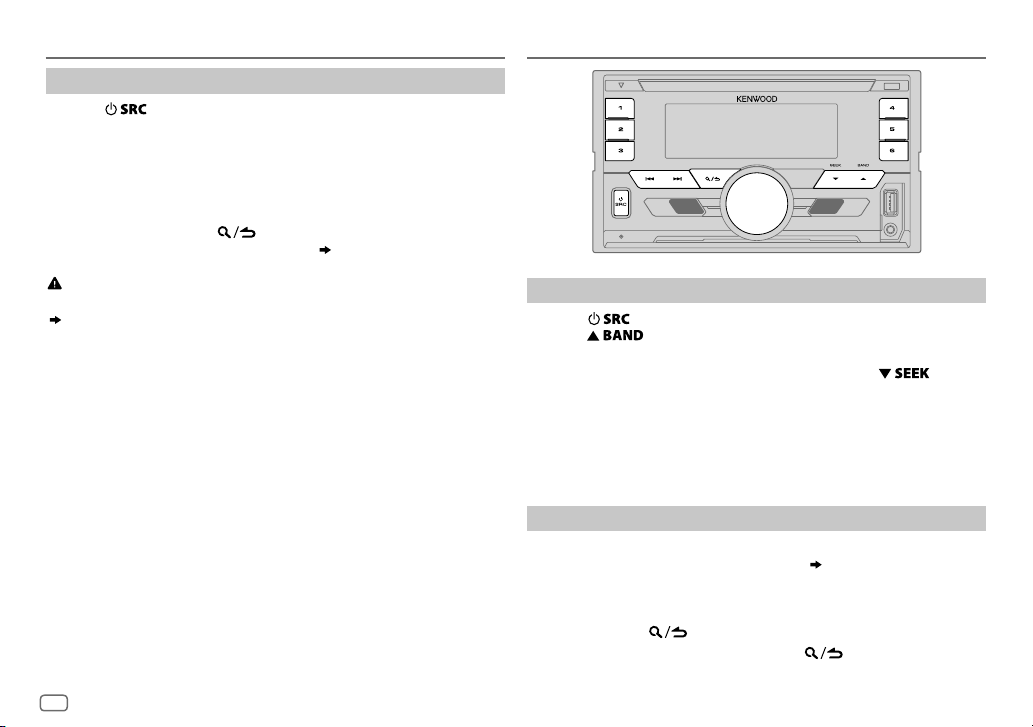
BASICS
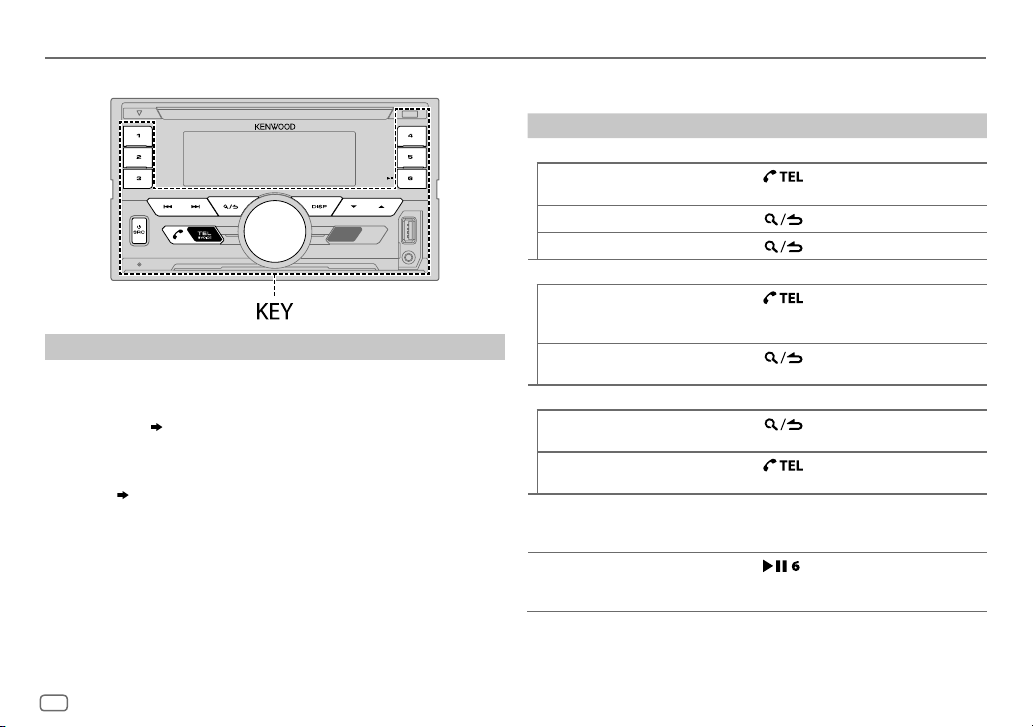
Faceplate
How to reset
Eject button and loading slot
Display
window
Volume knob
To On the faceplate
Turn on the power
Adjust the volume Turn the volume knob.
Select a source
Change the display information Press DISP repeatedly.
Press
• Press and hold to turn off the power.
Press
.
repeatedly.
( 28)
Lights up when
Bluetooth
connection is
established.
( 13)
Flashes when the unit
enters searching status.
ENGLISH
3

GETTING STARTED
1
Select the display language and cancel the demonstration
When you turn on the power for the first time (or
[YES], 5
), the display shows: “SEL LANGUAGE” “PRESS” “VOLUME
KNOB”
1 Turn the volume knob to select
[SPA]
(Spanish), then press the knob.
[ENG]
is selected for the initial setup.
Then, the display shows: “CANCEL DEMO”
KNOB”.
[ENG]
2 Press the volume knob.
[YES]
is selected for the initial setup.
3 Press the volume knob again.
“DEMO OFF” appears.
Then, the display shows the selected crossover type:
“2-WAY X ’ OVER” or “3-WAY X ’ OVER”
• To change the crossover type, see “Change the crossover type”.
[FACTORY RESET]
(English),
[RUS]
“PRESS” “VOLUME
(Russian) or
is set to
( 6)
2
Set the clock and date
1
Press the volume knob to enter
2 Turn the volume knob to select
To adjust the clock
3 Turn the volume knob to select
[FUNCTION]
[CLOCK]
[CLOCK ADJUST]
.
, then press the knob.
, then press the knob.
4 Turn the volume knob to make the settings, then press the knob.
Hour
5 Turn the volume knob to select
6 Turn the volume knob to select
To set the date
7 Turn the volume knob to select
8 Turn the volume knob to select
9 Turn the volume knob to select
the knob.
Minute
[CLOCK FORMAT]
[12H]
or
[24H]
[DATE FORMAT]
[DD/MM/YY]
[DATE SET]
or
, then press the knob.
, then press the knob.
, then press the knob.
, then press the knob.
[MM/DD/YY]
, then press
10 Turn the volume knob to make the settings, then press the knob.
Day
Month Year or Month Day Year
11 Press and hold to exit.
To return to the previous setting item, press .
3
Set the initial settings
1
Press repeatedly to enter STANDBY.
2 Press the volume knob to enter
3 Turn the volume knob to select an item
knob.
[FUNCTION]
.
( 5)
, then press the
4 Repeat step 3 until the desired item is selected or activated.
5 Press and hold to exit.
To return to the previous setting item, press .
4
ENGLISH
GETTING STARTED
AUDIO CONTROL
SWITCH
PREOUT
DISPLAY
EASY MENU
TUNER SETTING
PRESET TYPE
SYSTEM
KEY BEEP
SOURCE SELECT
SPOTIFY SRC
BUILT-IN AUX
(Not applicable if 3-way crossover is selected.)
REAR/SUBWOOFER
connected to the line out terminals on the rear (through an external
amplifier).
When entering
ON
: LCD DISPLAY zone illumination changes to white color. ;
OFF
: LCD DISPLAY zone illumination remains as
( 24)
•
KEY zone illumination changes to light blue color when you enter
[FUNCTION]
•
Refer to the illustration on page 23 for zone identification.
NORMAL
(FM1/FM2/FM3/MW/LW).;
button, regardless of the selected band.
(Not applicable if 3-way crossover is selected.)
ON
:Activates the keypress tone.;
ON
:Enables SPOTIFY in source selection.;
ON
:Enables AUX in source selection.;
Default:
: Selects whether rear speakers or a subwoofer are
( 34)
[FUNCTION]
, irregardless of the
:Memorizes one station for each preset button in each band
...
[COLOR SELECT]
[EASY MENU]
MIX
:Memorizes one station for each preset
OFF
:Deactivates.
OFF
:Disables.
OFF
:Disables.
setting.
( 11)
( 11)
color.
XX
P - OFF WAIT
CD READ
F/W UPDATE
UPDATE SYSTEM
F/W UP xxxx
FACTORY RESET YES
CLOCK
CLOCK DISPLAY
ENGLISH
РУССКИЙ
ESPANOL
Applicable only when the demonstration mode is turned off.
Sets the duration when the unit will automatically turn off (while in
standby mode) to save the battery.
20M
: 20minutes;
– – –
:Cancels
(For )
1
:Automatically distinguishes between audio file disc and music CD.;
2
:Forces to play as a music CD. No sound can be heard if an audio file
disc is played.
YES
:Starts upgrading the firmware.; NO:Cancels (upgrading is not
activated).
For details on how to update the firmware, visit
<www.kenwood.com/cs/ce/>.
:Resets the settings to default (except the stored station).;
NO
:Cancels
ON
:The clock time is shown on the display even when the unit is
turned off.;
Select the display language for
information if applicable.
By default,
OFF
:Cancels.
[ENGLISH]
40M
: 40minutes;
is selected.
60M
[FUNCTION]
: 60minutes;
menu and music
ENGLISH
5
GETTING STARTED
Change the crossover type
1
Press repeatedly to enter STANDBY.
2 Press and hold number buttons 4 and 5 to enter crossover select.
The current crossover type appears.
3 Turn the volume knob to select “2WAY” or “3WAY”, then press the
knob.
4 Turn the volume knob to select “YES” or “NO”, then press the knob.
The selected crossover type appears.
• To cancel, press and hold
• To adjust the selected crossover settings,
.
( 21, 22)
.
RADIO
Caution
Select a crossover type according to how the speakers are connected.
( 33, 34)
If you select a wrong type:
• The speakers may damage.
• The output sound level may be extremely high or low.
6
ENGLISH
Search for a station
1
Press repeatedly to select RADIO.
2 Press repeatedly to select FM1/FM2/FM3/MW/LW.
3 Press S/T to search for a station.
• To change the searching method for S/T: Press
repeatedly.
AUTO1 : Automatically search for a station.
AUTO2 : Search for a preset station.
MANUAL : Manually search for a station.
• To store a station: Press and hold one of the number buttons (1to6).
• To select a stored station: Press one of the number buttons (1to6).
Other settings
1
Press the volume knob to enter
2 Turn the volume knob to select an item
knob.
[FUNCTION]
.
( 7)
, then press the
3 Repeat step 2 until the desired item is selected/activated or follow
the instructions stated on the selected item.
4 Press and hold to exit.
To return to the previous setting item, press .
RADIO
Default:
TUNER SETTING
LOCAL SEEK
AUTO
MEMORY
MONO SET
NEWS SET ON
REGIONAL ON
AF SET ON
TI ON
PTY SEARCH1 Turn the volume knob to select the available Program Type (see the
CLOCK
TIME SYNC
ON
: Searches only stations with good reception. ;
•
Settings made are applicable only to the selected source/station. Once
you change the source/station, you need to make the settings again.
YES
:Automatically starts memorizing 6 stations with good reception.;
NO
:Cancels.
•
Selectable only if
ON
:Improves the FM reception, but the stereo effect may be lost.;
OFF
:Cancels.
: The unit will temporarily switch to News Programme if available. ;
OFF
:Cancels.
: Switches to another station only in the specific region using the “AF”
control.;
: Automatically searches for another station broadcasting the same
program in the same Radio Data System network with better reception
when the current reception is poor.;
:Allows the unit to temporarily switch to Traffic Information if available
(“TI” lights up).;
following), then press the knob.
2
Turn the volume knob to select the PTY language (
GERMAN
3
Press S/T to start searching.
ON
: Synchronizes the unit’s time to the Radio Data System station time. ;
OFF
: Cancels.
[NORMAL]
OFF
:Cancels.
OFF
:Cancels.
), then press the knob.
is selected for
OFF
OFF
: Cancels.
[PRESET TYPE]. ( 5)
:Cancels.
ENGLISH/FRENCH
XX
Available Program Type for
SPEECH
:
NEWS, AFFAIRS, INFO
CULTURE, SCIENCE, VARIED, WEATHER, FINANCE, CHILDREN, SOCIAL
RELIGION, PHONE IN, TRAVEL, LEISURE, DOCUMENT
MUSIC
:
POP M
(music),
CLASSICS, OTHER M
OLDIES, FOLK M
The unit will search for the Program Type categorized under
[MUSIC]
if selected.
[LOCAL SEEK]/[MONO SET]/[NEWS SET]/[REGIONAL]/[AF SET]/[PTY SEARCH]
•
selectable only when the band is FM1/FM2/FM3.
• If the volume is adjusted during reception of traffic information or news
bulletin, the adjusted volume is memorized automatically. It will be
applied the next time traffic information or news bulletin is turned on.
/
(information),
ROCK M
(music),
(music)
[PTY SEARCH]
SPORT, EDUCATE, DRAMA
(music),
EASY M
JAZZ, COUNTRY, NATION M
(music),
LIGHT M
(music),
,
(music),
[SPEECH]
is
,
or
ENGLISH
7
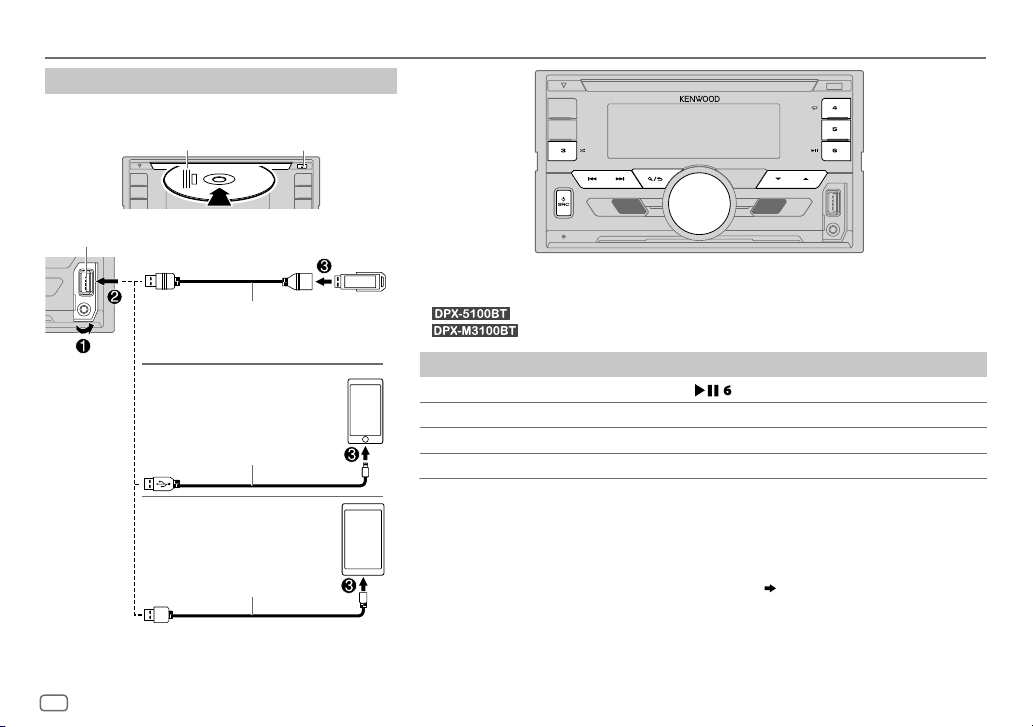
CD/USB/iPod/ANDROID
Start playback
The source changes automatically and playback starts.
CD
Label side
M
Eject disc
USB input terminal
8
ENGLISH
USB
CA-U1EX (max.: 500mA)
(optional accessory)
iPod/iPhone
KCA-iP102/KCA-iP103 (optional
1
*
accessory)
iPod/iPhone
ANDROID
USB cable
or accessory of the
2
*
3
*
2
*
(commercially available)
Selectable source:
•
•
: CD/USB/iPod USB/ANDROID
: USB/iPod USB/ANDROID
To On the faceplate
Playback/pause Press .
4
Reverse/Fast-forward
Select a track/file
Select a folder
1
*
KCA-iP102 : 30-pin type, KCA-iP103 : Lightning type
2
*
Do not leave the cable inside the car when not using.
3
*
When connecting an Android device, “Press [VIEW] to install KENWOOD MUSIC PLAY APP” is shown. Follow the
*
Press and hold S/T.
Press S/T.
5
*
Press J/K.
instructions to install the application. You can also install the latest version of KENWOOD MUSIC PLAY application
on your Android device before connecting. For more information, visit <www.kenwood.com/cs/ce/>.
4
*
For ANDROID: Applicable only when
5
*
For CD: Only for MP3/WMA/AAC files. This does not work for iPod/ANDROID.
[BROWSE MODE]
is selected.
( 9)
CD/USB/iPod/ANDROID
To On the faceplate
6
Repeat play
Random
play
6
*
For iPod/ANDROID: Applicable only when
7
*
For CD: Only for MP3/WMA/AAC files.
*
Press repeatedly.
TRACK REPEAT/ALL REPEAT
FILE REPEAT/FOLDER REPEAT/ALL REPEAT
FILE REPEAT/FOLDER REPEAT/REPEAT OFF
6
*
Press repeatedly.
DISC RANDOM/RANDOM OFF
FOLDER RANDOM/RANDOM OFF
Press and hold
: Audio CD
: Audio CD
: MP3/WMA/AAC/WAV/
FLAC file, iPod or ANDROID
to select
[MODE OFF]/[BROWSE MODE]
ALL RANDOM
Select control mode
While in iPod USB source, press 5 repeatedly.
MODE ON
: Control iPod using the iPod itself. However, you can still play/
MODE OFF
While in ANDROID source, press 5 repeatedly.
BROWSE MODE
HAND MODE
pause, file skip, fast-forward or reverse from this unit.
: Control iPod from this unit.
: Control Android device from this unit via KENWOOD MUSIC
PLAY application installed in the Android device.
: Control Android device using the Android device itself via
other media player applications installed in the Android
device. However, you can still play/pause and file skip from
this unit.
: MP3/WMA/AAC/
WAV/FLAC file
: iPod or ANDROID
7
*
.
is selected.
Select music drive
While in USB source, press 5 repeatedly.
Stored songs in the following drive will be played back.
• Selected internal or external memory of a smartphone (Mass Storage
Class).
• Selected drive of a multiple drives device.
Select a file from a folder/list
For iPod/ANDROID, applicable only when
selected.
[MODE OFF]/[BROWSE MODE]
is
1 Press .
2 Turn the volume knob to select a folder/list, then press the knob.
3 Turn the volume knob to select a file, then press the knob.
Quick Search
If you have many files, you can search through them quickly.
Turn the volume knob quickly to browse through the list
quickly.
Skip Search
Press S/T to search at a preset skip search ratio.
( 10, [SKIP SEARCH])
• Pressing and holding S/T searches at a 10% ratio.
Alphabet search
You can search for a file according to the first character.
For iPod USB source
(applicable only for CD, USB and ANDROID source)
(applicable only for iPod USB and ANDROID source)
(applicable only for iPod USB and ANDROID source)
1 Turn the volume knob quickly to enter character search.
2 Turn the volume knob to select the character.
• Select “
3 Press S/T to move to the entry position.
” to search for a character other than AtoZ, 0to9.
*
• You can enter up to 3characters.
4 Press the volume knob to start searching.
ENGLISH
9
CD/USB/iPod/ANDROID
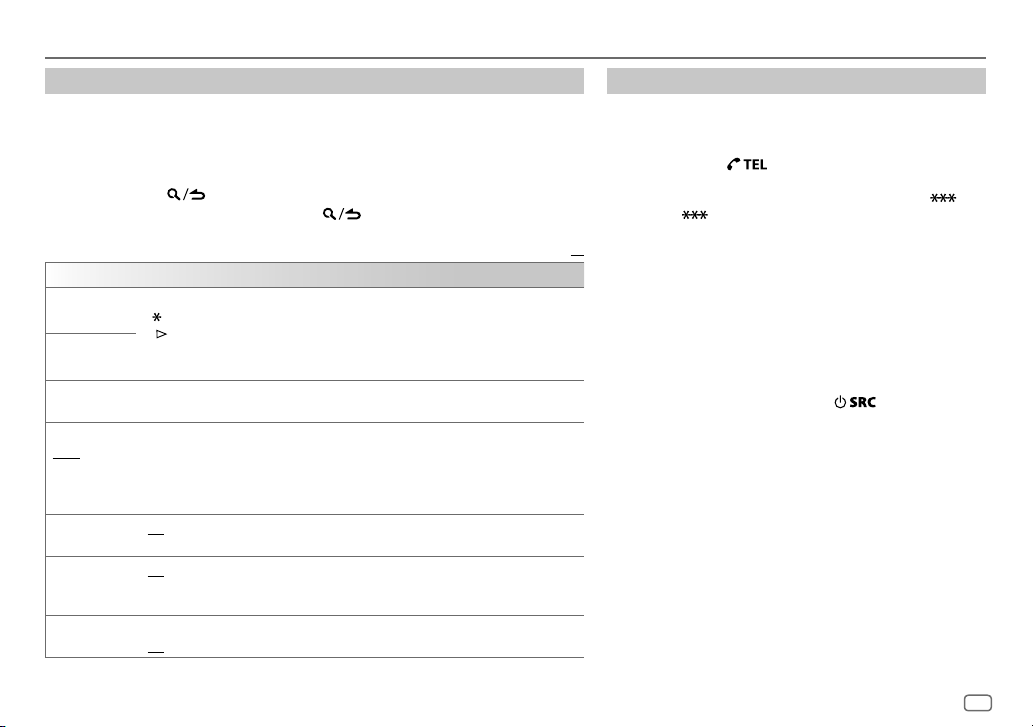
For ANDROID source
1 Press J/K to enter character search.
2 Turn the volume knob to select the character.
^A^: Upper case letters (A to Z)
_A_: Lower case letters (a to z)
-0-: Numbers (0 to 9)
: Character other than AtoZ, 0to9
***
3 Press the volume knob to start searching.
• To return to the root folder/first file/top menu, press 5.
BT AUDIO source.)
• To return to the previous setting item, press .
• To cancel, press and hold
.
(Not applicable for
Listen to TuneIn Radio/TuneIn Radio Pro
While listening to TuneIn Radio or TuneIn Radio Pro, connect the iPod/
iPhone to the USB input terminal of the unit.
• The unit will output the sound from these applications.
Settings to use KENWOOD Remote application
KENWOOD Remote application is designed to control the KENWOOD car
receiver’s operations from the iPhone/iPod (via USB input terminal).
Preparation:
Install the latest version of KENWOOD Remote application on your device
before connecting. For more information, visit
<www.kenwood.com/cs/ce/>.
You can make the settings in the same way as connection via Bluetooth.
( 18)
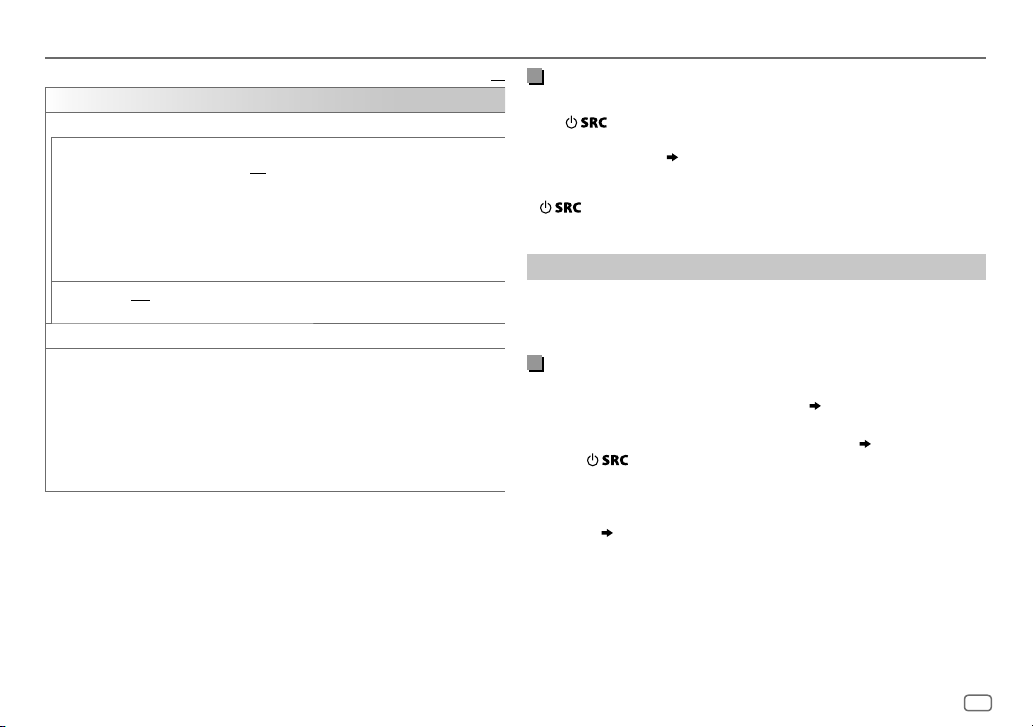
Other settings
1
Press the volume knob to enter
[FUNCTION]
.
2 Turn the volume knob to select an item (see the following table),
then press the knob.
3 Repeat step 2 until the desired item is selected or activated.
4 Press and hold to exit.
To return to the previous setting item, press .
Default:
USB
MUSIC DRIVE DRIVE CHANGE
automatically and playback starts.
Repeat steps
SKIP SEARCH 0.5%/1%/5%/10%
the skip search ratio over the total files.
:The next drive (
1
to 3 to select the following drives.
[DRIVE 1]
to
[DRIVE 4]
: While listening to iPod USB or ANDROID source, selects
) is selected
XX
10
ENGLISH
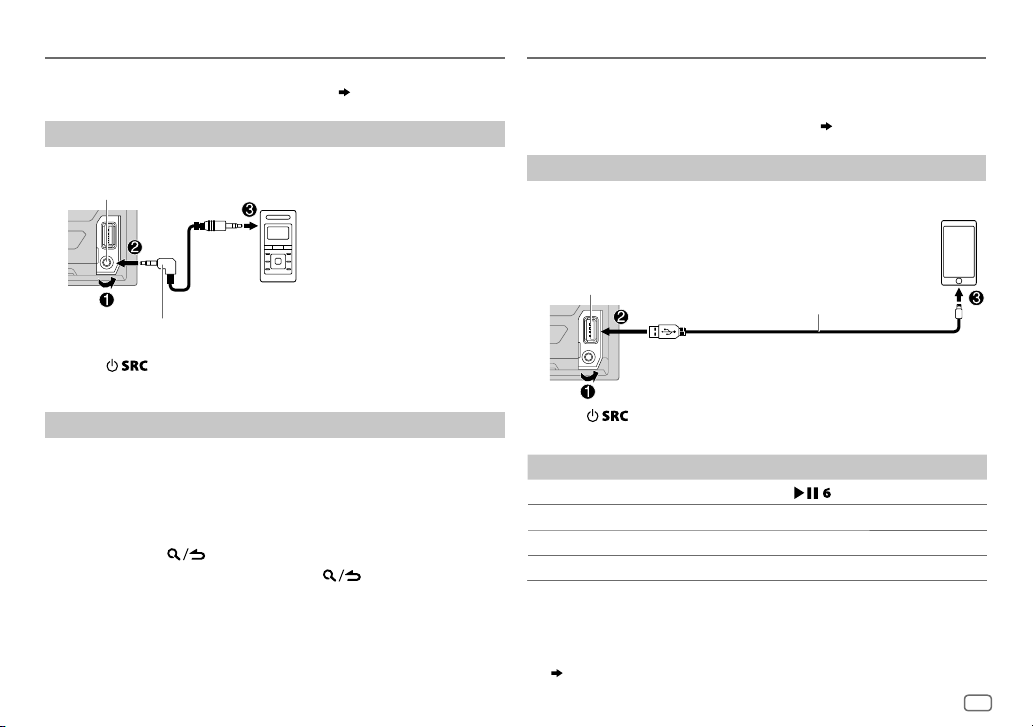
AUX
Preparation:
Select
[ON]
for
[BUILT-IN AUX]
Start listening
1
Connect a portable audio player (commercially available).
Auxiliary input jack
for
[SOURCE SELECT]. ( 5)
Portable audio
player
Spotify
Preparation:
Install the latest version of the Spotify application on your device (iPhone/
iPod touch), then create an account and log in to Spotify.
• Select
[ON]
for
[SPOTIFY SRC]
Start listening
1
Open the Spotify application on your device.
2 Connect your device to the USB input terminal.
in
[SOURCE SELECT]. ( 5)
3.5mm stereo mini plug with “L” shaped connector
(commercially available)
2 Press repeatedly to select AUX.
3 Turn on the portable audio player and start playback.
Set the AUX name
While listening to a portable audio player connected to the unit...
1 Press the volume knob to enter
2 Turn the volume knob to select
3 Turn the volume knob to select
[FUNCTION]
[SYSTEM]
[AUX NAME SET]
.
, then press the knob.
, then press the knob.
4 Turn the volume knob to select an item, then press the knob.
AUX
(default)/
DVD/PORTABLE/GAME/VIDEO/TV
5 Press and hold to exit.
To return to the previous setting item, press .
USB input terminal
KCA-iP102/KCA-iP103 (optional accessory)
or accessory of the iPod/iPhone
2
*
3 Press repeatedly to select SPOTIFY.
Broadcast starts automatically.
To On the faceplate
Playback/pause Press .
Skip a track
Thumbs up or thumbs down
Start radio Press and hold 5.
1
*
KCA-iP102 : 30-pin type, KCA-iP103 : Lightning type
2
*
Do not leave the cable inside the car when not using.
3
*
This feature is available for tracks in Radio only. If thumbs down is selected, the current
track is skipped.
4
*
( 12)
3
*
Press S*
Press J/K.
4
/T.
ENGLISH
1
*
11
Spotify
To On the faceplate
Repeat play*
Random play*
4
*
Available for premium account users only.
5
*
Available for tracks in Playlists only.
Save favorite song information
While listening to the Radio on Spotify...
Press and hold the volume knob.
“SAVED” appears and the information is stored to “Your Music” or “Your
Library” on your Spotify account.
To unsave, repeat the same procedure.
“REMOVED” appears and the information is removed from “Your Music”
or “Your Library” on your Spotify account.
Search for a song or station
1
Press .
2 Turn the volume knob to select a list type, then press the knob.
The list types displayed differ depending on the information sent
from Spotify.
3 Turn the volume knob to select the desired song or station.
4 Press the volume knob to confirm.
You can browse through the list quickly by turning the volume knob
quickly.
To cancel, press and hold
5
5
Press repeatedly.
REPEAT ALL/REPEAT ONE*4/
Press repeatedly.*
SHUFFLE ON/SHUFFLE OFF
.
REPEAT OFF
4
BLUETOOTH®
BLUETOOTH — Connection
Supported Bluetooth profiles
– Hands-Free Profile (HFP)
– Advanced Audio Distribution Profile (A2DP)
– Audio/Video Remote Control Profile (AVRCP)
– Serial Port Profile (SPP)
– Phonebook Access Profile (PBAP)
Supported Bluetooth codecs
– Sub Band Codec (SBC)
– Advanced Audio Coding (AAC)
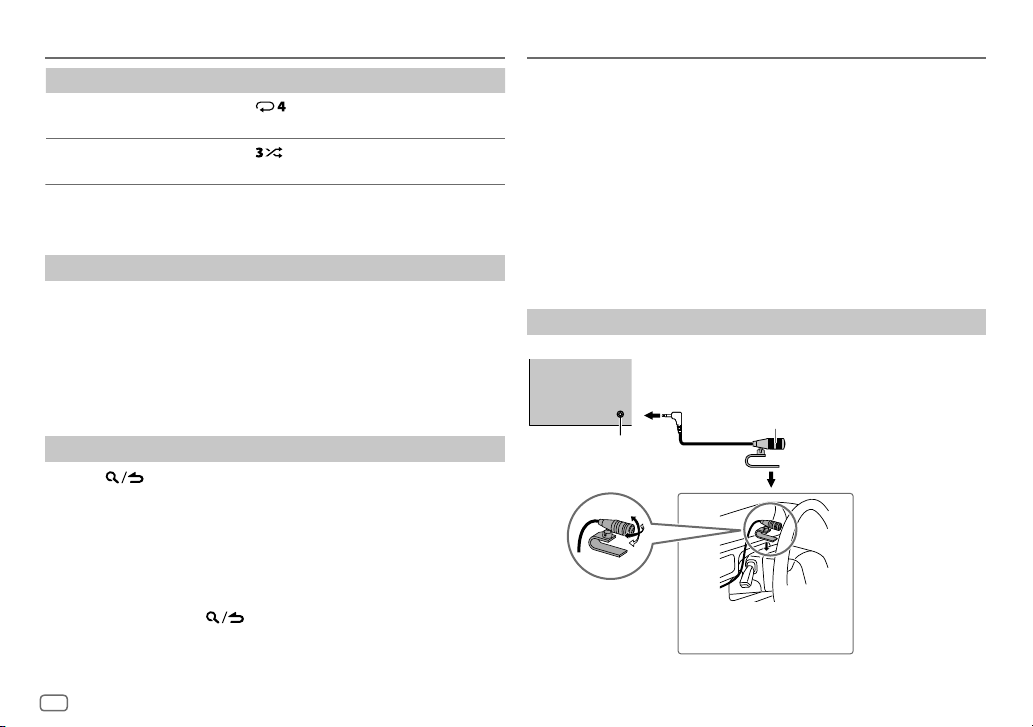
Connect the microphone
Rear panel
Microphone
(supplied)
Microphone input jack
Adjust the
microphone angle
Secure using cord clamps
(not supplied) if necessary.
12
ENGLISH
BLUETOOTH®
Pair and connect a Bluetooth device for the first time
1
Press to turn on the unit.
2 Search and select this unit model name (DPX-5 /DPX-M3 ) on
the Bluetooth device.
“PAIRING”
KNOB” appears on the display.
“PASS XXXXXX” Device name “PRESS” “VOLUME
• For some Bluetooth devices, you may need to enter the Personal
Identification Number (PIN) code immediately after searching.
3 Press the volume knob to start pairing.
“PAIRING OK” appears when pairing is completed.
Once pairing is completed, Bluetooth connection is established
automatically.
“BT1” and/or “BT2” indicator on the faceplate lights up.
• This unit supports Secure Simple Pairing (SSP).
• Up to five devices can be registered (paired) in total.
• Once the pairing is completed, the Bluetooth device will remain
registered in the unit even if you reset the unit. To delete the paired
device,
• A maximum of two Bluetooth phones and one Bluetooth audio device
17, [DEVICE DELETE]
can be connected at any time.
However, while in BT AUDIO source, you can connect to five Bluetooth
audio devices and switch between these five devices.
• Some Bluetooth devices may not automatically connect to the unit
after pairing. Connect the device to the unit manually.
• Refer to the instruction manual of the Bluetooth device for more
information.
.
( 18)
Auto Pairing
When you connect iPhone/iPod touch/Android device to the USB input
terminal, pairing request (via Bluetooth) is automatically activated.
Press the volume knob to pair once you have confirmed the device
name.
Automatic pairing request is activated only if:
– Bluetooth function of the connected device is turned on.
–
[AUTO PAIRING]
– KENWOOD MUSIC PLAY application is installed on the Android device
( 8)
and
[BROWSE MODE]
is set to
[ON]. ( 17)
is selected.
( 9)
ENGLISH
13
BLUETOOTH®
BLUETOOTH — Mobile phone
Receive a call
When there is an incoming call:
• The KEY zone illuminates in green color and flashes.
• The unit answers the call automatically if
selected time.
During a call:
• The LCD DISPLAY zone illuminates according to the settings made for
[DISPLAY] ( 24)
• If you turn off the unit, the Bluetooth connection is disconnected.
( 15)
and the KEY zone illuminates in green color.
[AUTO ANSWER]
is set to a
The following operations may differ or not available depending on the
connected phone.
To On the faceplate
First incoming call...
Answer a call
Reject a call
End a call
While talking on the first incoming call...
Answer another
incoming call and hold
the current call
Reject another incoming
call
While having two active calls...
End current call and
activate held call
Swap between the
current call and held call
Adjust the phone volume
[00]
to
[35]
(Default:
Switch between hands-free
and private talk modes
[15]
Press
of the number buttons (1 to 6).
Press
Press .
Press
Press
Press
Press
Turn the volume knob during a call.
)
• This adjustment will not affect the
volume of the other sources.
Press
• Operations may vary according to the
connected Bluetooth device.
or the volume knob or one
.
.
.
.
.
during a call.
14
ENGLISH
BLUETOOTH®
Improve the voice quality
While talking on the phone...
1 Press the volume knob to enter
2 Turn the volume knob to select an item (see the following table),
then press the knob.
3 Repeat step 2 until the desired item is selected or activated.
4 Press and hold to exit.
To return to the previous setting item, press .
MIC GAIN LEVEL –10
NR LEVEL LEVEL –5
ECHO CANCEL LEVEL –5
to
microphone increases as the number increased.
to
the least noise is being heard during a phone conversation.
to
time until the least echo is being heard during a phone conversation.
Make the settings for receiving a call
Press to enter Bluetooth mode.
1
2 Turn the volume knob to select an item (see the following table),
then press the knob.
3 Repeat step 2 until the desired item is selected or activated.
4 Press and hold to exit.
To return to the previous setting item, press .
[FUNCTION]
LEVEL +10(LEVEL –4
LEVEL +5(LEVEL 0
LEVEL +5(LEVEL 0
.
Default:
): The sensitivity of the
):Adjust the noise reduction level until
):Adjust the echo cancellation delay
SETTINGS
AUTO ANSWER
BATT/SIGNAL* AUTO
*
Functionality depends on the type of the phone used.
XX
1
to30:The unit answers incoming call automatically in the selected time
(in seconds).;
a Bluetooth device and the Bluetooth device is connected.;
OFF
OFF
:Cancels.
:Shows the strength of the battery and signal when the unit detects
:Cancels.
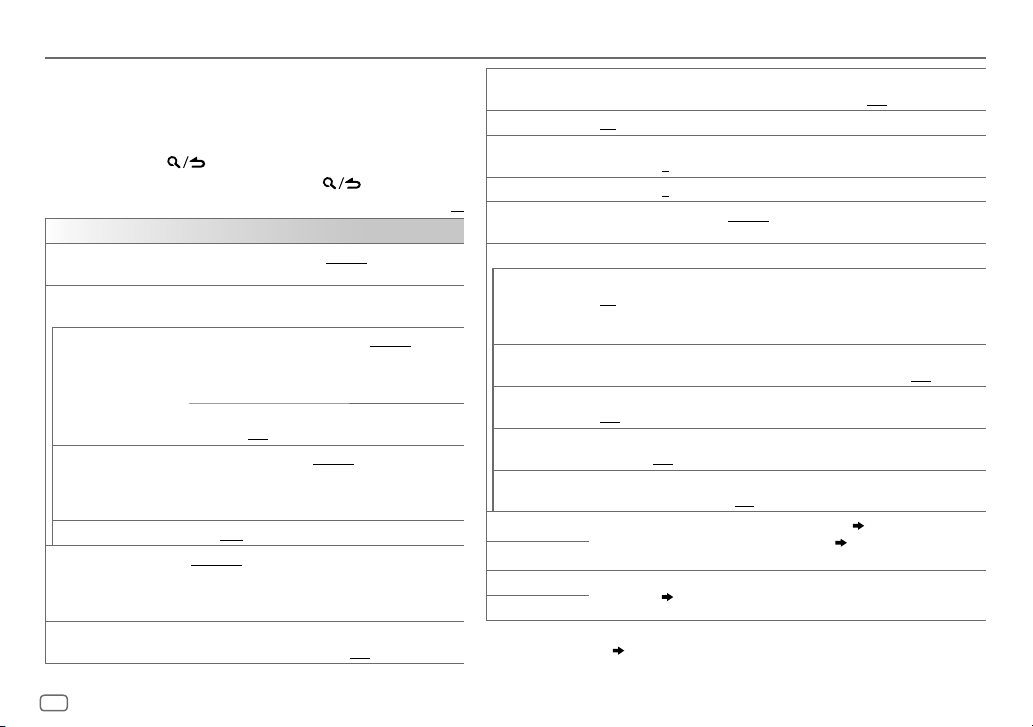
Make a call
You can make a call from the call history, phonebook, or dialing the
number. Call by voice is also possible if your mobile phone has the
feature.
1 Press to enter Bluetooth mode.
“(First device name)” appears.
• If two Bluetooth phones are connected, press again to switch
to another phone.
“(Second device name)” appears.
2 Turn the volume knob to select an item (see the following table),
then press the knob.
3 Repeat step 2 until the desired item is selected/activated or follow
the instructions stated on the selected item.
4 Press and hold to exit.
To return to the previous setting item, press .
CALL HISTORY
(Applicable only if the phone supports PBAP.)
1
Press the volume knob to select a name or a phone number.
• “INCOMING”, “OUTGOING”, or “MISSED” is shown on the lower part
of the display to indicate the previous call status.
• Press
DISP
• “NO DATA” appears if there is no recorded call history.
2
Press the volume knob to call.
to change the display category (NUMBER or NAME).
Default:
XX
ENGLISH
15
BLUETOOTH®
PHONE BOOK
NUMBER DIAL1 Turn the volume knob to select a number (0 to 9) or character
VOICE
BATT LOW
NO SIGNAL/LOW/MID/MAX*:Shows the strength of the current received signal.
*
Functionality depends on the type of the phone used.
(Applicable only if the phone supports PBAP.)
1
Turn the volume knob quickly to enter alphabet search mode (if the
phonebook contains many contacts).
The first menu (ABCDEFGHIJK) appears.
• To go to the other menu (LMNOPQRSTUV or WXYZ1
J/K
• To select the desired first letter, turn the volume knob or press
Select “1” to search with numbers and select “
2
3
•
The phonebook of the connected phone is automatically transferred to
•
Contacts are categorized as: HOME, OFFICE, MOBILE, OTHER, GENERAL.
•
This unit can display only non-accent letters. (Accent letters such as “Ú”
2
3
Speak the name of the contact you want to call or the voice command to
control the phone functions.
/
MID/FULL*:Shows the strength of the battery.
.
S/T
symbols.
Turn the volume knob to select a name, then press the knob.
Turn the volume knob to select a phone number, then press the knob
to call.
the unit when pairing.
is shown as “U”.)
(
, #, +).
Press
Repeat steps
Press the volume knob to call.
, then press the knob.
S/T
to move the entry position.
1
and 2 until you finish entering the phone number.
( Make a call using voice recognition)
” to search with
), press
Make a call using voice recognition
Press and hold to activate the voice recognition of the
1
connected phone.
2 Speak the name of the contact you want to call or the voice
command to control the phone functions.
• Supported Voice Recognition features vary for each phone. Refer to the
instruction manual of the connected phone for details.
• This unit also supports the intelligent personal assistant function of
iPhone.
Settings in memory
Store a contact in memory
You can store up to 6 contacts into the number buttons (1 to 6).
1 Press to enter Bluetooth mode.
2 Turn the volume knob to select
[NUMBER DIAL]
, then press the knob.
[CALL HISTORY], [PHONE BOOK]
, or
3 Turn the volume knob to select a contact or enter a phone number.
If a contact is selected, press the volume knob to show the phone
number.
4 Press and hold one of the number buttons (1 to 6).
“STORED” appears when the contact is stored.
To erase a contact from the preset memory, select
and store a blank number.
[NUMBER DIAL]
in step 2
Make a call from memory
Press to enter Bluetooth mode.
1
2 Press one of the number buttons (1 to 6).
3 Press the volume knob to call.
“NO MEMORY” appears if there is no contacts stored.
16
ENGLISH
BLUETOOTH®
Other settings
1
Press the volume knob to enter
[FUNCTION]
.
2 Turn the volume knob to select an item (see the following table), then press the
knob.
3 Repeat step 2 until the desired item is selected/activated or follow the
instructions stated on the selected item.
4 Press and hold to exit.
To return to the previous setting item, press .
Default:
BT MODE
PHONE SELECT
AUDIO SELECT
DEVICE DELETE
PIN CODE EDIT
(0000)
RECONNECT ON
AUTO PAIRING ON
INITIALIZE YES
Selects the phone or audio device to connect or disconnect.
“
” appears in front of the device name when connected.
“
” appears in front of the current playback audio device.
•
You can only connect a maximum of two Bluetooth phones and one Bluetooth audio
device at any time.
1
Turn the volume knob to select a device to delete, then press the knob.
2
Turn the volume knob to select
Changes the PIN code (up to 6 digits).
1
Turn the volume knob to select a number.
2
Press S/T to move the entry position.
Repeat steps
3
Press the volume knob to confirm.
:The unit automatically reconnect when the last connected Bluetooth device is within
range.;
:The unit automatically pair supported Bluetooth device (iPhone/iPod touch/Android
device) when it is connected through USB input terminal.Depending on the operating
system of the connected device, this function may not work. ;
:Initializes all the Bluetooth settings (including stored pairing, phonebook, and etc.).;
NO
:Cancels.
1
and 2 until you finish entering the PIN code.
OFF
:Cancels.
[YES]
or
[NO]
, then press the knob.
OFF
:Cancels.
Bluetooth test mode
You can check the connectivity of the supported profile
between the Bluetooth device and the unit.
• Make sure there is no Bluetooth device paired.
1 Press and hold .
“PLEASE PAIR YOUR PHONE PIN 0000” appears.
2 Search and select this unit model name (DPX-5 /
DPX-M3
) on the Bluetooth device.
3 Operate the Bluetooth device to confirm pairing.
“TESTING” flashes on the display.
XX
The connectivity result (OK or NG) appears after the test.
PAIRING: Pairing status
HF CNT: Hands-Free Profile (HFP) compatibility
AUD CNT: Advanced Audio Distribution Profile (A2DP)
PB DL: Phonebook Access profile (PBAP) compatibility
To cancel test mode, press and hold
unit.
compatibility
to turn off the
ENGLISH
17
BLUETOOTH®
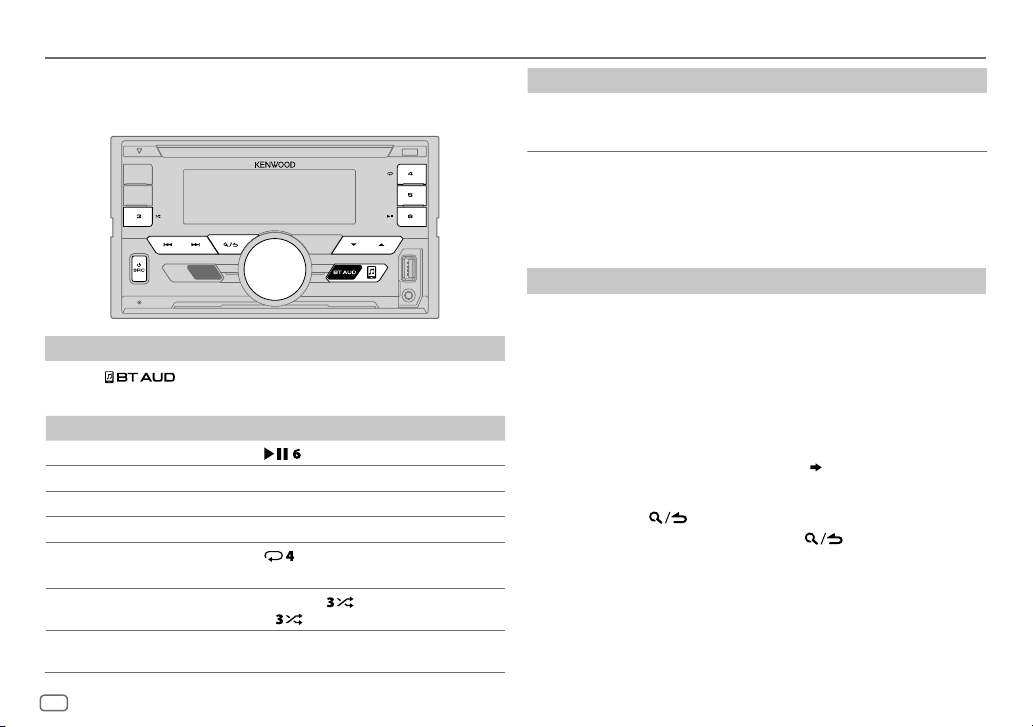
BLUETOOTH — Audio
While in BT AUDIO source, you can connect to five Bluetooth audio
devices and switch between these five devices.
Audio player via Bluetooth
1
Press to select BTAUDIO.
2 Operate the Bluetooth audio player to start playback.
To On the faceplate
Playback/pause Press .
Select group or folder
Reverse/Forward skip
Reverse/Fast-forward
Repeat play Press
Random play Press and hold to select
Select a file from a
folder/list
Press J/K.
Press S/T.
Press and hold S/T.
repeatedly.
ALL REPEAT, FILE REPEAT, REPEAT OFF
• Press
Refer to “Select a file from a folder/list” on
page 9.
to select
RANDOM OFF
ALL RANDOM
.
To On the faceplate
*
Switch between
connected Bluetooth
audio devices
*
Pressing the “Play” key on the connected device itself also causes switching of sound output
from the device.
Operations and display indications may differ according to their
availability on the connected device.
Press 5.
Settings to use KENWOOD Remote application
KENWOOD Remote application is designed to control the KENWOOD
car receiver’s operations from the iPhone/iPod (via Bluetooth or via USB
input terminal) or Android smartphone (via Bluetooth).
Preparation:
Install the latest version of KENWOOD Remote application on your device
before connecting. For more information, visit
<www.kenwood.com/cs/ce/>.
1 Press the volume knob to enter
2 Turn the volume knob to select an item
knob.
[FUNCTION]
.
( 19)
, then press the
3 Repeat step 2 until the desired item is selected or activated.
4 Press and hold to exit.
To return to the previous setting item, press .
.
18
ENGLISH
BLUETOOTH®
REMOTE APP
SELECT
IOS YES
ANDROID YES
ANDROID LIST
STATUS
*
Displayed only when
Select the device (IOS or ANDROID) to use the application.
via USB input terminal.;
If IOS is selected, select iPod BT source (or iPod USB if your iPhone/iPod is
connected via USB input terminal) to activate the application.
•
The connectivity of the application will be interrupted or disconnected if:
– You change from iPod BT source to any playback source connected via
– You change from iPod USB source to iPod BT source.
NO
*:Selects the Android smartphone to use from the list.
Shows the status of the selected device.
IOS CONNECTED
connected via Bluetooth or USB input terminal.
IOS NOT CONNECTED
ANDROID CONNECTED
Android smartphone connected via Bluetooth.
ANDROID NOT CONNECTED
application.
Default:
:Selects iPhone/iPod to use the application via Bluetooth or connected
the USB input terminal.
:Selects Android smartphone to use the application via Bluetooth.;
: Cancels.
[ANDROID]
NO
:Cancels.
: You are able to use the application using the iPhone/iPod
: No IOS device is connected to use the application.
: You are able to use the application using the
: No Android device is connected to use the
of
[SELECT]
is set to
[YES]
.
XX
Listen to iPhone/iPod via Bluetooth
You can listen to the songs on the iPhone/iPod via Bluetooth on this unit.
Press repeatedly to select iPodBT.
• You can operate the iPod/iPhone in the same way as iPod/iPhone via
USB input terminal.
• If you plug in an iPhone/iPod to the USB input terminal while listening
to iPodBT source, the source automatically change to iPod USB. Press
to select iPodBT if the device is still connected via Bluetooth.
( 8)
Internet radio via Bluetooth
You can listen to Spotify on the iPhone/iPod/Android device via
Bluetooth on this unit.
• Make sure the USB input terminal is not connected to any device.
Listen to Spotify
Preparation:
Select
[ON]
for
[SPOTIFY SRC]
in
[SOURCE SELECT]. ( 5)
1 Open the Spotify application on your device.
2 Connect your device via Bluetooth connection.
( 13)
3 Press repeatedly to select SPOTIFY (for iPhone/iPod) or
SPOTIFY BT (for Android device).
The source switches and broadcast starts automatically.
• You can operate Spotify in the same way as Spotify via USB input
terminal.
( 11)
ENGLISH
19
AUDIO SETTINGS
While listening to any source...
1 Press the volume knob to enter
2 Turn the volume knob to select an item (see the following
table), then press the knob.
3 Repeat step 2 until the desired item is selected or activated.
4 Press and hold to exit.
To return to the previous setting item, press .
AUDIO CONTROL
SUB-W LEVEL
MANUAL EQ
62.5HZ LEVEL LEVEL –9
100HZ/160HZ/250HZ/
400HZ/630HZ/1KHZ/
1.6KHZ/2.5KHZ/4KHZ/
6.3KHZ/10KHZ/16KHZ
Q FACTOR 1.35/1.50/2.00
PRESET EQ NATURAL/ROCK/POPS/EASY/TOP40/JAZZ
BASS BOOST LEVEL1/LEVEL2/LEVEL3/LEVEL4/LEVEL5
LEVEL –50
subwoofer output level.
The sound elements (frequency level, tone level,
Q factor) are preset into each selection.
BASS
EXTEND
LEVEL –9
to memorize for each source. (Before making an
adjustment, select the source you want to adjust.)
POWERFUL/USER
to the music genre. (Select
made in
your preferred bass boost level.;
[FUNCTION]
to
LEVEL +10 (LEVEL 0
the level to memorize for each source.
(Before making an adjustment, select the
source you want to adjust.)
ON
:Turns on the extended bass.;
OFF
:Cancels.
to
LEVEL +9 (LEVEL 0
:Adjust the quality factor.
[MANUAL EQ]
.
): Adjusts the
to
LEVEL +9 (LEVEL 0
):Adjusts the level
: Selects a preset equalizer suitable
[USER]
to use the settings
.)
OFF
:Cancels.
Default:
): Adjusts
/
:Selects
LOUDNESS LEVEL1/LEVEL2
SUBWOOFER SET ON
FADER
BALANCE L15
XX
VOLUME OFFSET LEVEL –15
SOUND EFFECT
SOUND RECNSTR
(Sound
reconstruction)
SPACE ENHANCE
SND REALIZER LEVEL1/LEVEL2/LEVEL3
STAGE EQ LOW/MIDDLE/HIGH
DRIVE EQ ON
SPEAKER SIZE
X’OVER
DTA SETTINGS
CAR SETTINGS
•
For 2-way crossover:
set to
[SUBWOOFER]. ( 5)
• [SUB-W LEVEL]
produce a well-balanced sound at a low volume level.;
(Not applicable if 3-way crossover is selected.)
R15
source. (Before adjustment, select the source you want to adjust.)
(Not applicable for RADIO source and AUX source.)
ON
and restoring the rise-time of the waveform that are lost in audio data
compression.;
(Not applicable for RADIO source.)
SMALL/MEDIUM/LARGE
OFF
speakers.;
running noise of the tyres.;
Depending on the crossover type you have selected
or 3-way crossover setting items will be shown.
By default, 2-way crossover type is selected.
For settings,
[SUB-W LEVEL]/[SUBWOOFER SET]
is selectable only if
:Selects your preferred low and high frequencies boost to
:Turns on the subwoofer output.;
to
F15 (0
):Adjusts the rear and front speaker output balance.
to
R15 (0
):Adjusts the left and right speaker output balance.
to
LEVEL +6 (LEVEL 0
:Creates realistic sound by compensating the high-frequency components
OFF
:Cancels.
:Cancels.
:Virtually adjust the sound position heard from the
OFF
:Cancels.
: Boosts the frequency to reduce the noise heard from outside the car or
22, 23, Digital Time Alignment settings
[SUBWOOFER SET]
OFF
:Cancels.
):Preset the initial volume level of each
:Virtually enhances the sound space.;
:Virtually makes the sound more realistic.;
OFF
:Cancels.
is selectable only if
is set to
[ON]
( 6)
( 21, 22)
.
OFF
:Cancels.
OFF
, 2-way crossover
.
[SWITCH PREOUT]
:Cancels.
is
20
ENGLISH
AUDIO SETTINGS
Crossover settings
Below are the available setting items for 2-way crossover
and 3-way crossover.
SPEAKER SIZE
Selects according to the connected speaker size for
optimum performance.
•
The frequency and slope settings are automatically set
for the crossover of the selected speaker.
•
When 2-way crossover is selected, if
for
[TWEETER]
of
[SPEAKER SIZE]
[FRONT], [REAR]
, the
[X ‘ OVER]
setting of the speaker is not
and
[NONE]
is selected
[SUBWOOFER]
for
available.
• When 3-way crossover is selected, if
for
[WOOFER]
of
[WOOFER]
[SPEAKER SIZE]
is not available.
, the
[NONE]
[X’OVER]
is selected
setting of
X ‘ OVER
• [FRQ]
/
[F - HPF FRQ]/[R - HPF FRQ]/[SW LPF FRQ]/[HPF FRQ]
[LPF FRQ]
: Adjusts the crossover frequency for the
/
selected speakers (high pass filter or low pass filter).
If
[THROUGH]
is selected, all signals are sent to the
selected speakers.
•
[F - HPF SLOPE]/[R - HPF SLOPE]/[SW LPF SLOPE]/[HPF SLOPE]
[LPF SLOPE]/[SLOPE]:
Selectable only if a setting other than
Adjusts the crossover slope.
[THROUGH]
/
is
selected for the crossover frequency.
• [SW LPF PHASE]/[PHASE]:
Selects the phase of the speaker
output to be in line with the other speaker output.
• [GAIN LEFT]/[GAIN RIGHT]/[F - HPF GAIN]/[R - HPF GAIN]
[SW LPF GAIN]/[GAIN]:
Adjusts the output volume of the
/
selected speaker.
2-way crossover setting items
SPEAKER SIZE
FRONT SIZE
8CM/10CM/12CM/13CM/16CM/17CM/18CM/4×6/5×7/6×8
6×9/7×10
TWEETER
SMALL/MIDDLE/LARGE/NONE
(not connected)
REAR 8CM/10CM/12CM/13CM/16CM/17CM/18CM/4×6/5×7/6×8/6×9/7×10/NONE
(not connected)
1
SUBWOOFER
*
16CM/20CM/25CM/30CM/38CM OVER/NONE
(not connected)
X ' OVER
TWEETER FRQ
1KHZ/1.6KHZ/2.5KHZ/4KHZ/5KHZ/6.3KHZ/8KHZ/10KHZ
12.5KHZ
GAIN LEFT
GAIN RIGHT
FRONT HPF F - HPF FRQ
–8
to
0
–8
to
0
30HZ/40HZ/50HZ/60HZ/70HZ/80HZ/90HZ/100HZ/120HZ
150HZ/180HZ/220HZ/250HZ/THROUGH
F - HPF SLOPE
F - HPF GAIN
–6DB/–12DB/–18DB/–24DB
–8
to
0
REAR HPF R - HPF FRQ
R - HPF SLOPE
FRONT HPF
settings above.)
(Refer
R - HPF GAIN
SUBWOOFER
1
*
LPF
1
*
Selectable only when
[ON]. ( 20)
SW LPF FRQ 30HZ/40HZ/50HZ/60HZ/70HZ/80HZ/90HZ/100HZ/120HZ
150HZ/180HZ/220HZ/250HZ/THROUGH
SW LPF SLOPE
SW LPF PHASE
SW LPF GAIN –8
[SWITCH PREOUT]
–6DB/–12DB/–18DB/–24DB
REVERSE
(180°)/
NORMAL
(0°)
to
0
is set to
[SUBWOOFER] ( 5)
and
[SUBWOOFER SET]
ENGLISH
/
/
/
/
is set to
21
AUDIO SETTINGS
3-way crossover setting items
SPEAKER SIZE
TWEETER
MID RANGE
WOOFER
SMALL/MIDDLE/LARGE
8CM/10CM/12CM/13CM/16CM/17CM/18CM/4×6/5×7/6×8/6×9
2
*
16CM/20CM/25CM/30CM/38CM OVER/NONE
X ' OVER
TWEETER HPF FRQ
1KHZ/1.6KHZ/2.5KHZ/4KHZ/5KHZ/6.3KHZ/8KHZ
10KHZ/12.5KHZ
SLOPE
PHASE
GAIN –8
MID RANGE HPF FRQ
–6DB/–12DB
REVERSE
to
0
30HZ/40HZ/50HZ/60HZ/70HZ/80HZ/90HZ/100HZ
120HZ/150HZ/180HZ/220HZ/250HZ/THROUGH
HPF SLOPE
LPF FRQ
–6DB/–12DB
1KHZ/1.6KHZ/2.5KHZ/4KHZ/5KHZ/6.3KHZ/8KHZ
10KHZ/12.5KHZ/THROUGH
WOOFER
LPF SLOPE
PHASE
GAIN –8
2
*
LPF FRQ 30HZ/40HZ/50HZ/60HZ/70HZ/80HZ/90HZ/100HZ
–6DB/–12DB
REVERSE
to
0
120HZ/150HZ/180HZ/220HZ/250HZ/THROUGH
2
*
Selectable only when
SLOPE
PHASE
GAIN –8
–6DB/–12DB
REVERSE
to
[SUBWOOFER SET]
0
(180°)/
(180°)/
(180°)/
is set to
NORMAL
(0°)
NORMAL
(0°)
NORMAL
(0°)
[ON]. ( 20)
(not connected)
Digital Time Alignment settings
Digital Time Alignment sets the delay time of the speaker output to
create a more suitable environment for your vehicle.
• For more information,
23, Determining the value for [DISTANCE] and
[GAIN] of [DTA SETTINGS].
DTA SETTINGS
POSITION
/
Selects your listening position (reference point).
ALL
:Not compensating;
FRONT LEFT
:Front left seat;
• [FRONT ALL]
FRONT RIGHT:
FRONT ALL
is displayed only when
Front right seat;
[2-WAY X’OVER]
( 6)
DISTANCE 0CM
/
GAIN –8DB
to
610CM
:Fine adjust the distance to compensate.
(Before making an adjustment, select the speaker you want to adjust.)
to
0DB
:Fine adjust the output volume of the selected speaker.
(Before making an adjustment, select the speaker you want to adjust.)
/
CAR SETTINGS
DTA RESET YES
:Resets the settings (
[POSITION]
to default.; NO:Cancels.
[DISTANCE]
and
Identify your car type and rear speaker location in order to make the
adjustment for
[DTA SETTINGS]
.
CAR TYPE COMPACT/FULL SIZE CAR/WAGON/MINIVAN/SUV
/
R - SP LOCATION
MINIVAN(LONG)
OFF:
Not compensating.
Selects the location of the rear speakers in your vehicle to calculate the
:Selects the type of vehicle.;
furthest distance from the listening position selected (reference point).
• DOOR/REAR DECK
:Selectable only when
[OFF], [COMPACT], [FULL SIZE CAR], [WAGON]
• 2ND ROW/3RD ROW
as
[MINIVAN]
:Selectable only when
or
[MINIVAN(LONG)]
.
:Front seat
[GAIN]
[CAR TYPE]
[CAR TYPE]
is selected.
) of the selected
/
is selected as
or
[SUV]
.
is selected
22
ENGLISH
AUDIO SETTINGS
•
Before making an adjustment for
speaker you want to adjust:
When 2-way crossover is selected:
FRONT LEFT/FRONT RIGHT/REAR LEFT/REAR RIGHT/SUBWOOFER
– You can only select
than
[NONE]
is selected for
When 3-way crossover is selected:
TWEETER LEFT/TWEETER RIGHT/MID LEFT/MID RIGHT/WOOFER
– You can only select
[SPEAKER SIZE]. ( 22)
• [R - SP LOCATION]
– 2-way crossover is selected.
– A setting other than
Determining the value for [DISTANCE] and [GAIN] of [DTA SETTINGS]
of
[DISTANCE]
[REAR LEFT], [REAR RIGHT]
[REAR]
[WOOFER]
if a setting other than
[CAR SETTINGS]
( 6)
[NONE]
is selected for
and
and
[SUBWOOFER]
is selectable only if:
[REAR]
If you specify the distance from the center of the
currently set listening position to every speaker,
the delay time will be automatically computed
and set.
1
Determine the center of the currently set
listening position as the reference point.
2
Measure the distances from the reference
point to the speakers.
3
Calculate the differences between the
distance of the furthest speaker (rear
speaker) and other speakers.
4
Set the
individual speakers.
5
Adjust
Example: When
listening position
[GAIN]
of
[DTA SETTINGS]
and
[SUBWOOFER]
of
[SPEAKER SIZE]. ( 21)
[NONE]
is selected for
of
[SPEAKER SIZE]. ( 21)
[DISTANCE]
[GAIN]
calculated in step 3 for
for individual speakers.
[FRONT ALL]
, select the
if a setting other
[WOOFER]
is selected as the
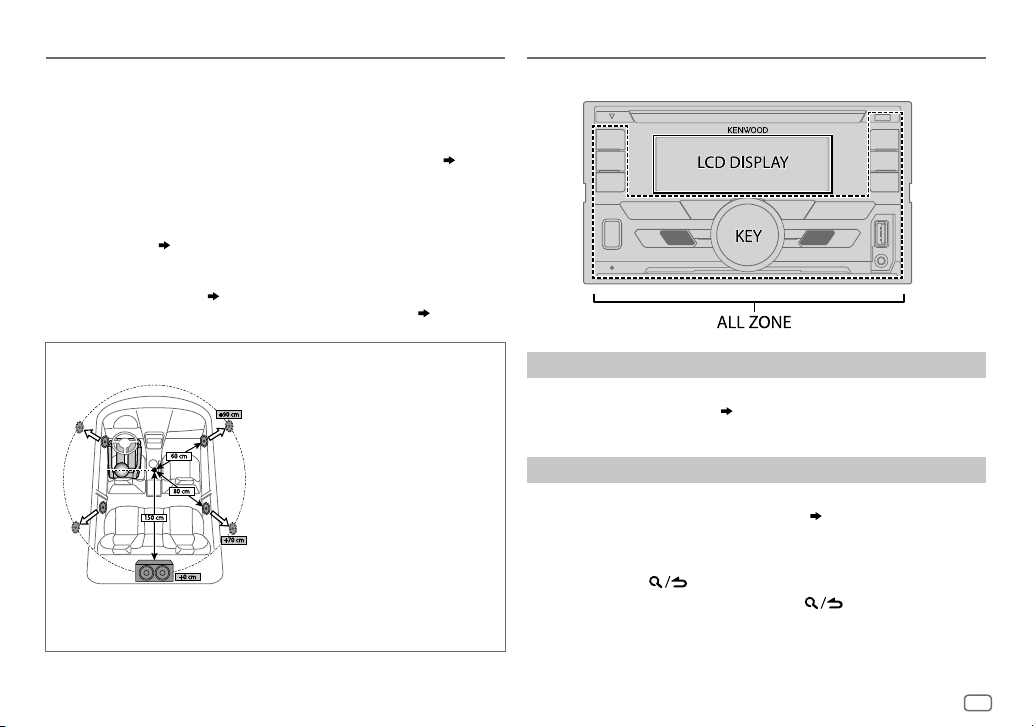
DISPLAY SETTINGS
Zone identification for color and brightness settings
of
Set the dimmer
Press and hold DISP to turn on or off the dimmer.
• If you have set
and hold this button.
Other settings
1
Press the volume knob to enter
2 Turn the volume knob to select an item
knob.
3 Repeat step 2 until the desired item is selected/activated or follow
the instructions stated on the selected item.
4 Press and hold to exit.
To return to the previous setting item, press .
[DIMMER TIME] ( 24)
, it will be canceled once you press
[FUNCTION]
.
( 24)
, then press the
ENGLISH
23
DISPLAY SETTINGS
Default:
DISPLAY
COLOR
SELECT
DIMMER
BRIGHTNESS1 Select a zone. (See the illustration on page 23.)
TEXT SCROLL AUTO/ONCE
*
Preset colors:
BLUE2/BLUE3/SKYBLUE1/SKYBLUE2/LIGHTBLUE/AQUA1/AQUA2/GREEN1
GREEN2/GREEN3/YELLOWGREEN1/YELLOWGREEN2/YELLOW/ORANGE1/ORANGE2
ORANGERED
Select color for
1
Select a zone. (See the illustration on page 23.)
2
Select a color for the selected zone.
To make your own color, select
will be stored in
1
Press the volume knob to enter the detailed color adjustment.
2
Press S/T to select the color (R/G/B) to adjust.
3
Turn the volume knob to adjust the level (0 to 9), then press the knob.
Dim the illumination.
ON
DIMMER TIME
1
Turn the volume knob to adjust the
2
Turn the volume knob to adjust the
(Default:
2 0
or scroll only once.;
RED1/RED2/RED3/PURPLE1/PURPLE2/PURPLE3/PURPLE4/BLUE1
ALL ZONE, LCD DISPLAY
INITIAL COLOR/VARIABLE SCAN/CUSTOM R/G/B
[CUSTOM R/G/B]
:Dimmer is turned on.;
[ON]: 18:00; [OFF]: 6:00
to 31: Select your preferred brightness level for the selected zone.
:Select whether to scroll the display information automatically,
OFF
:Set the dimmer on and off time.
OFF
:Cancels.
and
[CUSTOM R/G/B]
.
:Cancels.
[ON]
time, then press the knob.
[OFF]
)
KEY
separately.
/preset colors*
. The color you have made
time, then press the knob.
/
TROUBLESHOOTING
XX
Symptom Remedy
Sound cannot be heard.
“MISWIRING CHECK WIRING
THEN PWR ON” appears.
General
“PROTECTING SEND SERVICE”
appears.
The unit does not work at all. Reset the unit.
•
Radio reception is poor.
•
Static noise while listening
Radio
to the radio.
Disc cannot be ejected.
Noise is generated. Skip to another track or change the disc.
Tracks do not play back as you
intended them to play.
“READING” keeps flashing. Do not use too many hierarchical levels or folders.
Elapsed playing time is not
/
/
correct.
CD/USB/iPod
“LOADING” appears when you
enter search mode by pressing
.
Correct characters are not
displayed (e.g. album name).
•
Adjust the volume to the optimum level.
•
Check the cords and connections.
Turn the power off, then check to be sure the
terminals of the speaker wires are insulated properly.
Turn the power on again.
Send the unit to the nearest service center.
( 3)
Connect the antenna firmly.
Press and hold M to forcibly eject the disc. Be careful
not to drop the disc when it is ejected. If this does not
solve the problem, reset the unit.
Playback order is determined when files are recorded.
This is caused by how the tracks are recorded.
This unit is still preparing the iPod/iPhone music list.
It may take some time to load, try again later.
•
This unit can only display uppercase letters,
numbers, and a limited number of symbols.
•
Depending on the display language you have
selected
( 5)
displayed correctly.
, some characters may not be
( 3)
24
ENGLISH
TROUBLESHOOTING
Symptom Remedy
“NA FILE” Make sure the disc contains supported audio files.
“NO DISC” Insert a playable disc into the loading slot.
“TOC ERROR” Make sure the disc is clean and inserted properly.
“PLEASE EJECT” Reset the unit. If this does not solve the problem, consult
“NO DEVICE” Connect a USB device, and change the source to USB again.
“COPY PRO” A copy-protected file is played.
“UNSUPPORTED DEVICE”
“UNRESPONSIVE DEVICE” Make sure the device is not malfunction and reattach the
CD/USB/iPod
“USB HUB IS NOT
SUPPORTED”
•
The source does not
change to “USB” when
you connect a USB
device while listening
to another source.
•
“USB ERROR” appears
“NO MUSIC” Connect a USB device that contains playable audio files.
“iPod ERROR”
( 27)
your nearest service center.
•
Check whether the connected device is compatible with
this unit and ensure the file systems are in supported
formats.
( 27)
•
Reattach the device.
device.
This unit cannot support a USB device connected via a
USB hub.
The USB port is drawing more power than the design limit.
Turn the power off and unplug the USB device. Then, turn
on the power and reattach the USB device. If this does not
solve the problem, turn the power off and on (or reset the
unit) before replacing with another USB device.
•
Reconnect the iPod.
•
Reset the iPod.
Symptom Remedy
•
Sound cannot be heard
during playback.
•
Sound output only from
the Android device.
Cannot playback at
[BROWSE MODE]
ANDROID
“NO DEVICE” or “READING”
keeps flashing.
Playback is intermittent or
sound skips.
“ANDROID ERROR”/
“NADEVICE”
•
Reconnect the Android device.
•
If in
application on the Android device and start playback.
•
If in
application or use another media player application.
•
Restart the Android device.
•
If this does not solve the problem, the connected
Android device is unable to route the audio signal to
unit.
•
Make sure KENWOOD MUSIC PLAY APP is installed on
.
the Android device.
•
Reconnect the Android device and select the
appropriate control mode.
•
If this does not solve the problem, the connected
Android device does not support
( 28)
•
Switch off the developer options on the Android
device.
•
Reconnect the Android device.
•
If this does not solve the problem, the connected
Android device does not support
( 28)
Turn off the power saving mode on the Android device.
•
Reconnect the Android device.
•
Restart the Android device.
[HAND MODE]
[HAND MODE]
( 28)
, launch any media player
, relaunch the current media player
( 8)
[BROWSE MODE]
[BROWSE MODE]
.
.
ENGLISH
25
TROUBLESHOOTING
Symptom Remedy
“DISCONNECTED” USB is disconnected from the head unit. Please make sure
“CONNECTING”
Spotify
“CHECK APP” The Spotify application is not connected properly, or user is
No Bluetooth device is
detected.
Bluetooth pairing
cannot be made.
Echo or noise is heard
during a phone
conversation.
Phone sound quality
Bluetooth®
is poor.
Voice calling method is
not successful.
the device is connected properly through USB.
•
Connected via USB input terminal: The device is
connecting to the head unit. Please wait.
•
Connected via Bluetooth: The Bluetooth is disconnected.
Please check Bluetooth connection and make sure both
the device and the unit are paired and connected.
not login. End the Spotify application and restart, then login
to your Spotify account.
•
Search from the Bluetooth device again.
•
Reset the unit.
•
Make sure you have entered the same PIN code to both the
unit and Bluetooth device.
•
Delete pairing information from both the unit and the
Bluetooth device, then perform pairing again.
•
Adjust the microphone unit’s position.
•
Check the
•
Reduce the distance between the unit and the Bluetooth
device.
•
Move the car to a place where you can get a better signal
reception.
•
Use voice calling method in a more quiet environment.
•
Reduce the distance from the microphone when you speak
the name.
•
Make sure the same voice as the registered voice tag is
used.
( 3)
[ECHO CANCEL]
setting.
( 15)
( 12)
( 13)
Symptom Remedy
Sound is being
interrupted or skipped
during playback of a
Bluetooth audio player.
The connected
Bluetooth audio player
cannot be controlled.
“DEVICE FULL” The number of registered devices has reached its limit. Retry
“N/A VOICE TAG” Make sure the same voice as the registered voice tag is used.
Bluetooth®
“NOT SUPPORT” The connected phone does not support Voice Recognition
“NO ENTRY”/“NO PAIR” There is no registered device connected/found via Bluetooth.
“ERROR” Try the operation again. If “ERROR” appears again, check if
“NO INFO”/“NO DATA” Bluetooth device cannot get the contact information.
“HF ERROR XX”/
“BT ERROR”
“SWITCHING NG” The connected phones might not support phone switching
•
Reduce the distance between the unit and the Bluetooth
audio player.
•
Turn off, then turn on the unit and try to connect again.
•
Other Bluetooth devices might be trying to connect to the
unit.
•
Check whether the connected Bluetooth audio player
supports Audio/Video Remote Control Profile (AVRCP).
(Refer to the instructions of your audio player.)
•
Disconnect and connect the Bluetooth player again.
after deleting an unnecessary device.
( 17, DEVICE DELETE)
feature or phonebook transfer.
the device supports the function you have tried.
Reset the unit and try the operation again. If this does not
solve the problem, consult your nearest service center.
feature.
26
ENGLISH

REFERENCES
Maintenance
Cleaning the unit
Wipe off dirt on the faceplate with a dry silicone or soft cloth.
Handling discs
•
Do not touch the recording surface of the disc.
•
Do not stick tape etc. on the disc, or use a disc with tape stuck on it.
•
Do not use any accessories for the disc.
•
Clean from the center of the disc and move outward.
•
Clean the disc with a dry silicone or soft cloth. Do not use any solvents.
•
When removing discs from this unit, pull them out horizontally.
•
Remove burrs from the center hole and disc edge before inserting a disc.
More information
For: – Latest firmware updates and latest compatible item list
– KENWOOD original application
– Any other latest information
Visit <www.kenwood.com/cs/ce/>.
General
•
This unit can only play the following CDs:
•
For detailed information and notes about the playable audio files, visit
<www.kenwood.com/cs/ce/audiofile/>.
Playable files
•
Playable audio file:
For disc: MP3 (.mp3), WMA (.wma), AAC (.aac)
For USB mass storage class device: MP3 (.mp3), WMA (.wma), AAC (.aac), AAC (.m4a),
WAV (.wav), FLAC (.flac)
•
Playable disc media: CD-R/CD-RW/CD-ROM
•
Playable disc file format: ISO 9660 Level 1/2, Joliet, Long file name
•
Playable USB device file system: FAT12, FAT16, FAT32
Even when audio files comply with the standards listed above, playback may be impossible
depending on the types or conditions of media or device.
The AAC (.m4a) file in a CD encoded by iTunes cannot be played on this unit.
Unplayable discs
•
Discs that are not round.
•
Discs with coloring on the recording surface or discs that are dirty.
•
Recordable/ReWritable discs that have not been finalized.
•
8cm CD. Attempting to insert using an adapter may cause malfunction.
About USB devices
•
You cannot connect a USB device via a USB hub.
•
Connecting a cable whose total length is longer than 5m may result in abnormal playback.
•
This unit cannot recognize a USB device whose rating is other than 5V and exceeds 1.5A.
About iPod/iPhone
•
Via USB:
Made for
– iPod touch (5th and 6th generation)
– iPod nano (7th generation)
– iPhone 4S, 5, 5S, 5C, 6, 6 Plus, 6S, 6S Plus, SE, 7, 7 Plus
•
Via Bluetooth:
Made for
– iPod touch (5th and 6th generation)
– iPhone 4S, 5, 5S, 5C, 6, 6 Plus, 6S, 6S Plus, SE, 7, 7 Plus
•
You cannot operate iPod if “KENWOOD” or “ ” is displayed on iPod.
•
Depending on the version of the operating system of the iPod/iPhone, some functions may
not operate on this unit.
ENGLISH
27

REFERENCES
About Android device
•
This unit supports Android OS 4.1 and above.
•
Some Android devices (with OS 4.1 and above) may not fully support
Android Open Accessory (AOA) 2.0.
•
If the Android device supports both mass storage class device and AOA 2.0,
this unit always playback via AOA 2.0 as priority.
About Spotify
•
Spotify application supports:
– iPhone 4S, 5, 5S, 5C, 6, 6 Plus, 6S, 6S Plus, SE, 7, 7 Plus (iOS 8 or above)
– iPod touch (5th and 6th generation)
– Android OS 4.0.3 or above
•
Spotify is a third-party service, therefore the specifications are subject to
change without prior notice. Accordingly, compatibility may be impaired
or some or all of the services may become unavailable.
•
Some functions of Spotify cannot be operated from this unit.
•
For issues using the application, please contact Spotify at
<www.spotify.com>.
About Bluetooth
•
Depending on the Bluetooth version of the device, some Bluetooth devices
may not be able to connect to this unit.
•
This unit may not work with some Bluetooth devices.
•
Signal conditions vary, depending on the surroundings.
Change the display information
Each time you press
•
If the information is unavailable or not recorded, “NO TEXT”, “NO INFO”, or other information (eg. station name,
playing time) appears.
Source name Display information
STANDBY Source name (Date)*
RADIO Frequency (Date)*
CD or USB
iPod USB/iPodBT or
ANDROID
SPOTIFY/SPOTIFY BT Context title (Date)*
BT AUDIO Song title (Artist)
AUX Source name (Date)*
*
Battery and signal strength of the Bluetooth device will be shown if
( 15)
DISP
, the display information changes.
(For FM Radio Data System stations only)
Station name (Date)* Radio text (Date)* Radio text+ (R.TEXT+) Song title
(Artist)
Song title (Date)* Frequency (Date)* (back to the beginning)
(For CD-DA)
Track title (Artist) Track title (Disc name) Track title (Date)* Playing time
(Date)*
(back to the beginning)
(For MP3/WMA/AAC/WAV/FLAC files)
Song title (Artist) Song title (Album title) Song title (Date)* File name
(Folder name)
(back to the beginning)
When
Song title (Artist)
Playing time (Date)*
Song title (Date)*
(Date)*
File name (Date)* Playing time (Date)*
[MODE OFF]/[BROWSE MODE]
Song title (Album name) Song title (Date)*
(back to the beginning)
Song title (Artist) Song title (Album name)
Playing time (Date)* (back to the beginning)
Song title (Album name) Song title (Date)* Playing time
(back to the beginning)
is selected
[BATT/SIGNAL]
( 9)
:
is set to
[AUTO]
.
28
ENGLISH

SPECIFICATIONS
FM Frequency Range 87.5 MHz — 108.0 MHz (50 kHz space)
Usable Sensitivity
(S/N=30dB)
Quieting Sensitivity
(DIN S/N=46dB)
Frequency Response (±3dB) 30 Hz — 15 kHz
Signal-to-Noise Ratio (MONO) 64.0 dB
Tuner
Stereo Separation (1kHz) 40dB
MW
Frequency Range 531kHz — 1611kHz (9kHz space)
(AM)
Usable Sensitivity (S/N=20dB) 28.2μV
LW
Frequency Range 153kHz — 279kHz (9kHz space)
(AM)
Usable Sensitivity (S/N=20dB) 50μV
For :
Laser Diode GaAIAs
Digital Filter (D/A) 8 times over sampling
Spindle Speed 500rpm — 200rpm (CLV)
Wow & Flutter Below measurable limit
Frequency Response (±1dB) 20Hz — 20kHz
Total Harmonic Distortion (1kHz) 0.01%
CD player
Signal-to-Noise Ratio (1kHz) 105 dB
Dynamic Range 90dB
Channel Separation 85dB
MP3 Decode Compliant with MPEG-1/2 Audio Layer-3
WMA Decode Compliant with Windows Media Audio
AAC Decode AAC-LC “.aac” files
0.71μV/75Ω
2.0μV/75Ω
For :
USB Standard USB1.1/USB2.0 Full Speed
File System FAT12/16/32
Maximum Supply Current DC5V
MP3 Decode Compliant with MPEG-1/2 Audio Layer-3
USB
WMA Decode Compliant with Windows Media Audio
AAC Decode AAC-LC “.aac”, “.m4a” files
WAV Decode Linear-PCM
FLAC Decode FLAC file (Up to 96kHz/24bit)
For :
USB Standard USB1.1/USB2.0 Full Speed
File System FAT12/16/32
Maximum Supply Current DC5V
Frequency Response (±1dB) 20Hz — 20kHz
Signal-to-Noise Ratio (1kHz) 105 dB
Dynamic Range 90dB
USB
Channel Separation 85dB
MP3 Decode Compliant with MPEG-1/2 Audio Layer-3
WMA Decode Compliant with Windows Media Audio
AAC Decode AAC-LC “.aac”, “.m4a” files
WAV Decode Linear-PCM
FLAC Decode FLAC file (Up to 96kHz/24bit)
1.5A
1.5A
ENGLISH
29

SPECIFICATIONS
Version Bluetooth 3.0
Frequency Range 2.402GHz — 2.480GHz
Output Power +4dBm (MAX), 0dBm (AVE) Power Class 2
Maximum Communication
Range
Bluetooth
Profile HFP 1.6 (Hands-Free Profile)
Maximum Output Power 50W×4
Full Bandwidth Power 22W×4 (at less than 1% THD)
Speaker Impedance 4Ω—8Ω
Tone Action Band 1: 62.5Hz±9dB
Audio
Preout Level/Load CD
Preout Impedance ≤600Ω
Line of sight approx. 10m (32.8ft)
A2DP (Advanced Audio Distribution Profile)
AVRCP 1.5 (Audio/Video Remote Control Profile)
SPP (Serial Port Profile)
PBAP (Phonebook Access Profile)
Band 2: 100Hz±9dB
Band 3: 160 Hz±9dB
Band 4: 250 Hz±9dB
Band 5: 400 Hz±9dB
Band 6: 630Hz±9dB
Band 7: 1kHz±9dB
Band 8: 1.6kHz±9dB
Band 9: 2.5kHz±9dB
Band 10: 4kHz±9dB
Band 11: 6.3kHz±9dB
Band 12: 10kHz±9dB
Band 13: 16kHz±9dB
: 2500mV/10kΩ
USB
: 2500mV/10kΩ
Frequency Response (±3dB) 20Hz—20kHz
Input Maximum Voltage 1000mV
Auxiliary
Input Impedance 30kΩ
Operating Voltage 14.4V (10.5V—16V allowable)
Maximum Current Consumption 10A
Operational Temperature Range –10°C—+60°C
General
Installation Size (W×H×D) 182mm×111mm×158mm
Weight
Subject to change without notice.
: 1.6kg
: 1.2kg
30
ENGLISH

INSTALLATION/CONNECTION
Warning
•
The unit can only be used with a 12V DC power supply, negative ground.
•
Disconnect the battery’s negative terminal before wiring and mounting.
•
Do not connect Battery wire (yellow) and Ignition wire (red) to the car chassis or Ground wire (black) to prevent a
short circuit.
•
To prevent short circuit:
– Insulate unconnected wires with vinyl tape.
– Be sure to ground this unit to the car’s chassis again after installation.
– Secure the wires with cable clamps and wrap vinyl tape around the wires that come into contact with metal parts
to protect the wires.
Part list for installation
(A)
Mounting sleeve
Caution
•
For safety’s sake, leave wiring and mounting to professionals. Consult the car audio dealer.
•
Install this unit in the console of your vehicle. Do not touch the metal parts of this unit during and shortly after use of
the unit. Metal parts such as the heat sink and enclosure become hot.
•
Do not connect the [ wires of speakers to the car chassis or Ground wire (black), or connect them in parallel.
•
Mount the unit at an angle of less than 30º.
•
If your vehicle wiring harness does not have the ignition terminal, connect Ignition wire (red) to the terminal on the
vehicle’s fuse box which provides 12 V DC power supply and is turned on and off by the ignition key.
•
Keep all cables away from heat dissipate metal parts.
•
After the unit is installed, check whether the brake lamps, blinkers, wipers, etc. on the car are working properly.
•
If the fuse blows, first make sure the wires are not touching car’s chassis, then replace the old fuse with one that has
the same rating.
Basic procedure
1
Remove the key from the ignition switch, then disconnect the [ terminal of the car battery.
2
Connect the wires properly.
See Wiring connection.
3
Install the unit to your car.
See Installing the unit (in-dash mounting).
4
Connect the [ terminal of the car battery.
5
Press to turn on the power.
6
Reset the unit.
( 33, 34)
( 32)
( 3)
(B)
Trim plate
(C)
Wiring harness
(D)
Extraction key
ENGLISH
31

INSTALLATION/CONNECTION
Installing the unit (in-dash mounting) How to remove the unit
1
Fit the catch pin on the extraction keys into the holes on
both sides of the trim plate, then pull it out.
2
Do the required wiring.
( 33, 34)
Bend the appropriate tabs to hold the
mounting sleeve firmly in place.
Dashboard of
your car
Insert the extraction keys deeply into the slots on each
side, then follow the arrows as shown on the illustration.
When installing without the mounting
sleeve
1
Remove the mounting sleeve and trim plate from the
unit.
2
Align the holes in the unit (on both sides) with the
vehicle mounting bracket and secure the unit with
screws (commercially available).
Use only the specified screws. Using wrong screws might
damage the unit.
32
ENGLISH

INSTALLATION/CONNECTION
Wiring connection
When connecting to an external amplifier, connect its ground wire to the car’s chassis to
avoid damaging the unit.
If your car does not have an ISO terminal:
We recommend installing the unit with a commercially available custom wiring harness
specific for your car and leave this job to professionals for your safety. Consult your car audio
dealer.
Connecting the ISO connectors on some VW/Audi or Opel (Vauxhall)
automobiles
You may need to modify the wiring of the supplied wiring harness as illustrated below.
A7 (Red) Ignition wire (Red)
UnitVehicle
A4 (Yellow)
Battery wire (Yellow)
Default wiring
ISO connectors
Pin
A4 Yellow
A5 Blue/White
A7 Red
A8 Black
B1
B2
B3
B4
B5
B6
B7
B8
1
*
( 34)
]
Purple
Purple/black
]
Gray
Gray/black
]
White
White/black
]
Green
Green/black
Color and function (for ISO connectors)
:
Battery
1
*
:
Power control
:
Ignition (ACC)
:
Earth (ground) connection
Rear speaker (right)
:
For 3-way crossover: Tweeter (right)
[
Front speaker (right)
:
[
[
[
For 3-way crossover: Mid range speaker (right)
Front speaker (left)
:
For 3-way crossover: Mid range speaker (left)
Rear speaker (left)
:
For 3-way crossover: Tweeter (left)
ENGLISH
33

INSTALLATION/CONNECTION
Wiring connection
Microphone input jack
( 12)
Front/Rear/Subwoofer output
For 3-way crossover:
Mid Range/Woofer output
Antenna terminal
Yellow (Battery wire)
Red (Ignition wire)
Red (A7)
Yellow (A4)
ISO connectors
Fuse (10A)
If no connections are made, do not let the wire come out from the tab.
Light blue/yellow
(Steering remote control wire)
2
*
Blue/White
(Power control wire/
Antenna control wire)
Brown
(Mute control wire)
STEERING WHEEL
REMOTE INPUT
REMOTE CONT
ANT CONT
P. CONT
MUTE
To the steering wheel remote control
adapter
To the power control terminal when using
the optional power amplifier or to the
antenna control terminal in the vehicle
To connect the Kenwood navigation
system, refer your navigation manual
NOTE: Total output for Blue/White wire (
is 12 V
350 mA.
1
2
*
*
) + (
)
34
ENGLISH


INHALT
VOR DER INBETRIEBNAHME 2
GRUNDLAGEN 3
ERSTE SCHRITTE 4
1 Wählen Sie die Anzeigesprache und
brechen Sie die Demonstration ab
2 Stellen Sie die Uhrzeit und das
Datum ein
3 Festlegen der Anfangseinstellungen
RADIO 6
CD/USB/iPod/ANDROID 8
AUX 11
Spotify 11
BLUETOOTH® 12
AUDIOEINSTELLUNGEN 20
DISPLAY-EINSTELLUNGEN 23
FEHLERSUCHE 24
ZUR BEZUGNAHME 27
Wartung
Weitere Informationen
TECHNISCHE DATEN 29
EINBAU/ANSCHLUSS 31
VOR DER INBETRIEBNAHME
WICHTIG
•
Um richtige Verwendung sicherzustellen, lesen Sie die Bedienungsanleitung vor der Verwendung des Produkts sorgfältig durch. Es ist besonders wichtig, dass Sie die als
Warnung und Vorsicht gekennzeichneten Hinweise in dieser Anleitung lesen und beachten.
•
Bitte bewahren Sie die Anleitung an sicherer Stelle und griffbereit zum Nachschlagen auf.
WARNUNG
•
Bedienen Sie keine Funktion, die Ihre Aufmerksamkeit vom Straßenverkehr ablenkt.
Vorsicht
Lautstärkeeinstellung:
•
Stellen Sie die Lautstärke so ein, dass Sie immer noch Geräusche von außerhalb des Fahrzeugs hören können, um Unfälle zu vermeiden.
•
S enken Sie die Lautstärke vor dem Abspielen digitaler Tonquellen, um Beschädigung der Lautsprecher durch plötzliche Tonspitzen zu vermeiden.
Allgemeines:
•
Vermeiden Sie Verwendung des externen Geräts, wenn dieses das sichere Fahren behindern kann.
•
Stellen Sie sicher, dass alle wichtigen Daten gesichert sind. Wir übernehmen keine Haftung für jeglichen Verlust aufgenommener Daten.
•
Stellen Sie sicher, dass keine Metallgegenstände (wie etwa Münzen oder Werkzeuge) ins Innere des Geräts gelangen und Kurzschlüsse verursachen.
•
Für : Wenn ein Disc-Fehler durch Kondensationsbildung auf der Laserlinse auftritt, werfen Sie die Disc aus und warten Sie eine Zeit lang, bis die
Kondensation getrocknet ist.
•
Je nach dem Typ des Fahrzeugs wird die Antenne automatisch ausgeschoben, wenn Sie die Einheit mit angeschlossenem Antennensteuerkabel
Schalten Sie beim Parken in einem Bereich mit niedriger Decke die Einheit aus oder stellen Sie die Quelle auf STANDBY.
Wie Sie diese Anleitung lesen
•
D ie Bedienung wird im Wesentlichen anhand der Tasten auf der Frontblende des erläuter t.
•
Englischsprachige Anzeigen werden zur Erklärung verwendet. Sie können die Anzeigesprache im
• [XX]
zeigt die gewählten Punkte an.
• ( XX)
zeigt an, das Bezugsinformationen auf der angegebenen Seitennummer vorhanden sind.
[FUNCTION]
-Menü wählen.
( 5)
( 34)
. einschalten.
2
DEUTSCH

GRUNDLAGEN
Frontblende
Auswurftaste und Ladeschlitz
Displayfenster
Lautstärke-Regler
Zum Auf der Frontblende
Einschalten
Einstellen der Lautstärke
Quelle auswählen
Ändern der Display-Information
Drücken Sie .
•
Zum Ausschalten halten Sie die Taste gedrückt.
Drehen Sie den Lautstärke-Regler.
Drücken Sie wiederholt.
Drücken Sie
DISP
wiederholt.
( 28)
Leuchtet beim
Herstellen der
Bluetooth-Verbindung
auf.
( 13)
Rücksetzen
Blinkt wenn die Einheit auf
Suchstatus schaltet.
DEUTSCH
3

ERSTE SCHRITTE
1
Wählen Sie die Anzeigesprache und brechen Sie die
Demonstration ab
Beim ersten Einschalten des Geräts (oder wenn
ist), erscheint Folgendes im Display: “SEL LANGUAGE”
1 Drehen Sie den Lautstärke-Regler zum Wählen von
[RUS]
(Russisch) oder
[ENG]
ist für das ursprüngliche Setup gewählt.
Dann erscheint folgendes in der Anzeige: “CANCEL DEMO”
“VOLUME KNOB”.
2 Drücken Sie den Lautstärke-Regler.
[YES]
ist für das ursprüngliche Setup gewählt.
3 Drücken Sie den Lautstärke-Regler erneut.
“DEMO OFF” erscheint.
Danach zeigt das Display den gewählten Übergangstyp:
“2-WAY X ’ OVER” oder “3-WAY X ’ OVER”
•
Zum Ändern des Übergangstyps siehe “Übergangstyp ändern”.
4
DEUTSCH
[SPA]
(Spanisch), und drücken Sie dann den Regler.
[FACTORY RESET]
“PRESS” “ VOLUME KNOB”
auf
[YES], 5
[ENG]
(Englisch),
“PRESS”
( 6)
gestellt
2
Stellen Sie die Uhrzeit und das Datum ein
1
Drücken Sie den Lautstärke-Regler, um auf
2 Drehen Sie den Lautstärke-Regler zum Wählen von
Sie dann den Regler.
Zum Einstellen der Uhr
3 Drehen Sie den Lautstärke-Regler zum Wählen von
drücken Sie dann den Regler.
4 Drehen Sie den Lautstärke-Regler, um die Einstellungen vorzunehmen,
und drücken Sie dann den Regler.
Stunde Minute
5 Drehen Sie den Lautstärke-Regler zum Wählen von
drücken Sie dann den Regler.
6 Drehen Sie den Lautstärke-Regler zum Wählen von
drücken Sie dann den Regler.
Zum Einstellen des Datums
7 Drehen Sie den Lautstärke-Regler zum Wählen von
drücken Sie dann den Regler.
8 Drehen Sie den Lautstärke-Regler zum Wählen von
[MM/DD/YY]
9 Drehen Sie den Lautstärke-Regler zum Wählen von
drücken Sie dann den Regler.
10 Drehen Sie den Lautstärke-Regler, um die Einstellungen vorzunehmen,
und drücken Sie dann den Regler.
Tag Monat Jahr oder Monat Tag Jahr
, und drücken Sie dann den Regler.
[FUNCTION]
zu schalten.
[CLOCK]
, und drücken
[CLOCKADJUST]
[CLOCKFORMAT]
[12H]
oder
[24H]
[DATEFORMAT]
[DD/MM/YY]
[DATESET]
oder
, und
, und
, und
, und
, und
11 Halten Sie zum Beenden gedrückt.
Zum Zurückschalten zum vorherigen Einstellelement drücken Sie .
3
Festlegen der Anfangseinstellungen
1
Drücken Sie wiederholt, um auf STANDBY zu schalten.
2 Drücken Sie den Lautstärke-Regler, um auf
3 Drehen Sie den Lautstärke-Regler zum Wählen eines Gegenstands
und drücken Sie dann den Regler.
4 Wiederholen Sie Schritt 3, bis der gewünschte Gegenstand gewählt
oder aktiviert ist.
5 Halten Sie zum Beenden gedrückt.
Zum Zurückschalten zum vorherigen Einstellelement drücken Sie .
[FUNCTION]
zu schalten.
( 5)
,

ERSTE SCHRITTE
AUDIO CONTROL
SWITCH
PREOUT
DISPLAY
EASY MENU
TUNER SETTING
PRESET TYPE
SYSTEM
KEY BEEP
SOURCE SELECT
SPOTIFY SRC
BUILT-IN AUX
(Gilt nicht, wenn 3-Wege-Übergang gewählt ist.)
REAR/SUBWOOFER
Line-Out-Buchsen an der Rückseite angeschlossen sind (über einen externen Verstärker).
( 34)
Bei Eingabe von
ON
: Die LCD DISPLAY Zonenbeleuchtung wechselt auf weiße Farbe um. ;
OFF
: Die LCD DISPLAY Zonenbeleuchtung verbleibt als Farbe von
( 24)
•
D ie KEY Zonenbeleuchtung von wechselt auf hellblaue Farbe um, wenn Sie
[FUNCTION]
•
Siehe Abbildung auf S eite 23 zur Zonenidentifikation.
NORMAL
(FM1/FM2/FM3/MW/LW).;
ungeachtet des Frequenzbands.
(Gilt nicht, wenn 3-Wege-Übergang gewählt ist.)
ON
:Aktiviert den Tastenberührungston.;
ON
:Aktiviert Sie SPOTIFY in der Quellenwahl.;
ON
:Aktiviert Sie AUX in der Quellenwahl.;
Standard:
: Wählt, ob hintere Lautsprecher oder ein Subwoofer an die
[FUNCTION]
...
[COLOR SELECT]
eingeben, ungeachtet der Einstellung von
:Speichert einen Sender für jede Sendespeichertaste in jedem Frequenzband
MIX
:Speichert einen Sender für jede Sendespeichertaste
OFF
OFF
:Deaktiviert.
OFF
:Deaktiviert.
:Deaktiviert.
[EASY MENU]
( 11)
( 11)
.
XX
P - OFF WAIT
CD READ
F/W UPDATE
.
UPDATE SYSTEM
F/W UP xxxx
FACTORY RESET YES
CLOCK
CLOCK DISPLAY
ENGLISH
РУССКИЙ
ESPANOL
Nur zutreffend, wenn der Demonstrationsmodus ausgeschaltet ist.
Stellt die Zeitdauer ein, bis das Gerät automatisch ausschaltet (im Standby-Modus), um
Batteriestrom zu sparen.
20M
: 20 Minutes ;
40M
: 40 Minutes ;
60M
: 60Minutes;
–––
:Hebt auf
(Für )
1
:Hiermit wird automatisch zwischen Discs mit Audiodateien und Musik-CDs
unterschieden.;
2
:Hiermit wird die Wiedergabe zwangsweise als Musik-CD durchgeführt. Es kommt
kein Ton, wenn eine Disc mit Audiodateien abgespielt wird.
YES
:Startet die Aktualisierung der Firmware.; NO:Hebt auf (Aktualisierung wird
nicht ausgeführt).
Einzelheiten darüber, wie Sie die Firmware aktualisieren können, besuchen Sie
<www.kenwood.com/cs/ce/>.
:Setzt die Einstellungen auf Standardwerte zurück (ausgenommen gespeicherte
Sender).;
NO
:Hebt auf.
ON
:Die Uhrzeit wird im Display angezeigt, auch wenn das Gerät ausgeschaltet wird.;
OFF
:Hebt auf.
Wählen Sie die Anzeigesprache für das
Information, wo zutreffend.
Als Standard ist
[ENGLISH]
ausgewählt.
[FUNCTION]
-Menü und die Musik-
DEUTSCH
5

ERSTE SCHRITTE
Übergangstyp ändern
1
Drücken Sie wiederholt, um auf STANDBY zu schalten.
2 Die Zifferntasten 4 und 5 gedrückt halten, um auf Übergangswahl zu
schalten.
Der aktuelle Übergangstyp erscheint.
3 Drehen Sie den Lautstärke-Regler zum Wählen von “2WAY” oder “3WAY”,
und drücken Sie dann den Regler.
4 Drehen Sie den Lautstärke-Regler zum Wählen von “YES” oder “NO”, und
drücken Sie dann den Regler.
Der gewählte Übergangstyp erscheint.
•
Zum Abbrechen halten Sie gedrückt.
•
Zum Anpassen der gewählten Übergangseinstellungen
Vorsicht
Wählen Sie einen Übergangstyp entsprechend der Art des Anschlusses der
Lautsprecher.
Wenn Sie einen falschen Typ wählen:
•
Die Lautsprecher können beschädigt werden.
•
Der Ausgangstonpegel kann sehr hoch oder niedrig sein.
( 33, 34)
( 21, 22)
.
RADIO
Suche nach einem Sender
1
Drücken Sie wiederholt zum Wählen von RADIO.
2 Drücken Sie wiederholt, um FM1/FM2/FM3/MW/LW zu wählen.
3 Drücken Sie S/T, um einen Sender zu suchen.
•
Zum Ändern des Suchverfahrens für S/T
wiederholt.
AUTO1
AUTO2
MANUAL
•
Zum Speichern eines Senders
gedrückt.
•
Zum Auswählen eines gespeicherten Senders
Zifferntasten (
: Sucht automatisch nach einem Sender.
: Suchen Sie nach einem Festsender.
: Sucht manuell nach einem Sender.
1
bis6).
: Halten Sie eine der Zifferntasten (1bis6)
Andere Einstellungen
1
Drücken Sie den Lautstärke-Regler, um auf
2 Drehen Sie den Lautstärke-Regler zum Wählen eines Gegenstands
und drücken Sie dann den Regler.
3 Wiederholen Sie Schritt 2, bis der gewünschte Gegenstand gewählt/
aktiviert ist, oder folgen Sie den Anweisungen auf dem gewählten
Gegenstand.
4 Halten Sie zum Beenden gedrückt.
Zum Zurückschalten zum vorherigen Einstellelement drücken Sie .
: Drücken Sie
: Drücken Sie eine der
[FUNCTION]
zu schalten.
( 7)
,
6
DEUTSCH

RADIO
TUNER SETTING
LOCAL SEEK
AUTO
MEMORY
MONO SET
NEWS SET ON
REGIONAL ON
AF SET ON
TI ON
PTY SEARCH
CLOCK
TIMESYNC
Standard:
ON
: Sucht nur Sender mit gutem Empfang. ;
•
D ie vorgenommenen Einstellungen gelten nur für die gewählte Quelle/den gewählten
Sender. Wenn Sie die Quelle/den Sender gewechselt haben, müssen Sie die Einstellungen
erneut vornehmen.
YES
:Beginnt automatisch die Speicherung von 6 Sendern mit gutem Empfang.; NO:Hebt auf.
•
Nur wählbar, wenn
ON
:Verbessern Sie den FM (UKW)-Empfang (aber der Stereoeffekt kann verloren gehen).;
OFF
:Hebt auf.
: Das Gerät schaltet kurzzeitig auf das Nachrichtenprogramm, falls verfügbar. ;
OFF
:Hebt auf.
: Schaltet auf einen anderen Sender in der spezifischen Region nur mit der “AF”-Steuerung.;
OFF
:Hebt auf.
: Sucht automatisch einen anderen Sender auf, der das gleiche Programm im gleichen
Radio Data System-Netzwerk sendet und einen besseren Empfang aufweist, falls der aktuelle
Empfang schlecht ist.;
:Erlaubt es, das Gerät kurzzeitig auf Verkehrsinformation schalten, wenn verfügbar (“TI”
leuchtet auf).;
1
D rehen Sie den Lautstärke-Regler zum Wählen des verfügbaren Programmtyps (siehe
Folgendes), und drücken Sie dann den Regler.
2
D rehen Sie den Lautstärke-Regler zum Wählen der PTY-Sprache (
GERMAN
3
Drücken Sie S/T zum Starten des Suchlaufs.
ON
: Synchronisiert die Zeit des Geräts mit der Radio Data System-Senderzeit. ;
[NORMAL]
OFF
:Hebt auf.
OFF
:Hebt auf.
), und drücken Sie dann den Regler.
OFF
für
[PRESETTYPE]
: Hebt auf.
gewählt ist.
ENGLISH/FRENCH
( 5)
OFF
: Hebt auf.
XX
Verfügbarer Programmtyp für
:
NEWS, AFFAIRS, INFO
SPEECH
SCIENCE, VARIED, WEATHER, FINANCE, CHILDREN, SOCIAL, RELIGION
PHONE IN, TRAVEL, LEISURE, DOCUMENT
MUSIC
:
POPM
(Musik),
CLASSICS, OTHERM
FOLKM
Das Gerät sucht den Programmtyp, der unter
wenn gewählt.
• [LOCAL SEEK]/[MONOSET]/[NEWSSET]/[REGIONAL]/[AFSET]/[PTYSEARCH]
wählbar, wenn der Wellenbereich FM1/FM2/FM3 ist.
•
Wenn die Lautstärke während des Empfangs von Verkehrsinformationen oder
Nachrichtensendungen eingestellt wird, wird die eingestellte Lautstärke automatisch
gespeichert. Wird die Verkehrsfunk-Funktion oder die Nachrichtensendung das
nächste Mal aufgerufen, wird diese Einstellung übernommen.
/
(Musik)
(Information),
ROCKM
(Musik),
[PTY SEARCH]
SPORT, EDUCATE, DRAMA, CULTURE
(Musik),
EASYM
(Musik),
JAZZ, COUNTRY, NATIONM
[SPEECH]
oder
LIGHTM
[MUSIC]
(Musik),
,
(Musik),
OLDIES
kategorisiert ist,
ist nur
,
,
DEUTSCH
7

CD/USB/iPod/ANDROID
Starten Sie die Wiedergabe
Die Quelle schaltet automatisch um, und die Wiedergabe startet.
CD
Beschriftungsseite
M
Disc auswerfen
USB-Eingangsterminal
8
DEUTSCH
USB
CA-U1EX (max.: 500mA)
(optionales Zubehörteil)
iPod/iPhone
KCA-iP102/KCA-iP103
(optionales Zubehör)
oder Zubehör von iPod/iPhone
ANDROID
*
USB Kabel
(im Handel erhältlich)
Wählbare Quelle:
•
: CD/USB/iPod USB/ANDROID
•
: USB/iPod USB/ANDROID
Zum Auf der Frontblende
Wiedergabe/Pause
4
1
*
2
*
3
2
*
Vorspulen/Rückspulen
Auswählen eines Tracks/einer Datei
Auswählen eines Ordners
1
*
KCA-iP102 : 30-poliger Typ, KCA-iP103 : Lightning-Typ
2
*
Lassen Sie bei Nichtgebrauch nicht das Kabel im Auto liegen.
3
*
Wenn ein Android-Gerät angeschlossen wird, wird “Press [VIEW] to install KENWOOD MUSIC PLAY APP” angezeigt. Gehen Sie
zur Installation der Anwendung gemäß den Anweisungen vor. Sie können auch vor dem Verbinden die neueste Version der
KENWOOD MUSIC PLAY-Anwendung auf Ihrem Android-Gerät installieren. Für die neueste Information besuchen Sie
<www.kenwood.com/cs/ce/>.
4
*
Bei ANDROID: Trifft nur zu, wenn
5
*
Bei CD: Nur für MP3/WMA/AAC-Dateien. Dies funktioniert nicht bei iPod/ANDROID.
*
5
*
[BROWSE MODE]
Drücken Sie
Halten Sie S/T gedrückt.
Drücken Sie
Drücken Sie J/K.
gewählt ist.
( 9)
.
S/T.

CD/USB/iPod/ANDROID
Zum Auf der Frontblende
Wiederholte
Wiedergabe
Zufallswiedergabe
6
*
Bei iPod/ANDROID: Trifft nur zu, wenn
7
*
Bei CD: Nur für MP3/WMA/AAC-Dateien.
6
*
Drücken Sie wiederholt.
TRACK REPEAT/ALL REPEAT
FILE REPEAT/FOLDER REPEAT/ALL REPEAT
FILE REPEAT/FOLDER REPEAT/REPEAT OFF
6
*
Drücken Sie wiederholt.
DISC RANDOM/RANDOM OFF
FOLDER RANDOM/RANDOM OFF
Halten Sie die gedrückt, um
7
*
wählen.
[MODEOFF]/[BROWSE MODE]
: Audio-CD
: Audio-CD
: MP3/WMA/
: iPod oder
: MP3/WMA/AAC/WAV/
FLAC-Datei, iPod oder
ANDROID
ALLRANDOM
gewählt ist.
Wählen Sie den Steuermodus
Während iPod USB als Quelle gewählt ist, drücken Sie 5 wiederholt.
MODE ON
: Steuern Sie den iPod mit dem iPod selber. Sie können aber weiterhin
Wiedergabe/Pause, Datei-Überspringen, Vorspulen oder Zurückspulen von
MODE OFF
Während ANDROID als Quelle gewählt ist, drücken Sie 5 wiederholt.
BROWSE MODE
HAND MODE
Dateien von dieser Einheit steuern.
: Steuern Sie den iPod von dieser Einheit.
: Steuern Sie das Android-Gerät von dieser Einheit über die im Android-
Gerät installierte Anwendung KENWOOD MUSIC PLAY.
: Steuern Sie das Android-Gerät vom Android-Gerät selber über andere
im Android-Gerät installierte Media-Player-Anwendungen. Sie können
aber weiterhin Wiedergabe/Pause und Datei-Überspringen von dieser
Einheit steuern.
AAC/WAV/
FLAC-Datei
ANDROID
zu
Wählen Sie das Musiklaufwerk
Während USB als Quelle gewählt ist, drücken Sie 5 wiederholt.
Im folgenden Laufwerk gespeicherte Titel werden abgespielt.
•
Wählen Sie internen oder externen Speicher für ein Smartphone
(Massenspeicherklasse).
•
Gewähltes Laufwerk bei Gerät mit mehreren Laufwerken.
Auswählen einer Datei aus einem Ordner/einer Liste
Beim iPod/ANDROID nur gültig, wenn
1 Drücken Sie .
2 Drehen Sie den Lautstärke-Regler zum Wählen eines Ordners/einer
Liste, und drücken Sie dann den Regler.
3 Drehen Sie den Lautstärke-Regler zum Wählen einer Datei, und
drücken Sie dann den Regler.
Schnellsuche
Wenn Sie viele Dateien haben, können Sie diese schnell durchsuchen.
Drehen Sie den Lautstärke-Regler schnell, um die Liste schnell zu
durchsuchen.
Suchlauf überspringen
Drücken Sie S/T, um mit einem vorgegebenen Überspringen-
Suchverhältnis zu suchen.
•
Wenn S/T gedrückt gehalten wird, wird Suchlauf mit einem
Verhältnis von 10
Alphabetische Suche
Sie können eine Datei anhand des Anfangsbuchstabens suchen.
Für iPod USB-Quelle
1 Drehen Sie den Lautstärke-Regler schnell für Zeichensuche.
2 Drehen Sie den Lautstärke-Regler zum Wählen des
Buchstabens.
• Wählen Sie “ * ”, um ein anderes Zeichen als die Buchstaben A bis Z oder
die Zahlen 0 bis 9 zu suchen.
3 Drücken Sie S/T, um auf die Eingabeposition
umzuschalten.
• Sie können bis zu 3 Zeichen eingeben.
4 Drücken Sie den Lautstärke-Regler zum Starten der Suche.
(gilt nur für CD, USB und ANDROID-Quelle)
%
[MODEOFF]/[BROWSE MODE]
(gilt nur für iPod USB und ANDROID-Quelle)
( 10, [SKIPSEARCH])
ausgeführt.
(gilt nur für iPod USB und ANDROID-Quelle)
gewählt ist.
DEUTSCH
9

CD/USB/iPod/ANDROID
Für ANDROID-Quelle
1 Drücken Sie J/K, um auf Zeichensuche zu schalten.
2 Drehen Sie den Lautstärke-Regler zum Wählen des Buchstabens.
^A^
: Großbuchstaben (A bis Z)
_A_
: Kleinbuchstaben (a bis z)
-0-
: Zahlen (0 bis 9)
: Andere Zeichen als die Buchstaben A bis Z oder die Zahlen 0 bis 9
***
3 Drücken Sie den Lautstärke-Regler zum Starten der Suche.
•
Zum Zurückkehren zum Grundordner/ersten Datei/Top-Menü drücken 5.
für BT AUDIO-Quelle.)
•
Zum Zurückschalten zum vorherigen Einstellelement drücken Sie .
•
Zum Abbrechen halten Sie gedrückt.
(Gilt nicht
Hören Sie TuneIn Radio/TuneIn Radio Pro
Beim Hören von TuneIn Radio oder TuneIn Radio Pro schließen Sie das iPod/iPhone am
USB-Eingang des Geräts an.
•
Das Gerät gibt den Ton von diesen Anwendungen aus.
Einstellungen zur Verwendung der KENWOOD Remote-Anwendung
KENWOOD Remote-Anwendung ist darauf ausgelegt, die Bedienung des KENWOOD
Auto-Receivers vom iPhone/iPod (über USB-Eingang).
Vorbereitung:
Installieren Sie vor dem Verbinden die neueste Version der
KENWOOD Remote-Anwendung auf Ihrem Gerät. Für die neueste Information besuchen
Sie <www.kenwood.com/cs/ce/>.
Sie können die Einstellungen auf gleiche Weise vornehmen wie bei Verbindung über
Bluetooth.
( 18)
Andere Einstellungen
1
Drücken Sie den Lautstärke-Regler, um auf
2 Drehen Sie den Lautstärke-Regler, um einen Gegenstand zu treffen
(siehe folgende Tabelle), und drücken Sie dann den Regler.
3 Wiederholen Sie Schritt 2, bis der gewünschte Gegenstand gewählt
oder aktiviert ist.
4 Halten Sie zum Beenden gedrückt.
Zum Zurückschalten zum vorherigen Einstellelement drücken Sie .
[FUNCTION]
zu schalten.
Standard:
USB
MUSICDRIVE DRIVECHANGE
SKIPSEARCH 0.5%/1%/5%/10%
gewählt, und die Wiedergabe star tet.
Wiederholen Sie Schritt
Überspringen-Suchverhältnis für alle Dateien gewählt.
:Das nächste Laufwerk (
1
bis 3, um die folgenden Laufwerke zu wählen.
: Beim Hören einer iPod USB- oder ANDROID-Quelle wird das
[DRIVE 1]
bis
[DRIVE 4]
) wird automatisch
XX
10
DEUTSCH

AUX
Vorbereitung:
Wählen Sie
1
[ON]
für
[BUILT-IN AUX]
für
[SOURCE SELECT]. ( 5)
Beginnen Sie zu hören
Schließen Sie einen tragbaren Audioplayer (im Handel erhältlich) an.
Auxiliary-Eingabebuchse
Tragbarer Audioplayer
Spotify
Vorbereitung:
Installieren Sie die neueste Version der Spotify-Anwendung auf Ihrem Gerät (iPhone/
iPod touch), erstellen Sie ein Konto und melden sich bei Spotify an.
•
Wählen Sie
Beginnen Sie zu hören
1
2 Schließen Sie Ihr Gerät an die USB-Eingangsbuchse an.
[ON]
für
[SPOTIFYSRC]
Öffnen Sie die Spotify-Anwendung auf Ihrem Gerät.
in
[SOURCESELECT]. ( 5)
2 Drücken Sie wiederholt zum Wählen von AUX.
3 Schalten Sie den tragbaren Audioplayer ein und starten Sie die
3,5-mm-Stereo-Ministecker mit “L”-förmigem Anschluss
(im Handel erhältlich)
Wiedergabe.
Den AUX-Namen einstellen
Beim Hören eines am Gerät angeschlossenen tragbaren Audioplayer...
1 Drücken Sie den Lautstärke-Regler, um auf
2 Drehen Sie den Lautstärke-Regler zum Wählen von
drücken Sie dann den Regler.
3 Drehen Sie den Lautstärke-Regler zum Wählen von
drücken Sie dann den Regler.
4 Drehen Sie den Lautstärke-Regler zum Wählen eines Gegenstands, und
drücken Sie dann den Regler.
AUX
(Standard)/
5 Halten Sie zum Beenden gedrückt.
Zum Zurückschalten zum vorherigen Einstellelement drücken Sie .
DVD/PORTABLE/GAME/VIDEO/TV
[FUNCTION]
zu schalten.
[SYSTEM]
, und
[AUXNAME SET]
, und
USB-Eingangsterminal
3 Drücken Sie wiederholt zum Wählen von SPOTIFY.
Die Sendung beginnt automatisch.
KCA-iP102/KCA-iP103 (optionales Zubehör)
oder Zubehör von iPod/iPhone
2
*
Zum Auf der Frontblende
Wiedergabe/Pause
Einen Track überspringen
Daumen nach oben oder Daumen
nach unten
Starten Sie das Radio
1
*
2
*
3
*
4
*
3
*
KCA-iP102 : 30-poliger Typ, KCA-iP103 : Lightning-Typ
Lassen Sie bei Nichtgebrauch nicht das Kabel im Auto liegen.
Diese Funktion steht nur für Tracks im Radio zur Verfügung. Wenn Daumen nach unten gewählt ist, wird der
aktuelle Track übersprungen.
( 12)
Drücken Sie
Drücken Sie
Drücken Sie J/K.
Halten Sie
.
4
S*
/T.
5 gedrückt.
DEUTSCH
1
*
11

Spotify
Zum Auf der Frontblende
Wiederholte Wiedergabe*5Drücken Sie wiederholt.
REPEAT ALL/REPEAT ONE*
Zufallswiedergabe*
5
Drücken Sie wiederholt.*
SHUFFLE ON/SHUFFLE OFF
4
*
Nur für Premium-Konto-Anwender verfügbar.
5
*
Nicht für die Tracks in der Playlist verfügbar.
Bevorzugte Song-Information speichern
Während des Hörens von Radio mit Spotify...
Halten Sie den Lautstärke-Regler gedrückt.
“SAVED” erscheint, und die Informationen werden in “Your Music (Ihre Musik)” oder
“Your Library (Ihre Bibliothek)” in Ihrem Spotify-Konto gespeichert.
Zum Rücknehmen der Speicherung wiederholen Sie das gleiche Verfahren.
“REMOVED” erscheint, und die Informationen werden von “Your Music (Ihre Musik)” oder
“Your Library (Ihre Bibliothek)” in Ihrem Spotify-Konto entfernt.
Suchen Sie nach einem Song oder Sender
1
Drücken Sie .
2 Drehen Sie den Lautstärke-Regler zum Wählen eines Listentyps, und
drücken Sie dann den Regler.
Die angezeigten Listentypen unterscheiden sich je nach der von Spotify
gesendeten Information.
3 Drehen Sie den Lautstärke-Regler zum Wählen des gewünschten Songs
oder Senders.
4 Drücken Sie den Lautstärke-Regler zum Bestätigen.
Sie können die Liste schnell durchsuchen, indem Sie den Lautstärke-Regler schnell
drehen.
Zum Abbrechen halten Sie
gedrückt.
4
/
REPEAT OFF
4
BLUETOOTH®
BLUETOOTH — Verbindung
Unterstützte Bluetooth-Profile
–
Hands-Free Profile (HFP)
–
Advanced Audio Distribution Profile (A2DP)
–
Audio/Video Remote Control Profile (AVRCP)
–
Serial Port Profile (SPP)
–
Phonebook Access Profile (PBAP)
Unterstützte Bluetooth-Codecs
–
Sub-Band-Codec (SBC)
–
Er weiterte Audio-Codierung (AAC)
Schließen das Mikrofon an
Geräterückseite
Mikrofoneingangsbuchse
Stellen Sie den
Mikrofonwinkel ein
Sichern Sie das Kabel mit
Kabelklemmen (nicht mitgeliefert),
wenn erforderlich.
Mikrofon
(mitgeliefert)
12
DEUTSCH

BLUETOOTH®
Zum erstmaligen Registrieren und Anschließen eines
Bluetooth-Geräts
1
Drücken Sie , um die Einheit einzuschalten.
2 Suchen und wählen Sie den Modellnamen dieser Einheit (DPX-5 /
DPX-M3
“PAIRING” “PASS XXXXXX” Gerätename “PRESS” “VOLUME KNOB” erscheint
im Display.
• Bei einigen Bluetooth-Geräten müssen Sie möglicherweise den PIN-Code
(Personal Identification Number) sofort nach der Suche eingeben.
3 Drücken Sie den Lautstärke-Regler zum Starten des Pairing-Vorgangs.
“PAIRING OK” erscheint, wenn das Pairing fertig ist.
Wenn der Pairing-Vorgang ausgeführt ist, wird die Bluetooth-Verbindung automatisch
hergestellt.
Die Anzeige “BT1” und/oder “BT2” auf der Frontblende leuchtet auf.
•
Diese Einheit unterstützt Secure Simple Pairing (SSP).
•
Bis zu fünf Geräte können insgesamt registriert (gepairt) werden.
•
Wenn das Pairing ausgeführt ist, bleibt das Bluetooth-Gerät in der Einheit registriert,
auch wenn Sie die Einheit zurücksetzen. Zum Löschen des gekoppelten Geräts,
[DEVICEDELETE]
•
Es können maximal zwei Bluetooth-Telefone und ein Bluetooth-Audiogerät zur Zeit
angeschlossen werden.
Während BT AUDIO als Quelle eingestellt ist, können Sie die Verbindung zu fünf
Bluetooth-Audiogeräten herstellen und zwischen diesen Geräten umschalten.
•
Manche Bluetooth-Geräte können nicht in der Lage sein, nach dem Pairing die
Verbindung automatisch herzustellen. Schließen Sie das Gerät manuell an die Einheit
an.
•
Weitere Information siehe Bedienungsanleitung Ihres Bluetooth-Geräts.
) auf dem Bluetooth-Gerät.
.
17,
( 18)
Auto Pairing
Wenn Sie Ihr iPhone/iPod touch/Android-Gerät an den USB-Eingang anschließen, wird
automatisch eine Pairing-Anforderung (über Bluetooth) aktiviert.
Drücken Sie den Lautstärke-Regler einmal zum Pairing, nachdem Sie den
Gerätenamen bestätigt haben.
Automatische Pairing-Anforderung wird nur aktiviert, wenn:
–
Die Bluetooth-Funktion des angeschlossenen Geräts eingeschaltet ist.
– [AUTO PAIRING]
–
Die KENWOOD MUSIC PLAY-Anwendung wird auf dem Android-Gerät
installiert, und
auf
[ON]
gestellt ist.
[BROWSEMODE]
( 17)
wird gewählt.
( 9)
( 8)
DEUTSCH
13

BLUETOOTH®
BLUETOOTH — Handy
Empfangen Sie einen Ruf
Wenn ein Ruf empfangen wird:
•
Die KEY Zone leuchtet in grüner Farbe auf und blinkt.
•
Das Gerät nimmt automatisch den Ruf entgegen, wenn
gewählte Zeit gestellt ist.
Während eines Rufs:
•
Die LCD DISPLAY Zone leuchtet entsprechend den für
Zone vorgenommenen Einstellungen in grüner Farbe auf.
•
Falls Sie das Gerät ausschalten, wird die Bluetooth-Verbindung getrennt.
14
DEUTSCH
( 15)
[AUTO ANSWER]
[DISPLAY] ( 24)
auf eine
und die KEY
Die folgenden Bedienungsvorgänge sind je nach dem angeschlossenen Telefon
möglicherweise nicht verfügbar.
Zum Auf der Frontblende
Erster ankommender Anrufe...
Nehmen Sie einen Ruf
entgegen
Weisen Sie einen Ruf ab
Einen Anruf beenden
Während des Sprechens beim ersten ankommenden Anruf...
Einen anderen
ankommenden Anruf
entgegennehmen und den
aktuellen Anruf halten
Einen anderen
ankommenden Anruf
abweisen
Bei zwei aktiven Anrufen...
Aktuellen Anruf beenden
und gehaltenen Anruf
aktivieren
Umschalten zwischen
aktuellem Anruf und
gehaltenem Anruf
Stellen Sie die
Telefonlautstärke ein
[00]
bis
[35]
(Standard:
Umschalten zwischen
Freisprech- und
Privatgespräch-Modi
Drücken Sie
Regler oder eine der Zifferntasten
(
1bis 6).
Drücken Sie
Drücken Sie
Drücken Sie
Drücken Sie
Drücken Sie
Drücken Sie
Drehen Sie den Lautstärke-Regler
während eines Anrufs.
[15]
)
•
Diese Einstellung hat keine Auswirkung auf
den Lautstärkepegel der anderen Quellen.
Drücken Sie
•
Die Bedienung kann je nach dem
angeschlossenen Bluetooth-Gerät
unterschiedlich sein.
oder den Lautstärke-
.
.
.
.
.
.
während eines Anrufs.

BLUETOOTH®
Verbessern Sie die Sprachqualität
Während am Telefon gesprochen wird...
1 Drücken Sie den Lautstärke-Regler, um auf
2 Drehen Sie den Lautstärke-Regler, um einen Gegenstand zu treffen
(siehe folgende Tabelle), und drücken Sie dann den Regler.
3 Wiederholen Sie Schritt 2, bis der gewünschte Gegenstand gewählt
oder aktiviert ist.
4 Halten Sie zum Beenden gedrückt.
Zum Zurückschalten zum vorherigen Einstellelement drücken Sie .
MIC GAIN LEVEL –10
NR LEVEL LEVEL –5
ECHO CANCEL
bis
mit höherer Zahl zu.
an, bis das geringste Rauschen bei einem Telefongespräch gehört wird.
LEVEL –5
Löschung an, bis das letzte Echo bei einem Telefongespräch gehört wird.
LEVEL +10(LEVEL –4
bis
LEVEL +5(LEVEL 0
bis
LEVEL +5(LEVEL 0
Nehmen Sie die Einstellungen zum Empfang eines Anrufs vor
Drücken Sie , um auf Bluetooth-Modus zu schalten.
1
2 Drehen Sie den Lautstärke-Regler, um einen Gegenstand zu treffen
(siehe folgende Tabelle), und drücken Sie dann den Regler.
3 Wiederholen Sie Schritt 2, bis der gewünschte Gegenstand gewählt oder
aktiviert ist.
4 Halten Sie zum Beenden gedrückt.
Zum Zurückschalten zum vorherigen Einstellelement drücken Sie .
[FUNCTION]
):Passen Sie den Rauschunterdrückungspegel
):Passen Sie die Verzögerungszeit für die Echo-
zu schalten.
Standard:
): Die Empfindlichkeit des Mikrofons nimmt
SETTINGS
AUTO ANSWER
BATT/SIGNAL* AUTO
*
Funktionalität hängt von dem Typ der verwendeten Telefone ab.
XX
Tätigen Sie einen Ruf
Sie können einen Ruf von der Ruf-Historie, dem Telefonbuch oder durch Wählen der
Telefonnummer tätigen. Ruf durch Sprachbefehl ist auch möglich, wenn Ihr Handy
dieses Merkmal hat.
1 Drücken Sie , um auf Bluetooth-Modus zu schalten.
“(Name des ersten Geräts)” erscheint.
• Wenn zwei Bluetooth-Telefone angeschlossen sind, drücken Sie erneut,
um auf das andere Telefon umzuschalten.
“(Name des zweiten Geräts)” erscheint.
2 Drehen Sie den Lautstärke-Regler, um einen Gegenstand zu treffen
(siehe folgende Tabelle), und drücken Sie dann den Regler.
3 Wiederholen Sie Schritt 2, bis der gewünschte Gegenstand gewählt/
aktiviert ist, oder folgen Sie den Anweisungen auf dem gewählten
Gegenstand.
4 Halten Sie zum Beenden gedrückt.
Zum Zurückschalten zum vorherigen Einstellelement drücken Sie .
CALL HISTORY
1
bis30:Die Einheit nimmt den ankommenden Ruf automatisch innerhalb der gewählten
Zeit entgegen (in Sekunden).;
:Zeigt die Stärke der Batterie und des Signals, wenn die Einheit ein Bluetooth-Gerät
erkennt und das Bluetooth-Gerät verbunden ist.;
(Nur gültig, wenn das Telefon PBAP unterstützt.)
1
D rücken Sie den Lautstärke-Regler zum Wählen eines Namens oder einer
Telefonnummer.
• “INCOMING”, “OUTGOING” oder “MISSED” erscheint im unteren Teil des Displays, um
den vorherigen Rufstatus zu zeigen.
• Drücken Sie
• “NO DATA” erscheint, wenn kein aufgezeichneter Verlauf vorhanden ist.
2
D rücken Sie den Lautstärke-Regler zum Anrufen.
OFF
:Hebt auf.
OFF
:Hebt auf.
DISP
, um die Anzeigekategorie (NUMBER oder NAME) umzuschalten.
Standard:
XX
DEUTSCH
15

BLUETOOTH®
PHONE BOOK
NUMBER DIAL
VOICE
BATT LOW/MID/FULL
NO SIGNAL/LOW/MID/MAX
*
Funktionalität hängt von dem Typ der verwendeten Telefone ab.
(Nur gültig, wenn das Telefon PBAP unterstützt.)
1
D rehen Sie den Lautstärke-Regler schnell, um auf alphabetische Suche zu schalten
(wenn das Telefonbuch viele Kontakte enthält).
Das erste Menü (ABCDEFGHIJK) erscheint.
• Um zum anderen Menü (LMNOPQRSTUV oder WXYZ1
J/K
• Um den gewünschten ersten Buchstaben zu wählen, drehen Sie den Lautstärke-
Wählen Sie “1” für Suche mit Nummern und wählen Sie “
2
3
•
•
•
1
2
3
Sprechen Sie den Namen des anzurufenden Kontakts oder den Sprachbefehl deutlich, um die
Telefonfunktionen zu steuern.
.
Regler oder drücken Sie
D rehen Sie den Lautstärke-Regler zum Wählen eines Namens, und drücken Sie dann den
Regler.
D rehen Sie den Lautstärke-Regler zum Wählen einer Telefonnummer, und drücken Sie
dann den Regler zum Anrufen.
Das Telefonbuch des angeschlossenen Telefons wird automatisch beim Pairing zur Einheit
übertragen.
Kontakte werden in die folgenden Kategorien unterteilt: HOME, OFFICE, MOBILE, OTHER,
GENERAL.
D ieses Gerät kann nur Buchstaben ohne Umlaute oder Akzentzeichen anzeigen.
(Buchstaben mit Akzentzeichen wie “Ú” werden als “U” angezeigt.)
D rehen Sie den Lautstärke-Regler zum Wählen einer Nummer (0 bis 9) oder eines
Zeichens (
Drücken Sie
Wiederholen Sie Schritt
D rücken Sie den Lautstärke-Regler zum Anrufen.
*
:Zeigt die Batteriestärke.
*
:Zeigt die Stärke des momentan empfangenen Signals.
S/T
, #, +).
S/T
, um die Eingabeposition zu verschieben.
1
und 2, bis die Eingabe der Telefonnummer beendet ist.
( Einen Ruf mit Spracherkennung tätigen)
) zu gehen, drücken Sie
, und drücken Sie anschließend den Knopf.
” für Suche mit Symbolen.
Einen Ruf mit Spracherkennung tätigen
Halten Sie gedrückt, um die Spracherkennung auf dem
1
angeschlossenen Telefon zu aktivieren.
2 Sprechen Sie den Namen des anzurufenden Kontakts oder den
Sprachbefehl deutlich, um die Telefonfunktionen zu steuern.
•
Unterstützte Spracherkennungsmerkmale können sich je nach Telefon unterscheiden.
Einzelheiten siehe Bedienungsanleitung des angeschlossenen Telefons.
•
Diese Einheit unterstützt auch die Funktion “intelligenter persönlicher Assistent” des
iPhone.
Einstellungen im Speicher
Speichern Sie einen Kontakt im Speicher
Sie können bis zu 6 Kontakte unter den Nummerntasten (1 bis 6) speichern.
1 Drücken Sie , um auf Bluetooth-Modus zu schalten.
2 Drehen Sie den Lautstärke-Regler zum Wählen von
[PHONEBOOK]
3 Drehen Sie den Lautstärke-Regler zum Wählen eines Kontakts oder zum
Eingeben einer Telefonnummer.
Wenn ein Kontakt gewählt wird, drücken Sie den Lautstärke-Regler zur Anzeige der
Telefonnummer.
4 Halten Sie eine der Zifferntasten (1bis 6) gedrückt.
“STORED” wird angezeigt, wenn der Kontakt gespeichert ist.
Zum Löschen eines Kontakts aus dem Festspeicher wählen Sie
Schritt
2
oder
[NUMBERDIAL]
und speichern Sie eine leere Nummer.
, und drücken Sie dann den Regler.
[CALL HISTORY]
[NUMBER DIAL]
,
in
Einen Ruf aus dem Speicher tätigen
Drücken Sie , um auf Bluetooth-Modus zu schalten.
1
2 Drücken Sie eine der Zifferntasten (1bis 6).
3 Drücken Sie den Lautstärke-Regler zum Anrufen.
“NO MEMORY” erscheint, wenn kein Kontakt gespeichert ist.
16
DEUTSCH

BLUETOOTH®
Andere Einstellungen
1
Drücken Sie den Lautstärke-Regler, um auf
2 Drehen Sie den Lautstärke-Regler, um einen Gegenstand zu treffen (siehe folgende
Tabelle), und drücken Sie dann den Regler.
3 Wiederholen Sie Schritt 2, bis der gewünschte Gegenstand gewählt/aktiviert ist, oder
folgen Sie den Anweisungen auf dem gewählten Gegenstand.
4 Halten Sie zum Beenden gedrückt.
Zum Zurückschalten zum vorherigen Einstellelement drücken Sie .
[FUNCTION]
zu schalten.
Standard:
BT MODE
PHONE SELECT
AUDIO SELECT
DEVICE DELETE
PIN CODE EDIT
(0000)
RECONNECT ON
AUTO PAIRING ON
INITIALIZE YES
Wählt das Telefon oder Audiogerät zum Anschließen oder Abtrennen.
“
” erscheint vor dem Gerätenamen, wenn angeschlossen.
“
” erscheint vor dem aktuellen Wiedergabe-Audiogerät.
•
Sie können maximal zwei Bluetooth-Telefone und ein Bluetooth-Audiogerät zur Zeit anschließen.
1
D rehen Sie den Lautstärke-Regler zum Wählen eines Geräts zum Löschen, und drücken Sie dann den Regler.
2
D rehen Sie den Lautstärke-Regler zum Wählen von
Ändert den PIN-Code (bis zu 6 Stellen).
1
D rehen Sie den Lautstärke-Regler zum Wählen einer Nummer.
2
Drücken Sie S/T, um die Eingabeposition zu verschieben.
Wiederholen Sie Schritt
3
D rücken Sie den Lautstärke-Regler zum Bestätigen.
:Die Einheit stellt die Verbindung automatisch neu her, wenn das zuletzt angeschlossene Bluetooth-Gerät
innerhalb der Reichweite ist.;
:Die Einheit führt automatisch Pairing mit dem unterstützten Bluetooth-Gerät aus (iPhone/iPod touch/
Android-Gerät), wenn sie über die USB-Eingangsklemme verbunden wird.Je nach dem Betriebssystem des
angeschlossenen Geräts arbeitet diese Funktion möglicherweise nicht. ;
:Initialisiert alle Bluetooth-Einstellungen (einschließlich gespeichertes Pairing, Telefonbuch usw.).;
NO
:Hebt auf.
1
und 2, bis die Eingabe des PIN-Codes beendet ist.
OFF
:Hebt auf.
[YES]
oder
[NO]
, und drücken Sie dann den Regler.
OFF
:Hebt auf.
Bluetooth-Testmodus
Sie können die Konnektivität des unterstützten Profils zwischen dem
Bluetooth-Gerät und der Einheit prüfen.
•
Stellen Sie sicher, dass kein Bluetooth-Gerät gekoppelt ist.
1 Halten Sie gedrückt.
Die Meldung “PLEASE PAIR YOUR PHONE PIN 0000” erscheint.
2 Suchen und wählen Sie den Modellnamen dieser Einheit
(DPX-5
3 Bedienen Sie das Bluetooth-Gerät, um das Pairing zu
XX
bestätigen.
“ TESTING” blinkt im Display.
Das Konnektivitätsergebnis (OK oder NG) erscheint nach dem
Test.
PAIRING: Pairing-Status
HF CNT: Hands-Free Profile (HFP) Kompatibilität
AUD CNT: Advanced Audio Distribution Profile (A2DP) Kompatibilität
PB DL: Phonebook Access Profile (PBAP) Kompatibilität
Zum Beenden des Testmodus halten Sie
Gerät auszuschalten.
/DPX-M3 ) auf dem Bluetooth-Gerät.
gedrückt, um das
DEUTSCH
17

BLUETOOTH®
BLUETOOTH — Audio
Während BT AUDIO als Quelle eingestellt ist, können Sie die Verbindung zu fünf
Bluetooth-Audiogeräten herstellen und zwischen diesen Geräten umschalten.
Audioplayer über Bluetooth
1
Drücken Sie zum Wählen von BTAUDIO.
2 Bedienen Sie den Bluetooth-Audioplayer zum Starten der Wiedergabe.
Zum Auf der Frontblende
Wiedergabe/Pause
Wählen Sie die Gruppe
oder den Ordner
Reverse-/VorwärtsÜberspringen
Vorspulen/Rückspule
Wiederholte Wiedergabe Drücken Sie
Drücken Sie
Drücken Sie
Drücken Sie
Halten Sie
ALLREPEAT, FILEREPEAT, REPEATOFF
Zufallswiedergabe
Auswählen einer Datei aus
einem Ordner/einer Liste
Halten Sie die
zu wählen.
•
Drücken Sie , um
Siehe “Auswählen einer Datei aus einem Ordner/
einer Liste” auf Seite 9.
.
J/K.
S/T.
S/T gedrückt.
wiederholt.
gedrückt, um
RANDOMOFF
ALLRANDOM
zu wählen.
Zum Auf der Frontblende
Umschalten zwischen
angeschlossenen
Bluetooth-Audiogeräten
*
D urch Drücken der “Play”-Taste am angeschlossenen Gerät selber wird ebenfalls die Tonausgabe vom Gerät
umgeschaltet.
Die Bedienungen und Displayanzeigen unterscheiden möglicherweise sich je nach
Verfügbarkeit auf dem angeschlossenen Gerät.
Drücken Sie
*
5.
Einstellungen zur Verwendung der KENWOOD Remote-Anwendung
KENWOOD Remote-Anwendung ist darauf ausgelegt, die Bedienung des KENWOOD
Auto-Receivers vom iPhone/iPod (über Bluetooth oder über USB-Eingang) oder
Android-Smartphone (über Bluetooth) auszuführen.
Vorbereitung:
Installieren Sie vor dem Verbinden die neueste Version der
KENWOOD Remote-Anwendung auf Ihrem Gerät. Für die neueste Information besuchen
Sie <www.kenwood.com/cs/ce/>.
1 Drücken Sie den Lautstärke-Regler, um auf
2 Drehen Sie den Lautstärke-Regler zum Wählen eines Gegenstands
( 19)
, und drücken Sie dann den Regler.
3 Wiederholen Sie Schritt 2, bis der gewünschte Gegenstand gewählt
oder aktiviert ist.
4 Halten Sie zum Beenden gedrückt.
Zum Zurückschalten zum vorherigen Einstellelement drücken Sie .
[FUNCTION]
zu schalten.
18
DEUTSCH

BLUETOOTH®
REMOTE APP
SELECT
IOS YES
ANDROID YES
ANDROID LIST
STATUS
*
Wird nur angezeigt, wenn
Wählen Sie das Gerät (IOS oder ANDROID), das die Anwendung ausführen soll.
Anwendung ausführen soll.;
Wenn IOS gewählt ist, wählen Sie iPod BT Quelle (oder iPod USB, wenn Ihr iPhone/iPod über
USB-Eingang angeschlossen ist) zum Aktivieren der Anwendung.
•
D ie Konnektivität der Anwendung wird unterbrochen oder abgetrennt, wenn:
– Sie von der iPod BT-Quelle auf eine andere Wiedergabequelle umschalten, die über den
– Sie können von iPod USB-Quelle auf iPod BT-Quelle umschalten.
NO
: Hebt auf.
*:Wählt das Android-Smartphone zur Verwendung aus der Liste.
Zeigt den Status des gewählten Geräts.
IOS CONNECTED
angeschlossenen iPhone/iPod verwenden.
IOS NOT CONNECTED
ANDROID CONNECTED
angeschlossenen Android-Smartphone verwenden.
ANDROID NOT CONNECTED
angeschlossen.
Standard:
:Wählt das über Bluetooth oder USB-Eingang angeschlossene iPhone/iPod, das die
USB-Eingang angeschlossen ist.
:Wählt das Android-Smartphone zur Verwendung der Anwendung über Bluetooth.;
[ANDROID]
NO
:Hebt auf.
: Sie können die Anwendung mit dem über Bluetooth oder USB-Eingang
: Kein IOS-Gerät ist zur Verwendung der Anwendung angeschlossen.
: Sie können die Anwendung mit dem über Bluetooth
: Kein Android-Gerät ist zur Verwendung der Anwendung
unter
[SELECT]
auf
[YES]
gestellt ist.
XX
Hören von iPhone/iPod über Bluetooth
Sie können die Titel auf dem iPhone/iPod über Bluetooth auf dieser Einheit hören.
Drücken Sie wiederholt zum Wählen von iPodBT.
•
Sie können das iPod/iPhone auf gleiche Weise wie iPod/iPhone über USB-Eingang
bedienen.
•
Wenn Sie ein iPhone/iPod an den USB-Eingang anschließen, während Sie die iPodBT-
( 8)
Quelle hören, schaltet die Quelle automatisch auf iPod USB um. Drücken Sie
um iPod BT zu wählen wenn das Gerät immer noch über Bluetooth angeschlossen ist.
Internetradio über Bluetooth
Sie können Spotify auf dem iPhone/iPod/Android-Gerät über Bluetooth auf dieser
Einheit hören.
•
Stellen Sie sicher, dass an dem USB-Eingang kein Gerät angeschlossen ist.
Spotify hören
Vorbereitung:
Wählen Sie
1 Öffnen Sie die Spotify-Anwendung auf Ihrem Gerät.
2 Verbinden Sie Ihr Gerät über Bluetooth-Verbindung.
3 Drücken Sie wiederholt, um SPOTIFY (für iPhone/iPod) oder
Die Quelle wird umgeschaltet, und die Sendung startet automatisch.
•
[ON]
für
[SPOTIFY SRC]
in
[SOURCESELECT]. ( 5)
( 13)
SPOTIFY BT (für Android-Gerät) zu wählen.
Sie können das Spotify auf gleiche Weise wie Spotify über USB-Eingang bedienen.
( 11)
,
DEUTSCH
19

AUDIOEINSTELLUNGEN
Während des Hörens einer Tonquelle...
1 Drücken Sie den Lautstärke-Regler, um auf
schalten.
2 Drehen Sie den Lautstärke-Regler, um einen Gegenstand zu
treffen (siehe folgende Tabelle), und drücken Sie dann den Regler.
3 Wiederholen Sie Schritt 2, bis der gewünschte Gegenstand
gewählt oder aktiviert ist.
4 Halten Sie zum Beenden gedrückt.
Zum Zurückschalten zum vorherigen Einstellelement drücken Sie .
AUDIO CONTROL
SUB-WLEVEL
MANUAL EQ
62.5HZ LEVEL LEVEL –9
100HZ/160HZ/250HZ/
400HZ/630HZ/1KHZ/
1.6KHZ/2.5KHZ/4KHZ/
6.3KHZ/10KHZ/16KHZ
LEVEL –50
bis
Ausgangspegel ein.
Die Klangelemente (Frequenzpegel, Klangpegel, Q-Faktor) werden in
jeder Auswahl vorgewählt.
BASS
EXTEND
LEVEL –9
Speichern für jede Quelle ein. (Bevor Sie eine Einstellung vornehmen,
wählen Sie eine anzupassende Quelle aus.)
LEVEL +10 (LEVEL 0
Pegel zum Speichern für jede Quelle ein. (Bevor Sie eine
Einstellung vornehmen, wählen Sie eine anzupassende
Quelle aus.)
ON
:Schaltet den erweiterten Bass ein.;
OFF
bis
LEVEL +9 (LEVEL 0
Q FACTOR 1.35/1.50/2.00
PRESET EQ NATURAL/ROCK/POPS/EASY/TOP40/JAZZ
BASS BOOST LEVEL1/LEVEL2/LEVEL3/LEVEL4/LEVEL5
POWERFUL/USER
das Musikgenre geeignet ist. (Wählen Sie
[MANUAL EQ]
bevorzugten Bass-Boost-Pegel.;
vorgenommenen Einstellungen zu verwenden.)
[FUNCTION]
bis
LEVEL +9 (LEVEL 0
:Hebt auf.
:Den Qualitätsfaktor einstellen.
: Wählt einen Vorwahl-Equalizer, der für
OFF
zu
): Stellt den Subwoofer-
):Stellt den Pegel zum
[USER]
, um die in
:Hebt auf.
Standard:
): Stellt den
/
:Wählt Ihren
LOUDNESS LEVEL1/LEVEL2
Klangwirkung auch bei niedriger Lautstärke zu erhalten.;
SUBWOOFER SET ON
FADER
(Gilt nicht, wenn 3-Wege-Übergang gewählt ist.)
R15
BALANCE L15
VOLUME OFFSET LEVEL –15
XX
jeder Quelle vor. (Vor der Einstellung wählen Sie eine anzupassende Quelle aus.)
SOUND EFFECT
SOUND RECNSTR
(Klangrekonstruktion)
SPACE ENHANCE
(Gilt nicht für RADIO-Quelle und AUX-Quelle.)
ON
die Anstiegszeit der Wellenform, die bei der Audiodaten-Kompression verloren gehen,
wiederhergestellt werden.;
(Gilt nicht für RADIO-Quelle.)
SMALL/MEDIUM/LARGE
SND REALIZER LEVEL1/LEVEL2/LEVEL3
STAGE EQ LO W/MIDDLE/HIGH
DRIVE EQ ON
SPEAKER SIZE
X’OVER
DTA SETTINGS
CAR SETTINGS
•
Für 2-Wege-Übergang:
[SUBWOOFER]
• [SUB-W LEVEL]
OFF
Reifen zu verringern.;
Je nach dem gewählten Übergangstyp
die Einstellpunkte gezeigt.
Als Standard ist der 2-Wege-Übergangstyp gewählt.
Für Einstellungen,
[SUB-W LEVEL]/[SUBWOOFER SET]
gestellt ist.
ist nur wählbar, wenn
:Wählt Ihre bevorzugten niedrigen und hohen Frequenzen, um eine gute
:Schaltet den Subwoofer-Ausgang ein.;
bis
F15 (0
):Stellt die Balance zwischen hinterem und vorderem Lautsprecherausgang ein.
bis
R15 (0
):Stellen Sie die Ausgangsbalance zwischen linken und rechten Lautsprechern ein.
bis
LEVEL +6 (LEVEL 0
:Erzeugt realistischen Klang, indem die Hochfrequenzkomponenten kompensier t und
OFF
:Hebt auf.
:Erlaubt virtuelle Verbesserung des Klangraums.;
:Lässt den Klang virtuell realistischer wirken.;
:Hebt auf.
: Hebt die Frequenz an, um Störgeräusche von außerhalb des Fahrzeugs oder Laufgeräusche der
:Stellt die von den Lautsprechern gehörte Klangposition virtuell ein.;
OFF
:Hebt auf.
( 6)
( 21, 22)
22, 23, Einstellungen der digitalen Zeitanpassung
( 5)
[SUBWOOFER SET]
auf
OFF
:Hebt auf.
OFF
:Hebt auf.
):Nehmen Sie die Voreinstellung des Lautstärkepegels
OFF
:Hebt auf.
OFF
:Hebt auf.
, 2-Wege-Übergang oder 3-Wege-Übergang werden
.
ist nur wählbar, wenn
[ON]
gestellt ist.
[SWITCH PREOUT]
auf
20
DEUTSCH

AUDIOEINSTELLUNGEN
Übergangseinstellungen
Im Folgenden werden die verfügbaren Einstellpunkte für 2-WegeÜbergang und 3-Wege-Übergang gezeigt.
SPEAKER SIZE
Wählt entsprechend der Größe der angeschlossenen Lautsprecher
für optimale Leistung.
•
Die Einstellungen für Frequenz und Flanke werden automatisch
für die Übergangseinstellung des gewählten Lautsprechers
übernommen.
•
Wenn 2-Wege-Übergang gewählt ist und
von
[FRONT], [REAR]
gewählt ist, steht die Einstellung
nicht zur Verfügung.
•
Wenn 3-Wege-Übergang gewählt ist, wenn
von
[SPEAKER SIZE]
[WOOFER]
X ‘ OVER
• [FRQ]/[F - HPF FRQ]/[R - HPF FRQ]/[SWLPFFRQ]/[HPFFRQ]
[LPFFRQ]
Lautsprecher an (Hochpassfilter oder Tiefpassfilter).
Wenn
[THROUGH]
gewählten Lautsprechern gesendet.
• [F - HPF SLOPE]/[R - HPF SLOPE]/[SWLPFSLOPE]/[HPFSLOPE]
[LPFSLOPE]/[SLOPE]
Nur wählbar, wenn eine andere Einstellung als
Übergangsfrequenz gewählt ist.
• [SWLPFPHASE]/[PHASE]
Lautsprecherausgangs so, dass sie dem anderen
Lautsprecherausgang entspricht.
• [GAINLEFT]/[GAINRIGHT]/[F - HPF GAIN]/[R - HPF GAIN]
[SWLPFGAIN]/[GAIN]
gewählten Lautsprechers an.
und
[SUBWOOFER]
gewählt ist, steht die Einstellung
nicht zur Verfügung.
: Passt die Übergangsfrequenz für die gewählten
gewählt ist, werden alle Signale zu den
: Passt die Stellt die Übergangsflanke an.
: Wählt die Phase des
: Passt die Ausgangslautstärke des
[X ‘ OVER]
[NONE]
für
für
[TWEETER]
[SPEAKER SIZE]
des Lautsprechers
[NONE]
für
[WOOFER]
[X’OVER]
[THROUGH]
von
/
/
für die
/
Einstellpunkte für 2-Wege-Übergang
SPEAKER SIZE
FRONT SIZE
TWEETER
REAR 8CM/10CM/12CM/13CM/16CM/17CM/18CM/4×6/5×7/6×8/6×9/7×10/NONE
SUBWOOFER
(nicht angeschlossen)
1
*
16CM/20CM/25CM/30CM/38CM OVER/NONE
8CM/10CM/12CM/13CM/16CM/17CM/18CM/4×6/5×7/6×8
6×9/7×10
SMALL/MIDDLE/LARGE/NONE
(nicht angeschlossen)
(nicht angeschlossen)
X ' OVER
TWEETER FRQ
FRONT HPF F - HPF FRQ
GAIN LEFT
GAIN RIGHT
F - HPF SLOPE
F - HPF GAIN
1KHZ/1.6KHZ/2.5KHZ/4KHZ/5KHZ/6.3KHZ/8KHZ/10KHZ/12.5KHZ
–8
bis
0
–8
bis
0
30HZ/40HZ/50HZ/60HZ/70HZ/80HZ/90HZ/100HZ/120HZ/150HZ
180HZ/220HZ/250HZ/THROUGH
–6DB/–12DB/–18DB/–24DB
–8
bis
0
REAR HPF R - HPF FRQ
(Siehe
FRONT HPF
R - HPF SLOPE
-Einstellungen oben.)
R - HPF GAIN
SUBWOOFER
1
*
LPF
1
*
Nur wählbar, wenn
SW LPF FRQ 30HZ/40HZ/50HZ/60HZ/70HZ/80HZ/90HZ/100HZ/120HZ/150HZ
SW LPF SLOPE
SW LPF PHASE
SW LPF GAIN –8
[SWITCH PREOUT]
180HZ/220HZ/250HZ/THROUGH
–6DB/–12DB/–18DB/–24DB
REVERSE
(180°)/
NORMAL
bis
0
auf
[SUBWOOFER] ( 5)
(0°)
und
[SUBWOOFER SET]
auf
[ON]
gestellt ist.
/
/
/
( 20)
DEUTSCH
21

AUDIOEINSTELLUNGEN
Einstellpunkte für 3-Wege-Übergang
SPEAKER SIZE
TWEETER
MID RANGE
WOOFER
SMALL/MIDDLE/LARGE
8CM/10CM/12CM/13CM/16CM/17CM/18CM/4×6/5×7/6×8/6×9
2
*
16CM/20CM/25CM/30CM/38CM OVER/NONE
X ' OVER
TWEETER HPF FRQ
SLOPE
PHASE
GAIN –8
MID RANGE HPF FRQ
HPF SLOPE
LPF FRQ
LPF SLOPE
PHASE
GAIN –8
2
*
WOOFER
LPF FRQ 30HZ/40HZ/50HZ/60HZ/70HZ/80HZ/90HZ/100HZ
SLOPE
PHASE
GAIN –8
2
*
Nur wählbar, wenn
[SUBWOOFER SET]
1KHZ/1.6KHZ/2.5KHZ/4KHZ/5KHZ/6.3KHZ/8KHZ
10KHZ/12.5KHZ
–6DB/–12DB
REVERSE
(180°)/
NORMAL
bis
0
30HZ/40HZ/50HZ/60HZ/70HZ/80HZ/90HZ/100HZ
120HZ/150HZ/180HZ/220HZ/250HZ/THROUGH
–6DB/–12DB
1KHZ/1.6KHZ/2.5KHZ/4KHZ/5KHZ/6.3KHZ/8KHZ
10KHZ/12.5KHZ/THROUGH
–6DB/–12DB
REVERSE
(180°)/
NORMAL
bis
0
120HZ/150HZ/180HZ/220HZ/250HZ/THROUGH
–6DB/–12DB
REVERSE
(180°)/
NORMAL
bis
0
auf
[ON]
gestellt ist.
(0°)
(0°)
(0°)
( 20)
(nicht angeschlossen)
Einstellungen der digitalen Zeitanpassung
Die digitale Zeitanpassung stellt die Verzögerungszeit des Lautsprecherausgangs ein,
um eine geeignetere Umgebung für Ihr Fahrzeug zu erzeugen.
•
Für die weitere Informationen,
unter [DTA SETTINGS].
23, Bestimmen des Werts für [DISTANCE] und [GAIN]
DTA SETTINGS
/
/
POSITION
DISTANCE 0CM
/
GAIN –8DB
DTA RESET YES
CAR SETTINGS
CAR TYPE COMPACT/FULL SIZE CAR/WAGON/MINIVAN/SUV
/
R - SP LOCATION
Wählt Ihre Hörposition (Bezugspunkt).
ALL
:Keine Kompensation;
FRONT LEFT
• [FRONT ALL]
( 6)
bis
610CM
(Bevor Sie eine Einstellung vornehmen, wählen Sie den anzupassen gewünschten
Lautsprecher aus.)
bis
0DB
Lautsprechers vor. (Bevor Sie eine Einstellung vornehmen, wählen Sie den anzupassen
gewünschten Lautsprecher aus.)
:Setzt die Einstellungen (
[POSITION]
Identifizieren Sie Ihren Fahrzeugtyp und die Lage der hinteren Lautsprecher, um die
Anpassung für
MINIVAN(LONG)
OFF
: Keine Kompensation.
Wählt die Lage der hinteren Lautsprecher in Ihrem Fahrzeug, um den weitesten Abstand
von der gewählten Hörposition zu berechnen (Bezugspunkt).
• DOOR/REAR DECK
[COMPACT ], [FULL SIZE CAR], [WAGON]
• 2ND ROW/3RD ROW
oder
[MINIVAN(LONG)]
FRONT RIGHT
:Vorderer linker Sitz;
wird nur angezeigt, wenn
:Stellen Sie den auszugleichenden Abstand fein ein.
:Nehmen Sie Anpassung der Ausgangslautstärke des gewählten
[DISTANCE]
auf Standardwerte zurück.; NO:Hebt auf.
[DTA SETTINGS]
:Wählt den Typ des Fahrzeugs.;
:Nur wählbar, wenn
:Nur wählbar, wenn
FRONT ALL
vorzunehmen.
gewählt ist.
: Vorderer rechter Sitz;
:Vorderer Sitz
[2-WAY X’OVER]
und
[GAIN]
[CAR TYPE]
oder
[CAR TYPE]
gewählt ist.
) der gewählten
/
als
[OFF]
[SUV]
gewählt ist.
als
[MINIVAN]
,
22
DEUTSCH

AUDIOEINSTELLUNGEN
•
B evor Sie eine Einstellung für
anzupassen gewünschten Lautsprecher aus:
Wenn 2-Wege-Übergang gewählt ist:
FRONT LEFT/FRONT RIGHT/REAR LEFT/REAR RIGHT/SUBWOOFER
– Sie können nur
Einstellung als
Wenn 3-Wege-Übergang gewählt ist:
TWEETER LEFT/TWEETER RIGHT/MID LEFT/MID RIGHT/WOOFER
– Sie können nur
[SPEAKERSIZE]
• [R - SP LOCATION]
– 2-Wege-Übergang gewählt ist.
– Eine andere Einstellung als
Bestimmen des Werts für [DISTANCE] und [GAIN] unter [DTA SETTINGS]
[DISTANCE]
[REAR LEFT], [REAR RIGHT]
[NONE]
für
[WOOFER]
gewählt ist.
unter
und
[REAR]
und
[SUBWOOFER]
wählen, wenn eine andere Einstellung als
( 22)
[CAR SETTINGS]
( 6)
[NONE]
ist für
[REAR]
[GAIN]
von
[DTA SETTINGS]
und
[SUBWOOFER]
unter
ist nur wählbar, wenn:
unter
[SPEAKER SIZE]
Wenn Sie den Abstand von der Mitte der momentan
eingestellten Hörposition zu jedem Lautsprecher festlegen,
wird die Verzögerungszeit automatisch berechnet und
eingestellt.
1
B estimmen Sie die Mitte der momentan eingestellten
Hörposition als Bezugspunkt.
2
Messen Sie den Abstand vom Bezugspunkt zu den
Lautsprechern.
3
B erechnen Sie die Unterschiede zwischen dem Abstand
des am weitesten entfernten Lautsprechers (hinteren
Lautsprechers) und anderen Lautsprechern.
4
Stellen Sie den in Schritt 3 für die einzelnen
Lautsprecher berechneten Wert für
5
Stellen Sie
[GAIN]
Beispiel: Wenn
[FRONT ALL]
vornehmen, wählen Sie den
wählen, wenn eine andere
[SPEAKER SIZE]
[NONE]
für
[WOOFER]
gewählt.
für einzelne Lautsprecher ein.
als Hörposition gewählt ist
gewählt ist.
( 21)
[DISTANCE]
unter
( 21)
ein.
DISPLAY-EINSTELLUNGEN
Zonen-Identifikation für Farb- und Helligkeitseinstellungen
Stellen Sie die Abblendung ein
Halten Sie DISP gedrückt, um die Abblendung ein- und auszuschalten.
•
Wenn Sie
[DIMMER TIME] ( 24)
wenn Sie diese Taste drücken und gedrückt halten.
Andere Einstellungen
1
Drücken Sie den Lautstärke-Regler, um auf
2 Drehen Sie den Lautstärke-Regler zum Wählen eines Gegenstands
( 24)
, und drücken Sie dann den Regler.
3 Wiederholen Sie Schritt 2, bis der gewünschte Gegenstand gewählt/
aktiviert ist, oder folgen Sie den Anweisungen auf dem gewählten
Gegenstand.
4 Halten Sie zum Beenden gedrückt.
Zum Zurückschalten zum vorherigen Einstellelement drücken Sie .
eingestellt haben, wird diese Einstellung gelöscht,
[FUNCTION]
zu schalten.
DEUTSCH
23

DISPLAY-EINSTELLUNGEN
Standard:
DISPLAY
COLOR
SELECT
DIMMER
BRIGHTNESS
TEXTSCROLL AUTO/ONCE
*
Vorgabefarben:
BLUE3/SKYBLUE1/SKYBLUE2/LIGHTBLUE/AQUA1/AQUA2/GREEN1/GREEN2/GREEN3
YELLOWGREEN1/YELLOWGREEN2/YELLOW/ORANGE1/ORANGE2/ORANGERED
Wählen Sie die Farbe für
1
Wählen Sie eine Zone. (Siehe Abbildung auf Seite 23.)
2
Wählen Sie eine Farbe für die gewählte Zone.
INITIAL COLOR/VARIABLESCAN/CUSTOM R/G/B
Sie können Ihre eigene Farbe erzeugen, indem Sie
Farbe kann unter
1
D rücken Sie den Lautstärke-Regler, um auf Detail-Farbabstimmung zu schalten.
2
Drücken Sie S/T, um die Farbe (R/G/B) zum Anpassen zu wählen.
3
D rehen Sie den Lautstärke-Regler, um den Pegel einzustellen (0 bis 9), und drücken Sie
dann den Regler.
Blenden Sie die Beleuchtung ab.
ON
:Die Abblendung ist eingeschaltet.;
DIMMER TIME
1
D rehen Sie den Lautstärke-Regler zum Einstellen der Einschaltzeit
dann den Regler.
2
D rehen Sie den Lautstärke-Regler zum Einstellen der Einschaltzeit
dann den Regler.
(Standard:
1
Wählen Sie eine Zone. (Siehe Abbildung auf Seite 23.)
2 0
bis 31: Wählen Sie Ihre bevorzugte Helligkeitsstufe für die gewählte Zone.
Scrollen.;
ALL ZONE, LCD DISPLAY
[CUSTOM R/G/B]
:Stellen Sie die Anfangs- und Endzeit für die Abblendfunktion ein.
gespeichert werden.
[ON]: 18:00; [OFF]: 6:00
:Wählt automatisches Scrollen der Displayinformationen, oder einmaliges
OFF
:Hebt auf.
OFF
:Hebt auf.
)
und
KEY
getrennt.
[CUSTOM R/G/B]
/Vorgabefarben*
wählen. Die erzeugte
[ON]
, und drücken Sie
[OFF]
, und drücken Sie
RED1/RED2/RED3/PURPLE1/PURPLE2/PURPLE3/PURPLE4/BLUE1/BLUE2
FEHLERSUCHE
XX
Symptom Abhilfe
Es wird kein Ton gehört.
“MISWIRING CHECK WIRING THEN
PWR ON” erscheint.
Allgemeines
“PROTECTING SEND SERVICE”
erscheint.
Das Gerät funktioniert überhaupt
nicht.
•
D er Radioempfang ist schlecht.
Radio
•
Statikrauschen beim Radiohören.
Disc kann nicht ausgegeben werden.
Rauschen wird erzeugt. Springen Sie zu einem anderen Musikstück oder wechseln Sie
Tracks werden nicht so abgespielt, wie
Sie es wollten.
“READING” blinkt weiter. Verwenden Sie nicht zu viele Hierarchie-Ebenen oder Ordner.
Verflossene Spielzeit ist nicht richtig. Dies liegt daran, wie die Titel aufgezeichnet sind.
CD/USB/iPod
/
/
“LOADING” erscheint, wenn Sie durch
Drücken von
Suchmodus schalten.
Richtige Zeichen werden nicht
angezeigt (z.B. Albumname).
auf den
•
D ie Lautstärke auf den optimalen Pegel einstellen.
•
Prüfen Sie die Kabel und Verbindungen.
Schalten Sie die Stromversorgung aus, und prüfen Sie, ob die
Klemmen der Lautsprecherdrähte richtig isoliert sind. Schalten Sie
die Stromversorgung wieder ein.
Reichen Sie die Einheit beim nächsten Kundendienstzentrum ein.
Setzen Sie das Gerät zurück.
Schließen Sie das Antennenkabel fest an.
Halten Sie
M
auszugeben. Achten Sie darauf, die ausgeschobene Disc nicht fallen
zu lassen. Wenn dadurch das Problem nicht gelöst wird, setzen Sie
das Gerät zurück.
die Disc.
Die Wiedergabe-Reihenfolge wird bestimmt, wenn die Dateien
aufgezeichnet werden.
Die Einheit bereitet die iPod/iPhone-Musikliste vor. Das Laden kann
eine gewisse Zeit dauern, wiederholen Sie den Vorgang später.
•
D ieses Gerät kann nur Großbuchstaben, Zahlen und eine
begrenzte Anzahl von Symbolen anzeigen.
•
Je nach der Anzeigesprache, die Sie gewählt haben
können bestimmte Buchstaben möglicherweise nicht richtig
angezeigt werden.
( 3)
kräftig gedrückt, um die Disc zwangsweise
( 3)
( 5)
,
24
DEUTSCH

FEHLERSUCHE
Symptom Abhilfe
“NA FILE” Achten Sie darauf, dass die Disc unterstützte Audiodateien enthält.
“NO DISC” Setzen Sie eine abspielbare Disc in den Ladeschlitz ein.
“TOC ERROR” Achten Sie darauf, dass die Disc sauber und ordnungsgemäß eingelegt ist.
“PLEASE EJECT” Setzen Sie das Gerät zurück. Wenn dadurch das Problem nicht behoben
“NO DEVICE” Schließen Sie ein USB-Gerät an und schalten Sie die Quelle erneut zu
“COPY PRO” Eine kopiergeschützte Datei wird wiedergegeben.
“UNSUPPORTED DEVICE”
CD/USB/iPod
“UNRESPONSIVE DEVICE” Stellen Sie sicher, dass das Gerät nicht eine Fehlfunktion aufweist, und
“USB HUB IS NOT SUPPORTED” D iese Einheit nicht kann ein USB-Gerät unterstützen, das über einen
•
D ie Quelle wechselt nicht auf
“USB” um, wenn Sie ein USBGerät anschließen, während
Sie eine andere Quelle hören.
•
“USB ERROR ” erscheint.
“NO MUSIC” Schließen Sie ein USB-Gerät an, das abspielbare Audiodateien enthält.
“iPod ERROR”
( 27)
wird, wenden Sie sich an den Kundendienst.
USB um.
•
Prüfen Sie, ob das angeschlossene Gerät kompatibel mit diesem Gerät
ist, und stellen Sie sicher, dass die Dateisysteme die unterstützten
Formate haben.
•
Bringen Sie das Gerät wieder an.
bringen Sie das Gerät wieder an.
USB-Hub angeschlossen ist.
Der USB-Anschluss nimmt mehr Leistung auf als das Designlimit vorgibt.
Schalten Sie die Stromversorgung aus und trennen Sie das USB-Gerät
ab. Schalten Sie dann die Stromversorgung wieder ein und schließen Sie
das USB-Gerät erneut an. Wenn dies das Problem nicht behebt, schalten
Sie die Stromversorgung aus und wieder ein (oder setzen Sie die Einheit
zurück), bevor Sie das USB-Gerät durch ein anderes ersetzen.
•
Erneutes Anschließen des iPod.
•
S etzen Sie den iPod erneut zurück.
( 27)
Symptom Abhilfe
•
B ei Wiedergabe wird kein Ton
gehört.
•
Ton wird nur vom Android-
Gerät ausgegeben.
Bei
[BROWSE MODE]
Wiedergabe unmöglich.
ANDROID
“NO DEVICE” oder “READING”
blinkt weiter.
Die Wiedergabe ist unterbrochen
oder es treten Aussetzer im
Ton auf.
“ANDROID ERROR”/“NADEVICE”
•
Verbinden Sie das Android-Gerät neu.
•
Während der
Media Player Anwendung auf dem Android-Gerät und starten Sie die
Wiedergabe.
•
Während der
aktuelle Media Player Anwendung erneut oder verwenden Sie eine
andere Media Player Anwendung.
•
Star ten Sie das Android-Gerät neu.
•
Wenn dadurch das Problem nicht gelöst wird, kann das
angeschlossene Android-Gerät nicht das Audiosignal zur Einheit
leiten.
ist
•
Stellen Sie sicher, dass KENWOOD MUSIC PLAY APP im Android-Gerät
installiert ist.
•
S chließen Sie das Android-Gerät erneut an und wählen Sie den
geeigneten Steuermodus.
•
Wenn das Problem dadurch nicht gelöst wird, unterstützt das
verbundene Android-Gerät nicht
•
S chalten Sie die Entwickler-Optionen am Android-Gerät aus.
•
Verbinden Sie das Android-Gerät neu.
•
Wenn das Problem dadurch nicht gelöst wird, unterstützt das
verbundene Android-Gerät nicht
Schalten Sie den Stromsparmodus am Android-Gerät aus.
•
Verbinden Sie das Android-Gerät neu.
•
Star ten Sie das Android-Gerät neu.
[HAND MODE]
[HAND MODE]
( 28)
( 8)
eingestellt ist, starten Sie eine
eingestellt ist, starten Sie die
[BROWSE MODE]. ( 28)
[BROWSE MODE]. ( 28)
DEUTSCH
25

FEHLERSUCHE
Symptom Abhilfe
“DISCONNECTED” USB ist vom Kopfgerät getrennt. Bitte stellen Sie sicher, dass das Gerät
“CONNECTING”
Spotify
“CHECK APP” Die Spotify-Anwendung ist nicht richtig verbunden, oder der Benutzer ist
Kein Bluetooth-Gerät ist
erkannt.
Bluetooth-Pairing kann nicht
ausgeführt werden.
Echo oder Rauschen
wird während eines
Telefongesprächs gehört.
Bluetooth®
Die Telefon-Tonqualität ist
schlecht.
Sprach-Rufmethode ist nicht
erfolgreich.
richtig über USB angeschlossen ist.
•
Angeschlossen über den USB-Eingang: Das Gerät stillt die Verbindung zur
Kopfgerät her. Bitte war ten.
•
Angeschlossen über Bluetooth: Die Bluetooth-Verbindung ist getrennt.
Bitte prüfen Sie, ob die Bluetooth-Verbindung und stellen Sie sicher, dass
das Gerät und die Einheit gekoppelt und verbunden sind.
nicht angemeldet. Beenden Sie die Spotify-Anwendung und starten Sie sie
neu, und melden Sie sich dann bei Ihrem Spotify-Konto an.
•
Suchen Sie erneut vom Bluetooth-Gerät.
•
S etzen Sie das Gerät zurück.
•
Stellen Sie sicher, dass Sie den gleichen PIN-Code für die Einheit und das
Bluetooth-Gerät eingegeben haben.
•
Löschen Sie Pairing-Information sowohl von der Einheit als auch dem
Bluetooth-Gerät, und führen Sie dann das Pairing erneut aus.
•
Justieren Sie die Mikrofoneinheit-Position.
•
Prüfen Sie die
•
Verringern Sie den Abstand zwischen der Einheit und dem Bluetooth-
Gerät.
•
B ewegen Sie das Fahrzeug zu einem Ort, wo ein besseres Signal
empfangen wird.
•
Verwenden Sie die Sprach-Rufmethode in einer ruhigeren Umgebung.
•
Verringern Sie den Abstand zum Mikrofon, während Sie den Namen
sprechen.
•
Stellen Sie sicher, dass die gleiche Stimme wie für die Sprach-Kennung
registriert verwendet wird.
( 3)
[ECHO CANCEL]
( 12)
-Einstellung.
( 15)
( 13)
Symptom Abhilfe
Der Ton wird unterbrochen
oder weist bei Wiedergabe
von einem BluetoothAudioplayer Aussetzer auf.
Der angeschlossene
Bluetooth-Audioplayer kann
nicht gesteuert werden.
“DEVICE FULL” Die Anzahl registrierter Geräte hat den Höchstwert erreicht. Löschen Sie
“N/A VOICE TAG” Stellen Sie sicher, dass die gleiche Stimme wie für die Sprach-Kennung
Bluetooth®
“NOT SUPPORT” Das angeschlossene Telefon unterstützt nicht das Spracherkennungssystem
“NO ENTRY”/“NO PAIR” Kein registriertes Gerät ist über Bluetooth angeschlossen/gefunden.
“ERROR” Wiederholen Sie die Bedienung. Wenn “ERROR” erneut erscheint, prüfen Sie,
“NO INFO”/“NO DATA” Das Bluetooth-Gerät kann nicht die Kontaktinformationen erhalten.
“HF ERROR XX”/“BT ERROR” Setzen Sie die Einheit zurück und probieren Sie den Vorgang erneut.
“SWITCHING NG” Die angeschlossene Telefone unterstützen möglicher weise nicht die Telefon-
•
Verringern Sie den Abstand zwischen dem Gerät und dem Bluetooth-
Audioplayer.
•
S chalten Sie die Einheit aus und wieder ein, und versuchen Sie erneut, die
Verbindung herzustellen.
•
Andere Bluetooth-Geräte versuchen möglicherweise, die Verbindung zur
Einheit herzustellen.
•
Prüfen Sie, ob der angeschlossene Bluetooth-Audioplayer das Audio/
Video Remote Control Profile (AVRCP) unterstützt. (Siehe auch
Bedienungsanleitung Ihres Audioplayers.)
•
Trennen Sie den Bluetooth-Player ab und schließen ihn erneut an.
unbenötigte Geräte und wiederholen Sie den Vorgang.
( 17, DEVICEDELETE)
registriert verwendet wird.
oder die Telefonbuch-Über tragung.
ob das Gerät die probierte Funktion unterstützt.
Wenn dadurch das Problem nicht behoben wird, wenden Sie sich an den
Kundendienst.
Umschalten-Funktion.
26
DEUTSCH

ZUR BEZUGNAHME
Wartung
Reinigung des Geräts
Wischen Sie die Frontblende mit einem trockenen Silikonlappen oder weichen Lappen sauber.
Handhabung von Discs
•
B erühren Sie nicht die Aufnahme-Oberfläche der Disc.
•
Kleben Sie keine Aufkleber oder ähnliches auf eine Disc. Verwenden Sie dem entsprechend auch keine Discs, auf
denen sich bereits ein Aufkleber befindet.
•
Verwenden Sie kein Zubehör für die Disc.
•
Reinigen Sie CDs stets von der Mitte einer Disc nach außen hin.
•
Reinigen Sie die D isc mit einem trockenen Silikonlappen oder weichen Lappen. Verwenden Sie keine Lösungsmittel.
•
Ziehen Sie D iscs beim Entfernen aus dem Gerät horizontal heraus.
•
Entfernen Sie vor dem Einsetzen einer Disc die Grate vom Mittenloch und der Disc-Kante.
Weitere Informationen
Bei: – Neuste Firmware-Aktualisierungen und eine Liste der neuesten kompatiblen Artikel
– KENWOOD-Originalanwendung
– Jegliche neuesten Informationen
Besuchen Sie <www.kenwood.com/cs/ce/>.
Allgemeines
•
D ieses Gerät kann nur die folgenden CDs abspielen:
•
Für detaillier te Information und Hinweise über abspielbare Audiodateien besuchen Sie
<www.kenwood.com/cs/ce/audiofile/>.
Abspielbare Dateien
•
Wiederzugebende Audiodateien:
Für Disc: MP3 (.mp3), WMA (.wma), AAC (.aac)
Für USB-Massenspeichergerät: MP3 (.mp3), WMA (.wma), AAC (.aac), AAC (.m4a), WAV (.wav), FLAC (.flac)
•
Abspielbare Disc-Medien: CD-R/CD -RW/CD-ROM
•
Abspielbares Disc-Dateiformat: ISO 9660 Level 1/2, Joliet, Lange Dateinamen
•
Mögliche Dateisysteme auf USB-Geräten: FAT12, FAT16, FAT32
Auch wenn Audiodateien den oben aufgeführten Standards entsprechen, kann das Abspielen unter Umständen auf
Grund von Typ oder Zustand der Medien bzw. Geräte nicht möglich sein.
Die AAC (.m4a)-Datei in einem CD eine von iTunes codierte kann nicht auf diesem Gerät abgespielt werden.
Nicht abspielbare Discs
•
D iscs mit nicht runder Form.
•
D iscs die auf der Aufnahme-Oberfläche eingefärbt oder verschmutzt sind.
•
Recordable/ReWritable Discs, die nicht abgeschlossen (finalisiert) wurden.
•
8- cm-CD. Falls Sie versuchen, einen Adapter zu verwenden, kann es zu einer Fehlfunktion kommen.
Wissenswertes über USB-Geräte
•
Sie können ein USB-Gerät nicht über einen USB-Hub anschließen.
•
D er Anschluss eines Kabels mit einer Gesamtlänge von mehr als 5 m kann eine fehlerhafte Wiedergabe verursachen.
•
D iese Einheit kann nicht ein USB-Gerät mit einer anderen Bewertung als 5 V und mehr als 1,5A erkennen.
Wissenswertes über iPod/iPhone
•
Über USB:
Made for
– iPod touch (5th und 6th generation)
– iPod nano (7th generation)
– iPhone 4S, 5, 5S, 5C, 6, 6 Plus, 6S, 6S Plus, SE, 7, 7 Plus
•
Über Bluetooth:
Made for
– iPod touch (5th und 6th generation)
– iPhone 4S, 5, 5S, 5C, 6, 6 Plus, 6S, 6S Plus, SE, 7, 7 Plus
•
Sie können den iPod nicht bedienen, wenn “KENWOOD” oder “ ” auf dem iPod angezeigt wird.
•
Je nach der Version des Betriebssystems des iPod/iPhone sind einige Funktionen möglicherweise nicht verfügbar.
DEUTSCH
27

ZUR BEZUGNAHME
Wissenswertes über Android-Geräte
•
D iese Einheit unterstützt Android OS 4.1 und höher.
•
Manche Android-Geräte (mit OS 4.1 und höher) unterstützen möglicherweise Android Open
Accessory (AOA) 2.0 nicht vollständig.
•
Wenn das Android-Gerät sowohl Massenspeicherklasse-Gerät als auch AOA 2.0 unterstützt,
hat diese Einheit immer Wiedergabe über AOA 2.0 als Vorrang.
Wissenwertes über Spotify
•
Spotify-Anwendung unterstützt:
– iPhone 4S, 5, 5S, 5C, 6, 6 Plus, 6S, 6S Plus, SE, 7, 7 Plus (iOS 8 oder höher)
– iPod touch (5th und 6th generation)
– Android OS 4.0.3 oder höher
•
Spotify ist ein D ritter Dienstanbieter, deshalb bleiben unangekündigte Änderungen
der technischen Daten jederzeit vorbehalten. Entsprechend kann die Kompatibilität
eingeschränkt sein, oder einzelne oder alle der Dienste können unverfügbar werden.
•
B estimmte Funktionen von Spotify können nicht von dieser Einheit bedient werden.
•
B ezüglich Fragen zur Verwendung der Anwendung wenden Sie sich bitte an Spotify bei
<www.spotify.com>.
Wissenwertes über Bluetooth
•
Je nach Bluetooth-Version des Geräts lassen sich manche Bluetooth-Geräte möglicherweise
nicht an diese Einheit anschließen.
•
D iese Einheit arbeitet u.U. nicht mit bestimmten Bluetooth-Geräten.
•
D ie Signalbedingungen sind je nach Umgebung unterschiedlich.
Ändern der Display-Information
Jedesmal, wenn Sie
•
Wenn die Information nicht verfügbar oder nicht aufgezeichnet ist, erscheint “NO TEXT”, “NO INFO” oder andere Information
(z.B. Sendername, Spielzeit).
Quellenname Display-Information
STANDBY Quellenname (Datum)*
RADIO Frequenz (Datum)*
CD oder USB
iPod USB/iPodBT oder
ANDROID
SPOTIFY/SPOTIFY BT Kontexttitel (Datum)*
BT AUDIO Songtitel (Interpret)
AUX Quellenname (Datum)*
*
D ie Batterie- und Signalstärke des Bluetooth-Geräts werden angezeigt, wen
DISP
drücken, wechselt die Anzeige-Information.
(Nur für Radio Data System-FM (UKW)-Sender)
Sendername (Datum)* Radiotext (Datum)* Radiotext+ (R.TEXT+) Songtitel (Interpret)
Songtitel (Datum)*
(Für CD-DA)
Tracktitel (Interpret) Tracktitel (Disc-Name) Tracktitel (Datum)* Spielzeit (Datum)*
(zurück zum Anfang)
(Für MP3/WMA/AAC/WAV/FLAC-Datei)
Songtitel (Interpret) Songtitel (Albumtitel) Songtitel (Datum)* Dateiname (Ordnername)
Dateiname (Datum)*
Wenn
[MODE OFF]/[BROWSE MODE]
Songtitel (Interpret)
(zurück zum Anfang)
Spielzeit (Datum)*
(zurück zum Anfang)
Frequenz (Datum)* (zurück zum Anfang)
Spielzeit (Datum)* (zurück zum Anfang)
Songtitel (Albumname) Songtitel (Datum)* Spielzeit (Datum)*
Songtitel (Interpret) Songtitel (Albumname) Songtitel (Datum)*
(zurück zum Anfang)
Songtitel (Albumname) Songtitel (Datum)* Spielzeit (Datum)*
ausgewählt ist
( 9)
[BATT/SIGNAL]
auf
:
[AUTO]
gestellt ist.
( 15)
28
DEUTSCH

TECHNISCHE DATEN
FM Frequenzbereich 87,5 MHz — 108,0 MHz (50 kHz-Abstimmschritte)
Empfindlichkeit
(Rauschabstand=30dB)
Empfindlichkeitsschwelle
(DIN S/N=46dB)
Frequenzgang (±3 dB) 30 Hz — 15 kHz
Signal-Rauschabstand (MONO) 64,0 dB
Tuner
Kanaltrennung (1 kHz) 40dB
MW
Frequenzbereich 531kHz — 1611kHz (9kHz-Abstimmschritte)
(AM)
Empfindlichkeit
(Rauschabstand = 20dB)
LW
Frequenzbereich 153kHz — 279kHz (9kHz-Abstimmschritte)
(AM)
Empfindlichkeit
(Rauschabstand = 20dB)
Bei :
Laserdiode GaAIAs
Digitalfilter (D/A) 8-faches Oversampling
Spindeldrehzahl 500 U/min — 200 U/min (CLV)
Tonhöhenschwankung Unterhalb der Messgrenze
Frequenzgang (±1 dB) 20Hz — 20kHz
Gesamtklirrfaktor (1 kHz) 0,01%
CD-Player
Signal-Rauschabstand (1 kHz) 105 dB
Dynamikbereich 90dB
Kanaltrennung 85dB
MP3-Decodierung Unterstützt MPEG-1/2 Audio Layer-3
WMA-Decodierung Unterstützt Windows Media Audio
AAC-Decodierung AAC-LC “.aac ”-Dateien
0,71 V/75 Ω
2,0 V/75 Ω
28,2V
50V
Bei :
USB Standard USB1.1/USB2.0 Höchstgeschwindigkeit
Dateisystem FAT12/16/32
Maximaler Versorgungsstrom DC 5 V
MP3-Decodierung Unterstützt MPEG-1/2 Audio Layer-3
USB
WMA-Decodierung Unterstützt Windows Media Audio
AAC-Decodierung AAC-LC “.aac”, “.m4a”-Dateien
WAV-Decodierung Linear PCM
FLAC-Decodierung FLAC-Datei (Bis zu 96kHz/24Bit)
Bei :
USB Standard USB1.1/USB2.0 Höchstgeschwindigkeit
Dateisystem FAT12/16/32
Maximaler Versorgungsstrom DC 5 V
Frequenzgang (±1 dB) 20Hz — 20kHz
Signal-Rauschabstand (1 kHz) 105 dB
Dynamikbereich 90dB
USB
Kanaltrennung 85dB
MP3-Decodierung Unterstützt MPEG-1/2 Audio Layer-3
WMA-Decodierung Unterstützt Windows Media Audio
AAC-Decodierung AAC-LC “.aac”, “.m4a”-Dateien
WAV-Decodierung Linear PCM
FLAC-Decodierung FLAC-Datei (Bis zu 96kHz/24Bit)
1,5A
1,5A
DEUTSCH
29

TECHNISCHE DATEN
Version Bluetooth 3.0
Frequenzbereich 2,402GHz — 2,480GHz
Ausgangsleistung +4 dBm (MAX), 0 dBm (AVE) Leistungsklasse 2
Maximaler Kommunikationsbereich Sichtlinie ca. 10m (32,8ft)
Bluetooth
Profil HFP 1.6 (Hands-Free Profile)
Maximale Ausgangsleistung 50W×4
Volle Bandbreitenleistung 22W×4 (bei weniger als 1% Klirrfaktor)
Lautsprecherimpedanz 4—8
Klangregler Band 1: 62,5Hz ±9 dB
Audio
Vorverstärkerpegel/Last CD
Vorverstärkungsimpedanz ≤600
A2DP (Advanced Audio Distribution Profile)
AVRCP 1.5 (Audio/Video Remote Control Profile)
SPP (Serial Port Profile)
PBAP (Phonebook Access Profile)
Band 2: 100 Hz ±9 dB
Band 3: 160 Hz ±9 dB
Band 4: 250 Hz ±9 dB
Band 5: 400 Hz ±9 dB
Band 6: 630Hz ±9 dB
Band 7: 1kHz ±9 dB
Band 8: 1,6kHz ±9 dB
Band 9: 2,5kHz ±9 dB
Band 10: 4kHz ±9 dB
Band 11: 6,3kHz ±9 dB
Band 12: 10kHz ±9 dB
Band 13: 16kHz ±9 dB
: 2 500 mV/10k
USB
: 2 500 mV/10k
Frequenzgang (±3 dB) 20Hz — 20kHz
Maximaler Spannungseingang 1 000mV
Auxiliary
Eingangsimpedanz 30k
Betriebsspannung 14,4 V (10,5 V — 16 V zulässig)
Maximale Stromaufnahme 10A
Betriebstemperaturbereich –10°C — +60°C
Einbaumaße (B × H × T) 182mm×111mm×158mm
Allgemeines
Gewicht
Änderungen ohne Vorankündigung bleiben vorbehalten
: 1,6kg
: 1,2kg
30
DEUTSCH

EINBAU/ANSCHLUSS
Warnung
•
Das Gerät kann nur bei 12 V DC-Versorgung mit negativer Masse eingebaut werden.
•
Trennen Sie den negativen Batterieanschluss vor der Verkabelung und Befestigung ab.
•
S chließen Sie nicht das Batteriekabel (gelb) das Zündkabel (rot) an der Fahrzeugkarosserie oder dem Massekabel (schwarz) an, um einen
Kurzschluss zu vermeiden.
•
Zum Verhindern von Kurzschlüssen:
– Isolieren Sie nicht angeschlossene Kabel mit Vinylband.
– Sicherstellen, daß das Gerät nach dem Einbau a Chassis des Fahrzeugs geerdet wird.
– Sichern Sie die Kabel mit Kabelklemmen und wickeln Sie Vinylband um die Kabel, die mit Metallteilen in Berührung kommen, um die Kabel zu
schützen.
Vorsicht
•
Überlassen Sie aus Sicherheitsgründen die Arbeiten zur Montage und Verkabelung ausgewiesenem Fachpersonal. Lassen Sie sich vom
Autoradiohändler beraten.
•
Montieren Sie dieses Gerät in der Konsole Ihres Fahrzeugs. Keine Metallteile dieses Geräts bei und kurz nach der Verwendung des Geräts berühren.
Metallteile wie der Kühlkörper und das Gehäuse werden heiß.
•
Verbinden Sie nicht die [-Drähte von Lautsprechern mit der Karosserie, dem Massekabel (schwarz) oder schließen sie parallel an.
•
Montieren Sie das Gerät mit einem Winkel von weniger als 30°.
•
Wenn Ihr Fahrzeugkabelbaum nicht die Zündklemme hat, verbinden Sie das Zündkabel (rot) mit der Klemme am Sicherungskasten des Fahrzeugs,
die 12 V DC-Versorgung bietet und durch den Zündschlüssel ein- und ausgeschaltet wird.
•
Halten Sie alle Kabel von hitzeableitenden Metallteilen fern.
•
Überprüfen Sie nach der Montage des Geräts, ob die Bremslichter, Blinker, Scheibenwischer usw. ordnungsgemäß funktionieren.
•
Wenn die Sicherung durchbrennt, überprüfen Sie zuerst, dass die Drähte nicht die Karosserie berühren, und ersetzen Sie dann die durchgebrannte
Sicherung durch eine neue Sicherung mit der gleichen Nenngröße.
Grundlegendes Verfahren
1 Ziehen Sie den Schlüssel aus dem Zündschloss, und trennen Sie dann den [-Klemme der Autobatterie ab.
2 Schließen Sie die Kabel richtig an.
Siehe Verdrahtungsanschluss.
3 Bauen Sie das Autoradio in Ihrem Fahrzeug ein.
Siehe Einbau der Einheit (Einbau im Armaturenbrett).
4 Schließen Sie die [-Klemme der Autobatterie an.
5 Drücken Sie zum Einschalten.
6 Setzen Sie das Gerät zurück.
( 33, 34)
( 32)
( 3)
Teileliste für den Einbau
(A)
Einbauhalterung
(B)
Frontrahmen
(C)
Kabelbaum
(D)
Ausziehschlüssel
DEUTSCH
31

EINBAU/ANSCHLUSS
Einbau der Einheit (Einbau im Armaturenbrett) Entfernen der Einheit
Führen Sie die erforderliche Verkabelung aus.
( 33, 34)
Biegen Sie die entsprechenden Metalllaschen, um die
Einbauhalterung sicher festzuhalten.
Armaturenbrett
Ihres Autos
1 Passen Sie die Vorsprünge an den Ausziehschlüsseln an beiden
Seiten des Frontrahmens ein und ziehen Sie ihn heraus.
2 Setzen Sie die Ausziehschlüssel tief in die Schlitze an jeder
Seite ein und folgen dann den mit Pfeil gekennzeichneten
Anweisungen wie in der Abbildung gezeigt.
Beim Einbau des Geräts ohne
Einbauhalterung
1 Nehmen Sie die Einbauhalterung und den Frontrahmen vom
Gerät ab.
2 Richten Sie die Öffnungen am Gerät (an beiden Seiten) mit
der Befestigungskonsole am Fahrzeug aus und sichern Sie das
Gerät mit Schrauben (im Handel erhältlich).
Verwenden Sie nur die vorgeschriebenen Schrauben. Durch Verwendung
falscher Schrauben kann das Gerät beschädigt werden.
32
DEUTSCH

EINBAU/ANSCHLUSS
Verdrahtungsanschluss
Bei Anschluss an einen externen Verstärker schließen Sie dessen Massedraht an der Autokarosserie an, um
Beschädigung des Geräts zu vermeiden.
Wenn Ihr Fahrzeug KEINEN ISO-Anschluss hat:
Wir empfehlen, die Einheit mit einem im Handel erhältlichen, für Ihr Fahrzeug ausgelegten Kabelbaum zu
installieren und diese Arbeit zur Ihrer eigenen Sicherheit von qualifizierten Fachleuten ausführen zu lassen. Lassen
Sie sich von Ihrem Autoradiohändler beraten.
Anschluss des ISO-Anschlusses an manche VW/Audi oder Opel (Vauxhall)
Automobile
Sie müssen möglicherweise die Verkabelung des mitgelieferten Kabelbaums modifizieren, wie unten gezeigt.
A7 (Rot) Zündkabel (Rot)
GerätFahrzeug
A4 (Gelb)
Standardverkabelung
Batteriekabel (Gelb)
ISO-Anschlüsse
Stift Farbe und Funktion (für ISO-Anschlüsse)
A4 Gelb
A5
A7 Rot
A8 Schwarz
B1
B2
B3
B4
B5
B6
B7
B8
1
*
( 34)
*
Blau/Weiß
Lila
]
Lila/Schwarz
Grau
]
Grau/Schwarz
Weiß
]
Weiß/Schwarz
Grün
]
Grün/Schwarz
1
[
:
Batterie
:
Stromsteuerung
:
Zündung (ACC)
:
Erdungsanschluss (Masse)
:
Hinterer Lautsprecher (rechts)
Für 3-Wege-Übergang: Hochtöner (rechts)
:
Vorderer Lautsprecher (rechts)
[
[
[
Für 3-Wege-Übergang: Mitteltöner (rechts)
:
Vorderer Lautsprecher (links)
Für 3-Wege-Übergang: Mitteltöner (links)
:
Hinterer Lautsprecher (links)
Für 3-Wege-Übergang: Hochtöner (links)
DEUTSCH
33

EINBAU/ANSCHLUSS
Verdrahtungsanschluss
Mikrofoneingangsbuchse
Vorderer/Hinterer/Subwoofer-Ausgang
Für 3-Wege-Übergang:
Mitteltöner/Tieftöner-Ausgang
( 12)
Antennenanschluss
Gelb (Batteriekabel)
Rot (Zündkabel)
Rot (A7)
Gelb (A4)
ISO-Anschlüsse
Sicherung (10 A)
Falls kein Anschluss durchgeführt wird, lassen Sie den Draht bitte nicht aus der Lasche hervorstehen.
Hellblau/Gelb
(Lekungs-Fernbedienungskabel)
2
*
Blau/Weiß
(Stromsteuerungskabel/
Antennensteuerungskabel)
Braun
(Stummschaltungs-Steuerkabel)
HINWEIS: Der Gesamtausgang für den blauen/weißen Draht (
STEERING WHEEL
REMOTE INPUT
REMOTE CONT
ANT CONT
P. CONT
MUTE
Zum Lenkrad-Fernbedienungsadapter
Bei Verwendung des optionalen
Leistungsverstärkers entweder einen Anschluss
an den Stromsteuerungsanschluss oder an den
Antennensteuerungsanschluss des Fahrzeugs
durchführen
Beziehen Sie sich hinsichtlich des Anschlusses
an das Kenwood-Navigationssystem auf die
Bedienungsanleitung des betreffenden Geräts
1
2
*
*
) + (
) ist 12 V 350 mA.
34
DEUTSCH


INDICE
PRIMA DELL’USO 2
FONDAMENTI 3
OPERAZIONI PRELIMINARI 4
1 Selezionare la lingua da usare per le
visualizzazioni e annullare il modo
dimostrativo
2 Impostare l’ora e la data
3 Eseguire le impostazioni iniziali
RADIO 6
CD, USB, iPod e ANDROID 8
AUX 11
Spotify 11
BLUETOOTH® 12
IMPOSTAZIONI AUDIO 20
IMPOSTAZIONI DI
VISUALIZZAZIONE 23
RISOLUZIONE DEI
PROBLEMI 24
RIFERIMENTI 27
Manutenzione
Informazioni aggiuntive
CARATTERISTICHE
TECNICHE 29
INSTALLAZIONE E
COLLEGAMENTI 31
PRIMA DELL’USO
IMPORTANTE
•
Prima di usare l’apparecchio, e per usarlo in modo corretto, si raccomanda di leggere a fondo questo manuale. È particolarmente importante leggerne e osservarne gli avvisi e
le note di attenzione.
•
È infine consigliabile tenerlo in un luogo sicuro e prontamente accessibile per ogni necessità futura.
AVVERTENZA
•
Non usare l’apparecchio in alcun modo che distragga dalla guida.
Attenzione
Regolazione del volume:
•
Per ridurre il rischio d’incidenti regolare il volume in modo che sia possibile udire i rumori esterni al veicolo.
•
Per evitare di danneggiare i diffusori con l’aumento improvviso del livello d’uscita, ridurre il volume prima di riprodurre le sorgenti digitali.
Generale:
•
Non usare un apparecchio esterno se ciò può far distrarre dalla guida.
•
Eseguire il backup di tutti i dati importanti. Il produttore dell’apparecchio non accetta alcuna responsabilità in caso di perdita dei dati registrati.
•
Non inserire né lasciare nell’apparecchio corpi metallici quali monete o attrezzi, pena la possibilità di cortocircuiti.
•
Per : Se durante la riproduzione a causa della formazione di condensa sulla testina laser si verifica un errore si suggerisce di espellerlo e di attendere che
evapori prima d’inserirlo nuovamente.
•
Q uando in alcuni tipi di auto è installato il cavo di controllo dell’antenna, questa si estende automaticamente non appena si accende l’unità principale
prima di parcheggiare in un luogo a soffitto basso è raccomandabile spegnerla o semplicemente portarla in STANDBY.
Come leggere il manuale
•
Le operazioni di seguito descritte si riferiscono principalmente ai tasti del frontalino del modello .
•
Per le spiegazioni si usano indicazioni in inglese. La lingua delle visualizzazioni è selezionabile dal menu
• [XX]
indica l’elemento selezionato.
• ( XX)
indica la disponibilità di riferimenti nella pagina specificata.
[FUNCTION]. ( 5)
( 34)
. In tal caso,
2
ITALIANO

FONDAMENTI
Frontalino
Tasto di espulsione e vano di caricamento
Finestra del display
Manopola del volume
Per Dal frontalino
Accendere l’impianto
Regolare il volume
Selezione della sorgente
Cambiare le informazioni visualizzate sul display
Premere .
•
Premere a lungo per spegnere l’impianto.
Ruotare la manopola del volume.
Premere quante volte necessario.
Premere
DISP
quante volte necessario.
S’illumina non appena si
stabilisce la connessione
Bluetooth.
( 13)
( 28)
Come resettare
Lampeggia quando
l’apparecchio accede al
modo di ricerca.
ITALIANO
3

OPERAZIONI PRELIMINARI
1
Selezionare la lingua da usare per le visualizzazioni e
annullare il modo dimostrativo
Alla prima accensione dell’unità (o quando s’imposta
il display mostra: “SEL LANGUAGE”
1 Ruotando la manopola del volume selezionare
[RUS]
(russo) o
L’impostazione predefinita è
Sul display appaiono in sequenza: “CANCEL DEMO”
2 Premere la manopola del volume.
L’impostazione predefinita è
3 Premere nuovamente la manopola del volume.
Viene visualizzata l’indicazione “DEMO OFF”.
Sul display appare quindi il tipo di crossover selezionato:
“2-WAY X ’ OVER” o “3-WAY X ’ OVER”
•
Per istruzioni sul cambio del tipo di crossover vedere la sezione “Cambio del tipo di
crossover”.
[SPA]
( 6)
“PRESS” “ VOLUME KNOB”
(spagnolo), quindi premerla.
[ENG]
.
[YES]
.
[FACTORY RESET]
[ENG]
“PRESS” “ VOLUME KNOB”.
su
(inglese),
[YES], 5
2
Impostare l’ora e la data
1
Premere la manopola del volume per accedere al modo
2 Ruotare la manopola del volume sino a selezionare
premerla.
Per regolare l’ora
3 Ruotare la manopola del volume sino a selezionare
quindi premerla.
4 Ruotando la manopola del volume eseguire le varie impostazioni e
quindi premerla.
Ora Minuti
5 Ruotare la manopola del volume sino a selezionare
quindi premerla.
6 Ruotare la manopola del volume sino a selezionare
premerla.
Per impostare la data
7 Ruotare la manopola del volume sino a selezionare
),
quindi premerla.
8 Ruotare la manopola del volume sino a selezionare
[MM/DD/YY]
9 Ruotare la manopola del volume sino a selezionare
premerla.
10 Ruotando la manopola del volume eseguire le varie impostazioni e
quindi premerla.
Giorno Mese Anno o Mese Giorno Anno
e quindi premerla.
[CLOCK]
[CLOCKADJUST]
[CLOCKFORMAT]
[12H]
[DATEFORMAT]
[DD/MM/YY]
[DATESET]
11 Premere a lungo per uscire.
Per ritornare all’impostazione precedente premere .
3
Eseguire le impostazioni iniziali
1
Premere ripetutamente per accedere al modo STANDBY.
2 Premere la manopola del volume per accedere al modo
3 Ruotando la manopola del volume selezionare l’elemento desiderato
( 5)
e quindi premerla.
4 Ripetere il passo 3 sino a selezionare o attivare l’elemento desiderato.
5 Premere a lungo per uscire.
Per ritornare all’impostazione precedente premere .
[FUNCTION]
e quindi
o
[24H]
o
e quindi
[FUNCTION]
.
e
e
e quindi
e
.
4
ITALIANO

OPERAZIONI PRELIMINARI
AUDIO CONTROL
SWITCH
PREOUT
DISPLAY
EASY MENU
TUNER SETTING
PRESET TYPE
SYSTEM
KEY BEEP
SOURCE SELECT
SPOTIFY SRC
BUILT-IN AUX
(Non selezionabile quando è selezionato il crossover a tre vie.)
REAR/SUBWOOFER
diffusori posteriori o un subwoofer (attraverso un amplificatore esterno).
Per
[FUNCTION]
ON
: la zona LCD DISPLAY s’illumina di bianco ;
OFF
: la zona LCD DISPLAY rimane illuminata del colore specificato per
( 24)
•
Q uando si seleziona
prescindere dall’impostazione di
•
Per come identificare la zona vedere l’illustrazione a pagina 23.
NORMAL
FM2/FM3/MW/LW).;
selezionata.
(Non selezionabile quando è selezionato il crossover a tre vie.)
ON
:attiva il tono alla pressione dei tasti.;
ON
:abilita la sorgente SPOTIFY nella selezione delle sorgenti.;
ON
:abilita la sorgente AUX nella selezione delle sorgenti.;
: specifica se alle prese di uscita di linea posteriori sono collegati i
...
[FUNCTION]
:salva una stazione per ciascun tasto di preimpostazione in ciascuna banda (FM1/
MIX
:salva una stazione per ciascun tasto di a prescindere dalla banda
Impostazione predefinita:
( 34)
[COLOR SELECT]
, l’illuminazione della zona KEY diviene azzurra a
[EASY MENU]
OFF
:disattiva il tono.
.
OFF
OFF
:la disabilita.
:la disabilita.
( 11)
( 11)
XX
P - OFF WAIT
CD READ
F/W UPDATE
.
UPDATE SYSTEM
F/W UP xxxx
FACTORY RESET YES
CLOCK
CLOCK DISPLAY
ENGLISH
РУССКИЙ
ESPANOL
Disponibile soltanto quando il modo dimostrativo è disattivato.
Imposta l’intervallo di tempo al trascorrere del quale l’unità si spegne automaticamente
(mentre si trova in standby) per risparmiare la carica della batteria.
20M
: 20minuti;
40M
: 40minuti;
60M
: 60minuti;
–––
:annulla
(Per )
1
:distingue automaticamente tra i dischi contenenti file audio e i CD musicali.;
2
:forza la riproduzione come CD musicale. Se si riproduce un disco contenente file
audio non se ne può sentire il suono.
YES
:avvia l’aggiornamento del firmware.; NO:annulla l’operazione (non avvia
l’aggiornamento).
Per informazioni particolareggiate sull’aggiornamento del firmware si prega di vedere il
sito <www.kenwood.com/cs/ce/>.
:ripristina le impostazioni di fabbrica (a eccezione di quelle salvate
dall’utilizzatore).;
ON
Selezionare la lingua di visualizzazione del menu
musicali, se disponibile.
La lingua predefinita è
NO
:annulla.
:sul display appare l’ora anche ad apparecchio spento.;
[FUNCTION]
[ENGLISH]
.
OFF
:annulla.
e delle informazioni
ITALIANO
5

OPERAZIONI PRELIMINARI
Cambio del tipo di crossover
1
Premere ripetutamente per accedere al modo STANDBY.
2 Per selezionare il crossover premere a lungo i tasti numerici 4 e 5.
Appare il tipo di crossover attualmente selezionato.
3 Ruotando la manopola selezionare “2WAY” o “3WAY”, quindi premerla.
4 Ruotando la manopola selezionare “YES” o “NO”, quindi premerla.
Appare il nuovo tipo di crossover selezionato.
•
Per annullare l’operazione premere a lungo .
•
Per regolare le impostazioni di crossover:
Attenzione
Si deve selezionare il tipo di crossover adatto alla modo di collegamento dei diffusori.
( 33, 34)
Se si seleziona il tipo sbagliato:
•
i diffusori possono danneggiarsi.
•
il livello sonoro potrebbe essere eccessivamente alto o basso.
( 21, 22)
.
RADIO
Ricercare una stazione
1
Premere quante volte necessario sino a selezionare RADIO.
2 Premere quante volte necessario per selezionare la banda
FM1, FM2, FM3, MW o LW.
3 Premere S/T per cercare una stazione.
•
Per selezionare il metodo di ricerca di S/T
volte necessario.
AUTO1
AUTO2
MANUAL
•
Per salvare la stazione in memoria
da
•
Per selezionare una stazione salvata in memoria
numerici da
: cerca automaticamente le stazioni.
: per cercare una stazione preimpostata.
: cerca manualmente le stazioni.
1
a 6.
1
a 6.
: premere a lungo uno dei tasti numerici
Altre impostazioni
1
Premere la manopola del volume per accedere al modo
2 Ruotando la manopola del volume selezionare l’elemento desiderato
( 7)
e quindi premerla.
3 Ripetere il passo 2 sino a selezionare o attivare l’elemento desiderato,
oppure seguire le istruzioni riportate per l’elemento selezionato.
4 Premere a lungo per uscire.
Per ritornare all’impostazione precedente premere .
: premere quante
: premere uno dei tasti
[FUNCTION]
.
6
ITALIANO

RADIO
TUNER SETTING
LOCAL SEEK
AUTO
MEMORY
MONO SET
NEWS SET ON
REGIONAL ON
AF SET ON
TI ON
PTY SEARCH
CLOCK
TIMESYNC
Impostazione predefinita:
ON
: cerca soltanto le stazioni dal segnale forte. ;
•
L’impostazione eseguita riguarda solo la sorgente/stazione selezionata. Quando si cambia
sorgente/stazione è necessario ripetere l’impostazione.
YES
:inizia automaticamente a salvare le prime sei stazioni la cui ricezione è buona.;
NO
:annulla.
•
S elezionabile soltanto quando
ON
:migliora la ricezione FM (l’effetto stereo potrebbe tuttavia scomparire).;
: se disponibile, l’apparecchio seleziona temporaneamente il programma dei notiziari. ;
OFF
:annulla.
: passa a un’altra stazione, ma solo nella regione specifica, usando il comando “AF”.;
OFF
:annulla.
: quando la qualità di ricezione non è soddisfacente cerca automaticamente un’altra
stazione che diffonda lo stesso programma nella medesima rete Radio Data System ma il cui
segnale sia migliore.;
:permette all’apparecchio di passare temporaneamente alla ricezione delle informazioni sul
traffico, se disponibili (“TI” s’illumina).;
1
Ruotare la manopola del volume sino a selezionare il tipo di programma disponibile
(vedere oltre), e quindi premerla.
2
Ruotare la manopola del volume sino a selezionare la lingua PTY (
GERMAN
3
ON
) e quindi premerla.
Premere S/T per avviare la ricerca.
: sincronizza l’orologio dell’apparecchio con quello del Radio Data System. ;
OFF
[PRESETTYPE]
:annulla.
OFF
OFF
:annulla.
: annulla.
è impostato su
[NORMAL]. ( 5)
OFF
:annulla.
ENGLISH/FRENCH
OFF
: annulla.
XX
Tipi di programma disponibili durante la ricerca
:
NEWS, AFFAIRS, INFO
SPEECH
SCIENCE, VARIED, WEATHER, FINANCE, CHILDREN, SOCIAL, RELIGION
PHONE IN, TRAVEL, LEISURE, DOCUMENT
MUSIC
:
POPM
(musica),
CLASSICS, OTHERM
FOLKM
L’apparecchio cerca il tipo di programma categorizzato come
se selezionato.
• [LOCAL SEEK]/[MONOSET]/[NEWSSET]/[REGIONAL]/[AFSET]/[PTYSEARCH]
selezionabili soltanto nelle bande FM1, FM2 e FM3.
•
Se si regola il volume durante la ricezione delle informazioni sul traffico o mentre si
sta ricevendo un notiziario, l’apparecchio lo memorizza automaticamente. Applicherà
quindi lo stesso volume la volta successiva che si accederà allo stesso tipo di servizio.
/
(musica)
(informazioni),
ROCKM
(musica),
(musica),
EASYM
JAZZ, COUNTRY, NATIONM
[PTY SEARCH]
SPORT, EDUCATE, DRAMA, CULTURE
(musica),
LIGHTM
(musica),
[SPEECH]
(musica),
OLDIES
o
[MUSIC]
sono
,
,
,
,
ITALIANO
7

CD, USB, iPod e ANDROID
Avviare la riproduzione
L’apparecchio seleziona automaticamente la sorgente e ne avvia
la riproduzione.
CD
Presa d’ingresso USB
Lato dell’etichetta
USB
CA-U1EX (massimo.: 500mA)
(accessorio opzionale)
iPod/iPhone
KCA-iP102/KCA-iP103
(accessorio opzionale)
o accessorio dell’iPod o dell’iPhone
ANDROID
Comune cavo USB
(del tipo comunemente
disponibile in commercio)
M
Espulsione disco
1
*
2
*
3
*
2
*
Sorgenti selezionabili:
•
: CD, USB, iPod USB e ANDROID
•
: USB, iPod USB e ANDROID
Per Dal frontalino
Riprodurre/mettere in pausa
Avanzare o retrocedere
rapidamente
Selezionare un brano o un file
Seleziona una cartella
1
*
KCA-iP102 : tipo a 30 contatti; KCA-iP103 : tipo Lightning
2
*
Quando non lo si usa, non lasciare il cavo nella vettura.
3
*
Quando è collegata una periferica Android: appare “Press [VIEW ] to install KENWOOD MUSIC PLAY APP”. Seguire le istruzioni per installare
l’applicazione. La più recente versione dell’applicazione KENWOOD MUSIC PLAY può essere altresì installata nella periferica Android prima di
collegarla. Per maggiori informazioni al riguardo si prega di visitare il sito <www.kenwood.com/cs/ce/>.
4
*
Per le periferiche ANDROID: disponibile soltanto quando si seleziona
5
*
Per CD: solo con i file MP3/WMA/AAC. Non disponibile per l’iPod e ANDROID.
4
*
5
*
Premere
Premere a lungo S/T.
Premere
Premere J/K.
.
S/T.
[BROWSE MODE]. ( 9)
8
ITALIANO

CD, USB, iPod e ANDROID
Per Dal frontalino
6
*
Ripetizione
Riproduzione
*
casuale
6
*
Per iPod/ANDROID: disponibile soltanto quando si seleziona
7
*
Per CD: solo con i file MP3/WMA/AAC.
Premere quante volte necessario.
TRACK REPEAT/ALL REPEAT
FILE REPEAT/FOLDER REPEAT/ALL REPEAT
FILE REPEAT/FOLDER REPEAT/REPEAT OFF
Premere quante volte necessario.
6
DISC RANDOM/RANDOM OFF
FOLDER RANDOM/RANDOM OFF
Premere a lungo o sino a selezionare
: CD audio
: CD audio
: file MP3, WMA, AAC,
WAV e FLAC
: iPod o periferica
ANDROID
: file MP3, WMA, AAC, WAV, FLAC,
iPod o periferica ANDROID
ALLRANDOM
[MODEOFF]/[BROWSE MODE]
7
*
.
.
Selezionare il modo di controllo
Mentre è selezionata la sorgente iPod USB premere quante volte necessario 5.
MODE ON
: controlla l’iPod dall’iPod stesso. Dall’unità principale è comunque possibile
eseguire operazioni quali riproduzione, messa in pausa, salto dei file e
MODE OFF
Mentre è selezionata la sorgente ANDROID premere quante volte necessario 5.
BROWSE MODE
HAND MODE
avanzamento/inversione rapida.
: controlla l’iPod dall’unità principale.
: controlla il dispositivo Android dall’unità principale per mezzo
dell’applicazione KENWOOD MUSIC PLAY in esso installata.
: controlla il dispositivo Android da esso stesso per mezzo di un’altra
applicazione di riproduzione musicale in esso installata. Dall’unità
principale rimane tuttavia possibile riprodurre, mettere in pausa e
saltare i file.
Selezionare un’unità con file audio
Mentre è selezionata la sorgente USB premere quante volte necessario 5.
L’apparecchio riprodurrà i brani salvati in.
•
Memoria interna o esterna selezionata di uno smartphone (classe di archiviazione
di massa).
•
Unità selezionata di un dispositivo multi-unità.
Selezionare un file da una cartella o da un elenco
Con l’iPod o un dispositivo Android questa funzione è disponibile soltanto quando si
seleziona
[MODEOFF]/[BROWSE MODE]
1 Premere .
2 Ruotare la manopola del volume sino a selezionare la cartella o
l’elenco desiderato, quindi premerla.
3 Ruotare la manopola del volume sino a selezionare il file desiderato,
quindi premerla.
Ricerca rapida
Se i file sono molti è possibile cercarli rapidamente.
Ruotando velocemente la manopola del volume si scorre
velocemente l’elenco.
Salto di ricerca
Premere S/T per cercare i file al rapporto di salto ricerca
pre-impostato.
•
Premendo S/T a lungo la ricerca avanza con un rapporto di salto del
10
%
.
Ricerca alfabetica
La ricerca dei file può essere effettuata inserendone il primo carattere.
Sorgente iPod USB
1 Ruotare velocemente la manopola del volume per accedere alla
ricerca per caratteri.
2 Ruotare la manopola del volume sino a selezionare il carattere
d’interesse.
• Per cercare un carattere diverso da AaZ e da 0a9 selezionare “ * ”.
3 Premere S/T per fare scorrere la posizione d’inserimento.
• È possibile inserire sino a tre caratteri.
4 Premere la manopola del volume per avviare la ricerca.
(solo con il CD, l’unità USB e la sorgente ANDROID)
(solo con l’iPod USB e la sorgente ANDROID)
( 10, [SKIPSEARCH])
.
(solo con l’iPod USB e la sorgente ANDROID)
ITALIANO
9

CD, USB, iPod e ANDROID
Sorgente ANDROID
1 Premere J/K per accedere alla ricerca per caratteri.
2 Ruotare la manopola del volume sino a selezionare il carattere
d’interesse.
^A^
: lettere maiuscole (da A a Z)
_A_
: lettere minuscole (da a a z)
-0-
: numeri (da 0 a 9)
: caratteri diversi da A a Z e da 0 a 9
***
3 Premere la manopola del volume per avviare la ricerca.
•
Per ritornare alla cartella principale (root), al primo file o al menu principale premere il
tasto
5
.
(Operazione non disponibile con la sorgente BT AUDIO.)
•
Per ritornare all’impostazione precedente premere .
•
Per annullare l’operazione premere a lungo .
Ascoltare TuneIn Radio/TuneIn Radio Pro
Durante l’ascolto dell’applicazione TuneIn Radio o TuneIn Radio Pro collegare l’iPod o
l’iPhone alla presa d’ingresso USB di questo apparecchio.
•
Ora sarà l’apparecchio a emettere il suono proveniente da queste applicazioni.
Impostazioni per l’uso dell’applicazione KENWOOD Remote
L’applicazione KENWOOD Remote permette di gestire il sintolettore KENWOOD con un
iPhone o un iPod (mediante la presa d’ingresso USB).
Preparazione:
Prima di connettere il dispositivo è necessario installarvi la versione più recente
dell’applicazione KENWOOD Remote. Per maggiori informazioni al riguardo si prega di
visitare il sito <www.kenwood.com/cs/ce/>.
Le impostazioni sono effettuabili allo stesso modo della connessione Bluetooth.
( 18)
Altre impostazioni
1
Premere la manopola del volume per accedere al modo
2 Ruotare la manopola del volume sino a selezionare l’elemento
desiderato (vedere la tabella che segue), e quindi premerla.
3 Ripetere il passo 2 sino a selezionare o attivare l’elemento desiderato.
4 Premere a lungo per uscire.
Per ritornare all’impostazione precedente premere .
[FUNCTION]
Impostazione predefinita:
.
USB
MUSICDRIVE DRIVECHANGE
SKIPSEARCH 0.5%/1%/5%/10%
[DRIVE 4]
Ripetere i passi da
il rapporto di salto ricerca lungo tutti i file.
:seleziona automaticamente l’unità successiva (da
) e avvia la riproduzione.
1
a 3 per selezionare le unità successive.
: durante l’ascolto dell’iPod USB o di una sorgente ANDROID seleziona
[DRIVE 1]
a
XX
10
ITALIANO

AUX
Preparazione:
In
[SOURCE SELECT]
Avviare l’ascolto
1
Collegare un comune lettore audio portatile (del tipo comunemente
disponibile in commercio).
Presa d’ingresso ausiliario
impostare
[BUILT-IN AUX]
su
[ON]. ( 5)
Lettore audio portatile
Spotify
Preparazione:
Installare nel proprio iPhone o iPod touch l’ultima versione di Spotify, creare un account
e accedere al sito Spotify.
•
In
[SOURCE SELECT]
Avviare l’ascolto
1
Aprire nella periferica l’applicazione Spotify.
2 Collegare la periferica alla presa USB dell’apparecchio.
impostare
[SPOTIFY SRC]
su
[ON]. ( 5)
2 Premere quante volte necessario sino a selezionare AUX.
3 Accendere il lettore audio portatile e avviarne la riproduzione.
Mini spinotto stereo da 3,5mm con connettore a “L”
(del tipo comunemente disponibile in commercio)
Impostare il nome AUX
Durante l’ascolto del lettore audio portatile collegato all’apparecchio...
1 Premere la manopola del volume per accedere al modo
2 Ruotare la manopola del volume sino a selezionare
premerla.
3 Ruotare la manopola del volume sino a selezionare
quindi premerla.
4 Ruotando la manopola del volume selezionare l’elemento desiderato,
quindi premerla.
AUX
(impostazione predefinita)/
5 Premere a lungo per uscire.
Per ritornare all’impostazione precedente premere .
DVD/PORTABLE/GAME/VIDEO/TV
[FUNCTION]
[SYSTEM]
e quindi
[AUXNAME SET]
.
e
Presa d’ingresso USB
3 Premere quante volte necessario sino a selezionare SPOTIFY.
Se ne avvia automaticamente la ricezione.
KCA-iP102/KCA-iP103 (accessorio opzionale)
o accessorio dell’iPod o dell’iPhone
1
*
2
*
Per Dal frontalino
Riprodurre/mettere in pausa
Saltare un brano
3
Approvare o disapprovare
Avviare la radio
1
*
KCA-iP102 : tipo a 30 contatti; KCA-iP103 : tipo Lightning
2
*
Quando non lo si usa, non lasciare il cavo nella vettura.
3
*
Funzione disponibile unicamente in modalità Radio. Quando si disapprova un brano il sistema lo salta e passa a un
altro.
4
*
( 12)
*
Premere
Premere
Premere J/K.
Premere a lungo
S*
.
4
/T.
5.
ITALIANO
11

Spotify
Per Dal frontalino
Ripetizione*
Riproduzione casuale*5Premere quante volte necessario.*
4
*
5
*
Come salvare i dati relativi ai brani preferiti
Durante l’ascolto della radio...
Premere a lungo la manopola del volume.
Appare “SAVED” e i dati vengono salvati in “Your Music (La tua musica)” o in “Your Library
(La tua libreria)” del proprio account Spotify.
Per eliminarli ripetere la medesima procedura:
Appare “REMOVED” e i dati prima salvati vengono rimossi da “Your Music (La tua
musica)” o da “Your Library (La tua libreria)” dell’account.
Ricerca di un brano o di una stazione
1
2 Ruotando la manopola selezionare un tipo di elenco e premerla.
I tipi di elenchi visualizzati dipendono dalle informazioni trasmesse da Spotify.
3 Ruotando la manopola selezionare il brano o la stazione d’interesse.
4 Premere la manopola del volume per confermare.
Per velocizzare la ricerca occorre ruotare velocemente la manopola.
Per annullare l’operazione premere a lungo
5
Premere quante volte necessario.
REPEAT ALL/REPEAT ONE*
SHUFFLE ON/SHUFFLE OFF
Disponibile soltanto con gli account premium
Disponibile soltanto con i brani registrati nelle liste di riproduzione
Premere .
4
/
REPEAT OFF
4
.
BLUETOOTH®
BLUETOOTH — Connessione
Profili BLUETOOTH compatibili
–
HFP (chiamate vivavoce)
–
A2DP (distribuzione audio avanzata)
–
AVRCP (controllo audio/video remoto)
–
SPP (por ta seriale)
–
PBAP (accesso alla rubrica telefonica)
Codec Bluetooth compatibili
–
Sub Band Codec (SBC)
–
Advanced Audio Coding (AAC)
Collegare il microfono
Pannello posteriore
Presa d’ingresso microfono
Regolazione dell’angolo
del microfono
Se necessario assicurare con un
fermacavo (non in dotazione
all’apparecchio).
Microfono
(in dotazione)
12
ITALIANO

BLUETOOTH®
Accoppiamento e connessione iniziale di un dispositivo
Bluetooth
1
Premere per accendere l’apparecchio.
2 Dalla periferica Bluetooth ricercare e selezionare l’apparecchio modello
(DPX-5
Sul display appare “PAIRING” “PASS XXXXXX” Nome della periferica
“PRESS”
• Con alcune periferiche Bluetooth subito dopo la ricerca potrebbe essere
3 Premere la manopola del volume per avviare l’accoppiamento.
Al termine dell’accoppiamento appare “PAIRING OK”.
Al termine dell’accoppiamento la connessione Bluetooth si stabilisce automaticamente.
Sul frontalino s’illuminano gli indicatori “BT1” e/o “BT2”.
•
Questo apparecchio è compatibile con la funzione SSP (accoppiamento semplificato
e sicuro).
•
È possibile registrare (accoppiare) sino a cinque periferiche.
•
Una volta eseguito l’accoppiamento la periferica Bluetooth rimane registrata
nell’apparecchio anche qualora lo si resetti. Per informazioni sulla cancellazione della
periferica connessa:
•
In qualsiasi momento è possibile connettere sino a due cellulari e un lettore audio
Bluetooth.
Tuttavia mentre ci si trova nella sorgente BT AUDIO è possibile connettere e
commutare a piacere sino a cinque periferiche audio Bluetooth.
•
Alcune periferiche Bluetooth potrebbero non riuscire a connettersi automaticamente
all’apparecchio anche ad accoppiamento riuscito. In tal caso occorre provvedervi
manualmente.
•
Per maggiori informazioni al riguardo si prega di vedere il manuale d’istruzioni della
periferica in uso.
/DPX-M3 ).
“VOLUME KNOB”.
necessario inserire il codice PIN (Personal Identification Number).
17, [DEVICE DELETE]
.
( 18)
Accoppiamento automatico
Quando alla presa d’ingresso USB dell’apparecchio si collega un iPhone, un
iPodtouch o un dispositivo Android, attraverso la connessione Bluetooth se ne attiva
automaticamente la richiesta di accoppiamento.
Una volta controllato il nome della periferica, per accoppiarla premere una
volta la manopola del volume.
La richiesta automatica di accoppiamento si attiva soltanto quando:
–
La funzione Bluetooth della periferica connessa è attiva.
–
La funzione
–
Nel dispositivo Android è installata l’applicazione KENWOOD MUSIC PLAY
selezionato
[AUTO PAIRING]
è impostata su
[BROWSEMODE]. ( 9)
[ON]. ( 17)
( 8)
ed è
ITALIANO
13

BLUETOOTH®
BLUETOOTH — Telefono cellulare
Ricevere una chiamata
Al sopraggiungere di una chiamata:
•
La zona KEY s’illumina di verde e lampeggia.
•
Se la funzione
tempo l’apparecchio risponde alla chiamata automaticamente.
Durante la conversazione:
•
La zona LCD DISPLAY s’illumina sulla base delle impostazioni effettuate per
( 24)
•
Se si spegne l’apparecchio la connessione Bluetooth s’interrompe.
[AUTO ANSWER]
mentre la zona KEY s’illumina di verde.
è stata impostata su un determinato intervallo di
( 15)
[DISPLAY]
Le funzionalità di seguito elencate possono differire o mancare del tutto a seconda del
modello di telefono connesso.
Per Dal frontalino
Alla prima chiamata in arrivo...
Rispondere a una chiamata
Rifiutare una chiamata
Terminare una
conversazione
Mentre si risponde alla prima chiamata...
Rispondere a un’altra
chiamata lasciando in
attesa quella già in corso
Rifiutare un’altra chiamata
in arrivo
Quando vi sono due chiamate attive...
Terminare quella in corso e
accettare quella in attesa
Commutare tra la chiamata
in corso e quella in attesa
Regolare il volume della
conversazione da
(Impostazione predefinita:
[15]
)
Passare dal modo vivavoce
al modo di conversazione
privata
[00]
a
Premere
o uno dei tasti numerici da
Premere
Premere
Premere
Premere
Premere
Premere
Mentre si parla ruotare la manopola del
volume.
[35]
•
Questa regolazione non ha influenza sul
volume delle altre sorgenti.
Durante la conversazione premere
•
I comandi possono variare secondo il cellulare
Bluetooth effettivamente connesso.
, la manopola del volume
.
.
.
.
.
.
1 a 6.
.
14
ITALIANO

BLUETOOTH®
Come migliorare la qualità audio
Mentre si parla...
1 Premere la manopola del volume per accedere al modo
2 Ruotare la manopola del volume sino a selezionare l’elemento
desiderato (vedere la tabella che segue), e quindi premerla.
3 Ripetere il passo 2 sino a selezionare o attivare l’elemento desiderato.
4 Premere a lungo per uscire.
Per ritornare all’impostazione precedente premere .
MIC GAIN
NR LEVEL
ECHO CANCEL
da
LEVEL –10
a
aumenta all’aumentare del numero selezionato.
da
LEVEL –5
ridurre al minimo il rumore durante la conversazione telefonica.
da
LEVEL –5
sino a ridurlo al minimo durante la conversazione.
LEVEL +10(LEVEL –4
a
LEVEL +5(LEVEL 0
a
LEVEL +5(LEVEL 0
): la sensibilità del microfono incorporato
):regola il livello di riduzione dell’eco sino a
):regola il ritardo per la cancellazione dell’eco
Impostazione di ricezione delle chiamate
Premere per accedere al modo Bluetooth.
1
2 Ruotare la manopola del volume sino a selezionare l’elemento
desiderato (vedere la tabella che segue), e quindi premerla.
3 Ripetere il passo 2 sino a selezionare o attivare l’elemento d’interesse.
4 Premere a lungo per uscire.
Per ritornare all’impostazione precedente premere .
[FUNCTION]
Impostazione predefinita:
.
Impostazione predefinita:
SETTINGS
AUTO ANSWER
BATT/SIGNAL* AUTO
*
Q uesta funzionalità dipende dal tipo di telefono in uso.
da 1 a30:l’apparecchio risponde automaticamente alle chiamate in arrivo entro l’intervallo
di tempo specificato (in secondi).;
:quando l’apparecchio rileva una periferica Bluetooth connessa ne mostra lo stato di
carica della batteria e la forza del segnale.;
OFF
:annulla.
OFF
:annulla.
XX
Come effettuare una chiamata
Le chiamate possono essere effettuate dalla cronologia delle chiamate, dalla rubrica
telefonica o componendo direttamente il numero. Se il cellulare in uso è provvisto della
funzione di comando vocale è altresì possibile effettuarle in tal modo.
1 Premere per accedere al modo Bluetooth.
Appare il nome del primo cellulare.
• Se sono connessi due cellulari Bluetooth, premendo nuovamente si
passa all’altro.
Appare il nome del secondo cellulare.
2 Ruotare la manopola del volume sino a selezionare l’elemento
desiderato (vedere la tabella che segue), e quindi premerla.
3 Ripetere il passo 2 sino a selezionare o attivare l’elemento desiderato,
oppure seguire le istruzioni riportate per l’elemento selezionato.
4 Premere a lungo per uscire.
Per ritornare all’impostazione precedente premere .
CALL HISTORY
(Selezionabile soltanto quando il telefono connesso è compatibile con il profilo PBAP.)
1
Premendo la manopola selezionare il nome o il numero telefonico da chiamare.
• Nella par te inferiore del display appare “INCOMING”, “OUTGOING” o “MISSED” per
indicare lo stato della precedente chiamata.
• Premere
• In assenza di registrazione della cronologia delle chiamate appare “NO DATA”.
2
DISP
per selezionare la categoria da visualizzare (NUMBER o NAME).
Premere la manopola del volume per effettuare la chiamata.
XX
ITALIANO
15

BLUETOOTH®
PHONE BOOK
NUMBER DIAL
VOICE
BATT LOW/MID/FULL
NO SIGNAL/LOW/MID/MAX
*
Q uesta funzionalità dipende dal tipo di telefono in uso.
(Selezionabile soltanto quando il telefono connesso è compatibile con il profilo PBAP.)
1
Ruotare velocemente la manopola del volume per accedere al modo di ricerca alfabetico
(quando la rubrica telefonica contiene molti contatti).
Appare il primo menu (ABCDEFGHIJK).
• Per accedere agli altri menu (LMNOPQRSTUV o WXYZ1
• Ruotando velocemente la manopola del volume selezionare la prima lettera della
parola da ricercare, premere
Selezionare “1” per effettuare la ricerca con i numeri, oppure “
simboli.
2
Ruotare la manopola del volume sino a selezionare il nome desiderato, quindi premerla.
3
Ruotare la manopola del volume sino a selezionare il numero desiderato, quindi
premerla per comporlo.
•
D urante l’accoppiamento la rubrica telefonica del telefono connesso viene
automaticamente trasferita all’unità.
•
I contatti vengono categorizzati in: HOME, OFFICE, MOBILE, OTHER, GENERAL.
•
L’apparecchio visualizza esclusivamente le lettere non accentate. (La “Ú”, ad esempio,
appare come “U”.)
1
Ruotando la manopola del volume selezionare un numero da 0 a 9 o un carattere
(
, # o +).
2
Con
S/T
Ripetere i passi
3
Premere la manopola del volume per effettuare la chiamata.
Pronunciare il nome del contatto da chiamare oppure il comando vocale di controllo della
funzione telefonica desiderata.
riconoscimento vocale)
*
:mostra la carica della batteria.
1
e 2 sino a completare la composizione del numero.
*
:mostra la forza del segnale in ricezione.
) premere
S/T
fare scorrere la posizione d’inserimento.
( Come effettuare una chiamata mediante
e quindi anche la manopola stessa.
” per effettuarla con i
J/K
Come effettuare una chiamata mediante riconoscimento
vocale
1
Premere a lungo per attivare la funzione di riconoscimento
.
vocale del telefono connesso.
2 Pronunciare il nome del contatto da chiamare oppure il comando vocale
di controllo della funzione telefonica desiderata.
•
La capacità di riconoscimento vocale varia secondo il telefono effettivamente in uso.
Per maggiori informazioni al riguardo si prega di vedere il manuale d’istruzioni del
telefono.
•
Questo apparecchio è altresì compatibile con la funzione di assistenza personale
intelligente dell’iPhone.
Impostazioni in memoria
Registrare contatti nella memoria
In corrispondenza dei tasti numerici da 1 a 6 è possibile memorizzare sino a 6 contatti.
1 Premere per accedere al modo Bluetooth.
2 Ruotando la manopola del volume selezionare
[PHONEBOOK]
3 Ruotando la manopola selezionare il nome o il numero di telefono da
chiamare.
Dopo avere selezionato il contatto, premendo la manopola del volume se ne
visualizza il numero telefonico.
4 Premere a lungo uno dei tasti numerici da 1 a 6.
Se l’apparecchio trova tale contatto o numero di telefono appare “STORED”.
Per cancellare un contatto dalla memoria di preimpostazione al passo
[NUMBER DIAL]
, o
[NUMBERDIAL]
e registrare quindi un semplice spazio.
, quindi premerla.
[CALL HISTORY]
2
,
selezionare
Chiamata dalla memoria
Premere per accedere al modo Bluetooth.
1
2 Premere uno dei tasti numerici da 1 a 6.
3 Premere la manopola del volume per effettuare la chiamata.
Se non vi è alcun contatto salvato appare “NO MEMORY”.
16
ITALIANO

BLUETOOTH®
Altre impostazioni
1
Premere la manopola del volume per accedere al modo
2 Ruotare la manopola del volume sino a selezionare l’elemento desiderato (vedere la
tabella che segue), e quindi premerla.
3 Ripetere il passo 2 sino a selezionare o attivare l’elemento desiderato, oppure seguire
le istruzioni riportate per l’elemento selezionato.
4 Premere a lungo per uscire.
Per ritornare all’impostazione precedente premere .
[FUNCTION]
.
Impostazione predefinita:
BT MODE
PHONE SELECT
AUDIO SELECT
DEVICE DELETE
PIN CODE EDIT
(0000)
RECONNECT ON
AUTO PAIRING ON
INITIALIZE YES
Selezionano il telefono o la periferica audio da connettere o disconnettere.
Quando la periferica è connessa, di fronte al suo nome appare “
Davanti al lettore audio correntemente selezionato appare “
•
In qualsiasi momento è possibile connettere sino a due telefoni e un lettore audio Bluetooth.
1
Ruotare la manopola del volume sino a selezionare la periferica da cancellare, quindi premerla.
2
Ruotando la manopola selezionare
Cambia il codice PIN (sino a 6 cifre).
1
Ruotando la manopola selezionare un numero di telefono.
2
Con S/T fare scorrere la posizione d’inserimento.
Ripetere i passi
3
Premere la manopola del volume per confermare.
:quando la trova a portata di connessione, l’apparecchio riconnette automaticamente l’ultima periferica
connessa.;
:quando si collega alla presa d’ingresso USB una periferica Bluetooth compatibile (iPhone, iPod touch o un
dispositivo Android) l’apparecchio l’accoppia automaticamente.Questa funzione potrebbe non operare a seconda
del sistema operativo installato nella periferica connessa. ;
NO
:annulla.
1
e 2 sino a completare l’inserimento del codice PIN.
OFF
:annulla.
:inizializza tutte le impostazioni Bluetooth, dati di accoppiamento e rubrica telefonica compresi.;
[YES]
o
[NO]
”.
”.
, quindi premerla.
OFF
:annulla.
Modo di prova Bluetooth
L’apparecchio può verificare l’effettiva capacità di connessione dei propri
profili con le periferiche Bluetooth.
•
Accertarsi che non vi sia alcuna periferica Bluetooth accoppiata.
1 Premere a lungo .
Sul display appare “PLEASE PAIR YOUR PHONE PIN 0000”.
2 Dalla periferica Bluetooth ricercare e selezionare
l’apparecchio modello (DPX-5
3 Confermare l’accoppiamento dalla periferica Bluetooth.
XX
Sul display inizia a lampeggiare “TESTING”.
Al termine della prova ne appare il risultato (OK o NG).
PAIRING: stato dell’accoppiamento
HF CNT: compatibilità con il profilo HFP (chiamate vivavoce)
AUD CNT: compatibilità con il profilo A2DP (distribuzione audio
PB DL: compatibilità con il profilo PBAP (accesso alla rubrica
Per annullare il modo di prova spegnere l’apparecchio premendo a
lungo
avanzata)
telefonica)
.
/DPX-M3 ).
ITALIANO
17

BLUETOOTH®
BLUETOOTH — Audio
Mentre ci si trova nella sorgente BT AUDIO è possibile connettere e commutare a
piacere sino a cinque periferiche audio Bluetooth.
Come usare un lettore audio Bluetooth
1
Premere sino a selezionare BT AUDIO.
2 Avviare la riproduzione dal lettore audio Bluetooth.
Per Dal frontalino
Riprodurre/mettere in pausa
Selezionare un gruppo o una
cartella
Saltare avanti o indietro
Avanzare o retrocedere
rapidamente
Ripetizione Premere
Premere
Premere
Premere
Premere a lungo
ALLREPEAT, FILEREPEAT, REPEATOFF
Riproduzione casuale
Selezionare un file da una
cartella o da un elenco
Premere a lungo
ALLRANDOM
•
Premendo selezionare
Vedere la sezione “Selezionare un file da una
cartella o da un elenco” a pagina 9.
.
J/K.
S/T.
S/T.
quante volte necessario.
.
sino a selezionare
RANDOMOFF
Per Dal frontalino
Commutare tra le
periferiche Bluetooth
audio connesse
*
Anche la pressione del tasto “Play” del dispositivo connesso determina l’emissione del suono dal dispositivo stesso.
I comandi e i messaggi possono cambiare secondo la loro effettiva disponibilità nella
periferica connessa.
Premere
*
5.
Impostazioni per l’uso dell’applicazione KENWOOD Remote
L’applicazione KENWOOD Remote permette di gestire il sintolettore KENWOOD con un
iPhone o un iPod (mediante la connessione Bluetooth o la presa d’ingresso USB) o con
uno smartphone Android (mediante la connessione Bluetooth).
Preparazione:
Prima di connettere il dispositivo è necessario installarvi la versione più recente
dell’applicazione KENWOOD Remote. Per maggiori informazioni al riguardo si prega di
visitare il sito <www.kenwood.com/cs/ce/>.
1 Premere la manopola del volume per accedere al modo
2 Ruotando la manopola del volume selezionare l’elemento desiderato
( 19)
e quindi premerla.
3 Ripetere il passo 2 sino a selezionare o attivare l’elemento desiderato.
4 Premere a lungo per uscire.
Per ritornare all’impostazione precedente premere .
.
[FUNCTION]
.
18
ITALIANO

BLUETOOTH®
REMOTE APP
SELECT
IOS YES
ANDROID YES
ANDROID LIST
STATUS
*
Visualizzato solo quando
Seleziona il dispositivo (IOS o ANDROID) da usare con l’applicazione.
la presa d’ingresso USB.;
Se si è selezionato IOS, per attivare l’applicazione selezionare la sorgente iPod BT (o iPod USB se
l’iPhone o l’iPod è collegato alla presa d’ingresso USB).
•
L’applicazione s’interrompe o si disconnette quando:
– Si passa dalla sorgente iPod BT a un’altra sorgente collegata mediante la presa d’ingresso
– Si passa dalla sorgente iPod USB alla sorgente iPod BT.
Bluetooth.;
*:permette di selezionare dall’elenco lo smartphone Android da usare.
Mostra lo stato del dispositivo correntemente selezionato.
IOS CONNECTED
connessione Bluetooth o la presa d’ingresso USB.
IOS NOT CONNECTED
l’applicazione.
ANDROID CONNECTED
mediante la connessione Bluetooth.
ANDROID NOT CONNECTED
l’applicazione.
Impostazione predefinita:
:specifica l’iPhone o l’iPod da usare con l’applicazione mediante la connessione Bluetooth o
USB.
:specifica l’uso dello smartphone Android con l’applicazione mediante la connessione
[ANDROID]
NO
:annulla.
NO
: annulla.
: permette di usare l’applicazione con l’iPhone o l’iPod mediante la
: non è connesso alcun dispositivo IOS con il quale usare
: permette di usare l’applicazione con uno smartphone Android
: non è connesso alcun dispositivo Android con il quale usare
in
[SELECT]
è impostato su
[YES]
.
XX
Ascolto dell’iPhone o dell’iPod mediante la connessione
Bluetooth
Questo apparecchio permette di ascoltare mediante la connessione Bluetooth la musica
salvata nell’iPhone o nell’iPod.
Premere quante volte necessario sino a selezionare iPodBT.
•
L’iPhone o l’iPod è utilizzabile esattamente come quando è collegato alla presa
d’ingresso USB.
•
Se durante l’ascolto della sorgente iPodBT si collega un iPhone o l’iPod stesso alla
presa d’ingresso USB, l’apparecchio seleziona automaticamente la sorgente iPod USB.
Se il dispositivo è ancora via Bluetooth premere
( 8)
per selezionare iPodBT.
Radio Internet attraverso la connessione Bluetooth
Questo apparecchio permette di ascoltare Spotify con un iPhone, un iPod o un
dispositivo Android mediante la connessione Bluetooth.
•
Accertarsi innanzi tutto che alla presa d’ingresso USB non sia collegato un dispositivo.
Ascoltare Spotify
Preparazione:
In
[SOURCESELECT]
1 Aprire nella periferica l’applicazione Spotify.
2 Connettere il dispositivo mediante Bluetooth.
3 Premere quante vole necessario sino a selezionare SPOTIFY
(se con l’iPhone o l’iPod) o SPOTIFY BT (se con un dispositivo Android).
La periferica cambia sorgente e l’avvia automaticamente.
•
In questo caso Spotify è utilizzabile esattamente come quando lo si ascolta attraverso
la presa USB.
( 11)
impostare
[SPOTIFY SRC]
su
[ON]. ( 5)
( 13)
ITALIANO
19

IMPOSTAZIONI AUDIO
Durante l’ascolto di una sorgente qualsiasi...
1 Premere la manopola del volume per accedere al modo
[FUNCTION]
2 Ruotare la manopola del volume sino a selezionare l’elemento
desiderato (vedere la tabella che segue), e quindi premerla.
3 Ripetere il passo 2 sino a selezionare o attivare l’elemento
desiderato.
4 Premere a lungo per uscire.
Per ritornare all’impostazione precedente premere .
AUDIO CONTROL
SUB-WLEVEL
MANUAL EQ
62.5HZ LEVEL
100HZ/160HZ/250HZ/
400HZ/630HZ/1KHZ/
1.6KHZ/2.5KHZ/4KHZ/
6.3KHZ/10KHZ/16KHZ
Q FACTOR 1.35/1.50/2.00
PRESET EQ NATURAL/ROCK/POPS/EASY/TOP40/JAZZ
BASS BOOST LEVEL1/LEVEL2/LEVEL3/LEVEL4/LEVEL5
.
Impostazione predefinita:
da
LEVEL –50
a
d’uscita del subwoofer.
I parametri del suono (frequenza, tono e fattore Q) vengono
preimpostati in ciascuna selezione.
BASS
EXTEND
da
LEVEL –9
salvare per ciascuna sorgente. (Prima di effettuare una regolazione,
selezionare la sorgente che si desidera regolare.)
POWERFUL/USER
adatto al genere musicale in esecuzione. (Selezionare
usare le impostazioni fatte in
livello di potenziamento dei bassi.;
LEVEL +10 (LEVEL 0
da
LEVEL –9
il livello da salvare per ciascuna sorgente. (Prima di
effettuare una regolazione, selezionare la sorgente che
si desidera regolare.)
ON
a
:attiva i bassi estesi.;
a
LEVEL +9 (LEVEL 0
:regola il fattore di qualità.
: seleziona un equalizzatore preimpostato
[MANUAL EQ]
): regola il livello
LEVEL +9 (LEVEL 0
OFF
:annulla.
):regolano il livello da
.)
OFF
:annulla.
): regolano
/
[USER]
:specifica il
LOUDNESS LEVEL1/LEVEL2
SUBWOOFER SET ON
FADER
BALANCE
VOLUME OFFSET
XX
SOUND EFFECT
SOUND RECNSTR
(ricostruzione del
suono)
SPACE ENHANCE
SND REALIZER LEVEL1/LEVEL2/LEVEL3
STAGE EQ LO W/MIDDLE/HIGH
DRIVE EQ ON
SPEAKER SIZE
X’OVER
DTA SETTINGS
CAR SETTINGS
per
•
Con il crossover a due vie:
[SWITCH PREOUT]
• [SUB-W LEVEL]
da produrre a basso volume un suono ben bilanciato.;
:attiva l’uscita al subwoofer.;
(Non selezionabile quando è selezionato il crossover a tre vie.)
da
R15
da
L15
da
LEVEL –15
(Selezionare innanzi tutto la sorgente da regolare.)
(Non selezionabile con le sorgenti RADIO e AUX.)
ON
:compensando le componenti in alta frequenza e ripristinando il tempo di salita (o rise time)
della forma d’onda, elementi che vanno perduti durante la compressione audio, rende più realistico
il suono.;
(Non selezionabile con la sorgente RADIO.)
SMALL/MEDIUM/LARGE
OFF
: aumenta la frequenza per compensare il rumore esterno al veicolo o quello prodotto dagli
pneumatici durante la guida.;
Appaiono i parametri d’impostazione del crossover a due o a tre vie, a seconda di quello
effettivamente selezionato
Per impostazione predefinita è selezionato il crossover a due vie.
Impostazioni,
[SUB-W LEVEL]/[SUBWOOFER SET]
su
[SUBWOOFER]. ( 5)
sono selezionabili soltanto quando s’imposta
:seleziona il potenziamento desiderato per le basse e alte frequenze in modo
OFF
a
F15 (0
):regola il bilanciamento delle uscite dei diffusori posteriore e anteriori.
a
R15 (0
):regola il bilanciamento delle uscite dei diffusori destro e sinistro.
a
LEVEL +6 (LEVEL 0
OFF
:annulla.
:potenzia virtualmente lo spazio sonoro.;
:rende virtualmente più realistico il suono.;
:annulla.
:regola virtualmente la posizione sonora percepita attraverso i diffusori.;
OFF
:annulla.
OFF
:annulla.
:annulla.
):preimposta il volume iniziale per ciascuna sorgente.
( 6). ( 21, 22)
22, 23, Allineamento temporale digitale
sono selezionabili soltanto quando s’imposta
[SUBWOOFER SET]
OFF
:annulla.
OFF
:annulla.
.
su
[ON]
.
20
ITALIANO

IMPOSTAZIONI AUDIO
Impostazione del crossover
Di seguito si riportano i parametri d’impostazione dei crossover a
due e a tre vie.
SPEAKER SIZE
Per ottenere le massime prestazioni con questa impostazione,
selezionare la dimensione dei diffusori collegati.
•
L’apparecchio imposta automaticamente la frequenza e la
pendenza della curva del diffusore selezionato.
•
Quando si seleziona il crossover a due vie, se per
[SPEAKER SIZE]
[REAR]
[X ‘ OVER]
•
Quando si seleziona il crossover a tre vie, se per
corrispondenza di
[X’OVER]
X ‘ OVER
• [FRQ]/[F - HPF FRQ]/[R - HPF FRQ]/[SWLPFFRQ]/[HPFFRQ]
[LPFFRQ]
diffusori selezionati (filtro passa-alto o filtro passa-basso).
Quando si seleziona
diffusori selezionati.
• [F - HPF SLOPE]/[R - HPF SLOPE]/[SWLPFSLOPE]/[HPFSLOPE]
[LPFSLOPE]/[SLOPE]
di crossover.
Questa impostazione è disponibile soltanto quando la frequenza
di cross-over non è impostata su
• [SWLPFPHASE]/[PHASE]
dell’uscita di un determinato diffusore per allinearla con quella
degli altri diffusori.
• [GAINLEFT]/[GAINRIGHT]/[F - HPF GAIN]/[R - HPF GAIN]
[SWLPFGAIN]/[GAIN]
diffusore selezionato.
in corrispondenza di
e
[SUBWOOFER]
del diffusore non è disponibile.
di
[WOOFER]
: permette di regolare la frequenza di cross-over per i
si seleziona
[WOOFER]
stesso non è disponibile.
[THROUGH]
: permette di regolare la pendenza della curva
: permette di specificare la fase
: permette di regolare il volume d’uscita del
[TWEETER]
di
[NONE]
si seleziona
l’unità invia tutti i segnali ai
[THROUGH]
[FRONT]
l’impostazione
[SPEAKER SIZE]
[NONE]
l’impostazione
.
,
/
/
Parametri d’impostazione del crossover a due vie
SPEAKER SIZE
FRONT SIZE
TWEETER
REAR 8CM/10CM/12CM/13CM/16CM/17CM/18CM/4×6/5×7/6×8/6×9/7×10/NONE
SUBWOOFER
(non collegato)
1
*
16CM/20CM/25CM/30CM/38CM OVER/NONE
8CM/10CM/12CM/13CM/16CM/17CM/18CM/4×6/5×7/6×8
6×9/7×10
SMALL/MIDDLE/LARGE/NONE
(non collegato)
X ' OVER
in
TWEETER FRQ
FRONT HPF F - HPF FRQ
/
REAR HPF R - HPF FRQ
GAIN LEFT
GAIN RIGHT
F - HPF SLOPE
F - HPF GAIN
R - HPF SLOPE
1KHZ/1.6KHZ/2.5KHZ/4KHZ/5KHZ/6.3KHZ/8KHZ/10KHZ/12.5KHZ
da –8 a
0
da –8 a
0
30HZ/40HZ/50HZ/60HZ/70HZ/80HZ/90HZ/100HZ/120HZ/150HZ
180HZ/220HZ/250HZ/THROUGH
–6DB/–12DB/–18DB/–24DB
da –8 a
0
(Vedere le impostazioni
FRONT HPF
R - HPF GAIN
SUBWOOFER
1
*
LPF
1
*
Selezionabile soltanto quando
( 20)
SW LPF FRQ 30HZ/40HZ/50HZ/60HZ/70HZ/80HZ/90HZ/100HZ/120HZ/150HZ
SW LPF SLOPE
SW LPF PHASE
SW LPF GAIN
[SWITCH PREOUT]
180HZ/220HZ/250HZ/THROUGH
–6DB/–12DB/–18DB/–24DB
REVERSE
(180°)/
NORMAL
(0°)
da –8 a
0
è impostato su
[SUBWOOFER] ( 5)
(non collegato)
qui sopra.)
e
[SUBWOOFER SET]
/
/
/
su
[ON]
.
ITALIANO
21

IMPOSTAZIONI AUDIO
Parametri d’impostazione del crossover a tre vie
SPEAKER SIZE
TWEETER
MID RANGE
WOOFER
SMALL/MIDDLE/LARGE
8CM/10CM/12CM/13CM/16CM/17CM/18CM/4×6/5×7/6×8/6×9
2
*
16CM/20CM/25CM/30CM/38CM OVER/NONE
(non collegato)
X ' OVER
TWEETER HPF FRQ
SLOPE
PHASE
GAIN
MID RANGE HPF FRQ
HPF SLOPE
LPF FRQ
LPF SLOPE
PHASE
GAIN
2
*
WOOFER
LPF FRQ 30HZ/40HZ/50HZ/60HZ/70HZ/80HZ/90HZ/100HZ
SLOPE
PHASE
GAIN
2
*
Selezionabile soltanto quando
1KHZ/1.6KHZ/2.5KHZ/4KHZ/5KHZ/6.3KHZ/8KHZ
10KHZ/12.5KHZ
–6DB/–12DB
REVERSE
(180°)/
NORMAL
(0°)
da –8 a
0
30HZ/40HZ/50HZ/60HZ/70HZ/80HZ/90HZ/100HZ
120HZ/150HZ/180HZ/220HZ/250HZ/THROUGH
–6DB/–12DB
1KHZ/1.6KHZ/2.5KHZ/4KHZ/5KHZ/6.3KHZ/8KHZ
10KHZ/12.5KHZ/THROUGH
–6DB/–12DB
REVERSE
(180°)/
NORMAL
(0°)
da –8 a
0
120HZ/150HZ/180HZ/220HZ/250HZ/THROUGH
–6DB/–12DB
REVERSE
(180°)/
NORMAL
(0°)
da –8 a
0
[SUBWOOFER SET]
è impostato su
[ON]. ( 20)
Allineamento temporale digitale
La funzione Allineamento temporale digitale imposta il ritardo temporale dell’uscita dei
diffusori per creare un ambiente di ascolto più adatto al proprio veicolo.
•
Per maggiori informazioni,
[DTA SETTINGS].
23, Determinazione dei parametri [DISTANCE] e [GAIN] di
DTA SETTINGS
/
/
POSITION
DISTANCE
GAIN
/
DTA RESET YES
CAR SETTINGS
CAR TYPE COMPACT/FULL SIZE CAR/WAGON/MINIVAN/SUV
R - SP LOCATION
/
Permette di selezionare la propria posizione d’ascolto (punto di riferimento):
ALL
:nessuna compensazione;
FRONT LEFT
• [FRONT ALL]
da
(Prima di effettuare una regolazione selezionare il diffusore interessato.)
da
effettuare una regolazione selezionare il diffusore interessato.)
valori predefinite.;
Permette d’identificare il tipo di veicolo in uso e la posizione dei diffusori posteriori per
impostare i parametri
MINIVAN(LONG)
OFF
Permette di selezionare la posizione dei diffusori posteriori per calcolare la distanza
maggiore dalla posizione d’ascolto specificata (punto di riferimento):
• DOOR/REAR DECK
• 2ND ROW/3RD ROW
:sedile anteriore sinistro;
( 6)
0CM
a
610CM
–8DB
a
0DB
:resetta le impostazioni
: nessuna compensazione
[OFF], [COMPACT ], [FULL SIZE CAR], [WAGON]
seleziona
[MINIVAN]
FRONT RIGHT
appare soltanto dopo aver selezionato
:regolazione fine di compensazione della distanza.
:regolazione del volume d’uscita del diffusore selezionato. (Prima di
[DISTANCE]
NO
:annulla.
[DTA SETTINGS]
:seleziona il tipo di veicolo;
:selezionabile soltanto quando per
:selezionabile soltanto quando per
o
[MINIVAN(LONG)]
: sedile anteriore destro;
FRONT ALL
e
[GAIN]
.
.
:sedili anteriori
[2-WAY X’OVER]
del parametro
[POSITION]
/
[CAR TYPE]
o
[SUV]
[CAR TYPE]
si seleziona
.
.
ai
si
22
ITALIANO

IMPOSTAZIONI AUDIO
•
Prima d’impostare i parametri
diffusore da regolare:
Quando si seleziona il crossover a due vie:
FRONT LEFT/FRONT RIGHT/REAR LEFT/REAR RIGHT/SUBWOOFER
– Quando per
[NONE]
le selezioni possibili sono limitate a
( 21)
Quando si seleziona il crossover a tre vie:
TWEETER LEFT/TWEETER RIGHT/MID LEFT/MID RIGHT/WOOFER
– Quando per
possibili sono limitate a
•
Il parametro
[R - SP LOCATION]
– si è selezionato il crossover a due vie.
– per
[REAR]
Determinazione dei parametri [DISTANCE] e [GAIN] di [DTA SETTINGS]
[REAR]
e
[WOOFER]
di
[SPEAKER SIZE]
[DISTANCE]
e
[SUBWOOFER]
di
[WOOFER]. ( 22)
di
[SPEAKERSIZE]
di
[CAR SETTINGS]
( 6)
si è selezionata un’opzione diversa da
[GAIN]
di
[DTA SETTINGS]
[SPEAKER SIZE]
[REAR LEFT], [REAR RIGHT]
si seleziona un’impostazione diversa da
può essere selezionato soltanto se:
è necessario selezionare il
si seleziona un’impostazione diversa da
e
[SUBWOOFER]
[NONE]. ( 21)
Quando per ciascun diffusore si specifica la distanza
rispetto al punto centrale della posizione d’ascolto
correntemente impostata, l’apparecchio ne calcola e imposta
automaticamente il ritardo temporale:
1
D eterminazione, come punto di riferimento, del punto
centrale della posizione d’ascolto correntemente
impostata.
2
Misurazione della distanza dei diffusori da detto punto di
riferimento.
3
Calcolo delle differenze tra la distanza del diffusore più
lontano (diffusori posteriori) e quella dei rimanenti
diffusori.
4
Impostazione per ciascun diffusore del parametro
[DISTANCE]
diffusore.
calcolato al passo 3.
[GAIN]
5
Regolazione del parametro
Esempio in figura: come posizione d’ascolto si è selezionato
[FRONT ALL]
[NONE]
per ciascun
.
le selezioni
IMPOSTAZIONI DI VISUALIZZAZIONE
identificazione delle zone per l’impostazione dei colori e della luminosità
Impostazione dell’attenuazione luminosa
Per attivare o disattivare l’attenuazione luminosa premere a lungo DISP.
•
Dopo averla impostata, la funzione
nuovamente a lungo questo tasto.
Altre impostazioni
1
Premere la manopola del volume per accedere al modo
2 Ruotando la manopola del volume selezionare l’elemento desiderato
( 24)
e quindi premerla.
3 Ripetere il passo 2 sino a selezionare o attivare l’elemento desiderato,
oppure seguire le istruzioni riportate per l’elemento selezionato.
4 Premere a lungo per uscire.
Per ritornare all’impostazione precedente premere .
[DIMMER TIME] ( 24)
si annulla premendo
[FUNCTION]
.
ITALIANO
23

IMPOSTAZIONI DI VISUALIZZAZIONE
Impostazione predefinita:
DISPLAY
COLOR
SELECT
DIMMER
BRIGHTNESS
TEXTSCROLL AUTO/ONCE
*
Colori preimpostati:
BLUE2/BLUE3/SKYBLUE1/SKYBLUE2/LIGHTBLUE/AQUA1/AQUA2/GREEN1/GREEN2
GREEN3/YELLOWGREEN1/YELLOWGREEN2/YELLOW/ORANGE1/ORANGE2/ORANGERED
Seleziona il colore per
1
S elezionare una zona. (Vedere l’illustrazione a pagina 23.)
2
S cegliere il colore desiderato per la zona selezionata.
INITIAL COLOR/VARIABLESCAN/CUSTOM R/G/B
Per creare colori personalizzati selezionare
rimangono salvati in
1
Premere la manopola del volume per accedere al modo di regolazione dettagliata del
colore.
2
Con S/T selezionare il colore da regolare secondo il modello R/G/B.
3
Ruotando la manopola del volume regolare il livello (da 0a9), e quindi premerla.
Riduce la luminosità.
ON
:attenuazione attivata.;
DIMMER TIME
luminosa (dimmer).
1
Ruotando la manopola del volume regolare l’istante
2
Ruotando la manopola del volume regolare l’istante
(Impostazione predefinita:
1
S elezionare una zona. (Vedere l’illustrazione a pagina 23.)
2
da 0 a 31: seleziona il livello di luminosità della zona selezionata.
scorrimento.;
ALL ZONE, LCD DISPLAY
[CUSTOM R/G/B]
OFF
:annulla.
:imposta gli istanti di attivazione e disattivazione dell’attenuazione
[ON]: 18:00; [OFF]: 6:00
:seleziona il modo di scorrimento automatico delle informazioni oppure un solo
OFF
:annulla.
e
KEY
[CUSTOM R/G/B]
.
[ON]
[OFF]
)
in modo indipendente.
/colori preimpostati*
. I colori creati da sé
, quindi premerla.
, quindi premerla.
RED1/RED2/RED3/PURPLE1/PURPLE2/PURPLE3/PURPLE4/BLUE1
RISOLUZIONE DEI PROBLEMI
XX
Problema Rimedi
Il suono non è udibile.
Viene visualizzata l’indicazione
“MISWIRING CHECK WIRING THEN
PWR ON”.
Generale
Viene visualizzata l’indicazione
“PROTECTING SEND SERVICE”.
L’unità non funziona.
•
La ricezione radio è scarsa.
•
Inter ferenze statiche durante
Radio
l’ascolto di programmi radiofonici.
Impossibile espellere il disco.
Viene generato rumore. Selezionare un’altra traccia o cambiare disco.
La riproduzione dei brani non avviene
nel modo atteso.
“READING” continua a lampeggiare. Limitare il numero di gerarchie e cartelle.
Il tempo di riproduzione trascorso
non è corretto.
/
/
CD/USB/iPod
Quando si preme
accedere al modo di ricerca appare
“LOADING”.
Non vengono visualizzati i caratteri
corretti (ad esempio, il nome
dell’album).
•
Regolare il volume al livello ottimale.
•
Controllare i cavi e i collegamenti.
Spegnere l’apparecchio e controllare che le prese dei cavi dei
diffusori siano adeguatamente isolate. Riaccendere l’apparecchio.
Inviare l’apparecchio al più vicino centro di assistenza.
Resettare l’unità.
Collegare l’antenna correttamente.
Premere a lungo
cadere quando fuoriesce. Se il problema persiste provare a resettare
l’apparecchio.
L’ordine di riproduzione viene determinato al momento della
registrazione dei file.
Ciò è causato dal modo in cui le tracce sono registrate.
La preparazione dell’elenco musicale dell’iPod o dell’iPhone non è
per
ancora terminata. Poiché tale operazione richiede del tempo, prima
di provare occorre attendere qualche istante.
•
Q uesta unità può visualizzare soltanto lettere maiuscole, numeri
•
A seconda della lingua di visualizzazione selezionata
( 3)
M
per forzare l’espulsione del disco. Non lasciarlo
( 3)
e un numero limitato di simboli.
alcuni caratteri potrebbero non apparire correttamente.
( 5)
24
ITALIANO

RISOLUZIONE DEI PROBLEMI
Problema Rimedi
“NA FILE”
“NO DISC” Inserire un disco riproducibile nella fessura (slot) di caricamento.
“TOC ERROR” Accertarsi che il disco sia pulito e inserito correttamente.
“PLEASE EJECT” Resettare l’unità. Se il problema persiste si suggerisce di rivolgersi al più
“NO DEVICE” Collegare un dispositivo USB e cambiare di nuovo la sorgente ad USB.
“COPY PRO” Riproduzione di un file protetto da copia.
“UNSUPPORTED DEVICE”
“UNRESPONSIVE DEVICE” Accertarsi che il dispositivo funzioni correttamente, quindi scollegarlo
CD/USB/iPod
“USB HUB IS NOT SUPPORTED” L’apparecchio non è compatibile con le unità USB collegate attraverso
•
L’apparecchio non seleziona
“USB” quando si connette
un dispositivo USB durante
l’ascolto di un’altra sorgente.
•
Viene visualizzata
l’indicazione “USB ERROR”.
“NO MUSIC” Collegare un’unità USB che contenga file audio compatibili con
“iPod ERROR”
Accertarsi che il disco contenga file audio compatibili.
vicino centro di assistenza.
•
Accertarsi che il dispositivo connesso sia compatibile con questo
apparecchio e che anche i file siano in formato compatibile.
•
R icollegare la periferica.
e ricollegarlo.
un hub USB.
La porta USB sta assorbendo più corrente di quella massima prevista dalle
specifiche. Spegnere l’apparecchio e scollegare il dispositivo USB. Quindi
riaccenderlo e ricollegare il dispositivo. Se il problema persiste riaccendere
l’apparecchio (o resettarlo) e collegare un altro dispositivo USB.
l’apparecchio.
•
Ricollegare l’iPod.
•
Reinizializzare l’iPod.
( 27)
( 27)
Problema Rimedi
•
D urante la riproduzione il
suono non è udibile.
•
Il suono viene emesso soltanto
dalla periferica Android.
La riproduzione
[BROWSE MODE]
riesce.
ANDROID
“NO DEVICE” o “READING”
continua a lampeggiare.
La riproduzione è intermittente,
oppure il suono salta.
“ANDROID ERROR”/“NADEVICE”
•
R icollegare la periferica Android.
•
S e è selezionato
una qualsiasi applicazione di riproduzione e avviarla.
•
S e è selezionato
riproduzione attualmente aperta o usarne un’altra.
•
R iavviare la periferica Android.
•
S e il problema non si risolve può significare che la periferica Android
collegata non è in grado d’instradare il segnale audio a questo
apparecchio.
•
non
Accertarsi che nella periferica Android sia installata l’applicazione
KENWOOD MUSIC PLAY APP.
•
R icollegare la periferica Android e selezionare il modo di controllo
appropriato.
•
S e questo non risolve il problema può significare che la periferica
Android in uso non è compatibile con il modo
( 28)
•
Nella periferica Android disattivare le opzioni per sviluppatori.
•
R icollegare la periferica Android.
•
S e questo non risolve il problema può significare che la periferica
Android in uso non è compatibile con il modo
( 28)
Disattivare il modo di risparmio energetico della periferica Android.
•
R icollegare la periferica Android.
•
R iavviare la periferica Android.
[HAND MODE]
[HAND MODE]
( 28)
, dalla periferica Android aprire
, riavviare l’applicazione di
( 8)
[BROWSE MODE]
[BROWSE MODE]
.
.
ITALIANO
25

RISOLUZIONE DEI PROBLEMI
Problema Rimedi
“DISCONNECTED” L’unità USB si scollega. Accertarsi che sia saldamente collegata alla presa
“CONNECTING”
Spotify
“CHECK APP” L’applicazione Spotify non è correttamente connessa oppure l’utente non
Non è stata rilevata alcuna
periferica Bluetooth.
L’accoppiamento Bluetooth
non riesce.
La conversazione telefonica è
disturbata da un’eco.
Bluetooth®
La qualità audio del cellulare
è insoddisfacente.
La chiamata con
riconoscimento vocale
non riesce.
USB.
•
In caso di connessione USB: il dispositivo sta tentando di connettersi
all’apparecchio. Attendere.
•
In caso di connessione Bluetooth: connessione Bluetooth assente.
Controllare la connessione Bluetooth e accoppiare (associare) il
dispositivo all’apparecchio.
ha effettuato l’accesso al proprio account Spotify. Chiudere e riavviare
l’applicazione e accedere all’account.
•
Avviare una nuova ricerca.
•
Resettare l’unità.
•
Accertarsi di avere inserito lo stesso codice PIN sia nell’apparecchio sia
nella periferica Bluetooth.
•
Cancellare le informazioni di accoppiamento sia dall’apparecchio sia dalla
periferica Bluetooth ed eseguirlo nuovamente.
•
Regolare la posizione del microfono dell’apparecchio.
•
Controllare l’impostazione
•
R idurre la distanza tra l’apparecchio e la periferica Bluetooth.
•
Spostare la vettura in un punto che permetta una miglior ricezione.
•
Si suggerisce di usare questo metodo di composizione in un ambiente più
tranquillo.
•
Avvicinarsi maggiormente al microfono.
•
Si deve usare la stessa voce usata per la registrazione dei comandi vocali.
( 3)
( 13)
[ECHO CANCEL]. ( 15)
( 12)
Problema Rimedi
Durante la riproduzione del
lettore audio Bluetooth il
suono s’interrompe o salta.
Non si riesce a controllare
il lettore audio Bluetooth
connesso.
“DEVICE FULL” Il numero di periferiche registrate ha raggiunto il limite permesso. Riprovare
“N/A VOICE TAG” Si deve usare la stessa voce usata per la registrazione dei comandi vocali.
“NOT SUPPORT” Il cellulare connesso non dispone della funzione di riconoscimento vocale o
Bluetooth®
“NO ENTRY”/“NO PAIR” L’apparecchio non ha trovato alcuna periferica Bluetooth connessa o
“ERROR” Riprovare. Se continua ad apparire “ERROR” controllare innanzi tutto che la
“NO INFO”/“NO DATA” La periferica Bluetooth non ha ottenuto i dati di contatto.
“HF ERROR XX”/“BT ERROR” Resettare l’apparecchio e riprovare. Se il problema persiste si suggerisce di
“SWITCHING NG” I telefoni connessi potrebbero non essere compatibili con la funzione di
•
R idurre la distanza tra l’apparecchio e la periferica Bluetooth.
•
Spegnere e riaccendere l’apparecchio e tentare una nuova connessione.
•
Vi potrebbero essere altre periferiche Bluetooth che stanno tentando di
connettersi all’apparecchio.
•
Controllare se il lettore Bluetooth è compatibile con il profilo AVRCP
(connessione remota per apparecchi audio/video). (Consultare il manuale
d’uso del lettore.)
•
S collegare e ricollegare il lettore Bluetooth.
dopo avere cancellato una periferica non più necessaria.
( 17, DEVICEDELETE)
quella di trasferimento della rubrica telefonica.
registrata.
periferica disponga effettivamente della funzione richiesta.
rivolgersi al più vicino centro di assistenza.
commutazione.
26
ITALIANO

RIFERIMENTI
Manutenzione
Pulizia dell’unità
Rimuovere la sporcizia dal pannello con un panno asciutto e morbido o uno al silicone.
Maneggio e trattamento dei dischi
•
Non toccarne la super ficie registrata.
•
Non applicar vi nastro o etichette adesive, né usarli se si trovano in questa condizione.
•
Non usare accessori per dischi.
•
Pulire il CD partendo dal centro del disco verso il bordo esterno.
•
Pulire i dischi con un panno al silicone o un panno morbido. Non usare solventi.
•
Per rimuoverli dall’unità li si deve estrarre tenendoli in posizione orizzontale.
•
Prima d’inserire il disco rimuovere qualsiasi bava dal foro centrale o dal bordo esterno.
Informazioni aggiuntive
Per: – O ttenere il firmware più recente e l’elenco aggiornato degli accessori compatibili
– Applicazioni originali KENWOOD
– Ottenere altre informazioni aggiornate
Vedere il sito <www.kenwood.com/cs/ce/>.
Generale
•
Q uesto apparecchio riproduce i seguenti tipi di disco:
•
Per informazioni dettagliate e le note sui file audio riproducibili si prega di vedere il sito
<www.kenwood.com/cs/ce/audiofile/>.
File riproducibili
•
File audio riproducibili:
Dischi: MP3 (.mp3), WMA (.wma), AAC (.aac)
Unità USB di memoria di massa: MP3 (.mp3), WMA (.wma), AAC (.aac), AAC (.m4a), WAV (.wav), FLAC (.flac)
•
D ischi riproducibili: CD-R/CD-RW/CD-ROM
•
Formati di file riproducibili per i dischi: ISO 9660 Level 1/2, Joliet, nomi file lunghi
•
Formati file system dispositivo USB riproducibili: FAT12, FAT16, FAT32
Anche quando i file audio rispettano gli standard sopra elencati, la riproduzione potrebbe non riuscire a causa del tipo o
delle condizioni del supporto o dell’apparecchio usato per registrarli.
Questo apparecchio non riproduce i file AAC (.m4a) registrati in CD codificati da iTunes.
Dischi non riproducibili
•
D ischi non circolari.
•
D ischi la cui superficie registrata è colorata o sporca.
•
D ischi scrivibili e riscrivibili non finalizzati.
•
CD da 8 cm. Il tentativo d’inserimento con usando un adattatore può causare malfunzionamenti.
Note sulle unità USB
•
Non è possibile collegare un dispositivo USB tramite un hub USB.
•
Il collegamento di un cavo la cui lunghezza totale supera 5 m può causare una riproduzione anomala.
•
Q uesto apparecchio non riconosce le unità USB non alimentate a 5 V e con assorbimento di corrente superiore a
1,5A.
Note sull’iPod e l’iPhone
•
USB:
Made for
– iPod touch (5th e 6th generation)
– iPod nano (7th generation)
– iPhone 4S, 5, 5S, 5C, 6, 6 Plus, 6S, 6S Plus, SE, 7, 7 Plus
•
Connessione Bluetooth:
Made for
– iPod touch (5th e 6th generation)
– iPhone 4S, 5, 5S, 5C, 6, 6 Plus, 6S, 6S Plus, SE, 7, 7 Plus
•
L’iPod non è utilizzabile quando sul suo display appare “KENWOOD” o “ ”.
•
D ipendentemente dalla versione del sistema operativo dell’iPod o dell’iPhone, con questa unità alcune funzioni
potrebbero non operare.
ITALIANO
27

RIFERIMENTI
Informazioni sulla periferica Android
•
Q uesto apparecchio è compatibile con i sistemi operativi Android 4.1 e superiori.
•
Alcune periferiche Android (con sistema operativo 4.1 o superiore) potrebbero non essere
totalmente compatibili con la tecnologia Android Open Accessory (AOA) 2.0.
•
S e la periferica Android in uso è compatibile sia con i dispositivi di archiviazione di massa sia
con la tecnologia AOA 2.0 questo apparecchio riprodurrà sempre e prioritariamente la musica
con tale tecnologia.
Informazioni su Spotify
•
L’applicazione Spotify è compatibile con:
– iPhone 4S, 5, 5S, 5C, 6, 6 Plus, 6S, 6S Plus, SE, 7, 7 Plus (iOS 8 o successivo)
– iPod touch (5th e 6th generation)
– Android OS 4.0.3 o successivo
•
Poiché Spotify è un servizio fornito da una diversa società, le sue specifiche possono cambiare
senza preavviso. Di conseguenza si potrebbero creare problemi di compatibilità, oppure di
disponibilità di alcuni o tutti i servizi offerti.
•
Da questo apparecchio non è possibile utilizzare alcune funzioni Spotify.
•
Per qualsiasi problema con l’uso dell’applicazione s’invita a rivolgersi direttamente a Spotify
visitando il sito <www.spotify.com>.
Note sulla funzione Bluetooth
•
D ipendentemente dalla loro versione Bluetooth alcune periferiche potrebbero non riuscire a
connettersi con questo apparecchio.
•
L’apparecchio potrebbe non operare con alcune periferiche Bluetooth.
•
Le condizioni del segnale possono essere influenzate dai corpi circostanti.
Cambiare le informazioni visualizzate sul display
Ogni volta che si preme
•
S e l’informazione successiva non è disponibile oppure non è stata registrata, appare “NO TEXT”, “NO INFO” o un’altra informazione quale il
nome della stazione o la durata di riproduzione.
Nome della sorgente Informazioni visualizzate
STANDBY Nome della sorgente (data)*
RADIO Frequenza (data)*
CD o USB
iPod USB/iPodBT o
ANDROID
SPOTIFY/SPOTIFY BT Titolo contesto (data)*
BT AUDIO Titolo del brano (artista)
AUX Nome della sorgente (data)*
*
Quando s’imposta
connesso.
( 15)
DISP
le informazioni visualizzate sul display cambiano.
(Solo per stazioni FM Radio Data System)
Nome della stazione (data)* Testo radio (data)* Testo radio+ (R.TEXT+) Titolo del brano (artista)
Titolo del brano (data)* Frequenza (data)* (torna all’inizio)
(Per CD-DA)
Titolo del brano (artista) Titolo del brano (nome del disco) Titolo del brano (data)* Durata di
riproduzione (data)*
(Per file MP3, WMA, AAC, WAV e FLAC)
Titolo del brano (artista) Titolo del brano (titolo dell’album) Titolo del brano (data)* Nome del file
(nome della cartella)
Quando è selezionato
Titolo del brano (artista)
riproduzione (data)*
(data)*
riproduzione (data)*
[BATT/SIGNAL]
(torna all’inizio)
Nome del file (data)* Durata di riproduzione (data)* (torna all’inizio)
[MODE OFF]/[BROWSE MODE] ( 9)
Titolo del brano (nome dell’album) Titolo del brano (data)* Durata di
(torna all’inizio)
Titolo del brano (artista) Titolo del brano (nome dell’album) Titolo del brano
Durata di riproduzione (data)* (torna all’inizio)
Titolo del brano (nome dell’album) Titolo del brano (data)* Durata di
(torna all’inizio)
su
[AUTO]
appaiono lo stato di carica della batteria e la forza del segnale del dispositivo Bluetooth
:
28
ITALIANO
 Loading...