

Page 1

DPX-7200DAB
DUAL DIN SIZED CD RECEIVER
INSTRUCTION MANUAL
RECEPTEUR CD FORMAT DUAL DIN
MODE D’EMPLOI
DUALER DIN-GENORMTER CD-RECEIVER
BEDIENUNGSANLEITUNG
B5A-3156-00 (EN)© 2019 JVCKENWOOD Corporation
Page 2
Information on Disposal of Old Electrical and Electronic Equipment and Batteries (applicable
for countries that have adopted separate waste collection systems)
Products and batteries with the symbol (crossed-out wheeled bin) cannot be disposed as household waste.
Old electrical and electronic equipment and batteries should be recycled at a facility capable of handling
these items and their waste byproducts.
Contact your local authority for details in locating a recycle facility nearest to you. Proper recycling and
waste disposal will help conserve resources whilst preventing detrimental effects on our health and the
environment.
Notice: The sign “Pb” below the symbol for batteries indicates that this battery contains lead.
Information sur l’élimination des anciens équipements électriques et électroniques et piles
électriques (applicable dans les pays qui ont adopté des systèmes de collecte sélective)
Les produits et piles électriques sur lesquels le pictogramme (poubelle barrée) est apposé ne peuvent pas
être éliminés comme ordures ménagères.
Les anciens équipements électriques et électroniques et piles électriques doivent être recyclés sur des sites
capables de traiter ces produits et leurs déchets.
Contactez vos autorités locales pour connaître le site de recyclage le plus proche. Un recyclage adapté et
l’élimination des déchets aideront à conserver les ressources et à nous préserver des leurs effets nocifs sur
notre santé et sur l’environnement.
Remarque: Le symbole “Pb“ ci-dessous sur des piles électrique indique que cette pile contient du plomb.
Entsorgung von gebrauchten elektrischen und elektronischen Geräten und Batterien
(anzuwenden in Ländern mit einem separaten Sammelsystem für solche Geräte)
Das Symbol (durchgestrichene Mülltonne) auf dem Produkt oder seiner Verpackung weist darauf hin, dass
dieses Produkt nicht als normaler Haushaltsabfall behandelt werden darf, sondern an einer Annahmestelle
für das Recycling von elektrischen und elektronischen Geräten und batterien abgegeben werden muss.
Durch Ihren Beitrag zur korrekten Entsorgung dieses Produktes schützen Sie die Umwelt und die
Gesundheit Ihrer Mitmenschen.
Unsachgemässe oder falsche Entsorgung gefährden Umwelt und Gesundheit. Weitere Informationen
über das Recycling dieses Produktes erhalten Sie von Ihrer Gemeinde oder den kommunalen
Entsorgungsbetrieben.
Achtung: Das Zeichen „Pb“ unter dem Symbol fur Batterien zeigt an, dass diese Batterie Blei enthalt.
For Israel
i
Page 3

The marking of products using lasers
The label is attached to the chassis/case and says that the component uses laser beams that have been
classified as Class1. It means that the unit is utilizing laser beams that are of a weaker class. There is no
danger of hazardous radiation outside the unit.
Marquage des produits utilisant un laser
L’étiquette est attachée au châssis/boîtier de l’appareil et indique que l’appareil utilise des rayons laser
de classe 1. Cela signifie que l’appareil utilise des rayons laser d’une classe faible. Il n’y a pas de danger de
radiation accidentelle hors de l’appareil.
Kennzeichnung von Geräten mit Laser-Abtastern
Das Etikett ist am Chassis/Gehäuse angebracht und besagt, dass sich die Komponente Laserstrahlen
bedient, die als Laserstrahlen der Klasse 1 klassifiziert wurden. Dies weist darauf hin, dass sich das Gerät
Laserstrahlen bedient, die einer schwächeren Klasse angehören. Das bedeutet, dass durch den sehr
schwachen Laserstrahl keine Gefahr durch gefährliche Strahlungen außerhalb des Geräts besteht.
SOFTWARE LICENSE AGREEMENT
The software embedded in the Product (hereinafter the "Licensed Software") provided by Licensor is
copyrighted to or sublicensable by the Licensor, and this Agreement provides for the terms and conditions
which Users shall follow in order to use the Licensed Software.
The User shall use the Licensed Software by agreeing with the terms of this Software License Agreement.
This Agreement shall be deemed completed at the time the User (hereinafter the "User") initially used the
Product in which the "Licensed Software" is embedded.
The Licensed Software may include the software which has been licensed to the Licensor directly or
indirectly from any third party. In such case, some third parties require the Users to follow their conditions
for use separately from this Software License Agreement. Such software shall not be subject to this
Agreement, and the Users are urged to read the "Important Notice concerning the Software" to be provided
separately below.
Article 1 General Provision
The Licensor shall grant to the User a non-exclusive and non-transferable (other than the exceptional case
referred to in Article 3, Paragraph 1) licensed to use the Licensed Software within the country of the User.
(the country where the User bought the Product (hereinafter the "Country")
Article 2 License
1. The license granted under this Agreement shall be the right to use the Licensed Software in the
Product.
2. The User shall not duplicate, copy, modify, add, translate or otherwise alter, or lease the Licensed
Software and any related documents, whether in whole or in part.
3. The use of the Licensed Software shall be limited to personal purpose, and the Licensed Software shall
not be distributed, licensed or sub-licensed whether it is for commercial purpose or not.
4. The User shall use the Licensed Software according to the directions described in the operation
manual or help file, and is prohibited to use or duplicate any data in a manner violating the Copyright
Law or any other laws and regulations by applying whole or a part of the Licensed Software.
Article 3 Conditions for Grant of License
1. When the User transfers the Product, it may also transfer the license to use the Licensed Software
embedded in the Product (including any related materials, updates and upgrades) on condition that
no original, copies or related materials continue in the possession of the User, and that the User shall
cause the transferee to comply with this Software License Agreement.
2. The User shall not carry out reverse engineering, disassembling, decompiling or any other code
analysis works in connection with the Licensed Software.
ii
Page 4

Article 4 Right pertaining to the Licensed Software
Any and all copyrights and other rights pertaining to the Licensed Software and related documents
shall belong to the Licensor or the original holder of the right who granted to the Licensor the license or
sublicense for the Licensed Software (hereinafter the "Original Rightholder"), and the User shall not be
entitled to any right other than the license granted hereunder, in respect of the Licensed Software and any
related documents.
Article 5 Indemnification of Licensor
1. Neither the Licensor nor the Original Rightholder shall be liable for any damage incurred by the User
or any third party due to the exercise of the license granted to the User under this Agreement, unless
otherwise restricted by law.
2. The Licensor will offer no guarantee for the merchantability, convertibility and consistency with
certain objective of the Licensed Software.
Article 6 Liability to Third Party
If any dispute has arisen with any third party due to an infringement upon a copyright, patent or any
other intellectual property right that was caused by the User's use of the Licensed Software, the User shall
settle such dispute at its own cost and hold the Licensor and the Original Rightholder harmless from any
inconvenience it may cause.
Article 7 Confidentiality
The User shall keep the confidentiality of such portion of the Licensed Software, related documents thereof
or any other information to be granted under this Agreement, as well as the conditions of this Agreement
as has not yet entered the public domain, and shall not disclose or divulge the same to any third party
without approval of the Licensor.
Article 8 Termination
In case the User falls under any of the events described in the following items, the Licensor may
immediately terminate this Agreement or claim that the User compensates for the damage incurred by the
Licensor due to such event:
(1) when the User violated any provision of this Agreement; or
(2) when a petition has been filed against the User for an attachment, provisional attachment,
provisional disposition or any other compulsory execution.
Article 9 Destruction of the Licensed Software
If this Agreement is terminated pursuant to the provision of Article 8, the User shall destroy the Licensed
Software, any related documents and copies thereof within two (2) weeks from such date of termination.
Article 10 Protection of Copyright
1. The copyright and all the other intellectual property rights relating to the Licensed Software
shall belong to the Licensor and the Original Rightholder, and in no event shall they be under the
ownership of the User.
2. The User shall, whenever it uses the Licensed Software, comply with any laws relating to the
copyright and other intellectual property rights.
Article 11 Export Restriction
1. It is prohibited to export the Licensed Software and any related documents outside the country
of the User (including transmission thereof outside the country of the User via Internet of other
communication tools).
2. The User shall understand that the Licensed Software shall be subject to the export restrictions
adopted by the country of User and any other countries.
3. The User shall agree that the software will be subject to any and all applicable international and
domestic laws (including the export control regulation of the country of User and any other countries,
and any restrictions concerning the end-users, the use by end-users and importing countries to be
provided by the country of User and any other countries, and any other governmental authorities).
Article 12 Miscellaneous
1. In the event any part of this Agreement is invalidated by operation of law, the residual provisions
shall continue in force.
2. Matters not stipulated in this Agreement or any ambiguity or question raised in the construction of
this Agreement shall be provided or settled upon good-faith consultation between the Licensor and
the User.
3. The Licensor and the User hereby agree that this Agreement is governed by the laws of Japan, and
any dispute arising from, and relating to the rights and obligations under, this Agreement shall be
submitted to the exclusive jurisdiction of the Tokyo District Court for its first instance.
iii
Page 5

Important Notice concerning the Software
-jansson
Copyright (c) 2009-2012 Petri Lehtinen <petri@digip.org>
Permission is hereby granted, free of charge, to any person obtaining a copy of this software and associated
documentation files (the "Software"), to deal in the Software without restriction, including without
limitation the rights to use, copy, modify, merge, publish, distribute, sublicense, and/or sell copies of the
Software, and to permit persons to whom the Software is furnished to do so, subject to the following
conditions:
The above copyright notice and this permission notice shall be included in all copies or substantial portions
of the Software.
THE SOFTWARE IS PROVIDED "AS IS", WITHOUT WARRANTY OF ANY KIND, EXPRESS OR IMPLIED, INCLUDING
BUT NOT LIMITED TO THE WARRANTIES OF MERCHANTABILITY, FITNESS FOR A PARTICULAR PURPOSE
AND NONINFRINGEMENT. IN NO EVENT SHALL THE AUTHORS OR COPYRIGHT HOLDERS BE LIABLE FOR ANY
CLAIM, DAMAGES OR OTHER LIABILITY, WHETHER IN AN ACTION OF CONTRACT, TORT OR OTHERWISE,
ARISING FROM, OUT OF OR IN CONNECTION WITH THE SOFTWARE OR THE USE OR OTHER DEALINGS IN THE
SOFTWARE.
-cJSON
Copyright (c) 2009 Dave Gamble
Permission is hereby granted, free of charge, to any person obtaining a copy of this software and associated
documentation files (the "Software"), to deal in the Software without restriction, including without
limitation the rights to use, copy, modify, merge, publish, distribute, sublicense, and/or sell copies of the
Software, and to permit persons to whom the Software is furnished to do so, subject to the following
conditions:
The above copyright notice and this permission notice shall be included in all copies or substantial portions
of the Software.
THE SOFTWARE IS PROVIDED "AS IS", WITHOUT WARRANTY OF ANY KIND, EXPRESS OR IMPLIED, INCLUDING
BUT NOT LIMITED TO THE WARRANTIES OF MERCHANTABILITY, FITNESS FOR A PARTICULAR PURPOSE
AND NONINFRINGEMENT. IN NO EVENT SHALL THE AUTHORS OR COPYRIGHT HOLDERS BE LIABLE FOR ANY
CLAIM, DAMAGES OR OTHER LIABILITY, WHETHER IN AN ACTION OF CONTRACT, TORT OR OTHERWISE,
ARISING FROM, OUT OF OR IN CONNECTION WITH THE SOFTWARE OR THE USE OR OTHER DEALINGS IN THE
SOFTWARE.
-CMP
The MIT License (MIT)
Copyright (c) 2014 Charles Gunyon
Permission is hereby granted, free of charge, to any person obtaining a copy of this software and associated
documentation files (the "Software"), to deal in the Software without restriction, including without
limitation the rights to use, copy, modify, merge, publish, distribute, sublicense, and/or sell copies of the
Software, and to permit persons to whom the Software is furnished to do so, subject to the following
conditions:
The above copyright notice and this permission notice shall be included in all copies or substantial portions
of the Software.
THE SOFTWARE IS PROVIDED "AS IS", WITHOUT WARRANTY OF ANY KIND, EXPRESS OR IMPLIED, INCLUDING
BUT NOT LIMITED TO THE WARRANTIES OF MERCHANTABILITY, FITNESS FOR A PARTICULAR PURPOSE
AND NONINFRINGEMENT. IN NO EVENT SHALL THE AUTHORS OR COPYRIGHT HOLDERS BE LIABLE FOR ANY
CLAIM, DAMAGES OR OTHER LIABILITY, WHETHER IN AN ACTION OF CONTRACT, TORT OR OTHERWISE,
ARISING FROM, OUT OF OR IN CONNECTION WITH THE SOFTWARE OR THE USE OR OTHER DEALINGS IN THE
SOFTWARE.
nanopb
Copyright (c) 2011 Petteri Aimonen <jpa at nanopb.mail.kapsi.fi>
This software is provided 'as-is', without any express or implied warranty. In no event will the authors be
held liable for any damages arising from the use of this software.
Permission is granted to anyone to use this software for any purpose, including commercial applications,
and to alter it and redistribute it freely, subject to the following restrictions:
1. The origin of this software must not be misrepresented; you must not claim that you wrote
the original software. If you use this software in a product, an acknowledgment in the product
documentation would be appreciated but is not required.
2. Altered source versions must be plainly marked as such, and must not be misrepresented as being the
original software.
3. This notice may not be removed or altered from any source distribution.
iv
Page 6

sha2
AUTHOR: Aaron D. Gifford - http://www.aarongifford.com/
Copyright (c) 2000-2001, Aaron D. Gifford
All rights reserved.
You may obtain a copy of the license at
https://opensource.org/licenses/BSD-3-Clause
THE SOFTWARE IS PROVIDED "AS IS", WITHOUT WARRANTY OF ANY KIND, EXPRESS OR IMPLIED, INCLUDING
BUT NOT LIMITED TO THE WARRANTIES OF MERCHANTABILITY, FITNESS FOR A PARTICULAR PURPOSE
AND NONINFRINGEMENT. IN NO EVENT SHALL THE AUTHORS OR COPYRIGHT HOLDERS BE LIABLE FOR ANY
CLAIM, DAMAGES OR OTHER LIABILITY, WHETHER IN AN ACTION OF CONTRACT, TORT OR OTHERWISE,
ARISING FROM, OUT OF OR IN CONNECTION WITH THE SOFTWARE OR THE USE OR OTHER DEALINGS IN THE
SOFTWARE.
Posix
Copyright (c) 1990, 1993
The Regents of the University of California. All rights reserved.
Redistribution and use in source and binary forms, with or without modification, are permitted provided
that the following conditions are met:
1. Redistributions of source code must retain the above copyright notice, this list of conditions and the
following disclaimer.
2. Redistributions in binary form must reproduce the above copyright notice, this list of conditions and
the following disclaimer in the documentation and/or other materials provided with the distribution.
3. All advertising materials mentioning features or use of this software must display the following
acknowledgement:
This product includes software developed by the University of California, Berkeley and its contributors.
4. Neither the name of the University nor the names of its contributors may be used to endorse or
promote products derived from this software without specific prior written permission.
Copyright (C) 1993 by Sun Microsystems, Inc. All rights reserved.
Developed at SunPro, a Sun Microsystems, Inc. business.
Permission to use, copy, modify, and distribute this software is freely granted, provided that this notice is
preserved.
Copyright (C) 1991-2, RSA Data Security, Inc. Created 1991. All rights reserved.
License to copy and use this software is granted provided that it is identified as the “RSA Data Security, Inc.
MD4 Message-Digest Algorithm” in all material mentioning or referencing this software or this function.
Copyright (c) 1995, 1996 Carnegie-Mellon University. All rights reserved.
Author: Chris G. Demetriou
Permission to use, copy, modify and distribute this software and its documentation is hereby granted,
provided that both the copyright notice and this permission notice appear in all copies of the software,
derivative works or modified versions, and any portions thereof, and that both notices appear in supporting
documentation.
CARNEGIE MELLON ALLOWS FREE USE OF THIS SOFTWARE IN ITS "AS IS" CONDITION. CARNEGIE MELLON
DISCLAIMS ANY LIABILITY OF ANY KIND FOR ANY DAMAGES WHATSOEVER RESULTING FROM THE USE OF
THIS SOFTWARE.
Carnegie Mellon requests users of this software to return to
Software Distribution Coordinator or Software.Distribution@CS.CMU.EDU
School of Computer Science
Carnegie Mellon University
Pittsburgh PA 15213-3890
any improvements or extensions that they make and grant Carnegie the rights to redistribute these
changes.
License is also granted to make and use derivative works provided that such works are identified as
"derived from the RSA Data Security, Inc. MD4 Message-Digest Algorithm" in all material mentioning or
referencing the derived work.
RSA Data Security, Inc. makes no representations concerning either the merchantability of this software or
the suitability of this software for any particular purpose. It is provided "as is" without express or implied
warranty of any kind.
Copyright (c) 1993 Martin Birgmeier
All rights reserved.
You may redistribute unmodified or modified versions of this source code provided that the above
copyright notice and this and the following conditions are retained.
This software is provided ``as is'', and comes with no warranties of any kind. I shall in no event be liable for
anything that happens to anyone/anything when using this software.
These notices must be retained in any copies of any part of this documentation
and/or software.
v
Page 7

T-Kernel 2.0
This product uses the source code of T-Kernel 2.0 under T-License 2.0 granted by T-Engine Forum
(www.tron.org)
BSD-3-Clause
Copyright (c) 2000-2001, Aaron D. Gifford
All rights reserved.
You may obtain a copy of the license at
https://opensource.org/licenses/BSD-3-Clause
THE SOFTWARE IS PROVIDED "AS IS", WITHOUT WARRANTY OF ANY KIND, EXPRESS OR IMPLIED, INCLUDING
BUT NOT LIMITED TO THE WARRANTIES OF MERCHANTABILITY, FITNESS FOR A PARTICULAR PURPOSE
AND NONINFRINGEMENT. IN NO EVENT SHALL THE AUTHORS OR COPYRIGHT HOLDERS BE LIABLE FOR ANY
CLAIM, DAMAGES OR OTHER LIABILITY, WHETHER IN AN ACTION OF CONTRACT, TORT OR OTHERWISE,
ARISING FROM, OUT OF OR IN CONNECTION WITH THE SOFTWARE OR THE USE OR OTHER DEALINGS IN THE
SOFTWARE.
LFS Subsystem
Copyright The Regents of the University of California. All rights reserved.
You may obtain a copy of the license at
https://directory.fsf.org/wiki/License:BSD-4-Clause
THE SOFTWARE IS PROVIDED "AS IS", WITHOUT WARRANTY OF ANY KIND, EXPRESS OR IMPLIED, INCLUDING
BUT NOT LIMITED TO THE WARRANTIES OF MERCHANTABILITY, FITNESS FOR A PARTICULAR PURPOSE
AND NONINFRINGEMENT. IN NO EVENT SHALL THE AUTHORS OR COPYRIGHT HOLDERS BE LIABLE FOR ANY
CLAIM, DAMAGES OR OTHER LIABILITY, WHETHER IN AN ACTION OF CONTRACT, TORT OR OTHERWISE,
ARISING FROM, OUT OF OR IN CONNECTION WITH THE SOFTWARE OR THE USE OR OTHER DEALINGS IN THE
SOFTWARE.
Accordo2 Player
Apache License
Licensed under the Apache License,
Version 2.0, January 2004(the "License");
You may obtain a copy of the license at
http://www.apache.org/licenses/LICENSE-2.0
THE SOFTWARE IS PROVIDED "AS IS", WITHOUT WARRANTY OF ANY KIND, EXPRESS OR IMPLIED, INCLUDING
BUT NOT LIMITED TO THE WARRANTIES OF MERCHANTABILITY, FITNESS FOR A PARTICULAR PURPOSE
AND NONINFRINGEMENT. IN NO EVENT SHALL THE AUTHORS OR COPYRIGHT HOLDERS BE LIABLE FOR ANY
CLAIM, DAMAGES OR OTHER LIABILITY, WHETHER IN AN ACTION OF CONTRACT, TORT OR OTHERWISE,
ARISING FROM, OUT OF OR IN CONNECTION WITH THE SOFTWARE OR THE USE OR OTHER DEALINGS IN THE
SOFTWARE.
vi
Page 8

Declaration of Conformity with regard to the RE Directive 2014/53/EU
Declaration of Conformity with regard to the RoHS Directive 2011/65/EU
Manufacturer:
JVCKENWOOD Corporation
3-12, Moriya-cho, Kanagawa-ku, Yokohama-shi, Kanagawa, 221-0022, JAPAN
EU Representative:
JVCKENWOOD Europe B.V.
Amsterdamseweg 37, 1422 AC UITHOORN, THE NETHERLANDS
Déclaration de conformité se rapportant à la directive RE 2014/53/EU
Déclaration de conformité se rapportant à la directive RoHS 2011/65/EU
Fabricant:
JVCKENWOOD Corporation
3-12, Moriya-cho, Kanagawa-ku, Yokohama-shi, Kanagawa, 221-0022, JAPAN
Représentants dans l’UE:
JVCKENWOOD Europe B.V.
Amsterdamseweg 37, 1422 AC UITHOORN, THE NETHERLANDS
Konformitätserklärung in Bezug auf die RE-Vorschrift 2014/53/EU
Konformitätserklärung in Bezug auf die RoHS-Vorschrift 2011/65/EU
Hersteller:
JVCKENWOOD Corporation
3-12, Moriya-cho, Kanagawa-ku, Yokohama-shi, Kanagawa, 221-0022, JAPAN
EU-Vertreter:
JVCKENWOOD Europe B.V.
Amsterdamseweg 37, 1422 AC UITHOORN, Niederlande
English
Hereby, JVCKENWOOD declares that the radio
equipment “DPX-7200DAB” is in compliance with
Directive 2014/53/EU.
The full text of the EU declaration of conformity is
available at the following internet address:
http://www.kenwood.com/cs/ce/eudoc/
Français
Par la présente, JVCKENWOOD déclare que
l’équipement radio « DPX-7200DAB » est conforme
à la directive 2014/53/UE.
L’intégralité de la déclaration de conformité UE est
disponible à l’adresse Internet suivante :
http://www.kenwood.com/cs/ce/eudoc/
Deutsch
Hiermit erklärt JVCKENWOOD, dass das Funkgerät
“DPX-7200DAB” der Richtlinie 2014/53/EU
entspricht.
Der volle Text der EU-Konformitätserklärung
steht unter der folgenden Internetadresse zur
Verfügung:
http://www.kenwood.com/cs/ce/eudoc/
Nederlands
Hierbij verklaart JVCKENWOOD dat de
radioapparatuur “DPX-7200DAB” in
overeenstemming is met Richtlijn 2014/53/EU.
De volledige tekst van de EU-verklaring van
overeenstemming is te vinden op het volgende
internetadres:
http://www.kenwood.com/cs/ce/eudoc/
Italiano
Con la presente, JVCKENWOOD dichiara che
l΄apparecchio radio “DPX-7200DAB” è conforme
alla Direttiva 2014/53/UE.
Il testo integrale della dichiarazione di conformità
UE è disponibile al seguente indirizzo internet:
http://www.kenwood.com/cs/ce/eudoc/
Español
Por la presente, JVCKENWOOD declara que el
equipo de radio “DPX-7200DAB” cumple la
Directiva 2014/53/EU.
El texto completo de la declaración de
conformidad con la UE está disponible en la
siguiente dirección de internet:
http://www.kenwood.com/cs/ce/eudoc/
Português
Deste modo, a JVCKENWOOD declara que o
equipamento de rádio “DPX-7200DAB” está em
conformidade com a Diretiva 2014/53/UE.
O texto integral da declaração de conformidade
da UE está disponível no seguinte endereço de
internet:
http://www.kenwood.com/cs/ce/eudoc/
Polska
Niniejszym, JVCKENWOOD deklaruje, że sprzęt
radiowy “DPX-7200DAB” jest zgodny z dyrektywą
2014/53/UE.
Pełny tekst deklaracji zgodności EU jest dostępny
pod adresem:
http://www.kenwood.com/cs/ce/eudoc/
Český
Společnost JVCKENWOOD tímto prohlašuje, že
rádiové zařízení “DPX-7200DAB” splňuje podmínky
směrnice 2014/53/EU.
Plný text EU prohlášení o shodě je dostupný na
následující internetové adrese:
http://www.kenwood.com/cs/ce/eudoc/
Magyar
JVCKENWOOD ezennel kijelenti, hogy a
„DPX-7200DAB“ rádióberendezés megfelel a
2014/53/EU irányelvnek.
Az EU konformitási nyilatkozat teljes szövege az
alábbi weboldalon érhető el:
http://www.kenwood.com/cs/ce/eudoc/
vii
Page 9

Svenska
Härmed försäkrar JVCKENWOOD att
radioutrustningen “DPX-7200DAB” är i enlighet
med direktiv 2014/53/EU.
Den fullständiga texten av EU-försäkran
om överensstämmelse finns på följande
Internetadress:
http://www.kenwood.com/cs/ce/eudoc/
Suomi
JVCKENWOOD julistaa täten, että radiolaite
“DPX-7200DAB” on direktiivin 2014/53/EU
mukainen.
EU-vaatimustenmukaisuusvakuutusvaatimus
löytyy kokonaisuudessaan seuraavasta internetosoitteesta:
http://www.kenwood.com/cs/ce/eudoc/
Slovensko
S tem JVCKENWOOD izjavlja, da je radijska oprema
» DPX-7200DAB « v skladu z Direktivo 2014/53/EU.
Celotno besedilo direktive EU o skladnosti je
dostopno na tem spletnem naslovu:
http://www.kenwood.com/cs/ce/eudoc/
Slovensky
Spoločnosť JVCKENWOOD týmto vyhlasuje, že
rádiové zariadenie „DPX-7200DAB“ vyhovuje
smernici 2014/53/EÚ.
Celý text EÚ vyhlásenia o zhode nájdete na
nasledovnej internetovej adrese:
http://www.kenwood.com/cs/ce/eudoc/
Dansk
Herved erklærer JVCKENWOOD, at radioudstyret
“DPX-7200DAB” er i overensstemmelse med
Direktiv 2014/53/EU.
EU-overensstemmelseserklæringens fulde ordlyd
er tilgængelig på følgende internetadresse:
http://www.kenwood.com/cs/ce/eudoc/
Ελληνικά
Με το παρόν, η JVCKENWOOD δηλώνει ότι ο
ραδιοεξοπλισμός «DPX-7200DAB» συμμορφώνεται
με την Οδηγία 2014/53/ΕΕ.
Το πλήρες κείμενο της δήλωσης συμμόρφωσης
της ΕΕ είναι διαθέσιμο στην ακόλουθη διεύθυνση
στο διαδίκτυο:
http://www.kenwood.com/cs/ce/eudoc/
Eesti
Käesolevaga JVCKENWOOD kinnitab, et
„DPX-7200DAB“ raadiovarustus on vastavuses
direktiiviga 2014/53/EL.
ELi vastavusdeklaratsiooni terviktekst on
kättesaadav järgmisel internetiaadressil:
http://www.kenwood.com/cs/ce/eudoc/
Latviešu
JVCKENWOOD ar šo deklarē, ka radio aparatūra
„DPX-7200DAB” atbilst direktīvas 2014/53/ES
prasībām.
Pilns ES atbilstības deklarācijas teksts ir pieejams
šādā tīmekļa adresē:
http://www.kenwood.com/cs/ce/eudoc/
Lietuviškai
Šiuo JVCKENWOOD pažymi, kad radijo įranga
„DPX-7200DAB“ atitinka 2014/53/EB direktyvos
reikalavimus.
Visą EB direktyvos atitikties deklaracijos tekstą
galite rasti šiuo internetiniu adresu:
http://www.kenwood.com/cs/ce/eudoc/
Malti
B’dan, JVCKENWOOD jiddikjara li t-tagħmir
tar-radju “DPX-7200DAB” huwa konformi madDirettiva 2014/53/UE.
It-test kollu tad-dikjarazzjoni ta’ konformità huwa
disponibbli fl-indirizz intranet li ġej:
http://www.kenwood.com/cs/ce/eudoc/
HRVATSKI / SRPSKI JEZIK
JVCKENWOOD ovim izjavljuje da je radio oprema
“DPX-7200DAB” u skladu s Direktivom
2014/53/EU.
Cjeloviti tekst deklaracije Europske unije o
usklađenosti dostupan je na sljedećoj internet
adresi:
http://www.kenwood.com/cs/ce/eudoc/
ROMÂNĂ
Prin prezenta, JVCKENWOOD declară că
echipamentul radio “DPX-7200DAB” este în
conformitate cu Directiva 2014/53/UE.
Textul integral al declarației de conformitate UE
este disponibil la urmatoarea adresă de internet:
http://www.kenwood.com/cs/ce/eudoc/
БЪЛГАРСКИ
С настоящото JVCKENWOOD декларира, че
радиооборудването на “DPX-7200DAB” е в
съответствие с Директива 2014/53/ЕС.
Пълният текст на ЕС декларацията за
съответствие е достъпен на следния интернет
адрес:
http://www.kenwood.com/cs/ce/eudoc/
Turkish
Burada, JVCKENWOOD “DPX-7200DAB” radyo
ekipmanının 2014/53/AB Direktifine uygun
olduğunu bildirir.
AB uyumluluk deklarasyonunun tam metni
aşağıdaki internet adresinde mevcuttur.
http://www.kenwood.com/cs/ce/eudoc/
Русский
JVCKENWOOD настоящим заявляет, что
радиооборудование «DPX-7200DAB»
соответствует Директиве 2014/53/EU.
Полный текст декларации соответствия
ЕС доступен по следующему адресу в сети
Интернет:
http://www.kenwood.com/cs/ce/eudoc/
Українська
Таким чином, компанія JVCKENWOOD
заявляє, що радіообладнання «DPX-7200DAB»
відповідає Директиві 2014/53/EU.
Повний текст декларації про відповідність ЄС
можна знайти в Інтернеті за такою адресою:
http://www.kenwood.com/cs/ce/eudoc/
viii
Page 10

Contents
Before Use ................................................................................................. 3
Basics ......................................................................................................... 4
Getting Started ........................................................................................ 5
1 Select the display language and cancel the demonstration
2 Set the clock and date
3 Set the other optional settings
Digital Radio ............................................................................................. 7
Analog Radio .......................................................................................... 10
CD/USB/iPod........................................................................................... 11
Spotify ..................................................................................................... 14
AUX........................................................................................................... 16
Using Other Applications .....................................................................16
KENWOOD Remote application
TuneIn Radio/TuneIn Radio Pro
Bluetooth® .............................................................................................. 18
Bluetooth – Connection
Bluetooth – Mobile phone
Bluetooth – Audio
AMAZON ALEXA .................................................................................... 24
Audio Settings ........................................................................................25
Display Settings ..................................................................................... 30
Installation/Connection ....................................................................... 31
References .............................................................................................. 38
Maintenance
More information
Change the display information
Troubleshooting .................................................................................... 40
Specifications ......................................................................................... 43
2
ENGLISH
Page 11
Before Use
IMPORTANT
• To ensure proper use, please read through this manual before using this
product. It is especially important that you read and observe Warnings and
Cautions in this manual.
• Please keep the manual in a safe and accessible place for future reference.
WARNING
• Do not operate any function that takes your attention away from safe
driving.
CAUTION
Volume setting:
• Adjust the volume so that you can hear sounds outside the car to prevent
accidents.
• Lower the volume before playing digital sources to avoid damaging the
speakers by the sudden increase of the output level.
General:
• Avoid using the external device if it might hinder safe driving.
• Make sure all important data has been backed up. We shall bear no
responsibility for any loss of recorded data.
• Never put or leave any metallic objects (such as coins or metal tools) inside
the unit to prevent a short circuit.
• If a disc error occurs due to condensation on the laser lens, eject the disc
and wait for the moisture to evaporate.
• Depending on the types of cars, the antenna will automatically extend
when you turn on the unit with the antenna control wire connected
(page34). Turn off the unit or change the source to STANDBY when
parking at a low ceiling area.
How to read this manual
• The displays and faceplates shown in this manual are examples used to
provide clear explanations of the operations. For this reason, they may
be different from the actual displays or faceplates.
• Operations are explained mainly using buttons on the faceplate.
• English indications are used for the purpose of explanation. You can
select the display language from the
•
[XX]
indicates the selected items.
• (PageXX) indicates references are available on the stated page.
This symbol on the product means there are important
operating and maintenance instructions in this manual.
Be sure to carefully read instructions in this manual.
[FUNCTION]
menu. (Page6)
ENGLISH
3
Page 12
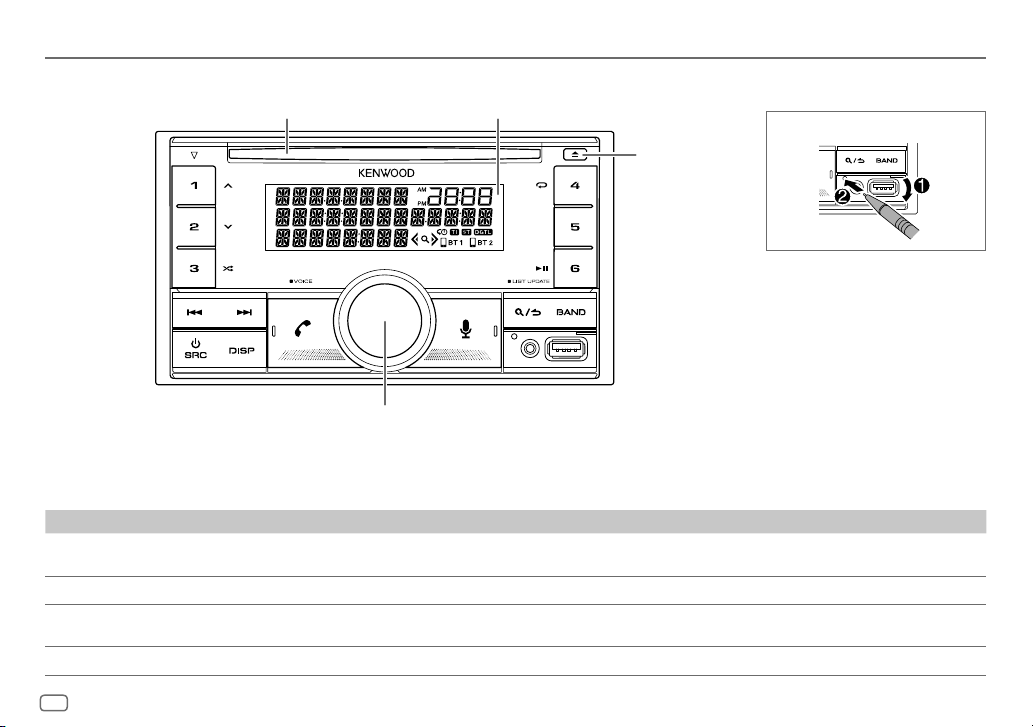
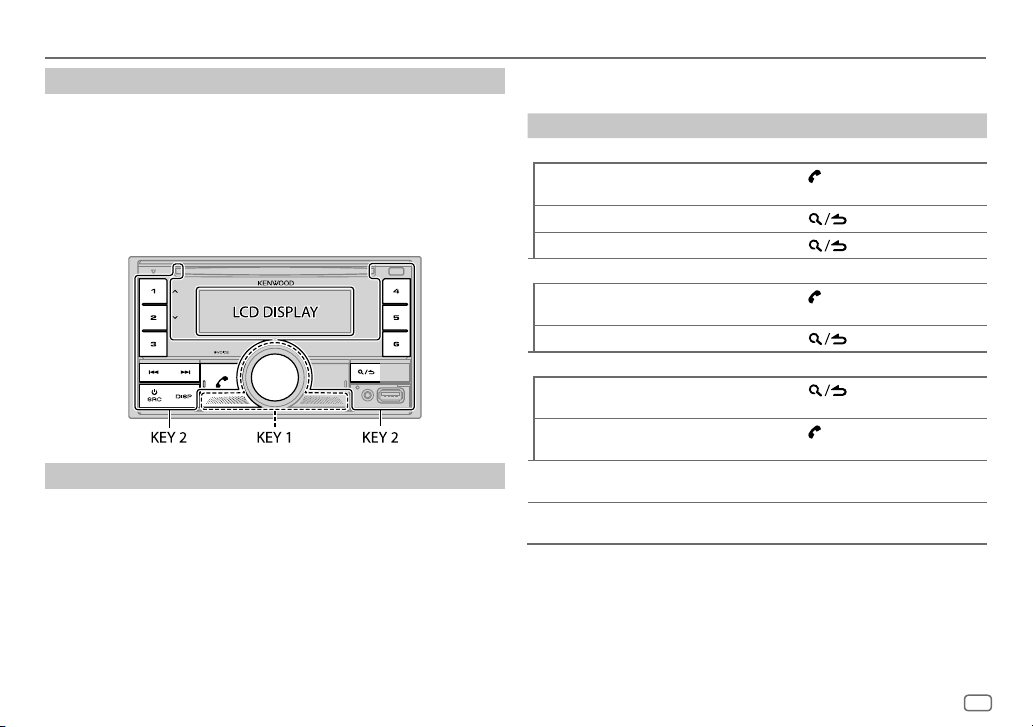
Basics
Faceplate
Loading slot
Volume knob
* Only for illustration purpose.
To On the faceplate
Turn on the power
Adjust the volume Turn the volume knob.
Select a source
Change the display information Press DISP repeatedly. (Page 39)
Display window*
Press B SRC.
• Press and hold to turn off the power.
• Press B SRC repeatedly.
• Press B SRC, then turn the volume knob within 2 seconds.
How to reset
Eject button
4
ENGLISH
Page 13
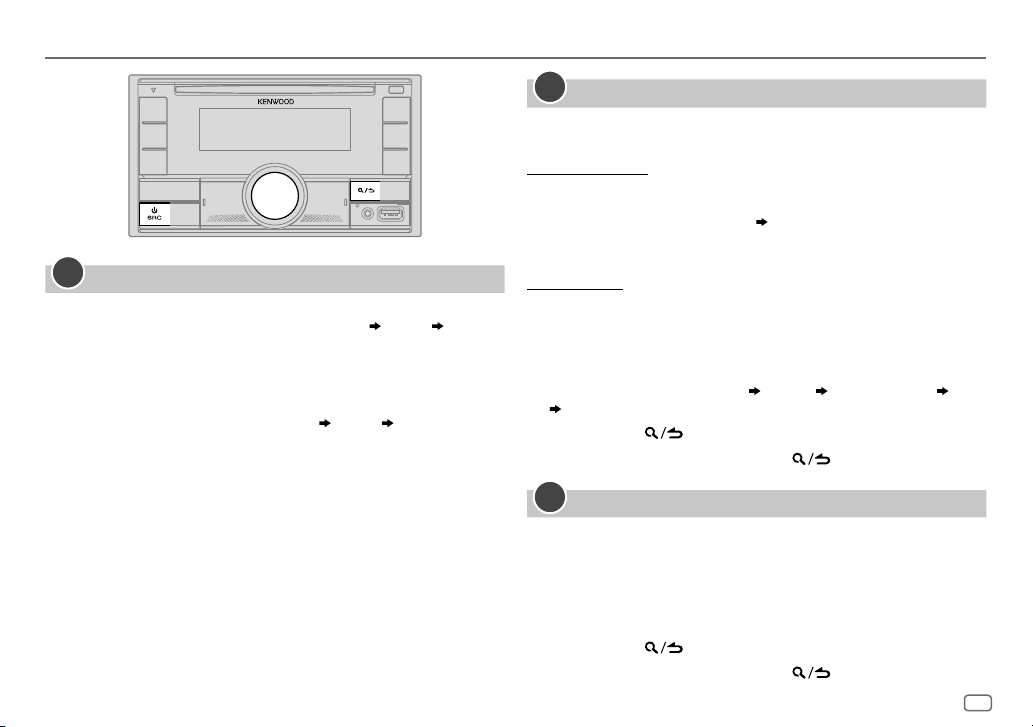
Getting Started
1
Select the display language and cancel the demonstration
When you turn on the power for the first time (or
[YES]
, see page6), the display shows: “SEL LANGUAGE” “PRESS”
“VOLUME KNOB”
1 Turn the volume knob to select
[SP]
(Spanish) /
[EN]
is selected for the initial setup.
[FR]
(French) /
[EN]
[GE]
(German), then press the knob.
Then, the display shows: “CANCEL DEMO” “PRESS” “VOLUME KNOB”.
2 Press the volume knob again.
[YES]
is selected for the initial setup.
3 Press the volume knob again.
“DEMO OFF” appears.
Then, the display shows the selected crossover type: “2-WAY X ’ OVER” or
“3-WAY X ’ OVER”
• To change the crossover type, see “Change the crossover type” on
page7.
(English) /
[FACTORY RESET]
[RU]
(Russian) /
is set to
2
Set the clock and date
1
Press the volume knob to enter
2 Turn the volume knob to select
To adjust the clock
3 Turn the volume knob to select
[FUNCTION]
.
[CLOCK]
, then press the knob.
[CLOCKADJUST]
, then press the knob.
4 Turn the volume knob to make the settings, then press the knob.
Set the time in the order of “Hour” “Minute”.
5 Turn the volume knob to select
6 Turn the volume knob to select
To set the date
7 Turn the volume knob to select
8 Turn the volume knob to select
the knob.
9 Turn the volume knob to select
[CLOCK FORMAT]
[12H]
or
[24H]
[DATEFORMAT]
[DD/MM/YY]
[DATESET]
, then press the knob.
, then press the knob.
, then press the knob.
, then press the knob.
or
[MM/DD/YY]
, then press
10 Turn the volume knob to make the settings, then press the knob.
Set the date in the order of “Day” “Month” “Year” or “Month” “Day”
“Year”.
11 Press and hold to exit.
To return to the previous setting item, press
3
Set the other optional settings
You can only set the following items while the unit is in STANDBY source.
.
1 Press B SRC repeatedly to enter STANDBY.
2 Press the volume knob to enter
[FUNCTION]
.
3 Turn the volume knob to select an item (page 6), then press the
knob.
4 Repeat step 3 until the desired item is selected or activated.
5 Press and hold to exit.
To return to the previous setting item, press
.
ENGLISH
5
Page 14

Getting Started
[DISPLAY]
[EASY MENU]
[TUNER SETTING]
[DAB ANT POWER]
[PRESET TYPE]
[SYSTEM]
[KEY BEEP]
[SOURCE SELECT]
[SPOTIFY SRC]
[BT AUDIO SRC]
[BUILT-IN AUX]
When entering [FUNCTION]...
[ON]: [LCD DISPLAY] illumination changes to white color. ;
[OFF]: [LCD DISPLAY] illumination remains as [COLOR SELECT] color.
(Page 30)
• [KEY 1] and [KEY 2] illuminations change to light blue color when you
• Refer to the illustration on page 30 for zone identification.
[ON]: Supplies power to the DAB antenna. ; [OFF]: Does not supply power.
Selects when using passive antenna without booster. (Page 35)
[NORMAL]: Memorizes one station for each preset button in each band
(FM1/FM2/FM3/MW/LW/DB1/DB2/DB3). ; [MIX]: Memorizes one station
(digital radio or analog radio) for each preset button, regardless of the
selected band.
(Applicable only if [X’OVER] is set to [2WAY].) (Page 7)
[ON]: Activates the keypress tone. ; [OFF]: Deactivates.
[ON]: Enables SPOTIFY/SPOTIFY BT in source selection. ; [OFF]: Disables.
(Page 14)
[ON]: Enables BT AUDIO in source selection. ; [OFF]: Disables. (Page 23)
[ON]: Enables AUX in source selection. ; [OFF]: Disables. (Page 16)
enter [FUNCTION], irregardless of the [EASY MENU] setting.
Default: [XX]
[P-OFF WAIT] Applicable only when the demonstration mode is turned off.
[CD READ]
[F/W UPDATE]
[UPDATE SYSTEM]/[UPDATE DAB]
[F/W UP xxxx]/
[F/W UP xxxxx]
[FACTORY RESET]
[ENGLISH]
[РУССКИЙ]
[ESPANOL]
[FRANCAIS]
[DEUTSCH]
Sets the duration when the unit will automatically turn off (while in
standby mode) to save the battery.
[20M]: 20 minutes ; [40M]: 40 minutes ; [60M]: 60 minutes ;
[– – –]: Cancels.
[1]: Automatically distinguishes between audio file disc and music CD. ;
[2]: Forces to play as a music CD. No sound can be heard if an audio file
disc is played.
[YES]: Starts upgrading the firmware. ; [NO]: Cancels (upgrading is not
activated).
For details on how to update the firmware, visit
<www.kenwood.com/cs/ce/>.
[YES]: Resets the settings to default (except the stored station). ;
[NO]: Cancels.
Select the display language for [FUNCTION] menu and music information
if applicable.
By default, [ENGLISH] is selected.
6
ENGLISH
Page 15

Getting Started
Change the crossover type
Press B SRC repeatedly to enter STANDBY.
1
2 Press and hold number buttons 4 and 5 to enter crossover select.
The current crossover type appears.
3 Turn the volume knob to select “2WAY” or “3WAY”, then press the
knob.
4 Turn the volume knob to select “YES” or “NO”, then press the knob.
The selected crossover type appears.
• To cancel, press and hold
• To adjust the selected crossover settings, see page 27.
CAUTION
Select a crossover type according to how the speakers are connected.
(Page33, 34)
If you select a wrong type:
• The speakers may damage.
• The output sound level may be extremely high or low.
.
Digital Radio
About DAB (Digital Audio Broadcasting)
DAB is one of the digital radio broadcasting systems available today. It can
deliver digital quality sound without any annoying interference or signal
distortion. Furthermore, it can carry text, pictures and data.
In contrast to FM broadcast, where each program is transmitted on its own
frequency, DAB combines several programs (called “services”) to form one
“ensemble.”
The “primary component” (main radio station) is sometimes accompanied
by a “secondary component” which can contain extra programs or other
information.
Preparation:
1 Connect the supplied DAB antenna to the DAB antenna jack.
(Page 33)
2 Press B SRC repeatedly to select DIGITAL AUDIO.
3 Press and hold (LIST UPDATE) to start the Service List update.
“LIST UPDATE” appears and update starts. “UPDATED” appears when
update completes.
Updates take up to 3 minutes. No interruption (such as traffic
information) is possible during updates.
• To cancel the Service List update: Press and hold
again.
(LIST UPDATE)
ENGLISH
7
Page 16

Digital Radio
• “DGTL” lights up when receiving DAB digital signal and flashes when
receiving a RDS signal.
• The unit switches to DAB alarm automatically when receiving an alarm
signal from DAB broadcast.
Search for an ensemble
Press B SRC repeatedly to select DIGITAL AUDIO.
1
2 Press BAND repeatedly to select DB1/DB2/DB3.
3 Press and hold S / T to search for an ensemble.
4 Press S / T to select an ensemble, service or component to listen.
You can store up to 18 services.
• To store a service: Press and hold one of the number buttons (1 to 6).
• To select a stored service: Press one of the number buttons (1 to 6).
Select a service
Press to enter Service Search mode.
1
2 Turn the volume knob to select a service, then press the knob.
To cancel the Service Search mode, press
Select a service by name
Press to enter Service Search mode.
1
2 Turn the volume knob quickly to enter Alphabet Search mode.
3 Turn the volume knob or press S / T to select the character to be
searched for.
• Press 1 / 2 to go to the next/previous page.
4 Press the volume knob to start searching.
5 Turn the volume knob to select a service, then press the knob.
To cancel the Alphabet Search mode, press
again.
again.
Other settings
Press the volume knob to enter
1
[FUNCTION]
.
2 Turn the volume knob to select an item (see the following table), then
press the knob.
3 Repeat step 2 until the desired item is selected/activated or follow the
instructions stated on the selected item.
4 Press and hold to exit.
To return to the previous setting item, press
[TUNER SETTING]
[SEEK MODE]
[AF SET]
[TI]
[PTY SEARCH]
Selects the searching method for S / T buttons when pressed.
[AUTO1]: Select an ensemble, service or component. Pressing and holding
S
/ T automatically search for an ensemble. ; [AUTO2]: Search for a
preset service. ; [MANUAL]: Select an ensemble, service or component.
Pressing and holding
[ON]:
While listening to DAB: Automatically switch to FM broadcasting the same
program if the DAB signal becomes weak. It will switch back to DAB sound
when the signal becomes strong again.
While listening to FM: Automatically switch to DIGITAL AUDIO source
broadcasting the same program (if available). ;
[OFF]: Cancels.
[ON]: Allows the unit to temporarily switch to Traffic Information if
available (“TI” indicator lights up). ; [OFF]: Cancels.
1
Turn the volume knob to select the available Program Type (see
“Available Program Type for [PTY SEARCH]” on page 9), then press
the knob.
2
Turn the volume knob to select the PTY language ([ENGLISH]/
[FRENCH]/[GERMAN]), then press the knob.
3
Press S / T to start searching.
S
/ T manually search for an ensemble.
.
Default: [XX]
8
ENGLISH
Page 17
Digital Radio
[ASW SELECT] [TRAVEL], [WARNINGS], [NEWS], [WEATHER], [EVENT], [SPECIAL],
[LIST UPDATE]
[PTY WATCH]
[RELATED SERV]
[RAD INFO], [SPORTS], [FINANCE]: Turn the volume knob to make a
selection, then press the knob.
“
” appears in front of the activated announcement type.
Automatically switch from any source to Digital radio ensembles
broadcasting an activated announcement type.
• Multiple announcement can be activated simultaneously.
• To deactivate, press the volume knob again (“
[AUTO]: Automatically update the DAB Service List when the power is
turned on. ; [MANUAL]: Updates the DAB Service List by pressing and
holding
1
Turn the volume knob to select the available Program Type, then press
The unit automatically switch from any source to Digital Radio ensembles
broadcasting the selected type of program.
Program Type:
[NEWS], [AFFAIRS], [INFO], [SPORT], [EDUCATE], [DRAMA],
[CULTURE], [SCIENCE], [VARIED], [POP M] (music), [ROCK M] (music),
[EASY M] (music), [LIGHT M] (music), [CLASSICS], [OTHER M] (music),
[WEATHER], [FINANCE], [CHILDREN], [SOCIAL], [RELIGION], [PHONE
IN], [TRAVEL], [LEISURE], [JAZZ], [COUNTRY], [NATION M] (music),
[OLDIES], [FOLK M] (music), [DOCUMENT]
[OFF]: Cancels.
2
Press the volume knob to enter PTY language selection.
3
Turn the volume knob to select the PTY language ([ENGLISH]/
[FRENCH]/[GERMAN]), then press the knob.
[ON]: Enable Soft-Link function to switch to an alternative service which is
different audio program from the current audio program. ; [OFF]: Disable.
(LIST UPDATE).
.
” goes off).
[CLOCK]
[TIME SYNC]
• If the volume is adjusted during reception of traffic information,
announcement, alarm or news bulletin, the adjusted volume is memorized
automatically. It will be applied the next time traffic information,
announcement, alarm or news bulletin is turned on.
Available Program Type for
[SPEECH]
:
[NEWS], [AFFAIRS], [INFO]
[SCIENCE], [VARIED], [WEATHER], [FINANCE], [CHILDREN], [SOCIAL], [RELIGION]
[PHONEIN], [TRAVEL], [LEISURE], [DOCUMENT]
:
[MUSIC]
[POPM]
(music),
[CLASSICS], [OTHERM]
[FOLKM]
(music)
The unit will search for the Program Type categorized under
[MUSIC]
if selected.
[ON]: Synchronizes the unit’s time to the Digital Radio station time. ;
[OFF]: Cancels.
[PTY SEARCH]
[ROCKM]
(music),
(information),
(music),
[SPORT], [EDUCATE], [DRAMA], [CULTURE]
[EASYM]
(music),
[JAZZ], [COUNTRY], [NATIONM]
[LIGHTM]
(music),
(music),
[OLDIES]
[SPEECH]
,
or
,
,
ENGLISH
9
Page 18
Analog Radio
• “ST” indicator lights up when receiving an FM stereo broadcast with
sufficient signal strength.
• The unit switches to FM alarm automatically when receiving an alarm
signal from FM broadcast.
Search for a station
Press B SRC repeatedly to select RADIO.
1
2 Press BAND repeatedly to select FM1/FM2/FM3/MW/LW.
3 Press S / T to search for a station.
You can store up to 18 stations for FM and 6 stations for MW/LW.
• To store a station: Press and hold one of the number buttons (1 to 6).
• To select a stored station:
Press one of the number buttons (1 to 6).
Other settings
Press the volume knob to enter
1
[FUNCTION]
.
2 Turn the volume knob to select an item (see the following table), then
press the knob.
3 Repeat step 2 until the desired item is selected/activated or follow the
instructions stated on the selected item.
4 Press and hold to exit.
To return to the previous setting item, press
[TUNER SETTING]
[SEEK MODE]
[LOCAL SEEK]
[AUTO MEMORY]
[MONO SET]
[NEWS SET]
[REGIONAL]
[AF SET]
Selects the searching method for S / T buttons when pressed.
[AUTO1]: Automatically search for a station. ; [AUTO2]: Search for a preset
station. ; [MANUAL]: Manually search for a station.
[ON]: Searches only stations with good reception. ; [OFF]: Cancels.
• Settings made are applicable only to the selected source/station. Once
you change the source/station, you need to make the settings again.
[YES]: Automatically starts memorizing 6 stations with good reception. ;
[NO]: Cancels.
• Selectable only if [NORMAL] is selected for [PRESET TYPE]. (Page 6)
[ON]: Improves the FM reception, but the stereo effect will be lost. ;
[OFF]: Cancels.
[ON]: The unit will temporarily switch to News Programme if available. ;
[OFF]: Cancels.
[ON]: Switches to another station only in the specific region using the “AF”
control. ; [OFF]: Cancels.
[ON]: Automatically searches for another station broadcasting the same
program in the same Radio Data System network with better reception
when the current reception is poor. ; [OFF]: Cancels.
.
Default: [XX]
10
ENGLISH
Page 19

Analog Radio CD/USB/iPod
[TI] [ON]: Allows the unit to temporarily switch to Traffic Information if
[PTY SEARCH]
•
[LOCAL SEEK]/[MONO SET]/[NEWS SET]/[REGIONAL]/[AF SET]/[PTY SEARCH]
selectable only when the band is FM1/FM2/FM3.
• If the volume is adjusted during reception of traffic information or news
bulletin, the adjusted volume is memorized automatically. It will be applied
the next time traffic information or news bulletin is turned on.
Available Program Type for [PTY SEARCH]
[SPEECH]
:
[NEWS], [AFFAIRS], [INFO]
[SCIENCE], [VARIED], [WEATHER], [FINANCE], [CHILDREN], [SOCIAL], [RELIGION]
[PHONEIN], [TRAVEL], [LEISURE], [DOCUMENT]
:
[MUSIC]
[POP M]
(music),
[CLASSICS], [OTHER M]
[FOLK M]
(music)
The unit will search for the Program Type categorized under
[MUSIC]
if selected.
available (“TI” indicator lights up). ; [OFF]: Cancels.
• [TI] in MW/LW band is for enabling traffic interruption to DIGITAL AUDIO
source only.
1
Turn the volume knob to select the available Program Type (see the
following “Available Program Type for [PTY SEARCH]”), then press the
knob.
2
Turn the volume knob to select the PTY language ([ENGLISH]/
[FRENCH]/[GERMAN]), then press the knob.
3
Press S / T to start searching.
[ROCK M]
(music),
(information),
(music),
[SPORT], [EDUCATE], [DRAMA], [CULTURE]
[EASY M]
(music),
[JAZZ], [COUNTRY], [NATION M]
[LIGHT M]
(music),
(music),
[SPEECH]
[OLDIES]
is
,
,
or
Insert a disc
Label side
The source changes to CD automatically and playback starts.
Connect a USB device
USB input terminal
,
CA-U1EX (max.: 500 mA)
(optional accessory)*
The source changes to USB automatically and playback starts.
* Do not leave the cable inside the car when not in use.
Eject disc
USB device
ENGLISH
11
Page 20
CD/USB/iPod
Connect an iPod/iPhone
USB input terminal
KCA-iP103 (optional accessory)*1
or accessory of the iPod/iPhone*2
The source changes to iPod USB automatically and playback starts.
• You can also connect iPod/iPhone via Bluetooth. (Page18)
*1 KCA-iP103: Lightning type
*2 Do not leave the cable inside the car when not in use.
Basic operations
iPod/
iPhone
To On the faceplate
Play back/pause
Reverse/Fast-forward
Select a track/file
Select a folder*1 Press 1
Repeat play*2 Press 4
Random play*2 Press 3
*1 For CD: Only for MP3/WMA/AAC files. This does not work for iPod.
*2 For iPod: Applicable only when [MODE OFF] is selected. (Page 13)
Press 6 IW.
Press and hold S / T.
Press S / T.
/ 2 .
repeatedly.
[TRACK REPEAT]/[ALL REPEAT]
[FILE REPEAT]/[FOLDER REPEAT]/[ALL REPEAT]
WMA/AAC/WAV/FLAC file
[REPEAT ONE]/[REPEAT ALL]/[REPEAT OFF]
repeatedly.
[DISCRANDOM]/[RANDOM OFF]
[FOLDERRANDOM]/[RANDOM OFF]
WAV/FLAC file
[SHUFFLE ON]/[SHUFFLE OFF]
Press and hold 3
to select
: Audio CD
: Audio CD
: MP3/WMA/AAC/
: iPod
[ALL RANDOM]
: MP3/
: iPod
.*1
12
ENGLISH
Page 21

CD/USB/iPod
Select music drive
While in USB source, press 5 repeatedly.
Stored songs in the following drive will be played back.
• Selected internal or external memory of a smartphone (Mass Storage
Class).
• Selected drive of a multiple drive device.
You can also select the music drive from the
1 Press the volume knob to enter
2 Turn the volume knob to select
3 Turn the volume knob to select
4 Turn the volume knob to select
The next drive (
playback starts.
[DRIVE 1]
to
[DRIVE 4]
[FUNCTION]
menu.
[FUNCTION]
.
[USB]
, then press the knob.
[MUSIC DRIVE]
[DRIVE CHANGE]
) is selected automatically and
, then press the knob.
, then press the knob.
5 Repeat step 1 to step 4 to select the following drives.
6 Press and hold to exit.
To return to the previous setting item, press
.
Select control mode
While in iPodUSB source (or iPodBT source), press 5 repeatedly.
[MODE ON]
: Control iPod/iPhone using the iPod/iPhone itself. However, you
can still perform play/pause, file skip, fast-forward or fast-reverse
[MODE OFF]
from this unit.
: Control iPod/iPhone from this unit.
Select a file to play
From a folder or list
• For iPod, applicable only when
[MODE OFF]
is selected.
1 Press .
2 Turn the volume knob to select a folder/list, then press the knob.
3 Turn the volume knob to select a file, then press the knob.
Selected file starts playing.
Quick search
If you have many files, you can search through them quickly.
(applicable only for CD source and USB source)
1 Press .
2 Turn the volume knob to select a folder/list, then press the knob.
3 Turn the volume knob quickly to browse through the list quickly.
4 Turn the volume knob to select a file, then press the knob.
Selected file starts playing.
Skip search
If you have many files in the selected list, you can perform the following to
search for a file by skipping through the list at a rate selected in
(Page 14)
• For iPod, applicable only when
(applicable only for iPodUSB source and iPodBT source)
[MODE OFF]
is selected.
[SKIP SEARCH]
1 Press .
2 Turn the volume knob to select a list, then press the knob.
3 Press S / T to search at a preset skip search ratio.
• Pressing and holding S / T searches at a 10% ratio irregardless of
the
[SKIP SEARCH]
settings.
4 Turn the volume knob to select a file, then press the knob.
Selected file starts playing.
.
ENGLISH
13
Page 22

CD/USB/iPod
[SKIP SEARCH] setting
1 Press the volume knob to enter
2 Turn the volume knob to select
3 Turn the volume knob to select
4 Turn the volume knob to select the skip search ratio, then press the
knob.
[0.5%]
(default)/
[1%]/[5%]/[10%]
The skip search ratio is shown as a percentage of the total files.
5 Press and hold to exit.
Alphabet search
You can search for a file according to the first character.
• For iPod, applicable only when
(applicable only for iPodUSB source and iPodBT source)
1 Press .
2 Turn the volume knob to select a list, then press the knob.
3 Turn the volume knob quickly to enter character search.
4 Turn the volume knob to select the character.
• Select “
5 Press S / T to move to the entry position.
” to search for a character other than A to Z, 0 to 9.
*
• You can enter up to 3 characters.
6 Press the volume knob to start searching.
7 Turn the volume knob to select a file, then press the knob.
Selected file starts playing.
• To return to the root folder/first file/top menu, press 5. (Not applicable for
BT AUDIO source.)
• To return to the previous setting item, press
• To cancel, press and hold
[FUNCTION]
[USB]
, then press the knob.
[SKIP SEARCH]
[MODE OFF]
is selected. (Page 13)
.
.
, then press the knob.
.
Spotify
You can listen to Spotify on iPhone/iPod touch (via Bluetooth or via USB
input terminal) or Android device (via Bluetooth) (page 18).
Preparation:
• Install the latest version of the Spotify application on your device (iPhone/
iPod touch or Android device), then create an account and log in to
Spotify.
• Select
[ON]
for
[SPOTIFY SRC]
Start listening
Start up the Spotify application on your device.
1
2 Connect your device to the USB input terminal.
You can also connect the iPhone/iPod touch or Android device via
Bluetooth. (Page 18)
• Make sure the USB input terminal is not connected to any device when
you connect via Bluetooth.
3 Press B SRC repeatedly to select SPOTIFY (for iPhone/iPod touch) or
SPOTIFYBT (for Android device).
Broadcast starts automatically.
*1 KCA-iP103: Lightning type
*2 Do not leave the cable inside the car when not in use.
in
[SOURCE SELECT]
USB input terminal
KCA-iP103 (optional accessory)*1 or
accessory of the iPhone/iPod touch*2
. (Page6)
iPhone/
iPod touch
14
ENGLISH
Page 23
Spotify
To On the faceplate
Play back/pause
Skip a track
Select thumbs up or thumbs
down *2
Start radio Press and hold 5.
Repeat play*3 Press 4
Random play*3 Press 3 repeatedly *1.
*1 Available for premium account users only.
*2 This feature is available for tracks in Radio only. If thumbs down is selected, the current track is
skipped.
*3 Available for tracks in Playlists only.
Press 6 IW.
Press S*1 / T.
/ 2 .
Press 1
repeatedly.
[REPEAT ALL]/[REPEATONE]
[SHUFFLE ON]/[SHUFFLEOFF]
*1/
[REPEATOFF]
Save favorite song information
While listening to the Radio on Spotify...
Press and hold the volume knob.
“SAVED” appears and the information is stored to “Your Music” or “Your
Library” on your Spotify account.
To unsave, repeat the same procedure.
“REMOVED” appears and the information is removed from “Your Music” or
“Your Library” on your Spotify account.
Search for a song or station
Press .
1
2 Turn the volume knob to select a list type, then press the knob.
The list types displayed differ depending on the information sent from
Spotify.
3 Turn the volume knob to select the desired song or station.
4 Press the volume knob to confirm.
You can browse through the list quickly by turning the volume knob
quickly.
To cancel, press and hold
.
ENGLISH
15
Page 24
AUX Using Other Applications
You can listen to music from a portable audio player via the auxiliary input
jack.
Preparation:
Select
[ON]
for
[BUILT-IN AUX]
in
[SOURCESELECT]
. (Page6)
Start listening
Connect a portable audio player (commercially available).
1
3.5 mm stereo mini plug with “L” shaped
connector (commercially available)
Auxiliary input jack
Portable audio
player
2 Press B SRC repeatedly to select AUX.
3 Turn on the portable audio player and start playback.
Set the name of the external device
While listening to a portable audio player connected to the unit...
1 Press the volume knob to enter
2 Turn the volume knob to select
3 Turn the volume knob to select
[FUNCTION]
.
[SYSTEM]
, then press the knob.
[AUX NAME SET]
, then press the knob.
4 Turn the volume knob to select an item, then press the knob.
[AUX]
(default)/
[DVD]/[PORTABLE]/[GAME]/[VIDEO]/[TV]
5 Press and hold to exit.
To return to the previous setting item, press
.
KENWOOD Remote application
You can control the KENWOOD car receiver from iPhone/iPod touch (via
Bluetooth or via USB input terminal) or Android device (via Bluetooth) using
KENWOOD Remote application.
• For more information, visit <http://www.kenwood.com/cs/ce/>.
Preparation:
Install the latest version of KENWOOD Remote application on your device
before connecting.
Start using KENWOOD Remote application
Start up the KENWOOD Remote application on your device.
1
2 Connect your device.
• For Android device:
Pair the Android device with this unit via Bluetooth. (Page 18)
• For iPhone/iPod touch:
Connect iPhone/iPod touch to the USB input terminal. (Page 12)
(or)
Pair the iPhone/iPod touch with this unit via Bluetooth. (Page 18)
(Make sure the USB input terminal is not connected to any device.)
3 Select the device to use from the
[FUNCTION]
See “Settings to use KENWOOD Remote application” on page 17.
By default,
[IOS]
[ANDROID]
.
is selected. To use iPhone/iPod touch, select
menu.
[YES]
for
16
ENGLISH
Page 25

Using Other Applications
Settings to use KENWOOD Remote application
Press the volume knob to enter
1
[FUNCTION]
.
2 Turn the volume knob to select an item (see the following table), then
press the knob.
3 Repeat step 2 until the desired item is selected or activated.
4 Press and hold to exit.
To return to the previous setting item, press
[REMOTE APP]
[SELECT] Selects the device ([IOS] or [ANDROID]) to use the application.
[IOS]
[ANDROID]
[ANDROID LIST] Selects the Android device to use from the list.
[YES]: Selects iPhone/iPod touch to use the application via Bluetooth or
connected via USB input terminal. ; [NO]: Cancels.
If [IOS] is selected, select iPod BT source (or iPod USB source if your iPhone/
iPod touch is connected via USB input terminal) to activate the application.
• The connectivity of the application will be interrupted or disconnected if:
– You change from iPod BT source to any playback source connected via
the USB input terminal.
– You change from iPod USB source to iPod BT source.
[YES]: Selects Android device to use the application via Bluetooth. ;
[NO]: Cancels.
• Displayed only when [ANDROID] of [SELECT] is set to [YES].
.
Default: [XX]
[STATUS] Shows the status of the selected device.
[IOS CONNECTED]: You are able to use the application using the iPhone/
iPod touch connected via Bluetooth or USB input terminal.
[IOS NOT CONNECTED]: No iOS device is connected to use the application.
[ANDROID CONNECTED]: You are able to use the application using the
Android device connected via Bluetooth.
[ANDROID NOT CONNECTED]: No Android device is connected to use the
application.
Tuneln Radio/Tuneln Radio Pro
While listening to TuneIn Radio or TuneIn Radio Pro, connect the iPhone/
iPod touch to the USB input terminal of the unit so that the unit will output
the sound from these applications.
ENGLISH
17
Page 26

Bluetooth®
• Depending on the Bluetooth version, operating system and the firmware
version of your mobile phone, Bluetooth features may not work with this
unit.
• Be sure to turn on the Bluetooth function of the device to make the
following operations.
• Signal conditions vary depending on the surroundings.
Bluetooth — Connection
Supported Bluetooth profiles
– Hands-Free Profile (HFP)
– Advanced Audio Distribution Profile (A2DP)
– Audio/Video Remote Control Profile (AVRCP)
– Serial Port Profile (SPP)
– Phonebook Access Profile (PBAP)
Supported Bluetooth codecs
– Sub Band Codec (SBC)
– Advanced Audio Coding (AAC)
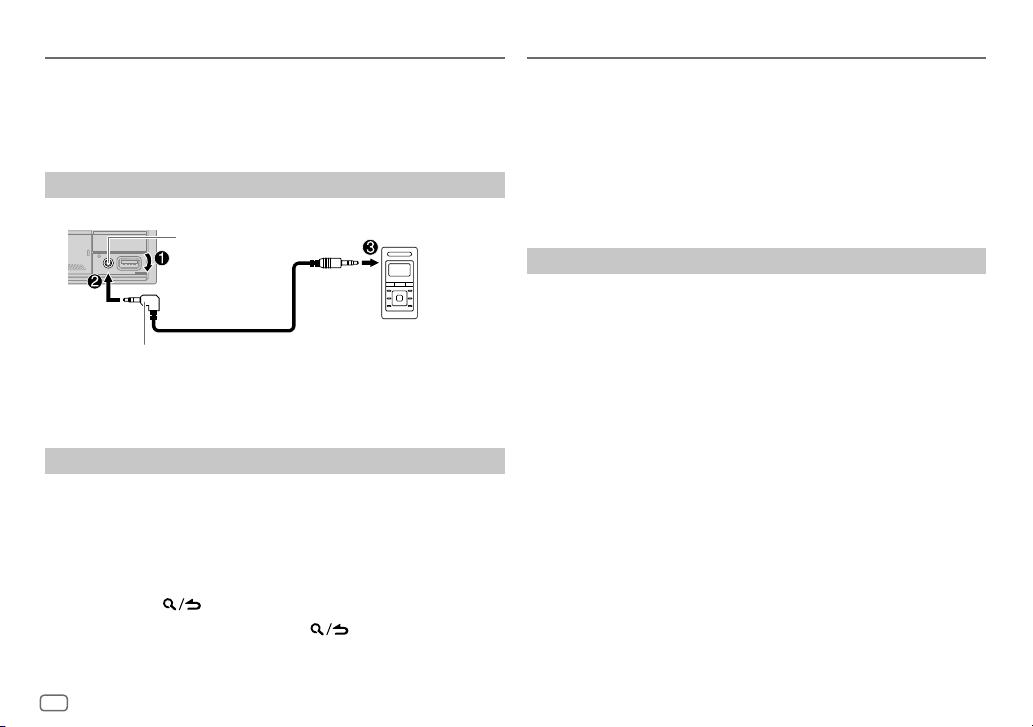
Connect the microphone
Rear panel
Microphone input
jack
microphone angle
Microphone (supplied)
Adjust the
Secure using cord clamps (not
supplied) if necessary.
Pair and connect a Bluetooth device for the first time
Press B SRC to turn on the unit.
1
2 Search and select the name of your receiver (“DPX-7200DAB”) on the
Bluetooth device.
“PAIRING” “PASS XXXXXX” “Device name” “PRESS” “VOLUME
KNOB” appears on the display.
• For some Bluetooth devices, you may need to enter the Personal
Identification Number (PIN) code immediately after searching.
3 Press the volume knob to start pairing.
“PAIRING OK” appears when pairing is completed.
Once pairing is completed, Bluetooth connection is established
automatically.
• “
” and/or “ ” indicator on the display window lights up.
• Depending on the settings made for
strength of the battery and signal of the connected device are shown on
the supplementary display (page 39).
• This unit supports Secure Simple Pairing (SSP).
• Up to five devices can be registered (paired) in total.
• Once the pairing is completed, the Bluetooth device will remain registered
in the unit even if you reset the unit. To delete the paired device, see
[DEVICE DELETE]
• A maximum of two Bluetooth phones and one Bluetooth audio device can
be connected at any time. To connect or disconnect the registered device,
see
[PHONE SELECT]
However, while in BT AUDIO source, you can connect to five Bluetooth
audio devices and switch between these five devices. (Page23)
• Some Bluetooth devices may not automatically connect to the unit after
pairing. Connect the device to the unit manually.
• Refer to the instruction manual of the Bluetooth device for more
information.
on page22.
or
[AUDIO SELECT]
[BATT/SIGNAL]
in
[BT MODE]
(page 20), the
. (Page 22)
18
ENGLISH
Page 27
Bluetooth®
Auto Pairing
When you connect iPhone/iPod touch to the USB input terminal, pairing
request (via Bluetooth) is automatically activated if
[ON]
. (Page 22)
Press the volume knob to pair once you have confirmed the device name.
Bluetooth — Mobile phone
Receive a call
When there is an incoming call:
•
[KEY 1]
zone and
• The unit answers the call automatically if
time. (Page20)
During a call:
•
[LCD DISPLAY]
SELECT]
color.
• If you turn off the unit, Bluetooth is disconnected.
[KEY 2]
zone illuminate in green color and flash.
zone illuminates according to the settings made for
(page30) while
[KEY 1]
zone and
[AUTO PAIRING]
[AUTO ANSWER]
[KEY 2]
is set to a selected
zone illuminate in green
is set to
[COLOR
The following operations may differ or be unavailable depending on the
connected phone.
To On the faceplate
First incoming call...
Answer a call
Reject a call
End a call
While talking on the first incoming call...
Answer another incoming call and
hold the current call
Reject another incoming call
While having two active calls...
End current call and activate held
call
Swap between the current call and
held call
Adjust the phone volume*1
[00]
to
[35]
(Default:
[15]
)
Switch between hands-free and
private talk modes*2
*1 This adjustment will not affect the volume of the other sources.
*2 Operations may vary according to the connected Bluetooth device.
Press
or the volume knob or one
of the number buttons (1 to 6).
Press
Press
Press
Press
Press
Press
Turn the volume knob during a call.
Press 6 IW during a call.
.
.
.
.
.
.
ENGLISH
19
Page 28

Bluetooth®
Improve the voice quality
While talking on the phone...
1 Press the volume knob to enter
2 Turn the volume knob to select an item (see the following table), then
press the knob.
3 Repeat step 2 until the desired item is selected or activated.
4 Press and hold to exit.
To return to the previous setting item, press
[MIC GAIN] [LEVEL –10] to [LEVEL +10] ([LEVEL –4]): The sensitivity of the
[NR LEVEL]
[ECHO CANCEL]
microphone increases as the number increases.
[LEVEL –5] to [LEVEL +5] ([LEVEL 0]): Adjust the noise reduction level
until the least noise is being heard during a phone conversation.
[LEVEL –5] to [LEVEL +5] ([LEVEL 0]): Adjust the echo cancellation
delay time until the least echo is being heard during a phone conversation.
Make the setting for receiving a call
Press to enter Bluetooth mode.
1
2 Turn the volume knob to select an item (see the following table), then
press the knob.
3 Repeat step 2 until the desired item is selected or activated.
4 Press and hold to exit.
To return to the previous setting item, press
[FUNCTION]
.
.
Default: [XX]
.
Default: [XX]
[SETTINGS]
[AUTO ANSWER]
[BATT/SIGNAL]*
* Functionality depends on the type of the phone used.
[1] to [30]: The unit answers incoming call automatically in the selected
time (in seconds). ; [OFF]: Cancels.
[AUTO]: Shows the strength of the battery and signal on the supplementary
display (page 39) when the unit detects a Bluetooth device and the
Bluetooth device is connected. ; [OFF]: Cancels.
Make a call
You can make a call from the call history, phonebook, or dialing the number.
Call by voice is also possible if your mobile phone has the feature.
1 Press to enter Bluetooth mode.
“(First device name)” appears.
• If two Bluetooth phones are connected, press again to switch to the
other phone.
“(Second device name)” appears.
2 Turn the volume knob to select an item (see the following table), then
press the knob.
3 Repeat step 2 until the desired item is selected/activated or follow the
instructions stated on the selected item.
4 Press and hold to exit.
To return to the previous setting item, press
[CALL HISTORY] (Applicable only if the phone supports PBAP.)
1
Press the volume knob to select a name or a phone number.
• “INCOMING,” “OUTGOING” or “MISSED” is shown on the lower part of
the display to indicate the previous call status.
• Press DISP to change the display category (NUMBER or NAME).
• “NO DATA” appears if there is no recorded call history or call number.
2
Press the volume knob to call.
.
20
ENGLISH
Page 29
Bluetooth®
[PHONE BOOK] (Applicable only if the phone supports PBAP.)
[NUMBER DIAL]
[VOICE] Speak the name of the contact you want to call or the voice command to
[LOW]/[MID]/[FULL]: Shows the strength of the battery.*
[NO SIGNAL]/[LOW]/[MID]/[MAX]: Shows the strength of the current received signal.*
* Functionality depends on the type of the phone used.
1
Turn the volume knob quickly to enter alphabet search mode (if the
phonebook contains many contacts).
The first menu (ABCDEFGHIJK) appears.
• To go to the other menu (LMNOPQRSTUV or WXYZ1
2
.
• To select the desired first letter, turn the volume knob or press
S
/ T, then press the knob.
Select “1” to search with numbers and select “
symbols.
2
Turn the volume knob to select a name, then press the knob.
3
Turn the volume knob to select a phone number, then press the knob to
call.
• For using phonebook with this unit, make sure to allow access to or
transfer from your smartphone. Depending on the connected phone, the
process may be different.
• Contacts are categorized as: HOME, OFFICE, MOBILE, OTHER, GENERAL
• This unit can display only non-accent letters. (Accent letters such as “Ú”
are shown as “U”.)
1
Turn the volume knob to select a number (0 to 9) or character ( , #, +).
2
Press S / T to move the entry position.
Repeat step 1 and step 2 until you finish entering the phone number.
3
Press the volume knob to call.
control the phone functions. (See also the following “Make a call using voice
recognition”.)
), press 1 /
” to search with
Make a call using voice recognition
Press and hold VOICE to activate the voice recognition of the
1
connected phone.
2 Speak the name of the contact you want to call or the voice command
to control the phone functions.
• Supported Voice Recognition features vary for each phone. Refer to the
instruction manual of the connected phone for details.
Store a contact in memory
You can store up to 6 contacts into the number buttons (1 to 6).
1 Press to enter Bluetooth mode.
2 Turn the volume knob to select
[NUMBERDIAL]
, then press the knob.
[CALL HISTORY], [PHONE BOOK]
or
3 Turn the volume knob to select a contact or enter a phone number.
If a contact is selected, press the volume knob to show the phone
number.
4 Press and hold one of the number buttons (1 to 6).
“STORED” appears when the contact is stored.
To erase a contact from the preset memory, select
store a blank number in step 3 and proceed to step 4.
[NUMBER DIAL]
in step 2,
Make a call to a registered number
Press to enter Bluetooth mode.
1
2 Press one of the number buttons (1 to 6).
3 Press the volume knob to call.
“NO MEMORY” appears if there is no contact stored.
ENGLISH
21
Page 30
Bluetooth®
Bluetooth mode settings
Press the volume knob to enter
1
[FUNCTION]
.
2 Turn the volume knob to select an item (see the following table), then
press the knob.
3 Repeat step 2 until the desired item is selected/activated or follow the
instructions stated on the selected item.
4 Press and hold to exit.
To return to the previous setting item, press
[BT MODE]
[PHONE SELECT]
[AUDIO SELECT]
[DEVICE DELETE]
[PIN CODE EDIT]
(0000)
[RECONNECT]
[AUTO PAIRING]
Selects the phone or audio device to connect or disconnect.
“
” appears in front of the device name when connected.
“
” appears in front of the current playback audio device.
• You can connect a maximum of two Bluetooth phones and one
Bluetooth audio device at a time.
1
Turn the volume knob to select a device to delete, then press the
knob.
2
Turn the volume knob to select [YES] or [NO], then press the knob.
Changes the PIN code (up to 6 digits).
1
Turn the volume knob to select a number.
2
Press S / T to move the entry position.
Repeat step 1 and step 2 until you finish entering the PIN code.
3
Press the volume knob to confirm.
[ON]: The unit is automatically reconnect when the last connected
Bluetooth device is within the connectable range. ; [OFF]: Cancels.
[ON]: The unit is automatically paired with the supported Bluetooth
device (iPhone/iPod touch) when it is connected through USB input
terminal. Depending on the operating system of the connected device,
this function may not work. ; [OFF]: Cancels.
.
Default: [XX]
[INITIALIZE] [YES]: Initializes all the Bluetooth settings (including stored pairing,
phonebook, and etc.). ; [NO]: Cancels.
Bluetooth test mode
You can check the connectivity of the supported profile between the
Bluetooth device and the unit.
• Make sure there is no Bluetooth device paired.
1 Press and hold .
“PLEASE PAIR YOUR PHONE PIN 0000” appears on the display.
2 Search and select the name of your receiver (“DPX-7200DAB”) on the
Bluetooth device.
3 Operate the Bluetooth device to confirm pairing.
“TESTING” flashes on the display.
The connectivity result (OK or NG) appears after the test.
PAIRING: Pairing status
HF CNT: Hands-Free Profile (HFP) compatibility
AUD CNT: Advanced Audio Distribution Profile (A2DP) compatibility
PB DL: Phonebook Access profile (PBAP) compatibility
To cancel test mode, press and hold B SRC to turn off the unit.
22
ENGLISH
Page 31

Bluetooth®
Bluetooth — Audio
While in BT AUDIO source, you can connect to five Bluetooth audio devices
and switch between these five devices.
Listen to the audio player via Bluetooth
Press B SRC repeatedly to select BTAUDIO.
1
2 Operate the audio player via Bluetooth to start playback.
To On the faceplate
Play back/pause
Select group or folder Press 1
Reverse skip/Forward skip
Reverse/Fast-forward
Repeat play Press 4
Press 6 IW.
/ 2 .
Press S / T.
Press and hold S / T.
repeatedly.
[ALLREPEAT]/[FILEREPEAT]/[GROUP REPEAT]
[REPEATOFF]
*/
To On the faceplate
Random play Press and hold 3 to select
Select a file from a folder/list Refer to “Select a file to play” on page 13.
Switch between connected
Bluetooth audio devices
* Depending on the connected device, some devices may not support this feature.
Operations and display indications may differ according to their availability
on the connected device.
or
[GROUP RANDOM]
•
Press 3 to select
Press 5.
(Pressing the “Play” key on the connected
device itself also causes switching of sound
output from the device.)
*.
[ALLRANDOM]
[RANDOMOFF].
Listen to iPod/iPhone via Bluetooth
You can listen to the songs on the iPod/iPhone via Bluetooth on this unit.
Press B SRC repeatedly to select iPodBT.
• You can operate the iPod/iPhone in the same way as iPod/iPhone via USB
input terminal. (Page12)
• If you plug in an iPod/iPhone to the USB input terminal while listening to
iPodBT source, the source automatically changes to iPodUSB source.
Press B SRC to select iPodBT source if the device is still connected via
Bluetooth.
ENGLISH
23
Page 32

AMAZON ALEXA
Alexa is the cloud-based voice service developed by Amazon. You can ask
Alexa to play music, get weather reports, traffic information, control smart
home devices, shop on Amazon, search the internet, set reminders and
Preparation:
• Create an account at <www.amazon.com>.
• Install the latest version of the Alexa mobile application on your device
(iPhone/iPod touch or Android device), then log in to the application.
• Be sure to enable the internet connection on your smartphone.
Setup for the first time
For Android device
1 Pair your device with this unit via Bluetooth. (Page 18)
2 Start up the Alexa mobile application on your device.
3 Pair this unit to Alexa mobile application.
Perform Option A or Option B.
For iPhone/iPod touch
1 Pair your device with this unit via Bluetooth. (Page 18)
2 Start up the Alexa mobile application on your device.
3 Press on the unit to enter ALEXA source.
• You may also press B SRC repeatedly to select iPod BT source.
4 Pair this unit to Alexa mobile application.
Perform Option A or Option B.
Option A: Direct Link
Access the following URL or scan the QR code with your smartphone:
https://www.kenwood.com/car/alexa
more.
Option B: Manual Pairing
1
Start up the Alexa mobile application and go to the “Devices” tab.
2
Tap the “ + ” icon at the top right corner.
3
Tap “Add Device”.
4
Tap “Automotive Accessory” or “Headphones” from the list of device types.
5
Tap the name of your receiver (“DPX-7200DAB”) and follow the instructions.
Once the setup process is completed, the Alexa mobile application will
establish a connection with this unit.
• The Alexa connection can be disconnected if:
– A2DP profile is disconnected
– Bluetooth is disconnected
– This unit is turned off
– Any other conditions depending on the connected device.
To establish Alexa connection again, reconnect the A2DP profile.
• Alexa connection cannot be established again if you:
– Reinstall Alexa mobile application
– Delete the paired device and perform pairing again (for Android device)
To establish Alexa connection again, perform the setup process again.
• You can check the Alexa connection from the Alexa mobile application.
If the name of this unit appears on the screen of “ALL DEVICES”, you do not
need to perform setup process again.
24
ENGLISH
Page 33

AMAZON ALEXA
Basic operations
Once Alexa connection is established...
1 Press on the unit to speak with Alexa.
The display shows: “ALEXA” “LISTENING...”.
2 Communicate with Alexa via the connected microphone. (Page18)
“THINKING...” appears when Alexa is processing your voice input.
“SPEAKING...” appears while Alexa is responding to your voice input.
“ALEXA” or display information such as playing time, song title, etc.
appears while Alexa is in idle state.
• To return to the previous source before ALEXA, press B SRC.
• To activate Alexa, press
• To cancel current listening state, press
• To cancel current thinking/speaking states and go to listening state,
press
.
• Only one Alexa connection can be connected at one time.
• “DISCONNECTED” appears if the unit is disconnected from Alexa mobile
application or the Bluetooth connection is disconnected.
.
.
Start listening
While in Alexa idle state...
1 Press on the unit to activate Alexa.
The display shows: “LISTENING...”.
2 Communicate with Alexa via the connected microphone. (Page18)
3 During music playback in ALEXA source, you can perform the
following operations:
To On the faceplate
Play back/pause
Reverse skip/Forward skip
During music playback, press
can now start to communicate with Alexa.
Press 6 IW.
Press S / T.
to pause the music and activate Alexa. You
Audio Settings
1 Press the volume knob to enter
2 Turn the volume knob to select an item (see the following table), then
press the knob.
3 Repeat step 2 until the desired item is selected or activated.
4 Press and hold to exit.
To return to the previous setting item, press
[AUDIO CONTROL]
[SUB-W LEVEL]
[EASYEQ]
[LEVEL –50] to [LEVEL +10] ([LEVEL 0]): Adjusts the subwoofer output
level.
Adjusts your own sound settings.
• The settings are stored to [USER] in [PRESET EQ].
• The settings made may affect the current settings of [MANUAL EQ].
[SW]: [LEVEL –50] to [LEVEL +10] (Default: [LEVEL 0]
[BASS]: [LEVEL –9] to [LEVEL +9] [LEVEL 0]
[MID]: [LEVEL –9] to [LEVEL +9] [LEVEL 0]
[TRE]: [LEVEL –9] to [LEVEL +9] [LEVEL 0])
[FUNCTION]
.
.
Default: [XX]
ENGLISH
25
Page 34

Audio Settings
[MANUAL EQ] Adjusts your own sound settings for each source.
[62.5HZ] [LEVEL]
[100HZ]/[160HZ]/
[250HZ]/[400HZ]/
[630HZ]/[1KHZ]/
[1.6KHZ]/[2.5KHZ]/
[4KHZ]/[6.3KHZ]/
[10KHZ]/[16KHZ]
[Q FACTOR]
[PRESET EQ]
[BASS BOOST]
[LOUDNESS]
[SUBWOOFER SET]
• The settings are stored to [USER] in [PRESET EQ].
• The settings made may affect the current settings of [EASYEQ].
[LEVEL–9] to [LEVEL+9] ([LEVEL0]): Adjusts
the level to memorize for each source.
(Before making an adjustment, select the source
you want to adjust.)
[BASS EXTEND]
[LEVEL –9] to [LEVEL +9] ([LEVEL 0]): Adjusts the level to memorize
for each source.
(Before making an adjustment, select the source you want to adjust.)
[1.35]/[1.50]/[2.00]: Adjusts the quality factor.
[NATURAL]/[ROCK]/[POPS]/[EASY]/[TOP40]/[JAZZ]/[POWERFUL]/
[USER]: Selects a preset equalizer suitable to the music genre.
• When the display demonstration is activated ([ON] is selected
initially, page 31), [ROCK] is automatically selected as the
[PRESET EQ].
– If you set [DEMO MODE] to [OFF] (page 31), [NATURAL] is
selected as the default setting for [PRESET EQ].
(Select [USER] to use the settings made in [EASY EQ] or
[MANUALEQ].)
[LEVEL1] to [LEVEL5]: Selects your preferred bass boost level. ;
[OFF]: Cancels.
[LEVEL1]/[LEVEL2]: Selects your preferred low or high frequencies
boost to produce a well-balanced sound at low volume. ;
[OFF]: Cancels.
[ON]: Turns on the subwoofer output. ; [OFF]: Cancels.
[ON]: Turns on the extended bass. ; [OFF]: Cancels.
[FADER] (Not applicable if 3-way crossover is selected.)
[BALANCE]
[VOLUME OFFSET]
[SOUND EFFECT]
[SOUNDRECNSTR]
(Sound
reconstruction)
[SPACE ENHANCE]
[SND REALIZER]
[STAGE EQ]
[DRIVE EQ]
[SPEAKER SIZE]
[X ‘ OVER]
[DTA SETTINGS]
[CAR SETTINGS]
•
[SUB-W LEVEL]
[R15] to [F15] ([0]): Adjusts the front and rear speaker output balance.
[L15] to [R15] ([0]): Adjusts the left and right speaker output balance.
[–15] to [+6] ([0]): Presets the initial volume level of each source by
comparing to the FM volume level.
(Before adjustment, select the source you want to adjust.)
(Not applicable for RADIO source, DIGITAL AUDIO source and AUX
source.)
[ON]: Creates realistic sound by compensating the high-frequency
components and restoring the rise-time of the waveform that are lost in
audio data compression. ; [OFF]: Cancels.
(Not applicable for RADIO source and DIGITAL AUDIO source.)
[SMALL]/[MEDIUM]/[LARGE]: Virtually enhances the sound space. ;
[OFF]: Cancels.
[LEVEL1]/[LEVEL2]/[LEVEL3]: Virtually makes the sound more
realistic. ; [OFF]: Cancels.
[LOW]/[MIDDLE]/[HIGH]: Virtually adjusts the sound position heard
from the speakers. ; [OFF]: Cancels.
[ON]: Boosts the frequency to reduce the noise heard from outside the
car or running noise of the tyres. ; [OFF]: Cancels.
Depending on the crossover type you have selected (see “Change the
crossover type” on page 7), 2-way crossover or 3-way crossover
setting items will be shown. (See “Crossover settings” on page 27.)
By default, 2-way crossover type is selected.
For settings, see “Digital Time Alignment settings” on page 28.
is selectable only when
[SUBWOOFER SET]
is set to
[ON]
.
26
ENGLISH
Page 35

Audio Settings
Crossover settings
Below are the available setting items for 2-way crossover and 3-way
crossover.
SPEAKER SIZE
Selects according to the connected speaker size for optimum performance.
• The frequency and slope settings are automatically set for the crossover of
the selected speaker.
• If
[NONE]
is selected for the following speaker in
setting of the selected speaker is not available.
– 2-way crossover:
– 3-way crossover:
X ‘ OVER (crossover)
•
[FRQ]/[F-HPFFRQ]/[R-HPFFRQ]/[SWLPF FRQ]/[HPFFRQ]/[LPFFRQ]
crossover frequency for the selected speakers (high pass filter or low pass
filter).
If
[THROUGH]
•
[SLOPE]/[F-HPFSLOPE]/[R-HPFSLOPE]/[SWLPF SLOPE]/[HPFSLOPE]/[LPFSLOPE]
Adjusts the crossover slope.
Selectable only if a setting other than
crossover frequency.
•
[SW LPF PHASE]/[PHASE]
with the other speaker output.
•
[GAINLEFT]/[GAINRIGHT]/[F-HPFGAIN]/[R-HPFGAIN]/[SWLPF GAIN]/[GAIN]
the output volume of the selected speaker.
[TWEETER]
of
[WOOFER]
is selected, all signals are sent to the selected speakers.
[FRONT]/[REAR]/[SUBWOOFER]
: Selects the phase of the speaker output to be in line
[THROUGH]
[SPEAKER SIZE]
is selected for the
, the
: Adjusts the
[X ‘ OVER]
:
: Adjusts
2-way crossover setting items
[SPEAKER SIZE]
[FRONT] [SIZE]
[TWEETER]
[REAR]
[SUBWOOFER]
[X ' OVER]
[TWEETER] [FRQ]
[FRONT HPF] [F-HPF FRQ]
[REAR HPF] [R-HPF FRQ]
[8CM]/[10CM]/[12CM]/[13CM]/[16CM]/[17CM]/[18CM]/[4×6]/
[5×7]/[6×8]/[6×9]/[7×10]/[NONE] (not connected)
[16CM]/[20CM]/[25CM]/[30CM]/[38CM OVER]/[NONE]
(not connected)
[GAIN LEFT]
[GAIN RIGHT]
[F-HPF SLOPE]
[F-HPF GAIN]
[R-HPF SLOPE]
[R-HPF GAIN]
[8CM]/[10CM]/[12CM]/[13CM]/[16CM]/[17CM]/
[18CM]/[4×6]/[5×7]/[6×8]/[6×9]/[7×10]
[SMALL]/[MIDDLE]/[LARGE]/[NONE]
(not connected)
[1KHZ]/[1.6KHZ]/[2.5KHZ]/[4KHZ]/[5KHZ]/
[6.3KHZ]/[8KHZ]/[10KHZ]/[12.5KHZ]
[–8] to [0]
[–8] to [0]
[30HZ]/[40HZ]/[50HZ]/[60HZ]/[70HZ]/[80HZ]/
[90HZ]/[100HZ]/[120HZ]/[150HZ]/[180HZ]/
[220HZ]/[250HZ]/[THROUGH]
[–6DB]/[–12DB]/[–18DB]/[–24DB]
[–8] to [0]
Configure the settings for the rear speakers similarly
to the front speakers.
ENGLISH
27
Page 36

Audio Settings
[SUBWOOFER LPF] [SW LPF FRQ] [30HZ]/[40HZ]/[50HZ]/[60HZ]/[70HZ]/[80HZ]/
[SW LPF SLOPE]
[SW LPF PHASE]
[SW LPF GAIN]
•
[SUBWOOFER]
only when
of
[SPEAKER SIZE]
[SUBWOOFERSET]
[90HZ]/[100HZ]/[120HZ]/[150HZ]/[180HZ]/
[220HZ]/[250HZ]/[THROUGH]
[–6DB]/[–12DB]/[–18DB]/[–24DB]
[REVERSE] (180°)/[NORMAL] (0°)
[–8] to [0]
and
is set to
[SUBWOOFER LPF]
[ON]
. (Page26)
of
[X’OVER]
is selectable
3-way crossover setting items
[SPEAKER SIZE]
[TWEETER]
[MID RANGE]
[WOOFER]
[X ' OVER]
[TWEETER] [HPF FRQ]
[SMALL]/[MIDDLE]/[LARGE]
[8CM]/[10CM]/[12CM]/[13CM]/[16CM]/[17CM]/[18CM]/[4×6]/
[5×7]/[6×8]/[6×9]
[16CM]/[20CM]/[25CM]/[30CM]/[38CM OVER]/[NONE]
(not connected)
[1KHZ]/[1.6KHZ]/[2.5KHZ]/[4KHZ]/[5KHZ]/
[6.3KHZ]/[8KHZ]/[10KHZ]/[12.5KHZ]
[SLOPE]
[PHASE]
[GAIN]
[–6DB]/[–12DB]
[REVERSE] (180°)/[NORMAL] (0°)
[–8] to [0]
[MID RANGE] [HPF FRQ] [30HZ]/[40HZ]/[50HZ]/[60HZ]/[70HZ]/[80HZ]/
[HPF SLOPE]
[LPF FRQ]
[LPF SLOPE]
[PHASE]
[GAIN]
[WOOFER] [LPF FRQ]
[SLOPE]
[PHASE]
[GAIN]
•
[WOOFER]
of
[SUBWOOFERSET]
[SPEAKER SIZE]
is set to
[90HZ]/[100HZ]/[120HZ]/[150HZ]/[180HZ]/
[220HZ]/[250HZ]/[THROUGH]
[–6DB]/[–12DB]
[1KHZ]/[1.6KHZ]/[2.5KHZ]/[4KHZ]/[5KHZ]/
[6.3KHZ]/[8KHZ]/[10KHZ]/[12.5KHZ]/[THROUGH]
[–6DB]/[–12DB]
[REVERSE] (180°)/[NORMAL] (0°)
[–8] to [0]
[30HZ]/[40HZ]/[50HZ]/[60HZ]/[70HZ]/[80HZ]/
[90HZ]/[100HZ]/[120HZ]/[150HZ]/[180HZ]/
[220HZ]/[250HZ]/[THROUGH]
[–6DB]/[–12DB]
[REVERSE] (180°)/[NORMAL] (0°)
[–8] to [0]
and
[WOOFER]
of
[X’OVER]
[ON]
. (Page26)
is selectable only when
Digital Time Alignment settings
Digital Time Alignment sets the delay time of the speaker output to create a
more suitable environment for your vehicle.
• For more information, see “Determining the delay time automatically” on
page 29.
28
ENGLISH
Page 37

Audio Settings
[DTA SETTINGS]
[POSITION]
[DISTANCE]
[GAIN]
[DTA RESET]
[CAR SETTINGS] Identify your car type and rear speaker location in order to make the
[CAR TYPE]
[R-SP LOCATION]
• Before making an adjustment for
select the speaker you want to adjust:
When 2-way crossover is selected:
[FRONT LEFT]/[FRONT RIGHT]/[REAR LEFT]/[REAR RIGHT]/[SUBWOOFER]
– You can only select
other than
(Page27)
Selects your listening position (reference point).
[ALL]: Not compensating ; [FRONT RIGHT]: Front right seat ;
[FRONT LEFT]: Front left seat ; [FRONT ALL]: Front seats
• [FRONT ALL] is displayed only when [2-WAY X’OVER] is selected.
(Page 7)
[0CM] to [610CM]: Fine adjust the distance to compensate.
(Before making an adjustment, select the speaker you want to adjust.)
[–8DB] to [0DB]: Fine adjust the output volume of the selected speaker.
(Before making an adjustment, select the speaker you want to adjust.)
[YES]: Resets the settings ([DISTANCE] and [GAIN]) of the selected
[POSITION] to default. ; [NO]: Cancels.
adjustment for [DTA SETTINGS].
[COMPACT]/[FULL SIZE CAR]/[WAGON]/[MINIVAN]/[SUV]/
[MINIVAN(LONG)]: Selects the type of vehicle. ;
[OFF]: Not compensating.
Selects the location of the rear speakers in your vehicle to calculate the
furthest distance from the listening position selected (reference point).
• [DOOR]/[REAR DECK]: Selectable only when [CAR TYPE] is selected
as [OFF], [COMPACT], [FULL SIZE CAR], [WAGON] or [SUV].
• [2ND ROW]/[3RD ROW]: Selectable only when [CAR TYPE] is
selected as [MINIVAN] or [MINIVAN(LONG)].
[DISTANCE]
and
[GAIN]
of
[DTA SETTINGS]
[REAR LEFT], [REAR RIGHT]
[NONE]
is selected for
[REAR]
and
and
[SUBWOOFER]
[SUBWOOFER]
of
if a setting
[SPEAKER SIZE]
When 3-way crossover is selected:
[TWEETER LEFT]/[TWEETER RIGHT]/[MID LEFT]/[MID RIGHT]/[WOOFER]
– You can only select
[WOOFER]
•
[R-SP LOCATION]
– 2-way crossover is selected. (Page7)
– A setting other than
Determining the delay time automatically
,
.
of
(Page27)
[WOOFER]
[SPEAKER SIZE]
of
[CAR SETTINGS]
if a setting other than
. (Page28)
is selectable only if:
[NONE]
is selected for
If you specify the distance from the currently set
listening position to every speaker, the delay time will
be automatically calculated.
1
Set [POSITION] and determine the listening
position as the reference point (the reference point
for [FRONT ALL] will be the center between the
right and left in the front seats).
2
Measure the distances from the reference point to
the speakers.
3
Calculate the distance between the furthest speaker
(subwoofer on the illustration) and other speakers.
4
Sets the [DISTANCE] calculated in step 3 for
individual speakers.
5
Adjusts [GAIN] for individual speakers.
Example: When [FRONT ALL] is selected as the
listening position.
[REAR]
[NONE]
of
[SPEAKER SIZE]
is selected for
.
ENGLISH
29
Page 38

Display Settings
Zone identification for color settings and brightness settings
Set the dimmer
Press and hold DISP to turn on or off the dimmer.
• Once you press and hold this button,
Change the display settings
Press the volume knob to enter
1
2 Turn the volume knob to select an item (see the following table), then
press the knob.
3 Repeat step 2 until the desired item is selected/activated or follow the
instructions stated on the selected item.
4 Press and hold to exit.
To return to the previous setting item, press
[DIMMER]
[FUNCTION]
setting will be overwritten.
.
.
[DISPLAY]
[COLOR SELECT]
[DIMMER]
[BRIGHTNESS] Sets the brightness for day and night separately.
[TEXT SCROLL]
Selects illumination colors for [ALLZONE], [LCDDISPLAY], [KEY1] and
[KEY2] separately.
1
Select a zone. (See the illustration on left column.)
2
Select a preset color for the selected zone. (Page 31)
Default: [VARIABLE SCAN]
To make your own color, select [CUSTOM R/G/B]. The color you have made
will be stored in [CUSTOM R/G/B].
1
Press the volume knob to enter the detailed color adjustment.
2
Press S/T to select the color ([R]/[G]/[B]) to adjust.
3
Turn the volume knob to adjust the level ([0] to [9]), then press the knob.
Dims the illumination.
[ON]: Dimmer is turned on.
[OFF]: Dimmer is turned off.
[DIMMER TIME]: Set the time to turn on dimmer and to turn off dimmer.
1
Turn the volume knob to adjust the [ON] time, then press the knob.
2
Turn the volume knob to adjust the [OFF] time, then press the knob.
Default: [ON]: [18:00] ; [OFF]: [6:00]
1
[DAY]/[NIGHT]: Select day or night.
2
Select a zone. (See the illustration on left column.)
3
[LEVEL 00] to [LEVEL 31]: Set the brightness level.
[ONCE]: Scrolls the display information once. ; [AUTO]: Repeats scrolling at
5-second intervals. ; [OFF]: Cancels.
•
Not applicable to Dynamic Label display information (page 39) while in
DIGITAL AUDIO source.
Default: [XX]
30
ENGLISH
Page 39

Display Settings
Installation/Connection
[CLOCK]
[CLOCK DISPLAY]
[DEMO MODE]
Preset color:
[INITIAL COLOR]/[VARIABLE SCAN]/[CUSTOM R/G/B]/[RED1]/[RED2]/[RED3]/[PURPLE1]
[PURPLE2]/[PURPLE3]/[PURPLE4]/[BLUE1]/[BLUE2]/[BLUE3]/[SKYBLUE1]/[SKYBLUE2]
[LIGHTBLUE]/[AQUA1]/[AQUA2]/[GREEN1]/[GREEN2]/[GREEN3]/[YELLOWGREEN1]
[YELLOWGREEN2]/[YELLOW]/[ORANGE1]/[ORANGE2]/[ORANGERED]
[ON]: The clock time is shown on the display even when the unit is turned
off. ; [OFF]: Cancels.
[ON]: Activates the display demonstration automatically if no operation is
done for about 15 seconds. ; [OFF]: Deactivates.
/
This section is for the professional installer.
For safety’s sake, leave wiring and mounting to professionals. Consult the
car audio dealer.
WARNING
• The unit can only be used with a 12V DC power supply, negative ground.
• Disconnect the battery’s negative terminal before wiring and mounting.
• Do not connect Battery wire (yellow) and Ignition wire (red) to the car
/
chassis or Ground wire (black) to prevent a short circuit.
/
• To prevent short circuit:
– Insulate unconnected wires with vinyl tape.
– Be sure to ground this unit to the car’s chassis again after installation.
– Secure the wires with cable clamps and wrap vinyl tape around the wires
that comes into contact with metal parts to protect the wires.
CAUTION
• Install this unit in the console of your vehicle. Do not touch the metal parts
of this unit during and shortly after use of the unit. Metal parts such as the
heat sink and enclosure become hot.
• Do not connect the
(black), or connect them in parallel.
• Mount the unit at an angle of less than 30°.
• If your vehicle wiring harness does not have the ignition terminal, connect
Ignition wire (red) to the terminal on the vehicle’s fuse box which provides
12 V DC power supply and is turned on and off by the ignition key.
• Keep all cables away from heat dissipate metal parts.
• After the unit is installed, check whether the brake lamps, blinkers, wipers,
etc. on the car are working properly.
• If the fuse blows, first make sure the wires are not touching car’s chassis,
then replace the old fuse with one that has the same rating.
wires of speakers to the car chassis or Ground wire
ENGLISH
31
Page 40

Installation/Connection
Part list for installation
(A) Mounting sleeve ( ×1 ) (B) Trim plate ( ×1 )
(C) Wiring harness ( ×1 ) (D) Extraction key ( ×2 )
Basic procedure
Remove the key from the ignition switch, then disconnect the
1
terminal of the car battery.
2 Install the DAB antenna.
See “Installing the DAB antenna” on page 35.
3 Connect the wires properly.
See “Wiring connection” on page34.
4 Install the unit to your car.
See the following “Installing the unit (in-dash mounting)”.
5 Connect the terminal of the car battery.
6 Press B SRC to turn on the power.
7 Reset the unit. (Page4)
Installing the unit (in-dash mounting)
Do the required wiring.
(Page 34)
Bend the appropriate tabs to hold the
mounting sleeve firmly in place.
Dashboard of your car
Installing the unit (without mounting sleeve)
1 Remove the mounting sleeve and trim plate from the unit before
installing.
2 Align the holes in the unit (on both sides) with the vehicle mounting
bracket and secure the unit with screws (commercially available).
Use only the specified screws. Using wrong screws might damage the
unit.
32
ENGLISH
Page 41

Installation/Connection
Removing the unit
1 Fit the catch pin on the extraction keys into the holes on both sides of
the trim plate, then pull it out.
2 Insert the extraction keys deeply into the slots on each side, then
follow the arrows as shown on the illustration.
Connect external components
No Part
Microphone input jack (Page 18)
1
Output terminals (See the following “Connect external amplifiers via output
2
terminals”.)
DAB antenna jack (Page 7, 37)
3
Connect external amplifiers via output terminals
When connecting an external amplifier to the output terminals of this unit,
securely connect the amplifier ground wire to the car chassis to prevent
damage to the unit.
Output terminals 2-way crossover 3-way crossover
REAR: Rear output Tweeter output
FRONT: Front output Mid Range output
SW: Subwoofer output Woofer output
ENGLISH
33
Page 42

Installation/Connection
Wiring connection
If your car does not have an ISO terminal:
We recommend installing the unit with a commercially available custom
wiring harness specific for your car and leave this job to professionals for
your safety. Consult your car audio dealer.
Connecting the ISO connectors on some VW/Audi or Opel
(Vauxhall) automobiles
You may need to modify the wiring of the supplied wiring harness as
illustrated below.
Fuse (10 A)
Antenna terminal
A7 (Red)
A4 (Yellow)
Default wiring
Pin Color and function (for ISO connectors)
A4 Yellow : Battery
A5 Blue/White*1 : Power control
A7 Red : Ignition (ACC)
A8 Black : Earth (ground) connection
B1
B2
B3
B4
B5
B6
B7
B8
34
]
Purple
Purple/black
]
Gray
Gray/black
]
White
White/black
Green
]
Green/black
ENGLISH
: Rear speaker (right)
For 3-way crossover: Tweeter (right)
[
: Front speaker (right)
For 3-way crossover: Mid range speaker (right)
[
: Front speaker (left)
For 3-way crossover: Mid range speaker (left)
[
: Rear speaker (left)
For 3-way crossover: Tweeter (left)
[
Ignition wire (Red)
Battery wire (Yellow)
Yellow (Battery wire)
If no connections are made, do not let the wire come out from the tab.
UnitVehicle
Red (Ignition wire)
Red (A7)
Light blue/yellow
(Steering remote control
wire)
Blue/White*2
(Power control wire/
Antenna control wire)
STEERING WHEEL
REMOTE INPUT
REMOTE CONT
ANT CONT
P. CONT
To the steering wheel remote control
adapter
To the power control terminal when using
the optional power amplifier or to the
antenna control terminal in the vehicle
Yellow (A4)
Brown
(Mute control wire)
ISO connectors
To connect the Kenwood navigation
MUTE
system, refer your navigation manual
NOTE: Total output for Blue/White wire
(*1) + (*2) is 12 V
350 mA.
Page 43

Installation/Connection
Installing the DAB antenna
Connect the supplied DAB antenna to the DAB antenna jack. (Page 33)
CAUTION
• The film antenna (E) is exclusively for use inside the vehicle.
• Do not install at the following locations:
– where it may block the driver’s view.
– where it may obstruct the operation of safety devices such as air bags.
– on movable glass surfaces such as the rear hatch.
– at side of vehicle (e.g. door, front quarter window).
– on rear window.
• Signal strength will weaken when installed at the following locations:
– on IR reflecting glass or locations covered with mirror type glass film.
– where it overlaps with genuine radio antenna (pattern).
– where it overlaps with window heating wires.
– on glass that blocks radio signals (e.g. IR reflecting glass, thermal
insulation glass).
• Poor reception may occur:
– due to noise when windscreen wiper, air conditioner, or motor is turned
on.
– depending on the direction of the broadcast station with respect to the
vehicle (antenna).
• Thoroughly wipe oil and dirt from the pasting surface with the supplied
cleaner (H).
• Do not bend or damage the film antenna (E).
• It may not be possible to install on certain vehicles.
• Check the cable routing of the film antenna (E) and amplifier unit (F)
before pasting.
• Do not apply any glass cleaner after pasting the film antenna (E).
Part list for installation
(E) Film antenna (×1) (F) Amplifier unit (cable with
booster, 3.5 m) (×1)
(G) Cable clamper
(×3)
(H) Cleaner (×1)
Determine the antenna installation position
• The direction of the film antenna (E) changes depending on whether the film antenna (E) is
installed on the right side or left side.
• Be sure to check the installation location of film antenna (E) before installing. Film antenna
cannot be re-pasted.
• Separate from other antennas by at least 100 mm.
• Do not paste the amplifier unit (F) on the ceramic line (black part) around the front glass.
Because there is not enough adhesion.
Installing the antenna on the left side Installing the antenna on the right side
Ceramic line (black part)
(F)
(G)
(G)
(F)
Earth sheet*
Earth sheet*
* Paste the earth sheet of the amplifier unit (F) on the metal part of the front pillar.
ENGLISH
35
Page 44

Installation/Connection
CAUTION
When installing the antenna cable inside the front pillar with the air bag installed
• The front pillar cover is secured with a special clip
which may need to be replaced when it is removed.
Contact your vehicle dealer for details on removing
the front pillar cover and availability of replacement
parts.
• Install the amplifier unit (F) above the air bag so that
it does not obstruct the operation of the air bag.
Installation overview
The antenna should be installed
on the passenger side for safety.
Front pillar
Air bag
Antenna installation
1
Remove the front pillar cover of your car.
Front pillar
Clip
2
Clean the windscreen with the supplied cleaner (H).
– Wait until the glass surface is completely dry before proceeding.
– Warm the surface of the windscreen with defroster if it is cold (during winter).
3
Remove the separator (tag 1) of film antenna (E) horizontally and paste the antenna on
the windscreen.
Separator (tag 1)
Do not touch the pasting surface (adhesive side) of the film antenna (E).
36
ENGLISH
Page 45

Installation/Connection
4
Rub the film antenna gently onto the windscreen in the
direction of the arrow shown to allow it to stick firmly.
5
Remove the separator (tag 2) of film antenna (E)
vertically.
Separator (tag 2)
6
Set the position of the protrusion of the amplifier unit
(F) with the
Do not touch the lead terminal or the pasting surface
(adhesive side) of the amplifier unit (F).
• When installing the antenna on the right side
Lead terminal of the
film antenna (E)
• When installing the antenna on the left side
K
mark on the film antenna (E) and paste.
Earth sheet
Set the position of
the protrusion with
K
Lead contact of the amplifier unit
(metal part)
Earth sheet
mark
7
Remove the film covering the earth sheet and paste the
earth sheet on the metal part of the vehicle.
Provide sufficient leeway for the earth sheet so that it does
not interfere with the interior parts (front pillar cover). Also
take care that the interior parts do not interfere with the
amplifier unit (F).
Windscreen
Earth sheet
Front pillar cover
8
Wire the antenna cables.
Use cable clamper (G) to secure the antenna to the pillar at
several positions.
9
Attach the front pillar cover back to its original position.
Be sure not to damage the earth sheet and amplifier unit (F)
when covering.
10
Connect the amplifier unit (F) to the DAB antenna jack
on the rear of the unit.
Note:
Make sure
[FUNCTION]
[ON]
[DAB ANT POWER]
menu in standby mode. (Page 6)
is selected initially.
is set to
[ON]
on the
ENGLISH
37
Page 46

References
Maintenance
Cleaning the unit
Wipe off dirt on the faceplate with a dry silicone or soft cloth.
Handling discs
• Do not touch the recording surface of the disc.
• Do not stick tape etc. on the disc, or use a disc with tape stuck on it.
• Do not use any accessories for the disc.
• Clean from the center of the disc and move outward.
• Clean the disc with a dry silicone or soft cloth. Do not use any solvents.
• When removing a disc from this unit, pull it out horizontally.
• Remove burrs from the center hole and disc edge before inserting a disc.
More information
For: – Latest firmware updates and latest compatible item list
– KENWOOD original application
– Any other latest information
Visit <www.kenwood.com/cs/ce/>.
General
• This unit can only play the following CDs:
• For detailed information and notes about the playable audio files, visit
<www.kenwood.com/cs/ce/audiofile/>.
Playable files
• Playable audio file:
For disc: MP3 (.mp3), WMA (.wma), AAC (.aac)
For USB mass storage class device:
MP3 (.mp3), WMA (.wma), AAC (.aac), AAC (.m4a), WAV (.wav), FLAC (.flac)
• Playable disc media: CD-R/CD-RW/CD-ROM
• Playable disc file format: ISO 9660 Level 1/2, Joliet, Long file name
• Playable USB device file system: FAT12, FAT16, FAT32
Even when audio files comply with the standards listed above, playback may be impossible
depending on the types or conditions of media or devices.
The AAC (.m4a) file in a CD encoded by iTunes cannot be played on this unit.
Unplayable discs
• Discs that are not round.
• Discs with coloring on the recording surface or discs that are dirty.
• Recordable/ReWritable discs that have not been finalized.
• 8 cm CD. Attempting to insert using an adapter may cause malfunction.
About USB devices
• You cannot connect a USB device via a USB hub.
• Connecting a cable whose total length is longer than 5 m may result in abnormal playback.
• This unit cannot recognize a USB device whose rating is other than 5 V and exceeds 1.5 A.
About iPod/iPhone
• Made for
– iPod touch (6th generation)
– iPhone 5S, 6, 6 Plus, 6S, 6S Plus, SE, 7, 7 Plus, 8, 8 Plus, X, XS, XS MAX, XR (iOS 12.1 or later)
• It is not possible to browse video files on the “Videos” menu in [MODE OFF].
• The song order displayed on the selection menu of this unit may differ from that of the iPod/
iPhone.
• You cannot operate iPod if “KENWOOD” or “
• Depending on the version of the operating system of the iPod/iPhone, some functions may not
operate on this unit.
” is displayed on iPod.
38
ENGLISH
Page 47

References
About Spotify
• Spotify application supports:
– iPhone 5S, 6, 6 Plus, 6S, 6S Plus, SE, 7, 7 Plus, 8, 8 Plus, X, XS, XS MAX, XR (iOS 12.1 or later)
– iPod touch (6th generation)
– Android OS 4.0.3 or above
• Spotify is a third party service, therefore the specifications are subject to change without prior
notice. Accordingly, compatibility may be impaired or some or all of the services may become
unavailable.
• Some functions of Spotify cannot be operated from this unit.
• For issues using the application, please contact Spotify at <www.spotify.com>.
About AMAZON ALEXA
• Alexa is a third party service, therefore the specifications are subject to change without prior
notice. Accordingly, compatibility may be impaired or some or all of the services may become
unavailable.
Change the display information
Each time you press DISP, the display information changes.
• If the information is unavailable or not recorded, “NO TEXT”, “NO INFO”, or other information
(eg. station name) appears or display will be blank.
Clock time
Main display
Supplementary display
Source name Display information: Main display (supplementary)
STANDBY Source name (Date)
DIGITAL AUDIO Service label (Ensemble label)
RADIO Frequency (Date)
CD/USB For CD-DA:
Title (Artist) Title (Date) Next program (EPG) (Date) Signal level
(Date)
back to the beginning
For FM Radio Data System stations only:
Station name/Program type (Date)
(Radio text+)
back to the beginning
Track title (Artist)
(Date)
For MP3/WMA/AAC/WAV/FLAC files:
Song title (Artist)
(Folder name)
beginning
Song title (Artist) Song title (Date) Frequency (Date)
back to the beginning
File name (Date) Playing time (Date) back to the
Service label (Date) Dynamic label (Date)
Radio text (Date) Radio text+
Track title (Disc title) Track title (Date) Playing time
Song title (Album title) Song title (Date) File name
ENGLISH
39
Page 48

Troubleshooting References
Source name Display information: Main display (supplementary)
iPod USB/iPod BT When [MODE OFF] is selected (page 13):
SPOTIFY/
SPOTIFY BT
BT AUDIO/
ALEXA
AUX Source name (Date)
Song title (Artist)
time (Date)
Context title (Date)
title (Date)
Song title (Artist)
time (Date)
back to the beginning
Playing Time (Date) back to the beginning
back to the beginning
Song title (Album title) Song title (Date) Playing
Song title (Artist) Song title (Album title) Song
Song title (Album title) Song title (Date) Playing
Symptom Remedy
Sound cannot be heard. • Adjust the volume to the optimum level.
“MISWIRING CHECK WIRING
THEN PWR ON” appears.
“PROTECTING SEND
SERVICE” appears.
Source cannot be selected. Check the [SOURCESELECT] setting. (Page 6)
General
The unit does not work
at all.
Correct characters are not
displayed.
DAB reception is poor. Make sure [ON] is selected for [DAB ANT POWER].
“DAB ANT ERR” Check the DAB antenna. If a passive antenna (without
Digital Radio
“RELATED SERV FOUND” • Press the volume knob to activate Soft-Link. (Page 9)
• Radio reception is poor.
• Static noise while
Radio
Analog
listening to the radio.
• Check the cords and connections.
Turn the power off, then check to be sure the terminals of
the speaker wires are insulated properly. Turn the power
on again.
Send the unit to the nearest service center.
Reset the unit. (Page 4)
• This unit can only display uppercase letters, numbers,
and a limited number of symbols.
• Depending on the display language you have selected
(page 6), some characters may not be displayed
correctly.
(Page 6)
a booster) is used, set [DAB ANT POWER] to [OFF].
(Page 6)
• Press
Connect the antenna firmly.
to cancel.
40
ENGLISH
Page 49

Troubleshooting
Symptom Remedy
Disc cannot be ejected.
Noise is generated. Skip to another track or change the disc.
“PLEASE EJECT” appears. Reset the unit (page 4). If this does not solve the
Playback order is not as
intended.
Elapsed playing time is not
correct.
“READING” keeps flashing. • Do not use too many hierarchical levels and folders.
“UNSUPPORTED DEVICE”
appears.
CD/USB/iPod
“UNRESPONSIVE DEVICE”
appears.
“USB HUB IS NOT
SUPPORTED” appears.
• The source does not
change to “USB” when
you connect a USB device
while listening to another
source.
• “USB ERROR” appears.
The iPod/iPhone does not
turn on or does not work.
Press and hold
to drop the disc when it is ejected. If this does not solve
the problem, reset the unit (page 4).
problem, consult your nearest service center.
The playback order is determined by the order in which
files were recorded (disc) or the file name (USB).
This depends on the recording process earlier (disc/USB).
• Reload the disc or reattach the device (USB/iPod/
iPhone).
• Check whether the connected USB device is compatible
with this unit and ensure the file systems are in
supported formats. (Page 38)
• Reattach the USB device.
Make sure the USB device is not malfunction and reattach
the USB device.
This unit cannot support a USB device connected via a
USB hub.
The USB port is drawing more power than the design
limit. Turn the power off and unplug the USB device.
Then, turn on the power and reattach the USB device.
If this does not solve the problem, turn the power off and
on (or reset the unit) before replacing with another USB
device.
• Check the connection between this unit and iPod/iPhone.
• Disconnect and reset the iPod/iPhone using hard reset.
to forcibly eject the disc. Be careful not
Symptom Remedy
“LOADING” appears when
you enter search mode by
pressing
“NO DISC” Insert a playable disc into the loading slot.
“TOC ERROR” Make sure the disc is clean and inserted properly.
“NA FILE” Make sure the media (disc/USB) contain supported audio
“COPY PRO” A copy-protected file is played (disc/USB).
“NO DEVICE” Connect a device (USB/iPod/iPhone), and change the
CD/USB/iPod
“NO MUSIC” Connect a device (USB/iPod/iPhone) that contains
“iPod ERROR” • Reconnect the iPod.
“MEMORY FULL” You have reached the maximum storage limit of your
“DISCONNECTED” USB is disconnected from the head unit. Please make
“CONNECTING” • Connected via USB input terminal: The device is
Spotify
“CHECK APP” The Spotify application is not connected properly or user
.
This unit is still preparing the iPod/iPhone music list. It
may take some time to load, try again later.
files. (Page 38)
source to USB or iPod USB again.
playable audio files.
• Reset the iPod.
iPod/iPhone.
sure the device is connected properly through USB.
connecting to the head unit. Please wait.
• Connected via Bluetooth: The Bluetooth is disconnected.
Please check Bluetooth connection and make sure both
the device and unit are paired and connected.
is not login. End the Spotify application and restart. Then,
log in to your Spotify account.
ENGLISH
41
Page 50

Troubleshooting
Symptom Remedy
No Bluetooth device is
detected.
Bluetooth pairing cannot
be made.
Echo or noise is heard during
a phone conversation.
Phone sound quality is poor. • Reduce the distance between the unit and the Bluetooth
Voice calling method is not
successful.
Bluetooth®
Sound is being interrupted or
skipped during playback of a
Bluetooth audio player.
The connected Bluetooth
audio player cannot be
controlled.
“NOT SUPPORT” The connected phone does not support Voice Recognition
• Search from the Bluetooth device again.
• Reset the unit. (Page 4)
• Make sure you have entered the same PIN code to both
the unit and Bluetooth device.
• Delete pairing information from both the unit and
the Bluetooth device, then perform pairing again.
(Page 18)
• Adjust the microphone unit’s position. (Page 18)
• Check the [ECHO CANCEL] setting. (Page 20)
device.
• Move the car to a place where you can get a better signal
reception.
• Use voice calling method in a more quiet environment.
• Reduce the distance from the microphone when you
speak the name.
• Make sure the same voice as the registered voice tag is
used.
• Reduce the distance between the unit and the Bluetooth
audio player.
• Turn off, then turn on the unit and try to connect again.
• Other Bluetooth devices might be trying to connect to the
unit.
• Check whether the connected Bluetooth audio player
supports Audio/Video Remote Control Profile (AVRCP).
(Refer to the instructions of your audio player.)
• Disconnect and connect the Bluetooth player again.
feature or phonebook transfer.
Symptom Remedy
“NO ENTRY”/“NO PAIR” There is no registered device connected/found via
“ERROR” Try the operation again. If “ERROR” appears again, check
“NO INFO”/“NO DATA” Bluetooth device cannot get the contact information.
“HF ERROR XX”/
“BT ERROR”
Bluetooth®
“SWITCHING NG” The connected phones might not support phone
The Bluetooth connection
between the Bluetooth
device and the unit is
unstable.
No response from Alexa after
the voice input.
Wrong response from Alexa. Alexa misunderstood what was said or did not catch
“DISCONNECTED” Be sure to connect your smartphone to the unit via
Not able to connect or
reconnect to Alexa mobile
AMAZON ALEXA
application.
Bluetooth.
if the device supports the function you have tried.
Reset the unit and try the operation again. If this does not
solve the problem, consult your nearest service center.
switching feature.
Delete the unused registered Bluetooth device from the
unit. (Page 22)
Amazon cloud was unable to analyze the voice input.
the entire request or sentence spoken. Please try again.
(Page 24)
Bluetooth. (Page 18)
• Be sure the audio device is connected via Bluetooth.
Select the audio device from [AUDIO SELECT] in
[BTMODE]. (Page 22)
• Perform the one-time setup process again. See “Setup for
the first time” on page 24.
• Turn off, then turn on the unit and try to connect again.
• For iOS device, make sure ALEXA source or iPod BT source
is selected.
42
ENGLISH
Page 51

Specifications
DAB Frequency Range Band III:
Sensitivity –100 dBm
Signal-to-Noise Ratio 90 dB
Antenna Connector Type SMB
Digital radio
Antenna Output Voltage DC 12 V
Antenna Maximum Current < 100 mA
FM Frequency Range 87.5 MHz — 108.0 MHz (50 kHz step)
Usable Sensitivity
(S/N = 30 dB)
Quieting Sensitivity
(DIN S/N = 46 dB)
Frequency Response (±3 dB) 30 Hz — 15 kHz
Signal-to-Noise Ratio (MONO) 68.0 dB
Stereo Separation (1 kHz) 40 dB
Analog radio
MW
Frequency Range 531 kHz — 1 611 kHz (9 kHz step)
(AM)
Usable Sensitivity
(S/N = 20 dB)
LW
Frequency Range 153 kHz — 279 kHz (9 kHz step)
(AM)
Usable Sensitivity
(S/N = 20 dB)
174.928 MHz — 239.200 MHz
6.2 dBf
(0.56 μV/75 Ω)
15.2 dBf
(1.58 μV/75 Ω)
28.5 μV
45 μV
Laser Diode GaAIAs
Digital Filter (D/A) 8 times over sampling
Spindle Speed 500 rpm — 200 rpm (CLV)
Wow & Flutter Below measurable limit
Frequency Response (±1 dB) 20 Hz — 20 kHz
Total Harmonic Distortion (1 kHz) 0.01 %
Signal-to-Noise Ratio (1 kHz) 96 dB
CD player
Dynamic Range 91 dB
Channel Separation 84 dB
MP3 Decode Compliant with MPEG-1/2 Audio Layer-3
WMA Decode Compliant with Windows Media Audio
AAC Decode AAC-LC “.aac” files
USB Standard USB 1.1, USB 2.0 (High speed)
File System FAT12/16/32
Maximum Supply Current DC 5 V
MP3 Decode Compliant with MPEG-1/2 Audio Layer-3
USB
WMA Decode Compliant with Windows Media Audio
AAC Decode AAC-LC “.aac”, “.m4a” files
WAV Decode Linear-PCM
FLAC Decode FLAC file (Up to 96 kHz/24 bit)
1.5 A
ENGLISH
43
Page 52

Specifications
Frequency Response (±3 dB) 20 Hz — 20 kHz
Input Maximum Voltage 1 000 mV
Auxiliary
Input Impedance 30 kΩ
Version Bluetooth 4.2
Frequency Range 2.402 GHz — 2.480 GHz
RF Output Power (E.I.R.P.) +4 dBm (MAX), Power Class 2
Maximum Communication Range Line of sight approx. 10 m (32.8 ft)
Profile HFP 1.7.1 (Hands-Free Profile)
Bluetooth
Maximum Output Power 50 W × 4
Full Bandwidth Power
Audio
(at less than 1 % THD)
Speaker Impedance 4 Ω — 8 Ω
A2DP (Advanced Audio Distribution Profile)
AVRCP 1.6.1 (Audio/Video Remote Control Profile)
PBAP (Phonebook Access Profile)
SPP (Serial Port Profile)
22 W × 4
Tone Action Band 1: 62.5 Hz ±9 dB
Audio
Preout Level/Load 2 500 mV/10 kΩ
Preout Impedance ≤ 600 Ω
Operating Voltage 12 V DC car battery
Installation Size (W × H × D) 182 mm × 111 mm × 156 mm
Net Weight
General
(includes Trimplate and Mounting
Sleeve)
Subject to change without notice.
Band 2: 100 Hz ±9 dB
Band 3: 160 Hz ±9 dB
Band 4: 250 Hz ±9 dB
Band 5: 400 Hz ±9 dB
Band 6: 630 Hz ±9 dB
Band 7: 1 kHz ±9 dB
Band 8: 1.6 kHz ±9 dB
Band 9: 2.5 kHz ±9 dB
Band 10: 4 kHz ±9 dB
Band 11: 6.3 kHz ±9 dB
Band 12: 10 kHz ±9 dB
Band 13: 16 kHz ±9 dB
1.6 kg
44
ENGLISH
Page 53

Page 54

Table des matieres
Avant l’utilisation .................................................................................... 3
Fonctionnement de base ....................................................................... 4
Prise en main ............................................................................................ 5
1 Sélectionne la langue d’affichage et annule la démonstration
2 Réglez l’horloge et la date
3 Réglage des autres réglages optionnels
Radio numérique ..................................................................................... 7
Radio analogique .................................................................................. 10
CD/USB/iPod ...........................................................................................11
Spotify ..................................................................................................... 14
AUX ........................................................................................................... 16
Utilisation d’autres applications ......................................................... 16
Application KENWOOD Remote
TuneIn Radio/TuneIn Radio Pro
Bluetooth® .............................................................................................. 18
Bluetooth – Connexion
Bluetooth – Téléphone portable
Bluetooth – Audio
AMAZON ALEXA.....................................................................................24
Réglages audio....................................................................................... 25
Réglages d’affichage ............................................................................. 30
Installation/Connexion .........................................................................31
Références...............................................................................................38
Entretien
Plus d’informations
Changez l’information sur l’affichage
Guide de dépannage ............................................................................40
Spécifications ......................................................................................... 43
2
FRANÇAIS
Page 55

Avant l’utilisation
IMPORTANTES
• Pour utiliser correctement l’appareil, veuillez ce manuel complément avant
de l’utiliser. Il est particulièrement important que vous lisiez et acceptiez les
avertissements et les précautions de ce manuel.
• Veuillez garder ce manuel dans un endroit sûr et accessible pour une utilisation
future.
MISE EN GARDE
• N’utilisez aucune fonction qui risque de vous distraire de la conduite sure
de votre véhicule.
AVERTISSEMENT
Réglage du volume:
• Ajustez le volume de façon à pouvoir entendre les sons extérieurs à la voiture
afin d’éviter tout risque d’accident.
• Réduisez le volume avant de reproduire des sources numériques afin d’éviter
d’endommager les enceintes par la soudaine augmentation du niveau de sortie.
Généralités:
• Éviter d’utiliser le périphérique extérieur s’il peut gêner une conduite en toute
sécurité.
• Assurez-vous que toutes les données importantes ont été sauvegardées.
Nous ne pouvons pas être tenu responsable pour toute perte des données
enregistrées.
• Veuillez faire en sorte de ne jamais mettre ou laisser d’objets métalliques (tels
que des pièces ou des outils) dans l’appareil, afin d’éviter tout risque de courtcircuit.
• Si une erreur de disque se produit à cause de la condensation sur l’objectif laser,
éjectez le disque et attendez que l’humidité s’évapore.
• En fonction du type de voiture, l’antenne s’étendra automatiquement quand
vous mettrez l’appareil sous tension si le câble de commande d’antenne est
connecté (page34). Mettez l’appareil hors tension ou changez la source sur
STANDBY quand vous vous garez dans un parking avec un plafond bas.
Comment lire ce manuel
• Les affichages et les façades montrés dans ce mode d’emploi sont des
exemples utilisés pour offrir une explication claire des opérations. Pour cette
raison, ils peuvent différer des affichages et des façades réels.
• Les opérations sont expliquées principalement en utilisant les touches de la
façade.
• Les indications en anglais sont utilisées dans un but explicatif. Vous pouvez
choisir la langue d’affichage à partir du menu
•
[XX]
indique les éléments choisis.
• (PageXX) indique que des références sont disponibles aux page citées.
Ce symbole sur le produit indique que ce mode d’emploi
contient d’importantes instructions d’utilisation et d’entretien.
Assurez-vous de lire attentivement les instructions de ce mode
d’emploi.
[FUNCTION]
. (Page6)
FRANÇAIS
3
Page 56

Fonctionnement de base
Façade
Fente d’insertion
Bouton de volume
* Uniquement à des fins d’illustration.
Pour Sur la façade
Mettez l’appareil sous tension
Ajustez le volume Tournez le bouton de volume.
Sélectionner la source
Changez l’information sur l’affichage Appuyez répétitivement sur DISP. (Page 39)
Fenêtre d’affichage*
Appuyez sur
• Maintenez la touche enfoncée pour mettre l’appareil hors tension.
• Appuyez répétitivement sur
• Appuyez sur
B SRC.
B SRC, puis tournez le bouton de volume avant 2 secondes.
B SRC.
Touche
d’éjection
Comment réinitialiser
4
FRANÇAIS
Page 57

Prise en main
1
Sélectionne la langue d’affichage et annule la
démonstration
Quand vous mettez l’appareil sous tension pour la première fois (ou que
[FACTORY RESET]
“SEL LANGUAGE”
1 Tournez le bouton de volume pour sélectionner
[SP]
[EN]
Puis, l’affichage montre: “CANCEL DEMO” “PRESS” “VOLUME KNOB ”.
2 Appuyez de nouveau sur le bouton de volume.
[YES]
3 Appuyez de nouveau sur le bouton de volume.
“DEMO OFF” apparaît.
Puis, l’affichage montre le type de transition sélectionné: “2-WAY X ’ OVER” ou
“3-WAY X ’ OVER”
• Pour changer le type de transition, reportez-vous à “Changement du type de
transition” à la page 7.
2
Appuyez sur le bouton de volume pour entrer
1
2 Tournez le bouton de volume pour choisir
bouton.
est réglé sur
(espagnol) /
est choisi pour le réglage initial.
est choisi pour le réglage initial.
[YES]
“PRESS” “VOLUME KNOB”
[FR]
, voir page6), l’affichage montre:
(français) /
[GE]
Réglez l’horloge et la date
[EN]
(allemand), puis appuyez sur le bouton.
(anglais) /
[FUNCTION]
[CLOCK]
, puis appuyez sur le
[RU]
(russe) /
.
Pour ajuster l’horloge
3 Tournez le bouton de volume pour choisir
le bouton.
4 Tournez le bouton de volume pour faire les réglages, puis appuyez sur le
bouton.
Réglez l’heure dans l’ordre “Heures” “Minutes”.
5 Tournez le bouton de volume pour choisir
le bouton.
6 Tournez le bouton de volume pour choisir
le bouton.
Pour régler la date
7 Tournez le bouton de volume pour choisir
le bouton.
8 Tournez le bouton de volume pour choisir
appuyez sur le bouton.
9 Tournez le bouton de volume pour choisir
bouton.
10 Tournez le bouton de volume pour faire les réglages, puis appuyez sur le
bouton.
Réglez la date dans l’ordre “Jour” “Mois” “Année” ou “Mois” “Jour ”
“Année”.
[CLOCKADJUST]
[CLOCK FORMAT]
[12H]
ou
[24H]
[DATEFORMAT]
[DD/MM/YY]
[DATESET]
ou
, puis appuyez sur le
, puis appuyez sur
, puis appuyez sur
, puis appuyez sur
, puis appuyez sur
[MM/DD/YY]
, puis
11 Maintenez enfoncée pour quitter.
Pour retourner à l’option de réglage précédente, appuyez sur
3
Réglage des autres réglages optionnels
Vous pouvez régler uniquement les éléments suivants quand l’appareil est sur la
source STANDBY.
1 Appuyez répétitivement sur B SRC pour entrer en veille STANDBY.
2 Appuyez sur le bouton de volume pour entrer
3 Tournez le bouton de volume pour choisir un élément (page 6), puis
appuyez sur le bouton.
4 Répétez l’étape 3 jusqu’à ce que l’élément souhaité soit sélectionné ou
activé.
5 Maintenez enfoncée pour quitter.
Pour retourner à l’option de réglage précédente, appuyez sur
[FUNCTION]
.
.
.
FRANÇAIS
5
Page 58

Prise en main
Défaut: [XX]
[DISPLAY]
[EASY MENU]
[TUNER SETTING]
[DAB ANT POWER]
[PRESET TYPE] [NORMAL]:Mémorise une station pour chaque touche de préréglage dans
[SYSTEM]
[KEY BEEP]
[SOURCE SELECT]
[SPOTIFY SRC]
[BT AUDIO SRC] [ON]:Met en service BT AUDIO dans la sélection de la source.; [OFF]:Hors
[BUILT-IN AUX] [ON]:Met en service AUX dans la sélection de la source.; [OFF]:Hors service.
Quand vous entrez dans [FUNCTION]...
[ON]:L’éclairage de [LCDDISPLAY] change sur la couleur blanche.;
[OFF]:L’éclairage de [LCDDISPLAY] reste sur la couleur [COLORSELECT].
(Page30)
• L’éclairage de
• Reportez-vous à l’illustration de la page 30 pour l’identification de zone.
[ON]: Fournit une alimentation à l’antenne DAB. ; [OFF]: Ne fournit pas
d’alimentation. Lors de l’utilisation d’une antenne passive sans amplificateur.
(Page 35)
chaque bande (FM1/FM2/FM3/MW/LW/DB1/DB2/DB3).;
une station (radio numérique ou radio analogique) pour chaque touche de
préréglage quelle que soit la bande choisie.
(Applicable uniquement si [X’OVER] est réglé sur [2WAY].) (Page 7)
[ON]:Met en service la tonalité des touches.; [OFF]:Met hors service la
fonction.
[ON]:Met en service SPOTIFY/SPOTIFYBT dans la sélection de source.;
[OFF]:Hors service. (Page14)
service. (Page23)
(Page16)
[KEY1] et [KEY2] change sur la couleur bleu clair quand vous
entrez
[FUNCTION], quel que soit le réglage [EASY MENU].
[MIX]:Mémorise
[P-OFF WAIT]
[CD READ] [1]: Distingue automatiquement les disques de fichiers audio et les CD de
Applicable uniquement quand le mode de démonstration est hors service.
Règle la durée avant que l’appareil se mette automatiquement hors service
(pendant le mode d’attente) pour économiser la batterie.
[20M]: 20 minutes ; [40M]: 40 minutes ; [60M]: 60 minutes ;
[– – –]: Annulation.
musique.;
[2]: Reproduit de force le disque comme un CD de musique. Aucun
son n’est entendu si un disque de fichiers audio est reproduit.
[F/W UPDATE]
[UPDATE SYSTEM]
[F/W UP xxxx]
[F/W UP xxxxx]
[FACTORY RESET] [ YES]:Réinitialise les réglages aux valeurs par défaut (sauf la station
/[UPDATE DAB]
/
[YES]:Démarrer la mise à niveau du micrologiciel.; [NO]:Annulation (la mise
à niveau n’est pas activée).
Pour en savoir plus sur la mise à niveau du micrologiciel, consultez
<www.kenwood.com/cs/ce/>.
mémorisée).;
[NO]:Annulation.
[ENGLISH]
[РУССКИЙ]
[ESPANOL]
[FRANCAIS]
Sélectionnez la langue d’affichage pour le menu [FUNCTION] et
l’information sur le morceau si elle est disponible.
Par défaut,
[ENGLISH] est sélectionné.
[DEUTSCH]
6
FRANÇAIS
Page 59

Prise en main
Changement du type de transition
1
Appuyez répétitivement sur B SRC pour entrer en veille STANDBY.
2 Maintenez enfoncée les touches numériques 4 et 5 pour accéder à la
sélection de transition.
Le type de transition actuelle apparaît.
3 Tournez le bouton de volume pour choisir “2WAY” ou “3WAY”, puis appuyez
sur le bouton.
4 Tournez le bouton de volume pour choisir “YES” ou “NO”, puis appuyez sur
le bouton.
Le type de transition sélectionnée apparaît.
• Pour annuler, maintenez enfoncée
• Pour ajuster les réglages de la transition sélectionnée, voir page 27.
AVERTISSEMENT
Sélectionnez un type de transition en fonction de la connexion de vos enceintes.
(Page 33, 34)
Si vous sélectionnez une mauvais type:
• Les enceintes peuvent être endommagées.
• Le niveau sonore de sortie peut être extrêmement élevé ou faible.
.
Radio numérique
À propos du DAB (Digital Audio Broadcasting)
DAB est l’un des systèmes de radio numérique disponibles aujourd’hui. Il peut
offrir un son de qualité numérique sans toutes les interférences gênantes ni les
distorsions des signaux. De plus, il peut transporter des textes, des images et des
données.
Contrairement aux émissions FM, où chaque programme est émis sur sa propre
fréquence, les émissions DAB combinent plusieurs programmes (appelés
“services”) pour former un “ensemble”.
La “composante primaire” (station radio principale) est parfois accompagnée d’une
“composante secondaire” qui peut contenir des programmes supplémentaires ou
d’autres informations.
Préparation:
1 Connectez l’antenne DAB fournie à la prise d’antenne DAB. (Page 33)
2 Appuyez répétitivement sur B SRC pour sélectionner DIGITAL AUDIO.
3 Maintenez enfoncée (LIST UPDATE) pour démarrer la mise à jour de
la Liste des services.
“LIST UPDATE” apparaît et la mise à jour démarre. “UPDATED” apparaît quand la
mise à jour est terminée.
La mise à jour prend un maximum de 3 minutes. Aucune interruption (telle
que des informations routières) n’est possible pendant la mise à jour.
• Pour annuler la mise à jour de la Liste des service: Maintenez de nouveau
enfoncée
(LIST UPDATE).
FRANÇAIS
7
Page 60

Radio numérique
• “DGTL” s’allume quand un signal numérique DAB est reçu et clignote quand un
signal RDS est reçu.
• L’appareil commute sur l’alarme DAB automatiquement lors de la réception d’un
signal d’alarme d’une émission DAB.
Recherche d’un ensemble
1
Appuyez répétitivement sur B SRC pour sélectionner DIGITAL AUDIO.
2 Appuyez répétitivemenent sur BAND pour sélectionner DB1/DB2/DB3.
3 Maintenez enfoncée S / T pour rechercher un ensemble.
4 Appuyez sur S / T pour choisir un ensemble, un service ou un
composant à écouter.
Vous pouvez mémoriser un maximum de 18 services.
• Pour mémoriser un service: Maintenez enfoncée une des touches numériques
(1 à 6).
• Pour choisir un service mémorisé: Appuyez sur l’une des touches numériques
(1 à 6).
Choisissez un service
1
Appuyez sur pour entrer en mode de recherche de service.
2 Tournez le bouton de volume pour choisir un service, puis appuyez sur le
bouton.
Pour annuler le mode de recherche de service, appuyez à nouveau sur
Sélectionnez un service par son nom
1
Appuyez sur pour entrer en mode de recherche de service.
2 Tournez le bouton de volume rapidement pour entrer en mode de
recherche alphabétique.
3 Tournez le bouton du volume ou appuyez sur S / T pour choisir le
caractère à rechercher.
• Appuyez sur 1 / 2 pour aller à la page suivante/précédente
4 Appuyez sur le bouton de volume pour démarrer la recherche.
5 Tournez le bouton de volume pour choisir un service, puis appuyez sur le
bouton.
Pour annuler le mode de recherche alphabétique, appuyez à nouveau sur
.
Autres paramètres
1
Appuyez sur le bouton de volume pour entrer
2 Tournez le bouton de volume pour sélectionner un élément (voir le tableau
suivant), puis appuyez sur le bouton.
3 Répétez l’étape 2 jusqu’à ce que l’élément souhaité soit sélectionné/activé
ou suivez les instructions données pour l’élément sélectionné.
4 Maintenez enfoncée pour quitter.
Pour retourner à l’option de réglage précédente, appuyez sur
[FUNCTION]
.
.
[TUNER SETTING]
[SEEK MODE]
[AF SET] [ON]:
[TI] [ON]:Permet à l’appareil de commuter temporairement sur les informations
[PTY SEARCH]
.
Sélectionne la méthode de recherche quand vous appuyez sur les touches
S
/ T.
[AUTO1]:Choisissez un ensemble, un service ou un composant. Maintenir
enfoncer
S
[AUTO2]:Recherche d’un service préréglé; [MANUAL]:Choisissez un
ensemble, un service ou un composant.
Maintenir enfoncer
ensemble.
Lors de l’écoute de la bande DAB: Commute automatiquement sur la station FM
diffusant le même programme si le signal DAB devient faible. Il retourne sur le
son DAB quand le signal devient de nouveau fort.
Lors de l’écoute de la bande FM: Commute automatiquement sur la source
DIGITAL AUDIO diffusant le même programme (si disponible).;
[OFF]:Annulation.
routières si elles sont disponibles (L’indicateur “TI” s’allume).;
1
2
3
/ T permet de rechercher automatiquement un ensemble.;
S
/ T permet de rechercher manuellement un
[OFF]:Annulation.
Tournez le bouton de volume pour sélectionner le type de programme
disponible (voir “Type de programme disponible pour
page9), puis appuyez sur le bouton.
Tournez le bouton de volume pour choisir la langue PTY ([ENGLISH]/
[FRENCH]/[GERMAN]), puis appuyez sur le bouton.
Appuyez sur S / T pour démarrer la recherche.
[PTY SEARCH]” à la
Défaut: [XX]
8
FRANÇAIS
Page 61

Radio numérique
[ASW SELECT] [ TRAVEL], [WARNINGS], [NEWS], [WEATHER], [EVENT], [SPECIAL],
[LIST UPDATE] [AUTO]:Met à jour automatiquement la liste des services DAB quand l’appareil
[PTY WATCH]
[RELATED SERV] [ON]:Activez la fonction Soft-Link pour commuter sur un service alternatif
[RAD INFO], [SPORTS], [FINANCE]: Tournez le bouton de volume pour faire
une sélection, puis appuyez sur le bouton.
“
” apparaît devant le type d’annonce activé.
Commute automatiquement, à partir de n’importe quelle source, sur des
ensembles de radio numérique diffusant un type d’annonce activé.
• Plusieurs annonces peuvent être activées simultanément.
• Pour les désactiver, appuyez de nouveau sur le bouton de volume
(“
” s’éteint).
est mis sous tension.;
pour mettre à jour la liste des services DAB.
1
Tournez le bouton de volume pour sélectionner le type de programme
disponible, puis appuyez sur
L’appareil commute automatiquement, à partir de n’importe quelle source,
sur des ensembles de radio numérique diffusant le type de programme
sélectionné.
Type de programme:
[NEWS], [AFFAIRS], [INFO], [SPORT], [EDUCATE], [DRAMA],
[CULTURE], [SCIENCE], [VARIED], [POPM](musique),
[ROCKM](musique), [EASYM](musique), [LIGHTM](musique),
[CLASSICS], [OTHERM](musique), [WEATHER], [FINANCE],
[CHILDREN], [SOCIAL], [RELIGION], [PHONEIN], [TRAVEL],
[LEISURE], [JAZZ], [COUNTRY], [NATIONM](musique), [OLDIES],
[FOLKM](musique), [DOCUMENT]
[OFF]:Annulation.
2
Appuyez sur le bouton de volume pour entrer en mode de sélection de la
langue PTY.
3
Tournez le bouton de volume pour choisir la langue PTY ([ENGLISH]/
[FRENCH]/[GERMAN]), puis appuyez sur le bouton.
qui offre un programme audio différent du programme audio actuel.;
[OFF]:Désactivé.
[MANUAL]:Maintenez enfoncée (LIST UPDATE)
.
[CLOCK]
[TIME SYNC]
• Si le volume est ajusté pendant la réception des informations routières,
des annonces, des alarmes ou des bulletins d’information, le volume ajusté
est automatiquement mémorisé. Il sera appliqué la prochaine fois que les
informations routières, les annonces, les alarmes ou les bulletins d’information
seront activées.
Type de programme disponible pour
[SPEECH]
:
[NEWS], [AFFAIRS], [INFO]
[SCIENCE], [VARIED], [WEATHER], [FINANCE], [CHILDREN], [SOCIAL], [RELIGION], [PHONEIN]
[TRAVEL], [LEISURE], [DOCUMENT]
[MUSIC]
:
[POP M]
(musique),
[CLASSICS], [OTHER M]
[FOLK M]
(musique)
L’appareil recherche le type de programme catégorisé dans
s’il a été choisi.
[ON]:Synchronise l’heure de l’appareil avec l’heure de la radio numérique.;
[OFF]:Annulation.
[PTY SEARCH]
(information),
[ROCK M]
(musique),
[SPORT], [EDUCATE], [DRAMA], [CULTURE]
(musique),
[EASY M]
[JAZZ], [COUNTRY], [NATION M]
(musique),
[LIGHT M]
(musique),
[SPEECH]
(musique),
[OLDIES]
ou
[MUSIC]
,
,
,
FRANÇAIS
9
Page 62

Radio analogique
• L’indicateur “ST” s’allume lors de la réception d’une émission FM stéréo avec un
signal suffisamment fort.
• L’appareil commute sur l’alarme FM automatiquement lors de la réception d’un
signal d’alarme d’une émission FM.
Recherchez une station
1
Appuyez répétitivement sur B SRC pour sélectionner RADIO.
2 Appuyez répétitivement sur BAND pour sélectionner FM1/FM2/FM3/MW/
LW.
3 Appuyez sur S / T pour recherche une station.
Vous pouvez mémoriser un maximum de 18 stations pour FM et de 6 stations
pour MW/LW.
• Pour mémoriser une station: Maintenez enfoncée une des touches
numériques (1 à 6).
• Pour choisir une station mémorisée: Appuyez sur l’une des touches
numériques (1 à 6).
Autres paramètres
1
Appuyez sur le bouton de volume pour entrer
2 Tournez le bouton de volume pour sélectionner un élément (voir le tableau
suivant), puis appuyez sur le bouton.
3 Répétez l’étape 2 jusqu’à ce que l’élément souhaité soit sélectionné/activé
ou suivez les instructions données pour l’élément sélectionné.
4 Maintenez enfoncée pour quitter.
Pour retourner à l’option de réglage précédente, appuyez sur
[FUNCTION]
.
.
Défaut: [XX]
[TUNER SETTING]
[SEEK MODE]
[LOCAL SEEK] [ON]: Recherche uniquement les stations avec une bonne réception.; [OFF]:
[AUTO MEMORY] [YES]:Mémorise automatiquement 6 stations dont la réception est bonne.;
[MONO SET] [ON]:Améliore la réception FM mais l’effet stéréo sera perdu.;
[NEWS SET] [ON]:L’appareil commute temporairement sur le programme d’information s’il
[REGIONAL] [ON]:Commute sur une autre station uniquement dans la région spécifiée, à
[AF SET] [ON]:Recherche automatiquement une autre station diffusant le même
Sélectionne la méthode de recherche quand vous appuyez sur les touches
S
/ T. [AUTO1]:Recherche automatiquement une station.;
[AUTO2]:Recherche d’une station préréglée.; [MANUAL]:Recherche
manuellement une station.
Annulation.
• Les réglages réalisés sont applicables uniquement à la source/station
sélectionnée. Si vous changez la source/station, vous devez refaire les réglages.
[NO]:Annulation.
• Peut être sélectionné uniquement si
[PRESETTYPE]. (Page6)
[NORMAL] est sélectionné pour
[OFF]:Annulation.
est disponible.;
l’aide de la commande “AF”.;
programme dans le même réseau Radio Data System mais qui possède
une meilleure réception quand la réception actuelle est mauvaise.;
[OFF]:Annulation.
[OFF]:Annulation.
[OFF]:Annulation.
10
FRANÇAIS
Page 63

Radio Analogique CD/USB/iPod
[TI] [ON]:Permet à l’appareil de commuter temporairement sur les informations
[PTY SEARCH]
•
[LOCAL SEEK]/[MONOSET]/[NEWSSET]/[REGIONAL]/[AFSET]/[PTYSEARCH]
choisi uniquement quand la bande est FM1/FM2/FM3.
• Si le volume est ajusté pendant la réception des informations routières ou de
bulletins d’information, le volume ajusté est automatiquement mémorisé. Il
sera appliqué la prochaine fois que les informations routières ou de bulletin
d’information seront activées.
routières si elles sont disponibles (L’indicateur “TI” s’allume).;
•
[TI] pour la bande MW/LW permet l’interruption en cas d’information routière
pour la source DIGITAL AUDIO uniquement.
1
Tournez le bouton de volume pour sélectionner le type de programme
disponible (reportez-vous à “Type de programme disponible pour
[PTY SEARCH]”), puis appuyez sur le bouton.
2
Tournez le bouton de volume pour choisir la langue PTY ([ENGLISH]/
[FRENCH]/[GERMAN]), puis appuyez sur le bouton.
3
Appuyez sur S / T pour démarrer la recherche.
[OFF]:Annulation.
peut être
Type de programme disponible pour [PTY SEARCH]
:
[SPEECH]
[NEWS], [AFFAIRS], [INFO]
[SCIENCE], [VARIED], [WEATHER], [FINANCE], [CHILDREN], [SOCIAL], [RELIGION], [PHONEIN]
[TRAVEL], [LEISURE], [DOCUMENT]
[MUSIC]
:
[POP M]
(musique),
[CLASSICS], [OTHER M]
[FOLK M]
(musique)
L’appareil recherche le type de programme catégorisé dans
s’il a été choisi.
(information),
[ROCK M]
(musique),
[SPORT], [EDUCATE], [DRAMA], [CULTURE]
(musique),
[EASY M]
[JAZZ], [COUNTRY], [NATION M]
(musique),
[LIGHT M]
(musique),
[SPEECH]
,
(musique),
[OLDIES]
ou
[MUSIC]
Insérez un disque
Face portant l’étiquette
La source change automatiquement sur CD et la lecture démarre.
Connectez un périphérique USB
Prise d’entrée USB
,
CA-U1EX (max.: 500 mA)
(accessoire en option)*
,
La source change automatiquement sur USB et la lecture démarre.
* Ne laissez pas le câble à l’intérieur de la voiture quand il n’est pas utilisé.
Éjectiez le disque
Périphérique
USB
FRANÇAIS
11
Page 64

CD/USB/iPod
Connectez un iPod/iPhone
Prise d’entrée USB
KCA-iP103 (accessoire en option)*1
ou accessoire du iPod/iPhone*2
La source change automatiquement sur iPod USB et la lecture démarre.
• Vous pouvez aussi connecter l’iPod/iPhone via Bluetooth. (Page18)
*1 KCA-iP103: Type d’éclairage
*2 Ne laissez pas le câble à l’intérieur de la voiture quand il n’est pas utilisé.
Opérations de base
iPod/
iPhone
Pour Sur la façade
Lecture/pause
Recherche rapide vers
l’arrière/vers l’avant
Sélectionnez une plage ou
un fichier
Sélectionnez un dossier*1 Appuyez sur 1
Lecture répétée*2 Appuyez répétitivement sur 4
Lecture aléatoire*2 Appuyez répétitivement sur 3
*1 Pour CD: Uniquement pour les fichiers MP3/WMA/AAC. Cela ne fonctionne pas pour l’iPod.
*2 Pour l’iPod: Fonctionne uniquement quand
Appuyez sur 6
Maintenez enfoncée
Appuyez sur
[TRACK REPEAT]/[ALL REPEAT]
[FILE REPEAT]/[FOLDER REPEAT]/[ALL REPEAT]
MP3/WMA/AAC/WAV/FLAC
[REPEAT ONE]/[REPEAT ALL]/[REPEAT OFF]
[DISCRANDOM]/[RANDOM OFF]
[FOLDERRANDOM]/[RANDOM OFF]
AAC/WAV/FLAC
[SHUFFLE ON]/[SHUFFLE OFF]
Maintenez enfoncée 3
[ALL RANDOM]
IW.
S / T.
S / T.
/ 2 .
.*1
.
: CD Audio
: iPod
.
: CD Audio
: Fichier MP3/WMA/
: iPod
pour sélectionner
[MODEOFF] est sélectionné. (Page 13)
: Fichier
12
FRANÇAIS
Page 65

CD/USB/iPod
Sélectionnez le lecteur de musique
Quand la source est USB, appuyez répétitivement sur 5.
Les morceaux mémorisés dans le lecture suivant seront lus.
• Mémoire sélectionnée interne ou externe d’un smartphone (Mass Storage
Class).
• Lecteur sélectionné parmi plusieurs lecteurs.
Vous pouvez aussi choisir le lecture de musique à partir du menu
1 Appuyez sur le bouton de volume pour entrer
2 Tournez le bouton de volume pour choisir
bouton.
3 Tournez le bouton de volume pour choisir
le bouton.
4 Tournez le bouton de volume pour choisir
le bouton.
Le lecteur suivant (
lecture démarre.
5 Répétez les étapes 1 à 4 pour choisir les lecteurs suivants.
6 Maintenez enfoncée pour quitter.
Pour retourner à l’option de réglage précédente, appuyez sur
[DRIVE 1]
à
[DRIVE 4]
[FUNCTION]
[USB]
, puis appuyez sur le
[MUSICDRIVE]
[DRIVE CHANGE]
) est sélectionné automatiquement et la
[FUNCTION]
.
, puis appuyez sur
, puis appuyez sur
.
Sélectionnez le mode de commande
Quand la source est iPodUSB (ou iPod BT), appuyez répétitivement sur 5.
[MODE ON]
: Commande l’iPod/iPhone en utilisant l’iPod/iPhone lui-même.
Cependant, vous pouvez toujours réaliser une lecture/pause, sauter
des fichiers, et faire une recherche rapide vers l’avant ou vers l’arrière à
[MODE OFF]
partir de cet appareil.
: Commande l’iPod/iPhone à partir de cet appareil.
Sélectionnez un fichier à lire
À partir d’un dossier ou d’une liste
• Pour l’iPod, applicable uniquement quand
1 Appuyez sur .
2 Tournez le bouton de volume pour sélectionner un dossier/liste, puis
appuyez sur le bouton.
3 Tournez le bouton de volume pour choisir un fichier, puis appuyez sur le
.
bouton.
La lecture du fichier sélectionné démarre.
Recherche rapide
Si vous avez beaucoup de fichiers, vous pouvez effectuer une recherche rapide
parmi eux.
1 Appuyez sur .
2 Tournez le bouton de volume pour sélectionner un dossier/liste, puis
appuyez sur le bouton.
3
Tournez rapidement le bouton de volume pour parcourir la liste rapidement.
4 Tournez le bouton de volume pour choisir un fichier, puis appuyez sur le
bouton.
La lecture du fichier sélectionné démarre.
Recherche à saut
iPod BT)
S’il y a plusieurs fichiers dans la liste sélectionnée, vous pouvez réaliser ce qui suit
pour rechercher un fichier en avançant dans la liste à un vitesse sélectionnée dans
[SKIP SEARCH]
• Pour l’iPod, applicable uniquement quand
1 Appuyez sur .
2
3 Appuyez sur S / T pour faire une recherche d’une ampleur prédéfinie.
• Maintenir enfoncer S / T permet de faire une recherche avec une
4 Tournez le bouton de volume pour choisir un fichier, puis appuyez sur le
La lecture du fichier sélectionné démarre.
. (Page 14)
Tournez le bouton de volume pour choisir une liste, puis appuyez sur le bouton.
ampleur de 10% quel que soit les réglages
bouton.
(applicable uniquement pour la source CD et USB)
(applicable uniquement pour la source iPod USB et la source
[MODE OFF]
[MODE OFF]
[SKIP SEARCH]
est sélectionné.
est sélectionné.
.
FRANÇAIS
13
Page 66

CD/USB/iPod
Réglage [SKIP SEARCH]
1 Appuyez sur le bouton de volume pour entrer
2 Tournez le bouton de volume pour choisir
bouton.
3 Tournez le bouton de volume pour choisir
le bouton.
4 Tournez le bouton de volume pour choisir l’ampleur de saut, puis appuyez
sur le bouton.
[0.5%]
(défaut)/
L’ampleur de saut est affiché comme un pourcentage de tous les fichiers.
5 Maintenez enfoncée pour quitter.
Recherche alphabétique
la source iPod BT)
Vous pouvez rechercher un fichier en fonction du premier caractère.
• Pour l’iPod, applicable uniquement quand
(Page 13)
1 Appuyez sur .
2 Tournez le bouton de volume pour choisir une liste, puis appuyez sur le
bouton.
3 Tournez le bouton de volume rapidement pour entrer en recherche de
caractères.
4 Tournez le bouton de volume pour sélectionner un caractère.
• Sélectionnez “
5 Appuyez sur S / T pour déplacer la position d’entrée.
• Vous pouvez entrer un maximum de trois caractères.
6 Appuyez sur le bouton de volume pour démarrer la recherche.
7 Tournez le bouton de volume pour choisir un fichier, puis appuyez sur le
bouton.
La lecture du fichier sélectionné démarre.
• Pour retourner au dossier racine/premier fichier/menu supérieur, appuyez sur 5.
(Ne s’applique pas à la source BT AUDIO.)
• Pour retourner à l’option de réglage précédente, appuyez sur
• Pour annuler, maintenez enfoncée
[1%]/[5%]/[10%]
(applicable uniquement pour la source iPod USB et
” pour chercher un caractère autre que A à Z, 0 à 9.
*
[USB]
[SKIPSEARCH]
[MODE OFF]
.
[FUNCTION]
.
, puis appuyez sur le
, puis appuyez sur
est sélectionné.
.
Spotify
Vous pouvez écouter Spotify à partir d’un iPhone/iPod touch (via Bluetooth ou via
la prise d’entrée USB) ou périphérique Android (via Bluetooth) (page 18).
Préparation:
• Installez la dernière version de l’application Spotify sur votre appareil (iPhone/
iPod touch ou périphérique Android), puis créez un compte et connectez-vous
sur Spotify.
• Sélectionnez
Démarrez l’écoute
1
Démarrez l’application Spotify sur votre appareil.
2 Connectez votre appareil à la prise d’entrée USB.
Vous pouvez aussi connecter l’iPhone/iPod touch ou le périphérique Android
via Bluetooth. (Page 18)
• Assurez-vous que la prise d’entrée USB n’est connectée à aucun
3 Appuyez répétitivement sur B SRC pour sélectionner SPOTIFY (pour
iPhone/iPod touch) ou SPOTIFY BT (pour le périphérique Android).
La diffusion démarre automatiquement.
*1 KCA-iP103: Type d’éclairage
*2 Ne laissez pas le câble à l’intérieur de la voiture quand il n’est pas utilisé.
[ON]
pour
[SPOTIFYSRC]
Prise d’entrée USB
KCA-iP103 (accessoire en option)*1 ou
accessoire du iPhone/iPod touch*2
périphérique quand vous utilisez une connexion Bluetooth.
dans
[SOURCE SELECT]
. (Page6)
iPhone/
iPod touch
14
FRANÇAIS
Page 67

Spotify
Pour Sur la façade
Lecture/pause
Sauter une plage
Sélectionnez un pouce vers le
haut ou vers le bas *2
Démarrer la radio Maintenez enfoncée 5.
Lecture répétée*3 Appuyez répétitivement sur 4
Lecture aléatoire*3 Appuyez répétitivement sur 3 *1.
Appuyez sur 6
Appuyez sur
Appuyez sur 1
IW.
S*1 / T.
/ 2 .
[REPEAT ALL]/[REPEATONE]
*1/
[REPEATOFF]
.
[SHUFFLE ON]/[SHUFFLEOFF]
*1 Disponible uniquement pour les utilisateurs avec un compte Premium.
*2 Cette fonction est disponible uniquement pour les plages de la radio. Si le défilement vers le bas est
sélectionné, la plage actuelle est sautée.
*3 Disponible uniquement pour les plages des listes de lecture.
Sauvegarde des informations des morceaux favoris
Lors de l’écoute de la radio sur Spotify...
Maintenez enfoncé le bouton de volume.
“SAVED” apparaît et les informations sont stockées dans “Your Music (votre musique)”
ou “Your Library (votre bibliothèque)” sur votre compte Spotify.
Pour annuler la sauvegarde, répétez la même procédure.
“REMOVED” apparaît et les informations sont supprimées de “Your Music
(votre musique)” ou “Your Library (votre bibliothèque)” sur votre compte Spotify.
Recherche d’un morceau ou d’une station
1
Appuyez sur .
2 Tournez le bouton de volume pour choisir un type de liste, puis appuyez
sur le bouton.
Les types de liste affichés diffèrent en fonction des informations envoyées par
Spotify.
3 Tournez le bouton de volume pour sélectionner le morceau ou la station
souhaité.
4 Appuyez sur le bouton de volume pour valider.
Vous pouvez parcourir la liste rapidement en tournant le bouton de volume
rapidement.
Pour annuler, maintenez enfoncée
.
FRANÇAIS
15
Page 68

AUX Utilisation d’autres applications
Vous pouvez écouter de la musique à partir d’un lecteur audio portable via la prise
d’entrée auxiliaire.
Préparation:
Sélectionnez
[ON]
pour
[BUILT-IN AUX]
dans
[SOURCESELECT]
. (Page6)
Démarrez l’écoute
1
Connectez un lecteur audio portable (en vente dans le commerce).
Prise d’entrée auxiliaire
Mini fiche stéréo de 3,5 mm avec connecteur
en forme de “L” (en vente dans le commerce)
2 Appuyez répétitivement sur B SRC pour sélectionner AUX.
3 Mettez sous tension le lecteur audio portable et démarrez la lecture.
Lecteur audio
portable
Réglez le nom du périphérique extérieur
Lors de l’écoute d’un lecteur audio portable connecté à l’appareil...
1 Appuyez sur le bouton de volume pour entrer
2 Tournez le bouton de volume pour choisir
bouton.
3 Tournez le bouton de volume pour choisir
le bouton.
4 Tournez le bouton de volume pour choisir un élément, puis appuyez sur le
bouton.
[AUX]
(défaut)/
5 Maintenez enfoncée pour quitter.
Pour retourner à l’option de réglage précédente, appuyez sur
[DVD]/[PORTABLE]/[GAME]/[VIDEO]/[TV]
[FUNCTION]
[SYSTEM]
, puis appuyez sur le
[AUXNAME SET]
.
, puis appuyez sur
.
Application KENWOOD Remote
Vous pouvez commander l’autoradio KENWOOD à partir d’un iPhone/iPod touch
(via Bluetooth ou via la prise d’entrée USB) ou d’un périphérique Android (via
Bluetooth) en utilisant l’application KENWOOD Remote.
• Pour plus d’informations, consultez <http://www.kenwood.com/cs/ce/>.
Préparation:
Installez la dernière version de l’application KENWOOD Remote sur votre
périphérique avant la connexion.
Commencez à utiliser l’application KENWOOD Remote
1
Démarrez l’application KENWOOD Remote sur votre appareil.
2 Connectez votre périphérique.
• Pour un périphérique Android:
Appariez le périphérique Android avec cet appareil via Bluetooth.
(Page 18)
• Pour iPhone/iPod touch:
Connectez l’iPhone/iPod touch à la prise d’entrée USB. (Page 12)
(ou)
Appariez le l’iPhone/iPod touch avec cet appareil via Bluetooth. (Page 18)
(Assurez-vous que la prise d’entrée USB n’est connectée à aucun
périphérique.)
3 Sélectionnez le périphérique à utiliser à partir du menu
Voir “Réglages pour utiliser l’application KENWOOD Remote” à la page 17.
Par défaut,
sélectionnez
[ANDROID]
est sélectionné. Pour utiliser l’iPhone/iPod touch,
[YES]
pour
[IOS]
.
[FUNCTION]
.
16
FRANÇAIS
Page 69

Utilisation d’autres applications
Réglages pour utiliser l’application KENWOOD Remote
1
Appuyez sur le bouton de volume pour entrer
2 Tournez le bouton de volume pour sélectionner un élément (voir le tableau
suivant), puis appuyez sur le bouton.
3 Répétez l’étape 2 jusqu’à ce que l’élément souhaité soit sélectionné ou
activé.
4 Maintenez enfoncée pour quitter.
Pour retourner à l’option de réglage précédente, appuyez sur
[FUNCTION]
.
.
Défaut: [XX]
[REMOTE APP]
[SELECT]
[IOS] [YES]:Sélectionnez iPhone/iPod touch pour utiliser l’application via Bluetooth ou
[ANDROID] [YES]:Sélectionnez le périphérique Android pour utiliser l’application via
[ANDROID LIST]
Sélectionnez le périphérique ([IOS] ou [ANDROID]) pour utiliser l’application.
connecté via la prise d’entrée USB.;
Si
[IOS] est sélectionné, sélectionnez la source iPod BT (ou la source iPodUSB
si votre iPhone/iPod touch est connecté via la prise d’entrée USB) pour activer
l’application.
• La connectivité del’application est interrompue ou déconnectée si:
– Vous changez la source de iPod BT à n’importe quelle source de lecture
connectée via la prise d’entrée USB.
– Vous passez de la source iPod USB a la source iPod BT.
Bluetooth.;
[NO]:Annulation.
Sélectionnez le périphérique Android à utiliser dans la liste.
• Affiché uniquement quand
[NO]:Annulation.
[ANDROID] de [SELECT] est réglé sur [YES].
[STATUS]
Tuneln Radio/Tuneln Radio Pro
Pendant l’écoute de TuneIn Radio ou TuneIn Radio Pro, connectez l’iPhone/
iPod touch à la prise d’entrée USB de l’appareil de façon que l’appareil puisse
sortir le son des ces applications.
Montre l’état du périphérique sélectionné.
[IOS CONNECTED]: Vous pouvez utiliser l’application à l’aide de l’iPhone/iPod
touch connecté via Bluetooth ou par la prise d’entrée USB.
[IOS NOT CONNECTED]: Aucun périphérique iOS n’est connecté pour utiliser
l’application.
[ANDROID CONNECTED]: Vous pouvez utiliser l’application à l’aide du
périphérique Android connecté via Bluetooth.
[ANDROID NOT CONNECTED]: Aucun périphérique Android n’est connecté pour
utiliser l’application.
FRANÇAIS
17
Page 70

Bluetooth®
• En fonction de la version Bluetooth, du système d’exploitation et de la version
du micrologiciel de votre téléphone portable, la fonction Bluetooth peut ne
pas fonctionner avec cet appareil.
• Assurez-vous d’activer la fonction Bluetooth du périphérique pour réaliser les
opérations suivantes.
• La condition du signal varie en fonction de l’environnement.
Bluetooth — Connexion
Profiles Bluetooth pris en charge
– Hands-Free Profile — Profile mains libres (HFP)
– Advanced Audio Distribution Profile — Profile de distribution audio avancé
(A2DP)
– Audio/Video Remote Control Profile — Profile de télécommande audio/vidéo
(AVRCP)
– Serial Port Profile — Profile de port série (SPP)
– Phonebook Access Profile — Profile d’accès au répertoire d’adresses (PBAP)
Codecs Bluetooth pris en charge
– Codec Sous-bande (SBC)
– Codage audio avancé (AAC)
Connectez le microphone
Panneau arrière
microphone
Microphone (fourni)
Fixez si nécessaire en utilisant des
serre-câbles (non fourni).
Connecteur
femelle d’entrée du
microphone
Ajustez l’angle du
Faites le pairage et connectez un périphérique Bluetooth pour
la première fois
1
Appuyez sur B SRC pour mettre l’appareil sous tension.
2 Recherchez et sélectionnez le nom de votre récepteur (“DPX-7200DAB”) sur
le périphérique Bluetooth.
“PAIRING” “PASS XXXXXX” “Nom du périphérique” “PRESS” “VOLUME
KNOB” apparaît sur l’affichage.
• Pour certains périphériques Bluetooth, il se peut que vous ayez besoin
d’entrer le code PIN (numéro d’identification personnel) immédiatement
après la recherche.
3 Appuyez sur le bouton de volume pour démarrer le pairage.
“PAIRING OK” apparait quand le pairage est terminé.
Une fois le pairage terminé la connexion Bluetooth est établie automatiquement.
• “
” et/ou “ ” s’allument sur la fenêtre d’affichage.
• En fonction des réglages réalisés pour
la batterie et le signal du périphérique connecté apparaissent sur l'affichage
supplémentaire (page 39).
• Cet appareil prend en charge le Pairage simple sécurisé (SSP).
• Un maximum de cinq appareils peuvent être enregistrés (appariés) en tout.
• Une fois que le pairage est termine, le périphérique Bluetooth reste enregistré
sur l’appareil même si vous réinitialisez l’appareil. Pour supprimer un
périphérique apparié, voir
• Un maximum de deux téléphones Bluetooth et un périphérique audio
Bluetooth peuvent être connecté en même temps. Pour connecter ou
déconnecter le périphérique enregistré, reportez-vous à
[AUDIO SELECT]
Cependant, quand la source est BT AUDIO, vous pouvez vous connecter à cinq
périphériques audio Bluetooth et commuter parmi ces cinq périphériques.
(Page23)
• Certains périphériques Bluetooth peuvent ne pas se connecter
automatiquement au système après le pairage. Connectez le périphérique à
l’appareil manuellement.
• Référez-vous au manuel d’instructions de votre périphérique Bluetooth pour en
savoir plus.
dans
[DEVICE DELETE]
[BT MODE]
. (Page 22)
[BATT/SIGNAL]
à la page22.
(page 20), la force de
[PHONE SELECT]
ou
18
FRANÇAIS
Page 71

Bluetooth®
Pairage automatique
Quand vous connectez un iPhone/iPod touch à la prise d’entrée USB, la demande
de pairage (via Bluetooth) est activée automatiquement si
sur
[ON]
. (Page 22)
Appuyez sur le bouton de volume pour faire le pairage une fois que vous avez
validé le nom de périphérique.
Bluetooth — Téléphone portable
Réception d’un appel
Quand il y a un appel entrant:
• La zone
[KEY 1]
et la zone
[KEY 2]
• L’appareil répond automatiquement à l’appel si
sélectionnée. (Page20)
Pendant un appel:
• La zone
[LCD DISPLAY]
SELECT]
(page 30) tandis que la zone
couleur verte.
• Si vous mettez hors tension l’appareil, le Bluetooth est déconnecté.
s’éclaire en fonction des réglages réalisés pour
s’allument en couleur verte et clignotent.
[KEY 1]
et la zone
[AUTO PAIRING]
[AUTO ANSWER]
[KEY 2]
est réglé
sur une heure
[COLOR
s’allument en
Les opérations suivantes peuvent différer ou peuvent ne pas être disponibles en
fonction du téléphone connecté.
Pour Sur la façade
Premier appel entrant...
Répondre à un appel
Refuser un appel
Fin d’un appel
Pendant que vous parlez pour le premier appel entrant...
Répondez à un autre appel entrant et
mettez en attente l’appel actuel
Refusez un autre appel entrant
Quand vous avez deux appels actifs...
Terminez l’appel actuel et activez
l’appel en attente
Commutez entre l’appel actuel et
l’appel en attente
Ajustez le volume du téléphone*1
[00]
à
[35]
(Défaut:
[15]
)
Commute entre le mode mains libres
et le mode de conversation privée*2
*1 Cet ajustement n’affecte pas le volume des autres sources.
*2 Les opérations peuvent différer en fonction du périphérique Bluetooth connecté.
Appuyez sur
volume ou sur l’une des touches
numériques (1 à 6).
Appuyez sur
Appuyez sur
Appuyez sur
Appuyez sur
Appuyez sur
Appuyez sur
Tournez le bouton de volume
pendant un appel.
Appuyez sur 6
appel.
, sur le bouton de
.
.
.
.
.
.
IW pendant un
FRANÇAIS
19
Page 72

Bluetooth®
Amélioration de la qualité des voix
Quand vous parlez au téléphone...
1 Appuyez sur le bouton de volume pour entrer
2 Tournez le bouton de volume pour sélectionner un élément (voir le tableau
suivant), puis appuyez sur le bouton.
3 Répétez l’étape 2 jusqu’à ce que l’élément souhaité soit sélectionné ou
activé.
4 Maintenez enfoncée pour quitter.
Pour retourner à l’option de réglage précédente, appuyez sur
[MIC GAIN] [LEVEL –10]à[LEVEL +10]([LEVEL –4]):La sensibilité du microphone
[NR LEVEL] [LEVEL –5]à[LEVEL +5]([LEVEL 0]):Ajustez le niveau de réduction de
[ECHO CANCEL] [LEVEL –5]à[LEVEL +5]([LEVEL 0]):Ajustez le temps de retard
augmente quand le numéro augmente.
bruit jusqu’à ce qu’un minimum de bruit soit entendu pendant une conversation
téléphonique.
d’annulation de l’écho jusqu’à ce que le dernier écho est entendu pendant une
conversation téléphonique.
Réalise les réglages de réception d’un appel
Appuyez sur pour entrer en mode Bluetooth.
1
2 Tournez le bouton de volume pour sélectionner un élément (voir le tableau
suivant), puis appuyez sur le bouton.
3 Répétez l’étape 2 jusqu’à ce que l’élément souhaité soit sélectionné ou
activé.
4 Maintenez enfoncée pour quitter.
Pour retourner à l’option de réglage précédente, appuyez sur
[FUNCTION]
.
.
Défaut: [XX]
.
Défaut: [XX]
[SETTINGS]
[AUTO ANSWER]
[BATT/SIGNAL]* [AUTO]: Indique la puissance de la batterie et du signal sur l’affichage
* Les fonctionnalités dépendent du type de téléphone utilisé.
[1] à [30]: L’appareil répond au téléphone entrant automatiquement pendant le
temps sélectionné (secondes).;
supplémentaire (page 39) quand l’appareil détectée un périphérique Bluetooth
et que le périphérique Bluetooth est connecté. ;
[OFF]: Annulation.
[OFF]: Annulation.
Faire un appel
Vous pouvez faire un appel à partir de l’historique, du répertoire d’adresses
ou composer le numéro. Un appel par commande vocale est possible si votre
téléphone portable possède cette fonction.
1 Appuyez sur pour entrer en mode Bluetooth.
“(Nom du premier périphérique)” apparaît.
• Si deux téléphones Bluetooth sont connectés, appuyez de nouveau sur
pour connecter sur un autre téléphone.
“(Nom du deuxième périphérique)” apparaît.
2 Tournez le bouton de volume pour sélectionner un élément (voir le tableau
suivant), puis appuyez sur le bouton.
3 Répétez l’étape 2 jusqu’à ce que l’élément souhaité soit sélectionné/activé
ou suivez les instructions données pour l’élément sélectionné.
4 Maintenez enfoncée pour quitter.
Pour retourner à l’option de réglage précédente, appuyez sur
[CALL HISTORY]
(Applicable uniquement quand le téléphone prend en charge PBAP.)
1
Appuyez sur le bouton de volume pour sélectionner un nom ou un numéro de
téléphone.
• “INCOMING,” “OUTGOING” ou “MISSED” apparaît sur la partie inférieure de
l’affichage pour indiquer l’état de l’appel précédent.
• Appuyez sur DISP pour changer la catégorie de l’affichage (NUMBER ou
NAME).
• “NO DATA” apparaît s’il n’y a pas d’historique d’appels enregistré ou de
numéro d’appel.
2
Appuyez sur le bouton de volume pour appeler.
.
20
FRANÇAIS
Page 73

Bluetooth®
[PHONE BOOK]
[NUMBER DIAL]
[VOICE]
(Applicable uniquement quand le téléphone prend en charge PBAP.)
1
Tournez le bouton de volume rapidement pour entrer en mode de recherche
alphabétique (si le répertoire d’adresses contient beaucoup de contacts).
Le premier menu (ABCDEFGHIJK) apparaît.
• Pour passer sur les autres menus (LMNOPQRSTUV ou WXYZ1
1
/ 2 .
• Pour sélectionner la première lettre souhaitée, touchez le bouton de volume
ou appuyez sur
Sélectionnez “1” pour faire une recherche avec les numéros et sélectionnez
“
2
Tournez le bouton de volume pour choisir un nom, puis appuyez sur le bouton.
3
Tournez le bouton de volume pour choisir un numéro de téléphone, puis
appuyez sur le bouton pour appeler.
• Pour utiliser le répertoire d’adresses avec cet appareil, assurez-vous d’autoriser
l’accès ou le transfert à partir de votre smartphone. En fonction du téléphone
connecté, le processus peut différer.
• Les contacts sont catégorisés de la façon suivante: HOME, OFFICE, MOBILE,
OTHER, GENERAL
• Cet appareil peut uniquement afficher les lettres non accentuées. (Les lettres
accentuées telles que “Ú” sont affichées comme “U”.)
1
Tournez le bouton de volume pour sélectionner un numéro (0 à 9) ou un
caractère (
2
Appuyez sur S / T pour déplacer la position d’entrée.
Répétez les étapes 1 et 2 jusqu’à ce que vous terminiez d’entrer le numéro de
téléphone.
3
Appuyez sur le bouton de volume pour appeler.
Dites le nom du contact que vous souhaitez appeler ou la commande vocale pour
commander les fonctions du téléphone. (Reportez-vous aussi à“Faites au appel en
utilisant la reconnaissance vocale” ci-après.)
S
/ T, puis appuyez sur le bouton.
” pour faire une recherche avec les symboles.
, #, +).
[LOW]/[MID]/[FULL]: Affiche la puissance de la batterie.*
[NO SIGNAL]/[LOW]/[MID]/[MAX]: Montre la puissance du signal actuellement reçu.*
* Les fonctionnalités dépendent du type de téléphone utilisé.
), appuyez sur
Faites au appel en utilisant la reconnaissance vocale
1 Maintenez enfoncée VOICE pour activer la reconnaissance vocale du
téléphone connecté.
2 Dites le nom du contact que vous souhaitez appeler ou la commande
vocale pour commander les fonctions du téléphone.
• Les fonctions de reconnaissance vocale prises en charge varient pour chaque
téléphone. Référez-vous au manuel d’instructions du téléphone connecté pour
les détails.
Stockage d’un contact en mémoire
Vous pouvez mémoriser un maximum de 6 contacts sur les touches numériques
(1 à 6).
1 Appuyez sur pour entrer en mode Bluetooth.
2 Tournez le bouton de volume pour choisir
[NUMBER DIAL]
3 Tournez le bouton de volume pour sélectionner un contact ou entrez un
numéro de téléphone.
Si un contact est sélectionné, appuyez sur le bouton de volume pour afficher
le numéro de téléphone.
4 Maintenez enfoncée une des touches numériques (1 à 6).
“STORED” apparaît quand les contacts sont mémorisés.
Pour supprimer un contact de la mémoire préréglée, choisissez
l’étape 2 et mémorisez un numéro vide à l’étape 3 et passez à l’étape 4.
, puis appuyez sur le bouton.
[CALL HISTORY], [PHONE BOOK]
[NUMBER DIAL]
ou
à
Passez un appel sur un numéro préréglé
1
Appuyez sur pour entrer en mode Bluetooth.
2 Appuyez sur l’une des touches numériques (1 à 6).
3 Appuyez sur le bouton de volume pour appeler.
“NO MEMORY” apparaît s’il n’y a pas de contact mémorisé.
FRANÇAIS
21
Page 74

Bluetooth®
Réglages du mode Bluetooth
1
Appuyez sur le bouton de volume pour entrer
2 Tournez le bouton de volume pour sélectionner un élément (voir le tableau
suivant), puis appuyez sur le bouton.
3 Répétez l’étape 2 jusqu’à ce que l’élément souhaité soit sélectionné/activé
ou suivez les instructions données pour l’élément sélectionné.
4 Maintenez enfoncée pour quitter.
Pour retourner à l’option de réglage précédente, appuyez sur
[FUNCTION]
.
.
Défaut: [XX]
[BT MODE]
[PHONE SELECT]
[AUDIO SELECT]
[DEVICE DELETE]
[PIN CODE EDIT]
(0000)
[RECONNECT] [ON]:L’appareil se reconnecte automatiquement quand le dernier
[AUTO PAIRING] [ON]:L’appareil est apparié automatiquement avec le périphérique Bluetooth
Permet de sélectionner le téléphone ou le périphérique audio à connecter
ou déconnecter.
“
” apparaît devant le nom de l’appareil quand il est connecté.
“
” apparaît devant le périphérique de lecture audio actuel.
• Vous pouvez connecter un maximum de deux téléphones Bluetooth et un
périphérique audio Bluetooth en même temps.
1
Tournez le bouton de volume pour choisir le périphérique à supprimer, puis
appuyez sur le bouton.
2
Tournez le bouton de volume pour choisir [YES] ou [NO], puis appuyez
sur le bouton.
Change le code PIN (6 chiffres maximum).
1
Tournez le bouton de volume pour sélectionner un numéro.
2
Appuyez sur S / T pour déplacer la position d’entrée.
Répétez les étapes 1 et 2 jusqu’à ce que le code PIN soit entré complètement.
3
Appuyez sur le bouton de volume pour valider.
périphérique Bluetooth connecté est dans la plage.;
pris en charge (iPhone/iPod touch) quand il est connecté par la prise d’entrée
USB. En fonction du système d’exploitation du périphérique connecté, il se
peut que cette fonction ne fonctionne pas. ;
[OFF]:Annulation.
[OFF]:Annulation.
[INITIALIZE] [ YES]:Initialise tous les réglages Bluetooth (y compris le pairage mémorisé,
le répertoire téléphonique, etc.).;
[NO]:Annulation.
Mode de vérification Bluetooth
Vous pouvez vérifier la connectivité du profile pris en charge entre le périphérique
Bluetooth et l’appareil.
• Assurez-vous qu’il n’y aucun périphérique Bluetooth apparié.
1 Maintenez enfoncée .
“PLEASE PAIR YOUR PHONE PIN 0000” apparaît sur l’affichage.
2 Recherchez et sélectionnez le nom de votre récepteur (“DPX-7200DAB”) sur
le périphérique Bluetooth.
3 Utilisez le périphérique Bluetooth pour valider le pairage.
“TESTING” clignote sur l’affichage.
Le résultat de la connectivité (OK ou NG) apparaît après la vérification.
PAIRING: État du pairage
HF CNT: Compatibilité avec le Profile mains libres (HFP)
AUD CNT: Compatibilité avec le Profile de distribution audio avancé (A2DP)
PB DL: Compatibilité avec le Profile d’accès au répertoire d’adresses (PBAP)
Pour annuler le mode de vérification, maintenez enfoncée
l’appareil hors tension.
B SRC pour mettre
22
FRANÇAIS
Page 75

Bluetooth®
Bluetooth — Audio
Quand la source est BT AUDIO, vous pouvez vous connecter à cinq périphériques
audio Bluetooth et commuter parmi ces cinq périphériques.
Écoute du lecteur audio via Bluetooth
1
Appuyez répétitivement sur B SRC pour sélectionner BT AUDIO.
2 Commandez le lecteur audio via Bluetooth pour démarrer la lecture.
Pour Sur la façade
Lecture/pause
Choisissez un groupe ou
un dossier
Saut vers l’arrière/saut vers
l’avant
Recherche rapide vers l’arrière/
vers l’avant
Lecture répétée Appuyez répétitivement sur 4
Appuyez sur 6
Appuyez sur 1
Appuyez sur
Maintenez enfoncée
[ALLREPEAT]/[FILEREPEAT]/[GROUP REPEAT]
[REPEATOFF]
IW.
/ 2 .
S / T.
S / T.
.
*/
Pour Sur la façade
Lecture aléatoire Maintenez enfoncée 3 pour sélectionner
Sélectionnez un fichier à partir
d’un dossier/liste
Commutation entre les
périphériques audio Bluetooth
* En fonction du périphérique connecté, il se peut que certains périphériques ne prennent pas en charge
cette fonction.
Les opérations et les indications de l’affichage peuvent différer en fonction de leur
disponibilité sur le périphérique connecté.
[ALL RANDOM]
•
Appuyez sur 3 pour sélectionner
[RANDOMOFF].
Reportez-vous à “Sélectionnez un fichier à lire”
à la page 13.
Appuyez sur 5.
(Appuyer sur la touche “Play” directement
sur le périphérique connecté permet
aussi de commuter sur la sortie sonore du
périphérique.)
ou
[GROUP RANDOM]
*.
Écoute de l’iPod/iPhone via Bluetooth
Vous pouvez écouter des morceaux sur l’iPod/iPhone via Bluetooth sur cet
appareil.
Appuyez répétitivement sur B SRC pour sélectionner iPodBT.
• Vous pouvez commander iPod/iPhone de la même façon que iPod/iPhone via
prise d’entrée USB. (Page12)
• Si vous branchez un iPod/iPhone sur la prise d’entrée USB pendant l’écoute
d’une source iPodBT, la source change automatiquement sur iPod USB.
Appuyez
B SRC pour sélectionner la source iPodBT si le périphérique est
toujours connecté via Bluetooth.
FRANÇAIS
23
Page 76

AMAZON ALEXA
Alexa est le service vocal de cloud mis au point par Amazon. Vous pouvez
demander à Alexa de lire de la musique, d’obtenir des bulletins météo, des
informations routières, de commander des périphériques de maison intelligente,
de faire des achat sur Amazon, de faire des recherches sur Internet, de
programmer des
Préparation:
• Créez un compte sur <www.amazon.com>.
• Installez la dernière version de l’application mobile Alexa sur votre appareil
(iPhone/iPod touch ou périphérique Android), puis connectez-vous à
l’application.
• Assurez-vous d’activer la connexion internet sur votre smartphone.
Configuration pour la première fois
Pour un périphérique Android
1 Appariez votre périphérique avec cet appareil via Bluetooth. (Page 18)
2 Démarrez l’application Alexa mobile sur votre appareil.
3 Appariez cet appareil à l’application mobile Alexa.
Réalisez l’option A ou l’option B.
Pour iPhone/iPod touch
1 Appariez votre périphérique avec cet appareil via Bluetooth. (Page 18)
2 Démarrez l’application Alexa mobile sur votre appareil.
3 Appuyez sur sur l’appareil pour accéder à la source ALEXA.
• Vous pouvez aussi appuyer répétitivement sur B SRC pour sélectionner la
source iPod BT.
4 Appariez cet appareil à l’application mobile Alexa.
Réalisez l’option A ou l’option B.
Option A: Liaison directe
Accédez à l’URL suivant ou scannez le code QR avec votre smartphone:
https://www.kenwood.com/car/alexa
rappels, etc.
Option B: Pairage manuel
1
Démarrez l’application mobile Alexa et accédez à l’ongle “Devices (Périphériques)”.
2
Touchez l’icône “ + ” dans le coin supérieur droit.
3
Touchez “Add Device (Ajout de périphérique)”.
4
Touchez “Automotive Accessory (Accessoire automobile)” ou “Headphones (Casque d’écoute)” sur la liste
des types de périphérique.
5
Touchez le nom de votre autoradio (“DPX-7200DAB”) et suivez les instructions.
Une fois le processus de configuration terminé, l’application Alexa mobile établit
une connexion avec l’appareil.
• La connexion Alexa peut se déconnecter si:
– Le profile A2DP est déconnecté
– Le Bluetooth est déconnecté
– Cet appareil est mis hors tension
– Toute autre condition relative au périphérique connecté.
Pour rétablir la connexion avec Alexa, reconnectez le profile A2DP.
• La connexion avec Alexa ne peut pas être rétablie si vous:
– Réinstallez l’application Alexa mobile
– Supprimez le périphérique apparié et réalisez de nouveau le pairage (pour un
périphérique Android)
Pour rétablir la connexion avec Alexa, réalisez de nouveau le processus de
configuration.
• Vous pouvez vérifier la connexion avec Alexa à partir de l’application Alexa
mobile.
Si le nom de cet appareil apparaît sur l’écran “ALL DEVICES”, vous n’avez pas
besoin de réaliser de nouveau le processus de configuration.
24
FRANÇAIS
Page 77

AMAZON ALEXA Réglages audio
Opérations de base
Une fois que la connexion avec Alexa est établie...
1 Appuyez sur sur l’appareil pour parler avec Alexa.
L’affichage montre: “ALEXA” “LISTENING...”.
2 Communiquez avec Alexa via le microphone connecté. (Page18)
“THINKING...” apparaît pendant qu’Alexa traite l’entrée vocale.
“SPEAKING...” apparaît pendant qu’Alexa répond à votre entrée vocale.
“ALEXA” ou une information sur l’affichage telle que la durée de lecture, le titre
due morceau, etc. apparaît pendant que Alexa est en attente.
• Pour retourner à la source précédente à ALEXA, appuyez sur
• Pour activer Alexa, appuyez sur
• Pour annuler l’état d’écoute actuel, appuyez sur
• Pour annuler les états penser/parler et passer à l’état d’écoute, appuyez sur
• Une seule connexion Alexa peut être réalisée en même temps.
• “DISCONNECTED” apparaît si l’appareil est déconnecté de l’application Alexa
mobile ou si la connexion Bluetooth est coupée.
.
.
Démarrez l’écoute
Quand Alexa est en attente...
1 Appuyez sur sur l’appareil pour activer Alexa.
L’affichage montre: “LISTENING...”.
2 Communiquez avec Alexa via le microphone connecté. (Page18)
3 Pendant la lecture de musique avec la source ALEXA, vous pouvez réaliser
les opérations suivantes.
Pour Sur la façade
Lecture/pause
Saut vers l’arrière/saut vers l’avant
Pendant la lecture de musique, appuyez sur
activer Alexa. Vous pouvez maintenant communiquer avec Alexa.
Appuyez sur 6
Appuyez sur
pour mettre la musique en pause et
B SRC.
IW.
S / T.
1 Appuyez sur le bouton de volume pour entrer
.
2 Tournez le bouton de volume pour sélectionner un élément (voir le tableau
suivant), puis appuyez sur le bouton.
3 Répétez l’étape 2 jusqu’à ce que l’élément souhaité soit sélectionné ou
activé.
4 Maintenez enfoncée pour quitter.
Pour retourner à l’option de réglage précédente, appuyez sur
[AUDIO CONTROL]
[SUB-W LEVEL]
[EASYEQ]
[LEVEL –50] à [LEVEL +10] ([LEVEL 0]): Ajuste le niveau de sortie du caisson
de grave.
Ajustez vos propres ajustements sonores.
• Les réglages sont mémorisés sur
• Les réglages réalisés peuvent affecter les réglages actuels de
[SW]: [LEVEL –50]à[LEVEL +10] (Défaut: [LEVEL 0]
[BASS]: [LEVEL –9]à[LEVEL +9] [LEVEL 0]
[MID]: [LEVEL –9]à[LEVEL +9] [LEVEL 0]
[TRE]: [LEVEL –9]à[LEVEL +9] [LEVEL 0])
[FUNCTION]
.
[USER] dans [PRESET EQ].
.
Défaut: [XX]
[MANUAL EQ].
FRANÇAIS
25
Page 78

Réglages audio
[MANUAL EQ]
[62.5HZ] [LEVEL] [LEVEL–9]à[LEVEL+9] ([LEVEL0]): Réglez le
[100HZ]/[160HZ]/
[250HZ]/[400HZ]/
[630HZ]/[1KHZ]/
[1.6KHZ]/[2.5KHZ]/
[4KHZ]/[6.3KHZ]/
[10KHZ]/[16KHZ]
Ajuste vos propres réglages sonores pour chaque source.
• Les réglages sont mémorisés sur
• Les réglages réalisés peuvent affecter les réglages actuels de
niveau à mémoriser pour chaque source.
(Avant de réaliser un ajustement, choisissez la source
que vous souhaitez ajuster.)
[BASS EXTEND] [ON]:Met en service les graves étendus.;
[LEVEL –9] à [LEVEL +9] ([LEVEL 0]): Réglez le niveau à mémoriser
pour chaque source.
(Avant de réaliser un ajustement, choisissez la source que vous souhaitez
ajuster.)
[OFF]:Annulation.
[USER] dans [PRESET EQ].
[EASYEQ].
[Q FACTOR] [1.35]/[1.50]/[2.00]:Règle le facteur de qualité.
[PRESET EQ] [NATURAL]/[ROCK]/[POPS]/[EASY]/[TOP40]/[JAZZ]/[POWERFUL]/
[BASS BOOST] [LEVEL1]à[LEVEL5]: Choisit votre niveau préféré d’accentuation des
[LOUDNESS] [LEVEL1]/[LEVEL2]:Sélectionner votre accentuations préférée pour les
[USER]: Sélectionne un égaliseur préréglé adapté à votre genre de musique.
• Quand la démonstration de l’affichage est activé (
initialement, page 31),
[PRESETEQ].
– Si vous réglez
sélectionné comme réglage par défaut pour
(Sélectionnez
[MANUAL EQ].)
graves.;
[OFF]:Annulation.
basses ou hautes fréquences pour produire un son plus équilibré aux faibles
niveaux de volume.;
[ROCK] est sélectionné automatiquement pour
[DEMO MODE] sur [OFF] (page 31), [NATURAL] est
[USER] pour utiliser les réglages réalisés dans [EASY EQ] ou
[OFF]:Annulation.
[ON] est sélectionné
[PRESET EQ].
[SUBWOOFER SET] [ON]: Met en service la sortie du caisson de grave.; [OFF]:Annulation.
[FADER]
(Non applicable si la transition 3 voies est sélectionnée.)
[R15]à[F15]([0]): Règle la balance de sortie des enceintes avant et arrière.
[BALANCE] [L15]à[R15]([0]): Règle la balance de sor tie des enceintes gauche et droite.
[VOLUME OFFSET] [–15]à[+6]([0]):Prérègle le niveau de volume initial de chaque source en
comparaison avec le niveau de volume FM.
(Avant un ajustement, sélectionnez la source que vous souhaitez ajuster.)
[SOUND EFFECT]
[SOUNDRECNSTR]
(Reconstruction
sonore)
[SPACE ENHANCE]
[SND REALIZER] [LEVEL1]/[LEVEL2]/[LEVEL3]:Rend virtuellement le son plus réaliste.;
[STAGE EQ] [LOW]/[MIDDLE]/[HIGH]:Ajuste virtuellement la position sonore entendue
[DRIVE EQ] [ON]:Accentue la fréquence pour réduire le bruit entendu de l’extérieur de la
[SPEAKER SIZE]
[X ‘ OVER]
[DTA SETTINGS]
[CAR SETTINGS]
•
[SUB-W LEVEL]
sur
[ON]
.
(Ne s’applique pas à la source RADIO, à la source DIGITAL AUDIO et à la source
AUX.)
[ON]:Crée un son réaliste en compensant les composants haute fréquence et
en rétablissant le temps de montée de la forme d’onde qui est perdu lors de la
compression des données audio.;
(Ne s’applique pas à la source RADIO et à la source DIGITAL AUDIO.)
[SMALL]/[MEDIUM]/[LARGE]:Améliore virtuellement l’espace sonore.;
[OFF]:Annulation.
[OFF]:Annulation.
[OFF]:Annulation.
par les enceintes.;
voiture ou le bruit roulement des pneus.;
En fonction du type de transition que vous avez sélectionné (voir “Changement
du type de transition” à la page 7), les options de réglage pour transition
2 voies ou transition 3 voies apparaîtront. (Voir “Réglages de transition” à la
page27.)
Par défaut, le type de transition 2 voies est sélectionné.
Pour les réglages, voir “Réglages de l’alignement temporel numérique” à la
page28.
peut être sélectionné uniquement si
[OFF]:Annulation.
[OFF]:Annulation.
[SUBWOOFER SET]
est réglé
26
FRANÇAIS
Page 79

Réglages audio
Réglages de transition
Voici les options de réglage disponibles pour la transition 2 voies et la transition
3 voies.
SPEAKER SIZE
La sélection est faite en fonction de la taille de l’enceinte connectée permettant
d’obtenir les performances optimales.
• Les réglages de la fréquence et de la pente sont réalisés automatiquement pour
la transition de l’enceinte sélectionnée.
• Si
[NONE]
est sélectionné pour l’enceinte suivante dans
[X ‘ OVER]
de l’enceinte sélectionnée n’est pas disponible.
– Transition 2 voies :
– Transition 3 voies :
X ‘ OVER (transition)
•
[FRQ]/[F-HPFFRQ]/[R-HPFFRQ]/[SWLPF FRQ]/[HPFFRQ]/[LPFFRQ]
fréquence de transition pour les enceintes sélectionnées (filtre passe haut ou
filtre passe bas).
Si
[THROUGH]
sélectionnées.
•
[SLOPE]/[F-HPFSLOPE]/[R-HPFSLOPE]/[SWLPF SLOPE]/[HPFSLOPE]/[LPFSLOPE]
Ajuste la pente de transition.
Peut être uniquement sélectionné si un réglage autre que
pour la fréquence de transition.
•
[SW LPF PHASE]/[PHASE]
synchroniser avec la sortie des autres enceintes.
•
[GAINLEFT]/[GAINRIGHT]/[F-HPFGAIN]/[R-HPFGAIN]/[SWLPF GAIN]/[GAIN]
volume de sortie de l’enceinte sélectionnée.
[TWEETER]
de
[WOOFER]
est sélectionné, tous les signaux sont envoyés aux enceintes
: Sélectionne la phase de la sortie de l’enceinte à
[FRONT]/[REAR]/[SUBWOOFER]
[SPEAKER SIZE]
: Ajuste la
[THROUGH]
, le réglage
:
est choisi
: Ajuste le
Options de réglage de la transition 2 voies
[SPEAKER SIZE]
[FRONT] [SIZE]
[TWEETER]
[REAR] [8CM]/[10CM]/[12CM]/[13CM]/[16CM]/[17CM]/[18CM]/[4×6]/
[SUBWOOFER]
[5×7]/[6×8]/[6×9]/[7×10]/[NONE] (non connecté)
[16CM]/[20CM]/[25CM]/[30CM]/[38CM OVER]/[NONE]
(non connecté)
[8CM]/[10CM]/[12CM]/[13CM]/[16CM]/[17CM]/
[18CM]/[4×6]/[5×7]/[6×8]/[6×9]/[7×10]
[SMALL]/[MIDDLE]/[LARGE]/[NONE](non connecté)
[X ' OVER]
[TWEETER] [FRQ]
[GAIN LEFT]
[GAIN RIGHT]
[FRONT HPF] [F-HPF FRQ]
[F-HPF SLOPE]
[F-HPF GAIN]
[1KHZ]/[1.6KHZ]/[2.5KHZ]/[4KHZ]/[5KHZ]/
[6.3KHZ]/[8KHZ]/[10KHZ]/[12.5KHZ]
[–8] à [0]
[–8] à [0]
[30HZ]/[40HZ]/[50HZ]/[60HZ]/[70HZ]/[80HZ]/
[90HZ]/[100HZ]/[120HZ]/[150HZ]/[180HZ]/
[220HZ]/[250HZ]/[THROUGH]
[–6DB]/[–12DB]/[–18DB]/[–24DB]
[–8] à [0]
[REAR HPF] [R-HPF FRQ]
[R-HPF SLOPE]
Configurez les réglages pour les enceintes arrière de la
même façon que pour les enceintes avant.
[R-HPF GAIN]
FRANÇAIS
27
Page 80

Réglages audio
[SUBWOOFER LPF] [SW LPF FRQ] [30HZ]/[40HZ]/[50HZ]/[60HZ]/[70HZ]/[80HZ]/
[SW LPF SLOPE]
[SW LPF PHASE]
[90HZ]/[100HZ]/[120HZ]/[150HZ]/[180HZ]/
[220HZ]/[250HZ]/[THROUGH]
[–6DB]/[–12DB]/[–18DB]/[–24DB]
[REVERSE] (180°)/[NORMAL] (0°)
[SW LPF GAIN] [–8] à [0]
•
[SUBWOOFER]
sélectionné uniquement si
de
[SPEAKER SIZE]
et
[SUBWOOFER LPF]
[SUBWOOFER SET]
de
[X’OVER]
est réglé sur
[ON]
peut être
. (Page26)
Options de réglage de la transition 3 voies
[SPEAKER SIZE]
[TWEETER]
[MID RANGE]
[WOOFER]
[SMALL]/[MIDDLE]/[LARGE]
[8CM]/[10CM]/[12CM]/[13CM]/[16CM]/[17CM]/[18CM]/[4×6]/
[5×7]/[6×8]/[6×9]
[16CM]/[20CM]/[25CM]/[30CM]/[38CM OVER]/[NONE](non connecté)
[X ' OVER]
[TWEETER] [HPF FRQ]
[SLOPE]
[PHASE]
[1KHZ]/[1.6KHZ]/[2.5KHZ]/[4KHZ]/[5KHZ]/
[6.3KHZ]/[8KHZ]/[10KHZ]/[12.5KHZ]
[–6DB]/[–12DB]
[REVERSE] (180°)/[NORMAL] (0°)
[GAIN] [–8] à [0]
[MID RANGE] [HPF FRQ] [30HZ]/[40HZ]/[50HZ]/[60HZ]/[70HZ]/[80HZ]/
[HPF SLOPE]
[LPF FRQ]
[LPF SLOPE]
[PHASE]
[90HZ]/[100HZ]/[120HZ]/[150HZ]/[180HZ]/
[220HZ]/[250HZ]/[THROUGH]
[–6DB]/[–12DB]
[1KHZ]/[1.6KHZ]/[2.5KHZ]/[4KHZ]/[5KHZ]/
[6.3KHZ]/[8KHZ]/[10KHZ]/[12.5KHZ]/[THROUGH]
[–6DB]/[–12DB]
[REVERSE] (180°)/[NORMAL] (0°)
[GAIN] [–8] à [0]
[WOOFER] [LPF FRQ]
[SLOPE]
[PHASE]
[GAIN]
•
[WOOFER]
de
uniquement si
[SPEAKER SIZE]
[SUBWOOFER SET]
[30HZ]/[40HZ]/[50HZ]/[60HZ]/[70HZ]/[80HZ]/
[90HZ]/[100HZ]/[120HZ]/[150HZ]/[180HZ]/
[220HZ]/[250HZ]/[THROUGH]
[–6DB]/[–12DB]
[REVERSE] (180°)/[NORMAL] (0°)
[–8] à [0]
et
[WOOFER]
de
[X’OVER]
est réglé sur
peut être sélectionné
[ON]
. (Page26)
Réglages de l’alignement temporel numérique
L’alignement temporel numérique règle la temporisation de la sortie d’enceinte
pour créer un environnement qui convient mieux à votre véhicule.
• Pour plus d’informations, voir “Détermination automatique du temps de retard” à
la page29.
28
FRANÇAIS
Page 81

Réglages audio
[DTA SETTINGS]
[POSITION]
[DISTANCE] [0CM] à [610CM]:Ajuste avec précision la distance de compensation.
[GAIN] [–8DB] à [0DB]:Ajuste avec précision le volume de sortie de l’enceinte
[DTA RESET] [YES]:Réinitialise les réglages ([DISTANCE] et [GAIN]) du réglage
[CAR SETTINGS]
[CAR TYPE] [COMPACT]/[FULL SIZE CAR]/[ WAGON]/[MINIVAN]/[SUV]/
[R-SP LOCATION]
• Avant de réaliser un ajustement pour
sélectionnez l’enceinte que vous souhaitez ajuster:
Quand la transition 2 voies est sélectionnée:
[FRONT LEFT]/[FRONT RIGHT]/[REAR LEFT]/[REAR RIGHT]/[SUBWOOFER]
– Vous pouvez sélectionner uniquement
[SUBWOOFER]
[SUBWOOFER]
Sélectionne votre position d’écoute (point de référence).
[ALL]:Sans compensation; [FRONT RIGHT]: Siège avant droit;
[FRONT LEFT]:Siège avant gauche; [FRONT ALL]:Sièges avant
•
[FRONT ALL] est affiché uniquement quand [2-WAY X’OVER] est
sélectionné. (Page 7)
(Avant de réaliser un ajustement, choisissez l’enceinte que vous souhaitez
ajuster.)
sélectionnée.
(Avant de réaliser un ajustement, choisissez l’enceinte que vous souhaitez
ajuster.)
[POSITION] sélectionné au réglages par défaut.; [NO]:Annulation.
Identifiez votre type de voiture et l’emplacement des enceintes arrière afin de
réaliser les ajustement pour
[MINIVAN(LONG)]:Sélectionne le type de véhicule.;
[OFF]: Sans compensation.
Sélectionne l’emplacement des enceintes arrières de votre véhicule pour
calculer la distance la plus loin de la position d’écoute sélectionnée (point
de référence).
•
[DOOR]/[REAR DECK]:Sélectionnable uniquement quand [CAR TYPE]
est sélectionné pour
ou
[SUV].
•
[2ND ROW]/[3RD ROW]:Sélectionnable uniquement quand
[CAR TYPE] est sélectionné pour [MINIVAN] ou [MINIVAN(LONG)].
si un autre réglage que
de
[SPEAKER SIZE]
[DTA SETTINGS].
[OFF], [COMPACT], [FULL SIZE CAR], [ WAGON]
[DISTANCE]
et
[GAIN]
de
[DTA SETTINGS]
[REAR LEFT], [REAR RIGHT]
[NONE]
. (Page27)
est sélectionné pour
et
[REAR]
Quand la transition 3 voies est sélectionnée:
[TWEETER LEFT]/[TWEETER RIGHT]/[MID LEFT]/[MID RIGHT]/[WOOFER]
– Vous pouvez sélectionner uniquement
[NONE]
•
– La transition 2 voies est sélectionnée. (Page7)
– Un autre réglage que
est sélectionné pour
[R-SP LOCATION]
(Page27)
de
[CAR SETTINGS]
[WOOFER]
de
est sélectionnable uniquement si :
[NONE]
est sélectionné pour
Détermination automatique du temps de retard
Si vous spécifiez la distance à partir de la position d’écoute
actuellement réglée pour n’importe quelle enceinte, le
temps de retard est calculé automatiquement.
1
Réglez [POSITION] et déterminez la position d’écoute
comme point de référence (le point de référence pour
[FRONT ALL] est le centre entre les sièges avant droite
et gauche).
2
Mesure la distance entre la position de référence et les
enceintes.
3
Calculez la distance entre l’enceinte la plus éloignée
(caisson de grave sur l’illustration) et les autres
enceintes.
4
Règle [DISTANCE] calculé à l’étape 3 pour les enceintes
individuelles.
5
Ajuste [GAIN] pour les enceintes individuelles.
Exemple: Quand
position d’écoute.
,
et
[WOOFER]
si un autre réglage que
[SPEAKERSIZE]
[REAR]
. (Page28)
de
[SPEAKER SIZE]
[FRONT ALL] est sélectionné comme
FRANÇAIS
.
29
Page 82

Réglages d’affichage
Identification de zone pour les réglages de la couleur et les réglages de la
luminosité
Réglez le gradateur
Maintenez DISP enfoncé pour activer/désactiver le gradateur.
• Une fois que vous avez maintenu enfoncé ce bouton, le réglage
remplacé par le nouveau.
Changez les réglages d’affichage
1
Appuyez sur le bouton de volume pour entrer
2 Tournez le bouton de volume pour sélectionner un élément (voir le tableau
suivant), puis appuyez sur le bouton.
3 Répétez l’étape 2 jusqu’à ce que l’élément souhaité soit sélectionné/activé
ou suivez les instructions données pour l’élément sélectionné.
4 Maintenez enfoncée pour quitter.
Pour retourner à l’option de réglage précédente, appuyez sur
[FUNCTION]
.
[DIMMER]
.
est
Défaut: [XX]
[DISPLAY]
[COLOR SELECT]
[DIMMER]
[BRIGHTNESS]
[TEXT SCROLL] [ONCE]:Fait défiler une fois les informations de l’affichage.; [AUTO]:Répète le
Sélectionne une couleur d’éclairage pour [ALLZONE], [LCDDISPLAY], [KEY1]
et
[KEY2] séparément.
1
Choisissez une zone. (Voir l’illustration sur la colonne de gauche.)
2
Choisissez une couleur préréglée pour la zone sélectionnée. (Page 31)
Défaut:
[VARIABLE SCAN]
Pour créer votre propre couleur, sélectionnez [CUSTOM R/G/B]. La couleur que
vous avez créé est mémorisée dans
1
Appuyez sur le bouton de volume pour accéder à l’ajustement détaillé de la
couleur.
2
Appuyez sur S/T pour sélectionner la couleur ([R]/[G]/[B]) à ajuster.
3
Tournez le bouton de volume pour ajuster le niveau ([0] à [9]), puis appuyez
sur le bouton.
Assombrit l’éclairage.
[ON]:Le gradateur est activé.
[OFF]:Le gradateur est désactivé.
[DIMMER TIME]:Réglez l’heure d’activation et de désactivation du gradateur.
1
Tournez le bouton de volume pour régler l’heure de mise en service [ON], puis
appuyez sur le bouton.
2
Tournez le bouton de volume pour régler l’heure de mise hors service [OFF],
puis appuyez sur le bouton.
Défaut:
[ON]: [18:00]; [OFF]: [6:00]
Réglez la luminosité séparément pour le jour et la nuit.
1
[DAY]/[NIGHT]: Choisissez le jour ou la nuit.
2
Choisissez une zone. (Voir l’illustration sur la colonne de gauche.)
3
[LEVEL 00] à [LEVEL 31]: Réglez le niveau de luminosité.
défilement à 5 secondes d’intervalle.;
•
Non applicable pour les informations affichées de l’étiquette dynamique
(page 39) pour la source DIGITAL AUDIO
[CUSTOM R/G/B].
[OFF]:Annulation.
30
FRANÇAIS
Page 83

Réglages d’affichage
Installation/Connexion
[CLOCK]
[CLOCK DISPLAY]
[DEMO MODE] [ON]: Active la démonstration automatique de l’affichage si aucune opération n’est
Couleur préréglée:
[INITIAL COLOR]/[VARIABLE SCAN]/[CUSTOM R/G/B]/[RED1]/[RED2]/[RED3]/[PURPLE1]
[PURPLE2]/[PURPLE3]/[PURPLE4]/[BLUE1]/[BLUE2]/[BLUE3]/[SKYBLUE1]/[SKYBLUE2]
[LIGHTBLUE]/[AQUA1]/[AQUA2]/[GREEN1]/[GREEN2]/[GREEN3]/[YELLOWGREEN1]
[YELLOWGREEN2]/[YELLOW]/[ORANGE1]/[ORANGE2]/[ORANGERED]
[ON]:L’horloge apparaît sur l’affichage même quand l’appareil est hors tension.;
[OFF]:Annulation.
effectuée pendant environ 15 secondes. ;
[OFF]: Met hors service la fonction.
/
/
Cette section est réservée aux installateurs professionnels.
Pour des raison de sécurité, laissez le travail de câblage et de montage des
professionnels. Consultez votre revendeur autoradio.
MISE EN GARDE
• L’appareil peut uniquement être utilisé avec une alimentation de 12 V CC, à
masse négative.
• Déconnectez la borne négative de la batterie avant le câblage et le montage.
/
• Ne connectez pas le fil de batterie (jaune) et le fil d’allumage (rouge) au châssis
de la voiture ou au fil de masse (noir) pour éviter les courts-circuits.
• Pour éviter les courts-circuits:
– Isolez les fils non connectés avec du ruban adhésif.
– Assurez-vous de raccorder de nouveau la mise à la masse de cet appareil au
châssis de la voiture après l’installation.
– Fixez les câbles avec des serre-câbles et enrouler un ruban de vinyle autour
des câbles qui entrent en contact avec des pièces métalliques pour protéger
les câbles.
AVERTISSEMENT
• Installez cet appareil dans la console de votre véhicule. Ne touchez pas les
parties métalliques de cet appareil pendant ou juste après son utilisation. Les
parties métalliques, comme le dissipateur de chaleur et le boîtier, deviennent
chaudes.
• Ne connectez pas les fils
masse (noir) ou en parallèle.
• Montez l’appareil avec un angle de moins de 30°.
• Si le faisceau de fils de votre véhicule ne possède pas de borne d’allumage,
connectez le fil d’allumage (rouge) à la borne du boîtier de fusible de votre
véhicule qui offre une alimentation de 12 V CC et qui se met en et hors service
avec la clé de contact.
• Gardez tous les câbles à l’écart des dissipateurs thermiques.
• Après avoir installé l’appareil, vérifiez si les lampes de frein, les indicateurs, les
clignotants, les essuie-glaces, etc. de la voiture fonctionnent correctement.
• Si un fusible saute, assurez-vous d’abord que les câbles ne touches pas le châssis
de la voiture puis remplacez le vieux fusible par un nouveau de même valeur.
des l’enceintes au châssis de la voiture, au fil de
FRANÇAIS
31
Page 84

Installation/Connexion
Liste des pièces pour l’installation
(A) Manchon de montage ( ×1 ) (B) Plaque de garniture ( ×1 )
(C) Faisceau de fils (×1) (D) Clé d’extraction ( ×2 )
Procédure de base
1
Retirez la clé de contact, puis déconnectez la borne de la batterie de la
voiture.
2 Installez l’antenne DAB.
Reportez-vous à “Installation de l’antenne DAB” à la page35.
3 Connectez les fils correctement.
Voir “Connexions” à la page34.
4 Installez l’appareil dans votre voiture.
Reportez-vous à “Installation de l’appareil (montage encastré)” ci-après.
5 Connectez la borne de la batterie de la voiture.
6 Appuyez sur B SRC pour mettre l’appareil sous tension.
7 Réinitialisez l’appareil. (Page4)
Installation de l’appareil (montage encastré)
Réalisez les connexions
nécessaires. (Page 34)
Tordez les languettes appropriées pour
maintenir le manchon de montage en
place.
Tableau de bord
de votre voiture
Installation de l’appareil (sans le manchon de montage)
1 Retirez le manchon de montage et la plaque d’assemblage de l’appareil
avant l’installation.
2 Alignez les entailles de l’appareil (des deux côtés) avec le support de
montage du véhicule et fixez l’appareil avec les vis (en vente dans le
commerce).
32
FRANÇAIS
N’utiliser que les vis spécifiés. L’utilisation de vis incorrects peut endommager
l’appareil.
Page 85

Installation/Connexion
Retrait de l’appareil
1 Insérez le loquet des clés d’extraction dans les trous de chaque côté de la
plaque d’assemblage, puis tirez vers l’extérieur.
2 Insérez les clés d’extraction profondément dans les fentes de chaque côté,
puis suivez les flèches indiquées sur l’illustration.
Connexion d’appareils extérieurs
No. Pièce
Connecteur femelle d’entrée du microphone (Page18)
1
Prises de sortie (Reportez-vous à “Connectez les amplificateurs extérieurs via les prises de
2
sortie” ci-après.)
Prise d’antenne DAB (Page 7, 37)
3
Connectez les amplificateurs extérieurs via les prises de sortie
Lors de la connexion d’un amplificateur extérieur aux prises de sortie de cet
appareil, connectez solidement le fil de masse de l’amplificateur au châssis de la
voiture pour éviter d’endommager l’appareil.
Prises de sortie Transition 2 voies Transition 3 voies
REAR: Sortie arrière Sortie de l’enceinte des aigus
FRONT: Sor tie avant Sortie de l’enceinte des médiums
SW: Sor tie de caisson de grave Sortie de l’enceinte des graves
FRANÇAIS
33
Page 86

Installation/Connexion
Connexions
Si votre voiture ne possède pas de prise ISO:
Nous recommandons d’installer l’appareil en utilisant un harnais de câblage en
vente dans le commerce recommandé spécifiquement pour votre voiture et, pour
votre sécurité, de laisser ce travail a des professionnels. Consultez votre revendeur
autoradio.
Connexion des connecteurs ISO sur certaines voitures VW/Audi ou
Opel (Vauxhall)
Vous aurez peut-être besoin de modifier le câblage du faisceau de fils fourni
comme montré sur l’illustration ci-dessous.
Fusible (10 A)
Borne de l’antenne
A7 (Rouge)
A4 (Jaune)
Câble d’allumage (Rouge)
Câble de batterie (Jaune)
Câblage par défaut
Broche Couleur et fonction (pour les connecteurs ISO)
A4 Jaune : Pile
A5 Bleu/Blanc*1 : Commande d’alimentation
A7 Rouge : Allumage (ACC)
A8 Noir : Connexion à la terre (masse)
]
Violet
34
B1
B2
B3
B4
B5
B6
B7
B8
Violet/noir
]
Gris
Gris/noir
]
Blanc
Blanc/noir
]
Ver t
Vert/noir
FRANÇAIS
: Enceinte arrière (droite)
Pour la transition 3 voies : Enceinte des aigus (droite)
[
: Enceinte avant (droite)
Pour la transition 3 voies : Enceinte des médiums
[
(droite)
: Enceinte avant (gauche)
Pour la transition 3 voies : Enceinte des médiums
[
(gauche)
: Enceinte arrière (gauche)
Pour la transition 3 voies : Enceinte des aigus (gauche)
[
Jaune (Câble de batterie)
Si aucune connexion n’est faite, ne laissez pas le câble sortir de la languette.
AppareilVéhicule
Rouge (Câble d’allumage)
Rouge (A7)
Jaune (A4)
Bleu clair/jaune
(Fil de télécommande de
volant)
Bleu/Blanc*2
(Fil de commande
d’alimentation/ Câble de
commande de l’antenne)
Marron
(Câble de contrôle de la
sourdine)
Connecteurs ISO
STEERING WHEEL
REMOTE INPUT
REMOTE CONT
ANT CONT
P. CONT
MUTE
À l’adaptateur de télécommande volant
À la borne de commande d’alimentation
lorsque vous utilisez l’amplificateur de
puissance en option, soit à la borne de
commande d’antenne du véhicule
Pour connecter au système de navigation
Kenwood, reportez-vous à votre manuel de
navigation
REMARQUE: La sortie totale pour le fil bleu/blanc
(*1) + (*2) est de 12V
350mA.
Page 87

Installation/Connexion
Installation de l’antenne DAB
Connectez l’antenne DAB fournie à la prise d’antenne DAB. (Page 33)
AVERTISSEMENT
• L’antenne film (E) doit uniquement être utilisée à l’intérieur du véhicule.
• Ne l’installez pas dans les endroits suivants:
– où il peut gêner le vue du conducteur.
– où il peut gêner le fonctionnement de dispositifs de sécurité tels que les
coussins de sécurité.
– sur une vitre mobile telle que sur le hayon.
– sur le côté du véhicule (par ex. sur la porte, quart avant de la vitre).
– sur la vitre arrière.
• La force du signal diminue si l’installation est faite dans les endroits suivants:
– sur une vitre réfléchissant les infrarouges ou un endroit recouvert d’un film de
type réfléchissant.
– où elle se superpose avec l’antenne radio d’origine (motif).
– où elle se superpose avec les fils de chauffage des fenêtres.
– sur une vitre qui bloque les signaux radio (par ex. vitre réfléchissante, vitre
d’isolation thermique).
• Une mauvaise réception peut se produire:
– à cause de bruits quand les essuie-glace, la climatisation, ou le moteur est mis
en marche.
– en fonction de la direction de station de diffusion par rapport au véhicule
(antenne).
• Essuyez soigneusement l’huile et les saletés de la surface de collage avec le
nettoyant fourni (H).
• Ne tordez pas ni n’endommagez l’antenne film (E).
• L’installation peut ne pas être possible sur certains véhicules.
• Vérifiez le câblage de l’antenne film (E) et de l’amplificateur (F) avant le collage.
• N’appliquez aucun nettoyant pour vitre après avoir collé l’antenne film (E).
Liste des pièces pour l’installation
Antenne film (×1)
(E)
Amplificateur (câble avec
(F)
amplificateur, 3,5 m) (×1)
Serre-câble (×3)
(G)
Nettoyant (×1)
(H)
Déterminez la position d’installation de l’antenne
• La direction de l’antenne film (E) change selon que l’antenne film (E) est installée sur le côté droit ou
gauche.
• Assurez-vous de vérifier l’emplacement de l’installation de l’antenne film (E) avant de l’installer.
L’antenne film ne peut pas être recollée.
• Séparé des autres antennes par au moins 100 mm.
• Ne collez pas l’amplificateur (F) sur la ligne de céramique (partie noire) autour de la vitre avant. Parce
qu’il n’y a pas assez adhérence.
Installation de l’antenne du côté gauche Installation de l’antenne du côté droit
Ligne de céramique (partie noire)
Feuille de
masse*
(F)
(G)
(G)
Feuille de masse*
* Collez la feuille de masse de l’amplificateur (F) sur la partie métallique du pilier avant.
(F)
FRANÇAIS
35
Page 88

Installation/Connexion
AVERTISSEMENT
Lors de l’installation du câble d’antenne à l’intérieur du pilier avant avec un coussin de sécurité installé
• Le couvercle du pilier avant est fixé avec une attache
spéciale qui peut avoir besoin d’être remplacée lorsqu’elle
est retirée. Contactez votre concessionnaire pour plus
de détails sur le retrait du couvercle du pilier avant et la
disponibilité des pièces de rechange.
• Installez l’amplificateur (F) au-dessus du coussin de
sécurité de façon qu’il ne gène pas le fonctionnement du
coussin de sécurité.
Pilier avant
Coussin de
sécurité
Attache
Présentation de l’installation
Pour des raison de sécurité,
l’antenne doit être installée du côté
passager.
Installation de l’antenne
1
Retirez le couvercle du pilier avant de votre voiture.
Pilier avant
2
Nettoyez le pare-brise avec le nettoyant fourni (H).
– Attendez que la surface de la vitre soit complètement sèche avant de continuer.
– Réchauffez la surface du pare-brise avec le dégivreur s’il fait froid (en hiver).
3
Retirez le séparateur (balise 1) de l’antenne film (E) horizontalement et collez l’antenne sur le
pare-brise.
Séparateur (balise 1)
Ne touchez pas la surface collante (côté adhésif) de l’antenne-film (E).
36
FRANÇAIS
Page 89

Installation/Connexion
4
Frotter l’antenne film doucement sur le pare-brise dans la
direction de la flèche pour qu’elle colle fermement.
5
Retirez le séparateur (balise 2) de l’antenne film (E)
verticalement.
Séparateur (balise 2)
6
Positionnez la protubérance de l’amplificateur (F) sur la
marque
K
Ne touchez la borne ou la surface collante (côté adhésif) de
• Lors de l’installation de l’antenne du côté droit
• Lors de l’installation de l’antenne du côté gauche
de l’antenne film (E) et collez.
l’amplificateur (F).
Borne de l’antenne
film (E)
Feuille de
masse
Feuille de masse
Positionnez la
protubérance sur la
marque
Contact de l’amplificateur
(partie métallique)
K
7
Retirez le film recouvrant la feuille de masse et collez la
feuille de masse sur la partie métallique du véhicule.
Laissez suffisamment d’espace pour la feuille de masse afin
qu’elle n’interfère pas avec les parties intérieures (couverture de
pilier avant). Faites aussi attention à ce que les parties intérieures
n’interfèrent pas avec l’amplificateur (F).
Pare-brise
Feuille de masse
Couvercle du
8
Attachez les câbles d’antenne.
Utilisez un serre-câble (G) pour fixer l’antenne au pilier en
plusieurs points.
9
Remettez en place le couvercle du pilier avant.
Veillez à ne pas endommager la feuille de masse et
l’amplificateur (F) lors de la remise en place.
10
Connectez l’amplificateur (F) à la prise d’antenne DAB située
à l’arrière de l’appareil.
Remarque:
Assurez-vous que
sur le menu
[ON]
est sélectionné initialement.
pilier avant
[DAB ANT POWER]
[FUNCTION]
en mode de veille. (Page 6)
est réglé sur
[ON]
FRANÇAIS
37
Page 90

Références
Entretien
Nettoyage de l’appareil
Essuyez la saleté de la façade avec un chiffon sec au silicone ou un chiffon doux.
Manipulation des disques
• Ne pas toucher la surface d’enregistrement du disque.
• Ne pas coller de ruban adhésif, etc. sur les disques et ne pas utiliser de disque avec du ruban adhésif
collé dessus.
• N’utilisez aucun accessoire pour le disque.
• Nettoyer le disque en partant du centre vers l’extérieur.
• Nettoyez le disque avec un chiffon sec au silicone ou un chiffon doux. N’utilisez aucun solvant.
• Pour retirer un disque de cet appareil, tirez-le horizontalement.
• Retirez les ébarbures du bord du trou central du disque avant d’insérer un disque.
Plus d’informations
Pour: – Les dernières mise à jour du micrologiciel et la liste de compatibilité la plus récente
– Application originale KENWOOD
– Autres informations récentes
Consultez <www.kenwood.com/cs/ce/>.
Généralités
• Cet appareil ne peut lire que les CD suivants:
• Pour des informations détaillées et des remarques sur les fichiers audio compatibles, reportez-vous à
<www.kenwood.com/cs/ce/audiofile/>.
Fichiers pouvant être lus
• Fichier audio reproductible:
Pour les disques: MP3 (.mp3), WMA (.wma), AAC (.aac)
Pour les périphériques USB à mémoire de grande capacité:
MP3(.mp3), WMA(.wma), AAC(.aac), AAC(.m4a), WAV (.wav), FLAC (.flac)
• Supports de disque compatibles: CD-R/CD-RW/CD-ROM
• Formats de fichiers de disques compatibles: ISO 9660 Niveau 1/2, Joliet, Nom de fichier étendu
• Systèmes de fichier de périphérique USB compatibles: FAT12, FAT16, FAT32
Même quand les fichiers audio sont conformes aux normes établies ci-dessus, il est possible que la
lecture ne soit pas possible suivant le type ou les conditions du support ou périphériques.
Un fichier AAC (.m4a) dans un CD codé par iTunes ne peut pas être lu sur cet appareil.
Disques ne pouvant pas être lus
• Disques qui ne sont pas ronds.
• Disques avec des colorations sur la surface d’enregistrement ou disques sales.
• Disques enregistrables/réinscriptibles qui n’ont pas été finalisés.
• CD de 8 cm. Essayer d’insérer un disque à l’aide d’un adaptateur peut entraîner un dysfonctionnement
de l’appareil.
À propos des périphériques USB
• Vous ne pouvez pas connecter un périphérique USB via un hub USB.
• La connexion d’un câble dont la longueur totale dépasse 5 m peut avoir pour conséquence un
fonctionnement anormal de la lecture.
• Cet appareil ne peut pas reconnaître les périphériques USB dont l’alimentation n’est pas de 5 V et
dépasse 1,5A.
À propos de l’iPod/iPhone
• Made for
– iPod touch (6th generation)
– iPhone 5S, 6, 6 Plus, 6S, 6S Plus, SE, 7, 7 Plus, 8, 8 Plus, X, XS, XS MAX, XR (iOS 12.1 ou ultérieur)
• Il n’est pas possible de parcourir les fichiers vidéo sur le menu “Videos” en mode
• L’ordre des morceaux affichés sur le menu de sélection de cet appareil peut être différent de celui de
iPod/iPhone.
• Il n’est pas possible d’utiliser un iPod lorsque “KENWOOD” ou “
• En fonction de la version du système d’exploitation de l’iPod/iPhone, certaines fonctions peuvent ne pas
être utilisables sur cet appareil.
” est affiché sur l’iPod.
[MODE OFF].
38
FRANÇAIS
Page 91

Références
À propos de Spotify
• Prise en charge par l’application Spotify:
– iPhone 5S, 6, 6 Plus, 6S, 6S Plus, SE, 7, 7 Plus, 8, 8 Plus, X, XS, XS MAX, XR (iOS 12.1 ou ultérieur)
– iPod touch (6th generation)
– Android OS 4.0.3 ou ultérieur
• Spotify est un service tiers, et par conséquent les spécifications sont sujettes à changement sans
notification préalable. Par conséquent, la compatibilité peut réduite ou certains services ou même tous
les services peuvent devenir indisponibles.
• Certaines fonction de Spotify ne peuvent pas être utilisées à partir de cet appareil.
• Pour les problèmes lors de l’utilisation de l’application, veuillez contacter Spotify à
<www.spotify.com>.
À propos d’AMAZON ALEXA
• Alexa est un service tiers, et par conséquent les spécifications sont sujettes à changement sans
notification préalable. Par conséquent, la compatibilité peut réduite ou certains services ou même tous
les services peuvent devenir indisponibles.
Changez l’information sur l’affichage
Chaque fois que vous appuyez sur DISP, les informations affichées changent.
• Si aucune information n’est disponible ou si aucune information n’est enregistrée, “NO TEXT”, “NO INFO”,
ou une autre information (par ex. le nom de la station) apparaît ou l’affichage est vide.
Heure de l’horloge
Affichage principal
Affichage supplémentaire
Nom de la
source
STANDBY Nom de la source (Date)
DIGITAL AUDIO Étiquette du service (Étiquette de l’ensemble)
RADIO Fréquence (Date)
CD/USB Pour CD-DA:
Informations sur l’affichage: Affichage principal
(supplémentaire)
Étiquette dynamique (Date)
(EPG) (Date)
Pour les stations FM Radio Data System uniquement:
Nom de la station/Type de programme (Date)
texte+ (Radio texte+)
Fréquence (Date)
Titre de plage (Artiste)
Durée de lecture (Date)
Pour les fichiers MP3/WMA/AAC/WAV/FLAC:
Titre du morceau (Artiste)
(Date)
lecture (Date)
Niveau du signal (Date) retour au début
Nom de fichier (Nom de dossier) Nom de fichier (Date) Durée de
retour au début
Titre (Artiste) Titre (Date) Programme suivant
Titre de morceau (Artiste) Titre de morceau (Date)
retour au début
Titre de plage (Titre du disque) Titre de plage (Date)
retour au début
Titre du morceau (Titre d’album) Titre du morceau
Étiquette du service (Date)
Radio texte (Date) Radio
FRANÇAIS
39
Page 92

Guide de dépannage Références
Nom de la
source
iPod USB/iPod BT
SPOTIFY/
SPOTIFY BT
BT AUDIO/
ALEXA
AUX Nom de la source (Date)
Informations sur l’affichage: Affichage principal
(supplémentaire)
[MODE OFF] est sélectionné (page13):
Quand
Titre de morceau (Artiste)
(Date)
Durée de lecture (Date) retour au début
Titre contextuel (Date)
d’album)
Titre du morceau (Date) Durée de lecture (Date) retour au début
Titre de morceau (Artiste)
(Date)
Durée de lecture (Date) retour au début
Titre de morceau (Titre d’album) Titre de morceau
Titre du morceau (Artiste) Titre du morceau (Titre
Titre de morceau (Titre d’album) Titre de morceau
Symptôme Remède
Le son ne peut pas être
entendu.
“MISWIRING CHECK WIRING
THEN PWR ON” apparaît.
“PROTECTING SEND SERVICE”
apparaît.
Vous ne pouvez pas choisir
la source.
Généralités
Cet appareil ne fonctionne
pas du tout.
Les caractères corrects ne sont
pas affichés.
La réception DAB est
mauvaise.
“DAB ANT ERR” Vérifiez l’antenne DAB. Si vous utilisez une antenne passive
Radio numérique
“RELATED SERV FOUND” • Appuyez sur le bouton de volume pour activer Soft-Link.
• La réception radio est
mauvaise.
Radio
• Bruit statique pendant
analogique
l’écoute de la radio.
• Ajustez le volume sur le niveau optimum.
• Vérifiez les cordons et les connexions.
Mettez l’appareil hors tension, puis assurez-vous que les
prises des câbles d’enceinte sont correctement isolées. Mettez
de nouveau l’appareil sous tension.
Envoyez l’appareil au centre de service le plus proche.
Cochez le réglage
Réinitialisez l’appareil. (Page4)
• Cet appareil peut uniquement afficher les lettres majuscules,
les chiffres et un nombre limité de symboles.
• En fonction de la langue d’affichage que vous avez choisie
(page6), certains caractères peuvent ne pas être affichés
correctement.
Assurez-vous que
(Page6)
(sans amplificateur), réglez
(Page6)
(Page9)
• Appuyez sur
Connectez l’antenne solidement.
[SOURCESELECT]. (Page6)
[ON] est choisi pour [DAB ANT POWER].
[DAB ANT POWER] sur [OFF].
pour annuler.
40
FRANÇAIS
Page 93

Guide de dépannage
Symptôme Remède
Le disque ne peut pas être
éjecté.
Du bruit est produit. Sautez à une autre plage ou changez le disque.
“PLEASE EJECT” apparaît. Réinitialisez l’appareil (page 4). Si cela ne résout pas le
L’ordre de lecture n’est pas celui
que vous pensiez.
La durée de lecture écoulée
n’est pascorrecte.
“READING” clignote sur. • N’utilisez pas trop de niveaux de hiérarchie et de dossiers.
“UNSUPPORTED DEVICE”
apparaît.
CD/USB/iPod
“UNRESPONSIVE DEVICE”
apparaît.
“USB HUB IS NOT SUPPORTED”
apparaît.
• La source ne change pas sur
“USB” quand vous connectez
un périphérique USB lors de
l’écoute d’une autre source.
• “USB ERROR” apparaît.
iPod/iPhone ne peut pas
être mis sous tension ou ne
fonctionne pas.
Maintenez enfoncée
attention que le disque ne tombe pas quand il est éjecté.
Si cela ne résout pas le problème, essayez de réinitialiser
l’appareil (page 4).
problème, consultez votre centre de service le plus proche.
L’ordre de lecture est déterminé par l’ordre dans lequel les
fichiers ont été enregistrés (disque) ou par le nom du fichier
(USB).
Cela dépend du processus d’enregistrement utilisé (disque/
USB).
• Réinsérez le disque ou reconnectez le périphérique (USB/
iPod/iPhone).
• Vérifiez si le périphérique USB connecté est compatible avec
cet appareil et assurez-vous que le système de fichiers est
dans un format compatible. (Page38)
• Reconnectez le périphérique USB.
Assurez-vous que le périphérique USB n’est pas défaillant et
reconnectez-le.
Cet appareil ne peut pas prendre en charge un périphérique
USB connectez via un hub USB.
Le port USB consomme plus de puissance que la limite de
conception. Mettez l’appareil hors tension et débranchez le
périphérique USB. Puis, remettez l’appareil sous tension et
rebranchez le périphérique USB.
Si cette solution ne résout pas le problème, mettez l’appareil
hors tension puis de nouveau sous tension (ou réinitialisez
l’appareil) avant de remplacer le périphérique USB par un
autre.
• Vérifiez la connexion entre cet appareil et l’iPod/iPhone.
• Déconnectez et réinitialisez l’iPod/iPhone en utilisant un
réinitialisation matérielle.
pour éjecter le disque de force. Faites
Symptôme Remède
“LOADING” apparaît quand vous
entrez en mode de recherche
en appuyant sur
“NO DISC” Insèrez un disque reproductible dans la fente d’insertion.
“TOC ERROR” Assurez-vous que le disque est propre et inséré correctement.
“NA FILE” Assurez-vous que le support (disque/USB) contient des
“COPY PRO” Un fichier interdit de copie a été lu (disque/USB).
“NO DEVICE” Connectez un périphérique (USB/iPod/iPhone), puis repassez
CD/USB/iPod
“NO MUSIC” Connectez un périphérique (USB/iPod/iPhone) qui contient
“iPod ERROR” • Reconnectez l’iPod.
“MEMORY FULL” Vous avez atteint la limite maximum de mémoire de votre
“DISCONNECTED” La prise USB est déconnectée de l’appareil principal. Assurez-
“CONNECTING” • Connecté via la prise d’entrée USB: L’appareil est connfecté à
Spotify
“CHECK APP” L’application Spotify n’est pas connectée correctement, ou
Cet appareil continue de préparer la liste des morceaux de
l’iPod/iPhone. Le chargement des données peut être long,
essayez de nouveau plus tard.
.
fichiers audio compatibles. (Page38)
à la source USB ou iPod USB.
des fichiers audio compatibles.
• Réinitialisez l’iPod.
iPod/iPhone.
vous que l’appareil est connecté correctement via USB.
l’appareil principal. Patienter svp.
• Connecté via Bluetooth: Le Bluetooth est déconnecté. Veuillez
vérifier la connexion Bluetooth et assurez-vous que le
périphérique et l’appareil sont appariés et connectés.
l’utilisateur n’est pas connecté. Quittez l’application Spotify et
redémarrez. Puis connectez vous à votre compte Spotify.
FRANÇAIS
41
Page 94

Guide de dépannage
Symptôme Remède
Aucun périphérique Bluetooth
n’est détecté.
Le pairage Bluetooth ne peut
pas être réalisé.
Un écho ou du bruit est
entendu pendant une
conversation téléphonique.
Le son du téléphone est de
mauvaise qualité.
La méthode d’appel vocal ne
réussie pas.
Bluetooth®
Le son est interrompu ou saute
pendant la lecture d’un lecteur
audio Bluetooth.
Le lecteur audio Bluetooth
connecté ne peut pas être
commandé.
“NOT SUPPORT” Le téléphone connecté ne prend pas en charge la fonction
• Faites de nouveau une recherche à partir du périphérique
Bluetooth.
• Réinitialisez l’appareil. (Page4)
• Assurez-vous que vous avez entré le même code PIN pour
l’appareil et le périphérique Bluetooth.
• Supprimez les informations de pairage pour cet appareil et le
périphérique Bluetooth, puis effectuez de nouveau le pairage.
(Page18)
• Ajustez la position du microphone. (Page18)
• Cochez le réglage
• Réduisez la distance entre cet appareil et le périphérique
Bluetooth.
• Déplacez la voiture dans un endroit où vous pouvez obtenir
un meilleur signal de réception.
• Utilisez la méthode d’appel vocal dans un environnement
plus calme.
• Réduisez la distance au microphone quand vous dites le nom.
• Assurez-vous que la même voix que la voix enregistrée est
utilisée.
• Réduisez la distance entre cet appareil et le lecteur audio
Bluetooth.
• Mettez cet appareil hors tension, puis de nouveau sous
tension et essayez de nouveau de connecter l’appareil.
• D’autres périphériques Bluetooth peuvent être en train de se
connecter à l’appareil.
• Vérifiez si le lecteur audio Bluetooth connecté prend en
charge AVRCP (Audio/Video Remote Control Profile).
(Référez-vous aux instructions de votre lecteur audio.)
• Déconnectez et reconnectez à nouveau le lecteur Bluetooth.
de reconnaissance vocale ou le transfert de répertoire
téléphonique.
[ECHO CANCEL]. (Page20)
Symptôme Remède
“NO ENTRY”/“NO PAIR” Il n’y a aucun appareil enregistré connecté/trouvé par
“ERROR” Essayez de nouveau l’opération. Si “ERROR” apparaît de
“NO INFO”/“NO DATA” L’appareil Bluetooth ne peut pas obtenir les informations du
“HF ERROR XX”/
Bluetooth®
“BT ERROR”
“SWITCHING NG” Les téléphones connectés ne prennent peut-être pas en
La connexion Bluetooth entre
le périphérique Bluetooth et
l’appareil est instable.
Aucune réponse d’Alexa après
l’entrée vocale.
Mauvaise réponse d’Alexa. Alexa n’a pas compris ce que vous avez dit ou n’a pas reçu
“DISCONNECTED” Assurez-vous de connecter votre smartphone à l’appareil via
Impossible de connecter ou de
reconnecter l’application Alexa
mobile.
AMAZON ALEXA
Bluetooth.
nouveau, vérifiez si l’appareil extérieur prend en charge la
fonction que vous avez essayée.
contact.
Réinitialiser l’appareil et essayez de nouveau l’opération. Si
cela ne résout pas le problème, consultez votre centre de
service le plus proche.
charge la fonction de commutation de téléphone.
Supprimer de l’appareil un périphérique Bluetooth enregistré
que vous n’utilisez pas. (Page 22)
Amazon cloud n’a pas été capable d’analyser l’entrée vocale.
toute la requête ou la phrase parlée. Essayez de nouveau.
(Page24)
Bluetooth. (Page 18)
• Assurez-vous que le périphérique audio est connecté via
Bluetooth. Sélectionnez le périphérique audio à partir de
[AUDIO SELECT] dans [BT MODE]. (Page22)
• Réalisez de nouveau le processus de configuration unique.
Reportez-vous à “Configuration pour la première fois” à la
page24.
• Mettez cet appareil hors tension, puis de nouveau sous
tension et essayez de nouveau de connecter l’appareil.
• Pour un périphérique iOS, assurez-vous que la source ALEXA
ou que la source iPodBT est sélectionnée.
42
FRANÇAIS
Page 95

Spécifications
DAB Plage de fréquences Bande III:
Sensibilité –100dBm
Taux-de-Signal/Bruit 90 dB
Type de connecteur d’antenne SMB
Radio numérique
Tension de sortie d’antenne CC 12 V
Courant maximum d’antenne < 100 mA
FM Plage de fréquences 87,5MHz — 108,0MHz (pas de 50kHz)
Sensibilité utilisable
(S/B = 30dB)
Seuil de sensibilité
(DIN S/B=46dB)
Réponse en fréquence (±3 dB) 30Hz — 15kHz
Taux de Signal/Bruit (MONO) 68,0 dB
Séparation stéréo (1 kHz) 40 dB
Radio analogique
MW
Plage de fréquences 531kHz — 1611kHz (pas de 9kHz)
(AM)
Sensibilité utilisable
(S/B = 20dB)
LW
Plage de fréquences 153kHz — 279kHz (pas de 9kHz)
(AM)
Sensibilité utilisable
(S/B = 20dB)
174,928 MHz — 239,200 MHz
6,2 dBf
(0,56 V/75 Ω)
15,2 dBf
(1,58 V/75 Ω)
28,5V
45V
Diode laser GaAIAs
Filtre numérique (D/A) 8 fois suréchantillonnage
Vitesse de rotation 500 t/min. — 200 t/min. (CLV)
Pleurage et scintillement Non mesurables
Réponse en fréquence (±1 dB) 20 Hz — 20 kHz
Distorsion harmonique totale (1 kHz) 0,01 %
Taux de Signal/Bruit (1 kHz) 96 dB
Lecteur CD
Gamme dynamique 91 dB
Séparation des canaux 84 dB
Décodage MP3 Compatible avec MPEG-1/2 Audio Layer-3
Décodage WMA Compatible avec Windows Media Audio
Décodage AAC Fichiers AAC-LC “.aac”
Standard USB USB1.1, USB2.0 (Grande vitesse)
Système de fichiers FAT12/16/32
Courant d’alimentation maximum CC5 V
Décodage MP3 Compatible avec MPEG-1/2 Audio Layer-3
USB
Décodage WMA Compatible avec Windows Media Audio
Décodage AAC Fichiers AAC-LC “.aac”, “.m4a”
Décodage WAV PCM linéaire
Décodage FLAC Fichier FLAC (96 kHz maximum/24bits)
1,5A
FRANÇAIS
43
Page 96

Spécifications
Réponse en fréquence (±3 dB) 20Hz—20kHz
Tension maximum d’entrée 1000 mV
Auxiliaire
Impédance d’entrée 30k
Version Bluetooth 4.2
Plage de fréquences 2,402 GHz — 2,480 GHz
Puissance de sortie RF (E.I.R.P.) +4 dBm (MAX), Classe d’alimentation 2
Portée de communication maximale Ligne de vue approximative 10 m (32,8pieds)
Profile HFP 1.7.1 (Hands-Free Profile — Profile mains libres)
Bluetooth
Puissance de sortie maximum 50W×4
Pleine Puissance de Largeur de Bande
(avec moins de 1% DHT)
Audio
Impédance d’enceinte 4—8
A2DP (Advanced Audio Distribution Profile — Profile
de distribution audio avancé)
AVRCP 1.6.1 (Audio/Video Remote Control Profile —
Profile de télécommande audio/vidéo)
PBAP (Phonebook Access Profile — Profile d’accès au
répertoire d’adresses)
SPP (Serial Port Profile — Profile de port série)
22W×4
Action en tonalité Bande 1: 62,5 Hz ±9 dB
Audio
Niveau de préamplification/charge 2500 mV/10k
Impédance du préamplificateur ≤600
Tension de fonctionnement Batterie de voiture 12V CC
Dimensions d’installation (L × H × P) 182 mm×111mm×156mm
Poids net
Généralités
(y compris la plaque d’assemblage et le
manchon de montage)
Sujet à changement sans notification.
Bande 2: 100 Hz ±9 dB
Bande 3: 160 Hz ±9 dB
Bande 4: 250 Hz ±9 dB
Bande 5: 400 Hz ±9 dB
Bande 6: 630 Hz ±9 dB
Bande 7: 1 kHz ±9 dB
Bande 8: 1,6 kHz ±9 dB
Bande 9: 2,5 kHz ±9 dB
Bande 10: 4 kHz ±9 dB
Bande 11: 6,3 kHz ±9 dB
Bande 12: 10 kHz ±9 dB
Bande 13: 16 kHz ±9 dB
1,6kg
44
FRANÇAIS
Page 97

Page 98

Inhalt
Vor der Inbetriebnahme ......................................................................... 3
Grundlagen ............................................................................................... 4
Erste Schritte ............................................................................................ 5
1 Wählen Sie die Anzeigesprache und brechen Sie die
Demonstration ab
2 Stellen Sie die Uhrzeit und das Datum ein
3 Festlegen anderer optionaler Einstellungen
Digital Radio ............................................................................................. 7
Analog Radio .......................................................................................... 10
CD/USB/iPod ...........................................................................................11
Spotify ..................................................................................................... 14
AUX ........................................................................................................... 16
Verwendung anderer Anwendungen ................................................ 16
KENWOOD Remote-Anwendung
TuneIn Radio/TuneIn Radio Pro
Bluetooth® .............................................................................................. 18
Bluetooth – Verbindung
Bluetooth – Handy
Bluetooth - Audio
AMAZON ALEXA.....................................................................................24
Audioeinstellungen ..............................................................................25
Display-Einstellungen...........................................................................30
Einbau/Anschluss .................................................................................. 31
Zur Bezugnahme ...................................................................................38
Wartung
Weitere Informationen
Ändern der Display-Information
Fehlersuche ............................................................................................40
Technische Daten .................................................................................. 43
2
DEUTSCH
Page 99

Vor der Inbetriebnahme
WICHTIG
• Um richtige Verwendung sicherzustellen, lesen Sie die Bedienungsanleitung vor
der Verwendung des Produkts sorgfältig durch. Es ist besonders wichtig, dass Sie
die Warnungen und Vorsichtshinweise in dieser Anleitung lesen und beachten.
• Bitte bewahren Sie die Anleitung an sicherer Stelle und griffbereit zum
Nachschlagen auf.
WARNUNG
•
Bedienen Sie keine Funktion, die Ihre Aufmerksamkeit vom Straßenverkehr
ablenkt.
ACHTUNG
Lautstärkeeinstellung:
• Stellen Sie die Lautstärke so ein, dass Sie immer noch Geräusche von außerhalb
des Fahrzeugs hören können, um Unfälle zu vermeiden.
• Senken Sie die Lautstärke vor dem Abspielen digitaler Tonquellen, um
Beschädigung der Lautsprecher durch plötzliche Tonspitzen zu vermeiden.
Allgemeines:
• Vermeiden Sie Verwendung des externen Geräts, wenn dieses das sichere
Fahren behindern kann.
• Stellen Sie sicher, dass alle wichtigen Daten gesichert sind. Wir übernehmen
keine Haftung für jeglichen Verlust aufgenommener Daten.
• Stellen Sie sicher, dass keine Metallgegenstände (wie etwa Münzen oder
Werkzeuge) ins Innere des Geräts gelangen und Kurzschlüsse verursachen.
• Wenn ein Disc-Fehler durch Kondensationsbildung auf der Laserlinse auftritt,
werfen Sie die Disc aus und warten Sie eine Zeit lang, bis die Kondensation
getrocknet ist.
• Je nach dem Typ des Fahrzeugs wird die Antenne automatisch ausgeschoben,
wenn Sie die Einheit mit angeschlossenem Antennensteuerkabel einschalten
(Seite34). Schalten Sie beim Parken in einem Bereich mit niedriger Decke die
Einheit aus oder stellen Sie die Quelle auf STANDBY.
Wie Sie diese Anleitung lesen
• Die in dieser Bedienungsanleitung dargestellten Anzeigen und Frontblenden
dienen der Veranschaulichung der Bedienung Ihres Geräts. Aus diesem
Grund können sie sich von den tatsächlichen Anzeigen oder Frontblenden
unterscheiden.
• Die Bedienung wird im Wesentlichen anhand der Tasten auf der Frontblende
erläutert.
• Englischsprachige Anzeigen werden zur Erklärung verwendet. Sie können
die Anzeigesprache im
•
[XX]
zeigt die gewählten Punkte an.
• (SeiteXX) zeigt an, das Bezugsinformationen auf der angegebenen
Seitennummer vorhanden sind.
[FUNCTION]
-Menü wählen. (Seite6)
Dieses Symbol auf dem Produkt bedeutet, dass es in dieser
Anleitung wichtige Betriebs- und Wartungsanweisungen gibt.
Lesen Sie die Anweisungen in dieser Anleitung sorgfältig
durch.
DEUTSCH
3
Page 100

Grundlagen
Frontblende
Ladeschlitz
Lautstärke-Regler
* Nur für Illustrationszwecke.
Zum Auf der Frontblende
Einschalten
Einstellen der Lautstärke Drehen Sie den Lautstärke-Regler.
Quelle auswählen
Ändern der Display-Information Drücken Sie DISP wiederholt. (Seite39)
Displayfenster*
Drücken Sie
• Zum Ausschalten halten Sie die Taste gedrückt.
• Drücken Sie
• Drücken Sie
B SRC.
B SRC wiederholt.
B SRC, und drehen Sie dann den Lautstärke-Regler innerhalb von 2 Sekunden.
Rücksetzen
Auswurftaste
4
DEUTSCH
 Loading...