

Page 1

DPX406DAB
DPX306BT
DUAL DIN SIZED CD RECEIVER
INSTRUCTION MANUAL
DUALER DIN-GENORMTER CD-RECEIVER
BEDIENUNGSANLEITUNG
CD-РЕСИВЕР РАЗМЕРА 2DIN
ИHCTPУKЦИЯ ПO ЭKCПЛУATAЦИИ
ПРИЙМАЧ CD ПОДВІЙНОГО DIN-РОЗМІРУ
ІНСТРУКЦІЯ З ЕКСПЛУАТАЦІЇ
B5A-0346-00 (EN)© 2014 JVC KENWOOD Corporation
Page 2
Information on Disposal of Old Electrical and Electronic Equipment and Batteries
(applicable for countries that have adopted separate waste collection systems)
Products and batteries with the symbol (crossed-out wheeled bin) cannot be disposed as
household waste.
Old electrical and electronic equipment and batteries should be recycled at a facility capable of
handling these items and their waste byproducts.
Contact your local authority for details in locating a recycle facility nearest to you. Proper
recycling and waste disposal will help conserve resources whilst preventing detrimental effects
on our health and the environment.
The sign “Pb” below the symbol for batteries indicates that this battery contains lead.
Notice:
Entsorgung von gebrauchten elektrischen und elektronischen Geräten und Batterien
(anzuwenden in Ländern mit einem separaten Sammelsystem für solche Geräte)
Das Symbol (durchgestrichene Mülltonne) auf dem Produkt oder seiner Verpackung weist
darauf hin, dass dieses Produkt nicht als normaler Haushaltsabfall behandelt werden darf,
sondern an einer Annahmestelle für das Recycling von elektrischen und elektronischen Geräten
und batterien abgegeben werden muss.
Durch Ihren Beitrag zur korrekten Entsorgung dieses Produktes schützen Sie die Umwelt und
die Gesundheit Ihrer Mitmenschen.
Unsachgemässe oder falsche Entsorgung gefährden Umwelt und Gesundheit. Weitere
Informationen über das Recycling dieses Produktes erhalten Sie von Ihrer Gemeinde oder den
kommunalen Entsorgungsbetrieben.
Achtung: Das Zeichen „Pb“ unter dem Symbol fur Batterien zeigt an, dass diese Batterie Blei
enthalt.
For Israel
For Turkey
Bu ürün 28300 sayılı Resmi Gazete’de yayımlanan Atik Elektrikli ve Elektronik Eşyalarin
Kontrolü Yönetmeliğe uygun olarak üretilmiştir.
Eski Elektrik ve Elektronik Ekipmanların İmha Edilmesi Hakkında Bilgi (atık yan ürün
toplama sistemlerini kullanan ülkeleri için uygulanabilir)
Sembollü (üzerinde çarpı işareti olan çöp kutusu) ürünler ev atıkları olarak
atılamaz.
Eski elektrik ve elektronik ekipmanlar, bu ürünleri ve ürün atıklarını geri
dönüştürebilecek bir tesiste değerlendirilmelidir. Yaşadığınız bölgeye en yakın
geri dönüşüm tesisinin yerini öğrenmek için yerel makamlara müracaat edin.
Uygun geri dönüşüm ve atık imha yöntemi sağlığımız ve çevremiz üzerindeki
zararlı etkileri önlerken kaynakların korunmasına da yardımcı olacaktır.
i
Page 3
The marking of products using lasers
The label is attached to the chassis/case and says that the component uses laser beams that have
been classified as Class1. It means that the unit is utilizing laser beams that are of a weaker class.
There is no danger of hazardous radiation outside the unit.
Kennzeichnung von Geräten mit Laser-Abtastern
Das Etikett ist am Chassis/Gehäuse angebracht und besagt, dass sich die Komponente Laserstrahlen
bedient, die als Laserstrahlen der Klasse 1 klassifiziert wurden. Dies weist darauf hin, dass sich das
Gerät Laserstrahlen bedient, die einer schwächeren Klasse angehören. Das bedeutet, dass durch
den sehr schwachen Laserstrahl keine Gefahr durch gefährliche Strahlungen außerhalb des Geräts
besteht.
Маркировка изделий, использующих лазеры
К корпусу устройства прикреплена табличка, указывающая, что устройство использует
лазерные лучи класса 1. Это означает, что в устройстве используются лазерные лучи слабой
интенсивности. Они не представляют опасности и не распространяют опасную радиацию вне
устройства.
Маркування виробів, обладнаних лазером
На каркас/корпус поміщається наклейка, в якій зазначається, що даний виріб випромінюєє
лазерні промені Класу 1. Це означає, що даний апарат використовує лазерні промені слабшого
класу. За межами даного апарату не існує небезпеки лазерного випромінювання.
Дата изготовления (месяц/год) находится на этикетке устройства.
В соответствии с Законом Российской Федерации “О защите прав потребителей”
срок службы (годности) данного товара “по истечении которого он может
представлять опасность для жизни, здоровья потребителя, причинять вред его
имуществу или окружающей среде” составляет семь (7) лет со дня производства.
Этот срок является временем, в течение которого потребитель данного товара
может безопасно им пользоваться при условии соблюдения инструкции по
эксплуатации данного товара, проводя необходимое обслуживание, включающее
замену расходных материалов и/или соответствующее ремонтное обеспечение в
специализированном сервисном центре.
Дополнительные косметические материалы к данному товару, поставляемые
вместе с ним, могут храниться в течение двух (2) лет со дня его производства.
Срок службы (годности), кроме срока хранения дополнительных косметических
материалов, упомянутых в предыдущих двух пунктах, не затрагивает никаких
других прав потребителя, в частности, гарантийного свидетельства KENWOOD,
которое он может получить в соответствии с законом о правах потребителя или
других законов, связанных с ним.
Декларація про Відповідність Вимогам Технічного Регламенту Обмеження
Використання деяких Небезпечних Речовин в електричному та електронному
обладнанні (затвердженого Постановою №1057 Кабінету Міністрів України)
Виріб відповідає вимогам Технічного Регламенту Обмеження Використання деяких
Небезпечних Речовин в електричному та електронному обладнанні (ТР ОВНР).
Вміст небезпечних речовин у випадках, не обумовлених в Додатку №2 ТР ОВНР:
1.
свинець(Pb) – не перевищує 0.1 % ваги речовини або в концентрації до 1000
частин на мільйон;
2.
кадмій (Cd)– не перевищує 0.01 % ваги речовини або в концентрації до 100
частин на мільйон;
3.
ртуть(Hg) – не перевищує 0.1 % ваги речовини або в концентрації до 1000 частин
на мільйон;
4.
шестивалентний хром (Cr 6+) – не перевищує 0.1 % ваги речовини або в
концентрації до 1000 частин на мільйон;
5.
полібромбіфеноли (PBB) – не перевищує 0.1% ваги речовини або в концентрації
до 1000 частин на мільйон;
6.
полібромдефенілові ефіри (PBDE) – не перевищує 0.1 % ваги речовини або в
концентрації до 1000 частин на мільйон.
ii
Page 4

Declaration of Conformity with regard to the R&TTE Directive 1999/5/EC
Declaration of Conformity with regard to the EMC Directive 2004/108/EC
Declaration of Conformity with regard to the RoHS Directive 2011/65/EU
Manufacturer:
JVC KENWOOD Corporation
3-12, Moriya-cho, Kanagawa-ku, Yokohama-shi, Kanagawa, 221-0022, Japan
EU Representative:
JVCKENWOOD NEDERLAND B.V.
Amsterdamseweg 37, 1422 AC UITHOORN, The Netherlands
Konformitätserklärung in Bezug auf die R&TTE-Vorschrift 1999/5/EC
Konformitätserklärung in Bezug auf die EMC-Vorschrift 2004/108/EC
Konformitätserklärung in Bezug auf die RoHS-Vorschrift 2011/65/EU
Hersteller:
JVC KENWOOD Corporation
3-12, Moriya-cho, Kanagawa-ku, Yokohama-shi, Kanagawa, 221-0022, Japan
EU-Vertreter:
JVCKENWOOD NEDERLAND B.V.
Amsterdamseweg 37, 1422 AC UITHOORN, Niederlande
Декларация соответствия относительно Директивы 1999/5/EC R&TTE
Декларация соответствия относительно Директивы 2004/108/EC Электромагнитная
совместимость
Декларация соответствия относительно Директивы 2011/65/EU об ограничении
содержания вредных веществ
Производитель:
ДжейВиСи КЕНВУД Корпорейшн
3-12, Moriya-cho, Kanagawa-ku, Yokohama-shi, Kanagawa, 221-0022, Япония
Представительство в EC:
ДжейВиСиКЕНВУД Нидерланд Би.Ви.
Amsterdamseweg 37, 1422 AC UITHOORN, Нидерланды
Декларація про відповідність вимогам Директиви R&TTE 1999/5/EC
Декларація про відповідність вимогам Директиви EMC 2004/108/EC
Декларація про відповідність вимогам Директиви RoHS 2011/65/EU
Виробник:
JVC KENWOOD Corporation
3-12 Moriya-cho, Kanagawa-ku, Yokohama-shi, Kanagawa, 221-0022, Japan
Представник у ЕС:
JVCKENWOOD NEDERLAND B.V.
Amsterdamseweg 37, 1422 AC UITHOORN, The Netherlands
iii
Page 5

English
Hereby, JVC KENWOOD declares that this unit
DPX406DAB/ DPX306BT is in compliance with
the essential requirements and other relevant
provisions of Directive 1999/5/EC.
Français
Par la présente JVC KENWOOD déclare que
l’appareil DPX406DAB/ DPX306BT est conforme
aux exigences essentielles et aux autres
dispositions pertinentes de la directive 1999/5/CE.
Par la présente, JVC KENWOOD déclare que
ce DPX406DAB/ DPX306BT est conforme aux
exigences essentielles et aux autres dispositions de
la directive 1999/5/CE qui lui sont applicables.
Deutsch
Hiermit erklärt JVC KENWOOD, dass sich dieser
DPX406DAB/ DPX306BT in Übereinstimmung
mit den grundlegenden Anforderungen und den
anderen relevanten Vorschriften der Richtlinie
1999/5/EG befindet. (BMWi)
Hiermit erklärt JVC KENWOOD die
Übereinstimmung des Gerätes DPX406DAB/
DPX306BT mit den grundlegenden Anforderungen
und den anderen relevanten Festlegungen der
Richitlinie 1999/5/EG. (Wien)
Nederlands
Hierbij verklaart JVC KENWOOD dat het toestel
DPX406DAB/ DPX306BT in overeenstemming is
met de essentiële eisen en de andere relevante
bepalingen van richtlijn 1999/5/EG.
Bij deze verklaat JVC KENWOOD dat deze
DPX406DAB/ DPX306BT voldoet aan de essentiële
eisen en aan de overige relevante bepalingen van
Richtlijn 1999/5/EC.
Italiano
Con la presente JVC KENWOOD dichiara che questo
DPX406DAB/ DPX306BT è conforme ai requisiti
essenziali ed alle altre disposizioni pertinenti
stabilite dalla direttiva 1999/5/CE.
Español
Por medio de la presente JVC KENWOOD declara
que el DPX406DAB/ DPX306BT cumple con
los requisitos esenciales y cualesquiera otras
disposiciones aplicables o exigibles de la Directiva
1999/5/CE.
Português
JVC KENWOOD declara que este DPX406DAB/
DPX306BT está conforme com os requisitos
essenciais e outras disposições da Directiva
1999/5/CE.
Polska
JVC KENWOOD niniejszym oświadcza, że
DPX406DAB/ DPX306BT spełnia zasadnicze
wymogi oraz inne istotne postanowienia
dyrektywy 1999/5/EC.
Český
JVC KENWOOD tímto prohlašuje, že tento
DPX406DAB/ DPX306BT je ve shodě se základními
požadavky a dalšími příslušnými ustanoveními
směrnice 1999/5/ES.
Magyar
Alulírott, JVC KENWOOD, kijelenti, hogy a jelen
DPX406DAB/ DPX306BT megfelel az 1999/5/
EC irányelvben meghatározott alapvető
követelményeknek és egyéb vonatkozó
előírásoknak.
Svenska
Härmed intygar JVC KENWOOD att denna
DPX406DAB/ DPX306BT stär l överensstämelse
med de väsentliga egenskapskrav och övriga
relevanta bestämmelser som framgår av direktiv
1999/5/EG.
Suomi
JVC KENWOOD vakuuttaa täten että DPX406DAB/
DPX306BT tyyppinen laite on direktiivin 1999/5/EY
oleellisten vaatimusten ja sitä koskevien direktiivin
muiden ehtojen mukainen.
Slovensko
S tem JVC KENWOOD izjavlja, da je ta DPX406DAB/
DPX306BT v skladu z osnovnimi zahtevami in
ostalimi ustreznimi predpisi Direktive 1999/5/EC.
Slovensky
Spoločnosť JVC KENWOOD týmto vyhlasuje, že
DPX406DAB/ DPX306BT spĺňa zákldné požiadavky
a ďalšie prislušné ustanovenia Direktĺvy 1999/5/EC.
Dansk
Undertegnede JVC KENWOOD erklærer harved,
at følgende udstyr DPX406DAB/ DPX306BT
overholder de væsentlige krav og øvrige relevante
krav i direktiv 1999/5/EF.
Ελληνικά
ΜΕ ΤΗΝ ΠΑΡΟΥΣΑ JVC KENWOOD ΔΗΛΩΝΕΙ
ΟΤΙ DPX406DAB/ DPX306BT ΣΥΜΜΟΡΦΩΝΕΤΑΙ
ΠΡΟΣ ΤΙΣ ΟΥΣΙΩΔΕΙΣ ΑΠΑΙΤΗΣΕΙΣ ΚΑΙ ΤΙΣ ΛΟΙΠΕΣ
ΣΧΕΤΙΚΕΣ ΔΙΑΤΑΞΕΙΣ ΤΗΣ ΟΔΗΓΙΑΣ 1999/5/EK.
Eesti
Sellega kinnitab JVC KENWOOD, et see
DPX406DAB/ DPX306BT vastab direktiivi
1999/5/EC põhilistele nõudmistele ja muudele
asjakohastele määrustele.
Latviešu
Ar šo, JVC KENWOOD, apstiprina, ka DPX406DAB/
DPX306BT atbilst Direktīvas 1999/5/EK galvenajām
prasībām un citiem tās nosacījumiem.
Lietuviškai
Šiuo, JVC KENWOOD, pareiškia, kad šis
DPX406DAB/ DPX306BT atitinka pagrindinius
Direktyvos 1999/5/EB reikalavimus ir kitas svarbias
nuostatas.
Malti
Hawnhekk, JVC KENWOOD, jiddikjara li dan
DPX406DAB/ DPX306BT jikkonforma mal-ħtiġijiet
essenzjali u ma provvedimenti oħrajn relevanti li
hemm fid-Dirrettiva 1999/5/EC.
Українська
Компанія JVC KENWOOD заявляє, що цей виріб
DPX406DAB/ DPX306BT відповідає ключовим
вимогам та іншим пов’язаним положенням
Директиви 1999/5/EC.
Turkish
Bu vesileyle JVC KENWOOD, DPX406DAB/
DPX306BT ünitesinin, 1999/5/EC Direktifinin
başlıca gereksinimleri ve diğer ilgili hükümleri ile
uyumlu olduğunu beyan eder.
Русский
Настоящим, JVC КЕНВУД декларирует, что
это устройство “DPX406DAB/ DPX306BT”
соответствует необходимым требованиям
и другим важным положениям директивы
1999/5/EC.
Україна
Цим, JVC KENWOOD декларує, що цей виріб
“DPX406DAB/ DPX306BT” Відповідає суттєвим
вимогам та іншим відповідним пунктам
Директиви 1999/5/EC.
iv
Page 6
CONTENTS BEFORE USE
BEFORE USE 2
BASICS 3
GETTING STARTED 3
DIGITAL RADIO (DAB)
(for )
5
ANALOG RADIO 7
CD / USB / iPod / ANDROID 9
AUX 11
BLUETOOTH® 12
AUDIO SETTINGS 18
DISPLAY SETTINGS 19
MORE INFORMATION 19
TROUBLESHOOTING 20
SPECIFICATIONS 22
INSTALLATION /
CONNECTION 24
Warning
Do not operate any function that takes your attention away from safe driving.
Caution
Volume setting:
• Adjust the volume so that you can hear sounds outside the car to prevent accidents.
• Lower the volume before playing digital sources to avoid damaging the speakers by the sudden increase of
the output level.
General:
• Avoid using the external device if it might hinder safe driving.
• Make sure all important data has been backed up. We shall bear no responsibility for any loss of recorded
data.
• Never put or leave any metallic objects (such as coins or metal tools) inside the unit, to prevent a short
circuit.
• If a disc error occurs due to condensation on the laser lens, eject the disc and wait for the moisture to
evaporate.
How to read this manual
• Operations are explained mainly
using buttons on the faceplate of
• English language is used for
the display explanation in this
manual.
• [
XX
] indicates the selected items.
• (
XX) indicates references are
available on the stated page.
.
2
Maintenance
Cleaning the unit: Wipe off dirt on the faceplate with a dry silicone or soft cloth.
Handling discs:
• Do not touch the recording surface of the disc.
• Do not stick tape etc. on the disc, or use a disc with tape stuck on it.
• Do not use any accessories for the disc.
• Clean from the center of the disc and move outward.
• Clean the disc with a dry silicone or soft cloth. Do not use any solvents.
• When removing discs from this unit, pull them out horizontally.
• Remove burrs from the center hole and disc edge before inserting a disc.
Page 7

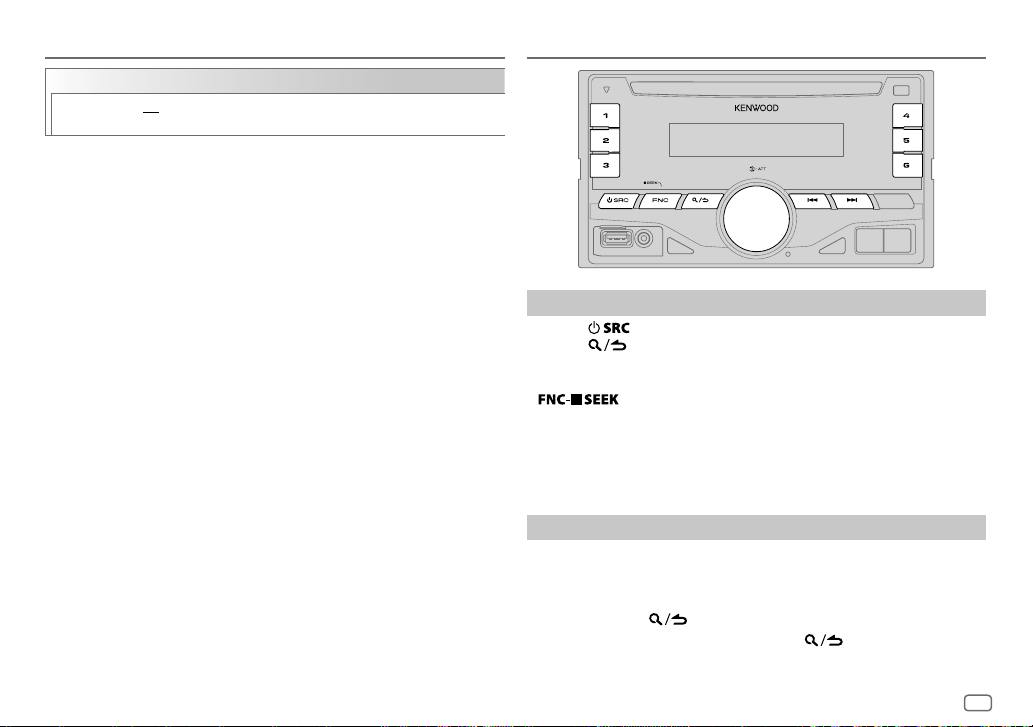
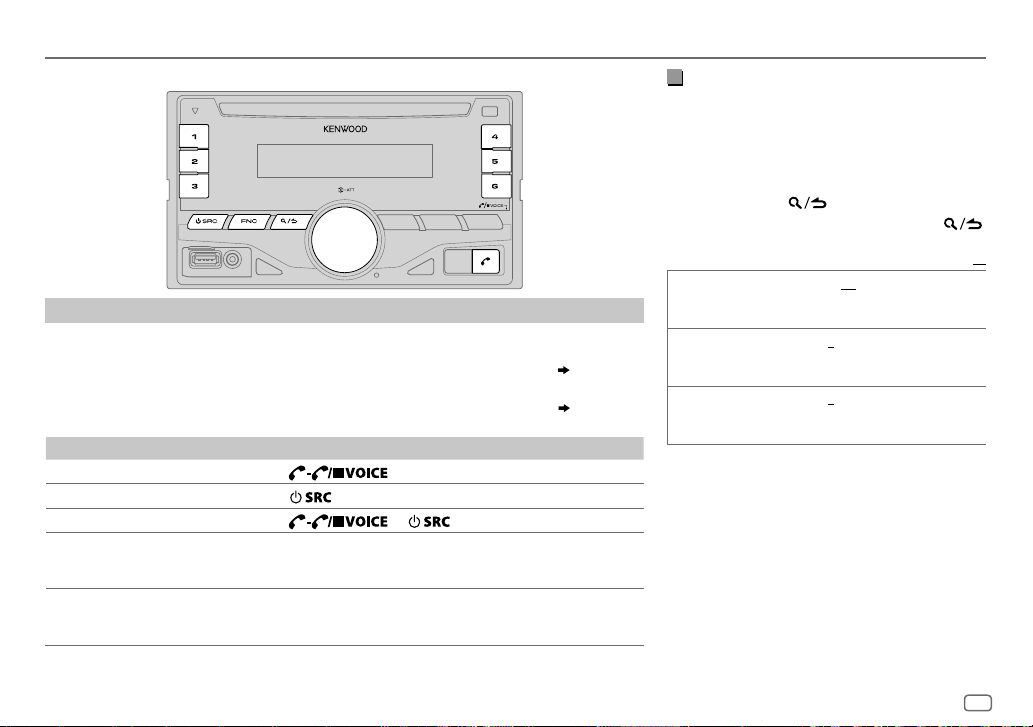
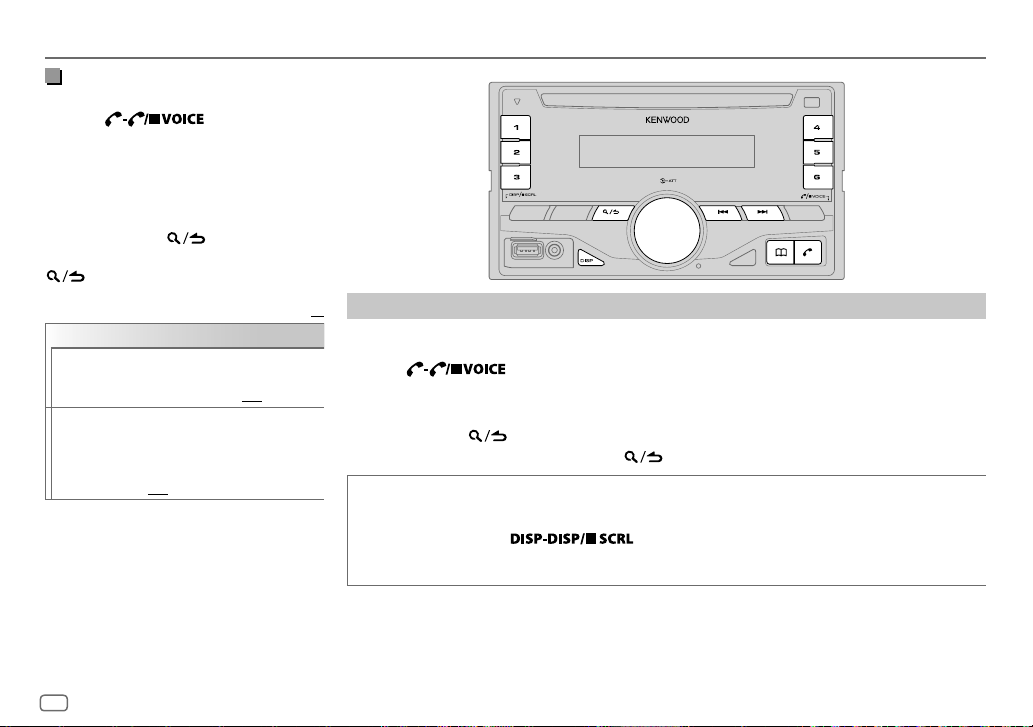
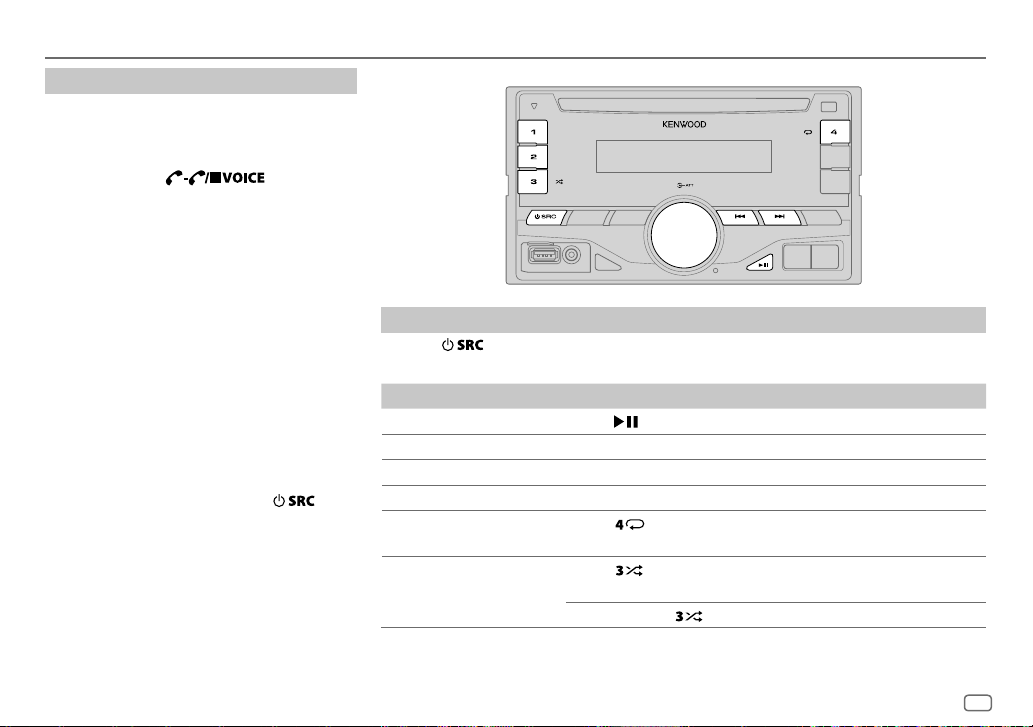
BASICS
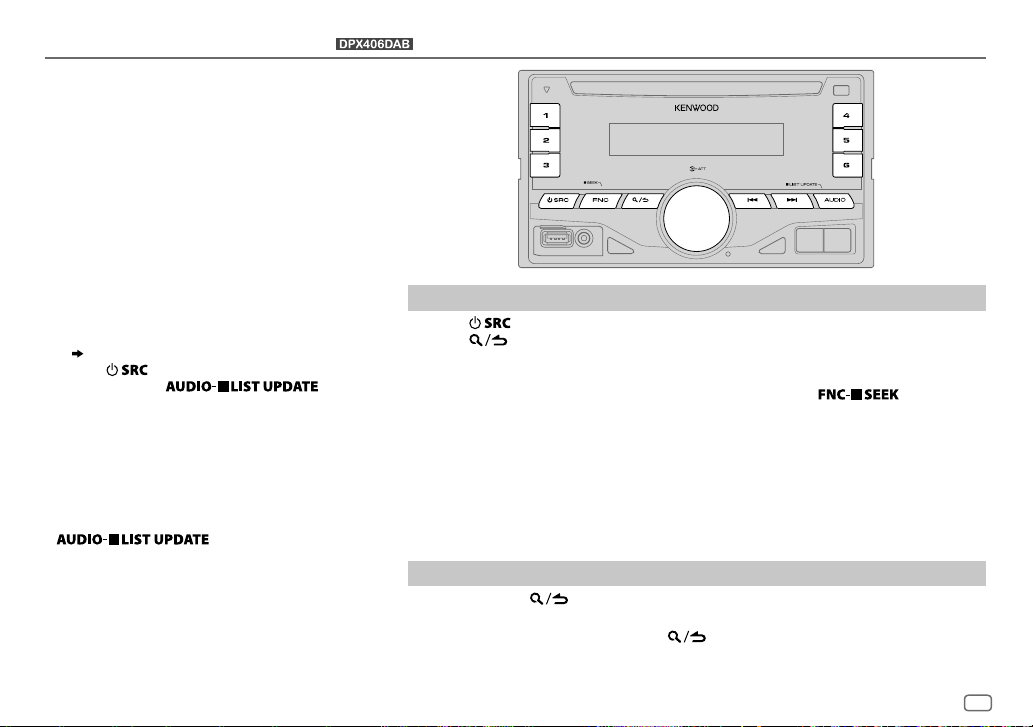
Faceplate
To On the faceplate
Turn on the power
Adjust the volume Turn the volume knob.
Select a source
Change the display
information
Loading slot Display window
Volume knob
(turn/press)
Press
• Press and hold to turn off the power.
Press the volume knob during playback to attenuate the
sound.
• Press again to cancel.
Press
Press
• Press and hold to scroll the current display information.
.
repeatedly.
(For )
Reset button
• Your preset adjustments will
also be erased.
repeatedly.
GETTING STARTED
1
Select the display language and cancel the
demonstration
When you turn on the power (or after you reset the unit), the
display shows: “SELLANGUAGE”
1 Turn the volume knob to select [
(Russian), then press the knob.
[
ENG
] is selected for the initial setup.
Then, the display shows: “CANCEL DEMO” “PRESS”
“VOLUME KNOB”.
2 Press the volume knob.
[
YES
] is selected for the initial setup.
3 Press the volume knob again.
“DEMOOFF” appears.
2
Set the clock
Press FNC to enter [
1
FUNCTION
2 Turn the volume knob to select [
knob.
3 Turn the volume knob to select [
the knob.
“PRESS” “VOLUMEKNOB”
ENG
].
] (English) or [
CLOCK
], then press the
CLOCKADJUST
RUS
], then press
]
ENGLISH
3
Page 8
GETTING STARTED
4 Turn the volume knob to make the settings, then
press the knob.
Day
5 Turn the volume knob to select [
6 Turn the volume knob to select [
7 Press and hold to exit.
To return to the previous setting item, press .
1
2 Press FNC to enter [
• Pressing AUDIO enter [
3 Turn the volume knob to make a selection (see the
4 Repeat step 3 until the desired item is selected or
5 Press and hold to exit.
To return to the previous setting item, press .
Hour Minute
press the knob.
press the knob.
3
Set the initial settings
Press repeatedly to enter STANDBY.
following table), then press the knob.
activated.
AUDIO CONTROL
SWITCH
PREOUT
SP SELECT OFF/ 5/4/ 6×9/6/ OEM
DISPLAY
EASY MENU
FUNCTION
REAR/ SUBWOOFER
a subwoofer are connected to the line out terminals on
the rear (through an external amplifier).
speaker size (5inches or 4inches, 6×9inches or
6inches) or OEM speakers for optimum performance.
ON
:Both display and button illumination change
to white color when entering [
OFF
:Both display and button illumination remain as
[
COLORSELECT
CLOCKFORMAT
12H
].
AUDIO CONTROL
: Selects whether rear speakers or
: Selects according to the
FUNCTION
] color. ( 19)
4
] or [
] directly.
24H
], then
], then
Default:
].;
TUNER SETTING
DAB L-BAND
DAB ANT
POWER
PRESET TYPE NORMAL
SYSTEM
KEY BEEP
SOURCE SELECT
BUILT-IN AUX
P-OFF WAIT
CD READ 1
XX
F/W UPDATE
UPDATE SYSTEM / UPDATE BT/ UPDATE DAB1
CLOCK
CLOCK DISPLAY
ENGLISH
РУССКИЙ
*
For .
*
*
F/W UP xx.xx/
F/W UP xxxxx/
F/W UP Vxxx
ON
ON
OFF
FM3/ MW/ LW/ DB1/ DB2/ DB3).;
regardless of the selected band.
ON
ON
Applicable only when the demonstration mode is turned off.
Sets the duration when the unit will automatically turn off (while in standby mode) to save
the battery.
20M
music CD. No sound can be heard if an audio file disc is played.
YES
For details on how to update the firmware, see: www.kenwood.com/cs/ce/
ON
Selected language is use as the display langauge for [
information (folder name, file name, song title, artist name, album name) if applicable.
:Receives L-BAND ensemble during digital audio reception.;
:Supplies power to the DAB antenna. Selects when using the supplied antenna.;
:Does not supply power. Selects when using passive antenna without booster. ( 27)
:Memorizes one station for each preset button in each band (FM1/ FM2/
:Activates the keypress tone.;
:Enables AUX in source selection.;
: 20minutes;
:Automatically distinguishes between audio file disc and music CD.; 2:Forces to play as a
:Starts upgrading the firmware.; NO:Cancels (upgrading is not activated).
:The clock time is shown on the display even when the unit is turned off.;
40M
: 40minutes;
*
/ UPDATE DAB2
MIX
:Memorizes one station for each preset button,
OFF
:Deactivates.
OFF
:Disables. ( 11)
60M
: 60minutes;
*
WAIT TIME – – –
FUNCTION
OFF
:Cancels.
:Cancels
] menu and Tag
OFF
:Cancels.
Page 9
DIGITAL RADIO (DAB)
(for )
About DAB (Digital Audio Broadcasting)
DAB is one of the digital radio broadcasting systems
available today. It can deliver digital quality sound
without any annoying interference or signal distortion.
Furthermore, it can carry text, pictures and data.
In contrast to FM broadcast, where each program
is transmitted on its own frequency, DAB combines
several programs (called “services”) to form one
“ensemble.”
The “primary component” (main radio station)
is sometimes accompanied by a “secondary
component” which can contain extra programs or
other information.
Preparation:
1 Connect a DAB antenna to the DAB antenna jack.
( 27)
2 Press to select DAB.
3 Press and hold to start
the Service List update.
“LIST UPDATE” appears and update starts.
“UPDATED” appears when update completes.
Updates take up to3 minutes. No interruption
(such as traffic information) is possible during
updates.
• To cancel the Service List update: Press and hold
again.
Search for an ensemble
Press repeatedly to select DAB.
1
2 Press repeatedly to select DB1/ DB2/ DB3.
3 Press and hold S/T to search for an ensemble.
4 Press S/T to select an ensemble, service or component to listen.
• To change the searching method for S/T: Press and hold repeatedly.
AUTO1 : Press S/T: Select an ensemble, service or component.
Press and hold S/T: Automatically search for an ensemble.
AUTO2 : Press S/T: Search for a preset station.
MANUAL : Press S/T: Select an ensemble, service or component.
Press and hold S/T: Manually search for an ensemble.
• To store a service: Press and hold one of the number buttons (1to6).
• To select a stored service: Press one of the number buttons (1to6).
Select a service
Press and hold to enter Service Search mode.
1
2 Turn the volume knob to select a service, then press the knob.
To cancel the Service Search mode, press .
ENGLISH
5
Page 10
DIGITAL RADIO (DAB)
Select a service by name
Press and hold to enter Service Search mode.
1
2 Turn the volume knob quickly to enter Alphabet
Search mode.
3 Turn the volume knob or press S/T to select
the character to be searched for.
•
To search for a character other than A to Z and
0to9, enter only “
• Press and hold / changes the characters
rapidly.
4 Press the volume knob to start searching.
5 Turn the volume knob to select a service, then press
the knob.
To cancel the Alphabet Search mode, press
Other settings
Press FNC to enter [
1
2 Turn the volume knob to make a selection (see the
following table), then press the knob.
3 Repeat step 2 until the desired item is selected or
activated.
4 Press and hold to exit.
To return to the previous setting item, press .
”.
*
FUNCTION
.
].
Default:
TUNER SETTING
AF SET
TI ON
PTY SEARCH
ASW SELECT TRAVEL, WARNINGS, NEWS, WEATHER, EVENT, SPECIAL, RAD INFO, SPORTS, FINANCE
LIST UPDATE AUTO
PTY WATCH
RELATED
SERV
ON
:
While listening to DAB: Automatically switch to FM broadcasting the same program if the DAB
signal becomes weak. It will switch back to DAB sound when the signal becomes strong again.
While listening to FM: Automatically switch to DAB source broadcasting the same program (if
available).;
OFF
:Cancels.
:Allows the unit to temporarily switch to Traffic Information if available (“TI” lights up).;
OFF
:Cancels.
Press the volume knob to enter PTY language selection. Turn the volume knob to select the PTY
language (
ENGLISH/ FRENCH/ GERMAN
Selects the available Program Type (see the following), then, press
Turn the volume knob to make a selection, then press the knob.
“
” appears in front of the activated announcement type.
*
Automatically switch from any source to Digital radio ensembles broadcasting an activated
announcement type.
•
Multiple announcement can be activated simultaneously.
•
To deactivate, press the volume knob again (“*” goes off).
:Automatically update the DAB Service List when the power is turned on.;
MANUAL
:Updates the DAB Service List by pressing and holding
Automatically switch from any source to Digital Radio ensembles broadcasting a selected type
of program.
NEWS, AFFAIRS, INFO, SPORT, EDUCATE, DRAMA, CULTURE, SCIENCE, VARIED
POPM
(music),
ROCKM
OTHERM
(music),
LEISURE, JAZZ, COUNTRY, NATIONM
OFF
:Cancels.
ON
:Enable Soft-Link function to switch to an alternative service which is different audio
program from the current audio program.;
(music),
WEATHER, FINANCE, CHILDREN, SOCIAL, RELIGION, PHONE IN, TRAVEL
), then press the knob.
EASYM
(music),
(music),
OFF
LIGHTM
OLDIES, FOLKM
:Disable.
AUDIO
(music),
(music),
S/T
.
CLASSICS
DOCUMENT
to start.
,
,
XX
:
,
6
Page 11
DIGITAL RADIO (DAB)
CLOCK
TIME SYNC
• Available Program Type:
SPEECH : NEWS, AFFAIRS, INFO
MUSIC
The unit will search for the Program Type categorized under [
[
MUSIC
• If the volume is adjusted during reception of traffic information,
announcement, alarm or news bulletin, the adjusted volume is
memorized automatically. It will be applied the next time traffic
information, announcement, alarm or news bulletin is turned on.
ON
:Synchronizes the unit’s time to the Digital Radio signal station time.;
OFF
:Cancels.
CULTURE, SCIENCE, VARIED, WEATHER, FINANCE, CHILDREN, SOCIAL
RELIGION, PHONE IN, TRAVEL, LEISURE, DOCUMENT
:
POPM
(music),
CLASSICS, OTHERM
OLDIES, FOLKM
] if selected.
(information),
ROCKM
(music),
(music),
(music)
SPORT, EDUCATE, DRAMA
EASYM
JAZZ, COUNTRY, NATIONM
(music),
LIGHTM
(music),
(music),
SPEECH
ANALOG RADIO
,
,
] or
Search for a station
Press repeatedly to select TUNER.
1
2 Press repeatedly to select FM1/ FM2/ FM3/ MW/ LW.
3 Press S/T to search for a station.
• To change the searching method for S/T: Press and hold
AUTO1 : Automatically search for a station.
AUTO2 : Search for a preset station.
MANUAL : Manually search for a station.
• To store a station: Press and hold one of the number buttons (1to6).
• To select a stored station: Press one of the number buttons (1to6).
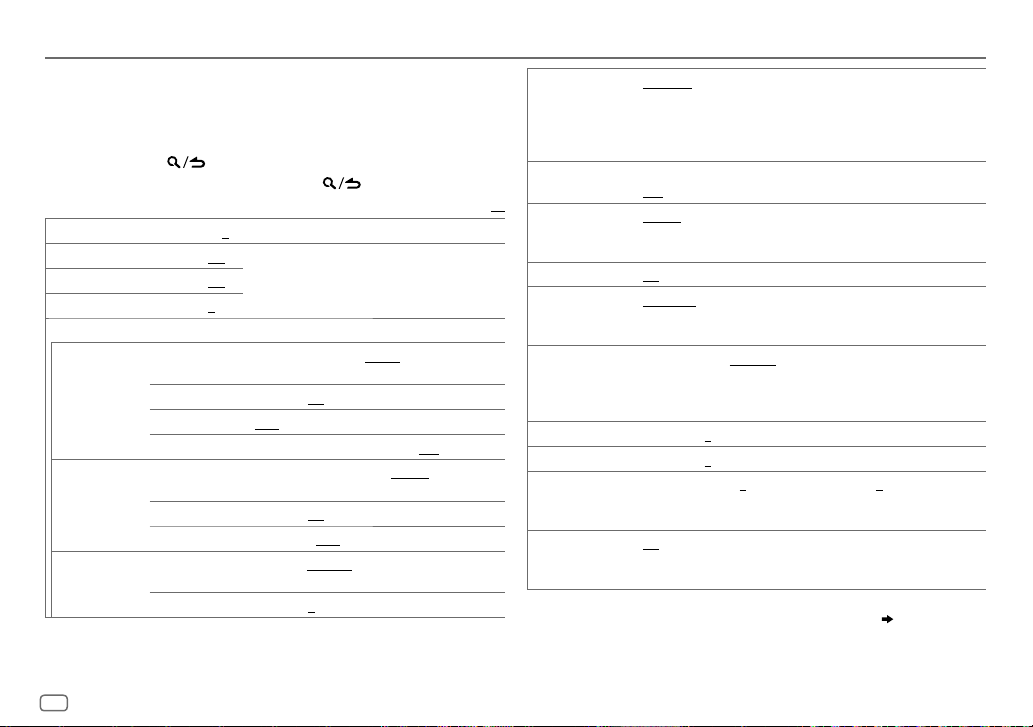
Other settings
Press FNC to enter [
1
2 Turn the volume knob to make a selection (see the following table),
then press the knob.
3 Repeat step 2 until the desired item is selected or activated.
4 Press and hold to exit.
To return to the previous setting item, press .
repeatedly.
FUNCTION
].
ENGLISH
7
Page 12
ANALOG RADIO
TUNER SETTING
LOCAL SEEK
AUTO
MEMORY
MONO SET ON
NEWS SET ON
REGIONAL ON
AF SET ON
*
TI
PTY SEARCH
ON
: Searches only stations with good reception. ;
YES
:Automatically starts memorizing 6 stations with good reception.;
NO
:Cancels.
•
Selectable only if [
:Improves the FM reception, but the stereo effect may be lost.;
OFF
:Cancels.
:The unit will temporarily switch to News Programme if available. ;
OFF
:Cancels.
: Switches to another station only in the specific region using the “AF”
control.;
: Automatically searches for another station broadcasting the same
program in the same Radio Data System network with better reception
when the current reception is poor.;
ON
: Allows the unit to temporarily switch to Traffic Information if available
(“TI” lights up).;
*
: [TI] in MW/LW is for enabling traffic interruption to DAB
source only.
Press the volume knob to enter PTY language selection. Turn the volume
knob to select the PTY language (
the knob.
Selects the available Program Type (see the following), then, press
S/T
OFF
:Cancels.
to start.
OFF
NORMAL
:Cancels.
OFF
: Cancels.
] is selected for [
ENGLISH/ FRENCH/ GERMAN
OFF
PRESETTYPE
:Cancels.
Default:
]. ( 4)
), then press
• [
LOCALSEEK
XX
FM3.
• Available Program Type:
SPEECH
MUSIC: POPM (music), ROCKM (music), EASYM (music), LIGHTM (music),
The unit will search for the Program Type categorized under [
[
MUSIC
• If the volume is adjusted during reception of traffic information, alarm
or news bulletin, the adjusted volume is memorized automatically. It
will be applied the next time traffic information, alarm or news bulletin
is turned on.
]/ [
MONOSET
)/ [
PTYSEARCH
: NEWS
, AFFAIRS
SCIENCE
, VARIED
IN
, TRAVEL
CLASSICS
, OTHERM (music), JAZZ
FOLK M (music)
] if selected.
]/ [
NEWS SET
]/ [
REGIONAL
]/ [
AF SET
] is selectable only when the band is FM1/ FM2/
, INFO (information), SPORT
, WEATHER
, FINANCE
, LEISURE
, DOCUMENT
, CHILDREN
, COUNTRY
]/ [TI] (for
, EDUCATE
, DRAMA
, SOCIAL
, NATIONM (music), OLDIES
, RELIGION
, CULTURE
, PHONE
SPEECH
] or
,
,
8
Page 13
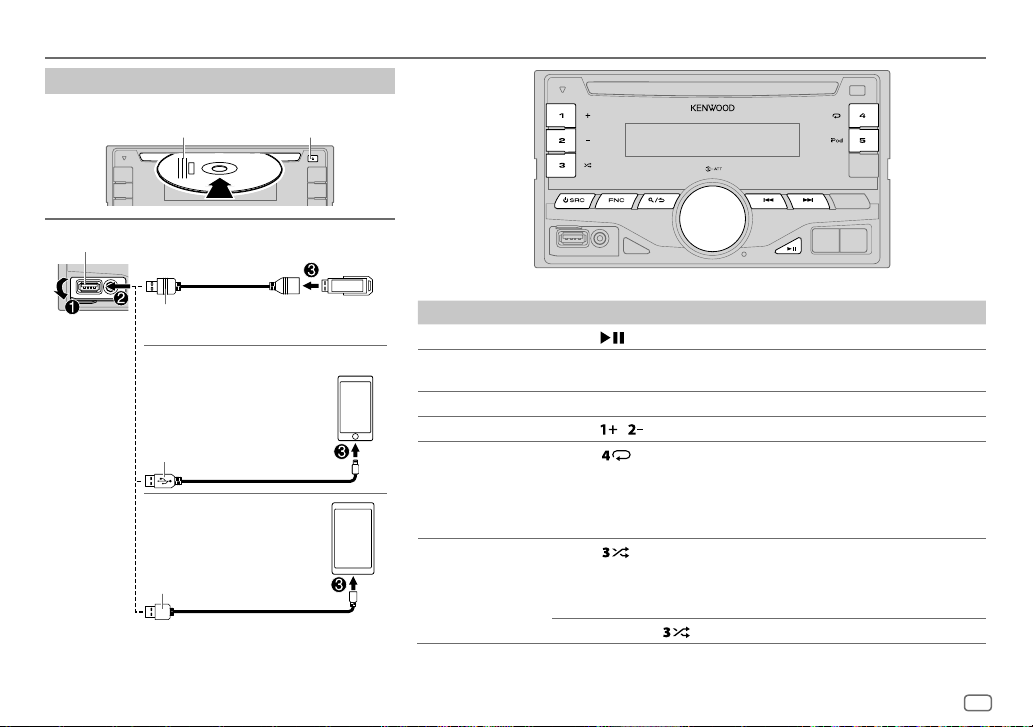
CD / USB / iPod / ANDROID
Start playback
The source changes automatically and playback starts.
Label side
USB input terminal
USB
M
Eject disc
CA-U1EX (max.: 500mA)
(optional accessory)
iPod/iPhone
KCA-iP102 / KCA-iP103 (optional
1
*
accessory)
the iPod/iPhone
ANDROID
Micro USB 2.0 cable
or accessory cable of
2
*
3
*
2
*
(commercially available)
1
*
KCA-iP102 : 30-pin type, KCA-iP103 : Lightning type
2
*
Do not leave the cable inside the car when not using.
To On the faceplate
Playback / pause Press .
Reverse /
Fast-forward
Select a track/file
Select a folder
Repeat play
*
Press and hold S/T.
4
*
Press S/T.
5
*
Press / .
6
Press repeatedly.
TRACK REPEAT/ REPEAT OFF
FILE REPEAT/ FOLDER REPEAT/ REPEAT OFF
FILE REPEAT/ REPEAT OFF
6
Random play
*
Press repeatedly.
DISC RANDOM/ RANDOM OFF
FOLDER RANDOM/ RANDOM OFF
Press and hold
: Audio CD
: MP3/WMA/AAC/WAV file,
iPod or ANDROID
: KME Light/ KMC file
: Audio CD
: MP3/WMA/AAC/WAV file, KME Light/
KMC file, iPod or ANDROID
8
to select
ALLRANDOM
*
.
ENGLISH
7
*
9
Page 14
CD / USB / iPod / ANDROID
To On the faceplate
Select control
mode
Select music drive
(
11, [
MUSIC DRIVE]
While in iPod source, press repeatedly.
MODE ON
: Control from the iPod
MODE OFF
: Control from the unit
While in ANDROID source,
Press
The stored songs in the following start playback.
)
repeatedly.
*
( 11, [
9
ANDROID SETUP])
• Selected internal or external memory of a
smartphone (Mass Storage Class).
• Selected drive of a multiple drives device.
3
*
When connecting an Android device, “Press [VIEW] to install KENWOOD MUSIC PLAY APP”
is shown. Follow the instructions to install the application. You can also install the latest
version of KENWOOD MUSIC PLAY application on your Android device before connecting.
(
20)
4
*
For ANDROID: Applicable only when [
SETUP
])
5
*
For CD: Only for MP3/WMA/AAC files. This does not work for iPod/ ANDROID.
6
*
For iPod/ ANDROID: Applicable only when [
7
*
KME Light : KENWOOD Music Editor Light, KMC : KENWOOD Music Control ( 19)
8
*
For CD: Only for MP3/WMA/AAC files.
9
*
You can still play/pause, file skip, fast-forward or reverse files from the unit.
BROWSE MODE
MODEOFF
] is selected. (
]/ [
BROWSE MODE
11, [ANDROID
] is selected.
Select a file from a folder/list
Press .
1
2 Turn the volume knob to select a folder/list, then press the knob.
3 Turn the volume knob to select a file, then press the knob.
Quick Search
If you have many files, you can search through them quickly.
For USB (for KME Light/ KMC files):
Press S/T to search at a preset skip search ratio.
(
11, [
SKIP SEARCH
Press and hold S/T to search at a 10
])
%
ratio.
• Not applicable for CD and MP3/WMA/AAC/WAV files.
For iPod:
You can search for a file according to the first character.
Turn the volume knob quickly to enter character search.
Turn the volume knob to select the character.
•
To search for a character other than A to Z and 0to9, enter
only “
”.
• Press and hold / changes the characters rapidly.
*
Press S/T to move to the entry position.
• You can enter up to 3characters.
Press the volume knob to start searching.
• To return to the root folder/ first file/ top menu, press
• To return to the previous setting item, press
• To cancel, press and hold
• For iPod, applicable only when [
mode
)
• For ANDROID, applicable only when [
(
11, [
ANDROID SETUP
])
.
MODEOFF
] is selected. (
BROWSE MODE
] is selected.
.
.
Select control
10
Page 15
CD / USB / iPod / ANDROID
Listen to TuneIn Radio/ TuneIn Radio Pro/ Aupeo
While listening to TuneIn Radio, TuneIn Radio Pro or Aupeo, connect the iPod/
iPhone to the USB input terminal of the unit.
• The unit will output the sound from these applications.
Other settings
Press FNC to enter [
1
2 Turn the volume knob to make a selection (see the following table), then
press the knob.
3 Repeat step 2 until the desired item is selected or activated.
4 Press and hold to exit.
To return to the previous setting item, press .
ANDROID SETUP
BROWSE MODE
HANDMODE
KENWOOD MUSIC PLAY application). However, you can still play/pause and file skip from the unit.
USB
MUSICDRIVE DRIVECHANGE
SKIPSEARCH 0.5%/ 1%/ 5%/ 10%
:Control other media player applications from the Android device (without using
FUNCTION
].
: Control from the unit (using KENWOOD MUSIC PLAY application).;
playback starts.
Repeat steps
the skip search ratio over the total files.
:The next drive ([
1
to 3 to select the following drives.
DRIVE 1
] to [
DRIVE 5
]) is selected automatically and
: While listening to iPod, ANDROID or KME Light/ KMC file, selects
Default:
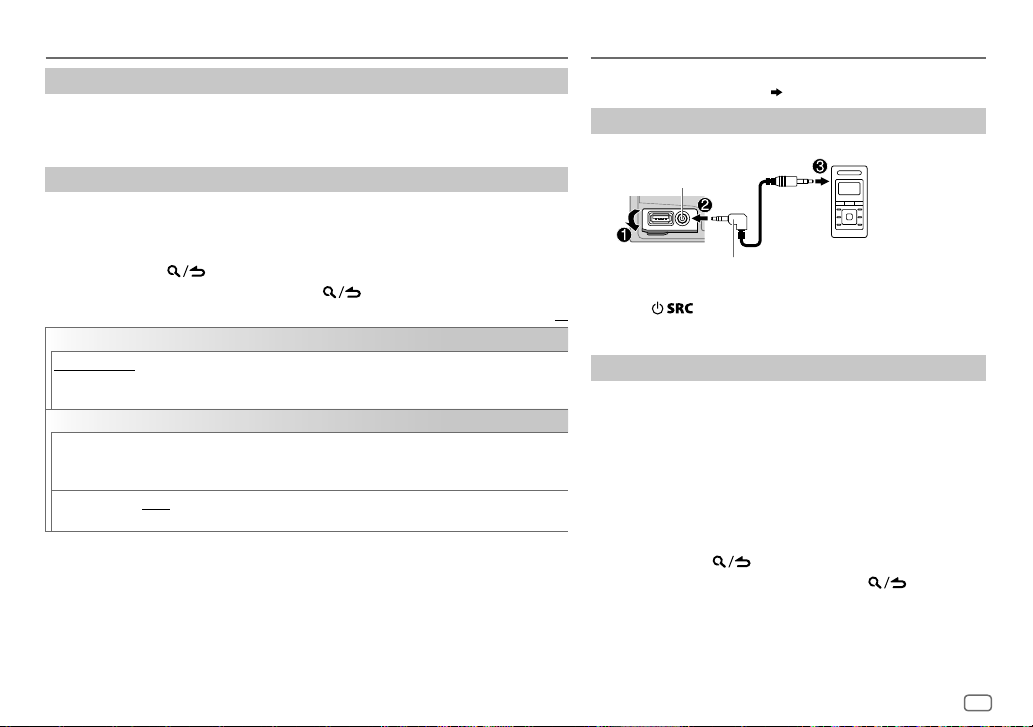
AUX
Preparation:
Select [
ON
] for [
BUILT-IN AUX
Start listening
Connect a portable audio player (commercially available).
1
Auxiliary input jack
3.5mm stereo mini plug with “L” shaped
connector (commercially available)
2 Press repeatedly to select AUX.
XX
3 Turn on the portable audio player and start playback.
Set the AUX name
While listening to a portable audio player connected to the
unit...
1 Press FNC to enter [
2 Turn the volume knob to select [
knob.
3 Turn the volume knob to select [
the knob.
4 Turn the volume knob to make a selection, then press the
knob.
AUX
(default)/
5 Press and hold to exit.
To return to the previous setting item, press .
]. ( 4)
FUNCTION
].
SYSTEM
], then press the
AUXNAME SET
DVD/ PORTABLE/ GAME/ VIDEO/ TV
Portable audio player
], then press
ENGLISH
11
Page 16
BLUETOOTH®
BLUETOOTH — Connection
Supported Bluetooth profiles
– Hands-Free Profile (HFP)
– Serial Port Profile (SPP)
– Phonebook Access Profile (PBAP)
– Advanced Audio Distribution Profile (A2DP)
– Audio/Video Remote Control Profile (AVRCP)
Supported Bluetooth codecs
– Sub Band Codec (SBC)
– Advanced Audio Coding (AAC)
– aptX Codec (aptX) (for
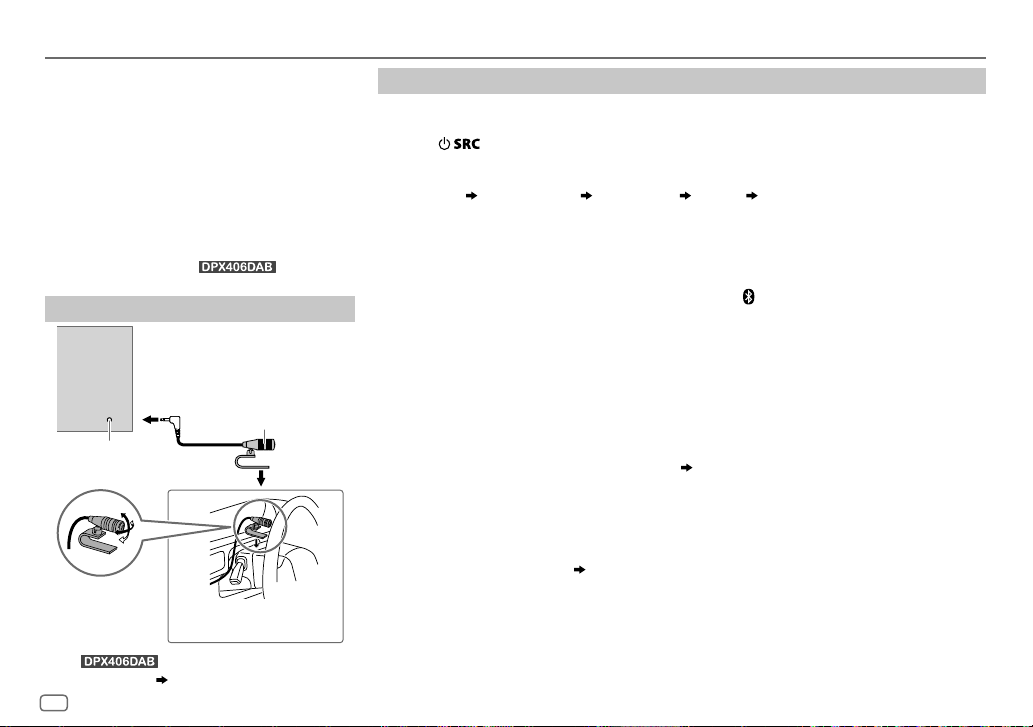
Connect the microphone
Rear panel
Microphone input
jack
Adjust the microphone
angle
* For , connect to the microphone
input terminal.
Secure using cord clamps (not
supplied) if necessary.
( 25)
12
)
Microphone
(supplied)
Pair a Bluetooth device
When connecting a Bluetooth device to the unit for the first time, perform pairing between the
unit and the device.
1 Press to turn on the unit.
2 Search and select this unit model name (DPX4
device.
“PAIRING”
display.
“PASS XXXXXX” Device name “PRESS” “VOLUME KNOB” scrolls on the
DAB/ DPX3**BT) on the Bluetooth
**
• For some Bluetooth devices, you may need to enter the Personal Identification Number
(PIN) code immediately after searching.
• Refer also to the manual supplied with your Bluetooth device.
3 Press the volume knob to start pairing.
“PAIRING OK” appears when pairing is completed and “
connection is established.
• Up to five devices can be registered (paired) in total.
• Only one Bluetooth device can be connected at any time.
• This unit supports Secure Simple Pairing (SSP).
• Some Bluetooth devices may not automatically connect to the unit after pairing. Connect the
device to the unit manually. Refer to the instruction manual of the Bluetooth device for more
information.
• Once the pairing is completed, the Bluetooth device will remain registered in the unit even if
you reset the unit. To delete the paired device,
• When you connect iPhone/ iPod touch/ Android device to the USB input terminal, pairing
request (via Bluetooth) is automatically activated. Press the volume knob to pair once you have
confirmed the device name.
Automatic pairing request is activated only if:
– Bluetooth function of the connected devcie is turned on.
– [
AUTO PAIRING
– KENWOOD MUSIC PLAY application is installed on the Android device.
] is set to [ON]. ( 16)
16, [
” will light up when the Bluetooth
DEVICE DELETE
].
Page 17
BLUETOOTH®
BLUETOOTH — Mobile phone
Receive a call
When there is an incoming call:
– All the buttons flash.
– The unit answers the call automatically if [
During a call:
– The buttons and display illuminate according to the settings made for [
– If you turn off the unit, the Bluetooth connection is disconnected.
To On the faceplate
Answer a call
Reject a call
End a call
Adjust the phone volume
[00]
to
[35]
(Default:
Switch between hands-free
and private talk modes
*
Not applicable for iPhone. During a call, the unit synchronizes the phone volume on the iPhone to the unit.
[15]*
Press
Press
Press
Turn the volume knob during a call.
)
• This adjustment will not affect the volume of the other
Press 6 during a call.
• Operations may vary according to the connected Bluetooth
sources.
device.
AUTO ANSWER
.
] is set to a selected time. ( 14)
DISPLAY
or one of the number buttons (1 to 6).
or .
]. ( 19)
Improve the voice quality
While talking on the phone...
1 Press FNC to enter [
FUNCTION
].
2 Turn the volume knob to make a selection
(see the following table), then press the knob.
3 Repeat step 2 until the desired item is
selected or activated.
4 Press and hold to exit.
To return to the previous setting item, press .
Default:
MIC GAIN –10
NR LEVEL –5
ECHO CANCEL –5
—
+10(–4
the microphone increases as the number
increased.
—+5(0):Adjust the noise reduction
level until the least noise is being heard
during a phone conversation.
—+5(0):Adjust the echo cancellation
delay time until the least echo is being heard
during a phone conversation.
):The sensitivity of
XX
ENGLISH
13
Page 18
BLUETOOTH®
Make the settings for receiving a
call
1
Press to enter
Bluetooth mode.
2 Turn the volume knob to make a
selection (see the following table), then
press the knob.
3 Repeat step 2 until the desired item is
selected or activated.
4 Press and hold to exit.
To return to the previous setting item, press
.
Default:
SETTINGS
AUTO ANSWER
BATT/SIGNAL AUTO
1
—30:The unit answers incoming
call automatically in the selected
time (in seconds).;
:Shows the strength of the
battery and signal when the unit
detects a Bluetooth device and the
Bluetooth device is connected.;
OFF
:Cancels. Clock time is shown.
OFF
:Cancels.
Make a call
XX
You can make a call from the call history, phonebook, or dialing the number. Call by voice is also
possible if your mobile phone has the feature.
1 Press to enter Bluetooth mode.
2 Turn the volume knob to make a selection (see the following table), then press the knob.
3 Repeat step 2 until the desired item is selected/activated or follow the instructions stated on
the selected item.
4 Press and hold to exit.
To return to the previous setting item, press .
CALL HISTORY
1
Press the volume knob to select a name or a phone number.
• “INCOMING”, “OUTGOING”, or “MISSED” is shown on the lower part of the display to indicate the
previous call status.
• Press
• “NO DATA” appears if there is no recorded call history.
2
Press the volume knob to call.
to change the display category (NUMBER or NAME).
14
Page 19
BLUETOOTH®
PHONE BOOK
NUMBER DIAL
VOICE
*
BATT
*
SIGNAL
*
Functionality depends on the type of the phone used.
1
Turn the volume knob quickly to enter alphabet search mode (if the
phonebook contains many contacts).
The first menu (ABCDEFGHIJK) appears.
• To go to the other menu (LMNOPQRSTUV or WXYZ1
volume knob.
• To select the desired first letter, press
knob.
Select “1” to search with numbers and select “
symbols.
2
Turn the volume knob to select a name, then press the knob.
3
Turn the volume knob to select a phone number, then press the knob
to call.
•
If the phone supports PBAP, the phonebook of the connected phone is
automatically transferred to the unit when pairing.
•
Contacts are categorized as: HOME, OFFICE, MOBILE, OTHER, GENERAL
•
This unit can display only non-accent letters. (Accent letters such as
“Ú” is showns as “U”.)
(
Make a call using phone book
1
Turn the volume knob to select a number (0 to 9) or character (*, #,
+).
2
Press
S/T
Repeat steps
3
Press the volume knob to call.
Speak the name of the contact you want to call or the voice command to
control the phone functions.
LOW/ MID/ FULL
NO SIGNAL/ LOW/ MID/ MAX
received signal.
to move the entry position.
1
and 2 until you finish entering the phone number.
:Shows the strength of the battery.
S/T
” to search with
*
)
(
Make a call using voice recognition
:Shows the strength of the current
), turn the
*
, then press the
Make a call using phone book
Press to enter phone book directly.
1
2 Turn the volume knob to select a name, then press the knob.
3 Turn the volume knob to select a phone number, then press the
knob to call.
Make a call using voice recognition
Press and hold to activate the connected phone.
1
2 Speak the name of the contact you want to call or the voice
command to control the phone functions.
• Supported Voice Recognition features vary for each phone. Refer to the
instruction manual of the connected phone for details.
• This unit also supports the intelligent personal assistant function of
iPhone.
Delete a contact
Press to enter Bluetooth mode.
1
2 Turn the volume knob to select [
CALL HISTORY
], then press the knob.
3 Turn the volume knob to select a contact.
4 Press and hold the volume knob to enter delete mode.
5 Turn the volume knob to select [
press the knob.
DELETE ONE
DELETE ALL:
)
deleted.
: Selected name or phone number in step 3 is deleted.
All names or phone numbers in [
6 Turn the volume knob to select [
DELETE ONE
YES
] or [
DELETE ALL
CALL HISTORY
], then press the knob.
] in step 2 is
7 Press and hold to exit.
• To return to the previous setting item, press .
• Not applicable for mobile phone that supports PBAP.
], then
ENGLISH
15
Page 20
BLUETOOTH®
Settings in memory
Store a contact in memory
You can store up to 6 contacts into the number
buttons (1to6).
1 Press to enter Bluetooth
mode.
2 Turn the volume knob to select [
[
PHONE BOOK
knob.
], or [
NUMBER DIAL
CALL HISTORY
], then press the
3 Turn the volume knob to select a contact or
enter a phone number.
If a contact is selected, press the volume knob
to show the phone number.
4 Press and hold one of the number buttons (1
to 6).
“STORED” appears when the contact is stored.
To erase a contact from the preset memory, select
[
NUMBER DIAL
] in step 2 and store a blank number.
Make a call from memory
Press to enter Bluetooth
1
mode.
2 Press one of the number buttons (1 to 6).
3 Press the volume knob to call.
“NO MEMORY” appears if there is no contacts
stored.
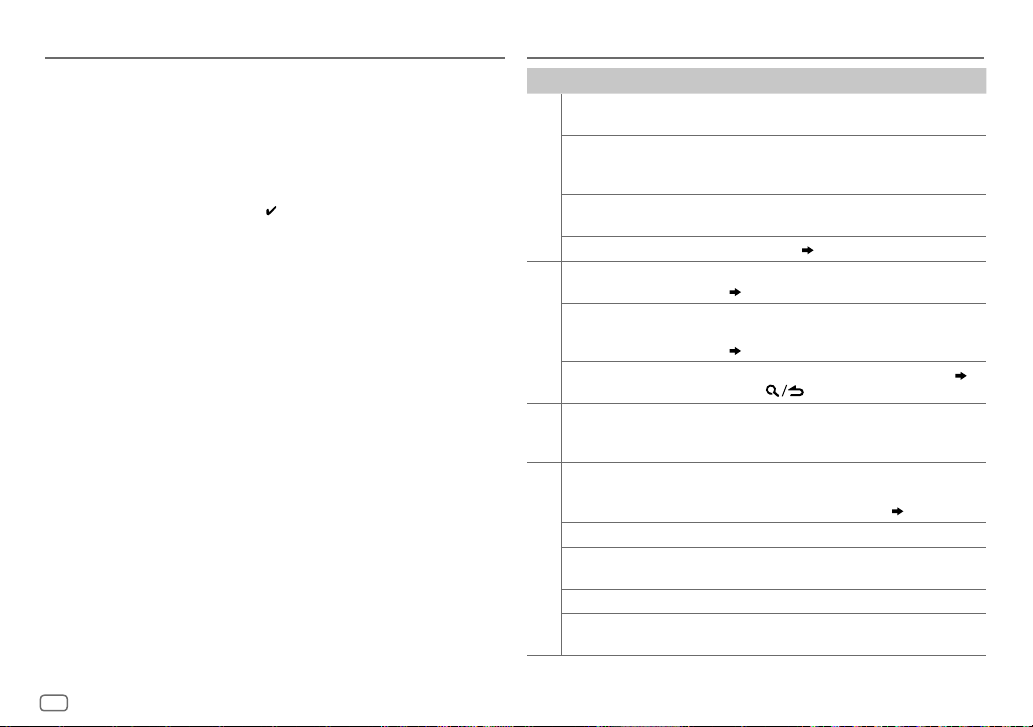
Other settings
Press FNC to enter [
1
FUNCTION
].
2 Turn the volume knob to make a selection (see the following table), then press the knob.
3 Repeat step 2 until the desired item is selected/activated or follow the instructions stated
on the selected item.
4 Press and hold to exit.
To return to the previous setting item, press .
],
BT MODE
PHONE SELECT
AUDIO SELECT
DEVICE DELETE
PIN CODE EDIT
(0000)
RECONNECT ON
AUTO PAIRING ON
INITIALIZE YES
Selects the phone or audio device to connect or disconnect.
“
” appears in front of the device name when connected.
*
•
You can only connect another Bluetooth device by disconnecting the connected Bluetooth device
first.
“
” disappears when disconnected.
*
1
Turn the volume knob to select a device to delete, then press the knob.
2
Turn the volume knob to select [
Changes the PIN code (up to 6 digits).
1
Turn the volume knob to select a number.
2
Press S/T to move the entry position.
Repeat steps
3
Press the volume knob to confirm.
:The unit automatically reconnect when the last connected Bluetooth device is within range.;
OFF
:Cancels.
:The unit automatically pair supported Bluetooth device (iPhone/ iPod touch/ Android device)
when it is connected through USB input terminal.Depending on the operating system of the
connected device, this function may not work. ;
:Initializes all the Bluetooth settings (including stored pairing, phonebook, and etc.).;
NO
:Cancels.
1
and 2 until you finish entering the PIN code.
YES
] or [NO], then press the knob.
OFF
:Cancels.
Default:
XX
16
Page 21
BLUETOOTH®
Bluetooth test mode
You can check the connectivity of the supported
profile between the Bluetooth device and the
unit.
• Make sure there is no Bluetooth device paired.
1 Press and hold .
“PLEASE PAIR YOUR PHONE PIN 0000”
appears.
2 Search and select this unit model name
(DPX4
device.
3 Operate the Bluetooth device to confirm
pairing.
“TESTING” flashes on the display.
The connectivity result (OK or NG) appears after
the test.
PAIRING: Pairing status
HF CNT: Hands-Free Profile (HFP) compatibility
AUD CNT: Advanced Audio Distribution Profile
PB DL: Phonebook Access profile (PBAP)
To cancel test mode, press and hold
turn off the unit.
DAB/ DPX3**BT) on the Bluetooth
**
(A2DP) compatibility
compatibility
to
BLUETOOTH — Audio
Audio player via Bluetooth
Press repeatedly to select BTAUDIO.
1
2 Operate the Bluetooth audio player to start playback.
To On the faceplate
Playback / pause
Select group or folder Press 1/2.
Reverse / Forward skip
Reverse / Fast-forward
Repeat play Press
Random play Press repeatedly.
Operations and display indications may differ according to their availability on the connected
device.
Press
Press S/T.
Press and hold S/T.
ALLREPEAT, FILEREPEAT, REPEATOFF
FOLDERRANDOM, RANDOMOFF
Press and hold to select
.
repeatedly.
ALLRANDOM
.
ENGLISH
17
Page 22
AUDIO SETTINGS
While listening to any source...
1 Press AUDIO to enter [
2 Turn the volume knob to make a selection (see the following table),
then press the knob.
3 Repeat step 2 until the desired item is selected or activated.
4 Press and hold to exit.
To return to the previous setting item, press .
SUB-WLEVEL –15
BASSLEVEL –8
MIDLEVEL –8
TRELEVEL –8
EQ PRO
BASS ADJUST BASS CTR FRQ
MID ADJUST MID CTR FRQ 0.5KHZ/ 1.0KHZ/ 1.5KHZ/ 2.5KHZ
TRE ADJUST TRE CTR FRQ 10.0KHZ/ 12.5KHZ/ 15.0KHZ/ 17.5KHZ
AUDIOCONTROL
to
+15 (0
) Adjusts the subwoofer output level.
to +8 (+6)
to +8 (+5)
to +8 (0)
BASS LEVEL –8
BASS Q FACTOR 1.00/ 1.25/ 1.50/ 2.00
BASS EXTEND ON
MID LEVEL –8
MID Q FACTOR 0.75/ 1.00/ 1.25
TRE LEVEL –8
].
Adjusts the level to memorize for each source.
(Before making an adjustment, select the source
you want to adjust.)
60HZ/ 80HZ/ 100HZ/ 200HZ
frequency.
to +8 (+6):Adjusts the level.
:Turns on the extended bass.;
center frequency.
to +8 (+5):Adjusts the level.
:Adjusts the quality factor.
the center frequency.
to +8 (0):Adjusts the level.
Default:
: Selects the center
:Adjusts the quality factor.
OFF
:Cancels.
:Selects the
:Selects
PRESET EQ DRIVEEQ/ TOP40/ POWERFUL/ ROCK/ POPS/ EASY/ JAZZ
BASSBOOST LEVEL1/ LEVEL2/ LEVEL3
XX
LOUDNESS LEVEL1/ LEVEL2
SUBWOOFERSET ON
LPFSUBWOOFER THROUGH
SUB-WPHASE REVERSE
FADER R15
BALANCE L15
VOLUMEOFFSET
SOUNDRECNSTR
(Sound
reconstruction)
• [
SUB-W LEVEL
selectable only if [
• [
SUB-WLEVEL
[
SUBWOOFERSET
NATURAL/ USER
genre. (Select [
[
DRIVE EQ
running noise of the tyres.
OFF
:Cancels.
boost to produce a well-balanced sound at a low volume level.;
OFF
:Cancels.
:Turns on the subwoofer output.;
160HZ
160Hz are sent to the subwoofer.
output to be in line with the speaker output for optimum performance.
(Selectable only if a setting other than [
[
LPFSUBWOOFER
to
to
For AUX:
adjustment level of each source. (Before adjustment, select the source
you want to adjust.)
ON
:Creates realistic sound by compensating the high-frequency
components and restoring the rise-time of the waveform that are lost
in audio data compression.;
]/ [
SUBWOOFER SET
SWITCH PREOUT
]/ [
LPFSUBWOOFER
] is set to [ON].
:Selects a preset equalizer suitable to the music
USER
] to use the customized settings.)
] is a preset equalizer that reduces noise outside the car or
:Selects your preferred bass boost level.;
:Selects your preferred low and high frequencies
OFF
:All signals are sent to the subwoofer.;
:Audio signals with frequencies lower than 85Hz/ 120Hz/
(180°)/
NORMAL
(0°):Selects the phase of the subwoofer
].)
F15 (0
):Adjusts the rear and front speaker output balance.
R15 (0
):Adjusts the left and right speaker output balance.
–8
to +8(0) ; For other sources: –8 to 0:Presets the volume
]/ [
LPF SUBWOOFER
] is set to [
]/ [
SUB-WPHASE
THROUGH
OFF
:Cancels.
]/ [
SUBWOOFER
] is selectable only if
:Cancels.
85HZ/ 120HZ
] is selected for
SUB-W PHASE
]. ( 4)
/
/
] is
18
Page 23
DISPLAY SETTINGS
1 Press FNC to enter [
2 Turn the volume knob to select [
3 Turn the volume knob to make a selection (see the following table),
then press the knob.
4 Repeat step 3 until the desired item is selected/activated or follow
the instructions stated on the selected item.
5 Press and hold to exit.
To return to the previous setting item, press .
COLOR SELECT VARIABLESCAN/ CUSTOM R/G/B/
DIMMER ON
BRIGHTNESS 0
TEXTSCROLL AUTO/ ONCE
*
Preset colors:
BLUE2
GREEN2
ORANGERED
RED1/ RED2/ RED3/ PURPLE1/ PURPLE2/ PURPLE3/ PURPLE4/ BLUE1/
/
BLUE3/ SKYBLUE1/ SKYBLUE2/ LIGHTBLUE/ AQUA1/ AQUA2/ GREEN1/
/
GREEN3/ YELLOWGREEN1/ YELLOWGREEN2/ YELLOW/ ORANGE1/ ORANGE2/
FUNCTION
].
DISPLAY
], then press the knob.
Default:
button and display illumination color.
You can create your own color (when [
selected). The color you have created can be stored in [
1
Press and hold the volume knob to enter the detailed color adjustment.
2
Press S/T to select the color (R/ G/ B) to adjust.
3 Turn the volume knob to adjust the level (0 — 9), then press the knob.
:Dims the display illumination and button illumination.;
— 31: Selects your preferred brightness level for display illumination
and button illumination.
automatically, or scroll only once.;
:Selects whether to scroll the display information
preset colors*: Selects your preferred
CUSTOM R/G/B
OFF
:Cancels.
] or preset colors* is
CUSTOM R/G/B
OFF
:Cancels.
].
MORE INFORMATION
General
•
This unit can only play the following CDs:
•
Detailed information and notes about the playable audio files are stated in an online manual
on the following web site: www.kenwood.com/cs/ce/audiofile/
Playable files
XX
•
Playable audio file: MP3 (.mp3), WMA (.wma), AAC (.m4a)
•
Playable disc media: CD-R/CD-RW/CD-ROM
•
Playable disc file format: ISO 9660 Level 1/2, Joliet, Long file name.
•
Playable USB device file system: FAT12, FAT16, FAT32
Even when audio files comply with the standards listed above, playback may be impossible
depending on the types or conditions of media or device.
Unplayable discs
•
Discs that are not round.
•
Discs with coloring on the recording surface or discs that are dirty.
•
Recordable/ReWritable discs that have not been finalized.
•
8cm CD. Attempting to insert using an adapter may cause malfunction.
About USB devices
•
This unit can play MP3/WMA/AAC/WAV files stored on a USB mass storage class device.
•
You cannot connect a USB device via a USB hub.
•
Connecting a cable whose total length is longer than 5m may result in abnormal playback.
•
This unit cannot recognize a USB device whose rating is other than 5V and exceeds 1A.
About KENWOOD Music Editor Light and KENWOOD Music Control
•
This unit supports the PC application KENWOOD Music Editor Light and Android™ application
KENWOOD Music Control.
•
When you play audio files with song data added using the KENWOOD Music Editor Light or
KENWOOD Music Control, you can search for audio files by Genres, Artists, Albums, Playlists,
and Songs.
•
KENWOOD Music Editor Light and KENWOOD Music Control are available on the following
web site: www.kenwood.com/cs/ce/
ENGLISH
19
Page 24
MORE INFORMATION
About iPod/iPhone
Made for
-
iPod touch (2nd, 3rd, 4th, and 5th generation)
-
iPod classic
-
iPod nano (3rd, 4th, 5th, 6th, and 7th generation)
-
iPhone 3G, 3GS, 4, 4S, 5, 5S, 5C
•
For the latest compatible list and software versions of iPhone/iPod, see:
www.kenwood.com/cs/ce/ipod
•
You cannot operate iPod if “KENWOOD” or “ ” is displayed on iPod.
About Android device
•
This unit supports Android OS 4.1 and above.
•
Some Android devices (with OS 4.1 and above) may not fully support Android Open Accessory
(AOA) 2.0.
•
If the Android device supports both mass storage class device and AOA 2.0, this unit always
playback via AOA 2.0 as priority.
•
For more information and the latest compatible list, see: www.kenwood.com/cs/ce/
About Bluetooth
•
Depending on the Bluetooth version of the device, some Bluetooth devices may not be able
to connect to this unit.
•
This unit may not work with some Bluetooth devices.
•
Signal conditions vary, depending on the surroundings.
•
For more information about Bluetooth, visit the following website:
www.kenwood.com/cs/ce/
TROUBLESHOOTING
Symptom Remedy
Sound cannot be heard.
“MISWIRING CHECK WIRING
THEN PWR ON” appears.
General
“PROTECTING SEND SERVICE”
appears.
The unit does not work at all. Reset the unit. (
DAB reception is poor. Make sure [ON] is selected for [
“DAB ANT ERR” Check the DAB antenna. If a passive antenna (without
Digital Radio
“RELATED SERV FOUND”
•
Radio reception is poor.
•
Static noise while listening
Radio
Analog
to the radio.
Disc cannot be ejected.
Noise is generated. Skip to another track or change the disc.
Tracks do not play back as
you intended them to play.
CD / USB / iPod
“READING” keeps flashing. Do not use too many hierarchical levels or folders.
Elapsed playing time is not
correct.
•
Adjust the volume to the optimum level.
•
Check the cords and connections.
Turn the power off, then check to be sure the
terminals of the speaker wires are insulated properly.
Turn the power on again.
Send the unit to the nearest service center.
3)
(
4)
a booster) is used, set [
(
4)
•
Press the volume knob to activate Soft-Link. ( 6)
•
Press to cancel.
•
Connect the antenna firmly.
•
Pull the antenna out all the way.
Press and hold M to forcibly eject the disc. Be careful
not to drop the disc when it is ejected. If this does not
solve the problem, reset the unit. (
Playback order is determined when files are recorded.
This is caused by how the tracks are recorded.
DAB ANT POWER
DAB ANT POWER
].
] to [
OFF
].
3)
20
Page 25
TROUBLESHOOTING
Symptom Remedy
Correct characters are
not displayed (e.g.
album name).
“NA FILE” Make sure the disc contains supported audio files.
“NO DISC” Insert a playable disc into the loading slot.
“TOC ERROR” Make sure the disc is clean and inserted properly.
“PLEASE EJECT” Reset the unit. If this does not solve the problem, consult your
“READ ERROR” Copy the files and folders onto the USB device again. If this
CD / USB / iPod
“NO DEVICE” Connect a USB device, and change the source to USB again.
“COPY PRO” A copy-protected file is played.
“NA DEVICE”
“NO MUSIC” Connect a USB device that contains playable audio files.
“iPod ERROR”
•
Sound cannot
be heard during
playback.
•
Sound output only
from the Android
ANDROID
device.
This unit can only display uppercase letters, numbers, and a
limited number of symbols. Uppercase Cyrillic letters can also
be displayed if [
(
19)
nearest service center.
does not solve the problem, reset the USB device or use
another USB device.
Connect a supported USB device, and check the connections.
•
Reconnect the iPod.
•
Reset the iPod.
•
Reconnect the Android device.
•
If in [
on the Android device and start playback.
•
If in [
application or use another media player application.
•
Restart the Android device.
•
If this does not solve the problem, the connected Android
device is unable to route the audio signal to unit. (
РУССКИЙ
HAND MODE
HAND MODE
] is selected. ( 4)
], launch any media player application
], relaunch the current media player
20)
Symptom Remedy
Cannot playback at
[
BROWSE MODE
“NO DEVICE” or “READING”
keeps flashing.
ANDROID
Playback is intermittent or
sound skips.
“ANDROID ERROR” /
“NADEVICE”
No Bluetooth device is
detected.
Bluetooth pairing cannot
be made.
Echo or noise is heard
during a phone
Bluetooth®
conversation.
Phone sound quality
is poor.
].
•
Make sure KENWOOD MUSIC PLAY APP is installed on
the Android device. (
•
Reconnect the Android device and make the
appropriate setting in [
•
If this does not solve the problem, the connected
Android device does not support [
(
20)
•
Switch off the developer options on the Android
device.
•
Reconnect the Android device.
•
If this does not solve the problem, the connected
Android device does not support [
(
20)
Turn off the power saving mode on the Android device.
•
Reconnect the Android device.
•
Restart the Android device.
•
Search from the Bluetooth device again.
•
Reset the unit. ( 3)
•
Make sure you have entered the same PIN code to
both the unit and Bluetooth device.
•
Delete pairing information from both the unit and the
Bluetooth device, then perform pairing again. (
•
Adjust the microphone unit’s position. ( 12)
•
Check the [
•
Reduce the distance between the unit and the
Bluetooth device.
•
Move the car to a place where you can get a better
signal reception.
ECHO CANCEL
10)
ANDROID SETUP
BROWSE MODE
BROWSE MODE
] setting. ( 13)
]. ( 11)
].
].
12)
ENGLISH
21
Page 26
TROUBLESHOOTING SPECIFICATIONS
Symptom Remedy
Voice calling method is
not successful.
Sound is being
interrupted or skipped
during playback of a
Bluetooth audio player.
The connected
Bluetooth audio player
cannot be controlled.
“DEVICE FULL” The number of registered devices has reached its limit.
Bluetooth®
“N/A VOICE TAG” Make sure the same voice as the registered voice tag is used.
“NOT SUPPORT” The connected phone does not support Voice Recognition
“NO ENTRY” /
“NO PAIR”
“ERROR” Try the operation again. If “ERROR” appears again, check if
“NO INFO” Bluetooth device cannot get the contact information.
“HF ERROR XX” /
“BT ERROR”
•
Use voice calling method in a more quiet environment.
•
Reduce the distance from the microphone when you speak
the name.
•
Make sure the same voice as the registered voice tag is
used.
•
Reduce the distance between the unit and the Bluetooth
audio player.
•
Turn off, then turn on the unit and try to connect again.
•
Other Bluetooth devices might be trying to connect to the
unit.
•
Check whether the connected Bluetooth audio player
supports Audio/Video Remote Control Profile (AVRCP).
(Refer to the instructions of your audio player.)
•
Disconnect and connect the Bluetooth player again.
Retry after deleting an unnecessary device. (
DELETE
)
feature.
There is no registered device connected/found via Bluetooth.
the device supports the function you have tried.
Reset the unit and try the operation again. If this does not
solve the problem, consult your nearest service center.
16,
DEVICE
DAB Frequency Range L Band 1452.960MHz — 1490.624MHz
)
Sensitivity –100dBm
Signal-to-Noise Ratio 80dB
Antenna Connector Type SMB
Digital radio
(for
Antenna Output Voltage 14.4V (11V – 16V)
Antenna Maximum Current <100mA
FM Frequency Range 87.5MHz — 108.0MHz (50kHz space)
Usable Sensitivity (S/N=26dB) 0.71μV/75Ω
Quieting Sensitivity
(DINS/N=46dB)
Frequency Response (±3dB) 30Hz — 15kHz
Signal-to-Noise Ratio (MONO) 64dB
Stereo Separation (1kHz) 40dB
Analog radio
MW Frequency Range 531kHz — 1611kHz (9kHz space)
Usable Sensitivity (S/N=20dB) 28.2μV
LW Frequency Range 153kHz — 279kHz (9kHz space)
Usable Sensitivity (S/N=20dB) 50μV
Laser Diode GaAIAs
Digital Filter (D/A) 8 times over sampling
Spindle Speed 500rpm — 200rpm (CLV)
Wow & Flutter Below measurable limit
CD player
Frequency Response (±1dB) 20Hz — 20kHz
Total Harmonic Distortion (1kHz) 0.01%
Band III 174.928MHz — 239.200MHz
2.0μV/75Ω
22
Page 27
SPECIFICATIONS
Signal-to-Noise Ratio (1kHz) 105 dB
Dynamic Range 90dB
Channel Separation 85dB
MP3 Decode Compliant with MPEG-1/2 Audio Layer-3
CD player
WMA Decode Compliant with Windows Media Audio
AAC Decode AAC-LC “.m4a” files
USB Standard USB1.1, USB2.0 (Full speed)
File System FAT12/16/32
Maximum Supply Current DC5V
MP3 Decode Compliant with MPEG-1/2 Audio Layer-3
USB
WMA Decode Compliant with Windows Media Audio
AAC Decode AAC-LC “.m4a” files
WAV Decode Linear-PCM
Version Bluetooth Ver.2.1+EDR / Bluetooth 3.0
Frequency Range 2.402GHz — 2.480GHz
Output Power +4dBm (MAX), 0dBm (AVE) Power Class 2
Maximum Communication Range Line of sight approx. 10m (32.8ft)
Profile HFP (Hands-Free Profile)
Bluetooth
1A
SPP (Serial Port Profile)
PBAP (Phonebook Access Profile)
A2DP (Advanced Audio Distribution Profile)
AVRCP (Audio/Video Remote Control Profile)
Maximum Output Power 50W×4
Full Bandwidth Power 22W×4 (at less than 1% THD)
Speaker Impedance 4Ω—8Ω
Tone Action Bass 200Hz±8dB
Audio
Preout Level/Load (CD) 2500mV/10kΩ
Preout Impedance ≤600Ω
Frequency Response (±3dB) 20Hz—20kHz
Input Maximum Voltage 1000mV
Auxiliary
Input Impedance 30kΩ
Operating Voltage 14.4V (10.5V—16V allowable)
Maximum Current Consumption 10A
Operational Temperature Range 0°C—+40°C
General
Installation Size (W×H×D) 182mm×111mm×158mm
Weight 1.6kg
Subject to change without notice.
Middle 2.5kHz±8dB
Treble 12.5kHz±8dB
ENGLISH
23
Page 28
Warning
•
The unit can only be used with a 12V DC power supply, negative ground.
•
Disconnect the battery’s negative terminal before wiring and mounting.
•
Do not connect Battery wire (yellow) and Ignition wire (red) to the car
chassis or Ground wire (black) to prevent a short circuit.
•
Insulate unconnected wires with vinyl tape to prevent a short circuit.
•
Be sure to ground this unit to the car’s chassis again after installation.
Caution
•
For safety’s sake, leave wiring and mounting to professionals. Consult
the car audio dealer.
•
Install this unit in the console of your vehicle. Do not touch the metal
parts of this unit during and shortly after use of the unit. Metal parts
such as the heat sink and enclosure become hot.
•
Do not connect the [ wires of speakers to the car chassis or Ground
wire (black), or connect them in parallel.
•
Mount the unit at an angle of less than 30º.
•
If your vehicle wiring harness does not have the ignition terminal,
connect Ignition wire (red) to the terminal on the vehicle’s fuse box
which provides 12 V DC power supply and is turned on and off by the
ignition key.
•
Keep all cables away from heat dissipate metal parts.
INSTALLATION / CONNECTION
•
After the unit is installed, check whether the brake lamps, blinkers,
wipers, etc. on the car are working properly.
•
If the fuse blows, first make sure the wires are not touching car’s chassis,
then replace the old fuse with one that has the same rating.
Basic procedure
1
Remove the key from the ignition switch, then
disconnect the [ terminal of the car battery.
2 (For )
Install the DAB antenna.
See Installing the DAB antenna. (
27)
3 Connect the wires properly.
See Wiring connection. (
25, 26
)
4 Install the unit to your car.
See Installing the unit (in-dash mounting).
5 Connect the [ terminal of the car battery.
6 Reset the unit. (
3
)
24
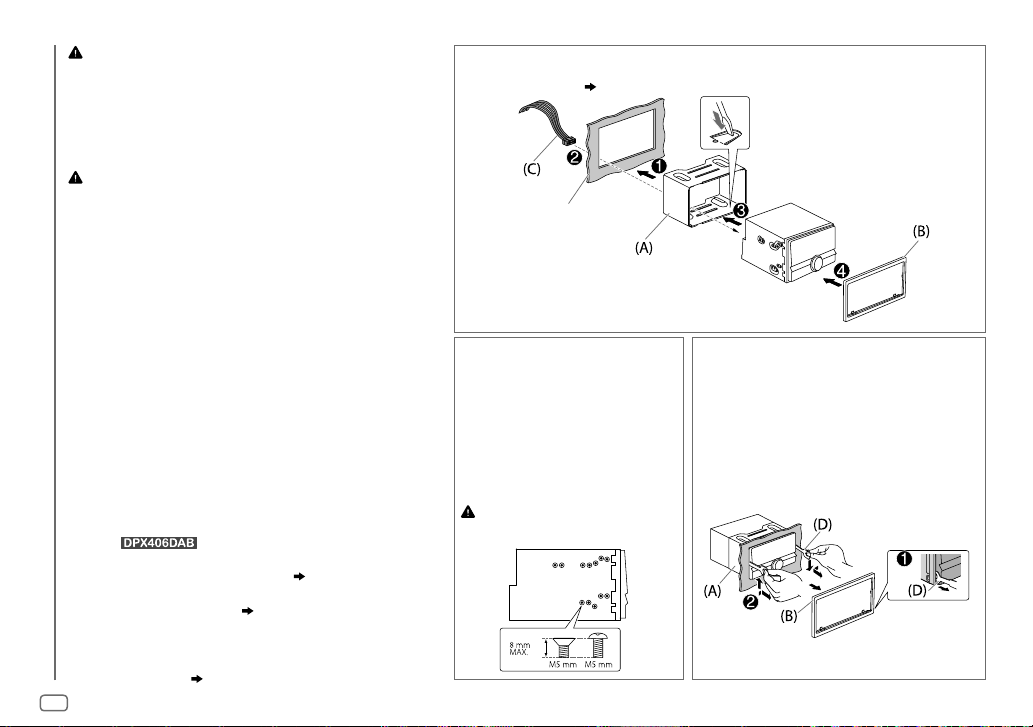
Installing the unit (in-dash mounting)
Do the required wiring. (
Dashboard of your car
When installing without the
mounting sleeve
1
Remove the mounting sleeve
from the unit.
2 Align the holes in the unit (on
both sides) with the vehicle
mounting bracket and
secure the unit with screws
(commercially available).
Use only the specified screws. Using
wrong screws might damage the unit.
25, 26
)
How to remove the unit
1
2 Insert the extraction keys deeply into
Bend the appropriate tabs to hold the
mounting sleeve firmly in place.
Fit the catch pin on the extraction keys
into the holes on both sides of the trim
plate, then pull it out.
the slots on each side, then follow the
arrows as shown below.
Page 29
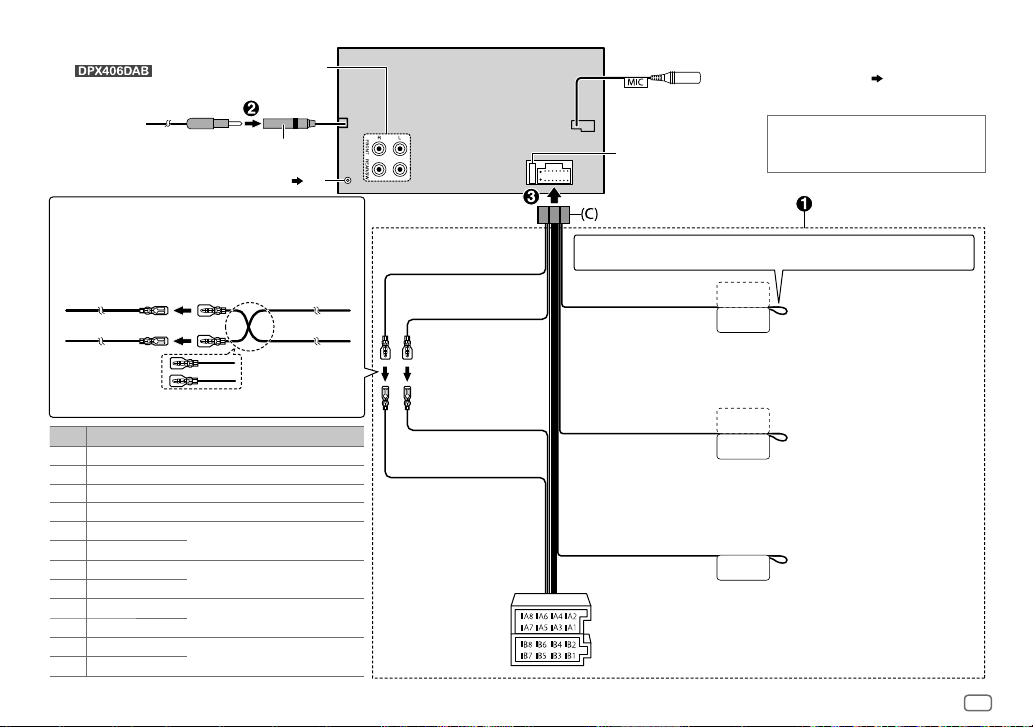
Wiring connection
(for
)
Front/ Rear/
subwoofer output
MIC (microphone input terminal) (
12)
Antenna terminal
DAB antenna jack ( 27)
Connecting the ISO connectors on some VW/Audi or
Opel (Vauxhall) automobiles
You may need to modify the wiring of the supplied
wiring harness as illustrated below.
Ignition wire
A7 (Red)
(Red)
Vehicle
A4 (Yellow)
Battery wire
(Yellow)
Default wiring
Pin
Color and function
A4 Yellow : Battery
A5 Blue/White : Power control
A7 Red : Ignition (ACC)
A8 Black : Earth (ground) connection
B1
Purple
B2
B3
B4
B5
B6
B7
B8
]
Purple/black
Gray
]
Gray/black
White
]
White/black
Green
]
Green/black
[
[
[
[
: Rear speaker (right)
: Front speaker (right)
: Front speaker (left)
: Rear speaker (left)
Unit
Yellow (Battery wire)
Red (Ignition wire)
Red (A7)
Yellow (A4)
ISO connectors
When connecting to an external amplifier,
Fuse (10A)
connect its ground wire to the car’s chassis
to avoid damaging the unit.
If no connections are made, do not let the wire come out from the tab.
Light blue/yellow
(Steering remote
control wire)
Blue/White
(Power control wire/
Antenna control wire)
Brown
(Mute control wire)
STEERING WHEEL
REMOTE INPUT
REMOTE CONT
ANT CONT
P. CONT
MUTE
To the steering wheel remote control
adapter
To the power control terminal when
using the optional power amplifier
or to the antenna control terminal in
the vehicle
To connect the Kenwood navigation
system, refer your navigations
manual
ENGLISH
25
Page 30
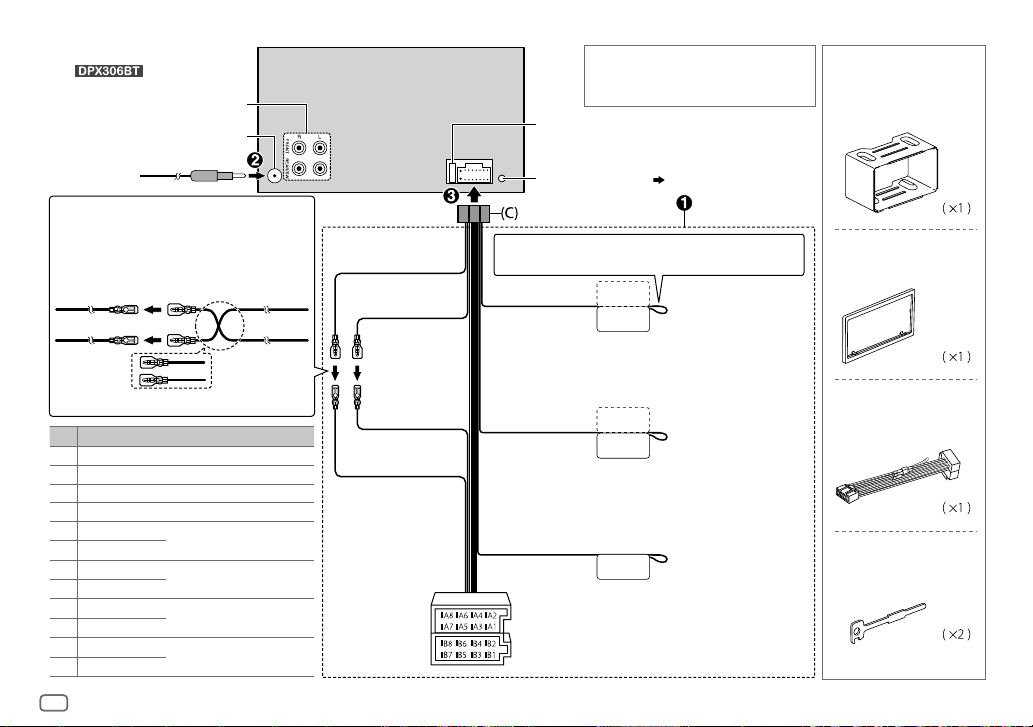
Wiring connection
(for
)
Front/ Rear/ subwoofer output
Antenna terminal
Connecting the ISO connectors on some VW/
Audi or Opel (Vauxhall) automobiles
You may need to modify the wiring of the supplied
wiring harness as illustrated below.
A7 (Red)
Ignition wire
(Red)
Vehicle
A4 (Yellow)
Battery wire
(Yellow)
Default wiring
Pin
Color and function
A4 Yellow : Battery
A5 Blue/White : Power control
A7 Red : Ignition (ACC)
A8 Black : Earth (ground) connection
B1
Purple
B2
B3
B4
B5
B6
B7
B8
]
Purple/black
Gray
]
Gray/black
White
]
White/black
Green
]
Green/black
: Rear speaker (right)
[
: Front speaker (right)
[
: Front speaker (left)
[
: Rear speaker (left)
[
Unit
Yellow (Battery wire)
Red (Ignition wire)
Red (A7)
Yellow (A4)
ISO connectors
When connecting to an external amplifier,
connect its ground wire to the car’s chassis to
avoid damaging the unit.
Fuse (10A)
Microphone input jack ( 12)
If no connections are made, do not let the wire come out
from the tab.
Light blue/yellow
(Steering remote
control wire)
STEERING WHEEL
REMOTE INPUT
REMOTE CONT
To the steering wheel
remote control adapter
To the power control
MUTE
terminal when using the
optional power amplifier
or to the antenna control
terminal in the vehicle
To connect the Kenwood
navigation system, refer
your navigations manual
Blue/White
(Power control wire/
Antenna control wire)
Brown
(Mute control wire)
ANT CONT
P. CONT
Part list for
installation
(A)
Mounting sleeve
(B)
Trim plate
(C)
Wiring harness
(D)
Extraction key
2626
Page 31

INSTALLATION / CONNECTION
Installing the DAB antenna (supplied)
Caution
•
The film antenna
•
Do not install at the following locations:
– where it may block the driver’s view.
– where it may obstruct the operation of safety devices such as air
bags.
– on movable glass surfaces such as the rear hatch.
– at side of vehicle (e.g. door, front quarter window).
– on rear window.
•
Signal strength will weaken when installed at the following
locations:
– on IR reflecting glass or locations covered with mirror type glass
film.
– where it overlaps with genuine radio antenna (pattern).
– where it overlaps with window heating wires.
– on glass that blocks radio signals (e.g. IR reflecting glass, thermal
insulation glass).
•
Poor reception may occur:
– due to noise when windscreen wiper, air conditioner, or motor is
turned on.
– depending on the direction of the broadcast station with respect
to the vehicle (antenna).
•
Thoroughly wipe oil and dirt from the pasting surface with the
supplied cleaner
•
Do not bend or damage the film antenna
•
It may not be possible to install on certain vehicles.
•
Check the cable routing of the film antenna
(F)
before pasting.
•
Do not apply any glass cleaner after pasting the film antenna
(E)
is exclusively for use inside the vehicle.
(H)
.
(E)
.
(E)
and amplifier unit
(E)
Determine the antenna installation position
•
The direction of the film antenna
right side or left side.
•
Be sure to check the installation location of film antenna
•
Separate from other antennas by at least 100mm.
•
Do not paste the amplifier unit
enough adhesion.
Installing the antenna on the left side
(E)
changes depending on whether the film antenna
(F)
on the ceramic line (black part) around the front glass. Because there is not
150 mm
30 mm
Earth sheet*
*
Paste the earth sheet of the amplifier unit
(E)
(F)
Part list for installation
.
(E)
before installing. Film antenna cannot be re-pasted.
Ceramic line (black part)
(F)
on the metal part of the front pillar.
(E)
is installed on the
Installing the antenna on the right side
150 mm
(F)
Earth sheet*
30 mm
(E)
(G)
Cable clamper
(E)
Film antenna
(F)
Amplifier unit
(cable with booster, 3.5m)
(H)
Cleaner
ENGLISH
27
Page 32

INSTALLATION / CONNECTION
Caution
When installing the antenna cable inside the front
pillar with the air bag installed
•
The front pillar cover is secured with a special clip which
may need to be replaced when it is removed.
Contact your vehicle dealer for details on removing the
front pillar cover and availability of replacement parts.
Clip
Front pillar
•
Install the amplifier unit
does not obstruct the operation of the air bag.
(F)
above the air bag so that it
(F)
Installation overview
The antenna should be installed on the passenger side
for safety.
(E)
(F)
Antenna installation
1
Remove the front pillar cover of your car.
Front pillar
2 Clean the windscreen with the supplied
cleaner (H).
(H)
– Wait until the glass surface is completely
dry before proceeding.
– Warm the surface of the windscreen with
defroster if it is cold (during winter).
3 Remove the separator (tag 1) of film
antenna (E) horizontally and paste the
antenna on the windscreen.
Separator (tag 1)
28
Air bag
Do not touch the pasting surface (adhesive
side) of the film antenna (E).
(E)
Page 33

INSTALLATION / CONNECTION
4 Rub the film antenna gently onto the
windscreen in the direction of the arrow
shown to allow it to stick firmly.
(E)
5 Remove the separator (tag 2) of film
antenna (E) vertically.
Separator (tag 2)
(E)
6 Set the postion of the protrusion of the
amplifier unit (F) with the K on the film
antenna (E) and paste.
Do not touch the lead terminal or the
pasting surface (adhesive side) of the
amplifier unit (F).
• When installing the antenna on the right
side
(F)
(E)
Lead terminal of the
film antenna
(E)
Earth sheet
Set the position of
the protrusion with
K
mark
Lead contact of the amplifier
unit (metal part)
• When installing the antenna on the left
side
(E)
Earth sheet
(F)
7 Remove the film covering the earth sheet
and paste the earth sheet on the metal
part of the vehicle.
Provide sufficient leeway for the earth sheet
so that it does not interfere with the interior
parts (front pillar cover). Also take care that
the interior parts do not interfere with the
amplifier unit (F).
Windscreen
Earth sheet
(F)
Front pillar cover
8 Wire the antenna cables.
Use cable clamper (G) to secure the
antenna to the pillar at several positions.
9 Attach the front pillar cover back to its
original position.
Be sure not to damage the earth sheet and
amplifier unit (F) when covering.
10 Connect the amplifier unit (F) to the DAB
input terminal on the rear of the unit.
11 Set [
DAB ANT POWER
] to [ON]. (
4)
ENGLISH
29
Page 34

INHALT VOR DER INBETRIEBNAHME
VOR DER INBETRIEBNAHME 2
GRUNDLAGEN 3
ERSTE SCHRITTE 3
DIGITAL RADIO (DAB)
(für )
5
ANALOG RADIO 7
CD / USB / iPod / ANDROID 9
AUX 11
BLUETOOTH® 12
AUDIOEINSTELLUNGEN 18
DISPLAY-EINSTELLUNGEN 19
WEITERE INFORMATIONEN 19
FEHLERSUCHE 20
TECHNISCHE DATEN 22
EINBAU / ANSCHLUSS 24
Warnung
Bedienen Sie keine Funktion, die Ihre Aufmerksamkeit vom Straßenverkehr ablenkt.
Vorsicht
Lautstärkeeinstellung:
•
Stellen Sie die Lautstärke so ein, dass Sie immer noch Geräusche von außerhalb des Fahrzeugs hören können, um Unfälle zu
vermeiden.
•
Senken Sie die Lautstärke vor dem Abspielen digitaler Tonquellen, um Beschädigung der Lautsprecher durch plötzliche
Tonspitzen zu vermeiden.
Allgemeines:
•
Vermeiden Sie Verwendung des externen Geräts, wenn dieses das sichere Fahren behindern kann.
•
Stellen Sie sicher, dass alle wichtigen Daten gesichert sind. Wir übernehmen keine Haftung für jeglichen Verlust
aufgenommener Daten.
•
Stellen Sie sicher, dass keine Metallgegenstände (wie etwa Münzen oder Werkzeuge) ins Innere des Geräts gelangen und
Kurzschlüsse verursachen.
•
Wenn ein Disc-Fehler durch Kondensationsbildung auf der Laserlinse auftritt, werfen Sie die Disc aus und warten Sie eine Zeit
lang, bis die Kondensation getrocknet ist.
Wie Sie diese Anleitung lesen
•
Die Bedienung wird im Wesentlichen
anhand der Tasten auf der Frontblende
des
•
Zur Erklärung des Displays wird in dieser
Anleitung English verwendet.
• [XX
] zeigt die gewählten Punkte an.
•
( XX) zeigt an, das
Bezugsinformationen auf der
angegebenen Seitennummer
vorhanden sind.
erläutert.
2
Wartung
Reinigung des Geräts: Wischen Sie die Frontblende mit einem trockenen Silikonlappen oder weichen Lappen sauber.
Handhabung von Discs:
•
Berühren Sie nicht die Aufnahme-Oberfläche der Disc.
•
Kleben Sie keine Aufkleber oder ähnliches auf eine Disc. Verwenden Sie dem entsprechend auch keine Discs, auf denen sich
bereits ein Aufkleber befindet.
•
Verwenden Sie kein Zubehör für die Disc.
•
Reinigen Sie CDs stets von der Mitte einer Disc nach außen hin.
•
Reinigen Sie die Disc mit einem trockenen Silikonlappen oder weichen Lappen. Verwenden Sie keine Lösungsmittel.
•
Ziehen Sie Discs beim Entfernen aus dem Gerät horizontal heraus.
•
Entfernen Sie vor dem Einsetzen einer Disc die Grate vom Mittenloch und der Disc-Kante.
Page 35

GRUNDLAGEN
Frontblende
Zum Auf der Frontblende
Einschalten
Einstellen der
Lautstärke
Quelle auswählen
Ändern der DisplayInformation
Ladeschlitz Displayfenster
Lautstärke-Regler
(drehen/drücken)
Drücken Sie
•
Zum Ausschalten halten Sie die Taste gedrückt.
Drehen Sie den Lautstärke-Regler.
Drücken Sie den Lautstärke-Regler während der Wiedergabe, um den
Ton stummzuschalten.
•
Zum Abbrechen drücken Sie die Taste erneut.
Drücken Sie
Drücken Sie
•
Halten Sie die Taste gedrückt, um die Display-Informationen zu
scrollen.
(Für )
Rückstelltaste
•
Ihre vorgegebenen Einstellungen
werden ebenfalls gelöscht.
.
wiederholt.
wiederholt.
ERSTE SCHRITTE
1
Wählen Sie die Anzeigesprache und brechen Sie
die Demonstration ab
Wenn Sie die Stromversorgung einschalten (nach dem Rücksetzen des
Geräts), erscheint folgende Anzeige im Display: “SELLANGUAGE”
“PRESS”
“VOLUMEKNOB”
1 Drehen Sie den Lautstärke-Regler zum Wählen von [
(Englisch) oder [
Regler.
[
ENG
] ist für das ursprüngliche Setup gewählt.
Dann erscheint folgendes in der Anzeige: “CANCEL DEMO”
“PRESS”
2 Drücken Sie den Lautstärke-Regler.
[
YES
] ist für das ursprüngliche Setup gewählt.
3 Drücken Sie den Lautstärke-Regler erneut.
“DEMOOFF” erscheint.
2
Stellen Sie die Uhr ein
Drücken Sie FNC, um auf [
1
2 Drehen Sie den Lautstärke-Regler zum Wählen von [
und drücken Sie dann den Regler.
3 Drehen Sie den Lautstärke-Regler zum Wählen von
[
CLOCK ADJUST
RUS
] (Russisch), und drücken Sie dann den
“VOLUME KNOB”.
FUNCTION
] zu schalten.
], und drücken Sie dann den Regler.
DEUTSCH
ENG
CLOCK
]
],
3
Page 36

ERSTE SCHRITTE
4 Drehen Sie den Lautstärke-Regler, um die Einstellungen
vorzunehmen, und drücken Sie dann den Regler.
Tag Stunde Minute
5 Drehen Sie den Lautstärke-Regler zum Wählen von
[
CLOCK FORMAT
6 Drehen Sie den Lautstärke-Regler zum Wählen von [
oder [
7 Halten Sie zum Beenden gedrückt.
Zum Zurückschalten zum vorherigen Einstellelement drücken Sie .
3
Festlegen der Anfangseinstellungen
Drücken Sie wiederholt, um auf STANDBY zu
1
schalten.
2 Drücken Sie FNC, um auf [
• Durch Drücken von
3 Drehen Sie den Lautstärke-Regler, um eine Auswahl zu
treffen (siehe folgende Tabelle), und drücken Sie dann den
Regler.
4 Wiederholen Sie Schritt 3, bis der gewünschte Gegenstand
gewählt oder aktiviert ist.
5 Halten Sie zum Beenden gedrückt.
Zum Zurückschalten zum vorherigen Einstellelement drücken Sie .
AUDIO CONTROL
SWITCH
PREOUT
SP SELECT OFF/ 5/4/ 6 × 9/6/ OEM
DISPLAY
EASY MENU
], und drücken Sie dann den Regler.
24H
], und drücken Sie dann den Regler.
FUNCTION
AUDIO
REAR/ SUBWOOFER
Subwoofer an die Line-Out-Buchsen an der Rückseite angeschlossen sind
(über einen externen Verstärker).
Lautsprechergröße (5 Zoll oder 4 Zoll, 6×9 Zoll oder 6 Zoll) oder OEMLautsprechern für optimale Leistung.
ON
:Sowohl die Anzeige als auch die Tastenbeleuchtung wechseln auf
Weiß um, wenn [
als auch Tastenbeleuchtung bleiben als Farbe von [
(
FUNCTION
19)
] zu schalten.
gehen Sie direkt zu [
: Wählt, ob hintere Lautsprecher oder ein
: Auswahl entsprechend der
] eingegeben wird.;
AUDIO CONTROL
COLOR SELECT
Standard:
OFF
:Sowohl Anzeige
12H
]
].
TUNER SETTING
DAB L-BAND
DAB ANT
POWER
PRESET TYPE NORMAL
*
ON
:Empfängt L-BAND-Ensemble bei digitalem Audioempfang.;
ON
*
:Versorgt die DAB-Antenne mit Strom. Wählen, wenn die mitgelieferte Antenne verwendet wird.;
OFF
(
27)
MW/ LW/ DB1/ DB2/ DB3).;
Frequenzbands.
SYSTEM
KEY BEEP
ON
:Aktiviert den Tastenberührungston.;
SOURCE SELECT
].
XX
BUILT-IN AUX
P-OFF WAIT
CD READ 1
ON
:Aktiviert AUX in der Quellenwahl.;
Nur zutreffend, wenn der Demonstrationsmodus ausgeschaltet ist.
Stellt die Zeitdauer ein, bis das Gerät automatisch ausschaltet (im Standby-Modus), um Batteriestrom zu
sparen.
20M
WAIT TIME – – –
:Hiermit wird automatisch zwischen Discs mit Audiodateien und Musik-CDs unterschieden.;
2
:Hiermit wird die Wiedergabe zwangsweise als Musik-CD durchgeführt. Es kommt kein Ton, wenn eine Disc
mit Audiodateien abgespielt wird.
F/W UPDATE
UPDATE SYSTEM / UPDATE BT/ UPDATE DAB1
F/W UP xx.xx/
F/W UP xxxxx/
F/W UP Vxxx
YES
Einzelheiten darüber, wie Sie die Firmware aktualisieren können, siehe: www.kenwood.com/cs/ce/
CLOCK
CLOCK DISPLAY
ENGLISH
РУССКИЙ
*
Bei .
ON
:Die Uhrzeit wird im Display angezeigt, auch wenn das Gerät ausgeschaltet wird.;
Die gewählte Sprache wird als Anzeigesprache für das [
(Ordnername, Dateiname, Songtitel, Interpretenname, Albumname) verwendet, wo zutreffend.
OFF
:Hebt auf.
:Liefert keine Stromversorgung. Wählen, wenn eine passive Antenne ohne Booster verwendet wird.
:Speichert einen Sender für jede Sendespeichertaste in jedem Frequenzband (FM1/ FM2/ FM3/
: 20 Minutes ;
:Startet die Aktualisierung der Firmware.; NO:Bricht ab (Aktualisierung wird nicht ausgeführt).
MIX
:Speichert einen Sender für jede Sendespeichertaste ungeachtet des
OFF
:Deaktiviert.
OFF
:Deaktiviert. ( 11)
40M
: 40 Minutes ;
60M
:Hebt auf
: 60Minutes;
*
/ UPDATE DAB2
*
FUNCTION
]-Menü und die Tag-Information
OFF
:Hebt auf.
4
Page 37

DIGITAL RADIO (DAB)
(für )
Über DAB (Digital Audio Broadcasting)
DAB ist eines der heute verfügbaren digitalen
Rundfunksendesysteme. Es kann Klang in Digitalqualität ohne
störende Interferenzen oder Signalverzerrung liefern. Außerdem
kann dieser Dienst Text, Bilder und Daten übermitteln.
Im Gegensatz zu UKW-Sendungen, wo jedes Programm auf
seiner eigenen Frequenz übertragen wird, kombiniert DAB
mehrere Programme (“Dienste” genannt), um ein sogenanntes
“Ensemble” zu bilden.
Die “Primärkomponente” (Hauptrundfunksender) wird manchmal
von einer “Sekundärkomponente” begleitet, die zusätzliche
Programme oder andere Informationen enthalten kann.
Vorbereitung:
1 Schließen Sie eine DAB-Antenne an die DAB-
Antennenbuchse an.
2 Drücken Sie zum Wählen von DAB.
3 Halten Sie gedrückt, um
die Aktualisierung der Dienstliste zu starten.
“LIST UPDATE” erscheint, und die Aktualisierung beginnt.
“UPDATED” erscheint, wenn die Aktualisierung fertig ist.
Die Aktualisierung dauert bis zu 3 Minuten. Keine
Unterbrechung (wie Verkehrsansagen) ist während der
Aktualisierung möglich.
•
Zum Abbrechen der Aktualisierung der Dienstliste: Halten Sie
( 27)
erneut gedrückt.
Suchen Sie nach einem Ensemble.
Drücken Sie wiederholt zum Wählen von DAB.
1
2 Drücken Sie wiederholt, um DB1/ DB2/ DB3 zu wählen.
3 Halten Sie S/T gedrückt, um ein Ensemble zu suchen.
4 Drücken Sie S/T, um ein Ensemble, einen Dienst oder eine Komponenten zum Hören
zu suchen.
•
Zum Ändern des Suchverfahrens für S/T: Halten Sie wiederholt gedrückt.
AUTO1 : Drücken Sie S/T: Wählen Sie ein Ensemble, einen Dienst oder eine Komponente.
Halten Sie
AUTO2 : Drücken Sie S/T: Suchen Sie nach einem Festsender.
MANUAL : Drücken Sie S/T: Wählen Sie ein Ensemble, einen Dienst oder eine Komponente.
Halten Sie
•
Zum Speichern eines Dienstes: Halten Sie eine der Zifferntasten (1bis 6) gedrückt.
•
Zum Auswählen eines gespeicherten Dienstes: Drücken Sie eine der Zifferntasten (1bis 6).
S
/T gedrückt: Sucht automatisch nach einem Ensemble.
S
/T gedrückt: Suchen Sie manuell nach einem Ensemble.
Wählen Sie einen Dienst
Halten Sie gedrückt, um auf Dienstsuche-Modus zu schalten.
1
2 Drehen Sie den Lautstärke-Regler zum Wählen eines Dienstes, und drücken Sie dann den
Regler.
Zum Abbrechen der Dienstsuche drücken Sie .
DEUTSCH
5
Page 38

DIGITAL RADIO (DAB)
Wählen Sie einen Dienst nach Namen
Halten Sie gedrückt, um auf Dienstsuche-Modus
1
zu schalten.
2 Drehen Sie den Lautstärke-Regler schnell für
Alphabetsuche.
3 Drehen Sie den Lautstärke-Regler oder drücken Sie
S
/
T, um das Zeichen auswählen, nach dem
gesucht werden soll.
• Um nach einem anderen Zeichen als die Buchstaben A bis Z
oder die Zahlen 0 bis 9 zu suchen, geben Sie nur “
• Halten Sie / gedrückt, um schnell durch die Zeichen zu
laufen.
4 Drücken Sie den Lautstärke-Regler zum Starten der
Suche.
5 Drehen Sie den Lautstärke-Regler zum Wählen eines
Dienstes, und drücken Sie dann den Regler.
Zum Beenden Sie des Alphabetsuche-Modus drücken Sie .
Andere Einstellungen
Drücken Sie FNC, um auf [
1
2 Drehen Sie den Lautstärke-Regler, um eine Auswahl zu
treffen (siehe folgende Tabelle), und drücken Sie dann
den Regler.
3 Wiederholen Sie Schritt 2, bis der gewünschte
Gegenstand gewählt oder aktiviert ist.
4 Halten Sie zum Beenden gedrückt.
Zum Zurückschalten zum vorherigen Einstellelement drücken Sie
.
FUNCTION
] zu schalten.
*
” ein.
Standard:
TUNER SETTING
AF SET
TI ON
PTY SEARCH
ASW SELECT TRAVEL, WARNINGS, NEWS, WEATHER, EVENT, SPECIAL, RAD INFO, SPORTS, FINANCE
LIST UPDATE AUTO
PTY WATCH
RELATED
SERV
ON
:
Während des Hörens von DAB: Schalten Sie automatisch auf UKW-Sendung des gleichen Programms um, wenn das
DAB-Signal schwach wird. Es wird automatisch auf DAB-Ton zurückgeschaltet, wenn das Signal wieder stark wird.
Während des Hörens von FM: Schalten Sie automatisch auf DAB-Sendung des gleichen Programms um (wenn
verfügbar).;
OFF
:Hebt auf.
:Erlaubt es, das Gerät kurzzeitig auf Verkehrsinformation schalten, wenn verfügbar (“TI” leuchtet auf).;
OFF
:Hebt auf.
Drücken Sie den Lautstärke-Regler zum Einschalten der PTY-Sprachauswahl. Drehen Sie den Lautstärke-Regler zum
Wählen der PTY-Sprache (
Wählt den verfügbaren Programmtyp (siehe Folgendes), und drücken Sie dann
Drehen Sie den Lautstärke-Regler, um eine Auswahl zu treffen, und drücken Sie dann den Regler.
“
” erscheint vor dem aktivierten Ansagetyp.
*
Schalten Sie automatisch von jeder Quelle auf Digitalradio-Ensembles um, die einen aktivierten Ansagetyp ausstrahlen.
•
Mehr fache Ansagen können gleichzeitig aktiviert werden.
•
Zum Deaktivieren drücken Sie den Lautstärke-Regler erneut (“*” erlischt).
:Aktualisieren Sie die DAB-Dienstliste automatisch bei eingeschalteter Stromversorgung.;
MANUAL
Schalten Sie automatisch von jeder Quelle auf Digitalradio-Ensembles um, die einen gewählten Programmtyp
ausstrahlen.
NEWS, AFFAIRS, INFO, SPORT, EDUCATE, DRAMA, CULTURE, SCIENCE, VARIED, POPM
ROCKM
FINANCE, CHILDREN, SOCIAL, RELIGION, PHONE IN, TRAVEL, LEISURE, JAZZ, COUNTRY
NATIONM
OFF
:Hebt auf.
ON
:Aktivieren Sie die Soft-Link-Funktion, um auf einen alternativen Dienst zu schalten, also ein anderes
Audioprogramm als das momentan eingestellte.;
ENGLISH/ FRENCH/ GERMAN
:Aktualisiert die DAB-Dienstliste, indem
(Musik),
EASYM
(Musik),
LIGHTM
(Musik),
OLDIES, FOLKM
(Musik),
), und drücken Sie dann den Regler.
AUDIO
gedrückt gehalten wird.
(Musik),
CLASSICS, OTHERM
DOCUMENT
OFF
:Deaktivieren.
S
/T zum Starten.
(Musik),
WEATHER
:
(Musik),
,
,
XX
6
Page 39

DIGITAL RADIO (DAB)
CLOCK
TIME SYNC
•
Verfügbare Programmart:
SPEECH : NEWS, AFFAIRS, INFO
MUSIC
Das Gerät sucht den Programmtyp, der unter [
wenn gewählt.
•
Wenn die Lautstärke während des Empfangs von Verkehrsfunk, Ansagen, Alarm
oder Nachrichtensendungen eingestellt wird, wird die eingestellte Lautstärke
automatisch gespeichert. Wird die Verkehrsfunk-Funktion, Ansagen, der Alarm
oder die Nachrichtensendung das nächste Mal aufgerufen, wird diese Einstellung
übernommen.
ON
:Synchronisiert die Zeit des Geräts mit der Digitalradiosignal-Senderzeit.;
SCIENCE, VARIED, WEATHER, FINANCE, CHILDREN, SOCIAL, RELIGION
PHONE IN, TRAVEL, LEISURE, DOCUMENT
:
POP M
(Musik),
CLASSICS, OTHER M
FOLK M
(Musik)
(Information),
ROCK M
(Musik),
(Musik),
SPORT, EDUCATE, DRAMA, CULTURE
EASY M
(Musik),
] oder [
LIGHT M
MUSIC
JAZZ, COUNTRY, NATION M
SPEECH
(Musik),
OFF
(Musik),
OLDIES
] kategorisiert ist,
:Hebt auf.
,
,
,
ANALOG RADIO
Suche nach einem Sender
Drücken Sie wiederholt zum Wählen von TUNER.
1
2 Drücken Sie wiederholt, um FM1/ FM2/ FM3/ MW/ LW zu wählen.
3 Drücken Sie S/T, um einen Sender zu suchen.
•
Zum Ändern des Suchverfahrens für S/T: Halten Sie
wiederholt gedrückt.
AUTO1 : Sucht automatisch nach einem Sender.
AUTO2 : Suchen Sie nach einem Festsender.
MANUAL : Sucht manuell nach einem Sender.
•
Zum Speichern eines Senders: Halten Sie eine der Zifferntasten (1bis 6) gedrückt.
•
Zum Auswählen eines gespeicherten Senders: Drücken Sie eine der Zifferntasten
(
1
bis 6).
Andere Einstellungen
Drücken Sie FNC, um auf [
1
2 Drehen Sie den Lautstärke-Regler, um eine Auswahl zu treffen (siehe
folgende Tabelle), und drücken Sie dann den Regler.
3 Wiederholen Sie Schritt 2, bis der gewünschte Gegenstand gewählt
oder aktiviert ist.
4 Halten Sie zum Beenden gedrückt.
Zum Zurückschalten zum vorherigen Einstellelement drücken Sie .
FUNCTION
] zu schalten.
DEUTSCH
7
Page 40

ANALOG RADIO
TUNER SETTING
LOCAL SEEK
AUTO
MEMORY
MONO SET ON
NEWS SET ON
REGIONAL ON
AF SET ON
*
TI
PTY SEARCH
ON
: Sucht nur Sender mit gutem Empfang. ;
YES
:Beginnt automatisch die Speicherung von 6 Sendern mit gutem Empfang.; NO:Hebt auf.
•
Nur wählbar, wenn [
:Verbessern Sie den FM (UKW)-Empfang (aber der Stereoeffekt kann verloren gehen).;
OFF
:Hebt auf.
:Das Gerät schaltet kurzzeitig auf das Nachrichtenprogramm, falls verfügbar. ;
OFF
:Hebt auf.
: Schaltet auf einen anderen Sender in der spezifischen Region nur mit der “AF”-Steuerung.;
OFF
:Hebt auf.
: Sucht automatisch einen anderen Sender auf, der das gleiche Programm im gleichen
Radio Data System-Netzwerk sendet und einen besseren Empfang aufweist, falls der aktuelle
Empfang schlecht ist.;
ON
: Erlaubt es, das Gerät kurzzeitig auf Verkehrsinformation schalten, wenn verfügbar (“TI”
leuchtet auf).;
*
: [TI] im MW/LW-Wellenbereich dient zum Aktivieren von
Verkehrsinformatinoen nur von DAB-Quelle.
Drücken Sie den Lautstärke-Regler zum Einschalten der PTY-Sprachauswahl. Drehen Sie den
Lautstärke-Regler zum Wählen der PTY-Sprache (
drücken Sie dann den Regler.
Wählt den verfügbaren Programmtyp (siehe Folgendes), und drücken Sie dann
zum Starten.
OFF
NORMAL
OFF
:Hebt auf.
:Hebt auf.
OFF
: Hebt auf.
] für [
PRESET TYPE
ENGLISH/ FRENCH/ GERMAN
] gewählt ist. ( 4)
Standard:
), und
S/T
• [LOCAL SEEK
XX
[
PTY SEARCH
•
Verfügbare Programmart:
SPEECH
MUSIC: POP M
Das Gerät sucht den Programmtyp, der unter [
wenn gewählt.
•
Wenn die Lautstärke während des Empfangs von Verkehrsinformationen, Alarm oder
Nachrichtensendungen eingestellt wird, wird die eingestellte Lautstärke automatisch
gespeichert. Wird die Verkehrsfunk-Funktion, der Alarm oder die Nachrichtensendung
das nächste Mal aufgerufen, wird diese Einstellung übernommen.
]/ [
MONO SET
]/ [
NEWS SET
]/ [
REGIONAL
]/ [
AF SET
] ist nur wählbar, wenn der Wellenbereich FM1/ FM2/ FM3 ist.
:
NEWS
,
AFFAIRS
,
INFO
SCIENCE
PHONE IN
OTHER M
(Musik)
,
VARIED
,
TRAVEL
(Musik),
(Musik),
,
WEATHER
,
ROCK M
JAZZ
LEISURE
(Information),
(Musik),
,
COUNTRY
,
FINANCE
,
DOCUMENT
EASY M
,
SPORT
,
CHILDREN
NATION M
(Musik),
SPEECH
]/ [TI] (für )/
,
EDUCATE
,
SOCIAL
LIGHT M
(Musik),
] oder [
MUSIC
,
DRAMA
,
RELIGION
(Musik),
OLDIES
,
] kategorisiert ist,
,
CULTURE
FOLK M
,
CLASSICS
,
,
8
Page 41

CD / USB / iPod / ANDROID
Starten Sie die Wiedergabe
Die Quelle schaltet automatisch um, und die Wiedergabe startet.
USB-Eingangsterminal
Beschriftungsseite
USB
M
Disc auswerfen
CA-U1EX (max.: 500mA)
(optionales Zubehörteil)
iPod/iPhone
KCA-iP102 / KCA-iP103
(optionales Zubehör)
oder Zubehörkabel von iPod/iPhone
ANDROID
Micro-USB 2.0-Kabel
(im Handel erhältlich)
1
*
KCA-iP102 : 30-poliger Typ, KCA-iP103 : Lightning-Typ
2
*
Lassen Sie bei Nichtgebrauch nicht das Kabel im Auto liegen.
1
*
3
*
2
*
Zum Auf der Frontblende
Wiedergabe / Pause
Vorspulen /
Rückspulen
Auswählen eines
Tracks/einer Datei
2
*
Auswählen eines
Ordners
Wiederholte
Wiedergabe
4
*
5
*
6
*
Drücken Sie
Halten Sie S/T gedrückt.
Drücken Sie
Drücken Sie / .
Drücken Sie wiederholt.
TRACK REPEAT/ REPEAT OFF
FILE REPEAT/ FOLDER REPEAT/ REPEAT OFF
FILE REPEAT/ REPEAT OFF
6
*
Zufallswiedergabe
Drücken Sie wiederholt.
DISC RANDOM/ RANDOM OFF
FOLDER RANDOM/ RANDOM OFF
Halten Sie die
S
.
/T.
: Audio-CD
: KME Light/ KMC-Datei
: Audio-CD
gedrückt, um
: MP3/ WMA/ AAC/ WAV-Datei,
iPod oder ANDROID
: MP3/ WMA/ AAC/ WAV-Datei, KME Light/
KMC-Datei, iPod oder ANDROID
ALL RANDOM
zu wählen.
*
8
*
DEUTSCH
7
9
Page 42

CD / USB / iPod / ANDROID
Zum Auf der Frontblende
Wählen Sie den
Steuermodus
Wählen Sie das
Musiklaufwerk
(
11, [
MUSIC DRIVE]
3
*
Wenn ein Android-Gerät angeschlossen wird, wird “Press [VIEW] to install KENWOOD MUSIC PLAY APP” angezeigt.
Gehen Sie zur Installation der Anwendung gemäß den Anweisungen vor. Sie können auch vor dem Verbinden die
neueste Version der KENWOOD MUSIC PLAY-Anwendung auf Ihrem Android-Gerät installieren. (
4
*
Bei ANDROID: Trifft nur zu, wenn [
5
*
Bei CD: Nur für MP3/ WMA/ AAC-Dateien. Dies funktioniert nicht bei iPod/ ANDROID.
6
*
Bei iPod/ ANDROID: Trifft nur zu, wenn [
7
*
KME Light : KENWOOD Music Editor Light, KMC : KENWOOD Music Control ( 19)
8
*
Bei CD: Nur für MP3/ WMA/ AAC-Dateien.
9
*
Sie können weiterhin Wiedergabe/Pause, Dateisuche, Vorspulen oder Zurückspulen von Dateien vom Gerät
steuern.
Während iPod als Quelle gewählt ist, drücken Sie
wiederholt.
MODE ON
: Steuerung vom iPod
MODE OFF
: Steuerung vom Gerät
Während die ANDROID-Quelle gewählt ist
[
ANDROID SETUP
Drücken Sie
Die gespeicherten Songs werden dann wiedergegeben.
)
•
Wählen Sie internen oder externen Speicher für ein
Smartphone (Massenspeicherklasse).
•
Gewähltes Laufwerk bei Gerät mit mehreren Laufwerken.
BROWSE MODE
MODE OFF
]
)
wiederholt.
] gewählt ist. (
]/ [
BROWSE MODE
9
*
( 11,
11, [ANDROID SETUP
] gewählt ist.
20)
Auswählen einer Datei aus einem Ordner/einer Liste
Drücken Sie .
1
2 Drehen Sie den Lautstärke-Regler zum Wählen eines Ordners/einer Liste,
und drücken Sie dann den Regler.
3 Drehen Sie den Lautstärke-Regler zum Wählen einer Datei, und drücken
Sie dann den Regler.
Schnellsuche
Wenn Sie viele Dateien haben, können Sie diese schnell durchsuchen.
Für USB (für KME Light/ KMC-Dateien):
Drücken Sie
Suchverhältnis zu suchen. (
Halten Sie
• Gilt nicht für CD und MP3/ WMA/ AAC/ WAV-Dateien.
Bei iPod:
Sie können eine Datei anhand des Anfangsbuchstabens suchen.
])
•
Zum Zurückkehren zum Grundordner / ersten Datei / Top-Menü drücken .
•
Zum Zurückschalten zum vorherigen Einstellelement drücken Sie .
•
Zum Abbrechen halten Sie gedrückt.
•
Beim iPod nur gültig, wenn [
Steuermodus
•
Beim ANDROID nur gültig, wenn [
[
ANDROID SETUP
S
/T, um mit einem vorgegebenen Überspringen-
S
/T gedrückt, um mit einem Verhältnis von 10% zu suchen.
Drehen Sie den Lautstärke-Regler schnell für Zeichensuche.
Drehen Sie den Lautstärke-Regler zum Wählen des Buchstabens.
• Um nach einem anderen Zeichen als die Buchstaben A bis Z oder die
Zahlen 0 bis 9 zu suchen, geben Sie nur “
• Halten Sie / gedrückt, um schnell durch die Zeichen zu laufen.
Drücken Sie S/T, um auf die Eingabeposition umzuschalten.
• Sie können bis zu 3 Zeichen eingeben.
Drücken Sie den Lautstärke-Regler zum Starten der Suche.
)
])
11, [
MODE OFF
BROWSE MODE
SKIP SEARCH
] gewählt ist. (
] gewählt ist. ( 11,
])
” ein.
*
Wählen Sie den
10
Page 43

CD / USB / iPod / ANDROID
Hören Sie TuneIn Radio/ TuneIn Radio Pro/ Aupeo
Beim Hören von TuneIn Radio, TuneIn Radio Pro or Aupeo schließen Sie das iPod/iPhone am USBEingang des Geräts an.
•
Das Gerät gibt den Ton von diesen Anwendungen aus.
Andere Einstellungen
Drücken Sie FNC, um auf [
1
2 Drehen Sie den Lautstärke-Regler, um eine Auswahl zu treffen (siehe folgende
Tabelle), und drücken Sie dann den Regler.
3 Wiederholen Sie Schritt 2, bis der gewünschte Gegenstand gewählt oder aktiviert
ist.
4 Halten Sie zum Beenden gedrückt.
Zum Zurückschalten zum vorherigen Einstellelement drücken Sie .
ANDROID SETUP
BROWSE MODE
Player Anwendungen vom Android-Gerät (ohne Verwendung der KENWOOD MUSIC PLAY-Anwendung). Sie können aber weiterhin
Wiedergabe/Pause und Datei-Überspringen vom Gerät steuern.
: Steuerung vom Gerät (mit KENWOOD MUSIC PLAY-Anwendung).;
USB
MUSIC DRIVE DRIVE CHANGE
SKIP SEARCH 0.5%/ 1%/ 5%/ 10%
Wiedergabe startet.
Wiederholen Sie Schritt
Überspringen-Suchverhältnis für alle Dateien gewählt.
FUNCTION
] zu schalten.
HAND MODE
:Das nächste Laufwerk ([
1
bis 3, um die folgenden Laufwerke zu wählen.
: Beim Hören von iPod, ANDROID oder KME Light/ KMC-Datei wird das
DRIVE 1
] bis [
DRIVE 5
]) wird automatisch gewählt, und die
Standard:
:Steuerung anderer Media
AUX
Vorbereitung:
Wählen Sie [
1
XX
2 Drücken Sie wiederholt zum Wählen von AUX.
3 Schalten Sie den tragbaren Audioplayer ein und starten Sie
Beim Hören eines am Gerät angeschlossenen tragbaren Audio-Players...
1 Drücken Sie FNC, um auf [
2 Drehen Sie den Lautstärke-Regler zum Wählen von [
3 Drehen Sie den Lautstärke-Regler zum Wählen von [
4 Drehen Sie den Lautstärke-Regler, um eine Auswahl zu
5 Halten Sie zum Beenden gedrückt.
Zum Zurückschalten zum vorherigen Einstellelement drücken Sie .
ON
] für [
BUILT-IN AUX
]. ( 4)
Beginnen Sie zu hören
Schließen Sie einen tragbaren Audioplayer (im Handel
erhältlich) an.
Auxiliary-Eingabebuchse
3,5-mm-Stereo-Ministecker mit “L”-förmigem Anschluss
(im Handel erhältlich)
die Wiedergabe.
Tragbarer Audioplayer
Den AUX-Namen einstellen
FUNCTION
] zu schalten.
und drücken Sie dann den Regler.
SET
], und drücken Sie dann den Regler.
treffen, und drücken Sie dann den Regler.
AUX
(Standard)/
DVD/ PORTABLE/ GAME/ VIDEO/ TV
SYSTEM
AUX NAME
],
DEUTSCH
11
Page 44

BLUETOOTH®
BLUETOOTH — Verbindung
Unterstützte Bluetooth-Profile
–
Hands-Free Profile (HFP)
–
Serial Port Profile (SPP)
–
Phonebook Access Profile (PBAP)
–
Advanced Audio Distribution Profile (A2DP)
–
Audio/Video Remote Control Profile (AVRCP)
Unterstützte Bluetooth-Codecs
–
Sub-Band-Codec (SBC)
–
Er weiterte Audio-Codierung (AAC)
–
aptX Codec (aptX) (für )
Schließen das Mikrofon an
Geräterückseite
Mikrofon
(mitgeliefert)
Mikrofoneingangsbuchse
Stellen Sie den
Mikrofonwinkel ein
*
Für stellen Sie die Verbindung an der
Mikrofon-Eingangsbuchse her.
Sichern Sie das Kabel mit Kabelklemmen
(nicht mitgeliefert), wenn erforderlich.
( 25)
Führen Sie Pairing für ein Bluetooth-Gerät aus
Wenn Sie ein Bluetooth-Gerät zum ersten Mal anschließen, nehmen Sie Pairing zwischen der Einheit und dem Gerät
vor.
1 Drücken Sie , um die Einheit einzuschalten.
2 Suchen und wählen Sie den Modellnamen dieser Einheit (DPX4
Bluetooth-Gerät.
“PAIRING” “PASS XXXXXX ” Gerätename “PRESS” “VOLUME KNOB” scrollt durch das Display.
• Bei einigen Bluetooth-Geräten müssen Sie möglicherweise den PIN-Code (Personal Identification Number)
sofort nach der Suche eingeben.
• Siehe auch mit Ihrem Bluetooth-Gerät mitgelieferte Anleitung.
3 Drücken Sie den Lautstärke-Regler zum Starten des Pairing-Vorgangs.
“PAIRING OK” erscheint, wenn das Pairing fertig ist, und “ ” leuchtet auf, wenn die Bluetooth-Verbindung
hergestellt ist.
•
Bis zu fünf Geräte können insgesamt registriert (gepairt) werden.
•
Nur ein Bluetooth-Gerät zur Zeit kann angeschlossen werden.
•
Diese Einheit unterstützt Secure Simple Pairing (SSP).
•
Manche Bluetooth-Geräte können nicht in der Lage sein, nach dem Pairing die Verbindung automatisch
herzustellen. Schließen Sie das Gerät manuell an die Einheit an. Weitere Information siehe Bedienungsanleitung
Ihres Bluetooth-Geräts.
•
Wenn das Pairing ausgeführt ist, bleibt das Bluetooth-Gerät in der Einheit registriert, auch wenn Sie die Einheit
zurücksetzen. Zum Löschen des gekoppelten Geräts,
•
Wenn Sie Ihr iPhone/ iPod touch/ Android-Gerät an den USB-Eingang anschließen, wird automatisch eine Pairing-
Anforderung (über Bluetooth) aktiviert. Drücken Sie den Lautstärke-Regler einmal zum Pairing, nachdem Sie den
Gerätenamen bestätigt haben.
Automatische Pairing-Anforderung wird nur aktiviert, wenn:
– Die Bluetooth-Funktion des angeschlossenen Geräts eingeschaltet ist.
– [
AUTO PAIRING
– Die KENWOOD MUSIC PLAY-Anwendung auf dem Android-Gerät installiert ist.
] auf [ON] gestellt ist. ( 16)
16, [
DEVICE DELETE
DAB/ DPX3**BT) auf dem
**
].
12
Page 45

BLUETOOTH®
BLUETOOTH — Handy
Empfangen Sie einen Ruf
Wenn ein Ruf empfangen wird:
–
Alle Tasten blinken.
–
Das Gerät nimmt automatisch den Ruf entgegen, wenn [
(
14)
Während eines Rufs:
–
Die Tasten und das Display leuchten entsprechend den für [
–
Falls Sie das Gerät während eines Telefongesprächs ausschalten, wird die Bluetooth-Verbindung getrennt.
Zum Auf der Frontblende
Nehmen Sie einen Ruf entgegen
Weisen Sie einen Ruf ab
Einen Anruf beenden
Stellen Sie die Telefonlautstärke
ein
[00]
bis
[35]
(Standard:
Umschalten zwischen Freisprechund Privatgespräch-Modi
*
Gilt nicht für iPhone. Während eines Anrufs synchronisiert die Einheit die Telefonlautstärke am iPhone mit der Einheit.
Drücken Sie
Drücken Sie
Drücken Sie
Drehen Sie den Lautstärke-Regler während eines Anrufs.
[15]*
)
•
Diese Einstellung hat keine Auswirkung auf den Lautstärkepegel der
anderen Quellen.
Drücken Sie
•
Die Bedienung kann je nach dem angeschlossenen Bluetooth-Gerät
unterschiedlich sein.
AUTO ANSWER
DISPLAY
] vorgenommenen Einstellungen. ( 19)
oder eine der Zifferntasten (1bis 6).
.
oder .
6
während eines Anrufs.
] auf eine gewählte Zeit gestellt ist.
Verbessern Sie die Sprachqualität
Während am Telefon gesprochen wird...
1 Drücken Sie FNC, um auf [
2 Drehen Sie den Lautstärke-Regler, um eine
Auswahl zu treffen (siehe folgende Tabelle), und
drücken Sie dann den Regler.
3 Wiederholen Sie Schritt 2, bis der gewünschte
Gegenstand gewählt oder aktiviert ist.
4 Halten Sie zum Beenden gedrückt.
Zum Zurückschalten zum vorherigen Einstellelement
drücken Sie
MIC GAIN –10
NR LEVEL –5
ECHO CANCEL –5
.
Mikrofons nimmt mit höherer Zahl zu.
—+5(0):Passen Sie den
Rauschunterdrückungspegel an, bis das geringste
Rauschen bei einem Telefongespräch gehört wird.
—+5(0):Passen Sie die Verzögerungszeit für
die Echo-Löschung an, bis das letzte Echo bei einem
Telefongespräch gehört wird.
—
FUNCTION
+10(–4
] zu schalten.
Standard:
):Die Empfindlichkeit des
XX
DEUTSCH
13
Page 46

BLUETOOTH®
Nehmen Sie die Einstellungen zum
Empfang eines Anrufs vor
1
Drücken Sie , um auf
Bluetooth-Modus zu schalten.
2 Drehen Sie den Lautstärke-Regler, um
eine Auswahl zu treffen (siehe folgende
Tabelle), und drücken Sie dann den Regler.
3 Wiederholen Sie Schritt 2, bis der
gewünschte Gegenstand gewählt oder
aktiviert ist.
4 Halten Sie zum Beenden gedrückt.
Zum Zurückschalten zum vorherigen Einstellelement
drücken Sie
SETTINGS
AUTO ANSWER
BATT/SIGNAL AUTO
.
XX
Standard:
1
—30:Die Einheit nimmt den
ankommenden Ruf automatisch innerhalb
der gewählten Zeit entgegen (in Sekunden).;
OFF
:Hebt auf.
:Zeigt die Stärke der Batterie und des
Signals, wenn die Einheit ein Bluetooth-Gerät
erkennt und das Bluetooth-Gerät verbunden
ist.;
OFF
:Hebt auf. Die Uhrzeit wird
angezeigt.
Tätigen Sie einen Ruf
Sie können einen Ruf von der Ruf-Historie, dem Telefonbuch oder durch Wählen der Telefonnummer tätigen. Ruf durch
Sprachbefehl ist auch möglich, wenn Ihr Handy dieses Merkmal hat.
1 Drücken Sie , um auf Bluetooth-Modus zu schalten.
2 Drehen Sie den Lautstärke-Regler, um eine Auswahl zu treffen (siehe folgende Tabelle), und drücken
Sie dann den Regler.
3 Wiederholen Sie Schritt 2, bis der gewünschte Gegenstand gewählt/aktiviert ist, oder folgen Sie den
Anweisungen auf dem gewählten Gegenstand.
4 Halten Sie zum Beenden gedrückt.
Zum Zurückschalten zum vorherigen Einstellelement drücken Sie .
CALL HISTORY
1
D rücken Sie den Lautstärke-Regler zum Wählen eines Namens oder einer Telefonnummer.
• “INCOMING”, “OUTGOING” oder “MISSED” erscheint im unteren Teil des Displays, um den vorherigen Rufstatus zu zeigen.
• Drücken Sie
• “NO DATA” erscheint, wenn kein aufgezeichneter Verlauf vorhanden ist.
2
D rücken Sie den Lautstärke-Regler zum Anrufen.
, um die Anzeigekategorie (NUMBER oder NAME) umzuschalten.
14
Page 47

BLUETOOTH®
PHONE BOOK
NUMBER DIAL
VOICE
*
BATT
*
SIGNAL
*
Funktionalität hängt von dem Typ der verwendeten Telefone ab.
1
D rehen Sie den Lautstärke-Regler schnell, um auf alphabetische Suche zu schalten
(wenn das Telefonbuch viele Kontakte enthält).
Das erste Menü (ABCDEFGHIJK) erscheint.
• Um zum anderen Menü (LMNOPQRSTUV oder WXYZ1
Lautstärke-Regler.
• Um den gewünschten ersten Buchstaben zu wählen, drücken Sie
und drücken Sie anschließend den Knopf.
Wählen Sie
2
D rehen Sie den Lautstärke-Regler zum Wählen eines Namens, und drücken Sie dann
3
D rehen Sie den Lautstärke-Regler zum Wählen einer Telefonnummer, und drücken Sie
•
Wenn Ihr Telefon PBAP unterstützt, wird das Telefonbuch des angeschlossenen Telefons
automatisch beim Pairing zur Einheit übertragen.
•
Kontakte werden in die folgenden Kategorien unterteilt: HOME, OFFICE, MOBILE, OTHER,
GENERAL
•
Dieses Gerät kann nur Buchstaben ohne Umlaute oder Akzentzeichen anzeigen.
(Buchstaben mit Akzentzeichen wie
(
1
D rehen Sie den Lautstärke-Regler zum Wählen einer Nummer (0 bis 9) oder eines
Zeichens (
2
Drücken Sie
Wiederholen Sie Schritt
3
D rücken Sie den Lautstärke-Regler zum Anrufen.
Sprechen Sie den Namen des anzurufenden Kontakts oder den Sprachbefehl deutlich, um die
Telefonfunktionen zu steuern.
LOW/ MID/ FULL
“1”
Symbolen.
den Regler.
dann den Regler zum Anrufen.
Einen Ruf mit Telefonbuch tätigen
für Suche mit Nummern und wählen Sie
, #, +).
*
S/T
, um die Eingabeposition zu verschieben.
1
und 2, bis die Eingabe der Telefonnummer beendet ist.
(
:Zeigt die Batteriestärke.
NO SIGNAL/ LOW/ MID/ MAX
) zu drehen Sie den
*
S/T
“*”
für Suche mit
“Ú”
werden als
“U”
angezeigt.)
)
Einen Ruf mit Spracherkennung tätigen
:Zeigt die Stärke des momentan empfangenen Signals.
Einen Ruf mit Telefonbuch tätigen
Drücken Sie , um direkt zum Telefonbuch zu gehen.
1
2 Drehen Sie den Lautstärke-Regler zum Wählen eines Namens, und
drücken Sie dann den Regler.
3 Drehen Sie den Lautstärke-Regler zum Wählen einer Telefonnummer,
,
und drücken Sie dann den Regler zum Anrufen.
Einen Ruf mit Spracherkennung tätigen
Halten Sie gedrückt, um das angeschlossene Telefon zu
1
aktivieren.
2 Sprechen Sie den Namen des anzurufenden Kontakts oder den
Sprachbefehl deutlich, um die Telefonfunktionen zu steuern.
•
Unterstützte Spracherkennungsmerkmale können sich je nach Telefon unterscheiden.
Einzelheiten siehe Bedienungsanleitung des angeschlossenen Telefons.
•
Diese Einheit unterstützt auch die Funktion “intelligenter persönlicher Assistent” des
iPhone.
Löschen eines Kontakts
Drücken Sie , um auf Bluetooth-Modus zu schalten.
1
2 Drehen Sie den Lautstärke-Regler zum Wählen von [
drücken Sie dann den Regler.
3 Drehen Sie den Lautstärke-Regler zum Wählen eines Kontakts.
4 Halten Sie den Lautstärke-Regler gedrückt, um auf den Löschen-Modus
zu schalten.
5 Drehen Sie den Lautstärke-Regler zum Wählen von [
[
DELETE ALL
)
DELETE ONE
gelöscht.
DELETE ALL
werden gelöscht.
6 Drehen Sie den Lautstärke-Regler zum Wählen von [
Sie dann den Regler.
7 Halten Sie zum Beenden gedrückt.
•
Zum Zurückschalten zum vorherigen Einstellelement drücken Sie .
•
Trifft nicht für Handys zu, die PBAP unterstützen.
], und drücken Sie dann den Regler.
: Der in Schritt 3 gewählte Name oder die Telefonnummer wird
: Alle Namen oder Telefonnummern in [
CALL HISTORY
DELETE ONE
CALL HISTORY
YES
] in Schritt 2
], und drücken
], und
] oder
DEUTSCH
15
Page 48

BLUETOOTH®
Einstellungen im Speicher
Speichern Sie einen Kontakt im Speicher
Sie können bis zu 6 Kontakte unter den Nummerntasten
(
1
bis 6) speichern.
1 Drücken Sie , um auf Bluetooth-
Modus zu schalten.
2 Drehen Sie den Lautstärke-Regler zum Wählen
von [
CALL HISTORY
DIAL
], und drücken Sie dann den Regler.
3 Drehen Sie den Lautstärke-Regler zum Wählen
eines Kontakts oder zum Eingeben einer
Telefonnummer.
Wenn ein Kontakt gewählt wird, drücken Sie den
Lautstärke-Regler zur Anzeige der Telefonnummer.
4 Halten Sie eine der Zifferntasten (1bis 6)
gedrückt.
“STORED” wird angezeigt, wenn der Kontakt gespeichert
ist.
Zum Löschen eines Kontakts aus dem Festspeicher wählen
Sie [
NUMBER DIAL
Nummer.
], [
PHONE BOOK
] in Schritt 2 und speichern Sie eine leere
] oder [
NUMBER
Einen Ruf aus dem Speicher tätigen
Drücken Sie , um auf Bluetooth-
1
Modus zu schalten.
2 Drücken Sie eine der Zifferntasten (1bis 6).
3 Drücken Sie den Lautstärke-Regler zum Anrufen.
“NO MEMORY” erscheint, wenn kein Kontakt gespeichert
ist.
Andere Einstellungen
Drücken Sie FNC, um auf [
1
2 Drehen Sie den Lautstärke-Regler, um eine Auswahl zu treffen (siehe folgende Tabelle), und
drücken Sie dann den Regler.
3 Wiederholen Sie Schritt 2, bis der gewünschte Gegenstand gewählt/aktiviert ist, oder folgen Sie
den Anweisungen auf dem gewählten Gegenstand.
4 Halten Sie zum Beenden gedrückt.
Zum Zurückschalten zum vorherigen Einstellelement drücken Sie .
FUNCTION
] zu schalten.
Standard:
XX
BT MODE
PHONE SELECT
AUDIO SELECT
DEVICE DELETE
PIN CODE EDIT
(0000)
RECONNECT ON
AUTO PAIRING ON
INITIALIZE YES
Wählt das Telefon oder Audiogerät zum Anschließen oder Abtrennen.
“
” erscheint vor dem Gerätenamen, wenn angeschlossen.
*
•
Sie können nur ein anderes Bluetooth-Gerät anschließen, nachdem Sie das aktuell angeschlossene Bluetooth-Gerät
abgetrennt haben.
“
” verschwindet, wenn abgetrennt.
*
1
D rehen Sie den Lautstärke-Regler zum Wählen eines Geräts zum Löschen, und drücken Sie dann den Regler.
2
D rehen Sie den Lautstärke-Regler zum Wählen von [
Ändert den PIN-Code (bis zu 6 Stellen).
1
D rehen Sie den Lautstärke-Regler zum Wählen einer Nummer.
2
Drücken Sie S/T, um die Eingabeposition zu verschieben.
Wiederholen Sie Schritt
3
D rücken Sie den Lautstärke-Regler zum Bestätigen.
:Die Einheit stellt die Verbindung automatisch neu her, wenn das zuletzt angeschlossene Bluetooth-Gerät innerhalb der
Reichweite ist.;
:Die Einheit führt automatisch Pairing mit dem unterstützten Bluetooth-Gerät aus (iPhone/ iPod touch/ Android-Gerät),
wenn sie über die USB-Eingangsklemme verbunden wird.Je nach dem Betriebssystem des angeschlossenen Geräts arbeitet
diese Funktion möglicherweise nicht. ;
:Initialisiert alle Bluetooth-Einstellungen (einschließlich gespeichertes Pairing, Telefonbuch usw.).; NO:Hebt auf.
1
und 2, bis die Eingabe des PIN-Codes beendet ist.
OFF
:Hebt auf.
OFF
:Hebt auf.
YES
] oder [NO], und drücken Sie dann den Regler.
16
Page 49

BLUETOOTH®
Bluetooth-Testmodus
Sie können die Konnektivität des unterstützten Profils
zwischen dem Bluetooth-Gerät und der Einheit prüfen.
•
Stellen Sie sicher, dass kein Bluetooth-Gerät gekoppelt
ist.
1 Halten Sie gedrückt.
Die Meldung “PLEASE PAIR YOUR PHONE PIN 0000”
erscheint.
2 Suchen und wählen Sie den Modellnamen
dieser Einheit (DPX4
dem Bluetooth-Gerät.
3 Bedienen Sie das Bluetooth-Gerät, um das
Pairing zu bestätigen.
“TESTING” blinkt im Display.
Das Konnektivitätsergebnis (OK oder NG) erscheint nach
dem Test.
PAIRING: Pairing-Status
HF CNT: Hands-Free Profile (HFP) Kompatibilität
AUD CNT: Advanced Audio Distribution Profile (A2DP)
PB DL: Phonebook Access Profile (PBAP)
Zum Beenden des Testmodus halten Sie
um das Gerät auszuschalten.
Kompatibilität
Kompatibilität
DAB/ DPX3**BT) auf
**
gedrückt,
BLUETOOTH — Audio
Audioplayer über Bluetooth
Drücken Sie wiederholt zum Wählen von BTAUDIO.
1
2 Bedienen Sie den Bluetooth-Audioplayer zum Starten der Wiedergabe.
Zum Auf der Frontblende
Wiedergabe / Pause
Wählen Sie die Gruppe oder
den Ordner
Reverse- / VorwärtsÜberspringen
Vorspulen / Rückspulen
Wiederholte Wiedergabe
Drücken Sie
Drücken Sie
Drücken Sie
Halten Sie
Drücken Sie
.
1
/2.
S
/T.
S
/T gedrückt.
wiederholt.
ALL REPEAT, FILE REPEAT, REPEAT OFF
Zufallswiedergabe
Drücken Sie
wiederholt.
FOLDER RANDOM, RANDOM OFF
Halten Sie die gedrückt, um
Die Bedienungen und Displayanzeigen unterscheiden möglicherweise sich je nach Verfügbarkeit auf dem
angeschlossenen Gerät.
ALL RANDOM
zu wählen.
DEUTSCH
17
Page 50

AUDIOEINSTELLUNGEN
Während des Hörens einer Tonquelle...
1 Drücken Sie AUDIO, um auf [
2 Drehen Sie den Lautstärke-Regler, um eine Auswahl zu treffen (siehe
folgende Tabelle), und drücken Sie dann den Regler.
3 Wiederholen Sie Schritt 2, bis der gewünschte Gegenstand gewählt
oder aktiviert ist.
4 Halten Sie zum Beenden gedrückt.
Zum Zurückschalten zum vorherigen Einstellelement drücken Sie .
SUB-W LEVEL –15
BASS LEVEL –8
MID LEVEL –8
TRE LEVEL –8
bis
bis +8 (+6)
bis +8 (+5)
bis +8 (0)
EQ PRO
BASS ADJUST BASS CTR FRQ
BASS LEVEL –8
BASS Q FACTOR 1.00/ 1.25/ 1.50/ 2.00
BASS EXTEND ON
MID ADJUST MID CTR FRQ 0.5KHZ/ 1.0KHZ/ 1.5KHZ/ 2.5KHZ
MID LEVEL –8
MID Q FACTOR 0.75/ 1.00/ 1.25
TRE ADJUST TRE CTR FRQ 10.0KHZ/ 12.5KHZ/ 15.0KHZ/ 17.5KHZ
TRE LEVEL –8
+15 (0
AUDIO CONTROL
Stellt den Subwoofer-Ausgangspegel ein.
)
Stellt den Pegel zum Speichern für jede Quelle ein. (Bevor Sie
eine Einstellung vornehmen, wählen Sie eine anzupassende
Quelle aus.)
60HZ/ 80HZ/ 100HZ/ 200HZ
bis +8 (+6):Stellt den Pegel ein.
Mittenfrequenz.
bis +8 (+5):Stellt den Pegel ein.
Mittenfrequenz.
bis +8 (0):Stellt den Pegel ein.
] zu schalten.
: Wählt die Mittenfrequenz.
:Stellt den Qualitätsfaktor ein.
:Schaltet den erweiterten Bass ein.;
:Stellt den Qualitätsfaktor ein.
OFF
:Wählt die
Standard:
:Hebt auf.
:Wählt die
PRESET EQ DRIVE EQ/ TOP40/ POWERFUL/ ROCK/ POPS/ EASY/ JAZZ/ NATURAL
BASS BOOST LEVEL1/ LEVEL2/ LEVEL3
XX
LOUDNESS LEVEL1/ LEVEL2
SUBWOOFER SET ON
LPF SUBWOOFER THROUGH
SUB-W PHASE REVERSE
FADER R15
BALANCE L15
VOLUME OFFSET
SOUND RECNSTR
(Klangrekonstruktion)
• [SUB-W LEVEL
wählbar, wenn [
• [SUB-W LEVEL
[
SUBWOOFER SET
USER
:Wählt einen Vorwahl-Equalizer, der für das Musikgenre geeignet ist. (Wählen Sie
[
USER
], um die benutzerangepassten Einstellungen zu verwenden.)
[
DRIVE EQ
] ist ein Programm-Equalizer, der Außengeräusche oder Fahrgeräusche von
den Reifen verringert.
OFF
:Hebt auf.
gute Klangwirkung auch bei niedriger Lautstärke zu erhalten.;
:Schaltet den Subwoofer-Ausgang ein.;
:Alle Signale werden zum Subwoofer gesendet.;
160HZ
:Audiosignale mit niedrigeren Frequenzen als 85Hz/ 120Hz/ 160Hz werden
zum Subwoofer geleitet.
(180°)/
sie dem Lautsprecher-Ausgang für optimale Leistung entspricht. (Nur wählbar, wenn
eine andere Einstellung als [
bis
F15 (0
Lautsprecherausgang ein.
bis
R15 (0
Lautsprechern ein.
Bei AUX:
–8
bis +8(0) ; Für andere Quellen: –8 bis 0:Speichert die
Lautstärkepegeleinstellung jeder Quelle als Vorwahl. (Vor der Einstellung wählen Sie eine
anzupassende Quelle aus.)
ON
:Erzeugt realistischen Klang, indem die Hochfrequenzkomponenten kompensiert
und die Anstiegszeit der Wellenform, die bei der Audiodaten-Kompression verloren
gehen, wiederhergestellt werden.;
]/ [
SUBWOOFER SET
SWITCH PREOUT
]/ [
LPF SUBWOOFER
] auf [ON] gestellt ist.
] auf [
:Wählt Ihren bevorzugten Bass-Boost-Pegel.;
:Wählt Ihre bevorzugten niedrigen und hohen Frequenzen, um eine
OFF
OFF
:Hebt auf.
85HZ/ 120HZ
NORMAL
(0°):Wählt die Phase des Subwoofer-Ausgangs so, dass
THROUGH
] für [
LPF SUBWOOFER
):Stellt die Balance zwischen hinterem und vorderem
):Stellen Sie die Ausgangsbalance zwischen linken und rechten
OFF
:Hebt auf.
]/ [
LPF SUBWOOFER
SUBWOOFER
]/ [
SUB-W PHASE
]/ [
SUB-W PHASE
] gestellt ist. ( 4)
] ist nur wählbar, wenn
/
:Hebt auf.
/
] gewählt ist.)
] ist nur
18
Page 51

DISPLAY-EINSTELLUNGEN
1 Drücken Sie FNC, um auf [
2 Drehen Sie den Lautstärke-Regler zum Wählen von [
drücken Sie dann den Regler.
3 Drehen Sie den Lautstärke-Regler, um eine Auswahl zu treffen (siehe
folgende Tabelle), und drücken Sie dann den Regler.
4 Wiederholen Sie Schritt 3, bis der gewünschte Gegenstand gewählt/
aktiviert ist, oder folgen Sie den Anweisungen auf dem gewählten
Gegenstand.
5 Halten Sie zum Beenden gedrückt.
Zum Zurückschalten zum vorherigen Einstellelement drücken Sie .
COLOR SELECT VARIABLE SCAN/ CUSTOM R/G/B/
DIMMER ON
BRIGHTNESS 0
TEXT SCROLL AUTO/ ONCE
*
Vorgabefarben:
BLUE2/ BLUE3/ SKYBLUE1/ SKYBLUE2/ LIGHTBLUE/ AQUA1/ AQUA2/ GREEN1/
GREEN2/ GREEN3/ YELLOWGREEN1/ YELLOWGREEN2/ YELLOW/ ORANGE1/ ORANGE2/
ORANGERED
und Display-Beleuchtungsfarbe.
Sie können Ihre eigene Farbe erzeugen (wenn [
gewählt ist). Die erzeugte Farbe kann unter [
1
Halten Sie den Lautstärke-Regler gedrückt, um auf Detail-Farbabstimmung zu schalten.
2
Drücken Sie S/T, um die Farbe (R/ G/ B) zum Anpassen zu wählen.
3
D rehen Sie den Lautstärke-Regler, um den Pegel einzustellen (0 — 9), und drücken Sie
dann den Regler.
:Blendet die Displaybeleuchtung und Tastenbeleuchtung ab.;
— 31: Wählt Ihre bevorzugten Helligkeitsstufe für Displaybeleuchtung und
Tastenbeleuchtung.
Scrollen.;
RED1/ RED2/ RED3/ PURPLE1/ PURPLE2/ PURPLE3/ PURPLE4/ BLUE1/
FUNCTION
] zu schalten.
Vorgabefarben*: Wählt Ihre bevorzugte Tasten-
CUSTOM R/G/B
:Wählt automatisches Scrollen der Displayinformationen, oder einmaliges
OFF
:Hebt auf.
CUSTOM R/G/B
DISPLAY
], und
Standard:
] oder Vorgabefarben*
] gespeichert werden.
OFF
:Hebt auf.
WEITERE INFORMATIONEN
Allgemeines
•
Dieses Gerät kann nur die folgenden CDs abspielen:
•
Detailinformationen und Hinweise über abspielbare Audiodateien werden im Online-Handbuch auf der folgenden
Website gegeben: www.kenwood.com/cs/ce/audiofile/
Abspielbare Dateien
•
Wiederzugebende Audiodateien: MP3 (.mp3), WMA (.wma), AAC (.m4a)
•
Abspielbare Disc-Medien: CD-R/CD-RW/CD-ROM
XX
•
Abspielbares Disc-Dateiformat: ISO 9660 Level 1/2, Joliet, Lange Dateinamen.
•
Mögliche Dateisysteme auf USB-Geräten: FAT12, FAT16, FAT32
Auch wenn Audiodateien den oben aufgeführten Standards entsprechen, kann das Abspielen unter Umständen auf
Grund von Typ oder Zustand der Medien bzw. Geräte nicht möglich sein.
Nicht abspielbare Discs
•
Discs mit nicht runder Form.
•
Discs die auf der Aufnahme- Oberfläche eingefärbt oder verschmutzt sind.
•
Recordable/ReWritable Discs, die nicht abgeschlossen (finalisiert) wurden.
•
8- cm-CD. Falls Sie versuchen, einen Adapter zu verwenden, kann es zu einer Fehlfunktion kommen.
Wissenswertes über USB-Geräte
•
Diese Einheit kann MP3/ WMA/ AAC/ WAV-Dateien abspielen, die auf einem USB-Massenspeichergerät gespeichert
sind.
•
Sie können ein USB-Gerät nicht über einen USB-Hub anschließen.
•
Der Anschluss eines Kabels mit einer Gesamtlänge von mehr als 5 m kann eine fehlerhafte Wiedergabe verursachen.
•
Diese Einheit kann nicht ein USB-Gerät mit einer anderen Bewertung als 5 V und mehr als 1 A erkennen.
Wissenwertes über KENWOOD Music Editor Light und KENWOOD Music Control
•
Diese Einheit unterstützt die PC-Anwendung KENWOOD Music Editor Light und die Android™-Anwendung KENWOOD
Music Control.
•
Wenn Sie Audiodateien mit hinzugefügten Song-Daten mit dem KENWOOD Music Editor Light oder KENWOOD Music
Control abspielen, können Sie Audiodateien nach Genres, Interpreten, Alben, Wiedergabelisten und Musikstücken
durchsuchen.
•
KENWOOD Music Editor Light und KENWOOD Music Control sind auf der folgenden Website erhältlich:
www.kenwood.com/cs/ce/
DEUTSCH
19
Page 52

WEITERE INFORMATIONEN
Wissenswertes über iPod/iPhone
Made for
-
iPod touch (2nd, 3rd, 4th und 5th generation)
-
iPod classic
-
iPod nano (3rd, 4th, 5th, 6th und 7th generation)
-
iPhone 3G, 3GS, 4, 4S, 5, 5S, 5C
•
Für die neueste Kompatibilitätsliste und Software-Versionen des iPhone/iPod siehe: www.kenwood.com/cs/ce/ipod
•
Sie können den iPod nicht bedienen, wenn “KENWOOD” oder “ ” auf dem iPod angezeigt wird.
Wissenswertes über Android-Geräte
•
Diese Einheit unterstützt Android OS 4.1 und höher.
•
Manche Android-Geräte (mit OS 4.1 und höher) unterstützen möglicherweise Android Open Accessory (AOA) 2.0
nicht vollständig.
•
Wenn das Android-Gerät sowohl Massenspeicherklasse-Gerät als auch AOA 2.0 unterstützt, hat diese Einheit immer
Wiedergabe über AOA 2.0 als Vorrang.
•
Für weitere Informationen und die neueste Liste zur Kompatibilität siehe: www.kenwood.com/cs/ce/
Über Bluetooth
•
Je nach Bluetooth-Version des Geräts lassen sich manche Bluetooth-Geräte möglicherweise nicht an diese Einheit
anschließen.
•
Diese Einheit arbeitet u.U. nicht mit bestimmten Bluetooth-Geräten.
•
Die Signalbedingungen sind je nach Umgebung unterschiedlich.
•
Für weitere Informationen über Bluetooth, besuchen Sie bitte die folgende Website: www.kenwood.com/cs/ce/
FEHLERSUCHE
Symptom Abhilfe
Es wird kein Ton gehört.
“MISWIRING CHECK WIRING THEN
PWR ON” erscheint.
Allgemeines
“PROTECTING SEND SERVICE”
erscheint.
Das Gerät funktioniert überhaupt
nicht.
Der DAB-Empfang ist schlecht.
“DAB ANT ERR” Prüfen Sie die DAB-Antenne. Wenn eine passive Antenne (ohne
Digitalradio
“RELATED SERV FOUND”
•
Der Radioempfang ist schlecht.
•
Statikrauschen beim Radiohören.
Analogradio
Disc kann nicht ausgegeben werden.
Rauschen wird erzeugt. Springen Sie zu einem anderen Musikstück oder wechseln Sie
Tracks werden nicht so abgespielt,
CD / USB / iPod
wie Sie es wollten.
“READING” blinkt weiter. Verwenden Sie nicht zu viele Hierarchie-Ebenen oder Ordner.
Verflossene Spielzeit ist nicht richtig. Dies liegt daran, wie die Titel aufgezeichnet sind.
•
Die Lautstärke auf den optimalen Pegel einstellen.
•
Prüfen Sie die Kabel und Verbindungen.
Schalten Sie die Stromversorgung aus, und prüfen Sie, ob die
Klemmen der Lautsprecherdrähte richtig isoliert sind. Schalten Sie
die Stromversorgung wieder ein.
Reichen Sie die Einheit beim nächsten Kundendienstzentrum ein.
Setzen Sie das Gerät zurück. (
Stellen Sie sicher, dass [
ist. (
4)
einen Booster) verwendet wird, stellen Sie [
auf [
OFF
]. ( 4)
•
Drücken Sie den Lautstärke-Regler zum Aktivieren von Soft-Link.
(
6)
•
Zum Abbrechen drücken Sie .
•
Schließen Sie das Antennenkabel fest an.
•
Ziehen Sie die Antenne vollständig heraus.
Halten Sie
M
kräftig gedrückt, um die Disc zwangsweise
auszugeben. Achten Sie darauf, die ausgeschobene Disc nicht fallen
zu lassen. Wenn dadurch das Problem nicht gelöst wird, setzen Sie
das Gerät zurück. (
die Disc.
Die Wiedergabe-Reihenfolge wird bestimmt, wenn die Dateien
aufgezeichnet werden.
ON
3)
3)
] für [
DAB ANT POWER
] gewählt
DAB ANT POWER
]
20
Page 53

FEHLERSUCHE
Symptom Abhilfe
Richtige Zeichen werden nicht
angezeigt (z.B. Albumname).
“NA FILE”
“NO DISC” Setzen Sie eine abspielbare Disc in den Ladeschlitz ein.
“TOC ERROR” Achten Sie darauf, dass die Disc sauber und ordnungsgemäß eingelegt ist.
“PLEASE EJECT” Setzen Sie das Gerät zurück. Wenn dadurch das Problem nicht behoben wird,
“READ ERROR” Kopieren Sie die Dateien und Ordner erneut auf das USB-Gerät. Wenn
CD / USB / iPod
“NO DEVICE” Schließen Sie ein USB-Gerät an und schalten Sie die Quelle erneut zu USB um.
“COPY PRO” Eine kopiergeschützte Datei wird wiedergegeben.
“NA DEVICE” Schließen Sie ein unterstütztes USB-Gerät an und prüfen Sie die Anschlüsse.
“NO MUSIC” Schließen Sie ein USB-Gerät an, das abspielbare Audiodateien enthält.
“iPod ERROR”
•
Bei Wiedergabe wird kein
Ton gehört.
•
Ton wird nur vom Android-
Gerät ausgegeben.
ANDROID
Dieses Gerät kann nur Großbuchstaben, Zahlen und eine begrenzte Anzahl
von Symbolen anzeigen. Kyrillische Großbuchstaben können auch angezeigt
werden, wenn [
Achten Sie darauf, dass die Disc unterstützte Audiodateien enthält. (
wenden Sie sich an den Kundendienst.
dadurch das Problem nicht gelöst wird, setzen Sie das USB-Gerät zurück oder
verwenden Sie ein anderes USB-Gerät.
•
•
•
•
•
•
•
РУССКИЙ
] gewählt ist. ( 4)
Erneutes Anschließen des iPod.
Setzen Sie den iPod erneut zurück.
Verbinden Sie das Android-Gerät neu.
Während der [
Während der [
Star ten Sie das Android-Gerät neu.
Wenn dadurch das Problem nicht gelöst wird, kann das angeschlossene
HAND MODE
Media Player Anwendung auf dem Android-Gerät und starten Sie die
Wiedergabe.
HAND MODE
Media Player Anwendung erneut oder verwenden Sie eine andere Media
Player Anwendung.
Android-Gerät nicht das Audiosignal zur Einheit leiten. (
] eingestellt ist, starten Sie eine
] eingestellt ist, starten Sie die aktuelle
20)
Symptom Abhilfe
Bei [
BROWSE MODE
Wiedergabe unmöglich.
19)
“NO DEVICE” oder “READING”
blinkt weiter.
ANDROID
Die Wiedergabe ist unterbrochen
oder es treten Aussetzer im
Ton auf.
“ANDROID ERROR” / “NADEVICE”
Kein Bluetooth-Gerät ist erkannt.
Bluetooth-Pairing kann nicht
ausgeführt werden.
Echo oder Rauschen wird
Bluetooth®
während eines Telefongesprächs
gehört.
Die Telefon-Tonqualität ist
schlecht.
•
] ist
Stellen Sie sicher, dass KENWOOD MUSIC PLAYER APP im Android-
Gerät installiert ist. (
•
Schließen Sie das Android-Gerät erneut an und nehmen Sie die
richtigen Einstellungen in [
•
Wenn das Problem dadurch nicht gelöst wird, unterstützt das
verbundene Android-Gerät nicht [
•
Schalten Sie die Entwickler-Optionen am Android-Gerät aus.
•
Verbinden Sie das Android-Gerät neu.
•
Wenn das Problem dadurch nicht gelöst wird, unterstützt das
verbundene Android-Gerät nicht [
Schalten Sie den Stromsparmodus am Android-Gerät aus.
•
Verbinden Sie das Android-Gerät neu.
•
Star ten Sie das Android-Gerät neu.
•
Suchen Sie erneut vom Bluetooth-Gerät.
•
Setzen Sie das Gerät zurück. ( 3)
•
Stellen Sie sicher, dass Sie den gleichen PIN-Code für die Einheit und
das Bluetooth-Gerät eingegeben haben.
•
Löschen Sie Pairing-Information sowohl von der Einheit als auch
dem Bluetooth-Gerät, und führen Sie dann das Pairing erneut aus.
(
12)
•
Justieren Sie die Mikrofoneinheit-Position. ( 12)
•
Prüfen Sie die [
•
Verringern Sie den Abstand zwischen der Einheit und dem
Bluetooth-Gerät.
•
Bewegen Sie das Fahrzeug zu einem Ort, wo ein besseres Signal
empfangen wird.
10)
ANDROID SETUP
ECHO CANCEL
BROWSE MODE
BROWSE MODE
]-Einstellung. ( 13)
] vor. ( 11)
]. ( 20)
]. ( 20)
DEUTSCH
21
Page 54

FEHLERSUCHE TECHNISCHE DATEN
Symptom Abhilfe
Sprach-Rufmethode ist nicht
erfolgreich.
Der Ton wird unterbrochen
oder weist bei Wiedergabe
von einem BluetoothAudioplayer Aussetzer auf.
Der angeschlossene
Bluetooth-Audioplayer kann
nicht gesteuert werden.
“DEVICE FULL” Die Anzahl registrierter Geräte hat den Höchstwert erreicht. Löschen
Bluetooth®
“N/A VOICE TAG” Stellen Sie sicher, dass die gleiche Stimme wie für die Sprach-Kennung
“NOT SUPPORT” Das angeschlossene Telefon unterstützt nicht das Spracherkennungssystem.
“NO ENTRY” /
“NO PAIR”
“ERROR” Wiederholen Sie die Bedienung. Wenn “ERROR” erneut erscheint, prüfen Sie,
“NO INFO” Das Bluetooth-Gerät kann nicht die Kontaktinformationen erhalten.
“HF ERROR XX” /
“BT ERROR”
•
Verwenden Sie die Sprach-Rufmethode in einer ruhigeren Umgebung.
•
Verringern Sie den Abstand zum Mikrofon, während Sie den Namen
sprechen.
•
Stellen Sie sicher, dass die gleiche Stimme wie für die Sprach-Kennung
registriert verwendet wird.
•
Verringern Sie den Abstand zwischen dem Gerät und dem Bluetooth-
Audioplayer.
•
Schalten Sie die Einheit aus und wieder ein, und versuchen Sie erneut, die
Verbindung herzustellen.
•
Andere Bluetooth-Geräte versuchen möglicherweise, die Verbindung zur
Einheit herzustellen.
•
Prüfen Sie, ob der angeschlossene Bluetooth-Audioplayer das Audio/
Video Remote Control Profile (AVRCP) unterstützt. (Siehe auch
Bedienungsanleitung Ihres Audioplayers.)
•
Trennen Sie den Bluetooth-Player ab und schließen ihn erneut an.
Sie unbenötigte Geräte und wiederholen Sie den Vorgang. (
DEVICE DELETE
registriert verwendet wird.
Kein registriertes Gerät ist über Bluetooth angeschlossen/gefunden.
ob das Gerät die probierte Funktion unterstützt.
Setzen Sie die Einheit zurück und probieren Sie den Vorgang erneut.
Wenn dadurch das Problem nicht behoben wird, wenden Sie sich an den
Kundendienst.
)
16,
DAB Frequenzbereich L-Band 1452,960MHz — 1490,624MHz
)
Empfindlichkeit –100dBm
Signal-Rauschabstand 80 dB
Antennenanschluss-Typ SMB
Digitalradio
(für
Antennen-Ausgangsspannung 14,4V (11V – 16V)
Antennen-Maximalstrom <100mA
FM Frequenzbereich 87,5 MHz — 108,0 MHz (50 kHz-Abstimmschritte)
Empfindlichkeit (Rauschabstand = 26dB) 0,71 V/75 Ω
Empfindlichkeitsschwelle
(DIN S/N = 46 dB)
Frequenzgang (±3 dB) 30Hz — 15kHz
Signal-Rauschabstand (MONO) 64 dB
Kanaltrennung (1 kHz) 40 dB
Analogradio
MW Frequenzbereich 531kHz — 1611kHz (9kHz-Abstimmschritte)
Empfindlichkeit (Rauschabstand = 20dB) 28,2V
LW Frequenzbereich 153kHz — 279kHz (9kHz-Abstimmschritte)
Empfindlichkeit (Rauschabstand = 20dB) 50V
Laserdiode GaAIAs
Digitalfilter (D/A) 8-faches Oversampling
Spindeldrehzahl 500 U/min — 200 U/min (CLV)
Tonhöhenschwankung Unterhalb der Messgrenze
CD-Player
Frequenzgang (±1 dB) 20Hz — 20kHz
Gesamtklirrfaktor (1 kHz) 0,01%
Band III 174,928MHz — 239,200MHz
2,0 V/75 Ω
22
Page 55

TECHNISCHE DATEN
Signal-Rauschabstand (1 kHz) 105 dB
Dynamikbereich 90 dB
Kanaltrennung 85 dB
MP3-Decodierung Unterstützt MPEG-1/2 Audio Layer-3
CD-Player
WMA-Decodierung Unterstützt Windows Media Audio
AAC-Decodierung AAC-LC “.m4a”-Dateien
USB Standard USB1.1, USB2.0 (Höchstgeschwindigkeit)
Dateisystem FAT12/16/32
Maximaler Versorgungsstrom DC 5 V
MP3-Decodierung Unterstützt MPEG-1/2 Audio Layer-3
USB
WMA-Decodierung Unterstützt Windows Media Audio
AAC-Decodierung AAC-LC “.m4a”-Dateien
WAV-Decodierung Linear-PCM
Version Bluetooth Ver.2.1+EDR / Bluetooth 3.0
Frequenzbereich 2,402GHz — 2,480GHz
Ausgangsleistung +4 dBm (MAX), 0 dBm (AVE) Leistungsklasse 2
Maximaler Kommunikationsbereich Sichtlinie ca. 10m (32,8ft)
Profil HFP (Hands-Free Profile)
Bluetooth
1A
SPP (Serial Port Profile)
PBAP (Phonebook Access Profile)
A2DP (Advanced Audio Distribution Profile)
AVRCP (Audio/Video Remote Control Profile)
Maximale Ausgangsleistung 50W×4
Volle Bandbreitenleistung 22W×4 (bei weniger als 1% Klirrfaktor)
Lautsprecherimpedanz 4—8
Klangregler Bass 200Hz ±8 dB
Audio
Vorverstärkerpegel / Last (CD) 2 500 mV/10k
Vorverstärkungsimpedanz ≤600
Frequenzgang (±3 dB) 20Hz — 20kHz
Maximaler Spannungseingang 1 000mV
Auxiliary
Eingangsimpedanz 30k
Betriebsspannung 14,4 V (10,5 V — 16 V zulässig)
Maximale Stromaufnahme 10A
Betriebstemperaturbereich 0°C—+40°C
Einbaumaße (B × H × T) 182mm×111mm×158mm
Allgemeines
Gewicht 1,6kg
Änderungen ohne Vorankündigung bleiben vorbehalten.
Mitten 2,5kHz ±8 dB
Höhen 12,5kHz ±8 dB
DEUTSCH
23
Page 56

Warnung
•
Das Gerät kann nur bei 12 V DC-Versorgung mit negativer Masse eingebaut werden.
•
Trennen Sie den negativen Batterieanschluss vor der Verkabelung und Befestigung ab.
•
Schließen Sie nicht das Batteriekabel (gelb) das Zündkabel (rot) an der Fahrzeugkarosserie
oder dem Massekabel (schwarz) an, um einen Kurzschluss zu vermeiden.
•
Isolieren Sie nicht angeschlossene Kabel mit Vinylband, um einen Kurzschluss zu
vermeiden.
•
Sicherstellen, daß das Gerät nach dem Einbau a Chassis des Fahrzeugs geerdet wird.
Vorsicht
•
Überlassen Sie aus Sicherheitsgründen die Arbeiten zur Montage und Verkabelung
ausgewiesenem Fachpersonal. Lassen Sie sich vom Autoradiohändler beraten.
•
Montieren Sie dieses Gerät in der Konsole Ihres Fahrzeugs. Keine Metallteile dieses Geräts
bei und kurz nach der Verwendung des Geräts berühren. Metallteile wie der Kühlkörper und
das Gehäuse werden heiß.
•
Verbinden Sie nicht die [-Drähte von Lautsprechern mit der Karosserie, dem Massekabel
(schwarz) oder schließen sie parallel an.
EINBAU / ANSCHLUSS
•
Montieren Sie das Gerät mit einem Winkel von weniger als 30°.
•
Wenn Ihr Fahrzeugkabelbaum nicht die Zündklemme hat, verbinden Sie das Zündkabel
(rot) mit der Klemme am Sicherungskasten des Fahrzeugs, die 12 V DC-Versorgung bietet
und durch den Zündschlüssel ein- und ausgeschaltet wird.
•
Halten Sie alle Kabel von hitzeableitenden Metallteilen fern.
•
Überprüfen Sie nach der Montage des Geräts, ob die Bremslichter, Blinker, Scheibenwischer
usw. ordnungsgemäß funktionieren.
•
Wenn die Sicherung durchbrennt, überprüfen Sie zuerst, dass die Drähte nicht die
Karosserie berühren, und ersetzen Sie dann die durchgebrannte Sicherung durch eine neue
Sicherung mit der gleichen Nenngröße.
Grundlegendes Verfahren
1
Ziehen Sie den Schlüssel aus dem Zündschloss, und
trennen Sie dann den
2 (Für )
Installieren Sie die DAB-Antenne.
Siehe Installieren Sie die DAB-Antenne. (
3 Schließen Sie die Kabel richtig an.
Siehe Verdrahtungsanschluss. (
4 Bauen Sie das Autoradio in Ihrem Fahrzeug ein.
Siehe Einbau der Einheit (Einbau im Armaturenbrett).
5 Schließen Sie die [-Klemme der Autobatterie an.
6 Setzen Sie das Gerät zurück. (
[-Pol der Autobatterie ab.
27)
25, 26
)
3
)
Einbau der Einheit (Einbau im Armaturenbrett)
Führen Sie die erforderliche Verkabelung aus.
(
25, 26
)
Armaturenbrett Ihres Autos
Beim Einbau des Geräts ohne
Einbauhalterung
1
Nehmen Sie die Einbauhalterung
vom Gerät ab.
2 Richten Sie die Öffnungen am
Gerät (an beiden Seiten) mit der
Befestigungskonsole am Fahrzeug
aus und sichern Sie das Gerät mit
Schrauben (im Handel erhältlich).
Verwenden Sie nur die vorgeschriebenen Schrauben.
Durch Verwendung falscher Schrauben kann das Gerät
beschädigt werden.
Biegen Sie die entsprechenden Metalllaschen, um die
Einbauhalterung sicher festzuhalten.
Entfernen der Einheit
1
Passen Sie die Vorsprünge an den
Ausziehschlüsseln an beiden Seiten des
Frontrahmens ein und ziehen Sie ihn
heraus.
2 Setzen Sie die Ausziehschlüssel
tief in die Schlitze an jeder Seite
ein und folgen dann den mit Pfeil
gekennzeichneten Anweisungen wie
unten gezeigt.
24
Page 57

Verdrahtungsanschluss
(für
Anschluss des ISO-Anschlusses an manche VW/Audi
oder Opel (Vauxhall) Automobile
Sie müssen möglicherweise die Verkabelung des mitgelieferten
Kabelbaums modifizieren, wie unten gezeigt.
A7 (Rot) Zündkabel (Rot)
Fahrzeug
A4 (Gelb)
Stift
A4 Gelb : Batterie
A5 Blau/Weiß : Stromsteuerung
A7 Rot : Zündung (ACC)
A8 Schwarz : Erdungsanschluss (Masse)
B1
Lila
B2
Lila/Schwarz
B3
Grau
B4
Grau/Schwarz
B5
Weiß
B6
Weiß/Schwarz
B7
Grün
B8
Grün/Schwarz
)
Standardverkabelung
Farbe und Funktion
]
[
]
[
]
[
]
[
Vorderer/ Hinterer/
Subwoofer-Ausgang
Antennenanschluss
DAB-Antennenbuchse ( 27)
Batteriekabel
(Gelb)
: Hinterer Lautsprecher (rechts)
: Vorderer Lautsprecher (rechts)
: Vorderer Lautsprecher (links)
: Hinterer Lautsprecher (links)
Gerät
Gelb (Batteriekabel)
Rot (Zündkabel)
Rot (A7)
Gelb (A4)
ISO-Anschlüsse
MIC (Mikrofoneingangsbuchse) (
Bei Anschluss an einen externen Verstärker schließen
Sicherung (10 A)
Falls kein Anschluss durchgeführt wird, lassen Sie den Draht bitte nicht aus der Lasche hervorstehen.
Hellblau/Gelb
(Lekungs-
Fernbedienungskabel)
Blau/Weiß
(Stromsteuerungskabel/
Antennensteuerungskabel)
Braun
(Stummschaltungs-Steuerkabel)
Sie dessen Massedraht an der Autokarosserie an, um
Beschädigung des Geräts zu vermeiden.
STEERING WHEEL
REMOTE INPUT
REMOTE CONT
ANT CONT
P. CONT
MUTE
12)
Zum Lenkrad-Fernbedienungsadapter
Bei Verwendung des optionalen
Leistungsverstärkers entweder einen Anschluss
an den Stromsteuerungsanschluss oder an den
Antennensteuerungsanschluss des Fahrzeugs
durchführen
Beziehen Sie sich hinsichtlich des Anschlusses
an das Kenwood-Navigationssystem auf die
Bedienungsanleitung des betreffenden Geräts
DEUTSCH
25
Page 58

Verdrahtungsanschluss
(für
Anschluss des ISO-Anschlusses an manche VW/
Audi oder Opel (Vauxhall) Automobile
Sie müssen möglicherweise die Verkabelung des mitgelieferten
Kabelbaums modifizieren, wie unten gezeigt.
A7 (Rot)
Fahrzeug
A4 (Gelb)
Stift
A4 Gelb : Batterie
A5 Blau/Weiß : Stromsteuerung
A7 Rot : Zündung (ACC)
A8 Schwarz : Erdungsanschluss (Masse)
B1
B2
B3
B4
B5
B6
B7
B8
)
Vorderer/ Hinterer/ Subwoofer-Ausgang
Antennenanschluss
Standardverkabelung
Farbe und Funktion
Lila
]
Lila/Schwarz
Grau
]
Grau/Schwarz
Weiß
]
Weiß/Schwarz
Grün
]
Grün/Schwarz
: Hinterer Lautsprecher (rechts)
[
: Vorderer Lautsprecher (rechts)
[
: Vorderer Lautsprecher (links)
[
: Hinterer Lautsprecher (links)
[
Zündkabel (Rot)
Batteriekabel
(Gelb)
Gerät
Gelb (Batteriekabel)
Rot (Zündkabel)
Rot (A7)
Gelb (A4)
ISO-Anschlüsse
Bei Anschluss an einen externen Verstärker schließen
Sie dessen Massedraht an der Autokarosserie an, um
Beschädigung des Geräts zu vermeiden.
Sicherung (10 A)
Mikrofoneingangsbuchse ( 12)
Falls kein Anschluss durchgeführt wird, lassen Sie den Draht bitte nicht aus
Hellblau/Gelb
(Lekungs-
Fernbedienungskabel)
Blau/Weiß
(Stromsteuerungskabel/
Antennensteuerungskabel)
Braun
(Stummschaltungs-
Steuerkabel)
der Lasche hervorstehen.
STEERING WHEEL
REMOTE INPUT
REMOTE CONT
ANT CONT
P. CONT
MUTE
Zum LenkradFernbedienungsadapter
Bei Verwendung des optionalen
Leistungsverstärkers entweder
einen Anschluss an den
Stromsteuerungsanschluss oder an
den Antennensteuerungsanschluss
des Fahrzeugs durchführen
Beziehen Sie sich hinsichtlich
des Anschlusses an das
Kenwood-Navigationssystem
auf die Bedienungsanleitung des
betreffenden Geräts
Teileliste für den
Einbau
(A)
Einbauhalterung
(B)
Frontrahmen
(C)
Kabelbaum
(D)
Ausziehschlüssel
2626
Page 59

EINBAU / ANSCHLUSS
Installieren Sie die DAB-Antenne (mitgeliefert)
Vorsicht
•
Die Folienantenne
gedacht.
•
Installieren Sie sie nicht an folgenden Orten:
– wo sie die Sicht des Fahrers blockieren kann.
– wo sie die Funktion von Sicherheitseinrichtungen wie etwa Airbags behindern
– auf beweglichen Glasoberflächen wie auf der Heckklappe.
– an der Seite des Fahrzeugs (z.B. Tür, vorderes Teilfenster).
– am Heckfenster.
•
Die Signalstärke nimmt bei Installation an den folgenden Orten ab:
– auf IR-Reflexionsglas oder an mit Spiegelfolien abgedeckten Stellen.
– wo sie mit einer echten Radioantenne überlappt (Muster).
– wo sie mit Fensterheizdrähten überlappt.
– auf Glas, das Radiosignale blockiert (z.B. IR-Reflexionsglas, Thermalisolierglas).
•
Schlechter Empfang kann auftreten:
– wegen Störungen bei eingeschaltetem Scheibenwischer, Klimagerät oder Motor.
– je nach der Richtung des Senders in Bezug auf das Fahrzeug (Antenne).
•
Wischen Sie gründlich Öl und Schmutz mit Hilfe des mitgelieferten Reinigungsmittels
(H)
•
Biegen oder beschädigen Sie die Folienantenne
•
Die Installation kann bei bestimmten Fahrzeugen unmöglich sein.
•
Prüfen Sie die Kabelführung auf der Folienantenne
(F)
•
Wenden Sie nach dem Aufkleben der Folienantenne
(E)
ist ausschließlich zur Verwendung im Inneren des Fahrzeugs
kann.
von der Anbringungsfläche ab.
vor dem Aufkleben.
(E)
nicht.
(E)
und auf der Verstärkereinheit
(E)
keinen Glasreiniger an.
Bestimmen Sie die Antenneneinbauposition
•
Die Richtung der Folienantenne
•
Prüfen Sie immer den Installationsort der Folienantenne
•
Lassen Sie einen Abstand zu anderen Antennen von mindestens 100mm.
•
Kleben Sie nicht die Verstärkereinheit
vorhanden.
Installieren der Antenne an der linken Seite
(E)
ist unterschiedlich, je nachdem ob die Folienantenne
(F)
(E)
vor der Installation. Die Folienantenne kann nicht erneut aufgeklebt werden.
auf die Keramiklinie (schwarzer Teil) um die Frontscheibe. Hier ist nicht ausreichend Klebkraft
Keramiklinie (schwarzer Teil)
150 mm
30 mm
Erdungsblatt*
*
Kleben Sie das Erdungsblatt der Verstärkereinheit
(E)
(F)
(F)
auf den Metallteil auf der Frontsäule.
Teileliste für den Einbau
(E)
Folienantenne
(F)
Verstärkereinheit
(Kabel mit Booster, 3,5m)
(E)
an der rechten oder linken Seite installiert ist.
Installieren der Antenne an der rechten Seite
Erdungsblatt*
150 mm
(F)
30 mm
(E)
(G)
Kabelklemme
(H)
Reiniger
DEUTSCH
27
Page 60

EINBAU / ANSCHLUSS
Vorsicht
Beim Installieren des Antennenkabels im Inneren
der Frontsäule bei eingebautem Airbag
•
Die Frontsäulenabdeckung wird mit einem speziellen Clip gesichert, der
beim Ausbau möglicherweise ausgetauscht werden muss.
Wenden Sie sich an Ihren Fahrzeughändler für Einzelheiten zum Entfernen
der Frontsäulenabdeckung und zur Bestellung von Ersatzteilen.
Clip
Frontsäule
•
Installieren Sie die Verstärkereinheit
nicht die Funktion des Airbags beeinträchtigt.
(F)
über dem Airbag, so dass sie
(F)
Einbauübersicht
Die Antenne sollte aus Sicherheitsgründen auf der Beifahrerseite
installiert werden.
(E)
(F)
Antenneneinbau
1
Entfernen Sie die Frontsäulenabdeckung an
Ihrem Fahrzeug.
Frontsäule
2 Reinigen Sie die Windschutzscheibe mit dem
mitgelieferten Reiniger
(H)
– Warten Sie, bis die Glasoberfläche vollständig
trocken ist, bevor Sie fortfahren.
– Wärmen Sie die Oberfläche der Frontscheibe mit
dem Entfroster an, wenn es kalt ist (im Winter).
3 Entfernen Sie das Trägerblatt (Zapfen 1) der
Folienantenne
Sie die Antenne auf die Scheibe.
(H).
(E) horizontal ab und kleben
Trägerblatt (Zapfen 1)
28
Airbag
(E)
Berühren Sie nicht die Aufkleboberfläche
(Klebeseite) der Folienantenne
(E)
.
Page 61

EINBAU / ANSCHLUSS
4 Reiben Sie die Folienantenne vorsichtig auf
der Windschutzscheibe in Pfeilrichtung, um
sicheres Anhaften zu erzielen.
(E)
5 Entfernen Sie das Trägerblatt (Zapfen 2) der
Folienantenne
Trägerblatt (Zapfen 2)
(E) vertikal.
(E)
6 Richten Sie die Position des Vorsprungs an
der Verstärkereinheit
Folienantenne
Berühren Sie nicht den Leiteranschluss an der
Aufkleboberfläche (Klebeseite) der Verstärkereinheit
(F)
.
• Beim Installieren der Antenne an der rechten Seite
(F)
(E)
Leiteranschluss der
Folienantenne
• Beim Installieren der Antenne an der linken Seite
Erdungsblatt
(E)
(F) mit dem K an der
(E) aus und kleben auf.
Erdungsblatt
Stellen Sie die Position
des Vorsprungs mit der
K
-Markierung ein
Leiteranschluss der Verstärkereinheit
(Metallteil)
(E)
(F)
7 Entfernen Sie die Folie, die das Erdungsblatt
abdeckt, und kleben Sie das Erdungsblatt auf
den Metallteil des Fahrzeugs.
Lassen Sie ausreichend Spielraum für das
Erdungsblatt, damit es nicht Innenteile
(Frontsäulenabdeckung) behindert. Achten Sie auch
darauf, dass Innenteile nicht die Verstärkereinheit
(F)
behindern.
Windschutzscheibe
Erdungsblatt
(F)
Frontsäulenabdeckung
8 Verdrahten Sie die Antennenkabel.
Verwenden Sie die Kabelklemme
der Antenne an der Säule an mehreren Stellen.
9 Bringen Sie die Frontsäulenabdeckung in
ihrer ursprünglichen Position an.
Achten Sie darauf, nicht das Erdungsblatt und
die Verstärkereinheit
beschädigen.
10 Schließen Sie die Verstärkereinheit (F) an der
DAB-Eingangsklemme an der Rückseite der
Einheit an.
11 Stellen Sie [
(F)
DAB ANT POWER
(G)
zum Sichern
beim Abdecken zu
] auf [ON]. (
4)
DEUTSCH
29
Page 62

CОДЕРЖАНИЕ ПОДГОТОВКА К ЭКСПЛУАТАЦИИ
ПОДГОТОВКА К ЭКСПЛУАТАЦИИ
ОСНОВНЫЕ СВЕДЕНИЯ 3
НАЧАЛО ЭКСПЛУАТАЦИИ 3
ЦИФРОВОЕ РАДИО (DAB)
(для )
5
АНАЛОГОВОЕ РАДИО 7
CD / USB / iPod / ANDROID 9
AUX 11
BLUETOOTH® 12
ЗВУКОВЫЕ НАСТРОЙКИ 18
НАСТРОЙКИ ДИСПЛЕЯ 19
ДОПОЛНИТЕЛЬНАЯ
ИНФОРМАЦИЯ 19
УСТРАНЕНИЕ ПРОБЛЕМ 20
ТЕХНИЧЕСКИЕ
ХАРАКТЕРИСТИКИ 22
УСТАНОВКА И ПОДКЛЮЧЕНИЕ 24
Как пользоваться данным
руководством
•
Операции объясняются в основном с
использованием кнопок на передней
панели модели
•
В целях объяснения индикации в данном
руководстве используется английский язык.
• [XX
] обозначает выбранные элементы.
•
( XX) означает, что материалы доступны на
указанной странице.
2
.
Предупреждение
Не используйте функции, которые отвлекают внимание и мешают безопасному вождению.
Внимание
Настройка громкости:
•
Отрегулируйте громкость таким образом, чтобы слышать звуки за пределами автомобиля для предотвращения
аварий.
•
Уменьшите громкость перед воспроизведением, чтобы предотвратить повреждение динамиков из-за внезапного
повышения уровня громкости на выходе.
Общие характеристики:
•
Не используйте внешние устройства, если это может отрицательно повлиять на безопасность движения.
•
Убедитесь в том, что созданы резервные копии всех важных данных. Мы не несем ответственность за потерю
записанных данных.
•
Никогда не оставляйте металлические предметы (например, монеты или металлические инструменты) внутри
устройства во избежание коротких замыканий.
•
Если ошибка чтения диска возникла из-за образования конденсата на лазерных линзах, извлеките диск и
дождитесь, пока влага испарится.
Обслуживание
Чистка устройства: В случае загрязнения протрите переднюю панель сухой силиконовой или мягкой тканью.
Обращение с дисками:
•
Не касайтесь записанной поверхности диска.
•
Не приклеивайте на диск клейкую ленту и т. п. и не используйте диск с приклеенной на него лентой.
•
Не используйте никакие дополнительные принадлежности для диска.
•
Проводите чистку по направлению от центра диска к его краю.
•
Для очистки диска используйте сухую силиконовую или иную мягкую ткань. Не используйте какие-либо
растворители.
•
При извлечении дисков из устройства держите их горизонтально.
•
Перед установкой диска устраните любые неровности центрального отверстия или внешнего края диска.
2
Page 63

ОСНОВНЫЕ СВЕДЕНИЯ
Передняя панель
Задача На передней панели
Включение питания
Настройка громкости Поверните ручку регулировки громкости.
Выберите источник
Изменение
отображаемой
информации
Загрузочный отсек Дисплей
Ручка регулировки громкости
(переверните/нажмите)
Нажмите кнопку
•
Нажмите и удерживайте нажатой, чтобы отключить питание.
Нажмите ручку регулировки громкости во время проигрывания
для заглушения звука.
•
Нажмите кнопку еще раз, чтобы отменить действие.
Нажмите кнопку
Нажмите кнопку
•
Нажмите кнопку и удерживайте ее нажатой для прокрутки
отображаемой в текущий момент информации.
Кнопка сброса
•
Запрограммированные настройки
будут также удалены.
.
несколько раз.
(Для )
несколько раз.
НАЧАЛО ЭКСПЛУАТАЦИИ
1
Выбор языка отображения и отмена
демонстрации
При включении питания (или после сброса устройства) на дисплее
отображается следующая информация: “SELLANGUAGE”
“VOLUMEKNOB”
1 Поверните ручку регулировки громкости для выбора
[
ENG
] (Aнглийский) или [
В качестве начальной настройки выбрано значение [
Затем на дисплее отображается: “CANCEL DEMO”
“VOLUME KNOB”.
2 Нажмите ручку регулировки громкости.
В качестве начальной настройки выбрано значение [
3 Нажмите ручку регулировки громкости еще раз.
Отображается надпись “DEMOOFF”.
2
Настройка часов
Нажмите кнопку FNC для перехода в режим [
1
2 Поверните ручку регулировки громкости для выбора
элемента [
3 Поверните ручку регулировки громкости для выбора
элемента [
CLOCK
CLOCK ADJUST
RUS
](Pусский), а затем нажмите ее.
], а затем нажмите ее.
], а затем нажмите ее.
“PRESS”
ENG
].
“PRESS”
YES
].
FUNCTION
].
РУССКИЙ
3
Page 64

НАЧАЛО ЭКСПЛУАТАЦИИ
4 Поворачивайте ручку регулировки громкости, чтобы
выбрать значения параметров, а затем нажмите ее.
День Час Минута
5 Поверните ручку регулировки громкости для выбора
элемента [
6 Поверните ручку регулировки громкости для выбора
элемента [
7 Нажмите кнопку и удерживайте ее нажатой для
выхода.
Для возврата к предыдущему элементу настройки нажмите кнопку
3
Нажмите несколько раз для перехода в режим
1
STANDBY.
2 Нажмите кнопку FNC для перехода в режим [
• Нажатие
3 Чтобы сделать выбор, поверните ручку регулировки
громкости (см. следующую таблицу), затем нажмите ее.
4 Повторяйте действие 3 до тех пор, пока не будет
выбран или активирован необходимый элемент.
5 Нажмите кнопку и удерживайте ее нажатой для
выхода.
Для возврата к предыдущему элементу настройки нажмите кнопку
AUDIO CONTROL
SWITCH
PREOUT
SP SELECT OFF/ 5/4/ 6 × 9/6/ OEM
DISPLAY
EASY MENU
4
CLOCK FORMAT
12H
.
], а затем нажмите ее.
] или [
24H
], а затем нажмите ее.
Установка начальных настроек
AUDIO
напрямую переключает в [
.
REAR/ SUBWOOFER
или низкочастотного динамика к разъемам “line out” на задней
панели устройства (через внешний усилитель).
динамиков (5-дюймовый или 4-дюймовый, 6×9-дюймовый
или 6-дюймовый) или динамиков OEM для оптимальной
производительности.
ON
:При переходе в режим [
кнопки становится белым.;
остается таким, как выбран в меню [
: Выбор подключения задних динамиков
: Выбор соответствующего размера
FUNCTION
OFF
:Цвет подсветки дисплея и кнопки
COLOR SELECT
FUNCTION
AUDIO CONTROL
По умолчанию:
] цвет подсветки дисплея и
]. ( 19)
TUNER SETTING
DAB L-BAND
DAB ANT
POWER
PRESET TYPE NORMAL
*
ON
*
ON
поставки.;
усилителя. (
диапазоне частот (FM1/ FM2/ FM3/ MW/ LW/ DB1/ DB2/ DB3).;
для каждой запрограммированной кнопки вне зависимости от выбранного диапазона частот.
SYSTEM
KEY BEEP
ON
SOURCE SELECT
].
].
XX
BUILT-IN AUX
P-OFF WAIT
CD READ 1
F/W UPDATE
ON
Применимо, только если выключен демонстрационный режим.
Выбор времени автоматического выключения устройства (в режиме ожидания) в целях экономии
аккумулятора.
20M
WAIT TIME – – –
:Автоматическое распознавание диска с аудиофайлами и музыкального компакт-диска.;
2
:Принудительное воспроизведение в качестве музыкального компакт-диска. Во время воспроизведения
диска с аудиофайлами звук не слышен.
UPDATE SYSTEM / UPDATE BT/ UPDATE DAB1
F/W UP xx.xx/
F/W UP xxxxx/
F/W UP Vxxx
YES
NO
Подробнее об обновлении встроенного программного обеспечения см.: www.kenwood.com/cs/ce/
CLOCK
CLOCK DISPLAY
ENGLISH
РУССКИЙ
*
Для .
ON
Выбранный язык используется в качестве языка отображения для меню [
применимых случаях для информации тегов (имя папки, имя файла, название песни, имя
исполнителя, название альбома).
:Принимает ансамбль L-BAND во время приема передач цифрового радио.;
:Подача питания на антенну DAB. Выбирайте при использовании антенны, входящей в комплект
OFF
:Питание не подается. Выбирайте при использовании пассивной антенны без
27)
:Запоминание одной радиостанции для каждой запрограммированной кнопки в каждом
:Включение звука нажатия кнопки.;
:Включение варианта AUX при выборе источника.;
: 20 минут ;
40M
: 40 минут ;
:Отмена
:Запуск обновления встроенного программного обеспечения.;
:Отмена (обновление не запущено).
:Даже в выключенном состоянии на дисплее отображается текущее время.;
OFF
:выключение.
60M
: 60минут;
*
/ UPDATE DAB2
OFF
:Отключение.
*
MIX
OFF
:Отмена.
:Запоминание одной радиостанции
( 11)
OFF
:Отмена.
FUNCTION
] и в
Page 65

ЦИФРОВОЕ РАДИО (DAB)
(для )
Информация о DAB (Digital Audio
Broadcasting — цифровое аудиовещание)
DAB представляет собой одну из доступных сегодня систем
цифрового радиовещания. Она позволяет передавать
звук цифрового качества без раздражающих помех или
искажения сигнала. Кроме того, она позволяет передавать
текст, изображения и данные.
В отличие от FM-вещания, в котором каждая программа
передается на своей частоте, DAB комбинирует несколько
программ (они называются “сервисами”), формируя один
“ансамбль”.
“Первичный компонент” (главная радиостанция) иногда
сопровождается “вторичным компонентом”, который
может содержать дополнительные программы или другую
информацию.
Подготовка:
1 Подсоедините DAB-антенну к гнезду DAB-
антенны.
2 Нажмите кнопку для выбора источника
DAB.
3 Нажмите и удерживайте ,
чтобы запустить обновление списка сервисов.
Отобразится “LIST UPDATE”, и запустится обновление.
Когда обновление завершится, отобразится “UPDATED”.
Выполнение обновления занимает до 3 минут. Во время
выполнения обновлений не допускается прерывания
(например информацией о дорожной ситуации).
•
Чтобы отменить обновление списка сервисов: Снова
нажмите и удерживайте
( 27)
.
Поиск ансамбля
Нажмите несколько раз для выбора DAB.
1
2 Нажмите кнопку несколько раз для выбора DB1/ DB2/ DB3.
3 Нажмите и удерживайте S/T для поиска ансамбля.
4 Нажмите S/T, чтобы выбрать ансамбль, сервис или компонент для
прослушивания.
•
Порядок изменения метода поиска для S/T: Последовательно нажимайте и удерживайте
нажатой кнопку
AUTO1 : Нажмите кнопку S/T: Выберите ансамбль, сервис или компонент.
Нажмите и удерживайте нажатой кнопку S/T: Автоматический поиск ансамбля.
AUTO2 : Нажмите кнопку S/T: Поиск запрограммированной радиостанции.
MANUAL : Нажмите кнопку S/T: Выберите ансамбль, сервис или компонент.
Нажмите и удерживайте нажатой кнопку S/T: Ручной поиск ансамбля.
•
Чтобы сохранить сервис: Нажмите и удерживайте нажатыми нумерованные кнопки (1–6).
•
Чтобы выбрать сохраненный сервис: Нажмите и удерживайте нажатыми нумерованные кнопки
(
1
–6).
.
Выбор сервиса
Нажмите и удерживайте , чтобы перейти в режим поиска сервиса.
1
2 Поверните ручку регулировки громкости для выбора сервиса, а затем нажмите ручку.
Чтобы отменить режим поиска сервиса, нажмите .
РУССКИЙ
5
Page 66

ЦИФРОВОЕ РАДИО (DAB)
Выбор сервиса по имени
Нажмите и удерживайте , чтобы перейти в
1
режим поиска сервиса.
2 Быстро поверните ручку регулировки громкости
для перехода в режим поиска по алфавиту.
3 Поверните ручку регулировки громкости или
нажмите
S
/
поиска.
• Для поиска по символам, отличным от A–Z и 0–9, введите
только “
• Нажатие и удержание кнопки / быстро изменяет
символы.
4 Нажмите ручку регулировки громкости, чтобы
запустить поиск.
5 Поверните ручку регулировки громкости для
выбора сервиса, а затем нажмите ручку.
Чтобы отменить режим поиска по алфавиту, нажмите .
Другие настройки
Нажмите кнопку FNC для перехода в режим
1
[
FUNCTION
2 Чтобы сделать выбор, поверните ручку регулировки
громкости (см. следующую таблицу), затем нажмите
ее.
3 Повторяйте действие 2 до тех пор, пока не будет
выбран или активирован необходимый элемент.
4 Нажмите кнопку и удерживайте ее нажатой
для выхода.
Для возврата к предыдущему элементу настройки нажмите
кнопку
T, чтобы выбрать символ для
”.
*
].
.
По умолчанию:
TUNER SETTING
AF SET
TI ON
PTY SEARCH
ASW SELECT TRAVEL, WARNINGS, NEWS, WEATHER, EVENT, SPECIAL, RAD INFO, SPORTS, FINANCE
LIST UPDATE AUTO
PTY WATCH
RELATED
SERV
ON
:
При прослушивании с DAB: Автоматическое переключение на FM-вещание, если DAB-сигнал становится слабым.
Когда сигнал снова станет сильным, произойдет переключение назад на DAB-звук.
При прослушивании с FM: Автоматическое переключение на DAB-источник, передающий ту же программу (если
он доступен).;
OFF
:Отмена.
:Позволяет устройству временно переключаться в режим приема сообщений о движении на дорогах, когда
эти сообщения доступны (загорается индикатор “TI”).;
Нажмите ручку регулировки громкости для входа в меню выбора языка функции PTY. Поверните ручку
регулировки громкости для выбора языка функции PTY (
ее.
Выберите доступный тип программы (см. далее), затем нажмите кнопку
сделать выбор, поверните ручку регулировки громкости, а затем нажмите ее.
Перед активированным типом сообщений отображается знак “
Автоматическое переключение с любого источника на ансамбли цифрового радио, передающие сообщения
активированного типа.
•
Одновременно может быть активировано несколько сообщений.
•
Чтобы деактивировать, нажмите ручку регулировки громкости снова (“*” исчезнет).
:Автоматическое обновление списка сервисов DAB при включении питания.;
списка сервисов DAB нажатием и удержанием
Автоматическое переключение с любого источника на ансамбли цифрового радио, передающие программы
выбранного типа.
NEWS, AFFAIRS, INFO, SPORT, EDUCATE, DRAMA, CULTURE, SCIENCE, VARIED
POPM
(музыка),
ROCKM
(музыка),
OTHERM
(музыка),
LEISURE, JAZZ, COUNTRY, NATIONM
OFF
:Отмена.
ON
:Включение функции Soft-Link для переключения на альтернативный сервис, являющийся другой
аудиопрограммой, отличной от текущей аудиопрограммы.;
WEATHER, FINANCE, CHILDREN, SOCIAL, RELIGION, PHONE IN, TRAVEL
EASYM
OFF
:Отмена.
ENGLISH/ FRENCH/ GERMAN
*
AUDIO
.
(музыка),
LIGHTM
(музыка),
OLDIES, FOLKM
OFF
S
”.
(музыка),
(музыка),
:Отключение.
), а затем нажмите
/T для запуска.
MANUAL
:Обновление
,
CLASSICS
,
DOCUMENT
XX
: Чтобы
,
6
Page 67

ЦИФРОВОЕ РАДИО (DAB)
CLOCK
TIME SYNC
•
Доступный тип программы:
SPEECH : NEWS, AFFAIRS, INFO
MUSIC
Устройство выполняет поиск типа программы, выбранного в функциях [
или [
•
В случае регулировки громкости в процессе приема информации о дорожной
ситуации, сообщений, предупреждений или новостей настроенная громкость
фиксируется в памяти автоматически. Настройка будет применена при
следующем включении информирования о дорожной ситуации, сообщениях,
предупреждениях или новостях.
ON
:Синхронизация времени устройства со временем станции, передающей цифровой
радиосигнал.;
SCIENCE, VARIED, WEATHER, FINANCE, CHILDREN, SOCIAL, RELIGION
PHONE IN, TRAVEL, LEISURE, DOCUMENT
:
POP M
(музыка),
CLASSICS, OTHER M
FOLK M
MUSIC
] (если тип выбран).
(музыка)
OFF
:Отмена.
(информация),
ROCK M
(музыка),
(музыка),
SPORT, EDUCATE, DRAMA, CULTURE
EASY M
JAZZ, COUNTRY, NATION M
(музыка),
LIGHT M
(музыка),
,
(музыка),
OLDIES
SPEECH
АНАЛОГОВОЕ РАДИО
,
,
]
Поиск радиостанции
Нажмите несколько раз для выбора TUNER.
1
2 Нажмите кнопку несколько раз для выбора FM1/ FM2/ FM3/
MW/ LW.
3 Нажмите S/T, чтобы выполнить поиск радиостанции.
•
Порядок изменения метода поиска для S/T: Последовательно
нажимайте и удерживайте нажатой кнопку
AUTO1 : Автоматический поиск станции.
AUTO2 : Поиск запрограммированной радиостанции.
MANUAL : Поиск станции вручную.
•
Порядок сохранения радиостанции: Нажмите и удерживайте нажатыми
нумерованные кнопки (
•
Порядок выбора сохраненной радиостанции: Нажмите и удерживайте
нажатыми нумерованные кнопки (
1
–6).
1
–6).
Другие настройки
Нажмите кнопку FNC для перехода в режим [
1
2 Чтобы сделать выбор, поверните ручку регулировки громкости (см.
следующую таблицу), затем нажмите ее.
3 Повторяйте действие 2 до тех пор, пока не будет выбран или
активирован необходимый элемент.
4 Нажмите кнопку и удерживайте ее нажатой для выхода.
Для возврата к предыдущему элементу настройки нажмите кнопку .
.
FUNCTION
].
РУССКИЙ
7
Page 68

АНАЛОГОВОЕ РАДИО
TUNER SETTING
LOCAL SEEK
AUTO
MEMORY
MONO SET ON
NEWS SET ON
REGIONAL ON
AF SET ON
*
TI
PTY SEARCH
ON
: Поиск только станций с хорошим качеством приема. ;
YES
:Aвтоматический запуск запоминания 6 станций с хорошим качеством приема.;
NO
:Отмена.
•
Дос тупно только в том случае, если для параметра [
значение [
NORMAL
:Улучшение качества приема в FM-диапазоне (при этом стереоэффект может быть
утрачен).;
OFF
:Отмена.
:Устройство временно переключается на программу новостей, если она доступна. ;
OFF
:Отмена.
: Переключение на другую станцию только в определенном регионе с помощью
элемента управления “AF”.;
: Автоматический поиск другой станции, транслирующей эту же программу в данной
сети Radio Data System с более высоким качеством приема, если текущее качество
приема является неудовлетворительным.;
ON
: Позволяет устройству временно переключаться в режим приема сообщений о
движении на дорогах, когда эти сообщения доступны (загорается индикатор “TI”).;
OFF
:Отмена.
*
: [TI] в режиме MW/LW служит для включения прерывания
информацией о дорожной ситуации только на DAB-источнике.
Нажмите ручку регулировки громкости для входа в меню выбора языка функции PTY.
Поверните ручку регулировки громкости для выбора языка функции PTY (
FRENCH/ GERMAN
Выберите доступный тип программы (см. далее), затем нажмите кнопку
для запуска.
]. ( 4)
OFF
:Отмена.
), а затем нажмите ее.
OFF
:Отмена.
По умолчанию:
OFF
: Отмена.
PRESET TYPE
] выбрано
ENGLISH
S/T
•
Параметр [
XX
•
Доступный тип программы:
•
В случае регулировки громкости в процессе приема информации о дорожной
/
LOCAL SEEK
диапазон частот FM1/ FM2/ FM3.
SPEECH
:
NEWS
SCIENCE
PHONE IN
MUSIC: POP M
CLASSICS
FOLK M
Устройство выполняет поиск типа программы, выбранного в функциях [
или [
MUSIC
ситуации, предупреждения или новостей настроенная громкость фиксируется в
памяти автоматически. Настройка будет применена при следующем включении
информирования о дорожной ситуации, предупреждениях или новостях.
]/ [
PTY SEARCH
AFFAIRS
,
VARIED
,
TRAVEL
(музыка),
,
OTHER M
(музыка)
MONO SET
] доступен для выбора, только когда используется
,
INFO
(информация),
,
WEATHER
,
LEISURE
ROCK M
(музыка),
)/ [
,
] (если тип выбран).
]/ [
NEWS SET
,
FINANCE
,
DOCUMENT
(музыка),
JAZZ
SPORT
,
CHILDREN
EASY M
,
COUNTRY
]/ [
REGIONAL
(музыка),
,
EDUCATE
,
,
NATION M
SOCIAL
]/ [
LIGHT M
AF SET
,
DRAMA
,
RELIGION
(музыка),
]/ [TI] (для
,
CULTURE
,
(музыка),
OLDIES
SPEECH
,
,
]
8
Page 69

CD / USB / iPod / ANDROID
Начало воспроизведения
Происходит автоматическая смена источника, и начинается
воспроизведение.
Входной USB-разъем
Верхняя сторонаM Извлечение диска
USB
CA-U1EX (макс.: 500 мА)
(дополнительный аксессуар)
iPod/iPhone
KCA-iP102 / KCA-iP103
(дополнительный аксессуар)
или кабель, прилагаемый к iPod/iPhone
ANDROID
Кабель Micro USB 2.0
(имеется в продаже)
1
*
KCA-iP102 : 30-контактного типа, KCA-iP103 : типа Lightning
2
*
Не оставляйте кабель в автомобиле, когда он не используется.
*
3
*
2
*
Задача На передней панели
Воспроизведение /
пауза
Перемотка назад или
4
*
вперед
Выбор дорожки или
1
2
*
файла
Выбор папки
Воспроизведение в
режиме повтора
Воспроизведение
в случайном
порядке
*
6
*
Нажмите кнопку
Нажмите и удерживайте нажатой кнопку S/T.
Нажмите кнопку
5
Нажмите кнопку / .
Нажмите кнопку несколько раз.
6
*
TRACK REPEAT/ REPEAT OFF
FILE REPEAT/ FOLDER REPEAT/ REPEAT OFF
FILE REPEAT/ REPEAT OFF
Нажмите кнопку несколько раз.
DISC RANDOM/ RANDOM OFF
FOLDER RANDOM/ RANDOM OFF
Нажмите и удерживайте нажатой кнопку
ALL RANDOM
.
S
/T.
: Звуковой компакт-диск
: Файл KME Light/ KMC
: Звуковой компакт-диск
8
*
.
: Файл MP3/ WMA/ AAC/ WAV, iPod
или ANDROID
: Файл MP3/ WMA/ AAC/ WAV, файл KME
Light/ KMC, iPod или ANDROID
для выбора элемента
7
*
РУССКИЙ
9
Page 70

CD / USB / iPod / ANDROID
Задача На передней панели
Выбор режима
управления
Выбор музыкального
диска
(
11, [
MUSIC DRIVE]
3
*
При подключении устройства Android отобразится “Press [VIEW] to install KENWOOD MUSIC PLAY APP”.
Следуйте инструкциям на экране, чтобы установить приложение. Вы также можете установить последнюю
версию приложения KENWOOD MUSIC PLAY на ваше устройство Android до его подключения. (
4
*
Для ANDROID: Применимо, только если выбрано [
5
*
Для CD: Только для файлов MP3/ WMA/ AAC. Эта функция не работают для устройства iPod/ ANDROID.
6
*
Для iPod/ ANDROID: Применимо, только если выбрано [
7
*
KME Light : KENWOOD Music Editor Light, KMC : KENWOOD Music Control ( 19)
8
*
Для CD: Только для файлов MP3/ WMA/ AAC.
9
*
С помощью устройства по-прежнему можно управлять паузой/воспроизведением, пропуском файлов,
быстрой перемоткой вперед или назад.
Когда источником является iPod, последовательно
нажимайте
MODE ON
MODE OFF
Когда в качестве источника используется ANDROID,
( 11, [
ANDROID SETUP
Нажмите кнопку
Начнется воспроизведение песен, сохраненных на
)
следующих носителях.
•
Выбранная внутренняя или внешняя память
смартфона (запоминающее устройство большой
емкости).
•
Выбранный привод устройства с несколькими
дисками.
.
: Управление с iPod
: Управление с устройства
BROWSE MODE
MODE OFF
9
*
]
)
несколько раз.
]. (
11, [ANDROID SETUP
]/ [
BROWSE MODE
].
20)
Выбор файла из папки/списка
Нажмите кнопку .
1
2 Поверните ручку регулировки громкости для выбора папки/списка,
а затем нажмите ручку.
3 Поверните ручку регулировки громкости для выбора файла, а затем
нажмите ручку.
Быстрый поиск
Если у вас имеется большое количество файлов, вы можете выполнить
быстрый поиск по ним.
Для USB (для файлов KME Light/ KMC):
Нажмите
S
пропуска при поиске. (
Нажмите и удерживайте
• Неприменимо для CD и файлов MP3/ WMA/ AAC/ WAV.
Для iPod:
Вы можете выполнить поиск файла по первому символу в имени.
])
•
Для возврата к корневой папке/ первому файлу/ верхнему меню нажмите
•
Для возврата к предыдущему элементу настройки нажмите кнопку .
•
Для отмены нажмите и удерживайте нажатой кнопку .
•
Для iPod применимо, только когда выбрано [
управления
•
Для ANDROID применимо, только когда выбрано [
(
11, [
/T для поиска с предварительно заданным коэффициентом
11, [
SKIP SEARCH
S
/T для поиска с коэффициентом 10%.
Быстро поверните ручку регулировки громкости для перехода к поиску
по символу.
Поверните ручку регулировки громкости для выбора символа.
• Для поиска по символам, отличным от A–Z и 0–9, введите только “ * ”.
• Нажатие и удержание кнопки / быстро изменяет символы.
Нажмите S/T для перемещения положения записи.
• Предусмотрен ввод не более трех символов.
Нажмите ручку регулировки громкости, чтобы запустить поиск.
.
)
ANDROID SETUP
])
])
MODE OFF
BROWSE MODE
]. (
Выбор режима
].
10
Page 71

CD / USB / iPod / ANDROID
Прослушивание TuneIn Radio/ TuneIn Radio Pro/ Aupeo
При прослушивании TuneIn Radio, TuneIn Radio Pro или Aupeo подсоедините iPod/iPhone к
входному USB-разъему устройства.
•
Устройство будет выводить звук из этих приложений.
Другие настройки
Нажмите кнопку FNC для перехода в режим [
1
2 Чтобы сделать выбор, поверните ручку регулировки громкости (см.
следующую таблицу), затем нажмите ее.
3 Повторяйте действие 2 до тех пор, пока не будет выбран или активирован
необходимый элемент.
4 Нажмите кнопку и удерживайте ее нажатой для выхода.
Для возврата к предыдущему элементу настройки нажмите кнопку .
ANDROID SETUP
BROWSE MODE
другими программными медиаплеерами с устройства Android (без использования приложения KENWOOD MUSIC PLAY).
Однако вы по-прежнему можете запускать воспроизведение/ставить на паузу и пропускать файл с данного устройства.
: Управление с устройства (с помощью приложения KENWOOD MUSIC PLAY).;
USB
MUSIC DRIVE DRIVE CHANGE
SKIP SEARCH 0.5%/ 1%/ 5%/ 10%
начинается воспроизведение.
Для выбора следующих дисков повторите действия
коэффициента пропуска при поиске по всем файлам.
:Следующий диск (с [
: При прослушивании с iPod, ANDROID или файла KME Light/ KMC выбор
DRIVE 1
FUNCTION
] по [
DRIVE 5
1
– 3.
].
По умолчанию:
HAND MODE
]) выбирается автоматически, и
:Управление
AUX
Подготовка:
Выберите [
1
XX
2 Нажмите несколько раз для выбора AUX.
3 Включите портативный аудиопроигрыватель и начните
Во время прослушивания портативного аудиопроигрывателя,
подключенного к устройству...
1 Нажмите кнопку FNC для перехода в режим [
2 Поверните ручку регулировки громкости для выбора
3 Поверните ручку регулировки громкости для выбора
4 Чтобы сделать выбор, поверните ручку регулировки
5 Нажмите кнопку и удерживайте ее нажатой для
Для возврата к предыдущему элементу настройки нажмите кнопку
ON
] для [
BUILT-IN AUX
]. ( 4)
Начало прослушивания
Подключите портативный аудиопроигрыватель (имеется
в продаже).
Дополнительный входной разъем
Мини-стереоразъем 3,5мм с разъемом в форме
буквы “L” (имеется в продаже)
воспроизведение.
Портативный
аудиопроигрыватель
Настройка имени AUX
элемента [
элемента [
громкости, а затем нажмите ее.
AUX
выхода.
SYSTEM
AUX NAME SET
(по умолчанию)/
.
], а затем нажмите ее.
], a затем нажмите ее.
DVD/ PORTABLE/ GAME/ VIDEO/ TV
FUNCTION
].
РУССКИЙ
11
Page 72

BLUETOOTH®
BLUETOOTH — Подключение
Поддерживаемые профили Bluetooth
–
Hands-Free Profile — профиль громкой связи (HFP)
–
Serial Port Profile — профиль последовательного порта (SPP)
–
Phonebook Access Profile — профиль доступа к телефонной
книге (PBAP)
–
Advanced Audio Distribution Profile — профиль
расширенного распространения звука (A2DP)
–
Audio/Video Remote Control Profile — профиль удаленного
управления звуком и видеоизображением (AVRCP)
Поддерживаемые кодеки Bluetooth
–
Sub Band Codec (SBC)
–
Advanced Audio Coding (AAC)
–
aptX Codec (aptX) (для )
Подключение микрофона
Задняя панель
Микрофон
(входит в комплект
поставки)
Входной разъем
микрофона
Сопряжение устройства Bluetooth
При первом подключении устройства Bluetooth необходимо выполнить сопряжение устройств.
1 Для включения устройства нажмите .
2 На устройстве Bluetooth найдите и выберите название модели этого устройства
(DPX4
DAB/ DPX3**BT).
На дисплее прокручивается сообщение “PAIRING” “PASS XXXXXX” Имя устройства “PRESS”
3 Нажмите ручку регулировки громкости, чтобы запустить сопряжение.
Сообщение “PAIRING OK” отображается при завершении сопряжения, а при установке соединения
•
•
•
•
•
•
**
“VOLUME KNOB”.
• Для некоторых устройств Bluetooth может потребоваться ввод персонального
идентификационного кода (PIN) непосредственно после поиска.
• Обращайтесь также к руководству, прилагаемому в комплекте поставки устройства Bluetooth.
Bluetooth загорается символ “
Всего можно зарегистрировать (выполнить сопряжение) до пяти устройств.
Одновременно может быть подключено только одно устройство Bluetooth.
Данное устройство поддерживает SSP (Secure Simple Pairing).
Некоторые устройства Bluetooth могут автоматически выполнять подключение после сопряжения.
Подключите такое устройство вручную. Подробные сведения см. в руководстве устройства Bluetooth.
После сопряжения устройство Bluetooth останется зарегистрированным в устройстве даже при
сбросе его настроек. Чтобы удалить сопряженное устройство,
При подсоединении устройства iPhone/ iPod touch/ Android к входному USB-разъему автоматически
активируется запрос на сопряжение (через Bluetooth). Нажмите ручку регулировки громкости для
сопряжения после того, как подтвердите имя устройства.
Автоматически запрос на сопряжение активируется только при условии, что:
– Функция Bluetooth подсоединенного устройства включена.
– Для параметра
– На устройстве Android установлено приложение KENWOOD MUSIC PLAY.
[AUTO PAIRING]
”.
установлено значение
[ON]
16, [
. ( 16)
DEVICE DELETE
].
Настройка угла микрофона
*
Для , подсоединяйте к входному разъему
микрофона.
( 25)
При необходимости закрепите с
помощью зажимов шнура (не входят в
комплект поставки).
12
Page 73

BLUETOOTH®
BLUETOOTH — Мобильный телефон
Прием вызова
При поступлении входящего вызова:
–
Все кнопки мигают.
–
Устройство отвечает на вызов автоматически, если для параметра [
время. (
Во время вызова:
–
–
14)
Все кнопки и дисплей подсвечиваются в соответствии с настройками, заданными для параметра [
(
19)
Если во время телефонного разговора выключить устройство, соединение Bluetooth отключается.
Задача На передней панели
Ответ на вызов
Отклонение вызова
Завершение вызова
Настройка громкости телефона
[00]
–
[35]
(По умолчанию:
Переключение между
режимами громкой связи и
частного разговора
*
Неприменимо д ля iPhone. Во время вызова устройство синхронизирует уровень громкости телефона на iPhone с устройством.
Нажмите
Нажмите кнопку
Нажмите кнопку
Во время вызова поверните ручку регулировки громкости.
[15]*
)
•
Эта настройка не влияет на уровень громкости других источников.
Во время вызова нажмите
•
Набор доступных функциональных возможностей зависит от
подключенного устройства Bluetooth.
AUTO ANSWER
или одну их нумерованных кнопок (1–6).
.
6
.
] установлено выбранное
или .
DISPLAY
Улучшение качества голосовой связи
Во время разговора по телефону...
1 Нажмите кнопку FNC для перехода в режим
[
FUNCTION
2 Чтобы сделать выбор, поверните ручку
3 Повторяйте действие 2 до тех пор, пока не
4 Нажмите кнопку и удерживайте ее
Для возврата к предыдущему элементу настройки
нажмите кнопку
MIC GAIN –10
NR LEVEL –5
].
ECHO CANCEL –5
].
регулировки громкости (см. следующую
таблицу), затем нажмите ее.
будет выбран или активирован необходимый
элемент.
нажатой для выхода.
.
По умолчанию:
—
+10(–4
микрофона увеличивается с увеличением числа.
—+5(0):Настраивайте уровень подавления
шума, пока шум не будет минимальным во время
телефонного разговора.
—+5(0):Настраивайте задержку
эхоподавления, пока эхо не будет минимальным
во время телефонного разговора.
):Чувствительность
XX
РУССКИЙ
13
Page 74

BLUETOOTH®
Выполнение настроек для приема
вызовов
1
Нажмите для
включения режима Bluetooth.
2 Чтобы сделать выбор, поверните ручку
регулировки громкости (см. следующую
таблицу), затем нажмите ее.
3 Повторяйте действие 2 до тех пор,
пока не будет выбран или активирован
необходимый элемент.
4 Нажмите кнопку и удерживайте
ее нажатой для выхода.
Для возврата к предыдущему элементу настройки
нажмите кнопку
SETTINGS
AUTO ANSWER
BATT/SIGNAL AUTO
.
По умолчанию:
1
—30:Устройство автоматически
отвечает на входящий вызов через
выбранное время (в секундах).;
OFF
:Отмена.
:Отображение заряда батареи
и силы сигнала при обнаружении
устройством Bluetooth-устройства и
подключении Bluetooth-устройства.;
OFF
:Отмена. Отображение текущего
времени.
XX
Выполнение вызова
Вы можете выполнять вызов из истории вызовов, из телефонной книги или через набор номера. Вызов по
голосовой команде также возможен, если ваш мобильный телефон поддерживает эту функцию.
1 Нажмите для включения режима Bluetooth.
2 Чтобы сделать выбор, поверните ручку регулировки громкости (см. следующую таблицу), затем
нажмите ее.
3 Повторяйте действие 2 до тех пор, пока не будет выбран/активирован желаемый элемент, или
следуйте инструкциям, приведенным для выбранного элемента.
4 Нажмите кнопку и удерживайте ее нажатой для выхода.
Для возврата к предыдущему элементу настройки нажмите кнопку .
CALL HISTORY
1
Нажмите ручку регулировки громкости д ля выбора имени или номера телефона.
• В нижней час ти дисплея отображается сообщение “INCOMING”, “OUTGOING” или “MISSED”, пок азывающее статус
предыдущего вызова.
• Нажмите
NAME).
• При отсу тствии записей в журнале вызовов отображается сообщение “NO DATA”.
2
Нажмите ручку регулировки громкости, чтобы выполнить вызов.
для переключения отображаемой категории (номер телефона NUMBER или имя
14
Page 75

BLUETOOTH®
PHONE BOOK
NUMBER DIAL
VOICE
*
BATT
*
SIGNAL
*
Функционирование зависит от типа используемого телефона.
1
Быс тро поверните ручку регулировки громкости для перехода в режим поиска
(если телефонная книга содержит много контактов).
Отображается первое меню (ABCDEFGHIJK).
• Д ля перехода к другому меню (LMNOPQRSTUV или WXYZ1
регулировки громкости.
• Д ля выбора желаемой первой буквы нажмите
нажмите ручку.
Выберите
2
Поверните ручку регулировки громкости д ля выбора имени, а затем нажмите
3
Поверните ручку регулировки громкости д ля выбора номера телефона, а затем
•
Если телефон поддерживает PBAP, при сопряжении телефонная книга
•
Контакты распределяются по следующим категориям: HOME, OFFICE, MOBILE,
•
Данное устройс тво может отображать только неакцентированные буквы.
(
1
Поверните ручку регулировки громкости и выберите число (от 0 до 9) или символ
2
Нажмите
Повторяйте действия
3
Нажмите ручку регулировки громкости, чтобы выполнить вызов.
Произнесите имя контакта, которому нужно позвонить, или голосовую команду для
управления функциями телефона.
распознавания голоса
LOW/ MID/ FULL
NO SIGNAL/ LOW/ MID/ MAX
сигнала.
“1”
для поиска по номерам и
ручку.
нажмите ее для вызова.
подключенного телефона автоматически передается на устройство.
OTHER, GENERAL
(Акцентированные буквы, такие как
Выполнение вызова из телефонной книги
(
, #, +).
*
S/T
для переноса позиции ввода.
1
и 2 до тех пор, пока не завершите ввод номера телефона.
)
:Отображение заряда аккумулятора.
) поверните ручку
*
S/T
“*”
для поиска по символам.
“Ú”
, будут отображаться как
(
Выполнение вызова с помощью
:Отображение силы текущего принимаемого
)
, а затем
“U”
.)
Выполнение вызова из телефонной книги
Нажмите , чтобы напрямую перейти к телефонной книге.
1
2 Поверните ручку регулировки громкости для выбора имени, а затем
нажмите ручку.
3 Поверните ручку регулировки громкости для выбора номера
телефона, а затем нажмите ее для вызова.
Выполнение вызова с помощью распознавания голоса
Нажмите и удерживайте для активации
1
подсоединенного телефона.
2 Произнесите имя контакта, которому нужно позвонить, или
голосовую команду для управления функциями телефона.
•
Поддерживаемые функции распознавания голоса зависят от телефона.
Подробные сведения см. в руководстве подключенного телефона.
•
Это устройство также поддерживает функцию интеллектуального личного
помощника iPhone.
Удаление контакта
Нажмите для включения режима Bluetooth.
1
2 Поверните ручку регулировки громкости для выбора элемента
[
CALL HISTORY
3 Для выбора контакта поверните ручку регулировки громкости.
4 Нажмите и удерживайте нажатой ручку регулировки громкости,
чтобы перейти в режим удаления.
5 Поверните ручку регулировки громкости для выбора элемента
[
DELETE ONE
DELETE ONE
DELETE ALL
удаляю тся.
6 Поверните ручку регулировки громкости для выбора элемента [
а затем нажмите ее.
7 Нажмите кнопку и удерживайте ее нажатой для выхода.
•
Для возврата к предыдущему элементу настройки нажмите кнопку .
•
Не применимо для мобильных телефонов, поддерживающих PBAP.
], а затем нажмите ее.
] или [
DELETE ALL
: Выбранное в действии 3 имя или номер телефона удаляются.
: Все имена или номера телефонов в
], а затем нажмите ручку.
[CALL HISTORY]
в действии 2
YES
],
РУССКИЙ
15
Page 76

BLUETOOTH®
Настройки в памяти
Сохранение контакта в памяти
Вы можете сохранить до 6 контактов под нумерованными
кнопками (
1 Нажмите для включения
2 Поверните ручку регулировки громкости
3 Поверните ручку регулировки громкости для
Если контакт выбран, нажмите ручку регулировки
4 Нажмите и удерживайте нажатыми
После сохранения контакта отображается сообщение
Чтобы удалить контакт из памяти, в действии
[
1–6
).
режима Bluetooth.
для выбора [
[
NUMBER DIAL
выбора контакта или ввода номера телефона.
громкости для отображения номера телефона.
нумерованные кнопки (
“STORED”.
NUMBER DIAL
CALL HISTORY
], а затем нажмите ручку.
], [
PHONE BOOK
1–6).
] и сохраните пустой номер.
2
выберите
] или
Выполнение вызова из памяти
Нажмите для включения
1
режима Bluetooth.
2 Нажмите и удерживайте нажатыми
нумерованные кнопки (
3 Нажмите ручку регулировки громкости, чтобы
выполнить вызов.
При отсутствии сохраненных в памяти контактов
отображается сообщение “NO MEMORY”.
1–6).
Другие настройки
Нажмите кнопку FNC для перехода в режим [
1
2 Чтобы сделать выбор, поверните ручку регулировки громкости (см. следующую таблицу),
затем нажмите ее.
3 Повторяйте действие 2 до тех пор, пока не будет выбран/активирован желаемый элемент,
или следуйте инструкциям, приведенным для выбранного элемента.
4 Нажмите кнопку и удерживайте ее нажатой для выхода.
Для возврата к предыдущему элементу настройки нажмите кнопку .
FUNCTION
].
По умолчанию:
BT MODE
PHONE SELECT
AUDIO SELECT
DEVICE DELETE
PIN CODE EDIT
(0000)
RECONNECT ON
AUTO PAIRING ON
INITIALIZE YES
Выбор телефона или аудиоустройства для подключения или отключения.
“
” отображается перед именем устройства при установлении соединения.
*
•
Вы сможете подключить другое устройство Bluetooth только после того, как сначала отсоедините подключенное
устройство Bluetooth.
При отсоединении, “
1
Поверните ручку регулировки громкости д ля выбора удаляемого устройства, а затем нажмите ручку.
2
Поверните ручку регулировки громкости д ля выбора [
Изменение PIN-кода (до 6 цифр).
1
Д ля выбора номера поверните ручку регулировки громкости.
2
Нажмите S/T для переноса позиции ввода.
Повторяйте действия
3
Нажмите ручку регулировки громкос ти для подтверждения.
:Устройство автоматически повторно подключается, когда устройство Bluetooth, подключавшееся последним,
находится в зоне действия.;
:Устройство автоматически выполняет сопряжение с поддерживаемым устройством Bluetooth (iPhone/ iPod
touch/ Устройство Android), когда оно подключено к входному разъему USB.В зависимости от операционной
системы подключенного устройства, данная функция может не работать. ;
:Инициализирует все настройки Bluetooth (включая сохраненное сопряжение, телефонную книгу и т. д.).;
NO
:Отмена.
” исчезает.
*
YES
] или [NO], а затем нажмите ручку.
1
и 2 до тех пор, пока не завершите ввод PIN-кода.
OFF
:Отмена.
OFF
:Отмена.
XX
16
Page 77

BLUETOOTH®
Режим тестирования Bluetooth
Можно проверить подключение поддерживаемого
профиля между устройством Bluetooth и данным
устройством.
•
Убедитесь в отсутствии какого-либо сопряженного
устройства Bluetooth.
1 Нажмите и удерживайте нажатой кнопку
Отображается сообщение “PLEASE PAIR YOUR PHONE
PIN 0000”.
2 На устройстве Bluetooth найдите и выберите
название модели этого устройства
(DPX4
**
3 Используйте устройство Bluetooth для
подтверждения сопряжения.
На дисплее мигает надпись “TESTING”.
После теста отображаются результаты подключения
(OK или NG).
PAIRING: Состояние сопряжения
HF CNT: Совместимость с профилем громкой связи
AUD CNT: Совместимость с профилем расширенного
PB DL: Совместимость с профилем доступа к
Чтобы отменить тестовый режим, нажмите и
удерживайте
.
DAB/ DPX3**BT).
(Hands-Free Profile — HFP).
распространения звука (Advanced Audio
Distribution Profile — A2DP).
телефонной книге (Phonebook Access
Profile — PBAP).
для отключения устройства.
BLUETOOTH — Звук
Аудиопроигрыватель через Bluetooth
Нажмите несколько раз для выбора BT AUDIO.
1
2 Для начала воспроизведения включите аудиопроигрыватель Bluetooth.
Задача На передней панели
Воспроизведение / пауза
Выбор группы / папки
Переход назад или вперед
Перемотка назад или вперед
Воспроизведение в режиме
повтора
Воспроизведение в случайном
порядке
Функции и отображаемые элементы могут различаться в зависимости от их наличия на подключенном
устройстве.
Нажмите кнопку
Нажмите кнопку
Нажмите кнопку
Нажмите и удерживайте нажатой кнопку
Нажмите кнопку
ALL REPEAT, FILE REPEAT, REPEAT OFF
Нажмите кнопку
FOLDER RANDOM, RANDOM OFF
Нажмите и удерживайте нажатой кнопку для выбора элемента
ALL RANDOM
.
.
1
/2.
S
/T.
несколько раз.
несколько раз.
S
/T.
РУССКИЙ
17
Page 78

ЗВУКОВЫЕ НАСТРОЙКИ
При прослушивании любого источника звука...
1 Нажмите кнопку AUDIO для перехода в режим [
2 Чтобы сделать выбор, поверните ручку регулировки громкости (см.
следующую таблицу), затем нажмите ее.
3 Повторяйте действие 2 до тех пор, пока не будет выбран или
активирован необходимый элемент.
4 Нажмите кнопку и удерживайте ее нажатой для выхода.
Для возврата к предыдущему элементу настройки нажмите кнопку .
SUB-W LEVEL
BASS LEVEL
MID LEVEL
TRE LEVEL
От
–15
до
От –8 до +8 (+6)
От –8 до +8 (+5)
От –8 до +8 (0)
Настройте уровень выходного сигнала низкочастотного
+15 (0
)
динамика.
Настройте уровень для сохранения в каждом источнике.
(Перед выполнением настройки выберите источник,
который необходимо настроить.)
EQ PRO
BASS ADJUST BASS CTR FRQ
BASS LEVEL
BASS Q FACTOR 1.00/ 1.25/ 1.50/ 2.00
BASS EXTEND ON
MID ADJUST MID CTR FRQ 0.5KHZ/ 1.0KHZ/ 1.5KHZ/ 2.5KHZ
MID LEVEL
60HZ/ 80HZ/ 100HZ/ 200HZ
частоты.
От –8 до +8 (+6):Настройте уровень.
качества.
:Включение усиленных нижних частот.;
центральной частоты.
От –8 до +8 (+5):Настройте уровень.
MID Q FACTOR 0.75/ 1.00/ 1.25
TRE ADJUST TRE CTR FRQ 10.0KHZ/ 12.5KHZ/ 15.0KHZ/ 17.5KHZ
TRE LEVEL
центральной частоты.
От –8 до +8 (0):Настройте уровень.
AUDIO CONTROL
: Выбор центральной
:Настройка коэффициента
:Настройка коэффициента качества.
].
По умолчанию:
OFF
:Отмена.
:Выбор
:Выбор
PRESET EQ DRIVE EQ/ TOP40/ POWERFUL/ ROCK/ POPS/ EASY/ JAZZ/ NATURAL
BASS BOOST LEVEL1/ LEVEL2/ LEVEL3
XX
LOUDNESS LEVEL1/ LEVEL2
SUBWOOFER SET ON
LPF SUBWOOFER THROUGH
SUB-W PHASE REVERSE
FADER
BALANCE
VOLUME OFFSET
SOUND RECNSTR
(реконструкция звука)
•
Элемент [
доступен только в том случае, если для параметра [
значение [
•
Элемент [
случае, если для параметра [
USER
:Выберите предварительно установленный режим эквалайзера,
соответствующего музыкальному жанру. (Выберите [
пользовательских настроек.)
[
DRIVE EQ
] — это запрограммированный эквалайзер, снижающий шум извне
автомобиля или шум шин.
частот.;
OFF
:Отмена.
получения хорошо сбалансированного звучания при низком уровне громкости.;
OFF
:Отмена.
:Включение выходного сигнала низкочастотного динамика.;
:Все сигналы передаются в низкочастотный динамик.;
120HZ/ 160HZ
частотами ниже 85Гц/ 120Гц/ 160Гц.
(180°)/
низкочастотного динамика в соответствии с выходным сигналом динамика в
целях обеспечения оптимальной производительности. (Доступно только в том
случае, если для параметра [
от [
THROUGH
От
R15
до
F15 (0
От
L15
до
R15 (0
Для AUX: От –8 до +8(0) ; Для других источников: От –8 до 0:
Программирование уровня регулировки громкости каждого источника. (Перед
настройкой выберите источник, который необходимо настроить.)
ON
:Cоздание реалистичного звука путем компенсации высокочастотных
компонентов и восстановления времени достижения максимального эффекта
волны, которые были потеряны при аудиокомпрессии данных.;
SUB-W LEVEL
SUBWOOFER
SUB-W LEVEL
]/ [
SUBWOOFER SET
]. ( 4)
]/ [
LPF SUBWOOFER
SUBWOOFER SET
:Выбор предпочитаемого уровня подъема нижних
:Выбор предпочитаемых низких и высоких частот для
:Низкочастотный динамик воспроизводит аудиосигналы с
NORMAL
(0°):Выбор фазы выходного сигнала
LPF SUBWOOFER
].)
):Настройка выходного баланса передних и задних динамиков.
):Настройка выходного баланса левых и правых динамиков.
]/ [
LPF SUBWOOFER
]/ [
SUB-W PHASE
] установлено значение [ON].
] выбрано значение, отличное
SWITCH PREOUT
USER
]/ [
SUB-W PHASE
] доступен только в том
] для использования
OFF
:Отмена.
85HZ
/
OFF
:Отмена.
]
] установлено
/
18
Page 79

НАСТРОЙКИ ДИСПЛЕЯ
1 Нажмите кнопку FNC для перехода в режим [
2 Поверните ручку регулировки громкости для выбора элемента
[
DISPLAY
3 Чтобы сделать выбор, поверните ручку регулировки громкости (см.
4 Повторяйте действие 3 до тех пор, пока не будет выбран/
5 Нажмите кнопку и удерживайте ее нажатой для выхода.
Для возврата к предыдущему элементу настройки нажмите кнопку .
COLOR SELECT VARIABLE SCAN/ CUSTOM R/G/B/
DIMMER ON
BRIGHTNESS 0
TEXT SCROLL AUTO/ ONCE
*
Предустановленные цвета:
], а затем нажмите ее.
следующую таблицу), затем нажмите ее.
активирован желаемый элемент, или следуйте инструкциям,
приведенным для выбранного элемента.
предпочитаемого цвета подсветки кнопок и дисплея.
Вы можете создавать собственные цвета (когда выбрано [
предустановленные цвета*). Созданный цвет можно сохранить в [
1
Нажмите и удерживайте нажатой ручку регулировки громкости для перехода в
режим подробной настройки цвета.
2
Нажмите S/T, чтобы выбрать цвет (R/ G/ B) для настройки.
3
Поверните ручку регулировки громкости д ля настройки уровня (0 — 9), а затем
нажмите ее.
:Снижение яркости подсветки дисплея и подсветки кнопок.;
— 31: Выбор предпочитаемого уровня яркости для подсветки дисплея и подсветки
кнопок.
единовременной прокрутки.;
BLUE1/ BLUE2/ BLUE3/ SKYBLUE1/ SKYBLUE2/ LIGHTBLUE/ AQUA1/ AQUA2/ GREEN1/
GREEN2/ GREEN3/ YELLOWGREEN1/ YELLOWGREEN2/ YELLOW/ ORANGE1/ ORANGE2/
ORANGERED
:Выбор автоматической прокрутки отображаемой информации или
OFF
:Отмена.
RED1/ RED2/ RED3/ PURPLE1/ PURPLE2/ PURPLE3/ PURPLE4/
FUNCTION
].
По умолчанию:
предустановленные цвета*: Выбор
CUSTOM R/G/B
CUSTOM R/G/B
OFF
:Отмена.
] или
ДОПОЛНИТЕЛЬНАЯ ИНФОРМАЦИЯ
Общие характеристики
•
Данное устройс тво обеспечивает воспроизведение только следующих компакт-дисков:
•
Подробные сведения и примечания относительно звуковых файлов, доступных для воспроизведения,
представлены в интерактивном руководстве на следующем веб-сайте: www.kenwood.com/cs/ce/audiofile/
Воспроизводимые файлы
•
Воспроизводимый звуковой файл: MP3 (.mp3), WMA (.wma), AAC (.m4a)
•
Воспроизводимые диски: CD-R/CD-RW/CD-ROM
XX
•
Воспроизводимый формат файлов на дисках: ISO 9660, уровень 1/2, Joliet, длинные имена файлов.
•
Воспроизводимая файловая система устройс тв USB: FAT12, FAT16, FAT32
Даже если аудиофайлы соответствуют перечисленным выше стандартам, при некоторых типах или состояниях
носителей воспроизведение может оказаться невозможным.
].
Диски, которые нельзя воспроизвести на данном устройстве
•
Диски некруглой формы.
•
Диски, записанная поверхность которых окрашена, или диски со следами загрязнений.
•
Записываемые диски, которые не были финализированы.
•
Компак т-диск диаметром 8см. Попытка вставки диска с помощью адаптера может привести к
неисправности устройства.
Об устройствах USB
•
Данное устройс тво может воспроизводить файлы MP3/ WMA/ AAC/ WAV, сохраненные на запоминающем
устройстве USB большой емкости.
•
Запрещается подключать USB-носитель через USB-концентратор.
•
Подключение к абеля, общая длина которого превышает 5 м, может привести к некорректному
воспроизведению.
•
Это устройс тво не распознает устройства USB с номинальным напряжением, отличным от 5В, и
номинальным током свыше 1А.
О приложениях KENWOOD Music Editor Light и KENWOOD Music Control
•
Данным устройс твом поддерживается приложение KENWOOD Music Editor Light для ПК и приложение
KENWOOD Music Control для Android™.
•
Если с помощью KENWOOD Music Editor Light или KENWOOD Music Control в аудиофайл были добавлены
данные о композиции, этот аудиофайл можно найти по жанру, исполнителю, альбому, списку
воспроизведения и композиции.
•
Приложения KENWOOD Music Editor Light и KENWOOD Music Control доступны для загрузки на следующем
веб-сайте: www.kenwood.com/cs/ce/
РУССКИЙ
19
Page 80

ДОПОЛНИТЕЛЬНАЯ ИНФОРМАЦИЯ
Об iPod/iPhone
Made for
-
iPod touch (2nd, 3rd, 4th и 5th generation)
-
iPod classic
-
iPod nano (3rd, 4th, 5th, 6th и 7th generation)
-
iPhone 3G, 3GS, 4, 4S, 5, 5S, 5C
•
Сведения о пос леднем списке совместимости и версиях программного обеспечения iPhone/iPod см. по
адресу: www.kenwood.com/cs/ce/ipod
•
Управление iPod невозможно, если на нем отображается текст “KENWOOD” или “ ”.
Об устройствах Android
•
Данное устройс тво поддерживает Android OS 4.1 и выше.
•
Некоторые устройства Android (с OS 4.1 и выше) могут не поддерживать полностью Android Open Accessory
(AOA) 2.0.
•
Если ус тройство Android одновременно поддерживает запоминающие устройства большой емкости и AOA
2.0, данное устройство всегда воспроизводит через AOA 2.0 в качестве приоритета .
•
Более подробную информацию о последнем списке совмес тимости см. на: www.kenwood.com/cs/ce/
О функции Bluetooth
•
В зависимос ти от версии Bluetooth некоторые устройства Bluetooth не могут быть подключены к этому
устройству.
•
Устройство может не работать с некоторыми устройствами Bluetooth.
•
Окружающая среда оказывает влияние на сос тояние сигнала.
•
Дополнительные сведения о Bluetooth см. на следующем веб-сайте: ww w.kenwood.com/cs/ce/
УСТРАНЕНИЕ ПРОБЛЕМ
Симптомы Способы устранения
Звук не слышен.
Отображается надпись
“MISWIRING CHECK WIRING THEN
PWR ON”.
Отображается надпись
Общие характеристики
“PROTECTING SEND SERVICE”.
Приемник не работает.
Слабый прием DAB.
“DAB ANT ERR” Проверьте DAB-антенну. Если используется пассивная антенна
Цифровое радио
“RELATED SERV FOUND”
•
Слабый радиоприем.
•
Статические помехи при
радио
прослушивании радио.
Аналоговое
Невозможно извлечь диск.
Слышен шум. Пропустите дорожку или смените диск.
Дорожки не воспроизводятся
намеченным образом.
CD / USB / iPod
Продолжает мигать текст
“READING”.
Время от начала воспроизведения
неправильное.
•
Установите оптимальный уровень громкости.
•
Проверьте кабели и соединения.
Выключите питание, затем выполните проверку, чтобы
убедиться, что контакты проводов динамиков должным
образом изолированы. Снова включите питание.
Отправьте устройство в ближайший сервисный центр.
Выполните сброс устройства. (
Убедитесь в том, что для параметра [
выбрано значение [
(без усилителя), установите для параметра
[
DAB ANT POWER
•
Нажмите ручку регулировки громкости, чтобы активировать
функцию Soft-Link. (
•
Нажмите , чтобы отменить.
•
Плотно вставьте антенну.
•
Полнос тью выдвиньте антенну.
Нажмите и удерживайте кнопку
извлечения диска. Осторожно, не уроните диск во время
извлечения. Если проблема не устранена, перезапустите
устройство. (
Порядок воспроизведения определяется при записи файлов.
Не используйте многоуровневую иерархическую структуру и
много папок.
Причиной является способ записи дорожек.
3)
ON
]. ( 4)
] значение [
6)
3)
DAB ANT POWER
OFF
]. ( 4)
M
для принудительного
]
20
Page 81

УСТРАНЕНИЕ ПРОБЛЕМ
Симптомы Способы устранения
Не отображаются
правильные символы (т.е.
название альбома).
“NA FILE”
“NO DISC” Вставьте в загрузочный отсек диск, который можно воспроизвести.
“TOC ERROR” Убедитесь, что на диске отсутствует грязь и он вставлен правильно.
“PLEASE EJECT” Выполните сброс устройства. Если проблема не устранена, обратитесь в
“READ ERROR” Повторите копирование файлов и папок на устройство USB.
CD / USB / iPod
“NO DEVICE” Подсоедините устройство USB, и снова смените источник на устройство
“COPY PRO” Воспроизводится защищенный от копирования файл.
“NA DEVICE” Подключите поддерживаемое устройство USB и проверьте
“NO MUSIC” Подключите устройство USB, содержащее доступные д ля
“iPod ERROR”
•
Во время
воспроизведения не
слышен звук.
•
Звук выводится только с
устройства Android.
ANDROID
Данное устройство может отображать только буквы верхнего регистра,
цифры и ограниченное число символов. Буквы кириллицы верхнего
регистра могут также отображаться, если выбрано [
Убедитесь, что диск содержит поддерживаемые аудиофайлы. (
ближайший центр обслуживания.
Если проблема не устранена, перезапустите устройство USB или
воспользуйтесь другим устройством USB.
USB.
подключение.
воспроизведения аудиофайлы.
•
Повторно выполните подключение iPod.
•
Перезапустите iPod.
•
Повторно выполните подключение устройства Android.
•
Если работает режим [
программный медиаплеер на устройстве Android и начните
воспроизведение.
•
Если работает режим [
программный медиаплеер или используйте другой программный
медиаплеер.
•
Перезапустите устройство Android.
•
Если это не решит проблему, подключенное устройство Android
неспособно передавать аудиосигнал на данное устройство. (
HAND MODE
HAND MODE
РУССКИЙ
], запустите любой
], перезапустите текущий
]. ( 4)
19)
20)
Симптомы Способы устранения
Не удается воспроизвести в
режиме [
BROWSE MODE
Продолжает мигать текст “NO
DEVICE” или “READING”.
ANDROID
Прерывистое воспроизведение
или пропускается звук.
“ANDROID ERROR” / “NADEVICE”
Устройства Bluetooth не
обнаружены.
Не удается выполнить
сопряжение Bluetooth.
Во время телефонного
Bluetooth®
разговора слышится эхо
или шум.
Плохое качество звука
телефона.
•
Убедитесь в том, что приложение KENWOOD MUSIC PLAY APP
].
установлено на устройство Android. (
•
Повторно выполните подключение устройства Android и задайте
соответствующие настройки в [
•
Если это не решит проблему, подключенное устройство Android
не поддерживает [
•
Отк лючите на устройстве Android опции для разработчика.
•
Повторно выполните подключение устройства Android.
•
Если это не решит проблему, подключенное устройство Android
не поддерживает [
Выключите режим энергосбережения на устройстве Android.
•
Повторно выполните подключение устройства Android.
•
Перезапустите устройство Android.
•
Выполните поиск с устройства Bluetooth еще раз.
•
Выполните сброс устройс тва. ( 3)
•
Удостоверьтесь, что введен одинаковый PIN-код на устройстве и
устройстве Bluetooth.
•
Удалите информацию о сопряжении с устройства и устройства
Bluetooth, а затем выполните сопряжение еще раз. (
•
Отрегулируйте положение микрофона. ( 12)
•
Проверьте настройку [
•
Уменьшите расстояние между устройством и устройс твом
Bluetooth.
•
Перемес тите автомобиль в место с более сильным уровнем
сигнала сотовой сети.
BROWSE MODE
BROWSE MODE
ECHO CANCEL
10)
ANDROID SETUP
]. ( 20)
]. ( 20)
]. ( 13)
]. ( 11)
12)
РУССКИЙ
21
Page 82

УСТРАНЕНИЕ ПРОБЛЕМ ТЕХНИЧЕСКИЕ ХАРАКТЕРИСТИКИ
Симптомы Способы ус транения
Ошибка голосового вызова.
Во время воспроизведения
с помощью
аудиопроигрывателя
Bluetooth происходит
прерывание звука.
Не удается осуществить
управление
подключенным
аудиопроигрывателем
Bluetooth.
“DEVICE FULL” Число зарегистрированных устройств уже достигло предела. Повторите
Bluetooth®
“N/A VOICE TAG” Необходимо произносить команды зарегистрированным голосом.
“NOT SUPPORT” Подк люченный телефон не поддерживает функцию распознавания
“NO ENTRY” /
“NO PAIR”
“ERROR” Попытайтесь выполнить операцию еще раз. Если снова отображается
“NO INFO” Устройство Bluetooth не может получить информацию о контактах.
“HF ERROR XX” /
“BT ERROR”
•
Используйте метод голосового вызова в более бесшумных условиях.
•
Будьте ближе к микрофону, когда произносите имя.
•
Необходимо произносить команды зарегистрированным голосом.
•
Уменьшите расстояние между устройством и аудиопроигрывателем
Bluetooth.
•
Вык лючите и включите приемник, затем подключите устройство.
•
Другие устройства Bluetooth могу т пытаться подключиться к
устройству.
•
Проверьте, поддерживает ли подключенный аудиопроигрыватель
Bluetooth профиль Audio/Video Remote Control Profile (AVRCP —
профиль удаленного управления звуком и видеоизображением).
(См. инструкции к аудиопроигрывателю.)
•
Отк лючите и подключите проигрыватель Bluetooth еще раз.
попытку после удаления неиспользуемого устройства. (
DEVICE DELETE
голоса.
Нет зарегистрированных устройств, подключенных/обнаруженных
через Bluetooth.
сообщение “ERROR”, проверьте, поддерживает ли устройство
запрашиваемую функцию.
Выполните сброс приемника и повторите операцию. Если проблема не
устранена, обратитесь в ближайший центр обслуживания.
)
16,
DAB Диапазон частот L-Диапазон 1452,960МГц — 1490,624МГц
)
Чувствительность –100дБм
Отношение сигнал/шум 80 дБ
Тип разъема антенны SMB
Цифровое радио
Выходное напряжение антенны 14,4В (11В —16В)
(для
Максимальный ток антенны <100мА
FM Диапазон частот 87,5МГц — 108,0МГц (с интервалом 50кГц)
Полезная чувствительность
(отношение сигнал/шум = 26дБ)
Пороговая чувствительность
(ДИН отношение сигнал/шум = 46дБ)
Частотная характеристика (±3 дБ) 30Гц — 15кГц
Отношение сигнал/шум (MONO) 64 дБ
Разделение стереоканалов (1 кГц) 40 дБ
MW Диапазон час тот 531кГц — 1611 кГц (с интервалом 9кГц)
Аналоговое радио
Полезная чувствительность
(отношение сигнал/шум = 20дБ)
LW Диапазон частот 153кГц — 279кГц (с интервалом 9кГц)
Полезная чувствительность
(отношение сигнал/шум = 20дБ)
Лазерный диод GaAIAs
Цифровой фильтр (D/A) 8-кратная дискретизация
Скорость вращения дисковода 500 об/мин — 200 об/мин (CLV)
Коэффициент детонации Ниже измерительных возможностей
Частотная характеристика (±1 дБ) 20Гц — 20кГц
Проигрыватель
компакт-дисков
Суммарное нелинейное искажение (1 кГц) 0,01%
Диапазон III 174,928МГц — 239,200МГц
0,71 мкВ/75 Ом
2,0 мкВ/75 Ом
28,2 мкВ
50 мкВ
22
Page 83

ТЕХНИЧЕСКИЕ ХАРАКТЕРИСТИКИ
Отношение сигнал/шум (1 кГц) 105 дБ
Динамический диапазон 90 дБ
Разделение каналов 85 дБ
MP3-декодирование В соответствии с аудиоуровнем-3 стандарта MPEG-1/2
WMA-декодирование Совместимо с Windows Media Audio
AAC-декодирование Файлы AAC-LC “.m4a”
Проигрыватель компакт-дисков
USB-стандарт USB1.1, USB2.0 (Полноскоростной)
Система файлов FAT12/16/32
Максимальный ток источника питания 5 В пост. тока
MP3-декодирование В соответствии с аудиоуровнем-3 стандарта MPEG-1/2
USB
WMA-декодирование Совместимо с Windows Media Audio
AAC-декодирование Файлы AAC-LC “.m4a”
WAV-декодирование Линейная импульсно-кодовая модуляция
Версия Bluetooth версии 2.1+EDR / Bluetooth 3.0
Диапазон частот 2,402ГГц — 2,480ГГц
Выходная мощность Класс мощнос ти 2: +4 дБм (МАКС.), 0 дБм (СРЕД.)
Максимальный диапазон связи Луч обзора приблизительно 10 м (32,8 ft)
Профиль HFP (Hands-Free Profile — профиль громкой связи)
Bluetooth
SPP (Serial Port Profile — профиль последовательного
порта)
PBAP (Phonebook Access Profile — профиль доступа к
телефонной книге)
A2DP (Advanced Audio Distribution Profile — профиль
расширенного распространения звука)
AVRCP (Audio/Video Remote Control Profile — профиль
удаленного управления звуком и видеоизображением)
1A
Mаксимальная выходная мощность 50Bт×4
Полный диапазон частот 22Bт× 4 (менее чем 1% THD)
Полное сопротивление катушки
громкоговорителя
Тоновоспроизведение Hизкие частоты 200Гц ±8 дБ
Звук
Уровень/нагрузка предусилителя (CD) 2500 мВ/10 кОм
Полное сопротивление выхода
предусилителя
Частотная характеристика (±3 дБ) 20Гц — 20кГц
Максимальное напряжение на входе 1000мВ
Полное сопротивление на входе 30 кОм
Вспом. оборуд.
Рабочее напряжение 14,4В (допустимо от 10,5 —16В)
Максимальное текущее потребление 10A
Диапазон рабочих температур 0°C—+40°C
Установочные размеры (Ш × B × Г) 182мм×111мм×158мм
Вес 1,6кг
Общие характеристики
Данные могут быть изменены без уведомления.
4Ом—8Ом
Средние частоты 2,5кГц ±8 дБ
Bысокие частоты 12,5кГц ±8 дБ
≤600Ом
РУССКИЙ
23
Page 84

Предупреждение
•
Устройство можно использовать только с источником питания 12 В постоянного тока
с отрицательным заземлением.
•
Отк лючите отрицательную клемму аккумулятора перед подключением проводов и
монтажом.
•
Не подключайте провод аккумулятора (жёлтый) и провод высокого напряжения
(красный) к корпусу машины или проводу заземления (чёрный), чтобы не допустить
короткое замыкание.
•
Изолируйте свободные провода виниловой лентой, чтобы не допустить короткое
замыкание.
•
Пос ле установки обязательно заземлите данное устройство на корпус автомобиля.
Внимание
•
В целях безопаснос ти работа по подключению проводов и монтажу должна
выполняться специалистами. Обратитесь к поставщику автомобильных аудиосистем.
•
Данное устройс тво подлежит установке в консоль автомобиля. Не прикасайтесь к
металлическим деталям устройства в процессе и на протяжении некоторого времени
после завершения эксплуатации устройства. Температура металлических деталей,
таких как радиатор охлаждения и кожух, существенно повышается.
•
Не подключайте провода динамиков [ к корпусу машины, проводу заземления
(чёрный) или параллельно.
•
Установите устройство под углом менее 30º.
•
Если в элек тропроводке транспортного средства нет клеммы зажигания,
подключите провод высокого напряжения (красный) к клемме на блоке плавких
предохранителей, которая обеспечивает питание с напряжением 12 В постоянного
тока и которая включается и выключается ключом зажигания.
•
Держите все кабели вдали от тепловыделяющих металлических частей.
УСТАНОВКА И ПОДКЛЮЧЕНИЕ
•
Пос ле установки устройства, убедитесь в том, что все осветительные и электронные
приборы вашего автомобиля работают в прежнем режиме.
•
Если предохранитель сгорел, первым делом убедитесь в том, что кабели не касаются
корпуса автомобиля, после чего замените предохранитель на аналогичный новый.
Стандартная процедура
1
Извлеките ключ из замка зажигания, затем
отсоедините разъем
2 (Для )
Установите DAB-антенну.
См. раздел “Установка DAB-антенны”. (
3 Правильно подключите провода.
См. раздел “Подключение проводов”. (
4 Установите устройство в вашем автомобиле.
См. раздел “Установка устройства (установка в приборную
панель)”.
5
Подключите клемму [ автомобильного аккумулятора.
6 Выполните сброс устройства. (
[
автомобильного аккумулятора.
27)
25, 26
)
3
)
24
Установка устройства (установка в приборную панель)
Подключите необходимые провода. (
Приборная панель автомобиля
При установке без посадочного
корпуса
1
Снимите посадочный корпус с
устройства.
2 Совместите отверстия в
устройстве (с обеих сторон)
с монтажной консолью
автомобиля и закрепите
устройство винтами (которые
можно приобрести в магазине).
Используйте только специальные винты.
Использование неподходящих винтов может привести к
повреждению устройства.
25, 26
)
Отогните соответствующие фиксаторы,
предназначенные для прочной установки
посадочного корпуса.
Порядок извлечения устройства
1
Вставьте соединительный штифт на
ключах для демонтажа в отверстия
на обеих сторонах декоративной
панели, затем извлеките его.
2 Введите ключи для демонтажа в
прорези на каждой стороне, затем
следуйте инструкциям со стрелками,
как показано ниже.
Page 85

Подключение проводов
(для
Подключение разъемов ISO на некоторых
автомобилях VW/Audi или Opel (Vauxhall)
Возможно, потребуется изменить схему соединений для
прилагаемого жгута проводов, как показано на рисунке.
A7 (Красный)
Автомобиль
A4 (Жёлтый)
Контакт
A4 Жёлтый : Аккумулятор
A5 Синий/белый : Управление питанием
A7 Kрасный : Зажигание (АCC)
A8 Чёрный : Заземляющее соединение (земля)
B1
B2
B3
B4
B5
B6
B7
B8
)
Схема соединений по умолчанию
Фиолетовый
]
Фиолетовый/чёрный
Cерый
]
Серый/чёрный
Белый
Белый/чёрный
Зелёный
Зелёный/чёрный
[
]
[
]
[
Выходные разъемы
передних/ задних динамиков/
низкочастотного динамика
Разъем для антенны
Гнездо DAB-антенны ( 27)
Kабель зажигания
(Kрасный)
Устройство
Kабель батареи
(Жёлтый)
Цвет и функция
: Задний динамик (справа)
[
: Передний динамик (справа)
: Передний динамик (слева)
: Задний динамик (слева)
Жёлтый (Kабель батареи)
Kрасный (Kабель зажигания)
Kрасный (A7)
Жёлтый (A4)
Разъемы ISO
MIC (входной разъем микрофона) (
При подсоединении внешнего усилителя
Предохранитель (10 A)
Если соединение не выполняется, не вытаскивайте кабель из наконечника.
Лампа синяя/жёлтая
(Провод дистанционного
управления с руля)
Синий/белый
(Провод управления питанием /
провод управления антенной)
Коричневый
(Провод управления
отключением звука)
подсоедините его провод заземления к корпусу
автомобиля, чтобы предотвратить повреждение
устройства.
STEERING WHEEL
REMOTE INPUT
REMOTE CONT
ANT CONT
P. CONT
MUTE
К адаптеру дистанционного
управления с руля
К гнезду управления питанием, если Вы
используете дополнительный усилитель
мощности, или к гнезду управления
антенной в автомобиле
Для подключения навигационной системы
Kenwood ознакомьтесь с прилагаемым к ней
руководством пользователя
12)
РУССКИЙ
25
Page 86

Подключение проводов
(для
Выходные разъемы передних/ задних
динамиков/ низкочастотного динамика
Подключение разъемов ISO на некоторых
автомобилях VW/Audi или Opel (Vauxhall)
Возможно, потребуется изменить схему соединений для
прилагаемого жгута проводов, как показано на рисунке.
A7 (Красный)
Автомобиль
A4 (Жёлтый)
Контакт
A4 Жёлтый : Аккумулятор
A5 Синий/белый : Управление питанием
A7 Kрасный : Зажигание (АCC)
A8 Чёрный : Заземляющее
B1
B2
B3
B4
B5
B6
B7
B8
)
Разъем для антенны
Схема соединений по умолчанию
Цвет и функция
[
[
[
соединение (земля)
: Задний динамик
(справа)
[
: Передний динамик
(справа)
: Передний динамик
(слева)
: Задний динамик
(слева)
Фиолетовый
]
Фиолетовый/чёрный
Cерый
]
Серый/чёрный
Белый
]
Белый/чёрный
Зелёный
]
Зелёный/чёрный
Kабель зажигания
(Kрасный)
Kабель батареи
(Жёлтый)
2626
Устройство
Жёлтый (Kабель батареи)
Kрасный (Kабель зажигания)
Kрасный (A7)
Жёлтый (A4)
Разъемы ISO
При подсоединении внешнего усилителя
подсоедините его провод заземления к корпусу
автомобиля, чтобы предотвратить повреждение
устройства.
Предохранитель (10 A)
Входной разъем микрофона ( 12)
Если соединение не выполняется, не вытаскивайте кабель из
Лампа синяя/жёлтая
(Провод
дистанционного
управления с руля)
Синий/белый
(Провод управления
питанием/провод
управления антенной)
Коричневый
(Провод управления
отключением звука)
наконечника.
STEERING WHEEL
REMOTE INPUT
REMOTE CONT
ANT CONT
P. CONT
MUTE
К адаптеру дистанционного
управления с руля
К гнезду управления
питанием, если Вы используете
дополнительный усилитель
мощности, или к гнезду
управления антенной в
автомобиле
Для подключения
навигационной системы
Kenwood ознакомьтесь
с прилагаемым к ней
руководством пользователя
Список деталей
для установки
(A)
Посадочный корпус
(B)
Декоративная панель
(C)
Жгут проводов
(D)
Ключ для демонтажа
Page 87

УСТАНОВКА И ПОДКЛЮЧЕНИЕ
Установка DAB-антенны (входит в комплект
поставки)
Внимание
•
Пленочная антенна
внутри автомобиля.
•
Не устанавливайте в следующих мес тах:
– там, где она может закрывать водителю обзор;
– там, где она может препятствовать функционированию устройств
безопасности, таких как подушка безопасности;
– на подвижных стеклянных поверхностях, например на заднем люке;
– по бокам автомобиля (напр., на двери, передней поворотной форточке);
– на заднем окне.
•
Сила сигнала будет слабее, если антенна установлена в с ледующих местах:
– на стекле, отражающем ИК-свет, или в местах, покрытых стеклянной
пленкой зеркального типа;
– там, где она будет перекрывать действие встроенной антенны (шаблон);
– там, где она будет перекрывать провода обогрева окна;
– на стекле, не пропускающем радиосигналы (напр., стекло, отражающее
ИК-свет, теплоизоляционное стекло).
•
Плохой прием может наблюдаться:
– вследствие помех, когда включен стеклоочиститель ветрового стекла,
кондиционер воздуха или мотор;
– в зависимости от направления на вещательную станцию относительно
автомобиля (антенны).
•
Тщательно вытрите масло и грязь с поверхности, на которую будет наклеиваться
антенна, с помощью прилагаемого в комплекте поставки очистителя
•
Будьте осторожны, чтобы не согнуть или не повредить пленочную антенну
•
Установка антенны на определенных автомобилях может оказаться
невозможной.
•
Перед тем как приклеивать, проверьте проводку кабелей пленочной антенны
(E)
и блока усилителя
•
Не применяйте никаких очистителей для с текол после приклеивания пленочной
антенны
(E)
(E)
предназначена исключительно для использования
(F)
.
.
(H)
.
(E)
Определение позиции установки антенны
•
Направление пленочной антенны
стороны.
•
Обязательно проверьте место установки пленочной антенны
•
Удаляйте от других антенн, по крайней мере, на 100мм.
•
Не прик леивайте блок усилителя
сцепление с поверхностью там будет недостаточным.
Установка антенны с левой стороны
(E)
меняется в зависимости от того, установлена ли пленочная антенна
(F)
на керамическую полоску (черный участок) по периметру переднего стекла. Поскольку
Керамическая полоска (черный участок)
150 mm
30 mm
Пластина заземления*
*
Прилепите плас тину заземления блока усилителя
.
Список деталей для установки
(E)
(F)
(F)
(E)
перед установкой. Пленочная антенна не может переклеиваться.
Установка антенны с правой стороны
150 mm
(F)
30 mm
(E)
на металлическую часть передней стойки.
(G)
(E)
с правой или с левой
Пластина заземления*
Фиксатор кабеля
(E)
Пленочная антенна
(F)
Блок усилителя
(кабель с усилителем, 3,5 м)
(H)
Очиститель
РУССКИЙ
27
Page 88

УСТАНОВКА И ПОДКЛЮЧЕНИЕ
Внимание
При установке кабеля антенны внутри передней
стойки с установленной подушкой безопасности
•
Кожух передней с тойки крепится специальным зажимом, который
может потребоваться заменить при демонтаже.
За подробной информацией о демонтаже кожуха передней стойки и
доступности сменных частей обращайтесь к вашему автомобильному
дилеру.
Зажим
Передняя стойка
•
Устанавливайте блок усилителя
таким образом, чтобы он не мешал функционированию подушки
безопасности.
(F)
сверху подушки безопасности
(F)
Общий вид установки
В целях безопасности антенну следует устанавливать со стороны
пассажира.
(E)
(F)
Установка антенны
1
Снимите кожух передней стойки
автомобиля.
Передняя стойка
2 Очистите ветровое стекло с помощью
прилагаемого в комплекте поставки
очистителя
– Перед тем как продолжить, подождите, пока
поверхность стекла не высохнет.
– В холодную погоду (в зимнее время)
согрейте поверхность ветрового стекла
стеклообогревателем.
3 Снимите разделитель (ярлык 1)
пленочной антенны
направлении и наклейте антенну на
ветровое стекло.
(H).
(H)
(E) в горизонтальном
Разделитель (ярлык 1)
28
Подушка
безопасности
Не прикасайтесь к клейкой поверхности (липкой
стороне) пленочной антенны
(E)
(E)
.
Page 89

УСТАНОВКА И ПОДКЛЮЧЕНИЕ
4 Осторожно притрите пленочную антенну
к ветровому стеклу в направлении,
указанном стрелками, чтобы она плотно
приклеилась.
(E)
5 Снимите разделитель (ярлык 2) пленочной
антенны
(E) в вертикальном направлении.
Разделитель (ярлык 2)
(E)
6 Установите позицию выступа блока
усилителя
антенне
Не прикасайтесь к контакту провода или клейкой
поверхности (липкой стороне) блока усилителя
(F)
• При установке антенны с правой стороны
(E)
Контакт провода
пленочной антенны
• При установке антенны с левой стороны
Пластина
заземления
(F) по метке K на пленочной
(E) и приклейте.
.
(F)
Пластина заземления
(E)
Контакт провода блока усилителя
(металлическая часть)
(F)
Установите положение
выступа по метке
(E)
K
7 Снимите пленочную оболочку с пластины
заземления и приклейте пластину
заземления к металлической части
автомобиля.
Обеспечьте достаточный зазор для пластины
заземления, чтобы она не касалась внутренних
частей (кожуха передней стойки). Также следите
за тем, чтобы внутренние части не касались блока
усилителя
(F)
.
Ветровое стекло
Пластина заземления
(F)
Кожух передней стойки
8 Проложите кабели антенны.
С помощью фиксатора кабеля
антенну к стойке в нескольких местах.
9 Прикрепите кожух передней стойки снова
в его изначальной позиции.
Следите за тем, чтобы при установке кожуха не
повредить пластину заземления и блок усилителя
(F)
.
10 Подсоедините блок усилителя (F) к
входному разъему DAB в задней части
устройства.
11 Установите [
DAB ANT POWER
(G)
прикрепите
] на [ON]. (
4)
РУССКИЙ
29
Page 90

ЗМІСТ ПЕРЕД ВИКОРИСТАННЯМ
ПЕРЕД ВИКОРИСТАННЯМ 2
ОСНОВИ 3
ПОЧАТОК РОБОТИ 3
ЦИФРОВЕ РАДІО (DAB)
(для )
5
АНАЛОГОВЕ РАДІО 7
CD / USB / iPod / ANDROID 9
AUX 11
BLUETOOTH® 12
НАСТРОЙКИ ЗВУКУ 18
НАСТРОЙКИ ЭКРАНУ 19
ДОДАТКОВІ ВІДОМОСТІ 19
НЕСПРАВНОСТІ 20
ХАРАКТЕРИСТИКИ 22
ВСТАНОВЛЕННЯ / З’ЄДНАННЯ
24
Попередження
Не використовуйте жодної функції, що може відвернути вашу увагу від безпечного управління автомобілем.
Застереження
Встановлення гучності:
•
Рівень гучності має бути таким, щоб можна було чути звуки ззовні автомобіля для уникнення небезпечних ситуацій.
•
Щоб запобігти пошкодженню гучномовців при раптовому збільшенні рівня вихідного сигналу, уменшіть гучність перед
початком відтворення цифрових джерел.
Загальні несправності:
•
Не використовуйте зовнішній пристрій, якщо він може заважати безпечному водінню.
•
Зробіть резервну копію всіх важливих даних. Ми не несемо жодної відповідальності за будь-які втрати записаних
даних.
•
Для уникнення короткого замикання не кладіть і не залишайте всередині приладу жодних металевих предметів
(наприклад, монети чи металеві інструменти).
•
Якщо виникає помилка диску через конденсат на лінзі лазеру, витягніть диск та зачекайте випаровування вологи.
Ознайомлення з цим
посібником
•
Для пояснення операцій в основному
використовуються кнопки на передній
панелі
•
У даному посібнику для пояснення
відображень використовується
англійська мова.
• [XX
] вказує вибрані елементи.
•
( XX) вказує, що на заявленій сторінці
наявні посилання.
.
2
Обслуговування
Чищення приладу: Забруднення з передньої панелі видаляють сухим силіконом або м’якою тканиною.
Правила поводження з дисками:
•
Не торкайтеся робочої сторони диска.
•
Не наклеюйте на диски етикетки і т.п., а також не використовуйте диски з наклейками.
•
Не використовуйте з дисками жодних допоміжних засобів.
•
Чистити диски слід у відцентровому напрямі.
•
Для чищення дисків використовуйте сухий силікон або м’яку тканину. Не використовуйте розчинників.
•
Виймаючи диск з програвача, тримайте його горизонтально, не перекошуючи.
•
Якщо на зовнішньому краю диску або у центральному отворі є обідок, його необхідно зняти перед тим, як вставляти
диск.
Page 91

ОСНОВИ
Передня панель
Завантажувальний отвір Вікно дисплея
Регулятор гучності
(повернути/натиснути)
До На передній панелі
Вмикання живлення
Регулювання гучності Натисніть регулятор гучності.
Вибір джерела
Зміна інформації, що
відображається на
дисплеї
Натисніть
•
Натисніть та утримуйте цю кнопку, щоб вимкнути живлення.
Натисніть регулятор гучності під час відтворення, щоб зменшити
гучність.
•
Натисніть ще раз, щоб скасувати попередню дію.
Натисніть
Натисніть
•
Натисніть та утримуйте, щоб прокрутити інформацію, що
відображається на екрані.
Кнопка скидання
•
.
декілька разів.
(Для )
Будуть також стерті зроблені вами
настройки.
декілька разів.
ПОЧАТОК РОБОТИ
1
Вибір мови та завершення демонстрації
При включенні живлення (або після скасування параметрів настройки)
на дисплеї відображається повідомлення: “SELLANGUAGE”
“VOLUMEKNOB”
1 Поворотом регулятора гучності виберіть [
або [
RUS
За замовчуванням встановлений варіант [
На екрані з’явиться наступне: “CANCEL DEMO”
2 Натисніть регулятор гучності.
За замовчуванням встановлений варіант [
3 Натисніть регулятор гучності ще раз.
На дисплеї з’являється “DEMOOFF”.
1
2 Поворотом регулятора гучності виберіть [
3 Поворотом регулятора гучності виберіть [
] (російська), а потім натисніть регулятор.
“VOLUME KNOB”.
2
Встановіть час на годиннику
Натисніть FNC, щоб перейти в режим очікування
[
FUNCTION
].
натисніть регулятор.
натисніть регулятор.
ENG
YES
].
].
“PRESS”
ENG
] (англійська)
“PRESS”
CLOCK
] і
CLOCK ADJUST
] і
УКРАЇНА
3
Page 92

ПОЧАТОК РОБОТИ
4 Поворотом регулятора гучності зробіть необхідні
налаштування, а потім натисніть регулятор.
День Година Хвилина
5 Поворотом регулятора гучності виберіть [
натисніть регулятор.
6 Поворотом регулятора гучності виберіть [
і натисніть регулятор.
7 Для виходу натисніть та утримуйте .
Щоб повернутись до попереднього налаштування, натисніть .
3
Початкові налаштування
Натискайте повторно , щоб перейти в режим
1
STANDBY.
2 Натисніть FNC, щоб перейти в режим очікування
[
FUNCTION
3 Поверніть регулятор гучності, щоб зробити вибір (див.
4 Повторіть крок 3, щоб обрати або активувати бажаний
5 Для виходу натисніть та утримуйте .
Щоб повернутись до попереднього налаштування, натисніть .
].
• При натисканні
[
AUDIO CONTROL
наступну таблицю), а потім натисніть регулятор.
пункт.
AUDIO
здійснюється безпосередній вхід у
].
Настройка за замовчуванням:
AUDIO CONTROL
SWITCH
PREOUT
SP SELECT OFF/ 5/4/ 6 × 9/6/ OEM
REAR/ SUBWOOFER
стінці автомагнітоли (через зовнішній підсилювач) підключені задні
динаміки або сабвуфер.
(5 дюймів або 4 дюймів, 6×9 дюймів або 6 дюймів) або динаміків
OEM для оптимальної роботи.
: Вибір, чи до вихідних з’єднувачів на задній
: Вибір відповідно до розміру динаміка
DISPLAY
EASY MENU
ON
:Після натискання кнопки [
та кнопки зміниться на білий колір.;
дисплею та кнопки стає обраного кольору за допомогою функції
[
COLOR SELECT
FUNCTION
]. ( 19)
4
CLOCK FORMAT
12H
] освітлення дисплею
OFF
:Підсвічування
] або [
24H
TUNER SETTING
*
ON
DAB L-BAND
] і
DAB ANT
POWER
],
PRESET TYPE NORMAL
*
:Приймає ансамбль L-BAND під час прийому передач цифрового аудіомовлення.;
ON
:Подача живлення на DAB-антену. Виберіть при використанні доданої антени.;
подається. Виберіть при використанні пасивної антени без підсилювача. (
з діапазонів (FM1/ FM2/ FM3/ MW/ LW/ DB1/ DB2/ DB3).;
для кожної кнопки фіксованої настройки незалежно від обраного діапазону.
SYSTEM
ON
KEY BEEP
:Включення звукового сигналу при натисненні клавіш.;
SOURCE SELECT
ON
:Включення AUX при виборі джерела.;
Застосовується лише, коли вимкнено режим демонстрації.
Встановлює проміжок часу, через який автомагнітола в режимі очікування (STANDBY), автоматично
вимкнеться, щоб не витрачати енергію акумулятора.
20M
WAIT TIME – – –
:Активується функція автоматичного розпізнання типу запису на компакт-диску: аудіофайли або
музичний компакт-диск.;
програванні диску із аудіофайлом немає звуку.
P-OFF WAIT
CD READ 1
F/W UPDATE
XX
BUILT-IN AUX
UPDATE SYSTEM / UPDATE BT/ UPDATE DAB1
F/W UP xx.xx/
F/W UP xxxxx/
F/W UP Vxxx
YES
Детальнішу інформацію щодо оновлення ПЗ див.: www.kenwood.com/cs/ce/
CLOCK
ON
CLOCK DISPLAY
ENGLISH
РУССКИЙ
*
Для .
:Навіть при відключеному живленні на дисплеї будуть відображатися покази годинника.;
OFF
Вибрана мова використовується як екранна мова для меню [
(ім’я папки, ім’я файла, назва пісні, ім’я виконавця та назви альбому).
OFF
OFF
27)
:В пам’ять вноситься одна радіостанція для кожної кнопки фіксованої настройки у кожному
: 20 хвилин;
40M
: 40 хвилин ;
:Відміняє
:Оновлює вбудоване ПЗ.; NO:Скасування (оновлення не активоване).
:Відміняє.
60M
2
:Примусово вмикається режим відтворення музичного компакт-диска. При
*
/ UPDATE DAB2
MIX
OFF
:Виключення. ( 11)
: 60хвилин;
*
:В пам’ять вноситься одна радіостанція
OFF
:Виключення.
FUNCTION
] та назв доступних ярликів
:Відміняє.
:Живлення не
Page 93

ЦИФРОВЕ РАДІО (DAB)
(для )
Про DAB (Digital Audio Broadcasting —
цифрове аудіомовлення)
DAB — це одна із доступних на даний час систем цифрового
радіо. Вона здатна передавати звук цифрової якості без
жодних надокучливих перешкод або спотворень сигналу.
Окрім цього, вона передає текст, зображення та дані.
На противагу FM-радіо, де кожна програма передається на
окремій частоті, DAB поєднує декілька програм (називаються
“сервісами”) в один “ансамбль”.
“Первинний компонент” (головна радіостанція) інколи
супроводжується “вторинним компонентом”, що може містити
додаткові програми або іншу інформацію.
Підготовка:
1 Під’єднайте DAB-антену до гнізда DAB-антени.
( 27)
2 Натисніть для вибору DAB.
3 Натисніть та утримуйте ,
щоб розпочати оновлення списку сервісів.
Відображається “LIST UPDATE” та розпочинається
оновлення. Відображається “UPDATED”, коли оновлення
завершене.
Оновлення триває до 3 хвилин. Під час оновлення
не допускається жодне переривання (наприклад,
інформацією про стан на дорозі).
•
Щоб скасувати оновлення списку сервісів: Натисніть та
утримуйте
знову.
Пошук ансамблю
Натискайте повторно , щоб вибрати DAB.
1
2 Натисніть кілька разів, щоб вибрати DB1/ DB2/ DB3.
3 Натисніть і утримуйте S/T для пошуку ансамблю.
4 Натисніть S/T, щоб вибрати ансамбль, сервіс або компонент для
прослуховування.
•
Для того, щоб змінити спосіб пошуку S/T: Натискайте і утримуйте повторно.
AUTO1 : Натисніть S/T: Вибір ансамблю, сервісу або компонента.
Натисніть і утримуйте кнопку S/T: Автоматичний пошук ансамблю.
AUTO2 : Натисніть S/T: Пошук запрограмованої станції.
MANUAL : Натисніть S/T: Вибір ансамблю, сервісу або компонента.
Натисніть і утримуйте кнопку S/T: Ручний пошук ансамблю.
•
Щоб зберегти сервіс: Натисніть і утримуйте одну з цифрових кнопок (від 1до6).
•
Щоб вибрати збережений сервіс: Натисніть одну з цифрових кнопок (від 1до6).
Вибір сервісу
Натисніть та утримуйте , щоб перейти в режим пошуку сервісу.
1
2 Поворотом регулятора гучності виберіть сервіс, а потім натисніть регулятор.
Щоб скасувати режим пошуку сервісу, натисніть .
УКРАЇНА
5
Page 94

ЦИФРОВЕ РАДІО (DAB)
Вибір сервісу за іменем
Натисніть та утримуйте , щоб перейти в режим
1
пошуку сервісу.
2 Щоб увійти в режим пошуку за алфавітом, швидко
поверніть регулятор гучності.
3 Щоб вибрати символ для пошуку, поверніть
регулятор гучності або натисніть
• Для пошуку за символами, відмінними від A-Z та 0-9,
введіть лише “
• Натисніть та утримуйте / для швидкої зміни
символів.
4 Щоб активувати режим пошуку, натисніть регулятор
гучності.
5 Поворотом регулятора гучності виберіть сервіс, а
потім натисніть регулятор.
Щоб скасувати режим пошуку за алфавітом, натисніть .
”.
*
Інші налаштування
Натисніть FNC, щоб перейти в режим очікування
1
[
FUNCTION
2 Поверніть регулятор гучності, щоб зробити
3 Повторіть крок 2, щоб обрати або активувати
4 Для виходу натисніть та утримуйте .
Щоб повернутись до попереднього налаштування, натисніть
].
вибір (див. наступну таблицю), а потім натисніть
регулятор.
бажаний пункт.
.
S
/
T.
Настройка за замовчуванням:
TUNER SETTING
AF SET
TI ON
PTY SEARCH
ASW SELECT TRAVEL, WARNINGS, NEWS, WEATHER, EVENT, SPECIAL, RAD INFO, SPORTS, FINANCE
LIST UPDATE AUTO
PTY WATCH
RELATED
SERV
ON
:
Під час прослуховування DAB: Автоматичне перемикання на FM-радіомовлення цієї ж програми, якщо DABсигнал слабшає. Як тільки сигнал стане знову сильним, відбудеться перемикання назад на DAB-мовлення.
Під час прослуховування FM: Автоматичне перемикання на DAB-джерело з мовленням тієї ж програми (якщо
доступно).;
OFF
:Відміняє.
:При доступності дозволяє тимчасово перемикнути пристрій на відтворення інформації про рух транспорту
(спалахує “TI”).;
Натисніть регулятор гучності, щоб перейти до вибору мови PTY. Поверніть регулятор гучності, щоб обрати мову
PTY (
Вибір доступного типу програми (див. нижче), потім натисніть
Поворотом регулятора гучності зробіть вибір, а потім натисніть регулятор.
Перед назвою активованого типу повідомлення з’являється позначка “
Автоматичне перемикання з будь-якого джерела на ансамблі цифрового радіо, що передають активований тип
повідомлення.
•
Можна активувати декілька повідомлень одночасно.
•
Щоб вимкнути, натисніть регулятор гучності ще раз (“*” зникає).
сервісів DAB за допомогою натискання та утримування
Автоматичне перемикання з будь-якого джерела на ансамблі цифрового радіо, що передають вибраний тип
програми.
NEWS, AFFAIRS, INFO, SPORT, EDUCATE, DRAMA, CULTURE, SCIENCE, VARIED
POPM
OTHERM
LEISURE, JAZZ, COUNTRY, NATIONM
OFF
ON
аудіопрограми.;
OFF
:Відміняє.
ENGLISH/ FRENCH/ GERMAN
:Автоматичне оновлення списку сервісів DAB при увімкненні живлення.;
(музика),
ROCKM
(музика),
WEATHER, FINANCE, CHILDREN, SOCIAL, RELIGION, PHONE IN, TRAVEL
:Відміняє.
:Активація функції Soft-Link для перемикання на альтернативний сервіс, що відрізняється від поточної
OFF
:Вимкнення.
), потім натисніть регулятор для підтвердження.
AUDIO
(музика),
EASYM
(музика),
LIGHTM
(музика),
OLDIES, FOLKM
S
/T, щоб розпочати роботу.
”.
*
MANUAL
.
(музика),
CLASSICS
(музика),
:Оновлення списку
,
,
DOCUMENT
XX
:
,
6
Page 95

ЦИФРОВЕ РАДІО (DAB)
CLOCK
TIME SYNC
•
Доступні для вибору типи програм:
SPEECH : NEWS, AFFAIRS, INFO
MUSIC
Автомагнітола буде шукати тип програми, який підпадає під категорію [
або [
MUSIC
•
Якщо гучність була налаштована під час прийому інформації про дорожню
ситуацію, повідомлень, попереджень або новин, вона зберігається автоматично.
Цей рівень гучності буде встановлений при наступній активації прийому
інформації про ситуацію на дорозі, повідомлень, попереджень або новин.
ON
:Синхронізація часу пристрою з сигналом часу станції цифрового радіо.;
OFF
:Відміняє.
SCIENCE, VARIED, WEATHER, FINANCE, CHILDREN, SOCIAL, RELIGION
PHONE IN, TRAVEL, LEISURE, DOCUMENT
:
POP M
(музика),
CLASSICS, OTHER M
FOLK M
(музика)
], якщо вона обрана.
(інформація),
ROCK M
(музика),
SPORT, EDUCATE, DRAMA, CULTURE
(музика),
EASY M
JAZZ, COUNTRY, NATION M
(музика),
LIGHT M
(музика),
(музика),
,
OLDIES
SPEECH
АНАЛОГОВЕ РАДІО
,
,
]
Пошук станції
Натискайте повторно , щоб вибрати TUNER.
1
2 Натисніть кілька разів, щоб вибрати FM1/ FM2/ FM3/ MW/ LW.
3 Для пошуку радіостанції натисніть кнопку S/T.
•
Для того, щоб змінити спосіб пошуку S/T: Натискайте і утримуйте
AUTO1 : Автоматичний пошук радіостанції.
AUTO2 : Пошук запрограмованої станції.
MANUAL : Пошук радіостанції вручну.
•
Збереження станції: Натисніть і утримуйте одну з цифрових кнопок (від 1до6).
•
Вибір збереженої станції: Натисніть одну з цифрових кнопок (від 1до6).
Інші налаштування
Натисніть FNC, щоб перейти в режим очікування [
1
2 Поверніть регулятор гучності, щоб зробити вибір (див. наступну
таблицю), а потім натисніть регулятор.
3 Повторіть крок 2, щоб обрати або активувати бажаний пункт.
4 Для виходу натисніть та утримуйте .
Щоб повернутись до попереднього налаштування, натисніть .
повторно.
FUNCTION
].
УКРАЇНА
7
Page 96

АНАЛОГОВЕ РАДІО
TUNER SETTING
LOCAL SEEK
AUTO
MEMORY
MONO SET ON
NEWS SET ON
REGIONAL ON
AF SET ON
*
TI
PTY SEARCH
ON
: Виконується пошук станцій тільки з хорошим сигналом. ;
YES
:Автоматичний запис у пам’ять 6 станцій з якісним рівнем сигналу.; NO:Відміняє.
•
Цей пункт дос тупний для вибору тільки, якщо у початкових настройках для функції
запису у пам’ять фіксованих настроювань на радіостанції [
обраний варіант [
:Покращує якість відтворювання сигналу радіостанції FM, але стереоефект при цьому
може зникнути.;
:Пристрій тимчасово буде переключено на режим News Programme (Програми
новин), якщо такі є. ;
: Встановлюється режим перемикання на іншу станцію тільки у заданому регіоні з
використанням функції “AF”.;
: Встановлюється режим автоматичного пошуку іншої радіостанції, яка транслює
таку саму програму у тій самій мережі Radio Data System, але з кращою якістю сигналу, у
випадку незадовільної якості сигналу радіостанції, який приймається.;
ON
: При доступності дозволяє тимчасово перемикнути пристрій на відтворення
інформації про рух транспорту (спалахує “TI”).;
*
: [TI] у режимі MW/LW служить для увімкнення переривання
інформацією про стан на дорозі тільки на DAB-джерелі.
Натисніть регулятор гучності, щоб перейти до вибору мови PTY. Поверніть регулятор
гучності, щоб обрати мову PTY (
регулятор для підтвердження.
Вибір доступного типу програми (див. нижче), потім натисніть
розпочати роботу.
NORMAL
]. ( 4)
OFF
:Відміняє.
OFF
:Відміняє.
OFF
ENGLISH/ FRENCH/ GERMAN
Настройка за замовчуванням:
:Відміняє.
OFF
:Відміняє.
OFF
: Відміняє.
PRESET TYPE
OFF
), потім натисніть
S/T
] був
:Відміняє.
, щоб
• [LOCAL SEEK
XX
•
Доступні для вибору типи програм:
SPEECH
MUSIC: POP M
Автомагнітола буде шукати тип програми, який підпадає під категорію [
або [
•
Якщо гучність була налаштована під час прийняття інформації про дорожню
ситуацію, попереджень або новин, вона зберігається автоматично. Цей рівень
гучності буде встановлений при наступній активації прийому інформації про
ситуацію на дорозі, попереджень або новин.
]/ [
MONO SET
)/ [
PTY SEARCH
:
NEWS
,
AFFAIRS
SCIENCE
,
VARIED
PHONE IN
,
(музика),
CLASSICS
,
FOLK M
(музика)
MUSIC
], якщо вона обрана.
]/ [
NEWS SET
]/ [
REGIONAL
]/ [
SPORT
,
CHILDREN
EASY M
,
COUNTRY
AF SET
,
EDUCATE
(музика),
,
NATION M
] доступний тільки в діапазонах FM1/ FM2/ FM3.
,
INFO
(інформація),
,
WEATHER
,
,
LEISURE
(музика),
FINANCE
,
DOCUMENT
(музика),
JAZZ
TRAVEL
OTHER M
ROCK M
]/ [TI] (для
,
,
SOCIAL
LIGHT M
DRAMA
,
,
RELIGION
(музика),
(музика),
CULTURE
,
OLDIES
SPEECH
,
,
]
8
Page 97

CD / USB / iPod / ANDROID
Розпочніть відтворення
Джерело вмикається автоматично та починається відтворення
запису.
Сторона, на якій нанесено етикеткуM Висування диску
Вхід для підключення USB-пристроїв
USB
CA-U1EX (макс.: 500 мА)
(не входить до основної комплектації)
iPod/iPhone
KCA-iP102 / KCA-iP103
(не входить до основного комплекту)
або кабель, що входить до комплекту
2
*
iPod/iPhone
3
ANDROID
Кабель Micro USB 2.0
(наявний у продажу)
1
*
KCA-iP102 : 30-контактний тип, KCA-iP103 : Тип Lightning
2
*
Не залишайте кабель всередині автомобіля, коли він не використовується.
*
2
*
1
*
До На передній панелі
Відтворення / пауза
Швидкий перехід
вперед або назад
Вибір доріжки/файлу
Вибір папки
Відтворення у
режимі повтору
4
*
5
*
6
*
Натисніть
Натисніть і утримуйте кнопку S/T.
Натисніть
Натисніть / .
Натисніть декілька разів.
TRACK REPEAT/ REPEAT OFF
FILE REPEAT/ FOLDER REPEAT/ REPEAT OFF
S
.
/T.
FILE REPEAT/ REPEAT OFF
Відтворення у
випадковому
6
*
порядку
Натисніть декілька разів.
DISC RANDOM/ RANDOM OFF
FOLDER RANDOM/ RANDOM OFF
Натисніть та утримуйте
: Аудіо компакт-диск
: Файл KME Light/ KMC
: Аудіо компакт-диск
: Файл MP3/ WMA/ AAC/ WAV,
iPod або ANDROID
: Файл MP3/ WMA/ AAC/ WAV, файл KME
Light/ KMC, iPod або ANDROID
8
, щоб обрати
ALL RANDOM
*
.
УКРАЇНА
7
*
9
Page 98

CD / USB / iPod / ANDROID
До На передній панелі
Виберіть режим
керування
Вибір накопичувача
з музикою
(
11, [
MUSIC DRIVE]
3
*
При підключенні Android-пристрою відображається повідомлення “Press [VIEW] to install
KENWOOD MUSIC PLAY APP”. Виконайте інструкції для встановлення програми. Перед підключенням
Android-пристрою ви можете також встановити на нього найостаннішу версію програми
KENWOOD MUSIC PLAY. (
4
*
Для ANDROID: Застосовується лише, коли обрано [
5
*
Для CD: Лише для файлів MP3/ WMA/ AAC. Ці функції не працюють на iPod/ ANDROID.
6
*
Для iPod/ ANDROID: Застосовується лише, коли обрано [
7
*
KME Light : KENWOOD Music Editor Light, KMC : KENWOOD Music Control ( 19)
8
*
Для CD: Лише для файлів MP3/ WMA/ AAC.
9
*
Ви зможете програвати/ставити на паузу записи, пропускати файли, перемотувати файли вперед/назад з
пристрою.
Коли вибране джерело iPod, повторно натискайте
.
MODE ON
: Керування з iPod
MODE OFF
: Керування з пристрою
Коли вибране джерело ANDROID,
[
ANDROID SETUP
Натисніть
Розпочинається відтворення пісень, збережених на
)
наступних носіях.
•
Вибрана внутрішня або зовнішня пам’ять смартфона
(класу Mass Storage).
•
Вибраний накопичувач пристрою з декількома
накопичувачами.
20)
]
)
декілька разів.
BROWSE MODE
MODE OFF
9
*
( 11,
]. (
11, [ANDROID SETUP
]/ [
BROWSE MODE
].
Вибір файла з папки/списку
Натисніть .
1
2 Поворотом регулятора гучності виберіть папку/список, а тоді
натисніть регулятор.
3 Поворотом регулятора гучності виберіть файл, а тоді натисніть
регулятор.
Швидкий пошук
При наявності великої кількості файлів можна здійснювати їх швидкий
пошук.
Для USB (для файлів KME Light/ KMC):
Натисніть
S
під час пошуку. (
Натисніть і утримуйте
• Не застосовується для CD та файлів MP3/ WMA/ AAC/ WAV.
Для iPod:
Можна здійснювати пошук файлів за першою літерою.
])
Натисніть S/T, щоб перемістити положення запису.
Щоб активувати режим пошуку, натисніть регулятор гучності.
•
Щоб повернутися до кореневої папки/ першого файла/ головного меню,
натисніть кнопку
•
Щоб повернутись до попереднього налаштування, натисніть .
•
Щоб скасувати, натисніть і утримуйте .
•
Для iPod — застосовується тільки тоді, коли вибрано [
режим керування
•
Для ANDROID — застосовується тільки тоді, коли вибрано [
(
11, [
/T для пошуку з запрограмованим коефіцієнтом пропуску
11, [
SKIP SEARCH
S
Для переходу до пошуку за літерою швидко поверніть регулятор
гучності.
Повертайте регулятор гучності для вибору літери.
• Для пошуку за символами, відмінними від A-Z та 0-9, введіть лише “ * ”.
• Натисніть та утримуйте / для швидкої зміни символів.
• Передбачено введення не більше 3 символів.
.
)
ANDROID SETUP
])
])
/T для пошуку з коефіцієнтом 10%.
MODE OFF
]. (
Виберіть
BROWSE MODE
].
10
Page 99

CD / USB / iPod / ANDROID
Прослуховування TuneIn Radio/ TuneIn Radio Pro/ Aupeo
Прослуховуючи TuneIn Radio, TuneIn Radio Pro або Aupeo, підключіть iPod/iPhone до вхідного
USB-роз’єму даного пристрою.
•
Пристрій розпочне відтворення звуку з цих програм.
Інші налаштування
Натисніть FNC, щоб перейти в режим очікування [
1
2 Поверніть регулятор гучності, щоб зробити вибір (див. наступну таблицю), а
потім натисніть регулятор.
3 Повторіть крок 2, щоб обрати або активувати бажаний пункт.
4 Для виходу натисніть та утримуйте .
Щоб повернутись до попереднього налаштування, натисніть .
ANDROID SETUP
BROWSE MODE
іншими програмами-медіаплеєрами із Android-пристрою (не використовуючи програму KENWOOD MUSIC PLAY). Однак ви й
надалі можете запускати відтворення/ставити на паузу та пропускати файл на пристрої.
: Керування з пристрою (за допомогою програми KENWOOD MUSIC PLAY).;
USB
MUSIC DRIVE DRIVE CHANGE
SKIP SEARCH 0.5%/ 1%/ 5%/ 10%
після чого розпочинається відтворення.
Для вибору наступного накопичувача повторіть кроки
коефіцієнт пропуску під час пошуку для всіх файлів.
:Наступний накопичувач (від [
: Під час прослуховування iPod, ANDROID файла KME Light/ KMC вибирає
FUNCTION
].
Настройка за замовчуванням:
HAND MODE
DRIVE 1
] до [
DRIVE 5
]) вибирається автоматично
1
та 3.
:Керування
AUX
Підготовка:
Оберіть [
ON
] для [
BUILT-IN AUX
Початок прослуховування
Підключення портативного аудіопрогравача (наявний у
1
продажу).
Додаткове вхідне гніздо
Мініатюрний стереофонічний штекер 3,5мм
XX
(з Г-подібним з’єднувачем) (наявний у продажу)
2 Натискайте повторно , щоб вибрати AUX.
3 Увімкніть портативний аудіопрогравач та почніть
відтворення.
Встановіть ім’я AUX
Під час прослуховування аудіо плеєру, який підключено до пристрою...
1 Натисніть FNC, щоб перейти в режим очікування
[
FUNCTION
2 Поворотом регулятора гучності виберіть [
3 Поворотом регулятора гучності виберіть [
4 Поворотом регулятора гучності зробіть вибір, а потім
5 Для виходу натисніть та утримуйте .
Щоб повернутись до попереднього налаштування, натисніть .
].
натисніть регулятор.
натисніть регулятор.
натисніть регулятор.
AUX
(за замовчуванням)/
]. ( 4)
Портативний
аудіопрогравач
SYSTEM
AUX NAME SET
DVD/ PORTABLE/ GAME/ VIDEO/ TV
] і
] і
УКРАЇНА
11
Page 100

BLUETOOTH®
BLUETOOTH — Підключення
Bluetooth-профілі, що підтримуються
–
Hands-Free Profile (HFP) - робота лише з гарнітурою
–
Serial Port Profile (SPP) - робота у режимі послідовного порту
–
Phonebook Access Profile (PBAP) - профіль доступу до телефонної книги
–
Advanced Audio Distribution Profile (A2DP) - розширені функції
відтворення звуку
–
Audio/Video Remote Control Profile (AVRCP) - дистанційне керування
аудіовідеопристроями
Кодеки Bluetooth, що підтримуються
–
Sub Band Codec (SBC)
–
Advanced Audio Coding (AAC)
–
aptX Codec (aptX) (для )
Підключіть мікрофон
Задня панель
Мікрофон
(постачається в
комплекті)
Вхідний роз’єм
для мікрофона
Регулювання кута
нахилу мікрофона
*
Для , під’єднайте до вхідного роз’єму мікрофона.
12
У разі необхідності зафіксуйте мікрофон
за допомогою скоб (не входить до
комплекту поставки).
( 25)
Сполучення Bluetooth-пристрою
При першому підключенні Bluetooth-пристрою до головного блоку відбувається з’єднання
між головним блоком та пристроєм.
1 Натисніть , щоб увімкнути головний блок.
2 Знайдіть та виберіть назву моделі цього блоку (DPX4
Bluetooth-пристрої.
На екрані з’являється наступне: “PAIRING” “PASS XXXXXX ” Назва пристрою “PRESS”
“VOLUME KNOB”.
• Для деяких Bluetooth-пристроїв можна ввести PIN-код (особистий код доступу) відразу
після пошуку.
• Див. також посібник, що входить у комплект вашого Bluetooth-пристрою.
3 Щоб розпочати сполучення, натисніть регулятор гучності.
Після виконання сполучення з’являється напис “PAIRING OK”, а напис “ ” почне миготіти
після встановлення Bluetooth-з’єднання.
•
Всього може бути зареєстровано (сполучено) не більше п’яти таких пристроїв.
•
Одночасно можна підключити тільки один Bluetooth-пристрій.
•
Цей пристрій підтримує Secure Simple Pairing (SSP) (Безпечне просте сполучання).
•
Деякі Bluetooth-пристрої можуть автоматично підключатися до головного блоку після
сполучення. Тоді необхідно підключити пристрій до головного блоку вручну. Більш
докладку інформацію можна отримати в керівництві з використання до Bluetoothпристрою.
•
Після виконання сполучення, Bluetooth-пристрій залишиться зареєстрованим у головному
блоці навіть після його перезавантаження. Щодо видалення спареного пристрою,
[
DEVICE DELETE
•
При підключенні пристрою iPhone/ iPod touch/ Android до вхідного USB-роз’єму
автоматично активується запит спарювання (через Bluetooth). Після підтвердження назви
пристрою натисніть регулятор гучності, щоб виконати спарювання.
Автоматичний запит спарювання активується тільки якщо:
– Функція Bluetooth підключеного пристрою увімкнена.
– [
AUTO PAIRING
– Програма KENWOOD MUSIC PLAY встановлена на пристрої Android.
].
] встановлено на [ON]. ( 16)
DAB/ DPX3**BT) на
**
16,
 Loading...