

Page 1

DPX405BT
DPX305U
DUAL DIN SIZED CD RECEIVER
Quick Start Guide
RECEPTEUR CD FORMAT DUAL DIN
Guide de démarrage rapide
DUALER DIN-GENORMTER CD-RECEIVER
Kurzanleitung
CD-ONTVANGER VAN DUBBEL DIN-FORMAAT
Snelstartgids
B59-2160-00/00 (EW)© 2012 JVC KENWOOD Corporation
Page 2

Contents About the Quick Start Guide
About the Quick Start Guide.............................................. 2
Before use ................................................................................. 3
Preparations/ Basic Operations ......................................... 4
Playing Music (CD/USB/iPod) .............................................5
Listening to the Radio .......................................................... 6
Hands-free phoning .............................................................. 7
Installation accessories......................................................... 8
Installation Procedure .......................................................... 8
Before Installation .................................................................. 8
Connecting Wires to Terminals..........................................9
Installing the trim plate/Installation .............................12
Removing the Unit...............................................................12
Installing the Microphone unit ......................................13
Appendix ................................................................................15
This Quick Start Guide describes basic functions of
this unit.
For functions not described in this Guide, refer to the
Instruction Manual stored in the enclosed CD-ROM.
To refer to the Instruction Manual, a browser such
as Internet Explorer® 7 or later, Firefox® 3.6 or later,
TM
20 or later, Safari® 5.1 or later, iOS Safari® 4.0
Chrome
or later, or Android
TM
2.2 or later is required.
The Instruction Manual is subject to change for
modification of specifications, etc. The latest
Instruction Manual can be downloaded from the
following website:
manual.jvckenwood.com/edition/im369/
The illustrations of the display and panel appearing in this
manual are examples used to explain more clearly how the
controls are used. Therefore, what appears on the display in the
illustrations may differ from what appears on the display on the
actual equipment, and some of the images on the display may
be inapplicable.
2 | Quick Start Guide
¤ CAUTION
• Keep battery out of reach of children and in
original package until ready to use. Dispose of
used batteries promptly. If swallowed, contact a
physician immediately.
• The battery pack or batteries shall not be exposed
to excessive heat such as sunshine, fire or the like.
• Do not set the remote control in hot places such
as on the dashboard.
• The Lithium battery is in danger of explosion if
replaced incorrectly. Replace it only with the same
or equivalent type.
Page 3

Before use
2 WARNING
To prevent injury or fire, take the following
precautions:
• Stop the car before operating the unit.
• To prevent a short circuit, never put or leave any
metallic objects (such as coins or metal tools) inside
the unit.
¤
CAUTION
• Adjust the volume so that you can hear sounds
outside the car. Driving with the volume too high
may cause an accident.
• Wipe off the dirt on the panel with a dry silicon or
soft cloth.
Failure to observe this precaution may result in
damage to the monitor or unit.”
Condensation
When the car is air-conditioned, moisture may collect
on the laser lens. This may cause disc read errors. In
this case, remove the disc and wait for the moisture to
evaporate.
Notes
• If you experience problems during installation,
consult your Kenwood dealer.
• When you purchase optional accessories, check with
your Kenwood dealer to make sure that they work
with your model and in your area.
• Characters that conform to ISO 8859-5 or ISO 8859-1
can be displayed. Refer to “RUSSIAN SET” of <11-6.
Initial settings>(Instruction Manual).
• The Radio Data System feature won’t work where the
service is not supported by any broadcasting station.
About discs used with this unit
• This unit can only play the CDs with .
• The following discs cannot be used:
- Discs that are not round
- Discs with coloring on the recording surface or
discs that are dirty
- Recordable/Rewritable disc that has not been
finalized (For the finalization process, refer to
your disc writing software, and your disc recorder
instruction manual.)
- 8 cm (3 inch) disc (Attempt to insert using an
adapter can cause malfunction.)
Handling discs
• Do not touch the recording surface of the disc.
• Do not stick tape etc. on the disc, or use a disc with
tape stuck on it.
• Do not use any accessories for the disc.
• Do not use any solvents to clean discs. Use a dry
silicon or soft cloth.
• Clean from the center of the disc and move outward.
• When removing discs from this unit, pull them out
horizontally.
• Remove the rims from the center hole and disc edge
before inserting a disc.
How to reset your unit
If the unit fails to operate properly, press the Reset
button. The unit returns to factory settings.
Reset button
English | 3
Page 4

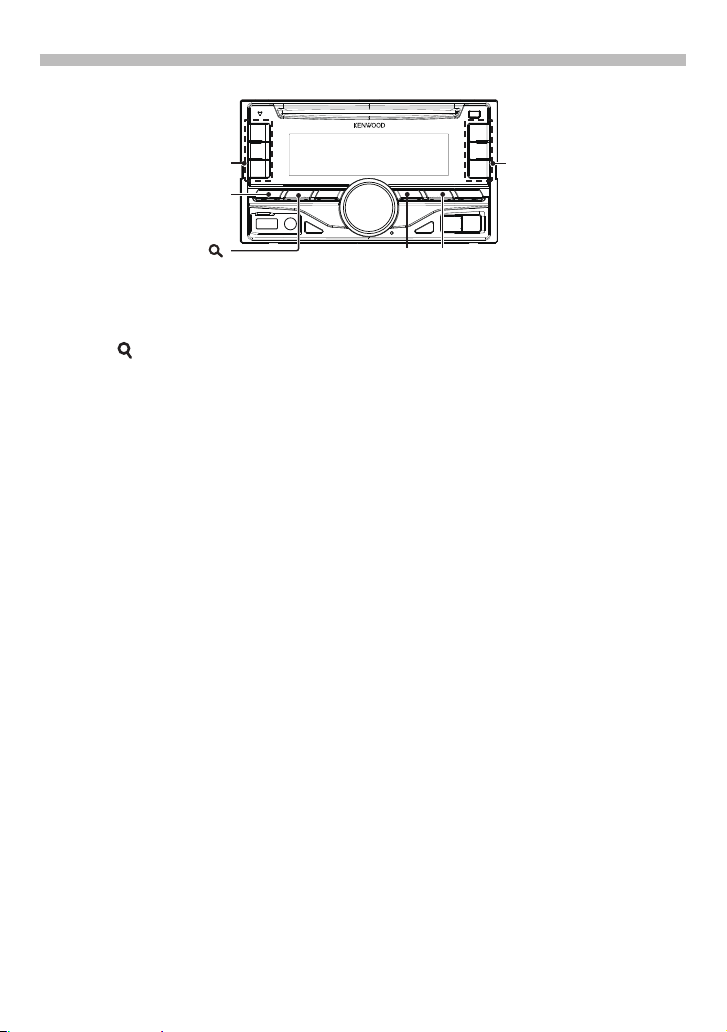
Preparations/ Basic Operations
[Control knob] (Volume knob)
Auxiliary input
[SRC]
USB terminal
[DISP]
Canceling the Demonstration Mode
Cancel the demonstration mode when you use it for
the first time after installation.
Press the [Control knob] to cancel the
Demonstration mode when the message “CANCEL
DEMO PRESS VOLUME KNOB” appears (approx. 15
seconds).
Turn the [Control knob] to select “YES”, and then
press the [Control knob] knob.
The demonstration mode can also be canceled in
the Function setting mode.
Refer to <11-3. Demonstration mode setting> of
Instruction manual.
Adjusting the Clock
Press and hold the [Control knob].
Turn the [Control knob] to adjust the hour, and
then press the [Control knob].
Turn the [Control knob] to adjust the minute, and
then press the [Control knob].
Power
Press the [SRC] button to turn on the power.
Press and hold the [SRC] button to turn off the
power.
Volume
Turn the [Control knob] to adjust the sound
volume.
Attenuator
Press the [Control knob].
Turning the volume down quickly.
DPX305U
[iPod]
Source selection
Press the [SRC] button repeatedly to select a
sources.
Source Display
Standby “STANDBY”
Tuner “TUNER”
[1]
USB or iPod
aha (Function of DPX405BT)
Bluetooth audio (Function of DPX405BT) “BT AUDIO”
[1]
CD
Auxiliary Input “AU X”
[1]
This source can be selected only when it can be
played.
DPX305U
Press the [iPod] button to switch the source to
iPod.
[1]
USB terminal
A USB device or iPod can be connected.
The CA-U1EX (optional accessories) or KCA-iP102
(optional accessories) is recommended to connect
a USB device or iPod.
Auxiliary input
Portable audio device can be connected with the
stereo mini-plug (3.5 mm ø).
Display selection
Each time you press the [DISP] button, another
display mode will be selected.
Refer to <10-4. Text Display Selection> of
Instruction manual
Display scroll
Press and hold the [DISP] button to scroll the CD or
Audio file text display.
“USB” or “iPod”
“AHA”
“CD”
4 | Quick Start Guide
Page 5

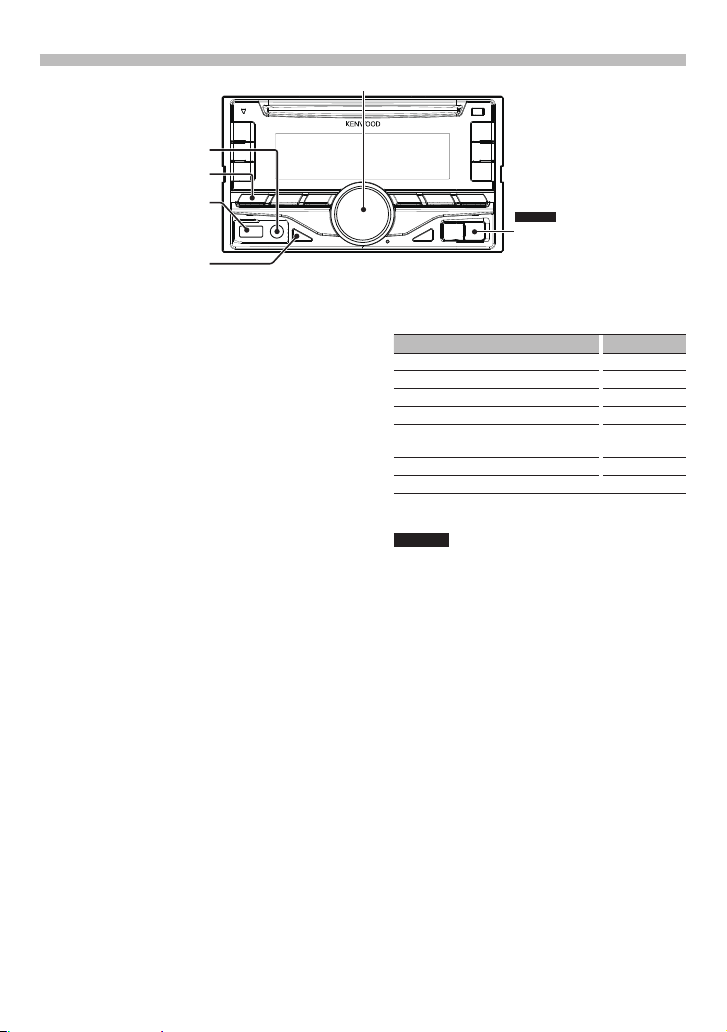
Playing Music (CD/USB/iPod)
Disc slot
[1]
[2]
[0]
[4]
[SRC]
USB terminal
[ ]
[ ]
Playing Disc
Insert a disc in the Disc slot.
When it is inserted, the source is switched
automatically and playback starts.
Playing USB device
Connect a USB device or iPod to the USB terminal
as shown above.
When it is connected, the source is switched
automatically and playback starts.
(USB terminal maximum supply current: DC 5 V
1 A)
Selecting an Audio file folder
Press the [1] button to select a next folder.
Press the [2] button to select a previous folder.
Selecting a Song
Press the [4] or [¢] button to select a song.
Fast Forward or Fast Backward of the Song
Press and hold the [4] or [¢] button to fastforward or fast-backward the song (tracks or files).
Pause and play
Press the [38] button to pause or resume playing a
song (track or file).
[¢]
[L]
Control knob
Music Search
Searching for the song you want to play.
Press the [ ] button.
Search for music.
Operation type Operation
Selecting items Turn the [Control knob].
Determining selection Press the [Control knob].
Returning to a previous item
To cancel music search in audio files or iPod, press
and hold the [
Ejecting Disc
Press the [0] button to eject a disc.
Removing USB device/ iPod
Press the [SRC] button to switch the source other
than USB, iPod, and aha, and then remove the USB
device/ iPod.
Data contained in the USB device/ iPod may be
damaged if you remove it when it is used as the
active source.
Press the [
] button.
] button.
English | 5
Page 6
Listening to the Radio
[SRC]
[4] – [6][1] – [3]
[ ]
Selecting a Tuner source
Press the [SRC] button to select “TUNER”.
Selecting the Band
Press the [ ] button to select FM1, FM2, FM3 or
LW/MW.
Selecting a Station
Press the [4] or [¢] button to select the
station you want to listen to.
[¢]
[4]
Station preset memory
Press and hold the button ([1] to [6]) to assign the
selected station.
Recalling the stations in the memory
Press the button ([1] to [6]) corresponding to the
station you want to listen to.
6 | Quick Start Guide
Page 7

Function of DPX405BT
Hands-free phoning
[SRC]
Control knob
[Ú]
[7]
Registering a Bluetooth device
You can register your Bluetooth device in this unit.
Press the [SRC] to turn on the power.
Start registering this unit by operating the
Bluetooth device.
By operating the Bluetooth device, register the
hands-free unit (pairing). Select “DPX4**BT” (for
DPX405BT) from the list of found units.
If “PAIRING PASS ****** (Bluetooth device name)
PRESS VOLUME KNOB” appears, proceed to step 5.
Input the PIN code (“0000”) in the Bluetooth device.
Check that registration is complete on the
Bluetooth device.
“PAIRING PASS ****** (Bluetooth device name)
PRESS VOLUME KNOB” appears.
PIN code is set to “0000” as the default. You can
change this code. Refer to <15-1. Registering the
PIN code> of Instruction manual.
Press the [Control knob].
Connection to your Bluetooth device starts,
“PAIRING OK” appears a while later, and then the
previous source is selected.
When registration of your cell-phone is completed,
the phone book of the cell-phone is automatically
downloaded to this unit. (If the phone book has
not been downloaded to this unit, operate the cellphone to download it.)
About automatic connection of the iPod touch or
iPhone through Bluetooth
• This unit is compatible with an Apple Auto Pairing
function. Connecting the iPod touch or iPhone to
this unit with USB cable will automatically register it
as a Bluetooth device.
1. The Bluetooth function of the iPod touch or
iPhone is turned on first.
2. Connect an iPod touch or iPhone to the USB
terminal.
3. Press the [Control knob] to pair once you have
confirm the passcode.
Dialing a number in the phone book
Dial the phone number in the phone book of your
cell-phone.
If the phone book has not been downloaded to this
unit, operate the cell-phone to download it. Refer to
<15-2. Downloading the phone book> of Instruction
manual.
Press the [ 7 ] button.
Turn the [Control knob] to select the name, and
then press the [Control knob].
Turn the [Control knob] to select a phone number.
Press the [ Ú ] button.
Answering a phone call
Press the [ Ú ] button.
Disconnecting a call
Press the [ Ú ] button.
English | 7
Page 8
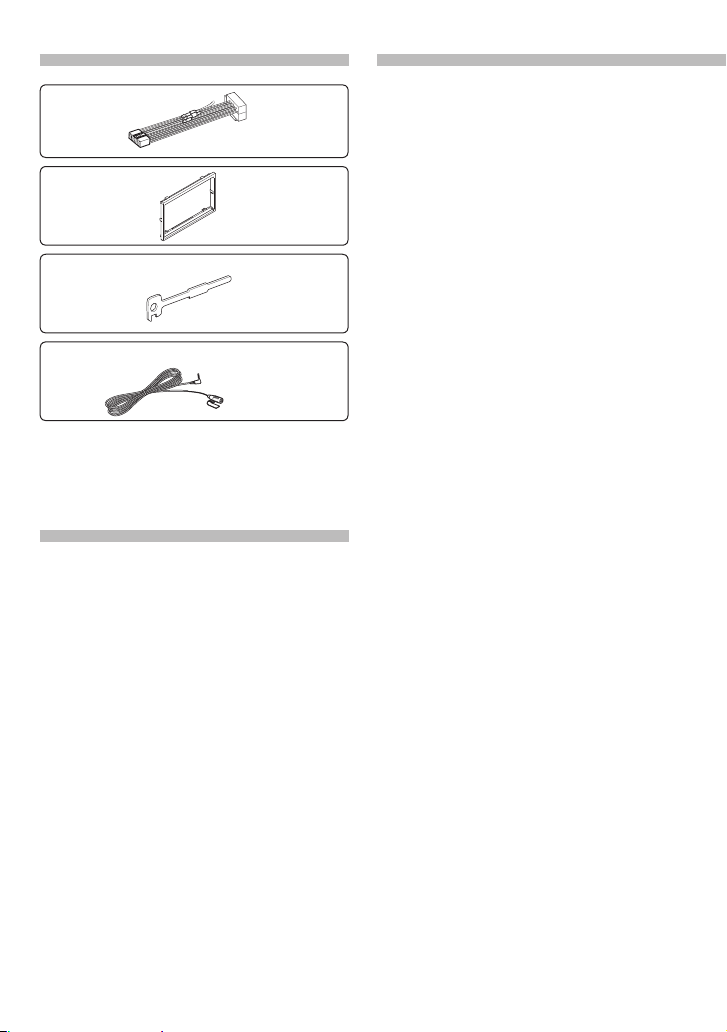
Installation accessories
Before Installation
1
.....1
2
.....1
3
.....2
4 (DPX405BT only)
3 m .....1
Installation Procedure
1. To prevent a short circuit, remove the key from the
ignition and disconnect the - battery.
2. Make the proper input and output wire
connections for each unit.
3. Connect the speaker wires of the wiring harness.
4. Connect the wiring harness wires in the following
order: ground, battery, ignition.
5. Connect the wiring harness connector to the unit.
6. Install the unit in your car.
7. Reconnect the - battery.
8. Press the reset button.
2WARNING
• The unit can only be installed in a car with a 12V DC
power supply, negative ground.
• If you connect the ignition wire (red) and the battery
wire (yellow) to the car chassis (ground), you may
cause a short circuit, that in turn may start a fire.
Always connect those wires to the power source
running through the fuse box.
¤
CAUTION
• Mounting and wiring this product requires skills and
experience. For safety’s sake, leave the mounting and
wiring work to professionals.
• Make sure to ground the unit to a negative 12V DC
power supply.
• Do not install the unit in a spot exposed to direct
sunlight or excessive heat or humidity. Also avoid
places with too much dust or the possibility of water
splashing.
• Do not use your own screws. Use only the supplied
screws. Using wrong screws, could damage the unit.
• If the power is not turned ON (“PROTECT” is
displayed), the speaker wire may have a shortcircuit or touched the chassis of the vehicle and
the protection function may have been activated.
Therefore, the speaker wire should be checked.
• If your car’s ignition key switch does not have an
ACC position, connect the ignition wires to a power
source that can be turned on and off with the
ignition key. If you connect the ignition wires to
a constant-voltage power source, as with battery
wires, the battery may die.
• If the console has a lid, make sure to install the unit
so that the faceplate will not hit the lid when it is
closed or opened.
• If the fuse blows, first make sure the wires are not
touching other parts to cause a short circuit, and
then replace the old fuse with one with a new the
same rating.
• Insulate unconnected wires with vinyl tape or other
similar materials. To prevent a short circuit, do not
remove the caps on the ends of the unconnected
wires and terminals.
• Connect the speaker wires correctly to the
corresponding terminals. The unit may be damaged
or fail to work if you share the - wires or ground
them to any metal part in the car.
• When connecting only two speakers, connect
the connectors either to both of the front output
terminals or to both of the rear output terminals
(do not mix front and rear terminals). For example,
if you connect the + connector of the left speaker
to a front output terminal, do not connect the connector to a rear output terminal.
8 | Quick Start Guide
Page 9

• After the installing the unit, check whether the brake
lamps, blinkers, wipers, etc. on the car are working
properly.
• Mount the unit so that the mounting angle is 30°
or less.
• Reception may become poor if there are metal
objects near the Bluetooth antenna. (DPX405BT only)
Bluetooth antenna unit
For Good Reception
To assure good reception, note the following:
• Communicate with the cell-phone within the lineof-sight distance of 10 m (30 ft). The communication
range becomes shorter depending on the
surrounding environment. The communication
range also becomes shorter when there is an
obstacle between this unit and the cell-phone. The
above maximum communication range (10 m) is not
always assured.
• A broadcast station or walkie-talkie located nearby
can interfere with communication due to a too
strong signal.
Connecting Wires to
Terminals
Connecting the ISO Connector
The pin arrangement for the ISO connectors depends
on the type of the car. Make sure to make the proper
connections to prevent damage to the unit.
The default connection for the wiring harness is
described in 1 below. If the ISO connector pins
are set as described in 2, make the connection as
illustrated.
Please be sure to reconnect the cable as shown 2
below to install this unit to the Volkswagen vehicles
etc.
1 (Default setting) The A-7 pin (red) of the vehicle’s
ISO connector is linked with the ignition, and the
A-4 pin (yellow) is connected to the constant power
supply.
Ignition cable
(Red)
Unit
Battery cable
(Yellow)
2 The A-7 pin (red) of the vehicle’s ISO connector is
connected to the constant power supply, and the
A-4 pin (yellow) is linked to the ignition.
Ignition cable
(Red)
Unit
Battery cable
(Yellow)
A-7 Pin
(Red)
A-4 Pin
(Yellow)
A-7 Pin
(Red)
A-4 Pin
(Yellow)
Vehicle
Vehicle
! CAUTION
Install this unit in the console of your vehicle.
Do not touch the metal parts of this unit during and
shortly after use of the unit. Metal parts such as the
heat sink and enclosure become hot.
English | 9
Page 10

Connecting Wires to Terminals
Microphone input (DPX405BT only)
Microphone
(Accessory4)
LR
Antenna Cord
Connector Function Guide
Pin Numbers for
ISO Connectors
External Power
Connector
A-4 Yellow Battery
A-5 Blue/White Power Control
A-6 Orange/White Dimmer
A-7 Red Ignition (ACC)
A-8 Black Earth (Ground)
Speaker
Connector
B-1 Purple Rear Right (+)
B-2 Purple/Black Rear Right (–)
B-3 Gray Front Right (+)
B-4 Gray/Black Front Right (–)
B-5 White Front Left (+)
B-6 White/Black Front Left (–)
B-7 Green Rear Left (+)
B-8 Green/Black Rear Left (–)
Cable Colour Functions
Connection
⁄ See <Connecting the ISO Connector> (page 9).
Connector A
Connector B
8
8
1234567
1234567
Yellow (A–4 Pin)
Red (A–7 Pin)
FM/AM antenna input (JASO)
Yellow (Battery wire)
Red (Ignition wire)
10 | Quick Start Guide
Page 11

LR
Front output
Rear output/ Sub Woofer output
Fuse (10A)
Wiring harness
(Accessory1)
If no connections are made, do not let the wire come out from
the tab.
Blue/White (Power control/
Antenna control wire)
P.CONT
ANT.
CONT
Connect either to the power control terminal
when using the optional power amplifier, or to
the power terminal for the booster amplifier of the
film-type or short pole type antenna.
Brown (Mute control wire)
Light Blue/Yellow (Steering
remote control wire)
MUTE
REMOTE CONT
STEERING WHEEL
REMOTE INPUT
Connect to the terminal that is grounded when
either the telephone rings or during conversation.
To connect the Kenwood navigation system,
⁄
consult your navigation manual.
To use the steering wheel remote control feature,
an exclusive remote adapter (not supplied) that
matches your car is required.
English | 11
Page 12

Installing the trim plate/
Installation
Installing the trim plate
Attach Accessory 2 to the unit.
Removing the Unit
Removing the trim plate
Engage the catch pins on the extraction key
(Accessory 3) and remove the two locks on the
lower level.
Lower the frame and pull it forward as shown in
the figure.
Accessory 3
Accessory 2
Installation
Bend the tabs of the mounting sleeve
with a screwdriver or similar utensil
and attach it in place.
⁄
• Make sure that the unit is installed securely in
place. If the unit is unstable, it may malfunction (for
example, the sound may skip).
Lock
Catch
⁄
• The frame can be removed from the top side in the
same manner.
When the lower level is removed, remove the upper
two locations.
12 | Quick Start Guide
Page 13

Removing the Unit
Remove the trim plate by referring to the removal
procedure in the section <Removing the trim
plate>.
Insert the two extraction keys (Accessory 3) deeply
into the slots on each side, as shown.
Accessory 3
Lower the extraction key toward the bottom, and
pull out the unit halfway while pressing towards
the inside.
¤
• Be careful to avoid injury from the catch pins on the
extraction key.
Pull the unit all the way out with your hands, being
careful not to drop it.
DPX405BT only
Installing the Microphone
unit
Check the installation position of the microphone
(Accessory 4).
Remove oil and other dirt from the installation
surface.
Install the microphone.
Lay the cable up to the unit with it secured at
several positions using tape or the like.
⁄
• Install the microphone as far as possible from the
cell-phone.
Accessory 4
Fix a cable with a commercial item of tape.
Peel off the release coated
paper of double-face adhesive tape to secure the
microphone on the place
shown above.
Adjust the direction of the
microphone to the driver.
English | 13
Page 14

Appendix
About Audio file
• Playable Audio files
AAC-LC (.m4a), MP3 (.mp3), WMA (.wma), WAV of USB
device (.wav)
• Playable disc media
CD-R/RW/ROM
• Playable disc file formats
ISO 9660 Level 1/2, Joliet, Long file name.
• Playable USB devices
USB mass storage class
• Playable USB device file systems
FAT12, FAT16, FAT32
The online manual about audio files is put on the site,
www.kenwood.com/cs/ce/audiofile/.
iPod/iPhone that can be connected to this
unit
Made for
• iPod touch (4th generation)
• iPod touch (3rd generation)
• iPod touch (2nd generation)
• iPod touch (1st generation)
• iPod classic
• iPod with video
• iPod nano (6th generation)
• iPod nano (5th generation)
• iPod nano (4th generation)
• iPod nano (3rd generation)
• iPod nano (2nd generation)
• iPod nano (1st generation)
• iPhone 4S
• iPhone 4
• iPhone 3GS
• iPhone 3G
• iPhone
For information on the compatibility with iPod/iPhone
software, visit www.kenwood.com/cs/ce/ipod/.
This Product is not installed by the manufacturer of a vehicle
on the production line, nor by the professional importer of a
vehicle into an EU Member State.
Information on Disposal of Old Electrical and
Electronic Equipment and Batteries (applicable
for EU countries that have adopted separate
waste collection systems)
Products and batteries with the symbol (crossed-
out wheeled bin) cannot be disposed as
household waste.
Old electrical and electronic equipment and
batteries should be recycled at a facility capable of
handling these items and their waste byproducts.
Contact your local authority for details in locating
a recycle facility nearest to you.
Proper recycling and waste disposal will help
conserve resources whilst preventing detrimental
effects on our health and the environment.
Notice: The sign “Pb” below the symbol for
batteries indicates that this battery
contains lead.
The marking of products using lasers
CLASS 1
LASER PRODUCT
The label is attached to the chassis/case and says that the
component uses laser beams that have been classified as Class
1. It means that the unit is utilizing laser beams that are of a
weaker class. There is no danger of hazardous radiation outside
the unit.
For Turkey
Bu ürün 28300 sayılı Resmi Gazete’de yayımlanan Atik Elektrikli
ve Elektronik Eşyalarin Kontrolü Yönetmeliğe uygun olarak
üretilmiştir.
Eski Elektrik ve Elektronik Ekipmanların İmha
Edilmesi Hakkında Bilgi (ayrı atık toplama
sistemlerini kullanan ülkeleri için uygulanabilir)
Sembollü (üzerinde çarpı işareti olan çöp kutusu)
ürünler ev atıkları olarak atılamaz.
Eski elektrik ve elektronik ekipmanlar, bu ürünleri
ve ürün atıklarını geri dönüştürebilecek bir tesiste
değerlendirilmelidir. Yaşadığınız bölgeye en yakın
geri dönüşüm tesisinin yerini öğrenmek için yerel
makamlara müracaat edin. Uygun geri dönüşüm
ve atık imha yöntemi sağlığımız ve çevremiz
üzerindeki zararlı etkileri önlerken kaynakların
korunmasına da yardımcı olacaktır..
14 | Quick Start Guide
Page 15

Requirements Aha™:
Requirements for listening to the Aha™
are as follows:
iPhone or iPod touch
• Use an Apple iPhone or iPod touch
running iOS4 or later.
• Search for “Aha” in the Apple iTunes
App Store to find and install the
most current version of the Aha™
application on your device.
• iPhone/ iPod touch connected to
this unit with a KCA-iP102.
Android™
• Use Android OS 2.2 or later.
• Download the Aha™ application
to your smartphone from the
Google play.
• Bluetooth must be built in and
the following profiles must be
supported.
- SPP (Serial Port Profile)
- A2DP (Advanced Audio
Distribution Profile)
NOTE
• In the application on your device,
log in and create a free account
with Aha.
• Internet connection by 3G, LTE,
EDGE, or WiFi.
• Because Aha™ is a third-party
service, the specifications are
subject to change without prior
notice. Accordingly, compatibility
may be impaired or some or
all of the services may become
unavailable.
• Some Aha™ functionality cannot
be operated from this unit.
• The Bluetooth word mark and logos are owned by the Bluetooth
SIG, Inc. and any use of such marks by JVC KENWOOD Corporation
is under license. Other trademarks and trade names are those of
their respective owners.
• The “AAC” logo is a trademark of Dolby Laboratories.
• “Made for iPod” and “Made for iPhone” mean that an electronic
accessory has been designed to connect specifically to iPod or
iPhone, respectively, and has been certified by the developer to
meet Apple performance standards. Apple is not responsible for
the operation of this device or its compliance with safety and
regulatory standards. Please note that the use of this accessory
with iPod or iPhone may affect wireless performance.
• iPhone, iPod, iPod classic, iPod nano, and iPod touch are
trademarks of Apple Inc., registered in the U.S. and other countries.
• iTunes and Safari are trademark of Apple Inc.
Specifications
FM tuner section
Frequency range (50 kHz step)
: 87.5 MHz – 108.0 MHz
Usable sensitivity (S/N = 26dB)
: 0.63 μV/75 Ω
Quieting Sensitivity (DIN S/N = 46dB)
: 1.6 μV/75 Ω
Frequency response (±3 dB)
: 30 Hz – 15 kHz
Signal to Noise ratio (MONO): 75 dB
Stereo separation (1 kHz): 45 d B
MW tuner section
Frequency range (9 kHz step)
: 531 kHz – 1611 kHz
Usable sensitivity (S/N = 20dB)
: 36 µV
LW tuner section
Frequency range
: 153 kHz – 279 kHz
Usable sensitivity (S/N = 20dB)
: 57 µV
CD player section
Laser diode: GaAlAs
Digital filter (D/A)
: 8 Times Ove r Sampling
D/A Converter: 24 B it
Spindle speed (Audio files)
: 500 – 200 rp m (CLV)
Wow & Flutter: Bel ow Measurabl e Limit
Frequency response (±1 dB)
: 20 Hz – 20 kHz
Total harmonic distortion (1 kHz)
: 0.01 %
Signal to Noise ratio (1 kHz): 105 dB
Dynamic range: 90 dB
MP3 decode: Compliant wi th MPEG-1/2 Audio
Layer-3
WMA decode: Compliant wi th Windows Me dia
AAC decode: AAC-LC “.m4 a” files
USB inter face
USB Standard: USB1.1/ 2.0 (Full speed)
File System : FAT12/ 16/ 32
Maximum Supply current
: DC 5 V
MP3 decode
: Compliant w ith MPEG-1/2 Audio L ayer-3
WMA decode: Compliant wi th Windows Me dia
AAC decode: AAC-LC “.m4 a” files
WAV decode: Linear-PCM
Audio section
Maximum output power: 50 W x 4
Output power (DIN 45324, +B=14.4V) : 30 W x 4
Speaker Impedance: 4 – 8 Ω
Tone action
Bass : 100 H z ±8 dB
Middle : 1 kH z ±8 dB
Treble : 12.5 kH z ±8 dB
Preout level/ Load (CD): 2500 mV/10 kΩ
Preout impedance: ≤ 6 00 Ω
Bluetooth section (DPX405BT only)
Version: B luetooth Ver.2.1+EDR Ce rtified
Frequency range: 2.402 – 2.480 GH z
Output Power: + 4dBm (MAX), 0 dBm (AVE)
Power Clas s 2
Maximum Communication range
: Line of sig ht approx.10m
Profiles
: HFP (Hand s Free Profile)
: SPP (Seria l Port Profi le)
: PBAP (Pho nebook Access P rofile)
: OPP (Obje ct Push Profi le)
: A2DP (Advan ced Audio Dist ribution Pr ofile)
: AVRCP (Audio/Video Remote Control Profile)
Auxiliary input
Frequency response (±3 dB)
: 20 Hz – 20 kHz
Input Maximum Voltage: 1200 mV
Input Impedance: 10 kΩ
General
Operating voltage
DPX405BT: 14.4 V (10.5 – 16V all owable)
DPX305U: 14.4 V (11 – 16V allow able)
Maximum Current consumption: 10 A
Installation Size (W x H x D)
: 182 x 111 x 157 mm
Weight: 1.5 kg
Audio
1 A
Audio
• IOS is a trademark or registered trademark of Cisco in the U.S. and
other countries and is used under license.
• Android and Chrome are trademark of Google Inc.
• Internet Explorer and Windows Media are registered trademark of
Microsoft Corporation in the United States and other countries.
• Firefox is a registered trademark of Mozilla Foundation in the
United States and other countries.
• aha, the Aha logo, and the Aha trade dress are trademarks or
registered trademarks of HARMAN International Industries, used
with permission.
• BlackBerr y®, RIM®, Research In Motion® and related trademarks,
names and logos are the property of Research In Motion Limited
and are registered and/or used in the U.S. and countries around
the world. Used under license from Research In Motion Limited.
English | 15
Page 16

Table des matières À propos du Guide de
À propos du Guide de démarrage rapide ................... 16
Avant utilisation .................................................................... 17
Préparatifs/ Fonctions de base ........................................18
Reproduire de la musique (CD/USB/iPod) ..................19
Écoute de la radio ................................................................ 20
Téléphonie mains libres .....................................................21
Accessoires pour l'installation ......................................... 22
Procédure d’installation .....................................................22
Avant installation ................................................................. 22
Connexion des fils aux bornes ........................................ 23
Poste de l'habillage/Pose ..................................................26
Retrait de l’appareil ............................................................. 26
Montage du microphone ................................................. 27
Annexe .................................................................................... 29
démarrage rapide
Ce Guide de démarrage rapide décrit les fonctions de
base de cet appareil.
Les fonctions qui ne sont pas décrites ici, le sont dans
le mode d'emploi sur le CD-ROM fourni.
Pour consulter le mode d'emploi, utilisez un navigateur
du type Internet Explorer® version 7, Firefox®
version 3.6, Chrome
iOS Safari® version 4.0 ou Android
leurs versions postérieures).
Les spécifications, notamment, reprises dans le mode
d'emploi sont sujettes à modification. La toute dernière
version du mode d'emploi est toujours disponible à
l'adresse suivantes :
manual.jvckenwood.com/edition/im369/
TM
version 2.0, Safari® version 5.1,
TM
version 2.2 (ou
Les illustrations d’affichage et de panneau utilisées dans ce
manuel sont des exemples qui permettent d'expliquer plus
clairement l'utilisation des commandes. Il est donc possible que
les illustrations d’affichage soient différentes de ce qui apparaît
réellement sur votre appareil et que certaines images d'affichage
ne soient pas applicables.
16 | Guide de démarrage rapide
¤ AVERTISSEMENT
• Conservez les piles hors de portée des enfants
dans leur conditionnement original jusqu'à leur
utilisation. Débarrassez-vous des piles usagées
rapidement. En cas d'ingestion, contactez
immédiatement un médecin.
• Le boîtier de la pile ou les piles ne doivent pas être
exposés à des chaleurs excessives telles que les
rayons du soleil, du feu, etc.
• Ne pas poser la télécommande sur des endroits
chauds, comme par exemple sur le tableau de
bord.
• Une pile au lithium peut exploser en cas
de remplacement incorrect. Remplacez-la
uniquement par une pile du même type ou d'un
type équivalent.
Page 17

Avant utilisation
2AVERTISSEMENT
Pour éviter toute blessure et/ou incendie,
veuillez prendre les précautions suivantes :
• Arrêtez le véhicule avant d'utiliser l'appareil.
• Pour éviter tout court-circuit, ne posez jamais
d'objets métalliques (telles que pièces ou outils
métalliques) à l'intérieur de l'appareil.
¤
ATTENTION
• Réglez le volume de façon à pouvoir entendre
les sons extérieurs au véhicule. Conduire avec
un volume sonore trop élevé peut entraîner un
accident.
• Nettoyez les poussières se déposant sur la façade à
l'aide d'un chiffon sec siliconé ou d'un chiffon doux.
Le non respect de cette précaution peut
endommager l'écran ou l'appareil.
Condensation
De la condensation peut se former sur la lentille du
laser si le véhicule est climatisé. Cela peut entraîner
des erreurs de lecture des disques. En pareil cas, retirez
le disque et laissez l'appareil au repos le temps que la
condensation s'évapore.
Remarques
• Si vous rencontrez des problèmes pendant
l’installation, consultez votre revendeur Kenwood.
• Lorsque vous achetez des accessoires en option,
vérifiez auprès de votre revendeur Kenwood que ces
accessoires fonctionnent avec votre modèle dans
votre région.
• Les caractères conformes à l'ISO 8859-5 ou l'ISO
8859-1 peuvent être affichés. Reportez-vous à la
section “RUSSIAN SET” sous <11-6. Réglage initial>
du mode d'emploi.
• La fonction Radio Data System ne fonctionne pas
dans les régions où le service n'est pris en charge par
aucune station de diffusion.
À propos des disques utilisables avec cet
appareil
• Cet appareil ne peut lire que les CD comportant
.
• Les disques suivants sont incompatibles avec cet
appareil :
- Les disques qui ne sont pas ronds
- Les disques comportant des colorations sur la
surface d’enregistrement ou qui sont sales
- Les disques inscriptibles/réinscriptibles dont
la gravure n'a pas été finalisée (pour plus
d'informations sur la finalisation d'une gravure,
reportez-vous à votre logiciel de gravure ainsi
qu'au mode d'emploi de votre graveur)
- Les disques de 8 cm de diamètre (une tentative
d'insertion avec un adaptateur peut entraîner des
dysfonctionnements)
Manipulation des disques
• Ne touchez pas la surface d’enregistrement des
disques.
• Ne collez pas de ruban adhésif, etc. sur les disques
et n'utilisez pas de disques avec du ruban adhésif
collé dessus.
• N'utilisez aucun accessoire avec les disques.
• N'utilisez aucun solvant pour nettoyer les disques.
Utilisez un chiffon sec siliconé ou un chiffon doux.
• Nettoyez le disque en partant du centre vers
l'extérieur.
• Pour retirer des disques de cet appareil, tirez-les
horizontalement.
• Retirez les éventuelles montures présentes dans le
trou central et sur les bords des disques avant de
les insérer.
Comment réinitialiser votre appareil
Si l'appareil ne fonctionne pas correctement, appuyez
sur le bouton de réinitialisation. L'appareil est alors
reconfiguré comme en sortie d'usine.
Bouton de réinitialisation
Français | 17
Page 18
Préparatifs/ Fonctions de base
[Molette de commande] (molette de réglage du volume)
Entrée auxiliaire
[SRC]
Borne USB
[DISP]
Désactiver le mode de démonstration
La première fois que vous utilisez l'appareil après
l'avoir installé, vous devez désactiver le mode de
démonstration.
Pour quitter le mode de démonstration, appuyez
sur la [molette de commande] lorsque le message
“CANCEL DEMO PRESS VOLUME KNOB” (Appuyez
sur la molette de commande pour annuler la démo)
s'affiche (vous disposez d'environ 15 secondes).
Tournez la [molette de commande] pour
sélectionner “YES” (Oui) et appuyez sur la [molette
de commande].
Le mode de démonstration peut également être
désactivé via le mode de réglage des fonctions.
Reportez-vous à la section <11-3. Réglage du mode
de démonstration> du mode d'emploi.
Réglage de l'horloge
Appuyez sur la [molette de commande] et
maintenez-la enfoncée.
Tournez la [molette de commande] pour régler
les heures, puis appuyez sur la [molette de
commande].
Tournez la [molette de commande] pour régler
les minutes, puis appuyez sur la [molette de
commande].
Alimentation
Appuyez sur la touche [SRC] pour allumer l'appareil.
Maintenez la touche [SRC] enfoncée pour arrêter
l'appareil.
Volume
Tournez la [molette de commande] pour régler
le volume.
Atténuateur
Appuyez sur la [molette de commande].
Ceci baisse rapidement le volume.
DPX305U
[iPod]
Sélection de la source
Appuyez sur la touche [SRC] pour sélectionner les
différentes sources.
Source Option affichée
Mode veille “STANDBY”
TUNER “TUNER”
[1]
USB ou iPod
aha (Fonction spécifique au modèle DPX405BT)
Audio Bluetooth (Fonction spécifique au modèle
DPX405BT)
[1]
CD
Entrée auxiliaire “AU X”
[1]
Cette source n'est disponible que lorsqu'un
dispositif compatible est connecté.
DPX305U
Appuyez sur la touche [iPod] pour définir la source
sur l'iPod relié à l'appareil.
Borne USB
Vous pouvez connecter un périphérique USB ou
un iPod.
Les accessoires CA-U1EX (en option) et KCA-iP102
(en option) sont recommandés pour la connexion
d'un périphérique USB ou d'un iPod.
Entrée auxiliaire
Un baladeur audio peut être branché à la prise
mini-jack stéréo (ø 3,5 mm).
Sélection de l'affichage
Chaque fois que vous appuyez sur la touche [DISP],
un autre mode d'affichage s'active.
Reportez-vous à la section <10-4. Sélection de texte
pour l’affichage> du mode d'emploi
Défilement de l'affichage
Maintenez la touche [DISP] enfoncée pour faire
défiler les informations textuelles relatives au CD ou
au fichier audio.
“USB” ou “iPod”
[1]
“AHA”
“BT AUDIO”
“CD”
18 | Guide de démarrage rapide
Page 19

Reproduire de la musique (CD/USB/iPod)
[0]
Fente pour le disque
[1]
[2]
[4]
[SRC]
Borne USB
[ ]
Lecture d'un disque
Insérez un disque dans la fente.
Une fois le disque inséré, la source change
automatiquement et la lecture démarre.
Lire un périphérique USB
Connectez un périphérique USB ou un iPod à la
prise USB.
Une fois le périphérique connecté, la source change
automatiquement et la lecture démarre.
(Courant d'alimentation maximal pour la prise USB :
1 A
: CC 5 V
Sélection d'un dossier de fichiers audio
Appuyez sur la touche [1] pour sélectionner le
dossier suivant.
Appuyez sur la touche [2] pour sélectionner un
dossier précédent.
Sélection d'une chanson
Appuyez sur la touche [4] ou [¢] pour
sélectionner un morceau.
Avance ou retour rapide
Maintenez la touche [4] ou [¢] enfoncée pour
une avance rapide ou un retour rapide du morceau
(piste ou fichier).
Pause et lecture
Appuyez sur la touche [38] pour mettre un
morceau (piste ou fichier) sur pause ou en
reprendre la lecture.
[ ]
Molette de commande
Recherche de morceau
Recherchez le morceau que vous désirez écouter.
Appuyez sur la touche [ ].
Recherchez le morceau souhaité en appliquant les
commandes suivantes.
Type d’opération Description
Sélection d'éléments Tournez la [molette de
Confirmation d'une sélection Appuyez sur la [molette de
Retour à un élément précédent
Pour annuler la recherche de musique dans les
fichiers audio ou sur l'iPod, appuyez sur la touche
[
Éjection du disque
Appuyez sur la touche [0] pour éjecter un disque.
Retrait d'un périphérique USB/iPod
Appuyez sur la touche [SRC] pour passer à une
source autre que le périphérique USB, l'iPod ou la
radio Aha, puis retirez le périphérique USB ou l'iPod.
Les données stockées sur le périphérique USB/iPod
risquent d'être altérées si vous le retirez lorsqu'il est
utilisé en tant que source active.
[¢]
[L]
commande].
commande].
Appuyez sur la touche [
] et maintenez-la enfoncée.
].
Français | 19
Page 20

Écoute de la radio
[SRC]
[4] – [6][1] – [3]
[ ]
Sélection d'une source Tuner
Appuyez sur la touche [SRC] pour sélectionner
“TUNER” (Radio).
Sélection de la bande
Appuyez sur la touche [ ] pour sélectionner FM1,
FM2, FM3 ou LW/MW.
Sélection d'une station
Appuyez sur la touche [4] ou [¢] pour
sélectionner la station que vous souhaitez écouter.
[¢]
[4]
Mémoire de préréglage des stations
Maintenez la touche ([1] à [6]) enfoncée pour lui
attribuer la station active.
Rappel des stations mises en mémoire
Appuyez sur la touche ([1] à [6]) correspondant à la
station que vous souhaitez écouter.
20 | Guide de démarrage rapide
Page 21

Fonction spécifique au modèle DPX405BT
Téléphonie mains libres
[SRC]
Molette de commande
[Ú]
[7]
Enregistrement d'un dispositif Bluetooth
Vous pouvez enregistrer votre téléphone Bluetooth
dans cet appareil.
Appuyez sur la touche [SRC] pour allumer l'appareil.
Lancez l'enregistrement de cet appareil en utilisant
l'appareil Bluetooth
Avec l'appareil Bluetooth, enregistrez l'appareil
mains libres (appariement). Sélectionnez “DPX4**BT”
(DPX405BT) dans la liste des appareils détectés.
Si “PAIRING PASS ****** (nom du périphérique
Bluetooth) PRESS VOLUME KNOB” (Appariement du
***** OK, appuyez sur la molette de commande)
apparaît, passez à l'étape 5.
Saisissez le code PIN (“0000”) dans l'appareil
Bluetooth.
Vérifiez que l'enregistrement est terminé sur
l'appareil Bluetooth.
“PAIRING PASS ****** (Nom du périphérique
Bluetooth) PRESS VOLUME KNOB” (Appariement du
***** OK, appuyez sur la molette de commande)
apparaît.
Le code PIN par défaut est “0000”. Vous pouvez
changer ce code. Reportez-vous à la section <15-1.
Enregistrement du code PIN> du mode d'emploi.
Appuyez sur la [molette de commande].
La connexion au dispositif Bluetooth démarre, la
mention “PAIRING OK” (Appariement réussi) s'affiche
au bout de quelques instants, puis la source
précédente est sélectionnée.
Une fois l'enregistrement de votre téléphone
mobile terminé, le répertoire du téléphone est
automatiquement chargé dans cet appareil. (Dans
le cas contraire, chargez-le à partir du téléphone
portable.)
À propos de la connexion automatique d'un iPod
touch ou d'un iPhone via Bluetooth
• Le présent appareil est compatible avec la fonction
d'appariement automatique d'Apple. Le fait de
connecter un iPod touch ou un iPhone à cet appareil
à l'aide d'un câble USB l'enregistre automatiquement
en tant qu'appareil Bluetooth.
1.La fonction Bluetooth de l'iPod touch ou de
l'iPhone est tout d'abord activée.
2. Branchez un iPod touch ou un iPhone à la prise
USB.
3. Appuyez sur la [molette de commande] pour
apparier l'équipement une fois le code confirmé.
Composition d'un numéro du répertoire
téléphonique
Composition d'un numéro de téléphone via le
répertoire de votre téléphone.
(Si le répertoire du téléphone n'a pas été chargé
dans cet appareil, chargez-le à partir du téléphone
portable.) Reportez-vous à la section <15-2.
Téléchargement du répertoire téléphonique> du
mode d'emploi.
Appuyez sur la touche [7].
Tournez la [molette de commande] pour
sélectionner le nom, puis appuyez sur la [molette
de commande].
Tournez la [molette de commande] pour
sélectionner un numéro de téléphone.
Appuyez sur la touche [ Ú ].
Répondre à un appel téléphonique
Appuyez sur la touche [ Ú ].
Mettre fin à un appel
Appuyez sur la touche [ Ú ].
Français | 21
Page 22

Accessoires pour
l'installation
1
.....1
2
.....1
3
.....2
4 (DPX405BT uniquement)
3m .....1
Procédure d’installation
1. Pour éviter tout court-circuit, retirez la clé du
contact et déconnectez la borne - de la batterie.
2. Effectuez correctement la connexion des câbles de
sortie et d'entrée de chaque appareil.
3. Connectez les câbles d'enceintes du faisceau de
câbles.
4. Connectez les câbles du faisceau de câbles dans
l'ordre suivant : terre, batterie, allumage.
5. Connectez le connecteur du câblage électrique à
l’appareil.
6. Installez l’appareil dans votre voiture.
7. Reconnectez la borne - de la batterie.
8. Appuyez sur la touche de réinitialisation.
22 | Guide de démarrage rapide
Avant installation
2AVERTISSEMENT
• L'appareil ne peut être installé que dans un véhicule
doté d'une alimentation 12 V CC avec borne
négative reliée à la masse.
• Si vous connectez le câble d’allumage (rouge) et
le câble de batterie (jaune) au châssis de la voiture
(masse), vous risquez de causer un court-circuit qui
peut provoquer un incendie. Connectez toujours
ces câbles à la source d'alimentation passant par le
boîtier de fusibles.
¤
AVERTISSEMENT
• Le montage et le câblage de ce produit nécessitent
des compétences spécifiques. Pour des raisons de
sécurité, laissez un professionnel effectuer le travail
de montage et de câblage.
• Assurez-vous de mettre l’appareil à la masse sur une
alimentation négative de 12V CC.
• N’installez pas l’appareil dans un endroit exposé
directement à la lumière du soleil, à une chaleur
excessive ou à l’humidité. Évitez également
les endroits trop poussiéreux ou exposés aux
éclaboussures.
• N'utilisez pas vos propres vis. N'utilisez que les vis
fournies. L'utilisation de vis non appropriées risque
d'endommager l'appareil.
• Si l'alimentation est déconnectée (“PROTECT”
s'affiche), le câble des enceintes peut être en courtcircuit ou touche le châssis du véhicule et par
conséquent, la fonction de protection est activée. Le
câble des enceintes doit donc être vérifié.
• Si l'interrupteur d'allumage de votre voiture n'est
pas équipé de la position ACC, connectez les fils
d'allumage à une source d'alimentation pouvant
être mise sous tension et hors tension avec la clé
de contact. Si vous connectez les câbles d'allumage
à une source d'alimentation à tension constante,
comme un câble de batterie, la batterie risque de se
décharger.
• Si la console est équipée d'un couvercle, veillez à
installer l'appareil de façon à ce que la façade ne
touche pas le couvercle lors de la fermeture ou de
l'ouverture de celui-ci.
• Si un fusible saute, assurez-vous d'abord que les fils
n'ont pas causé de court-circuit suite à un contact
avec une autre pièce, puis remplacez le fusible
défectueux par un nouveau de même calibre.
• Isolez les câbles non connectés avec un ruban de
vinyle ou un autre matériel similaire. Pour éviter
tout court-circuit, ne retirez pas les capuchons des
extrémités des fils non connectés ou des bornes.
• Raccordez les câbles du haut-parleur aux bornes
correspondantes. L’appareil peut être endommagé
si le câble négatif - pour une des enceintes ou le
câble de masse entre en contact avec une partie
métallique du véhicule.
Page 23

• Si deux haut-parleurs seulement sont raccordés au
système, raccordez les fils aux deux bornes de sortie
avant ou aux deux bornes de sortie arrière (n'utilisez
pas simultanément la sortie avant et la sortie arrière).
Par exemple, si vous connectez le câble + de
l'enceinte de gauche à une prise de sortie avant, ne
connectez pas le câble - de l'enceinte de droite à la
prise de sortie arrière.
• Une fois l'appareil installé, contrôlez que les feux de
freinage, les clignotants, les essuie-glaces, etc. du
véhicule fonctionnent correctement.
• Montez l'appareil selon un angle de montage de 30°
ou moins.
• La réception peut se détériorer si des objets
métalliques se trouvent à proximité de l'antenne
Bluetooth. (DPX405BT uniquement)
Antenne Bluetooth
Pour obtenir une bonne réception
Pour assurer une bonne réception, veuillez tenir
compte des indications suivantes :
• Communiquez avec le téléphone portable à une
distance en visibilité directe de 10 m maximum.
La portée de communication diminue selon
l'environnement. La portée de communication
diminue également lorsqu'un obstacle se trouve
entre cet appareil et le téléphone portable. La portée
de communication maximale (10 m) indiquée
ci-dessus n'est pas toujours garantie.
• La présence d'une station radio ou d'un émetteurrécepteur portable (talkie-walkie) à proximité peut
entraîner des interférences avec la communication
en raison d'un signal trop fort.
Connexion des fils aux
bornes
Connexion du connecteur ISO
La disposition des broches pour les connecteurs
ISO dépend du type de votre véhicule. Vérifiez les
connexions pour éviter tout dommage sur l'appareil.
La connexion par défaut pour le câblage électrique
est décrite au point 1 ci-dessous. Si les broches du
connecteur ISO sont réglées comme décrit dans la
section 2, réalisez les connexions comme indiqué
dans l’illustration.
Assurez-vous de reconnecter le câble comme indiqué
ci-dessous 2 pour installer cet appareil dans les
véhicules Volkswagen.
1 (Réglage par défaut) La broche A-7 (rouge)
du connecteur ISO du véhicule est associée à
l’allumage, et la broche A-4 (jaune) est connectée à
l’alimentation constante.
Câble d’allumage
(Rouge)
Appareil
Câble de batterie
(Jaune)
2 La broche A-7 (rouge) du connecteur ISO du
véhicule est connectée à l’alimentation constante
et la broche A-4 (jaune) est associée à l’allumage.
Câble d’allumage
(Rouge)
Appareil
Câble de batterie
(Jaune)
Broche A-7
(Rouge)
Véhicule
Broche A-4
(Jaune)
Broche A-7
(Rouge)
Véhicule
Broche A-4
(Jaune)
! ATTENTION
Installez cet appareil sur la console de votre véhicule.
Ne touchez pas les pièces métalliques de cet
appareil pendant son utilisation et dans les minutes
qui la suivent. Les pièces métalliques, telles que le
dissipateur thermique et le boîtier, peuvent être très
chauds.
Français | 23
Page 24

Connexion des fils aux bornes
Entrée microphone (DPX405BT uniquement)
Microphone
(Accessoire 4)
LR
Guide de fonctionnement des connecteurs
Numéros de
broche pour
connecteurs ISO
Connecteur
d'alimentation
externe
A-4 Jaune Batterie
A-5 Bleu/Blanc Commande d’alimentation
A-6 Orange/Blanc Variateur de luminosité
A-7 Rouge Allumage (ACC)
A-8 Noir Connexion à la terre
Connecteur de
haut-parleur
B-1 Violet Arrière droit (+)
B-2 Violet/Noir Arrière droit (–)
B-3 Gris Avant droit (+)
B-4 Gris/Noir Avant droit (–)
B-5 Blanc Avant gauche (+)
B-6 Blanc/Noir Avant gauche (–)
B-7 Vert Arrière gauche (+)
B-8 Vert/Noir Arrière gauche (–)
Couleur du
câble
Fonctions
(masse)
⁄ Voir <Connexion du connecteur ISO> (page 23).
Jaune (broche A–4)
1234567
Rouge (broche A–7)
1234567
Connecteur A
Connecteur B
8
8
Cordon antenne
Entrée d'antenne FM/AM (JASO)
Jaune (câble de batterie)
Rouge (câble d’allumage)
24 | Guide de démarrage rapide
Page 25

LR
Sortie avant
Sortie arrière/ Sortie subwoofer
Fusible (10A)
Câblage électrique
(accessoire 1)
Si aucune connexion n'est faite, ne laissez pas le câble sortir de la languette.
Bleu/Blanc (commande
d'alimentation/câble de commande
de l'antenne moteur)
P.CONT
ANT.
CONT
Marron (câble de commande
de la sourdine)
MUTE
Connectez soit à la borne de commande
d'alimentation lorsque vous utilisez l'amplificateur
de puissance en option, soit à la borne
d'alimentation de l'amplificateur de puissance de
l'antenne film ou de l'antenne à tige courte.
Connectez à la borne qui est mise à la masse
lorsque le téléphone sonne ou pendant les
conversations.
Pour effectuer une connexion avec un
⁄
système de navigation Kenwood, consultez
le manuel de votre système de navigation.
Bleu clair/Jaune
(télécommande au volant)
REMOTE CONT
STEERING WHEEL
REMOTE INPUT
Pour utiliser la télécommande au volant, un
adaptateur exclusif (non fourni) adapté à votre
véhicule est nécessaire.
Français | 25
Page 26

Poste de l'habillage/Pose Retrait de l’appareil
Pose de l'habillage
Fixez l'accessoire 2 à l'appareil.
Accessoire 2
Pose
Tordre les pattes du manchon de
montage avec un tournevis ou un outil
similaire et fixer.
⁄
• Assurez-vous que l’appareil est solidement installé.
Si l’appareil est instable, il risque de mal fonctionner
(par ex. le son risque de sauter).
Retrait de l'habillage
Enfoncez les broches de saisie sur l’outil de retrait
(accessoire 3) et débloquez les deux verrous du
bas.
Abaissez le cadre et tirez-le vers l'avant comme
indiqué sur la figure.
Accessoire 2
Broche de saisie
Crochet
⁄
• Le cadre peut être également retiré à partir du côté
avant de la même façon.
Lorsque le niveau supérieur est retiré, retirez les
deux emplacements inférieurs.
26 | Guide de démarrage rapide
Page 27

DPX405BT uniquement
Montage du microphone
Retrait de l’appareil
Retirez l'habillage en vous aidant de la procédure
de dépose de la section <Retrait de l’habillage>.
Insérez les deux outils de retrait (accessoire 3)
profondément dans les fentes de chaque côté,
comme indiqué.
Accessoire 2
Abaissez l'outil de retrait et tirez l'appareil à moitié
tout en poussant l'outil vers l'intérieur.
¤
• Faites attention de ne pas vous blesser avec les
ergots de l'outil de retrait.
Extrayez totalement l'appareil en le manipulant
avec les mains, et en faisant attention de ne pas le
faire tomber.
Vérifiez la position à laquelle le microphone
(accessoire 4) va être installé.
Nettoyez la surface d'installation afin d'éliminer
toute trace de gras ou de poussière.
Installez le microphone.
Reliez le câble à l'appareil en le fixant en plusieurs
endroits avec du ruban adhésif ou équivalent.
⁄
• Installez le microphone aussi loin que possible de
l'emplacement dédié à votre téléphone.
Accessoire4
Fixer le câble à l'aide de bande adhésive
disponible dans le commerce.
Retirez le papier couché
antiadhésif de l'adhésif
double-face afin de
fixer le microphone à
l'emplacement indiqué cidessus.
Ajuster l'orientation du
microphone par rapport au
poste conducteur.
Français | 27
Page 28

Annexe
À propos des fichiers audio
• Fichiers audio compatibles
AAC-LC (.m4a), MP3 (.mp3), WMA (.wma), WAV ou
périphérique USB (.wav)
• Supports de disque compatibles
CD-R/RW/ROM
• Formats de fichiers de disques compatibles
ISO 9660 niveau 1/2, Joliet, Nom de fichier étendu.
• Périphériques USB compatibles
Classe de stockage de masse USB
• Systèmes de fichier de périphérique USB
compatibles
FAT12, FAT16, FAT32
Un guide en ligne sur les fichiers audio est
disponible sur le site à l'adresse suivante :
www.kenwood.com/cs/ce/audiofile/.
iPod/iPhone pouvant être connecté à cet
appareil
Made for
• iPod touch (4th generation)
• iPod touch (3rd generation)
• iPod touch (2nd generation)
• iPod touch (1st generation)
• iPod classic
• iPod with video
• iPod nano (6th generation)
• iPod nano (5th generation)
• iPod nano (4th generation)
• iPod nano (3rd generation)
• iPod nano (2nd generation)
• iPod nano (1st generation)
• iPhone 4S
• iPhone 4
• iPhone 3GS
• iPhone 3G
• iPhone
Pour plus d'informations sur la compatibilité avec les
logiciels iPod/iPhone, visitez le site www.kenwood.
com/cs/ce/ipod/.
Ce produit n’est pas installé par le fabricant d’un véhicule sur la
chaîne de production, ni par le professionnel ayant importé un
véhicule dans un pays membre de l’UE.
Informations sur le traitement des appareils
électriques et électroniques et des batteries
usagés (applicable aux pays de l’UE ayant adopté
un système de tri des déchets)
Les produits et les batteries sur lesquels le
pictogramme (poubelle barrée) est apposé ne
peuvent pas être jetés parmi les déchets
ménagers.
Les vieux appareils électriques et électroniques,
ainsi que les batteries doivent être recyclés dans
un complexe adapté au traitement de ces déchets
et de leurs sous-produits.
Prenez contact avec les services publics locaux
afin de localiser un complexe de recyclage proche
de chez vous.
Recycler de manière adaptée et jeter ses déchets
au bon endroit aide à préserver les ressources tout
en évitant les effets néfastes sur notre santé et
l’environnement.
Remarque : Le signe “Pb” sous le symbole des piles
indique que la batterie contient du
plomb.
Signalisation sur les produits utilisant des lasers
CLASS 1
LASER PRODUCT
L’étiquette est attachée au châssis/boîtier et indique que le
composant utiliser des rayons laser de classe 1. Cela signifie que
l’appareil se sert de rayons laser d’une classe inférieure. Il n’y a
pas de danger de radiation accidentelle hors de l’appareil.
28 | Guide de démarrage rapide
Page 29

Conditions d'utilisation de
l'application Aha™ :
Conditions pour utiliser l'application
Aha™ :
iPhone ou iPod touch
• Utilisez un iPhone ou iPod touch
Apple équipé d'un iOS4 ou
postérieur.
• Recherchez “Aha” dans l'Apple
iTunes App Store pour installer
la toute dernière version de
l'application Aha™ sur votre
appareil.
• iPhone/ iPod touch relié à cet
appareil à l'aide d'un câble KCAiP102.
Android™
• Utiliser la version d'Android OS 2.2
ou postérieure.
• Téléchargez l'application Aha™ sur
votre appareil à partir de la page
Google play.
• Votre appareil doit être compatible
Bluetooth et les profils suivants
doivent pouvoir être pris en
charge.
- SPP (Profil port série)
- A2DP (Profil de distribution audio
avancée)
REMARQUE
• Dans l'application de votre
périphérique, vous devez vous
connecter et créer un compte
Aha gratuit.
• Connexion Internet 3G, LTE, EDGE
ou WiFi.
• Aha™ est un service proposé
par un tiers. Cette offre est donc
sujette à modification sans préavis
Il est donc possible que le service
ne soit pas toujours compatible ou
que certains ou tous les services ne
soient pas disponibles.
• Certaines fonctionnalités Aha™ ne
peuvent être utilisées depuis cet
équipement.
• La marque et les logos Bluetooth appartiennent à
Bluetooth SIG, Inc. et toute utilisation de ces marques par
JVC KENWOOD Corporation est sous licence. Les autres marques
et appellations commerciales appartiennent à leurs propriétaires
respectifs.
• The “AAC” logo is a trademark of Dolby Laboratories.
• “Made for iPod” and “Made for iPhone” mean that an electronic
accessory has been designed to connect specifically to iPod or
iPhone, respectively, and has been certified by the developer to
meet Apple performance standards. Apple is not responsible for
the operation of this device or its compliance with safety and
regulatory standards. Please note that the use of this accessory
with iPod or iPhone may affect wireless performance.
• iPhone, iPod, iPod classic, iPod nano, and iPod touch are
trademarks of Apple Inc., registered in the U.S. and other countries.
Caractéristiques techniques
Section tuner FM
Bande de fréquences (pas de 50 kHz)
: 87,5 MHz – 108,0 MHz
Sensibilité utile (S/B = 26 dB)
: 0,63 µV/75 Ω
Sensibilité d'atténuation (DIN S/B = 46 dB)
: 1,6 µV/75 Ω
Réponse en fréquence (±3 dB)
: 30 Hz – 15 kHz
Taux de Signal/Bruit (MONO) : 75 dB
Séparation stéréo (1 kHz): 4 5 dB
Section tuner MW
Bande de fréquences (pas de 9 kHz)
: 531 kHz – 1611 kHz
Sensibilité utile (S/B = 20 dB)
: 36 µV
Section tuner LW
Bande de fréquences
: 153 kHz – 279 kHz
Sensibilité utile (S/B = 20 dB)
: 57 µV
Section lecteur CD
Diode laser: GaAlAs
Filtre numérique (D/A)
: Suréchantillonnage x8
Convertisseur D/A : 24 bits
Vitesse de rotation (fichiers audio)
: 500 – 200 t/m in (CLV)
Pleurage et scintillement : Non mesurab les
Réponse en fréquence (±1 dB)
: 20 Hz — 20 kHz
Distorsion harmonique totale (1 kHz)
: 0,01 %
Taux de signal/Bruit (1 kHz) : 105 dB
Gamme dynamique : 90 dB
Décodage MP3
: C ompatible ave c le format MPE G-1/2 Audio
Layer-3 (MP3)
Décodage WMA
: Compatib le Windows Med ia Audio
Décodage AAC : Fichiers A AC-LC “.m4a”
Interface USB
Standard USB : USB1.1/ 2.0 (Full speed)
Système de fichiers : FAT12/1 6/32
Intensité maximale en entrée
: CC 5 V
Décodage MP3
: C ompatible ave c le format MPE G-1/2 Audio
Layer-3 (MP3)
Décodage WMA
: Compatib le Windows Med ia Audio
Décodage AAC : Fichiers A AC-LC “.m4a”
Décodage WAV : MIC linéaire
Section audio
Puissance de sortie maximum : 50 W x 4
Puissance de sortie (DIN 45324, +B=14,4 V)
: 30 W x 4
Impédance des enceintes : 4 – 8 Ω
Action en tonalité
Graves : 10 0 Hz ±8 dB
Moyenne s : 1 kHz ±8 dB
Aiguës : 12. 5 kHz ±8 dB
Niveau de préamplification/charge (CD)
: 2500 mV/10 kΩ
Impédance de la sortie préamplifiée : ≤ 600 Ω
Section Bluetooth (modèle DPX405BT
uniquement)
Version : Ce rtifiée B luetooth Ver.2.1+EDR
Bande de fréquences : 2,402 — 2,48 0 GHz
Puissance de sortie
: +4 dBm (MA X), 0 dBm (AVE) Class e d'énergie 2
Portée de communication maximale
: environ 10 m e n ligne de vue dire cte
Profils
: HFP (prof il mains libre s)
: SPP (prof il port sér ie)
: PBAP (profil d'accès au répertoire téléphonique)
: OPP (prof il d'envoi de fic hiers)
: A2DP (Prof il de distrib ution audio av ancée)
: AVRCP (Profil de télécommande audio/vidéo)
Entrée auxiliaire
Réponse en fréquence (±3 dB)
: 20 Hz – 20 kHz
Tension d'entrée maximale : 1 200 mV
Impédance d’entrée : 10 kΩ
Général
Tension de fonctionnement
DPX405BT : 14,4 V (plage auto risée : 10,5 – 16 V)
DPX305U : 14,4 V (plage auto risée : 11 – 16 V)
Consommation de courant maximale : 10 A
Dimensions d'installation (L x H x P)
: 182 x 111 x 157 mm
Poids : 1,5 kg
1 A
• iTunes and Safari are trademark of Apple Inc.
• IOS is a trademark or registered trademark of Cisco in the U.S. and
other countries and is used under license.
• Android and Chrome are trademark of Google Inc.
• Internet Explorer and Windows Media are registered trademark of
Microsoft Corporation in the United States and other countries.
• Firefox is a registered trademark of Mozilla Foundation in the
United States and other countries.
• aha, the Aha logo, and the Aha trade dress are trademarks or
registered trademarks of HARMAN International Industries, used
with permission.
• BlackBerr y®, RIM®, Research In Motion® and related trademarks,
names and logos are the property of Research In Motion Limited
and are registered and/or used in the U.S. and countries around
the world. Used under license from Research In Motion Limited.
Français | 29
Page 30

Inhalt Informationen zur
Informationen zur Kurzanleitung ................................... 30
Vor der Verwendung ........................................................... 31
Vorbereitungen/ Grundbedienung ............................... 32
Musikwiedergabe (CD/USB/iPod) .................................. 33
Radiowiedergabe ................................................................. 34
Freisprech-Telefon ................................................................35
Montagezubehör ................................................................. 36
Hinweise zum Einbau ......................................................... 36
Vor dem Einbau .................................................................... 36
Anschlussdiagramm ............................................................ 37
Montieren der Radioblende/Montage ......................... 40
Entfernen des Geräts...........................................................40
Mikrofon einbauen ............................................................. 41
Anhang ................................................................................... 43
Kurzanleitung
In der vorliegenden Kurzanleitung finden Sie eine
Beschreibung der Geräte-Grundfunktionen.
Informationen über bestimmte Funktionen, die
hier nicht beschrieben sind, finden Sie in der
Bedienungsanleitung auf der mitgelieferten CD-ROM.
Um die Bedienungsanleitung lesen zu können, ist
ein Browser wie z.B. Internet Explorer® 7 oder höher,
Firefox® 3.6 oder höher, Chrome
Safari® 5.1 oder höher, iOS Safari® 4.0 oder höher oder
TM
2.2 oder höher erforderlich.
Android
Die Informationen in dieser Bedienungsanleitung
können geändert werden, falls sich bestimmte
Spezifikationen der Geräte ändern. Die neueste Version
der Bedienungsanleitung können Sie von folgender
Webseite herunterladen:
manual.jvckenwood.com/edition/im369/
TM
20 oder höher,
Die in dieser Bedienungsanleitung dargestellten Abbildungen
der Anzeige und der Frontblende dienen der Veranschaulichung
der Bedienung Ihres Geräts. Daher können die Abbildungen der
Anzeige von der tatsächlichen Anzeige am Gerät abweichen.
Eventuell sind sogar manche Abbildungen der Anzeige nicht
zutreffend.
30 | Kurzanleitung
¤ ACHTUNG
• Bewahren Sie Batterien bis zur Verwendung
außerhalb der Reichweite von Kindern und in der
Originalverpackung auf. Entsorgen Sie gebrauchte
Batterien umgehend. Bei Verschlucken der Batterie
sofort einen Arzt aufsuchen.
• Batteriepackung oder Batterien sollten
keiner großen Hitze, wie beispielsweise
Sonneneinstrahlung, Feuer oder Ähnlichem,
ausgesetzt werden.
• Bewahren Sie die Fernbedienung nicht an heißen
Orten wie beispielsweise auf dem Armaturenbrett
auf.
• Bei falscher Lithium-Batterie besteht
Explosionsgefahr. Ersetzen Sie die Batterie
ausschließlich durch gleiche Batterien oder durch
Batterien desselben Typs.
Page 31

Vor der Verwendung
2 WARNUNG
Zur Vermeidung von Bränden und
Verletzungen beachten Sie bitte die
folgenden Hinweise:
• Halten Sie das Fahrzeug an, bevor Sie das Gerät in
Betrieb nehmen.
• Stellen Sie sicher, dass keine Metallgegenstände
(Münzen, Nadeln, Werkzeuge usw.) ins Innere des
Geräts gelangen und Kurzschlüsse verursachen.
¤
ACHTUNG
• Stellen Sie die Lautstärke so ein, dass Sie noch alle
Geräusche außerhalb des Fahrzeugs wahrnehmen
können. Ist die Lautstärke während des Fahrens zu
hoch eingestellt, besteht Unfallgefahr.
• Wischen Sie die verschmutzte Frontblende mit
einem trockenen Silikontuch oder einem anderen
weichen Tuch ab.
Wird diese Vorsichtsmaßnahme nicht beachtet, kann
der Bildschirm bzw. das Gerät beschädigt werden.
Kondensation
Ist die Klimaanlage im Fahrzeug in Betrieb, kann sich
Feuchtigkeit auf der Laserlinse ansammeln. Dadurch
können Fehler beim Lesen der CD auftreten. Nehmen
Sie die CD aus dem Gerät und warten Sie bis die
Feuchtigkeit getrocknet ist.
Hinweise
• Sollten Sie Probleme bei der Installation des Geräts
haben, lassen Sie sich bitte von Ihrem KenwoodFachhändler beraten.
• Lassen Sie sich beim Kauf von optionalem
Zubehör von Ihrem Kenwood-Händler beraten, um
sicherzustellen, dass das Zubehör von Ihrem Modell
und in Ihrem Bereich unterstützt wird.
• Zeichen nach ISO 8859-5 oder ISO 8859-1 können
angezeigt werden. Siehe “RUSSIAN SET” unter <11-6.
Grundeinstellungen> (Bedienungsanleitung).
• Die Radiodatensystem-Funktion funktioniert nicht,
wenn dieser Dienst von keinem Sender angeboten
wird.
Informationen zu den CDs, die mit diesem
Gerät abgespielt werden können
• Dieses Gerät kann nur CDs mit der Kennung
wiedergeben.
• Die folgenden CDs können nicht verwendet werden:
- CDs, die nicht rund sind.
- CDs, die auf der Aufnahme-Oberfläche eingefärbt
oder verschmutzt sind.
- CD-Rs oder CD-RWs, die nicht abgeschlossen
sind (Einzelheiten hinsichtlich der Finalisierung
finden Sie in den Bedienungsanleitungen Ihrer
CD-Brennsoftware sowie Ihres CD-Recorders.)
- CDs mit einer Größe von 8 cm (3 Zoll) (Falls
Sie dennoch versuchen, eine solche CD mit
einem Adapter zu verwenden, kann es zu einer
Fehlfunktion kommen.)
Handhabung von CDs
• Berühren Sie nicht die Aufnahme-Oberfläche der CD.
• Kleben Sie keine Aufkleber oder ähnliches auf eine
CD. Verwenden Sie dem entsprechend auch keine
CDs, auf denen sich bereits ein Aufkleber befindet.
• Verwenden Sie kein Zubehör für Ihre CD.
• Verwenden Sie zum Reinigen der CD keine
Lösungsmittel. Verwenden Sie ein trockenes
Silikontuch oder ein anderes weiches Tuch.
• Reinigen Sie CDs stets von der Mitte einer CD nach
außen hin.
• Ziehen Sie CDs beim Entfernen aus dem Gerät
horizontal heraus.
• Halten Sie die CD am Rand und nehmen Sie sie von
der Mittelhalterung, bevor Sie die CD einschieben.
Wissenswertes über die Rückstellung Ihres
Gerätes
Sollte das Gerät nicht richtig funktionieren, drücken
Sie die Rückstelltaste. Die Werkseinstellungen werden
wieder hergestellt.
Rückstelltaste
Deutsch | 31
Page 32

Vorbereitungen/ Grundbedienung
[Hauptregler] (Lautstärkeregler)
Zusatzeingang
[SRC]
USB-Anschluss
[DISP]
Demonstrationsmodus deaktivieren
Deaktivieren Sie zunächst den
Demonstrationsmodus, wenn Sie das Gerät nach der
Installation zum ersten Mal benutzen.
Drücken Sie den [Hauptregler], um den
Demonstrationsmodus zu verlassen, wenn die
Meldung “CANCEL DEMO PRESS VOLUME KNOB”
erscheint (ca. 15 Sekunden).
Drehen Sie den [Hauptregler], um “YES”
auszuwählen, und drücken Sie dann auf den
[Hauptregler].
Der Demonstrationsmodus kann auch im
Funktionseinstellungsmodus deaktiviert werden.
Siehe <11-3. Demonstrationsmodus-Einstellungen>
in der Bedienungsanleitung.
Uhr einstellen
Halten Sie den [Hauptregler] gedrückt.
Drehen Sie den [Hauptregler], um die gewünschte
Stunde einzustellen, und drücken Sie dann auf den
[Hauptregler].
Drehen Sie den [Hauptregler], um die gewünschte
Minute einzustellen, und drücken Sie dann auf den
[Hauptregler].
Einschalten
Drücken Sie die [SRC]-Taste, um das Gerät
einzuschalten.
Halten Sie die [SRC]-Taste gedrückt, um das Gerät
auszuschalten.
Lautstärke
Drehen Sie den [Hauptregler] und stellen Sie die
Lautstärke ein.
Lautstärkeabsenkung
Drücken Sie den [Hauptregler].
Zum schnellen Absenken der Lautstärke.
Quellenauswahl
USB-Anschluss
Zusatzeingang
Anzeigenauswahl
Navigation auf der Anzeige
DPX305U
[iPod]
Drücken Sie die [SRC]-Taste mehrere Male, um eine
Quelle auszuwählen.
Quelle Anzeige
Standby “STANDBY”
Tuner “TUNER”
[1]
USB oder iPod
aha (Funktion des DPX405BT)
Bluetooth-Audio (Funktion des DPX405BT) “BT AUDIO”
[1]
CD
Zusatzeingang “AU X”
[1]
Diese Quelle kann nur ausgewählt werden, wenn
sie auch wiedergegeben werden kann.
DPX305U
Drücken Sie die [iPod]-Taste, um als Quelle “iPod”
auszuwählen.
Sie können ein USB-Gerät oder einen iPod
anschließen.
Für den Anschluss eines USB-Geräts oder eines
iPods wird ein CA-U1EX (optionales Zubehör) oder
KCA-iP102 (optionales Zubehör) empfohlen.
Hier kann ein tragbares Audiogerät mit StereoMiniklinke (ø 3,5 mm) angeschlossen werden.
Mit jedem Drücken der [DISP]-Taste wechselt der
gewählte Anzeigemodus.
Siehe <10-4. Umschalten der Textanzeige> in der
Bedienungsanleitung
Halten Sie die [DISP]-Taste gedrückt, um durch
die Textanzeige der CD oder der Audiodatei zu
navigieren.
[1]
“USB” oder “iPod”
“AHA”
“CD”
32 | Kurzanleitung
Page 33

Musikwiedergabe (CD/USB/iPod)
CD-Fach
[1]
[2]
[0]
[4]
[SRC]
USB-Anschluss
[ ]
[ ]
Wiedergabe - Disc
Legen Sie eine CD in das CD-Fach ein.
Nach dem Einlegen wird die Quelle automatisch
umgeschaltet, und die Wiedergabe beginnt.
Wiedergabe - USB-Gerät
Schließen Sie wie oben dargestellt ein USB-Gerät
oder einen iPod an den USB-Anschluss an.
Nach dem Anschließen wird die Quelle automatisch
umgeschaltet, und die Wiedergabe beginnt.
(Maximaler Versorgungsstrom des USB-Anschlusses:
1 A)
DC 5 V
Audiodatei-Ordner auswählen
Drücken Sie die [1]-Taste, um den jeweils nächsten
Ordner zu wählen.
Drücken Sie die [2]-Taste, um den jeweils nächsten
Ordner zu wählen.
Titel auswählen
Drücken Sie die [4]- oder [¢]-Taste, um einen
Titel auszuwählen.
Schnelles Vor- und Zurückspulen des Titels
Halten Sie die [4]- oder [¢]-Taste gedrückt,
um die Musikdatei schnell vor- oder zurückzuspulen
(Titel oder Dateien).
Pause und Wiedergabe
Drücken Sie die [38]-Taste, um die Wiedergabe
einer Musikdatei (Titel oder Datei) anzuhalten oder
fortzusetzen.
[¢]
[L]
Hauptregler
Musiksuche
Suche nach einem Titel, der wiedergegeben werden
soll.
Drücken Sie die [ ]-Taste.
Suchen Sie nach Musik.
Funktion Vorgang
Elemente auswählen Drehen Sie den [Hauptregler].
Auswahl festlegen Drücken Sie den [Hauptregler].
Rückkehr zum vorherigen
Element
Um die Musiksuche in Audiodateien oder auf
dem iPod abzubrechen, halten Sie die [
gedrückt.
CD auswerfen
Drücken Sie die [0]-Taste, um eine CD auszuwerfen.
USB-Gerät/ iPod entfernen
Drücken Sie die [SRC]-Taste, um eine beliebige
andere Quelle als USB, iPod oder aha als Quelle
auszuwählen, und entfernen Sie dann das USBGerät bzw. den iPod.
Die auf dem USB-Gerät bzw. iPod gespeicherten
Daten können beschädigt werden, wenn Sie das
USB-Gerät entfernen, während es als aktive Quelle
genutzt wird.
Drücken Sie die [
]-Taste.
]-Taste
Deutsch | 33
Page 34

Radiowiedergabe
[SRC]
[4] – [6][1] – [3]
[ ]
Tuner-Quelle auswählen
Drücken Sie die [SRC]-Taste, um “TUNER”
auszuwählen.
Band auswählen
Drücken Sie die [ ]-Taste, um FM1, FM2, FM3
oder LW/MW auszuwählen.
Sender auswählen
Drücken Sie die [4]- oder [¢]-Taste, um den
gewünschten Sender auszuwählen.
[¢]
[4]
Senderspeicher
Halten Sie die Taste ([1] bis [6]) gedrückt, um den
ausgewählten Sender abzuspeichern.
Abrufen der im Speicher abgelegten
Sender
Drücken Sie die Taste ([1] bis [6]), auf die der
wiederzugebende Sender abgespeichert ist.
34 | Kurzanleitung
Page 35

Funktion des DPX405BT
Freisprech-Telefon
[SRC]
Hauptregler
[Ú]
[7]
Bluetooth-Gerät registrieren
Sie können Ihr Bluetooth-Gerät für die Verwendung
mit diesem Gerät registrieren.
Drücken Sie die [SRC], um das Gerät einzuschalten.
Registrierung dieses Geräts durch Bedienung des
Bluetooth-Geräts beginnen.
Nehmen Sie das Bluetooth-Gerät in Betrieb, um
die Freisprecheinrichtung zu registrieren (Pairing).
Wählen Sie “DPX4**BT” (für DPX405BT) aus der Liste
der gefundenen Geräte aus.
Falls “PAIRING PASS ****** (Bluetooth-Gerätename)
PRESS VOLUME KNOB” angezeigt wird, fahren Sie
mit Schritt 5 fort.
Geben Sie den PIN-Code (“0000”) in das Bluetooth-
Gerät ein.
Stellen Sie sicher, dass die Registrierung am
Bluetooth-Gerät abgeschlossen wurde.
Es erscheint “PAIRING PASS ****** (BluetoothGerätename) PRESS VOLUME KNOB”.
Der PIN-Code ist standardmäßig auf “0000”
eingestellt. Sie können diesen Code ändern.
Siehe <15-1. PIN-Code registrieren> in der
Bedienungsanleitung.
Drücken Sie den [Hauptregler].
Die Verbindung mit dem Bluetooth-Gerät wird
aufgebaut, nach einiger Zeit wird “PAIRING OK”
angezeigt, und anschließend wird die vorherige
Quelle ausgewählt.
Ist die Registrierung Ihres Mobiltelefons
abgeschlossen, wird das Telefonbuch Ihres
Mobiltelefons automatisch auf dieses Gerät
übertragen. (Wurde das Telefonbuch noch
nicht auf dieses Gerät übertragen, führen Sie
die entsprechenden Bedienvorgänge auf Ihrem
Mobiltelefon aus und übertragen sie es.)
Informationen zur automatischen Verbindung
von iPod touch bzw. iPhone über Bluetooth
• Diese Gerät ist mit der Apple-Auto-Pairing-Funktion
kompatibel. Wird der iPod touch bzw. das iPhone
über ein USB-Kabel an dieses Gerät angeschlossen,
wird er bzw. es automatisch als Bluetooth-Gerät
registriert.
1. Zuerst wird die Bluetooth-Funktion des iPod touch
bzw. iPhones aktiviert.
2. Schließen Sie einen iPod touch bzw. ein iPhone an
den USB-Anschluss an.
3. Drücken Sie den [Hauptregler], um den PairingVorgang zu starten, nachdem Sie das Passwort
bestätigt haben.
Eine Nummer aus dem Telefonbuch wählen
Wählen Sie eine Telefonnummer aus dem
Telefonbuch Ihres Mobiltelefons.
Wurde das Telefonbuch noch nicht auf dieses
Gerät übertragen, führen Sie die entsprechenden
Bedienvorgänge auf Ihrem Mobiltelefon aus und
übertragen sie es. Siehe <15-2. Übertragen des
Telefonbuchs> in der Bedienungsanleitung.
Drücken Sie die [ 7 ]-Taste.
Drehen Sie den [Hauptregler], um den Namen
auszuwählen, und drücken Sie dann auf den
[Hauptregler].
Drehen Sie den [Hauptregler], um eine
Telefonnummer auszuwählen.
Drücken Sie die [ Ú ]-Taste.
Annehmen eines Anrufs
Drücken Sie die [ Ú ]-Taste.
Anruf beenden
Drücken Sie die [ Ú ]-Taste.
Deutsch | 35
Page 36

Montagezubehör
Vor dem Einbau
1
.....1
2
.....1
3
.....2
4 (nur DPX405BT)
3 m .....1
Hinweise zum Einbau
1. Um einen Kurzschluss zu verhindern, ziehen Sie den
Zündschlüssel ab und klemmen Sie die - Batterie
ab.
2. Schließen Sie die Eingangs- und Ausgangskabel
jedes Gerätes richtig an.
3. Schließen Sie die Lautsprecherkabel am Kabelbaum
an.
4. Schließen Sie die Kabel des Kabelbaums in
der folgenden Reihenfolge an: Masse, Batterie,
Zündung.
5. Schließen Sie den Kabelbaumanschluss am Gerät
an.
6. Bauen Sie das Autoradio in Ihrem Fahrzeug ein.
7. Schließen Sie die - Batterie wieder an.
8. Drücken Sie die Rückstelltaste.
2 WARNUNG
• Voraussetzung für den Einbau des Geräts im
Fahrzeug ist ein 12-Volt-Gleichstromanschluss sowie
eine negative Masseverbindung.
• Beim Anschließen des Zündkabels (rot) sowie des
Batteriekabels (gelb) an das Chassis des Fahrwerks
(Masse) können Kurzschlüsse auftreten, die
wiederum Feuer verursachen könnten. Schließen Sie
diese Kabel nur an Stromquellen an, die durch den
Sicherungskasten führen.
¤
ACHTUNG
• Die Montage sowie die Verkabelung dieses Gerätes
macht besondere Fähigkeiten und Erfahrung
erforderlich. Überlassen Sie die Arbeiten zur
Montage und Verkabelung ausgewiesenem
Fachpersonal.
• Betreiben Sie das Gerät ausschließlich mit 12-VoltGleichstrom und negativer Masseverbindung.
• Setzen Sie weder die Frontblende noch deren
Etui direktem Sonnenlicht, extremer Wärme oder
Luftfeuchtigkeit aus. Schützen Sie beides darüber
hinaus vor Staub und Spritzwasser.
• Verwenden Sie auf keinen Fall eigene Schrauben.
Verwenden Sie ausschließlich die mitgelieferten
Schrauben. Zu lange oder zu dicke Schrauben
könnten das Gerät beschädigen.
• Schaltet sich das Gerät nicht ein (“PROTECT” wird
angezeigt), liegt möglicherweise ein Kurzschluss
im Lautsprecherkabel vor, oder das Kabel hat das
Fahrzeugchassis berührt, und die Schutzfunktion
wurde deswegen aktiviert. Daher sollte das
Lautsprecherkabel überprüft werden.
• Falls der Zündschalter Ihres Fahrzeugs keine ACCPosition aufweist, schließen Sie die Zündkabel
an eine Stromquelle an, die sich mit dem
Zündschlüssel ein- und ausschalten lässt. Wenn
Sie die Zündkabel an einer Stromquelle mit einer
konstanten Stromversorgung wie beispielsweise an
Batteriekabeln anschließen, kann sich die Batterie
entladen.
• Wenn die Konsole über einen Deckel verfügt, stellen
Sie sicher, dass die Frontblende beim Öffnen und
Schließen nicht an den Deckel stößt.
• Wenn die Sicherung durchbrennt, überprüfen Sie
zuerst, ob die Drähte keine anderen Teile berühren
und einen Kurzschluss verursachen. Ersetzen Sie
dann die durchgebrannte Sicherung durch eine
neue Sicherung mit den gleichen Nenngrößen.
• Isolieren Sie nicht angeschlossene Kabel mit
Vinylband oder ähnlichem Material. Entfernen
Sie nicht die Schutzhülsen von den Enden nicht
angeschlossener Kabel und Anschlüsse, damit keine
Kurzschlüsse entstehen.
36 | Kurzanleitung
Page 37

Anschlussdiagramm
• Schließen Sie beide Pole der Lautsprecher an den
entsprechenden Lautsprecherausgängen am
Gerät an. Das Gerät kann beschädigt werden oder
den Dienst versagen, wenn Sie die Minuspole
(-) zusammenführen oder über Metallteile des
Fahrzeugs erden.
• Werden nur zwei Lautsprecher an das System
angeschlossen, schließen Sie die Anschlüsse
entweder an den beiden vorderen oder an
den beiden hinteren Ausgangsanschlüssen an
(mischen Sie auf keinen Fall vorn und hinten).
Wenn Sie beispielsweise den +-Anschluss des
linken Lautsprechers an einen der vorderen
Ausgangsanschlüsse anschließen, schließen Sie den
--Anschluss auf keinen Fall an einen der hinteren
Ausgangsanschlüsse an.
• Überprüfen Sie nach der Montage des Geräts, ob
die Bremslichter, Blinker, Scheibenwischer usw.
ordnungsgemäß funktionieren.
• Montieren Sie das Gerät so, dass der Montagewinkel
30˚ oder weniger beträgt.
• Die Empfangsqualität wird u. U. durch metallische
Gegenstände in der Nähe der Bluetooth-Antenne
beeinträchtigt. (Nur DPX405BT)
Bluetooth-Antenne
Guter Empfang
Um einen guten Empfang sicherzustellen, sollten Sie
Folgendes beachten:
• Halten Sie einen Maximalabstand von 10 m zum
Mobiltelefon ein. Die Reichweite kann in bestimmten
Umgebungen weiter abnehmen. Die Reichweite
wird ebenfalls kürzer, wenn sich zwischen dem Gerät
und dem Mobiltelefon Hindernisse befinden. Die
oben genannte maximale Reichweite (10 m) kann
nicht immer garantiert werden.
• In der Nähe befindliche Sendestationen oder
Funksprechgeräte können durch zu starke Signale
die Kommunikation stören.
ISO-Anschluss anschließen
Die Stiftbelegung der ISO-Anschlüsse ist vom
Fahrzeugtyp abhängig. Stellen Sie sicher, dass Sie alles
ordnungsgemäß anschließen, um Schäden am Gerät
zu verhindern.
Der Standardanschluss für den Kabelbaum wird unten
unter 1 beschrieben. Sind die ISO-Anschlussstifte wie
unter 2 beschrieben belegt, führen Sie den Anschluss
bitte wie dargestellt durch.
Stellen Sie bitte sicher, dass das Kabel wie unter 2
unten beschrieben wieder angeschlossen wird, falls
dieses Gerät in ein Fahrzeug der Marke Volkswagen
eingebaut wird.
1 (Standardeinstellung) Der Stift A-7 (rot) des ISO-
Anschlusses am Fahrzeug ist mit der Zündung,
der Stift A-4 (gelb) mit der Konstantstromquelle
verbunden.
Zündkabel (rot)
Gerät Fahrzeug
Batteriekabel
(gelb)
2 Der Stift A-7 (rot) des ISO-Anschlusses am Fahrzeug
ist mit der Konstantstromquelle, der Stift A-4 (gelb)
mit der Zündung verbunden.
Zündkabel (rot)
Gerät
Batteriekabel
(gelb)
Stift A-7 (rot)
Stift A-4 (gelb)
Stift A-7 (rot)
Fahrzeug
Stift A-4 (gelb)
! ACHTUNG
Montieren Sie dieses Gerät in der Konsole Ihres
Fahrzeugs.
Berühren Sie die Metallteile des Geräts während
oder kurz nach der Benutzung nicht. Metallteile wie
der Kühlkörper und das Gehäuse werden heiß.
Deutsch | 37
Page 38

Anschlussdiagramm
Mikrofon
(Zubehör 4)
Mikrofoneingang (nur DPX405BT)
LR
Antennenkabel
Zuordnung/Funktion der Anschlüsse
Stiftnummern für
ISO-Anschlüsse
Externer
Stromanschluss
A-4 gelb Batterie
A-5 blau/weiß Stromsteuerung
A-6 orange/weiß Dimmer
A-7 rot Zündung (ACC)
A-8 schwarz Erdungsanschluss
Lautsprecheranschluss
B-1 lila hinten rechts (+)
B-2 lila/schwarz hinten rechts (–)
B-3 grau vorne rechts (+)
B-4 grau/schwarz vorne rechts (–)
B-5 weiß vorne links (+)
B-6 weiß/schwarz vorne links (–)
B-7 grün hinten links (+)
B-8 grün/schwarz hinten links (–)
Kabelfarbe Funktionen
(Masse)
⁄ Siehe <ISO-Anschluss anschließen> (Seite 37).
Anschluss A
Anschluss B
8
8
1234567
1234567
gelb (Stift A–4)
rot (Stift A–7)
UKW/MW-Antenneneingang (JASO)
gelb (Batteriekabel)
rot (Zündkabel)
38 | Kurzanleitung
Page 39

LR
vorderer Ausgang
Ausgang für hintere Lautsprecher/
Subwoofer-Ausgang
Sicherung (10A)
Kabelbaum
(Zubehör 1)
Falls kein Anschluss hergestellt wird, lassen Sie den Draht nicht
aus der Lasche hervorstehen.
blau/weiß (Stromsteuerung/
Steuerkabel für die Antenne)
P.CONT
ANT.
CONT
Bei Verwendung der optionalen Endstufe an
die Stromsteuerklemme, andernfalls an die
Stromklemme für den Boosterverstärker der Filmoder kurzen Stabantenne anschließen.
braun (Stummschaltkabel)
hellblau/gelb
(Lenkrad-Fernbedienung)
MUTE
REMOTE CONT
STEERING WHEEL
REMOTE INPUT
An den Anschluss anschließen, der geerdet ist,
wenn das Telefon klingelt oder wenn Sie einen
Anruf erledigen.
Lesen Sie für den Anschluss an das
⁄
Kenwood-Navigationssystem die
Bedienungsanleitung des betreffenden
Geräts.
Für die Verwendung der LenkradFernbedienungsfunktion benötigen Sie einen
speziellen Fernbedienungsadapter (nicht im
Lieferumfang enthalten), der auf den Typ Ihres
Fahrzeugs abgestimmt ist.
Deutsch | 39
Page 40

Montieren der Radioblende/
Montage
Montieren der Radioblende
Bringen Sie das Zubehörteil 2 am Gerät an.
Entfernen des Geräts
Entfernen der Radioblende
Lassen Sie die Mitnehmernasen des
Demontageschlüssels (Zubehör 3) eingreifen und
lösen Sie die beiden Arretierungen im unteren
Bereich.
Senken Sie den Rahmen nach unten und ziehen Sie
ihn wie in der Abbildung gezeigt nach vorn.
Zubehör 3
Zubehör 2
Montage
Sichern Sie das Gerät, indem Sie die
Metalllaschen mit einem Schraubendreher
o. Ä. umbiegen.
⁄
• Stellen Sie sicher, dass das Gerät fest sitzt. Wenn
das Gerät nicht fest sitzt, können Fehlfunktionen
(beispielsweise Klangbeeinträchtigungen) auftreten.
Verriegelung
Anschlag
⁄
• Der Rahmen kann in der gleichen Weise von der
Oberseite entfernt werden.
Lösen Sie, wenn der untere Bereich entfernt ist, die
oberen zwei Stellen.
40 | Kurzanleitung
Page 41

nur DPX405BT
Mikrofon einbauen
Entfernen des Geräts
Entfernen Sie wie in Abschnitt <Entfernen der
Radioblende> beschrieben die Radioblende.
Schieben Sie wie gezeigt die beiden
Demontageschlüssel (Zubehör 3) tief in die
Schlitze an den beiden Seiten.
Zubehör 3
Drücken Sie den Demontageschlüssel nach unten
und ziehen Sie das Gerät halb heraus. Üben Sie
derweil Druck nach innen aus.
¤
• Achten Sie darauf, dass Sie sich nicht an den
Vorsprüngen des Demontageschlüssels verletzen.
Fassen Sie das Gerät mit den Händen und ziehen
Sie es vorsichtig ganz heraus.
Überprüfen Sie die Einbaulage des Mikrofons
(Zubehör 4).
Entfernen Sie Öl- und Schmutzrückstände von der
Montagefläche.
Bauen Sie das Mikrofon ein.
Verlegen Sie das Kabel zum Gerät, und befestigen
Sie es an mehreren Stellen mit Klebeband oder
Ähnlichem.
⁄
• Bauen Sie das Mikrofon soweit wie möglich vom
Mobiltelefon entfernt ein.
Zubehör 4
Befestigen Sie das Kabel mit einem
handelsüblichen Klebeband.
Ziehen Sie das Trennpapier
des doppelseitigen
Klebebandes ab, um das
Mikrofon an der oben
dargestellten Stelle zu fixieren.
Richten Sie das Mikrofon
zum Fahrer aus.
Deutsch | 41
Page 42

Anhang
Über Audiodateien
• Abspielbare Audiodateien
AAC-LC (.m4a), MP3 (.mp3), WMA (.wma), WAV vom
USB-Gerät (.wav)
• Abspielbare CD-Medien
CD-R/RW/ROM
• Abspielbare CD-Dateiformate
ISO 9660 Level 1/2, Joliet, lange Dateinamen.
• Abspielbare USB-Geräte
USB-Massenspeicher-Klasse
• Abspielbare Dateisysteme von USB-Geräten
FAT12, FAT16, FAT32
Das Online-Handbuch zu Audiodateien finden Sie auf
der Webseite www.kenwood.com/cs/ce/audiofile/.
iPods/iPhones, die an dieses Gerät
angeschlossen werden können
Made for
• iPod touch (4th generation)
• iPod touch (3rd generation)
• iPod touch (2nd generation)
• iPod touch (1st generation)
• iPod classic
• iPod with video
• iPod nano (6th generation)
• iPod nano (5th generation)
• iPod nano (4th generation)
• iPod nano (3rd generation)
• iPod nano (2nd generation)
• iPod nano (1st generation)
• iPhone 4S
• iPhone 4
• iPhone 3GS
• iPhone 3G
• iPhone
Weitere Informationen zur Kompatibilität mit der iPod/
iPhone-Software erhalten Sie unter: www.kenwood.
com/cs/ce/ipod/.
Dieses Produkt wird nicht serienmäßig durch KFZ-Hersteller
bzw. durch gewerbsmäßige Importeure von Fahrzeugen in
EU-Mitgliedsstaaten eingebaut.
Informationen zur Entsorgung von Elektro- und
Elektronikaltgeräten (anwendbar in EU-Ländern
mit Systemen zur getrennten Abfallsammlung)
Produkte und Batterien mit dem Symbol
(durchgestrichene Abfalltonne auf Rädern) dürfen
nicht als Haushaltsabfälle entsorgt werden.
Elektro- und Elektronikaltgeräte und Batterien
müssen in Anlagen recycelt werden, die auf die
Entsorgung dieser Gegenstände und ihrer
Abfallnebenprodukte ausgelegt sind.
Ausführliche Informationen zur nächstgelegenen
Recycling-Anlage erhalten Sie bei den örtlichen
Behörden.
Die ordnungsgemäße Durchführung von Recycling
und Abfallentsorgung trägt zur Schonung der
Ressourcen bei und verhindert schädliche
Auswirkungen auf Gesundheit und Umwelt.
Hinweis: Das Zeichen “Pb” unter dem
Batteriesymbol bedeutet, dass diese
Batterie Blei enthält.
Kennzeichnung von Produkten, die mit
Lasertechnik arbeiten
CLASS 1
LASER PRODUCT
Dieser Aufkleber wird am Chassis/Gehäuse angebracht und
besagt, dass das Gerät mit Laserstrahlung der Klasse 1 arbeitet.
Das bedeutet, dass das Gerät mit schwächeren Laserstrahlen
arbeitet. Außerhalb des Geräts besteht keine Gefahr schädlicher
Strahlung.
42 | Kurzanleitung
Page 43

Aha™-Anforderungen:
Die Anforderungen für die Wiedergabe
von Aha™ lauten wie folgt:
iPhone oder iPod touch
• Verwenden Sie ein Apple iPhone
bzw. einen Apple iPod touch mit
dem Betriebssystem iOS 4 oder
höher.
• Suchen Sie im Apple iTunes App
Store nach “Aha” und installieren
Sie die aktuellste Version der Aha™App auf Ihrem Gerät.
• iPhone/ iPod touch muss mittels
KCA-iP102 an dieses Gerät
angeschlossen sein.
Android™
• Verwenden Sie Android OS 2.2
oder höher.
• Laden Sie die Aha™-App vom
Google Play Store auf Ihr
Smartphone.
• Bluetooth muss vorhanden sein
und die folgenden Profile müssen
unterstützt werden.
- SPP (Serial Port Profile)
- A2DP (Advanced Audio
Distribution Profile)
HINWEIS
• Melden Sie sich in der Anwendung
auf Ihrem Gerät an und erstellen
Sie ein kostenloses Konto bei Aha.
• Internetverbindung über 3G, LTE,
EDGE oder WiFi.
• Da es sich bei Aha™ um
einen Fremdservice handelt,
sind Änderungen der
technischen Daten vorbehalten.
Dementsprechend kann die
Kompatibilität beeinträchtigt sein
bzw. stehen evt. nicht alle Dienste
zur Verfügung.
• Einige Aha™-Funktionen können
auf diesem Gerät nicht ausgeführt
werden.
• Die Bluetooth-Wortmarke und -Logos sind Eigentum von
Bluetooth SIG, Inc., und jegliche Verwendung dieser Marken durch
JVC KENWOOD Corporation steht unter Lizenz. Andere Marken
und Handelsmarken sind Eigentum der jeweiligen Inhaber.
• The “AAC” logo is a trademark of Dolby Laboratories.
• “Made for iPod” and “Made for iPhone” mean that an electronic
accessory has been designed to connect specifically to iPod or
iPhone, respectively, and has been certified by the developer to
meet Apple performance standards. Apple is not responsible for
the operation of this device or its compliance with safety and
regulatory standards. Please note that the use of this accessory
with iPod or iPhone may affect wireless performance.
• iPhone, iPod, iPod classic, iPod nano, and iPod touch are
trademarks of Apple Inc., registered in the U.S. and other countries.
• iTunes and Safari are trademark of Apple Inc.
Technische Daten
UKW -Tuner
Frequenzbereich (50-kHz-Schritte)
: 87,5 MHz – 108,0 MHz
Empfindlichkeit (Rauschabstand = 26 dB)
: 0,63 μV/75 Ω
Empfindlichkeitsschwelle (DIN S/N = 46 dB)
: 1,6 μV/75 Ω
Frequenzgang (±3 dB)
: 30 Hz – 15 kHz
Rauschabstand (MONO): 75 dB
Kanaltrennung (1 kHz): 45 dB
MW-Tun er
Frequenzbereich (9-kHz-Schritte)
: 531 kHz – 1611 kHz
Empfindlichkeit (Rauschabstand = 20 dB)
: 36 µV
LW-Tun er
Frequenzbereich
: 153 kHz – 279 kHz
Empfindlichkeit (Rauschabstand = 20 dB)
: 57 µV
CD-Player
Laserdiode: GaAlAs
Digitalfilter (D/A)
: 8-faches Oversampling
D/A-Wandler: 24 Bit
Spindeldrehzahl (Audiodateien)
: 500 – 200 U/min (C LV)
Tonhöhenschwankung
: unterhalb des messbaren Bereichs
Frequenzgang (±1 dB)
: 20 Hz – 20 kHz
Gesamtklirrfaktor (1 kHz)
: 0,01 %
Rauschabstand (1 kHz): 105 dB
Dynamikbereich: 90 dB
MP3-Decodierung
: Unterst ützt MPEG -1/2 Aud io Layer-3.
WMA-Decodierung
: Unterstützt Windows Media Audio.
AAC-Decodierung: AAC-LC “.m4a”-Dateien
USB-Schnittstelle
USB-Standard: USB 1.1 / 2.0 (höchste
Übertragungsrate)
Dateisystem: FAT12 / 16 / 32
Maximaler Versorgungsstrom
: DC 5 V
MP3-Decodierung
: Unterst ützt MPEG -1/2 Aud io Layer-3.
WMA-Decodierung
: Unterstützt Windows Media Audio.
AAC-Decodierung: AAC-LC “.m4a”-Dateien
WAV-Decodierung: Lineare PCM
Audio
Maximale Ausgangsleistung: 50 W x 4
Ausgangsleistung (DIN 45324, +B=14,4V)
: 30 W x 4
Lautsprecherimpedanz: 4 – 8 Ω
Klangregler
Bass : 100 H z ±8 dB
Mitte n : 1 kHz ±8 dB
Höhen : 12,5 k Hz ±8 dB
Vorverstärkerpegel/Impedanz (CD)
: 2500 mV/10 kΩ
Vorverstärker-Impedanz: ≤ 6 00 Ω
Bluetooth (nur DPX405BT)
Version: B luetooth Ver.2.1+EDR ze rtifizi ert
Frequenzbereich: 2,402 – 2,480 GH z
Ausgangsleistung
: +4 dBm (max .), 0 dBm (Mitte l) Leistun gsklasse 2
Maximaler Kommunikationsbereich
: Sichtli nie etwa 10 m
Profile
: HFP (Hand s Free Profile)
: SPP (Seria l Port Profi le)
: PBAP (Pho nebook Access P rofile)
: OPP (Obje ct Push Profi le)
: A2DP (Advan ced Audio Dist ribution Pr ofile)
: AVRCP (Audio/Video Remote Control Profile)
Zusatzeingang
Frequenzgang (±3 dB)
: 20 Hz – 20 kHz
Maximaler Spannungseingang: 1200 mV
Eingangsimpedanz: 10 kΩ
Allgemeines
Betriebsspannung
DPX405BT: 14,4 V (10,5 – 16 V zulä ssig)
DPX305U: 14,4 V (11 – 16 V zulässi g)
Maximale Stromaufnahme: 10 A
Einbaumaß (B x H x T)
: 182 x 111 x 157 mm
Gewicht: 1,5 kg
1 A
• IOS is a trademark or registered trademark of Cisco in the U.S. and
other countries and is used under license.
• Android and Chrome are trademark of Google Inc.
• Internet Explorer and Windows Media are registered trademark of
Microsoft Corporation in the United States and other countries.
• Firefox is a registered trademark of Mozilla Foundation in the
United States and other countries.
• aha, the Aha logo, and the Aha trade dress are trademarks or
registered trademarks of HARMAN International Industries, used
with permission.
• BlackBerr y®, RIM®, Research In Motion® and related trademarks,
names and logos are the property of Research In Motion Limited
and are registered and/or used in the U.S. and countries around
the world. Used under license from Research In Motion Limited.
Deutsch | 43
Page 44

Inhoud Over de snelstartgids
Over de snelstartgids .......................................................... 44
Voor de ingebruikneming ................................................. 45
Voorbereidingen/ basisbewerkingen ........................... 46
Muziek afspelen (CD/USB/iPod) ......................................47
Naar de radio luisteren ....................................................... 48
Handsfree telefoneren ........................................................49
Installatieaccessoires ...........................................................50
Installatieprocedure ............................................................ 50
Voor de installatie ................................................................ 50
Verbinden van kabels met aansluitingen ................... 51
Het inbouwframe bevestigen/Bevestiging ................ 54
Toestel verwijderen .............................................................54
De microfoon installeren .................................................. 55
Bijlage ...................................................................................... 57
In deze snelstartgids worden de basisfuncties van dit
toestel besproken.
Raadpleeg de gebruiksaanwijzing op de bijgesloten
cd-rom voor functies die niet in deze gids worden
behandeld.
Voor het raadplegen van de gebruiksaanwijzing is een
browser zoals Internet Explorer® 7 of hoger, Firefox® 3.6
of hoger, Chrome
iOS Safari® 4.0 of hoger of Android
TM
20 of hoger, Safari® 5.1 of hoger,
TM
2.2 of hoger
vereist.
De gebruiksaanwijzing is onderhevig aan
veranderingen, bijvoorbeeld vanwege aanpassing van
de specificaties. De nieuwste gebruiksaanwijzing kan
via de volgende website gedownload worden:
manual.jvckenwood.com/edition/im369/
De afbeeldingen van het display en het voorpaneel in deze
gebruiksaanwijzing zijn slechts voorbeelden en zijn bedoeld om
het gebruik van de bedieningselementen te verduidelijken. Het
is daarom mogelijk dat de displays in de afbeeldingen afwijken
van wat er werkelijk op het display van het apparaat wordt
weergegeven, en dat sommige displays in de afbeeldingen niet
van toepassing zijn.
44 | Snelstartgids
¤ LET OP
• Houd de batterij buiten het bereik van kinderen
en in de oorspronkelijke verpakking totdat u
gereed bent om deze te gaan gebruiken. Gooi
gebruikte batterijen onmiddellijk weg. Als een
batterij wordt ingeslikt, raadpleegt u onmiddellijk
een arts.
• De batterijen mogen niet worden blootgesteld
aan buitensporige hitte, zoals direct zonlicht, vuur,
enz.
• Plaats de afstandsbediening niet op warme
plaatsen zoals het dashboard.
• De lithiumbatterij kan ontploffen als deze niet
correct wordt geplaatst. Vervang de batterij door
hetzelfde of een vergelijkbaar type.
Page 45

Voor de ingebruikneming
2 WAARSCHUWING
Voorkom persoonlijk letsel en/of
brand en neem derhalve de volgende
voorzorgsmaatregelen:
• Stop de auto voordat u het toestel bedient.
• Voorkom kortsluiting en steek derhalve
nooit metalen voorwerpen (zoals munten en
gereedschap) in het toestel.
¤
LET OP
• Stel het volume zo in dat u geluiden van buiten de
auto kunt horen. Rijden met een te hoog volume
kan een ongeluk veroorzaken.
• Veeg het paneel schoon met een droge silicone of
zachte doek.
Als u dit voorschrift negeert kan de monitor of het
toestel beschadigen.
Condensatie
Als de auto airconditioning heeft, kan condens
neerslaan op de laserlens. Hierdoor kunnen
afspeelfouten ontstaan. Verwijder in dat geval de disk
en wacht tot het vocht is verdampt.
Opmerkingen
• Raadpleeg uw Kenwood-dealer indien u problemen
of vragen hebt tijdens de installatie.
• Vraag bij aankoop van optionele accessoires aan
uw Kenwood-dealer of deze functioneren met uw
model en in uw gebied.
• Tekens die voldoen aan de norm ISO 8859-5
of ISO 8859-1 kunnen worden afgespeeld. Zie
“RUSSIAN SET” in <11-6. Begininstellingen>
(gebruiksaanwijzing).
• De Radio Data System-functie werkt niet als de
service door geen enkele zender wordt ondersteund.
Met dit toestel te gebruiken disks
• Dit toestel kan alleen cd’s met het merkteken
weergeven.
• De volgende disks kunnen niet worden gebruikt:
- Disks die niet rond zijn
- Disks met een gekleurd opnameoppervlak of vuile
disks
- Recordable/Rewritable disk die niet is gefinaliseerd
(raadpleeg voor de finalisatiemethode de
diskbrandersoftware en de gebruiksaanwijzing van
uw diskrecorder.)
- 8 cm (3 inch) disk (als deze probeert af te spelen
met een adapter kan het toestel defect raken.)
Behandeling van disks
• Raak het opnameoppervlak van de disk niet aan.
• Plak geen plakband e.d. op de disk. Gebruik ook
geen disks waar plakband e.d. op geplakt is.
• Gebruik geen toebehoren voor disks.
• Gebruik geen oplosmiddelen om disks schoon te
maken. Gebruik een droge silicone of zachte doek.
• Veeg vanuit het midden van de disk naar de rand.
• Trek disks horizontaal uit het toestel.
• Verwijder eventuele randen rond het gat in het
midden en langs de omtrek van de disk voordat u de
disk in het toestel steekt.
Terugstellen van uw toestel
Als het toestel niet naar behoren werkt, drukt u op de
resettoets. Het toestel neemt de fabrieksinstellingen
over.
Resettoets
Nederlands | 45
Page 46

Voorbereidingen/ basisbewerkingen
[Regelknop] (volumeknop)
Hulpingang
[SRC]
USB-aansluiting
[DISP]
De demonstratiemodus annuleren
Annuleer de demonstratiemodus als u deze voor de
eerste keer na de installatie gebruikt.
Druk op de [regelknop] om de
demonstratiemodus te verlaten als het bericht
“CANCEL DEMO PRESS VOLUME KNOB” wordt
weergegeven (circa 15 seconden).
Draai de [regelknop] om “YES” te selecteren en
druk vervolgens op de [regelknop].
De demonstratiemodus kan tevens worden
geannuleerd in de modus Functies instellen.
Zie <11-3. Instelling van de demonstratiemodus>
van de gebruiksaanwijzing.
De klok aanpassen
Druk op de [regelknop] en houd deze ingedrukt.
Draai de [regelknop] om het uur aan te passen en
druk vervolgens op de [regelknop].
Draai de [regelknop] om de minuten aan te passen
en druk vervolgens op de [regelknop].
Voeding
Druk op de toets [SRC] om de stroom in te
schakelen.
Druk op de toets [SRC] en houd deze ingedrukt om
de stroom uit te schakelen.
Volume
Draai aan de [regelknop] om het geluidsvolume
aan te passen.
Demper
Druk op de [regelknop].
Hiermee wordt het volume snel gedempt.
Bronselectie
Druk herhaaldelijk op de toets [SRC] om een bron
te selecteren.
Geluidsbron Display
Stand-by “STANDBY”
Tuner “TUNER”
USB of iPod
aha (functie van DPX405BT)
Bluetooth-audio (functie van DPX405BT) “BT AUDIO”
[1]
CD
Hulpingang “AU X”
[1]
Deze bron kan alleen geselecteerd worden als hij
afgespeeld kan worden.
DPX305U
Druk op de toets [iPod] om de bron op iPod te
schakelen.
USB-aansluiting
Er kan een USB-apparaat of iPod worden
aangesloten.
CA-U1EX (optionele accessoires) of KCA-iP102
(optionele accessoires) worden aanbevolen voor
het aansluiten van een USB-apparaat of iPod.
Hulpingang
Er kan een draagbaar audioapparaat worden
aangesloten via de stereo ministekker (3,5 mm ø).
Display selectie
Elke keer dat u op de knop [DISP] drukt, wordt er
een andere weergavemodus geselecteerd.
Zie <10-4. Tekstweergave selecteren> van de
gebruiksaanwijzing.
Door beeld schuiven
Druk op de toets [DISP] en houd deze ingedrukt
om door de tekstweergave van de cd of van het
audiobestand te schuiven.
DPX305U
[iPod]
[1]
[1]
“USB” of “iPod”
“AHA”
“CD”
46 | Snelstartgids
Page 47

Muziek afspelen (CD/USB/iPod)
Diskgleuf
[1]
[2]
[0]
[4]
[SRC]
USB-aansluiting
[ ]
[ ]
Cd afspelen
Plaats een disk in de diskgleuf.
Als de disk is geplaatst, wordt automatisch van bron
veranderd en wordt het afspelen gestart.
USB-apparaat afspelen
Sluit een USB-apparaat of iPod aan op de USBaansluiting zoals hierboven weergegeven.
Als het apparaat is aangesloten, wordt automatisch
van bron veranderd en wordt het afspelen gestart.
(Maximale toevoerstroom USB-aansluiting: DC 5 V
1 A)
Een map met audiobestanden selecteren
Druk op knop [1] om een volgende map te
selecteren.
Druk op knop [2] om een vorige map te selecteren.
Een muzieknummer selecteren
Druk op de knop [4] of [¢] om een
muzieknummer te selecteren.
Snel vooruit- of terugspoelen door het
nummer
Druk op knop [4] of [¢] en houd de knop
ingedrukt om het nummer (tracks of bestanden)
snel vooruit of achteruit te spoelen.
Onderbreken en afspelen
Druk op de knop [38] om het afspelen van een
muzieknummer (liedje of bestand) te onderbreken
of te hervatten.
[¢]
[L]
Regelknop
Muziek zoeken
Het nummer dat u wilt afspelen zoeken.
Druk op de toets [ ].
Zoek naar muziek.
Type bewerking Actie
Items selecteren Draai de [regelknop].
Selectie bepalen Druk op de [regelknop].
Teruggaan naar een vorig item
U kunt het zoeken naar muziek in audiobestanden
of op de iPod annuleren door op de toets [
drukken en deze ingedrukt te houden.
Disk uitwerpen
Druk op de toets [0] om een disk uit te werpen.
USB-apparaat/iPod verwijderen
Druk op de toets [SRC] om de bron te veranderen
naar een andere dan USB, iPod of aha, en verwijder
daarna het USB-apparaat of de iPod.
Gegevens op het USB-apparaat of op de iPod
kunnen beschadigd raken als u het apparaat
verwijdert terwijl het als actieve bron in gebruik is.
Druk op de knop [
].
] te
Nederlands | 47
Page 48

Naar de radio luisteren
[SRC]
[4] – [6][1] – [3]
[ ]
Een tunerbron selecteren
Druk op de toets [SRC] om “TUNER” te selecteren.
Frequentieband selecteren
Druk op de knop [ ] om FM1, FM2, FM3 of LW/
MW te selecteren.
Radiozender selecteren
Druk op de knop [4] of [¢] om de radiozender
waarnaar u wilt luisteren te selecteren.
[¢]
[4]
Zendervoorkeurgeheugen
Druk op de knop ([1] tot [6]) en houd deze
ingedrukt om het geselecteerde station toe te
wijzen.
Oproepen van zenders die in het geheugen
zijn vastgelegd
Druk de knop ([1] tot [6]) in die correspondeert
met de zender waarnaar u wilt luisteren.
48 | Snelstartgids
Page 49

Functie van DPX405BT
Handsfree telefoneren
[SRC]
Regelknop
[Ú]
[7]
Een Bluetooth-apparaat registreren
U kunt uw Bluetooth-apparaat bij dit toestel
registreren.
Druk op de toets [SRC] om de stroom in te
schakelen.
Registreer dit toestel door het Bluetooth-apparaat
te gebruiken.
Registreer het handsfree toestel (pairing) door
het Bluetooth-apparaat te gebruiken. Selecteer
“DPX4**BT” (voor DPX405BT) uit de lijst met
gevonden toestellen.
Als “PAIRING PASS ****** (naam van Bluetooth-
apparaat) PRESS VOLUME KNOB” wordt
weergegeven, ga dan door met stap 5.
Voer de pincode (“0000”) in op het Bluetooth-
apparaat.
Controleer op het Bluetooth-apparaat of de
registratie werd voltooid.
“PAIRING PASS ****** (naam van Bluetoothapparaat) PRESS VOLUME KNOB” wordt
weergegeven.
De pincode is standaard ingesteld op “0000”. U
kunt deze code wijzigen. Zie <15-1. De PIN-code
registreren> van de gebruiksaanwijzing.
Druk op de [regelknop].
Het aansluiten op uw Bluetooth-apparaat wordt
gestart, vervolgens wordt na enige tijd “PAIRING
OK” weergegeven en tot slot wordt de vorige bron
geselecteerd.
Als het registreren van uw mobiele telefoon is
voltooid, wordt het telefoonboek automatisch uit
de telefoon gedownload naar dit toestel. (Als het
telefoonboek nog niet is gedownload naar dit
toestel, gebruikt u de telefoon om dit alsnog te
doen).
Automatische aansluiting van de iPod touch of
de iPhone via Bluetooth
• Dit toestel is compatibel met Apple-functie voor
automatisch koppelen. Als de iPod touch of de
iPhone via een USB-kabel op dit toestel wordt
aangesloten, wordt het automatisch geregistreerd
als een Bluetooth-apparaat.
1. Schakel eerst de Bluetooth-functie van de iPod
touch of de iPhone in.
2. Sluit een iPod touch of een iPhone op de USBaansluiting aan.
3. Druk op de [regelknop] om het apparaat te
koppelen zodra u het wachtwoord hebt bevestigd.
Een nummer bellen in het telefoonboek
Kies het telefoonnummer in het telefoonboek van
uw mobiele telefoon.
Als het telefoonboek nog niet is gedownload naar
dit toestel, gebruikt u de telefoon om dit alsnog te
doen. Zie <15-2. De telefoonlijst downloaden> van
de gebruiksaanwijzing.
Druk op knop [7].
Draai de [regelknop] om de naam te selecteren en
druk vervolgens op de [regelknop].
Draai de regelknop om een telefoonnummer te
selecteren.
Druk op knop [ Ú ].
Een telefonisch gesprek beantwoorden
Druk op knop [ Ú ].
Een gesprek beëindigen
Druk op knop [ Ú ].
Nederlands | 49
Page 50

Installatieaccessoires
Voor de installatie
1
.....1
2
.....1
3
.....2
4 (alleen DPX405BT)
3 m .....1
Installatieprocedure
1. Voorkom kortsluiting door de sleutel uit het
contactslot te verwijderen en de - accu los te
koppelen.
2. Zorg voor de juiste verbindingen van invoer- en
uitvoerkabels op elk toestel.
3. Sluit de luidsprekerdraden van de
bedradingsbundel aan.
4. Sluit de draden van de bedradingsbundel in de
volgende volgorde aan: massa, accu, ontsteking.
5. Neem de bedradingsbundel en verbind deze met
het toestel.
6. Installeer het toestel in het voertuig.
7. Sluit de - pool van de accu weer aan.
8. Druk op de reset-knop.
50 | Snelstartgids
2WAARSCHUWING
• Het toestel kan uitsluitend worden geïnstalleerd
in een auto met een 12V-accu met massa aan de
min-pool.
• Als u de ontstekingskabel (rood) en de accukabel
(geel) op het chassis van de auto (massa) aansluit,
kan u een kortsluiting veroorzaken waardoor brand
kan ontstaan. Sluit deze kabels altijd aan op de
voedingsbron die door de zekeringkast loopt.
¤
LET OP
• De bevestiging en bedrading van dit product vereist
vakbekwaamheid en ervaring. Laat de bevestiging
en bedrading om veiligheidsredenen door vaklui
uitvoeren.
• Zorg dat het toestel op een negatieve
gelijkstroomvoeding van 12-volt is geaard.
• Installeer het toestel niet op plaatsen die aan direct
zonlicht, hitte of extreme vochtigheid blootstaan.
Vermijd ook plaatsen waar het zeer stoffig is of waar
gevaar bestaat voor waterspatten.
• Gebruik bij het installeren uitsluitend de bijgeleverde
schroeven. Gebruik uitsluitend de meegeleverde
schroeven. Het gebruik van onjuiste schroeven kan
resulteren in schade aan het toestel.
• Als de stroom niet is ingeschakeld (“PROTECT” wordt
weergegeven), is er mogelijk sprake van kortsluiting
in de luidsprekerkabel of raakt deze het chassis van
het voertuig waardoor de beschermingsfunctie
mogelijk is geactiveerd. Daarom moet u de
luidsprekerkabel controleren.
• Als de voeding van uw auto geen ACC-stand
heeft, verbind dan de ontstekingsdraden met
een voedingsbron die met de contactsleutel kan
worden aan- en uitgezet. Als u de ontstekingsdraden
verbindt met een constante voedingsbron, zoals de
accukabels, dan kan de accu leeglopen.
• Als de console een deksel heeft, moet u er bij
de installatie van het toestel op letten dat het
voorpaneel bij het openen en sluiten het deksel
niet raakt.
• Als de zekering is doorgebrand, controleert u eerst of
de kabels geen andere onderdelen raken en zo een
kortsluiting veroorzaken en vervangt u vervolgens
de oude zekering door een nieuwe met dezelfde
stroomsterkte.
• Isoleer niet-aangesloten kabels met isolatieband of
ander geschikt materiaal. Voorkom kortsluiting door
de kapjes op het uiteinde van de niet-aangesloten
kabels en aansluitingen niet te verwijderen.
• Sluit de luidsprekerdraden correct aan op de
bijbehorende aansluitingen. Dit toestel kan
beschadigd raken of niet functioneren als u de
- kabels deelt of met een metalen deel van het
voertuig aardt.
Page 51

• Wanneer u slechts twee luidsprekers op het
systeem aansluit, sluit u de stekkers aan op beide
voor-uitgangsaansluitingen of beide achteruitgangsaansluitingen (meng de voor- en achteruitgangsaansluitingen niet). Als u, bijvoorbeeld,
de + connector van de linker luidspreker
aansluit op een voor-uitgangsaansluiting, sluit
dan de - connector niet aan op een achteruitgangsaansluiting.
• Controleer na het installeren van het toestel of de
remlichten, richtingaanwijzers, ruitenwissers, enz. van
de auto juist functioneren.
• Installeer het toestel onder een maximale hoek van
30˚.
• De ontvangst wordt mogelijk slecht wanneer zich
metalen voorwerpen in de buurt van de Bluetoothantenne bevinden. (alleen DPX405BT)
Bluetooth-antenne
Voor een goede ontvangst
Houd voor een goede ontvangst rekening met het
volgende:
• Communiceer met de mobiele telefoon terwijl deze
zich op een afstand van maximaal 10 m bevindt. Het
communicatiebereik kan korter worden, afhankelijk
van de omgevingssituatie. Het communicatiebereik
wordt tevens korter als er zich een obstakel tussen
dit toestel en de mobiele telefoon bevindt. Het
bovengenoemde maximale communicatiebereik (10
m) is niet altijd verzekerd.
• Een zendstation of walkietalkie in de buurt kan de
communicatie verstoren ten gevolge van een te
krachtig signaal.
Verbinden van kabels met
aansluitingen
Aansluiten van de ISO-stekker
De penopstelling van de ISO-stekkers is afhankelijk van
uw type auto. Zorg dat de aansluitingen juist zijn om
beschadiging van het toestel te voorkomen.
De standaardverbinding van de bedradingsbundel
wordt in stap 1 hieronder beschreven. Maak de
getoonde verbindingen als de penopstelling van de
ISO-stekker overeenkomt met de beschrijving in 2.
De kabel moet opnieuw worden aangesloten zoals
getoond in 2 hieronder als u dit toestel installeert in
Volkswagen-modellen.
1 (Standaardverbinding) De pen A-7 (rood) van de
ISO-stekker van de auto is verbonden met het
contact en de pen A-4 (geel) is verbonden met de
constante spanningsbron.
Ontstekingskabel
(rood)
Toestel
Accukabel
(geel)
2 De pen A-7 (rood) van de ISO-stekker van de auto is
verbonden met de constante spanningsbron en de
pen A-4 (geel) is verbonden met het contact.
Ontstekingskabel
(rood)
Toestel
Accukabel
(geel)
Pen A-7
(rood)
Pen A-4
(geel)
Pen A-7
(rood)
Pen A-4
(geel)
Auto
Auto
! LET OP
Installeer dit toestel in de console van uw voertuig.
Raak de metalen onderdelen van dit toestel niet
aan tijdens en kort na het gebruik van het toestel.
Metalen onderdelen zoals de warmteafvoer en
behuizing worden heet.
Nederlands | 51
Page 52

Verbinden van kabels met aansluitingen
Microfooningang (alleen DPX405BT)
Microfoon
(accessoire 4)
Antennekabel
LR
Stekkerfunctietabel
Pennummers voor
ISO-stekkers
Externe
spanningsaansluiting
A-4 Geel Accu
A-5 Blauw/wit Spanningsregeling
A-6 Oranje/wit Dimmer
A-7 Rood Contact (ACC)
A-8 Zwart Massaverbinding
Luidsprekerstekker
B-1 Paars Rechts achter (+)
B-2 Paars/zwart Rechts achter (–)
B-3 Grijs Rechts voor (+)
B-4 Grijs/zwart Rechts voor (–)
B-5 Wit Links voor (+)
B-6 Wit/zwart Links voor (–)
B-7 Groen Links achter (+)
B-8 Groen/zwart Links achter (–)
Kleur van kabel Functies
⁄ Zie <Aansluiten van de ISO-stekker> (pagina 51).
Aansluiting A
Aansluiting B
8
8
1234567
1234567
Geel (pen A–4)
Rood (pen A–7)
FM/AM antenne-ingang (JASO)
Geel (accukabel)
Rood (ontstekingskabel)
52 | Snelstartgids
Page 53

LR
Zekering (10A)
Bedradingsbundel
(accessoire 1)
Zorg dat de kabel niet uit het lipje komt wanneer u geen verbindingen
heeft gemaakt.
Blauw/wit (geschakelde
voeding/antennemotor)
Vooruitgang
Achter-uitgang/ subwoofer-uitgang
Sluit aan op de voedingsaansluiting wanneer u de
P.CONT
ANT.
CONT
optionele vermogensversterker gebruikt, of op de
spanningsaansluiting van de antenneversterker
voor de platte of pooltype antenne.
Bruin (draad stilteregeling)
Lichtblauw/geel (draad
stuurafstandsbediening)
MUTE
REMOTE CONT
STEERING WHEEL
REMOTE INPUT
Verbinden met de aansluiting die is geaard
tijdens de ontvangst van of gedurende een
telefoongesprek.
Raadpleeg de navigatiehandleiding als u een
⁄
Kenwood-navigatiesysteem wilt aansluiten.
Als u de stuurafstandsbediening wilt gebruiken,
hebt u een adapter nodig (niet geleverd) die bij
uw auto past.
Nederlands | 53
Page 54

Het inbouwframe
bevestigen/Bevestiging
Het inbouwframe bevestigen
Bevestig accessoire 2 op het toestel.
Toestel verwijderen
Het inbouwframe verwijderen
Steek de klempennen op het uitbouwsleutel
(accessoire 3) in en verwijder de twee
vergrendelingen aan de onderkant.
Breng het frame omlaag en trek het naar voren
zoals te zien is in de afbeelding.
Accessoire 3
Accessoire 2
Bevestiging
Buig de lipjes van de bevestigingshuls
met een schroevendraaier of iets
dergelijks en bevestig op zijn plaats.
⁄
• Controleer of het toestel goed op zijn plaats is
geïnstalleerd. Als het toestel niet stabiel is, kan het
slecht werken (het geluid kan bijvoorbeeld soms
onderbroken worden).
Vergrendeling
Klem
⁄
• Aan de bovenkant kan het frame op dezelfde manier
worden verwijderd.
Nadat de onderkant is verwijderd, verwijdert u de
twee plaatsen aan de bovenkant.
54 | Snelstartgids
Page 55

alleen DPX405BT
De microfoon installeren
Toestel verwijderen
Verwijder het inbouwframe (zie hiervoor de sectie
<Het inbouwframe verwijderen>).
Steek de twee uitbouwsleutels (accessoire 3) diep
in de openingen aan beide kanten, zie afbeelding.
Accessoire 3
Breng de uitbouwsleutel omlaag en trek het toestel
half naar voren terwijl u naar het midden drukt.
¤
• Wees voorzichtig om verwonding door de
klempennen op de uitbouwsleutel te vermijden.
Trek het toestel met uw handen geheel naar voren
en let op dat u het toestel niet laat vallen.
Controleer de installatiepositie van de microfoon
(accessoire 4).
Verwijder olie en ander vuil van het
installatieoppervlak.
Installeer de microfoon.
Leid de kabel naar het toestel en zet deze op
verschillende plaatsen vast met behulp van tape of
iets dergelijks.
⁄
• Installeer de microfoon zo ver mogelijk van de
mobiele telefoon.
Accessoire 4
Bevestig de kabel met in de handel
verkrijgbare tape.
Verwijder de beschermlaag
van het dubbelzijdige
plakband voor bevestiging van de microfoon op
de hierboven getoonde
plaats.
Richt de microfoon op de
bestuurder.
Nederlands | 55
Page 56

Bijlage
Audiobestanden
• Afspeelbare audiobestanden
AAC-LC (.m4a), MP3 (.mp3), WMA (.wma), WAV van
USB-apparaat (.wav)
• Afspeelbare diskmedia
CD-R/RW/ROM
• Bestandsindelingen voor afspeelbare disks
ISO 9660 Niveau 1/2, Joliet, lange bestandsnaam.
• Afspeelbaar USB-apparaten
USB-massaopslag klasse
• Bestandssystemen voor afspeelbare USB-apparaten
FAT12, FAT16, FAT32
Een online handleiding over
audiobestanden is beschikbaar op de site
www.kenwood.com/cs/ce/audiofile/.
iPod/iPhone die kan worden aangesloten
op dit toestel
Made for
• iPod touch (4th generation)
• iPod touch (3rd generation)
• iPod touch (2nd generation)
• iPod touch (1st generation)
• iPod classic
• iPod with video
• iPod nano (6th generation)
• iPod nano (5th generation)
• iPod nano (4th generation)
• iPod nano (3rd generation)
• iPod nano (2nd generation)
• iPod nano (1st generation)
• iPhone 4S
• iPhone 4
• iPhone 3GS
• iPhone 3G
• iPhone
Kijk voor informatie over de compatibiliteit met iPod-/
iPhone-software op www.kenwood.com/cs/ce/ipod/.
Dit product is niet geïnstalleerd door de fabrikant van een
voertuig in de productielijn of door de professionele importeur
van een voertuig in een lidstaat van de EU.
Informatie met betrekking tot de afvoer van
oude elektrische en elektronische apparatuur
en batterijen (van toepassing op EU-landen die
aparte systemen voor afvalinzameling hebben
geïntroduceerd)
Producten en batterijen met het symbool
(afvalcontainer met kruis) kunnen niet worden
afgevoerd als huishoudelijk afval.
Oude elektrische en elektronische apparaten en
batterijen moeten worden gerecycled in een
installatie waar deze items en hun bijproducten
kunnen worden verwerkt.
Neem contact op met uw lokale autoriteiten voor
nadere details bij het zoeken naar de
dichtstbijzijnde afvalverwerkingsinstallatie.
Correcte recycling en afvalverwijdering helpt
hulpbronnen te besparen en negatieve gevolgen
voor onze gezondheid en het milieu te
voorkomen.
Opmerking: Het teken “Pb” onder het symbool voor
batterijen geeft aan dat deze batterij
lood bevat.
De markering van producten waarbij gebruik
wordt gemaakt van lasers
CLASS 1
LASER PRODUCT
Het label is bevestigd aan het chassis/de behuizing en geeft
aan dat de component gebruikmaakt van laserstralen die
zijn geclassificeerd als Klasse 1. Dit betekent dat het toestel
gebruikmaakt van laserstralen van een lagere (zwakkere) klasse.
Er bestaat geen risico op gevaarlijke straling buiten het toestel.
56 | Snelstartgids
Page 57

Vereisten voor Aha™:
Voor het luisteren naar Aha™ gelden de
volgende vereisten:
iPhone of iPod touch
• Gebruik een Apple iPhone of iPod
touch met iOS4 of hoger.
• Zoek in de Apple iTunes App Store
naar “Aha” en installeer de recentste
versie van de Aha™-toepassing op
uw apparaat.
• iPhone/ iPod touch op dit toestel
aangesloten via een KCA-iP102kabel.
Android™
• Gebruik Android OS 2.2 of hoger.
• Ga naar Google Play en download
de Aha™-toepassing op uw
smartphone.
• Bluetooth moet ingebouwd zijn
en de volgende profielen moeten
worden ondersteund.
- SPP (Serial Port Profile)
- A2DP (Advanced Audio
Distribution Profile)
OPMERKING
• Meld u bij de toepassing op uw
apparaat aan en maak een gratis
account bij Aha aan.
• Internetverbinding via 3G, LTE,
EDGE of WiFi.
• Omdat Aha™ een service
van derden is, kunnen de
specificaties zonder voorafgaande
bekendmaking worden gewijzigd.
Bijgevolg kan de compatibiliteit
worden aangetast en zijn bepaalde
of alle diensten mogelijk niet meer
beschikbaar.
• Bepaalde Aha™-functies kunnen
niet via het toestel worden
bediend.
• Het Bluetooth-woordmerk en de Bluetooth-logo's zijn het
eigendom van Bluetooth SIG, Inc. en elk gebruik van dergelijke
merken door JVC KENWOOD Corporation vindt plaats onder
licentie. Andere handelsmerken en handelsnamen zijn het
eigendom van hun respectievelijke houders.
• The “AAC” logo is a trademark of Dolby Laboratories.
• “Made for iPod” and “Made for iPhone” mean that an electronic
accessory has been designed to connect specifically to iPod or
iPhone, respectively, and has been certified by the developer to
meet Apple performance standards. Apple is not responsible for
the operation of this device or its compliance with safety and
regulatory standards. Please note that the use of this accessory
with iPod or iPhone may affect wireless performance.
• iPhone, iPod, iPod classic, iPod nano, and iPod touch are
trademarks of Apple Inc., registered in the U.S. and other countries.
Technische gegevens
FM-tunergedeelte
Frequentiebereik (50 kHz afstand)
: 87,5 MHz – 108,0 MHz
Bruikbare gevoeligheid (signaal/ruisverhouding =
26dB)
: 0,63 μV/75 Ω
Onderdrukkingsgevoeligheid (DIN S/R = 46 dB)
: 1,6 μV/75 Ω
Frequentieweergave (±3 dB)
: 30 Hz – 15 kHz
Signaal/ruisverhouding (MONO): 75 dB
Stereoscheiding (1 kHz): 4 5 dB
MW-tunergedeelte
Frequentiebereik (9 kHz afstand)
: 531 kHz – 1611 kHz
Bruikbare gevoeligheid (signaal/ruisverhouding =
20dB)
: 36 µV
LW-tunergedeelte
Frequentiebereik
: 153 kHz – 279 kHz
Bruikbare gevoeligheid (signaal/ruisverhouding =
20dB)
: 57 µV
Cd-spelergedeelte
Laserdiode: GaAlAs
Digitaal filter (D/A)
: 8 keer overs ampling
D/A-converter: 24 bit
Assnelheid (audiobestanden)
: 500 – 200 rp m (CLV)
Wow & flutter: On der meetbar e limiet
Frequentieweergave (±1 dB)
: 20 Hz – 20 kHz
Totale harmonische vervorming (1 kHz)
: 0,01 %
Signaal/ruisverhouding (1 kHz): 105 dB
Dynamisch bereik: 90 dB
MP3-decodering
: Conform MP EG-1/2 Audio Layer-3
WMA-decodering
: C ompatibel me t Windows Med ia Audio
AAC-decodering: AAC-LC “.m4a” bestan den
USB-interface
USB-standaard: USB1.1/ 2.0 (volledige sn elheid)
Bestandsindeling : FAT12 /16/32
Maximale toevoerstroom
: DC 5 V
MP3-decodering
: Conform MP EG-1/2 Audio Layer-3
WMA-decodering
: C ompatibel me t Windows Med ia Audio
AAC-decodering: AAC-LC “.m4a” bestan den
WAV-decodering: Lineair PCM
Audiogedeelte
Maximaal uitgangsvermogen: 50 W x 4
Uitgangsvermogen (DIN 45324, +B=14,4 V)
: 30 W x 4
Luidsprekerimpedantie: 4 – 8 Ω
Toonbereik
Lage ton en : 100 Hz ±8 dB
Middent onen : 1 kHz ±8 dB
Hoge ton en : 12,5 kHz ±8 dB
Voor-uitgangsniveau/belasting (cd)
: 2500 mV/10 kΩ
Voor-uitgangsimpedantie: ≤ 60 0 Ω
Bluetooth-gedeelte (alleen DPX405BT)
Versie: B luetooth Ver.2.1+EDR ge certifi ceerd
Frequentiebereik: 2,402 – 2,480 GH z
Uitgangsvermogen
: +4dBm (M AX), 0dBm (AVE) k lasse 2 verm ogen
Maximaal communicatiebereik
: In rechte l ijn ong. 10 m
Profielen
: HFP (Hand s Free Profile)
: SPP (Seria l Port Profi le)
: PBAP (Pho nebook Access P rofile)
: OPP (Obje ct Push Profi le)
: A2DP (Advan ced Audio Dist ribution Pr ofile)
: AVRCP (Audio/Video Remote Control Profile)
Hulpingang
Frequentieweergave (±3 dB)
: 20 Hz – 20 kHz
Maximale ingangsspanning: 1200 mV
Ingangsimpedantie: 10 kΩ
Algemeen
Bedrijfsspanning
DPX405BT: 14,4 V (10,5 – 16V toe gestaan)
DPX305U: 14,4 V (11 – 16 V toeges taan)
Maximaal stroomverbruik: 10 A
Installatie-afmetingen (B x H x D)
: 182 x 111 x 157 mm
Gewicht: 1,5 kg
1 A
• iTunes and Safari are trademark of Apple Inc.
• IOS is a trademark or registered trademark of Cisco in the U.S. and
other countries and is used under license.
• Android and Chrome are trademark of Google Inc.
• Internet Explorer and Windows Media are registered trademark of
Microsoft Corporation in the United States and other countries.
• Firefox is a registered trademark of Mozilla Foundation in the
United States and other countries.
• aha, the Aha logo, and the Aha trade dress are trademarks or
registered trademarks of HARMAN International Industries, used
with permission.
• BlackBerr y®, RIM®, Research In Motion® and related trademarks,
names and logos are the property of Research In Motion Limited
and are registered and/or used in the U.S. and countries around
the world. Used under license from Research In Motion Limited.
Nederlands | 57
Page 58

Declaration of Conformity with regard to the EMC
Directive 2004/108/EC
Declaration of Conformity with regard to the
R&TTE Directive 1999/5/EC
Manufacturer:
JVC KENWOOD Corporation
3-12, Moriyacho, Kanagawa-ku, Yokohama-shi, Kanagawa 2210022, Japan
EU Representative's:
Kenwood Electronics Europe BV
Amsterdamseweg 37, 1422 AC UITHOORN, The Netherlands
Konformitätserklärung in Bezug auf die EMCVorschrift 2004/108/EC
Konformitätserklärung in Bezug auf die R&TTEVorschrift 1999/5/EC
Hersteller:
JVC KENWOOD Corporation
3-12, Moriyacho, Kanagawa-ku, Yokohama-shi, Kanagawa 2210022 Japan
EU-Vertreter:
Kenwood Electronics Europe BV
Amsterdamseweg 37, 1422 AC UITHOORN, Niederlande
Déclaration de conformité se rapportant à la
directive EMC 2004/108/EC
Déclaration de conformité se rapportant à la
directive R&TTE 1999/5/EC
Fabricant:
JVC KENWOOD Corporation
3-12, Moriyacho, Kanagawa-ku, Yokohama-shi, Kanagawa 2210022 Japon
Représentants dans l’UE:
Kenwood Electronics Europe BV
Amsterdamseweg 37, 1422 AC UITHOORN, Pays-Bas
Conformiteitsverklaring met betrekking tot de
EMC-richtlijn van de Europese Unie (2004/108/
EC)
Conformiteitsverklaring met betrekking tot de
R&TTE-richtlijn van de Europese Unie (1999/5/EC)
Fabrikant:
JVC KENWOOD Corporation
3-12, Moriyacho, Kanagawa-ku, Yokohama-shi, Kanagawa 2210022 Japan
EU-vertegenwoordiger:
Kenwood Electronics Europe BV
Amsterdamseweg 37, 1422 AC UITHOORN, Nederland
Page 59

English
• Hereby, JVC KENWOOD declares that this unit DPX405BT is in compliance with the
essential requirements and other relevant provisions of Directive 1999/5/EC.
Français
• Par la présente JVC KENWOOD déclare que l’appareil DPX405BT est conforme aux
exigences essentielles et aux autres dispositions pertinentes de la directive 1999/5/CE.
• Par la présente, JVC KENWOOD déclare que ce DPX405BT est conforme aux exigences
essentielles et aux autres dispositions de la directive 1999/5/CE qui lui sont applicables.
Deutsch
• Hiermit erklärt JVC KENWOOD, dass sich dieser DPX405BT in Übereinstimmung mit den
grundlegenden Anforderungen und den anderen relevanten Vorschriften der Richtlinie
1999/5/EG befindet. (BMWi)
• Hiermit erklärt JVC KENWOOD die Übereinstimmung des Gerätes DPX405BT mit
den grundlegenden Anforderungen und den anderen relevanten Festlegungen der
Richitlinie 1999/5/EG. (Wien)
Nederlands
• Hierbij verklaart JVC KENWOOD dat het toestel DPX405BT in overeenstemming is met
de essentiële eisen en de andere relevante bepalingen van richtlijn 1999/5/EG.
• Bij deze verklaat JVC KENWOOD dat deze DPX405BT voldoet aan de essentiële eisen en
aan de overige relevante bepalingen van Richtlijn 1999/5/EC.
Italiano
• Con la presente JVC KENWOOD dichiara che questo DPX405BT è conforme ai requisiti
essenziali ed alle altre disposizioni pertinenti stabilite dalla direttiva 1999/5/CE.
Español
• Por medio de la presente JVC KENWOOD declara que el DPX405BT cumple con los
requisitos esenciales y cualesquiera otras disposiciones aplicables o exigibles de la
Directiva 1999/5/CE.
Português
• JVC KENWOOD declara que este DPX405BT está conforme com os requisitos essenciais e
outras disposições da Directiva 1999/5/CE.
Polska
• JVC KENWOOD niniejszym oświadcza, że DPX405BT spełnia zasadnicze wymogi oraz
inne istotne postanowienia dyrektywy 1999/5/EC.
Český
• JVC KENWOOD timto prohlasuje, ze DPX405BT je ve shode se zakladnimi pozadavky a s
dalsimi prislusnymi ustanoveni Narizeni vlady c. 426/2000 Sb.
Magyar
• Alulírott, JVC KENWOOD, kijelenti, hogy a jelen DPX405BT megfelel az 1999/5/
EC irányelvben meghatározott alapvető követelményeknek és egyéb vonatkozó
előírásoknak.
Svenska
• Härmed intygar JVC KENWOOD att denna DPX405BT stär l överensstämelse med de
väsentliga egenskapskrav och övriga relevanta bestämmelser som framgår av direktiv
1999/5/EG.
Suomi
• JVC KENWOOD vakuuttaa täten että DPX405BT tyyppinen laite on direktiivin 1999/5/EY
oleellisten vaatimusten ja sitä koskevien direktiivin muiden ehtojen mukainen.
Slovensko
• S tem JVC KENWOOD izjavlja, da je ta DPX405BT v skladu z osnovnimi zahtevami in
ostalimi ustreznimi predpisi Direktive 1999/5/EC.
Slovensky
• Spoločnosť JVC KENWOOD týmto vyhlasuje, že DPX405BT spĺňa zákldné požiadavky a
ďalšie prislušné ustanovenia Direktĺvy 1999/5/EC.
Dansk
• Undertegnede JVC KENWOOD erklærer harved, at følgende udstyr DPX405BT overholder
de væsentlige krav og øvrige relevante krav i direktiv 1999/5/EF.
Ελληνικά
• ΜΕ ΤΗΝ ΠΑΡΟΥΣΑ JVC KENWOOD ΔΗΛΩΝΕΙ ΟΤΙ DPX405BT ΣΥΜΜΟΡΦΩΝΕΤΑΙ ΠΡΟΣ ΤΙΣ
ΟΥΣΙΩΔΕΙΣ ΑΠΑΙΤΗΣΕΙΣ ΚΑΙ ΤΙΣ ΛΟΙΠΕΣ ΣΧΕΤΙΚΕΣ ΔΙΑΤΑΞΕΙΣ ΤΗΣ ΟΔΗΓΙΑΣ 1999/5/EK.
Eesti
• Sellega kinnitab JVC KENWOOD, et see DPX405BT vastab direktiivi 1999/5/EC põhilistele
nõudmistele ja muudele asjakohastele määrustele.
Latviešu
• Ar šo, JVC KENWOOD, apstiprina, ka DPX405BT atbilst Direktīvas 1999/5/EK galvenajām
prasībām un citiem tās nosacījumiem.
Lietuviškai
• Šiuo, JVC KENWOOD, pareiškia, kad šis DPX405BT atitinka pagrindinius Direktyvos
1999/5/EB reikalavimus ir kitas svarbias nuostatas.
Malti
• Hawnhekk, JVC KENWOOD, jiddikjara li dan DPX405BT jikkonforma mal-ħtiġijiet
essenzjali u ma provvedimenti oħrajn relevanti li hemm fid-Dirrettiva 1999/5/EC.
Українська
• Компанія JVC KENWOOD заявляє, що цей виріб DPX405BT відповідає ключовим
вимогам та іншим пов’язаним положенням Директиви 1999/5/EC.
Turkish
• JVC KENWOOD, işbu belge ile DPX405BT numaralı bu ünitenin 1999/5/EC Direktifi’nin
özel gereksinimlerine ve ilgili diğer hükümlerine uygun olduğunu beyan eder.
Page 60

 Loading...