

Kenwood DMX5019DAB Instruction Manual

MONITOR WITH RECEIVER
INSTRUCTION MANUAL
DMX5019DAB
This instruction manual is used to describe the models listed above. Model availability and features (functions)
may differ depending on the country and sales area.
ENGLISH
© 2018 JVC KENWOOD Corporation
B5A-2611-00 (EN)

Important NoticeImportant Notice
To ensure proper use, please read through this
manual before using this product. It is especially
important that you read and observe WARNINGS
and CAUTIONS in this manual.
Please keep the manual in a safe and accessible
place for future reference.
WARNINGS
To prevent accidents and damages
• DO NOT install any unit or wire any cable in a
location where;
– it may obstruct the steering wheel and gearshift
lever operations.
– it may obstruct the operation of safety devices such
as air bags.
– it may obstruct visibility.
• DO NOT raise the volume level too much, as this will
make driving dangerous by blocking outside sounds,
and may cause hearing loss.
• DO NOT operate the unit while driving. If you need
to operate the unit while driving, be sure to look
around carefully.
• Stop the car before performing any complicated
operations.
• The driver must not watch the monitor while driving.
CAUTIONS
To care for the unit
• If you have parked the car for a long time in hot or
cold weather, wait until the temperature in the car
becomes normal before operating the unit.
To care for the monitor
• The monitor built into this unit has been produced
with high precision, but it may have some ineffective
dots. This is inevitable and is not considered
defective.
• Do not expose the monitor to direct sunlight.
• Do not operate the touch panel using a ball-point
pen or similar tool with a sharp tip.
Touch the keys on the touch panel with your finger
directly (if you are wearing a glove, take it off).
• When the temperature is very cold or very hot...
– Chemical changes occur inside, causing
malfunction.
– Pictures may not appear clearly or may move
slowly. Pictures may not be synchronized with
the sound or picture quality may decline in such
environments.
On the volume setting
• Digital devices produce very little noise compared
with other sources. Lower the volume before playing
these digital sources to avoid damaging the speakers
by sudden increase of the output level.
For Israel
ENGLISHi

Important NoticeImportant Notice
Information on Disposal of Old Electrical and
Electronic Equipment and Batteries (applicable
for countries that have adopted separate waste
collection systems)
Products and batteries with the symbol (crossedout
wheeled bin) cannot be disposed as household waste.
Old electrical and electronic equipment and batteries
should be recycled at a facility capable of handling
these items and their waste byproducts.
Contact your local authority for details in locating a
recycle facility nearest to you.
Proper recycling and waste disposal will help conserve
resources whilst preventing detrimental effects on our
health and the environment.
Notice: The sign “Pb” below the symbol for batteries
indicates that this battery contains lead.
Declaration of Conformity with regard to the
RE Directive 2014/53/EU
Declaration of Conformity with regard to the
RoHS Directive 2011/65/EU
Manufacturer:
JVC KENWOOD Corporation
3-12, Moriya-cho, Kanagawa-ku, Yokohama-shi,
Kanagawa, 221-0022, Japan
EU Representative:
JVCKENWOOD Europe B.V.
Amsterdamseweg 37, 1422 AC UITHOORN,
THE NETHERLANDS
English
Hereby, JVCKENWOOD declares that the radio
equipment “DMX5019DAB” is in compliance with
Directive 2014/53/EU.
The full text of the EU declaration of conformity is
available at the following internet address:
http://www.kenwood.com/cs/ce/eudoc/
Français
Par la présente, JVCKENWOOD déclare que
l’équipement radio « DMX5019DAB » est conforme à la
directive 2014/53/UE.
L’intégralité de la déclaration de conformité UE est
disponible à l’adresse Internet suivante :
http://www.kenwood.com/cs/ce/eudoc/
Deutsch
Hiermit erklärt JVCKENWOOD, dass das Funkgerät
“DMX5019DAB” der Richtlinie 2014/53/EU entspricht.
Der volle Text der EU-Konformitätserklärung steht
unter der folgenden Internetadresse zur Verfügung:
http://www.kenwood.com/cs/ce/eudoc/
Nederlands
Hierbij verklaart JVCKENWOOD dat de radioapparatuur
“DMX5019DAB” in overeenstemming is met Richtlijn
2014/53/EU.
De volledige tekst van de EU-verklaring van
overeenstemming is te vinden op het volgende
internetadres:
http://www.kenwood.com/cs/ce/eudoc/
ENGLISH ii

Important NoticeImportant Notice
Italiano
Con la presente, JVCKENWOOD dichiara che
l΄apparecchio radio “DMX5019DAB” è conforme alla
Direttiva 2014/53/UE.
Il testo integrale della dichiarazione di conformità UE è
disponibile al seguente indirizzo internet:
http://www.kenwood.com/cs/ce/eudoc/
Español
Por la presente, JVCKENWOOD declara que el equipo
de radio “DMX5019DAB” cumple la Directiva
2014/53/EU.
El texto completo de la declaración de conformidad
con la UE está disponible en la siguiente dirección de
internet:
http://www.kenwood.com/cs/ce/eudoc/
Português
Deste modo, a JVCKENWOOD declara que o
equipamento de rádio “DMX5019DAB” está em
conformidade com a Diretiva 2014/53/UE.
O texto integral da declaração de conformidade da UE
está disponível no seguinte endereço de internet:
http://www.kenwood.com/cs/ce/eudoc/
Polska
Niniejszym, JVCKENWOOD deklaruje, że sprzęt radiowy
“DMX5019DAB” jest zgodny z dyrektywą 2014/53/UE.
Pełny tekst deklaracji zgodności EU jest dostępny pod
adresem:
http://www.kenwood.com/cs/ce/eudoc/
Český
Společnost JVCKENWOOD tímto prohlašuje, že rádiové
zařízení “DMX5019DAB” splňuje podmínky směrnice
2014/53/EU.
Plný text EU prohlášení o shodě je dostupný na
následující internetové adrese:
http://www.kenwood.com/cs/ce/eudoc/
Magyar
JVCKENWOOD ezennel kijelenti, hogy a
„DMX5019DAB“ rádióberendezés megfelel a
2014/53/EU irányelvnek.
Az EU konformitási nyilatkozat teljes szövege az alábbi
weboldalon érhető el:
http://www.kenwood.com/cs/ce/eudoc/
Svenska
Härmed försäkrar JVCKENWOOD att radioutrustningen
“DMX5019DAB” är i enlighet med direktiv 2014/53/EU.
Den fullständiga texten av EU-försäkran om
överensstämmelse finns på följande Internetadress:
http://www.kenwood.com/cs/ce/eudoc/
Suomi
JVCKENWOOD julistaa täten, että radiolaite
“DMX5019DAB” on direktiivin 2014/53/EU mukainen.
EU-vaatimustenmukaisuusvakuutusvaatim us löytyy
kokonaisuudessaan seuraavasta internet-osoitteesta:
http://www.kenwood.com/cs/ce/eudoc/
Slovensko
S tem JVCKENWOOD izjavlja, da je radijska oprema
»DMX5019DAB« v skladu z Direktivo 2014/53/EU.
Celotno besedilo direktive EU o skladnosti je dostopno
na tem spletnem naslovu:
http://www.kenwood.com/cs/ce/eudoc/
Slovensky
Spoločnosť JVCKENWOOD týmto vyhlasuje, že rádiové
zariadenie „DMX5019DAB“ vyhovuje smernici
2014/53/EÚ.
Celý text EÚ vyhlásenia o zhode nájdete na
nasledovnej internetovej adrese:
http://www.kenwood.com/cs/ce/eudoc/
Dansk
Herved erklærer JVCKENWOOD, at radioudstyret
“DMX5019DAB” er i overensstemmelse med Direktiv
2014/53/EU.
EU-overensstemmelseserklæringens fulde ordlyd er
tilgængelig på følgende internetadresse:
http://www.kenwood.com/cs/ce/eudoc/
Ελληνικά
Με το παρόν, η JVCKENWOOD δηλώνει ότι ο
ραδιοεξοπλισμός «DMX5019DAB» συμμορφώνεται με
την Οδηγία 2014/53/ΕΕ.
Το πλήρες κείμενο της δήλωσης συμμόρφωσης της
ΕΕ είναι διαθέσιμο στην ακόλουθη διεύθυνση στο
διαδίκτυο:
http://www.kenwood.com/cs/ce/eudoc/
ENGLISHiii

Important NoticeImportant Notice
Eesti
Käesolevaga JVCKENWOOD kinnitab, et
„DMX5019DAB“ raadiovarustus on vastavuses
direktiiviga 2014/53/EL.
ELi vastavusdeklaratsiooni terviktekst on kättesaadav
järgmisel internetiaadressil:
http://www.kenwood.com/cs/ce/eudoc/
Latviešu
JVCKENWOOD ar šo deklarē, ka radio aparatūra
„DMX5019DAB” atbilst direktīvas 2014/53/ES prasībām.
Pilns ES atbilstības deklarācijas teksts ir pieejams šādā
tīmekļa adresē:
http://www.kenwood.com/cs/ce/eudoc/
Lietuviškai
Šiuo JVCKENWOOD pažymi, kad radijo įranga
„DMX5019DAB“ atitinka 2014/53/EB direktyvos
reikalavimus.
Visą EB direktyvos atitikties deklaracijos tekstą galite
rasti šiuo internetiniu adresu:
http://www.kenwood.com/cs/ce/eudoc/
Malti
B’dan, JVCKENWOOD jiddikjara li t-tagħmir tar-radju
“DMX5019DAB” huwa konformi mad-Direttiva
2014/53/UE.
It-test kollu tad-dikjarazzjoni ta’ konformità huwa
disponibbli fl-indirizz intranet li ġej:
http://www.kenwood.com/cs/ce/eudoc/
HRVATSKI / SRPSKI JEZIK
JVCKENWOOD ovim izjavljuje da je radio oprema
“DMX5019DAB” u skladu s Direktivom 2014/53/EU.
Cjeloviti tekst deklaracije Europske unije o usklađenosti
dostupan je na sljedećoj internet adresi:
http://www.kenwood.com/cs/ce/eudoc/
ROMÂNĂ
Prin prezenta, JVCKENWOOD declară că echipamentul
radio “DMX5019DAB” este în conformitate cu Directiva
2014/53/UE.
Textul integral al declarației de conformitate UE este
disponibil la urmatoarea adresă de internet:
http://www.kenwood.com/cs/ce/eudoc/
БЪЛГАРСКИ
С настоящото JVCKENWOOD декларира, че
радиооборудването на “DMX5019DAB” е в
съответствие с Директива 2014/53/ЕС.
Пълният текст на ЕС декларацията за съответствие е
достъпен на следния интернет адрес:
http://www.kenwood.com/cs/ce/eudoc/
Turkish
Burada, JVCKENWOOD “DMX5019DAB” radyo
ekipmanının 2014/53/AB Direktifine uygun olduğunu
bildirir.
AB uyumluluk deklarasyonunun tam metni aşağıdaki
internet adresinde mevcuttur.
http://www.kenwood.com/cs/ce/eudoc/
Русский
JVCKENWOOD настоящим заявляет, что
радиооборудование «DMX5019DAB» соответствует
Директиве 2014/53/EU.
Полный текст декларации соответствия ЕС доступен
по следующему адресу в сети Интернет:
http://www.kenwood.com/cs/ce/eudoc/
Українська
Таким чином, компанія JVCKENWOOD заявляє,
що радіообладнання «DMX5019DAB» відповідає
Директиві 2014/53/EU.
Повний текст декларації про відповідність ЄС можна
знайти в Інтернеті за такою адресою:
http://www.kenwood.com/cs/ce/eudoc/
ENGLISH iv
About this manual
ContentsContents
The displays and panels shown in this manual are
examples used to provide clear explanations of the
operations. For this reason, they may be different
from the actual displays or panels.
This manual mainly explains operations using the
buttons on the monitor panel and keys on the
touch panel. For operations using the remote
controller, see page39.
< > indicates the various screens/menus/
operations/settings that appear on the touch
panel.
[ ] indicates the keys on the touch panel.
Indication language: English indications are used
for the purpose of explanation. You can select the
indication language from the <SET-UP> menu.
(Page36)
Component Names and Operations ...............3
Basic Operations .................................................3
Turning on the power ..................................................................3
Turning off the power/turning off the AV source .......3
Putting the unit in standby .......................................................3
Turning off the screen ..................................................................4
Adjusting the volume ...................................................................4
Attenuating the sound ................................................................4
Getting Started ...................................................4
Initial settings .....................................................................................4
Setting the security code ...........................................................5
Calendar/clock settings ...............................................................5
Various Screens and Operations .....................6
Touch screen operations ............................................................6
Home screen ......................................................................................6
Source control screen ...................................................................7
List/setting screen...........................................................................9
Video ...................................................................10
USB ......................................................................10
iPod/iPhone .......................................................12
Apps—WebLink™/Waze ..................................13
Radio ...................................................................14
Digital Radio (DAB) ..........................................17
Spotify ................................................................20
Other External Components ..........................22
Rear view camera .........................................................................22
AV-IN .....................................................................................................22
Bluetooth® .........................................................22
Information ...................................................................................... 22
Preparation ....................................................................................... 23
Connection.......................................................................................23
Bluetooth mobile phone ......................................................... 25
Bluetooth audio player .............................................................28
Bluetooth mobile phone settings ......................................29
Settings ..............................................................29
Audio settings ................................................................................29
Display settings ..............................................................................34
User interface settings ...............................................................35
Camera settings ............................................................................37
Special system settings .............................................................37
Bluetooth settings .......................................................................38
Security settings ............................................................................ 39
Remote Controller ............................................39
Preparation ....................................................................................... 39
Basic operations ........................................................................... 40
KENWOOD Remote APP ......................................................41
Installation and Connection ...........................42
Before installation ........................................................................42
Installing the unit..........................................................................43
Removing the unit ....................................................................... 44
Connecting external components .................................... 44
Wiring connection ....................................................................... 45
References .........................................................46
Maintenance ................................................................................... 46
More information .........................................................................46
Troubleshooting ...............................................48
Specifications ....................................................50
Trademarks and licenses .......................................................... 53
2
ENGLISH
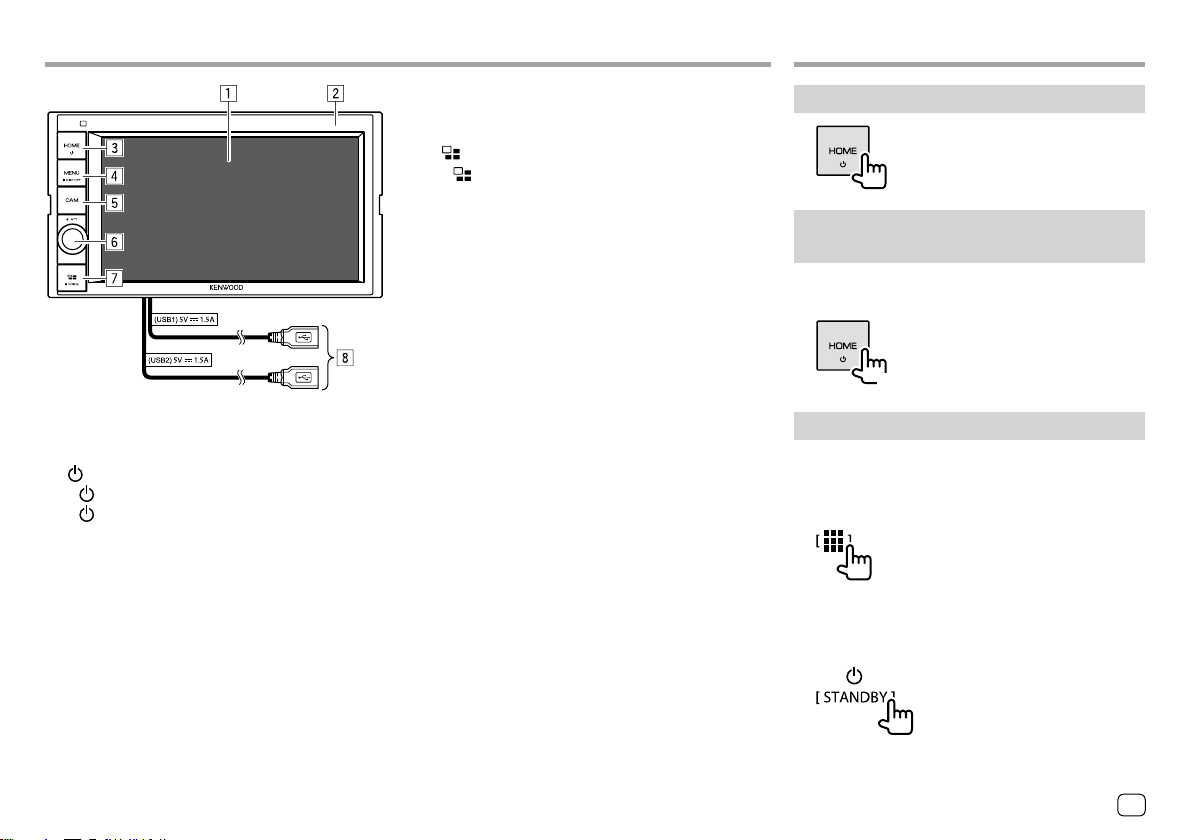
Component Names and OperationsComponent Names and Operations
Basic OperationsBasic Operations
1 Screen (touch panel)
2 Monitor panel
3 HOME button
• (Press): Turns on the power.
• (Hold): Turns off the power or AV source.*1
• HOME (Press): Displays the Home screen while
the power is on.
4 MENU/DISP OFF button
• MENU (Press): Pops up the short-cut menu.
• DISP OFF (Hold): Turns off the screen.
5 CAM button
• (Press): Displays the picture from the connected
rear view camera.
6 Volume/ATT knob
• Volume (Turn): Adjusts the audio volume.
• ATT (Press): Attenuates the sound.
/VOICE button
7
• (Press): Displays the App screen.
• VOICE (Hold): Activates the voice dialing.
8 USB input terminals from the rear panel*2
*1 The function of the button when held varies depending on
the <Manual Power OFF> setting on the <Special> screen.
(Page37)
*2 To switch between the USB devices connected to the USB input
terminals, see page 11.
Turning on the power
Turning off the power/turning off the AV
source
• This function varies depending on the <Manual
Power OFF> setting. (Page37)
(Hold)
Putting the unit in standby
1 Display the source/option selection
screen.
On the Home screen, touch as follows:
2 Put the unit in standby.
On the source/option selection screen, touch as
follows:
3ENGLISH
Basic OperationsBasic Operations
Getting StartedGetting Started
Turning off the screen
On the monitor panel
(Hold)
To turn on the screen: Press the same button on the
monitor panel or touch the screen.
On the pop-up short-cut menu
1 Display the pop-up short-cut menu.
2 On the pop-up short-cut menu, touch as
follows:
Display OFF
To turn on the screen: Touch the screen.
Adjusting the volume
You can adjust the volume (00 to 40) by turning
the knob to the right to increase and to the left to
decrease.
Attenuating the sound
The ATT indicator lights up.
To cancel attenuation: Press the same button again.
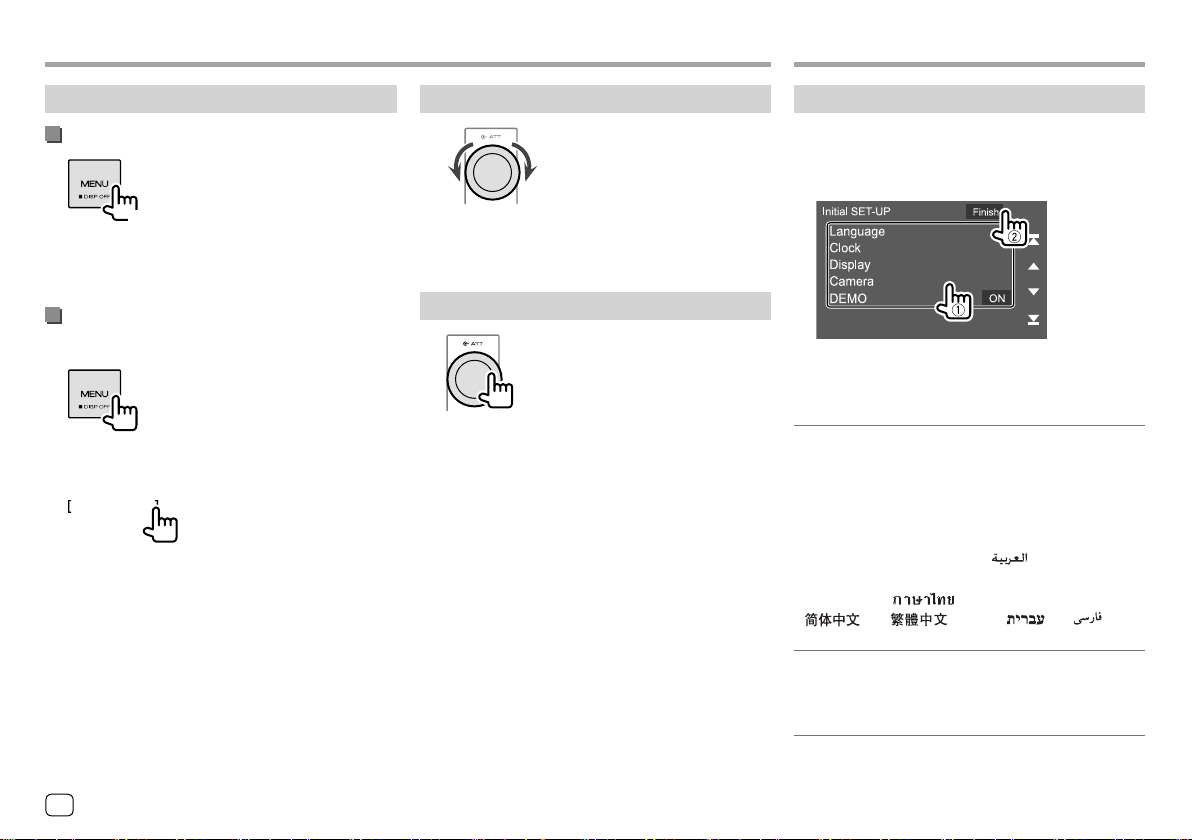
Initial settings
When you power on the unit for the first time, the
<Initial SET-UP> screen appears.
Perform the initial settings.
E.g. Initial settings screen
Once completed, a warning message appears. Touch
[Agree] to display the Home screen.
[Language]
Select the text language used for on-screen
information.
Touch [Language select], then select the language.
• American English(en)/British English(en) (Initial)/
Nederlands(nl)/Français(fr)/Deutsch(de)/
Italiano(it)/Español(es)/(ar)
Português(pt)/Čeština(cs)/Polski(pl)/Magyar(hu)/
Руccĸий(ru)/ (th)/Türkçe(tr)/
(zh)/ (zh)/(he) /(fa) /
BahasaMelayu(ms)/Bahasa Indonesia(id)
[Clock] (Page5)
Set the calendar and clock time.
Make the settings for [Clock], [Time Zone] or [Clock
Adjust].
/Ελληνικά(el)/
4 ENGLISH
Getting StartedGetting Started
[Display] (Page34)
Make the settings to adjust the display.
[Camera] (Page37)
Make the settings to display the picture from the
connected rear view camera.
[DEMO]
• ON (Initial): Activates the display demonstration.
• OFF: Deactivates the display demonstration.
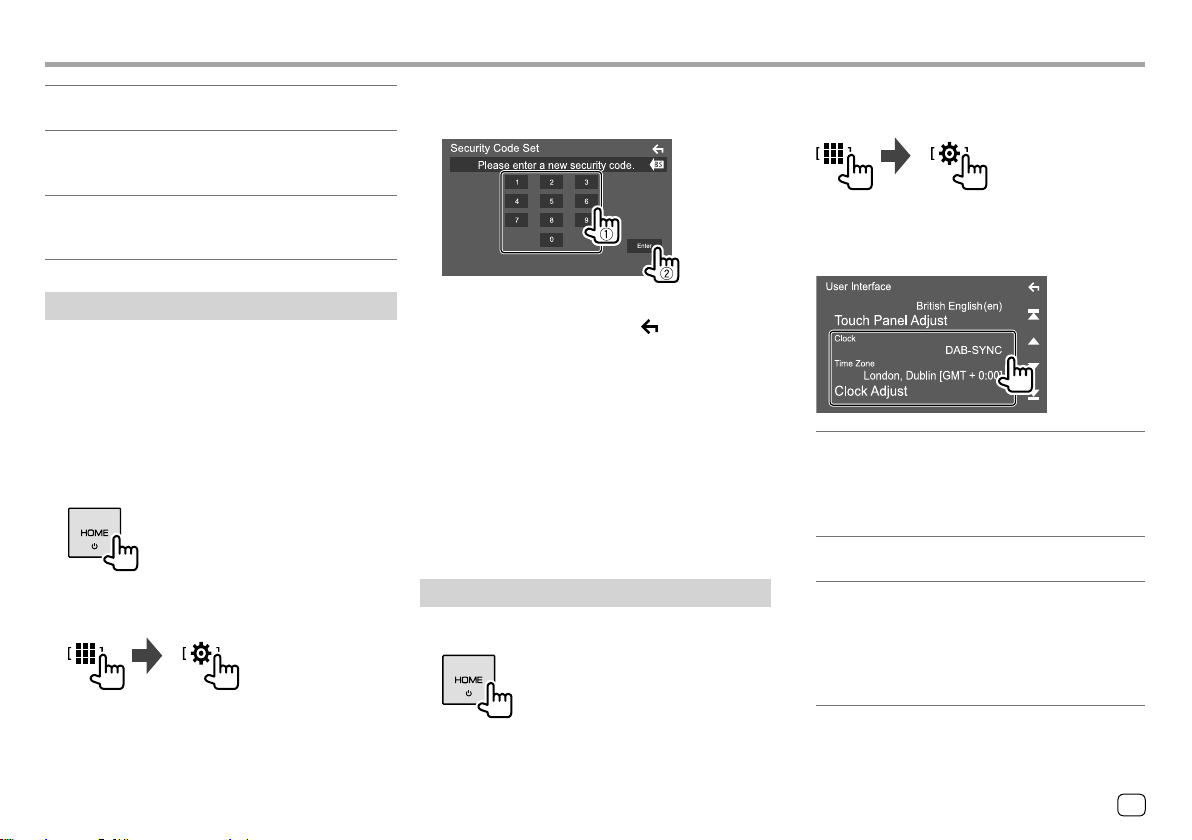
Setting the security code
You can set a security code (four-digit number of your
choice) to protect your receiver system against theft.
• Once you set the security code, you are required to
input the security code if you have disconnected the
unit from the battery.
Enter the security code you have set in step 3, then
touch [Enter] when you reconnect the battery.
1 Display the Home screen.
2 Display the <Security Code Set> screen.
On the Home screen, touch as follows:
Then, on the <SET-UP> screen, touch as follows:
[Security] [Security Code Set]
3 Enter a four-digit number (1), then
confirm the entry (
• To clear the last entry, touch [BS].
• To cancel the setting, touch [ ].
2).
4 Enter the four-digit number entered in
step 3 and touch [Enter] again to confirm
your security code.
To change the security code: Touch [Security Code
Change] on the <Security> screen on step 2, then
repeat steps 3 and 4.
To clear the security code: Touch [Security Code
Cancellation] on the <Security> screen on step2,
then repeat step 3.
Calendar/clock settings
1 Display the Home screen.
2 Display the <User Interface> screen.
On the Home screen, touch as follows:
Then, on the <SET-UP> screen, touch [User
Interface].
3 Set the date and clock.
[Clock]
Select the method to set the date and clock.
• DAB-SYNC (Initial): Synchronizes the clock with
the digital radio (DAB).
• Manual: Sets the date and clock manually.
[Time Zone]*
Select the time zone for your area.
[Clock Adjust]*
Set the date and clock manually when [Clock] is
set to [Manual].
J]/[K] to adjust the date (year/month/
Touch [
date), then clock (hour/minute). To finish setting,
touch [Set].
* Selectable when [Clock] is set to [Manual].
5ENGLISH
Various Screens and OperationsVarious Screens and Operations
iPod
Radio
You can display or change to other screens at any time
to show information, change the AV source, change
the settings, etc.
Touch screen operations
To perform operations on the screen, you need to
touch, touch and hold, flick or swipe to select an item,
display setting menu screen or to change the page,
etc.
Touch
Touch the screen gently to select an
item on the screen.
Touch and hold
Touch the screen and keep your
finger in place until the display
changes or a message is displayed.
Flick
Slide your finger to the left or right on
the screen to change the page.
Swipe
Slide your finger up or down on the
screen to scroll the screen.
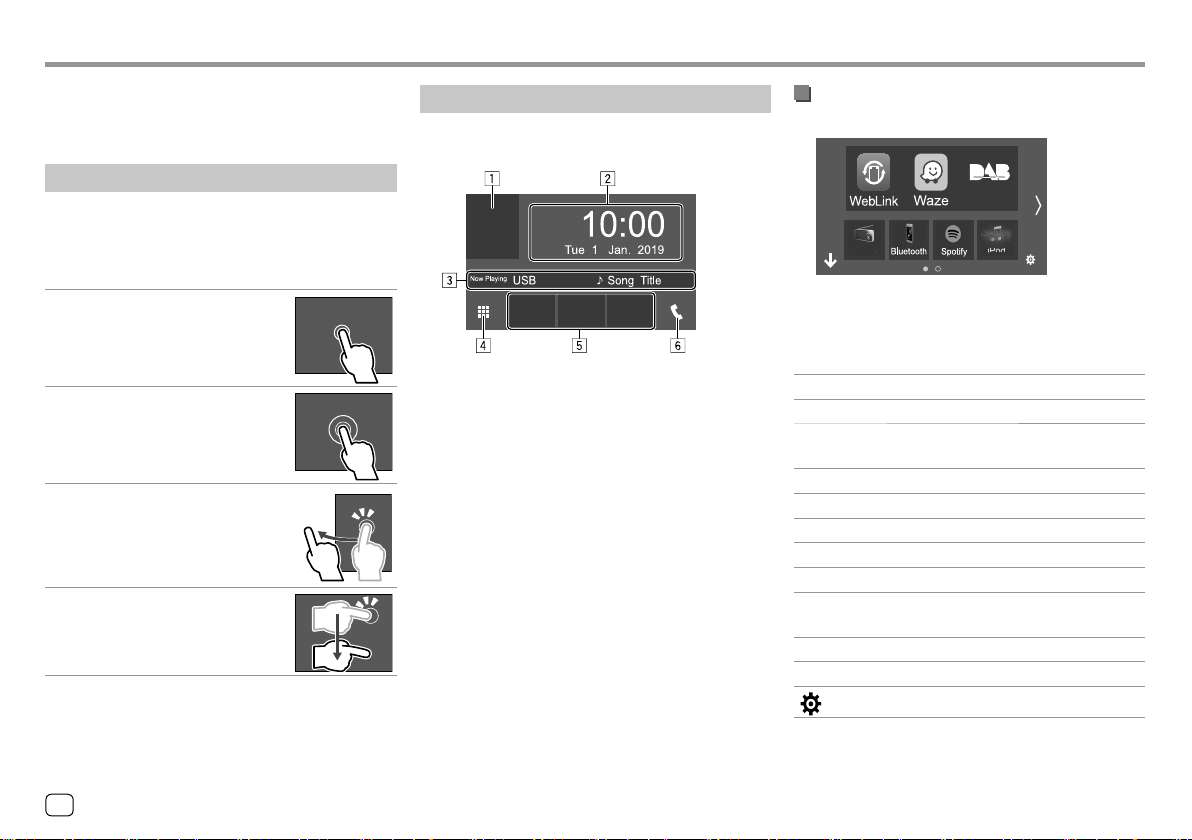
Home screen
Press HOME on the monitor panel to display the
Home screen from other screens.
E.g. Home screen
Touching the operation keys performs the following
actions:
1 Displays the current playing source control screen
2 Clock/date
3 Current source information
4 Displays all playback sources and options
5 Short-cut playback source keys
6 Displays the phone control screen
Available playback sources and options
Touch 4 to display the source/option selection screen.
DAB
iPodRadio
E.g. Source/option selection screen
Touching the operation keys performs the following
actions:
[WebLink] Switches to the WebLink™ application.
[Waze] Switches to the Waze application.
[DAB] Switches to the digital audio broadcast
(DAB).
[Radio] Switches to the radio broadcast.
[Bluetooth] Plays a Bluetooth audio player.
[Spotify] Switches to the Spotify application.
[iPod] Plays an iPod/iPhone.
[USB] Plays files on a USB device.
[AV-IN] Switches to an external component
connected to the AV-IN input terminal.
[Audio] Displays the sound adjustment screen.
[STANDBY] Puts the unit in standby.
]
[
Displays the <SET-UP> screen.
6
ENGLISH

Various Screens and OperationsVarious Screens and Operations
iPod
Radio
To change the page: Touch [ ]/[ ] . Current page is
shown by the page indication on the bottom of the
screen.
To return to the Home screen: Touch [
source/option selection screen.
] on the
Customizing the source/option selection
screen
You can arrange the items to display on the source/
option selection screen.
1 Select an item to move.
Touch and hold the item you want to move until
boxes appear around the icons.
2 Drag the selected item and drop to the
position you want to move it to.
DAB
iPodRadio
E.g. Source/option selection screen
About short-cut playback source keys on the
Home screen
The three items displayed on the top of the source/
option selection screen with large icons are also
shown on the Home screen as the short-cut playback
source keys. You can set the source keys which you use
frequently and access quickly from the Home screen.
E.g. Home screen
Source control screen
You can perform the playback operation from the
source control screen during playback.
• The operation keys and information displayed vary
depending on the selected source/file type being
played.
• If the operation keys are not displayed on the screen,
touch the screen to show them.
E.g. Common audio playback source screen
1 Playback source or media type
2 Picture data/artwork (shown if the file contains
artwork)
3 For video: Hides the operation keys on the screen
while video is played
• Touch the screen to restore the operation keys.
For audio: File format
ENGLISH
7
Various Screens and OperationsVarious Screens and Operations
4 Repeat/random playback mode keys*
5 Signal strength and battery level of the connected
Bluetooth device (only when the information is
acquired from the device)
6 Track/file/song/video information
• Touching [] scrolls the text if not all of the text
is shown.
7 Clock display
8 Displays the track/file/station/service list
9 Displays/hides other available operation keys*
p Displays the source/option selection screen
q Operation keys*
w Secondary screen
Each time you touch [ ]/[ ] , the items shown on
the secondary screen change as follows:
• Indicators: Displays the current source conditions,
etc.
The followings are the common indicators:
−ATT: The sound is attenuated.
−LOUD: The loudness is activated.
−MUSIC/VIDEO: Music/video file is played back.
• Short-cut keys: Changes the source from those
you have located on the Home screen.
e Displays the phone control screen
* See the following “Common operation keys on source control
screen”.
Common operation keys on source control screen
• The appearance of the operation keys may differ,
however the similar operation keys have the same
operations.
• Available operation keys differ depending on the
selected source or connected device.
Touching the operation keys performs the following
actions:
4
[ ]*
]*
[
9
[ ]
[SETUP] Displays the setting screen of the
][ ]
[
Selects repeat playback mode.
•
: Repeat one
• : Repeat folder
• ALL: Repeat all
• (gray): Off
Selects random playback mode.
•
: Random folder
• ALL: Random all
• (gray): Off
Displays other available operation keys
besides those shown on q.
• To hide the window, touch [
current playback source.
Selects a folder.
].
q
[ ]
]
[
S]/[T]
[
IW]
[
* Available playback mode differs depending on the source, file
type, connected device, etc.
Displays the <Graphic Equalizer>
screen. (Page 31)
Displays the folder list/track list/audio
menu/video menu.
• (Touch) Selects an item (folder/track/
audio file/video file).
• (Hold) Reverses/forwards search.
Starts/pauses playback.
Using the pop-up short-cut menu
While displaying the source control screen, you can
jump to another screen by touching the operation
keys on the pop-up short-cut menu.
1 Display the pop-up short-cut menu.
8 ENGLISH
Various Screens and OperationsVarious Screens and Operations
2
Select an item to jump.
Using touch screen operation during
playback
E.g. Pop-up short-cut menu screen
1 Displays the picture adjustment screen.
(Page10)
2 Turns off the screen. (Page4)
3 Displays the picture from the connected rear
view camera. (Page22)
4 Displays the <SET-UP> screen. (Page34)
5 Displays the <Audio> screen. (Page29)
6 Displays the current source control screen.
7 Closes the pop-up short-cut menu.
8 Changes the playback source.
• The three short-cut playback source keys
displayed on the Home screen are displayed
on the short-cut menu.
9 Displays the phone control screen. (Page26)
Touching the areas performs the following actions:
1 Displays the source control screen.
2 Goes to the previous track.*
3 Goes to the next track.*
* Not available for video from an external component (AV-IN).
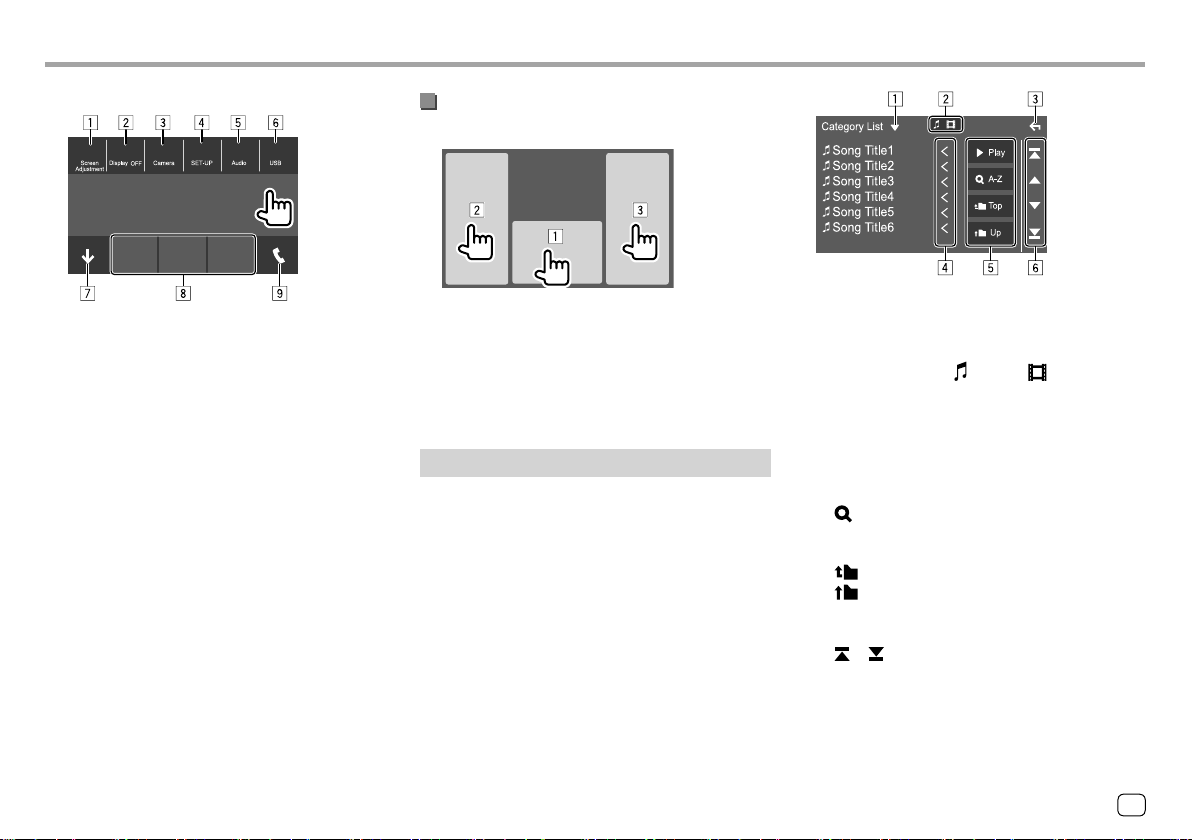
List/setting screen
The followings are the common operation keys which
appear on the list/setting screen.
• The appearance of the operation keys may differ,
however the similar operation keys have the same
operations.
• Available operation keys differ depending on the
setting screens. Not all the following operation keys
are shown on every screen.
Touching the operation keys performs the following
actions:
1 Displays list type selection window.
2 Selects the file type ([ ]: audio/[ ]: video).
3 Exits from the current screen or returns to the
previous screen.
4 Scrolls the text if not all of the text is shown.
5 Play/search keys
• [I Play]: Plays all tracks in the folder containing
the current track.
• [ A-Z]: Enters alphabet search to list the items
in alphabetical order. When a keypad appears,
touch the first letter you want to search for.
• [ Top]: Returns to the root folder.
• [ Up]: Returns to the upper layer.
6 Changes the page to display more items.
• [J]/[K]: Scrolls the page.
• [ ]/[ ] : Jumps to the top or bottom page.
ENGLISH
9
VideoVideo
USBUSB
Playback operations
Video playback information on the source
control screen
E.g. Video playback source control screen
1 Media type
2 Hides the operation keys on the screen.
• Touch the screen to restore the operation keys.
3 Repeat/random playback mode keys
4 Current playback item information/audio format
5 Playback status/playing time
6 Indicators
• VIDEO: Lights up when video is played.
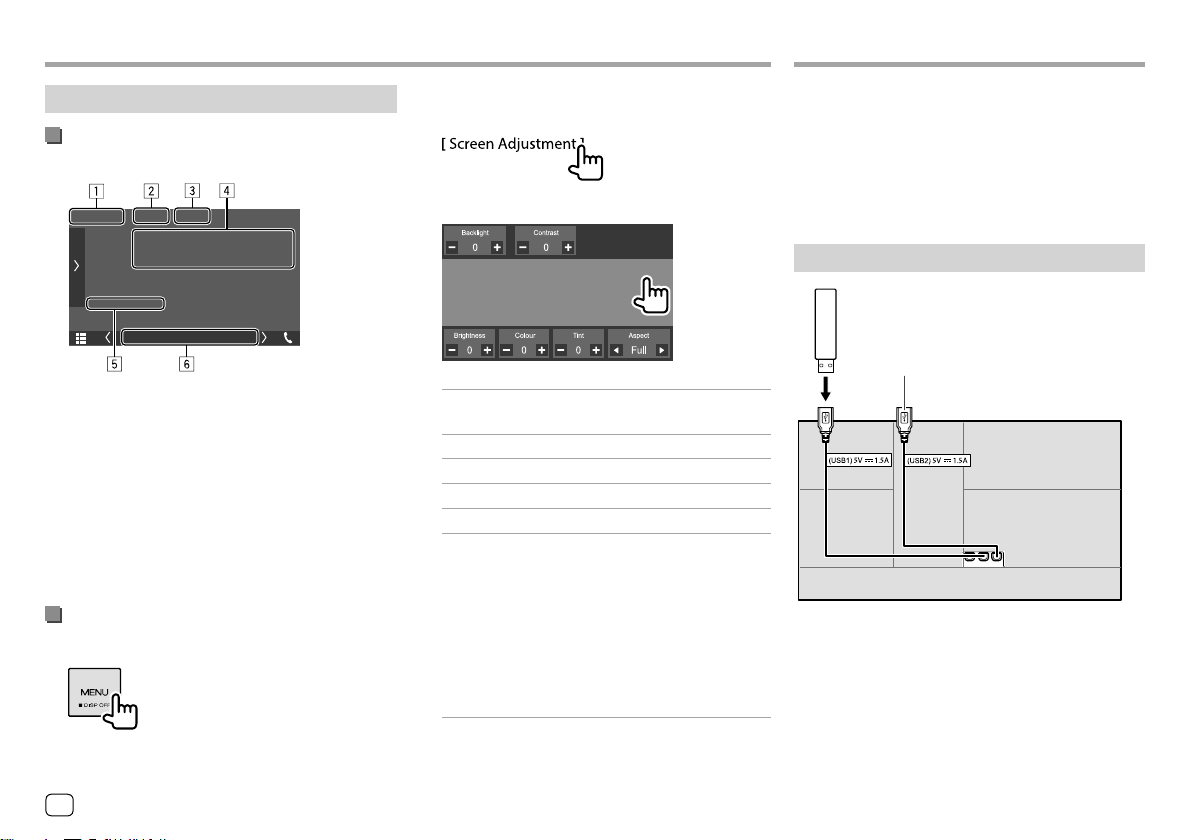
Adjusting the picture
1 Display the pop-up short-cut menu.
2 Display the picture adjustment screen.
On the pop-up short-cut menu, touch as follows:
3 Adjust the picture.
<Backlight> Adjusts the brightness of the
backlight. (−4 to 4)
<Contrast> Adjusts the contrast. (−4 to 4)
<Brightness> Adjusts the brightness. (−4 to 4)
<Colour> Adjusts the color. (−4 to 4)
<Tint> Adjusts the tint. (−4 to 4)
<Aspect> Selects the aspect ratio.
• Full: Changes the aspect ratio of
video and displays fully on the
screen.
• Normal: Displays the video in
the aspect ratio of 4:3.
• Auto: Displays the video fully
on vertical or horizontal with no
ratio change.
• Adjustable items are different depending on the
current source.
You can connect a USB mass storage class device such
as a USB memory, digital audio player, etc. to the unit.
• For playable file types and other information, see
pages46 and47.
• You cannot connect a PC or portable HDD to the
USB input terminal.
• You cannot connect a USB device via a USB hub.
Connecting a USB device
USB device
(commercially available)
You can also connect to the USB2 cable.
Rear panel
• Use CA-U1EX for extending the cable if necessary.
(Max 500 mA, 5V)
10
ENGLISH

USBUSB
Switching the USB drives
You can switch between the USB devices connected
to the USB input terminals from the rear panel.
On the source control screen, touch as follows:
The playback control screen of the next drive appears
and playback starts if there are playable files on the
USB device.
Performing the above operations will also change the
drive of the following devices:
• Selected internal or external memory of a
smartphone (Mass Storage Class).
• Selected drive of a multiple drive device.
Playback operations
Playback information and key operation
• For playback information, see “Source control screen”
on page7.
• For key operations on the touch panel, see “Common
operation keys on source control screen” on
page8.
• All tracks in the USB device will be played repeatedly
until you change the drive, change the source or
disconnect the USB device.
Selecting a folder/track on the list
1 Display the folder/track list.
On the source control screen, touch as follows:
2 Select the list type.
3 Select the desired track.
• Repeat the procedure until you select the desired
track.
• For details about the list operation, see
page9.
From <Category List>:
1 Select the file type ([
2 Select a category, then the item in the selected
category.
]: audio/[ ]: video).
From <Link Search>:
1 Select the file type ([ ]: audio/[ ]: video).
2 Select the tag type to display a list of contents
that contains the same tag as the track/file
currently being played, then select the item.
From <Folder List>:
Select the folder, then the item in the selected
folder.
ENGLISH
11

iPod/iPhoneiPod/iPhone
Connecting an iPod/iPhone
• For playable iPod/iPhone types and other
information, see page47.
• You cannot watch video.
Wired connection
iPod/iPhone
(commercially available)
USB Audio cable for iPod/iPhone:
KCA-iP103 (optional accessory)
You can also connect to the USB2 cable.
Rear panel
Only one iPod/iPhone can be used at a time. The first
detected device will be used. If you try to connect
another iPod/iPhone to the other USB input terminal,
the following message will pop-up:
“Only the first connected iPod can be used. Please
disconnect the another iPod at first, and try reconnect
this iPod again.”
Bluetooth connection
Pair the iPod/iPhone with this unit via Bluetooth.
(Page23)
Playback operations
Playback information and key operation
• For playback information, see “Source control screen”
on page7.
• For key operations on the touch panel, see “Common
operation keys on source control screen” on
page8.
Selecting an audio file from the menu
1 Display the list.
On the source control screen, touch as follows:
2 Select the list type.
3 Select the desired track.
• Repeat the procedure until you select the desired
track.
• For details about the list operation, see
page9.
From <Category List>:
Select a category, then the item in the selected
category.
• Available categories differ depending on the type
of iPod/iPhone.
From <Link Search>:
Select the tag type to display a list of contents that
contain the same tag as the track/file currently
being played, then select the item.
12 ENGLISH

Apps—WebLink™/WazeApps—WebLink™/Waze
You can display and control the App on the unit
while your smartphone is connected to the USB input
terminal.
Preparation:
Be sure to ground the PRK SW lead. (Page 45)
Available Apps
You can use the following Apps on this unit. Install the
WebLink™ App and/or Waze App on your smartphone
beforehand.
WebLink™
WebLink™ enables you to use the following Apps with
the unit.
• Media Player
• Yelp
• YouTube
• Weather
Waze
Waze is the world's largest community based traffic
and navigation App. Join other drivers in your area
who share real-time traffic and road info, saving
everyone time and gas money on their daily commute.
• To use Waze on the unit, you need to install Waze
App on your smartphone and connect WebLink™
before starting Waze.
Connecting a smartphone
Android™ device
(commercially available)
USB cable (commercially available)
USB Audio cable for iPod/iPhone:
KCA-iP103 (optional accessory)
( or )
*
iPhone
(commercially available)
Rear panel
* – You can connect two Android devices to both USB input
terminals from the rear panel at the same time. However, the
first detected device will establish the WebLink™ connection
with the unit.
– WebLink
• When the smartphone is connected to the unit and
• You can check the connection status on the
™
App and/or Waze App does not work on iPhone
connected to the USB2 cable from the rear panel.
“WebLink” is selected as the source, a confirmation
message to communicate with each other appears
on the smartphone. Touch [Allow] to establish
connection, or [Ignore] to cancel the connection.
WebLink™ screen on your smartphone.
Start playback
1 Select “WebLink”/“Waze” as the source.
• To use WebLink™: Select “WebLink”.
• To use Waze: Select “Waze”.
2 Operate on the unit to select App.
• On the “WebLink” source screen, you can also
operate on the touch panel as follows:
[ ]
[
• Displays the main menu of the
“WebLink” source screen.
• Exits the current App.
• Returns to the previous screen.
]
• Exits the current App.
ENGLISH
13
RadioRadioApps—WebLink™/WazeApps—WebLink™/Waze
3 Operate on your smartphone.
• When you are asked to communicate between
your smartphone and the unit, touch [Allow] to
proceed.
• If App does not start while using “WebLink”, start
the App on your smartphone.
Switching to the App screen while listening
to the another source
You can display the App screen while listening to the
other source.
Listening to the radio
The unit switches to FM alarm scene automatically
when receiving an alarm signal from FM broadcast.
Playback information on the source control
screen
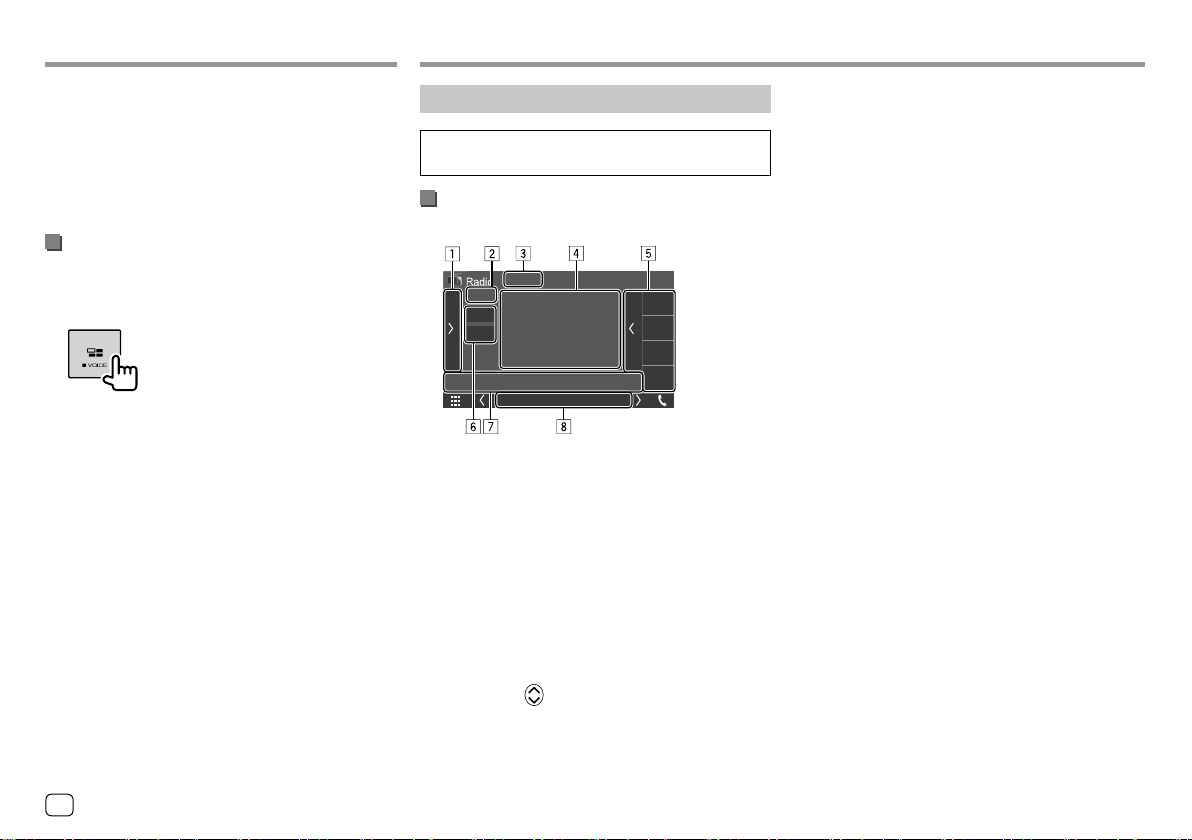
FM 01
FM 02
FM 03
FM 04
E.g. Radio source control screen
1 Displays/hides other available operation keys*
2 Preset no.
3 Changes the seek mode for [S]/[T]
• AUTO1 (Initial): Auto search
• AUTO2: Tunes in preset stations one after
another
• MANUAL: Manual search
4 Text information
• Touching [<] scrolls the text if not all of the text
is shown.
• Touching [ ] switches the information (e.g.
frequency, PS name, Radio Text, title, artist, etc.).
−The availability of the information varies
depending on the reception, selected station.
5 Preset list
6 Selects the band (AM/FM)
7 Operation keys*
8 Indicators
• NEWS: Lights up when News Standby Reception
is activated.
• AF: Lights up when Network-Tracking Reception
is activated.
• TI: Lights up in white when receiving the traffic
information, and lights in orange when Traffic
Information Reception is on standby.
• LOS: Lights up when Local Seek is activated.
• ST: Lights up when receiving a stereo broadcast.
• MONO: Lights up when receiving stations in
monaural forcibly.
• RDS: Indicates the status of the Radio Data
System station reception when the NetworkTracking Reception is activated. (Page16)
−Lights in white: Radio Data System station is
being received.
−Lights in orange: Radio data System station is
not being received.
• EON: Lights up when a Radio Data System station
is sending EON signals.
* See “Operation keys on source control screen” on page 15.
14 ENGLISH
 Loading...