


417.4110

Models/ Modelos / Modèles: 417.4110*
Kenmore Elite
®
Front Load Washer
Lavadora a Cargo Frontal
Laveuse à Chargement Frontal
Use & Care Guide
Guía de Uso y Cuidado
Guide d’utilisation et d’entretien
English / Español / Français
P/N 137413000 A (1012)
Sears Brands Management Corporation
Hoff man Estates, IL 60179 U.S.A.
www.kenmore.com
www.sears.com
Sears Canada Inc.
Toronto, Ontario, Canada M5B 2C3
www.sears.ca
* = Color number, número de color, le numéro de couleur
TM
For best results, a lower-sudsing, HE High Effi ciency
Detergent made for front loading washers must be
used.
Para obtener mejores resultados, una baja espuma,
H.E. Alta efi ciencia de detergentes para lavadoras de
carga hizo frente debe ser utilizado.
Pour de meilleurs résultats, et un bas niveau de mousse,
un détergent haute-efficacité HE conçu pour les
laveuses à chargement frontal doit être utilisé.

2
Table of Contents
The model and serial numbers of your washer are found on
the washer serial plate located on the inside of the door.
Record and retain these numbers.
Model Number ____________________
Serial Number ____________________
Purchase Date ____________________
This
Use and Care Guide
provides general operating
instructions for your washer. It also contains information
about features for several other models. Your washer may
not have every feature included.
The instructions in this manual and all other literature
included with this washer are not meant to cover every
possible condition and situation that may occur. Good safe
practice and caution MUST be applied when installing,
operating and maintaining any appliance. Use the washer
only as instructed in this
Use & Care Guide
.
Save these instructions
for future reference.
Record Model/Serial Numbers Important Safety Instructions
DANGER
DANGER indicates an imminently hazardous situation
which, if not avoided, will result in death or serious injury.
WARNING
WARNING indicates a potentially hazardous situation
which, if not avoided, could result in death or serious
injury.
CAUTION
CAUTION indicates a potentially hazardous situation
which, if not avoided, may result in minor or moderate
injury.
IMPORTANT
IMPORTANT indicates installation, operation or
maintenance information which is important but not
hazard-related.
Defi nitions
This is the safety alert symbol. It is used to alert you
to potential personal injury hazards. Obey all safety
messages that follow this symbol to avoid possible injury or
death.
Recognize safety symbols, words and
labels
Safety items throughout this manual are labeled with
a WARNING or CAUTION based on the risk type as
described below:
Important Safety Instructions ............................................2-3
Warranty / Protection Agreement .......................................4
Features ....................................................................................5
Operating Instructions ...................................................... 6-16
Stain Removal Guide ......................................................17-18
Care and Cleaning ......................................................... 19-22
Solutions to Common Problems ................................... 23-27
Notes ......................................................................................28
Español .................................................................................. 29
Français ................................................................................. 57

3
Important Safety Instructions
PREVENT FIRE
Do not wash items that have been previously cleaned in, •
soaked in, or spotted with gasoline, cleaning solvents,
kerosene, cooking oils, waxes, etc. Do not store these items
on or near the washer. These substances give off vapors or
chemical reactions that could ignite or explode.
Do not put oily or greasy rags or clothing on top of the •
washer. These substances give off vapors that could
ignite the materials.
Do not add gasoline, cleaning solvents, or other fl am-•
mable or explosive substances to the wash water. These
substances give off vapors that could ignite or explode.
Under certain conditions, hydrogen gas may be pro-•
duced in a hot water system that has not been used for
2 weeks or more. HYDROGEN GAS IS EXPLOSIVE. If the
hot water system has not been used for such a period,
before using the washer, turn on all hot water faucets
and let the water fl ow from each for several minutes.
This will release any accumulated hydrogen gas. Hy-
drogen gas is fl ammable; do not smoke or use an open
fl ame during this time.
Do not store or use gasoline or other fl ammable vapors •
or liquids in the vicinity of this or any other appliance.
Failure to comply with these warnings could result in fi re, •
explosion, serious bodily injury and/or damage to the
rubber or plastic parts of the washer.
PROTECT CHILDREN
Do not allow children to play on or in the washer. Close •
supervision of children is necessary when the washer is
used near children. As children grow, teach them the
proper, safe use of all appliances.
Destroy the carton, plastic bag and other packing ma-•
terials after the washer is unpacked. Children might use
them for play. Cartons covered with rugs, bedspreads or
plastic sheets can become airtight chambers.
Keep laundry products out of children’s reach. To prevent •
personal injury, observe all warnings on product labels.
Before the washer is removed from service or discarded, •
remove the washer door to prevent accidental entrapment.
Failure to comply with these warnings could result in seri-•
ous personal injuries.
PREVENT INJURY
To prevent shock hazard and assure stability during •
operation, the washer must be installed and electrically
grounded by a qualifi ed service person in accordance
with local codes. Installation instructions are packed in
the washer for installer’s reference. Refer to
INSTALLA-
TION INSTRUCTIONS
for detailed grounding proce-
dures. If the washer is moved to a new location, have it
checked and reinstalled by a qualifi ed service person.
To prevent personal injury or damage to the washer, the •
electrical power cord of the washer must be plugged
into a properly grounded and polarized 3-prong outlet.
The third grounding prong must never be removed.
Never ground the
washer to a gas
pipe. Do not use an
extension cord or
an adaptor plug.
Grounding type
Grounding type
wa
wa
ll receptacl
ll receptacle
Po
Po
wer cord with
wer cord with
3-prong
3-prong
gr
gr
ounded plug
ounded plug
Do not,
Do not,
under
under
an
an
y cir
y cir
cumstances,
cumstances,
cut,
cut,
remo
remo
ve
ve,
or b
or b
ypass th
ypass the
gr
gr
ounding pr
ounding pr
ong.
ong.
PREVENT INJURY AND DAMAGE TO THE WASHER
To prevent serious personal injury and damage to the
washer:
All repairs and servicing must be performed by an au-•
thorized servicer unless specifi cally recommended in this
Use & Care Guide. Use only authorized factory parts.
Do not tamper with controls.•
Do not install or store the washer where it will be ex-•
posed to the weather.
Do not install on carpet. Install washer on a solid fl oor. It •
may be necessary to reinforce the fl oor to prevent vibra-
tion or movement.
To reduce the risk of electric shock, disconnect this appli-•
ance from the power supply before attempting any user
maintenance. Turning the controls to the OFF position
does not disconnect this appliance from the power sup-
ply.
To prevent injury, do not reach into the washer while •
parts are moving. Before loading, unloading or adding
items, push in the cycle selector knob and allow the drum
to coast to a complete stop before reaching inside.
This washer is equipped with an electrical overload pro-•
tector. The motor will stop if it becomes overheated.
Failure to comply with these warnings could result in seri-•
ous personal injuries.
Follow package directions when using laundry products. •
Incorrect usage can produce poisonous gas - resulting in
serious injury or death.
Do not combine laundry products for use in 1 load unless •
specifi ed on the label.
Do not mix chlorine bleach with ammonia or acids such •
as vinegar.
WARNING
To reduce the risk of fi re, electrical shock, or injury to
persons when using this washer, comply with the basic
warnings listed below. Failure to comply with these
warnings could result in serious personal injuries.
You can be killed or seriously injured if you don’t follow
these Important Safety Instructions:

4
Kenmore Appliance Warranty
One Year Limited Warranty
When installed, operated and maintained according to
all instructions supplied with the product, if this appliance
fails due to a defect in material or workmanship within one
year from the date of purchase, call 1-800-4-MY-HOME
®
to arrange for free repair.
If this appliance is used for other than private family pur-
poses, this warranty applies for only 90 days from the date
of purchase.
This warranty covers only defects in material and work-
manship. Sears will NOT pay for:
Expendable items that can wear out from normal use, 1.
including but not limited to fi lters, belts, light bulbs and
bags.
A service technician to instruct the user in correct 2.
product installation, operation or maintenance.
A service technician to clean or maintain this product.3.
Damage to or failure of this product if it is not installed, 4.
operated or maintained according to all instructions
supplied with the product.
Damage to or failure of this product resulting from 5.
accident, abuse, misuse or use for other than its
intended purpose.
Damage to or failure of this product caused by the use 6.
of detergents, cleaners, chemicals or utensils other than
those recommended in all instructions supplied with the
product.
Damage to or failure of parts or systems resulting from 7.
unauthorized modifi cations made to this product.
Disclaimer of implied warranties; limitation of remedies
Customer’s sole and exclusive remedy under this limited
warranty shall be product repair as provided herein. Im-
plied warranties, including warranties of merchantability
or fi tness for a particular purpose, are limited to one year
or the shortest period allowed by law. Sears shall not be
liable for incidental or consequential damages. Some states
and provinces do not allow the exclusion or limitation of
incidental or consequential damages, or limitations on the
duration of implied warranties of merchantability or fi tness,
so these exclusions or limitations may not apply to you.
This warranty applies only while this appliance is used in
the United States and Canada.
This warranty gives you specifi c legal rights, and you may
also have other rights which vary from state to state.
Sears Brands Management Corporation, Hoff man Estates,
IL 60179
Sears Canada Inc., Toronto, Ontario, Canada M5B 2C3
Master Protection Agreements
Congratulations on making a smart purchase. Your new
Kenmore
®
product is designed and manufactured for years
of dependable operation. But like all products, it may re-
quire preventive maintenance or repair from time to time.
That’s when having a Master Protection Agreement can
save you money and aggravation.
The Master Protection Agreement also helps extend the life
of your new product. Here’s what the Agreement* includes:
Parts and labor needed to help keep products •
operating properly under normal use, not just defects.
Our coverage goes well beyond the product warranty.
No deductibles, no functional failure excluded from
coverage – real protection.
Expert service by a force of more than 10,000 •
authorized Sears service technicians, which means
someone you can trust will be working on your product.
Unlimited service calls and nationwide service, as often •
as you want us, whenever you want us.
“No-lemon” guarantee – replacement of your covered •
product if four or more product failures occur within
twelve months.
Product replacement if your covered product can not be •
fi xed.
Annual Preventive Maintenance Check at your request – •
no extra charge.
Fast help by phone – we call it Rapid Resolution – •
phone support from a Sears representative on all
products. Think of us as a “talking owner’s manual”.
Power surge protection against electrical damage due •
to power fl uctuations.
$250 Food Loss Protection annually for any food •
spoilage that is the result of mechanical failure of any
covered refrigerator or freezer.
Rental reimbursement if repair of your covered product •
takes longer than promised.
10% discount off the regular price of any non-covered •
repair service and related installed parts.
Once you purchase the Agreement, a simple phone call is
all that it takes for you to schedule service. You can call
anytime day or night, or schedule a service appointment
online.
The Master Protection Agreement is a risk free purchase.
If you cancel for any reason during the product warranty
period, we will provide a full refund. Or, a prorated refund
anytime after the product warranty period expires. Pur-
chase your Master Protection Agreement today!
Some limitations and exclusions apply. For prices and ad-
ditional information in the U.S.A. call 1-800-827-6655.
* Coverage in Canada varies on some items. For full de-
tails call Sears Canada at 1-800-361-6665.
Sears Installation Service
For Sears professional installation of home appliances, ga-
rage door openers, water heaters, and other major home
items, in the U.S.A. or Canada call 1-800-4-MY-HOME
®
.

5
Features
As an ENERGY STAR
®
Partner, Sears
Brands Management Corporation has
determined that this product meets the
ENERGY STAR
®
guidelines for energy
effi ciency.
Control Lock
Drum Light
Door Latch with
Safety Lock
Cycle Selector
Laundry Product Dis-
penser Drawer
Door Striker
Reversible
Door
Cascading
Wash Vanes
Stainless Steel
Wash Drum
Adjustable
Leveling Legs
LED Display
Inner glass with small article
redistribution ramp

6
1 2
5
3 4
1
Cycle selector
3
POWER button
5
Cycle options / Cycle status display
2
Cycle settings
4
START/PAUSE button
Operating Instructions
Press the POWER button turn on the unit. Turn the cycle
selector in either direction to the cycle desired. The indica-
tor for that cycle will be illuminated.
To change the cycle once the cycle has begun, press POW-
ER to cancel the current cycle, press POWER to turn on
unit again, select a new cycle, and press START again. Just
turning the cycle selector knob will not change the cycle.
Cycle Selection
Follow the fabric care label instructions
on items to be washed.
For best results
Normal/Casual
Use this load for cotton, linen, towels, shirts, sheets, den-
ims and mixed loads.
Bulky/Bedding
This cycle is designed for bulky items such as comforters,
blankets, mattress pads, sleeping bags and similar items.
Heavy Duty
Use this cycle for heavily soiled, durable garments - such
as towels, sports gear, or fabric tote bags. For best soil
and stain removal, use the hottest water safe for the
fabrics being washed.
Whitest Whites
Use this cycle for white fabrics and lightly colored cloth-
ing. Refer to fabric care label for use of liquid chlorine
bleach. Hot water is recommended to ensure optimal
bleach activation. For peak rinsing performance and to
avoid chlorine residues on your laundry add Extra Rinse
to this cycle.
Towels
Select this cycle for a full load of towels and/or bath
mats. Select a higher spin speed to reduce drying time.
Steam Refresh
Refresh a small load of dry clothes with the perfect
amount of steam. Steam alone will infuse into the dry
load as it tumbles to refresh fabrics, remove odors, and
release wrinkles, reducing ironing. Remove load, hang or
iron as necessary.
This manual covers many models and not all cycles, options, or features listed are available on every model. Console shown
above for reference only. Your model may diff er.
IMPORTANT
If washer is paused during the •
Steam Refresh
cycle, the
door will remain locked due to higher temperature in
drum. DO NOT force open - it will unlock upon cooling.
During •
the
Steam Refresh cycle you may notice
steam exiting from the rear vent of the washer - this is
normal and not cause for alarm.
NOTE
Steam may not necessarily be visible inside drum •
during the Steam Refresh cycle.
Steam may not be present during entire cycle.•
IMPORTANT
If you cancel a running cycle, you must manually drain
any water in the drum with a Rinse & Spin or Drain &
Spin cycle before starting a new one.

7
Delicates
Use this cycle for lightly soiled knits and delicates which
require gentle washing.
Handwash
Use this cycle to provide intermittent, gentle tumbling for
items labeled “Hand Wash”.
Rinse & Spin
Select Rinse & Spin for loads that need a cold water
rinse or to add fabric softener that may have been omit-
ted in a regular cycle. Add the fabric softener to the
dispenser chamber. Select the spin speed appropriate
for the load.
As a precaution, the washer door is locked once the
water temperature reaches 130° F (55° C). If the cycle is
cancelled during the wash phase and the water temper-
ature is greater than 150° F (66° C) an automatic cool
down rinse will occur before the door can be opened.
Cold Clean
Designed for a small load of mixed items, wash and
rinse temperatures are equivalent to temperature of cold
tap supply. Use this selection for fabrics and colors that
are prone to dye transfer. Best used with cold water
detergent.
Silk
Select this cycle for washable silk items. It will provide
gentle reversing tumble wash action in cold water and
multiple rinses. Chlorine bleach will not be dispensed
in this cycle. The water will drain out at the end of the
cycle, but the drum will not spin. The garments will be
very wet.
Cycle Selection, continued
Express Wash
Quickly wash a small, lightly soiled load in 18 minutes.
Express Sanitize
Use the Express Sanitize cycle to clean and sanitize
heavily soiled, colorfast fabrics including towels, bed-
ding, cloth diapers, and children’s clothing.
It is recommended that you set your water heater to 120°
F (49° C) or higher to ensure proper performance during
this cycle. If the setting is lower or the load is extra large,
the cycle time may be extended.
The Express Sanitize cycle will kill 99.9% of bacteria
with no carryover of bacteria between loads. No bleach
or harsh chemicals are needed, but higher temperatures
are required. Please check fabric care labels to prevent
damage.
NSF Protocol P172
Sanitization Performance of Residential
and Commercial, Family-Sized Clothes
Washers
The wash water is heated by an internal boost heater to
a maximum of 152° F (67° C) as the load tumbles.
is displayed during the wash phase alternately with the
estimated cycle time. Cold water is added to cool down
the load prior to drain and spin.
Operating Instructions
NOTE
Washing silk garments labeled “
Dry Clean Only
” or
using chlorine bleach can result in permanent damage.
NOTE
You may deselect Extra Rinse if you wish to perform a
Spin Only cycle or select No Spin if you want to perform
a Drain Only cycle.
NOTE
If the voltage at your outlet is under 110 v, the internal
heater may not adequately heat the wash water. If
the cycle is interrupted while the water is heating, the
fi nal temperature of the wash water may be lower and
sanitation may be reduced.
NOTE
This cycle has been certifi ed by NSF International,
an independent third party testing and certifi cation
organization dedicated to public health, safety and
environmental protection.
Clean Washer
To clean and freshen the washer, perform the Clean
Washer cycle. If you wish to begin the cycle, empty the
drum, add bleach and press START. This maintenance
cycle removes residue that may cause odor. See
Inside
Routine Cleaning (Preventive)
for detailed information
about the Clean Washer cycle.
8
Cycle Settings
Appropriate wash temperature, spin speeds, soil level and
options will automatically be displayed for each cycle. The
settings can be changed before the cycle is started.
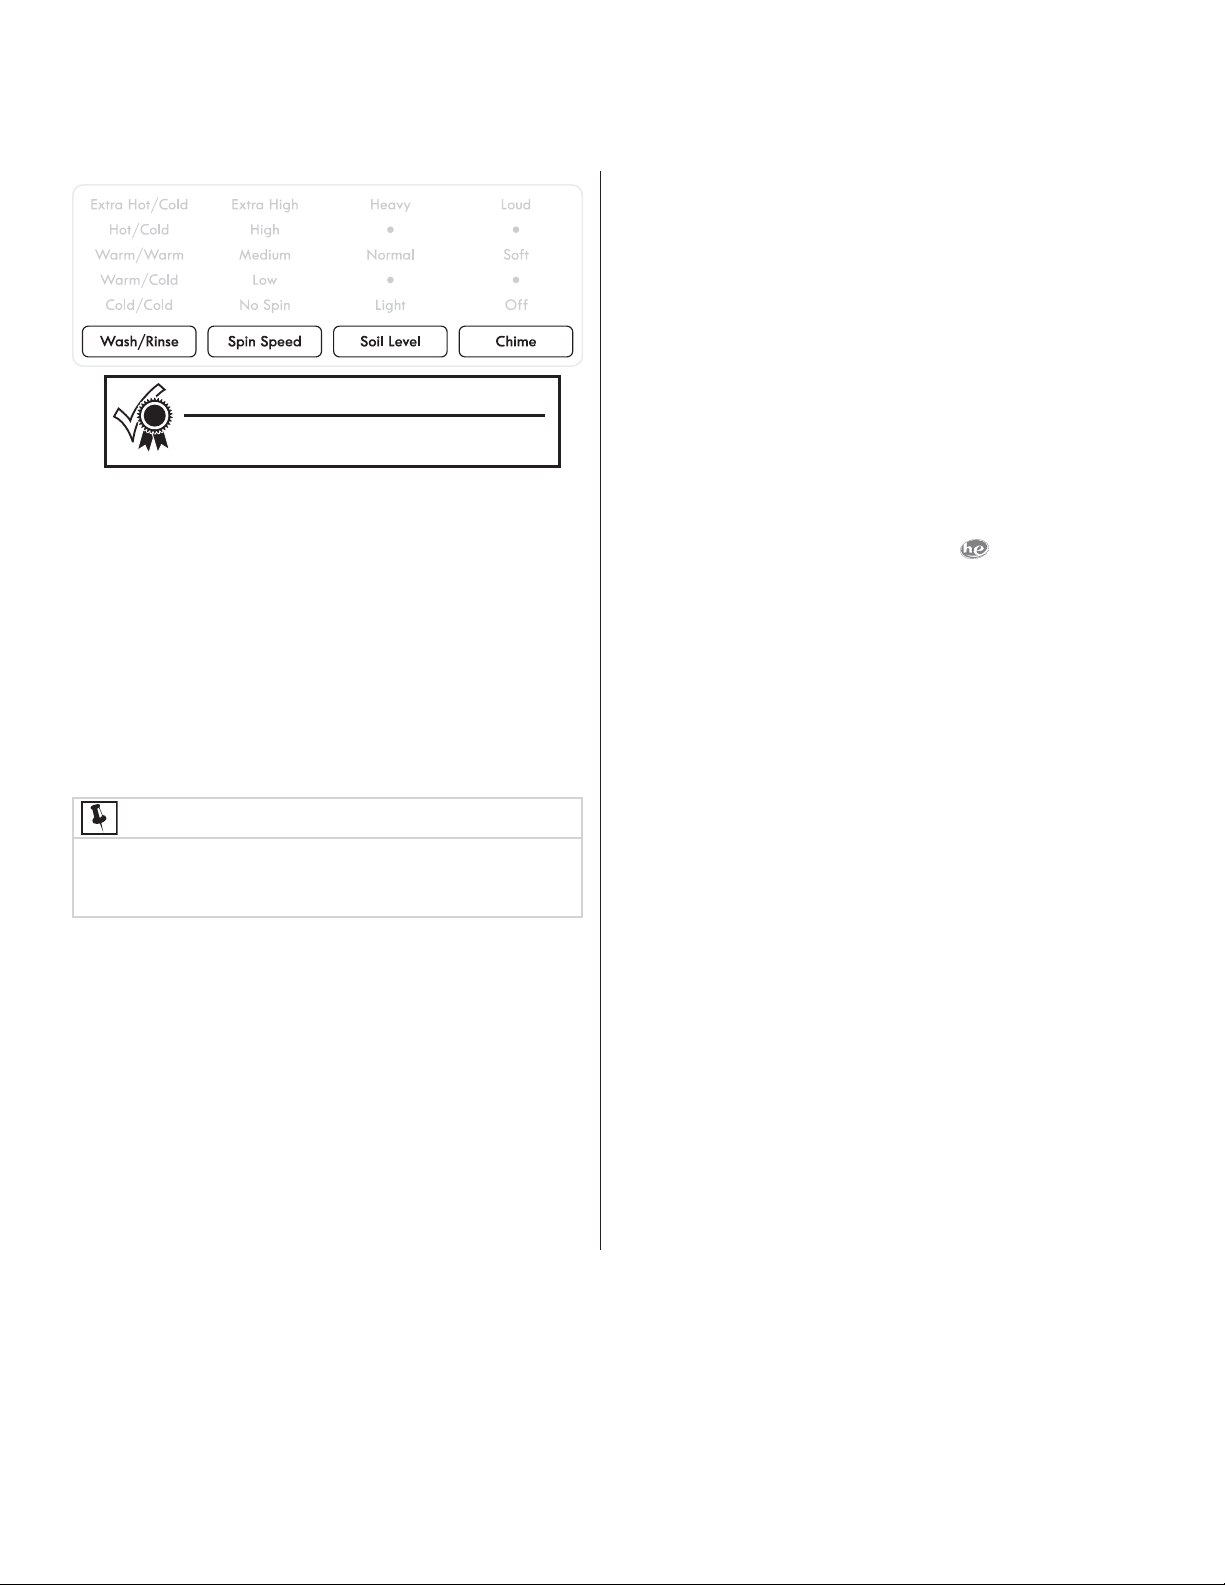
WASH/RINSE WATER TEMPERATURE
To change the preset temperature, press the Wash/Rinse
button to scroll to the desired setting. Select a wash water
temperature according to fi ber content, colorfastness and
soil level. A cold water rinse saves energy and reduces
wrinkling.
To protect your fabrics, not all temperatures are available
with every cycle. The indicator will not light if the setting is
not available with that cycle.
Auto Temp wash water temperatures are automatically
regulated to maximize detergent eff ectiveness and im-
prove washing performance. The water heater setting and
its distance from the washer, water usage in other parts of
the home, and seasonally low ground water temperature in
some geographic areas can aff ect water temperature.
Extra Hot/Cold
Use this setting for heavily soiled colorfast fabrics such
as towels, bedding, and children’s clothing. Extra Hot/
Cold provides wash water heated with an internal boost
heater.
Hot/Cold
Use this setting for heavily soiled white or colorfast cot-
tons and blends.
Warm/Warm
Use this setting when a warm water rinse is desired.
Warm/Cold
Use this setting for normally soiled white or colorfast cot-
tons or blends.
Cold/Cold
Wash and rinse temperatures are equivalent to tem-
perature of cold tap supply. Use this selection for lightly
soiled non-colorfast items, knits, delicates, and hand
washables and other fabrics and colors that are prone to
dye transfer. For use with cold water
detergents.
SPIN SPEED
SOIL LEVEL
CHIME
To protect your fabrics, not all spin speeds are available
with every cycle. The indicator will not light if the setting is
not available with that cycle.
Extra High, High, Medium and Low spin speeds are
available for appropriate cycles. The spin speed and/or
duration of fi nal spin vary from model to model and cycle
to cycle.
Increasing the spin speed will extract more water, decrease
drying time and conserve energy. Decreasing the spin
speed will reduce wrinkling.
Select Low spin speed to gently spin items that should be
line dried.
Use No Spin to omit the fi nal spin at the end of the cycle.
The load will be very wet. Remove items from the wash
drum to drip dry or select a Rinse & Spin cycle to remove
excess water at a more convenient time.
Adjust the wash time in 3-minute increments based on the
soil level of each load. Five soil levels are available.
A chime will sound at the end of the cycle when this option
is selected. The signal has an adjustable volume level or
can be turned off .
Operating Instructions
Follow the fabric care label instructions
on items to be washed.
For best results
NOTE
To change the temperature once the cycle has begun,
press the PAUSE button, make the new selection and
press START again.
9
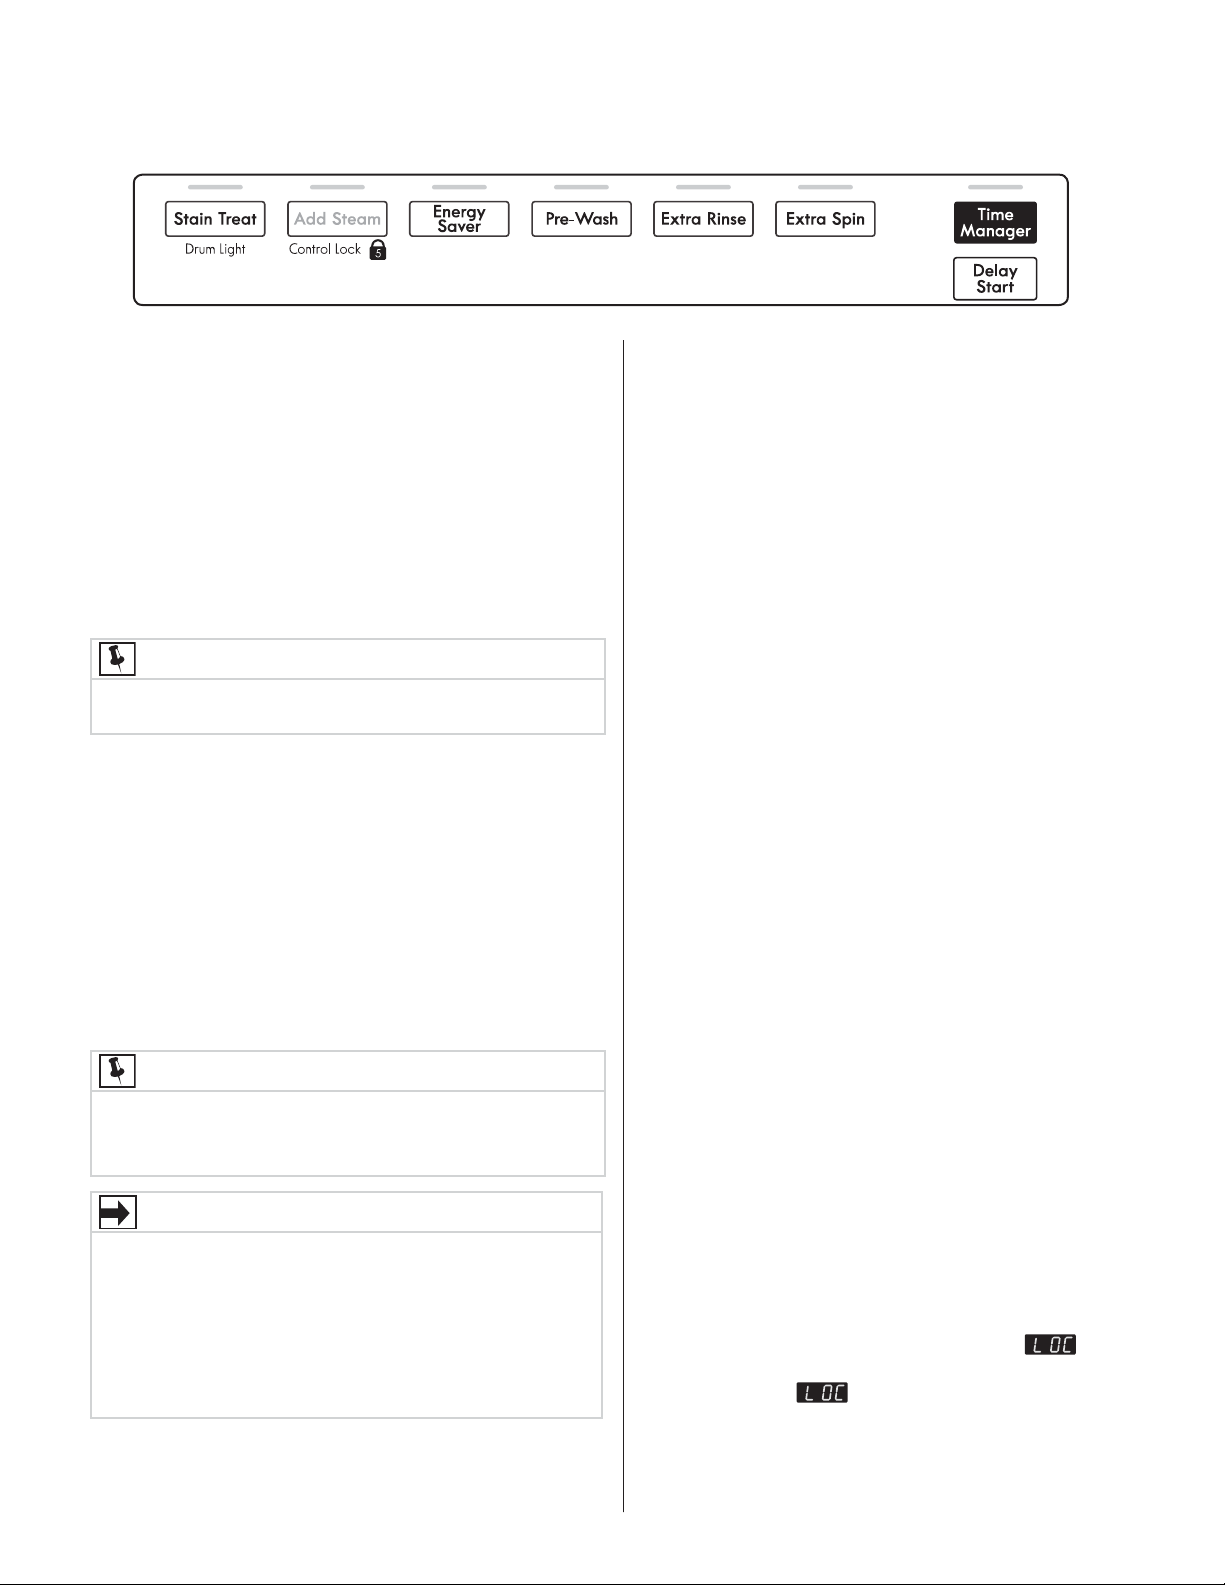
Cycle Options
To add options, press the corresponding options buttons to
illuminate the selections desired. To delete options, press
the options buttons again and the indicator lights will turn
off . Some options require a “Press & Hold” eff ort to acti-
vate or deactivate the secondary function.
Not all options are available on every model. To protect
your fabrics, not all options are available with every cycle.
If an option is not appropriate for the cycle, the indicator
will not light. Occasionally, a setting and option in the same
cycle will confl ict with each other, such as Add Steam and
Energy Saver. When this happens, the option selected fi rst
will cause the confl icting option to not be selectable.
Stain Treat
The Stain Treat option adds a special 10 minute soak/
pretreat agitation before the main wash. It fi lls initially
with detergent and cold water to prevent protein stains
from setting, then the internal heater is activated to heat
the wash water to remove non-protein based stains. Can
be used with Prewash for the toughest stains.
Add Steam
Select this option to add approximately 20 minutes of
tumbling in steam during the wash cycle. It is recom-
mended for heavily soiled loads to help enhance the
release of tough stains from fabrics after initial agitation.
Energy Saver
The Energy Saver option reduces the warm water tem-
perature a few degrees to save energy.
Operating Instructions
Pre Wash
Select this option to add a short initial wash period to a
cycle. Heavily soiled and stained loads will prewash for
approximately 5 minutes. The water will drain and the
load will automatically advance to the regular wash cycle
.
See step 5 in “
Operating Your Washer
” section in this
guide for details on adding detergent to the dispenser.
Extra Rinse
Use this option when additional rinsing is desired to
remove excess dirt and detergent. It is recommended for
heavily soiled loads or if household members have sensi-
tive skin.
Extra Spin
Use this option to add minutes to the fi nal spin at the
selected Spin Speed. This will improve water extraction,
decrease drying time and save energy.
Time Manager
Customize cycle duration to fi t your schedule by shorten-
ing the length of each cycle. Repeatedly press the Time
Manager button to select a level of duration manage-
ment - aggressively manage (quickest), moderately man-
age (quicker) or no management (normal).
Delay Start
Press Delay Start to select a wash time convenient to
your schedule or during off peak energy hours. The delay
time selected will be displayed and begin counting down
when you select START.
Drum Light (Press & Hold)
The drum light will come on whenever the door is
opened to illuminate the drum during loading and
unloading. Closing the door turns off the light. The drum
light will automatically turn off if the door is left open
more than 3 minutes.
You can activate the drum light during a cycle by press-
ing and holding the Stain Treat button for 3 seconds. The
light will stay on during the cycle for 3 minutes. To turn it
off , press and hold the button again.
Control Lock (Press & Hold)
To lock the controls between or during cycles, press and
hold the Add Steam button for 5 seconds.
will be
displayed if you attempt to wake up a “between cycle”
locked unit and
will alternate with cycle time re-
maining in a “during cycle” locked unit. Repeat to unlock
the controls when you are ready to operate the washer.
Use this feature to reduce the likelihood of accidental
operation by children.
IMPORTANT
If steam is selected, rinse temperatures will be elevated.•
If washer is paused during a steam wash cycle, the door •
will remain locked due to higher temperature in drum.
DO NOT force open - it will unlock upon cooling.
During a steam cycle you may notice steam exiting •
from the rear vent of the washer - this is normal and
not cause for alarm.
NOTE
Steam may not necessarily be visible inside drum •
during a steam wash cycle.
Steam may not be present during entire steam wash cycle.•
NOTE
To change the options after the cycle starts, press PAUSE,
adjust the setting and press START to resume the cycle.
 Loading...