

Page 1

®
Use & Care Guide
Guía de Uso y Cuidado
Guide d’utilisation et d’entretien
English / Español / Français
Models/ Modelos / Modèles: 417.8194*
Kenmore
®
Compact Condensing Dryer
Condensación Secadora Compacto
Sécheuse Compact à Condensation
* = Color number, número de color, le numéro de couleur
P/N 136937493 (1704)
Sears Brands Management Corporation
Homan Estates, IL 60179 U.S.A.
www.kenmore.com
Sears Canada Inc.
Toronto, Ontario, Canada M5B 2C3
www.sears.ca
Page 2
IMPORTANT SAFETY INSTRUCTIONS
WARNING
Please read all instructions before using this appliance.
Recognize safety symbols, words and labels
Safety items throughout this manual are labeled with
a WARNING or CAUTION based on the risk type as
described below:
Denitions
This is the safety alert symbol. It is used to alert you to
potential personal injury hazards. Obey all safety messages
that follow this symbol to avoid possible injury or death.
DANGER
DANGER indicates an imminently hazardous situation
which, if not avoided, will result in death or serious injury.
WARNING
WARNING indicates a potentially hazardous situation
which, if not avoided, could result in death or serious
injury.
CAUTION
CAUTION indicates a potentially hazardous situation
which, if not avoided, may result in minor or moderate
injury.
IMPORTANT
IMPORTANT indicates installation, operation or
maintenance information which is important but not
hazard-related.
Record Model/Serial Numbers
The model and serial numbers of your dryer are found on the
serial plate located inside the door opening. Record and retain
these numbers.
Model Number __________________________
Serial Number ___________________________
Purchase Date ___________________________
Read all instructions before using this appliance. This book
contains valuable information about:
• Operation
• Care
• Service
Keep it in a safe place.
This
Use & Care Guide
tions for your dryer. It also contains information about
features for several other models. Your washer may not have
every feature included.
Use the washer only as instructed in this
provides general operating instruc-
Use & Care Guide
NOTE
The instructions appearing in this
meant to cover every possible condition and situation that
may occur. Common sense and caution must be practiced
when installing, operating and maintaining any appliance.
Use & Care Guide
are not
.
Table of Contents
Important Safety Instructions .................................................2-4
Warranty ..................................................................................... 5
Features .........................................................................................6
Operating Instructions ............................................................7-13
Care and Cleaning ............................................................... 14-15
Solutions to Common Problems ..........................................16-17
Español .........................................................................................18
Français .......................................................................................34
SAVE THESE INSTRUCTIONS FOR
FUTURE REFERENCE.
2
Page 3
IMPORTANT SAFETY INSTRUCTIONS
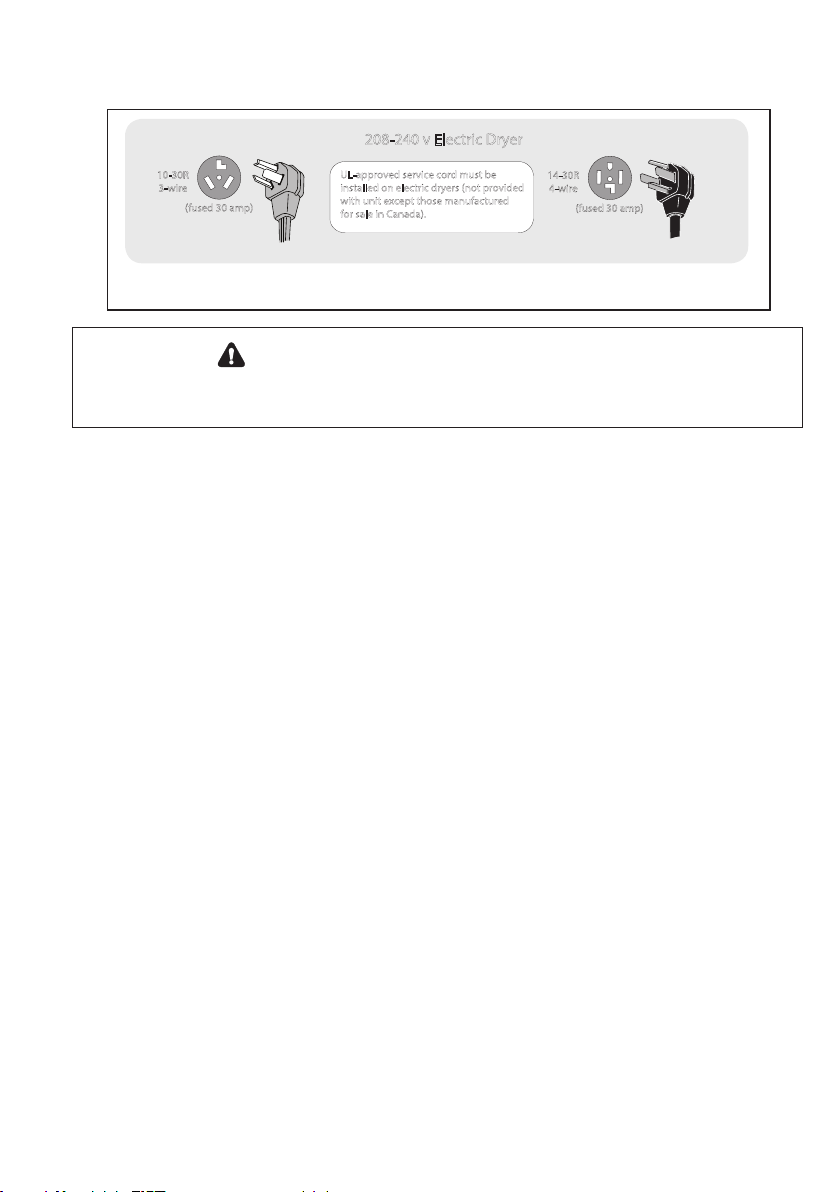
208-240 v Electric Dryer
10-30R
3-wire
(fused 30 amp)
Avoid re hazard or electrical shock. Do not use an adaptor plug or extension cord or remove grounding
prong from electrical power cord. Failure to follow this warning can cause serious injury, re or death.
WARNING - RISK OF FIRE
To reduce the risk of re, electrical shock, or injury to persons when using this dryer, comply with the basic warnings
listed below. Failure to comply with these warnings could result in serious personal injuries.
You can be killed or seriously injured if you don’t follow these Important Safety Instructions:
UL-approved service cord must be
installed on electric dryers (not provided
with unit except those manufactured
for sale in Canada).
14-30R
4-wire
(fused 30 amp)
PREVENT FIRE
• Do not dry items that have been previously cleaned in,
soaked in, or spotted with gasoline, cleaning solvents,
kerosene, waxes, etc. Do not store these items on or near
the dryer. These substances give o vapors that could
ignite or explode.
• Do not place items exposed to cooking oils in your dryer.
Items contaminated with cooking oils may contribute to a
chemical reaction that could cause a load to catch re.
• Do not dry articles containing rubber, plastic or similar
materials such as bras, galoshes, bath mats, rugs, bibs, baby
pants, plastic bags and pillows that may melt or burn. Some
rubber materials, when heated, can under certain circumstances produce re by spontaneous combustion.
• Do not use heat to dry items containing feathers or
down, foam rubber, plastics similarly textured, rubber-like
materials.
• Clean the lint screen before or after each load. The
interior of the dryer, and lint screen housing should be
cleaned approximately every 18 months by qualied
service personnel. An excessive amount of lint build-up in
these areas could result in inecient drying and possible
re. See Care and Cleaning.
• Do not operate the dryer if the lint screen is blocked,
damaged or missing. Fire hazard, overheating and damage to fabrics can occur.
• Do not obstruct the ow of ventilating air. Do not stack
or place laundry or throw rugs against the front or back
of the dryer.
• Do not spray any type of aerosol into, on or near dryer
at any time.
• Do not use fabric softeners or products to eliminate static
unless recommended by the manufacturer of the fabric
softener or product.
• Do not continue to use the dryer is you hear squeaking,
grinding, rubbing or other unusual noises. This could be a
sign of mechanical breakdown and lead to re or serious
injury. Contact a qualied technician immediately.
• Failure to comply with these warnings could result in re,
explosion, serious bodily injury and/or damage to the
rubber or plastic parts of the dryer.
3
Page 4
IMPORTANT SAFETY INSTRUCTIONS
PROTECT CHILDREN
• Do not allow children to play on or in the dryer. Close
supervision of children is necessary when the dryer is used
near children. As children grow, teach them the proper,
safe use of all appliances.
• Destroy the carton, plastic bag and other packing materials after the dryer is unpacked. Children might use them
for play. Cartons covered with rugs, bedspreads or plastic
sheets can become airtight chambers.
• Keep laundry products out of children’s reach. To prevent
personal injury, observe all warnings on product labels.
• Before the dryer is removed from service or discarded,
remove the dryer door to prevent accidental entrapment.
• Failure to comply with these warnings could result in serious personal injuries.
PREVENT INJURY
• To prevent shock hazard and assure stability during
operation, the dryer must be installed and electrically
grounded by a qualied service person in accordance
with local codes. Installation instructions are packed in the
dryer for the installer’s reference. Refer to INSTALLATION
INSTRUCTIONS for detailed grounding procedures. If the
dryer is moved to a new location, have it checked and
reinstalled by a qualied service person.
• ALWAYS disconnect the dryer from the electrical supply
before attempting any service or cleaning. Failure to do
so can result in electrical shock or injury.
• Do not use any type spray cleanser when cleaning dryer
interior. Hazardous fumes or electrical shock could occur.
• To prevent injury, do not reach into the dryer if the drum
is moving. Wait until the dryer has stopped completely
before reaching into the drum.
PREVENT INJURY AND DAMAGE TO THE DRYER
• All repairs and servicing must be performed by an authorized servicer unless specically recommended in this Use
& Care Guide. Use only authorized factory parts.
• Do not tamper with controls.
• Do not sit on, step on or stand on the dryer. Do not rest
heavy loads on top. The dryer is not meant to support
weight.
• Do not install or store the dryer where it will be exposed
to the weather.
• Failure to comply with these warnings could result in serious personal injuries.
CAUTION
The California Safe Drinking Water and Toxic Enforcement Act requires the Governor of California to publish a list of
substances known to the state to cause cancer, birth defects or other reproductive harm, and requires businesses to warn
customer of potential exposure to such substances. Included in this list are soot and carbon monoxide, both of which may
be produced by the use of this product.
4
Page 5

KENMORE LIMITED WARRANTY
FOR ONE YEAR from the date of sale this appliance is warranted against defects in material or workmanship when it is
correctly installed, operated and maintained according to all
supplied instructions.
WITH PROOF OF SALE, a defective appliance will receive
free repair or replacement at option of seller.
For warranty coverage details to obtain free repair or replacement, visit the web page: www.kenmore.com/warranty
This warranty applies for only 90 DAYS from the sale date in
the United States, and is void in Canada, if this appliance is
ever used for other than private household purposes.
This warranty covers ONLY defects in material and workmanship, and will NOT pay for:
1. Expendable items that can wear out from normal use,
including but not limited to lters, belts, bags or screw-in
base light bulbs.
2. A service technician to clean or maintain this appliance,
or to instruct the user in correct appliance installation,
operation and maintenance.
3. Service calls to correct appliance installation not
performed by Sears authorized service agents, or to
repair problems with house fuses, circuit breakers, house
wiring, and plumbing or gas supply systems resulting
from such installation.
4. Damage to or failure of this appliance resulting from
installation not performed by Sears authorized service
agents, including installation that was not in accord with
electrical, gas or plumbing codes.
5. Damage to or failure of this appliance, including
discoloration or surface rust, if it is not correctly operated
and maintained according to all supplied instructions.
6. Damage to or failure of this appliance, including
discoloration or surface rust, resulting from accident,
alteration, abuse, misuse or use for other than its
intended purpose.
7. Damage to or failure of this appliance, including
discoloration or surface rust, caused by the use of
detergents, cleaners, chemicals or utensils other than
those recommended in all instructions supplied with the
product.
8. Damage to or failure of parts or systems resulting from
unauthorized modications made to this appliance.
9. Service to an appliance if the model and serial plate is
missing, altered, or cannot easily be determined to have
the appropriate certication logo.
Disclaimer of implied warranties; limitation of remedies
Customer’s sole and exclusive remedy under this limited
warranty shall be product repair or replacement as provided
herein. Implied warranties, including warranties of merchantability or tness for a particular purpose, are limited to one
year or the shortest period allowed by law. Seller shall not
be liable for incidental or consequential damages. Some
states and provinces do not allow the exclusion or limitation
of incidental or consequential damages, or limitation on the
duration of implied warranties of merchantability or tness,
so these exclusions or limitations may not apply to you.
This warranty applies only while this appliance is used in
the United States or Canada*.
This warranty gives you specic legal rights, and you may
also have other rights which vary from state to state.
* In-home repair service is not available in all Canadian geographical areas, nor will this warranty cover user or servicer
travel and transportation expenses if this product is located
in a remote area (as dened by Sears Canada Inc.) where an
authorized servicer is not available.
Sears Brands Management Corporation, Homan Estates,
IL 60179
Sears Canada Inc., Toronto, Ontario, Canada M5B 2C3
5
Page 6
Features
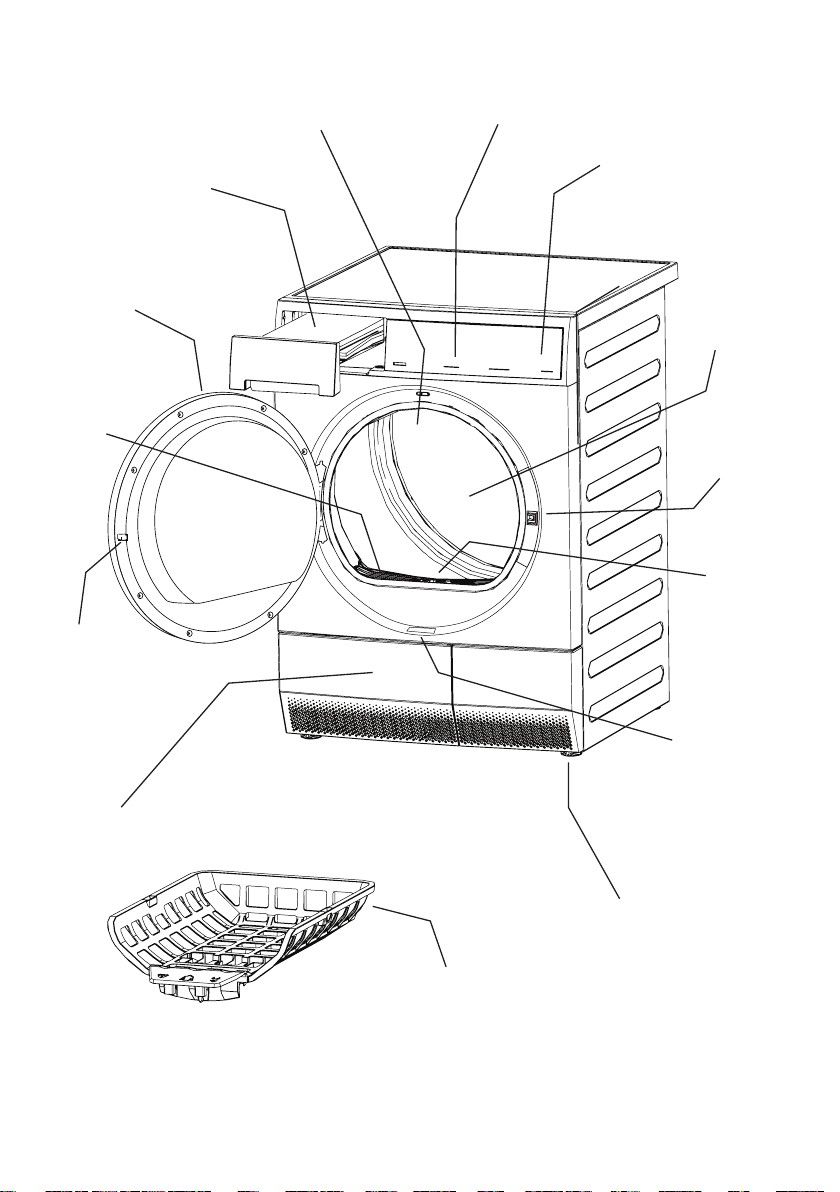
Water Container
Reversible Door
Lint Filter
Door Strike
Drum Light
LED Display
Control Lock
Reversing-Action
Tumble System
Door Latch
Moisture
Sensor
Condenser
Access Door
Drying Rack*
6
Condenser Access
Door Latch
Adjustable
Leveling Legs
*Not all models come with drying rack and
stacking kit from the factory. They may be
purchased as accessories.
Page 7
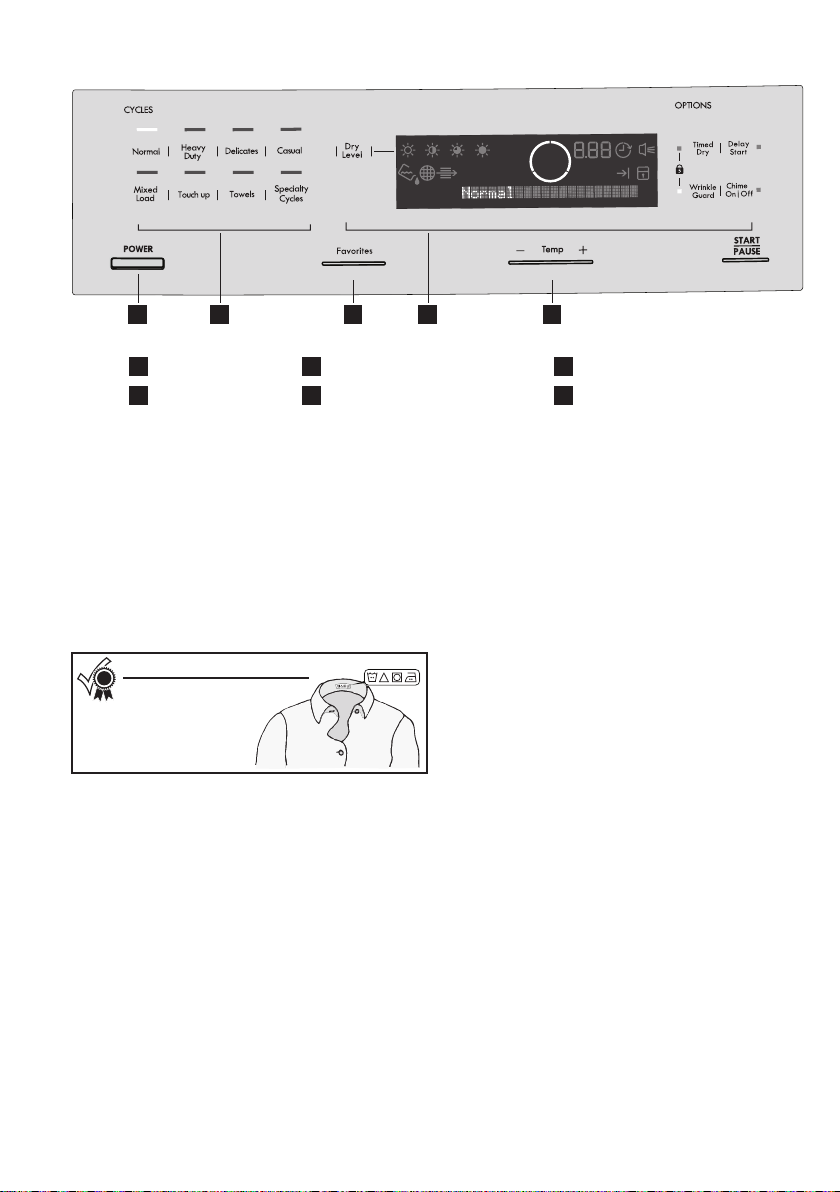
2 41 3 5
Operating Instructions
POWER Button
1
Cycle Selection
2
This manual covers many models and not all cycles, options, or features listed are available on every model. Console shown above for
reference only. Your model may dier.
Favorites Button
3
Cycle Options / Cycle Status Display
4
Cycle Selection
Press the POWER button to turn on the unit. Press the icon
for the cycle desired and the indicator for that cycle will
be illuminated. To power the unit o, press and hold the
POWER button until the unit shuts down.
To change the cycle once the cycle has begun, press and
hold the POWER button to cancel the current cycle, press
the POWER button to turn on unit again, select a new cycle,
and press START again. Just pressing another cycle icon will
not change the cycle.
For best results
Follow the fabric care label
instructions on items to
be dried.
Auto Dry Cycles
Auto Dry cycles take the guesswork out of selecting the
correct drying time for each load. Moisture sensing bars in
the front of the dryer drum sense the moisture level of the
load as it tumbles through the heated air. With Auto Dry
cycles, the load will automatically be dried at the selected
temperature to the desired dryness level. Auto Dry cycles
save time and energy and protect fabrics.
When the load has reached the selected dryness level, it
will continue to tumble during a cool down period. This
helps reduce wrinkling and makes items easier to handle
during unloading.
Drying time varies depending on size and dampness of
load and fabric type. If the load is too small or almost dry,
the moisture sensing bars may not detect enough moisture
to continue the cycle and the cycle may end after a few
minutes. If this occurs, select a Timed Dry cycle.
Room temperature, and electrical voltage can also aect
drying time.
Temp Button
5
START/PAUSE Button
6
Normal
Select this Auto Dry cycle for cotton items.
Heavy Duty
Select this Auto Dry cycle to dry durable fabrics such as
jeans and overalls.
Delicates
Select this Auto Dry cycle for knits and delicate items.
Casual
Select this Auto Dry cycle for cottons and blends with a
no-iron nish.
Mixed Load
Select this Auto Dry cycle to dry loads containing a mix
of fabrics.
Touch Up
Select Touch Up to help remove wrinkles from clean and
dry items that were not taken from the dryer at the end of
the cycle, have been stored in crowded closets or drawers,
or unpacked from luggage following a trip. It provides
approximately 10 minutes of low heat tumbling followed
by a 25-minute cool down period.
Towels
Select this cycle to dry heavy loads such as towels and
non-rubber-backed bath mats.
7
Page 8
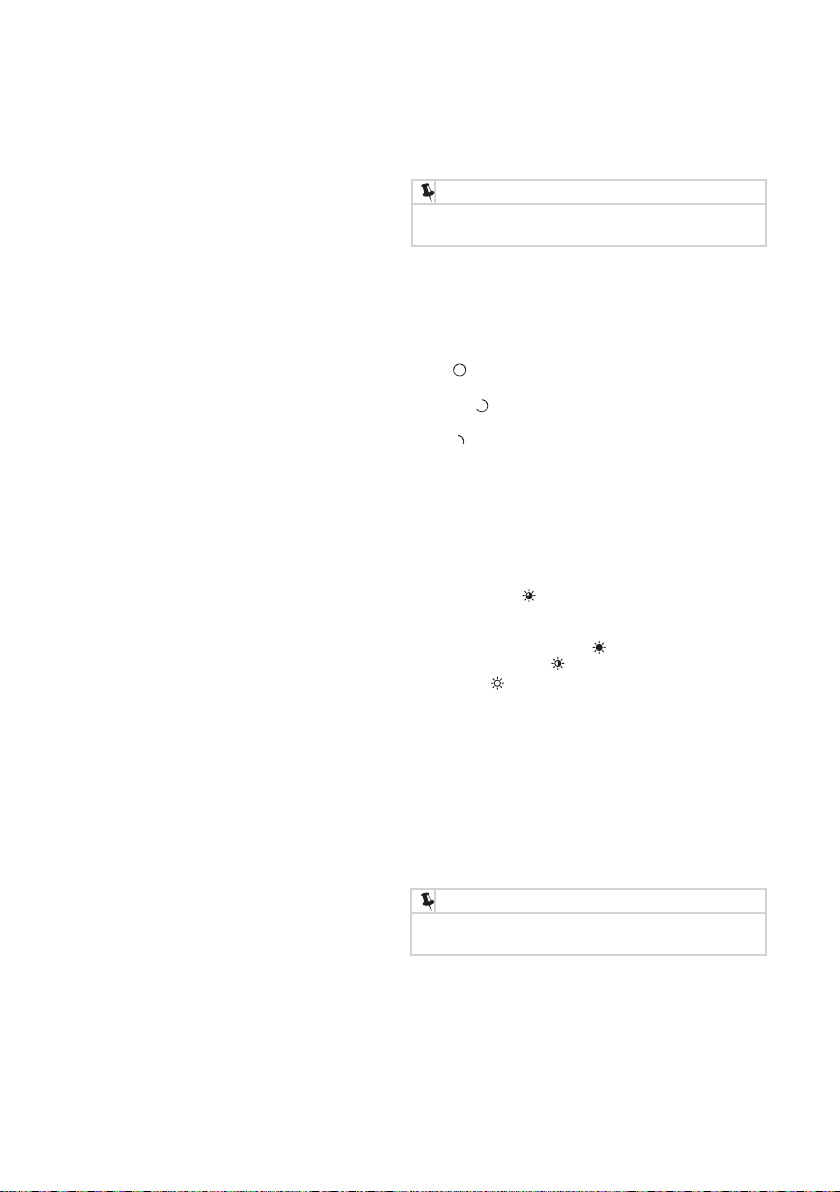
Operating Instructions
Specialty Cycle Selection
To scroll through the specialty cycles, continue to press the
Specialty Cycles icon. The selected cycle will be shown on
the text display.
Jeans
Select this Auto Dry cycle for drying an entire load of
denim jeans.
Fast Dry
Quickly dry a small load
Wool
Use the wool cycle with washable woolens - check your
fabric care label to ensure proper garment care. To help
your wool items keep their shape, use of optional drying
rack is recommended.
Time Dry
To manually select the drying time for this specialty cycle,
press the Timed Dry icon. Actual drying time (20 minutes
to 120 minutes) will be displayed.
Because this is not an Auto Dry cycle, you will not be
able to select a dryness level. Moisture sensing bars are
not active and dryer will continue to heat throughout the
cycle until the nal cool down period.
.
Cycle Settings
Appropriate temperature, dryness level and options will be
displayed for each cycle. The settings can be changed before
the cycle is started. If changes are attempted after the cycle
starts a signal will beep and “
Not possible
” will be displayed.
NOTE
To change settings after the cycle starts, press PAUSE,
adjust the setting and press START to resume the cycle.
Drying Temperature
To change the preset temperature, press the Temp button to
scroll to the desired setting.
To protect your fabrics, not all temperatures are available
with every cycle. The indicator will not light if the setting is
not available with that cycle.
Max
Recommended for durable fabrics and towels.
Medium
Recommended for most cotton fabrics.
Low
Recommended for delicate fabrics.
Dryness Level (Auto Dry)
To change the preset level, press the Dry Level icon to scroll
to the degree of dryness desired.
To protect your fabrics, not all dryness levels are available
with every cycle. If a dryness level is not appropriate for the
cycle, it cannot be selected.
Select the Normal
Occasionally a load may seem too damp or over-dried
at the end of the cycle. To increase drying time for similar
loads in the future, select Max
drying time, select Less
Select Damp
hanging or ironing.
dry level for most Auto Dry cycles.
. For loads requiring less
.
for items you wish to partially dry before
Cycle Options
To add options, press the corresponding option’s icon to
illuminate the selection desired. To cancel options, press the
option’s icon again and the indicator light will turn o. If an
option is not appropriate for the cycle, the indicator will not
light. To protect your fabrics, not all options are available with
every cycle. Not all options are available on every model.
NOTE
To change the options once the cycle has begun, press the
PAUSE button, make the new selection and press START again.
Wrinkle Guard
Select Wrinkle Guard if the dried load might not be
removed promptly at the end of the cycle. The dry load will
continue tumbling without heat to help reduce wrinkling.
When Chime is selected, a beep will be heard periodically.
The load may be removed any time during Wrinkle Guard.
Chime
A signal will sound at the end of the cycle (and periodically
during Wrinkle Guard) if this option is selected.
8
Page 9
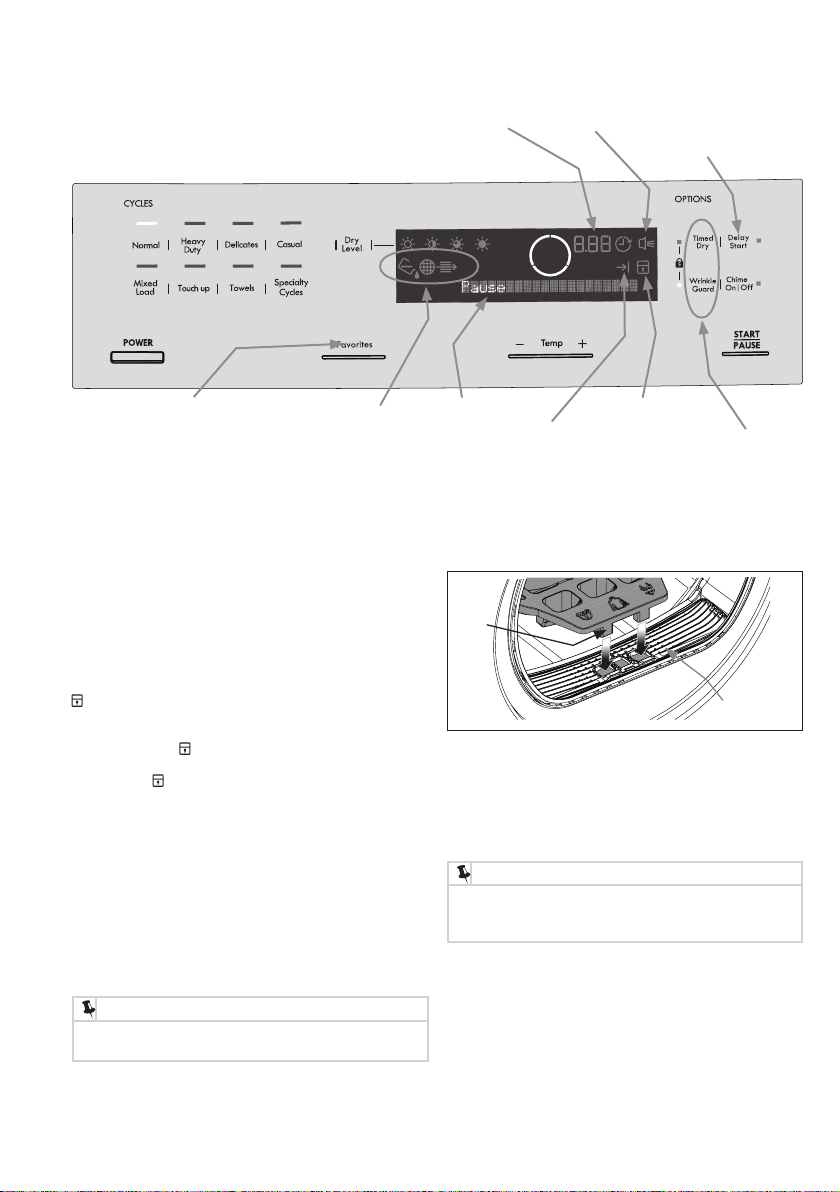
Operating Instructions
Other Features
cycle count down/
delay start timer
Favorites
Favorites
After a time period of initial usage, the dryer will
automatically remember the 3 most used cycles with their
settings and options. To cycle through this list continue
to press the My Favorites button. Press START after your
desired cycle appears.
Delay Start
Press Delay Start to select a dry time convenient to your
schedule or during o peak energy hours. The delay time
selected will be displayed and begin counting down when
you select START.
Control Lock
To avoid having someone accidentally start or stop the
dryer, press Timed Dry and Wrinkle Guard at the same time
and hold until the
press Timed Dry and Wrinkle Guard at the same time and
hold until the
Status Display/Status Lights
The estimated total cycle time will be displayed when the
cycle is selected. The estimated remaining cycle time is
displayed during the cycle.
Drum Light
The drum light will come on whenever the door is opened to
illuminate the drum during loading and unloading. Closing
the door turns o the light.
Reversible Door
Your dryer is equipped with a reversible door. The door can
be hinged on the right or left side.
indicator is lit. To unlock the controls,
indicator is no longer lit.
maintenance
indicators
NOTE
For step-by-step instructions on DOOR REVERSAL, refer
to the Installation Instructions supplied with this dryer.
chime
indicator
status display
end of cycle
indicator
Drying Rack (on select models)
Use the drying rack for items which should not be tumble
dried. Insert the rack into the dryer drum and lower the
front two “legs” into the openings on the lint lter grille.
front
legs
Place items to be dried on top of the rack, leaving space
between items and not allowing them to hang over the
sides or through the holes. Select the low heat setting for
items containing plastic, foam rubber, rubber-like materials,
feathers or down.
When items are dry, remove the rack and store it in a
convenient location.
control lock
indicator
Delay Start
control lock
key combination
lint lter
grille
NOTE
9
Page 10
Operating Instructions
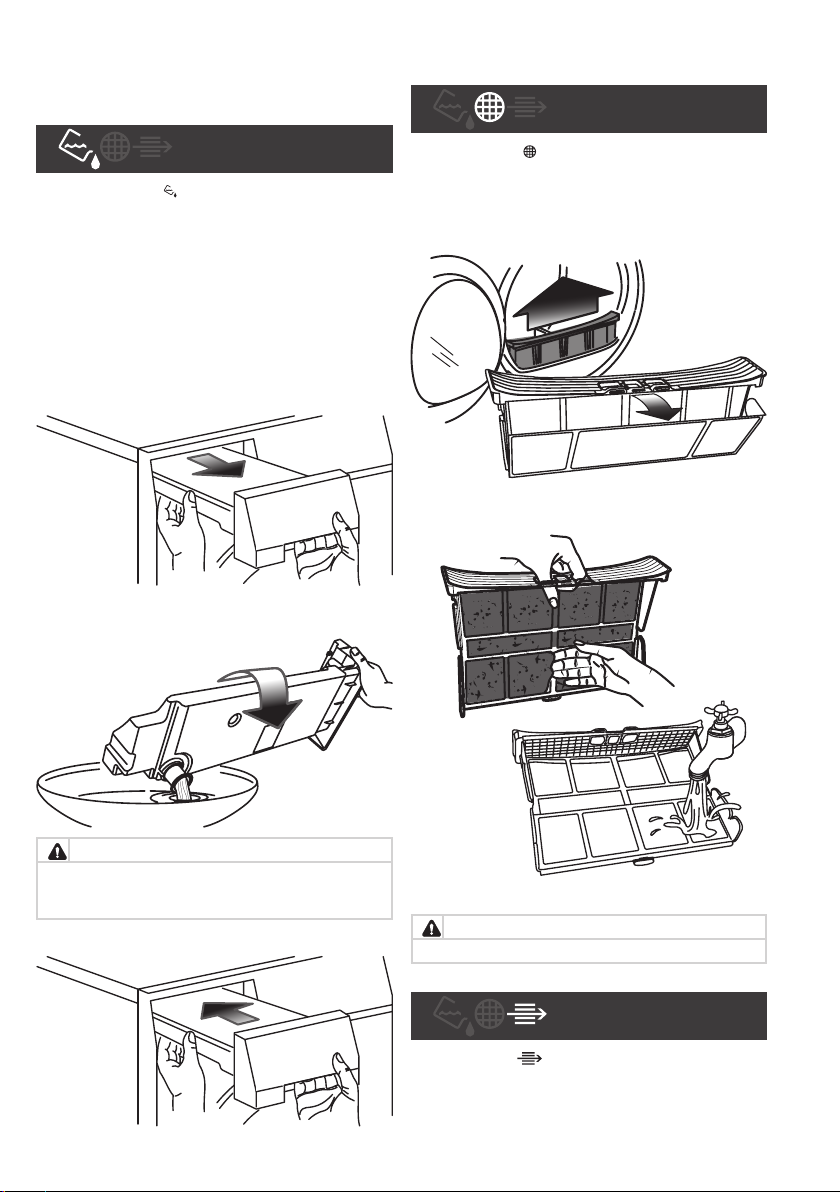
Drying System Maintenance Procedures
Water Container Full (if direct drain kit not installed)
A condensing dryer does not expel moisture-lled air to
the outside like a conventional dryer. Moisture is extracted
from the air by a condenser within the dryer. The moisture
is then collected in a built-in water container, which should
be emptied after every dried load of clothes. The container
MUST be emptied when the Water Container Full indicator
light illuminates on the dryer control panel.
If the water container becomes full during a drying cycle,
the indicator will illuminate and the dryer will stop. Empty
and replace the water container and restart the dryer.
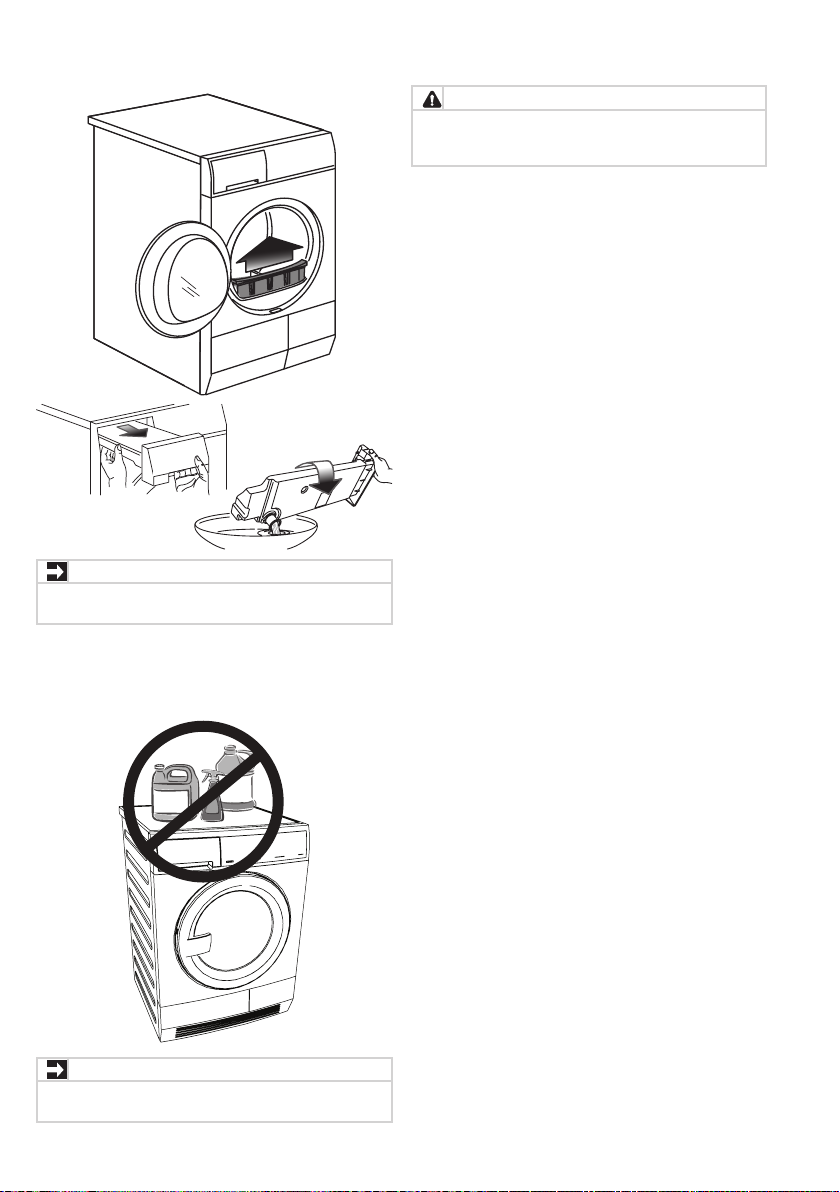
To empty the container:
1. Support the container as you pull it out.
2. Hold container level to prevent water from spilling.
3. Dump water container in sink or drain.
Lint Filter Plugged
When the “Lint Filter Plugged” indicator comes on, follow
these steps to clean the lter:
1. Remove the lter by pulling straight up.
2. Release the latch on the lter grille to open the lter.
3. Remove trapped lint and larger particles by hand.
4. If necessary, clean lter screen with hot water.
CAUTION
Do not drink or prepare food with the condensed water
from your dryer water. It can cause health problems to
people and pets.
4. Return container fully before continuing operation of dryer.
5. Return lter before continuing use of the dryer.
CAUTION
Do not operate dryer without lint lter in place.
Clean Condenser
When the “Clean Condenser” indicator comes on, follow the
Condenser Cleaning instructions in the Care and Cleaning
section of this manual.
10
Page 11
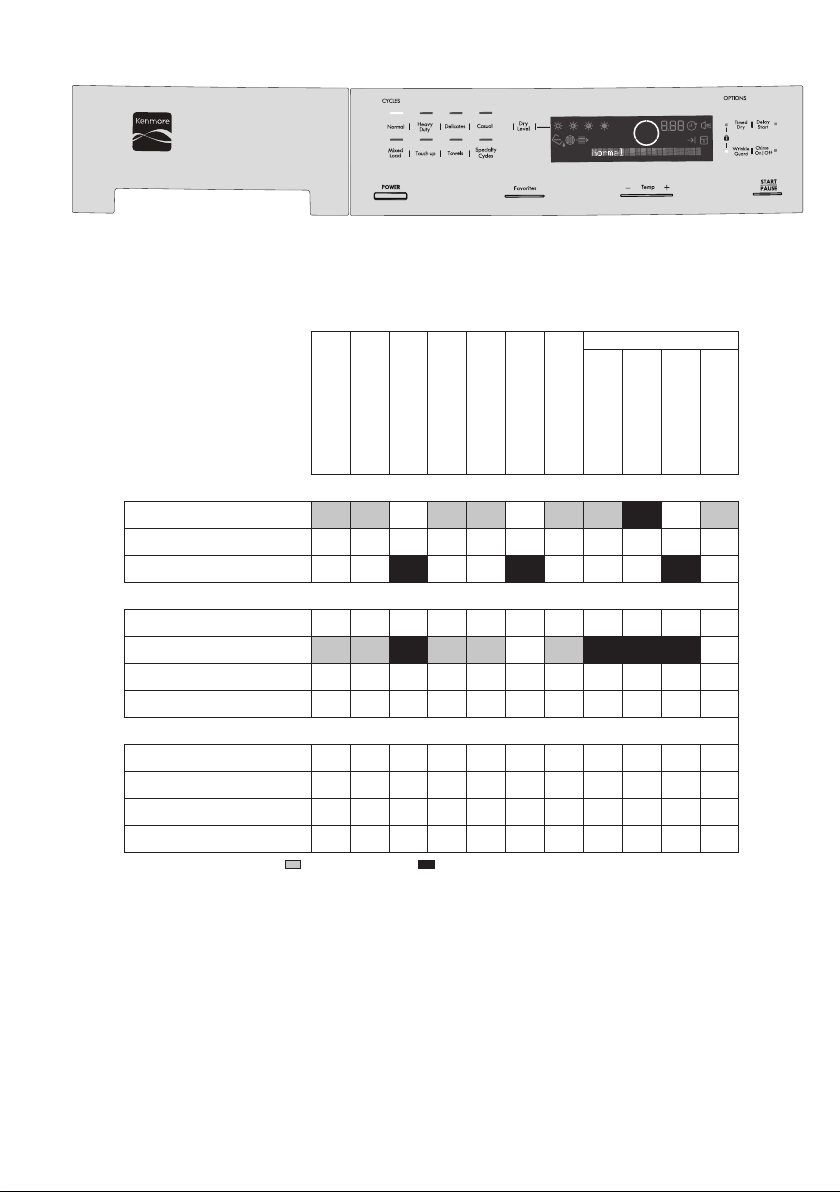
Dryer Settings Table
Operating Instructions
These Temperatures, Dryness Levels, and Options are available with the following cycles:
Normal
Heavy Duty
Delicates
Casual
Mixed Load
Touch Up
Towels
Temp
Max
Medium
Low
Dry Level
Max
Normal
Less
Damp
Options
Wrinkle Guard
Timed Dry
Delay Start
Chime
= Available selections. = Cycle defaults. = Non-modiable presets.
Specialty Cycles
Jeans
Fast Dry
Wool
Timed Dry
11
Page 12
Operating Instructions
Operating Your Dryer
WARNING
To reduce the risk of re, electric shock or injury to
persons, read the IMPORTANT SAFETY INSTRUCTIONS in
Use and Care Guide
this
1 Prepare load for drying.
• Dry items of similar fabric, weight and construction in
the same load.
• Separate dark items from light-colored items. Separate items that shed lint from those that attract lint.
• Check for stains which may not have been removed in
washing. Repeat stain removal process and wash again
before drying. Drying may permanently set some stains.
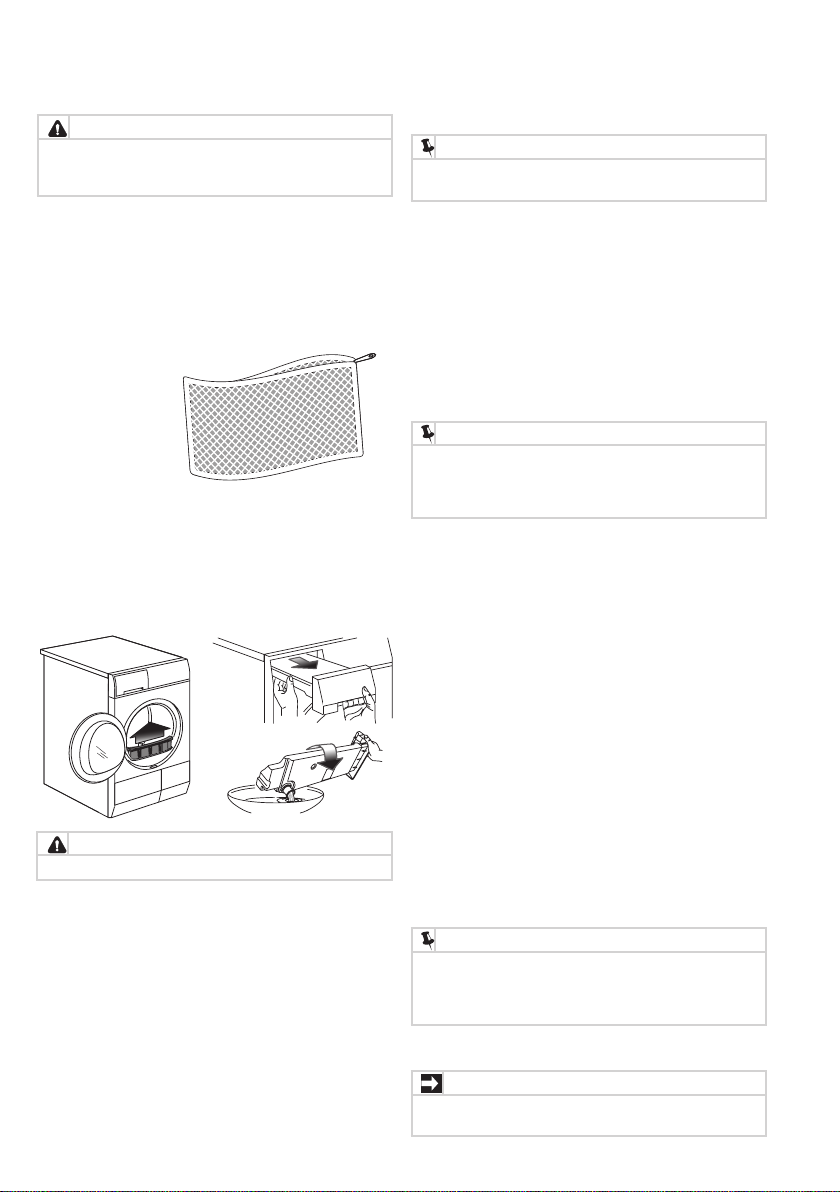
• Place delicate or small items in a
mesh bag.
• Be sure
buckles, but-
tons and trim
are heatproof and won’t damage the drum nish. Close
zippers; fasten hooks and Velcro
strings and sashes to prevent snagging and tangling.
2 Check that the lint lter is clean and in place and water
container is empty. See also Care and Cleaning section.
CAUTION
Do not operate dryer without lint lter in place.
3 Load the dryer and close the door.
• Load items loosely. The average wet load will ll the
drum 1/3 to 1/2 full. Items need room to tumble freely
for even drying and less wrinkling.
• Fabric softener sheets are not recommended with this
condensing dryer.
• To save energy and time and avoid uneven drying and
wrinkling, do not overload the dryer.
• When drying large items, dry only two or three items
at a time. Fill out the load with small and medium
sized items.
• For delicate or very small loads, add two or three
similar items to improve tumbling action.
before operating your dryer.
(Mesh bag not included.)
®
-like fasteners. Tie
4 Select the appropriate cycle and settings for each load.
NOTE
Over-drying can cause wrinkles, shrinkage, lint, harshness
and a build up of static electricity.
• Press the POWER button to turn on the unit.
• Select a desired cycle by pressing its icon.
• The estimated cycle time, drying temperature, dry-
ness level and options will be indicated for the cycle
selected. See the “Dryer Settings Chart” for more
details. Estimated (and actual) cycle times may dier
depending on load size and moisture content.
• To change the settings, press the Temp or Dry Level
icons to scroll to the desired settings.
• To select or delete an option, press the icon for that
option. The indicator will be illuminated when the option has been selected. The indicator will no longer be
lighted when the option has been deleted.
NOTE
To provide the best care for your laundry, not every setting
or option is available with every cycle. If a setting or option
is not available for the cycle selected, the indicator will
not light.
5 Start the dryer.
• Close the door and press START. The dryer will not
operate with the door open. “
displayed as a reminder to close the door.
• Select Delay Start to delay the beginning of the cycle,
if desired.
• To add a forgotten item to the dryer drum, press
PAUSE and open the door. “
alternately with the estimated remaining cycle time.
Opening the door with a cycle running will also pause
the cycle. Add the item, close the door and press
START to resume the cycle.
• If changes to the settings or options are attempted
after the cycle starts, you will hear several beeps
when the buttons are pressed. To change the settings
or options, press PAUSE, make the new selections and
press START again.
• To change the cycle once the cycle has begun, press
and hold the POWER button to cancel the current
cycle, press the POWER button to turn on unit again,
select a new cycle, and press START again. Just press-
ing another cycle icon will not change the cycle.
• To stop the cycle, press and hold the POWER button.
• A signal will sound at the end of the cycle if the
Chime option has been selected.
Check the door
PAUSE
” will be displayed
” will be
NOTE
If drying a single large or bulky item remove the item
part way through the cycle and turn it “inside out” to
maximize drying eectiveness. Place item back in dryer
and re-start cycle.
6 When the cycle ends, remove items immediately and
hang or fold.
IMPORTANT
Clean the lint lter and empty the water container after
every load.
12
Page 13
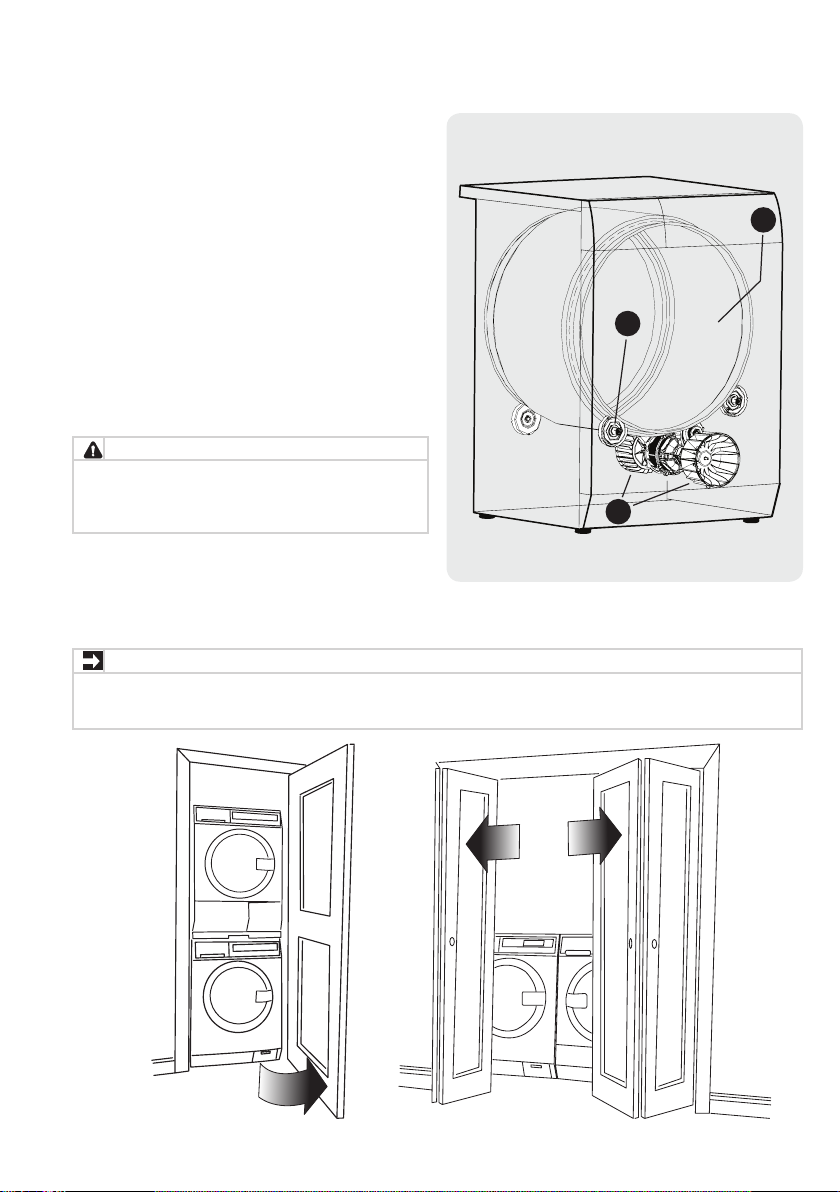
Normal Operating Sounds
A
C
B
You may or may not hear the following sounds from your
new dryer:
A. SUSPENSION ROLLERS The dryer drum is supported
by a set of suspension rollers. At times there may be a
thumping or rolling sound when the dryer starts. This may
happen if the dryer has not been in use for a period of
time, or after a heavy load has remained in the dryer
drum for an extended period, creating a temporary at
spot on the edge of the roller. The noise should dissipate
as the dryer operates and the at spots smooth out.
B. REVERSING-ACTION TUMBLE SYSTEM You will hear
the intermittent sound of the dryer stopping, momentarily
pausing, then restarting in the opposite direction.
C. AIR FLOW SYSTEM Your dryer is equipped with a high
volume air handling system. In some installations there
may be some sounds associated with air movement
throughout the dryer. This is normal and can vary with
load size and type.
CAUTION
Do not continue to use the dryer if you hear squeaking,
grinding, rubbing or other unusual noises. This could be a
sign of mechanical breakdown and lead to re or serious
injury. Contact a qualied technician immediately.
Operating Instructions
IMPORTANT
If installed in a closet the dryer will not function correctly with the closet door in the closed position. This condensation
process requires access to cool air from the room. The unit must only be operated with the door in the open position to
allow correct air circulation.
13
Page 14
Care and Cleaning
IMPORTANT
Clean the lint lter and dump water container after every
load.
WARNING
To reduce risk of re or serious injury to persons or
property, comply with the basic warnings listed in the
Important Safety Instructions and those listed below.
• Before cleaning the dryer interior, unplug the electrical
power cord to avoid electrical shock hazards.
• Do not use any type of spray cleanser when cleaning the
dryer interior. Hazardous fumes or electrical shock could
occur.
INSIDE
• Clean the lint lter after every load. Lint build-up on the
lter restricts air ow, which causes longer drying times.
The lter is located at the bottom of the door opening. Remove by pulling straight up. Remove the lint and
replace the lter.
• Occasionally a waxy build-up may form on the lint lter
and/or moisture sensing bars from using dryer-added
fabric softener sheets. To remove this build-up, wash
them with warm, soapy water. Dry the lter thoroughly
and replace. Do not operate the dryer without the lint
lter in place.
• If the dryer drum becomes stained from noncolorfast
fabrics, clean the drum with a damp cloth and a mild
liquid household cleanser. Remove cleanser residue
before drying the next load.
• See next page for more information regarding cleaning of
the condenser assembly.
OUTSIDE
• Clean the cabinet with mild soap and water. Never use
harsh, gritty or abrasive cleansers.
• Remove debris and lint from the front of the condenser
door with a vacuum cleaner.
• Remove glue residue from tape or labels with a mixture
of warm water and mild detergent. Or, touch residue
with the sticky side of the tape or label.
• Before moving the dryer, place a strip of cardboard or
thin berboard under the front leveling legs to prevent
damage to the oor.
IMPORTANT
Do not store or place laundry products on top of dryer at
any time. They can damage the nish or controls.
14
Page 15
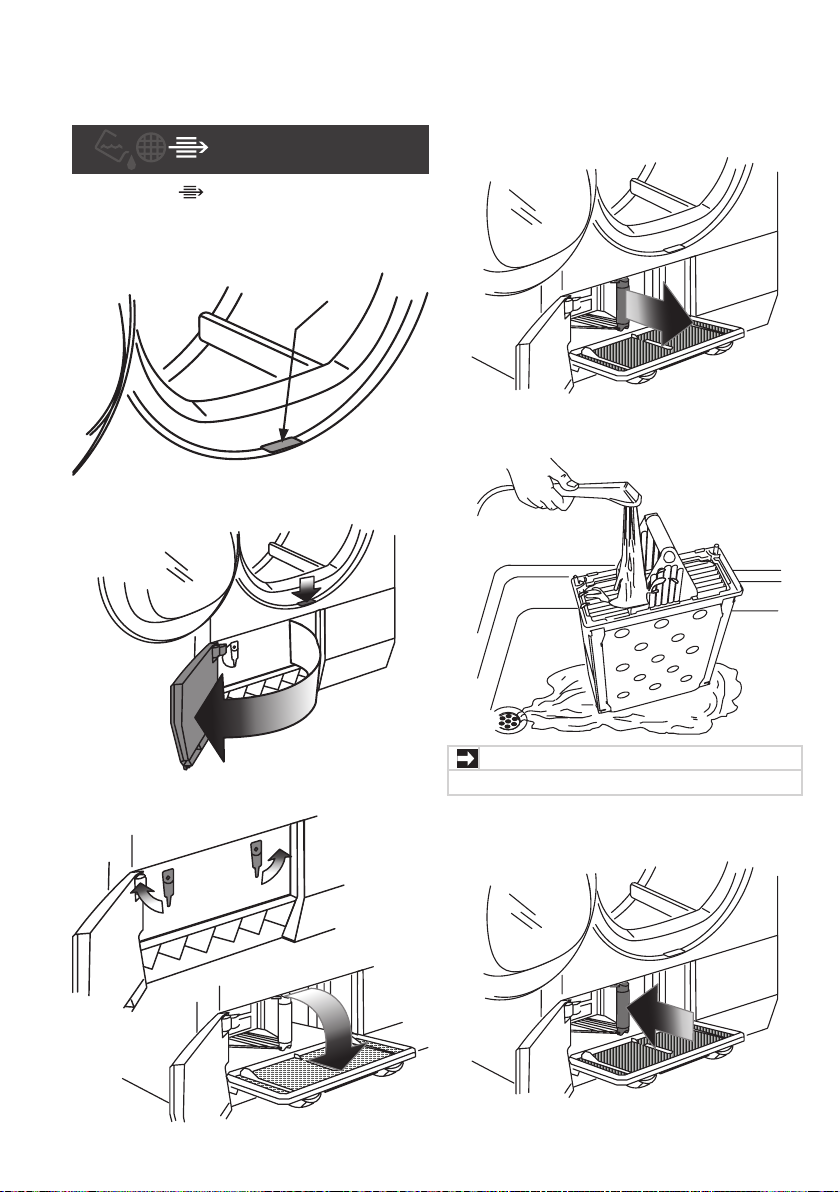
Cleaning Condenser
Clean Condenser
When the “Clean Condenser” indicator comes on, follow
these steps to remove and clean the condenser assembly:
1. Open the dryer door and locate the condenser access
door latch release.
2. While pressing the release, open the condenser access
door.
Care and Cleaning
4. Grab the condenser handle and pull straight out.
5. Rinse condenser in sink. Clean with mild soap and water
if necessary.
3. Rotate the two latches to lower the condenser screen.
IMPORTANT
Do not place condenser in dishwasher for cleaning.
6. Push condenser back in place, close retention panel, rotate
latches and close condenser access door until it latches.
15
Page 16
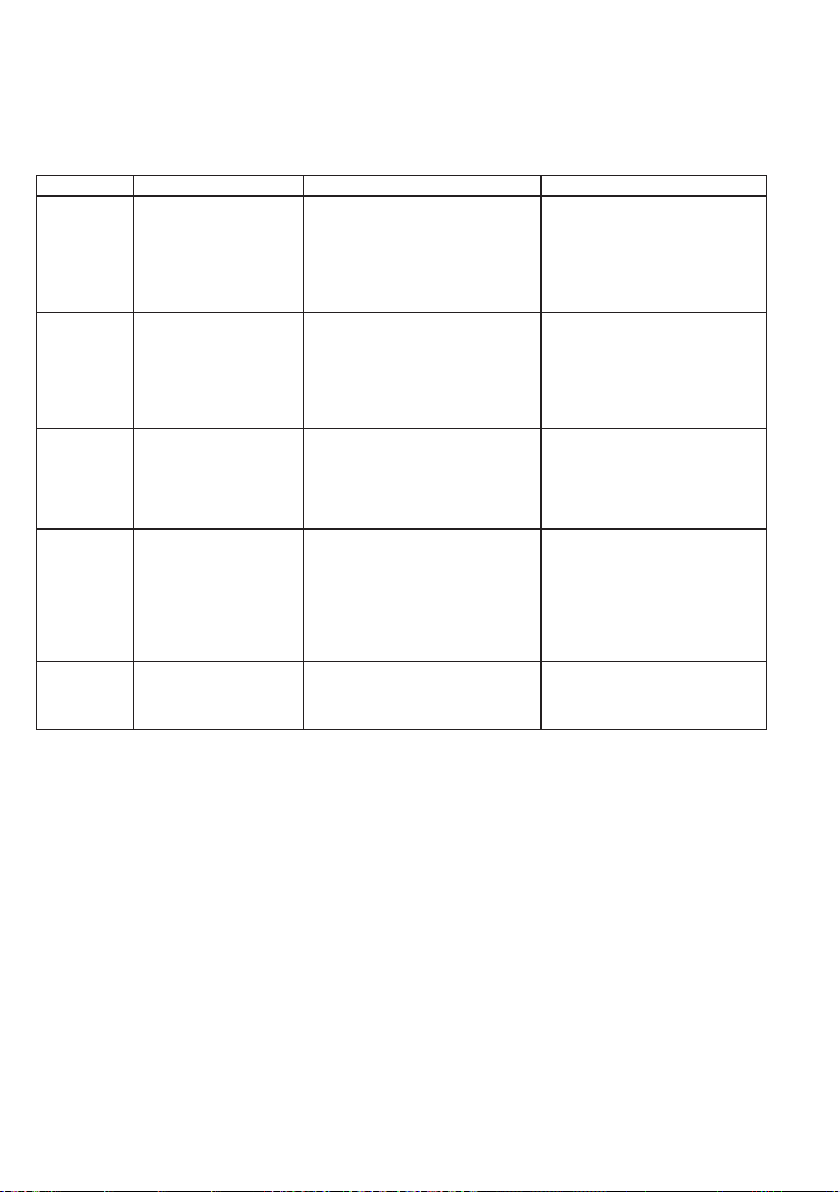
Solutions to Common Problems
Common Drying Problems
Many drying problems involve poor soil and stain removal, residues of lint and scum, and fabric damage. For satisfactory
washing results, follow these suggestions provided by The Soap and Detergent Association.
PROBLEM POSSIBLE CAUSES SOLUTIONS PREVENTIVE MEASURES
Greasy, oily
stains
Lint • Overloading.
Pilling
(Fibers break
o, ball up
and cling to
fabric.)
Shrinking • Temperature too high.
Wrinkling • Overloading.
• Fabric softener sheet. • Rub fabric softener stains with bar
• Overdrying causes static
electricity.
• Lint screen not clean
when cycle began.
• Lint is attached to “pills.”
• Overdrying. • Use a lint brush or shaver to remove
• Overdrying.
• Leaving items in dryer
after cycle ends.
soap. Rinse and rewash.
• Reduce load size and rewash using
liquid fabric softener in the nal
rinse.
• Or, add a fabric softener sheet and
tumble without heat.
• Use lint brush or roller to remove
lint.
pills.
• Irreversible condition. • Follow fabric care label direc-
• Reduce load size and tumble at me-
dium or low heat for 5-10 minutes.
• Remove items immediately. Hang
or fold.
• Add a few bath towels to small
loads for proper tumbling.
• Some “silk-like” fabrics should be
air dried.
• Use proper drying temperature.
• Place fabric softener sheet on top
of load before starting the dryer.
• Do not overload dryer.
• Use fabric softener in washer or
dryer to reduce static electricity.
• Remove items when they are
slightly damp to avoid overdrying.
• Check that lint lter is clean and
in place.
• Use fabric softener to lubricate
bers.
• When ironing, use spray starch or
fabric nish on collars and cus.
• Turn items inside out to reduce
abrasion.
tions.
• If shrinking is a concern, check
load often.
• Remove items while slightly damp
and hang or lay at to complete
drying.
• Block knits into shape.
• Do not overload dryer.
• Remove items as soon as cycle
ends.
16
Page 17
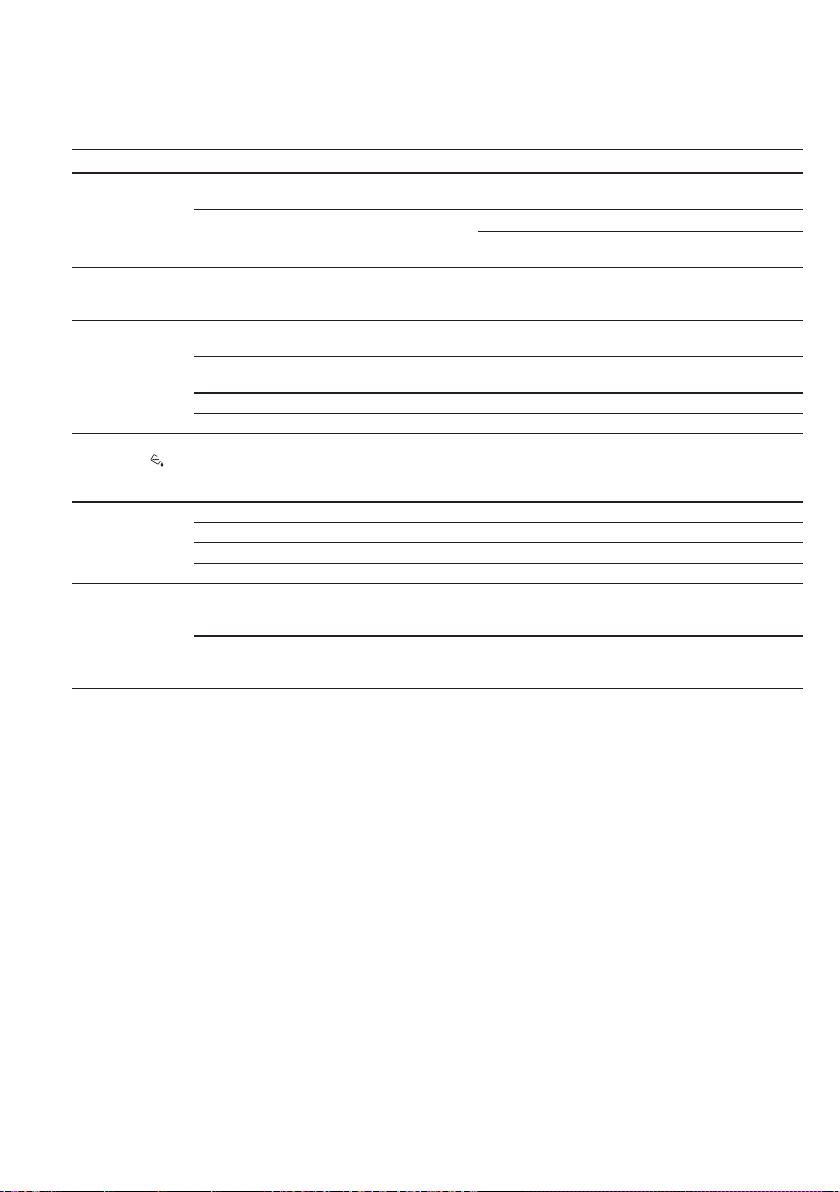
Solutions to Common Problems
Avoid Service Checklist
Before calling for service, review this list. It may save both time and expense. The list includes common occurrences that are
not the result of defective workmanship or materials in this dryer.
OCCURRENCE POSSIBLE CAUSE SOLUTION
Dryer does not
start.
Dryer runs but
won’t heat.
Drying cycle takes
too long, outside
of the dryer feels
too hot or smells
hot.
Dryer stops during
a cycle and
symbol is lit on
control panel.
Excessive wrin-
kling.
Scratching or
chipping of the
drum nish.
Electrical power cord is not securely plugged
in or plug may be loose.
House fuse blown or circuit breaker tripped. Reset circuit breaker or replace fuse.
There are 2 house fuses in the dryer circuit. If 1
of the 2 fuses is blown, the drum may turn but
the heater will not operate.
Lint lter is clogged with lint. Make sure all lint has been removed from the dryer
Electric dryer is connected to a 208 volt
circuit.
Drying procedures have not been followed. See “Operating Instructions.”
High humidity. Use a dehumidier near the dryer.
Water container was not emptied between
cycles and is full.
Dryer is overloaded. Do not overload. See “Operating Instructions.”
Items left in dryer too long. Remove items as soon as cycle ends.
Insucient sorting of items. See “Operating Instructions.”
Drying temperature too high. Follow fabric care label instructions.
Foreign objects such as coins, pins, clips or
buttons are inside the dryer.*
Permanently attached items such as belt
buckles, zippers and fasteners may be hitting
the inside of the drum.*
*Drum damage caused by foreign objects or permanently attached items is not covered by the warranty.
Make sure the plug ts tightly in wall outlet.
Make sure electrical line is not overloaded and the
dryer is on a separate circuit.
Replace fuse.
lint lter before starting each cycle.
Drying time will be 20% longer than drying on a
240 volt circuit.
Empty and replace water container and restart dryer.
Always remove foreign objects from pockets before
laundering. Remove objects from drum and restart
dryer.
It may be necessary to sew a scrap of material
securely around ornaments before drying to prevent
scratching and damage to the dryer.
17
Page 18
Kenmore ®
Customer Care Hotline
To schedule repair service or order parts
Para pedir servicio o ordenar piezas
1-844-553-6667
www. kenmore. com
For service in Canada Au Canada pour service
1-800-469-4663
www.sears.ca
®
 Loading...