


3851249380

Kenmor'e
SEWING MACHINE 12493
OWNER'S MA
P/N 648800071
Sears, Roebuck and Co.
Dear Homemaker:
You have just invested in a very finezigzag sewing machine.
Before using your new Kenmore machine, please pause for a
moment and carefully read this booklet which contains
instructions on how to operate and care for your machine.
Specific instructions are given on threading, tension
adjustments, cleaning, oiling, etc. This will help you obtain
the best sewing results and avoid unnecessary service expense
for conditions beyond our control.
Advice on the operation and care.of your machine is always
available at your nearest Sears Retail Store. Please remember,
if you have questions about your machine, always mention the
model number and serial number when you inquire.
Kenmore Sewing Machine
Record in space provided below the model
number and serial number of this appliance.
The model number and serial number are
located on the nomenclature plate, as identified
on Page 2 of this booklet.
Model No.385. Serial No.
Retain these numbers for future reference.
....i!,::!i_i!!!i_i:,
TABLE OF CONTENTS
KNOWING YOUR SEWING MACHINE
Machine identification .................... 2
Accessories ........................... 4
Setting spool pins ....................... 5
Installing extension table .................. 5
Pressure regulator, Presser foot lever ........... 6
Presser feet, Speed control plug .............. 7
Light and power switch, Sewing light .......... 8
Foot control, Seam guides, Darning plate ....... 9
Needle, thread and fabric chart .............. 10
Needles, Placement of needle ............... 11
Winding the bobbin ...................... 12
Threading the bobbin case ................. 13
Threading top thread... .................. 14
Picking up bobbin thread .................. 15
Adjusting top thread tensions ............... 16
Adjusting bobbin tensions ................. 16
STARTING TO SEW ..................... 17
SIMPLE SEWING
Straight stitching ....................... 18
Fastening a seam, Turning a square corner
Zigzag stitching ........................ 20
Checking tensions, Overcasting,
Interfacing darts
STRETCH AND UTILITY STITCH SEWING
Stretch stitching ........................ 22
Adjusting stretch stitch balance .............. 22
Straight stretch stitching .................. 23
Rick-rack stretch stitching ................. 24
Smocking stretch stitching ................. 25
Overcast stretch stitching .................. 26
Serging or pine leaf stretch stitching ........... 27
Buttonhole making ...................... 28
Adjusting buttonhole stitch balance ........... 30
Shell stitching ......................... 30
Blind hemming ......................... 31
Satin stitching, Appliqueing ................ 32
Zipper application ...................... 33
Mending, Darning ....................... 34
Button sewing, Bar tacking ................. 35
Free-arm sewing ........................ 36
CHECKING PERFORMANCE PROBLEMS ...... 36
CARING FOR THE MACHINE
Cleaning feed dogs and shuttle .............. 39
Oiling under arm cover plate ................ 40
Oiling underside ........................ 41
Oiling in face cover plate .................. 42
Parts list ........ ..................... 44
USING PORTABLE CASE OR CABINET ....... 45

_KNOWING YOUR SEWING MACHINE L_:
bIACIdlNE IDENTIFICATION
Prbssure Regulator
Upper Thread Guides
Bobbin Winder
\
Take-up Lever
Face Cover Plate Light and Power Switch
Extension Table
Shuttle Cover
Support Leg
Arm Cover Plate
Buttonhole Stitch Adjustor
Thread Guide
Needle Clamp
Screw
Thread Spool Pins
Hand Wheel
Clutch Knob
Electric Cord Receptacle _/
Thread Guide
Needle Plate
Presser Foot Thumb Screw
Presser Foot
"_. Presser Foot Lever
-__Free Arm
\
\ Nomenclature Plate
d
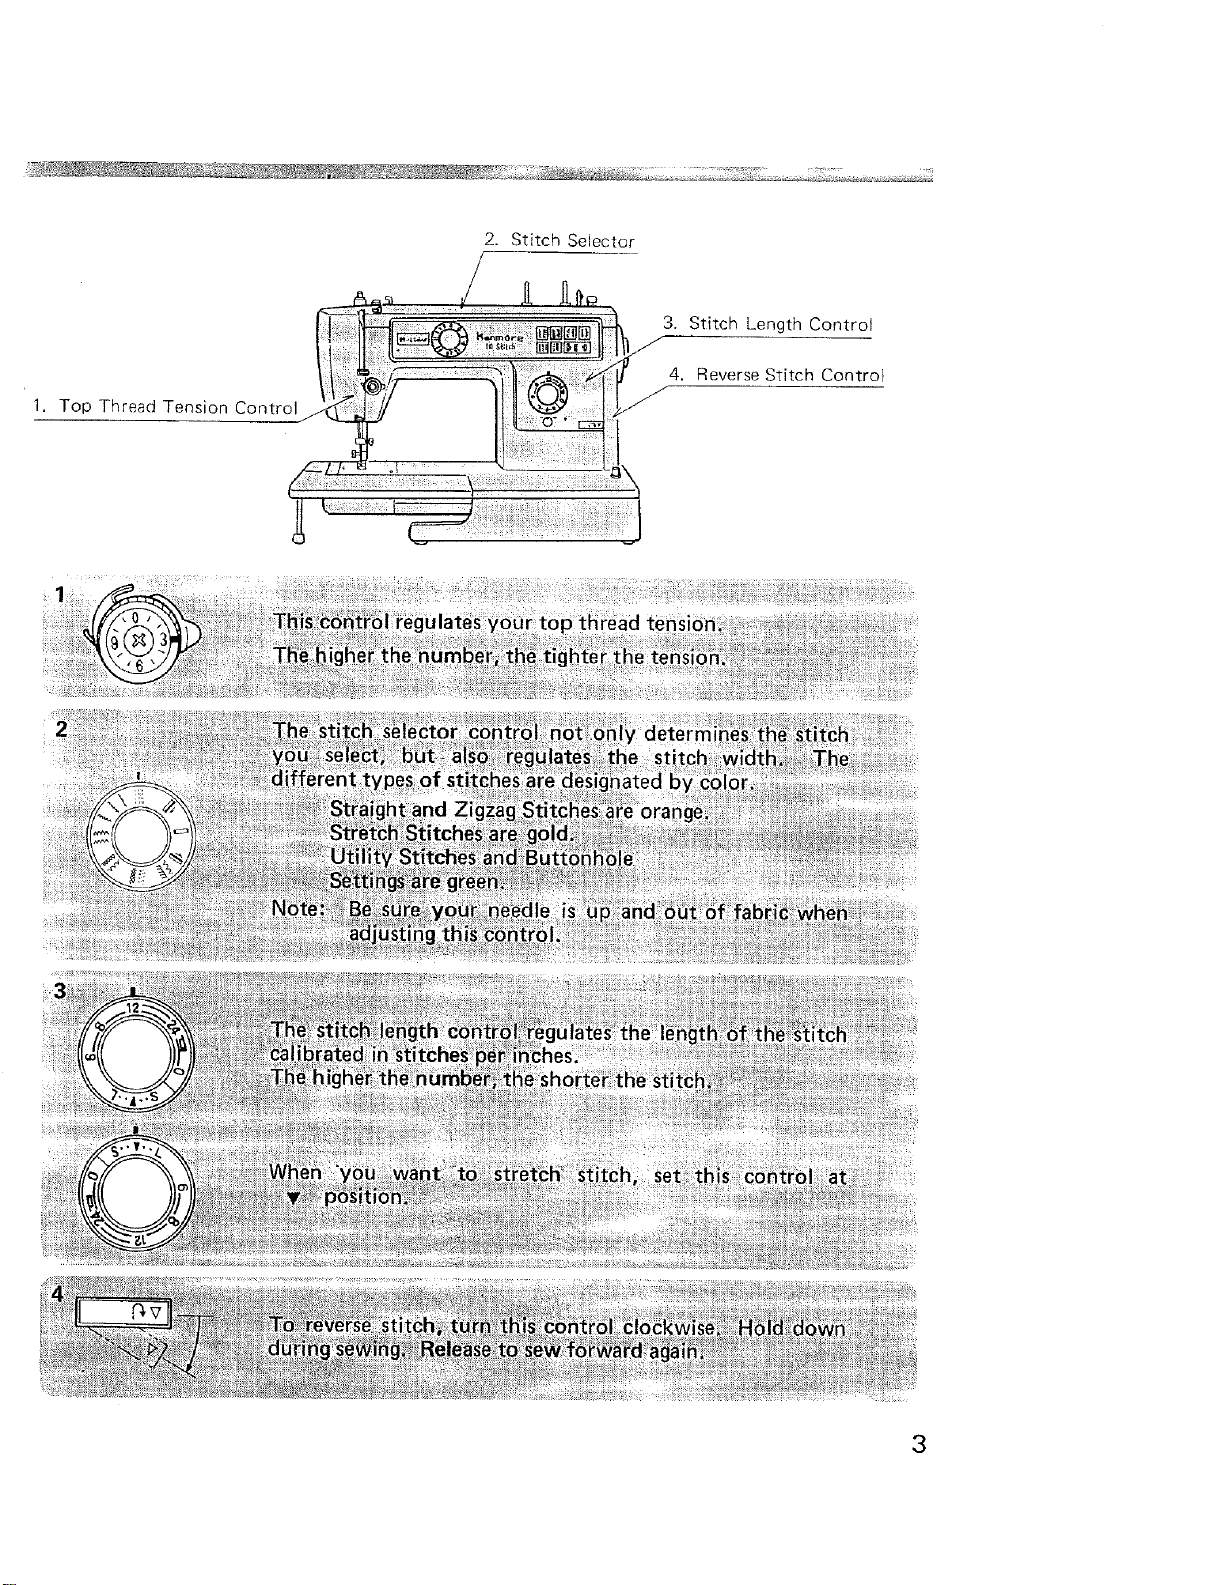
1. Top Thread Tension Control
2, Stitch Selector
3. Stitch Length Control
4, Reverse Stitch Control
3

ACCESSORI ES
Accessory box
Bobbin
Needle set
\
Darning plate
Buttonhole opener
Small screw driver
Large screw driver
Thread spool pin Nylon disc
/
\ /
Buttonhole guide foot
/
Foot control
Satin stitch foot
Zipper foot
/
Owner's manual
\
\
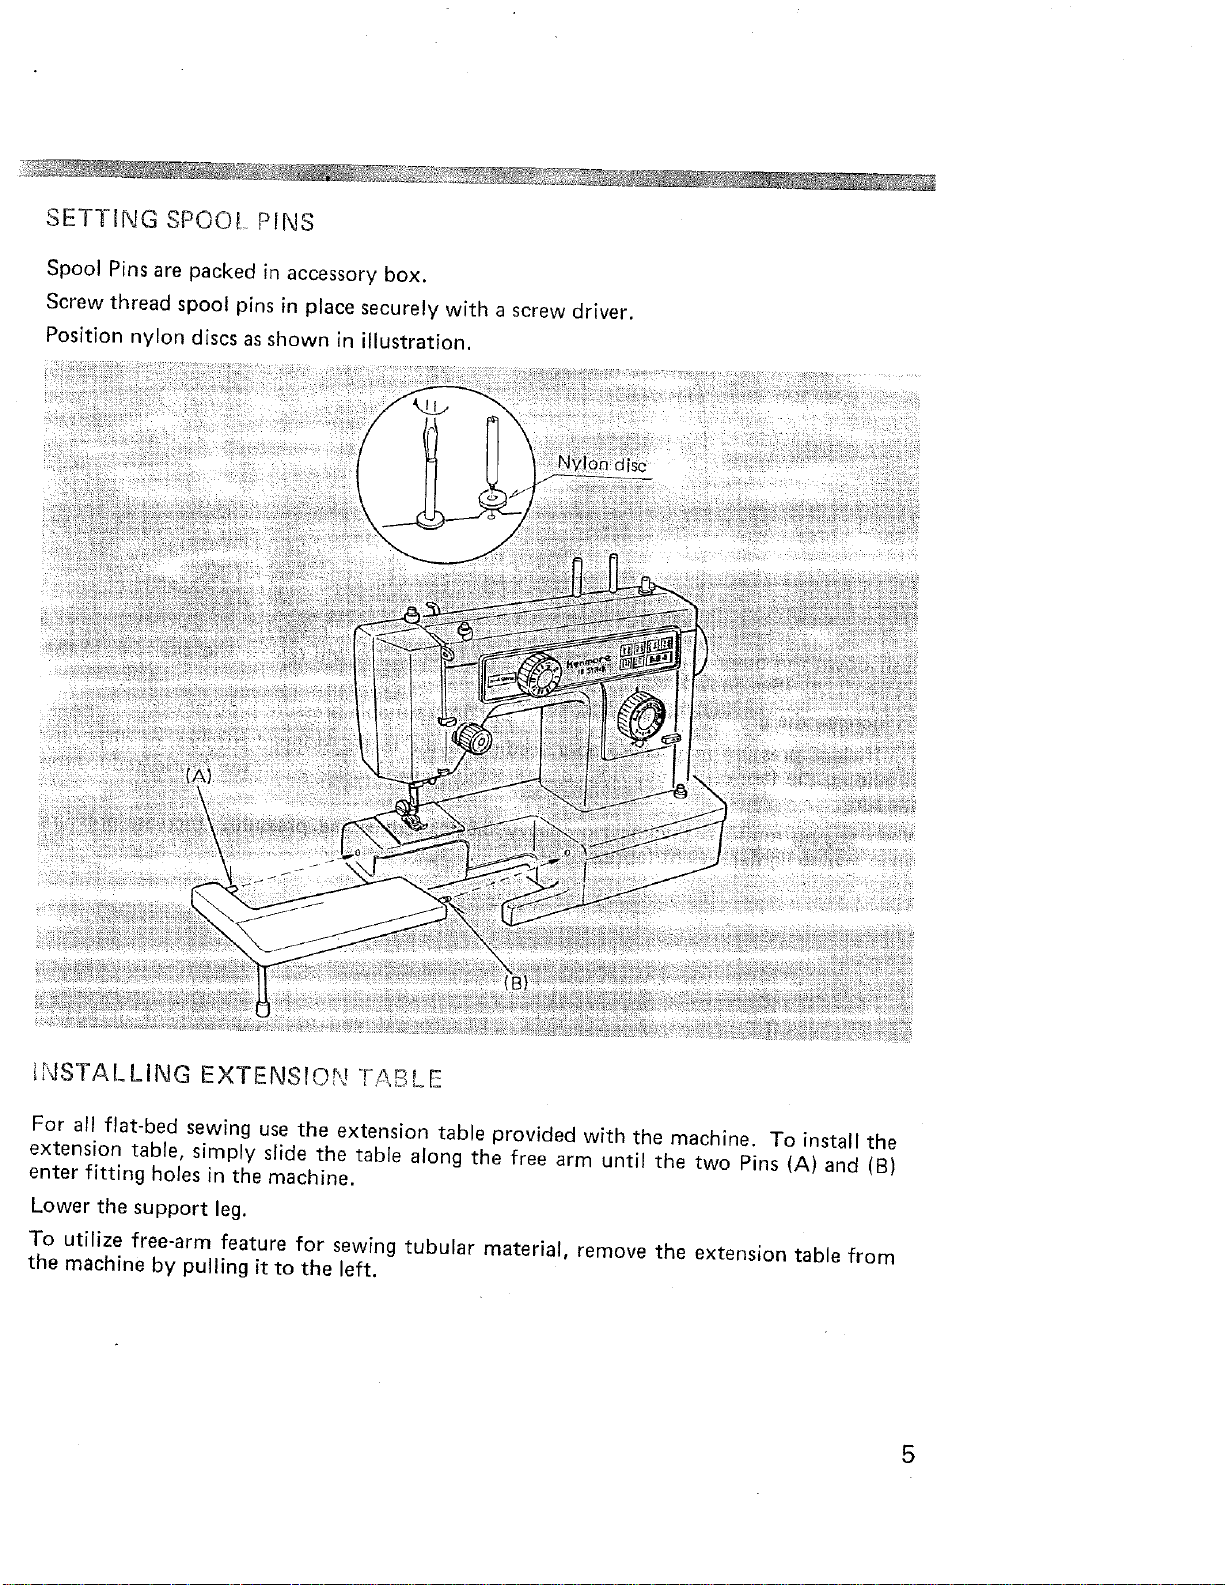
SETTING SPOOL PINS
Spool Pins are packed in accessory box.
Screw thread spool pins in place securely with a screw driver.
Position nylon discs as shown in illustration.
NSTALLING EXTENSION TABLE
For all flat-bed sewing use the extension table provided with the machine. To install the
extension table, simply slide the table along the free arm until the two Pins (A) and (B)
enter fitting holes in the machine.
Lower the support leg.
To utilize free-arm feature for sewing tubular material, remove the extension table from
the machine by pulling it to the left.
5
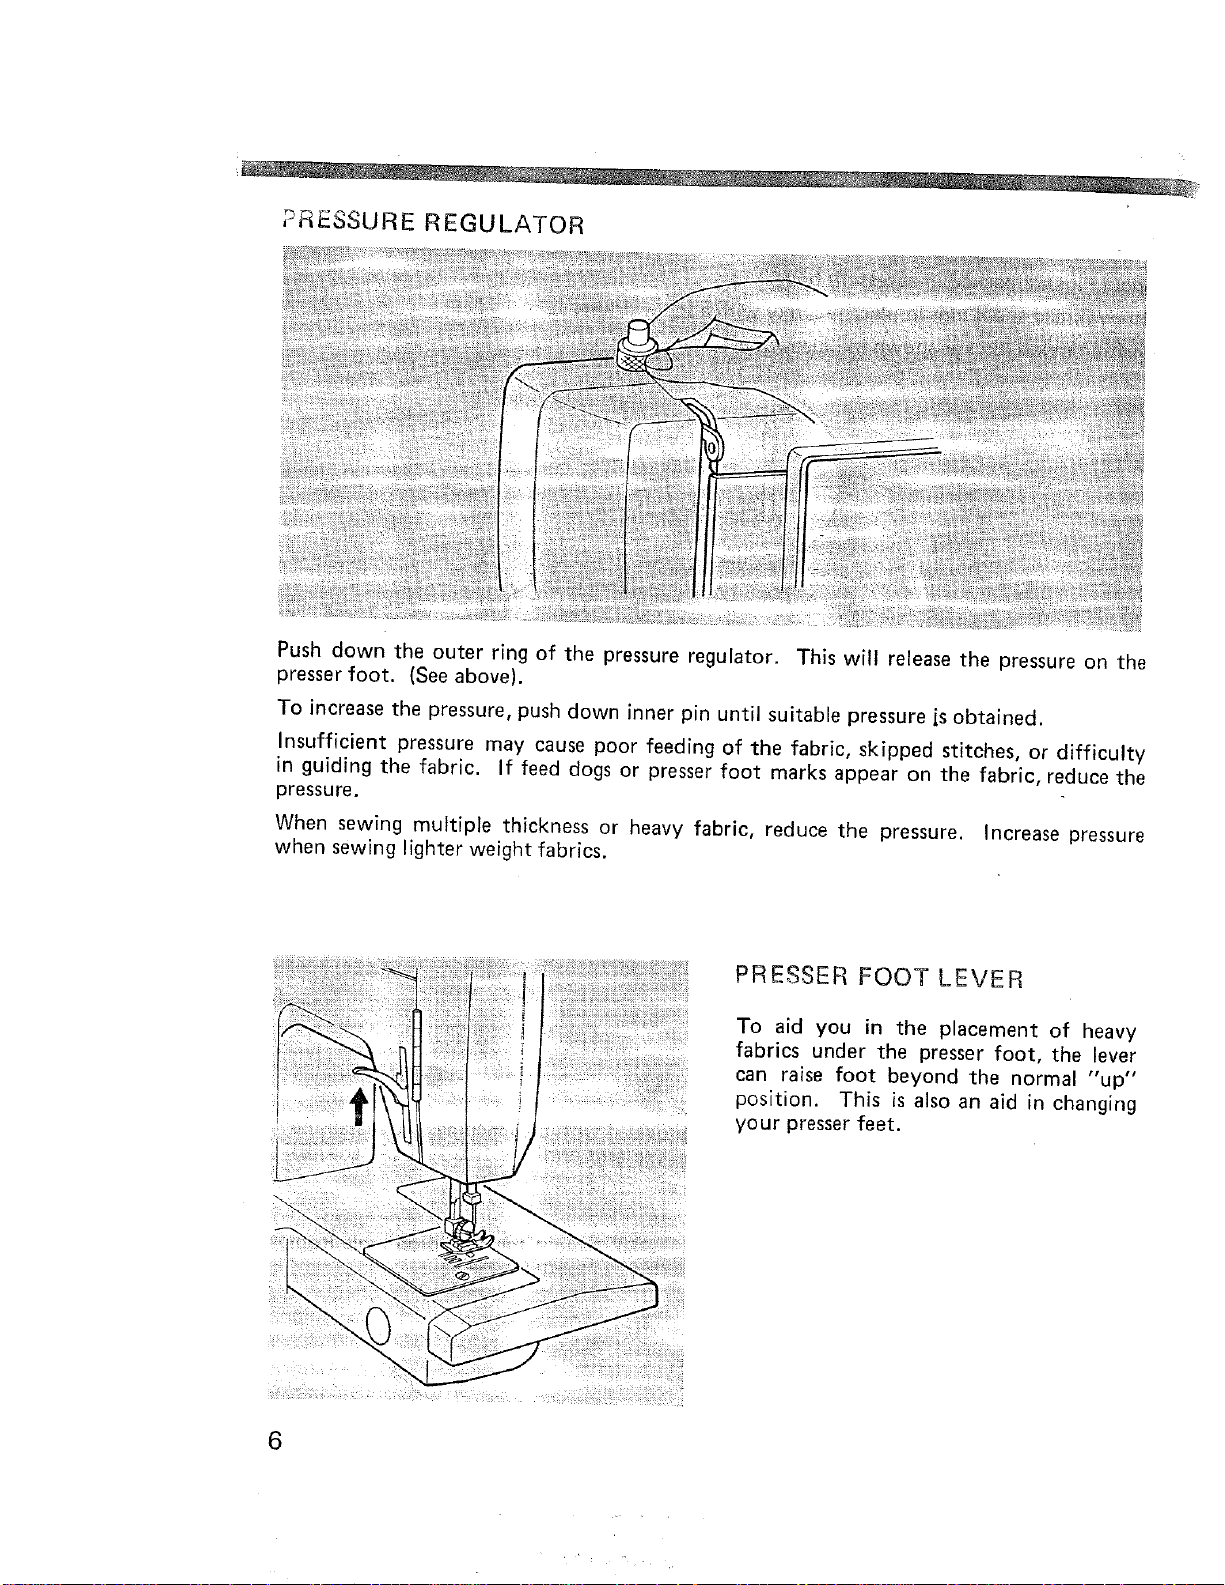
PRESSURE REGULATOR
Push down the outer ring of the pressure regulator. This will release the pressure on the
presser foot. (See above).
To increase the pressure, push down inner pin until suitable pressure is obtained.
Insufficient pressure may cause poor feeding of the fabric, skipped stitches, or difficulty
in guiding the fabric. If feed dogs or presser foot marks appear on the fabric, reduce the
pressure.
When sewing multiple thickness or heavy fabric, reduce the pressure. Increase pressure
when sewing lighter weight fabrics.
PRESSER FOOT LEVER
To aid you in the placement of heavy
fabrics under the presser foot, the lever
can raise foot beyond the normal "up"
position. This is also an aid in changing
your presser feet,
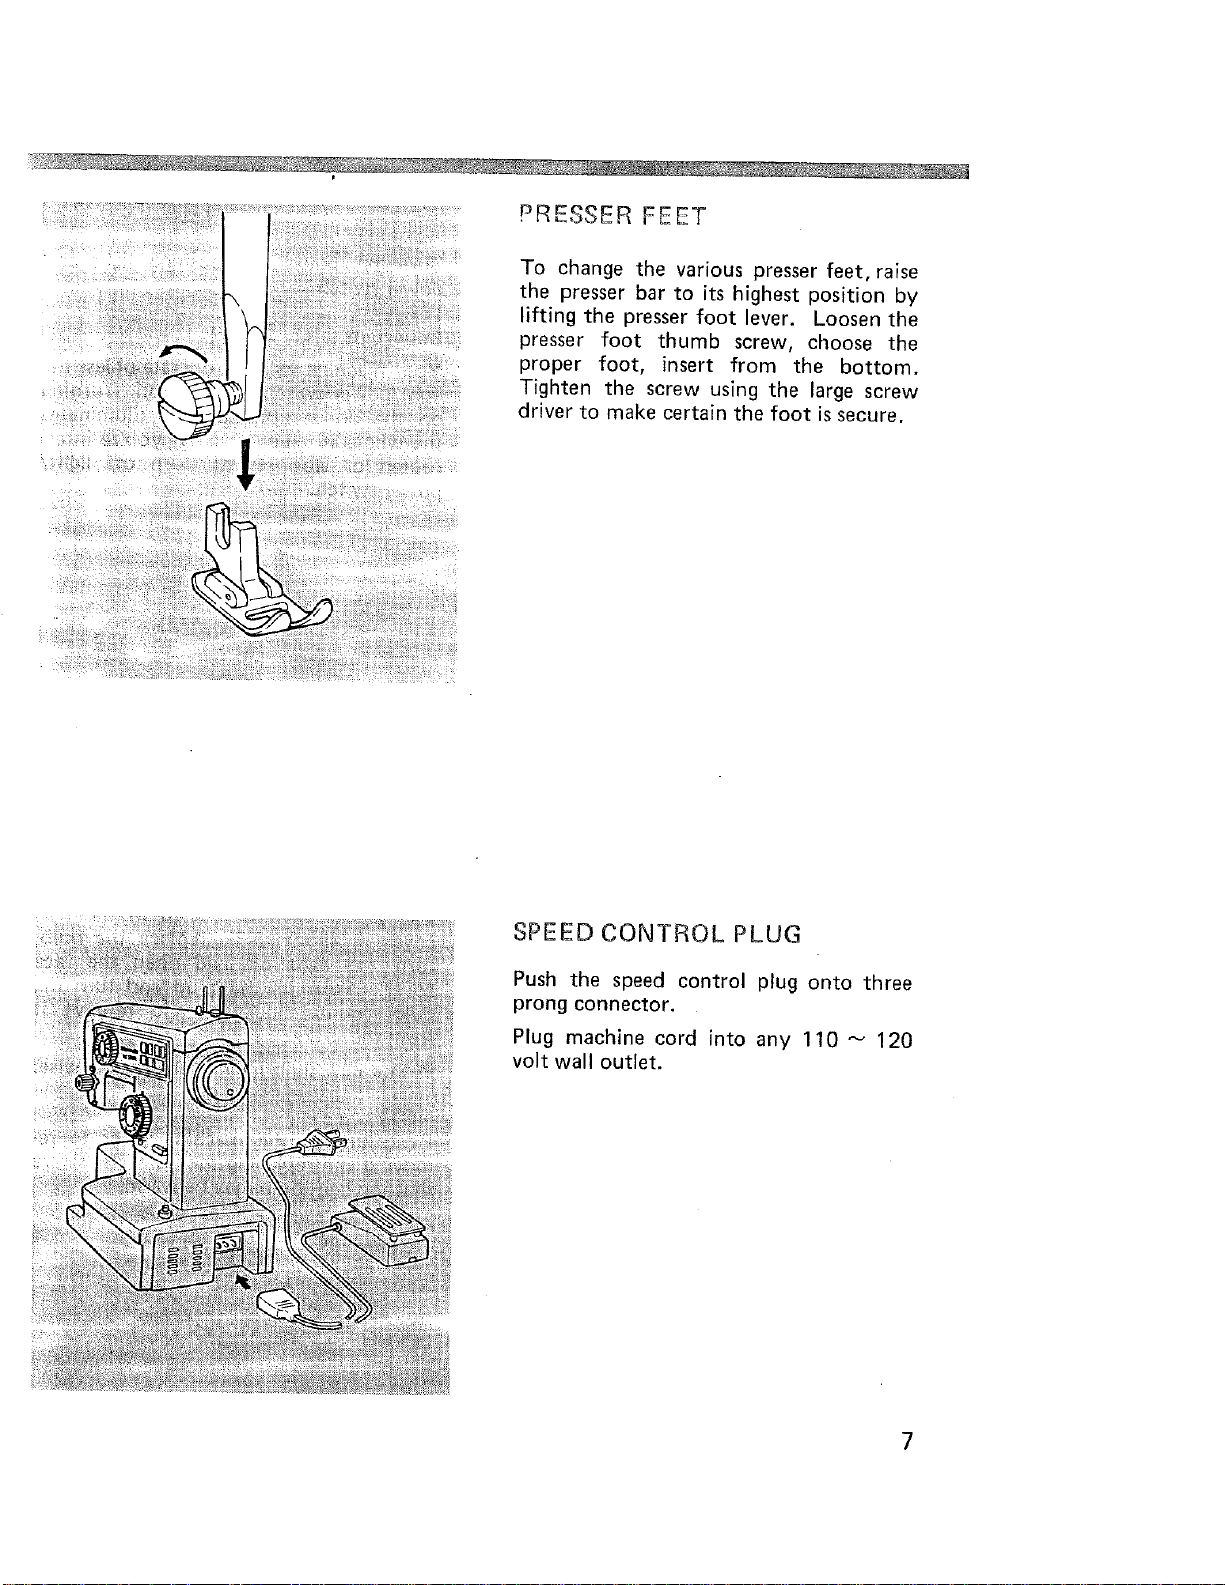
PRESSER FEET
To change the various presser feet, raise
the presser bar to its highest position by
lifting the presser foot lever. Loosen the
presser foot thumb screw, choose the
proper foot, insert from the bottom.
Tighten the screw using the large screw
driver to make certain the foot is secure.
SPEED CONTROL PLUG
Push the speed control plug onto three
prong connector.
Plug machine cord into any 110 _ 120
volt wall outlet.
7

LIGHT AND POWER SWITCH
Turn on power by pushing light and
power switch.
Important safety feature
Your machine will not operate unless the
light/power switch is turned on. Turning
on the power automatically illuminates
the whole stitching area. If you're inter-
rupted or stop sewing, turn off light/
power switch.
SL_#tklG LiGH
The sewing light is located in the face
cover as shown. To replace the bulb,
turn the light off and open the face
cover, Push the bulb up and turn the
bulb counter-clockwise and remove it
from the socket.
Push a new bulb in and turn it clockwise.
NOTE:
First, unplug the machine prior to re-
moving and replacing the bulb. Be awar,e
that the light bulb may be warm.
8
Coiner ng Gu de
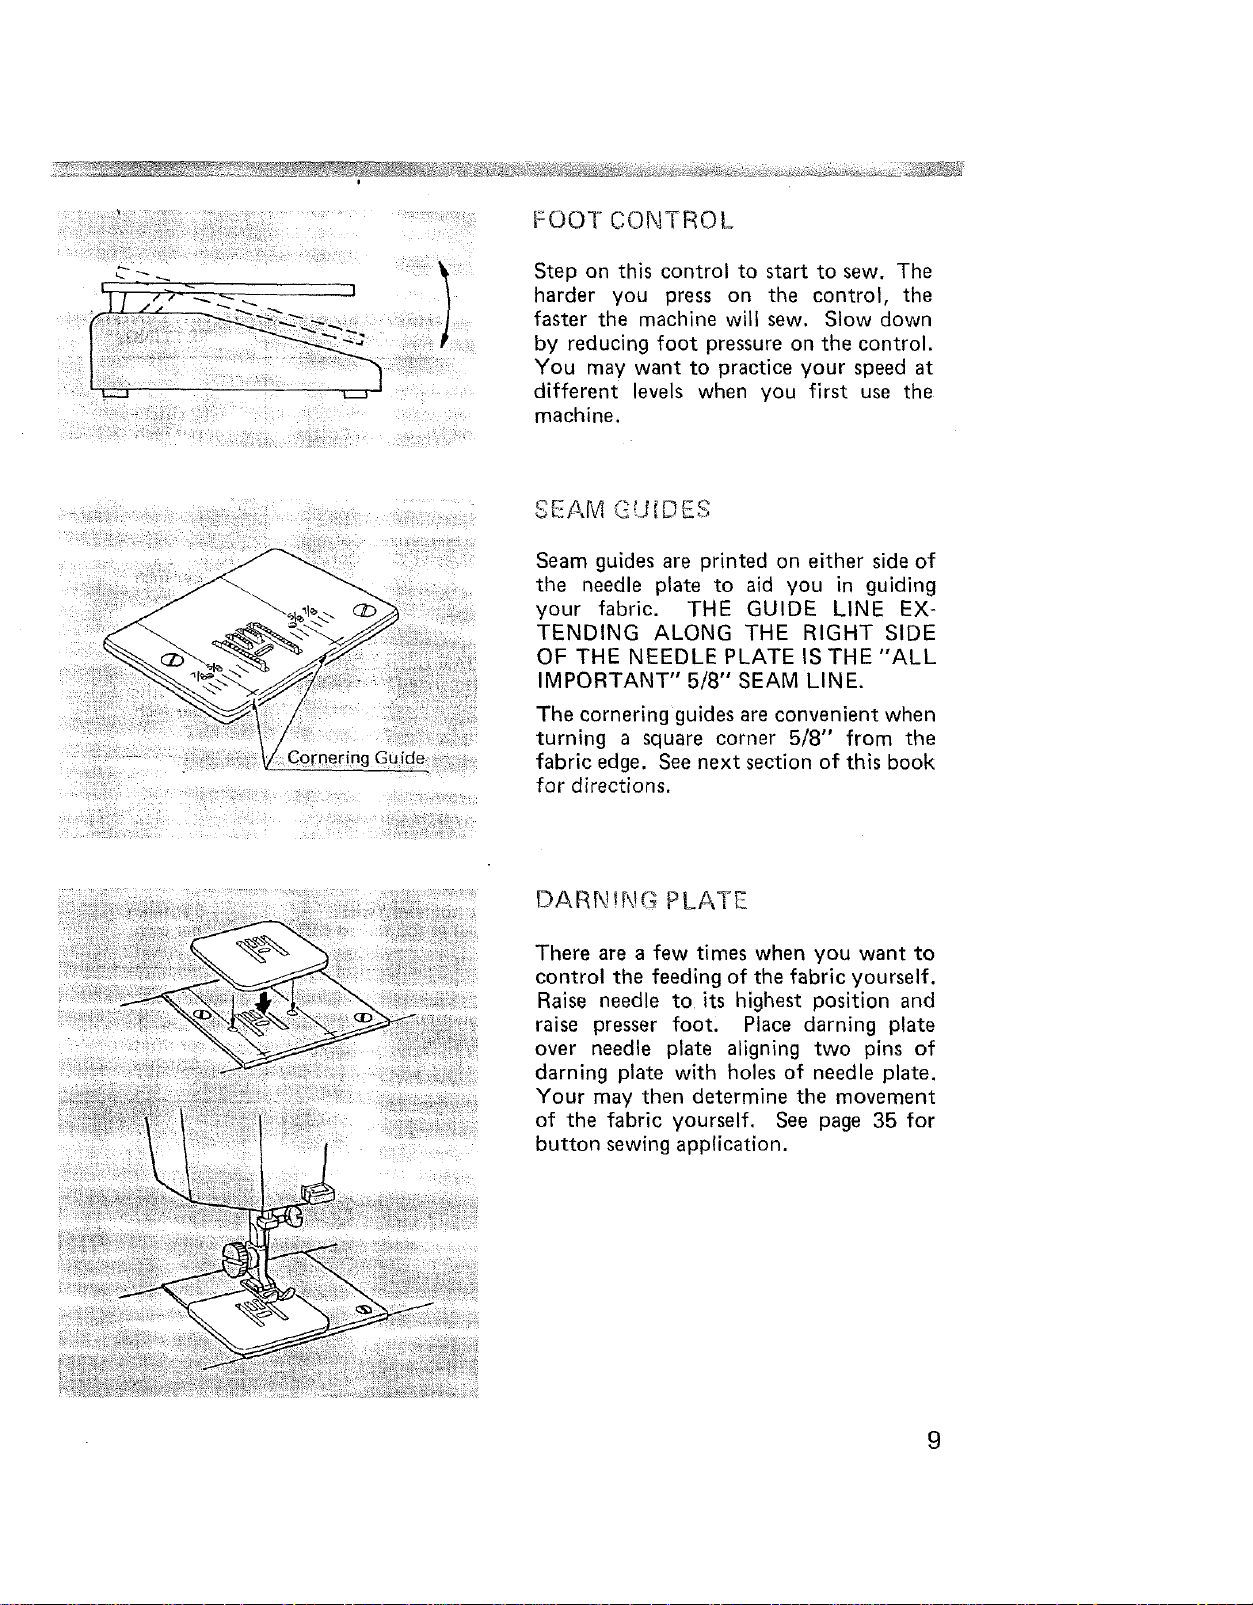
FOOTCONTROL
Step on this control to start to sew. The
harder you press on the control, the
faster the machine will sew. Slow down
by reducing foot pressure on the control.
You may want to practice your speed at
different levels when you first use the
machine.
SEAM _"_d[DES
Seam guides are printed on either side of
the needle plate to aid you in guiding
your fabric. THE GUIDE LINE EX-
TENDING ALONG THE RIGHT SIDE
OF THE NEEDLE PLATE IS THE "ALL
IMPORTANT" 5/8" SEAM LINE.
The cornering guides are convenient when
turning a square corner 5/8" from the
fabric edge. See next section of this book
for directions.
DARN!NG PLATE
There are a few times when you want to
control the feeding of the fabric yourself.
Raise needle to its highest position and
raise presser foot, Place darning plate
over needle plate aligning two pins of
darning plate with holes of needle plate.
Your may then determine the movement
of the fabric yourself. See page 35 for
button sewing application.
9

NEEDLE_THREADAND FABRIC CHART
12 stitches
per inch
10 to 12 stitches
per inch
8 to 10 stitches
per inch
8 stitches
oer inch
6 stitches
per inch
10 for Regular
or
6 for Stretch
Stitches
10

NEEDLES
Use KENMORE needles, The size of the
needle should conform with the size of
the thread and both should suit the
fabric. Kenmore needles are color-coded
by size for your convenience (See chart
on facing page).
Never use a bent needle or one with a
dull point.
The exact length of your needle is shown
at left. Be sure you never use one in
your machine that is not this exact
length.
You will find among your accessories a
Q NEEDLEr"with blue shank.This special
needle is to be used when sewing knits
and certain difficult synthetic fabrics. If
you experience skipped stitches in any of
your sewing, use Q NEEDLE TM and
Q FOOT'" *
* Available at most Sears retail stores and
catalog.
PLACEMENT OF NEEDtE
Raise needle bar to its highest position by
turnir_g the hand wheel toward you.
Loosen the needle clamp screw. Holding
the needle with the flat side away from
you, slip the needle into the needle bar.
When it is in as far as it will go, tighten
the needle clamp screw with small screw-
driver provided in the accessory box.
11
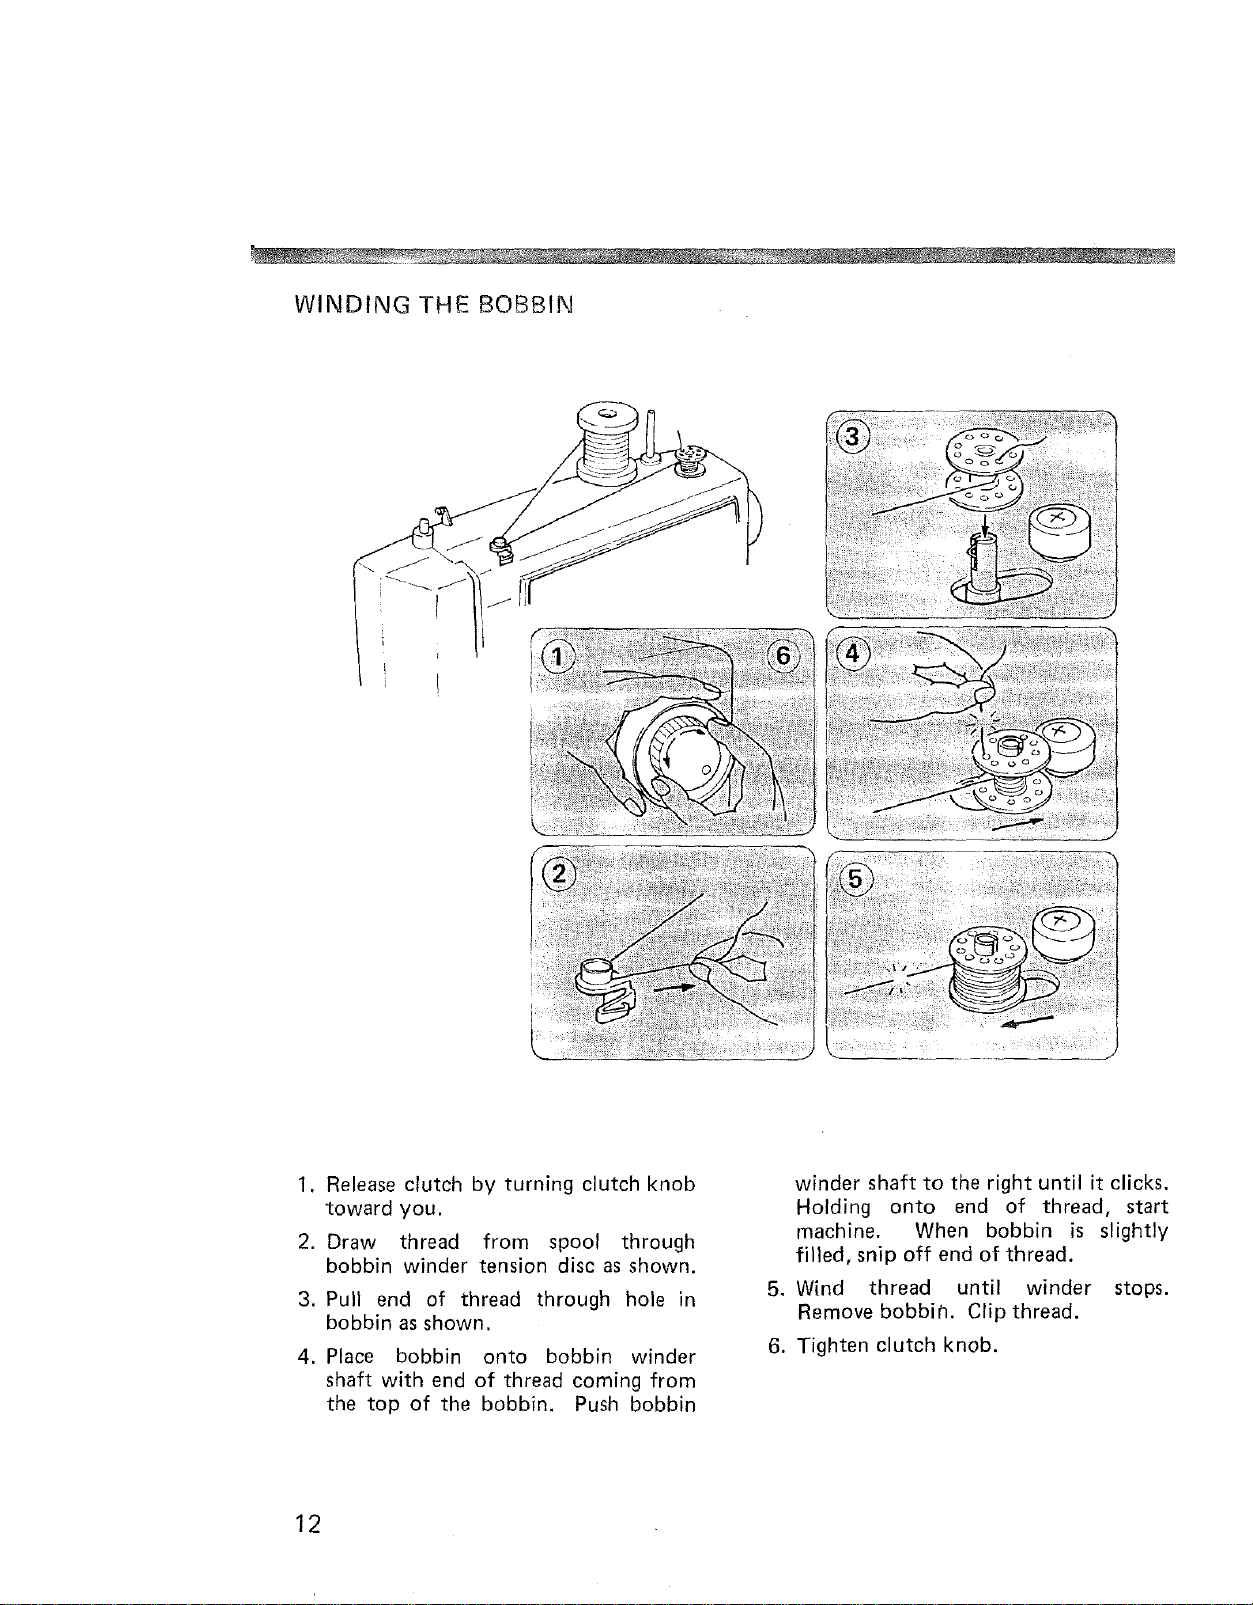
WINDING THE BOBBIN
1. Release clutch by turning clutch knob
toward you.
2. Draw thread from spool through
bobbin winder tension disc as shown.
3. Pull end of thread through hole in
bobbin as shown.
4. Place bobbin onto bobbin winder
shaft with end of thread coming from
the top of the bobbin. Push bobbin
12
winder shaft to the right until it clicks.
Holding onto end of thread, start
machine. When bobbin is slightly
filled, snip off end of thread.
5, Wind thread until winder stops.
Remove bobbitl. Clip thread.
6. Tighten clutch knob.
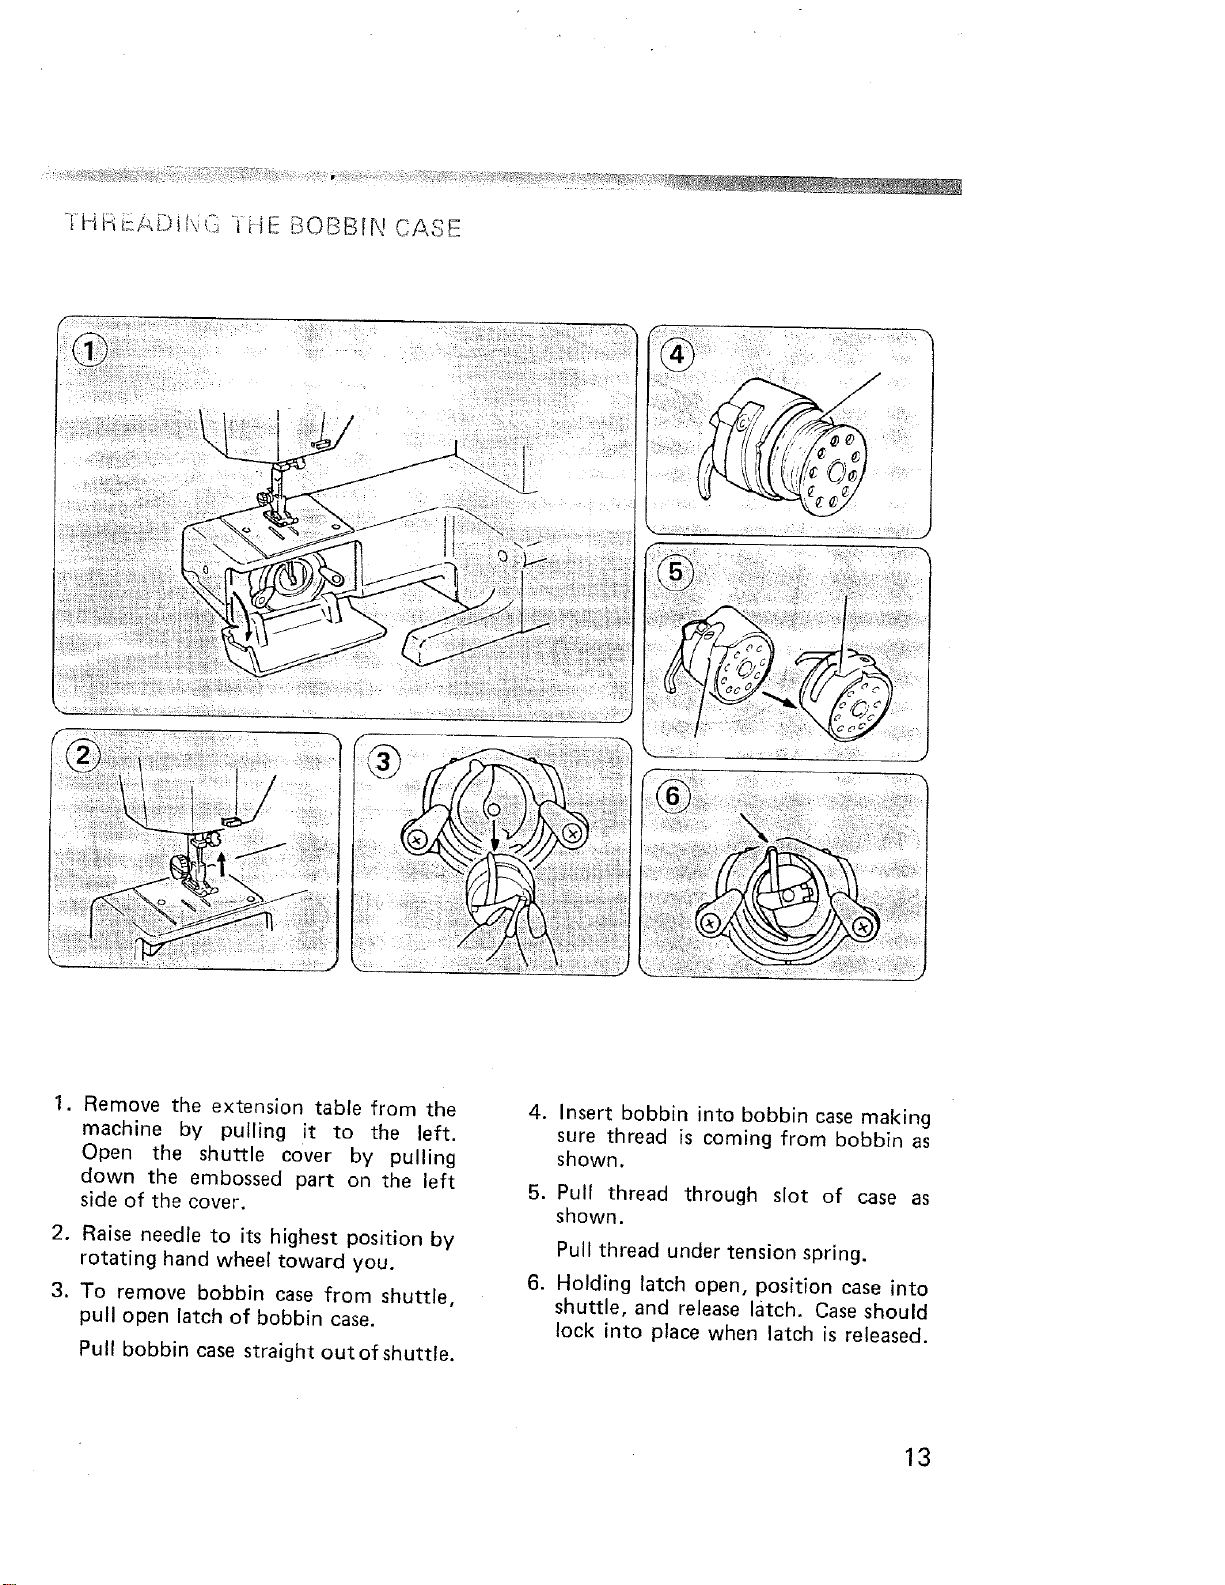
1. Remove the extension table from the
machine by pulling it to the left.
Open the shuttle cover by pulling
down the embossed part on the left
side of the cover.
2. Raise needle to its highest position by
rotating hand wheel toward you.
3. To remove bobbin case from shuttle,
pull open latch of bobbin case.
Pull bobbin case straight out of shuttle.
4. Insert bobbin into bobbin case making
sure thread is coming from bobbin as
shown.
5. Pull thread through slot of case as
shown.
Pull thread under tension spring.
6. Holding latch open, position case into
shuttle, and release latch. Case should
lock into place when latch is released.
13
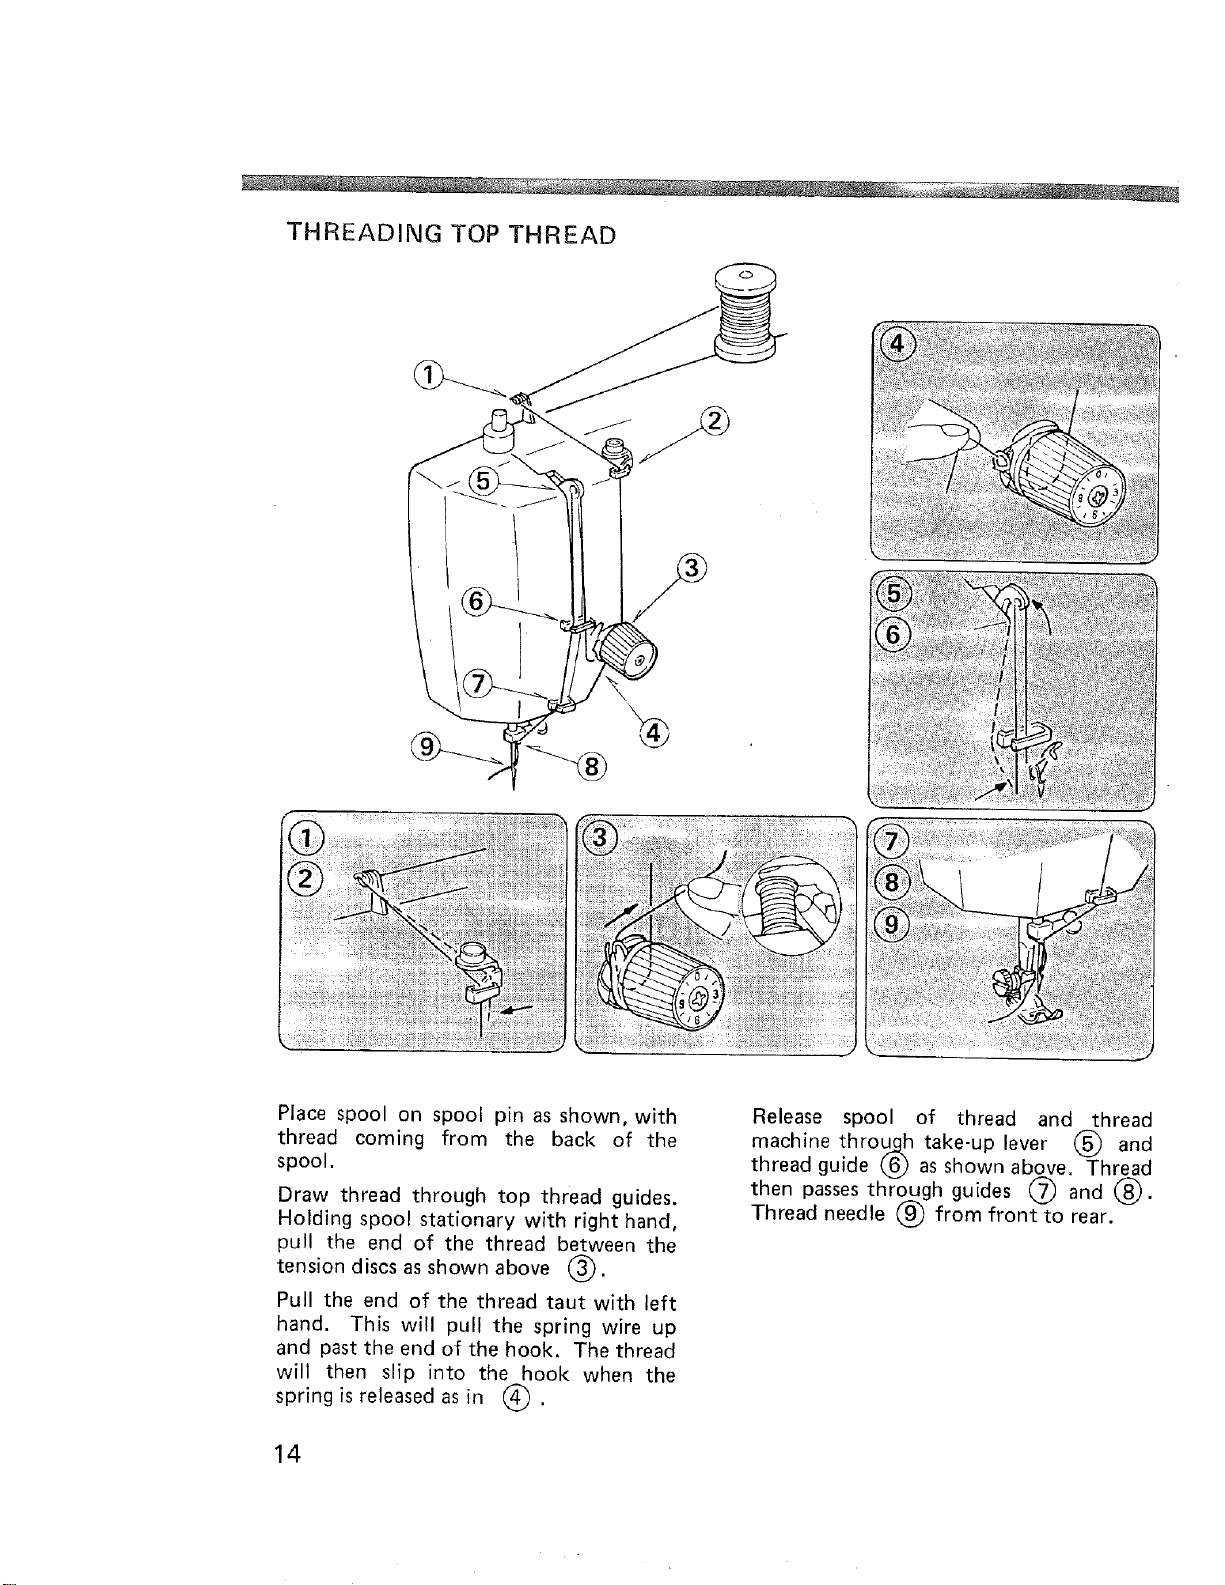
THREADING TOP THREAD
' I "_'f
Place spool on spool pin as shown, with
thread coming from the back of the
spool.
Draw thread through top thread guides.
Holding spool stationary with right hand,
pull the end of the thread between the
tension discs as shown above (_.
Pull the end of the thread taut with left
hand. This will pull the spring wire up
and past the end of the hook. The thread
will then slip into the hook when the
spring is released as in (_ .
14
Release spool of thread and thread
machine through take-up lever (_ and
thread guide (6) as shown above. Thread
then passes through guides (_ and (_.
Thread needle _ from front to rear.
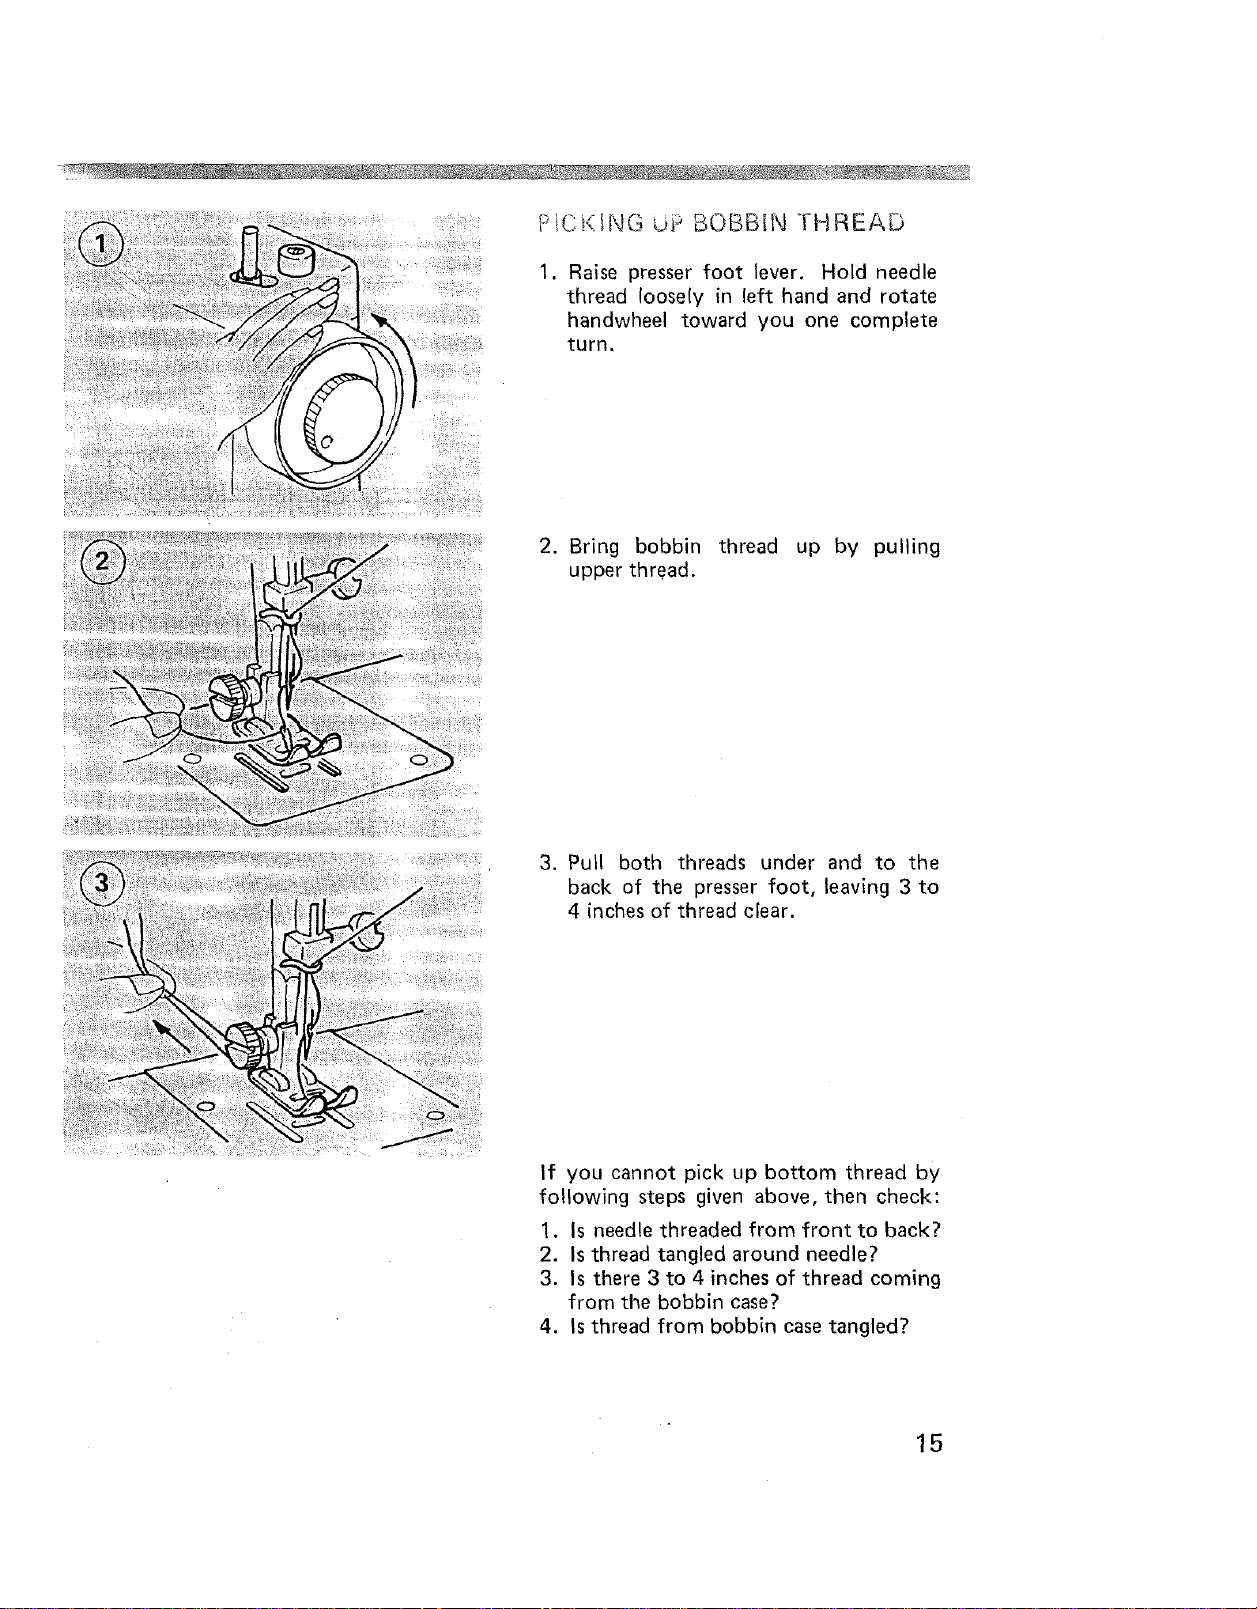
-,ING bi :_ BOBBIN THREAD
1. Raise presser foot lever. Hold needle
thread loosely in left hand and rotate
handwheel toward you one complete
turn.
2. Bring bobbin thread up by pulling
upper thread.
3. Pull both threads under and to the
back of the presser foot, leaving 3 to
4 inches of thread clear.
If you cannot pick up bottom thread by
following steps given above, then check:
1. Is needle threaded from front to back?
2. Is thread tangled around needle?
3. Is there 3 to 4 inches of thread coming
from the bobbin case?
4. Is thread from bobbin case tangled?
15
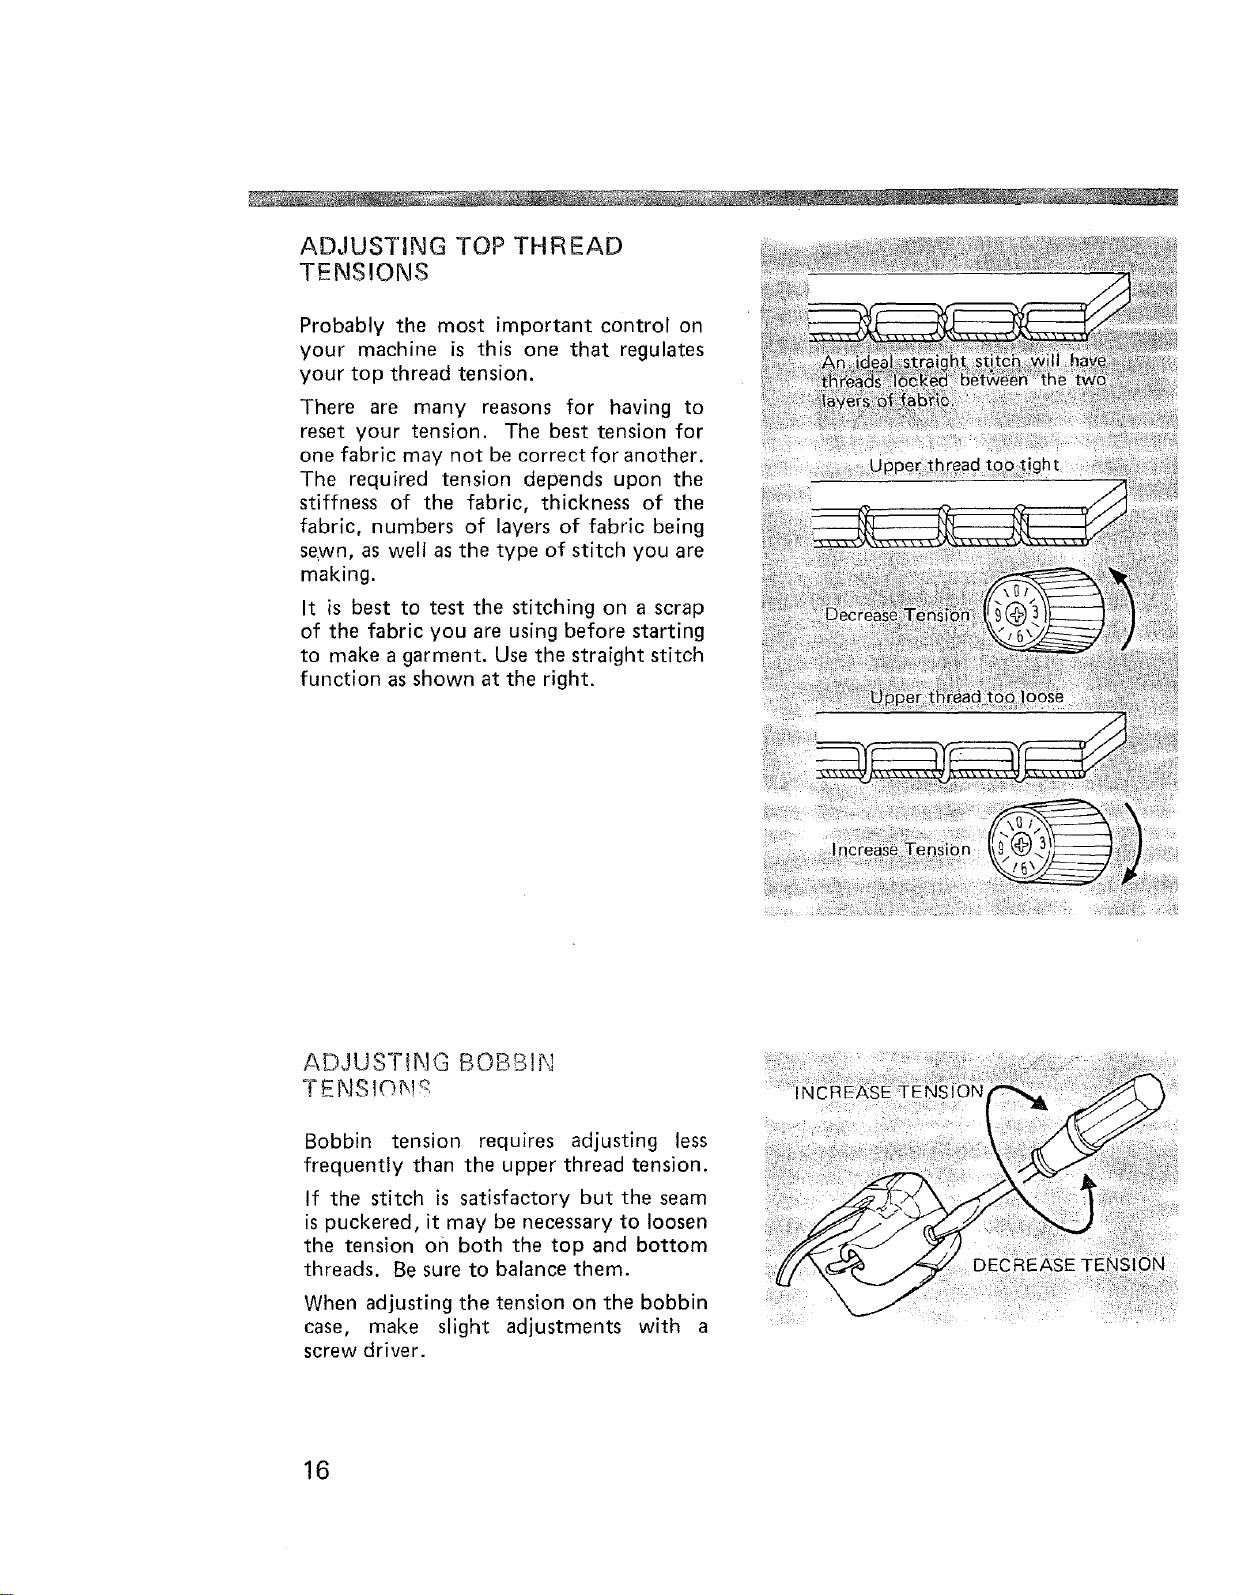
ADJUSTING TOP THREAD
TENSIONS
Probably the most important control on
your machine is this one that regulates
your top thread tension.
There are many reasons for having to
reset your tension. The best tension for
one fabric may not be correct for another.
The required tension depends upon the
stiffness of the fabric, thickness of the
fabric, numbers of layers of fabric being
se,wn, as well as the type of stitch you are
making.
It is best to test the stitching on a scrap
of the fabric you are using before starting
to make a garment. Use the straight stitch
function as shown at the right.
i!ilii!
ADJUSTING BOBBIN
TENSIOH_
Bobbin tension requires adjusting less
frequently than the upper thread tension.
If the stitch is satisfactory but the seam
is puckered, it may be necessary to loosen
the tension on both the top and bottom
threads. Be sure to balance them.
When adjusting the tension on the bobbin
case, make slight adjustments with a ..........
screw driver.
:
16
........... !!if{( _ ...........
....ART N( TO SEW
Now that you are familiar with the controls on your machine and with the accessories
provided for the machine, you are ready to start to sew with your new Kenmore sewing
machine. Below are some good habits to follow each time you sit down to sew:
1. Test the needle it should be straight, properly set and sharp on the point. It should be
the correct size for the fabric and thread being used. Do not be afraid to change your
needle frequently. Many of the new fabrics made of synthetic blends tend to dull the
needles more easily than fabrics made of natural fibers.
2. Before placing the material on the machine, see that the ends of the threads have been
drawn about 4 inches to the rear of the machine. Hold on to threads during the sewing
of the first 3 or 4 stitches of the seam.
3. Test the machine stitch on a scrap of fabric you plan to use. The fabric should be
double thickness. Adjust the machine for the length of stitch and tension suitable to
your fabric.
4. Fabric should be placed under the presser foot with the bulk of the material to the left
of the needle and the right edge of the material placed on the 5/8" seam marking on
the needle plate when making a simple seam.
5. Run the machine at a slow even speed. The more pressure you put on the foot control,
the faster the machine will sew.
6. Fasten each seam by back tacking at the beginning and end of the seam.
7. Always finish sewing each seam with the needle at its highest point.
8. Guide the fabric gently with your hand in front of the needle. Never pull or hold the
fabric in such a way that the normal feeding is altered.
9. When turning the hand wheel manually, always turn it toward you.
17
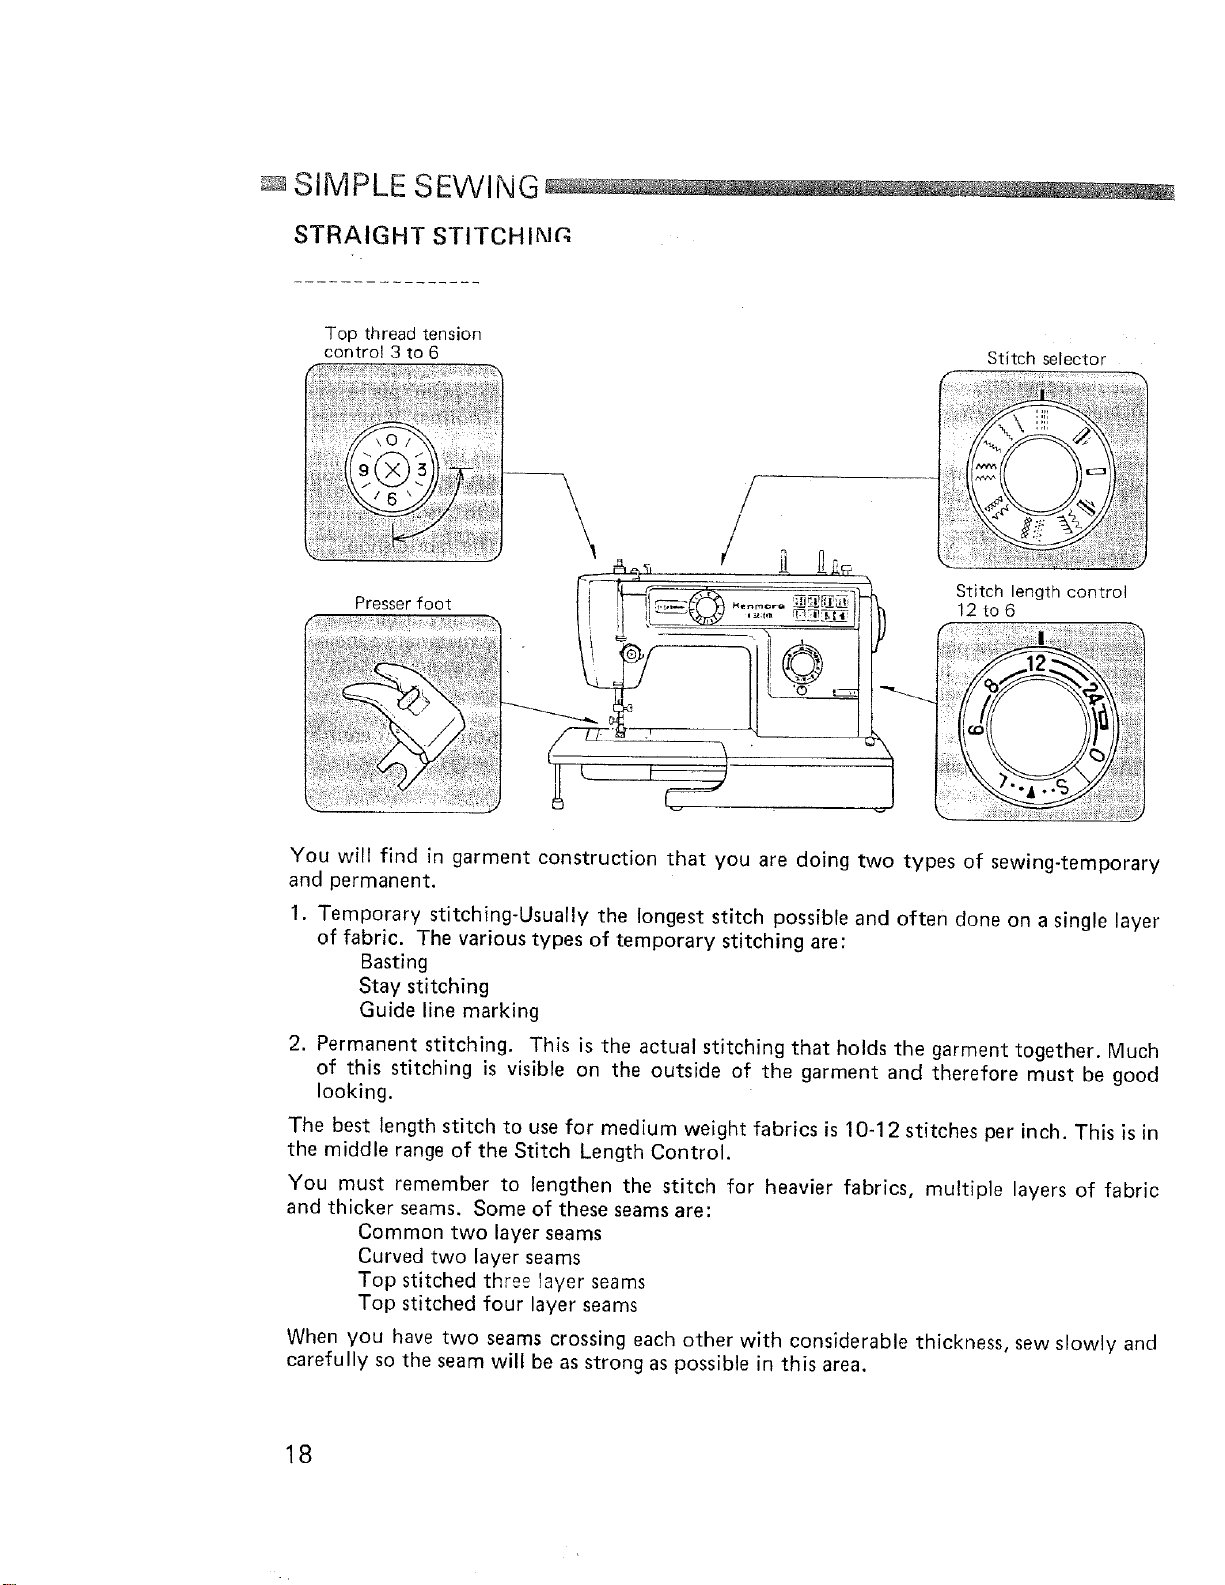
SIMPLE SEWING ...........
STRAIGHT STITCHI IC
Top thread tension
control 3 to 6 Stitch selector
_'
Presser foot
v
Stitch length control
12 to6
You will find in garment construction that you are doing two types of sewing-temporary
and permanent.
1. Temporary stitching-Usually the longest stitch possible and often done on a single layer
of fabric. The various types of temporary stitching are:
Basting
Stay stitching
Guide line marking
2. Permanent stitching. This is the actual stitching that holds the garment together. Much
of this stitching is visible on the outside of the garment and therefore must be good
looking.
The best length stitch to use for medium weight fabrics is 10-12 stitches per inch. This is in
the middle range of the Stitch Length Control.
You must remember to lengthen the stitch for heavier fabrics, multiple layers of fabric
and thicker seams. Some of these seams are:
Common two layer seams
Curved two layer seams
Top stitched three layer seams
Top stitched four layer seams
When you have two seams crossing each other with considerable thickness, sew slowly and
carefully so the seam will be as strong as possible in this area.
18
i ; }i
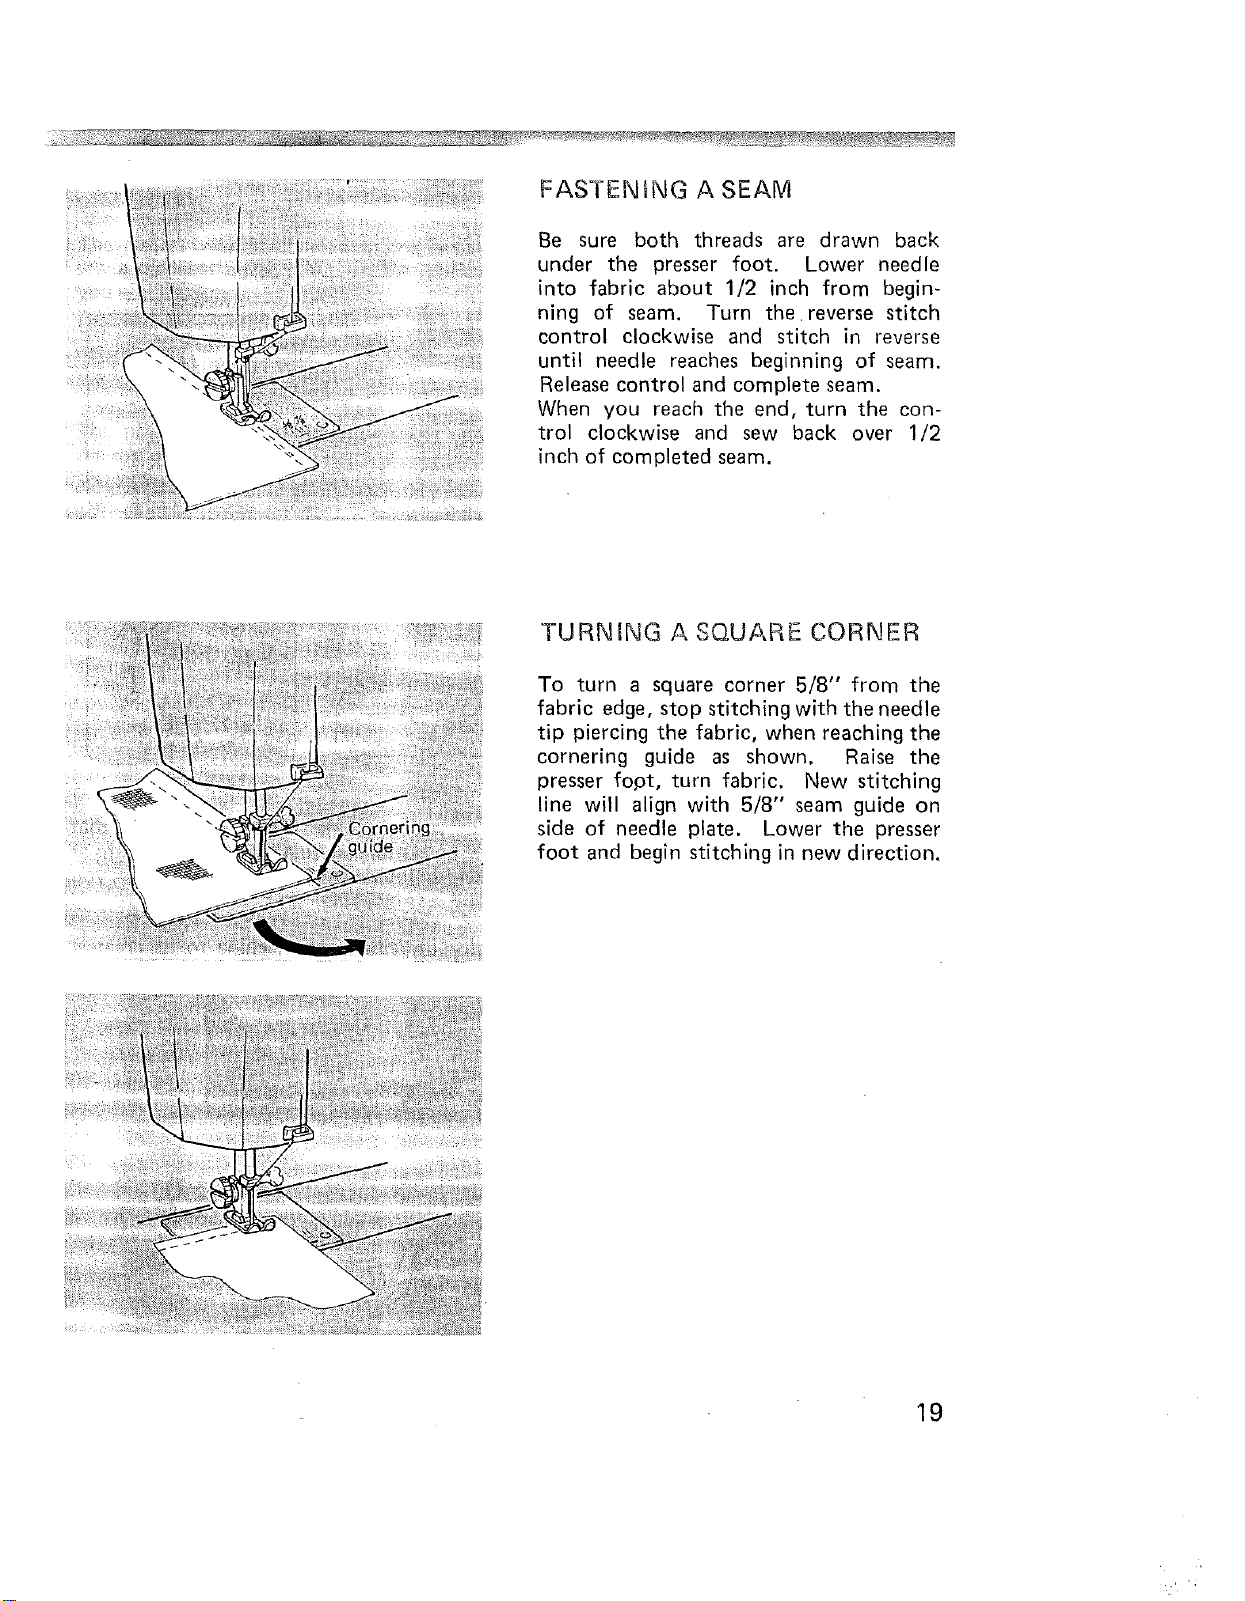
FASTENING A SEAM
Be sure both threads are drawn back
under the presser foot. Lower needle
into fabric about 1/2 inch from begin-
ning of seam. Turn thereverse stitch
control clockwise and stitch in reverse
until needle reaches beginning of seam.
Release control and complete seam.
When you reach the end, turn the con-
trol clockwise and sew back over 1/2
inch of completed seam.
TURNING A SQUARE CORNER
To turn a square corner 5/8" from the
fabric edge, stop stitching with the needle
tip piercing the fabric, when reaching the
cornering guide as shown. Raise the
presser fopt, turn fabric. New stitching
line will align with 5/8" seam guide on
side of needle plate. Lower the presser
foot and begin stitching in new direction.
19
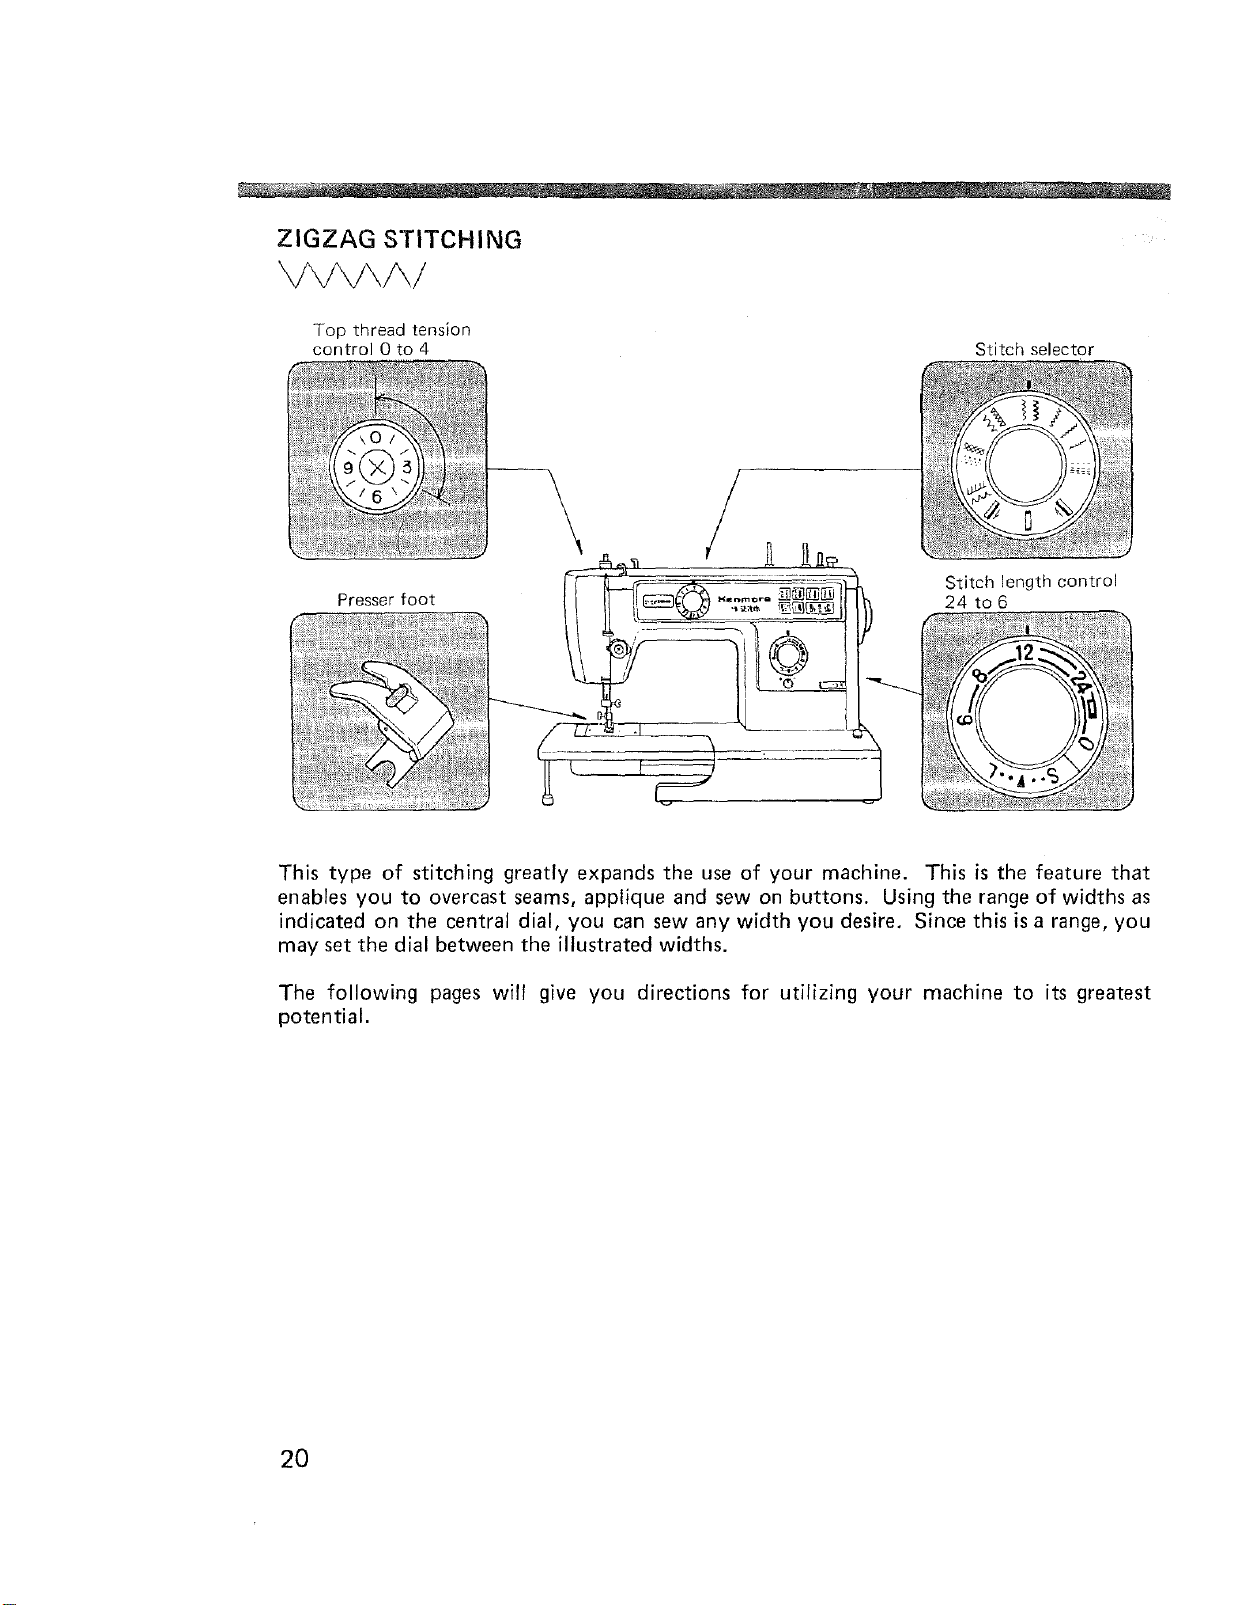
ZIGZAG STITCHING
Top thread tension
control 0 to 4 Stitch selector
/
Presser foot
This type of stitching greatly expands the use of your machine. This is the feature that
enables you to overcast seams, applique and sew on buttons. Using the range of widths as
indicated on the central dial, you can sew any width you desire. Since this is a range, you
may set the dial between the illustrated widths.
The following pages will give you directions for utilizing your machine to its greatest
potential.
Stitch length control
24 to 6
20

CHECKING TENSIONS
The easiest way to check tensions is to
sew a medium zigzag stitch on the fabric UNDESIRABLE DESIRABLE
you will be using. •.... ::::;::';_::,.-;_ ;i::::::;:;,':t:;::;..
Use the appropriate type of thread and ........ "" ....
needle. Use different colors of thread on "'_::;:"":'°.........." "'"'"'" "'°i ..............
the bobbin and upper spool. ........ " ...........
...."..... "..... i i: !iii
Sew a line of medium zig-zag stitches. "':-'_'_:' ":'::::-': ....................
The bobbin thread should not show on 1,:;::::o .-':::::,:
the top of the fabric. °.... ' .... ""::":;"
Adjust the top tension if necessary to ._'_",:':;_., ._. ....
achieve the stitch formation mentioned ii;:;:': ": ":"::::
above. _: ....... "..... ,_;
TOP SIDE OF FABRIC
OVERCASTING
Fig. 1
Fig. 2
I /
t /
I I
This is one of the more frequently used
zigzag stitches in garment construction.
You may want to overcast along the raw
edge of each seam allowance or fold the
raw edge toward the garment and stitch.
Fig. 1 shows the raw edge finished.
Fig. 2 illustrates the folded edge stitched.
Stitch so the needle pierces the fabric
just short of the outside edge. Raw or
worn edges of older garments can be
overcast to prevent further raveling.
INTERFACING DARTS
To reduce bulk of interfacing darts, cut
interfacing down center between dart
lines. Overlap cut edges, matching dart
/
lines. Zigzag stitch along marking line
from point to wide end of dart. Trim
'both raw edges close to stitching.
21

STRETCH AND UTILITY STITCH SEWING .......
STRETCH STITCHING
The stitches shown below are all for use with stretch and.knit fabrics. These are special
stitches built in to the machine for your quick selection.
@
@ ®@
/\/
\/\
/\/
\/\
/\/
\/\
/\/
\/\
/\/
\/\
./\/
1. Straight Stretch
2. Rickrack Stretch
3. Overcast Stretch
4. Smocking Stretch
5. Serging or Pine Leaf Stretch
®
ADJUSTING STRETCH
STITCH BALANCE
In stretch stitch sewing, Stitch Length
Control should be in the detent position
between S and L ( • position) for most
materials. Depending upon the type of
fabric used, you may need to adjust this
control to match forward stitches of
stretch sewing with reverse motion
stitches. To shorten stretch stitches, turn
the control slightly toward "S". To
lengthen, turn toward "L".
22
R ECO _/!_/1EN D A,T ION
1. It is recommended that the "Q"
needle and "Q" foot be used for
sewing knits and synthetic fabrics.
2. It may be necessary to use a backing
with very soft fabrics. Tissue paper
is usually available. It can be torn
away from seam after sewing.
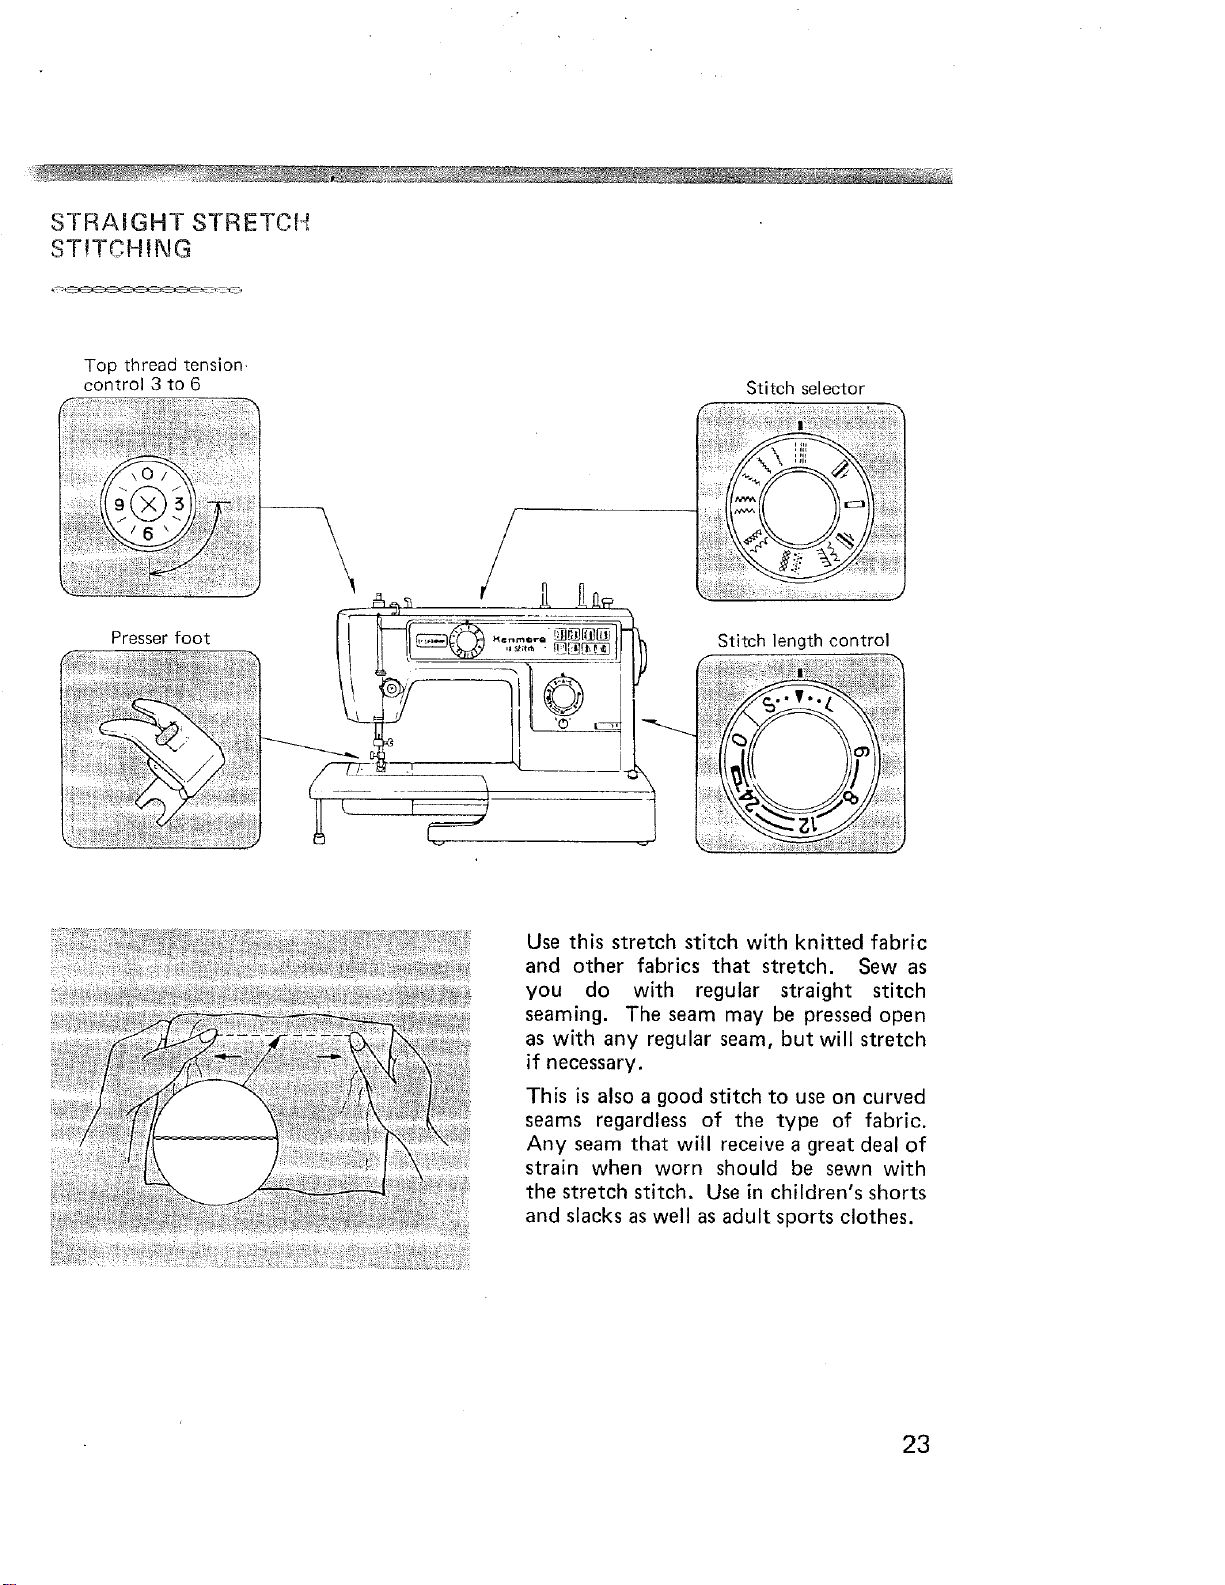
STRAIGHT STRETCI4
STITCHING
Top thread tension
control 3 to 6
Stitch selector
Presser foot
Stitch length control
Use this stretch stitch with knitted fabric
and other fabrics that stretch. Sew as
you do with regular straight stitch
seaming. The seam may be pressed open
as with any regular seam, but will stretch
if necessary.
This is also a good stitch to use on curved
seams regardless of the type of fabric.
Any seam that will receive a great deal of
strain when worn should be sewn with
the stretch stitch. Use in children's shorts
and slacks as well as adult sports clothes.
23


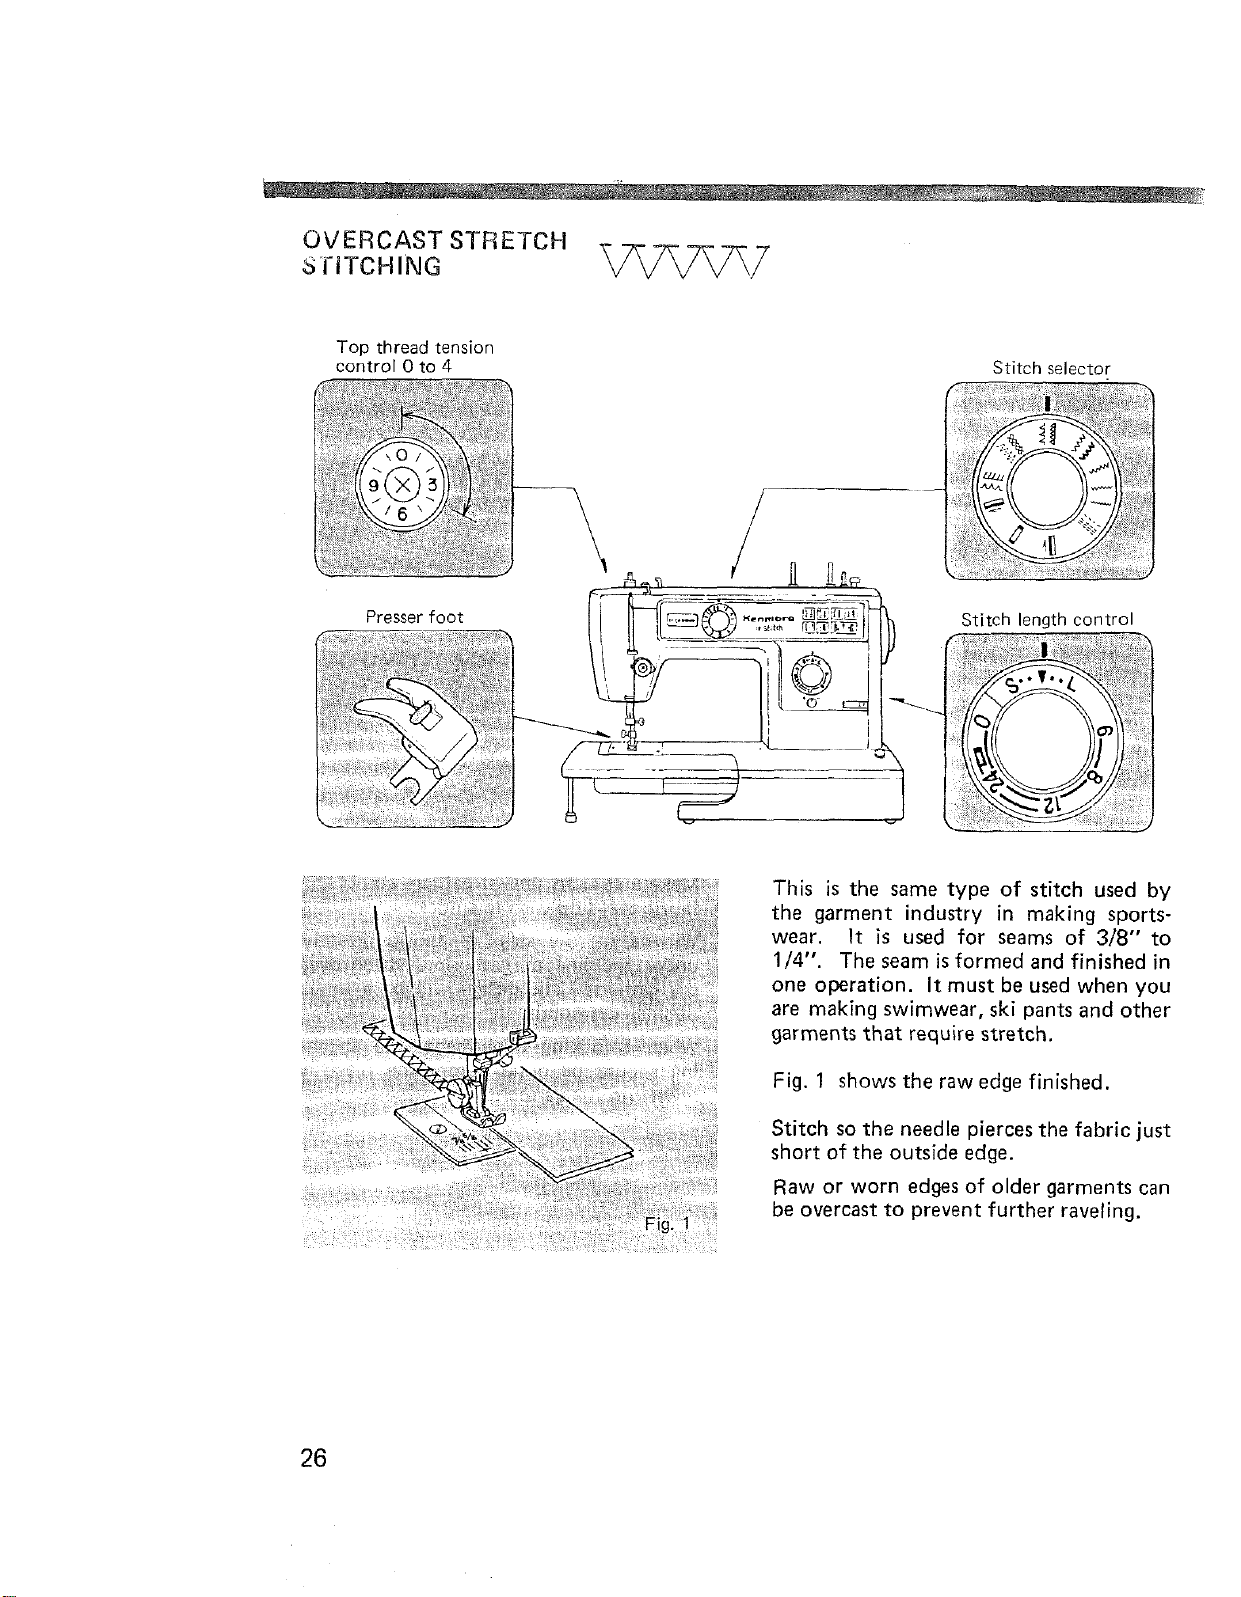
OVERCAST STRETCH
5 rSTCHING
Top thread tension
control 0 to 4
Stitch selector
Presser foot
Stitch length control
This is the same type of stitch used by
the garment industry in making sports-
wear. It is used for seams of 3/8" to
1/4". The seam is formed and finished in
one operation. It must be used when you
are making swimwear, ski pants and other
garments that require stretch.
Fig. 1 shows the raw edge finished.
Stitch so the needle pierces the fabric just
short of the outside edge.
Raw or worn edges of older garments can
be overcast to prevent further raveling.
26
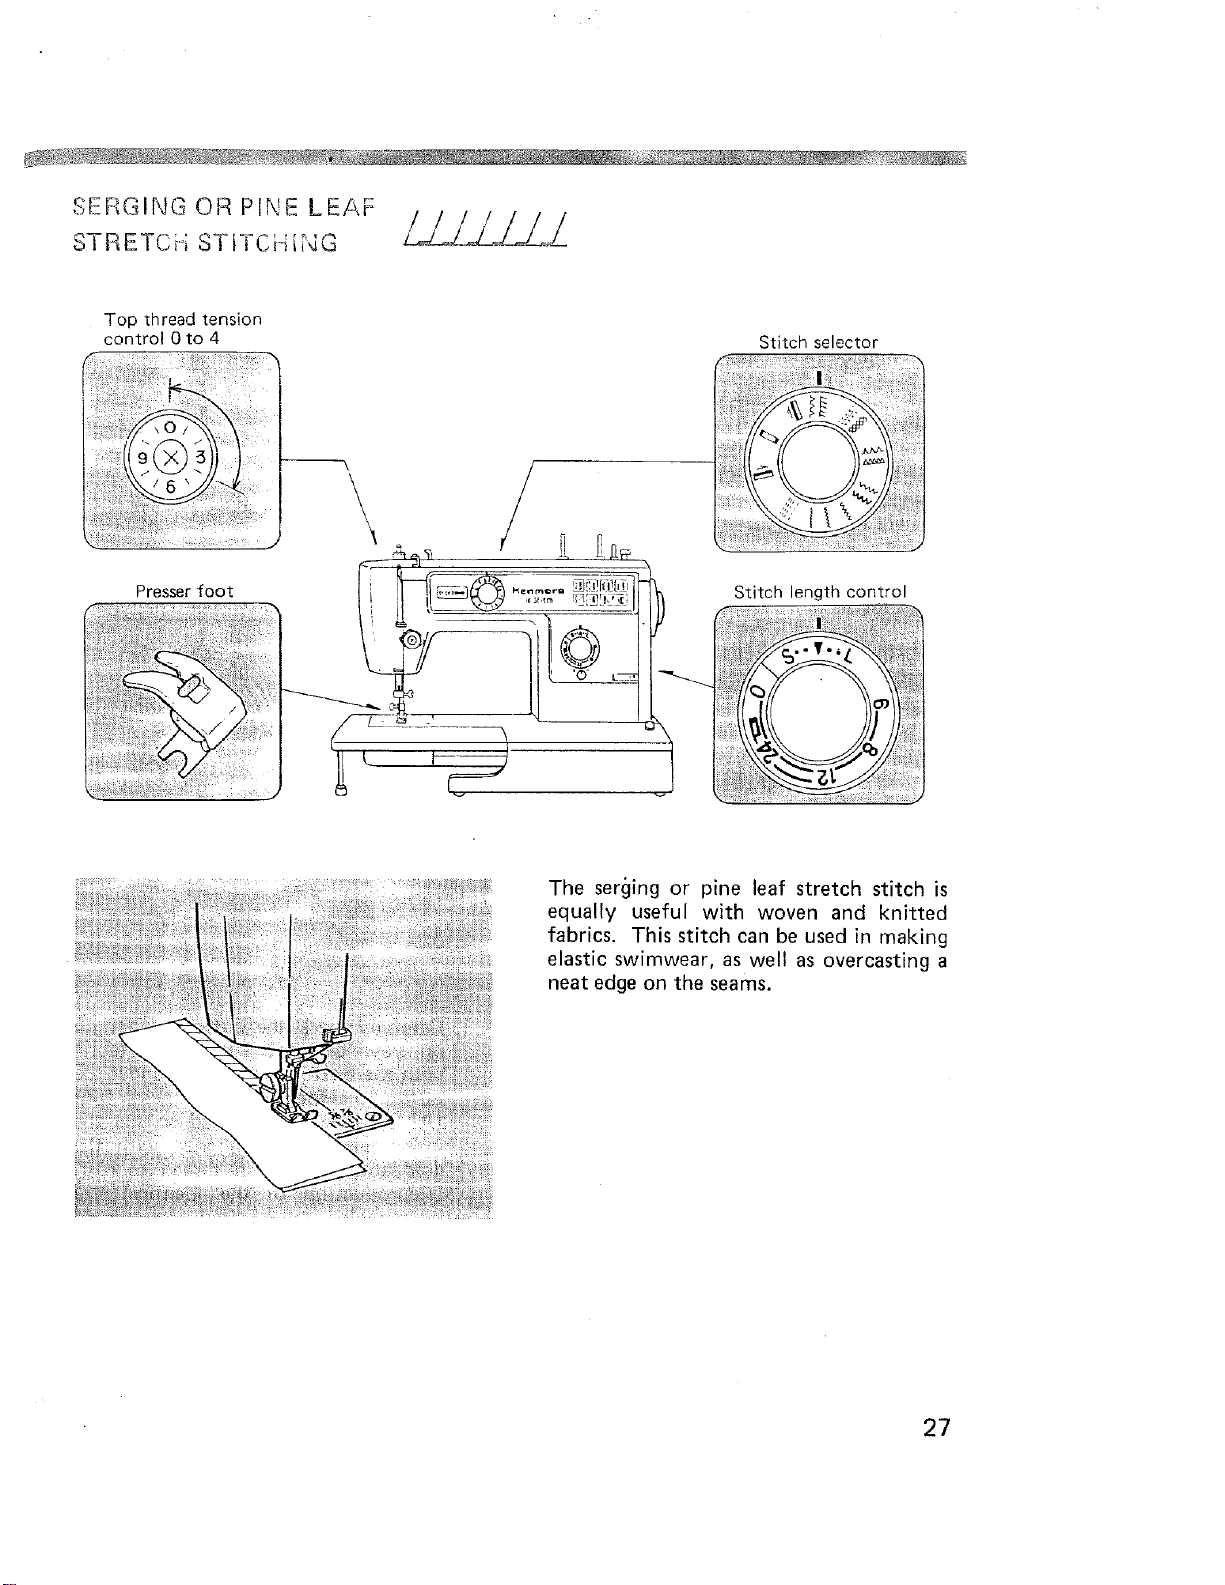
8ERGING OR PINE LEAF
STRETCiI STtt 6i-_tt,_
Top thread tension
control 0 to 4
/
Stitch selector
/
Presser foot
Stitch length control
The ser_ling or pine leaf stretch stitch is
equally useful with woven and knitted
fabrics. This stitch can be used in making
elastic swimwear, as well as overcasting a
neat edge on the seams.
27
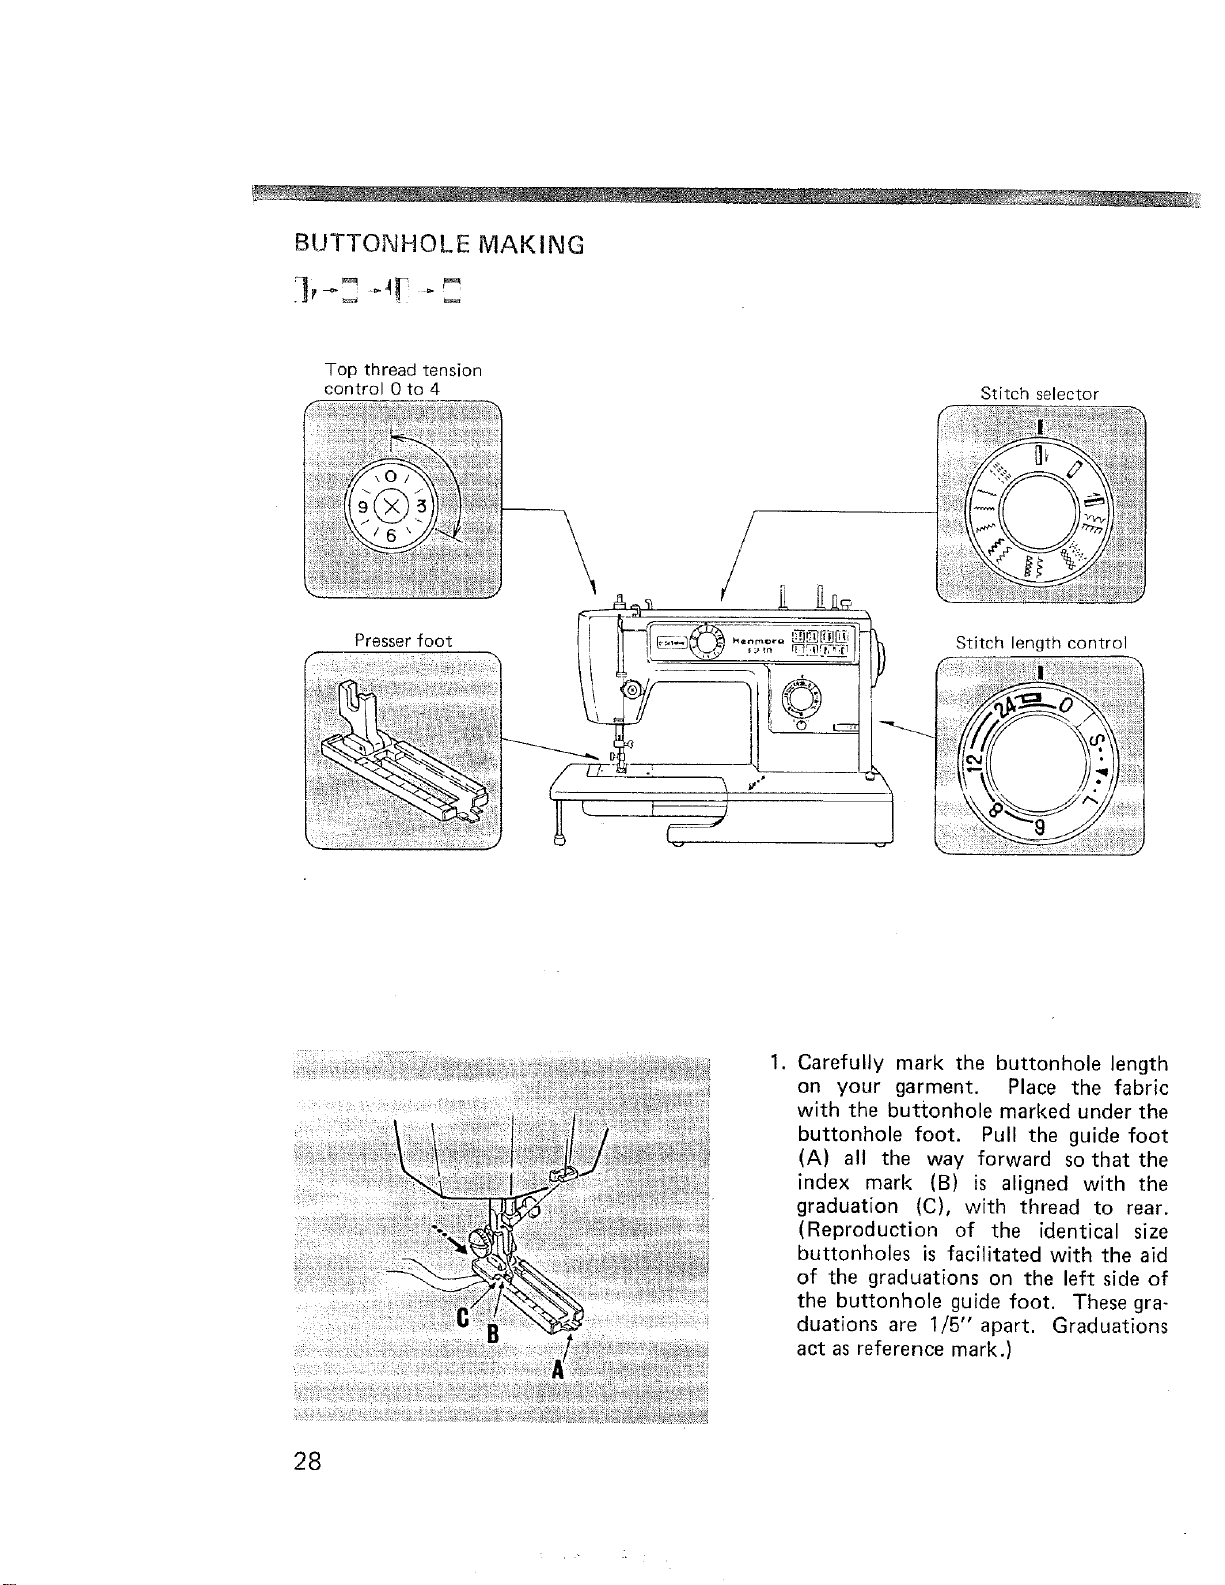
BUTTONHOLE MAKING
7-
Top thread tension
control 0 to 4
Stitch selector
/
/
Presser foot
Stitch length control
.
Carefully mark the buttonhole length
on your garment. Place the fabric
with the buttonhole marked under the
buttonhole foot. Pull the guide foot
(A) all the way forward so that the
index mark (B) is aligned with the
graduation (C), with thread to rear.
(Reproduction of the identical size
buttonholes is facilitated with the aid
of the graduations on the left side of
the buttonhole guide foot. These gra-
duations are 1/5" apart. Graduations
act as reference mark.)
28
• . ."
 Loading...