


36315658891
Kenmore 36315658891, 36315658890, 36315655891, 36315655890, 36315651891 Owner’s Manual
...
Model Nos.
15651 _"'__
15655 _-'_-_
15658 __' _
Model and Serial
Number Plate
AUTOMAT|C DISHWASHER
CAUTION: Read and follow all Safety
Rules and Operating Instructions
before first use of this product,
Sears, Roebuck and Co., Hoffman Estates, RL60179 U.S.A.
165D3592P068
SR5567
228 CG (JR)
Prlntod in U S A
Warranty .................... Below
Important Safety Instructions ....... 3
Important Parts of Your Dishwasher . 4
What Your Dishwasher Needs ...... 5
Special Tips ........................ 6
Operating Instructions ............ 7-9
Detergent Dispenser'. ............ 10
Detergent Usage Guide ............ 10
Rinse Agent Dispenser ............. 10
Proper Loading .............. 11, 12
User Maintenance Instructions ..... 13
Care and Cleaning ................ 13
Air Gap ........................... 13
Color Paneis .................... 14
Problems and Solutions ........ 15-18
Sears Service .................... 20
Full One-Year Warranty on
Dishwasher
For one year from the first day of use
in your home, Sears will repair, free of
charge, defects in material or workmanship
which appear in this dishwasher:
Full Ten-Year Warranty Against
Leaks in the Tub and Inner Door
Panel
For ten years from the first day of use in
your home, if a leak should occur as a
result of failure of the tub or inner door
panel due to cracking, chipping, or peeling,
Sears wil! replace, free of charge, the tub
or inner door panel
If the dishwasher is subjected to other than
private family use, the above warranty
coverage is effective for only 90 days_
Warranty service is available by
contacting the nearest Sears Service
CentedDepartment in the United States
This warranty applies only while this
product is in use in the United States.
This warranty gives you specific legal
rights, and you may also have other rights
which vary from state to state.
The model number of your automatic
dishwasher is found on the serial plate
fastened to the tub wall just inside the
dishwasher door:
All repair parts are available for immediate
purchase or special order when you visit
your nearest Sears Service Center, or the
Service Department at most Sears
Stores_ To request service or' order parts
by phone, call the toll free numbers listed
on the back cover,
When requesting service or ordering parts,
always provide the following information:
• Product Type
• Part Number
•Modef Number
• Part Description
Sears, Roebuck and Co.,
Dept. 817WA,
Hoffman Estates, IL 60179
A WARNING:
Please follow these basic precautions, including the following:
Read all instructions before using your
dishwasher
. Only use detergents and rinse agents
recommended for use in a dishwasher
• Store detergents and rinse agents in a
cool dry pface out of children's reach.
• Do not tamper with controls
• Do not operate dishwasher unless all
enclosure panets are properly in place
oAlways disconnect electrical power to
dishwasher before attempting to service
it. We recommend having a qualified
technician service your appliance
° Remember, use dishwasher for its
intended purpose only
• Do not wash plastic items unless
marked "Dishwasher Safe" or equivalent
If unmarked, check manufacturer's
recommendations
• This dishwasher must be properly
installed in accordance with the Instal-
lation Instructions before it is used
GROUNDING
iNSTRUCTiONS
• Connect to a properly rated, protected
and sized power-supply circuit to avoid
electrical overload
• This appliance must be connected to
a grounded metal, permanent wiring
system; or an equipment-grounding
conductor must be run with the circuit
conductors and connected to the
equipment-grounding terminal or lead
of the appliance
WARNING:
The improper connection of the
equipment-grounding conductor can
result in a risk of electric shock. Check
with a qualified electrician or service
representative if you are in doubt whether
the appliance is properly grounded
• To avoid risk of electrical shock,
the dishwasher must be electrically
grounded before it is operated
• If you did not receive Installation
Instructions with your dishwasher,
you can get a copy by contacting your
Sears Service Center
• Do not touch heating element during
or immediately after use Allow time
to cool
° Load sharp or pointed tableware with
handles up (points down) to avoid injury
when reaching into dishwasher
° Load sharp items and knives so they
aren't likely to damage door seal
• Do riot sit or stand on or abuse
dishwasher door or dishracks
• Do not atlow children to play in or on
dishwasher
• When discarding old dishwasher,
be sure to remove door to prevent
accidental entrapment
• Do not install the dishwasher on
carpeted floor
A WARNING:
Under certain conditions, hydrogen gas
may build up in a hot water system that
has not been used for two weeks or
more HYDROGEN GAS IS EXPLOSIVE.
To prevent injury or damage, before using
dishwasher, turn on all hot water faucets
and allow water to run for several
minutes This will allow gases to escape
As the gas is flammable, do not smoke
or use an open flame or appliance near
faucets while they are open
NOTE: Do not store or use combustible
materials, gasoline or other ffammable
vapors and liquids in the vicinity of this
or any other appliance
SAVE THESE
3INSTRUCTIONS
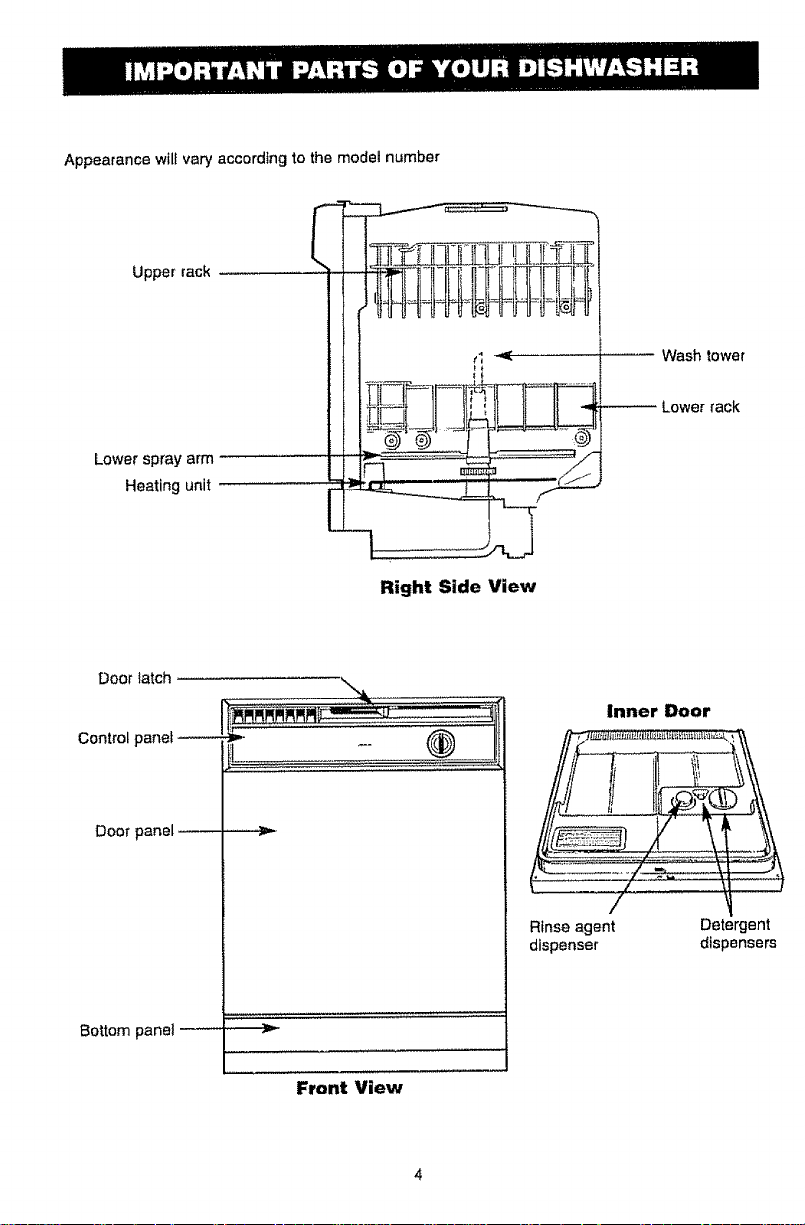
Appearance wllf vary according to the model number
Upper rack ......
Lower spray arm
Heating unit
Right Slde View
Wash tower
Lower lack
Door latch
Control panel
Door panel ,,
Bottom panel .......
_ _ ® JL
Front View
Inner Door
Rtnse agent
dispenser
I
Detergent
dispensers

Hot Water
To get dishes clean and dry you need
hot water To help you get water of the
proper temperature, your dishwasher
automatically heats the water in the
wash cycle Higher water temperature is
needed to dissolve grease and activate
powder detergents For good washing
and drying, the entering water must be
at least 120°E To prevent dish damage,
inlet water should not exceed 150°E
Check your water temperature with a
candy or meat thermometer
Turn on the hot water faucet nearest the
dishwasher Put the thermometer in a glass
and let the water run continuously into the
glass until the temperature stops dsing
Do not operate the dishwasher during or
right after other heavy use of hot water,
such as for laundry or bathing.
Water Pressure
Water supply pressure must be between
!5 and 120 pounds per square Inch. To
determine if you have enough pressure,
put a 1 quart container under a fully
opened hot water faucet nearest the
dishwasher If the container fills in less
than 9 seconds, water pressure is within
an acceptable range, Be sure all other
faucets are turned off during this test
1 :!Y
Water Conditions
In areas where water is very hard
(12 grains or more), it may be necessary
to install a water softener to assure
proper performance from your
dishwasher. If you do not know the
hardness of your water supply, contact
your local water department or bring a
sample into your Sears store for testing.
Detergents
Only use detergents labeted for use in
automatic dishwashers NEVER use
laundry detergents, liquid soaps or other
household cleaners in your dishwasher
Some detergents wii! be more effective
with your water conditions than others
Store detergent in a coot, dry place.
Rinse Agents
Rinse agents make water flow off dishes
quicker than usual This lessens water
spotting and makes drying faster, too
Rinse agents come in either liquid or solid
form Your dishwasher's dispenser uses
the liquid form.
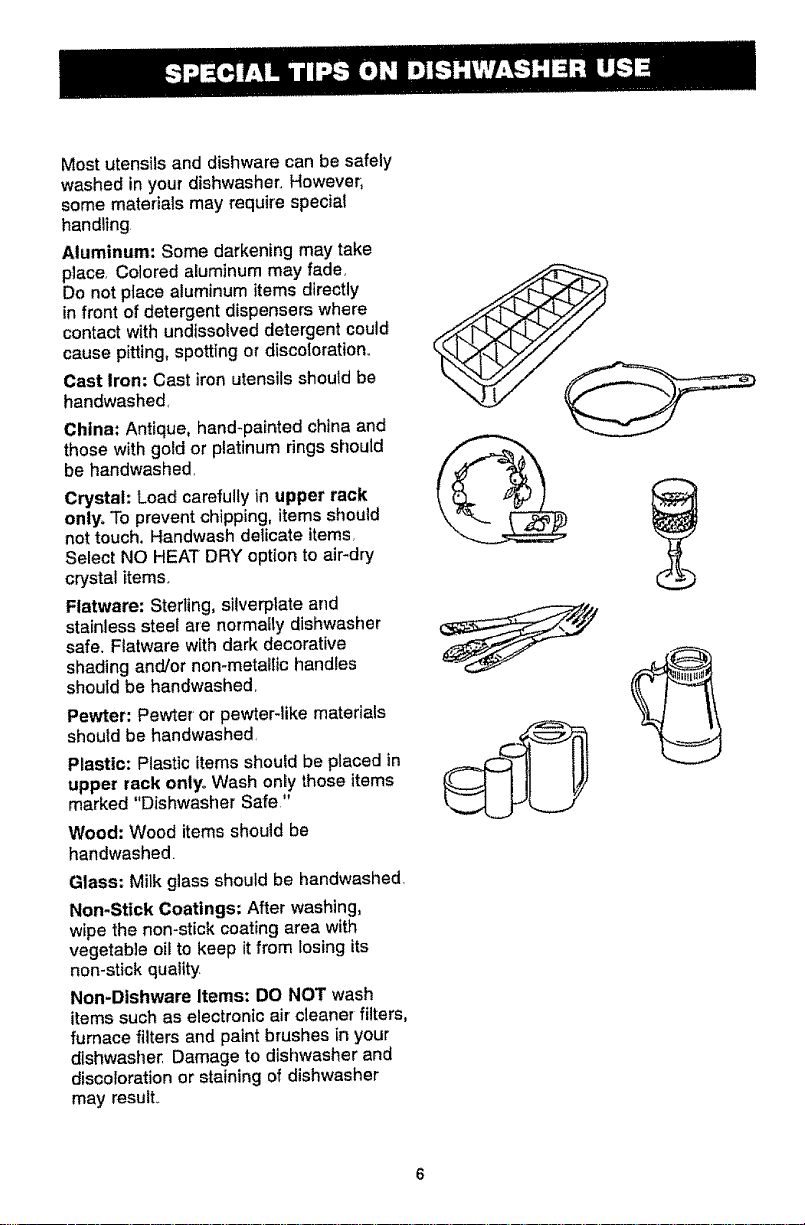
Mostutensilsanddishwarecanbesafely
washedinyourdishwasher.However,
somematerialsmayrequirespecial
handling
Aluminum: Some darkening may take
place. Colored aluminum may fade.
Do not place aluminum items directly
in front of detergent dispensers where
contact with undissolved detergent could
cause pitting, spotting or discoloration.
Cast Iron: Cast iron utensils should be
handwashed,
China: Antique, hand-painted china and
those with gold or platinum rings should
be handwashed
Crystal: Load carefully in upper rack
only, To prevent chipping, items should
not touch, Handwash delicate items,
Select NO HEAT DRY option to air-dry
crystal items.
Flatware: Sterling, sllverplate and
stainless steel are normally dishwasher
safe. Flatware with dark decorative
shading and/or non-metallic handles
should be handwashed,
Pewter: Pewter or pewter-like materials
should be handwashed,
Plastic: Plastic items should be placed in
upper rack onlyo Wash only those items
marked "Dishwasher Safe"
Wood: Wood items should be
handwashed
Glass: Milk glass should be handwashed.
Non-Stick Coatings: After washing,
wipe the non-stick coating area with
vegetable oil to keep it from losing its
non-stick quality
Non-Dishware Items: DO NOT wash
items such as electronic air cleaner filters,
furnace filters and paint brushes in your
dishwasher. Damage to dishwasher and
discoloration or staining of dishwasher
may resulL

Appearance may van]
[VI i ! I Iiiillli
_#_lZ_ ot_lt0Ns
mmmulIH IIIR lllmIlK roll
wA_r_t_t_,_r z _ _rzd,3
STARTING YOUR DISHWASHER
• Load the dishwasher
(see pages 11and 12)
• Add detergent
(see page 10)
• Close the door but do not latch it.
• If dishwasher drains into a food
waste disposer, operate disposer
until it is empty,
• Turn on hot water faucet nearest
dishwasher and let it run until the
water is hot
• Push selector buttons for desired cycles
and options,
• For alt cycles but SHORT WASH and
RINSE & HOLD, slowly turn the Dial to
START Then latch the door to start the
dishwasher,
. If you plan to use the SHORT WASH
or RINSE & HOLD cycle, push the
NORMAL WASH button and turn the
Dial to the desired cycle Then latch
the door to start the dishwasher
When using WASH DELAY option
(for alt cycles except SHORT WASH
and RINSE & HOLD).,
• SFowJyturn the Dial to desired delay
time (up to 5 hours),,Then latch the
door to start the timer.
• The CYCLE ON light will come on and
stay on until the dishwasher starts
automatically at the end of the selected
delay time

SELECT THE CYCLE
POTS PANS
For heavily soiled dishes and pots and pans,
Cycle Time: Approx, 95 minutes*
Water Usage; Approx, 93 gallons
NORMAL WASH
For normally soiled dishes,
Cycle Time: Approx, 95 minutes*
Water Usage: Approx, 93 gallons
LIGHT WASH
For prednsed or lightly soiled dishes and
dishes that have been stored,
Cycle Time: Approx 95 minutes*
Water Usage: Approx_ 6.7 gallons
WATER MISER
For' tableware that }s tightly soiled with fresh
soils and is prerinse¢
Cycle Time: Approx, 95 minutes*
Water Usage: Approx 5.4 gallons
SHORT WASH
For lightly soiled dishes
Cycle Time: Approx. 87 minutes*
Water Usage: Approx 6.6 gallons
RINSE & HOLD
For rinsing dishes that wil_ be washed later, DO NOT
use detergent, Select NO HEAT DRY option,,
Cycle Time: Approx 12 minutes
Water Usage: Approx 3.9 gallons
"Unextended times, These _de timeswill be increased approximately21 minutes for your dishwasher toheat
the water forgood washability when you usetheWATER HEAT op_on

SELECT OPTIONS
WATER HEAT
Select this option and the main wash
cycle is extended 21 minutes while the
dishwasher heats the water for good
washing and drying
NO HEAT DRY
Turns heater off for entire drying period,
To shorten drying time, open dishwasher
door slightly,
RESET OPTIONS
Cancels setected WATER HEAT and
NO HEAT DRY options. Main wash time
wilt not be extended, and dishes will dry
in heated air
NORMAL SIGHTS AND SOUNDS
. You'll see water vapor coming through
the vents by the door latch during drying
and when water is being pumped out
• You'll hear occasional sounds while your
dishwasher is running:
• Soft food disposer shredding action.
• Drain valve opening to pump water out,
= Timer control as cycle progresses
• Detergent cup opening
• Pump motor starting,
• The motor stops during drying,
ENERGY & WATER SAVIING TiPS
oWash full !oads,
• Use your dishwasher during off-peak hours.
° Use the LIGHT WASH cycle whenever
possible,
=SelectNO HEAT DRY optionwhen you
don'tneed drydishesina hurry,
°Don'tprerinsenormallysoileddishes
=Load correctlyto ensuregood washing
action,
HOW TO ADD A DISH DURING
A CYCLE
° Add dishes any time during RINSE &
HOLD cycle
° With other wash cycles, you can add
dishes at any time BEFORE the
detergent cup has opened.
Here's how to add a forgotten dish;
1. Push door latch to the left Washing
will stop,
2 Wait a few seconds until the water
calms Then open the door.
3oAdd dishes you've forgotten,
PREPARING DISHES FOR
WASHING
. Prerinsing of norma! food soil is not
necessary.
• Scrape off bones, seeds, skins,
toothpicks and other hard soils
• Remove hard shelled vegetables, meat
trimmings, leafy vegetables, and
excessive amounts of oil or grease,
= Remove foods with high acid content--
they can discolor stainless steel.
- Remove large quantities of any food
° When using the POTS PANS cycle, less
preparation is required, This cycle can
wash heavily-soiled dishes and remove
dried-on and baked-on soils from pots,
pans and casseroles. However, items with
burned-on soils may not come clean,
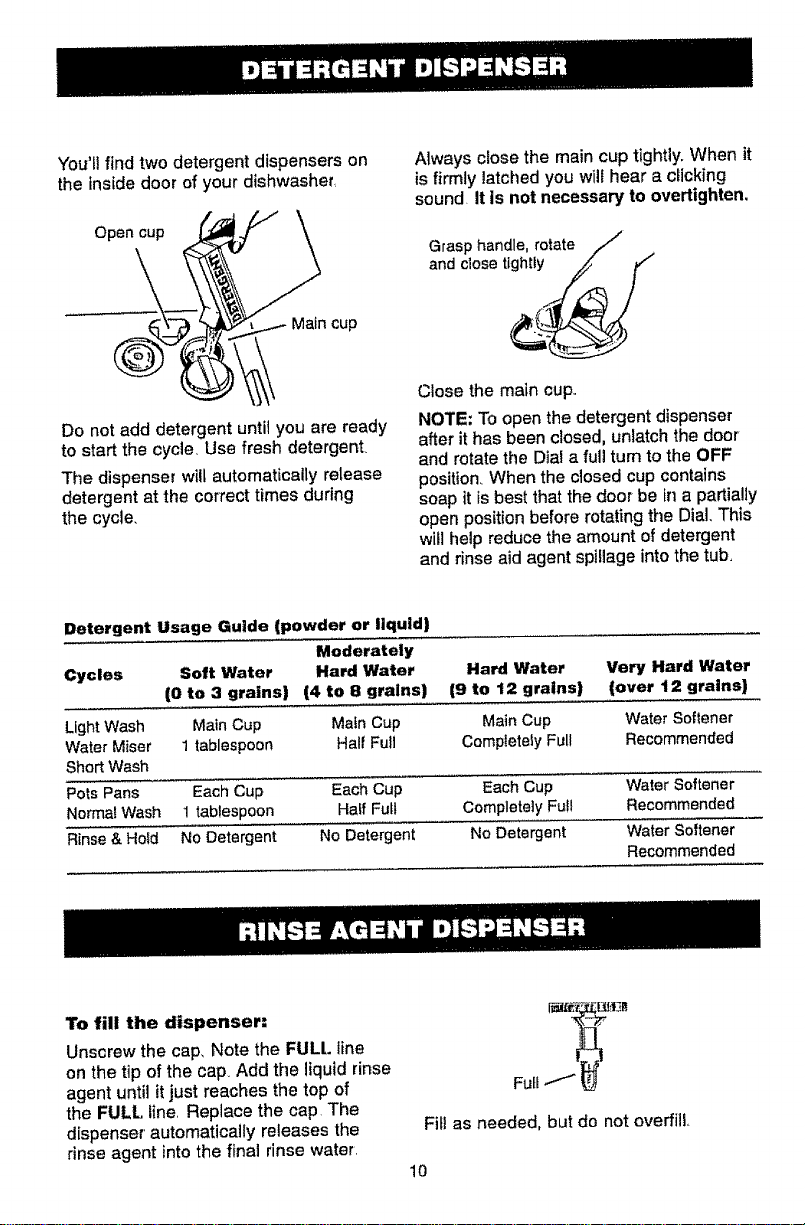
You'llfindtwodetergentdispenserson
theInsidedoorofyourdishwasher
Open cup
Main cup
Do not add detergent until you are ready
to start the cycle, Use fresh detergent.
The dispenser will automatically release
detergent at the correct times during
the cycle.
Always close the main cup tightly, When it
is firmly latched you will hear a clicking
sound, It is not necessary to evertighten,
Grasp handle, rotate ._
and close tt___F,
Close the main cup,,
NOTE: To open the detergent dispenser
after it has been closed, unlatch the door
and rotate the Dial a full tum to the OFF
posifion_ When the closed cup contains
soap it is best that the door be in a partially
open position before rotating the Dial. This
will help reduce the amount of detergent
and dnse aid agent spillage into the tub,
Detergent Usage Guide (powder or liquid)
Moderately
Cycles Soft Water Hard Water Hard Water Very Hard Water
(0 to 3 grains) (4 to 8 grains) (9 to 12 grains) (over 12 grains)
Light Wash Main Cup Main Cup Main Cup Water Softener
Water Miser 1 tablespoon Half Full Completely Full Recommended
Short Wash
Pots Pans Each Cup Each Cup Each Cup Water Softener
Normal Wash 1 tablespoon Half FuEl Completely Full Recommended
Rinse & Hold No Detergent No Detergent No Detergent Water Softener
Recommended
To fill the dispenser:
Unscrew the cap, Note the FULL line
on the tip of the cap Add the liquid rinse
agent until it just reaches the top of
the FULL. line, Replace the cap, The
dispenser' automatically releases the
rinse agent into the final rinse water.
Full
Fill as needed, but do not overfill,
10

ILOADIING10 PLACE SETTaNGS..,
Follow these guidelines for loading 10
place settings., Features and appearance
of racks and silverware baskets may vary
from your model,,
UPPER RACK--10 place setting
LOWER RACK--10 place setting
UPPER RACK (appearance will vary)
The upper rack is best for g_asses, cups
and saucers Cups and g_asses fit best
atong the sides., This is also the place for
dishwasher safe plastics. Make sure small
plastic items are lodged in tightly so they
can't fall onto the heating unit_Arrange
stemware so that it cannot move easily,,
Don't let the glasses touch each other
The upper rack is handy for all kinds of
odd shapes° Saucepans, mixing bow_s
and other items should be ptaced face
down_ When loading dishwasher-safe
plastics make sure each plastic item is
secured over two fingers This wifl insure
good washing results.
tt
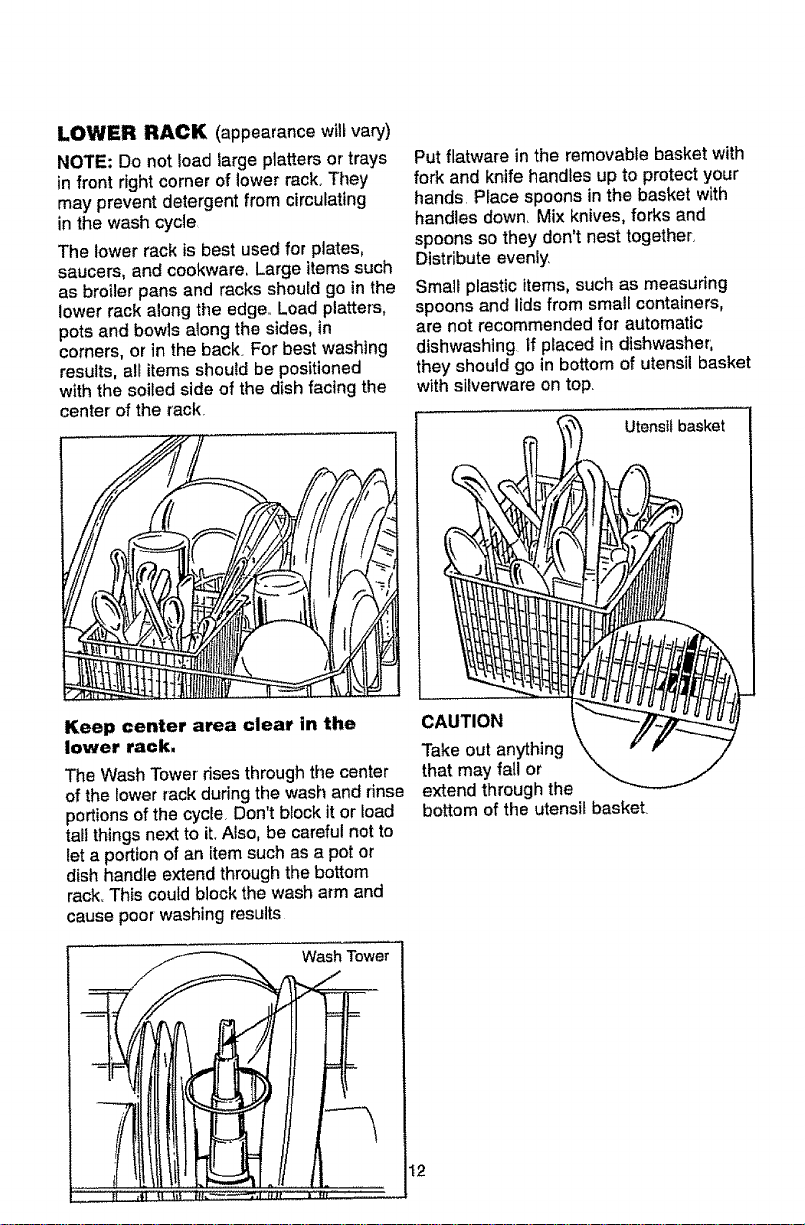
LOWER RACK (appearance wilt vary)
NOTE: Do not load large platters or trays
in front right corner of lower rack+They
may prevent detergent from c_rculating
in the wash cycle
The lower rack is best used for plates,
saucers, and cookware, Large items such
as broiler' pans and racks should go in the
lower rack along the edge., Load platters,
pots and bowls along the sides, in
corners, or in the back. For best washing
results, all items should be positioned
with the soiled side of the dish facing the
center of the rack
Put flatware in the removable basket with
fork and knife handles up to protect your
hands. Place spoons in the basket with
handles down. Mix knives, forks and
spoons so they don't nest together,
Distribute evenly.
Small plastic items, such as measuring
spoons and lids from small containers,
are not recommended for automatic
dishwashing If placed in dishwasher,
they should go in bottom of utensil basket
with silverware on top,
Utens+t basket
Keep center area clear in the
lower rack+
The Wash Tower rises through the center
of the tower rack during the wash and rinse
portions of the cycle+ Don't block it or load
tall things next to it. Also, be careful not to
let a portion of an item such as a pot or
dish handle extend through the bottom
rack This could block the wash arm and
cause poor washing results
Wash Tower
CAUTION
Take out anything
that may fall or
extend through the
bottom of the utensil basket+
12
 Loading...