

Page 1
BR 47/35 ESC
English 3
Français 19
Español 35
5.961-740.0 01/09
Page 2

2
Page 3

IMPORTANT SAFETY IN-
STRUCTIONS
READ ALL INSTRUCTIONS
BEFORE USING.
– Do not use to pick up flammable or
combustible liquids, such as gasoline, or
use in areas where they may be present.
– Connect to a properly grounded outlet
only. See Grounding Instruction.
SAVE THESE INSTRUCTIONS
WARNING
To reduce the risk of fire, electric shock, or
injury:
– Do not leave appliance when plugged in.
Unplug from outlet when not in use and
before servicing.
WARNING
– TO REDUCE THE RISK OF ELECTRIC
SHOCK-USE INDOORS ONLY
– Do not allow to be used as a toy. Close
attention is necessary when used by or
near children.
– Use only as discribed in this manual. Use
only manufacturer`s recommended
attachments.
– Do not use with damaged cord or plug. If
appliance is not working as it should, has
been dropped, damaged, left outdoors,
or dropprd into water, return it to a
service center.
– Do not pull or carry by cord, use cord as
a handle, close a door on cord, or pull
cord around sharp edges or corners. Do
not run appliance over cord. Keep cord
away from heated surfaces.
– Do not unplug by pulling on cord. To
unplug, grasp the plug, not the cord.
– Do not handle plug or appliance with wet
hands.
– Do not put any object into openings. Do
not use with any opening blocked; keep
free of dust, lint, hair, and anything that
may reduce air flow.
– Keep hair, loose clothing, fingers, and all
parts of body away from openings and
moving parts.
– Turn off all controls before unplugging.
– Use extra care when cleaning on stairs.
GROUNDING INSTRUCTIONS
This appliance must be grounded. If it
should malfunction or breakdown, grounding provides a path of least resistance for
electric current to reduce the risk of electric
shock. This appliance is equipped with a
cord having an equipment-grounding conductor and a grounding plug. The plug must
be inserted into an appropriate outlet that is
properly installed and grounded in accordance with all local codes and ordinances.
WARNING
Improper connection of the equipment
grounding conductor can result in a risk of
electric shock. Check with a qualified electrician or service person if you are in doubt as
to whether the outlet is properly grounded.
Do not modify the plug provided with the appliance-if it will not fit the outlet, have a proper outlet installed by a qualified electrician.
This appliance is for use on a nominal 120volt circuit and has a grounding attachment
plug that looks like the plug illustrated in
sketchpicture A. Make sure that the
appliance is connected to an outlet having
the same configuration as the plug. No
adaptor should be used with this appliance.
English 3
Page 4
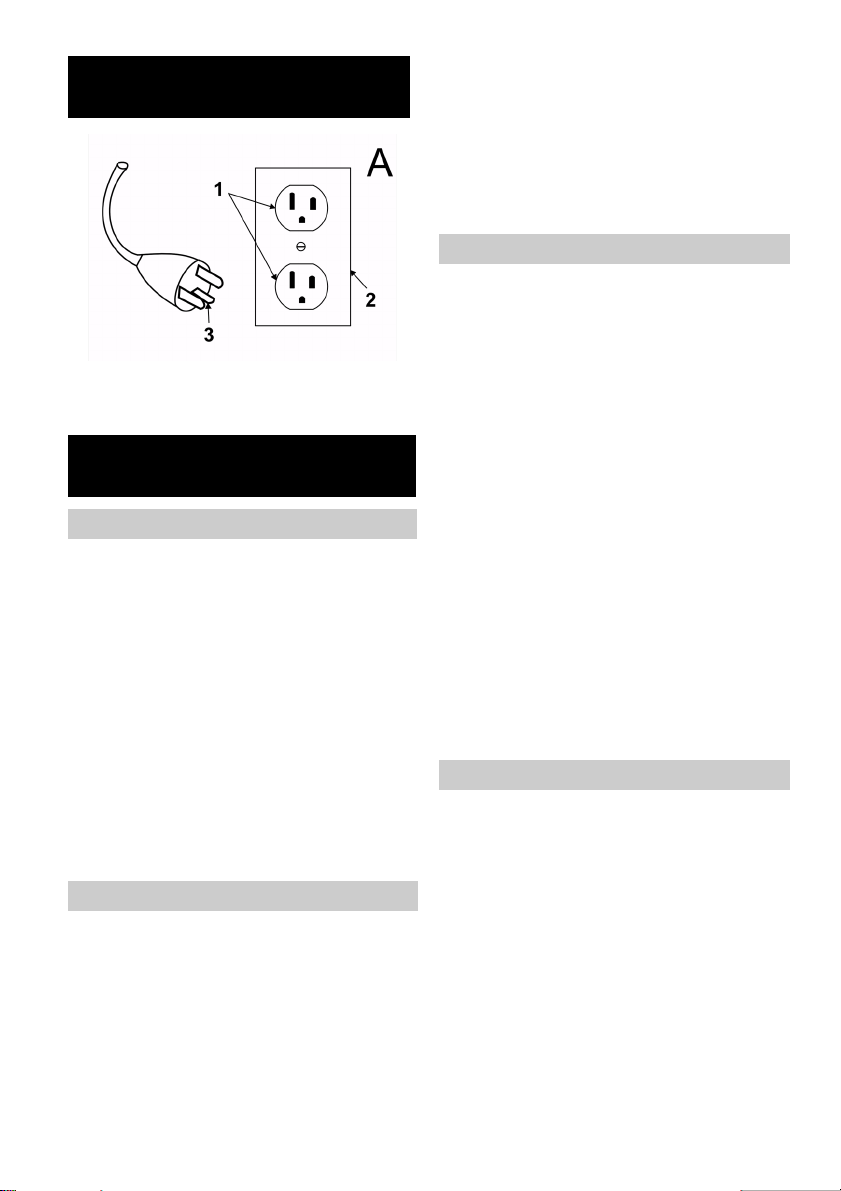
CONNECT TO A PROPERLY
GROUNDED OUTLET ONLY
1 Grounded outlet
2 Grounded outlet Box
3 Grounded Pin
OPERATING SAFETY RULES
AND PRACTICES
Operator Responsibility
Save operation is in the responsibility of the
operator.
The operator shall be familiar with the operation and function of all controls and instruments before undertaking to operate the
unit.
Before operating the unit, operators shall
have read and be familiar with the operator’s
manual for the particular unit being operated
and they shall also abide by the safety rules
and practices in the following paragraphs.
Before operating any unit, the operator shall
be familiar with unusual operating conditions
which may require additional safety precautions or special operating instructions.
General
Before starting to operate the unit be in operating position.
Do not start or operate the unit, any of its
functions or attachments, from any place
other than from the designated operators
position.
Before leaving the operator’s position:
A bring the unit to a complete stop;
B if the unit must be on an incline, block the
wheels.
Maintain a safe distance from the edge of
ramps, platforms, and other similar working
surfaces.
Do not add to, or modify the unit.
Do not block access to fire aisles, stairways
or fire equipment.
Travelling
Yield the right of way to pedestrians and
emergency vehicles such as ambulances
and fire trucks.
Cross railroad tracks at an angle wherever
possible. Do not park closer than 6 ft (1800
mm) to the nearest rail of a railroad track.
Keep a clear view of the path of travel and
observe for other traffic, personnel, and safe
clearances.
Under all travel conditions, operate the unit
at a speed that will pernit it to be brought to
a stop in a safe manner.
Do not indulge in stunt driving or horseplay.
Slow down for wet and slippery floors.
Before driving over a dockboard or bridge
plate, be sure that it is properly secured.
Drive carefully and slowly across the dockboard or bridge plate, and never exceed its
rated capacity.
When negotiating turns, reduce speed to a
safe level consistent with the operating environment. Make the turns smoothly.
Operator care of the unit
If the unit is found to be in need of repair or
in any way unsafe, or contributes to an unsafe condition, the matter shall be reported
immediately to the user’s designated authority, and the unit shall not be operated until it
has been restored to safe operating condition.
If during operation the unit becomes unsafe
in any way, the matter shall be reported immediately to the user’s designated authority,
and the unit shall not be operated until it has
been restored to safe operating condition.
Do not make repairs or adjustments unless
specifically authorized to do so.
4 English
Page 5

MAINTENANCE AND REBUILD
PRACTICES
Operation of the unit may be hazardous if
maintenance is neglected or repairs, rebuilds, or adjustments are not performed in
accordance with the manufacturer’s design
criteria. Therefore, maintenance facilities
(on or off premises), trained personnel, and
detailed procedures shall be provided.
Maintenance and inspection of the unit shall
be performed in conformance with the following practices:
A a schedules planned maintenance, lubri-
cation, and inspection system shall be
followed; consult the manufacturer’s recommendations.
B only tranined and authorized personnel
shall be permitted to maintain, repair, adjust, and inspect the unit, and in accord-
ance with manufacturer’s specifications.
Avoid fire hazards and have fire protection
equipment present in the work area. Do not
use open pans of fuel or flammable cleaning
fluids for cleaning parts.
FIRE SAFETY STANDARD
Any unit not in safe operating condition shall
be removed from service.
Repairs shall not be made in Class I, Class
II, and Class III locations.
Fire Prevention: The unit shall be kept in a
clean condition and reasonably free of lint,
excess oil, and grease. Noncombustible
agents are preferred for cleaning the unit.
Flammable liquids [those having flash points
at or above 100°F (37,8°C)] are not allowed.
Precautions regarding toxicity, ventilation,
and fire hazard shall be appropriate for the
agent or solvent used.
Nameplate Visibility: The unit type designations as shown on the nameplate and the
type markers shall not be covered over with
paint so that their identification information is
obscured.
The unit shall not be used in classified areas.
English 5
Page 6

Please read and comply with
these instructions prior to the
initial operation of your appliance. Retain
these operating instructions for future reference or for subsequent possessors.
Contents
Safety instructions 6
Function 6
Proper use 6
Environmental Protection, Disposal 7
Operating and Functional Elements 8
Before Startup 9
Start up 9
Operation 10
Shutting down 12
Maintenance and care 12
Transport 15
Troubleshooting 16
Specifications 16
Warranty 16
Accessories and Spare Parts 16
Safety instructions
For operator:
Please ensure that all users of the machine
have read and understood the contents of
this Operating Instructions Manual and are
familiar with the local regulations about work
safety. The users must have been technically trained to use this appliance.
For users:
Before using the appliance for the first time,
read and observe these operating instructions and the accompanying brochure: Safety information for brush cleaning units and
spray-extraction units, No. 5.956-251.
Safety Devices
Safety devices serve to protect the user and
must not be rendered inoperational or their
functions bypassed.
Foot pedal
The appliance can only be started when you
press the foot pedal fully downwards. The
machine stops when you release the foot
pedal.
Function
From he stationary escalator cleaner, detergent fluid (from the fresh water tank) is applied to the running travellator/ escalator.
The rolling brushes brush the detergent
againt the running direction into the ridges of
the travellator/ escalator. In the same working step, the dirty detergent is sucked into
the dirt water tank of the machine via the intake brushes.
Proper use
Use this appliance only as directed in these
operating instructions.
– The appliance may only be used to clean
the stepping areas of travellators/ escalators.
– The running or movement direction of
the unit to be cleaned must be adjusted
in such a way that the travellator/ escalator moves away from the machine.
– To clean the escalator, place the ma-
chine only at the lower end of the escalator.
– The appliance may only be equipped
with original accessories and spare
parts.
6 English
Page 7

Environmental protection
The packaging material can be
recycled. Please do not throw
the packaging material into
household waste; please send
it for recycling.
Old appliances contain valuable materials that can be recycled; these should be sent for
recycling. Batteries, oil, and
similar substances must not
enter the environment. Please
dispose of your old appliances
using appropriate collection
systems.
English 7
Page 8
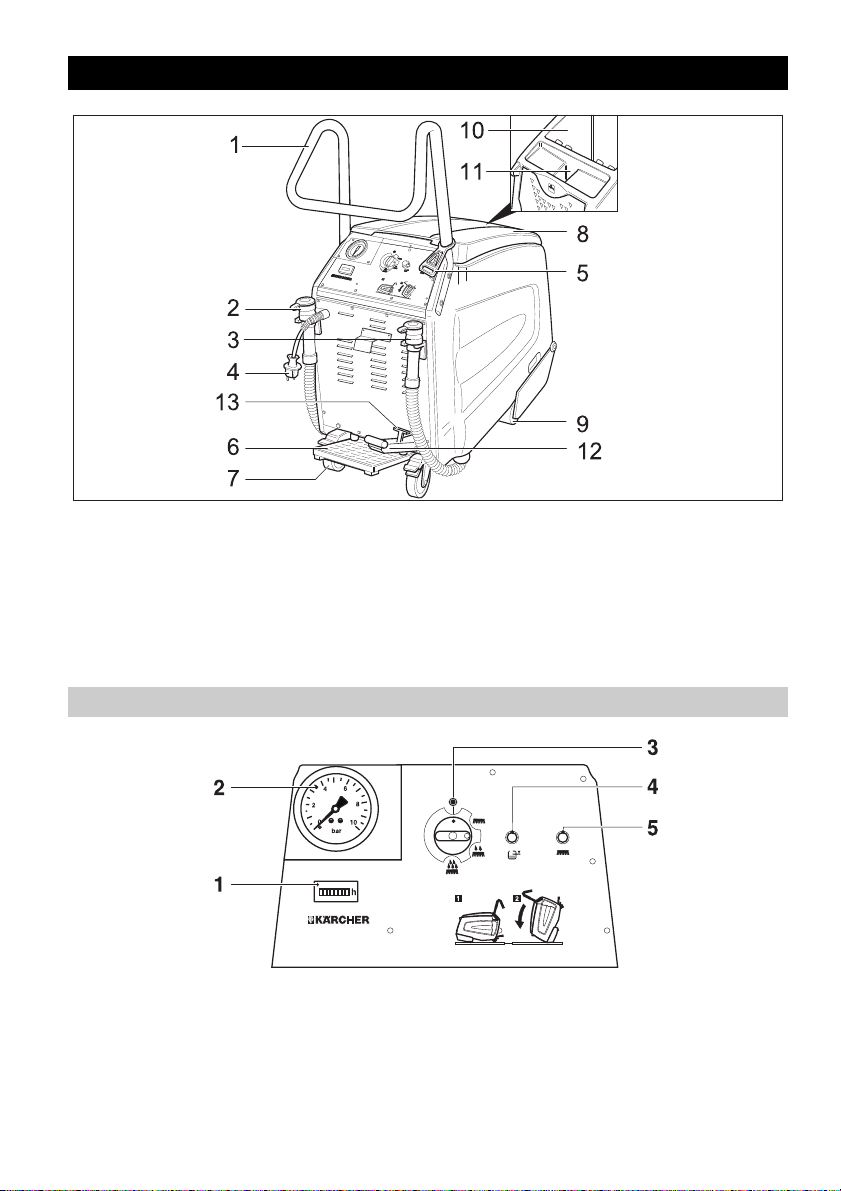
Operating and Functional Elements
1 Push handle
2 Drainage hose for fresh water
3 Dirt water discharge hose
4 Mains plug
5 Strain relief clamp
6 Foot pedal
7 Rear wheels with stopping lever
Operator console
1 Operating hour counter
2 Display pump pressure
3 Power switch
4 Indicator lamp "Dirt water tank full"
5 Indicator lamp "Brush motor overload"
8 Cover dirt water reservoir
9 Front wheels
10 Dirt water reservoir
11 Fresh water reservoir filler neck
12 Pedal for raising/ lowering the brush
head
13 Lever to lock the brush head
8 English
Page 9
Before Startup
Î Remove all packaging material except
the wooden palette.
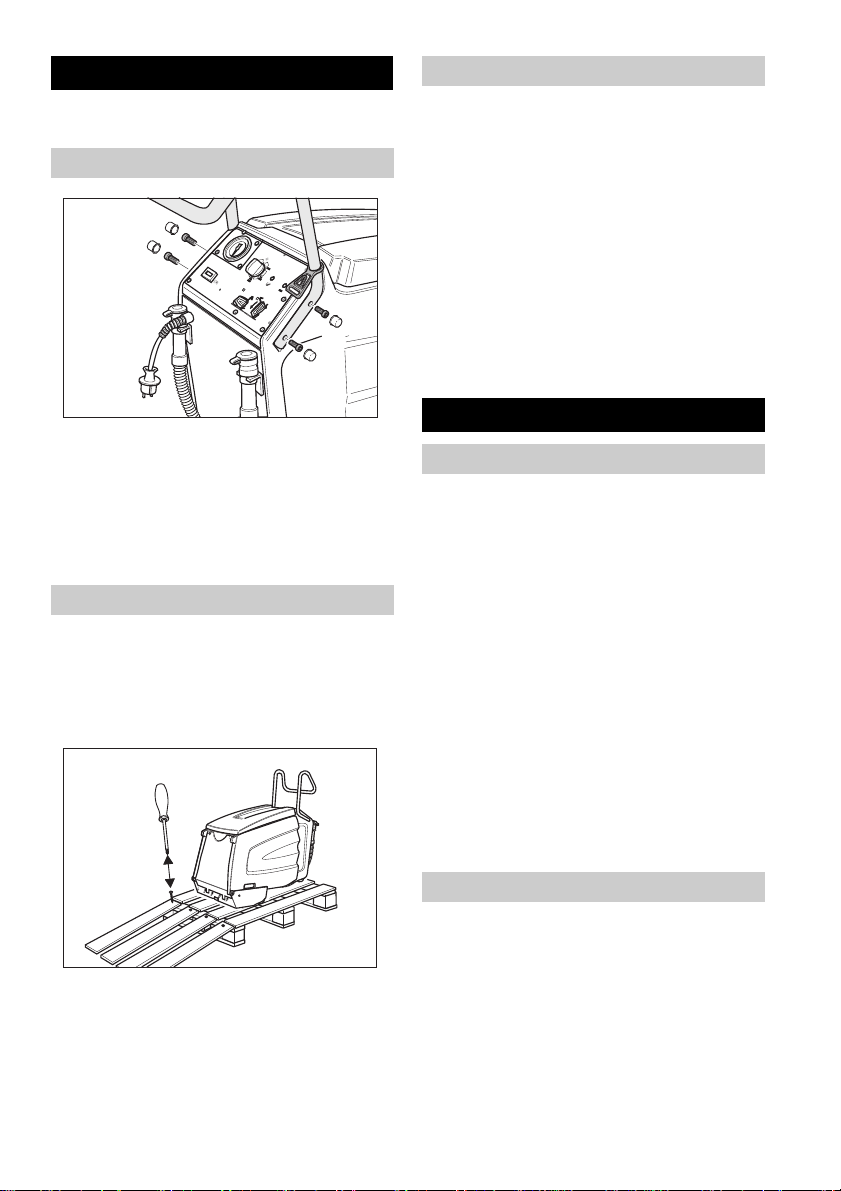
Installing the pushing handle
Removing anti-frost agents
Note
At the time of manufacturing the appliance,
it has already been flused using an anti-frost
agent. Before starting the machine for the
first time, you need to first remove the antifrost agent.
Î Fill in 10 litres of fresh water in the fresh
water reservoir.
Î Press the foot pedal.
Î Set the machine switch to basic clean-
ing.
Î Keep the machine running until the pres-
sure on the manometer falls.
Î Insert the pushing handle in the grooves
on the appliance.
Î Fasten the pushing handle with the 4
screws enclosed in the packet.
Î Fasten the covering flaps.
Î Hang in the strain relief clamp at the
pushing handle.
Unloading
Î Lock the rear wheels; remove the wood-
en blocks used for stopping the wheels.
Î Four indicated floor boards of the pallet
are fastened with screws. Unscrew
these boards.
Î Place the boards on the edge of the pal-
let. Place the boards in such a way that
they lie in front of the four wheels of the
machine. Fasten the boards with screws.
Î Slowly push the machine down from the
ramp.
Start up
Preparing the travellator/ escalator
Danger
Risk of injury! The appliance can get stuck
and be dragged away by the travellator/ escalator. Before starting cleaning, check the
stepping areas and the ridge profile to see
that there are no deformations or any objects stuck therein. To be on the safer side,
make sure that you know where the emergency switch-off button of the travellator/ escalator is located.
Î Cordon off the travellator/ escalator as
long as cleaning operations are on and
the stepping areas are still wet.
Î Switch on the travellator/ escalator.
Î Ensure that the running direction of the
travellator/ escalator is away from the
machine.
Preparing the appliance
Î Check whether the combs and the guide
rails of the machine match the make of
the travellator/ escalator. Replace the
combs and the guide rails, if required.
English 9
Page 10
Regular cleaning
Cleaning slighly dirty travellators/ escalators
(normally, at short regular intervals). At this
setting, the appliance works with reduced
quantity of water. The water pump works
with regular strokes.
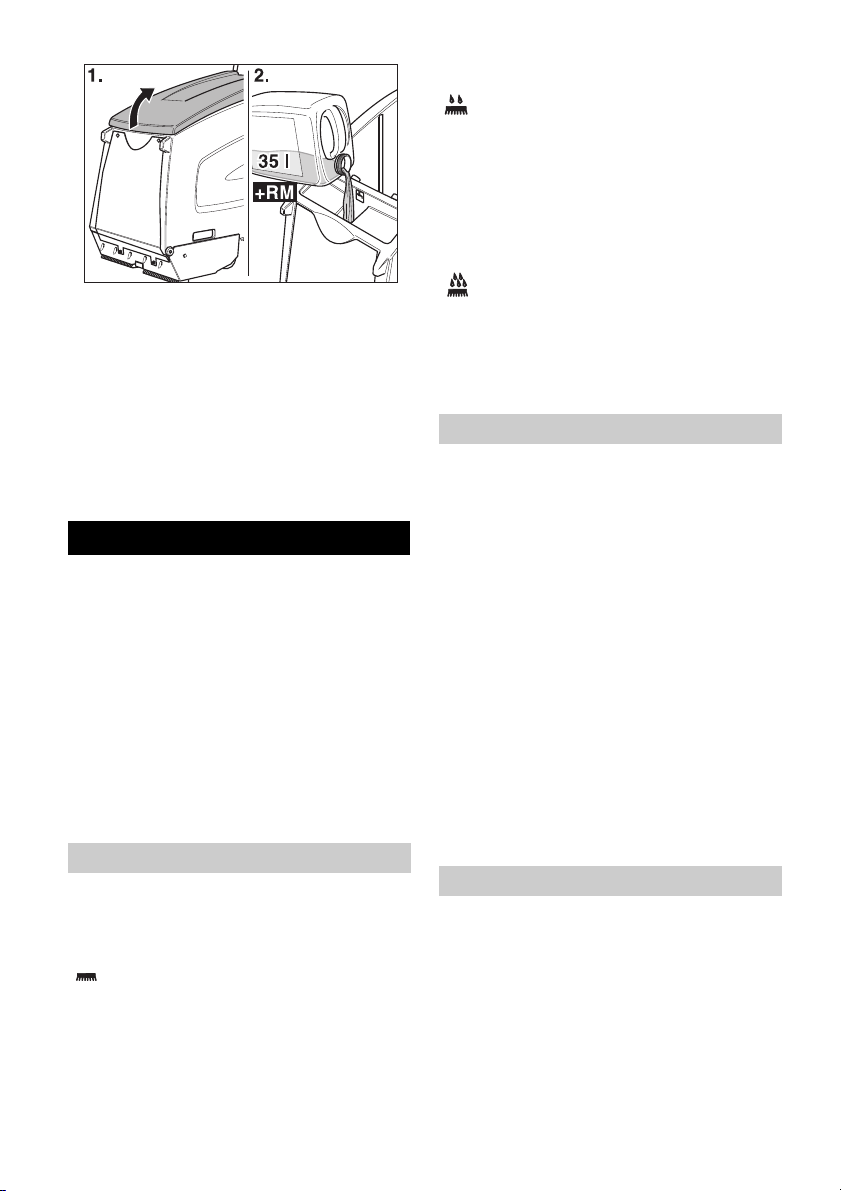
Basic cleaning
Î Open the cover of the fresh water reser-
voir.
Î Fill in fresh water.
Î Pour in detergent.
Use only those detergents approved by
the manufacturer of the appliance.
Î Close the cover of the fresh water reser-
voir.
Î Drive the machine in front of the travella-
tor/ escalator platform.
Operation
Danger
Risk of injury!
– Press the foot lever with only one foot.
The other foot must be placed firmly on
the ground.
– Hold the pushing handle firmly with at
least one hand.
– Loose fitting clothes and jewellery can
get entangled in the moving parts of the
travellator/ escalator. Hence, remove
jewellery and wear clothes fitting well on
the body and safety shoes.
Cleaning types
The cleaning time depends on the level of
dirt and is divided into three cleaning types.
Dry vacuum cleaning
Use dry vacuum clean on the travellators/
escalators that have already been cleaned.
Cleaning very dirty travellators/ escalators
(normally done when the escalator has not
been cleaned for a long time). Areas with
heavy dirt and stains should ideally be
cleaned manually.
Tips for cleaning
– First clear off loose, coarse dust manual-
ly.
– Remove hard objects (such as stones)
from the ridges of the steps.
– Clean the front side of the escalator
steps manually.
– Clean the stepping areas in overlapping
strips. To do that, first move the appliance from the working position and place
it on the side.
– Observe the steps while cleaning. They
should be moist but not wet. There
should not be any foam residue.
– First do moist cleaning (with detergent
liquid) and then dry (by setting the appliance to dry vacuum cleaning).
– Then clean using clear water so as to re-
move detergent residues.
Cleaning operations
Danger
Risk of injury and electrical shock! Always
lay the extension cable in such a way that it
does not get jammed or crushed and also
does not cause somebody to stumble over it.
Î Plug in the main plug.
10 English
Page 11

Î Insert the end of the extension cable as
a loop in the strain relief clamp.
Î Lock the rear wheels.
Î Place the machine on the platform in
such a way that the front wheels do not
touch the first step of the moving travellator/ escalator.
Î Press pedal for lowering the brush head.
The brush head will be lowered and the
lock lever will arrest in its position.
Î Press the foot pedal with one foot and
while doing so move the machine a little
back and forth towards the side. The machine will position itself centrally in the
grooves of the steps; you will then hear a
rustling sound.
Danger
Risk of injury! Do not push the appliance
onto the escalator any further than the indications given below. Otherwise, the machine will get dragged off by the escalator.
In case of danger, immediately press the
emergency stop switch of the escalator.
The cleaning head must lie flat on the escalator.
Î Set the appliance switch to regular or ba-
sic cleaning.
The machine is started.
Note
The machine switches off when the dirt water reservoir is full. To restart the machine,
empty the dirt water reservoir and briefly set
the appliance switch to "0".
Î Continue cleaning until the travellator/
escalator has completed 1 or 2 rounds.
Then move the machine towards the
side and start a new cleaning process.
Moving the appliance to the side
Î Set the appliance switch to 'dry vacuum
cleaning' position. Dry vacuum cleaning
is activated.
Î Let the pump pressure fall to 0 bar.
Î Set the appliance switch to "0".
Î Release the foot pedal.
Î Press pedal for raising the brush head.
Brush head is raised.
Î Move the appliance to the side.
Î Press pedal for lowering the brush head.
The brush head will be lowered and the
lock lever will arrest in its position.
Î Press the foot pedal and place the ma-
chine centrally in the ridges of the steps.
Î Set the appliance switch to regular or ba-
sic cleaning.
Î Then clean using clear water so as to re-
move detergent residues.
Danger
Risk of injury! To refill detergent, always
move out the machine first from the working
position.
English 11
Page 12
Shutting down
Maintenance and care
Complete cleaning
Î Set the appliance switch to 'dry vacuum
cleaning' position. Dry vacuum cleaning
is activated.
Î Let the pump pressure fall to 0 bar.
Î Set the appliance switch to "0".
Î Release the foot pedal.
Î Activate the lever to lock and the pedal to
raise the brush head. Brush head is
raised.
Î Release the rear wheels.
Î Drive out the machine from the working
position and the podium until it is on firm
ground.
Turn off device
Î Pull out the mains plug.
Î Drain off and disose the remaining deter-
gent fluid.
Î Drain out the dirt water and dispose it off.
Î Clean the inside and outside of the ma-
chine. Rinse the tanks with clear water.
Î Store the machine in a frost-free room on
an even and clean floor.
Î Lock the rear wheels.
Î Remove the cordon from the travellator/
escalator only when the entire working
area is dry again. There is risk of accident on account of slipping even if the
travellator/ escalator is slightly moist.
Danger
Risk of injury! Before doing any work on the
machine:
Î Set the appliance switch to "0".
Î Pull out the mains plug.
Î Lock the rear wheels.
Î Drain off and disose the remaining deter-
gent fluid.
Î Drain out the dirt water and dispose it off.
Cleaning the device
몇 Warning
Risk of damage! Do not wash down the appliance with water and do not use aggressive detergents.
Î Clean the outside of the appliance with a
damp cloth which has been soaked in
mild detergent.
Î Wipe the insides of the dirt water reser-
voir.
Î Clean the fluff filter.
Maintenance intervals
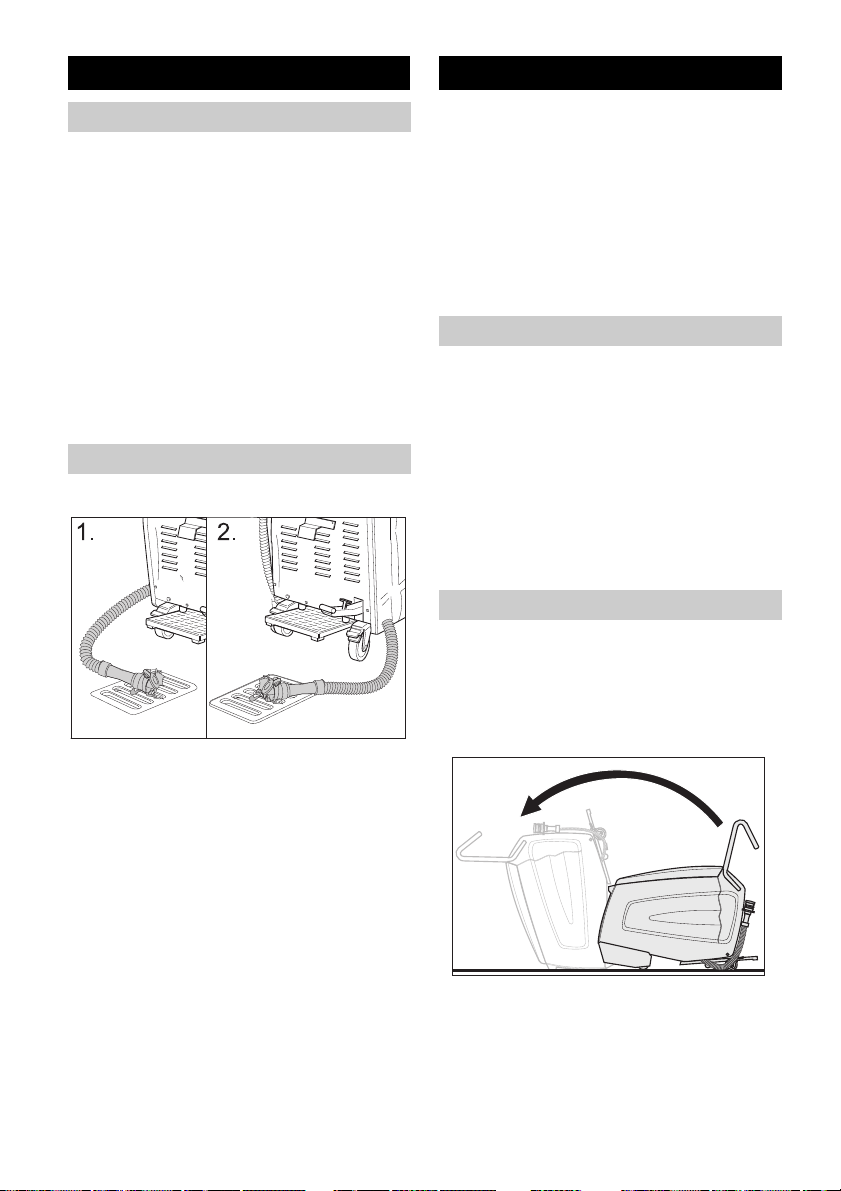
Tilt the machine in the maintenance position.
The escalator cleaner must be accessible
from the bottom side to perform any testing
or maintenance jobs on the machine.
Î Take the help of another person to tilt the
machine forward until it stands on the
front casing.
Daily before use
Î Check spray pattern of the nozzles.
Î Check if suction nozzles are dirty.
12 English
Page 13
Î Check emergency stop function of the
1
2
foot pedal.
Press the foot pedal, set the appliance
switch to 'dry vacuum cleaning', the ap-
pliance must run. Release the foot pedal; the appliance must stop.
Get the machine repaired only by authorised customer service agents.
Î Check the locking of the rear wheels.
Get the machine repaired only by authorised customer service agents.
Î Check for wear and tear:
Roller brushes, intake brushes, combs,
guide rails, hoses, stopper and front
wheels. Replace stopper and front
wheels, if required, only through authorised customer service agents.
Î Check mains cable and plug for damage
or breakage. Get them replaced only
through customer service agent or an
electrician.
After 100 operating hours
Î Check if all fasteners are fastened tight-
ly.
Î Check the drive belt for tension and wear
(Customer Service).
Maintenance Works
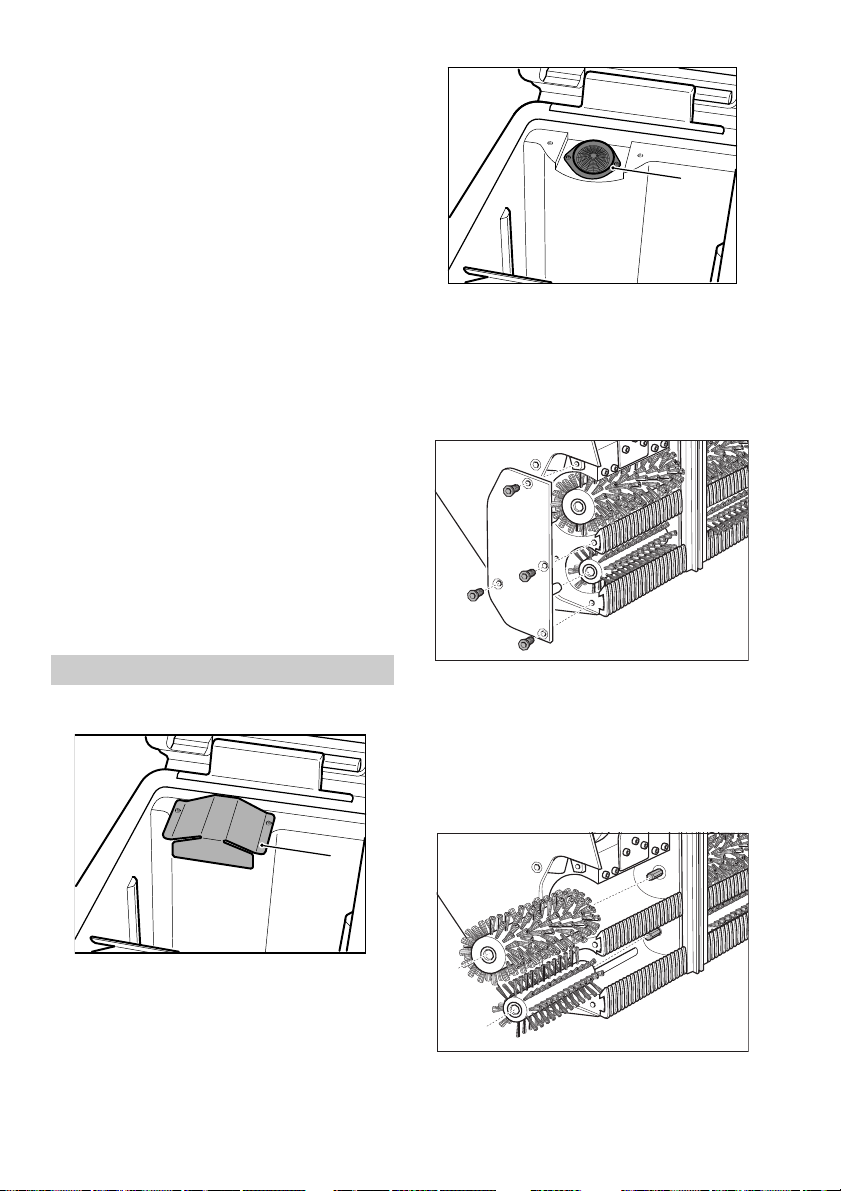
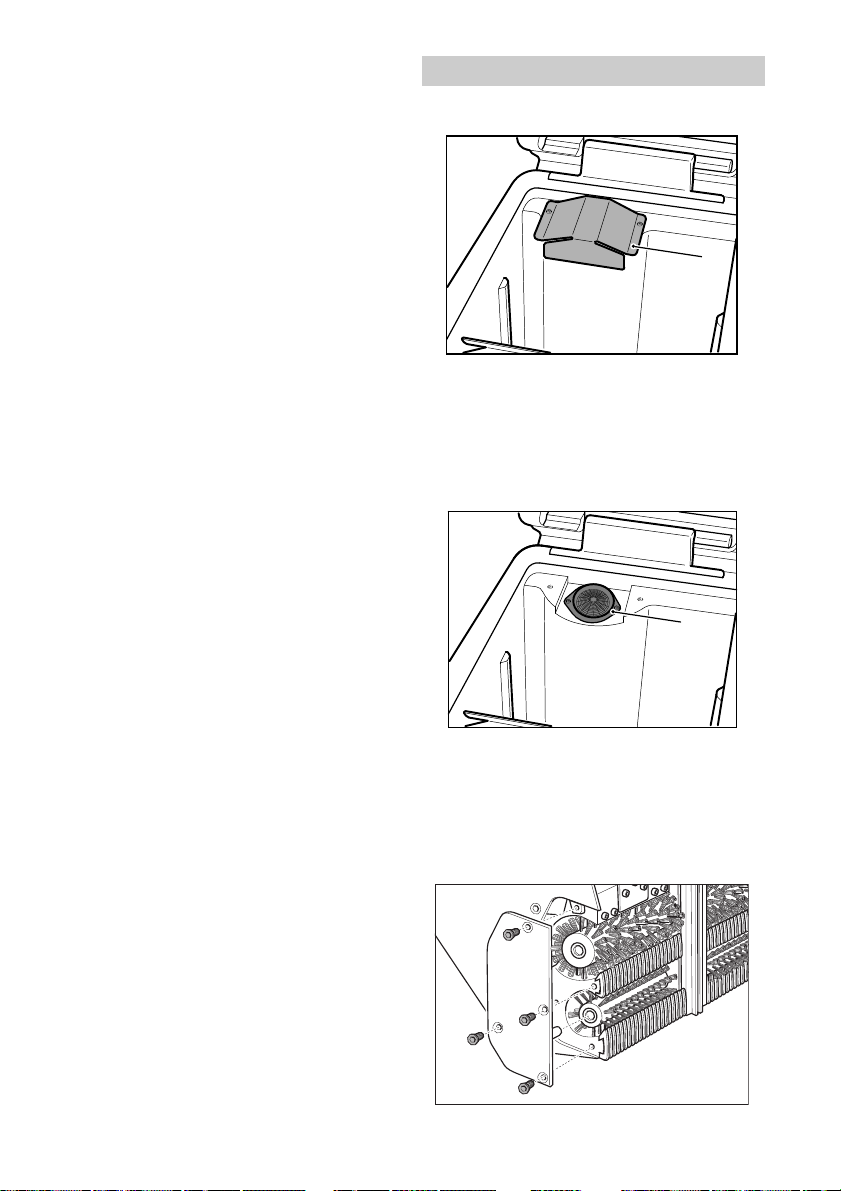
Clean the fluff filter
Î Clean the fluff filter.
Î Replace the tin plate.
Replacing the roller brushes and the intake brushes
Î Loosen all the four screws and remove
the bearing lid.
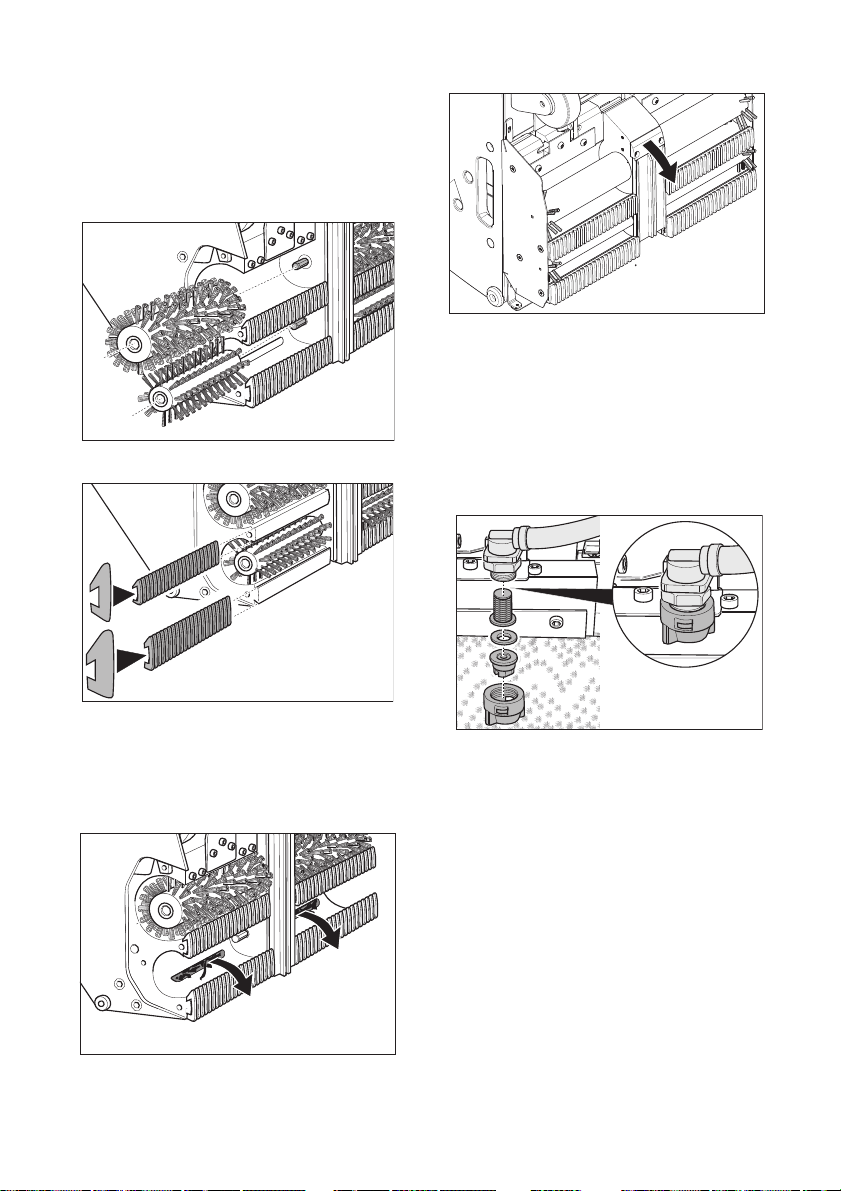
Î Remove the roller brushes (large) and in-
take brushes (small) and replace them
(pay attention to the hexagonal intake of
the brushes!).
Also check simultaneously the combs
and the guide rails and replace or clean
them as required.
Î Unscrew the tin cover plate using a torx
spanner.
Note
You will find a torx spanner in the holder of
the drainage hose of the dirt water reservoir.
English 13
Page 14
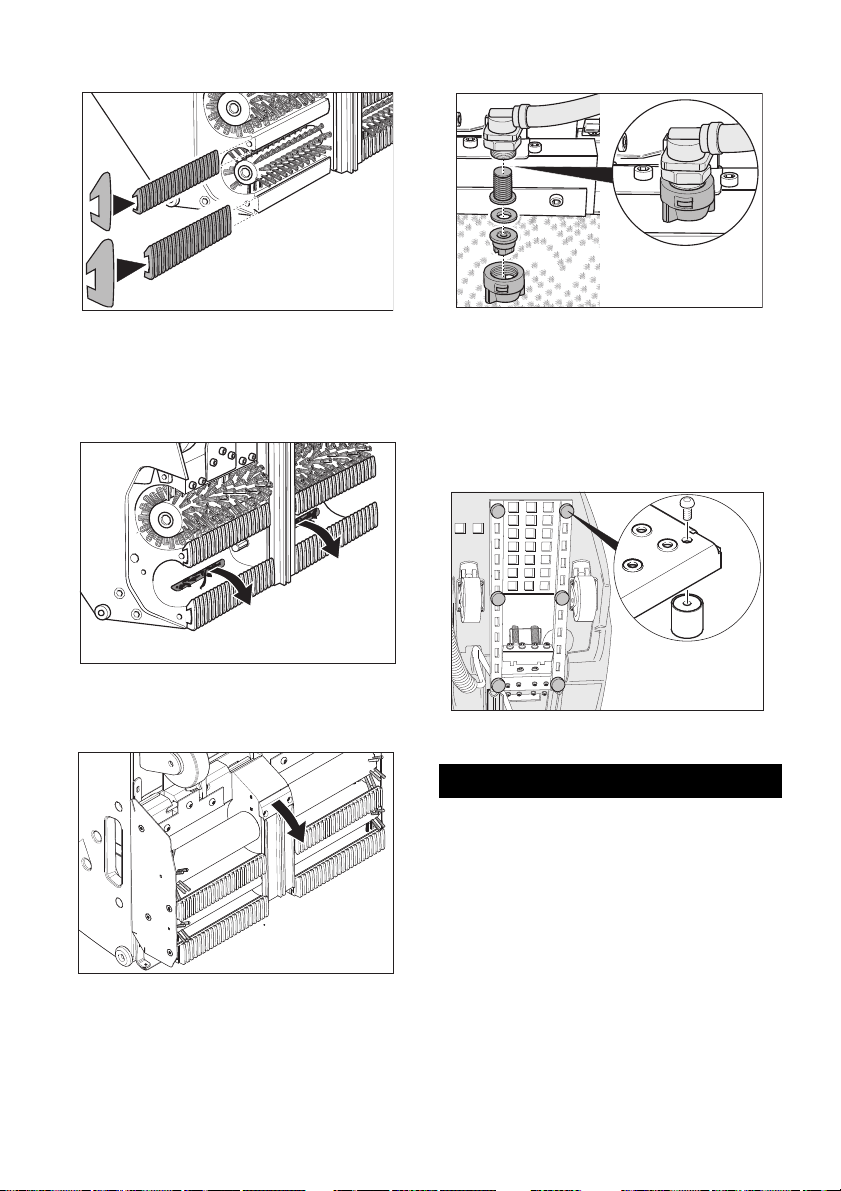
Replacing the combs
Check nozzles and filters for detergents
Î Remove the combs and replace them.
To do this, slide the inlet combs on the
narrow rails and the outlet combs on the
wider rails.
Cleaning the suction nozzles
Î Pull out all dirt particles from the suction
nozzles; do not push them in.
Replacing the guide rails
Î Loosen the fastening screws of the hold-
er for the guide rails.
Î Dismantle the guide rails.
Î Insert the guide rails in reverse se-
quence. Ensure that they sit properly.
Î Loosen the union joint. Remove nozzle,
washer and sieve.
Î Clean the nozzle or insert a new nozzle
in the union joint.
Î Insert washer and sieve and tighten the
union joint by hand.
Replacing the pad
Î Unscrew the pad with a screw-driver and
replace it.
Transport
Danger
Risk of injury! Do not drive over slopes greater than 5°. Never transport the machine over
the travellator/ escalator.
Î Lock the rear wheels.
Î Secure the machine with clamping belts
and ropes so that it doesn't slip off.
14 English
Page 15

Troubleshooting
Danger
Risk of injury! Before doing any work on the
machine:
Î Set the appliance switch to "0".
Î Pull out the mains plug.
Fault Remedy
Motor/pump do not start or
switch off automatically when the
machine is on.
Indicator lamp "Dirt water tank
full" is glowing.
Working pressure of min. 3 bar is
not building up.
Cleaned steps are too wet. Check the combs for wear, replace if required.
Washed steps are not clean. Check detergent nozzles to see if they are blocked; clean
Indicator lamp "Brush motor
overload" is glowing.
Dirt water reservoir is full; empty it.
Press the foot pedal.
Dirt water reservoir is full; empty it.
If fresh water reservoir is empty, then fill it up (35 litres).
Check pipes to see if there are any leaks. If required, get
it sealed by customer service.
Check the nozzles.
Get customer service to clean the pump.
Check the condition of the seal of the dirt water reservoir
for damages, replace if required.
Check the intake brushes for wear, replace if required.
Check suction nozzles and hose for blockages; clean if
required.
Check whether the wastewater reservoir lid is completely
closed.
Check whether the correct combs have been installed.
or replace if required.
Check the condition of the seal of the dirt water reservoir
for damages, replace if required.
Check the brush rollers and intake brushes for wear, re-
place if required.
Check detergent. Check the concentration of the deter-
gent solution.
Check the intake brushes for wear, replace if required.
Check whether the wastewater reservoir lid is completely
closed.
Check whether the correct combs have been installed.
Set appliance switch to "0", then turn it back to the de-
sired operating position. If the fault recurs often, call customer service.
Remove belts or cords from brushes.
Î Lock the rear wheels.
Î Drain off and disose the remaining deter-
gent fluid.
Î Drain out the dirt water and dispose it off.
English 15
Page 16

Specifications
Warranty
1.310-105
Nominal voltage V 120
Frequency Hz 60
Control voltage V 12
Rated power (max.) W 1360
Suction engine output W 800
Brush engine output W 650
Pump pressure bar 3-4
Water Consumption l/h 25-50
Speed of roller brushes 1/min 870
Speed of intake brushes 1/min 1090
Working width mm 470
Width mm 480
Length mm 1150
Height with pushing
handle
Height without pushing
handle
Fresh/dirt water reser-
voir volume
Unladen weight kg approx.
Operating weight kg approx.
Sound pressure level
(EN 60704-1)
Vibration total value
(ISO 5349)
mm 1050
mm 760
l 35/35
90
125
dB(A) <75
2
m/s
0,43
The warranty terms published by the relevant sales company are applicable in each
country. We will repair potential failures of
your appliance within the warranty period
free of charge, provided that such failure is
caused by faulty material or defects in manufacturing. In the event of a warranty claim
please contact your dealer or the nearest
authorized Customer Service centre. Please
submit the proof of purchase.
Accessories and Spare Parts
Danger
Risk of injury and electrical shock! Repair
works may only be performed by the authorised customer service.
– Only use accessories and spare parts
which have been approved by the manufacturer. The exclusive use of original accessories and original spare parts
ensures that the appliance can be operated safely and troublefree.
– At the end of the operating instructions
you will find a selected list of spare parts
that are often required.
– For additional information about spare
parts, please go to the Service section at
www.kaercher.com.
16 English
Page 17

Accessories
Accessories Type Part no.: Description
Roller brushes, soft
(standard)
Roller brushes, hard 5.762-267 Roller brushes for regular cleaning,
Intake brushes 5.762-268 For transporting the dirt water trans-
Inlet combs, blue Kone 6.369-509 Combs for adjusting the appliance to
Outlet combs, blue Kone 6.369-519
Inlet combs, black OTIS 6.369-510
Outlet combs, black OTIS 6.369-520
Inlet combs, green Schindler 6.369-511
Outlet combs, green Schindler 6.369-521
Inlet combs, white CNIM 6.369-512
Outlet combs, white CNIM 6.369-522
Groove scraper Kone und
Schindler
OTIS und
Thyssen
Set Handpads Kone 6.369-513 For manually cleaning the front side
OTIS 6.369-514
Schindler 6.369-515
Thyssen 6.369-516
Detergent RM 758 For cleaning by machine.
Detergent RM 759 For basic cleaning (30 kg). For man-
5.762-266 Roller brushes for regular cleaning
(appliance needs 2 pieces).
for removing stubborn dirt (appliance needs 2 pieces).
port from the travellator/ escalator to
the suction nozzles (appliance requires 2 pieces).
the respective travellator/ escalator
brand (set with 2 pieces).
6.369-507 For manual pre-cleaning (removing
stones, chewing gum and other
6.369-508
sticky dirt).
of the steps (set with 5 green pads).
ually cleaning very dirty spots.
English 17
Page 18

Page 19

INSTRUCTIONS IMPORTANTES EN MATIÈRE DE SÉCU-
RITÉ
LIRE TOUTES LES INSTRUC-
TIONS AVANT DE FAIRE
FONKTIONNER
Attention
Pour réduire les risques d'incendie, de chok
électrique ou de blessure:
– Ne pas laisser l'appareil sans
surveillance lorsqu'il est branché.
Débrancher lorsque l'appareil n'est pas
utilisé et avant l'entretien.
Attention
– Pour réquire les risques de choc
électrique, utiliser à l'interieur seulement.
– Ne pas permettre aux enfants de jouer
avec l'appareil. Une attention particulière
est nécessaire lorsque l'appareil est
utilisé par des enfants ou à proximité de
ces derniers.
– N'utiliser que conformément à cette
notice avec les accessoires
recommandés par le fabricant.
– Ne pas utiliser si le cordon ou la fiche est
endommagé. Retourner l'appareil à un
atelier de réparation s'il ne fonctionne
pas bien, s'il est tombé ou s'il a été
endommagé, oublie à l'extérieur ou
immergé.
– Ne pas tirer soulever ni traîner l'appareil
par le cordon. Ne pas utiliser le cordon
comme une poignée, le coincer dans
l'embrasure d'une porte ou l'appuyer
contre des arêtes vives ou des coins. Ne
pas faire rouler l'appareil sur le cordon.
Garder le cordon à l'écart des surfaces
chaudes.
– Ne pas débrancher en tirant sur le
cordon. Tirer plutôt la fiche.
– Ne pas toucher la fiche ni l'appareil
lorsque vos mains sont humides.
– N'insérer aucun objet dans les
ouvertures. Ne pas utiliser l'appareil
lorsqu'une ouverture est bloquée.
S'assurer que de la poussière, de la
peluche, des cheveux ou d'autres
matières ne réduisent pas le debit d'air.
– Maintenir les cheveux, les vêtements
amples, les doigts et toutes les parties
du corps à l'écart des ouvertures et des
pièces mobiles.
– Mettre toutes les commandes à la
position ARRÊT avant de débrancher
l'appareil.
– User de prudence lors du nettoyage des
escaliers.
– Ne pas aspirer des liquides
inflammables ou combustibles, comme
de l'essence, et ne pas faire functionner
dans des endroits où peuvent se trouver
de tels liquides.
– Ne brancher qu'à une prise de courant
avec mise à la terre. Voir les instructions
la mise à la terre.
CONSERVER CES INSTRUC-
TIONS
INSTRUCTIONS VISANT LA
MISE À LA TERRE
Cet appareil doit être mis à la terre. En cas
de défaillance ou de panne, la mise à la terre
fournit au courant un chemin de moindre résistance qui réduit le risque de choc électrique. Cet appareil est pourvu d'un cordon
muni d'un conducteur de terre et d'une fiche
avec broche de terre. La fiche doit être
branchée dans une prise appropriée correctement installée et mise à la terre conformément aux règlements et ordonnances
municipaux.
Attention
Un conducteur de terre mal raccordé peut
entraîner un risque de choc électrique. Consulter un électricien ou un technicien d'entretien qualifié si vous n'êtes pas certain que la
prise est correctement mise à la terre. Ne
Français 19
Page 20

pas modifier la fiche fournie avec l'appareil si elle ne peut être insérée dans la prise, fair
installer une prise adéquate par un électricien qualifié.
Cet appareil est destiné à un circuit de 120
V et est muni d'une fiche de mise à la terre
semblable à celle illustrée par le croqui A.
S'assurer que l'appareil est branché à une
prise de courant ayant la même configuration que la fiche. Aucun adaptreur nr devrait
être utilisé avec cet appareil.
NE BRANCHER QU'À UNE
PRISE DE COURANT AVEC
MISE À LA TERRE
1 Sortie avec mise à la terre
2 Boîte avec mise à la terre
3 Fiche avec mise à la terre
REGLES ET PRATIQUES DE
SECURITE DE FONCTION-
NEMENT
Responsabilité de l'opérateur
Un fonctionnement sûr est la responsabilité
de l'opérateur.
L'opérateur doit être au courant du fonctionnement et des fonctions de toutes les commandes et de tous les instruments avant
d'entreprendre de faire fonctionner l'unité.
Avant de faire fonctionner l'unité, les opérateurs doivent avoir lu et bien connaître le
manuel d'utilisation pour l'unité particulière
en fonctionnement et ils doivent également
obéir aux règles et pratiques de sécurité
énoncées dans les paragraphes suivants.
Avant de faire fonctionner l'unité, l'opérateur
doit bien connaître les conditions de fonctionnement inhabituelles qui peuvent nécessiter des précautions de sécurité
supplémentaires ou des instructions de
fonctionnement spéciales.
Généralités
Avant de commencer à faire fonctionner
l'unité, soyez dans une position d'opération.
Ne démarrez pas ou n'opérez pas l'unité,
l'une quelconque de ses fonctions ou accessoires, depuis tout endroit autre que la position désignée pour les opérateurs.
Avant de quitter la position de l'opérateur :
A arrêtez complètement l'unité ;
B si l'unité doit se trouver sur un plan incli-
né, bloquez les roues.
Conservez une distance de sécurité depuis
le bord des rampes, plate-formes et autres
surfaces de travail similaires.
N'effectuez aucun ajout ou aucune modification à l'unité.
Ne bloquez pas l'accès aux couloirs à incendie, escaliers ou équipement de lutte contre
les incendies.
Déplacements
Donnez la priorité aux piétons et véhicules
d'urgence tels que les ambulances et les camions de pompiers.
Traversez les voies ferrées de manière angulaire si possible. Ne vous garez pas à
moins de 1800 mm du rail le plus proche
d'une voie ferrée.
Conservez une vision claire du chemin de
déplacement et prenez garde au reste de la
circulation, au personnel et aux dégagements sûrs.
Opérez l'unité à une vitesse qui lui permettra
d'être arrêtée de manière sûre dans toutes
les conditions de déplacement.
Ne vous adonnez pas aux cascades ou à la
brutalité.
Ralentissez en cas de sols mouillés et glissants.
Avant de passer sur un bord de quai ou sur
la chaussée d'un pont, assurez-vous qu'il/
20 Français
Page 21

elle est correctement fixé(e). Conduisez prudemment et lentement sur le bord de quai ou
la chaussée d'un pont et ne dépassez jamais sa capacité nominale.
Lors de la prise de virages, ralentissez à une
vitesse sûre en correspondance avec l'environnement de fonctionnement. Prenez les
virages en douceur.
Entretien de l'unité par l'opérateur
Si l'unité s'avère nécessiter des réparations
ou être dangereuse d'une manière quelconque ou contribue à une condition dangereuse, le problème doit être rapporté
immédiatement au supérieur désigné de
l'utilisateur et l'unité ne doit pas être opérée
jusqu'à ce qu'elle ait été remise en une condition de fonctionnement sûre.
Si l'unité devient dangereuse d'une manière
quelconque au cours du fonctionnement, le
problème doit être rapporté immédiatement
au supérieur désigné de l'utilisateur et l'unité
ne doit pas être opérée jusqu'à ce qu'elle ait
été remise en une condition de fonctionnement sûre.
N'effectuez pas de réparations ou de réglages à moins d'y être autorisé spécifiquement.
PRATIQUES D'ENTRETIEN
ET DE RECONSTRUCTION
Le fonctionnement de l'unité peut être dangereux si l'entretien est négligé ou si des réparations, reconstructions ou réglages ne sont pas
effectués conformément aux critères de conception du constructeur. Par conséquent, des
installations d'entretien (sur site ou au dehors),
du personnel qualifié et des procédures détaillées doivent être fournis.
L'entretien et l'inspection de l'unité doivent
être réalisés conformément aux pratiques
suivantes :
A un système d'entretien, de lubrification et
d'inspection planifié doit être suivi ; consultez les recommandations du constructeur.
B seul du personnel qualifié et autorisé doit
être autorisé à effectuer l'entretien, répa-
rer, régler et inspecter l'unité et ce conformément aux spécifications du
constructeur.
Evitez les risques d'incendie et disposez
d'un équipement de protection contre les incendies dans la zone de travail. N'utilisez
pas de récipients ouverts d'essence ou de
fluides de nettoyage inflammables pour le
nettoyage des pièces.
NORME DE SECURITE IN-
CENDIE
Toute unité ne se trouvant pas dans une
condition de fonctionnement sûre doit être
mise hors service.
Les réparations doivent être effectuées dans
les emplacements de Classe I, Classe II et
Classe III.
Prévention incendie : L'unité doit être conservée dans une condition propre et raisonnablement exempte de peluche, d'huile en
excès et de graisse. Des agents non combustibles sont préférés pour le nettoyage de
l'unité. Les liquides inflammables [ceux possédant des points d'inflammation à ou supérieurs à 100°F (37,8°C)] ne sont pas permis.
Les précautions concernant la toxicité, la
ventilation et les risques d'incendie doivent
être appropriées à l'agent ou au solvant utilisé.
Visibilité de la plaque signalétique : Les désignations du type d'unité telles qu'illustrées
sur la plaque signalétique et les marqueurs
de type ne doivent pas être recouverts par
de la peinture de sorte que les informations
concernant leur identification sont obscurcies.
L'unité ne doit pas être utilisée dans des zones classifiées.
Français 21
Page 22

Lisez attentivement ce mode
d’emploi avant la première utilisation de l’appareil et respectez les conseils
y figurant. Conservez ce mode d’emploi
pour une utilisation ultérieure ou un éventuel
repreneur de votre matériel.
Table des matières
Consignes de sécurité 22
Fonction 22
Utilisation conforme 22
Protection de l'environnement, élimination
23
Eléments de commande 24
Avant la mise en service 25
Mise en service 25
Fonctionnement 26
Mise hors service 28
Entretien et maintenance 28
Transport 31
Assistance en cas de panne 32
Données techniques 33
Garantie 33
Accessoires et pièces de rechange 33
Consignes de sécurité
Pour l'exploiteur:
S'assurez vous que tous les utilisateurs ont
lus ce manuel, ainsi qu'ils conaissent les reglèments nacionaux relatif à la sécurité du
travail. Les utilisateurs doivent être instruites
appropriement dans l'utilisation de l'apapreil.
Pour l'utilisateur:
Lire le présent mode d'emploi ainsi que la
brochure ci-jointe Consignes de sécurité
pour les aspirateurs eau/poussières n°
5.956251 avant d'utiliser l'appareil et respecter les instructions.
Dispositifs de sécurité
Les dispositifs de sécurité ont pour but de
protéger l'utilisateur et ils ne doivent donc jamais être désactivés ni évités.
Pédale à pied
Lorsque la pédale à pied est pressé totalement vers le bas, l'appareil peut être démarré. En lâchant la pédale, l'appareil s'arrête.
Fonction
Du nettoyeur fixe de l'escalier roulant est appliqué détergent (du réservoir d'eau propre)
sur le trottoir/l'escalier roulant en marche.
Les brosses rotatives balayent le détergent
dans le sens inverse de la direction de cours
dans les rainures du trottoir/l'escalier roulant. Au même process de travail, le détergent sale est aspiré par les brosses de
absorption dans le réservoir d'eau sale de
l'appareil.
Utilisation conforme
L'utilisation de l'appareil doit être faite en
conformité avec les consignes figurant dans
les instructions de service.
– L'appareil doit uniquement être utilisé
pour nettoyer les trottoir et les escaliers
roulantes.
– La sens de fabrication soir être réglée de
cette façon, que le trottoir/l'escalier roulante s'éloignent de l'appareil.
– Pour nettoyer les escaliers roulantes,
l'appareil peut être utilisée que au bout
inférieure de l'escalier roulante.
– L'appareil doit uniquement être équipé
d'accessoires et de pièces de rechange
d'origine.
22 Français
Page 23

Protection de l’environne-
ment
Les matériaux constitutifs de
l’emballage sont recyclables.
Ne pas jeter les emballages
dans les ordures ménagères,
mais les remettre à un système
de recyclage.
Les appareils usés contiennent
des matériaux précieux recyclables lesquels doivent être
apportés à un système de recyclage. Il est interdit de jeter
les batteries, l'huile et les substances similaires dans l'environnement. Pour cette raison,
utiliser des systèmes de collecte adéquats afin d'éliminer les
appareils hors d'usage.
Français 23
Page 24

Eléments de commande et de fonction
1 Guidon de poussée
2 Flexible de vidange d'eau propre
3 Flexible de vidange pour eau sale
4 Fiche secteur
5 Crochet de soulagement de traction
6 Pédale à pied
7 Les roues arrières avec un levier de blo-
cage
8 Couvercle du réservoir d'eau sale
Pupitre de commande
1 Compteur d'heures de service
2 Affichage de la pression de la pompe
3 Interrupteur principal
9 Roues d'avant
10 Réservoir d'eau sale
11 Orifice de remplissage pour réservoir
d'eau propre
12 Pédale pour abaisser/lever la tête des
brosses
13 Levier pour le blocage de la tête de bros-
se
4 Voyant de contrôle "réservoir de l'eau
sale plein"
5 Voyant de contrôle "Surcharge du mo-
teur des brosses"
24 Français
Page 25

Avant la mise en service
Î Eliminer completement l'emballage.
Monter le guidon de poussée
Enlever le produit antigel.
Remarque
A la fabrication, l'appareil était rincé avec
produit antigel. Avant la première mise en
service, le produit antigel doit être eliminé.
Î Remplir 10 litres d'eau propre dans le ré-
servoir d'eau propre.
Î Actionner la pédale à pied.
Î Regler l'interrupteur d'appareil sur net-
toyage de base.
Î Laisser l'appareil en marche, jusqu"à la
pression abaisse sur le manomètre.
Mise en service
Î Poser le guidon de poussée dans les
ouvertures de l'appareil.
Î Fixer le guidon de poussée à l'aide des 4
vis.
Î Fixer l'évent.
Î Accrocher le crochet de soulagement de
traction au guidon de poussée.
Déchargement de la machine
Î Fixer les roues arrières, eliminer les
billots pour le blocage des roues.
Î Quatre planches de fond identifiées de la
palette sont vissées. Dévisser ces planches.
Î Poser les planches sur le bord de la pa-
lette. Orienter les planches de manière à
ce qu'elles reposent en amont des roues
de l'appareil. Fixer les planches à l'aide
des vis.
Î Pousser doucement l'appareil de la ram-
pe.
Préparation du trottoir roulant/de
l'escalier roulante
Danger
Risque de blessure ! L'appareil peut rester
accrochée et peut être emportée par le trottoir roulant/par l'escalier roulante. Contôler,
avant le nettoyage, les trottoirs roulants et le
profil des rainures, s'il y a des déformations
et eliminer des objets coincés. S'assurezvous pour le cas d'urgênce, où se trouve l'interrupteur d'arrêt d'urgênce du trottoir roulant/de l'escalier roulante.
Î Barrer le trottoir roulant/l'escalier roulant
dans un vaste périmètre, aussitôt que se
déroule le nettoyage et les trottoir roulants sont encore humides.
Î Mettre en marche le trottoir roulant/l'es-
calier roulant.
Î S'assurer que le sens de fabrication du
trottoir roulant/l'escalier roulant s'éloigne
de l'appareil.
Préparation de l'appareil
Î Contrôler si les brosses et les rails de
guidage de l'appareil s'ils sont accordés
au produit du trottoir roulant/l'escalier
roulant. En cas de besoin, échanger les
brosses et les rails de guidage.
Français 25
Page 26

Î Ouvrir le couvercle du réservoir d'eau
propre.
Î Remplir eau propre.
Î Remplir détergent.
Seul des détergents autorisés par le
constructeur de l'appareil peuvent être
utilisés.
Î Fermer le couvercle du réservoir d'eau
propre.
Î Placer l'appareil avant le l'estrade du
trottoir roulant/l'escalier roulant.
Fonctionnement
Danger
Risque de blessure !
– Actionner la pédale à pied seulement
avec un pied. L'autre pied doit rester fixe
au sol.
– Tenir le guidon de poussée au moins
avec une mains.
– Des pièces de vêtement ou des bijoux
qui sont amples peuvent être happés de
pièces mobiles du trottoir roulant/l'escalier roulant. Ce pour cela que vous devez retirez les bijoux et porter des
vétements collantes et des chaussures
de sécurité.
Modes de nettoyage
Le temps de nettoyage dépend du degré de
saleté et est divisé en trois modes de nettoyage.
Aspiration de poussières
Aspiration de poussières des trottoir roulants/ des escaliers roulants déjà nettoyés.
Nettoyge d'entretien
Nettoyage des trottoirs roulants/des escaliers roulants qui ne sont pas si sale (en règle géral en périodes courtes et régulières).
Dans cette position, l'appareil travaille avec
une quantité d'eau réduite. La pompe d'eau
travaille.
Nettoyage de base
Nettoyage des trottoirs roulants/des escaliers roulants qui sont très sale (en règle géral lorsque le nettoyage n'était pas effectué
pendant un période plus long). Des zones
trop sales doivent être nettoyées manuellement.
Consignes au nettoyage
– Balayer la saleté grossière manuelle-
ment.
– Eliminer des objets (p.ex. des pierres)
des rainures des trottoirs roulants.
– Nettoyer la face frontal des marches de
l'escalier roulante manuellement.
– Nettoyer les marches en voies chevau-
chentes. Pour cela, retirer l'appareil de
sa position de travail et déplacer à la côté.
– Observer les trottoirs roulants pendant le
nettoyage. Doivent être humides, mais
pas mouiller. Il ne doit pas resté de
mousse.
– Nettoyer avant humide (avec détergent),
ensuite sec (interrupteur de l'appareil sur
aspiration de poussière).
– A la fin rincer avec eau claire, pour elimi-
ner les restes du détergent.
Fonctionnement de nettoyage
Danger
Risque de blessure et de choc électrique!
Poser le cable prolongueur de cette façon
qu'il n'e peut être coincé ou écraissé et qu'il
ne provoque pas un risque de trébuche.
Î Brancher la fiche secteur.
26 Français
Page 27

Î Accrocher l'extrémité de la rallonge com-
me boucle dans le crochet de soulagement de traction.
Î Régler les roues arrières.
Î Poser l'appareil sur l'estrade de façon
que les roues d'avant ne touche pas la
première marche du trottoir roulant/de
l'escalier roulant en marche.
Î Activer la pédale pour abaisser la tête de
la brosse. La tête de la brosse est abaissée et le levier d'arrêt s'enclenche.
Î Actoinner la pédale à pied avec un pied
et bouger l'appareil un peu sur le côté.
L'appareil se centre dans les rainures de
la marche, ensuite un bruit est audible.
Danger
Risque de blessure ! Poser l'appareil seulement sur l'escalier roulant comme il est indiquer en bas. Sinon il y a un risque que
l'appareil est emporté de l'escalier roulant.
En cas de risque, appuyer immédiatement
sur la touche d'arrêt d’urgence de l'escalier
roulant.
La tête de nettoyage doit être poser superficiellement sur l'escalier roulant.
Î Positionner l'interrupteur de l'appareil
sur nettoyage d'entretien ou sur nettoyage de base.
Démarrer l'appareil.
Remarque
Lorsque le réservoir d'eau sale est plein,
l'appareil s'arrête. Pour une nouvelle mise
en marvhe, vider le réservoir d'eau sale et
positionner l'interrupteur de l'appareil brièvement sur "0".
Î Effectuer le nettoyage jusqu'à l'esclaier
roualnt/trottoir roulant en effectué 1 ou 2
rotations. Ensuite poser l'appareil sur la
côté et démarrer le nouveau processus
de nettoyage.
Poser l'appareil sur la côté
Î Mettre l'interrupteur de l'appareil sur "As-
piration de poussière". L'aspiration de
poussière est activée.
Î Laisser abaisser la pression de la pompe
sur 0 bar.
Î Mettre l'interrupteur principal sur "0".
Î Lâcher la pédale à pied.
Î Actionner la pédale pour léver la tête des
brosses La tête des brosses est relevée.
Î Poser l'appareil sur la côté.
Î Activer la pédale pour abaisser la tête de
la brosse. La tête de la brosse est abaissée et le levier d'arrêt s'enclenche.
Î Actionner la pédale à pied et centrer l'ap-
pareil dans les rainures de la marche.
Î Positionner l'interrupteur de l'appareil
sur nettoyage d'entretien ou sur nettoyage de base.
Î A la fin rincer avec eau claire, pour elimi-
ner les restes du détergent.
Français 27
Page 28

Danger
Risque de blessure ! Pour remplir détergent,
tirer l'appareil toujours de la position de travail.
Mise hors service
Terminer le nettoyage
Î Mettre l'interrupteur de l'appareil sur "As-
piration de poussière". L'aspiration de
poussière est activée.
Î Laisser abaisser la pression de la pompe
sur 0 bar.
Î Mettre l'interrupteur principal sur "0".
Î Lâcher la pédale à pied.
Î Activer le levier d'arrêt et la pédale pour
soulever la tête de la brosse La tête de la
brosse est soulevée.
Î Débloquer les roues arrières.
Î Retirer l'appareil de la position de travail
et de l'estrade.
Mettre l'appareil hors tension
Î Retirer le connecteur de la prise.
Entretien et maintenance
Danger
Risque de blessure ! Avant tous les travaux
à l'appareil.
Î Mettre l'interrupteur principal sur "0".
Î Retirer le connecteur de la prise.
Î Régler les roues arrières.
Î Vider et eliminer le reste du détergent.
Î Vider et eliminer l'eau sale.
Nettoyage de l’appareil
몇 Avertissement
Risque d'endommagement! Ne pas laver
l'appareil au jet d'eau et ne jamais utiliser de
détergents agressifs.
Î Nettoyer l'extérieur de l'appareil avec un
chiffon humide et imbibé de détergent
doux.
Î Essuier l'intérieur du réservoir d'eau sa-
le.
Î Nettoyer le tamis à peluches.
Fréquence de maintenance
Basculer l'appareil en position de maintenance.
Pour pouvoir effectuer quelques travaux de
réparation et de maintenance, le dessous
du nettoyer des escaliers roulant doit être
accessible.
Î Vider et eliminer le reste du détergent.
Î Vider et eliminer l'eau sale.
Nettoyer l'intérieur et l'extérieur de l'appa-
Î
reil. Rincer les réservoir avec eau claire.
Î Installer l'appareil uniquement dans des
espaces sans gelée et sur un sol plat et
propre.
Î Régler les roues arrières.
Î Eliminer le barrage du trottoir roulant/de
l'escalier roulant lorsque la zone complet
de travail est séche. Il ya un risque d'accident si le trottoir roulant.l'escalier roulant est mouillé.
28 Français
Î Basculer l'appareil avec une deusième
personne vers l'avant, jusqu'à l'appareil
est poder sur la face frontal du boîtier.
Page 29
Quotidiennement avant l'usage
1
2
Î Contôler le cône de vaporisation des bu-
ses.
Î Contrôler la buse d'aspiration s'il elle est
sale.
Î Contrôler la fonction d'arrêt d’urgence de
la pédale à pied.
Actionner la pédale à pied, positionner
l'interrupteur de l'appareil sur aspiration
de poussière, l'appareil doit être en marche. Lâcher la pédale à pied, l'appareil
doit s'arrête.
La réparation doit être effectuée que par
le service après-vente.
Î Contrôler le positionnement des roues
arrières.
La réparation doit être effectuée que par
le service après-vente.
Î Contrôler l'état d'usure:
Brosses rotatives, brosses d'absorption,
brosses, rails de guidage, flexibles,
stoppeur et roues avant. Faire échanger
le stoppeur et les roues avant en cas de
besoin par le service clientèle seulement.
Î Contrôler le cable d'alimentation et la fi-
che de secteur s'ils sont endommagés
ou cassés. L'échanger doit être effectuée que par le service après-vente ou
par une eléctricien.
Après 100 heures de service
Î Contrôler si les pièces de fixation sont
bien fixées.
Î Contrôler si la courroie de commande
est tendue ou usée (service après-vente).
Travaux de maintenance
Nettoyer le tamis à peluches
Î Dévisser le couvercle avec un tournevis
pour vis à tête six pans creux (Torx).
Remarque
Un tournevis pour vis à tête six pans creux
(Torx) se trouve dans le support du flexible
de vidange d'eau sale.
Î Nettoyer le tamis à peluches.
Î Fixer le couvercle.
Echanger les brosses rotatives et les
brosses d'absorption.
Î Dévisser toutes les 4 vis et retirer le cha-
peua de palier.
Français 29
Page 30
Î Retirer les brosses rotatives (grand) et
les brosses d'absorption (petit) et substituer (faire attention à l'absorption hexagonale!).
Contrôler aussi les buses d'aspiration et
en cas de besoin les échanger ou nettoyer.
Échanger les brosses
Echanger le rail de guidage
Î Dévisser les vis de fixation du support
pour les rails de guidage.
Î Démonter les rails de guidage.
Î Pour la montage des nouveaux rails de
guidage, procéder dans l'ordre inverse.
Faire attention s'ils sont biens fixés.
Contrôler les buses et le filtre pour le détergent.
Î Retirer les brosses et substituer. Pour
cela, poser les brosses d'entrée sur un
rail étroit et les brosses de sortie sur un
rail large.
Nettoyer les buses d'aspiration.
Î Eliminer des impuretés des buses d'as-
piration.
30 Français
Î Dévisser l'écrou raccord. Retirer la buse,
l'anneau de joint et le filtre.
Î Nettoyer la buse ou poser une nouvelle
buse dans l'écrou raccord.
Î Poser l'anneau de joint et le filtre et vis-
ser manuellement l'écrou raccord.
Page 31

Echanger le goëlette
Î Dévisser le goëlette avec un tournevis et
le substituer.
Transport
Danger
Risque de blessure ! Ne pas faire des pentes qui ont plus de 5°. Jamais transporter
l'appareil sur des escaliers roulants/des trottoirs roulants.
Î Régler les roues arrières.
Î Protéger la machine par des sangles ou
des cordes.
Français 31
Page 32

Assistance en cas de panne
Danger
Risque de blessure ! Avant tous les travaux
à l'appareil.
Î Mettre l'interrupteur principal sur "0".
Panne Remède
Le moteur/lapompe ne se
met pas en marche ou s'arrête toujours pendant le
service.
Voyant de contrôle "réservoir de l'eau sale plein"
s'allume.
La pression de travail de
au moins 3 bars n'est pas
attendue.
Les trottoirs roulants nettoyés sont trop mouillés.
Les trottoirs roulants nettoyés ne sont pas nettoyés.
Voyant de contrôle "Surcharge du moteur des
brosses" s'allume.
Vider le réservoir d'eau sale.
Actionner la pédale à pied.
Vider le réservoir d'eau sale.
Si le réservoir d'eau propre est vide, remplir completement (35
litres).
Examiner le système des conduites s'il est étanche. En cas de
besoins, laisser le boucher par le service après-vente.
Contrôler les buses.
Faire nettoyer la pompe par le service après-vente.
Contrôler le degré d'usure des brosses et le cas échéant, les
remplacer.
Contrôler les joints de la couvercle du réservoir d'eau sale, le
cas échéant, les remplacer.
Contrôler le degré d'usure des brosses et le cas échéant, les
remplacer.
Contrôler si les buses et les flexibles d'aspiration sont bouchés, en cas de besoin les nettoyer.
Contrôler si le couvercle du réservoir d'eau sale est bien fermé.
Contrôler, si les bonnes brosses sont montées.
Contrôler si les buses pour le détergent sont bouchés, en cas
de besoin les nettoyer.
Contrôler les joints de la couvercle du réservoir d'eau sale, le
cas échéant, les remplacer.
Contrôler le degré d'usure des brosses et le cas échéant, les
remplacer.
Contrôler le détergent. Contrôler la concentration du détergent.
Contrôler le degré d'usure des brosses et le cas échéant, les
remplacer.
Contrôler si le couvercle du réservoir d'eau sale est bien fermé.
Contrôler, si les bonnes brosses sont montées.
Positionner l'interrupteur de l'appareil sur "0" et ensuite encore
une fois sur la position de service souhaitée. Si le défaut apparaît plusieurs fois, contacter le service après-vente.
Ôter les fils et bandes des brosses.
Î Retirer le connecteur de la prise.
Î Régler les roues arrières.
Î Vider et eliminer le reste du détergent.
Î Vider et eliminer l'eau sale.
32 Français
Page 33

Données techniques
Garantie
1.310-105
Tension nominale V 120
Fréquence Hz 60
Tension de commande V 12
Puissance nominal
(max.)
Puissance du moteur
d'aspiration
Puissance de moteur de
brosses
Pression de la pompe bar 3-4
Consommation d'eau l/h 25-50
Vitesse de rotation des
brosses rotatives
Vitesse de rotation des
brosses d'absorption
Largeur de travail mm 470
Largeur mm 480
Longueur mm 1150
Hauteur avec guidon de
poussée
Hauteur sans guidon de
poussée
Volume du réservoir
d'eau propre/réservoir
d'eau sale
Poids à vide kg approx.
Poids de fonctionnement
Niveau de pression
acoustique (EN 60704-
1)
Valeur globale de vibra-
tions (ISO 5349)
W1360
W800
W650
1/min 870
1/min 1090
mm 1050
mm 760
l 35/35
90
kg approx.
125
dB(A) <75
2
m/s
0,43
Dans chaque pays, les conditions de garantie en vigueur sont celles publiées par notre
société de distribution responsable. Les
éventuelles pannes sur l’appareil sont réparées gratuitement dans le délai de validité de
la garantie, dans la mesure où celles-ci relèvent d'un défaut matériel ou d'un vice de fabrication. En cas de recours en garantie,
adressez-vous à votre revendeur ou au service après-vente agréé le plus proche munis
de votre preuve d'achat.
Accessoires et pièces de re-
change
Danger
Risque de blessure et de choc électrique!
Seul le service après-vente agréé est autorisé à effectuer des travaux de réparation sur
l'appareil.
– Utiliser uniquement des accessoires et
des pièces de rechange autorisés par le
fabricant. Des accessoires et des pièces
de rechange d’origine garantissent un
fonctionnement sûr et parfait de l’appareil.
– Une sélection des pièces de rechange
utilisées le plus se trouve à la fin du
mode d'emploi.
– Plus information sur les pièces de re-
change vous les trouverez sous
www.kaercher.com sous le menu Service.
Français 33
Page 34

Accessoires
Accessoires Type Référence Description
Brosses rotatives, doux
(standard)
Brosses rotatives,dur 5.762-267 Brosses rotatives pour le nettoyage
Brosses d'absorption 5.762-268 Pour soutenir le trasnport d'eau sale
Brosses d'entrée,
bleues
Broses de sortie, bleues Kone 6.369-519
Brosses d'entrée, noires
Brosses de sortie, noi-
res
Brosses d'entrée, ver-
tes
Brosses de sortie, vertes
Brosses d'entrée, blan-
ches
Brosses de sortie, blan-
ches
Grattoir pour les rainures
Set Handpads Kone 6.369-513 Pour un nettoyage manuel des faces
Produit détergent RM 758 Pour le nettoyage manuel.
Produit détergent RM 759 Pour le nettoyage de base (30 kg).
Kone 6.369-509 Brosses pour l'adaptation de l'appa-
OTIS 6.369-510
OTIS 6.369-520
Schindler 6.369-511
Schindler 6.369-521
CNIM 6.369-512
CNIM 6.369-522
Kone und
Schindler
OTIS und
Thyssen
OTIS 6.369-514
Schindler 6.369-515
Thyssen 6.369-516
5.762-266 Brosses rotatives pour le nettoyage
d'entretien (l'appareil besoin 2).
de base, pour des saletés dures
(l'appareil besoin 2).
du trottoir roulant/de l'escalier roulant aux buses d'aspiration (l'appareil besoin de 2).
reil au produit de trottoir roulant/l'escalier roulant (kit avec 2).
6.369-507 Pour un prénettoyage manuel (elimination des pierres, de chewing-gum
6.369-508
et d'autres impuretés).
frontales des marches (kit avec 5
pads verts).
Pour le nettoyage manuel des endroits très sales.
34 Français
Page 35

INSTRUCCIONES IMPOR-
TANTES DE SEGURIDAD
LEA TODAS LAS INSTRUC-
CIONES ANTES DE USAR LA
MÁQUINA
ADVERTENCIA
Para evitar el peligro de incendio, descarga
eléctrica o heridas:
– No se aleje de la máquina mientras esté
enchufada. Saque el enchufe de la base
cuando no la esté usando, y antes del
mantenimiento.
ADVERTENCIA
– PARA EVITAR PELIGRO DE
DESCARGAS ELÈCTRICAS, LA
MÀQUINA SÒLO DEBE EMPLEARSE
EN INTERIORES
– La máquina no es un juguete. Llevar
mucho cuidado si va a utilizarse donde
hay niños.
– La máquina sólo debe emplearse tal
como se describe en este manual. Sólo
deben usarse los accesorios
recomendados por el fabricante.
– No emplearla si el cable o el enchufe
están dañados. Si la máquina no
funciona correctamente, si se ha caído,
si está averiada, si ha permanecido al
exterior o si ha caído al agua, devolverla
al servicio posventa.
– No tirar de la máquina ni alzarla con el
cable, no emplear el cable como manija,
no aprisionarlo con una puerta ni pasarlo
sobre esquinas o bordes agudos. No
pasar la máquina sobre el cable.
Mantener el cable alejado de fuentes de
calor.
– Al desenchufar, no tirar del cable. Para
desenchufar, tomar el enchufe y no el
cable.
– No tocar el enchufe ni la máquina con las
manos mojadas.
– No colocar objetos en las aberturas. No
usar la máquina con las aberturas
obstruidas; éstas deben estar libres de
polvo, pelusa, pelos y cualquier otro
objeto que pueda impedir el paso de
aire.
– Mantener el cabello, la ropa, los dedos y
todas las partes del cuerpo alejadas de
las aberturas y las piezas móviles.
– Apagar la máquina antes de
desenchufarla.
– Llevar mucho cuidado al trabajar en
escaleras.
– No emplearla para recoger líquidos
inflamables o combustibles, p.ej.
gasolina, ni en zonas donde pueda
haber dichos líquidos.
– Es imprescindible que la toma eléctrica
esté debidamente puesta a tierra.
Véanse las Instrucciones de Puesta a
Tierra.
GUARDE ESTAS INSTRUC-
CIONES
INSTRUCCIONES DE PUES-
TA A TIERRA
La máquina debe ser puesta a tierra. Si no
funciona bien, o si se estropea, la puesta a
tierra constituye una vía de menor resistencia para la corriente eléctrica, para disminuir
el peligro de descarga eléctrica. La máquina
está provista de cable con conductor de
puesta a tierra, y enchufe con puesta a tierra. El enchufe debe insertarse en una base
de enchufe adecuada, debidamente instalada y puesta a tierra, conforme a la legislación y las normas válidas en el lugar de
utilización.
ADVERTENCIA
Si el conductor de puesta a tierra de la
máquina está mal conectado, puede haber
peligro de descarga eléctrica. Consulte a un
electricista experto o a un técnico de mantenimiento, si Ud. no sabe con certeza si la
base de enchufe está correctamente puesta
Español 35
Page 36

a tierra. No cambie el enchufe suministrado
con la máquina - no encajará en la base de
enchufe; acuda a un electricista experto.
La máquina está diseñada para emplearla
en un circuito de
120 voltios; tiene un enchufe de puesta a
tierra cuyo aspecto es como se ilustra en la
Figura A. Cerciórese de conectar la máquina a una base de enchufe de la misma configuración que el conector. Con esta
máquina no deben emplearse adaptadores.
CONECTAR SÓLO A UNA
BASE DE ENCHUFE CO-
RRECTAMENTE PUESTA A
TIERRA
1 Enchufe puesto a tierra
2 Caja de enchufe puesta a tierra
3 Pin puesto a tierra
NORMAS Y PROCEDIMIEN-
TOS DE SEGURIDAD DU-
RANTE EL
FUNCIONAMIENTO
Responsabilidad del operario
El operario será responsable de garantizar
un funcionamiento seguro.
El operario deberá estar familiarizado con el
manejo y las funciones de todos los elementos de mando y todos los instrumentos antes
de proceder al manejo de la unidad.
Antes de poner en funcionamiento la unidad, los operarios deberán haber leído el
manual de instrucciones de la unidad parti-
cular de que se trate y estar familiarizados
con él; además, deberán respetar las normas y procedimientos de seguridad que se
describen a continuación.
Antes de poner en funcionamiento una unidad cualquiera, el operario deberá conocer
bien las posibles condiciones inusuales de
funcionamiento que requieren la adopción
de determinadas precauciones especiales o
para las que existen unas instrucciones de
manejo especiales.
Generalidades
Antes de poner en funcionamiento la unidad, ésta deberá encontrarse en la posición
de servicio.
No ponga en marcha ni utilice la unidad ni
ninguna de sus funciones o sus aditamentos
desde un lugar que no sea el concebido
para el operario.
Antes de abandonar la posición del operario:
A pare la unidad por completo;
B si es necesario dejar la unidad en una
pendiente, bloquee las ruedas.
Guarde una distancia segura respecto a los
bordes de las rampas y las plataformas, y
respecto a los de otras superficies de trabajo similares.
No efectúe ampliaciones ni modificaciones
en la unidad.
No bloquee el acceso a las salidas previstas
en caso de incendio, las escaleras o los extintores.
Durante la circulación
Ceda el paso a los peatones y a los vehículos de emergencia, como son las ambulancias y los camiones de bomberos.
Siempre que sea posible, cruce las vías férreas formando un ángulo con ellas. No estacione a menos de 6 ft (1800 mm) de
distancia respecto a los raíles o las vías férreas más cercanos.
Asegúrese de mantener una vista libre de
obstáculos del trayecto a recorrer, respete
las normas de tráfico, tenga cuidado con las
36 Español
Page 37

personas y guarde las distancias de seguridad.
Sean cuales sean las condiciones de circulación, conduzca la unidad siempre a una
velocidad tal que le permita detenerse por
completo de modo seguro.
Durante la conducción, no acceda jamás a
realizar acrobacias o competiciones.
Cuando circule por pisos húmedos o resbaladizos, reduzca la velocidad.
Antes de circular por un muelle o por el tablero de un puente, asegúrese de que dichos elementos estén correctamente
sujetos. Conduzca con precaución y despacio por el muelle y el puente, y no sobrepase
nunca la capacidad nominal de los mismos.
Cuando tenga que efectuar giros, reduzca la
velocidad hasta que sea seguro efectuarlos
conforme al entorno en que esté maniobrando. Realice los giros con suavidad.
Cuidado de la unidad por parte del
operario
Si se descubre la necesidad de reparar la
unidad o se detecta que ésta resulta insegura de alguna manera o que contribuye a
crear condiciones de inseguridad, se debe
informar de inmediato a la autoridad designada por el usuario. Además, la unidad no
deberá volver a utilizarse hasta que se la
haya devuelto a un estado operativo seguro.
Si, durante el funcionamiento, la unidad se
vuelve insegura de alguna manera, se debe
informar de inmediato a la autoridad designada por el usuario. Además, la unidad no
deberá volver a utilizarse hasta que se la
haya devuelto a un estado operativo seguro.
No lleve a cabo reparaciones ni practique
ajuste alguno a no ser que haya sido expresamente autorizado para ello.
TAREAS DE MANTENIMIEN-
TO Y ACONDICIONAMIENTO
Si se descuida el mantenimiento o se practican en la unidad reparaciones, tareas de
acondicionamiento o ajustes en los que no
se respeten los criterios de diseño del fabricante, su manejo puede resultar peligroso.
Por ello, se debe disponer de servicios de
mantenimiento (dentro o fuera de las instalaciones), contar con personal cualificado y
establecer unos modos de proceder detallados.
El mantenimiento y la inspección de la unidad deberán llevarse a cabo respetando las
tareas que se indican a continuación:
A se deben seguir unos esquemas de
mantenimiento, lubricación e inspección
conforme a su planificación; consulte las
recomendaciones del fabricante.
B el mantenimiento, las reparaciones, los
ajustes y las inspecciones de la unidad
sólo podrán ser llevados a cabo por personal cualificado y autorizado; además,
dichas tareas se realizarán siempre de
conformidad con las especificaciones
del fabricante.
Evite las posibles fuentes de peligro de incendio y disponga siempre de extintores en
la zona de trabajo. En la limpieza de las piezas, no use recipientes de combustible
abiertos ni líquidos limpiadores inflamables.
Español 37
Page 38

NORMAS DE SEGURIDAD
CONTRA INCENDIOS
Cuando las condiciones operativas de una
unidad no sean seguras, ésta deberá ponerse fuera de servicio.
En los emplazamientos de la clase I, la clase
II y la clase III está prohibido efectuar reparaciones.
Prevención contra incendios: la unidad se
debe mantener limpia y debe estar razonablemente libre de pelusas, restos de aceite
y grasa. Para limpiar la unidad, se recomienda usar preferiblemente agentes incombustibles. No está permitido emplear líquidos
inflamables [aquellos cuyo punto de inflamación esté en 100°F (37,8°C) o por encima].
Se deben adoptar precauciones adecuadas
al tipo de agente o disolvente empleado en
lo que a la toxicidad, la ventilación y el peligro de incendios respecta.
Visibilidad de la placa de características: las
denominaciones de tipo y las marcas de tipo
de la unidad indicadas en la placa de características no deben cubrirse con pintura que
oscurezca la información identificativa allí
contenida.
No se debe utilizar la unidad en zonas clasificadas.
38 Español
Page 39

Antes de poner en marcha por
primera vez el aparato, lea el
presente manual de instrucciones y siga las
instrucciones que figuran en el mismo. Conserve estas instrucciones para su uso posterior o para propietarios ulteriores.
Índice de contenidos
Instrucciones de seguridad 39
Función 39
Uso previsto 39
Protección del medio ambiente, eliminación
40
Elementos de operación y funcionamiento
41
Antes de la puesta en marcha 42
Puesta en marcha 42
Funcionamiento 43
Puesta fuera de servicio 45
Conservación y mantenimiento 45
Transporte 48
Ayuda en caso de avería 49
Datos técnicos 50
Garantía 50
Accesorios y piezas de repuesto 50
Instrucciones de seguridad
Para el propietario:
Asegúrese, de que todos los usuarios del
aparato estén familiarizados con instrucciones de uso y con las normativas nacionales
sobre seguridad en el trabajo. Los usuarios
tienen que estar formados técnicamente en
el manejo del aparato.
Para usuarios:
Antes de utilizar por primera vez el aparato,
lea y tenga en cuenta el presente manual de
instrucciones y el folleto adjunto relativo a
las indicaciones de seguridad para aparatos
de limpieza con cepillos y aparatos pulverizadores, 5.956-251.
Dispositivos de seguridad
La función de los dispositivos de seguridad
es proteger al usuario y está prohibido ponerlos fuera de servicio y modificar o ignorar
su funcionamiento.
Pedal
Ahora, el aparato sólo se puede arrancar si
se pisa totalmente el pedal. Después de soltar el pedal se para la máquina.
Función
Desde el limpiador de escaleras mecánicas
se aplica detergente líquido (del depósito de
agua limpia) sobre el andén/ escalera mecánica en movimiento. Al hacerlo, los cepillos
de rodillo cepillan en la dirección contraria a
la marcha de las ranuras del andén rodante/
la escalera mecánica. El detergente líquido
sucio se aspira a la vez por los cepillos de
entrada y pasa al depósito de agua sucia del
aparato.
Uso previsto
Utilice el aparato únicamente de conformidad con las indicaciones del presente manual de instrucciones.
– El aparato sólo se puede utilizar para
limpiar andenes rodantes y escaleras
mecánicas.
– Se debe ajustar la dirección de marcha
de la instalación a limpiar de forma que
se mueva en la dirección contraria del
andén rodantes/escalera mecánica.
– Sólo se puede utili8zar el aparato para
limpiar la parte inferior de la escalera
mecánica.
– Sólo está permitido dotar al aparato de
accesorios y piezas de repuesto originales.
– Sólo pueden utilizar el aparato personas
que tengan un peso corporal de al menos 65 kg.
Español 39
Page 40

Protección del medio ambien-
te, eliminación
Los materiales de embalaje son
reciclables. Por favor, no tire el
embalaje al cubo de basura; llé-
velo a un lugar de reciclaje.
Los aparatos viejos contienen
materiales valiosos reciclables
que debieran aprovecharse.
Evite el contacto de baterías,
aceites y materias semejantes
con el medioambiente. Deshá-
gase de los aparatos viejos re-
curriendo a sistemas de
recogida apropiados.
40 Español
Page 41

Elementos de operación y funcionamiento
1 estribo de empuje
2 Manguera de salida de agua limpia
3 Manguera de salida de agua sucia
4 Clavija de red
5 Gancho de relajación de esfuerzos me-
cánicos
6 Pedal
7 Ruedas traseras con palanca de blo-
queo
Pupitre de mando
1 contador de horas de servicio
2 Indicador presión de la bomba
3 Interruptor del aparato
8 Tapa del depósito de agua sucia
9 Ruedas delanteras
10 depósito de agua sucia
11 Orificio de llenado del depósito de agua
limpia
12 Pedal para bajas/elevar el cabezal del
cepillo
4 Piloto de control "depósito de agua sucia
lleno"
5 Piloto de control "sobrecarga motor del
cepillo"
Español 41
Page 42

Antes de la puesta en marcha
Î Retirar todo el embalaje menos el palet
de madera.
Montar el estribo de empuje
Eliminar el anticongelante
Nota
El aparato viene de fábrica enjuagado con
anticongelante. Antes de la primera puesta
en marcha se debe eliminar los restos de
anticongelante.
Î Rellenar el depósito de agua fresca con
10 litros de agua fresca.
Î Pisar el pedal.
Î Ajustar el interruptor del aparato en lim-
pieza a fondo.
Î Dejar el aparato en funcionamiento has-
ta que se vea en el manómetro que ha
bajado la presión.
Î Colocar el estribo de empuje en las ranu-
ras del aparato.
Î Fijar el estribo con los 4 tornillos que vie-
nen incluidos.
Î Fijar la tapadera abatible.
Î
Colgar el gancho de relajación de esfuerzos mecánicos del estribo de empuje.
Descarga
Î Fijar las ruedas trasera, retirar las cuñas
de madera para bloquear las ruedas.
Î Las cuatro tablas de suelo marcadas del
palet están sujetas mediante tornillos.
Desatornille dichas tablas.
Î Coloque las tablas sobre el borde del pa-
let. Verifique que queden ubicadas delante de las ruedas del equipo. Fije las
tablas con los tornillos.
Î Empujar lentamente el aparato de la
rampa.
Puesta en marcha
Preparación andén rodante/escale-
ra mecánica
Peligro
Peligro de lesiones El aparato puede engancharse y se arrastrado por el andén rodante/
escalera mecánica. Examinar los peldaños
y el perfil de las ranuras para comprobar si
tienen deformaciones o hay objetos enganchados. Asegúrese en caso de emergencia
de saber dónde se encuentra el botón de
parada de emergencia del andén rodante/
escalera mecánica.
Î Bloquear ampliamente el andén rodan-
tes/escalera mecánica mientras se esté
limpiando y los escalones aún estén húmedos.
Î Encender el andén rodante/escalera
mecánica.
Î Asegúrese de que el andén rodante/es-
calera mecánica va en la dirección contraria al aparato.
42 Español
Page 43

Preparación aparato
Î Comprobar si los dientes y el carril guía
del aparato están adaptados al fabrican-
te del andén rodante/escalera mecánica.
Si es necesario cambiar los dientes y el
carril guía.
Aspiración en seco
Aspiración en seco del andén rodante/escalera mecánica ya limpios.
Limpieza de mantenimiento
Limpieza de andenes rodantes/escaleras
mecánicas ligeramente sucios (generalmente, regularmente cada poco). El aparato
trabaja con menos agua para esta configuración. La bomba de agua está sincronizada.
Limpieza a fondo
Î Abra la tapa del depósito de agua limpia.
Î Añadir agua limpia.
Î Adición de detergente.
Sólo podrá usar detergentes que el fabri-
cante del aparato haya aprobado.
Î
Cierre la tapa del depósito de agua limpia.
Î
Llevar el aparato hasta delante del rellano
del andén rodante/escalera mecánica.
Funcionamiento
Peligro
Peligro de lesiones
– El peso del usuario tiene que ser al me-
nos 65 kg.
– Pulsar el pedal siempre con un pie. El
otro pie tiene que mantenerse en una
posición estable y segura en el suelo.
– Sujetar el estribo de empuje al menos
con una mano.
– Las piezas móviles del andén rodante/
escalera mecánica pueden enganchar
ropa holgada o joyas. Por lo tanto, quíte-
se las joyas y utilice ropa pegada al cuer-
po y zapatos de seguridad.
Tipos de limpieza
El tipo de limpieza depende del grado de suciedad y se divide en tres tipos de limpieza.
Limpieza de andenes rodantes/escaleras
muy sucios (generalmente si no se ha limpiado durante un largo período). Las zonas
que estén especialmente sucias se deberán
limpiar previamente de modo manual.
Indicaciones sobre la limpieza
– En primer lugar barrer la suciedad suelta
más gruesa.
– Retirar los objetos (p.ej. piedras) de las
ranuras de los escalones.
– Limpiar manualmente las superficies
frontales de los escalones de las escaleras mecánicas.
– Limpiar la superficie de los escalones en
tramos que se solapen. Para ello retirar
el aparato de la posición de trabajo y
desplazarlo hacia un lateral.
– Observar las superficies de los escalo-
nes durante la limpieza. Deben estar húmedas pero no mojadas. No debe
quedar nada de espuma.
– En primer lugar limpiar en húmedo (con
detergente líquido), después en seco
(interruptor en limpieza en seco).
– A continuación limpiar una vez con agua
limpia, para eliminar los restos de detergente líquido.
Español 43
Page 44

Servicio de limpieza
Peligro
¡Peligro de lesiones y descarga eléctrica!
Colocar el cable alargador siempre de modo
que no quede enganchado ni pueda ser
aplastado o se pueda tropezar con él.
Î Enchufe la clavija de red.
Î Enganche el extremo del cable de pro-
longación a modo de lazo en el gancho
de relajación de esfuerzos mecánicos.
Î Bloquear las ruedas traseras.
Î Deslizar en aparato hacia el rellano, de
modo que las ruedas delanteras no toquen el primer escalón del andén rodante/escalera mecánica en movimiento.
Î Pulsar el pedal para bajar la cabeza del
cepillo. La cabeza del cepillo baja.
Î Pulsar el pedal con un pie y mover a la
vez el aparato de un lado a otro. El aparato se centra en las ranuras de la superficie del escalón y después se oye un
ruido.
Peligro
Peligro de lesiones No deslizar el aparato
más allá de lo indicado sobre la escalera
mecánica. De lo contrario se corre el riesgo
de que la escalera mecánica enganche el
aparato. En caso de peligro pulsar inmediatamente el botón de parada de emergencia
de la escalera mecánica.
El cabezal de limpieza tiene que estar plano
sobre la escalera mecánica.
Î Ajustar el interruptor del aparato en lim-
pieza de mantenimiento o limpieza a fondo.
Arrancar el aparato.
Nota
Cuando el depósito de agua sucia esté lleno
el aparato se apaga. Vaciar el depósito para
poner de el aparato de nuevo en marcha y
poner brevemente el interruptor del aparato
a „0“.
Î Limpiar hasta que el andén/escalera me-
cánica haya dado 1 ó 2 vueltas. A continuación colocar el aparato hacia un lado
y comenzar un nuevo proceso de limpieza.
44 Español
Page 45
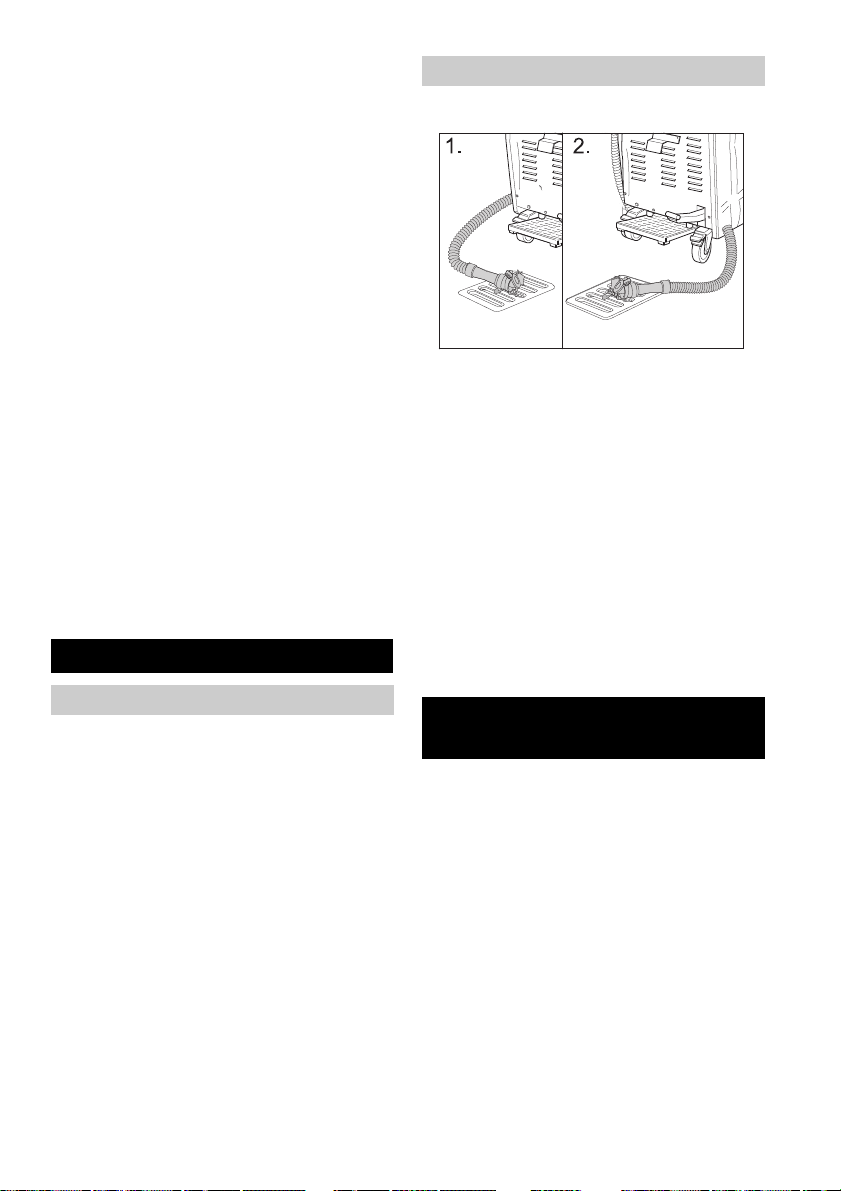
Desplazar el aparato hacia un lado
Î Ajustar el interruptor del aparato en la
posición de limpieza en seco. Se activa
la limpieza en seco.
Î Bajar la presión de la bomba a 0 bares.
Î Colocar el interruptor principal en la po-
sición "0".
Î Descargar el pedal.
Î Pulsar el pedal para elevar la cabeza del
cepillo. La cabeza del cepillo se eleva.
Î Desplazar el aparato hacia un lado.
Î Pulsar el pedal para bajar la cabeza del
cepillo. La cabeza del cepillo baja.
Î Pulsar el pedal y centrar el aparato en
las ranuras de la superficie del escalón.
Î Ajustar el interruptor del aparato en lim-
pieza de mantenimiento o limpieza a fon-
do.
Î A continuación limpiar una vez con agua
limpia, para eliminar los restos de deter-
gente líquido.
Peligro
Peligro de lesiones Para rellenar el detergente líquido, retirar siempre el aparato de
la posición de trabajo.
Puesta fuera de servicio
Finalizar la limpieza
Î Ajustar el interruptor del aparato en la
posición de limpieza en seco. Se activa
la limpieza en seco.
Î Bajar la presión de la bomba a 0 bares.
Î Colocar el interruptor principal en la po-
sición "0".
Î Descargar el pedal.
Î Pulsar el pedal para elevar la cabeza del
cepillo. La cabeza del cepillo se eleva.
Î Desbloquear las ruedas traseras.
Î Retirar el aparato de la posición de tra-
bajo y del rellano, hasta que esté sobre
suelo firme.
Parar el aparato
Î Extraer el enchufe de la red.
Î Evacuar el resto del detergente líquido y
eliminar
Î Dejar salir el agua sucia y eliminar.
Î Limpie el aparato por dentro y por fuera.
Enjuagar los depósitos con agua limpia.
Î Aparcar el aparato sólo en un lugar a sal-
vo de heladas y sobre un suelo llano y
limpio.
Î Bloquear las ruedas traseras.
Î Retirar el bloqueo del andén rodante/es-
calera mecánica, cuando esté seca toda
la zona de trabajo. Si el andén rodante/
escalera mecánica están mojados se
puede correr riesgo de resbalar y tener
un accidente.
Conservación y mantenimien-
to
Peligro
Peligro de lesiones Antes de realizar cualquier trabajo en el aparato:
Î Colocar el interruptor principal en la po-
sición "0".
Î Extraer el enchufe de la red.
Î Bloquear las ruedas traseras.
Î Evacuar el resto del detergente líquido y
eliminar
Î Dejar salir el agua sucia y eliminar.
Español 45
Page 46
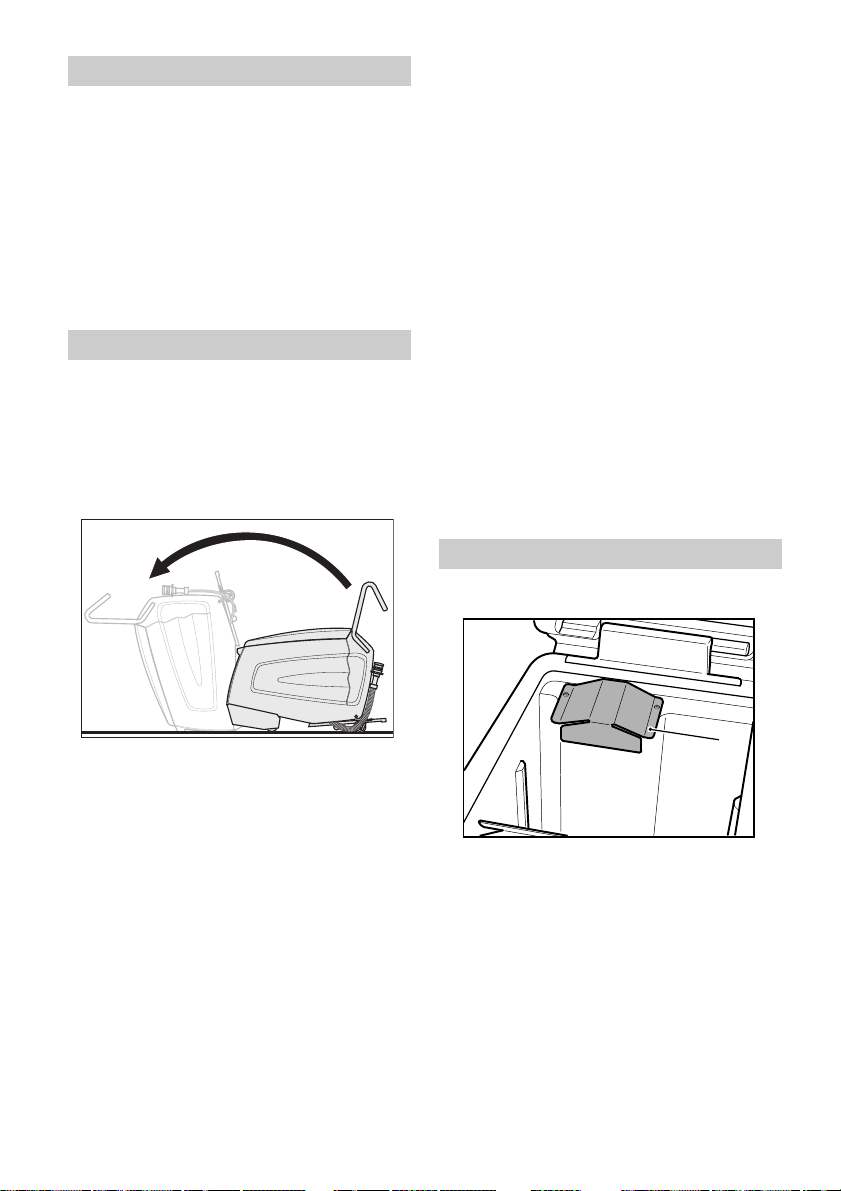
Limpieza del aparato
1
몇 Advertencia
¡Peligro de daños en la instalación! No salpique al aparato con agua ni utilice detergentes agresivos.
Î Limpie el aparato por fuera con un trapo
húmedo ligeramente empapado en una
solución jabonosa suave.
Î Limpiar el interior del depósito de agua
sucia.
Î Limpiar el filtro de pelusas.
Intervalos de mantenimiento
Bascular el aparato en la posición de
mantenimiento
Para poder llevar a cabo diferentes trabajos
de inspección y mantenimiento, se debe poder acceder a la parte inferior del limpiador
de escaleras mecánicas.
Î Comprobar el bloqueo de las ruedas tra-
seras.
Sólo es servicio técnico puede reparar el
aparato.
Î Comprobar el desgaste:
Cepillos de rodillo, cepillos de entrada,
dientes, carriles guía, mangueras, funda, tope y ruedas delanteras. Si es necesario cambiar el tope y las ruedas
delanteras, diríjase exclusivamente al
servicio técnico.
Î Comprobar si el cable de alimentación y
la clavija están dañados o rotos. Sólo los
puede cambiar el servicio técnico o un
electricista.
Tras 100 horas de servicio
Î Comprobar si todas las piezas de fijación
están bien colocadas.
Î Comprobar la tensión y el desgaste de
las correas de accionamiento (servicio
técnico).
Trabajos de mantenimiento
Limpie el filtro de pelusas
Î Bascular el aparato hacia delante con
ayuda de una persona hasta que esté
sobre la superficie de la carcasa delantera.
Diariamente antes del uso
Î Controlar el rociado de las boquillas.
Î Comprobar la suciedad de las boquillas
de aspiración.
Î Comprobar el funcionamiento del para-
da de emergencia del pedal.
Pulsar el pedal, ajustar el interruptor del
aparato a limpieza en seco, el aparato
tiene que estar en funcionamiento. Soltar el pedal, el aparato tiene que pararse.
Sólo es servicio técnico puede reparar el
aparato.
46 Español
Î Desenroscar la cubierta de chapa con un
llave hexagonal (Torx).
Nota
Hay una llave hexagonal (Torx) en el soporte de la manguera de salida del agua sucia.
Page 47

Î Limpiar el filtro de pelusas.
2
Î Desatornillar la cubierta de chapa.
Cambiar los cepillos de rodillo y de entrada
Î Desenroscar los 4 tornillos y quitar la
tapa del cojinete.
Cambiar los dientes
Î Extraer los dientes y sustituir. Para ello
deslizar los dientes de entrada a dientes
de salida estrechos sobre un carril ancho.
Limpiar las boquillas de aspiración
Î Extraer los cepillos de rodillo (grande) y
de entrada (pequeño) y sustituir (¡tener
en cuenta la forma hexagonal de los ce-
pillos!).
Comprobar también los dientes y las bo-
quillas de aspiración en este paso y si es
necesario cambiar o limpiar.
Î Extraer la suciedad de las boquillas de
aspiración, no presionar hacia dentro.
Cambiar el carril guía
Î Aflojar los tornillos de fijación del soporte
del carril guía.
Î Desmontar el carril guía.
Î Coloque el nuevo carril guía siguiendo
los mismos pasos en el orden inverso.
Asegúrese de que está bien colocado.
Español 47
Page 48
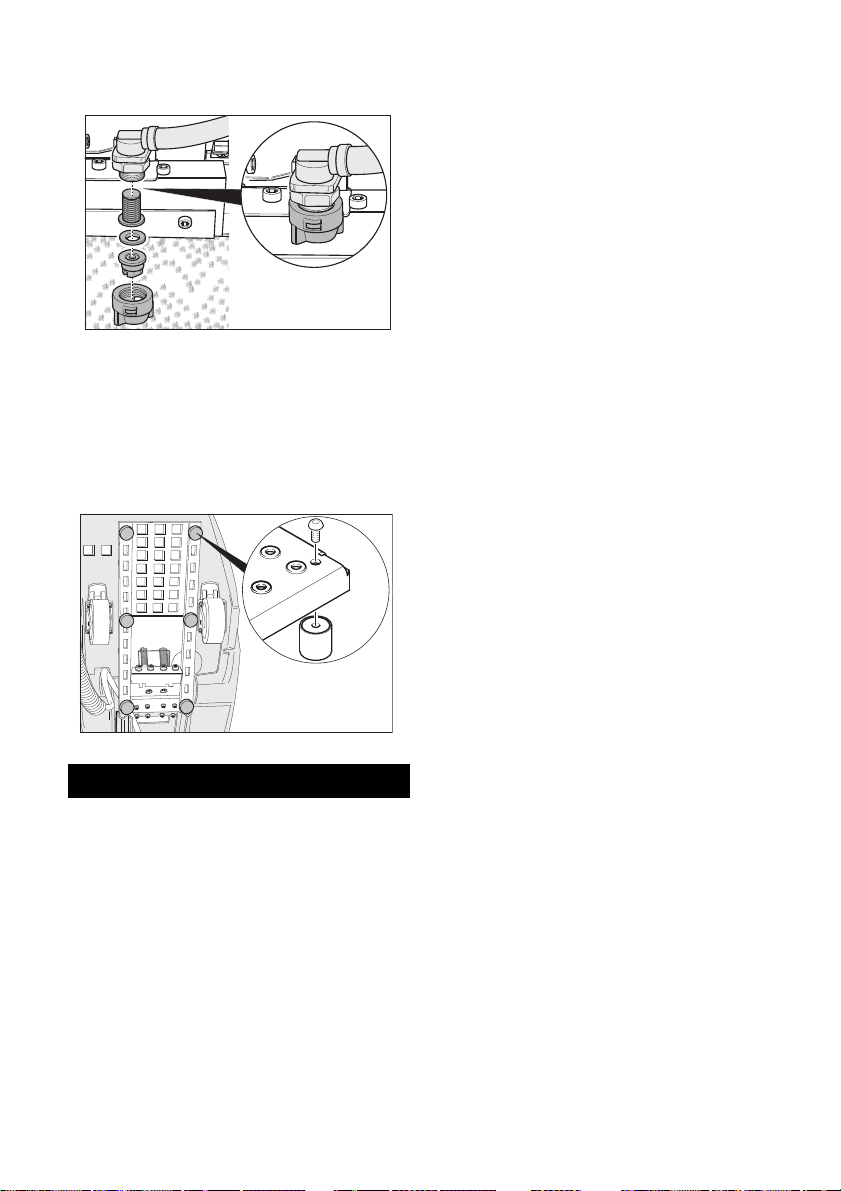
Comprobar si hay detergente líquido en
las boquillas y en el filtro
Î Aflojar la tuerca de racor. Extraer la bo-
quilla, arandela de junta y el tamiz.
Î Limpiar la boquilla o colocar una boquilla
nueva en la tuerca de racor.
Î Colocar la arandela de junta y el tamiz y
apretar la tuerca de racor con la mano.
Cambiar la funda
Î Desatornillar y sustituir la funda.
Transporte
Peligro
Peligro de lesiones No subir inclinaciones
de más de 5º. No transportar el aparato nunca con la escalera mecánica/andén mecánico.
Î Bloquear las ruedas traseras.
Î Asegurar el aparato con cinturones y
cuerdas para que resbale.
48 Español
Page 49

Ayuda en caso de avería
Peligro
Peligro de lesiones Antes de realizar cualquier trabajo en el aparato:
Î Colocar el interruptor principal en la po-
sición "0".
Avería Modo de subsanarla
El motor/bomba no funciona o se
apaga automáticamente.
El piloto de control "depósito de
agua sucia lleno" se ilumina.
No ha alcanzado la presión de
trabajo de al menos 3 bares.
Las superficies de los escalones
que ha limpiado están demasiado mojadas.
Las superficies de los escalones
que ha limpiado no están limpios.
El piloto de control "sobrecarga
motor del cepillo" está iluminado.
Depósito de agua sucia lleno, vaciar.
Si el depósito de agua limpia está vacío, rellenar totalmente (35 litros).
Comprobar la estanqueidad del sistema de tuberías. Si
es necesario, póngase en contacto con el servicio técnico para que lo estanquice.
Solicitar al servicio técnico que limpie la bomba.
Compruebe si los dientes presentan desgaste y, en caso
necesario, cámbielos.
Compruebe el estado de la junta situada entre el depósito de agua sucia y la tapa y, en caso necesario, cámbiela.
Compruebe si los cepillos de entrada presentan desgaste y, en caso necesario, cámbielos.
Comprobar si las boquillas de aspiración y los tubos están atascados, si es necesario limpiar.
Comprobar si las boquillas del detergente líquido están
atascadas, si es necesario limpiar o cambiar.
Compruebe el estado de la junta situada entre el depósito de agua sucia y la tapa y, en caso necesario, cámbiela.
Compruebe si los cepillos de rodillo y entrada presentan
desgaste y, en caso necesario, cámbielos.
Comprobar el detergente líquido. Comprobar la concentración de la solución del detergente.
Compruebe si los cepillos de entrada presentan desgaste y, en caso necesario, cámbielos.
Poner el interruptor del aparato a "0", después girar de
nuevo a la posición de servicio deseada. Si se sigue produciendo el fallo, acuda al servicio técnico.
Extraiga las cintas y los cordones del cepillo.
Î Extraer el enchufe de la red.
Î Bloquear las ruedas traseras.
Î Evacuar el resto del detergente líquido y
eliminar
Î Dejar salir el agua sucia y eliminar.
Español 49
Page 50

Datos técnicos
Garantía
1.310-105
Tensión nominal V 120
Frecuencia Hz 60
Tensión de control V 12
Potencia nominal (máx.) W 1360
Potencia del motor de
aspiración
Potencia del motor de
barrido
Presión de la bomba bar 3-4
Consumo de agua l/h 25-50
Velocidad del cepillo de
rodillo
Velocidad del cepillo de
entrada
Anchura de trabajo mm 470
Anchura mm 480
Longitud mm 1150
Altura con el estribo de
empuje
Altura sin estribo de em-
puje
Volumen de los depósitos de agua limpia y
agua sucia
Peso en vacío kg approx.
Peso en estado de funcionamiento
Nivel de presión acústica (EN 60704-1)
Valor total de la vibración (ISO 5349)
W800
W650
1/min 870
1/min 1090
mm 1050
mm 760
l 35/35
90
kg approx.
125
dB(A) <75
2
m/s
0,43
En todos los países rigen las condiciones de
garantía establecidas por nuestra empresa
distribuidora. Las averías del aparato serán
subsanadas gratuitamente dentro del periodo de garantía, siempre que se deban a defectos de material o de fabricación. En un
caso de garantía, le rogamos que se dirija
con el comprobante de compra al distribuidor donde adquirió el aparato o al servicio al
cliente autorizado más próximo a su domicilio.
Accesorios y piezas de re-
puesto
Peligro
¡Peligro de lesiones y descarga eléctrica!
Los trabajos de reparación en el aparato
sólo los puede realizar el Servicio técnico
autorizado.
– Sólo deben emplearse accesorios y pie-
zas de repuesto originales o autorizados
por el fabricante. Los accesorios y piezas de repuesto originales garantizan el
funcionamiento seguro y sin averías del
aparato.
– Podrá encontrar una selección de las
piezas de repuesto usadas con más frecuencia al final de las instrucciones de
uso.
– En el área de servicios de www.kaer-
cher.com encontrará más información
sobre piezas de repuesto.
50 Español
Page 51

Accesorios
Accesorios Modelo No. de pieza Descripción
Cepillos de rodillo, suaves (estándar)
Cepillos de rodillo , duros
Cepillos de entrada 5.762-268 Para favorecer el transporte del
Dientes de entrada,
azul
Dientes de salida, azul Kone 6.369-519
Dientes de entrada, ne-
gro
Dientes de salida, negro OTIS 6.369-520
Dientes de entrada, ver-deSchindler 6.369-511
Dientes de salida, verde Schindler 6.369-521
Dientes de entrada,
blanco
Dientes de salida, blan-coCNIM 6.369-522
Kone 6.369-509 Dientes para adaptar el aparato a
OTIS 6.369-510
CNIM 6.369-512
5.762-266 Cepillo de rodillo para limpieza de
mantenimiento (el aparato necesita
2 unidades).
5.762-267 Cepillo de rodillo para limpieza a
fondo de suciedad resistente (el
aparato necesita 2 unidades).
agua sucia del andén rodante/escalera mecánica a las boquillas de aspiración (el aparato necesita 2
unidades).
cada fabricante de andén rodante /
escalera mecánica (juego de 2 unidades).
Rascador de ranuras Kone und
Schindler
OTIS und
Thyssen
Set Handpads Kone 6.369-513 Para limpiar manualmente la parte
OTIS 6.369-514
Schindler 6.369-515
Thyssen 6.369-516
Detergente RM 758 Para limpieza a máquina.
Detergente RM 759 Para la limpieza a fondo (30 kg).
6.369-507 Para realizar una limpieza manual
previa (eliminar piedras, chicles y
6.369-508
otras suciedades fijas).
frontal de los escalones (juego con 5
pads manuales).
Para la limpieza manual de zonas
muy sucias.
Español 51
Page 52

Page 53

Page 54

Page 55

Page 56

 Loading...