

BDP 50/1500 C
Deutsch 3
English 12
Français 21
Italiano 30
Nederlands 39
Español 48
Português 57
Dansk 66
Norsk 75
Svenska 84
Suomi 93
Ελληνικά 102
Türkçe 111
Русский 120
Magyar 129
Čeština 138
Slovenščina 147
Polski 156
Româneşte 165
Slovenčina 174
Hrvatski 183
Srpski 192
Български 201
Eesti 210
Latviešu 219
Lietuviškai 228
Українська 237
59627930 05/19

2

Lesen Sie vor der ersten Benut-
zung Ihres Gerätes diese Originalbetriebsanleitung, handeln Sie danach
und bewahren Sie diese für späteren Gebrauch oder für Nachbesitzer auf.
Inhaltsverzeichnis
Umweltschutz . . . . . . . . . . . . . DE 1
Symbole in der Betriebsanlei-
tung . . . . . . . . . . . . . . . . . . . . . DE 1
Sicherheitshinweise . . . . . . . . DE 2
Sicherheitseinrichtungen. . . . . DE 2
Entriegelung . . . . . . . . . . . . . . DE 2
Funktion . . . . . . . . . . . . . . . . . DE 2
Bestimmungsgemäße Verwen-
dung . . . . . . . . . . . . . . . . . . . . DE 2
Bedien- und FunktionselementeDE 3
Montage . . . . . . . . . . . . . . . . . DE 4
Vor Inbetriebnahme. . . . . . . . . DE 4
Betrieb. . . . . . . . . . . . . . . . . . . DE 5
Transport. . . . . . . . . . . . . . . . . DE 6
Lagerung. . . . . . . . . . . . . . . . . DE 6
Pflege und Wartung . . . . . . . . DE 6
Hilfe bei Störungen . . . . . . . . . DE 7
Garantie . . . . . . . . . . . . . . . . . DE 8
Zubehör und Ersatzteile . . . . . DE 8
EU-Konformitätserklärung. . . . DE 8
Technische Daten . . . . . . . . . . DE 9
Umweltschutz
Die Verpackungsmaterialien
sind recyclebar. Bitte werfen Sie
die Verpackungen nicht in den
Hausmüll, sondern führen Sie
diese einer Wiederverwertung
zu.
Altgeräte enthalten wertvolle recyclingfähige Materialien, die einer Verwertung zugeführt werden sollten. Batterien, Öl und
ähnliche Stoffe dürfen nicht in
die Umwelt gelangen. Bitte entsorgen Sie Altgeräte deshalb
über geeignete Sammelsysteme.
Hinweise zu Inhaltsstoffen (REACH)
Aktuelle Informationen zu Inhaltsstoffen finden Sie unter:
www.kaercher.de/REACH
Symbole in der
Betriebsanleitung
Gefahrenstufen
GEFAHR
Für eine unmittelbar drohende Gefahr, die
zu schweren Körperverletzungen oder zum
Tod führt.
몇 WARNUNG
Für eine möglicherweise gefährliche Situation, die zu schweren Körperverletzungen
oder zum Tod führen könnte.
몇 VORSICHT
Hinweis auf eine möglicherweise gefährliche Situation, die zu leichten Verletzungen
führen kann.
ACHTUNG
Hinweis auf eine möglicherweise gefährliche Situation, die zu Sachschäden führen
kann.
– 1
3DE

Sicherheitshinweise
Lesen und beachten Sie vor der ersten Benutzung des Gerätes diese Betriebsanleitung und beiliegende Broschüre Sicherheitshinweise für Disc-Einscheibenmaschinen, Nr. 5.956-659.0 und handeln Sie danach.
Sicherheitseinrichtungen
Sicherheitseinrichtungen dienen dem
Schutz des Benutzers und dürfen nicht außer Betrieb gesetzt oder in ihrer Funktion
umgangen werden.
Entriegelung
Verhindert das unbeabsichtigte Einschalten des Gerätes.
Funktion
Das Gerät wird zum Polieren von ebenen
Böden eingesetzt.
Der beim Polieren anfallende Staub wird
von einer auswechselbaren Filtertüte aufgenommen.
– Eine Arbeitsbreite von 500 mm ermög-
licht einen effektiven Einsatz.
– Netzbetrieb ermöglicht ein hohes Leis-
tungsvermögen ohne Arbeitszeitbegrenzung.
Bestimmungsgemäße
Verwendung
Verwenden Sie dieses Gerät ausschließlich gemäß den Angaben in dieser Betriebsanleitung.
– Das Gerät darf nur zum Polieren von
glatten Böden benutzt werden.
– Das Gerät darf nur mit Original-Zubehör
und -Ersatzteilen ausgestattet werden.
– Das Gerät ist nicht für den Einsatz in ex-
plosionsgefährdeten Umgebungen geeignet.
– Dieses Gerät ist nur zur Trockenanwen-
dung bestimmt und darf nicht im Freien
unter nassen Bedingungen verwendet
oder aufbewahrt werden.
4 DE
– 2

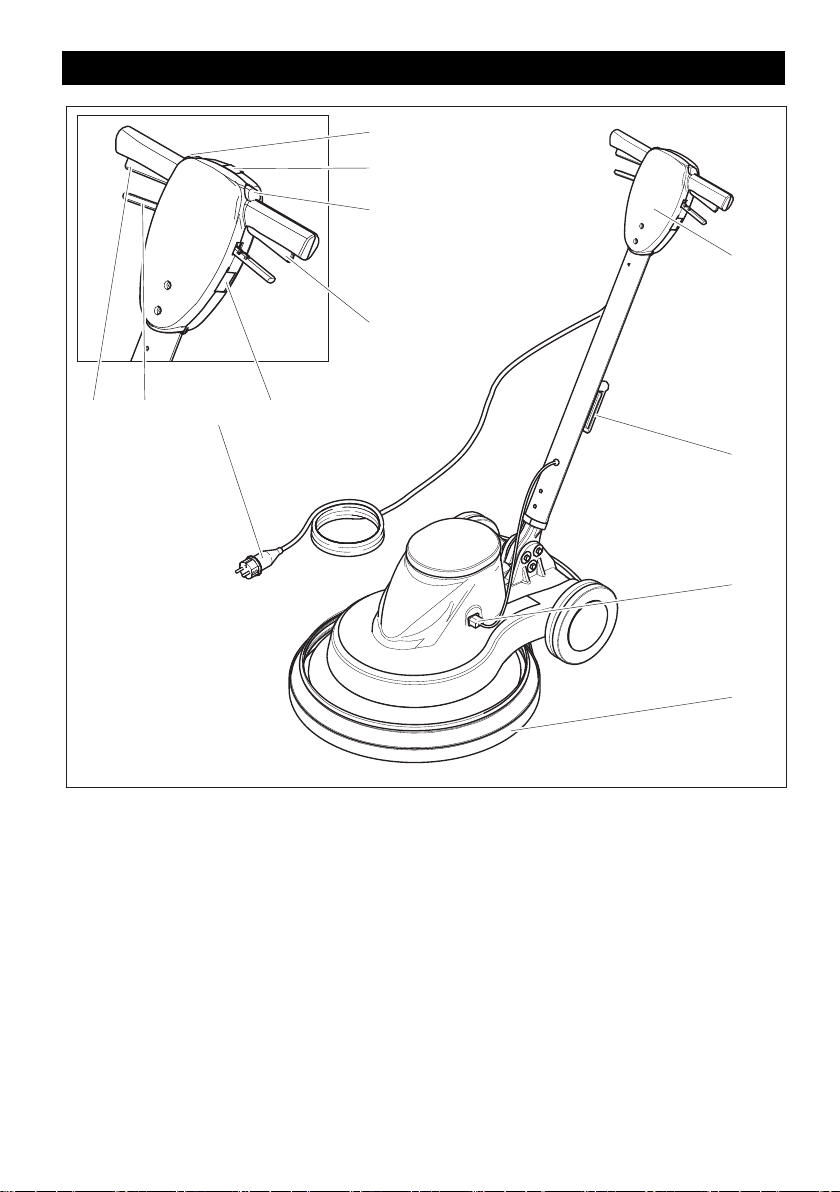
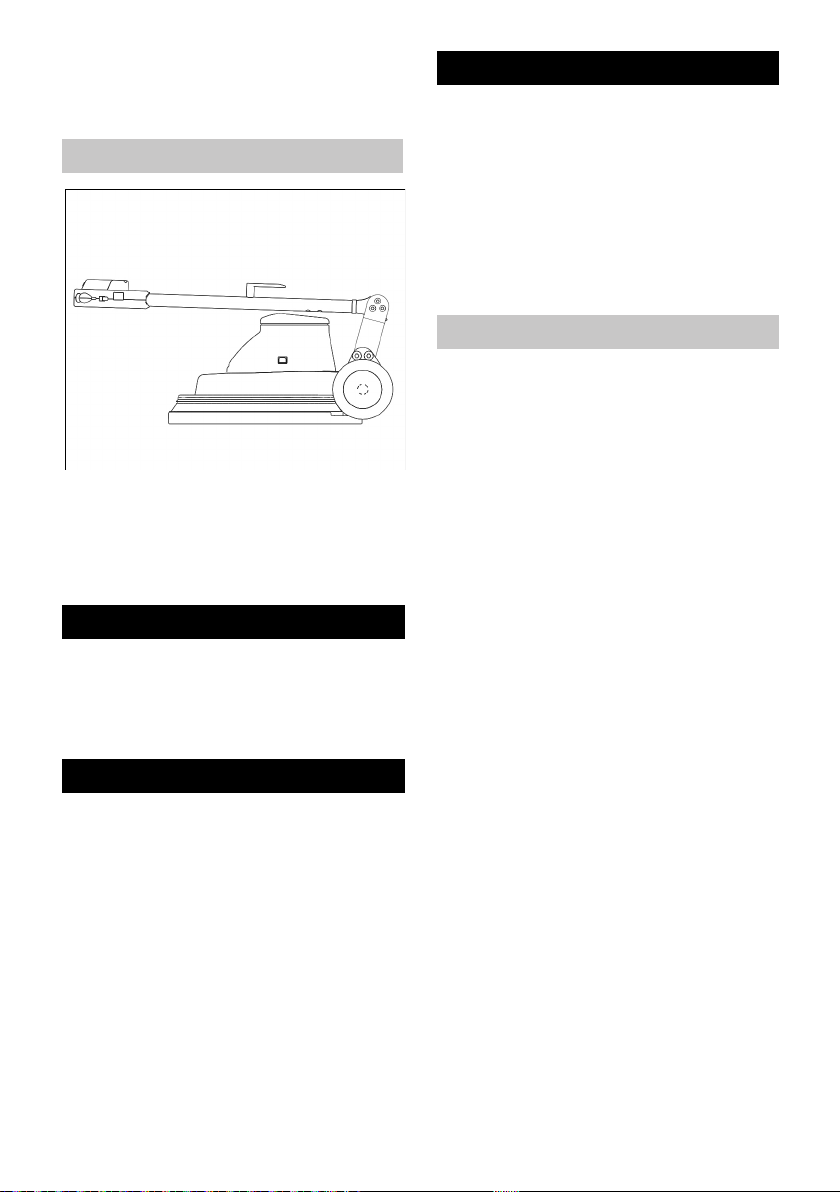
Bedien- und Funktionselemente
8
7
6
5
9
12
1 Schalter rechts
2 Hebel Neigungsverstellung
3 Netzkabel mit Netzstecker
4 Steckdose (nur für vom Geräteherstel-
ler freigegebenes Zubehör)
5 Schalter links
6 Entriegelung links
7 Kontrollleuchte „Netzspannung“
8 Entriegelung rechts
9 Griff
10 Kabelhaken, drehbar
11 Steckverbindung Steuerleitung
12 Unterdruckschürze
3
4
10
11
12
– 3
5DE
Montage
Vor Inbetriebnahme
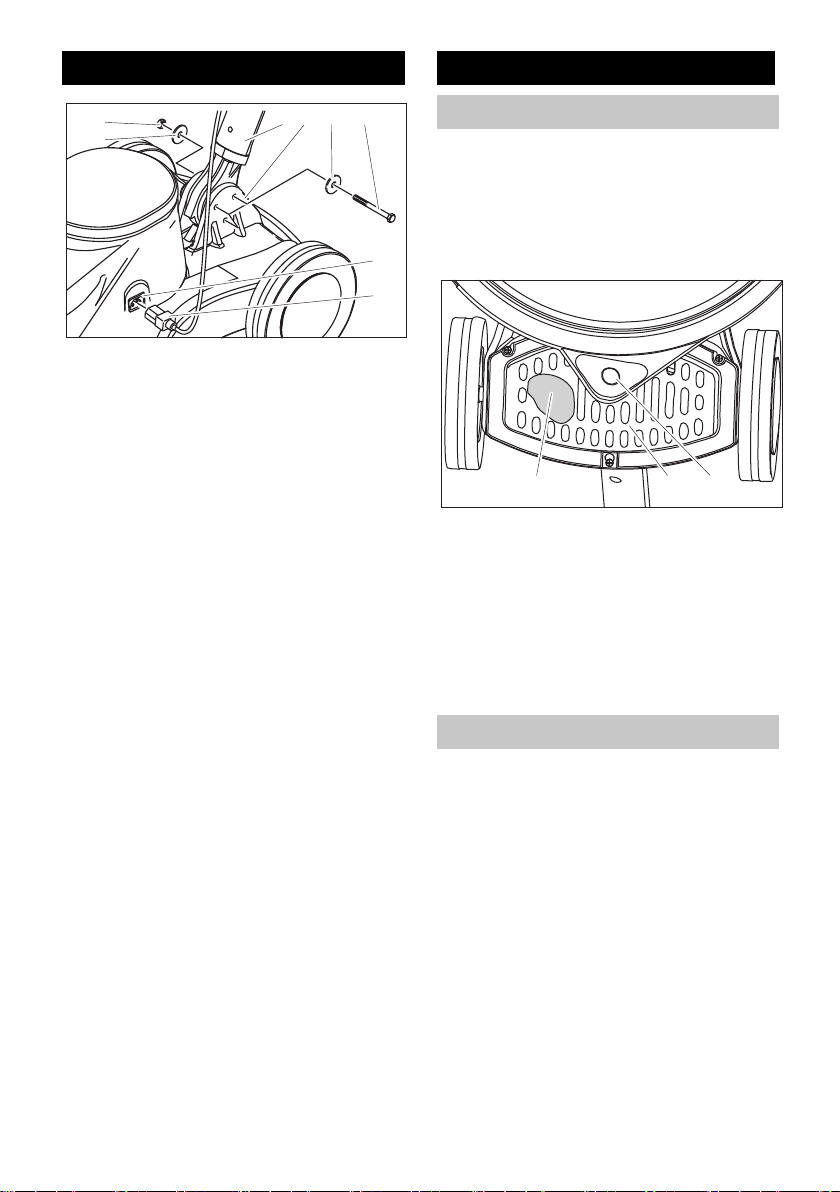
1
2
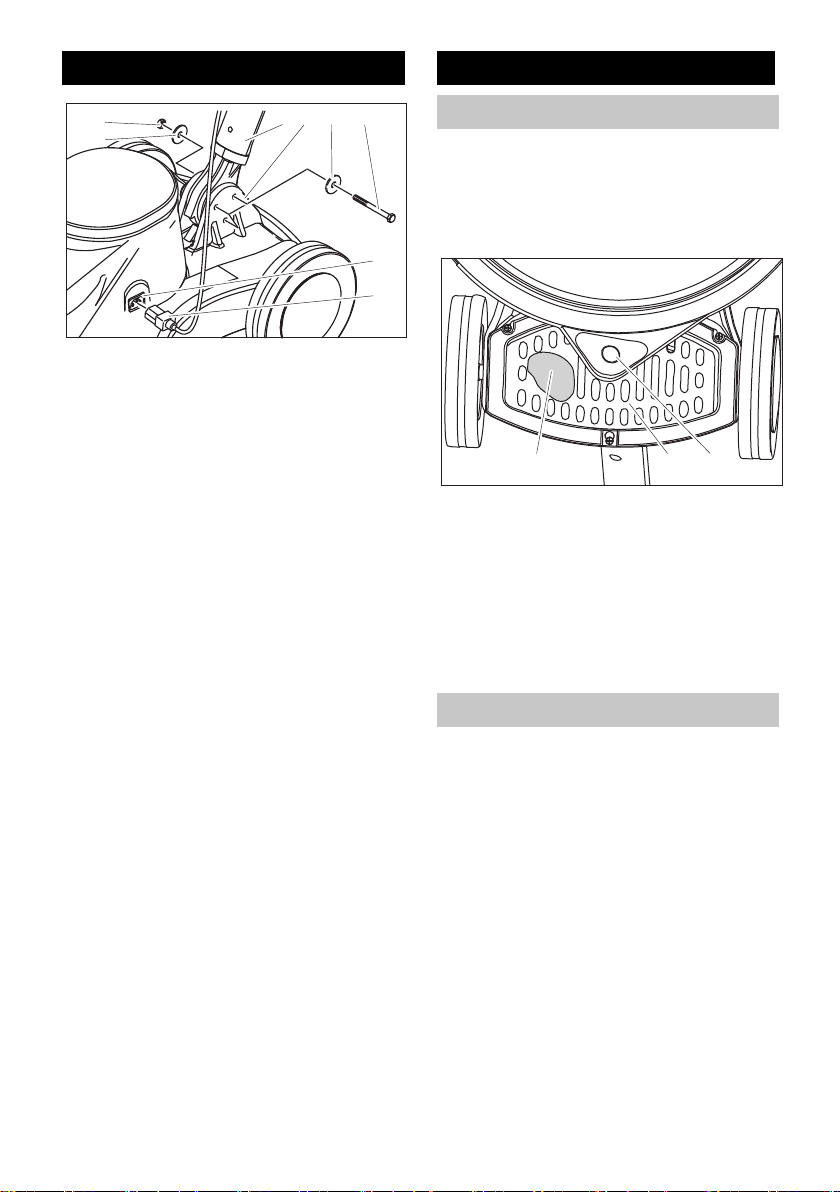
1 Mutter
2 Scheibe
3 Griff
4 Geräte-Unterteil
5 Sechskantschraube
6 Buchse Steuerleitung
7 Stecker Steuerleitung
Gerät auspacken.
Kabelbinder vom unteren Ende des
Griffs entfernen.
HINWEIS
Darauf achten, dass das Zahnrad nicht aus
der Öffnung herausfällt.
Griff senkrecht und mit dem Kabelha-
ken nach hinten über das Geräte-Unter-
teil halten.
Unteres Ende des Griffs zwischen die
beiden Laschen des Geräte-Unterteils
einsetzen.
Bohrungen ausrichten.
Griff und Geräte-Unterteil mit den bei-
liegenden 3 Schrauben, 6 Scheiben
und 3 Muttern wie im Bild oben gezeigt
verbinden.
Schrauben mit den beiliegenden Gabel-
schlüsseln festziehen.
Stecker der Steuerleitung in die Buchse
Steuerleitung einstecken.
3
42
5
6
7
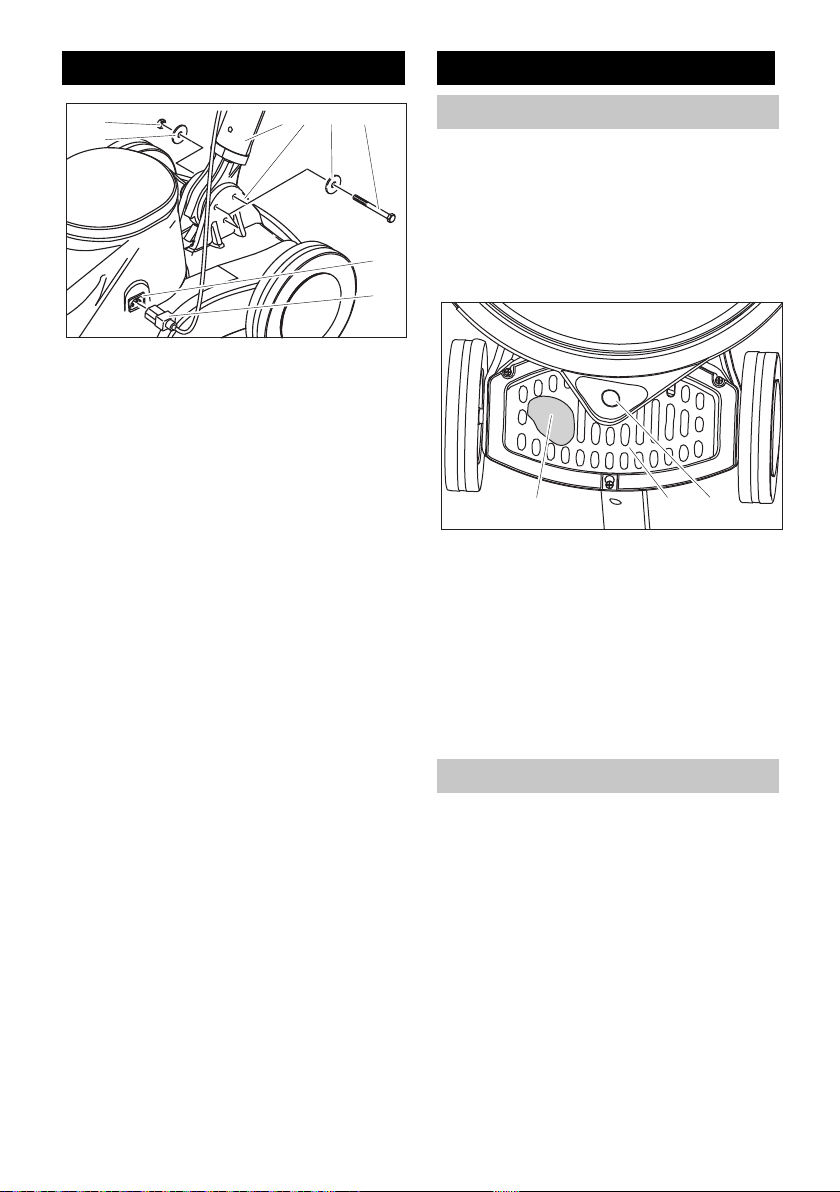
Filtertüte einsetzen
Netzstecker aus der Steckdose ziehen.
Hebel Neigungsverstellung ziehen und
Griff in senkrechte Position bringen.
Gerät nach hinten kippen und auf dem
Griff ablegen.
123
1 Filtertüte
2 Abdeckung
3 Anschlussstutzen Unterdruckschürze
Abdeckung nach unten/hinten schieben
und abnehmen.
Filtertüte in das Gerät einsetzen und
auf den Anschlussstutzen der Unterdruckschürze aufstecken.
Abdeckung anbringen.
Pad anbringen
몇 VORSICHT
Beschädigungsgefahr!
Gerät nicht mit eingesetztem Pad aufbewahren. Pad nach jeder Benützung abnehmen.
Netzstecker aus der Steckdose ziehen.
Hebel Neigungsverstellung ziehen und
Griff in senkrechte Position bringen.
Gerät nach hinten kippen und auf dem
Griff ablegen.
6 DE
– 4

1 Mutter
2 Werkzeug
Mutter mit dem beiliegenden Werkzeug
im Uhrzeigersinn abschrauben.
Unterlegscheibe abnehmen.
Pad mittig auf den Treibteller setzen
und andrücken.
Unterlegescheibe aufsetzen.
Mutter gegen den Uhrzeigersinn auf-
schrauben und mit dem beiliegenden
Werkzeug festziehen.
Werkzeug entfernen.
Gerät nach vorne kippen.
Betrieb
GEFAHR
Verletzungsgefahr durch das rotierende
Pad. Hände und Füße nicht in die Nähe des
rotierenden Pads bringen.
Griff einstellen
Hebel Neigungsverstellung ziehen.
Griff in angenehme Position schwen-
ken.
Hebel Neigungsverstellung loslassen.
Transport
Griff in senkrechter Position feststellen.
Gerät nach hinten kippen und zum Ein-
satzort fahren.
Gerät einschalten
몇 Warnung
Beschädigungsgefahr für Bodenbelag. Gerät nicht auf der Stelle betreiben.
Gerät nicht benützen, wenn kein Pad montiert ist.
HINWEIS
Das Gerät kann nicht eingeschaltet werden, wenn sich der Griff in senkrechter
Stellung zum Fußboden befindet.
Kabelhaken nach oben schwenken und
Kabel vollständig vom Gerät abnehmen.
Netzstecker in eine Steckdose stecken.
Die Kontrollleuchte „Netzspannung“
leuchtet.
Griff auf Arbeitshöhe einstellen.
Griff mit beiden Händen festhalten.
Entriegelung links oder rechts drücken
und festhalten.
Schalter auf der gleichen Seite drücken
- das Gerät startet.
Entriegelung loslassen.
Gerät vorwärts und rückwärts über die
zu bearbeitende Fläche schieben.
Zur Unterbrechung des Betriebs Schal-
ter loslassen.
Außerbetriebnahme
Schalter loslassen.
Netzstecker aus der Steckdose ziehen.
Hebel Neigungsverstellung ziehen und
Griff in senkrechte Position bringen.
Kabelhaken nach unten schwenken
und Kabel zwischen Griff und Kabelhaken aufwickeln.
Gerät nach hinten kippen und auf dem
Griff ablegen.
Pad abnehmen.
Gerät nach vorne kippen.
Gehäuse mit einem feuchten Lappen
reinigen.
Gerät in einem trockenen Raum aufbe-
wahren.
몇 WARNUNG
Gerät kann wegrollen und Unfälle verursachen. Gerät nicht auf geneigten Flächen
abstellen.
– 5
7DE

Griff nach vorne schwenken
Bei der 230V/60Hz Variante kann zu
Transport und Lagerung der Griff nach vorne geschwenkt werden.
Hebel Neigungsverstellung ziehen.
Griff nach vorne schwenken.
Hebel Neigungsverstellung loslassen.
Transport
Beim Transport in Fahrzeugen Gerät
nach den jeweils gültigen Richtlinien
gegen Rutschen und Kippen sichern.
Pad aus dem Gerät entfernen.
Pflege und Wartung
GEFAHR
Verletzungsgefahr. Vor allen Arbeiten am
Gerät Netzstecker ziehen.
Netzkabel auf Beschädigung prüfen.
Defektes Netzkabel ersetzen.
Füllungsgrad der Filtertüte prüfen, bei
Bedarf auswechseln.
Wartungsvertrag
Für einen zuverlässigen Betrieb des Gerätes können mit dem zuständigen KärcherVerkaufshaus Wartungsverträge abgeschlossen werden.
Lagerung
몇 VORSICHT
Verletzungs- und Beschädigungsgefahr!
Gewicht des Gerätes bei Lagerung beachten.
Dieses Gerät darf nur in Innenräumen
gelagert werden.
Abstellplatz unter Berücksichtigung des
zulässigen Gesamtgewichts des Gerä-
tes wählen, um die Standsicherheit
nicht zu beeinträchtigen.
Pad aus dem Gerät entfernen.
8 DE
– 6

Hilfe bei Störungen
GEFAHR
Verletzungsgefahr. Vor allen Arbeiten am
Gerät Netzstecker ziehen.
Störung Behebung
Gerät lässt sich nicht starten, Kontrollleuchte „Netzspannung“ leuchtet
nicht
Gerät lässt sich nicht starten, Kontrollleuchte „Netzspannung“ leuchtet
Gerät vibriert stark Pad-Befestigung prüfen
Pad dreht sich nicht Prüfen, ob Fremdkörper das Pad blockiert, gegebe-
Sicherung im Gebäude, Netzkabel, Netzstecker und
Steckdose prüfen. Wird die Sicherung im Gebäude
mehrmals hintereinander ausgelöst, Kundendienst
aufsuchen.
Entriegelung korrekt bedienen, siehe „Gerät einschalten“.
Griff in Arbeitsposition bringen. Bei senkrecht stehendem Griff kann das Gerät nicht gestartet werden.
Korrekte Verbindung der Steckverbindung Steuerleitung prüfen.
Pad reinigen
Pad austauschen
nenfalls Fremdkörper entfernen.
Bei Störungen, die mit Hilfe dieser Tabelle
nicht behoben werden können, Kundendienst rufen.
– 7
9DE
Garantie
In jedem Land gelten die von unserer zuständigen Vertriebsgesellschaft herausgegebenen Garantiebedingungen. Etwaige
Störungen an Ihrem Gerät beseitigen wir
innerhalb der Garantiefrist kostenlos, sofern ein Material- oder Herstellungsfehler
die Ursache sein sollte. Im Garantiefall
wenden Sie sich bitte mit Kaufbeleg an Ihren Händler oder die nächste autorisierte
Kundendienststelle.
Zubehör und Ersatzteile
Es dürfen nur Zubehör und Ersatzteile verwendet werden, die vom Hersteller freigegeben sind. Original-Zubehör und OriginalErsatzteile bieten die Gewähr dafür, dass
das Gerät sicher und störungsfrei betrieben
werden kann.
Ersatzteile
– Eine Auswahl der am häufigsten benö-
tigten Ersatzteile finden Sie am Ende
der Betriebsanleitung.
– Weitere Informationen über Ersatzteile
erhalten Sie unter www.kaercher.com
im Bereich Service.
Zubehör
EU-Konformitätserklärung
Hiermit erklären wir, dass die nachfolgend
bezeichnete Maschine aufgrund ihrer Konzipierung und Bauart sowie in der von uns
in Verkehr gebrachten Ausführung den einschlägigen grundlegenden Sicherheitsund Gesundheitsanforderungen der EURichtlinien entspricht. Bei einer nicht mit
uns abgestimmten Änderung der Maschine
verliert diese Erklärung ihre Gültigkeit.
Produkt: Bodenreiniger
Typ: 1.291-xxx
Einschlägige EU-Richtlinien
2006/42/EG (+2009/127/EG)
2014/30/EU
Angewandte harmonisierte Normen
EN 60335–1
EN 60335–2–67
EN 55014–1: 2006+A1: 2009+A2: 2011
EN 55014–2: 2015
EN 61000–3–2: 2014
EN 61000–3–11: 2000
EN 62233: 2008
Angewandte nationale Normen
-
Die Unterzeichnenden handeln im Auftrag
und mit Vollmacht des Vorstands.
Bezeichnung Teile-Nr.
Pad, weich, natur 6.371-146.0
Pad, weich, beige 6.369-468.0
Pad, mittelweich, rot 6.369-079.0
Pumpsprühflasche, 1 Liter 6.394-409.0
Vorsprüheinrichtung 6.670-020.0
Reinigungsmittel
Bezeichnung Teile-Nr.
Spray Cleaner RM 748, 10
Liter
10 DE
6.295-162.0
Chairman of the Board of Management
Dokumentationsbevollmächtigter:
S. Reiser
Alfred Kärcher SE & Co. KG
Alfred-Kärcher-Straße 28-40
71364 Winnenden (Germany)
Tel.: +49 7195 14-0
Fax: +49 7195 14-2212
Winnenden, 2019/01/01
– 8
Director Regulatory Affairs & Certification

Technische Daten
BDP 50/1500
Leistung
Netzspannung V/Hz 230/50 230/60
Leistungsaufnahme Motor W 1100 1100
Pad
Arbeitsbreite mm 500 500
Durchmesser mm 500 500
Drehzahl 1/min 1500 1500
Anpressdruck N/cm
Maße und Gewichte
Theoretische Flächenleistung m²/h 900 900
Volumen Filtertüte l 1 1
Gewicht kg 34,5 34,0
Abmessungen (l x b x h) mm 760x560x1260 760x560x1260
Kabellänge m 20 20
Netzkabel H07RN-F 3x1,5 mm
Geräuschemission
Schalldruckpegel (EN 60704-1) dB(A) 56 61,3
Gerätevibrationen
Schwingungsgesamtwert (ISO 5349) m/s² 0,35 0,78
2
0,04 0,04
2
– 9
11DE

Please read and comply with
these original instructions prior
to the initial operation of your appliance and
store them for later use or subsequent owners.
Contents
Environmental protection . . . . EN 1
Symbols in the operating in-
structions. . . . . . . . . . . . . . . . . EN 1
Safety instructions. . . . . . . . . . EN 2
Safety Devices . . . . . . . . . . . . EN 2
Unlocking . . . . . . . . . . . . . . . . EN 2
Function . . . . . . . . . . . . . . . . . EN 2
Proper use . . . . . . . . . . . . . . . EN 2
Operating and Functional Ele-
ments . . . . . . . . . . . . . . . . . . . EN 3
Assembly . . . . . . . . . . . . . . . . EN 4
Before Startup. . . . . . . . . . . . . EN 4
Operation . . . . . . . . . . . . . . . . EN 5
Transport. . . . . . . . . . . . . . . . . EN 6
Storage . . . . . . . . . . . . . . . . . . EN 6
Care and maintenance . . . . . . EN 6
Troubleshooting . . . . . . . . . . . EN 7
Warranty . . . . . . . . . . . . . . . . . EN 8
Accessories and Spare Parts . EN 8
EU Declaration of Conformity . EN 8
Technical specifications . . . . . EN 9
Environmental protection
The packaging materials are recyclable. Please do not throw
packaging in the domestic waste
but pass it on for recycling.
Old units contain valuable recyclable materials. Batteries, oil
and similar substances may not
be released into the environment. Therefore please dispose
of old units through suitable collection systems.
Notes about the ingredients (REACH)
You will find current information about the
ingredients at:
www.kaercher.com/REACH
Symbols in the operating
instructions
Danger or hazard levels
DANGER
Immediate danger that can cause severe
injury or even death.
몇 WARNING
Possible hazardous situation that could
lead to severe injury or even death.
몇 CAUTION
Pointer to a possibly dangerous situation,
which can lead to minor injuries.
ATTENTION
Pointer to a possibly dangerous situation,
which can lead to property damage.
12 EN
– 1

Safety instructions
Before using the appliance for the first time,
read and observe these operating instructions and the accompanying brochure:
Safety information for Disc single-pulley
machine machines No. 5.956-659.0.
Safety Devices
Safety devices serve to protect the user
and must not be rendered in operational or
their functions bypassed.
Unlocking
Prevents the machine from being switched
on accidentally.
Function
The appliance is used for the wet cleaning
or polishing of level floors.
The dust generated during polishing is absorbed by an exchangeable filter bag.
– A working distance of 500 mm will im-
prove the efficiency.
– Power supply operation allows a high
capacity without a restriction of the
working time.
Proper use
Use this appliance only as directed in these
operating instructions.
– The appliance should only be used for
polishing level floors.
– The appliance may only be equipped
with original accessories and spare
parts.
– The appliance is not suited for the use
in potentially explosive environments.
– This appliance is designed only for dry
applications and should not be used or
stored in the open under moist conditions.
– 2
13EN
Operating and Functional Elements
8
7
6
5
9
12
1 Right switch
2 Lever for level adjustment
3 Mains cable with mains plug
4 Receptacle (only use manufacturer ap-
proved accessories)
5 Left switch
6 Left unlocking
7 Indicator lamp "Mains voltage present"
8 Right unlocking
9 Handle
10 Cable hook, rotating
11 Plug connection for control cable
12 Vacuum apron
3
4
10
11
12
14 EN
– 3
Assembly
Before Startup
1
2
1 Nut
2 Disc
3 Handle
4 Appliance base
5 Hexagonal screw
6 Female connector control line
7 Male connector control line
Unpack the appliance.
Remove the cable ties from the bottom
end of the handle.
NOTICE
Ensure that the toothed wheel does not fall
out of the opening.
Hold the handle over the appliance
base upright and with the cable hook to
the back.
Insert the bottom end of the handle be-
tween the two tabs of the appliance
base.
Align the borings.
Connect the handle and the appliance
base using the 3 enclosed screws, 6
washers and 3 nuts as shown in the il-
lustration above.
Tighten the screws using the enclosed
open end wrench.
Insert the plug of the control line into the
female connector of the control line.
3
42
5
6
7
Inserting a filter bag
Disconnect the mains plug from the
socket.
Pull the lever for level adjustment and
bring the handle in a vertical position.
Tilt the appliance backward and store it
on the handle.
123
1 Filter bag
2 Cover
3 Connection neck, vacuum apron
Slide the cover downward/to the rear
and remove it.
Insert the filter bag into the appliance
and place over the connection neck of
the vacuum apron.
Replace cover.
Attach the pad
몇 CAUTION
Risk of damage!
Do not store the appliance with inserted
pad. Always remove the pad after every
use.
Disconnect the mains plug from the
socket.
Pull the lever for level adjustment and
bring the handle in a vertical position.
Tilt the appliance backward and store it
on the handle.
– 4
15EN

1 Nut
2 Tool
Unscrew the nut in the clockwise direc-
tion using the enclosed tool.
Remove the washer.
Place the pad on the centre of the driv-
ing plate and press it slightly.
Install the washer.
Screw the nut in the anti-clockwise di-
rection and tighten it using the enclosed
tool.
Remove the tool.
Tilt the appliance forward.
Operation
DANGER
Risk of injury on account of the rotating
pad. Do not bring your hands and feet anywhere close to the rotating pads.
Adjust handle
Pull the lever for level adjustment.
Tilt the handle into a comfortable posi-
tion.
Release the lever for level adjustment.
Transport
Park the handle in vertical position.
Tilt the appliance backwards and drive
it to the place of use.
Turning on the Appliance
몇 Warning
Risk of damage to the floor covering. Do
not operate the appliance on the spot.
Do not use the appliance when no pad is
mounted.
NOTICE
The device cannot be switched on while the
handle is perpendicular to the floor.
Swivel bottom cable hook upward and
remove the cable completely from the
appliance.
Insert the mains plug into a socket.
The indicator lamp "main power" will illuminate.
Set handle to working height.
Hold the handle with both hands.
Press the left or right release and hold
it.
Press the switch on the same side - the
appliance starts.
Release unlocking mechanism.
Move the appliance forward and back-
ward over the surface to be processed.
Release the switch to interrupt opera-
tion.
Shutting down
Release the switch.
Disconnect the mains plug from the
socket.
Pull the lever for level adjustment and
bring the handle in a vertical position.
Swivel the cable hook toward the bot-
tom and wind the cable between the
handle and the cable hook.
Tilt the appliance backward and store it
on the handle.
Remove the pad.
Tilt the appliance forward.
Clean the casing with a damp cloth.
Store the appliance in a dry room.
몇 WARNING
Device can roll away and cause accidents.
Do not park the device on slopes.
16 EN
– 5

Swivel the handle to the front
With the 230V/60Hz variant the handle can
be swivelled to the front for transport and
storage.
Pull the lever for level adjustment.
Swivel the handle to the front.
Release the lever for level adjustment.
Transport
When transporting in vehicles, secure
the appliance according to the guide-
lines from slipping and tipping over.
Remove the pad from the device.
Care and maintenance
DANGER
Risk of injury. Pull the plug from the mains
before carrying out any tasks on the appliance.
Check the mains connection cable for
damages. Replace the defective mains
cable.
Check filled level of the filter bag; re-
place, if required.
Maintenance contract
To ensure a reliable operation of the appliance maintenance contracts can be concluded with the competent Kärcher sales
office.
Storage
몇 CAUTION
Risk of personal injury or damage! Consider the weight of the appliance when storing
it.
This appliance must only be stored in
interior rooms.
Select the storage site for the appliance
taking into consideration the permissi-
ble total weight of the appliance in order
not to impact its stability.
Remove the pad from the device.
– 6
17EN

Troubleshooting
DANGER
Risk of injury. Pull the plug from the mains
before carrying out any tasks on the appliance.
Fault Remedy
Appliance does not start, indicator
lamp "main power" does not illuminate.
Appliance does not start, indicator
lamp "main power" is illuminated.
Appliance vibrates strongly Check pad attachment
Pad does not turn Check if foreign bodies are blocking the pad; remove
Check fuse in the building, main cables, plugs and
socket. If the fuse in the building is tripped several
times, contact customer service.
Properly operate the release, see "switching on the
appliance“.
Put the handle into the working position. With the handle in the upright position, the appliance cannot be
started.
Check for correct connection of the connector in the
control line.
Clean the pad
Replacing the pad
the foreign bodies if required.
In case of faults that cannot be remedied
using the table below please contact the
customer service.
18 EN
– 7

Warranty
The warranty terms published by the relevant sales company are applicable in each
country. We will repair potential failures of
your appliance within the warranty period
free of charge, provided that such failure is
caused by faulty material or defects in manufacturing. In the event of a warranty claim
please contact your dealer or the nearest
authorized Customer Service centre.
Please submit the proof of purchase.
Accessories and Spare Parts
Only use accessories and spare parts
which have been approved by the manufacturer. The exclusive use of original accessories and original spare parts ensures
that the appliance can be operated safely
and trouble free.
Spare parts
– At the end of the operating instructions
you will find a selected list of spare parts
that are often required.
– For additional information about spare
parts, please go to the Service section
at www.kaercher.com.
Accessories
EU Declaration of Conformity
We hereby declare that the machine described below complies with the relevant
basic safety and health requirements of the
EU Directives, both in its basic design and
construction as well as in the version put
into circulation by us. This declaration shall
cease to be valid if the machine is modified
without our prior approval.
Product: Floor cleaner
Type: 1.291-xxx
Relevant EU Directives
2006/42/EC (+2009/127/EC)
2014/30/EU
Applied harmonized standards
EN 60335–1
EN 60335–2–67
EN 55014–1: 2006+A1: 2009+A2: 2011
EN 55014–2: 2015
EN 61000–3–2: 2014
EN 61000–3–11: 2000
EN 62233: 2008
Applied national standards
-
The signatories act on behalf of and with
the authority of the company management.
Description Part no.:
Pad, soft, nature 6.371-146.0
Pad, soft, biege 6.369-468.0
Pad, medium soft, red 6.369-079.0
Pump spray bottle, 1 liter 6.394-409.0
Pre-spraying unit 6.670-020.0
Detergent
Description Part no.:
Spray Cleaner RM 748, 10
liters
6.295-162.0
Chairman of the Board of Management
Documentation supervisor:
S. Reiser
Alfred Kärcher SE & Co. KG
Alfred-Kärcher-Straße 28-40
71364 Winnenden (Germany)
Tel.: +49 7195 14-0
Fax: +49 7195 14-2212
Winnenden, 2019/01/01
– 8
Director Regulatory Affairs & Certification
19EN

Technical specifications
BDP 50/1500
Power
Mains voltage V/Hz 230/50 230/60
Motor output W 1100 1100
Pad
Working width mm 500 500
Diameter mm 500 500
Speed 1/min 1500 1500
Contact pressure N/cm
Dimensions and weights
Theoretical surface cleaning performance m²/h 900 900
Volume of filter bag l 1 1
Weight kg 34,5 34,0
Dimensions (l x b x h) mm 760x560x1260 760x560x1260
Cable length m 20 20
Supply Cord H07RN-F 3x1,5 mm
Noise emission
Sound pressure level (EN 60704-1) dB(A) 56 61,3
Machine vibrations
Vibration total value (ISO 5349) m/s² 0,35 0,78
2
0,04 0,04
2
20 EN
– 9

Lire ce manuel d'utilisation origi-
nal avant la première utilisation
de votre appareil, le respecter et le conserver pour une utilisation ultérieure ou pour le
futur propriétaire.
Table des matières
Protection de l’environnement FR 1
Symboles utilisés dans le mode
d'emploi. . . . . . . . . . . . . . . . . . FR 1
Consignes de sécurité . . . . . . FR 2
Dispositifs de sécurité . . . . . . . FR 2
Déverrouillage. . . . . . . . . . . . . FR 2
Fonction . . . . . . . . . . . . . . . . . FR 2
Utilisation conforme . . . . . . . . FR 2
Eléments de commande et de
fonction . . . . . . . . . . . . . . . . . . FR 3
Montage . . . . . . . . . . . . . . . . . FR 4
Avant la mise en service . . . . . FR 4
Fonctionnement . . . . . . . . . . . FR 5
Transport. . . . . . . . . . . . . . . . . FR 6
Entreposage . . . . . . . . . . . . . . FR 6
Entretien et maintenance . . . . FR 6
Assistance en cas de panne . . FR 7
Garantie . . . . . . . . . . . . . . . . . FR 8
Accessoires et pièces de re-
change . . . . . . . . . . . . . . . . . . FR 8
Déclaration UE de conformité . FR 8
Caractéristiques techniques . . FR 9
Protection de
l’environnement
Les matériaux constitutifs de
l'emballage sont recyclables. Ne
pas jeter les emballages dans
les ordures ménagères, mais les
rendre à un système de recyclage.
Les appareils usés contiennent
des matériaux précieux recyclables lesquels doivent être
rendus à un système de recyclage. Des batteries, de l’huile et
d'autres substances semblables
ne doivent pas être tout simplement jetées. Pour cette raison,
utiliser des systèmes adéquats
de collecte pour éliminer les appareils usés.
Instructions relatives aux ingrédients
(REACH)
Les informations actuelles relatives aux ingrédients se trouvent sous :
www.kaercher.com/REACH
Symboles utilisés dans le
mode d'emploi
Niveaux de danger
DANGER
Pour un danger immédiat qui peut avoir
pour conséquence la mort ou des blessures corporelles graves.
몇 AVERTISSEMENT
Pour une situation potentiellement dangereuse qui peut avoir pour conséquence des
blessures corporelles graves ou la mort.
몇 PRÉCAUTION
Remarque relative à une situation potentiellement dangereuse pouvant entraîner
des blessures légères.
ATTENTION
Remarque relative à une situation éventuellement dangereuse pouvant entraîner
des dommages matériels.
– 1
21FR

Consignes de sécurité
Lire le présent mode d'emploi ainsi que la
brochure ci-jointe Consignes de sécurité
pour les machines d'un seul disque n°
5.956659 avant d'utiliser l'appareil et respecter les instructions.
Dispositifs de sécurité
Les dispositifs de sécurité ont pour but de
protéger l'utilisateur et ils ne doivent donc
jamais être désactivés ni évités.
Déverrouillage
Evite la mise en marche involontaire de
l'appareil.
Fonction
L’appareil est employé pour le polissage
des sols plans par voie humide.
La poussière produite au cours du polissage est emmagasinée dans un sac filtrant
remplaçable.
– Une largeur de travail de 500 mm per-
met une mise en œuvre efficace.
– Un fonctionnement par courant permet
d'obtenir une capacité élevée sans limitation de la durée de travail.
Utilisation conforme
L'utilisation de l'appareil doit être faite en
conformité avec les consignes figurant
dans les instructions de service.
– L'appareil peut être urilizé que pour le
polissage des sols plats.
– L'appareil doit uniquement être équipé
d'accessoires et de pièces de rechange
d'origine.
– L'appareil n'est pas approprié pour l'ap-
plication dans des environnements à
risque d'explosion.
– Cet appareil est destiné pour l'utilisation
à sec et ne peut être utilisé ou gardé à
l'air libre sous des conditions humides.
22 FR
– 2

Eléments de commande et de fonction
8
7
6
5
9
12
1 Interrupteur droite
2 Levier Réglage d'inclination
3 Câble secteur avec fiche secteur
4 Fiche secteur (uniquement pour les ac-
cessoires validés par le fournisseur de
l'appareil)
5 Interrupteur gauche
6 Déverrouillage gauche
7 Voyant de contrôle "il y a tension du
secteur"
8 Déverrouillage droite
9 Poignée
10 Crochet de câble, rotatif
11 Cosse de raccordement Conduite de
commande
3
4
10
11
12
12 Tablier de dépression
– 3
23FR
Montage
Avant la mise en service
1
2
1 Écrou
2 Disque
3 Poignée
4 Partie inférieure de l'appareil
5 Vis à six pans
6 Douille conduite de commande
7 Connecteur conduite de commande
Déballer l’appareil.
Retirer le serre-câble de la partie infé-
rieure de la poignée.
REMARQUE
Veiller que la roue dentée ne tombe pas par
l'ouverture.
Maintenir la poignée verticale et avec le
crochet de câble vers l'arrière au-des-
sus de la partie inférieure de l'appareil.
Mettre en place l'extrémité inférieure de
la poignée entre les deux éclisses de la
partie inférieure de l'appareil.
Aligner les alésages.
Connecter la poignée et la partie infé-
rieure de l'appareil avec les 3 vis, 6 ron-
delles et 3 écrous joints comme présen-
té dans l'illustration ci-dessus.
Serrer les vis avec les clés à fourche
jointes.
Enficher le connecteur de la conduite
de commande dans la douille de
conduite de commande.
3
42
5
6
7
mise en place du sachet filtre
Retirer la fiche secteur de la prise de
courant.
Tirer le levier Réglage d'inclinaison et
positionner la poignée en position verticale.
Verser l'appareil en arrière et poser le
sur la poignée.
123
1 Sac
2 Capot
3 Embouts de raccordement tablier de
dépression
Pousser le recouvrement vers le bas/
l'arrière et le retirer.
Mettre le sac filtrant en place dans l'ap-
pareil et l'enficher sur les embouts de
raccordement du tablier de dépression.
Fixer le capot.
Fixer le pad
몇 PRÉCAUTION
Risque d'endommagement!
Ne pas garder l'appareil avec le pad monté.
Enlever après chaque utilisation le pad.
Retirer la fiche secteur de la prise de
courant.
Tirer le levier Réglage d'inclinaison et
positionner la poignée en position verticale.
Verser l'appareil en arrière et poser le
sur la poignée.
24 FR
– 4

1 Écrou
2 Outil
Dévisser l'écrou avec l'outil joint au
sens des aiguilles d'une montre.
Retirer la rondelle.
Mettre le pad au centre de l'assiette et
presser.
Mettre la rondelle en place.
Dévisser l'écrou au sens inverse des ai-
guille d'une montre et serrer avec l'outil
joint.
Enlever l'outil.
Verser l'appareil en avant.
Fonctionnement
DANGER
Risque de blessure par le pad tournant. Ne
pas mettre les main ou les pieds près du
pad tournant.
Régler la poignée
Tirer le levier Réglage d'inclinaison.
Pivoter la poignée dans la position
confortable.
Lâcher le levier Réglage d'inclinaison.
Transport
Fixer la poignée en position verticale.
Basculer l'appareil vers l'arrière et
l'amener au site de mise en œuvre.
Mise sous tension de l’appareil
몇 Avertissement
Risque d'endommagement pour le revêtement de sol. Ne pas exploiter l'appareil sur
place.
Ne pas utiliser l'appareil, s'l y a aucun pas
monté.
REMARQUE
L'appareil ne peut pas être mis en service
quand la poignée se trouve en position verticale par rapport au sol.
Basculer le crochet de câble vers le
haut et sortir le câble en totalité de l'appareil.
Brancher la fiche secteur dans une
prise de courant.
La lampe témoin "Tension secteur" est
allumée.
Régler la poignée sur la hauteur de tra-
vail.
Maintenir la poignée avec les deux
mains.
Presser le déverrouillage gauche ou
droit et maintenir.
Pousser le commutateur du même cô-
té, l'appareil démarre.
Relâcher le déverrouillage.
Pousser l'appareil en avant et en arrière
sur la surface à travailler.
Pour interrompre le fonctionnement, re-
lâcher le commutateur.
Mise hors service
Relâcher le commutateur.
Retirer la fiche secteur de la prise de
courant.
Tirer le levier Réglage d'inclinaison et
positionner la poignée en position verticale.
Basculer le crochet de câble vers le bas
et enrouler le câble entre la poignée et
le crochet de câble.
Verser l'appareil en arrière et poser le
sur la poignée.
Enlever le pad.
Verser l'appareil en avant.
Essuyer le corps avec un chiffon.
Stocker l’appareil dans un local sec.
– 5
25FR
몇 AVERTISSEMENT
L'appareil peut rouler et causer des accidents. Ne pas poser l'appareil sur des
plans inclinés.
Basculer la poignée vers l'avant
Pour la variante 230V/60Hz, la poignée
peut être basculée vers l'avant pour le
transport et le stockage.
Tirer le levier Réglage d'inclinaison.
Basculer la poignée vers l'avant.
Lâcher le levier Réglage d'inclinaison.
Transport
Sécuriser l'appareil contre les glisse-
ments ou les basculements selon les di-
rectives en vigueur lors du transport
dans des véhicules.
Retirer le pad de l'appareil.
Entretien et maintenance
DANGER
Risque de blessure. Avant d'effectuer tout
type de travail sur l'appareil, débrancher la
fiche secteur.
Vérifier si le câble d'alimentation est en-
dommagé. Remplacer le câble d'alimentation défectueux.
Contrôler le niveau de remplissage du
sac de filtrage, si nécessaire le remplacer.
Contrat de maintenance
Afin de pouvoir garantir un fonctionnement
fiable de l'appareil, il est possible de
conclure des contrats de maintenance
avec le bureau de ventes Kärcher responsable.
Entreposage
몇 PRÉCAUTION
Risque de blessure et d'endommagement !
Prendre en compte le poids de l'appareil à
l'entreposage.
Cet appareil doit uniquement être entre-
posé en intérieur.
Choisir l'emplacement en tenant
compte du poids total de l'appareil, afin
de ne pas porter préjudice à la stabilité.
Retirer le pad de l'appareil.
26 FR
– 6

Assistance en cas de panne
DANGER
Risque de blessure. Avant d'effectuer tout
type de travail sur l'appareil, débrancher la
fiche secteur.
Panne Remède
Impossible de démarrer l'appareil,
la lampe témoin "Tension secteur"
ne s'allume pas.
Impossible de démarrer l'appareil,
la lampe témoin "Tension secteur"
s'allume.
L'appareil vibre fortement Contrôler la fixation du pad
Le pad ne tourne pas Vérifier si des corps étrangers bloquent les pads et le
Contrôler le fusible dans l'appareil, le câble d'alimentation, la fiche électrique et la prise électrique. Si le fusible s'est déclenché plusieurs fois à la suite, faire appel au SAV.
Commander correctement le déverrouillage, voir
"Mettre l'appareil en service".
Amener la poignée en position de travail. Lorsque la
poignée est en position verticale, l'appareil ne peut
pas être démarré.
Contrôler la connexion correcte de la connexion enfichée Conduite de commande.
Nettoyer le pad
Remplacer le pad
cas échéant, éliminer les corps étrangers.
En cas de pannes ne pouvant pas être résolues grâce aux instructions de ce tableau, appeler le service après-vente.
– 7
27FR
Garantie
Dans chaque pays, les conditions de garantie en vigueur sont celles publiées par
notre société de distribution responsable.
Les éventuelles pannes sur l’appareil sont
réparées gratuitement dans le délai de validité de la garantie, dans la mesure où
celles-ci relèvent d'un défaut matériel ou
d'un vice de fabrication. En cas de recours
en garantie, adressez-vous à votre revendeur ou au service après-vente agréé le
plus proche munis de votre preuve d'achat.
Accessoires et pièces de
rechange
Utiliser uniquement des accessoires et des
pièces de rechange autorisés par le fabricant. Des accessoires et des pièces de rechange d’origine garantissent un fonctionnement sûr et parfait de l’appareil.
Pièces de rechange
– Une sélection des pièces de rechange
utilisées le plus se trouve à la fin du
mode d'emploi.
– Vous trouverez plus d'informations sur
les pièces de rechange dans le menu
Service du site www.kaercher.com.
Accessoires
Déclaration UE de conformité
Nous certifions par la présente que la machine spécifiée ci-après répond de par sa
conception et son type de construction ainsi que de par la version que nous avons
mise sur le marché aux prescriptions fondamentales stipulées en matière de sécurité et d’hygiène par les directives européennes en vigueur. Toute modification apportée à la machine sans notre accord rend
cette déclaration invalide.
Produit : Nettoyeur de plancher
Type : 1.291-xxx
Directives européennes en vigueur :
2006/42/CE (+2009/127/CE)
2014/30/UE
Normes harmonisées appliquées :
EN 60335–1
EN 60335–2–67
EN 55014–1: 2006+A1: 2009+A2: 2011
EN 55014–2: 2015
EN 61000–3–2: 2014
EN 61000–3–11: 2000
EN 62233: 2008
Normes nationales appliquées :
-
Les signataires agissent sous ordre et avec
le pouvoir de la direction.
Désignation Référence
Pad, doux, nature 6.371-146.0
Pad, douce, beige 6.369-468.0
Pad, moyenne doux, rouge 6.369-079.0
Bouteille de pulvérisation de
pompe, 1 litre
Dispositif de pré-arrosage 6.670-020.0
6.394-409.0
Produit détergent
Désignation Référence
Spray Cleaner RM 748, 10
litres
28 FR
6.295-162.0
Chairman of the Board of Management
Responsable de la documentation :
S. Reiser
Alfred Kärcher SE & Co. KG
Alfred-Kärcher-Straße 28-40
71364 Winnenden (Germany)
Tel.: +49 7195 14-0
Fax: +49 7195 14-2212
Winnenden, 2019/01/01
– 8
Director Regulatory Affairs & Certification

Caractéristiques techniques
BDP 50/1500
Performances
Tension du secteur V/Hz 230/50 230/60
Puissance absorbée Moteur W 1100 1100
Pad
Largeur de travail mm 500 500
Diamètre mm 500 500
Vitesse de rotation t/min 1500 1500
Pression appliquée par les brosses N/cm
Dimensions et poids
Surface théoriquement nettoyable m²/h 900 900
Volume sac filtrant l 1 1
Poids kg 34,5 34,0
Dimensions (l x l x h) mm 760x560x1260 760x560x1260
Longueur de câble m 20 20
Câble d’alimentation H07RN-F 3x1,5 mm
Emissions sonores
Niveau de pression acoustique (EN 60704-1)dB(A) 56 61,3
Vibrations de l'appareil
Valeur globale de vibrations (ISO 5349) m/s² 0,35 0,78
2
0,04 0,04
2
– 9
29FR

Prima di utilizzare l'apparecchio
per la prima volta, leggere le
presenti istruzioni originali, seguirle e conservarle per un uso futuro o in caso di rivendita dell'apparecchio.
Indice
Protezione dell’ambiente. . . . . IT 1
Simboli riportati nel manuale
d'uso . . . . . . . . . . . . . . . . . . . . IT 1
Norme di sicurezza . . . . . . . . . IT 2
Dispositivi di sicurezza . . . . . . IT 2
Sbloccaggio . . . . . . . . . . . . . . IT 2
Funzione . . . . . . . . . . . . . . . . . IT 2
Uso conforme a destinazione . IT 2
Elementi di comando e di funzio-
ne . . . . . . . . . . . . . . . . . . . . . . IT 3
Montaggio . . . . . . . . . . . . . . . . IT 4
Prima della messa in funzione IT 4
Funzionamento . . . . . . . . . . . . IT 5
Trasporto. . . . . . . . . . . . . . . . . IT 6
Supporto . . . . . . . . . . . . . . . . . IT 6
Cura e manutenzione . . . . . . . IT 6
Guida alla risoluzione dei guastiIT 7
Garanzia . . . . . . . . . . . . . . . . . IT 8
Accessori e ricambi. . . . . . . . . IT 8
Dichiarazione di conformità UE IT 8
Dati tecnici . . . . . . . . . . . . . . . IT 9
Protezione dell’ambiente
I materiali dell’imballaggio sono
riciclabili. Non smaltire l’imballaggio con i rifiuti domestici, ma
conferirlo al riciclaggio.
Gli apparecchi usati contengono
materiali riciclabili preziosi, che
dovrebbero pertanto essere
conferiti al riciclaggio per assicurare il loro riutilizzo. Batterie, olio
e sostanze simili non devono essere dispersi nell’ambiente.
Smaltire pertanto gli apparecchi
usati attraverso idonei centri di
raccolta.
Avvertenze sui contenuti (REACH)
Informazioni aggiornate sui contenuti sono
disponibili all'indirizzo:
www.kaercher.com/REACH
Simboli riportati nel manuale
d'uso
Livelli di pericolo
PERICOLO
Per un rischio imminente che determina lesioni gravi o la morte.
몇 AVVERTIMENTO
Per una situazione di rischio possibile che
potrebbe determinare lesioni gravi o la morte.
몇 PRUDENZA
Indica una probabile situazione pericolosa
che potrebbe causare lesioni leggere.
ATTENZIONE
Indica una probabile situazione pericolosa
che potrebbe determinare danni alle cose.
30 IT
– 1
 Loading...