


PORTABLE MINIDISC RECORDER GRABADOR PORTÁTIL DE MINIDISC ENREGISTREUR DE MINIDISC PORTABLE
XM-R70SL/BK
INSTRUCTIONS
MANUAL DE INSTRUCCIONES MANUEL D’INSTRUCTIONS
For Customer Use:
Enter below the Model No. and Serial No. which are located either on the rear, bottom or side of the cabinet. Retain this information for future reference.
Model No.
Serial No.
LVT0335-005A [J]

IMPORTANT FOR LASER PRODUCTS / IMPORTANTE PARA LOS PRODUCTOS LÁSER / IMPORTANT POUR
LES PRODUITS LASER
CAUTION!
THIS PRODUCT UTILIZES A LASER.
USE OF CONTROLS OR ADJUSTMENTS OR PERFORMANCE OF PROCEDURES OTHER THAN THOSE SPECIFIED HEREIN MAY RESULT IN HAZARDOUS RADIATION EXPOSURE.
DO NOT OPEN COVERS AND DO NOT REPAIR YOURSELF. REFER SERVICING TO QUALIFIED PERSONNEL.
WARNING:
TO REDUCE THE RISK OF FIRE OR ELECTRIC SHOCK, DO NOT EXPOSE THIS APPLIANCE TO RAIN OR MOISTURE.
1.CLASS 1 LASER PRODUCT
2.DANGER: Invisible laser radiation when open and interlock failed or defeated. Avoid direct exposure to beam.
3.CAUTION: Do not open the top cover. There are no user serviceable parts inside the Unit; leave all servicing to qualified service personnel.
The AC adaptor AA-R552 is not intended to be serviced. Should the product cease to function in its intended manner, it should be returned to the manufacturer or be discarded.
This device complies with part 15 of the FCC Rules. Operation is subject to the following two conditions:
(1) This device may not cause harmful interference, and (2) this device must accept any interference received, including interference that may cause undesired operation.
INFORMATION (For U.S.A.)
This equipment has been tested and found to comply with the limits for a Class B digital device, pursuant to Part 15 of the FCC Rules. These limits are designed to provide reasonable protection against harmful interference in a residential installation. This equipment generated, uses, and can radiate radio frequency energy and, if not installed and used in accordance with the instructions, may cause harmful interference to radio communications. However, there is no guarantee that interference will not occur in a particular installation. If this equipment does cause harmful interference to radio or television reception, which can be determined by turning the equipment off and on, the user is encouraged to try to correct the interference by one or more of the following measures:
-Reorient or relocate the receiving antenna.
-Increase the separation between the equipment and receiver.
-Connect the equipment into an outlet on a circuit different from that to which the receiver is connected.
-Consult the dealer or an experienced radio/TV technician for help.
INFORMATION (For Canada)
This digital apparatus does not exceed the Class B limits for radio noise emissions form digital apparatus as set out in the interference - causing equipment standard entitled “Digital Apparatus”, ICES-003 of the Department of Communications.
• • • • • • • • • • • • • • •
¡ADVERTENCIA!
ESTA APARATO UTILIZA UN LÁSER.
EL USAR LOS CONTROLES, HACER LOS REGLAJES O LOS PASOS REQUERIDOS EN FORMA DIVERSA DE LA AQUÍ EXPUESTA PUEDE REDUNDAR EN EXPOSICIÓN PELIGROSA A LA RADIACIÓN.
NO ABRA LAS TAPES NI HAGA REPARACIONES USTED MISMO. EN CASO DE PRODUCIRSE ANOMALÍAS SOLICITE AYUDA DE PERSONAL CUALIFICADO.
AVISO:
PARA REDUCIR EL RIESGO DE INCENDIOS O SACUDIDAS ELÉCTRICAS, NO LO EXPONGA A LA LLUVIA O HUMEDAD.
1.PRODUCTO LASER CLASE 1
2.PELIGRO: En el interior hay radiación láser invisible. Evite el contacto directo con el haz.
3.PRECAUCIÓN : No abra la tapa superior. En el interior de la unidad no existen piezas reparables por el usuario; deje todo servicio técnico en manos de personal calificado.
El adaptador de corriente continua AA-R552 no es reparable. Si deja de funcionar correctamente deberá desecharse o devolverse al fabricante.
Este aparato cumple el apartado 15 de las normas FCC. Su manejo está sujeto a las dos condiciones siguientes:
(1) El aparato no deberá provocar interferencias nocivas y (2) el aparato debe aceptar cualquier interferencia recibida, incluyendo las interferencias que puedan causar un funcionamiento indeseado.
IMPORTANTE (EE. UU.)
Este equipo se ha sometido a todo tipo de pruebas y cumple con las normas establecidas para dispositivos de Clase B, de conformidad con la Parte 15 de las reglas de la FCC (Comisión Federal de Comunicaciones). Estas reglas están diseñadas para asegurar una protección razonable contra este tipo de interferencias en las instalaciones residenciales. Este equipo genera y utiliza energía de radiofrecuencia. Si no se instala y utiliza debidamente, es decir, conforme a las instrucciones, podrían producirse interferencias en radiocomuniccaciones. Sin embargo, no se garantiza que estas interferencias no se produzcan en una instalación determinada. Si esta equipo ocasiona interferencias en la recepción de radio o televisión, lo cual puede comprobarse mediante la conexión o desconexión del equipo, el problema podará corregirse mediante una o una combinación de las siguientes medidas:
–Reorienta la antena receptora o cámbiela de lugar.
–Aumente la separación entre el equipo y el aparato receptor.
–Enchufe el equipo a una toma de corriente situada en un circuito distinto del aparato receptor.
–Consulte a su distribuidor o a un técnico experto en radio/televisión.
G-1

ATTENTION!
CET APPAREIL EST DOTÉ D'UN LECTEUR AU LASER. L'UTILISATION DE COMMANDES OU LE RECOURS À DES RÉGLAGES AUTRES QUE CEUX INDIQUÉS DANS CE MANUEL PEUVENT PRÉSENTER DES RISQUES D'EXPOSITION À DES RADIATIONS.
NE PAS OUVRIR LE BOÎTIER. TOUTE RÉPARATION DOIT ÊTRE FAITE PAR UN PERSONNEL QUALIFIÉ ET NON PAR L'USAGER.
MISE EN GARDE:
AFIN DE PRÉVENIR TOUR RISQUE D'INCENDIE OU DE CHOCS ÉLECTRIQUES, NE PAS L'EXPOSER À LA PLUIE OU À UNE HUMIDITÉ EXCESSIVE.
RENSEIGNEMENT (Pour Canada)
Cet appareil numérique respecte les limites de bruits radioélectriques applicables aux appareils numériques de Classe B prescrites dans la norme sur le matériel brouilleur: “Appareils Numériques”, ICES-003 édictée par le ministre des Communications.
1.PRODUIT LASER CLASSE1
2.ATTENTION: Radiation laser invisible quand l'appareil est ouvert ou que le verrouillage est en panne ou désactivé. Eviter une exposition directe au rayon.
3.ATTENTION: Ne pas ouvrir le couvercle du dessus. Il n'y a aucune pièce utilisable à l'intérieur. Laisser à un personnel qualifié le soin de réparer votre appareil.
Aucune intervention technique n’est prévue pour l’adaptateur secteur AA-R552. En cas d’anomalie dans le fonctionnement de l’appareil, renvoyer celui-ci au fabricant ou le mettre directement aux rebuts.
• • • • • • • • • • • • • • •
NEVER TOUCH THE LENS.
NO TOCAR NUNCA LA LENTE.
NE JAMAIS TOUCHER LA LENTILLE.
G-2
English
Thank you for purchasing this JVC product. Please read these instructions carefully before starting operation to be sure to obtain optimum performance and a longer service life from the unit.
Table of Contents |
|
Supplied Accessories .................................................... |
1 |
Location of Controls ..................................................... |
1 |
Power Supply Preparations ........................................... |
2 |
Accidental Operation Prevention Function |
|
(Hold Mode) ............................................................ |
3 |
Normal Play .................................................................. |
3 |
Showing the Disc Information ...................................... |
5 |
Repeat Play and Random Play ..................................... |
5 |
Selecting the Operational Options of Remote Control . 6 |
|
Preparation Before Recording ...................................... |
6 |
Check Items Before Starting Recording ....................... |
7 |
Standard Recording (MONO/STEREO) ...................... |
7 |
SYNCHRO Recording (SYNCHRO) ........................... |
8 |
Editing the MD ............................................................. |
8 |
Dividing Tracks (DIVIDE Function) ............................ |
9 |
Joining Tracks (JOIN Function) ................................... |
9 |
Moving Tracks (MOVE Function) ............................. |
10 |
Erasing Tracks (ERASE Function) ............................. |
10 |
Erasing All the Tracks (ALL ERASE Function) ........ |
10 |
Giving Titles to MD (TITLE Function) ...................... |
11 |
Using the Unit with Optional Accessories ................. |
12 |
Cautions ...................................................................... |
12 |
Information on MDs (Minidiscs) ............................... |
13 |
MD (Minidisc) Messages ........................................... |
14 |
Minidisc Limitations .................................................. |
15 |
Rules of Digital Dubbing ........................................... |
15 |
Maintenance ............................................................... |
15 |
TroubleShooting Guide .............................................. |
16 |
Specifications ............................................................. |
16 |
Supplied Accessories
AC adaptor (AA-R552) ......................................... |
1 pc. |
Lithium–ion battery (rechargeable) (BN-R3610) |
.. 1 pc. |
||||||||
Headphones ........................................................... |
1 pc. |
External Battery case ............................................. |
1 pc. |
||||||||
Remote controller .................................................. |
1 pc. |
Carrying pouch ...................................................... |
1 pc. |
||||||||
|
|
|
|
|
|
|
|
|
|
|
|
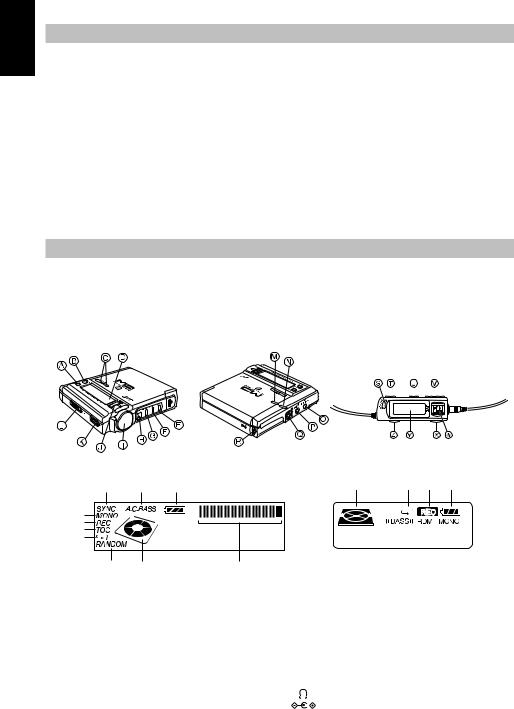
Location of Controls |
|
|
|
|
|
|
|
|
|
|
|
|
|
|
|
|
|
|
|
|
|
|
|
|
|
|
|
|
|
|
|
|
|
|
|
|
|
|
|
|
|
|
|
|
|
|
|
[Display on the unit] |
[Display on the remote control] |
A.C. |
Disc Mark Repeat REC Battery |
Synchro BASS Battery |
-dB |
40 |
12 |
OVER |
MONO |
|
|
|
REC |
|
|
|
TOC |
|
|
|
Repeat |
|
|
|
RANDOM Disc Mark |
Peak Level Meter |
|
|
|
|
A.C. BASS |
MONO |
||
Random
[On the unit] |
|
|
|
[On the remote control] |
A DISPLAY / CHARA. button |
J SET button |
|
|
S A.C.BASS (Active Clear Bass) |
B EDIT/ENTER button |
K REC switch |
|
|
button |
C VOLUME +, – button |
L OPEN switch |
|
|
T P.MODE (Play Mode) button |
D Display |
M HOLD switch |
|
|
U HOLD switch |
E Skip / search button (¢) |
N REC MODE switch |
|
|
V VOLUME +, – button |
F Skip / search button (4) |
O MIC (PLUG IN POWER) jack |
W Skip / search buttons (4¢), |
||
G Stop (7)/CHARGE button |
P LINE IN (OPTICAL) jack |
Play / pause button (6) |
||
H Play / pause button (6) |
Q Headphones jack ( |
) |
X Stop button (7) |
|
I JOG dial |
R DC IN 6V jack ( |
|
) |
Y Display |
|
||||
|
|
|
|
Z DISPLAY button |
1
Power Supply Preparations
As a power supply source, you can use the rechargeable battery and/or dry-cell batteries, or AC adaptor. For information on operating times of batteries, refer to the specifications (page 16).
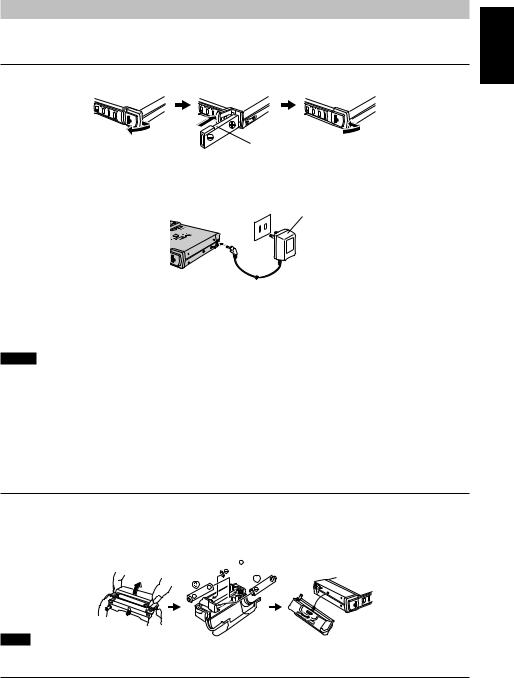
Using lithium–ion battery (rechargeable battery) (BN-R3610)
1 Insert the rechargeable battery into the unit.
Cut part |
Slide the cover and open it. |
Insert the battery with its “–” ter- |
Firmly close the cover. |
|
minal facing you and its cut part |
|
|
facing up. |
|
English
2 To charge the rechargeable battery, connect the supplied AC adaptor.
To AC power outlet |
AC adaptor |
3Press the 7/CHARGE button twice on the unit.
“CHARGE” appears on the display and charging starts. When charging is completed, “CHARGE” will disappear.
• “CHARGE” will appear for 5 seconds even when no lithium-ion battery is inserted.
4Disconnect the AC adaptor.
Notes
•Recharging is not made if the unit is being used.
•It takes approximately 2 hours to recharge the rechargeable battery.
•Rechargeable battery has a service life of approximately 500 charge-discharge cycles. If the operating time on one full charge becomes noticeably shorter than it used to be, the battery has reached the end of its service life and should be replaced.
•The AC adaptor may become warm while recharging is in progress. This is not a malfunction.
•Before starting recording, fully charge the rechargeable battery. Otherwise, the unit may shut off during recording.
•Recharging with this unit shall be made at the temperature from +5°C to +35°C (41°F to 95°F). Otherwise, “HIGH TEMP” or “LOW TEMP” will appear on the display.
Using dry-cell batteries (not included)
1As explained below, open the battery cover of the battery case and insert three AA (LR6) alkaline batteries into the battery compartment.
2Turn the knob of the battery case in the direction as shown by the arrow until it stops. (To detach the battery case, turn the knob toward in reverse until the battery case is removed.) 
(Bottom View)
Note
To lengthen the battery life, you can use both rechargeable battery and the dry-cell batteries.
Using the AC adaptor
Connect the supplied AC adaptor to the unit.
Refer to the connecting diagram in “Using lithium-ion battery (rechargeable battery)”.
When the unit is turned off with a lithium-ion battery inserted, “CHARGE” is displayed and recharging automati-
cally starts. |
2 |
|
English
Note
The unit is in the standby condition when the AC adaptor is connected. The primary circuit is always “live” as long as the AC adaptor is connected to an electrical outlet.
Battery indicator
The battery indicator appears on the display of the unit and remote control. When the indication changes as follows, power will be shut off a short while after.
Rechargeable battery: Recharge it.
Dry-cell batteries: Replace them with new ones.
Note
The battery indicator also appears when the AC adaptor is connected, though it has no meaning.
Accidental Operation Prevention Function (Hold Mode)
This function prevents the unit from accidental button operation.
The unit and remote control have the HOLD switches, each of which works independently.
Bot tom of the unit
Top of the remote control
Slide the HOLD switch in the direction shown by the arrow to activate it.
When the HOLD switch of the unit or remote control is activated, no button operation is possible in the unit or the remote control.
• Once the HOLD switch of the unit has been activated, “HOLD” will appear each time a button on the unit is pressed.
To operate the unit or remote control normally, return the HOLD switch.
Normal Play
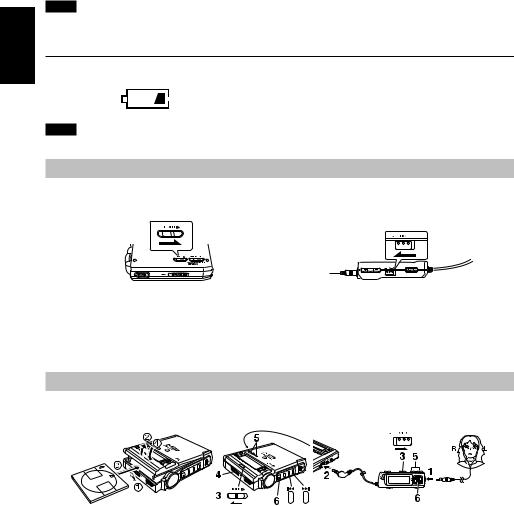
Follow the numbers in the figure to normal-play.
1Connect the headphones plug firmly.
2Connect the remote control plug firmly.
3Release the HOLD switches.
4Load an MD.
1 Slide the OPEN switch to open the lid.
2 Open the lid by hand.
3 Insert the MD into the MD slot beneath the lid, with its label side facing up. Insert the MD until it stops. Be sure %or ]mark on the MD directs as shown in the figure.
4 Close the lid.
“TOC Reading” appears on the display. Then the track number and playback time appear.
5Adjust the VOLUME level between 0 and 25.
Press the VOLUME+, – button on the unit or remote control. To continuously change the volume level, depress the VOLUME button.
3
 Loading...