

Page 1

Jamo S 502
Page 2

Page 3

english
français
deutsch
svenska
español
suomi
Page 4

english
Contents
Introduction 5
Connecting the system 6
Geneal setup 12
Speaker setup 14
Audio setup 15
DivX(R) Registration 16
Language setup 17
Playing back files from Disc and USB 18
Radio - Basic operation and storing 19
Troubleshooting 20
Service and warranty 21
4
Page 5
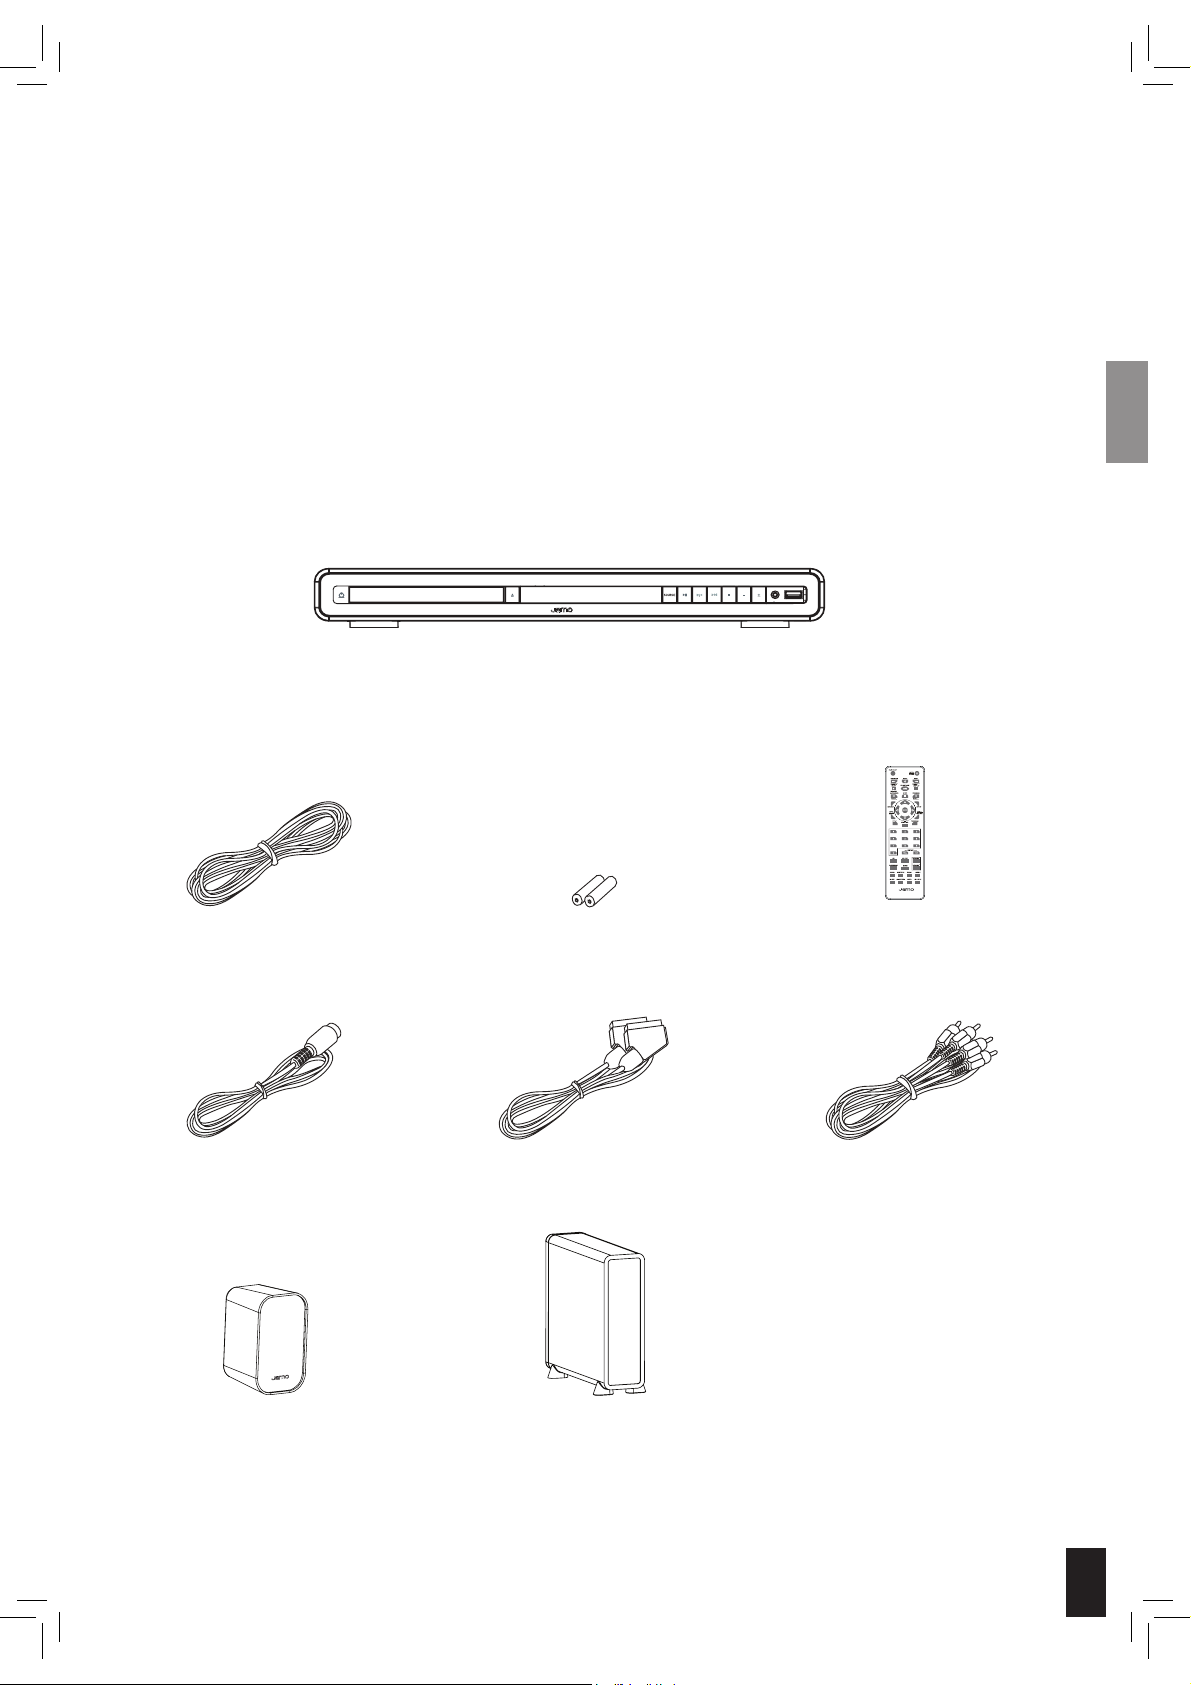
Introduction
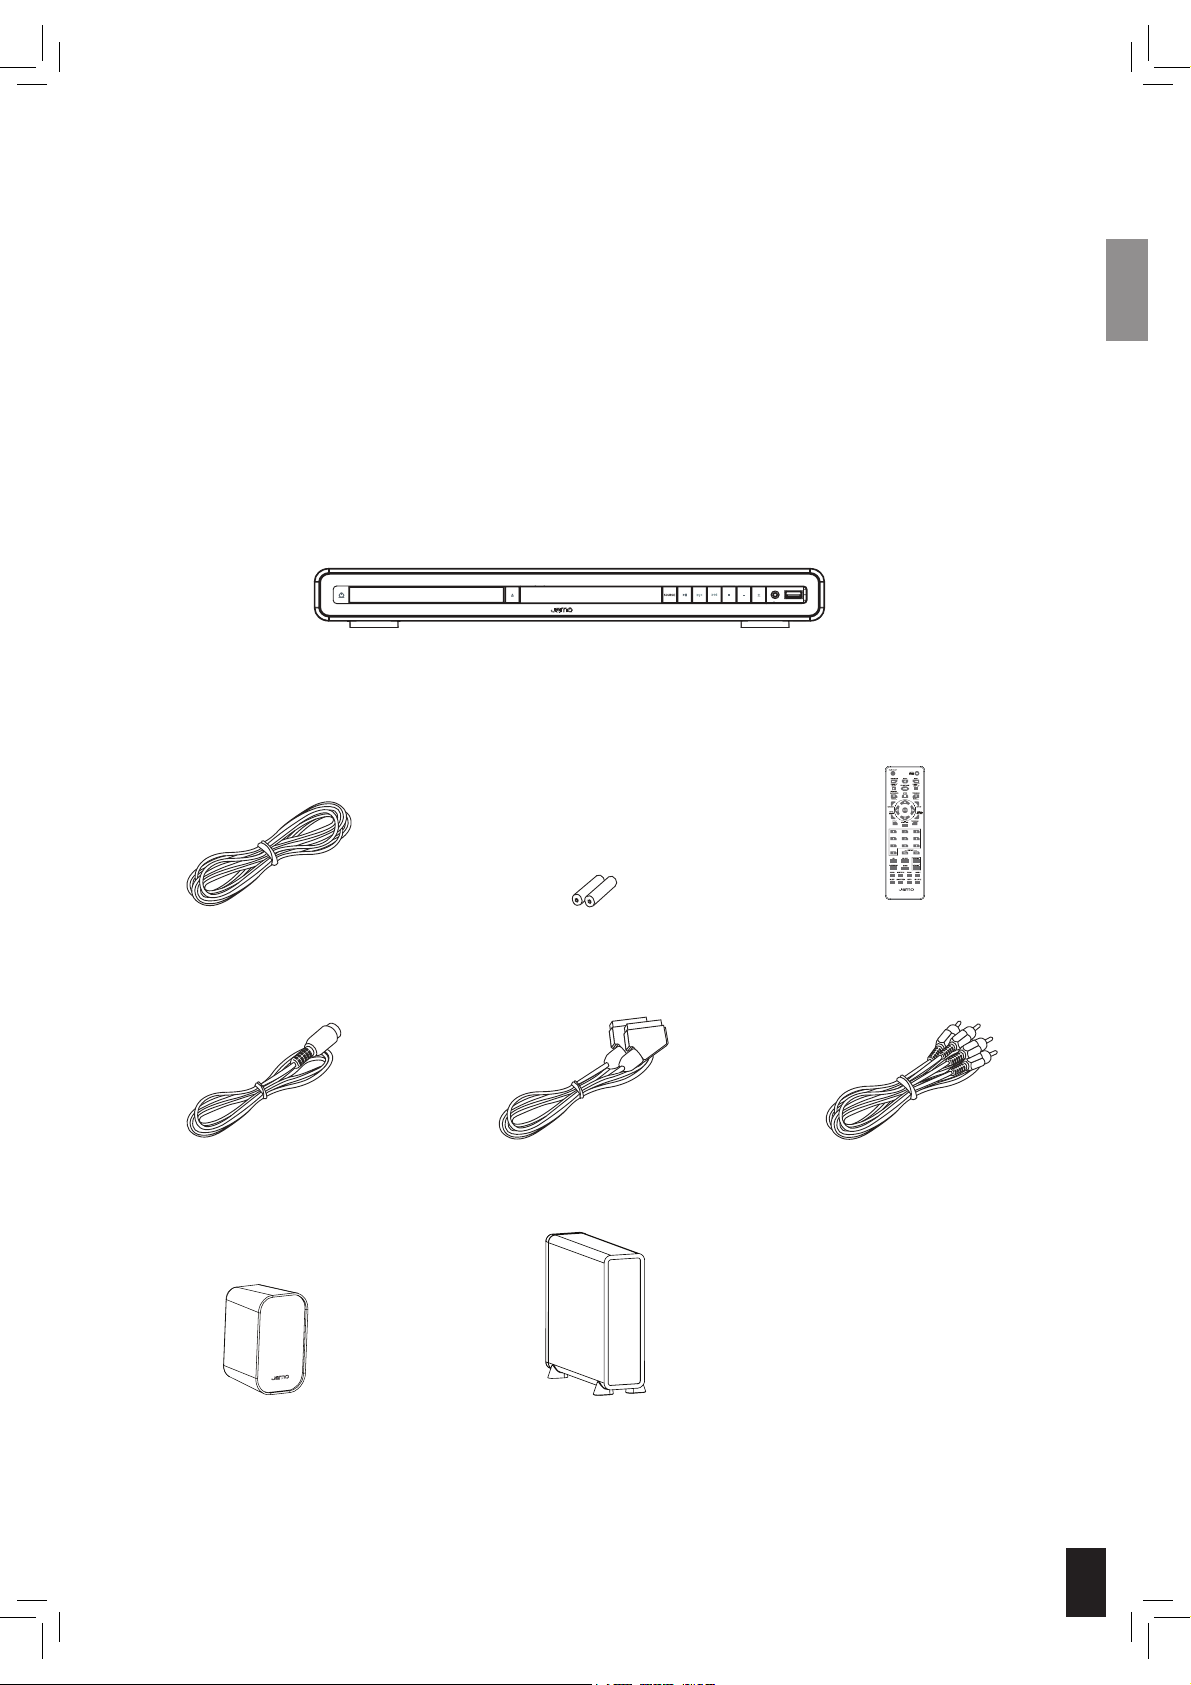
Make sure the following accessories are included with your S 502 package.
DVD-Receiver Jamo S DVR 52
Aux
REMOTECONTROLLER
Speaker cable Remote control
Batteries
for the remote control
SCARTFM Antenna
Audio cable /
Composite Video
5 x speakers
Subwoofer
5
Page 6
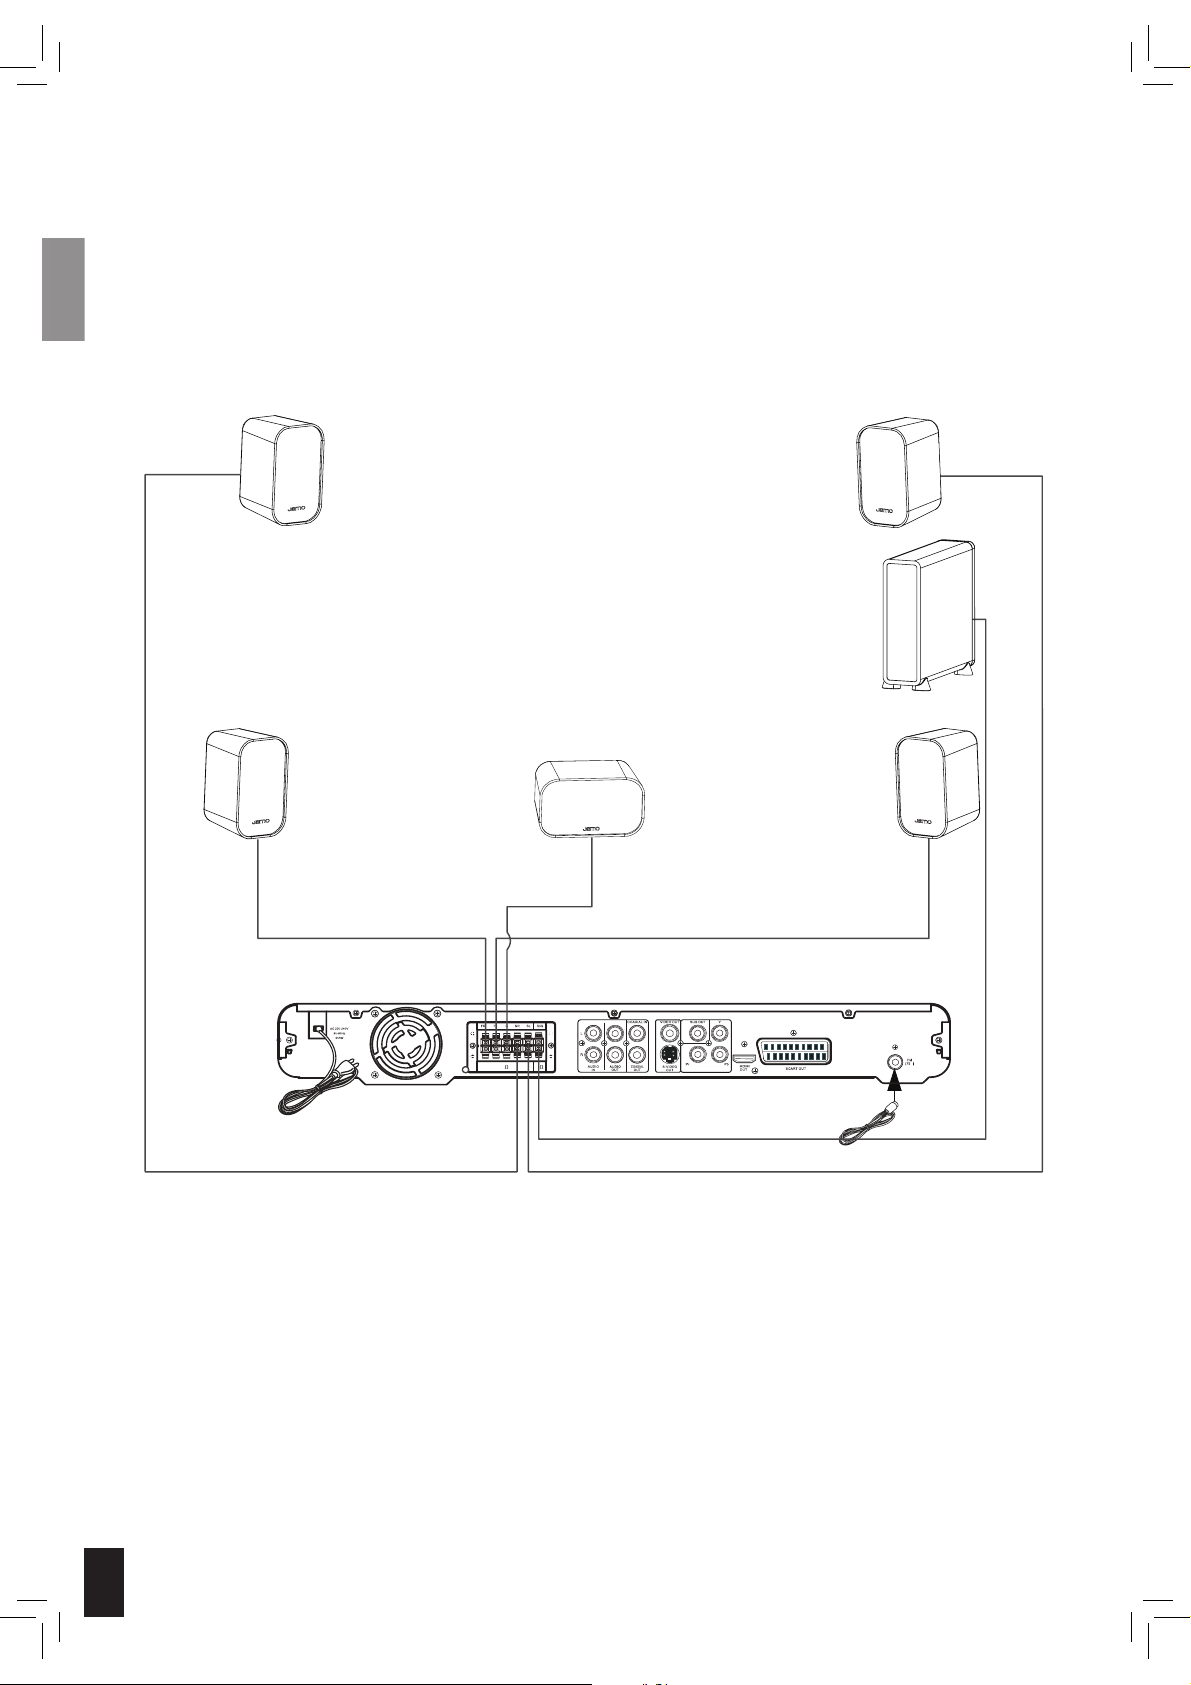
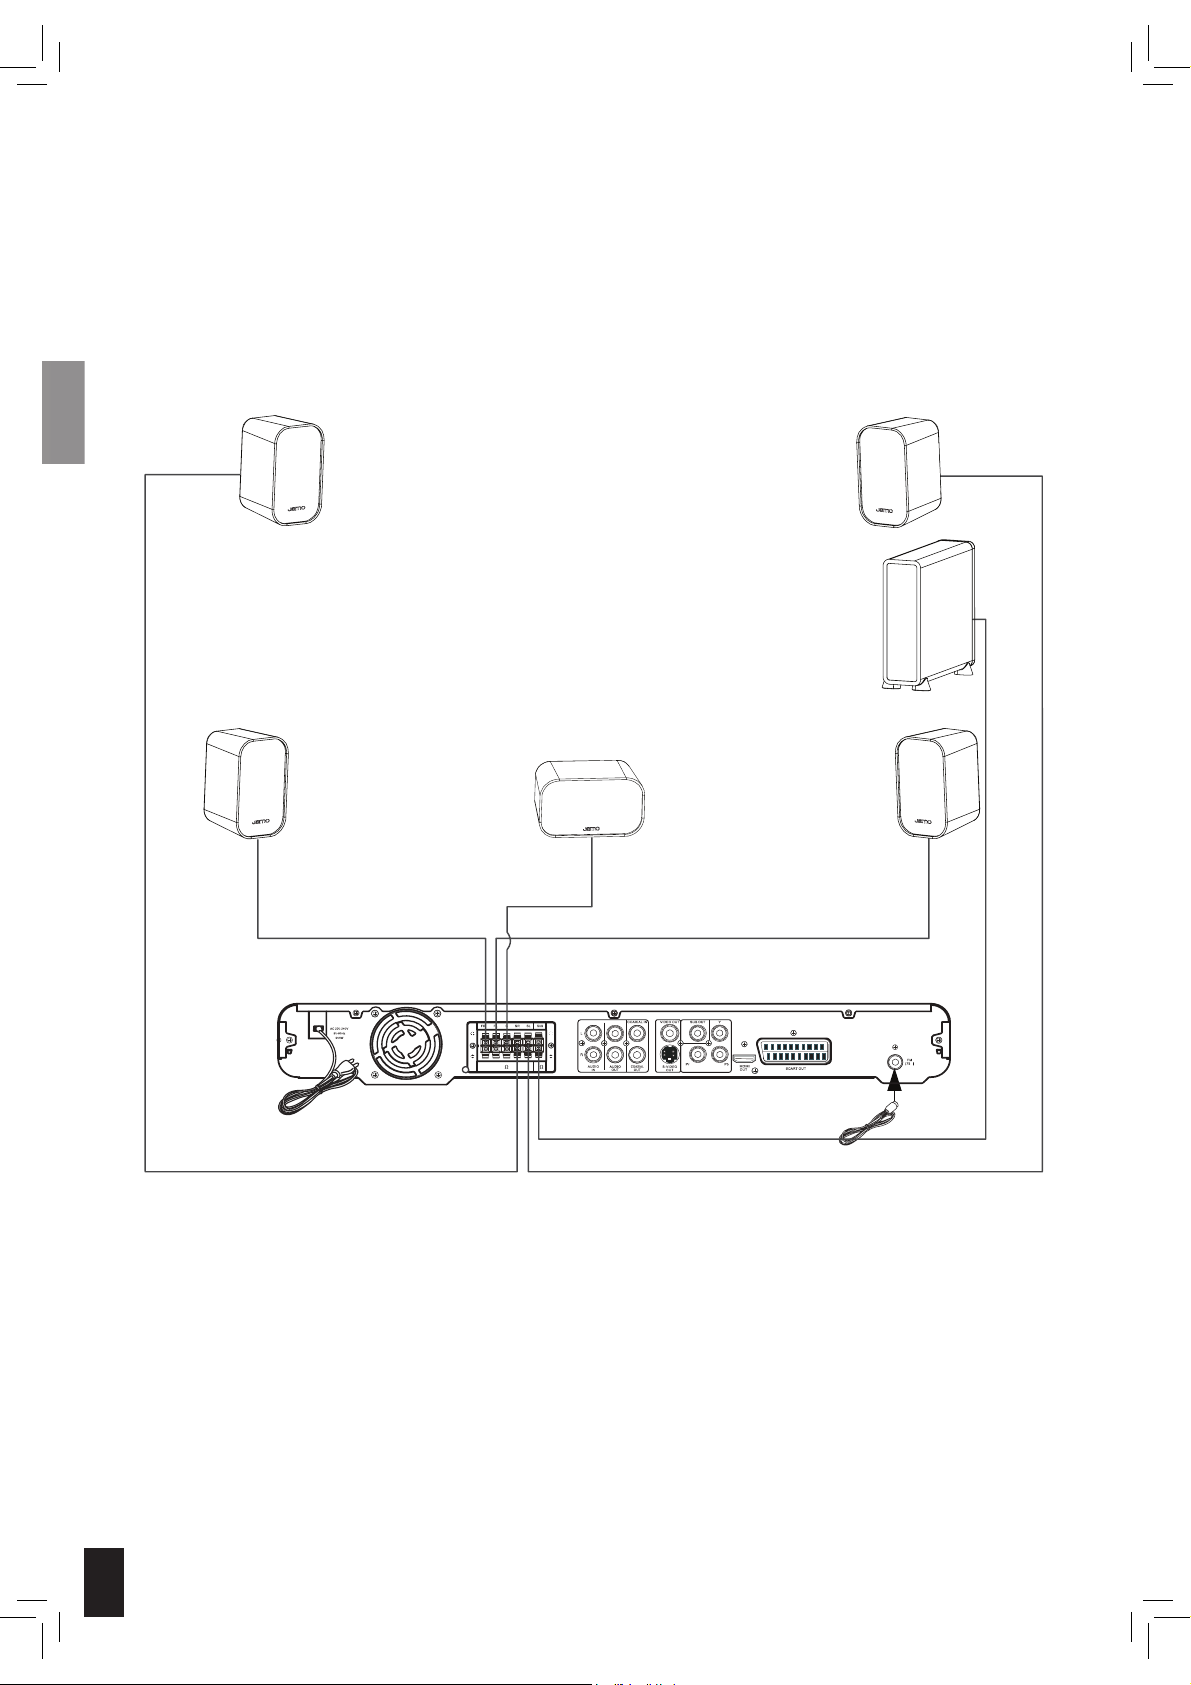
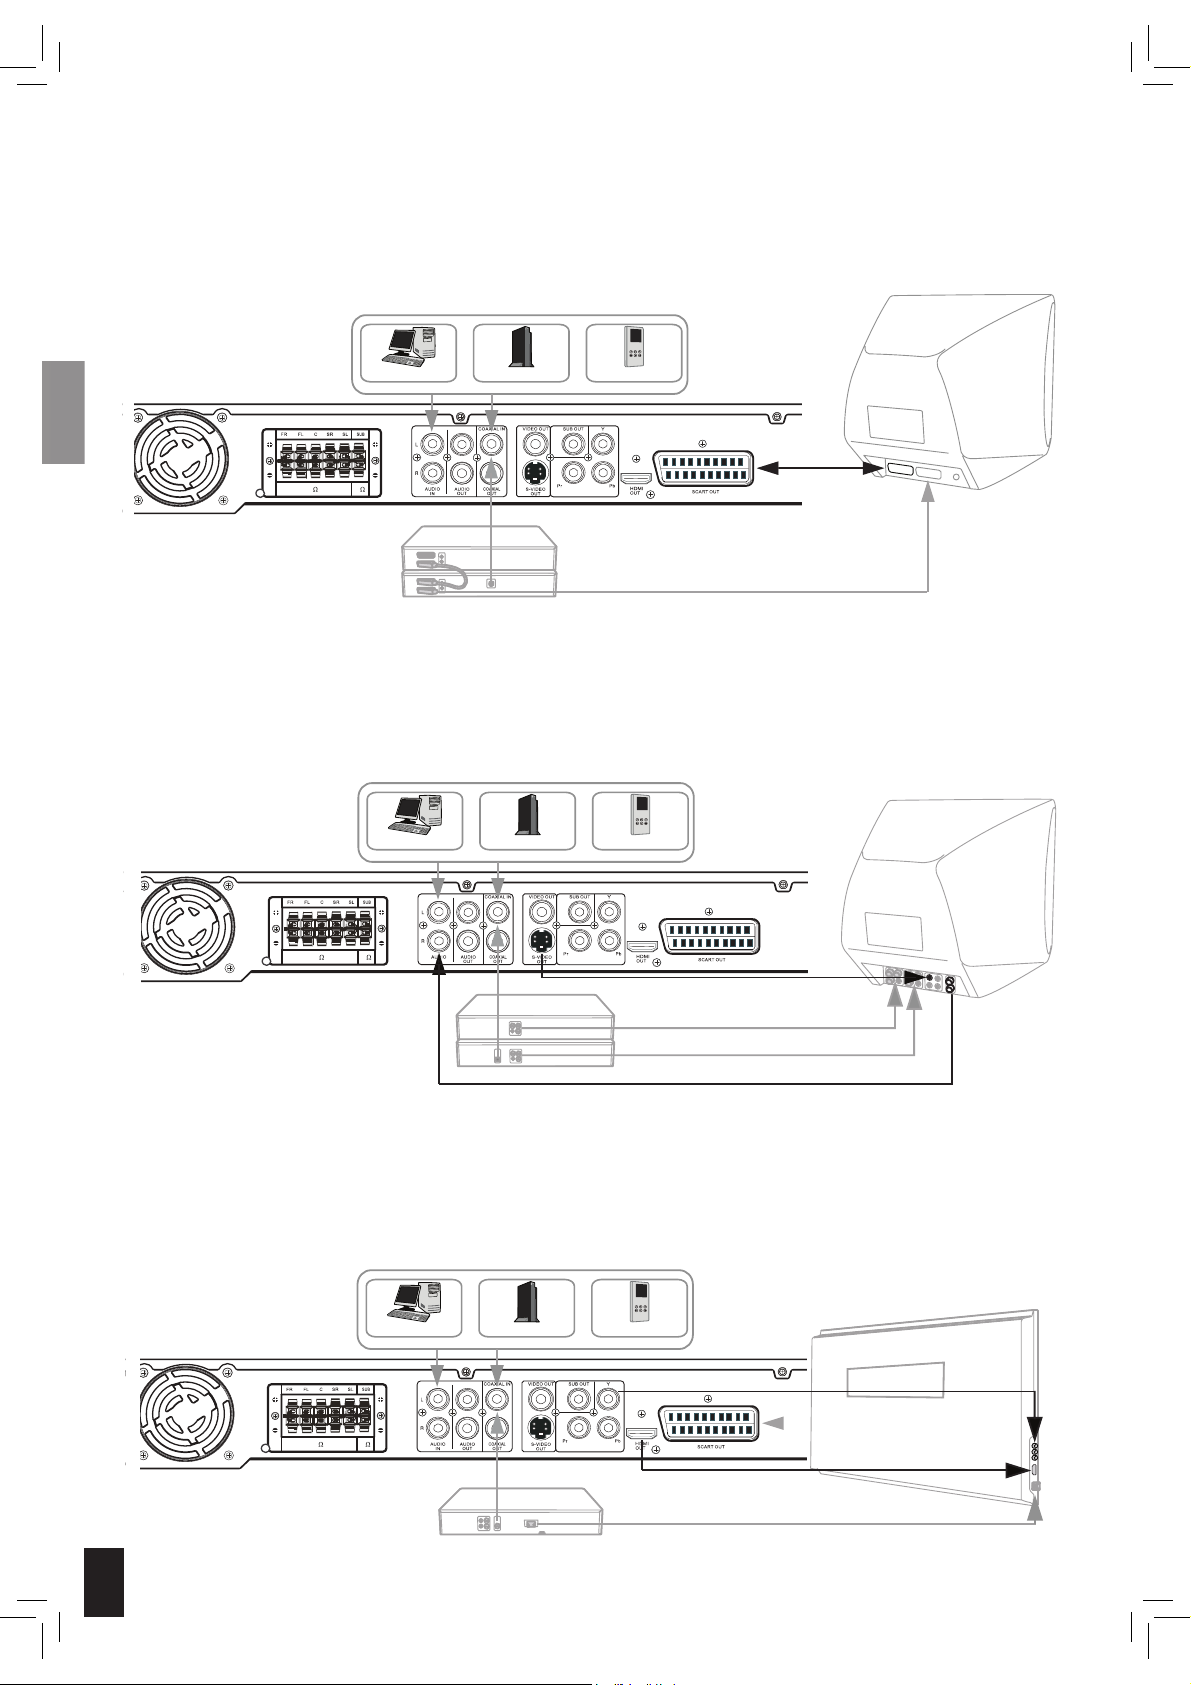
Connecting the system
Refer to the illustration below to connect speakers, subwoofer and antennas. To install the S DVR 52 into your current TV system, refer to the three configuration examples. Choose from one of them or make your own combination.
Be sure to connect + to + and – to – from the S DVR 52 to the speakers and subwoofer. If the cables are reversed, the sound
will be distorted and lack bass.
Surround leftSurround right
Subwoofer
Front right Centre Front left
6
4
&20321(17
Ϩ
6
Page 7
Front
Surround
Centre
Subwoofer
7
Page 8
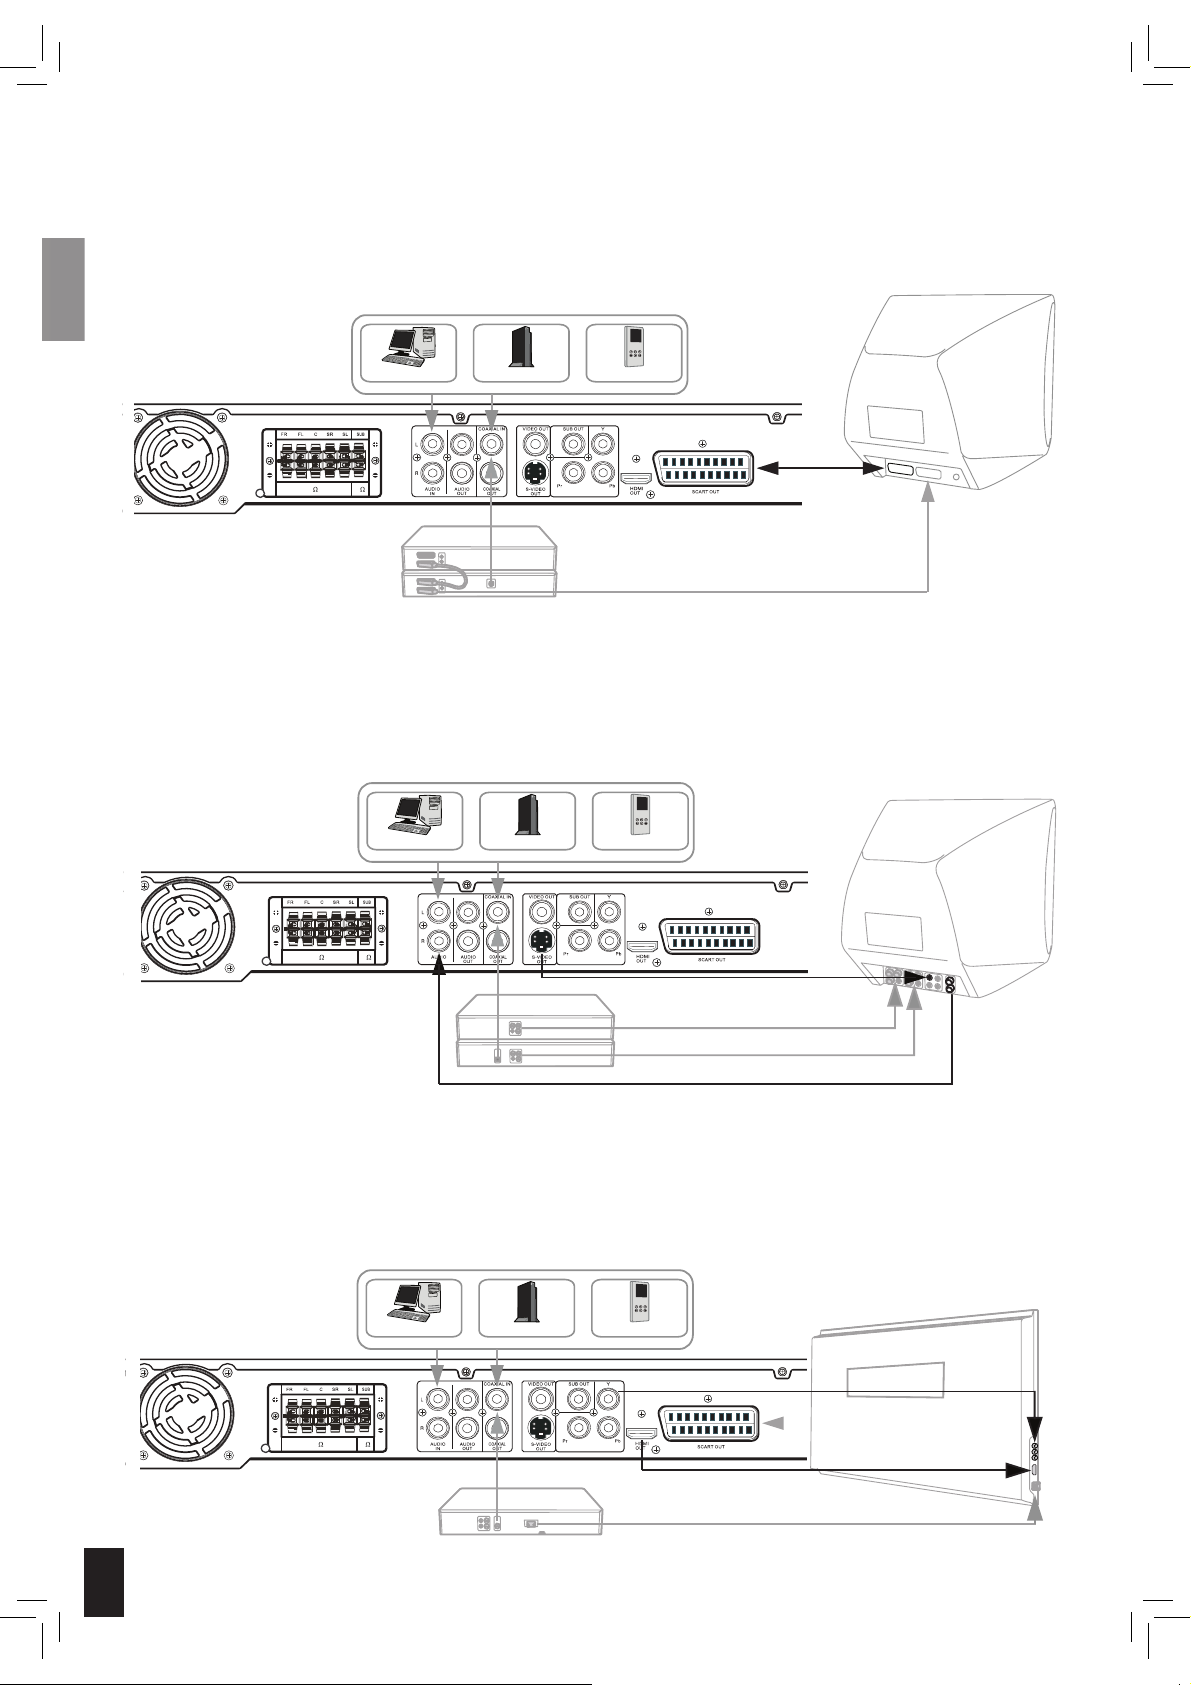
SCART video configuration
Both audio and video are passed through the SCART cable. If you connect a device to the SCART 2 on your TV, most TVs will automatically send the audio to the S DVR 52.
If a Satellite receiver, set top box, VCR, PC, Games consol or MP3 player has digital or analogue audio output, you can connect it
directly to the S DVR 52.
TV
PC
6
4
Games consol MP3 Player
&20321(17
Ω
VCR
Satellite/STB
S-Video configuration
Video is connected through the S-Video cable to the TV. Audio is connected from the TV to the S DVR 52.
If a Satellite receiver, set top box, VCR, PC, Games consol or MP3 player has digital or analogue audio output, you can connect it
directly to the S DVR 52.
TV
PC
6
4
Games consol MP3 Player
&20321(17
Ω
Satellite/STB
VCR
Component and HDMI configuration
The Component video output can be connected to plasma and LCD displays (component cables are not included).
Audio from the HD video source is connected directly to the S DVR 52.
If a PC, Games consol or MP3 player has digital or analogue audio output, you can connect it directly.
HDMI output can be connected to a TV with HDMI input (HDMI cable not included).
PC
6
4
HDTV
8
Games consol MP3 Player
&20321(17
Ω
Page 9
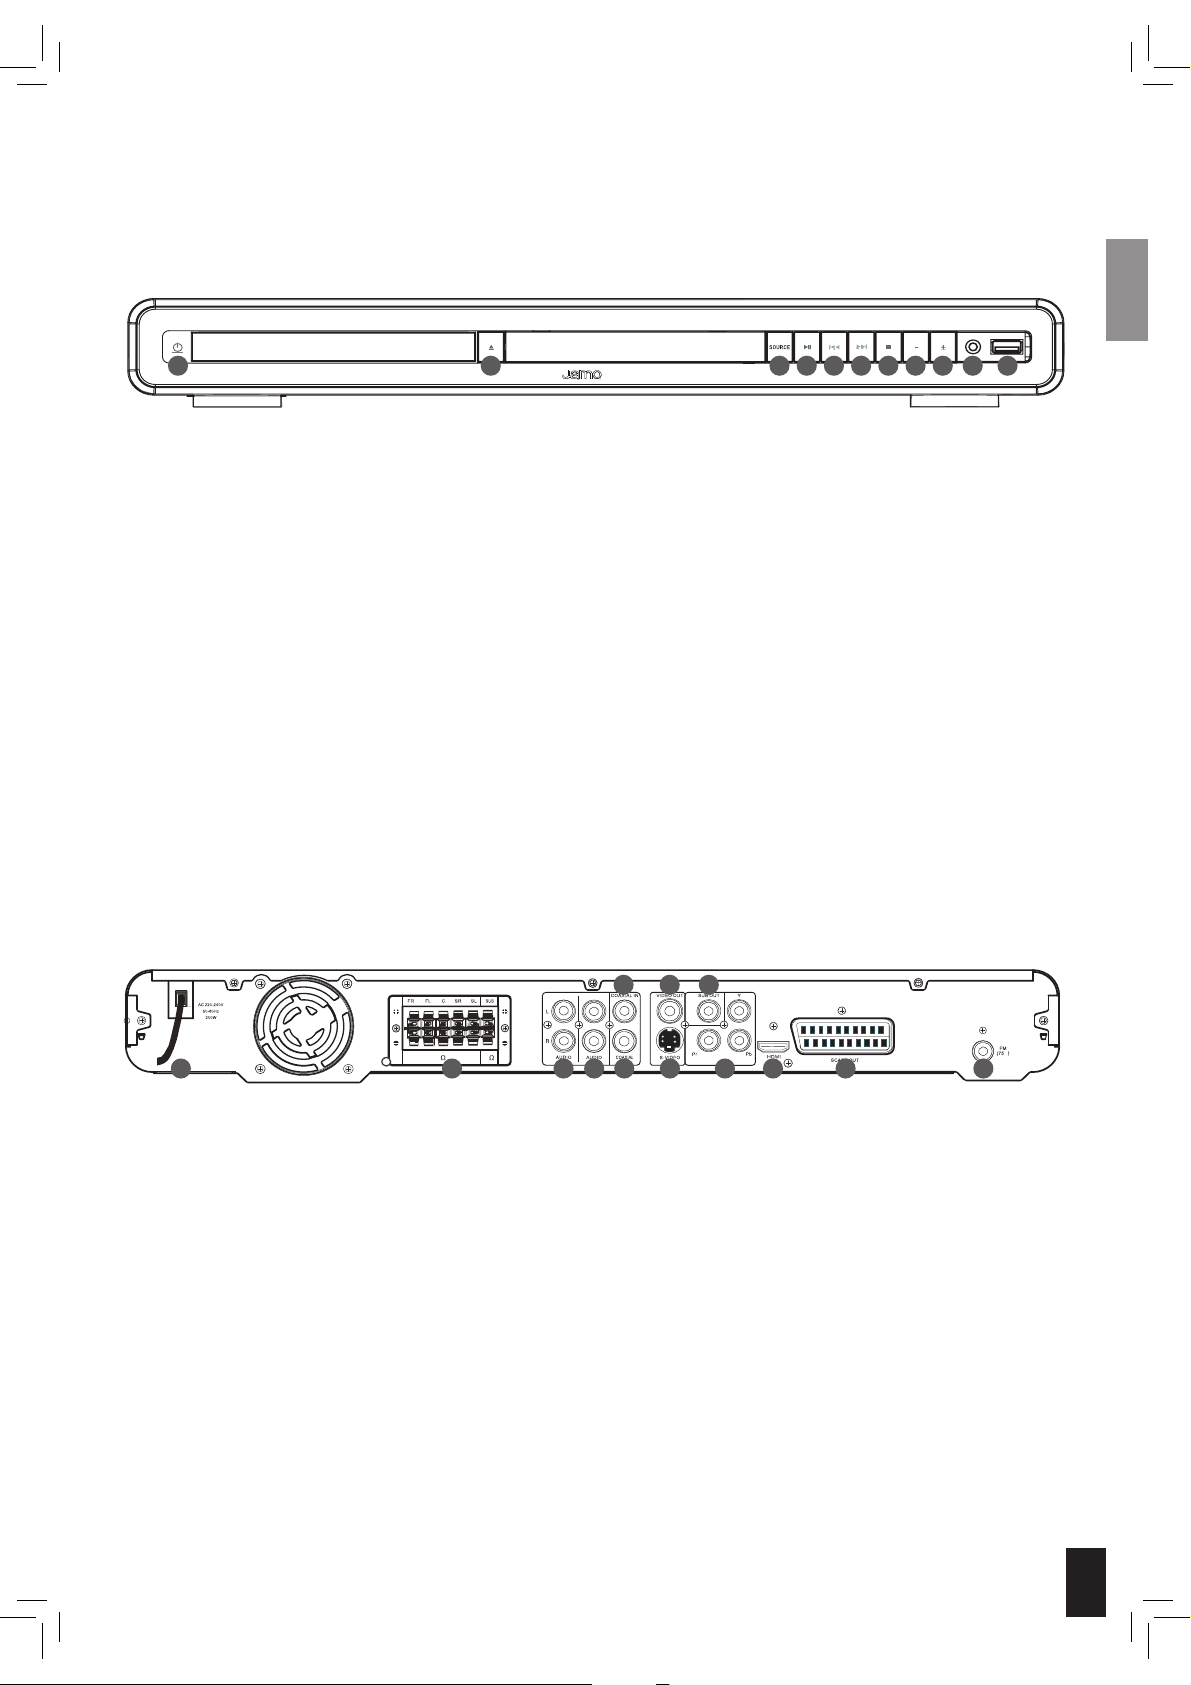
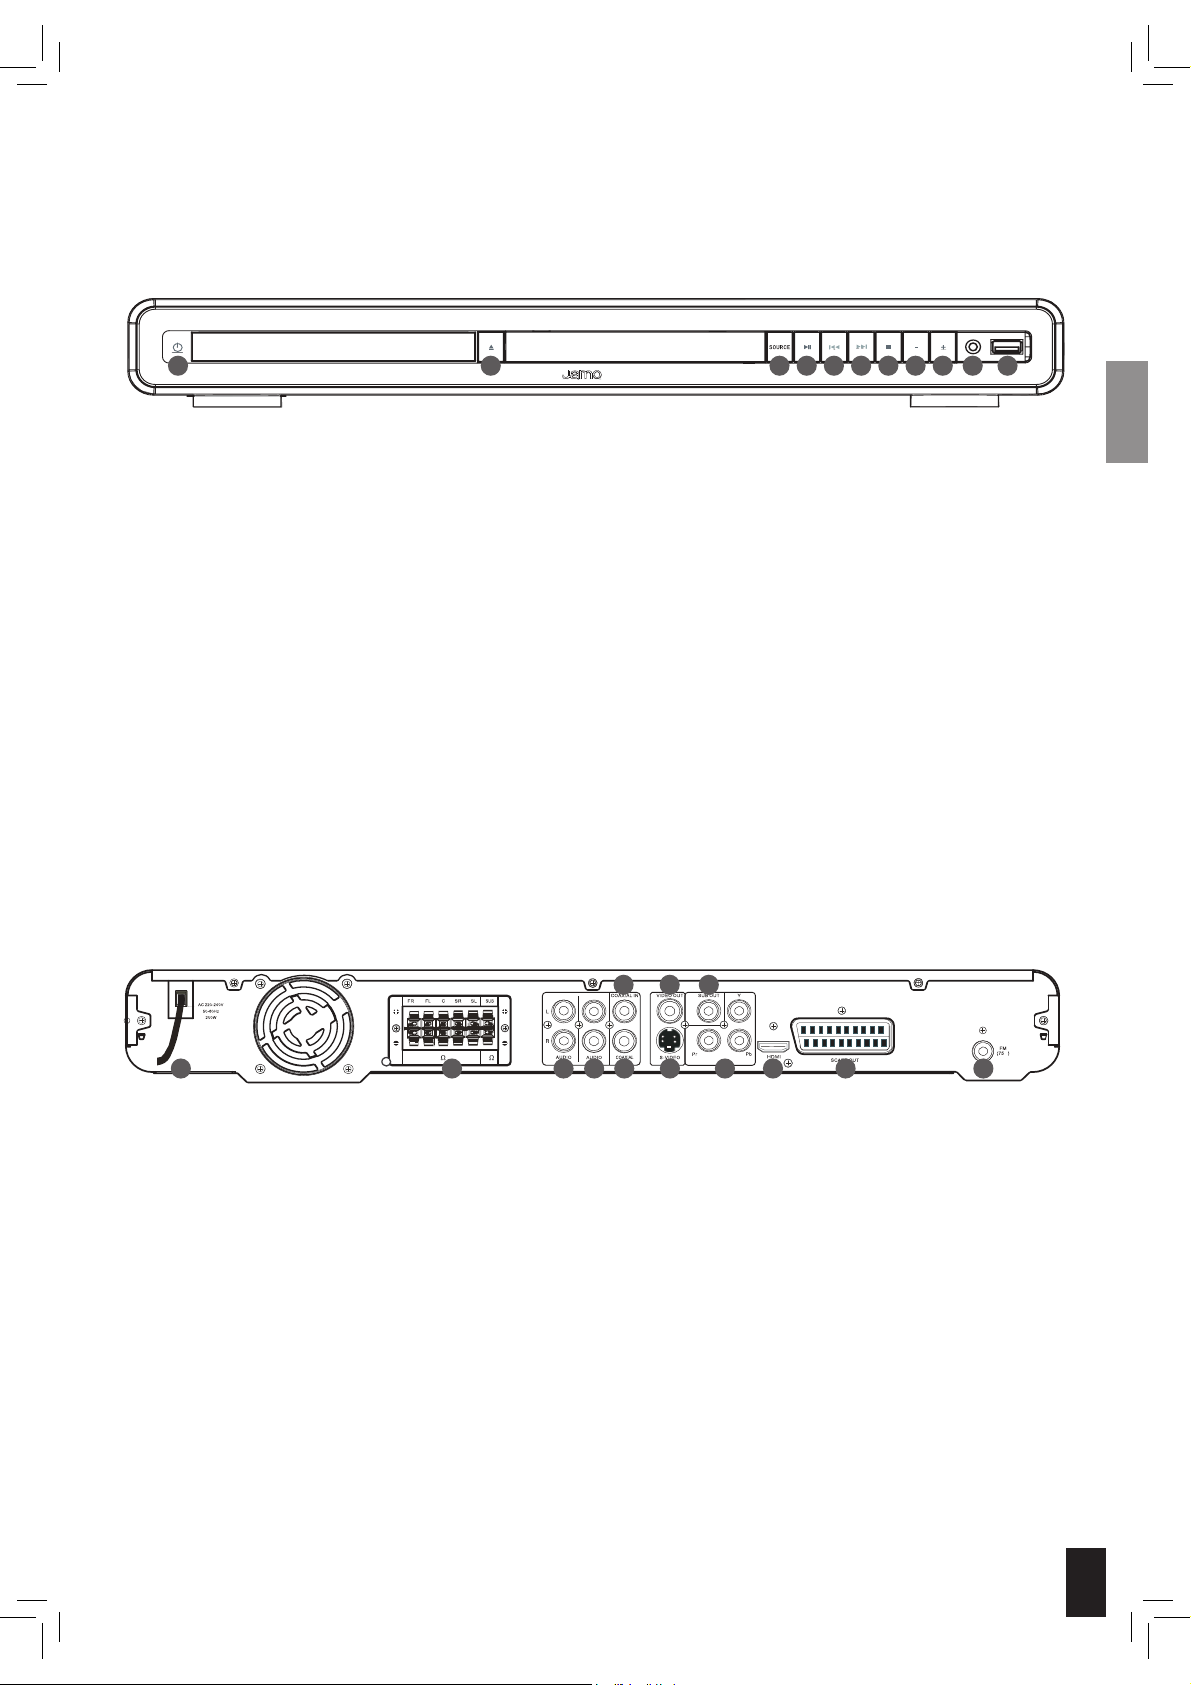
Front panel layout
1 2 3 4 5 6 7 8 9 10 11
1. Standby
Standby will turn the
S DVR 52 on and off.
2. Open/close
Press to open and
close the disc tray.
3. Source
Switches between
DVD, FM ,AUX,TV,
4. Play/pause
Press to start or pause
playback.
5. Previous
Selects previous track/
preset radio station.
COAX IN input
sources.
6. Next
Selects next track/pre-
7. Stop
Press to stop playback.
8. Volume (-)
Turns volume down.
9. Volume (+)
Turns volume up.
10. Front aux in
AUX input.
set radio station.
11. USB
USB connector
Back panel layout
Aux
6
1 2 3
1. Power cord 2. Speakers and
4
4
3. Analogue audio in. 4. Analogue audio out 5. Coaxial digital out.
subwoofer output
6. Coaxial digital in.
7. Composite video
out.
8. S-video out 9. Active subwoofer
11. HDMI out 12. SCART in/out 13. FM antenna
6 789
5
&20321(17
10 11 12 13
10. Component video
output
out
Ω
9
Page 10
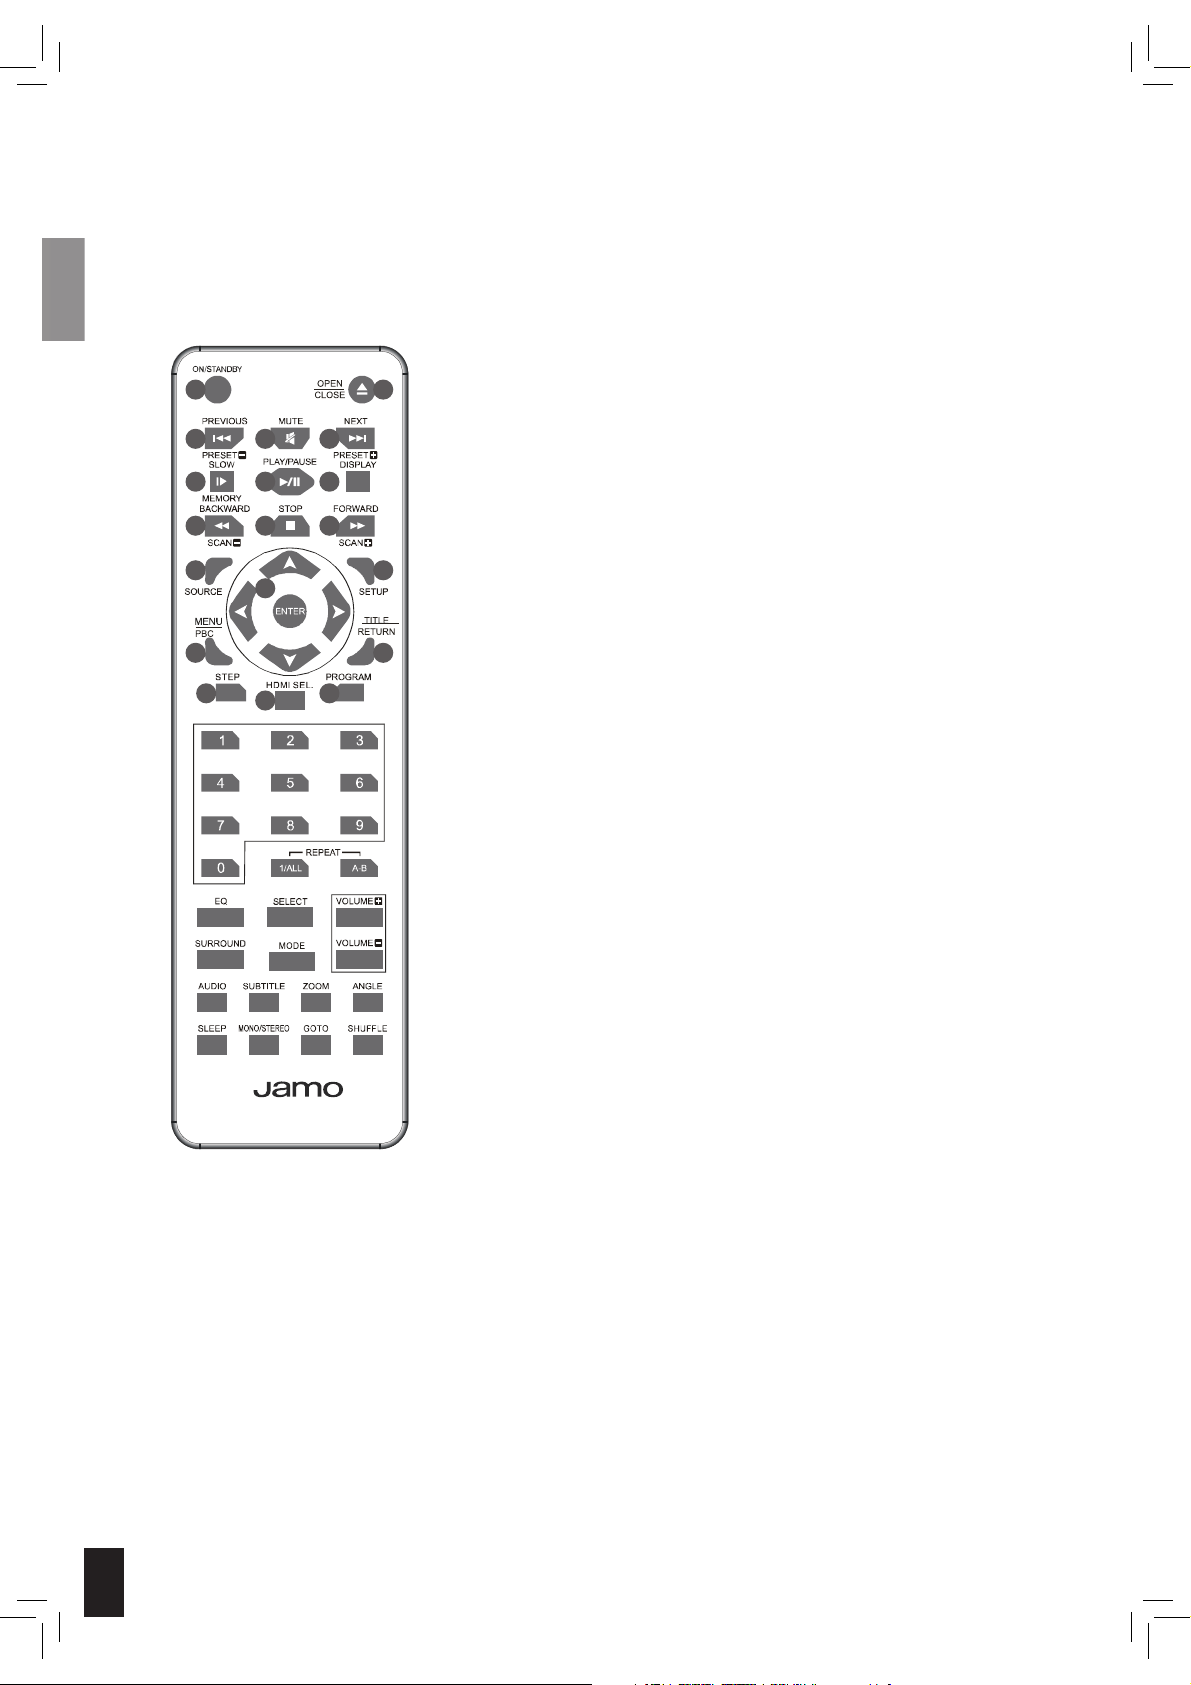
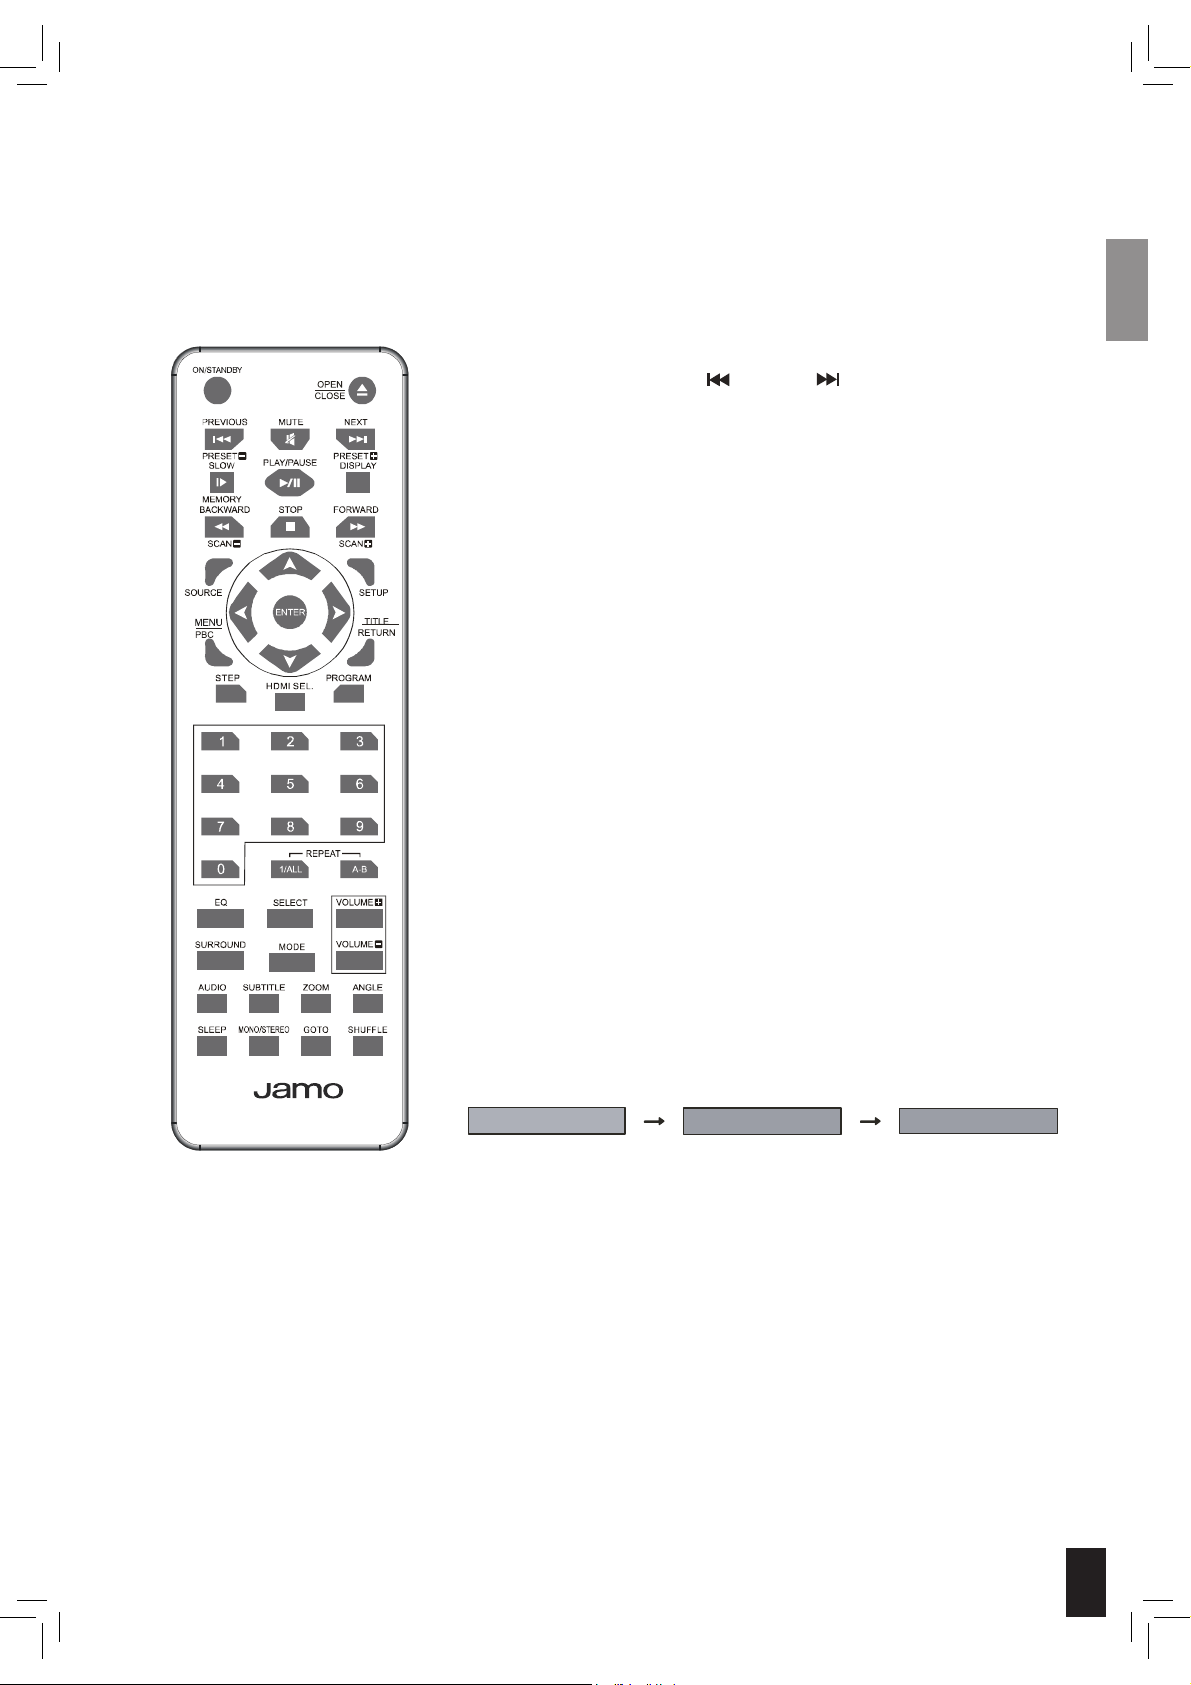
Remote control layout
1 2
3
6 7 8
9 10 11
12 13
15 16
17
4
14
18
REMOTE CONTROLLER
5
19
1. Standby
Standby will turn the S DVR 52 on and off.
2. Open/close
Press to open or close the disc tray.
3. Previous/preset
Selects previous track/preset radio station.
4. Mute
Press to mute.
5. Next/preset
Selects next track/preset radio station.
6. Slow/memory
In disc mode, press to play in slow motion.
In tuner mode, press to store the radio stations manually.
7. Play/pause
Press to start or pause the playback.
8. Display
Press to show the elapsed playing time, the track number etc.
9. Backward/scan
In disc mode: to fast reverse the disc.
In tuner mode: to start reverse frequency search.
10. Stop
Stops playback.
11. Forward/scan
In disc mode: fast forwards.
In tuner mode: starts frequency search.
12. Source
Switches between DVD, AUX1, AUX2, COAXIAL, OPTICAL DIGITAL, FM.
13. Setup
Press to enter into the setup menu.
14. Adjustment Buttons
Used in menu pages.
15. Menu/PBC
Shows the disc menu on the DVD.
Switches the PBC function on a VCD on and off.
16. Title/return
Displays the title menu when playing a DVD and returns to the disc menu.
17. Step
Press to play in step motion.
18. HDMI sel.
Press to select HDMI when a HDMI TV is connected.
Press to select P-SCAN when a HDMI TV is not connected.
19. Program
Programs tracks.
In tuner mode, hold on for 5 seconds to store the radio stations automati-
cally.
10
Page 11
Remote control layout
20
21 22
23 24
25
26 27
28 29 30 31
32 33 34 35
REMOTE CONTROLLER
20. Number Buttons
Used in DVD, FM and Audio CD selection.
21. 1/all
Allows you to repeat a title, a chapter, a song or all songs on the disc.
22. A-B
Specifi es a section and plays it repeatedly.
23. Eq
Selects the sound effect settings.
24. Select
Press to choose a speaker which needs individual adjustment.
25. Volume (+/-)
Press to adjust the volume.
26. Surround
Press to change the surround sound settings.
27. Mode
HDMI OUT picture mode.
28. Audio
Press to select audio channel.
29. Subtitle
Press to select a subtitle language on the DVD.
30. Zoom
Press to enlarge or reduce the picture.
31. Angle
If available on the DVD, press to see various camera angles.
32. Sleep
Press to set sleep timer.
33. Mono/stereo
In tuner mode, press to choose mono or stereo output.
34. Goto
Press to goto a chapter/time.
35. Shuffl e
Press to start the shuffl e play.
11
Page 12
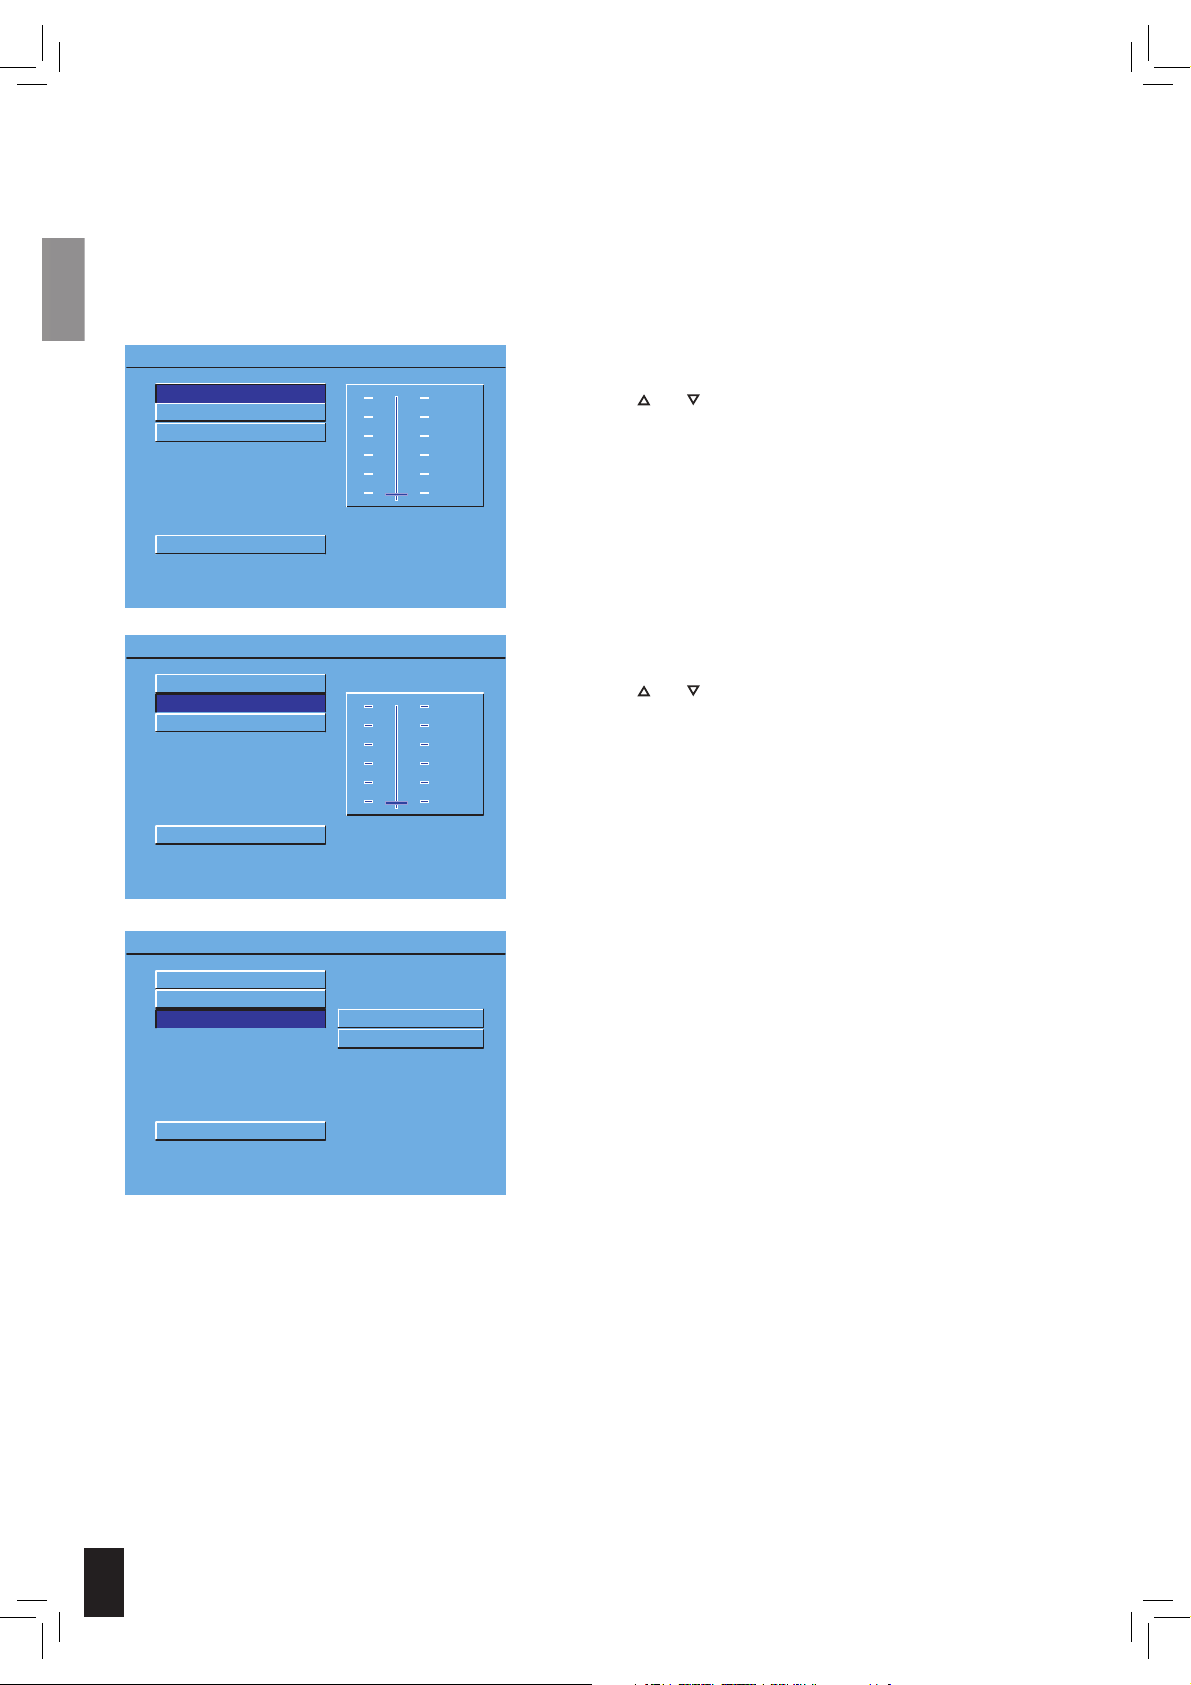
General Setup
To access the S DVR 52 setup menu, press “SETUP”.
Use
/ / / to browse through the menus, and press “OK” to select an item.
To exit System Setup, press “SETUP”.
TV DISPLAY
TV TYPE
SCREEN SAVER
RESOLUTION
VIDEO OUTPUT
MAIN PAGE
GENERAL SETUP
TV DISPLAY
TV TYPE
SCREEN SAVER
RESOLUTION
VIDEO OUTPUT
-- GENERAL PAGE --
-- GENERAL PAGE --
4 : 3 PS
4 : 3 LB
16 : 9
MULTI SYSTEM
NTSC
PAL
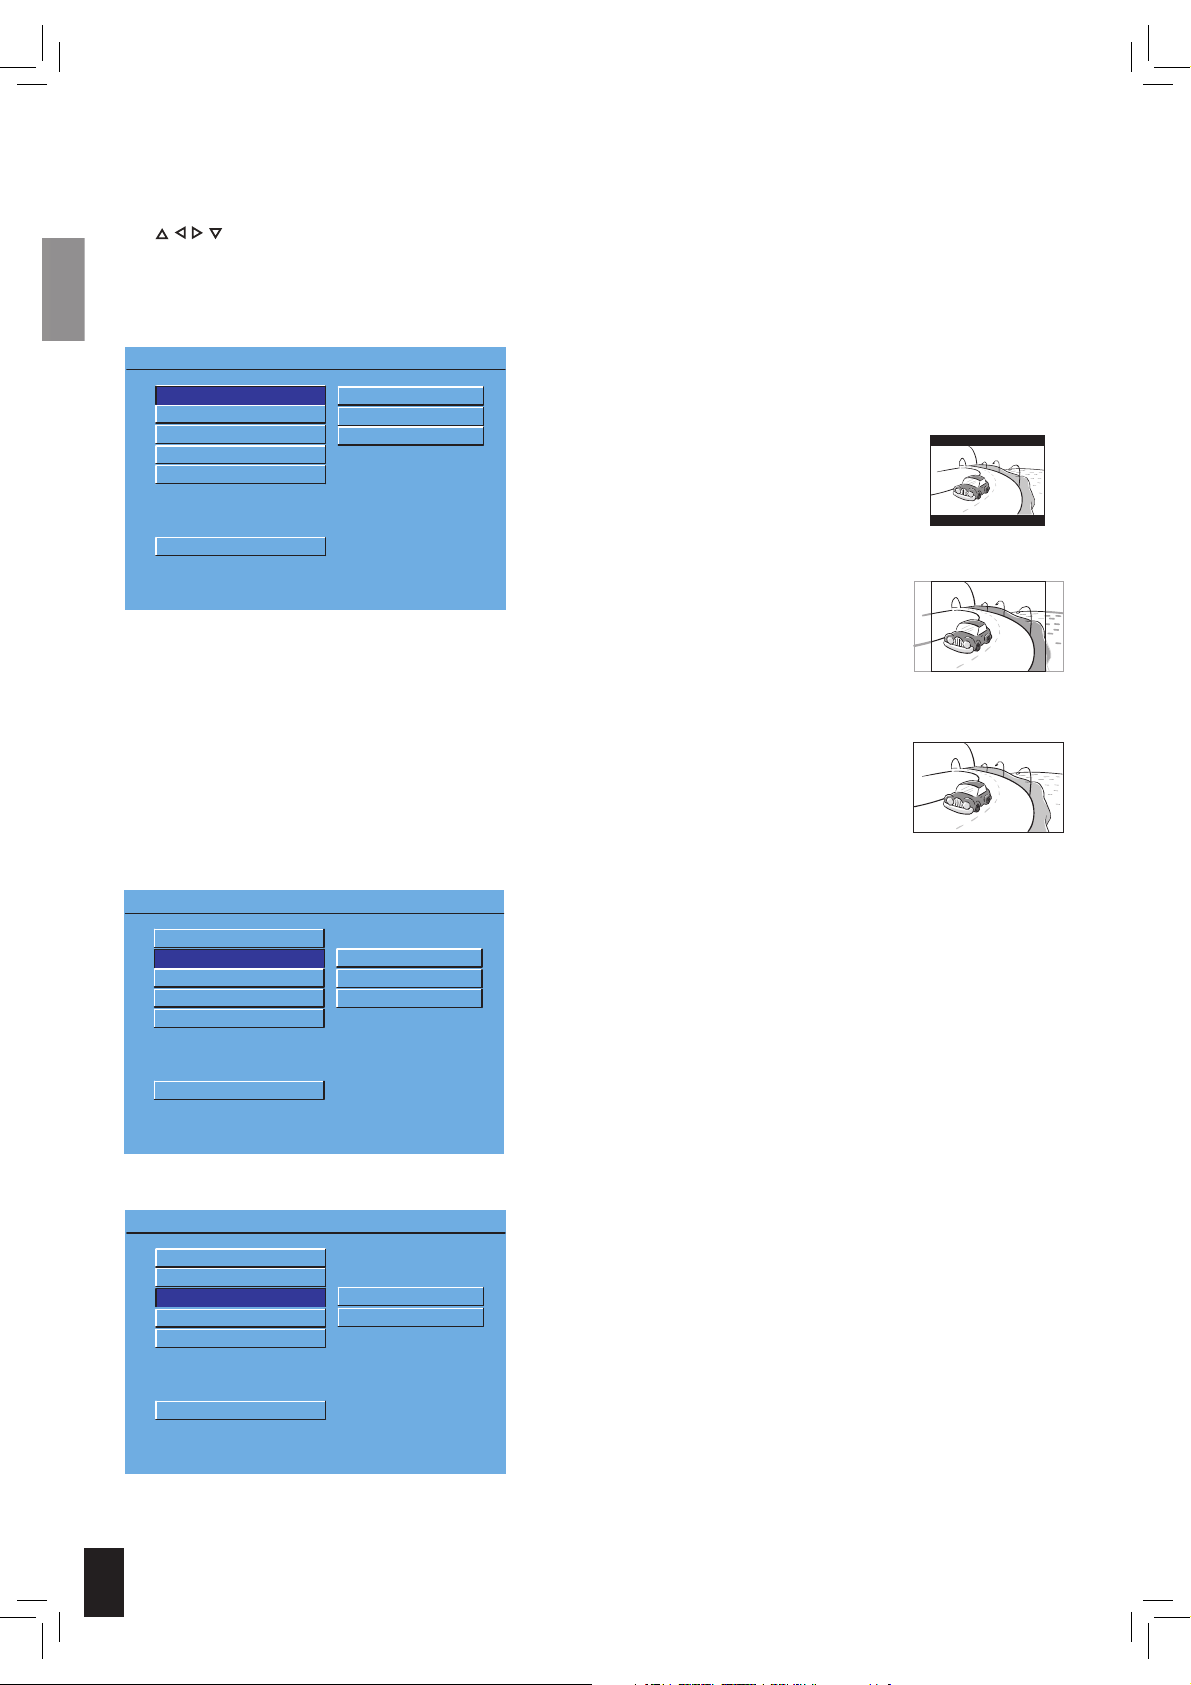
TV DISPLAY
You can select the aspect ratio that is appropriate for your TV
display. The default setting is 16:9.
• 4:3 LB
If you have a conventional ‘square’ set
and would like to see the DVD picture
in its full format, use this setting. Wide
bands will be displayed on the upper
and lower portions of the TV screen.
• 4:3 PS
If you have a conventional TV set and
would like to see the DVD picture fill
your TV screen then use this setting. A
wide picture is displayed on the whole
TV screen with a portion automatically
out off.
• 16:9
If you have a widescreen TV set, use this
setting (you must also set your widescreen TV to it’s 16:9 mode.).
TV TYPE
Choose between Multi System (the connected TV is compatible with both NTSC and PAL), NTSC and PAL video output
from the S DVR 52.
The default setting should be appropriate for your region
- changing it may result in poor picture quality.
MAIN PAGE
SET TV STANDARD
TV DISPLAY
TV TYPE
SCREEN SAVER
RESOLUTION
VIDEO OUTPUT
MAIN PAGE
SCREEN SAVER SETTING
12
-- GENERAL PAGE --
SCREEN SAVER
Turns screen saver ON and OFF.
ON
OFF
Page 13

General Setup
TV DISPLAY
TV TYPE
SCREEN SAVER
RESOLUTION
VIDEO OUTPUT
MAIN PAGE
SET RESOLUTION
TV DISPLAY
TV TYPE
SCREEN SAVER
RESOLUTION
VIDEO OUTPUT
-- GENERAL PAGE --
-- GENERAL PAGE --
SD INTERLACE
SD PROGRESSIVE
770P
1080I
YUV
RGB
RESOLUTION
SD Interlace
720x480 interlace video.
SD progressive
720x480 progressive-scan video.
720P
1280x720 pixel progressive-scan video.
1080I
1920x1080 pixel interlace video.
Note
• When a HDMI cable is connected, you can only enter this
setup to select SD progressive, 720P and 1080I.
• When a HDMI cable is not connected, you can only enter
this setup to select SD interlace and SD progressive.
VIDEO OUTPUT
Video output selection enables you to choose the type of
video output suitable for your DVD Home Cinema System
when a HDMI TV is connected.
MAIN PAGE
SET VIDEO OUTPUT
13
Page 14
Speaker Setup
-- SPEAKER SETUP PAGE --
CENTER DELAY
REAR DELAY
TEST TONE
MAIN PAGE
LOUDSPEAKER SETUP
-- SPEAKER SETUP PAGE --
CENTER DELAY
REAR DELAY
TEST TONE
MAIN PAGE
SET SURROUND DELAY
15MS
9MS
3MS
OFF
15MS
9MS
3MS
OFF
CENTRE DELAY
Selects the Centre-channel delay time for Dolby Digital audio.
Use
and to turn it up and down.
REAR DELAY
Selects the rear channel delay time for Dolby Digital audio.
Use
and to turn it up and down.
CENTER DELAY
REAR DELAY
TEST TONE
MAIN PAGE
TEST TONE
-- SPEAKER SETUP PAGE --
ON
OFF
TEST TONE
Press this to test that all your speakers are connected correctly.
14
Page 15
Audio Setup
DYNAMIC
SPDIF OUTPUT
MAIN PAGE
AUDIO RELATED
DYNAMIC
SPDIF OUTPUT
MAIN PAGE
SET SPDIF
-- AUDIO SETUP --
-- AUDIO SETUP --
OFF
SPDIF/RAW
SPDIF/PCM
FULL
6/8
4/8
2/8
OFF
DYNAMIC
If you want to watch a movie without disturbing others in
the house, you can reduce the dynamics (loud sounds) by
activating the dynamic range function.
Dynamic range compression can be selected in Dolby Digital
mode. Use
and to turn it up and down.
Default setting is: OFF.
SPDIF OUTPUT
SPDIF / RAW
If an external AV Receiver with DD and DTS decoder is connected through a digital output socket, select SPDIF / RAW.
SPDIF / PCM
If an external AV Receiver without DD and DTS decoder is
connected through a digital output socket, select SPDIF /
PCM.
15
Page 16

DivX(R) Registration
-- DIVX(R) REGISTRATION --
Your registration code is: XXXXXXXX
To learn more go to www.divx.com/vod
DONE
DIVX (R) REGISTRATION
This is a unique code which you can use to register your
player. It will allow you to rent and purchase DivX Video On
Demand files.
16
Page 17
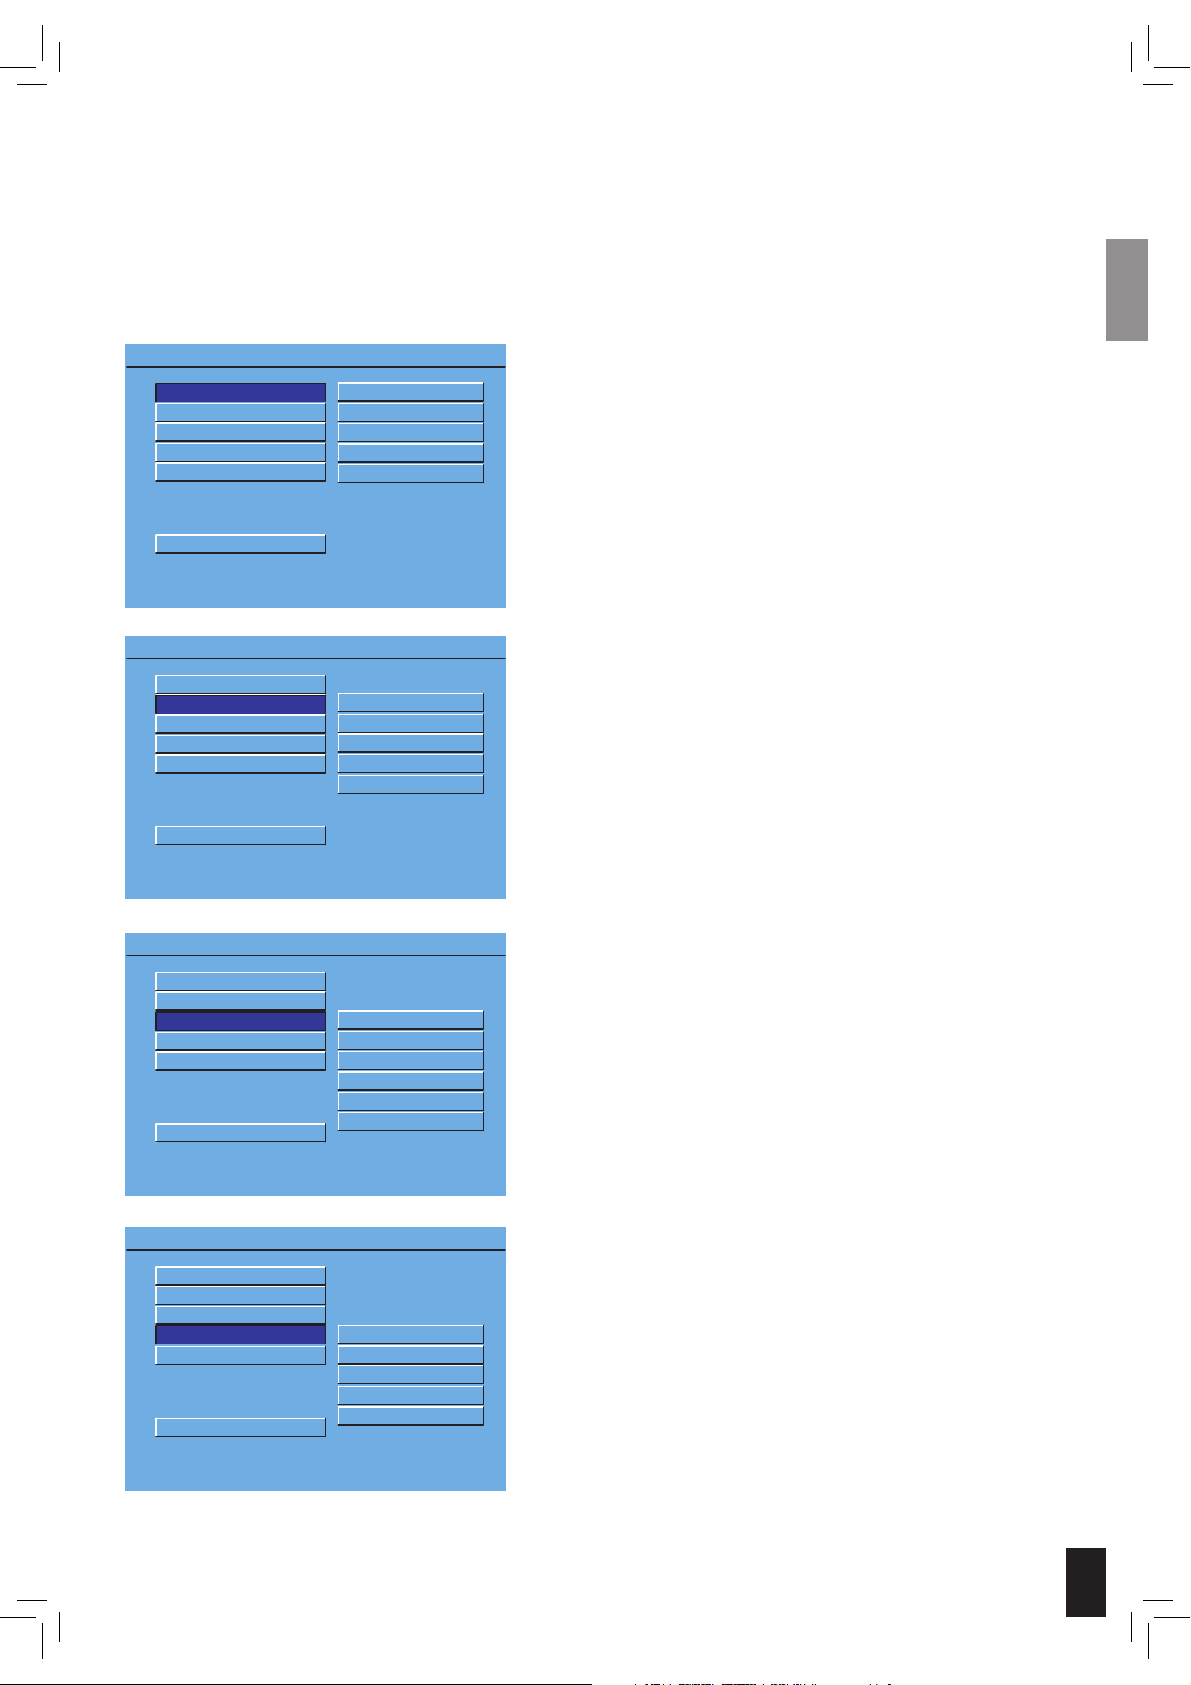
Language setup
-- PREFERENCES PAGE --
OSD LANG
AUDIO LANG
SUBTITLE LANG
DISC MENU LANG
DEFAULTS
MAIN PAGE
SET PREFERENCES
-- PREFERENCES PAGE --
OSD LANG
AUDIO LANG
SUBTITLE LANG
DISC MENU LANG
DEFAULTS
MAIN PAGE
PREFERRED AUDIO LANGUAGE
ENGLISH
FRENCH
SPANISH
GERMAN
ITALIAN
ENGLISH
FRENCH
SPANISH
GERMAN
ITALIAN
OSD LANGUAGE
This sets the OnScreen Display language for the S DVR 52.
AUDIO LANGUAGE
If available on the DVD, this function allows you to select the
preferred audio language.
-- PREFERENCES PAGE --
OSD LANG
AUDIO LANG
SUBTITLE LANG
DISC MENU LANG
DEFAULTS
MAIN PAGE
PREFERRED SUBTITLE LANGUAGE
-- PREFERENCES PAGE --
OSD LANG
AUDIO LANG
SUBTITLE LANG
DISC MENU LANG
DEFAULTS
MAIN PAGE
PREFERRED MENU LANGUAGE
SUBTITLE LANGUAGE
If available on the DVD, this function allows you to select the
preferred Subtitle language.
ENGLISH
FRENCH
SPANISH
GERMAN
ITALIAN
OFF
DISC MENU
If available on the DVD, this function allows you to select the
desired Disc Menu language.
ENGLISH
FRENCH
SPANISH
GERMAN
ITALIAN
17
Page 18
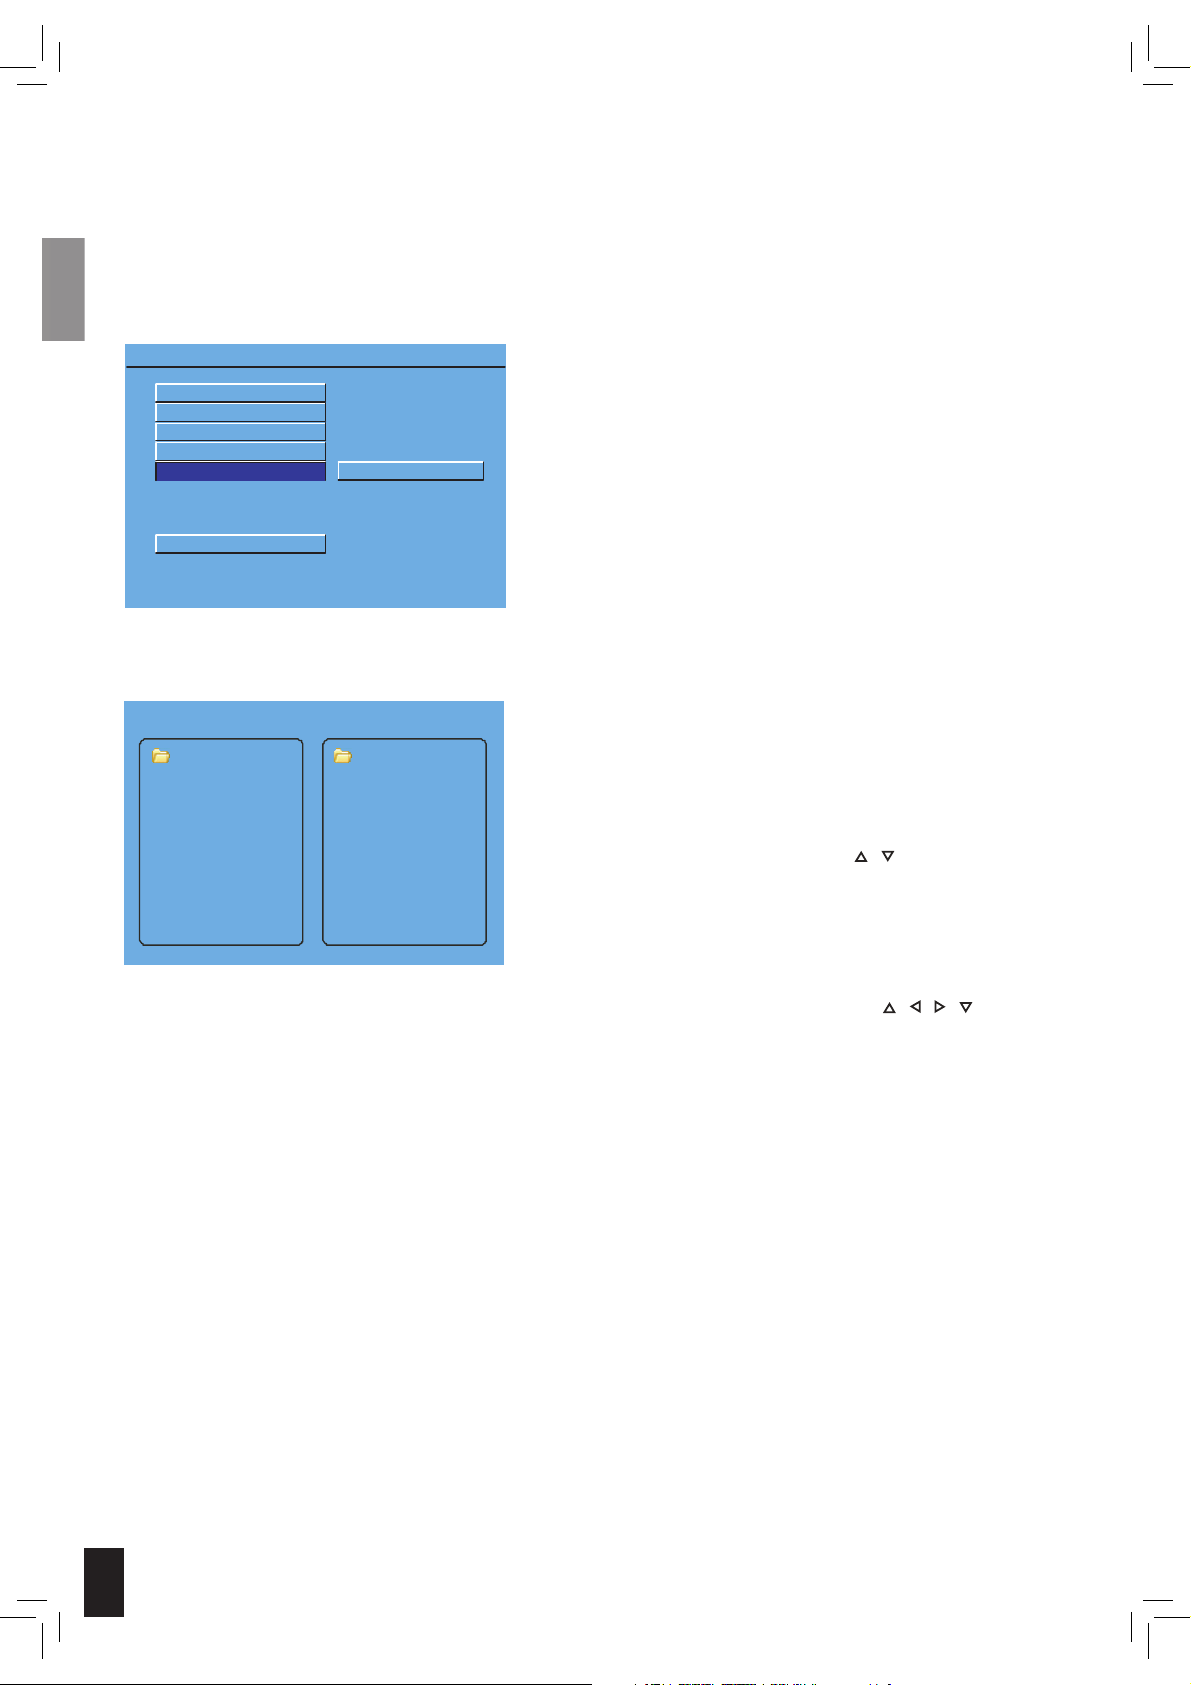
-- PREFERENCES PAGE --
OSD LANG
AUDIO LANG
SUBTITLE LANG
DISC MENU LANG
DEFAULTS
MAIN PAGE
LOAD FACTORY SETTINGS
RESET
DEFAULT
If you select this function, all the functions will be restored to
their default settings.
Playing back files from Disc and USB
MENU
ROOT
ROOT
MOVIE 1
MOVIE 2
Selecting USB
To select the USB device, do the following:
1. Press STOP twice on the remote to end all playback.
2. Press GOTO on the remote and choose USB.
Playing files
1. Browse through the files using / on your remote, and
press “ENTER” to enter/exit a library.
2. Press “ENTER” to select a file.
Note
Depending on file format, you may need to press STOP twice
to stop playback.
When showing pictures, you can use
remote to change views.
/ / / on your
18
Page 19
Radio - Basic operation and storing
If the antennas are correctly connected, you should be able to listen to FM radio.
Press SOURCE to select the tuner.
Selecting preset programs
To select preset programs, press PRESET -or PRESET + on the remote.
Manually find and store a radio station
1. Press and hold SCAN - or SCAN + until the frequency indicator starts to
change, then release. The system automatically tunes to the next strong radio
station.
2. Press SLOW/MEMORY
3. Enter a number between 01-40.
4. Press SLOW/MEMORY.
You station is now saved.
Automatically find and store a radio station
1. Press and hold PROGRAM for more than 5 seconds, all radio stations with
strong signal strength will be stored automatically
REMOTE CONTROLLER
2. The system will stop when all the available stations are stored or the memory
of 40 preset radio stations is full.
Stereo and mono reception
If the signal from the FM stereo station is weak, you can improve the sound quality by switching to mono reception. To do this, press the MONO/STEREO button
on the remote.
RDS station service
RDS (Radio Data System) is an additional information system provided by most
FM stations.
If a RDS station is being received, you can see programme information on the S
DVR 52 display by pressing DISPLAY on the remote.
FM 92.90
MHZ
P3
FM 92.90
MHZ
19
Page 20

Troubleshooting
If the S DVR 52 appears to be faulty, first consult this troubleshooting guide before calling for service.
Refer also to the corresponding instructions in this manual.
WARNING
Under no circumstances should you attempt to repair the system yourself.
Symptom Possible cause Correction
No picture. • The TV is switched OFF.
• The TV is not connected correctly.
• Turn ON the TV.
• Connect the TV correctly.
Disc can’t be played. • The disc is placed upside down.
• The disc is empty or the format is
not supported by S DVR 52.
• The disc is dirty or defect.
• The disc is not placed within the disc
tray guide.
No sound. • The VOLUME is set to 0.
• Speaker cords are not connected
correctly.
The S DVR 52 unit does not
respond to commands from the
remote control.
Power is not supplied even though
the power cable is connected.
The S DVR 52 does not respond to
some operating commands during
playback
• No batteries are inserted in the
remote control.
• The batteries are worn out.
• The remote controller is not pointed
at the remote sensor of the S DVR 52.
• The remote controller is too far from
the S DVR 52.
• The power plug is not securely
connected.
• The wall plug is not turned ON.
• Operations may not be permitted by
the disc.
• Ensure the disc label is facing up.
• Remove the disc and try another.
• Clean the disc or dispose of it.
• Place the disk within the proper guide
on the disc tray.
• Turn up the VOLUME.
• Connect them correctly.
• Insert new batteries.
• Replace with new batteries.
• Point the remote controller at the
remote sensor of the S DVR 52.
• Operate the remote controller
within 5 m.
• Connect the power plug securely.
• Turn ON the wall plug.
• Read the instructions on the disc.
20
Page 21

Service and Warranty
Environmental information
• The system is made of recyclable materials which can be re-used if disassembled by authorised personnel.
• Please follow local regulations for the disposal of packaging materials, used batteries and discarded units.
Copyright
This product contains copyright technology which is protected pursuant to patents that are the property of Macrovision Corporation and
other copyright holders. Any use of this copyright technology must be approved by Macrovision Corporation. The technology is intended
for use in the home unless otherwise approved by Macrovision Corporation. Breakdown and disassembly are prohibited.
Made under license from Dolby Laboratories. “Dolby” and the double “D” symbol are trademarks of Dolby Laboratories. “DTS” and “DTS
Digital Out” are trademarks of Digital Theater Systems, Inc.
Service
In case of warranty enquiries, please contact your dealer. In case of request for service under warranty, please enclose your original receipt.
Important: Never send the product to be repaired without prior agreement. If the DVD player is STILL UNDER WARRANTY, Jamo will pay
freight costs back and forth between the dealer and the Jamo authorised service centre. Any other freight must be paid for by the customer.
The product must always be packed properly, otherwise the product warranty will be discontinued. If the DVD player is NOT UNDER WARRANTY, all costs must be paid for by the customer.
Warranty certificate
Jamo provides a twenty-four (24) month warranty from the date of purchase against material and manufacturing defects. For defects covered by the warranty, the product must be returned to the dealer that sold the product. The expected time of repair, excluding transport, is
approximately five working days.
If any problems arise, information from our authorised service centres is available at the following address, or from the dealer who sold the
product.
Terms of Warranty
1. The warranty is only valid on presentation of the original sales receipt, and if the serial number on the product is fully legible.
2.The obligations of Jamo are limited either to repair or replacement of defective components. The repair or replacement of defective components is based on an assessment by Jamo.
Exchange is only possible if the repair cannot be performed.
3.Warranty repairs must be carried out by an authorised Jamo dealer, or an authorised service centre. No remuneration is provided for
repairs performed by unauthorised workshops. Any repairs or damage to the product caused by unauthorised intervention are not covered
by this warranty.
4.This product will not be considered as being defective, either in materials or in manufacture, if adaptation to national, local, technical or
safetyrelated requirements is required in countries other than the specific country for which the product was originally designed and manufactured.
5.This warranty does not cover these types of adaptations, and no remuneration will be offered for these types of adaptations or for any
consequential damages. The warranty does not cover the following:
a) Periodic inspection, maintenance and repair or replacement of parts resulting from normal wear.
b) Costs connected to transport, disassembly or installation of the product.
c) Mis-use, including use for purposes other than was intended, or faulty installation.
d) Damage caused by lightning, water, fire, natural catastrophes, war, insurrection, incorrect line voltage, insufficient ventilation, transport
or other causes outside of the control of Jamo.
6.This warranty applies to every legal owner of the product during the warranty period.
Packaging
If possible, use the original packing material for any shipping. Otherwise, re-pack the S DVR 52 using:
• A reinforced cardboard box, strong enough to carry the weight of the product.
• At least 6 cm / 2.36 inches of shock-absorbing material around the product.
• Non-abrasive dust-free material for the other parts.
• Non-abrasive wrapping for the product. (Dust and dirt cover)
• Re-pack the product in such a way as to ensure that it cannot shift in the box during transport.
Information we must receive before repairing the product:
Model name: Jamo DVD Receiver S DVR 52
Serial no.:
Fault description:
Copy of the invoice or sales receipt
The dealer’s name, address and phone no.
Personal information: Name, address, post code/city, phone no. and e-mail address (optional).
Your signature
Dealer’s stamp and signature
Date
21
Page 22

Jamo S 502
Page 23

français
Page 24

français
Sommaire
Introduction 25
Installation du système 26
Configuration générale 32
Réglage des enceintes 34
Audio Setup 35
Enregistrement DivX (R) 36
Réglage de la langue 37
Lecture des fichiers à partir d’un CD ou d’une clé 38
Radio : fonctionnement de base et enregistrement 39
Dépannage 40
Service et Garantie 41
24
Page 25
Introduction
Votre système S 502 doit contenir les accessoires suivants
DVD-Receiver Jamo S DVR 52
Aux
REMOTECONTROLLER
Câble pour haut-
parleur
5 x enceintes
Piles
pour la télécommande
PéritelAntenne FM
Caisson de grave
Télécommande
Câble audio /
Vidéo Composite
25
Page 26
Installation du système
Reportez-vous aux schémas ci-dessous pour l’installation des enceintes, du caisson de grave et des antennes. Pour intégrer le
S DVR 52 à votre système TV actuel, reportez-vous aux trois exemples de configuration. Choisissez l’une d’entre elles ou bien
réalisez la vôtre.
Veillez à respecter la polarité (+ avec + et – avec -) lors du branchement du S DVR 52 aux enceintes et au caisson de grave. En
cas d’inversion, le son sera déformé et il n’y aura pas de grave.
Surround gaucheSurround droite
Caisson de
grave
Avant droite
6
Centrale
4
&20321(17
Avant gauche
Ϩ
26
Page 27
Avant
Surround
Centrale
Caisson de grave
27
Page 28
Configuration vidéo Péritel
L’audio et la vidéo sont toutes deux transmises par le câble Péritel. Si vous raccordez un appareil à la Péritel 2 de votre TV, il est
possible que cette dernière transmette le son automatiquement au DVR 52. Vous pouvez directement brancher un récepteur
satellite, set top box, magnétoscope, PC, console de jeux ou lecteur MP3 au DVR 52 s’ils disposent d’une sortie audio analogique
ou numérique.
TV
PC
6
4
Console de jeux MP3 Player
&20321(17
Ω
magnétoscope
Satellite/STB
Configuration S-Vidéo
La vidéo est transmise au TV par le câble S- Vidéo. L’audio est également transmise du TV au DVR 52. Vous pouvez directement
raccorder un récepteur satellite, set top box, magnétoscope, PC, console de jeux ou lecteur MP3 au DVR 52 s’ils disposent d’une
sortie audio analogique ou numérique.
TV
PC
6
4
Console de jeux MP3 Player
&20321(17
Ω
Satellite/STB
magnétoscope
Configuration HDMI et composants
La sortie vidéo composante se connecte aux écrans plasma et LCD (câble composante non fourni). L’audio des sources vidéo
HD se raccorde directement au DVR 52.
Vous pouvez directement brancher un PC, console de jeux ou lecteur MP3 au DVR 52 s’ils disposent d’une sortie audio
analogique ou numérique.
La sortie HDMI peut être connectée à un téléviseur possédant une entrée HDMI (câble HDMI non fourni).
Console de jeux MP3 Player
&20321(17
Ω
28
PC
6
4
TVHD
Page 29
Disposition des touches sur le panneau frontal
1 2 3 4 5 6 7 8 9 10 11
1. Veille
Met le S DVR 52 sous
et hors tension.
6. Suivant
Sélectionne la plage /
2. Ouvrir/fermer
Ouvre et ferme le
plateau CD.
7. Arrêt
Arrête la lecture.
3. Source
Bascule entre les
sources d’entrée DVD,
FM, AUX, TV, COAX IN.
8. Volume (-)
Baisse le volume.
4. Lecture/pause
Lance ou suspend la
lecture.
9. Volume (+)
Augmente le volume.
5. Précédent
Sélectionne la plage /
la station radio préréglée précédente.
10. Front aux in
Entrée AUX. frontale
la station radio préréglée suivante.
11. USB
Prise USB
Disposition du panneau arrière
Aux
1 2 3
1. Cordon
d’alimentation
6. Entrée coaxiale
numérique.
2. Sortie enceintes et
caisson de grave
7. Sortie vidéo composite.
6
11. Sortie HDMI 12. Entrée / sortie
péritel
6 789
4
3. Entrée audio
analogique.
5
4
&20321(17
10 11 12 13
4. Sortie audio
analogique
8. Sortie S-vidéo 9. Sortie caisson de
grave actif
13. Antenne FM
Ω
5. Sortie coaxiale
numérique.
10. Sortie vidéo composant
29
Page 30
Remote control layout
1 2
3
6 7 8
9 10 11
12 13
15 16
17
4
14
18
REMOTE CONTROLLER
5
19
1. Veille
Met le S DVR 52 sous et hors tension.
2. Ouvrir/fermer
Ouvre et ferme le plateau CD.
3. Précédent/préréglé
Sélectionne la plage / la station radio préréglée précédente.
4. Mute
Coupe le son.
5. Suivant/préréglé
Sélectionne la plage /station radio préréglée suivante.
6. Lent/mémoire
En mode CD : appuyez sur ce bouton pour une lecture en mode ralenti.
En mode sélection : appuyez sur ce bouton pour enregistrer manuellement
les stations de radio.
7. Lecture/pause
Lance ou suspend la lecture.
8. Affi chage
Affi che le temps de lecture écoulé, le numéro de plage, etc.
9. Arrière / balayage
En mode CD : retour rapide du CD.
En mode sélection : lance la recherche inversée de fréquence.
10. Arrêt
Arrête la lecture.
11. Avant/balayage
En mode CD : avance rapide.
En mode sélection : lance la recherche de fréquence.
12. Source
Bascule entre DVD, AUX1, AUX2, COAXIAL, OPTICAL DIGITAL (optique numéri
que), FM.
13. Confi guration
Accède au menu de confi guration.
14. Boutons de réglage
Employés dans les pages de menu.
15. Menu/PBC
Affi che le menu du CD sur le lecteur de DVD.
Met la fonction PBC du VCD sous et hors tension.
16. Titre/retour
Affi che le menu de titre lors de la lecture d’un DVD et revient au menu du
CD.
17. Commande pas à pas
Appuyez sur ce bouton pour jouer avec la commande pas à pas.
18. Sélection HDMI
Sélectionne HDMI lorsqu’un téléviseur doté d’une connexion HDMI est
branché.
Sélectionne P-SCAN lorsqu’un téléviseur doté d’une connexion HDMI n’est
pas branché.
30
Page 31

Remote control layout
20
21 22
23 24
25
26 27
28 29 30 31
32 33 34 35
REMOTE CONTROLLER
19. Programme
Programme les plages.
En mode sélection : appuyez sur le bouton pendant 5 secondes pour
enregistrer automatiquement les stations de radio.
20. Boutons numérotés
Employés pour la sélection en mode DVD, FM et CD Audio.
21. 1/tous
Ce bouton vous permet de rejouer un titre, un chapitre, une chanson ou
toutes les chansons d’un CD.
22. A-B
Permet de défi nir un passage et de le rejouer plusieurs fois.
23. Egalisateur
Sélectionne les paramètres d’effets sonores.
24. Sélection
Permet de choisir l’enceinte qui a besoin d’un réglage individuel.
25. Volume (+/-)
Règle le volume.
26. Surround
Modifi e les paramètres du son surround.
27. Mode
Mode image sortie HDMI OUT.
28. Audio
Sélectionne le canal audio.
29. Sous-titres
Sélectionne une langue de sous-titrage sur le lecteur de DVD.
30. Zoom
Agrandit ou réduit l’image.
31. Angle
Si cette fonction est disponible sur le DVD, appuyez sur ce bouton pour
visualiser les différents angles de la caméra.
32. Sleep (Minuterie d’arrêt)
Programme le temporisateur de la minuterie d’arrêt.
33. Mono/stéréo
En mode sélection : appuyez sur ce bouton pour choisir la sortie mono ou
stéréo.
34. Goto (Aller à)
Sélectionne un point de lecture de départ.
35. Shuffl e (mode aléatoire)
Appuyez sur ce bouton pour lancer la lecture aléatoire.
31
Page 32

Configuration générale
Pour accéder au menu de configuration du S DVR 52, appuyez sur le bouton « SETUP ».
Utilisez
Pour sortir du menu Configuration Système, appuyez sur « SETUP ».
/ / / pour naviguer dans les menus et appuyez sur « OK » pour effectuer votre sélection.
TV DISPLAY
TV TYPE
SCREEN SAVER
RESOLUTION
VIDEO OUTPUT
MAIN PAGE
GENERAL SETUP
TV DISPLAY
TV TYPE
SCREEN SAVER
RESOLUTION
VIDEO OUTPUT
-- GENERAL PAGE --
-- GENERAL PAGE --
4 : 3 PS
4 : 3 LB
16 : 9
MULTI SYSTEM
NTSC
PAL
TV TYPE /Type d’image
Sélectionnez le format d’image correspondant à votre écran.
Le 16:9 est programmé par défaut.
• 4:3 LB
Si vous disposez d’un téléviseur standard, ce paramètre affiche l’image plein
écran avec des bandes noires en bas et
en haut.
• 4:3 PS
Si vous disposez d’un téléviseur standard, ce paramètre affiche une image
large sur tout l’écran avec une portion
automatiquement coupée.
• 16:9
Si vous disposez d’un grand écran, cette
fonction est la plus adaptée. Sélectionnez aussi sur le téléviseur le mode 16:9.
TYPE DE TELEVISEUR
Choisissez entre la sortie vidéo Multi System (le téléviseur
branché est compatible avec les systèmes NTSC et PAL), NTSC
ou PAL, à partir du S DVR 52.
Le paramètre par défaut doit convenir à votre région ; son
changement peut entraîner une image de mauvaise qualité.
MAIN PAGE
SET TV STANDARD
TV DISPLAY
TV TYPE
SCREEN SAVER
RESOLUTION
VIDEO OUTPUT
MAIN PAGE
SCREEN SAVER SETTING
32
-- GENERAL PAGE --
ECONOMISEUR D’ECRAN
Cette fonction permet d’activer et de désactiver
l’économiseur d’écran.
ON
OFF
Page 33

Configuration générale
TV DISPLAY
TV TYPE
SCREEN SAVER
RESOLUTION
VIDEO OUTPUT
MAIN PAGE
SET RESOLUTION
TV DISPLAY
TV TYPE
SCREEN SAVER
RESOLUTION
VIDEO OUTPUT
-- GENERAL PAGE --
-- GENERAL PAGE --
SD INTERLACE
SD PROGRESSIVE
770P
1080I
YUV
RGB
RESOLUTION
Vidéo entrelacée 720x480 pixels.
SD progressive
Vidéo à balayage progressif 720x480 pixels.
720P
Vidéo à balayage progressif 1280x720 pixels.
1080I
Vidéo entrelacée 1920x1080 pixels.
Nota
• Lorsqu’un câble HDMI est branché, vous ne pouvez accéder
à cette configuration que pour sélectionner SD progressive,
720P et 1080I.
• Lorsqu’un câble HDMI n’est pas branché vous ne pouvez
accéder à cette configuration que pour sélectionner SD entrelacée et SD progressive.
SORTIE VIDEO
La sélection de la sortie vidéo vous permet de choisir le
type de sortie vidéo convenant à votre système DVD Home
Cinéma lorsqu’un téléviseur doté d’une connexion HDMI TV
est branché.
MAIN PAGE
SET VIDEO OUTPUT
33
Page 34

Réglage des enceintes
-- SPEAKER SETUP PAGE --
CENTER DELAY
REAR DELAY
TEST TONE
MAIN PAGE
LOUDSPEAKER SETUP
-- SPEAKER SETUP PAGE --
CENTER DELAY
REAR DELAY
TEST TONE
MAIN PAGE
SET SURROUND DELAY
15MS
9MS
3MS
OFF
15MS
9MS
3MS
OFF
RETARD CENTRAL
Sélectionne le temps de retard du canal central pour le son
audio Dolby Digital.
Utilisez
et pour augmenter ou réduire le temps.
RETARD ARRIERE
Sélectionne le temps de retard du canal arrière pour le son
audio Dolby Digital audio.
Utilisez
et pour augmenter ou réduire le temps.
CENTER DELAY
REAR DELAY
TEST TONE
MAIN PAGE
TEST TONE
-- SPEAKER SETUP PAGE --
ON
OFF
ESSAI DE TONALITE
Appuyez sur ce bouton pour vérifier que l’ensemble des
enceintes est correctement branché.
34
Page 35

Réglage des enceintes
DYNAMIC
SPDIF OUTPUT
MAIN PAGE
AUDIO RELATED
DYNAMIC
SPDIF OUTPUT
MAIN PAGE
SET SPDIF
-- AUDIO SETUP --
-- AUDIO SETUP --
OFF
SPDIF/RAW
SPDIF/PCM
FULL
6/8
4/8
2/8
OFF
PLAGE DYNAMIQUE
Si vous souhaitez visionner un film sans déranger toute la
maison, il est possible de réduire la dynamique (pics sonores)
en activant la fonction “Dynamic Range”.
La compression de la plage dynamique est réglable en mode
Dolby Digital. Utilisez
et pour augmenter et baisser la
valeur.
SORTIE SPDIF
SPDIF / RAW
Si un récepteur AV externe doté d’un décodeur DD et DTS est
raccordé au moyen d’une prise de sortie numérique, sélectionnez SPDIF / RAW.
SPDIF / PCM
Si un récepteur AV externe ne disposant pas d’un décodeur
DD et DTS est raccordé au moyen d’une prise de sortie numérique, sélectionnez SPDIF / PCM.
35
Page 36

Enregistrement DivX (R)
-- DIVX(R) REGISTRATION --
Your registration code is: XXXXXXXX
To learn more go to www.divx.com/vod
DONE
Enregistrement DivX (R)
Ce code est unique et vous sera utile pour l’enregistrement
de votre lecteur. Il vous permettra de louer et d’acheter des
vidéos DivX au moyen du service à la demande.
36
Page 37

Réglage de la langue
-- PREFERENCES PAGE --
OSD LANG
AUDIO LANG
SUBTITLE LANG
DISC MENU LANG
DEFAULTS
MAIN PAGE
SET PREFERENCES
-- PREFERENCES PAGE --
OSD LANG
AUDIO LANG
SUBTITLE LANG
DISC MENU LANG
DEFAULTS
MAIN PAGE
PREFERRED AUDIO LANGUAGE
ENGLISH
FRENCH
SPANISH
GERMAN
ITALIAN
ENGLISH
FRENCH
SPANISH
GERMAN
ITALIAN
LANGUE OSD
Cette sélection paramètre la langue utilisée pour l’affichage
des menus OSD du DVR 52.
LANGUE AUDIO
Si disponible sur le DVD, cette fonction permet de sélectionner la langue dans laquelle vous souhaitez écouter le film.
-- PREFERENCES PAGE --
OSD LANG
AUDIO LANG
SUBTITLE LANG
DISC MENU LANG
DEFAULTS
MAIN PAGE
PREFERRED SUBTITLE LANGUAGE
-- PREFERENCES PAGE --
OSD LANG
AUDIO LANG
SUBTITLE LANG
DISC MENU LANG
DEFAULTS
MAIN PAGE
PREFERRED MENU LANGUAGE
LANGUE DES SOUS-TITRES
Si disponible sur le DVD, cette fonction permet de sélectionner la langue des sous-titres du film que vous souhaitez voir.
ENGLISH
FRENCH
SPANISH
GERMAN
ITALIAN
OFF
LANGUE DU MENU
Si disponible sur le DVD, cette fonction permet de sélectionner la langue du menu du film.
ENGLISH
FRENCH
SPANISH
GERMAN
ITALIAN
37
Page 38

-- PREFERENCES PAGE --
OSD LANG
AUDIO LANG
SUBTITLE LANG
DISC MENU LANG
DEFAULTS
MAIN PAGE
LOAD FACTORY SETTINGS
RESET
DEFAUT
Si vous sélectionnez ce bouton, les paramètres par défaut de
toutes les fonctions seront restaurés.
Lecture des fichiers à partir d’un CD ou d’une clé
Selecting USB
To select the USB device, do the following:
1. Press STOP twice on the remote to end all playback.
2. Press GOTO on the remote and choose USB.
Lecture des fichiers
1. Parcourez les fichiers au moyen des touches / de votre
télécommande et appuyez sur « ENTER » pour entrer et sortir
d’une bibliothèque de programmes.
2. Appuyez sur « ENTER » pour choisir un fichier.
Nota
Selon le format du fichier, vous devrez peut-être appuyer
deux fois sur la touche « STOP » pour arrêter la lecture.
Lors de la visualisation d’images, vous pouvez utiliser
/ sur votre télécommande pour changer les vues.
ROOT
MENU
ROOT
MOVIE 1
MOVIE 2
/ /
38
Page 39

Radio : fonctionnement de base et enregistrement
Vous pouvez écouter la radio FM si les antennes sont correctement branchées.
Appuyez sur « SOURCE » pour sélectionner le syntoniseur.
Sélection de programmes préréglés
Pour sélectionner des programmes préréglés, appuyez sur les touches PRESET ou
Trouver et enregistrer manuellement une station radio
1. Maintenez la touche SCAN - ou SCAN + enfoncée jusqu’à ce que l’indicateur
de fréquence commence à défiler puis relâchez la touche. Le système se règle
automatiquement sur le signal de la station radio suivant.
2. Appuyez sur SLOW/MEMORY (Lent/Mémoire)
3. Saisissez un nombre entre 01-40.
4. Appuyez sur SLOW/MEMORY (Lent/Mémoire).
Votre station est maintenant enregistrée.
Trouver et enregistrer automatiquement une station radio
1. Maintenez la touche « PROGRAM » enfoncée pendant plus de 5 secondes et
toutes les stations de radio avec un fort signal seront automatiquement enregistrées.
PRESET + de la télécommande.
REMOTE CONTROLLER
2. Le système s’arrête lorsque toutes les stations disponibles sont enregistrées
ou lorsque la mémoire de 40 stations préréglées est pleine.
Réception stéréo et mono
Si le signal d’une station de radio stéréo FM est faible, vous pouvez en améliorer
la qualité sonore en basculant en mode de réception mono. Pour ce faire, appuyez sur la touche « MONO/STEREO » de la télécommande.
Service de station RDS
La plupart des stations FM offrent un système d’informations supplémentaire
appelé RDS (Radio Data System).
Si une station RDS est captée vous pouvez voir les informations du programme
s’afficher sur le S DVR 52 en appuyant sur la touche « DISPLAY » de la télécommande.
FM 92.90
MHZ
P3
FM 92.90
MHZ
39
Page 40

Dépannage
Si vous rencontrez une anomalie de fonctionnement du DVR 52, vérifiez les points suivants avant de faire appel à un technicien. Referez vous aussi aux instructions de ce manuel.
ATTENTION
Ne tentez en aucun cas de réparer l’appareil par vous-même !
Symptôme Causes possibles Corrections
Absence d’image. • Le TV est éteint.
• Le TV n’est pas correctement
branché.
• Allumez le TV.
• Branchez le TV correctement.
La lecture du disque ne se lance
pas.
Absence de son. • Le VOLUME est sur 0.
Le DVR 52 ne répond pas aux
commandes de la télécommande.
Pas de mise en service. • Le câble d’alimentation est
Le DVR 52 ne répond pas à toutes
les commandes lors de la lecture.
• Le disque est à l’envers.
• Le disque est vide ou le format n’est
pas reconnu par le DVR 52.
• Le disque est sale ou défectueux.
• Le lecteur ne contient aucun disque.
• Les câbles des enceintes ne sont pas
correctement branchés.
• La télécommande ne contient pas
de pile.
• Les piles sont usées.
• La télécommande n’est pas dirigée
vers le capteur du DVR 52.
• La télécommande est trop loin du
DVR 52.
débranché.
• L’alimentation est coupée
• Fonction non permise par le disque. • Consultez les instructions notées sur le
• Veillez à ce que la face portant la
gravure soit tournée vers le bas.
• Enlevez le disque et essayez-en un
autre
• Nettoyez le disque.
• Posez le disque dans l’alvéole prévue
sur le tiroir.
• Montez le volume.
• Branchez les câbles correctement.
• Placez des piles neuves dans la
télécommande.
• Remplacez les piles.
• Dirigez la télécommande vers le
capteur en façade du DVR 52.
• Utilisez la télécommande à moins de
5m de l’appareil.
• Contrôlez le raccordement au secteur.
• Mettez l’appareil sous tension.
disque.
40
Page 41

Service et Garantie
Information relative à l’environnement
• Le système est composé de matériaux recyclables qui peuvent être réutilisés après avoir été
désassemblés par du personnel agréé.
• Respectez la réglementation locale en vigueur pour vous débarrasser de l’emballage, des piles usagées et
des appareils à mettre au rebut.
Copyright
Ce produit contient une technologie protégée par copyright, basée sur des brevets appartenant à Macrovision Corporation et à d’autres
détenteurs de copyright. Toute utilisation de cette technologie protégée par copyright doit faire l’objet d’une approbation par Macrovision
Corporation. Cette technologie est destinée à un usage uniquement domestique, sauf autorisation préalable de Macrovision Corporation.
Tout démontage ou désassemblage est interdit. Fabriqué sous licence de Dolby Laboratories. “Dolby” et le symbole double “D” sont des
marques de Dolby Laboratories. “DTS” et “DTS Digital Out” sont des marques de Digital Theater Systems, Inc.
Service
Pour toute demande concernant la garantie, veuillez vous adresser au revendeur du matériel. En cas de demande d’intervention pendant
la période de garantie, joignez votre facture originale. Important : n’envoyez jamais le produit en réparation sans accord préalable. Si le
produit est TOUJOURS SOUS GARANTIE, Jamo assumera les frais de port entre le revendeur et le centre d’assistance agréé. Tout autre frais
de transport sera à la charge du client. Le produit doit être emballé convenablement, sinon la garantie sera résiliée. Si le produit n’est PAS
SOUS GARANTIE, tous les frais sont à la charge du client.
Certificat de garantie
Jamo fournit une garantie de vingt-quatre (24) mois à compter de la date d’achat. Cette garantie couvre les défauts de
fabrication et le matériel. En présence de vices couverts par la garantie, il convient de retourner le produit au revendeur
auprès duquel il a été acheté. La durée de réparation, transport compris, est généralement estimée à quinze jours ouvrables
environ.
Termes de garantie
1. La garantie n’est valable que sur présentation du justificatif d’achat original, et que si le numéro de série est parfaitement lisible sur le
produit.
2. Les seules obligations de Jamo se limitent à réparer les composants défectueux ou à les remplacer. C’est Jamo, à sa seule et unique
appréciation, qui décide du remplacement ou de la réparation des composants défectueux.
Un échange n’est possible que si l’appareil ne peut pas être réparé.
3. Les réparations d’un appareil sous garantie doivent être effectuées par un revendeur Jamo ou par un centre de réparation agréé. Les
réparations effectuées par des centres non agréés ne donneront lieu à aucune indemnisation. Les réparations ou les dommages causés au
produit suite à une intervention non autorisée ne sont pas couverts par cette garantie.
4. Ce produit ne sera pas considéré comme défectueux, ni au niveau du matériel, ni au niveau de la fabrication, si une adaptation a été
effectuée pour répondre à des exigences nationales, locales, techniques ou sécuritaires d’un pays autre que celui pour lequel le produit a
été initialement conçu et fabriqué.
5. Cette garantie ne couvre pas ces types d’adaptations, et aucune indemnisation n’aura lieu pour effectuer ces types d’adaptations ni pour
réparer les dommages qui en résulteraient. La garantie ne couvre pas non plus les éléments suivants:
a) Inspection périodique, maintenance et réparation ou remplacement des pièces ayant subi une usure normale.
b) Coûts liés au transport, au désassemblage ou à l’installation du produit.
c) Utilisation impropre, y compris l’utilisation à des fins autres que celles pour lesquelles le produit a été conçu, ou installation incorrecte.
d) Dommages causés par la foudre, l’eau, le feu, les catastrophes naturelles, la guerre, les insurrections, une tension inadéquate, une
aération insuffisante ou toute autre cause échappant au contrôle de Jamo.
6. Cette garantie s’applique au propriétaire légal du produit, pendant la période de couverture.
Emballage
Utilisez si possible les matériaux d’emballage d’origine pour toute expédition. Sinon, emballez le
DVR 52 en utilisant :
• Une boîte en carton rigide, assez solide pour supporter le poids de l’appareil.
• Au moins 6 cm / 2,36 pouces de matériau de protection contre les chocs autour de l’appareil.
• Une matière non abrasive et exempte de poussière pour les autres pièces.
• Un emballage non abrasif pour le produit. (Pour le protéger contre la poussière et la saleté)
• Reconditionnez le produit de sorte qu’il ne puisse pas bouger à l’intérieur du carton pendant le
transport.
Informations dont nous avons besoin pour procéder à la réparation du produit :
Nom du modèle : Ampli-Tuner DVD Jamo DVR 52
N° de série :
Description de la panne :
Copie de la facture ou de la preuve d’achat
Nom, adresse et n° de téléphone du revendeur
Vos informations personnelles : nom, adresse, code postal, ville, numéro de téléphone et adresse e-mail (facultatif)
Votre signature
Cachet et signature du revendeur
Date
41
Page 42

Jamo S 502
Page 43

deutsch
Page 44

Inhalt
deutsch
Einleitung 45
Anschließen des Systems 46
Allgemeines Setup 52
Lautsprecher-Setup 54
Audio Setup 55
DivX(R) Registration 56
Setup Sprachen 57
Wiedergabe von Dateien von Disks oder über 58
Radio - Grundfunktionen und Speichern 59
Störungsbehebung 60
Kundendienst und Garantie 61
44
Page 45

Einleitung
Überprüfen Sie, ob Ihrem S 502 das folgende Zubehör beiliegt.
DVD-Receiver Jamo S DVR 52
Aux
REMOTECONTROLLER
Lautsprecherkabel Fernbedienung
Batterien
für die Fernbedienung
SCARTFM Antenna
Audio cablen /
Composite Video
5 Lautsprecher
Subwoofer
45
Page 46

Anschließen des Systems
Aus der unten stehenden Abbildung ist zu ersehen, wie die Lautsprecher, der Subwoofer und die Antennen anzuschließen
sind. Um den S DVR 52 in Ihr bestehendes TV-System zu integrieren, beachten Sie bitte die drei Konfigurationsbeispiele.
Wählen Sie eine der Konfigurationen oder erstellen Sie Ihre eigene Kombination.
Bitte achten Sie darauf, beim Anschluss der Lautsprecher und des Subwoofers an den S DVR 52 + an + und - an - anzuschließen. Wenn die Anschlüsse vertauscht werden, ist der Klang verzerrt und hat zu wenig Bässe.
Surround leftSurround right
Subwoofer
Front right Centre Front left
46
6
4
&20321(17
Ϩ
Page 47

Front
Surround
Centre
Subwoofer
47
Page 48

Anschluss über die SCART-Buchse
Sowohl Audio- als auch Video-Signale werden über das SCART-Kabel geführt. Wenn Sie ein Gerät an die SCART-2-Buchse an
Ihrem TV anschließen, senden die meisten TVs automatisch die Audio-Signale an den DVR 52. Wenn ein Satelliten-Receiver, eine
Set-Top-Box, ein Videorekorder, ein PC, eine Spiele-Konsole oder ein MP3-Player einen digitalen oder analogen Audio-Ausgang
hat, können Sie diese Geräte direkt an den DVR 52 anschließen.
TV
PC
6
4
Spiele-Konsole MP3 Player
&20321(17
Ω
Videorekorder
Satellit/Set-Top-Box
Anschluss über den S-Video-Anschluss
Die Video-Signale werden über das S-Video-Kabel zum TV-Gerät geführt. Die Audio-Signale werden vom TV-Gerät zum DVR 52
geführt. Wenn ein Satelliten-Receiver, eine Set-Top-Box, ein Videorekorder, ein PC, eine Spiele-Konsole oder ein MP3-Player einen
digitalen oder analogen Audio-Ausgang hat, können Sie diese Geräte direkt an den DVR 52 anschließen.
TV
PC
6
4
Spiele-Konsole MP3 Player
&20321(17
Ω
Satellit/Set-Top-Box
Videorekorder
Konfiguration Component und HDMI
Am Component-Video-Ausgang können Plasma-Fernseher und LCD-Bildschirme angeschlossen werden (Component-Kabel
sind nicht im Lieferumfang enthalten). Audio-Signale von der HD-Videoquelle werden direkt zum DVR 52 geführt.
Wenn ein PC, eine Spiele-Konsole oder ein MP3-Player einen digitalen oder analogen Audio-Ausgang hat, können Sie diese
Geräte direkt anschließen.
An den HDMI-Ausgang kann ein TV-Gerät mit HDMI-Eingang angeschlossen werden (HDMI-Kabel nicht im Lieferumfang).
Spiele-Konsole MP3 Player
&20321(17
Ω
48
PC
6
4
HDTV
Page 49

Vorderseite des Geräts
1 2 3 4 5 6 7 8 9 10 11
1. Standby
Über die StandbyTaste wird der S DVR
52 ein- und ausgeschaltet.
2. Öffnen/Schließen
Drücken Sie diese
Taste, um die DiskSchublade zu öffnen
und zu schließen.
3. Quelle
Schaltet zwischen den
Eingangsquellen DVD,
FM ,AUX, TV, COAX IN
um.
4. Wiedergabe/Pause
Drücken Sie diese
Taste, um auf Wiedergabe bzw. auf Pause
zu schalten.
5. Vorheriger
Mit dieser Taste kann
der vorherige Track/
voreingestellte Radiosender ausgewählt
werden.
6. Nächster
Mit dieser Taste kann
der nächste Track/
voreingestellte Radio-
7. Stopp
Drücken Sie diese
Taste, um die Wiedergabe zu stoppen.
8. Lautstärke (-)
Leisere Wiedergabe.
9. Lautstärke (+)
Lautere Wiedergabe.
10. AUX-Eingang
Vorderseite
AUX-Eingang.
sender ausgewählt
werden.
11. USB
USB-Anschluss
Anschlüsse an der Geräterückseite
Aux
1 2 3
6
1. Netzkabel 2. Lautsprecher- und
Subwoofer-Ausgang
6. Koaxialer digitaler
Eingang
7. Composite-VideoAusgang
11. HDMI-Ausgang 12. SCART Ein-/Ausgang
6 789
4
4
3. Analoger Audio-Eingang
5
&20321(17
10 11 12 13
4. Analoger AudioAusgang
8. S-Video-Ausgang 9. Ausgang Aktiver
Subwoofer
13. FM-Antenne
Ω
5. Koaxialer digitaler
Ausgang
10. Component-VideoAusgang
49
Page 50

Remote control layout
1 2
3
4
6 7 8
9 10 11
12 13
14
15 16
17
18
REMOTE CONTROLLER
5
19
1. Standby
Über die Standby-Taste wird der S DVR 52 ein- und ausgeschaltet.
2. Öffnen/Schließen
Drücken Sie diese Taste, um die Disk-Schublade zu öffnen oder zu schließen.
3. Vorheriger/voreingestellter
Mit dieser Taste kann der vorherige Track/voreingestellte Radiosender aus gewählt
werden.
4. Mute
Drücken Sie diese Taste, um die Stummschaltung zu aktivieren.
5. Nächster/voreingestellter
Mit dieser Taste kann der nächste Track/voreingestellte Radiosender aus gewählt
werden.
6. Slow/memory
Drücken Sie diese Taste im Disk-Modus für eine Wiedergabe in Zeitlupe.
Drücken Sie diese Taste im Tuner-Modus, um die Radiosender manuell zu speichern.
7. Wiedergabe/Pause
Zum Starten oder Anhalten der Wiedergabe.
8. Display
Anzeige der abgelaufenen Wiedergabezeit, der Tracknummer usw.
9. Rückwärts/Scannen
Im Disk-Modus: Schnellrücklauf der Disk.
Im Tuner-Modus: Start der Frequenzsuche in absteigender Richtung.
10. Stopp
Stoppt die Wiedergabe.
11. Vorwärts/Scannen
Im Disk-Modus: Schnellvorlauf.
Im Tuner-Modus: Start der Frequenzsuche.
12. Quelle
Umschaltung zwischen DVD, AUX1, AUX2, COAXIAL, OPTICAL DIGITAL, FM.
13. Setup
Drücken Sie diese Taste, um in das Setup-Menü zu gelangen.
14. Einstellungstasten
Werden auf den Menü-Seiten genutzt.
15. Menu/PBC
Zeigt das Disk-Menü auf der DVD an.
Schaltet die PBC-Funktion auf einer VCD ein und aus.
16. Titel/zurück
Wenn Sie diese Taste während der Wiedergabe einer DVD drücken, können Sie sich
das Titel-Menü anzeigen lassen bzw. zum Disk-Menü zurückkehren.
17. Step
Drücken Sie diese Taste für eine Wiedergabe im Step-Modus.
18. HDMI Ausw.
Drücken Sie diese Taste, um HDMI auszuwählen, wenn ein HDMI-TV-Gerät
angeschlossen ist.
Drücken Sie diese Taste, um P-SCAN auszuwählen, wenn kein HDMI-TV-Gerät
angeschlossen ist.
50
Page 51

Remote control layout
20
21 22
23 24
25
26 27
28 29 30 31
32 33 34 35
REMOTE CONTROLLER
19. Programm
Zur Programmierung von Tracks.
Halten Sie diese Taste im Tuner-Modus für 5 Sekunden gedrückt, um Radiosender
automatisch zu speichern.
20. Numerisches Tastenfeld
Wird für die Auswahl DVD, FM und Audio CD genutzt.
21. 1/alle
Mit dieser Taste können Sie einen Titel, ein Kapitel, ein Stück oder alle Stücke auf
einer Disk wiederholen.
22. A-B
Hiermit wird ein Abschnitt festgelegt, der dann wiederholt wiedergegeben wird.
23. Eq
Mit dieser Taste können Sie die Sound-Effekt-Einstellungen auswählen.
24. Auswahl
Drücken Sie diese Taste, um einen Lautsprecher auszuwählen, der einzeln angepasst
werden muss.
25. Volume (+/-)
Drücken Sie diese Taste, um die Lautstärke anzupassen.
26. Surround
Drücken Sie diese Taste, um die Surround-Sound-Einstellungen zu ändern.
27. Modus
Bildmodus HDMI OUT.
28. Audio
Drücken Sie diese Taste, um den Audiokanal auszuwählen.
29. Subtitle
Drücken Sie diese Taste, um eine Untertitel-Sprache auf der DVD auszuwählen.
30. Zoom
Drücken Sie diese Taste, um das Bild zu vergrößern oder zu verkleinern.
31. Winkel
Falls diese Funktion auf der DVD verfügbar ist, können Sie hiermit eine Wiedergabe
aus verschiedenen Kamerawinkel erhalten.
32. Sleep
Drücken Sie diese Taste, um den Timer für die Sleep-Funktion einzustellen.
33. Mono/Stereo
Drücken Sie diese Taste im Tuner-Modus, um zwischen Mono- oder Stereo-Wieder
gabe zu wählen.
34. Gehe zu
Drücken Sie diese Taste, um einen Startpunkt für die Wiedergabe auszuwählen.
35. Zufallswiedergabe
Drücken Sie diese Taste, um die Zufallswiedergabe zu starten.
51
Page 52

Allgemeines Setup
Drücken Sie die Taste „SETUP“, um das Setup-Menü des S DVR 52 zu öffnen.
Blättern Sie mit
Um das Menü für das System-Setup zu verlassen, drücken Sie „SETUP“.
/ / / durch die Menüs und klicken Sie „OK“, um einen Unterpunkt auszuwählen.
TV DISPLAY
TV TYPE
SCREEN SAVER
RESOLUTION
VIDEO OUTPUT
MAIN PAGE
GENERAL SETUP
-- GENERAL PAGE --
4 : 3 PS
4 : 3 LB
16 : 9
TV-TYPE
Sie können das für Ihren TV-Bildschirm passende Bildseitenverhältnis wählen.
• 4:3 Letterbox
Wenn Sie einen herkömmlichen „quadratischen“ Fernseher haben und
ein DVD-Bild in vollem Format sehen
möchten, wählen Sie diese Einstellung. Am oberen und unteren Rand des
TV-Bildschirms werden breite Ränder
dargestellt.
• 4:3 Panscan
Wenn Sie einen herkömmlichen Fernseher haben und möchten, dass das
DVD-Bild Ihren gesamten TV-Bildschirm
ausfüllt, wählen Sie diese Einstellung. Es
wird ein breites Bild auf der gesamten
Fläche Ihres TV-Bildschirms wiedergegeben, wobei ein Teil des Bildes automatisch abgeschnitten ist.
• 16:9
Wenn Sie ein TV-Gerät mit Breitbildformat haben, wählen Sie diese Einstellung
(Sie müssen auch Ihren Breitbildfernseher in den 16:9-Modus schalten).
-- GENERAL PAGE --
TV DISPLAY
TV TYPE
SCREEN SAVER
RESOLUTION
VIDEO OUTPUT
MAIN PAGE
SET TV STANDARD
-- GENERAL PAGE --
TV DISPLAY
TV TYPE
SCREEN SAVER
RESOLUTION
VIDEO OUTPUT
MAIN PAGE
SCREEN SAVER SETTING
MULTI SYSTEM
NTSC
PAL
ON
OFF
TV-TYPE (TV-Typ)
Wählen Sie zwischen Multi-System- (das angeschlossene
TV-Gerät ist sowohl NTSC- als auch PAL-fähig), NTSC- oder
PAL-Videoausgabe aus dem S DVR 52.
Die Standardeinstellung sollte für Ihr Land geeignet sein
- eine Änderung kann zu einer schlechten Bildqualität führen.
SCREEN SAVER (Bildschirmschoner)
Zum Ein- (ON) und Ausschalten (OFF) des Bildschirmschoners.
52
Page 53

Allgemeines Setup
TV DISPLAY
TV TYPE
SCREEN SAVER
RESOLUTION
VIDEO OUTPUT
MAIN PAGE
SET RESOLUTION
TV DISPLAY
TV TYPE
SCREEN SAVER
RESOLUTION
VIDEO OUTPUT
-- GENERAL PAGE --
-- GENERAL PAGE --
SD INTERLACE
SD PROGRESSIVE
770P
1080I
YUV
RGB
RESOLUTION (Auflösung)
SD Interlace
720 x 480 Interlace-Video.
SD progressive
720x480 Progressive-Scan-Video.
720P
1280x720 Pixel Progressive-Scan Video.
1080I
1920x1080 Pixel Interlace-Video.
Hinweis
• Wenn ein HDMI-Kabel angeschlossen ist, können Sie in diesem Setup nur SD progressive, 720P und 1080I auswählen.
• Wenn kein HDMI-Kabel angeschlossen ist, können Sie in diesem Setup nur SD interlace oder SD progressive auswählen.
VIDEO OUTPUT (Bildausgabe)
Mit Hilfe dieser Auswahl können Sie die für Ihr DVD-Heimkino-System geeignete Bildausgabe auswählen, wenn ein
HDMI-TV-Gerät angeschlossen ist.
MAIN PAGE
SET VIDEO OUTPUT
53
Page 54

Lautsprecher-Setup
-- SPEAKER SETUP PAGE --
CENTER DELAY
REAR DELAY
TEST TONE
MAIN PAGE
LOUDSPEAKER SETUP
-- SPEAKER SETUP PAGE --
CENTER DELAY
REAR DELAY
TEST TONE
MAIN PAGE
SET SURROUND DELAY
15MS
9MS
3MS
OFF
15MS
9MS
3MS
OFF
CENTRE DELAY (Center-Delay)
Dient zur Auswahl der Verzögerung des Center-Kanals für
Dolby Digital Audio.
Benutzen Sie die Tasten
und , um eine größere oder klei-
nere Verzögerung einzustellen.
REAR DELAY (Verzögerung rückwärtig)
Dient zur Auswahl der Verzögerung des rückwärtigen Kanals
für Dolby Digital Audio.
Benutzen Sie die Tasten
nere Verzögerung einzustellen.
und , um eine größere oder klei-
CENTER DELAY
REAR DELAY
TEST TONE
MAIN PAGE
TEST TONE
-- SPEAKER SETUP PAGE --
ON
OFF
TEST TONE (Prüfton)
Wählen Sie diese Funktion, um zu testen, ob alle Ihre Lautsprecher korrekt angeschlossen sind.
54
Page 55

Audio Setup
DYNAMIC
SPDIF OUTPUT
MAIN PAGE
AUDIO RELATED
DYNAMIC
SPDIF OUTPUT
MAIN PAGE
SET SPDIF
-- AUDIO SETUP --
-- AUDIO SETUP --
OFF
SPDIF/RAW
SPDIF/PCM
FULL
6/8
4/8
2/8
OFF
DYNAMIKBEREICH
Wenn Sie einen Film ansehen möchten, ohne andere Personen in der Wohnung zu stören, können Sie die dynamischen Effekte (laute Geräusche) reduzieren, indem Sie die
Funktion Dynamikbereich aktivieren.
Die Einschränkung des Dynamikbereichs ist im Modus Dolby
Digital wählbar. Benutzen Sie die Tasten
und , um eine
größere oder kleinere Verzögerung einzustellen.
SPDIF OUTPUT (SPDIF-Ausgang)
SPDIF / RAW
Wenn ein externer AV-Receiver mit DD- und DTS-Dekoder
über einen digitalen Ausgang angeschlossen ist, wählen Sie
SPDIF / RAW.
SPDIF / PCM
Wenn ein externer AV-Receiver ohne DD- und DTS-Dekoder
über eine digitalen Ausgang angeschlossen ist, wählen Sie
SPDIF / PCM.
55
Page 56

DivX(R) Registration
-- DIVX(R) REGISTRATION --
Your registration code is: XXXXXXXX
To learn more go to www.divx.com/vod
DONE
DIVX (R) REGISTRATION (Registrierung DivX (R))
Dies ist ein nur einmal vergebener Code, den Sie benutzen
können, um Ihren Player zu registrieren. Die Registrierung
eröffnet Ihnen die Möglichkeit, DivX Video-On-Demand-Dateien zu mieten und zu kaufen.
56
Page 57

Setup Sprachen
-- PREFERENCES PAGE --
OSD LANG
AUDIO LANG
SUBTITLE LANG
DISC MENU LANG
DEFAULTS
MAIN PAGE
SET PREFERENCES
-- PREFERENCES PAGE --
OSD LANG
AUDIO LANG
SUBTITLE LANG
DISC MENU LANG
DEFAULTS
MAIN PAGE
PREFERRED AUDIO LANGUAGE
ENGLISH
FRENCH
SPANISH
GERMAN
ITALIAN
ENGLISH
FRENCH
SPANISH
GERMAN
ITALIAN
OSD-SPRACHE
Über diese Funktion wird die Sprache für das OnScreen-Display für den DVR 52 eingestellt.
SPRACHE DER TONSPUR
Falls auf der DVD verfügbar kann über diese Funktion die
bevorzugte Sprache der Tonspur gewählt werden.
-- PREFERENCES PAGE --
OSD LANG
AUDIO LANG
SUBTITLE LANG
DISC MENU LANG
DEFAULTS
MAIN PAGE
PREFERRED SUBTITLE LANGUAGE
-- PREFERENCES PAGE --
OSD LANG
AUDIO LANG
SUBTITLE LANG
DISC MENU LANG
DEFAULTS
MAIN PAGE
PREFERRED MENU LANGUAGE
UNTERTITEL-SPRACHE
Falls auf der DVD verfügbar kann über diese Funktion die
bevorzugte Sprache für die Untertitel gewählt werden.
ENGLISH
FRENCH
SPANISH
GERMAN
ITALIAN
OFF
MENÜ-SPRACHE
Falls auf der DVD verfügbar kann über diese Funktion die
gewünschte Sprache für das Menü gewählt werden.
ENGLISH
FRENCH
SPANISH
GERMAN
ITALIAN
57
Page 58

-- PREFERENCES PAGE --
OSD LANG
AUDIO LANG
SUBTITLE LANG
DISC MENU LANG
DEFAULTS
MAIN PAGE
LOAD FACTORY SETTINGS
RESET
DEFAULT (Standardeinstellung)
Wenn Sie diese Funktion auswählen, werden alle Funktionen
auf ihre Standardeinstellung zurückgesetzt.
Wiedergabe von Dateien von Disks oder über
Selecting USB
To select the USB device, do the following:
1. Press STOP twice on the remote to end all playback.
2. Press GOTO on the remote and choose USB.
Wiedergabe von Dateien
1. Blättern Sie mit Hilfe der Tasten / auf Ihrer Fernbedienung durch die Dateien und drücken Sie „OK“, um eine
Bibliothek zu öffnen/zu verlassen.
2. Drücken Sie „ENTER“, um eine Datei auszuwählen.
Hinweis
Abhängig vom Dateiformat müssen Sie eventuell die Taste
STOP zweimal drücken, um die Wiedergabe zu stoppen.
Wenn Sie Bilder zeigen, können Sie mit Hilfe von
auf der Fernbedienung die Ansicht verändern.
ROOT
MENU
ROOT
MOVIE 1
MOVIE 2
/ / /
58
Page 59

Radio - Grundfunktionen und Speichern
Wenn die Antennen korrekt angeschlossen sind, sollten Sie FM-Sender empfangen können.
Drücken Sie die Taste „SOURCE“, um den Tuner auszuwählen.
Auswahl von voreingestellten Sendern
Um voreingestellte Sender auszuwählen, drücken Sie auf der Fernbedienung die
Taste „
Manuelle Suche und manuelles Speichern von Radiosendern
1. Drücken Sie SCAN - oder SCAN + so lange, bis die Frequenzanzeige sich zu
verändern beginnt, lassen Sie die Taste dann los. Das System sucht nun automatisch nach dem nächsten klar zu empfangenden Radiosender.
2. Drücken Sie die Taste SLOW/MEMORY
3. Geben Sie eine Zahl von 01 bis 40 ein.
4. Drücken Sie die Taste SLOW/MEMORY.
Ihr Sender wird gespeichert.
Automatische Suche und automatisches Speichern eines
Radiosenders
1. Halten Sie die Taste „PROGRAM“ für mehr als 5 Sekunden gedrückt. Alle Radiosender mit klarem Empfang werden automatisch gespeichert.
PRESET -“ oder „ PRESET +“.
REMOTE CONTROLLER
2. Das System stoppt die Speicherung, wenn alle verfügbaren Sender gespeichert sind oder die Speicherkapazität (40 Sender) erschöpft ist.
Stereo- und Mono-Empfang
Wenn das Signal des FM-Radiosenders schwach ist, können Sie die Klangqualität
verbessern, indem Sie auf Mono-Empfang schalten. Um dies zu tun, müssen Sie
die Taste „MONO/STEREO“ auf der Fernbedienung drücken.
RDS
RDS (Radio Data System) ist ein System, über das die von den meisten FM-Sendern bereitgestellten Informationen wiedergegeben werden können.
Wenn ein RDS-Sender empfangen wird, können Sie sich durch Drücken der Taste
„DISPLAY“ auf der Fernbedienung die Programminformationen auf dem Display
des S DVR 52 anzeigen lassen.
FM
92.90
MHZ
P3
FM 92.90
MHZ
59
Page 60

Störungsbehebung
Wenn Sie den Eindruck haben, dass der DMR nicht fehlerfrei arbeitet, gehen Sie zuerst diesen Leitfaden zur Störungsbehebung durch, bevor Sie sich an den Kundendienst wenden. Bitte beachten Sie auch die entsprechenden Anweisungen in
diesem Handbuch.
ACHTUNG
Auf gar keinen Fall sollten Sie den Versuch unternehmen, das System selbst zu reparieren.
Symptom Mögliche Ursache Behebung
Kein Bild. • Das TV-Gerät ist AUSgeschaltet.
• Das TV-Gerät ist nicht korrekt
angeschlossen.
• Schalten Sie das TV-Gerät EIN.
• Schließen Sie das TV-Gerät korrekt an.
Disk kann nicht gespielt werden. • Die Disk wurde verkehrt herum
eingelegt.
• Die Disk ist leer oder das Format
wird vom DVR 52 nicht unterstützt.
• Die Disk ist verschmutzt oder defekt
Kein Ton. • Die LAUTSTÄRKE ist auf 0 eingestellt.
• Lautsprecherkabel sind nicht korrekt
angeschlossen.
Das Gerät DVR 52 reagiert nicht auf
Befehle von der Fernbedienung.
he DVR 52 unit does not respond
to commands from the remote
control.
Es liegt keine Netzspannung am
Gerät an, obwohl das Netzkabel
angeschlossen ist.
• In die Fernbedienung wurden keine
Batterien eingelegt.
• Die Batterien sind leer.
• Die Fernbedienung wurde nicht auf
den Fernbedienungssensor des DVR
52 gerichtet.
• Die Fernbedienung ist zu weit vom
DVR 52 entfernt.
• Das Netzkabel ist nicht richtig
eingesteckt.
• Die Wandsteckdose ist nicht
EINgeschaltet.
• Stellen Sie sicher, dass das Label der
Disk nach oben zeigt.
• Entfernen Sie die Disk und versuchen
Sie es mit einer anderen.
• Säubern Sie die Disk oder entsorgen
Sie sie.
• Legen Sie die Disk richtig in die
Führung der Disk-Schublade ein.
• Stellen Sie die LAUTSTÄRKE höher.
• Schließen Sie sie richtig an.
• Legen Sie neue Batterien ein.
• Durch neue Batterien ersetzen.
• Richten Sie die Fernbedienung auf den
Fernbedienungssensor des DVR 52.
• Benutzen Sie die Fernbedienung in
einer Entfernung von höchstens 5 m.
• Stecken Sie das Netzkabel richtig ein.
• Schalten Sie die Wandsteckdose EIN.
Der DVR 52 reagiert bei der
Wiedergabe nicht auf einige der
Bedienungsbefehle
60
• Die Funktionen sind eventuell für die
Disk nicht verfügbar.
• Lesen Sie bitte die Anweisungen auf
der Disk.
Page 61

Kundendienst und Garantie
Umweltinformationen
• Das System ist aus recyclingfähigen Materialien gefertigt, die nach der Demontage durch befugte Personen wiederverwertet
werden können.
• Bitte beachten Sie die nationalen Bestimmungen für die Entsorgung von Verpackungsmaterialien, leeren Batterien und
Altgeräten.
Copyright
Dieses Produkt enthält durch Copyright geschützte Technologie, die durch Patente, die sich im Besitz von Macrovision Corporation und anderer Copyright-Inhaber befinden, geschützt ist. Jedweder Einsatz dieser durch Copyright geschützten Technologie muss von Macrovision Corporation genehmigt werden. Die Technologie ist für den Einsatz in Privathaushalten gedacht,
sofern keine andere Genehmigung von Macrovision Corporation erteilt wurde. Die Demontage und Zerlegung ist untersagt.
Unter Lizenz der Dolby Laboratories hergestellt. „Dolby“ und das Doppel-“D“-Symbol sind Warenzeichen der Dolby Laboratories. „DTS“ und „DTS Digital Out“ sind Warenzeichen von Digital Theater Systems, Inc.
Kundendienst
Wenden Sie sich bei Garantie-Anfragen bitte an Ihren Händler. Legen Sie bei Kundendienst-Anfragen im Rahmen der Garantie
bitte Ihre Originalquittung bei. Wichtig: Versenden Sie nie ein Produkt, für das eine Reparatur erforderlich ist, ohne vorherige
Vereinbarung. Wenn sich der DVD-Player noch innerhalb des Garantiezeitraums befindet, wird Jamo die Frachtkosten für die
Wege zwischen dem Händler und dem autorisierten Kundendienst-Center tragen. Sämtliche anderen Frachtkosten sind vom
Kunden zu zahlen. Das Produkt muss immer angemessen verpackt werden, andernfalls erlischt die Garantie. Wenn sich der
DVD-Player nicht mehr innerhalb des Garantiezeitraums befindet, sind sämtliche Kosten vom Kunden zu tragen.
Garantieschein
Jamo gibt eine Garantie von vierundzwanzig (24) Monaten ab Kaufdatum auf Material- und Fertigungsfehler. Bei Fehlern, die
unter die Garantie fallen, muss das Produkt an den Händler zurückgegeben werden, bei dem es gekauft wurde. Die zu erwartende Reparaturzeit beträgt, ohne Transport, ungefähr fünf Arbeitstage.
Beim Auftreten jedweder Probleme sind Informationen bei unseren autorisierten Kundendienst-Centern unter der folgenden
Adresse oder bei dem Händler, der das Produkt verkauft hat, verfügbar.
Garantiebedingungen
1. Die Garantie gilt nur bei Vorlage des Original-Kaufbelegs und wenn die Seriennummer des Produkts vollständig lesbar ist.
2. Die Verpflichtung von Jamo ist auf die Reparatur bzw. den Ersatz defekter Komponenten beschränkt. Die Reparatur bzw.
der Ersatz von defekten Komponenten erfolgt auf der Grundlage einer Bewertung durch Jamo.
Der Austausch erfolgt nur, wenn eine Reparatur nicht möglich ist.
3. Reparaturen im Rahmen der Garantie müssen von einem autorisierten Jamo Händler oder einem autorisierten Kundendienst-Center durchgeführt werden. Es erfolgt keine Vergütung für Reparaturen, die von nicht autorisierten Werkstätten
durchgeführt werden. Jedwede Reparatur oder Beschädigung des Produkts infolge eines unautorisierten Eingriffs werden von
dieser Garantie nicht abgedeckt.
4. Technische Anforderungen oder Anforderungen im Zusammenhang mit der Sicherheit sind in anderen Ländern als dem,
für die das Produkt ursprünglich gestaltet und hergestellt wurde, zu erfüllen.
5. Diese Garantie erstreckt sich nicht auf diese Arten von Anpassungen, und es wird keinerlei Vergütung für diese Arten von
Anpassungen oder beliebige auf sie zurückzuführende Schäden angeboten. Diese Garantie erstreckt sich nicht auf folgende
Punkte:
a) Regelmäßige Inspektion, Wartung und Reparatur oder Austausch von Teilen infolge normalen Verschleißes. b) Kosten im
Zusammenhang mit dem Transport, der Zerlegung oder der Installation des Produktes.
c) Missbräuchliche Verwendung einschließlich der Verwendung für andere als die beabsichtigten Zwecke oder fehlerhafte
Installation.
d) Schäden infolge von Blitzschlag, Wasser, Feuer, Naturkatastrophen, Krieg, Aufruhr, nicht korrekter Netzspannung, unzureichender Belüftung, Transport oder anderen Gründen, die sich dem Einfluss von Jamo entziehen.
6. Diese Garantie gilt für jeden rechtmäßigen Eigentümer des Produktes während des Garantiezeitraums.
Verpackung
Benutzen Sie für jeden Versand nach Möglichkeit die Originalverpackung. Verpacken Sie den DVR 52 andernfalls bitte folgendermaßen:
• Ein Karton aus verstärkter Pappe, der fest genug ist, das Gewicht des Produkts zu tragen.
• Mindestens 6 cm stoßdämpfendes Material um das Produkt herum.
• Nicht scheuerndes und staubfreies Material für die anderen Teile.
• Nicht scheuernde Umhüllung für das Produkt. (Staub- und Schmutzschutz)
• Verpacken Sie das Produkt so, dass ein Verrutschen im Karton während des Transports ausgeschlossen ist.
Informationen, die wir benötigen, bevor wir das Produkt reparieren: Name des Modells: Jamo DVD Receiver DVR 52
Seriennummer:
Fehlerbeschreibung
Kopie der Rechnung oder Kaufquittung
Name, Adresse und Telefonnummer des Händlers
Informationen zu Ihrer Person Name, Adresse, Postleitzahl/Ort, Telefonnummer und E-Mail-Adresse (optional). Ihre Unterschrift
Stempel und Unterschrift des Händlers
Datum
61
Page 62

Jamo S 502
Page 63

svenska
Page 64

svenska
Innehåll
Introduktion 65
Koppla in systemet 66
Allmänna inställningar 72
Speaker Setup 74
Audio Setup 75
DivX(R) Registrering 76
Språkinställningar 77
Uppspelning av filer från skiva och USB 78
Radio 79
Felsökning 80
Service och garanti 81
64
Page 65

Introduktion
Se till att följande tillbehör medföljer din S 502.
DVD-Receiver Jamo S DVR 52
Aux
REMOTECONTROLLER
Högtalarkabel Fjärrkontroll
Batterier
till fjärrkontrollen
SCARTFM-antenn
Ljudkabel /
Kompositvideo
5 x högtalare
Subwoofer
65
Page 66

Koppla in systemet
Se illustration nedan för anslutning av högtalare, subwoofer och antenner. För att installera S DVR 52 till ditt nuvarande TVsystem, se de tre konfigurationsexemplen. Välj en av dem eller skapa din egen kombination.
Se till att ansluta + till + och – till – från S DVR 52 till högtalare och subwoofer. Om kablarna ansluts fel förvrängs ljudet och
basen försvinner.
Surround höger
Främre höger
Surround vänster
Subwoofer
Mitt Främre vänster
66
6
4
&20321(17
Ϩ
Page 67

Främre
Surround
Mitt
Subwoofer
67
Page 68

SCART-videokonfigurering
Både ljud och video går via SCART-kabeln. Om du ansluter en enhet till SCART 2 på TV:n kommer de flesta TV-apparater automatsikt skicka ljud till DVR 52. Om en satellitmottagare, digitalbox, video, PC, spelkonsol eller MP3-spelare har digitala eller
analoga ljudutgångar, kan du ansluta dem direkt till DVR 52.
TV
PC
6
4
Spelkonsol MP3-spelare
&20321(17
Ω
video
Satellite / STB
S-videokonfigurering
Video ansluts till TV:n via S-videokabeln. Ljud ansluts från TV:n till DVR 52. Om en satellitmottagare, digitalbox, video, PC, spelkonsol eller MP3-spelare har digitala eller analoga ljudutgångar, kan du ansluta dem direkt till DVR 52.
TV
PC
6
4
Spelkonsol MP3-spelare
&20321(17
Ω
Satellite / STB
video
Komponent- och HDMI-konfiguration
Komponentvideoutgången kan anslutas till plasma- och LCD-skärmar (komponentkablar medföljer ej). Ljud från en HD-videokälla ansluts direkt till DVR 52.
Om en PC, spelkonsol eller MP3-spelare har digitala eller analoga ljudutgångar, kan du ansluta dem direkt till DVR 52.
HDMI-utgången kan anslutas till en TV med HDMI-ingång (HDMI-kabel ingår inte).
Spelkonsol MP3-spelare
&20321(17
Ω
68
PC
6
4
HDTV
Page 69

Layout frontpanel
1 2 3 4 5 6 7 8 9 10 11
1. Standby
Standby sätter på och
stänger av S DVR 52.
6. Nästa
Väljer nästa spår/förinställd radiostation.
2. Öppna/stäng
Tryck för att öppna
och stänga skivfacket.
7. Stopp
Tryck för att stanna
uppspelningen.
3. Källa
Välj mellan följande ingångar: DVD, FM ,AUX,
TV, COAX IN.
8. Volym (-)
Minskar ljudvolymen.
4. Spela/Pausa
Tryck för att starta eller
pausa uppspelningen.
9. Volym (+)
Höjer ljudvolymen.
5. Föregående
Väljer föregående
spår/förinställd radiostation.
10. AUX in på frontpanelen
AUX-ingång.
11. USB
USB-anslutning
Layout bakre panel
Aux
6
1 2 3
1. Elkabel 2. Utgång högtalare
4
4
3. Analogt ljud in. 4. Analogt ljud ut 5. Digital koaxial ut.
och subwoofer
6. Digital koaxial in.
7. Kompositvideo ut. 8. S-video ut 9. Utgång aktiv sub-
11. HDMI ut 12. SCART in/ut 13. FM-antenn
6 789
5
&20321(17
10 11 12 13
10. Komponentvideo
woofer
ut
Ω
69
Page 70

Remote control layout
1 2
3
6 7 8
9 10 11
12 13
15 16
17
4
14
18
REMOTE CONTROLLER
5
19
1. Standby
Standby sätter på och stänger av S DVR 52.
2. Open/close
Tryck för att öppna och stänga skivfacket.
3. Previous/preset
Väljer föregående spår/förinställd radiostation.
4. Mute
Tryck för att stänga av ljudet.
5. Next/preset
Väljer nästa spår/förinställd radiostation.
6. Slow/memory
När du har inställning för skiva, tryck för att spela upp i slow motion
När du har inställning för radio, tryck för att lagra radiostationerna manuellt.
7. Play/pause
För att starta eller pausa uppspelningen.
8. Display
För att visa den avverkade speltiden, spår nummer etc.
9. Backward/scan
När du befi nner dig i läge för skiva: för att snabbspela skivan bakåt.
När du befi nner dig i läge för radio: för att starta frekvenssökning bakåt.
10. Stop
Stoppar uppspelningen.
11. Forward/scan
När du befi nner dig i läge för skiva: snabbt framåt.
När du befi nner dig i läge för radio: startar frekvenssökning.
12. Source
Skiftar mellan DVD, AUX1, AUX2, COAXIAL, OPTICAL DIGITAL, FM.
13. Setup
Tryck för att komma in i inställningsmenyn.
14. Inställningsknappar
Används på menysidorna.
15. Menu/PBC
Visar skivmenyn på DVD.
Sätter på och stänger av PBC-funktionen på VCD.
16. Title/return
Visar titelmenyn vid uppspelning av DVD och återgår till skivmenyn.
17. Step
Tryck för att spela upp steg för steg.
18. HDMI sel.
Tryck för att välja HDMI när en HDMI-TV är ansluten.
Tryck för att välja P-SCAN när en HDMI-TV inte är ansluten.
19. Program
Programs tracks.
I tuner-läge, håll kvar i 5 sekunder så lagras radiostationen automatiskt.
70
Page 71

Remote control layout
20
21 22
23 24
25
26 27
28 29 30 31
32 33 34 35
REMOTE CONTROLLER
20. Nummerknappar
Används för val av DVD, FM och Audio CD.
21. 1/all
Gör det möjligt att repetera en titel, ett kapitel, en låt eller alla låtar på
skivan.
22. A-B
Specifi cerar en sektion och spelar upp den om och om igen.
23. Eq
Väljer inställningar av ljudeffekter.
24. Select
Tryck för att välja högtalare, som kräver individuell inställning.
25. Volume (+/-)
Tryck för att ändra ljudvolymen.
26. Surround
Tryck för att ändra inställning av surroundljud.
27. Läge
Bildläge HDMI UT.
28. Audio
Tryck för att välja ljudkanal.
29. Subtitle
Tryck för att välja språk för textning av DVD.
30. Zoom
Tryck för att förstora eller förminska bilden.
31. Angle
Om funktionen är tillgänglig på DVD:n, tryck för att se ur olika
kameravinklar.
32. Sleep
Tryck för att ställa in sleep-timer.
33. Mono/stereo
I tuner-läge, tryck för att välja mono- eller stereo-utgång.
34. Goto
Tryck för att välja en startpunkt för uppspelningen.
35. Shuffl e
Tryck för att starta shuffl e-spelningen.
71
Page 72

Allmänna inställningar
För att få tillgång till inställningsmenyn för S DVR 52, tryck ”SETUP”.
Använd
För att gå ur Systeminställningar, tryck ”SETUP”.
/ / / för att söka igenom menyerna och tryck ”OK” för att välja område.
TV DISPLAY
TV TYPE
SCREEN SAVER
RESOLUTION
VIDEO OUTPUT
MAIN PAGE
GENERAL SETUP
TV DISPLAY
TV TYPE
SCREEN SAVER
RESOLUTION
VIDEO OUTPUT
-- GENERAL PAGE --
-- GENERAL PAGE --
4 : 3 PS
4 : 3 LB
16 : 9
MULTI SYSTEM
NTSC
PAL
TV-TYP
Du kan ställa in de proportioner som passar TV:ns
skärm. Standardinställningen är 16:9.
• 4:3 LB
Om du har en vanlig kvadratisk TV och
vill se DVD-bilden i fullt format, använd
den här inställningen. Breda band visas i
den övre och nedre delen av TV-rutan.
• 4:3 PS
Om du har en vanlig TV och vill att DVDbilden ska fylla skärmen ska du använda
den här inställningen istället. En vid bild
visas på hela skärmen med en del av
bilden automatiskt avskuren.
• 16:9
Om du har en widescreen-TV använd
den här inställningen (du måste också
ställa in widescreen-TV:n i 16:9-läge).
TYP AV TV
Välj mellan Multi System- (den anslutna TV:n är kompatibel
med både NTSC och PAL), NTSC- och PAL-videoutgång från S
DVR 52.
Standardinställningen bör vara rätt för din region – om du
ändrar den kan du försämra bildkvaliteten.
MAIN PAGE
SET TV STANDARD
TV DISPLAY
TV TYPE
SCREEN SAVER
RESOLUTION
VIDEO OUTPUT
MAIN PAGE
SCREEN SAVER SETTING
72
-- GENERAL PAGE --
SKÄRMSPARARE
Sätter på och stänger av skärmsparare.
ON
OFF
Page 73

Allmänna inställningar
TV DISPLAY
TV TYPE
SCREEN SAVER
RESOLUTION
VIDEO OUTPUT
MAIN PAGE
SET RESOLUTION
TV DISPLAY
TV TYPE
SCREEN SAVER
RESOLUTION
VIDEO OUTPUT
-- GENERAL PAGE --
-- GENERAL PAGE --
SD INTERLACE
SD PROGRESSIVE
770P
1080I
YUV
RGB
UPPLÖSNING
SD Interlace
720x480 interlace-video.
SD progressiv
720x480 progressiv-skanningsvideo.
720P
1280x720 pixlar, progressiv-skanningsvideo.
1080I
1920x1080 pixlar, interlace-video.
Obs!
• När en HDMI-kabel har anslutits, kan du bara använda
denna inställning för att välja SD-progressiv, 720P och 1080I.
• När en HDMI-kabel inte har anslutits, kan du bara använda
denna inställning för att välja SD-interlace och SD-progressiv.
VIDEOUTGÅNGAR
Alternativa videoutgångar gör det möjligt för dig att välja
den typ av videoutgång som bäst passar ditt DVD-hemmabiosystem när en HDMI-TV har anslutits.
MAIN PAGE
SET VIDEO OUTPUT
73
Page 74

Speaker Setup
-- SPEAKER SETUP PAGE --
CENTER DELAY
REAR DELAY
TEST TONE
MAIN PAGE
LOUDSPEAKER SETUP
-- SPEAKER SETUP PAGE --
CENTER DELAY
REAR DELAY
TEST TONE
MAIN PAGE
SET SURROUND DELAY
15MS
9MS
3MS
OFF
15MS
9MS
3MS
OFF
CENTRE DELAY
Väljer tidsfördröjning för center-kanalen för Dolby Digitalljud.
Använd
och för att gå uppåt eller nedåt.
REAR DELAY
Väljer tidsfördröjning för bakre kanalen för Dolby Digital-ljud.
Använd
och för att gå uppåt eller nedåt.
CENTER DELAY
REAR DELAY
TEST TONE
MAIN PAGE
TEST TONE
-- SPEAKER SETUP PAGE --
ON
OFF
TEST TONE
Tryck här för att testa att alla högtalare är rätt anslutna.
74
Page 75

Audio Setup
DYNAMIC
SPDIF OUTPUT
MAIN PAGE
AUDIO RELATED
DYNAMIC
SPDIF OUTPUT
MAIN PAGE
SET SPDIF
-- AUDIO SETUP --
-- AUDIO SETUP --
OFF
SPDIF/RAW
SPDIF/PCM
FULL
6/8
4/8
2/8
OFF
DYNAMISKT OMFÅNG (DYNAMIC)
Om du vill se en film utan att störa andra i huset kan du
minska dynamiken (höga ljud)genom att aktivera funktionen
dynamiskt omfång.
Kompression av dynamiskt omfång kan väljas i Dolby Digitalläge. Använd
och för att skruva upp och ned det.
SPDIF-UTGÅNG
SPDIF / RAW
Om en extern AV-mottagare med DD- och DTS-dekoder är
ansluten via en digital utgångskontakt, välj SPDIF / RAW.
SPDIF / PCM
Om en extern AV-mottagare utan DD- och DTS-dekoder är
ansluten via en digital utgångskontakt, välj SPDIF / PCM.
75
Page 76

DivX (R) Registrering
-- DIVX(R) REGISTRATION --
Your registration code is: XXXXXXXX
To learn more go to www.divx.com/vod
DONE
DivX (R) Registrering
Det här är en engångskod som du kan använda för att registrera din spelare. Den ger dig möjlighet att hyra och köpa
DivX VOD-filer (Video On Demand).
76
Page 77

Språkinställningar
-- PREFERENCES PAGE --
OSD LANG
AUDIO LANG
SUBTITLE LANG
DISC MENU LANG
DEFAULTS
MAIN PAGE
SET PREFERENCES
-- PREFERENCES PAGE --
OSD LANG
AUDIO LANG
SUBTITLE LANG
DISC MENU LANG
DEFAULTS
MAIN PAGE
PREFERRED AUDIO LANGUAGE
ENGLISH
FRENCH
SPANISH
GERMAN
ITALIAN
ENGLISH
FRENCH
SPANISH
GERMAN
ITALIAN
OSD-SPRÅK (OSD LANG.)
Här ställer du in språket på skärmmenyn för DVR 52.
LJUDSPRÅK (AUDIO LANG.)
Om funktionen finns på DVD-skivan kan du välja det ljudspråk du vill ha med den här funktionen.
-- PREFERENCES PAGE --
OSD LANG
AUDIO LANG
SUBTITLE LANG
DISC MENU LANG
DEFAULTS
MAIN PAGE
PREFERRED SUBTITLE LANGUAGE
-- PREFERENCES PAGE --
OSD LANG
AUDIO LANG
SUBTITLE LANG
DISC MENU LANG
DEFAULTS
MAIN PAGE
PREFERRED MENU LANGUAGE
TEXTNINGSSPRÅK (SUBTITLE LANG.)
Om funktionen finns på DVD-skivan kan du välja det textningsspråk du vill ha med den här funktionen.
ENGLISH
FRENCH
SPANISH
GERMAN
ITALIAN
OFF
MENYSPRÅK (DISC MENU)
Om funktionen finns på DVD-skivan kan du välja det menyspråk du vill ha med den här funktionen.
ENGLISH
FRENCH
SPANISH
GERMAN
ITALIAN
77
Page 78

-- PREFERENCES PAGE --
OSD LANG
AUDIO LANG
SUBTITLE LANG
DISC MENU LANG
DEFAULTS
MAIN PAGE
LOAD FACTORY SETTINGS
RESET
DEFAULT
Om du väljer den här funktionen kommer alla funktioner att
ändras tillbaka till standardinställningar.
Uppspelning av filer från skiva och USB
MENU
ROOT
ROOT
MOVIE 1
MOVIE 2
Selecting USB
To select the USB device, do the following:
1. Tryck två gånger på fjärrkontrollens STOP-knapp för att
avsluta alla uppspelningar.
2. Tryck på GOTO på fjärrkontrollen och välj USB.
Uppspelning av filer
1. Sök igenom filerna genom att använda / på fjärrkontrollen och tryck ”ENTER” för att spara eller ta bort ett bibliotek.
2. Tryck ”ENTER” för att välja fil.
Obs!
Beroende på filformat kan det hända att du måste trycka
STOP två gånger för att stoppa uppspelningen.
Vid bildvisning kan du använda
len för att ändra bilder.
/ / / på fjärrkontrol-
78
Page 79

Radio – Basfunktioner och lagring av kanaler
Om antennerna är rätt anslutna kan du lyssna på FM-radio.
Tryck SOURCE för att välja kanal.
Val av förinställda program
För att välja förinställda program, tryck PRESET -eller PRESET + på
fjärrkontrollen.
Hitta och lagra radiostationen manuellt
1. Tryck och håll inne SCAN – eller SCAN + tills frekvensindikatorn börjar ändras.
Systemet fortsätter automatiskt att leta upp nästa radiostation.
2. Tryck SLOW/MEMORY
3. Knappa in ett nummer mellan 01-40.
4. Tryck SLOW/MEMORY.
Radiostationen har därmed lagrats.
Hitta och lagra radiostationen automatiskt
1. Tryck och håll in PROGRAM i mer än 5 sekunder, alla radiostationer med starka
radiosignaler kommer att lagras automatiskt.
REMOTE CONTROLLER
2. Lagringen avslutas när alla tillgängliga radiostationer har lagrats eller när minnet med plats för 40 förinställda radiostationer är fullt.
Stereo- och mono-mottagning
Om stereosignalen från FM-stationen är svag kan du förbättra ljudkvaliteten genom att ändra till mono-mottagning. Du trycker på MONO/STEREO på fjärrkontrollen.
RDS-tjänster
RDS (Radio Data System) är ett extra informationssystem anslutet till de flesta
FM-stationer.
Om en RDS-station tas emot kan du se programinformationen på S DVR 52-displayen genom att trycka på DISPLAY på fjärrkontrollen.
FM 92.90
MHZ
P3
FM 92.90
MHZ
79
Page 80

Felsökning
Om DVR 52 verkar vara trasig ska du konsultera den här felsökningsmanualen innan du ringer efter service. Se också motsvarande instruktioner i den här bruksanvisningen.
VARNING
Du ska under inga förhållanden försöka reparera systemet själv.
Symptom Möjlig orsak Åtgärd
Ingen bild • TV:n är avstängd.
• TV:n är inte korrekt ansluten.
• Sätt PÅ TV:n.
• Anslut TV:n ordentligt.
Det går inte att spela skivan. • Skivan är placerad upp och ner.
• Skivan är tom eller så stöds inte formatet
av DVR 52.
• Skivan är smutsig eller trasig.
• Skivan är inte korrekt placerad i
skivfacket.
Inget ljud. • VOLYMEN är inställd på 0.
• Högtalarkablarna är inte korrekt anslutna.
DVR 52-enheten svarar inte på
kommandon från fjärrkontrollen.
Det finns ingen ström trots att
strömkabeln är ansluten.
DVR 52 svarar inte på vissa
kommandon under uppspelning
• Det finns inga batterier i fjärrkontrollen.
• Batterierna är slut.
• Fjärrkontrollen är inte riktad mot fjärrsen-
sorn på DVR 52.
• Fjärkontrollen är för långt ifrån DVR 52.
• Strömkontakten är inte fast ansluten.
• Väggkontakten är inte på.
• Användningen kanske inte tillåts av
skivan.
• Se till att skivetiketten ligger uppåt.
• Ta bort skivan och pröva med en annan.
• Rengör skivan eller kasta den.
• Placera skivan korrekt i skivfacket.
• Höj VOLYMEN.
• Anslut dem ordentligt.
• Sätt i nya batterier.
• Byt till nya batterier.
• Peka fjärrkontrollen mot fjärrsensorn
på DVR 52.
• Använd fjärrkontrollen inom en radie
på 5 m.
• Anslut strömkontakten ordentligt.
• Sätt på väggkontakten.
• Läs skivans instruktioner.
80
Page 81

Service och garanti
Miljöinformation
• Systemet är tillverkat av återvinningsbart material som kan återvinnas om det monteras ned av auktoriserad personal.
• Följ lokala regler för bortskaffning av förpackningsmaterial, använda batterier och gamla enheter.
Upphovsrätt
Den här produkten innehåller upphovsrättsskyddad teknik som skyddas av patent som tillhör Macrovision Corporation och andra upphovsrättsinnehavare. All användning av den här upphovsrättsskyddade tekniken måste godkännas av Macrovision Corporation. Tekniken
är avsedd att användas för hemmabruk, om inte annan användning godkänts av Macrovision Corporation. Det är förbjudet att ta isär och
montera ned produkten.
Tillverkas på licens av Dolby Laboratories. ”Dolby” och dubbel-”D”-symbolen är varumärken som tillhör Dolby Laboratories. ”DTS” och ”DTS
Digital Out” är varumärken som tillhör Digital Theater Systems, Inc.
Service
Kontakta din återförsäljare om du har frågor om garantin. Om du behöver service under garantiperioden ska du skicka med originalkvittot.
Viktigt! Skicka aldrig produkten för reparation utan tidigare överenskommelse. Om DVD-spelaren fortfarande har GILTIG GARANTI betalar
Jamo fraktkostnader till och från återförsäljaren och Jamos auktoriserade servicecenter. All annan frakt betalas av kunden. Produkten måste
alltid vara korrekt förpackad annars återkallas produktgarantin. Om DVD-spelaren inte har giltig garanti betalas alla kostnader av kunden.
Garanticertifikat
Jamo erbjuder tjugofyra (24) månaders garanti från inköpsdatumet gällande material- och tillverkningsfel. För fel som täcks av garantin,
måste produkten lämnas tillbaka till återförsäljaren som sålde produkten. Förväntad reparationstid, exklusive transport, är ca fem arbetsdagar.
Om det skulle uppstå några problem finns information från våra auktoriserade servicecentra på följande adress, eller från återförsäljaren
som sålde produkten.
Garantivillkor
1. Garantin är endast giltig om det ursprungliga kvittot kan uppvisas och om serienumret på produkten är helt läsligt.
2. Jamos åtaganden är begränsade till att antingen reparera eller ersätta felaktiga komponenter. Reparation eller ersättning av felaktiga
komponenter baseras på en utvärdering gjord av Jamo.
Ersättning är endast möjligt då det inte går att reparera produkten.
3. Garantireparationer måste utföras av en auktoriserad Jamo-återförsäljare eller av ett auktoriserat servicecenter. Inga ersättningar betalas
ut för reparationer som utförs av icke auktoriserade verkstäder. Alla reparationer som utförs och skador som orsakas på produkten av någon
icke auktoriserad täcks inte av den här garantin.
4. Den här produkten anses inte felaktig, vare sig i material eller tillverkning om anpassning till nationella, lokala, tekniska eller säkerhetsrelaterade åtgärder krävs i länder andra än det landet produkten ursprungligen formgivits och tillverkats för.
5. Den här garantin täcker inte dessa typer av anpassning, och ingen ersättning erbjuds för dessa typer av anpassningar eller för eventuella
följdskador. Garantin täcker inte följande:
a) Regelbunden inspektion, underhåll och reparation eller ersättning av delar som utsätts för normalt slitage.
b) Kostnader i anslutning till transport, nedmontering eller installation av produkten.
c) Felanvändning, inklusive användning till andra syften än de avsedda, eller felaktig installation.
d) Skador orsakade av åsknedslag, vatten, eld, naturkatastrofer, krig, uppror, felaktig nätspänning, otillräcklig ventilation, transport eller
andra orsaker utanför Jamos kontroll.
6. Den här garantin gäller alla lagliga ägare av produkten under garantiperioden.
Förpackning
Om möjligt ska du använda det ursprungliga förpackningsmaterialet för eventuell frakt. Om inte ska du packa in DVR 52 med:
• En förstärkt kartong, stark nog att bära produktens vikt.
• Åtminstone 6 cm stötabsorberande material runt produkten.
• Ej skrovligt dammfritt material för de andra delarna.
• Ej skrovligt emballage för produkten. (Damm- och smutsskydd)
• Förpacka om produkten på ett sådant sätt att den inte kan flytta sig i kartongen under transport.
Information som vi måste få innan produkten kan repareras: Modellnamn: Jamo DVD Receiver DVR 52
Serienummer:
Felbeskrivning:
Kopia av fakturan eller säljkvittot
Återförsäljarens namn, adress och telefonnummer.
Personlig information: Namn, adress, postnummer, telefonnummer, och e-postadress (valfritt). Din underskrift
Återförsäljarens stämpel och underskrift
Datum
81
Page 82

Jamo S 502
Page 83

español
Page 84

español
Sumario
Introducción 85
Conexiones del equipo 86
Configuración General 92
Configuración de los altavoces 94
Audio Setup 95
Registro DivX 96
Configuración del idioma 97
Lectura de ficheros de disco y USB 98
Radio 99
Solución de problemas 100
Servicio y garantía 101
84
Page 85

Introducción
Por favor, compruebe que con su equipo S 502 ha recibido los siguientes accesorios.
Aux
Receptor DVD Jamo S DVR 52
REMOTECONTROLLER
Cable de altavoces
5 x altavoces
Pilas
para el mando a distancia
EuroconectorAntena de FM
Subwoofer
Mando a distancia
Cable de audio /
Cable para
Vídeo compuesto
85
Page 86

Conexiones del equipo
Consulte la ilustración siguiente para conectar los altavoces, el subwoofer y las antenas. Para instalar el S DVR 52 en su equipo
de TV actual, consulte los tres ejemplos de configuración, eligiendo uno de ellos u optando por su propia combinación.
Asegúrese de conectar los bornes + y – del S DVR 52 a los terminales correspondientes + y - de los altavoces y del subwoofer.
Si los cables están invertidos el sonido será distorsionado y carente de graves.
Posterior izquierdaPosterior derecha
Subwoofer
Frontal derecha Central Frontal izquierda
86
6
4
&20321(17
Ϩ
Page 87

Frontal
Posterior
Central
Subwoofer
87
Page 88

Configuración de vídeo con euroconector
El cable con euroconectores transporta tanto el audio como el vídeo. Si conecta un dispositivo al euroconector SCART 2 del televisor, la mayoría de los televisores enviarán automáticamente el audio al DVR 52.
Si el receptor de satélite, decodificador, vídeo, PC, consola de videojuegos o reproductor MP3 disponen de salida de audio digital
o analógica, puede conectarla directamente al DVR 52.
TV
PC
6
4
Consola juegos Repr. MP3
&20321(17
Ω
Vídeo
Satélite/decodificador
Configuración con S-Video
El video se conecta al televisor mediante el cable S-Video. El audio se conecta del televisor al DVR 52.
Si el receptor de satélite, decodificador, vídeo, PC, consola de videojuegos o reproductor MP3 disponen de salida de audio digital
o analógica, puede conectarla directamente al DVR 52.
TV
PC
6
4
Consola juegos Repr. MP3
&20321(17
Ω
Satélite/decodificador
Vídeo
Configuración con video por componentes y HDMI
La salida de vídeo por componentes se puede conectar a pantallas de plasma y LCD (no se incluyen los cables necesarios).
La salida de la fuente de vídeo de HD se conecta directamente al DVR 52.
Si el PC, consola de videojuegos o reproductor MP3 disponen de salida de audio digital o analógica, puede conectarla
directamente.
La salida HDMI puede conectarse a un TV equipado con entrada HDMI (cable HDMI no incluido).
Consola juegos Repr. MP3
&20321(17
Ω
88
PC
6
4
HDTV
Page 89

Disposición del panel frontal
1 2 3 4 5 6 7 8 9 10 11
1. Standby (Reposo)
Para encender y
apagar el S DVR 52.
6. Next (Siguiente)
Selecciona la pista
siguiente o la siguiente emisora memo-
2. Open/close (Abrir/
cerrar)
Pulse este botón para
abrir/cerrar la bandeja
portadiscos.
7. Stop (Paro)
Pulse este botón para
detener la reproducción.
3. Source (Fuente)
Selecciona una de las
fuentes de entrada:
DVD, FM ,AUX, TV,
COAX IN
8. Volume (-)
Pulse para bajar el
Volumen.
4. Play/pause (Lectura/
pausa)
Pulse este botón para
iniciar o pausar la
reproducción.
9. Volume (+)
Pulse para subir el
Volumen.
5. Previous (Previo)
Selecciona la pista
anterior o la siguiente
emisora memorizada.
10. Front aux in
Entrada auxiliar frontal.
rizada.
11. USB
Conector USB
Disposición del panel posterior
Aux
1 2 3
6
1. Cable de red 2. Salidas de altavoces
y subwoofer
6. Entrada digital
coaxial
7. Salida de vídeo
compuesto
11. Salida HDMI 12. EUROCONECTOR
entrada/salida
6 789
4
4
3. Entrada de audio
analógico
5
&20321(17
10 11 12 13
4. Salida de audio
analógico
8. Salida S-video 9. Salida de subwoofer
activo
13. Antena de FM
Ω
5. Salida digital coaxial
10. Saluda de vídeo
por componentes
89
Page 90

Remote control layout
1 2
3
6 7 8
9 10 11
12 13
15 16
17
4
14
18
REMOTE CONTROLLER
5
19
1. Standby
Pulse para encender y apagar el S DVR 52.
2. Open/close
Pulse este botón para abrir/cerrar la bandeja portadiscos.
3. Previous/preset
Selecciona la pista anterior o la anterior emisora memorizada.
4. Mute
Pulse para enmudecer el sonido
5. Next/preset
Selecciona la pista siguiente o la siguiente emisora memorizada.
6. Slow/memory
Durante la reproducción de un disco, pulse para reproducir a cámara lenta.
En modo radio, pulse para memorizar las emisoras de forma manual.
7. Play/pause
Pulse este botón para iniciar o pausar la reproducción.
8. Display
VIsualiza informaciones tales como el tiempo transcurrido del disco, número
de pista, etc.
9. Backward/scan
Durante la reproducción de un disco, retroceso rápido.
En modo radio, pulse para la búsqueda de emisoras inversa.
10. Stop
Detiene la reproducción
11. Forward/scan
Durante la reproducción de un disco, avance rápido.
En modo radio, inicia la búsqueda de emisoras.
12. Source
Selecciona una de las fuentes de entrada: DVD, AUX1, AUX2, COAXIAL,
OPTICAL DIGITAL, FM.
13. Setup
Pulse este botón para acceder al menú de confi guración .
14. Botones de Ajuste
Utilizados en las páginas de menú y confi guración.
15. Menu/PBC
Visualiza el menú contenido en un DVD.
Activa/desactiva la función PBC (menú de control) de un VCD.
16. Title/return
Durante la reproducción de un DVD, visualiza/regresa la opción de menú
del disco.
17. Step
Pulse para reproducir cuadro a cuadro.
18. HDMI sel.
Si se ha conectado un televisor con entrada HDMI, pulse este botón para
seleccionar la salida HDMI.
Si no se ha conectado un televisor con entrada HDMI, púlselo para seleccio
nar P-SCAN (exploración progresiva).
90
Page 91

Remote control layout
20
21 22
23 24
25
26 27
28 29 30 31
32 33 34 35
REMOTE CONTROLLER
19. Program
Programación de pistas.
En modo radio, mantenga pulsado este botón durante 5 segundos para
memorizar las emisoras de radio de forma automática.
20. Teclado numérico
Utilizado en la selección de DVD, FM y Audio CD.
21. 1/all
Permite la repetición de un título, capítulo o pista, o todas las pistas de un
disco.
22. A-B
Especifi ca una sección que se reproducirá de forma repetida.
23. Eq
Selecciona los efectos sonoros.
24. Select
Pulse para elegir un altavoz y proceder a su ajuste individual.
25. Volume (+/-)
Pulse para ajustar el Volumen.
26. Surround
Pulse este botón para cambiar las opciones surround.
27. Mode
Imagen en modo HDMI OUT.
28. Audio
Pulse este botón para seleccionar los canales de audio.
29. Subtitle
Pulse para seleccionar el idioma de los subtítulos de un DVD.
30. Zoom
Pulse para ampliar o reducir la imagen.
31. Angle
Si esta disponible en el DVD, está función permite visualizar la imagen
desde distintos ángulos.
32. Sleep
Pulse para activar la función de apagado automático.
33. Mono/stereo
En modo radio, permite la selección de FM Mono o Stereo.
34. Goto
Pulse para seleccionar un punto desde donde inciar la reproducción.
35. Shuffl e
Pulse para iniciar la reproducción al azar.
91
Page 92

Configuración General
Pulse “SETUP” para acceder al menú de configuración del S DVR 52.
Utilice
Para abandonar el menú de configuración pulse de nuevo “SETUP”.
/ / / para navegar a través de los menús y pulse “OK” para seleccionar una opción.
TV DISPLAY
TV TYPE
SCREEN SAVER
RESOLUTION
VIDEO OUTPUT
MAIN PAGE
GENERAL SETUP
TV DISPLAY
TV TYPE
SCREEN SAVER
RESOLUTION
VIDEO OUTPUT
-- GENERAL PAGE --
-- GENERAL PAGE --
4 : 3 PS
4 : 3 LB
16 : 9
MULTI SYSTEM
NTSC
PAL
TIPO DE TV
Elija la proporción correspondiente a la pantalla de su televisor. El valor por omisión es de 16:9.
• 4:3 LB
Si tiene usted un TV convencional
‘cuadrado’ y desea ver la imagen del DVD
en todo su formato, elija esta opción. La
imagen se mostrará en la pantalla enmarcada con franjas negras por encima y
por debajo.
• 4:3 PS
Si tiene usted un TV convencional y
desea que la imagen del DVD llene
toda la pantalla, utilice esta opción. La
imagen ocupará toda la pantalla del TV,
quedando automáticamente recortada
una parte.
• 16:9
Si su TV es panorámico, utilice esta opción (también tendrá que activar la modalidad 16:9 del televisor panorámico).
TV TYPE (Sistema de TV)
Elija entre salida Multi System (el televisor debe ser compatible con los dos sistemas, PAL y NTSC), NTSC o PAL.
La selección por defecto debe ser la adecuada a la zona
donde se utilice; de lo contrario se podría ver afectada la
calidad de imagen.
MAIN PAGE
SET TV STANDARD
TV DISPLAY
TV TYPE
SCREEN SAVER
RESOLUTION
VIDEO OUTPUT
MAIN PAGE
SCREEN SAVER SETTING
92
-- GENERAL PAGE --
SCREEN SAVER (Salvapantallas)
Activa o desactiva el salvapantallas.
ON
OFF
Page 93

Configuración General
TV DISPLAY
TV TYPE
SCREEN SAVER
RESOLUTION
VIDEO OUTPUT
MAIN PAGE
SET RESOLUTION
TV DISPLAY
TV TYPE
SCREEN SAVER
RESOLUTION
VIDEO OUTPUT
-- GENERAL PAGE --
-- GENERAL PAGE --
SD INTERLACE
SD PROGRESSIVE
770P
1080I
YUV
RGB
RESOLUTION (Resolución)
SD interlace (Estándar entrelazado
720x480 - entrelazado.
SD progressive (Estándar progresivo)
720x480 – progresivo.
720P
1280x720 puntos – progresivo.
1080I
1920x1080 puntos - entrelazado.
Nota
• Si se utiliza la salida HDMI, únicamente es posible seleccionar SD progressive , 720P y 1080I.
• Si no se utiliza la salida HDMI, únicamente es posible seleccionar SD interlace y SD progressive.
VIDEO OUTPUT (Salida de vídeo)
Esta opción permite seleccionar la salida de vídeo adecuada
del sistema cuando está conectado a un televisor con HDMI.
MAIN PAGE
SET VIDEO OUTPUT
93
Page 94

Configuración de los altavoces
-- SPEAKER SETUP PAGE --
CENTER DELAY
REAR DELAY
TEST TONE
MAIN PAGE
LOUDSPEAKER SETUP
-- SPEAKER SETUP PAGE --
CENTER DELAY
REAR DELAY
TEST TONE
MAIN PAGE
SET SURROUND DELAY
15MS
9MS
3MS
OFF
15MS
9MS
3MS
OFF
CENTRE DELAY (Retardo canal Central)
Selecciona el retardo del Canal Central para Dolby Digital.
Utilice
y para aumentar o disminuir.
REAR DELAY (Retardo canales Posteriores)
Selecciona el retardo de los canales posteriores para Dolby
Digital audio. Utilice
y para aumentar o disminuir.
CENTER DELAY
REAR DELAY
TEST TONE
MAIN PAGE
TEST TONE
-- SPEAKER SETUP PAGE --
ON
OFF
TEST TONE (Test de tonos)
Pulse para comprobar que todos los altavoces han sido conectados correctamente.
94
Page 95

Audio Setup
DYNAMIC
SPDIF OUTPUT
MAIN PAGE
AUDIO RELATED
DYNAMIC
SPDIF OUTPUT
MAIN PAGE
SET SPDIF
-- AUDIO SETUP --
-- AUDIO SETUP --
OFF
SPDIF/RAW
SPDIF/PCM
FULL
6/8
4/8
2/8
OFF
RANGO DINÁMICO
Para ver películas sin molestar a las demás personas de la
casa, puede reducir la dinámica (los sonidos más fuertes)
mediante la función de rango dinámico.
La compresión del rango dinámico se puede activar en la
modalidad Dolby Digital. Utilice
y para incrementarla o
disminuirla.
SPDIF OUTPUT (Salida SPDIF)
SPDIF / RAW
Si se conecta un receptor AV externo con decodificador DD/
DTS a través de una salida digital, seleccione SPDIF / RAW.
SPDIF / PCM
Si se conecta un receptor AV externo sin decodificador DD/
DTS a través de una salida digital, seleccione SPDIF / RAW.
95
Page 96

Registro DivX
-- DIVX(R) REGISTRATION --
Your registration code is: XXXXXXXX
To learn more go to www.divx.com/vod
DONE
DIVX (R) REGISTRATION (Registro DivX)
Éste es un código único que le permite registrar su reproductor. Este código es útil para alquilar o comprar ficheros DivX
en puntos DivX Video-On-Demand.
96
Page 97

Configuración del idioma
-- PREFERENCES PAGE --
OSD LANG
AUDIO LANG
SUBTITLE LANG
DISC MENU LANG
DEFAULTS
MAIN PAGE
SET PREFERENCES
-- PREFERENCES PAGE --
OSD LANG
AUDIO LANG
SUBTITLE LANG
DISC MENU LANG
DEFAULTS
MAIN PAGE
PREFERRED AUDIO LANGUAGE
ENGLISH
FRENCH
SPANISH
GERMAN
ITALIAN
ENGLISH
FRENCH
SPANISH
GERMAN
ITALIAN
IDIOMA DE LOS MENÚS EN PANTALLA
Selecciona el idioma de los menús en pantalla del DVR 52.
IDIOMA DEL AUDIO
Si el DVD ofrece esta posibilidad, esta función sirve para elegir el idioma de audio preferido.
-- PREFERENCES PAGE --
OSD LANG
AUDIO LANG
SUBTITLE LANG
DISC MENU LANG
DEFAULTS
MAIN PAGE
PREFERRED SUBTITLE LANGUAGE
-- PREFERENCES PAGE --
OSD LANG
AUDIO LANG
SUBTITLE LANG
DISC MENU LANG
DEFAULTS
MAIN PAGE
PREFERRED MENU LANGUAGE
ENGLISH
FRENCH
SPANISH
GERMAN
ITALIAN
OFF
ENGLISH
FRENCH
SPANISH
GERMAN
ITALIAN
IDIOMA DE LOS SUBTÍTULOS
Si el DVD ofrece esta posibilidad, esta función sirve para elegir el idioma de suntítulos preferido.
El valor por omisión es: SIN SUBTÍTULOS (OFF).
IDIOMA DE LOS MENÚS
Si el DVD ofrece esta posibilidad, esta función sirve para elegir el idioma preferido de los menús.
El valor por omisión es: INGLÉS.
97
Page 98

-- PREFERENCES PAGE --
OSD LANG
AUDIO LANG
SUBTITLE LANG
DISC MENU LANG
DEFAULTS
MAIN PAGE
LOAD FACTORY SETTINGS
RESET
DEFAULT (por defecto)
Esta función restaura la configuración y las opciones del
sistema a sus valores originales.
Lectura de ficheros de disco y USB
MENU
ROOT
ROOT
MOVIE 1
MOVIE 2
Selecting USB
To select the USB device, do the following:
1. Pulse dos veces el botón STOP del mando a distancia para
finalizar cualquier reproducción.
2. Pulse el botón GOTO del mando a distancia y seleccione.
Reproducción de ficheros
1. Desplácese a través de los ficheros mediante los botones
/
del mando a distancia y pulse “ENTER” para acceder o salir
de cada biblioteca.
2. Pulse “ENTER” para seleccionar un fichero.
Nota
Según el tipo de formato del fichero, puede ser necesario
pulsar dos veces el botón STOP para detener la reproducción.
Durante el visionado de imágenes puede utilizar los botones
/ / / del mando a distancia para cambiar las vistas.
98
Page 99

Radio – Funcionamiento y memorización de emisoras
Si las antenas se han conectado correctamente, deberá ser posible la recepción de emisoras de FM.
Pulse SOURCE para seleccionar radio (tuner).
Selección de emisoras memorizadas
Para seleccionar emisoras memorizadas pulse los botones PRESET – o
PRESET + del mando a distancia.
Búsqueda y memorización manual de emisoras de radio
1. Pulsar y mantener pulsado SCAN – o SCAN + hasta que el indicador de frecuencias empiece a cambiar y entonces soltar el botón. El sistema sintonizará
automáticamente la siguiente emisora que se reciba con suficiente intensidad.
2. Pulse SLOW/MEMORY
3. Introduzca un número comprendido entre 01 y 40.
4. Pulse SLOW/MEMORY.
La emisora ha sido memorizada.
Búsqueda y memorización automática de emisoras de radio
1. Pulsar y mantener pulsado el botón PROGRAM durante más de cinco segundos. Todas las emisoras de radio que se reciban con suficiente intensidad
quedarán memorizadas automáticamente.
REMOTE CONTROLLER
2. La operación se detendrá una vez memorizadas todas las emisoras disponibles
o cuando se alcance la capacidad máxima de la memoria (40 emisoras presintonizadas).
Recepción Stereo y Mono
Si la señal de la emisora de FM es débil, puede mejorarse su recepción conmutando a recepción mono. Para ello pulse el botón MONO/STEREO del mando a
distancia.
Emisoras con servicio RDS
El RDS (Radio Data System) es un sistema de información suplementaria que
ofrecen la mayoría de las emisoras de FM.
Si la emisora sintonizada dispone de RDS, la información del programa se puede
ver en el S DVR 52 pulsando el botón DISPLAY del mando a distancia.
FM 92.90
MHZ
P3
FM 92.90
MHZ
99
Page 100

Solución de problemas
T
V
VOL
A
”
T
VOL
Si el DVR 52 parece funcionar mal, sírvase consultar esta guía de solución de problemas antes de solicitar la intervención del
servicio técnico. Consulte también las instrucciones correspondientes de este manual.
ATENCIÓN
No debe usted tratar de reparar el equipo usted mismo bajo ninguna circunstancia
Síntoma Causaposible Corrección
No se ve la imagen
• El
V está apagado.
• El TV no está bien conectado.
• Encender el
• Conectar correctamente el TV.
.
No se puede leer el disco
No se oye el sonido
El DMR 60 no responde a las
órdenes del mando a distancia
El equipo no se enciende pese a
estar enchufado
El DMR 60 no responde a algunas
órdenes de manejo durante el
funcionamiento
• Se ha colocado el disco al revés
• Disco vacío o de s formato
incompatible con el DMR 60.
• Disco sucio o defectuoso.
• Disco no colocado dentro de la guía
de la bandeja portadiscos.
• El
• Los cables de los altavoces no están
• El mando a distancia no tiene
• Las pilas están agotadas.
• El mando no está orientado hacia el
• El mando está demasiado lejos del
• La clavija no está bien introducida
• El enchufe de la pared no tiene
• Las operaciones solicitadas no están
UMEN está a 0.
bien conectados.
pilas.
sensor de control remoto del DMR 60.
DMR 60.
en el enchufe.
corriente eléctrica.
permitidas en el disco.
• Comprobar que la etiqueta del disco
queda hacia arriba.
• Retirar el disco y probar con otro.
• Limpiar el disco o descartarlo.
• Colocar el disco correctamente en las
• guías de la bandeja.
• Subir el
• Conectar los cables correctamente.
• Introducir pilas nuevas (2 x“AA
• Cambiar las pilas por otras nuevas.
• Orientar el mando hacia el sensor de
control remoto del DMR 60.
• Utilizar el mando a menos de 5 m de
distancia.
• Introducir la clavija totalmente en el
enchufe.
• Aplicar corriente eléctrica al enchufe.
• Consultar las instrucciones del disco.
UMEN.
R6P)
100
 Loading...