


i300


Contents
Introduction .................................................................................................................................5
Connecting the system ............................................................................................................6
Connecting the iPod .................................................................................................................7
Auxiliary Audio Input ................................................................................................................9
System operation ....................................................................................................................10
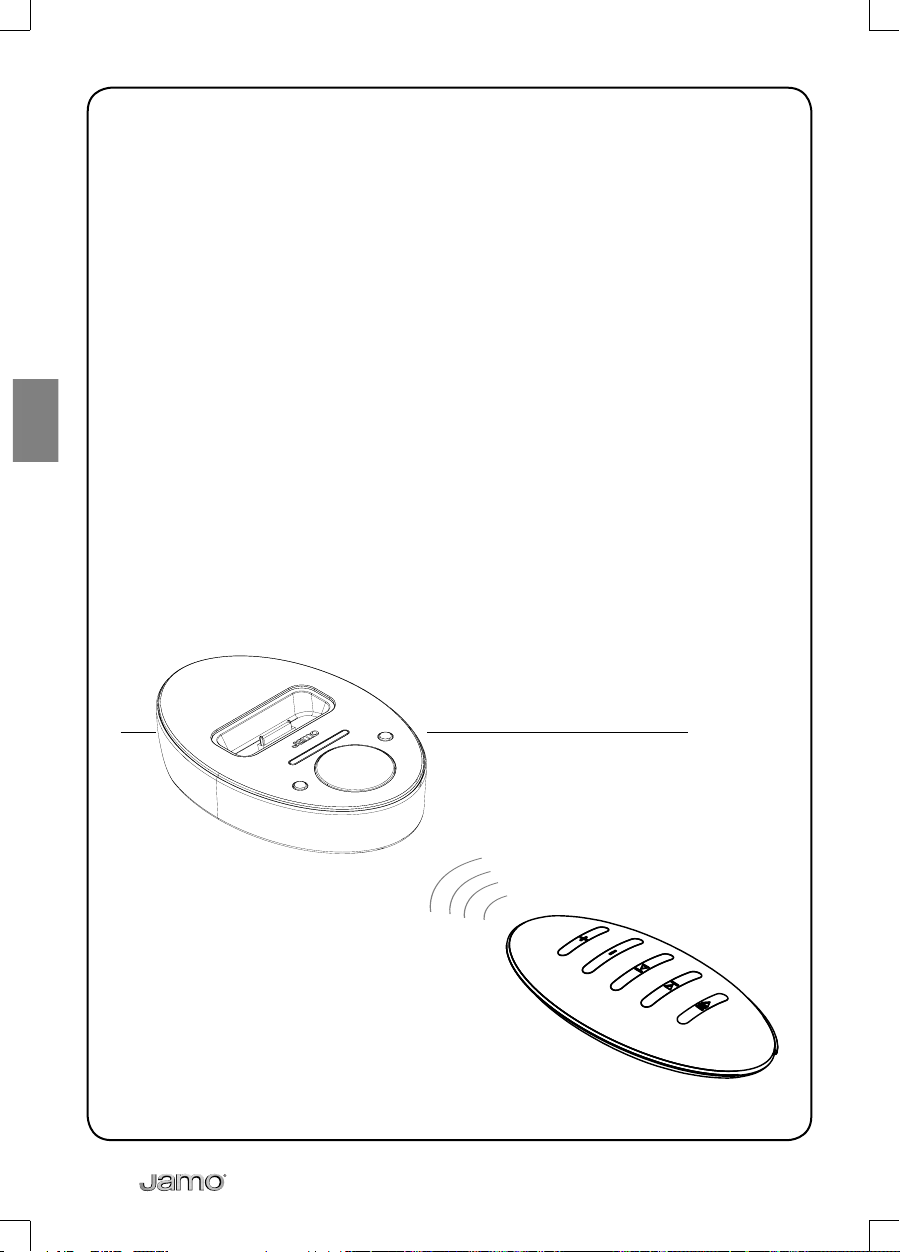
Remote control ........................................................................................................................11
Synching the Remote to the Control Dock ....................................................................12
Troubleshooting ......................................................................................................................13
Care and cleaning ...................................................................................................................14
Specification ..............................................................................................................................14
Service and warranty .............................................................................................................15
Congratulations on your new purchase... the Jamo i300.
Got some great news for you. You haven’t just bought an iPod accessory…
you’ve acquired a full-strength home entertainment system that will transform
the way you listen to music on your favourite portable music player. The i300 is
a powerful, powered subwoofer/satellite system - with true hi-fi grade speakers
- that’s been fully optimized for use with the iPod but that’s not all. It also sports
two additional auxiliary inputs for your computer, games console etc so you can
hear all your audio sources via one, super-neat package. Did we mention that
the whole system can be remote controlled from another room thanks to its
long-range radio frequency remote control?
Trust us…
you’re about to discover a whole bunch of new reasons to fall in love with your
iPod all over again. Go for it!
4
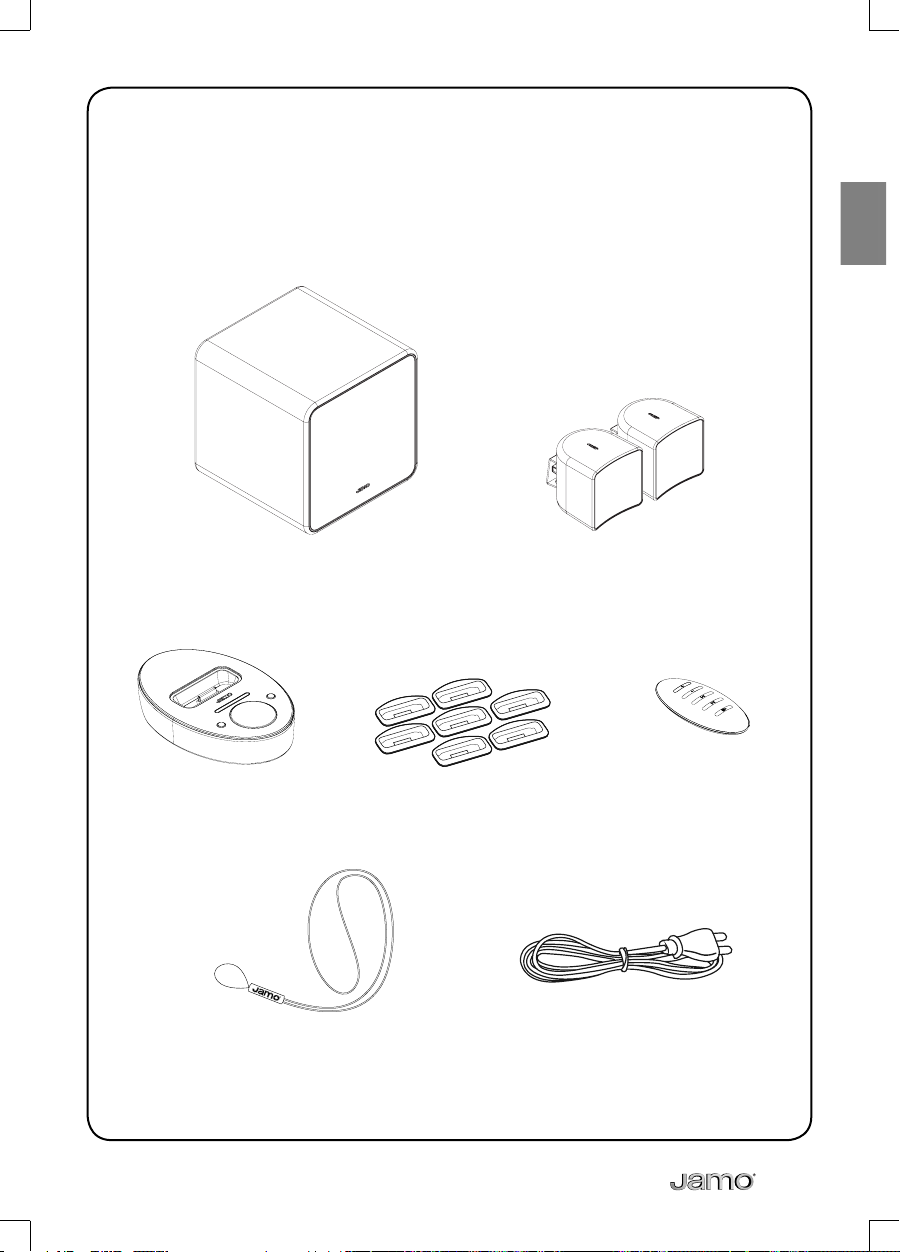
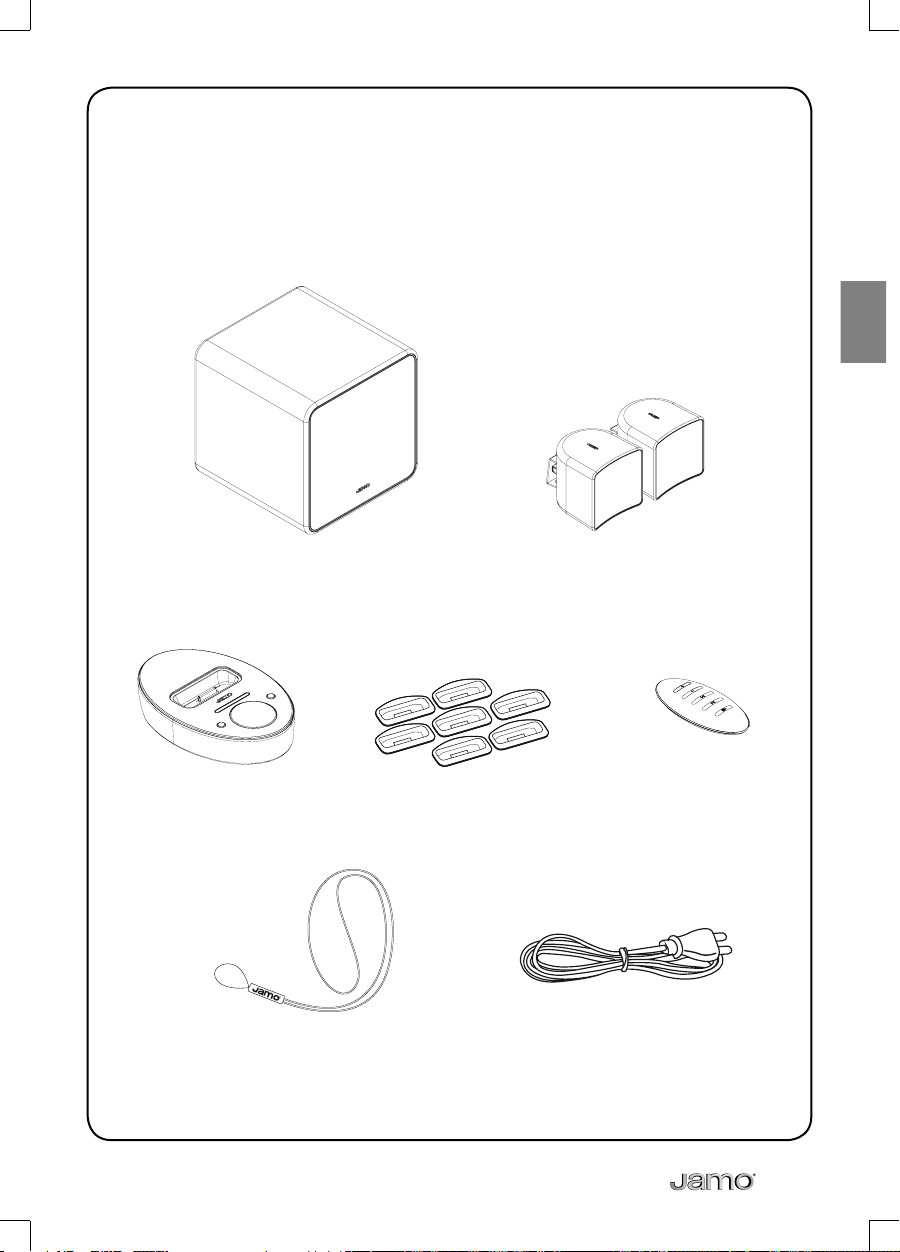
Introduction
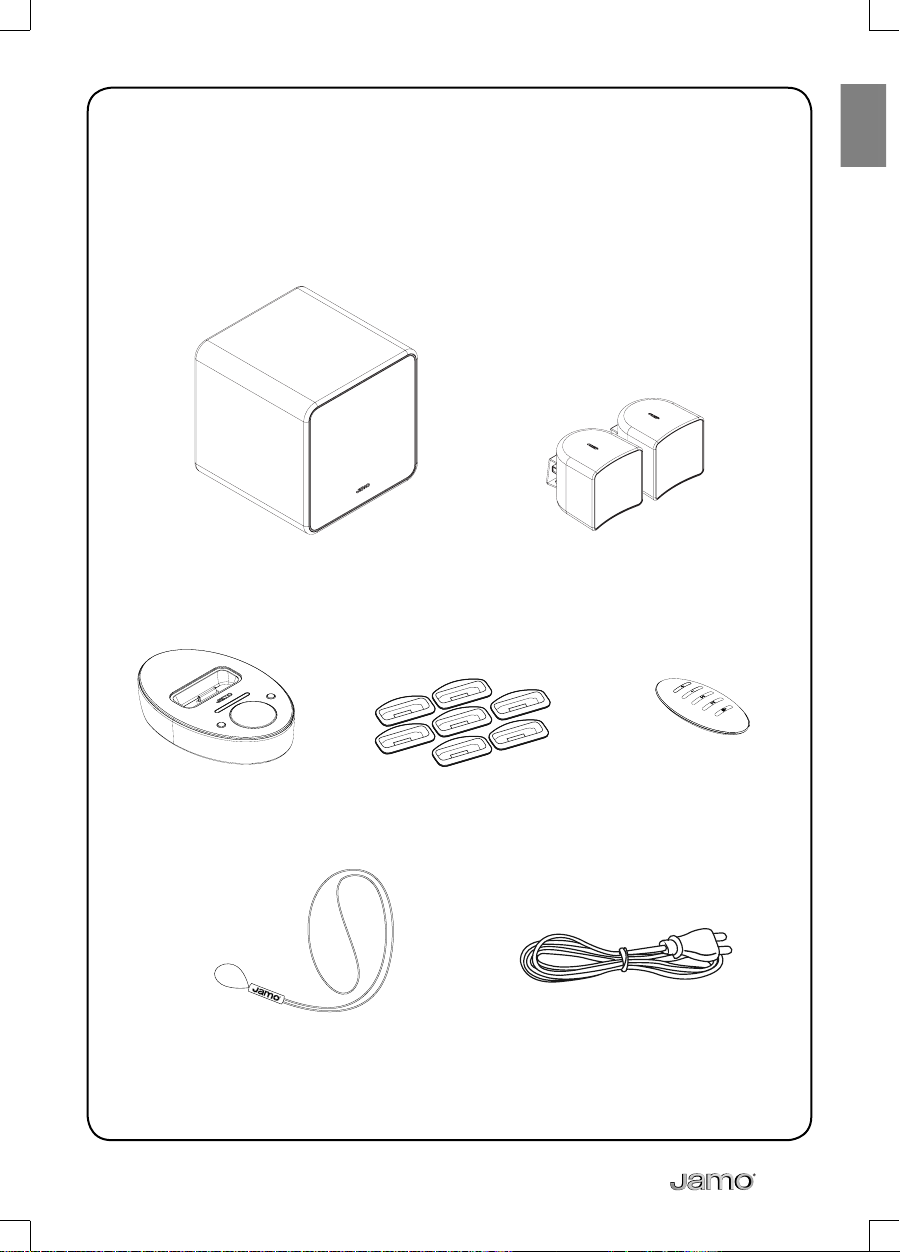
Make sure the following accessories are included with your i300.
i300 SUB
i300 control dock 7 x dock adapters Remote control
2 x A 102
Power cordKey hanger
5
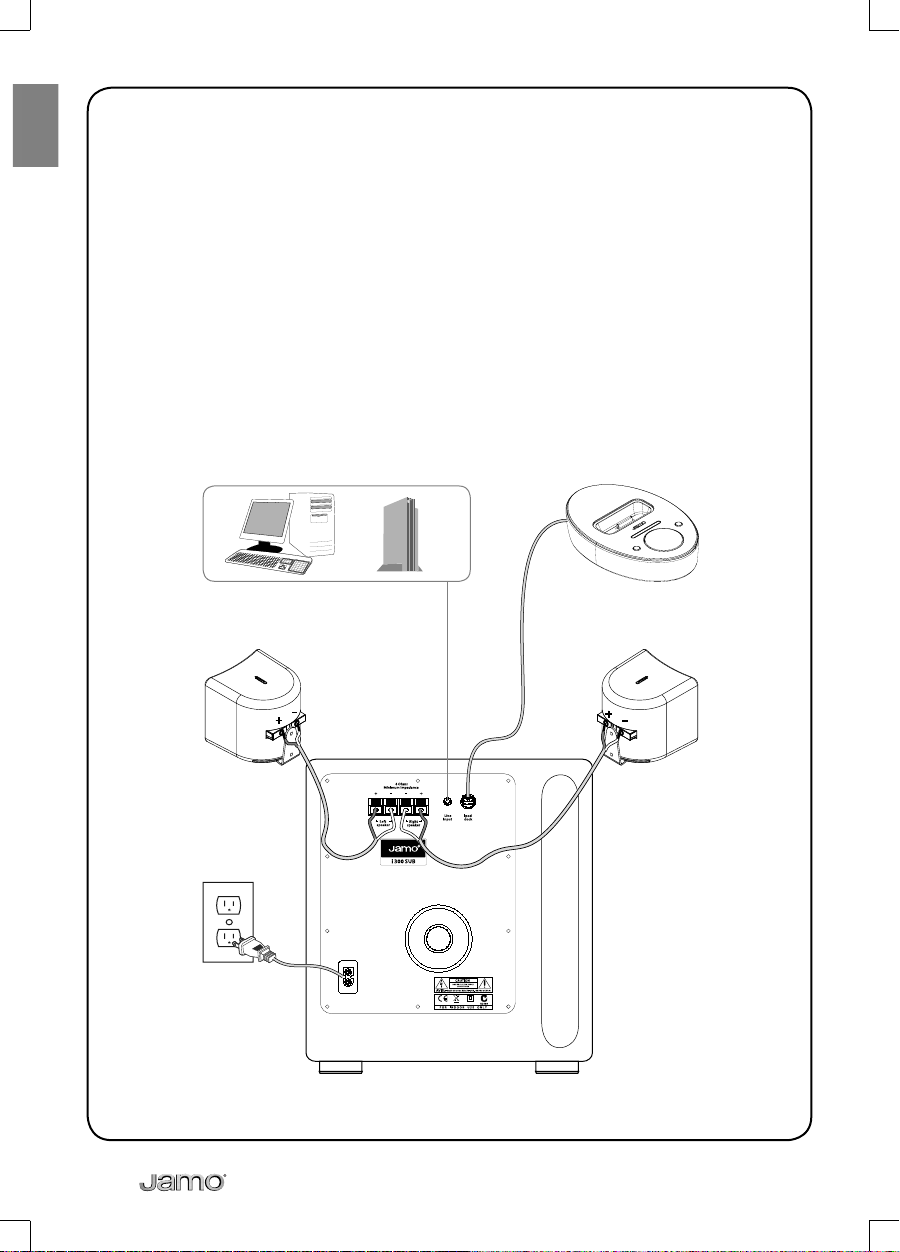
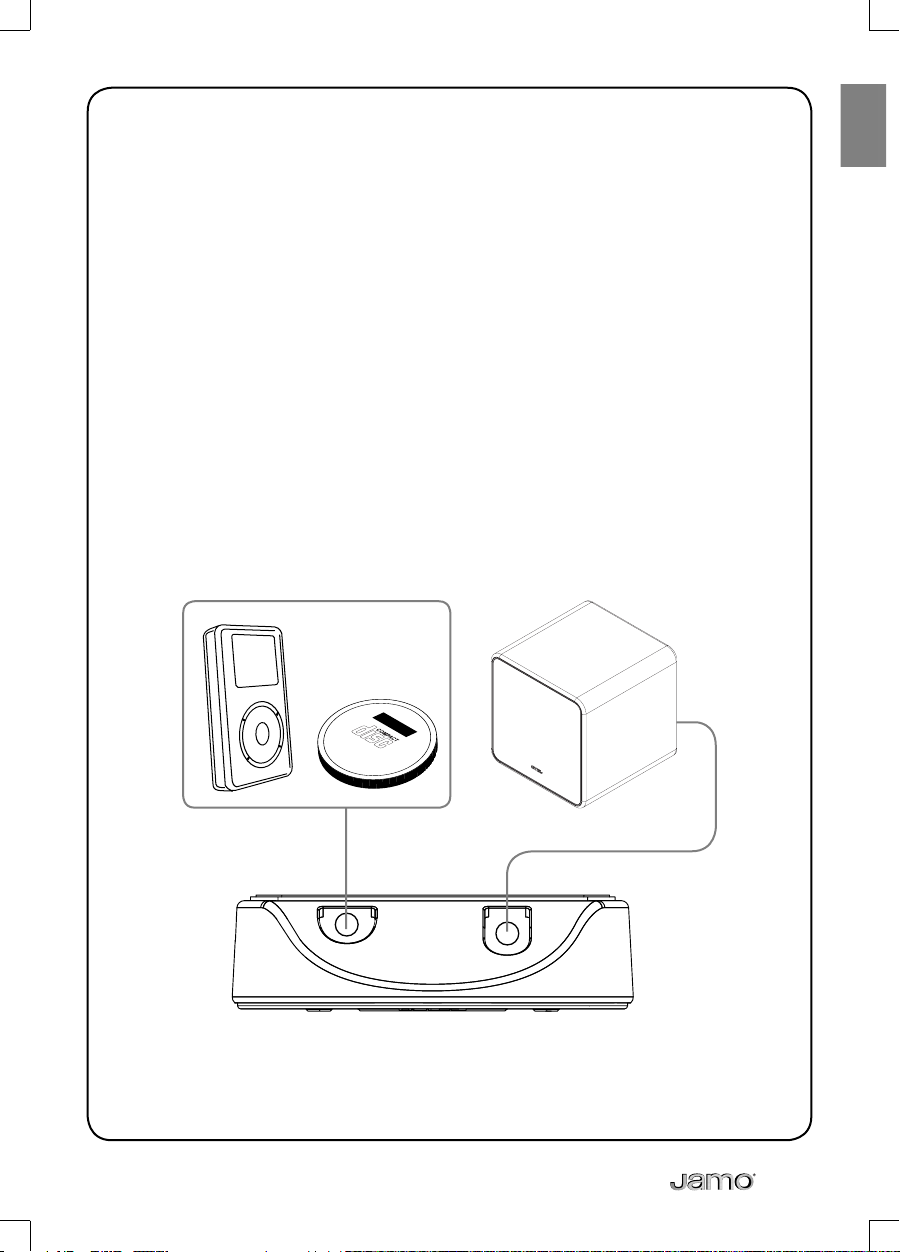
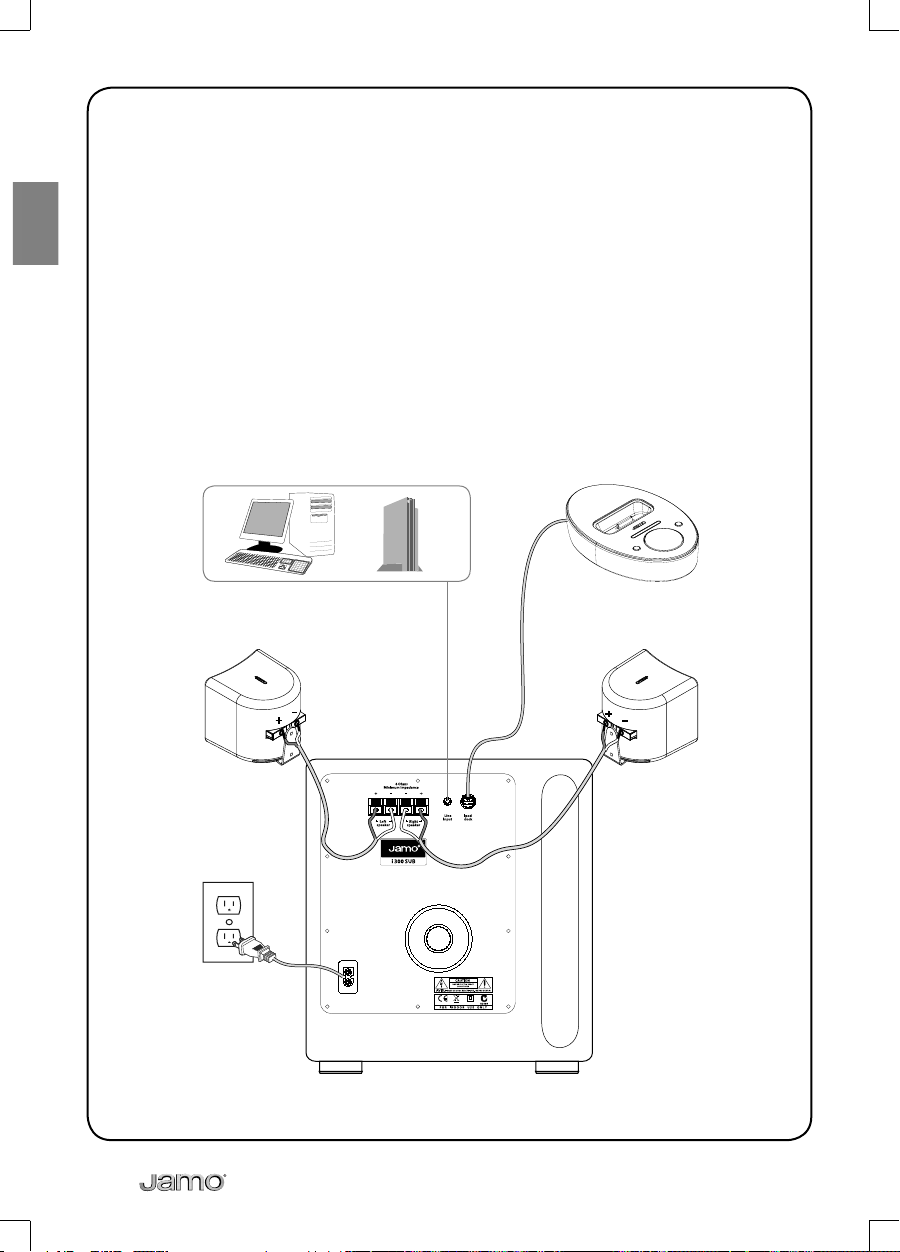
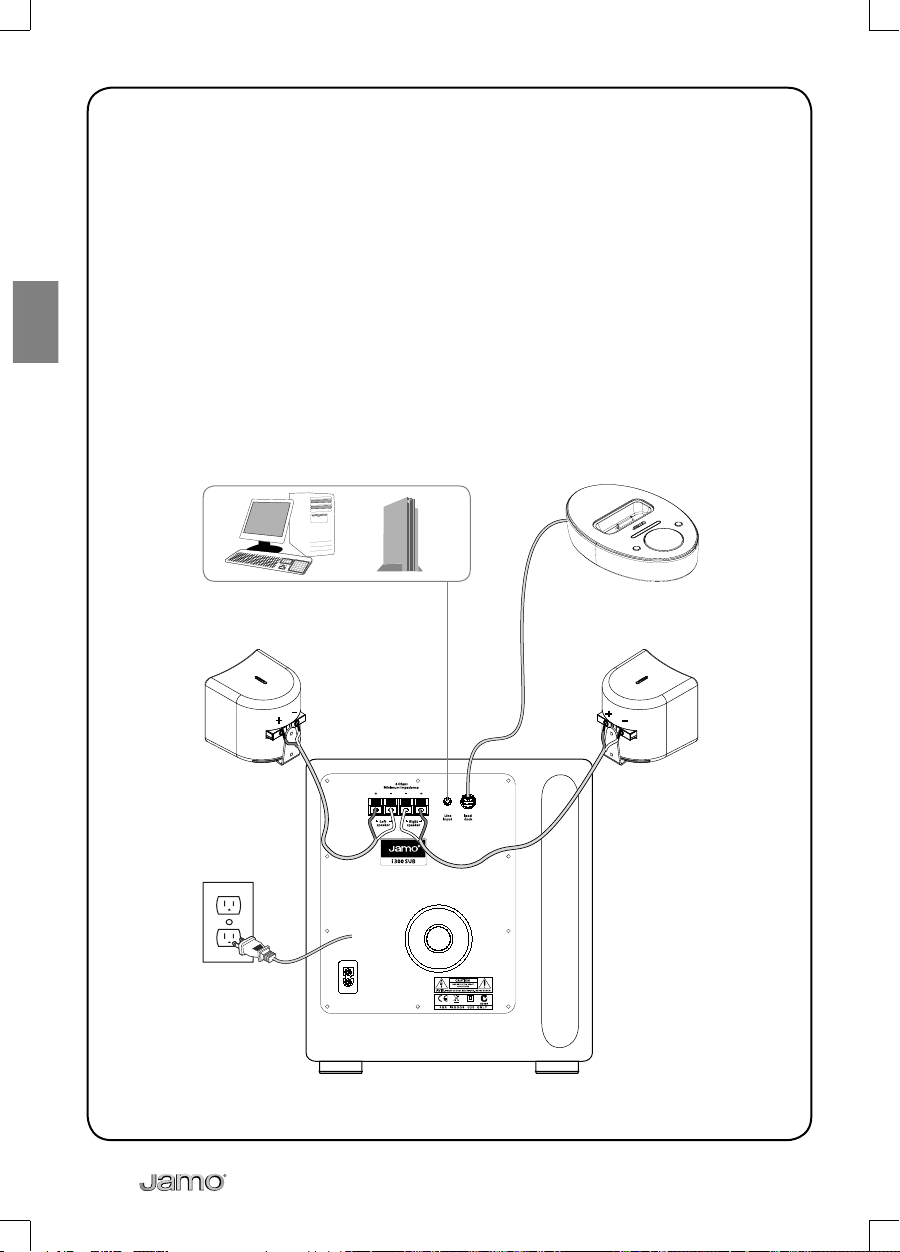
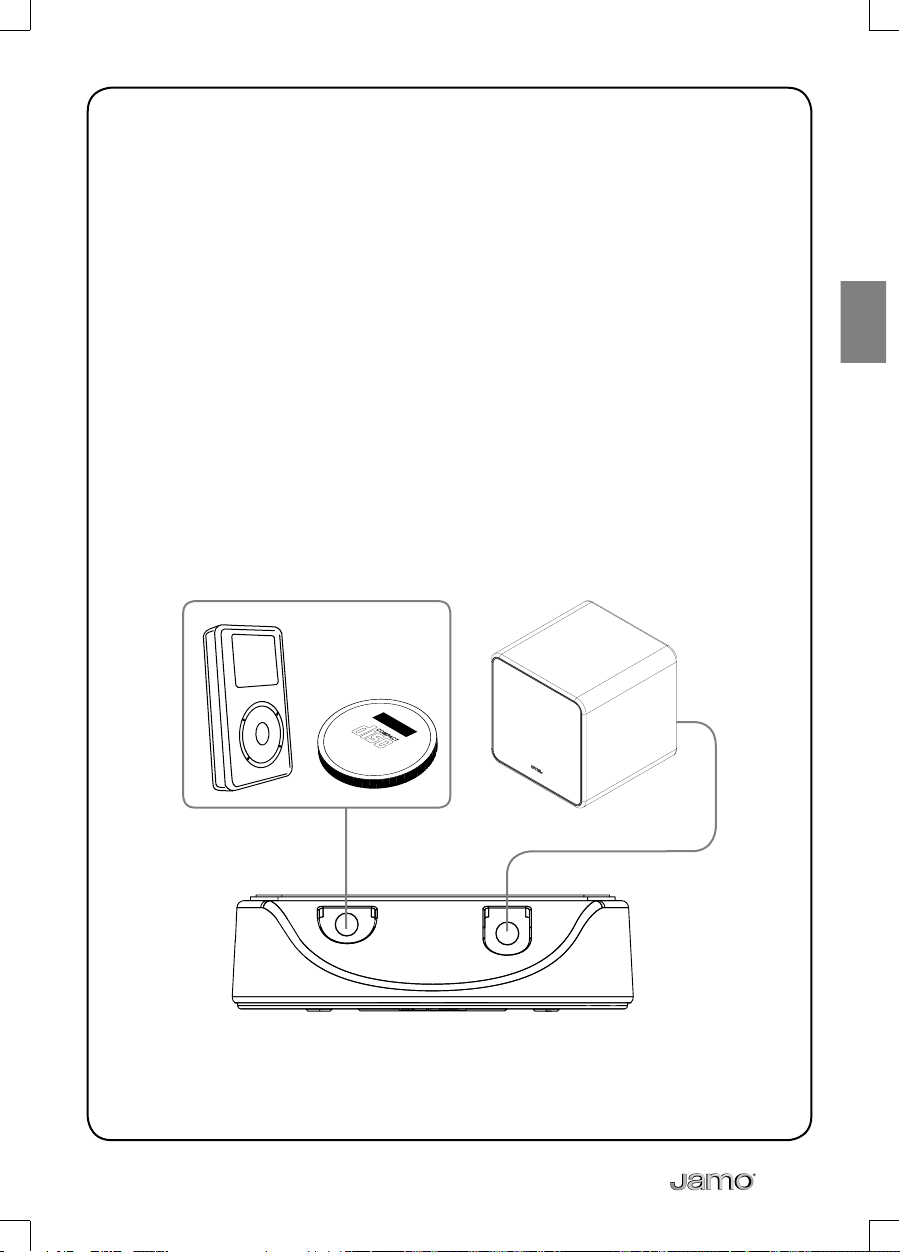
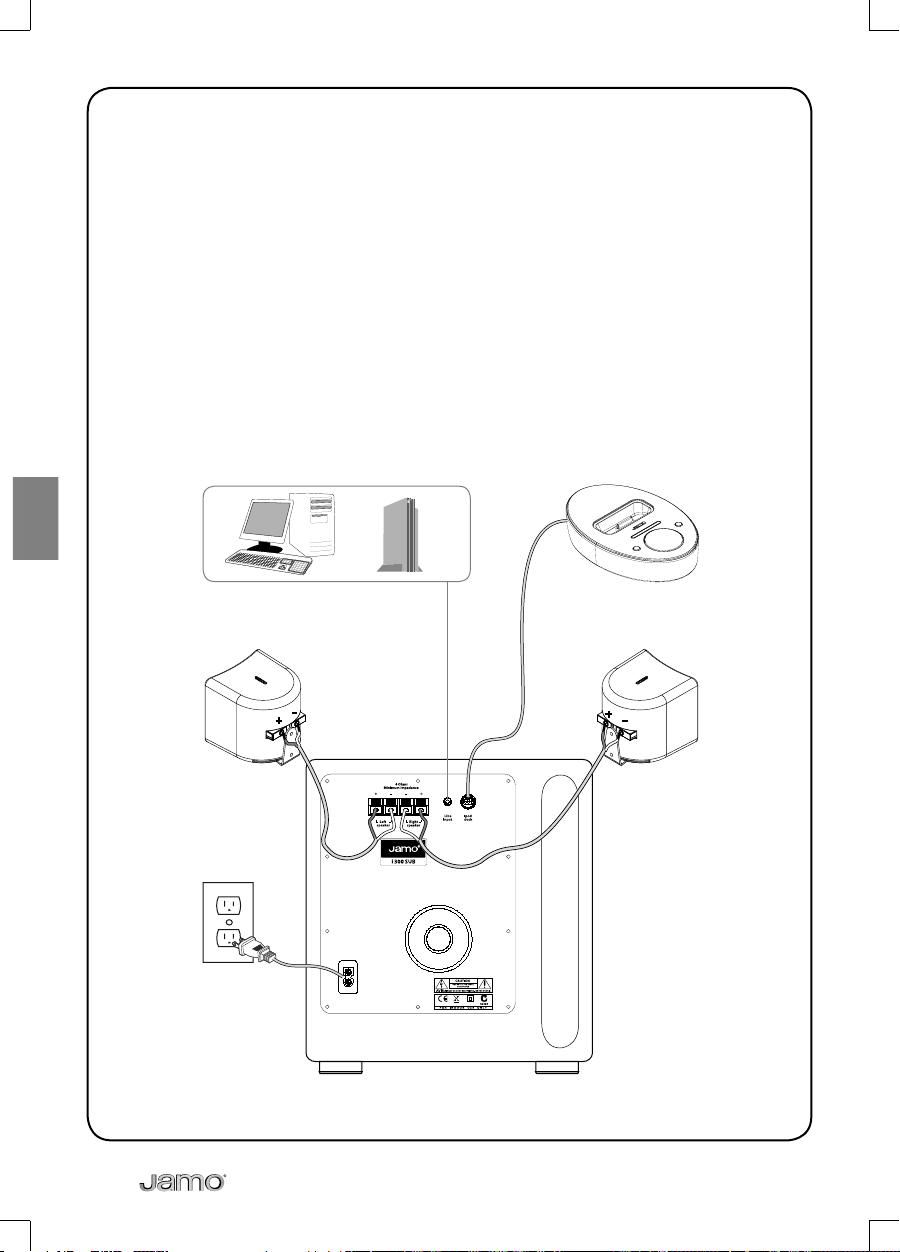
Connecting the system
To connect the i300, refer to the illustration below.
Please note, the input is mixed with the signal from the dock, whether from the
iPod or from the auxiliary input so that both sources are heard simultaneously.
This allows for, as an example, the sound from your computer to be heard while
music is playing from an iPod in the dock.
6

1
2
3
7
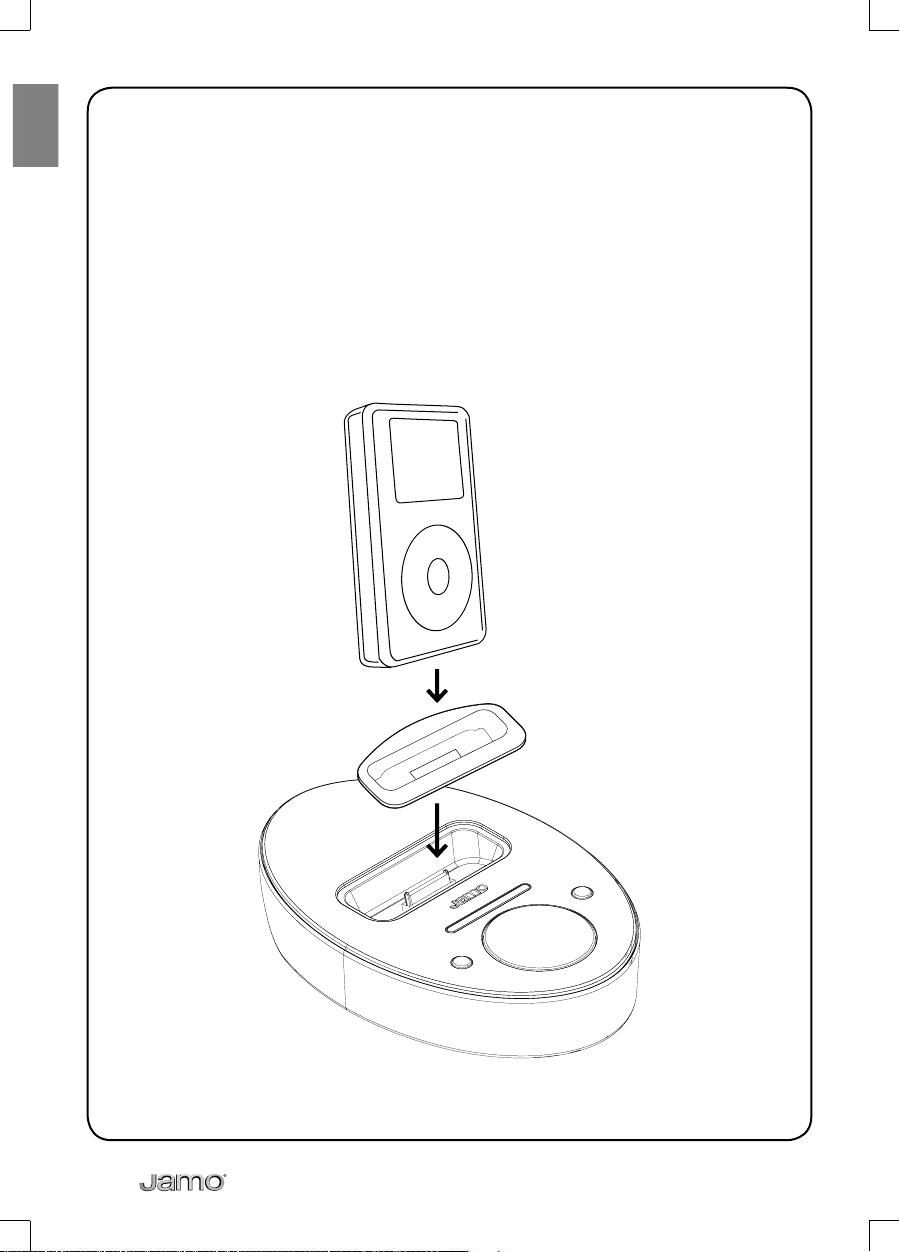
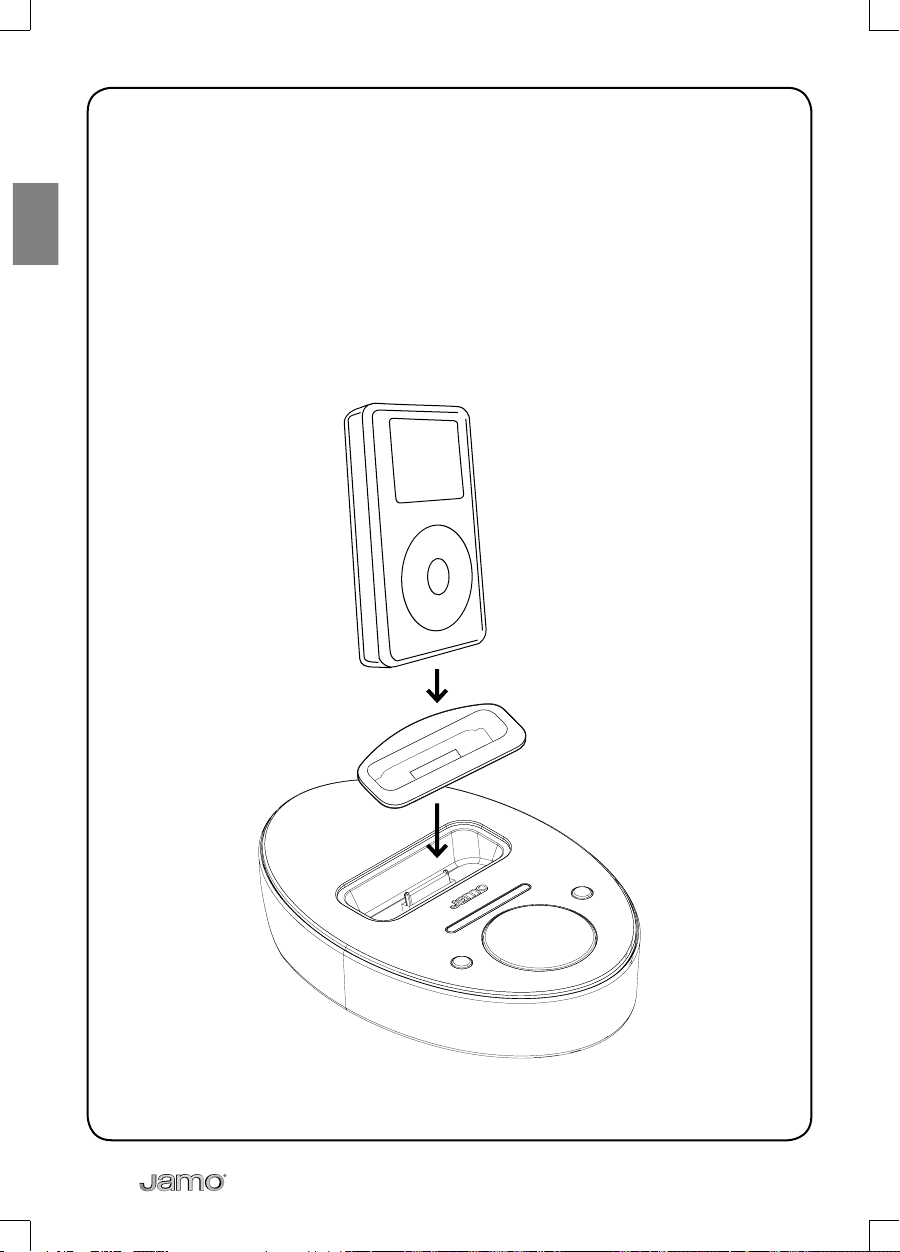
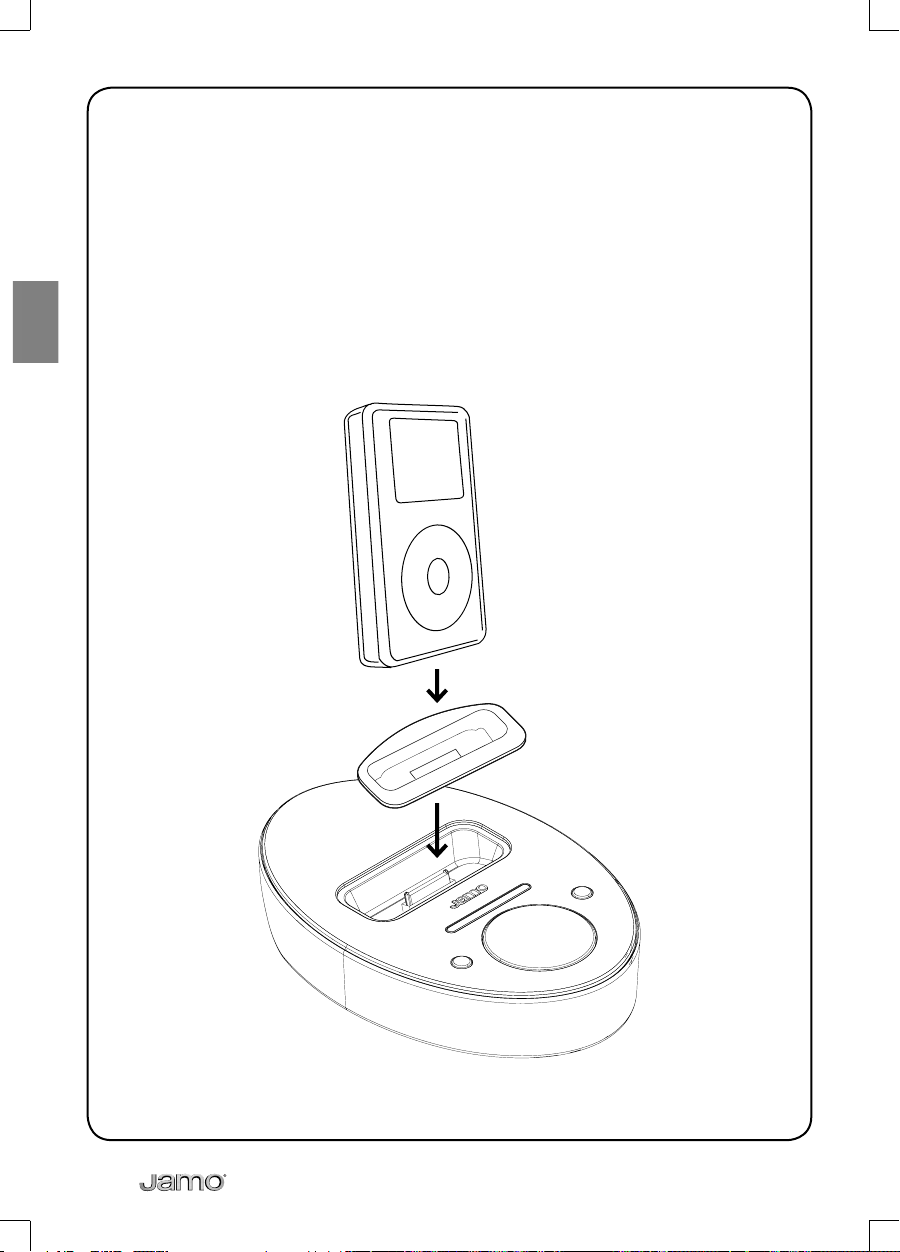
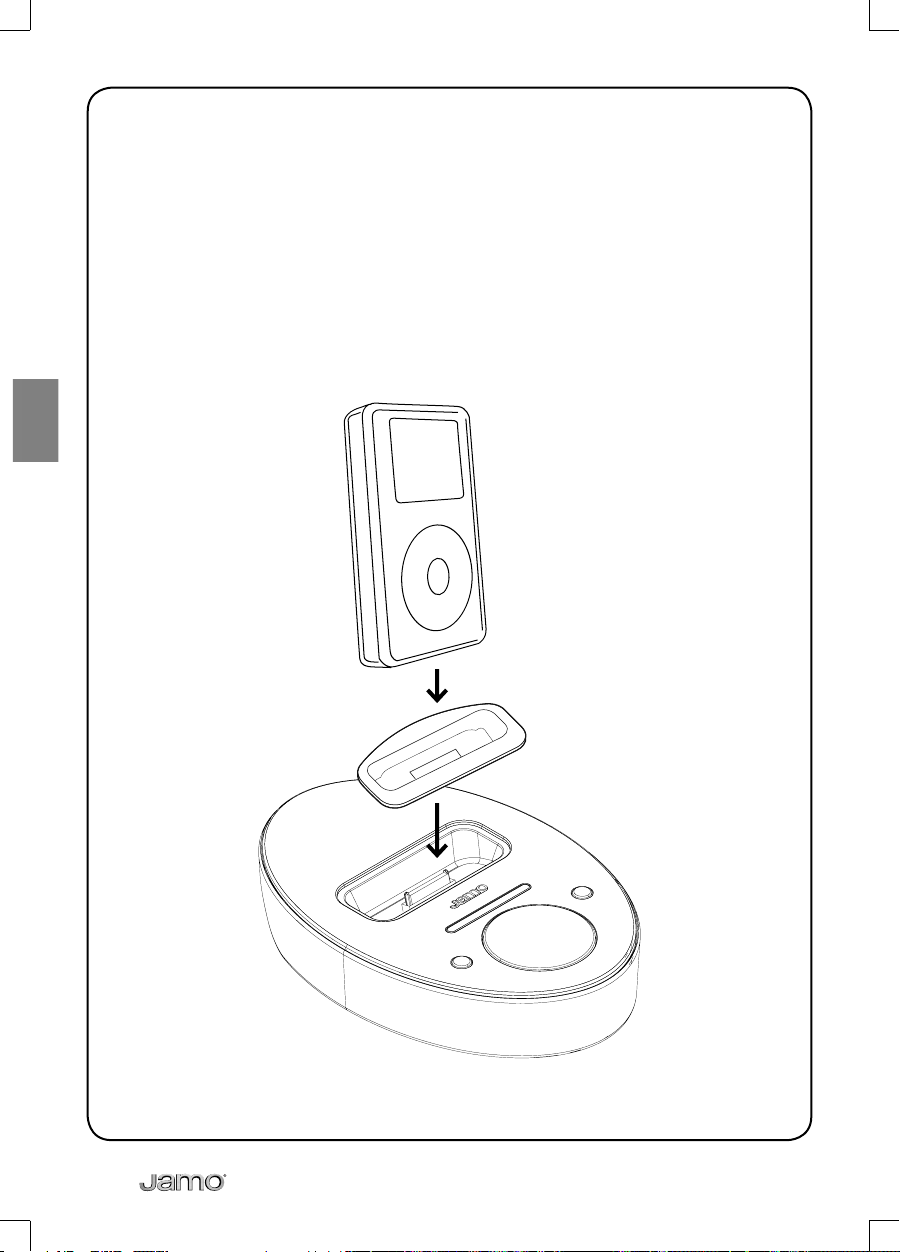
Connecting the iPod
Choose the adapter that matches your iPod and insert it into the top of the
dock until it is snugly in place with the slot centered over the multipin docking
connector.
8
Auxiliary Audio Input
The control dock has a 3.5 mm stereo minijack auxiliary audio input on its back
panel. It allows you to listen to an external source (a portable CD player, for
example) through the system. When a plug is inserted in this jack, the system
automatically switches to the auxiliary input. To switch back to the iPod,
disconnect the auxiliary input.
AUDIO SUBWOOFER
9
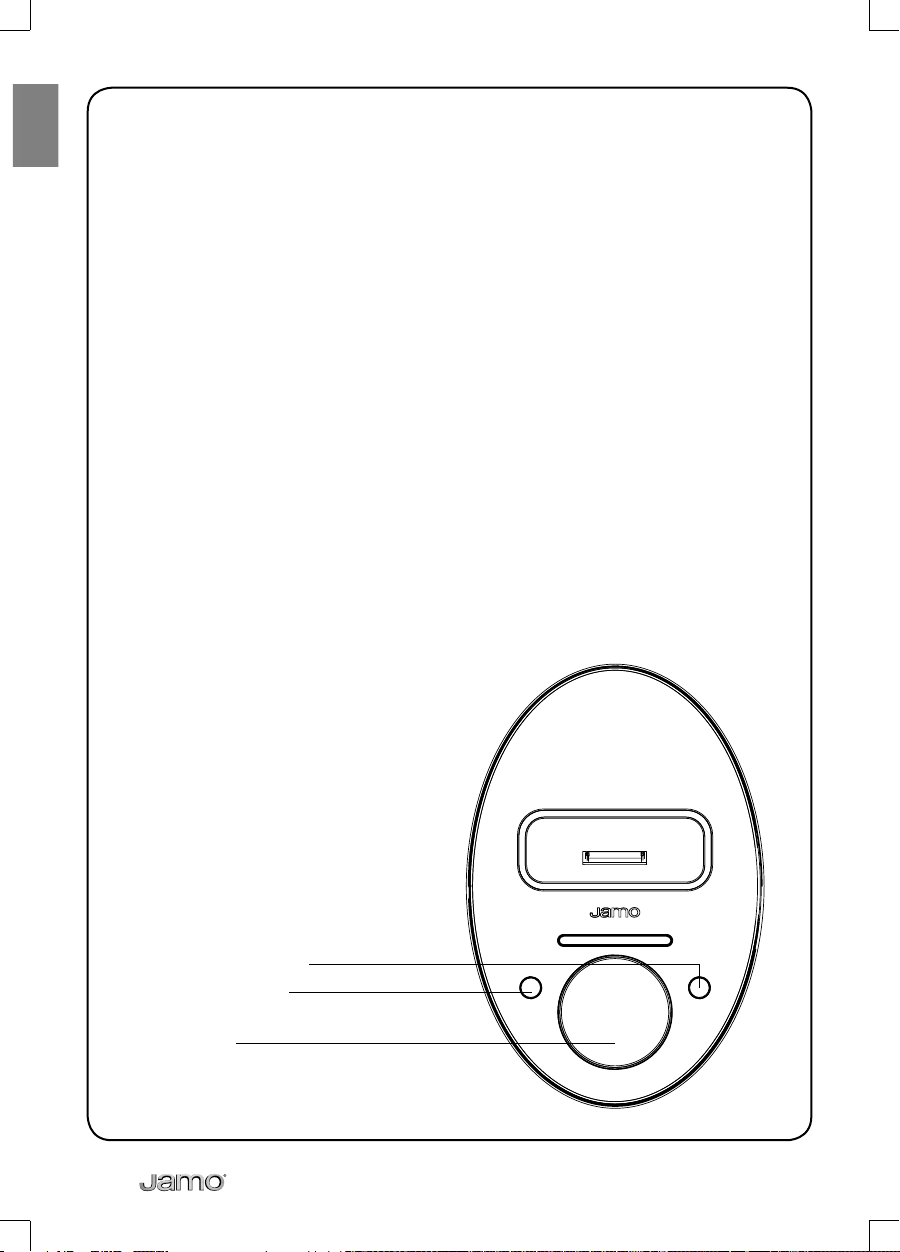
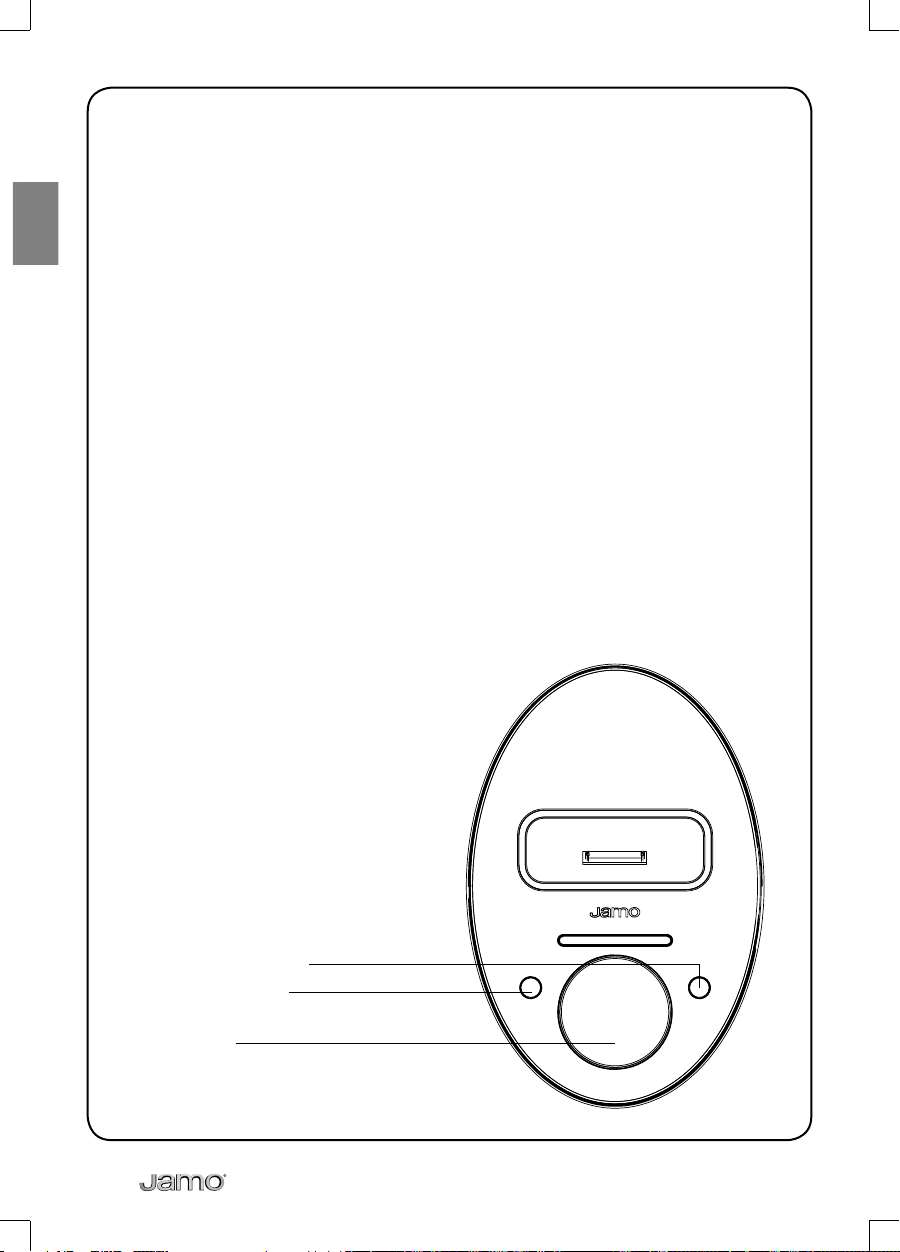
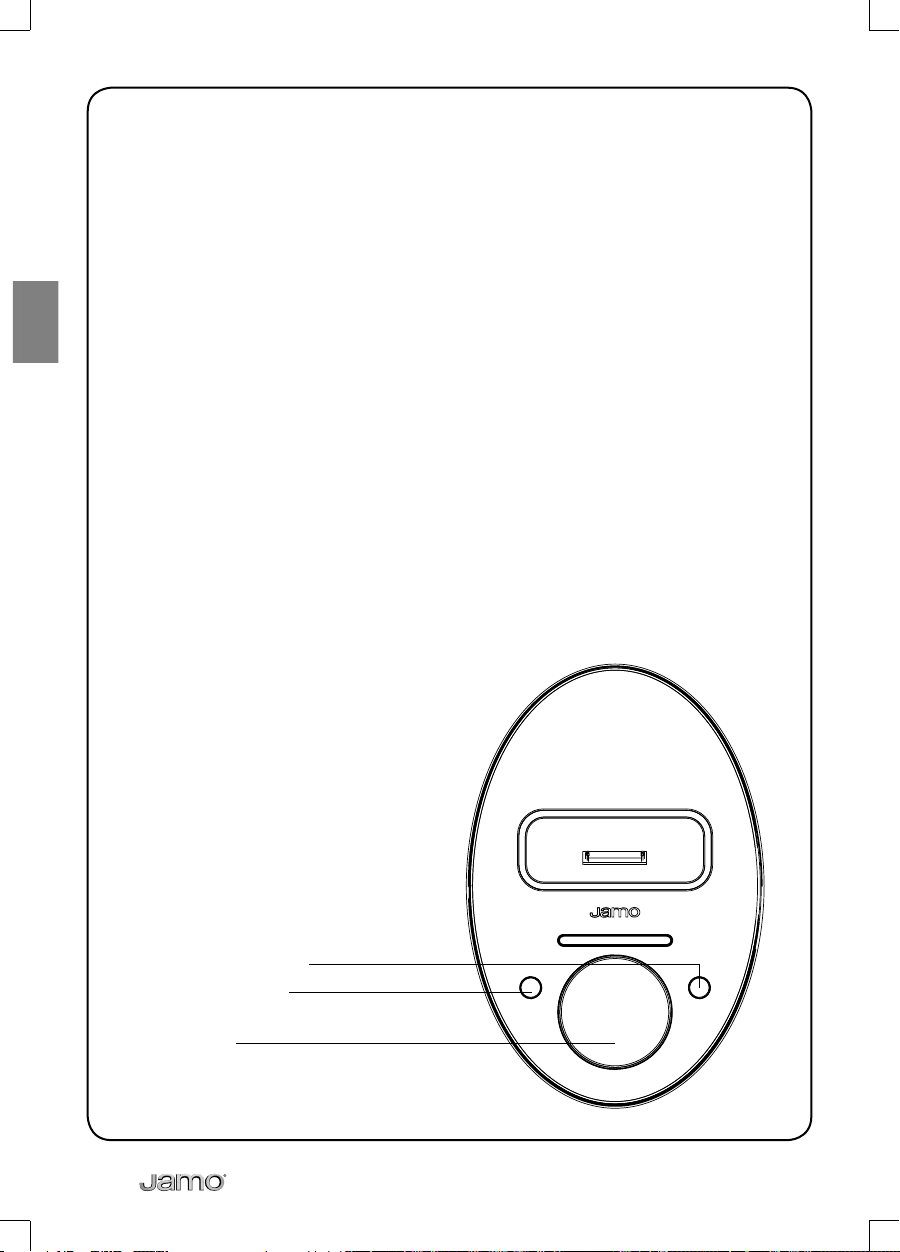
System operation
Standby/Mute Button
In Standby mode, pushing the Standby/Mute button will switch the system On.
If an iPod is in the dock, it will be turned on automatically.
Pressing the Standby/Mute button will mute the sound and pause the iPod.
Pressing the button again will unmute the system and start the iPod. Pressing
and holding the Standby/Mute button will switch the system to Standby.
Volume/Subwoofer Select Button
To adjust the subwoofer level, push the Volume/Subwoofer Select button, then
turn the Volume knob. The Light Bar will now indicate the relative subwoofer
level. Pressing the Volume/ Subwoofer Select button again will switch the knob
back to master volume control.
Volume knob
The Volume knob adjusts the overall
volume and subwoofer level.
NOTE: When in the Subwoofer mode,
the system will automatically revert to
master volume after fi ve seconds.
Standby/Mute Button
Volume/Subwoofer
Select Button
Volume knob
10

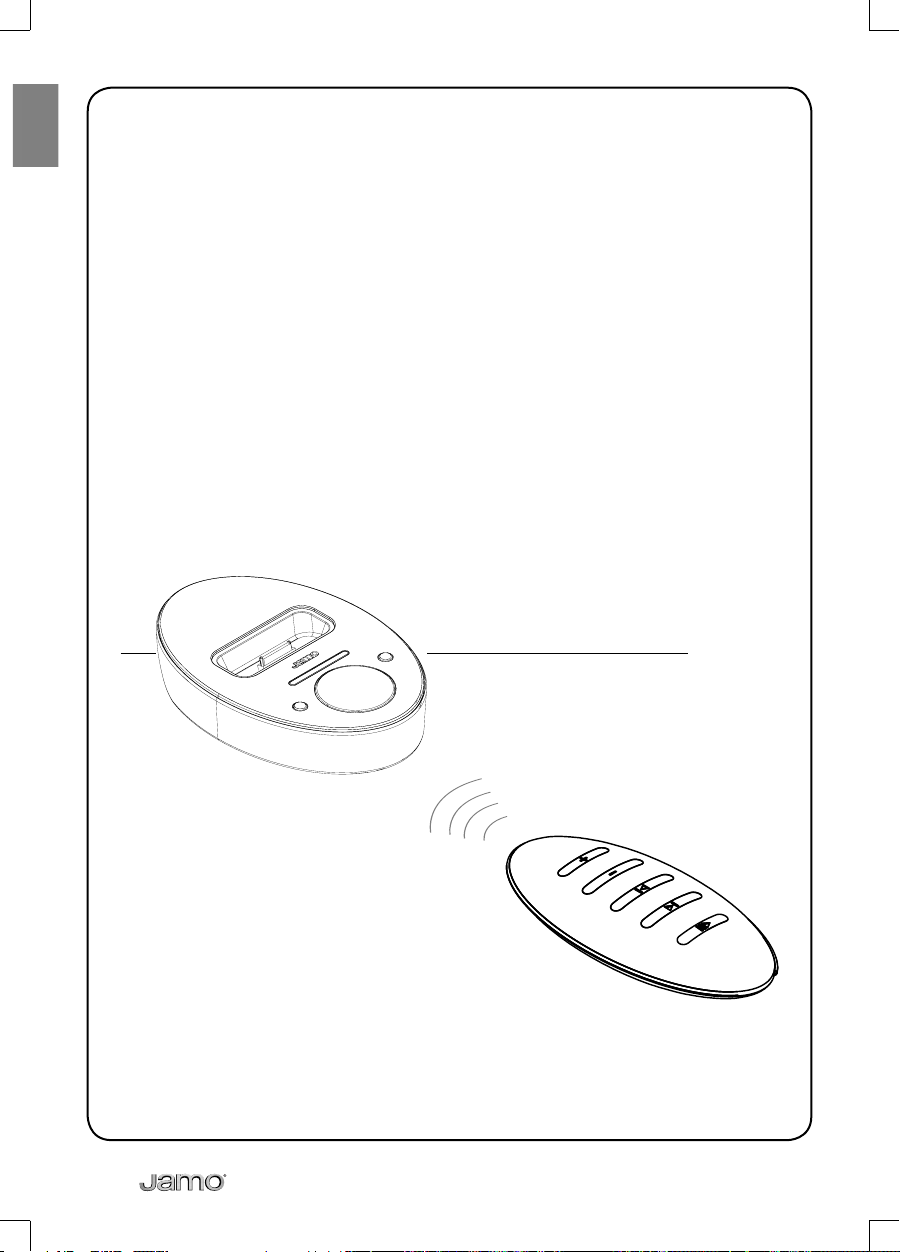
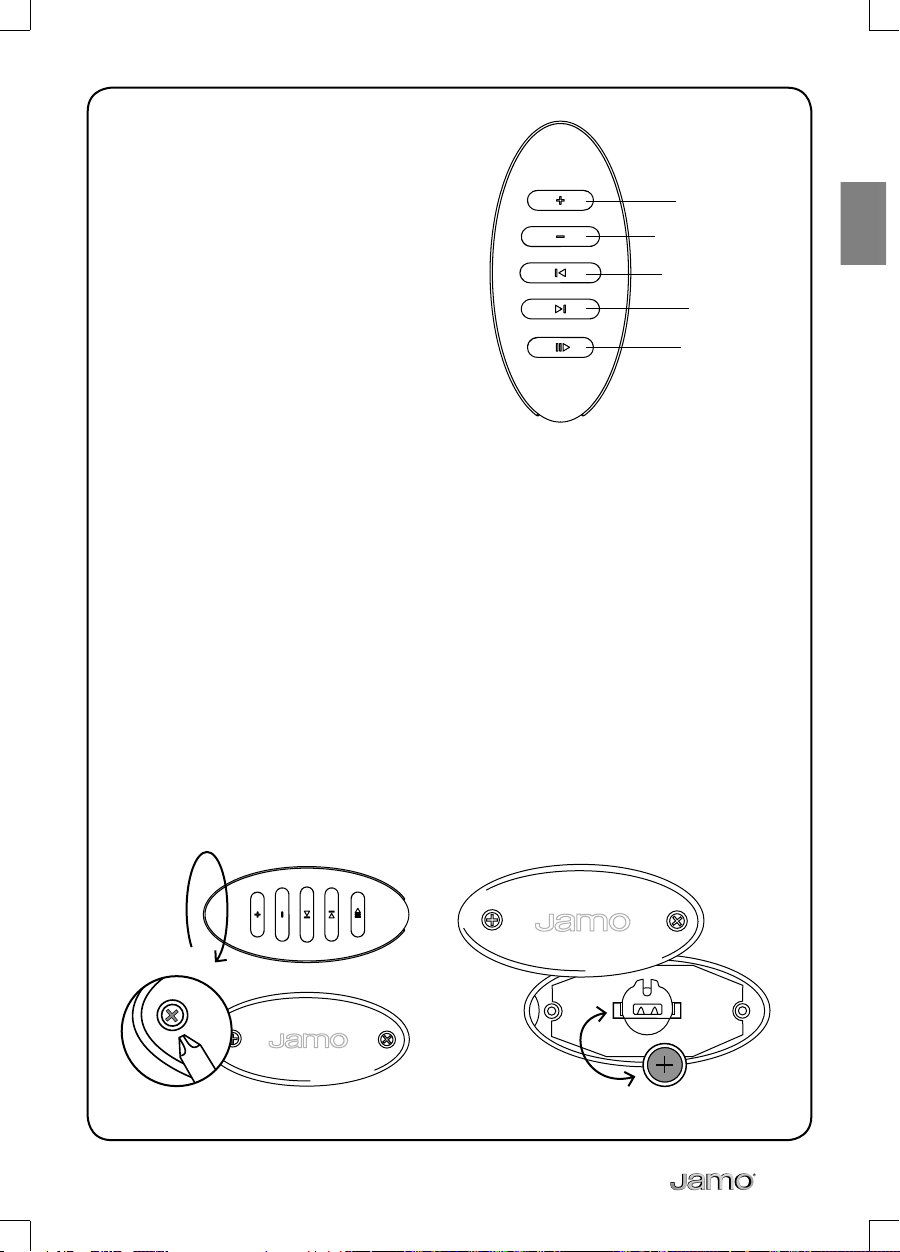
Remote control
Volume Up/Volume Down
Press to turn volume up and
down.
Skip Forward/Skip Back
Press to skip back and forward
between tracks on the iPod.
Holding the Skip Forward or Skip
Back button down will fast-forward
or rewind the current track.
Volume Up
Volume Down
Skip Forward
Skip Back
Play/Pause
Play/Pause
Press to play and pause the iPod. Holding the Play/Pause button down will
switch the system and the iPod to Standby mode.
Remote Control Battery Replacement
To replace the battery, remove the two screws on back of the
remote and disassemble as shown.
NOTE: You may have to re-syncronise the remote to the system after changing
the battery. See the “Synching the Remote to the Control Dock” chapter.
11
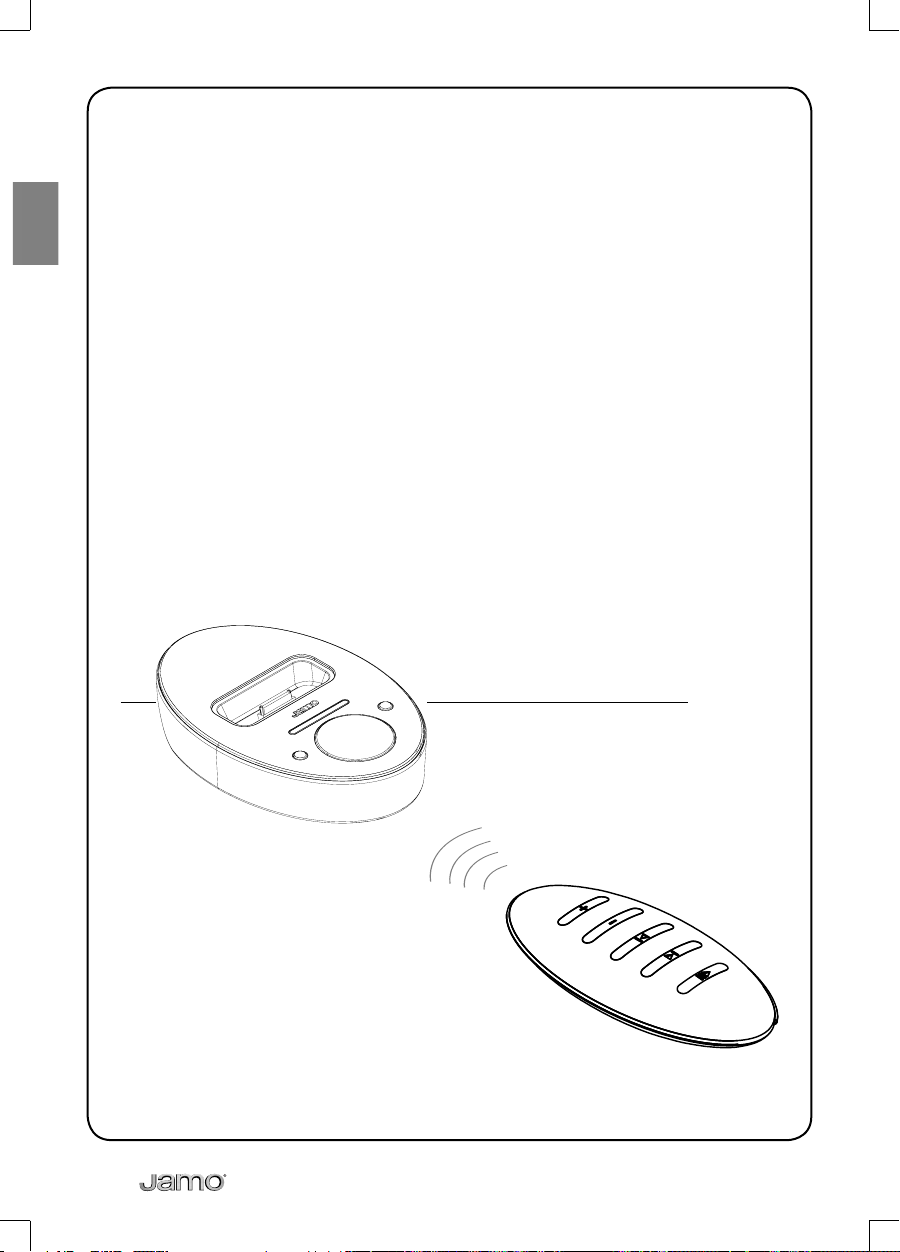
Synching the Remote to the Control Dock
If a conflict arises with multiple units being operated in close proximity to
each other, or the Remote lost synchronisation after a battery change, do the
following: - Hold down the Play/Pause button for 10 seconds while the system
is On. The unit will go into standby mode and after 10 seconds, and will be
properly synched.
If you have to re-synchronise because of multiple units in the area, in order to
keep the remotes from synching to all systems, the other systems should be
unplugged, or out of range, while the remote for the system in question is being
synchronised.
12
Troubleshooting
iPod does not dock
properly in the system
No sound Make sure the iPod is seated properly in the control
iPod not charging Make sure the iPod is properly seated in the control
Remote control
will not operate
the system
Make sure the proper docking adapter for your iPod
is inserted in the control dock.
Remove the iPod; check the connectors on the
control dock and the bottom of the iPod to ensure
there are no obstructions.
dock, turned On, and playing.
If an external device is connected to the control
dock’s auxilary input, make certain that device is On
and playing. If you are trying to listen to an iPod in
the dock, unplug the cable from the auxiliary input
on the control dock.
Make certain that the volume is turned up, as
indicated by the Light Bar on the control dock.
dock.
Make sure the system is plugged in.
Turn on the power for the entire system and the
subwoofer.
Make sure the battery is properly installed.
If the battery is old, it may need to be replaced.
Remote control
conflicts with another
nearby iFi system
To avoid conflicts the remote needs to be properly
synched to the system. Use the procedure detailed
in the “Synching the Remote to the Control Dock”
section to synch the remote control to the iFi
control dock.
13
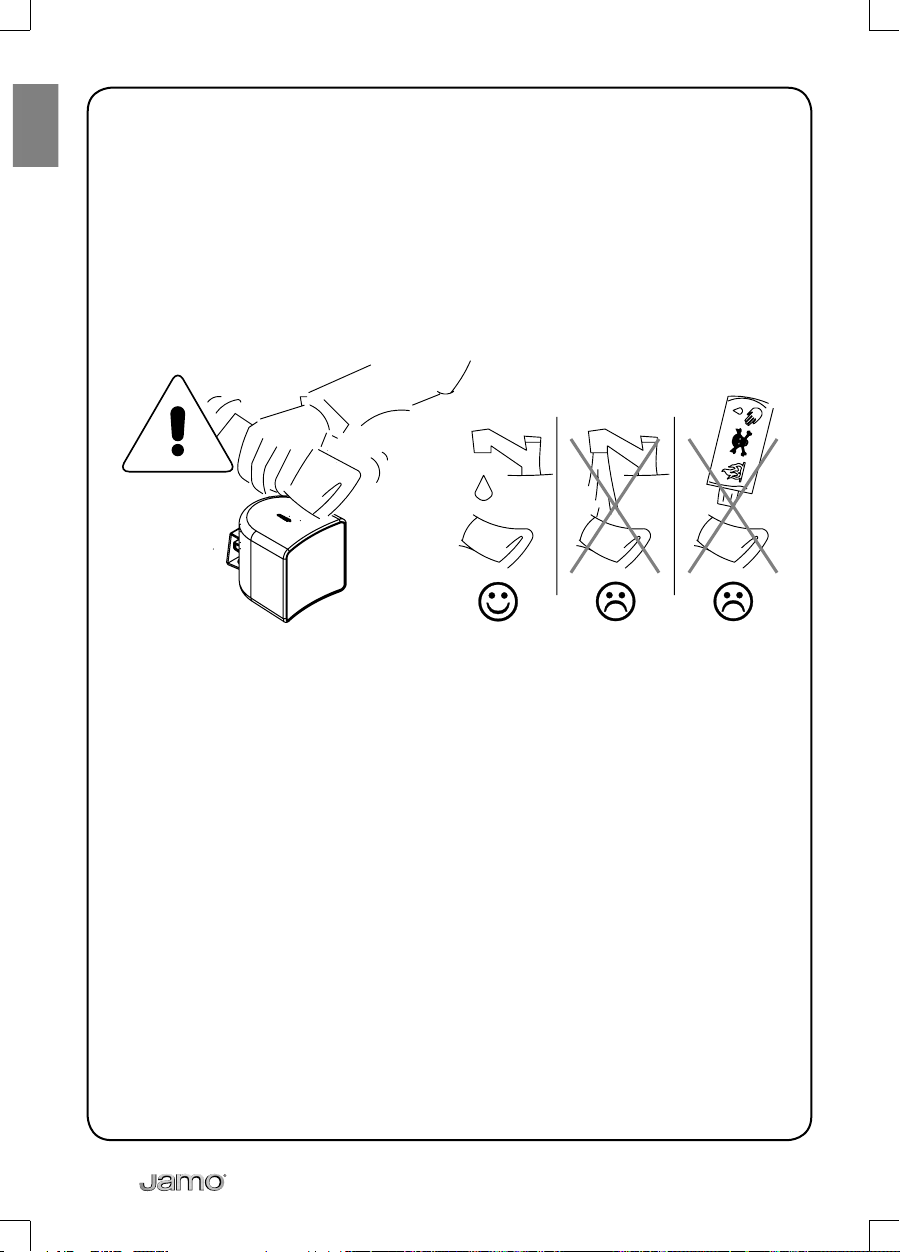
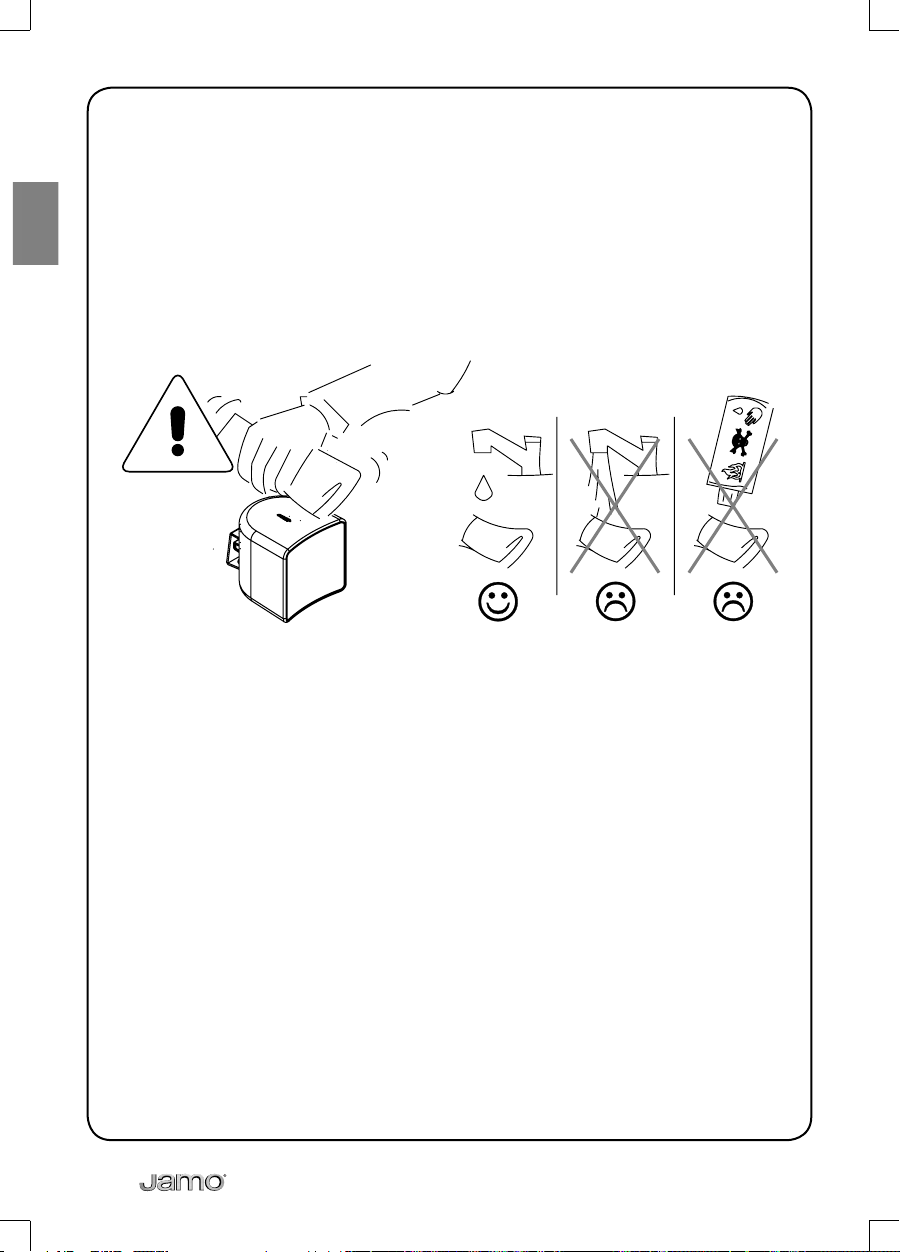
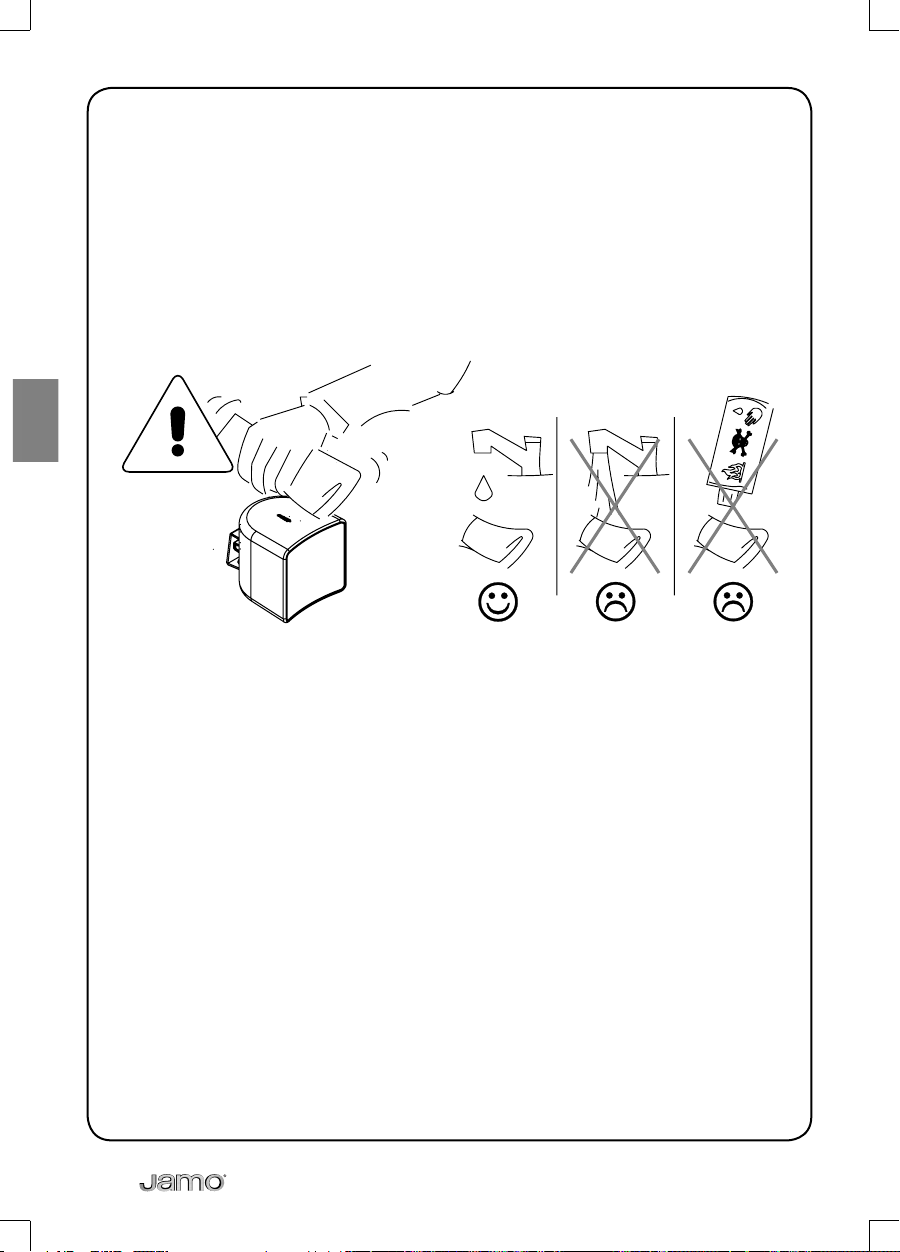
Care and cleaning
Please use a dust-free cloth to clean this system. It is also possible to use a slightly
damp cloth for more stubborn marks.
Under no circumstances should you use any kind of cleaning agent on, or in
close proximity to, these speakers.
Specifi cation
Type ..........................................................................................................................................................................................................A 102
System ...................................................................................................................................................................................................... 2-way
Woofer (in / mm) ...................................................................................................................................................................................3 / 76
Tweeter (in / mm ..................................................................................................................................................................................¾ / 19
Sensitivity (dB - 2,8V / 1m) ....................................................................................................................................................................... 86
Power handling long / short term (W) .........................................................................................................................................60 / 80
Frequency range (Hz) .............................................................................................................................................................150 – 20.000
Impedance (Ohm) ..........................................................................................................................................................................................6
Dimensions (HxWxD in / mm) ...........................................................................................................................................3.6 x 6.9 x 3.7
....................................................................................................................................................................................................... 91 x 174 x 92
Weight (Kg / lb) .................................................................................................................................................................................1,1 / 2.4
Type ...................................................................................................................................................................................................i300 SUB
System .............................................................................................................................................................................................. Bassreflex
Woofer (in / mm) .............................................................................................................................................................................6½ / 165
Frequency range (Hz) ...................................................................................................................................................................... 45-150
Rated output for sub (W peak) .............................................................................................................................................................150
Rated output for speaker (W peak) ................................................................................................................................................ 2 x 75
Dimensions (HxWxD in / mm) ............................................................................................................................................9.8 / 9.8 / 9.8
Weight (Kg / lb) ...............................................................................................................................................................................7,2 / 15.9
250 x 250 x 250
14

Service and warranty
Environmental information
• The system is made of recyclable materials which can be re-used if disassembled by authorised personnel.
• Please follow local regulations for the disposal of packaging materials, used batteries and discarded units.
Copyright
All trade names are registered trademarks of respective manufacturers listed.
iPod® is a trademark of Apple Computer, Inc., registered in the U.S. and other countries.
Service
In case of warranty enquiries, please contact your dealer. In case of request for service under warranty, please
enclose your original receipt.
Important: Never send the product to be repaired without prior agreement. If the product is STILL UNDER
WARRANTY, Jamo will pay freight costs back and forth between the dealer and the Jamo authorised service
centre. Any other freight must be paid for by the customer.
The product must always be packed properly, otherwise the product warranty will be discontinued. If the
product is NOT UNDER WARRANTY, all costs must be paid for by the customer.
Warranty certificate
Jamo provides a twenty-four (24) month warranty from the date of purchase against material and manufacturing
defects. For defects covered by the warranty, the product must be returned to the dealer that sold the product.
The expected time of repair, excluding transport, is approximately five working days.
If any problems arise, information from our authorised service centres is available at the following address, or
from the dealer who sold the product.
Terms of Warranty
1. The warranty is only valid on presentation of the original sales receipt, and if the serial number on the product
is fully legible.
2.The obligations of Jamo are limited either to repair or replacement of defective components. The repair or
replacement of defective components is based on an assessment by Jamo. Exchange is only possible if the repair
cannot be performed.
3.Warranty repairs must be carried out by an authorised Jamo dealer, or an authorised service centre. No
remuneration is provided for repairs performed by unauthorised workshops. Any repairs or damage to the
product caused by unauthorised intervention are not covered by this warranty.
4.This product will not be considered as being defective, either in materials or in manufacture, if adaptation to
national, local, technical or safetyrelated requirements is required in countries other than the specific country for
which the product was originally designed and manufactured.
5.This warranty does not cover these types of adaptations, and no remuneration will be offered for these types of
adaptations or for any consequential damages. The warranty does not cover the following:
a) Periodic inspection, maintenance and repair or replacement of parts resulting from normal wear.
b) Costs connected to transport, disassembly or installation of the product.
c) Mis-use, including use for purposes other than was intended, or faulty installation.
d) Damage caused by lightning, water, fire, natural catastrophes, war, insurrection, incorrect line voltage,
insufficient ventilation, transport or other causes outside of the control of Jamo.
6.This warranty applies to every legal owner of the product during the warranty period.
Packaging
If possible, use the original packing material for any shipping. Otherwise, re-pack the product using:
• A reinforced cardboard box, strong enough to carry the weight of the product.
• At least 6 cm / 2.36 inches of shock-absorbing material around the product.
• Non-abrasive dust-free material for the other parts.
• Non-abrasive wrapping for the product. (Dust and dirt cover)
• Re-pack the product in such a way as to ensure that it cannot shift in the box during transport.
Information we must receive before repairing the product:
Model name:
Serial no.:
Fault description:
Copy of the invoice or sales receipt
The dealer’s name, address and phone no.
Personal information: Name, address, post code/city, phone no. and e-mail address (optional).
Your signature
Dealer’s stamp and signature
Date
15

Sommaire
Introduction ..............................................................................................................................17
Branchement du système ....................................................................................................18
Branchement du iPod ............................................................................................................20
Entrée audio auxiliaire ........................................................................................................... 21
Fonction du système .............................................................................................................. 22
Telecommande ........................................................................................................................23
Synchroniser la télécommande avec la station d’accueil (dock) ...........................24
Dépannage ................................................................................................................................25
Entretien et nettoyage ..........................................................................................................26
Specification ..............................................................................................................................26
Service et Garantie .................................................................................................................. 27
Félicitations pour votre nouvelle acquisition, Jamo i300 !
Bonne nouvelle, vous venez d’acheter plus qu’un simple accessoire iPod !
Vous avez sélectionné un véritable système de Home Entertainment qui va
transformer vos habitudes musicales avec votre baladeur préféré. Le i300 est
un puissant système caisson de grave amplifié/satellites, avec d’authentique
enceintes hi-fi, optimisé pour une utilisation avec l’iPod. Ce système est équipé
de deux entrées auxiliaires supplémentaires pour votre ordinateur, votre
console de jeux, etc. Vous pouvez écouter toutes vos sources audio sur un seul
appareil. C’est ingénieux système peut être piloté d’une autre pièce grâce à sa
télécommande à radio fréquences.
Faites-nous confiance, vous allez découvrir un tas de bonnes raisons pour
tomber sous le charme de votre iPod, encore une fois ! Bonne écoute!
16
Introduction
Vérifiez que les articles suivant sont inclus dans le carton avec votre i300.
i300 SUB
Station d’accueil
i300 (dock)
Key hanger
7 x adaptateurs pour
station d’accueil (dock)
Câble d’alimentation
2 x A 102
Télécommande RF
secteur détachable
17
Branchement du système
Suivez l’illustration ci-dessous pour brancher i300.
Remarque : Le signal provenant du iPod et celui de l’entrée auxiliaire sont
mélangés. On entend les sources simultanément. Cela permet, par exemple
d’entendre le son de votre ordinateur pendant que l’iPod dans sa station
d’accueil transmet de la musique.
18
1
2
3
19
Branchement du iPod
Sélectionnez l’adaptateur qui correspond à votre iPod et insérez le dans la
station d’accueil. Veillez à ce que l’adaptateur s’emboîte correctement avec la
rainure centrée sur la prise multibroche.
20

Entrée audio auxiliaire
A l’arrière de la station d’accueil (dock) se trouve une entrée audio auxiliaire
mini-jack 3,5 mm. Vous pouvez ainsi écouter sur le système une source externe
(un lecteur CD portable, par exemple). Quand la fiche mini-jack est branchée, le
système bascule automatiquement sur l’entrée auxiliaire. Pour rebasculer sur
l’iPod, débranchez l’entrée auxiliaire.
AUDIO SUBWOOFER
21
Fonction du système
Touche de mise en veille/silence (Standby/Mute)
En mode veille, appuyez sur cette touche pour allumer le système. Si l’iPod est
dans sa station d’accueil (dock), il va s’allumer automatiquement.
Appuyez sur la touche mise en veille/silence pour couper le son momentanément
et mettre en pause l’iPod. Une autre pression sur cette touche, relance le système
et l’iPod. Appuyez et maintenez la touche enfoncée pour mettre en veille le
système.
Touche de sélection du caisson de grave (Volume/Subwoofer Select)
Pour régler le niveau du caisson de grave, appuyez sur cette touche de sélection,
puis tournez le bouton de volume. Les diodes lumineuses (light bar) vous
indiquent maintenant le niveau du caisson de grave. Appuyez encore sur la
touche de sélection (Volume/Subwoofer Select) pour rebasculer le contrôle du
volume général sur le bouton d’origine.
Bouton de volume (Volume knob)
Le bouton de volume règle le niveau
général ainsi que le niveau du caisson
de grave
REMARQUE : En mode de sélection
du caisson de grave, le système va
automatiquement basculer sur le
contrôle du volume général après cinq
secondes.
Standby/Mute Button
Volume/Subwoofer
Select Button
Volume knob
22
Telecommande
Augmenter/baisser le volume
(Volume Up/Volume Down)
Appuyez pour augmenter et baisser le
volume.
Suivant/précédent
(Skip Forward/Skip Back)
Appuyez pour accéder au morceau
musical précédent ou suivant du iPod.
Maintenez la touche enfoncée pour
une avance rapide ou un retour arrière du morceau en cours de lecture.
Volume Up
Volume Down
Skip Forward
Skip Back
Play/Pause
Lecture/pause (Play/Pause)
Appuyez pour lancer la lecture ou mettre en pause l’iPod.
Maintenez cette touche enfoncée pour mettre en veille le système et l’iPod.
Remplacement de la pile de la télécommande
Pour remplacer la pile, retirez les deux vis à l’arrière de la télécommande et
démontez-la comme illustré.
Remarque: Vous devrez re-synchroniser la télécommande avec le système
après le changement de pile. Consultez la rubrique “Synchroniser la
télécommande avec la station d’accueil”.
23
Synchroniser la télécommande avec
la station d’accueil (dock)
Si des conflits apparaissent lors du fonctionnement des multiples appareils
branchés l’un à l’autre ou si la télécommande perd sa synchronisation après le
changement de la pile, procédez comme suit :
- Maintenez enfoncée la touche Play/Pause pendant 10 secondes lorsque le
système est allumé.
L’appareil va alors se mettre en veille après 10 secondes et sera correctement
synchronisé.
Si vous devez re-synchroniser à cause de multiples appareils branchés, pour
protéger les télécommandes de la synchronisation de tous les systèmes, les
autres produits doivent être débranchés ou bien enlevés pendant que la
télécommande du système en question est synchronisée.
24
Dépannage
iPod ne s’insère pas
correctement dans la
station d’accueil du
système
Absence de son Vérifiez que l’iPod est correctement installé dans sa
iPod ne se recharge
pas
La télécommande ne
fonctionne pas
Conflits de la
télécommande avec
un autre système i300
à proximité
Assurez-vous que l’adaptateur correspondant à
votre iPod est emboîté dans la station d’accueil.
Enlevez le iPod; vérifiez les connexions de la
station d’accueil ainsi que ceux du iPod pour retirer
d’éventuels obstacles au contact.
station d’accueil, allumez-le et lancez la lecture.
Si un appareil externe est branché à l’entrée
auxiliaire de la station d’accueil, assurez-vous que
l’appareil est allumé et que la lecture est lancée. Si
vous essayez d’écouter votre iPod dans la station
d’accueil, débranchez le câble de l’entrée auxiliaire à
l’arrière de la station d’accueil.
Vérifiez que le niveau de volume est monté comme
indiqué par les diodes lumineuses sur la station
d’accueil.
Assurez-vous que l’iPod est correctement emboîté
dans sa station d’accueil.
Assurez-vous que le système est branché.
Allumer le système entièrement ainsi que le caisson
de grave.
Assurez-vous que la pile est correctement installée.
Si la pile est vieille, il est peut être temps de la
changer.
Pour éviter les conflits, la télécommande doit être
correctement synchronisée au système. Suivez la
procédure détaillée sous la rubrique ”Synchroniser
la télécommande avec la station d’accueil” pour
synchroniser la télécommande à la station d’accueil
i300.
25
Entretien et nettoyage
Veuillez utiliser un chiffon doux et propre pour nettoyer le système. Il est possible de se servir d’un chiffon légèrement humide pour enlever les marques qui
résistent.
Ne jamais utiliser de détergent ou autres agents nettoyants sur le système ou à
proximité.
Specifi cation
Type ..........................................................................................................................................................................................................A 102
System ...................................................................................................................................................................................................... 2-way
Woofer (in / mm) ...................................................................................................................................................................................3 / 76
Tweeter (in / mm ..................................................................................................................................................................................¾ / 19
Sensitivity (dB - 2,8V / 1m) ....................................................................................................................................................................... 86
Power handling long / short term (W) .........................................................................................................................................60 / 80
Frequency range (Hz) ............................................................................................................................................................. 150 – 20.000
Impedance (Ohm) ..........................................................................................................................................................................................6
Dimensions (HxWxD in / mm) ...........................................................................................................................................3.6 x 6.9 x 3.7
....................................................................................................................................................................................................... 91 x 174 x 92
Weight (Kg / lb) .................................................................................................................................................................................1,1 / 2.4
Type ...................................................................................................................................................................................................i300 SUB
System .............................................................................................................................................................................................. Bassreflex
Woofer (in / mm) .............................................................................................................................................................................6½ / 165
Frequency range (Hz) ...................................................................................................................................................................... 45-150
Rated output for sub (W peak) .............................................................................................................................................................150
Rated output for speaker (W peak) ................................................................................................................................................ 2 x 75
Dimensions (HxWxD in / mm) ............................................................................................................................................9.8 / 9.8 / 9.8
Weight (Kg / lb) ...............................................................................................................................................................................7,2 / 15.9
250 x 250 x 250
26

Service et Garantie
Information relative à l’environnement
• Le système est composé de matériaux recyclables qui peuvent être réutilisés après avoir été désassemblés par du
personnel agréé.
• Respectez la réglementation locale en vigueur pour vous débarrasser de l’emballage, des piles usagées et des
appareils à mettre au rebut.
Copyright
Toutes les marques sont des marques déposées des fabricants respectivement nommés.
iPod® est une marque de Apple Computer, Inc., déposée aux U.S. A et dans d’autres pays.
Service
Pour toute demande concernant la garantie, veuillez vous adresser au revendeur du matériel. En cas de demande
d’intervention pendant la période de garantie, joignez votre facture originale.
Important : n’envoyez jamais le produit en réparation sans accord préalable. Si le produit est TOUJOURS SOUS
GARANTIE, Jamo assumera les frais de port entre le revendeur et le centre d’assistance agréé. Tout autre frais de
transport sera à la charge du client. Le produit doit être emballé convenablement, sinon la garantie sera résiliée. Si le
produit n’est PAS SOUS GARANTIE, tous les frais sont à la charge du client.
Certificat de garantie
Jamo fournit une garantie de vingt-quatre (24) mois à compter de la date d’achat. Cette garantie couvre les défauts
de fabrication et le matériel. En présence de vices couverts par la garantie, il convient de retourner le produit au
revendeur auprès duquel il a été acheté. La durée de réparation, transport compris, est généralement estimée à
cinq jours ouvrables environ. En cas de problème, vous pouvez obtenir des informations sur nos différents centres
de réparation agréés à l’adresse suivante ou auprès de votre revendeur.
Termes de garantie
1. La garantie n’est valable que sur présentation du justificatif d’achat original, et uniquement si le numéro de série
est parfaitement lisible sur le produit.
2. Les seules obligations de Jamo se limitent à réparer les composants défectueux ou à les remplacer. C’est Jamo, à
sa seule et unique appréciation, qui décide du remplacement ou de la réparation des composants défectueux. Un
échange n’est possible que si l’appareil ne peut pas être réparé.
3. Les réparations d’un appareil sous garantie doivent être effectuées par un revendeur Jamo ou par un centre de
réparation agréé. Les réparations effectuées par des centres non agréés ne donneront lieu à aucune indemnisation.
Les réparations ou les dommages causés au produit suite à une intervention non autorisée ne sont pas couverts par
cette garantie.
4. Ce produit ne sera pas considéré comme défectueux, ni au niveau du matériel, ni au niveau de la fabrication, si
une adaptation a été effectuée pour répondre à des exigences nationales, locales, techniques ou sécuritaires d’un
pays autre que celui pour lequel le produit a été initialement conçu et fabriqué.
5. Cette garantie ne couvre pas ces types d’adaptations, et aucune indemnisation n’aura lieu pour effectuer ces
types d’adaptations ni pour réparer les dommages qui en résulteraient. La garantie ne couvre pas non plus les
éléments suivants:
a) Inspection périodique, maintenance et réparation ou remplacement des pièces ayant subi une usure normale.
b) Coûts liés au transport, au désassemblage ou à l’installation du produit.
c) Utilisation impropre, y compris l’utilisation à des fins autres que celles pour lesquelles le produit a été conçu, ou
installation incorrecte.
d) Dommages causés par la foudre, l’eau, le feu, les catastrophes naturelles, la guerre, les insurrections, une tension
inadéquate, une aération insuffisante ou toute autre cause échappant au contrôle de Jamo.
6. Cette garantie s’applique au propriétaire légal du produit, pendant la période de couverture.
Emballage
Utilisez si possible les matériaux d’emballage d’origine pour toute expédition. Sinon, emballez le produit en utilisant
:
• Une boîte en carton rigide, assez solide pour supporter le poids de l’appareil.
• Au moins 6 cm / 2,36 pouces de matériau de protection contre les chocs autour de l’appareil.
• Une matière non abrasive et exempte de poussière pour les autres pièces.
• Un emballage non abrasif pour le produit. (Pour le protéger contre la poussière et la saleté)
• Reconditionnez le produit de sorte qu’il ne puisse pas bouger à l’intérieur du carton pendant le transport.
Informations dont nous avons besoin pour procéder à la réparation du produit :
Nom du modèle :
N° de série :
Description de la panne :
Copie de la facture ou de la preuve d’achat
Nom, adresse et n° de téléphone du revendeur
Vos informations personnelles : nom, adresse, code postal, ville, numéro de téléphone et adresse e-mail (facultatif)
Votre signature
Cachet et signature du revendeur
Date
27

Inhalt
Einleitung ...................................................................................................................................29
Anschließen des Systems .................................................................................................... 30
Anschließen des iPod ............................................................................................................32
Aux-Audioeingang .................................................................................................................33
Bedienung des systems ........................................................................................................34
Fernbedienung .......................................................................................................................35
Fernbedienung mit der Dockingstation synchronisieren ........................................36
Störungsbehebung ...............................................................................................................37
Pflege und reinigung .............................................................................................................38
Specification ..............................................................................................................................38
Kundendienst und garantie ................................................................................................39
Wir gratulieren Ihnen zum Kauf... Ihres neuen Jamo i300.
Wir haben hervorragende Neuigkeiten für Sie. Sie haben sich nicht einfach
nur Zubehör zu Ihrem iPod gekauft... Sie haben ein volltaugliches HomeEntertainment-System erstanden, das die Art, wie Sie Musik von Ihrem
bevorzugten portablen Music-Player hören, vollkommen verändern wird.
Das i300 ist ein leistungsfähiges, aktives Subwoofer-/Satelliten-System - mit
Lautsprechern in echter HiFi-Qualität - das für die Nutzung im Zusammenhang
mit dem iPod optimiert wurde. Aber das ist noch nicht alles. Es ist darüber hinaus
mit zwei zusätzlichen Aux-Eingängen für Ihren Computer, Ihre Spielekonsole
usw. ausgestattet, so dass Sie all Ihre Audioquellen über ein einziges, äußerst
elegantes Paket wiedergeben können. Haben wir erwähnt, dass das ganze
System dank seiner weit reichenden Funkfernbedienung von einem anderen
Raum aus fernbedient werden kann?
Glauben Sie uns... Sie sind gerade dabei, eine Unmenge neuer Gründe zu finden,
um sich noch einmal ganz neu in Ihren iPod zu verlieben. Nur zu!
28
Einleitung
Überprüfen Sie, ob Ihrem i300 das folgende Zubehör beiliegt.
i300 SUB
i300 Dockingstation
mit Steuerelementen
2 x A 102
7 x Dock-Adapter Fernbedienung
NetzkabelSchlüsselanhänger
29
Anschließen des Systems
Der unten stehenden Abbildung können Sie Einzelheiten zum Anschluss des
i300 entnehmen.
Bitte beachten Sie, dass der Eingang mit dem Signal von der Dockingstation
gemischt wird, ob nun vom iPod oder vom Aux-Eingang, so dass beide Quellen
gleichzeitig zu hören sind. So können Sie beispielsweise die Klangwiedergabe
Ihres Computers hören, während gleichzeitig Musik vom iPod, der in die
Dockingstation eingesteckt ist, gespielt wird.
30

1
2
3
31
Anschließen des iPod
Wählen Sie den Adapter, der zu Ihrem iPod passt, und stecken Sie ihn auf der
Oberseite Ihrer Dockingstation ein, bis er mit dem Schlitz mittig über dem
mehrpoligen Docking-Stecker einrastet.
32
Aux-Audioeingang
Die Dockingstation ist auf der Rückseite mit einem 3,5 mm Stereo-Aux-Eingang
versehen.
Über diesen Eingang können Sie Musik von einer externen Quelle
(z.B. von einem tragbaren CD-Player) über das System wiedergeben. Wenn in
diesen Eingang ein Stecker eingesteckt ist, schaltet das System automatisch auf
den Aux-Eingang um.
Wenn Sie wieder auf den iPod umschalten möchten, ziehen Sie den Stecker aus
dem Aux-Eingang.
AUDIO SUBWOOFER
33
Bedienung des systems
Taste Standby/Stummschaltung (Standby/Mute)
Wenn sich das System im Standby-Modus befindet, wird durch das Drücken der
Taste Standby/Stummschaltung das System eingeschaltet.
Wenn sich ein iPod in der Dockingstation befindet, wird er automatisch
eingeschaltet.
Durch das Drücken der Taste Standby/Stummschaltung wird die Wiedergabe
stummgeschaltet und der iPod angehalten. Durch nochmaliges Drücken der
Taste wird das System wieder auf Wiedergabe geschaltet und der iPod nimmt
die Wiedergabe an der Stelle wieder auf, an der sie unterbrochen wurde.
Wird die Taste Standby/Stummschaltung gedrückt gehalten, wird das System in
den Standby-Modus geschaltet.
Auswahltaste Lautstärke/Subwoofer (Volume/Subwoofer Select)
Um den Subwoofer-Pegel einzustellen, wird die Auswahltaste Lautstärke/
Subwoofer gedrückt und anschließend der Lautstärkeregler gedreht.
Über die Lautstärkeanzeige wird nun der relative Subwoofer-Pegel angezeigt.
Durch das nochmalige Drücken der Auswahltaste Lautstärke/Subwoofer wird
der Regler wieder auf die MasterLautstärke zurückgeschaltet.
Lautstärkeregler (Volume knob)
Der Lautstärkeregler dient zur
Einstellung der allgemeinen
Lautstärke sowie des SubwooferPegels.
HINWEIS: Wenn sich das System im
Subwoofer-Modus befi ndet, wird es
nach fünf Sekunden automatisch zur
Master-Lautstärke zurückschalten.
Standby/Mute Button
Volume/Subwoofer
Select Button
Volume knob
34

Fernbedienung
Lauter/Leiser
(Volume Up/Volume Down)
Diese Tasten drücken, um eine
lautere oder leisere Wiedergabe
zu wählen.
Einen Titel vor/Einen Titel
zurück (Skip Forward/Skip Back)
Drücken Sie diese Tasten, um auf
dem iPod einen Titel vor- bzw. einen Titel zurückzuspringen.
Wenn die Tasten gedrückt gehalten werden, erfolgt ein schneller Vorlauf bzw.
schneller Rücklauf innerhalb des aktuellen Titels.
Wiedergabe/Pause (Play/Pause)
Diese Tase Drücken, um den iPod auf Wiedergabe bzw. Pause zu schalten.
Wird die Taste Wiedergabe/Pause gedrückt gehalten, werden das System und
der iPod in den Standby-Modus geschaltet.
Batterie der Fernbedienung austauschen
Um die Batterie zu ersetzen, lösen Sie die beiden Schrauben auf der Rückseite
der Fernbedienung und nehmen Sie wie in der Abbildung dargestellt die
Abdeckung ab und die Batterie heraus.
HINWEIS: Es kann sein, dass Sie nach dem Batteriewechsel die Fernbedienung
neu mit dem System synchronisieren müssen. Siehe Abschnitt „Fernbedienung
mit der Dockingstation synchronisieren“.
35

Fernbedienung mit der
Dockingstation synchronisieren
Falls Konflikte zwischen verschiedenen Einheiten auftreten, die in direkter
Nähe zueinander betrieben werden, oder die Fernbedienung nach dem
Batterieaustausch erneut synchronisiert werden muss, ist folgendermaßen
vorzugehen:
- Halten Sie die Taste Wiedergabe/Pause zehn Sekunden lang gedrückt, während
das System eingeschaltet ist.
Die Einheit schaltet um auf Standby-Betrieb und ist nach zehn Sekunden korrekt
synchronisiert.
Falls Sie die Synchronisierung erneut vornehmen müssen, da es mehrere
Systeme in diesem Bereich gibt, sollten die anderen Systeme während der
Synchronisierung der Fernbedienung des betroffenen Systems vom Netz
genommen oder außerhalb der Reichweite der Fernbedienung platziert
werden, um zu vermeiden, dass sich die Fernbedienung mit allen Systemen
synchronisiert.
36

Störungsbehebung
Der iPod lässt sich
nicht korrekt in die
Dockingstation
einstecken.
Keine
Tonwiedergabe
iPod lädt nicht Stellen Sie sicher, dass der iPod korrekt in der
Das System lässt
sich nicht über die
Fernbedienung
bedienen
Die Fernbedienung
kommt mit einem
anderen i300 in der
Nähe in Konflikt
Stellen Sie sicher, dass der richtige Dock-Adapter für
Ihren iPod in die Dockingstation eingesteckt ist.
Nehmen Sie den iPod heraus; überprüfen Sie die
Kontakte an der Dockingstation und auf der Unterseite
des iPod um sicherzustellen, dass keine störenden
Teile vorhanden sind
Stellen Sie sicher, dass der iPod korrekt in die
Dockingstation eingesteckt und eingeschaltet und auf
Wiedergabe geschaltet ist.
Wenn ein externes Gerät an den Aux-Eingang der
Dockingstation angeschlossen ist, stellen Sie sicher,
dass das Gerät eingeschaltet und auf Wiedergabe
geschaltet ist. Wenn Sie versuchen, die Wiedergabe
eines iPods zu hören, der in die Dockingstation
eingesteckt ist, ziehen Sie das Kabel des Aux-Eingangs
an der Dockingstation ab.
Stellen Sie sicher, dass die Lautstärke ausreichend
laut eingestellt ist; dies können Sie an der
Lautstärkeanzeige an der Dockingstation erkennen.
Dockingstaton eingesteckt ist.
Stellen Sie sicher, dass das Netzkabel des Systems
eingesteckt ist.
Schalten Sie das gesamte System und den Subwoofer
ein.
Stellen Sie sicher, dass die Batterie korrekt eingelegt ist.
Falls die Batterie schon älter ist, muss sie eventuell
ersetzt werden.
Um Störungen zu vermeiden, muss die Fernbedienung
korrekt mit dem System synchronisiert werden.
Synchronisieren Sie die Fernbedienung mit der i300
Dockingstation wie unter „Fernbedienung mit der
Dockingstation synchronisieren“ beschrieben.
37

Pfl ege und reinigung
Bitte verwenden Sie zur Reinigung dieses Systems ein staubfreies Tuch. Für
hartnäckigere Verunreinigungen können Sie auch ein leicht angefeuchtetes
Tuch benutzen.
Sie sollten unter keinen Umständen ein Reinigungsmittel für das System
verwenden, und auch kein solches in ihrer Nähe einsetzen.
Specifi cation
Type ..........................................................................................................................................................................................................A 102
System ...................................................................................................................................................................................................... 2-way
Woofer (in / mm) ...................................................................................................................................................................................3 / 76
Tweeter (in / mm ..................................................................................................................................................................................¾ / 19
Sensitivity (dB - 2,8V / 1m) ....................................................................................................................................................................... 86
Power handling long / short term (W) .........................................................................................................................................60 / 80
Frequency range (Hz) ............................................................................................................................................................. 150 – 20.000
Impedance (Ohm) ..........................................................................................................................................................................................6
Dimensions (HxWxD in / mm) ...........................................................................................................................................3.6 x 6.9 x 3.7
....................................................................................................................................................................................................... 91 x 174 x 92
Weight (Kg / lb) .................................................................................................................................................................................1,1 / 2.4
Type ...................................................................................................................................................................................................i300 SUB
System .............................................................................................................................................................................................. Bassreflex
Woofer (in / mm) .............................................................................................................................................................................6½ / 165
Frequency range (Hz) ...................................................................................................................................................................... 45-150
Rated output for sub (W peak) .............................................................................................................................................................150
Rated output for speaker (W peak) ................................................................................................................................................ 2 x 75
Dimensions (HxWxD in / mm) ............................................................................................................................................9.8 / 9.8 / 9.8
Weight (Kg / lb) ...............................................................................................................................................................................7,2 / 15.9
250 x 250 x 250
38

Kundendienst und garantie
Umweltinformationen
• Das System ist aus recyclingfähigen Materialien gefertigt, die nach der Demontage durch befugte Personen
wiederverwertet werden können.
• Bitte beachten Sie die nationalen Bestimmungen für die Entsorgung von Verpackungsmaterialien, leeren Batterien und
Altgeräten.
Copyright
Alle Markennamen sind eingetragene Warenzeichen der jeweils aufgeführten Hersteller.
iPod® ist ein Warenzeichen von Apple Computer, Inc., das in den USA und anderen Ländern registriert ist.
Kundendienst
Wenden Sie sich bei Garantie-Anfragen bitte an Ihren Händler. Legen Sie bei Kundendienst-Anfragen im Rahmen der
Garantie bitte Ihre Originalquittung bei.
Wichtig: Versenden Sie nie ein Produkt, für das eine Reparatur erforderlich ist, ohne vorherige Vereinbarung. Wenn sich
das Produkt noch INNERHALB DES GARANTIEZEITRAUMS befindet, wird Jamo die Frachtkosten für die Wege zwischen
dem Händler und dem autorisierten Kundendienst-Center tragen. Sämtliche anderen Frachtkosten sind vom Kunden zu
zahlen.
Das Produkt muss immer angemessen verpackt werden, andernfalls erlischt die Garantie. Wenn sich das Produkt NICHT
MEHR INNERHALB DES GARANTIEZEITRAUMS befindet, sind sämtliche Kosten vom Kunden zu tragen.
Garantieschein
Jamo gibt eine Garantie von vierundzwanzig (24) Monaten ab Kaufdatum auf Material- und Fertigungsfehler. Bei Fehlern,
die unter die Garantie fallen, muss das Produkt an den Händler zurückgegeben werden, bei dem es gekauft wurde. Die zu
erwartende Reparaturzeit beträgt, ohne Transport, ungefähr fünf Arbeitstage.
Sollten Probleme auftreten, können Sie von dem Händler, bei dem Sie das Produkt gekauft haben, oder unter der
folgenden Adresse von einem unserer autorisierten Kundendienst-Center Informationen erhalten.
Garantiebedingungen
1. Die Garantie ist nur bei Vorlage der Originalquittung und bei vollständig lesbarer Seriennummer am Gerät gültig.
2. Die Verpflichtung von Jamo ist auf die Reparatur bzw. den Ersatz defekter Komponenten beschränkt. Die Reparatur
bzw. der Ersatz von defekten Komponenten erfolgt auf der Grundlage einer Bewertung durch Jamo. Der Austausch
erfolgt nur, wenn eine Reparatur nicht möglich ist.
3. Reparaturen im Rahmen der Garantie müssen von einem autorisierten Jamo Händler oder einem autorisierten
Kundendienst-Center durchgeführt werden. Es erfolgt keine Vergütung für Reparaturen, die von nicht autorisierten
Werkstätten durchgeführt werden. Jedwede Reparatur oder Beschädigung des Produkts infolge eines unautorisierten
Eingriffs werden von dieser Garantie nicht abgedeckt.
4. Dieses Produkt wird nicht als mit Material- oder Fertigungsfehlern behaftet betrachtet, wenn eine Anpassung an
nationale, regionale, technische oder sicherheitsrelevante Anforderungen in anderen Ländern als dem, für das das
Produkt ursprünglich gestaltet und hergestellt worden ist, erforderlich ist.
5. Diese Garantie erstreckt sich nicht auf diese Arten von Anpassungen, und es wird keinerlei Vergütung für diese Arten
von Anpassungen oder beliebige auf sie zurückzuführende Schäden angeboten. Diese Garantie erstreckt sich nicht auf
folgende Punkte:
a) Regelmäßige Inspektion, Wartung und Reparatur oder Austausch von Teilen infolge normalen Verschleißes.
b) Kosten im Zusammenhang mit dem Transport, der Zerlegung oder der Installation des Produktes.
c) Missbräuchliche Verwendung einschließlich der Verwendung für andere als die beabsichtigten Zwecke oder fehlerhafte
Installation.
d) Schäden infolge von Blitzschlag, Wasser, Feuer, Naturkatastrophen, Krieg, Aufständen, nicht korrekter Netzspannung,
unzureichender Belüftung, Transport oder anderen Ursachen, die auf die Jamo keinen Einfluss hat.
6. Diese Garantie gilt für jeden rechtmäßigen Eigentümer des Produktes während des Garantiezeitraums.
Verpackung
Benutzen Sie für jeden Versand nach Möglichkeit die Originalverpackung. Verpacken Sie das Produkt andernfalls bitte
folgendermaßen:
• Ein Karton aus verstärkter Pappe, die fest genug ist, das Gewicht des Produkts zu tragen.
• Mindestens 6 cm stoßdämpfendes Material um das Produkt herum.
• Nicht scheuerndes und staubfreies Material für die anderen Teile.
• Nicht scheuernde Umhüllung für das Produkt. (Staub- und Schmutzschutz)
• Verpacken Sie das Produkt so, dass ein Verrutschen im Karton während des Transports ausgeschlossen ist.
Informationen, die wir benötigen, bevor wir das Produkt reparieren:
Name des Modells:
Seriennummer:
Fehlerbeschreibung:
Kopie der Rechnung oder Kaufquittung
Name, Adresse und Telefonnummer des Händlers
Informationen zu Ihrer Person: Name, Adresse, Postleitzahl/Ort, Telefonnummer und E-Mail-Adresse (optional).
Ihre Unterschrift
Stempel und Unterschrift des Händlers
Datum
39

Indhold
Indledning .................................................................................................................................41
Tilslutning af systemet ..........................................................................................................42
Tilslutning af din iPod ............................................................................................................ 44
AUX audioindgang ................................................................................................................. 45
Betjening af systemet ............................................................................................................46
Fjernbetjening ..........................................................................................................................47
Synkronisering af fjernbetjeningen til iPod docking-stationen ............................. 48
Fejlfinding ..................................................................................................................................49
Vedligeholdelse og rengøring ............................................................................................50
Specification ..............................................................................................................................50
Service og garanti ...................................................................................................................51
Tillykke med din nyanskaffelse – Jamo i300!
Jamo i300 er alle tiders nyhed. Du har ikke blot investeret i et stykke iPod tilbehør – du har købt et fuldt hjemme underholdningssystem, som vil give dig helt
nye oplevelser, når du lytter til musik på din personlige, transportable audioafspiller. Jamo i300 er et kraftfuldt, aktivt subwoofer/satellit-system – med ægte
HiFi højttalere – som er 100% optimeret til brug sammen med din iPod. Og det
er kun begyndelsen. Systemet kommer også med 2 ekstra AUX indgange, som
du kan bruge til din computer, din spilkonsol eller andet udstyr, så du kan høre
alle dine audiokilder via ét smart, kompakt anlæg. Glem heller ikke, at hele systemet kan fjernbetjenes – også fra et andet rum – i kraft af dets langtrækkende
radiofrekvens-fjernbetjening.
Glæd dig! Du er kun nogle minutter fra at opdage en hel række grunde til at få
endnu større udbytte af din iPod. Hvad venter du på?
40

Indledning
Du bør kontrollere, at du har modtaget alt dette tilbehør sammen
med dit i300 system.
i300 iPod
docking-station
i300 SUB
7 adaptere til forskellige
iPod modeller
2 x A 102
Fjernbetjening
NetkabelNøglesnor
41

Tilslutning af systemet
Se diagrammet herunder.
Vær opmærksom på, at indgangssignalet mixes med signalet fra iPod dockingstationen, uanset om du bruger din iPod eller andet udstyr som kilde. Det
betyder, at du hører begge kilder samtidig. Denne løsning sikrer, at du f.eks. kan
høre e-mail og andre lydsignaler fra din computer, mens du lytter til musik fra
din iPod i docking-stationen.
42

1
2
3
43
Tilslutning af din iPod
Vælg den adapter, som passer til din iPod, og tryk den forsigtigt ned i dockingstationen, indtil den flugter med docking-stationens overside, og dens udskæring
er centreret i forhold til det specielle iPod multi-stik på docking-stationen.
44

AUX audioindgang
iPod docking-stationen har en 3,5 mm stereo mini-jack indgang til en anden
audiokilde på bagpanelet. Den giver dig mulighed for at lytte til en anden kilde,
f.eks. en transportabel CD-afspiller, gennem systemet. Når et stik sættes i denne
indgang, skifter systemet automatisk til denne AUX indgang. Træk stikket ud
igen, når du vil skifte tilbage til din iPod.
AUDIO SUBWOOFER
45

Betjening af systemet
Standby/Mute tast
Når systemet er i standby, tænder du det med et tryk på denne tast. Hvis en iPod
sidder i docking-stationen, tændes den automatisk.
Når systemet er tændt, og du trykker på Standby/Mute tasten, afbrydes lyden, og
din iPod sættes i pause. Med endnu et tryk vender lyden tilbage til den tidligere
styrke, og din iPod starter igen.
Tryk og hold på Standby/Mute tasten for at sætte systemet i standby.
Volume/Subwoofer Select tast
Hvis du vil justere subwoofer-niveauet, så tryk på Volume/Subwoofer Select
tasten og drej derefter Volume knappen. Lysbjælken angiver subwooferens
niveau i forhold til satellitterne. Tryk igen på Volume/Subwoofer Select tasten
for at skifte Volume knappen tilbage til almindelig styrkeregulering.
Volume knap
Med Volume knappen regulerer du
lydstyrken og subwoofer-niveauet.
NB: Når du har sat systemet til
subwoofer-justering, vender det
automatisk tilbage til almindelig
styrkeregulering efter 5 sekunder.
Standby/Mute Button
Volume/Subwoofer
Select Button
Volume knob
46

Fjernbetjening
Volume op/Volume ned
Tryk for at øge eller dæmpe
lydstyrken.
Skip frem/Skip tilbage
Tryk for at skippe frem eller tilbage
mellem numrene på din iPod.
Tryk og hold på Skip frem eller Skip
tilbage tasten for at søger hurtigt
frem eller tilbage i det aktuelle
nummer.
Volume Up
Volume Down
Skip Forward
Skip Back
Play/Pause
Play/Pause
Tryk for sætte din iPod til gengivelse eller pause.
Tryk og hold på Play/Pause tasten for sætte systemet og din iPod i standby.
Udskiftning af fjernbetjeningens batteri
Batteriet udskiftes ved at fjerne de to skruer på fjernbetjeningens bagside og
adskille den som vist på tegningen.
NB: Efter at batteriet er udskiftet, kan det være nødvendigt at synkronisere
fjernbetjeningen med systemet. Se afsnittet “Synkronisering af fjernbetjeningen
til iPod docking-stationen” på næste side.
47
Synkronisering af fjernbetjeningen
til iPod docking-stationen
Hvis der opstår konflikt mellem flere apparater, som betjenes i nærheden
af hinanden, eller fjernbetjeningen er kommet ud af synkronisering efter et
batteriskift, skal du følge disse anvisninger:
- Tryk og hold på Play/Pause tasten i 10 sekunder eller mere, mens systemet er
tændt.
Systemet går i standby, og efter 10 sekunder vil det være korrekt synkroniseret.
Hvis du er nødt til at synkronisere fjernbetjeningen, fordi der er flere apparater i
dit hjem, bør du sørge for, at fjernbetjeningen ikke synkroniseres med alle systemerne. Derfor bør du slukke for de andre systemer på stikkontakten eller sørge
for, at de er uden for rækkevidde, mens det aktuelle system synkroniseres.
48

Fejlfi nding
iPod afspilleren
kan ikke høres over
systemet.
Ingen lyd fra systemet. Kontrollér at din iPod sidder rigtigt på docking-
iPod afspilleren
oplades ikke.
Fjernbetjeningen kan
ikke styre systemet.
Fjernbetjeningen
skaber konflikt med
et andet HiFi system i
nærheden.
Kontrollér at du har monteret den adapter, som
passer til din iPod, i docking-stationen.
Fjern din iPod fra docking-stationen. Kontrollér at
der ikke sidder støv eller andre fremmedlegemer
på stikket på docking-stationen eller bøsningen på
undersiden af din iPod.
stationen, samt at den er tændt og sat til gengivelse.
Hvis et andet apparat er sat til AUX indgangen på
iPod docking-stationen, skal dette apparat være
tændt og sat til gengivelse. Hvis du vil lytte til din
iPod på docking-stationen, skal du trække stikket ud
af AUX indgangen på docking-stationen.
Kontrollér at der er lukket op for lydstyrken, som
angives af lysbjælken på iPod docking-stationen.
Kontrollér at din iPod sidder rigtigt på
docking-stationen.
Kontrollér at systemet er rigtigt tilsluttet.
Tænd for hele systemet og subwooferen.
Kontrollér at batteriet er rigtigt isat.
Hvis batteriet er gammelt eller brugt, skal det
udskiftes med et nyt.
For at undgå konflikter bør fjernbetjeningen være
rigtigt synkroniseret til systemet. Følg anvisningerne
under “Synkronisering af fjernbetjeningen til iPod
docking-stationen”.
49
Vedligeholdelse og rengøring
Brug kun en ren og blød, fnugfri klud til rengøring af dette system. Hvis der er
fedtfingre eller andet fastsiddende smuds på systemet, kan kluden fugtes med
rent vand eller et mildt rengøringsmiddel.
Brug under ingen omstændigheder nogen form for opløsnings- eller slibemiddel
på eller i nærheden af dette system.
Specifi cation
Type ..........................................................................................................................................................................................................A 102
System ...................................................................................................................................................................................................... 2-way
Woofer (in / mm) ...................................................................................................................................................................................3 / 76
Tweeter (in / mm ..................................................................................................................................................................................¾ / 19
Sensitivity (dB - 2,8V / 1m) ....................................................................................................................................................................... 86
Power handling long / short term (W) .........................................................................................................................................60 / 80
Frequency range (Hz) ............................................................................................................................................................. 150 – 20.000
Impedance (Ohm) ..........................................................................................................................................................................................6
Dimensions (HxWxD in / mm) ...........................................................................................................................................3.6 x 6.9 x 3.7
....................................................................................................................................................................................................... 91 x 174 x 92
Weight (Kg / lb) .................................................................................................................................................................................1,1 / 2.4
Type ...................................................................................................................................................................................................i300 SUB
System .............................................................................................................................................................................................. Bassreflex
Woofer (in / mm) .............................................................................................................................................................................6½ / 165
Frequency range (Hz) ...................................................................................................................................................................... 45-150
Rated output for sub (W peak) .............................................................................................................................................................150
Rated output for speaker (W peak) ................................................................................................................................................ 2 x 75
Dimensions (HxWxD in / mm) ............................................................................................................................................9.8 / 9.8 / 9.8
Weight (Kg / lb) ...............................................................................................................................................................................7,2 / 15.9
250 x 250 x 250
50

Service og garanti
Miljømæssig information
• Dette system er fremstillet af genanvendelige materialer, som kan genbruges, hvis produktet adskilles af
kvalificeret personale.
• Følg de lokale miljømyndigheders regler vedrørende bortskaffelse af emballage, brugte batterier og kasseret
elektronisk udstyr.
Copyright
Alle handelsnavne er registrerede varemærker tilhørende de respektive listede producenter.
iPod7 er et varemærke tilhørende Apple Computer, Inc., registreret i USA og andre lande.
Service
Kontakt din forhandler vedrørende forespørgsler om garanti. Hvis du ønsker service under garanti, bedes du
vedlægge din originale kvittering.
Vigtigt: Send aldrig et produkt til reparation uden forudgående aftale. Hvis produktet STADIG ER UNDER
GARANTI, betaler Jamo fragtomkostninger frem og tilbage mellem forhandleren og et Jamo Autoriseret
Servicecenter. Al anden fragt skal betales af forbrugeren. Produktet skal altid være forsvarligt emballeret. Ellers
bortfalder garantien. Hvis produktet IKKE ER UNDER GARANTI, skal alle omkostninger betales af forbrugeren.
Garantibevis
Jamo giver 24 (fireogtyve) måneders garanti fra købsdatoen mod materiale- og fabrikationsfejl. I tilfælde af fejl,
som ønskes dækket af garantien, skal produktet returneres til den forhandler, der solgte det. Den forventede
reparationstid, eksklusive forsendelse, er ca. 5 arbejdsdage.
I tilfælde af problemer kan information om Jamo autoriserede servicecentre fås på adressen herunder eller hos
den forhandler, som solgte produktet.
Garantibetingelser
1. Garantien gælder kun ved fremvisning af den originale kvittering, samt hvis serienummeret på produktet er
fuldt læseligt.
2. Jamo’s forpligtelser er begrænset til enten reparation eller udskiftning af defekte komponenter. Reparation
eller udskiftning af defekte komponenter baseres på et skøn hos Jamo. Ombytning sker kun, hvis en reparation
ikke kan foretages.
3. Garantireparationer skal foretages af en autoriseret Jamo forhandler eller et autoriseret servicecenter. Udgifter
til reparationer, som er udført på et uautoriseret værksted, refunderes ikke. Enhver reparation eller skade, som er
forårsaget ved uautoriserede indgreb, er ikke omfattet af denne garanti.
4. Dette produkt anses ikke for defekt i hverken materialer eller produktion, hvis der kræves tilpasning til
nationale, lokale, tekniske eller sikkerhedsmæssige krav i andre lande end netop det land, hvortil produktet
oprindelig er konstrueret og produceret.
5. Denne garanti omfatter ikke sådanne tilpasninger, og der tilbydes ingen kompensation for de nævnte
tilpasninger eller følgeskader. Herudover omfatter garantien ikke:
a) Periodisk eftersyn, vedligeholdelse og reparation eller udskiftning af dele som følge af normalt slid.
b) Omkostninger i forbindelse med transport, frakobling eller installation af produktet.
c) Misbrug, herunder anvendelse til andre formål end tiltænkt, eller fejlbehæftet installation.
d) Skade forårsaget af lynnedslag, vand, ild, naturkatastrofer, krig, oprør, forkert netspænding, utilstrækkelig
ventilation, transport eller andre forhold uden for Jamo’s kontrol.
6. Denne garanti gælder for produktets retmæssige ejer i garantiperioden.
Emballering
Brug så vidt muligt den originale emballage til enhver forsendelse. Ellers bør produktet indpakkes ved brug af:
• En forstærket papkasse, som er solid nok til at bære produktets vægt.
• Mindst 6 cm stødabsorberende materiale omkring produktet.
• Blødt, støvfrit materiale til andre dele.
• Blødt materiale til indpakning af produktet og beskyttelse mod støv og snavs.
• Pak produktet således, at det ikke kan forrykke sig i kassen under transport.
Information, som vi behøver for at reparere produktet:
Modelnavn:
Serienummer:
Fejlbeskrivelse:
Kopi af faktura eller salgskvittering:
Forhandlers navn, adresse og telefonnummer
Personlig information: Navn, adresse, postnummer/by, telefonnummer og e-mail adresse (ikke obligatorisk)
Din underskrift
Forhandlers stempel og underskrift
Dato
51

Innehåll
Inledning ....................................................................................................................................53
Ansluta systemet .....................................................................................................................54
Ansluta iPod ..............................................................................................................................56
Aux-audioingång ....................................................................................................................57
Systemanvändning .................................................................................................................58
Fjärrkontroll ...............................................................................................................................59
Synkronisera fjärrkontrollen med kontrolldockan ...................................................... 60
Felsökning ..................................................................................................................................61
Underhåll och rengöring ..................................................................................................... 62
Specification ..............................................................................................................................62
Service och garanti .................................................................................................................63
Grattis till ditt nya köp – Jamo i300.
Vi har goda nyheter till dig. Du har inte bara köpt ett iPod-tillbehör – du har
köpt ett fullfjädrat hemmaunderhållningssystem som kommer att förändra hur
du lyssnar på musik på din bärbara favoritmusikspelare. i300 är ett kraftfullt,
förstärkt subwoofer/satellitsystem, med äkta hi-fi-högtalare, som har optimerats
för att användas med iPod, men det är inte allt. Den har även två ytterligare auxingångar för dator, spelkonsol osv. så att du kan lyssna på alla dina audiokällor
via ett enda supersmidigt paket. Sa vi att det går att fjärrstyra hela systemet från
ett annat rum, tack vare fjärrkontrollen med radiofrekvens för långa avstånd?
Tro oss – du kommer att upptäcka en hel hög nya anledningar att bli förälskad i
din iPod igen. Kom igen!
52

Inledning
Se till att följande tillbehör medföljer i300.
i300 SUB
i300 kontrolldocka 7 x dockadaptrar Fjärrkontroll
2 x A 102
NätsladdNyckel band
53
Ansluta systemet
När du ska ansluta i300 följer du illustrationen nedan.
Tänk på att ingångssignalen blandas med signalen från dockan, oavsett om det
är från iPod eller från aux-ingången så att båda källorna hörs samtidigt. Det gör
det till exempel möjligt att höra ljudet från datorn samtidigt som musik spelas
upp från en iPod i dockan.
54

1
2
3
55

Ansluta iPod
Välj den adapter som passar din iPod och sätt in den i
dockan tills den sitter ordentligt på plats med skåran centrerad över
dockningsanslutningen med flera stift.
56

Aux-audioingång
Kontrolldockan har en 3,5 mm minijackingång för aux-stereoljud på den bakre
panelen. Det gör det möjligt att lyssna på en extern källa (t.ex. en bärbar CDspelare) via systemet. När en kontakt sätts in i detta uttag växlar systemet
automatiskt till aux-ingången. Om du vill växla tillbaka till iPod kopplar du ifrån
aux-ingången.
AUDIO SUBWOOFER
57

Systemanvändning
Standby/Mute-knapp (Standby/Mute)
I standbyläge sätts systemet på om du trycker på Standby/Mute-knappen. Om
det finns en iPod i dockan sätts den på automatiskt.
Volume/Subwoofer Select-knapp (Volume/Subwoofer Select)
Om du vill justera subwoofer-nivån trycker du på Volume/Subwoofer Selectknappen och vrider sedan på volymknappen. Ljusraden visar nu den relativa
subwoofer-nivån. Om du trycker på Volume/ Subwoofer Select-knappen igen
går knappen tillbaka till huvudvolymkontroll
Volymknapp (Volume knob)
Volymknappen justerar den allmänna volymen och subwoofer-nivån.
OBS! I subwoofer-läget återgår systemet
automatiskt till huvudvolym efter fem sekunder.
Standby/Mute Button
Volume/Subwoofer
Select Button
Volume knob
58

Fjärrkontroll
Volume Up/Volume Down
Tryck för att höja och sänka volymen.
Skip Forward/Skip Back
Håll intryckt för att hoppa bakåt och
framåt mellan spåren på iPod.
Om knappen Skip Forward eller Skip
Back hålls intryckt snabbspolar man
framåt eller bakåt i det aktuella spåret.
Volume Up
Volume Down
Skip Forward
Skip Back
Play/Pause
Play/Pause
Tryck för att spela upp och pausa iPod.
Om knappen Play/Pause hålls intryckt sätts systemet och iPod i standbyläge.
Byta batteri i fjärrkontrollen
När du ska byta batteriet tar du bort de två skruvarna på
fjärrkontrollens baksida och tar isär den på det sätt som visas.
Obs! Du kanske måste synkronisera om fjärrkontrollen med systemet
efter att du bytt batteriet. Se kapitlet ”Synkronisera fjärrkontrollen med
kontrolldockan”.
59

Synkronisera fjärrkontrollen med kontrolldockan
Om det uppstår en konflikt där flera enheter används nära varandra, eller om
fjärrkontrollen har förlorat synkroniseringen efter ett batteribyte, gör du på
följande sätt:
- Håll knappen Play/Pause intryckt i 10 sekunder när systemet är på.
Enheten går över i standbyläge och efter 10 sekunder synkroniseras det
korrekt.
Om du måste synkronisera om på grund av att det finns flera enheter i området,
ser du till att inte fjärrkontrollerna synkroniseras med alla system genom
att koppla ur de andra systemen, eller se till att de är utom räckhåll, medan
fjärrkontrollen för systemet ifråga synkroniseras.
60

Felsökning
iPod dockas inte
korrekt i systemet
Inget ljud Se till att iPod sitter ordentligt i kontrolldockan,att
iPod laddas inte Se till att iPod sitter ordentligt i kontrolldockan.
Fjärrkontrollen styr
inte systemet
Se till att rätt dockningsadapter för din iPodsätts in i
kontrolldockan.
Ta bort iPod. Kontrollera anslutningarna på
kontrolldockan och undersidan av iPod för att se till
att det inte finns något som hindrar anslutningen.
den är på och att den spelar.
Om en extern enhet är ansluten till kontrolldockans
aux-ingång ser du till att den enheten är på
och att den spelar. Om du försöker lyssna på en
iPod i dockan kopplar du ifrån aux-ingången på
kontrolldockan.
Se till att volymen har vridits upp, vilket visas
avljusraden på kontrolldockan.
Se till att systemet är inkopplat.
Sätt på strömmen till hela systemet och subwoofern.
Se till att batteriet satts i korrekt.
Om batteriet är gammalt kan det behöva bytas ut.
Fjärrkontrollen är
i konflikt med ett
annat i300-system i
närheten
Fjärrkontrollen måste vara korrekt synkroniserad
med systemet för attundvika konflikter. Använd
den metod som anges i kapitlet ”Synkronisera
fjärrkontrollen med kontrolldockan” för
att synkronisera fjärrkontrollen med i300kontrolldockan.
61

Underhåll och rengöring
Använd en dammfri trasa för att rengöra systemet. Det går även att använda en
lätt fuktad trasa för envisa fläckar.
Inga former av rengöringsmedel får någonsin användas på eller i närheten av
dessa högtalare.
Specifi cation
Type ..........................................................................................................................................................................................................A 102
System ...................................................................................................................................................................................................... 2-way
Woofer (in / mm) ...................................................................................................................................................................................3 / 76
Tweeter (in / mm ..................................................................................................................................................................................¾ / 19
Sensitivity (dB - 2,8V / 1m) ....................................................................................................................................................................... 86
Power handling long / short term (W) .........................................................................................................................................60 / 80
Frequency range (Hz) ............................................................................................................................................................. 150 – 20.000
Impedance (Ohm) ..........................................................................................................................................................................................6
Dimensions (HxWxD in / mm) ...........................................................................................................................................3.6 x 6.9 x 3.7
....................................................................................................................................................................................................... 91 x 174 x 92
Weight (Kg / lb) .................................................................................................................................................................................1,1 / 2.4
Type ...................................................................................................................................................................................................i300 SUB
System .............................................................................................................................................................................................. Bassreflex
Woofer (in / mm) .............................................................................................................................................................................6½ / 165
Frequency range (Hz) ...................................................................................................................................................................... 45-150
Rated output for sub (W peak) .............................................................................................................................................................150
Rated output for speaker (W peak) ................................................................................................................................................ 2 x 75
Dimensions (HxWxD in / mm) ............................................................................................................................................9.8 / 9.8 / 9.8
Weight (Kg / lb) ...............................................................................................................................................................................7,2 / 15.9
250 x 250 x 250
62

Service och garanti
Miljöinformation
• Systemet är tillverkat av återvinningsbart material som kan återvinnas om det monteras ned av auktoriserad
personal.
• Följ lokala regler för bortskaffning av förpackningsmaterial, använda batterier och gamla enheter.
Upphovsrätt
Alla varunamn är registrerade varumärken som tillhör respektive angiven tillverkare.
iPod® är ett varumärke som tillhör Apple Computer, Inc. och är registrerat i USA och andra länder.
Service
Kontakta din återförsäljare om du har frågor om garantin. Om du behöver service under garantiperioden ska du
skicka med originalkvittot.
Viktigt! Skicka aldrig produkten för reparation utan tidigare överenskommelse. Om produkten FORTFARANDE
HAR GILTIG GARANTI betalar Jamo fraktkostnader till och från återförsäljaren och Jamos auktoriserade
servicecenter. All annan frakt betalas av kunden.
Produkten måste alltid vara korrekt förpackad annars återkallas produktgarantin. Om produkten INTE HAR GILTIG
GARANTI betalas alla kostnader av kunden.
Garanticertifikat
Jamo erbjuder en tjugofyra (24) månaders garanti från inköpsdatumet gällande material- och tillverkningsfel. För
fel som täcks av garantin måste produkten lämnas tillbaka till återförsäljaren som sålde produkten. Förväntad
reparationstid, exklusive transport, är ca fem arbetsdagar.
Om det skulle uppstå några problem finns information från våra servicecentra på följande adress, eller från
återförsäljaren som sålde produkten.
Garantivillkor
1. Garantin är endast giltig om det ursprungliga kvittot kan uppvisas och om serienumret på produkten är helt
läsligt.
2. Jamos åtaganden är begränsade antingen till att antingen reparera eller ersätta felaktiga komponenter.
Reparation eller ersättning av felaktiga komponenter baseras på en utvärdering gjord av Jamo. Ersättning är
endast möjligt då det inte går att reparera produkten.
3.Garantireparationer måste utföras av en auktoriserad Jamo-återförsäljare eller av ett auktoriserat servicecenter.
Inga ersättningar betalas för reparationer som utförs av icke auktoriserade verkstäder. Alla reparationer som
utförs och skador som orsakas på produkten av någon icke auktoriserade täcks inte av den här garantin.
4.Den här produkten anses inte felaktig, vare sig i material eller tillverkning, om anpassning till nationella, lokala,
tekniska eller säkerhetsrelaterade åtgärder krävs i länder andra än det landet produkten ursprungligen formgivits
och tillverkats för.
5.Den här garantin täcker inte dessa typer av anpassning, och ingen ersättning erbjuds för dessa typer av
anpassningar eller för eventuella följdskador. Garantin täcker inte följande:
a) Regelbunden inspektion, underhåll och reparation eller ersättning av delar som utsätts för normalt slitage.
b) Kostnader i anslutning till transport, nedmontering eller installation av produkten.
c) Felanvändning, inklusive användning till andra syften än de avsedda, eller felaktig installation.
d) Skador orsakade av blixtnedslag, vatten, eld, naturkatastrofer, krig, uppror, felaktig nätspänning, otillräcklig
ventilation, transport eller andra orsaker utanför Jamos kontroll.
6.Den här garantin gäller alla lagliga ägare av produkten under garantiperioden.
Förpackning
Om möjligt ska du använda det ursprungliga förpackningsmaterialet för eventuell frakt. Om inte ska du packa in
produkten med:
• En förstärkt kartong, stark nog att bära produktens vikt.
• Åtminstone 6 cm stötabsorberande material runt produkten.
• Ej skrovligt dammfritt material för de andra delarna.
• Ej skrovligt emballage för produkten. (Damm- och smutsskydd)
• Förpacka om produkten på ett sådant sätt att den inte kan flytta sig i kartongen under transport.
Information som vi måste få innan produkten kan repareras:
Modellnamn:
Serienummer:
Felbeskrivning:
Kopia av fakturan eller säljkvittot
Återförsäljarens namn, adress och telefonnummer
Personlig information: Namn, adress, postnummer/stad, telefonnummer och e-postadress (valfritt).
Din underskrift
Återförsäljarens stämpel och underskrift
Datum
63

Sisältö
Johdanto ....................................................................................................................................65
Järjestelmän kytkentä ............................................................................................................66
iPod-soittimen telakointi ......................................................................................................68
Lisälaitetulo (AUX) ................................................................................................................... 69
Järjestelmän käyttö ................................................................................................................70
Kauko-ohjain .............................................................................................................................71
Kauko-ohjaimen ja telakan synkronointi ........................................................................ 72
Ongelmien ratkaisuja .............................................................................................................73
Underhåll och rengöring ......................................................................................................74
Specification ..............................................................................................................................74
Huolto ja takuu ......................................................................................................................... 75
Onnittelumme Jamo i300 -kaiutinjärjestelmän hankinnasta!
Meillä on sinulle hienoa kerrottavaa. Uusi kaiutinjärjestelmäsi ei ole tavanomainen
iPod-lisävaruste, vaan sen avulla nautit musiikkikokoelmistasi aivan uudella
tavalla. Aktiivisen subwooferin ja satelliittikaiuttimien mahtava ääni täyttää
puhtaasti iPodin asettamat laatuvaatimukset. Lisäksi i300 -järjestelmässä on
kaksi tuloliitäntää esimerkiksi tietokonetta tai pelikonsolia varten, joten voit
kuunnella kaikkia audio-ohjelmalähteitäsi samojen kaiuttimien kautta. Eikä tässä
vielä kaikki. Radiotaajuuksilla toimivan kauko-ohjaimen ansiosta järjestelmän
hallinta onnistuu vaikka toisesta huoneesta.
Olemme vakuuttuneita siitä, että pian löydät koko joukon uusia syitä rakastua
iPod-järjestelmääsi yhä uudelleen.
64
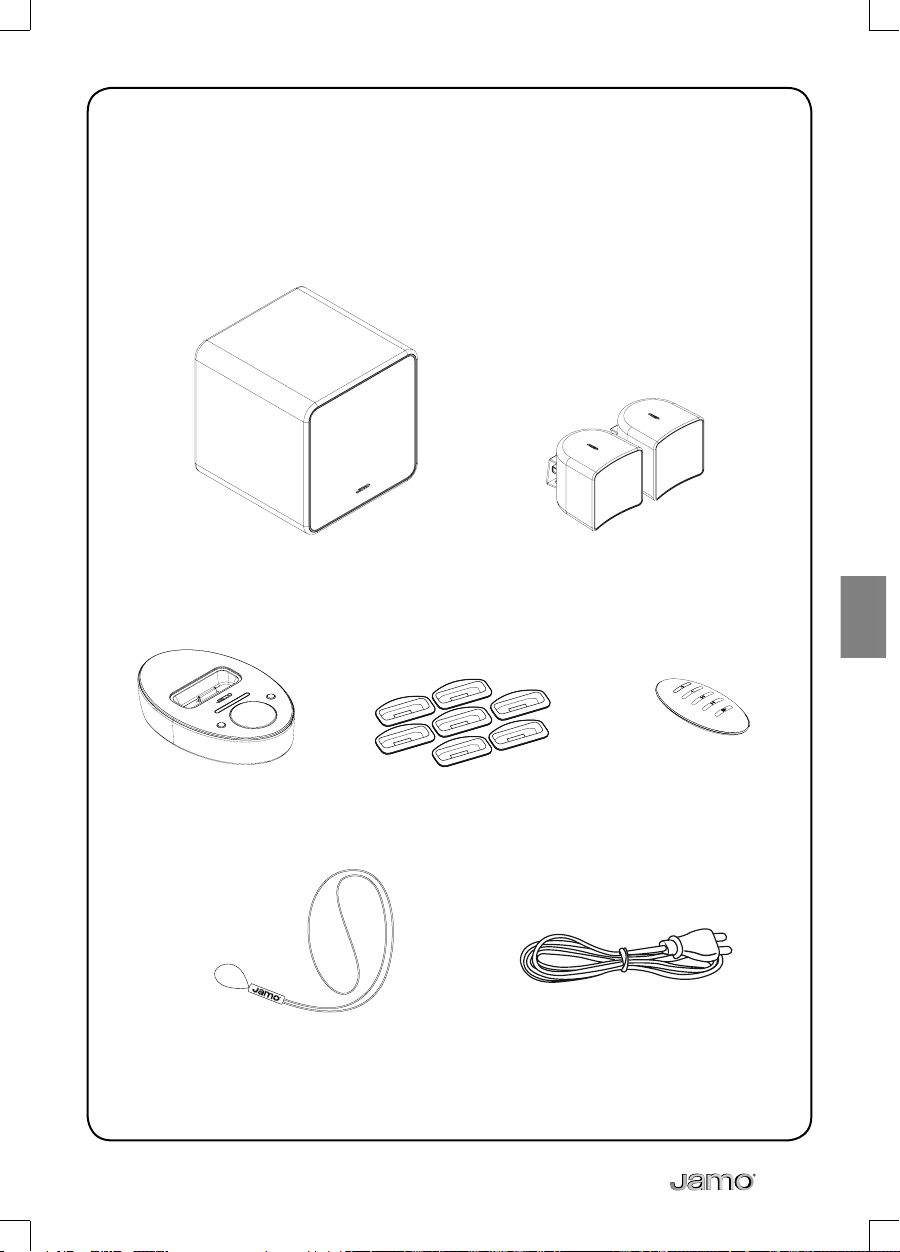
Johdanto
Tarkista, että i300 -pakkaus sisältää seuraavat osat:
i300 SUB -subwoofer
i300 telakka Telakointisovitin (7 kpl) Kauko-ohjain
A 102 -satelliittikaiutin (2 kpl)
VirtajohtoKantohihna
65
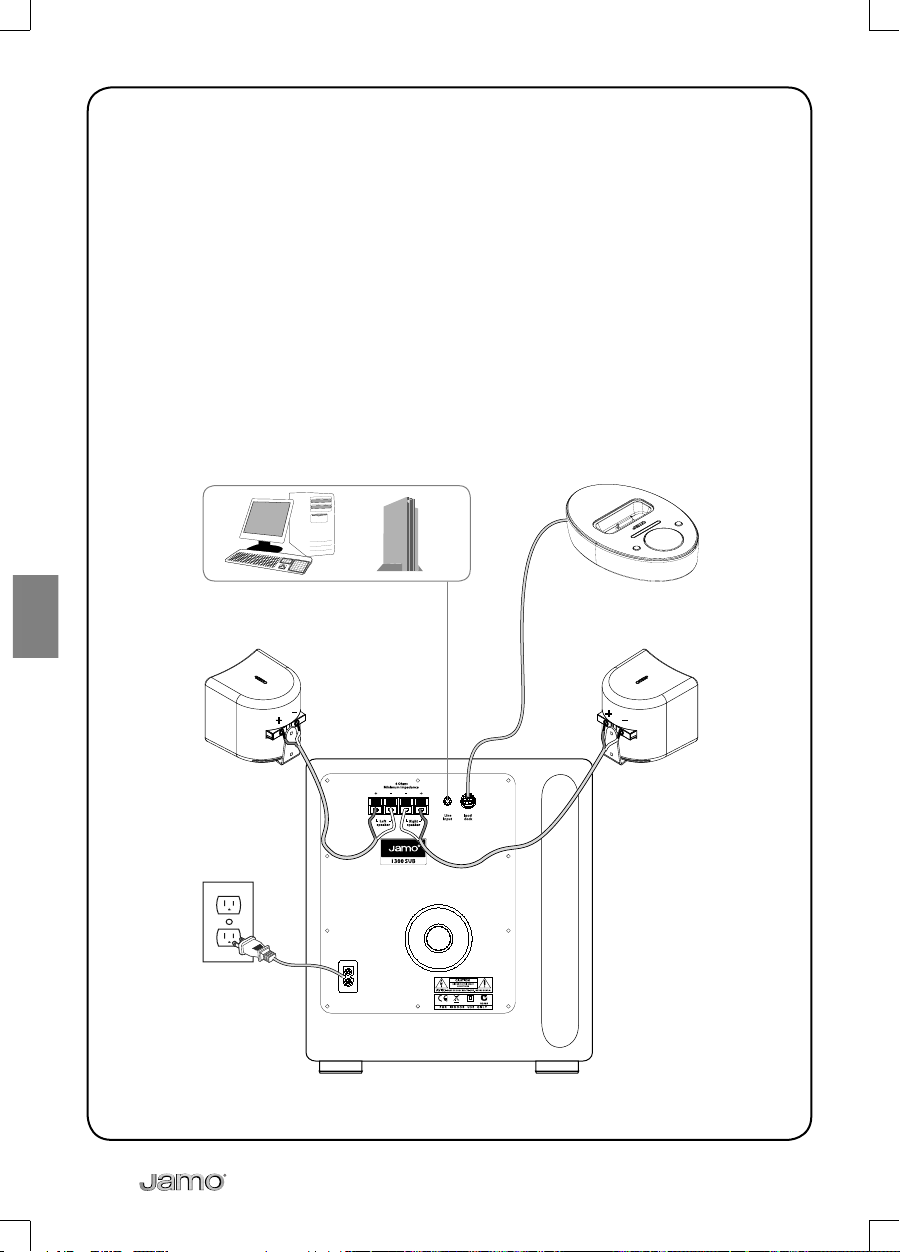
Järjestelmän kytkentä
Kytke i300 -kaiutinjärjestelmä oheisen kuvan mukaisesti.
Huomioi, että eri tuloihin syötettävät signaalit sekoittuvat (mix) yhdeksi
kokonaisuudeksi. Voit esimerkiksi kuunnella taustamusiikkia iPod-soittimesta ja
seurata samalla tietokoneohjelman ääniä.
66
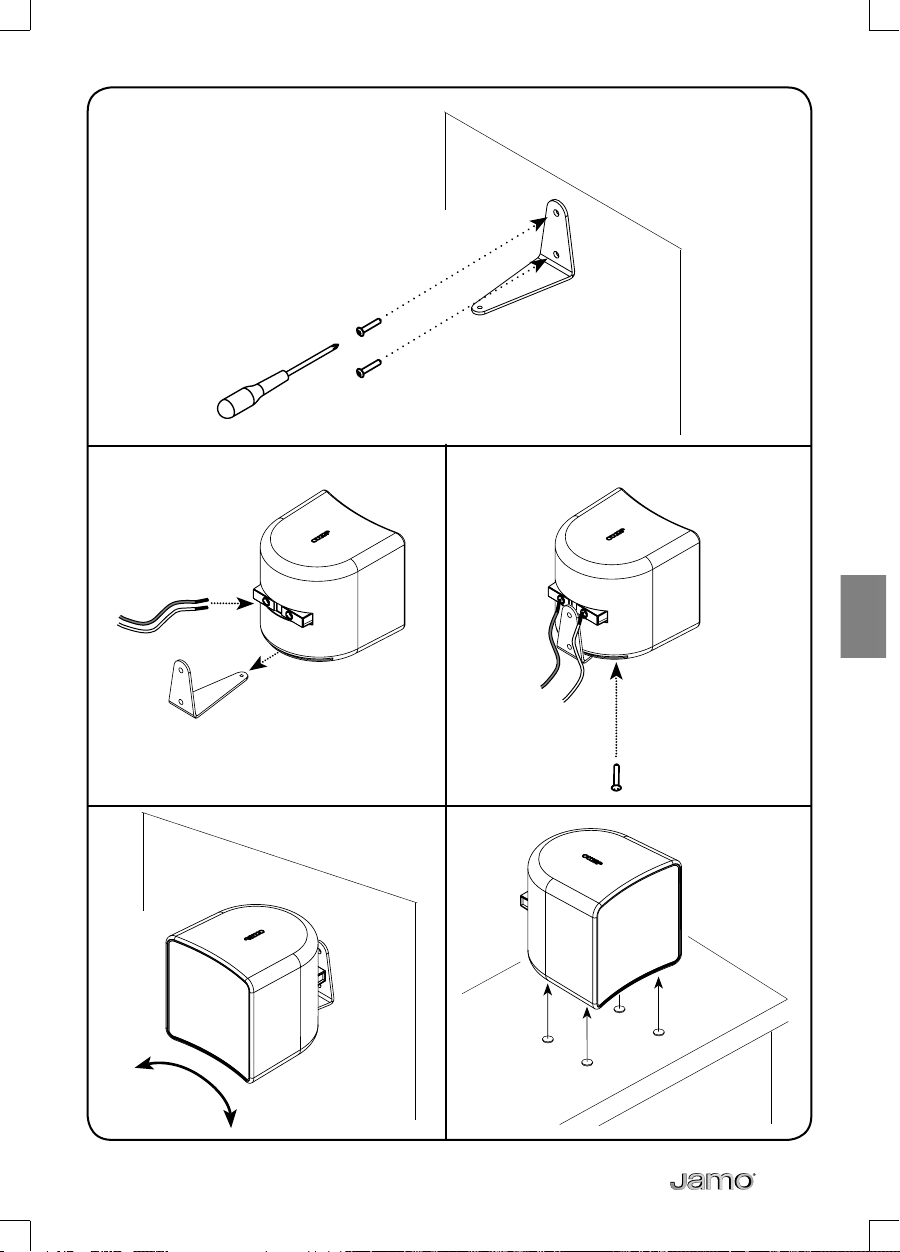
1
2
3
67

iPod-soittimen telakointi
Valitse ensin sovitin, joka sopii juuri sinun iPod-malliisi, ja paina se tukevasti kiinni
telakan laella olevaan syvennykseen. Työnnä lopuksi iPod-soitin sovittimeen
siten, että se kytkeytyy hyvin telakan moninapaliittimeen.
68

Lisälaitetulo (AUX)
Telakan takalevyssä on 3,5 mm stereojakilla varustettu audiotulo, johon voit
kytkeä esimerkiksi kannettavan CD-soittimen tai muun lisälaitteen. Kun työnnät
stereoplugin jakkiin, lisälaite valikoituu automaattisesti ohjelmalähteeksi. Kun
haluat jälleen kuunnella iPod-soitinta, vedä plugi irti jakista.
AUDIO SUBWOOFER
69

Järjestelmän käyttö
Standby/Mute-näppäin (valmiustila/mykistys)
Kun painat Standby/Mute-näppäintä, järjestelmä aktivoituu valmiustilasta
käyttötilaan. Jos telakassa on iPod-soitin, se käynnistyy automaattisesti.
Kun painat Standby/Mute-näppäintä lyhyesti järjestelmän ollessa käyttötilassa,
ääni mykistyy ja iPod asettuu taukotilaan. Painaessasi näppäintä uudelleen,
mykistystila kumoutuu ja iPod jatkaa soittoa.
Jos pidät Standby/Mute-näppäintä painettuna, soitto loppuu ja järjestelmä
asettuu valmiustilaan.
Volume/Subwoofer-valitsin (koko järjestelmä / subwoofer)
Kun haluat korostaa tai vaimentaa subwooferin toistoa satelliittikaiuttimiin
verrattuna, paina ensin Volume/Subwoofer-valitsinta ja säädä sitten subwooferin
voimakkuus sopivaksi Volume-säätimellä. Ilmaisinpalkki havainnollistaa
subwooferin suhteellista äänitasoa. Kun painat Volume/Subwoofer-valitsinta
uudelleen, Volume-säädin vaikuttaa jälleen kokonaisäänenvoimakkuuteen.
Volume-säädin
(äänenvoimakkuus)
Voit säätää sekä järjestelmän
kokonaisäänenvoimakkuutta että
subwooferin suhteellista äänitasoa
satelliittikaiuttimiin verrattuna.
Standby/Mute Button
Volume/Subwoofer
Select Button
Volume knob
70

Kauko-ohjain
Äänenvoimakkuuden
säätäminen
Nosta tai laske äänenvoimakkuutta
painamalla kauko-ohjaimen vastaavaa
näppäintä.
Toisto/Tauko
Kun painat näppäintä, iPod asettuu
joko toisto- tai taukotilaan.
Jos pidät näppäintä pitkään
painettuna, kaiutinjärjestelmä ja iPod asettuvat valmiustilaan.
Volume Up
Volume Down
Skip Forward
Skip Back
Play/Pause
Kappaleohitus eteen- tai taaksepäin
Kun painat näppäintä, toisto jatkuu iPodin seuraavan tai edellisen kappaleen
alusta. Voit pikasiirtää toistokohtaa eteen- tai taaksepäin pitämällä näppäintä
pitkään painettuna.
Kauko-ohjaimen pariston vaihto
Avaa kauko-ohjaimen pohjalevyssä olevat ruuvit ja irrota pohjalevy. Vaihda
paristo uuteen ja kiinnitä pohjalevy takaisin paikoilleen.
HUOMAA: Saatat joutua synkronoimaan kauko-ohjausjärjestelmän
paristonvaihdon jälkeen. Katso tarkemmat ohjeet luvusta ”Kauko-ohjaimen ja
telakan synkronointi”.
71

Kauko-ohjaimen ja telakan synkronointi
Synkronointi saattaa olla tarpeen kauko-ohjaimen paristonvaihdon jälkeen tai
lähekkäisten järjestelmien kauko-ohjaustoimintojen häiritessä toisiaan.
Suorita synkronointi seuraavalla tavalla:
Kytke i300 käyttötilaan ja pidä kauko-ohjaimen toisto/tauko-näppäintä painettuna kymmenen sekuntia. Järjestelmä asettuu valmiustilaan ja synkronoi itsensä
noin kymmenessä sekunnissa.
Jos synkronointitarpeen syynä on lähekkäisten järjestelmien toisilleen aiheuttamat ongelmat, irrota muut järjestelmät sähköverkosta synkronoinnin ajaksi tai
siirrä ne pois synkronoitavan kauko-ohjausjärjestelmän toiminta-alueelta.
72

Ongelmien ratkaisuja
iPod ei telakoidu
kunnolla.
Ääntä ei kuulu. Varmista, että iPod on telakoitu oikein ja soitto on
iPod ei lataudu. Varmista, että iPod on telakoitu oikein.
Kauko-ohjaus ei toimi. Varmista, että kauko-ohjaimen paristo on asennettu
Varmista, että telakkaan on kiinnitetty juuri sinun
iPod-malliisi sopiva telakointisovitin.
Irrota iPod telakasta ja tarkasta soittimessa ja
telakassa olevien liittimien kunto ja puhtaus.
käynnissä.
Varmista, että telakan AUX-lisälaitetuloon kytketty
soitin on toiminnassa. Jos haluat kuunnella
lisälaitteen sijaan iPodin ohjelmaa, irrota
kytkentäjohto lisälaitetulosta.
Nosta äänenvoimakkuutta. Telakassa oleva
ilmaisinpalkki havainnollistaa äänenvoimakkuuden
tasoa.
Varmista, että kaikki johdot on kytketty oikein.
Kytke subwooferin ja järjestelmän muiden osien
virta päälle.
oikein.
Vaihda tyhjentynyt paristo uuteen.
Lähekkäiset kaukoohjausjärjestelmät
häiritsevät toisiaan.
Estä lähekkäisten kauko-ohjausjärjestelmien
häiriintyminen synkronoimalla tämän järjestelmän
kauko-ohjain ja telakka uudelleen. Noudata ”Kaukoohjaimen ja telakan synkronointi” -luvun ohjeita.
73

Underhåll och rengöring
Använd en dammfri trasa för att rengöra systemet. Det går även att använda en
lätt fuktad trasa för envisa fläckar.
Inga former av rengöringsmedel får någonsin användas på eller i närheten av
dessa högtalare.
Specifi cation
Type ..........................................................................................................................................................................................................A 102
System ...................................................................................................................................................................................................... 2-way
Woofer (in / mm) ...................................................................................................................................................................................3 / 76
Tweeter (in / mm ..................................................................................................................................................................................¾ / 19
Sensitivity (dB - 2,8V / 1m) ....................................................................................................................................................................... 86
Power handling long / short term (W) .........................................................................................................................................60 / 80
Frequency range (Hz) ............................................................................................................................................................. 150 – 20.000
Impedance (Ohm) ..........................................................................................................................................................................................6
Dimensions (HxWxD in / mm) ...........................................................................................................................................3.6 x 6.9 x 3.7
....................................................................................................................................................................................................... 91 x 174 x 92
Weight (Kg / lb) .................................................................................................................................................................................1,1 / 2.4
Type ...................................................................................................................................................................................................i300 SUB
System .............................................................................................................................................................................................. Bassreflex
Woofer (in / mm) .............................................................................................................................................................................6½ / 165
Frequency range (Hz) ...................................................................................................................................................................... 45-150
Rated output for sub (W peak) .............................................................................................................................................................150
Rated output for speaker (W peak) ................................................................................................................................................ 2 x 75
Dimensions (HxWxD in / mm) ............................................................................................................................................9.8 / 9.8 / 9.8
Weight (Kg / lb) ...............................................................................................................................................................................7,2 / 15.9
250 x 250 x 250
74

Huolto ja takuu
Ympäristönsuojelu
• Järjestelmä on valmistettu kierrätettävistä materiaaleista, jotka voidaan käyttää uudelleen mikäli laite puretaan
asianmukaisesti.
• Hävitä pakkausmateriaalit, käytöstä poistetut paristot ja laite asianmukaisella tavalla.
Tekijänoikeudet
Järjestelmän tekniikkaa ja tuotenimiä suojaavat tekijänoikeuslait.
iPod® on Yhdysvalloissa ja/tai muissa maissa rekisteröity tavaramerkki, jonka omistaa Apple Computer, Inc.
Huolto
Ota takuuseen liittyvissä asioissa yhteyttä laitteen myyjään. Säilytä ostokuitti takuuaikana mahdollisesti tehtäviä
korjauksia ja huoltotoimenpiteitä varten.
Tärkeää: älä lähetä laitetta huoltoon sopimatta siitä etukäteen. Takuun ollessa voimassa Jamo vastaa
rahtikustannuksista myyjäliikkeen ja valtuutetun huollon välillä. Muista kuljetuskustannuksista vastaa laitteen
ostaja. Kuljetusta varten laite on pakattava asianmukaisesti, sillä muutoin takuu raukeaa. Takuuajan päätyttyä
laitteen ostaja vastaa kaikista kustannuksista.
Takuutodistus
Jamo myöntää laitteelle kahden (2) vuoden takuun, joka kattaa materiaali- ja valmistusviat. Mikäli laitteessa
ilmenee vikaa, se tulee toimittaa viipymättä laitteen myyneeseen liikeeseen. Arvioitu huoltoaika ilman rahtiin
kuluvaa aikaa on noin viisi arkipäivää. Takuuseen liittyviä lisätietoja antaa valtuutettu huoltopalvelu ja laitteen
myynyt liike.
Takuuehdot
1. Takuun voimassaolo edellyttää alkuperäisen ostokuitin näyttämistä ja laitteen sarjanumeron asianmukaisuutta.
2. Jamon vastuu rajoittuu viallisen osan korjaamiseen tai vaihtamiseen. Korjaamisesta tai vaihtamisesta uuteen
päättää Jamo. Vaihtaminen uuteen tulee kysymykseen vain silloin, kun korjaus ei ole mahdollinen.
3. Takuuhuollon voi tehdä ainoastaan valtuutettu Jamo-kauppias tai -huoltokorjaamo. Jamo ei vastaa
valtuuttamattomissa huoltopalveluissa tehdyistä korjauksista eikä takuu kata niistä aiheutuneita vikoja.
4. Tekniset tai turvallisuuteen liittyvät vaatimukset on otettava huomioon mikäli laitetta aiotaan käyttää
sellaisessa maassa, johon sitä ei alunperin ole tarkoitettu.
5. Takuu ei kata em. tapauksissa aiheutuneita vikoja tai vammoja eikä mitään välillisiä vahinkoja. Takuu ei
myöskään kata seuraavaa:
a) Normaalista kulumisesta aiheutuvia vikoja, laitteen ylläpitoa tai tarkistuksia.
b) Kuljetuksiin, purkamiseen tai asennukseen liittyviä kustannuksia.
c) Väärinkäytöstä, muusta kuin tässä ohjeessa opastetusta käytöstä tai väärästä asennuksesta aiheutuneita vikoja.
d) Vioista, jotka johtuvat salamasta, vedestä, tulesta, luonnonmullistuksista, sodasta, selkkauksista, epäsopivasta
jännitteestä, riittämättömästä tuuletuksesta, kuljetuksesta tai muista syistä, joihin Jamo ei pysty vaikuttamaan.
6. Takuu koskee jokaista laitteen laillista omistajaa takuuaikana.
Pakkaus
Käytä laitteen kuljetuksessa mahdollisuuksien mukaan laitteen alkuperäistä pakkausta. Muussa tapauksessa
pakkaa laite näin:
• Käytä tukevaa, laitteen painon kestävää pahvilaatikkoa.
• Pane laitteen ympärille vähintään 6 cm kerros tärinöitä vaimentavaa materiaalia.
• Täytä tyhjä tila naarmuttamattomalla ja nukkaamattomalla materiaalilla.
• Pane laite muovipussiin tai vastaavaan, joka suojaa laitetta lialta ja pölyltä.
• Varmista, ettei laite pääse liikkumaan laatikossa.
Laitteen korjauksessa tarvittavat tiedot:
Malli
Sarjanumero
Kuvaus viasta
Kopio maksetusta laskusta tai ostokuitista
Myyjän nimi, osoite ja puhelinnumero
Henkilötietosi: nimi, katuosoite, postinumero, postitoimipaikka, puhelinnumero ja mahdollisen sähköpostiosoite.
Allekirjoitus
Myyjän nimikirjoitus ja leima
Päivämäärä
75

Sumario
Introducción ..............................................................................................................................77
Conexión del equipo .............................................................................................................. 78
Conexión del iPod ................................................................................................................... 80
Entrada de audio auxiliar ......................................................................................................81
Funcionamiento del equipo ................................................................................................82
Mando a distancia ................................................................................................................... 83
Sincronización del mando a distancia con la base de control ................................ 84
Solución de problemas .........................................................................................................85
Cuidado y limpieza .................................................................................................................86
Specification ..............................................................................................................................86
Servicio y garantía ...................................................................................................................87
Le felicitamos por la adquisición de su nuevo Jamo i300.
Tenemos excelentes noticias para usted. Lo que acaba de adquirir no es sólo un
accesorio para el iPod sino un sistema completo de entretenimiento doméstico
que transformará la forma de escuchar música con su reproductor portátil
favorito. El i300 es un potente sistema activo de satélites y subwoofer con
altavoces de auténtica calidad hi-fi, que ha sido totalmente optimizado para su
uso con el iPod. Cuenta además con otras dos entradas auxiliares donde podrá
conectar su ordenador, la consola de videojuegos, etc. pudiendo escuchar así
todas sus fuentes de sonido a través del mismo equipo compacto. Además, todo
el conjunto puede controlarse a distancia, incluso desde otra habitación, gracias
a su mando a distancia de largo alcance por radiofrecuencia.
Créanos, está usted a punto de descubrir muchos nuevos motivos para volver a
enamorarse de su iPod. ¡Disfrútelo!
76

Introducción
Compruebe que su i300 incluye los accesorios siguientes.
i300 SUB
Base de control i300 7 adaptadores para la
base de control
2 x A 102
Mando a distancia
Cable de corrienteCordón llavero
77

Conexión del equipo
Para conectar el i300, consulte la ilustración siguiente.
Observe que la entrada se mezcla con la señal procedente de la base de control,
ya sea del iPod o de la entrada auxiliar, a fin de poder oír las dos fuentes al
mismo tiempo. De este modo, por ejemplo, se puede oír el sonido del ordenador
mientras se escucha la música del iPod colocado en la base.
78

1
2
3
79

Conexión del iPod
Elija el adaptador correspondiente a su modelo de iPod e insértelo en la parte
superior de la base de control hasta que encaje con la ranura centrada sobre el
conector múltiple.
80

Entrada de audio auxiliar
La base de control dispone de una entrada auxiliar de audio de tipo minijack
estéreo de 3,5 mm en la parte trasera. Esta entrada permite escuchar una fuente
externa (por ejemplo, un reproductor de CD portátil) a través del equipo. Al
introducir la clavija en este terminal, el equipo conmuta automáticamente a la
entrada auxiliar. Para volver al sonido del iPod, desconecte la entrada auxiliar.
AUDIO SUBWOOFER
81

Funcionamiento del equipo
Botón Standby/Mute
Partiendo de la situación de reposo, al pulsar el botón Standby/Mute se enciende
el equipo. Si hay un iPod colocado en la base, se pondrá en funcionamiento
automáticamente.
Al pulsar el botón Standby/Mute se interrumpirá el sonido y el iPod se detendrá.
Al volver a pulsar el botón, el equipo sonará de nuevo y el iPod se pondrá de
nuevo en funcionamiento.
Pulsando y manteniendo pulsado el botón Standby/Mute, el equipo pasa a la
situación de reposo.
Botón de selección de Volumen/Subwoofer
Para ajustar el nivel del subwoofer, pulse el botón Volume/Subwoofer Select,
y a continuación accione el botón Volume. La barra iluminada mostrará ahora
el nivel relativo del subwoofer. Al volver a pulsar el botón Volume/Subwoofer
Select, el mando volverá a controlar el volumen general.
Botón de Volumen
El botón Volume ajusta el nivel general
de audición incluido el del subwoofer.
NOTA: Estando en la modalidad
de Subwoofer, el equipo volverá
automáticamente al modo de volumen
general al cabo de cinco segundos.
Standby/Mute Button
Volume/Subwoofer
Select Button
Volume knob
82

Mando a distancia
Volume Up/Volume Down
Pulse estos botones para subir y bajar
el volumen.
Play/Pause
Pulse para poner en marcha y detener
el iPod.
Al pulsar y mantener pulsado el botón
Play/Pause, tanto el equipo como el
iPod pasarán a situación de reposo.
Volume Up
Volume Down
Skip Forward
Skip Back
Play/Pause
Skip Forward/Skip Back
Sirve para avanzar y retroceder entre pistas del iPod.
Manteniendo pulsado el botón Skip Forward o Skip Back, se avanza o
retrocede rápidamente dentro de la pista que se está reproduciendo.
Sustitución de la pila del mando a distancia
Para reemplazar la pila, retire los dos tornillos de la parte trasera del mando y
desmóntela tal como se indica.
NOTA: Es posible que tras cambiar la pila sea necesario volver a sincronizar el
mando a distancia con el equipo. Sírvase consultar el apartado “Sincronización
del mando a distancia con la base de control”.
83
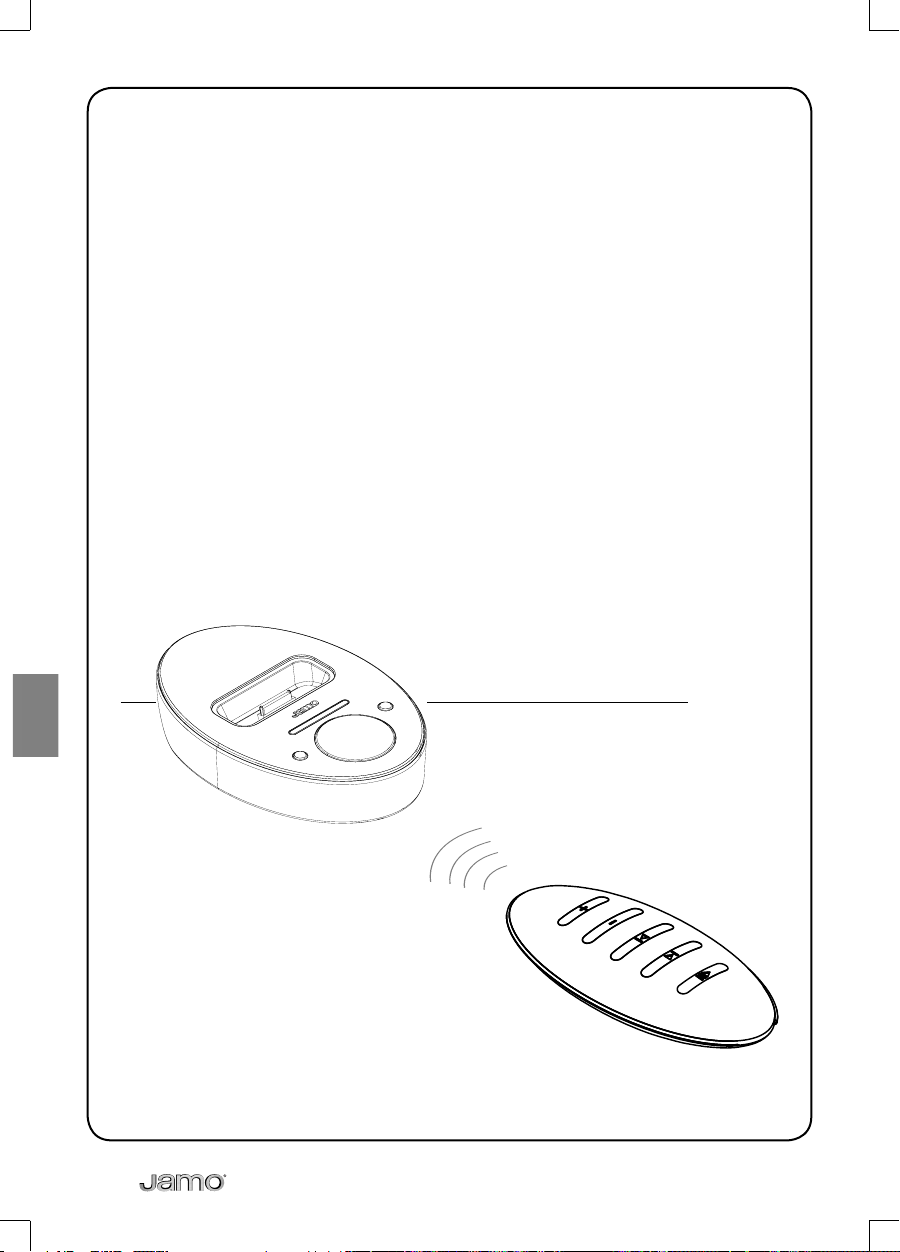
Sincronización del mando a distancia
con la base de control
En caso de surgir algún problema cuando se utilizan varios equipos muy próximos entre sí, o de que se pierda la sincronización del mando tras cambiar la pila
del mismo, haga lo siguiente:
- Mantenga pulsado el botón Play/Pause durante 10 segundos con el equipo en
funcionamiento.
El equipo se situará en modalidad de reposo al cabo de 10 segundos y quedará
sincronizado correctamente.
En caso de que sea necesario volver a sincronizar debido a la presencia de varios
equipos en la misma zona, con el fin de evitar que los mandos se sincronicen
con todos los equipos a la vez, será preciso desenchufar o alejar los demás equipos mientras se está sincronizando cada mando con su equipo.
84

Solución de problemas
El iPod no encaja
perfectamente en la
base
No hay sonido Compruebe que el iPod está bien encajado en la
El iPod no se recarga Compruebe que el iPod está correctamente
El equipo no responde
al mando a distancia
El mando a distancia
entra en conflicto con
otro equipo cercano
Compruebe que está utilizando en la base de
control el adaptador correspondiente a su modelo
de iPod.
Extraiga el iPod; examine los conectores de la base
de control y la parte inferior del iPod y verifique que
no están obstruidos.
base de control,encendido y reproduciendo.
Si hay un dispositivo externo conectado a la entrada
auxiliar de la base de control, compruebe que dicho
dispositivo está encendido y funcionando. Si lo que
intenta escuchar es el iPod colocado en la base,
desenchufe el cable de la entrada auxiliar de la base
de control.
Compruebe que hay suficiente volumen,
observando la indicación de la barra luminosa de la
base de control.
encajado en la base de control.
Compruebe que el equipo está enchufado a la
corriente.
Encienda todo el equipo y el subwoofer.
Compruebe que la pila está bien colocada.
Si la pila es antigua, puede que sea preciso
cambiarla.
Para evitar estos conflictos será necesario
sincronizar correctamente el mando con el equipo.
Siga el procedimiento que se indica en el apartado
“Sincronización del mando a distancia con la base
de control” para sincronizar el mando a distancia
con la base de control.
85

Cuidado y limpieza
Para limpiar su equipo utilice una gamuza suave. También puede utilizar un
paño húmedo para limpiar manchas persistentes.
Nunca emplee, bajo ninguna circunstancia, agente o líquido limpiador alguno,
tanto sobre los propios altavoces como cerca de ellos.
Specifi cation
Type ..........................................................................................................................................................................................................A 102
System ...................................................................................................................................................................................................... 2-way
Woofer (in / mm) ...................................................................................................................................................................................3 / 76
Tweeter (in / mm ..................................................................................................................................................................................¾ / 19
Sensitivity (dB - 2,8V / 1m) ....................................................................................................................................................................... 86
Power handling long / short term (W) .........................................................................................................................................60 / 80
Frequency range (Hz) ............................................................................................................................................................. 150 – 20.000
Impedance (Ohm) ..........................................................................................................................................................................................6
Dimensions (HxWxD in / mm) ...........................................................................................................................................3.6 x 6.9 x 3.7
....................................................................................................................................................................................................... 91 x 174 x 92
Weight (Kg / lb) .................................................................................................................................................................................1,1 / 2.4
Type ...................................................................................................................................................................................................i300 SUB
System .............................................................................................................................................................................................. Bassreflex
Woofer (in / mm) .............................................................................................................................................................................6½ / 165
Frequency range (Hz) ...................................................................................................................................................................... 45-150
Rated output for sub (W peak) .............................................................................................................................................................150
Rated output for speaker (W peak) ................................................................................................................................................ 2 x 75
Dimensions (HxWxD in / mm) ............................................................................................................................................9.8 / 9.8 / 9.8
Weight (Kg / lb) ...............................................................................................................................................................................7,2 / 15.9
250 x 250 x 250
86

Servicio y garantía
Información medioambiental
• Este equipo está fabricado con materiales reciclables, que pueden ser reutilizados si el desmontaje corre a cargo
de personal autorizado.
• Sírvase cumplir la normativa local sobre tratamiento de materiales de embalaje, pilas usadas y equipos
desechados.
Copyright
Todas los nombres comerciales corresponden a marcas registradas de sus titulares respectivos.
iPod® es una marca comercial de Apple Computer, Inc., registrada en los EE.UU. así como en otros países.
Servicio
En caso de consultas sobre la garantía, sírvase consultar a su distribuidor. Para acogerse a la garantía en sus
peticiones de servicio, sírvase adjuntar el comprobante original de compra.
Importante: No enviar nunca el producto a reparar sin haberlo acordado previamente. Si el producto se
encuentra TODAVÍA EN GARANTÍA, Jamo asumirá los costes de envío y devolución entre el establecimiento y el
centro de servicio autorizado Jamo. Cualesquiera otros costes de transporte correrán a cargo del cliente.
El producto deberá estar siempre bien embalado; de lo contrario, la garantía quedará sin vigencia. Si el producto
ya NO SE ENCUENTRA EN GARANTÍA, todos los costes correrán a cargo del cliente.
Certificado de Garantía
Jamo proporciona una garantía de veinticuatro (24) meses, a contar desde la fecha de compra, frente a defectos
en los materiales y en la fabricación. En el caso de defectos cubiertos por la garantía, el producto deberá ser
devuelto al establecimiento en el que fue adquirido. El plazo estimado de reparación, sin contar el tiempo de
transporte, es de unos cinco días laborables.
En caso de surgir problemas, encontrará usted información sobre nuestros centros de servicio autorizados en la
dirección siguiente, o bien en el establecimiento donde adquirió el producto.
Condiciones de garantía
1. La garantía sólo será válida si se presenta el comprobante original de la compra y si el número de serie del
producto es completamente legible.
2.Las obligaciones de Jamo se limitan a la reparación o bien a la sustitución de los componentes defectuosos. Los
componentes defectuosos serán reparados o sustituidos a discreción de Jamo. Sólo se llevará a cabo un cambio
de producto en caso de que no sea posible proceder a la reparación.
3.Las reparaciones en garantía deben ser efectuadas por un distribuidor autorizado Jamo o por un centro de
servicio autorizado. No se remunerarán las reparaciones efectuadas por talleres no autorizados. La presente
garantía no cubre las reparaciones o daños en el producto causadas por intervenciones no autorizadas.
4.Este producto no será considerado defectuoso, ni en materiales ni en fabricación, si requiere una adaptación a
los requisitos nacionales, locales, técnicos o relativos a la seguridad vigentes en países distintos a aquél para el
que fue diseñado y fabricado originalmente el producto.
5.La presente garantía no cubre dichos tipos de adaptaciones y no se proporcionará ninguna remuneración por
dichos tipos de adaptaciones ni por ningún daño consiguiente. La garantía no cubre lo siguiente:
a) Inspección periódica, mantenimiento y reparación o sustitución de componentes como resultado del desgaste
normal de los mismos.
b) Costes relativos al transporte, el desmontaje o la instalación del producto.
c) Uso indebido, incluido el uso para aplicaciones distintas de las previstas, o instalación defectuosa.
d) Daños producidos por relámpagos, agua, fuego, catástrofes naturales, insurrecciones, tensión de red
incorrecta, ventilación insuficiente, transporte u otras causas que escapen al control de Jamo.
6.Esta garantía se aplica a cualquier propietario legal del producto durante el periodo de garantía del mismo.
Embalaje
A ser posible, utilice el material de embalaje original para cualquier transporte del producto. De lo contrario,
vuelva a embalar el producto utilizando lo siguiente:
• Una caja de cartón reforzado, lo bastante fuerte como para soportar el peso del producto.
• Un mínimo de 6 cm / 2,36 pulgadas de material amortiguador de golpes, dispuesto alrededor del producto.
• Material no abrasivo y que no deje pelusa, para los demás componentes.
• Envoltorio no abrasivo para el producto. (protección contra polvo y suciedad)
• Embale el producto de manera que no pueda moverse dentro de la caja durante el transporte.
Información que debemos recibir antes de proceder a reparar el producto:
Modelo:
Nº de serie:
Descripción de la avería:
Copia de la factura o comprobante de compra
Nombre, domicilio y nº de teléfono del establecimiento.
Datos personales: Nombre, domicilio, código postal/población, nº de teléfono y dirección de correo electrónico
(opcional).
Firma del comprador
Firma y sello del establecimiento
Fecha
87

Indice
Introduzione .............................................................................................................................89
Collegamento del sistema ...................................................................................................90
Collegamento dell’iPod ........................................................................................................92
Entrata audio ausiliaria .......................................................................................................... 93
Funzionamento del sistema ................................................................................................ 94
Telecomando ............................................................................................................................95
Sincronizzazione del Telecomando con il Dock di Controllo ................................. 96
Soluzione dei problemi .........................................................................................................97
Manutenzione e pulizia ........................................................................................................98
Specification ..............................................................................................................................98
Assistenza e garanzia ............................................................................................................. 99
Congratulazioni per il vostro nuovo acquisto…l’iPod Jamo.
Abbiamo delle splendide notizie per voi. Non avete appena comperato un
semplice accessorio iPod…avete acquisito un sistema di home entertainment
di grande efficacia che trasformerà il vostro modo di ascoltare musica sul vostro
lettore portatile preferito. L’i300 è un potente sistema amplificato subwoofer/
satellitare – con veri altoparlanti a livello di hi-fi – che è stato interamente
ottimizzato per l’utilizzo con l’iPod, ma non è tutto. E’ anche dotato di due
entrate addizionali ausiliarie per il computer, la console dei giochi etc., in modo
tale da consentirvi di ascoltare tutte le vostre sorgenti audio attraverso un unico,
eccezionale impianto. Vi abbiamo già detto che l’intero sistema può essere
comandato a distanza da un altro locale grazie al suo telecomando a frequenze
radio a lunga portata?
Fidatevi di noi…state per scoprire un mucchio di nuove ragioni per innamorarvi
di nuovo del vostro iPod. Avanti dunque!
88
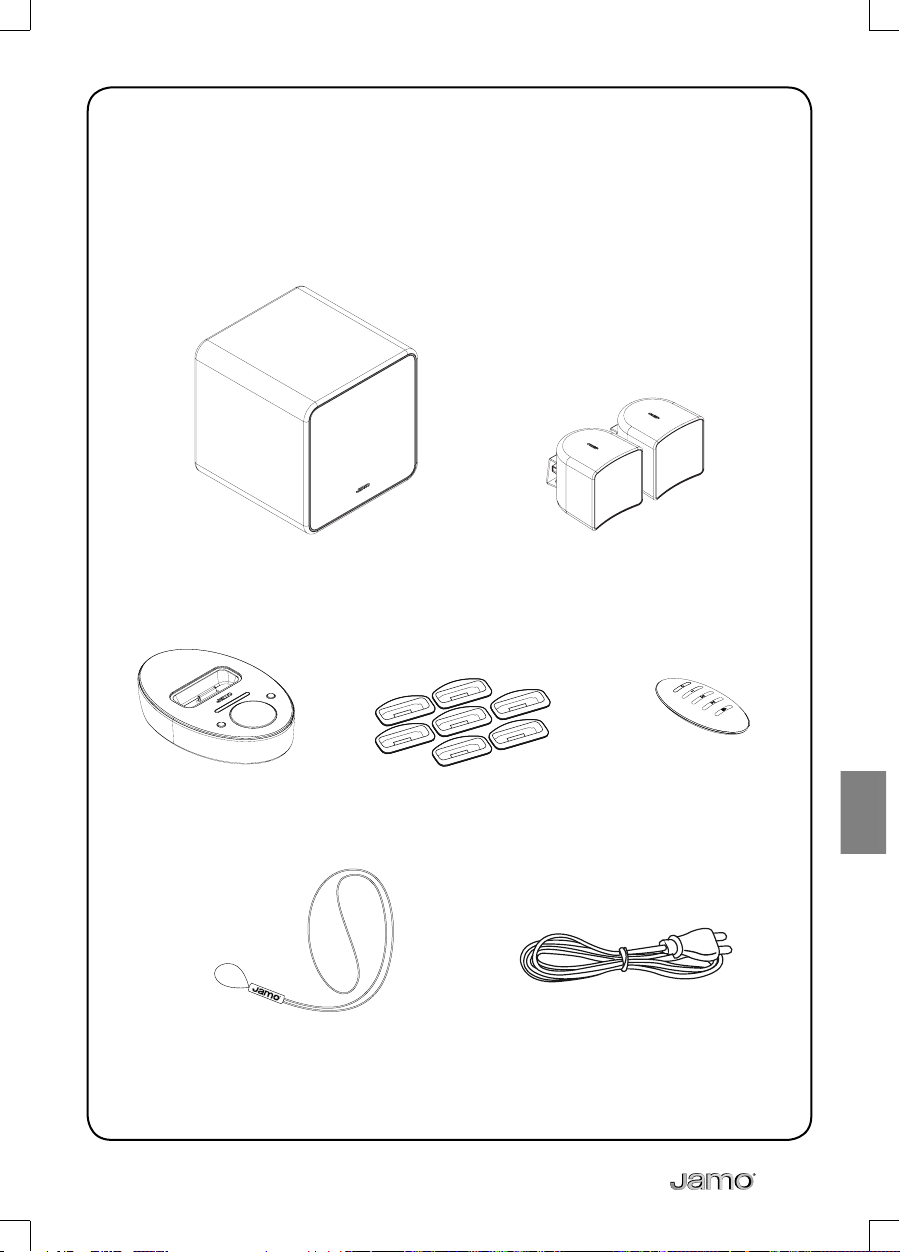
Introduzione
Assicuratevi che con l’i300 vi siano forniti i seguenti accessori:
i300 SUB
i300 dock di controllo
telecomando
2 x A 102
7 adattatori per il dock Telecomando
Cavo di alimentazioneCollare di supporto per
89

Collegamento del sistema
Per collegare l’i300, fare riferimento alle illustrazioni qui di seguito.
Vi segnaliamo che l’entrata è mixata con il segnale proveniente dal dock, sia esso
originato dall’iPod o dall’entrata ausiliaria, di modo che entrambe le sorgenti
possano essere sentite simultaneamente. Ciò vi consentirà, per esempio, di
sentire il suono proveniente dal vostro computer mentre ascoltate musica
suonata da un iPod sul dock.
90
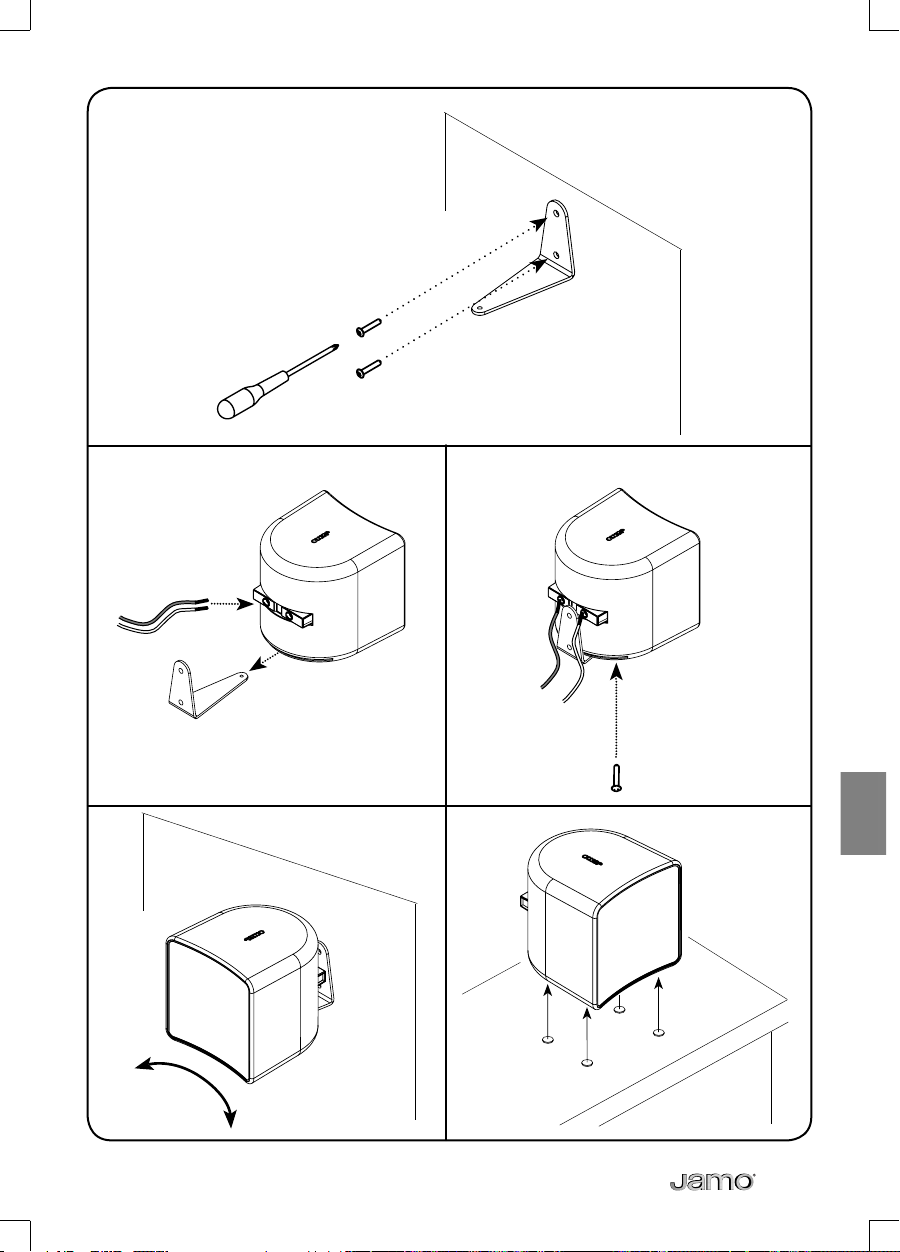
1
2
3
91
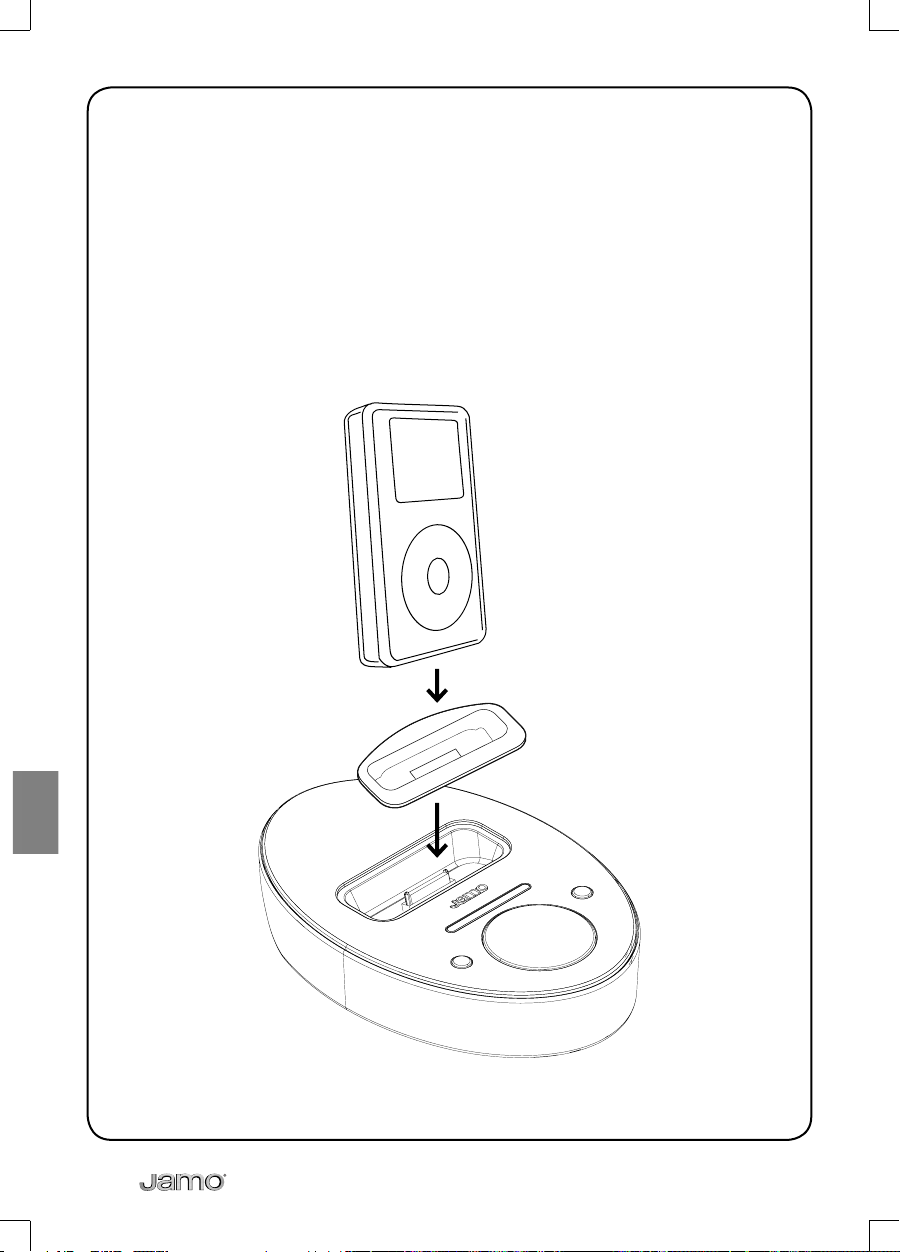
Collegamento dell’iPod
Scegliete l’adattatore corrispondente al vostro iPod ed inseritelo nella parte
superiore del dock in modo che sia correttamente posizionato con la fessura
centrata sopra il connettore di raccordo multipin.
92

Entrata audio ausiliaria
Il dock di controllo è dotato di un’entrata audio ausiliaria minijack stereo da 3.5
mm sul pannello posteriore. Ciò vi permette di ascoltare una sorgente esterna
(per esempio un lettore CD portatile) attraverso il sistema. Quando una spina
viene inserita nel jack, il sistema passa automaticamente all’entrata ausiliaria.
Per ritornare all’iPod, basta scollegare l’entrata ausiliaria.
AUDIO SUBWOOFER
93

Funzionamento del sistema
Pulsante Standby/Mute (Standby/Mute Button)
Premendo il pulsante Standby/Mute in modalità standby, il sistema si accende.
Nel caso ci sia un iPod nel dock, questo si attiverà automaticamente.
Premendo il pulsante Standby/Mute il suono scompare e l’iPod va in pausa.
Premendo di nuovo il pulsante il suono ritorna e l’iPod riparte.
Tenendo premuto il pulsante Standby/Mute il sistema passa in modalità
standby.
Pulsante di selezione Volume/Subwoofer
(Volume/Subwoofer Select Button)
Per regolare il livello del subwoofer, premere il pulsante di selezione Volume/
Subwoofer, quindi ruotare la manopola del Volume. La barra luminosa
indicherà il relativo livello del subwoofer. Premendo nuovamente il pulsante
di selezione Volume/Subwoofer la manopola tornerà a regolare il volume
principale.
Manopola del Volume (Volume knob)
La manopola del volume regola il volume
generale e il livello del subwoofer.
NOTA: Dalla modalità Subwoofer, il
sistema tornerà automaticamente al
volume principale dopo cinque secondi.
Standby/Mute Button
Volume/Subwoofer
Select Button
Volume knob
94

Telecomando
Volume Up/Volume Down
Premere questi pulsanti per alzare ed
abbassare il volume.
Skip Foward/Skip Back
Premere questi pulsanti per passare
alla traccia precedente o successiva
sull’iPod. Tenendo premuto il
pulsante Skip Forward o Skip Back
si otterrà l’avanzamento veloce o il
riavvolgimento della traccia in corso.
Volume Up
Volume Down
Skip Forward
Skip Back
Play/Pause
Play/Pause
Premere questo pulsante per far funzionare e mettere in pausa l’iPod.
Tenendo premuto il pulsante Play/Pause il sistema e l’iPod passano in modalità
standby.
Sostituzione della Batteria del Telecomando
Per sostituire la batteria rimuovere le due viti sulla parte posteriore del
telecomando e smontare il dispositivo come indicato.
NOTA: Dopo la sostituzione della batteria, potrebbe rendersi necessario
risincronizzare il telecomando con il sistema. Vedere il capitolo “Sincronizzazione
del Telecomando con il Dock di Controllo”.
95

Sincronizzazione del Telecomando con
il Dock di Controllo
Se dovesse verificarsi un conflitto tra diverse unità molto vicine tra loro in funzione contemporaneamente, o se il telecomando dovesse perdere la sincronizzazione dopo la sostituzione della batteria, procedere come segue:
- Tenere premuto il pulsante Play/Pause per 10 secondi con il sistema acceso.
L’unità passerà in modalità standby e dopo 10 secondi sarà sincronizzata correttamente.
Per impedire ai telecomandi di sincronizzarsi con tutti i sistemi se doveste risincronizzare a causa della presenza di varie unità nella stessa area, sarà necessario,
mentre il telecomando del sistema che vi interessa viene sincronizzato, che tutti
gli altri sistemi siano scollegati o disattivati.
96

Soluzione dei problemi
L’iPod non si aggancia
correttamente al
sistema
Non c’è alcun suono
L’iPod non si ricarica Assicuratevi che l’iPod sia collocato correttamente
Il telecomando non fa
funzionare il sistema
Il telecomando
conflitta con con
un altro sistema
i300 collocato nelle
vicinanze
Assicuratevi che l’adattatore indicato per il vostro
iPod sia inserito nel dock di controllo.
Rimuovete l’iPod, controllate i connettori sul dock
di controllo e sul fondo dell’iPod per accertarvi che
non ci siano ostruzioni.
Accertatevi che l’iPod sia collocato correttamente
nel dock di controllo, acceso e in funzione.
Se un apparecchio esterno è collegato all’entrata
ausiliaria del dock di controllo, assicuratevi che esso
sia acceso e in funzione. Se volete ascoltare un iPod
sul dock, scollegate il cavo proveniente dall’entrata
ausiliaria dal dock di controllo.
Accertatevi che il volume sia sufficientemente alto,
come indicato dalla barra luminosa sul dock di
controllo.
nel dock di controllo.
Assicuratevi che il sistema sia collegato alla presa
elettrica.
Accendete l’intero sistema e il subwoofer.
Assicuratevi che la batteria sia installata
correttamente.
Se la batteria è vecchia, può essere necessario
sostituirla.
Per evitare conflitti è necessario che il telecomando
sia correttamente sincronizzato con il sistema.
Applicate la procedura descritta nella sezione
“Sincronizzazione del Telecomando con il Dock di
Controllo” per sincronizzare il telecomando con il
dock di controllo i300.
97

Manutenzione e pulizia
Per la pulizia di questo sistema si consiglia di usare un panno antipolvere.
E’ anche possibile utilizzare un panno leggermente umido per rimuovere i segni
più resistenti.
In nessun caso devono essere usati detergenti di qualsiasi tipo sul sistema o
nelle sue immediate vicinanze.
Specifi cation
Type ..........................................................................................................................................................................................................A 102
System ...................................................................................................................................................................................................... 2-way
Woofer (in / mm) ...................................................................................................................................................................................3 / 76
Tweeter (in / mm ..................................................................................................................................................................................¾ / 19
Sensitivity (dB - 2,8V / 1m) ....................................................................................................................................................................... 86
Power handling long / short term (W) .........................................................................................................................................60 / 80
Frequency range (Hz) ............................................................................................................................................................. 150 – 20.000
Impedance (Ohm) ..........................................................................................................................................................................................6
Dimensions (HxWxD in / mm) ...........................................................................................................................................3.6 x 6.9 x 3.7
....................................................................................................................................................................................................... 91 x 174 x 92
Weight (Kg / lb) .................................................................................................................................................................................1,1 / 2.4
Type ...................................................................................................................................................................................................i300 SUB
System .............................................................................................................................................................................................. Bassreflex
Woofer (in / mm) .............................................................................................................................................................................6½ / 165
Frequency range (Hz) ...................................................................................................................................................................... 45-150
Rated output for sub (W peak) .............................................................................................................................................................150
Rated output for speaker (W peak) ................................................................................................................................................ 2 x 75
Dimensions (HxWxD in / mm) ............................................................................................................................................9.8 / 9.8 / 9.8
Weight (Kg / lb) ...............................................................................................................................................................................7,2 / 15.9
250 x 250 x 250
98

Assistenza e garanzia
Informazioni ambientali
· I componenti del sistema sono realizzati con materiale riciclabile che può essere riutilizzato se il sistema viene
smontato da personale autorizzato.
· Attenersi alle normative locali per lo smaltimento del materiale di imballaggio, delle batterie scariche e degli
apparecchi scartati.
Copyright
Tutte le denominazioni commerciali sono marchi registrati dei rispettivi produttori elencati. iPod ® è un marchio
della Apple Computers Inc. registrato negli Stati Uniti e in altri paesi.
Assistenza
Per richieste di informazioni sulla garanzia, contattare il proprio rivenditore. In caso di richiesta di assistenza in
garanzia, allegare lo scontrino originale di vendita. Importante: non spedire mai il prodotto da riparare senza aver
prima preso accordi. Se il prodotto è ANCORA IN GARANZIA, la Jamo si accollerà le spese di trasporto andata e
ritorno fra il rivenditore e il centro autorizzato di assistenza Jamo. Qualsiasi altro costo di trasporto sarà sostenuto
dal cliente. Il prodotto dovrà sempre essere imballato adeguatamente, pena la decadenza della garanzia. Se il
prodotto NON E’ PIU’ IN GARANZIA, tutti i costi dovranno essere sostenuti dal cliente.
Certificato di garanzia
La Jamo fornisce una garanzia di ventiquattro (24) mesi dalla data di acquisto a fronte di difetti del materiale e di
fabbricazione. Per i difetti coperti dalla garanzia, il prodotto deve essere riportato al negoziante che l’ha venduto.
Il tempo previsto per la riparazione, escluso il trasporto, è di circa cinque giorni lavorativi. Per eventuali problemi,
è possibile rivolgersi ai nostri centri di assistenza autorizzati all’indirizzo indicato o al negoziante che ha venduto
il prodotto.
Condizioni di garanzia
1. La garanzia è valida soltanto su presentazione dello scontrino originale di vendita e solo nel caso in cui il
numero di serie del prodotto sia perfettamente leggibile.
2. La Jamo è tenuta soltanto alla riparazione o alla sostituzione dei pezzi difettosi. La riparazione o la sostituzione
dei componenti sono basati su una valutazione della Jamo. La sostituzione può aver luogo soltanto nel caso in
cui la riparazione non sia possibile.
3. Le riparazioni in garanzia devono essere effettuate da un rivenditore Jamo autorizzato o da un centro
assistenza autorizzato. Non è previsto alcun rimborso per riparazioni effettuate da laboratori non autorizzati. La
garanzia non copre alcuna riparazione o danno al prodotto causato da interventi non autorizzati.
4. Il prodotto non può essere considerato difettoso, sia nei materiali che nella fabbricazione, quando si rendano
necessari adattamenti a requisiti nazionali, locali, tecnici o di sicurezza in paesi diversi da quello per il quale il
prodotto è stato originariamente progettato e fabbricato.
5. La garanzia non copre questo tipo di adattamenti, pertanto nessun rimborso è previsto per questi adattamenti
o eventuali danni ad essi imputabili.
La garanzia non copre quanto segue:
a) Controlli periodici, manutenzione e riparazioni o sostituzione di pezzi dovuti alla normale usura.
b) Costi relativi al trasporto, smontaggio o installazione del prodotto.
c) Uso improprio, compreso l’uso per scopi diversi da quello previsto, o installazione difettosa.
d) Danni causati da fulmini, acqua, fuoco, catastrofi naturali, guerra, insurrezioni, voltaggio non corretto della
linea, ventilazione insufficiente, trasporto o altre cause che esulano dal controllo della Jamo.
6. La presente garanzia si riferisce al legale proprietario del prodotto durante il periodo di garanzia.
Imballaggio
In caso di spedizione, usare se possibile il materiale d’imballaggio originale. Altrimenti reimballare il prodotto
usando:
• Una scatola di cartone rinforzata, abbastanza robusta da sostenere il peso del prodotto.
• Almeno 6 cm/2.36 pollici di materiale antiurto intorno al prodotto.
• Materiale non abrasivo antipolvere per le altre parti.
• Involucro non abrasivo per il prodotto.(Copertura antipolvere e antisporco)
• Reimballare il prodotto in modo che non possa muoversi all’interno della scatola durante il trasporto.
Informazioni che devono essere comunicate prima della riparazione del prodotto:
Modello:
Numero di serie:
Descrizione del guasto:
Copia della fattura o dello scontrino di vendita
Nome, indirizzo e numero telefonico del rivenditore
Dati personali: Nome, indirizzo, codice di avviamento postale/città, numero telefonico e indirizzo di posta
elettronica (facoltativo).
Firma del cliente
Timbro e firma del rivenditore
Data
99

Inhoud
Inleiding ....................................................................................................................................101
Het systeem aansluiten .......................................................................................................102
De iPod aansluiten ................................................................................................................104
Externe geluidsinvoer ..........................................................................................................105
Gebruik van het systeem ....................................................................................................106
Afstandsbediening ...............................................................................................................107
De afstandsbediening en het dock synchroniseren .................................................108
Problemen oplossen ............................................................................................................109
Onderhoud en reiniging .....................................................................................................110
Specification ............................................................................................................................110
Service en garantie ...............................................................................................................111
Gefeliciteerd met uw nieuwe aankoop… de Jamo i300.
Wij hebben een prettige mededeling voor u: u hebt niet zomaar een accessoire
voor uw iPod gekocht, maar een volwaardig home entertainment system dat
de manier waarop u met uw draagbare speler naar muziek luistert volledig zal
veranderen. De i300 is een krachtig systeem bestaande uit een subwoofer en
satellieten – echte hifi speakers – dat is geoptimaliseerd voor gebruik met een
iPod. En dat is nog niet alles: de i300 is tevens voorzien van twee extra ingangen
voor uw computer, videospel, enz., zodat u al uw geluidsbronnen via één en
hetzelfde systeem kunt beluisteren. En hadden we al verteld dat het hele systeem
op afstand – zelfs vanuit een andere kamer – kan worden bediend dankzij een
afstandsbediening die op radiofrequentie werkt?
Neem één ding van ons aan: u staat op het punt om opnieuw verliefd te worden
op uw iPod. Wij wensen u veel plezier!
100
 Loading...